Mystery Trackers: Nightsville Horror Walkthrough, Guide, & Tips
Mystery Trackers: Nightsville Horror Walkthrough

Welcome to the Mystery Trackers: Nightsville Horror Walkthrough
A mysterious Owl Man is terrorizing citizens!
Whether you use this document as a reference when things get difficult or as a road map to get you from beginning to end, we’re pretty sure you’ll find what you’re looking for here.
This document contains a complete Mystery Trackers: Nightsville Horror game walkthrough featuring annotated screenshots from actual gameplay!
We hope you find this information useful as you play your way through the game. Use the walkthrough menu below to quickly jump to whatever stage of the game you need help with.
Remember to visit the Big Fish Games Forums if you find you need more help. Have fun!
This walkthrough was created by prpldva, and is protected under US Copyright laws. Any unauthorized use, including re-publication in whole or in part, without permission, is strictly prohibited.
General Tips
- This is the official guide for Mystery Trackers: Nightsville Horror.
- This guide will not mention each time you have to zoom into a location; the screenshots will show each zoom scene.
- Hidden-object puzzles are referred to as HOPs. This guide will not show HOP solutions. It will identify the location of the HOP and the inventory item acquired.
- This guide will show solutions for non-random puzzles. Please read the in-game instructions for each puzzle.
Chapter 1: What Happened?

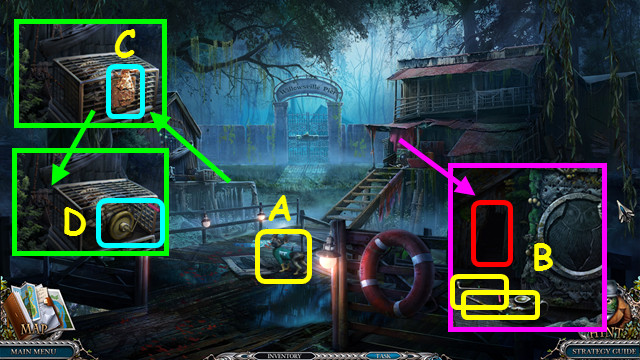
- Take ELF (A).
- Use ELF; take the HOIST HANDLE and OILCAN (B).
- Use the OILCAN and open the cage (C).
- Place the HOIST HANDLE and turn it (D).

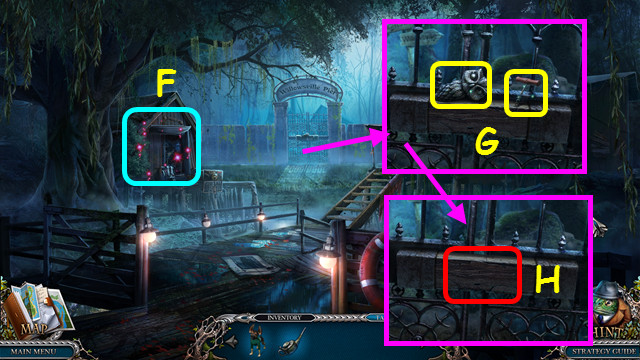
- Play the HOP; earn the CHAINSAW (F).
- Combine the CHAINSAW and OILCAN to make the WORKING CHAINSAW (inventory).
- Take the 1st EMBLEM and CORKSCREW (G).
- Use the WORKING CHAINSAW (H).
- Walk forward.

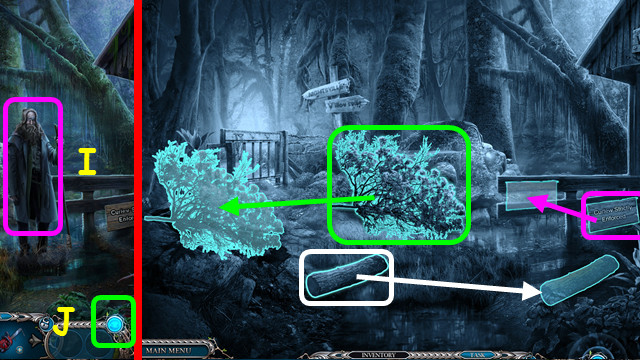
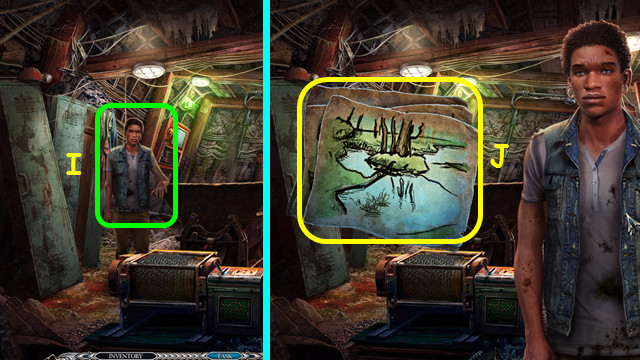
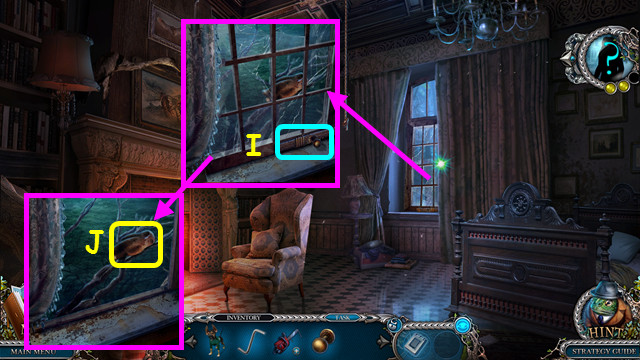
- Talk to the Old Man (I).
- Press the FORESIGHT button (J).
- Restore the 3 items (color-coded).

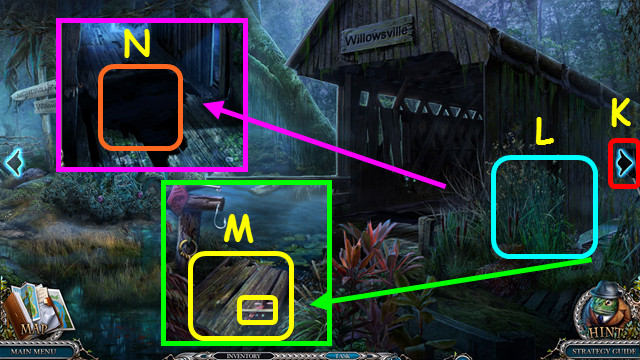
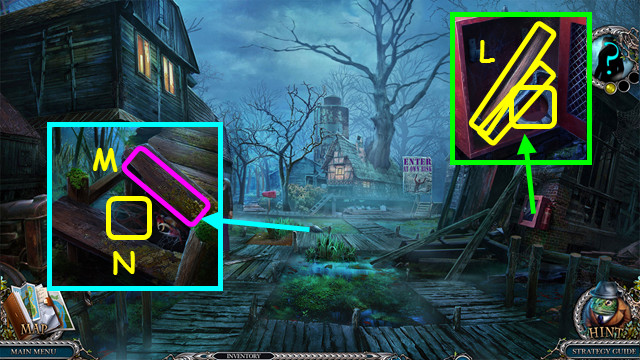
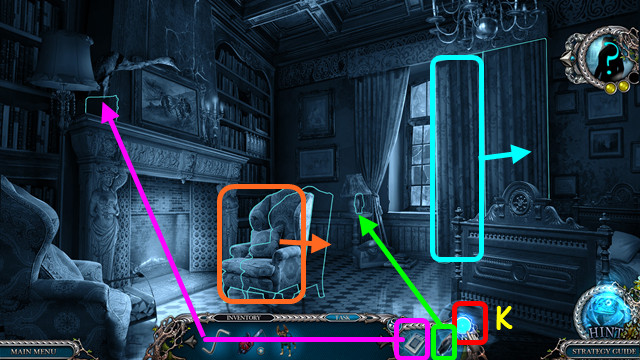
- Pan right (K). There are several scenes with the pan feature. This guide will assume this feature is understood.
- Part the weeds (L).
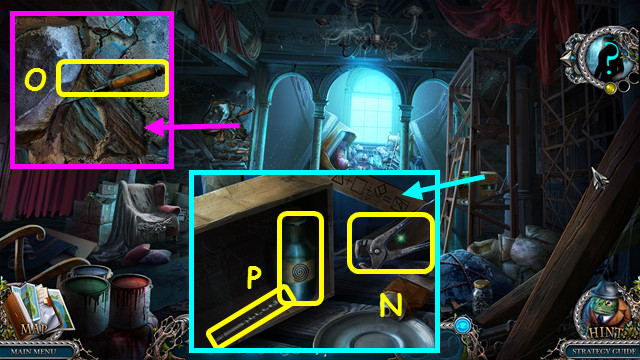
- Take the TOY AIRPLANE and BOARDS (M).
- Place the BOARDS (N).
- Walk right.

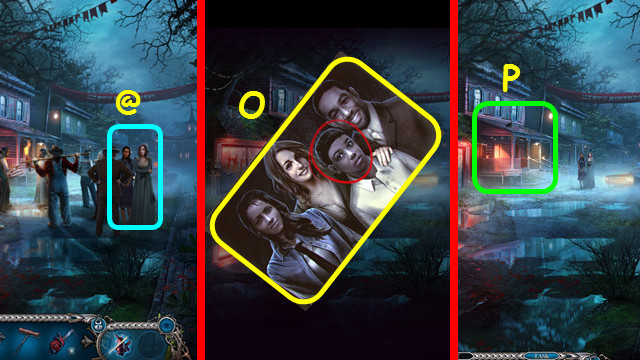
- Talk to Mrs. Johnson (@).
- Take the JOHNSON FAMILY PICTURE (O).
- Enter the Johnson’s House (P).

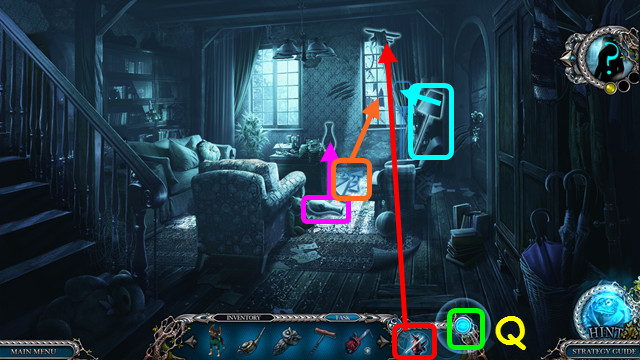
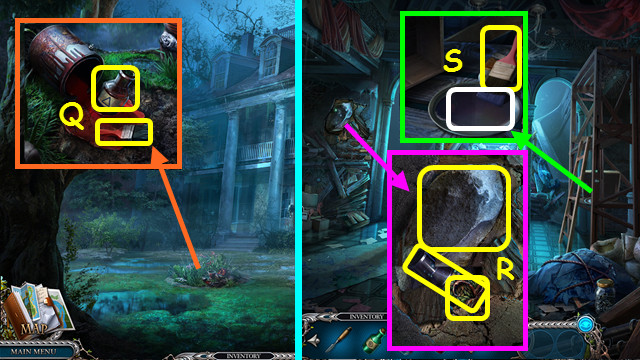
- Use the FORESIGHT (Q).
- Restore the items (color-coded).

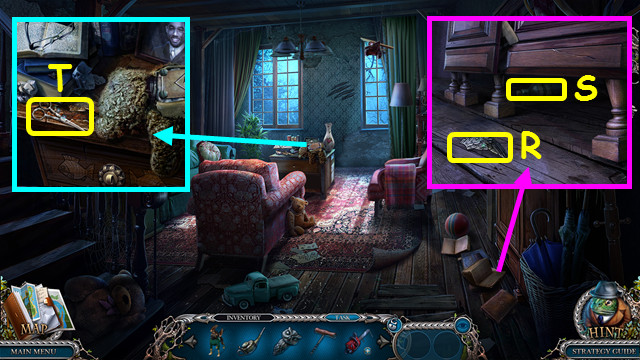
- Move the books; take the 2nd EMBLEM (R).
- Use ELF; take the BOTTLE OF CHLOROFORM (S).
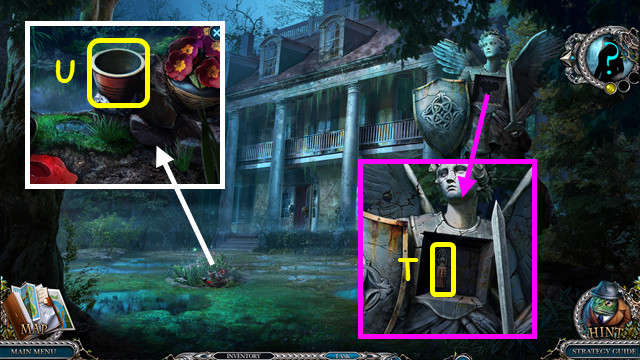
- Take the SCISSORS (T).
- Walk down 2x.

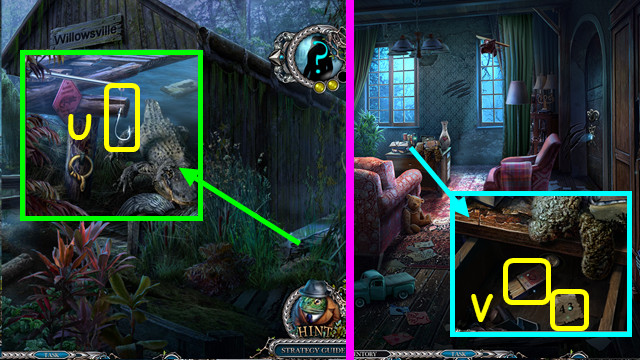
- Use the SCISSORS; take the FISHING HOOK (U).
- Return to the Johnson’s House.
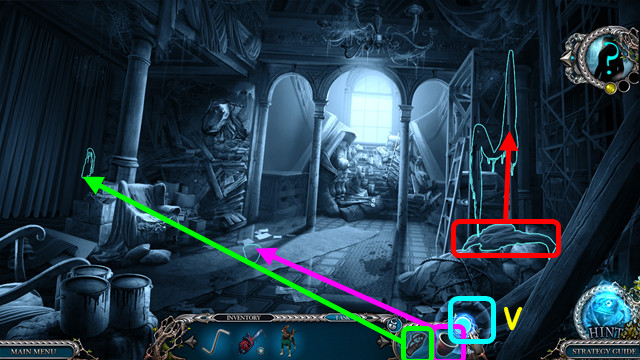
- Use the FISHING HOOK; take the MATCHES and NOTE WITH CODE (V).
- Walk down.

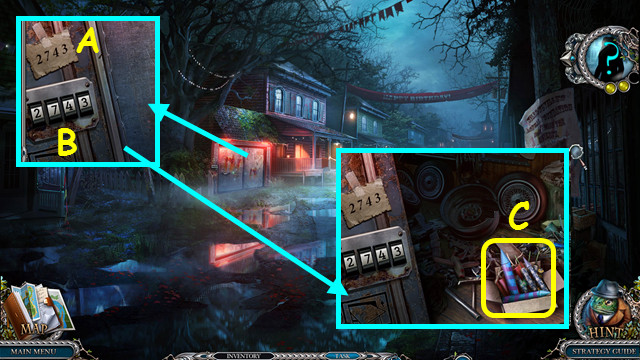
- Place the NOTE WITH CODE (A).
- Enter 2743 (B).
- Take the FIREWORKS (C).
- Walk down.

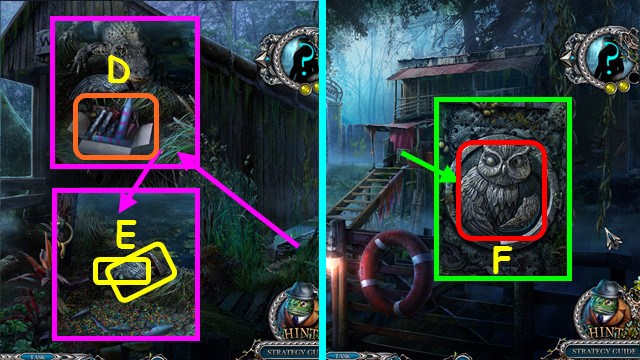
- Use the FIREWORKS and MATCHES (D).
- Take the 3rd EMBLEM and HAMMER (E).
- Walk down.
- Place the 3 EMBLEMS (F).

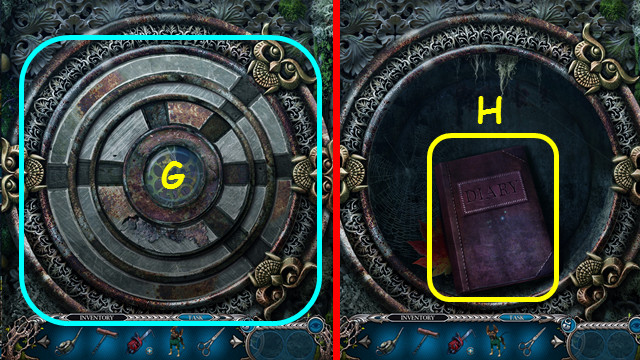
- Turn the rings as shown (G).
- Take the DIARY OF A WILLOWSVILLE CITIZEN (H).
- Walk forward and right.

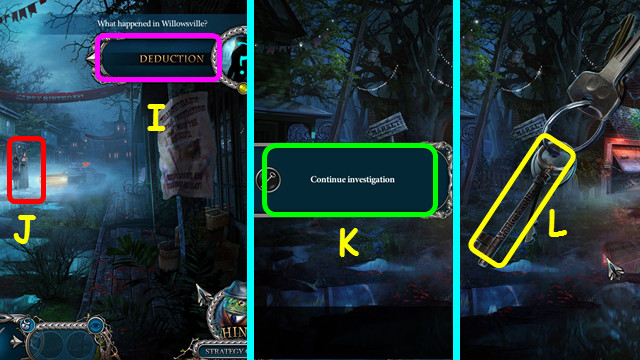
- Select DEDUCTION (I).
- Talk to Mrs. Johnson (J); select the conversation box (K).
- Move the keys; take the OFFICE KEY (L).
- Enter the Johnson’s House.
Chapter 2: George’s Connection

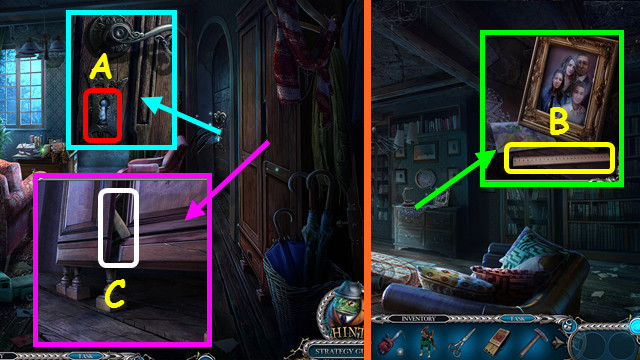
- Use the OFFICE KEY (A).
- Walk right.
- Take the RULER (B).
- Walk down.
- Use the RULER (C).

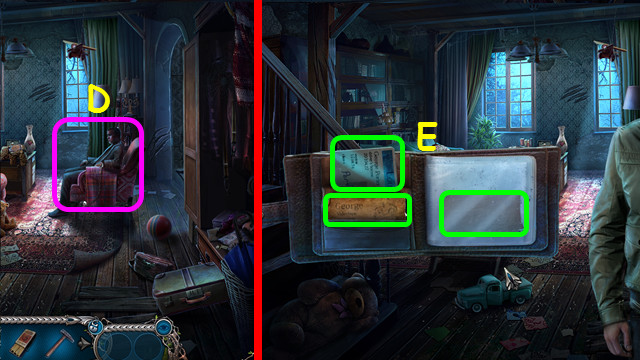
- Talk to George completely (D).
- Examine the 3 items (E).

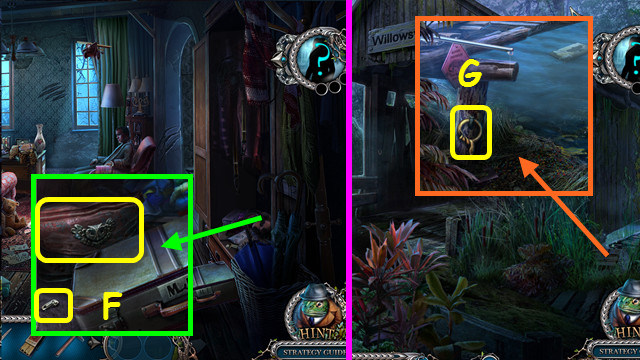
- Take the ZIPPER PULL and BAG (F).
- Combine the BAG, OILCAN, and ZIPPER PULL; take the PLIERS and FIGURINE (inventory).
- Walk down 2x.
- Use the PLIERS to take the RING (G).
- Return to the Office.

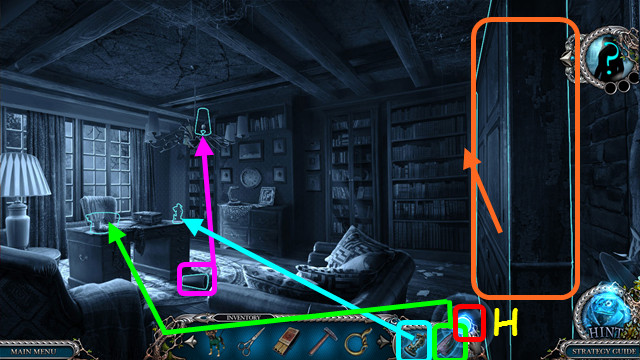
- Select the FORESIGHT button (H).
- Restore the items (color-coded).

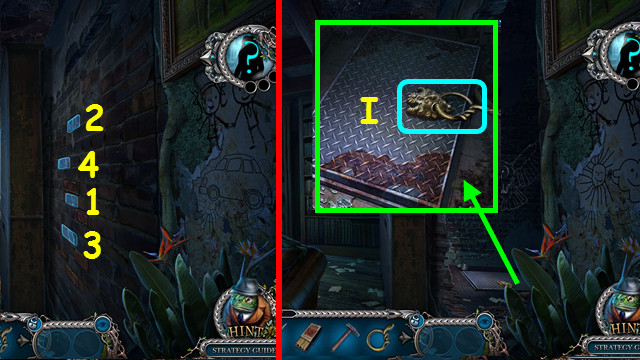
- Press the bricks (1-4).
- Place the RING; open the hatch (I).
- Go right.

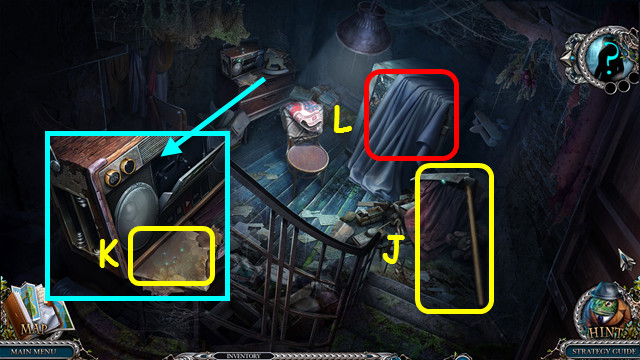
- Take the SCYTHE (J).
- Take the NOTE FROM CRIMINAL (K).
- Remove the drape; select the machine (L).

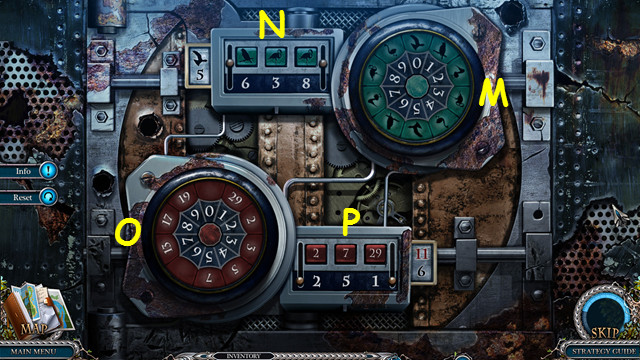
- Set the dial (M).
- Change the symbols (N).
- Set the dial (O).
- Change the numbers (P).

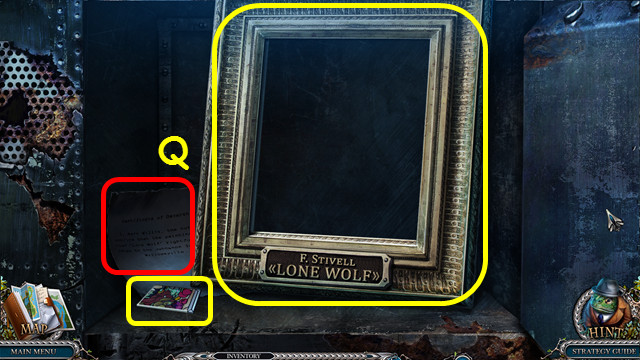
- Take the CHEST PIECE and PICTURE FRAME; read the note (Q).
- Walk down.

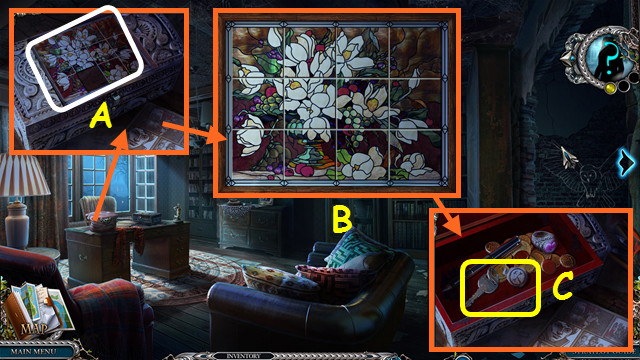
- Place the CHEST PIECE and select the box (A).
- Solution (B).
- Take the BRIEFCASE KEY (C).
- Walk down 3x.

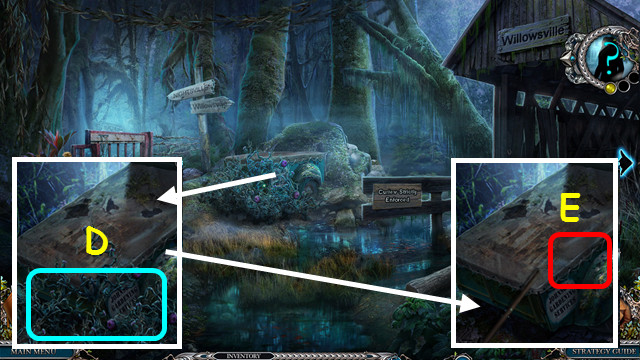
- Use the SCYTHE (D).
- Use the SCISSORS (E).

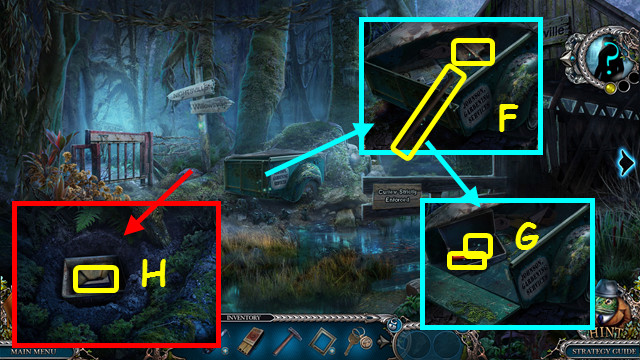
- Take the HANDLE and BROKEN SPADE (F).
- Use the BRIEFCASE KEY; take the SCREWDRIVER and NAILS (G).
- Combine the BROKEN SPADE, HANDLE, NAILS, and HAMMER to make the SPADE (inventory).
- Use the SPADE; open the box and take the CASSETTE (H).
- Go to the Johnson’s House.

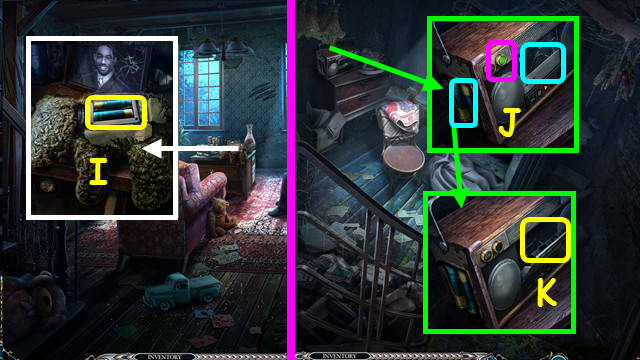
- Use the SCREWDRIVER; take the BATTERIES (I).
- Go right 2x.
- Place the BATTERIES and CASSETTE; close the cassette door and push the button (J).
- Take the INSTRUCTIONS (K).
- Walk down 2x.

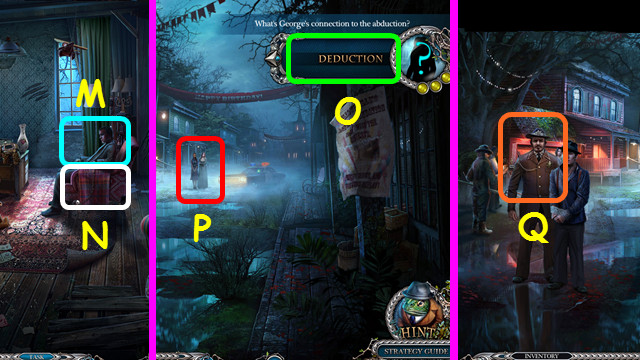
- Talk to George (M).
- Play the HOP; earn the PICTURE (N).
- Combine the PICTURE FRAME and PICTURE to make the STOLEN PICTURE (inventory).
- Walk down.
- Select DEDUCTION (O).
- Talk to Mrs. Johnson (P).
- Talk to the Sherriff (Q).
- Walk left.
Chapter 3: Sam’s Connection

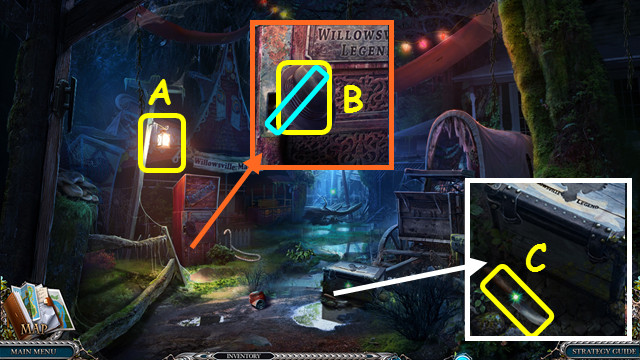
- Take the LANTERN (A).
- Combine the LANTERN and MATCHES to make the LIT LANTERN (inventory).
- Return the LIT LANTERN to the hook.
- Take the HAT and pull the lever (B).
- Take the KNIFE (C).

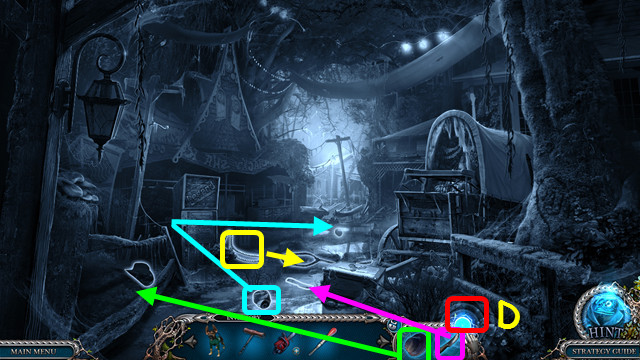
- Select the FORESIGHT button (D).
- Restore the items (color-coded).

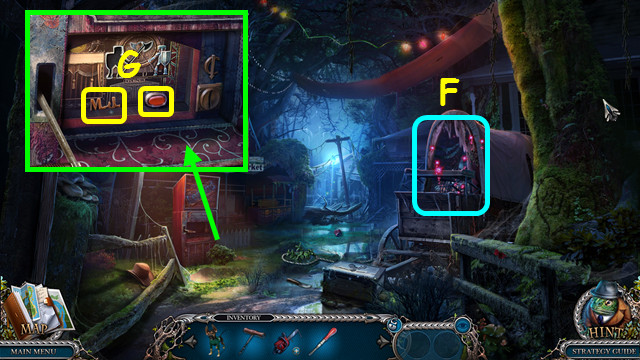
- Play the HOP; earn the TOKEN (F).
- Place the TOKEN; take the MONOGRAM and BUTTON (G).
- Return to the Johnson’s House.

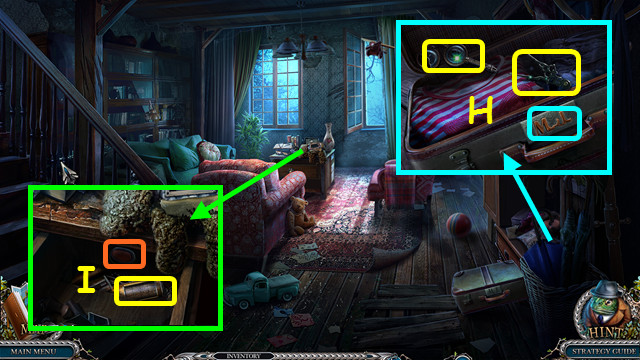
- Place the MONOGRAM; take the BROKEN GLASSES and CLOCK HANDS (H).
- Combine the BROKEN GLASSES and SCREWDRIVER to get the 1st LENS (inventory).
- Place the button and push it; take the CRYPTEX (I).

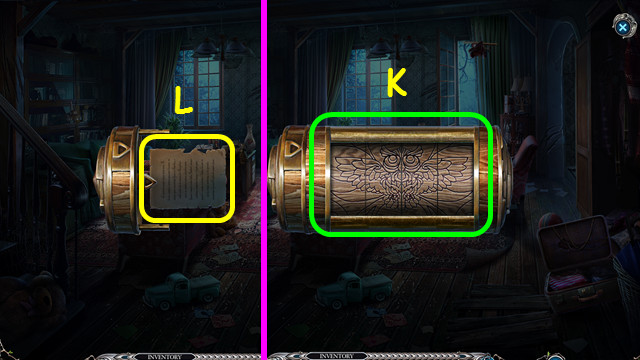
- Select the CRYPTEX (inventory).
- Set the image (K).
- Take the MICRO NOTE (L).
- Walk right.

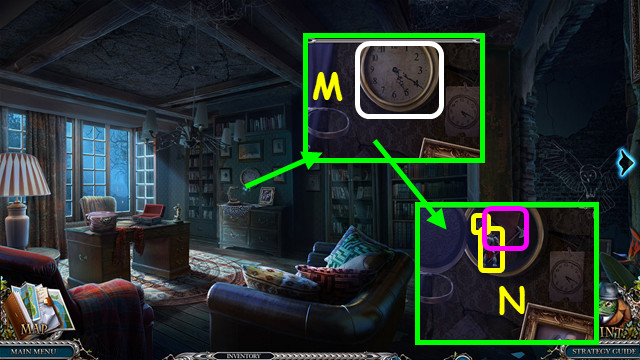
- Place the CLOCK HANDS; set to5:20 (M).
- Take the FIGURINE and MAGNIFIER; open Mr. Johnson’s Diary and take the PICTURE of SAM AND MARY (N).
- Combine the MAGNIFIER and SCREWDRIVER to get the 2nd LENS (inventory).

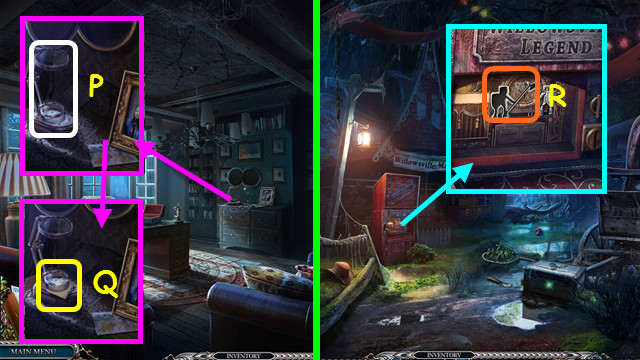
- Place the 2 LENSES and MICRO NOTE (P).
- Take and read SAM’S NOTE (Q).
- Walk down 2x; go left.
- Place the FIGURINE (R).

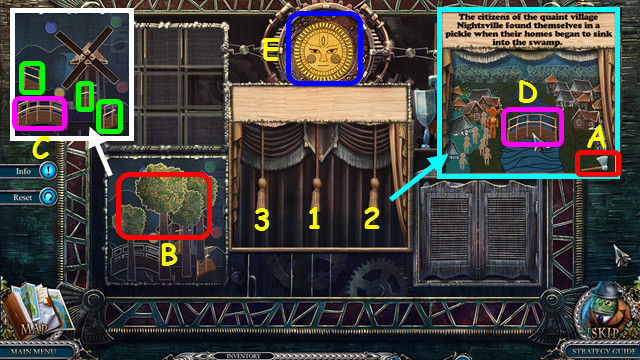


- Pull 1-3; use (A) on (B).
- Place the 3 pieces (green) in the outline; place (C) on (D).
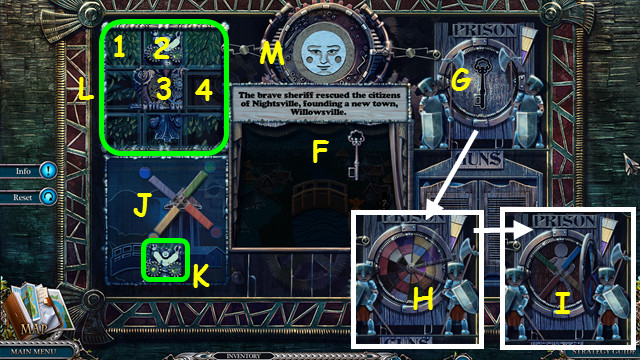
- Select (E).
- Move key (F) to (G).
- Rotate to match the wedge (H).
- Place (I) on (J); swap blades to match.
- Move (K) to (L), select 1-4, and select (M).
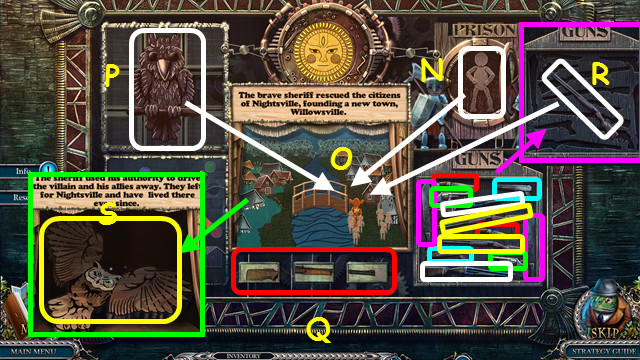
- Move figure (N) to (O); move (P) to (O).
- Form the rifle (Q); select pairs (color-coded).
- Use the rifle (R) on (O).
- Take the TRUNK INLAY (S).

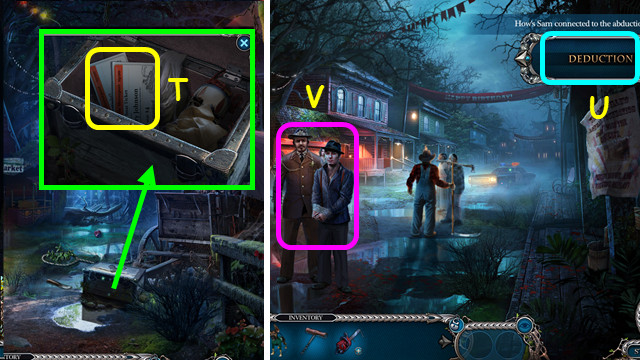
- Place the TRUNK INLAY; take the FERRY TICKETS (T).
- Walk down.
- Select DEDUCTION (U).
- Talk to the Sherriff (V).
Chapter 4: The Children’s Connection

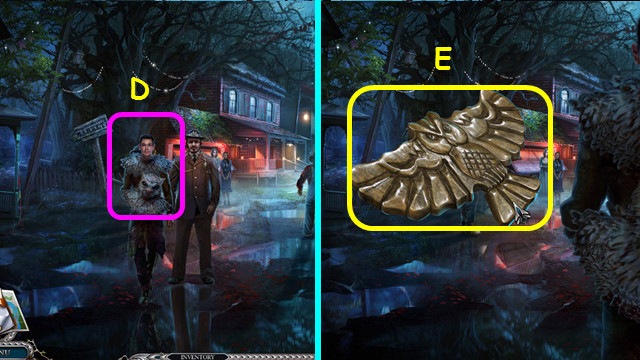
- Talk to Robin (D).
- Restore and take the OWL (E).
- Walk down.

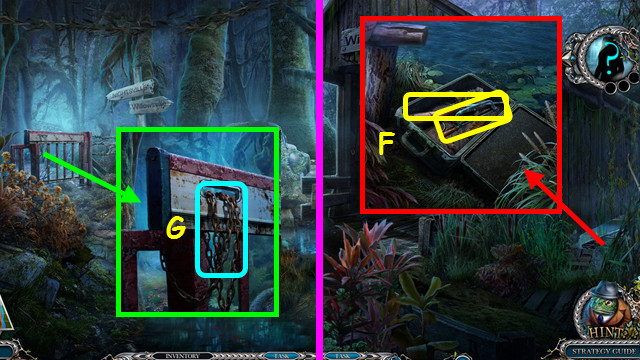
- Place the OWL; take the RIFLE and HACKSAW (F).
- Use the HACKSAW (G).
- Walk left.

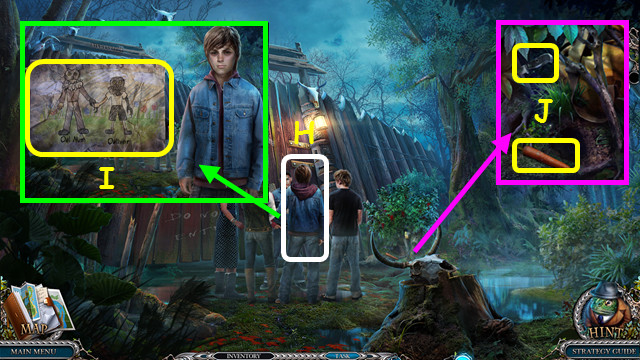
- Talk to Jack 2x (H).
- Open and take the DRAWING; also open and look at the locket (I).
- Take the CARROT and KNIFE (J).

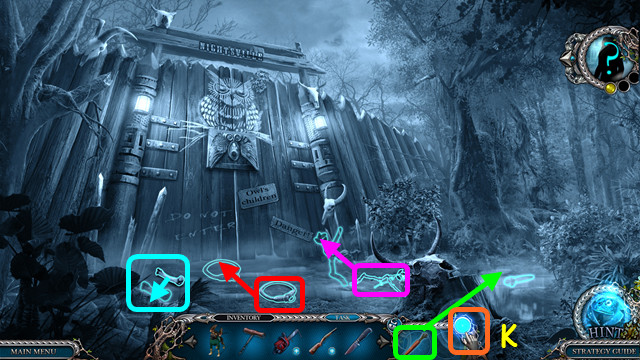
- Select the FORESIGHT button (K).
- Restore the items (color-coded).

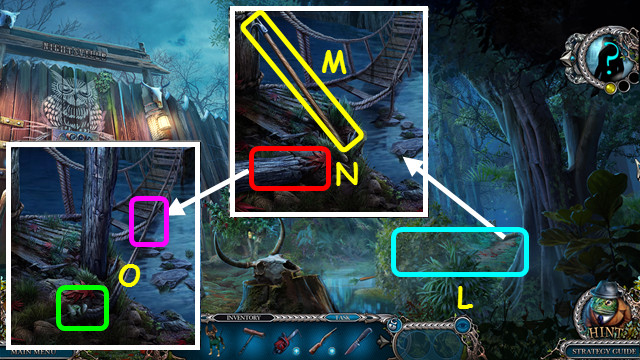
- Part the bushes (L).
- Take the PIKE POLE (M).
- Use the KNIFE; select the log (N).
- Use ELF; tie off the rope (O).
- Walk down.

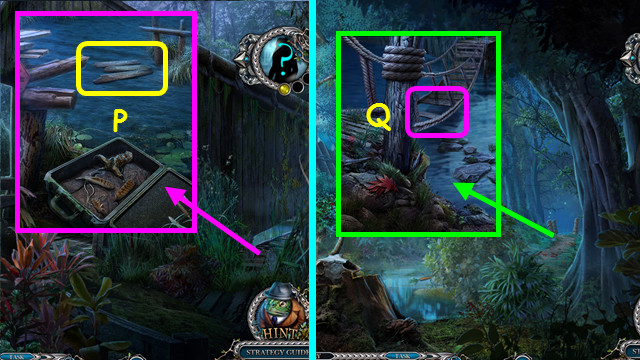
- Use the PIKE POLE; take the PLANKS (P).
- Walk left.
- Place the PLANKS (Q).
- Walk right.

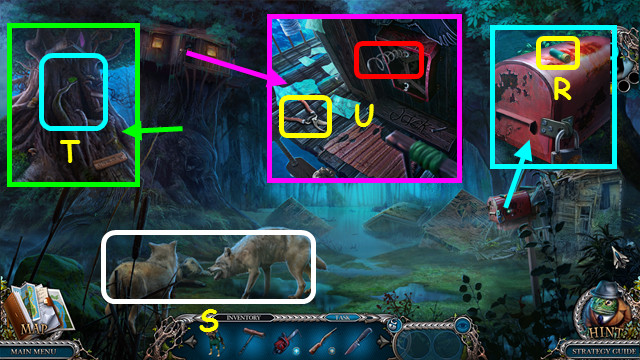
- Take the CARTRIDGE (R).
- Combine the RIFLE and CARTRIDGE to make the LOADED GUN (inventory).
- Use the LOADED GUN (S).
- Use ELF (T).
- Take the PRUNERS and pull the spring (U).
- Walk down.

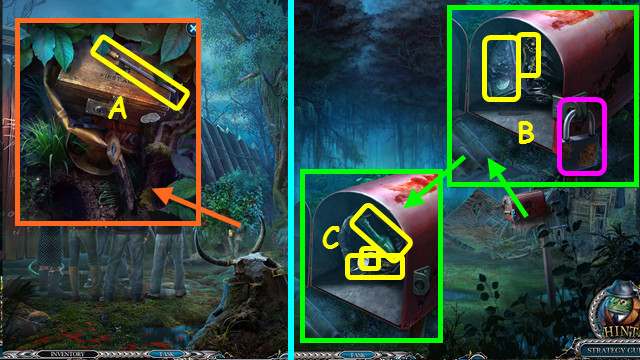
- Use the PRUNERS; open the bag and take the FILE (A).
- Walk right.
- Use the FILE; take the VIDEOTAPE and HAIRPIN (B).
- Use the KNIFE; take the BOTTLE, FLASHLIGHT, and COIN (C).
- Combine the BOTTLE and CORKSCREW to find the NOTE (inventory).
- Walk down.

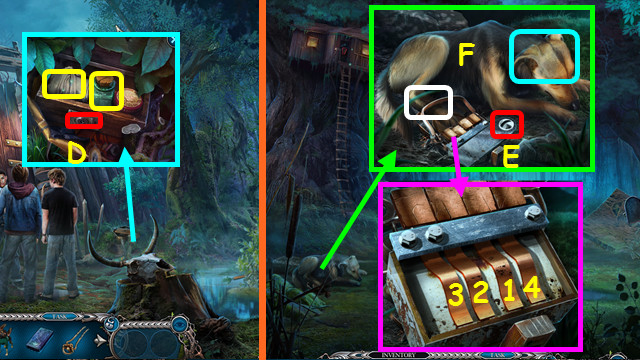
- Use the HAIRPIN; take the BANDAGE and MEDICINE (D).
- Walk right.
- Use the COIN (E).
- Select 1-4.
- Use the BANDAGE and MEDICINE (F).

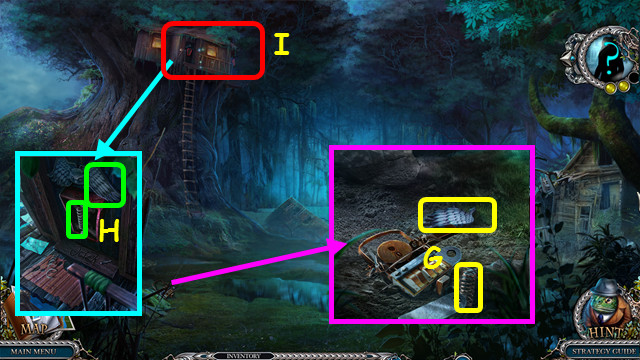
- Take the WING EMBLEM and SPRING (G).
- Place the WING EMBLEM and SPRING (H).
- Play the HOP to earn the CAMERA (I).
- Combine the CAMERA and VIDEOTAPE to find VIDEOTAPE (inventory).
- Walk down.

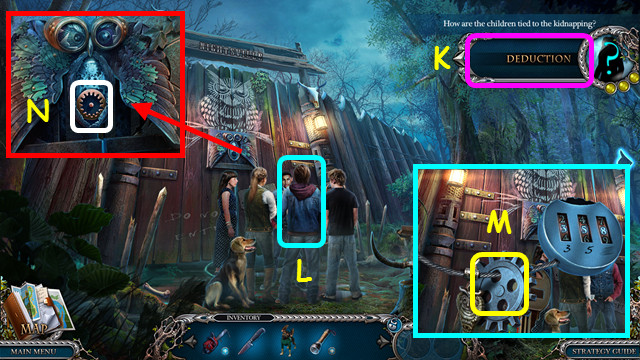
- Select DEDUCTION (K).
- Talk to Jack (L).
- Set the combination to 358; take the MECHANISM PART (M).
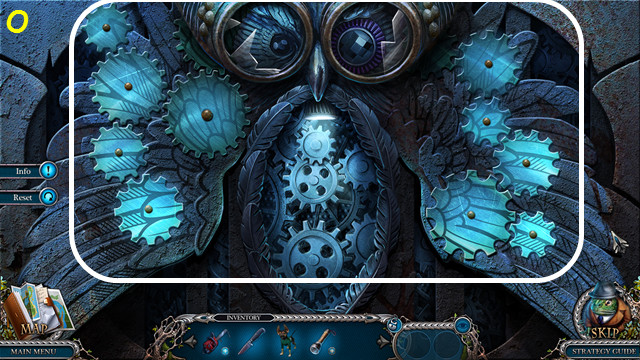
- Place the MECHANISM PART (N).

Chapter 5: Nightsville

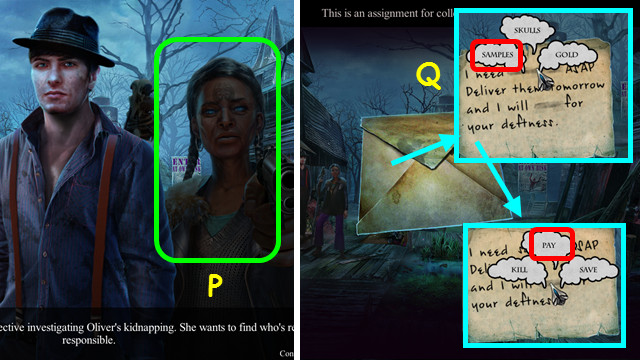
- Talk to Ms. Bernadette (P).
- Open the envelope; select ‘samples’ and ‘pay’, and take the LETTER (Q).

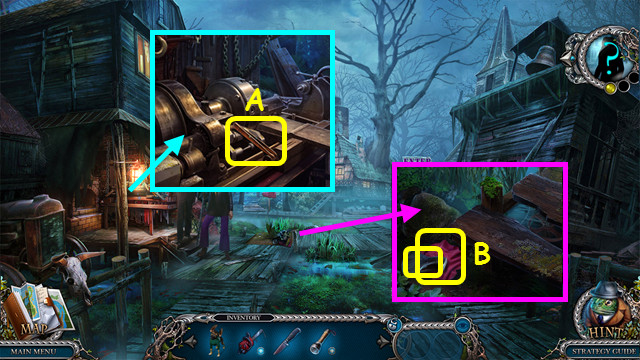
- Take the TWEEZERS (A).
- Move the items; take the AXE BLADE and HANKY (B).
- Walk forward.

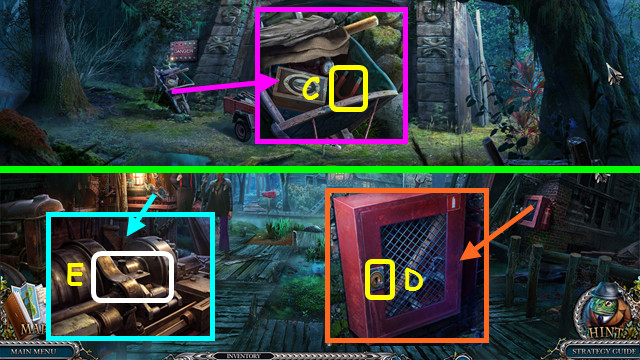
- Move the cover; take the MAGNET (C).
- Walk down.
- Use the MAGNET to take the BROKEN KEY (D).
- Use the BROKEN KEY (E).

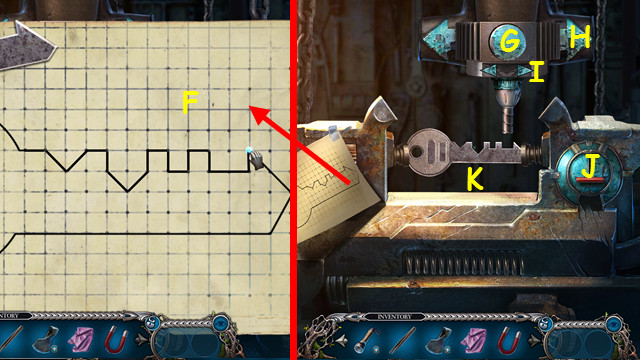
- Draw the outline (F).
- Select J-I-G-H-J-G-H-J-Ix2-G-H-Ix2-G.
- Take the FIREBOX KEY (K).

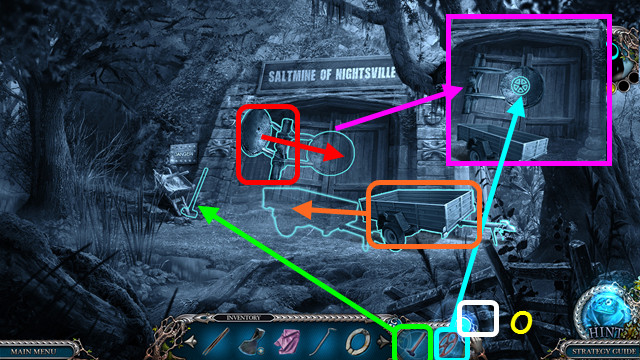
- Use the FIREBOX KEY; take the CROWBAR, SLEDGEHAMMER, and CHEST PART (L).
- Use the CROWBAR (M).
- Use the MAGNET to take the VALVE (N).
- Walk forward.

- Select the FORESIGHT button (O).
- Restore the items (color-coded).

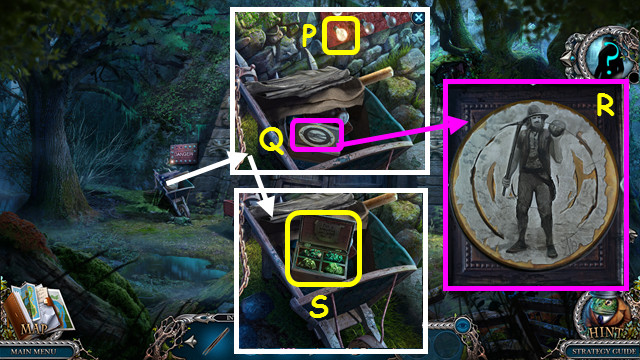
- Use the HANKY to take the BULB (P).
- Combine the FLASHLIGHT and BULB to make the WORKING FLASHLIGHT (inventory).
- Place the CHEST PART (Q).
- Restore the image (R).
- Take the BOX OF SAMPLES (S).

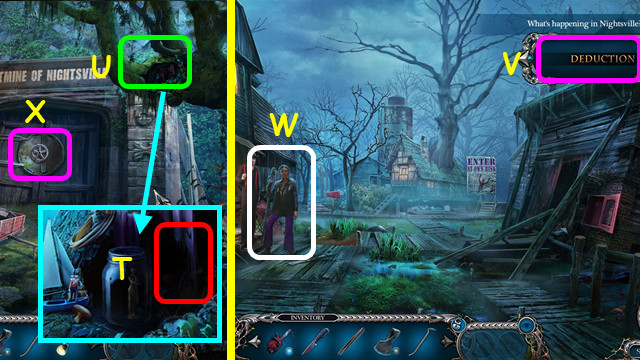
- Use the WORKING FLASHLIGHT (T).
- Play the HOP; earn the RECEIPT (U).
- Select DEDUCTION (V).
- Walk down.
- Talk to Bernadette (W).
- Walk forward.
- Look at the mine entrance (X).

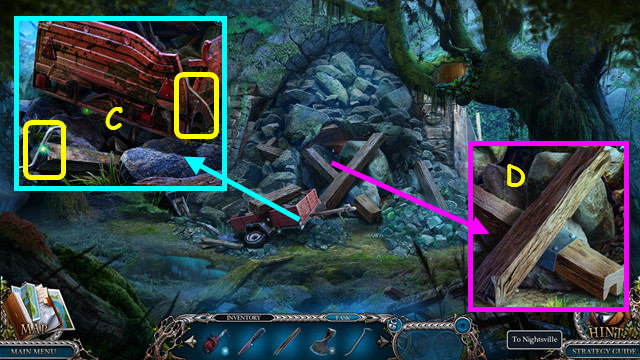
- Take the HEX KEY and AXE HANDLE (C).
- Combine the AXE BLADE and AXE HANDLE to make the AXE (inventory).
- Use the AXE, and then use the CROWBAR (D).
- Walk forward.

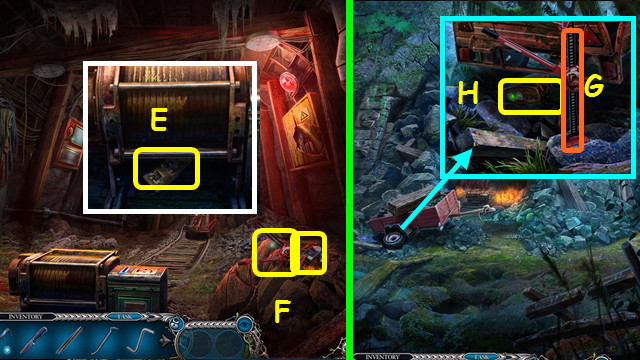
- Use the CROWBAR; take the REMOTE CONTROL (E).
- Combine the REMOTE CONTROL, HEX KEY, and KNIFE to take the TOGGLE SWITCH (inventory).
- Take the JACK and METER (F).
- Combine the METER and KNIFE to get the ELECTRICAL TAPE (inventory).
- Walk down.
- Use the JACK (G).
- Use ELF; take the RECEIVER PIECES (H).
- Combine the RECEIVER PIECES and TWEEZERS to take the FUSE (inventory).
- Walk forward.

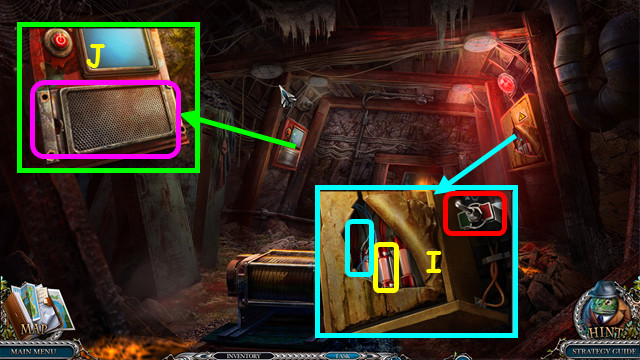
- Use the ELECTRICAL TAPE, FUSE, and TOGGLE SWITCH; flip the switch (I).
- Use the HEX KEY (J).

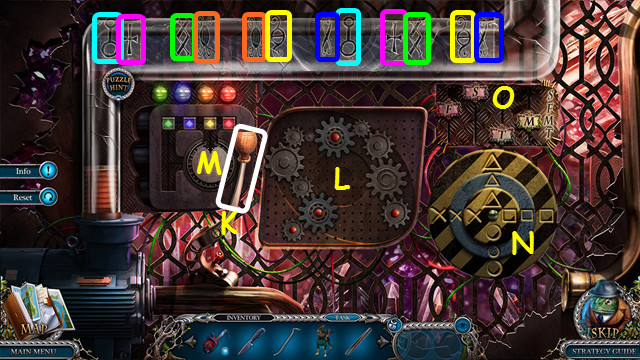
- Pull the lever 5x (K).
- Restore the gears (L).
- Move green down-M-left-up-M; move blue right,-down-M-left-M.
- Move yellow left-down; move red right x3, move yellow up.
- Move blue up x2-right; move green up x3.
- Rotate the rings as shown (N).
- Arrange the letters (O).
- Select the pairs (color-coded).

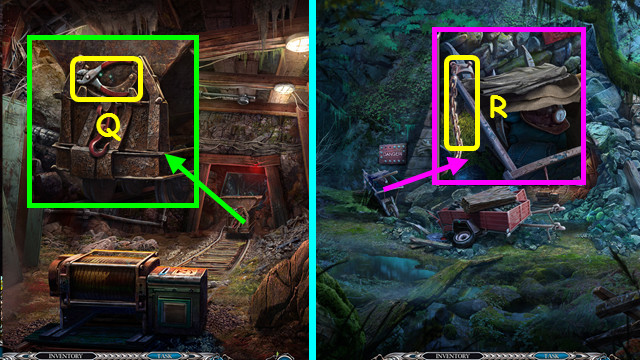
- Take the CLIPPERS (Q).
- Walk down.
- Use the CLIPPERS to take the CHAIN (R).
- Walk forward.

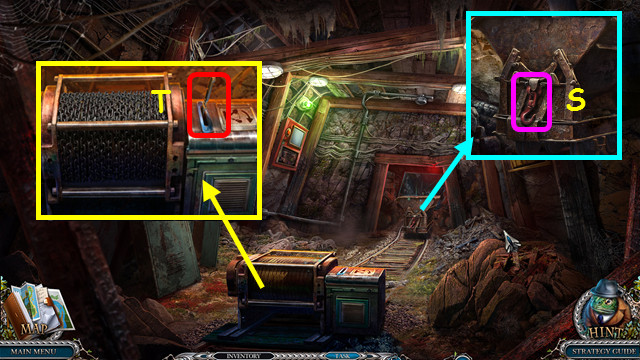
- Place the CHAIN (S).
- Place the KNIFE and pull it (T).

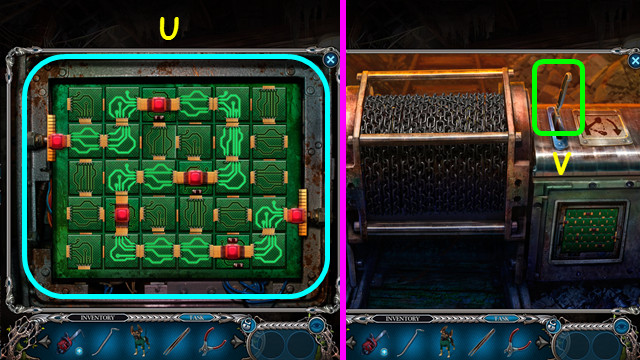
- Connect the power.
- Solution (U).
- Pull the lever (V).
- Walk forward.

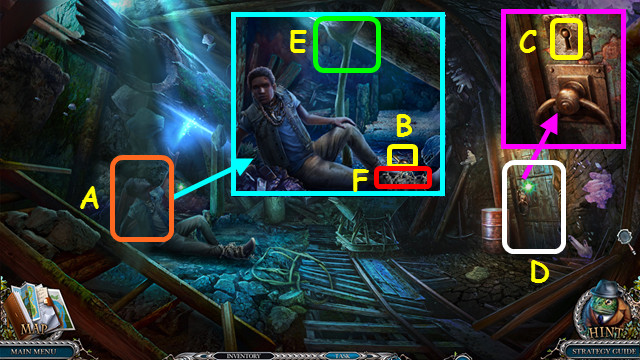
- Talk to the man (A).
- Take the STOREROOM KEY (B).
- Use the STOREROOM KEY (C).
- Play the HOP; earn the FORK (D).
- Place the FORK (E).
- Use the CLIPPERS (F).
- Select the man again; walk down.

- Talk to Kevin (I).
- Open and take the MAP (J).
- Walk down 2x.

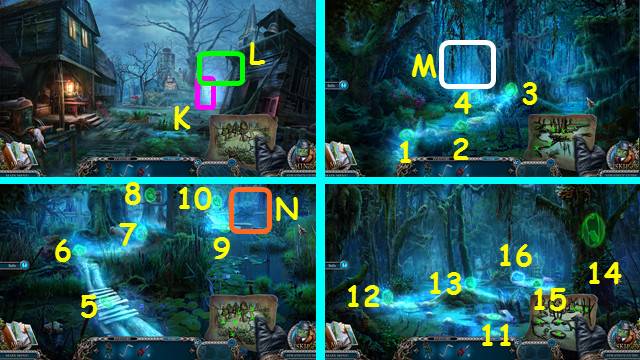
- Use the MAP (K).
- Walk right (L).
- Uncover the 4 symbols; select the stones (1-4).
- Walk forward (M).
- Uncover the 6 symbols; select the stones (5-10).
- Walk forward (N).
- Uncover the 6 symbols; select the stones (11-16).
Chapter 6: The Owl Man

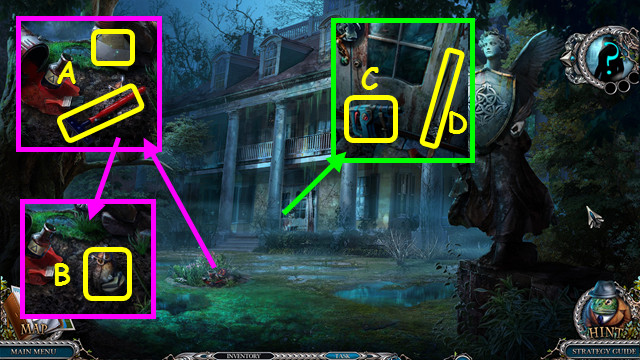
- Take the KID RAKE and MESSAGE (A).
- Use ELF; take the PORCELAIN OWL (B).
- Take the HAMMER DRILL (C).
- Use the KID RAKE; take the STONE SWORD (D).

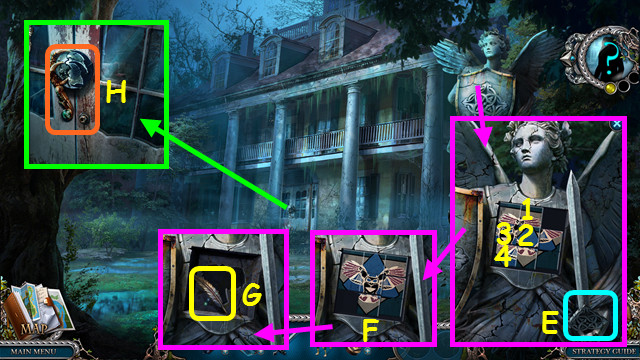
- Place the STONE SWORD (E).
- Select 1-4.
- Solution (F).
- Take the PORCELAIN KEY (G).
- Combine the PORCELAIN OWL and PORCELAIN KEY to find the LOCK PIECE (inventory).
- Place the LOCK PIECE (H).
- Walk forward.

- Take the TONGS (N).
- Use the TONGS to take the CHISEL (O).
- Use the CHISEL; take the DRILL BIT and BOTTLE SUBSTANCE A (P).
- Combine the HAMMER DRILL and DRILL BIT to make the WORKING DRILL (inventory).
- Walk down.

- Use the CHISEL; take the BOTTLE SUBSTANCE B and BRUSH (Q).
- Walk forward.
- Use the WORKING DRILL to get the STONE; take the STATUE PIECE and BOTTLE SUBSTANCE C (R).
- Use BOTTLE SUBSTANCE A, BOTTLE SUBSTANCE B, BOTTLE SUBSTANCE C, and BRUSH; take the GLUED BRUSH (S).
- Combine the STATUE PIECE and GLUED BRUSH to make the STATUE (inventory).
- Walk down.

- Place the STATUE; take the CURTAIN ROPE (T).
- Use the CHISEL and STONE to take the FLOWER POT (U).
- Walk forward.

- Select the FORESIGHT button (V).
- Restore the items (color-coded).

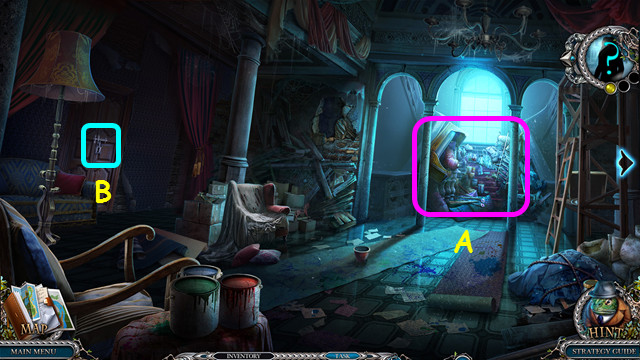
- Play the HOP; earn the CHAMBER KEY (A).
- Use the CHAMBER KEY (B).
- Walk left.

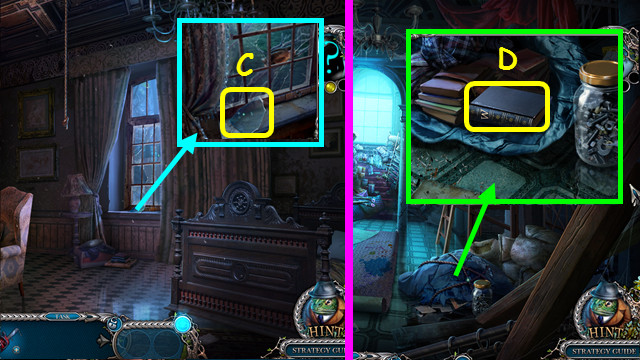
- Take the GLASS PIECE (C).
- Walk down.
- Use the GLASS PIECE; take the BOOK (D).
- Walk left.

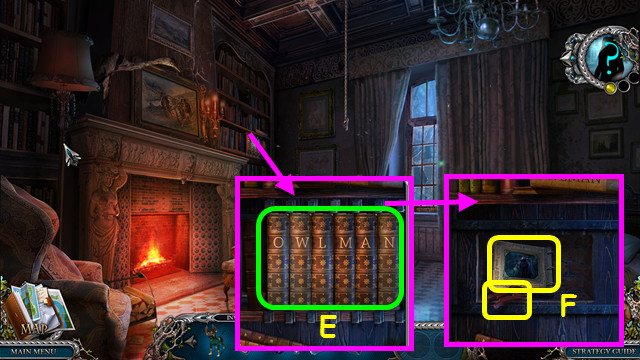
- Place the BOOK; arrange the books as shown (E).
- Take the PHOTO ALBUM and OPENER (F).
- Combine the PHOTO ALBUM and GLASS PIECE to get the PHOTO (inventory).
- Walk down.

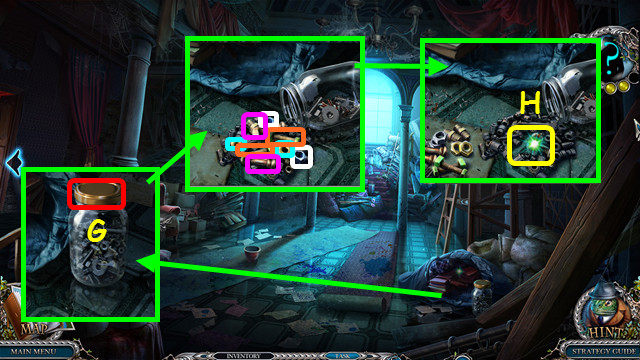
- Use the OPENER (G).
- Select pairs (color-coded).
- Take the LATCH HANDLE (H).
- Walk left.

- Use the LATCH HANDLE (I).
- Use ELF; take the FIGURINE (J).

- Select the FORESIGHT button (K).
- Restore the items (color-coded).

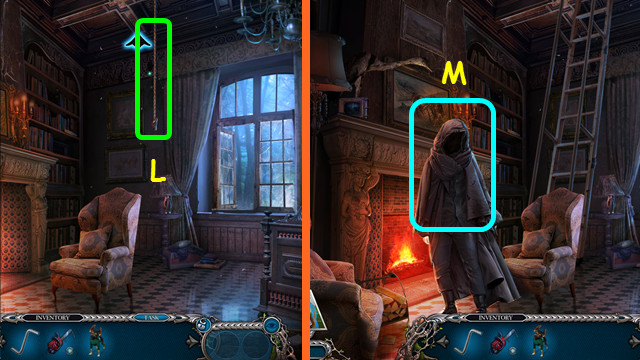
- Pull the rope (L).
- Talk to the Owl Man (M).

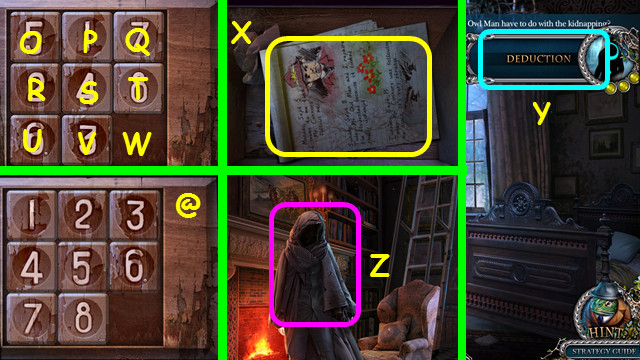
- Select V-U-R-O-P-S-V-W-T-Q-P-S-V-U-R-O-P-S-V-W-T-Q-P-S-T-Q-P-O-R-S-P-Q-T-S-R-U-V-S-R-U-V-W-T-S-R-U-V-S-T-W.
- Solution (@).
- Take the DIARY (X).
- Select Deduction (Y).
- Talk to the Owl Man (Z).
- Play the HOP.
Chapter 7: The Sherriff

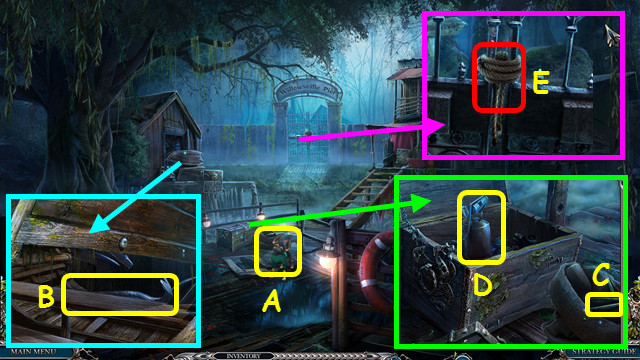
- Take ELF (A).
- Use ELF; take the CROWBAR (B).
- Open the sack; take the TWEEZERS, HEX KEY, and BROKEN CHAINSAW (C).
- Use the CROWBAR; take the TORCH (D).
- Use the TORCH (E).
- Walk forward.

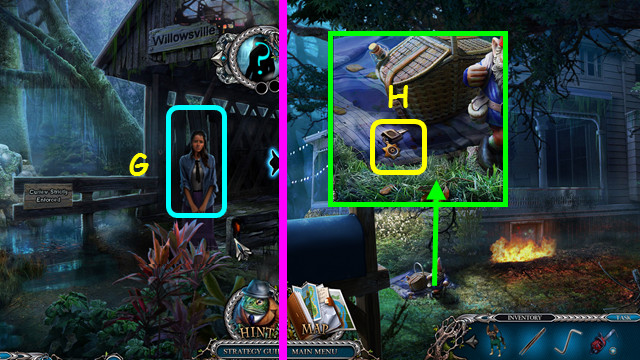
- Talk to Mary (G).
- Walk right and forward.
- Take the CAR KEYS (H).
- Walk down.

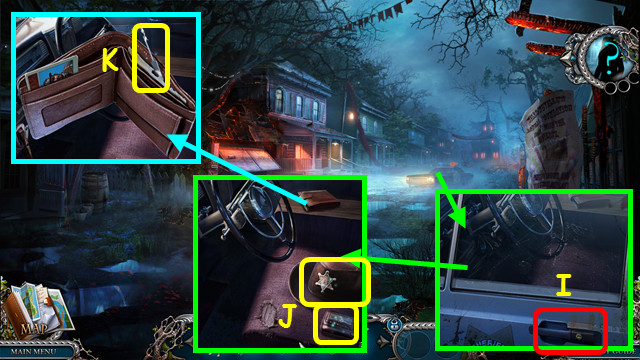
- Use the CAR KEYS (I).
- Take the HAT and PAGER (J).
- Take the LOCKPICK (K).
- Walk down.

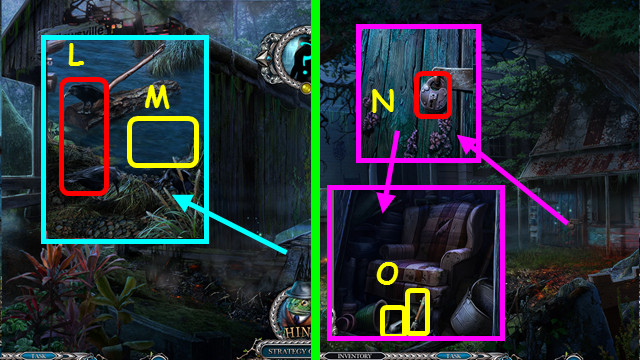
- Use ELF (L).
- Use the HAT to take the FULL HAT (M).
- Return to the Sherriff’s House.
- Use the LOCKPICK (N).
- Take the GLASS CUTTER and GLOVE COMPARTMENT HANDLE (O).
- Walk down.

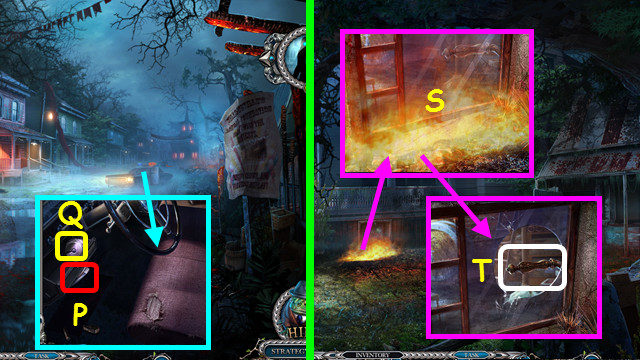
- Remove the old handle; use the GLOVE COMPARTMENT HANDLE (P).
- Take the GLASS CUTTER BLADE (Q).
- Combine the GLASS CUTTER and GLASS CUTTER BLADE to make the WORKING GLASS CUTTER (inventory).
- Walk forward.
- Use the FULL HAT (S).
- Use the WORKING GLASS CUTTER and turn the handle (T).
- Walk forward.

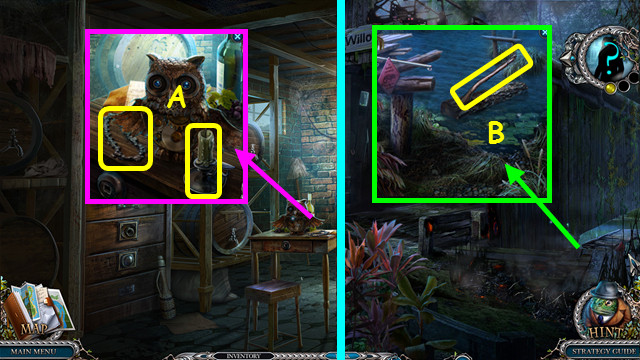
- Take the CHAINSAW CHAIN and CANDLE (A).
- Combine the BROKEN CHAINSAW and the CHAINSAW CHAIN to make the WORKING CHAINSAW (inventory).
- Walk down 3x.
- Use the WORKING CHAINSAW; take the STICK (B).
- Return to the Sherriff’s House.

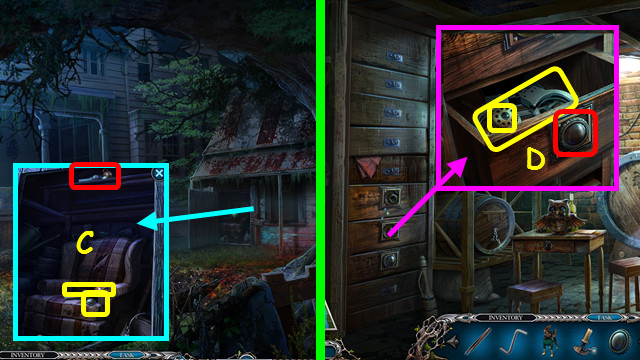
- Use the STICK; take the OIL LAMP and BUTTON 1 (C).
- Go forward.
- Place the BUTTON 1 and push; take the GEAR 1 and HANDCUFFS (D).

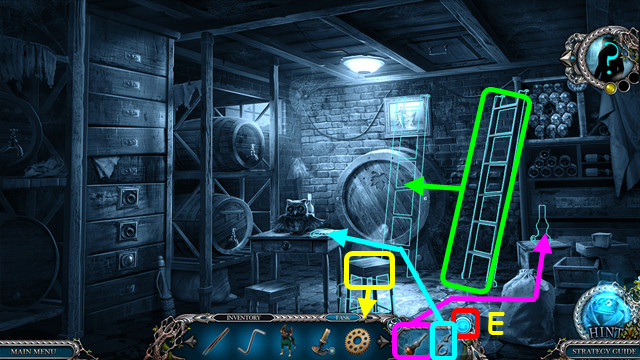
- Select the FORESIGHT button (E).
- Restore the items (color-coded).

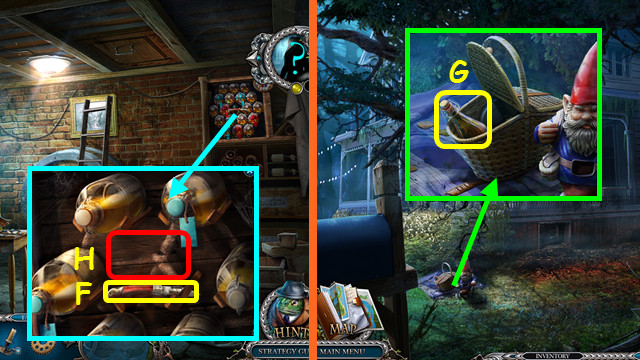
- Take the PENKNIFE (F).
- Walk down.
- Use the PENKNIFE; take the BOTTLE OF WINE (G).
- Go forward.
- Place the BOTTLE OF WINE (H).

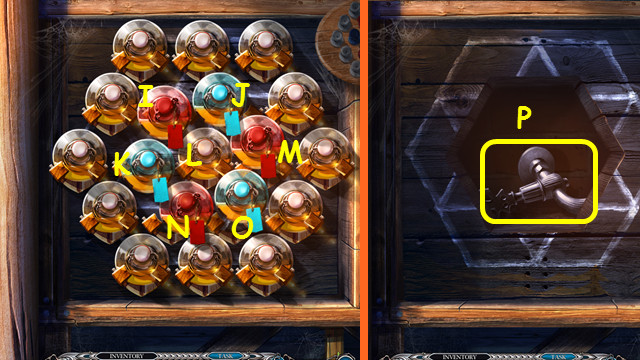
- Solution: M-Ix4-Jx4-Nx5-K-Ox2-Nx3-Ox3-Nx3-K-Jx3-L.
- Open the compartment; take the TAP (P).

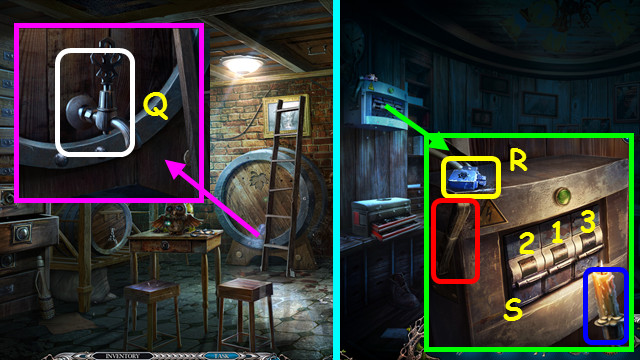
- Place the TAP and turn it (Q).
- Walk forward.
- Take the LIGHTER (R).
- Combine the CANDLE and LIGHTER to make the LIT CANDLE (inventory).
- Use the LIT CANDLE; press 2-1-3 and pull the lever (S).

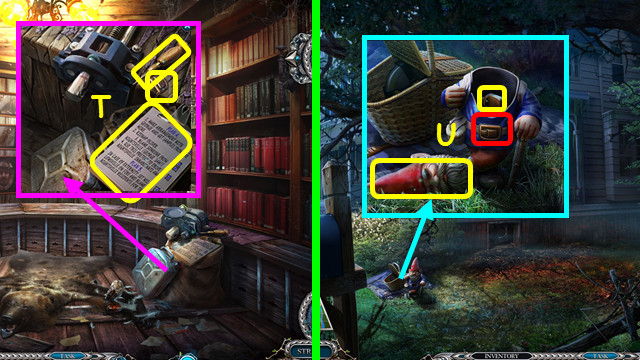
- Take the AWL, GNOME BUCKLE, and CLIPBOARD (T).
- Walk down 2x.
- Place the GNOME BUCKLE; take the GNOME HEAD and DRAWER PULL (U).
- Walk forward.

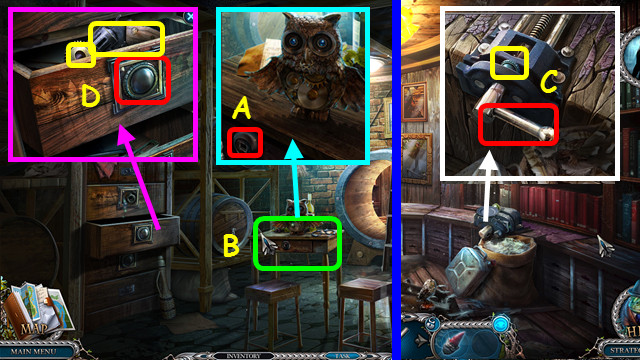
- Place the DRAWER PULL (A).
- Play the HOP; earn the VISE HANDLE (B).
- Go forward.
- Place the VISE HANDLE and turn it; take BUTTON 2 (C).
- Walk down.
- Place BUTTON 2 and push; take GEAR 2 and the GUN (D).
- Walk forward.

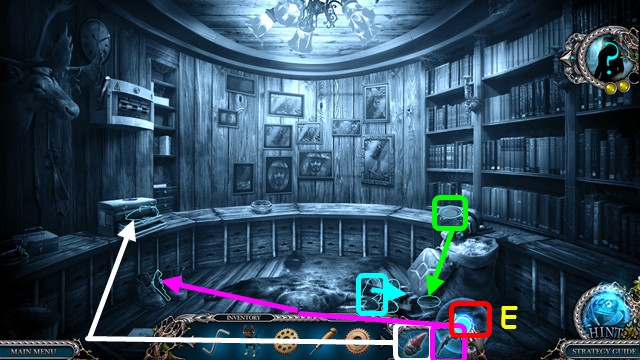
- Press the FORESIGHT button (E).
- Restore the items (color-coded).

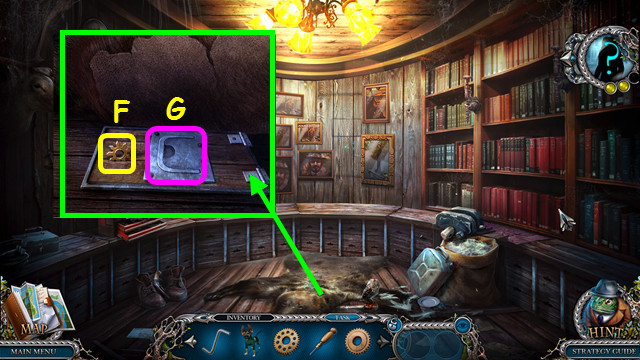
- Move the bearskin; use the TWEEZERS to take the GEAR 3 (F).
- Use the AWL (G).
- Walk down.

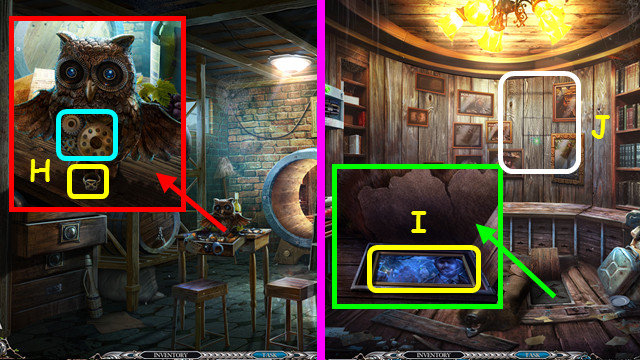
- Place GEAR 1, GEAR 2, and GEAR 3; take the RING (H).
- Walk forward.
- Place the RING; take the FRAMED PHOTO (I).
- Select the wall (J).

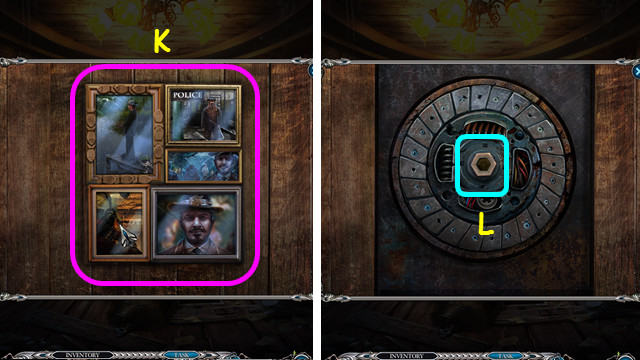
- Place the FRAMED PHOTO and the other photos in the outline (K).
- Use the HEX KEY (L).

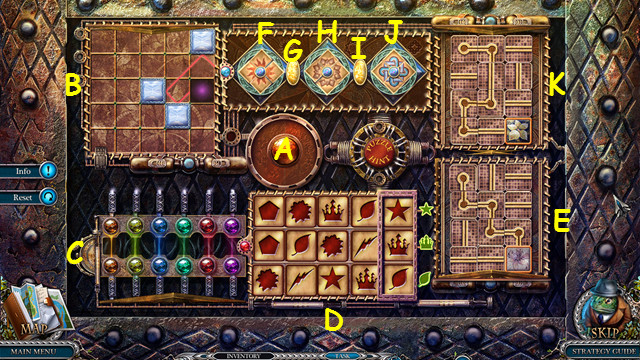
- Select the sides to make a circle (A).
- Arrange the tiles (B).
- Swap the bulbs as shown (C).
- Slide the panels as shown (D).
- Change the tiles as shown (E).
- Select: G-F-H-Jx3-I-H-G-F-H-G-I-H-Jx2-I.
- Change the tiles as shown (K).

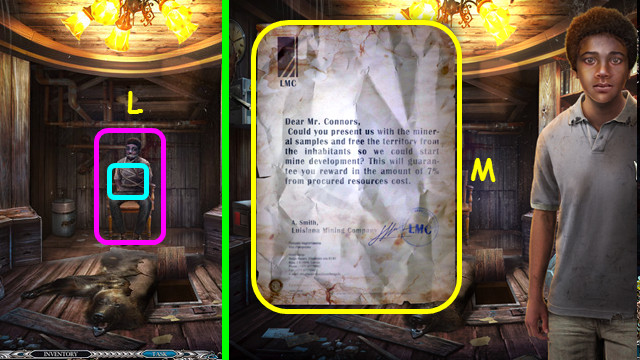
- Remove the ropes and talk to Oliver (L).
- Open the paper and take the LETTER (M).
- Walk down 4x.

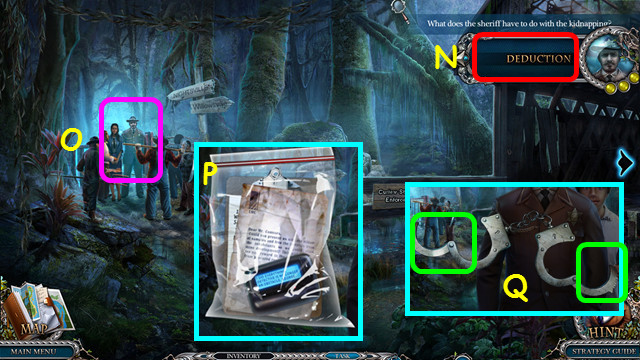
- Select DEDUCTION (N).
- Talk to the Sherriff (O).
- Open the bag and remove the 3 pieces of evidence; select the evidence (P).
- Open the handcuffs and try to put them on the Sherriff (Q).
- Congratulations! You have completed Mystery Trackers: Nightsville Horror!




 Rhianna Ford and the DaVinci Letter Walkthrough, Guide, & Tips
 Strange Cases: The Faces of Vengeance Walkthrough, Guide, & Tips
 Lost Souls: Enchanted Paintings Walkthrough, Guide, & Tips
 Azada: Elementa Walkthrough, Guide, & Tips
 Grim Tales: Color of Fright Walkthrough, Guide, & Tips