Strange Cases: The Faces of Vengeance Walkthrough, Guide, & Tips
Strange Cases: The Faces of Vengeance Walkthrough

Welcome to the Strange Cases: The Faces of Vengeance Walkthrough
Agent Claire Ellery must rescue her young ward, but this masked kidnapper has set deadly traps in the abandoned mall!
Whether you use this document as a reference when things get difficult or as a road map to get you from beginning to end, we’re pretty sure you’ll find what you’re looking for here.
This document contains a complete Strange Cases: The Faces of Vengeance game walkthrough featuring annotated screenshots from actual gameplay!
We hope you find this information useful as you play your way through the game. Use the walkthrough menu below to quickly jump to whatever stage of the game you need help with.
Remember to visit the Big Fish Games Forums if you find you need more help. Have fun!
This walkthrough was created by Nathaniel A., and is protected under US Copyright laws. Any unauthorized use, including re-publication in whole or in part, without permission, is strictly prohibited.
General Tips

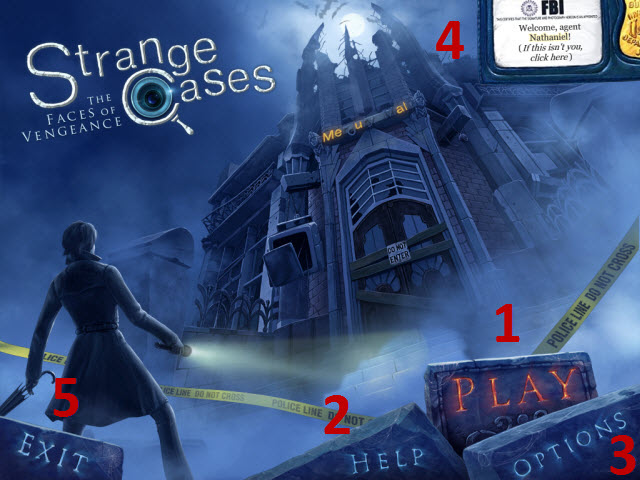
- This is the Official Guide for Strange Cases: The Faces of Vengeance.
- Early on you will be given an in-game Map. The Map will enable fast travel to any area you have previously been before.
- Select Play (1) to begin the game.
- Select the Help button (2) for additional help in the game.
- The Options Menu (3) will allow you to adjust your cursor, screen size, and sound levels.
- Select the badge (4) to edit your profiles.
- Exit the game here (5).
- Throughout the guide, we will use the acronym ‘HOP’ for Hidden-object puzzles. You must find a tarot card in each of these scenes; they are marked in blue throughout the guide.
- Items listed in green in HOPs require an extra step; they will be marked in green on the screenshots.
- There are three difficulty levels: Casual, Advanced, and Expert. These may be changed at any time.

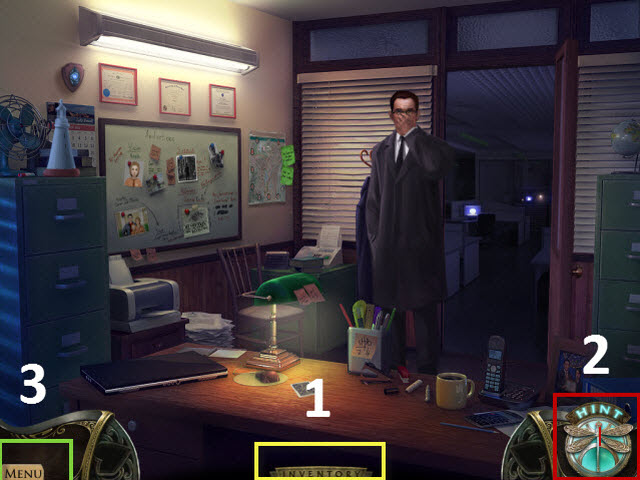
- The Inventory items are stored here (1).
- The Hint button will offer hints and allow you to skip puzzles, but will take some time to recharge (2).
- Selecting the Menu button will bring up the Options, Help, and allow you to exit the game (3).
Chapter 1: Kidnapped!

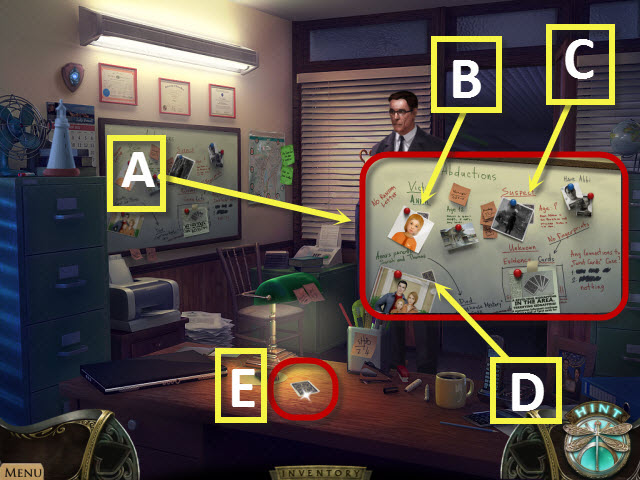
- Open the door.
- Examine the bulletin board (A). Move the picture of the little girl (B), the suspect (C), and the parents (D). Take the three CARDS from behind each picture.
- Examine the tarot card on the table (E).

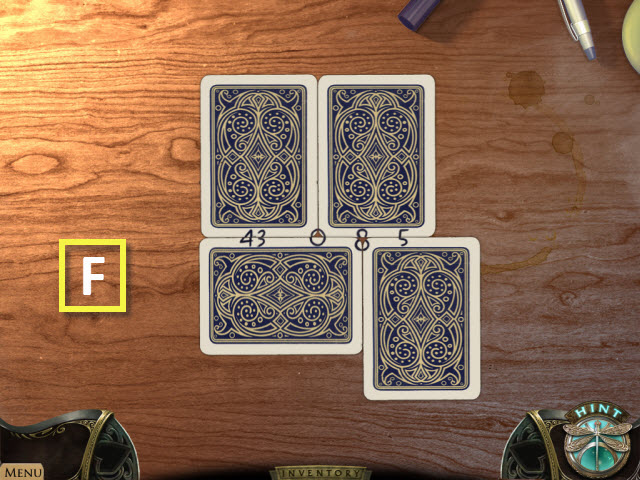
- Place the CARDS on the table to begin a puzzle.
- Arrange the cards to uncover a message; right-click on the cards to rotate them and left-click to drag them.
- Please look at the screenshot for the solution (F).
- You will receive the STICKER.

- Examine the map; place the STICKER on it to begin a puzzle (G).
- Select 43, 0, 8, and 5.

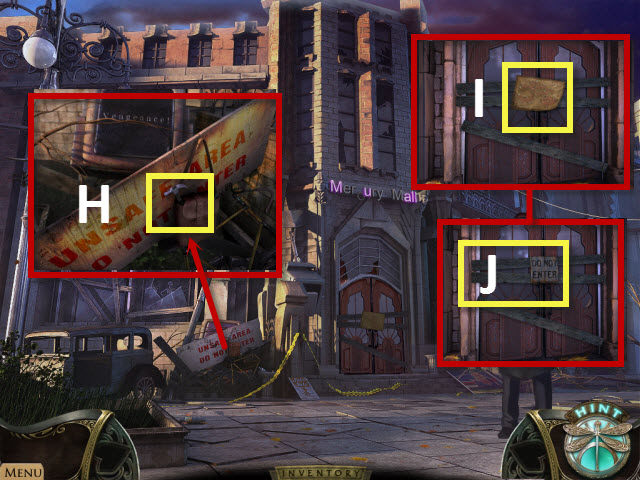
- Examine the sign (H); take the HAMMER.
- Examine the mall door; pick up the map (I).
- Use the HAMMER on the boards (J).
- Enter the mall.
- Remove the police tape.
- Walk forward to the statue room.

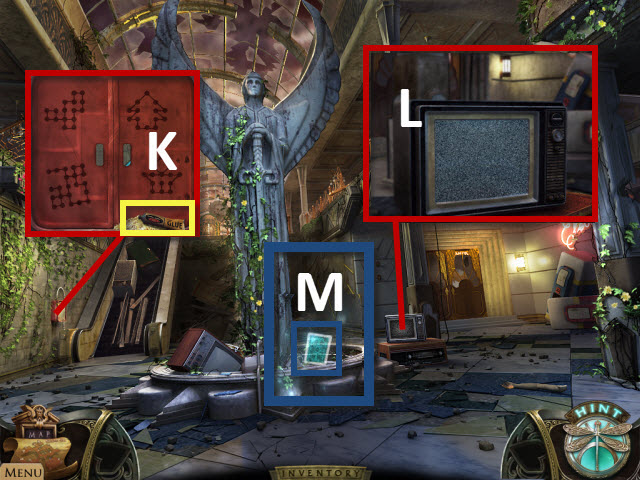
- Examine the fuse box; take the GLUE (K).
- Examine the TV set (L).
- Exit the TV set and a floating tarot card will appear. Select the floating tarot card (M) to activate a HOP.

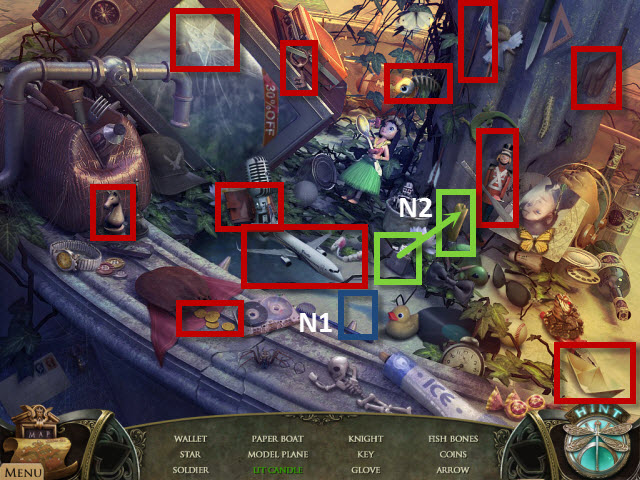
- Find the tarot card (N1).
- Use the lighter with the candle to get the lit candle (N2).
- You will receive the GLOVE.

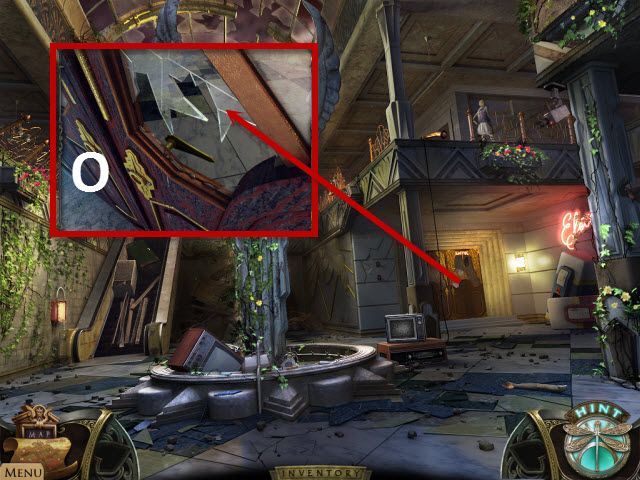
- Examine the door; use the GLOVE on the broken shards of glass (O).
- Walk forward.

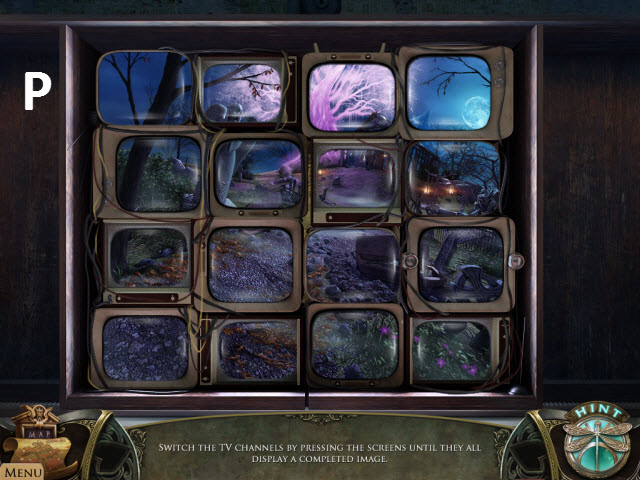
- Examine the surveillance monitors to begin a puzzle; you must cycle each monitor to create a complete image.
- Please look at the screenshot for the solution (P).
- Walk forward to the secret room.
Chapter 2: Save Anna


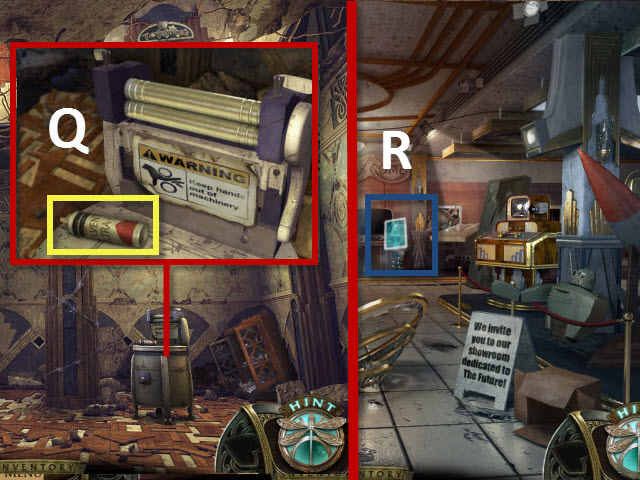
- Examine the machine press; pick up the SOLVENT (Q).
- Walk down and then walk right to the exposition room.
- Select the floating tarot card to activate a HOP (R).

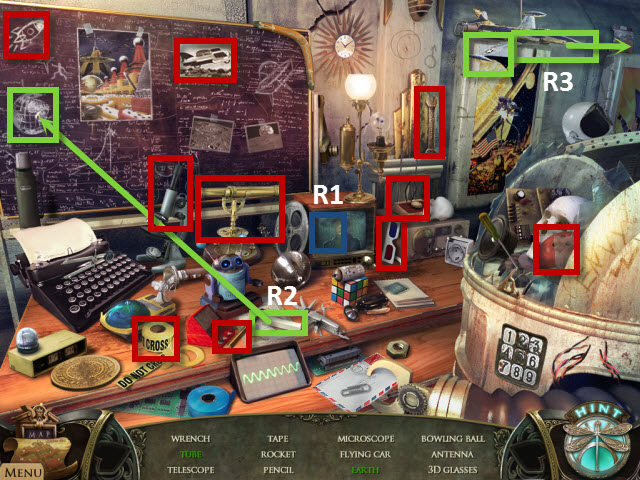
- Find the tarot card (R1).
- Use the chalk on the chalkboard to get the earth (R2).
- Move the airplane to get the tube (R3).
- You will receive the ANTENNA.
- Walk down twice.

- Select the floating tarot card to activate a HOP (S).
- Find the tarot card (S1).
- Find all the items in silhouette.
- You will receive the ROTARY DIAL.

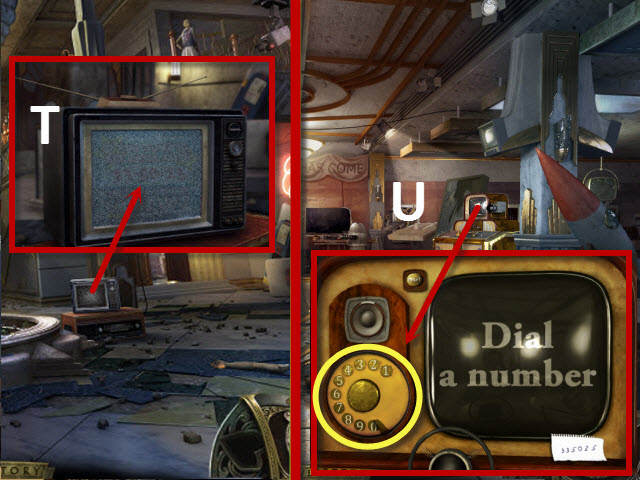
- Examine the TV set; place the ANTENNA on it and touch the TV screen twice (T).
- You will receive the PHONE NUMBER.
- Return to the exposition room.
- Examine the telephone console; place the ROTARY DIAL on it and dial 3, 3, 5, 0, 2, and 5 (U).
- Walk down.

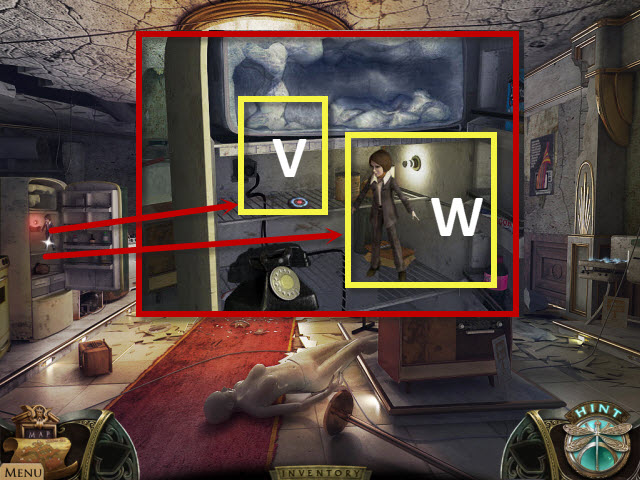
- Open the fridge; examine it and pick up the ELECTRONIC SWITCH (V).
- Touch the doll and then use the GLUE on the doll’s body; place the head on the doll’s body.
- Take the CLAIRE DOLL (W).
- Walk down.


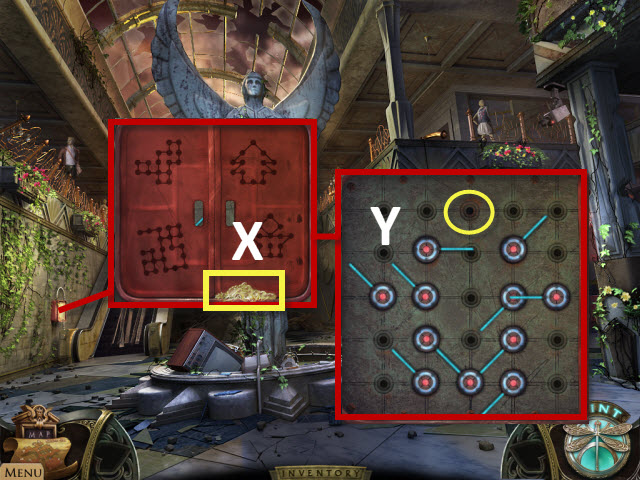
- Examine the fuse box; use the SOLVENT on the glue (X).
- Open the doors.
- Place the ELECTRONIC SWITCH on the empty slot to begin a puzzle (Y).

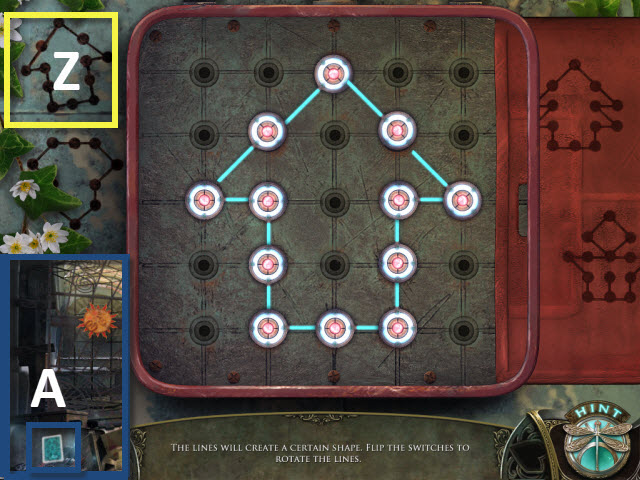
- Rotate each switch to form the image shown (Z).
- Walk upstairs to the vending machine room.
- Select the floating tarot card to activate a HOP (A).

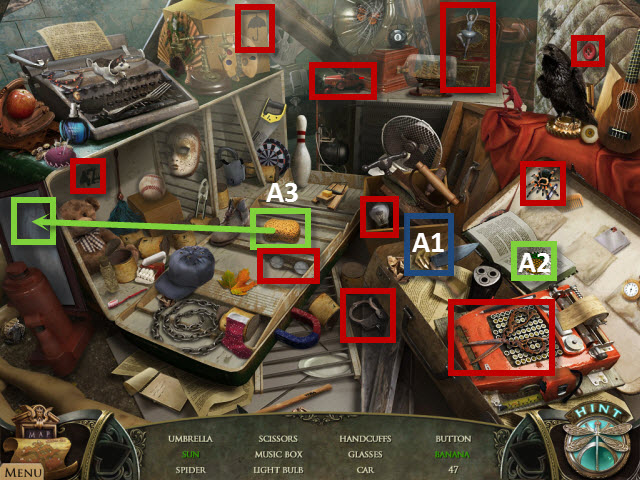
- Find the tarot card (A1).
- Touch the pineapple to get the banana (A2).
- Use the sponge on the mirror to get the sun (A3).
- You will receive the SCISSORS.

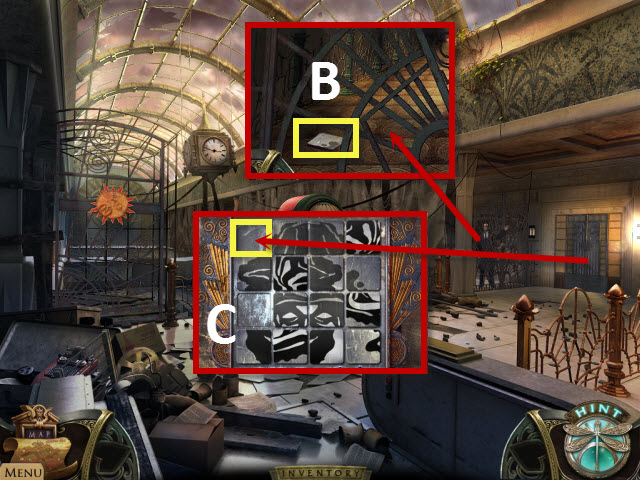
- Walk to the detective; pick up the PICTURE TILE (B).
- Walk down.
- Examine the gate; place the PICTURE TILE in the empty square to begin the puzzle (C).

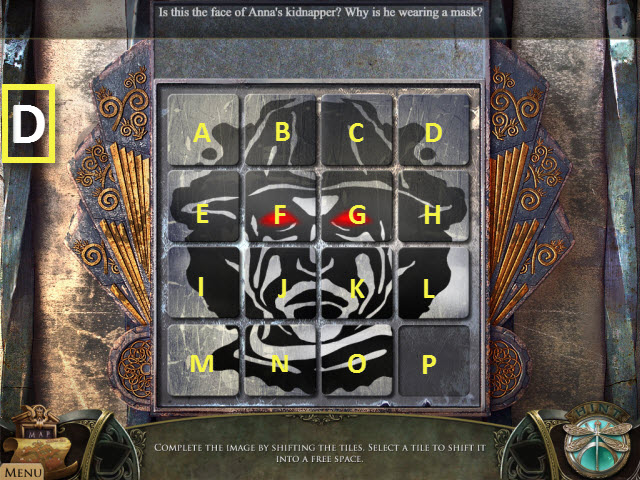
- Slide the tiles around to create a complete image.
- To solve the puzzle (D) select these tiles: J, K, L, H, D, C, G, H, L, P, O, K, G, C, D, H, G, K, L, P, O, K, J, N, O, P, L, K, J, I, M, N, O, K, J, F, G, K, L, P, O, N, J, F, G, K, J, N, O, and P.
- Walk right to the costume room.

- Touch the owl (E).
- Examine the mannequin; take the BANDAGE from the mannequin’s mouth (F).
- Take the TICKET from the mannequin’s mouth (G).
- Open the closet doors (H).
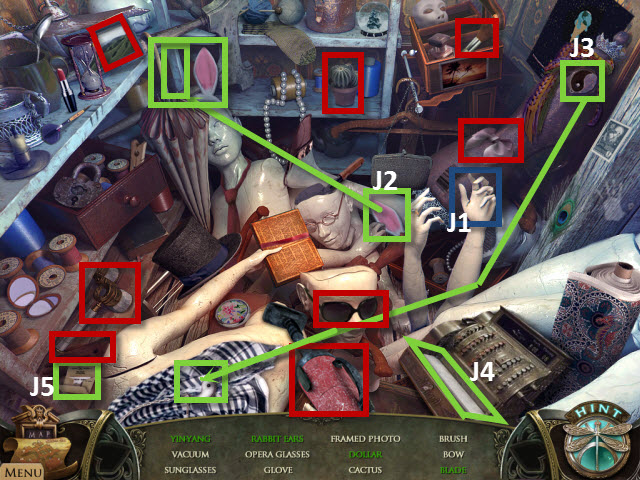
- Select the floating tarot card to activate a HOP (J).


- Use the SCISSORS on the mannequin’s hand to get the tarot card (J1).
- Combine the rabbit ears with each other to get the rabbit ears (J2).
- Combine the yin and yang symbols to get the yinyang (J3).
- Open the cash register to get the dollar (J4).
- Open the packet to get the blade (J5).
- You will receive the VACUUM.

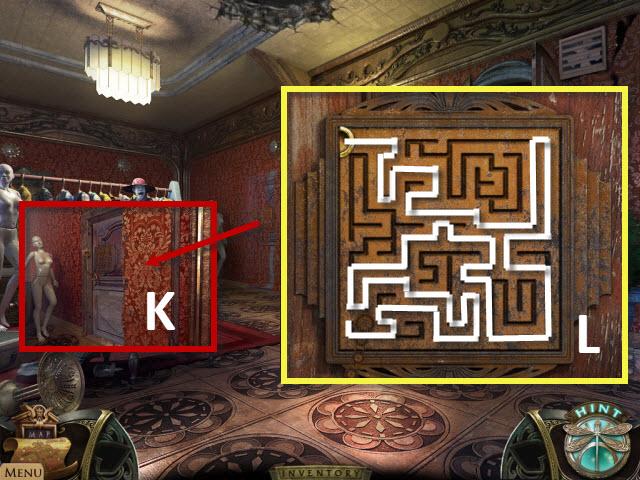
- Examine the wallpaper; move both pieces of wallpaper (K).
- Examine the wall to begin a puzzle; drag the chain through the labyrinth to open the door.
- Please look at the screenshot for the solution (L).
- Walk forward to the tube room.

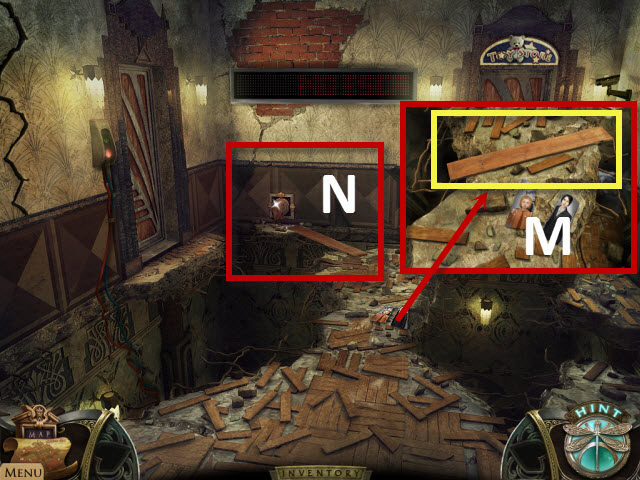
- Examine the floor; pick up the PLANK (M).
- Use the PLANK with the tube (N).

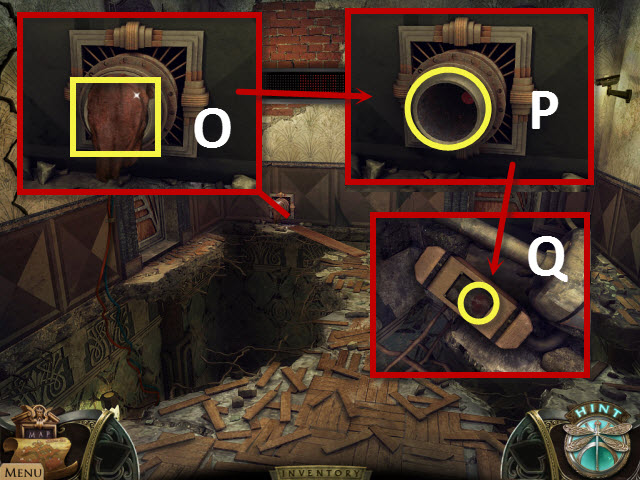
- Examine the tube; take the RAG (O).
- Use the VACUUM on the tube (P).
- Use the SCISSORS on the vacuum bag; take the RED BUTTON (Q).
- Return to the secret room.

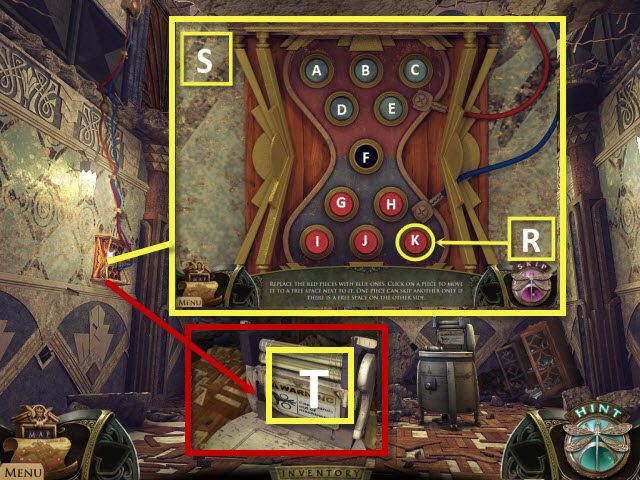
- Examine the power box and place the RED BUTTON in the empty slot to begin the puzzle (R).
- Swap the positions of the red and blue buttons; buttons may jump over each other, but there must be an empty space on the opposite side.
- To solve the puzzle (S) select these buttons: H, D, F, E, G, F, I, G, H, F, A, D, H, F, K, J, G, E, F, K, H, F, C, E, G, F, D, B, E, F, D, H, and F.
- Examine the machine press; place the TICKET in it (T).
- Return to the tube room.

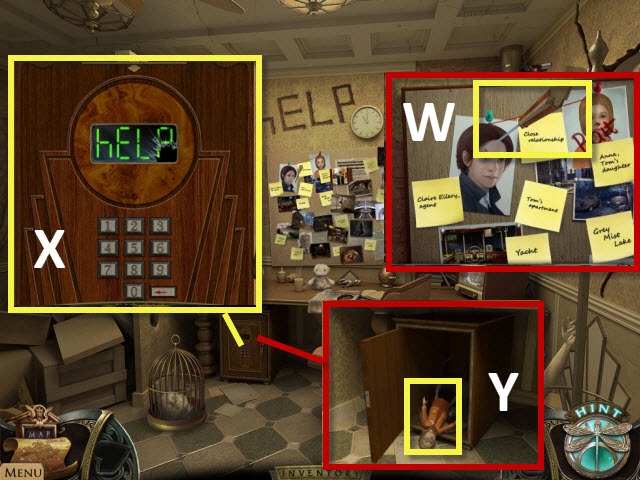
- Select the plank to move it to the left (U).
- Walk left.
- Examine the switch; place the BANDAGE on the switch (V).
- Walk forward.


- Examine the bulletin board; pick up the ICE PICK (W).
- Examine the safe to begin a puzzle; enter 8, 7, 3, and 4 (X).
- Examine the safe; open the safe and pick up the ANNA DOLL (Y).
- Return to the vending machine room.

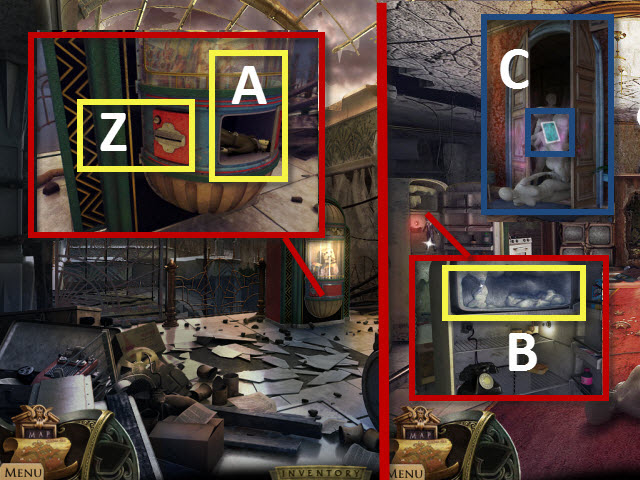
- Examine the vending machine; place the TICKET in the slot (Z).
- Pick up the MASKED DOLL (A).
- Return to the surveillance room.
- Examine the refrigerator; use the ICE PICK on the ice (B).
- You will receive the ICE.
- Return to the costume room.
- Select the floating tarot card to activate a HOP (C).

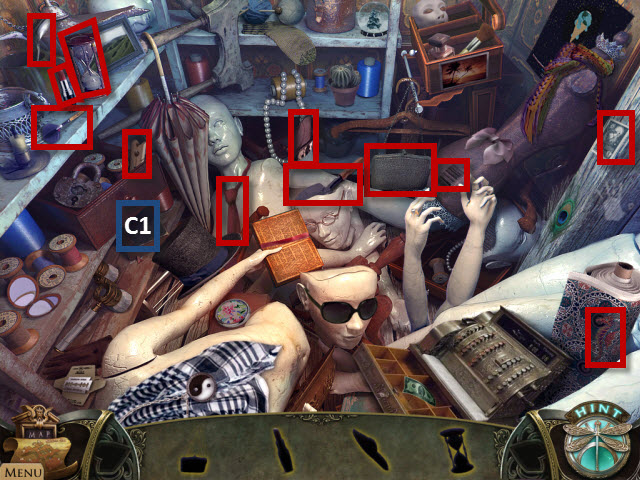
- Find the tarot card (C1).
- Find the items in silhouette.
- You will receive the TROWEL.
- Walk forward.

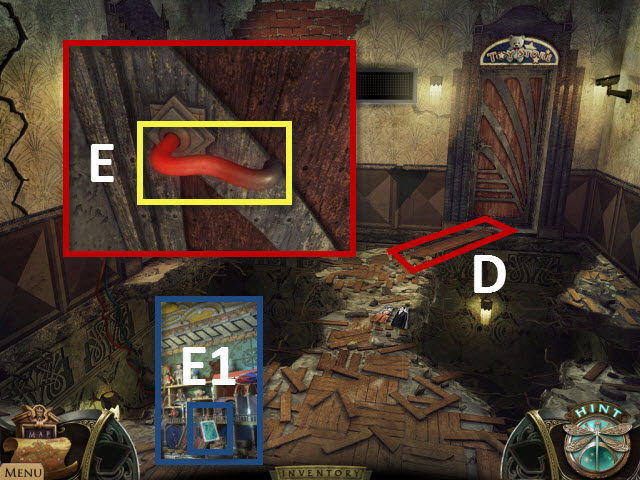
- Select the plank to move it to the right (D).
- Examine the door; use the ICE on the door handle (E).
- Examine the door; open the door.
- Walk forward.
- Select the floating tarot card to activate a HOP (E1).

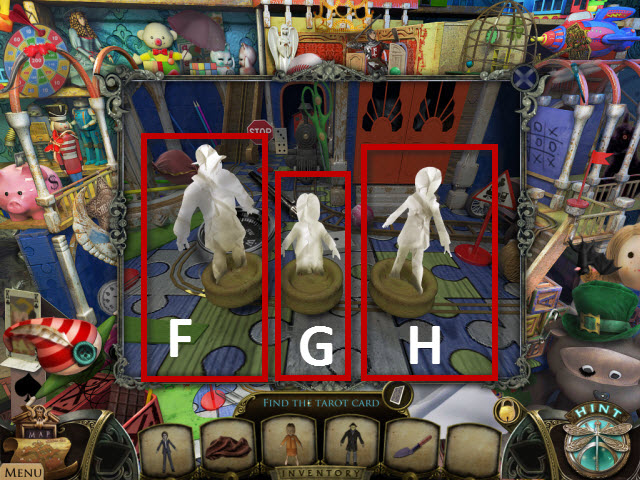
- Examine the doll stand; place the MASKED DOLL (F), the ANNA DOLL (G), and the CLAIRE DOLL on the stand (H).

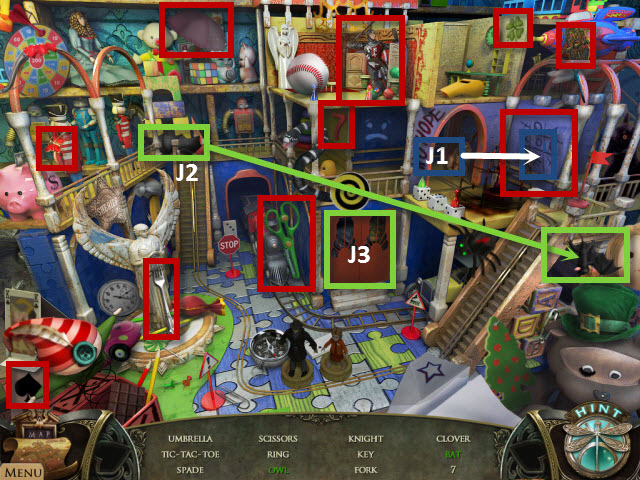
- Find the tarot card (J1).
- Place the bat wing on the bat to get the bat (J2).
- Open the doors to get the owl (J3).
- You will receive the KEY.
Chapter 3: The Search Continues

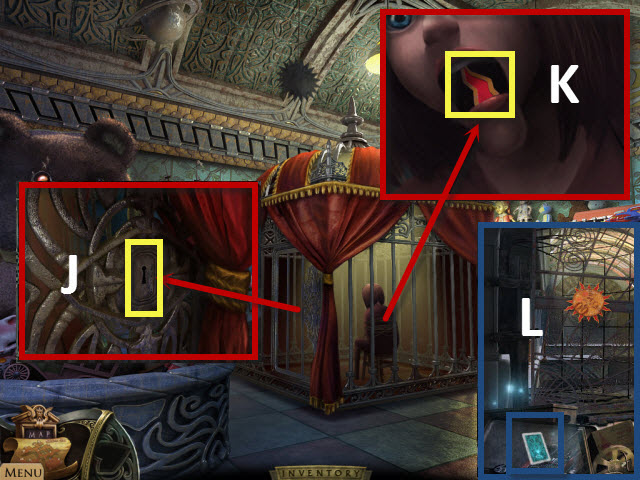
- Examine the door; use the KEY on the lock (J) and turn it.
- Examine the caged dummy; take the SUN PUZZLE PART (K).
- Return to the vending machine room.
- Select the floating tarot card to activate a HOP (L).

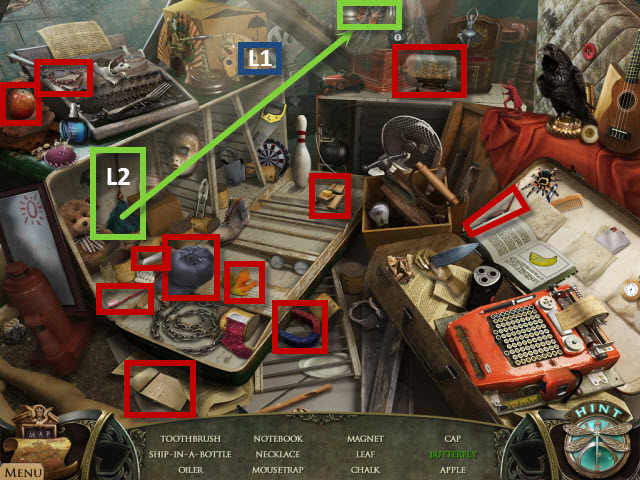
- Find the tarot card (L1).
- Use the brush on the cobweb to get the butterfly (L2).
- You will receive the OILER.

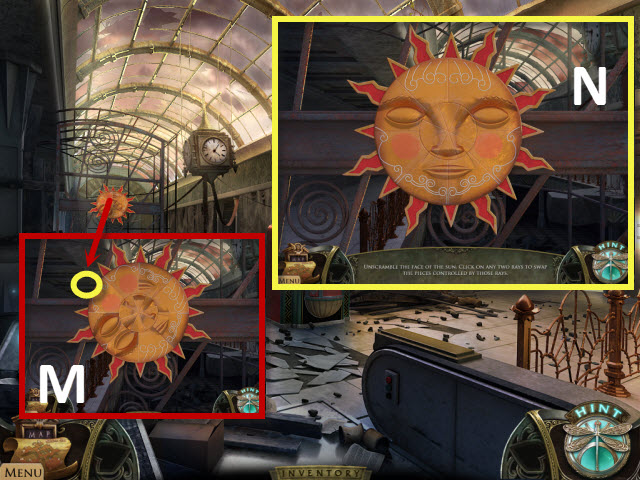
- Examine the sun platter; place the SUN PUZZLE PART on it to begin a puzzle (M).
- You must swap the matching sun rays to create the image shown.
- Please look at the screenshot for the solution (N).
- Walk forward.

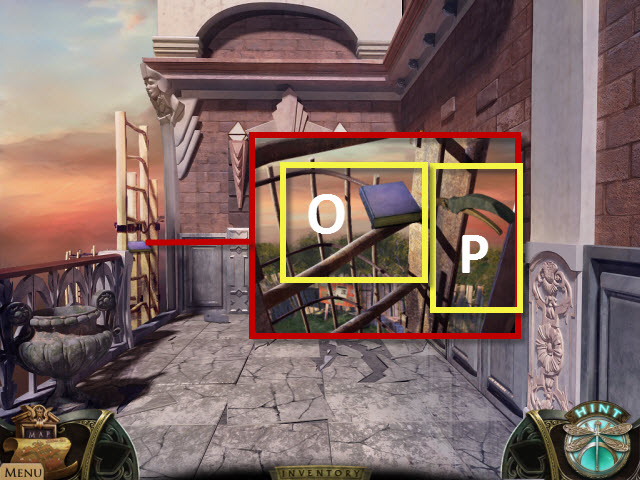
- Examine the fire escape; pick up the BOOK (O).
- Use the OILER on the fire escape latch (P).
- Walk left.

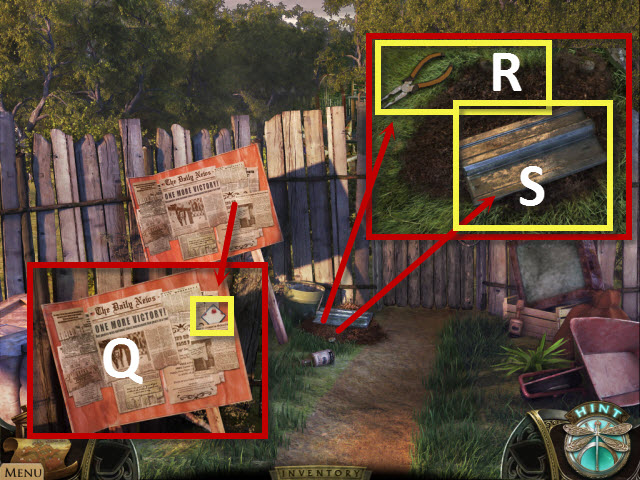
- Examine the billboard; take the CAKE TILE (Q).
- Examine the mound of dirt; take the PLIERS (R) and the RAIL (S).
- Walk down.

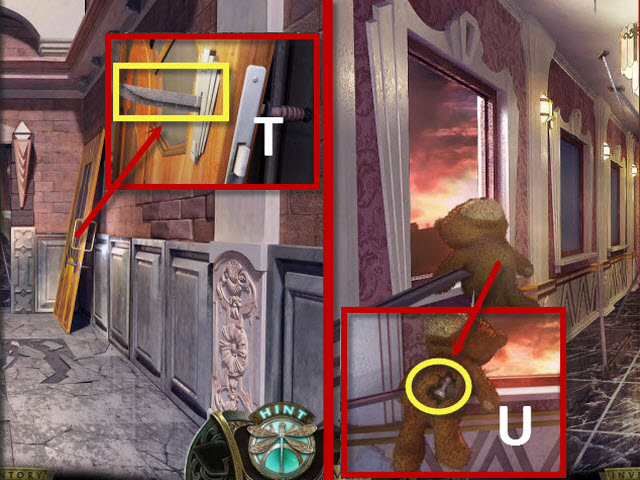
- Examine the door; use the PLIERS on the sword (T).
- You will receive the DAGGER BLADE.
- Walk forward.
- Examine the teddy bear; use the DAGGER BLADE on the teddy bear and take the PAWN (U).
- Walk down and then left.

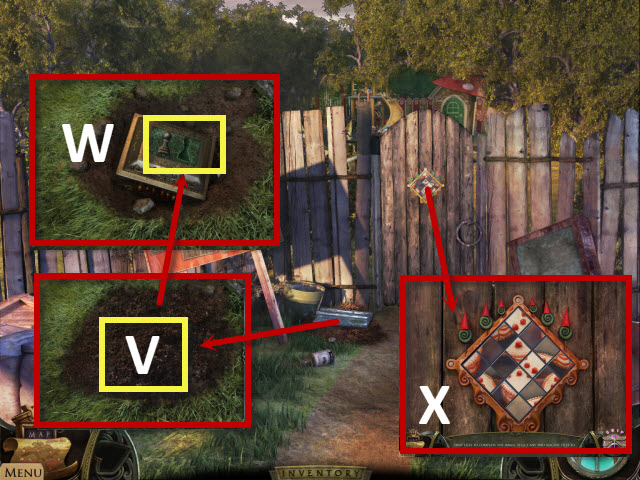
- Examine the mound of dirt; use the TROWEL on the mound of dirt (V).
- Place the PAWN in the empty slot; take the CAKE TILE (W).
- Examine the door; place the CAKE TILES to begin a puzzle (X).

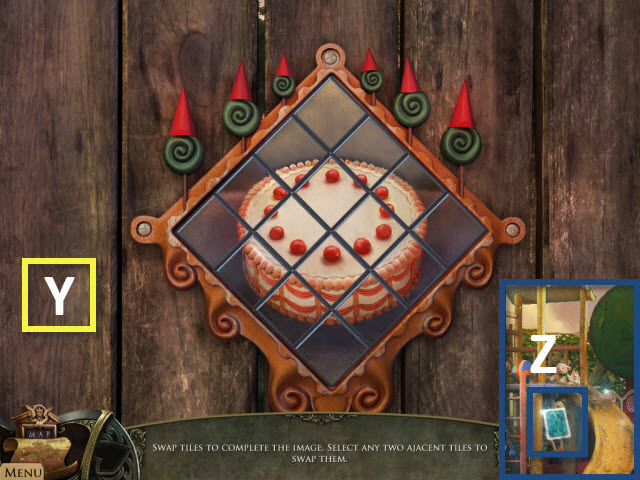
- Swap adjacent tiles to create a complete image; please look at the screenshot for the solution (Y).
- Walk forward to the playground.
- Select the floating tarot card to activate a HOP (Z).

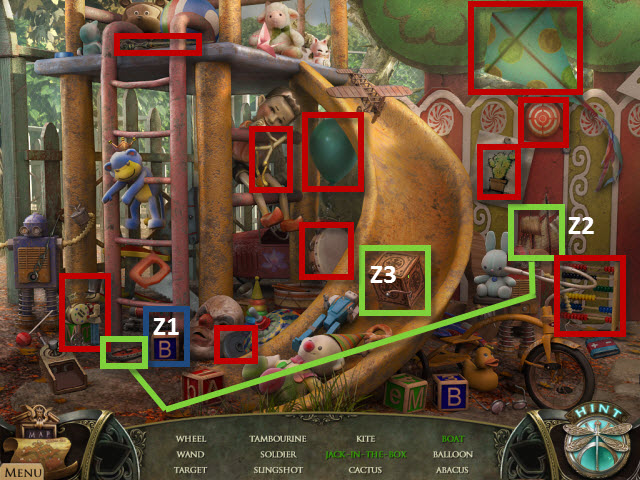
- Find the tarot card (Z1).
- Place the sail on the boat to get the boat (Z2).
- Touch the Jack-in-the-box and then take it (Z3).
- You will receive the WHEEL.
- Walk left.

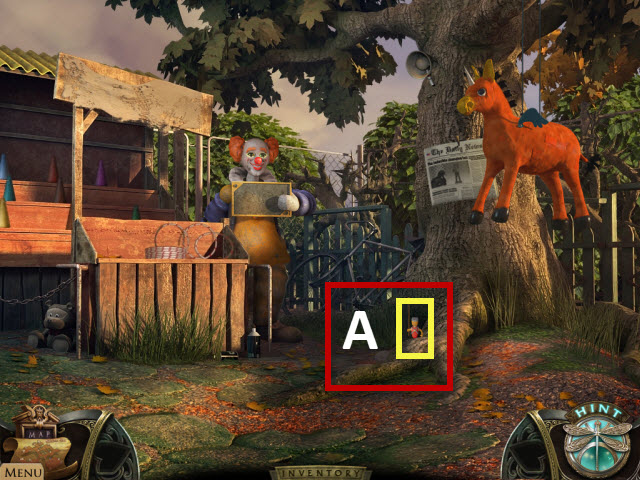
- Pick up the STICK (A).
- Walk down.

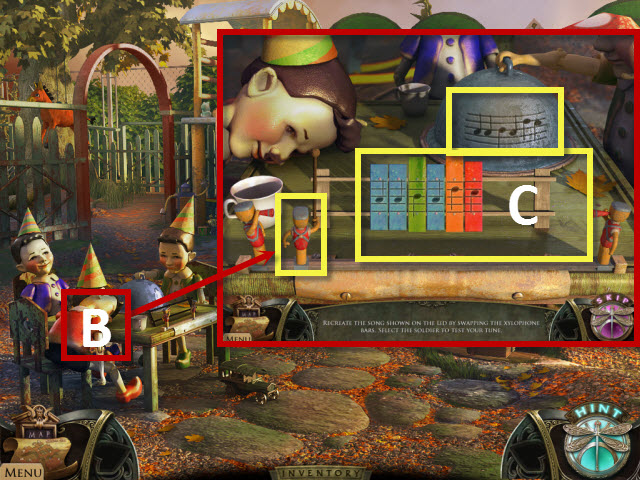
- Examine the table; place the STICK on the xylophone to begin a puzzle (B).
- You must arrange the keys so they match the musical notes shown on the lid and then touch the toy soldier to play them.
- Please look at the screenshot for the solution (C).
- Walk left.

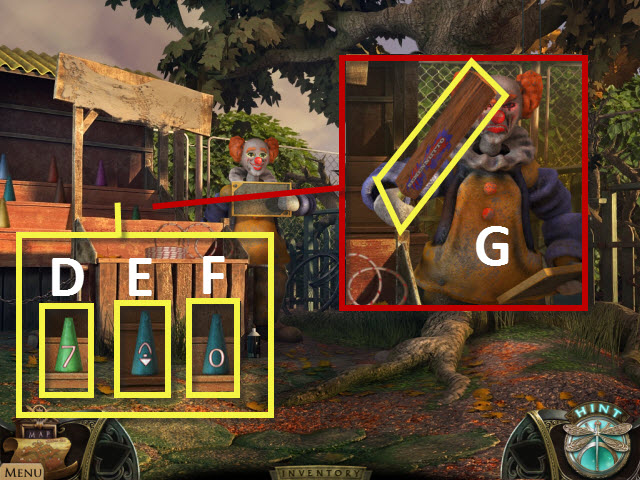
- Examine the carnival stand; select the cups shown: D, E, and F.
- Take the BAT (G).

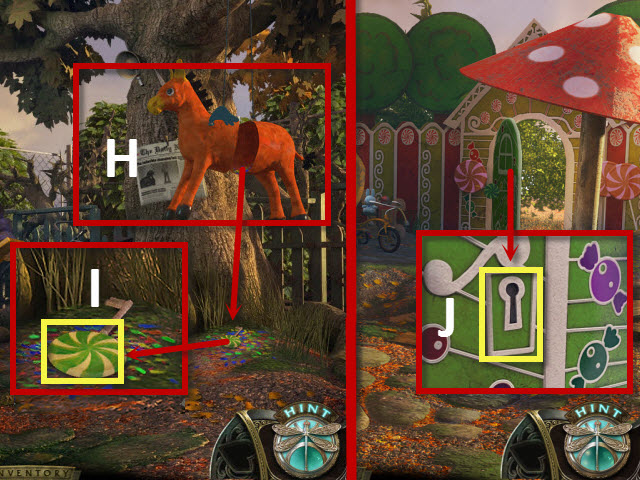
- Use the BAT on the piñata (H); pick up the CANDY KEY (I).
- Walk down.
- Examine the candy door; use the CANDY KEY on the lock (J).
- Walk forward.

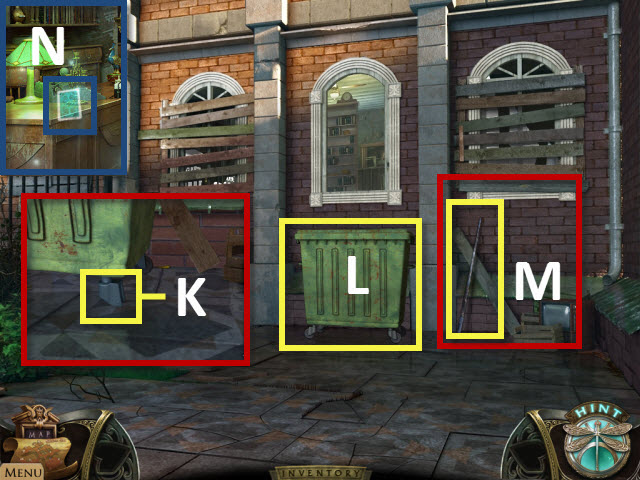
- Examine the trash dumpster; place the WHEEL on the trash dumpster leg (K).
- Move the trash dumpster (L); pick up the IRON BAR (M).
- Walk forward into the library.
- Select the floating tarot card to activate a HOP (N).

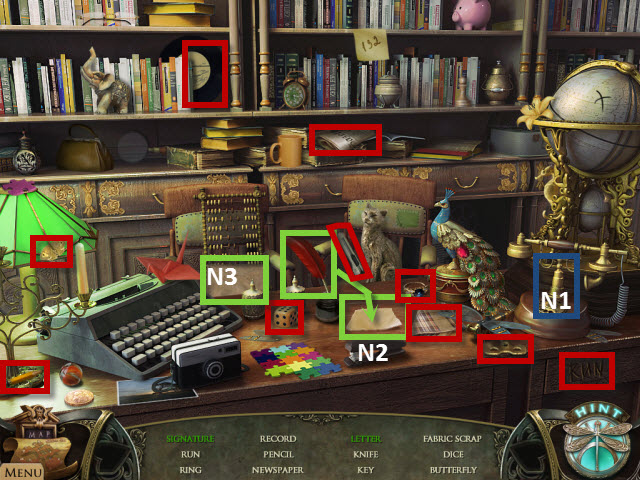
- Find the tarot card (N1).
- Use the quill on the paper to get the signature (N2).
- Open the envelope to get the letter (N3).
- You will receive the KEY.

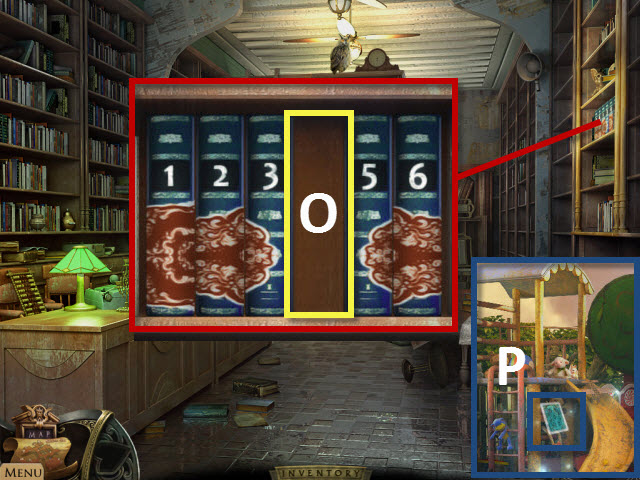
- Examine the bookshelf; place the BOOK on the bookshelf (O).
- Place the books in the following order: 5, 2, 1, 4, 6, and 3.
- You will receive the CODE NOTE.
- Return to the playground.
- Select the floating tarot card to activate a HOP (P).

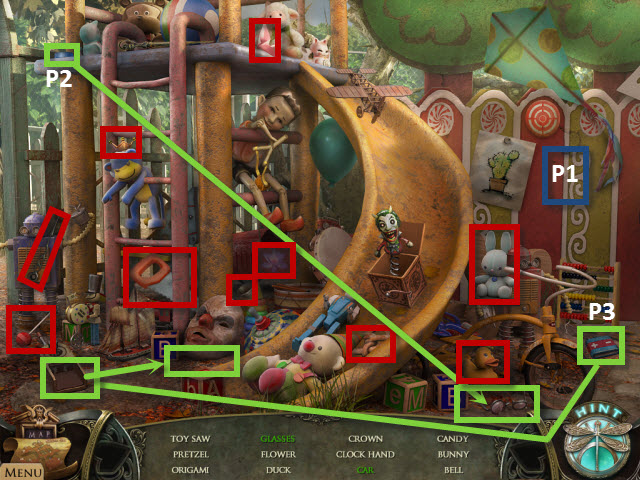
- Find the tarot card (P1).
- Place the lens on the glasses to get the glasses (P2).
- Place the battery in the boat to reveal the car (P3).
- You will receive the HOUR HAND.

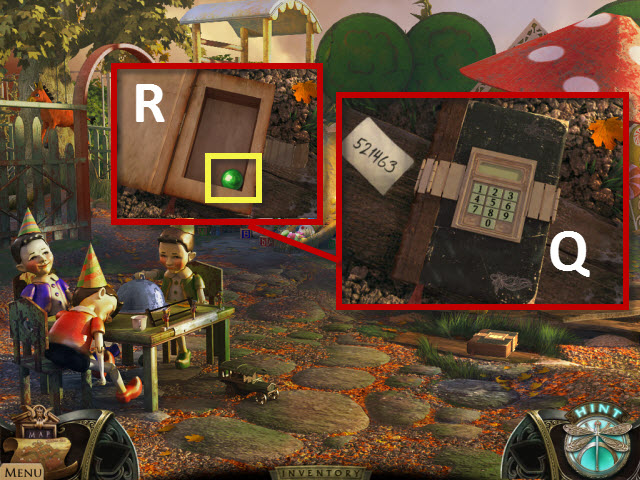
- Examine the keypad; place the CODE NOTE on the keypad (Q). Press 5, 2, 1, 4, 6, and 3.
- Pick up the GREEN MARBLE (R).
- Return to the library.

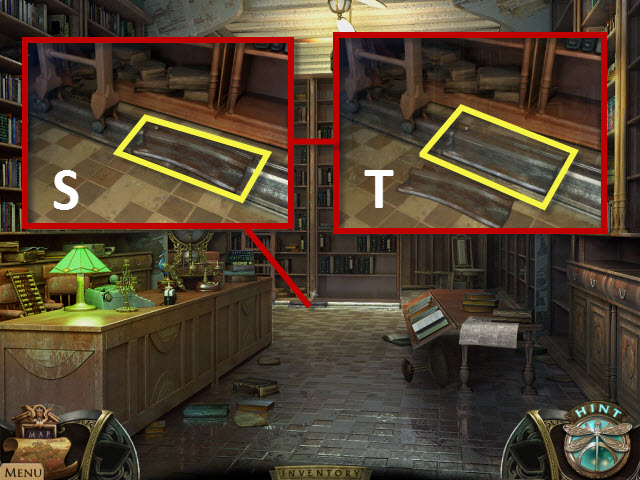
- Examine the floor; use the IRON BAR on the loose rail (S).
- Place the RAIL on the track (T).

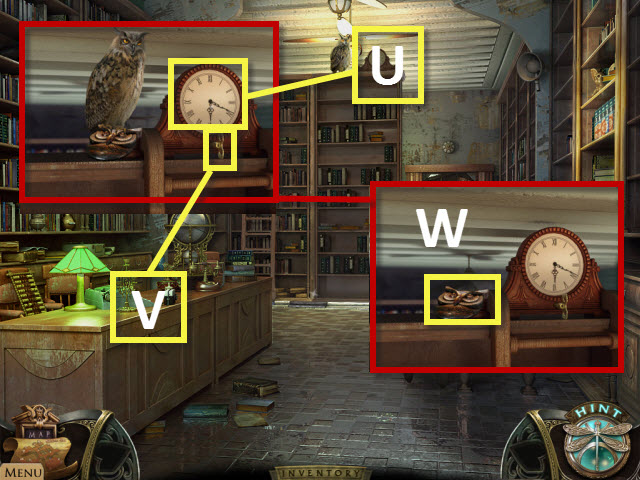
- Examine the clock; place the HOUR HAND on the clock (U).
- Use the KEY with the clock; turn the key (V).
- Examine the clock; pick up the OWL (W).
- Return to the fire escape.

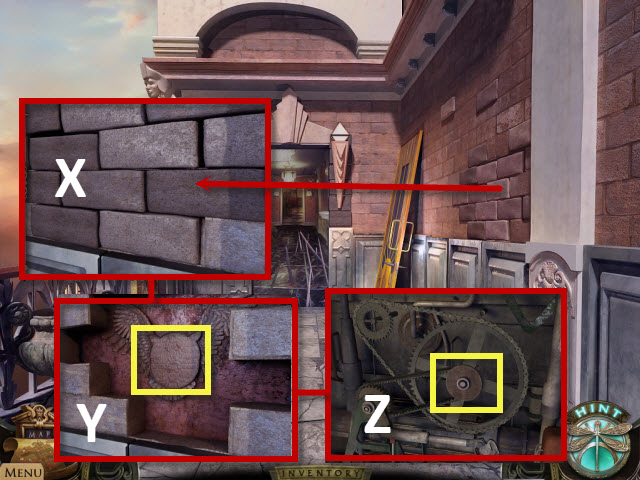
- Examine the brick wall; use the IRON BAR with the loose bricks (X).
- Place the OWL (Y).
- Examine the broken wall; use the IRON BAR on the mechanism (Z).
- Walk forward.

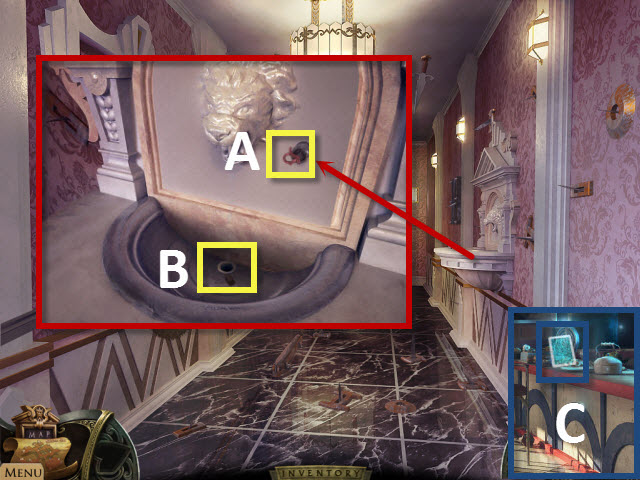
- Examine the fountain; use the PLIERS on the valve (A).
- Pick up the STOPPER (B).
- Walk forward to the café.
- Select the floating tarot card to activate a HOP (C).

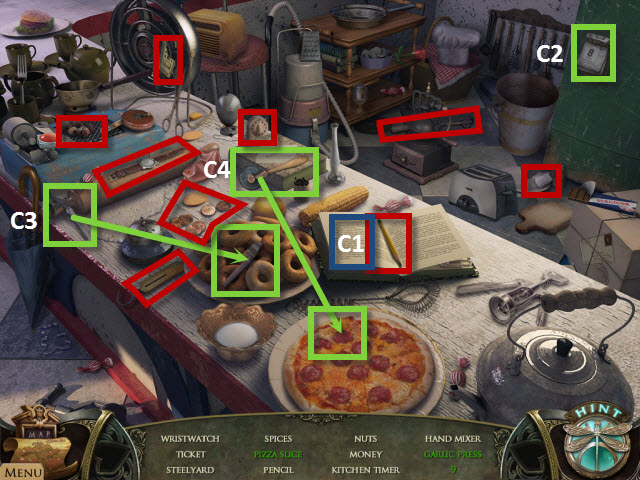
- Find the tarot card (C1).
- Touch the calendar to get the 9 (C2).
- Combine the handle with the garlic press to get the garlic press (C3).
- Use the pizza roller on the pizza to get the pizza slice (C4).
- You will receive the TICKET.

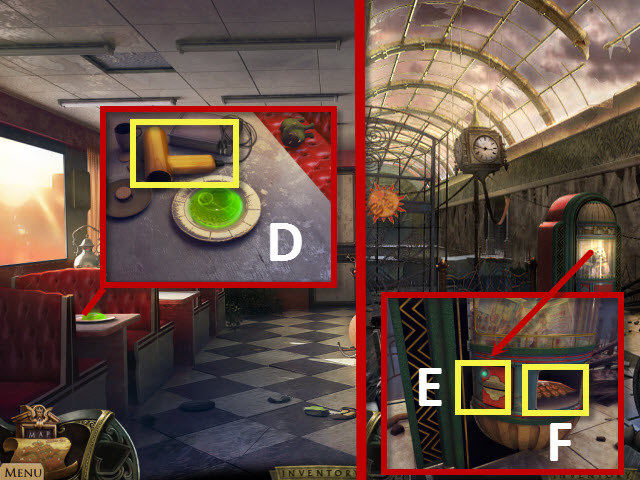
- Examine the table; pick up the HAIR DRYER (D).
- Return to the vending machine room.
- Examine the vending machine; use the TICKET on the vending machine (E).
- Pick up the OWL WING (F).
- Return to the trash dumpster.
Chapter 4: Rescue the Detective

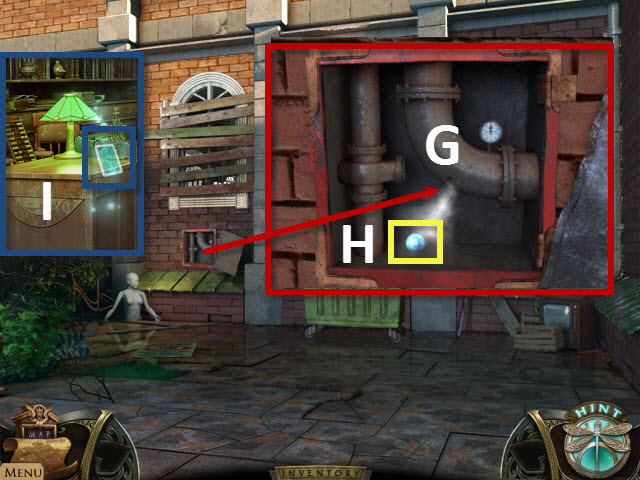
- Examine the pipes; use the STOPPER on the steaming pipe (G).
- Pick up the BLUE MARBLE (H).
- Walk forward.
- Select the floating tarot card to activate a HOP (I).

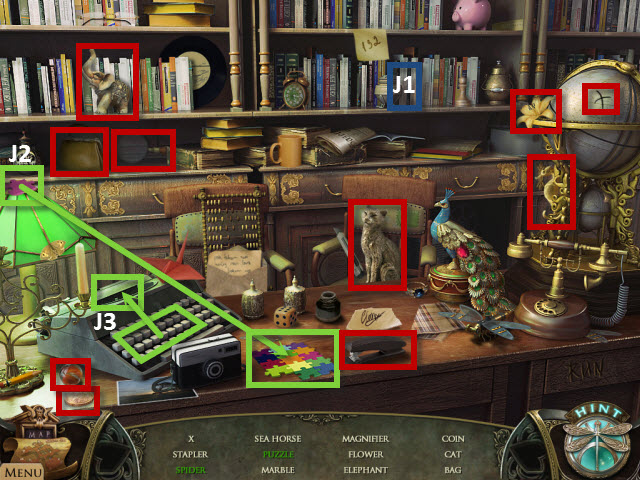
- Find the tarot card (J1).
- Place the puzzle piece on the puzzle to get the puzzle (J2).
- Touch the typewriter to get the spider (J3).
- You will receive the COIN.

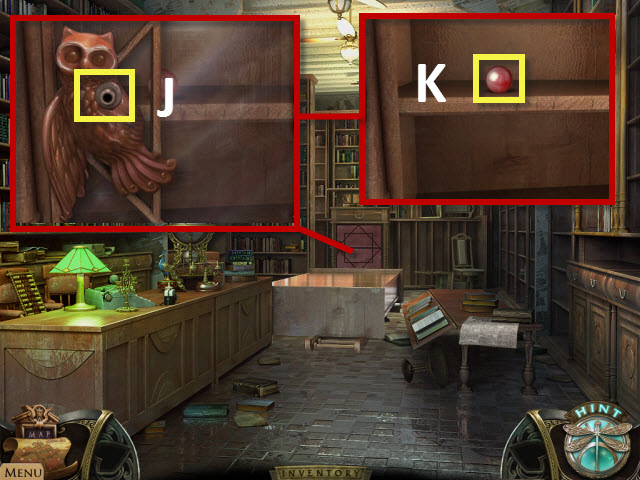
- Examine the cabinet; place the OWL WING on the slot (J).
- Pick up the RED MARBLE (K).
- Return to the café.

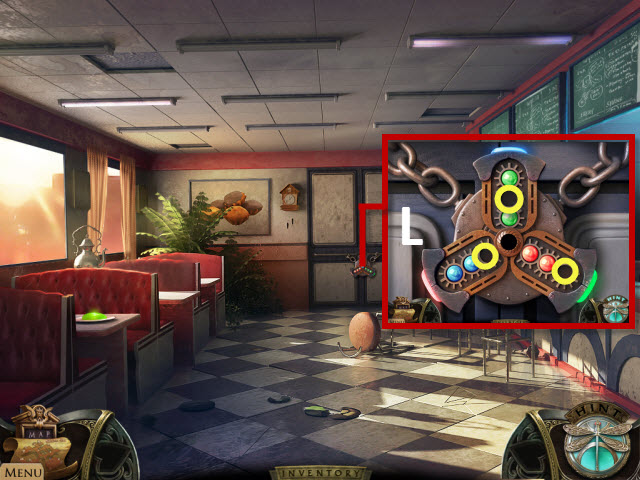
- Examine the door; place the RED, GREEN, and BLUE MARBLES to begin the puzzle (L).

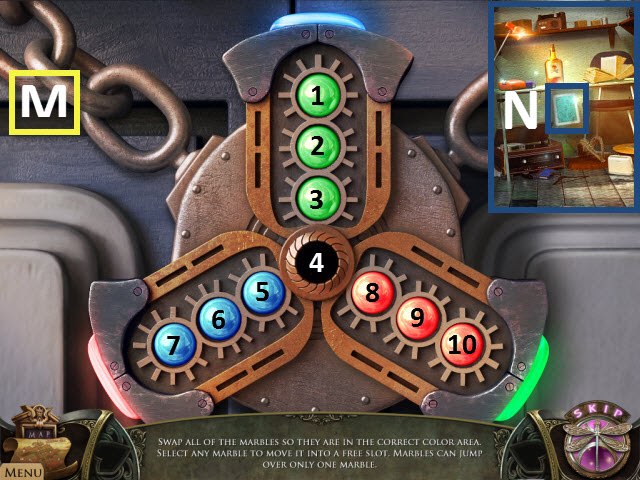
- Move the marbles into the corresponding colored slots. Each marble can only move to an empty space. Marbles can jump over each other one at a time, but there must be an empty space on the other side.
- Please look at the screenshot for the solution: 8, 3, 5, 4, 9, 8, 4, 2, 3, 4, 8, 3, 4, 6, 5, 7, 6, 5, 3, 1, 2, 4, 6, 5, 4, 8, 10, 9, 4, 8, 3, 5, and 4 (M).
- Walk forward.
- Select the floating tarot card to activate a HOP (N).

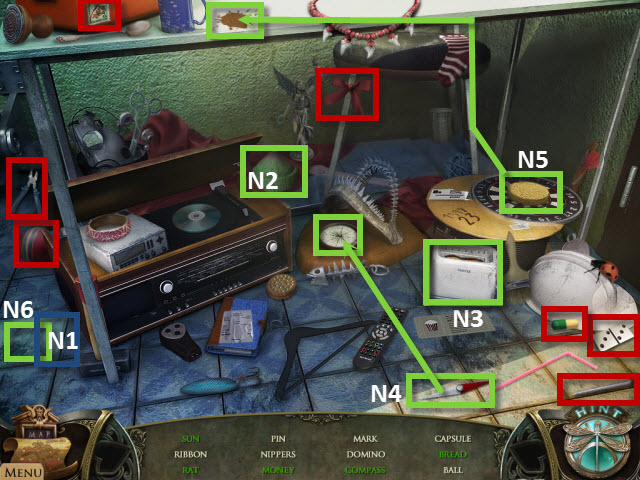
- Find the tarot card (N1).
- Move the cap to get the rat (N2).
- Touch the toaster to get the bread (N3).
- Place the needle on the compass to get the compass (N4).
- Use the sponge on the stain to get the sun (N5).
- Touch the tile to get the money (N6).
- You will receive the NIPPERS.

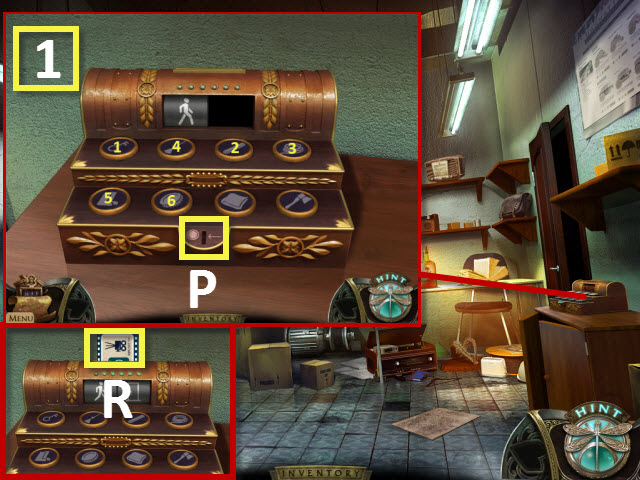
- Examine the ticket machine; place the COIN in the slot (P).
- Select the button that best helps the stick man defeat the obstacle shown in the window pane.
- Please look at the screenshot for the solution (1).
- Take the CINEMA TICKET (R).
- Walk right.

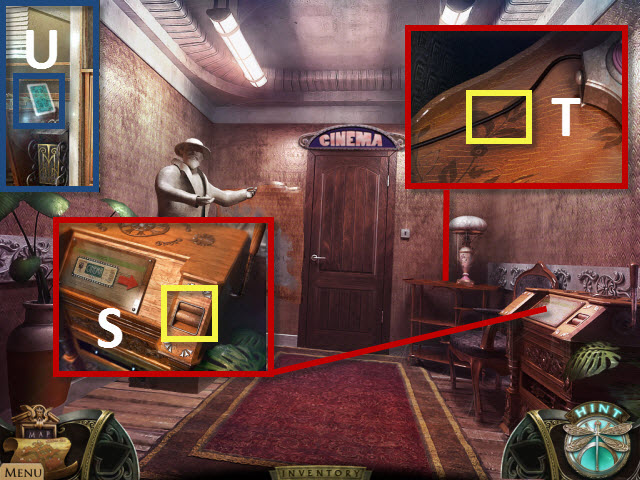
- Examine the ticket kiosk; place the CINEMA TICKET in the slot (S).
- Examine the lamp; use the NIPPERS on the cord to get the WIRE (T).
- Walk forward to the screening room.
- Select the floating tarot card to activate a HOP (U).

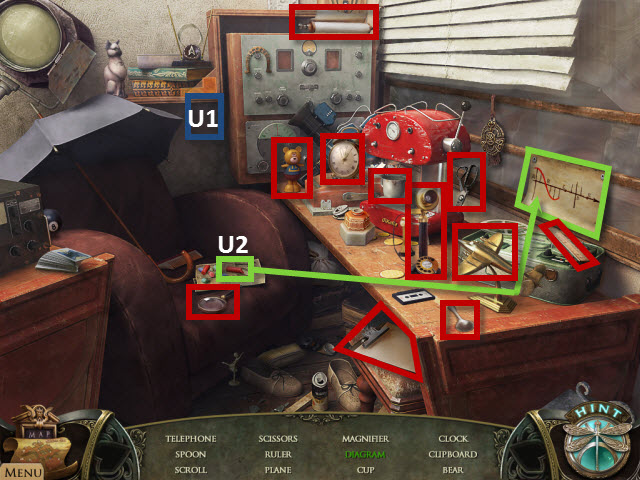
- Find the tarot card (U1).
- Use the crayon on the diagram to get the diagram (U2).
- You will receive the SPOON.

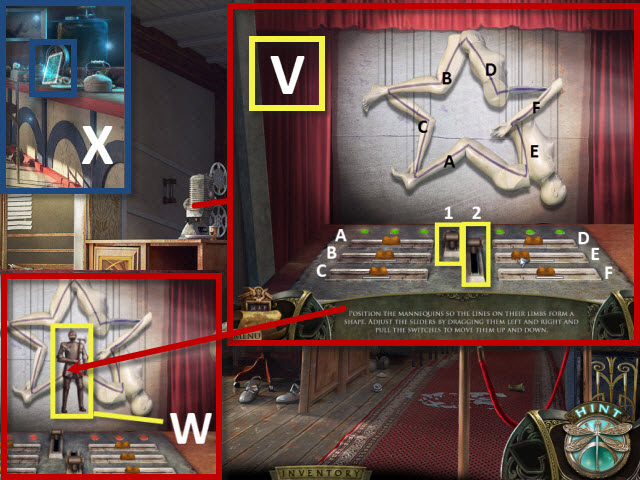
- Examine the movie reel to begin the puzzle.
- Adjust the levers to move the pieces up and down. Slide the buttons left and right to align them and form an image.
- Each letter moves the corresponding limb.
- Press each lever a single time (1 and 2); drag the sliders left and right to form the image shown (V). The lights on the buttons will turn from red to green when you have a limb aligned correctly.
- Take the KNIGHT KEY (W).
- Return to the café.
- Select the floating tarot card to activate a HOP (X).

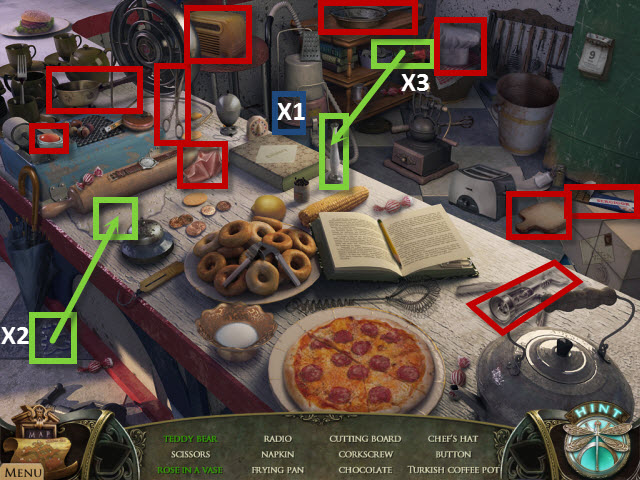
- Find the tarot card (X1).
- Use the cookie cutter on the dough to get the teddy bear (X2).
- Place the rose in the vase to get the rose in a vase (X3).
- You will receive the BUTTON.

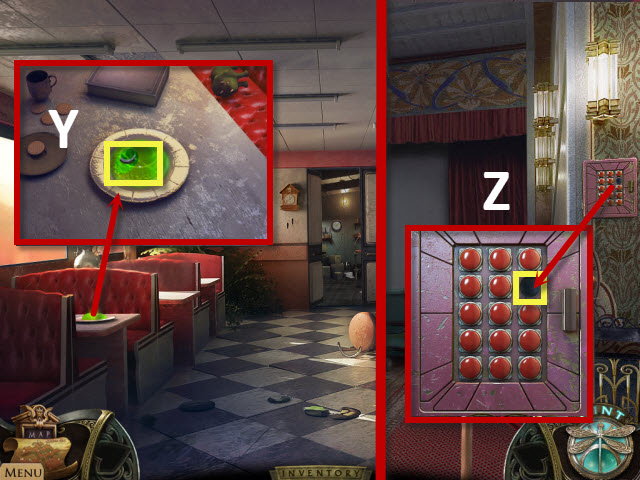
- Examine the table; use the SPOON on the gelatin and pick up the KEY (Y).
- Return to the screening room.
- Examine the keypad; place the BUTTON in the empty slot to begin a puzzle (Z).

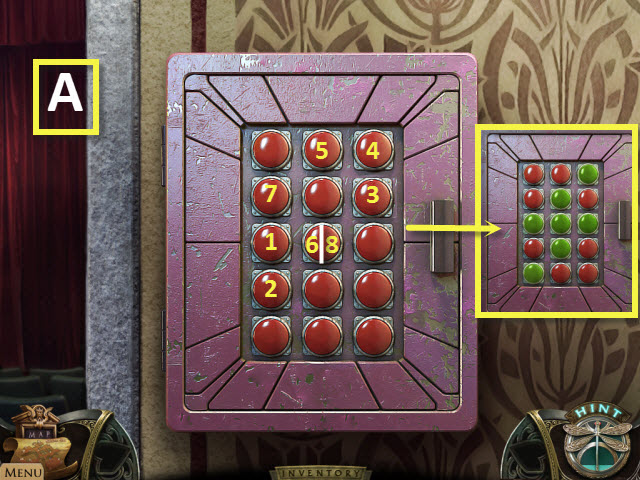
- Push the buttons to form the symbol shown.
- Please look at the screenshot for the solution (A). Push the buttons in the right order (1-8).

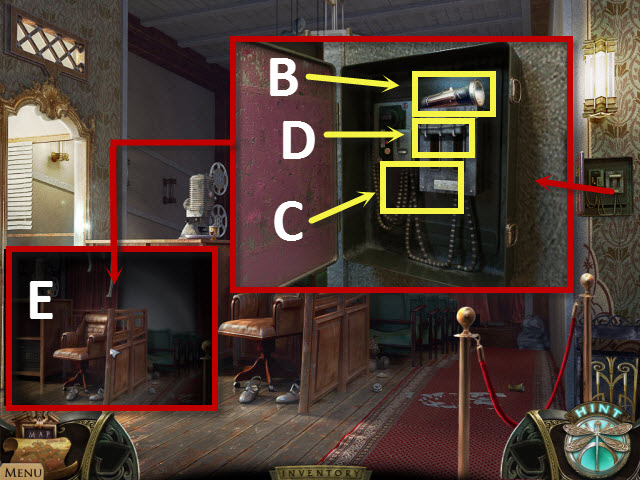
- Examine the power box; pick up the FLASHLIGHT (B).
- Use the NIPPERS on the wire (C).
- Pull the lever (D).
- Use the FLASHLIGHT on the scene (E).
- Walk down twice.

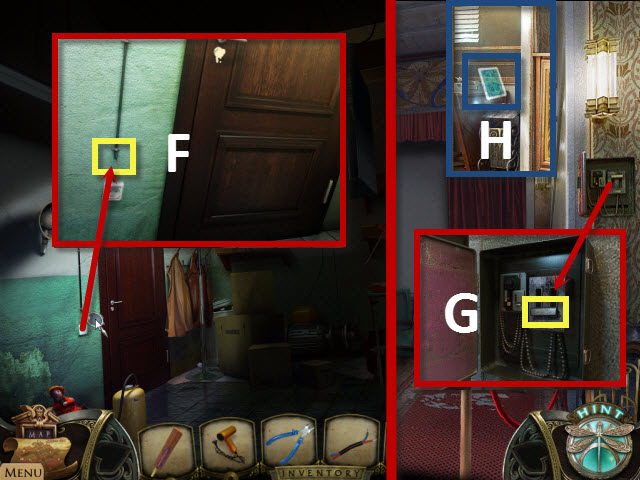
- Examine the power outlet; use the WIRE on the damaged cable (F).
- Return to the screening room.
- Examine the power box; pull the lever (G).
- Select the floating tarot card to activate a HOP (H).

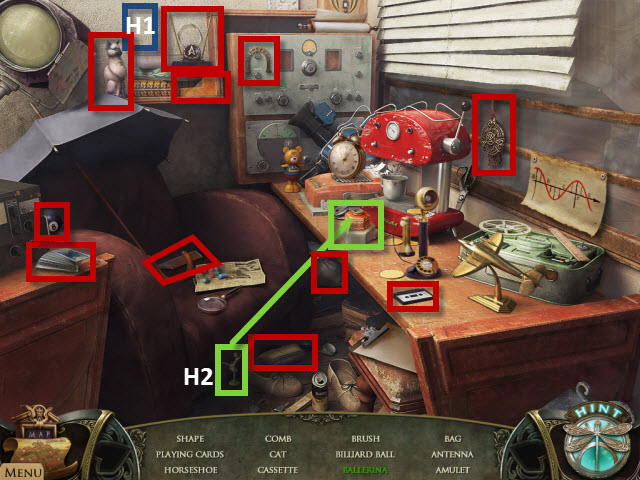
- Find the tarot card (H1).
- Place the ballerina on the pedestal to get the ballerina (H2).
- You will receive the MACHINE PART 1.
- Walk down twice.

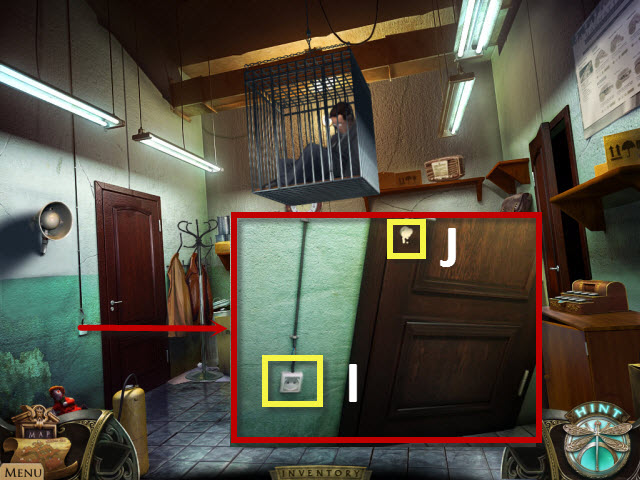
- Examine the outlet; use the HAIR DRYER with the electrical outlet (I).
- Use the KEY on the door (J).
- Walk left twice.

- Pick up the STICK (K).
- Walk down.
- Examine the door; use the KNIGHT KEY on the slot (L).
- Walk right to the armory.
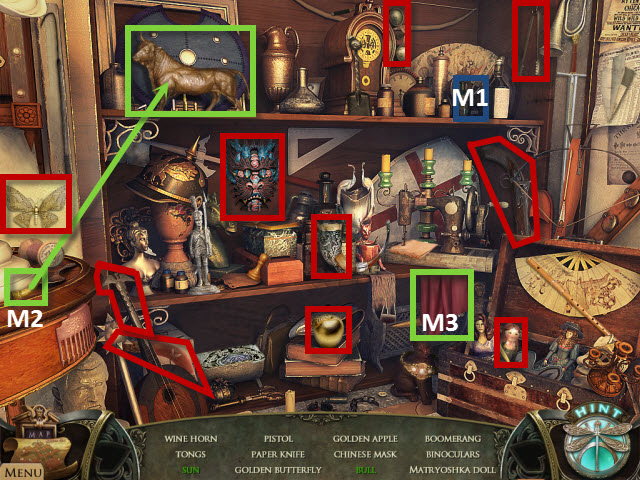
- Select the floating tarot card to activate a HOP (M).


- Find the tarot card (M1).
- Place the bull horn on the bull to get the bull (M2).
- Move the curtain to get the sun (M3).
- You will receive the TONGS.
- Walk down and then walk left.

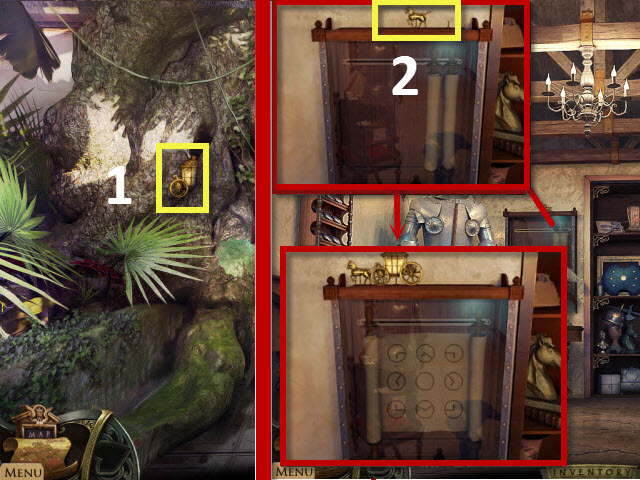
- Use the TONGS to get the CARRIAGE (1).
- Return to the armory.
- Examine the display case; place the CARRIAGE with the horse (2).

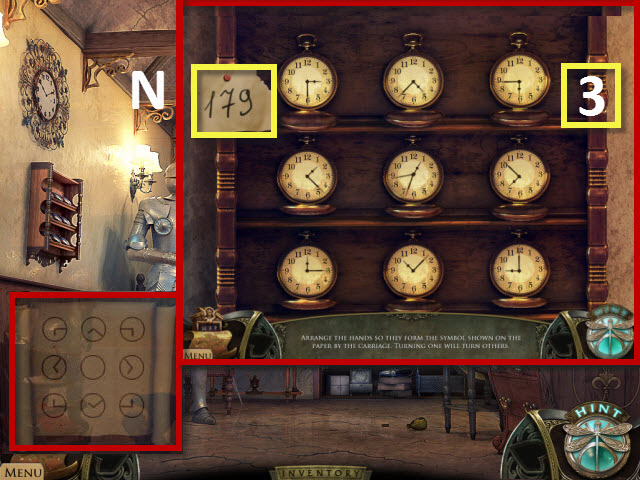
- Examine the cabinet to begin a puzzle.
- Arrange the clocks as shown in the diagram in the display case. Moving one clock will move others.
- The setup for this puzzle is random; please look at the screenshot for the solution (3).
- Take the SAFE CODE NOTE (N).
- Return to the screening room.

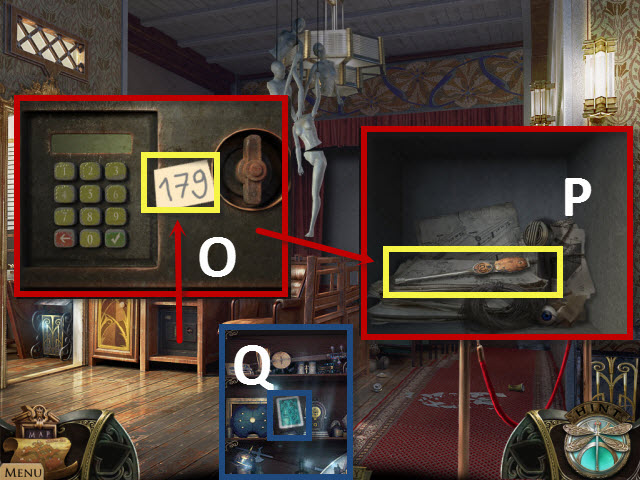
- Examine the safe; place the SAFE CODE NOTE on the safe and enter 1, 7, and 9 (O).
- Take the CHISEL (P).
- Return to the armory.
- Select the floating tarot card to activate a HOP (Q).

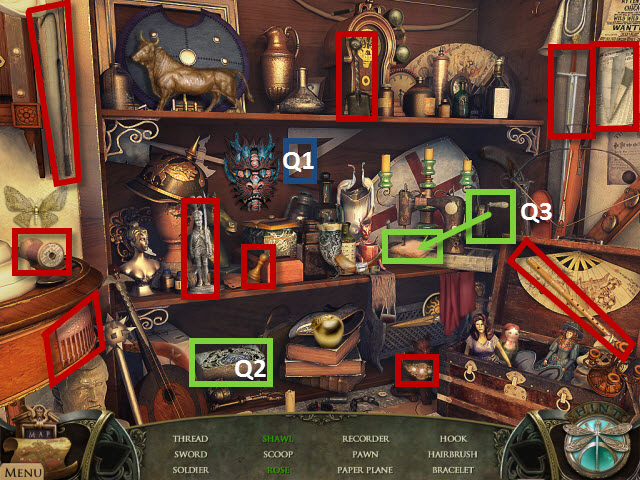
- Find the tarot card (Q1).
- Open the jewelry box to get the rose (Q2).
- Touch the handle on the sewing machine to get the shawl (Q3).
- You will receive the HOOK.

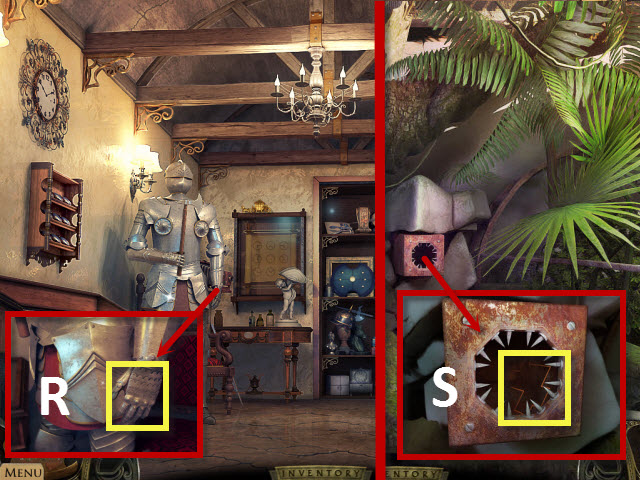
- Examine the suit of armor; use the CHISEL on the glove to get the ARM (R).
- Walk down and then walk left.
- Examine the thorny container; use the ARM to get the MACHINE PART 2 (S).
- Return to the ticket kiosk room.

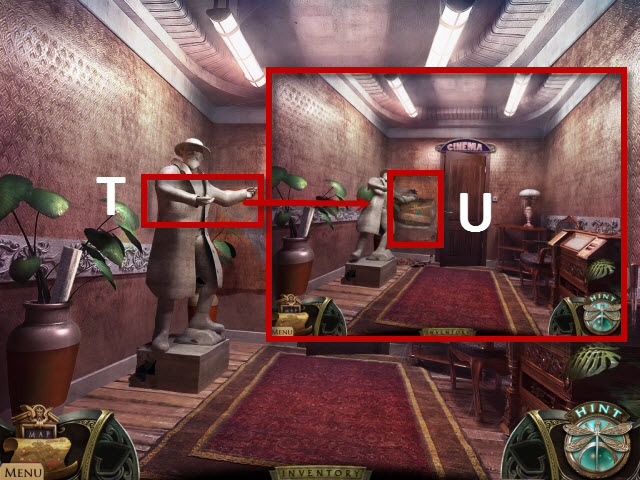
- Use the HOOK with the statue (T).
- Examine the hole in the wall to begin a puzzle (U).

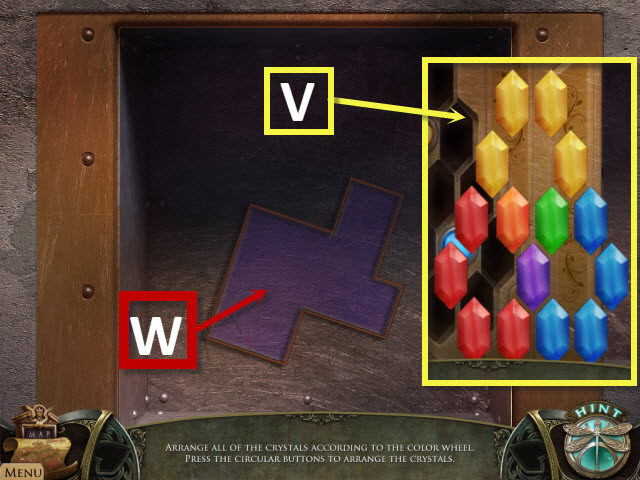
- Rotate the gems to form the image shown (V).
- Y = Yellow button. B = Blue button. R = Red button.
- Solution: R, Y, R, R, R, Y, R, Y, R, Y, R, Y, R, Y, Y, R, B, Y, B, Y, B, B, Y, Y, Y, Y, Y, B, B, Y, and B.
- Pick up the MACHINE PART 3 (W).
- Walk down.

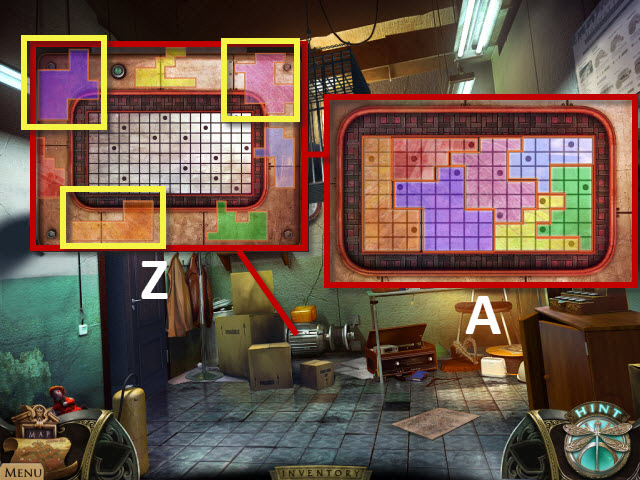
- Examine the cage mechanism; place the MACHINE PARTS 1, 2, and 3 in the puzzle area to begin a puzzle (Z).
- Place the jigsaw pieces inside the rectangular puzzle. Two dots must be included within each puzzle piece. Left-click to drag the pieces; right-click to rotate them.
- Please look at the screenshot for the puzzle solution (A).
Chapter 5: Caged In

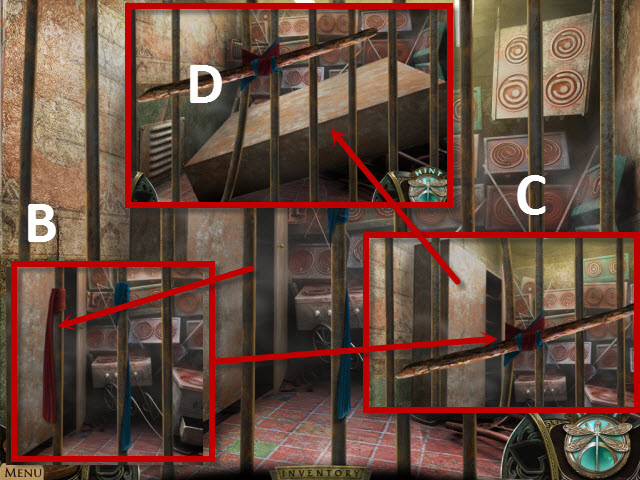
- Use the RAG on the cell bar (B).
- Use the STICK with the rags (C).
- Use the HOOK with the storage locker (D).

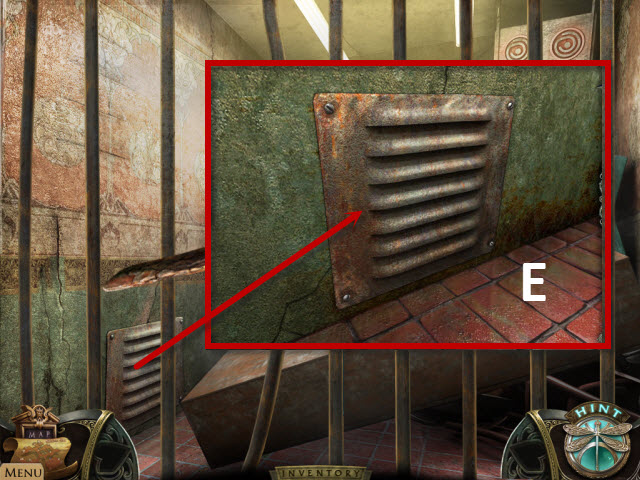
- Examine the grate; use the CHISEL on the grate (E).
- Walk left to the monitor room. Return to the statue room.

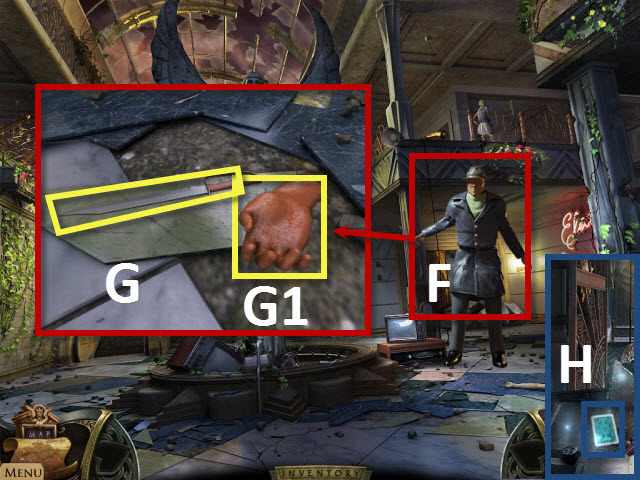
- Use the BAT on the dummy (F).
- Examine the dummy; take the KNIFE (G) and the HAND (G1).
- Walk upstairs.
- Select the floating tarot card to activate a HOP (H).

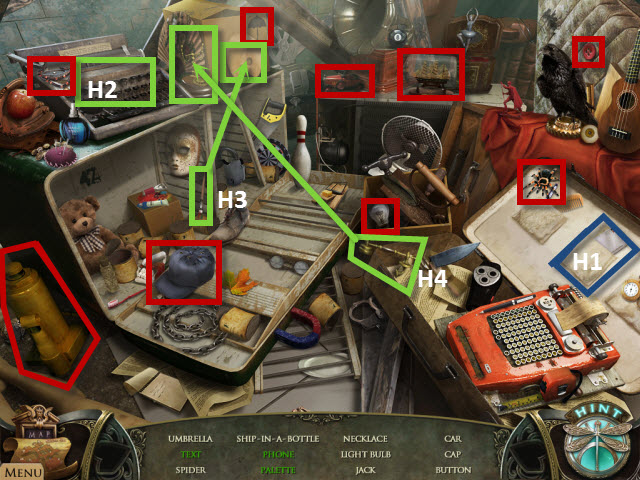
- Find the tarot card (H1).
- Touch the typewriter to get the text (H2).
- Use the paintbrush with the palette to get the palette (H3).
- Place the phone receiver on the phone to get the phone (H4).
- You will receive the JACK.

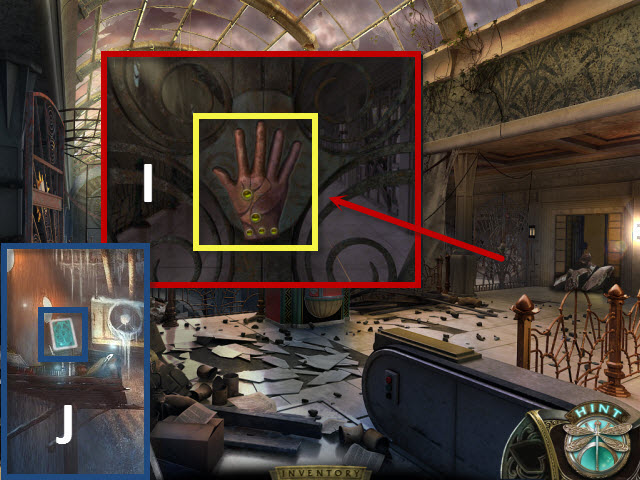
- Examine the gate; place the HAND on the slot (I).
- Enter the doorway; walk left to the frozen room.
- Select the floating tarot card to activate a HOP (J).

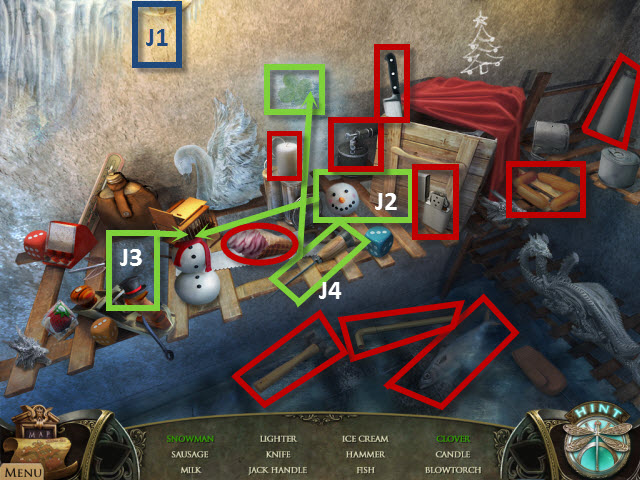
- Find the tarot card (J1).
- Place the snowman head (J2) and then the top hat (J3) on the snowman to get the snowman.
- Use the chisel on the wall to get the clover (J4).
- You will receive the JACK HANDLE.
- Return to the monitor room.

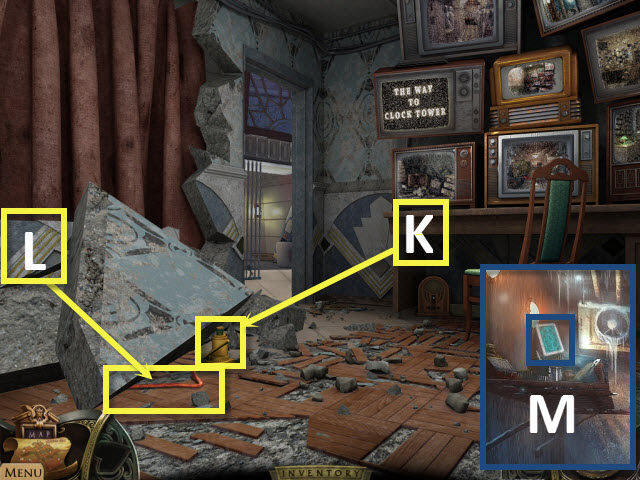
- Use the JACK with the granite slab; use the JACK HANDLE with the jack (K).
- Pick up the CROWBAR (L).
- Return to the frozen room.
- Select the floating tarot card to activate a HOP (M).

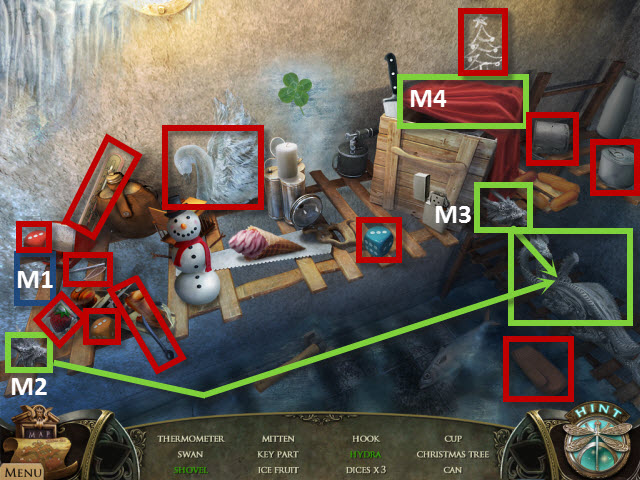
- Find the tarot card (M1).
- Place the hydra heads (M2 and M3) on the hydra to get the hydra.
- Move the blanket to get the shovel (M4).
- You will receive the KEY PART 1.

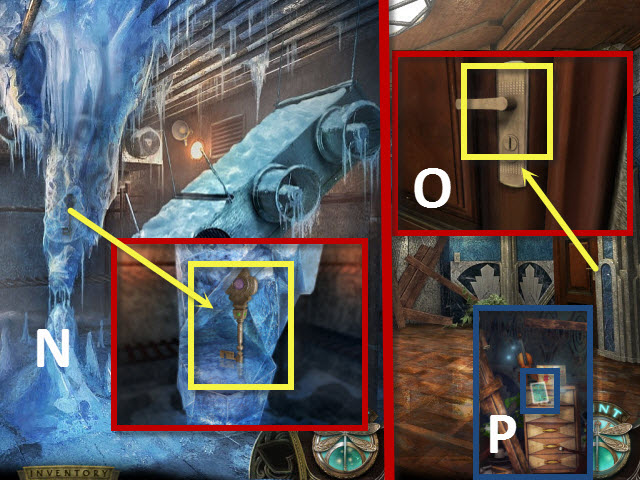
- Examine the ice shard; use the CROWBAR on the ice shard and pick up the ROOM KEY (N).
- Walk down.
- Examine the door; use the ROOM KEY on the lock (O).
- Walk right.
- Examine the back of the room.
- Select the floating tarot card to activate a HOP (P).

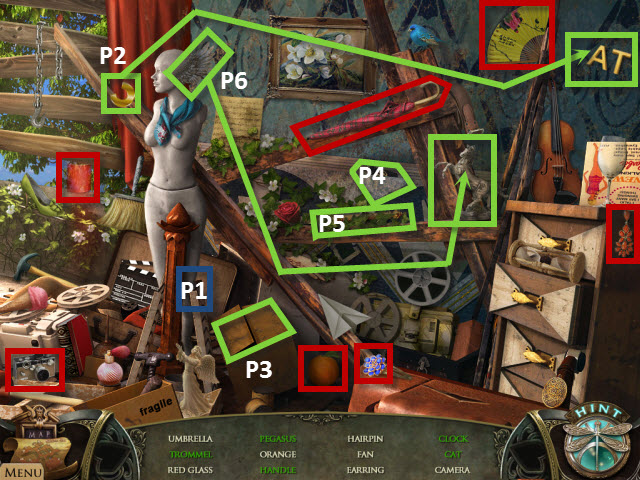
- Find the tarot card (P1).
- Place the ‘C’ with ‘AT’ to get the cat (P2).
- Open the box to get the trommel (P3).
- Move the board to get the clock (P4).
- Move the leaves to get the handle (P5).
- Place the Pegasus wing on the Pegasus to get the Pegasus (P6).
- You will receive the RED GLASS.
- Walk down.

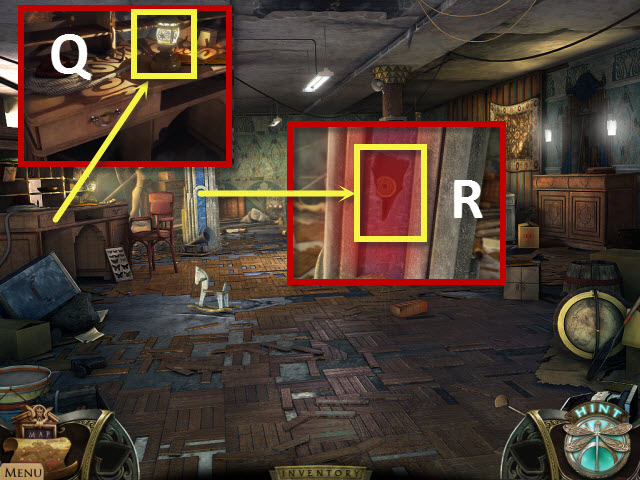
- Examine the desk; place the RED GLASS on the lantern (Q).
- Examine the wall; use the CROWBAR on the crack and take the COIN (R).
- Examine the right side of the room.

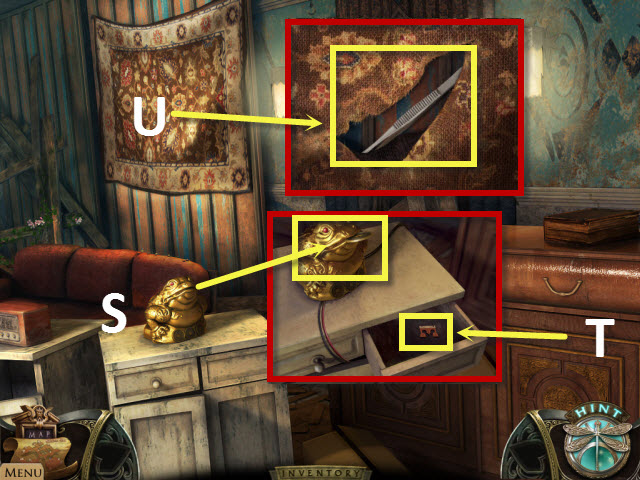
- Examine the frog; place the COIN in its mouth (S).
- Examine the drawer; take the KEY PART 4 (T).
- Examine the awning; use the KNIFE on it and take the TWEEZERS (U).
- Walk down.

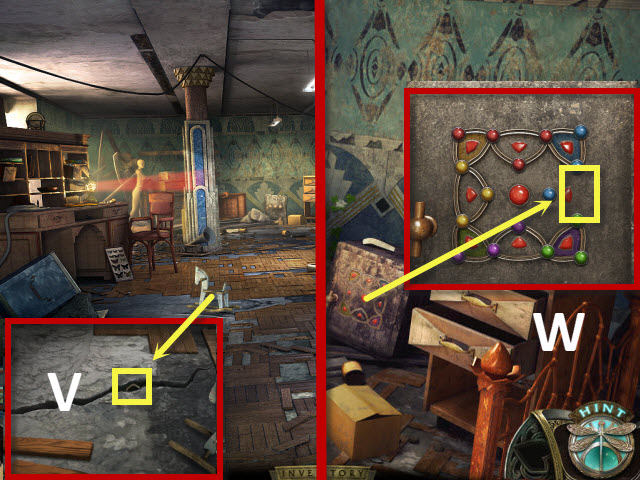
- Examine the floor; use the TWEEZERS to get the SAFE OBJECT (V).
- Examine the back of the room.
- Examine the safe; place the SAFE OBJECT on the safe to begin a puzzle (W).

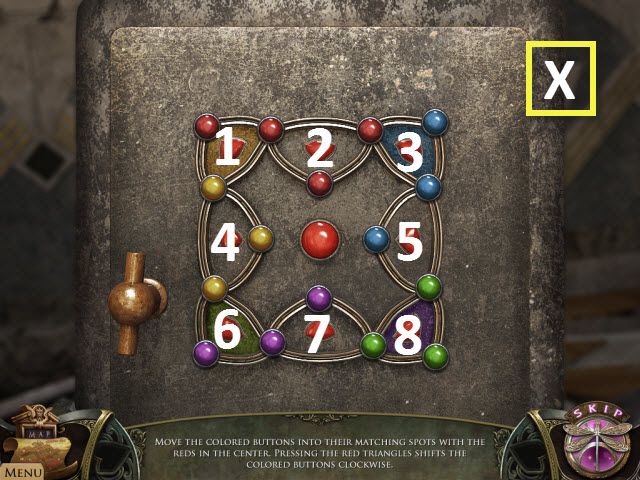
- Press the triangular red buttons to move the balls around to their corresponding colored corners. The red balls must end up in the middle.
- Please follow these steps to solve the puzzle: 1, 4, 1, 4, 6, 3, 5, 5, 3, 5, 7, 8, 7, 8, 6, 7, 6, 8, and 7 (X).

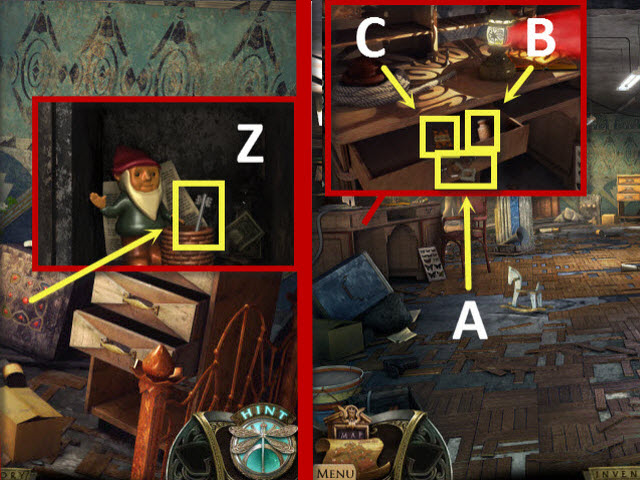
- Take the SHELF KEY (Z).
- Walk down.
- Examine the desk; unlock the drawer with the SHELF KEY (A).
- Pick up the LOAD (B) and the KEY PART 2 (C).
- Examine the back of the room.

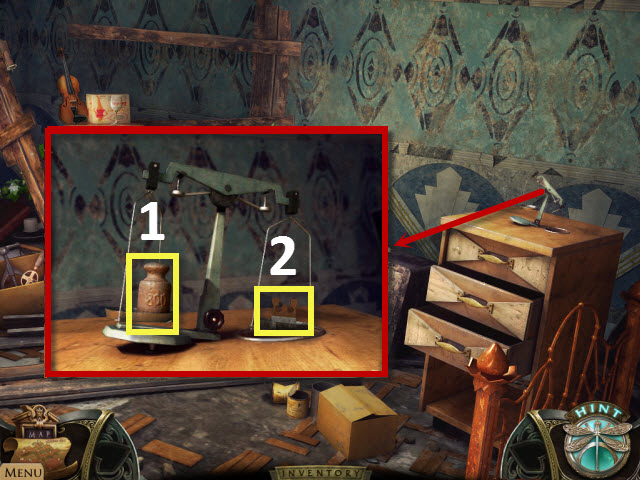
- Examine the scales; place the LOAD on the scales (1).
- Pick up the KEY PART 3 (2).
- Walk down.
- Examine the right side of the room.

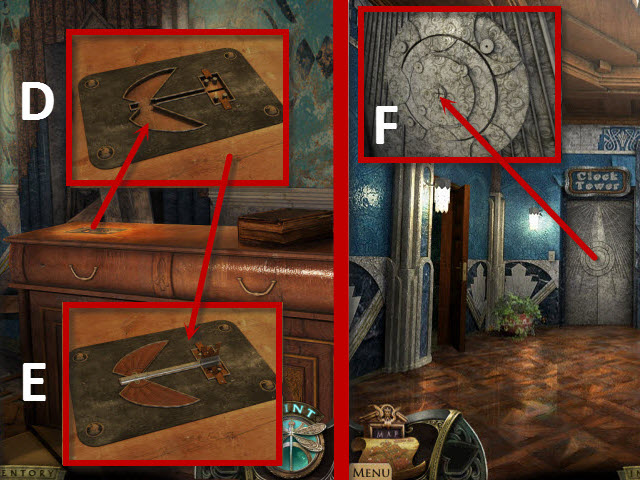
- Examine the desk; place all four of the KEY PARTS on the desk (D).
- Take the CLOCKTOWER KEY (E).
- Walk down twice.
- Examine the elevator; use the CLOCKTOWER KEY on the lock (F).
- Walk forward.

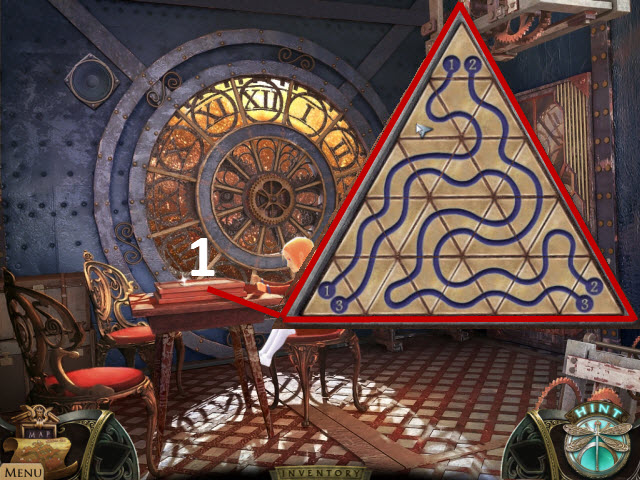
- Examine the table to begin a puzzle.
- Rotate each puzzle piece to create a complete image.
- Please look at the screenshot for the puzzle solution (1).

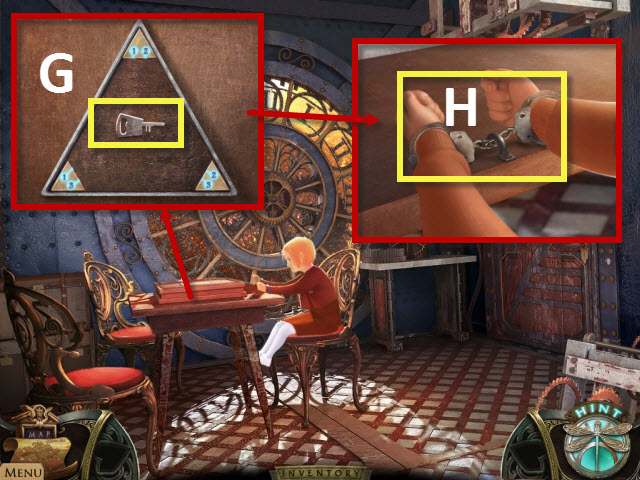
- Take the HANDCUFF KEY (G).
- Examine Anna; use the HANDCUFF KEY on the handcuffs (H).
- Congratulations! You have completed Strange Cases: The Faces of Vengeance!


 Greek Gems Tips and Tricks, Guide, & Tips
 A Gypsy's Tale: The Tower of Secrets Walkthrough, Guide, & Tips
 The Great Unknown: Houdini's Castle Walkthrough, Guide, & Tips
 Surface: The Soaring City Walkthrough, Guide, & Tips
 The Mystery of the Dragon Prince Walkthrough, Guide, & Tips