Surface: The Soaring City Walkthrough, Guide, & Tips
Surface: The Soaring City Walkthrough

Welcome to the Surface: The Soaring City Walkthrough
Your brother is kidnapped during an air show. Search for him in a beautiful world where the sky is as wide as your imagination
Whether you use this document as a reference when things get difficult or as a road map to get you from beginning to end, we’re pretty sure you’ll find what you’re looking for here.
This document contains a complete Surface: The Soaring City game walkthrough featuring annotated screenshots from actual gameplay!
We hope you find this information useful as you play your way through the game. Use the walkthrough menu below to quickly jump to whatever stage of the game you need help with.
Remember to visit the Big Fish Games Forums if you find you need more help. Have fun!
This walkthrough was created by Lucky Smile, and is protected under US Copyright laws. Any unauthorized use, including re-publication in whole or in part, without permission, is strictly prohibited.
General Tips

- This is the official guide for Surface: The Soaring City.
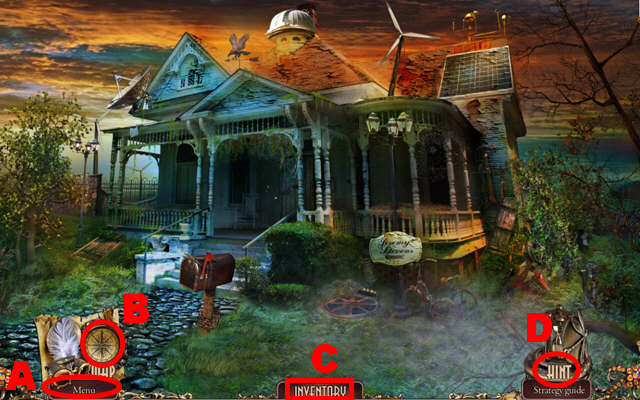
- Select the menu (A) to adjust the options and to leave the game.
- Access the map (B) to visit different locations and to review which tasks have to be done.
- Collected items will remain in the inventory section (C).
- Press the hint button (D) whenever you get stuck to receive help.
- There are three grades of difficulty you can choose from: casual, advanced, and hardcore mode.
- Hidden Object scenes will be referred to as HOS throughout this guide.
Chapter 1: Jeremy’s House
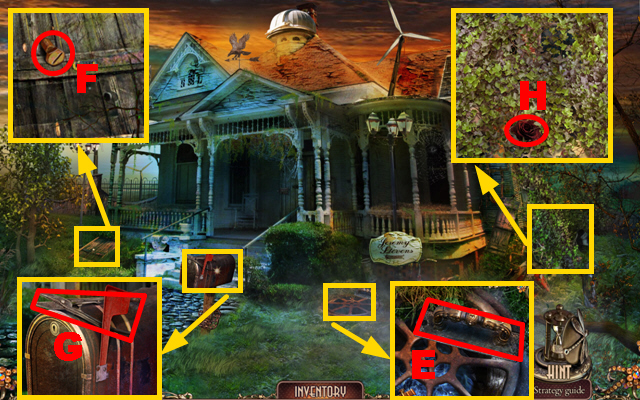
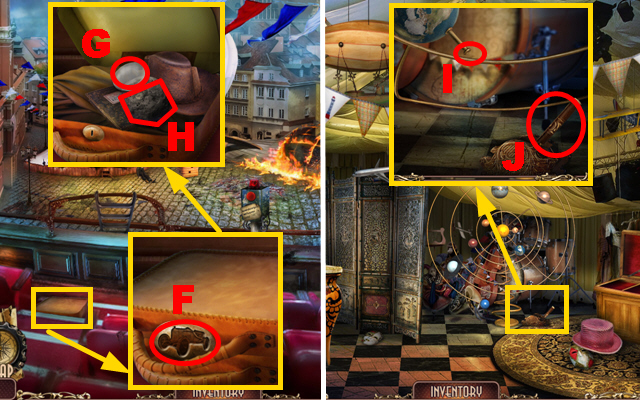
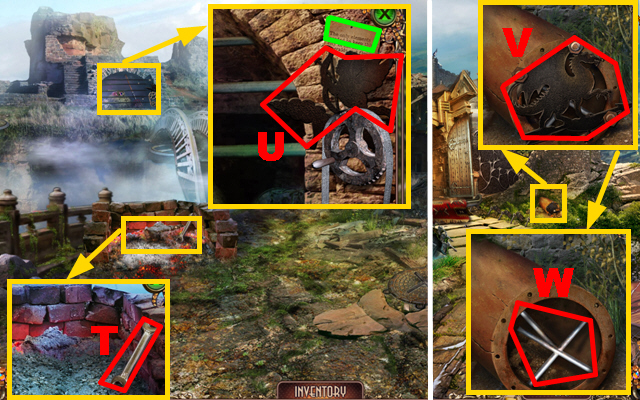
- Zoom into the drain; take the HANDLE (E).
- Zoom into the trapdoor; take the 1/2 BOLT (F).
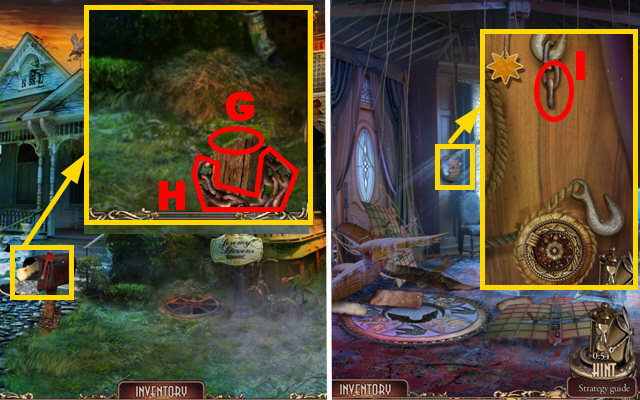
- Zoom into the mailbox; take the PRUNERS (G).
- Zoom into the vines; remove the vines with the PRUNERS to acquire the FLOWER (H).
- Play the HOS.
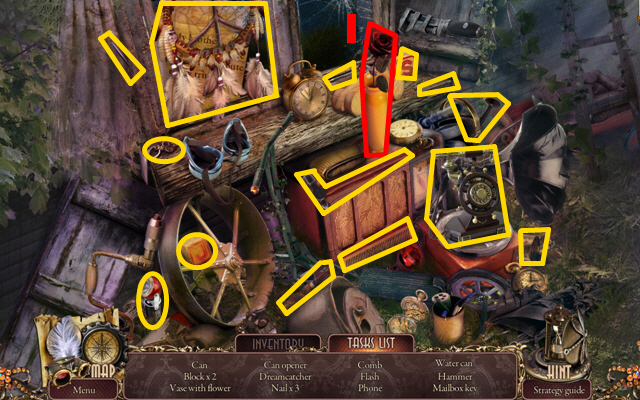
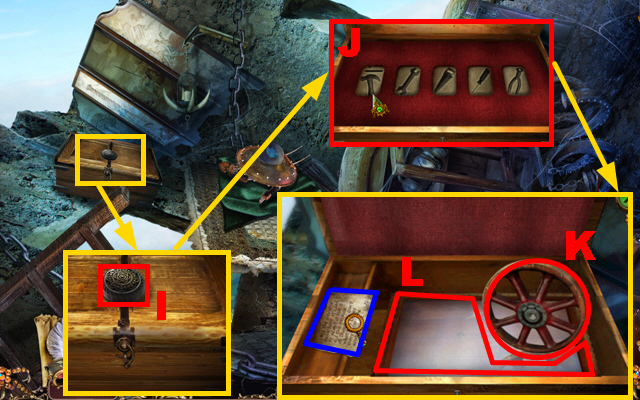
- Put the FLOWER from your inventory into the vase and take the vase with flower (I).
- You will receive the MAILBOX KEY.
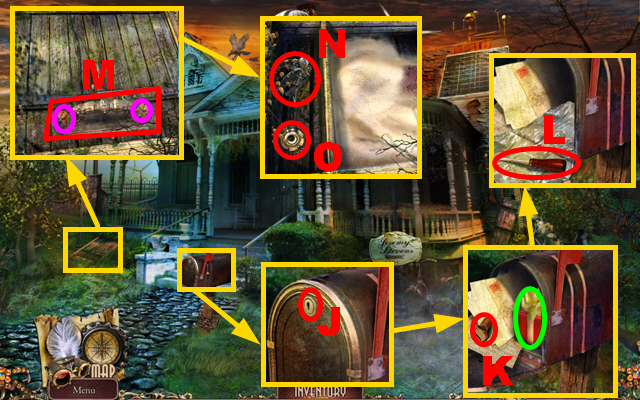
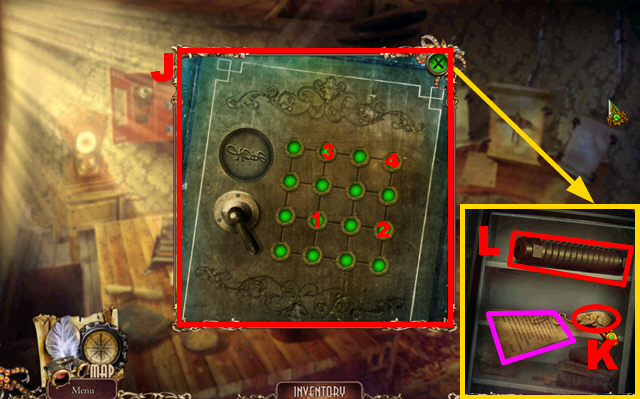
- Zoom into the mailbox, put the MAILBOX KEY into the lock (J) and turn the key once; take the 2/2 BOLT (K) and open the present marked in green.
- Take the SCREWDRIVER (L).
- Zoom into the trapdoor and put down the HANDLE (M); put the 2 BOLTS marked in purple into the handle and fix the bolts with the SCREWDRIVER.
- Open the trapdoor; take the 1/4 BIRD (N) and the GEAR (O).
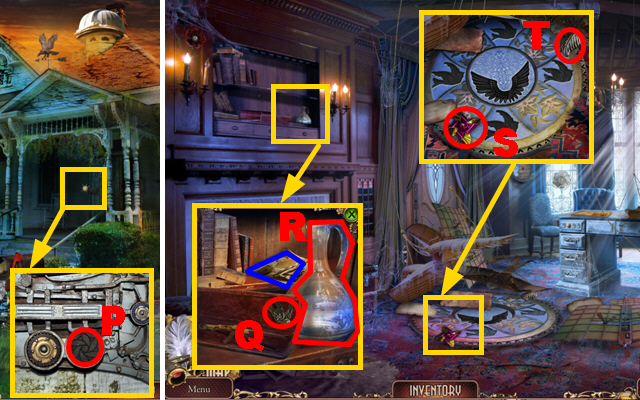
- Zoom into the door; put the GEAR into the slot (P).
- Move forward.
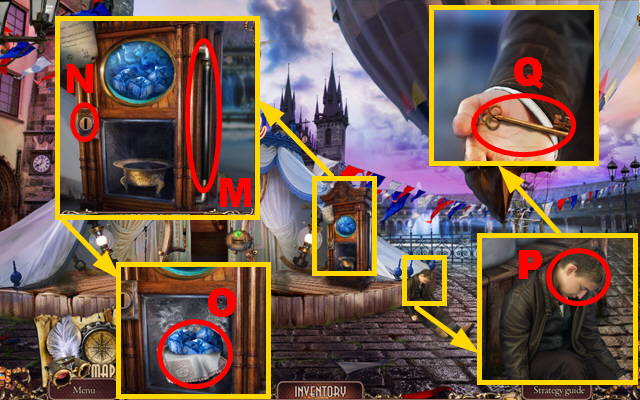
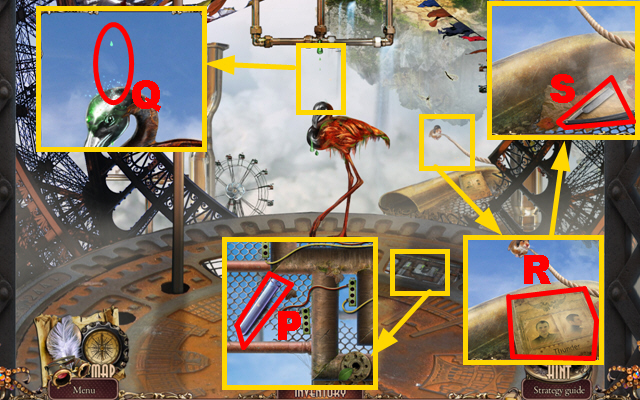
- Zoom into the shelf; take the 2/4 BIRD (Q), the BOTTLE OF WATER (R), and take a look at the photo marked in blue.
- Zoom into the floor; take the PINWHEEL (S) and the LEAF DECORATION (T).
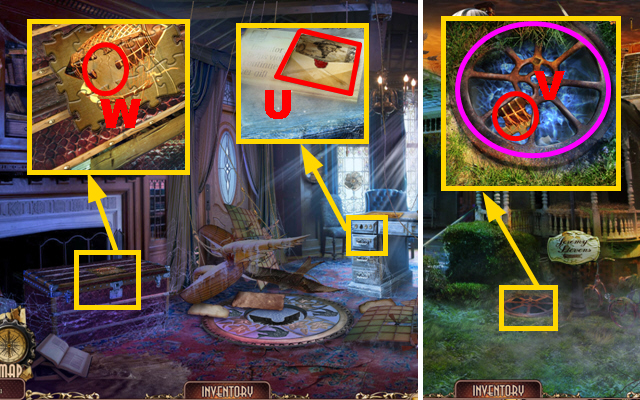
- Zoom into the drawer; take the letter (U).
- Walk down.
- Zoom into the drain and pour the BOTTLE OF WATER into the drain marked in purple; take the WOODEN DETAIL (V).
- Move forward.
- Zoom into the chest; put down the WOODEN DETAIL (W).
- Play the mini-game.
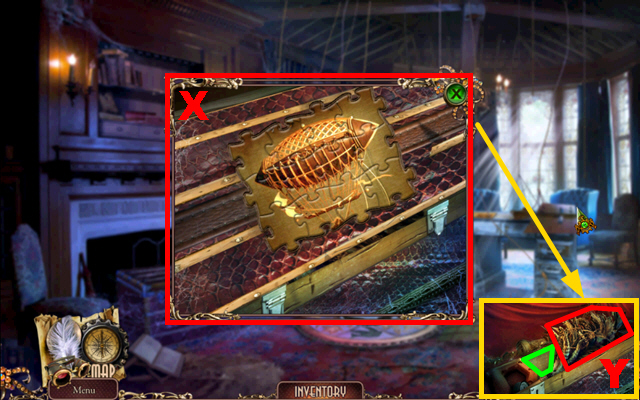
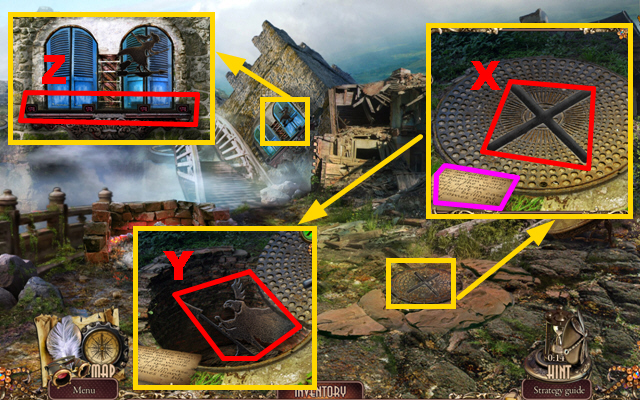
- To solve this puzzle (X), swap the puzzle pieces to recreate the correct picture.
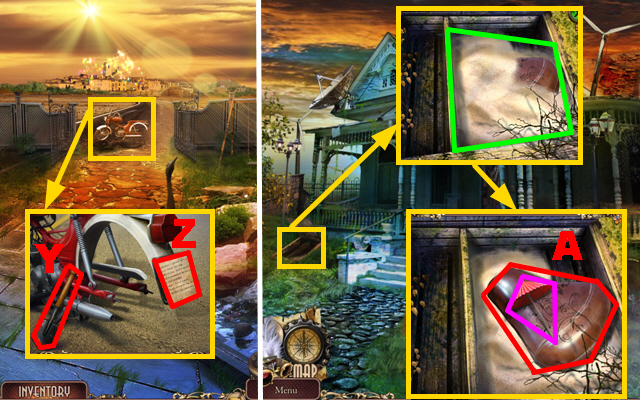
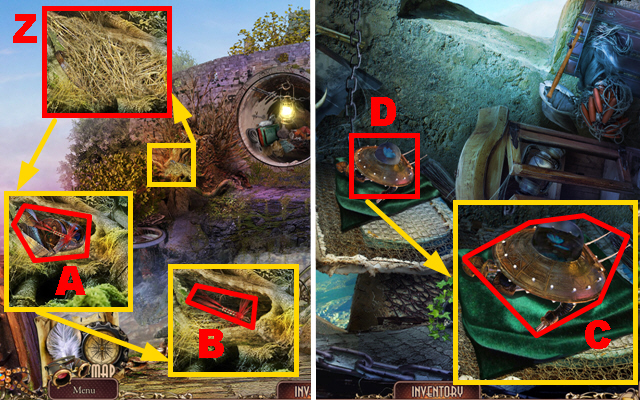
- Take the DUSTER (Y) and remove the saw blade marked in green.
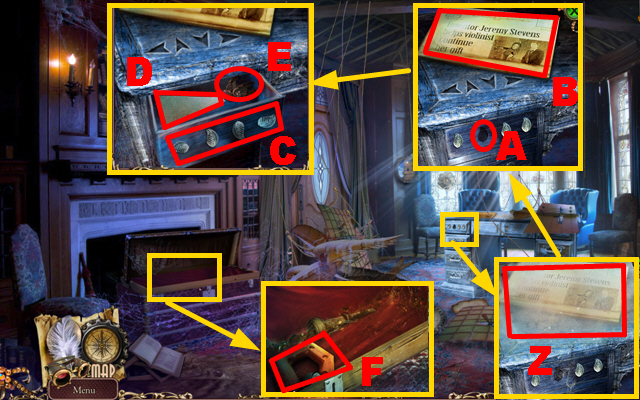
- Zoom into the drawer; remove the cobwebs (Z) with the DUSTER.
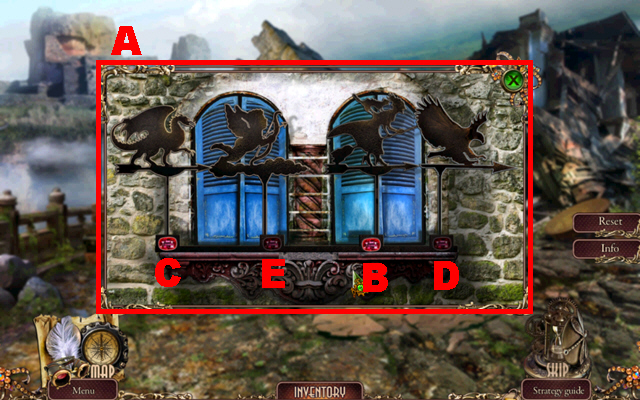
- Put the LEAF DECORATION into the niche (A) and read the newspaper (B).
- Turn the leaves in the following positions (C): left, up, down, and right.
- Take the SAW BLADE (D) and the 3/4 BIRD (E).
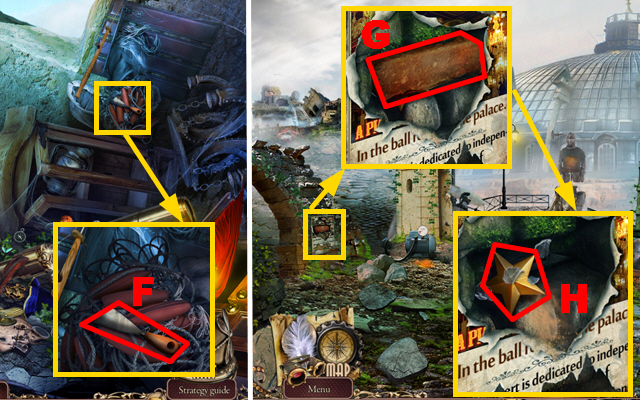
- Zoom into the chest and connect the SAW BLADE to the saw handle (F); take the SAW.
- Walk down.
- Zoom into the mailbox and cut the wooden beam with the SAW (G); take the CHAIN (H).
- Move forward.
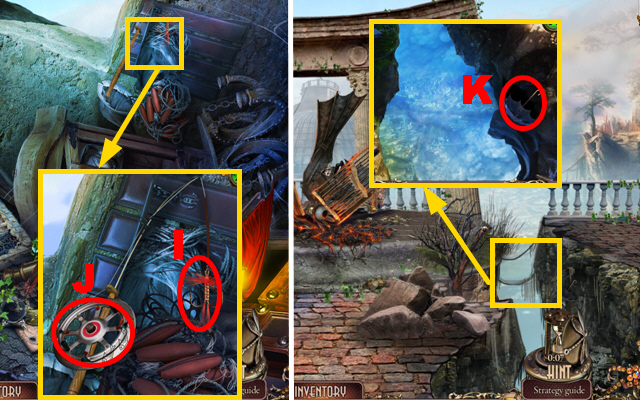
- Zoom into the panel; connect the CHAIN to the hook (I).
- Play the mini-game.
- To solve this puzzle (J), drag and move the images to the correct height.
- Images will light up if placed correctly.
- Enter the Backyard.
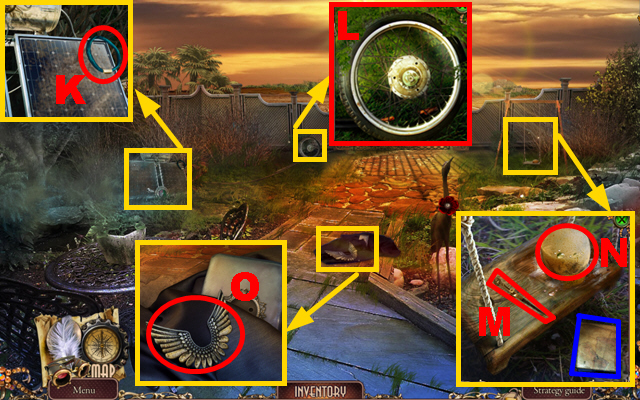
- Zoom into the solar panel; take the RUBBER BAND (K).
- Zoom into the wheel; take the WHEEL (L).
- Zoom into the swing; take the COMPASS LEG LEFT (M), the WET SPONGE (N), and read the book marked in blue.
- Zoom into the coat; take the LITTLE WINGS (O) and move aside a piece of the coat.
- Walk down.

- Zoom into the shelf and connect the COMPASS LEG LEFT to the other half of the compass (P); take the COMPASS.
- Turn left.
- Zoom into the coat and put the COMPASS into the slot (Q); take the 4/4 BIRD (R) and open and read the note (S).
- Zoom into the solar panel; clean the solar panel marked in purple with the WET SPONGE.
- Walk down.
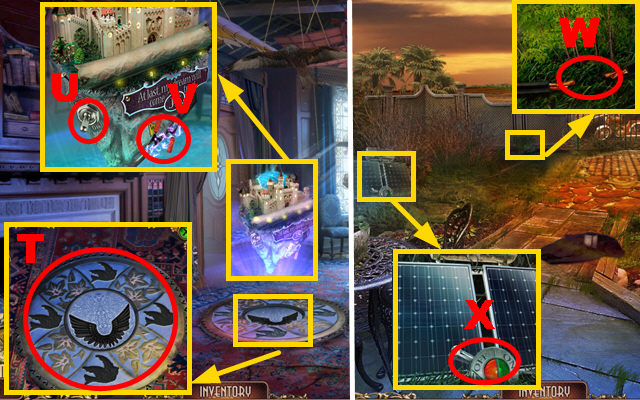
- Zoom into the floor; put down the 4 BIRDS and the LITTLE WINGS (T).
- Zoom into the floating island and connect the RUBBER BAND to the switch (U); take the CLAMP (V).
- Turn left.
- Zoom into the fence; connect the CLAMP to the wires (W).
- Zoom into the solar panel; turn the lever (X).
- Zoom into the motorcycle; take the SPADE (Y) and read the note (Z).
- Walk down twice.
- Zoom into the trapdoor and remove the sand marked in green with the SPADE; take the COCKTAIL UMBRELLA marked in purple and the SEAT (A).
- Move forward and turn left.
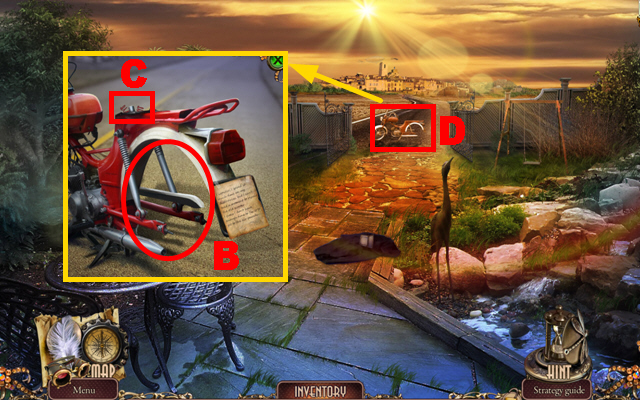
- Zoom into the motorcycle; put down the WHEEL (B) and the SEAT (C).
- Start the motorcycle (D) to leave this location.
Chapter 2: The Tribunes
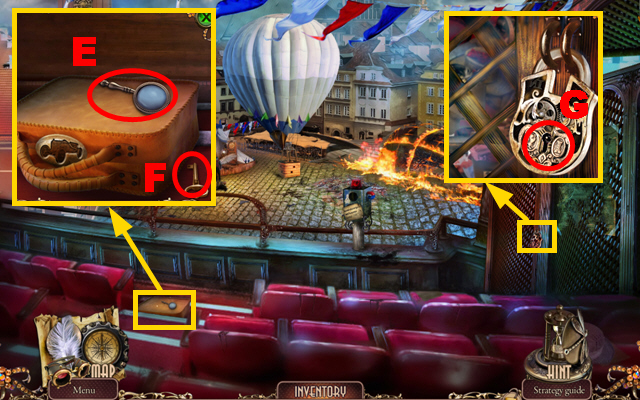
- Zoom into the bag; take the MAGNIFYING GLASS (E) and the KEY (F).
- Zoom into the lock; put the KEY into the lock (G) and turn the key once.
- Play the HOS.
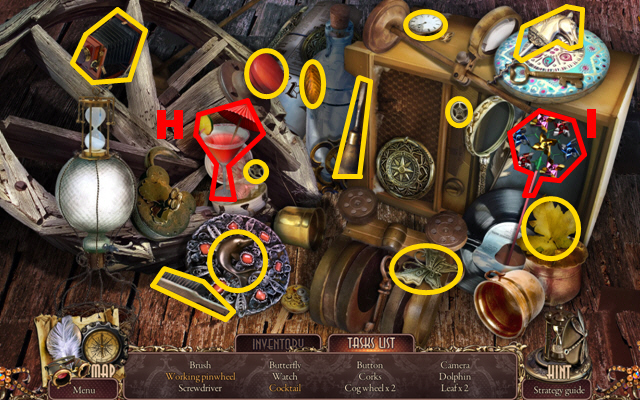
- Take the COCKTAIL UMBRELLA from your inventory, put it into the glass, and take the cocktail (H).
- Take the PINWHEEL from your inventory, connect it to the fan, and take the working pinwheel (I).
- You will receive the BUTTON.
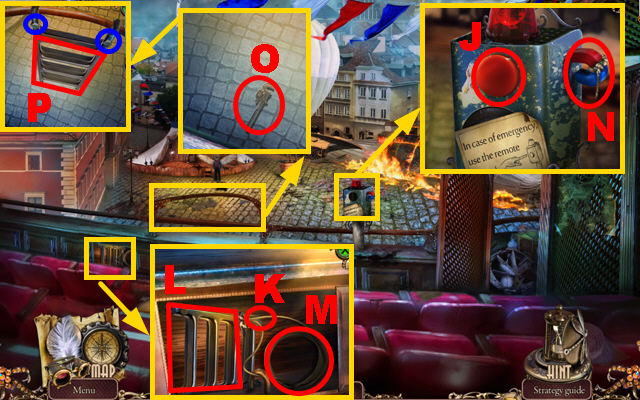
- Zoom into the device; put down the BUTTON (J) and press it.
- Zoom into the compartment and use the MAGNIFYING GLASS to burn the rope (K); take the LADDER (L) and the ROPE (M).
- Zoom into the device; connect the ROPE to the magnet (N) and take the MAGNET.
- Zoom into the holding; hold down the MAGNET to pull up the wrench (O) and take the WRENCH.
- Put down the LADDER (P) and fix the bolts marked in blue with the WRENCH.
- Move forward.
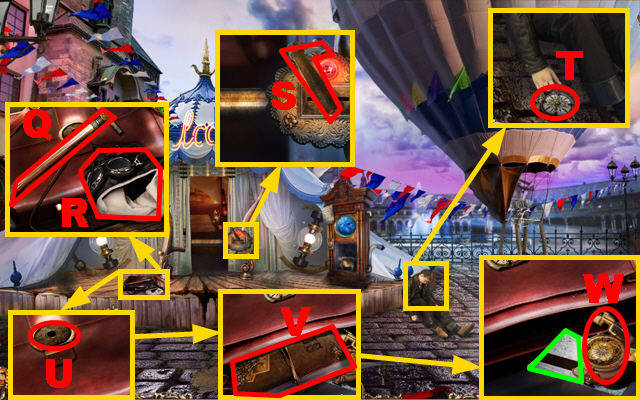
- Zoom into the bag; take the PISTON PUMP (Q) and the HELMET (R).
- Zoom into the panel; take the CRANK (S).
- Zoom into the man; take the COMPASS (T).
- Zoom into the bag and put the COMPASS into the niche (U); open the bag and take the book (V).
- Take the COMPASS (W) and JEREMY’S PASS marked in green.

- Zoom into the panel; put JEREMY’S PASS into the slot (X).
- Move forward.
- Zoom into the side table and turn over the cup; take the KEY TO THE CHEST (Y) and read the note marked in purple.
- Zoom into the planetary system; take the CAR EMBLEM (Z).
- Zoom into the chest; put the KEY TO THE CHEST into the niche (A).
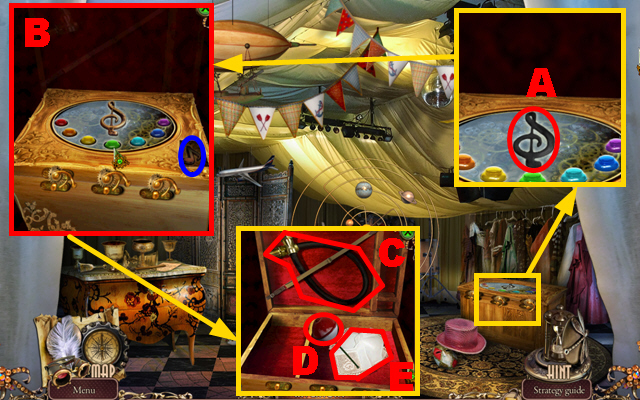
- Play the mini-game.
- To solve this puzzle (B), press the colored buttons in the correct sequence three times.
- Press the button marked in blue to see the correct sequence.
- The first sequence is: green, orange, and yellow.
- The second sequence is: red, purple, green, and dark blue.
- The third sequence is: red, light blue, yellow, orange, and green.
- Take the PIPE (C), the BOBBER (D), and the HANDKERCHIEF (E).
- Walk down twice.
- Zoom into the bag and put the CAR EMBLEM into the slot (F); take the LENS (G) and the MOON (H).
- Move forward twice.
- Zoom into the planetary system and put down the MOON (I); turn the lever (J).
- Play the HOS.
- Take the LENS from your inventory, put it into the monkey’s glasses, and take the glasses (K).
- Take the PISTON PUMP from your inventory, use it to inflate the ball, and take the ball (L).
- You will receive the COIN.
- Walk down.
- Zoom into the ice machine and put down the PIPE (M); insert the COIN into the slot (N).
- Put the HANDKERCHIEF below the ice and take the ICE (O).
- Zoom into the man and place the ICE on his head (P); give the HELMET to him.
- Zoom into the man; take the WIND-UP KEY (Q).
- You will receive the RADIO.
- Move forward.
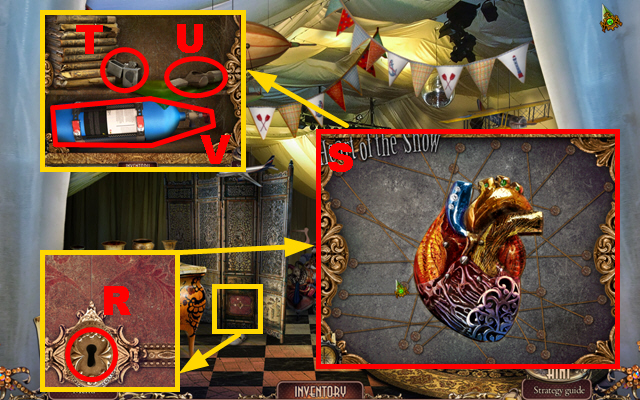
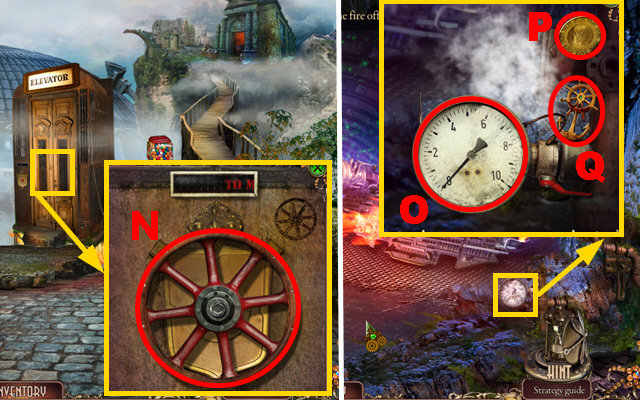
- Zoom into the partition; put the WIND-UP KEY into the lock (R).
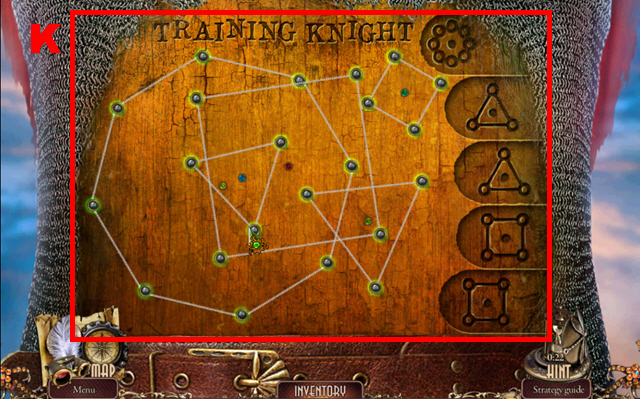
- Play the mini-game.
- To solve this puzzle (S), drag the puzzle pieces along the strings to recreate the correct figure.
- Take the LIGHTER (T), the TOP OF THE HAMMER (U), and the GAS CYLINDER (V).

- Zoom into the side table; connect the TOP OF THE HAMMER to the hammer handle (W) and take the HAMMER.
- Walk down.
- Zoom into the balloon; replace the old gas cylinder with the GAS CYLINDER (X) and fix the wooden beam (Y) with the HAMMER.
- Light the gas cylinder with the LIGHTER (Z).
- Go up in the air.

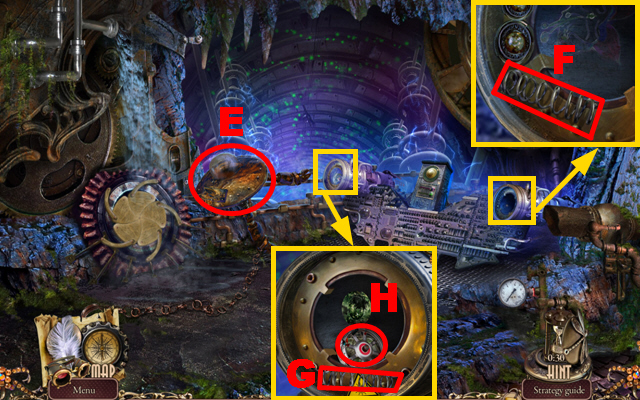
- Zoom into the sack; take the NUT OIL (A), the TORCH (B), and read the book marked in green.
- Zoom into the helm; put down the COMPASS (C).
- Play the mini-game.
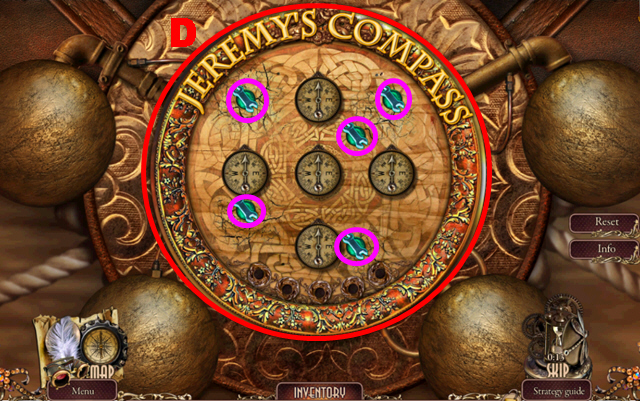
- To solve this puzzle (D), set the five magnets marked in purple in a way so that each compass needle points towards North.
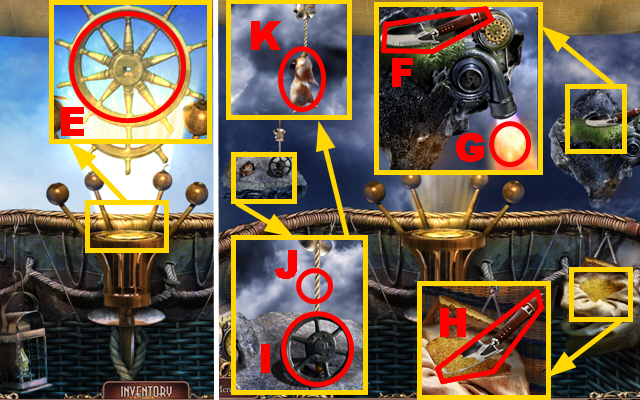
- Zoom into the helm; turn the wheel (E).
- Zoom into the right island; take the SHOVEL (F) and hold the TORCH next to the flame (G) to acquire the LIT TORCH.
- Zoom into the sack; put the SHOVEL into the sand and take the SCOOP OF SAND (H).
- Zoom into the left island and take the VALVE (I); spread the NUT OIL over the rope (J) and take the HAMSTER (K).
- You will receive the BALLOON.
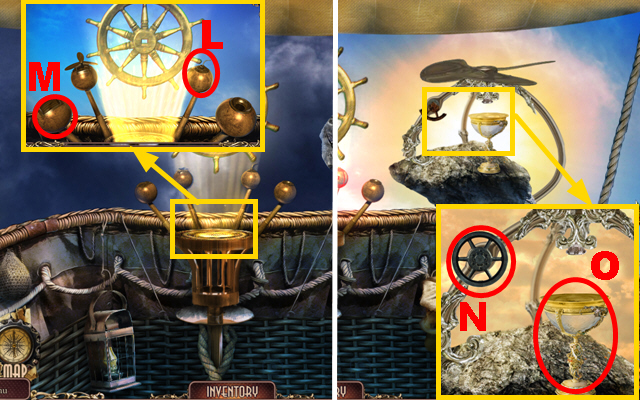
- Zoom into the helm; use the LIT TORCH to activate the orb (L) and pour the SCOOP OF SAND into the orb (M).
- Turn the wheel.
- Zoom into the island and put the VALVE on the spot (N); turn the valve and take the CUP OF WATER (O).
- Zoom into the helm; pour the CUP OF WATER into the orb (P) and put the BALLOON next to the orb (Q).
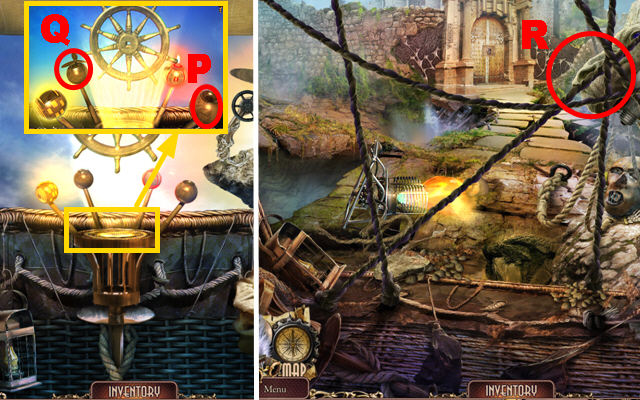
- Use the HAMSTER to remove the ropes (R).
Chapter 3: Entering the Soaring City
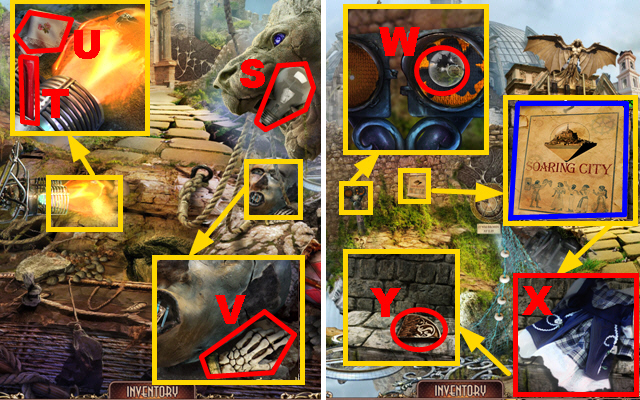
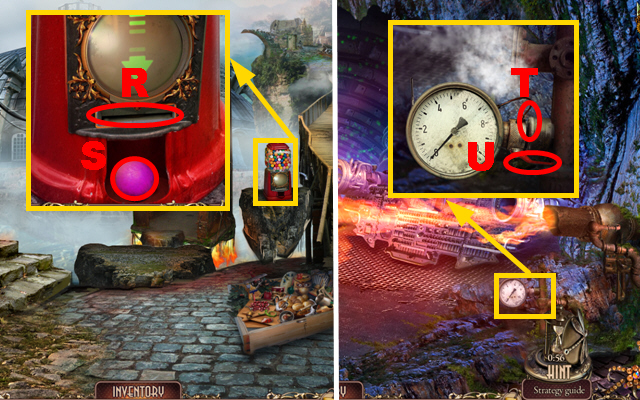
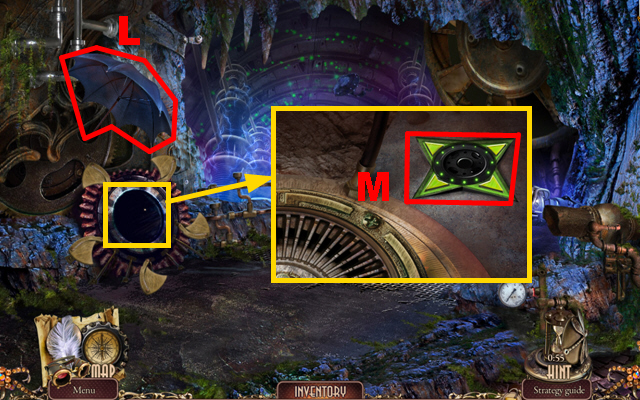
- Take the BULB (S).
- Zoom into the open flame and turn the lever (T); take the PIECE OF CLOTH (U).
- Zoom into the head; take the SKELETON HAND (V).
- Move forward.
- Zoom into the traffic light; use the PIECE OF CLOTH to remove the broken bulb (W) and replace it with the BULB.
- Zoom into the poster and remove the poster marked in blue; take the DOLL DRESS (X) and the 1/3 PART OF AN AMULET (Y).
- Move forward.
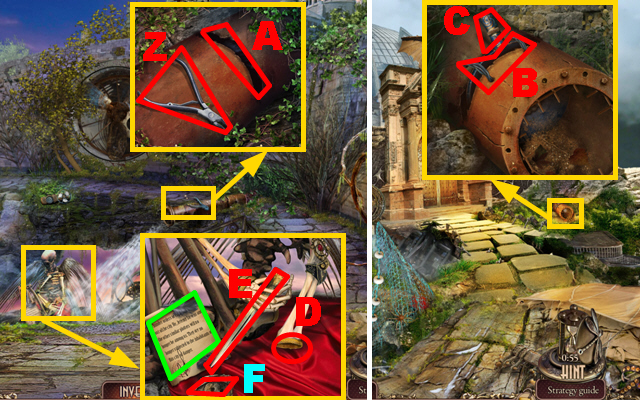
- Zoom into the pipe; take the CUTTING PLIERS (Z).
- Walk down.
- Zoom into the pipe and cut the wires with the CUTTING PLIERS (A); take the PIPE BLOCKER (B).
- Move forward.
- Zoom into the pipe; put the PIPE BLOCKER into the gap (C).
- Zoom into the skeleton and connect the SKELETON HAND to the skeleton (D); take the DAGGER (E), the STONE EYE (F), and read the note marked in green.
- Walk down.
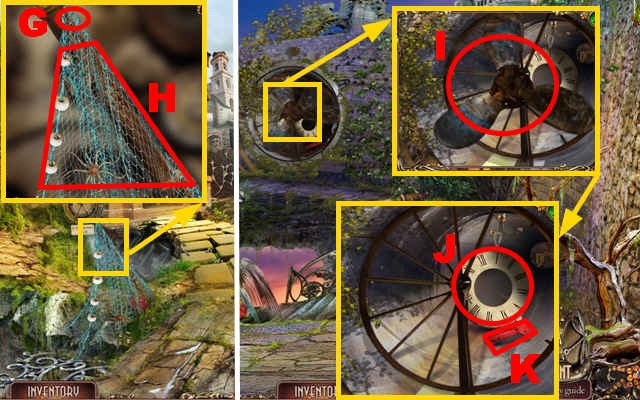
- Zoom into the net and cut it with the DAGGER (G); take the NET (H) and you will also receive the STONE EAR.
- Move forward.
- Zoom into the propeller and throw the NET at the propeller (I); take the CLOCK FACE (J) and the EMERGENCY MALLET (K).
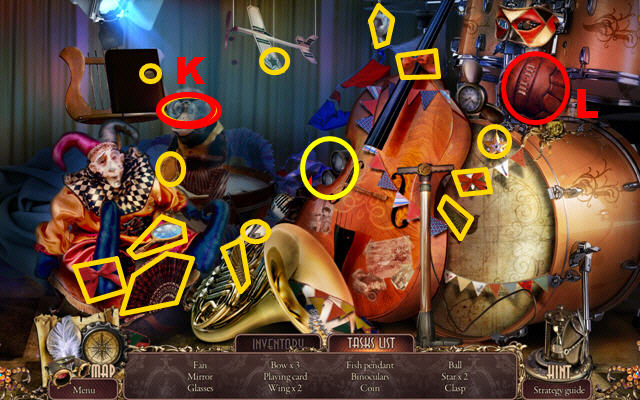
- Play the HOS.
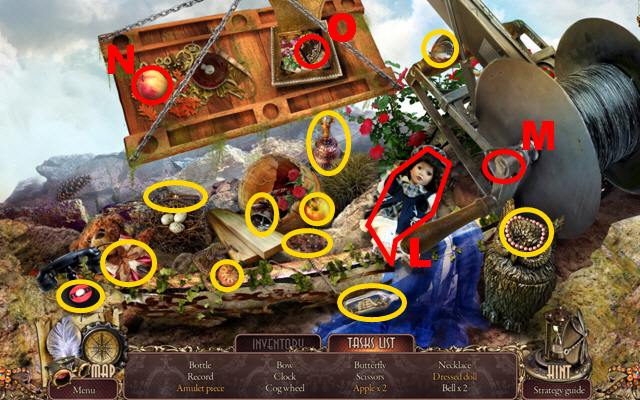
- Take the DOLL DRESS from your inventory, put it on the doll, and take the dressed doll (L).
- Take the CRANK from your inventory, put it into the slot (M), and take the apple (N) and the amulet piece (O).
- You will receive the 2/3 PART OF AN AMULET.
- Walk down.
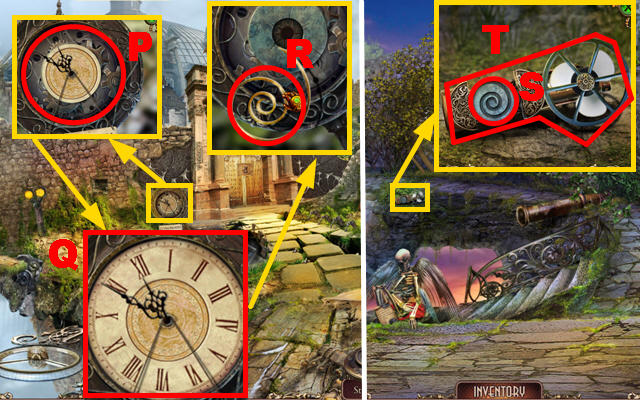
- Zoom into the clock and put down the CLOCK FACE (P); turn the clock hands until it displays the time ’11:55′ (Q) and take the SPRING (R).
- Move forward.
- Zoom into the machine and put the SPRING into the niche (S); take the MANUAL PROPELLER (T).
- Walk down twice.
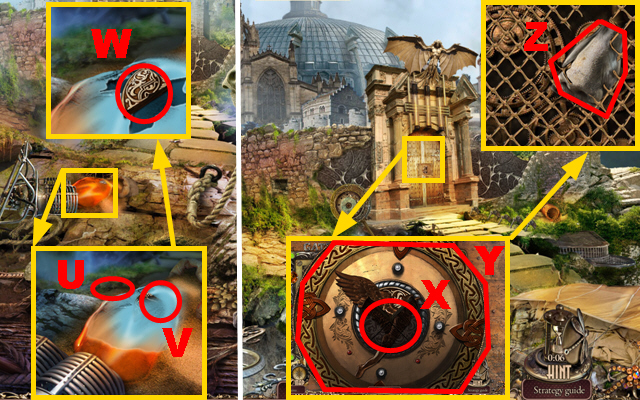
- Zoom into the lamp and hold the MANUAL PROPELLER next to it (U); use the EMERGENCY MALLET to break the glass (V).
- Take the 3/3 PART OF AN AMULET (W).
- Move forward.
- Zoom into the door; put the 3 PARTS OF AN AMULET into the niche (X) and take the SHIELD (Y).
- Take the STONE NOSE (Z).
- Walk down.
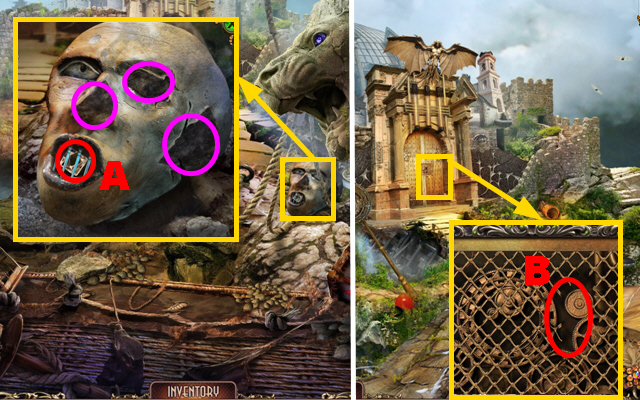
- Zoom into the head; put the STONE EYE, the STONE EAR, and the STONE NOSE into the niches marked in purple.
- Take the DIAMOND (A).
- Move forward.
- Zoom into the door; put down the DIAMOND (B) to interrupt the mechanism.
- Play the mini-game.
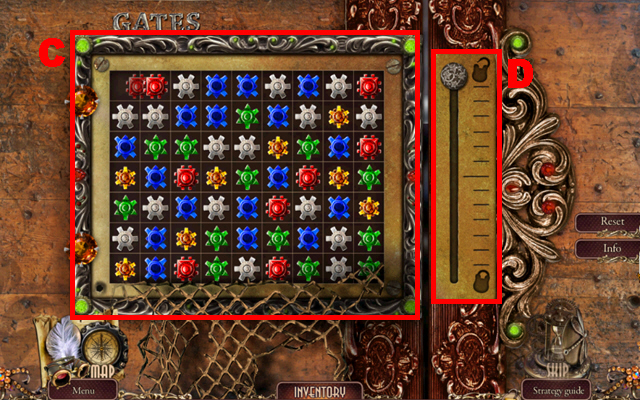
- To complete this mini-game (C), swap gears to create rows and columns of three or more groups of similar gears until the ball reaches the top of the bar (D).
- Move forward.
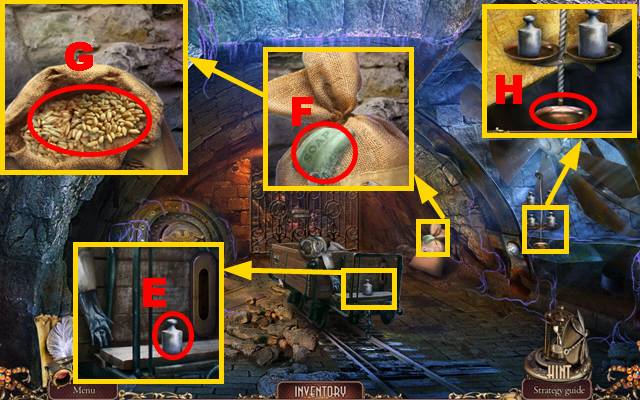
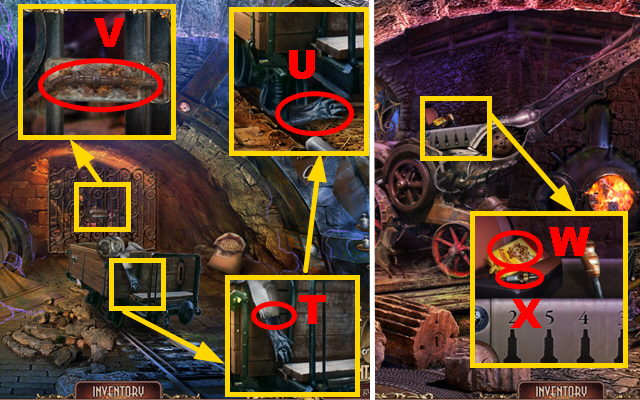
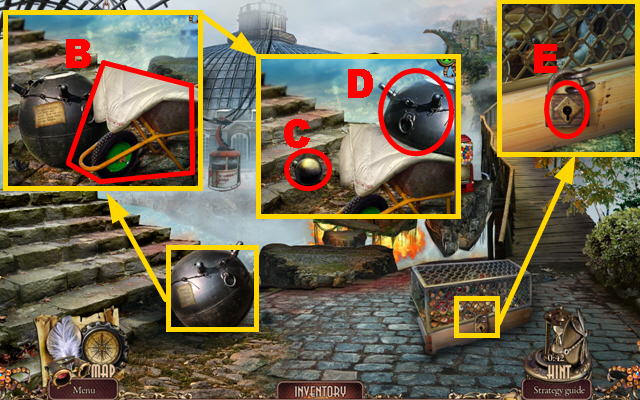
- Zoom into the wagon; take the WEIGHT (E).
- Zoom into the sack and take the SOAP (F); open the sack and take the GRAIN (G).
- Zoom into the weights; put down the WEIGHT (H).
- Put down the GRAIN (I) and take the BRASS FEATHER (J).
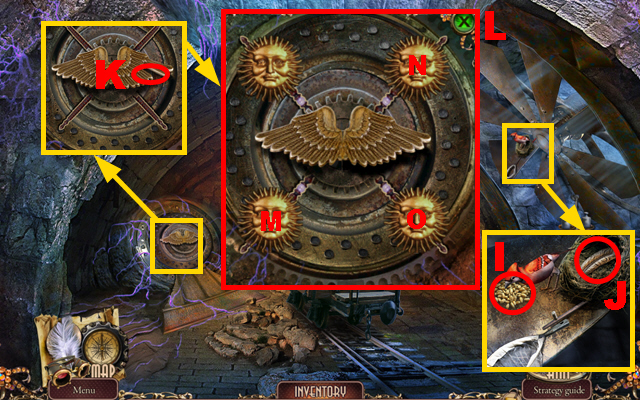
- Zoom into the electric trapdoor; put down the BRASS FEATHER (K) to play a mini-game.
- To solve this puzzle (L), turn the suns in the following sequence: M, Nx2, and O.
- Go down.
- Zoom into the grid; take the TEST TUBE (P).
- Zoom into the statue; hold down the test tube (Q) to acquire the TEST TUBE WITH ACID.
- Zoom into the hamster and take the folder (R); take the KNIFE BLADE (S).
- Walk down.
- Zoom into the wagon; cut free the glove (T) with the KNIFE BLADE and take the GLOVE (U).
- Zoom into the gate; remove the rust with the TEST TUBE WITH ACID (V) and open the lock.
- Move forward.
- Zoom into the vehicle; take the PACK OF NUTS (W) and the 1/4 SPARK PLUG (X).
- Move forward.
Chapter 4: The Elevator
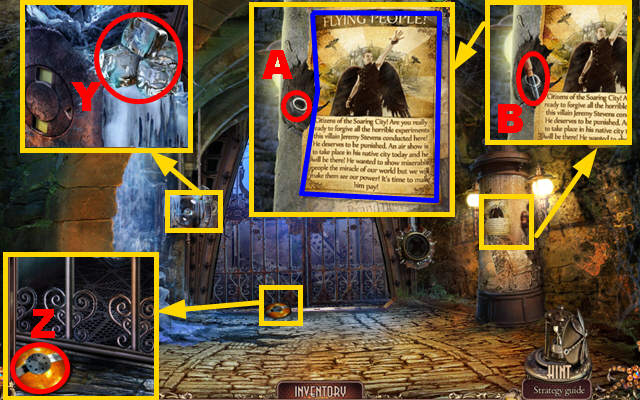
- Zoom into the iced panel; take the PIECE OF ICE (Y).
- Zoom into the floor; take the ELEVATOR BUTTON (Z).
- Zoom into the column; take the EYE DROPPER (B), the NUT (A), and take a look at the poster marked in blue.
- Walk down twice.
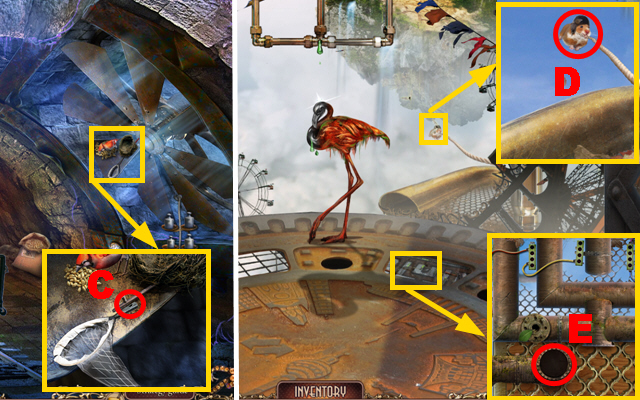
- Zoom into the propeller; fix the net with the NUT (C) and take the NET.
- Go down.
- Zoom into the hamster; use the NET to acquire the HAMSTER (D).
- Zoom into the grate; put down the HAMSTER and the PACK OF NUTS (E).
- Play the mini-game.

- To solve this puzzle (F), guide the hamster to collect the three spark plugs by placing nuts.
- The green lights next to the gates indicate how often they can be opened.
- To collect the three spark plugs and leave the labyrinth, guide the hamster in the following sequence: up x2, right, up, left, down, up, left x3, up, right, up, left, right, down, right x2, up, right, left, down, left, down, left x2, down, right, and down.
- You will receive three SPARK PLUGS.
- Walk down and move forward.
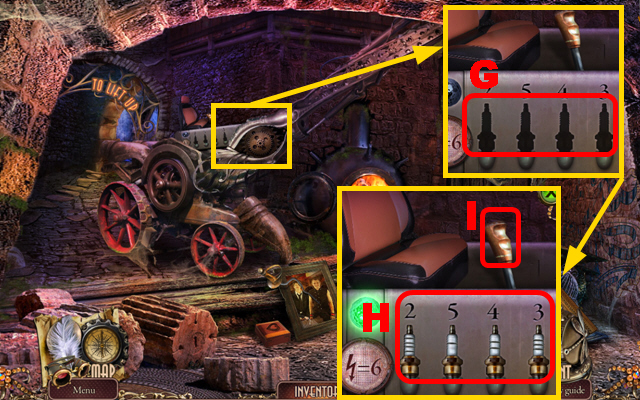
- Zoom into the vehicle; put the 4 SPARK PLUGS into the slots (G).
- Swap the spark plugs in a way so that the vehicle starts running (H).
- Turn the lever (I).
- Play the HOS.
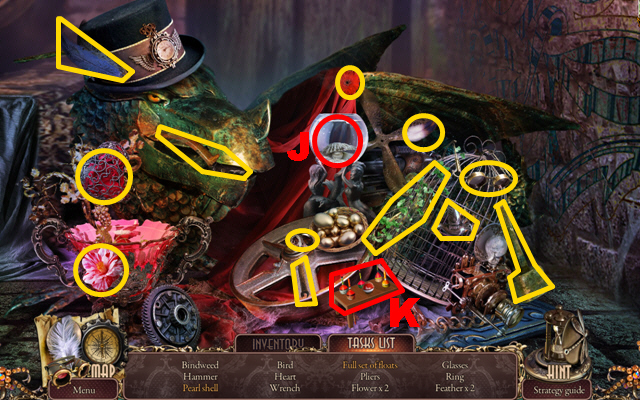
- Take the GLOVE from your inventory, use it to remove the fish, and take the pearl shell (J).
- Take the BOBBER from your inventory, put it into the box, and take the full set of floats (K).
- You will receive the PLIERS.
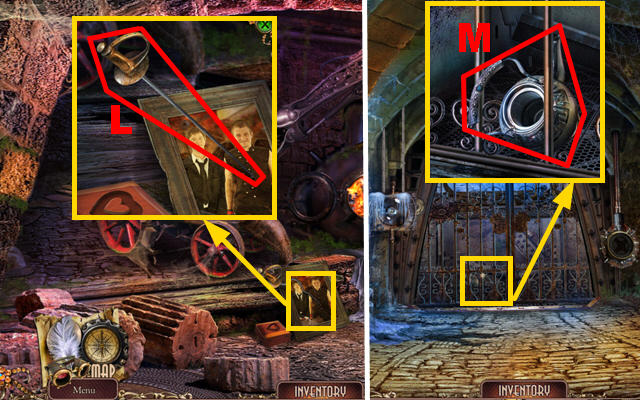
- Zoom into the portrait; use the PLIERS to straighten the rapier and take the RAPIER (L).
- Move forward.
- Zoom into the elevator; use the RAPIER to pull the kettle and take the KETTLE (M).
- Walk down.

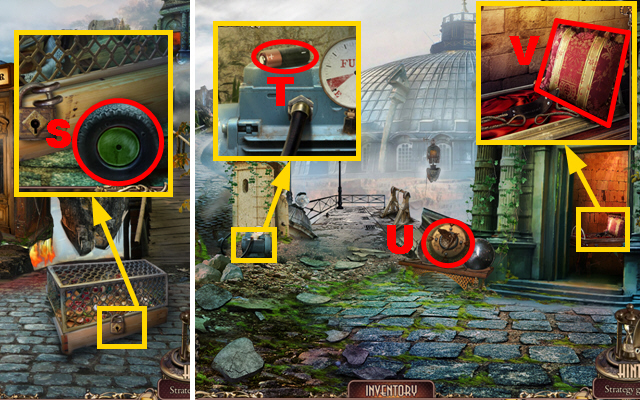
- Zoom into the oven and put down the KETTLE; put the PIECE OF ICE into the kettle (N) and take the KETTLE OF BOILING WATER.
- Move forward.
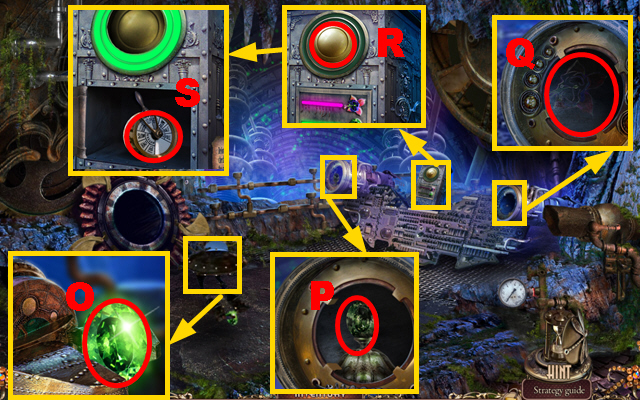
- Zoom into the mechanism; pour the KETTLE OF BOILING WATER over it (O).
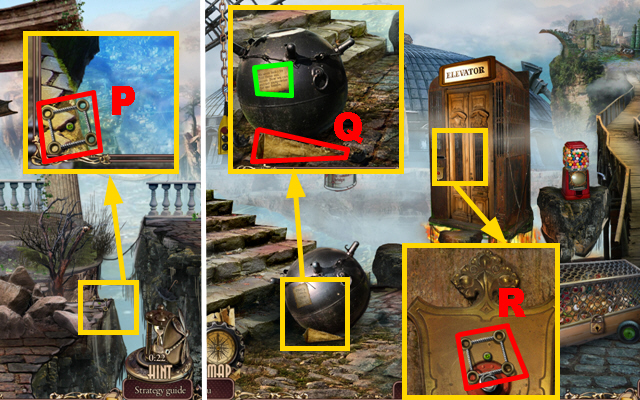
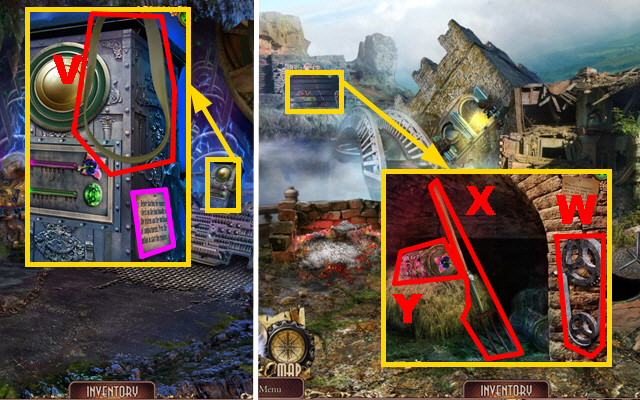
- Zoom into the panel; put the ELEVATOR BUTTON into the slot (P) and press it.
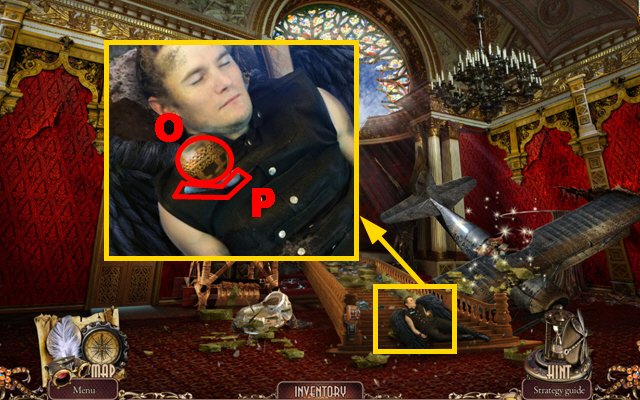
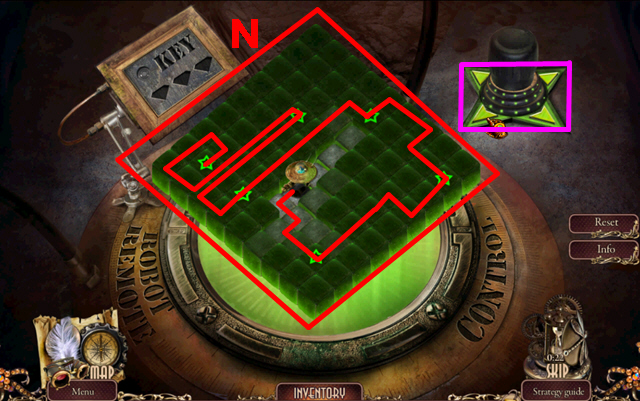
- Zoom into the elevator boy (Q) to play a mini-game.
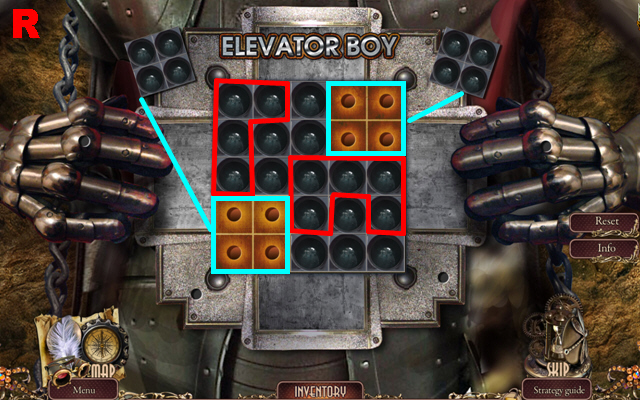
- To solve the first part of this puzzle (R), place the four figures as indicated by the red lines, then place the two square figures into the slots marked in light blue.
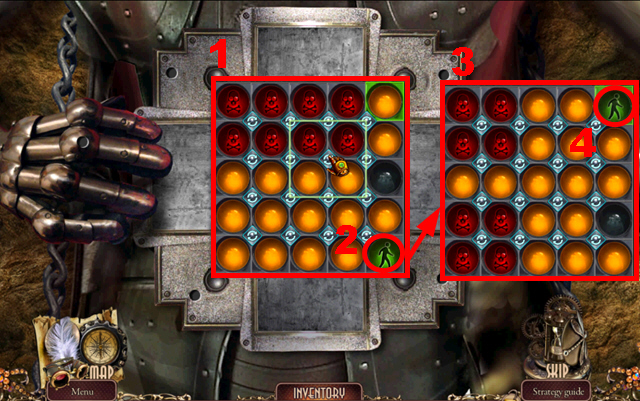
- To solve the second part of this puzzle, first rotate all the red balls as shown on picture (1), then rotate the green man to the spot (2).
- Now rotate the four red balls as shown on picture (3), then rotate the green man to the spot (4) to complete this puzzle.
- Move forward.
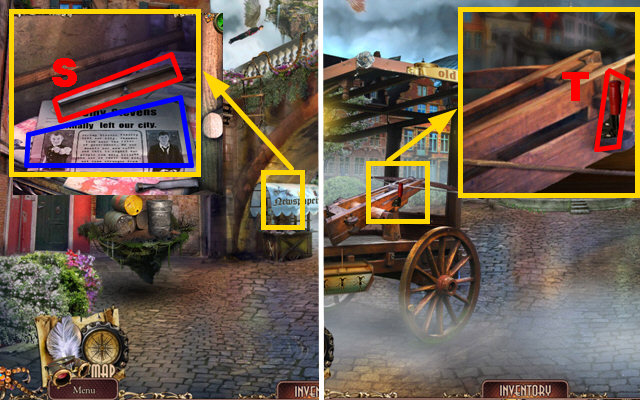
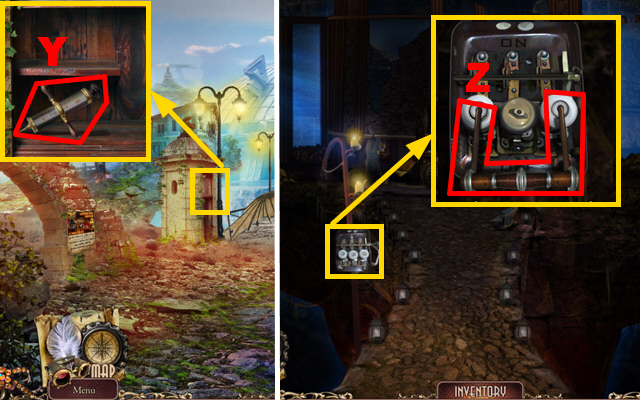
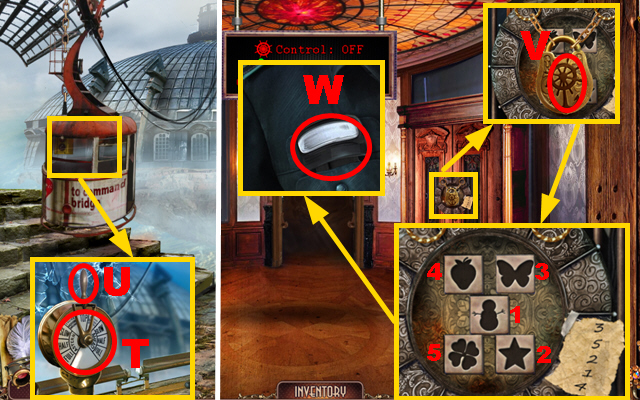
- Zoom into the newspaper stand; take the RAIL (S) and read the article marked in blue.
- Move forward.
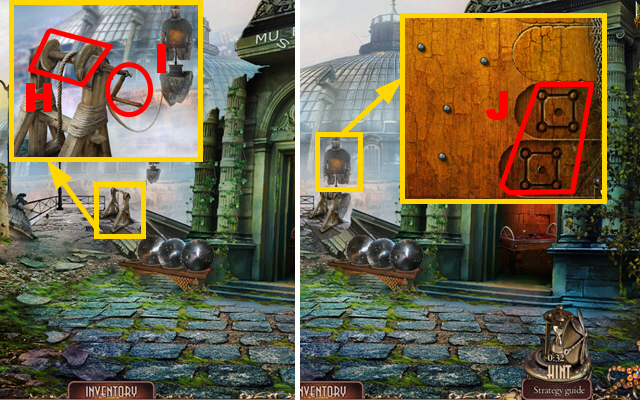
- Zoom into the crossbow; take the LEVER (T).
- Walk down four times.
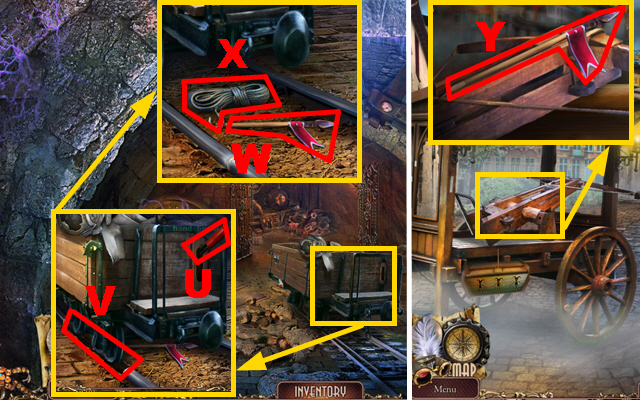
- Zoom into the wagon; put the LEVER into the slot (U) and put down the RAIL (V).
- Press the lever and take the ARROW (W) and the ROPE WITH HOOK (X).
- Move forward four times.
- Zoom into the crossbow; put down the ARROW (Y).
- Walk down.
- Connect the ROPE WITH HOOK to the ladder (Z).
- Go up the ladder.
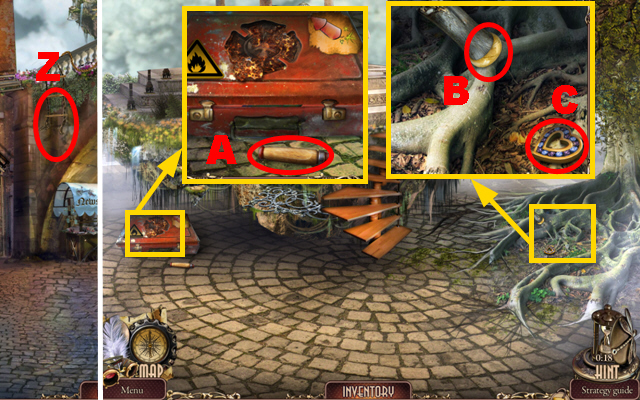
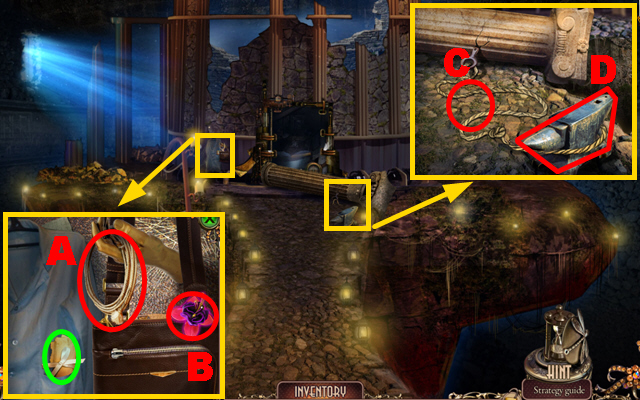
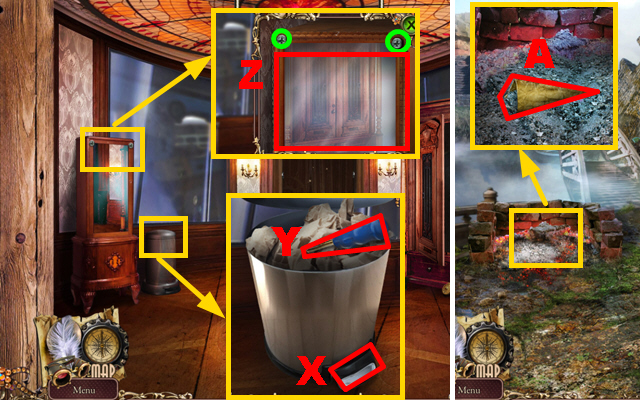
- Zoom into the suitcase; take the CHISEL HANDLE (A).
- Zoom into the roots and spread the PIECE OF SOAP over the ring; take the RING (B) and the HEART PENDANT (C).
- Walk down three times.
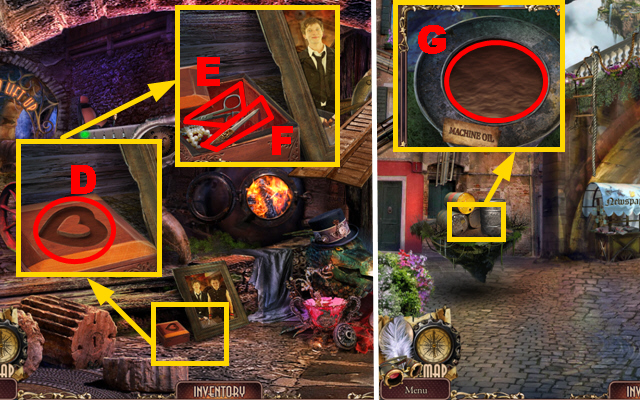
- Zoom into the portrait and put the HEART PENDANT into the slot (D); take the CUTICLE SCISSORS (E) and the NAIL FILE (F).
- Move forward twice.
- Zoom into the barrels; put the EYE DROPPER into the oil (G) to acquire the DROPPER OF MACHINE OIL.
- Go up the ladder.
- Play the HOS.
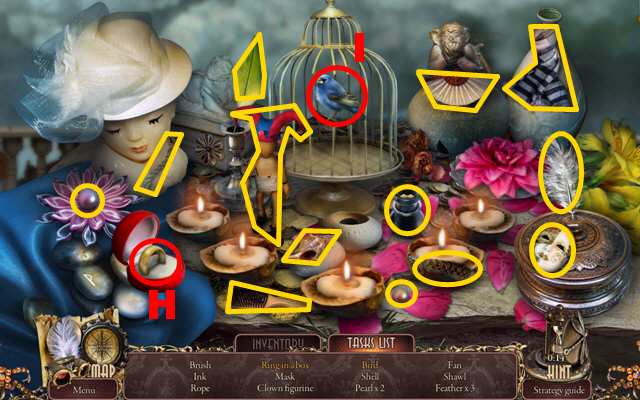
- Take the RING from your inventory, put it into the box, and take the ring in a box (H).
- Take the NAIL FILE from your inventory, use it to cut the metal bars of the cage, and take the bird (I).
- You will receive the JESTER FIGURINE.
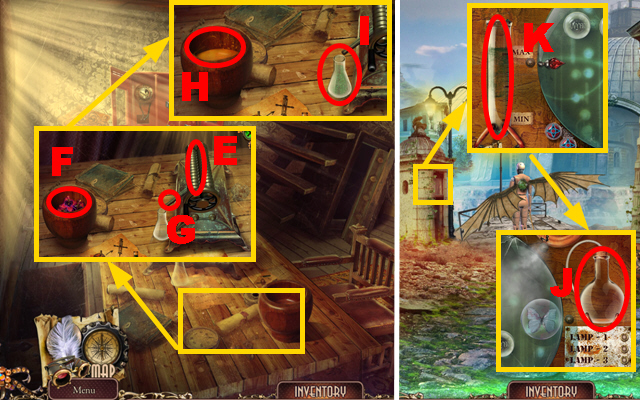
- Walk down and move forward.
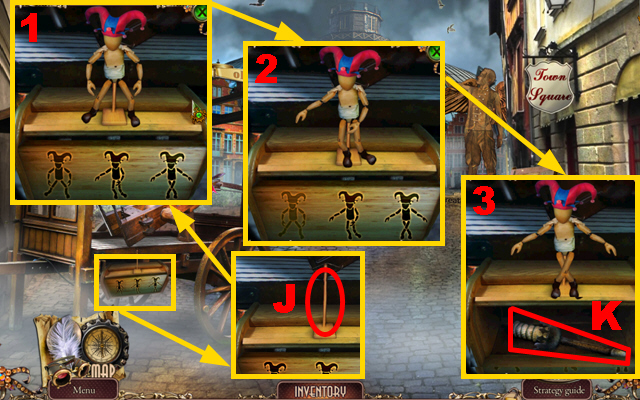
- Zoom into the plate; put down the JESTER FIGURINE (J).
- Move the limbs of the jester figurine to create the gestures (1), (2), and (3).
- Take the TORCH (K).
- Walk down three times.
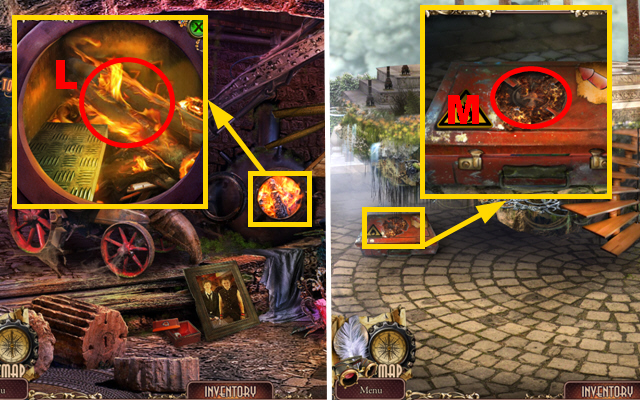
- Zoom into the oven; put the TORCH into the flames (L) to acquire the BURNING TORCH.
- Move forward twice and go up the ladder.
- Zoom into the suitcase; pour the DROPPER OF MACHINE OIL over the rust (M).
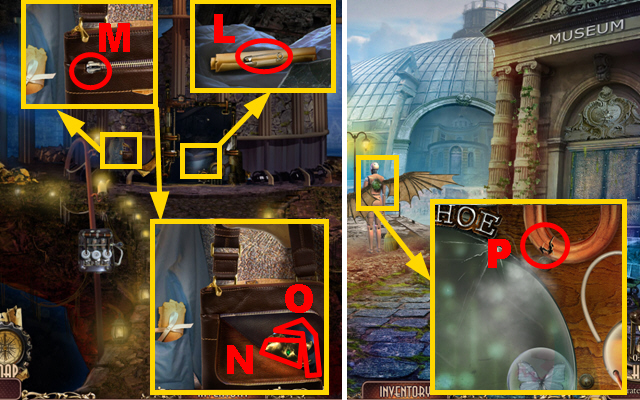
- Walk down.
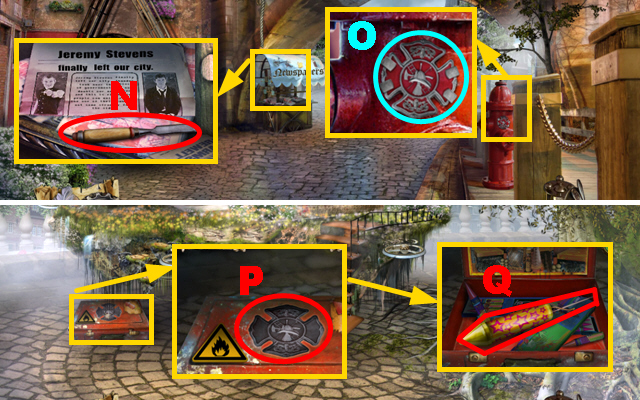
- Zoom into the newspaper stand; connect the CHISEL HANDLE to the chisel head and take the CHISEL (N).
- Zoom into the fire hydrant; remove the badge with the CHISEL and take the FIREMAN’S BADGE (O).
- Go up the ladder.
- Zoom into the suitcase and put the FIREMAN’S BADGE into the slot (P); open the suitcase and take the FIRECRACKER (Q).
- Walk down and move forward.

- Zoom into the board; cut the glue free with the CUTICLE SCISSORS (R) to acquire the GLUE.
- Zoom into the crossbow and connect the FIRECRACKER to the arrow; fix the firecracker with the GLUE and light it with the BURNING TORCH (S).
Chapter 5: The Trapped Brother
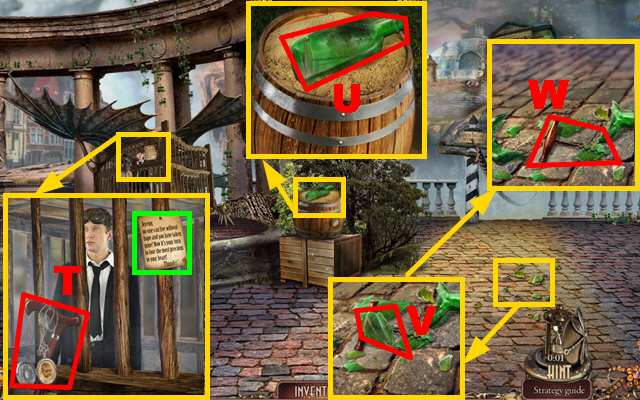
- Zoom into the cage and read the note marked in green; take the LOCKET and the CANE (T).
- Zoom into the barrel; take the BOTTLE WITH CORKSCREW (U).
- Zoom into the floor and put down the BOTTLE WITH CORKSCREW; take the GLASS SHARD (V) and the CORKSCREW (W).
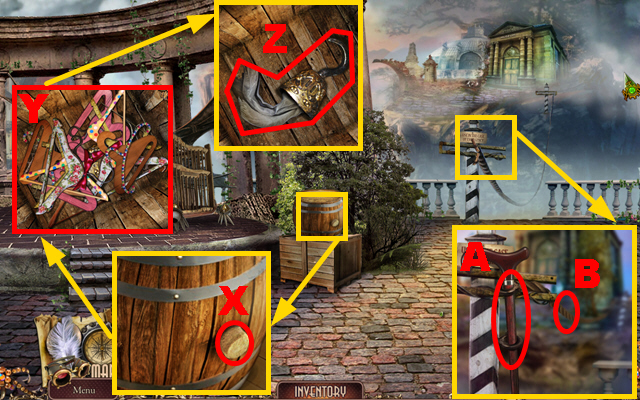
- Zoom into the barrel; remove the cork with the CORKSCREW (X) and remove the barrel.
- Open the box and remove pairs of hangers (Y).
- Take the HOOK (Z).
- Zoom into the rope and replace the broken beam with the CANE (A); use the HOOK to travel across the abyss (B).
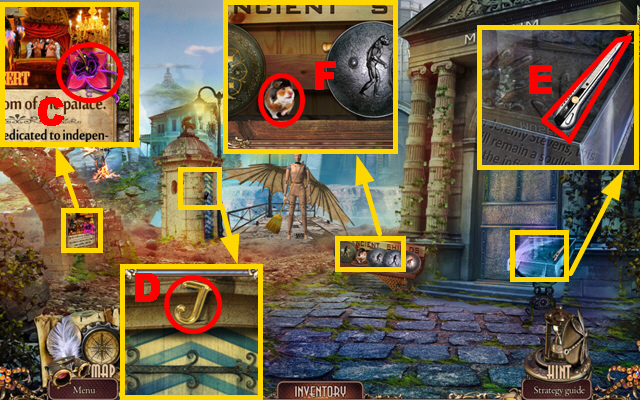
- Zoom into the poster; take the 1/3 FLOWER (C).
- Zoom into the booth; take the LETTER ‘J’ (D).
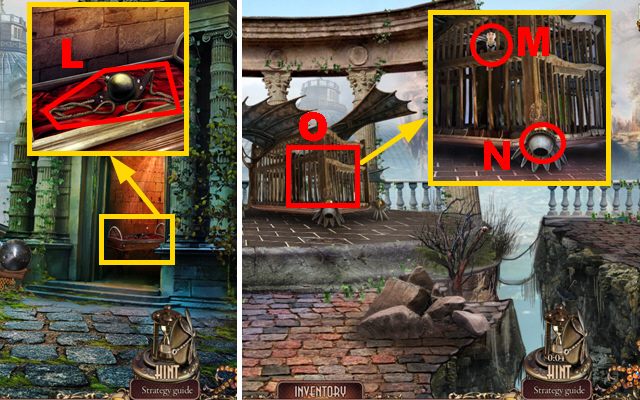
- Zoom into the glass display; take the UTILITY KNIFE (E).
- Zoom into the shields; take the HAMSTER (F) and put the SHIELD in its place.
- Play the mini-game.
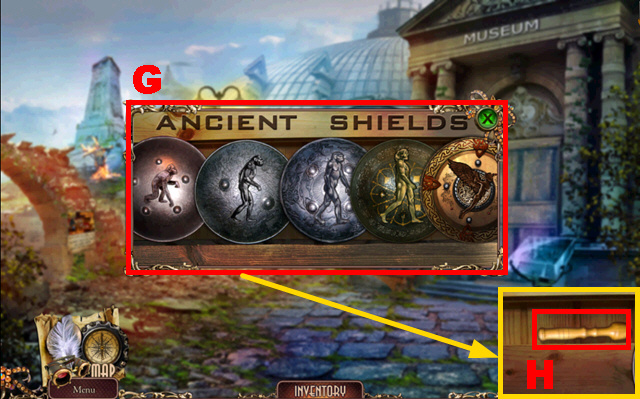
- To solve this puzzle (G), swap the shields so that their images reflect the course of human evolution.
- Take the PESTLE (H).
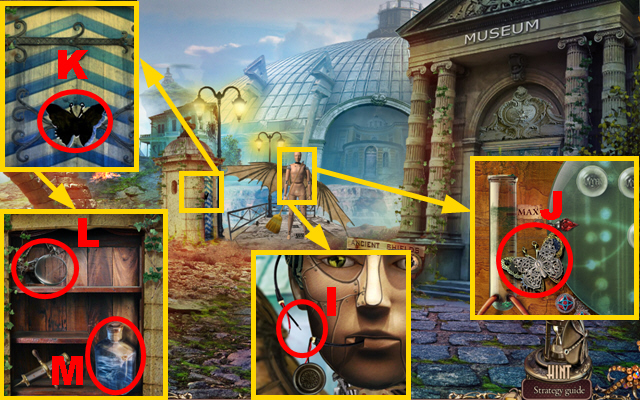
- Zoom into the robot; connect the RADIO to the robot (I).
- Zoom into the robot once more; take IVANHOE’S AMULET (J).
- Zoom into the booth and put IVANHOE’S AMULET into the niche (K); take the JEWELER’S LENS (L) and the BOTTLE OF WATER (M).
- Move forward.
- Play the HOS.
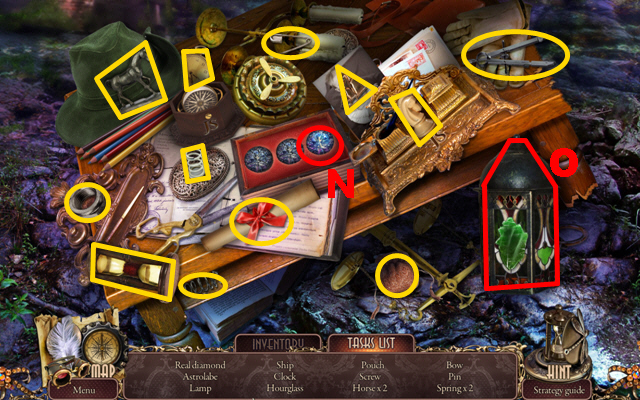
- Take the JEWELER’S LENS from your inventory, use it to detect the real diamond, and take the real diamond (N).
- Take the GLASS SHARD from your inventory, put it into the lamp, and take the lamp (O).
- You will receive the DIAMOND.
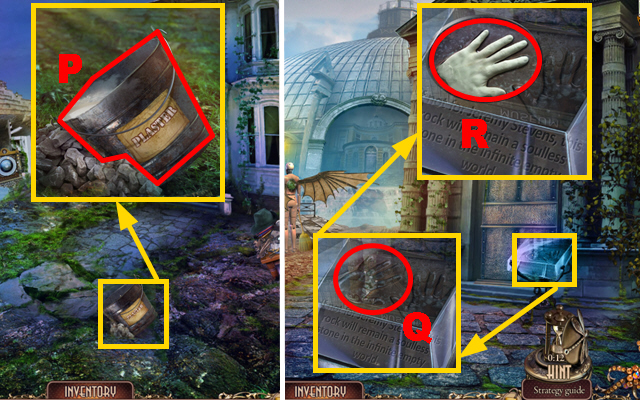
- Zoom into the bucket; pour the BOTTLE WITH WATER into the bucket and take the BUCKET WITH PLASTER (P).
- Walk down.
- Zoom into the glass display and cut it open with the DIAMOND (Q); pour the BUCKET WITH PLASTER into the hand shape and take the HANDPRINT (R).
- Move forward.
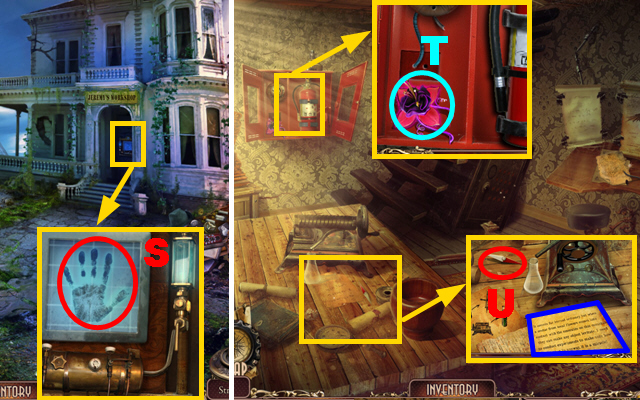
- Zoom into the door; put the HANDPRINT onto the panel (S).
- Enter the Workshop.
- Zoom into the extinguisher; take the 2/3 FLOWER (T).
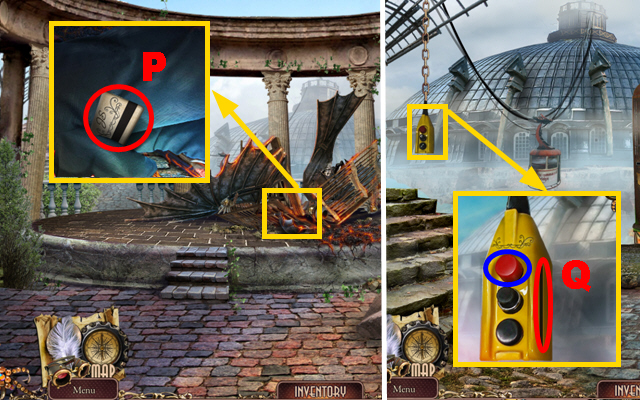
- Zoom into the table; read the note marked in blue and take the COMPASS ARROW (U).
- Walk down.
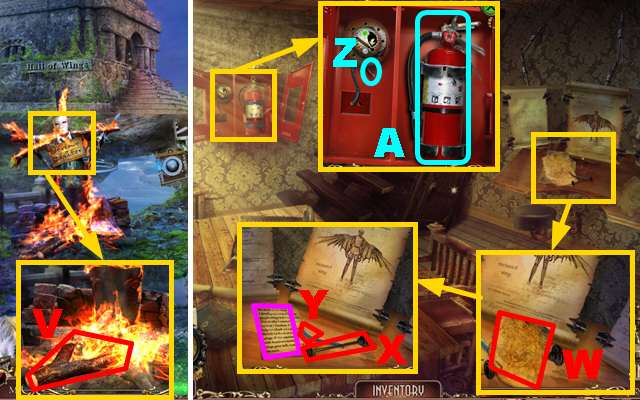
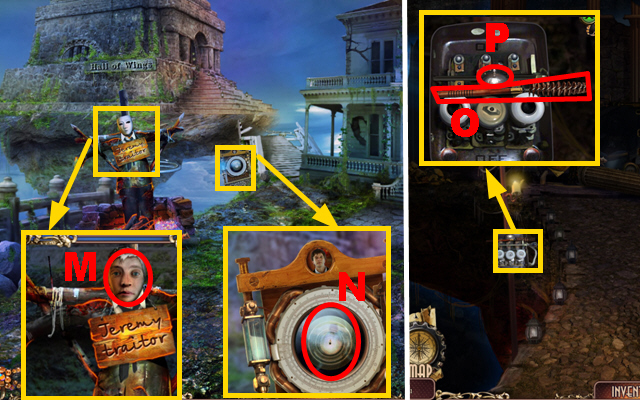
- Zoom into the burning effigy; take the BURNING STICK (V).
- Move forward.
- Zoom into the desk and take the flight log (W); take the SYRINGE PLUNGER (X), the WIRE (Y), and read the note marked in purple.
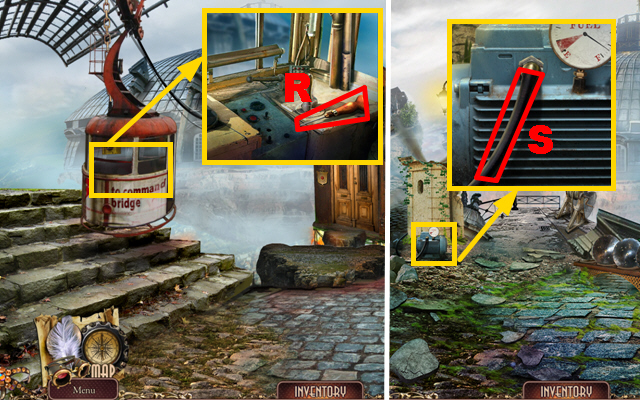
- Zoom into the extinguisher and put down the WIRE (Z); hold the BURNING STICK next to the extinguisher and take the FIRE EXTINGUISHER (A).
- Walk down.
- Zoom into the burning effigy and extinguish the fire with the FIRE EXTINGUISHER (B); take the OFFICE KEY (C).
- Enter the Workshop.
- Zoom into the lock; put the OFFICE KEY into the lock (D) and turn the key once.
- Go upstairs.
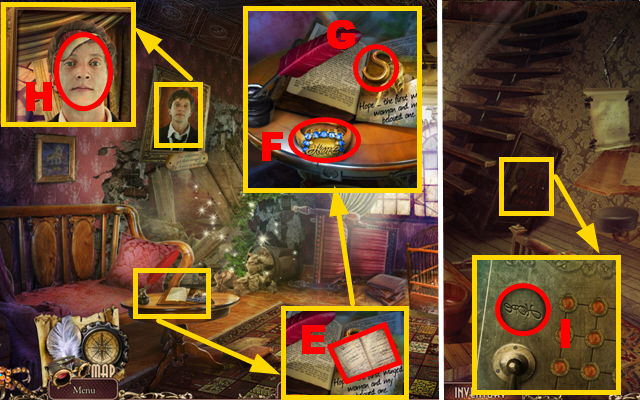
- Zoom into the table and take the note (E); take HOPE’S RING (F) and the LETTER ‘S’ (G).
- Zoom into the portrait; cut out the face with the PAPER KNIFE and take JEREMY’S PORTRAIT (H).
- Walk down.
- Zoom into the safe; put HOPE’S RING into the slot (I) and play the mini-game.
- To solve this puzzle (J), press the buttons 1-4 to turn all the buttons green.
- Take the HAMSTER’S AMULET (K), the GRINDER (L), and read the note marked in purple.
- Walk down.
- Zoom into the effigy; put JEREMY’S PORTRAIT onto the mask and take JEREMY’S MASK (M).
- Zoom into the panel; put JEREMY’S MASK into the shape (N).
- Move forward.
- Zoom into the machine; take the BRUSH (O) and the ALARM BELL (P).
- Walk down, enter the Workshop, and go upstairs.
- Play the HOS.
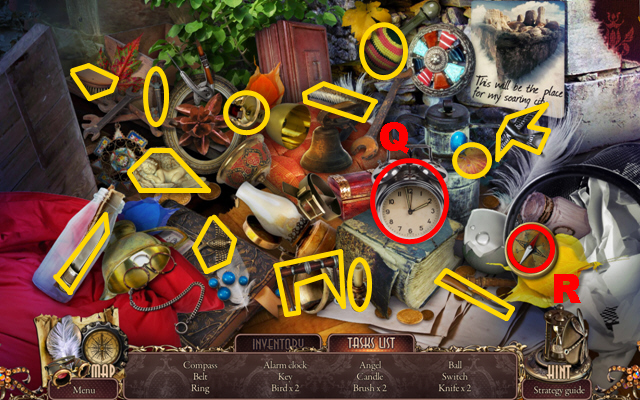
- Take the ALARM BELL from your inventory, put it onto the clock, and take the alarm clock (Q).
- Take the COMPASS ARROW from your inventory, put it into the compass, and take the compass (R).
- You will receive the SWITCH HANDLE.
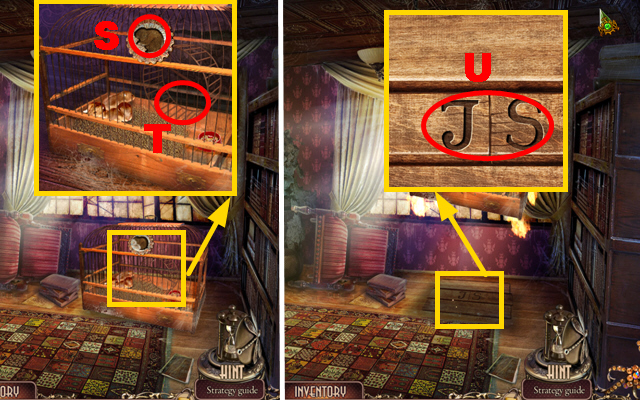
- Zoom into the cage and put the HAMSTER’S AMULET into the niche (S); put the HAMSTER into the cage (T).
- Zoom into the trapdoor; put the LETTER ‘J’ and the LETTER ‘S’ into the slots (U).
- Play the mini-game.
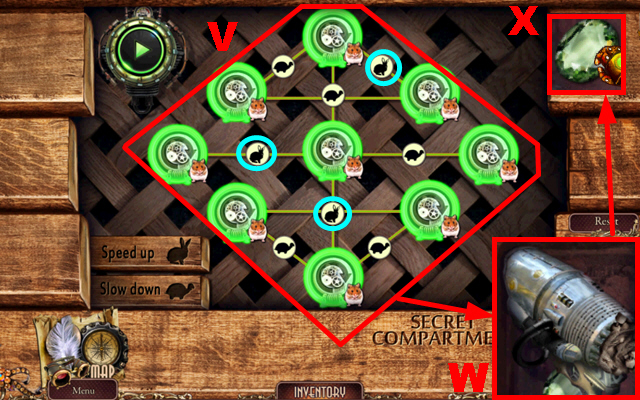
- To solve this puzzle (V), put the rabbit buttons into the spots marked in light blue.
- Take the NET PISTOL (W) and the EMERALD (X).
- Walk down three times.
- Zoom into the booth and connect the SYRINGE PLUNGER to the syringe head; take the SYRINGE (Y).
- Go to the Hall of Wings.
- Zoom into the mechanism and put down the SWITCH HANDLE; pull the handle (Z).
- Zoom into the coat; take the 3/3 FLOWER (A), the ROPE (B), and read the note marked in green.
- Zoom into the anvil and put down the ROPE (C); push the anvil (D) twice.
- Walk down and enter the Workshop.
- Zoom into the table; put down the GRINDER (E) and the 3 FLOWERS (F).
- Put the EMERALD into the grinder, turn the lever (G), and pound the flowers with the PESTLE.
- Put the SYRINGE into the mortar (H), take the FLOWER NECTAR, and take the EMERALD POWDER (I).
- Walk down twice.
- Zoom into the robot; put the FLOWER NECTAR in the container (J) and the EMERALD POWDER in the container (K).
- Go to the Hall of Wings.
- Zoom into the cell; take the PIN (L).
- Zoom into the coat; put the PIN on the bag (M) and open the bag.
- Take the 1/2 COPPER DOG HANDLE (N) and the BLACK TAPE (O).
- Walk down twice.
- Zoom into the robot; seal the leak with the BLACK TAPE (P).
- Play the mini-game.
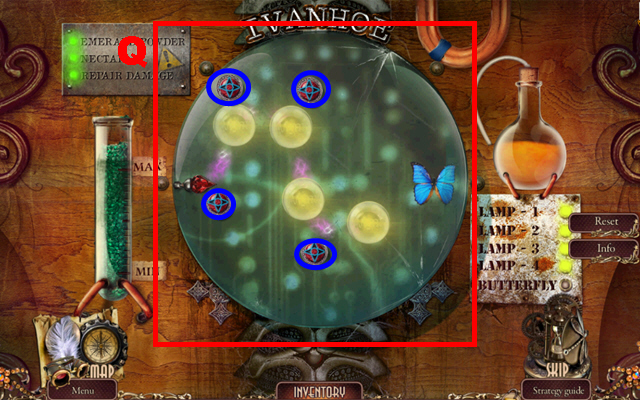
- To solve this puzzle (Q), put down the magnets marked in blue so that the beam flows towards the butterfly.
- Go to the Palace Entrance.
Chapter 6: The Palace Entrance
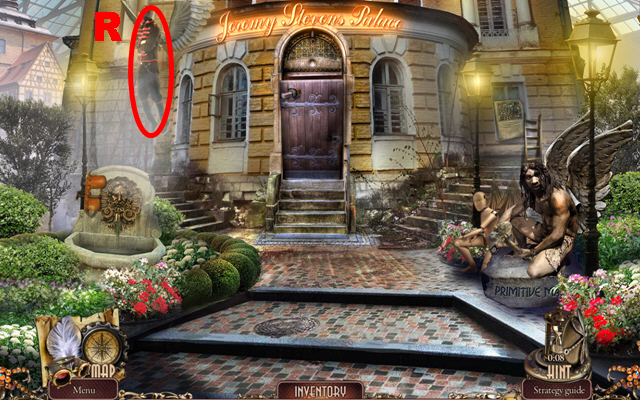
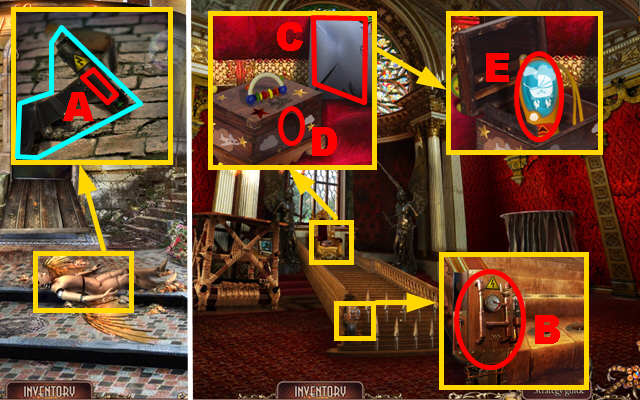
- Shoot the NET PISTOL at the guard (R).

- Zoom into the window; take the CHISEL (S).
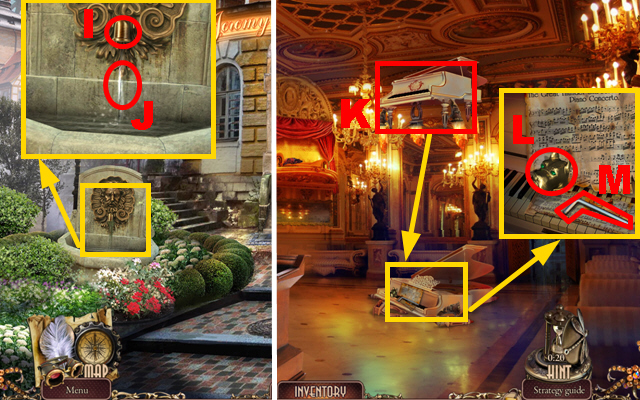
- Zoom into the fountain; put down the CHISEL (T) and take the SCULPTOR’S SET (U).
- Zoom into Ivanhoe; take IVANHOE THE BUTTERFLY (V), the RADIO (W), and the HAND KEY (X).
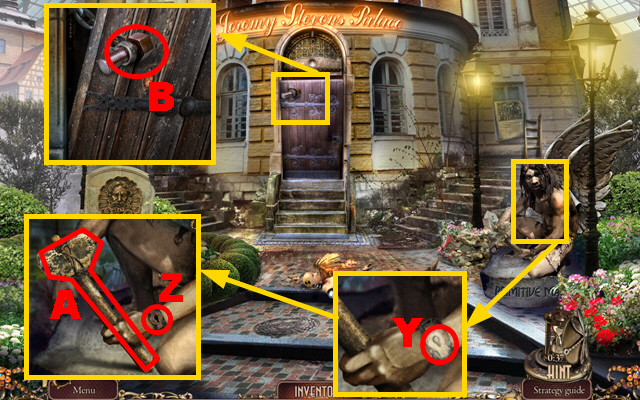
- Zoom into the statue and remove the plaster with the SCULPTOR’S SET (Y); put the HAND KEY into the lock (Z) and take the ANCIENT HAMMER (A).
- Zoom into the gate; use the ANCIENT HAMMER to push out the bolt (B).
- Enter the Ballroom.
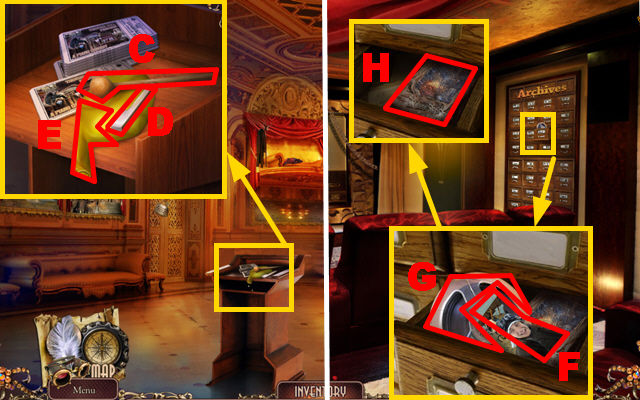
- Zoom into the table; take the MALLET (C), the PIANO KEY (D), and the BALLOON (E).
- Enter the Conference Hall.
- Zoom into the archives; take the PHOTO FRAGMENT (F), the FILM (G), and read the book (H).
- Walk down twice.
- Zoom into the fountain and use the BRUSH to clean the faucet (I); hold the BALLOON into the water (J) and take the WATER BALLOON.
- Move forward.
- Throw the WATER BALLOON at the piano (K).
- Zoom into the piano; take the 2/2 COPPER DOG HANDLE (L) and the HEX WRENCH (M).
- Move forward.
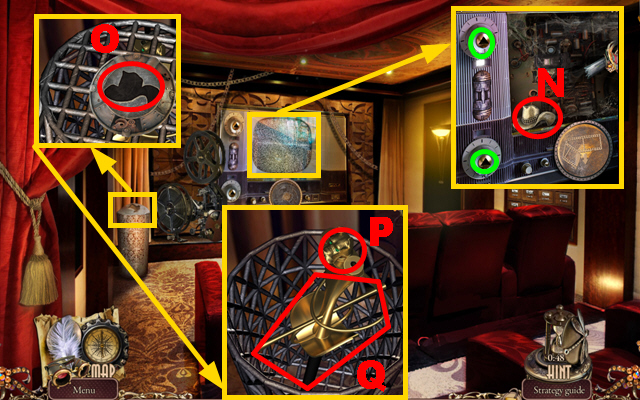
- Zoom into the tv set and put the HEX WRENCH into the slots marked in green; take the HAT BADGE (N).
- Zoom into the stand and put the HAT BADGE into the slot (O); put down the 2 DOG COPPER HANDLES (P) and take the RAPIER (Q).
- Walk down.

- Zoom into the tapestry; remove the tapestry with the RAPIER (R).
- Play the mini-game.
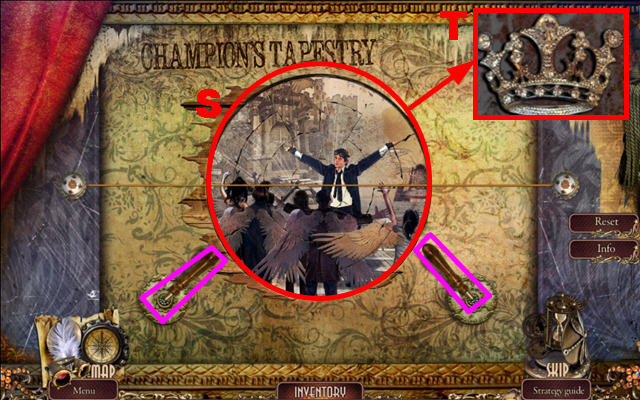
- To solve this puzzle (S), drag the picture pieces along the line to create the correct picture.
- Use the levers marked in purple to rotate the pieces into the correct position.
- Take the THRONE ROOM KEY (T).
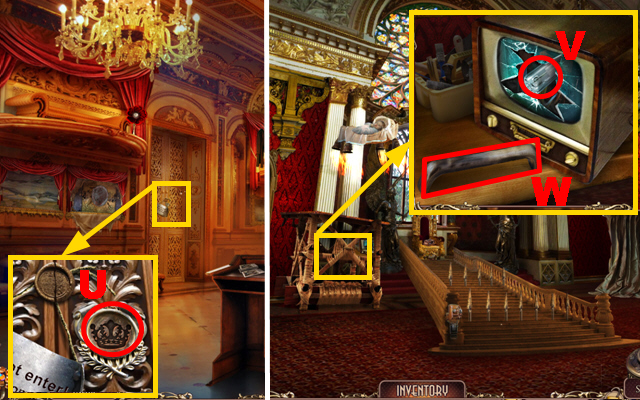
- Zoom into the door; put the THRONE ROOM KEY into the slot (U).
- Enter the Throne Room.
- Zoom into the shelf; take the FUSE (V) and the LADDER RUNG (W).
- Walk down and move forward.
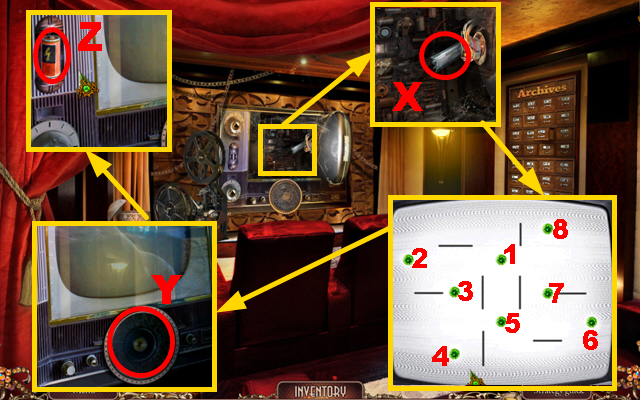
- Zoom into the TV set; replace the broken diode with the FUSE (X).
- Play the mini-game.
- To solve this puzzle, unite the crystals in the sequence 1-8.
- Put the FILM into the slot (Y).
- Take the BATTERY (Z).
- Walk down twice.
- Zoom into Ivanhoe and put the BATTERY into the slot (A); take the SHOCKER marked in light blue.
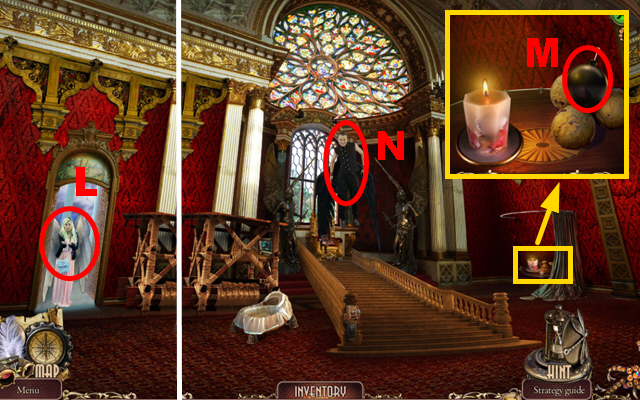
- Move forward and turn left.
- Zoom into the stairs; use the SHOCKER to overcharge the device (B).
- Zoom into the throne; read the letter (C) and put the LOCKET into the slot (D).
- Take the REMOTE CONTROL (E).

- Use the REMOTE CONTROL to pull down the cradle (F).
- Walk down twice.
- Zoom into the window; connect the LADDER RUNG to the ladder (G) and take the LADDER (H).
- Move forward.
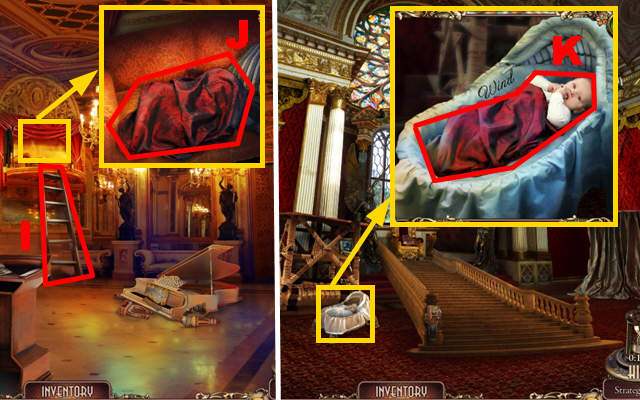
- Put down the LADDER (I).
- Zoom into the balcony; take the DIAPER (J).
- Turn left.
- Zoom into the cradle; put the DIAPER on wind and take WIND (K).
- Give WIND to the woman (L).
- Zoom into the table; take the BOMB (M).
- Throw the BOMB at Thunder (N).
- Zoom into Thunder; take the CITY MEDALLION (O) and the AIRPLANE WING (P).
- Play the HOS.
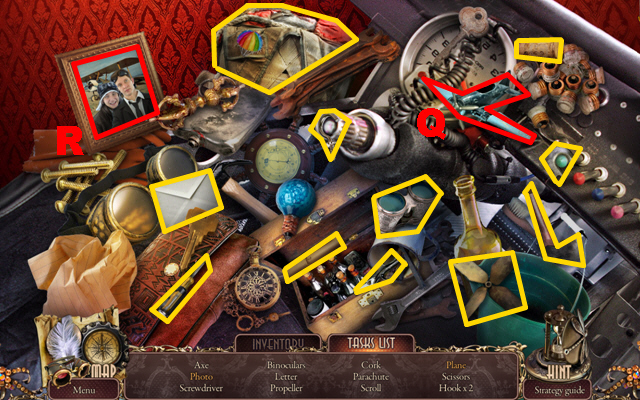
- Take the AIRPLANE WING from your inventory, put it on the plane, and take the plane (Q).
- Take the PHOTO HALF from your inventory, add it to the other photo half, and take the photo (R).
- You will receive the PARACHUTE.
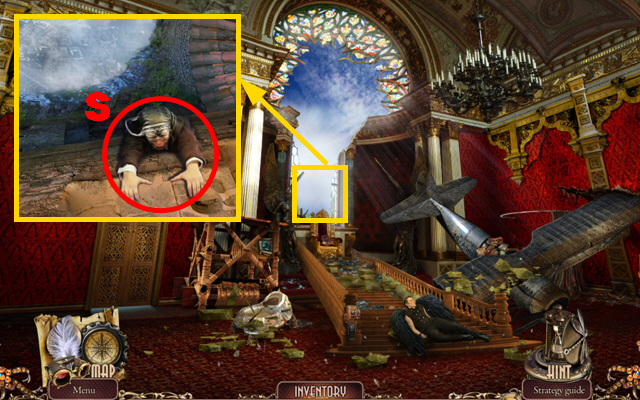
- Zoom into the window; give the PARACHUTE to Chester (S).
- Move forward.
Chapter 7: Back at the Soaring City
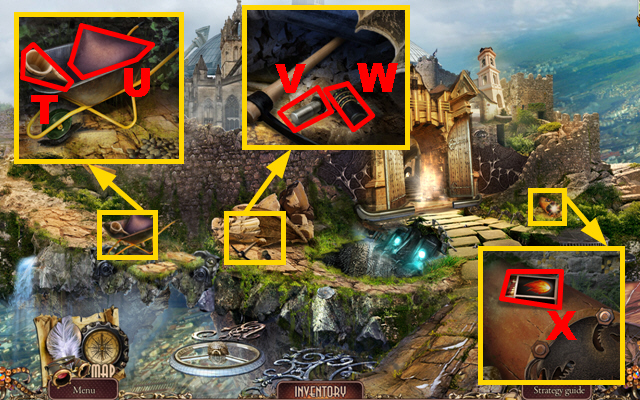
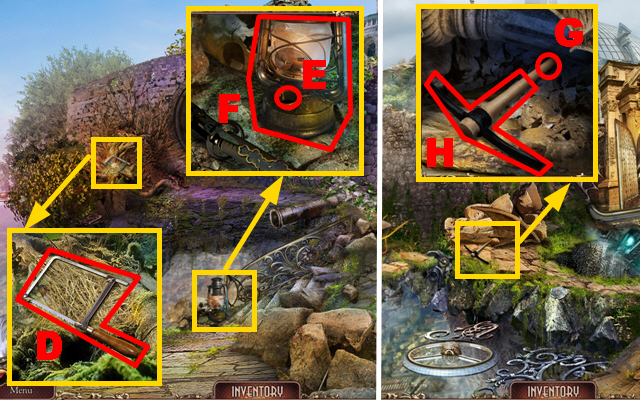
- Zoom into the wheelbarrow; take the SCOOP (T) and the 1/5 PROTECTIVE STUFF (U).
- Zoom into the broken statue; take the BOLT (V) and the JOYSTICK (W).
- Zoom into the column; take the MATCHES (X).
- Turn left.

- Zoom into the debris; take the journal (Y) and read the note (Z).
- Walk down.
- Zoom into the crack and put the SCOOP into the oil; take the SPRAY PAINT (A), the OIL (B), and the SAW BLADE (C).
- Turn left.
- Zoom into the bush; connect the SAW BLADE to the saw handle and take the HACK SAW (D).
- Zoom into the lantern; pour the OIL into the lantern (E) and light it with the MATCHES.
- Take the LANTERN (F).
- Walk down.
- Zoom into the broken statue; use the HACK SAW to cut the handle (G) and take the PICK (H).
- Turn left.
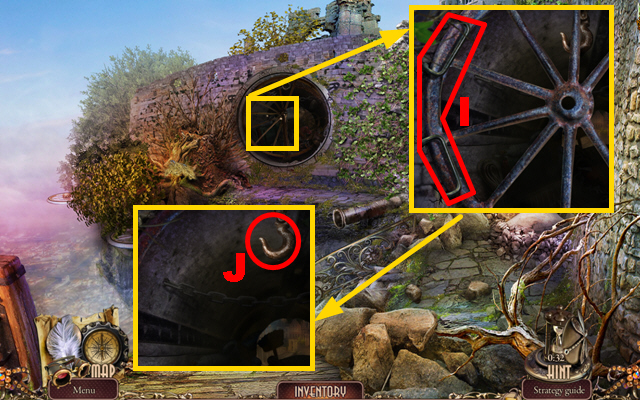
- Zoom into the grate; use the PICK to remove the grate (I).
- Put down the LANTERN (J).
- Play the HOS.
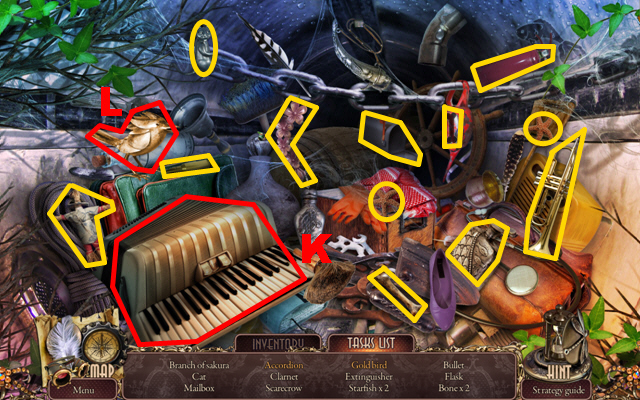
- Take the ACCORDION BUTTON from your inventory, put it into the accordion, and take the accordion (K).
- Take the SPRAY PAINT from your inventory, paint the bird with it, and take the gold bird (L).
- You will receive the CHERRY BLOSSOM INLAY.

- Zoom into the skull and put the CHERRY BLOSSOM INLAY into the slot marked in blue; take the KATANA (M).
- Zoom into the carpet and cut open the carpet with the KATANA (N); take the CARPET.
- Walk down.
- Put the CARPET on the steam (O).
- Move forward.
- Zoom into the abyss; take the 1/2 RING DISK (P).
- Move forward.
- Zoom into the core; take the PAPER BAG (Q) and read the note marked in green.
- Zoom into the elevator; take the 2/2 RING DISK (R).
- Zoom into the box; take the WHEEL (S).
- Go to the Dome.
- Zoom into the tank; take the BATTERY (T).
- Take the 2/5 PROTECTIVE STUFF (U).
- Zoom into the chamber; take the 3/5 PROTECTIVE STUFF (U).
- Walk down three times.

- Zoom into the wheelbarrow; connect the WHEEL to the wheelbarrow (V) and take the WHEELBARROW.
- Take the HOOK (W) and the KEY (X).
- Turn left.
- Zoom into the trapdoor; use the HOOK to open the trapdoor (Y).
- Take the 4/5 PROTECTIVE STUFF (Z) and the BLANKET (A).
- Walk down, go through the door, and move forward.
- Zoom into the core; put down the WHEELBARROW and the BLANKET (B); put the mine into the cart.
- Take the BOMB (C) and the MINE (D).
- Zoom into the box; put the KEY into the lock (E).
- Play the HOS.
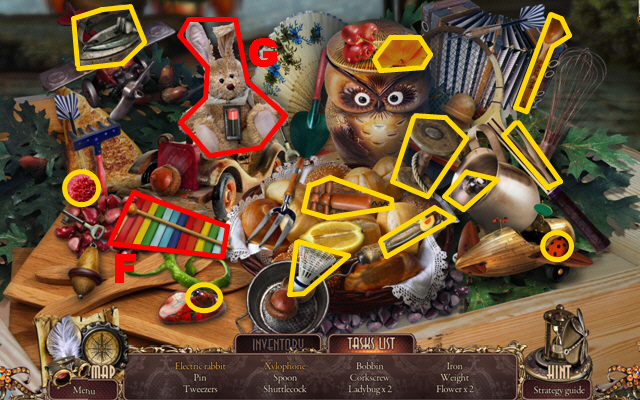
- Take the MALLET from your inventory, put it on the xylophone, and take the xylophone (F).
- Take the BATTERY from your inventory, put it into the rabbit, and take the electric rabbit (G).
- You will receive the COIL.
- Move forward.
- Zoom into the abyss and connect the COIL to the rope (H); turn the lever (I).
- Zoom into the armor; put down the 2 RING DISKS (J).
- Play the mini-game.
- To solve this puzzle (K), rotate and extend the five figures and place them correctly onto the board.
- You will receive the 5/5 PROTECTIVE STUFF.
- Zoom into the chamber; put the BOMB into the slingshot and take the SLING WITH BOMB (L).
- Walk down twice.
- Zoom into the cage; give the 5 PROTECTIVE STUFFS to Jeremy (M) and connect the MINE to the cage (N).
- Shoot the SLING WITH BOMB at the cage (O).
- Zoom into the debris; take the ID CARD (P).
- Move forward.
- Zoom into the panel; put the ID CARD into the slot (Q) and press the button marked in blue.
- Zoom into the lift; take the AWL (R).
- Move forward.
- Zoom into the fuel tank; cut the hose with the AWL (S).
- Move forward.
Chapter 8: Near Jeremy’s Tower
- Zoom into the fireplace; take the WRENCH (T).
- Zoom into the grid; take the 1/3 WEATHER VANES (U) and read the note marked in green.
- Walk down four times.
- Zoom into the pipe and remove the weather vane with the WRENCH (V); take the 2/3 WEATHER VANES and the CROSS (W).
- Move forward four times.
- Zoom into the drain; put the CROSS into the niche (X) and read the note marked in purple.
- Take the 3/3 WEATHER VANES (Y).
- Zoom into the window; put down the 3 WEATHER VANES (Z).
- Play the mini-game.
- To solve this puzzle (A), press the weather vanes in the following sequence: B, C, D, E, D, C, and E.
- Move forward.
- Zoom into the fishing gear; take the PALETTE KNIFE (F).
- Walk down twice.
- Zoom into the poster and remove the brick with the PALETTE KNIFE; take the BRICK (G) and the STAR (H).
- Move forward twice.
- Zoom into the chest and fix its lock mechanism with the BRICK (I).
- Play the mini-game.
- To solve this puzzle (J), switch the symbols so that they all refer to the tool category.
- Read the note marked in blue, take the VALVE WHEEL (K), and the 1/2 MIRROR (L).
- Play the HOS.

- Take the STAR from your inventory, put it into the constellation, and take the ursa minor (M).
- You will receive the COMPRESSOR GAUGE.
- Walk down three times.
- Zoom into the elevator and put down the VALVE WHEEL (N); turn the valve.
- Go down.
- Zoom into the device and replace the broken compressor with the COMPRESSOR (O); take the COIN (P) and the CAPTAIN’S BADGE (Q).
- Walk down.
- Zoom into the vending machine and put the MEAL TICKET into the slot (R); take the CHEWING GUM (S).
- Go down.
- Zoom into the device; cover the hole with the CHEWING GUM (T) and turn the handle (U).
- Zoom into the panel; take the BELT (V) and read the note marked in purple.
- Walk down and move forward twice.
- Zoom into the grid and connect the BELT to the mechanism (W); put the BOLT into the pitchfork, take the PITCHFORK (X), and the JAR OF FLOWERS (Y).
- Walk down four times and turn left.
- Zoom into the bush and remove the hay with the PITCHFORK (Z); take the CLAW (A) and the HOOK (B).
- Walk down, go through the gate, and move forward four times.
- Zoom into the robot and put down IVANHOE THE BUTTERFLY and the CLAW (C); take the ROBOT (D).
- Walk down three times and go down.
- Replace the old robot with the ROBOT (E).
- Zoom into the right compartment; take the SPRING (F).
- Zoom into the left compartment and remove the old spring; put down the SPRING (G) and take the REEL (H).
- Walk down and move forward three times.
- Zoom into the fishing gear; put down the HOOK (I) and the REEL (J); take the FISHING ROD.
- Walk down four times.
- Zoom into the abyss; use the FISHING ROD to acquire the UMBRELLA (K).
- Move forward and go down.
- Put down the UMBRELLA (L).
- Zoom into the control panel; put down the JOYSTICK (M).
- Play the mini-game.
- To solve this puzzle (N), guide the robot along the indicated lines by pressing the buttons marked in purple.
- Zoom into the robot; take the EMERALD (O).
- Zoom into the left compartment; put down the EMERALD (P).
- Zoom into the right compartment; put down the JAR OF DLOWERS (Q).
- Zoom into the panel; press the button (R).
- Take the THROTTLE LEVER (S).
- Walk down.
- Zoom into the lift and put down the THROTTLE LEVER (T); turn the lever (U).
- Zoom into the cabinet and put the CAPTAIN’S BADGE into the niche (V).
- Press the buttons in the sequence 1-5 to complete this puzzle.
- Take the PEDAL (W).
- Zoom into the bin and put down the PEDAL (X); press the pedal and take the SCREWDRIVER (Y).
- Zoom into the mirror and remove the screws marked in green with the SCREWDRIVER; take the 2/2 MIRROR (Z).
- Walk down, go to the Dome, and move forward.
- Zoom into the fireplace; put down the PAPER BAG and take the ASHES (A).
- Walk down twice and go to the Wheelhouse.
- Zoom into the security system; put down the ASHES (B) and the 2 MIRRORS (C).
- Move forward.
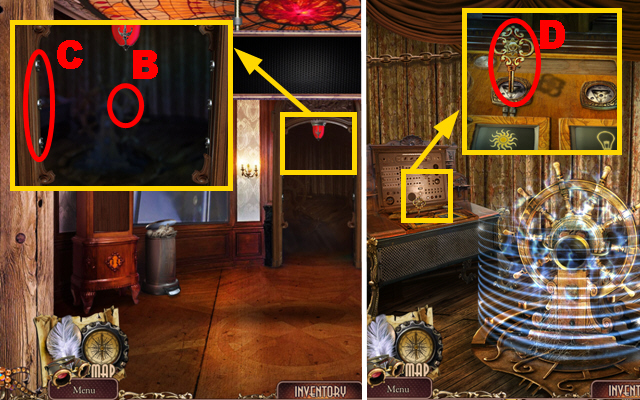
- Zoom into the control panel; turn the key (D).
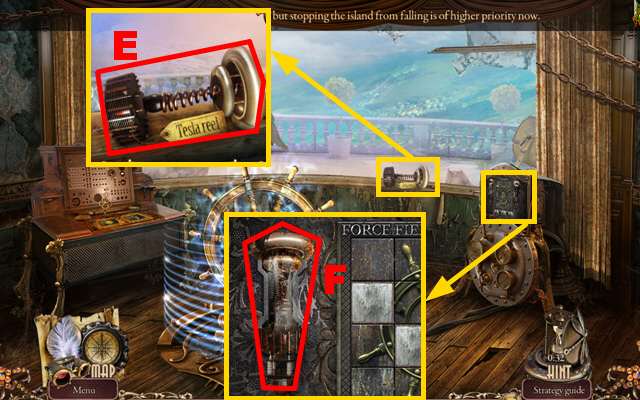
- Zoom into the device; take the TESLA COIL (E).
- Zoom into the machine; put down the TESLA COIL (F).
- Play the mini-game.
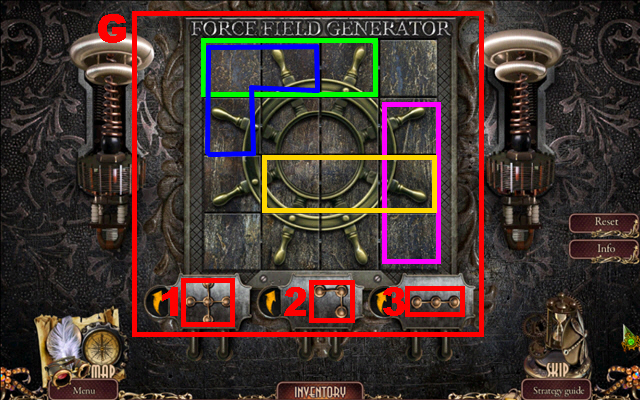
- To solve this puzzle (G), put figure 3 into the spot marked in purple, rotate figure 3 and put it into the spot marked in yellow, put figure 3 into the spot marked in green, and rotate figure 2 and put it into the spot marked in blue.
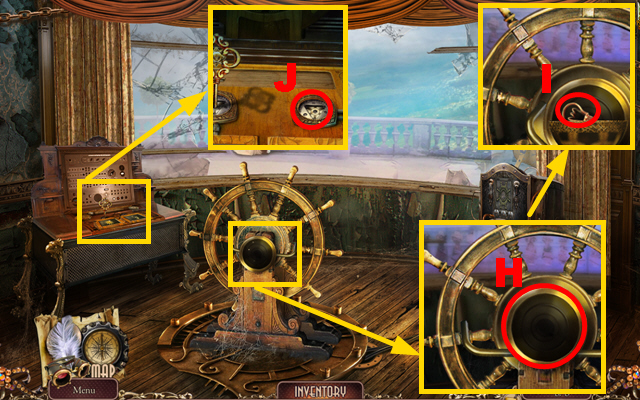
- Zoom into the steering wheel and put the CITY MEDALLION into the slot (H); press the medallion and take the KEY (I).
- Zoom into the machine; put the KEY into the slot (J) and turn it.
- Congratulations, you have completed Surface: The Soaring City!


 Kate Arrow: Deserted Wood Walkthrough, Guide, & Tips
 Diamon Jones: Devil's Contract Walkthrough, Guide, & Tips
 Sea of Lies: Tide of Treachery Walkthrough, Guide, & Tips
 Mystery Case Files: Shadow Lake Walkthrough, Guide, & Tips
 Reflections of Life: Equilibrium Walkthrough, Guide, & Tips