Reflections of Life: Equilibrium Walkthrough, Guide, & Tips
Reflections of Life: Equilibrium Walkthrough
Welcome to the Reflections of Life: Equilibrium Walkthrough
The Queen of Creatos is missing, and if you don’t get her back soon… the entire world will crumble!
Whether you use this document as a reference when things get difficult or as a road map to get you from beginning to end, we’re pretty sure you’ll find what you’re looking for here.
This document contains a complete Reflections of Life: Equilibrium game walkthrough featuring annotated screenshots from actual gameplay!
We hope you find this information useful as you play your way through the game. Use the walkthrough menu below to quickly jump to whatever stage of the game you need help with.
Remember to visit the Big Fish Games Forums if you find you need more help. Have fun!
This walkthrough was created by Laurie Murphy, and is protected under US Copyright laws. Any unauthorized use, including re-publication in whole or in part, without permission, is strictly prohibited.
General Tips
- This is the official guide for Reflections of Life: Equilibrium!
- This guide does not mention each time you have to zoom into a location; the screenshots show each zoom scene.
- Hidden-object puzzles are referred to as HOPs. This guide does not show screenshots of the HOPs, however, it is mentioned when a HOP is available and the inventory item collected.
- This guide gives step-by-step solutions for all puzzles that are not random. Please read the instructions in the game for each puzzle.
Chapter 1: Creatos

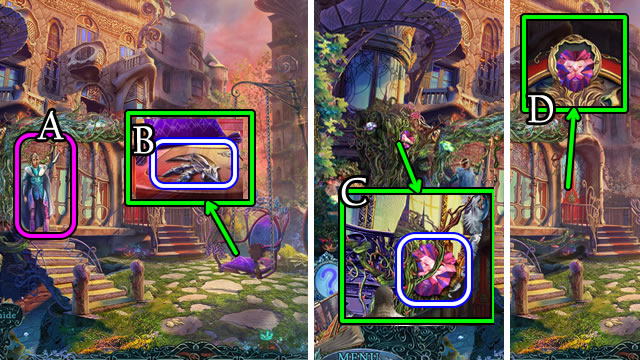
- Speak to the King (A).
- Move the pillow; take the note and METAL CLAWS (B).
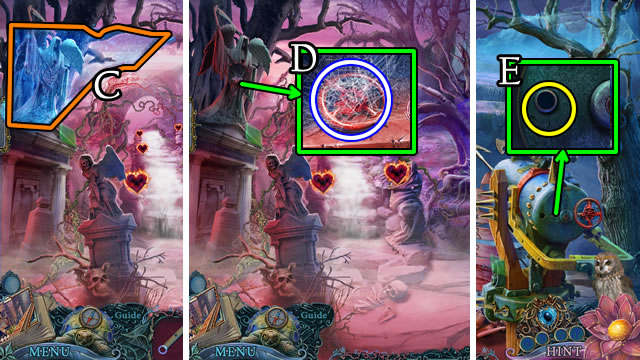
- Place the METAL CLAWS (C); receive a LION GEM.
- Place the LION GEM (D).
- Walk forward.

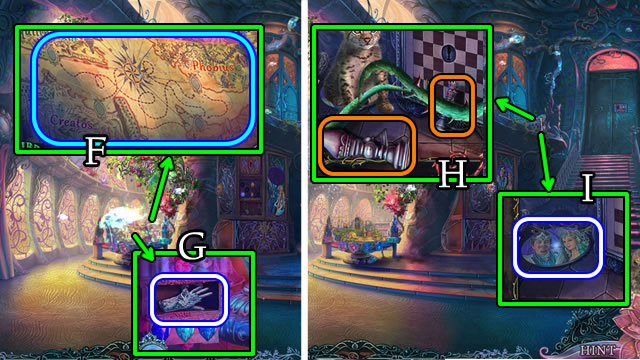
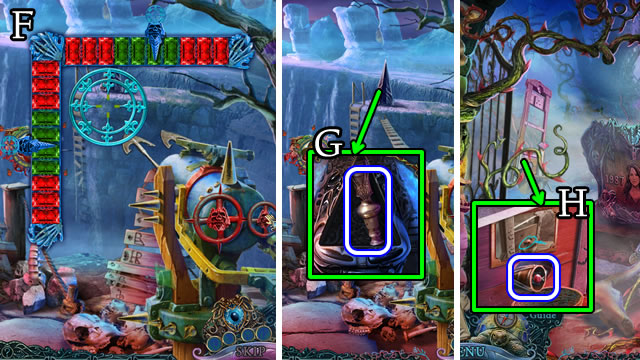
- Take the Map (F) to play a HOP; take the GLOVE TOKEN (G).
- Select (H); take the KING AND QUEEN (I).

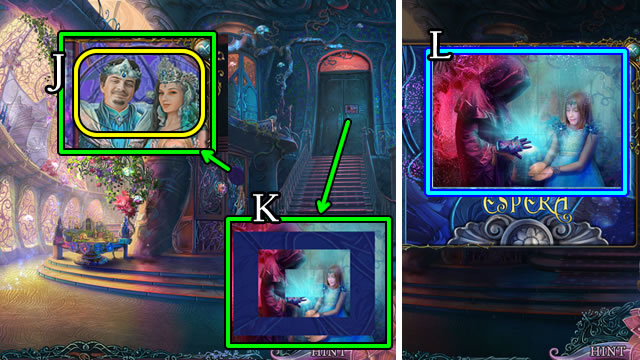
- Place the KING AND QUEEN (J); receive a SMALL FRAME.
- Place the SMALL FRAME (K).
- Solution (L).
- Walk forward.

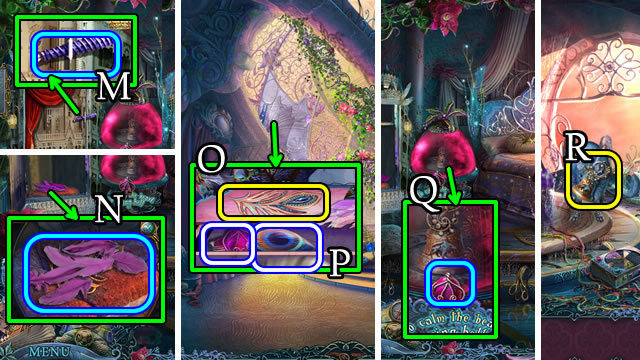
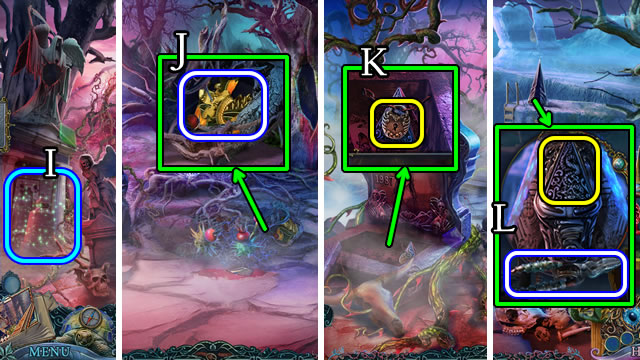
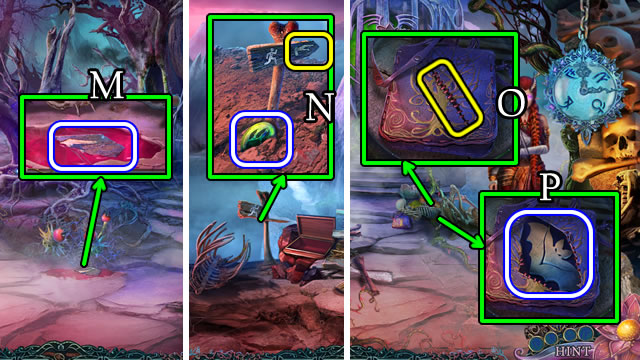
- Take (M).
- Move (N); take the FEATHER.
- Walk down.
- Place the FEATHER (O). Take the PIANO GEM and DOME KEY (P).
- Walk forward.
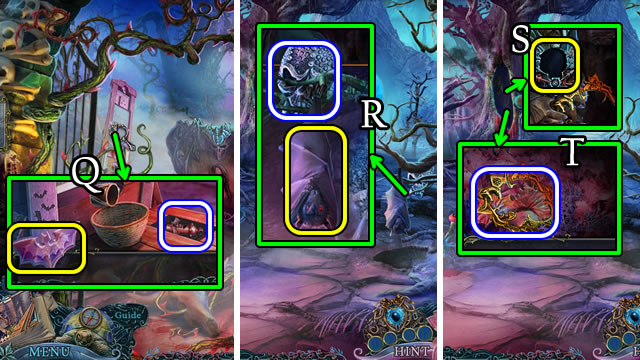
- Place the DOME KEY (Q), open, take the BELL.
- Place the BELL (R).

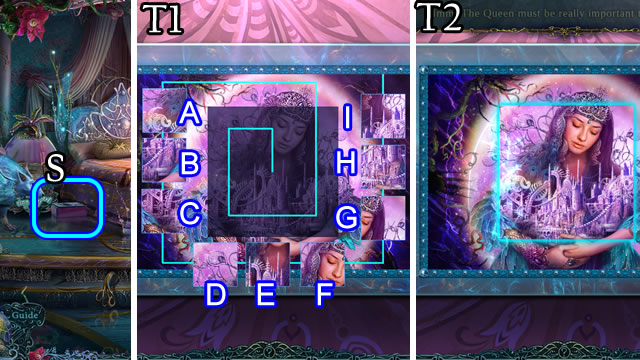


- Select (S).
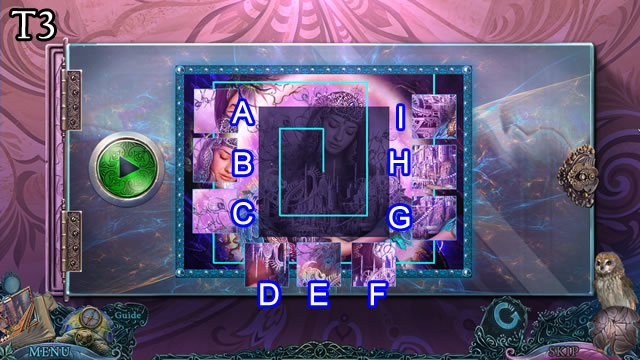
- Solution, part one (T1). A-E, B-F, C-D, D-E, G-I, G-H, F-G.
- Solved (T2).
- Solution for Hardcore Mode (T3). Ax2-Dx2-I. A-D, E-I, F-H, D-I.
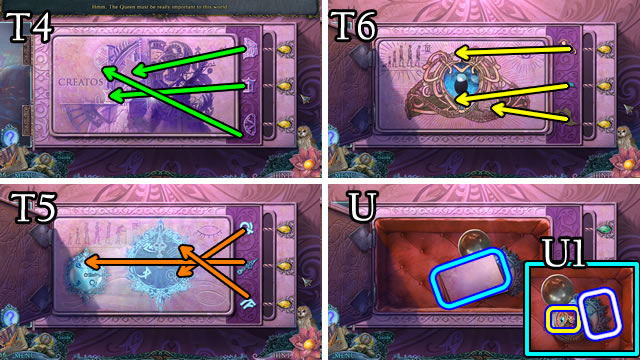
- Solution, part two (T4-T5-T6).
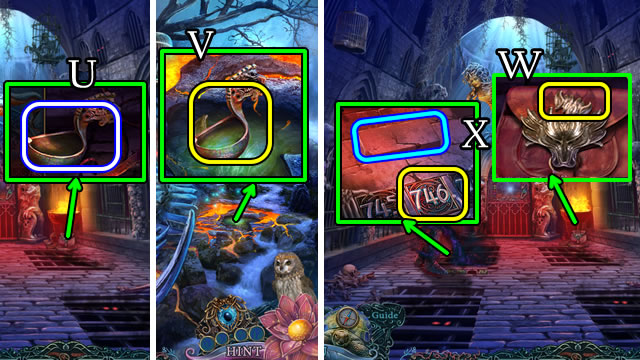
- Take the note (U). Take the Vision Ring and CLOCK HALF (U1).

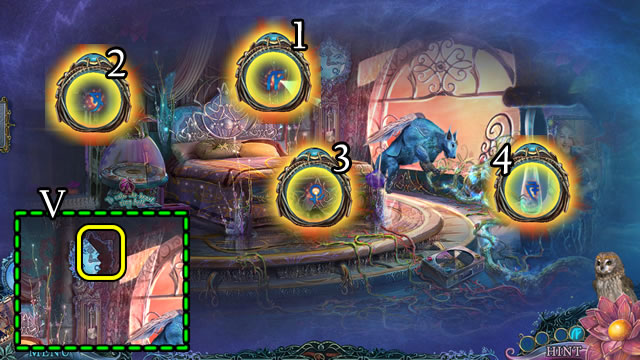
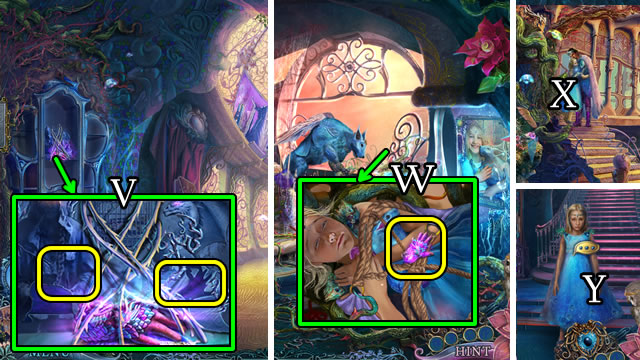
- Place the CLOCK HALF (V).
- Use the Vision Ring (1-2-3-4).

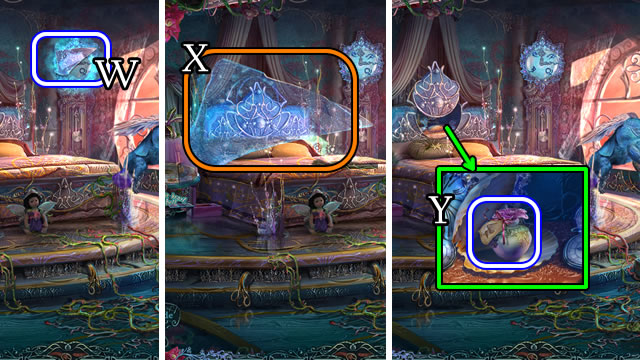
- Take (W), then place (X) the MYSTICAL IMAGE.
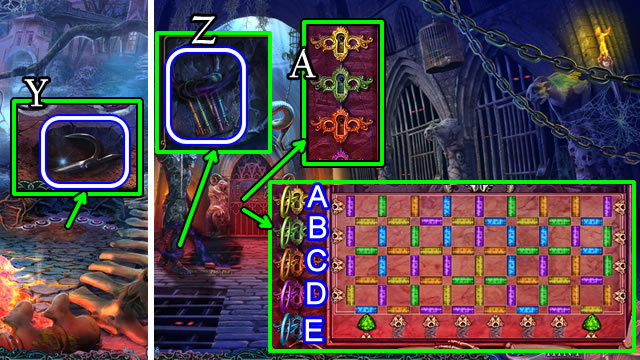
- Open; take the SMELLING SALTS (Y).

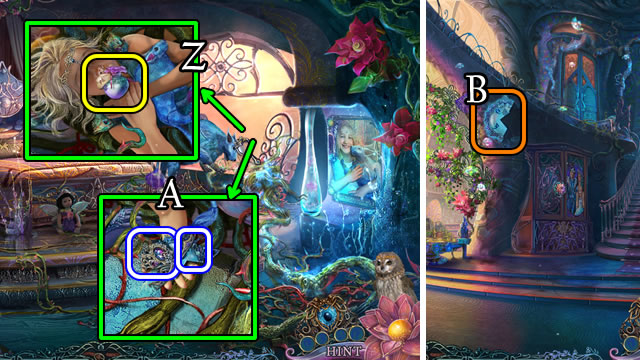
- Place the SMELLING SALTS (Z).
- Take the BROKEN CROWN and CLOCK HALF (A).
- Walk down.
- Place the CLOCK HALF (B).
- Use the Vision Ring.

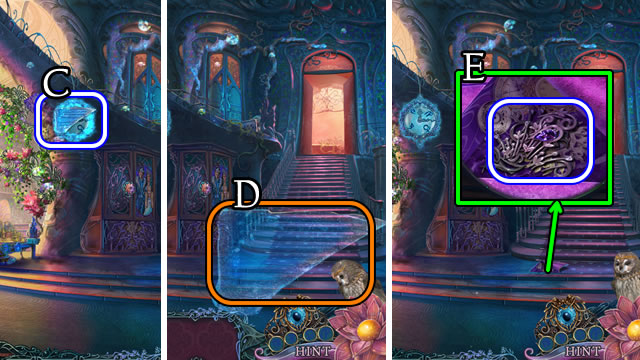
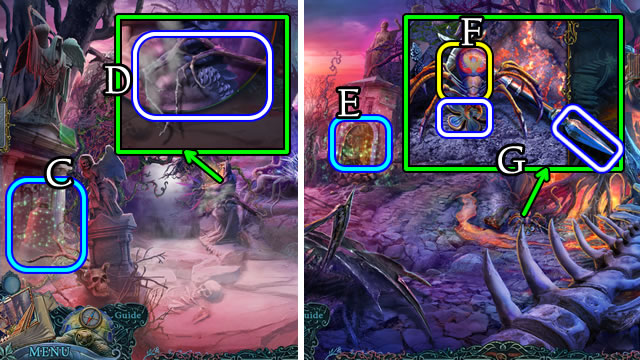
- Take (C), then place (D) the MYSTICAL IMAGE.
- Select, then take the CROWN SHARDS (E).
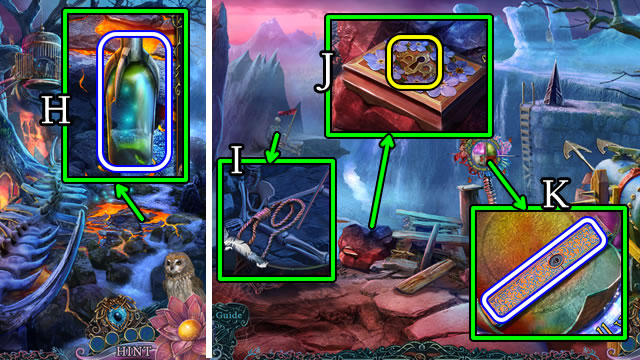
- Combine the BROKEN CROWN and CROWN SHARDS; take the CROWN INSERT (Inventory).

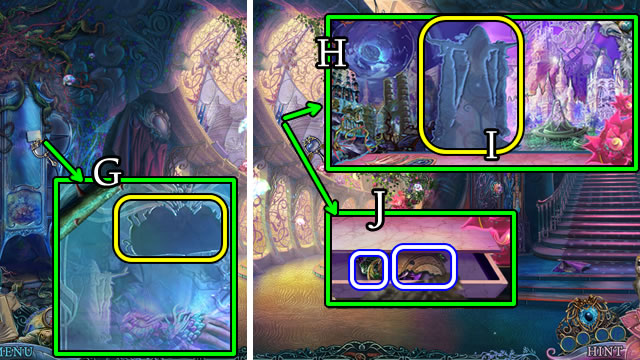
- Take the note; place the CROWN INSERT (G). Take the HUMAN FIGURE.
- Repair the window (H); place the HUMAN FIGURE (I).
- Take the SEAL PART and BROKEN MEDALLION (J).
- Restore the BROKEN MEDALLION; take the CHAIR MEDALLION (Inventory).
- Walk down.

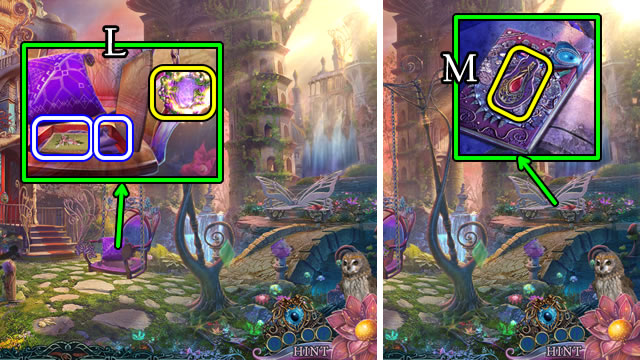
- Place the CHAIR MEDALLION. Take the CARD and HAMMOCK (l).
- Open the CARD; take the BOOK KEY (Inventory).
- Place the BOOK KEY (M), open; take the PUZZLE-BOX PIECE.
- Walk forward 2x.

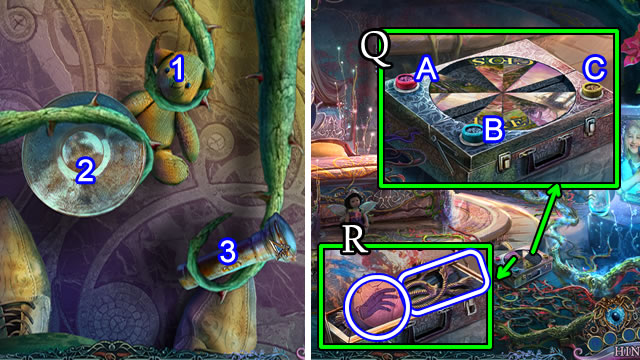
- Select and place the objects (1-2-3).
- Place the PUZZLE-BOX PIECE (Q).
- Solution: Bx6-Ax10-Cx8.
- Open, take the HAND BUTTON 1/3 and SCRAPS OF ROPE (R).
- Combine the HAMMOCK and SCRAPS OF ROPE; take the HAMMOCK ON ROPE (Inventory).

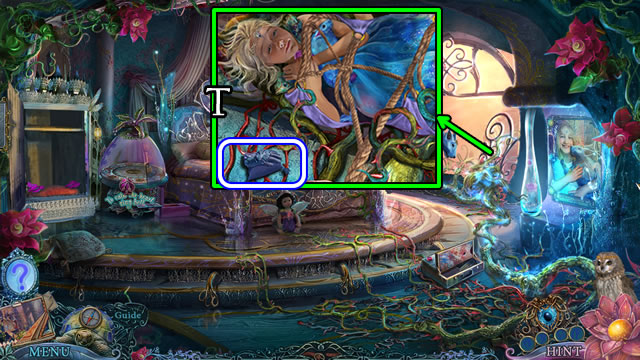
- Place the HAMMOCK ON ROPE; take the GLOVE TOKEN (T).
- Walk down.

- Place 2 GLOVE TOKENS (V). Take the MAGIC GLOVE.
- Walk forward.
- Place the MAGIC GLOVE (W).
- Walk down 2x. Speak to the King (X).
- Walk forward; speak to the Princess (Y).

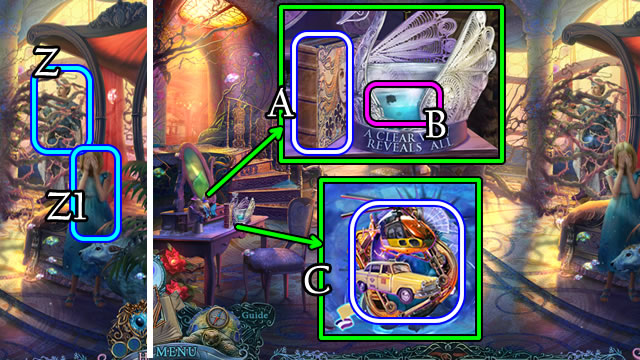
- Walk left; speak to the King (Z); receive a BOOK CIRCLE; speak to the Princess (Z1).
- Take the QUEEN’S DIARY (A); select (B).
- Solutions vary. Take the BROKEN SYMBOL (C).
- Restore the BROKEN SYMBOL; take the ACTUALUS SYMBOL (Inventory).
- Walk left.

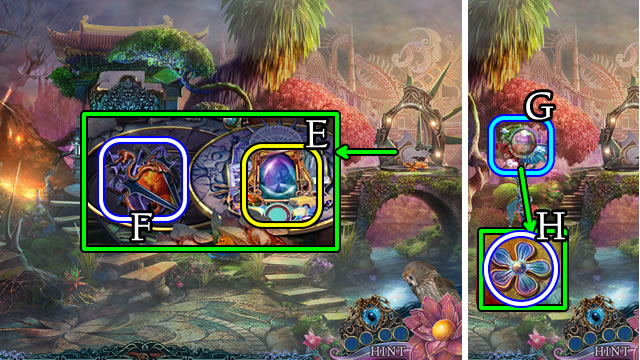
- Move the leaves 2x; place the ACTUALUS SYMBOL (E); take the BROKEN SYMBOL (F).
- Restore the BROKEN SYMBOL; take the PHOBIUS SYMBOL (Inventory).
- Play the HOP (G); take the FORGET-ME-NOT (H).

- Select 2x (J); receive a BROKEN SEAL.
- Walk down and forward.
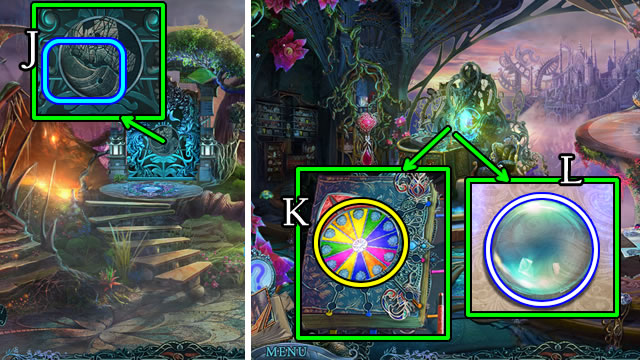
- Place the BOOK CIRCLE (K); open for a HOP; take the LENS (L).

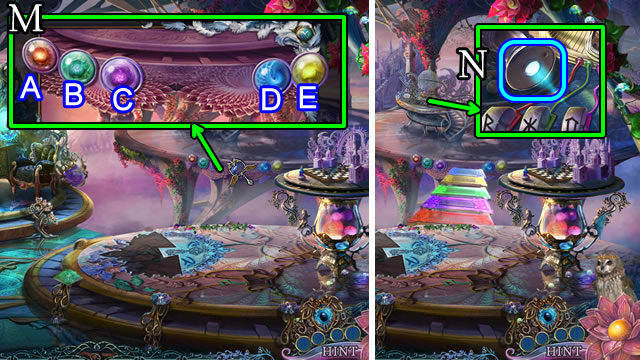
- Select (M).
- Solution: A-B-E-C-D.
- Replace the LENS; (N).

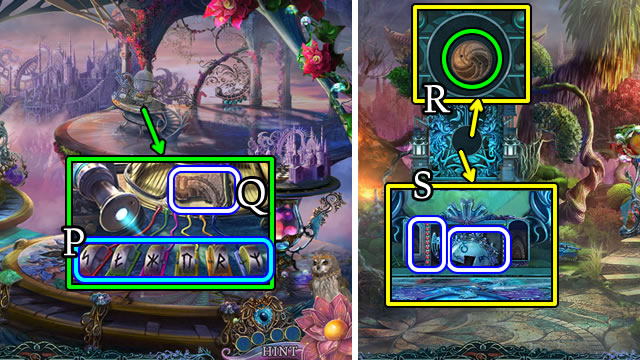
- Solution (P).
- Take the SEAL PART (Q).
- Walk down and left.
- Combine the BROKEN SEAL and 2 SEAL PARTS; take the SEAL (Inventory).
- Place the SEAL (R); take the CLOCK HALF and BUTTERFLY WING (S).
- Walk down.

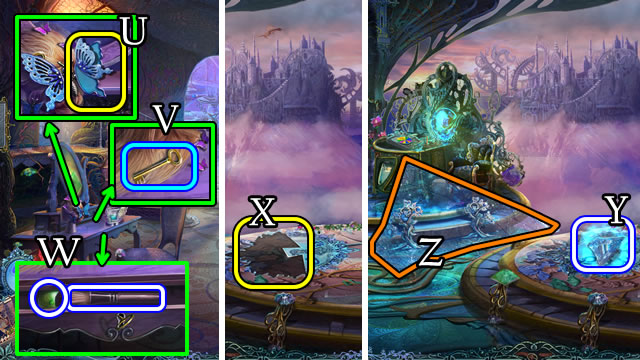
- Place the BUTTERFLY WING (U); select the butterfly. Take the key (V); turn 2x. Take the MAKEUP BRUSH and PEARL (W).
- Walk forward.
- Place the CLOCK HALF (X).
- Use the Vision Ring.
- Take (Y) then place (Z) the MYSTICAL IMAGE.

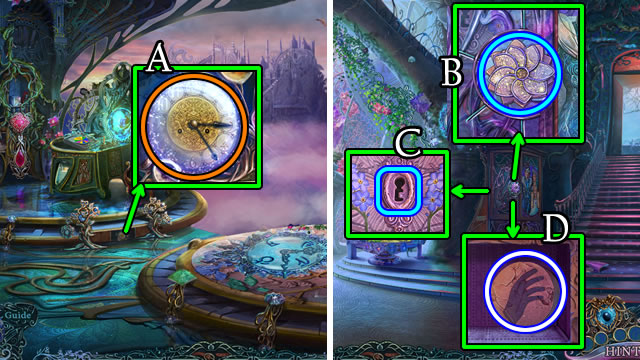
- Select (A); take HAND BUTTON 2/3.
- Walk down 2x.
- Combine the QUEEN’S DIARY and FORGET-ME-NOT; take the QUEEN’S KEY (Inventory).
- Select (B); place the QUEEN’S KEY (C); take HAND BUTTON 3/3 (D).
- Walk left 2x.

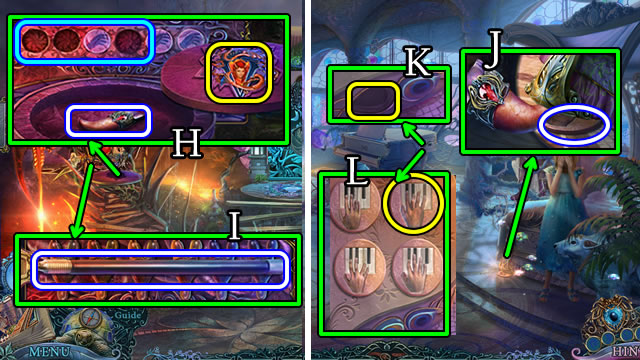
- Place the PHOBIUS SYMBOL; take the DRAGON TOOTH; place HAND BUTTON 3/3 (H).
- Select all buttons, take the GLASS CUTTER (I).
- Walk down.
- Place the DRAGON TOOTH; take the PIANO TOKEN (J).
- Place the PIANO GEM (K) and PIANO TOKEN (L); take FLOWERS 1/3.
- Walk forward.

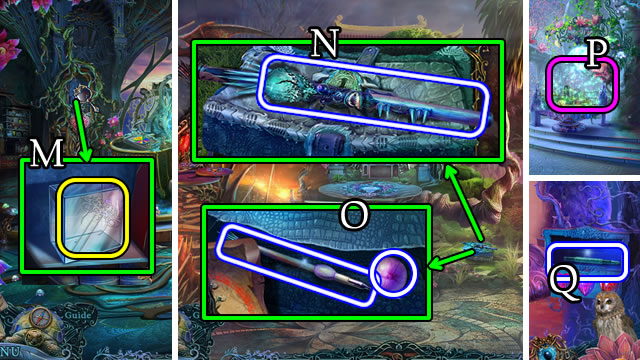
- Use the GLASS CUTTER (M); take the HAIRPIN.
- Bend the HAIRPIN 3x; earn the LOCKPICK (Inventory).
- Walk down, then left.
- Pick up the BLOWGUN (N). Use the LOCKPICK. Remove drawings 3x; take the TRANQUILIZER DART and PEARL (O).
- Walk down 2x.
- Play the HOP (P); take the PEN (Q).

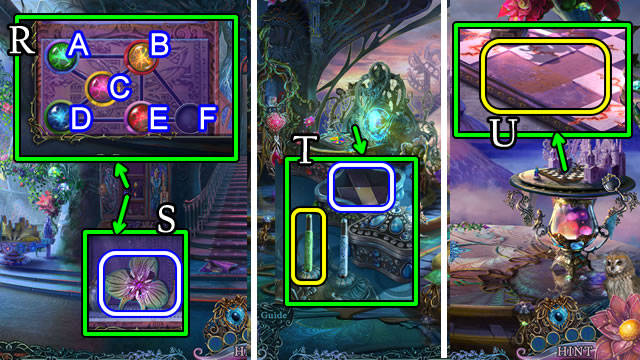
- Place 2 PEARLS (R).
- Solution. E-B-A-C-D-E-B-A-C-D-E-B-F.
- Take FLOWERS 2/3 (S).
- Walk left, then forward.
- Place and select the PEN; take the CHESSBOARD PART (T).
- Place the CHESSBOARD PART (U).

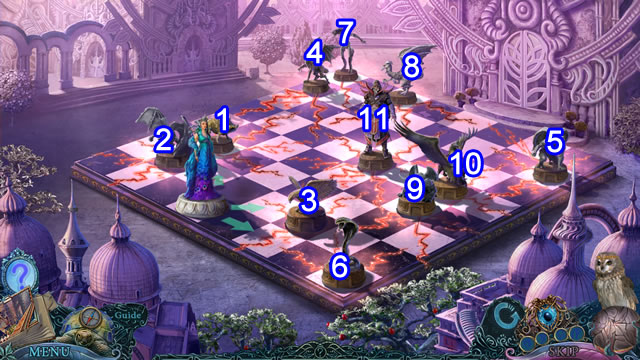
- Solution. 1-2-3-4-5-6-7-8-9-10-11.
- Take FLOWERS 3/3.
- Walk down.

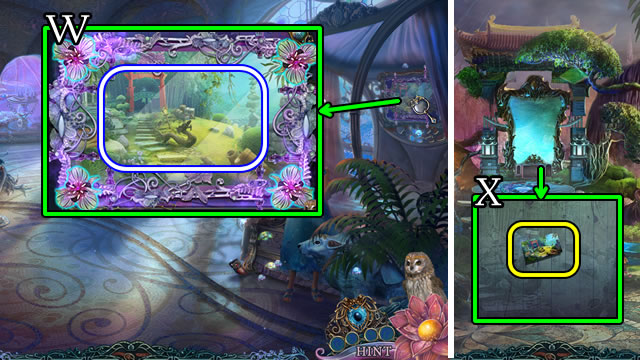
- Place FLOWERS 3/3; take the EQUILIBRIUM PHOTO (W).
- Walk left.
- Place the EQUILIBRIUM PHOTO (X).

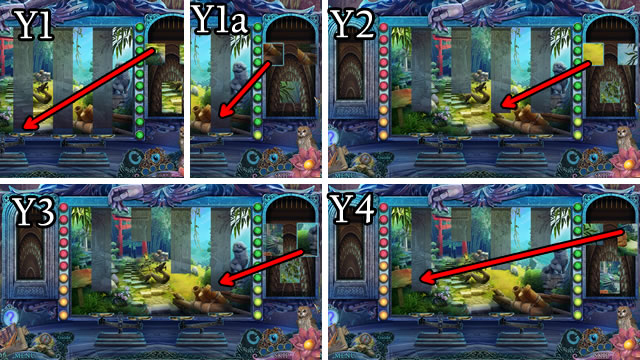

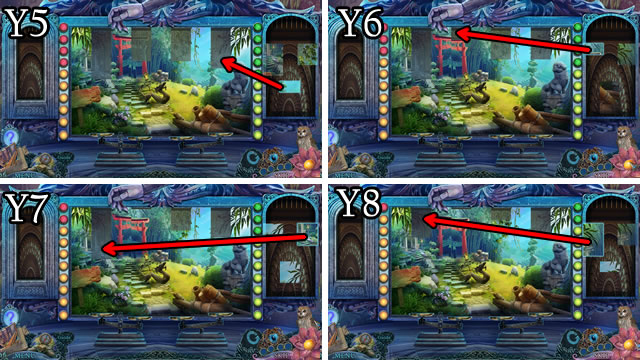

- Solution, part one. (Y1-Y1a-Y2-Y3-Y4).
- Solution, part two. (Y5-Y6-Y7-Y8).
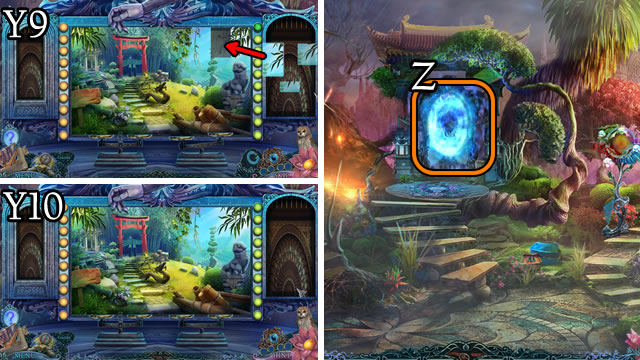
- Solution, part three. (Y9-Y10).
- Walk forward (Z).
Chapter 2: Approaching Equilibrium

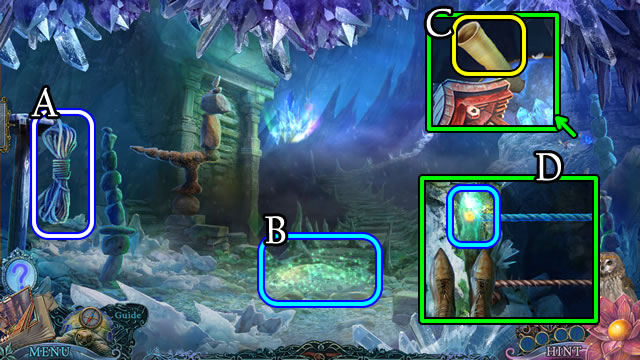
- Grab the ROPE (A).
- Play the HOP (B); take the MESSAGE.
- Untie and take the MESSAGE; take the DAGGER (Inventory).
- Place the ROPE (C) and cross the crevasse (D).

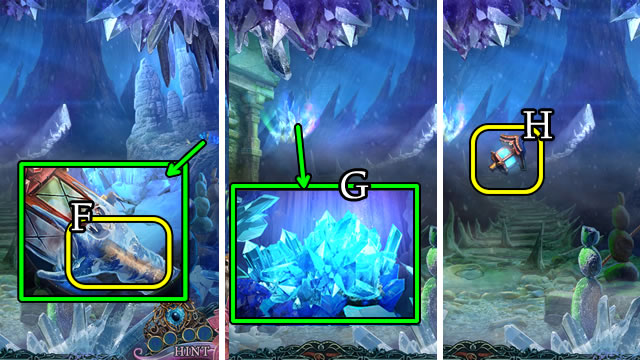
- Use the DAGGER (F); take the EMPTY LAMP.
- Play the HOP; take the GLOWING ICE (G).
- Combine the EMPTY LAMP and GLOWING ICE; take the LAMP (Inventory).
- Place the LAMP (H).

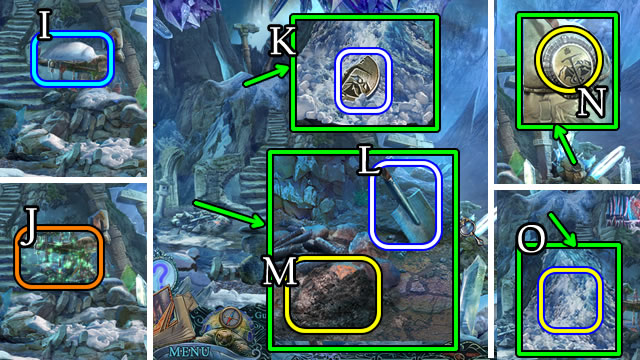
- Remove (I); play the HOP (J); receive ALPINIST’S KEY 1/3.
- Take ALPINIST’S KEY 2/3 (K).
- Select then take the SHOVEL HEAD (L).
- Use the MAKEUP BRUSH, move (M); take ALPINIST’S KEY 3/3.
- Place ALPINIST’S KEY 3/3 (N); open; take the HANDLE.
- Combine the SHOVEL HEAD and HANDLE; take the SHOVEL (Inventory).
- Use the SHOVEL (O).
- Walk forward.

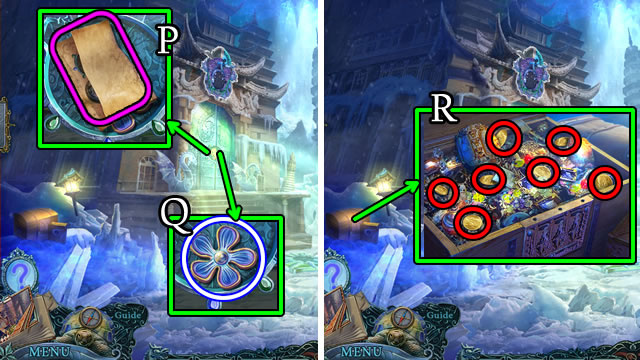
- Take the note (P) and FORGET-ME-NOT (Q).
- Combine the FORGET-ME-NOT and QUEEN’S DIARY; take the QUEEN’S KEY (Inventory).
- Uncover and take GOLDEN COINS 7/7 (R).
- Walk right.

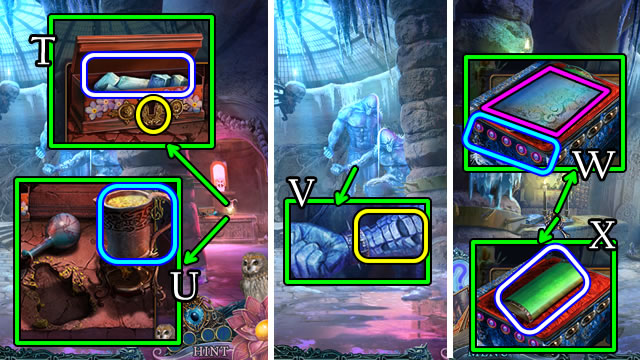
- Use the QUEEN’S KEY; take ICY SCALES (T).
- Place the GOLDEN COINS 7/7; select (U); take the GOLDEN PORTRAIT.
- Place the ICY SCALES (V); take TOOLS TOKEN.
- Depress the buttons; take the note (W); take the GLOWING CYLINDER (X).
- Walk down.

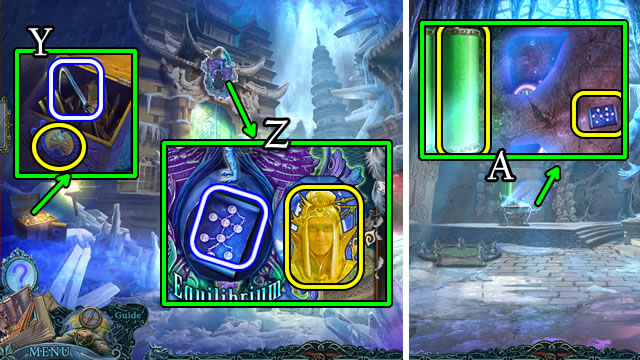
- Place the TOOLS TOKEN; take the HOOK (Y).
- Place the GOLDEN PORTRAIT; take the MAP (Z).
- Walk right.
- Place the GLOWING CYLINDER and MAP (A).

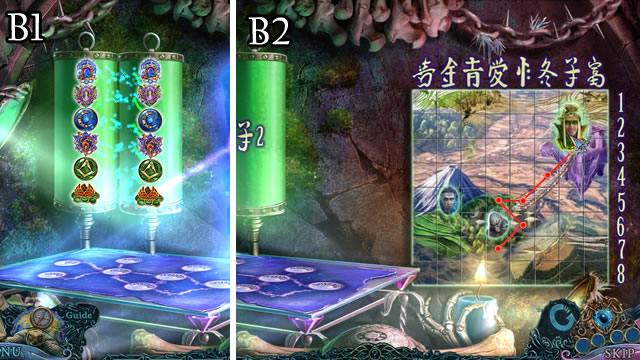
- Solutions vary. Possible solutions (B1-B2).
- Take the SCALE PAN.
- Walk down 2x.

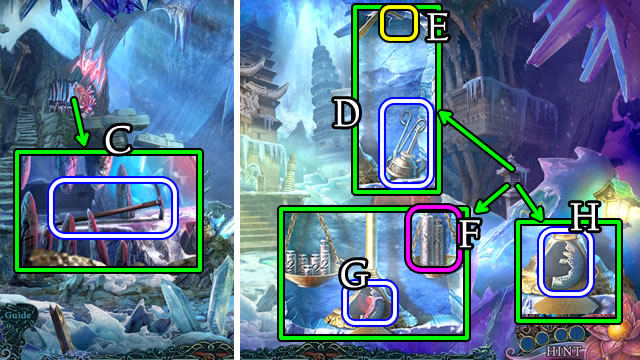
- Use the HOOK; take the PICK (C).
- Walk forward.
- Use the PICK; take the EMPTY OILER and TONGS (D).
- Place the SCALE PAN (E).
- Solution (F).
- Take the BALANCER (G) and ICY STONE (H).

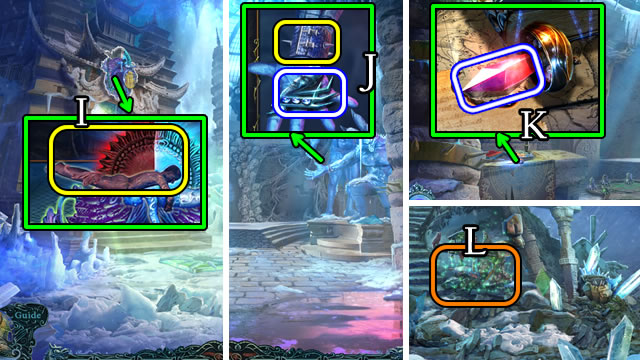
- Place the BALANCER (I); take the BRACELET.
- Walk right.
- Place the BRACELET; take AKVOS PORTRAIT HALF (J).
- Use the TONGS; receive a HOT MINERAL (K).
- Walk down 2x.
- Play the HOP (L); receive a SHAWL.

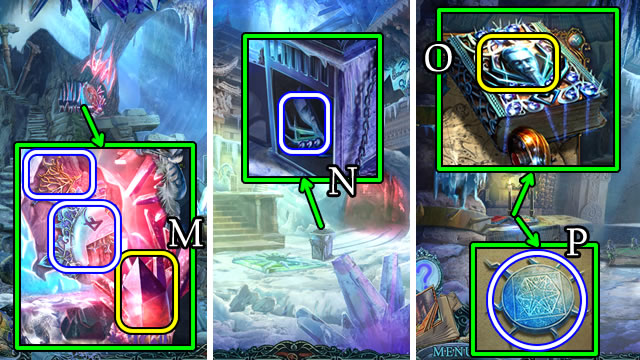
- Place the HOT MINERAL; take a CLOCK HALF and BAT TOKEN (M).
- Walk forward.
- Place the BAT TOKEN; take AKVOS PORTRAIT HALF (N).
- Walk right.
- Place AKVOS PORTRAIT HALVES (O); play the HOP; take MAGIC ICE (P).
- Walk down.

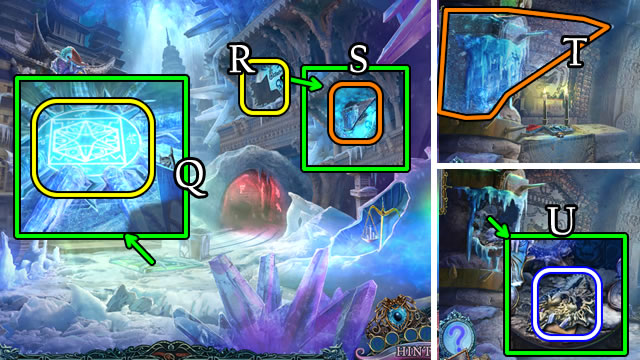
- Place MAGIC ICE (Q); take an ICY STONE.
- Place the CLOCK HALF (R).
- Use the Vision Ring.
- Take the MYSTICAL IMAGE (S).
- Walk right.
- Place the MYSTICAL IMAGE (T). Uncover and take the BROKEN AMULET (U).

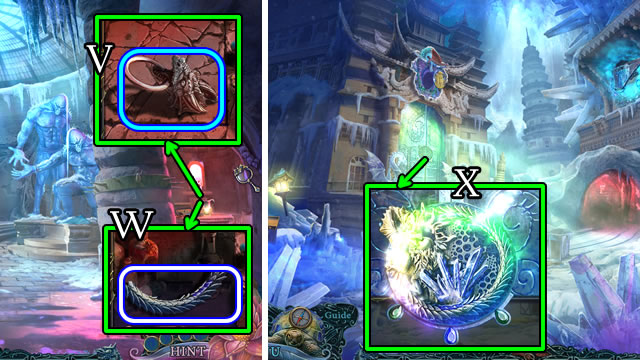
- Use the SHAWL, open (V); take the ICY STONE (W).
- Combine the BROKEN AMULET and 3 ICY STONES; take the ICY AMULET (Inventory).
- Walk down.
- Place the ICY AMULET (X). Walk forward.

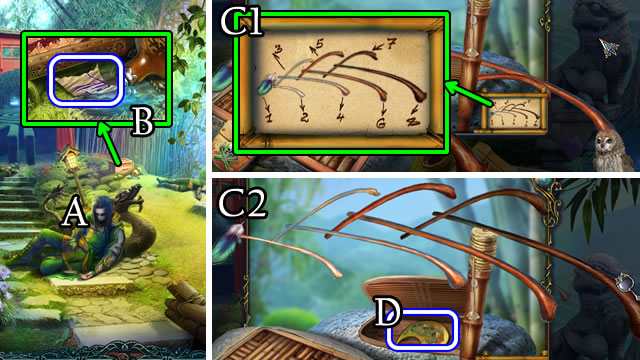
- Speak to the guard (A); receive a LABYRINTH MAP HALF.
- Take the MAP PIECE (B).
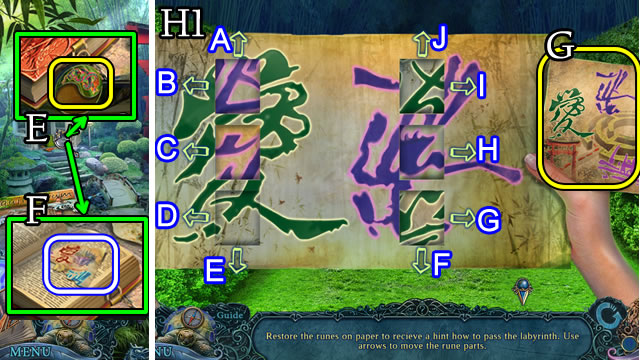
- Touch the mobile.
- Solution (C1-C2).
- Take the DRAGON SYMBOL (D).


- Place the DRAGON SYMBOL (E); open; take a MAP PIECE (F).
- Combine the LABYRINTH MAP HALF and 2 MAP PIECES; take the LABYRINTH MAP (Inventory).
- Walk forward.
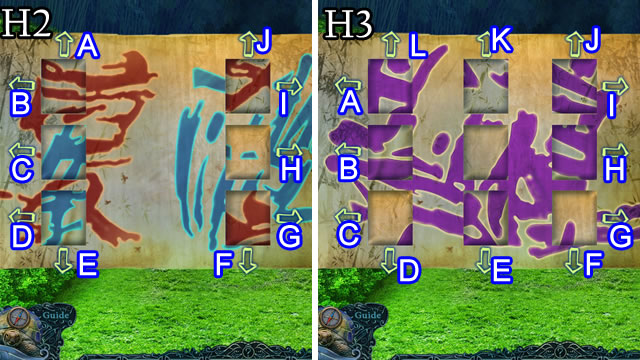
- Place the LABYRINTH MAP (G).
- Solution, part one (H1). C-F-B-C-F.
- Solution, part two (H2). H-F-H-J-G-E.
- Solution, part three (H3). D-K-F-A-H-C.
- Walk forward.
- Combine the BLOWGUN and TRANQUILIZER DART; take the LOADED BLOWGUN (Inventory).

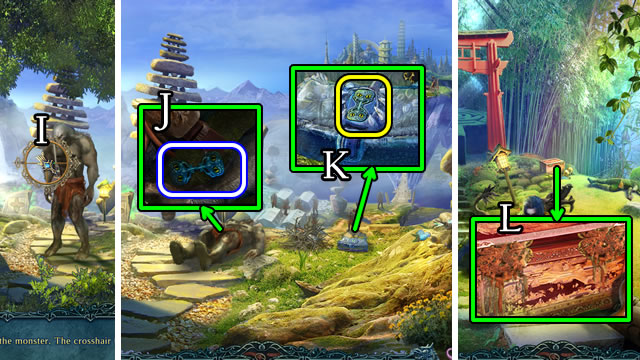
- Use the LOADED BLOWGUN (I).
- Attempt to walk forward 2x.
- Take (J) and place the LIZARD KEY (K); open, take the OIL.
- Combine the OIL and EMPTY OILER; take a FULL OILER (Inventory).
- Walk down.
- Use the FULL OILER (L); open, take the APPLE.
- Walk forward.

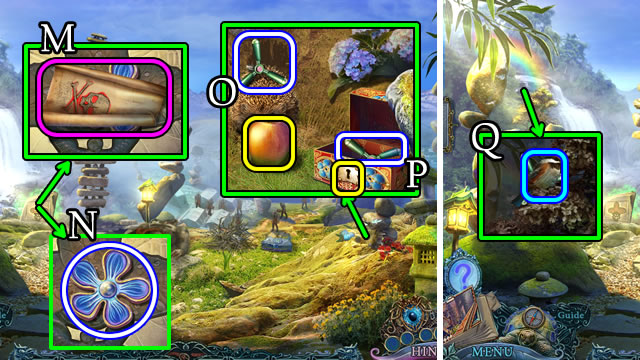
- Take the note (M) and FORGET-ME-NOT (N).
- Combine the FORGET-ME-NOT and QUEEN’S DIARY; take the QUEEN’S KEY (Inventory).
- Place the APPLE; take HANDLES 1/3 (O).
- Use the QUEEN’S KEY; take HANDLES 2/3 (P).
- Shoo (Q); take the HANDLES 3/3.
- Walk down.

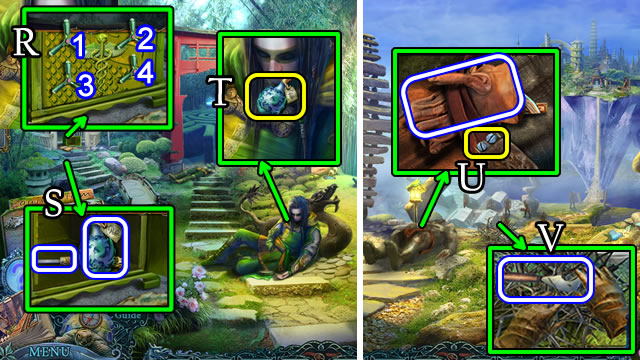
- Place HANDLES 3/3; turn (1-2-3-4); open; take the ANTIDOTE and SCREWDRIVER (S).
- Place the ANTIDOTE (T); receive a SEAL.
- Walk forward.
- Use the SCREWDRIVER; take GLOVES (U) and CITY IMAGE.
- Use the GLOVES; take the BROKEN SCRAPER (V).
- Walk down.

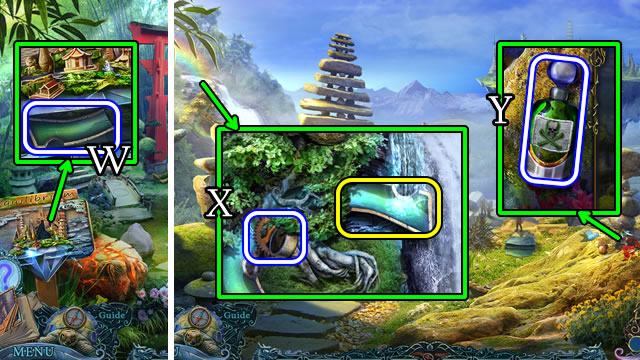
- Place the CITY IMAGE; take the BAMBOO PIPE (W).
- Walk forward.
- Place the BAMBOO PIPE, take the METAL CLIP and GEAR (X).
- Combine the BROKEN SCRAPER and METAL CLIP; take the SCRAPER (Inventory).
- Use the SCRAPER; take ACID (Y).
- Walk down.

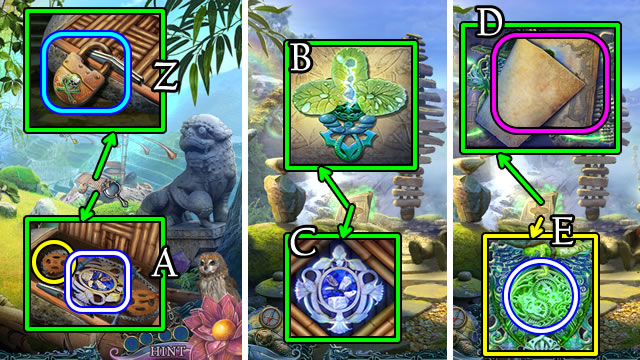
- Use the ACID (Z); open; place the GEAR, take the SEAL (A).
- Walk forward.
- Place SEAL (B) and SEAL (C).
- Take the note (D) and GREEN MECHANISM HEART (E).
- Walk forward.

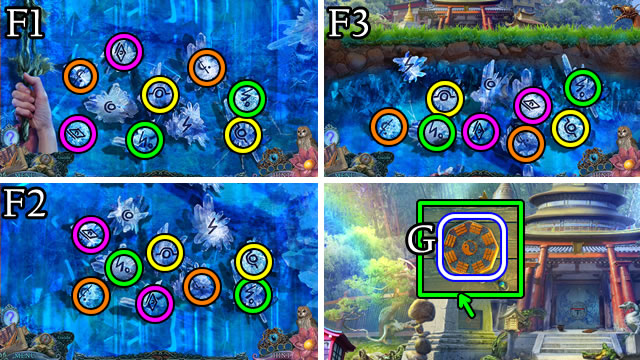
- Solution. (F1-F2-F3); walk forward.
- Take the BUCKLE (G).

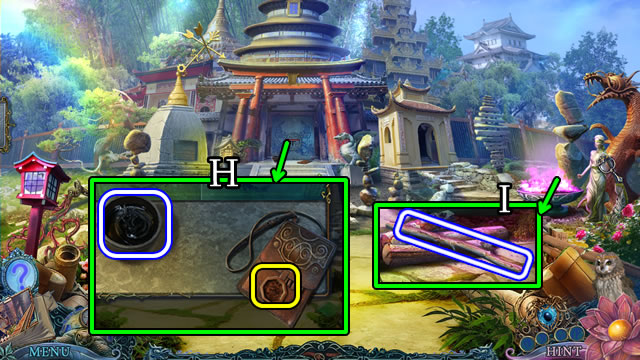
- Take the RESIN; place the BUCKLE (H); open; take the BANDAGE.
- Take the STICK (I).
- Combine the STICK, RESIN and BANDAGE; take the UNLIT TORCH (Inventory).

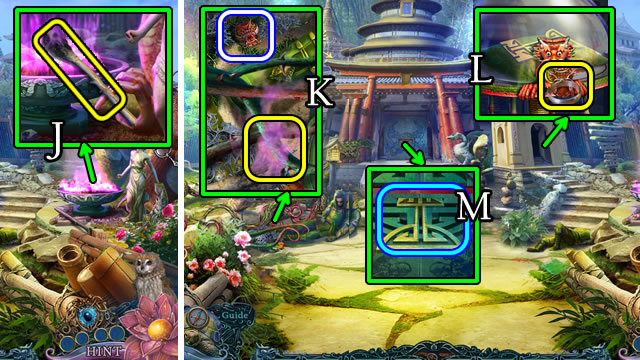
- Place the UNLIT TORCH; receive a TORCH (J).
- Use the TORCH; take a DRAGON RING (K).
- Place the DRAGON RING (L); take the CITY KEY.
- Place the CITY KEY (M).
- Walk forward.
Chapter 3: Equilibrium

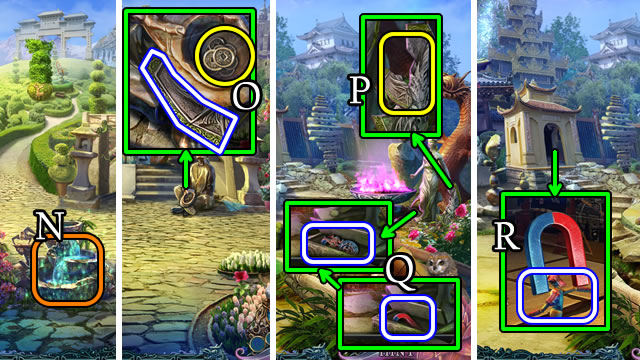
- Shoo the butterflies. Play the HOP (N); receive COINS.
- Place the COINS; take the SHIELD PIECE (O).
- Walk down.
- Place the SHIELD PIECE (P); BRONZE PORTRAIT and MAGNET (Q).
- Use the MAGNET; receive a DOLL ACROBAT (R).
- Walk forward.

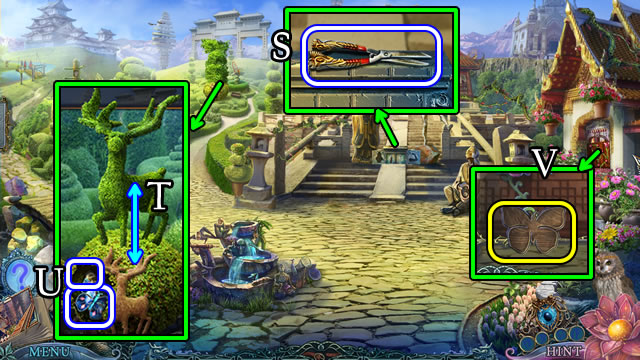
- Take PRUNING SHEARS (S).
- Use the PRUNING SHEARS (T); take the BUTTERFLY and WISDOM SYMBOL (U).
- Place the BUTTERFLY (V).

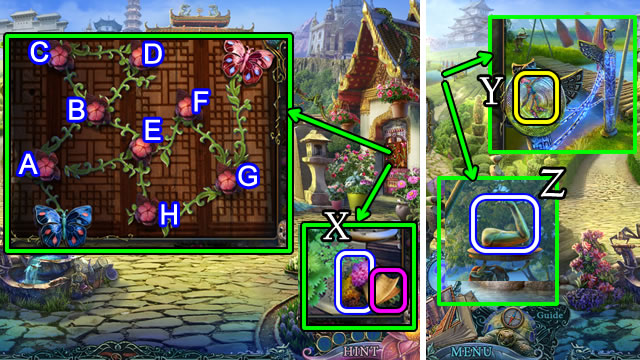
- Solution. A-B-C-D-B-E-B-E-F-G-H-E-F-G-F-G.
- Take the note and DECORATIVE FLOWER (X).
- Place the DOLL ACROBAT (Y); select the totem.
- Solutions vary. Take the STRENGTH SYMBOL (Z).

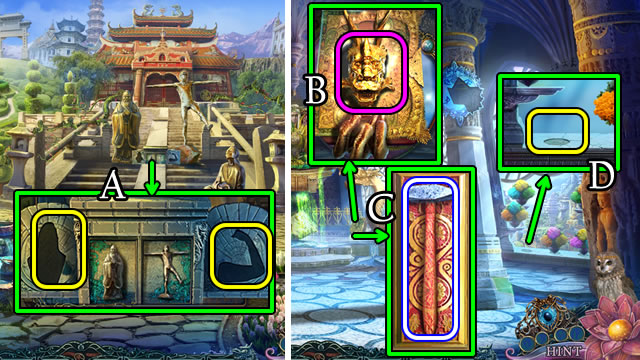
- Place the WISDOM SYMBOL and STRENGTH SYMBOL (A).
- Walk forward.
- Speak to the King to receive a DRAGON HEAD.
- Place the DRAGON HEAD (B); play the HOP; take the HAMMER PLATE (C).
- Place the DECORATIVE FLOWER (D).

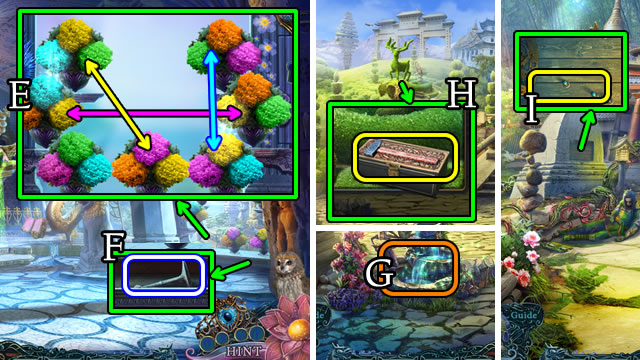
- Solution (E).
- Take the JUSTICE SWORD HANDLE (F).
- Walk down.
- Play the HOP (G); receive JUSTICE SWORD BLADE.
- Combine the JUSTICE SWORD HANDLE and JUSTICE SWORD BLADE; take the SWORD OF JUSTICE (Inventory).
- Place the HAMMER PLATE (H); open, take GEARS.
- Walk down.
- Place the GEARS (I).

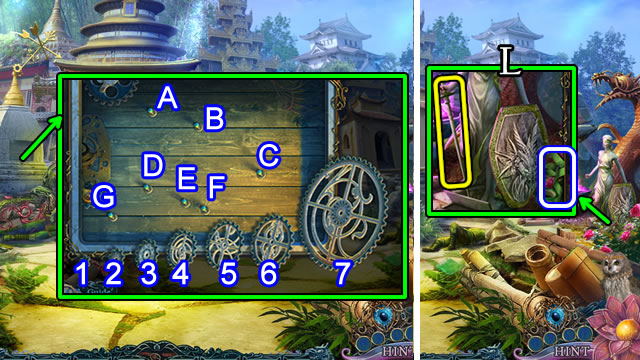
- Solution. 1-F, 2-E, 3-G, 4-B, 5-A, 6-D, 7-C.
- Take the SMALL KING.
- Place the SWORD OF JUSTICE; take RIBBON (L).
- Walk forward.

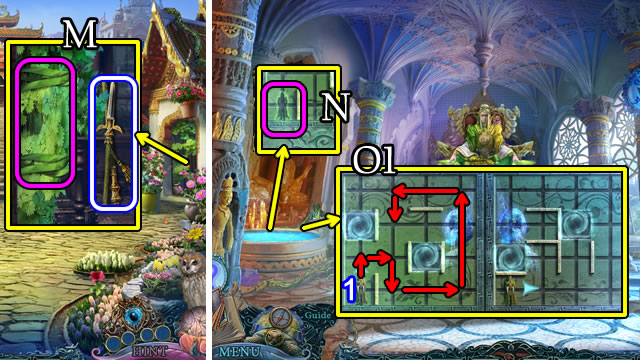

- Place the RIBBON; take SPEAR PARTS (M).
- Walk forward.
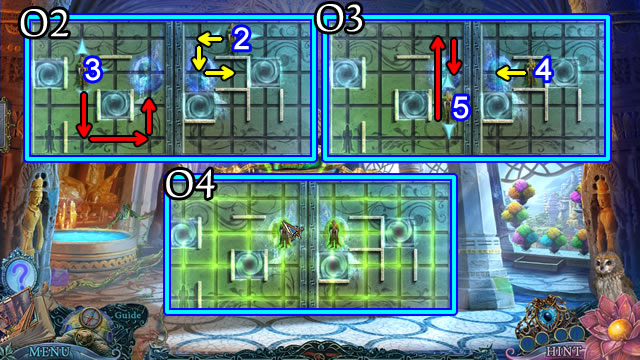
- Place the SMALL KING (N).
- Solution, part one (O1). 1.
- Solution, part two (O2). 2-3.
- Solution, part three (O3). 4-5.
- Solved (O4).
- Take the GUARD PORTRAIT and CLOCK HALF.

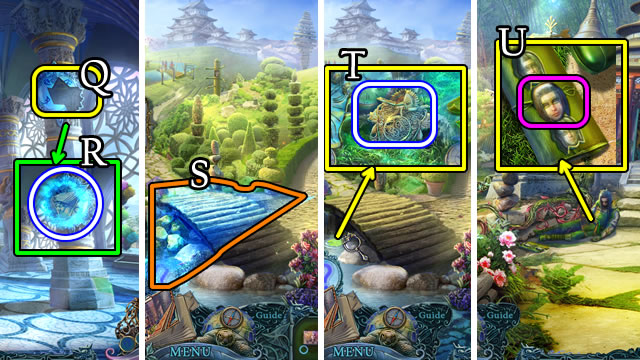
- Place the CLOCK HALF (Q).
- Use the Vision Ring.
- Take the MYSTICAL IMAGE (R).
- Walk down.
- Place the MYSTICAL IMAGE (S).
- Move the lily pad; take the BROWN MECHANISM HEART (T).
- Walk down.
- Place the GUARD PORTRAIT (U); take the SPEAR CLAMP.
- Walk forward.
- Combine the SPEAR PARTS and SPEAR CLAMP; take the EQUILIBRIUM SPEAR (Inventory).

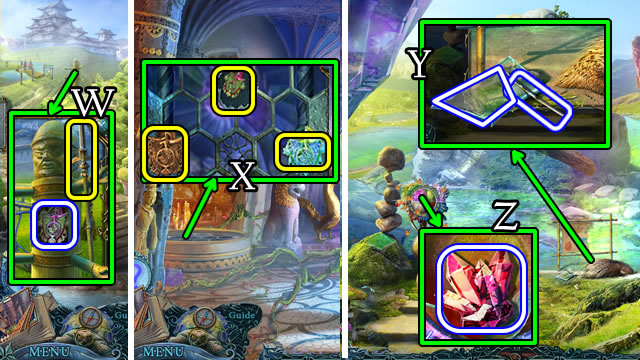
- Place the EQUILIBRIUM SPEAR; take the WOODEN MECHANISM HEART (W).
- Walk forward.
- Place the GREEN MECHANISM HEART, BROWN MECHANISM HEART and WOODEN MECHANISM HEART (X).
- Walk down the steps.
- Take the PORCUPINE NEEDLE and SHARP GLASS (Y).
- Play the HOP; take the RED CRYSTAL (Z).

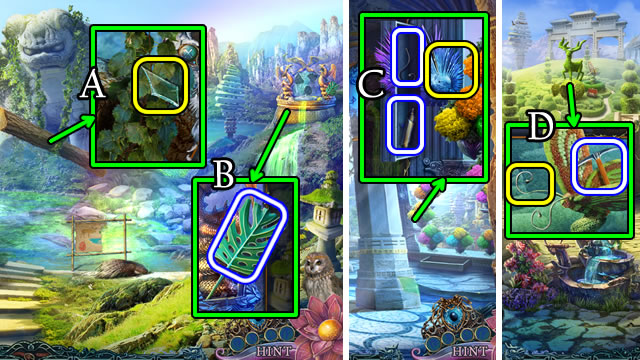
- Use the SHARP GLASS (A).
- Take the IKEBANA BRANCH (B).
- Walk down.
- Place the PORCUPINE NEEDLE; take the BUTTERFLY ANTENNA and SCROLL (C).
- Walk down.
- Place the BUTTERFLY ANTENNA; take the SMALL PICK (D).
- Walk forward, then left.

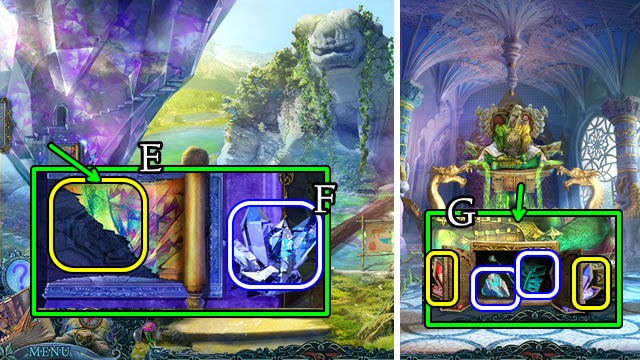
- Place the SCROLL (E); take the CRYSTAL CITY IMAGE. Use the SMALL PICK; take the BLUE CRYSTAL (F).
- Walk down.
- Place the RED CRYSTAL and BLUE CRYSTAL; take the FROST CAVES IMAGE and IKEBANA BRANCH (G).
- Walk down.

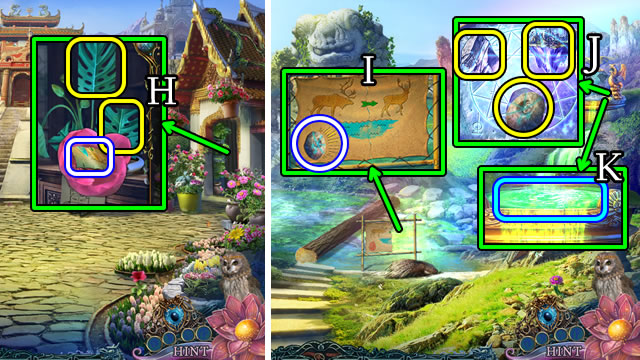
- Place 2 IKEBANA BRANCHES; take the IMAGE ON PARCHMENT (H).
- Walk forward, then left.
- Place the IMAGE ON PARCHMENT; take the WELLSPRING IMAGE (I).
- Place the CRYSTAL CITY IMAGE, FROST CAVES IMAGE and WELLSPRING IMAGE (J); select (K).

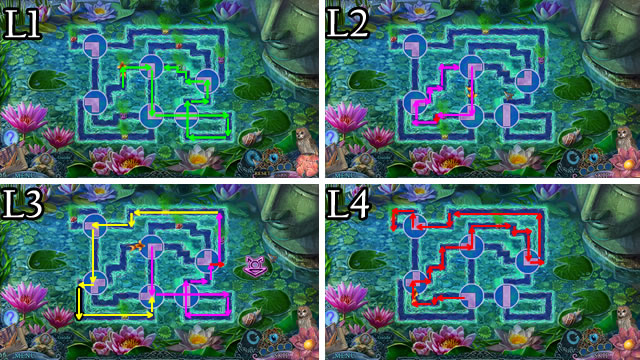

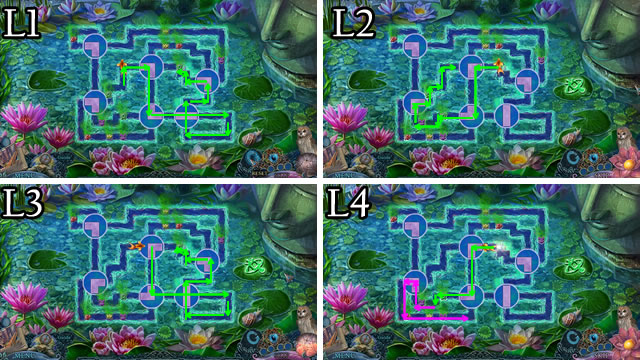
- Solution, Hardcore Mode part one. (L1-L2-L3-L4).

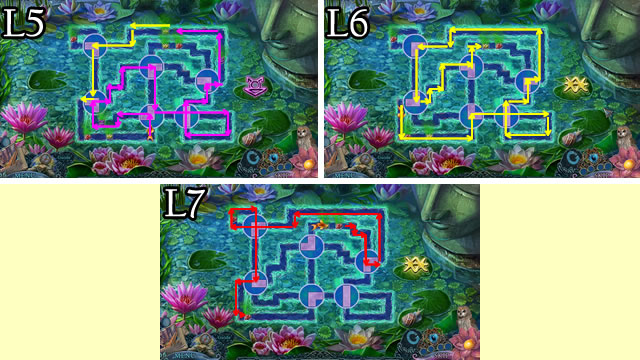
- Solution, Hardcore Mode part two. (L5-L6-L7).
- Walk down; speak to the King; take the FORGET-ME-NOT.
- Combine the FORGET-ME-NOT and the QUEEN’S DIARY; take the QUEEN’S KEY (Inventory).

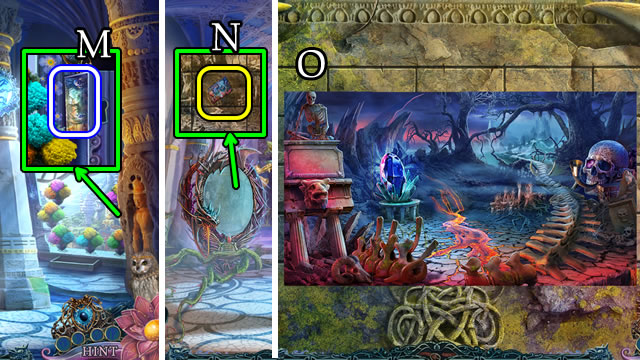
- Use the QUEEN’S KEY; take the PHOBIUS PHOTO (M).
- Place the PHOBIUS PHOTO (N).
- Solution (O).
- Walk forward.
Chapter 4: Phobius

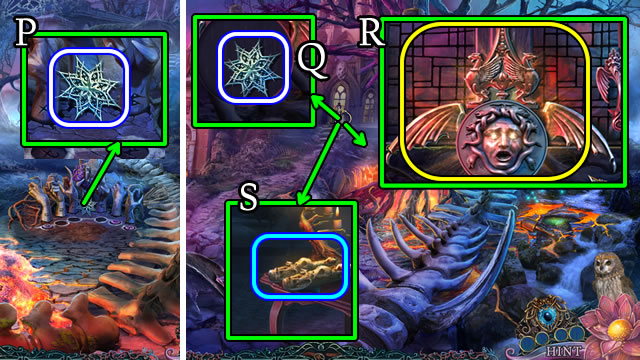
- Take the STAR (P).
- Walk forward.
- Take the STAR (Q). Place the BRONZE PORTRAIT (R). Select (S).

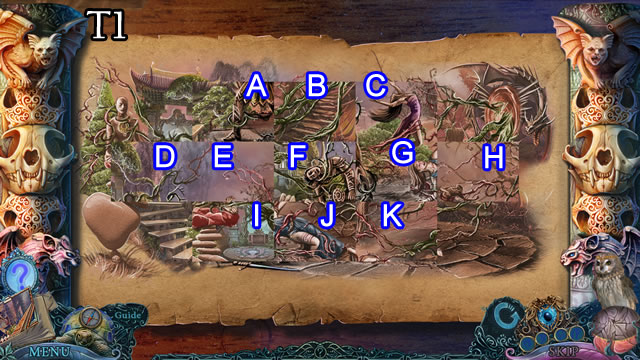

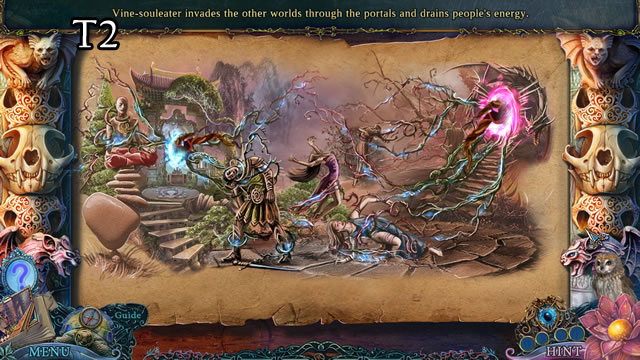
- Solution, part one (T1). D-I, E-F, A-I, B-H, C-B, G-J, B-F, G-K.
- Solved (T2).

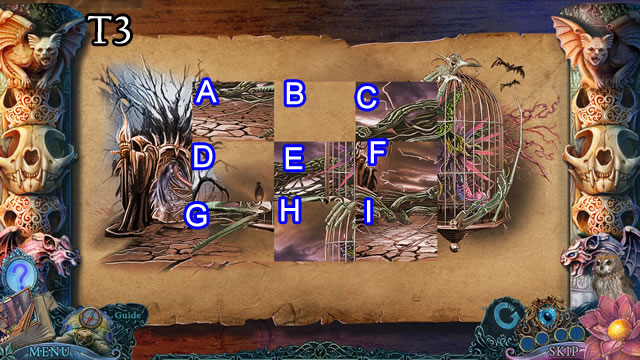

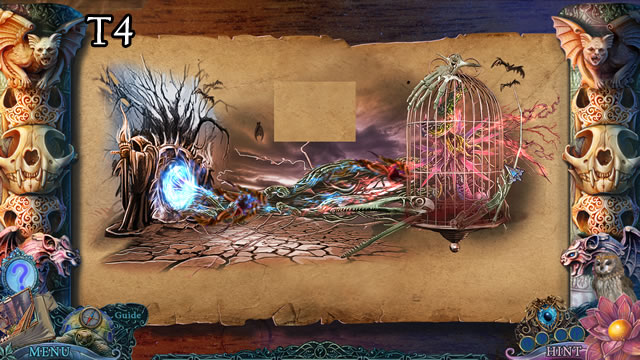
- Solution, part two. C-F-I-H-E-F-I-H-G-D-E-B-C-F-I-H-G-D-A-B-E H-G-D-E-B-A-D-E-H-G-D-E-B-A-D-G-H-E-D-A-B-E-H-G-D-E-B.
- Solved (T4).
- Take the CLAY PHOBIUS SYMBOL.

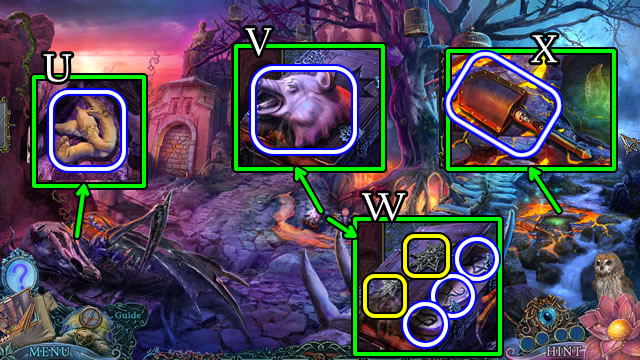
- Take the CLAY HYDRA (U).
- Take the CLAY WEREWOLF (V). Place 2 STARS; take RUNE STONES 3/3 (W).
- Take the COVERED SHOVEL (X).
- Walk down.

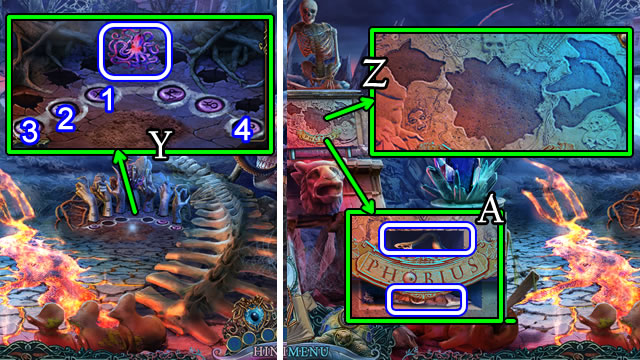
- Place the STONE RUNES 3/3. Press 1-2-3-4; take the METAL OCTOPUS (Y).
- Place the CLAY WEREWOLF, CLAY HYDRA and CLAY PHOBIUS SYMBOL (Z); take the STONE SNAKE and STAKE TOKEN (A).
- Walk forward.

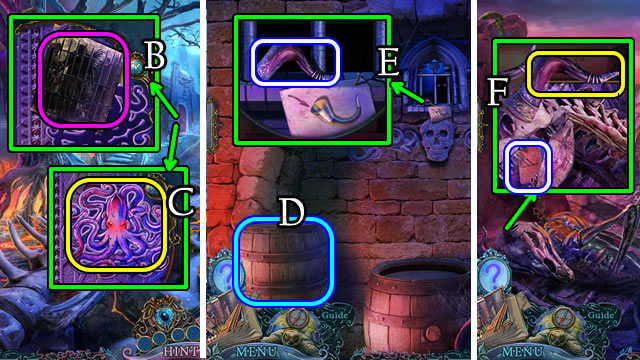
- Take the note (B); place the METAL OCTOPUS (C); walk forward.
- Select the barrel (D). Speak to the prisoner. Take the DRAGON HORN (E).
- Walk down.
- Place the DRAGON HORN; take the RUNE BRICK (F).
- Walk forward.

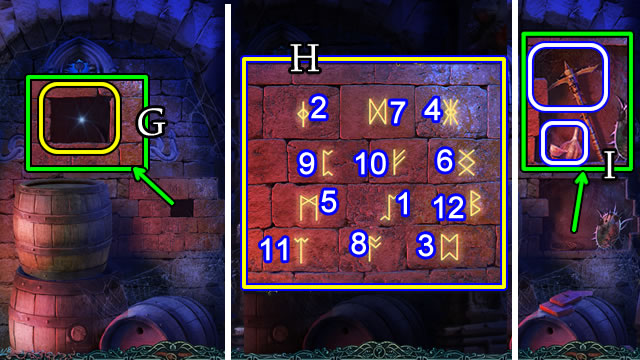
- Place the RUNE BRICK (G).
- Solution (H).
- Take the PICKAXE and GARLIC TOKEN (I).
- Walk down 2x.

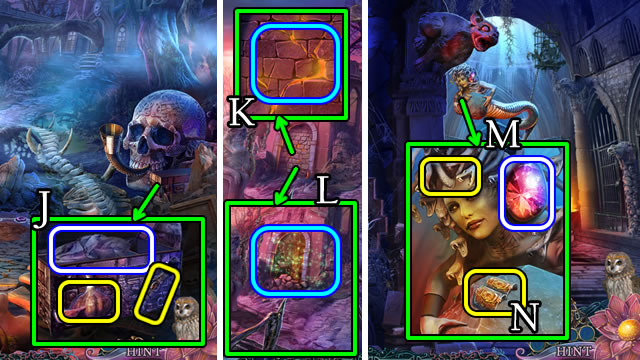
- Place the GARLIC TOKEN and STAKE TOKEN, open, take the RAG (J).
- Walk forward.
- Use the PICKAXE (K); play the HOP (L); receive a STONE SNAKE.
- Walk forward.
- Place 2 STONE SNAKES; take a GEM EYE (M); select (N).

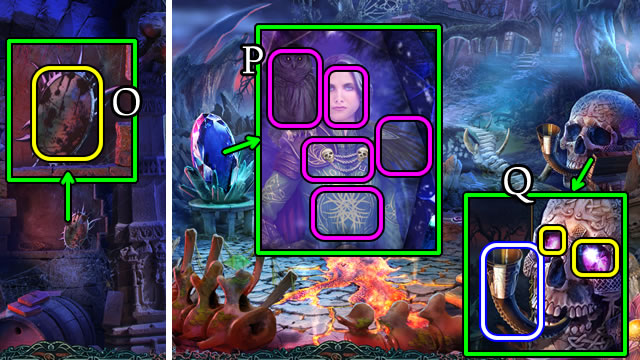
- Use the RAG (O); take the MIRROR.
- Walk down 2x.
- Replace the MIRROR; select the differences (P).
- Take a GEM EYE.
- Place 2 GEM EYES; take the HORN (Q).
- Walk forward 2x.

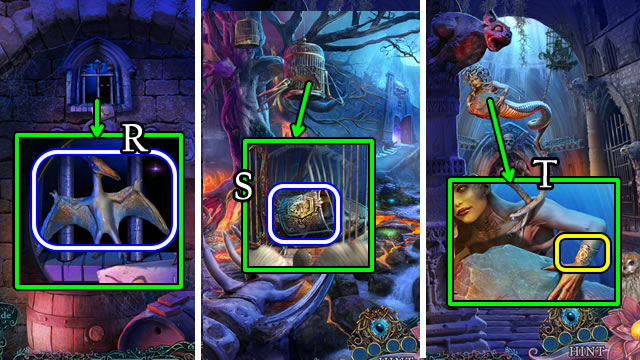
- Give the HORN; take the PTERODACTYL TOKEN (R).
- Walk down.
- Place the PTERODACTYL TOKEN; take the GOLDEN BRACELET (S).
- Walk forward.
- Place the GOLDEN BRACELET (T); walk forward.

- Take the SCOOP (U); walk down.
- Use the SCOOP (V); take the DRAGON CROWN.
- Walk forward.
- Place the DRAGON CROWN (W); open; take the PRISON PLATE.
- Place the PRISON PLATE, remove (X); take the SKULL BUCKLE.
- Combine the SKULL BUCKLE and COVERED SHOVEL; take the SHOVEL (Inventory).
- Walk down 2x.

- Use the SHOVEL; take the GAFF (Y).
- Walk forward 2x.
- Use the GAFF; receive PRISON KEYS (Z).
- Place the PRISON KEYS (A).
- Solution. E-A-C-D-E-A-D-B-C-A-B-E.
- Speak to Sacrosa.
- Walk down; select Sacrosa; walk left.

- Play the HOP (C); receive FLAG PART.
- Speak to Sacrosa; take the SMOKING BRANCH (D).
- Walk down; play the HOP (E); receive NET AND BOTTLE.
- Use the SMOKING BRANCH (F); take the FORGET-ME-NOT and HAMMER (G).

- Place the NET AND BOTTLE; take BOTTLED SWAMP LIGHTS (H).
- Walk left, then right.
- Take the ROPE (I).
- Combine the FORGET-ME-NOT and QUEEN’S DIARY; take the QUEEN’S KEY (Inventory).
- Use the HAMMER; use the QUEEN’S KEY (J); take the DECORATED HANDLE.
- Play the HOP; take the LOCKED BOX (K).
- Walk down.

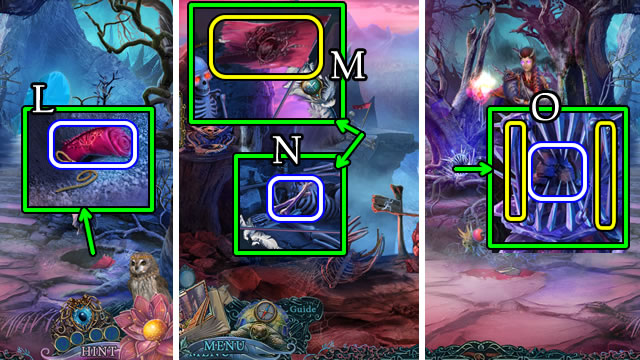
- Place the ROPE; receive a FLAG PART (L).
- Walk right.
- Place 2 FLAG PARTS (M); take METAL BONES (N).
- Walk down.
- Place METAL BONES; take COAL LUMP (O).
- Walk right.

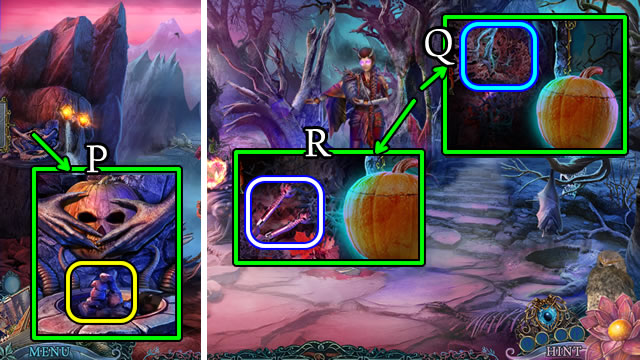
- Place the COAL LUMP (P); receive JACK-O-LANTERN.
- Walk down.
- Combine the BOTTLED SWAMP LIGHTS and JACK-O-LANTERN; take the TERRIBLE LANTERN (Inventory).
- Place the TERRIBLE LANTERN; move (Q); select the lantern; move leaves 2x; take the METAL SCISSORS (R).
- Walk down.

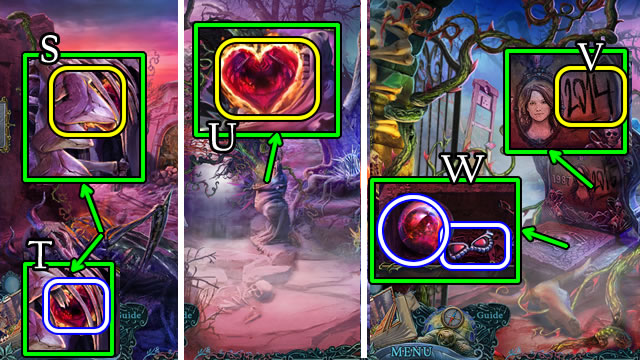
- Use the METAL SCISSORS (S); receive a DRAGON SCALE.
- Combine the DRAGON SCALE and DECORATED HANDLE; take the DRAGON SHOVEL (Inventory).
- Use the DRAGON SHOVEL (T); receive DRAGONFIRE.
- Walk left.
- Place the DRAGONFIRE (U).
- Walk left; speak to Sacrosa.
- Select (V); take the DANGEROUS SPHERE and GARGOYLE EYES (W).
- Walk down.

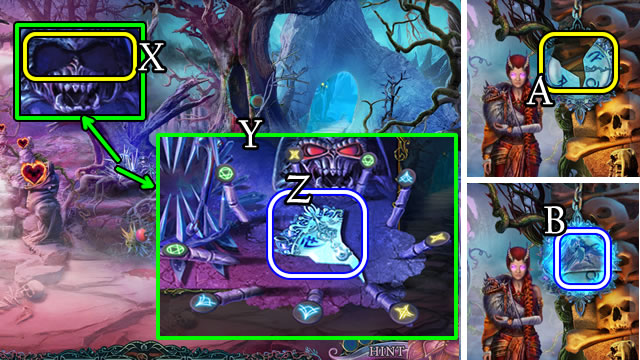
- Place the GARGOYLE EYES (X).
- Solution (Y).
- Take the CLOCK HALF (Z).
- Walk left.
- Place the CLOCK HALF (A).
- Use the Vision Ring; take the MYSTICAL IMAGE (B).
- Walk down.

- Place the MYSTICAL IMAGE (C) to take the LEVER (D).
- Walk right.
- Place (E); select the LEVER.

- Solution (F). Take the CAPSULE (G).
- Walk down, then left.
- Place the CAPSULE; take the DEVICE (H).
- Select the DEVICE 2x; take a POINTER (Inventory).
- Walk down.

- Play the HOP (I); receive a KEY.
- Use the POINTER; take GOLDEN DETAILS (J).
- Walk left.
- Use the KEY (K); take the DARK PYRAMID.
- Walk down, then right.
- Place the DARK PYRAMID; take the FORCEPS (L).
- Walk down.

- Use the FORCEPS; receive a POINTER PART (M).
- Walk right.
- Place the POINTER PART; take the PAW PRINT INLAY (N).
- Walk down, then left.
- Combine the LOCKED BOX and PAW PRINT INLAY; take the RAZOR (Inventory).
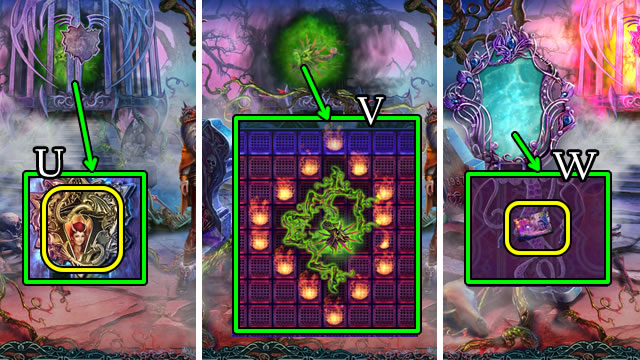
- Use the RAZOR (O); take the BAT (P).

- Place the BAT; take the WHISTLE (Q).
- Walk down.
- Place the WHISTLE; take the SKULL PENDANT (R).
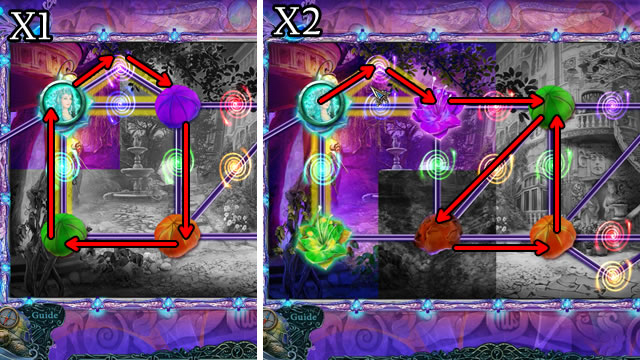
- Select the pumpkin 2x; place the SKULL PENDANT (S); select the pumpkin 3x; take the GOLDEN SYMBOL (T).
- Walk left.
- Combine the GOLDEN SYMBOL and GOLDEN DETAILS; take the GOLDEN PHOBIUS SYMBOL (Inventory).

- Place the GOLDEN PHOBIUS SYMBOL (U).
- Possible solution (V).
- Speak to Sacrosa; receive the CREATOS PHOTO.
- Place the CREATOS PHOTO (W).


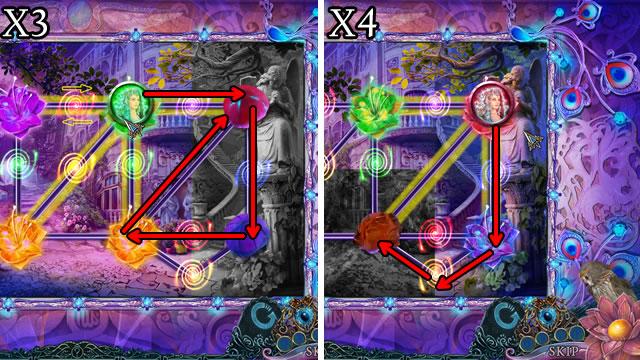
- Solution, part one (X1-X2).
- Solution, part two (X3-X4).
- Walk forward.
Chapter 5: Finding the Queen

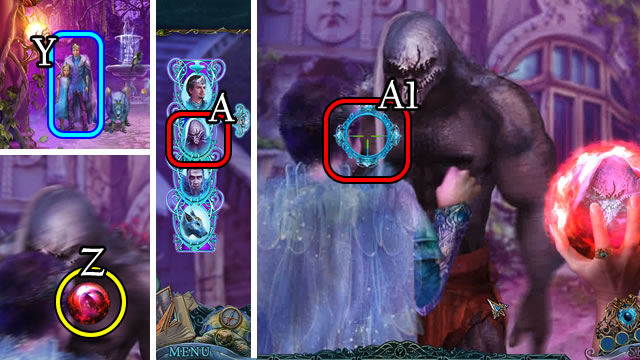
- Speak to the King (Y). Place the DANGEROUS SPHERE (Z).
- Solution (A-A1).

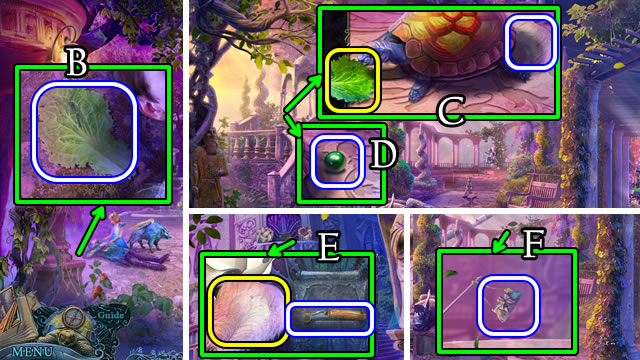
- Take the LETTUCE (B).
- Walk forward.
- Place the LETTUCE; take the FEATHER DUSTER (C) and GREEN PEARL (D).
- Walk down.
- Use the FEATHER DUSTER; take the GARDEN FORK (E).
- Walk forward.
- Use the GARDEN FORK (F); receive a BAG.
- Open the BAG; find and take the PURPLE PEARL and GLOWING JELLYFISH (Inventory).
- Walk down.

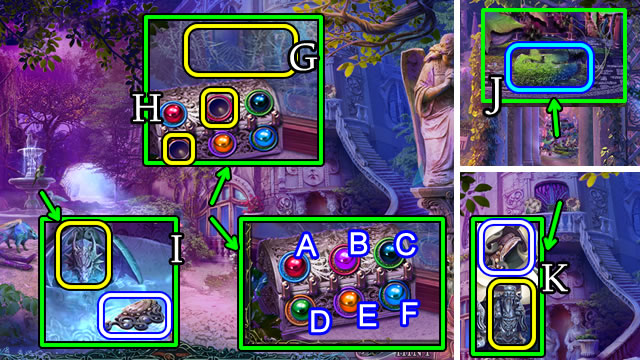
- Touch (G); place the GREEN PEARL and PURPLE PEARL (H).
- Solution. B-E, C-F, A-B, D-C, A-D.
- Open; take the FOUNTAIN DECORATION and SCRAPER.
- Place the FOUNTAIN DECORATION; take ARGUS DIADEM 1/2 (I).
- Walk forward.
- Use the SCRAPER (J); take the SAGE FIGURINE.
- Walk down.
- Place the SAGE FIGURINE; take ARGUS DIADEM 2/2 (K).
- Walk forward.

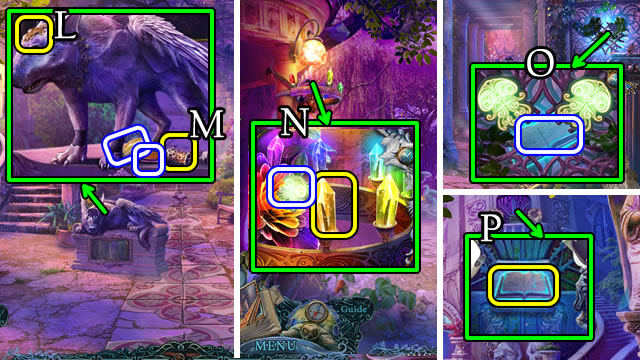
- Place ARGUS DIADEM 2/2 (L). Select (M) then take the ORANGE CRYSTAL and COVERED TOOL.
- Walk down.
- Place the ORANGE CRYSTAL; take a GLOWING JELLYFISH (N).
- Walk forward.
- Remove the foliage 2x; place 2 GLOWING JELLYFISH; take the GLOWING BOOK (O).
- Walk down.
- Place the GLOWING BOOK (P); walk right.

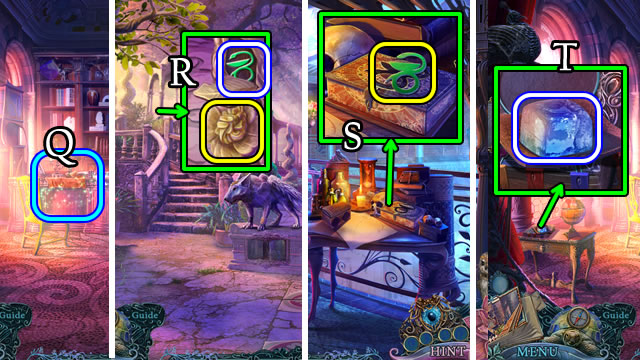
- Play the HOP (Q); receive a STONE FLOWER.
- Select the table; walk down, then forward.
- Place the STONE FLOWER; take a MEDICINE SYMBOL (R).
- Walk down and right.
- Place the MEDICINE SYMBOL (S); take the TOURNIQUET and GAUZE.
- Take the ICE (T).
- Walk down.
- Combine the GAUZE and ICE; receive a COMPRESS (Inventory).

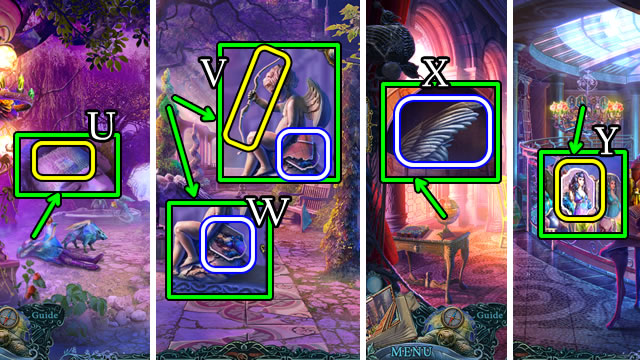
- Place the COMPRESS (U); receive a MARBLE BOW.
- Walk forward.
- Place the MARBLE BOW; take a CONTINENT (V) and EVIL QUEEN PORTRAIT (W).
- Walk down, then right.
- Place the CONTINENT; take the WING (X).
- Place the EVIL QUEEN PORTRAIT (Y); receive a DIAMOND.
- Walk down.

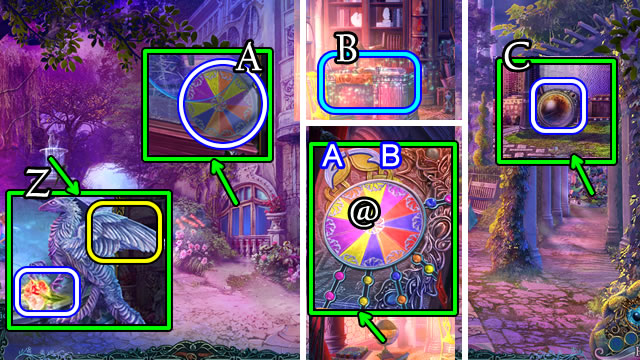
- Place the Wing; take the GLOWING FLOWER (Z).
- Use the DIAMOND; take the MULTICOLORED CIRCLE (A).
- Walk right.
- Play the HOP (B); receive an AMBER JEWEL.
- Place the MULTICOLORED CIRCLE (@).
- Solution. A-Ax5-Ax4.
- Open for a HOP; take the BADGE.
- Walk down, then forward.
- Combine the COVERED TOOL and BADGE; take the PRUNING SHEARS (Inventory).
- Use the PRUNING SHEARS; take the AMBER JEWEL (C).
- Walk down and right.

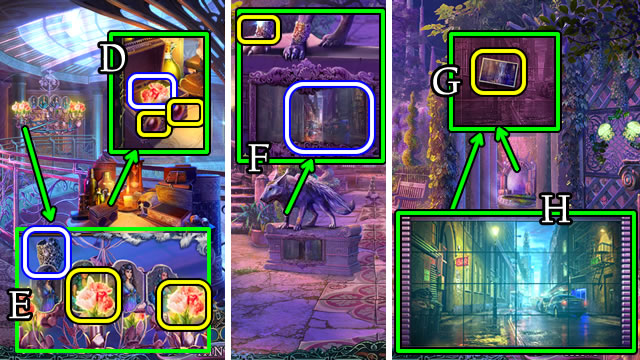
- Place 2 AMBER JEWELS; take the GLOWING FLOWER (D).
- Place 2 GLOWING FLOWERS; take the ARGUS BRACELET (E).
- Walk down, then forward.
- Place the ARGUS BRACELET; take the ACTUALUS PHOTO (F).
- Place the ACTUALUS PHOTO (G).
- Solution (H).
- Walk forward.
Chapter 6: Actualus

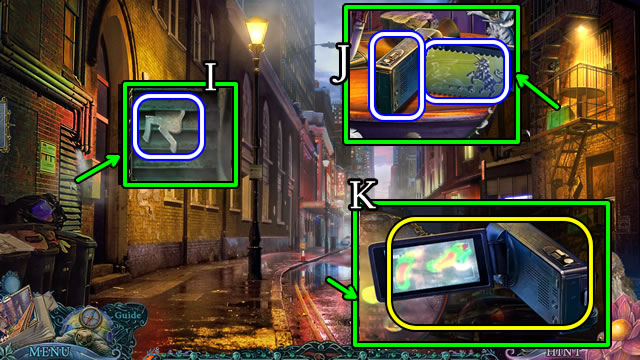
- Take the UNICORN HALF (I).
- Take SUBSCRIPTION and CAMERA (J).
- Use the CAMERA (K).

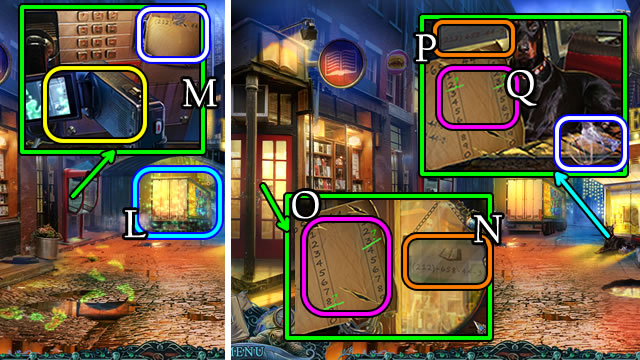
- Walk forward; play the HOP (L); receive a COIN 1/3.
- Use the CAMERA; take the PHONE NUMBER (M).
- Select (N); select 8-3 (O).
- Select (P); select 2-3 (Q); take the PLASTIC BAG.

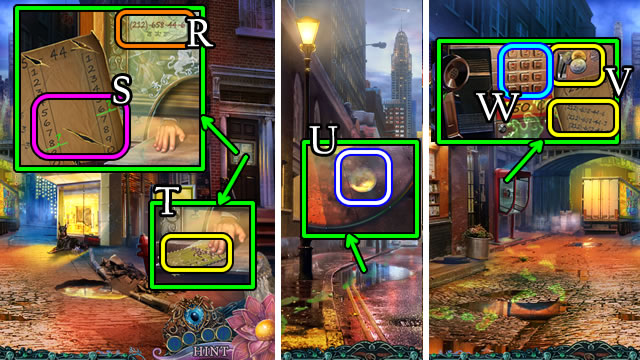
- Select (R); select 8-6 (S). Give the SUBSCRIPTION (T); take COIN 2/3.
- Walk down.
- Place the PLASTIC BAG; receive COIN 3/3 (U).
- Walk forward.
- Select the PHONE NUMBER; receive POTENTIAL PHONE NUMBERS (Inventory).
- Place the POTENTIAL PHONE NUMBERS remove the handset; insert COIN 3/3 (V).
- Solution (W). 2-1-2-6-5-8-4-4-3.
- Walk left.

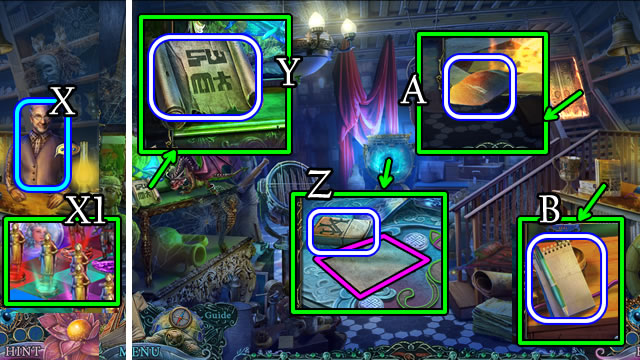
- Speak to the man (X).
- Solutions vary (X1).
- Take the RUNES CODE (Y).
- Take the LIGHTER and note (Z).
- Take the PATCH (A); take PEN AND PAPER (B).
- Walk down.

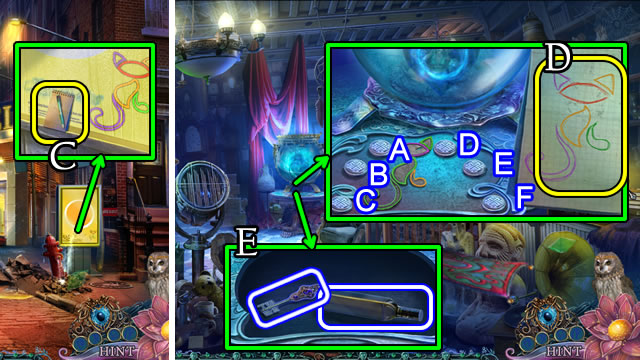
- Place the PEN AND PAPER (C); receive a CAT LOGO.
- Walk left.
- Place the CAT LOGO (D).
- Solution. Ax3-Dx2-B-Cx3.
- Take an INACTIVE MAGIC KEY and OIL (E).
- Walk down 2x.
- Combine the PATCH and TOURNIQUET for a PATCH WITH RUBBER (Inventory).
- Match the INACTIVE MAGIC KEY teeth to the RUNES CODE; take a SKELETON KEY (Inventory).

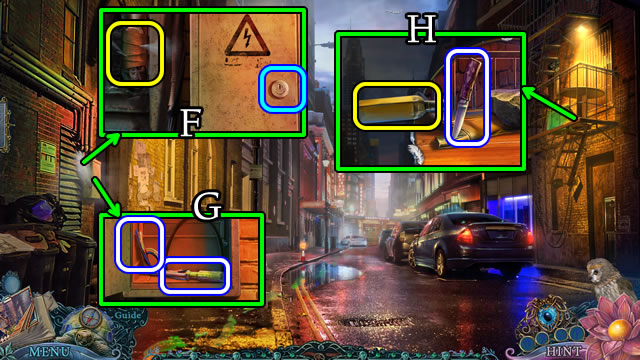
- Place the PATCH WITH RUBBER and SKELETON KEY (F), open, take a SCREWDRIVER and WIRE (G).
- Use the OIL; receive a KNIFE (H).
- Walk forward.

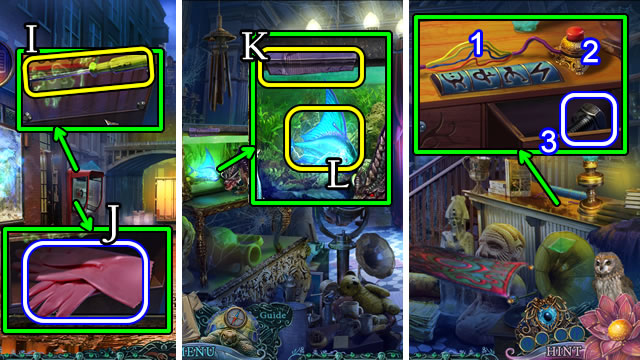
- Use the SCREWDRIVER (I); take RUBBER GLOVES (J).
- Walk left.
- Use the KNIFE (K) and RUBBER GLOVES (L); receive an ELECTRIC FISH.
- Place the WIRE (1); press (2), take the METAL BOLT (3).
- Walk down 2x.

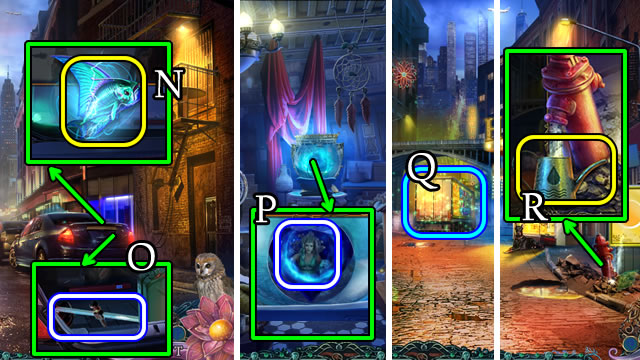
- Place the ELECTRIC FISH (N); open; take GLASS CUTTER (O).
- Walk forward and left.
- Use the GLASS CUTTER; take a BLACK HEART (P).
- Walk down.
- Play the HOP (Q); receive an EMPTY BUCKET.
- Place the EMPTY BUCKET (R); receive FULL BUCKET.
- Walk left.

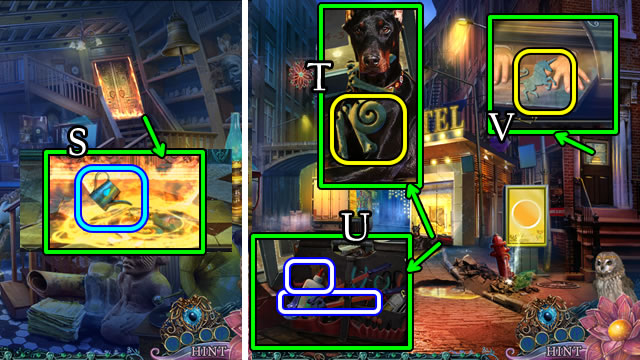
- Use the FULL BUCKET (S); take a BONE AMULET and UNICORN HALF.
- Walk down.
- Give the BONE AMULET (T). Open; take BROKEN NIPPERS and GLUE (U).
- Use the GLUE to combine the UNICORN HALVES; take the UNICORN (Inventory).
- Give the UNICORN (V); take a DRAGON POSTER.
- Walk down.
- Combine the BROKEN NIPPERS and METAL BOLT; take NIPPERS (Inventory).

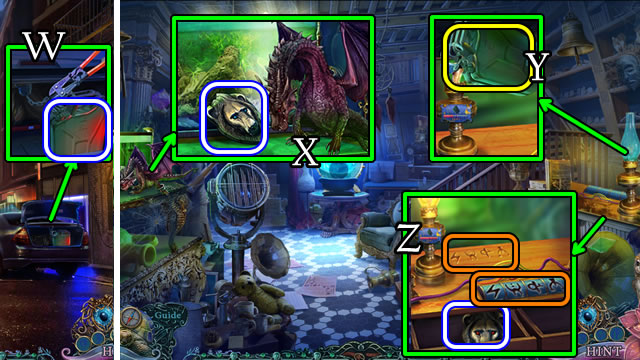
- Use the NIPPERS; take a GASOLINE CANISTER (W).
- Walk forward and left.
- Place the DRAGON POSTER; take the LION HEAD (X).
- Remove lamp glass. Pour the GASOLINE CANISTER (Y); use the LIGHTER.
- Replace lamp glass. Match (Z). Take the LION HEAD.

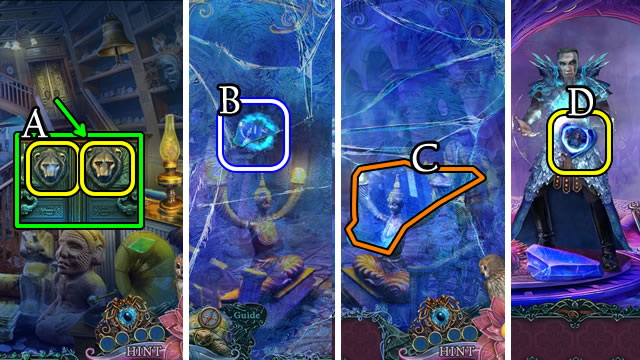

- Place 2 LION HEADS (A); walk forward 2x.
- Use the Vision Ring.
- Take (B), then place (C) the MYSTICAL IMAGE.
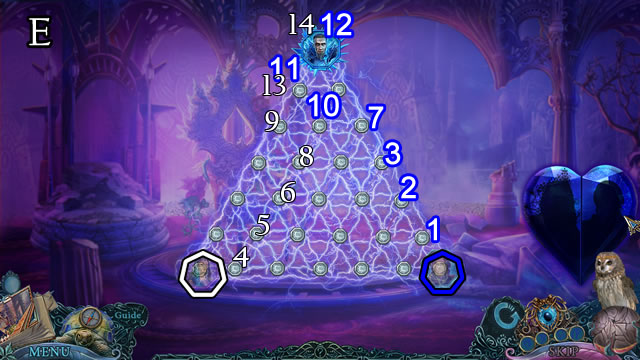
- Place the BLACK HEART (D). Play the HOP.
- One possible solution (E).
- Congratulations, you’ve completed Reflections of Life: Equilibrium.


 Grim Tales: The Legacy Walkthrough, Guide, & Tips
 Nevertales: Smoke and Mirrors Walkthrough, Guide, & Tips
 Twisted Lands: Insomniac Walkthrough, Guide, & Tips
 Secrets of the Dark: The Flower of Shadow Walkthrough, Guide, & Tips
 Mystery of the Missing Brigantine Walkthrough, Guide, & Tips