Grim Tales: The Legacy Walkthrough, Guide, & Tips
Grim Tales: The Legacy Walkthrough

Welcome to the Grim Tales: The Legacy Walkthrough
After being invited to the Christening of your sister’s son, you arrive to find a deserted estate! Save your sister before it’s too late!
Whether you use this document as a reference when things get difficult or as a road map to get you from beginning to end, we’re pretty sure you’ll find what you’re looking for here.
This document contains a complete Grim Tales: The Legacy game walkthrough featuring annotated screenshots from actual gameplay!
We hope you find this information useful as you play your way through the game. Use the walkthrough menu below to quickly jump to whatever stage of the game you need help with.
Remember to visit the Big Fish Games Forums if you find you need more help. Have fun!
This walkthrough was created by BrownEyedTigre, and is protected under US Copyright laws. Any unauthorized use, including re-publication in whole or in part, without permission, is strictly prohibited.
General Tips

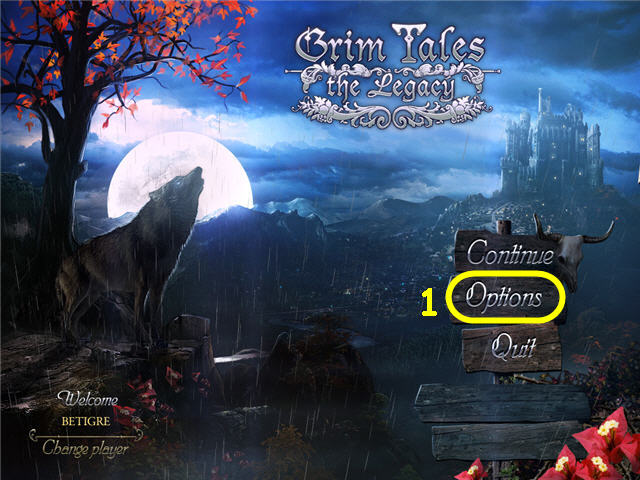
- Click on Options (1) to adjust the Music, Environment, Effects, and Voice Volume.
- In Options, you may also adjust Graphics, Full Screen, Custom Cursor and change the level of difficulty.
- You may set your difficulty level and choose between Casual, Advanced or Hardcore Mode.
- Throughout the guide, we will use the acronym ‘HOS’ for Hidden Object Scenes.
- Puzzles may be skipped.
- Move your cursor to the bottom of the screen to access the Inventory Bar.
- Click on the wolf in the lower left to get a hint in either the Hidden Object Scenes or regular gameplay.
- Click on the compass in the lower right to access a map. Clicking on the areas after you have been there once will take you straight there; hover your cursor over the exclamation points to see the task list for that area.
- If it is shorter to use the Map to travel, and the location has been unlocked, the guide lists the location name instead of directions.
- Click on the Info button on the left during a puzzle to get your puzzle objective.
- This game is not linear and you may do things in a different order as the guide. If you cannot do an action when stated in the guide, please check the previous entries to see if you missed something.
Chapter 1 – Gray’s Castle

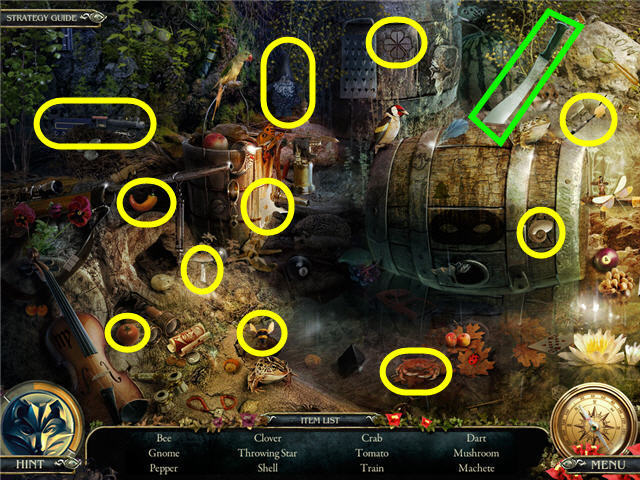
- Examine the barrels on the left to access a HOS.
- Find the items and earn a MACHETE.
- Go straight.

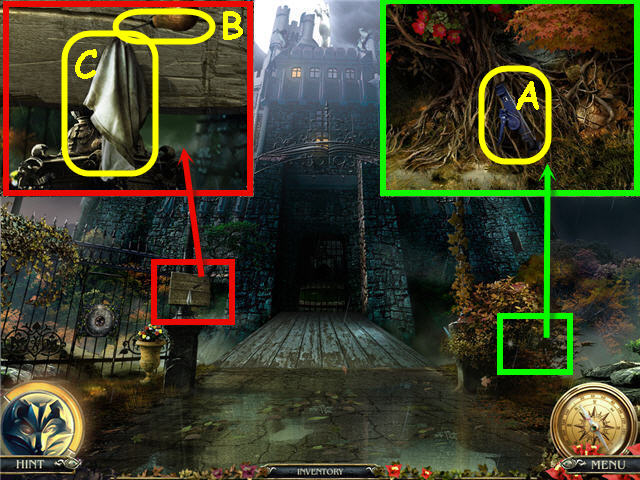
- Examine and use the MACHETE on the bush twice; take the JACK (A).
- Examine the post; take the AWL (B) and RAG (C).
- Back out.

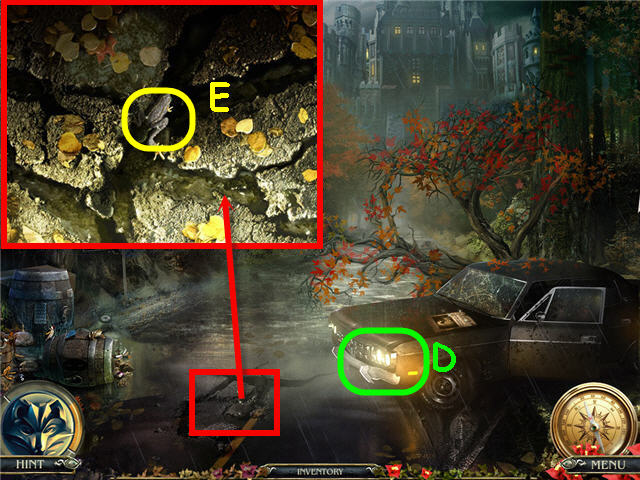
- Examine and use the RAG on the headlights (D).
- Examine and use the AWL on the crack; get a FROG (E).
- Go forward twice.

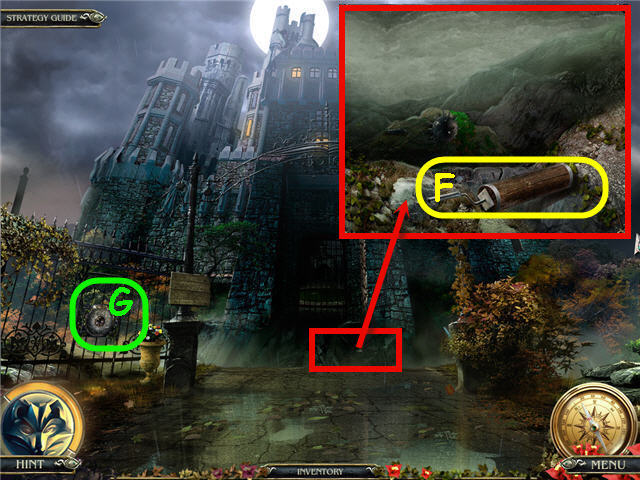
- Examine the moat; take the WINCH (F).
- Examine and place the FROG in the center of the gate lock (G) to trigger a puzzle.

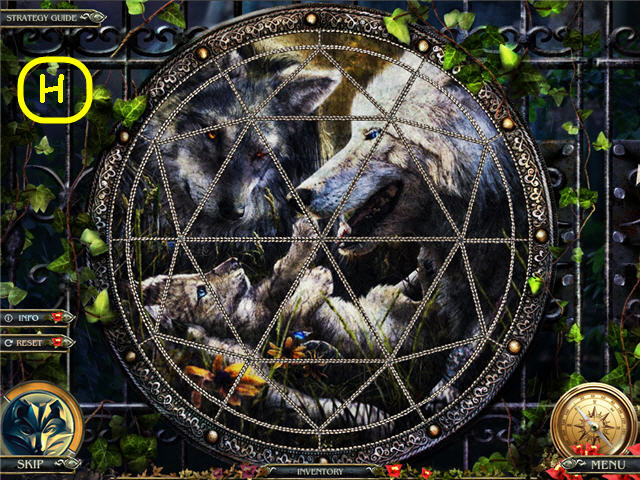
- Assemble the pieces to complete the picture.
- See screenshot (H) for solution.
- Go left.

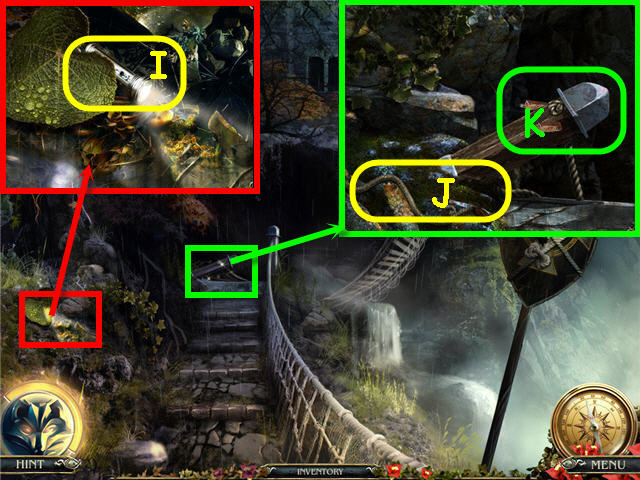
- Examine the grass; move the leaf, take the FLASHLIGHT (I).
- Examine the bridge post; take the SMALL ROPE (J).
- Use the JACK and WINCH on the post (K); crank the winch a few times.
- Go across the bridge.

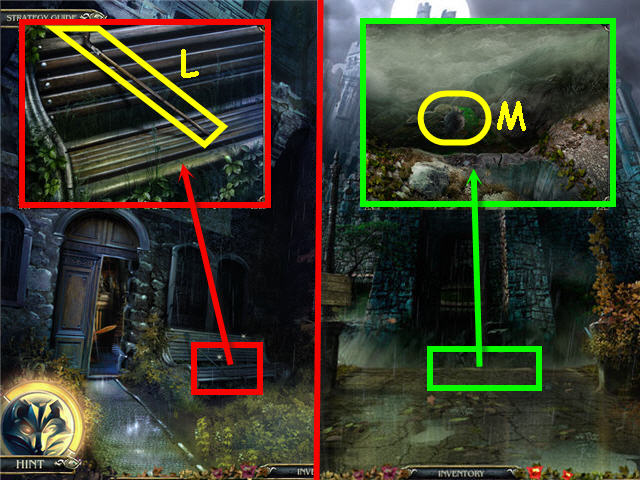
- Examine the bench; take the HOOK (L).
- Back out twice.
- Examine the edge of the steep; use the HOOK to get the MACE (M).
- Go left; go straight, through the door and go upstairs.

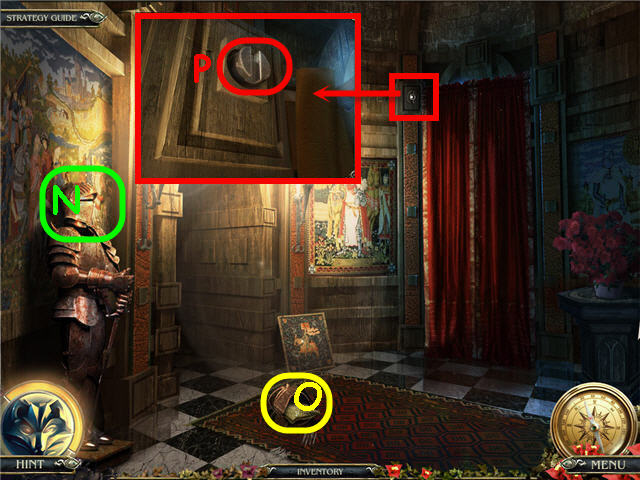
- Examine and use the MACE on the armor (N).
- Take the BAG WITH SAND (O).
- Examine the drapes and place the SMALL ROPE on the hook (P).
- Examine under the window to access a HOS.

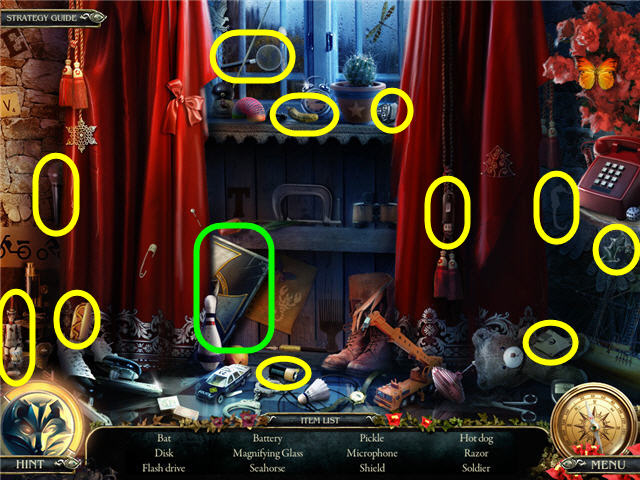
- Find the items to earn a SHIELD.
- Back out and go straight left.

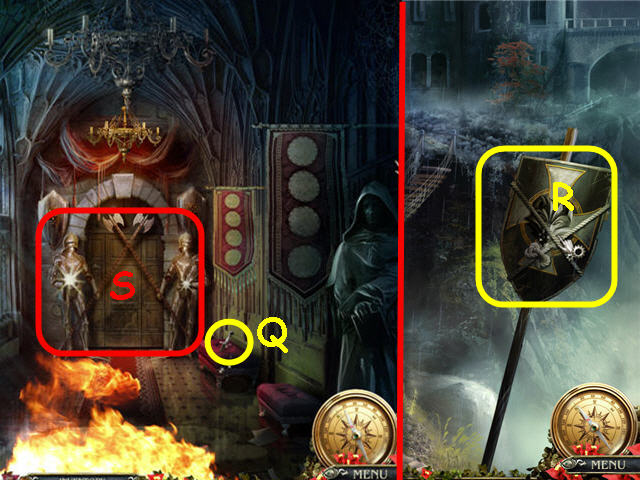
- Use the BAG WITH SAND on the flames.
- Examine the ottoman; take the KNIFE (Q).
- Back out three times.
- Use the KNIFE on the rope; take the 2nd SHIELD (R).
- Go to the knight’s corridor.
- Examine and place a SHIELD on both knights (S).
- Go straight.

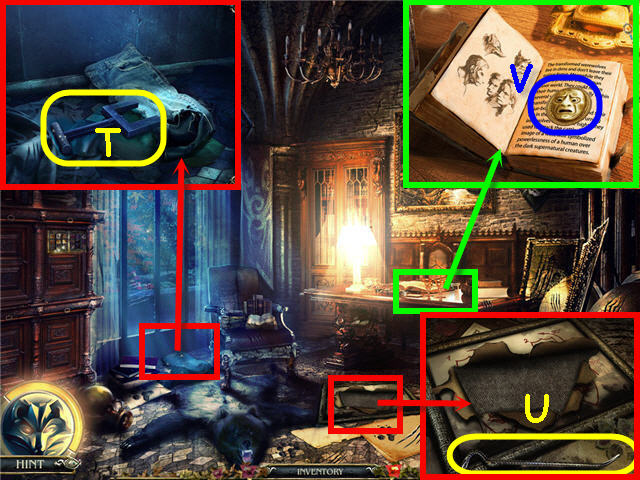
- Examine under the window; move the pants and take the KNIFE SWITCH (T).
- Examine the picture; take the CROWBAR (U).
- Examine the desk; take the SCARED FACE (V).
- Back out twice; go upstairs and left.

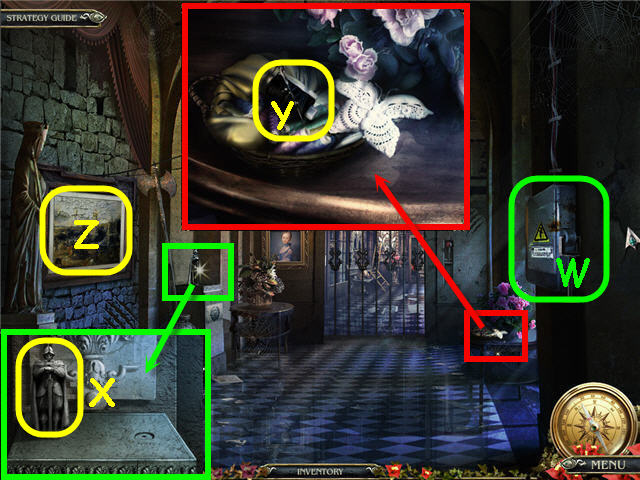
- Use the FLASHLIGHT and KNIFE SWITCH on the electric panel (W).
- Examine the pedestal; take the FIGURE (X).
- Examine the table; take the NEEDLE AND THREAD (Y).
- Examine and use the CROWBAR on the painting (Z) to trigger a puzzle.

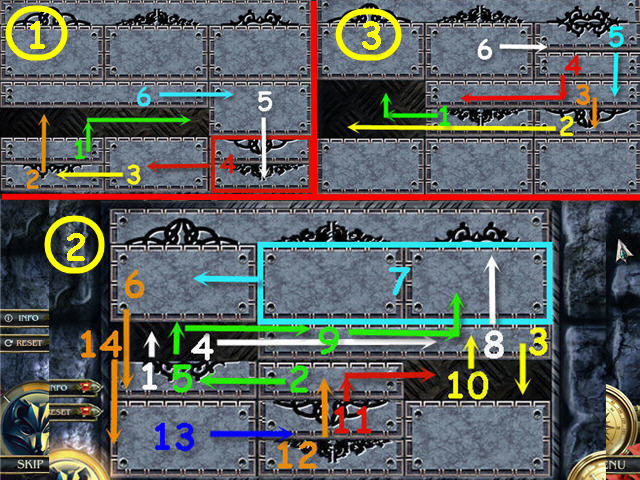
- Arrange the pieces to complete the three pictures at the top.
- See screenshot for the first half of solution (steps 1 to 3).

- See screenshot for the second half of solution (steps 4 to 7).
- Go straight twice.
- Examine the fireplace to access a HOS.


- Find the items.
- Earn a SCREWDRIVER.


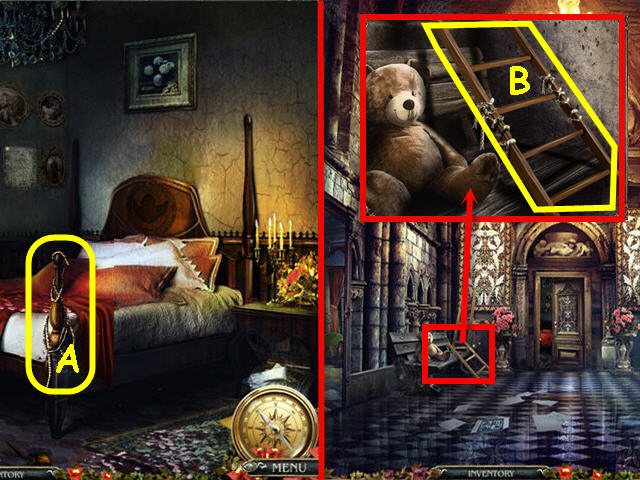
- Move the cloth; take the ROPE (A).
- Back out.
- Examine and use the ROPE on the ladder; take the LADDER (B).
- Back out three times.

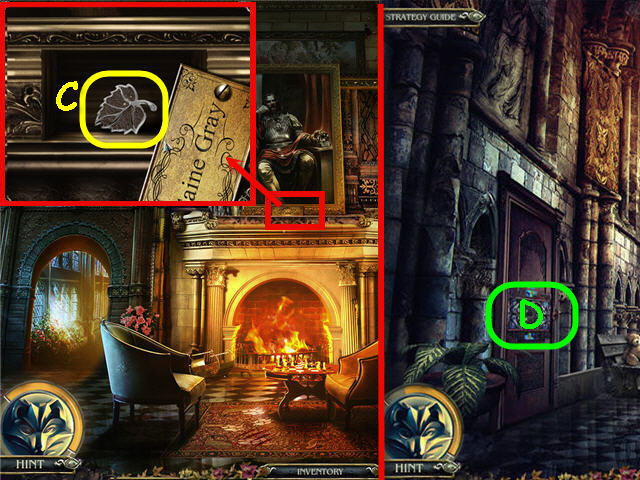
- Examine and use the SCREWDRIVER on the nameplate; take the LEAF (C).
- Go to main corridor.
- Examine the left door (D).
- Place the LEAF in the center to trigger a puzzle.

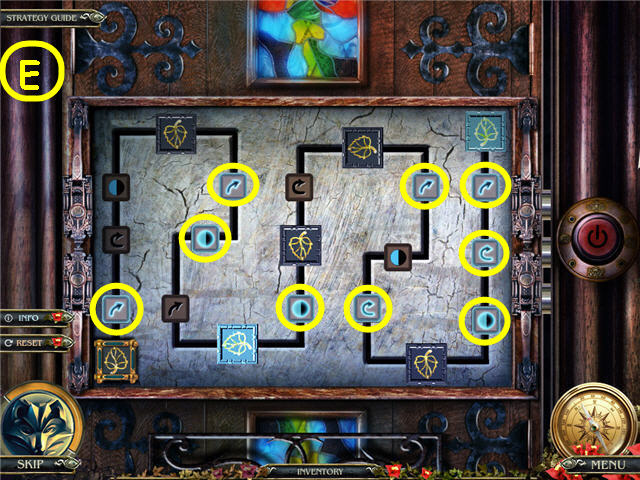
- Click the buttons necessary to move the leaf along the path.
- Use the red button to check your progress or when complete. See screenshot (E) for solution.
- Back out twice.

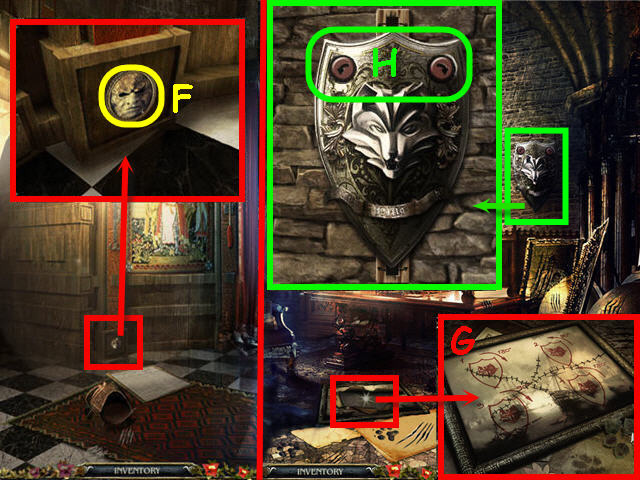
- Move the mosaic and examine the trim; use the KNIFE to get the INDIFFERENT FACE (F).
- Go to cabinet room.
- Examine and use the NEEDLE AND THREAD on the painting (G) to get a clue.
- Examine the emblem to trigger a puzzle.
- Use the arrows (H) to turn the head per the painting.
- Solution: Right 2x, left 1x, right 1x, and left 2x.
- Examine the cupboard to access a HOS.

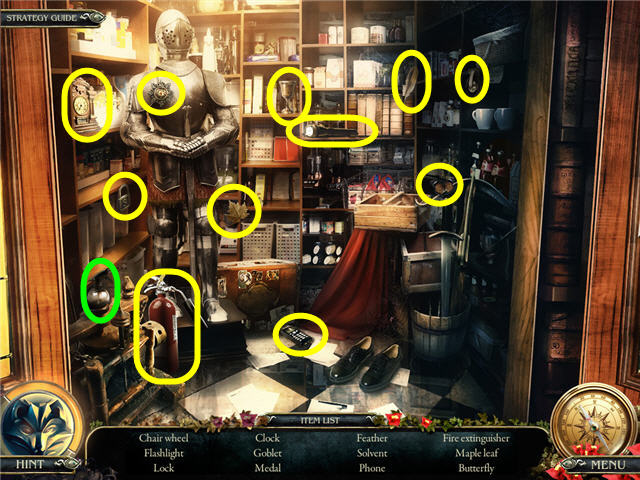
- Find the items and earn a SOLVENT.
- Back out 6 times and go to the fallen tree.

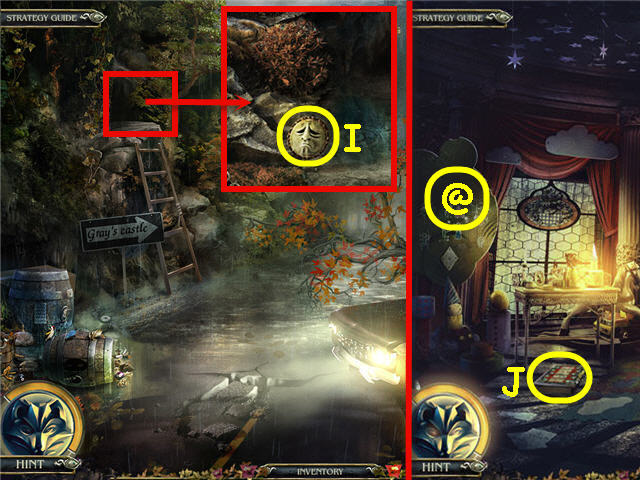
- Place the LADDER by the sign; examine the rock.
- Use the SOLVENT on the face; take the SAD FACE (I).
- Go to main corridor; turn left.
- Examine the hint board (@) for clues.
- Examine and place the SCARED FACE, INDIFFERENT FACE, and SAD FACE on the album (J) to trigger a puzzle.

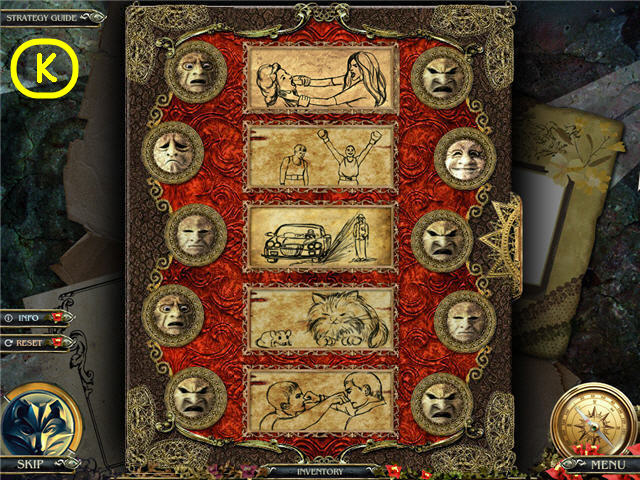
- Click on the buttons to toggle through the faces until you have matched the appropriate faces to the situation.
- See screenshot (K) for solution.
- Take the STOREROOM KEY.
- Go to the fireplace.
- Examine and use the STOREROOM KEY on the door under the stairs.
- Examine the door to access a HOS.

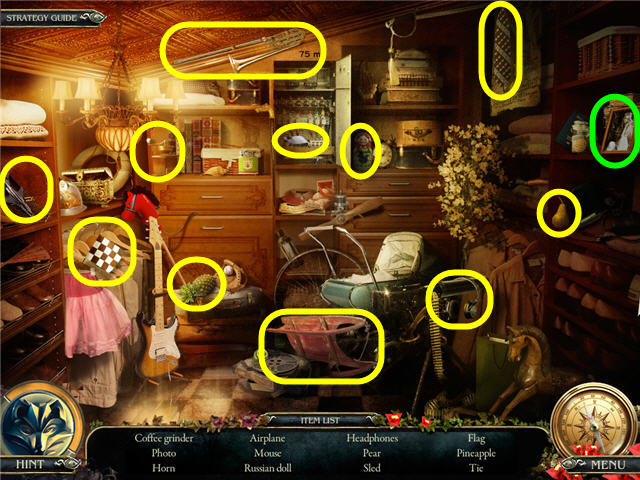
- Find the items and earn a PHOTO.
- Go to the bedroom.
- Examine and place the PHOTO by the portraits to trigger a puzzle.

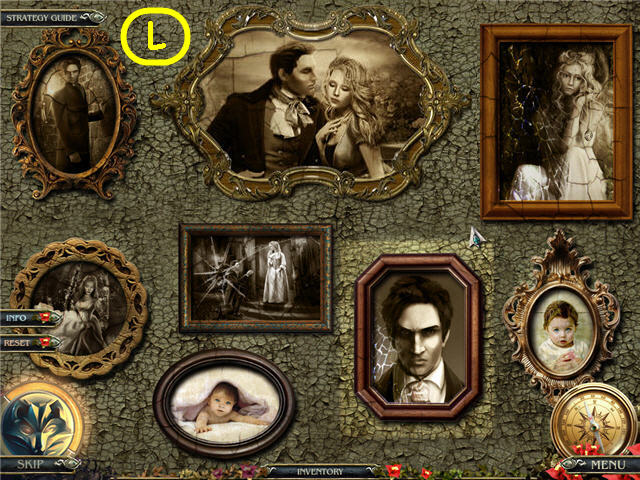
- Arrange the photos in the order of the hint board in the child’s room.
- See screenshot (L) for solution.
- Take the PHOTO.
- Back out and go left.
- Examine and place the PHOTO in the album on the floor.
Chapter 2 – Luisa’s Memory

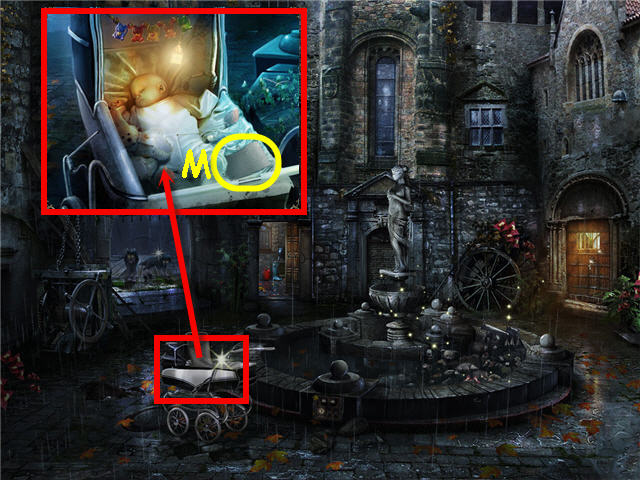
- Examine the carriage; take the PAPER (M).
- Examine the fountain to access a HOS.

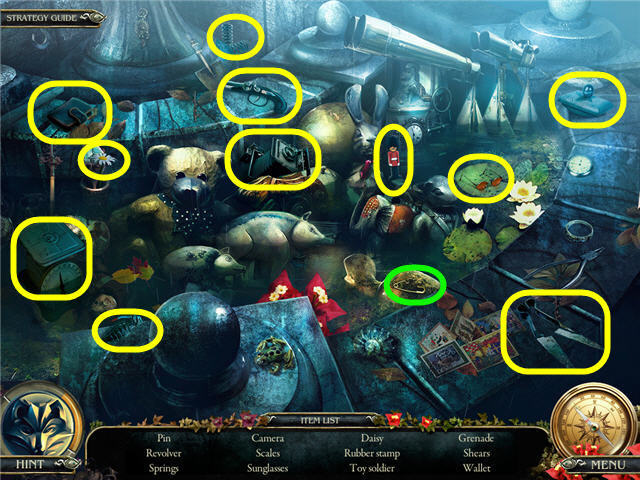
- Find the items and earn a PIN.
- Go through the left door.

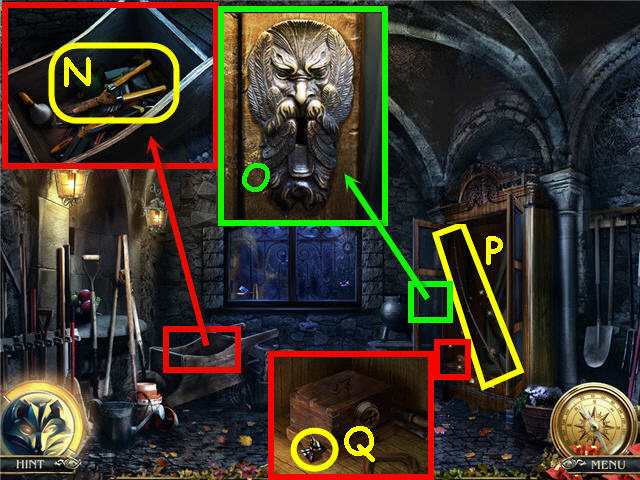
- Examine the cart; take the BLUNT SHEARS (N).
- Examine and use the PIN on the cabinet lock (O).
- Take the ROD (P).
- Examine the box; take the PUZZLE PIECE (Q).
- Back out.

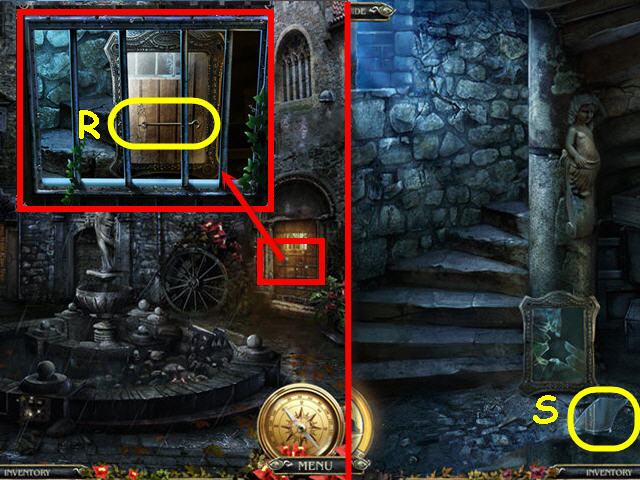
- Examine the door; use the ROD on the hook (R).
- Go through the right door.
- Take the MIRROR PIECE (S).
- Go upstairs.

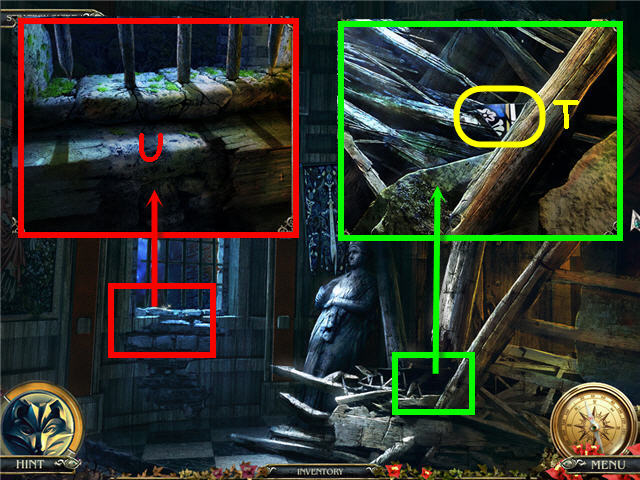
- Examine the beams; take the 2nd PUZZLE PIECE (T).
- Examine and use the CROWBAR on the bricks (U).
- Back out.
- Examine the door; place the 2 PUZZLE PIECES in the upper left to trigger a puzzle.

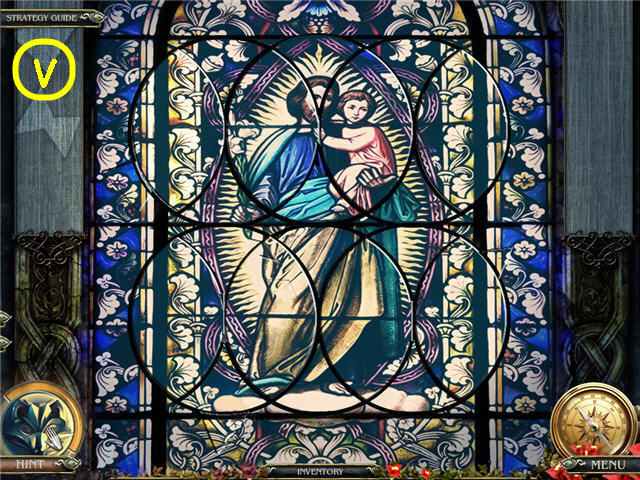
- Rotate the pieces until you can place the puzzle pieces in the white shapes; then rotate the pieces to complete the picture.
- Puzzle Piece Solution: Rotate top left circle and place the top 2 left pieces, place the top and bottom pieces from the right on the bottom row. Rotate the bottom center and place the bottom left piece. Rotate the bottom right, center and right to place the last piece.
- Picture Solution: C=Center Circle, R=Right Circle, L=Left Circle; Top row; C-L-R-C-L-C-L-C. Bottom row; C-L-R-C-L-C-R-C.
- See screenshot (V) for solution.
- Go through the door.

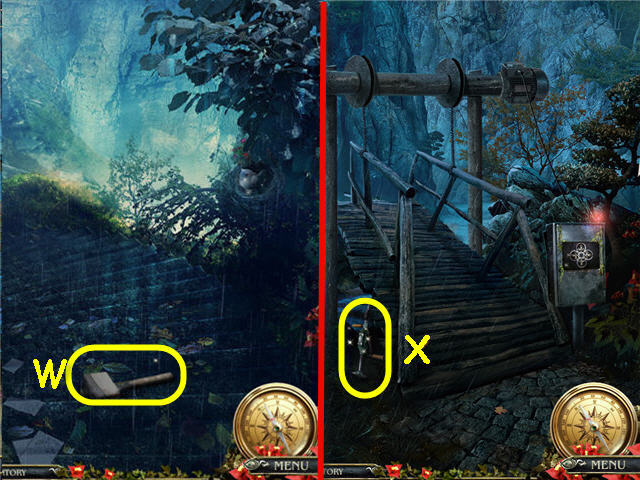
- Take the MALLET (W).
- Go down the steps.
- Take the DRILL (X).
- Back out twice.

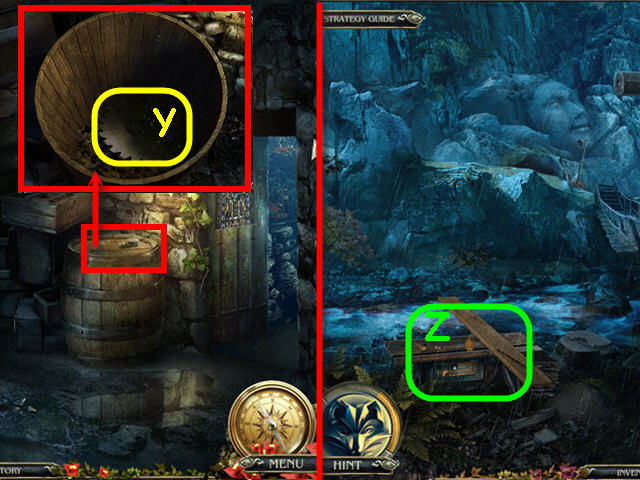
- Examine and use the DRILL on the barrel cork; remove the lid; take the SAW (Y).
- Go right and down.
- Examine and place the SAW in the sawmill (Z); get BOARDS.
- Go to the second floor.

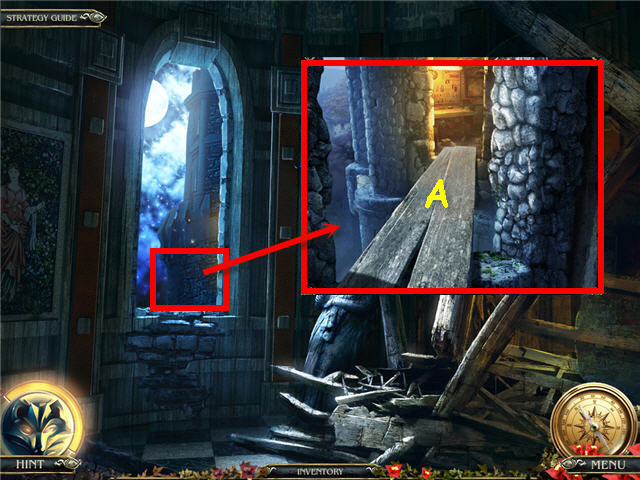
- Examine the window.
- Use the boards on the chasm (A) and cross into the workshop.
- Examine the objects to access a HOS.

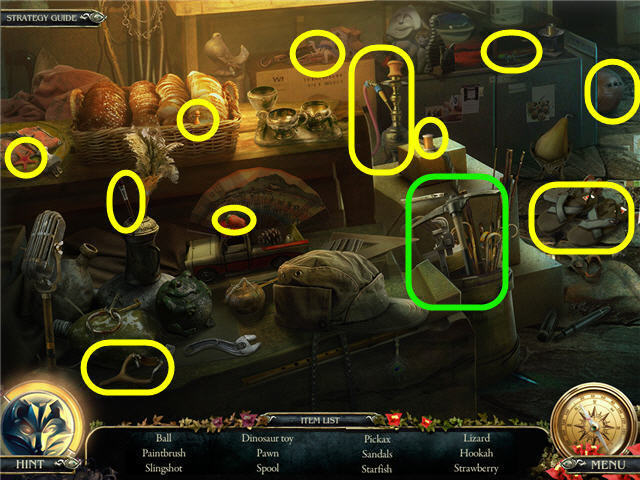
- Find the items.
- You will earn a PICKAXE.

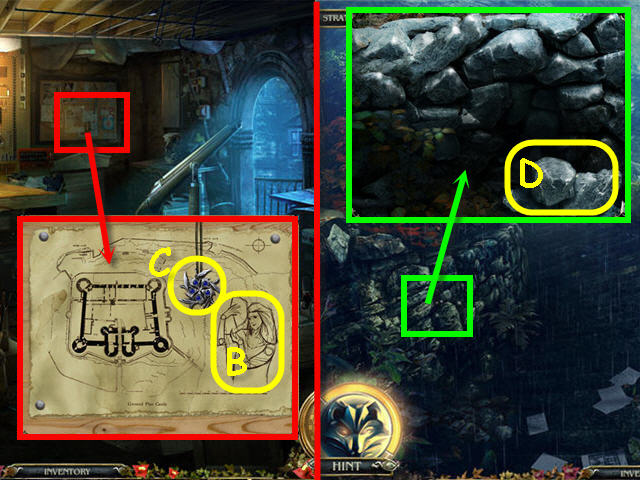
- Examine the board; take the DRAWING OF A WOMAN (B) and BLUE BAS-RELIEF (C).
- Go to the stone stairs.
- Examine and use the PICKAXE on the parapet; take the STONES (D).
- Go down the stairs to the bridge.

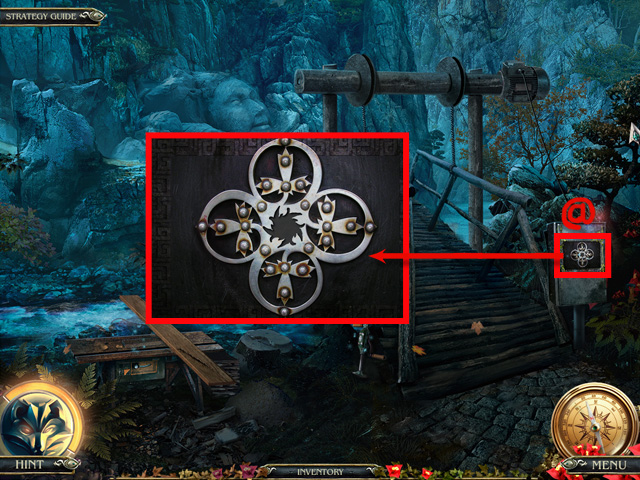
- Examine and place the BLUE BAS-RELIEF on the bridge panel to trigger a puzzle (@).

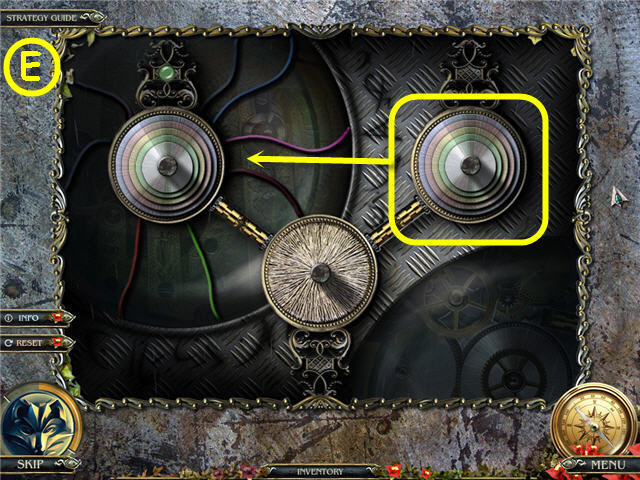
- Move the stack of disks from the right to the left.
- You cannot place a larger disk on top of a smaller disc.
- Solution: Move the silver disk to the left stack, move the green disk to the center stack, move the silver disk to the center stack, move the yellow disk to the left stack, move the silver disk to the right stack.
- Move the green disk to the left stack, move the silver disk to the left stack, move the pink disk to the center stack, move the silver disk to the center stack, move the green disk to the right stack.
- Move the silver disk to the right stack, move the yellow disk to the center stack, move the silver disk to the left stack, move the green disk to the center stack, move the silver disk to the center stack.
- Move the blue disk to the left stack, move the silver disk to the right stack, move the green disk to the left stack, move the silver disk to the left stack, move the yellow disk to right stack, move the silver disk to the center stack.
- Move the green disk to the right stack, move the silver disk to the right stack, move the pink disk to the left stack, move the silver disk to the left stack, move the green disk to the center stack.
- Move the silver disk to the center stack, move the yellow disk to the left stack, move the silver disk to the right stack, move the green disk to the left stack, and move the silver disk to the left stack.
- See screenshot (E) for final solution.
- Go straight.

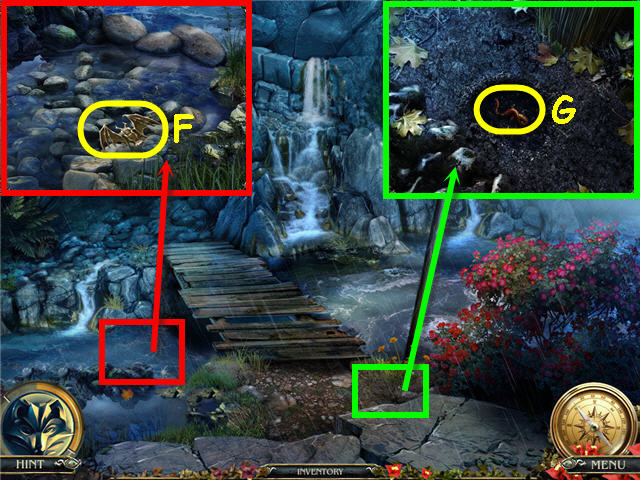
- Examine and place the STONES in the river; take the BAS-RELIEF (F).
- Examine the dirt; take the SOIL and WORM (G) underneath.
- Back out four times.

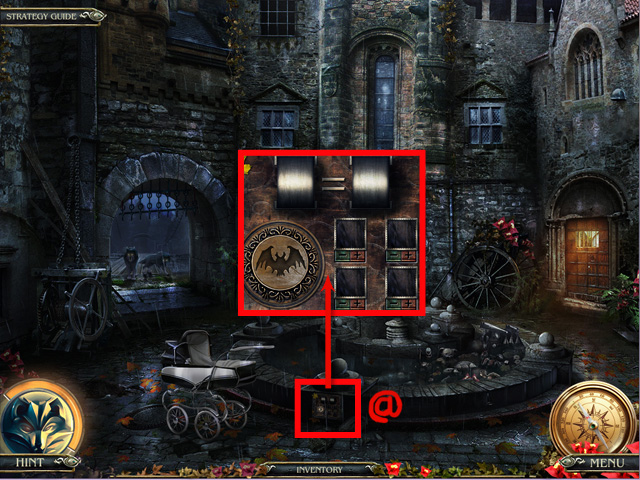
- Examine and place the BAS-RELIEF on the fountain panel to trigger a puzzle (@).

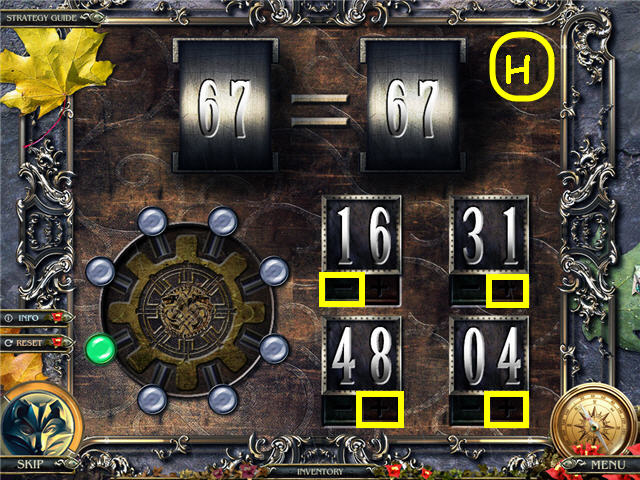
- Choose the correct equation sign under the numbers to match the number given above.
- See screenshot (H) for first example.
- Solution: Note the equation symbol to press is after the number; 67=16-48+31+04+.
- 38=13+31- 46+ 10+.
- 31=02+28- 51+ 06+.
- 13=06-11-25+5+.
- 23=17+24-41+11-.
- 22=12-54+26-06+.
- 27=17-35+ 28+19-.
- 18=17-24+26+ 15-.
- Go down underground.

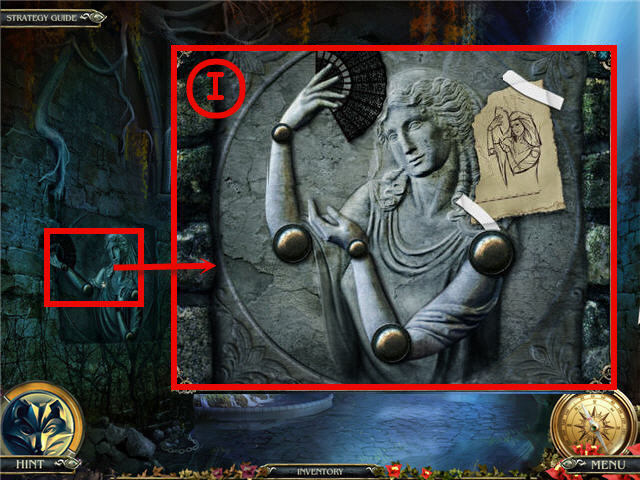
- Examine and place the DRAWING OF A WOMAN on the stone girl.
- Move the arms in the same position as the sketch. See screenshot (I) for solution.
- Automatically get a FAN.
- Go to the bridge.

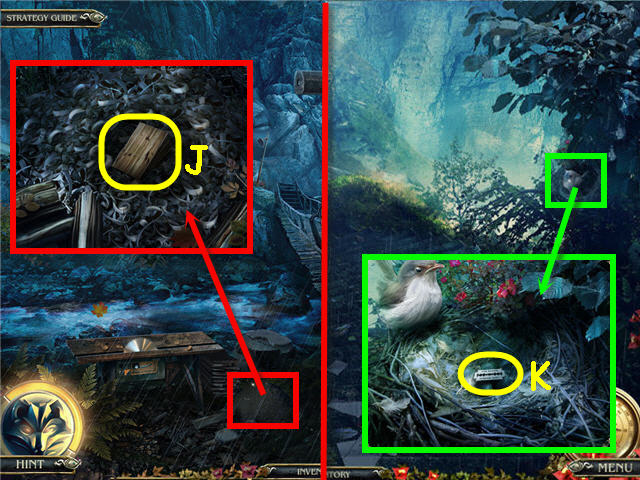
- Examine and use the FAN on the shavings; take the WEDGE (J).
- Back out.
- Examine the nest; give the WORM to the bird; take the BLADE (K).
- Go back to the underground and straight to the torture room.

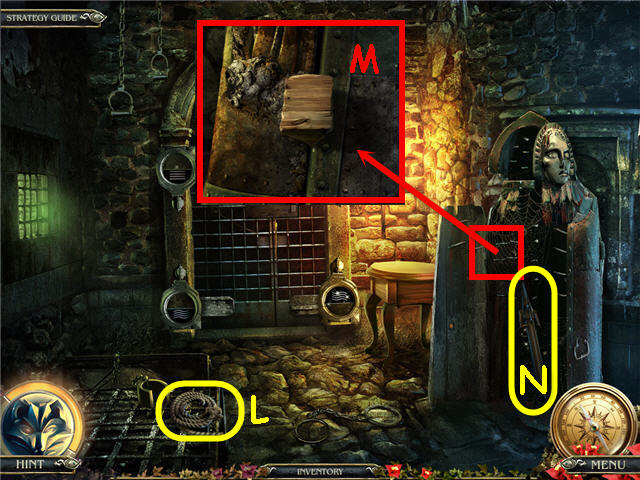
- Take the ROPE (L).
- Examine and use the WEDGE and MALLET on the iron maiden (M); take the HARPOON (N).
- Go to the workshop.

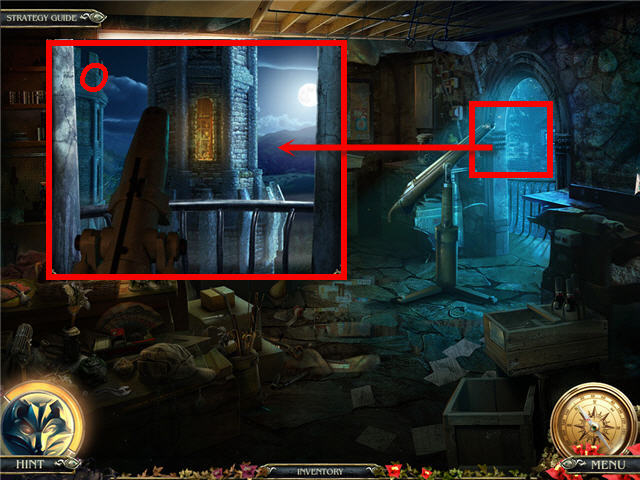
- Examine the harpoon cannon.
- Use the HARPOON and ROPE on the harpoon cannon (O).
- Go out the balcony doorway to Gray’s tower.
- Examine the desk to access a HOS.

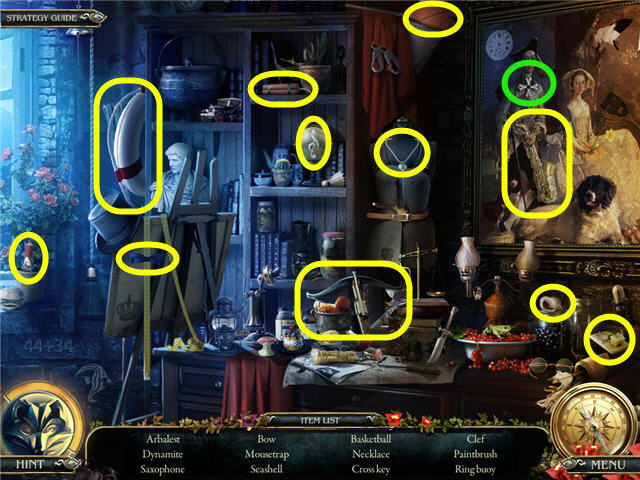
- Find the items.
- You will earn a CROSS KEY.

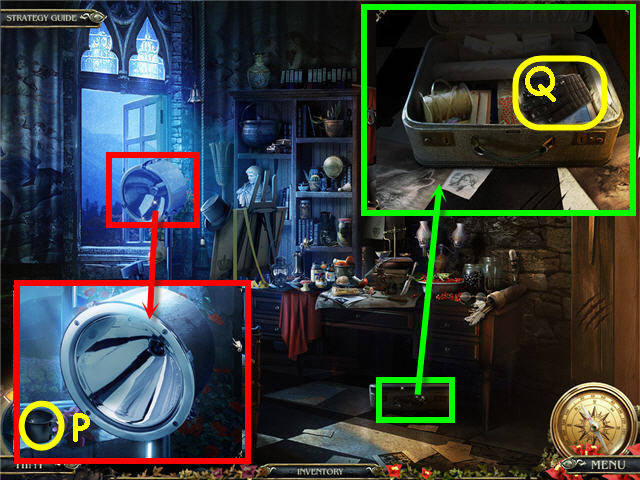
- Click the spotlight twice; take the EMPTY CUP (P).
- Examine the suitcase; open and take the GLOVE (Q).
- Go to the gate room.

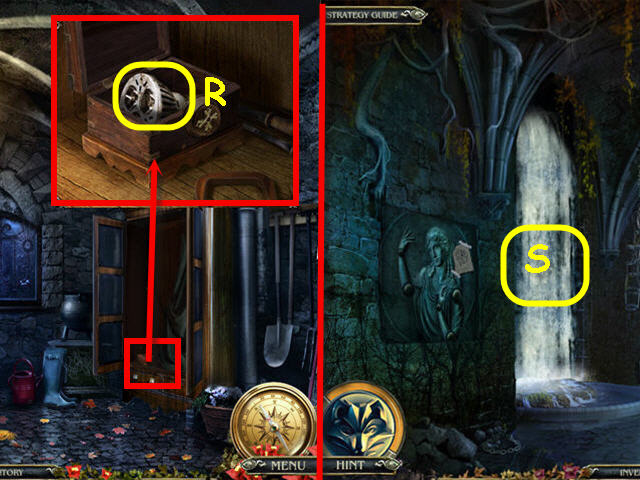
- Examine and place the CROSS KEY on the box; take the BULB (R).
- Back out; go down.
- Examine and use the EMPTY CUP on the waterfall (S); get a BOTTLE WITH WATER.
- Go to Gray’s tower.

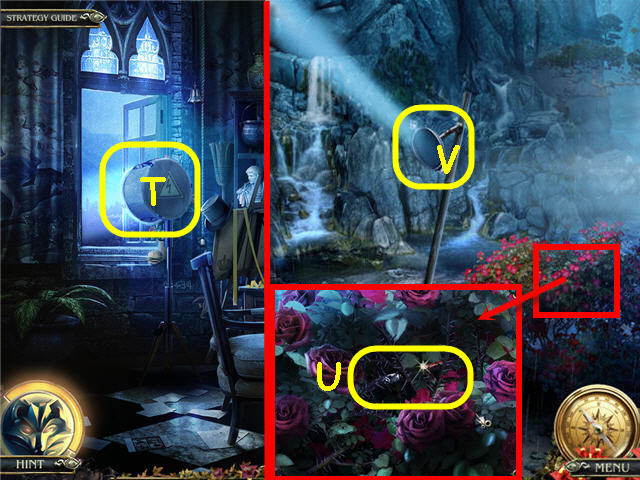
- Examine and place the BULB in the spotlight (T).
- Go to the river.
- Examine the rosebush; use the GLOVE to get the GLASS CUTTER (U).
- Examine and use the PAPER and BLADE on the mirror frame (V) to get a TEMPLATE.
- Go to the workshop.

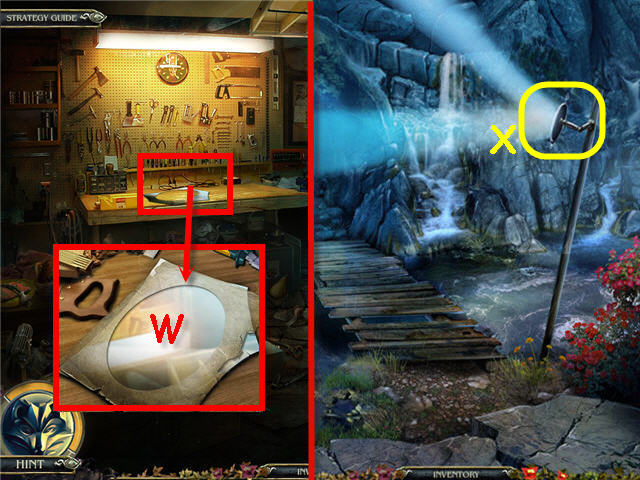
- Examine and place the MIRROR PIECE and TEMPLATE on the workbench (W); use the GLASS CUTTER to get a MIRROR.
- Go to the river.
- Examine and place the MIRROR in the frame (X); click to turn.
- Cross the bridge.
- Examine the den to access a HOS.

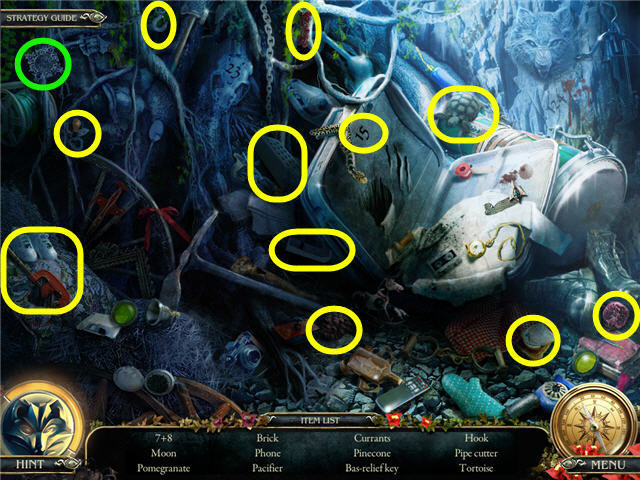
- Find the items.
- You will earn the EMBLEM.

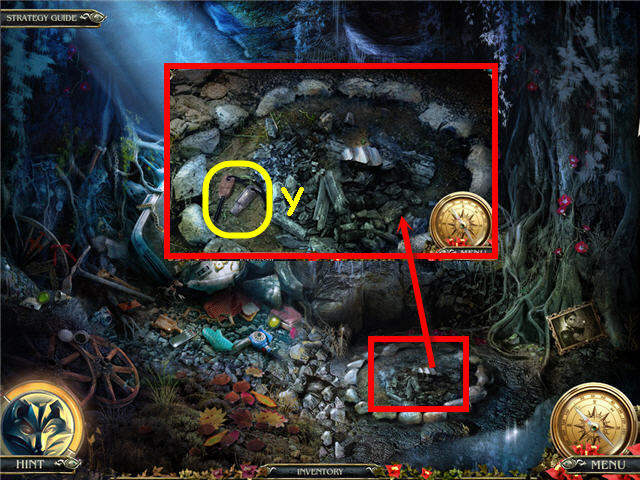
- Examine the fire ring; take the FLINT (Y).
- Go to the torture room.

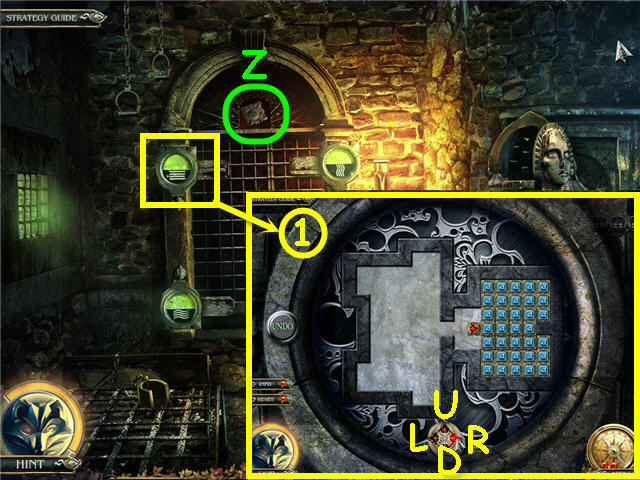
- Examine and place the TORTURE KEY on the top of the door (Z).
- Examine and place the SOIL in the upper left door lock to trigger a puzzle.
- Move each gray square into the blue spaces by using the arrows at the bottom of the scene.
- See screenshot (1) for solution and follow these steps:
- To solve the puzzle in screenshot 1, please follow these steps: R2x, U, R4x, U, R, D, R.
- D, U2x, R, U, R2x, L2x, D, L, D2x, R, D,R2x, U4x, D2x, L, U, D2x, L, D, R, U, R, D, L2x.
- U3x, L3x, D2x, R4x, D, R, U3x, L5x, D, L4x, D2x, R, D, R, U2x, D, L2x, U2x, R8x, U, R.
- D2x, U, L9x, D, L2x, U, R9x, U, R, D2x, U, L6x, D2x, L, U, L, U, R6x, U, R, D2x, U, L5x.
- D5x, L, U4x, L, U, R8x, L7x, D4x, L, U3x, L, U, R8x, D, R, U, L, U, R, D, L8x, D3x, L, U2x, L.
- U, R9x, U, R, D, L, D, R, U, L9x, D3x, L, D, R3x, D, R, U4x, L, U, R6x, L9x, D2x, R, D2x.
- L2x, U, R4x, D, R, U3x, L, U, R5x, D, R, U, L, U, R, D, L5x, U3x, L, D2x, R, D2x, L2x, U.
- R6x, U, R, D, L, D, R, U, L5x, U5x, L, D4x, R, D2x, L2x, U, R6x, L5x, U2x, L, D, L, D, R6x.
- D, R, U, L, U, R, D, L5x, U4x, L, D3x, L, D, R6x, U, R, D, L, D, R, U, L6x, U3x, L, D2x, R.
- D2x, L2x, U, R7x, L6x, U2x, L, D4x, R, D2x, L2x, U, R4x, D, R, U3x, L, U, R3x, D, R, U, L.
- U, R, D, L7x, U4x, R3x, U, R, D4x, L, D, R3x, U, R, D, L, D, and R.

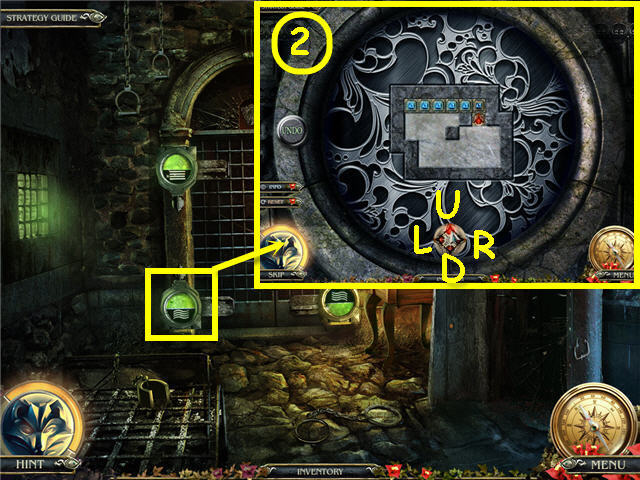
- Examine and place the BOTTLE WITH WATER on the bottom left door lock to trigger a puzzle.
- To solve the puzzle in screenshot 2, please follow these steps: U3x, R, U, L2x, R, D4x.
- R2x, U, L, D, L, U3x, D3x, R4x, U, L2x, D, L2x, U3x, R, U, R2x, D2x, R, D2x, L4x, U3x.
- L2x, D, R, U, R2x, U, R2x, D2x, L, D2x, L2x, U2x, L, U2x, R2x, L2x, D2x, R, U, L, U, R.
- D4x, L, U3x, D3x, R3x, U, L, D, L, U3x, D3x, R3x, and U3x.

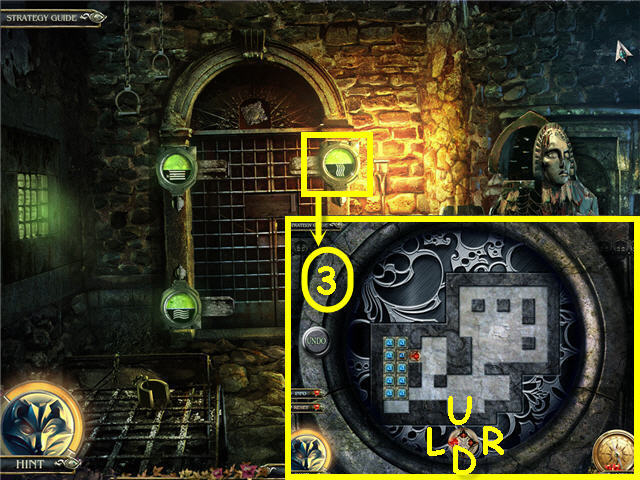
- Examine and use the FLINT on the upper right lock to trigger a puzzle.
- To solve the puzzle in screenshot 3, please follow these steps: U6x, R, U, D, R2x, U, L.
- D3X, R, L, U2x, L3x, U, R2x, L, D6x, R2x, U, L, D, L, U5x, R2x, D2x, L, R, U2x, L2x, D4x.
- R, D, L7x, D, L, U4x, D3x, R7x, U3x, R2x, U, L, U, L, D4x, R, D, L6x, R, U3x, L3x, D4x, R.
- U4x, D3x, R4x, U, R, D, R, U3x, R, U2x, L, D4x, R, D, L6x, R, U3x, L3x, D4x, R, U3x, L, U.
- R2x, L, D3x, R6x, U5x, L, U3x, R6x, D5x, L4x, U, L, D3x, R, D, L6x, R, U2x, R, U2x, L, D.
- L3x, D4x, R, U2x, D, R6x, U5x, L, U3x, R2x, D3x, R, D, L, U, L, D4x, R, D, L6x, R, U2x, R.
- U2x, L, D, L3x, D4x, R, U, R6x, U5x, L, U, R, L, U2x, R2x, D3x, R, D, L, U, L, D4x, R, D.
- L7x, D, L, U3x, D2x, R7x, U5x, R3x, U, L, D, L3x, U3x, R2x, D3x, R, D, L, U, L, D4x, R, D.
- L7x, D, L, U2x, D, R7x, U5x, R3x, D, L2x, U4x, R4x, D5x, L4x, U, L, D3x, R, D, L7x, D, L.
- U, R7x, U3x, R5x, U2x, L4x, U, L, D5x, R, D, L7x, R6x, U6x, R, U2x, R2x, D4x, U, R2x.
- D2x, L4x, U, L, D3x, R, D, L6x, R, U2x, R, U, and L2x.

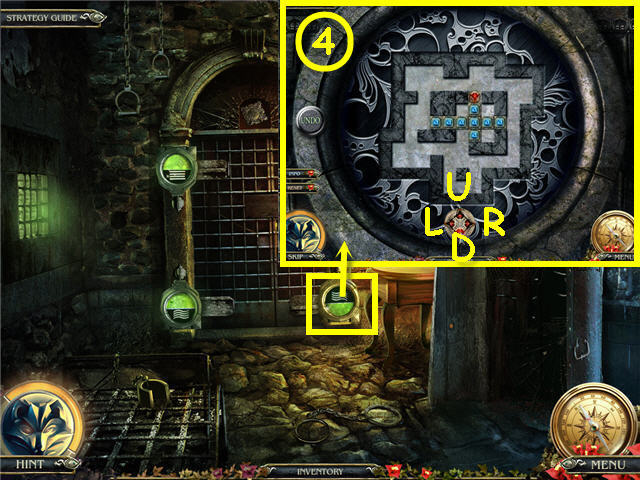
- Examine and use the FAN on the bottom right lock to trigger a puzzle.
- To solve the puzzle in screenshot 4, please follow these steps: L3x, D2x, L2x, U2x.
- D2x, R2x, U2x, L, U2x, R2x, U, R2x, U3x, L3x, D2x, R, D2x, L2x, D2x, R4x, U5x, D2x.
- L2x, U, L, D, U, L, D, R4x, U2x, R, U, L3x, U, L, D3x, L, D, R2x, U, L, U2x, R3x, D6x, L4x.
- U, L3x, D, L2x, U, R, U2x, R5x, U3x, R3x, D6x, L4x, U2x, D2x, R4x, U6x, L3x, D3x, L2x.
- R, D2x, L, D, U, L2x, D, L2x, U, R4x, D, R, U2x, D2x, R4x, U6x, L3x, D3x, L, R, U3x, L3x.
- U, L2x, D, R5x, D3x, L, D3x, R4x, U6x, L2x, U, L, D3x, U2x, R3x, D6x, L5x, U, L3x, U3x.
- R, U, D2x, L, D2x, R4x, D, R, D2x, L2x, U2x, R, U4x, R, U2x, L3x, U, L2x, D, R4x, L3x.
- D3x, L, D2x, R3x, D, R, U2x, D2 x, R4x, U6x, L2x, U, L, and D2x.
- Go forward.

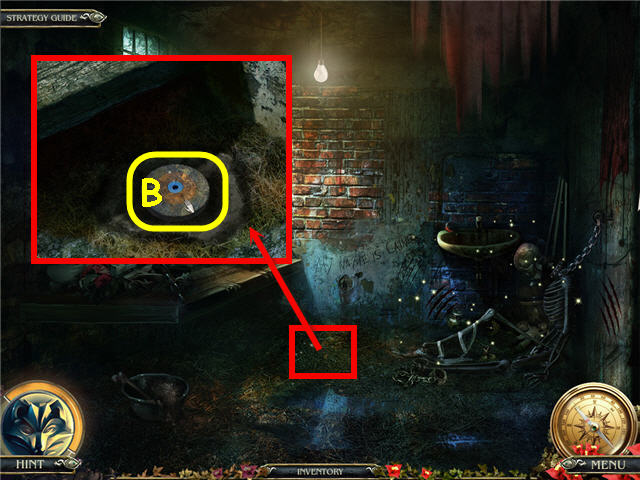
- Examine and use the FLINT on the straw; take the GRINDING WHEEL (B).
- Examine the skeleton to access a HOS.

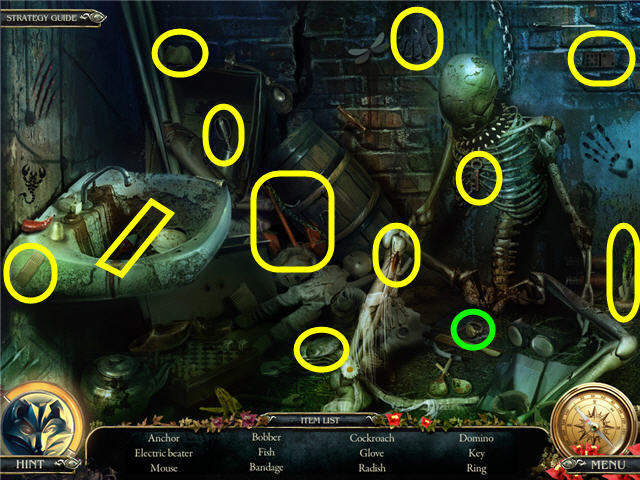
- Find the items and earn a RING.
- Back out twice.

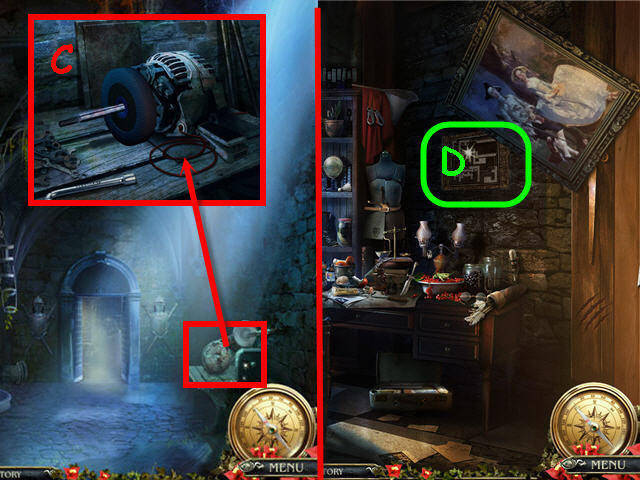
- Examine and place the GRINDING WHEEL on the grindstone.
- Use the BLUNT SHEARS on the wheel (C) to get SHARP SHEARS.
- Go to Gray’s Tower.
- Move the painting; examine and place the RING in the safe lock (D) to trigger a puzzle.

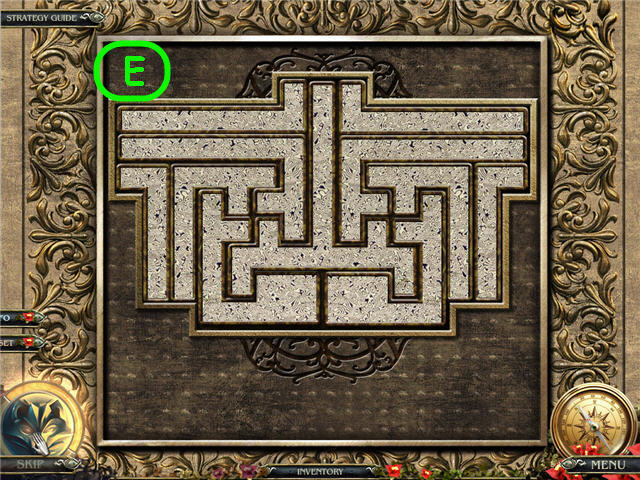
- Arrange all the pieces in the center to complete the panel.
- See screenshot (E) for solution.
- Take the DYNAMITE.
- Go to the wolf den.

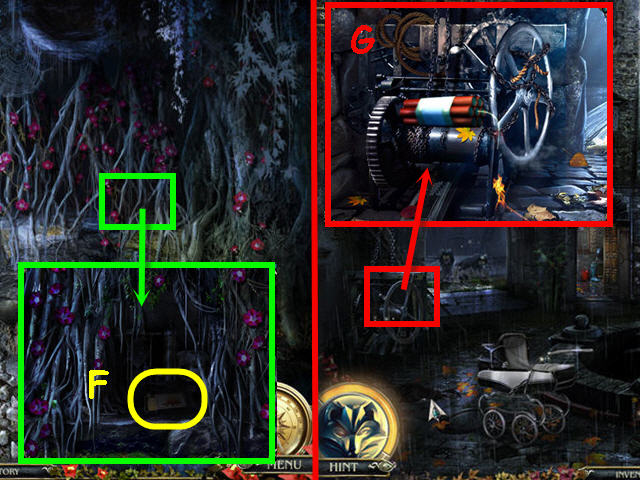
- Examine and use the SHARP SHEARS on the roots; take the MATCHES (F).
- Go to the castle yard.
- Examine and use the DYNAMITE and MATCHES on the mechanism (G).
Chapter 3 – Caine

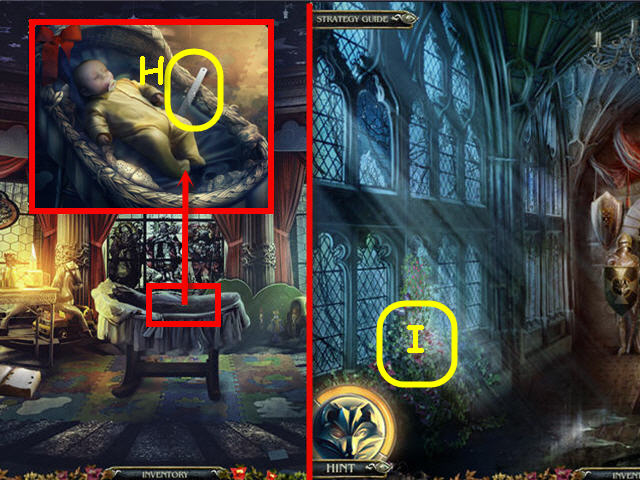
- Examine the cradle; take the RULER (H).
- Go to the knight’s corridor.
- Examine and use the SHARP SHEARS on the flowers (I).
- Examine the flowers to access a HOS.

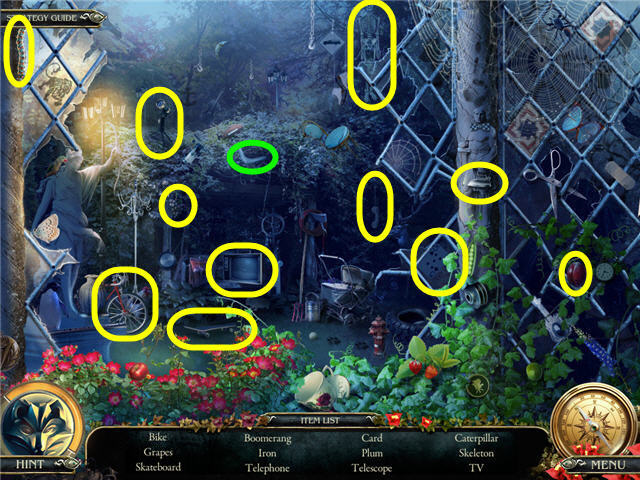
- Find the items and earn a BOOMERANG.
- Go straight.

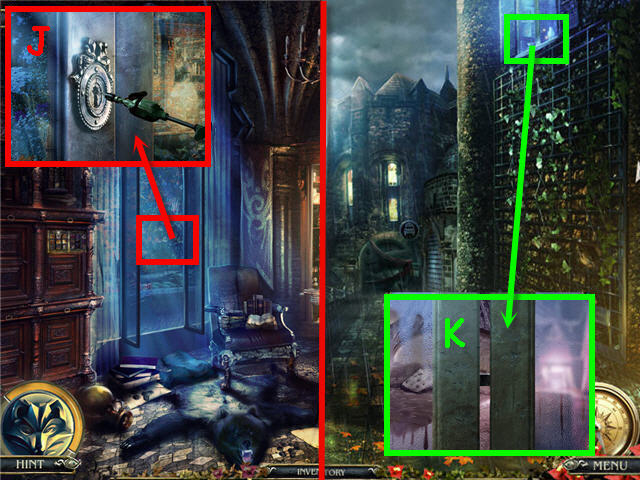
- Examine and use the DRILL on the window (J).
- Go through the window.
- Examine and use the RULER on the window (K).
- Go through the window.

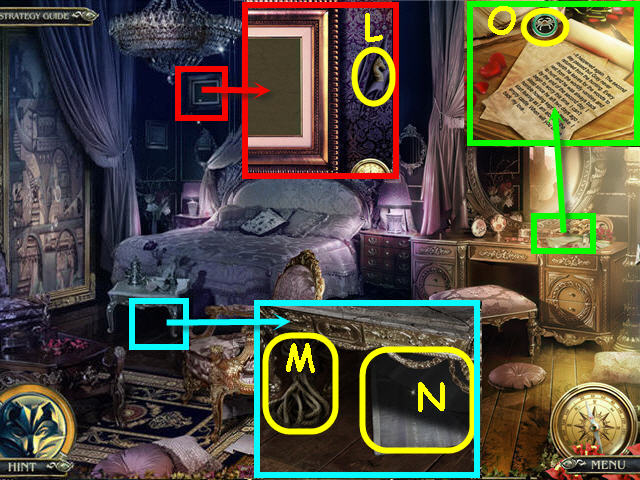
- Examine the photo frame; take the CHESS PIECE (L).
- Examine the padded stool; take the ROPE (M) and BAG (N).
- Examine the dressing table; take the CANCER (O); read the note.
- Go to the footbridge.

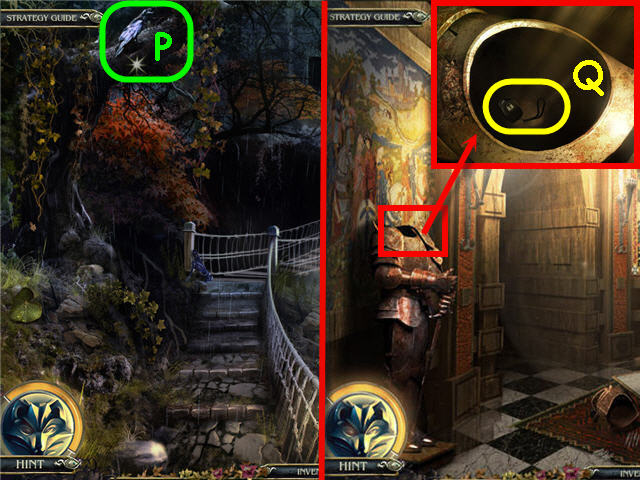
- Examine and use the BOOMERANG on the bird (P); get the ARIES.
- Go to the arch.
- Examine and use the ROD on the knight to get the REMOTE (Q).
- Go back to the cabinet, go left and then straight.

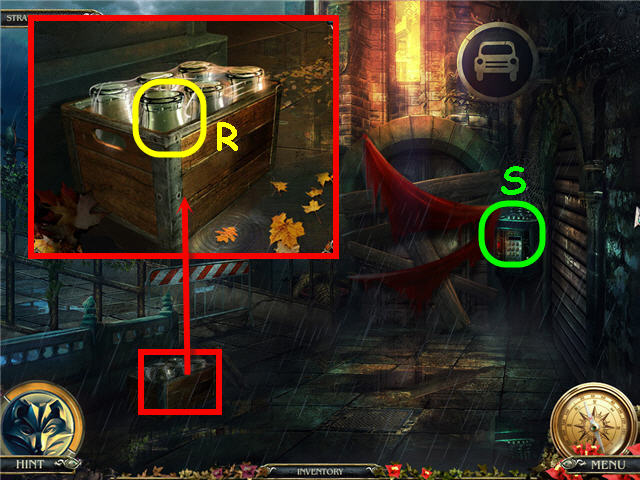
- Examine the bottles; take the BOTTLE (R).
- Examine the door panel (S) to trigger a puzzle.

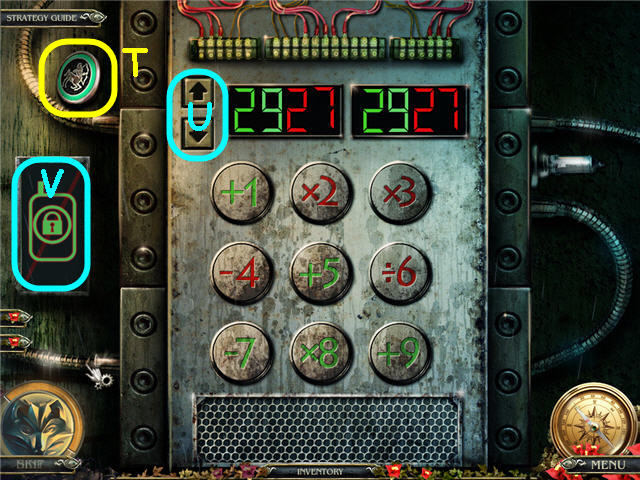
- Take the SAGITTARIUS (T).
- Find the correct two digit numbers that can be made by using the matching colored equation buttons below.
- Solution: Green; use the arrows (U) to get to 29; press +1, +9, -7, x8, +5.
- Red: Use the arrows to get to 27; press x2, -4, ÷6, x3.
- Use the REMOTE on the remote panel (V).
- Go right.
- Move the car cover; open the hood and examine to access a HOS.

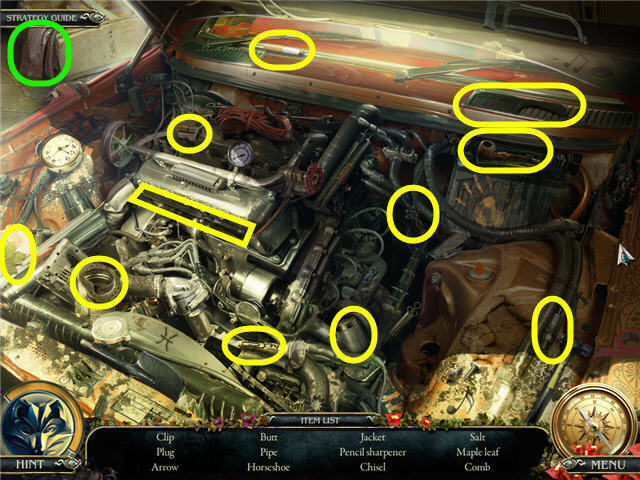
- Find the items listed.
- You will earn a JACKET.

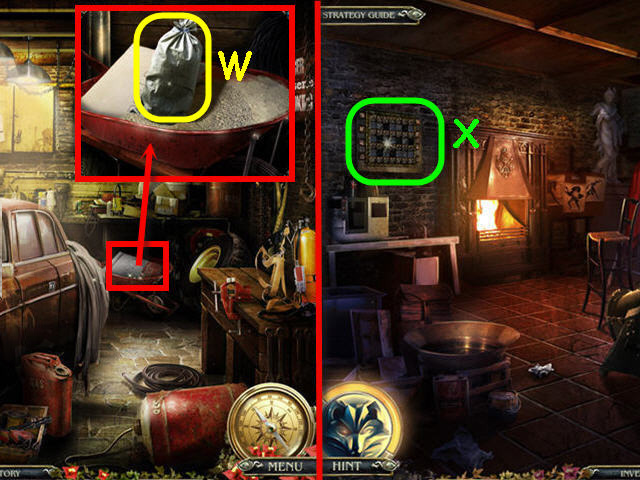
- Examine and use the BAG on the wheelbarrow; take the BAG WITH CEMENT (W).
- Go left.
- Examine the wall (X) to trigger a puzzle.

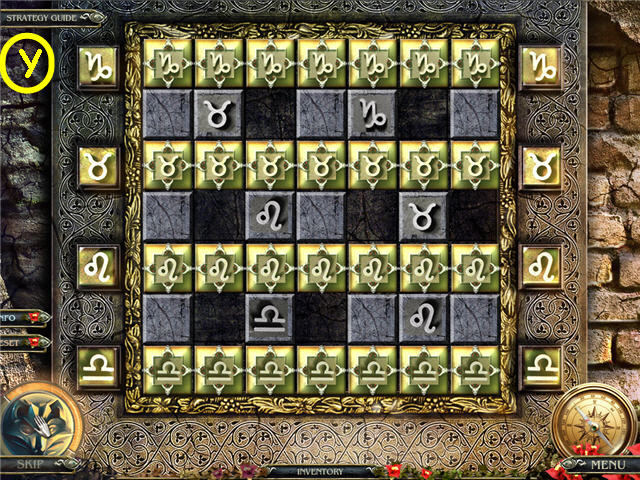
- Use the arrows on each piece to move them to their matching rows.
- See screenshot (Y) for solution.
- Take the FLARE GUN and LEO.
- Back out twice.

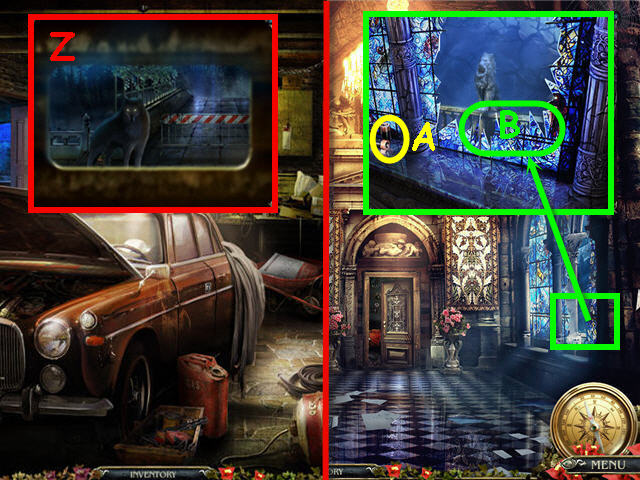
- Use the FLARE GUN on the wolf (Z).
- Go to the main corridor.
- Examine the broken window; take the BATTERIES (A).
- Use the JACKET on the glass (B).
- Exit out the window.
- Examine the box to access a HOS.

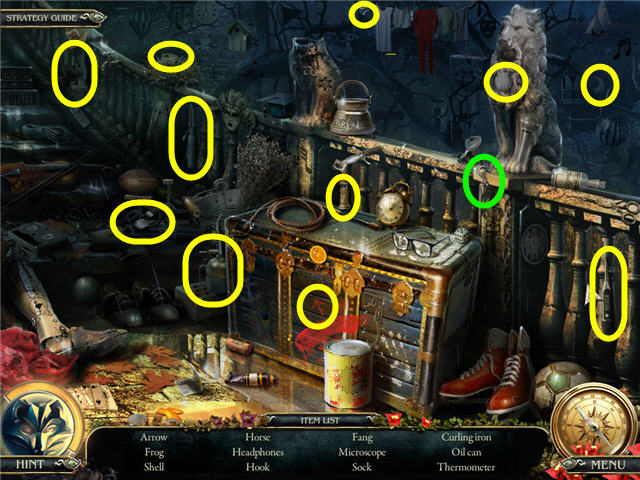
- Find the items listed.
- You will earn a HOOK.

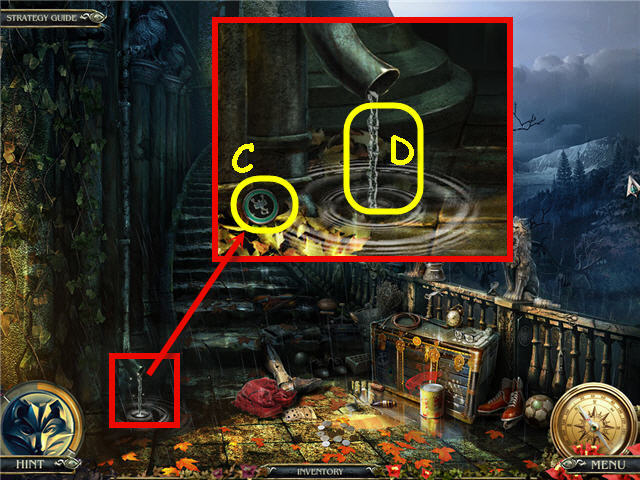
- Examine the downspout; take the SCORPIO (C).
- Use the BOTTLE on the water to get a BOTTLE WITH WATER (D).
- Go to the child’s room.

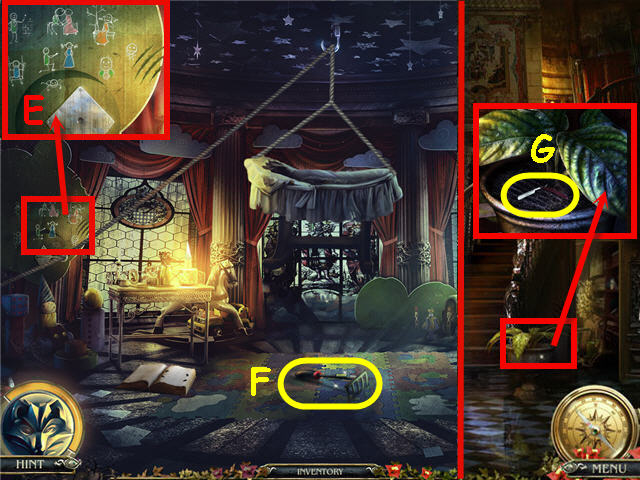
- Use the ROPE on the cradle.
- Examine and place the HOOK on the board (E).
- Click on the cradle; take the LITTLE RAKE (F).
- Go to the fireplace room.
- Examine the plant; use the LITTLE RAKE on the dirt; take the RAZOR (G).
- Go to Luisa’s room.

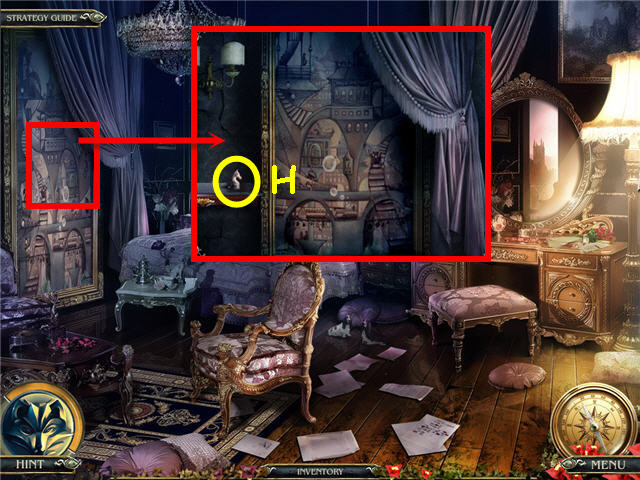
- Examine the picture; take the 2nd CHESS PIECE (H).
- Use the RAZOR on the picture.
- Go up to Caine’s study.
- Examine the desk to access a HOS.

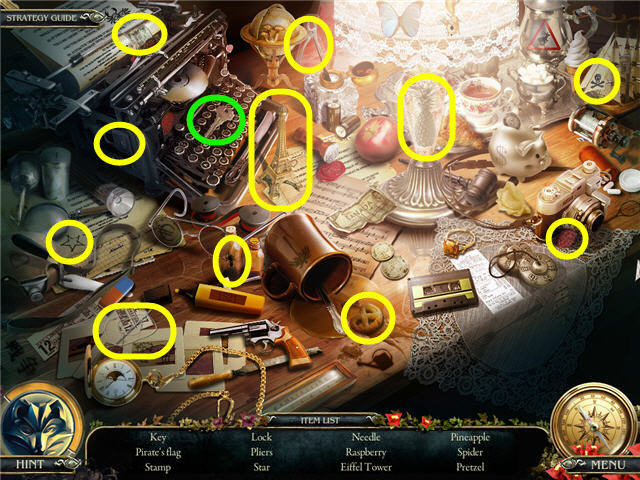
- Find the items and earn a KEY.
- Go to the garage.

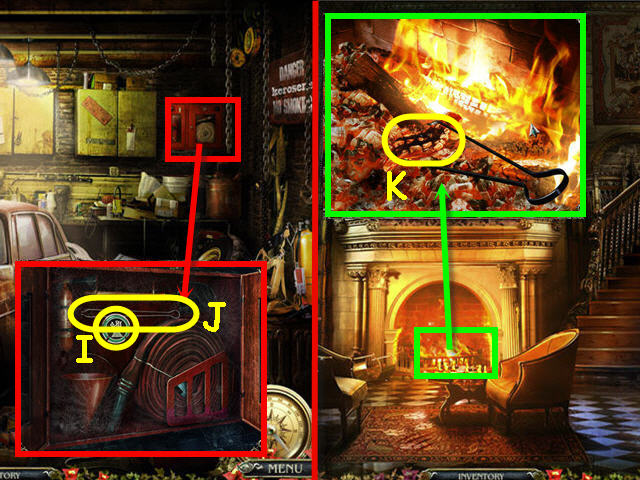
- Examine and use the KEY on the red box; take the VIRGO (I) and TONGS (J).
- Go to the fireplace room.
- Examine and use the TONGS on the fire; get a COAL (K).
- Go to Caine’s room.

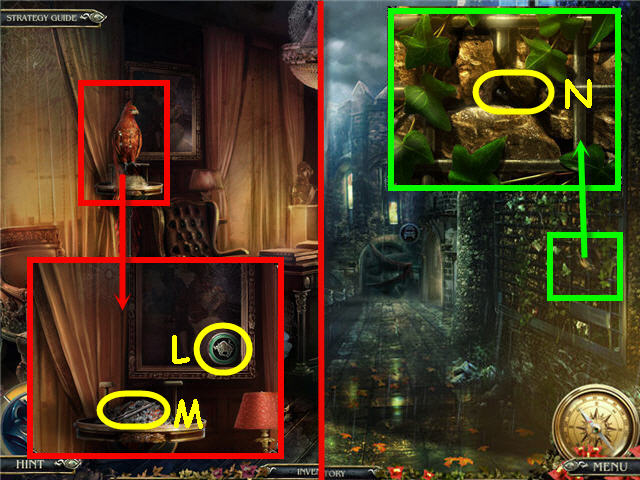
- Examine and use the COAL on the phoenix; take the TAURUS (L) and PINCERS (M).
- Go back twice.
- Examine the ladder; use the PINCERS to get the PEN (N).
- Go straight and right.

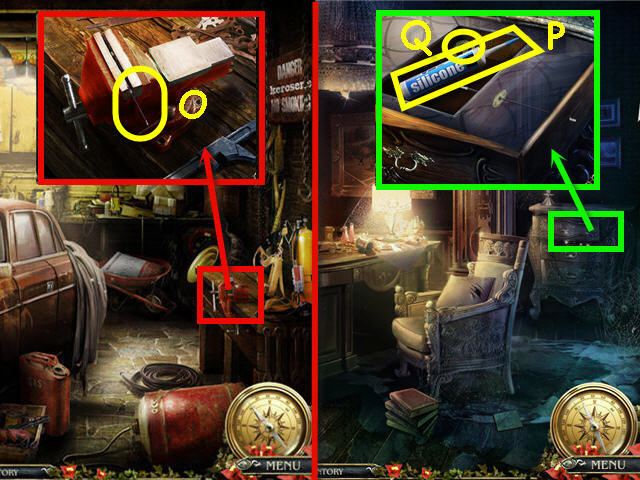
- Examine and place the PEN on the vice; turn the handle; take the PEN PART (O).
- Go to Caine’s room.
- Examine and use the PEN PART on the drawer; take the SILICONE (P) and LIBRA (Q).
- Go to the workshop.

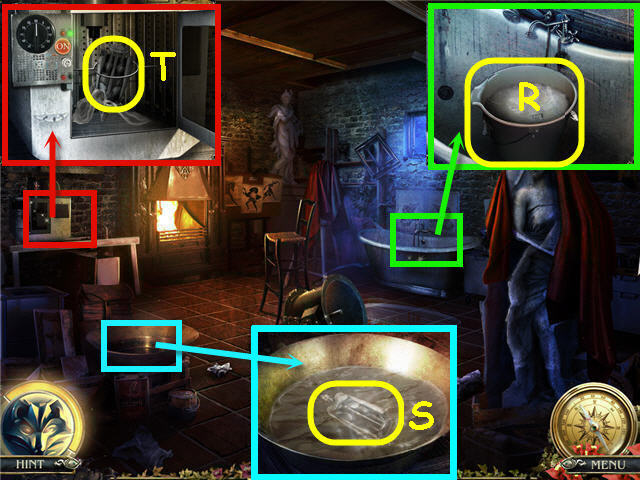
- Examine the bath.
- Use the BOTTLE WITH WATER (get a BOTTLE back in Inventory) and BAG WITH CEMENT on the bucket; take the BUCKET WITH CEMENT (R).
- Examine and place the SILICONE and FIGURINE in the bowl; take the FIGURINE (S) to get a FIGURE and MOLD.
- Examine and use the MOLD and BUCKET WITH CEMENT in the dryer.
- Close the dryer door; click the dial and press the on button; open the oven and take the 2nd FIGURE (T).
- Go to the Hallway.

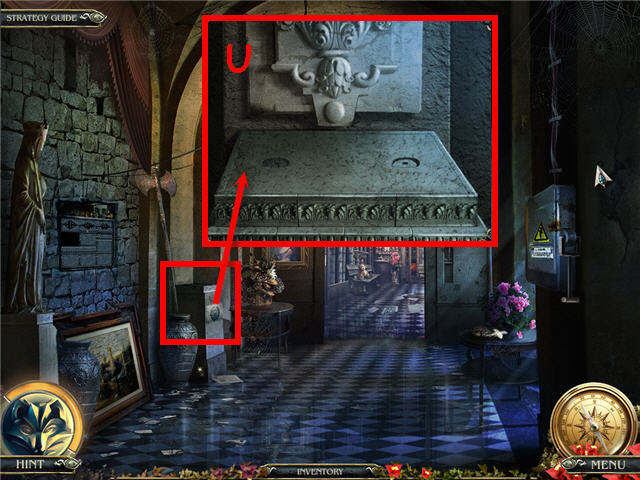
- Examine and place the 2 FIGURINES on the pedestal (U).
- Examine the pedestal to trigger a puzzle.

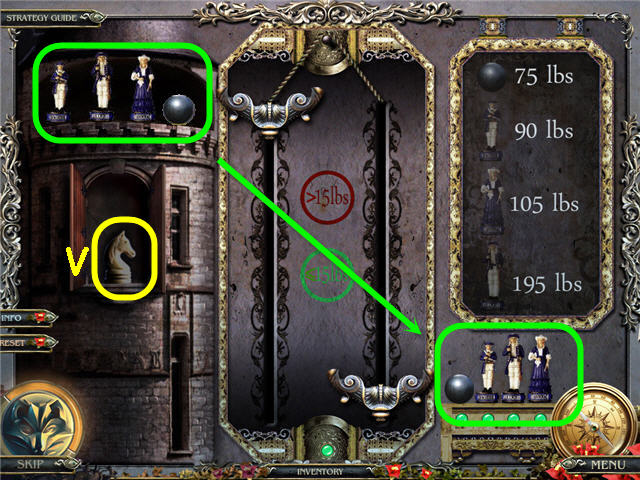
- Transport the 3 figures and weight from the upper left to the lower right with no more than 15 pound difference.
- Solution: Click the weight, knight 2x, weight, knight, queen, knight, weight, king, queen, weight, king, weight, knight 2x, weight, knight, queen, knight, weight, queen, knight 2x, and weight.
- Take the 3rd CHESS PIECE (V).
- Back out twice.

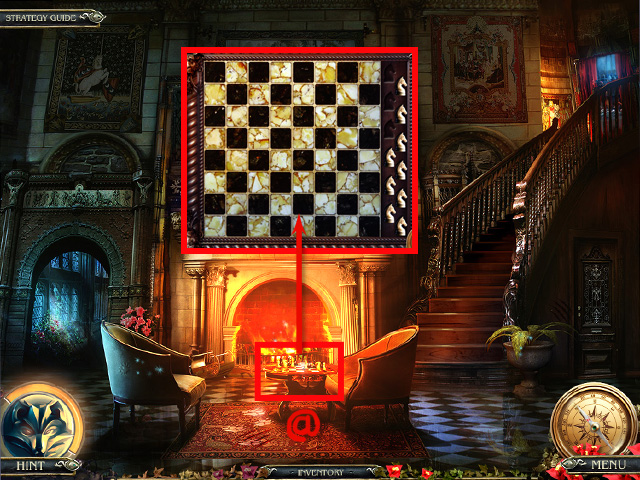
- Examine and place the 3 CHESS PIECES on the chessboard to trigger a puzzle (@).

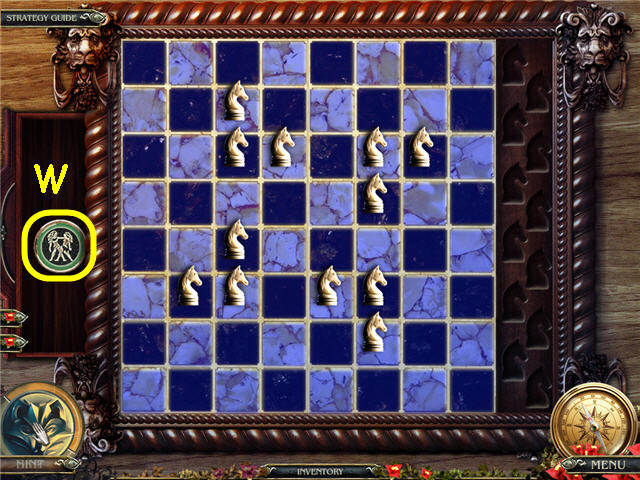
- Place the chess pieces on the board so that all squares turn blue.
- See screenshot for solution.
- Take the GEMINI (W).
- Go to the balcony over window; go up the stairs.
- Place the GEMINI, LIBRA, TAURUS, VIRGO, SCORPIO, LEO, SAGITTARIUS, ARIES, and CANCER on the top center to trigger a puzzle.

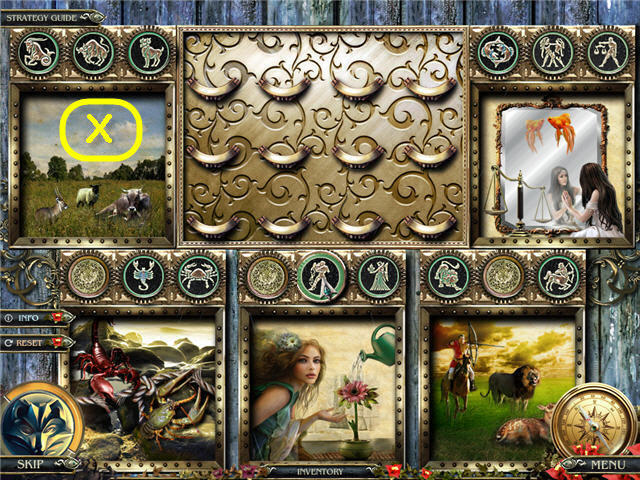
- Place the zodiac signs in the slots above their corresponding pictures to complete the pictures.
- Click on each picture to get a clue. See screenshot (X) for solution.
- Go upstairs.
- Examine the back of the room to access a HOS.

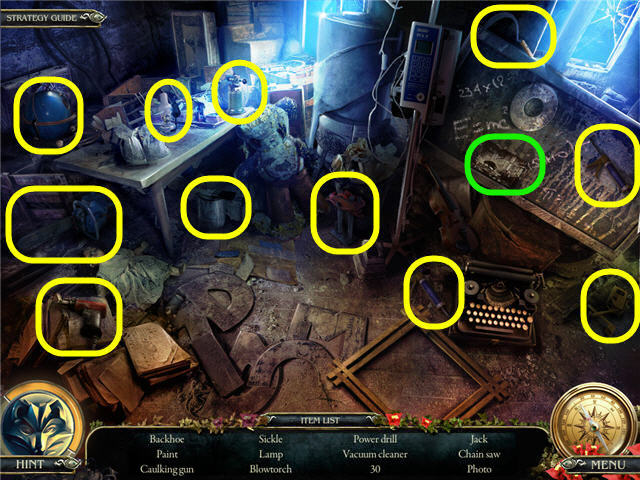
- Find the items listed.
- You will earn a PHOTO.

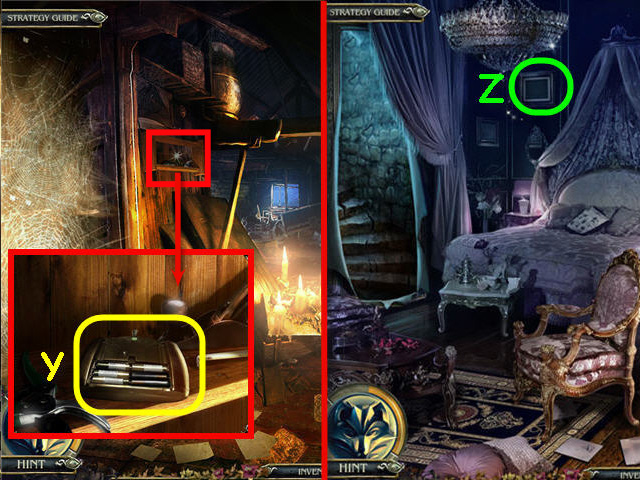
- Examine the shelf; place the BATTERIES in the transmitter; take the CAR REMOTE (Y).
- Go to Luisa’s room.
- Examine and place the PHOTO in the photo frame (Z).
Chapter 4 – Gray

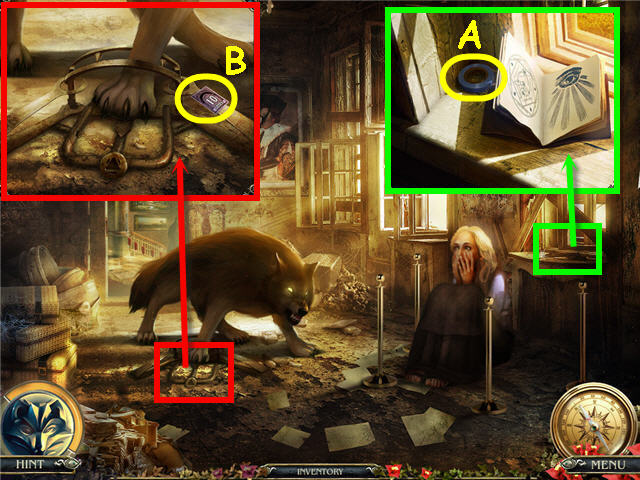
- Examine the window; take the INSULATING TAPE (A).
- Examine the trap; take the 10 CENT STAMP (B).
- Go straight.

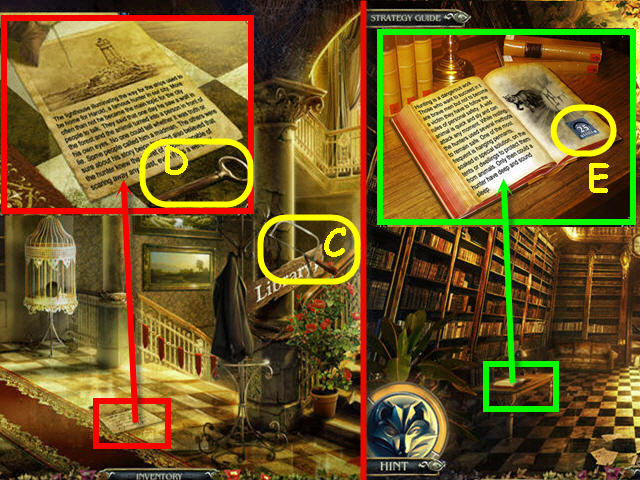
- Take the HACKSAW (C).
- Examine the note; take the KEY (D) and read the note.
- Go right upstairs.
- Examine the book; take the 25 CENT STAMP (E).
- Back out; go out the door.

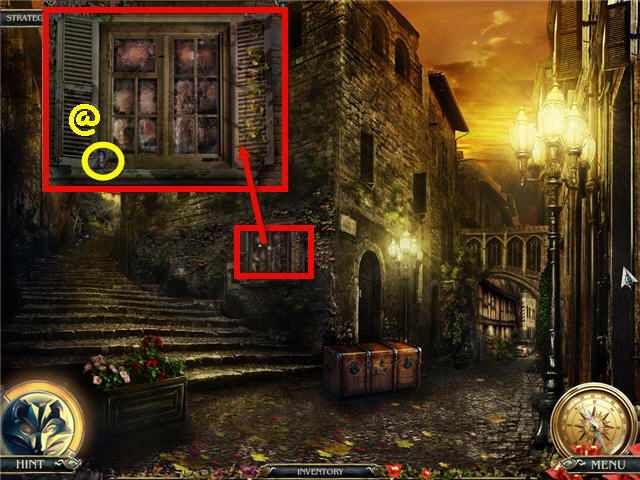
- Examine the window; take the 15 CENT STAMP (@).
- Go up the right street.

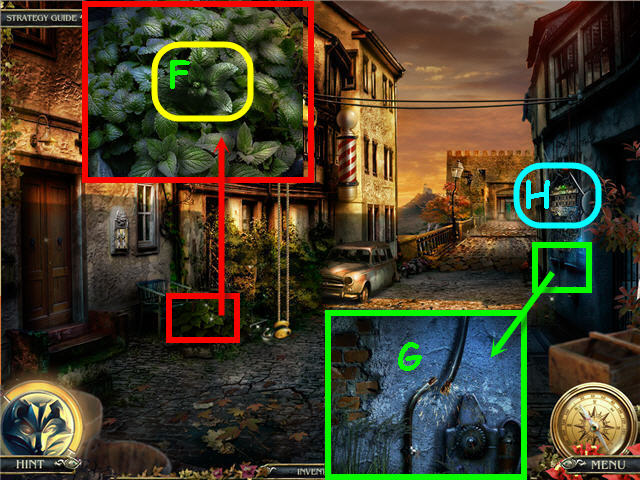
- Examine the plant; take the MINT (F).
- Examine and place the INSULATING TAPE on the wires (G).
- Examine the mechanism (H) to trigger a puzzle.

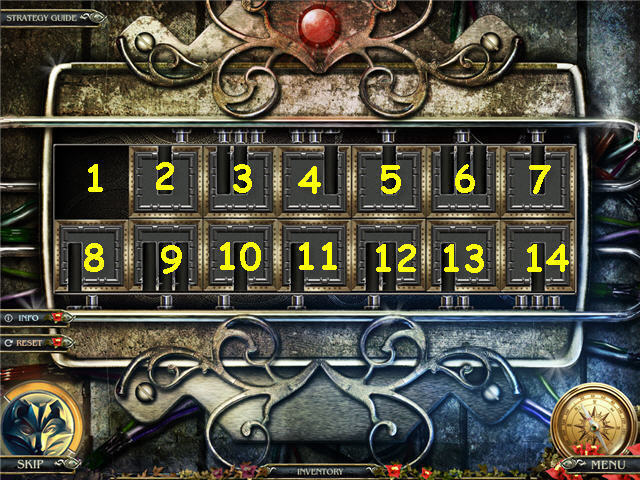
- Arrange the pieces to match the lock teeth.
- See screenshot for solution.
- Click on these numbers to solve the puzzle:
- 2,9,10,3,2,1,8,9,10,11,4,3,2.
- 9,10,3,2,1,8,9,10,11,4,5,12,11,10,3,4,5,6.
- 7,14,13,12,5,4,11,12,5,6,7,14,13,12.
- 5,4,3,10,11,4,3,10,9,2,3,4,5,6,7,14,13.
- 12,11,10,9,2,3,4,5,6,13,12,11,10,3,4,5,12,13,14.
- 7,6,5,12,11,4,3,2,9,8,1,2,3.
- 10,9,2,3,4,11,10,9,2,3,10,11,4,3,2,1,8,9,10.
- 3,2,9,10,3,2,1,8,9,10,11,4,3,10.
- 11,4,3,10,11,4,3,10,11,12,5,4,3,2,9,10,3,10,9.
- 8,1,2,3,10,9,2,1,8,9,10,3,4,5.
- 12, 11, 10, 3, 2, and 1.
- Go straight.

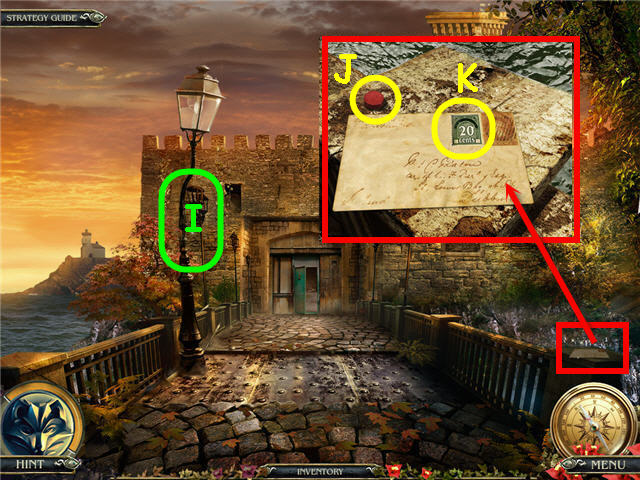

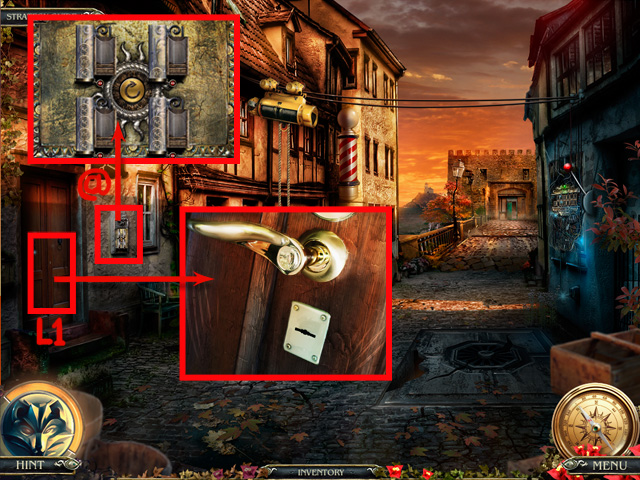
- Examine and use the HACKSAW on the light pole (I).
- Examine the letter; take the 20 CENT STAMP (J) and RED BUTTON (K).
- Back out.
- Examine the mailbox under the scissors sign.
- Place the 10 CENT STAMP, 15 CENT STAMP, 20 CENT STAMP and 25 CENT STAMP in the slots to trigger a puzzle (@).

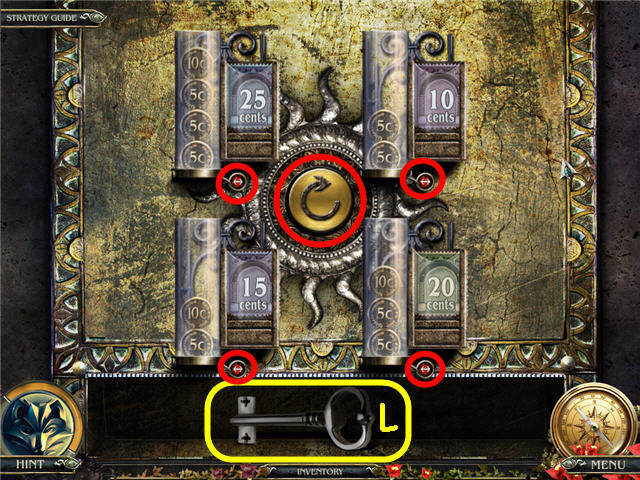
- Use the arrows to move the coins so that they add up to the stamps.
- Solution: Click the following arrows circled in red; center, upper right, center, upper right, center 2x, upper right, center, upper right, center, and upper right.
- Take the silver KEY (L).
- Examine and use the silver KEY on the barbershop door (L1).
- Go left.

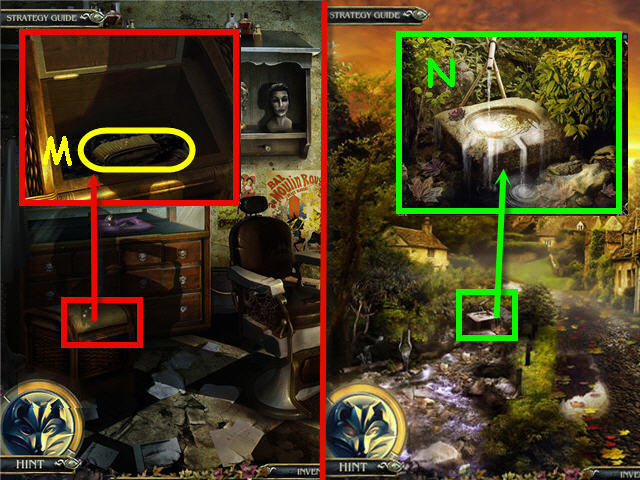
- Examine the stool; open and take the BRUSH (M).
- Back out twice and go upstairs.
- Examine and use the BOTTLE on the waterfall; get a BOTTLE WITH WATER (N).
- Examine the right archway to access a HOS.

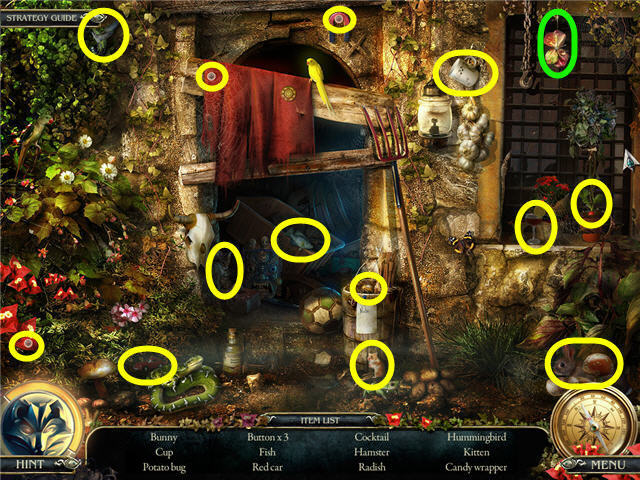
- Find the items listed and get a CANDY WRAPPER.
- Back out.

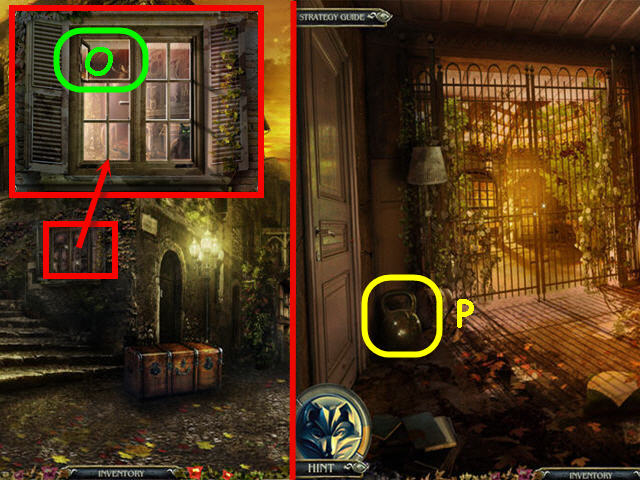
- Examine and use the BRUSH on the window.
- Open the upper left panel (O); throw in the CANDY WRAPPER.
- Enter the window.
- Take the WEIGHT (P).
- Go to shop street.

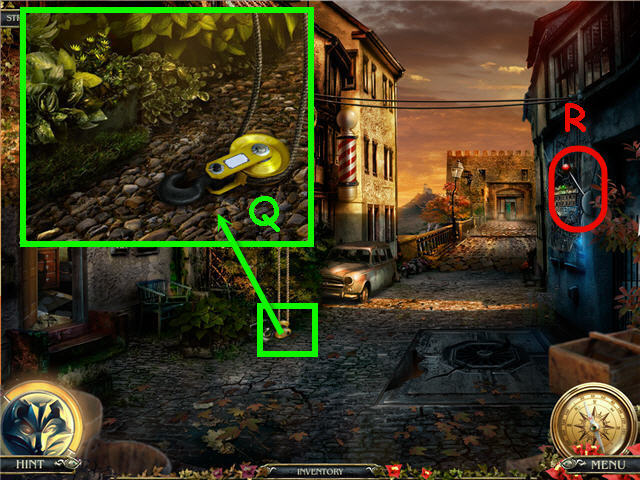
- Examine and place the WEIGHT on the hook (Q).
- Pull the lever (R).
- Go down the hole.
- Examine the shelves to access a HOS.

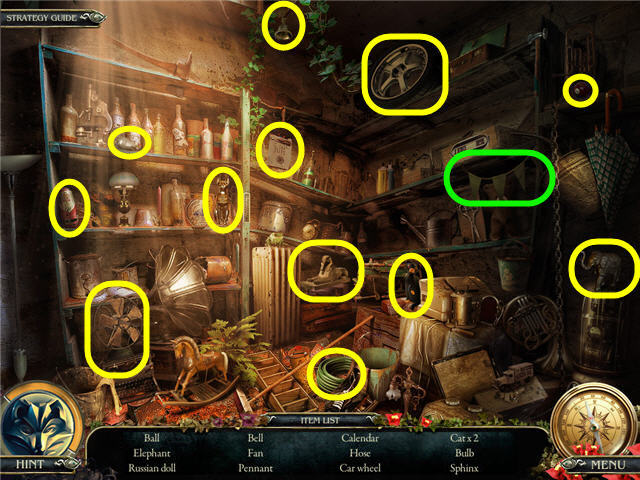
- Find the items listed.
- You will earn a PENNANT.

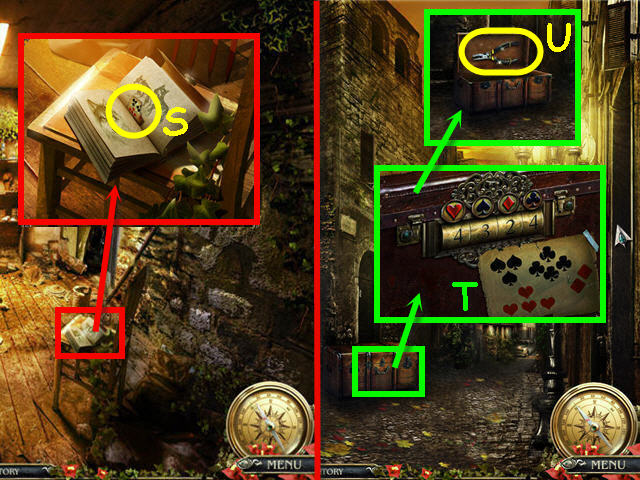
- Examine the chair; take the CODE (S).
- Back out twice.
- Examine and place the CODE on the chest (T).
- Set the numbers to match the number on the same suit on the code.
- Solution: 4324.
- Take the PLIERS (U).
- Back out.

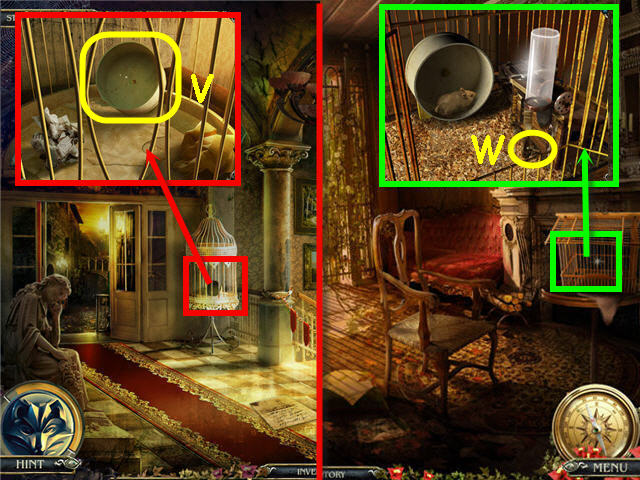
- Examine and use the PLIERS on the cage; take the WHEEL (V).
- Go to the room behind the window.
- Examine and place the WHEEL in the cage; take the ROLLER (W).
- Back out; go upstairs and forward.

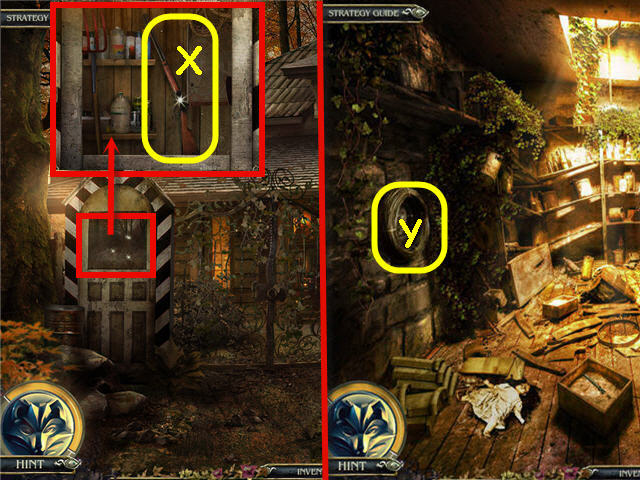
- Examine and use the PLIERS on the guard post; take the RIFLE (X).
- Go to the room under the road.
- Examine and use the PLIERS on the wire; get the WIRE (Y).
- Back out and go forward.

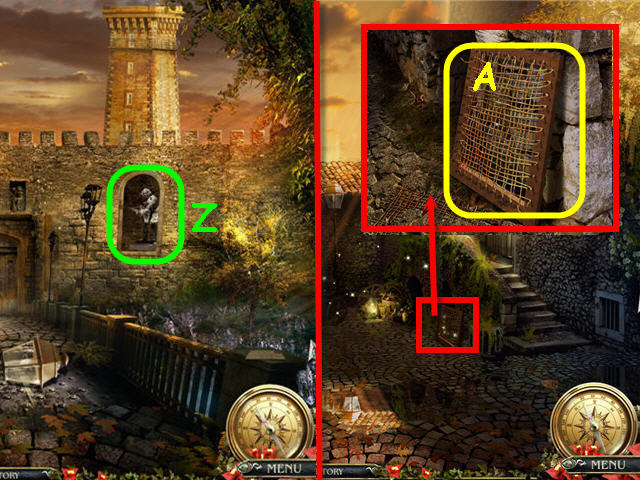
- Examine and use the RIFLE on the crossbowman (Z).
- Go forward.
- Examine and click on the sieve to remove the broken wire.
- Use the WIRE on the sieve; take the SIEVE (A).
- Examine the stuff to access a HOS.

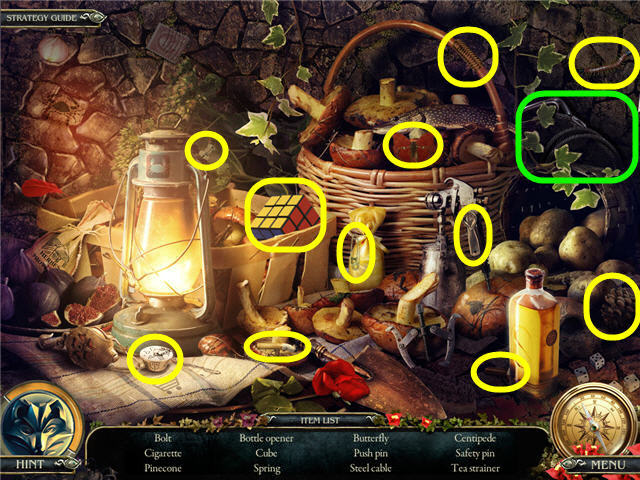
- Find the items and earn a STEEL CABLE.
- Go to Bog Street.

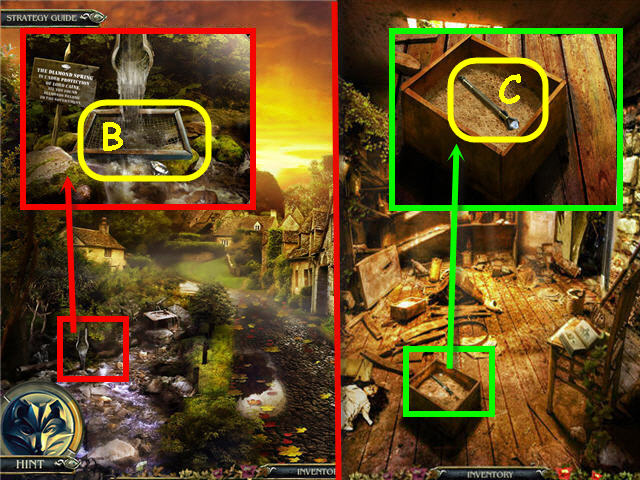
- Examine and use the SIEVE on the diamond spring; get a DIAMOND (B).
- Go to the under road.
- Examine the box; place the DIAMOND on the cutter; take the GLASS CUTTER (C).
- Back out and go left.

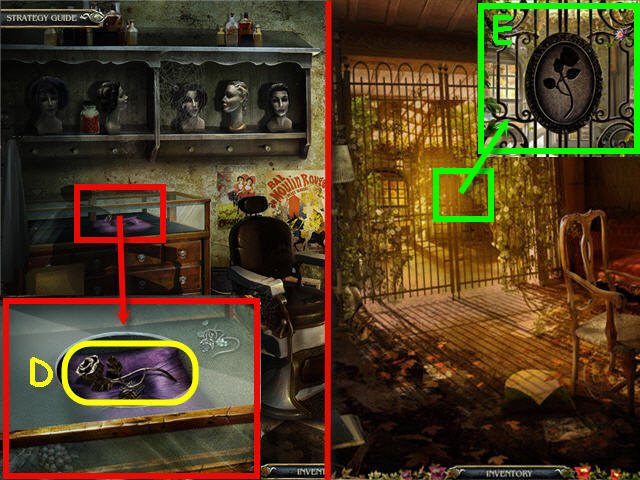
- Examine and use the GLASS CUTTER on the showcase; take the ROSE BAS-RELIEF (D).
- Go to the room behind the window.
- Examine and place the ROSE BAS-RELIEF on the gate (E).
- Go straight.

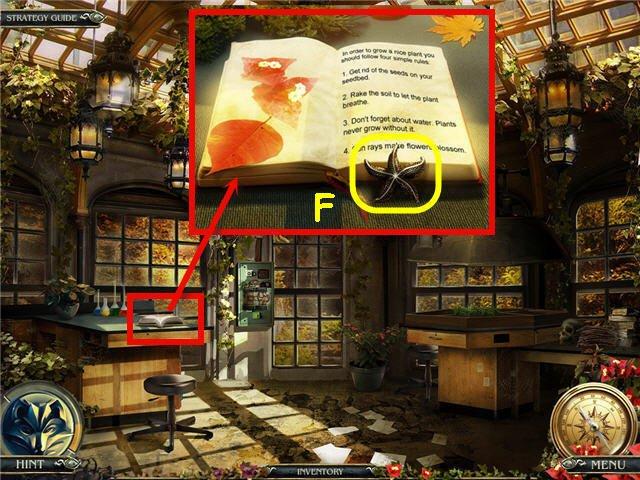
- Examine the book; take the SEA STAR (F); read the page.
- Go to the lighthouse yard.

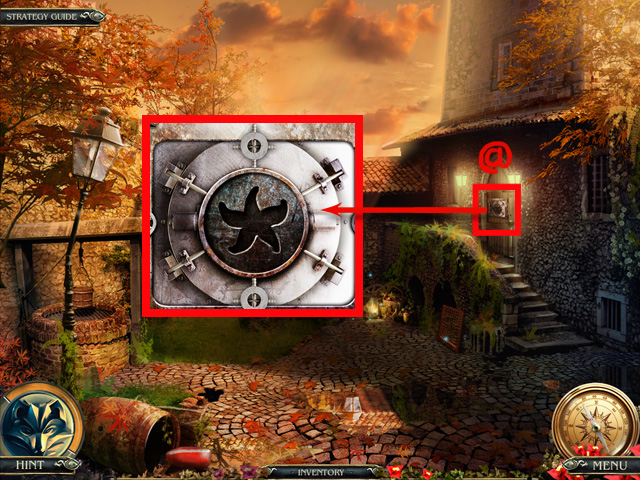
- Examine and place the SEA STAR on the door to trigger a puzzle (@).

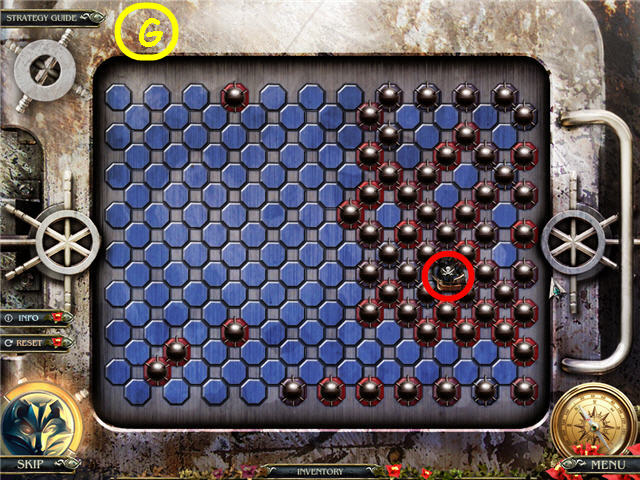
- Trap the pirate with the mines.
- See screenshot for one solution (G).
- Enter the lighthouse.

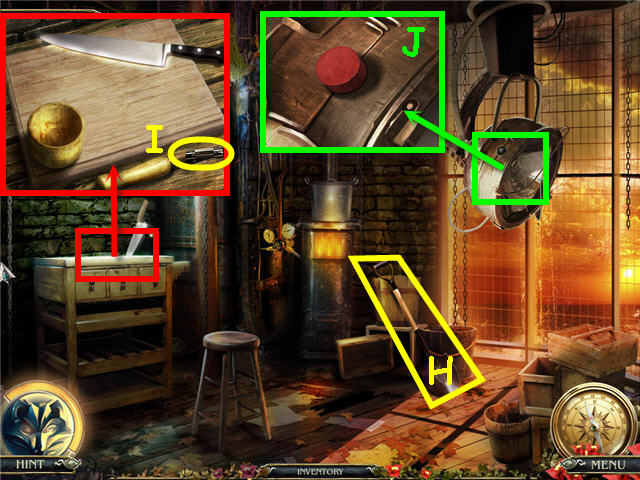
- Take the SHOVEL (H).
- Examine the table; take the 1st FUSE (I).
- Examine and place the RED BUTTON on the lamp; push the button (J).
- Back out.

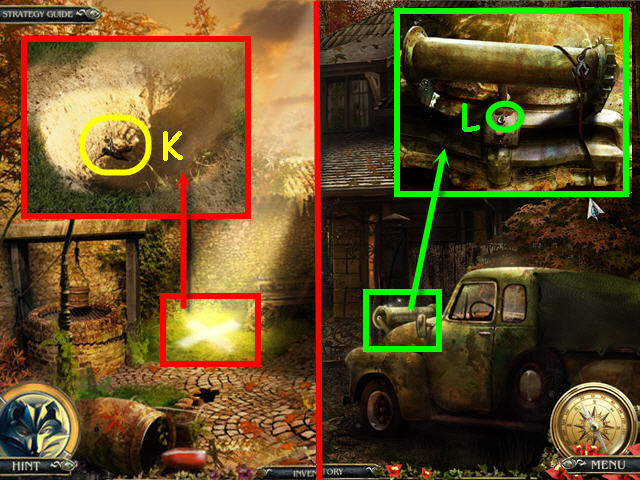
- Examine and use the SHOVEL on the X; take the BAS-RELIEF (K).
- Go to the truck at the Hunter’s house foyer.
- Examine and place the STEEL CABLE on the hoist; click the green switch (L).
- Enter the house.
- Examine and place the BAS-RELIEF on the map over the fireplace to trigger a puzzle.

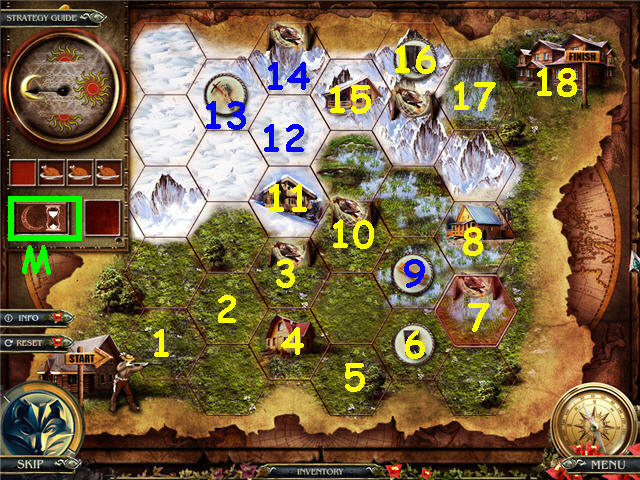
- Lead the hunter to the house making sure he has the correct sleep, equipment and food.
- Solution: Move right, right angle up, duck, down house, right, boots, duck, house, skis, duck, lodge, hit the sleep button (M), up, climbing equipment, duck, house, boots, right, finish. See screenshot for solution.
- Take the TRIANGLE KEY.

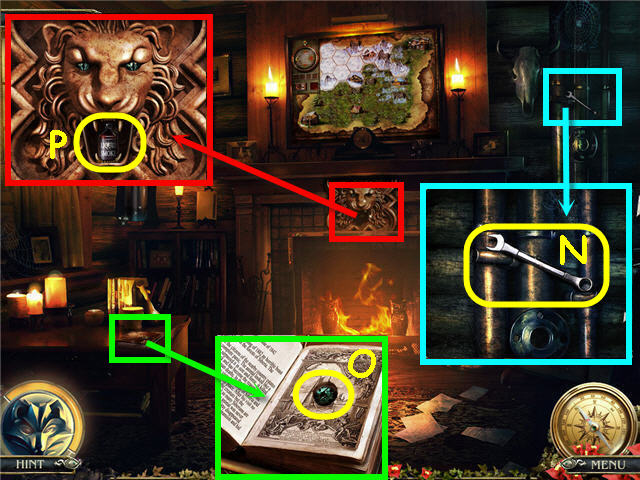
- Examine the pipe; take the WRENCH (N).
- Examine and use the KEY on the book; take the EYE (O).
- Examine the lion head; place the EYE in the socket; take the LIQUID SMOKE (P).
- Go to the barber room.

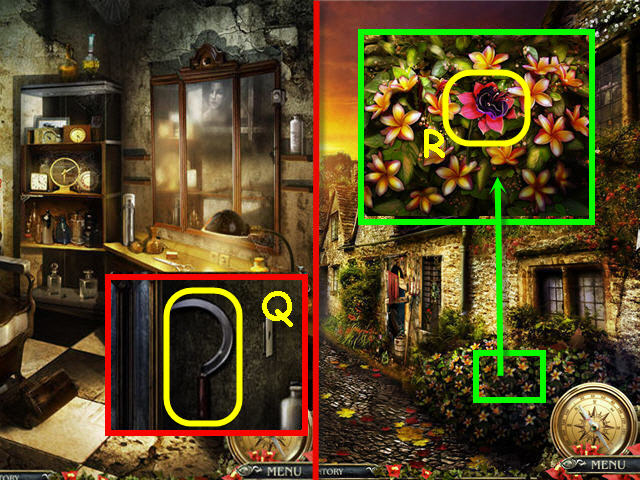
- Examine and use the WRENCH on the mirror bolt; take the SICKLE (Q).
- Go to Bog Street.
- Examine the flower; use the SICKLE to get the FLOWER (R).
- Go straight.
- Examine and use the SICKLE on the back of the pickup truck.
- Examine the back of the truck to access a HOS.

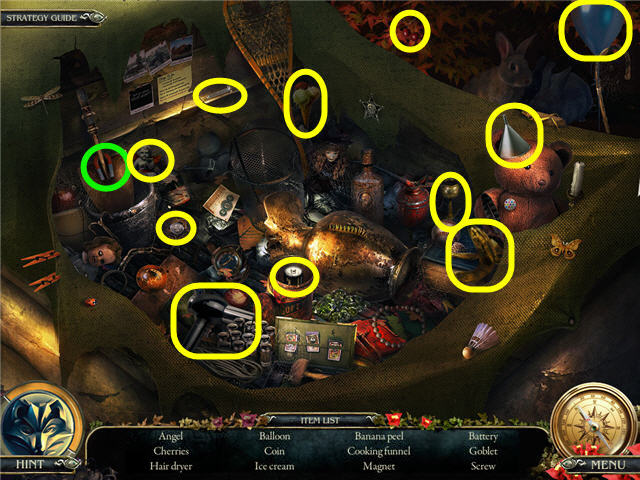
- Find the items and earn a MAGNET.
- Go straight.

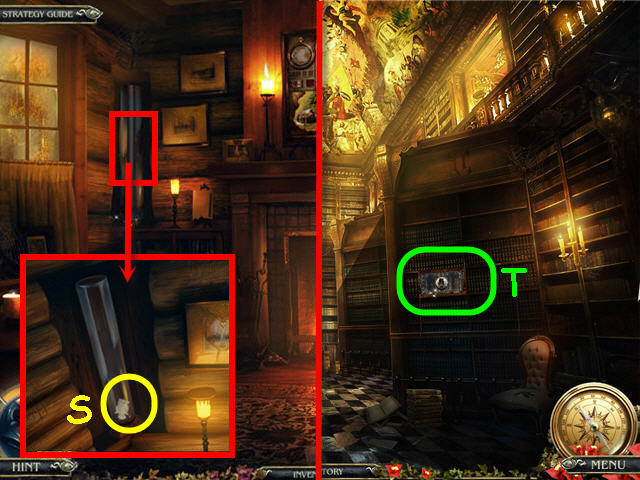
- Examine and use the MAGNET on the glass tube; get a GOLD OWL (S).
- Go to the library.
- Examine and use the GOLD OWL on the shelf (T) to trigger a puzzle.

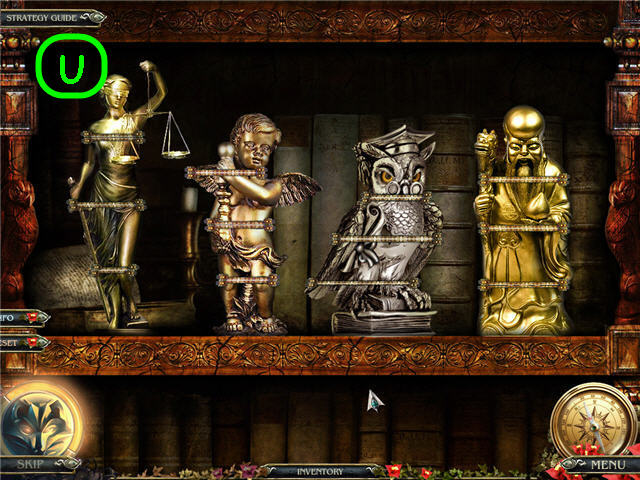
- Assemble the statues by moving the pieces on the pedestals.
- There are to be no more than 4 pieces on each pedestal at a time and the head can only go on top.
- Solution: Move the pieces on the pedestals in this order; 1-4, 3-1, 4-1, 4-3, 4-3, 1-4, 3-4, 3-4, 3-1, 4-3, 4-3, 1-4, 2-4.
- 1-2, 3-1, 3-1, 2-3, 2-3, 1-3, 1-2, 1-2, 3-1, 2-1, 2-1, 2-3.
- 1-2, 1-2, 3-1, 2-1, 2-3, 1-2, 3-2; place the 3 remaining heads next to the statues on their matching statues. See screenshot for solution (U).

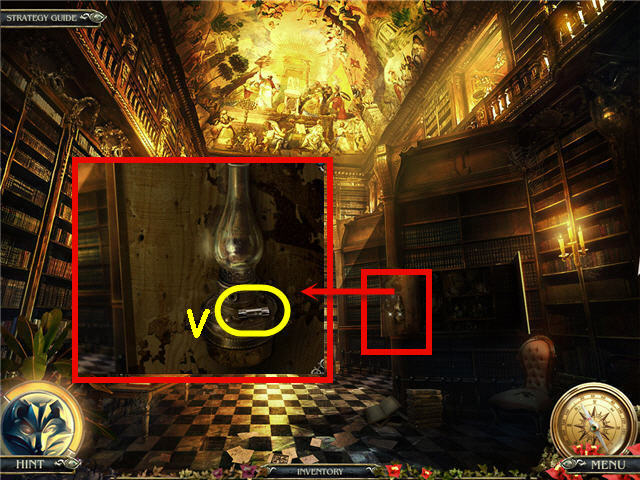
- Examine the lamp; take the 2nd FUSE (V).
- Use the ROLLER on the lamp.
- Examine the shelf to access a HOS.

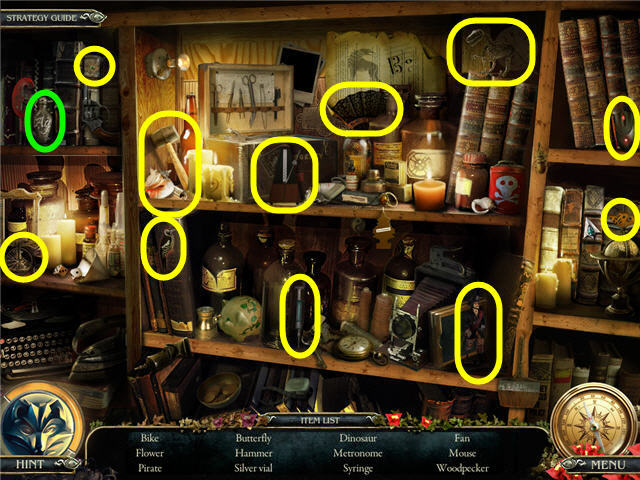
- Find the items listed and earn SILVER.
- Go to the arboretum.

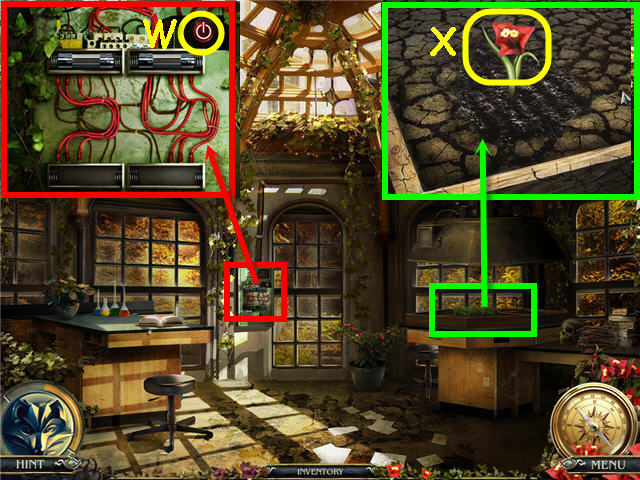
- Examine and place the 2 FUSE on the panel; push the button (W).
- Examine the flower bed.
- Pull the weeds; use the LITTLE RAKE and BOTTLE WITH WATER on the dirt; take the DIVINE FLOWER (X).
- Go to the lighthouse.

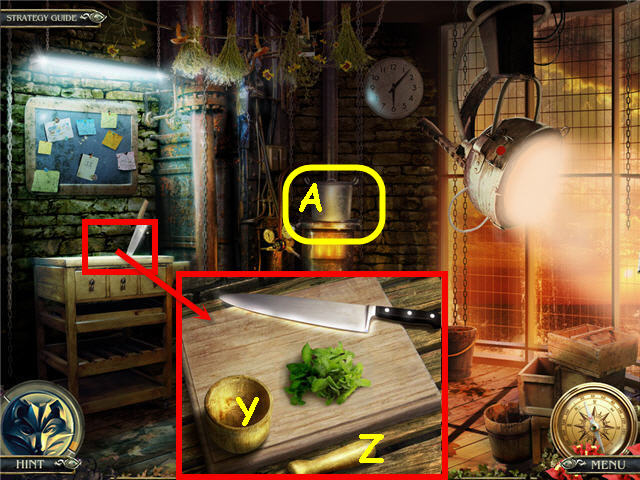
- Examine the table.
- Place the MINT on the cutting board; use the knife to get the CHOPPED MINT.
- Place the FLOWER in the mortar (Y); use the pestle (Z) to get the JUICE.
- Examine and place the CHOPPED MINT, the LIQUID SMOKE, JUICE, SILVER, DIVINE FLOWER and PENNANT in the pot (A); get a PENNANT WITH POTION.
- Go to the throne room.

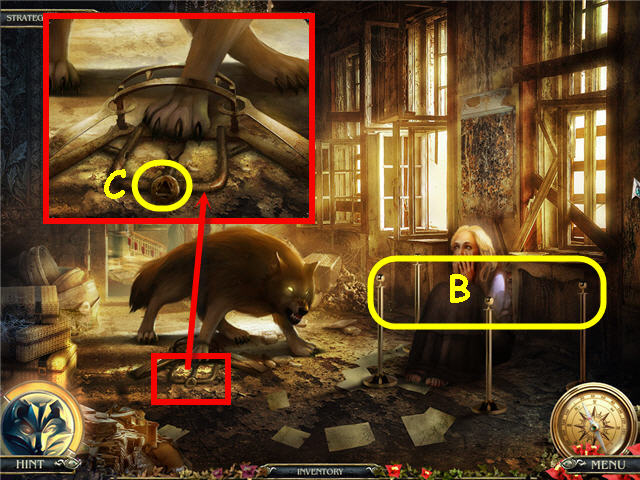
- Place the PENNANT WITH POTION on the poles (B).
- Examine and use the TRIANGLE KEY on the trap (C).
Chapter 5 – Brandon

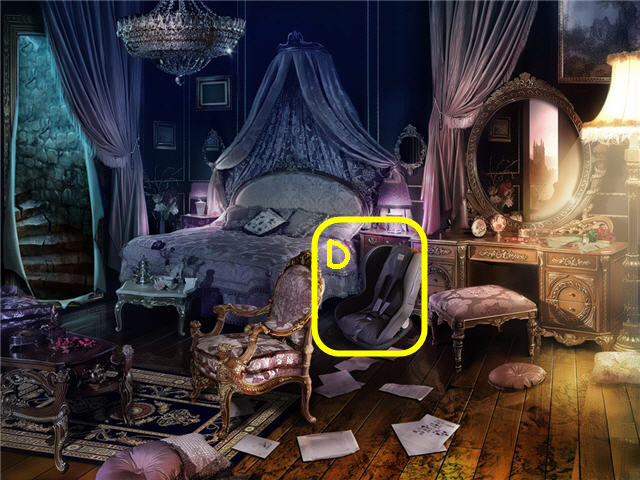
- Take the BABY CHAIR (D).
- Go up the left stairs.
- Examine the left chair to access a HOS.

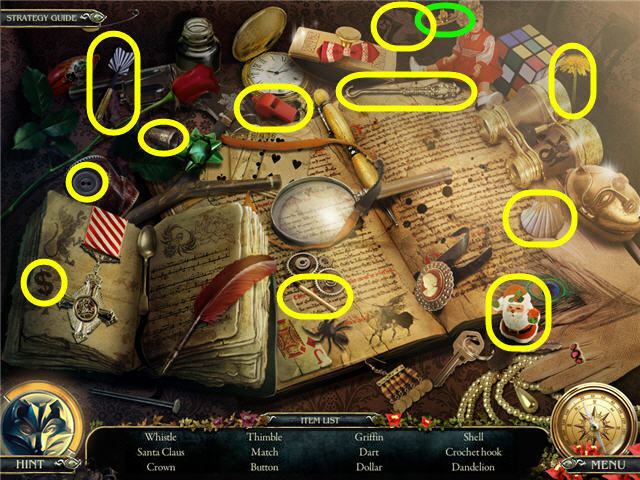
- Find the items and earn a CROWN.
- Go to the child’s room.

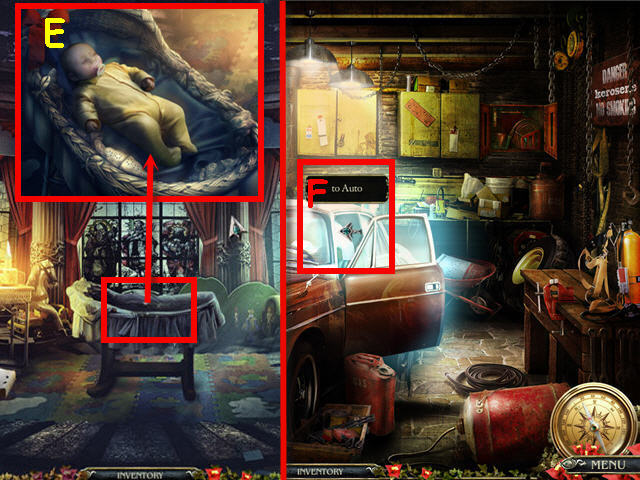
- Examine and use the BABY CHAIR on the cradle; get BRANDON (E).
- Go to the garage.
- Go into the car (F).

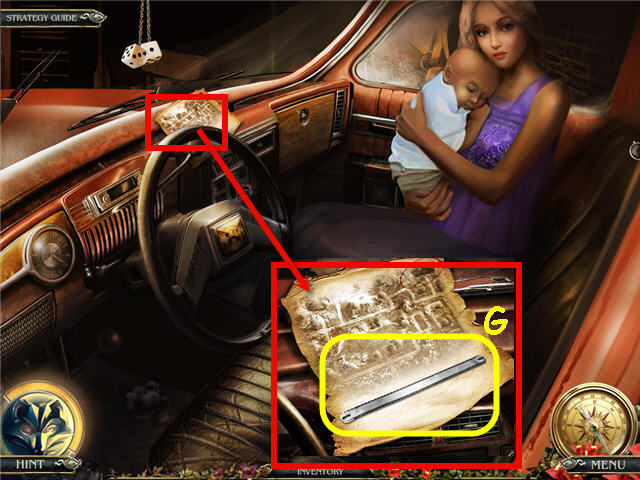
- Give BRANDON to Luisa.
- Examine the note; take the SMALL SAW (G).
- Go to the fireplace room.

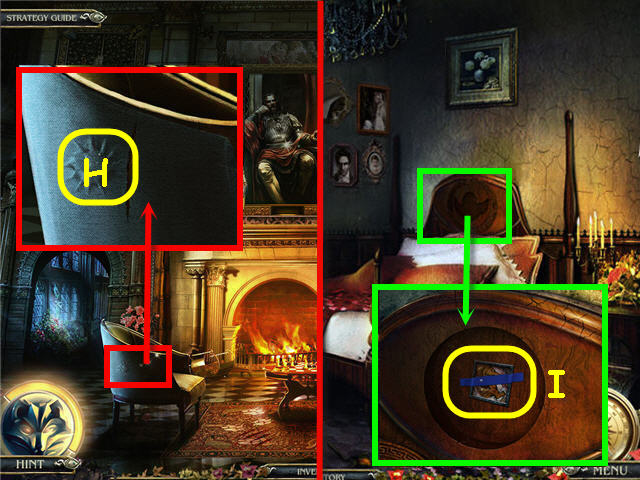
- Examine the chair; use the MAGNET on the bump to get an ANGEL (H).
- Go to the bedroom.
- Examine and place the ANGEL in the headboard; take the PIECE OF PUZZLE (I).
- Go to the cabinet room.
- Examine and place the PIECE OF PUZZLE on the left shelf to trigger a puzzle.

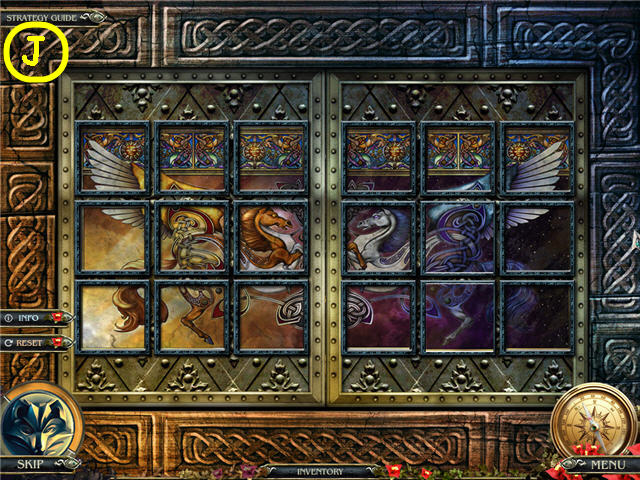
- Arrange the pieces to create two mirror image pictures.
- See screenshot (J) for solution.
- Take the SWORD and BLOWTORCH.
- Go to the attic.

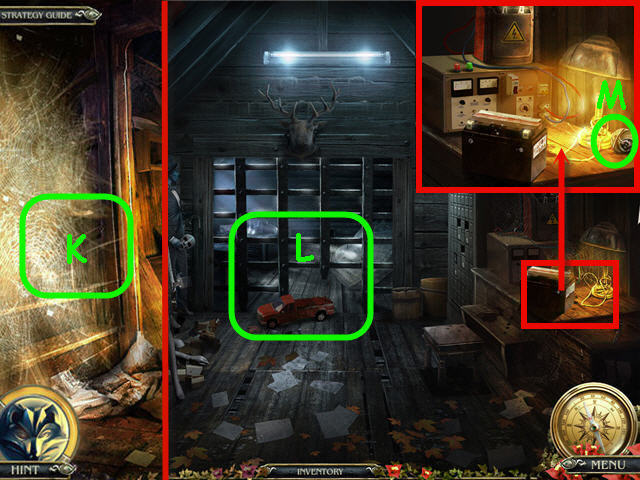
- Use the BLOWTORCH on the cobwebs (K); go left.
- Examine and use the CAR REMOTE on the cage (L); get a FAN.
- Examine the charging unit; take the TOKEN (M).
- Examine the mannequins to access a HOS.

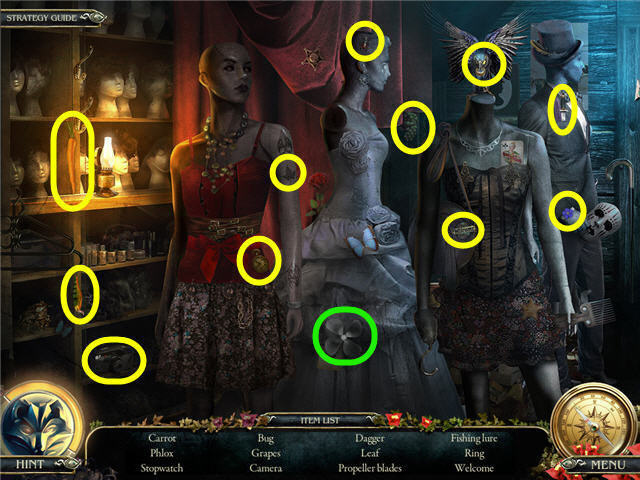
- Find the items listed and earn a PROPELLER.
- Back out three times.

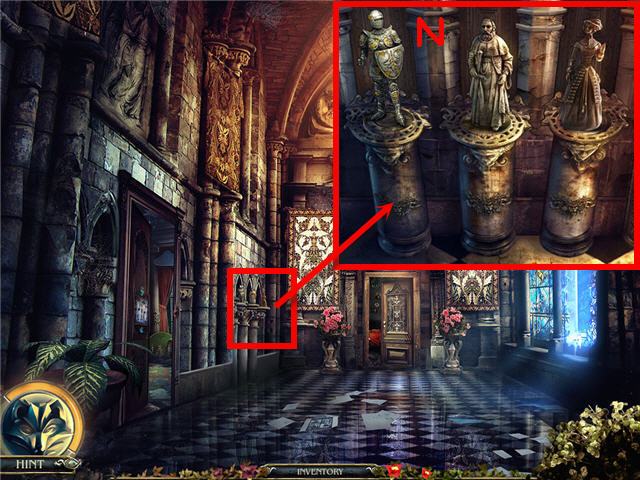
- Examine the wall (N).
- Place the SWORD on the left statue, the CROWN on the center and the FAN on the right.
- Examine the eagle to trigger a puzzle.

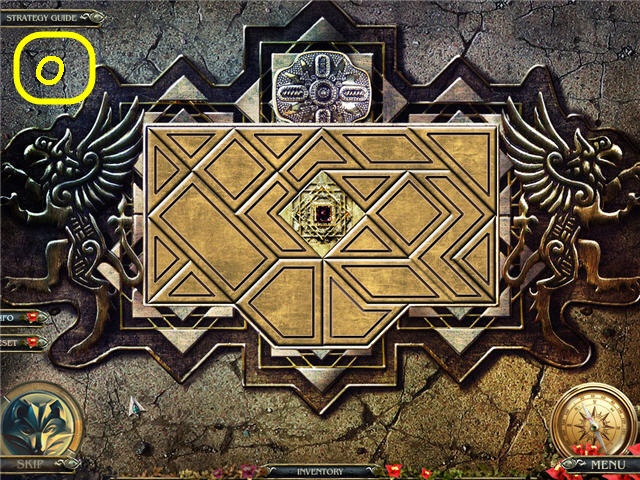
- Arrange the pieces so that they all fit inside.
- See screenshot (O) for solution.
- Go downstairs.
- Examine the boxes to access a HOS.

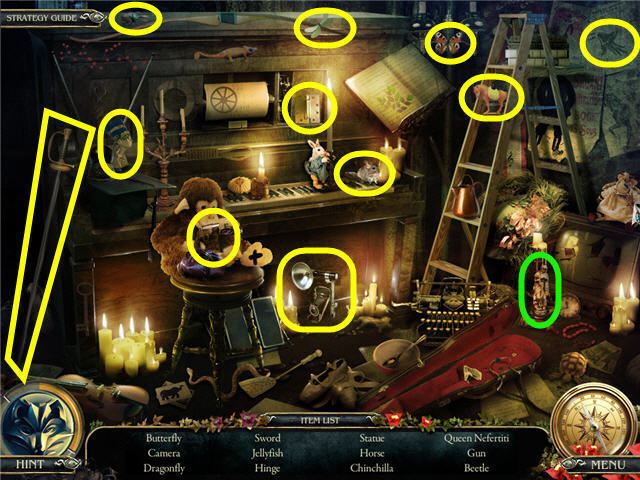
- Find the items and earn the 1st STATUE.
- Go to the knight’s corridor.

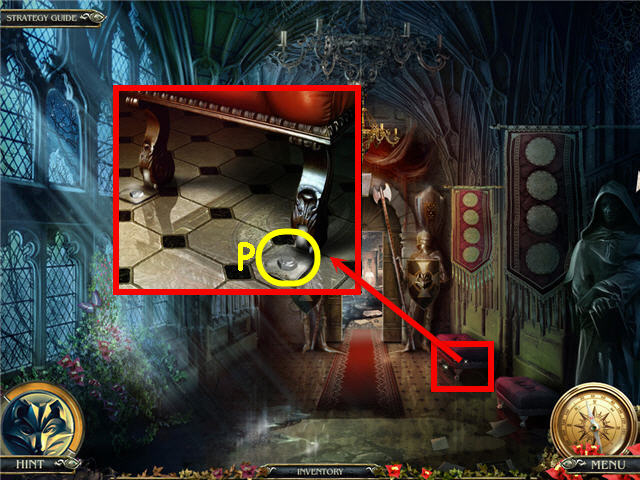
- Examine the stool; use the WRENCH on the bolts (P).
- Examine and place the COVER on the overturned stool to trigger a puzzle.

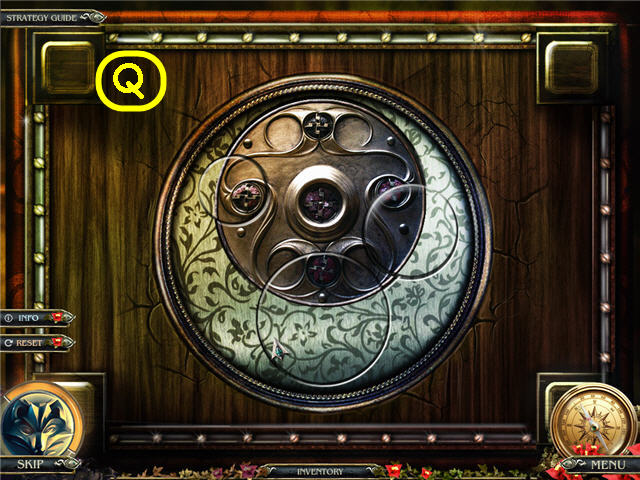
- Place and rotate the rings to complete the picture.
- Click-hold and drag the inner ring to complete the circles; click the 3 pieces into the circles.
- Solution: Rotate the medium sized ring to complete that circle, and then rotate the largest ring to complete the large and small ring.
- See screenshot (Q) for solution.
- Take the FISHING LINE.
- Go to the fountain.

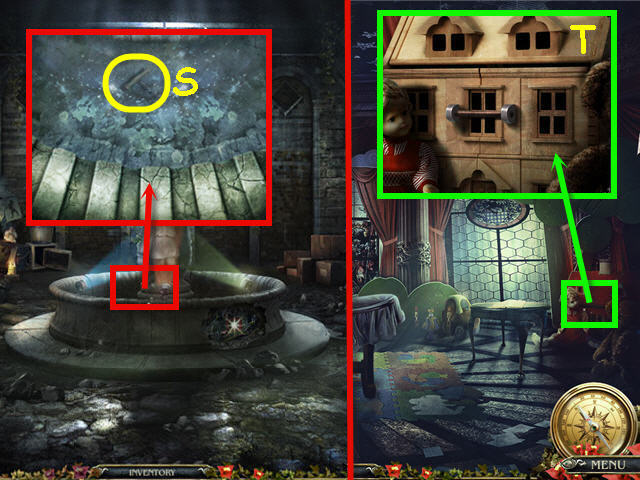
- Examine and use the FISHING LINE on the water; get a CORK SCREW (S).
- Go to the child’s room.
- Examine and use the CORK SCREW on the dollhouse (T).
- Examine the dollhouse to access a HOS.

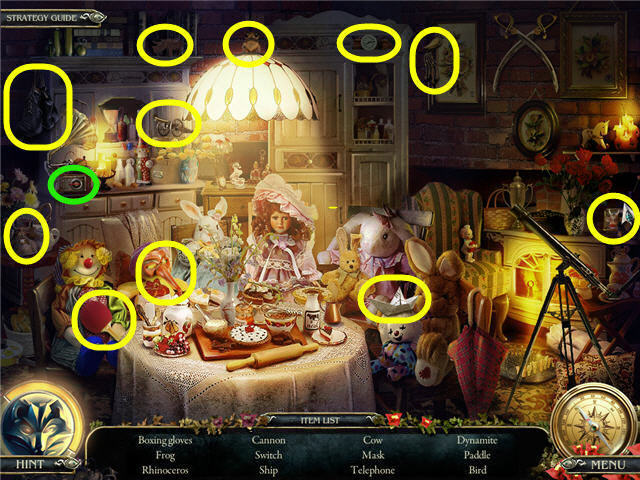
- Find the items listed and earn a SWITCH.
- Go to the fountain.

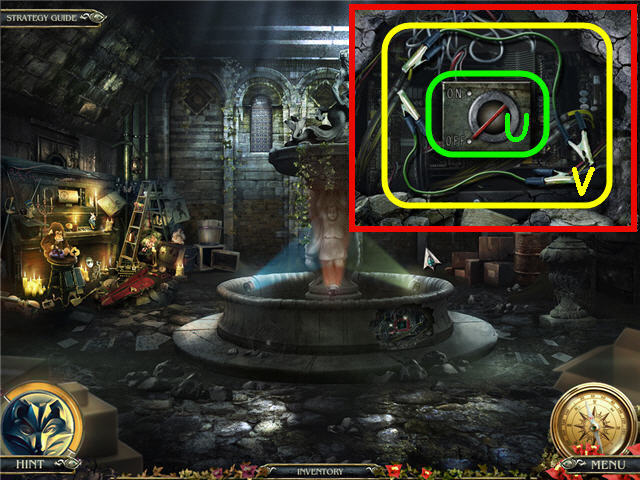
- Examine and place the SWITCH on the fountain panel; turn off the switch (U).
- Take the JUMPER CABLES (V).
- Go to the inside attic.

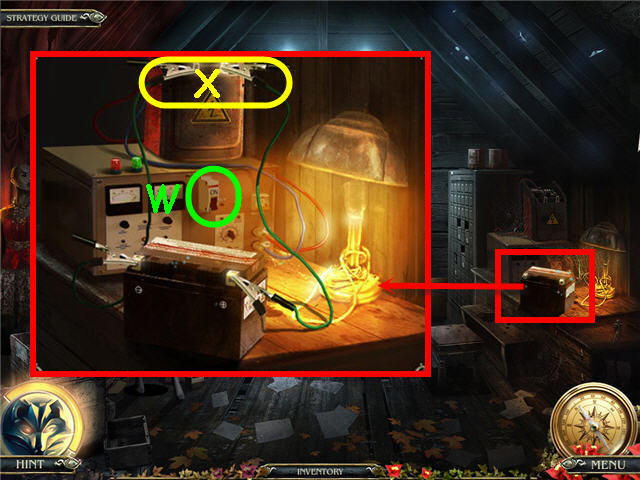
- Examine and place the JUMPER CABLES on the charger.
- Turn on the switch (W); click on the JUMPER CABLES (X) to get the CHARGED BATTERY.
- Go to the workshop.

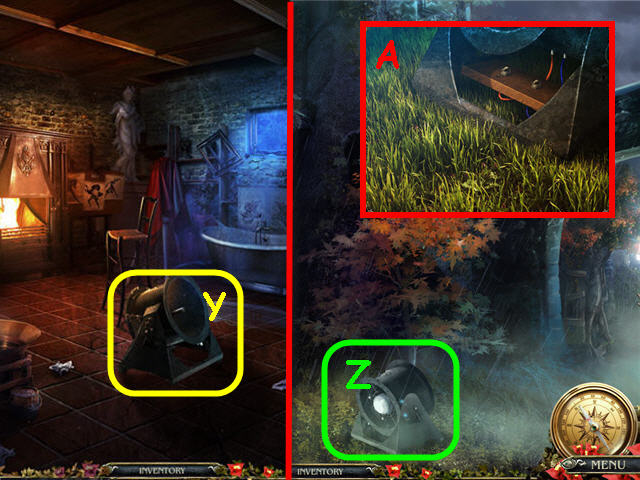
- Examine and place the PROPELLER on the generator; take the GENERATOR (Y).
- Go to the castle entrance.
- Place the GENERATOR in the yard (Z).
- Examine and place the CHARGED BATTERY in the GENERATOR (A).
- Go right.
- Examine the pile to access a HOS.

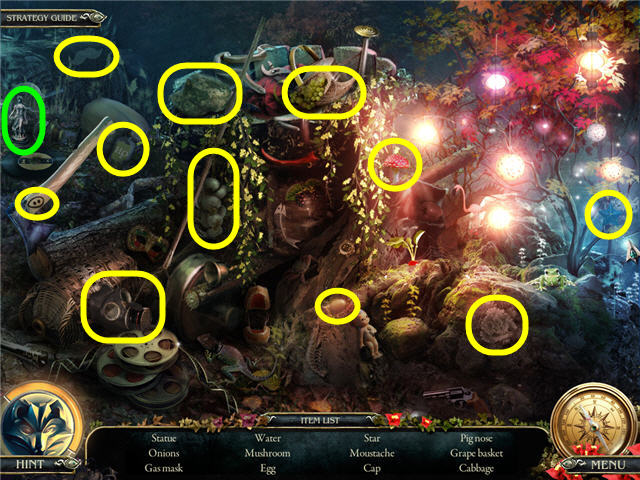
- Find the items.
- Earn the 2nd STATUE.

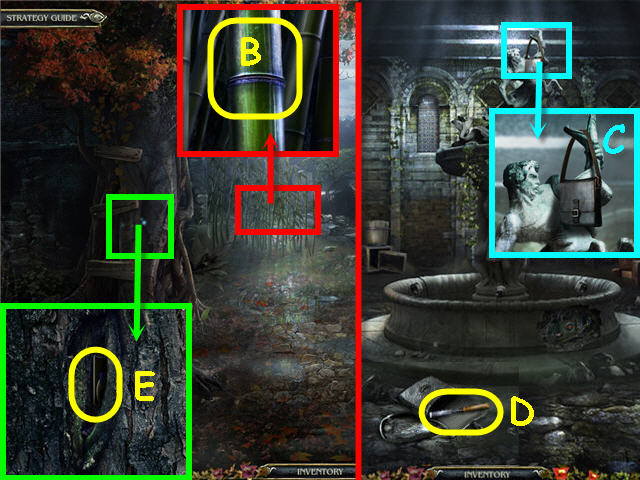
- Examine and use the SMALL SAW on the bamboo; get a BAMBOO STICK (B).
- Go to the fountain.
- Examine and use the BAMBOO STICK on the purse (C).
- Take the CHISEL (D).
- Go to the cliff.
- Examine and use the CHISEL on the tree; get the PLASTIC CARD (E).
- Go to the garage and enter the car.

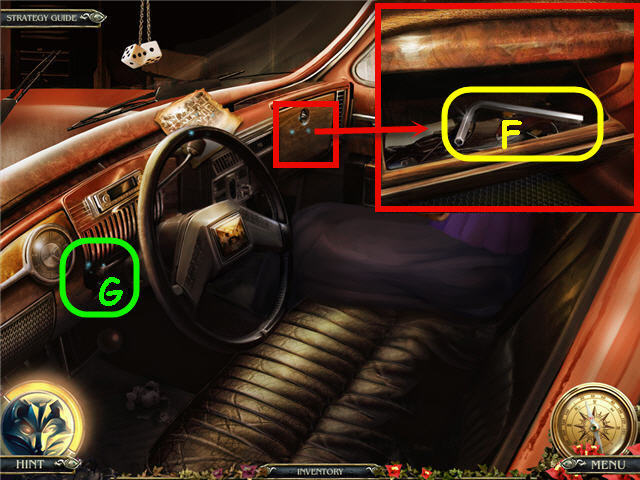
- Examine and use the PLASTIC CARD on the glove box; take the HEX KEY (F).
- Examine and use the HEX KEY on the ignition (G) to trigger a puzzle.

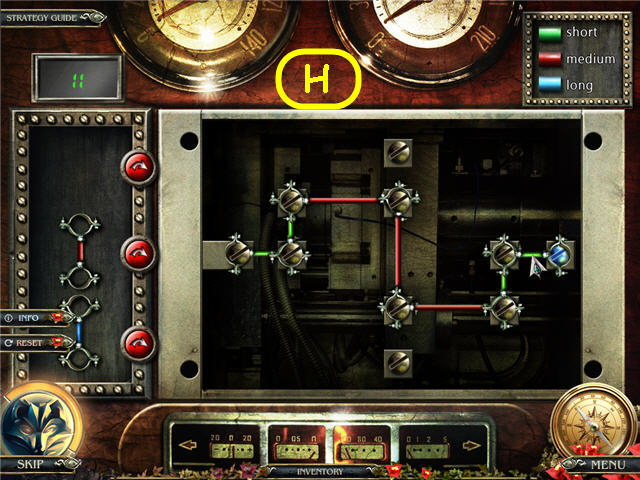
- Use 17 of the 3 different sized wires on the panel to complete the circuit.
- Use the arrows to turn the wires.
- See screenshot (H) for 1st panel solution.

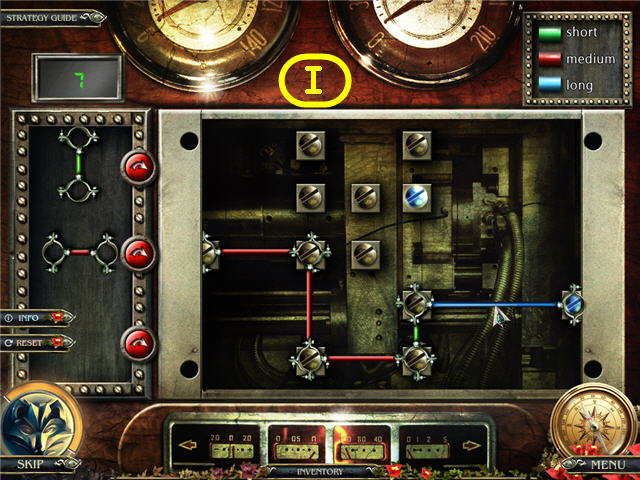
- Place the next set of wires in place.
- See screenshot (I) for 2nd panel solution.

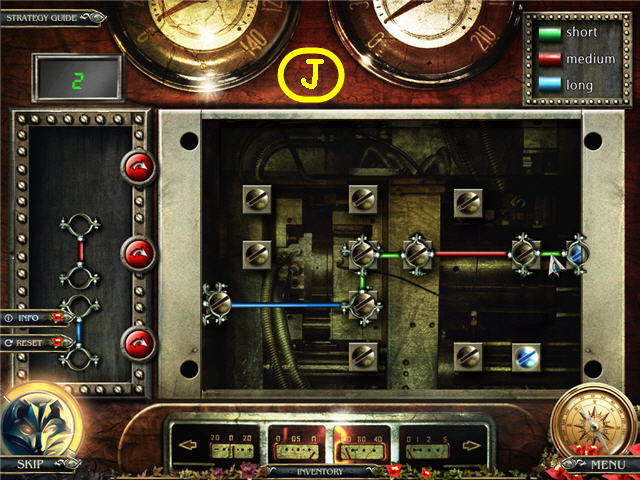
- Place the last set of wires.
- See screenshot (J) for 3rd panel solution.
- Automatically trigger a puzzle.

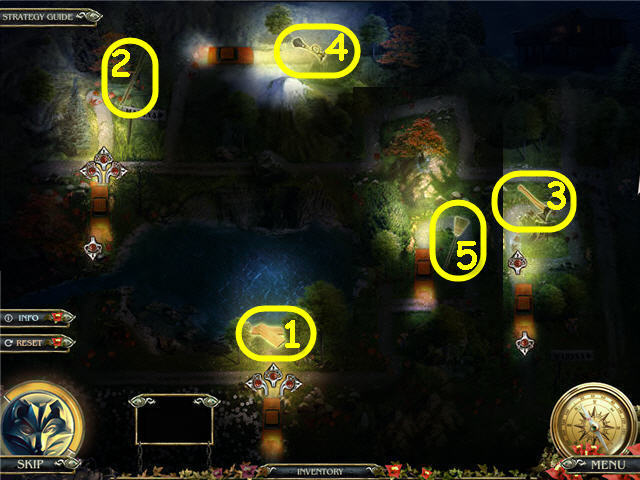
- Drive the car to the fishing hut by collecting inventory items to clear the obstacles.
- See screenshot for order and location of the inventory items.
- Solution: These directions are for the way the car needs to go, not the direction of the arrows: up, left, up, right 3x, up, left, up, left, down, right, left, right 2x, and up.

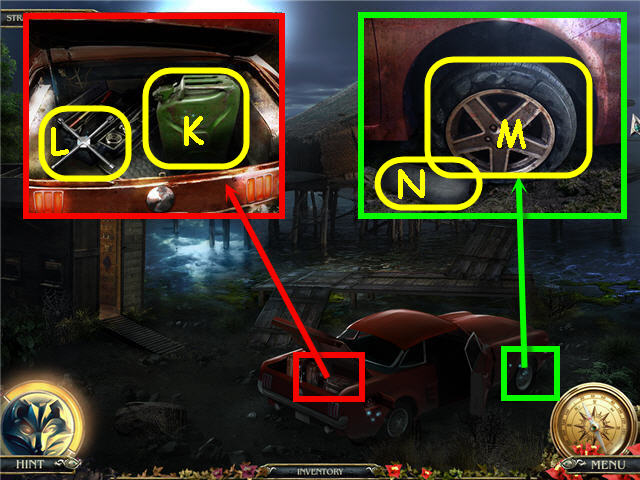
- Examine the trunk; take the EMPTY CAN (K) and LUG WRENCH (L).
- Examine and use the LUG WRENCH on the tire; take the FLAT TIRE (M) and RUBBER (N).
- Go into the shed.

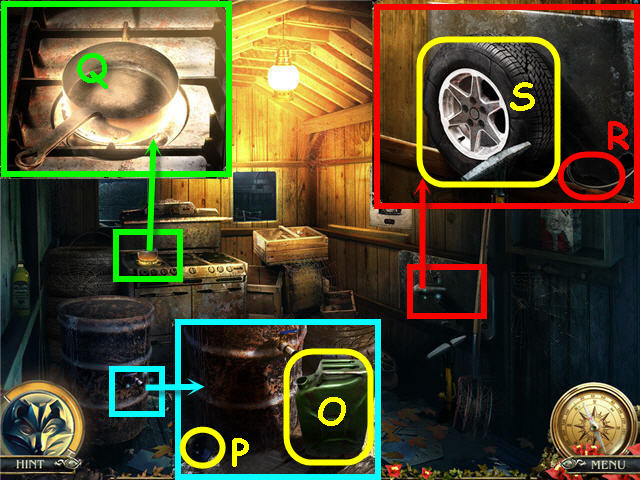
- Examine and use the EMPTY CAN on the barrel; turn the tap; take the GAS CAN (O) and FUNNEL (P).
- Examine the stove; place the RUBBER in the pot (Q); take the MELTED RUBBER.
- Examine and place the FLAT TIRE on the dowel.
- Use the PLIERS and MELTED RUBBER on the tire; click the hose(R) and pump the handle to inflate; take the INFLATED TIRE (S).
- Back out.

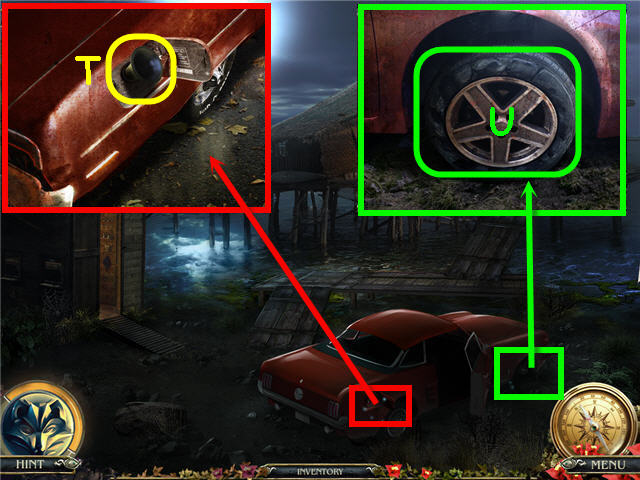
- Examine and use the FUNNEL and GAS CAN on the gas tank; remove the funnel (T).
- Examine and place the INFLATED TIRE on the wheel (U); use the LUG WRENCH.
- Enter the car.
- Go to the garage.

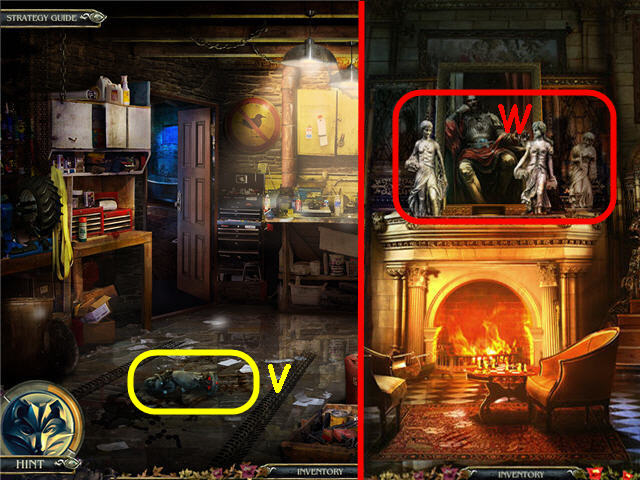
- Take the 3rd STATUE (V).
- Go to the fireplace room.
- Examine and use the 3 STATUES on the mantel (W) to trigger a puzzle.

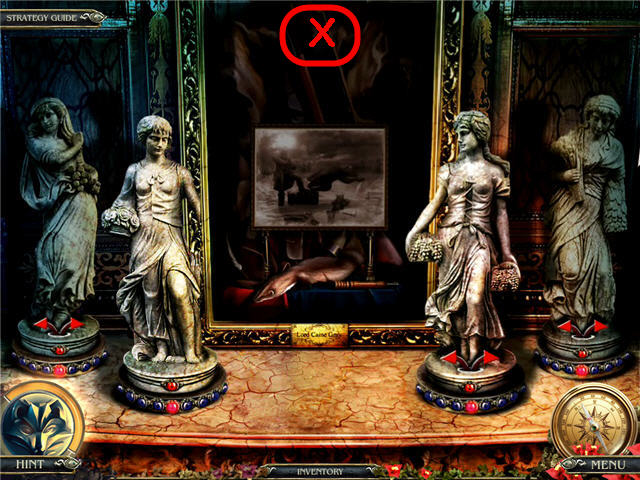
- Set the statue bases so the red lamp is in the center of each base.
- Click the arrows on the statue bases to move the red lamp.
- Solution: Second from left statue – click right, left, right; second from right statue – left, right; right statue – right, left, and right 3x.
- See screenshot (X) for solution.
Chapter 6 – Siberia

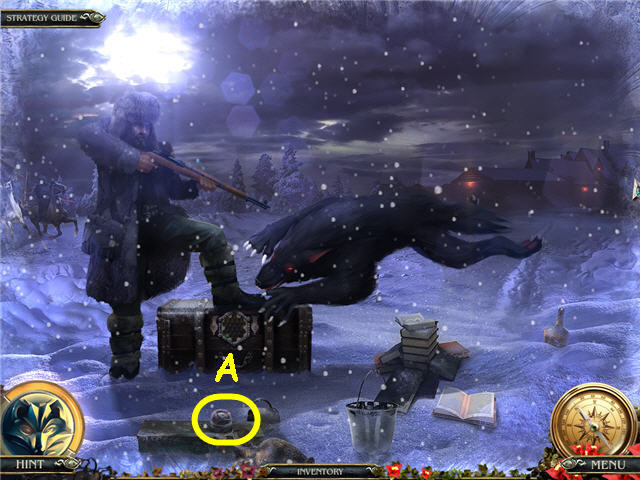
- Take the TWINE (A).
- Go forward twice.

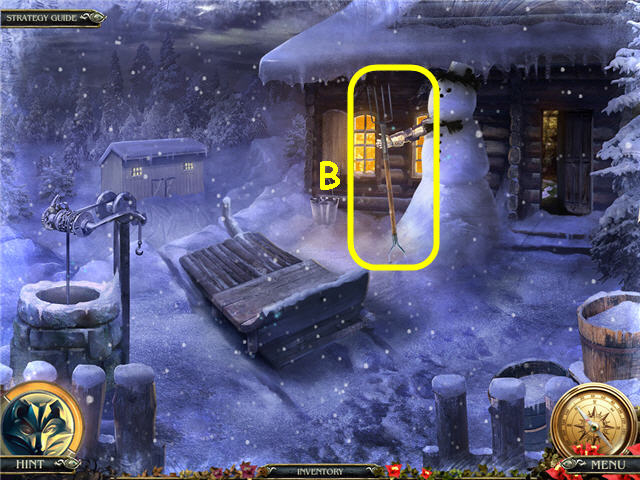
- Take the PITCHFORK (B).
- Back out.

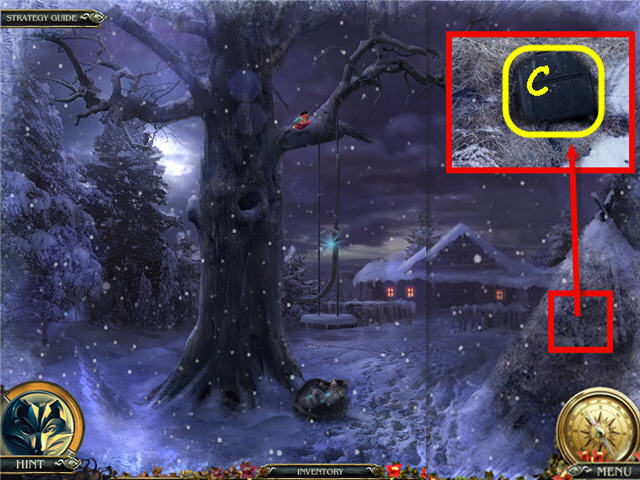
- Examine the haystack; take the STRAW.
- Use the PITCHFORK on the haystack (C).
- Examine the handbag to trigger a puzzle.

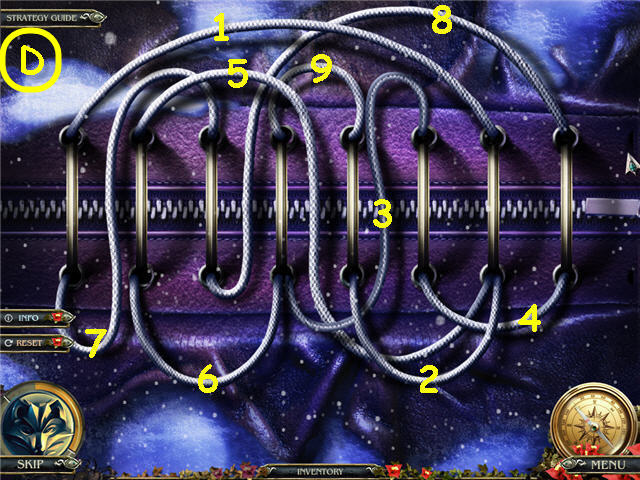
- Remove the threads by removing the topmost one each time.
- See screenshot (D) for solution.
- Take the RIFLE BOLT and GLASS.

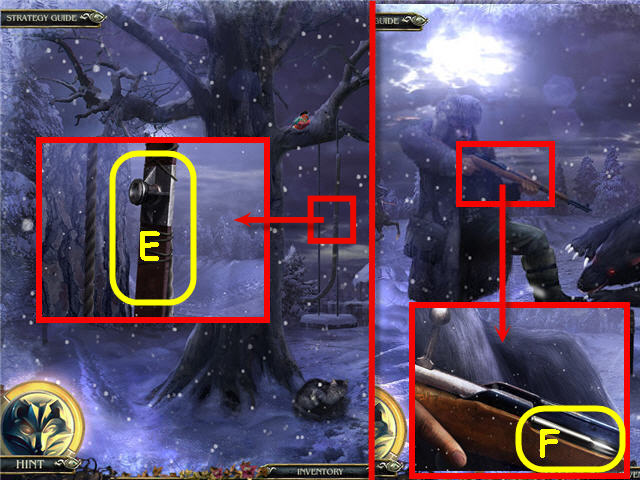
- Examine the swing; use the GLASS on the rope; get the SKI (E).
- Back out.
- Examine and place the RIFLE BOLT on the rifle; click and take the SILVER BULLET (F).
- Go forward twice.

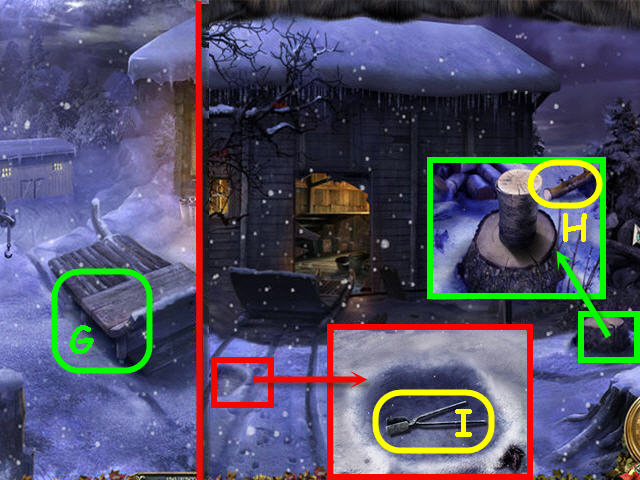
- Examine and place the SKI on the sled (G).
- Go down the sled path.
- Examine the stump; take the LOG (H).
- Examine the snow; dig and take the TONGS (I).
- Go into the stable.
- Examine the hayloft to access a HOS.

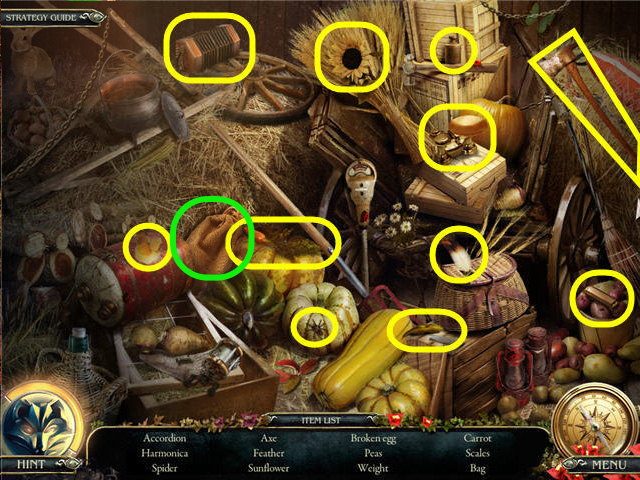
- Find the items listed.
- You will earn a BAG.

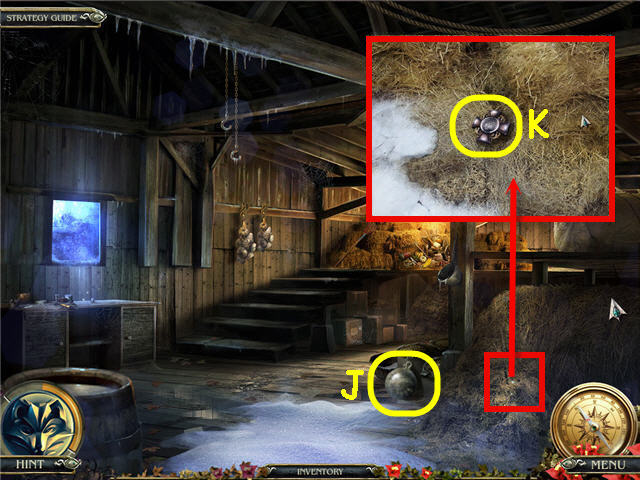
- Take the COUNTERBALANCE (J).
- Examine and move the hay twice; take the ORDER (K).
- Back out twice.

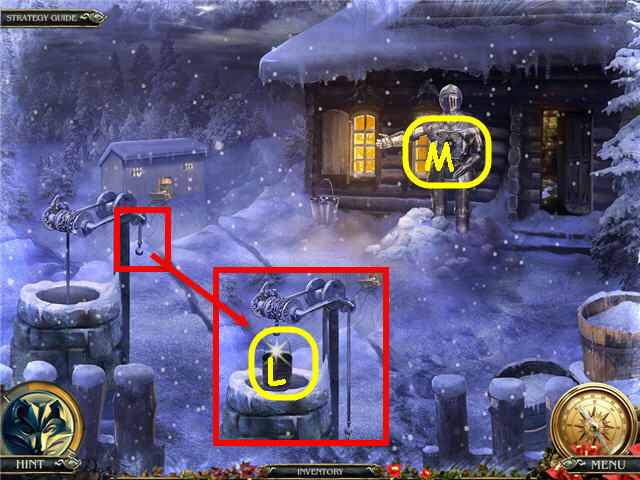
- Place the COUNTERBALANCE on the well; take the BUCKET (L).
- Examine and place the ORDER on the knight (M) to trigger a puzzle.

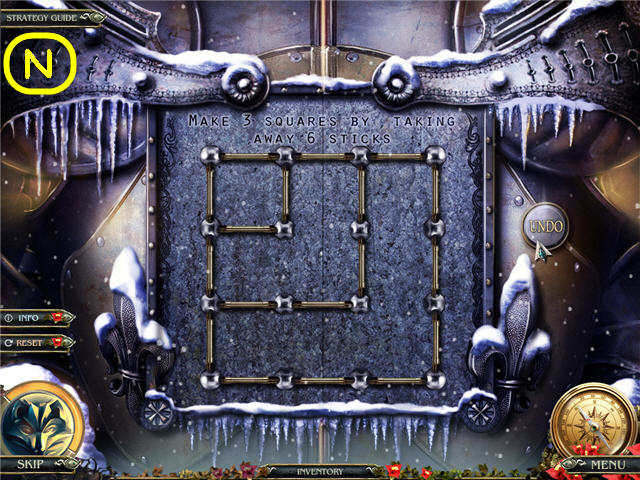
- Remove 6 sticks to make 3 squares.
- See screenshot (N) for solution.
- Take the TORCH.
- Go straight.
- Examine the table to access a HOS.

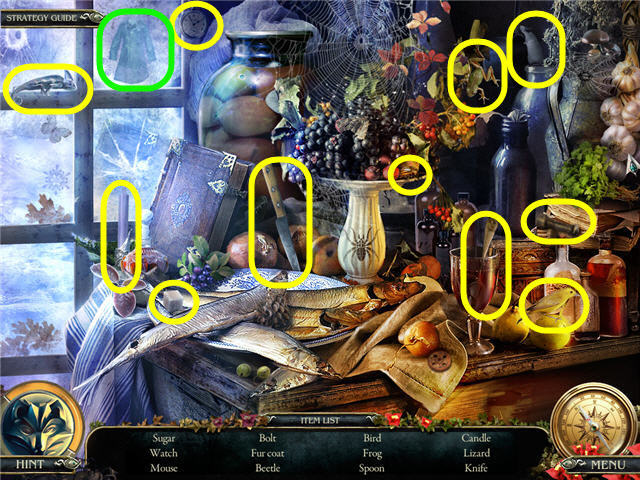
- Find the items listed.
- You will earn a COAT which is automatically put on you not in your inventory.

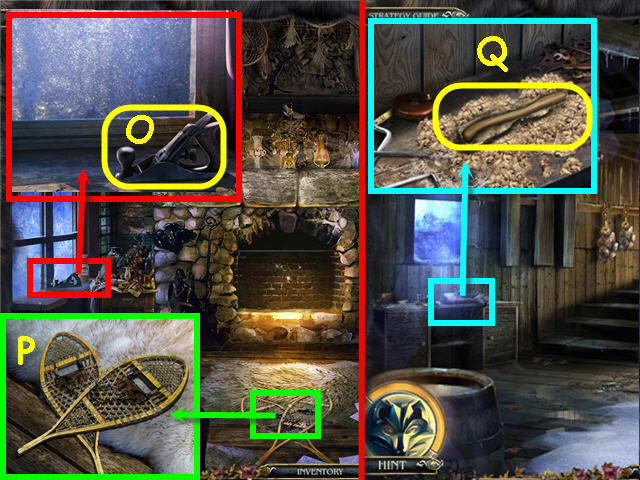
- Examine the window; take the PLANE (O).
- Examine and use the TWINE on the snowshoes; take the SNOWSHOES (P).
- Go to the stable.
- Examine and place the LOG on the table.
- Use the PLANE on the LOG; take the AXE HANDLE (Q).
- Back out three times.
- Use the SNOWSHOES on the path left of the tree; go left.

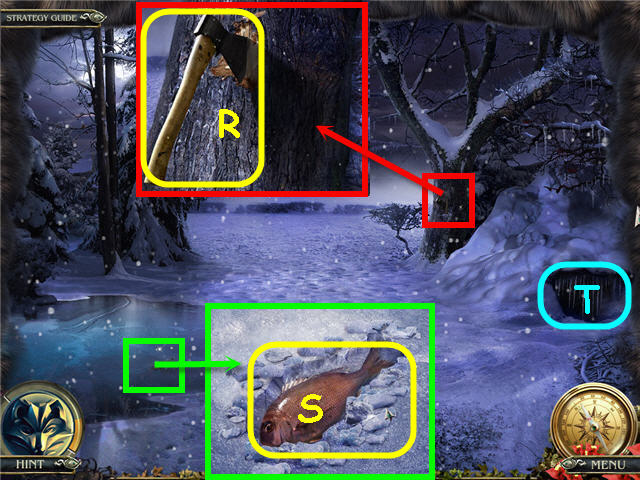
- Examine and use the AXE HANDLE on the axe head; take the AXE (R).
- Examine and use the CHISEL on the ice; take the FISH (S).
- Examine and use the PITCHFORK then the TORCH on the bear den (T).
- Enter the bears den.
- Examine the stuff to access a HOS.

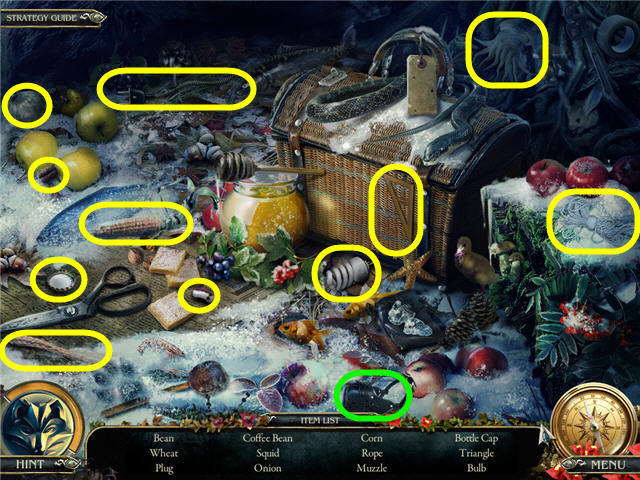
- Find the items.
- You will earn a MUZZLE.

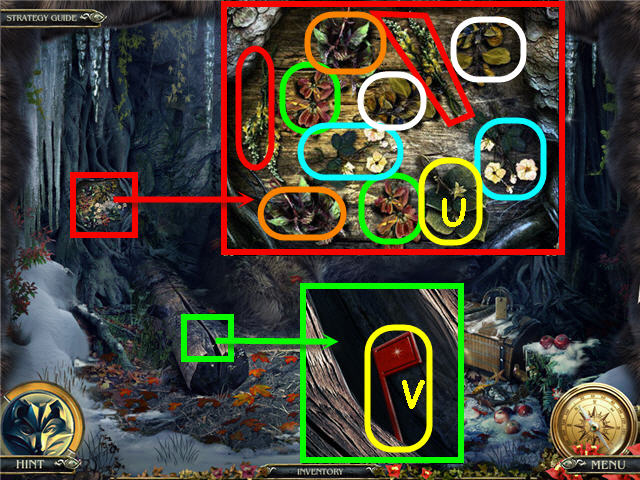
- Examine the herbs.
- Remove the pairs and take the THISTLE (U).
- Examine and use the TONGS on the cracked log; take the FLAG (V).
- Back out twice.

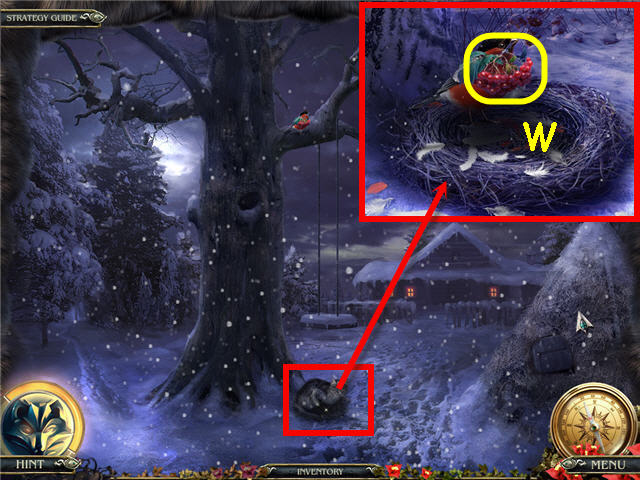
- Examine and give the FISH to the cat; take the ASHBERRY (W).
- Go to stable entrance.

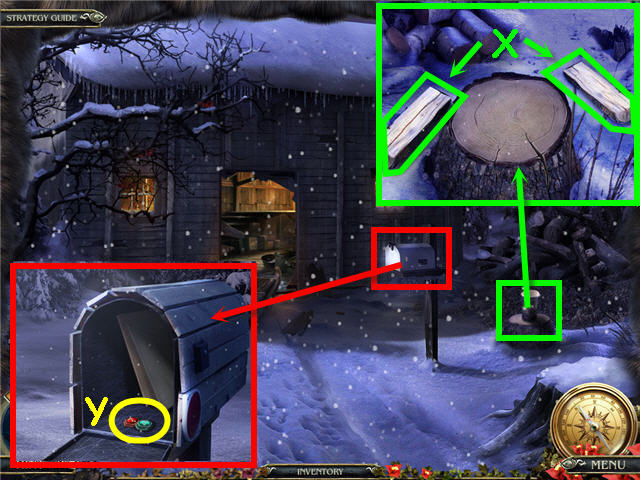
- Examine and use the AXE on the wood.
- Place the split wood (X) on the stump one at a time and use the AXE again to get FIREWOOD.
- Examine and place the FLAG on the mailbox; take the CHIPS (Y).
- Back out three times.

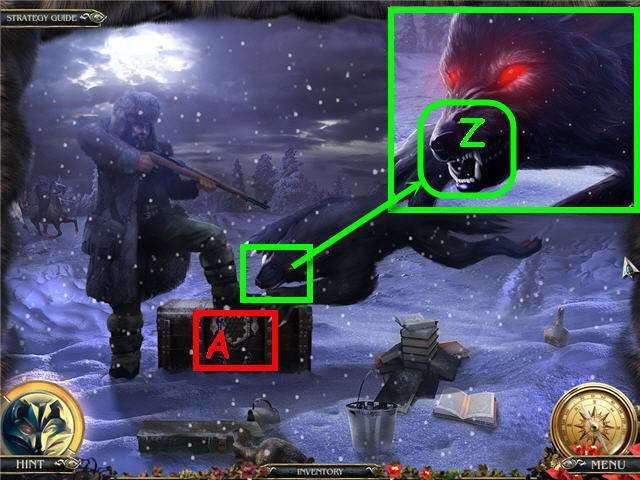
- Examine and place the MUZZLE on the snout (Z).
- Place the BAG on the wolf; take the WOLF.
- Examine and place the CHIPS on the chest (A) to trigger a puzzle.

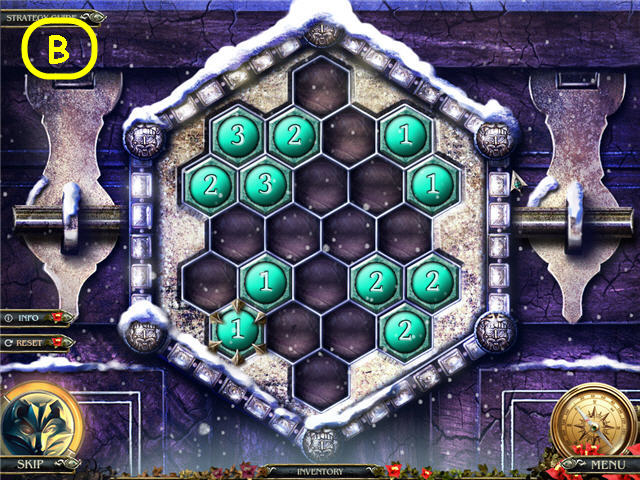
- Place the chips so that the number on the chips matches the number of other chips touching it.
- See screenshot (B) for solution.
- Take the EMPTY SYRINGE.
- Go to the healer’s room.

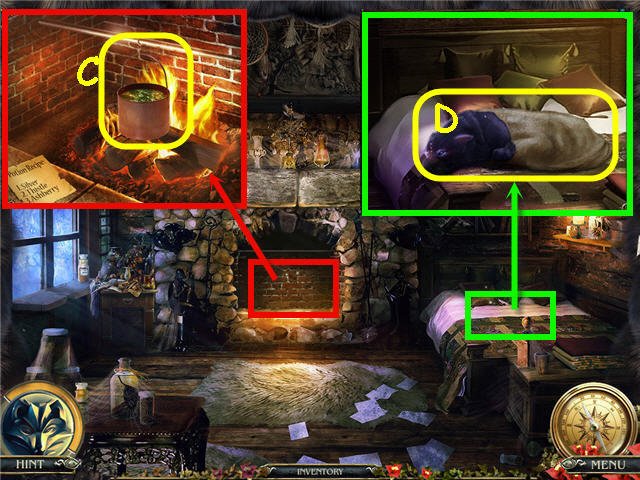
- Examine and place the STRAW and FIREWOOD in the fireplace.
- Place the BUCKET on the hook (C).
- Place the SILVER BULLET, THISTLE and ASHBERRY in the BUCKET.
- Use the EMPTY SYRINGE on the BUCKET to get a FULL SYRINGE.
- Examine and place the WOLF on the bed.
- Use the FULL SYRINGE on the WOLF; take the WOLF (D).
- Go to the Forest.

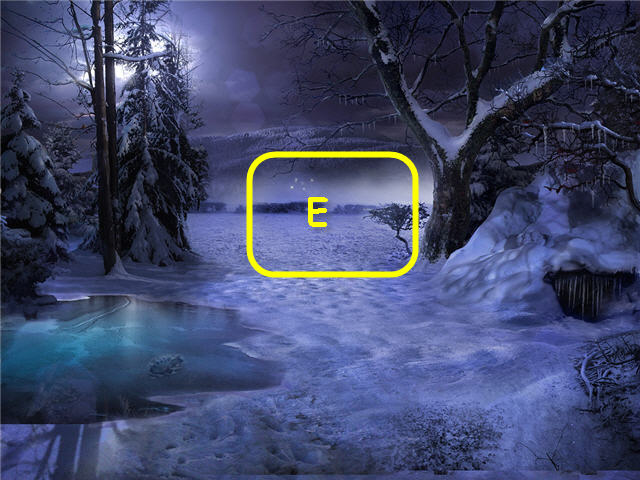
- Place the WOLF on the tundra (E).
- Congratulations! You have successfully completed Grim Tales: The Legacy Standard Edition.




 Lost Lands: The Four Horsemen Walkthrough, Guide, & Tips
 Zodiac Prophecies: The Serpent Bearer Walkthrough, Guide, & Tips
 Myths of the World: Stolen Spring Walkthrough, Guide, & Tips
 Witches' Legacy: The Charleston Curse Walkthrough, Guide, & Tips
 Revived Legends: Road of the Kings Walkthrough, Guide, & Tips