Revived Legends: Road of the Kings Walkthrough, Guide, & Tips
Revived Legends: Road of the Kings Walkthrough
Welcome to the Revived Legends: Road of the Kings Walkthrough
Journey down a magical road to save two worlds!
Whether you use this document as a reference when things get difficult or as a road map to get you from beginning to end, we’re pretty sure you’ll find what you’re looking for here.
This document contains a complete Revived Legends: Road of the Kings game walkthrough featuring annotated screenshots from actual gameplay!
We hope you find this information useful as you play your way through the game. Use the walkthrough menu below to quickly jump to whatever stage of the game you need help with.
Remember to visit the Big Fish Games Forums if you find you need more help. Have fun!
This walkthrough was created by MargieB, and is protected under US Copyright laws. Any unauthorized use, including re-publication in whole or in part, without permission, is strictly prohibited.
General Tips
- This is the official guide for Revived Legends: Road of the Kings!
- This guide will not mention each time you have to zoom into a location; the screenshots will show each zoom scene.
- Hidden-object puzzles are referred to as HOPs in this guide. Items listed in green are hidden or require additional actions to locate. Interactive items in HOPs are color-coded.
- Mini-games and HOPs are sometimes randomized; your solution may vary.
- This guide will give step-by-step solutions for all puzzles which are not random. Please read the instructions in the game for each puzzle.
Chapter 1: The Village

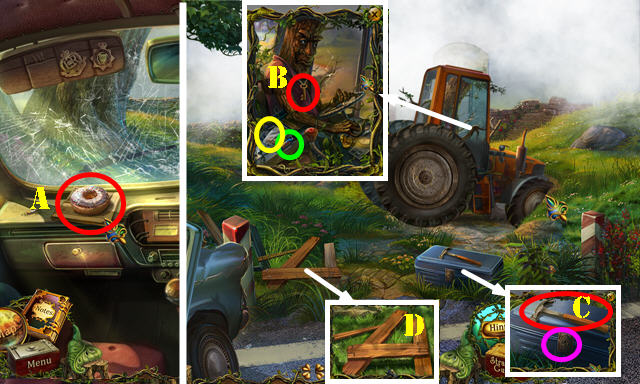
- Take the DOUGHNUT (A).
- Exit the car through the right door.
- Take the TOOLBOX KEY (B) and BAG OF SEEDS (yellow). Open the compartment; take the BATTERY (green).
- Take the HAMMER (C). Use the TOOLBOX KEY in the lock (purple); turn the key to activate a HOP.
- Use the HAMMER on the nails to get the NAILS (D), then take the BOARDS.

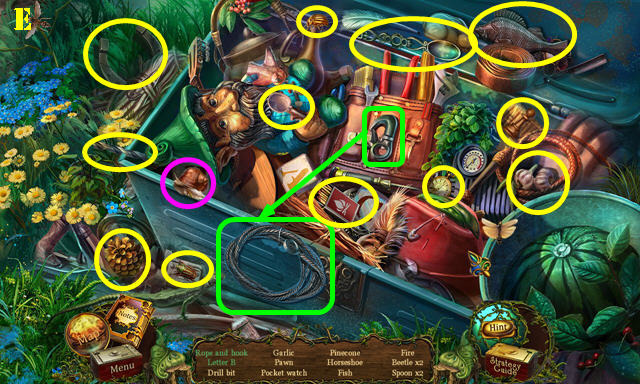
- Play the HOP.
- You receive the ROPE AND HOOK (E).
- Return to the Car.

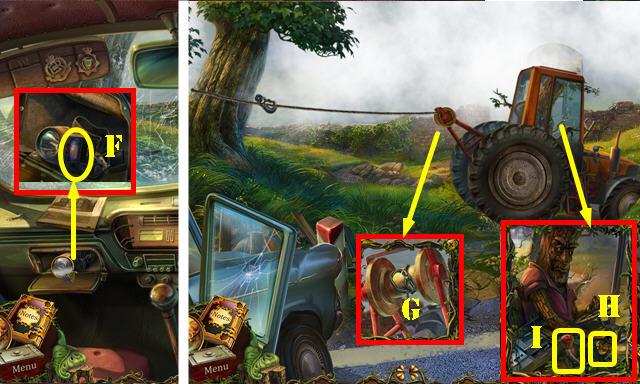
- Open the glove compartment. Place the BATTERY in the slot; close the cover and take the FLASHLIGHT (F).
- Exit the car.
- Place the ROPE AND HOOK on the tractor (G); touch the rope on the ground.
- Turn the key (H) and pull the lever (I).

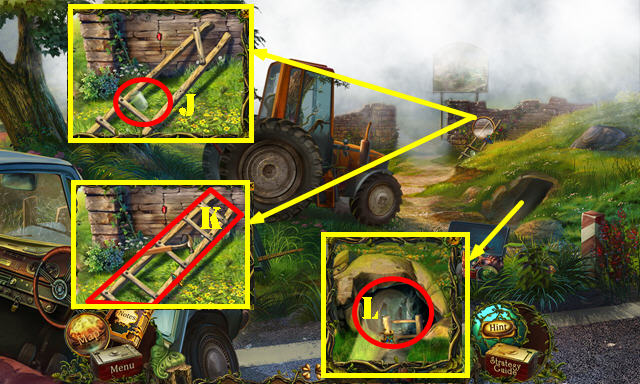
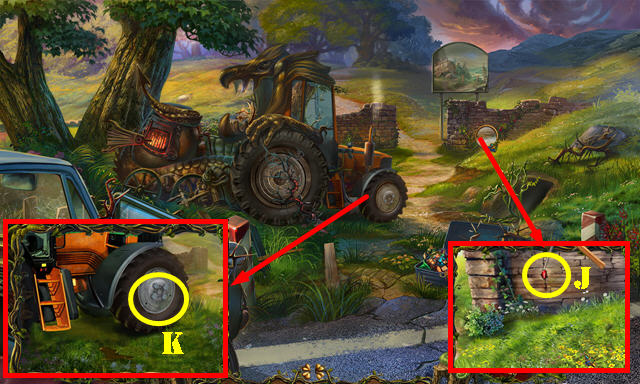
- Take the EMPTY JAR (J).
- Place the BOARDS and then the NAILS on the broken ladder (K). Use the HAMMER on the nails and take the LADDER.
- Place the FLASHLIGHT in the hole and then put down the LADDER (L).
- Go down into the Tomb.

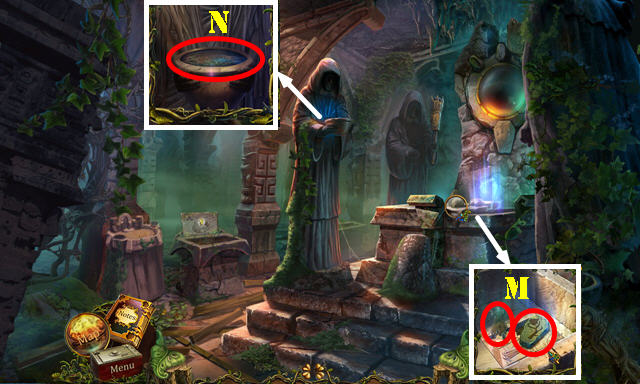
- Touch the lantern on the right for a cut scene (not pictured).
- Take the EMPTY GROWTH RUNE and the CORNELIUS FIGURINE (M).
- Use the EMPTY JAR in the bowl to get the JAR OF WATER (N).

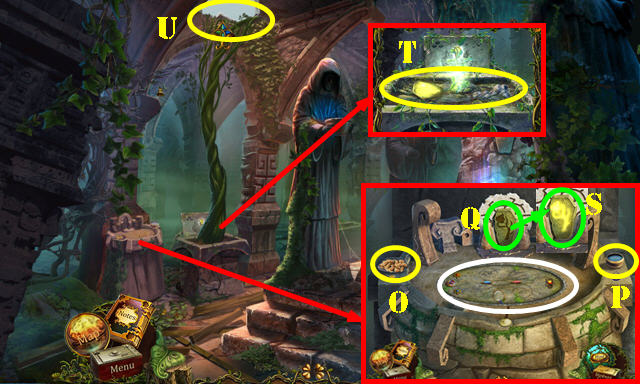

- Place the BAG OF SEEDS and JAR OF WATER in the bowls (O and P). You receive the EMPTY JAR.
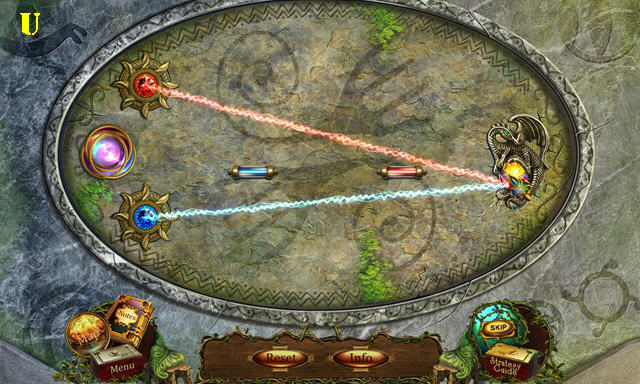
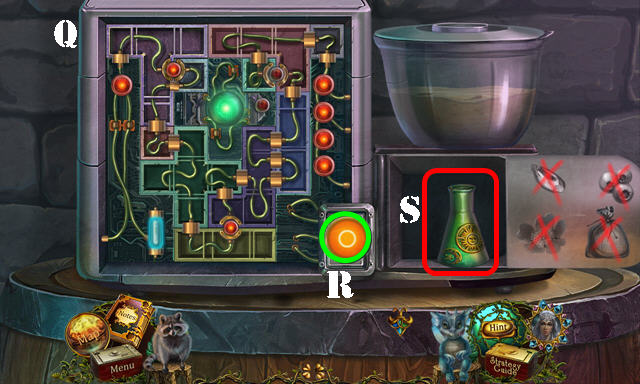
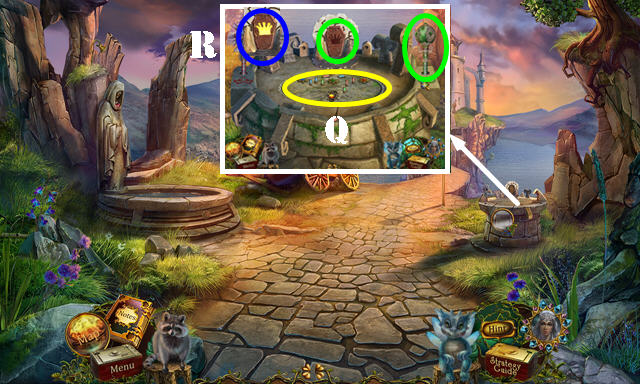
- Place the EMPTY GROWTH RUNE in the slot (Q) and zoom into the puzzle.
- Drag the colored lights from the glowing sphere to the dragon.
- Solution (R).
- Take the CHARGED GROWTH RUNE (S).
- Use the CHARGED GROWTH RUNE on the vines (T).
- Go through the ceiling (U).

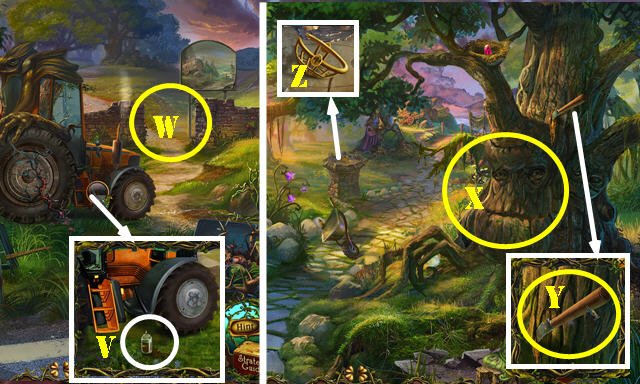
- Use the EMPTY JAR on the oil; take the JAR WITH OIL (V).
- Go forward (W) to the Gardens.
- Talk to the tree and then give it the DOUGHNUT (X).
- Take the GARDEN-SHEARS HALF (Y) and EGG STAND (Z).
- Go forward.

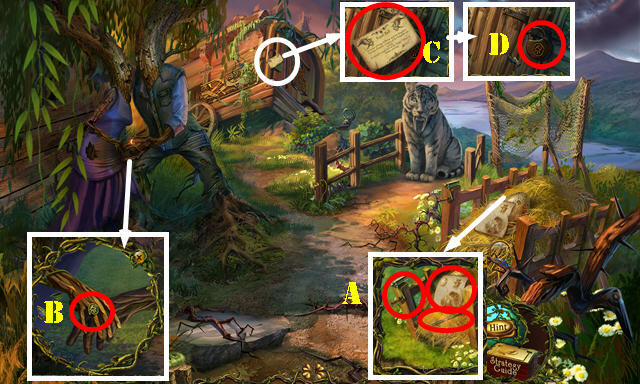
- Take the LUG WRENCH, CRANK FOR NET, and Note (A).
- Use the JAR WITH OIL on the ring; take the RING (B).
- Read the Note (C). Use the RING on the lock to activate a HOP (D).

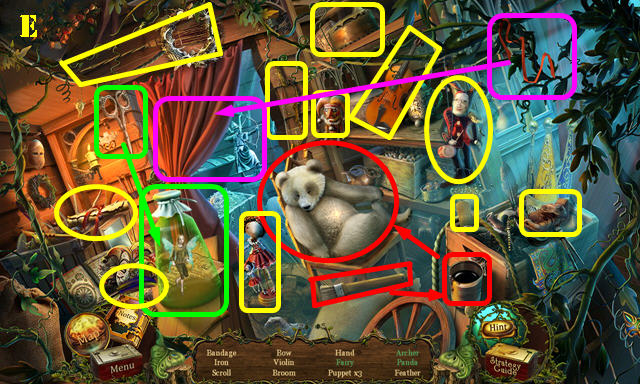
- Play the HOP.
- You receive the BANDAGE (E).
- Walk down.

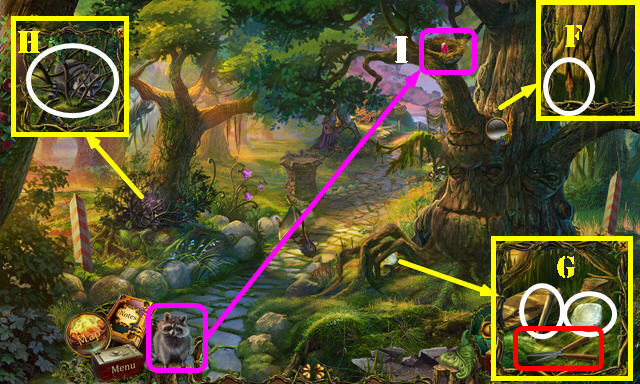
- Place the BANDAGE over the wound (F).
- Take the DRY ICE and CHISEL (G). Place the GARDEN-SHEARS HALF over the other one to get the GARDEN SHEARS (red).
- Use the GARDEN SHEARS on the vines; take the Raccoon (H).
- Use the Raccoon to get the CRYSTAL 1/2 (I).
- Walk down.

- Use the CHISEL in the crack; use the HAMMER on the chisel and take the CRYSTAL 2/2 (J).
- Remove the bolts with the LUG WRENCH; take the BOLTS (K).
- Return to the Tomb.

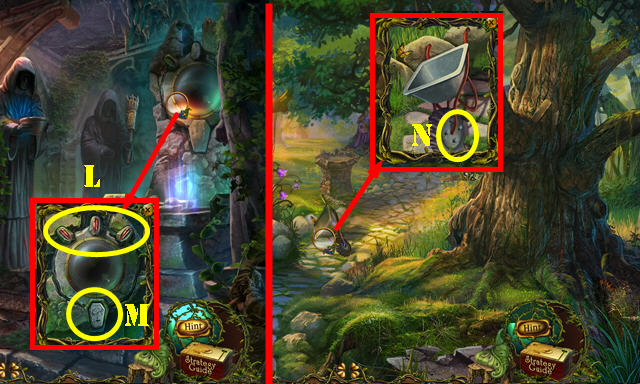
- Place the 2 CRYSTALS in the slot (L); take the EMPTY SHRINKING RUNE (M).
- Return to the Gardens.
- Place the 4 BOLTS on the wheel and use the LUG WRENCH on them (N). Take the WHEELBARROW.
- Go forward.

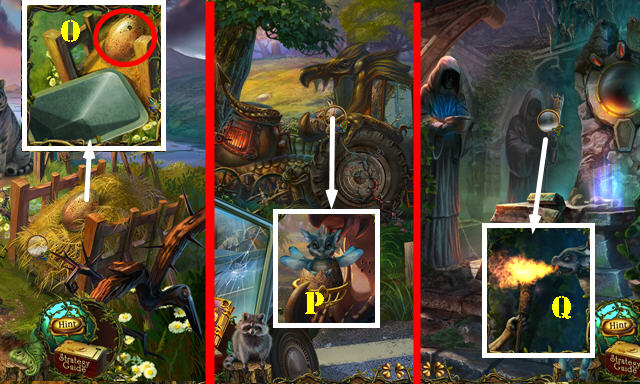
- Put down the WHEELBARROW; touch the EGG (O) and take it.
- Walk down twice.
- Remove the egg shell, put down the EGG STAND and place the EGG in it. Take the Fire Dragon and name it (P).
- Return to the Tomb.
- Use the Fire Dragon on the torch; take the BURNING TORCH (Q).
- Return to the Gardens.

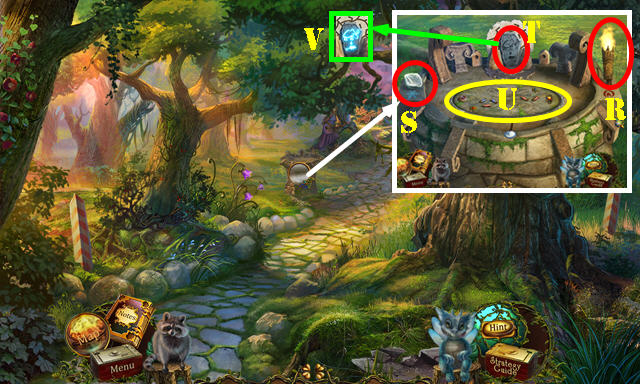

- Put down the BURNING TORCH (R) and the DRY ICE (S).
- Place the EMPTY SHRINKING RUNE in the slot (T).
- Touch the puzzle (U).
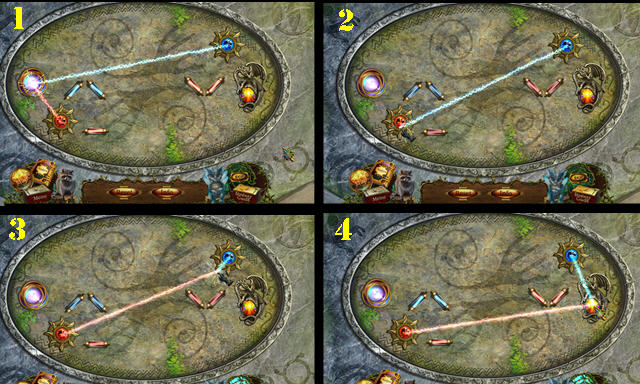
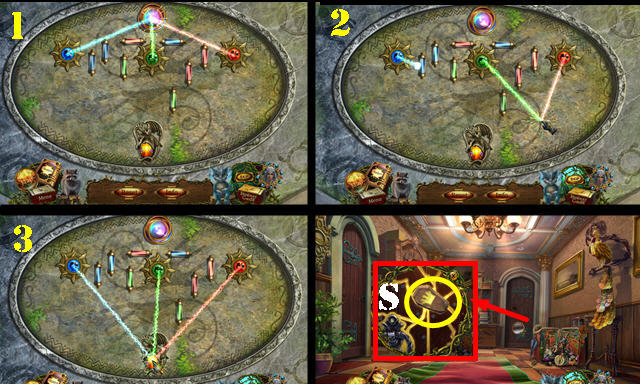
- Drag the colored lights from the glowing sphere to the dragon.
- Solution (1-4).
- Take the CHARGED SHRINKING RUNE (V).
- Go forward.

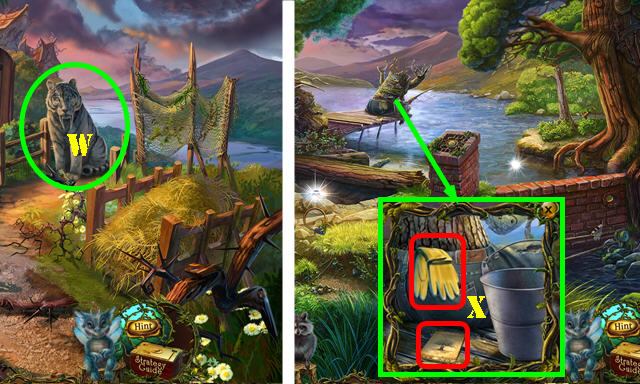
- Use the CHARGED SHRINKING RUNE on the tiger (W).
- Go forward.
- Talk to the Fairy.
- Take the GLOVES and Note (X).
- Walk down.

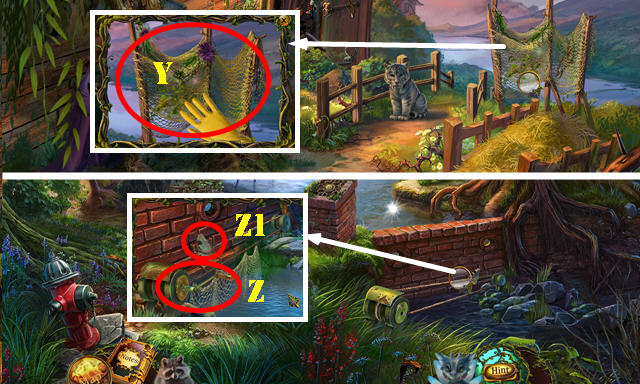
- Use the GLOVES to get the pointy things; take the NET (Y).
- Go forward.
- Place the CRANK FOR NET in the niche (Z); attach the NET to the chain and take the FRESCO PART (Z1).
- Return to the Tomb.

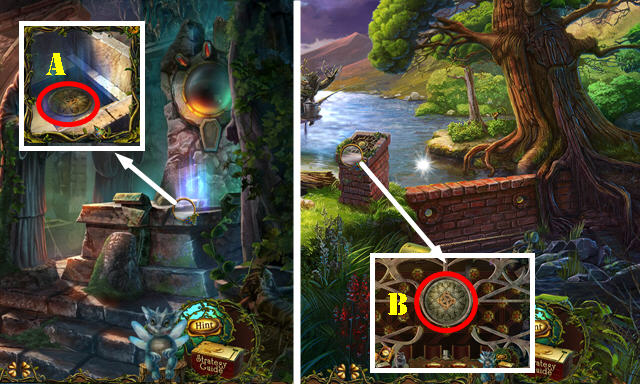
- Place the FRESCO PART in the niche. Take the CONTROL SEAL (A).
- Return to the River.
- Place the CONTROL SEAL in the slot to activate a puzzle (B).

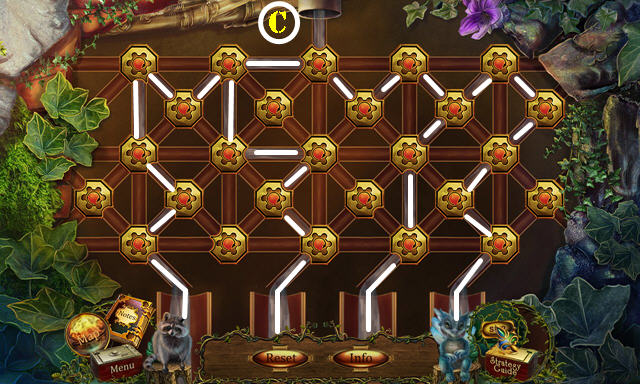

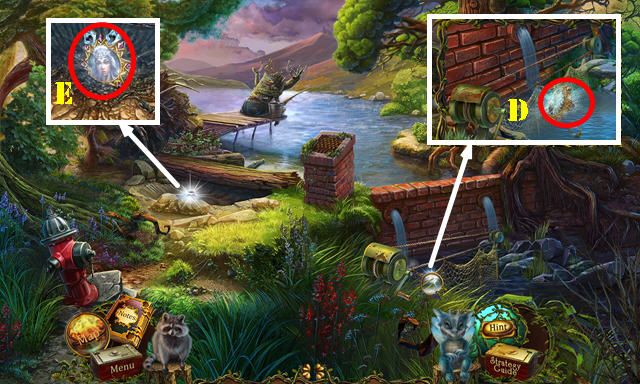
- Rotate the valves as shown (C).
- Take the STAR-AMULET HALF (D).
- Place the STAR-AMULET HALF on the other one; take the Magic Star (E).
- You will be automatically transported to the Outer Wood.
Chapter 2: The Forest

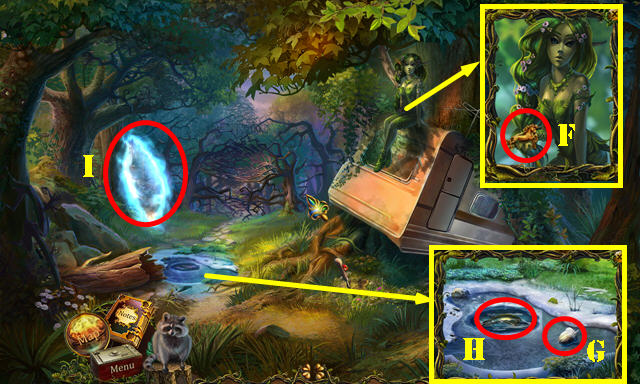
- Talk to the nymph; take the UNICORN FIGURINE (F).
- Take the ACORN (G).
- Use the FIRE DRAGON on the ice; take the HORN PIECE (H).
- Go through the portal (I).

- Take the SPADE and BUCKET (J).
- Walk down.
- Use the SPADE on the ground; take the WINDOW HANDLE (K).
- Go through the portal.
- Place the WINDOW HANDLE in the slot (L) to activate a HOP.

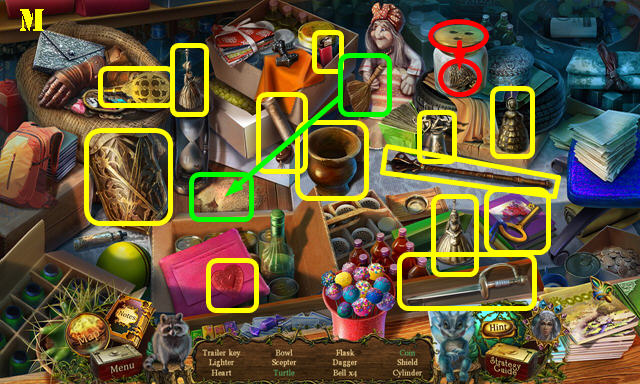
- Play the HOP.
- You receive the TRAILER KEY (M).
- Walk down.


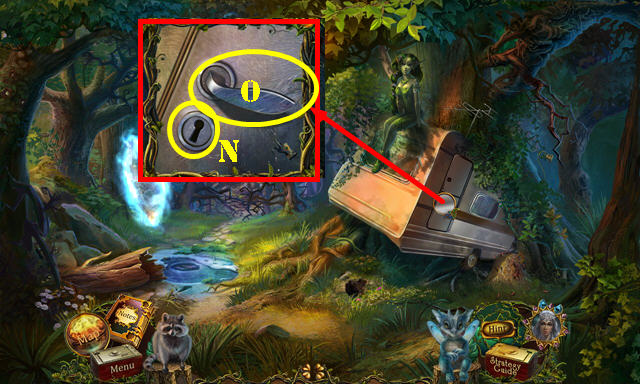
- Use the TRAILER KEY in the lock; turn the key (N) and pull the handle (O).
- Enter the Trailer.

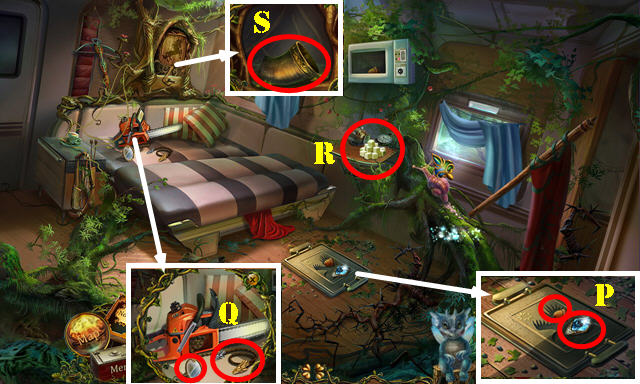
- Take the Shard and the ACORN 2/4 (P).
- Take the CLAMPS and MIRROR (Q).
- Grab the SUGAR (R).
- Place the UNICORN FIGURINE in the slot; take the HORN PIECE (S).
- Walk down.

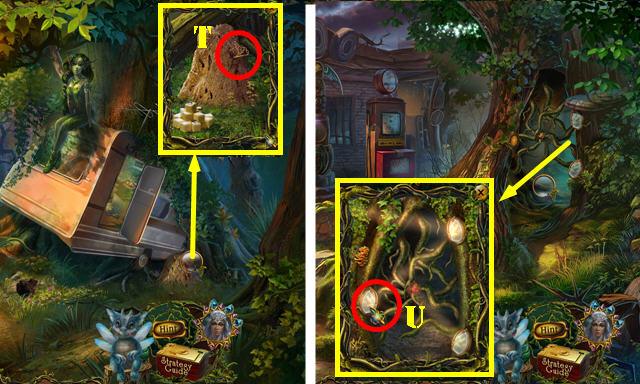
- Put down the SUGAR; take the DECORATION PIECE (T).
- Go to the Gas Station.
- Place the MIRROR in the frame (U); go through the hole.

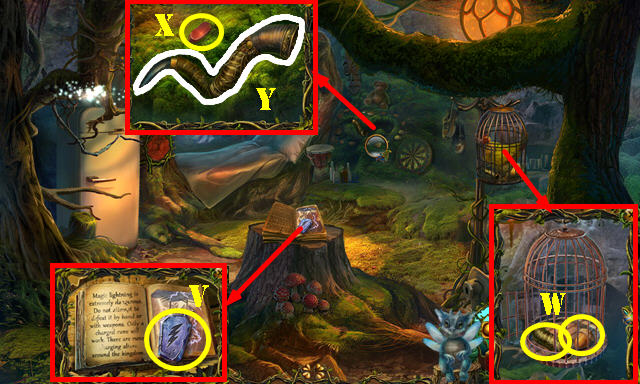
- Take the EMPTY LIGHTNING RUNE (V).
- Open the cage, take the HORN PIECE and the ACORN 3/4 (W).
- Take the MICROWAVE BUTTON (X). Place the 3 HORN PIECES, then take the NYMPH’S HORN (Y).
- Walk down twice.

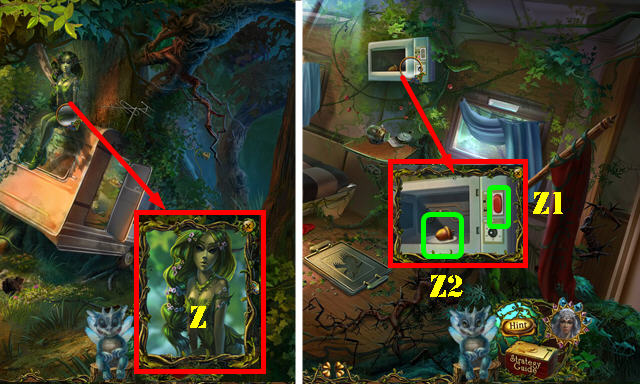
- Give the NYMPH’S HORN to the nymph (Z).
- Go into the Trailer.
- Place the MICROWAVE BUTTON (Z1); push the button and open the door. Take the ACORN 4/4 (Z2).
- Return to the Gas Station.

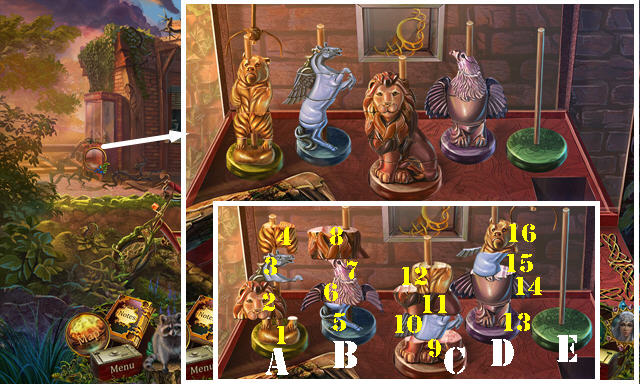
- Put down the 4 ACORNS to activate a puzzle.
- Solution: 16-E, 15-E, 14-E, 8-D, 12-B, 11-D, 14-D; 10-E, 12-C, 4-C, 3-C, 2-B, 3-A, 10-A, 15-A.
- 2-E, 7-C, 6-E, 15-B, 10-B, 3-B, 14-A, 6-A, 7-A, 4-E, 11-C, 8-C, 4-D, 2-D, 8-E, 11-E.
- 12-D, 11-C, 8-C, 12-E, 2-C, 4-E, 7-D, 6-D, 14-D, 4-A, 12-A, 14-A, 6-E, 7-E, 14-D, 7-A, 6-D, 7-D, 16-A.
- You receive the DECORATION PIECE.
- Return to the Small Hut.

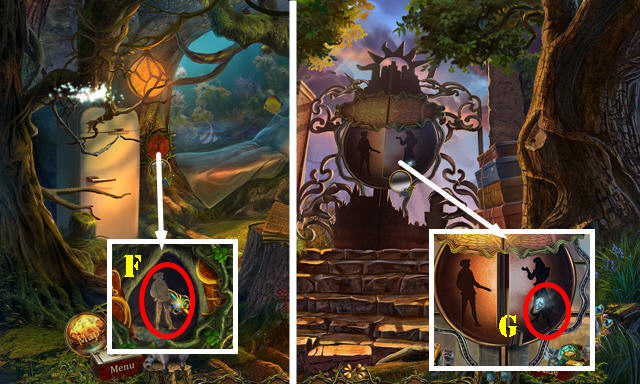
- Place the 2 DECORATION PIECES in the slot; take the WILHELM FIGURINE (F).
- Walk down twice and go forward to the Gates.
- Touch the Shard (G). Place the WILHELM FIGURINE and CORNELIUS FIGURINE in the slots to activate a puzzle.

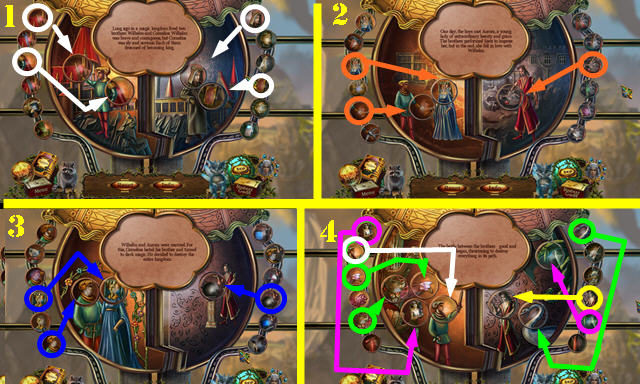
- Place the correct pictures in the slots for the 4 rounds.
- Solution (1-4).

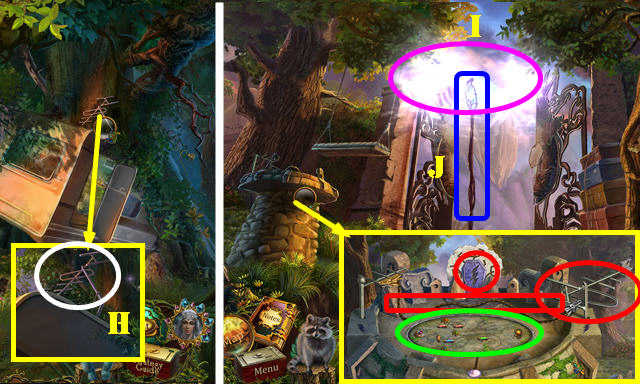

- Use the Raccoon to get the ANTENNA (H).
- Go forward.
- Place the ANTENNA, the CLAMPS and then the EMPTY LIGHTNING RUNE (red).
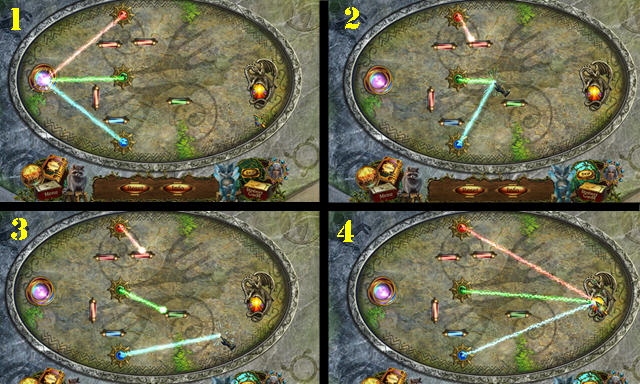
- Touch the puzzle to activate it (green).
- Solution (1-4).
- Take the CHARGED LIGHTNING RUNE.
- Use the CHARGED LIGHTNING RUNE on the lightning (I).
- Take the STAFF WITH LIGHTNING (J).
- Go forward.

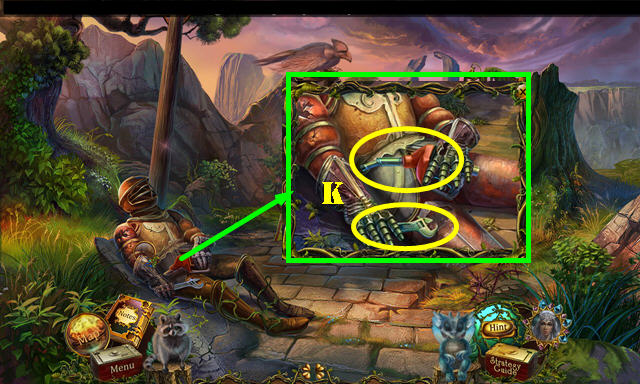
- Use the JAR WITH OIL on the armor; take the WRENCH and NOZZLE (K).
- Return to the Gas Station.

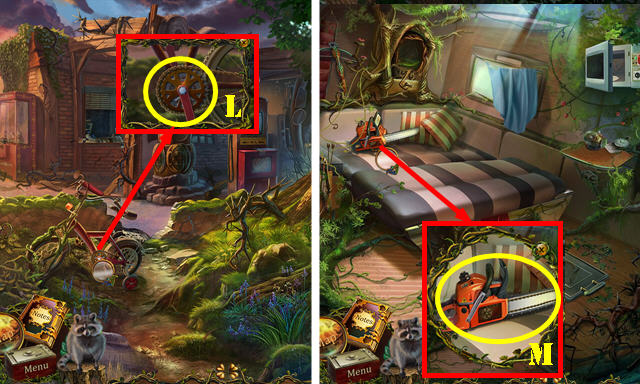
- Use the WRENCH on the bolt; take the CHAIN (L).
- Return to the Trailer.
- Place the CHAIN on the chainsaw; take the EMPTY CHAINSAW (M).
- Return to the Gas Station.

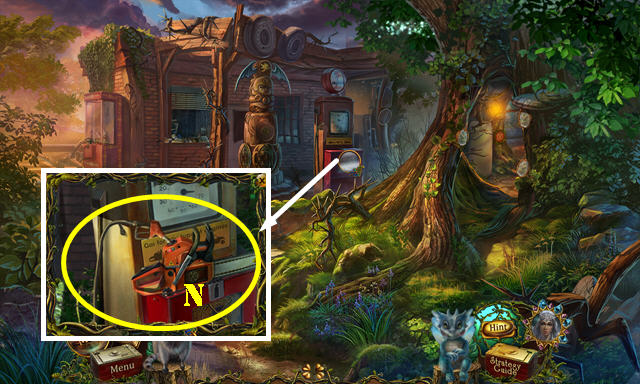
- Place the NOZZLE on the pump; put down the EMPTY CHAINSAW (N).
- Touch the nozzle; take the CHAINSAW.
- Return to the Kings’ Road.

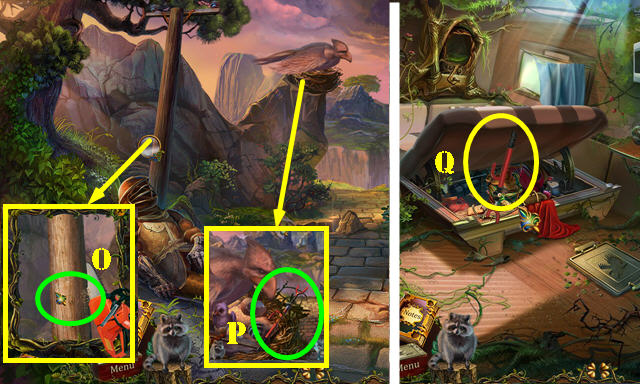
- Use the CHAINSAW on the pole (O); go up the pole.
- Take the WHEEL LOCK (P).
- Return to the Trailer.
- Place the WHEEL LOCK here (Q) to activate a HOP.

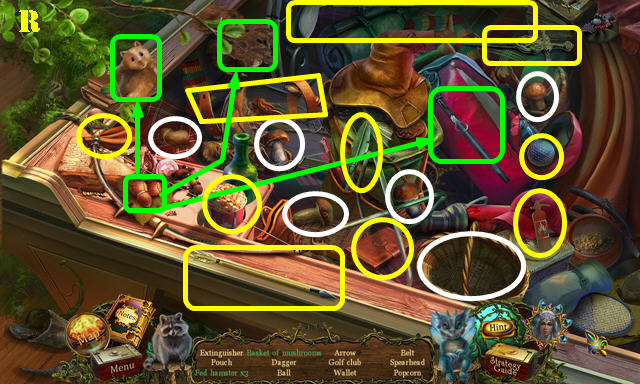
- Play the HOP.
- You receive the EXTINGUISHER (R).
- Return to the Gas Station.

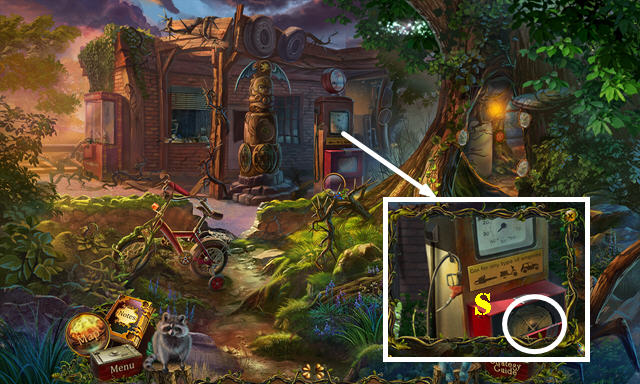

- Place the EXTINGUISHER in the slot; take the ROPE (S).
- Return to the Kings’ Road.
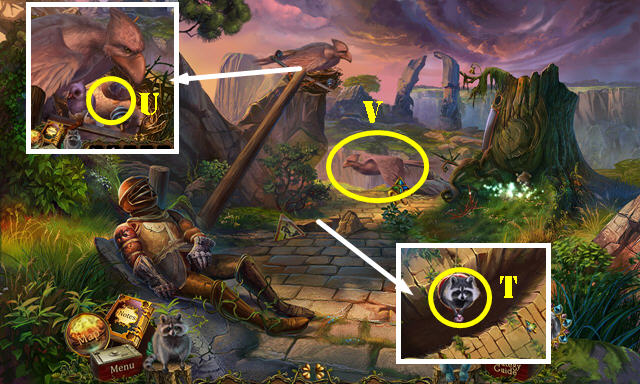
- Put down the BUCKET; use the ROPE on it and place the Raccoon in the bucket to get the ROC CHICK (T).
- Go up the pole; place the ROC CHICK in the nest (U).
- Hop on the bird (V) to reach the Mountain Pass.
Chapter 3: Mountain Pass

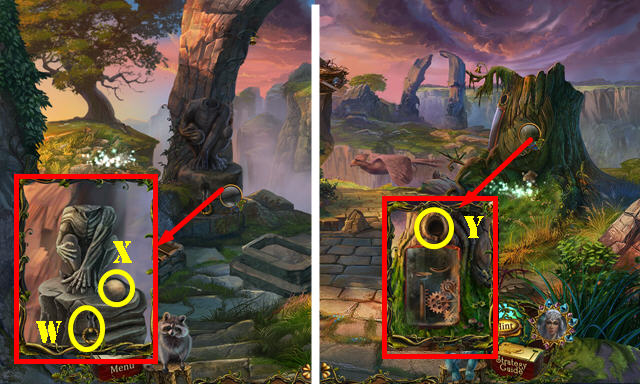
- Pull the chain twice (W); take the STONE BALL (X).
- Walk down.
- Place the STONE BALL in the hole to activate a HOP (Y).

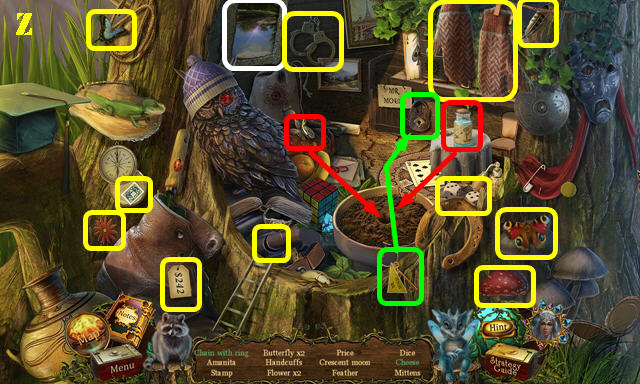
- Play the HOP.
- You receive the CHAIN WITH RING (Z).
- Return to the Mountain Pass.

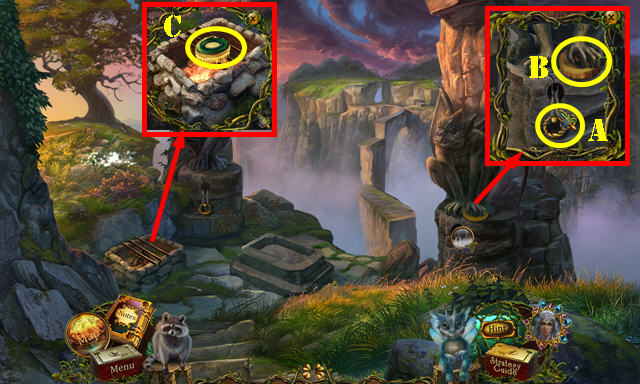
- Use the CHAIN WITH RING on the chain (A); pull it and take the SNAKE IN WAX (B).
- Use the Fire Dragon in the pit, then place the SNAKE IN WAX on the pit; take the SNAKE SYMBOL (C).
- Return to the Gas Station.

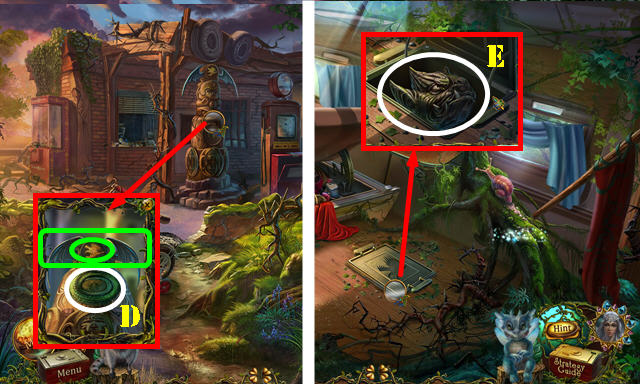
- Place the SNAKE SYMBOL in the slot (D); take the EAGLE SYMBOL and the WINGS (green).
- Return to the Trailer.
- Place the EAGLE SYMBOL in the slot; take the GARGOYLE HEAD (E).
- Return to the Mountain Pass.

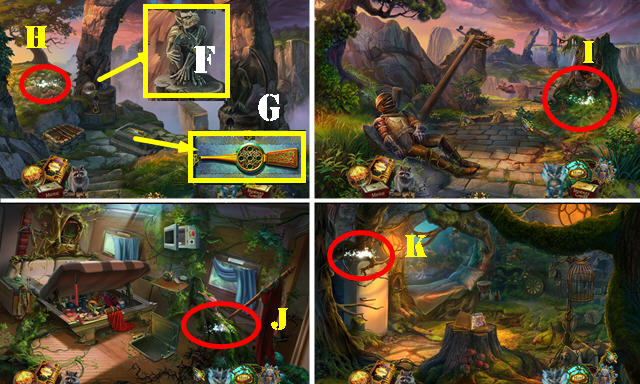

- Place the GARGOYLE HEAD and the WINGS on the statue (F); take the EMPTY MAGIC CATCHER (G).
- Place the EMPTY MAGIC CATCHER on the sparkles to get the MAGIC SPARKLES 1/5 (H).
- Return to the Kings’ Road. Place the MAGIC CATCHER on the sparkles to get the MAGIC SPARKLES 2/5 (I).
- Return to the Trailer. Place the MAGIC CATCHER on the sparkles to get the MAGIC SPARKLES 3/5 (J).
- Return to the Small Hut. Place the MAGIC CATCHER on the sparkles to get the MAGIC SPARKLES 4/5 (K).
- Return to the Gas Station. Place the MAGIC CATCHER on the sparkles to get the MAGIC SPARKLES 5/5 (L).
- Return to the Mountain Pass.
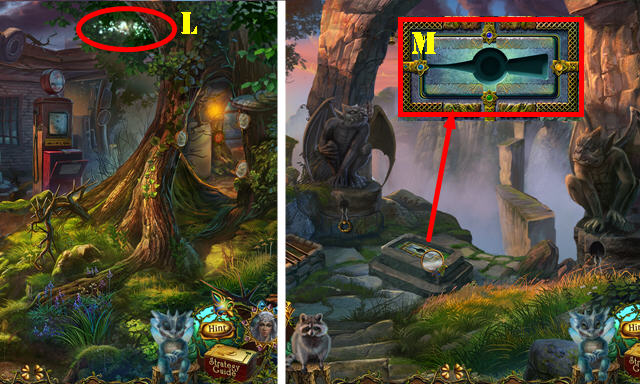
- Place the CHARGED MAGIC CATCHER in the slot to activate a puzzle (M).

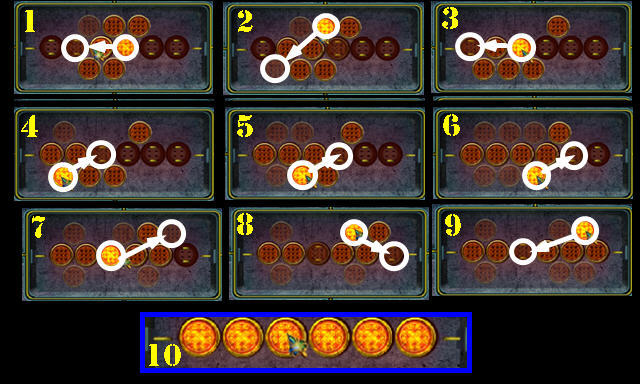
- Place the tokens in a straight line.
- Follow steps 1-9 to achieve the image in section 10.
- Go forward to the Valley.

- Take the WOODEN BUCKET (N).
- Go up the steps.
- Take the RACKET WITHOUT STRINGS (O).
- Put down the WOODEN BUCKET; attach the rope to it and flip the handle (P).Take the BUCKET OF WATER.
- Walk down.

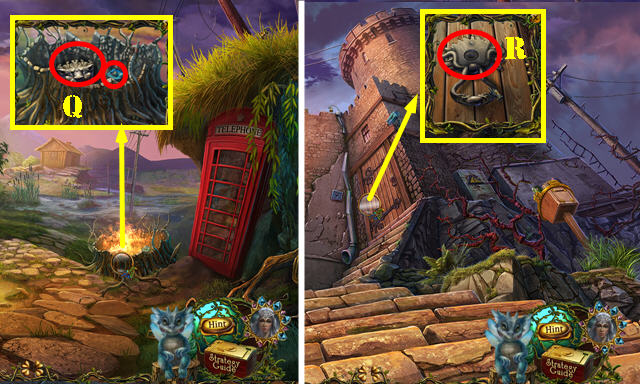
- Use the BUCKET OF WATER on the fire. Touch the Shard and take the DOOR-HANDLE PART (Q).
- Return to the Tower.
- Place the DOOR-HANDLE PART on the door (R).
- Enter the Guardhouse.

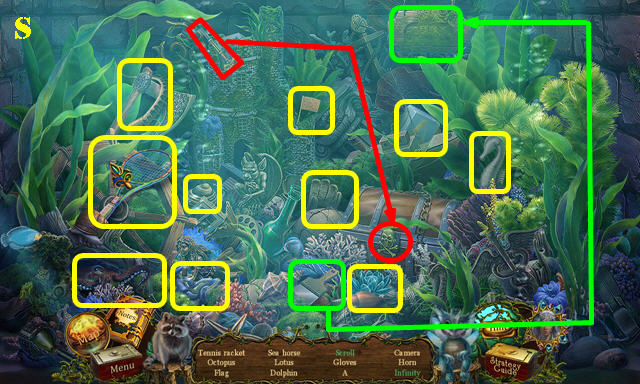
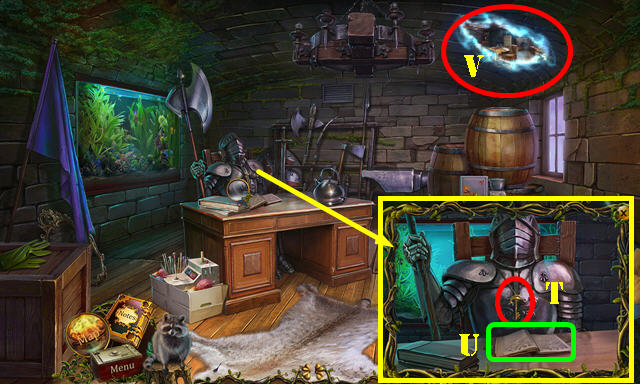
- Play the HOP.
- You receive the RACKET 1/2 (S).


- Take the KNIGHT KEY (T).
- Read the book (U).
- Go through the portal to reach the Workshop (V).

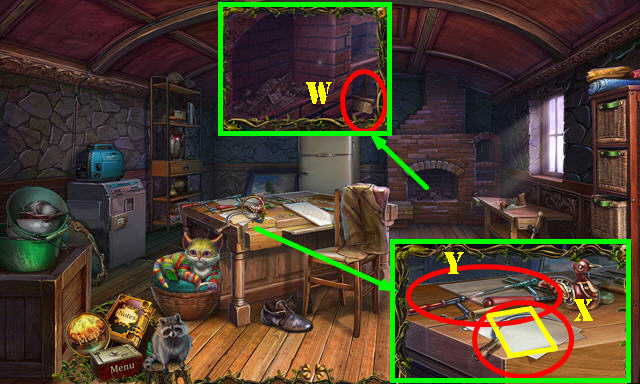
- Take the BROOM (W), SICKLE (X) and SAW (Y).
- Read the note (yellow).
- Walk down.

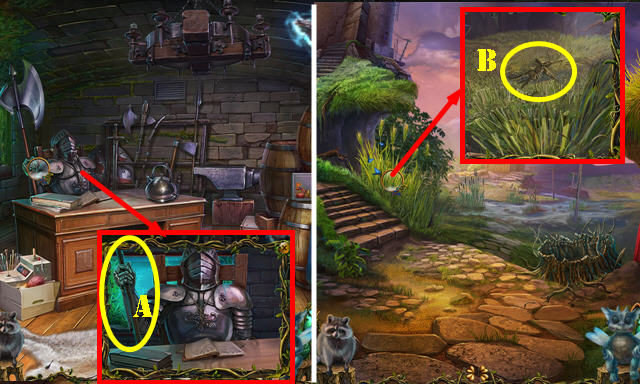
- Cut the pole with the SAW; take the POLE (A).
- Walk down twice.
- Take the REEDS with the SICKLE, then take the TIN SOLDIER 1/5 (B).
- Return to the Workshop.

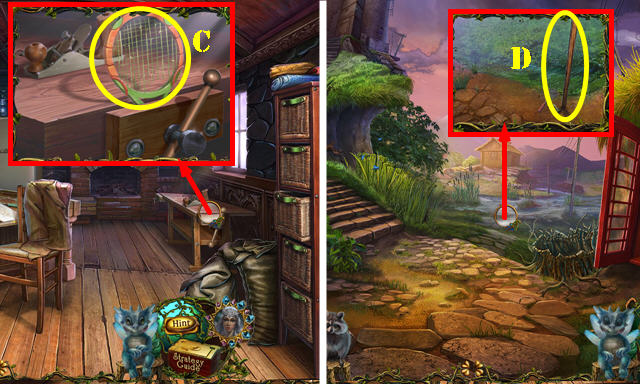
- Put down the RACKET WITHOUT STRINGS, then place the REEDS on it; take the RACKET 2/2 (C).
- Return to the Valley.
- Put down the POLE (D) and the 2 RACKETS to activate a puzzle.

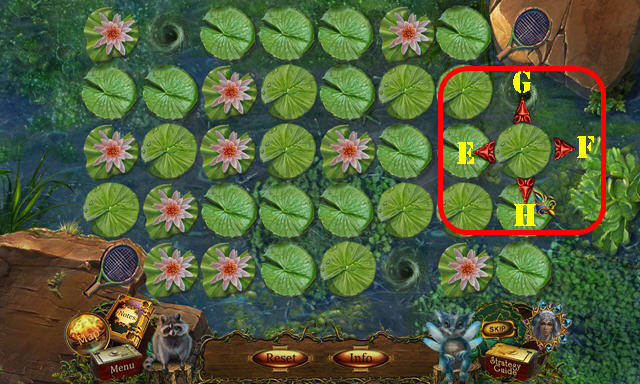
- Cross the swamp by moving both rackets to both stones.
- Solution: Ex4, Gx4, Fx5, and Hx4.
- Go forward to the Swamp.
Chapter 4: The Swamp

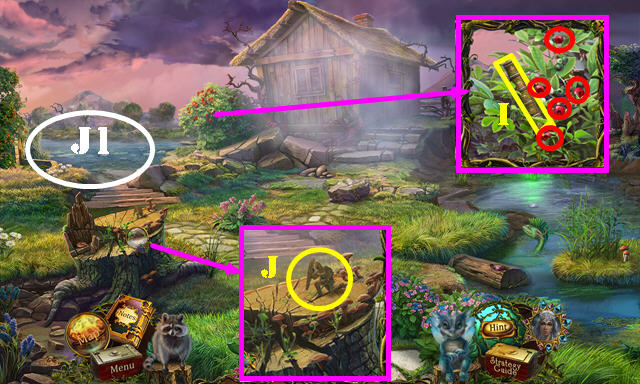
- Take the GREEN SPINE (I) and the 5/5 RED BERRIES (red).
- Grab the TIN SOLDIER 5/5 (J).
- Go to Lakeshore (J1).

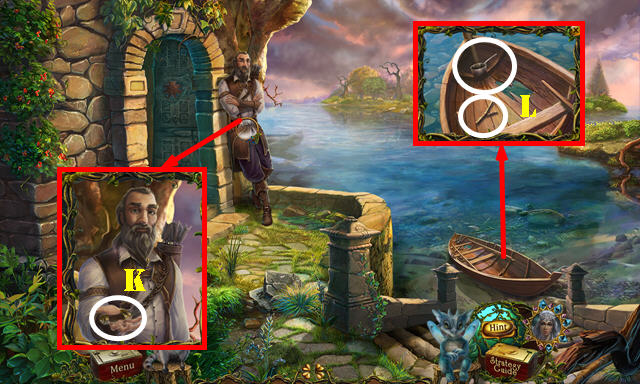
- Talk to David; take the HUNTING KNIFE (K).
- Take the PROP and the POT (L).
- Walk down.

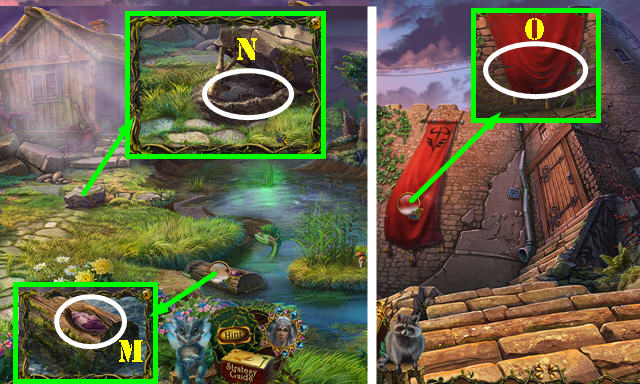
- Get the RESIN PIECE with the HUNTING KNIFE (M).
- Use the PROP on the stone; use the Raccoon on the ground; take the HALF LOCK (N).
- Return to the Tower.
- Cut the CLOTH PIECE with the HUNTING KNIFE (O).
- Return to the Workshop.

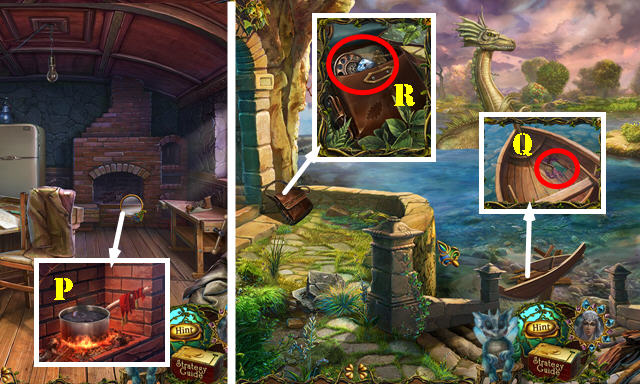
- Use the Fire Dragon in the fireplace. Place the POT on the fire; put the RESIN PIECE in the pot; place the CLOTH PIECE on the handle and take the HOT RESIN (P).
- Return to Lakeshore.
- Place the HOT RESIN over the hole, then use the BROOM on the resin (Q).
- Open the bag. Take the Crystal Shard, PHONE DISK, TIN SOLDIER 3/5, Note, and HALF LOCK 2/2 (R).
- Walk down.

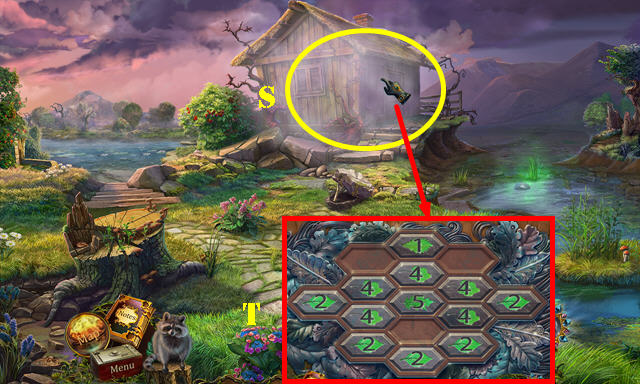
- Use the Magic Star to remove the fog (S).
- Place the 2 HALF LOCKS on the door to activate a puzzle. Place the pieces in the right spots.
- Solution (T).
- Enter the Huntsman’s House.

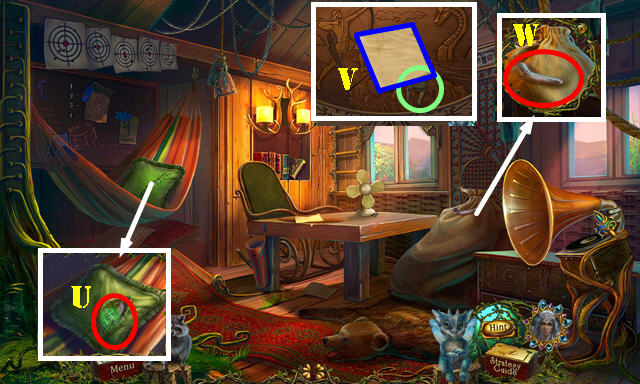
- Cut the pillow with the HUNTING KNIFE; take the THREAD and FEATHER (U).
- Take the Note and TIN SOLDIER 4/5 (V).
- Take the REFRIGERATOR HANDLE (W). Cut the sack with the HUNTING KNIFE to activate a HOP.

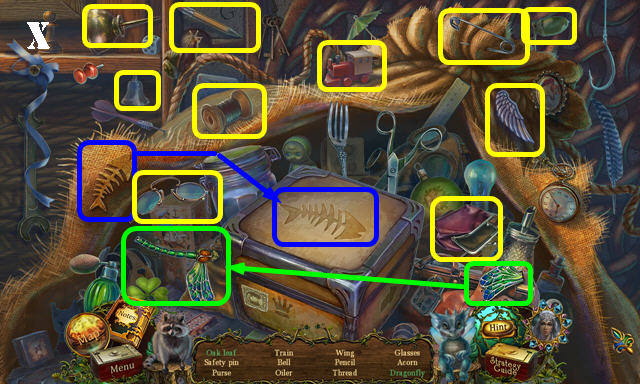
- Play the HOP.
- You receive the OAK LEAF (X).
- Return to the Valley.

- Open the phone booth. Place the PHONE DISK on the phone (A); dial 911 and take the TIN SOLDIER 5/5 (B).
- Return to the Guardhouse.
- Place the THREAD on the device (C); touch the thread and pull the handle (D).
- Take the BALL OF YARN (E).
- Go to the Workshop.

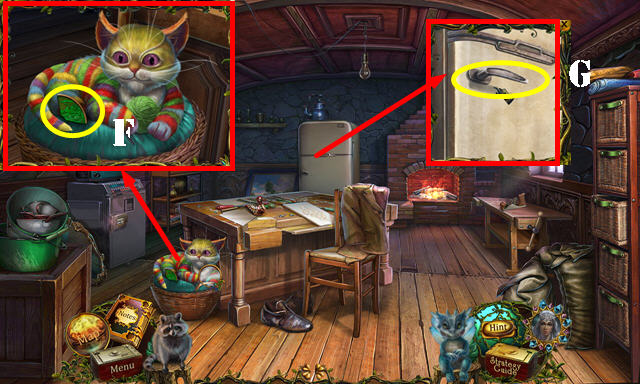
- Give the BALL OF YARN to the cat; take the EARTH ORNAMENT (F).
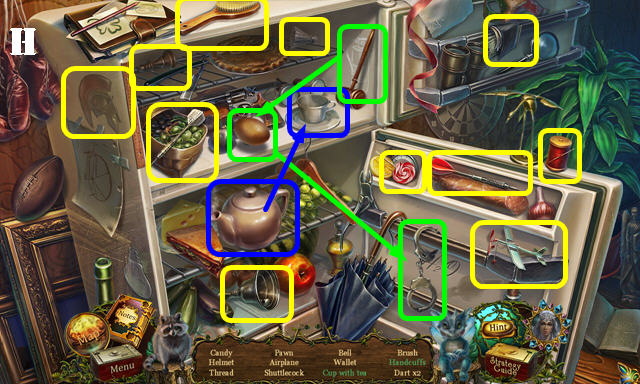
- Place the REFRIGERATOR HANDLE on the door (G) and pull it to activate a HOP.


- Play the HOP.
- You receive the CANDY (H).
- Return to Lakeshore.

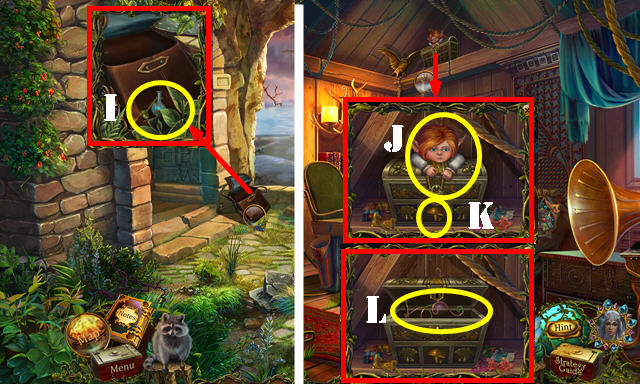
- Use the OAK LEAF on the bag; take the GARDENER ELIXIR and CHEST KEY (I).
- Return to the Huntsman’s House.
- Give the CANDY to the little girl (J).
- Use the CHEST KEY in the lock (K); take the GOLDEN BOWSTRING and KNIGHT KEY (L).
- Walk down.

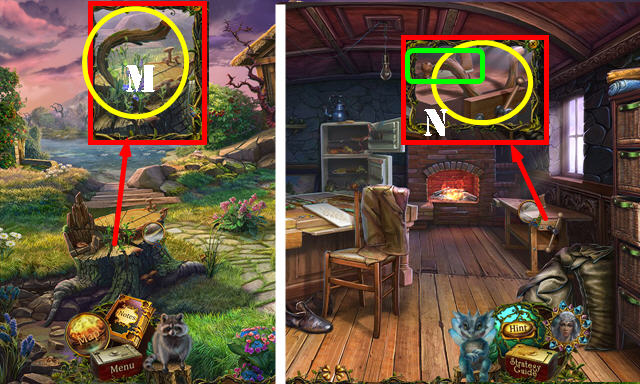
- Place the GARDENER ELIXIR on the stump; take the WOOD (M).
- Return to the Workshop.
- Place the WOOD on the clamp (N); use the plane (green) on the wood. Use the GOLDEN BOWSTRING on the wood; take the BOW.
- Return to the Guardhouse.

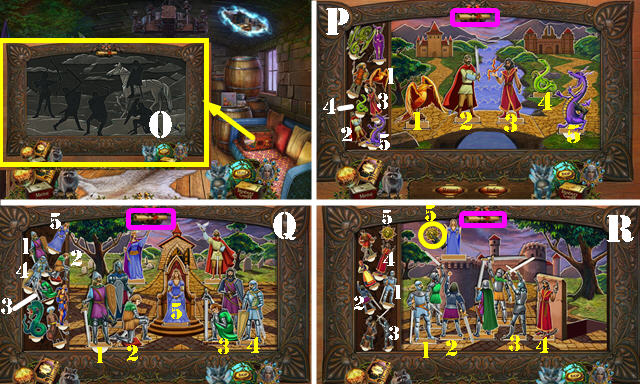
- Place the 5 TIN SOLDIERS on the chest to activate a puzzle (O).
- Place the figurines in the right spots using the information on the scrolls as a clue (purple).
- Solution (P-R).
- Take the MAGIC ARROWS.
- Return to the Huntsman’s House.

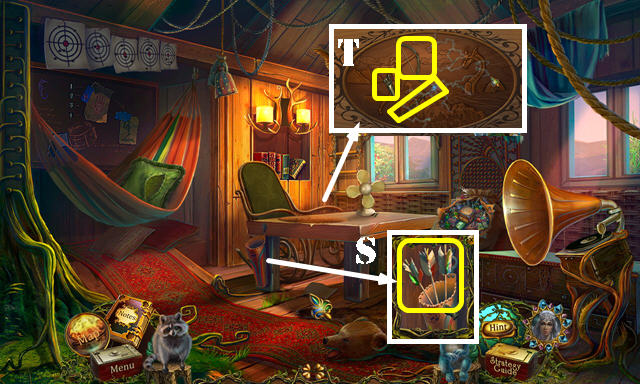
- Place the MAGIC ARROWS in the quiver; take the QUIVER WITH ARROWS (S).
- Place the BOW, STAFF WITH LIGHTNING, and QUIVER WITH ARROWS in the slots to activate a puzzle (T).

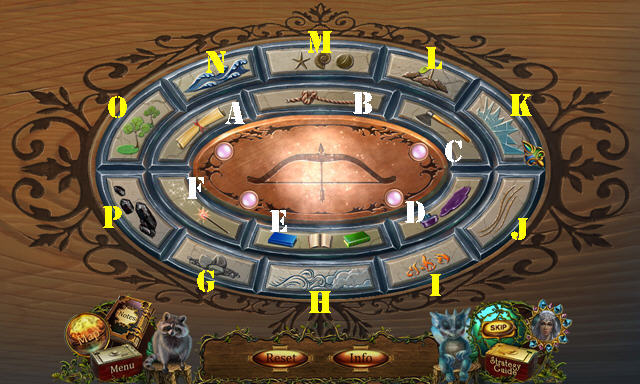

- Find the correct combination of symbols.
- Level 1: (L and I). Level 2: (H and L). Level 3: (L and N). Level 4: (M and I).
- Level 5: (O and I). Level 6: (O and G). Level 7: (J, P, and N). Level 8: (O, B, and G). Level 9: (O, N, and C).
- Level 10: (K, N, and P). Level 11: (A, B, and D). Level 12: (E, I, N, L, and H) Level 13: (O, E, F, B).
- Take the MAGIC BOW.
- Return to Lakeshore.
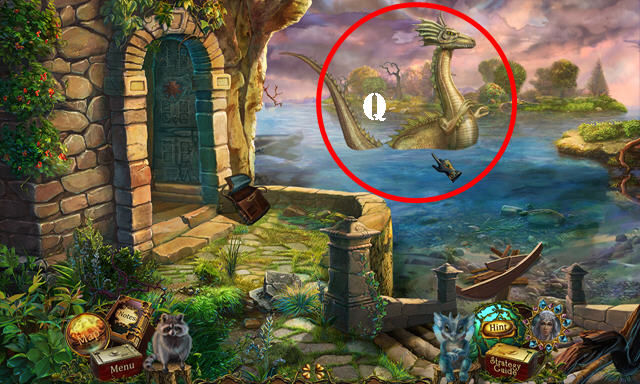
- Use the MAGIC BOW on the sea monster (Q).
- Go forward to the Island.

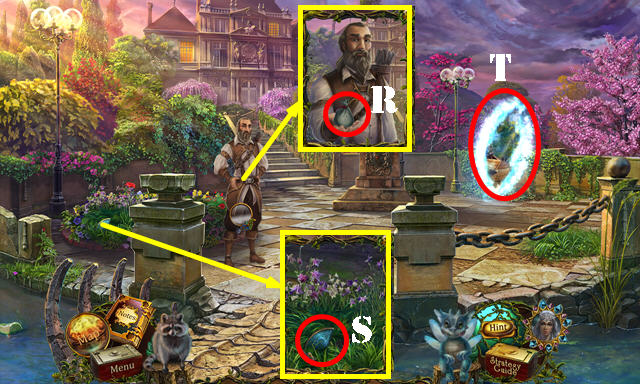
- Talk to David; take the MAGIC DUST (R).
- Take the AIR ORNAMENT (S).
- Go through the portal (T).

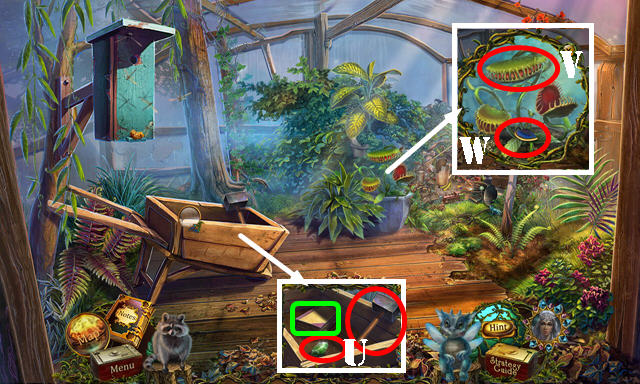
- Take the SMITH HAMMER and the GREEN JEWEL (U). Open the book and read it (green).
- Use the FEATHER on the flytrap (V); take the WATER ORNAMENT (W).

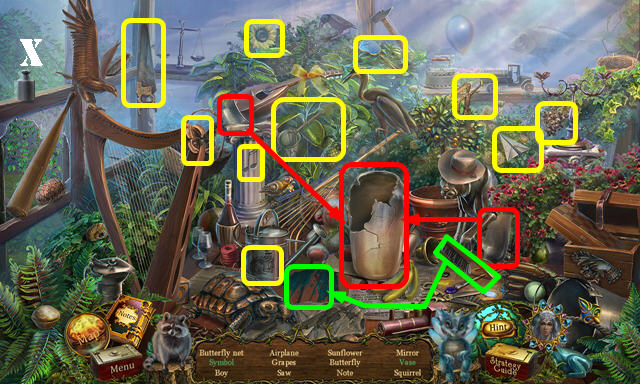
- Play the HOP.
- You receive the BUTTERFLY NET (X).
- Walk down.

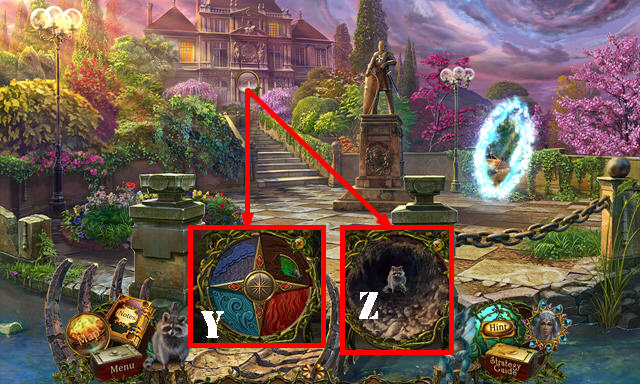

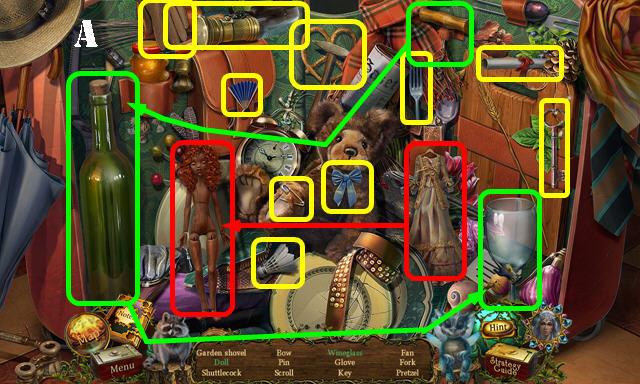
- Zoom into the door and then the doormat; place the AIR ORNAMENT, WATER ORNAMENT, and EARTH ORNAMENT into the slots (Y).
- Place the Raccoon in the hole to activate a puzzle (Z).
- Lead the raccoon to the exit.
- Solution: Rx2, Ux3, Rx2, D, R, D, L, Dx2, R, U, and R.
- Go into the Estate Hall.
Chapter 5: The Estate


- Play the HOP.
- You receive the SHOVEL (A).

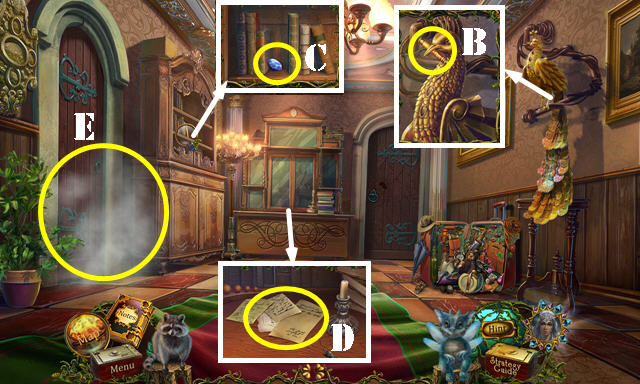
- Take the ORANGE SPINE (B) and BLUE JEWEL (C).
- Remove the papers and take the Note (D).
- Use the Magic Star on the fog (E).
- Go through the door.

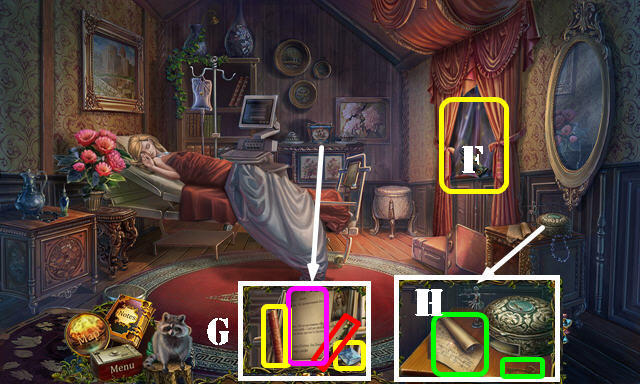
- Take the STAR CURTAIN (F).
- Take the PEN, RED SPINE, and Shard (G).
- Look at the note (purple).
- Take the KNIGHT KEY and look at the Note (H).
- Walk down.

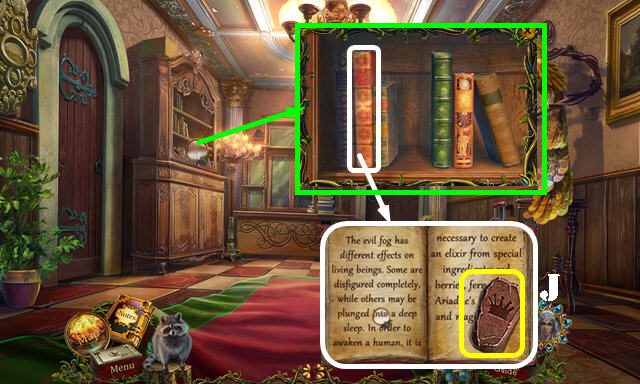
- Place the ORANGE, GREEN, and RED SPINES on the shelf. Open the book; take the EMPTY ACCESS RUNE (J).
- Return to the Greenhouse.

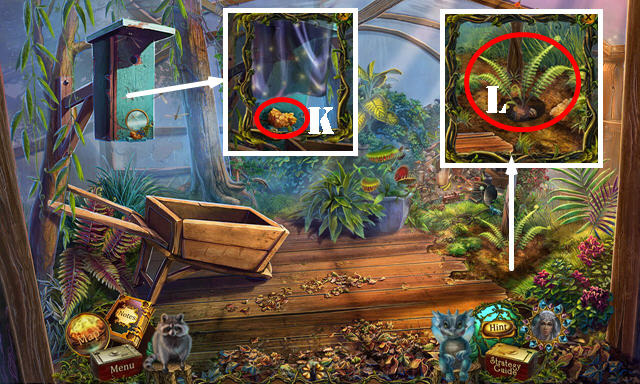
- Place the STAR CURTAIN over the dragonflies; take the AMBER (K).
- Use the SHOVEL on the dirt; take the FERN and the CARRIAGE HANDLE (L).
- Walk down.

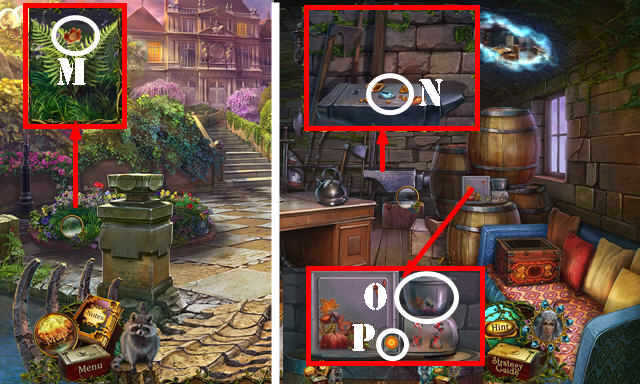
- Use the SHOVEL in the dirt; plant the FERN and use the BUCKET OF WATER on it. Take the FERN FLOWER (M).
- Return to the Guardhouse.
- Place the AMBER on the anvil; use the SMITH HAMMER on it and take ARIADNE’S TEARDROP (N).
- Place the 5 RED BERRIES, ARIADNE’S TEARDROP, FERN FLOWER, and MAGIC DUST in the container (O).
- Press the button to activate a puzzle (P).

- Place the pieces in the right spots.
- Solution (Q).
- Press the button (R); touch the flask and take the WAKING POTION (S).
- Return to Ariadne’s Estate.

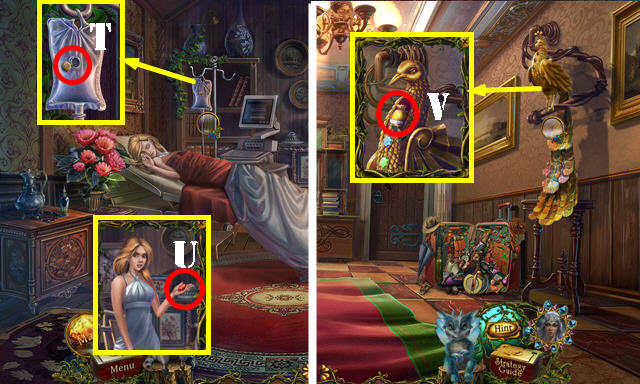
- Open the bag; use the WAKING POTION on it (T).
- Talk to Ariadne; take the RED JEWEL (U).
- Walk down.
- Place the RED, GREEN, and BLUE JEWELS into the slots; take the JEWELED EGG (V).
- Return to the Tower.

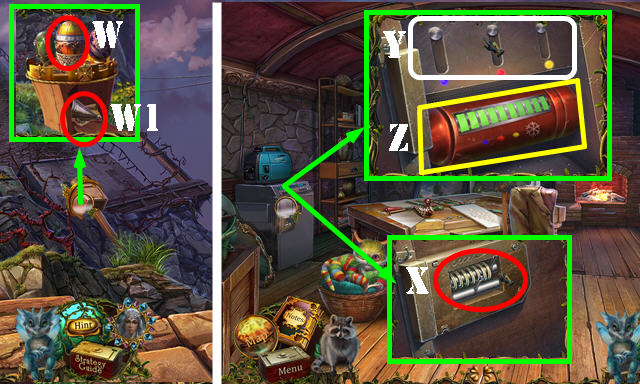

- Place the JEWELED EGG on the stand (W); take the NOZZLE, Note, PAPER, and HANDLE PART (W1).
- Return to the Workshop.
- Place the HANDLE PART on the generator and pull it twice (X). Take the Note on top of the tank (not pictured).
- Pull the buttons until you have blue, red, and yellow lights on the tank. Solution: select the third button and then the first one (Y).
- Take the NITROGEN TANK (Z).
- Return to the Swamp.
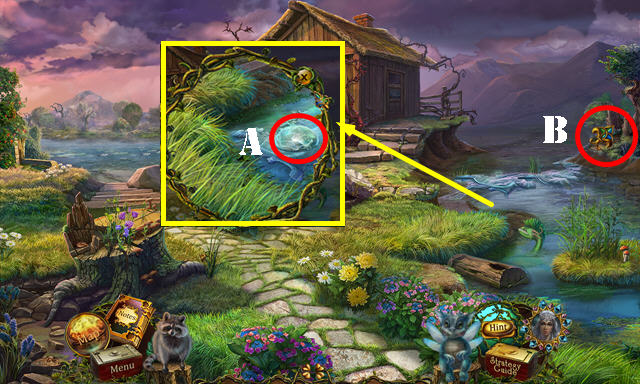
- Put down the NITROGEN TANK and place the NOZZLE on it. Spray the can in the water; take the GAS BUBBLE (A).
- Head to Temple Road (B).

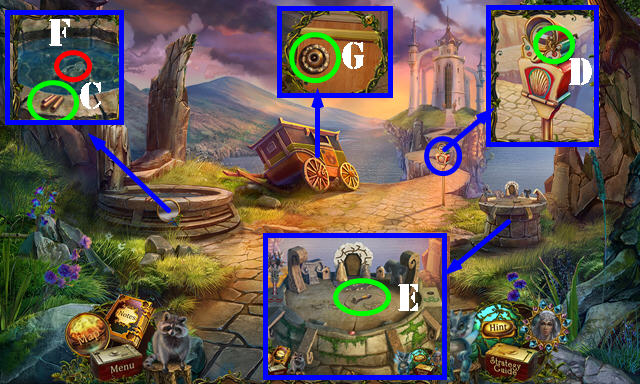
- Take the PAN-FLUTE PART (C), KNIGHT KEY (D), and ROYAL SEAL (E).
- Use the BUTTERFLY NET to get the PICTURE-FRAME PART (F).
- Place the CARRIAGE HANDLE in the slot (G). Pull the handle to activate a HOP.

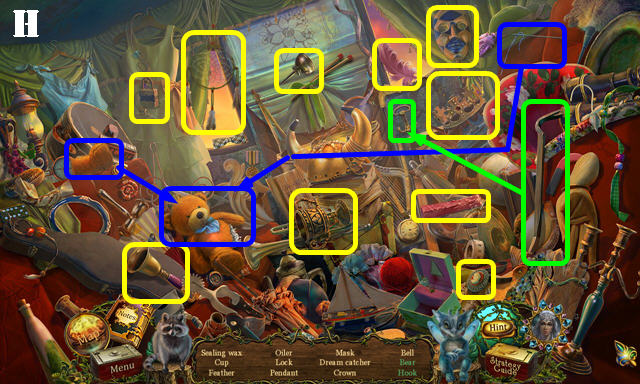
- Play the HOP.
- You receive the WAX (H).
- Return to the Estate Hall.

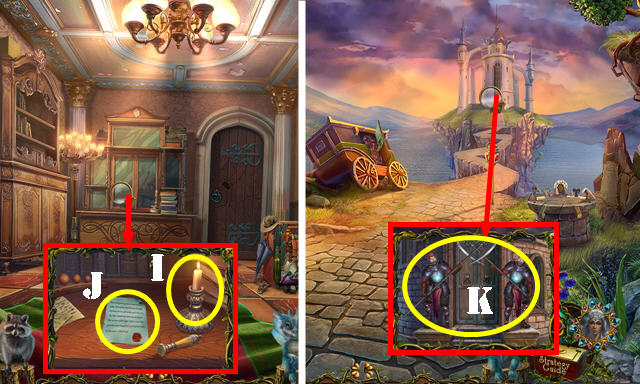
- Put down the ROYAL SEAL and PAPER. Use the PEN on the paper.
- Use the fire Dragon on the candle (I).
- Place the WAX on the candle, then use the ROYAL SEAL on the wax. Take the ROYAL OATH (J).
- Return to Temple Road.
- Give the ROYAL OATH to the guards (K).
- Enter Wilhelm’s Temple.

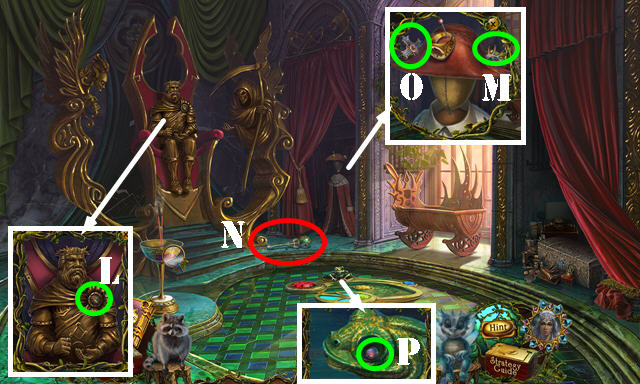
- Take the MEDAL (L), EYE OF WISDOM (M), MACE (N), WILHELM’S CROSS (O), and PEARL 1/2 (P).
- Walk down.


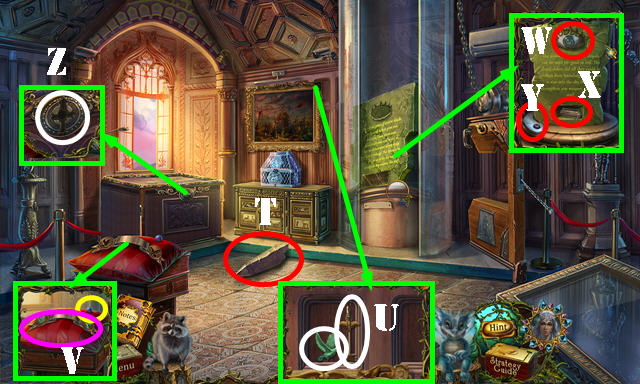
- Place the MACE and EMPTY ACCESS RUNE in the slots (green).
- Touch the puzzle to activate it (Q).
- Solution (1-3).
- Take the CHARGED ACCESS RUNE (R).
- Return to the Estate Hall.
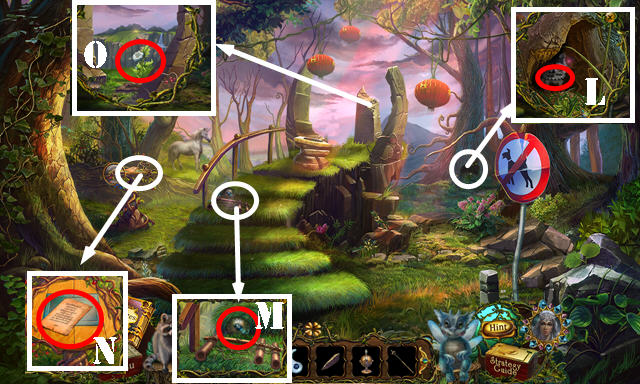
- Place the CHARGED ACCESS RUNE in the slot (S). Go through the door.

- Take the PILLAR PART (T) and PEARL 2/2 (yellow).
- Place the PICTURE-FRAME PART on the frame; take the KNIGHT KEY and the MEDAL (U).
- Place the 2 MEDALS in the slots; take the METAL RIBBON (V).
- Place the EYE OF WISDOM (W); take the MUSIC CYLINDER (X) and the YANG (Y).
- Place WILHELM’S CROSS in the slot to activate a HOP (Z).

- Play the HOP.
- You receive the RIDER (A).
- Walk down twice.

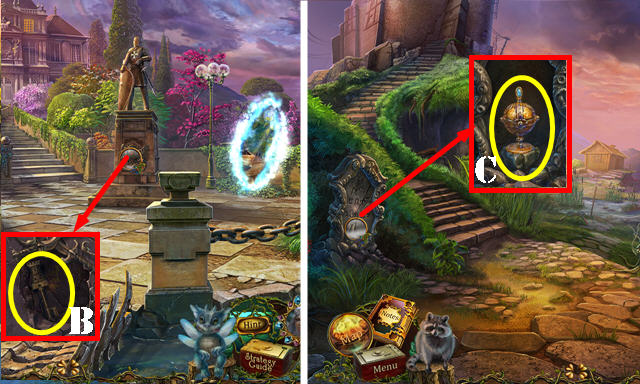
- Place the METAL RIBBON in the slot. Take the KNIGHT KEY (B).
- Return to the Valley.
- Place the RIDER in the slot; take the ORB (C).
- Return to Ariadne’s Estate.

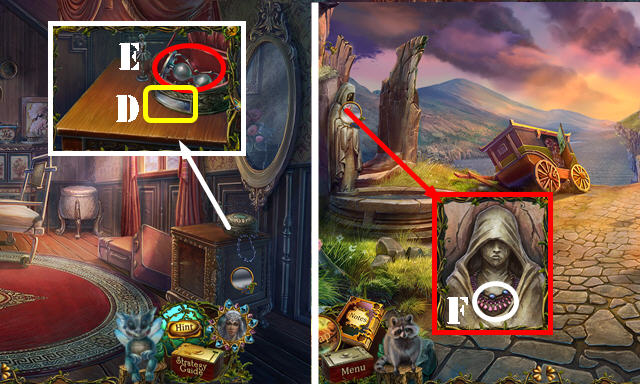
- Place the MUSIC CYLINDER in the slot (D); take the HOURGLASS (E).
- Return to Temple Road.
- Place the 2 PEARLS on the necklace; take the NECKLACE (F).
- Go to Wilhelm’s Hall.

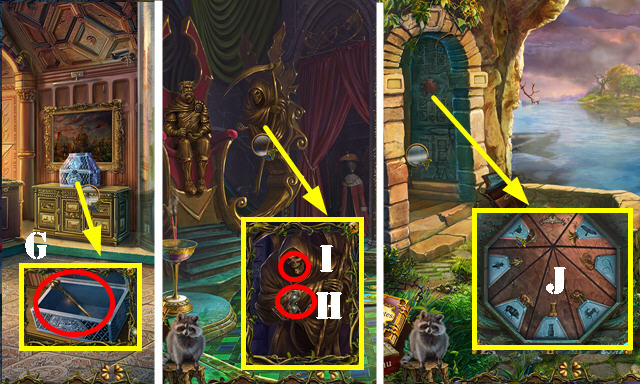
- Place the NECKLACE in the slot; take the SCEPTER (G).
- Go to Wilhem’s Temple.
- Give the HOURGLASS to the statue (H); take the KNIGHT KEY (I).
- Return to Lakeshore.
- Place the 7 KNIGHT KEYS in the lock to activate a puzzle (J).

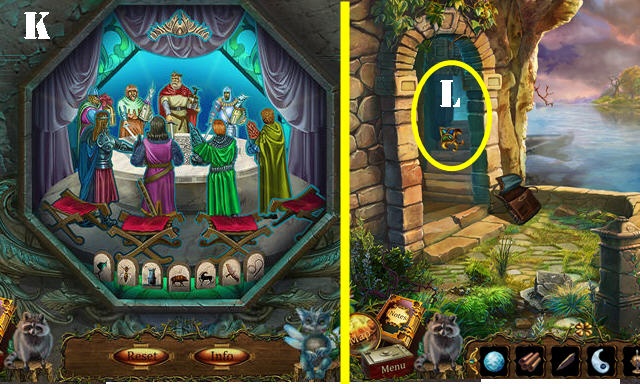
- Swap the puzzle pieces as shown (K).
- Go to Druid Grove (L).
Chapter 6: Druid Grove


- Use the Raccoon in the hole; take the COGWHEEL (L).
- Take the TOAD EYE (M).
- Take the Note (N).
- Place the PILLAR PART on the other one; take the SCENTED PLANT (O).
- Go to Wilhelm’s Temple.

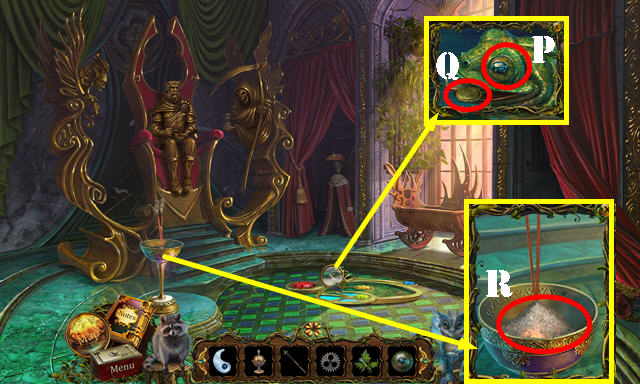
- Place the TOAD EYE (P) in the socket; take the COIN (Q).
- Place the SCENTED PLANT in the burner. Use the Fire Dragon in the burner; take the MAGIC ASH (R).
- Return to Wilhelm’s Hall.

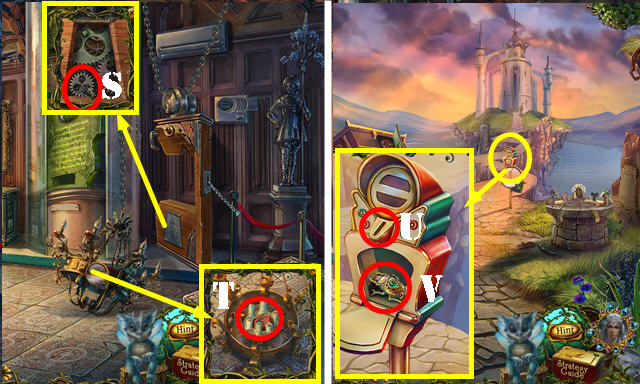
- Remove the cover and place the COGWHEEL (S).
- Remove three candles and take the STONE TILE (T).
- Return to Temple Road.
- Place the COIN in the slot (U); take the SCARAB (V).
- Return to Wilhelm’s Temple.

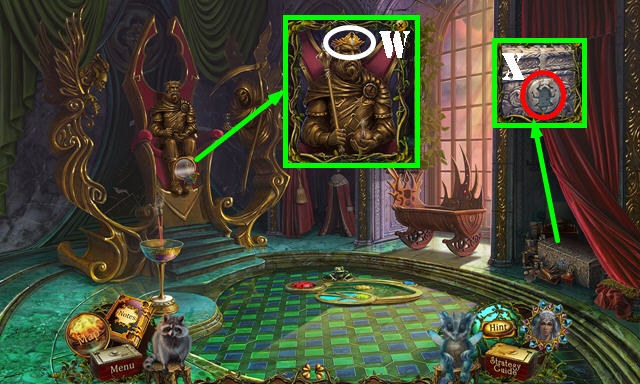
- Give the ORB and SCEPTER to the statue; take the CROWN (W).
- Place the SCARAB to activate a HOP (X).

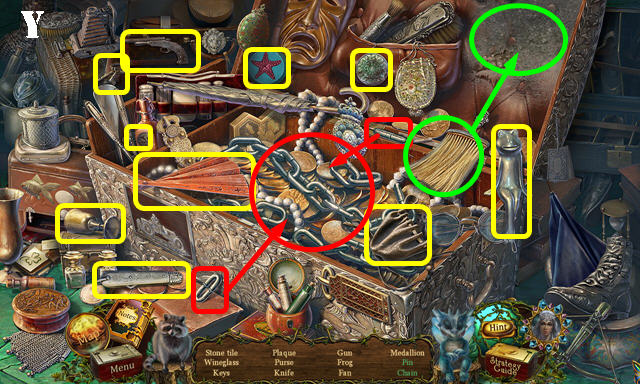
- Play the HOP.
- You receive the STONE TILE (Y).
- Return to Druid Grove.

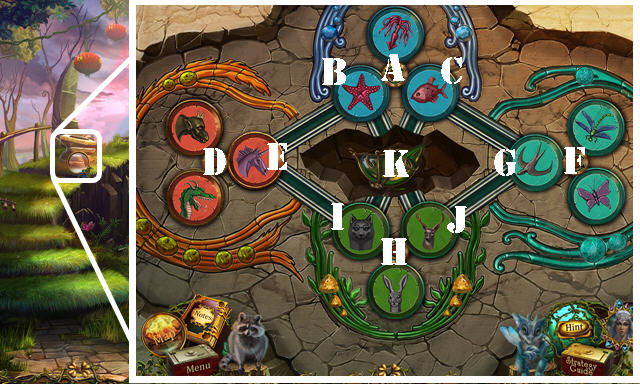
- Place the 2 STONE TILES to activate a puzzle. Place the tokens in the right spots.
- Solution: F, J, G, C, F, K, B, E, I, D, Hx2, G, Ax2, C, Ax2, K, C, Ax2, E, Hx2, I, and K.
- Take the DRUID AMULET.

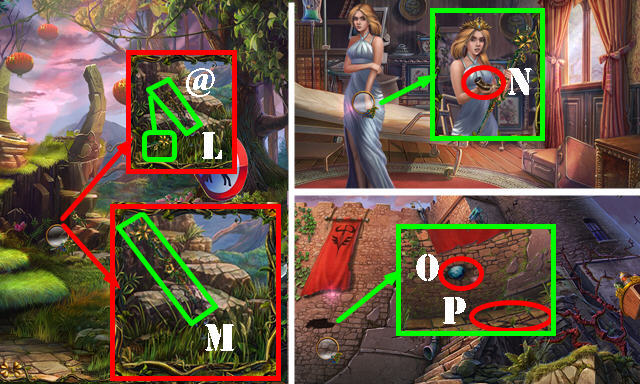
- Use the MAGIC ASH on the staff (@); place the head on it (L).
- Place the DRUID AMULET on it and take the DRUID STAFF (M).
- Return to Ariadne’s Estate.
- Give the CROWN and DRUID STAFF to Ariadne; take the GUNPOWDER HORN (N).
- Go to the Tower.
- Place the GAS BUBBLE (O) and GUNPOWDER (P); use the Fire Dragon on the gunpowder.
- Go through the hole to reach the Castle.

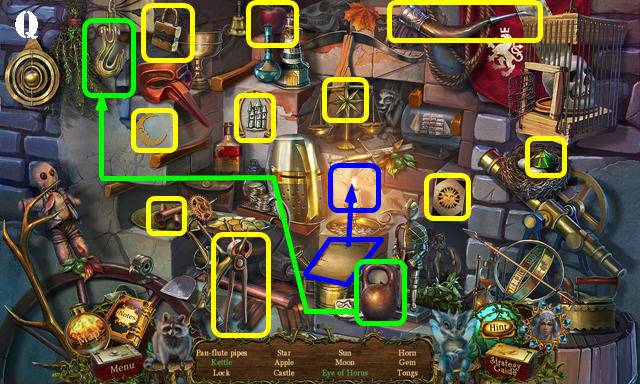
- Play the HOP.
- You receive the PAN-FLUTE PART (Q).

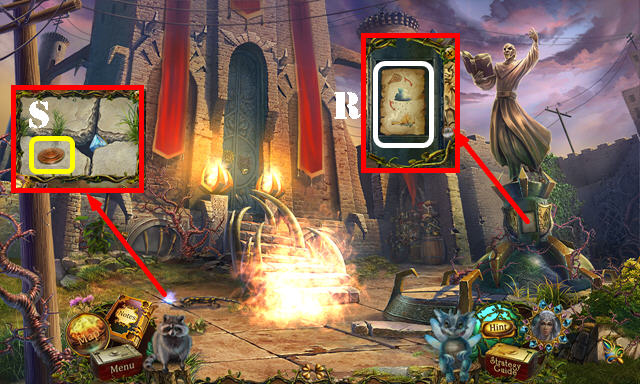
- Use the Magic Star to remove the fog on the right.
- Take the Note (R).
- Take the RING PART (S).
- Return to Druid Grove.

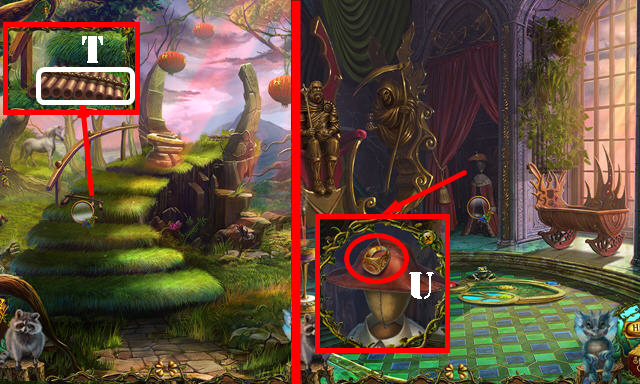
- Place the 2 PAN-FLUTE PARTS on the other one; take the PAN FLUTE (T).
- Return to Wilhelm’s Temple.
- Place the RING PART on the RING; take WILHELM’S RING (U).
- Return to Cornelius’ Castle.

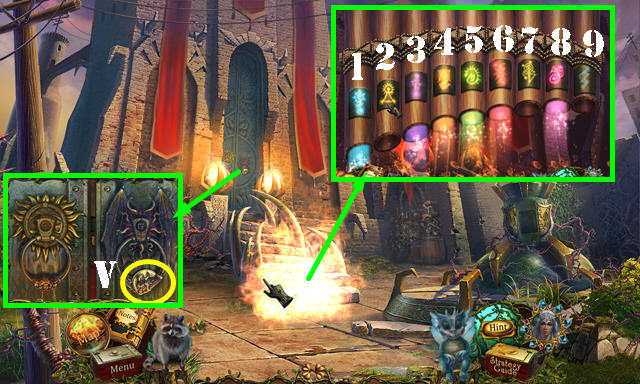
- Use the PAN FLUTE on the fire for a puzzle.
- Repeat the pattern according to the clue.
- Round One: 2, 8, 4.
- Round Two: 1, 7, 3, 9, 6.
- Round Three: 5, 3, 1, 4, 6, 8, 2.
- Take the MOON (V).
- Return to Temple Road.

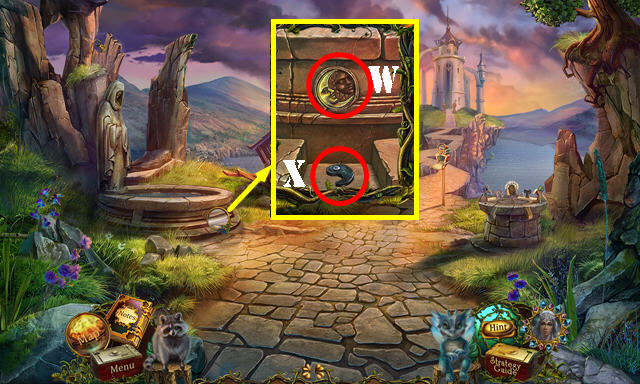
- Place the MOON in the slot (W); take the YIN (X).
- Return to Druid Grove.

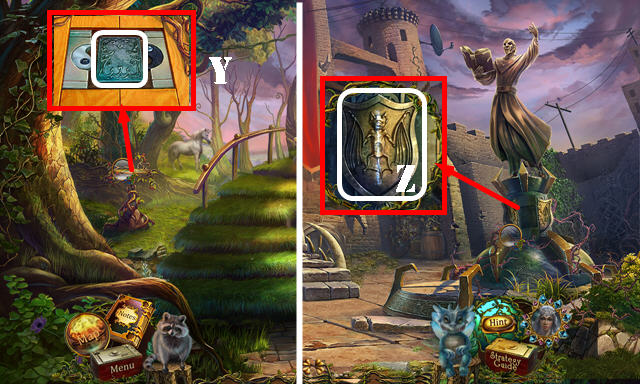
- Place YIN and YANG in the slot. Take the STONE GRIMOIRE (Y).
- Return to Cornelius’ Castle.
- Place the STONE GRIMOIRE in the slot. Take CORNELIUS’ CREST (Z).
- Return to Wilhelm’s Temple.

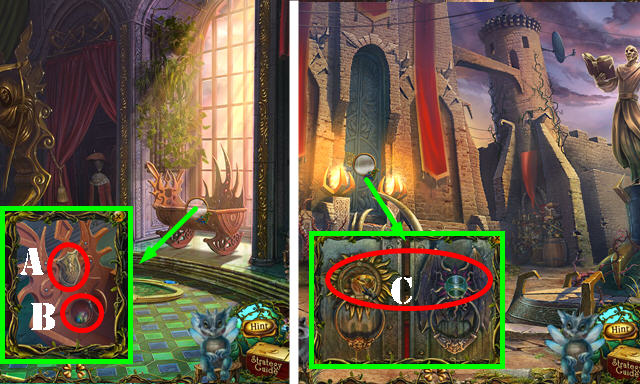
- Place CORNELIUS’ CREST in the slot (A); take CORNELIUS’ RING (B).
- Return to Cornelius’ Castle.
- Use WILHELM’S RING and CORNELIUS’ RING on the handle (C).
- Go into the Throne Room.

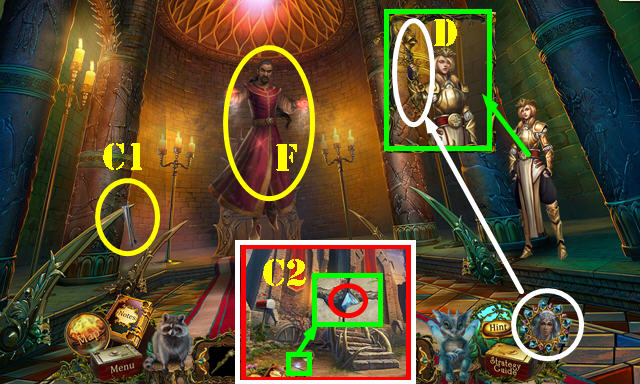

- Take the TONGS (C1).
- Walk down.
- Take the Shard with the TONGS (C2).
- Return to the Throne Room.
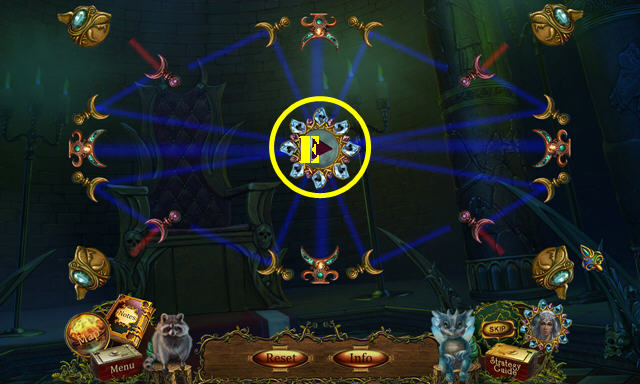
- Use the Magic Star on the staff to activate a puzzle (D).
- Send light beams to all gems. Place the pieces as shown and then press the center button (E).
- You receive the CHARGED STAFF. Use the CHARGED STAFF on Cornelius (F).
- Congratulations, you have completed Revived Legends: Road of the Kings Collector’s Edition!




 Hidden Expedition: Devil's Triangle ® Walkthrough, Guide, & Tips
 Fabled Legends: The Dark Piper Walkthrough, Guide, & Tips
 Grim Tales: The Bride Walkthrough, Guide, & Tips
 Final Cut: Encore Walkthrough, Guide, & Tips
 Haunted Legends: The Stone Guest Walkthrough, Guide, & Tips