Grim Tales: The Bride Walkthrough, Guide, & Tips
Grim Tales: The Bride Walkthrough

Welcome to the Grim Tales: The Bride Walkthrough!
After your sister vanishes on her wedding day no one has any idea what happened to her, so it’s up to you to find the truth!
Whether you use this document as a reference when things get difficult or as a road map to get you from beginning to end, we’re pretty sure you’ll find what you’re looking for here.
This document contains a complete Grim Tales: The Bride game walkthrough featuring annotated screenshots from actual gameplay!
We hope you find this information useful as you play your way through the game. Use the walkthrough menu below to quickly jump to whatever stage of the game you need help with.
Remember to visit the Big Fish Games Forums if you find you need more help. Have fun!
This walkthrough was created by BrownEyedTigre, and is protected under US Copyright laws. Any unauthorized use, including re-publication in whole or in part, without permission, is strictly prohibited.
General Tips

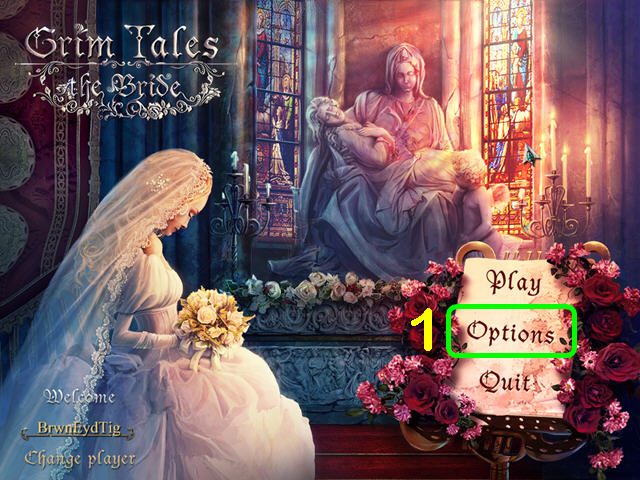
- Choose from three modes of play: Casual, Advanced or Hardcore.
- Casual Mode has sparkles in all areas of interest. Advanced Mode has no sparkles.
- Hardcore Mode has no hints, mini-game skips or sparkles.
- Click on Options (1) to adjust the Volume, Cursor and Screen size.

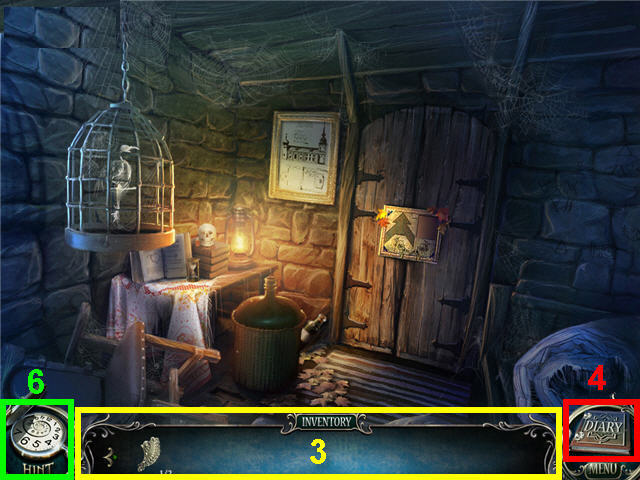
- Move your cursor to the bottom of the screen to access the Inventory Bar (3).
- Consult your Diary (4) often; it contains story points and puzzle hints.
- Click on the pocket watch (6) to get a hint in either the Hidden Object Scenes or regular gameplay.
- Click on the Info button above the pocket watch during a puzzle to get your puzzle objective.
- There is no penalty for random clicking.
- Items in Hidden Object Scenes may be random.
Chapter 1- The Ring

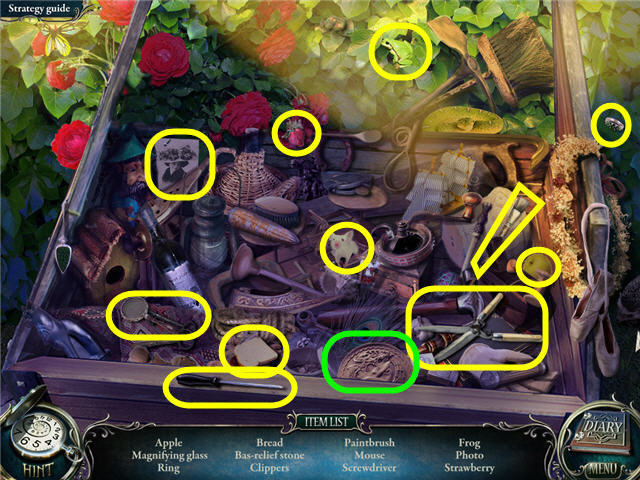
- Examine the crate to access a Hidden Object Scene.
- Find the items listed and get a BAS-RELIEF STONE.

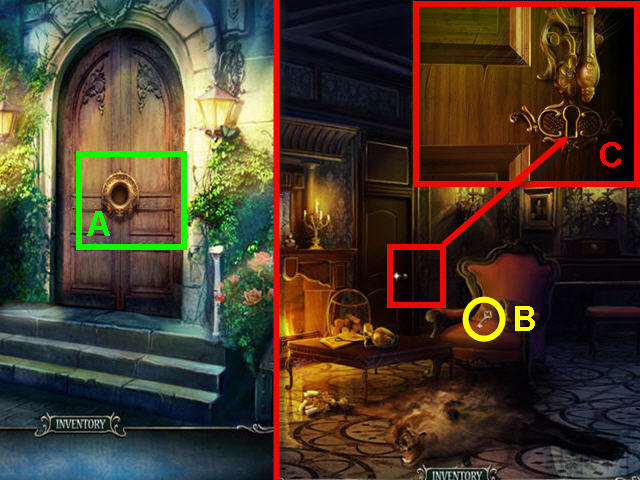
- Examine the door; place the BAS-RELIEF STONE on the lock (A).
- Enter the house.
- Examine the chair; take the DOOR KEY (B).
- Examine the door; use the DOOR KEY on the lock (C).
- Enter Luisa’s room.

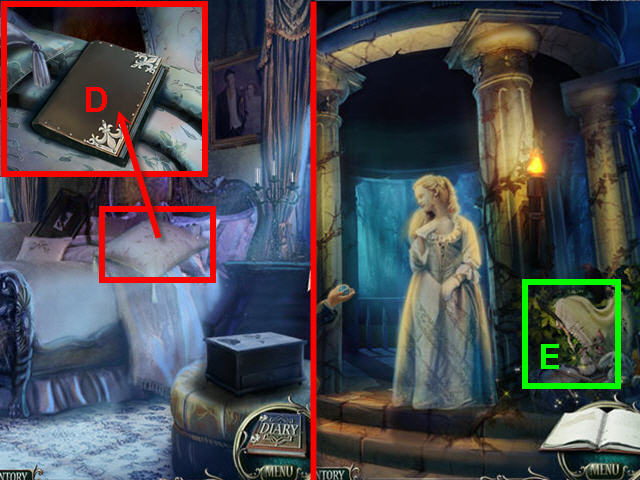
- Examine the pillow; move it and open the diary (D).
- Examine the bush (E) to access a Hidden Object Scene.

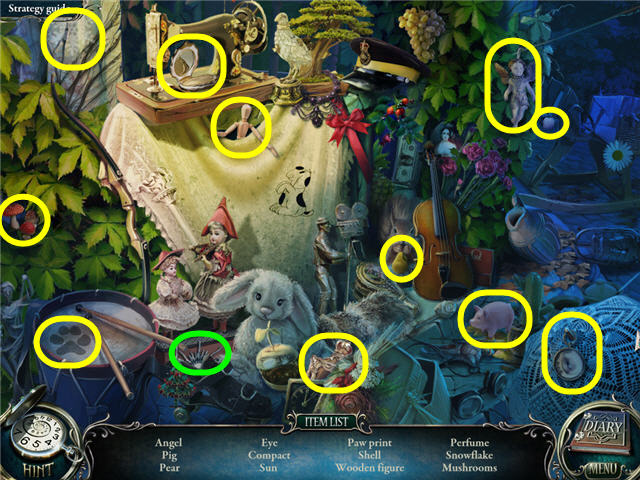
- Find the items listed and get a BAS-RELIEF PIECE 1 OF 2.
- Head to the church.

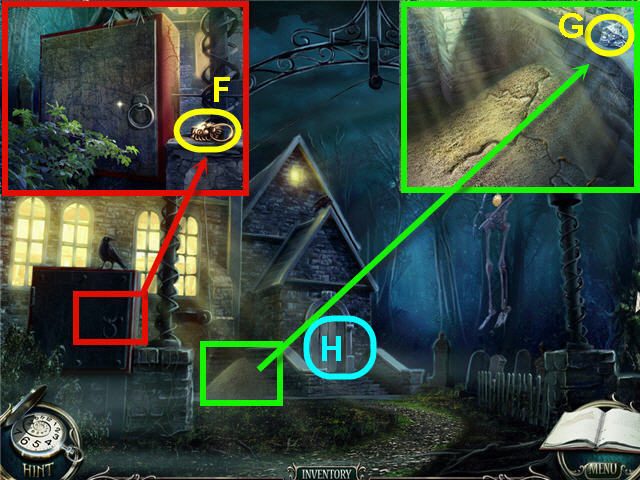
- Examine the gear box; take the LION (F).
- Examine the termitary; take the MOSAIC PIECE (G).
- Zoom into the closed door (H); place the LION on the door.
- Enter the church and head left.

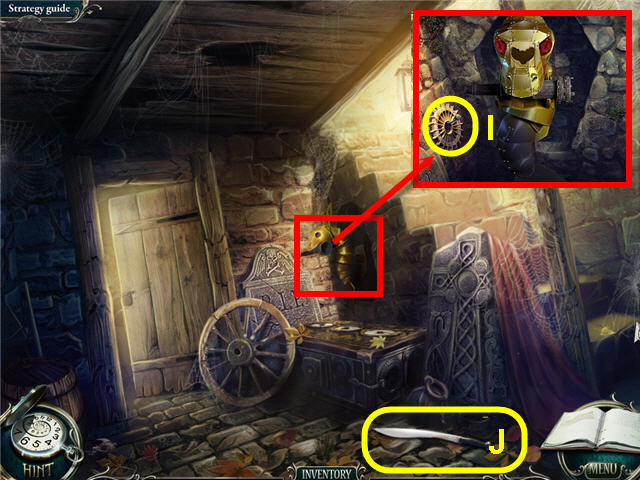
- Examine the torch; take the GEAR (I).
- Take the MACHETE (J).
- Head to the outside.
- Zoom into, open, and examine the block.

- Place the GEAR on the gear box to trigger a puzzle.
- Arrange the gears on the pegs from the right to the left so that they all turn as shown in the screenshot (K).

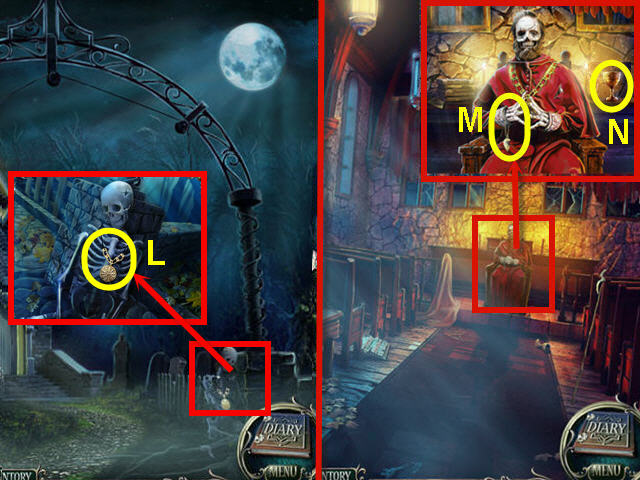
- Examine the skeleton; take the MEDALLION (L).
- Head into the church.
- Examine the holy man; give him the MEDALLION; take the HEART HALF (M) and MUG (N).
- Head to the cemetery.

- Use the MACHETE on the right bush (O).
- Examine the bush; use the MACHETE three times and take the ACORN (P).
- Head forward twice to the tree.
- Examine the roots of the tree; give the ACORN to the squirrel. Take the SLINGSHOT (Q) and PIECE OF PUZZLE (R).
- Examine the swing and take the PIECE OF MEDALLION (S).
- Head into the church, head left and into the small room.

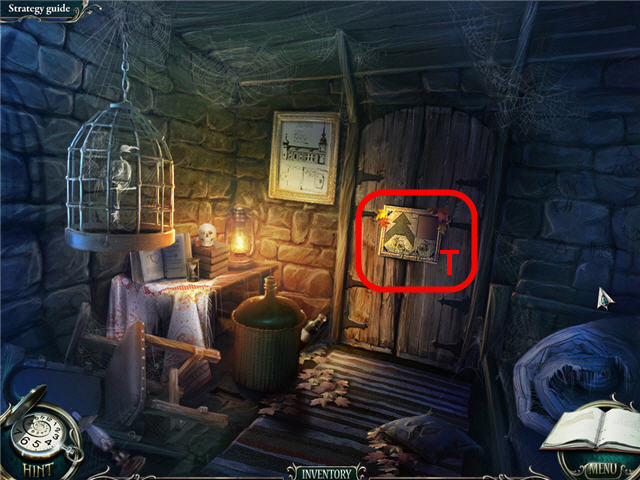
- Examine the cupboard (T).
- Place the PIECE OF PUZZLE in the empty slot to trigger a puzzle.

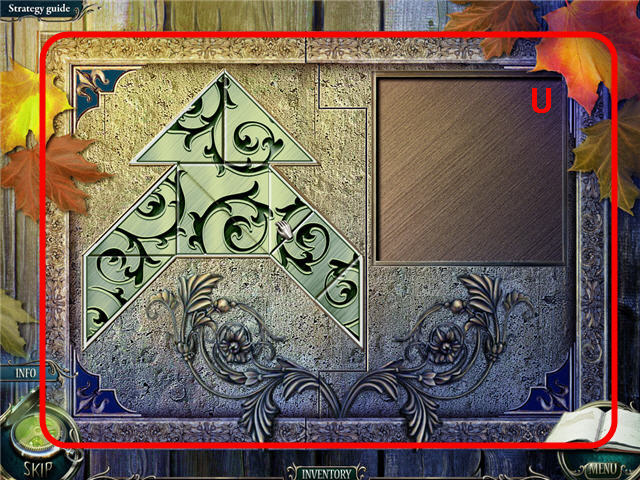
- Place the pieces of the puzzle on the grid to complete the pattern on the tiles.
- Right-click to rotate the tiles. See screenshot for solution (U).

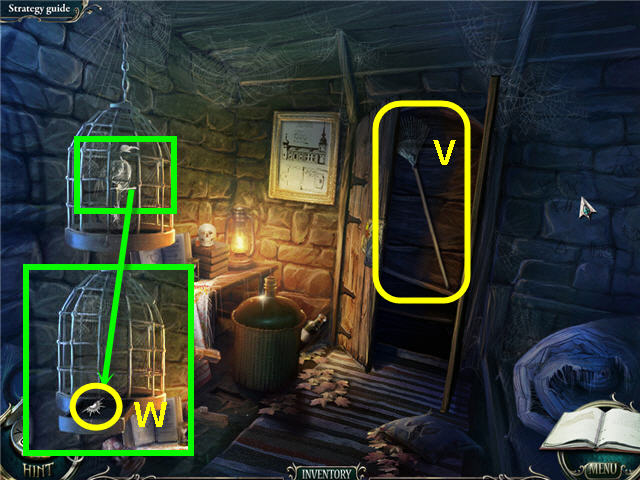
- Take the RAKE (V).
- Examine the birdcage; use the SLINGSHOT on the cage. Take the BAS-RELIEF PIECE 2 OF 2 (W).
- Head to the cemetery.


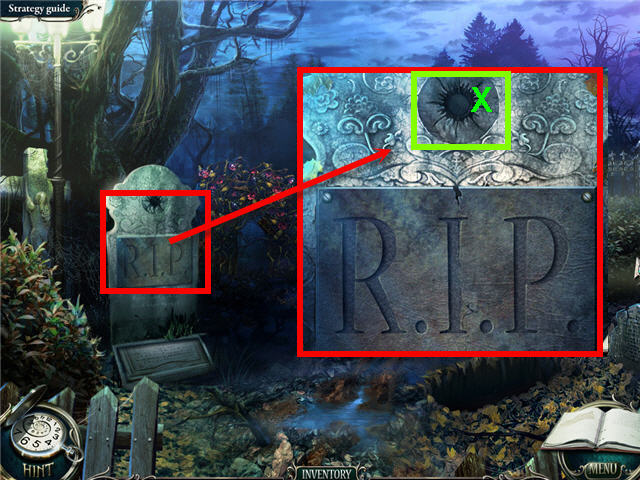
- Examine the headstone.
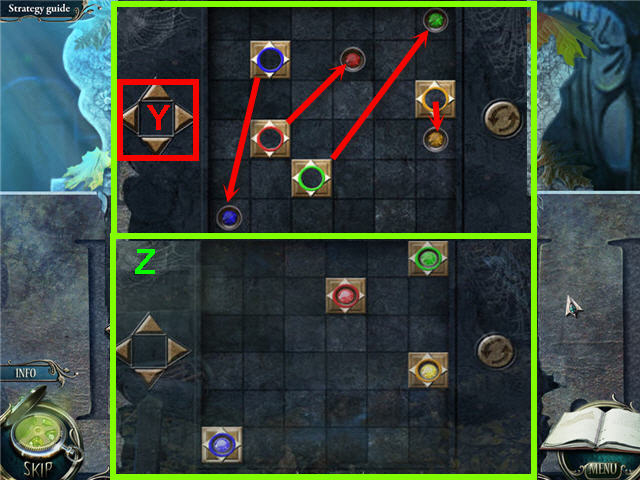
- Place the BAS-RELIEF PIECE on the slot (X) to trigger a puzzle.


- Move the 4 colored squares to their matching colored centers.
- Click on the square you wish to move and then use the arrows on the left (Y) to move it.
- Solution: click on red – left, up, right, yellow – up, blue – left, green – left, up, blue – right, red – left, down, right, yellow – down, green – right, yellow – up, green – up, blue – down, left. See screenshot for solution (Z).

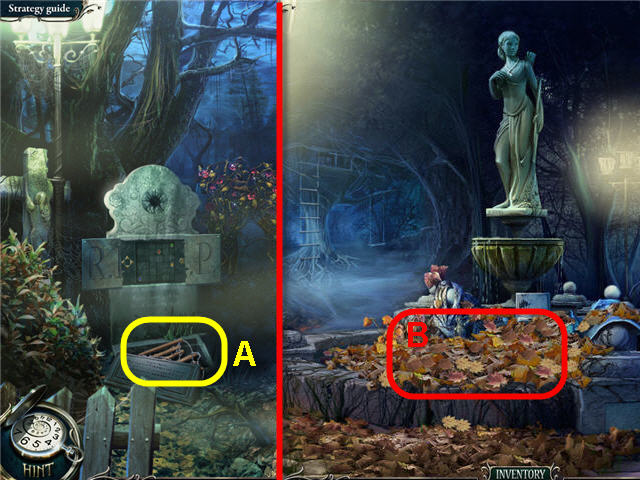
- Take the LADDER (A).
- Head to the fountain; use the RAKE on the leaves (B).
- Click on the fountain to access a Hidden Object Scene.

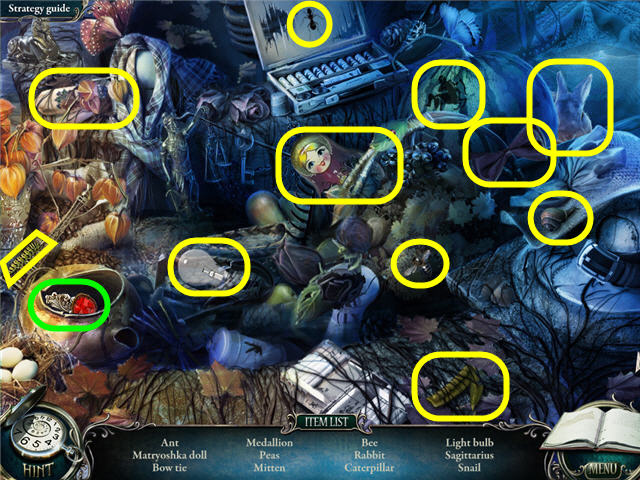
- Find the items listed and get the PIECE OF MEDALLION 2 OF 2.
- Head to the church basement.

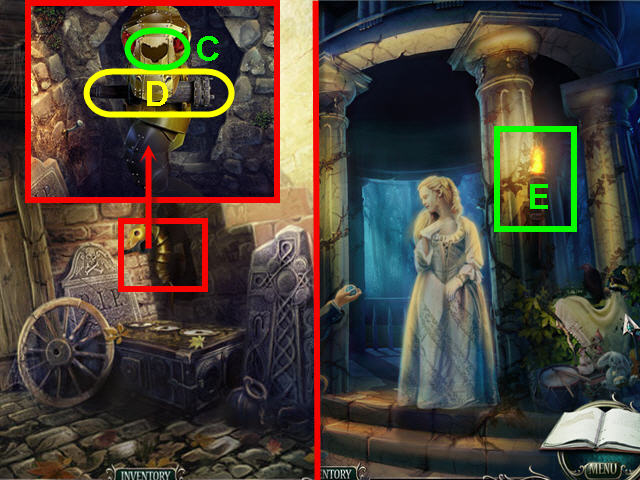
- Examine the dragon; place the PIECE OF MEDALLION in the slot (C) and take the TORCH (D).
- Head to the rotunda.
- Examine the torch (E); light the TORCH and get a BLAZING TORCH.
- Head to the tree.

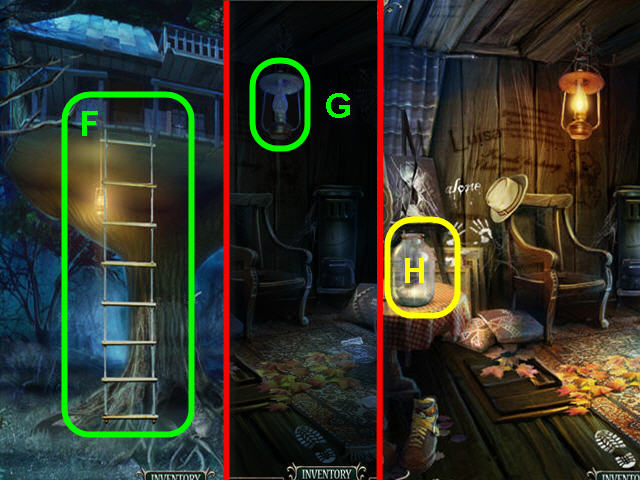
- Examine and place the LADDER on the tree house (F) and climb up.
- Examine the lamp (G) and light it with the BLAZING TORCH.
- Take the JAR (H).
- Back out to the front of the church.

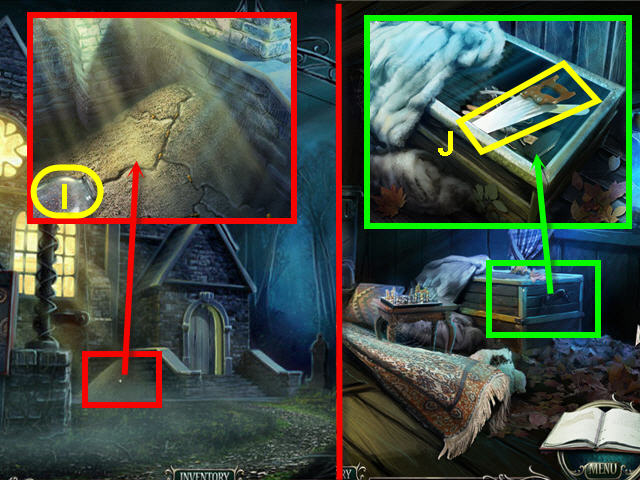
- Examine the termitary; use the JAR on the termites and take the JAR WITH TERMITES (I).
- Head into the tree house.
- Examine and use the JAR OF TERMITES on the box; take the SAW (J).
- Enter the church.

- Examine and use the SAW on the halberd (K) to get a STICK.
- Head to the tree.
- Examine and use the STICK on the head of the ice axe and take the ICE AXE (L).
- Back out to the fountain.

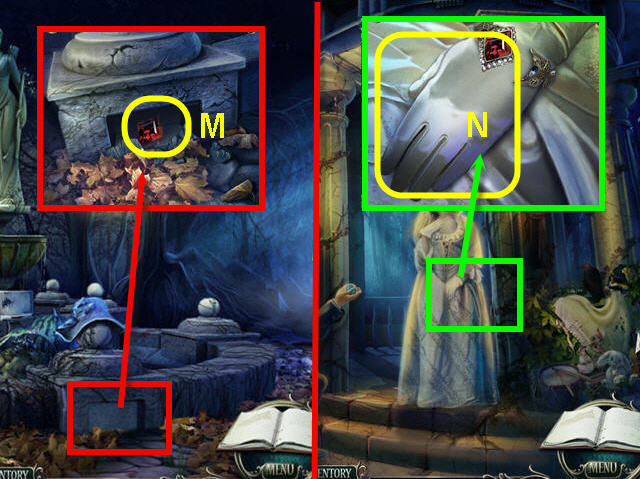
- Examine the tile and use the ICE AXE four times; take the RUBY (M).
- Head back to the rotunda.
- Examine Luisa’s hand; place the RUBY on the bracelet and take the GLOVE (N).
- Head to the cemetery.


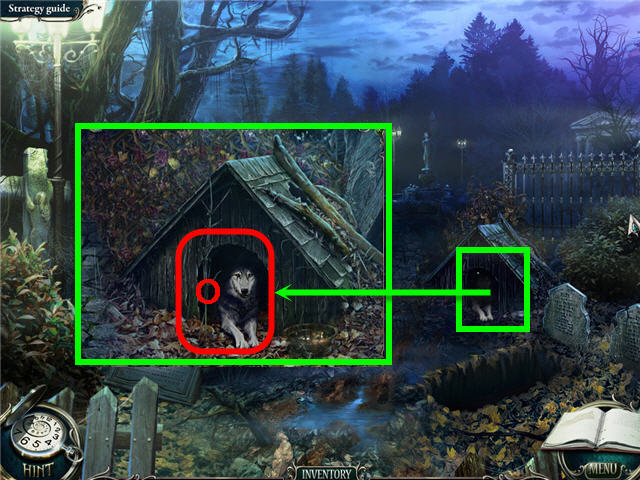
- Examine the dog house (O) and give the dog the GLOVE.
- Click on the dog house to access a Hidden Object Scene.

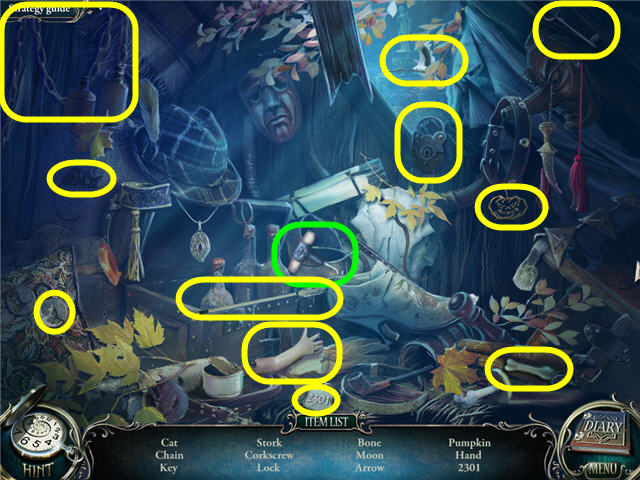
- Find the items listed and get a CORKSCREW.
- Enter the small room in the church basement.

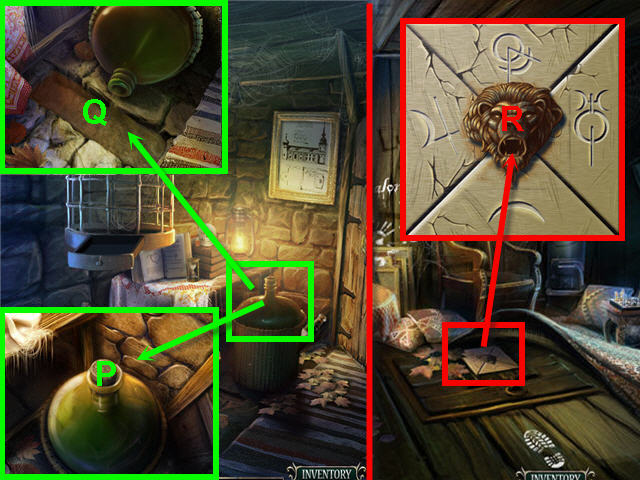
- Examine the bottle; use the CORKSCREW on the cork (P).
- Examine the falling bottle; use the MUG on the oil (Q) to get a MUG WITH OIL.
- Head into the tree house.
- Click on the carpet and examine the hiding place.
- Use the MUG WITH OIL on the rusty lion head (R); click the lion head to turn.
- Place the MOSAIC PIECE on the board to trigger a puzzle.

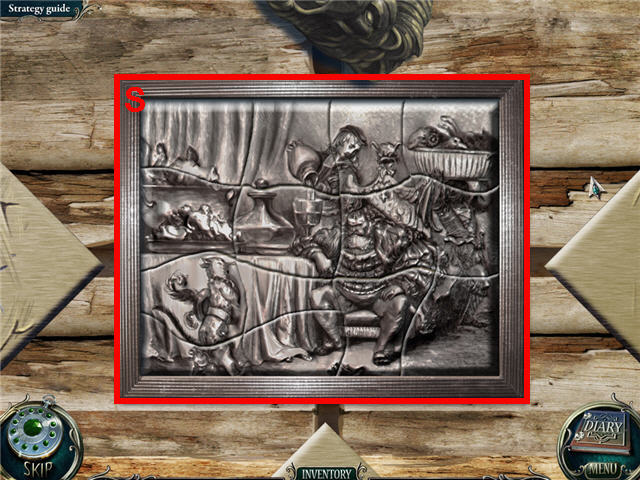
- Drag the pieces to the board to complete the picture.
- Right click to rotate the pieces. See screenshot for solution (S).
- Click on the hiding place to access a Hidden Object Scene.

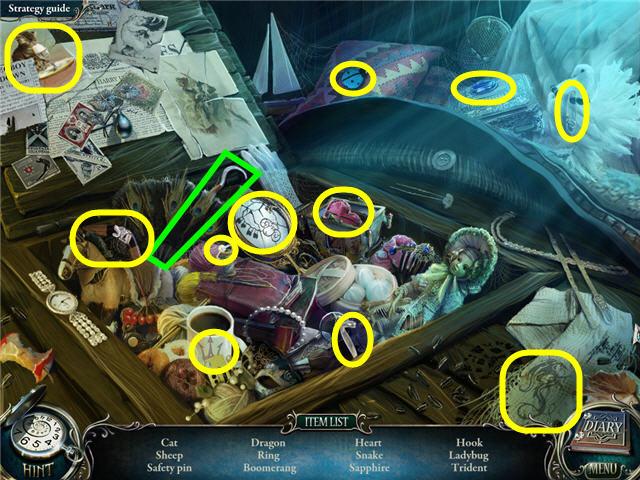
- Find the items listed and get a HOOK.
- Go to the fountain.

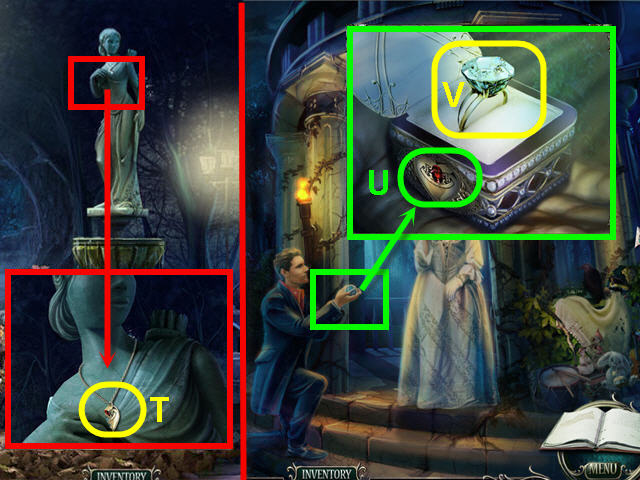
- Examine the statue neck; use the HOOK on the necklace to get the HEART HALF 2 OF 2 (T).
- Back out to the rotunda.
- Examine John Gray’s hand; place the HEART HALF in the slot (U) and take the RING (V).

- Back out to the living room.
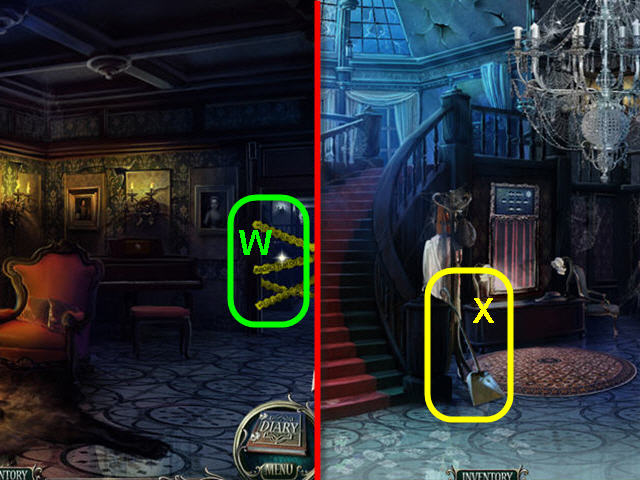
- Use the MACHETE on the police tape (W) and enter the hallway.
- Take the SCOOP (X).
- Head to the second floor.

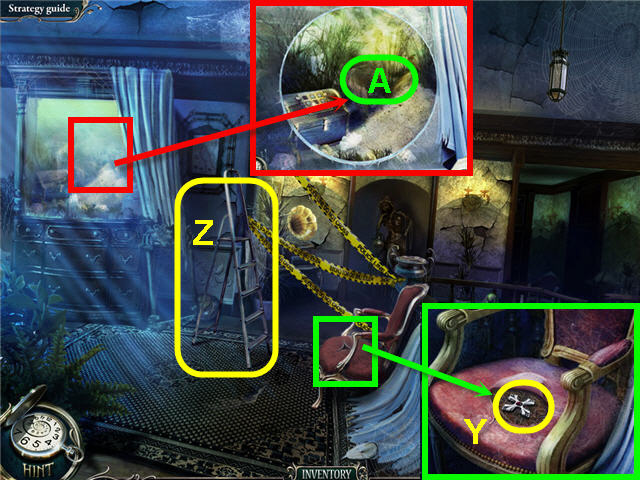
- Examine the chair; click on the seat and take the KEY (Y).
- Take the STEPLADDER (Z).
- Examine the aquarium; use the RING on the glass.
- Use the SCOOP on the sand (A) to get a SCOOP WITH SAND.
- Go to the first floor.

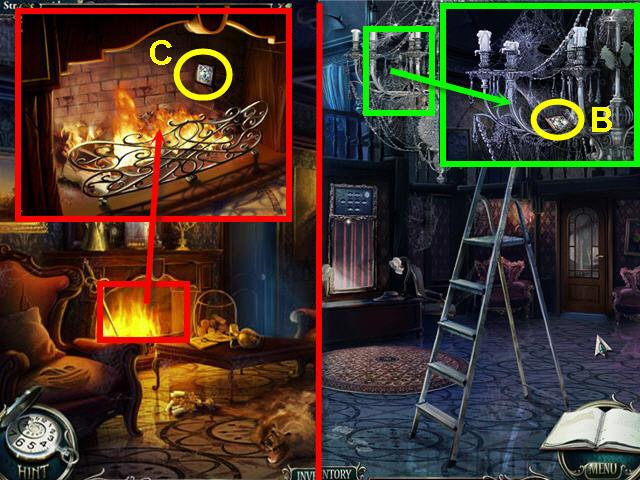
- Place the STEPLADDER under the chandelier.
- Examine the chandelier; take the BUTTON 1 OF 3 (B).
- Back out to the living room.
- Examine the fireplace; use the SCOOP WITH SAND on the fire.
- Take the BUTTON 2 OF 3 (C).
- Head to Luisa’s room.

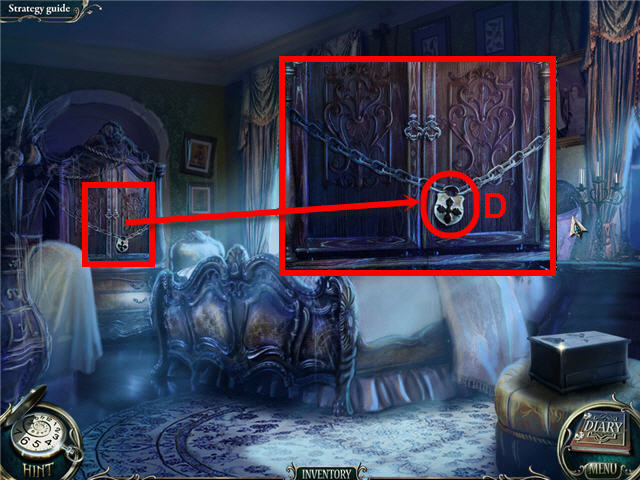
- Examine the cupboard; use the KEY on the lock (D).
- Click on the cupboard to access a Hidden Object Scene.

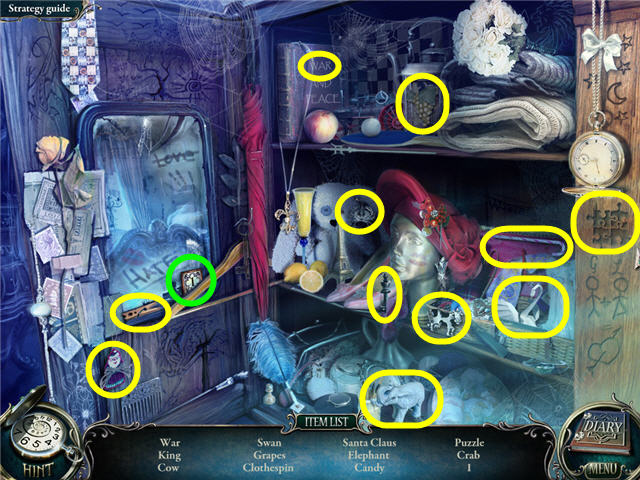
- Find the items listed and get a BUTTON 3 OF 3.
- Head to the second floor.
- Examine the aquarium and click on the trunk.
- Place the BUTTON on the trunk to trigger a puzzle.

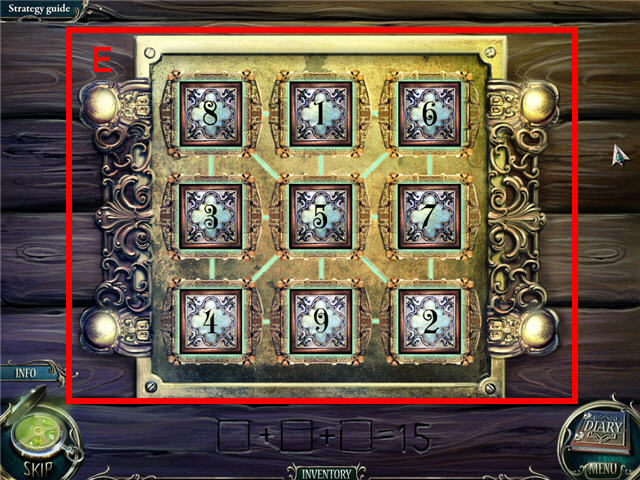
- Rearrange the buttons so that all rows, columns, and diagonals add up to 15.
- Click on any two buttons to switch them. The lights in between the buttons will light when correct. See screenshot for solution (E).
Chapter 2 – The Handkerchief

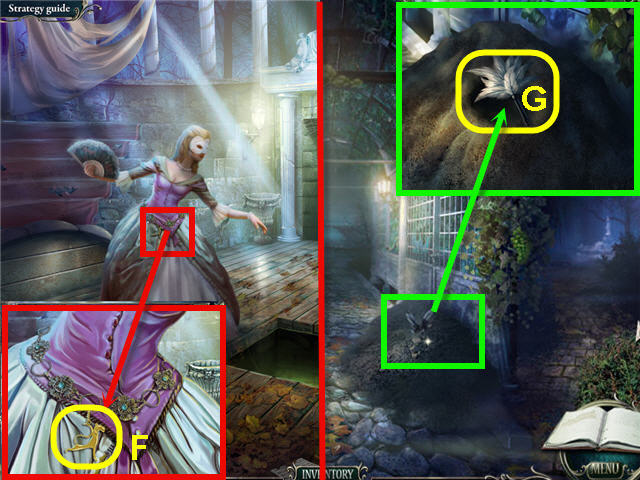
- Examine Luisa’s dress; take the CAT (F).
- Head to the vineyard.
- Examine the heap; use the SCOOP; take the FEATHER DUSTER (G).
- Go to the fountain.

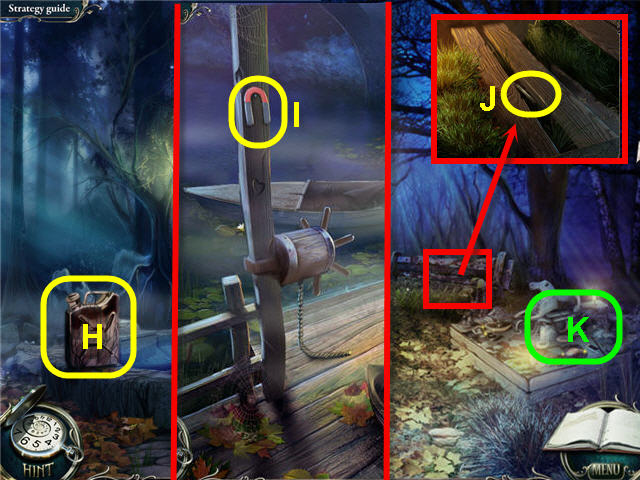
- Take the GAS CAN (H).
- Back out and head forward to the boat launch.
- Take the MAGNET (I).
- Head right to the children’s playground.
- Examine the grass; use the MAGNET to get the FILE (J).
- Click on the sandbox (K) to access a Hidden Object Scene.

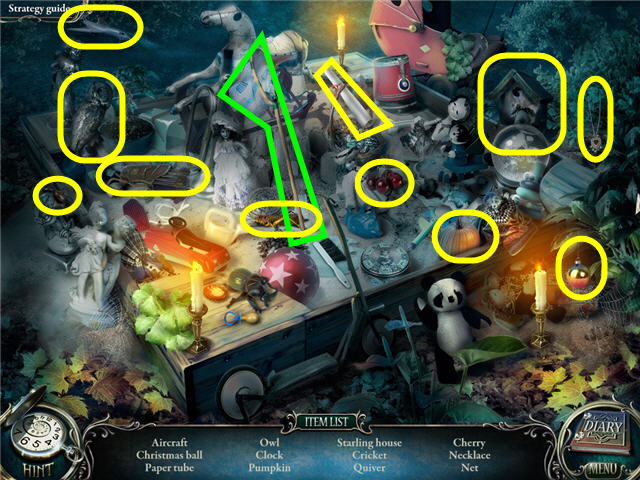
- Find the items listed and get a NET.
- Go to the vineyard.

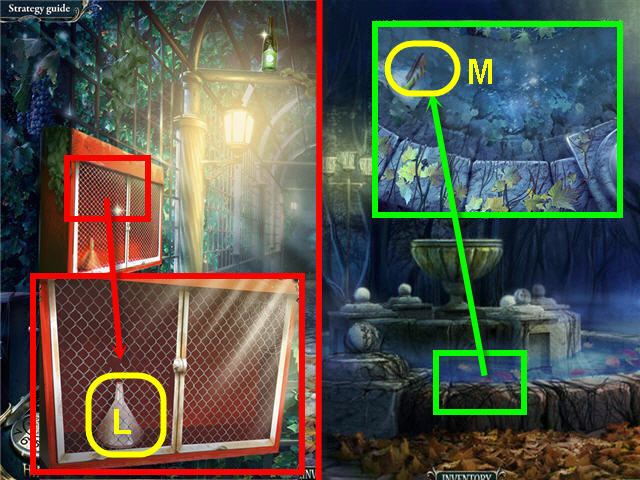
- Examine the panel; use the FILE twice on the grate; take the FUNNEL (L).
- Head to the fountain.
- Examine the water in the fountain; use the NET to catch the FISH (M).
- Go to the landing.

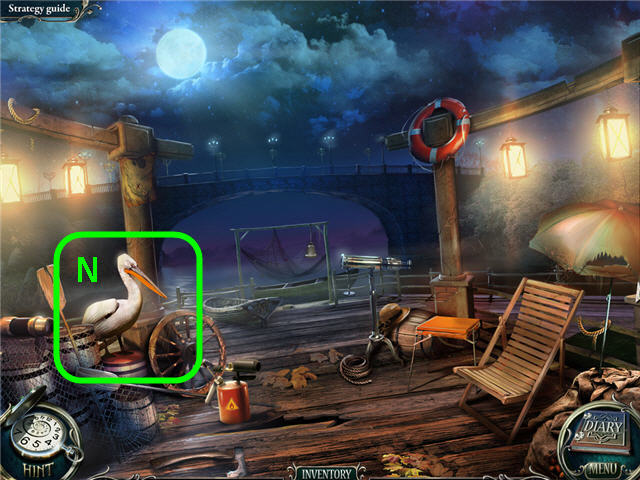
- Examine and give the FISH to the pelican (N).
- Click on the barrels to access a Hidden Object Scene.

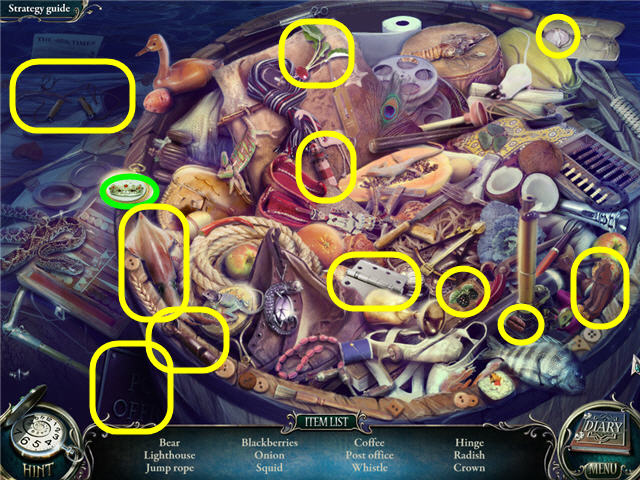
- Find the items listed and get a BUTTON.
- Back out twice and enter the basement.
- Examine the closed door; place the BUTTON on the lock to trigger a puzzle.

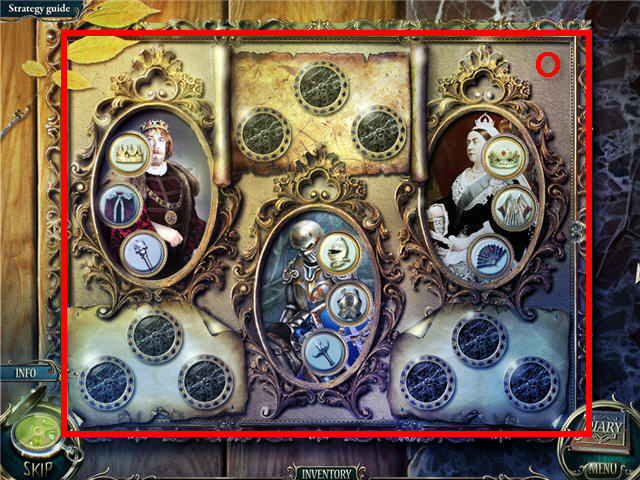
- Drag the buttons to their appropriate spots to dress the characters.
- See screenshot for solution (O).
- Enter the dressing room.

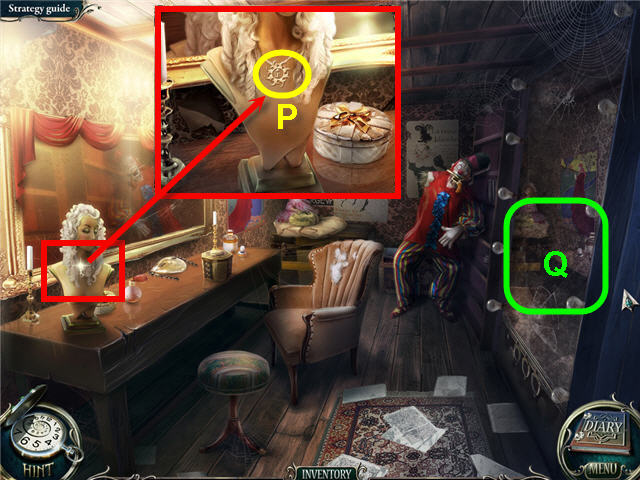
- Examine the bust; take the KEY (P).
- Examine the mirror; use the FEATHER DUSTER on it (Q) to trigger a puzzle.

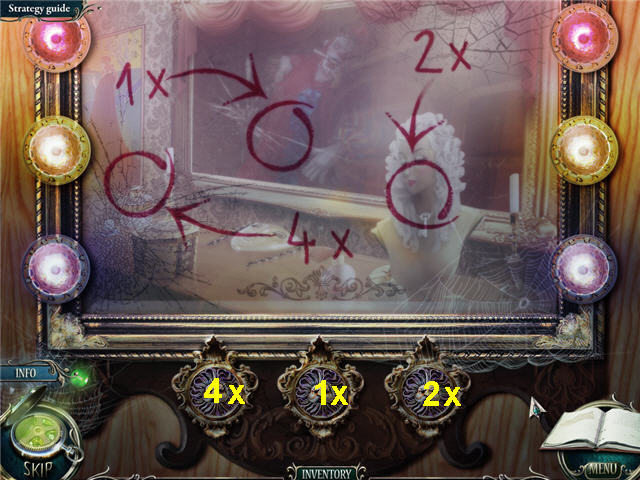
- Press the buttons the amount of times shown on the mirror.
- Solution: from left; 4 times, 1 time, 2 times.
- Click where the mirror was to access a Hidden Object Scene.

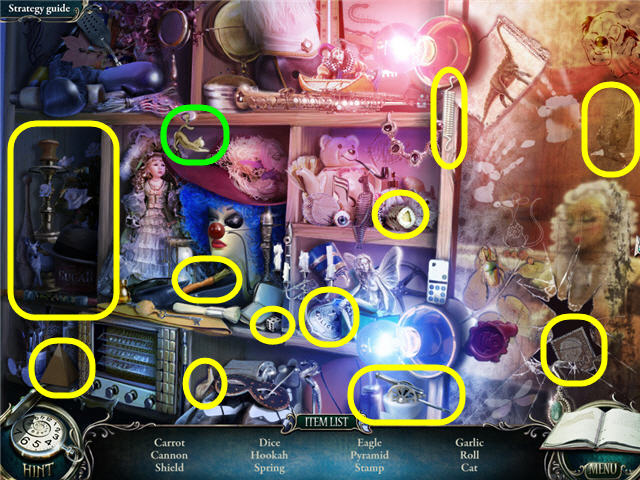
- Find the items listed and get a CAT.
- Go to the boat launch.

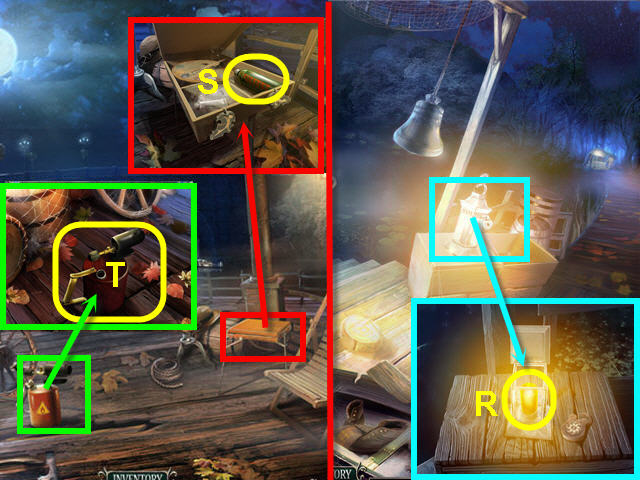
- Examine the lantern; use the KEY on the lock and take the CANDLE (R).
- Back out.
- Examine the painter’s case; place the 2 CAT on the locks and take the SOLVENT (S).
- Examine and use the FUNNEL, GAS CAN and CANDLE on the blowtorch.
- Take the BLOWTORCH (T).
- Go to the amphitheatre.

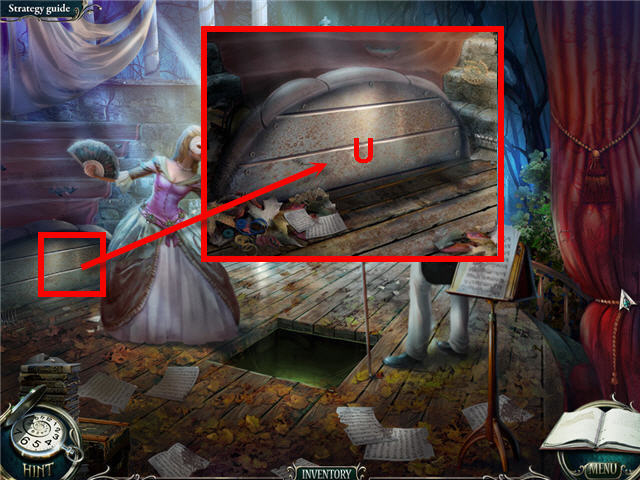
- Examine the prompt box; use the BLOWTORCH on the panel (U).
- Click on the prompt box to access a Hidden Object Scene.

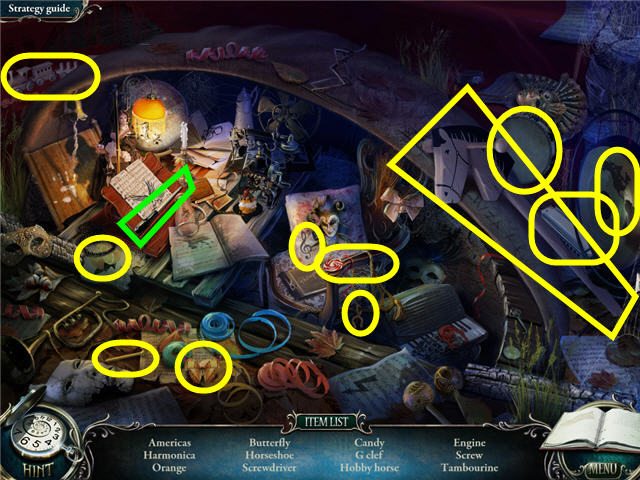
- Find the items listed and get a SCREWDRIVER.
- Head into the basement.

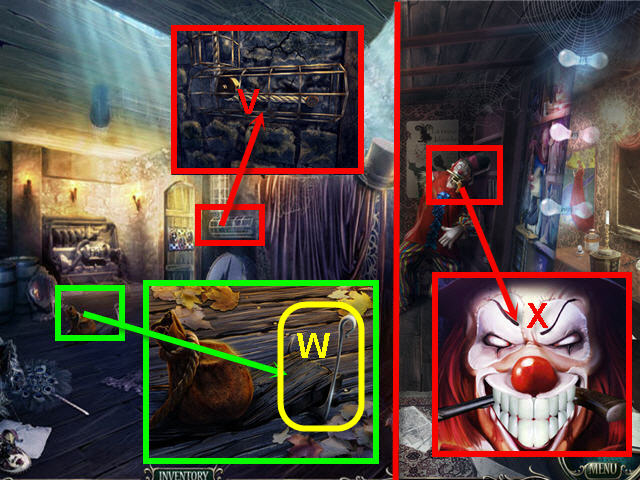
- Examine the right mechanism; use the BLOWTORCH on the rope (V).
- Examine the HOOK and take it (W).
- Head into the dressing room.
- Examine the clown; use the SOLVENT on the clown’s face (X) to trigger a puzzle.

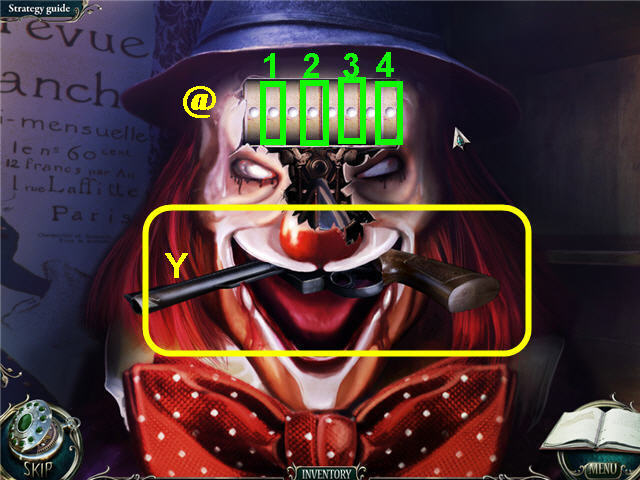
- Turn the reels so that a white circle appears on each.
- Clicking on one reel will turn the ones on either of side also.
- Click on the reels in the order shown in the screenshot (@).
- Take the GUN (Y).
- Go to the vineyard.

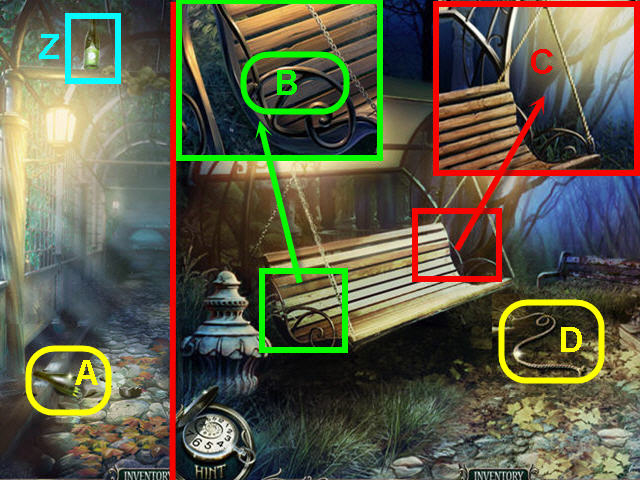
- Examine the bottle (Z) and shoot it with the GUN.
- Pick up the BROKEN BOTTLE (A).
- Head to the children’s playground.
- Examine the left swing handle; use the SCREWDRIVER on the screw (B) and get a HANDLE.
- Examine the right swing handle; use the BROKEN BOTTLE on the rope (C).
- Take the ROPE (D).
- Back out.

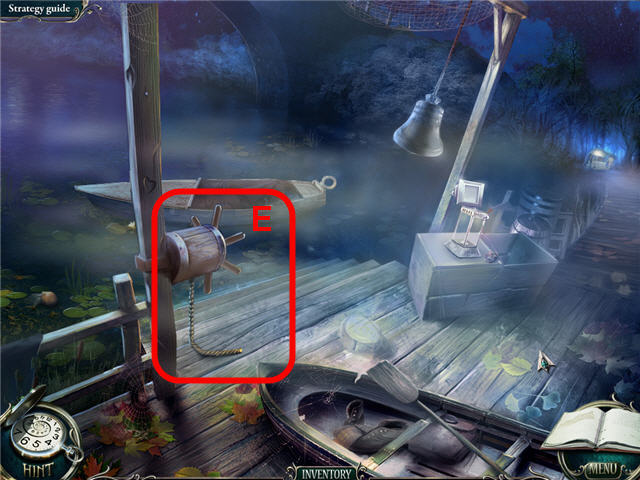
- Place the ROPE on the winch (E).
- Place the HOOK on the rope; click on the rope.
- Click on the boat to access a Hidden Object Scene.

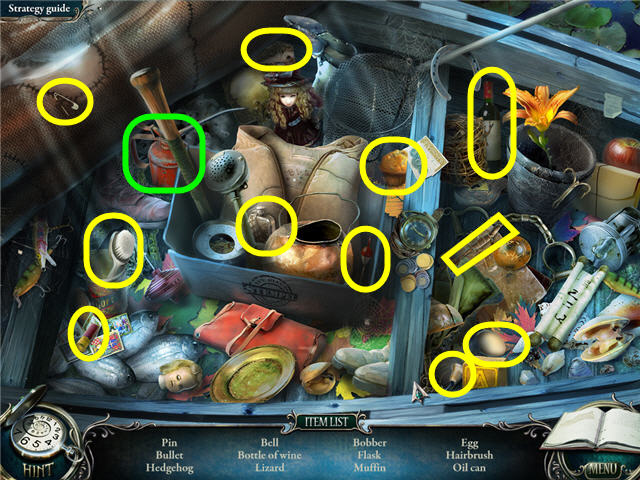
- Find the items listed and get an OIL CAN.
- Go to the basement of the amphitheatre.

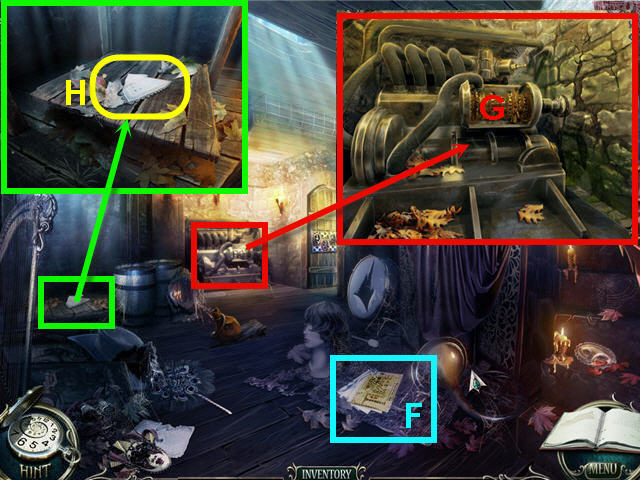
- Examine the note (F).
- Examine and place the HANDLE and OIL CAN on the mechanism (G); pull the handle.
- Examine the elevator; take the HANDKERCHIEF (H).

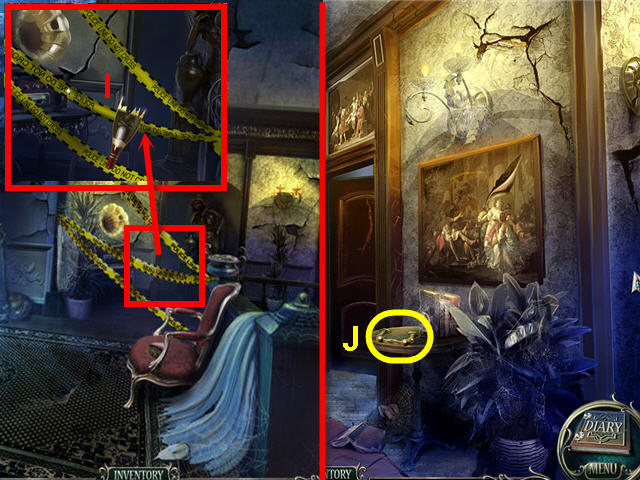
- Examine the police tape; cut it with the BROKEN BOTTLE (I).
- Head to the corridor.
- Take the HANDLE (J).
- Enter mother’s room.

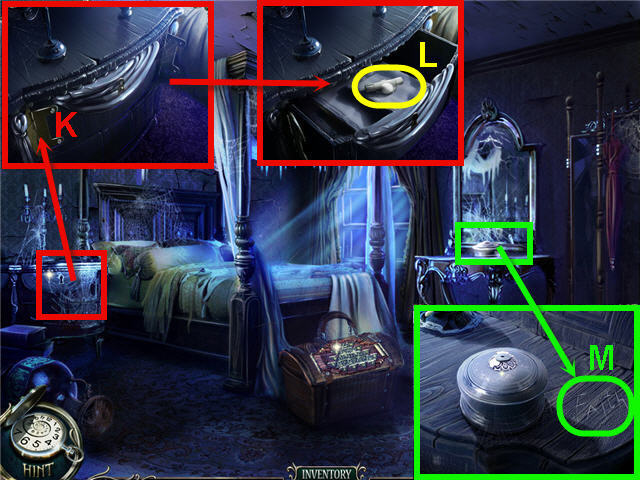
- Examine the cupboard; use the SCREWDRIVER on the hinge (K).
- Take the FUSE 1 OF 2 (L).
- Examine the mirror; click on Faith (M) to get a diary update.
- Go to the living room.

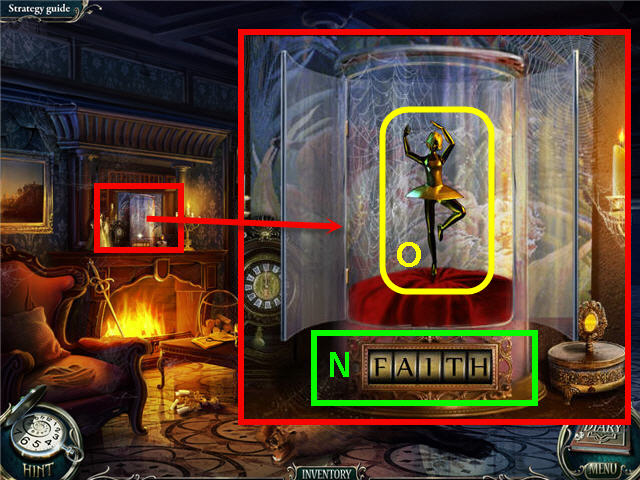
- Examine the mantle; use the code from mother’s room to open the glass case.
- Solution: click the reels until they spell FAITH (N).
- Take the BALLET DANCER (O).
- Head to mother’s room.

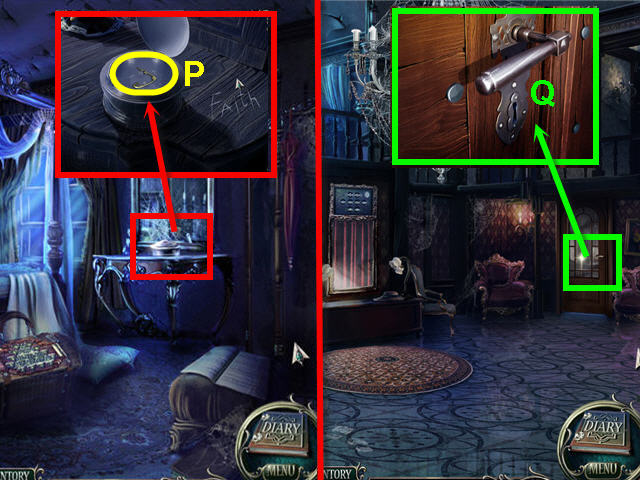
- Examine the mirror; place the BALLET DANCER on the music box.
- Take the LOCK PICK (P).
- Back out three times.
- Examine the closed door; use the LOCK PICK on the lock (Q).
- Enter the dining room.

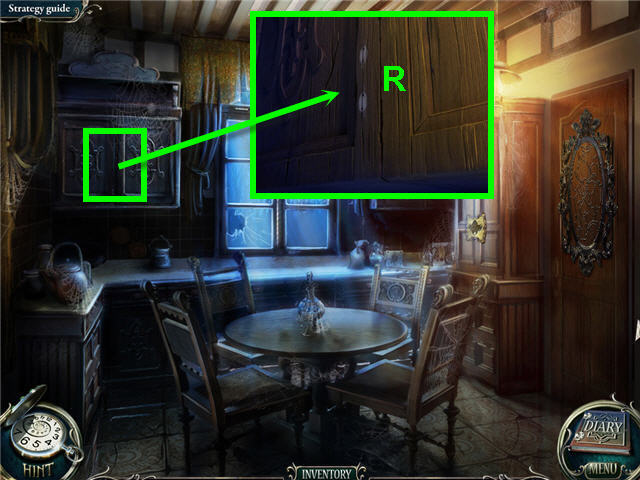
- Examine the cupboard; place the HANDLE on the door (R).
- Click on the cupboard to access a Hidden Object Scene.

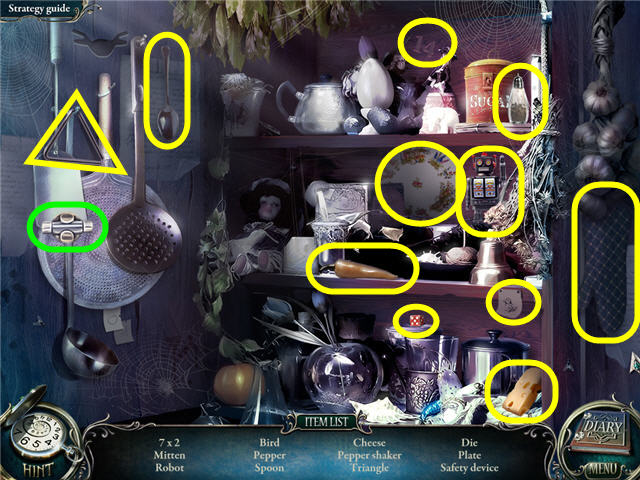
- Find the items listed and get a FUSE 2 OF 2.
- Back out.

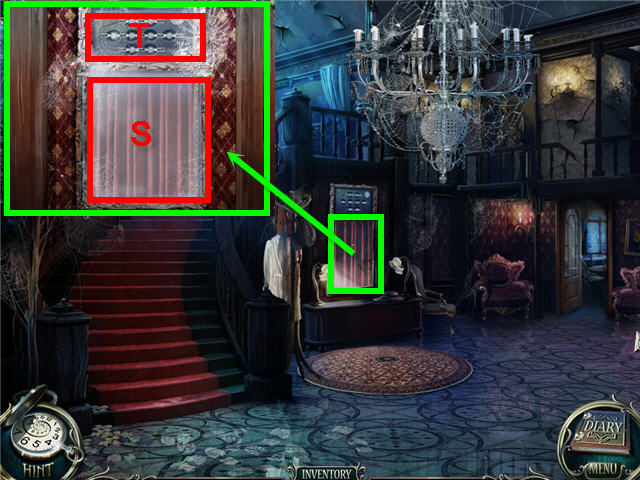
- Examine the niche; use the HANDKERCHIEF on the dust (S).
- Examine the upper portion of the mechanism (T).
- Place the FUSE on the panel to trigger a puzzle.

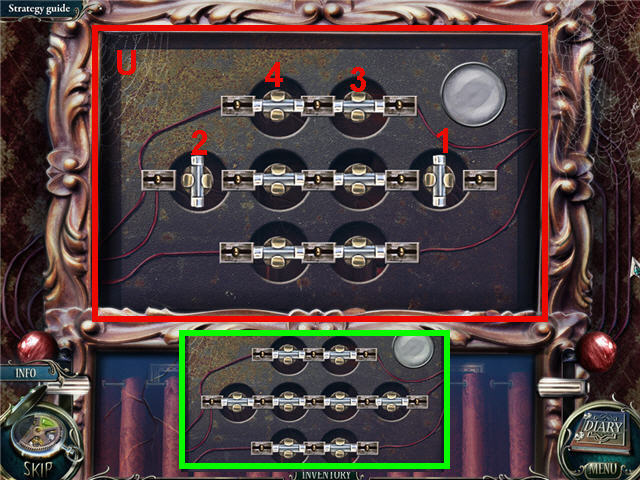
- Turn all the fuses horizontally.
- Clicking on one fuse will turn other fuses.
- See screenshot for solution (U).
Chapter 3 – The Rifle

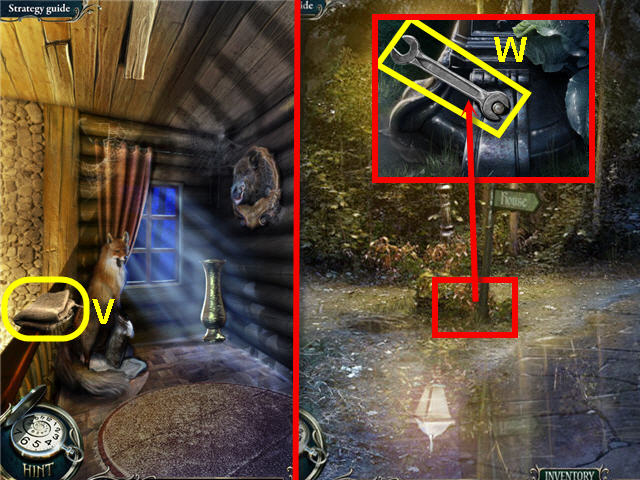
- Head to the second floor.
- Take the BAG (V).
- Exit the house.
- Examine the foundation of the sign; take the WRENCH (W).
- Go to the stable, then left to the pavilion.

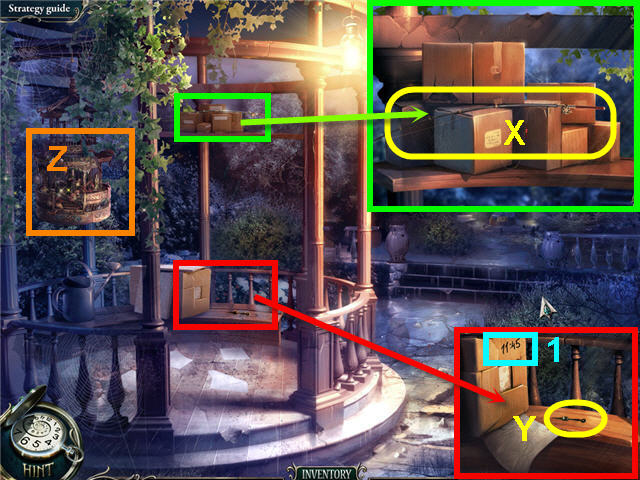
- Examine the shelf; take the ROD (X).
- Examine the bench; take the CLOCK HANDS 1 OF 2 (Y).
- Note the time on the box (1).
- Click on the cage (Z) to access a Hidden Object Scene.

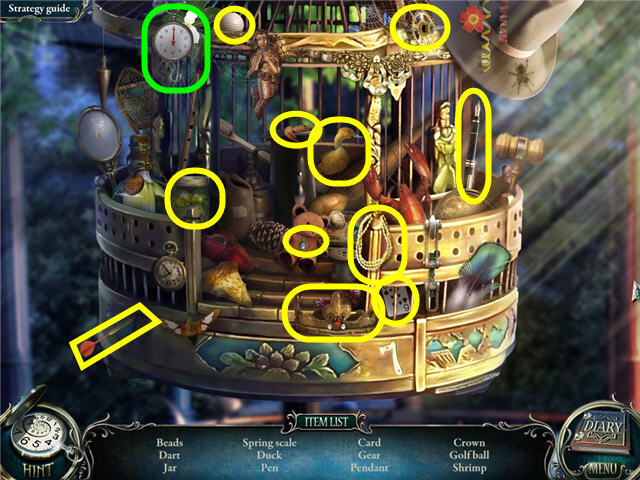
- Find the items listed and get a SPRING SCALE.
- Enter the stable.

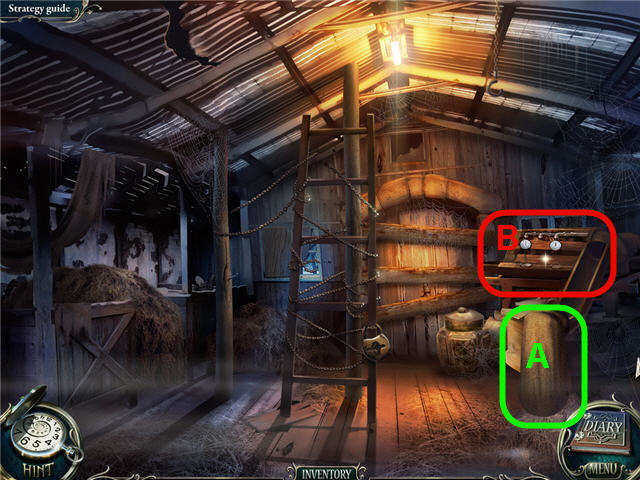
- Place the BAG on the grain chute (A).
- Examine the grain sorter (B).
- Place the SPRING SCALE in the center to trigger a puzzle.

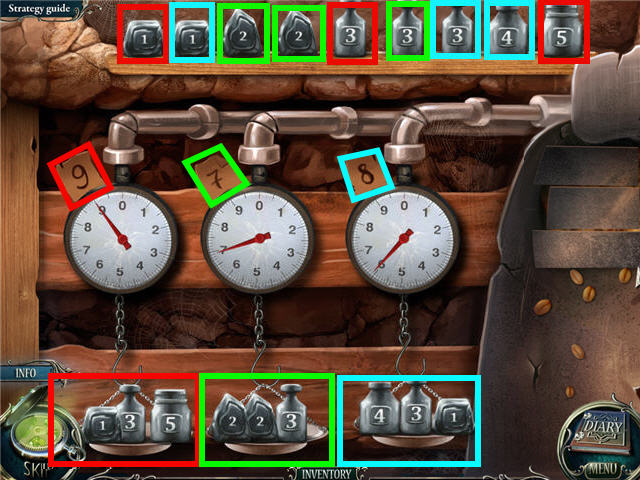
- Place the weights on the scales so that the number on the scale matches the number above.
- You can only place three weights on each scale.
- Solution: left scale – 3, 5, 1, middle scale – 3, 2, 2, right scale – 4, 3, 1.

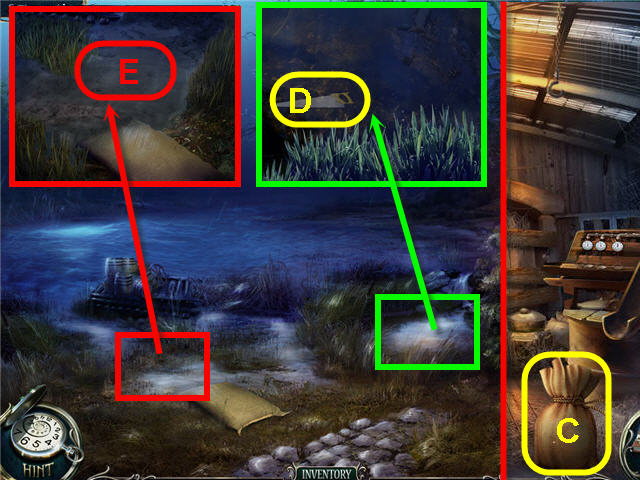
- Take the FULL BAG (C).
- Back out twice and head left to the lake.
- Examine the spring; use the ROD to get the SAW (D).
- Examine the quagmire; place the FULL BAG on the water (E).
- Click on the raft to access a Hidden Object Scene.

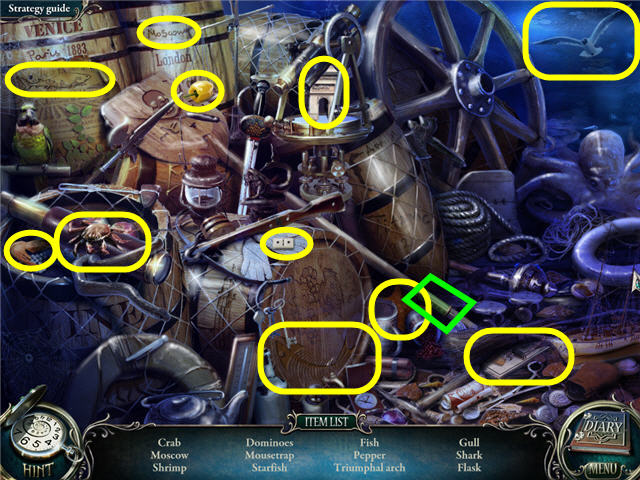
- Find the items listed and get a FLASK.
- Back out and go forward.

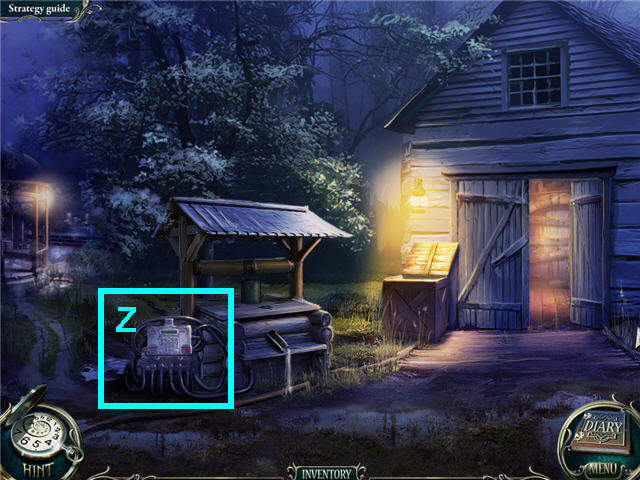
- Examine the motor.
- Place the FLASK on the motor (Z) to trigger a puzzle.

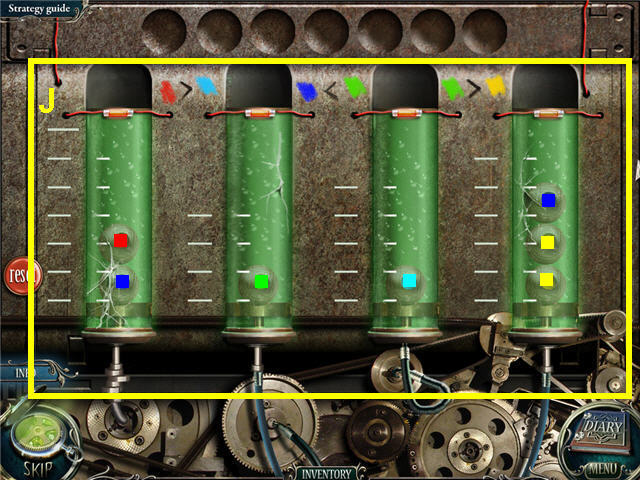
- Place the colored balls into the flasks so that all the plungers are at the bottom.
- Each ball is a different weight, note the coding of which are greater or less than others. See screenshot (J) for solution.

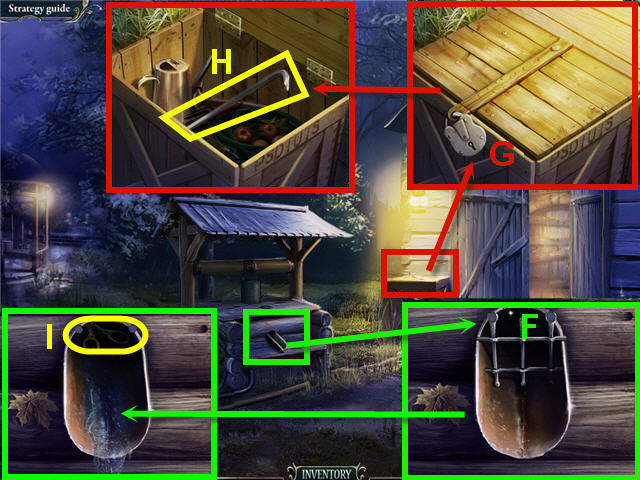
- Examine the crate; use the SAW on the lock (G).
- Take the CROWBAR (H).
- Examine the spout; use the WRENCH on the grating (F).
- Take the SCISSORS (I).
- Back out to the fireplace room.

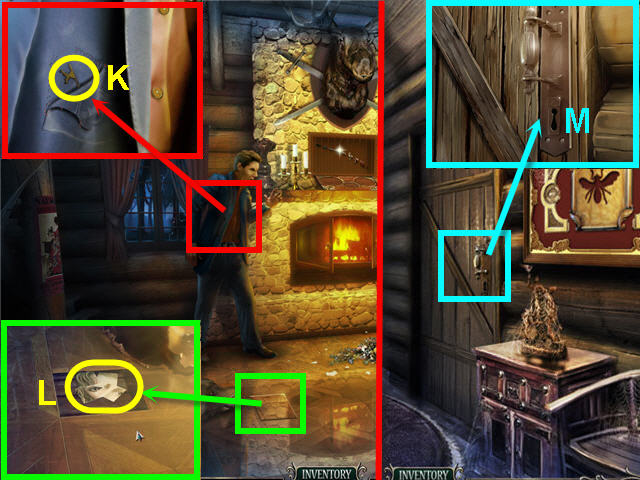
- Examine the pocket and use the SCISSORS on it; take the KEY (K).
- Examine the floor; use the CROWBAR on the tile.
- Take the PIECES OF PUZZLE (L).
- Head to the second floor.
- Examine the door; use the KEY on the lock (M) and enter.
- Click under the bed to access a Hidden Object Scene.

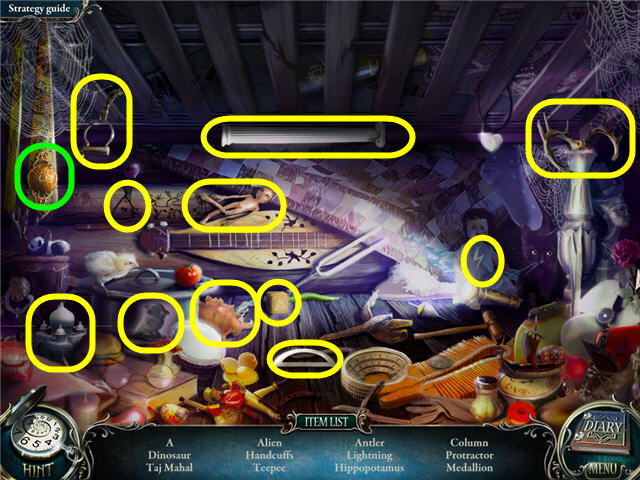
- Find the items listed and get a MEDALLION.
- Examine the picture on the left wall.
- Place the PIECES OF PUZZLE on the picture to activate a puzzle.

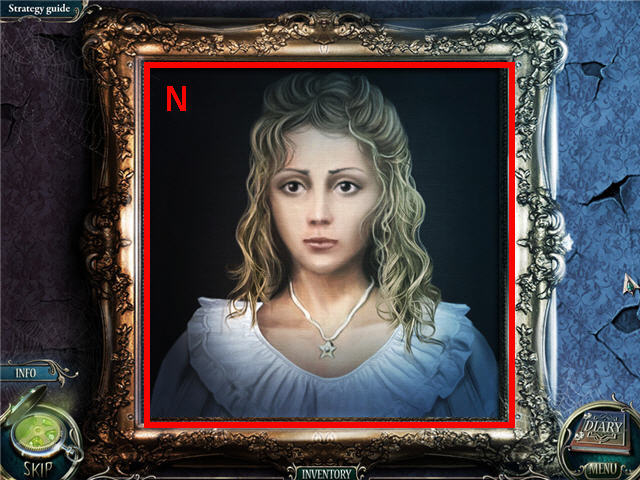
- Drag the columns and rows into place to complete the picture.
- Tip: Do all the rows first and then the columns. See screenshot (N) for solution.
- Take the BUTTON.
- Go into the stable.

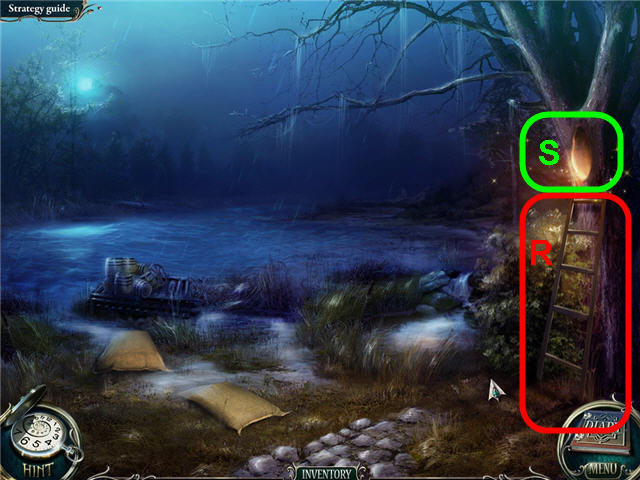
- Examine the lock and use the MEDALLION on it (O).
- Take the LADDER (P).
- Examine the notch and take the CLOCK HANDS 2 OF 2 (Q).
- Head to the lake.


- Place the LADDER against the tree (R).
- Click on the hollow (S) to access a Hidden Object Scene.

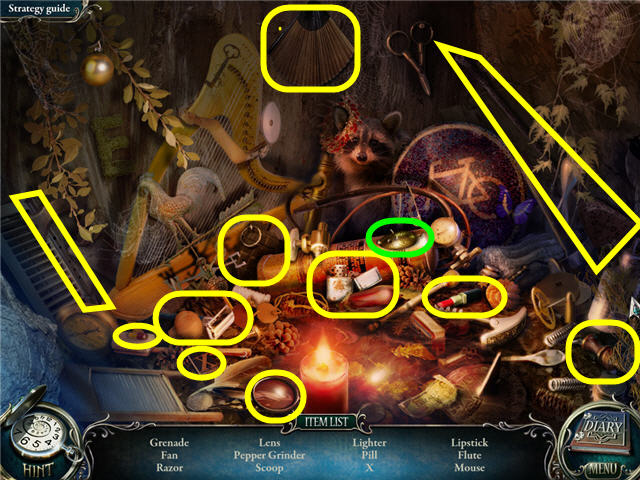
- Find the items listed and get a MOUSE.
- Head to the second floor in the house.

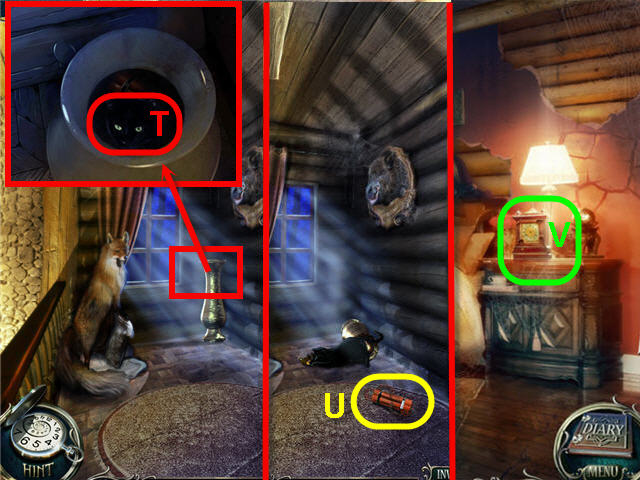
- Examine the vase; use the MOUSE on the cat (T).
- Take the DYNAMITE (U).
- Head into the bedroom.
- Examine the clock (V); place the CLOCK HANDS on the clock face.

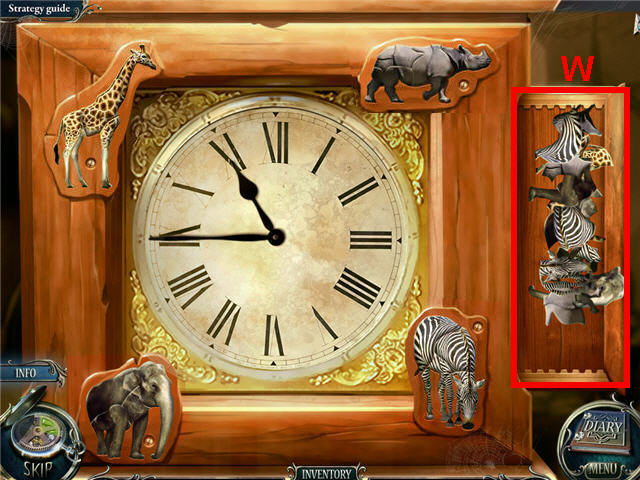
- Set the clock to the time found on the box at the pavilion (11:45).
- Reassemble the 4 animal puzzles as shown in the screenshot by dragging the puzzle pieces into place (W).
- Get a CLOCK.
- Exit the house and head to the square past the pavilion.

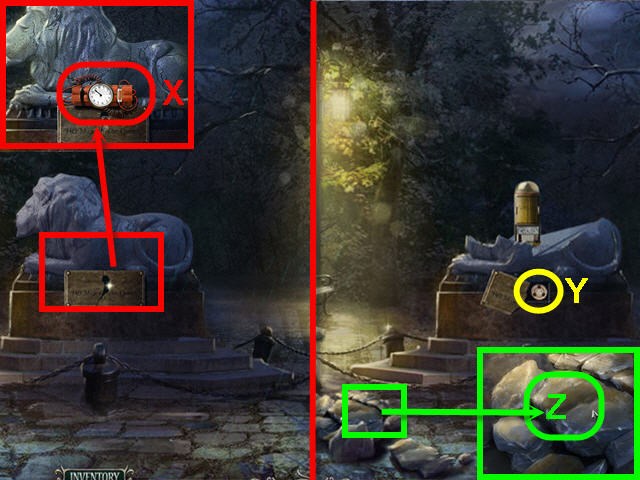
- Examine the lion; use the DYNAMITE and the CLOCK on the plaque (X).
- Examine the lion; take the BUTTON (Y).
- Examine the fragments; take the STONE (Z).
- Go to the sign.

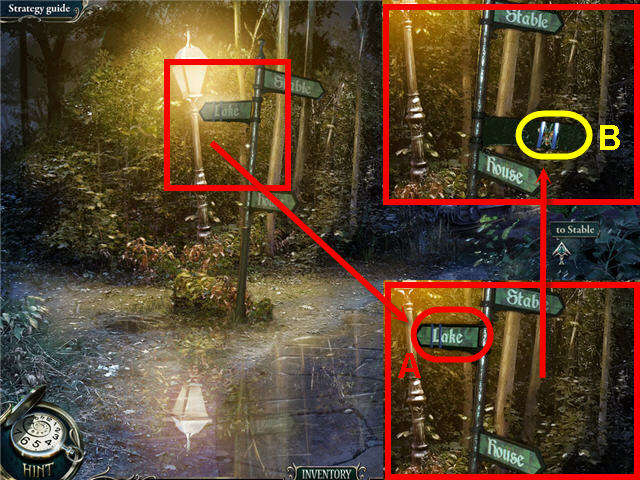
- Examine the sign; use the STONE on the lake sign (A); take the BEE (B).
- Head to the second floor of the house.

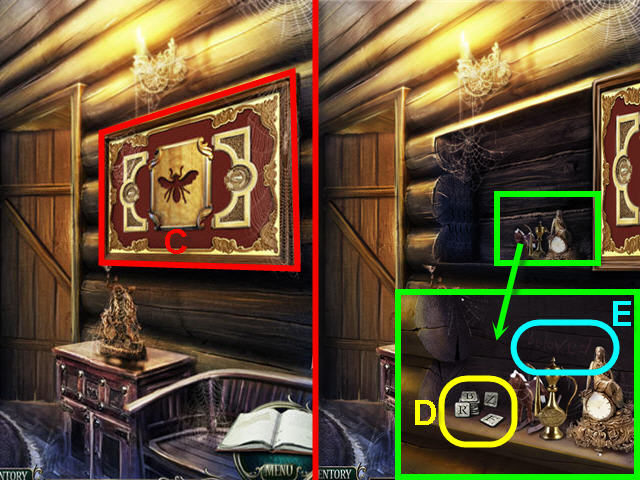
- Place the BEE on the picture (C).
- Examine the picture; take the LETTERS (D). Note the etching of “beloved” (E).
- Head to the lion square.

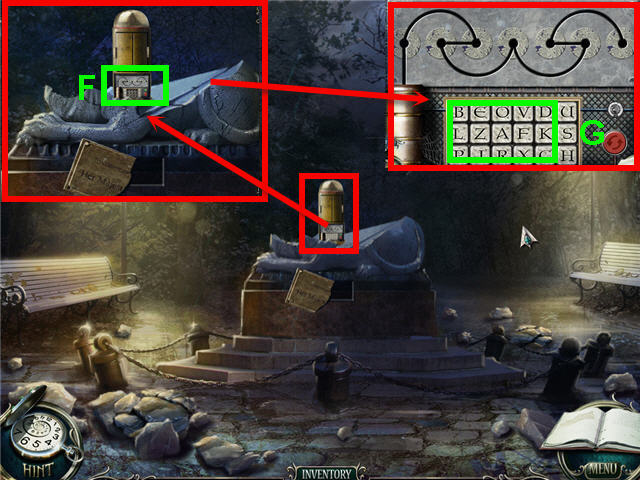
- Examine the broken lion.
- Examine the lock (F); place the LETTERS on the lower panel to trigger a puzzle.

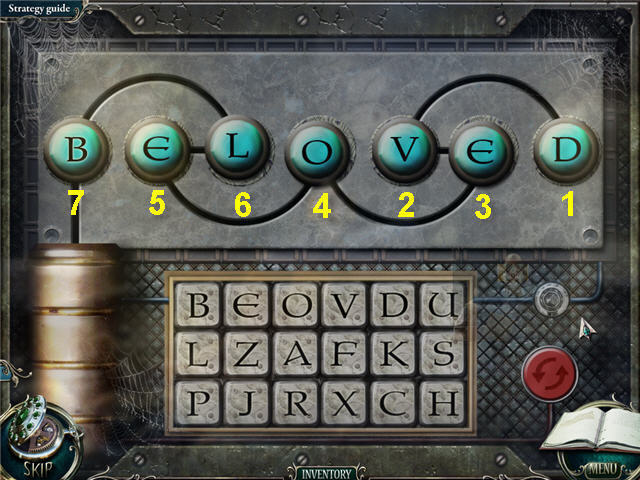
- Spell the word etched in the wall behind the bee picture.
- The letters will follow the path above; push the reset button in red to start over.
- Spell ‘BELOVED’ by clicking on the letters in this order: DVEOELB.
- Take the BUTTON.
- Go to the fireplace room.

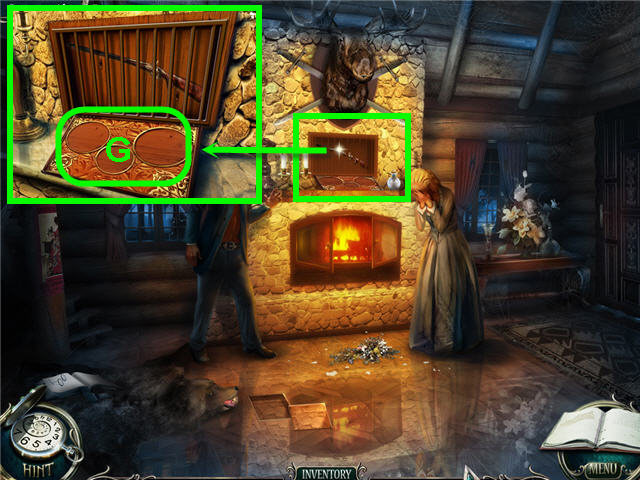
- Examine the gun.
- Place the 3 BUTTON on the slots (G) to trigger a puzzle.

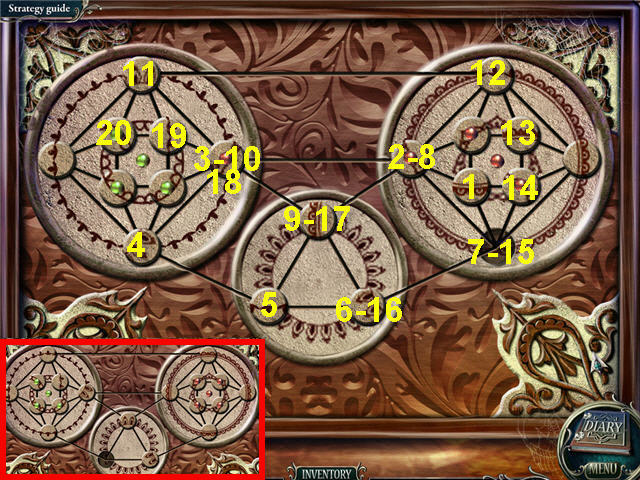
- Move the buttons around to complete the patterns.
- Click on any button that is connected to an empty space to move it to that space.
- Click on the buttons in the order shown in the screenshot.
- Take the GUN.

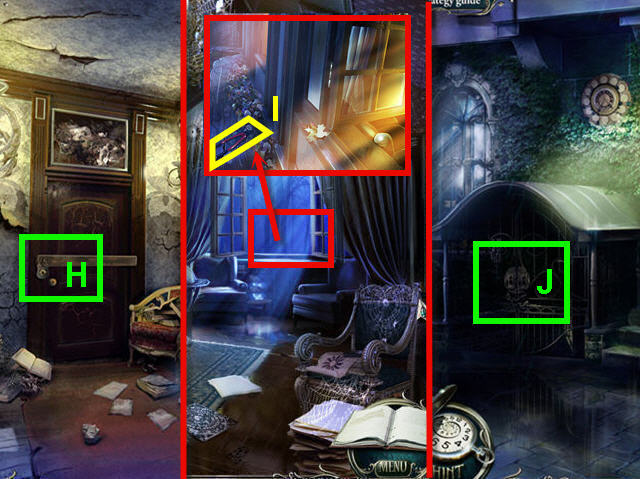
- Head upstairs to the corridor.
- Examine the door lock; shoot the lock (H) with the GUN.
- Enter father’s room.
- Examine the window; take the BOLT CUTTERS (I).
- Back out to the entrance of the house.
- Examine the gates; use the BOLT CUTTERS on the lock (J).
- Enter the basement.
- Click on the shelf to access a Hidden Object Scene.

- Find the items listed and get a FLASK.
- Go to the father’s room.
- Examine the table and click on the flasks to zoom into the lab area.
- Place the FLASK in the center to trigger a puzzle.

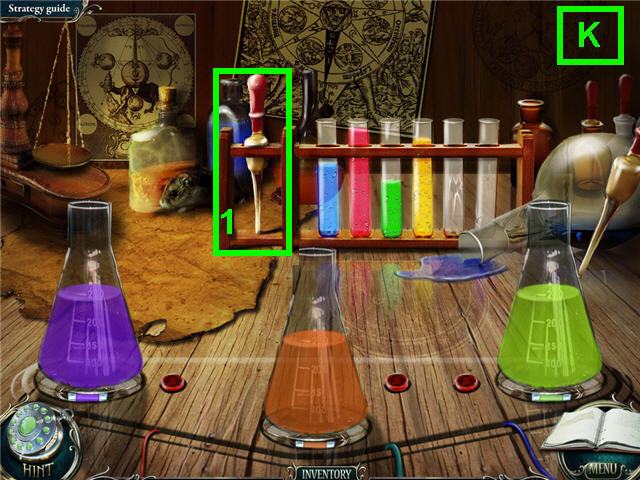
- Mix the colors in the flasks to match the labels on the bottom.
- Use the dropper (1) on the test tubes and then on the flasks.
- Solution: Left flask = blue (already there) +red, middle flask = red + yellow, right flask = green + yellow (K).
- Take the KEY.
- Head to the basement.

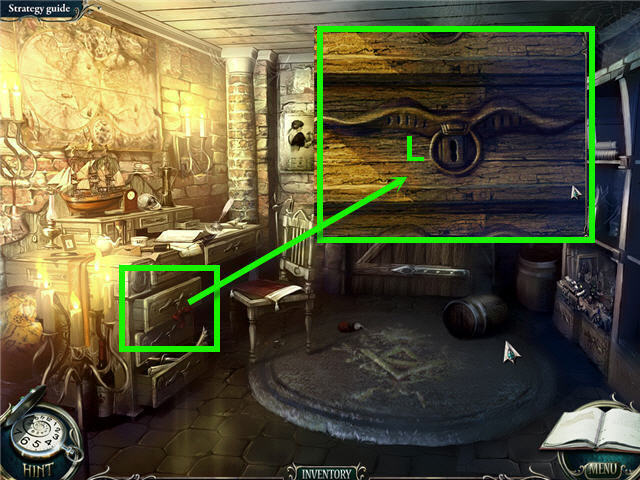
- Examine the table and zoom into the drawer.
- Use the KEY on the lock (L).
- Examine the drawer to access a Hidden Object Scene.

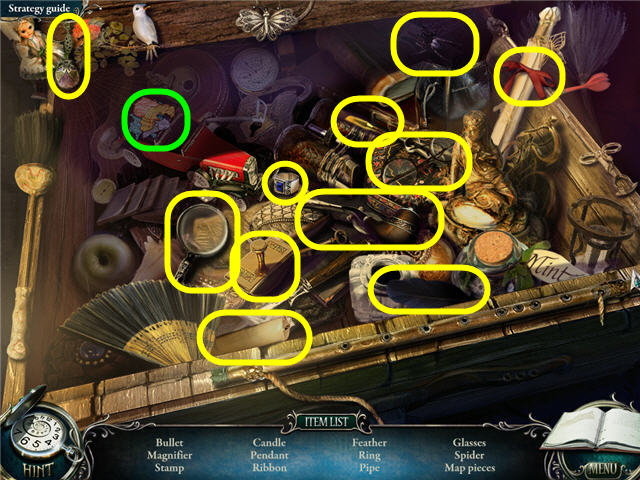
- Find the items listed and get the MAP PIECES.
- Back out of the desk close-up and click on the wall map above the desk.
- Place the MAP PIECES on the map to trigger a puzzle.

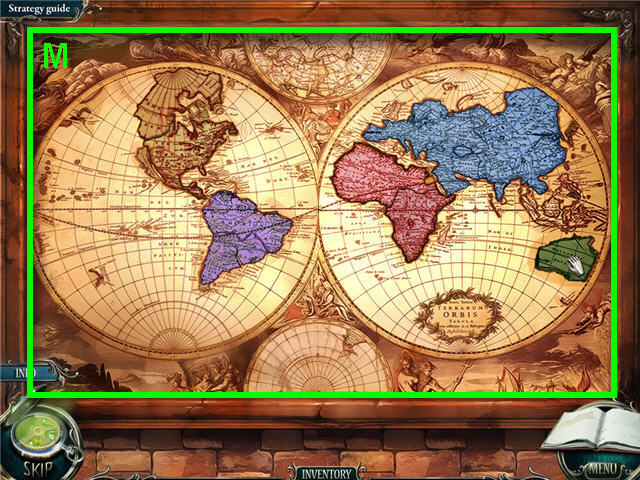
- Arrange the MAP PIECES on the map to complete it.
- Drag the pieces and right-click to rotate.
- See screenshot (M) for solution.
Chapter 4 – The Rose


- Examine the chair; take the WOODEN INLAY (N).
- Head to the gazebo.
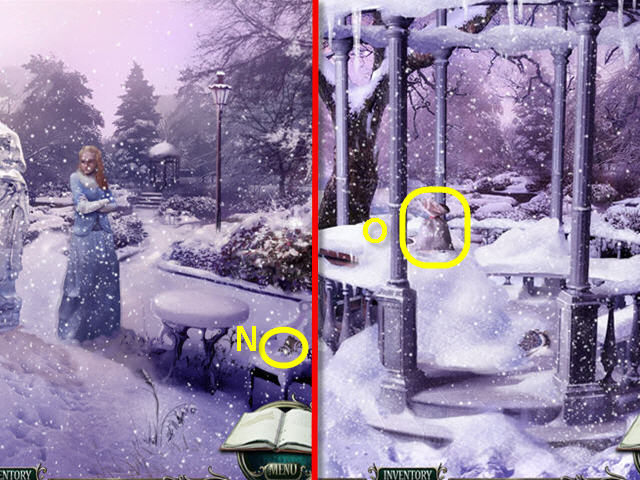
- Take the SALT (O).
- Back out and head to the valley of ice figures.

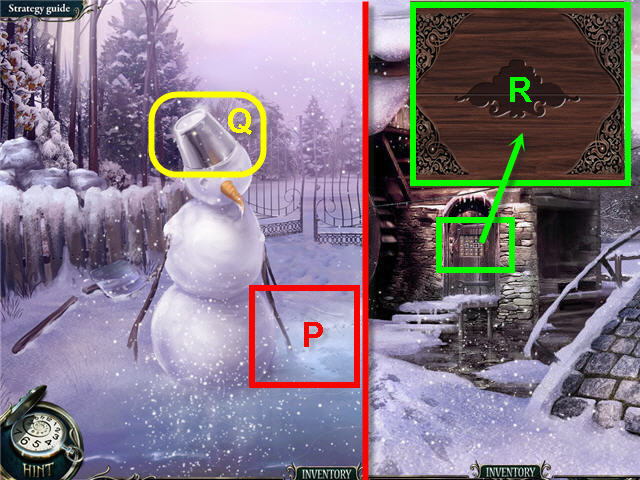
- Place the SALT on the skating rink (P).
- Take the BUCKET (Q).
- Head to the bridge.
- Examine the mill door; place the WOODEN INLAY in the slot (R) to trigger a puzzle.

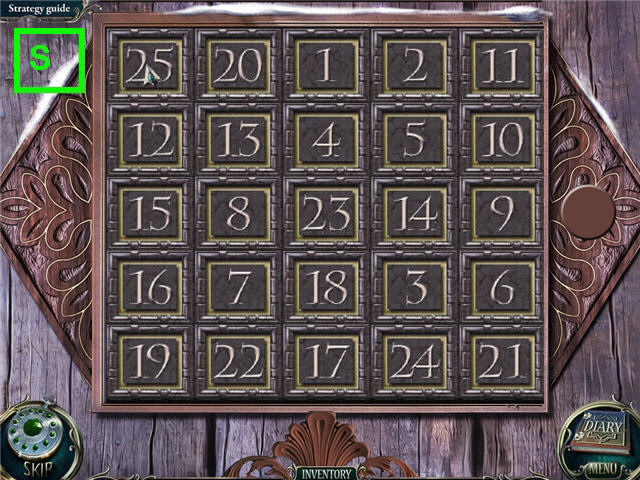
- Open the cells 1 through 25 in consecutive order.
- See screenshot (S) for the original layout solution. The placing of numbers is random after each attempt.
- Enter into the mill.
- Click on the shelves to access a Hidden Object Scene.

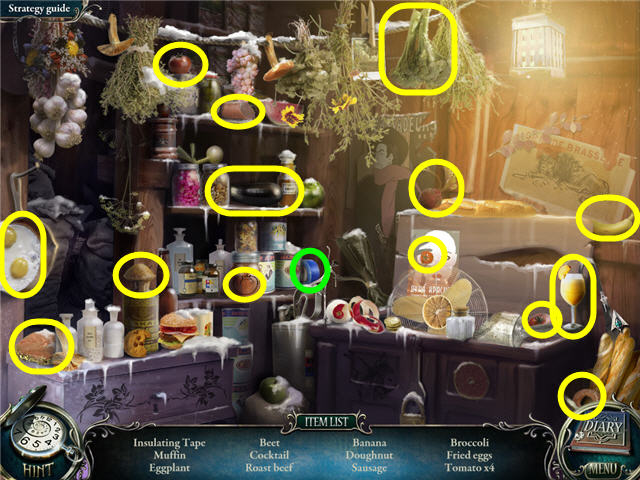
- Find the items listed and get the INSULATING TAPE.
- Head to the ice figures.

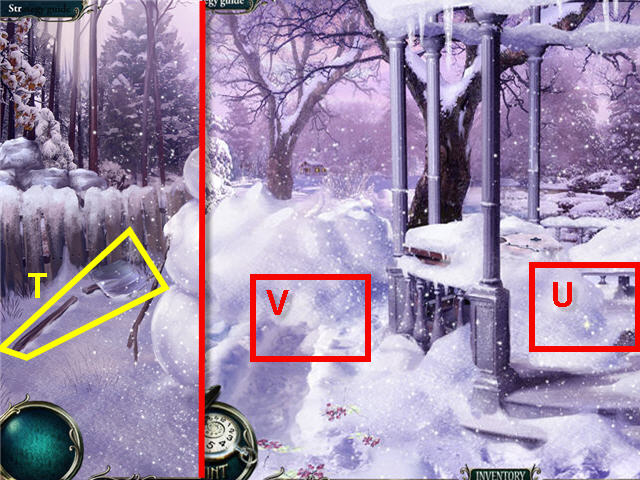
- Examine the spade; use the INSULATING TAPE on the handle.
- Take the SPADE (T).
- Head to the gazebo.
- Use the SPADE on the snow in the gazebo (U) and on the path (V).
- Head to the hunting lodge.
- Click on the veranda to access a Hidden Object Scene.

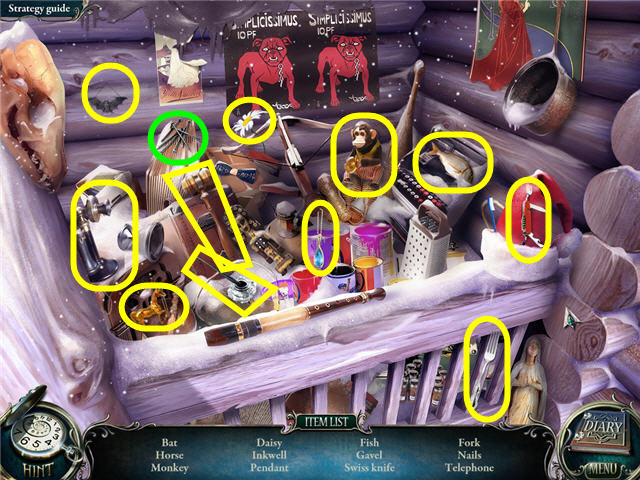
- Find the items listed.
- Get the NAILS.

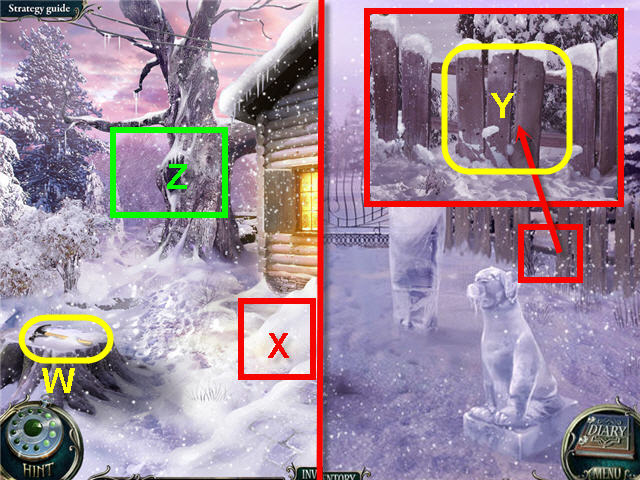
- Take the HAMMER (W).
- Examine the snow; use the BUCKET on the pile (X) to get a BUCKET WITH SNOW.
- Head to the ice figures.
- Examine the fence; use the HAMMER to get the BOARDS (Y).
- Head to the hunting lodge.
- Examine the tree; place the BOARDS, NAILS and HAMMER on the trunk (Z).
- Head up to the roof.

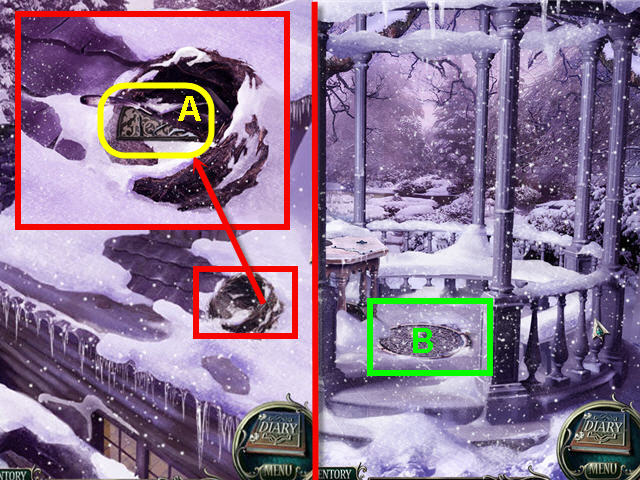
- Examine the nest; take the BAS-RELIEF PIECE (A).
- Go to the gazebo.
- Examine the hatch; place the BAS-RELIEF PIECE on the hatch (B) to trigger a puzzle.

- Arrange the pieces to complete the picture.
- Click on any two pieces to switch them. See screenshot for solution (C).
- Click on the hatch to access a Hidden Object Scene.

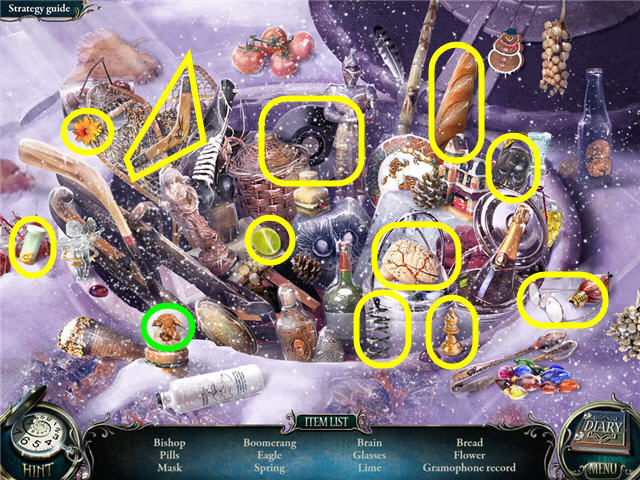
- Find the items listed and get an EAGLE.
- Head up to the hunting lodge roof.

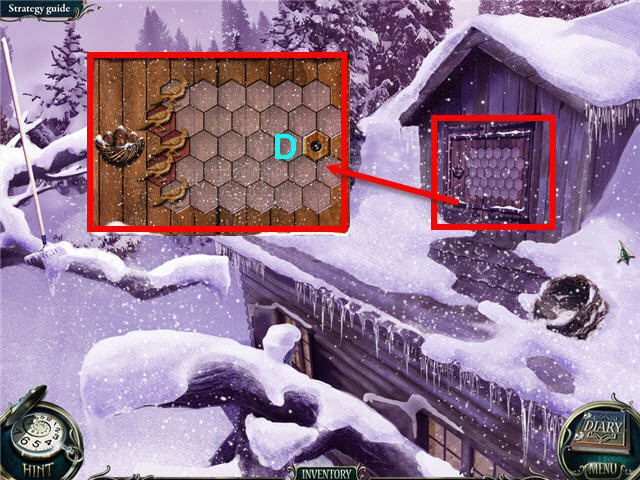
- Examine the attic doors.
- Place the EAGLE on the slot (D) to trigger a puzzle.

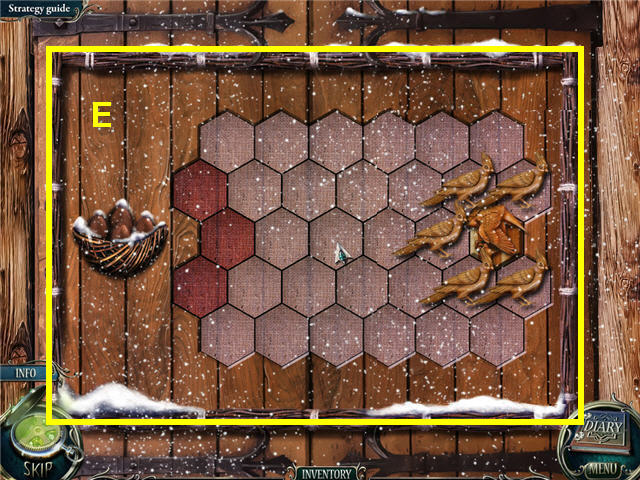
- Keep the eagle away from the nest by moving the birds to trap him in a corner.
- Be sure and keep all the birds in a line so that the eagle does not find a way through.
- The moves of the eagle are random. See screenshot for one solution (E).
- Click on the attic doors to access a Hidden Object Scene.

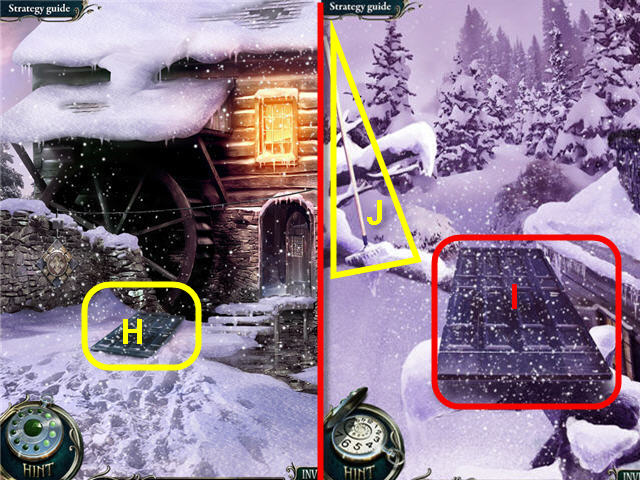
- Find the items listed and get a CROSS.
- Go to the bridge.

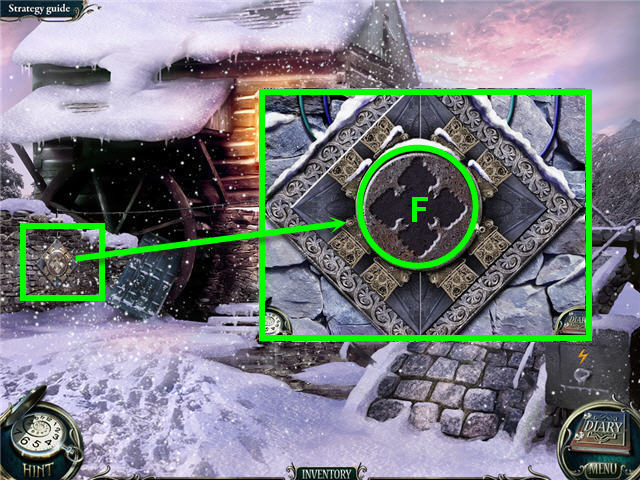
- Examine the wall.
- Place the CROSS in the center (F).

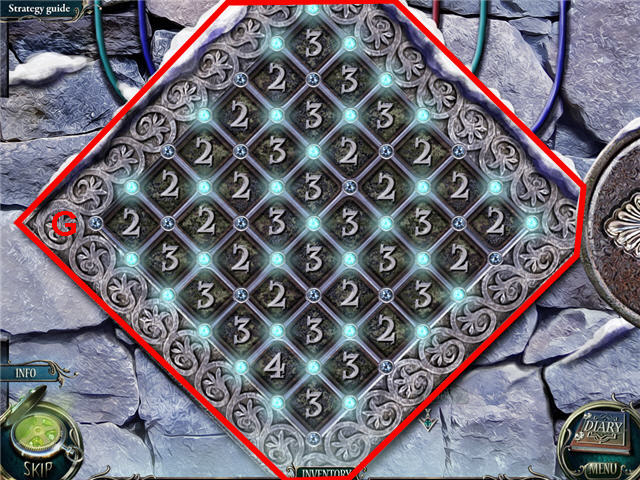
- Turn on the lights so that the number of lights lit around each square equals the number written in the square.
- See screenshot for solution (G).


- Take the DOOR (H).
- Head to the hunting lodge roof.
- Place the door on the branch (I); take the RAKE (J).
- Head over the bridge to the forest.

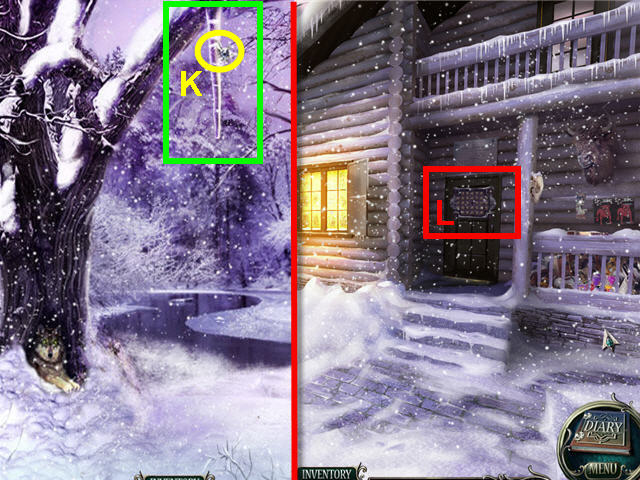
- Examine the icicle.
- Use the RAKE on the icicle; get a STAR JEWEL (K).
- Head to the hunting lodge.
- Examine the door (L).
- Place the STAR JEWEL on the lock to trigger a puzzle.

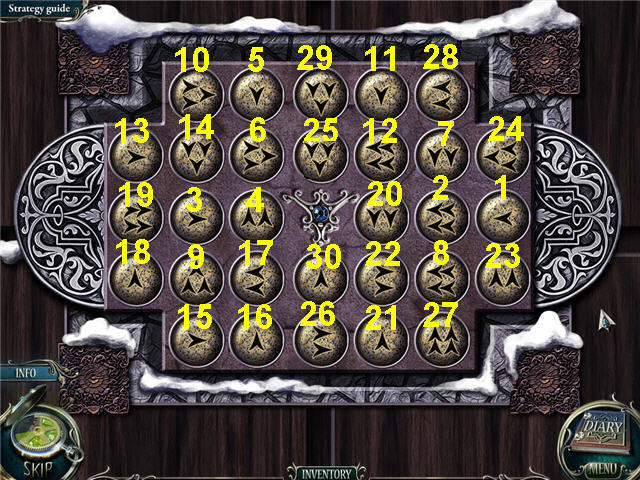
- Find the starting point to get to the medallion in the center by using each arrow.
- Jump to the next button by jumping the number and direction of arrows on the button you are on.
- See screenshot for solution.
- Enter the hunting lodge.

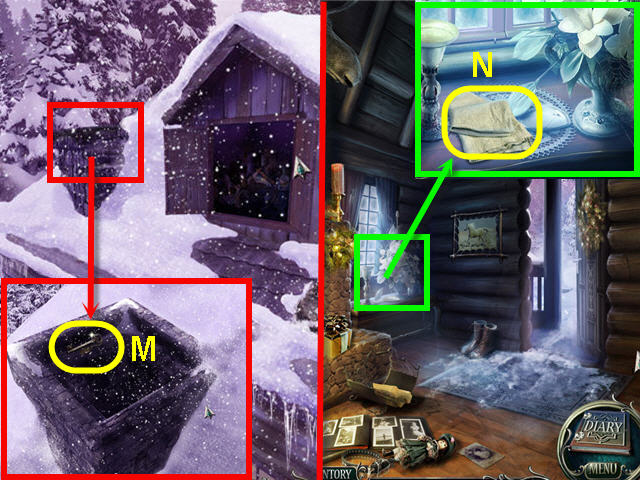
- Examine the window; take the CLOTH (N).
- Exit and head up on the roof.
- Examine the chimney; use the CLOTH on the chimney and take the MILL KEY (M).
- Enter the mill house.

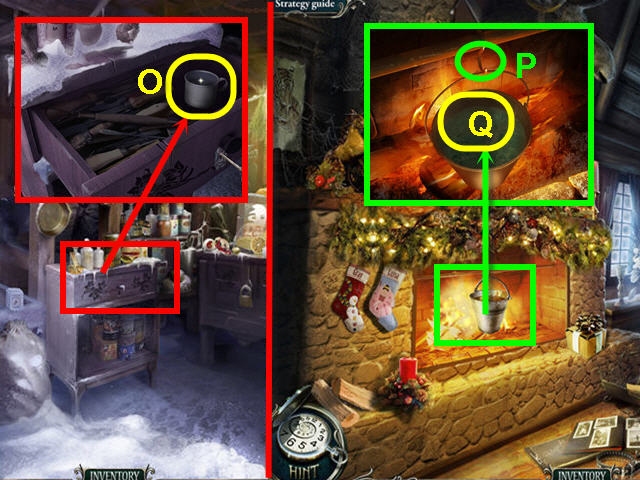
- Examine the cupboard; use the MILL KEY on the lock.
- Take the MUG (O).
- Head to the hunting lodge.
- Examine the fireplace; hang the BUCKET WITH SNOW on the hook (P).
- Use the MUG on the water bucket (Q) to get a MUG WITH HOT WATER.
- Head to the yard.

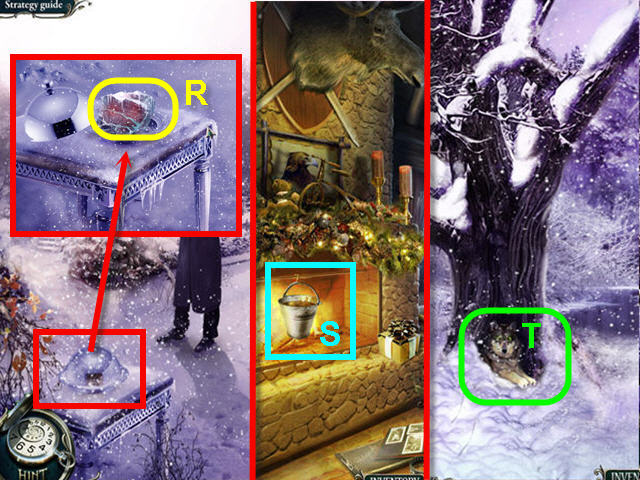
- Examine the plate; use the MUG WITH HOT WATER on the plate.
- Move the lid and take the FROZEN MEAT (R).
- Head to the hunting lodge.
- Examine the fireplace; place the FROZEN MEAT in the bucket (S); get THAWED MEAT.
- Head to the forest.
- Examine the wolf and give it the THAWED MEAT (T).
- Click on the den to access a Hidden Object Scene.

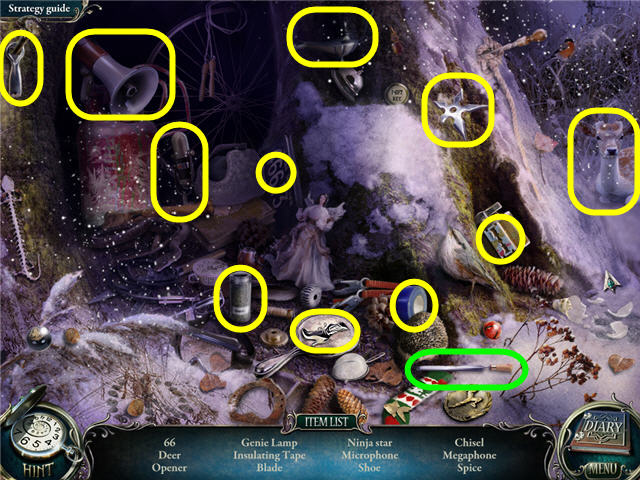
- Find the items listed and get a CHISEL.
- Head to the yard.

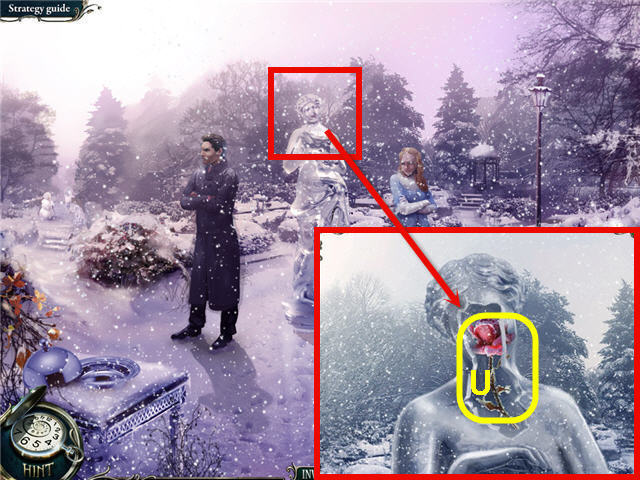
- Examine the head of the statue; use the CHISEL on the ice.
- Take the ROSE (U).

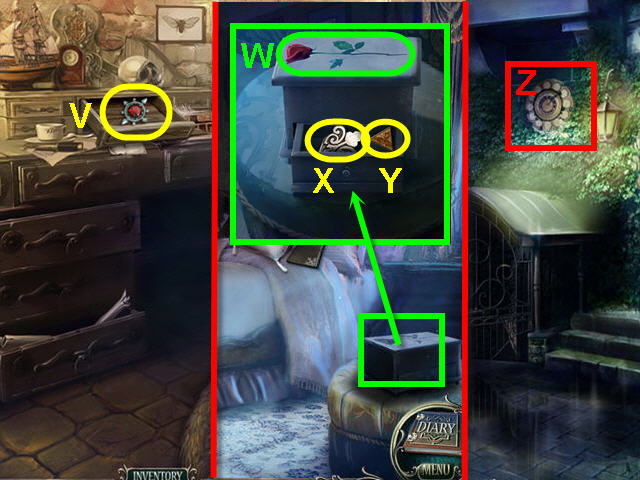
- Examine the table; open the drawer; take the RUBY MEDALLION (V).
- Head to Luisa’s room.
- Examine the chest; place the ROSE on the top (W).
- Take the KEY (X) and TRIANGLE (Y).
- Exit the house.
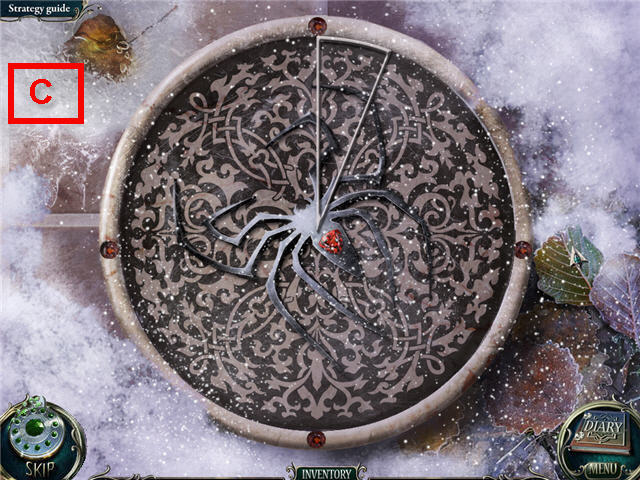
- Examine the clock (Z); place the KEY in the slot to trigger a puzzle.

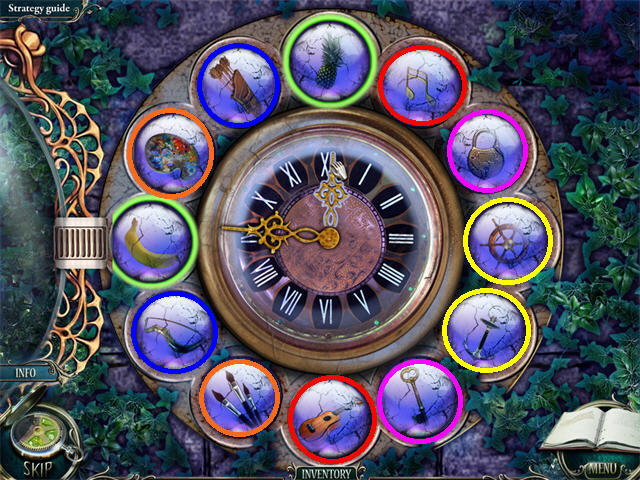
- Move the clock hands to matching items; repeat until all are grayed out.
- See screenshot for solution.
- Get the CLOCK HAND.
- Enter into the basement.
Chapter 5 – Father

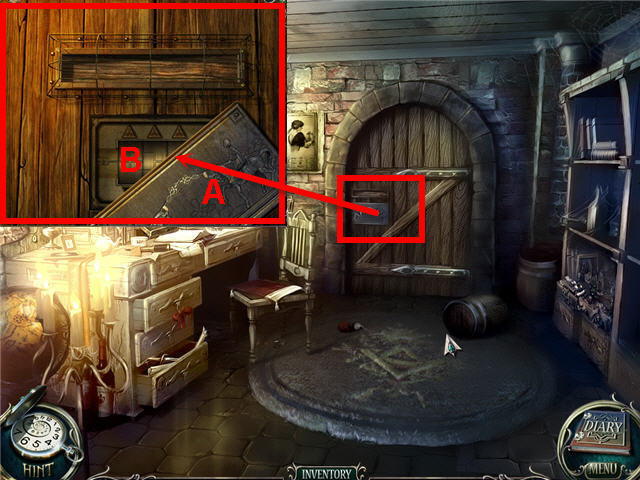
- Examine the door.
- Place the ARROWS on the knights (A); click on the exposed lock (B).
- Place the TRIANGLE on the empty slot to trigger a puzzle.

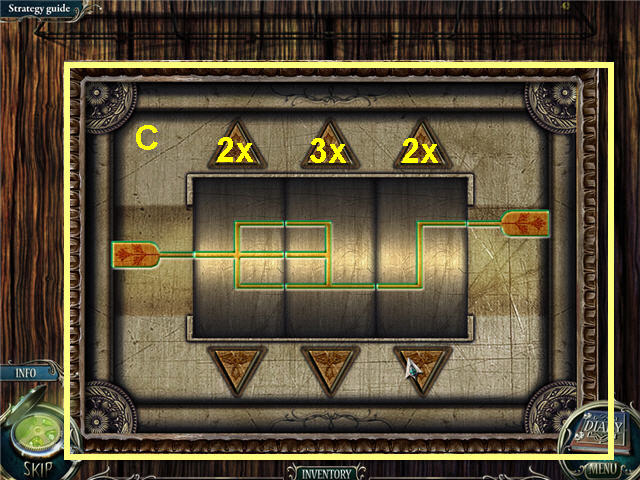
- Use the clock hands to connect the lines from left to right.
- See screenshot for solution (C).
- Enter the basement corridor.
- Click on the statue to access a Hidden Object Scene.

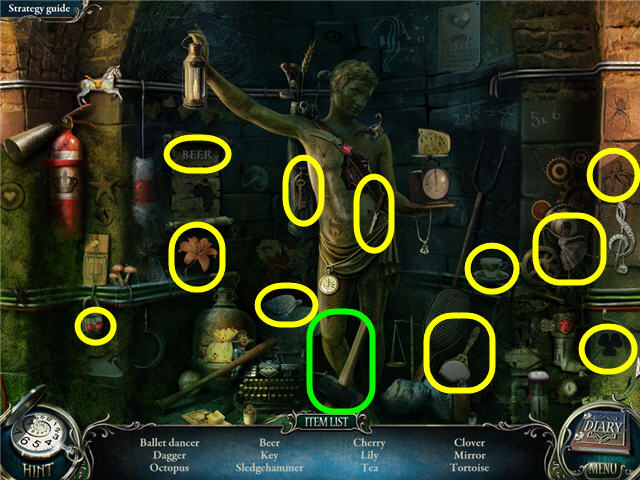
- Find the items listed.
- Get a SLEDGEHAMMER.

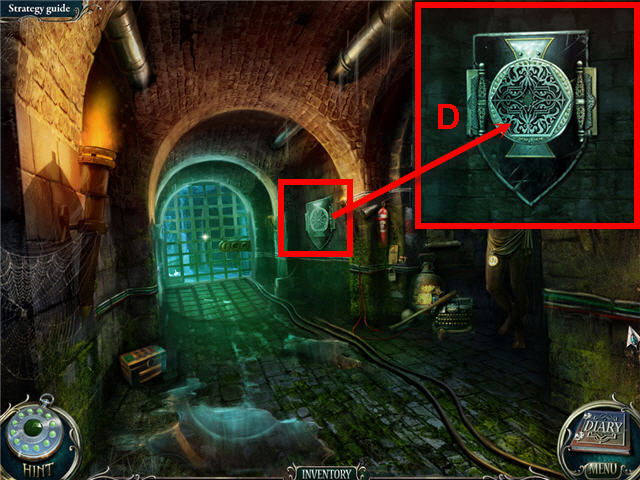
- Examine the wall; zoom onto the shield.
- Place the RUBY MEDALLION on the shield (D) to trigger a puzzle.

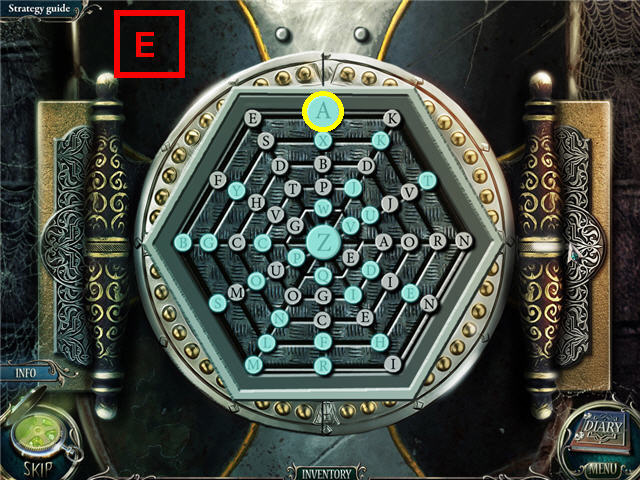
- Click on the buttons in alphabetical order from A-Z.
- You can only choose a button that is along the lighted connecting lines.
- See screenshot for solution (E).
- Use the SLEDGEHAMMER on the wall three times.
- Enter into the walled room.
- Click on the pile of debris to access a Hidden Object Scene.

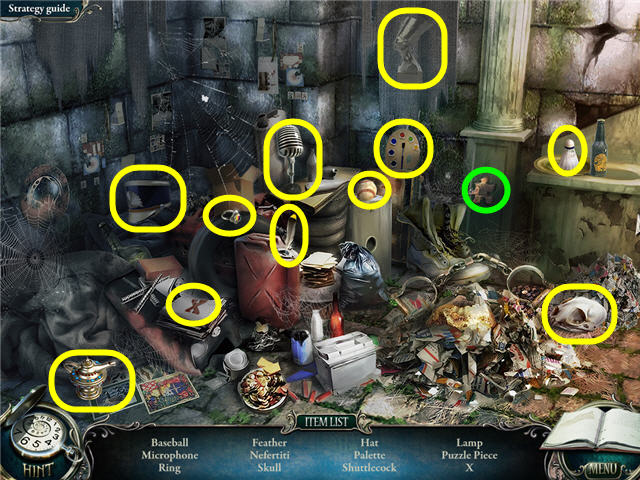
- Find the items listed and get a PUZZLE.
- Click on Gray.
- Click on the frame in front of Gray’s feet; place the puzzle on the frame to trigger a puzzle.

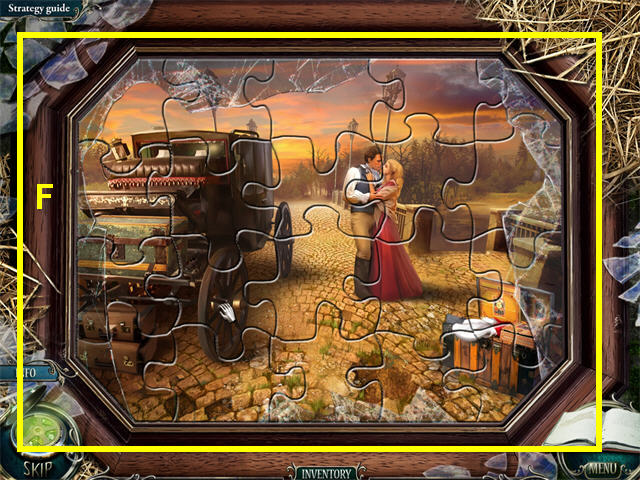
- Assemble the puzzle to complete the picture.
- Right-click on a piece to turn it. See screenshot (F) for solution.

- Head to the forest.
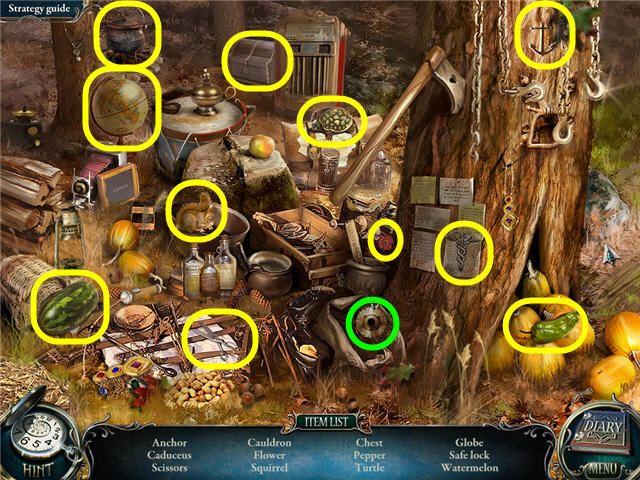
- Click on the tree to access a Hidden Object Scene.
- Find the items listed.
- Get a SAFE LOCK.

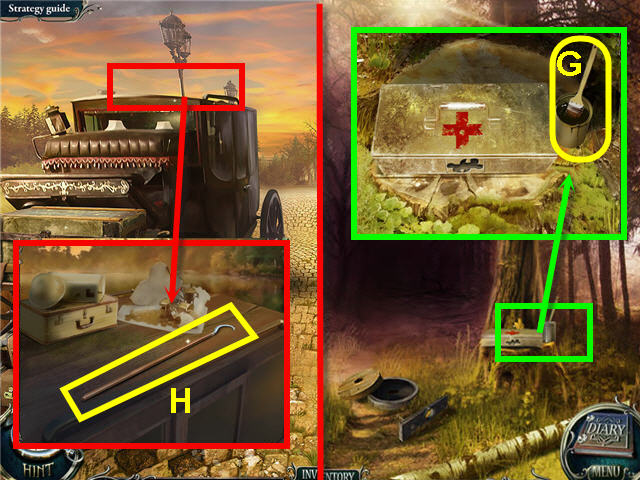
- Examine the medicine chest; take the RESIN (G).
- Go to the bridge.
- Examine the carriage roof; take the HOOK (H).
- Head to the bank.

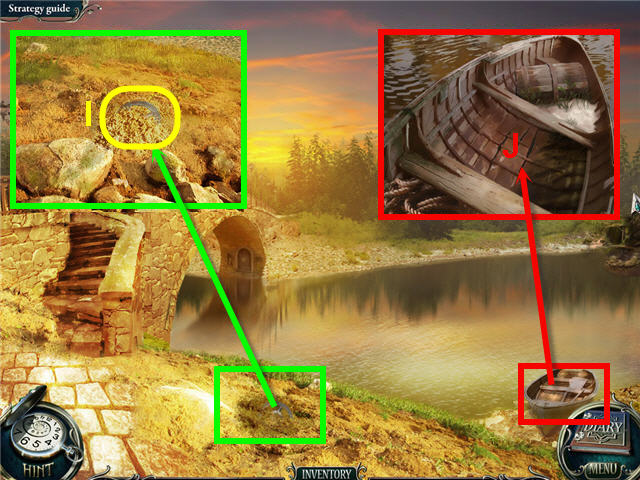
- Examine the sand; uncover and take the COGWHEEL (I).
- Examine the boat; use the RESIN on the boat (J).
- Head to the spring.

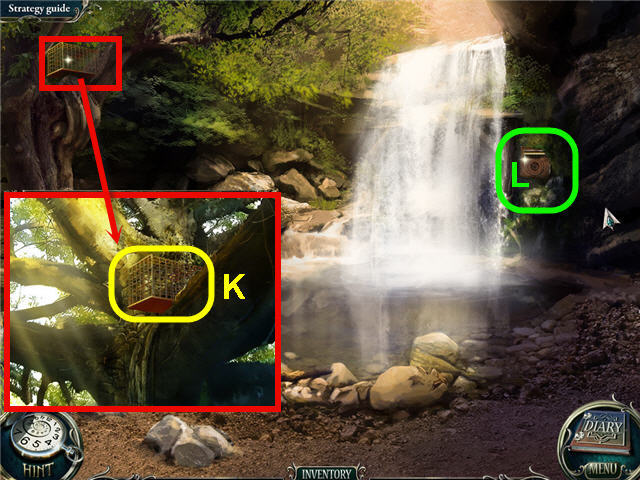
- Examine the branch; use the HOOK to get a CAGE (K).
- Examine the waterfall pump (L).
- Place the SAFE LOCK in the center to trigger a puzzle.

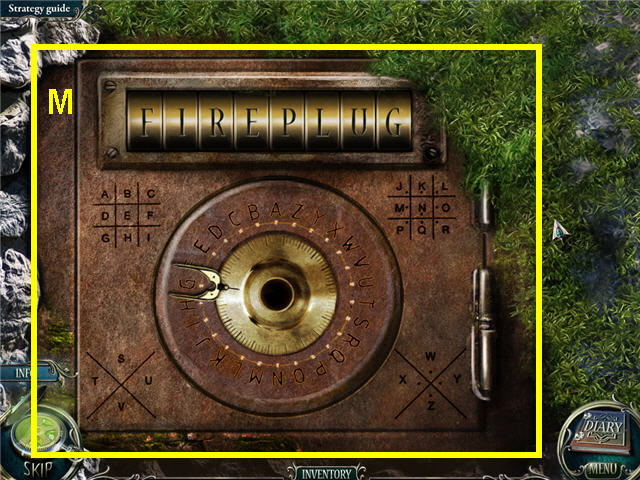
- Rotate the dial to the correct letter to complete the word.
- Use the letters and the grids on the 4 corners of the dial to decipher the code above.
- The solution is: ‘FIREPLUG’ (M).
- Turn the wheel.
- Head into the mine.
- Click on the discarded items to access a Hidden Object Scene.

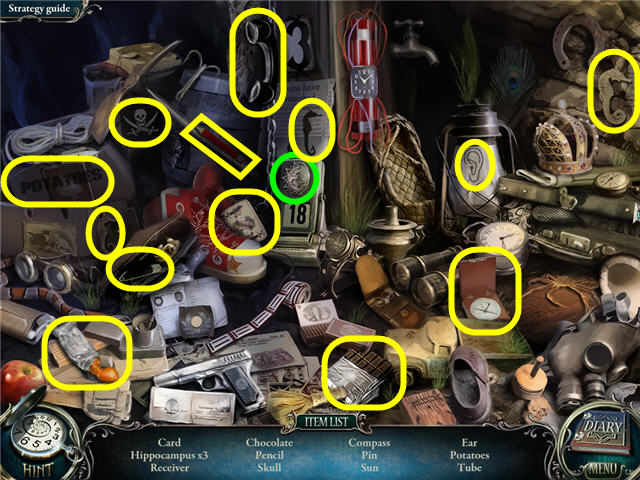
- Find the items listed.
- Get a SUN 1 OF 2.

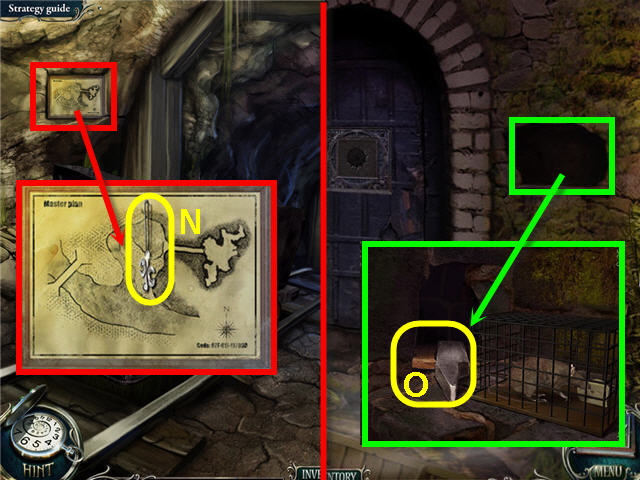
- Examine the wall; take the MEDICINE CHEST KEY (N).
- Go to the overpass.
- Examine the hole in the wall; use the CAGE on the mouse.
- Take the HAMMER (O).
- Head to the forest.

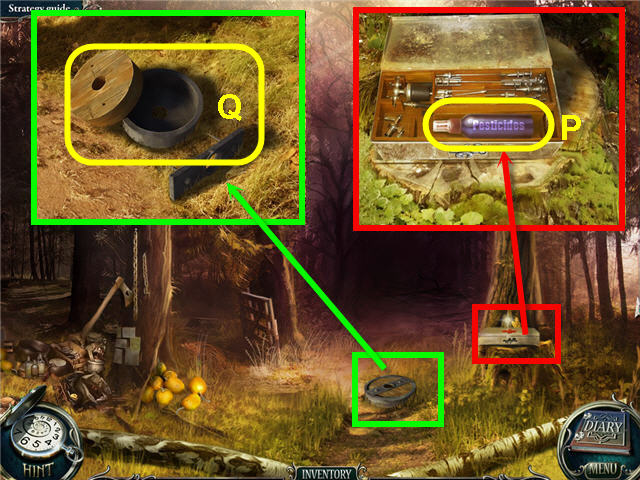
- Examine the medicine chest; use the MEDICINE CHEST KEY on the lock.
- Take the WEED KILLER (P).
- Examine the wheel; click on any piece to assemble.
- Use the HAMMER on the assembled wheel and take the WHEEL (Q).
- Head to the spring.

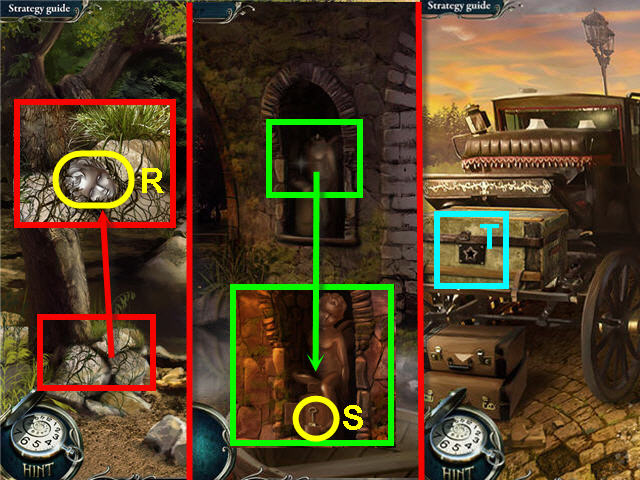
- Examine the stones; use the WEED KILLER on the grass and take the HEAD (R).
- Go to the overpass.
- Examine the statue; place the HEAD on top.
- Take the STAR KEY (S).
- Go to the bridge.
- Examine the box; use the STAR KEY on the lock (T).
- Click on the box to access a Hidden Object Scene.

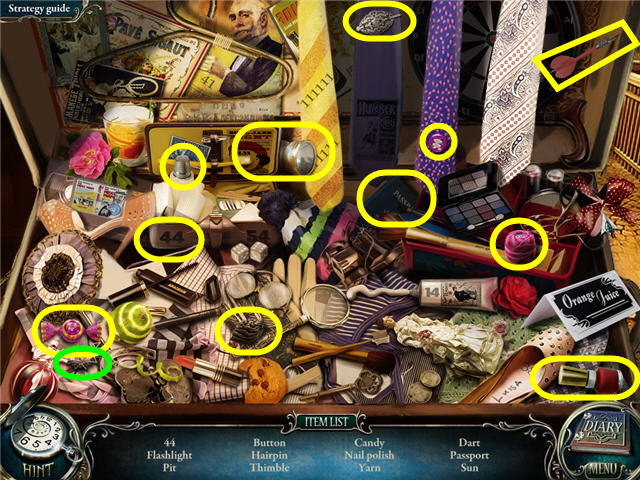
- Find the items listed and get a SUN 2 OF 2.
- Head to the overpass.

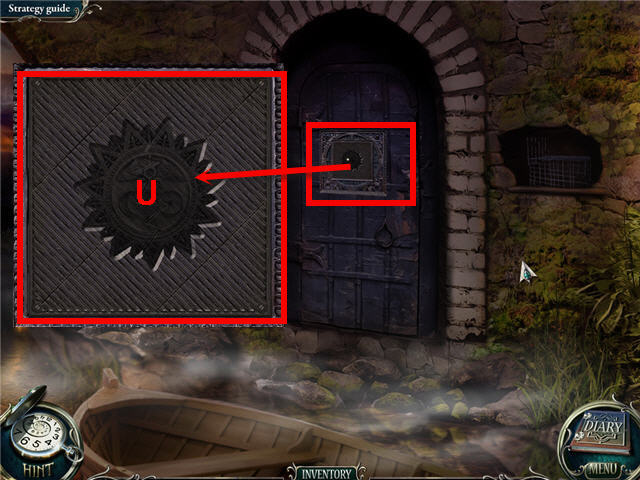
- Examine the door.
- Use the SUN on the slot (U) to trigger a puzzle.

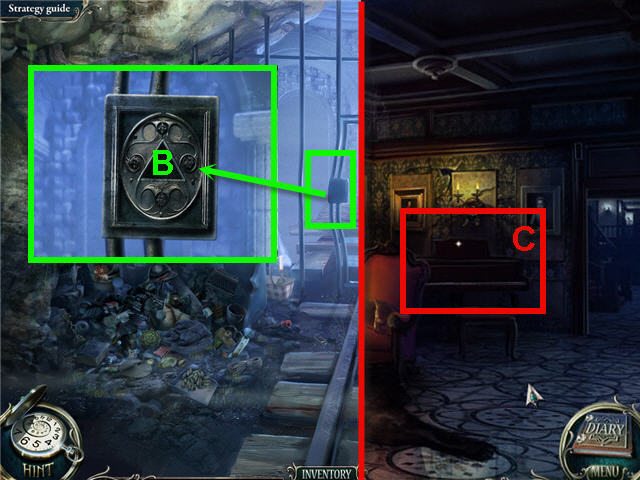
- Arrange the tiles so that they are on top of their matching symbol.
- For the solution move the squares marked on the screenshot in the following order: the first number is the square to move, the second number is the square to move it to: 6-1, 3-2, 10-6, 15-19, 11-15, 7-9, 15-3, 19-7, 12-10, 13-15, 7-16, 15-13, 18-7, 10-12, 9-18, 6-19, 7-6. 12-9 (V).
- Enter the secret room.

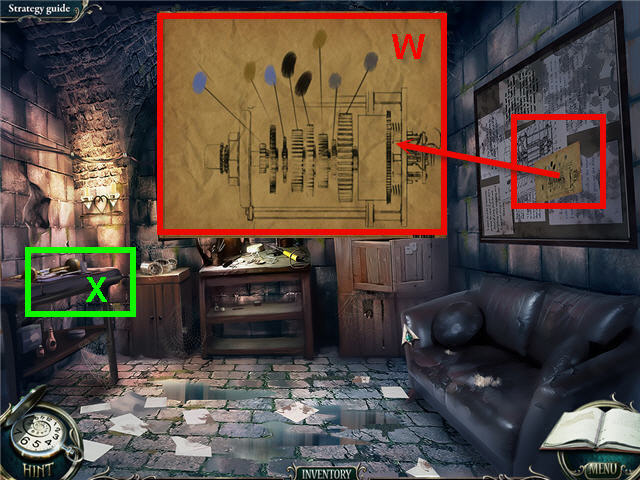
- Examine the instructions (W) to get a diary update.
- Examine the engine (X).
- Place the COG WHEEL on the engine to trigger a puzzle.

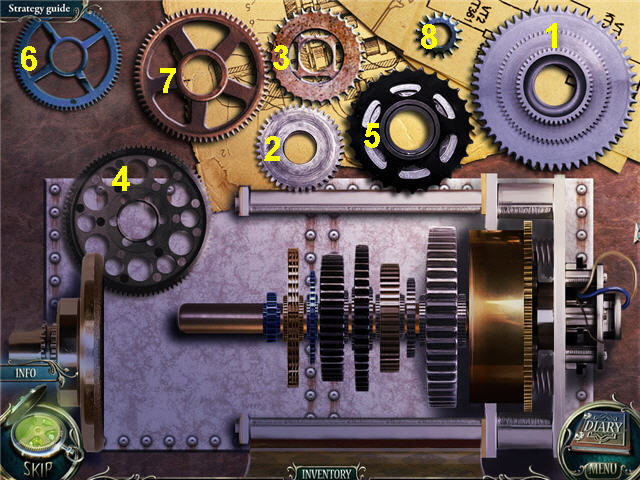
- Place the cogs on the spindle in the order given on the instruction from the wall. See screenshot for solution.
- Get an ENGINE.
- Head to the mine.

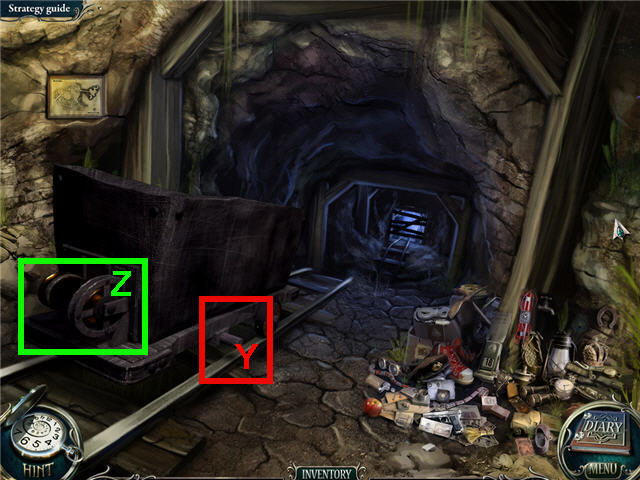
- Examine the wheel and place the WHEEL on the axle (Y).
- Examine the engine and place the ENGINE in the compartment (Z).
- Head to the grotto.
- Click on the crashed mine cart to access a Hidden Object Scene.

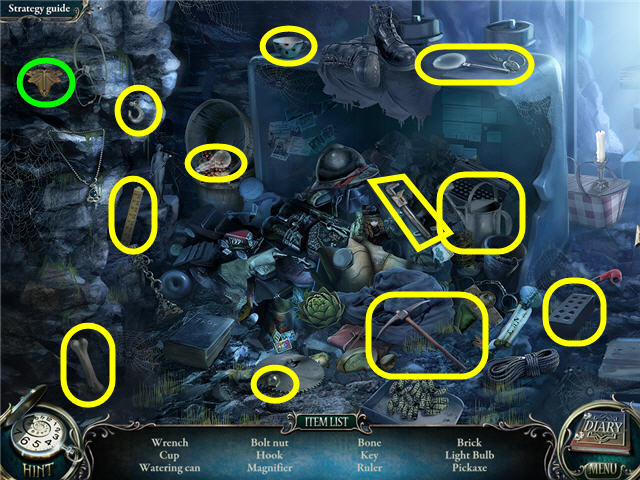
- Find the items listed and get a DRAGONFLY KEY.
- Head to the secret room by the overpass.
- Examine the books to trigger a puzzle.

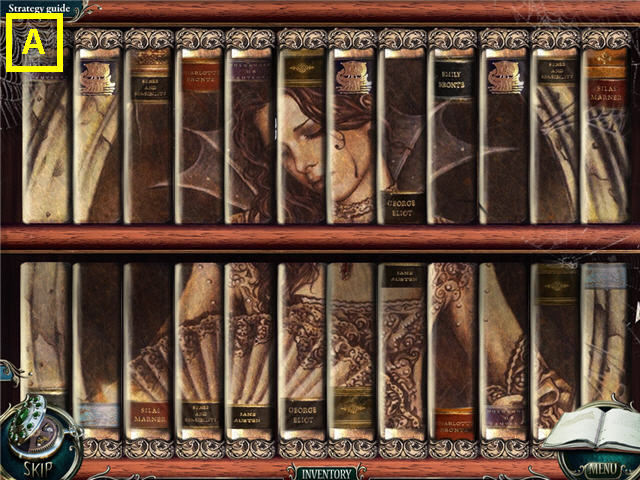
- Arrange the books on both shelves to complete the picture.
- See screenshot for solution (A).
- Place the DRAGONFLY KEY in the slot; take the CLEF and TRIANGULAR KEY.
- Head into the grotto via the mine.
Chapter 6 – Luisa


- Examine the fence; use the TRIANGULAR KEY on the lock (B).
- Go to the drawing room.
- Examine the piano (C); place the CLEF in the slot to trigger a puzzle.

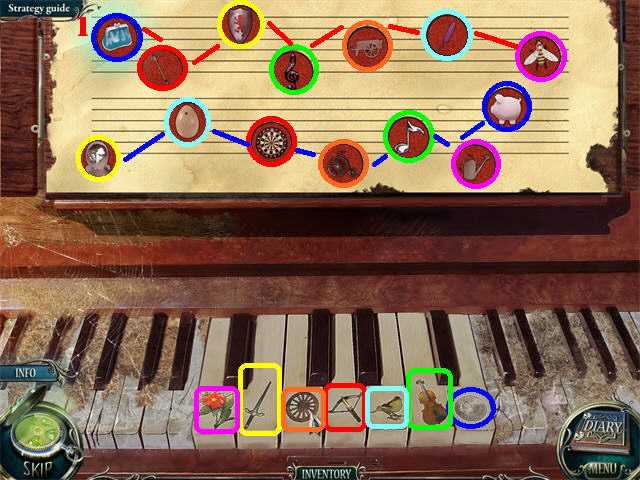
- Play the melody on the sheet music by pressing the related keys.
- See screenshot for solution.
- Click on the piano to access a Hidden Object Scene.

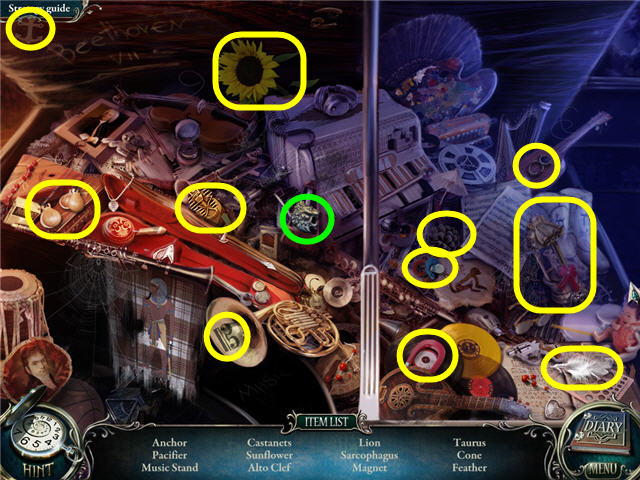
- Find the items listed and get a LION.
- Go to the basement corridor.

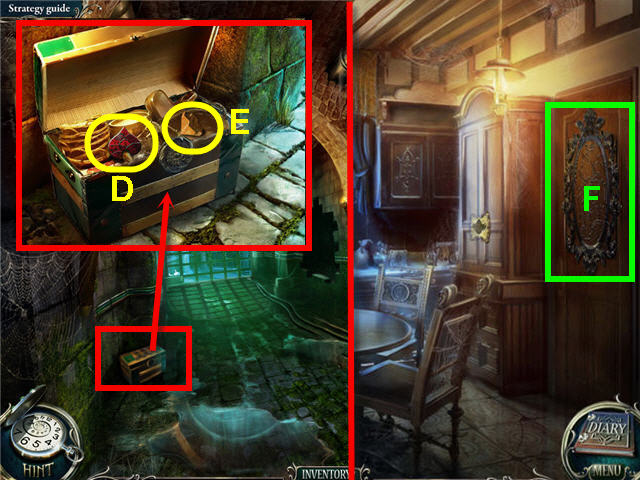
- Examine the box.
- Place the LION on the lock; take the STAINED GLASS PIECE (D) and the CROSS (E).
- Head to the dining room.
- Examine the door.
- Place the STAINED GLASS PIECE on the mosaic to trigger a puzzle.

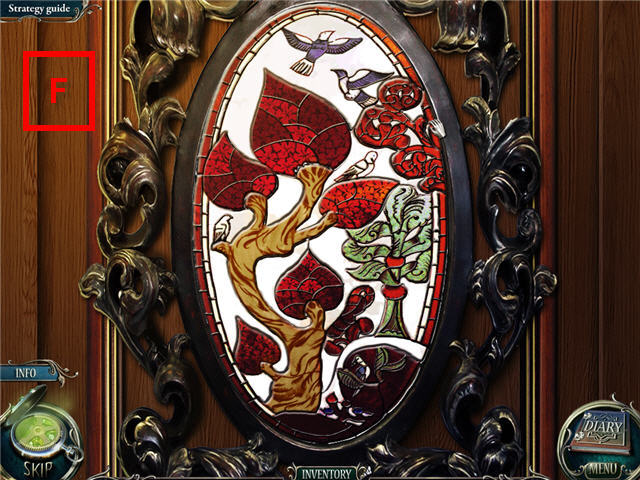
- Assemble the pieces to complete the mosaic.
- Right click to turn the pieces. See screenshot (F) for solution.
- Click on the pantry to access a Hidden Object Scene.

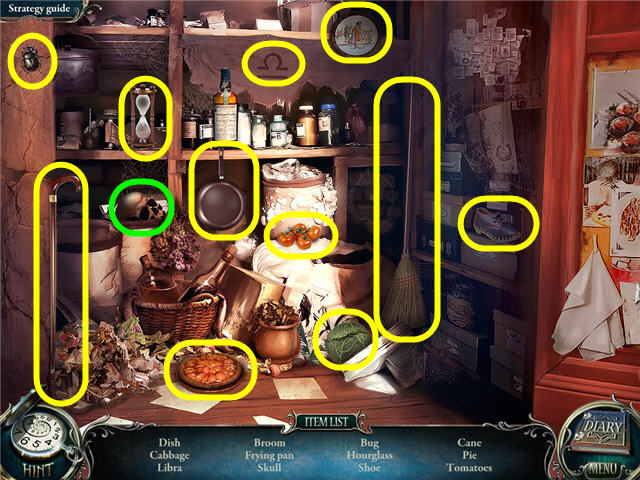
- Find the items listed and get a SKULL.
- Head to the basement corridor and into the walled room.

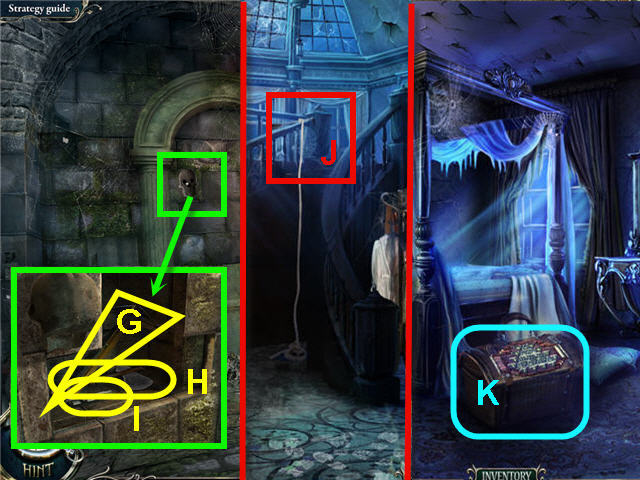
- Examine the niche; place the SKULL in the slot.
- Take the CROSSBOW (G), AXE (H) and LOCK PIECE (I).
- Head to the hallway.
- Examine the banister; use the CROSSBOW on the banister (J).
- Head upstairs and into mother’s room.
- Examine the box (K); place the LOCK PIECE on the left hinge to trigger a puzzle.

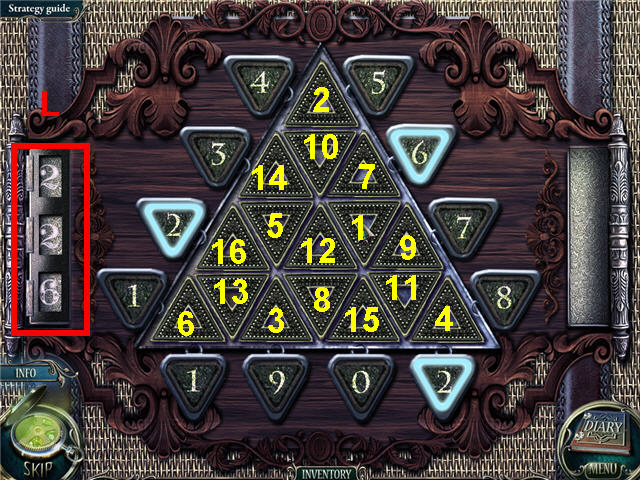
- The goal is to have each triangle pressed in.
- Note the number on the left (L), scroll your cursor over the triangles and note which 3 numbers light up on the sides. When the lit up numbers match the numbers on the dial, click on the triangle.
- See screenshot for solution.
- Click on the chest to access a Hidden Object Scene.

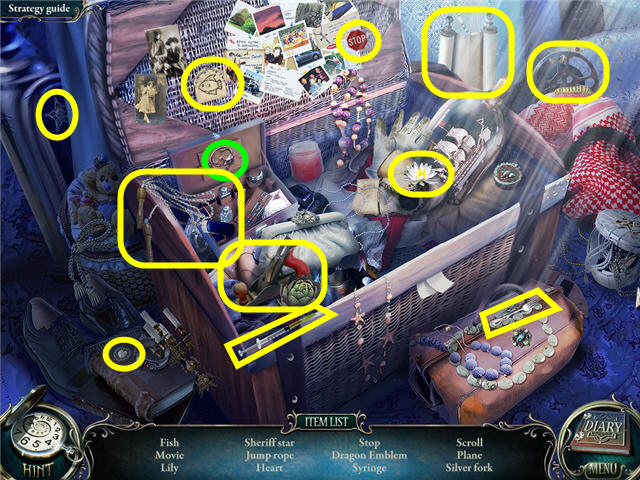
- Find the items listed and get a DRAGON.
- Go to father’s room.
- Examine the cabinet; place the DRAGON on the slot to trigger a puzzle.

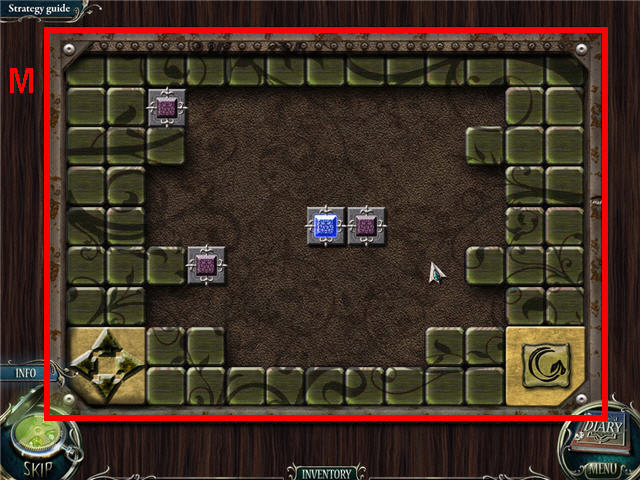
- Move the blue square to the center by using the arrows on the left and the pink squares.
- Solution legend- ULP=upper left pink, LRP=lower right pink square, M = Middle, B =blue square etc. L =left arrow, R=right arrow, U = up arrow, D = down arrow.
- One solution: LLP – R, U; ULP – R; B- L; UMP – D; B – R, U; URP – L, D; B – R, D; MRP – L; LRP – U, L; LLP – U; URP – L, D, R; LLP – L; ULP – D, R; URP – U, L; B – U, L, D, R.
- See screenshot for final solution (M).
- Enter the secret room.

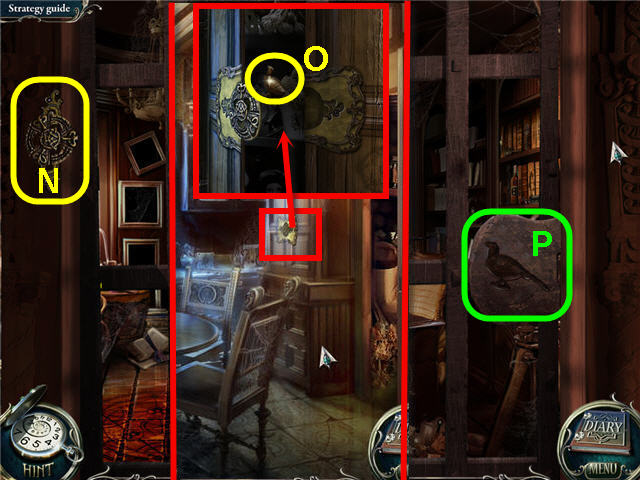
- Take the KEY (N).
- Go to the kitchen.
- Examine the cupboard.
- Place the KEY in the lock; take the PIGEON (O).
- Head back to the secret room in father’s room.
- Place the PIGEON in the lock (P).
- Click on the bookcase to access a Hidden Object Scene.

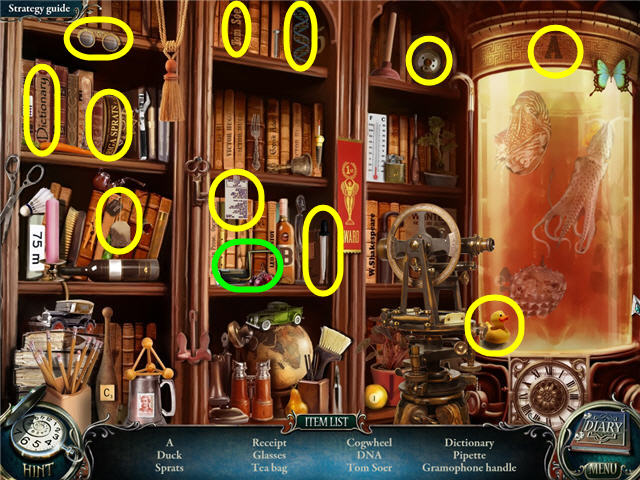
- Find the items listed.
- Get a GRAMOPHONE HANDLE.

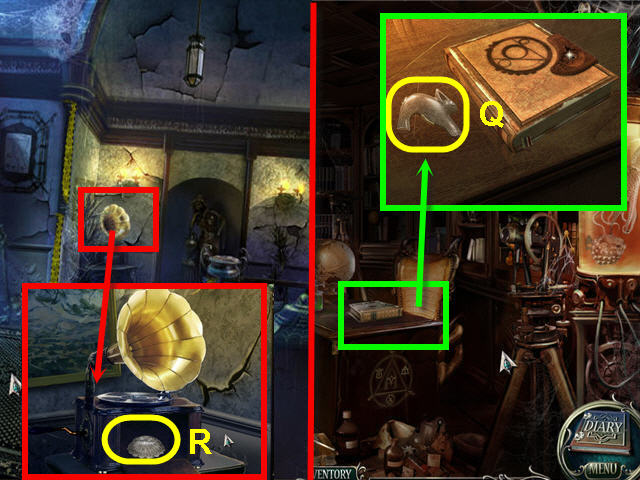
- Examine the book; take the RABBIT (Q).
- Find the items listed.
- Back out to the second floor hallway.
- Examine the gramophone.
- Place the gramophone handle on the gramophone; take the SEASHELL (R).
- Head to the basement corridor.

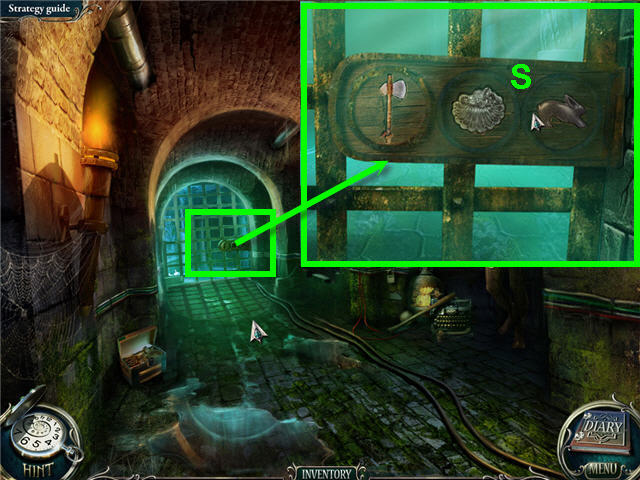
- Examine the fence; place the AXE, RABBIT and SEASHELL on the lock (S).
- Head to the stairs.
- Click on the junk pile to access a Hidden Object Scene.

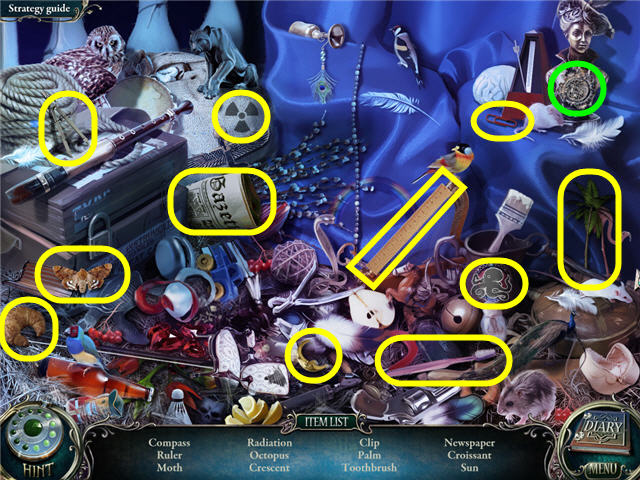
- Find the items listed.
- Get a BAS-RELIEF PIECE.

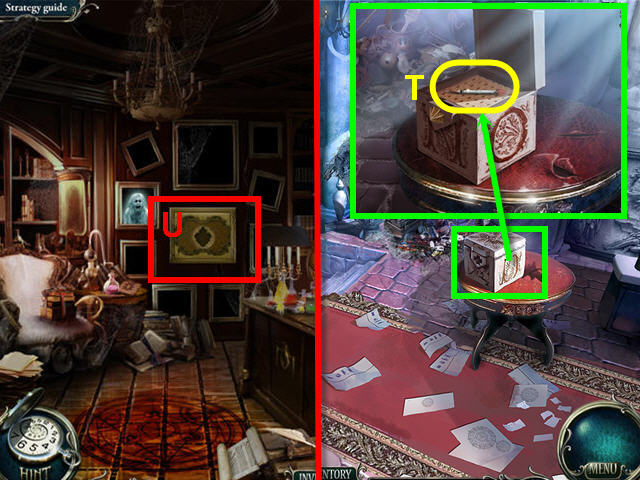
- Examine the box; use the CROSS on the slot.
- Take the SOPORIFIC (T).
- Head into the secret room in the father’s room.
- Examine the safe (U); place the BAS-RELIEF PIECE on the slot to trigger a puzzle.

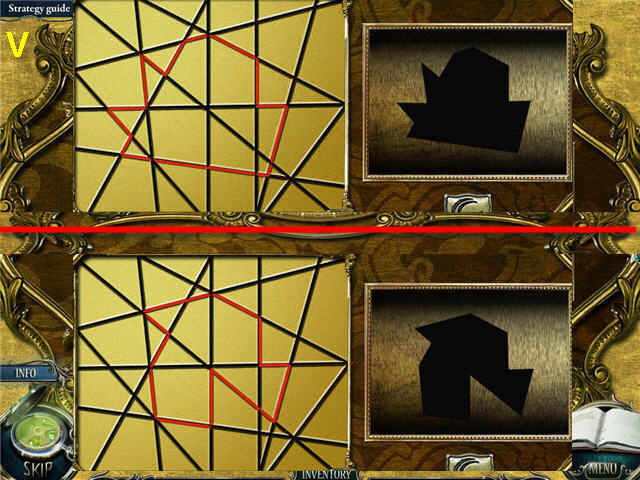
- Recreate the shapes on the right on the left grid by clicking on the lines to highlight them.
- See screenshot (V) for the first two solutions.

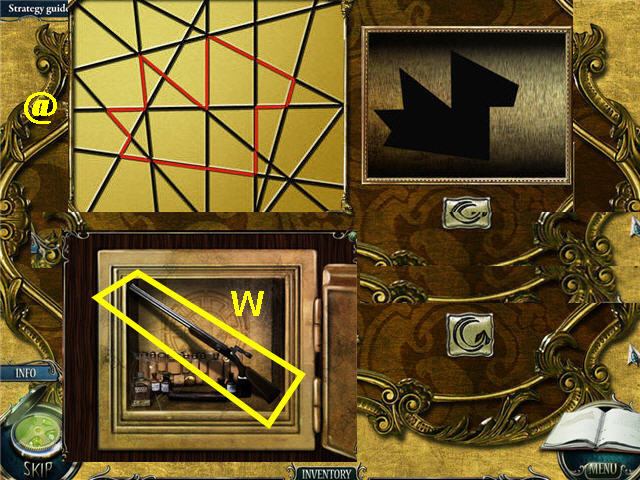
- See screenshot section (@) for the third solution.
- Examine the opened safe.
- Take the GUN (W) to get a GUN WITH SOPORIFIC.
- Head to the stairs at the end of the basement corridor.

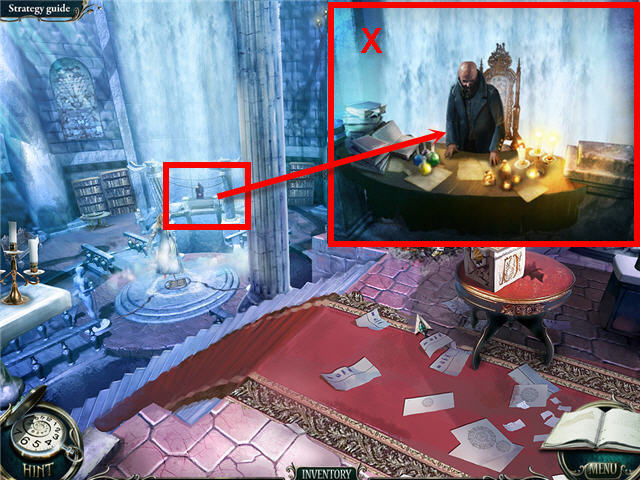
- Examine the demon (X); shoot him with the GUN WITH SOPORIFIC.
- Head down to the demon.

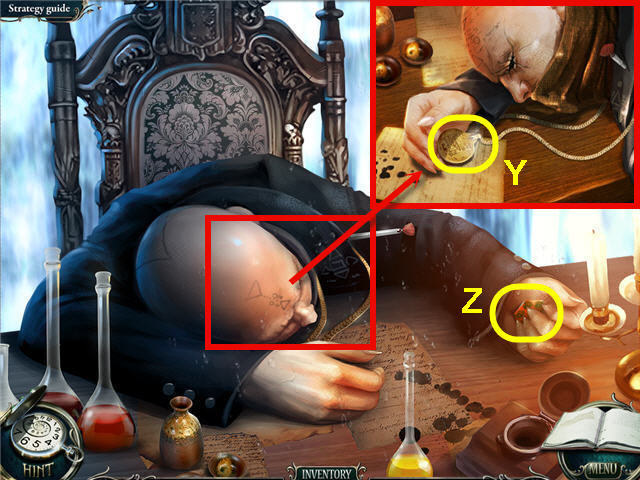
- Zoom into the demon (Y); take the MEDALLION.
- Open the demon’s hand; take the ORANGE COIN (Z).
- Head up to the secret room in father’s room.

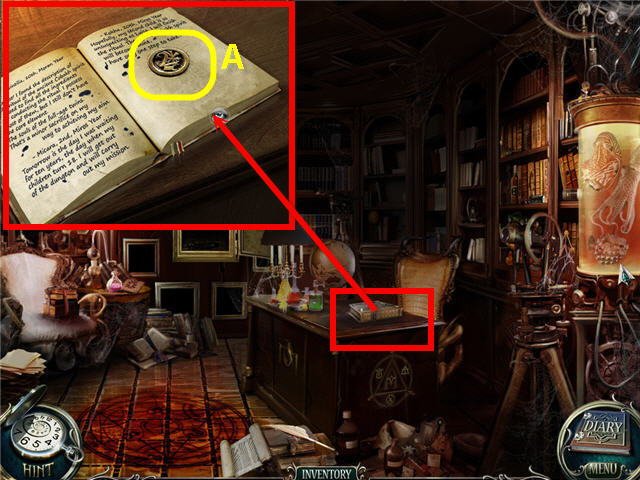
- Examine the book; place the MEDALLION on the slot.
- Open the book; take the YELLOW COIN (A).
- Head down to the levitation platform.
- Click on the platform below Luisa.
- Place the ORANGE COIN and the YELLOW COIN on the mechanism to trigger a puzzle.

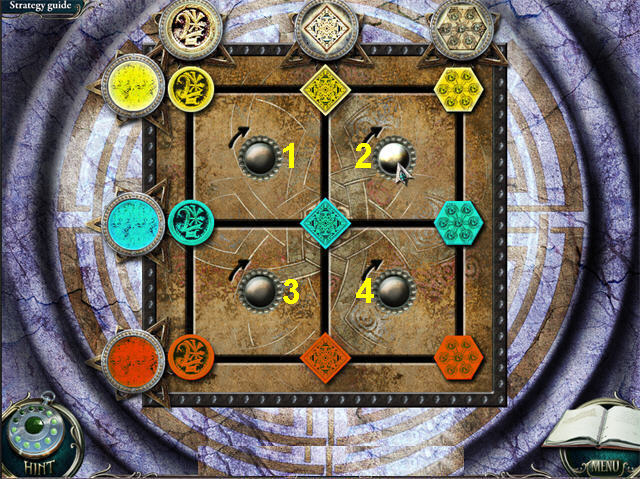
- Arrange the coins so that they match the vertical and horizontal shapes on the top and left.
- See screenshot for solution guide. The first number is the button you push and the second number is the amount of times you push it: 1×2, 3, 4, 3×2, 4×2, 2×2, 1×3, 2, 3, 1, 3, 2, 4, 3×3, 4, 3, 2×2, 4, 2, 4×2, 2, 4×3, and 2×3.
- Congratulations! You have successfully completed Grim Tales: The Bride Standard Edition.






 Forest Legends: The Call of Love Walkthrough, Guide, & Tips
 The Curse of the Ring Walkthrough, Guide, & Tips
 Angelica Weaver: Catch Me When You Can Walkthrough, Guide, & Tips
 Twilight Phenomena: The Incredible Show Walkthrough, Guide, & Tips
 Tamara the 13th Walkthrough, Guide, & Tips