Final Cut: Encore Walkthrough, Guide, & Tips
Final Cut: Encore Walkthrough

Welcome to the Final Cut: Encore Walkthrough
Your murderous half-sister has escaped, and you’ve got the last piece of your father’s treacherous film projector…
Whether you use this document as a reference when things get difficult or as a road map to get you from beginning to end, we’re pretty sure you’ll find what you’re looking for here.
This document contains a complete Final Cut: Encore game walkthrough featuring annotated screenshots from actual gameplay!
We hope you find this information useful as you play your way through the game. Use the walkthrough menu below to quickly jump to whatever stage of the game you need help with.
Remember to visit the Big Fish Games Forums if you find you need more help. Have fun!
This walkthrough was created by Nathaniel A., and is protected under US Copyright laws. Any unauthorized use, including re-publication in whole or in part, without permission, is strictly prohibited.
General Tips

- This is the Official Guide for Final Cut 2: Encore.
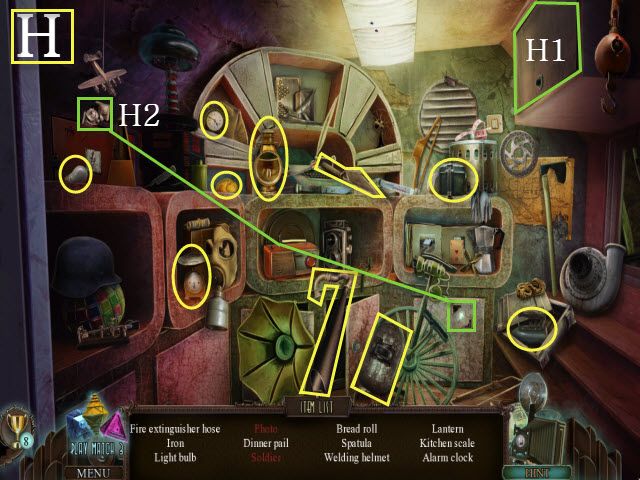
- Throughout the guide, we will use the acronym ‘HOP’ for Hidden-object puzzles. Certain items in HOP scenes require an extra step to find; these will be noted in green and marked with a connecting arrow. HOPs are random; our lists may vary from yours.
- An HOP or a step will not become available until a journal entry has been added. Please refer to the guide to see if you have missed any of these steps.
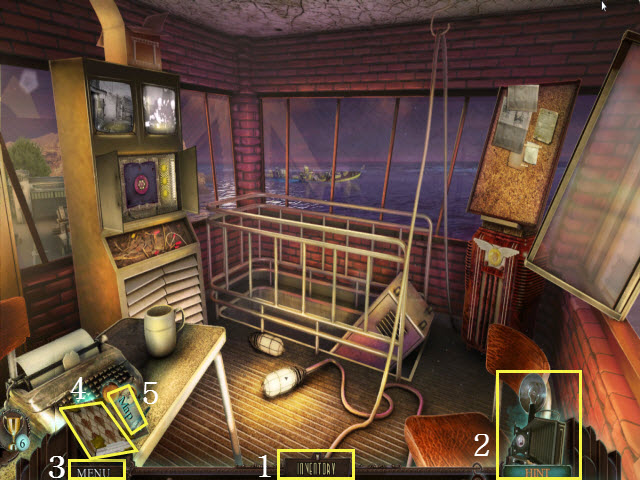
- The Inventory items are stored here (1).
- The Hint button will offer hints and allow you to skip puzzles, but will take some time to recharge (2).
- Selecting the Menu button will bring up the Options, Help, and allow you to exit the game (3).
- The Journal will show your current tasks and clues (4).
- Use the map to fast travel from location to location (5).
Chapter 1: Family Reunion
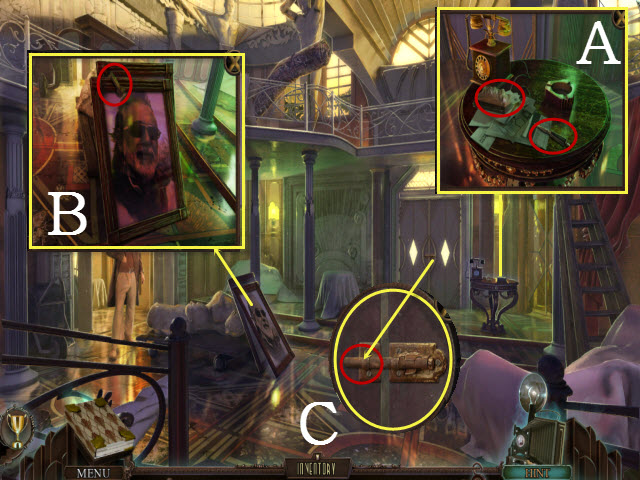
- Examine the table; pick up the LETTER OPENER and the PAPERWEIGHT (A).
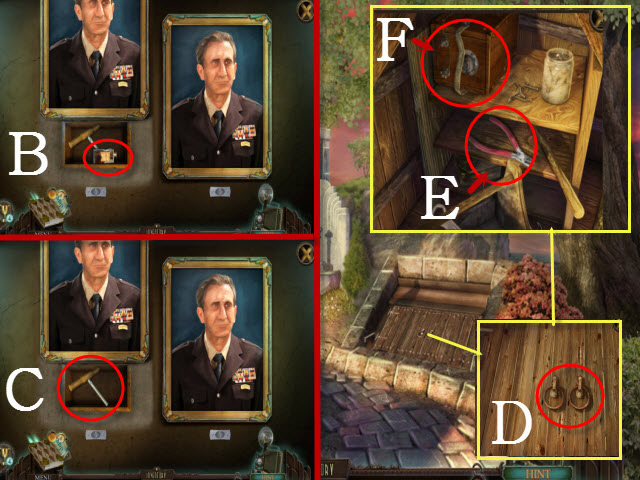
- Move the sheet and examine the painting; take the CRANK HANDLE (B).
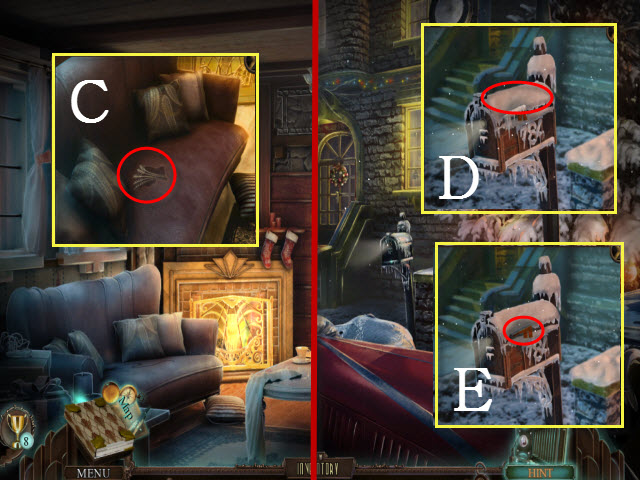
- Examine the door; select the latch and use the LETTER OPENER on it (C).
- Talk to the General.
- Walk left to the East Hall.
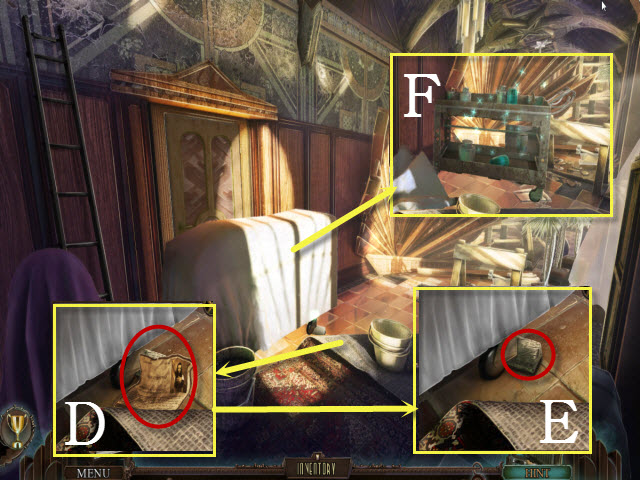
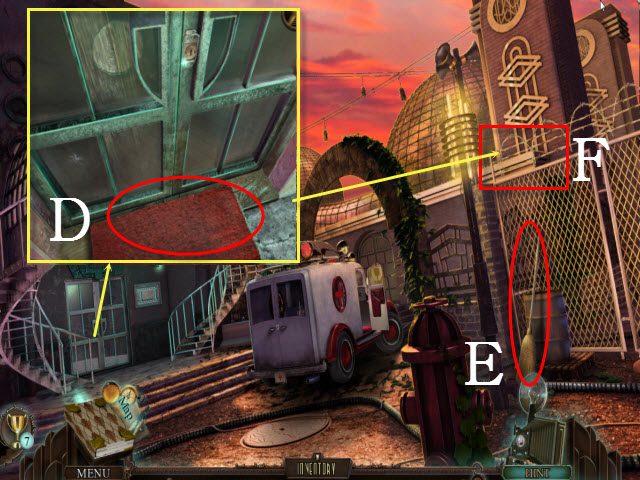
- Examine the carpet; select and then take the newspaper clipping (D).
- Use the PAPERWEIGHT on the wedge to get the WOODEN WEDGE (E).
- Move the dolly and select it to activate a HOP (F); any time a HOP is activated you will be able to choose to play a Match 3 game instead by selecting the Match 3 option.
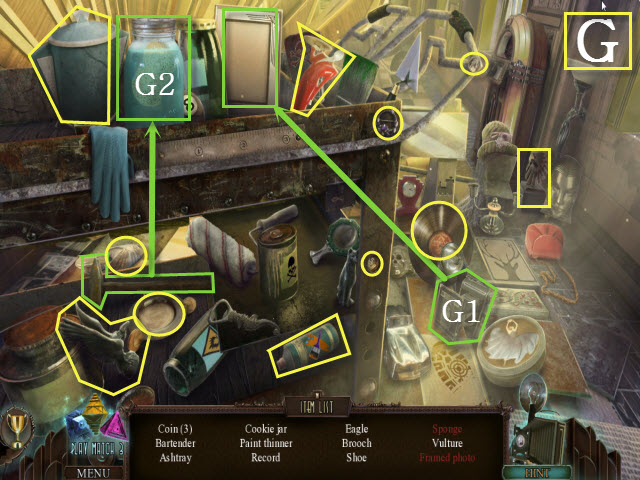
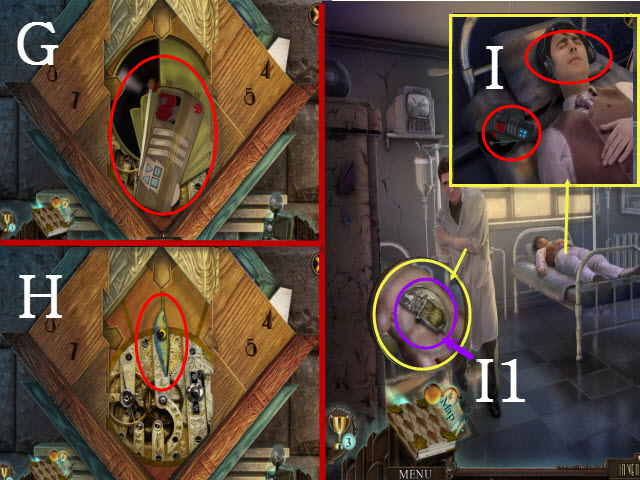
- Play the HOP to receive the PAINT THINNER (G).
- Walk forward to the Library.
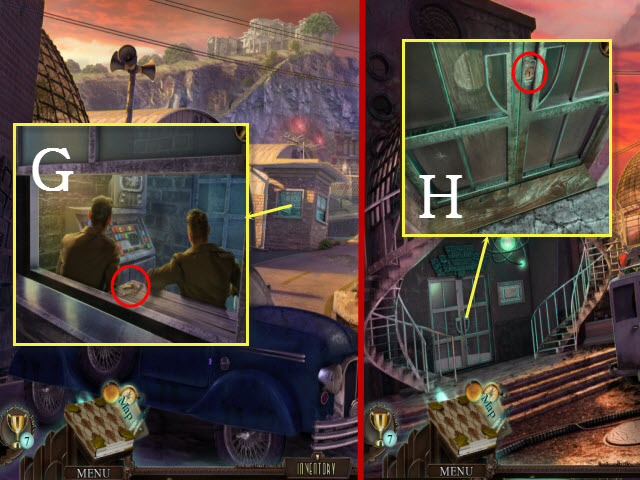
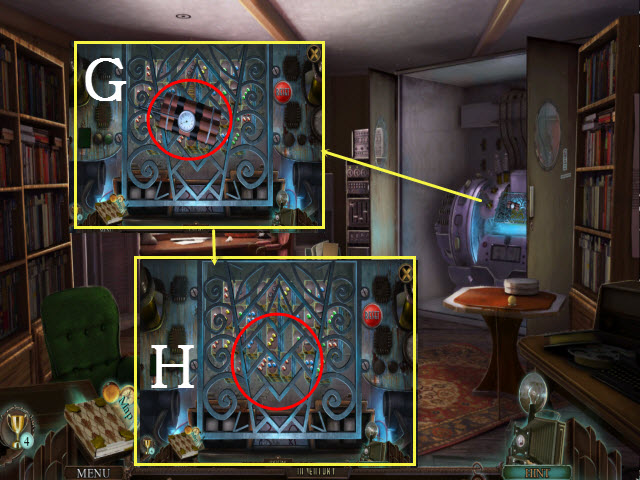
- Move the blanket and examine the register.
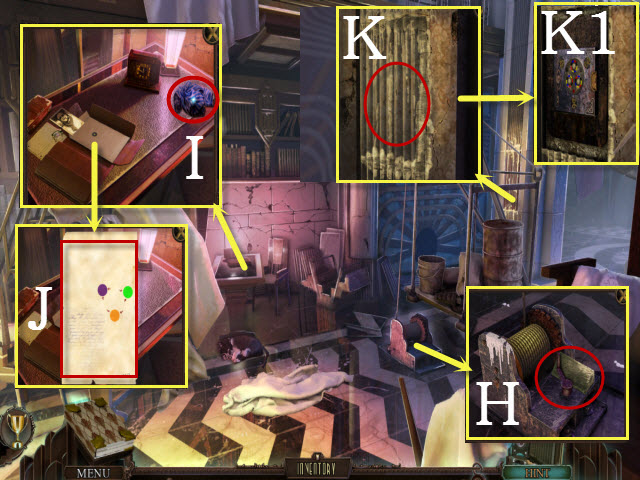
- Place the CRANK HANDLE in the slot and select it; use the WOODEN WEDGE on the crank (H).
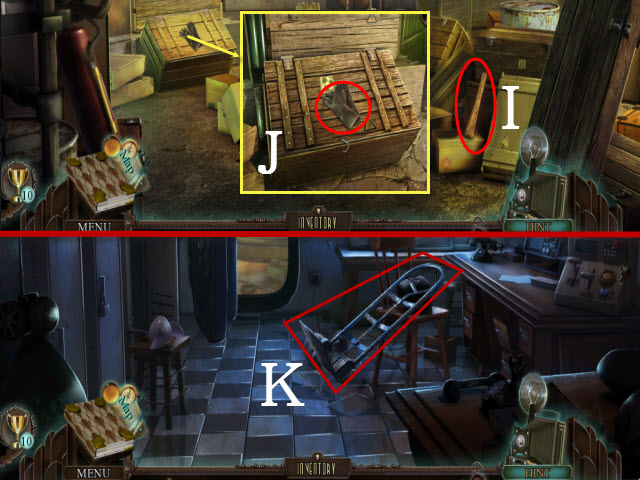
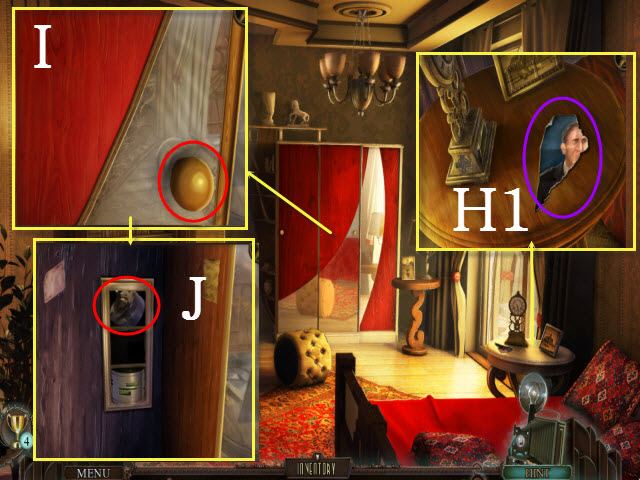
- Examine the desk and take the OLD CLOTH (I); open the folder and select the contents until you receive the FATHER’S PHOTO (J).
- Examine the wall; use the PAINT THINNER, the OLD CLOTH, and then the LETTER OPENER on it (K).
- Examine the wall; place the FATHER’S PHOTO on it to activate a mini-game.
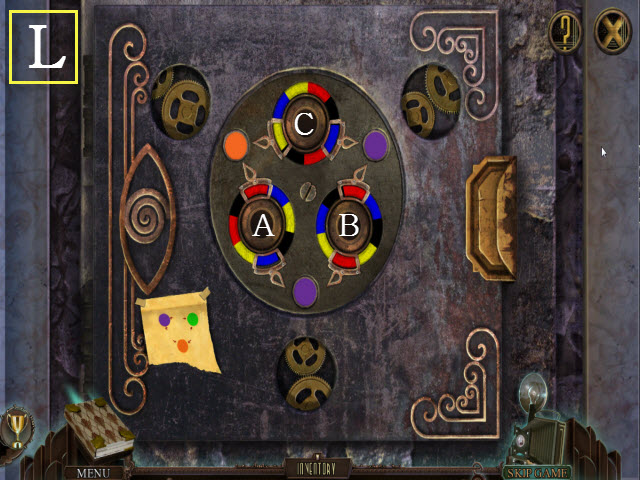
- To solve the mini-game, rotate the three dials so the colors match those shown on the note.
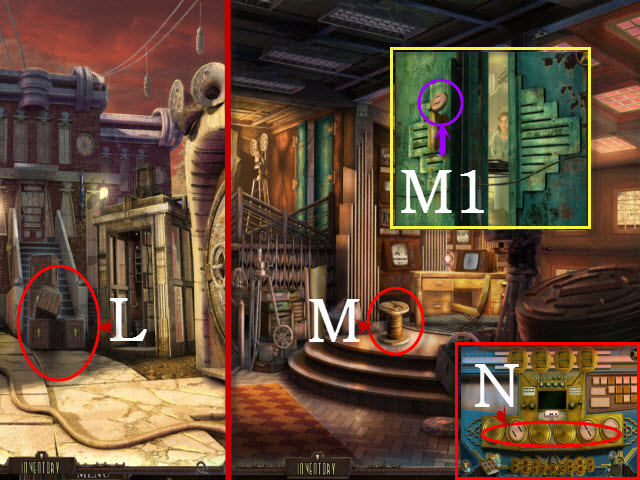
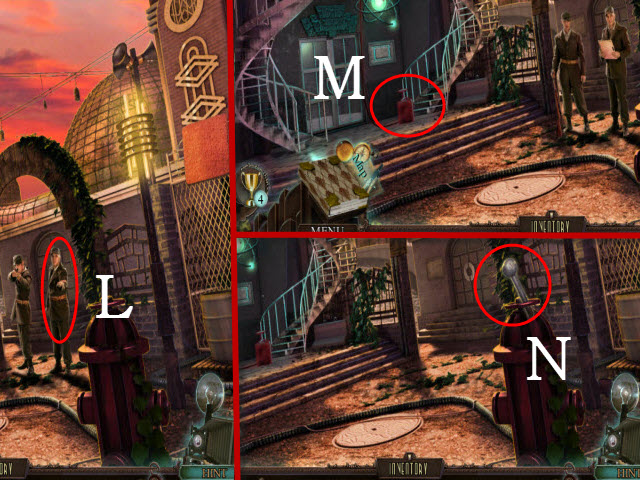
- Solution: Ax4, Bx7, and Cx5 (L).

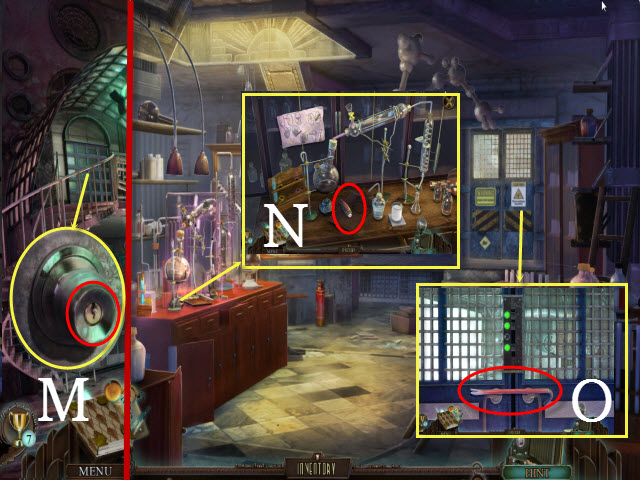
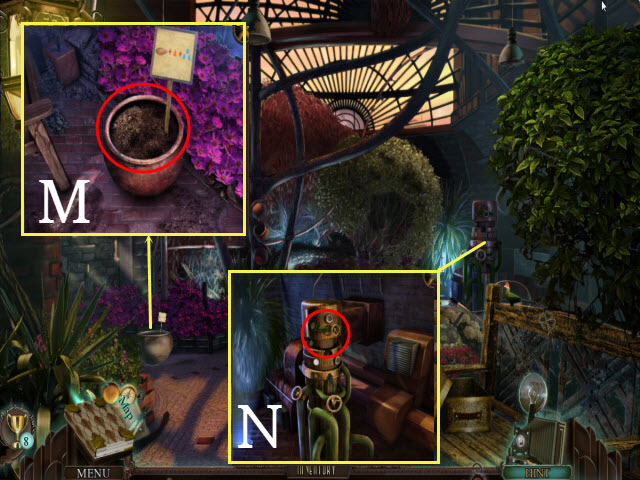
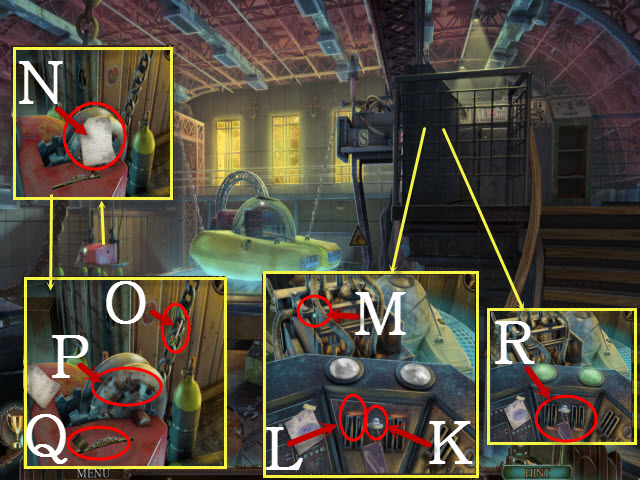
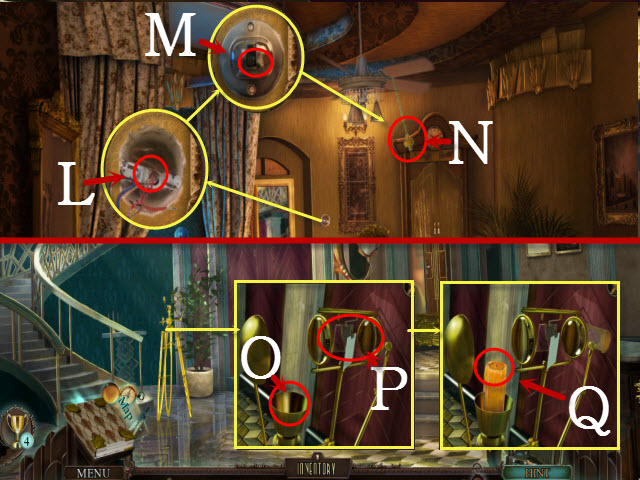
- Pick up the PROJECTOR IRIS (M).
- Return to the Foyer; walk outside to the Fountain.
- Give the PROJECTOR IRIS to the General (N).
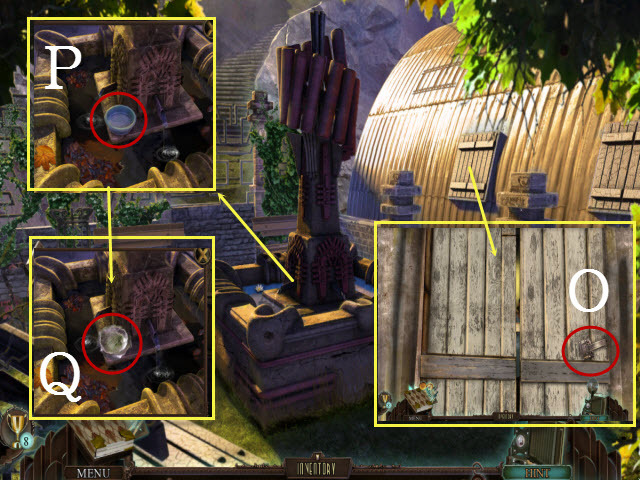
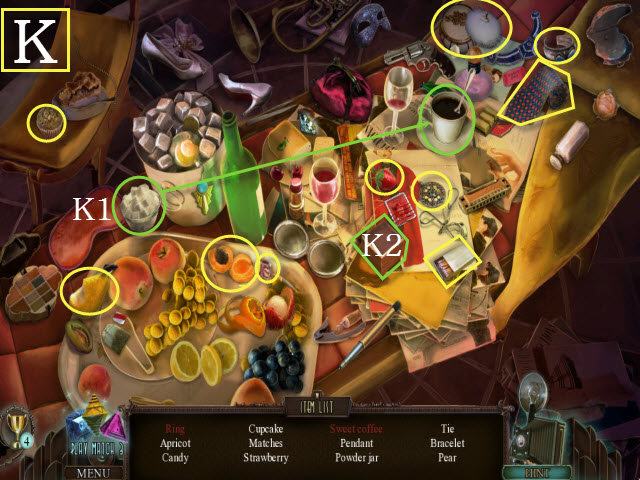
- Talk to Frederick; examine the debris to activate a HOP.
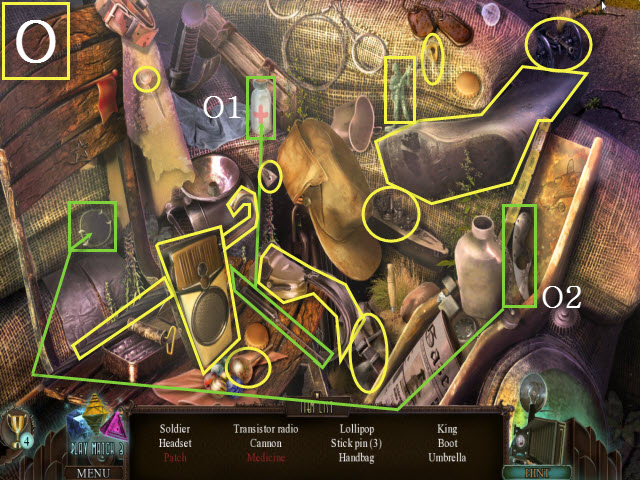
- Play the HOP to receive the UMBRELLA (O).
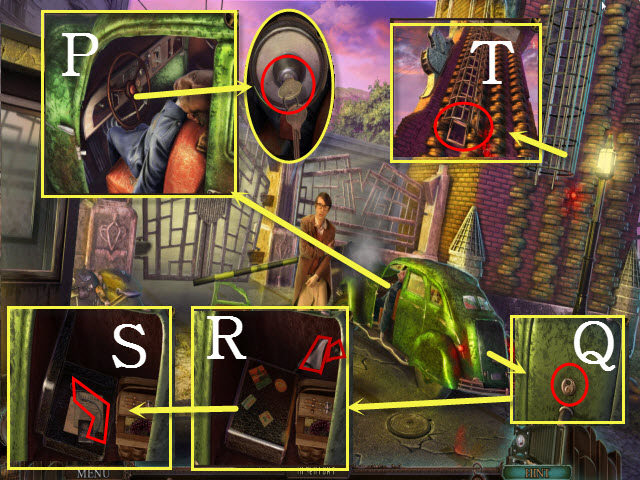
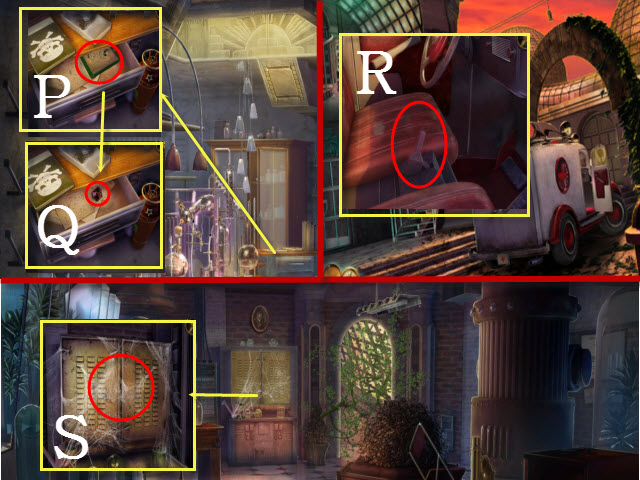
- Examine the car; select the steering wheel and take the CAR KEY (P).
- Examine the trunk; use the CAR KEY on the lock to open it (Q).
- Pick up the SILK NAPKIN and then take the TIRE IRON (R).
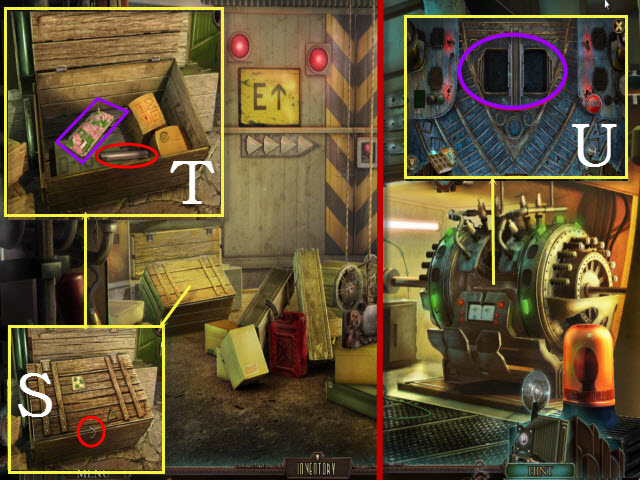
- Open the suitcase and select the medical files until you get them; take the PIECE OF WIRE (S).
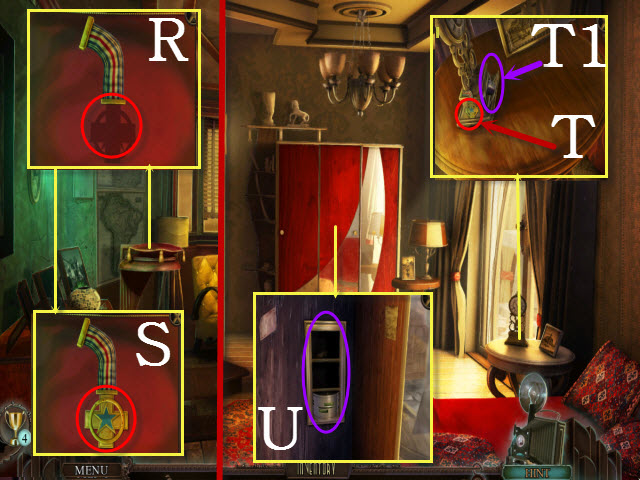
- Examine the ladder; use the UMBRELLA on it (T).
- Climb up the ladder to the Guard Tower.
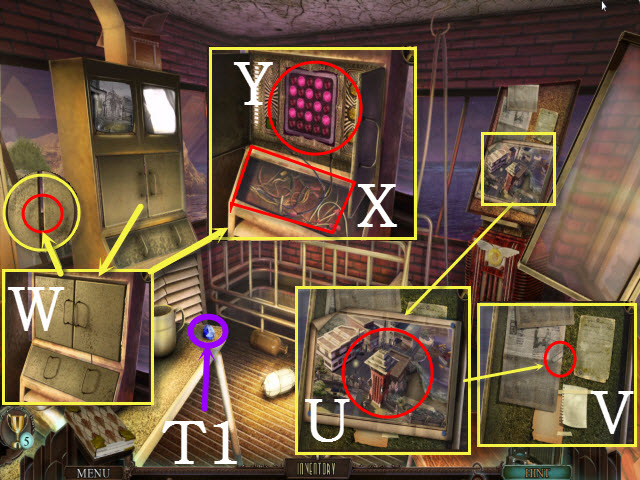
- Pick up the 1/5 SAPPHIRE (T1).
- Examine the bulletin board; inspect and take the aerial photograph (U) to get the in-game Map. The Map allows you to fast travel between locations and to see your current objectives.
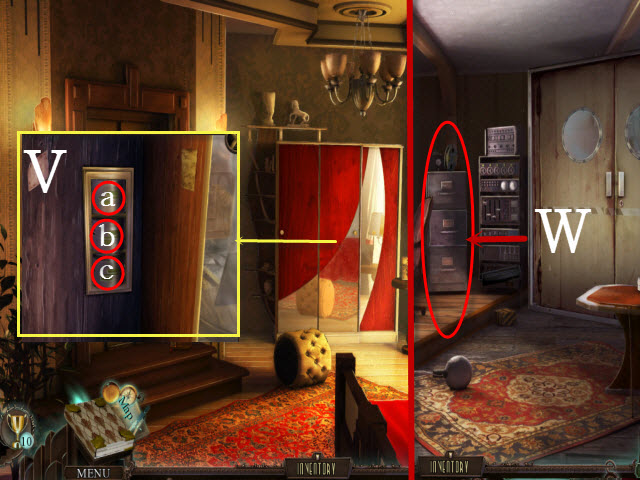
- Take the PAPER CLIP (V).
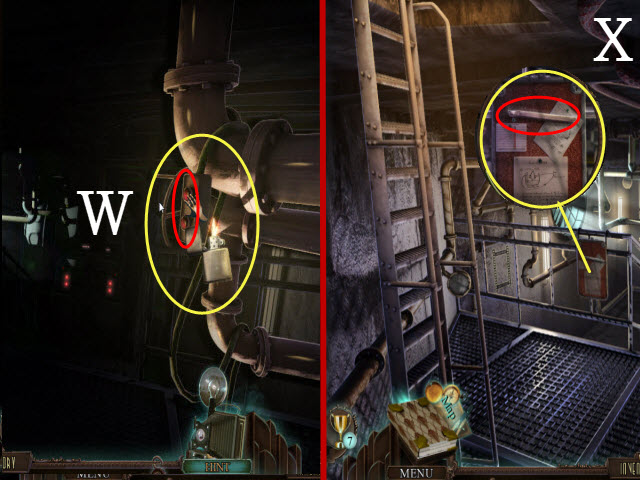
- Look at the console; examine the doors and use the PAPER CLIP on the latch (W).
- Remove the panel and place the PIECE OF WIRE with the wires (X).
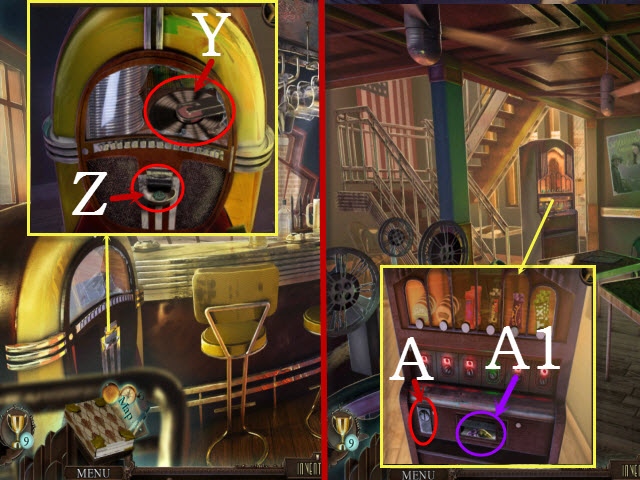
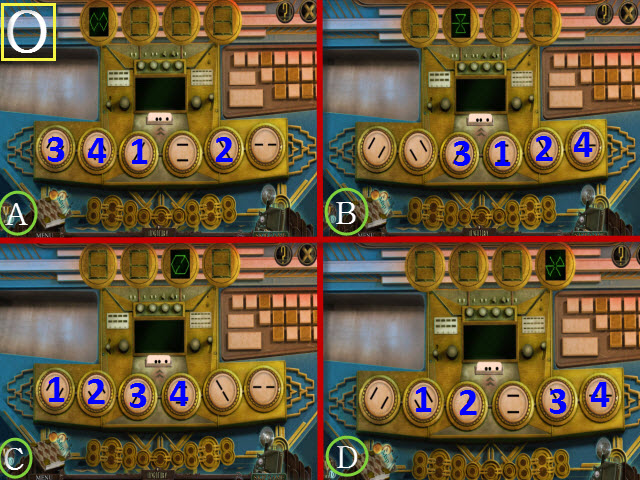
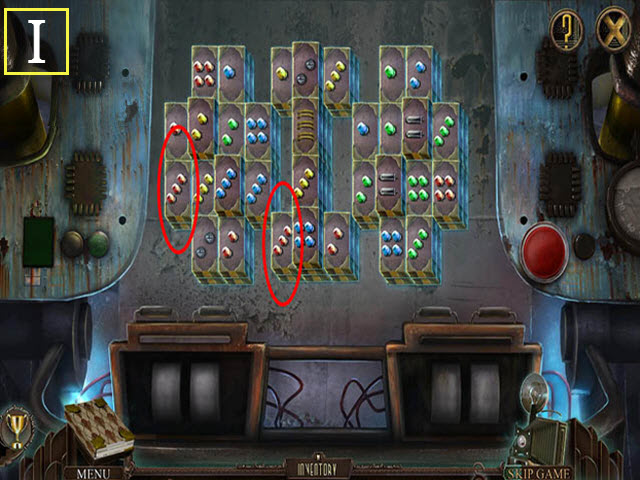
- Examine the buttons to activate a puzzle (Y).
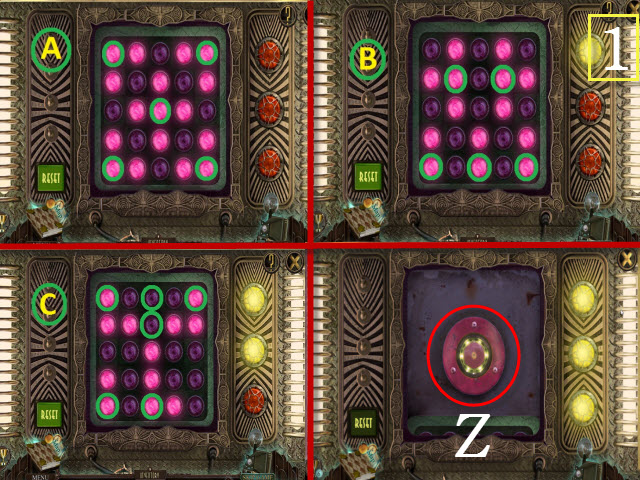
- To solve the puzzle, turn all the lights off three times in order to light up the three bulbs on the right-hand side.
- Choose the buttons highlighted in green to solve; follow steps A-C to solve the puzzle (1).
- Select the button (Z).
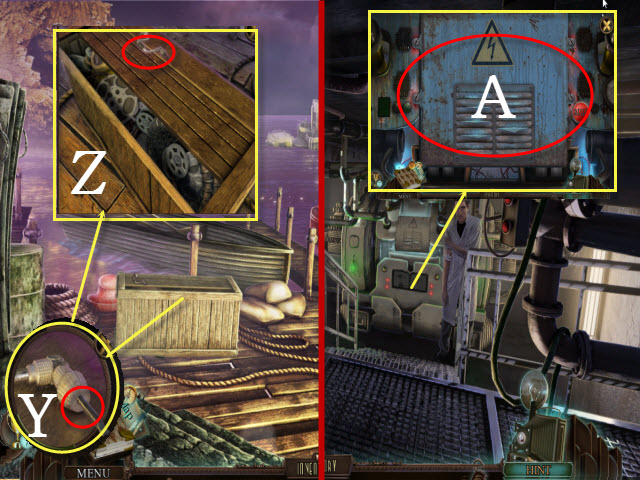
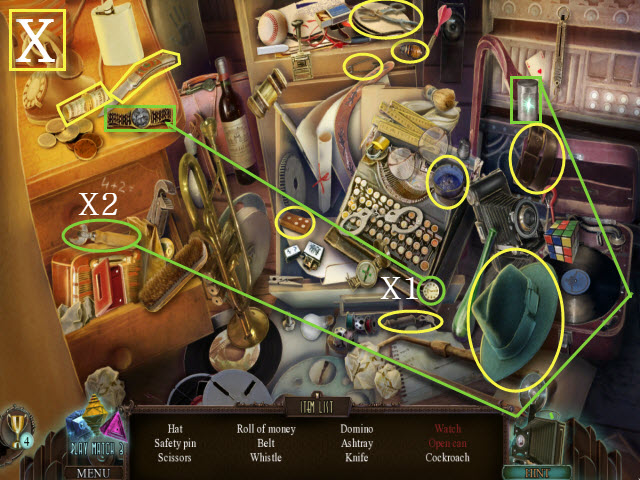
- Walk down to the Base Entrance and examine the debris to activate a HOP.
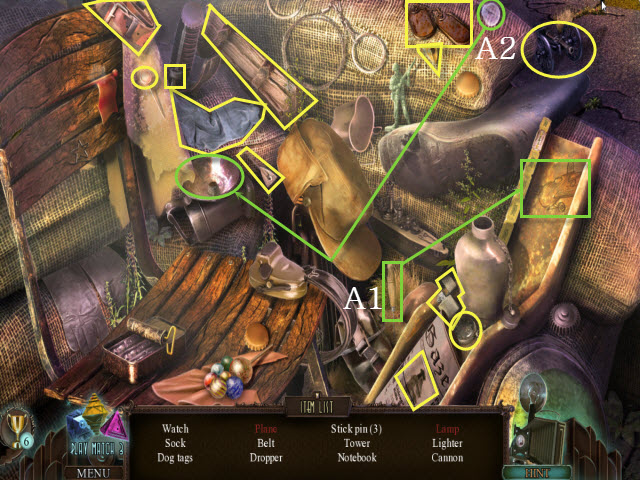
- Play the HOP to receive the LIGHTER (A).
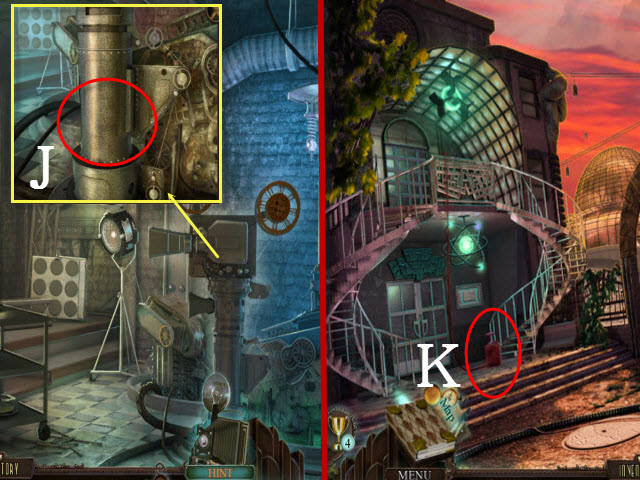
- Walk forward to the Road Fork and select the projector.

- Look at the door; take the 2/5 SAPPHIRE (A1).
- Examine the junk pile; take the MAGNET (B).
- Examine the garage door; use the LIGHTER on the rope (C).
- Enter the Maintenance Service Room.
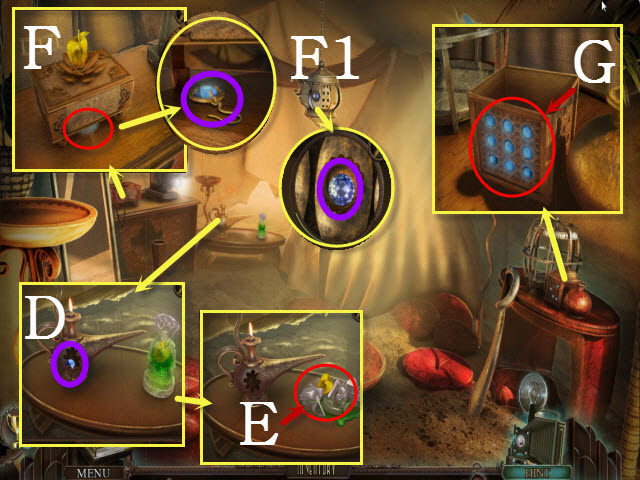
- Examine the table; use the LIGHTER on the oil lamp and take the 3/5 SAPPHIRE (D).
- Use the TIRE IRON on the golden apple; take the 1/2 GOLD APPLE SLICE (E).
- Examine the chest and look underneath it; use the MAGNET on it to get the 4/5 SAPPHIRE (F).
- Examine the hanging lamp; take the 5/5 SAPPHIRE (F1).
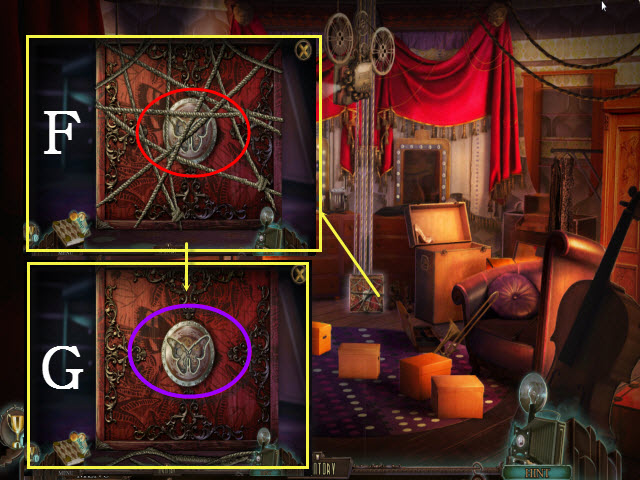
- Examine the puzzle box and place the 5/5 SAPPHIRE on it (G).
- Examine the puzzle box to activate a puzzle.
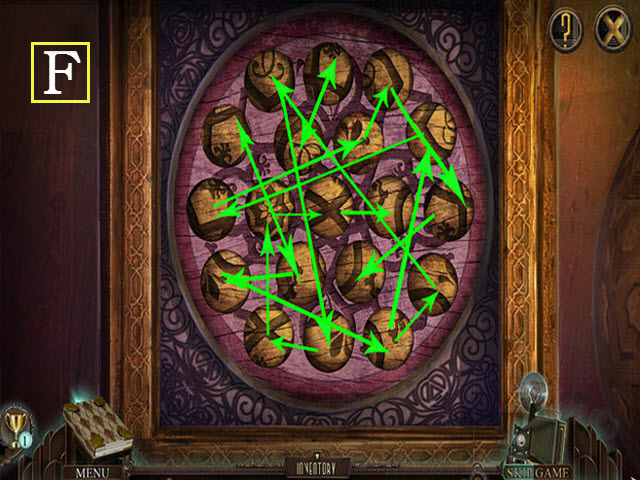
- Swap the circles with each other to create a complete image; see the screenshot for the solution (F).
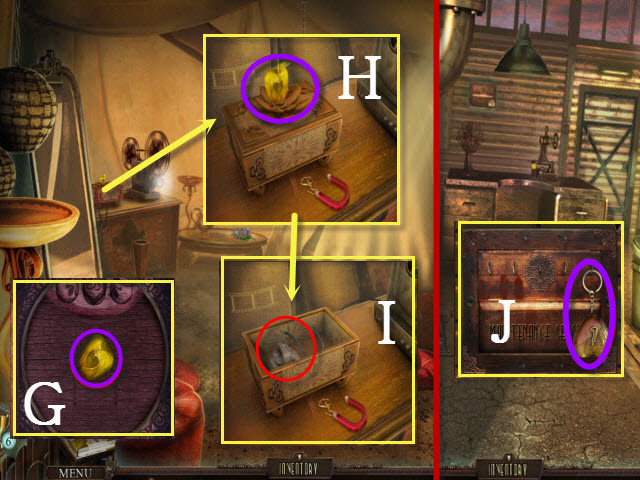
- Take the 2/2 GOLD APPLE SLICE (G).
- Examine the chest and place the 2/2 GOLD APPLE SLICE with the apple (H).
- Unplug the cord (I).
- Examine the key holder; take the 1/2 HEART LOCKET (J).
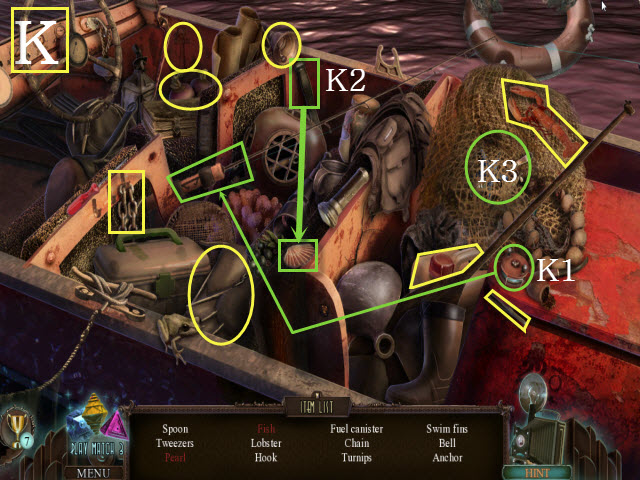
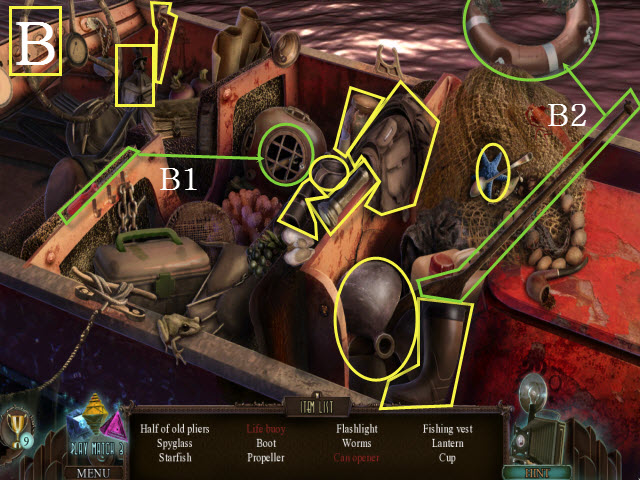
- Walk forward to the Bay Dock; select the boat to activate a HOP.
- Play the HOP to receive the PAIR OF TWEEZERS (K).
Chapter 2: Digging Deeper
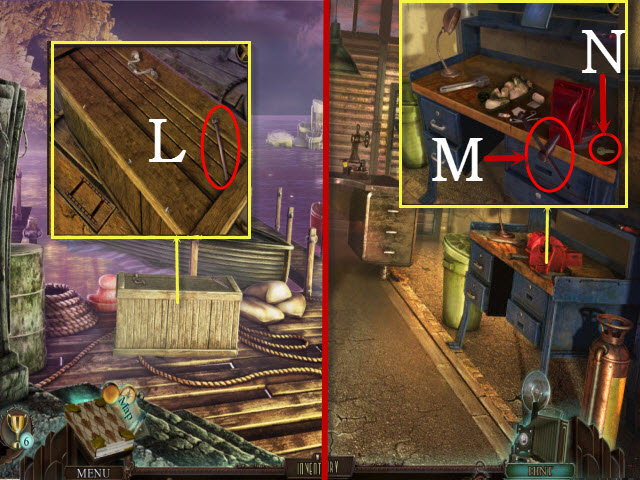
- Examine the crate; take the LEVER (L).
- Walk down.
- Examine the vice; use the LEVER on it (M).
- Take the BLANK KEY (N).
- Walk down.
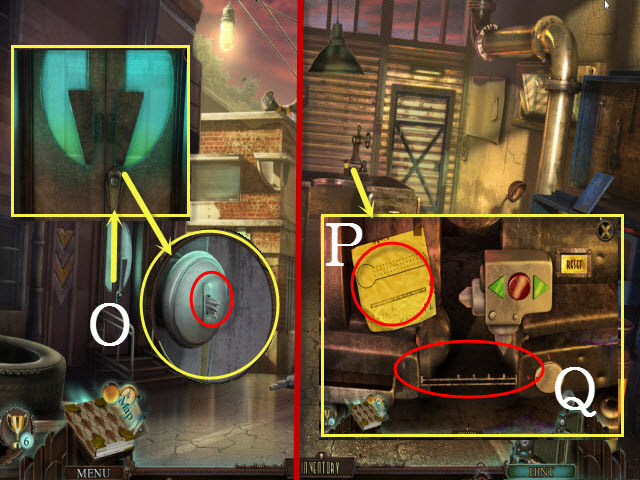
- Look at the door and examine the doorknob; use the PAIR OF TWEEZERS on the doorknob to get the KEY PART (O).
- Return to the Maintenance Service Room.
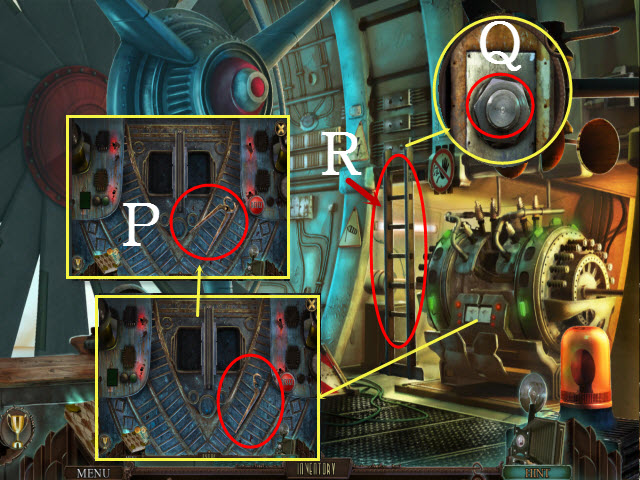
- Examine the key press; place the KEY PART (P) with the diagram and place the BLANK KEY in the slot (Q) to activate a puzzle.
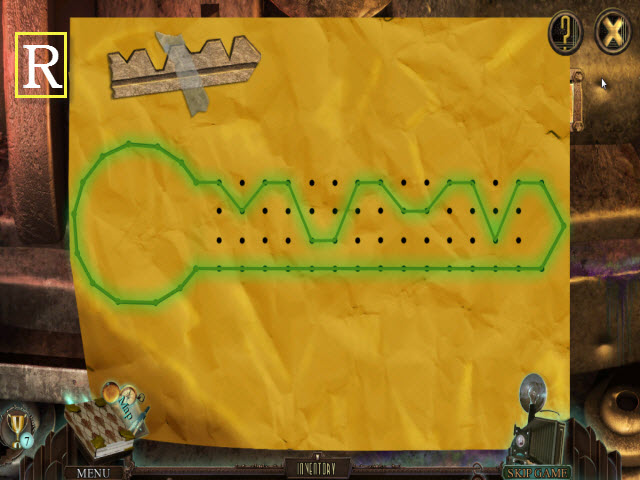
- To solve phase one, connect the dots so the key matches the carving on the note (R).
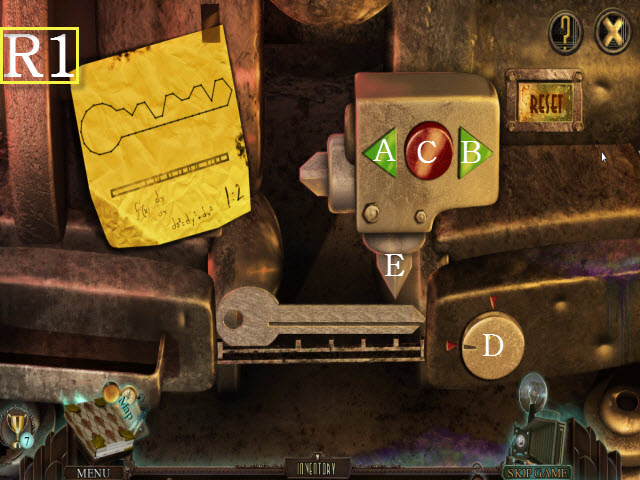
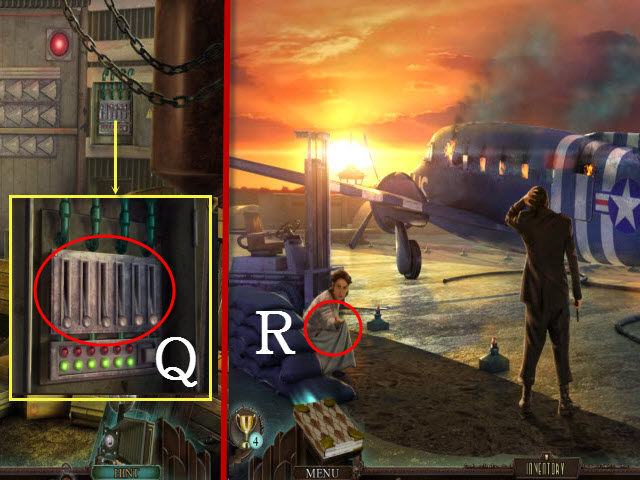
- For the second phase, manipulate the buttons to create the key shown on the diagram. The green buttons move the drill left and right. The drill head can be swapped between dull and sharp. The red button will activate the drill. The dial raises and lowers the key level.
- Solution: D, C, A, D, E, C, A, D, C, A, E, D, and C (R1).
- You will receive the CAFETERIA KEY.
- Walk down.
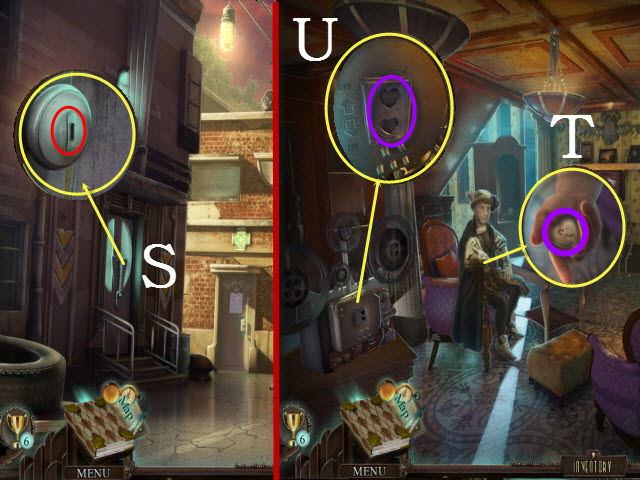
- Look at the door; examine the lock and use the CAFETERIA KEY on it (S).
- Walk left to the Cafeteria.
- Talk to the Romeo; examine his hand and take the 2/2 HEART LOCKET (T).
- Examine the movie projector; place the 2/2 HEART LOCKET in the slots (U).
- Press the switch.
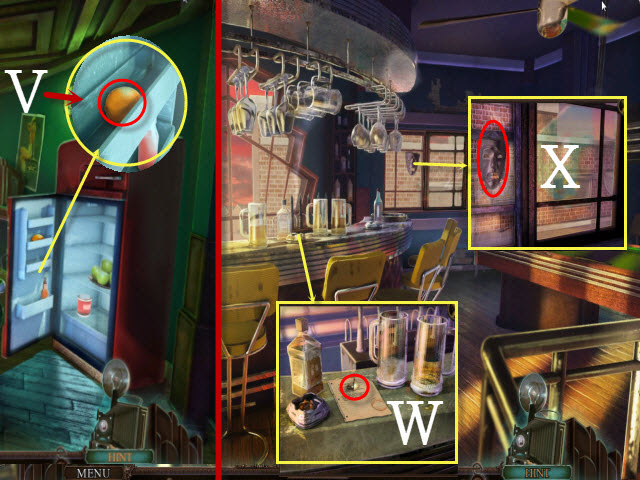
- Open the refrigerator; examine the door and take the LEMON (V).
- Walk upstairs to the Cafeteria Bar.
- Examine the bar; take the EGYPTIAN RING (W).
- Examine the window; take the TRAGEDY MASK (X).
- Walk downstairs; examine the movie projector and press the switch.
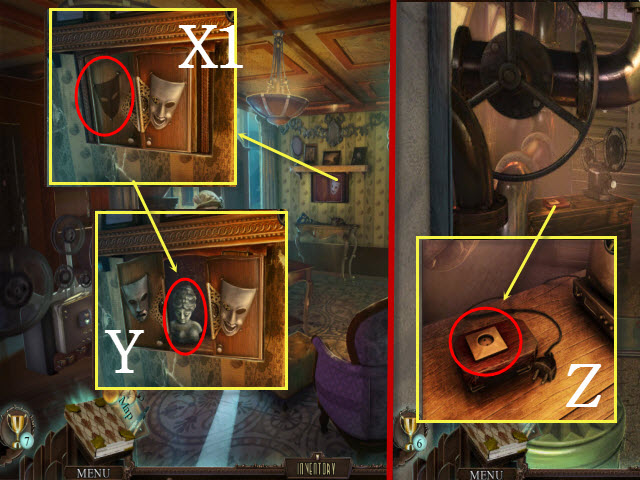
- Examine the movie case and place the TRAGEDY MASK on the slot (Y).
- Take the JULIET’S BUST (Z).
- Return to the Maintenance Service Room.
- Examine the desk; select the plug (A).

- Examine the lamp; place the EGYPTIAN RING in the slot (B).
- Pick up the JEWELED DAGGER (C).
- Examine the projection box; pull the plug (D).
- Walk forward to the Bay Dock.
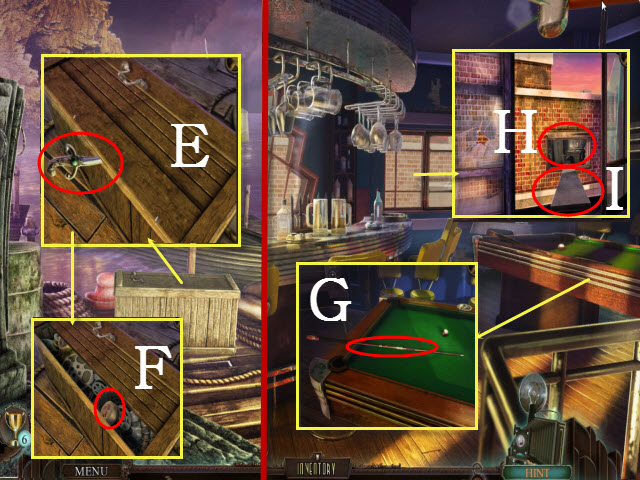
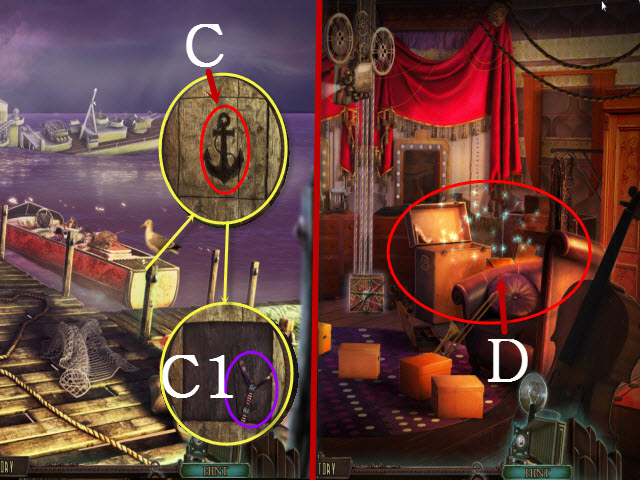
- Examine the crate; place the JEWELED DAGGER WITH it and then use the JULIET’S BUST on the dagger (E).
- You will receive the PLANK.
- Take the DUCT TAPE (F).
- Return to the Cafeteria and examine the movie projector; press the button. Walk upstairs to the Cafeteria Bar.
- Examine the pool table; use the DUCT TAPE on the pool cue and take the CUE (G).
- Examine the window and open it; use the CUE on the window three times (H) and then place the PLANK with the window (I).
- Walk forward.
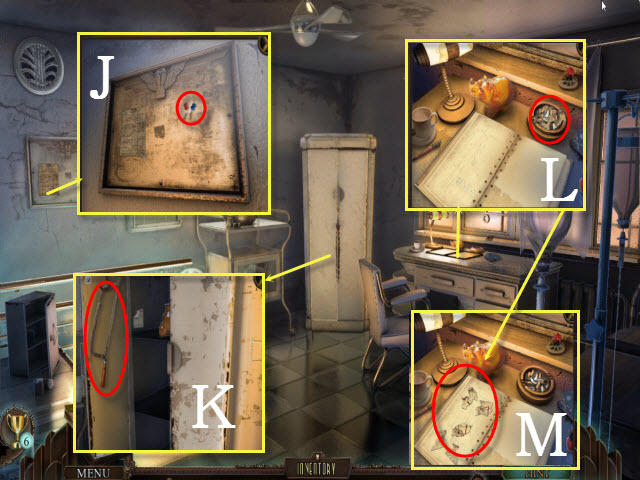
- Examine the board; take the BOARD PIN (J).
- Examine the locker and open it; take the METAL SAW (K).
- Examine the desk; use the PAIR OF TWEEZERS on the ashtray (L).
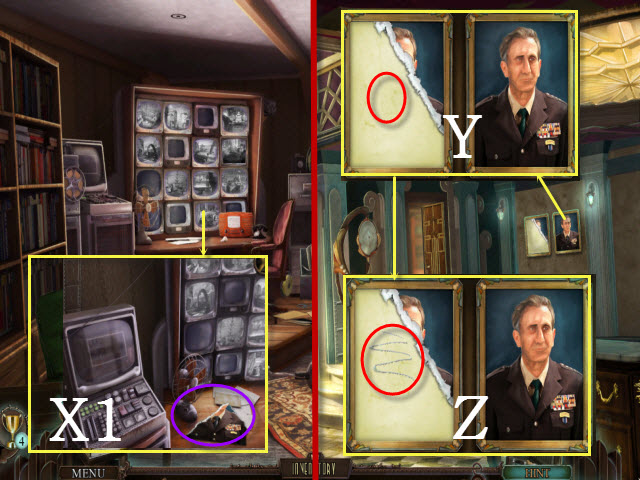
- Examine the note scraps to activate a puzzle (M).
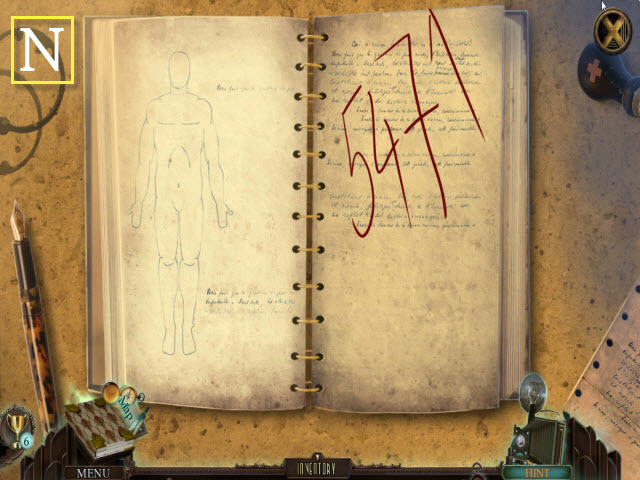
- To solve the puzzle, drag the page pieces together to create a whole image. When a piece is correctly positioned, it will snap into place (N).
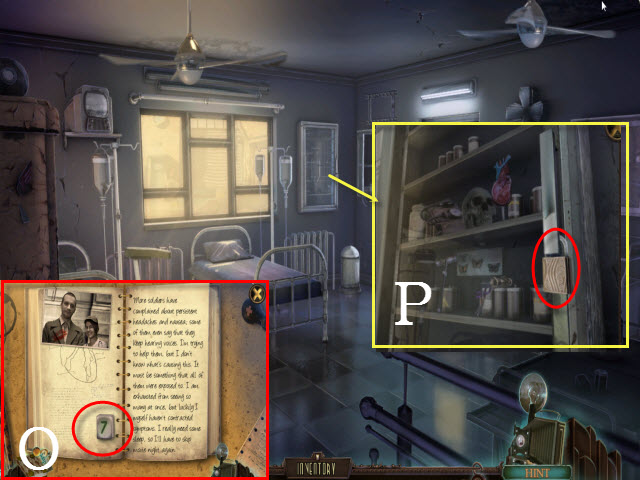
- Turn the notebook page; take the NUMBER SEVEN (O).
- Walk left to the Medical Service Center.
- Examine the cabinet; use the METAL SAW on the padlock (P).
- Examine the cabinet to activate a HOP.
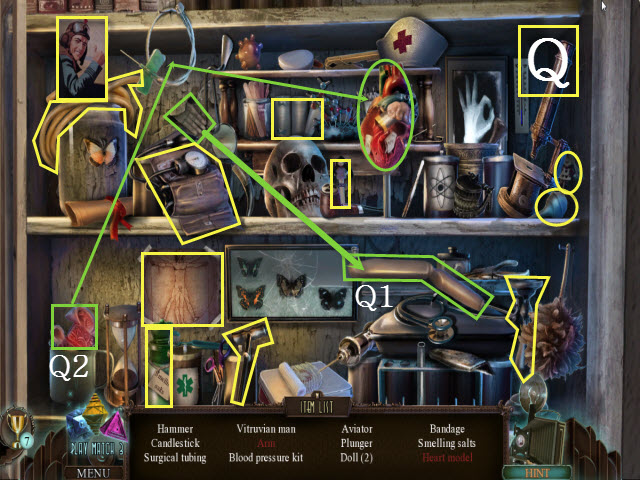
- Play the HOP to receive the SMELLING SALTS (Q).
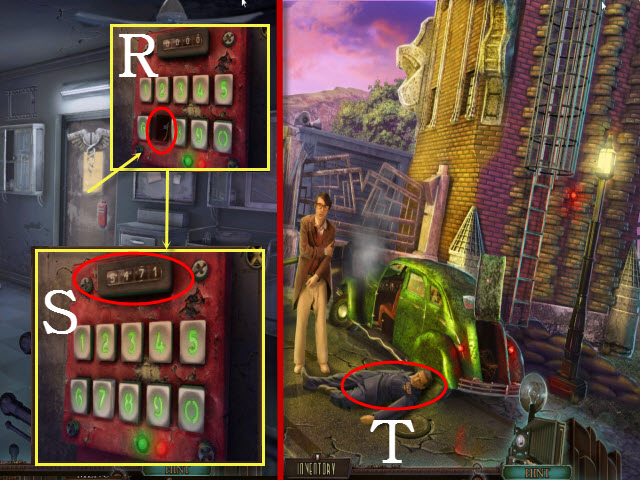
- Examine the keypad and place the NUMBER SEVEN in the empty slot (R).
- Enter the code: 5471 (S).
- Return to the Base Entrance.
- Give the SMELLING SALTS to the General (T).
- Walk forward.

- Examine the General; take the BASEMENT KEY (U).
- Walk forward to the Maintenance Service Room.
- Examine the hatch; use the BASEMENT KEY on the lock (V).
- Walk downstairs to the Maintenance Basement.
- Use the LIGHTER on the scene and press the button (W).
- Walk upstairs.
- Walk downstairs to the Maintenance Basement.
- Examine the clipboard; take the SCREWDRIVER HEAD (X).
- Return to the Bay Dock.
- Examine the crate and look at the crank drill; place the SCREWDRIVER HEAD with it (Y).
- Take the CRANK SCREWDRIVER (Z).
- Return to the Maintenance Basement.
- Examine the generator; use the CRANK SCREWDRIVER on the screws to activate a puzzle (A).
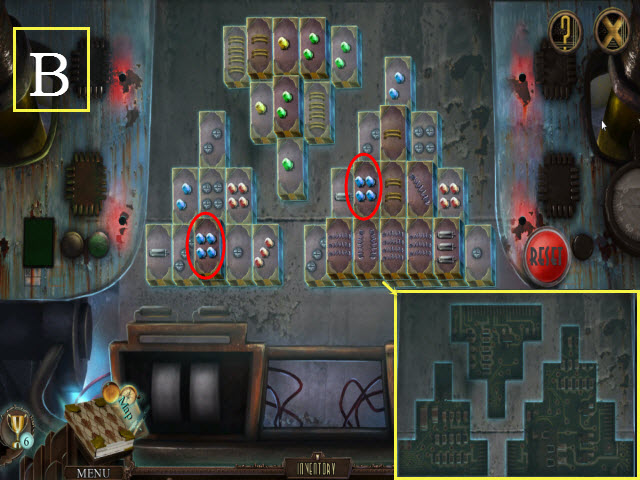
- To solve the puzzle, remove matching pairs until nothing remains. You can only choose tiles that are not blocked by anything else.
- Press Reset to start over (B).
- Examine the cabinet to activate a HOP.
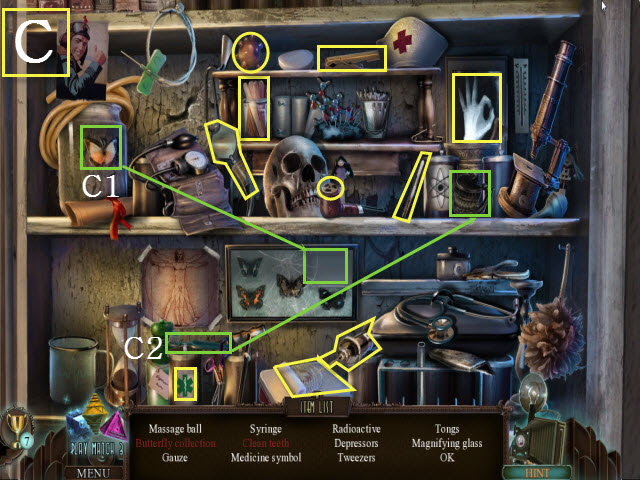
- Play the HOP to receive the GAUZE (C).
- Walk right; open the electrified gate and then walk forward to the Lab Complex Courtyard.
Chapter 3: The Labs
- Examine the door; take the WELCOME MAT (D).
- Pick up the BROOM (E).
- Place the WELCOME MAT on the fence (F).
- Walk right to the Guardhouse Road.
- Examine the guardhouse; take the KEY RING (G).
- Walk down.
- Examine the door; use the KEY RING on the lock and turn the key (H).
- Enter the Physics Lab.
- Examine the machine; take the schematics and pick up the SPOOL OF COPPER WIRE (I).
- Examine the table; pick up the EMPTY OIL CAN (J).
- Examine the laser; select the note and take it (K).
- Take the CANADIAN FLAG (L).
- Walk down.
- Examine the door; use the KEY RING on the lock and turn the key (M).
- Enter the Bio Lab.
- Examine the flasks; take the HAND BRAKE (N).
- Walk forward towards the Projector Room and take the CROWBAR (O).
- Walk down.
- Examine the desk and use the CROWBAR on the drawer; look at the notebook and select it until you get it (P).
- Take the RUBY (Q).
- Walk down.
- Examine the ambulance; place the HAND BRAKE on the lever (R) and pull on it.
- Enter the Botany Lab.
- Examine the cupboard; use the BROOM on it (S).
- Select the cupboard to activate a HOP.
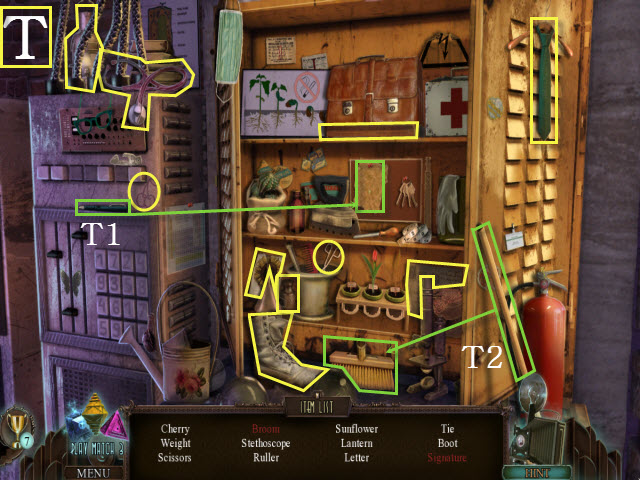
- Play the HOP to receive the STETHOSCOPE (T).
- Return to the Bio Lab.
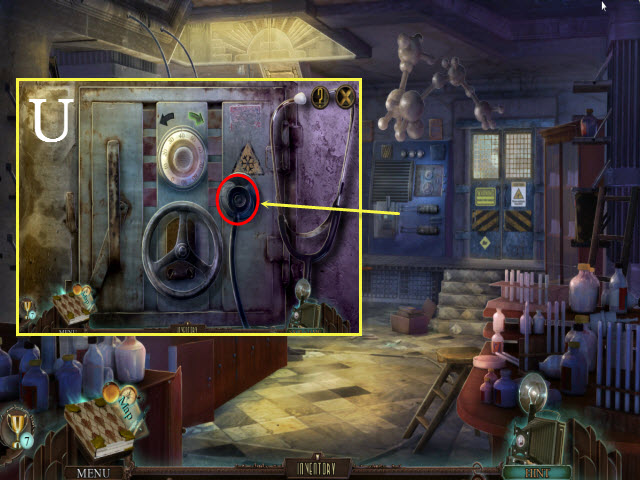
- Examine the safe; place the STETHOSCOPE on it to activate a mini-game (U).
- To complete the mini-game, you must rotate the dial in the direction indicated by the left and right arrows. If you make a mistake, you will have to start over.
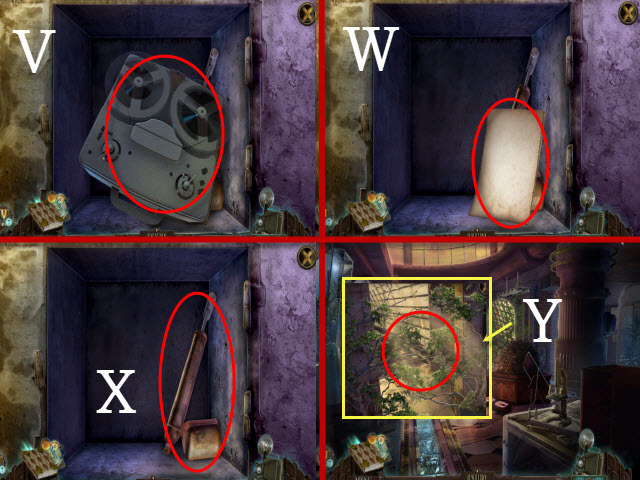
- Select the tape recorder and take it (V).
- Select the recipe and take it (W).
- Pick up the HERBICIDE (X).
- Return to the Botany Lab.
- Examine the vines; use the HERBICIDE on them (Y).
- Walk forward to the Botanical Garden and examine the flowers to activate a HOP.
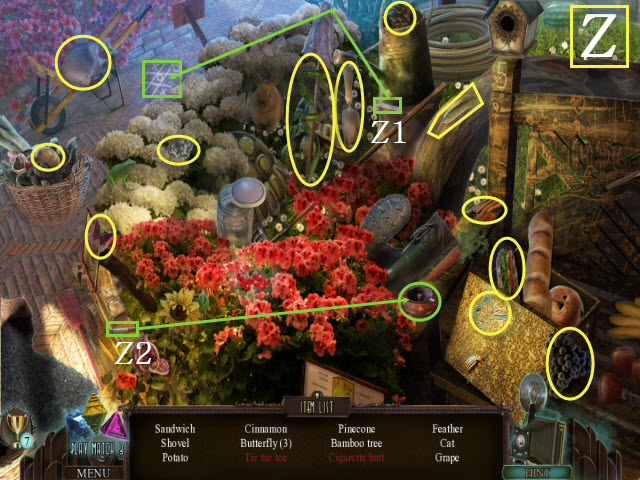
- Play the HOP to receive the POTATO (Z).
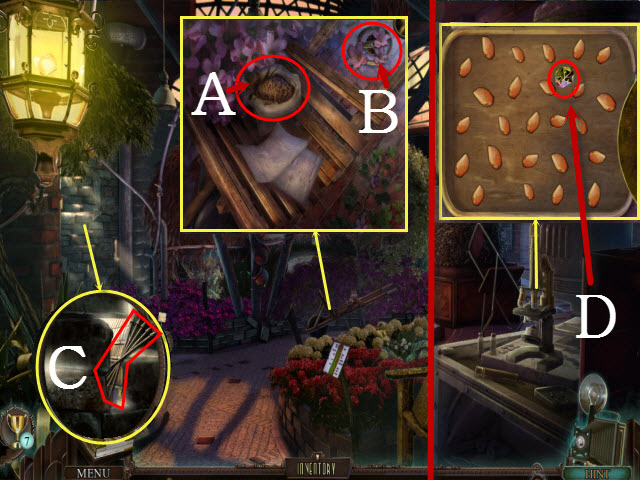
- Examine the cart; take the BAG OF SEEDS (A).
- Move the three flower petals; take the recording (B).
- Examine the wall; grab the BRONZE ARROWS (C).
- Walk down.
- Examine the microscope and place the BAG OF SEEDS on the tray; take the TOPAZ (D).
- Return to the Physics Lab.
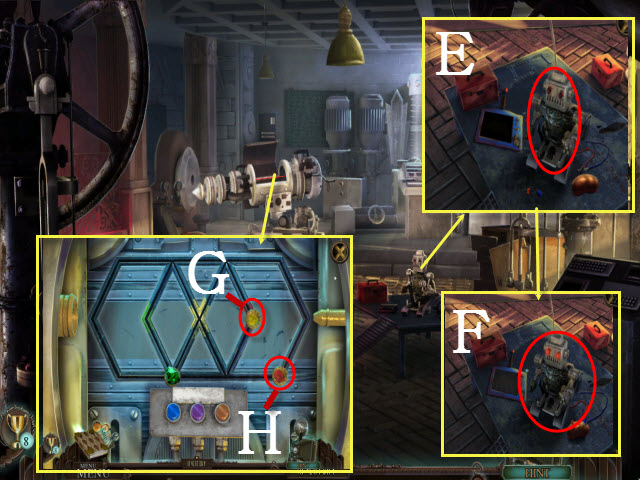
- Examine the robot; place the BOARD PIN, SPOOL OF COPPER WIRE, and the POTATO with it (E).
- Select the potato.
- Pick up the ROBOT WITH A REMOTE (F).
- Examine the laser; place the TOPAZ (G) and the RUBY (H) in the slots to activate a puzzle.
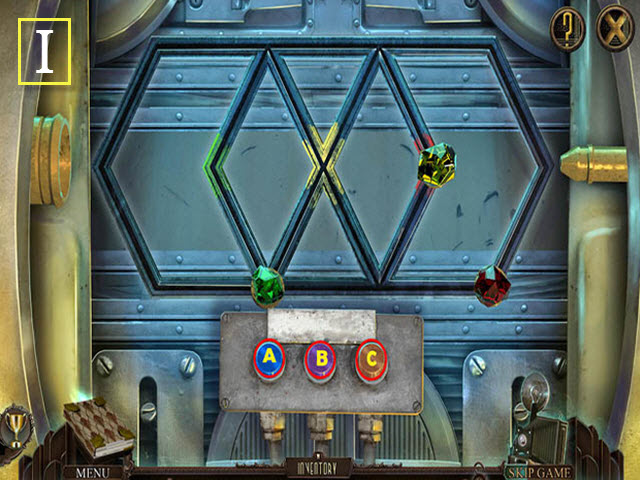
- To solve the puzzle, slide the gems into their corresponding colored spaces by selecting the buttons below.
- Solution: Ax3, Cx2, Bx1, Ax3, Cx1, and Bx5 (I).
- Select the water tank; walk left to the Physics Lab Basement.
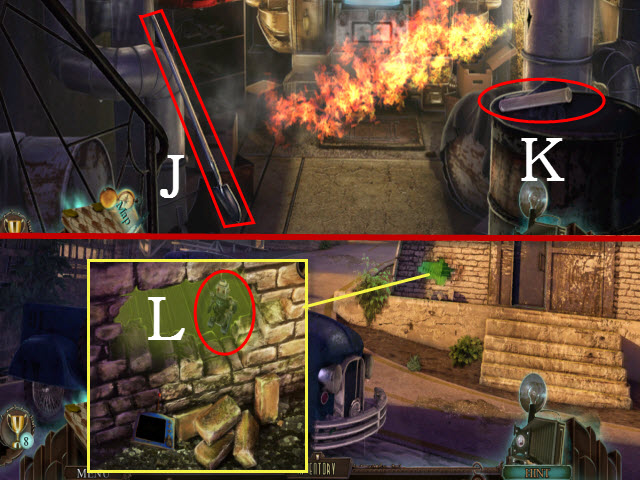
- Take the SHOVEL (J) and the EMPTY VIAL (K).
- Return to the Guardhouse Road.
- Examine the crack in the wall; place the ROBOT WITH A REMOTE in it (L).
- Examine the crack in the wall to activate a puzzle.
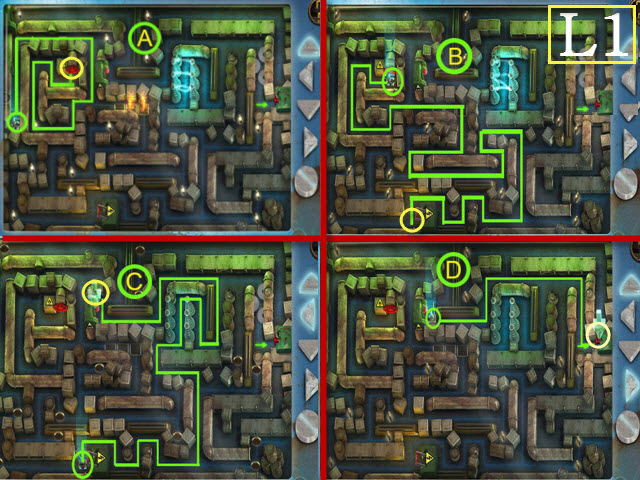
- To solve the puzzle, lead the robot all the way through the maze by using the buttons on the right. The directional arrows will move the robot. The circle button will allow you to select a switch in order to progress to a new section of the maze.
- Follow steps A-D to solve (L1); guide the robot along the green line; press the circle button at the end of each path (yellow).
- Enter the Testing Hangar.
Chapter 4: Christmas Comes Early
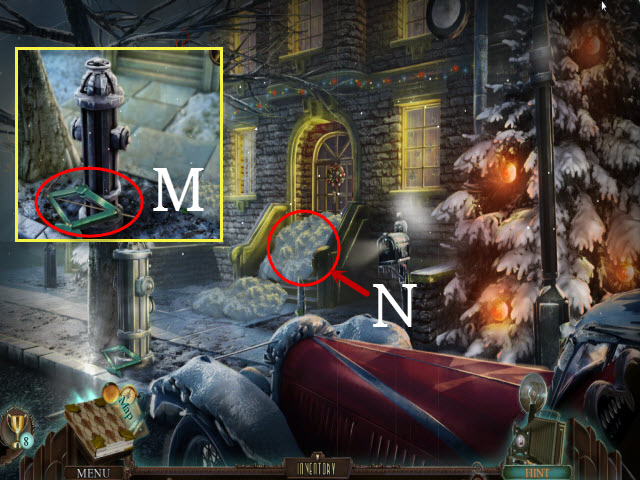
- Examine the fire hydrant; take the CAR JACK (M).
- Use the SHOVEL on the snow (N).
- Enter the Testing Hangar Home and examine the Christmas tree to activate a HOP.

- Play the HOP to receive the LENS (O).
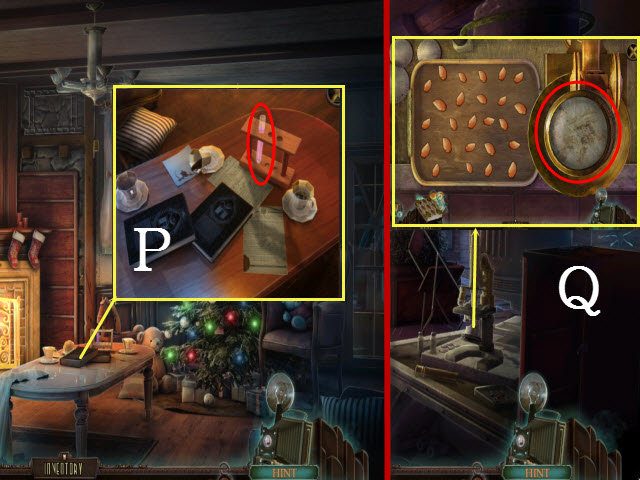
- Examine the table; take the PURPLE VIAL (P).
- Return to the Botany Lab.
- Examine the microscope and place the LENS on it. Use the SILK NAPKIN on the lens to activate a mini-game (Q).
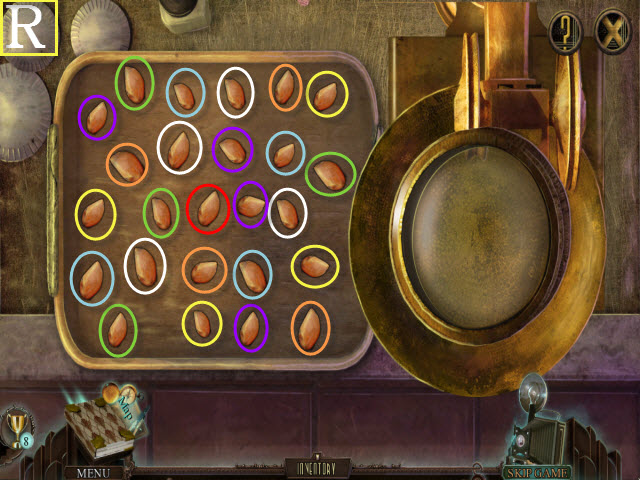
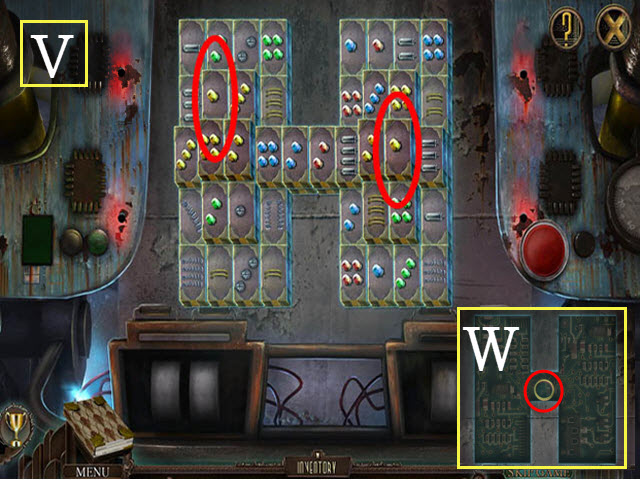
- To solve the mini-game, match pairs of similar seeds indicated by matching colors (R).
- After you find all of the matching pairs, there will be one seed remaining in the middle (red).
- Take the SEED (S) and then pick up the SCALPEL (T).
- Return to the Cafeteria.
- Examine the juicer and place the LEMON in it (U).
- Use the EMPTY VIAL on the lemon juice to get the YELLOW VIAL (V).
- Return to the Bio Lab.
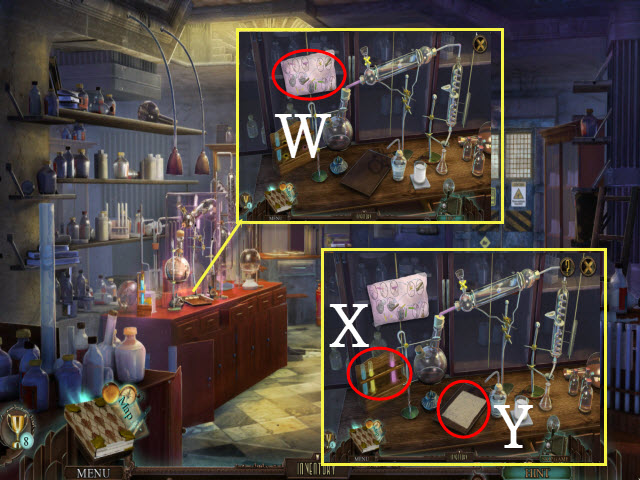
- Examine the flasks and select the note (W).
- Place the PURPLE VIAL and the YELLOW VIAL in the holder (X).
- Place the GAUZE on the tray to activate a puzzle (Y).
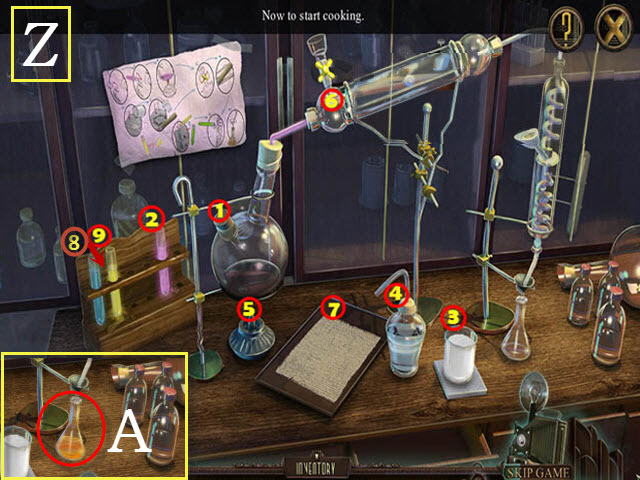
- To solve the puzzle, select the ingredients shown on the recipe: 1-9 (Z).
- Take the RAPID GROWTH AGENT (A).
- Return to the Testing Hangar Home.
- Examine the Christmas tree to activate a HOP.
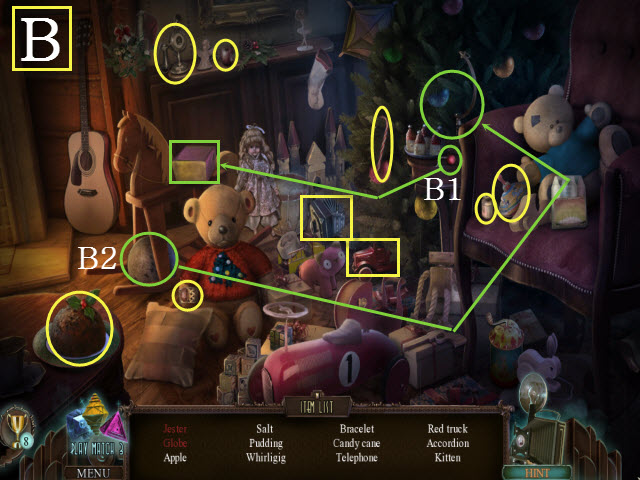
- Play the HOP to receive the SALT (B).
- Examine the couch and use the SCALPEL on it; take the BRONZE WHEAT (C).
- Walk down.
- Examine the movie projector; use the SALT on it (D).
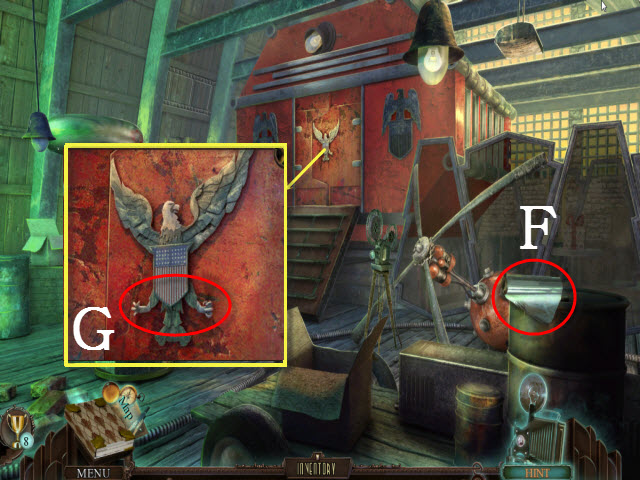
- Select the flag (E).
- Take the TIN FOIL (F).
- Examine the crest; place the BRONZE WHEAT and the BRONZE ARROWS on it (G).
- Examine the storage locker to activate a HOP.
- Play the HOP to receive the FIRE EXTINGUISHER HOSE (H).
- Return to the Bio Lab.
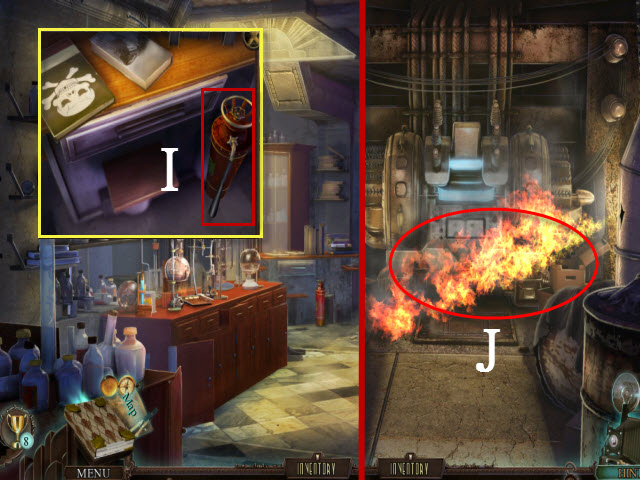
- Examine the desk and place the FIRE EXTINGUISHER HOSE with the extinguisher; take the FIRE EXTINGUISHER (I).
- Return to the Physics Lab Basement.
- Use the FIRE EXTINGUISHER on the fire (J).
- Examine the generator to activate a puzzle.
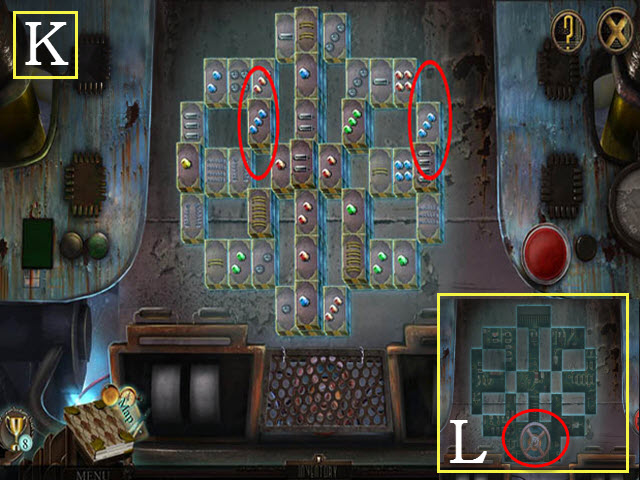
- To solve the puzzle, remove matching pairs until nothing remains. You can only choose tiles that are not blocked by anything else.
- Press Reset to start over (B).
- Press Reset to start over if you get stuck (K).
- Take the VALVE HANDLE (L).
- Return to the Botanical Garden.
- Examine the pot; place the SEED and use the RAPID GROWTH AGENT on it (M).
- Examine the pump; place the VALVE HANDLE on the slot and then turn the handle (N).
- Walk left to the Rear Courtyard.
- Examine the window; take the LATCH (O).
- Examine the fountain; place the TIN FOIL in the bowl (P).
- Select the bowl twice to receive the SIEVE FULL OF WATER (Q).
- Return to the Botany Lab.
- Examine the shelves to activate a HOP.
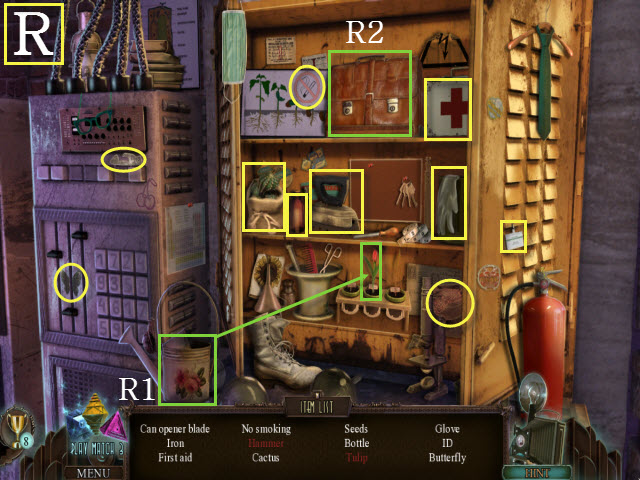
- Play the HOP to receive the CAN OPENER BLADE (R).
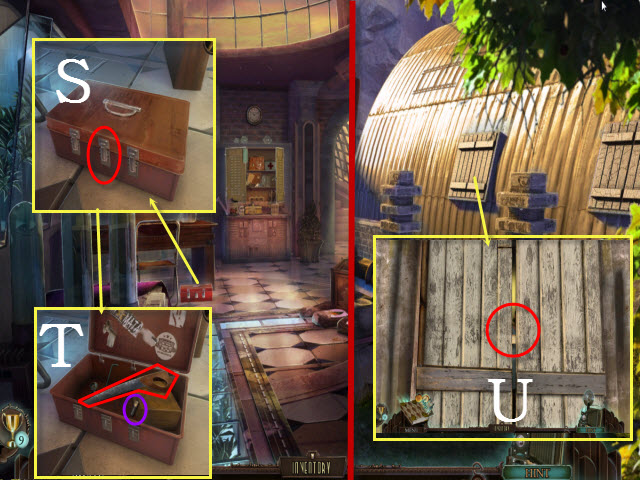
- Examine the toolbox and place the LATCH on it; select the three latches and then open the toolbox (S).
- Take the PRUNING SAW and the 1/2 BATTERY (T).
- Return to the Rear Courtyard.
- Examine the window; use the PRUNING SAW on the board (U).
- Enter the Barracks.
Chapter 5: Searching High and Low
- Examine the locker; take the 2/2 BATTERY and the RAZOR BLADE (V).
- Examine the floor and use the CAN OPENER BLADE with the handle; take the CAN OPENER (W).
- Walk forward.
- Examine the guardhouse; use the SIEVE FULL OF WATER on the control panel (X).
- Walk forward to the Upper Lab Complex; examine the shed to activate a HOP.

- Play the HOP to receive the CARABINER (Y).

- Pick up the PETROL (Z).
- Walk left to the Aeronautics Lab.
- Examine the doors; place the CAR JACK on them (A).
- Select the car jack and walk forward to the Main Hangar.
- Examine the boxes to activate a HOP.
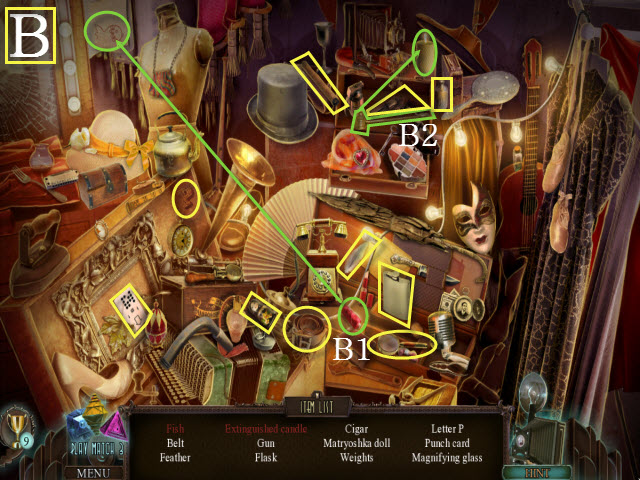
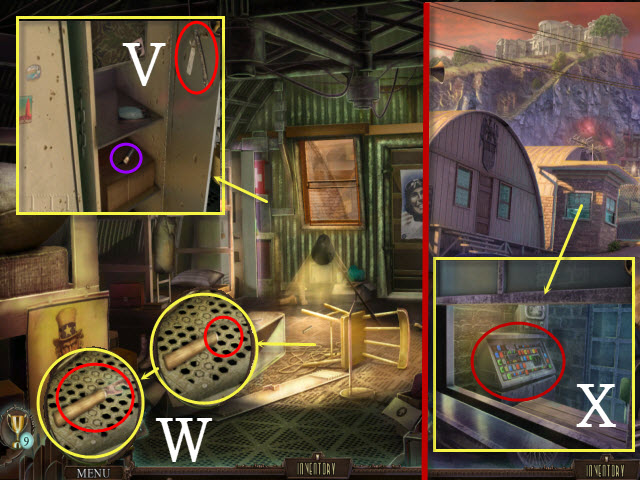
- Play the HOP to receive the PUNCH CARD (B).
- Pick up the MOP (C).
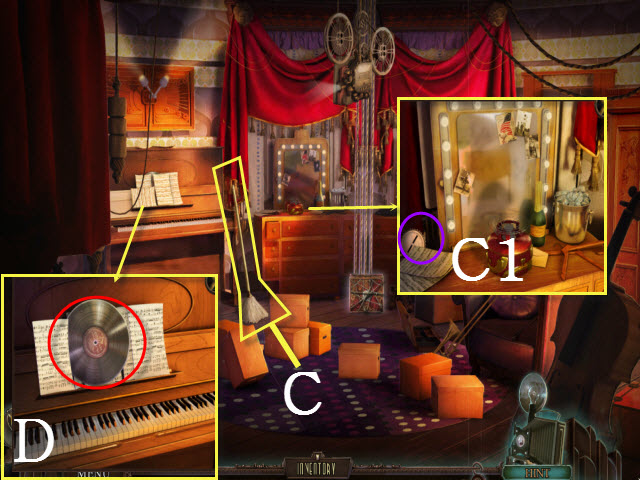
- Examine the mirror; take the 1/3 COMPUTER BUTTON (C1).
- Examine the piano; move the three musical sheets and then take the RECORD (D).
- Walk down.
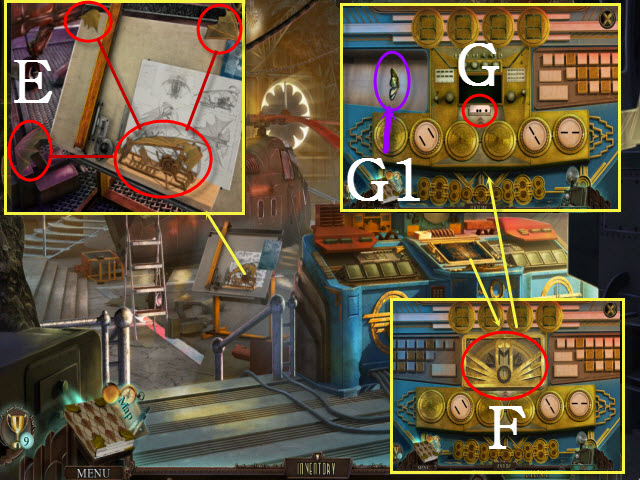
- Examine the easel; select the three wings and then take the AIRPLANE MODEL (E).
- Examine the control panel; use the CAN OPENER on the plate (F).
- Place the PUNCH CARD in the slot (G) and take the 1/3 BUTTERFLY (G1).
- Walk right to the Wind Tunnel.

- Take the 2/3 COMPUTER BUTTON (G2).
- Return to the Upper Lab Complex and then walk right to the Nautical Lab.
- Use the MOP on the puddle (H).
- Examine the desk; take the recording (I).
- Pick up the LAUNCH KEY (J).
- Walk forward to the Testing Pool.
- Examine the control panel; use the LAUNCH KEY on the slot (K) and pull the handle (L).
- Use the EMPTY OIL CAN with the oil to get the FULL OIL CAN (M).
- Examine the casing; select the note (N).
- Place the CARABINER on the chain (O).
- Use the FULL OIL CAN on the gears (P).
- Pull the lever (Q).
- Examine the control panel; pull both handles (R).
- Enter the submarine to activate a puzzle.
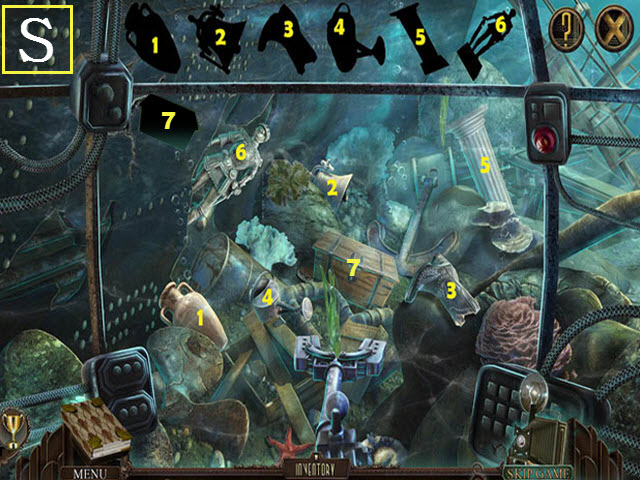
- To solve the puzzle, find the silhouetted items (S).
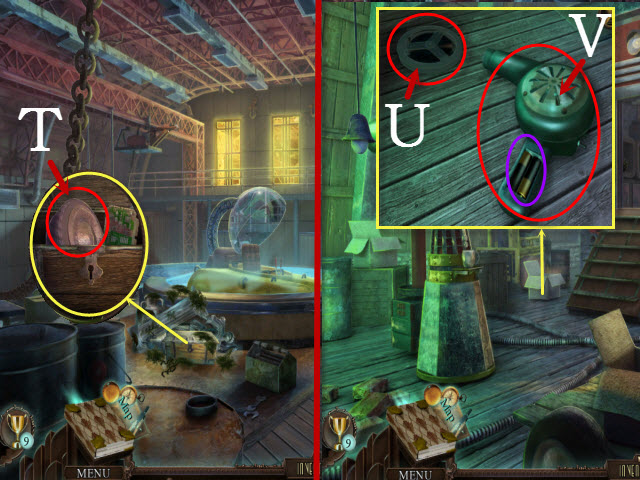
- Open the treasure chest; examine it and take the WHEEL (T).
- Return to the Testing Hangar.
- Examine the box; take the recording (U).
- Place the 2/2 BATTERY in the hair dryer; take the HAIR DRYER (V).
- Return to the Testing Pool.
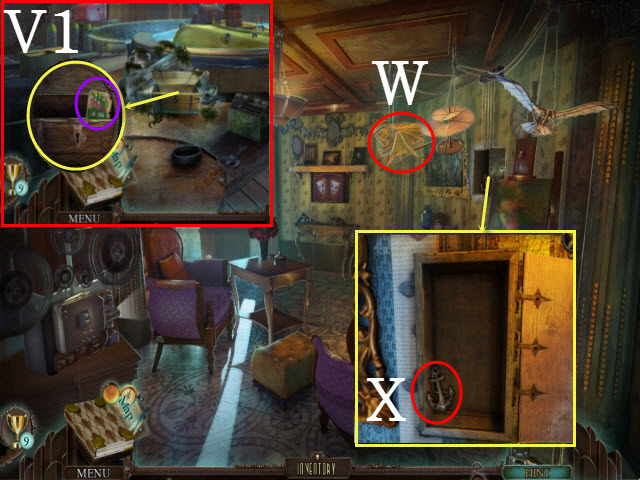
- Examine the treasure chest and use the HAIR DRYER on the circuit; take the 1/2 CIRCUIT BOARD (V1).
- Return to the Cafeteria; examine the projector and push the switch.
- Place the AIRPLANE MODEL on the hanger (W).
- Examine the compartment; take the ANCHOR (X).
- Examine the projector and push the switch. Walk upstairs to the Cafeteria Bar.
- Examine the jukebox; place the RECORD (Y) in it and take the COINS (Z).
- Walk downstairs.
- Examine the vending machines; place the COINS in the slot (A).
- Take the 2/3 BUTTERFLY (A1).
- Return to the Bay Dock; examine the boat to activate a HOP.
- Play the HOP to receive the HALF OF PLIERS (B).
Chapter 6: Family First
- Examine the pole and place the ANCHOR in the engraving (C).
- Take the 3/3 BUTTERFLY (C1).
- Return to the Main Hangar.
- Examine the boxes to activate a HOP (D).
- Play the HOP to receive the HANDLE (E).
- Examine the box; use the RAZOR BLADE on the rope (F).
- Place the 3/3 BUTTERFLY in the engraving to activate a puzzle (G).
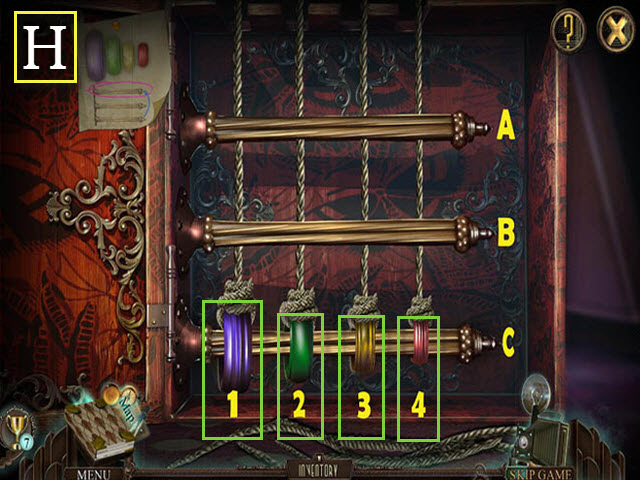
- To solve the puzzle, move the rings from the bottom row to the top row while retaining their original order.
- Move each ring (1-4) to the corresponding row (A-C) to solve.
- Solution: 4B, 3A, 4A, 2B, 4C, 3B, 4B, 1A, 4A, 3C, 4C, 2A, 4B, 3A, and 4A (H).
- Examine the projector; press the switch.
- Pick up the WOODEN SHAFT (I).
- Examine the crate; take the RUBBER GLOVES (J).
- Return to the Nautical Lab.
- Place the HANDLE and the WHEEL with the dolly; pick up the HAND TRUCK (K).
- Return to the Upper Lab Complex.
- Use the HAND TRUCK with the boxes twice (L).
- Walk forward to the AV Lab.
- Pick up the WIRE COIL (M).
- Examine the door; use the RUBBER GLOVES with the button to get the 3/3 COMPUTER BUTTON (M1).
- Return to the Aeronautics Lab.
- Examine the panel and place the 3/3 COMPUTER BUTTON on it to activate a puzzle (N).
- To solve the puzzle, create the shapes shown above by selecting the buttons in the correct order.
- Follow the steps A-D to solve the puzzle (O).
- Press the switch; walk right to the Wind Tunnel.
- Examine the generator and place the HALF OF PLIERS with pliers; take the PLIERS (P).
- Examine the bolt and use the PLIERS on it (Q).
- Take the METAL LADDER (R).
- Return to the Main Hangar.
- Examine the crate; use the PLIERS on the nail (S).
- Take the 2/2 CIRCUIT BOARD and the SHORT PIPE (T).
- Return to the Wind Tunnel.
- Examine the generator; place the 2/2 CIRCUIT BOARD in it to activate a puzzle (U).
- To solve the puzzle, remove matching pairs until nothing remains. You can only choose tiles that are not blocked by anything else.
- Press Reset to start over (B).
- Press Reset to start over if you get stuck (V).
- Take the GOLDEN RING (W).
- Return to the AV Lab and walk upstairs to the Studio.
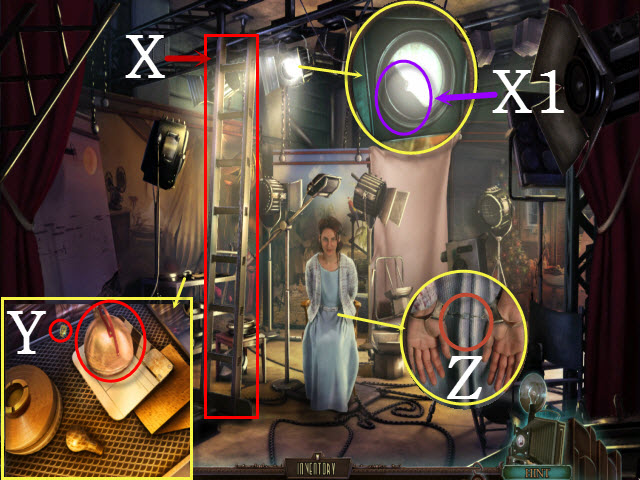
- Use the METAL LADDER with the lights (X).
- Examine the light and move the lens; take the 1/2 EAGLE SYMBOL (X1).
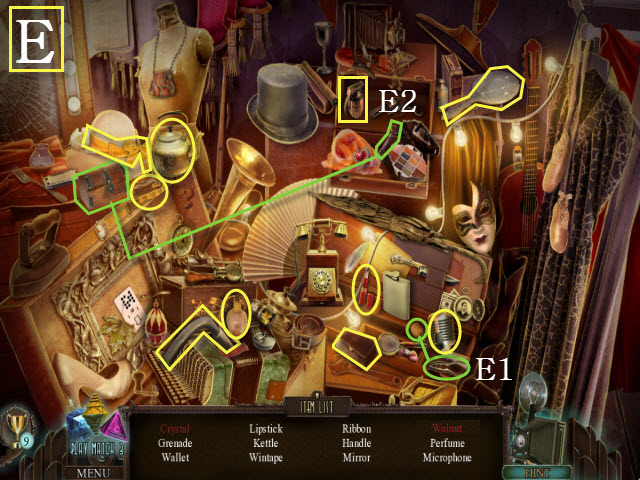
- Examine the cart; take the HAIRPIN and the KETTLE (Y).
- Examine Linda; use the HAIRPIN on the handcuffs (Z).
- Walk down; examine the crates to activate a HOP.
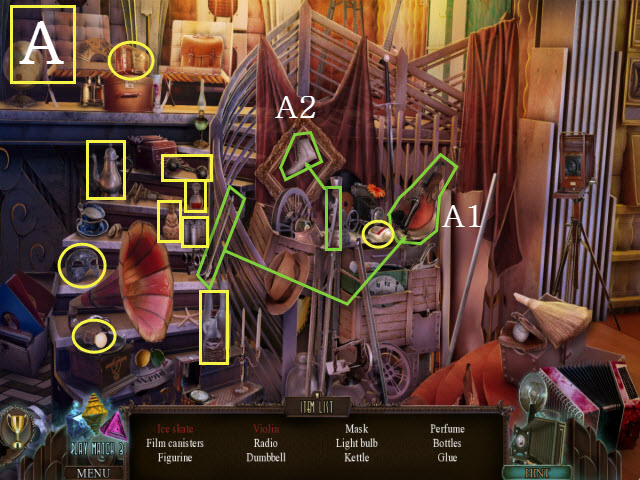
- Play the HOP to receive the GLUE (A).
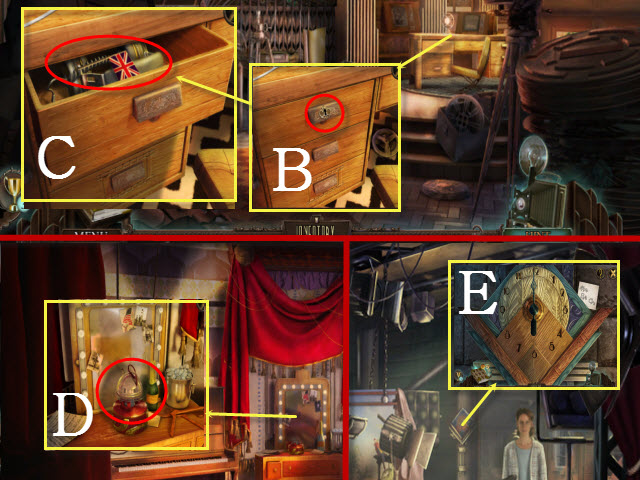
- Examine the drawer; use the HAIRPIN on the lock (B).
- Take the BRITISH FLAG and the HEADPHONES (C).
- Return to the Main Hangar; examine the projector and press the switch.
- Examine the mirror; place the KETTLE on the grill and select the kettle (D).
- Return to the Studio; examine the clock to activate a puzzle (E).
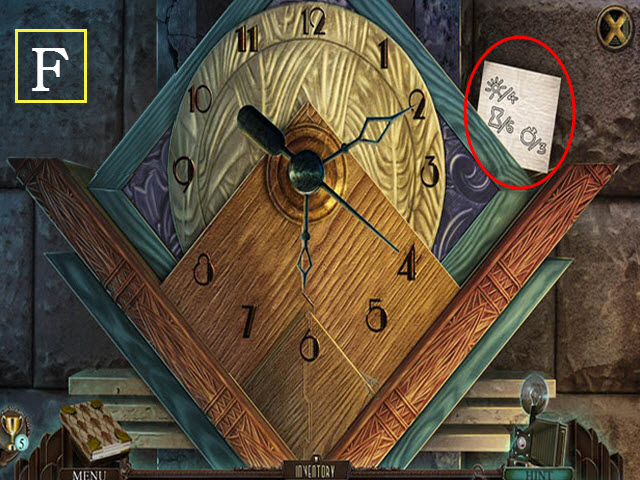
- To solve the puzzle, move the clock hands to the numbers that correspond to the fractional clue shown on the note.
- Please see the screenshot for the solution (F).
- Take the PORTABLE RECORDER (G) and the EAGLE EYE (H).
- Return to the Medical Service Center.
- Examine Frederick; place the HEADPHONES and the PORTABLE RECORDER with him (I).
- Examine Alfred; take the 2/2 EAGLE SYMBOL (I1).
- Return to the Rear Courtyard.
Chapter 7: The General’s Mansion

- Examine the stone; place the 2/2 EAGLE SYMBOL in the slot (J).
- Walk forward to the Narrow Path.
- Examine the eagle; place the EAGLE EYE (K) on the slot and take the GOLDEN STAR (L).
- Examine the rake and move the three leaves; take the CHISEL (M).
- Examine the altar; take the recording and the CANDLE (N).
- Walk up to the Villa Garden.
- Examine the fountain and place the CHISEL on the plaque; use the SHORT PIPE on the chisel (O).
- Take the TERRACE KEY (P).
- Examine the brick and select it; take the 1/3 SMALL BRASS PLATE (P1).
- Examine the door; use the TERRACE KEY on the keyhole (Q).
- Enter the Guest Room; examine the chair to activate a HOP.
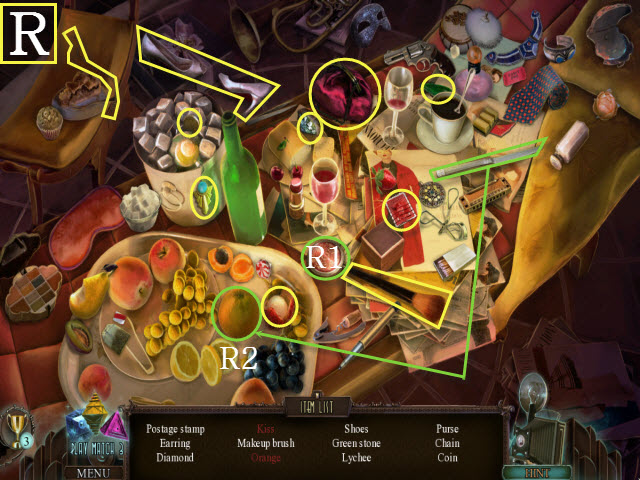
- Play the HOP to receive the MAKEUP BRUSH (R).
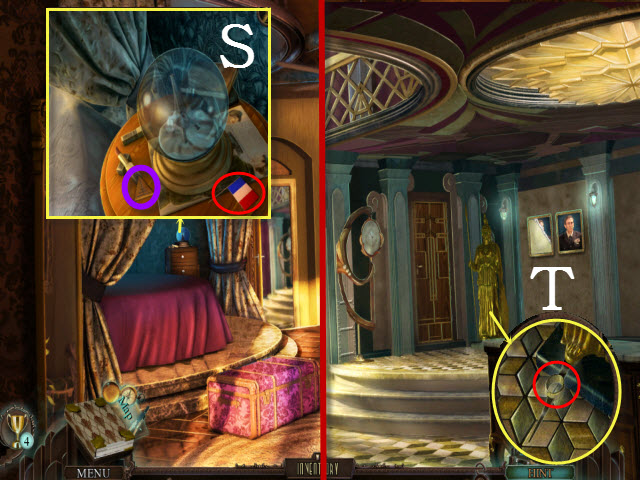
- Examine the globe; take the 2/3 SMALL BRASS PLATE and the FRENCH FLAG (S).
- Walk forward into the Hall.
- Examine the statue; use the WOODEN SHAFT on the base to get the PICKAX (T).
- Enter the General’s Office.
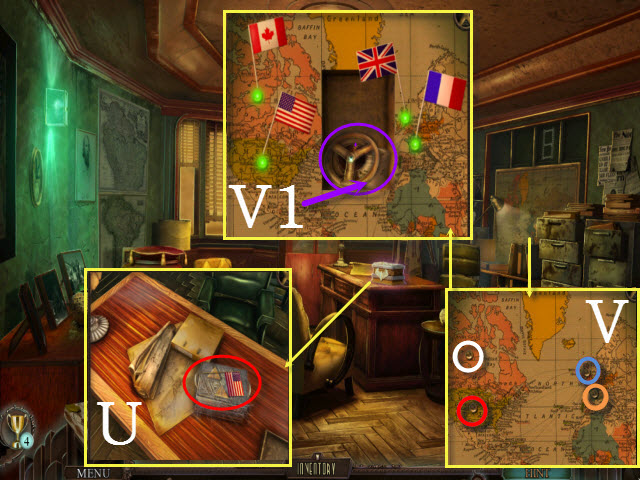
- Examine the desk; take the US FLAG (U).
- Examine the map; place the US (red), CANADIAN (white), BRITISH (blue), and FRENCH FLAGS (orange) on it (V).
- Take the recording and pick up the 1/2 METAL CYLINDER (V1).
- Return to the Narrow Path.
- Examine the rocks; use the PICKAX on them (W) and take the 3/3 SMALL BRASS PLATE (W1).
- Return to the General’s Office.
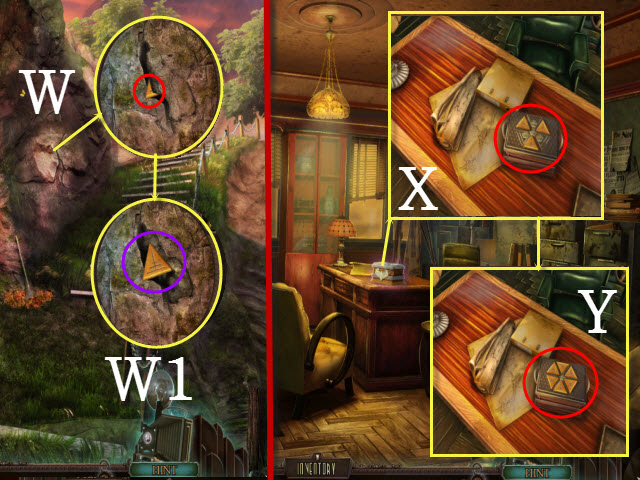
- Examine the box; use the MAKEUP BRUSH on it and then place the 3/3 SMALL BRASS PLATE on the lid (X).
- Examine the box to activate a puzzle (Y).
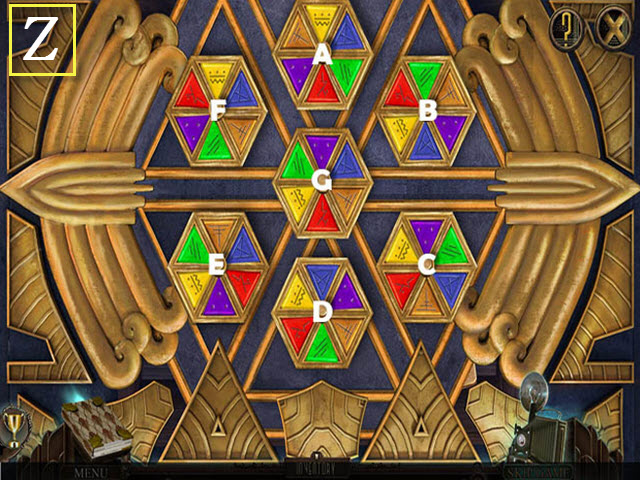
- To solve the puzzle, rotate all of the hexagons so that like colors are connected to each other.
- Solution: Ax5, Bx4, Cx3, Dx2, Ex1, Fx4, and Gx5 (Z).
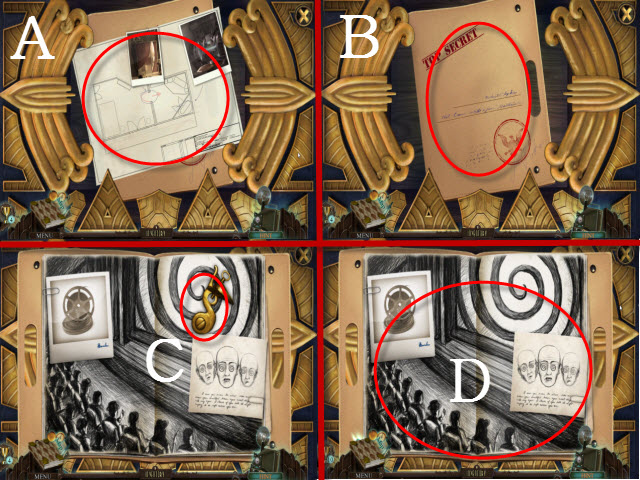
- Select and take the photos (A).
- Select the top secret folder and examine it twice (B); take the FLINTLOCK HAMMER (C).
- Select the document (D); you will receive the FOLDER.
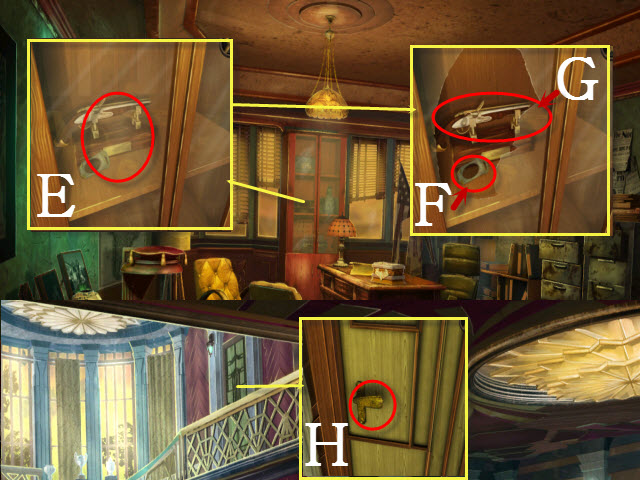
- Examine the cabinet; use the PICKAX on the glass (E).
- Take the SHADOW SLIDE (F).
- Place the FLINTLOCK HAMMER with the gun; take the FLINTLOCK (G).
- Walk down.
- Examine the door; use the FLINTLOCK on the handle (H).
- Enter the General’s Bedroom.
- Examine the nightstand; take the 1/2 PAINTING PIECE (H1).
- Examine the closet and select the doorknob (I); take the SWITCH (J).
- Return to the Guest Room; examine the chair to activate a HOP.
- Play the HOP to receive the MATCHES (K).
- Examine the fixture; place the SWITCH (L) on it and press the switch (M).
- Take the GOLD CROSS (N).
- Walk forward.
- Examine the stand; place the CANDLE (O) in the holder and the SHADOW SLIDE with the lens (P).
- Use the MATCHES on the candle (Q).
- Enter the General’s Office.
Chapter 8: Drastic Measures
- Examine the pillow and place the GOLDEN STAR, the GOLDEN RING, and the GOLD CROSS with the base (R).
- Take the MEDAL (S).
- Return to the General’s Bedroom.
- Examine the nightstand; place the MEDAL on the imprint (T) and take the 2/2 METAL CYLINDER (T1).
- Examine the closet; place the 2/2 METAL CYLINDER in the mechanism (U).
- Align the metal cylinders: Ax2 and Cx1 (V).
- Enter the Surveillance Room.
- Select the file cabinet (W).
- Examine the file cabinet to activate a HOP.
- Play the HOP to receive the BELT (X).
- Examine the monitors and take the 2/2 PAINTING PIECE (X1).
- Return to the Hall.
- Examine the painting and place the GLUE on it (Y).
- Place the 2/2 PAINTING PIECE on the painting to activate a puzzle (Z).
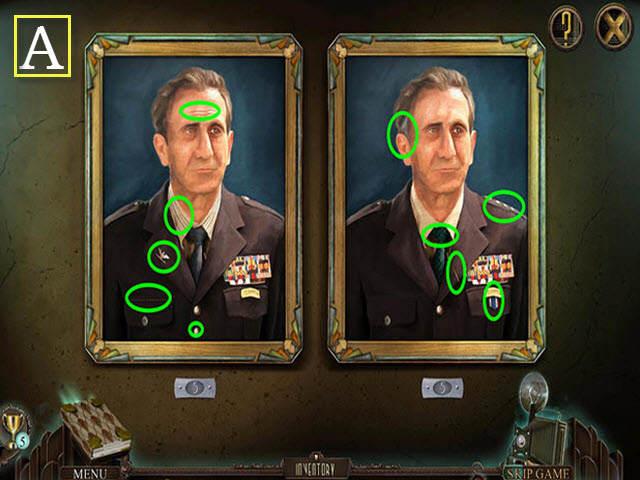
- To solve the puzzle, select the five differences on each portrait; these are highlighted in green (A).
- Take the CHLOROFORM (B) and the T-SHAPED PLUNGER (C).
- Return to the Villa Garden.
- Examine the cellar door and use the PETROL and then the MATCHES on the knobs (D); open the doors.
- Take the WIRE CUTTERS (E).
- Place the T-SHAPED PLUNGER with the device to get the DETONATOR (F).
- Return to the Surveillance Room.
- Open the doors and examine the generator; use the WIRE CUTTERS on the wires to get the DYNAMITE (G).
- Select the grate to activate a puzzle (H).
- To solve the puzzle, remove matching pairs until nothing remains. You can only choose tiles that are not blocked by anything else.
- Press Reset to start over (B).
- Press Reset to start over if you get stuck (I).
- Return to the Projector Room.
- Open the doors.
- Examine the projector; place the BELT, the DYNAMITE, and the WIRE COIL with it (J).
- Return to the Lab Complex Courtyard.
- Place the DETONATOR with the wire and select it (K).
- Give the FOLDER to the soldiers (L).
- Select the detonator (M).
- Take the LEVER (N).
- Return to the Main Hangar; examine the projector and press the switch.
- Examine the fuse box and open it; place the LEVER on the empty slot and then pull all six levers (Q).
- Walk forward to the Airfield.
- Give the CHLOROFORM to Linda (R).
- Congratulations, you have completed Final Cut: Encore.


 The Chronicles of Shakespeare: Romeo and Juliet Walkthrough, Guide, & Tips
 Drawn: The Painted Tower ™ Walkthrough, Guide, & Tips
 Time Mysteries: The Final Enigma Walkthrough, Guide, & Tips
 Awakening: The Skyward Castle Walkthrough, Guide, & Tips
 The Secret Legacy: A Kate Brooks Adventure Walkthrough, Guide, & Tips