The Secret Legacy: A Kate Brooks Adventure Walkthrough, Guide, & Tips
The Secret Legacy: A Kate Brooks Adventure Walkthrough

Welcome to the The Secret Legacy: A Kate Brooks Adventure Walkthrough!
Explore Egypt and discover The Secret Legacy of Kate Brooks’ grandmother!
Whether you use this document as a reference when things get difficult or as a road map to get you from beginning to end, we’re pretty sure you’ll find what you’re looking for here.
This document contains a complete The Secret Legacy: A Kate Brooks Adventure game walkthrough featuring annotated screenshots from actual gameplay!
We hope you find this information useful as you play your way through the game. Use the walkthrough menu below to quickly jump to whatever stage of the game you need help with.
Remember to visit the Big Fish Games Forums if you find you need more help. Have fun!
This walkthrough was created by Chie, and is protected under US Copyright laws. Any unauthorized use, including re-publication in whole or in part, without permission, is strictly prohibited.
General Tips

- When starting a new game you can choose to play in expert mode or not. Expert mode uses sparkles to denote places with which you can interact and recharges hints faster.
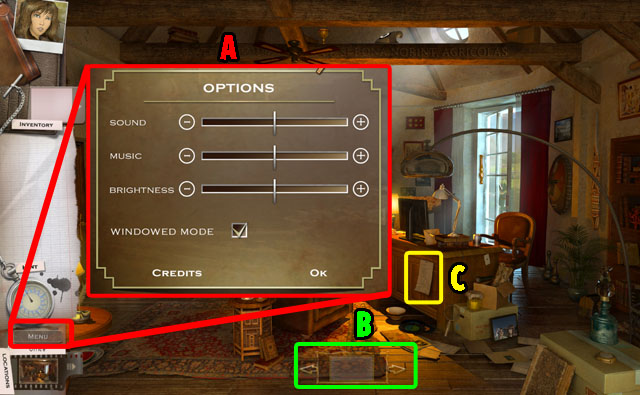
- From the main menu you can make a new profile, adjust options like sound, music, brightness and fullscreen mode, and see the game help (A).
- There are 5 different types of cursors in this game. The finger cursor is the standard cursor; the gears cursor tells you an action can be taken on an object; the magnifying glass tells you that you can zoom in; the arrow cursor tells you that you can move; and the word bubble cursor tells you that you can talk to a character.
- If you click too many times, you will lose control of the cursor for a short time.
- You can use the x button to get out of a Hot Spot and the arrow button to skip dialog.
- Some area views can be scrolled back and forth. If you see a white box at the bottom of the screen, click on it to move the viewing angle and see more things.
- Clicking on lists found in the game will bring up Hidden Object Scenes.
- Click on the arrow beside your inventory to show all the items you’ve collected.
- A list is always highlighted in light blue in this guide.
Chapter 1

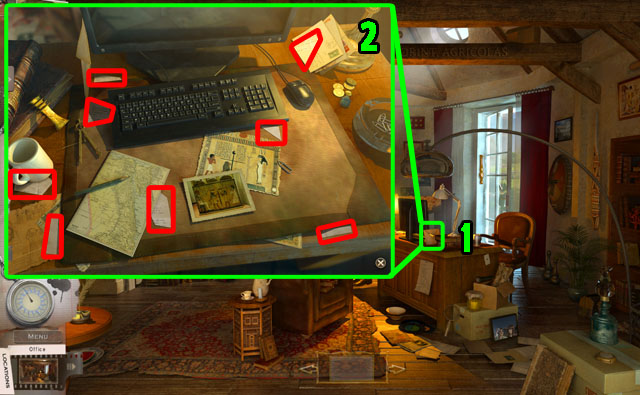
- Click on the letter highlighted in green on the desk to get a close up of that scene (1).
- Find pieces of the letter circled in red (2).
- You will automatically exit the scene.

- You may play the tutorial at this point if you want to learn more about how to play the game.
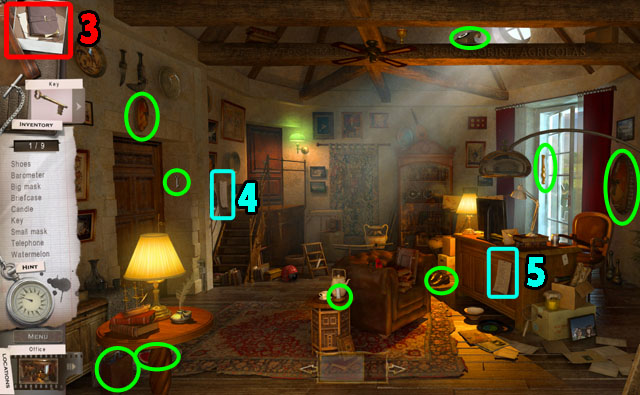
- When you click on the notebook in the upper left corner, you can read any letters or notes that you have collected (3).
- When you find a list, clicking on it displays items you must find in the current Hidden Object Scene.
- Click on the list on the wall on the left side of the screen (4).
- In order to find all of the hidden objects, sometimes you have to move the screen by clicking and moving the white box at the bottom.
- Find 9 objects in the list circled green.
- The hidden objects can be randomized in this game.
- After finding all of the objects, you will get a KEY.
- Click on the list on the desk (5).

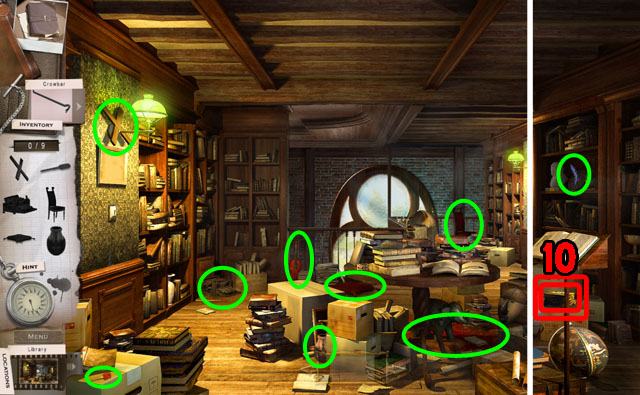
- Find 9 objects in the list circled in green. The list this time will be shown in silhouettes, not words.
- You will receive the FLASHLIGHT.
- Open the inventory, and drag the KEY to the door to open it (6).
- Enter the library.

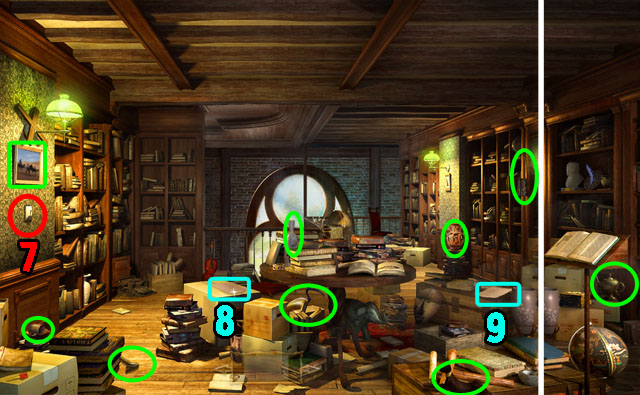
- Use the FLASHLIGHT to light up the spot in the left side of the room.
- Turn on the light (7).
- Click on the list (8).
- Find 9 objects in the list circled in green.
- Click on another list (9).


- Find 9 objects in the list circled in green.
- You will receive the KEY.
- Open the box on the right with the KEY (10).

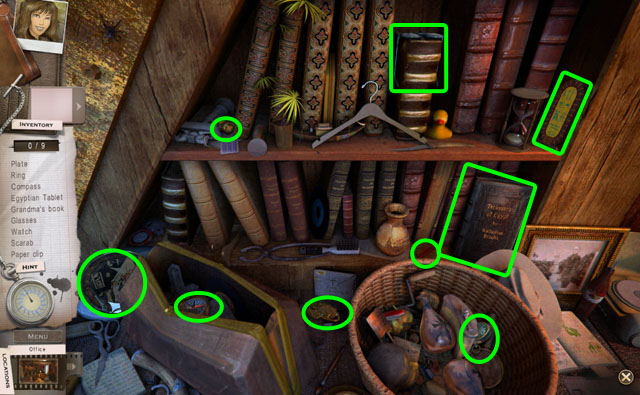
- Find 5 tile lock pieces highlighted in green.
- You will receive the TILE LOCK PIECES.
- Return to the office.


- Click on the rag on the wall (1).
- Remove the boards with the CROWBAR (2).
- Place the TILE LOCK PIECES on the safe (3).
- Place the tile lock pieces onto the grid. Connect all the pieces to make a perfect square without any overlapping.
- Refer to the image for the solution (4).
- This will open up a secret room, but you still need to do things in this room first before going in.
- Click on the door under the stairs (5).


- Find 9 hidden objects in the list highlighted in green.
- You will receive the TABLET.
- The tablet goes to the special holder that Kate has. When you click on a tablet in the holder, you can see the history of the item.
- Enter the secret room through the hole in the wall.

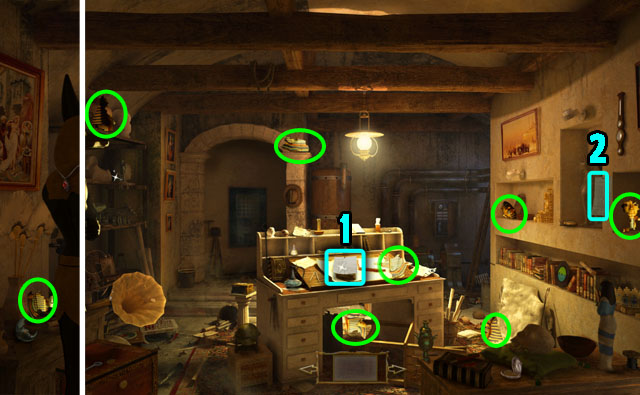
- Click on the list highlighted in light blue on the desk (1).
- Find the 8 pieces highlighted in green.
- You will receive the PHARAOH’S MASK.
- Click on the list highlighted in light blue in the right side of the screen (2).

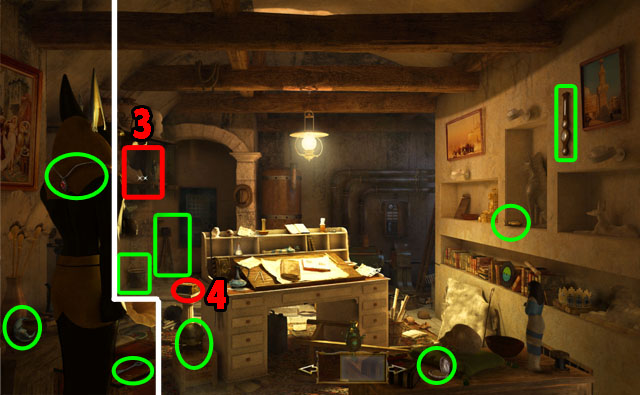
- Find the 9 objects highlighted in green.
- You will receive the MANOR’S KEY.
- Click on the shelf (3).

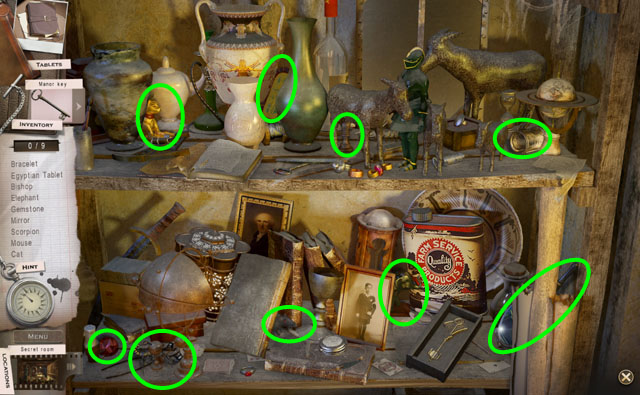
- Find the 9 objects highlighted in green.
- You will receive the TABLET.
- Open the box beside the desk with the Manor’s key (4 in the previous screenshot).

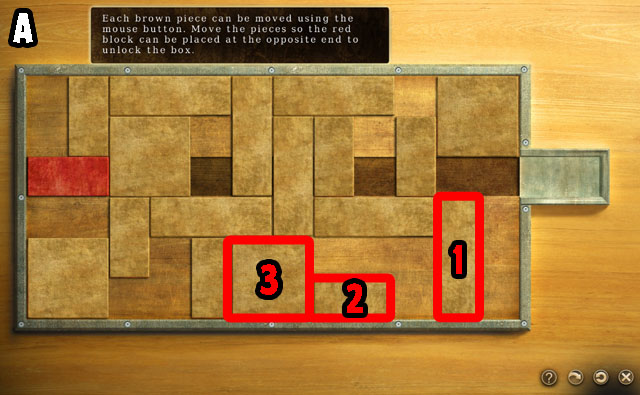
- Move blocks 1, 2, and 3 (A) in that order.

- The after positions of block 1, 2, and 3 are shown in the screenshot (B).
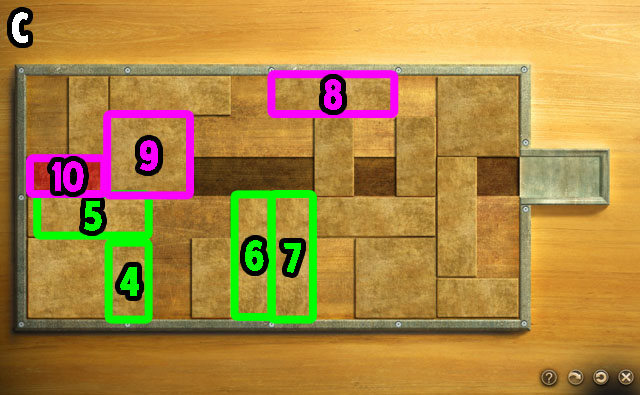
- Next, move the blocks marked 4, 5, 6, and 7, in that order.


- The after positions of blocks 4, 5, 6, and 7 are shown in screenshot (C).
- Next move the blocks marked 8, 9, and 10, in that order.

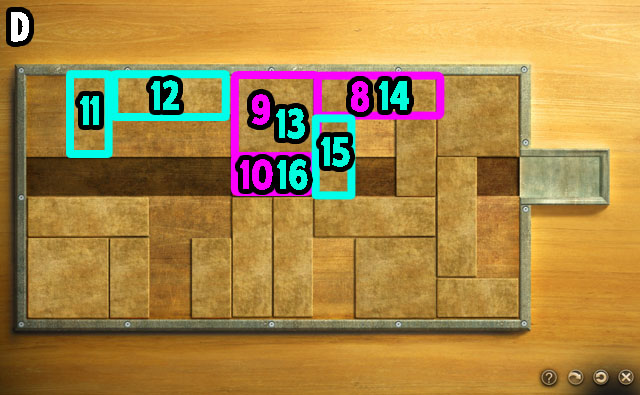
- The after positions of blocks 8, 9, and 10 are shown in screenshot (D).
- Next, move the blocks marked 11, 12, 13, 14, 15, and 16, in that order. Some of these blocks are the same blocks moved in the last step.

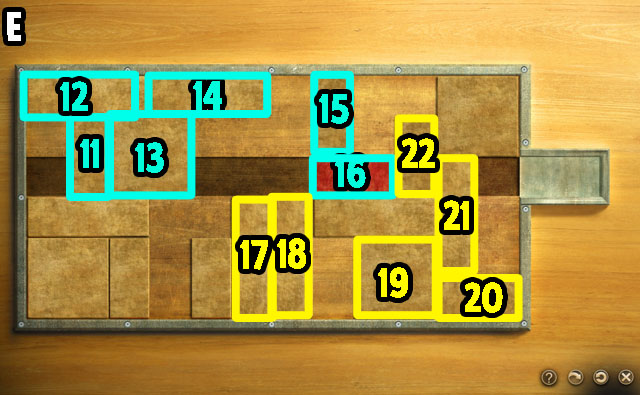
- The after positions of blocks 11, 12, 13, 14, 15, and 16 are shown in screenshot (E).
- Next, move the blocks marked 17, 18, 19, 20, 21, and 22 in that order.

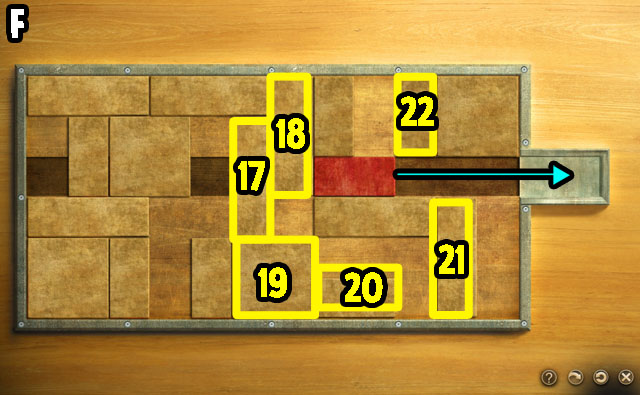
- The after positions of blocks 17, 18, 19, 20, 21, and 22 are shown in screenshot (F).
- Move the red block to the right edge space to solve the puzzle.
Chapter 2

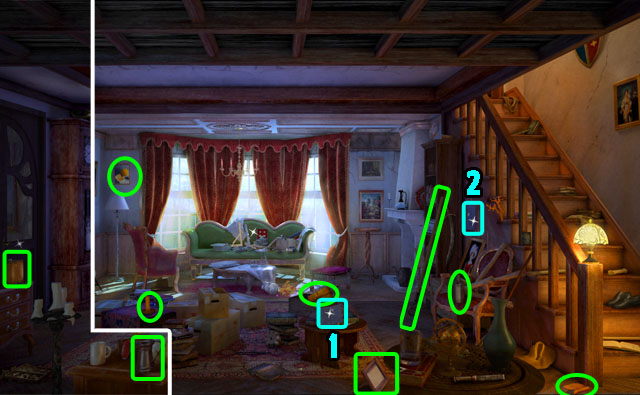
- Click on the list on the low table (1).
- Find the 9 objects highlighted in green.
- You will receive the POLE.
- Click on another list on the right side of the screen (2).

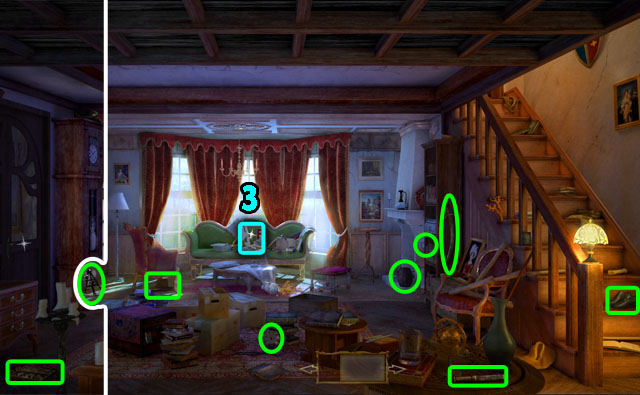
- Find 9 hidden objects from the list.
- You will receive a GEAR.
- Click on the sofa in the middle of the screen (3).

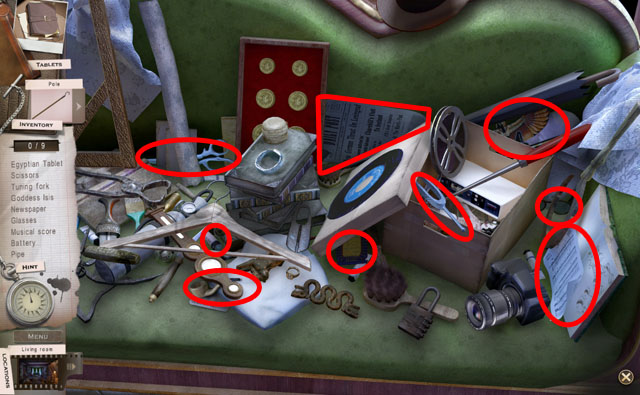
- Find 9 hidden objects from the list.
- You will receive the TABLET.
- Move to the bedroom from the stairs in the previous scene.

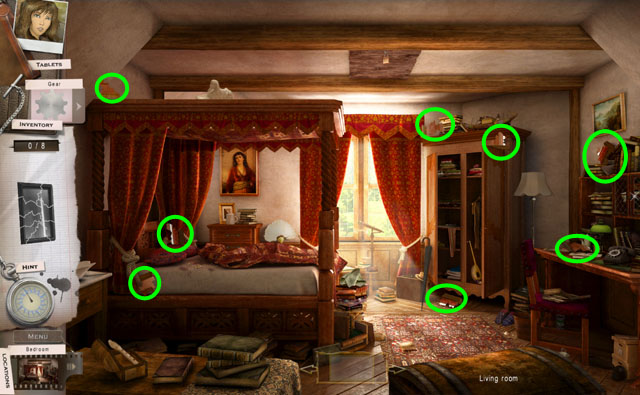
- Find the 8 pieces of mirror.
- You will receive the MIRROR.

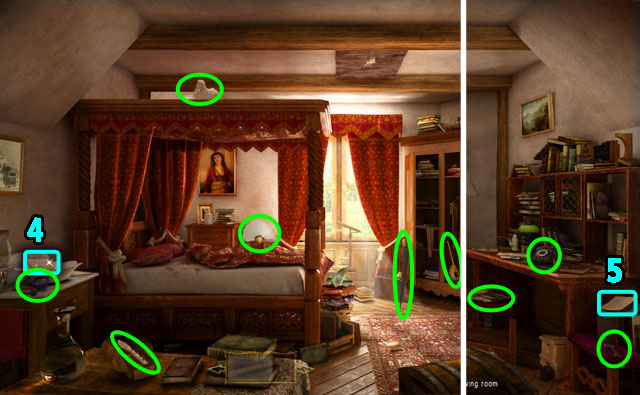
- Read the letter from Grandma on the desk on the right side.
- Click on the list on the side table on the left side (4).
- Find 9 hidden objects from the list.
- You will receive a KEY.
- Click on the list on the chair (5).

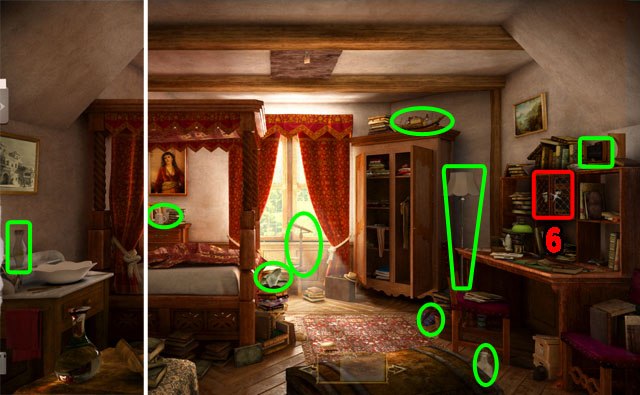
- Find 9 hidden objects from the list.
- You will receive the DUST RAG.
- Open the cupboard with the key from your inventory (6).

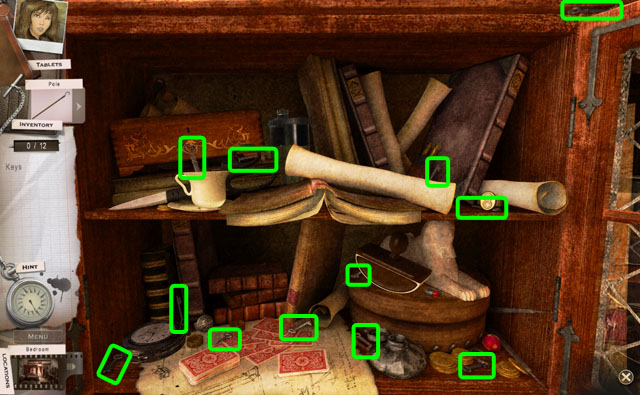
- Find 12 keys.
- You will receive another KEY.
- Return to the living room.

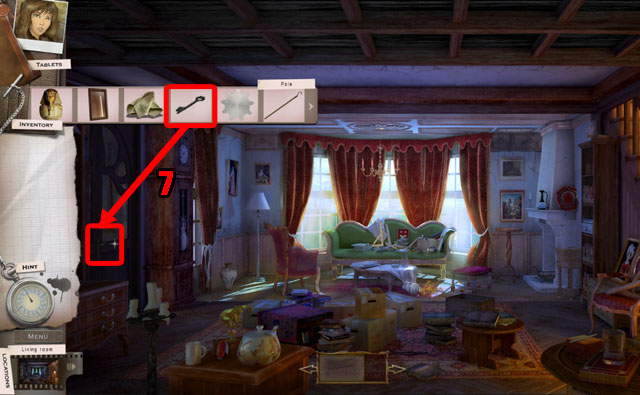
- Open the door with the key (7).
- Enter the library.

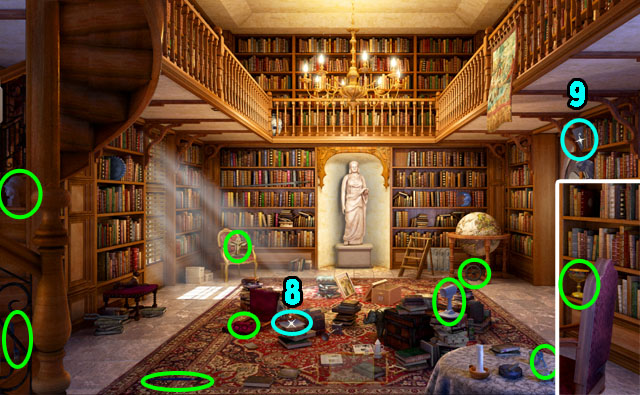
- Click on the list in the middle of the screen (8).
- Find 9 hidden objects from the list.
- You will receive the TRAP DOOR KEY.
- Click on the list in the right side of the book shelves (9).

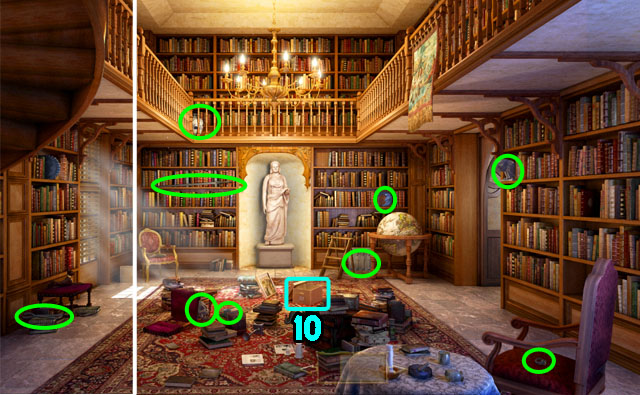
- Find 9 hidden objects from the list.
- You will receive the PLIERS.
- Click on the box in the middle of the screen (10).

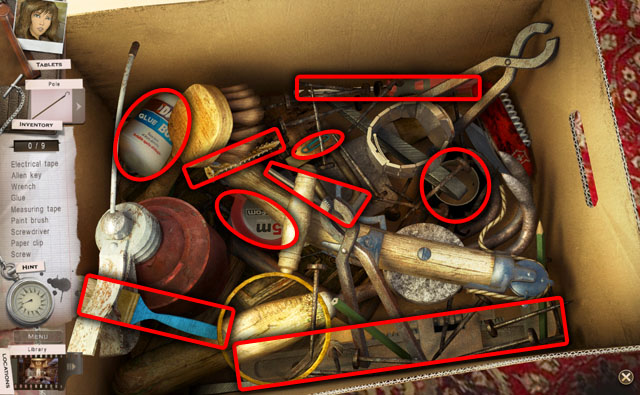
- Find 9 hidden objects from the list.
- You will receive the SCREWDRIVER.

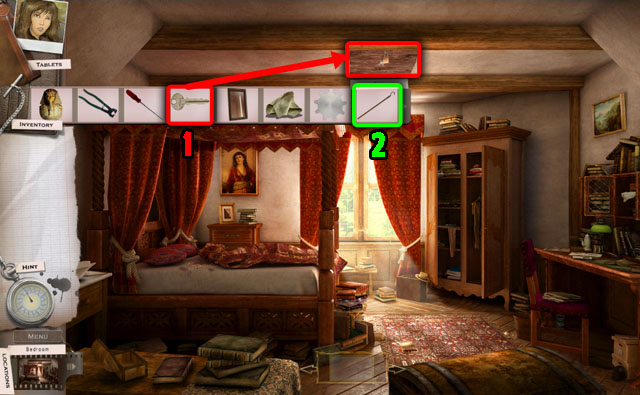
- Return to the living room, and go to the bedroom.
- Open the trapdoor in the ceiling with the TRAPDOOR KEY (1).
- Use the POLE to take out the stairs (2).

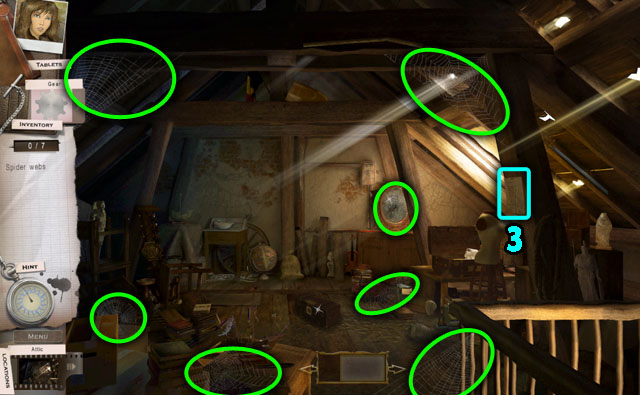
- Find 7 spider webs circled in green.
- Click on the list in the right side of the screen (3).

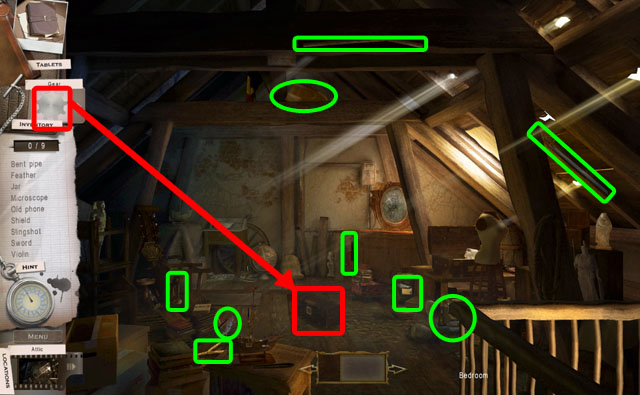
- Find 9 hidden objects from the list.
- You will receive the BENT PIPE.
- Open the inventory, and drag the GEAR to the chest in middle of the room to open it.

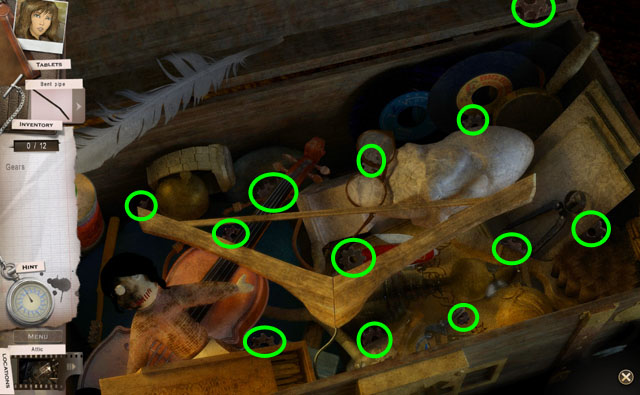
- Find 12 gears.
- You will receive the GEARS in your inventory.

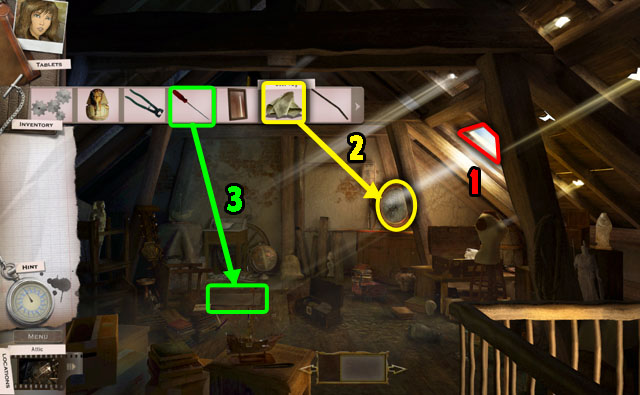
- Click on the paper on the ceiling to remove it (1).
- Remove the dust on the mirror with the DUST RAG (2).
- Take off the boards on the floor with the SCREWDRIVER (3).
- Return to the living room through the bedroom.

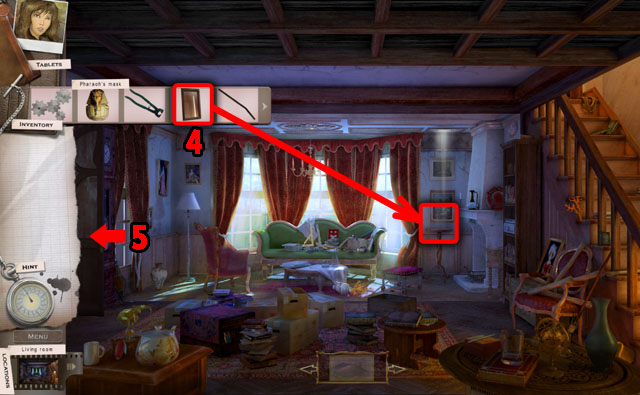
- Place the mirror from the inventory on the side table (4).
- Return to the library (5).

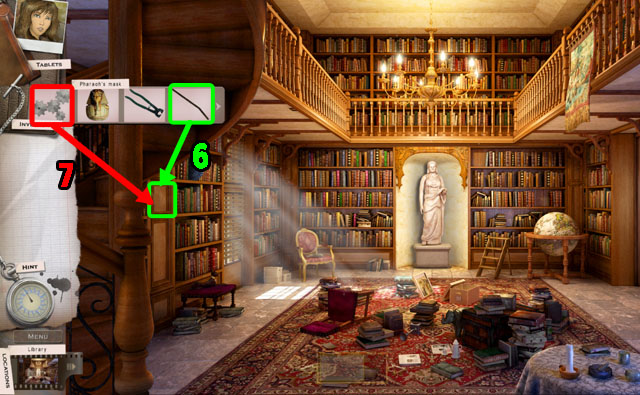
- Open the secret panel with the BENT BAR (6).
- Place the GEARS (7) in the panel.

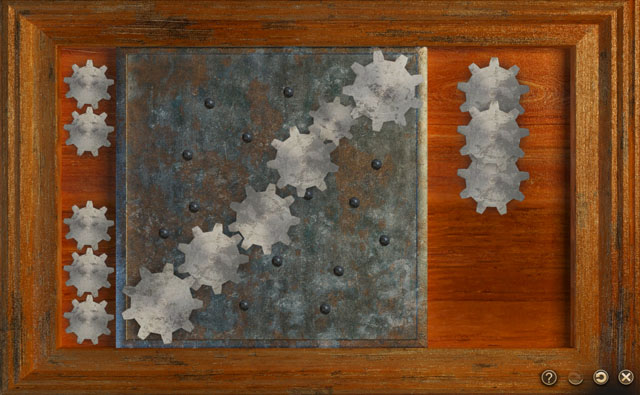
- Place the gears on the metal plate.
- Connect the gears from the left side to the right side. They must all be touching to move each other.
- You do not need to use all the gears.
- Refer to the screenshot for the sample solution.
- The statue will move, revealing the path to the basement.
- Move to the basement.

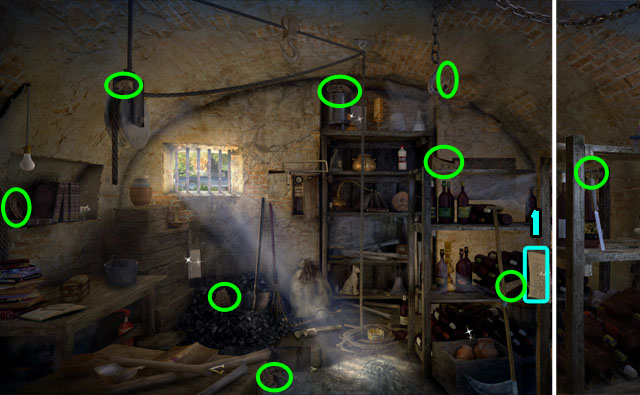
- Click on the list in the right side of the screen (1).
- Find the 9 pieces of the stone.
- You will receive the ANKH.

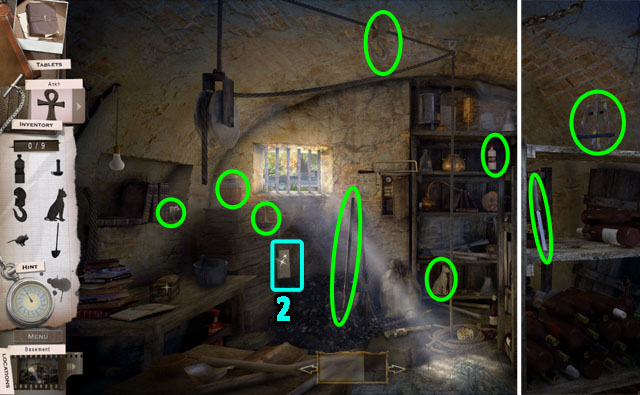
- Click on the list on the left side of the screen (2).
- Find the 9 objects highlighted in green.
- You will receive the FILE.

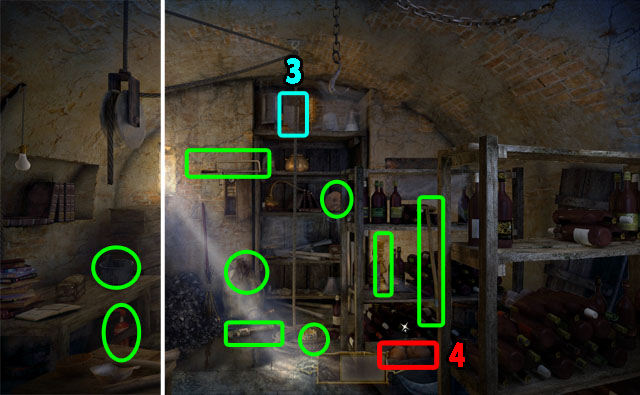
- Click on the list in the middle of the screen (3).
- Find 9 hidden objects from the list.
- You will receive the HACKSAW.
- Click on the wooden box on the right side (4).

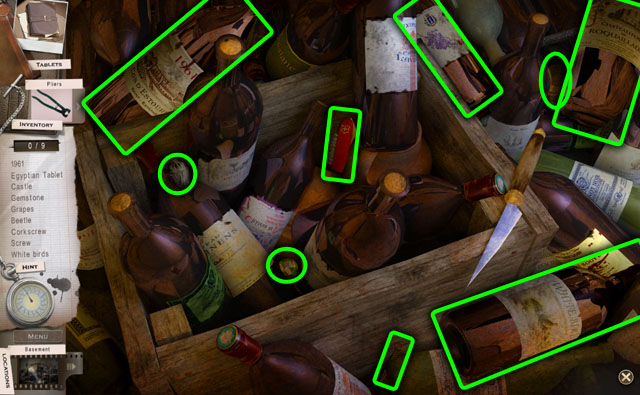
- Find 9 hidden objects from the list.
- You will receive the TABLET.

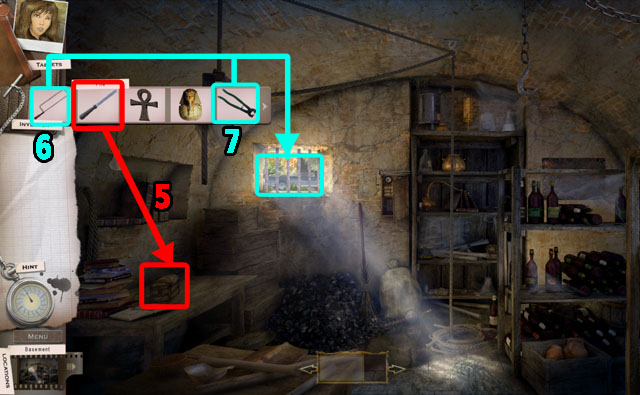
- Open the chest in the bottom left corner with the FILE (5).
- Click on the chest to read the letter.
- You will receive the MAP PIECES and CRUISE TICKET.
- Cut the bars in the window with the HACKSAW (6).
- Use the PLIERS to get through the window (7).
- Move outside through the window.
Chapter 3
- Enter the hotel in the middle of the screen.

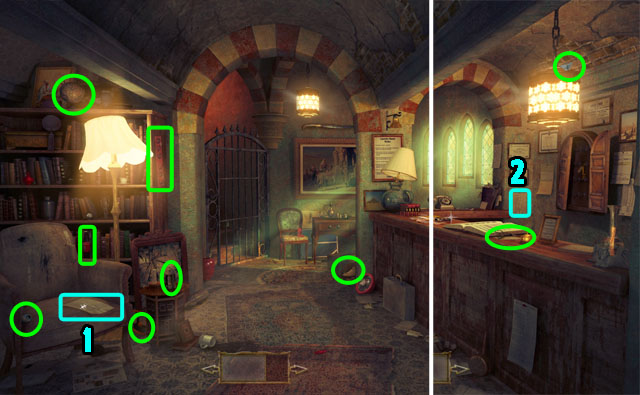
- Click on the list in the bottom left corner of the screen (1).
- Find 9 hidden objects from the list.
- You will receive the STEERING WHEEL.
- Click on the list in the right side of the screen (2).

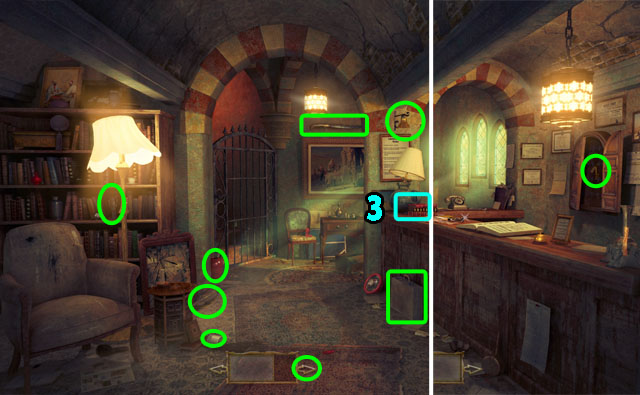
- Find 9 hidden objects from the list.
- You will receive the ROOM KEY.
- Click on the ashtray on the counter (3).

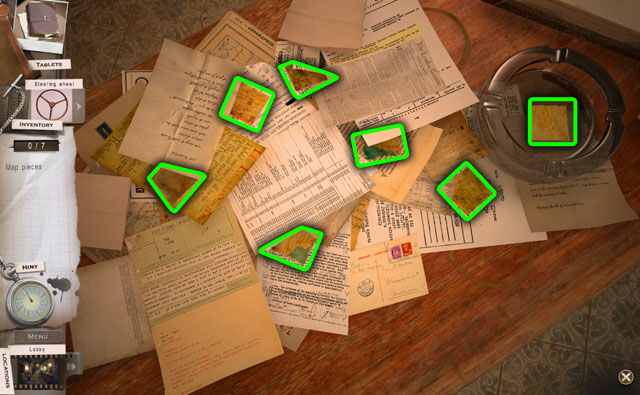
- Find 7 pieces of the map.
- You will receive the MAP PIECES.
- Open the gate in the middle of the scene with the ROOM KEY.
- Enter the room.

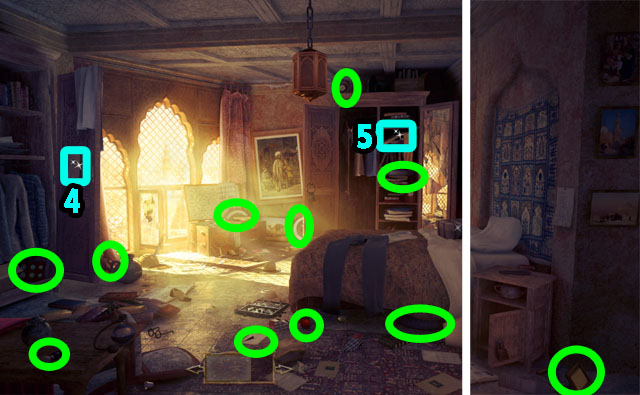
- Click on the list in the left side of the screen (4).
- Find 12 hidden objects from the list.
- You will receive the WHEELS.
- Click on the closet in the middle (5).

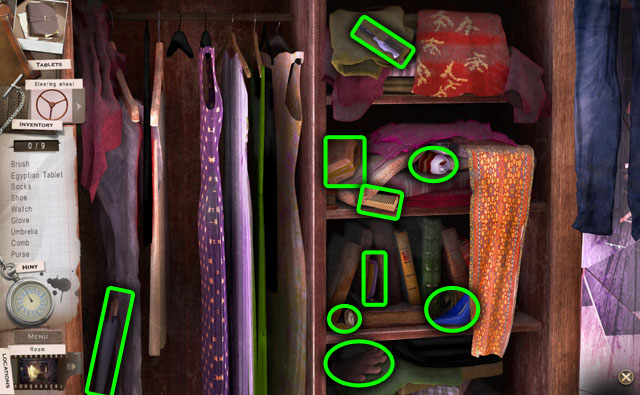
- Find 9 hidden objects from the list.
- You will receive a TABLET.

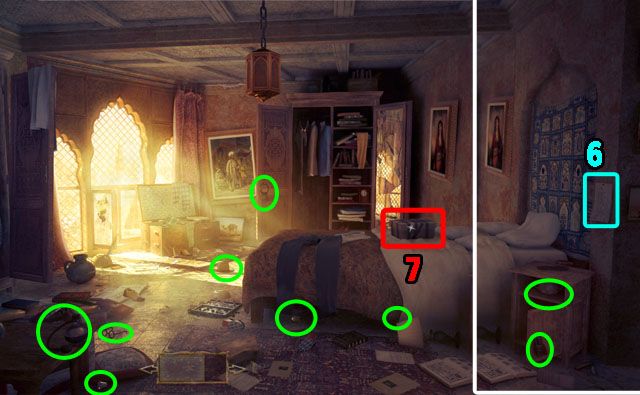
- Click on the list in the right side of the screen (6).
- Find 9 hidden objects from the list.
- You will receive a KNIFE.
- Cut the tape on the box on the bed with the KNIFE (7).
- Put the map pieces into the box.
- Click on the box to move to the next scene.

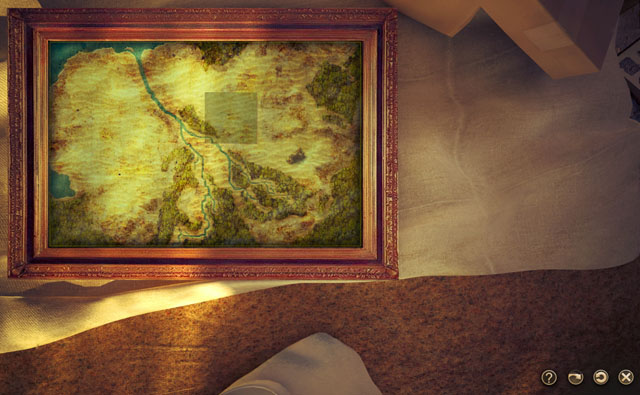
- Arrange the map pieces correctly to complete the map.
- To complete the map, drag the pieces into the frame and move them around.
- You do not need to rotate any pieces.
- Refer to the screenshot for the final image.
- Return to the dock through the lobby.

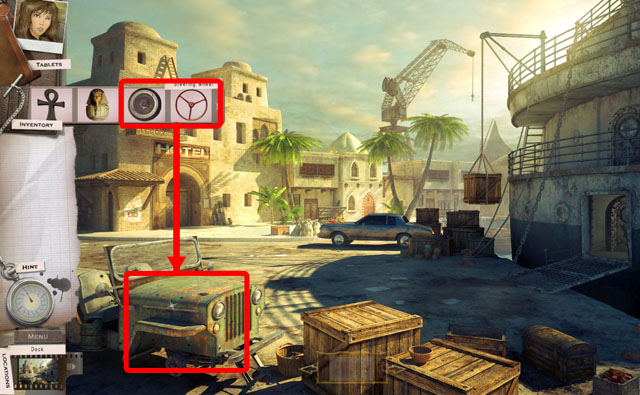
- Put the STEERING WHEEL and the WHEELS on the old truck in the bottom left corner.

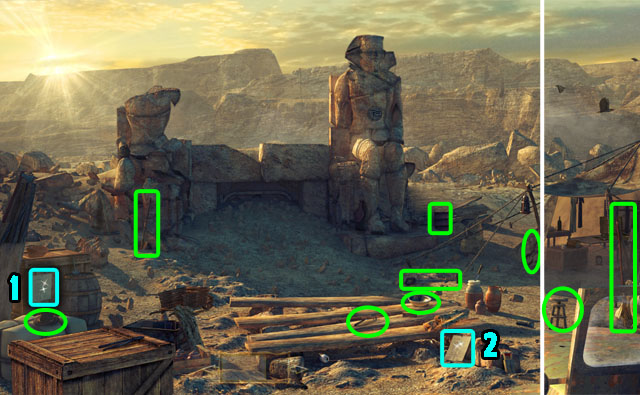
- Click on the list in the left side of the screen (1).
- Find 9 hidden objects from the list.
- You will receive the SHOVEL.
- Click on the list in the middle of the screen (2).

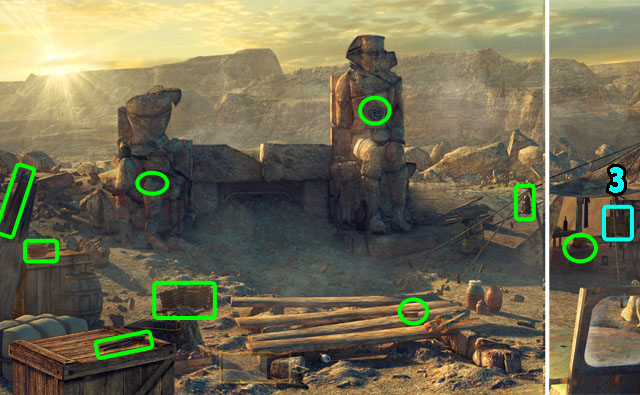
- Find 9 hidden objects from the list.
- The names in the list are randomized.
- You will receive the EYE OF HORUS.
- Click on the suitcase in the right side of the screen (3).

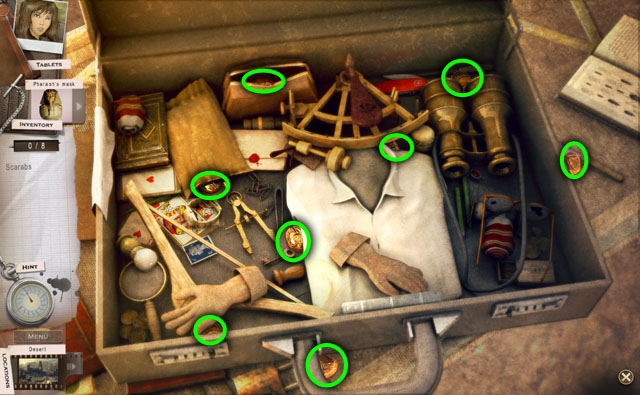
- Find 8 scarabs.
- You will receive the SCARABS.

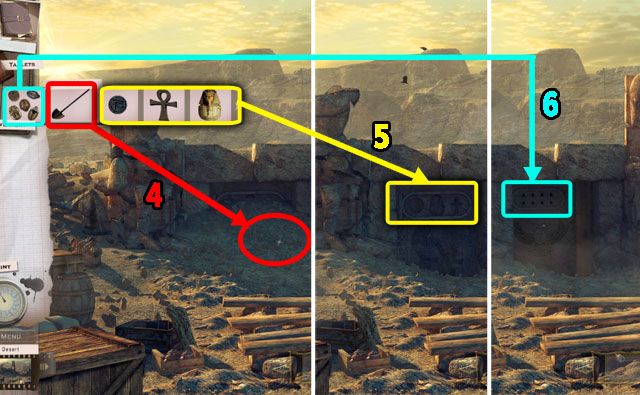
- Dig the ground with the SHOVEL (4) to remove dirt from in front of the stone arch.
- Put the EYE OF HORUS, ANKH, and the PHARAOH’S MASK into the stone hole (5).
- Place the SCARABS in the smaller holes that appear (6).
- Enter the antechamber.
Chapter 4

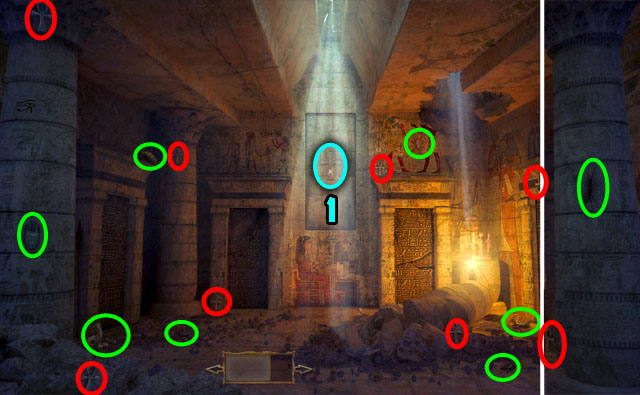
- Find 9 hidden objects highlighted in green in the list.
- Click on the outline of an ankh in the middle (1).
- Find 8 ankhs highlighted in red.
- You will receive the ANKH.
- Place the ANKH in the middle (1).
- Click on the grid to move to the next scene.

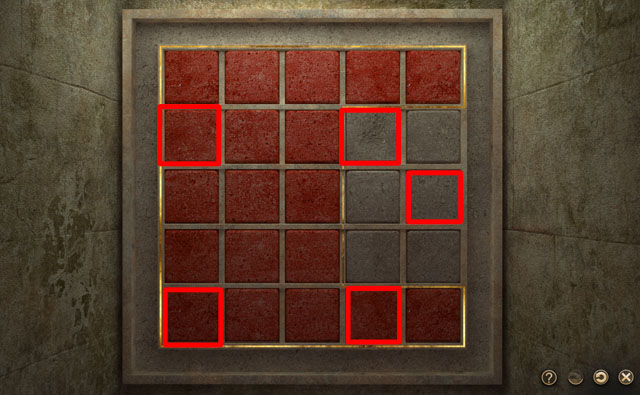
- Recreate the pattern shown in light red by selecting the correct stones in order to unlock the tomb doors.
- The light red stones will also have a gold border around them that tells you which stones need to be lit.
- Clicking on a stone will flip the color of the stone and all of the stones touching it, including diagonals; if a stone is red, it will get turned off to white again.
- Click on the circling arrow to restart the puzzle if you get stuck.
- Click 5 tiles highlighted in red in the screenshot in any order to complete the puzzle.
- Enter the Anubis Statue by clicking between 2 posts in the left side of the screen.

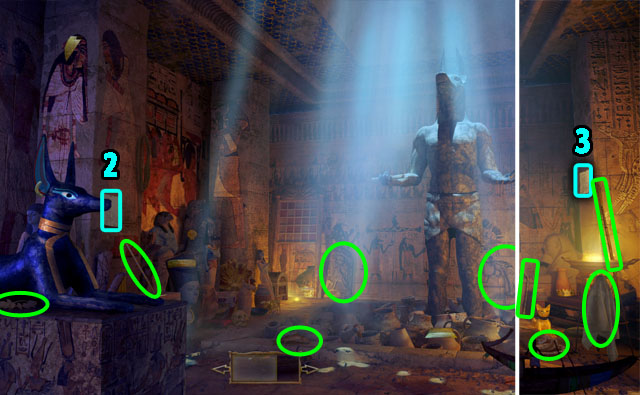
- Click on the list in the left side of the screen (2).
- Find 9 hidden objects highlighted in green in the list.
- You will receive a PIECE OF FRESCO.
- Click on the list in the right side of the screen (3).

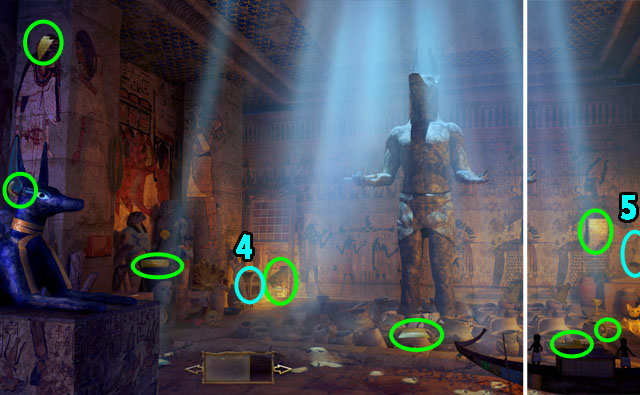
- Click on the list in the left side of the screen (4).
- Find 8 pieces of the urn.
- You will receive the URN.

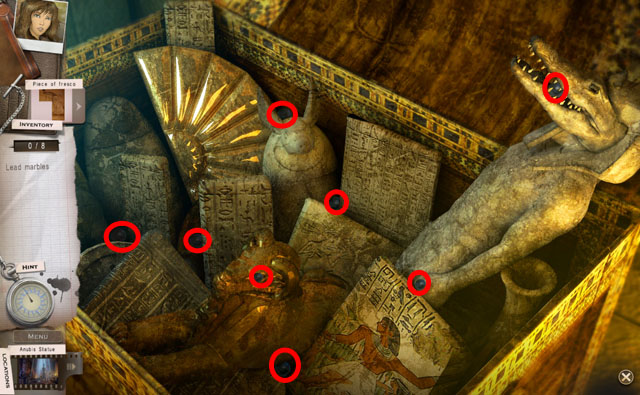
- Find 8 lead marbles.
- You will receive the LEAD MARBLES.
- Click on the white statue in the right side of the screen (5 in the previous screenshot).

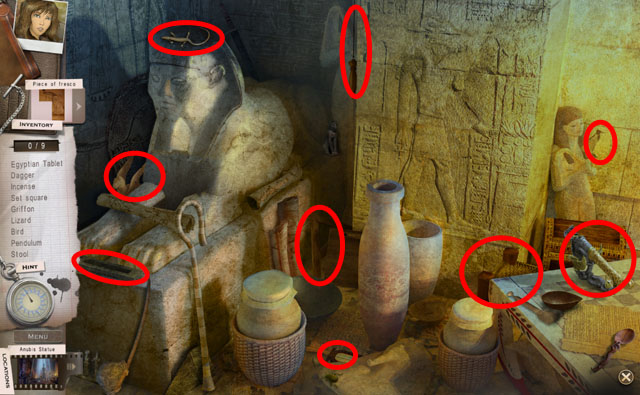
- Find 9 hidden objects from the list.
- You will get another TABLET.
- Return to the antechamber.
- Click on the grid in the middle to start the puzzle.

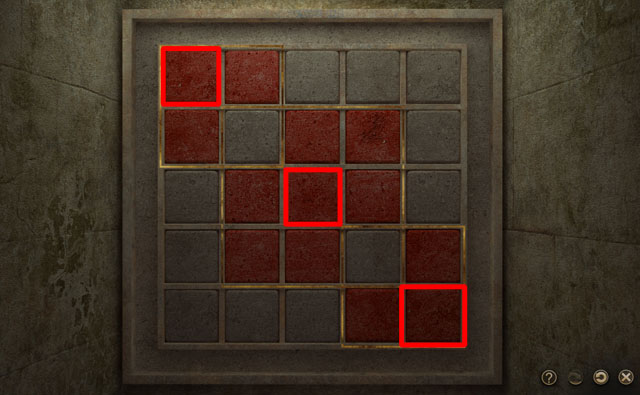
- Unlock the tomb doors by recreating the stone pattern shown in light red.
- The light red stones will also have a gold border around them that tells you which stones need to be lit.
- Clicking a stone will flip the color of the stone and all of the stones touching it, including diagonals.
- If a stone is red, it will get turned off to white again.
- Click on the circling arrow to restart the puzzle if you get stuck.
- Click the three tiles, highlighted in red in the screenshot, in any order to complete the puzzle.
- Enter the pantry from the left side of the gate.

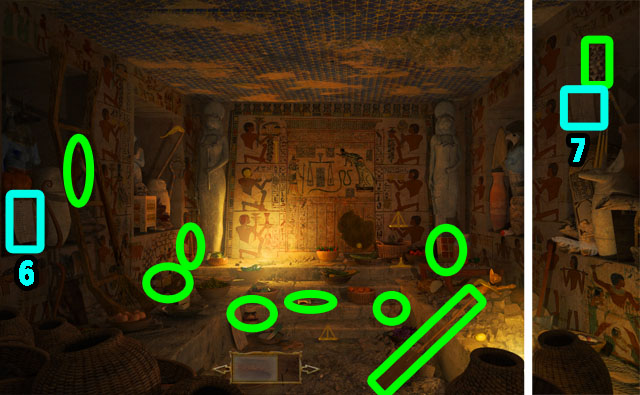
- Click on the list in the left side of the screen (6).
- Find 9 hidden objects from the list.
- You will receive a PATTERN PIECE.
- Click on the list in the right side of the screen (7).

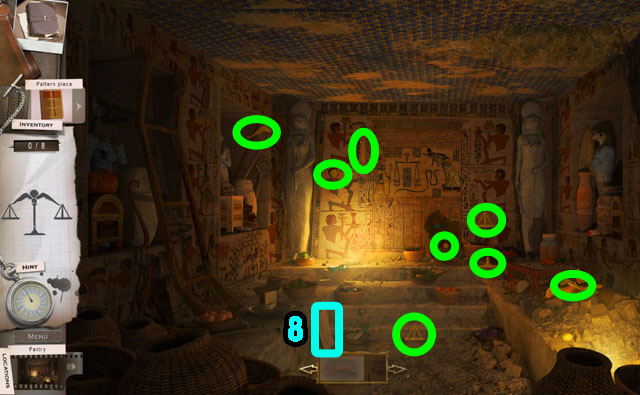
- Find 8 pieces of the scale.
- You will receive the SCALE.
- Click on the list at the bottom of the screen (8).

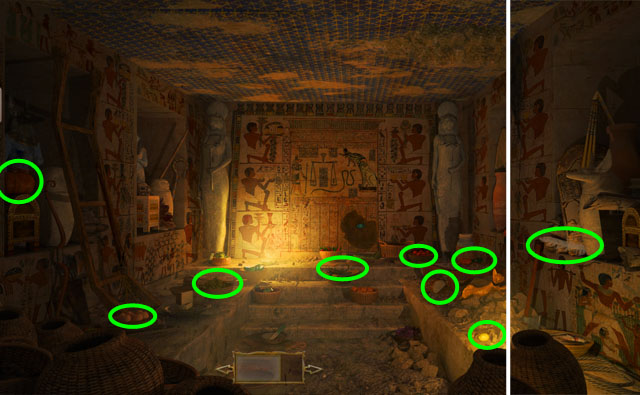
- Find 9 hidden objects from the list.
- You will receive a FEATHER.
- Return to the antechamber.
- Enter the fresco from the right side of gates.

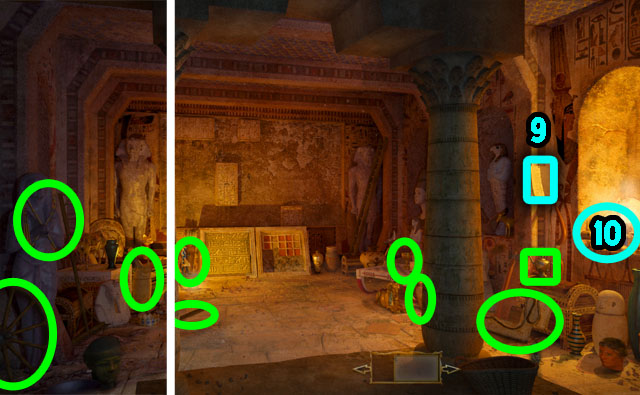
- Click on the list in the right side of the screen (9).
- Find 9 hidden objects from the list.
- You will receive another PIECE OF FRESCO.
- Click on the shelf in the right side of the screen to move to the next scene (10).

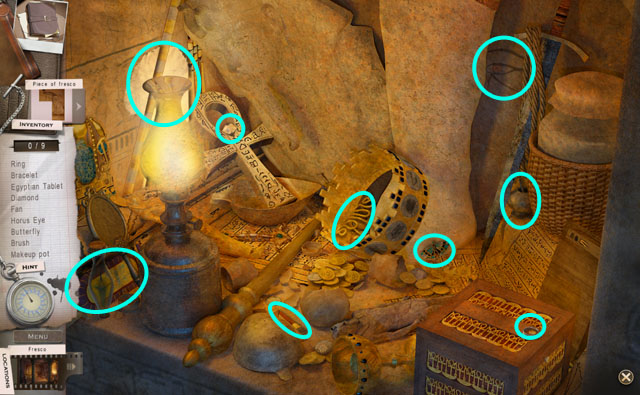
- Find 9 hidden objects from the list.
- You will receive another TABLET.
- Return to the antechamber.
- Move to the Anubis Statue.

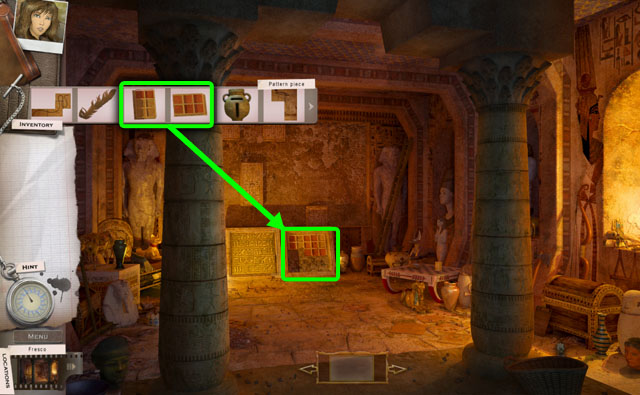
- Place the SCALE in the statue’s left hand (1).
- Place the LEAD MARBLES onto the SCALE (2).
- Click on the right hand to collect another PATTERN PIECE (3).
- Return to the antechamber.
- Enter the fresco.


- Place 2 PATTERN PIECES from the inventory into the frame in the middle.
- Return to the antechamber.

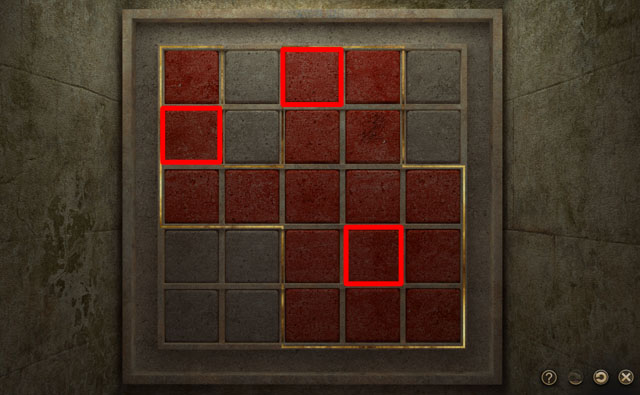
- Unlock the tomb doors by recreating the stone pattern shown in light red.
- The light red stones will also have a gold border around them that tells you which stones need to be lit.
- Clicking a stone will flip the color of the stone and all of the stones touching it, including diagonals.
- If a stone is red, it will get turned off to white again.
- Click on the circling arrow to restart the puzzle if you get stuck.
- Click the 3 tiles, highlighted in red in the screenshot, in any order to complete the puzzle.
- Enter the corridor in the left side of the screen.

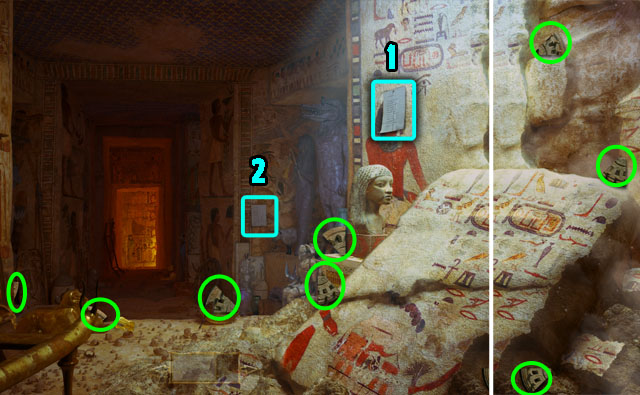
- Click on the list in the right side of the screen (1).
- Find 8 pieces of the wheel.
- You will receive the WHEEL.
- Click on the list in the middle of the screen (2).

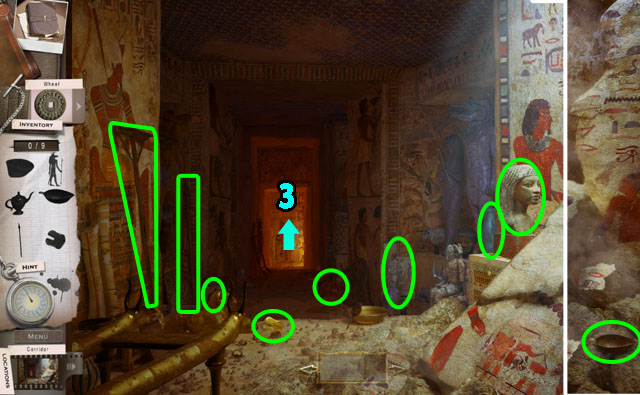
- Find 9 hidden objects from the list.
- You will receive another PIECE OF FRESCO.
- Enter the Abyss in the middle (3).

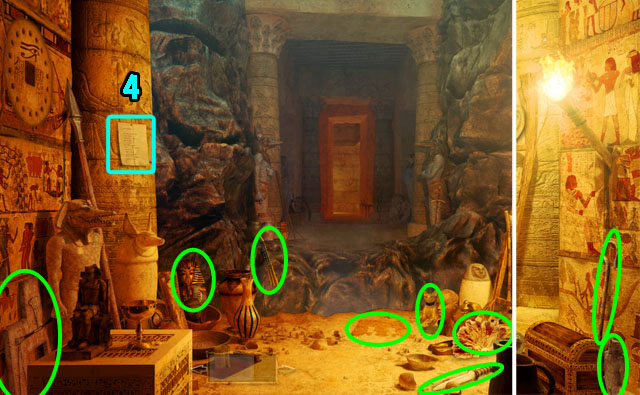
- Click on the list in the left side of the screen (4).
- Find 9 hidden objects from the list.
- You will receive the last PIECE OF FRESCO.
- Return to the fresco.
- Place one of the PIECES OF FRESCO in the missing spot in the middle.

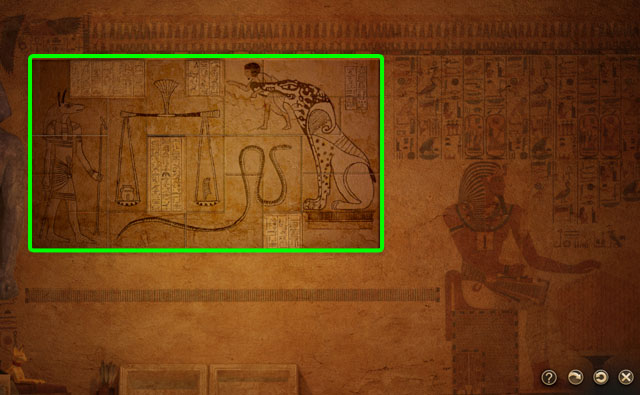
- Place the pieces on the fresco to lock them to the grid.
- Connect all the pieces to make a square shape without any overlapping.
- Finish the image following the solution in the screenshot.
- You do not need to rotate any pieces.
- Click on the frame under the fresco.

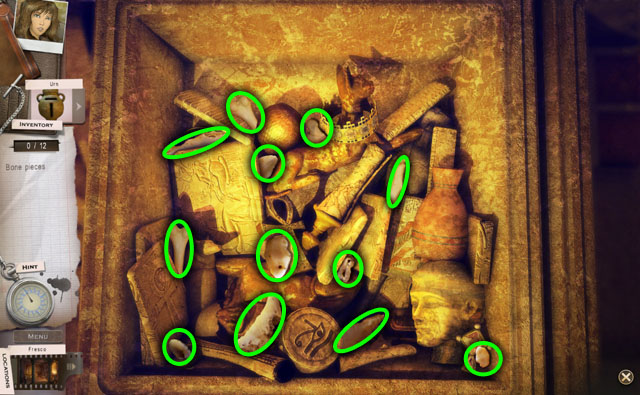
- Find the 12 pieces of bone.
- You will receive the HANDLE.
- Return to the Abyss.

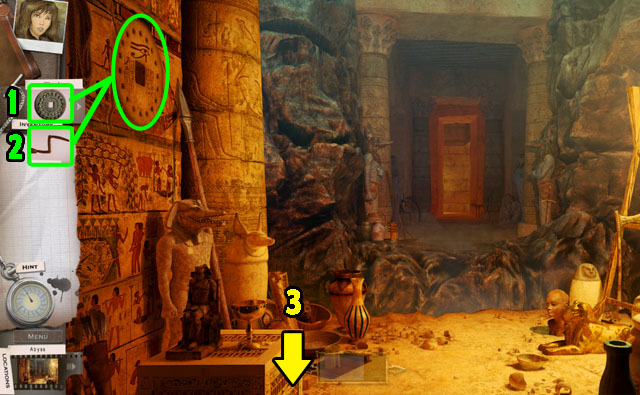
- Place the WHEEL on the left side of wall (1).
- Put the HANDLE on the wheel (2).
- Return to the corridor (3).

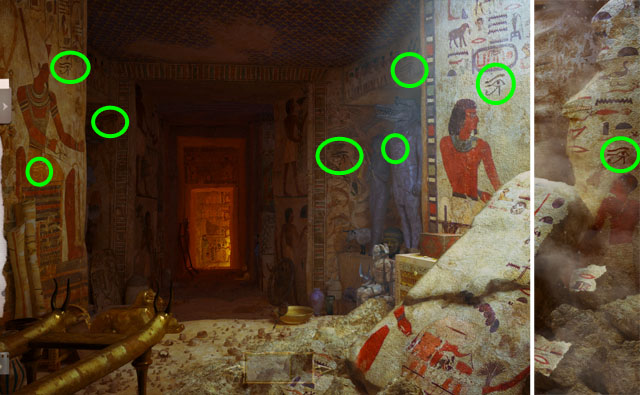
- Find 8 Horus eyes.
- Return to the Abyss again.
- Click on the handle in the right side of the screen.
- The bridge will appear.
- Enter the Judgment.

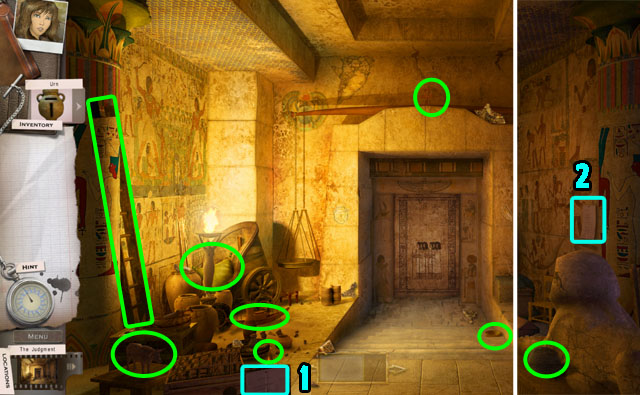
- Click on the list in the bottom left corner of the screen (1).
- Find 9 hidden objects from the list.
- The names in the list are randomized.
- You will receive a LADDER.
- Click on the list in the right side of the screen (2).

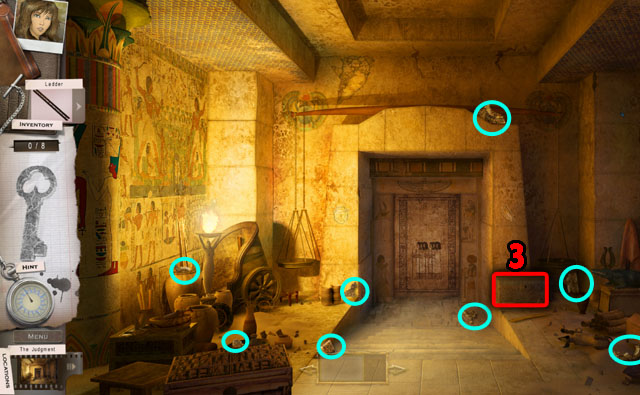
- Find 8 pieces of the key.
- You will receive the STONE KEY.
- Open the box with the STONE KEY (3).

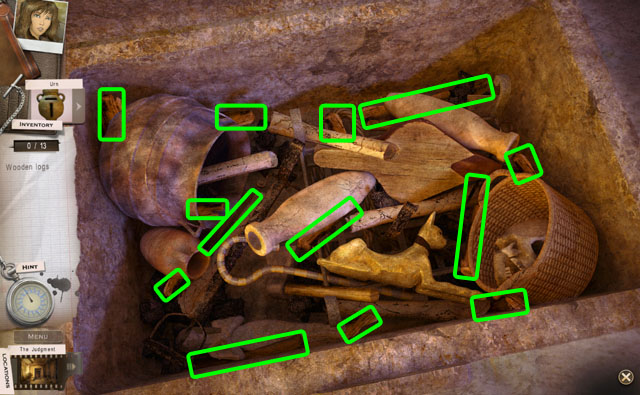
- Find 13 wooden logs.
- You will receive the WOODEN LOGS.

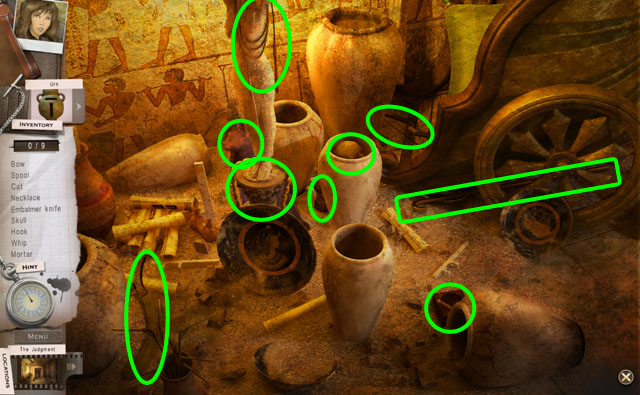
- Click on the vase in the bottom left corner of the screen.
- Find 9 hidden objects from the list.
- You will receive the CAT STATUE.

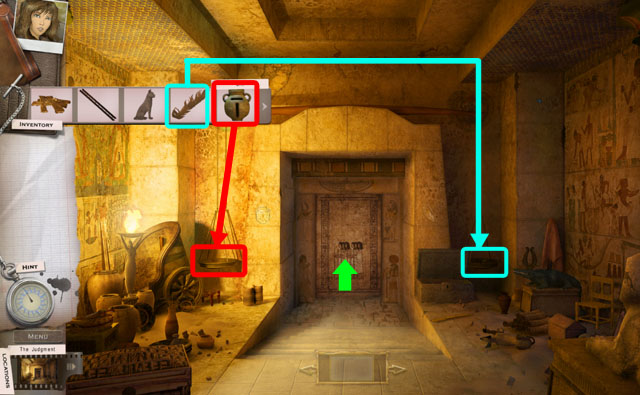
- Place the URN and the FEATHER on the scale.
- Enter the door of Babai from the entrance in the middle of the screen.
Chapter 5

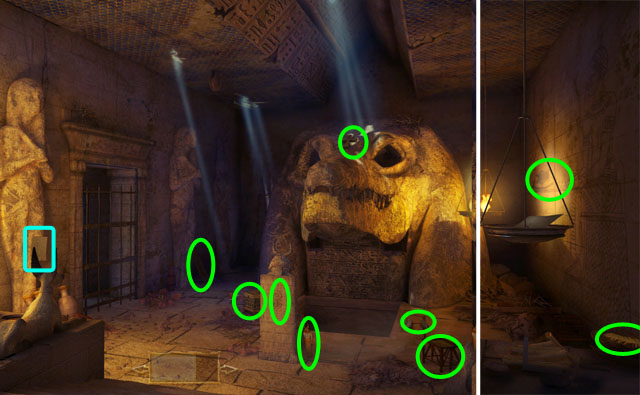
- Click on the list in the bottom left corner of the screen.
- Find 9 hidden objects from the list.
- You will receive some FLINT.

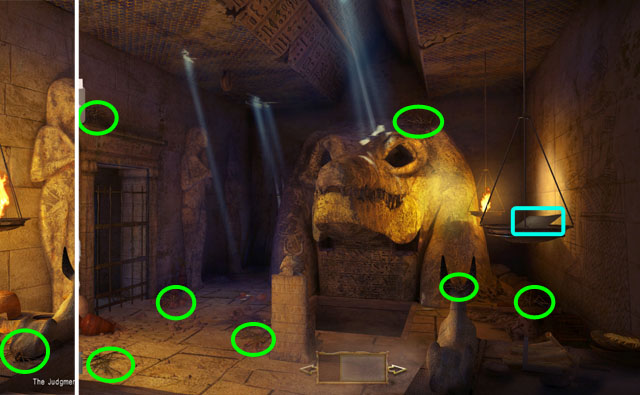
- Click on the list on the scale, on the right side of the screen.
- Find 8 twigs.
- You will receive the TWIGS.
- Place the LADDER on the statue of Babai’s eye.
- Enter the statue of Babai.

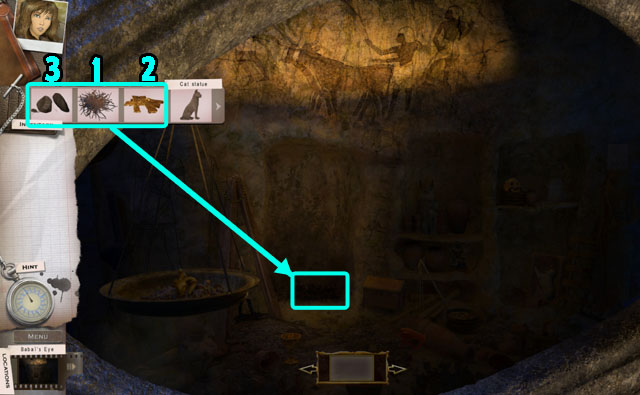
- Place the TWIGS in the fire place (1).
- Place the WOODEN LOGS (2) in the fire place as well.
- Light a fire with the FLINT (3) to light the room.

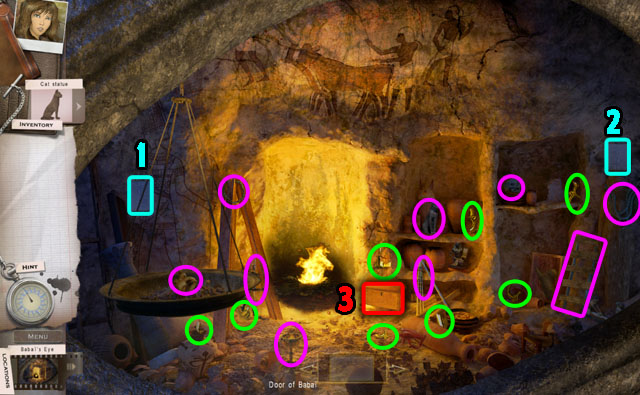
- Click on the list in the left side of the screen (1).
- Find 8 pieces of the key highlighted in green in the screenshot.
- You will receive the CHEST KEY.
- Click on the list in the right side of the screen (2).
- Find 9 hidden objects highlighted in purple in the list.
- You will receive the ROPE.
- Open the chest in the middle with the CHEST KEY (3).

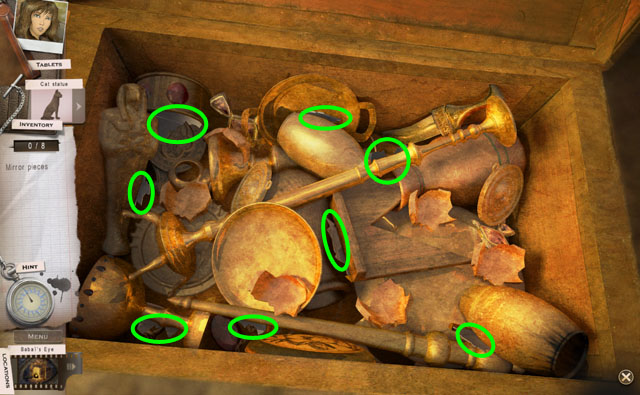
- Find the 8 pieces of mirror.
- You will receive the MIRROR.
- Return to the door of Babai.

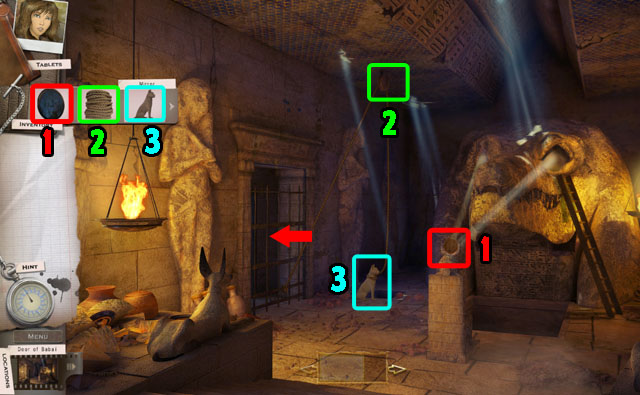
- Place the MIRROR on the turtle statue (1).
- Put the ROPE on the pulley (2).
- Tie the CAT STATUE with the rope (3).
- Click on the CAT STATUE to drop it into the hole.
- Enter the well now that the door is open.

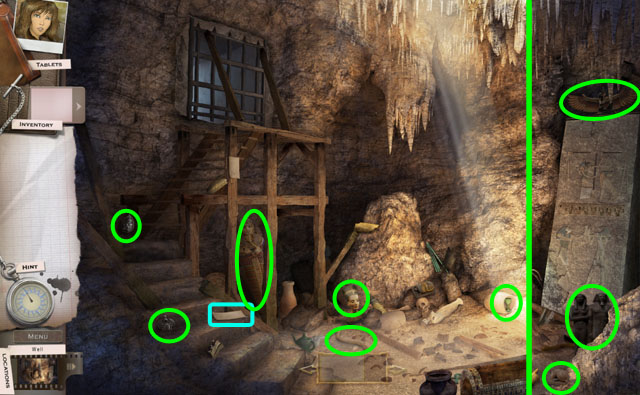
- Click on the list in the bottom right corner of the screen.
- Find 9 hidden objects from the list.
- You will receive a MAGNIFYING GLASS.

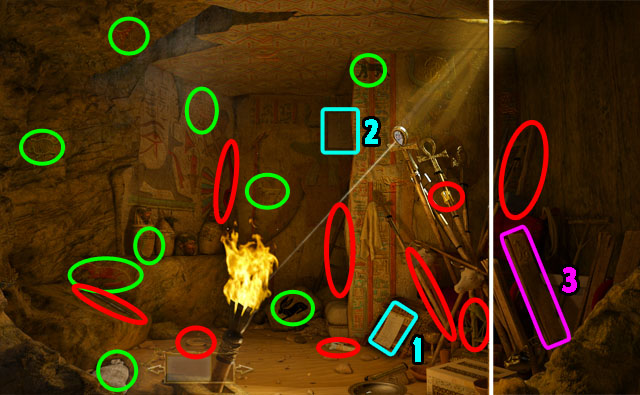
- Click on the list in the middle of the screen.
- Find 8 pieces of the torch.
- You will receive a TORCH.
- Click on the skull on the ground (2).

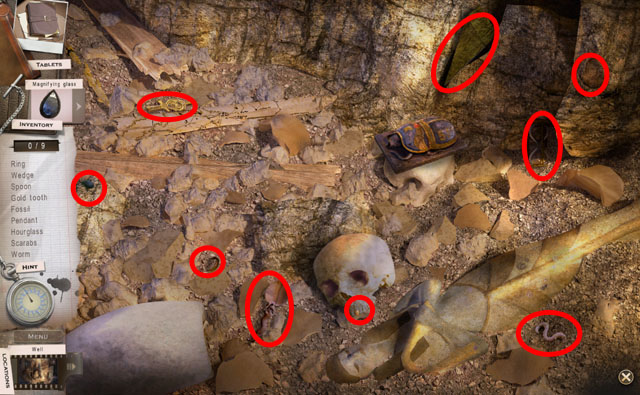
- Find 9 hidden objects from the list.
- You will receive the WEDGE.
- Move to the secret room in the far right side of the screen.

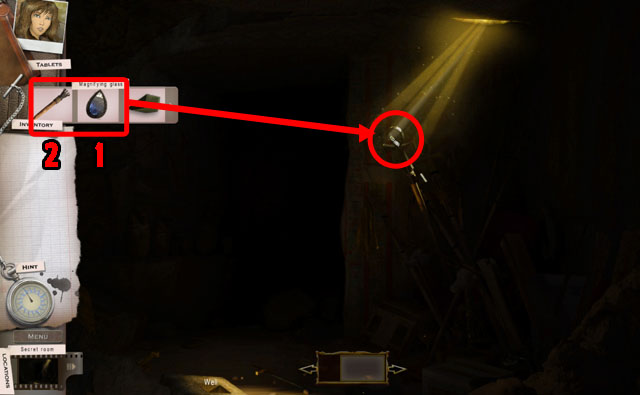
- Place the MAGNIFYING GLASS into the hole of the ankh getting hit by sunlight.
- Drag the TORCH to the MAGNIFYING GLASS to light up the room.


- Click on the list in the bottom side of the screen (1).
- Find 9 hidden objects highlighted in green in the list.
- You will receive the SACK OF GRAIN.
- Click on the list in the middle of the screen (2).
- Find 9 hidden objects highlighted in red in the list.
- You will receive the MACE.
- Click on the board highlighted in purple to move to the next scene (3).

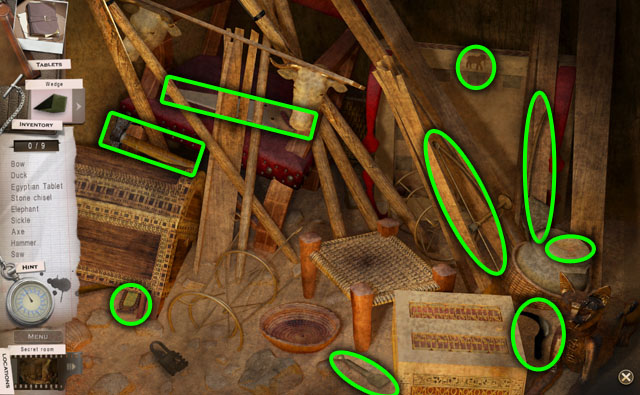
- Find 9 hidden objects highlighted in green in the list.
- You will receive another TABLET.
- Return to the well.

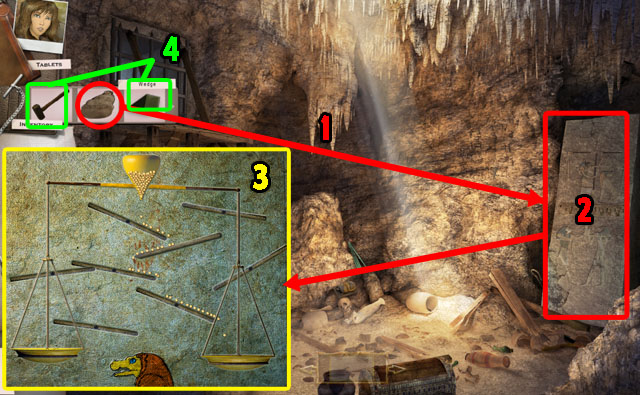
- Drag the SACK OF GRAIN onto the stone (1).
- Click the stone to start the puzzle (2).
- Change position of the platforms to make the grain fall into the tray on the right (3).
- Refer to the screenshot for a sample solution.
- Place the WEDGE under the gate. Break the gate with the MACE (4).
- Return to the door of Babai.
- The statue of Babai’s mouth will now be open.
- Enter the tomb.

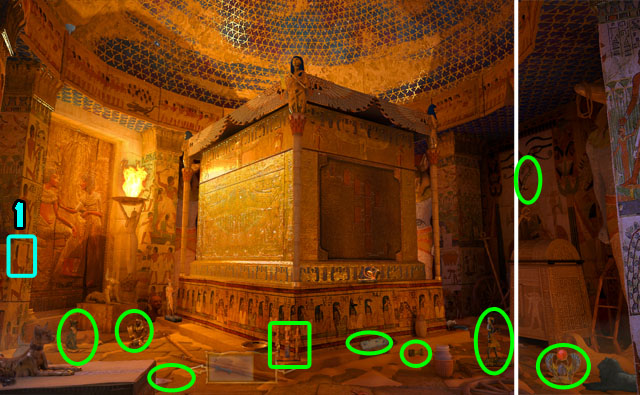
- Click on the list at the bottom of the screen.
- Find 9 hidden objects highlighted in green in the list.
- You will receive an OIL LAMP.

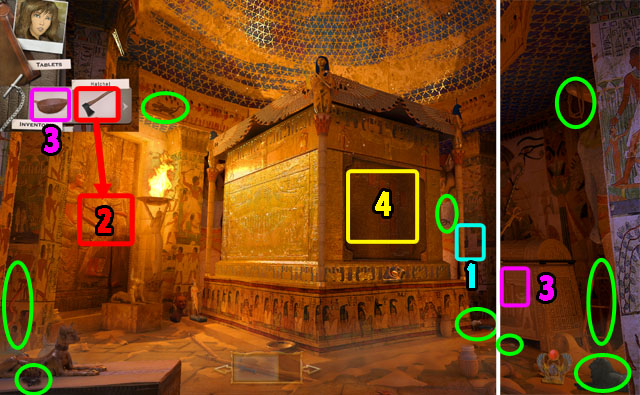
- Click on the list in the middle of the screen (1).
- Find 9 hidden objects highlighted in green in the list.
- You will receive the HATCHET.
- Break the door on the left with the hatchet.
- You will find a KEY (2).
- Use the OIL LAMP to put oil into the key hole on the right side of the screen (3).
- Use the KEY on the key hole to open the chest.

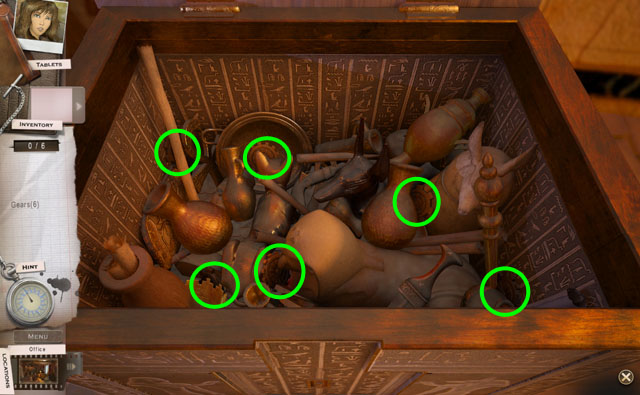
- Find the 6 hidden gears in the scene.
- You will receive the GEARS in your inventory.
- Exit the scene and click on the area in the middle of the sarcophagus to start the puzzle.

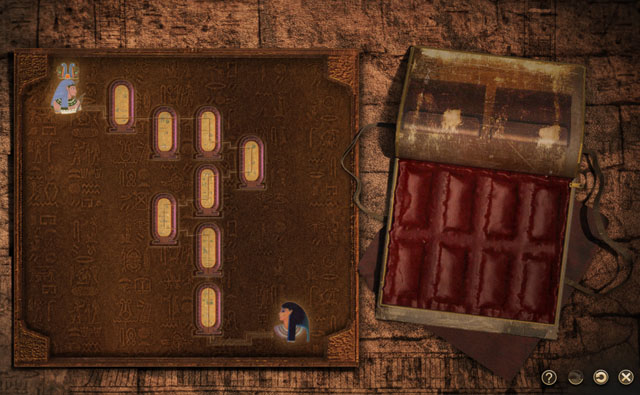
- Place the tablets from your case into the correct spots on the map (marked 4 in the previous screenshot).
- The line through the tablets should run uninterrupted from the top left corner to the bottom right.
- The line is small and hard to see but that is the only way to line up the tablets.
- See the screenshot for the correct solution.
- Once this is finished the panel will slide down and another panel will be visible.

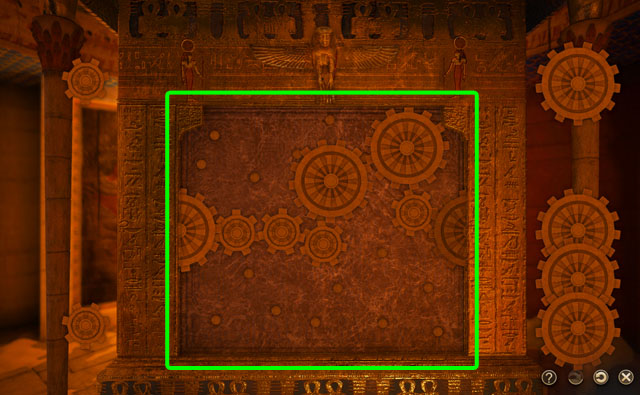
- Use the GEARS on the panel.
- Place the gears on the metal plate.
- Connect the gears from the left side to the right side. They must all be touching to move each other.
- You do not need to use all the gears.
- Refer to the screenshot for a sample solution.
- Congratulations! You’ve Completed The Secret Legacy: A Kate Brooks Adventure!


 New York Mysteries: Secrets of the Mafia Walkthrough, Guide, & Tips
 Witch Switch Tips and Tricks, Guide, & Tips
 Great Secrets: Nostradamus Walkthrough, Guide, & Tips
 Lost Lands: Dark Overlord Walkthrough, Guide, & Tips
 The Agency of Anomalies: Mystic Hospital Walkthrough, Guide, & Tips