Secrets of the Dark: Mystery of the Ancestral Estate Walkthrough, Guide, & Tips
Secrets of the Dark: Mystery of the Ancestral Estate Walkthrough
Welcome to the Secrets of the Dark: Mystery of the Ancestral Estate Walkthrough
If you have enough courage to challenge the darkness, then you’ll manage to find out the mystery of the Rossolimo family.
Whether you use this document as a reference when things get difficult or as a road map to get you from beginning to end, we’re pretty sure you’ll find what you’re looking for here.
This document contains a complete Secrets of the Dark: Mystery of the Ancestral Estate game walkthrough featuring annotated screenshots from actual gameplay!
We hope you find this information useful as you play your way through the game. Use the walkthrough menu below to quickly jump to whatever stage of the game you need help with.
Remember to visit the Big Fish Games Forums if you find you need more help. Have fun!
This walkthrough was created by BrownEyedTigre, and is protected under US Copyright laws. Any unauthorized use, including re-publication in whole or in part, without permission, is strictly prohibited.
General Tips

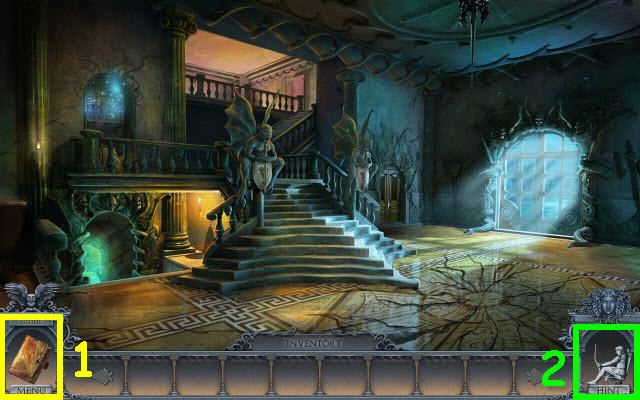
- This is the official guide for Secrets of the Dark: Mystery of the Ancestral Estate.
- Select Options to adjust the Music, Sound, Full Screen, Aspect Ratio, and Custom Cursor.
- You may select between Regular, Advanced, and Hardcore Mode.
- All events and actions are recorded in the journal (1).
- Hidden-object puzzles are referred to as HOP throughout the guide.
- The HOPs are triggered by actions in the game. If you do not have a HOP where it is mentioned in the guide, please check what you may have missed.
- Puzzles may be skipped and reset.
- Select the Instructions Button on the bottom right of the puzzles to access the game instructions.
- Select the Hint button (2) on the bottom right to get a hint in a HOP and in the main quest.
- Inventory items will be marked in all CAPS in the strategy guide.
Chapter 1 – The Lamp

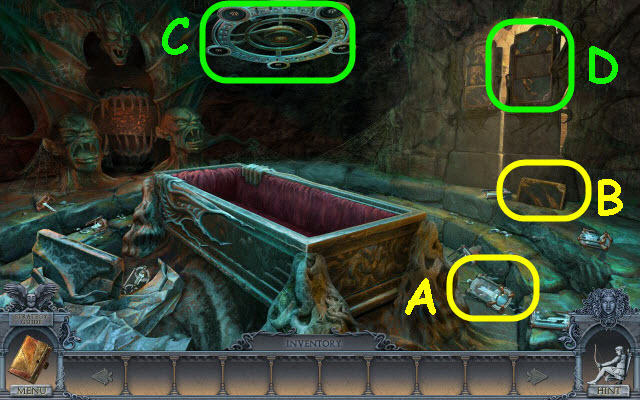
- Move the coffin lid to continue the cut scene.
- Take the BULB (A) and the TILE (B).
- Examine the lamp and place the BULB in it (C).
- Examine the door and place the TILE on it to trigger a puzzle (D).

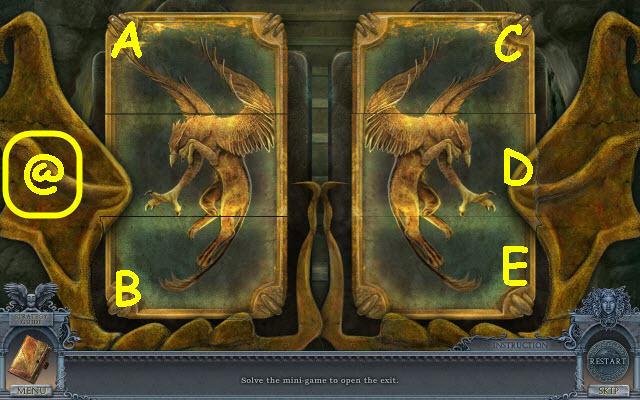
- Swap the tiles to complete the picture.
- To solve the puzzle, swap the following tiles: B-E, E-D, E-A, E-D, and E-C (@).
- Go through the newly-opened passage.

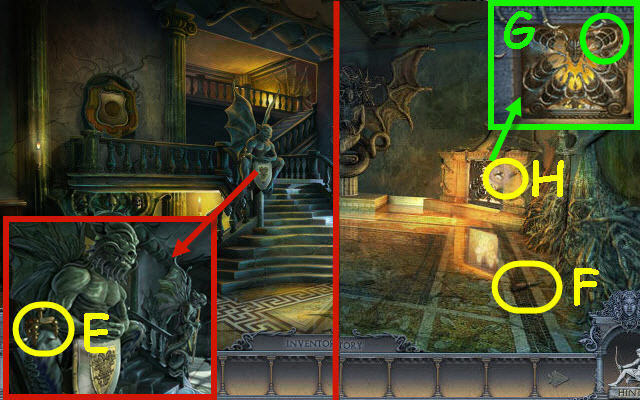
- Examine the statue; take the FIREPLACE HANDLE (E).
- Go up the stairs.
- Take the SCREWDRIVER (F).
- Examine the fireplace and place the FIREPLACE HANDLE on the grate (G).
- Select the illuminator to change the lighting (H).

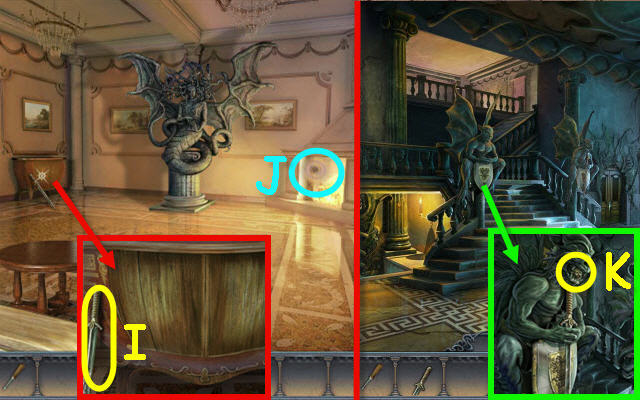
- Examine the cabinet; take the SWORD (I).
- Select the illuminator to change the lighting (J).
- Back out.
- Examine the statue and place the SWORD in its hands; take the MASK (K).
- Go up the stairs.

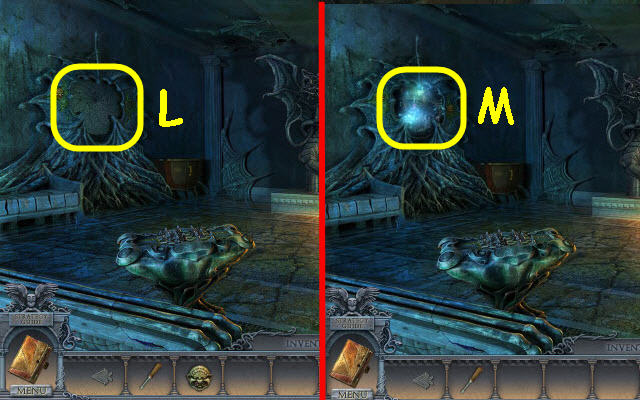
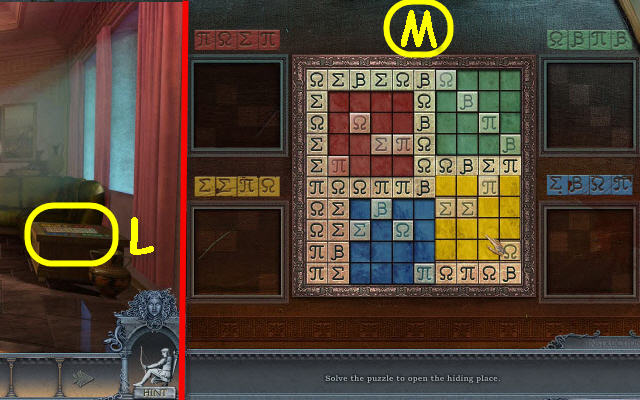
- Examine the mechanism and place the MASK on the right slot (L).
- Examine the opening to access a HOP (M).

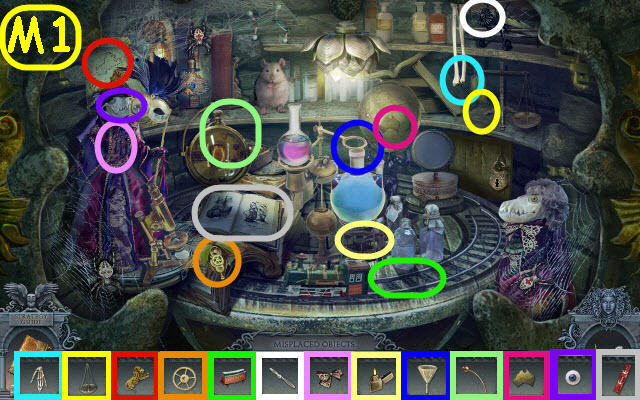
- Place the items where they belong in the scene (M1).
- You will earn a SHIP.

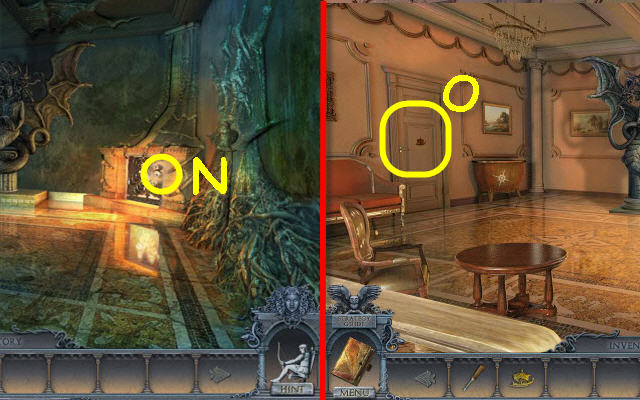
- Select the illuminator to change the lighting (N).
- Examine the door and place the SHIP on it to trigger a puzzle (O).

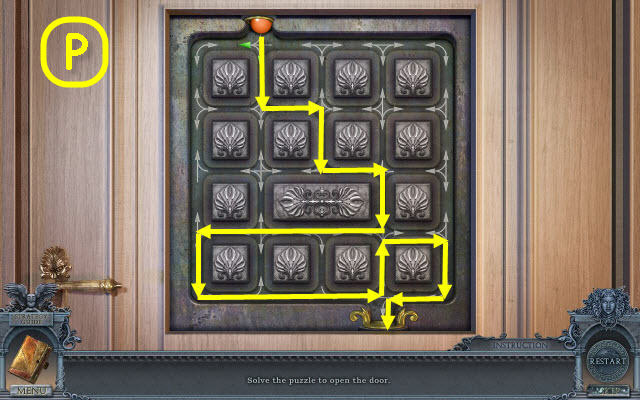
- Move the ball to the bottom socket.
- To solve the puzzle, select the following arrows: down, right, right, left, left, right, up, right, down, and down (P).
- Go left through the newly-opened door.

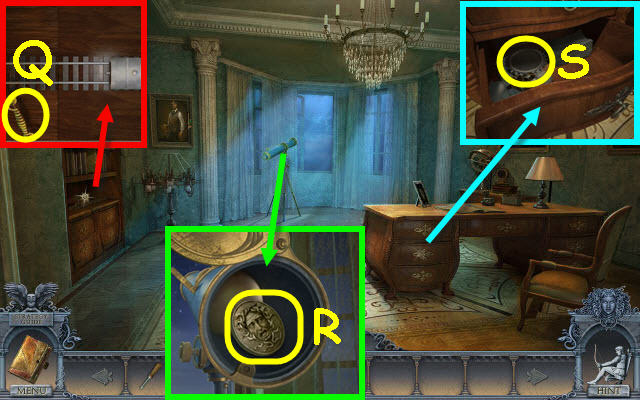
- Examine the bottom shelf; take the HANDLE (Q).
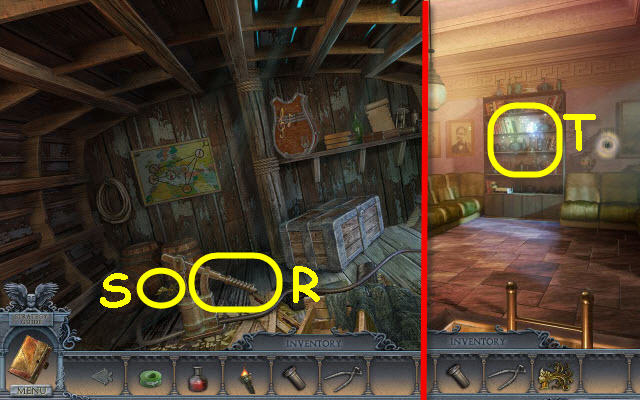
- Examine the telescope and use the SCREWDRIVER on the screw; take the GORGON (R).
- Examine the desk drawers and open the drawer; read the note and take the GEAR (S).
- Back out twice.

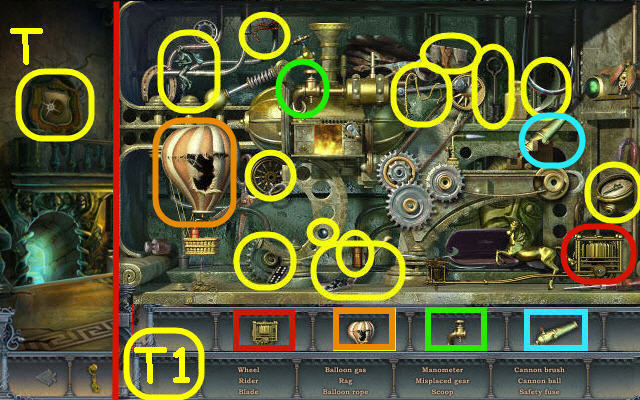
- Examine the shield and place the GORGON in the center; examine the alcove to access a HOP (T).
- Place the items where they belong and then find the items listed (T1).
- You will earn a DOOR KEY.
- Go up the stairs.

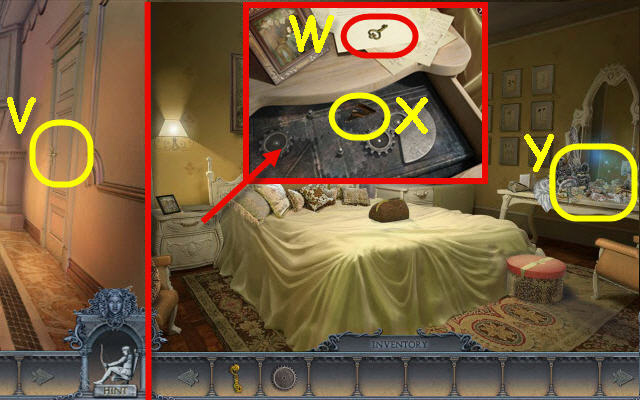
- Examine the door and use the DOOR KEY on the lock; turn the DOOR KEY (V).
- Go right through the newly-opened door.
- Examine the nightstand; read the note and take the DRAWER KEY (W).
- Open the drawer; take the PORTRAIT PART (X).
- Examine the dresser to access a HOP (Y).

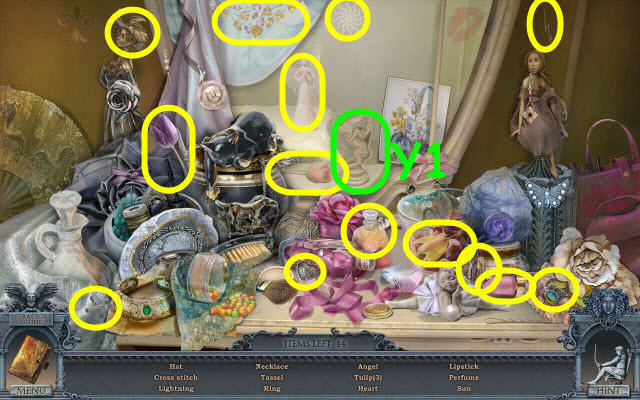
- Find the items listed (Y1).
- You will earn a KNIGHT.
- Back out and go left into the office.

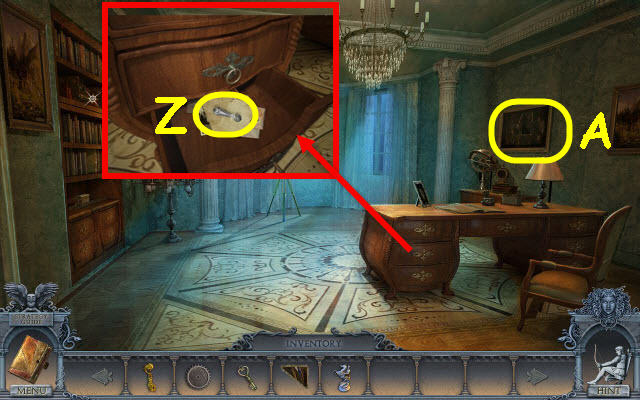
- Examine the desk drawers and use the DRAWER KEY on the bottom drawer. Read the note and take the CONNECTING ROD (Z).
- Examine the portrait and place the PORTRAIT PART on it to trigger a puzzle (A).

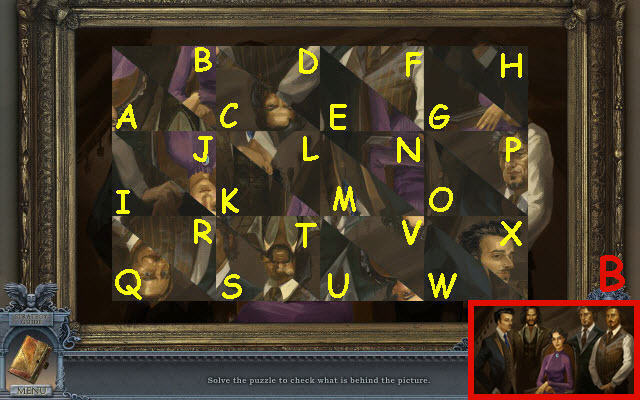
- Arrange the pieces to complete the portrait.
- To solve the puzzle, switch the following pieces: J-M, B-T, A-L, E-V, N-U, F-P, S-G, Q-H, B-C, O-R, D-B, B-X, and I-W (B).
- Take the MAGIC BALL.
- Back out of the room.

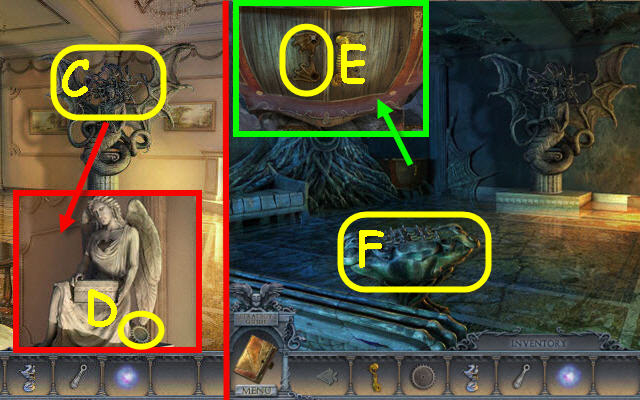
- Use the MAGIC BALL on the statue (C).
- Examine the statue; take the 2nd GEAR (D).
- Change the illumination of the room.
- Examine the cabinet and place the HANDLE on it (E).
- Examine the chessboard and place the KNIGHT on it to trigger a puzzle (F).

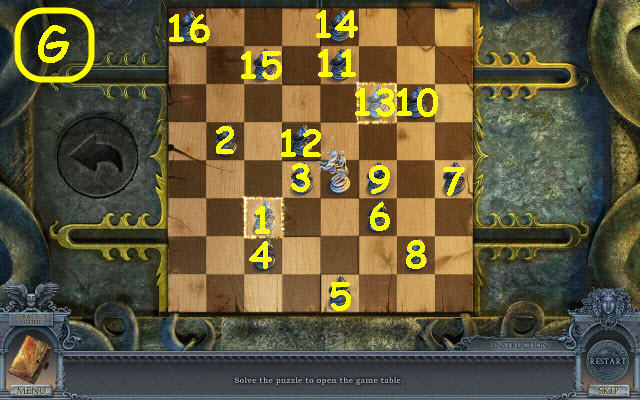
- Move the knight to remove all the pawns.
- See screenshot for solution (G).
- Take the 2nd CONNECTING ROD.
- Change the illumination in the room.

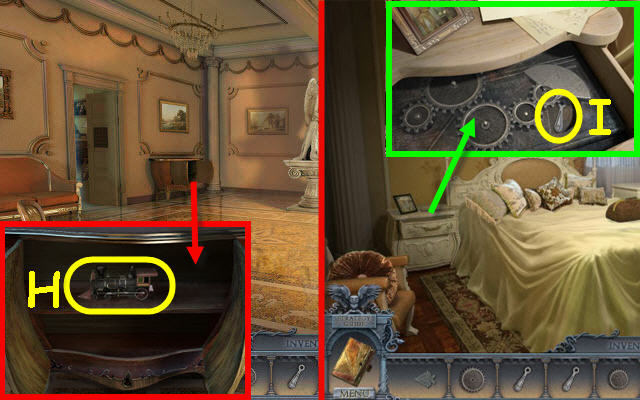
- Examine the cabinet; take the LOCOMOTIVE (H).
- Go right into the bedroom.
- Examine the nightstand and place the 2 GEARS on the mechanism; take the 3rd CONNECTING ROD (I).
- Back out and go left into the office.

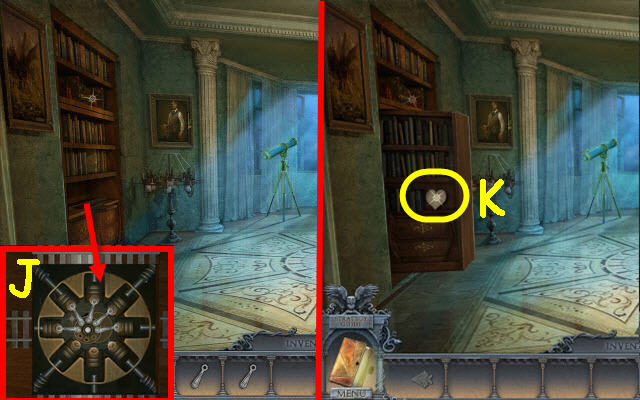
- Examine the bottom shelf; place the LOCOMOTIVE on the track. Place the 3 CONNECTING RODS on the mechanism (J).
- Take the ANGEL HEART (K).
- Back out.

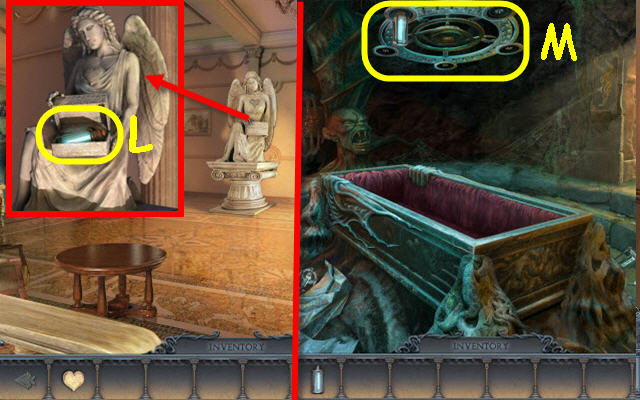
- Examine the statue and place the ANGEL HEART on it; take the BULB (L).
- Back out and go down into the crypt.
- Examine the lamp and place the BULB on it (M).
- Back out.
Chapter 2 – The Library

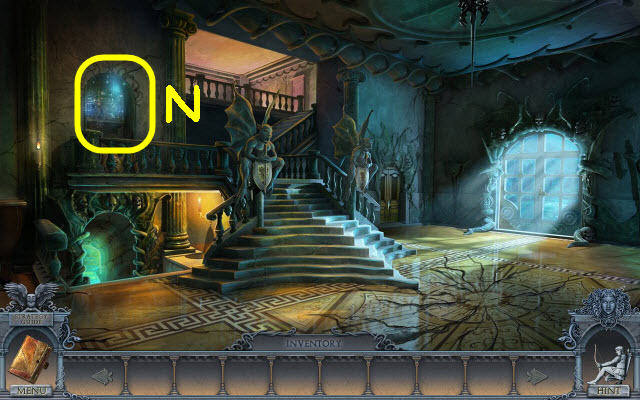
- Examine the alcove (N).
- You will access a HOP.

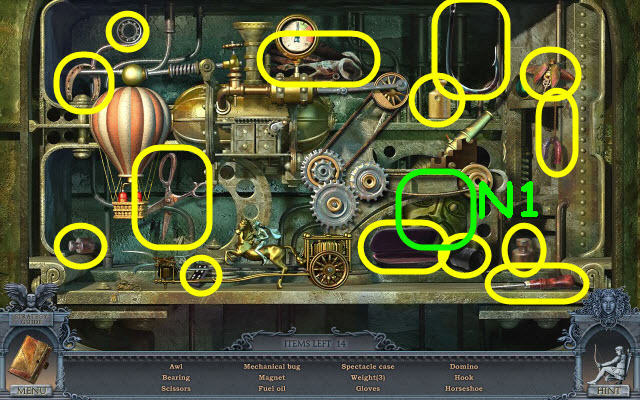
- Find the items listed (N1).
- You will earn a GREEK MASK.
- Go up the stairs.
- Change the illumination.

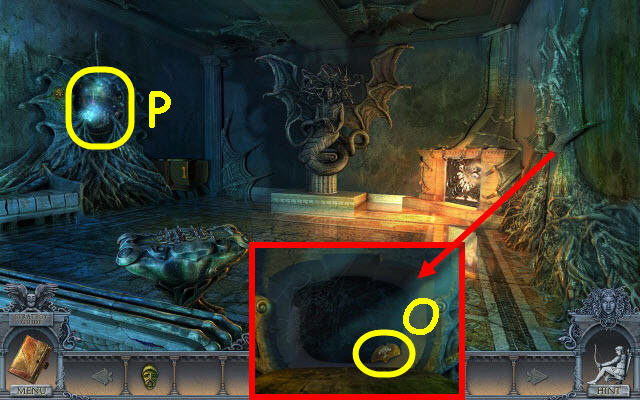
- Examine the top of the roots and place the GREEK MASK in the slot; take the CHEST BUTTON (O).
- Examine the left alcove to access a HOP (P).

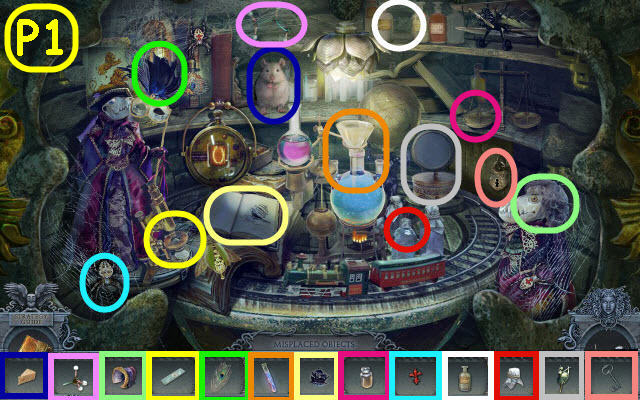
- Place the items where they belong in the scene (P1).
- You will earn a KNIFE.
- Change the illumination and go right into the bedroom.

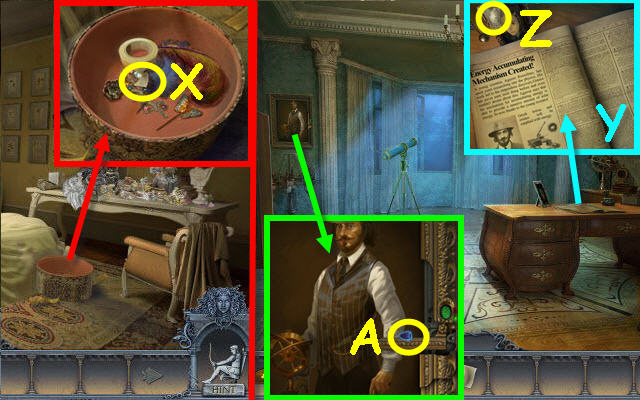
- Examine the box and use the KNIFE on the ribbon; take the LENS (Q), and the DOOR HANDLE (R).
- Examine the dresser to access a HOP (S).

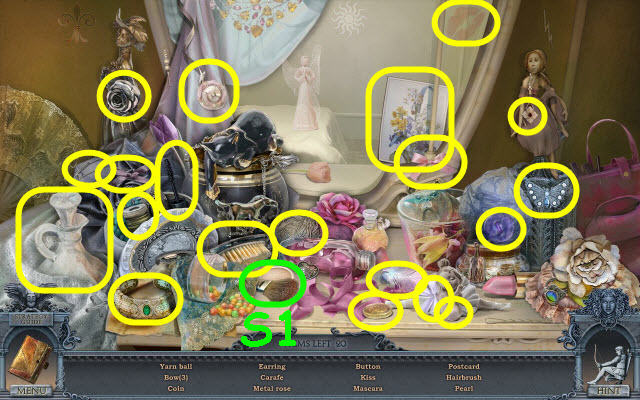
- Find the items listed (S1).
- You will earn a POWDER WITH BRUSH.
- Back out twice.

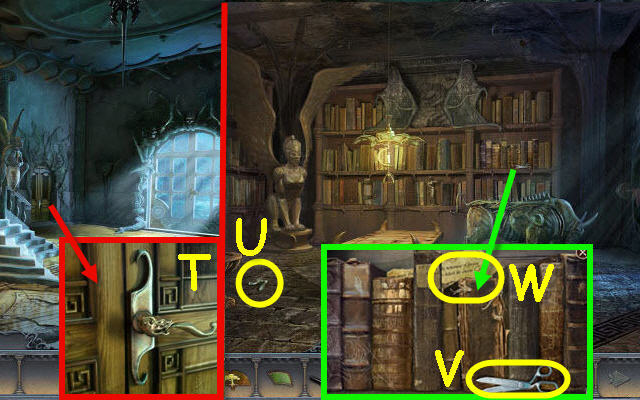
- Examine the door and place the DOOR HANDLE on it; turn the handle (T).
- Go through the newly-opened door to the library.
- Take the TAP (U).
- Examine the book shelf; take the SCISSORS (V) and read the note (W).
- Back out; go up the stairs and then right into the bedroom.


- Examine the box and use the SCISSORS on the tape; take the TAPE (X).
- Back out and go left.
- Examine the desktop and turn the newspaper pages to read the articles (Y).
- Use the POWDER WITH BRUSH and then the TAPE on the fingerprint; take the FINGERPRINT (Z).
- Examine the portrait and use the FINGERPRINT on the green button; read the scroll and take the SEED (A).
- Back out twice and go into the library.

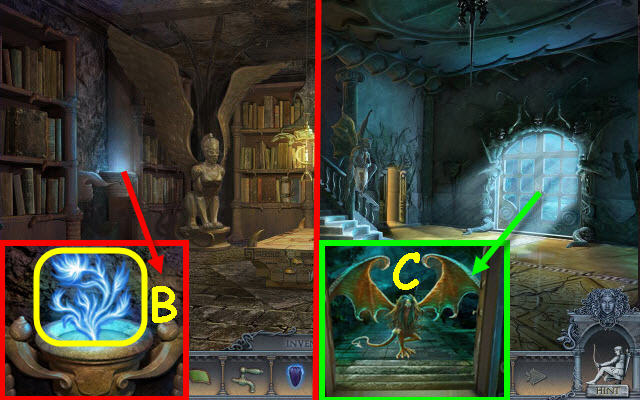
- Examine the magic pot and place the SEED in it; take the FIRE FLOWER (B).
- Back out.
- Examine the glass doors and open them; use the FIRE FLOWER on the Harpy (C).
- Go through the newly-opened door.

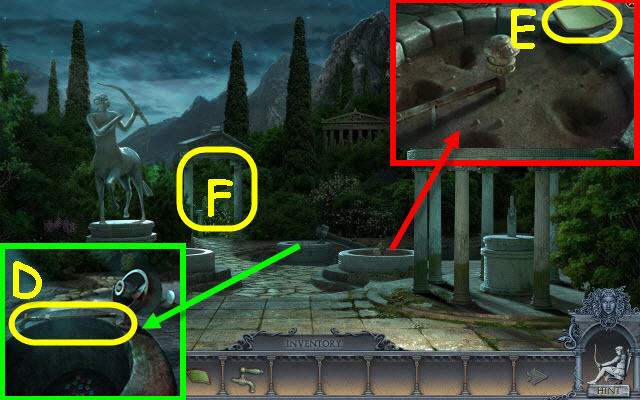
- Examine the center fountain; take the CANE (D).
- Examine the right fountain; take the 2nd LENS (E).
- Go left through the arch (F).

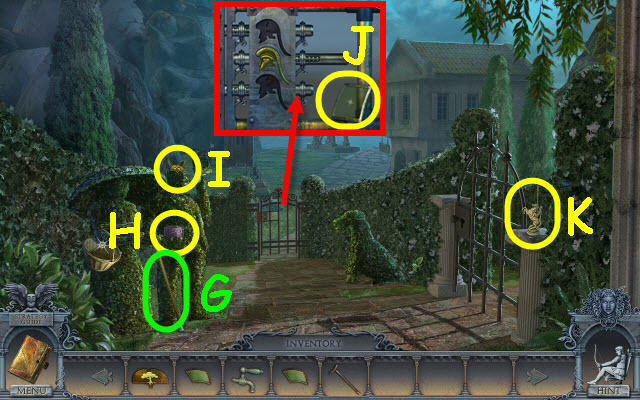
- Give the CANE to the gentleman topiary (G); take the BOOK (H) and the 2nd CHEST BUTTON (I).
- Examine the gate; take the 3rd LENS (J).
- Take the KNIGHT (K).
- Back out twice and go into the library.

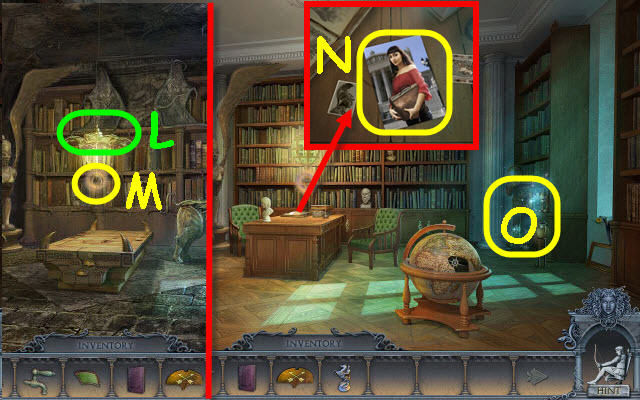
- Examine the lamp and place the 3 LENSES on it (L).
- Turn on the illuminator (M).
- Examine the desk; take the picture to get the code from her bag entered into the journal (N).
- Examine the right bookcase to access a HOP (O).

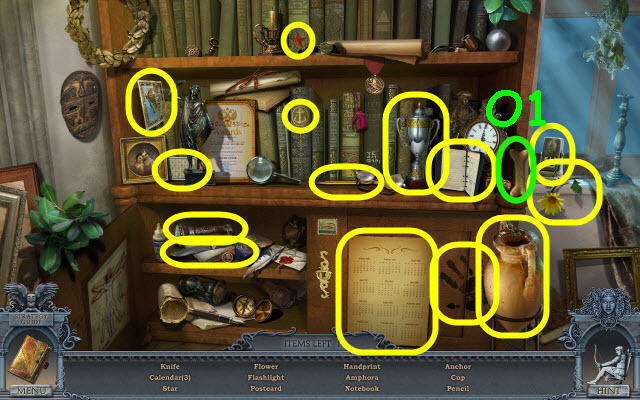
- Find the items listed (O1).
- You will earn a BONE.
- Change the illumination back to the dark.
- Back out; go right and then left through the arch.

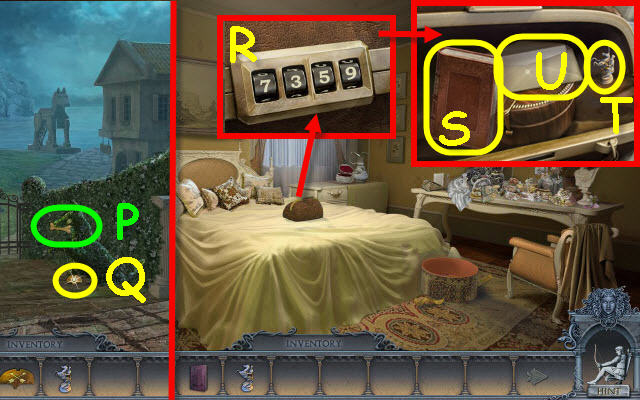
- Give the BONE to the dog topiary (P).
- Take the 3rd CHEST BUTTON (Q).
- Back out twice; go up the stairs and then right into the bedroom.
- Examine the bag and use the code found in your journal from the picture; 7, 3, 5 and 9 (R).
- Take the 2nd BOOK (S), the 2nd KNIGHT (T) and read the note (U).
- Back out twice and go to into the library.

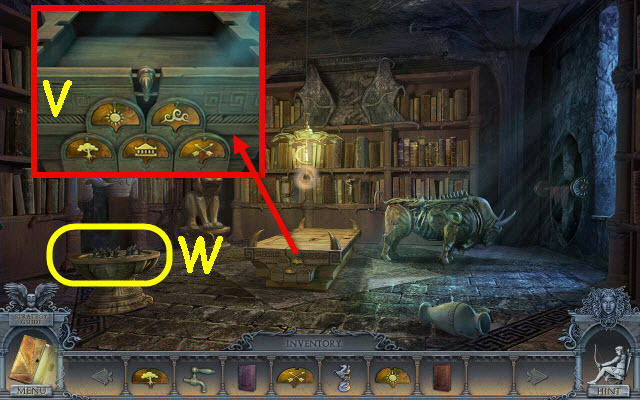
- Examine the chest and place the 3 CHEST BUTTONS in their matching slots (V).
- Examine the chess board and place the 2 KNIGHTS on it to trigger a puzzle (W).

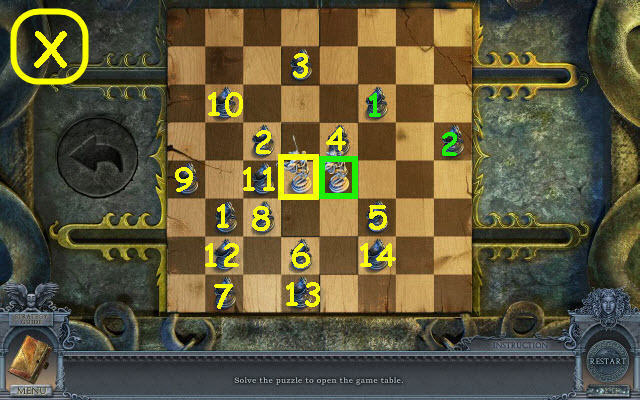
- Move the knights to remove all the pawns.
- See screenshot for solution (X).
- Take the GLOBE PART.
- Change the illumination.

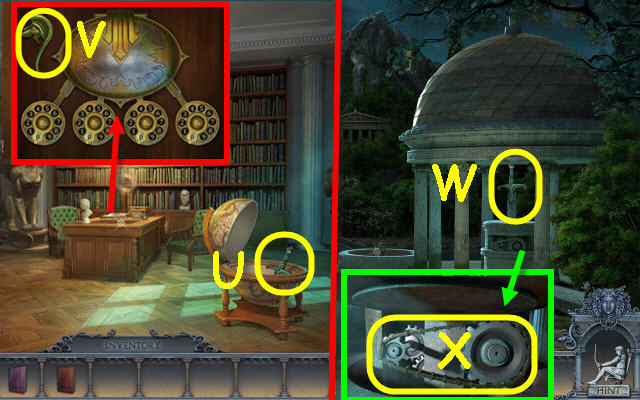
- Place the GLOBE PART on the globe; take the SWORD HANDLE (U).
- Examine the desk; take the HELMET (V).
- Back out and go right out the door.
- Place the SWORD HANDLE on the blade (W); examine the mechanism and remove the chain (X).

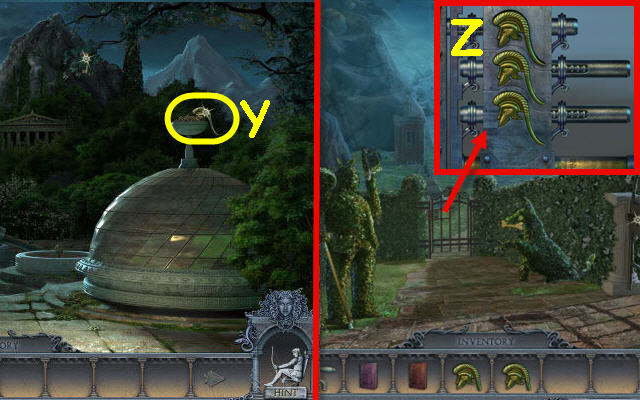
- Take the 2nd HELMET (Y).
- Go left through the arch.
- Examine the gate and place the 2 HELMETS on it (Z).
- Go forward to the shore.

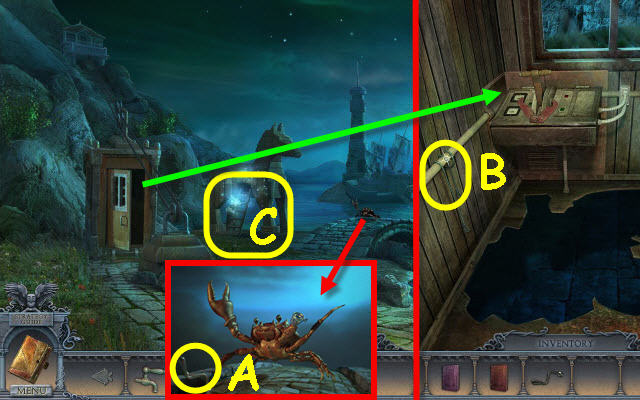
- Examine the crab; take the CRANK (A).
- Go into the cable car; take the BOWSTRING (B).
- Back out.
- Examine the Trojan horse to access a HOP (C).

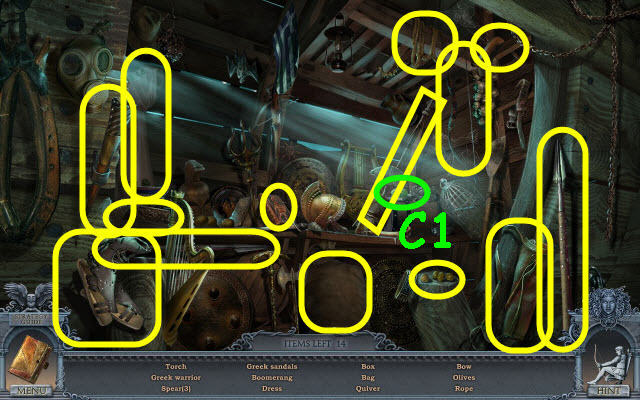
- Find the items listed (C1).
- You will earn PLUMBERS TAPE.
- Back out twice.

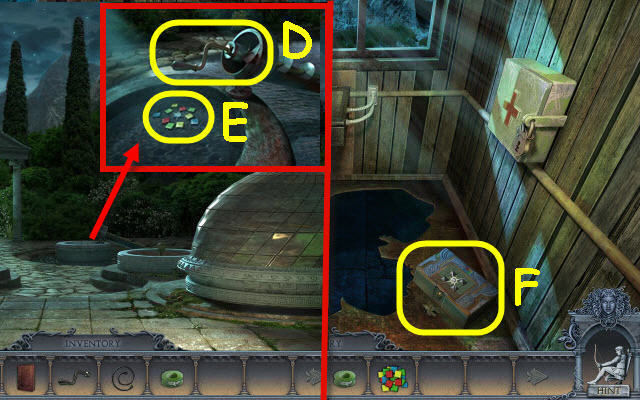
- Examine the center fountain and place the CRANK on the mechanism (D); take the TILES (E).
- Return the shore and into the cable car.
- Examine the box and place the TILES on it to trigger a puzzle (F).

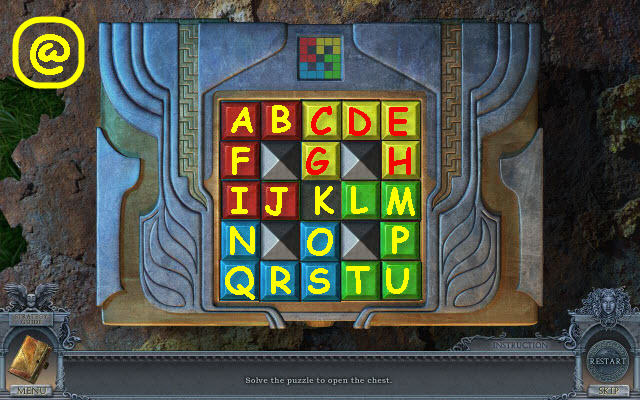
- Slide the tiles to match the pattern above.
- To solve the puzzle, select the following pieces: L-M-H-E-D-C-B-A-F-I-N-Q-R-S-T-U-P-M-H-E-D-C-G-K-L-M-H-E-D-C-B-A-F-I-N-Q-R-S-T-U-P-M-H-E-D.
- C-B-A-F-I-J-K-L-M-H-E-D-C-B-A-F-I-N-Q-R-S-O-K-J-I-F-A-B-C-D-E-H-M-P-U-T-S-O-K-G-C-B-A-F-I-N.
- Q-R-S-O-K-J-I-N-Q-R-S-O-K-L-M-H-E-D-C-B-A-F-I-J-K-O-S-T-U-P-M-L-K-O-S-T-U-P-M-H-E-D-C-G-K-L-M-H-E-D-C-B-A-F-I-J-K-G-C.
- B-A-F-I-N-Q-R-S-O-K-J-I-N-Q-R-S-T-U-P-M-H-E-D-C-B-A-F-I-J-K-O-S-T-U-P-M-H-E-D-C-B-A-F-I-N.
- Q-R-S-T-U-P-M-H-E-D-C-B-A-F-I-J-K-O-S-T-U-P-M-L-K-O-S-T-U-P-M-H-E-D-C-G-K-L-M-H-E-D-C-B-A-F-I-J-K-G-C-B-A-F-I-N-Q-R-S.
- T-U-P-M-H-E-D-C-G-K-O-S-T-U-P-M-H-E-D-C-B-A-F-I-N-Q-R-S-O-K-G-C-B-A-F-I-N-Q-R-S-T-U-P-M-H-E-D-C-B-A-F-I-J and K (@).
- Take the CUTTING PLIERS and the WIRE.
- Back out.

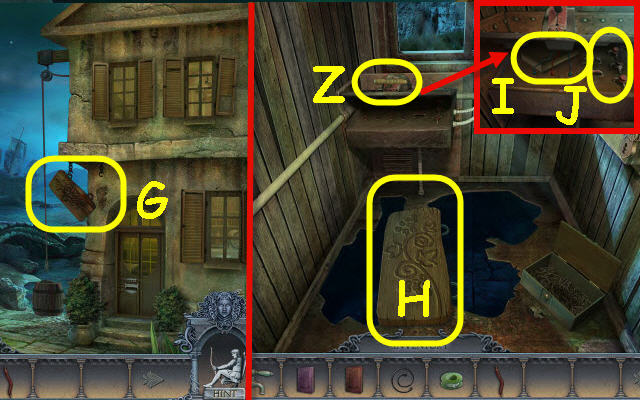
- Use the CUTTING PLIERS on the sign; take the SIGNBOARD (G).
- Enter the cable car.
- Place the SIGNBOARD on the gap (H) and move the lever (Z).
- Zoom into the control panel and take the 3rd BOOK (I) and remove the broken transistors (J).
- Go to the library.

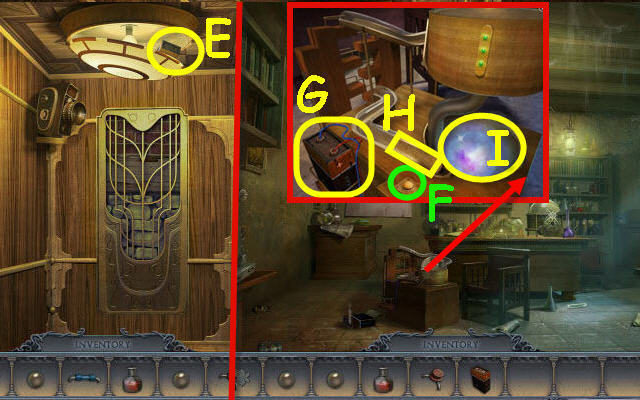
- Examine the bookcase and place the 3 BOOKS on the shelves to trigger a puzzle (K).
- Arrange the books per the clues.
- See screenshot for solution (L).
- Go left through the newly-opened doorway to the elevator.

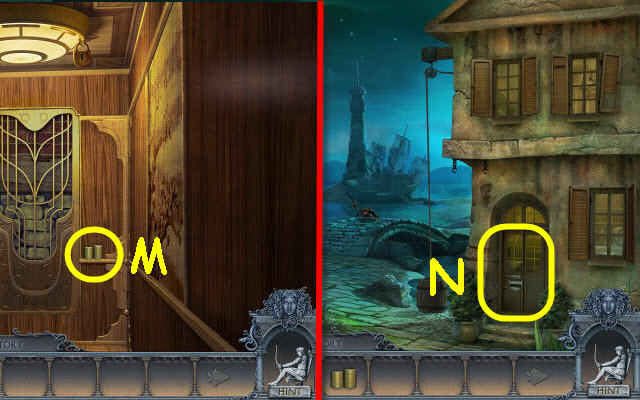
- Take the DOWELS (M).
- Go to the shore.
- Examine the door and place the DOWELS on the lock to trigger a puzzle (N).

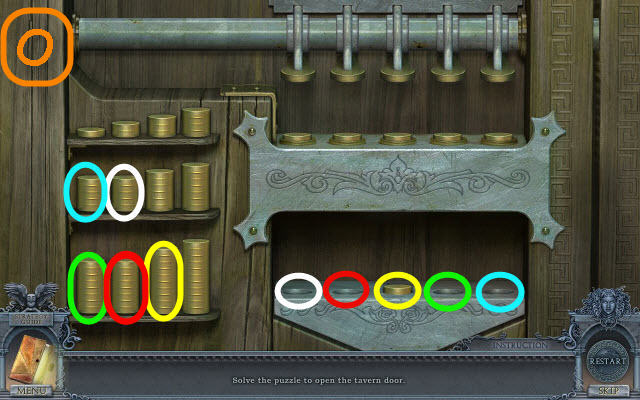
- Place the correct dowels in the slots.
- See screenshot for solution (O).
- Enter the building.

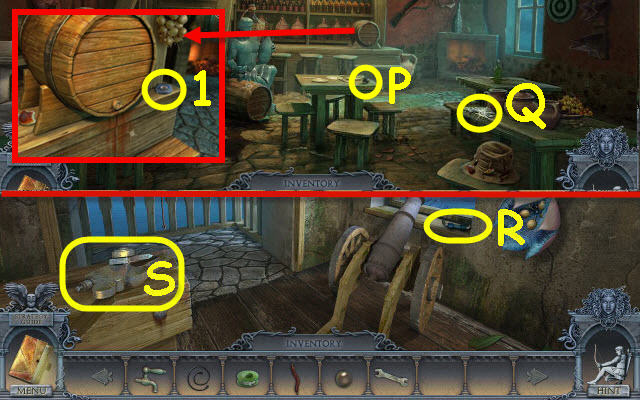
- Take the METAL BALL (P) and the WRENCH (Q).
- Examine the barrel; take the ELECTRICAL TAPE (1).
- Go up the stairs.
- Take the RESISTOR (R).
- Use the WRENCH on the claw; take the MECHANICAL CLAW (S).
- Back out twice.

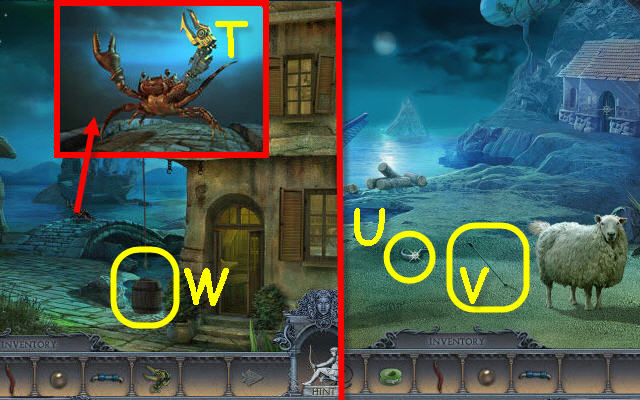
- Examine the crab and place the MECHANICAL CLAW on it (T).
- Go across the bridge.
- Take the HOOK (U), and ARROW (V).
- Back out.
- Place the HOOK on the rope to hook the barrel (W).
- Back out twice.

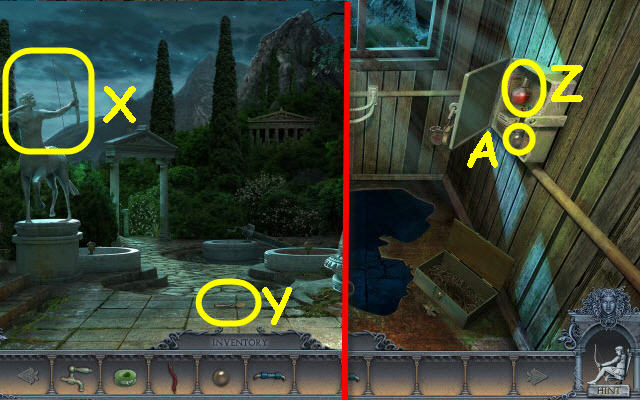
- Place the BOWSTRING and ARROW on the archer (X).
- Take the KEY (Y).
- Go forward three times to the cable car.
- Use the KEY on the first aid kit; take the REAGENT (Z) and the 2nd METAL BALL (A).
- Go to the library and then left into the elevator.

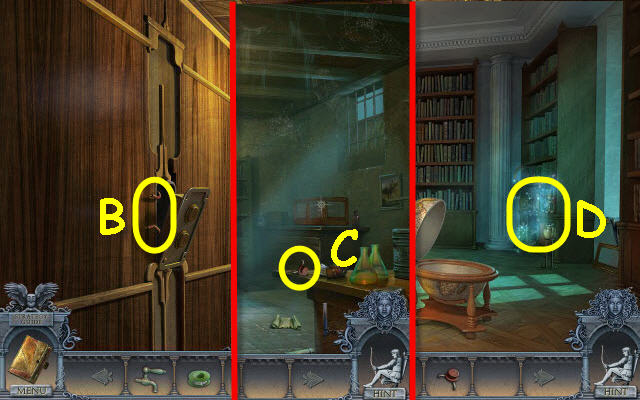
- Place the WIRE and ELECTRICAL TAPE on the back of the button panel (B).
- Press the down button.
- Take the TRANSISTOR (C).
- Back out and press the up button.
- Examine the right bookshelf to access a HOP (D).

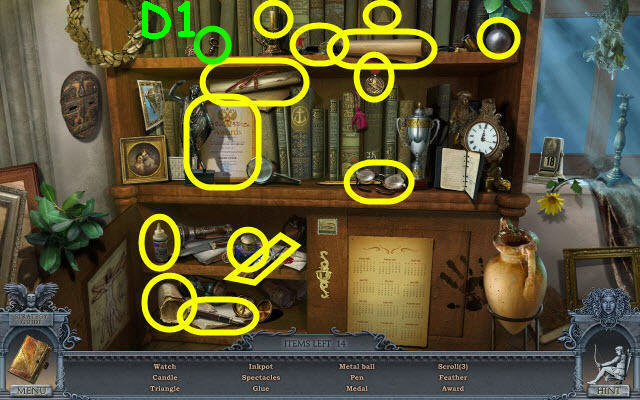
- Find the items listed (D1).
- You will earn a PADLOCK KEY.
- Go left into the elevator.


- Use the PADLOCK KEY on the padlock and turn the key. Lower the light cover; take the BATTERY (E).
- Press the elevator down button.
- Examine the device and press the button (F); remove the burnt out battery and place the BATTERY in the holder (G).
- Place a METAL BALL in the chute (H) and press the button (F); repeat with the 2nd METAL BALL.
- Take the MAGIC BALL (I).
- Back out and press the up button.

- Use the MAGIC BALL on the statue (J).
- Examine the statue; take the MAP PART (K).
- Go to the shore; enter the building and go up the stairs.
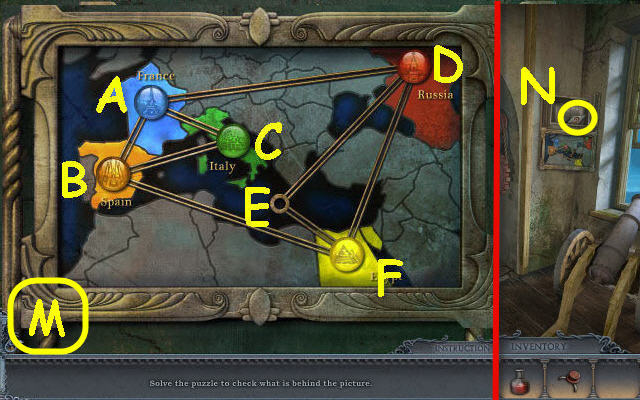
- Examine the map and place the MAP PART on it to trigger a puzzle (L).


- Move the chips to their matching colored locations.
- To solve the puzzle, select the following: C, A, D, E, F, B, C, A, D, E, F, B, C, A, D and E (M).
- Take the PLATE (N).
- Back out twice and cross the bridge.

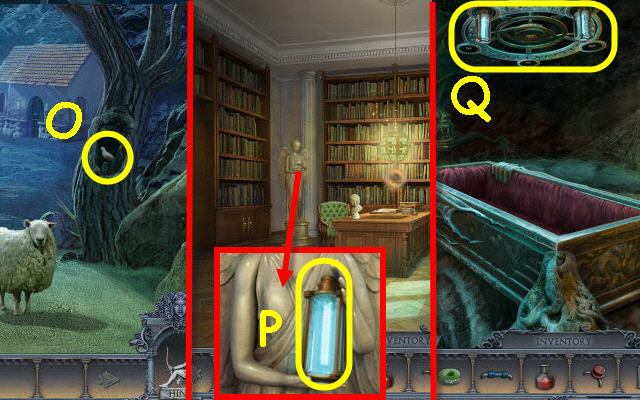
- Place the PLATE in the tree hollow; take the DOVE (O).
- Go to the library.
- Examine the statue and place the DOVE in its hands; take the BULB (P).
- Back out and go down into the crypt.
- Examine the lamp and place the BULB in a slot (Q); select anywhere in the scene to get a SECRET KEY.
- Go to the shore and into the cable car.
Chapter 3- House of Kleitos

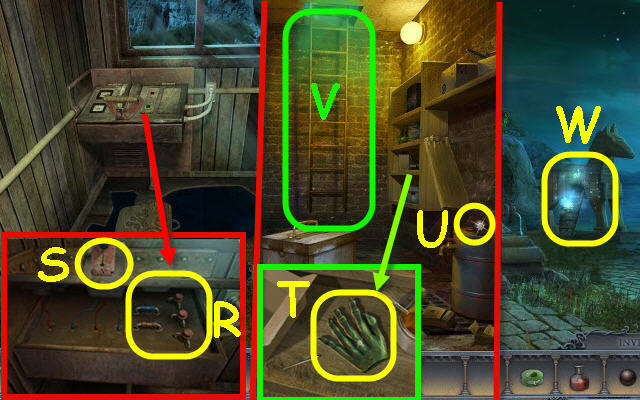
- Examine the control panel and place the TRANSISTOR and RESISTOR on it (R).
- Use the SECRET KEY in the keyhole (S); close the panel and move the lever.
- Examine the shelf; take the HAND (T).
- Take the CANNON BALL (U).
- Attempt to go up the ladder (V).
- Go forward on the left into the cable car; pull the lever.
- Examine the Trojan horse to access a HOP (W).

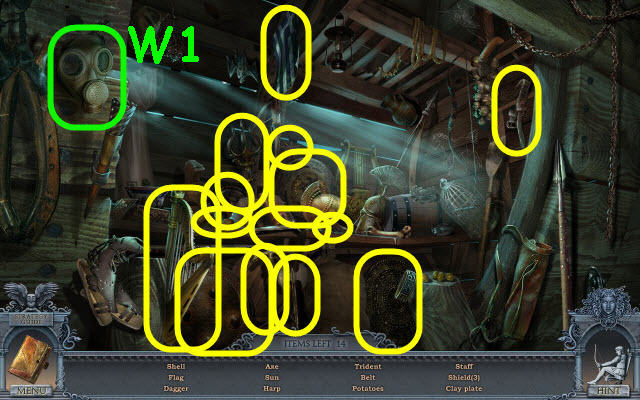
- Find the items listed (W1).
- You will earn a GAS MASK.
- Go into the cable car and push the lever forward.

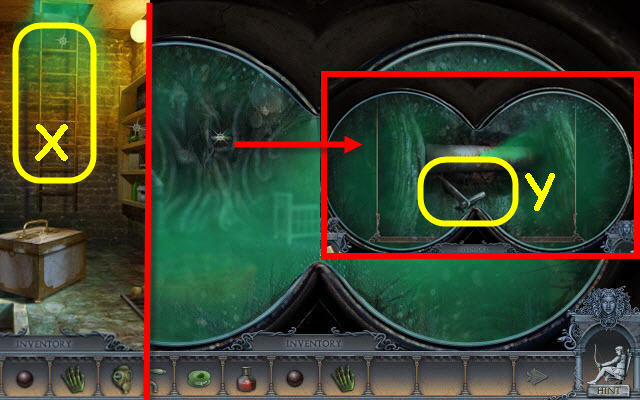
- Use the GAS MASK on the ladder (X).
- Go up the ladder.
- Examine the roots; take the WINCH HANDLE (Y).
- Back out; enter the cable car and pull the lever. Go up to the second floor of the building on the right.

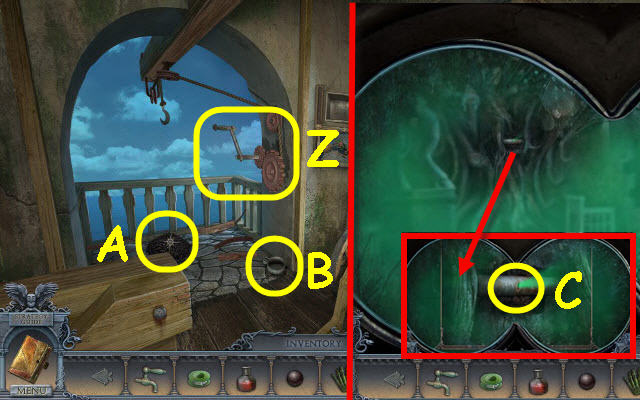
- Place the WINCH HANDLE on the gears; crank the handle twice (Z).
- Take the GUN POWDER (A) and the CLAMP (B).
- Return to the cable car; push the lever and go up the ladder.
- Examine the roots and place the CLAMP on the pipe (C).

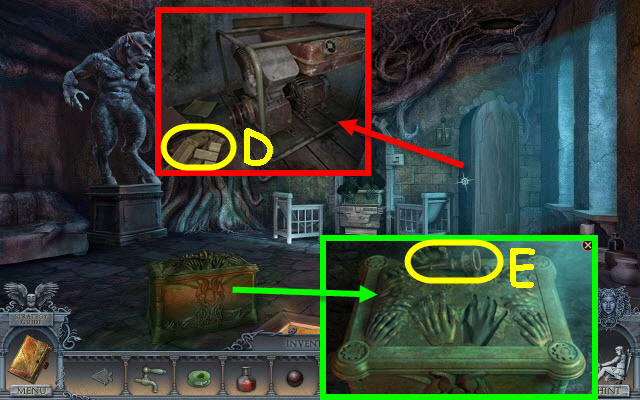
- Examine the opened door; take the BOARDS (D).
- Examine Pandora’s Box and place the HAND on the left handprint; take the UNLIT TORCH (E).
- Go back via the cable car and go right over the bridge.

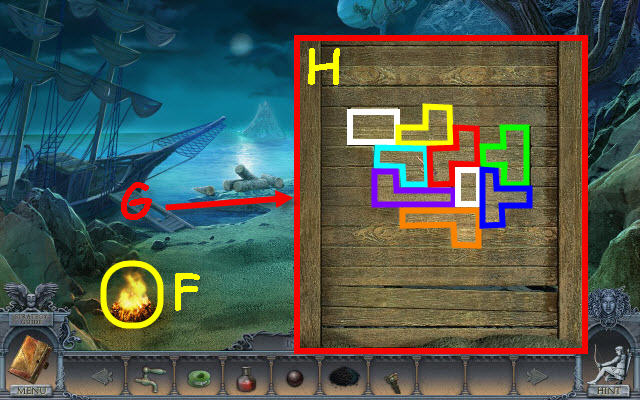
- Use the UNLIT TORCH on the fire to get a LIT TORCH (F).
- Examine the ship’s ramp and place the BOARDS on it to trigger a puzzle (G).
- Place the boards to fill in the space.
- See screenshot for solution (H).
- Go up the ramp to the ship.

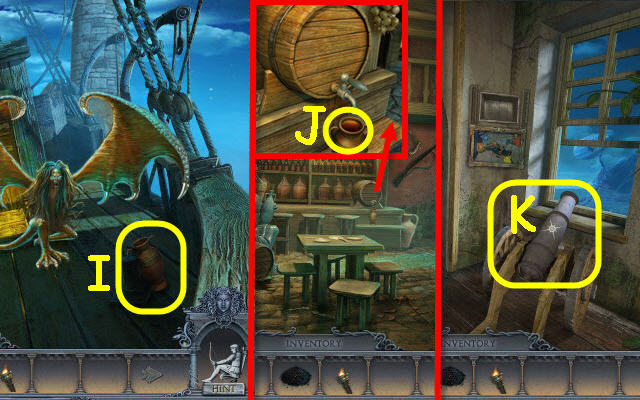
- Take the JUG (I).
- Back out twice and enter the building.
- Examine the barrel and place the TAP on it; place the JUG under the tap. Turn the tap and take the RUM (J).
- Go up the stairs.
- In this order; place the GUN POWDER, CANNON BALL and LIT TORCH on the cannon (K).
- Back out twice and cross the bridge.

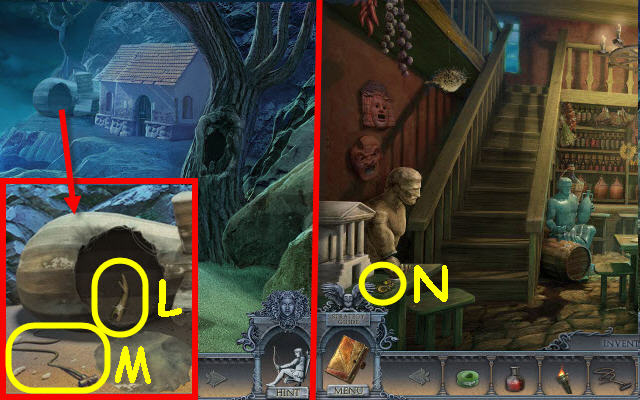
- Examine the blimp; take the ARM (L) and the CORD (M).
- Back out and enter the building.
- Place the ARM on the wrestler; take the LOCK PIECE (N).
- Go to the cable car; push the lever and go up the ladder.

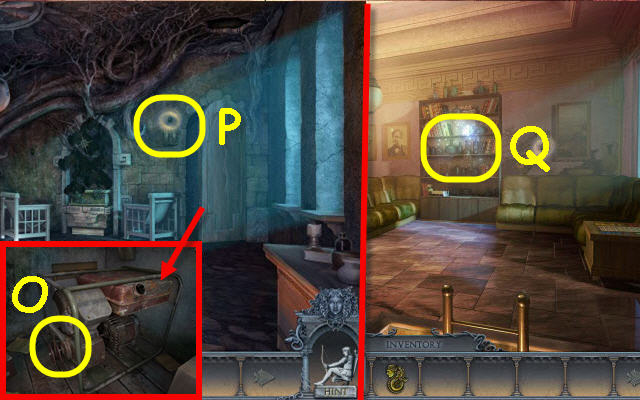
- Examine the generator room; place the CORD on the wheel and the RUM in the tank. Pull the cord (O).
- Pull the illuminator switch to change the illumination (P).
- Examine the shelves to trigger a HOP (Q).

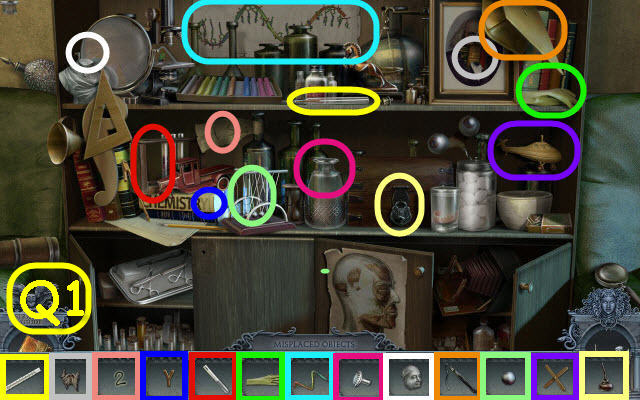
- Place the items where they belong in the scene (Q1).
- You will earn a 2nd LOCK PIECE.
- Change the illumination.

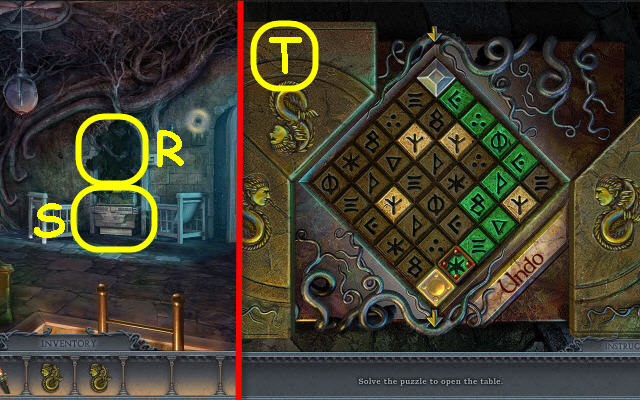
- Select the alcove to rid the bats (R).
- Examine the table and place the 2 LOCK PIECES on the lid to trigger a puzzle (S).
- Guide the square to the bottom slot.
- See screenshot for solution (T).
- Take the COLUMN PART.
- Change the illumination.

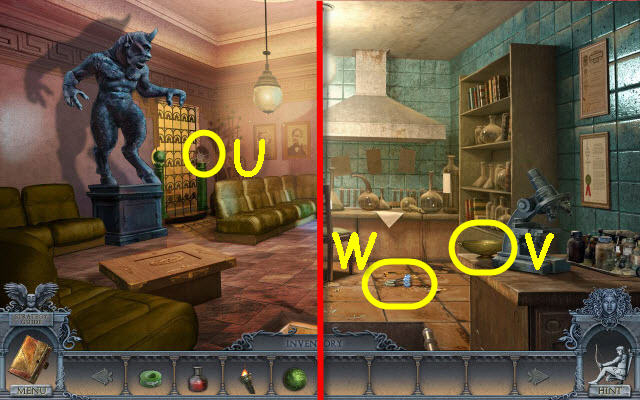
- Place the COLUMN PART on the column (U).
- Go up the newly-opened staircase.
- Take the MUG (V) and the DARTS (W).
- Back out twice and use the cable car; enter the building.

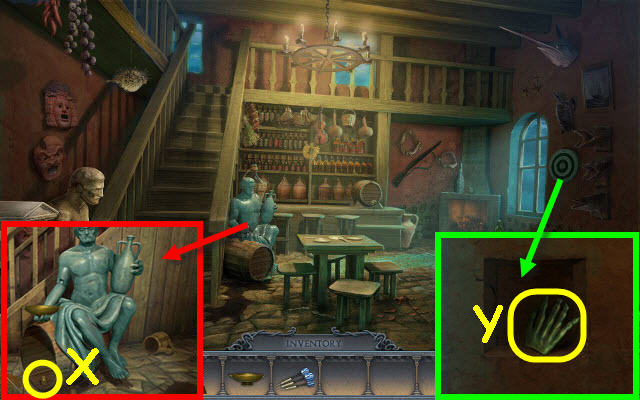
- Examine the statue and place the MUG in his hand; take the WEIGHT (X).
- Examine the dart board and use the DARTS on it; take the HAND (Y).
- Back out and use the cable car; go up the ladder.
- Change the illumination.

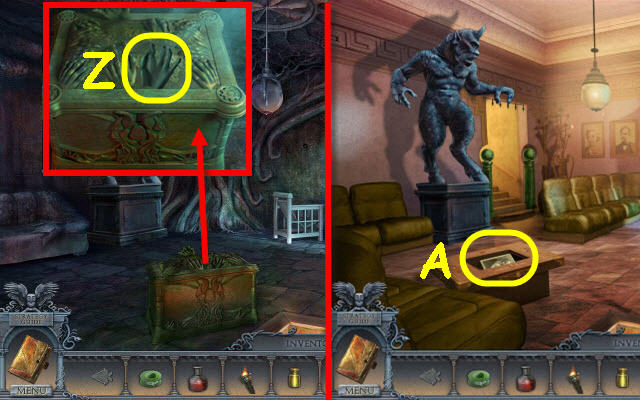
- Examine Pandora’s Box; place the HAND in the slot (Z).
- Change the illumination.
- Take the SCIENTIST (A).
- Go up the staircase to the lab.

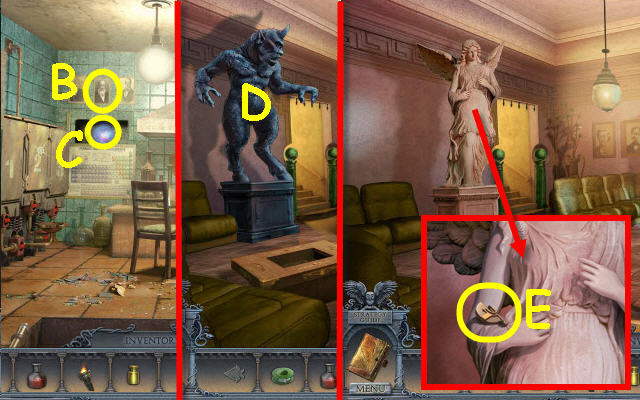
- Hang the SCIENTIST on the wall (B).
- Take the MAGIC BALL (C).
- Back out.
- Use the MAGIC BALL on the statue (D).
- Examine the angel statue; take the BAS RELIEF (E).
- Go to the library. Go left into the elevator and push the down button.

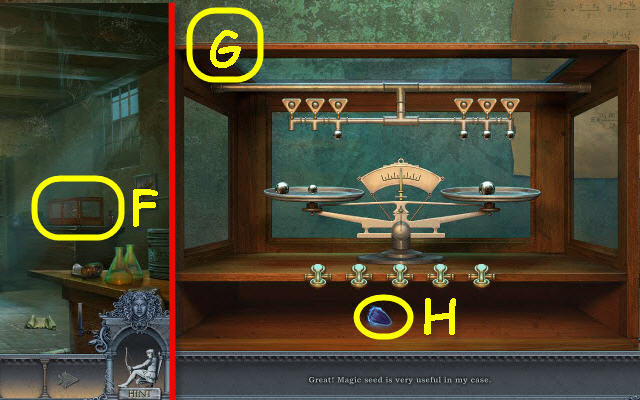
- Examine the cabinet and place the WEIGHT in the lock to trigger a puzzle (F).
- Balance the scales five times by selecting the tabs and dropping balls on the scales to balance them. Hold the tab to increase the size of the ball (G).
- Take the SEED (H).
- Back out and go up in the elevator.
- Change the illumination.

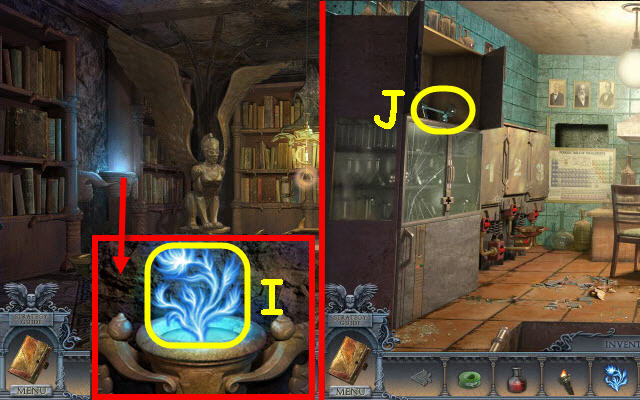
- Examine the magic pot and place the SEED in it; take the FIRE FLOWER (I).
- Go to the cable car and push the lever forward; go up the ladder and left to the lab.
- Place the BAS RELIEF on the cabinet; take the KEY (J).
- Return to the cable car and use it; go right over the bridge and enter the ship.

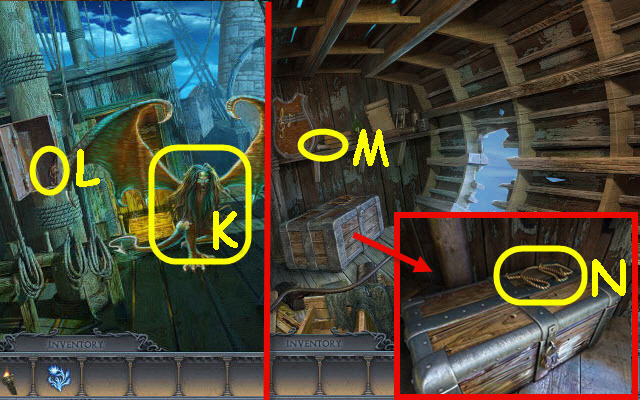
- Use the FIRE FLOWER on the Harpy (K).
- Use the KEY on the cabinet; take the TREBLE CLEF (L).
- Go down into the hold through the doorway that the Harpy was blocking.
- Place the TREBLE CLEF on the case; take the EYEPIECE (M).
- Examine the chest; take the ROPE (N).
- Back out twice.

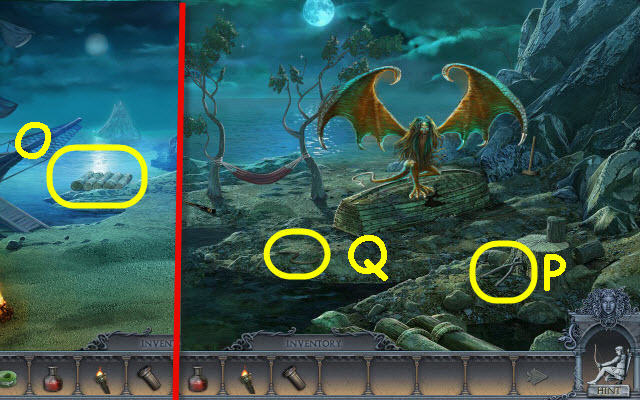
- Use the ROPE on the logs to create a raft (O).
- Go forward on the raft.
- Take the TONGS (P) and the HOSE (Q).
- Return to the ships hold.

- Place the HOSE on the pump and pump the handle (R); take the PUZZLE PIECE (S).
- Go to the cable car and push the lever; go up the ladder.
- Examine the shelves to access a HOP (T).

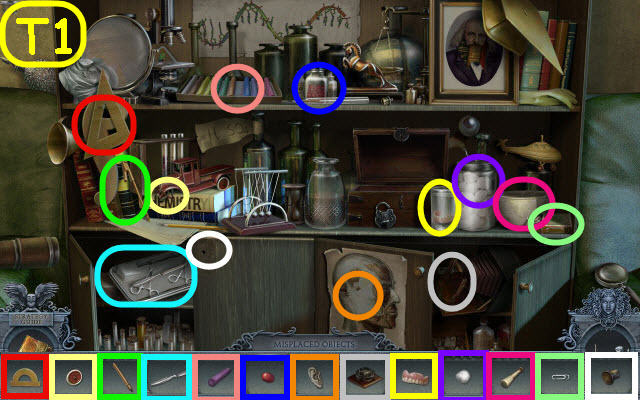
- Place the items where they belong in the scene (T1).
- You will earn a CARD.
- Go left into the lab.

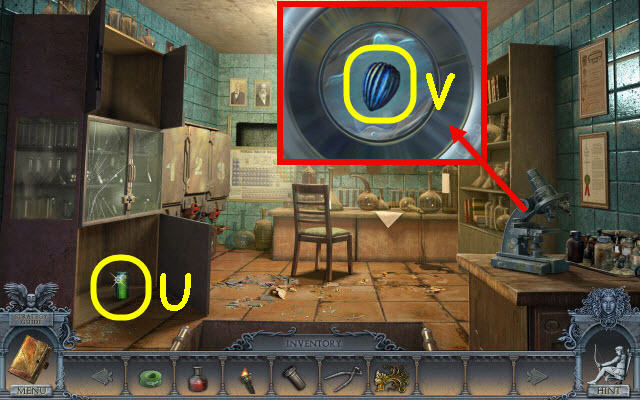
- Use the CARD on the cabinet; take the LIQUID (U).
- Place the EYEPIECE on the microscope and zoom in. Select the center of the seed to gather the pieces to create the seed; take the SEED (V).
- Back out.
- Change the illumination.

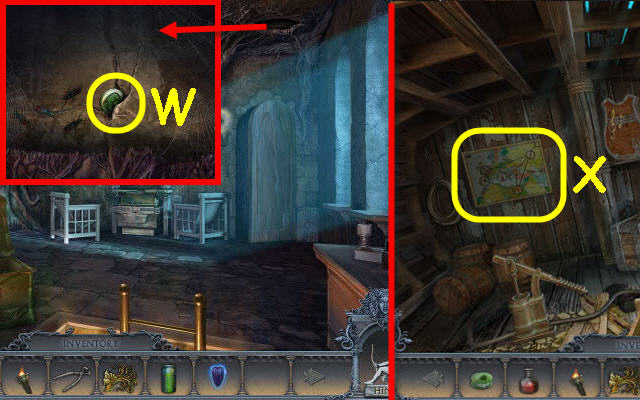
- Examine the hole in the ceiling; use the TONGS to get the MAP PART (W).
- Go to the ship and down into the hold.
- Examine the map and place the MAP PART on it to trigger a puzzle (X).

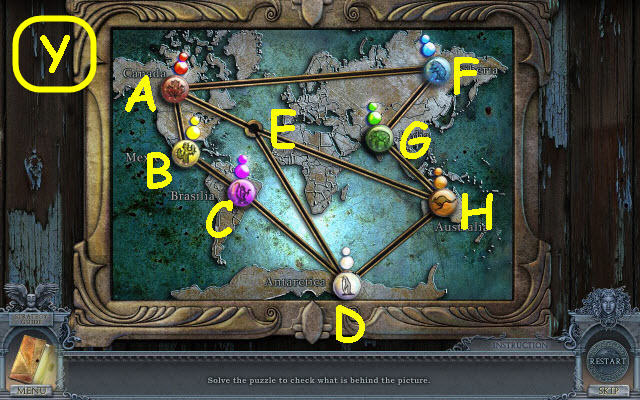
- Move the chips to their matching locations.
To solve the puzzle, select the following chips: D, E, H, D, E, A, B, C, D, H, G, F, A, B, C, D, E, H, G, F, A, E, D, H and E (Y).
- Take the NOTE.

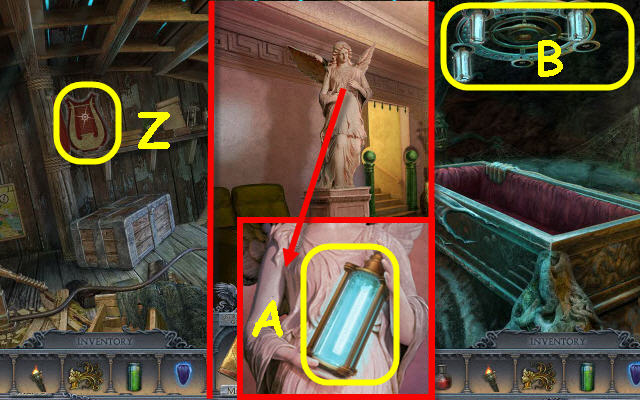
- Place the NOTE on the case; take the HARP (Z).
- Take the cable car to the house of Kleitos and go up the ladder.
- Change the illumination.
- Examine the angel statue and give her the HARP; take the BULB (A).
- Go to the mansion and down into the crypt.
- Examine the lamp and place the BULB in a slot (B).
- Select anywhere in the scene to get a 2nd LIQUID.
- Back out and go into the library.
Chapter 4 – Zofia’s House

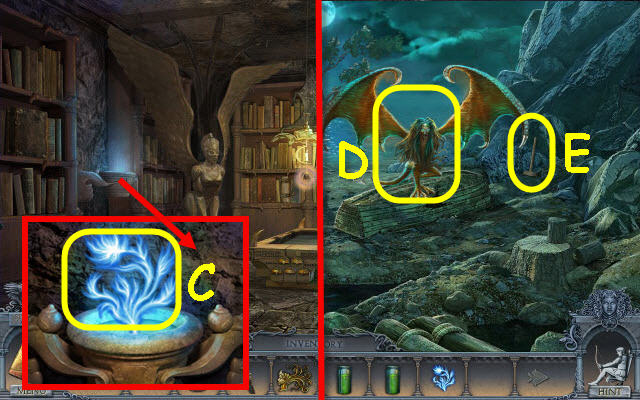
- Examine the magic pot and place the SEED in it; take the FIRE FLOWER (C).
- Go to the ship and forward via the raft.
- Use the FIRE FLOWER on the Harpy (D).
- Take the SLEDGEHAMMER (E).
- Back out.

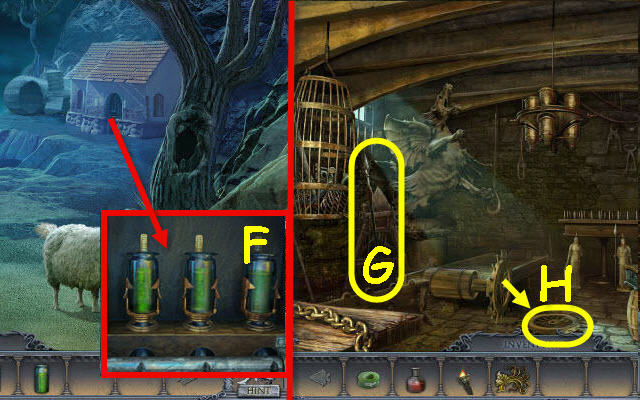
- Examine the door and place the 2 LIQUID on the lock (F).
- Enter Zofia’s house.
- Take the SPEAR (G).
- Use the SLEDGEHAMMER on the wheel; take the STEERING WHEEL (H).
- Back out and go forward via the raft.

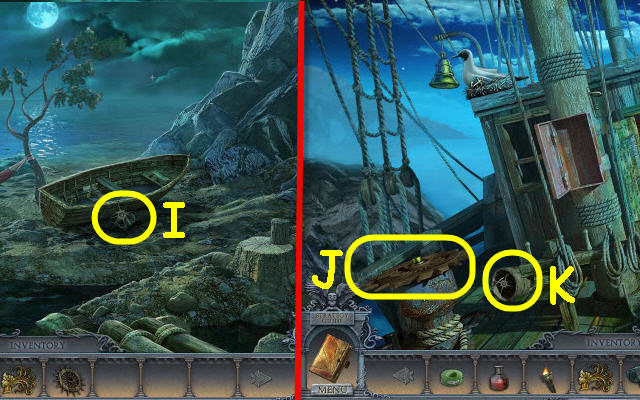
- Use the SPEAR on the boat; take the DIVING MASK (I).
- Back out and enter the ship.
- Place the STEERING WHEEL on the stem and turn it (J).
- Take the BUCKET (K).
- Go down into the hold.

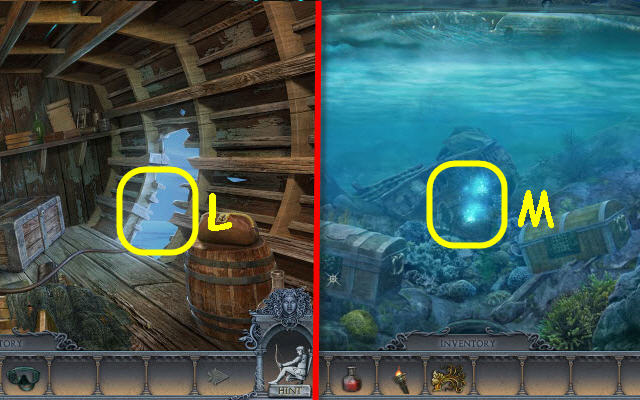
- Use the DIVING MASK on the opening and go right (L).
- Examine the sunken ship to access a HOP (M).

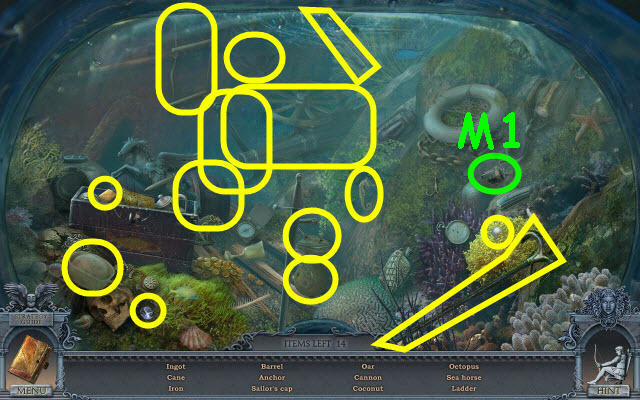
- Find the items listed (M1).
- You will earn a FISHING LINE.
- Exit the ship and go forward via the raft.

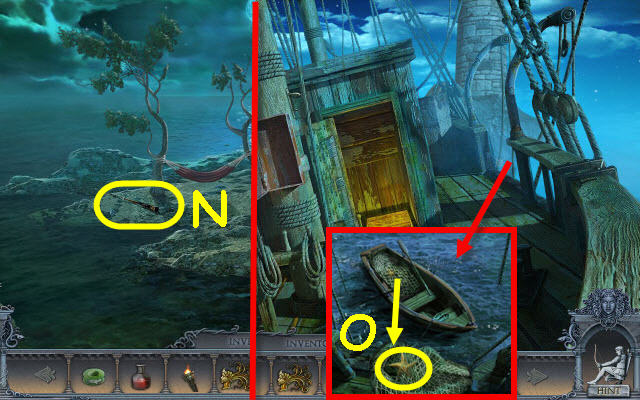
- Place the FISHING LINE on the pole; take the FISHING ROD (N).
- Back out and enter the ship.
- Examine the ship’s side and use the FISHING ROD on the net; take the STAR (O).
- Go down into the hold and right through the opening.

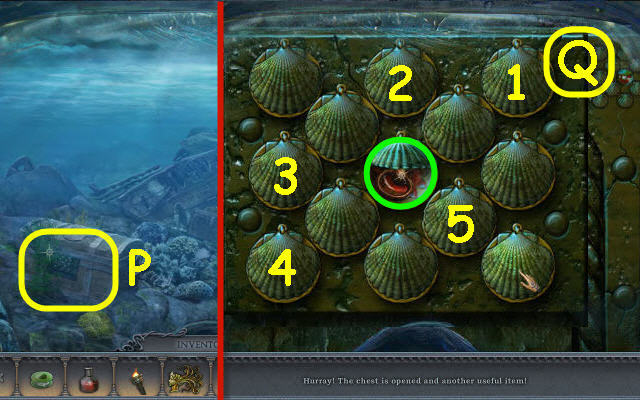
- Examine the left chest and place the STAR in the recess to trigger a puzzle (P).
- Close all the shells except the center.
- To solve the puzzle, select the shells in the order marked on the screenshot (Q).
- Take the LAMP RING circled in green.
- Exit the ship and enter Zofia’s house.

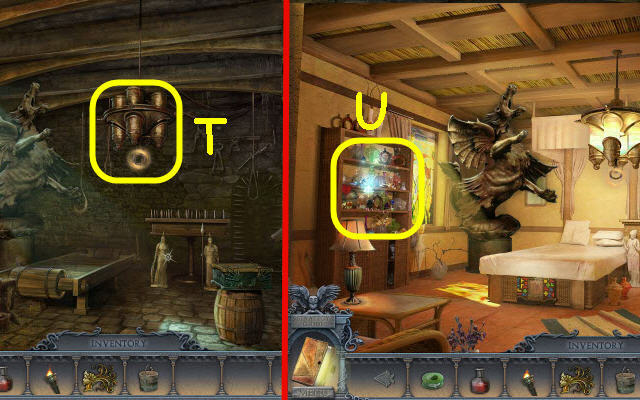
- Examine the lamp and place the LAMP RING on it (T).
- Select the ring to change the illumination.
- Examine the shelves to access a HOP (U).

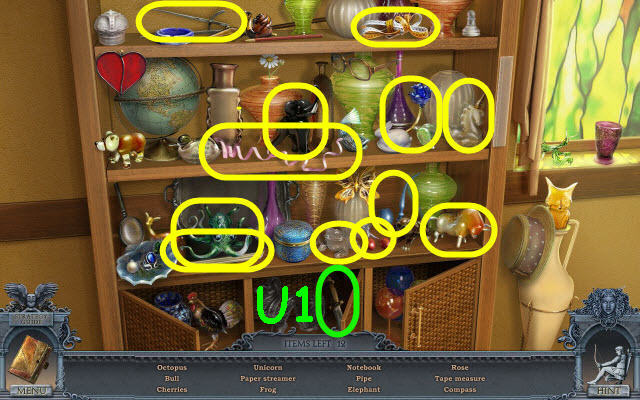
- Find the items listed (U1).
- You will earn a KNIFE.
- Back out and go forward via the raft.

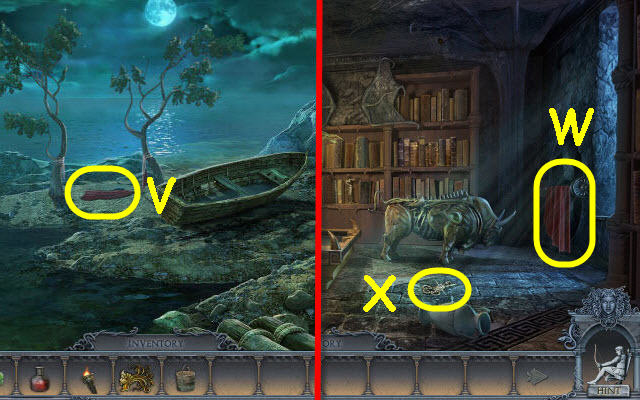
- Use the KNIFE on the hammock; take the RED FABRIC (V).
- Back out to the mansion and go into the library.
- Hang the RED FABRIC on the rack (W).
- Take the GATE KEY (X).
- Exit the mansion and go left through the arch.

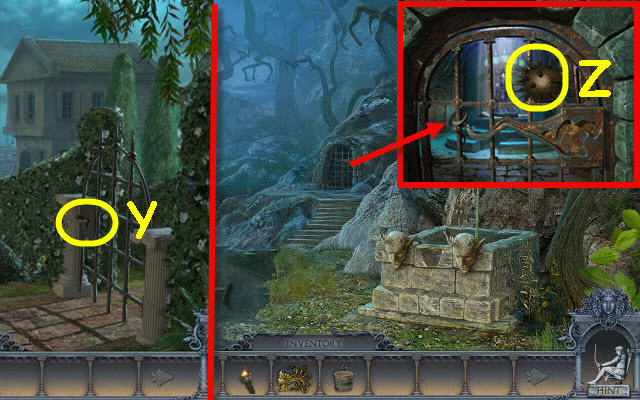
- Use the GATE KEY on the gate; turn the key (Y).
- Go right through the newly-opened gate.
- Examine the iron gate; take the MACE HEAD (Z).
- Go to the ship and enter Zofia’s house.

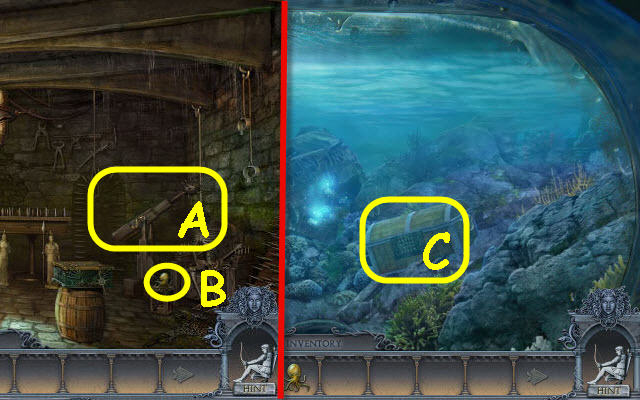
- Change the illumination.
- Place the MACE HEAD on the weapon; select the handle (A).
- Take the OCTOPUS (B).
- Go to the ship’s hold and right through the opening.
- Examine the right chest and place the OCTOPUS in the recess to trigger a puzzle (C).

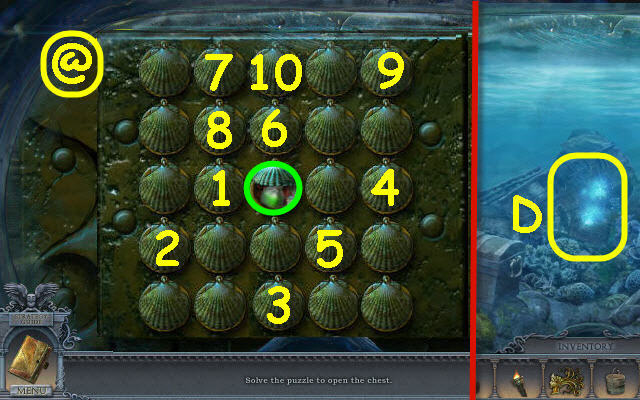
- Close all the shells except for the center one.
- To solve the puzzle, select the shells in the order marked in the screenshot (@).
- Take the 2nd REAGENT circled in green.
- Examine the sunken ship to access a HOP (D).

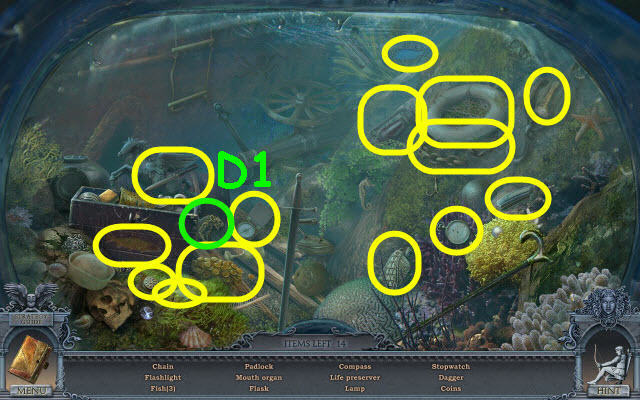
- Find the items listed (D1).
- You will earn a GATE KEY.
- Back out five times and go right.

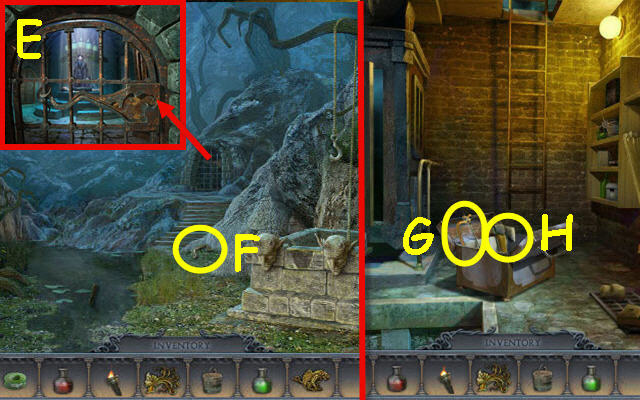
- Examine the iron gate and place the GATE KEY in the lock (E).
- Take the HANDLE (F).
- Go to the cable car and go forward.
- Place the HANDLE on the box; take the SAW (G) and AXE (H).
- Go to Zofia’s house.

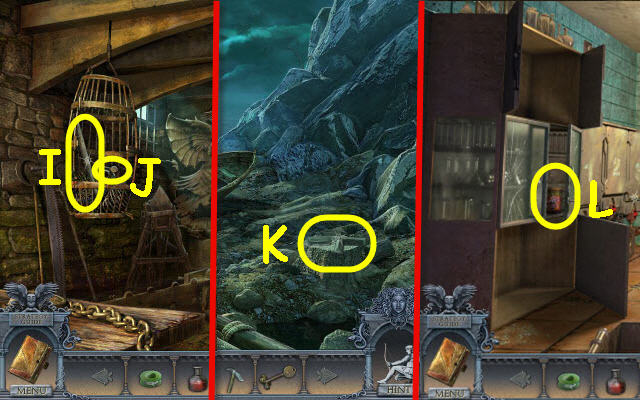
- Use the SAW on the cage; take the PICKAXE (I) and COFFER KEY (J).
- Back out and go forward via the raft.
- Use the AXE on the log; take the FIREWOOD (K).
- Go to the lab in the house of Kleitos.
- Use the COFFER KEY on the cabinet; take the FISH FOOD (L).
- Go to Zofia’s house.
- Change the illumination.

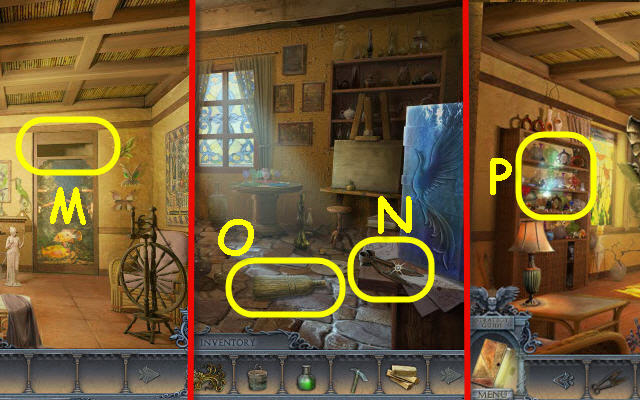
- Use the FISH FOOD on the top of the aquarium (M).
- Go forward through the newly-opened doorway.
- Take the SHEARS (N) and the BROOM (O).
- Back out.
- Examine the shelves to access a HOP (P).

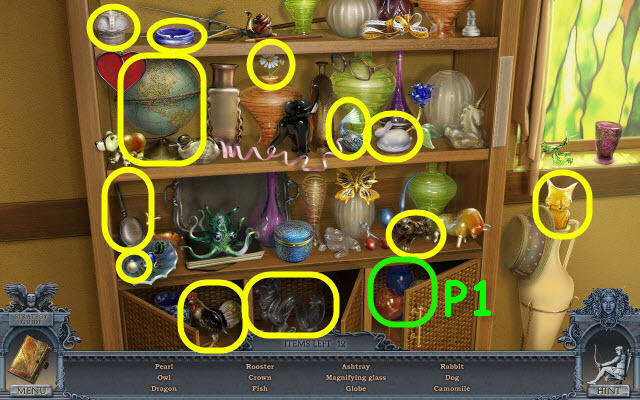
- Find the items listed (P1).
- You will earn STEMWARE.
- Back out.

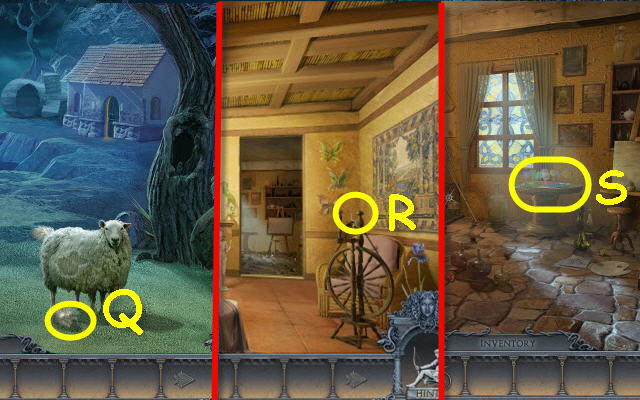
- Use the SHEARS on the sheep; take the FLEECE (Q).
- Enter Zofia’s house.
- Use the FLEECE on the spinning wheel; take the THREAD (R).
- Go forward.
- Examine the table and place the STEMWARE on it to trigger a puzzle (S).

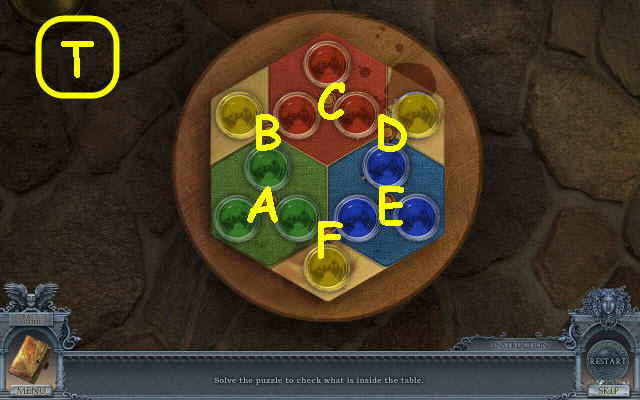
- Place all the colored glasses on their matching colors.
- To solve the puzzle, select the following buttons: B, D, C, F, A, B, E and F (T).
- Take the MAGIC BALL.
- Back out.

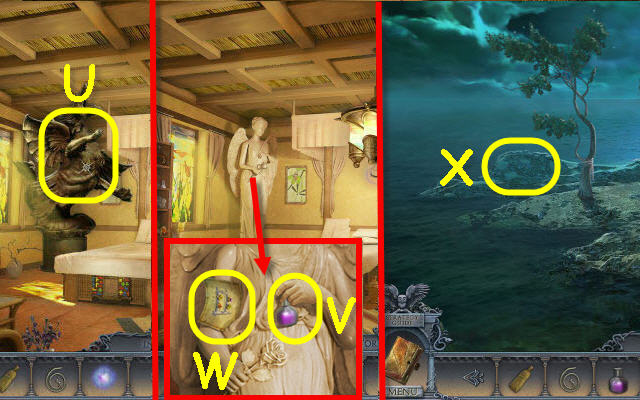
- Use the MAGIC BALL on the statue (U).
- Examine the statue; take the 3rd REAGENT (V) and the note (W).
- Back out and go forward via the raft.
- Examine the rocky shore and use the BROOM on the sand to trigger a puzzle (X).

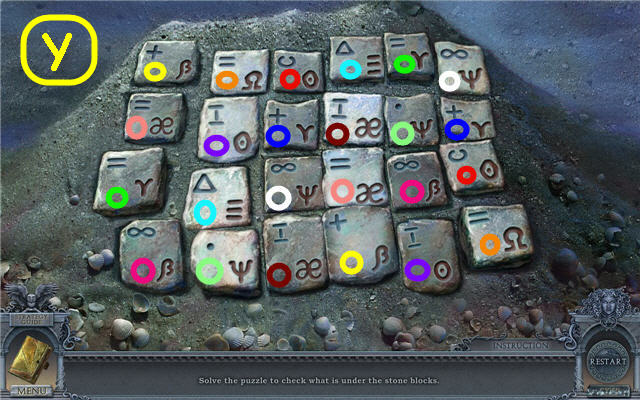
- Find the matching pairs.
- See screenshot for solution (Y).

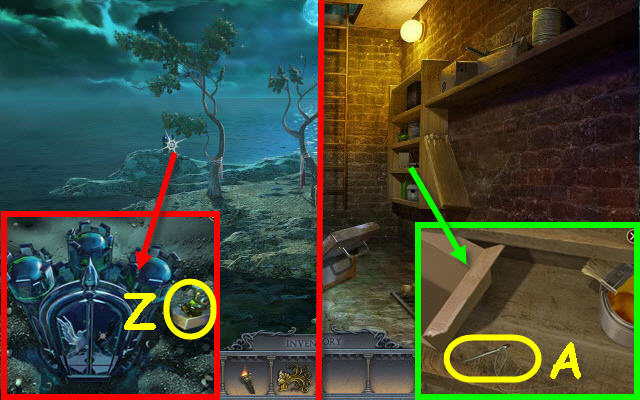
- Examine the glass castle; take the MECHANISM PART (Z).
- Go to the cable car and take it forward.
- Examine the shelves and place the THREAD on the needle; take the THREADED NEEDLE (A).
- Return via the cable car and go right.

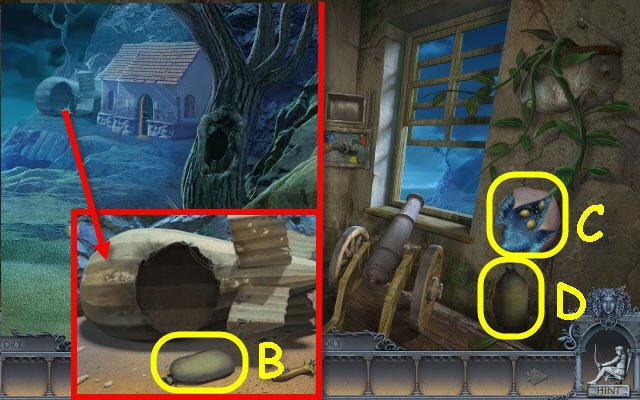
- Examine the blimp and use the THREADED NEEDLE on the cloth; take the BAG (B).
- Back out; enter the building and go up the stairs.
- Use the BAG on the flower (C); take the SEEDS (D).
- Back out four times.

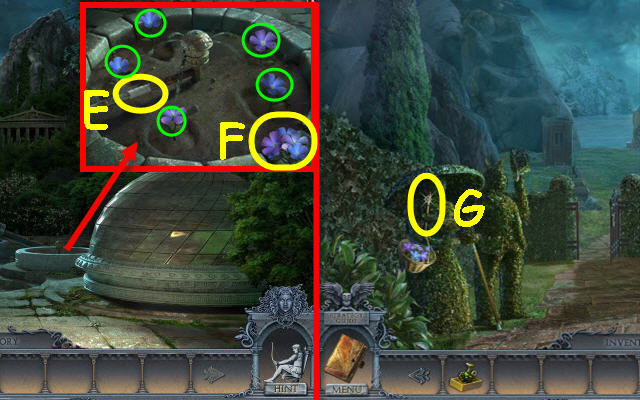
- Examine the fountain and use the PLUMBERS TAPE on the pipe (E); place the SEEDS on the dirt.
- Pick the five flowers circled in green; take the FLOWERS (F).
- Go through the arch.
- Give the FLOWERS to the lady topiary; take the BRUSH (G).
- Go to the art room of Zofia’s house.

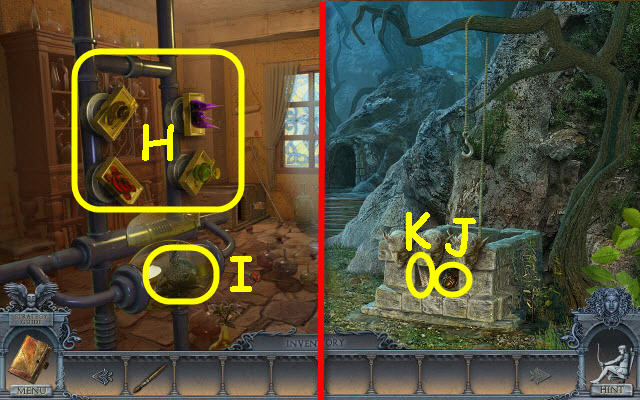
- Place the MECHANISM PART on the mechanism; turn the parts to match the code in your journal (H).
- Take the FACE (I).
- Back four times and go right.
- Place the FACE on the well; take the METAL HEAD (J) and the BOARD PART (K).
- Take the cable car to Kleitos’house and go up the ladder.

- Examine the table and place the BOARD PART on it to trigger a puzzle (L).
- Place the colored templates on the board to match the symbols.
- See screenshot for solution (M).
- Take the 4th REAGENT.
- Go to the art room of Zofia’s house.

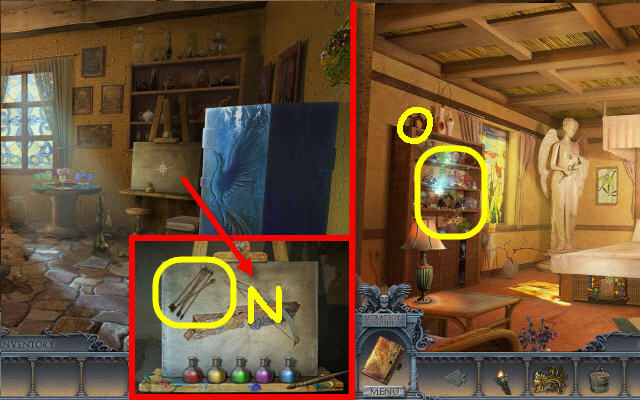
- Examine the easel and place the 4 REAGENTS and BRUSH on it; take the ARROWS (N).
- Back out.
- Examine the shelves to access a HOP (O).

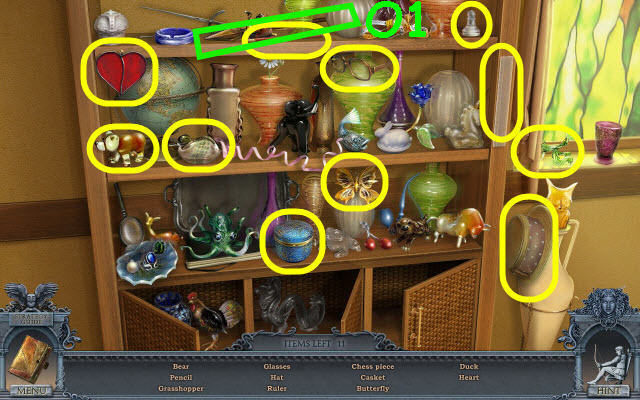
- Find the items listed (O1).
- You will earn a LANCE.
- Change the illumination.

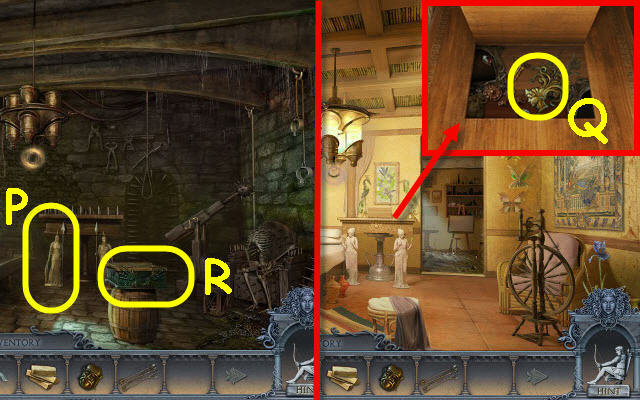
- Place the LANCE on the soldier statue (P).
- Change the illumination.
- Examine the table; take the 2nd PUZZLE PIECE (Q).
- Change the illumination.
- Examine the puzzle box and place the 2 PUZZLE PIECES in the slots to trigger a puzzle (R).

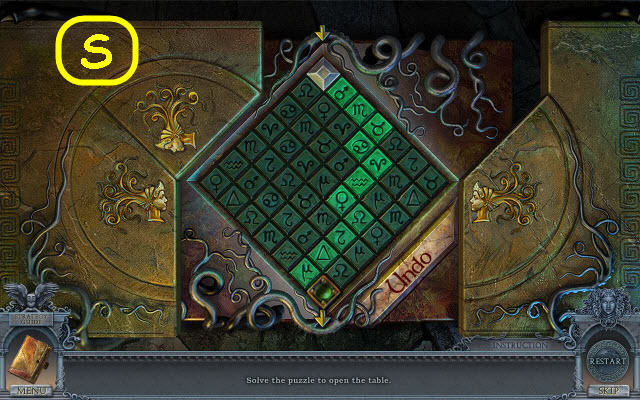
- Guide the square to the bottom slot.
- See screenshot for solution (S).
- Take the STONE FLOWER.
- Change the illumination.

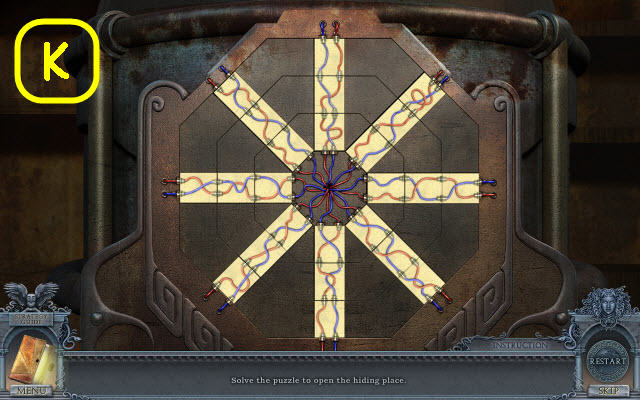
- Examine the angel statue and place the STONE FLOWER in her hand; take the BULB (T).
- Back out five times and go down into the crypt.
- Examine the lamp and place the BULB in the slot (U).
- Select anywhere in the scene to get a CRYSTAL.
- Go to the shore.
Chapter 5 – The Central Part

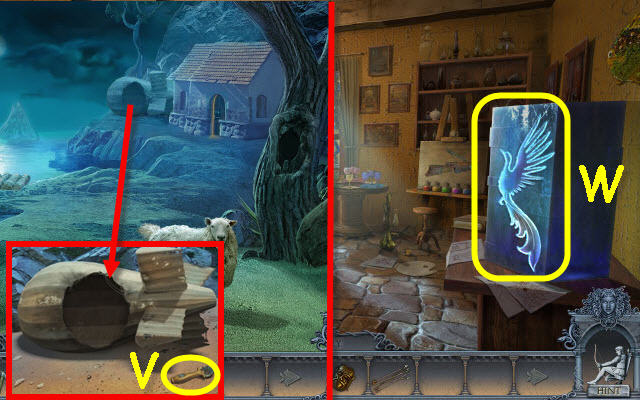
- Examine the blimp and place the CRYSTAL in the holder; take the GLASS CUTTER (V).
- Go to the art room of Zofia’s house.
- Use the GLASS CUTTER on the glass; take the GLASS BIRD (W).
- Back out twice and go forward via the raft.

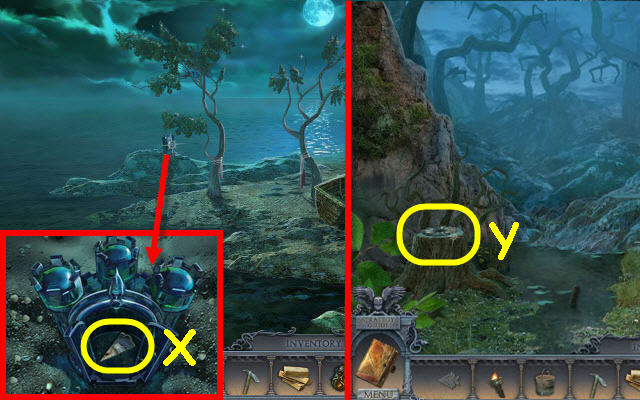
- Examine the glass castle and place the GLASS BIRD on the door; take the PORTRAIT PART (X).
- Back out three times and go right.
- Examine the tree stump and place the PORTRAIT PART on the empty slot to trigger a puzzle (Y).

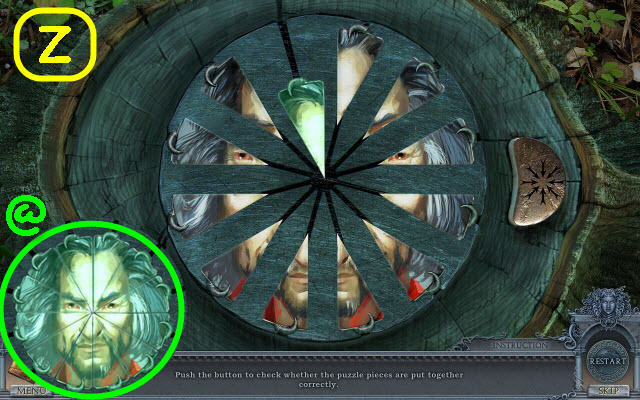
- Swap the pieces to complete the portrait.
- See screenshot for proper placement prior to selecting the button (Z).
- See inset (@) for completed face.
- Take the CAMERA KEY and the CLAPPER.
- Go to the ship deck.

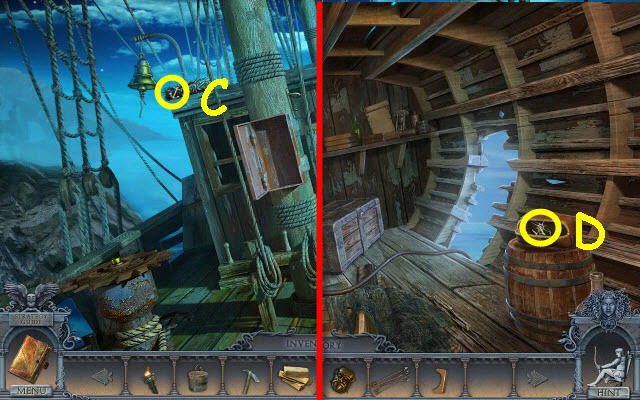
- Place the CLAPPER on the bell and ring it; take the MASTER KEY (C).
- Go down into the hold.
- Use the MASTER KEY on the bag; take the RING (D).
- Go to the mansion and into the library.
- Change the illumination.
- Go left into the elevator.

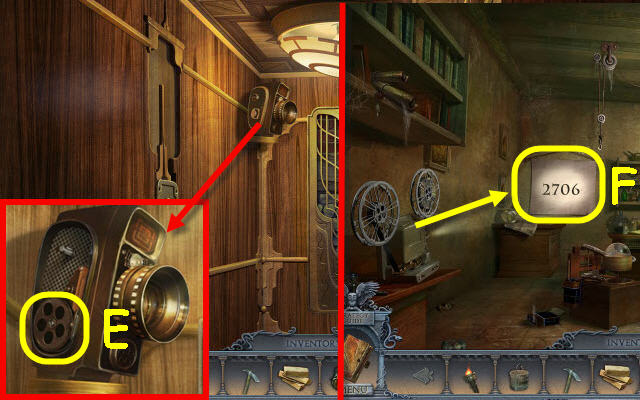
- Examine the camera and use the CAMERA KEY on it; take the TAPE (E).
- Press the down button.
- Place the TAPE on the projector and note the code (F).
- Back out and press the up button.

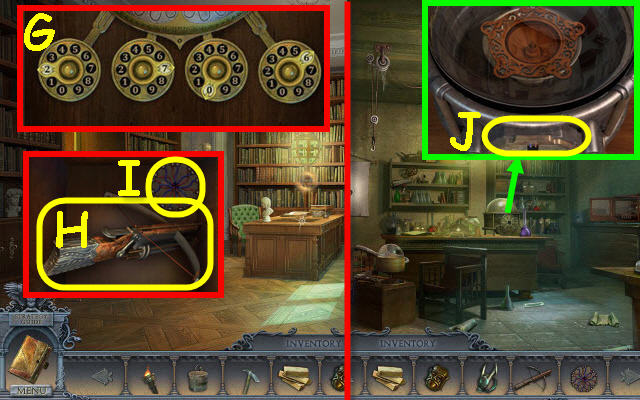
- Examine the desk and use the code from the film on the disks; 2706 (G).
- Place the ARROWS on the arbalest; take the MAGIC ARBALEST (H), and HEXAGON (I).
- Go left and press the down button.
- Examine the device and then zoom into the front panel (J).
- Place the HEXAGON in the center to trigger a puzzle.


- Arrange the wires so they all light up.
- See screenshot for solution (K).
- Take the HOLDER.
- Go to the topiary garden and go right.

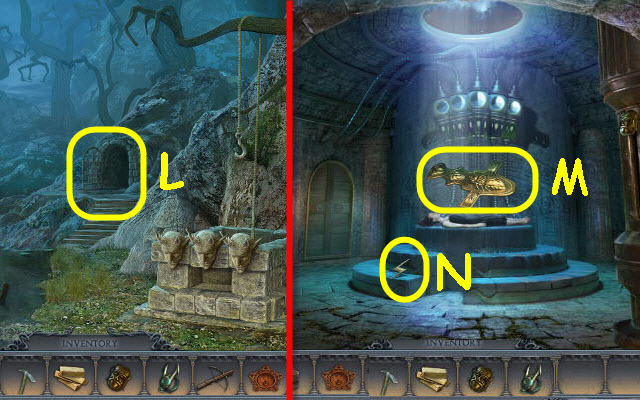
- Use the MAGIC ARBALEST on the ritual site doorway (L).
- Examine the woman; take the CASKET KEY (M).
- Take the TESLA KEY (N).
- Back out to the mansion; go upstairs and right.

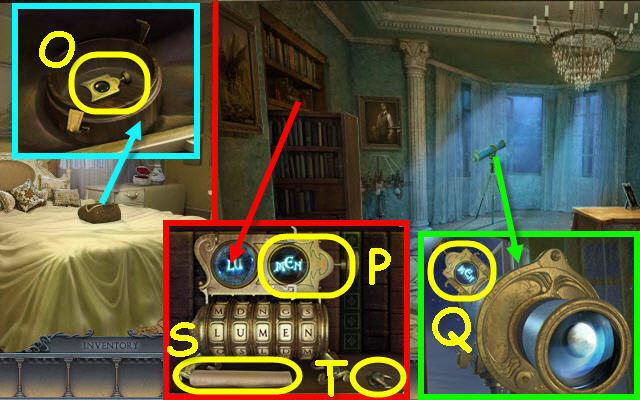
- Examine the box and use the CASKET KEY on it; take the SLIDE (O).
- Back out and go left.
- Examine the shelf and place the SLIDE in the device; remove the SLIDE (P). Please note it will not have the code on it yet as shown in the screenshot.
- Examine the telescope and place the SLIDE in the holder; take the CRYPTEX CODE (Q).
- Examine the shelves and place the CRYPTEX CODE in the device to get a code.
- Rotate the dials under the code to duplicate the code; take the scroll (S) and the 2nd RING (T).
- Go to the topiary garden; go right and enter the ritual site.

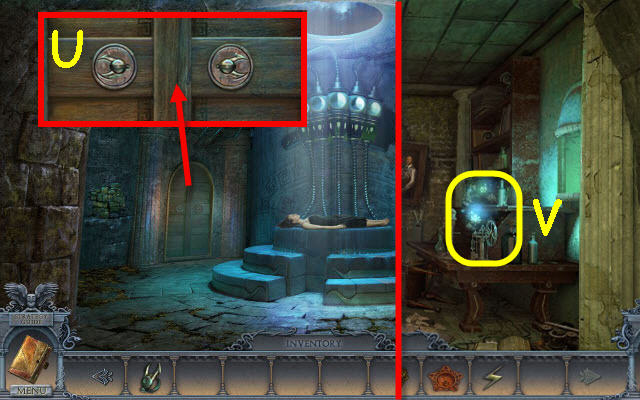
- Examine the door and place the 2 RINGS in the slots; turn the rings (U).
- Enter the newly-opened machine room.
- Examine the bottom shelf to access a HOP (V).

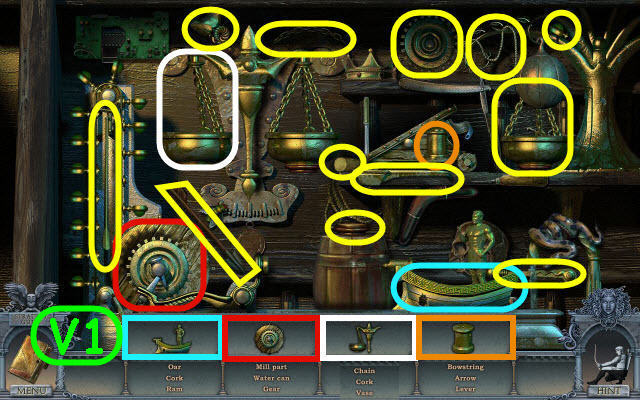
- Place the items where they belong in the scene to access a HOP.
- Find the items listed (V1).
- You will earn a SAFE KEY.
- Back out.

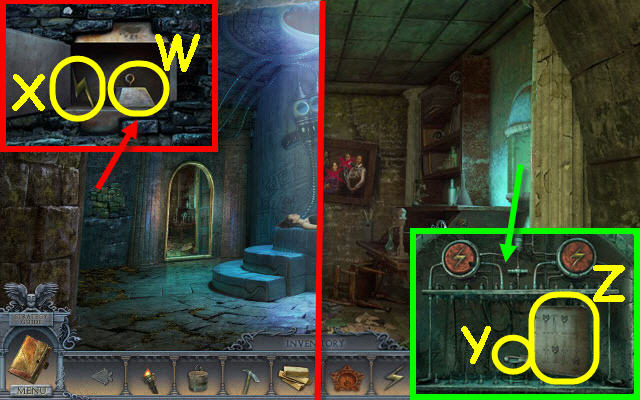
- Examine the wall and use the PICKAXE on the bricks. Use the SAFE KEY on the safe; take the BLOCK (W) and the 2nd TESLA KEY (X).
- Go left.
- Examine the device and place the 2 TESLA KEYS in the matching slots; take the KEY (Y) and the code (Z).
- Back out twice.

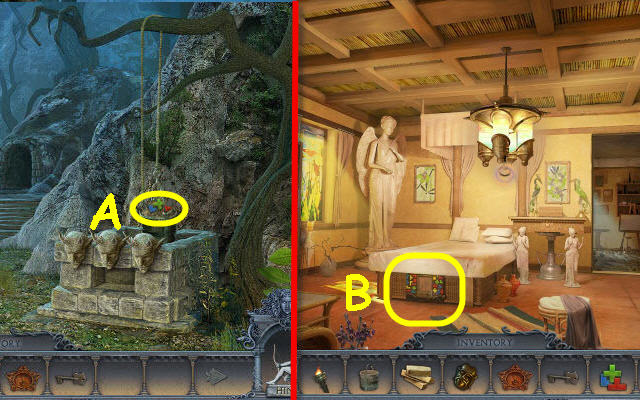
- Place the BLOCK on the well hook; take the MOSAIC PIECE (A).
- Go to Zofia’s house.
- Examine the footboard of the bed and place the MOSAIC PIECE on it to trigger a puzzle (B).

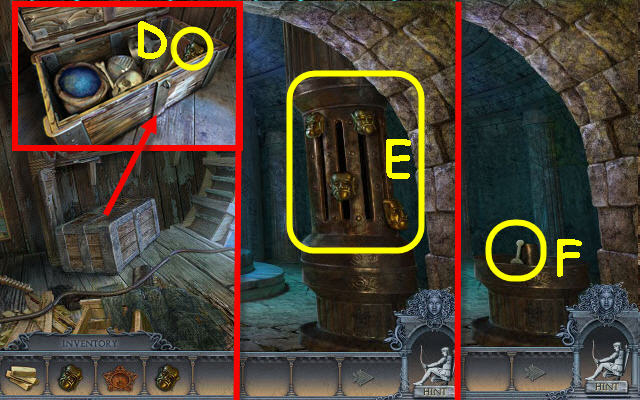
- Place the pieces so that no two of the same colors touch.
- See screenshot for solution (C).
- Take the 2nd METAL HEAD.
- Back out; go on the ship and down into the hold.


- Examine the chest and use the KEY on it; take the 3rd METAL HEAD (D).
- Go to the ritual hall.
- Place the 3 METAL HEADS on the column; set the heads based on the clue in your journal. Select the second from left head twice and the right head four times (E).
- Take the KEY (F).
- Go left.

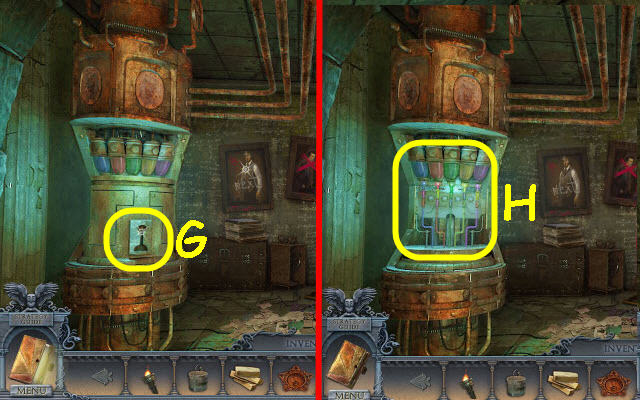
- Use the KEY on the device (G).
- Examine the device to trigger a puzzle (H).

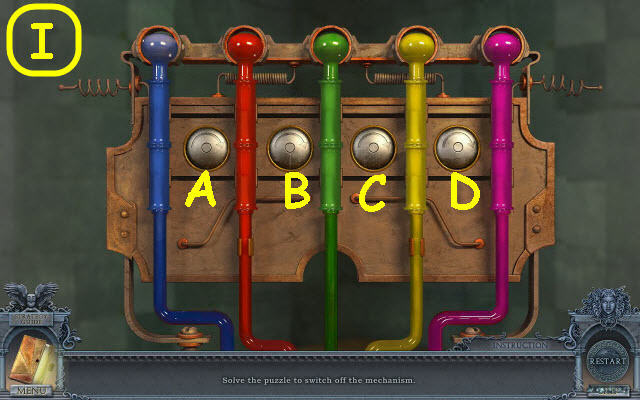
- Arrange the tubes so that all of one color is linked together.
- To solve the puzzle, select the following: Bx2, C, D, A, B, C, D, C, Ax2, Bx3, C, Bx2, A, B and Ax3 (I).

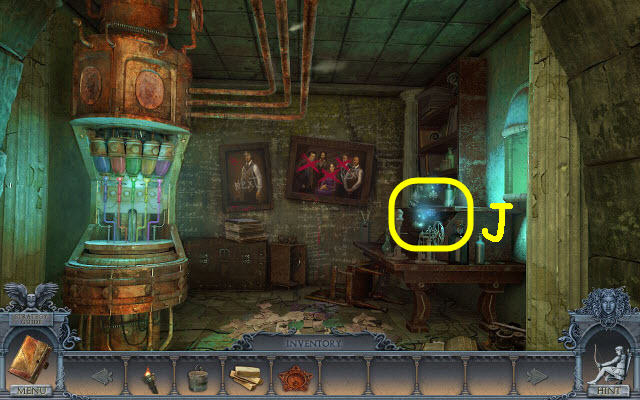
- Examine the shelves (J).
- You will access a HOP.

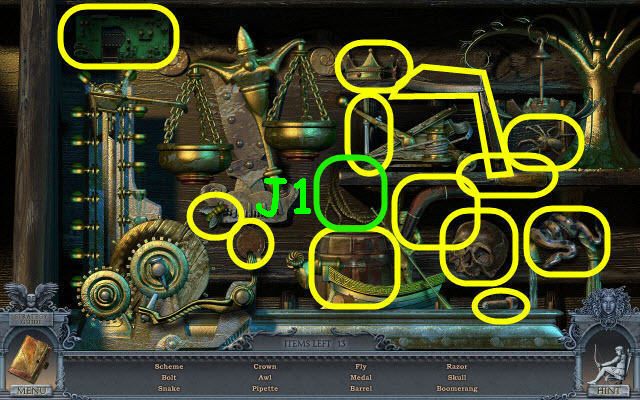
- Find the items listed (J1).
- You will earn a LASSO.
- Back out twice.

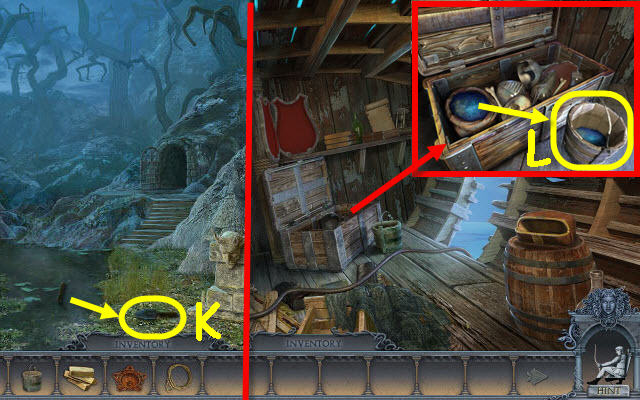
- Use the LASSO on the item in the water; take the SPADE (K).
- Go to the ship’s hold.
- Examine the chest and place the BUCKET by it; use the SPADE on the sand and take the SAND (L).
- Go to Zofia’s art room.

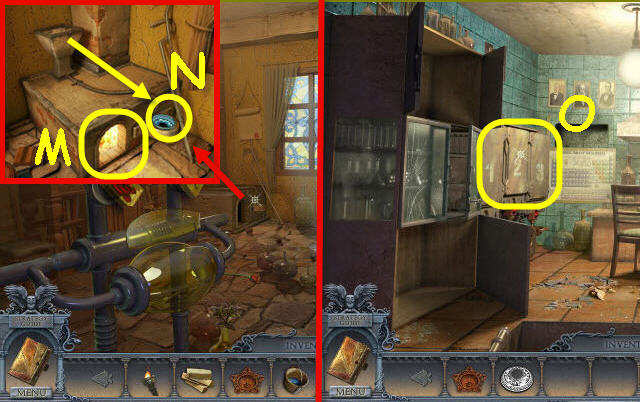
- Examine the furnace and place the FIREWOOD in it; light the furnace with the LIT TORCH (M).
- Place the SAND in the funnel; take the EMPTY BULB (N).
- Take the cable car to Kleitos’ house; go up the ladder and left.
- Examine the device and place the HOLDER and then the EMPTY BULB in the center to trigger a puzzle (O).

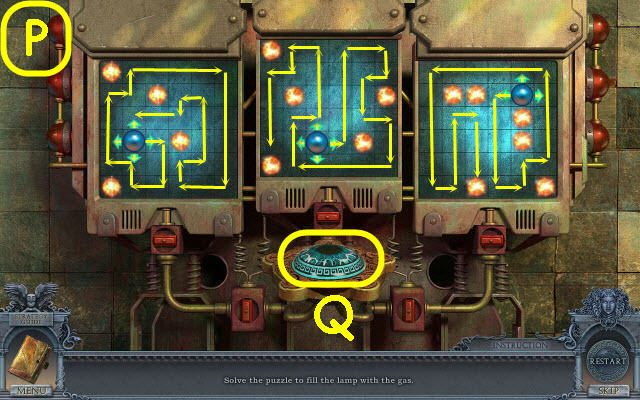
- Charge each field with energy.
- See screenshot for solution (P).
- Take the BULB (Q).
- Go to the mansion and down into the crypt.

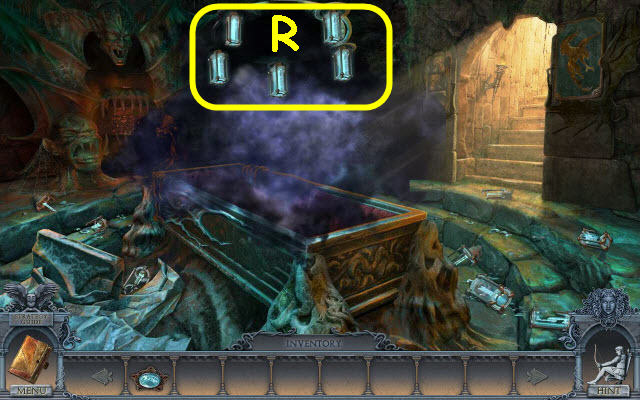
- Examine the lamp and place the BULB in the center (R).
- Congratulations, you have completed Secrets of the Dark: Mystery of the Ancestral Estate.



 Treasure Seekers: Follow the Ghosts Walkthrough, Guide, & Tips
 Witch Switch Tips and Tricks, Guide, & Tips
 Time Dreamer Walkthrough, Guide, & Tips
 Haunted Legends: Queen of Spades Walkthrough, Guide, & Tips
 Time Riddles: The Mansion Walkthrough, Guide, & Tips