Fierce Tales: Marcus' Memory Walkthrough, Guide, & Tips
Fierce Tales: Marcus’ Memory Walkthrough

Welcome to the Fierce Tales: Marcus’ Memory Walkthrough
Solve the mystery of a seaside town as you uncover your lost memories.
Whether you use this document as a reference when things get difficult or as a road map to get you from beginning to end, we’re pretty sure you’ll find what you’re looking for here.
This document contains a complete Fierce Tales: Marcus’ Memory game walkthrough featuring annotated screenshots from actual gameplay!
We hope you find this information useful as you play your way through the game. Use the walkthrough menu below to quickly jump to whatever stage of the game you need help with.
Remember to visit the Big Fish Games Forums if you find you need more help. Have fun!
This walkthrough was created by Lucky Smile, and is protected under US Copyright laws. Any unauthorized use, including re-publication in whole or in part, without permission, is strictly prohibited.
General Tips

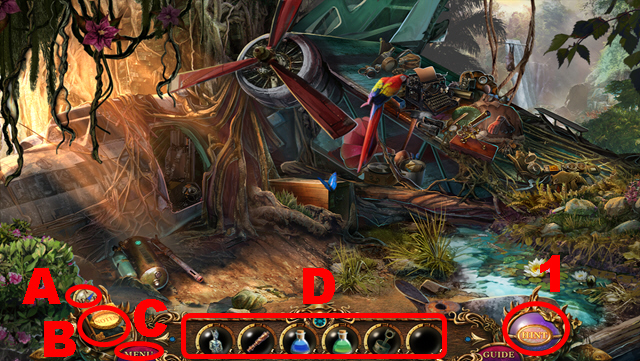
- This is the official guide for Fierce Tales: Marcus’ Memory.
- Access the map (A) to quick-jump to any available location.
- Select the notes (B) to review what you have revealed so far.
- From the menu (C) you can leave the game, adjust the difficulty, and adjust the game’s settings.
- Collected items will be stored in the inventory (D).
- Press the hint button (1) whenever you need help.
- Hidden Object-Puzzles will be referred to as HOP throughout this guide. Puzzles may be random; our solutions may vary from yours.
- There are three grades of difficulty you can choose from in the beginning: casual, advanced, and hardcore mode.
Chapter 1: The Small Island

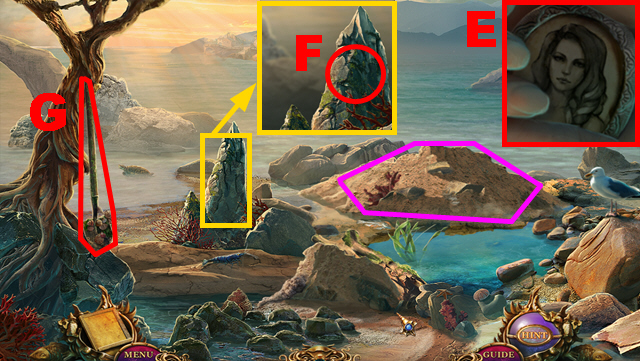
- Take the PORTRAIT (E).
- Take the SHOVEL WITH SHELLS (G).
- Zoom into the rock; hit the SHOVEL WITH SHELLS against the rock (F) to acquire the SHOVEL.
- Remove the sand pile with the SHOVEL (purple).
- Play the HOP.

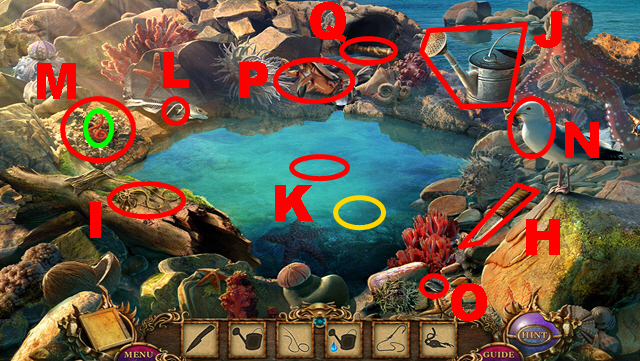
- Take the knife (H).
- Cut the string with the knife (I) and take the string.
- Take the empty watering can (J). Put the empty watering can into the water (K) to acquire the full watering can.
- Connect the string to the hook (L) and take the empty fishhook.
- Pour the full watering can over the soil (M). Catch the worm with the empty fishhook (green) and take the hook with worm.
- Place the hook with worm into the water (yellow) to acquire the fish. Give the fish to the seagull (N).
- Take the closed clam (O). Give the closed clam to the crab (P) and take the whistle (Q).
- You will receive the DOLPHIN WHISTLE.

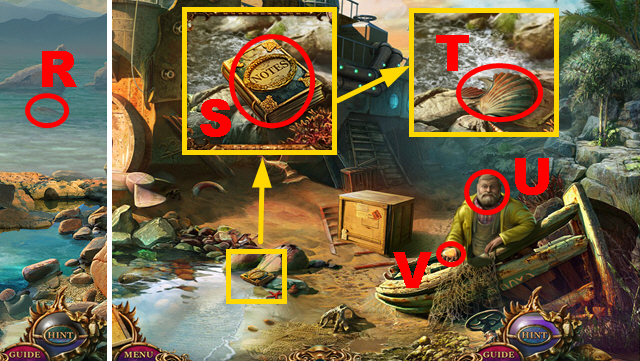
- Call the dolphin with the DOLPHIN WHISTLE (R).
- Zoom into the book; take the book (S) and the SHARP SHELL (T).
- Talk to the fisherman (U) and take the HEART (V).
- Move forward.

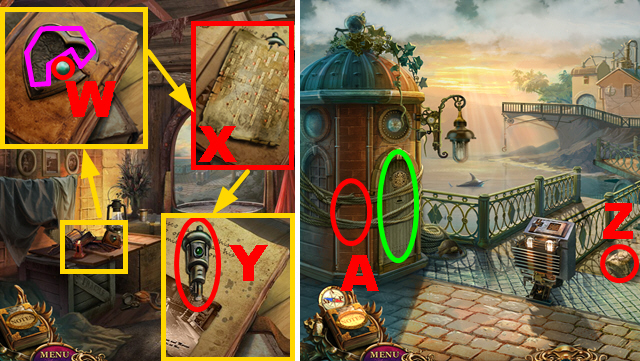
- Zoom into the crates and take the 1/3 PEARL (W); insert the HEART into the niche (purple), open the book twice, take the map (X), and the CLAMP (Y).
- Move forward.
- Take the STONE (Z).
- Cut the rope with the SHARP SHELL (A) and open the door (green).

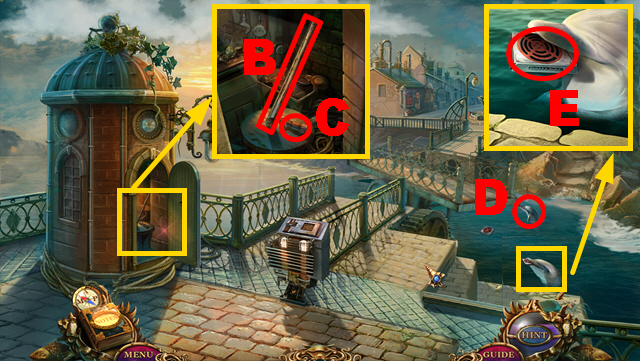
- Zoom into the cabin; take the STICK (B) and the SHAFT (C).
- Call the dolphin with the DOLPHIN WHISTLE (D).
- Zoom into the dolphin; take the CONTROL PANEL (E).
- Walk down twice.

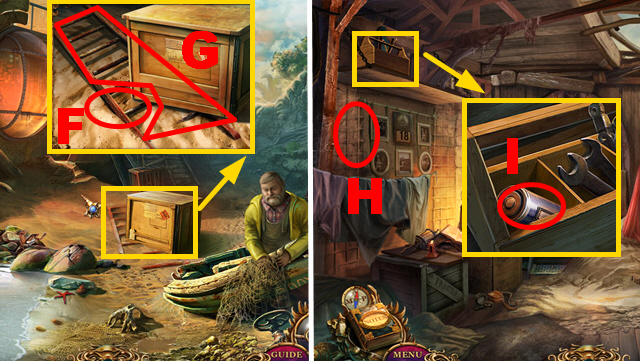
- Zoom into the crate and put down the STONE and the STICK (F); take the LADDER (G).
- Move forward.
- Put down the LADDER (H).
- Zoom into the toolbox; take the UNCHARGED BATTERY (I).

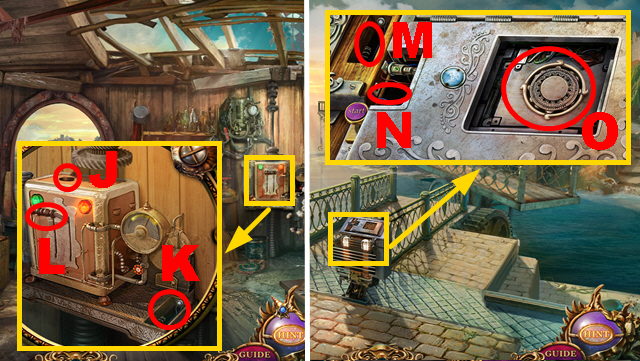
- Zoom into the machine, connect the SHAFT to it (J), and insert the UNCHARGED BATTERY into the niche (K); pull the handle (L) and take the CHARGED BATTERY.
- Move forward.
- Zoom into the device; connect the CHARGED BATTERY (M), the CLAMP (N), and the CONTROL PANEL (O) to the device.
- Play the mini-game.

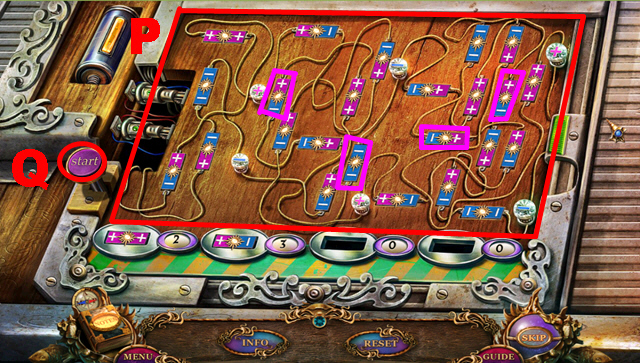
- To solve this puzzle (P), insert the correct pieces into the empty slots (purple) to connect plus- and minus-signs correctly.
- Push the start-button (Q) to complete the mini-game.
- Move forward.

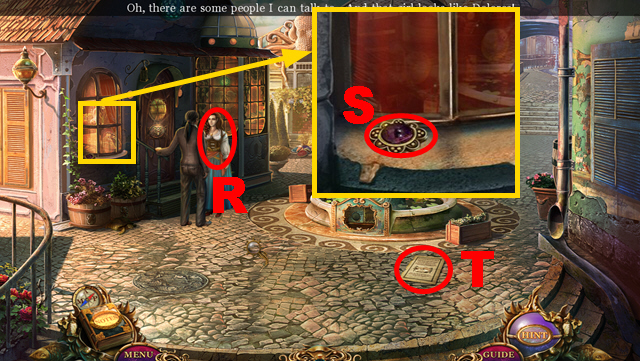
- Talk to the woman (R).
- Zoom into the window; take the PURPLE MEDALLION (S).
- Zoom into the newspaper (T) to acquire the 1/2 NEWSPAPER.
- Move forward.

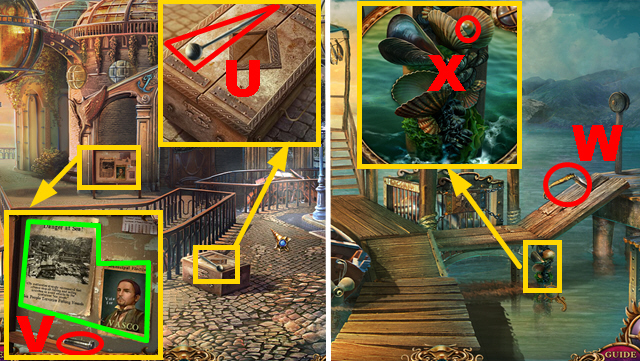
- Zoom into the box; take the JACK HANDLE (U).
- Zoom into the bulletin board; take a look at the two posters (green) and take the 1/2 BOLT (V).
- Move left, down the docks.
- Take the KNIFE (W).
- Zoom into the shells and open the three shells; take the 2/2 PEARL (X).
- Turn left.
- Play the HOP.
Chapter 2: The Fisherman’s House

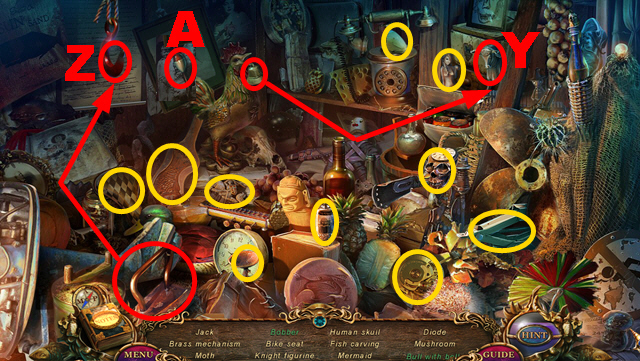
- Take the bell, connect it to the bull, and take the bull with bell (Y).
- Take the iron, connect it to the hook (Z), and take the bobber (A).
- You will receive the JACK.

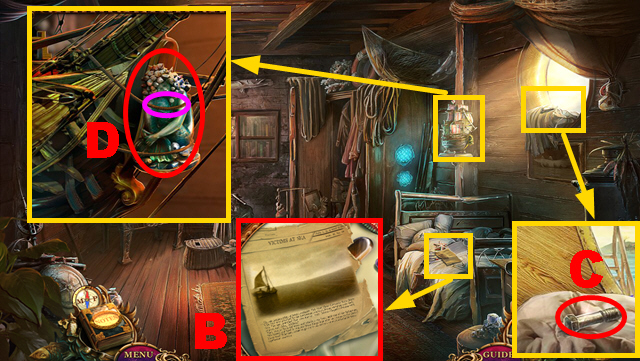
- Zoom into the bed; read the note (B); you will receive the 2/2 NEWSPAPER.
- Zoom into the porthole; take the 2/2 BOLT (C).
- Zoom into the ship and cut the rope with the KNIFE (purple); take the MERMAID (D).
- Walk down.

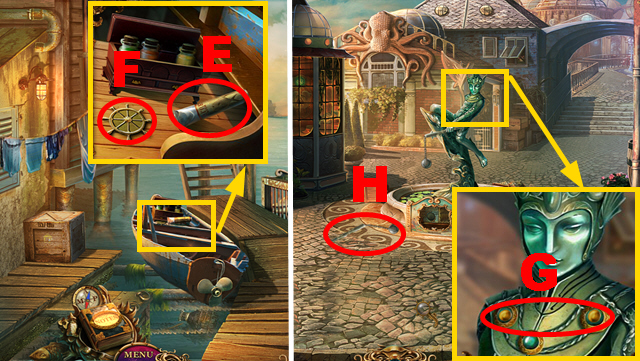
- Zoom into the boat; take the GLUE (E) and the WHEEL (F).
- Walk down twice.
- Zoom into the statue; insert the 2 PEARLS into the slots (G).
- Take the MACE (H).
- Move forward.

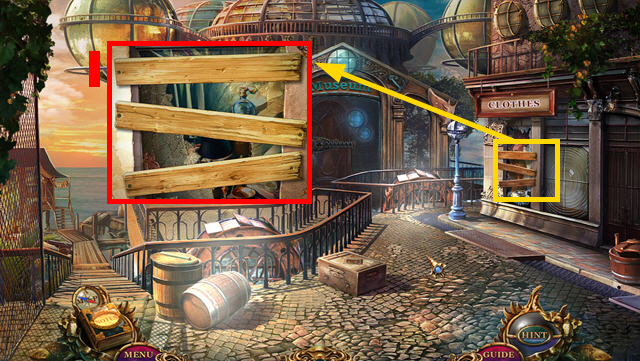
- Zoom into the boarded window; remove the boards with the MACE (I).
- Play the HOP.

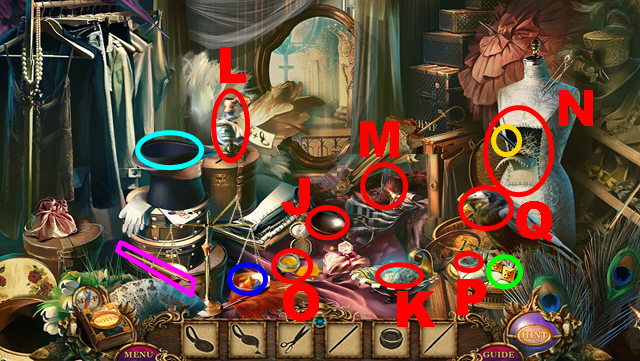
- Put the scoop (J) into the sand (K) to acquire the scoop with sand. Pour the scoop with sand into the bottle (L).
- Cut the seam (N) with the scissors (M) and take the magic wand (yellow).
- Hit the top hat with the magic wand (light blue).
- Pour the paint (O) into the other paints (dark blue) and take the brush (purple).
- Dip the brush into the paints to acquire the brush with paint. Paint the coin with the brush with paint (P) and take the gold coin.
- Give the gold coin to the bird (Q).
- Take the gold cufflinks (green).
- You will receive the GOLD CUFFLINKS.

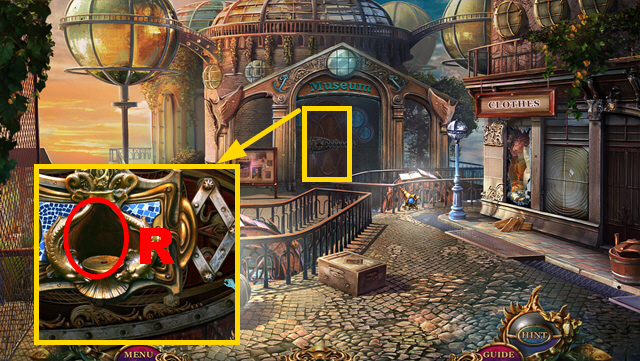
- Zoom into the museum door; put down the MERMAID (R).
- Play the mini-game.

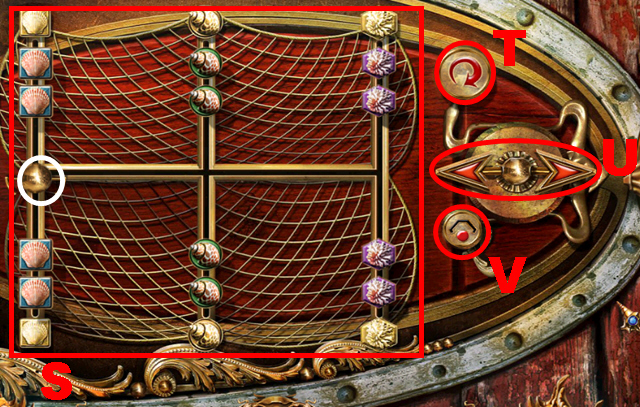
- To solve this puzzle (S), set the shell chips into the corresponding columns with the joystick (white).
- Rotate the joystick with the button (T).
- Move the joystick left and right with the button (U).
- Pick up shell chips with the button (V).
- Enter the museum.

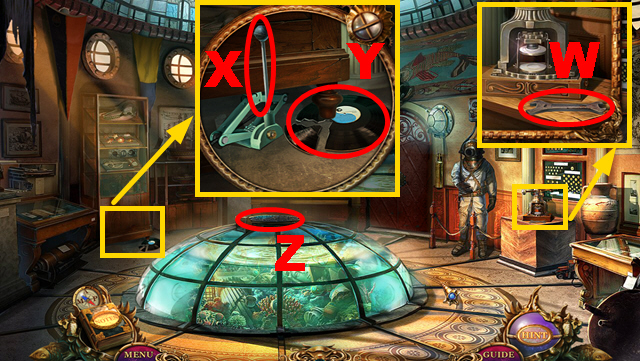
- Zoom into the device; take the WRENCH (W).
- Zoom into the showcase, put down the JACK, connect the JACK HANDLE to it, and turn the handle (X); apply the GLUE to the record, put the record together, and take the RECORD (Y).
- Open the trapdoor (Z).
- Play the HOP.

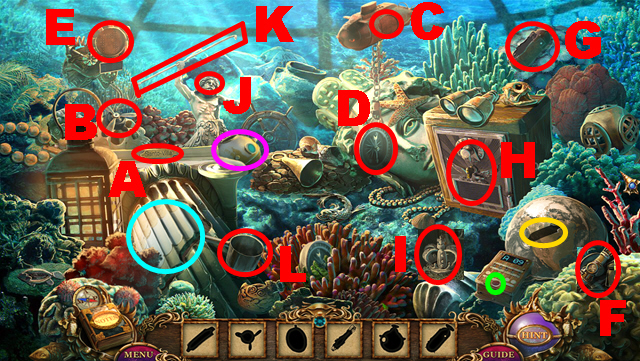
- Take the plaque (A) and the propeller (B). Connect the propeller to the submarine (C) and take the compass (D).
- Insert the compass into the device (E). Press the button (green) and insert the plaque into the niche (yellow).
- Take the battery from inside the globe (F). Insert the battery into the detonator (G) and take the detonator.
- Insert the detonator into the bomb (purple) and take the bomb.
- Break the safe with the bomb (H) and take the crown from inside the safe (I). Put the crown onto the statue (J) and take the crowbar (K).
- Break the column with the crowbar (light blue) and take the ladle (L).
- You will receive the LADLE.
- Go to the Fisherman’s House.

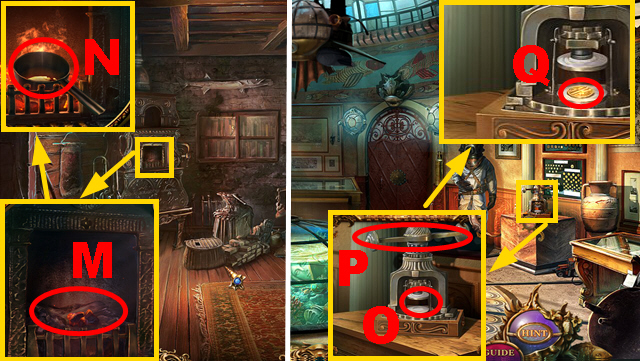
- Zoom into the oven and insert the 2 NEWSPAPERS and the LADLE into it (M); put the GOLD CUFFLINKS into the ladle and take the MELTED GOLD (N).
- Go to the Sea Museum.
- Zoom into the device, pour the MELTED GOLD into it (O), and turn the handle (P); take the GOLD COIN (Q).
- Go to the City Embankment.

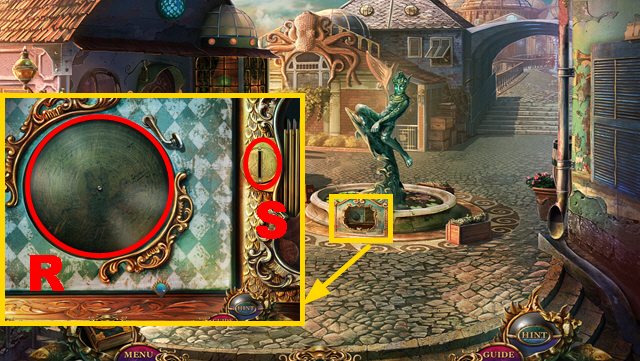
- Zoom into the panel; connect the RECORD to it (R) and insert the GOLD COIN into the slot (S).
- Play the mini-game.

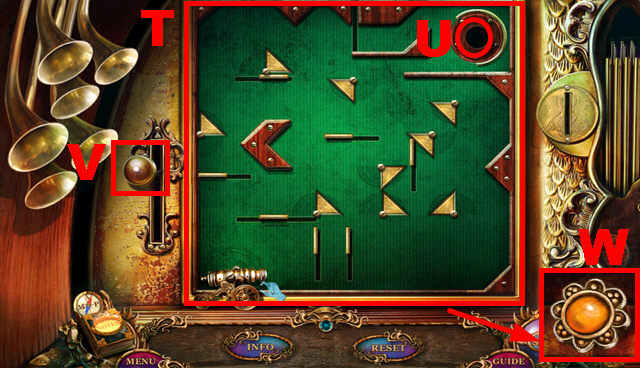
- To solve this puzzle (T), set the cannon and the board pieces correctly so that the cannonball reaches the hole (U).
- Pull the lever (V) when the board setup is correct to shoot the cannonball into the hole.
- Take the YELLOW MEDALLION (W).

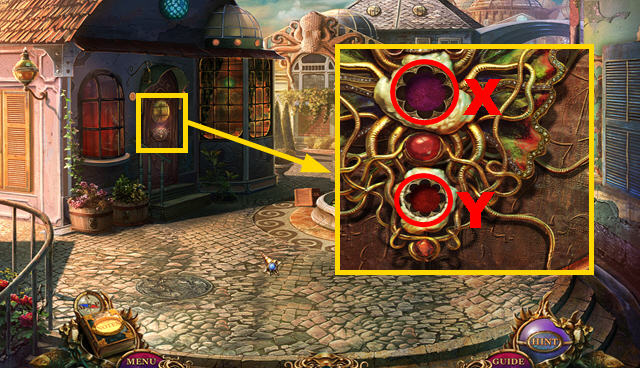
- Zoom into the left door; insert the PURPLE MEDALLION (X) and the YELLOW MEDALLION (Y) into the slots.
- Play the mini-game.

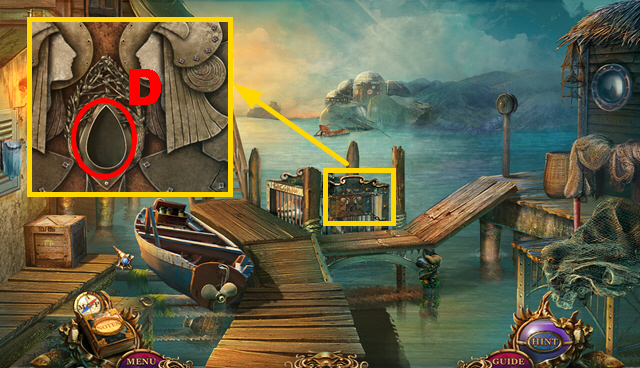
- To solve this puzzle (Z), move the ball into the hole (purple).
- Push the arrow buttons (light blue) to move around the ball.
- Move the ball in the following directions: down x2, left x4, up x2, right x2, down x2, right x7, up x2, left x2, down, left, down, right, down x2, right, down x3, right, down, and left x2.
- Up, left x3, up, left x2, down, left x2, up x2, right, up, right x5, down x3, left, down, left, down, and left x3.
- Enter Dolores’ House.

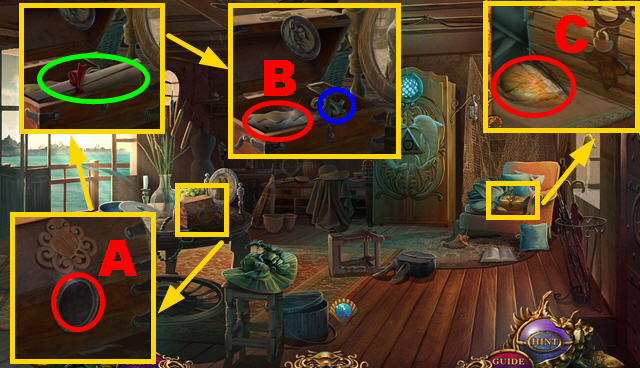
- Zoom into the table, insert the PORTRAIT into the niche (A), and open the box; read the scroll (green), take the WHALE FIGURINE (B), and the WAVE (dark blue).
- Zoom into the chair; take the YELLOW STONE (C).
- Go to the Fishing Village.


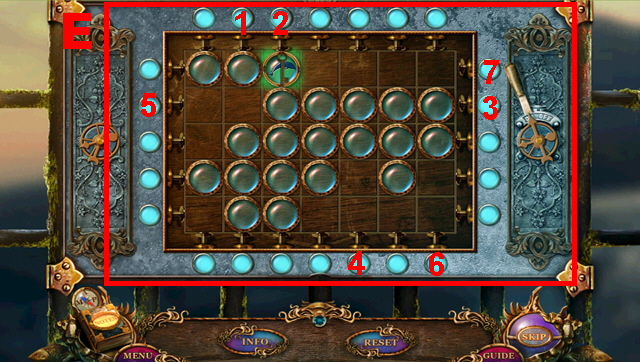
- Zoom into the cage; insert the YELLOW STONE into the niche (D).
- Play the mini-game.
- To solve this puzzle (E), select the buttons in the numerical order (1-7).
Chapter 3: The Residence Entrance

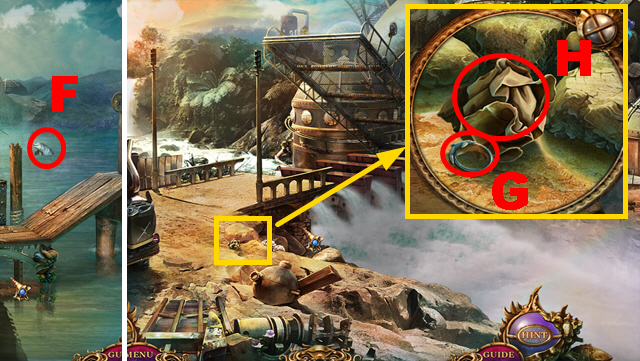
- Call the dolphin with the DOLPHIN WHISTLE (F).
- Zoom into the stone; take the DOLPHIN RING (G) and read the note (H).
- Go to Dolores’ House.

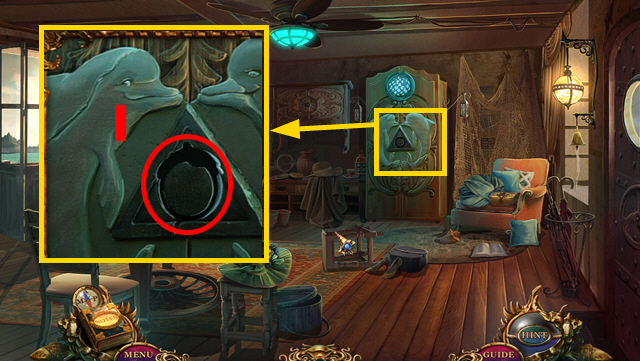
- Zoom into the cabinet; insert the DOLPHIN RING into the niche (I) and open the door.
- Play the HOP.

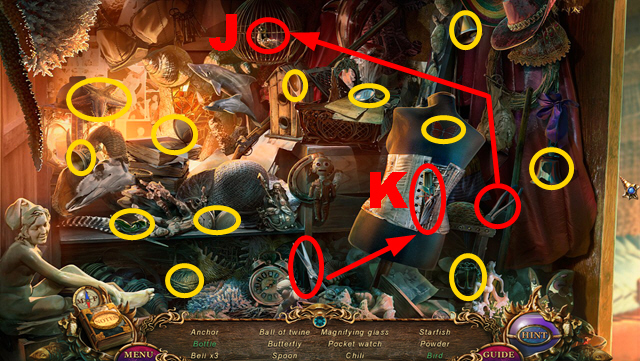
- Take the pliers, open the cage with it, and take the bird (J).
- Take the scissors, cut open the seam with it, and take the bottle (K).
- You will receive the ANCHOR.
- Go to the Sea Museum.

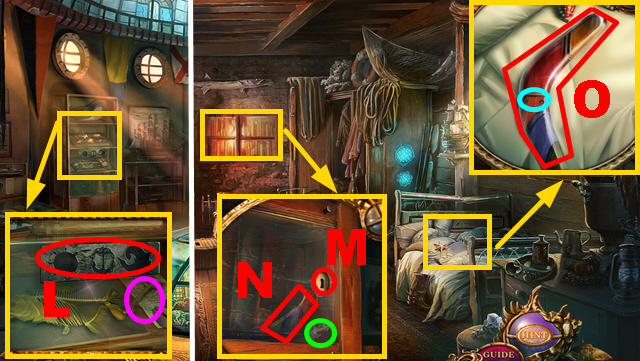
- Zoom into the showcase and insert the WHEEL, the ANCHOR, and the WAVE into the niches (L); take the CABINET KEY (purple).
- Go to the Fisherman’s House.
- Zoom into the cabinet, insert the CABINET KEY into the lock (M), and turn the key twice; take the BOOMERANG PART (N) and the SHARK FIGURINE (green).
- Zoom into the bed and connect the BOOMERANG PART to its other half (O); insert the 2 BOLTS into the boomerang (light blue), tighten the bolts with the WRENCH, and take the BOOMERANG.
- Go to the Entrance to the Residence.

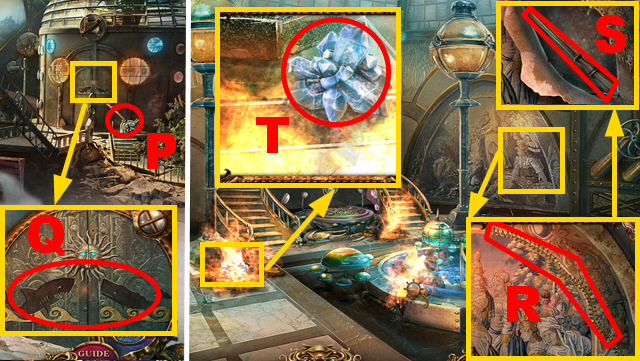
- Throw the BOOMERANG at the lever (P).
- Zoom into the door; insert the SHARK FIGURINE and the WHALE FIGURINE into the niches (Q).
- Move forward.
- Zoom into the wall and cut the seam with the KNIFE (R); take the FIREPLACE POKER (S).
- Zoom into the crystal; acquire the CRYSTAL with the FIREPLACE POKER (T).

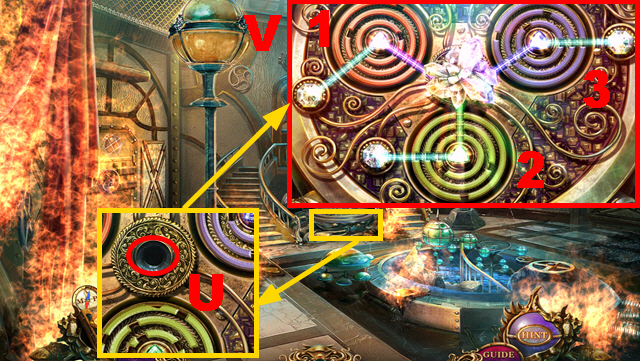
- Zoom into the device; insert the CRYSTAL into the slot (U).
- Play the mini-game.
- To solve this puzzle (V), turn the disk parts 1-3 so that all diamonds are connected by the ray of light as shown in the screenshot.
- Go through the door and talk to Vasco.

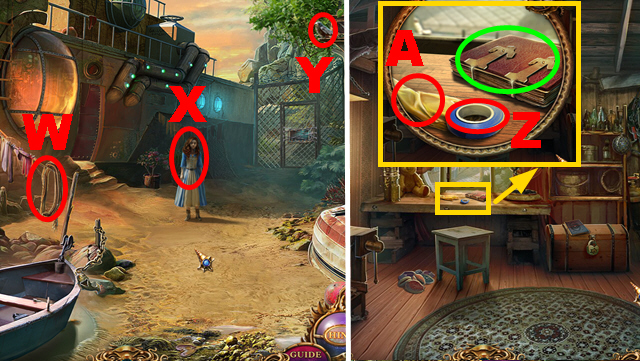
- Take the ROPE (W).
- Talk to the girl (X) and chase away the crow (Y).
- Turn left.
- Zoom into the table; take the TAPE (Z), the GLOVE (A), and read the book (green).
- Walk down.

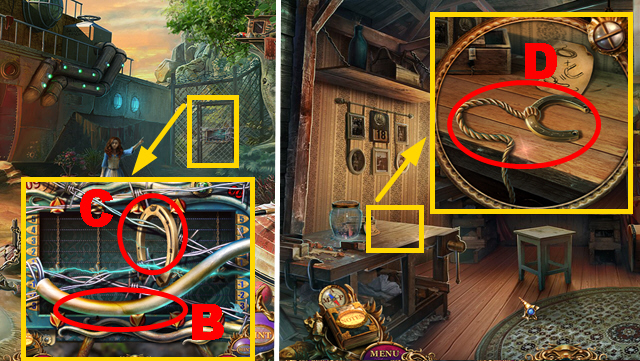
- Zoom into the gate; remove the wire with the GLOVE (B) and take the HORSESHOE (C).
- Return to the Ship House.
- Zoom into the left table and put down the HORSESHOE and the ROPE; take the GRAPPLING HOOK (D).
- Walk down.

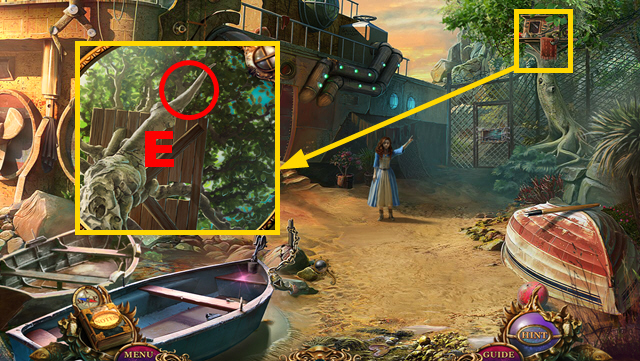
- Zoom into the tree; throw the GRAPPLING HOOK at the branch (E).
- Play the HOP.

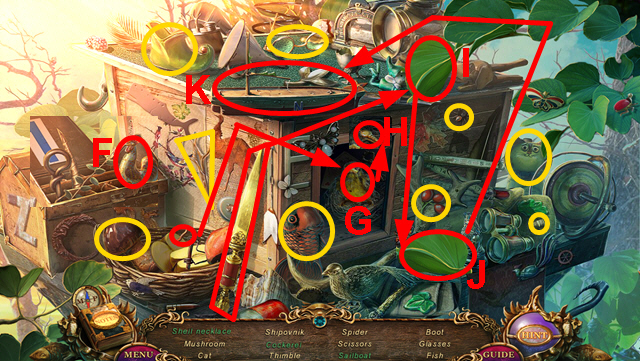
- Open the box and take the cockerel (F).
- Take the worm, give it to the bird (G), and take the shell necklace (H).
- Take the knife, cut the leaf with it (I), take the leaf (J), connect it to the ship, and take the sailboat (K).
- You will receive the SHELL NECKLACE.

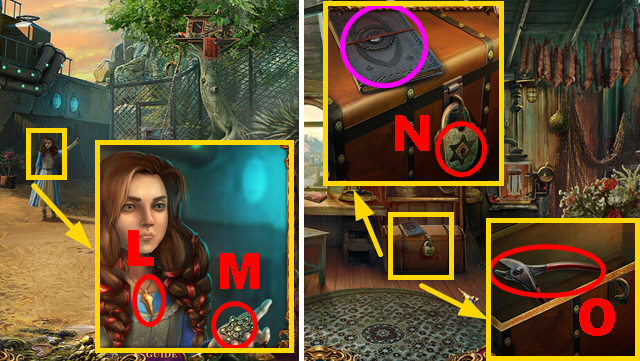
- Give the SHELL NECKLACE to the girl (L) and take the STAR (M).
- Turn left.
- Zoom into the chest; read the book (purple), insert the STAR into the niche (N), and remove the padlock.
- Zoom into the chest once more; take the WIRE CUTTERS (O).
- Walk down.

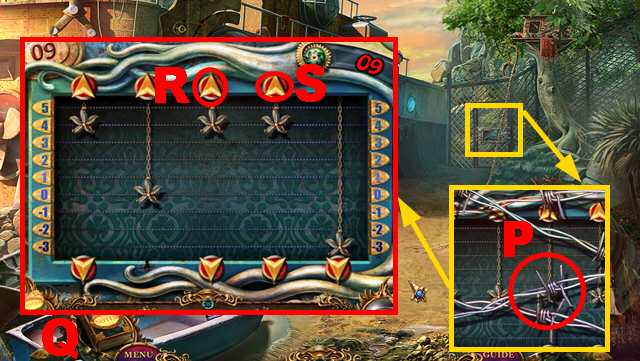
- Zoom into the gate; cut the wire with the WIRE CUTTERS (P).
- Play the mini-game.
- To solve this puzzle (Q), press the button (R) four times and then press the button (S) four times.
- Move forward.
- Play the HOP.

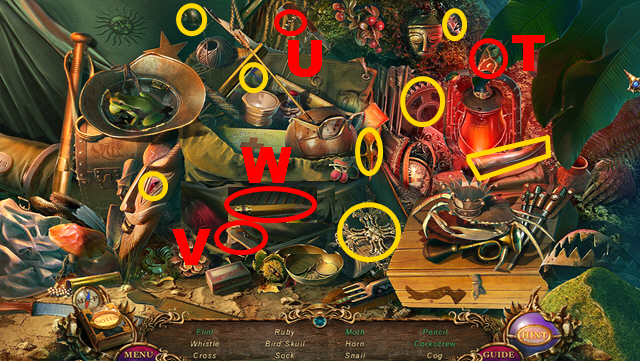
- Move aside the leaf and take the moth (T).
- Press the pocketknife twice and take the corkscrew (U).
- Open the bag; take the flint (V), and the pencil underneath (W).
- You will receive the 1/2 FLINT.

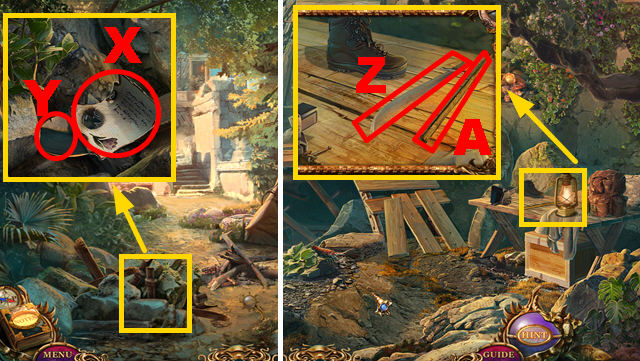
- Zoom into the debris and remove 2 stones; read the note (X), remove the board, and take the SHOVEL HEAD (Y).
- Move forward.
- Zoom into the table and take the MACHETE (Z); connect the SHOVEL HEAD to the stick (A), put down the TAPE, fix the scoop with the tape, and take the SHOVEL.
- Walk down.

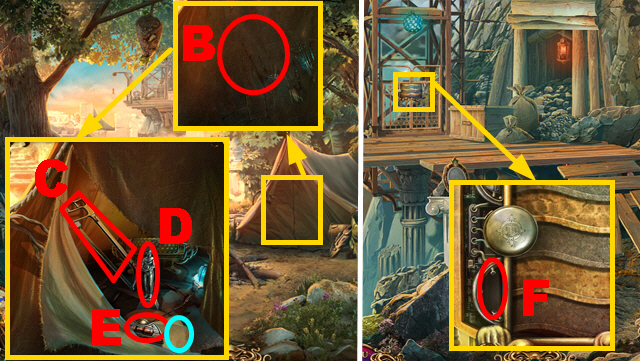
- Zoom into the tent and cut it open with the MACHETE (B); take the SAW (C), the SILVER MAN (D), the RESISTOR (E), and read the note (light blue).
- Move forward.
- Zoom into the panel; connect the RESISTOR to it (F).
- Play the mini-game.

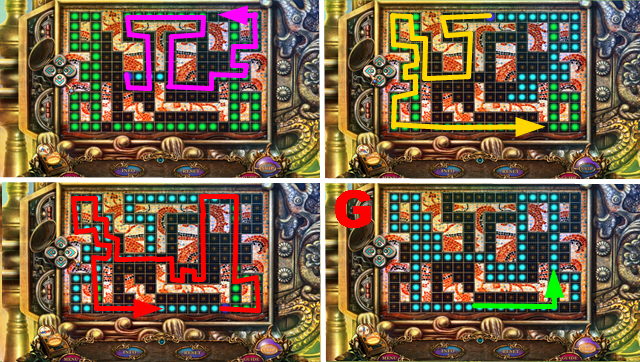
- To solve this puzzle (G), direct the blue snake according to the purple, yellow, red, and green lines (in that order).
- Move forward.
Chapter 4: The Peak

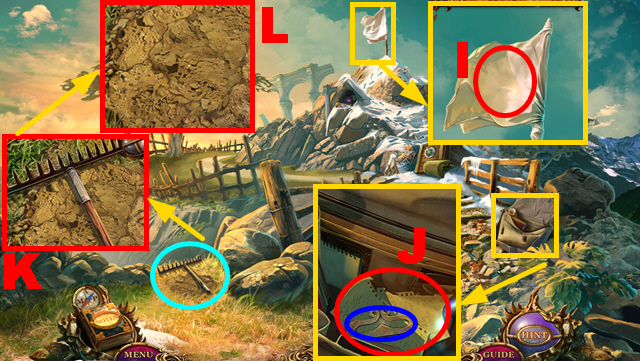
- Zoom into the flag; cut the flag with the MACHETE (I) to acquire the FLAG.
- Zoom into the bag; take the 2/2 FLINT (dark blue) and read the notes (J).
- Zoom into the rake; take the BROKEN RAKE (K).
- Remove the soil with the SHOVEL (L).
- Zoom into the ground again (light blue).
- Play the mini-game.

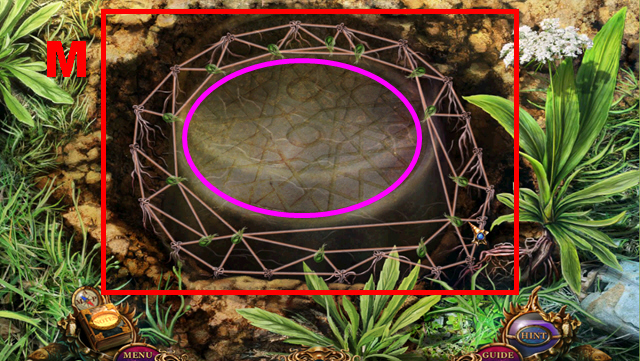
- To solve this puzzle (M), unravel the roots and move them away from the bucket.
- Take the BUCKET (purple).
- Walk down.

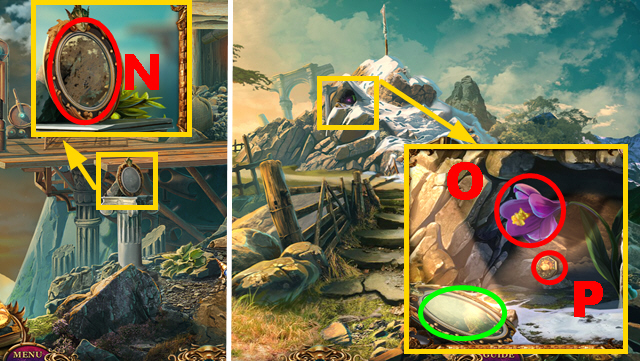
- Zoom into the mirror; clean the mirror with the FLAG (N) and take the MIRROR.
- Move forward.
- Zoom into the cave and put down the MIRROR (green); take the MOUNTAIN FLOWER (O) and the BOREAN RUNE (P).
- Move forward.

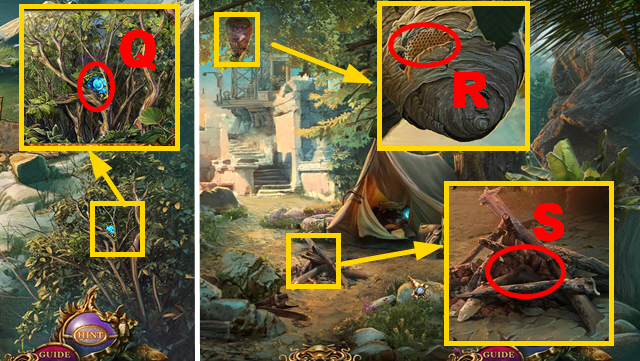
- Zoom into the bush and cut away the branches with the MACHETE to receive the BRUSHWOOD; take the BOREAN RUNE (Q).
- Walk down three times.
- Zoom into the fire pit; put down the BRUSHWOOD (S) and light the brushwood with the 2 FLINTS.
- Zoom into the beehive; take the HONEYCOMB (R).
- Move forward three times.

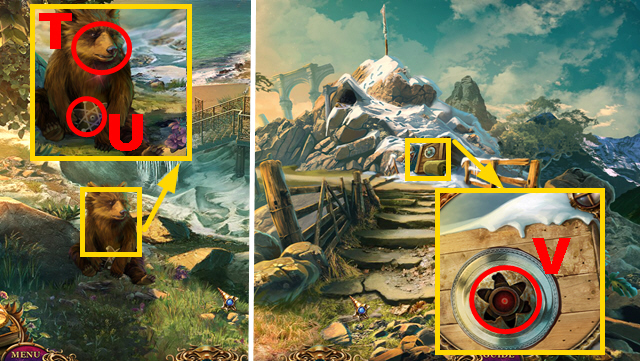
- Zoom into the bear; give the HONEYCOMB to the bear (T) and take the ATOM SYMBOL (U).
- Walk down.
- Zoom into the crate; insert the ATOM SYMBOL into the niche (V).
- Play the HOP.

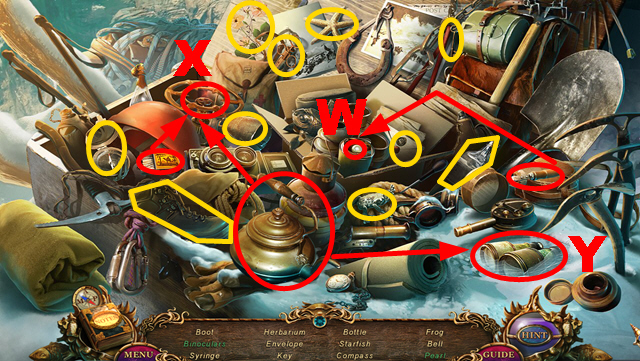
- Take the can opener, open the can with it, and take the pearl (W).
- Take the matches, use them to light the stove (X), put the kettle on the stove, take the kettle, pour it over the binoculars, and take the binoculars (Y).
- You will receive the BOOT.
- Walk down.

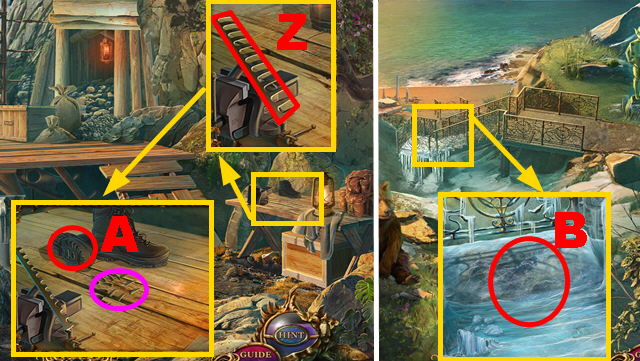
- Zoom into the table and insert the BROKEN RAKE into the device (Z); cut the broken rake with the SAW.
- Put down the BOOT (A), connect the spikes (purple) to the boots, and take the CLIMBING BOOTS.
- Move forward twice.
- Zoom into the stairs; use the CLIMBING BOOTS on the stair (B) to get past it.
- Play the HOP.

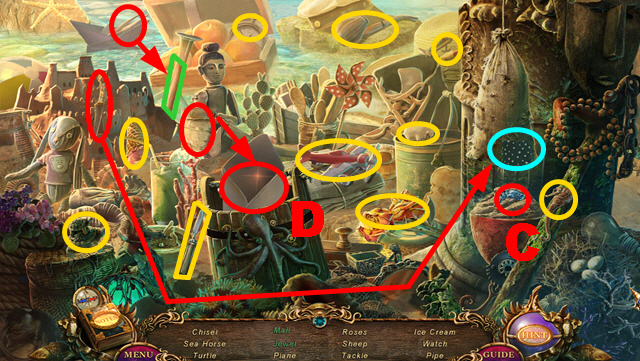
- Take the dagger, cut the sack with it (light blue), and take the jewel (C).
- Take the tweezers, use the tweezers to pull out the page (green), take the page, put it into the letter (D), close the letter, and take the mail.
- You will receive the CHISEL.

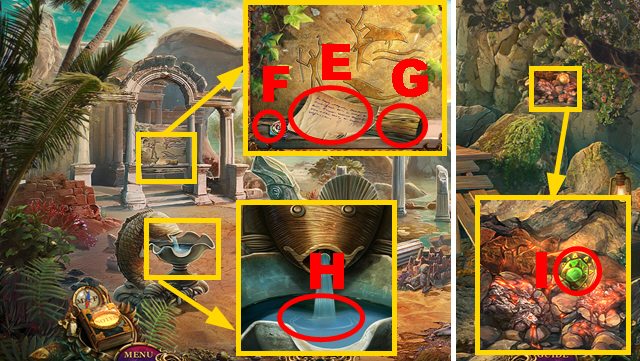
- Zoom into the pantheon; read the note (E), take the CYLINDER KEY (F), and the WOOD PIECE (G).
- Zoom into the fountain; put the BUCKET into the water (H) to acquire the BUCKET OF WATER.
- Walk down three times.
- Zoom into the burning coal; pour the BUCKET OF WATER over the borean rune (I) and take the BOREAN RUNE.
- Walk down.

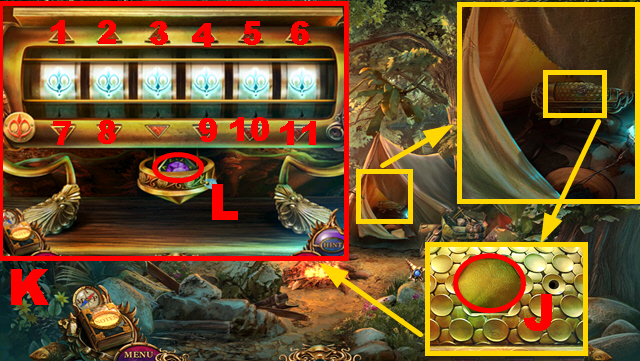
- Zoom into the tent and then zoom into the device; insert the CYLINDER KEY into the niche (J).
- Play the mini-game.
- To solve this puzzle (K), select the buttons in the following order: 2, 5, 4, 4, 3, 3, 7, 7, 11, and 11.
- Take the BOREAN RUNE (L).
- Move forward three times.

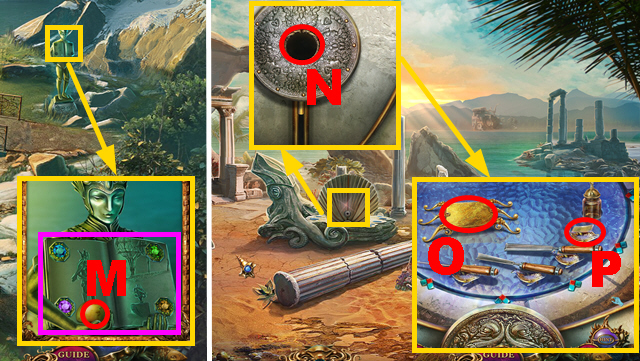
- Zoom into the statue; insert the 4 BOREAN RUNES into the book (purple) and take the ALTAR SPHERE (M).
- Move forward.
- Zoom into the large shell; insert the ALTAR SPHERE into the slot (N).
- Put down the WOOD PIECE (O) and the CHISEL (P).
- Play the mini-game.

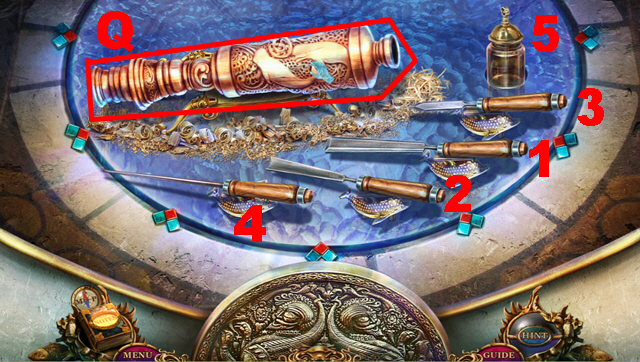
- To solve this puzzle, select the tools in numerical order (1-5) and use them to carve the wood piece.
- Take the DOLPHIN WHISTLE (Q).

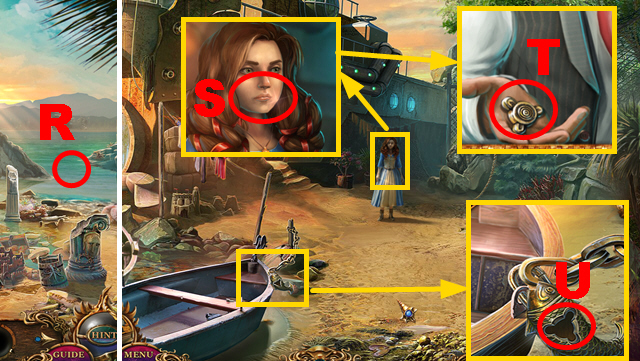
- Call the dolphin with the DOLPHIN WHISTLE (R).
- Zoom into the girl; talk to her and give the MOUNTAIN FLOWER to her (S).
- Take the FISH KEY (T).
- Zoom into the boat; insert the FISH KEY into the lock (U).

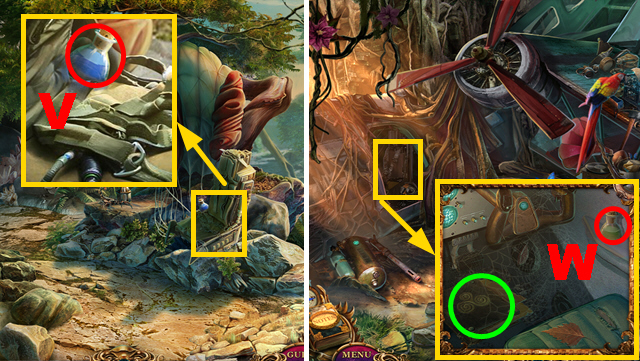
- Zoom into the seat; take the ACTIVATING AGENT (V).
- Move forward to the right.
- Zoom into the cockpit; read the notes (green) and take the PHOSPHORUS (W).
- Play the HOP.

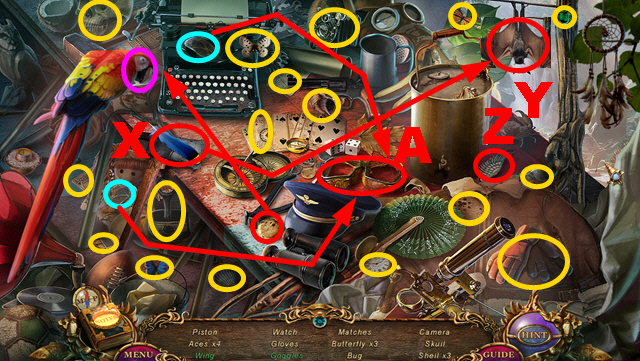
- Take the cookie, give it to the parrot (purple), take the feather (X), touch the bat with it (Y), and take the wing (Z).
- Take the 2 pieces of glass (light blue), put them into the goggles (A), and take the goggles.
- You will receive the PISTON.

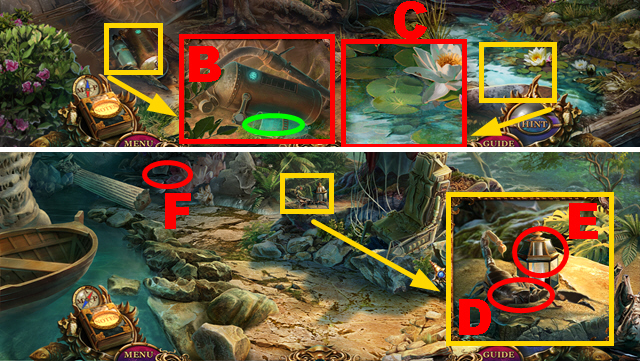
- Zoom into the water tank; connect the PISTON to it (green) and take the EMPTY WATER TANK (B).
- Zoom into the water; hold the EMPTY WATER TANK into the water (C) to acquire the WATER TANK.
- Walk down.
- Zoom into the scorpion; chase away the scorpion with the WATER TANK (D), pour the ACTIVATING AGENT and the PHOSPHORUS into the lamp (E), and take the LAMP.
- Put the LAMP into the cave (F).
- Turn left.
Chapter 5: The Crystal Cave

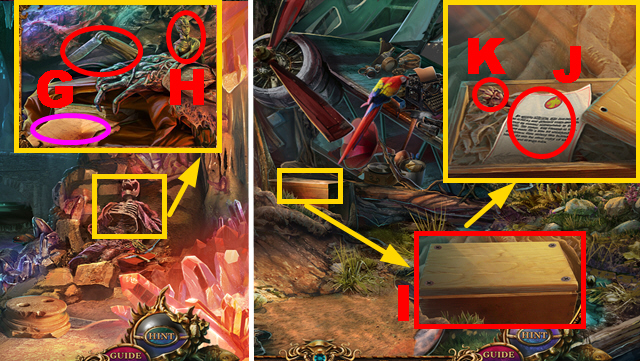
- Zoom into the skeleton; read the note (purple), take the POCKETKNIFE (G), and the GOLD MAN (H).
- Walk down and turn right.
- Zoom into the crate, open the cover with the POCKET KNIFE (I), and remove the cover; read the note (J) and take the COPPER MAN (K).
- Walk down and turn left.

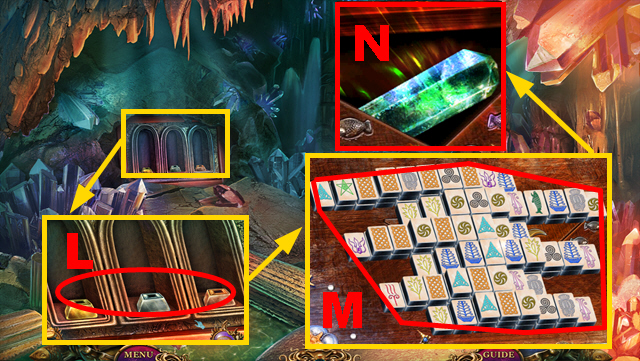
- Zoom into the pedestals; put down the GOLD MAN, the SILVER MAN, and the COPPER MAN (L).
- Play the mini-game.
- To solve this puzzle, remove stones of the same symbols (M) until all the stones are removed.
- Take the CAVE CRYSTAL (N).
- Walk down.

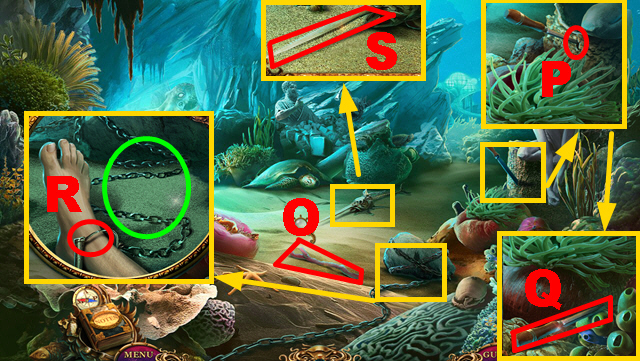
- Take the CORAL BRANCH (O).
- Zoom into the file; free the file with the CORAL BRANCH (P) and take the FILE (Q).
- Zoom into the chain; cut the chain with the FILE (R) and take the CHAIN (green).
- Zoom into the swordfish; cut the bone sword with the FILE and take the BONE SWORD (S).
- Play the HOP.

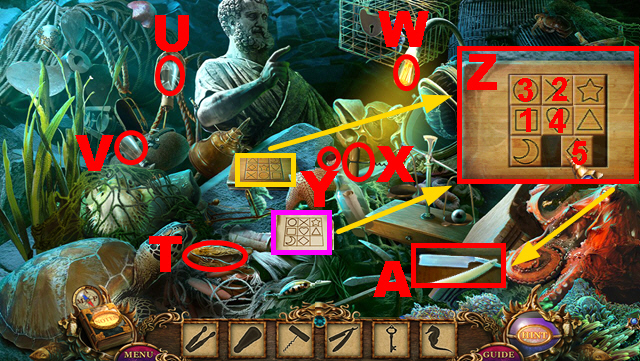
- Take the tongs (T) and use them to remove the light bulb (U).
- Take the light blub (V). Insert the light bulb into the slot (W).
- Take the corkscrew (X). Use the corkscrew to open the bottle (Y).
- Open the note (purple).
- Zoom into the box; rearrange the symbols according to the note (Z); 1 down, 2 right, 3 up, 1 left, 4 up, and 5 left.
- Take the razor (A).

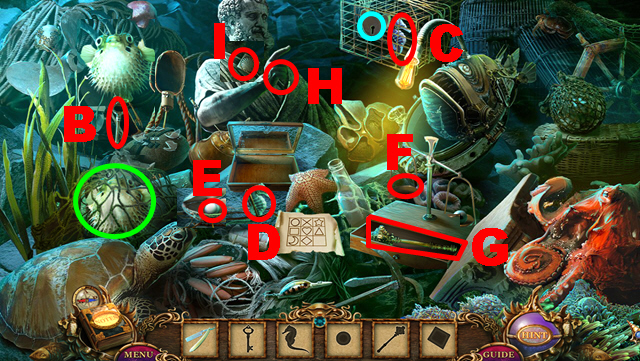
- Cut open the net with the razor (green).
- Take the key (B). Insert the key into the lock (light blue) and take the seahorse (C).
- Connect the seahorse to the other seahorse (D); take the pearl (E).
- Put the pearl on the scales (F) and take the scepter (G).
- Connect the scepter to the statue (H).
- Take the shell (I).
- You will receive the OYSTER IMAGE.
- Turn right.

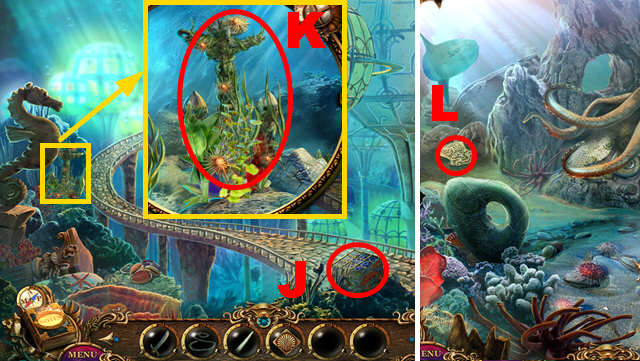
- Take the CUBE (J).
- Zoom into the anchor and clear the anchor with the BONE SWORD (K) to receive the SEA GRASS; take the ANCHOR.
- Walk down and turn left.
- Take the TABLET (L).

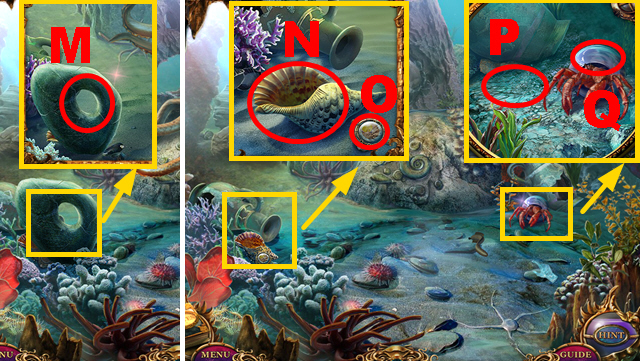
- Zoom into the stone; connect the ANCHOR and the CHAIN to the stone (M).
- Zoom into the vase; take the SHELL (N) and the 1/4 DECODER (O).
- Zoom into the crab; put down the SHELL (P) and take the FISHBOWL (Q).
- Walk down and turn right.

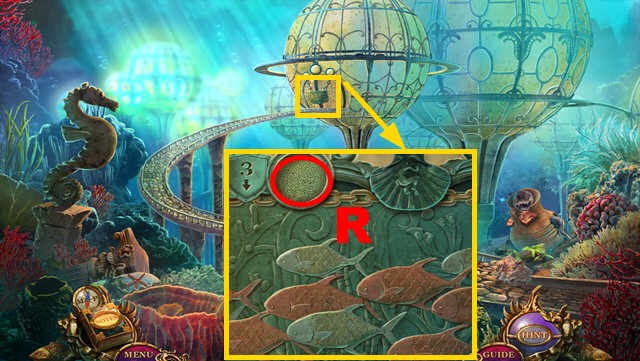
- Zoom into the door; connect the FISHBOWL and the SEA GRASS to the panel (R).
- Play the mini-game.

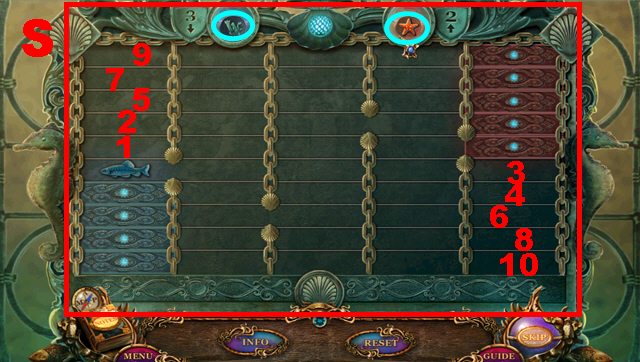
- To solve this puzzle (S), swap the positions of the red and the blue fishes.
- Press the buttons (light blue) to move any selected fish up and down.
- Move the red fish (1-5) and the blue fish (16-20) into the following positions: 5-11, 4-13, 16-purple area, 4-12, 16-10, 17-9, 3-13, 18-14, 19-7, 2-purple area, 19-8, 18-purple area, 20-purple area, 2-14, 20-7, 1-15, and 18-6.
- Go through the door.

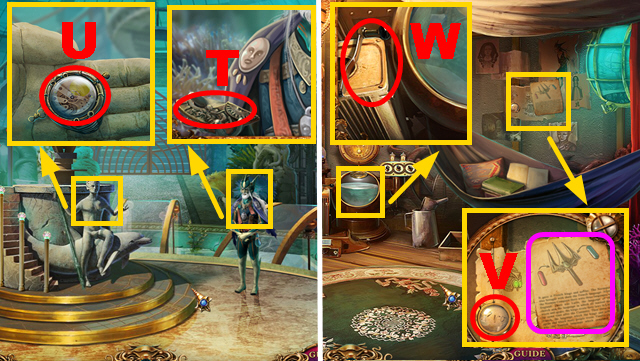
- Talk to the man; take the TABLET (T).
- Zoom into the statue; take the 2/4 DECODER (U).
- Turn left.
- Zoom into the wall; take the UNCHARGED LENS (V) and read the note (purple).
- Zoom into the mechanism; take the LEVER (W).
- Walk down and move forward.
- Play the HOP.

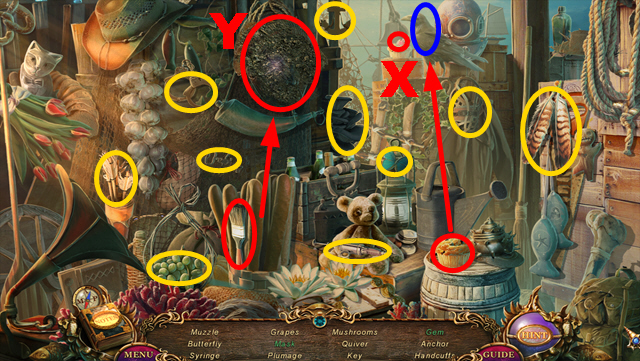
- Take the muffin, give it to the bird (dark blue), and take the gem (X).
- Take the brush, clean the mask with it (Y), and take the mask.
- You will receive the MUZZLE.

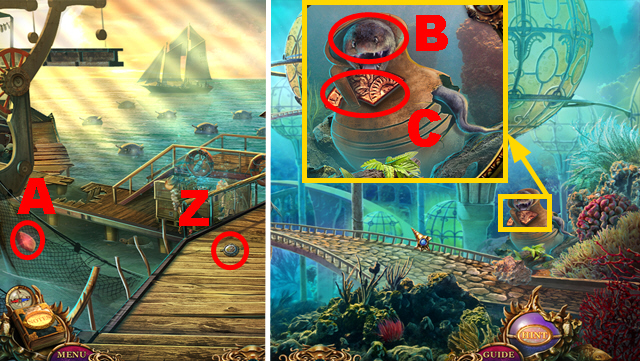
- Take the 3/4 DECODER (Z) and the BAIT (A).
- Walk down twice.
- Zoom into the eel; put the MUZZLE on the eel (B) and take the TABLET (C).
- Move forward.

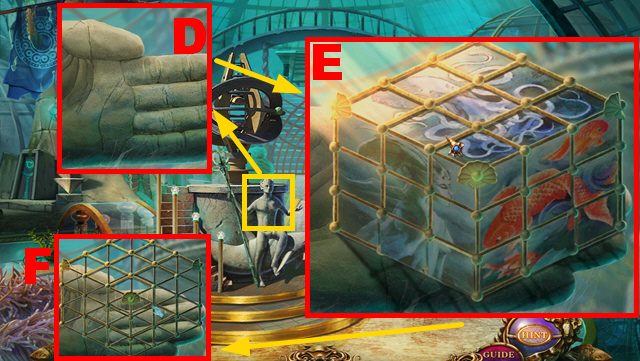
- Zoom into the statue; put the CUBE into the hand (D).
- Play the mini-game.
- To solve this puzzle (E), swap the picture pieces until the correct pictures on all the three sides of the cube are created.
- Take the CAGE (F).
- Walk down twice and turn left.

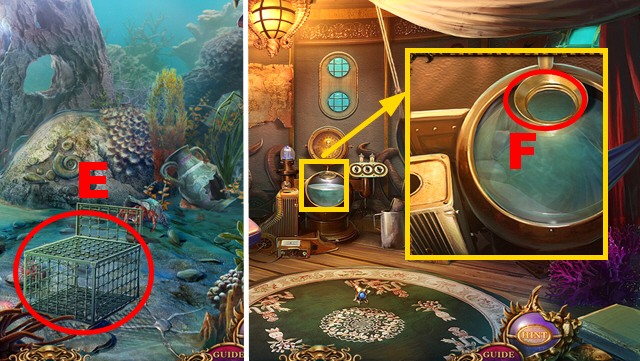
- Put down the CAGE (E).
- Insert the BAIT into the cage.
- Wait until the eel is trapped in the cage and take the CAGED EEL.
- Go to Marcus’ Room.
- Zoom into the mechanism; insert the CAGED EEL into the mechanism (F).
- Walk down.

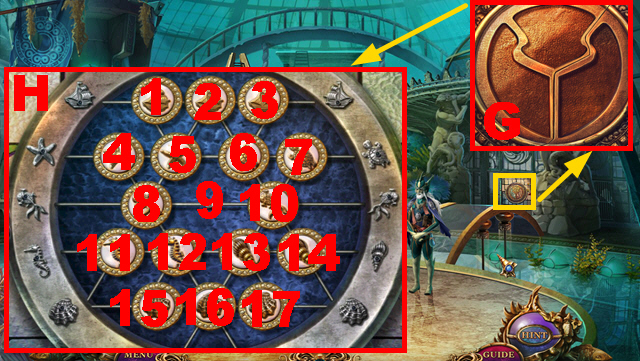
- Zoom into the right door; insert the 3 TABLETS into the niches (G).
- Play the mini-game.
- To solve this puzzle (H), move the symbols into the following positions: 8-9, 5-8, 1-5, 2-1, 6-1, 10-6, 13-10, 12-13, 8-12, 5-8, 2-5, 6-2, 10-6, 13-10, 12-13, 8-12, 5-8, 6-5, 10-6, 9-10, 8-9, 5-8, 2-5, 3-2, 6-3, 5-6, 2-5, 3-2, 6-3, 7-6, 10-7, 9-10, 8-9, 5-8, 6-5, 10-6, 13-10, 16-13, 15-16, 12-15, 13-12, 16-13, 12-16, 13-12, 10-13, 14-10, 13-14, 12-13, 8-12, 9-8, 10-9, 6-10, 5-6, 8-5, 4-8, 5-4, 6-5, 10-6, 13-10, 12-13, 8-12, 5-8, 4-5, and 8-4.
- 9-8, 10-9, 7-10, 6-7, 5-6, 8-5, 12-8, 13-12, 10-13, 9-10, 8-9, 4-8, 4-4, 6-5, 10-6, 13-10, 12-13, 11-12, 8-11, 9-8, 10-9, 6-10, 5-6, 8-5, 12-8, 13-12, 14-13, 10-14, 6-10, 5-6, 8-5, 12-8, 13-12, 10-13, 14-10, 13-14, 12-13, 8-12, 5-8, 6-5, 10-6, 9-10, 8-9, 11-8, 12-11, 8-12, 11-8, 12-11, 15-12, 16-15, 12-16, 8-12, 9-8, 10-9, 13-10, 16-13, 12-16, 11-12, 8-11, 9-8, 10-9, 13-10, 16-13, 12-16, 13-12, 10-13, 9-10, 8-9, 12-8, 13-12, 10-13, and 9-10.
- Turn right.
- Play the HOP.

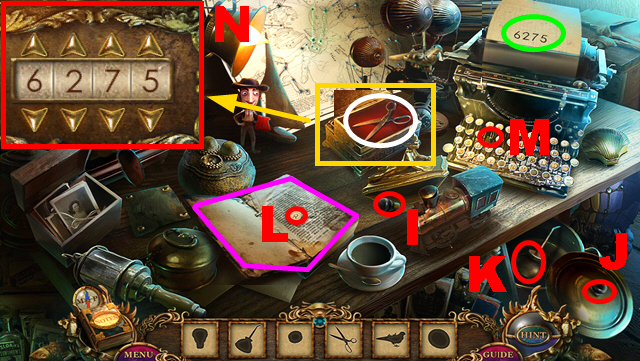
- Take the lid handle (I). Put the lid handle on the pot (J) and take the oiler (K).
- Pour the oiler over the book (purple), open the book, and take the typewriter key (L).
- Put the typewriter key into the typewriter (M).
- Make note of the code (green).
- Zoom into the safe; enter the code ’6275′ into it (N).
- Take the scissors (white).

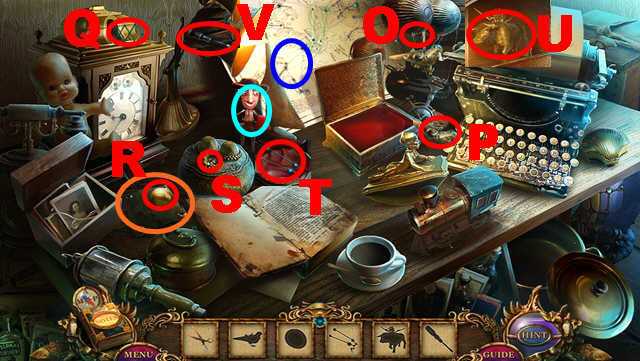
- Cut the rope with the scissors (O) and take the cuckoo (P).
- Connect the cuckoo to the clock (Q) and take the egg (R).
- Put the egg on the box (S) and take the constellation (T).
- Connect the constellation to the map (dark blue) and take the bull from behind the map (U).
- Connect the bull to the figurine (light blue) and take the screwdriver (V).
- Loosen the sheet with the screwdriver (orange) and take the sheet metal.
- You will receive the SHEET METAL.

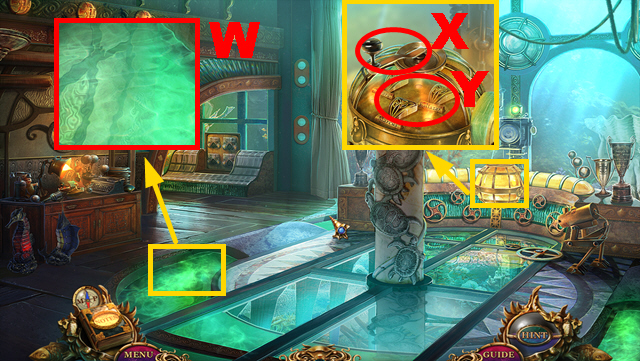
- Zoom into the water; place the UNCHARGED LENS into the water (W) to acquire the CHARGED LENS.
- Zoom into the container, connect the LEVER to it (X), and turn the lever; take the MEMORY CARD (Y).
- Walk down and turn left.

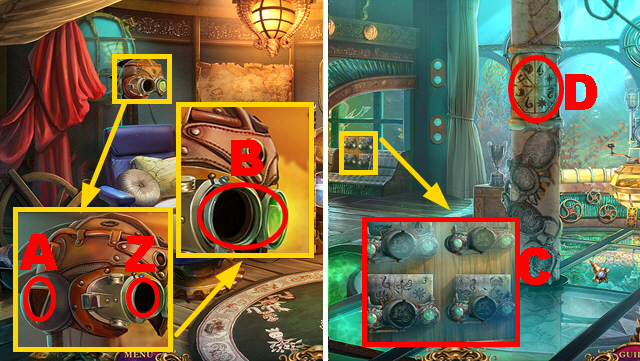
- Zoom into the projector helmet; connect the CHARGED LENS (Z) and the MEMORY CARD (A) to it.
- Take the 4/4 DECODER (B).
- Walk down and turn right.
- Zoom into the control panel; connect the 4 DECODERS to the panel (C).
- Zoom into the column (D).
- Play the mini-game.

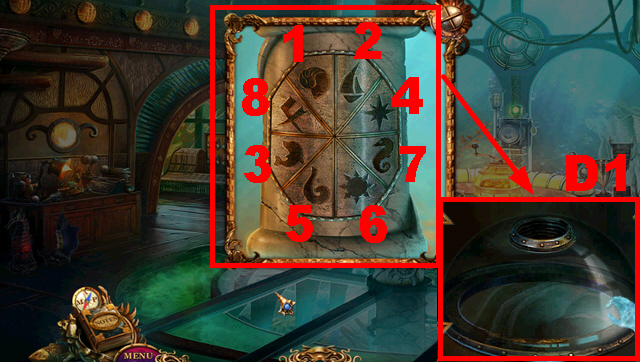
- To solve this puzzle, push the buttons in the numerical order 1-8.
- Take the SOURCE CAP (D1).
- Walk down.

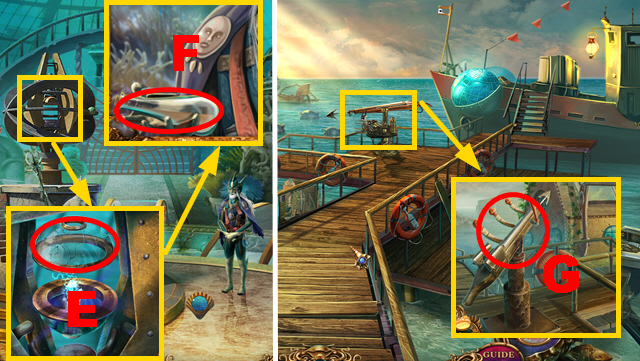
- Zoom into the source; remove the broken source cap (E) and put the SOURCE CAP in its place.
- Take the OIL (F).
- Move forward.
- Zoom into the harpoon; pour the OIL over the harpoon (G).
- Play the mini-game.

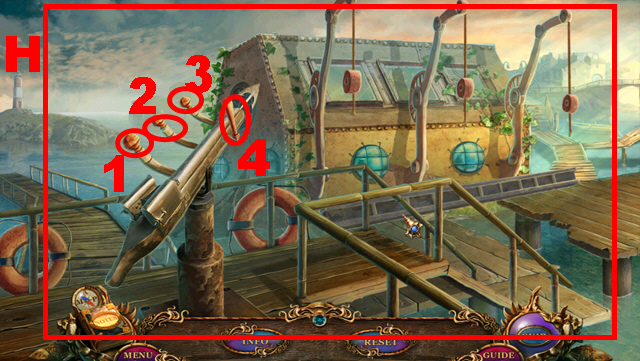
- To solve this puzzle (H), press the levers in the following order to hit all the 3 targets: 2, 4, 1, 3, 4, 1, 2, 3, and 4.
- Turn left and walk down.

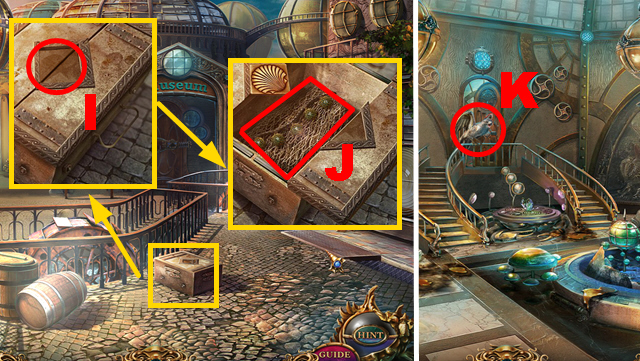
- Zoom into the chest, insert the OYSTER IMAGE into the niche (I), and open the chest; take the NET (J).
- Turn left and move forward twice.
- Throw the NET at the bird (K).
- Move forward.
Chapter 6: Vasco’s Room

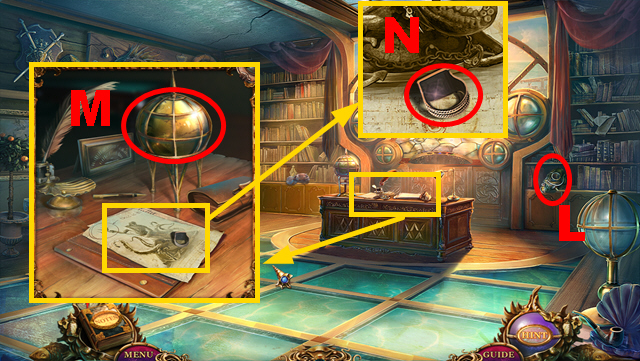
- Speak to Vasco.
- Take the GAS MASK (L).
- Zoom into the table; take the AQUAPOLIS MODEL SPHERE (M).
- Zoom into the note; take VASCO’S RING (N).
- Walk down.

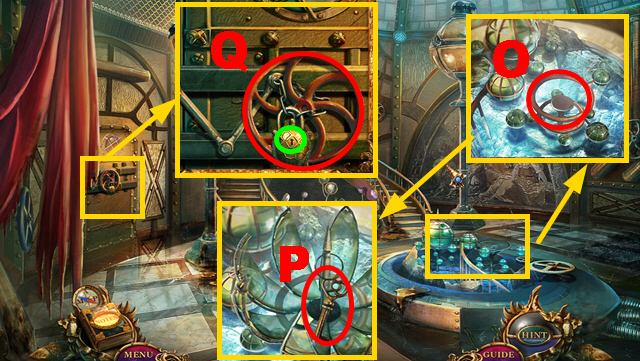
- Zoom into the model and connect the AQUAPOLIS MODEL SPHERE to it (O); take the KEY (P).
- Zoom into the left door, insert the KEY into the lock (green), and turn the key; turn the valve (Q).
- Turn left.

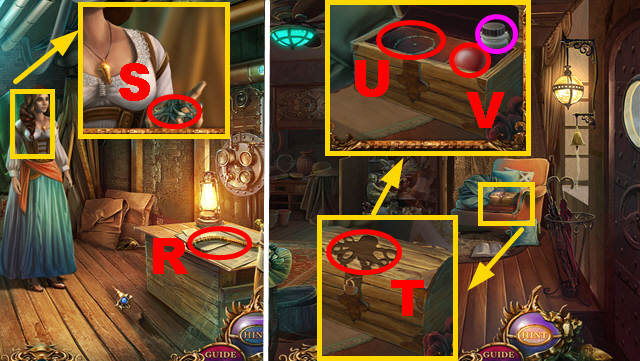
- Take the HOSE (R).
- Talk to the girl; take the OCTOPUS MEDALLION (S).
- Go to Dolores’ House.
- Zoom into the box, insert the OCTOPUS MEDALLION into the niche (T), and open the box; read the book (U), take the BILLIARD BALL (V), and the JAR OF PAINT (purple).
- Go to the Fishing Village.

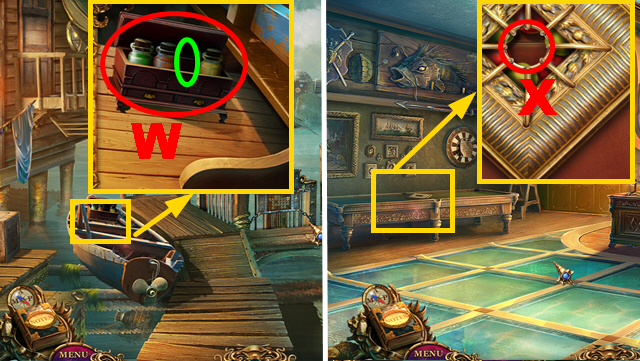
- Zoom into the boat; insert the JAR OF PAINT into the box (green) and take the PAINT SET (W).
- Go to Vasco’s Room.
- Zoom into the billiard table; insert the BILLIARD BALL into the slot (X).
- Play the mini-game.

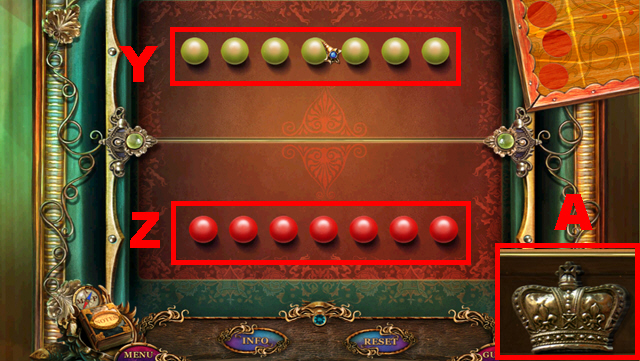
- To complete this mini-game, remove all the opponent’s billiard balls (Y) from the table three times.
- The opponent’s moves are random.
- Select one of your balls (Z) to set its direction.
- Take the CROWN (A).
- Go to the Sea Museum.

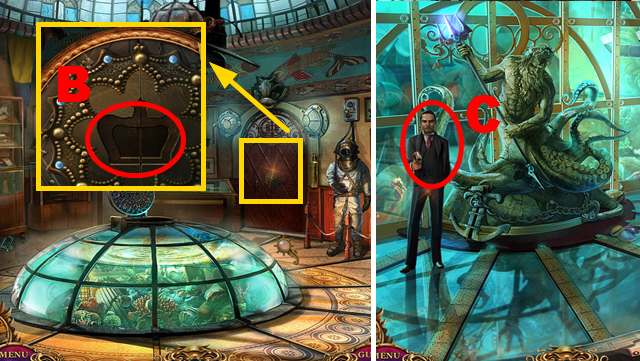
- Zoom into the door; insert the CROWN into the niche (B).
- Move forward.
- Talk to Vasco (C).
- Play the HOP.

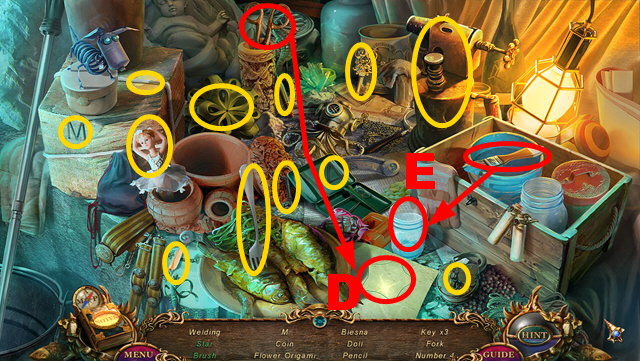
- Take the scissors, cut out the star with it (D), and take the star.
- Take the brush, put it into the glass with water (E), and take the brush.
- You will receive the BLOWTORCH.
- Go to Vasco’s Prison.

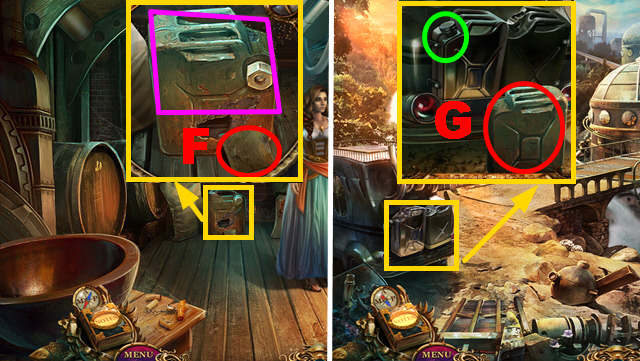
- Zoom into the can and put down the SHEET METAL (F); use the BLOWTORCH to apply the sheet metal to the can and take the EMPTY GAS CAN (purple).
- Go to the Entrance to the Residence.
- Zoom into the cans and put down the EMPTY GAS CAN (G); connect the 2 cans with the HOSE (green) and take the FULL GAS CAN.
- Go to Vasco’s Room.

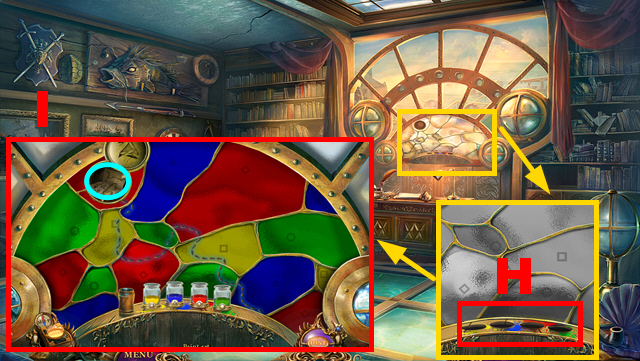
- Zoom into the window; put down the PAINT SET (H).
- Play the mini-game.
- To solve this puzzle (I), paint the window fragments according to the symbols on the paint cans.
- Take the MINEFIELD MAP (light blue).
- Go to the Wharf.

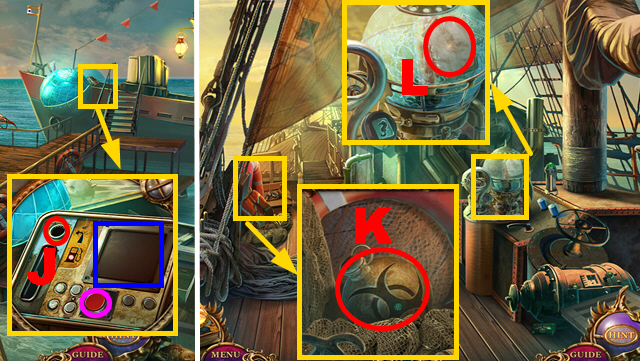
- Zoom into the control panel; pour the FULL GAS CAN into the engine (J), put down the MINEFIELD MAP (dark blue), and press the button (purple).
- Move forward.
- Zoom into the equipment and remove two items; take the SMOKE BOMB (K).
- Zoom into the device; read the note (L).
- Go to the Sea Hall.

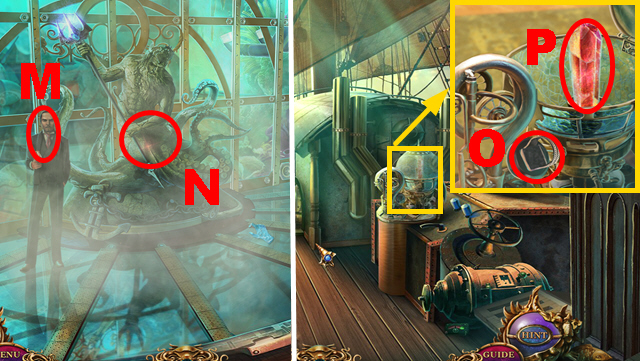
- Throw the SMOKE BOMB at Vasco (M).
- Put on the GAS MASK (N).
- Go to Vasco’s Schooner.
- Zoom into the device and insert VASCO’S RING into the lock (O); take the SOURCE OF EARTH (P).
- Go to the Sea Hall.

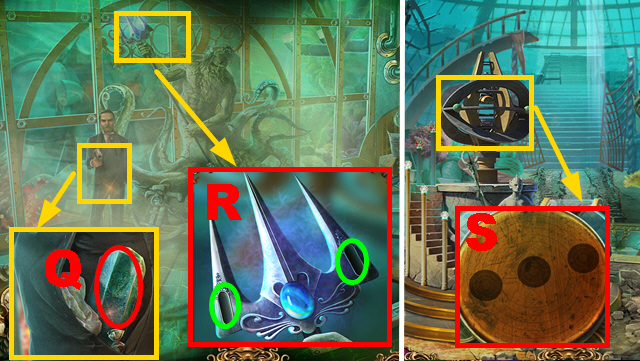
- Zoom into Vasco; take the SOURCE OF AQUAPOLIS (Q).
- Zoom into the statue; insert the SOURCE OF EARTH and the SOURCE OF AQUAPOLIS into the scepter (green) and take POSEIDON’S SCEPTER (R).
- Go to the Aquapolis Center.
- Zoom into the device; put down the POSEIDON’S SCEPTER (S).
- Play the mini-game.

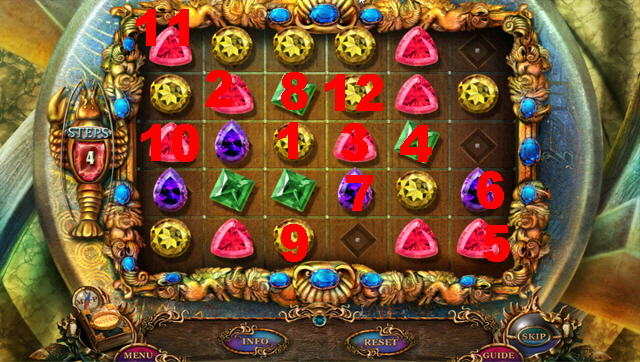
- To solve this puzzle, push the crystals in the following order: 1, 2, 3, 4, 5, 6, 7, 7, 7, 8, 9, 10, 11, 12, and 3.
- Congratulations, you have completed Fierce Tales: Marcus’ Memory.




 Dark Strokes: The Legend of the Snow Kingdom Walkthrough, Guide, & Tips
 The Mysterious Past of Gregory Phoenix Walkthrough, Guide, & Tips
 Governor of Poker Texas Tycoon Tips & Tricks, Guide, & Tips
 Lost Tales: Forgotten Souls Walkthrough, Guide, & Tips
 Fear for Sale: Nightmare Cinema Walkthrough, Guide, & Tips