Witches' Legacy: Lair of the Witch Queen Walkthrough, Guide, & Tips
Witches’ Legacy: Lair of the Witch Queen Walkthrough

Welcome to the Witches’ Legacy: Lair of the Witch Queen Walkthrough
A letter offers new information about Elizabeth just as Lynn’s powers have awakened. Help her overcome the darkness before it’s too late!
Whether you use this document as a reference when things get difficult or as a road map to get you from beginning to end, we’re pretty sure you’ll find what you’re looking for here.
This document contains a complete Witches’ Legacy: Lair of the Witch Queen game walkthrough featuring annotated screenshots from actual gameplay!
We hope you find this information useful as you play your way through the game. Use the walkthrough menu below to quickly jump to whatever stage of the game you need help with.
Remember to visit the Big Fish Games Forums if you find you need more help. Have fun!
This walkthrough was created by prpldva, and is protected under US Copyright laws. Any unauthorized use, including re-publication in whole or in part, without permission, is strictly prohibited.
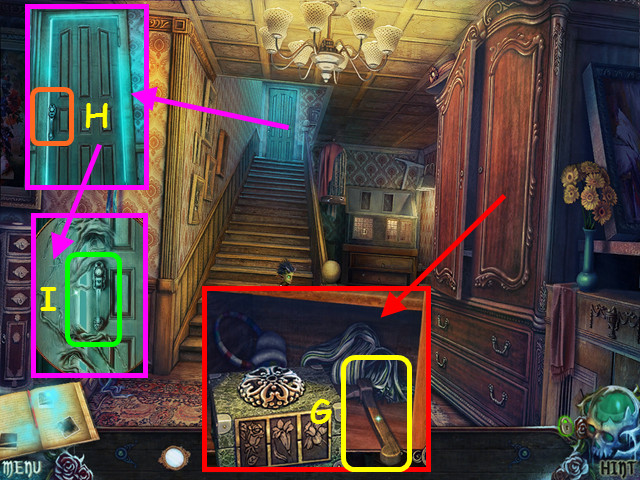
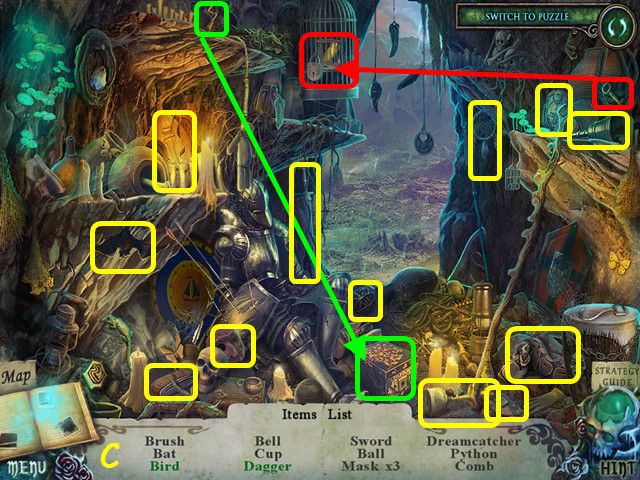
General Tips

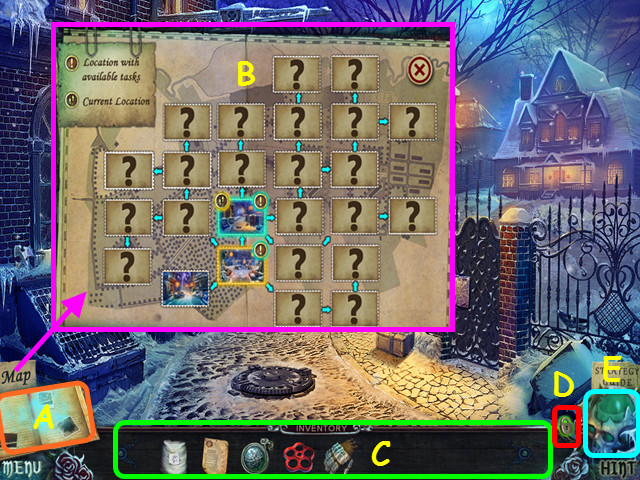
- This is the official guide for Witches’ Legacy: Lair of the Witch Queen.
- Select the journal to view notes on the story (A).
- Once you locate the map, you can select the tab to view it as needed (B).
- Your inventory (C) is located in the lower panel. Select an item to use it.
- The panel auto-hides; move your mouse down to bring it up.
- You can lock the inventory panel in place with this lock (D).
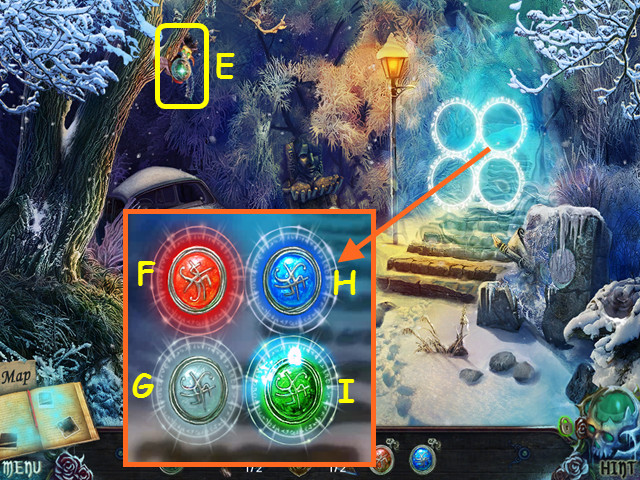
- Hints are unlimited, but you must wait for the skull to refill (E).
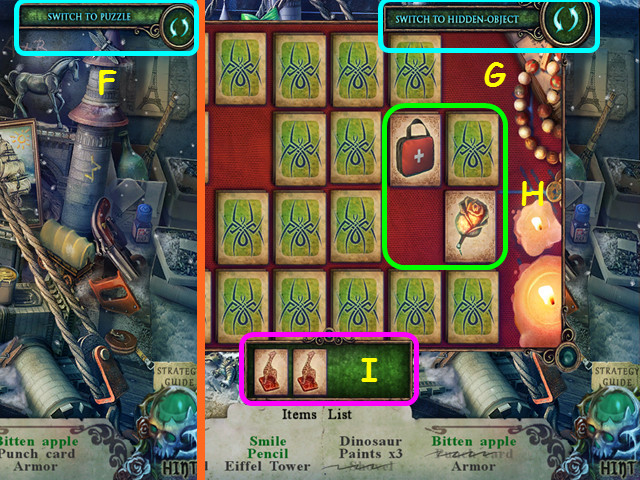
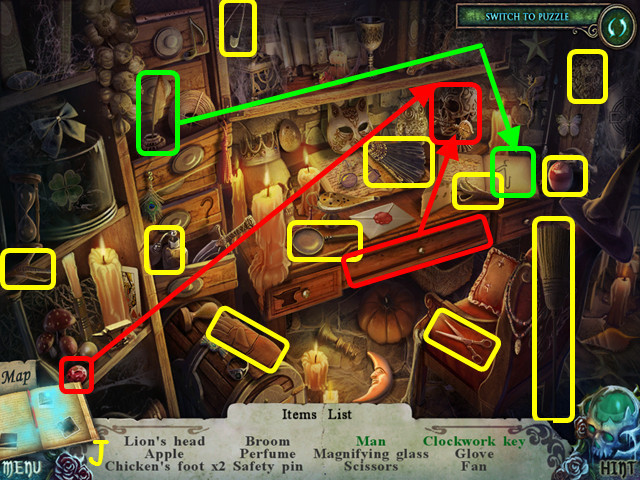
- Hidden-object puzzles are referred to as HOPs in this walkthrough.
- Mini-games and HOPs are sometimes randomized; your solution may vary.
- Items listed in green are hidden, or they require additional actions to locate.
- You have the option to play a memory match game instead of the HOP.
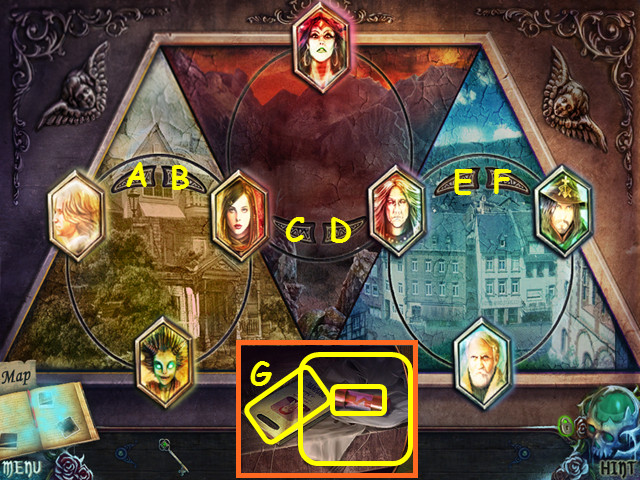
- Select the green button in the upper right to switch to the puzzle (F).
- You can switch back to the HOP at any time (G).
- Select 2 cards at a time to find matching pairs (H).
- Finding 2 pairs will remove an item from your list (I).
Chapter 1: Following Lynn
- You will have the option of an interactive tutorial.
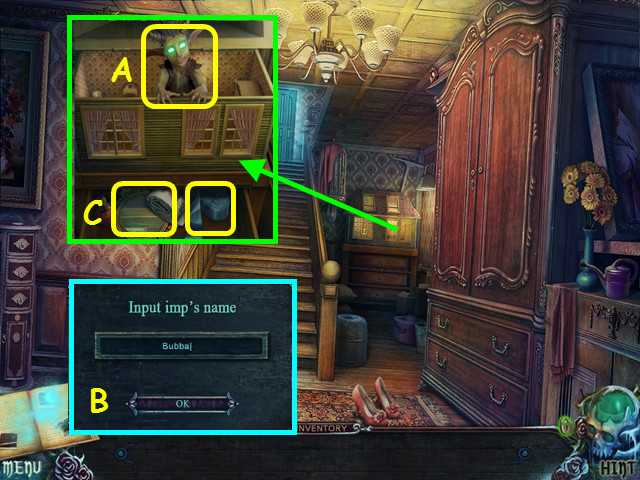
- Look at the dollhouse, open the lid, and take the Imp (A).
- You will need to give him a name (B).
- Open the drawer; take the MIRROR and the RIBBON (C).
- Look at the planter and hang the RIBBON on the pole (D).
- Hover your mouse over the ribbon, and then select the ribbon once you see the imp cursor (E).
- You will earn the CABINET KEY.
- Look at the armoire and use the CABINET KEY in the lock (F).
- Look in the armoire and take the AXE (G).
- Look at the door and zoom into the keyhole (H).
- Zoom into the door handle and use the AXE 3 times to cut it open (I).
- Walk forward, up the stairs.
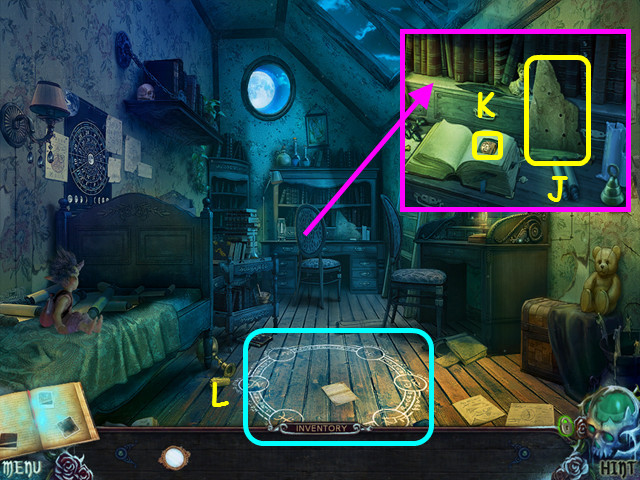
- Look at the desk and take the 1/2 RUNE STENCIL (J).
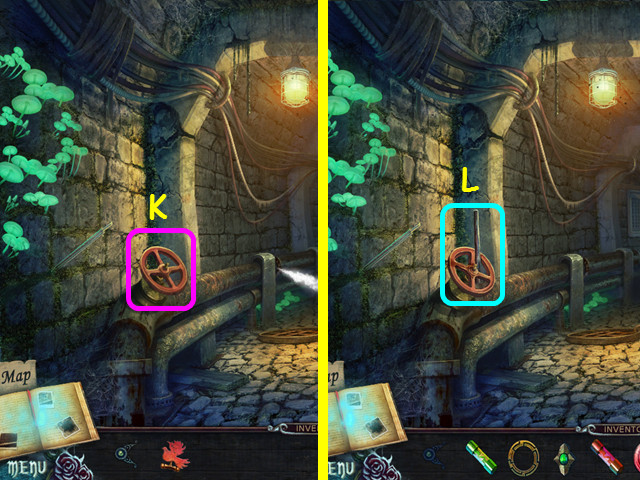
- Open the book, turn the page, and take the RING (K).
- Look at the circle (L).
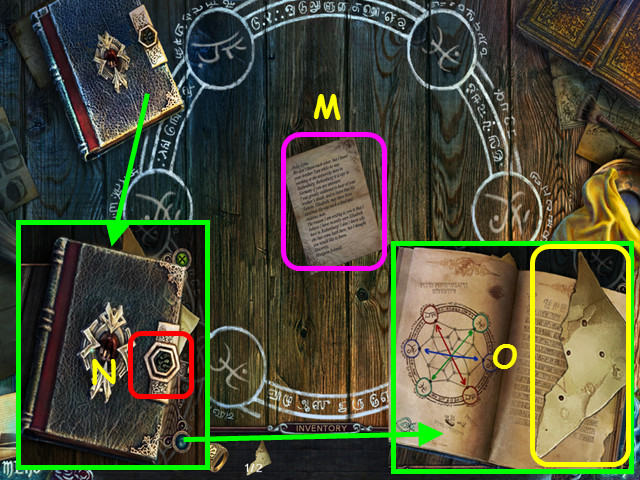
- Take the note (M).
- Look at the book and use the RING in the lock (N).
- Open the book, turn the page, and take the 2/2 RUNE STENCIL (O).
- Exit the close-up of the circle.
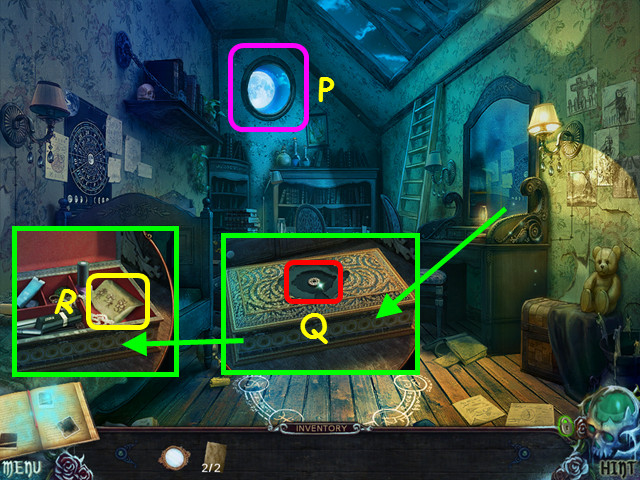
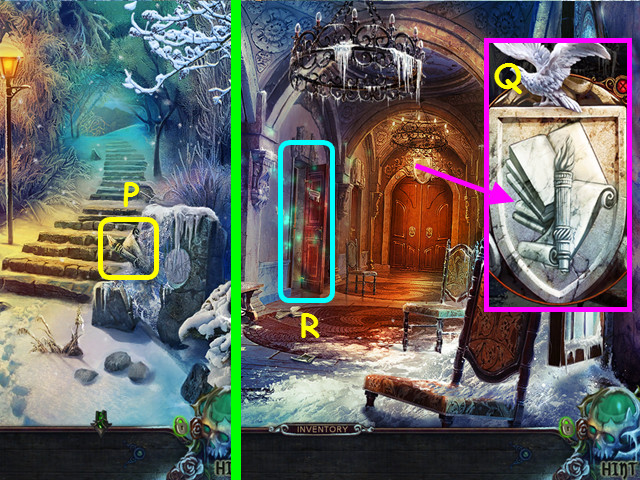
- Place the RUNE STENCIL on the window (P).
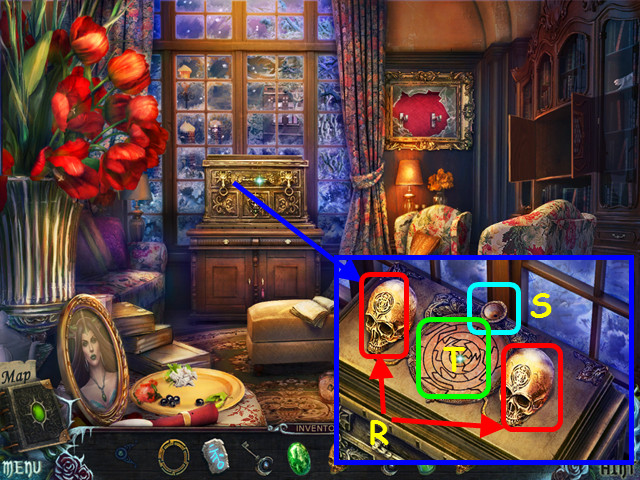
- Look at the dresser, place the MIRROR on the chest (Q), and take the COMBINATION (R).
- Walk down.
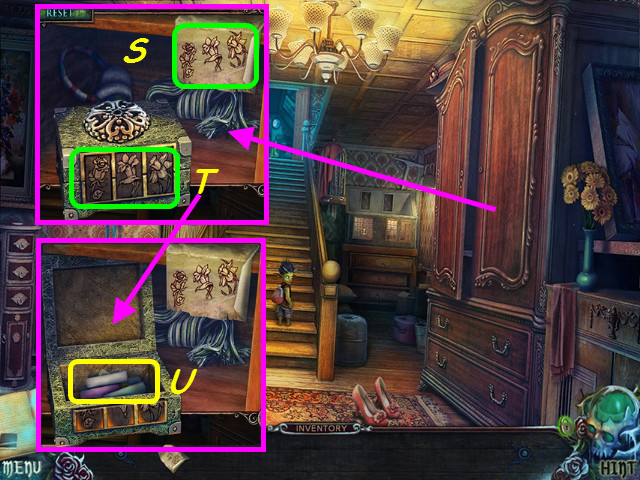
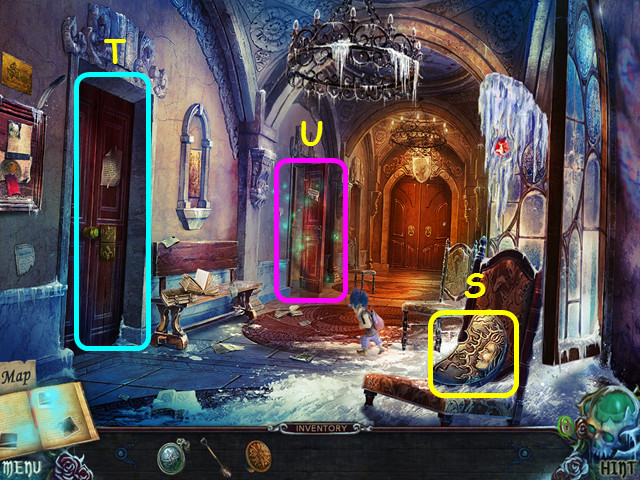
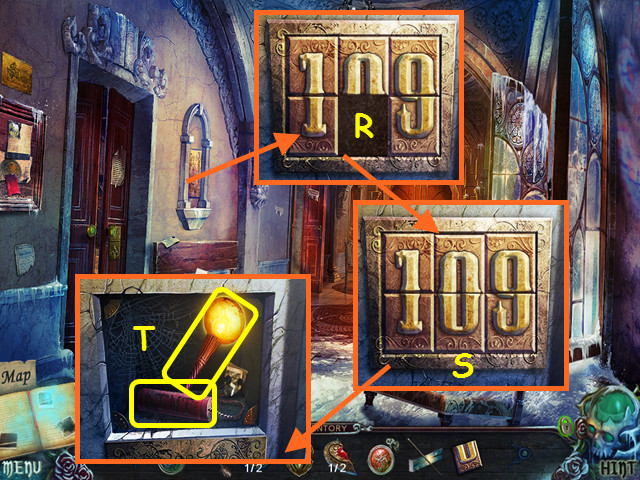
- Look in the armoire and use the COMBINATION on the box (S).
- Press the flower tiles to match the combination (T).
- Take the CHALK (U).
- Walk up the stairs and look at the circle on the floor.
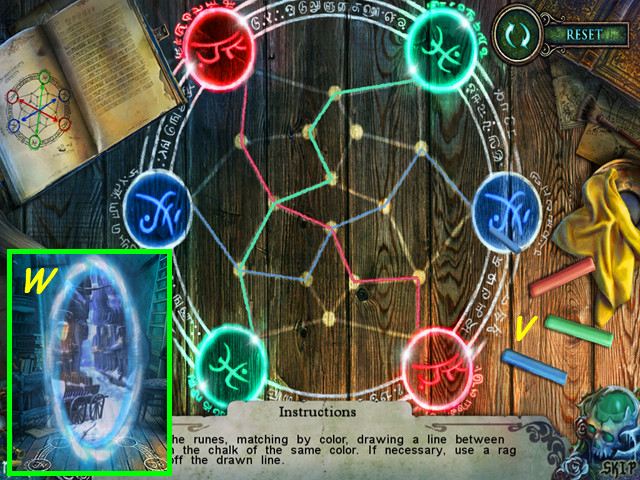
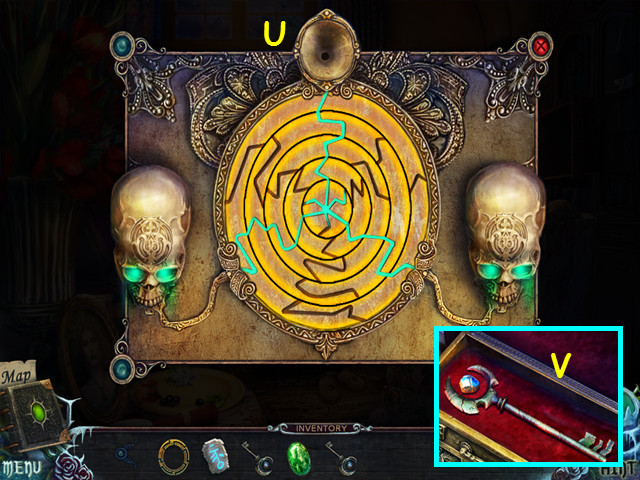
- Use the CHALK on the circle to activate the mini-game.
- Select a piece of chalk (V) and connect the 2 colored circles.
- Select one of the outer, highlighted circles and select a path of dots to the other circle.
- Do this for the other 2 colors; you can use previously selected dots, but not paths.
- Enter the portal (W).
Chapter 2: Locating Morgana
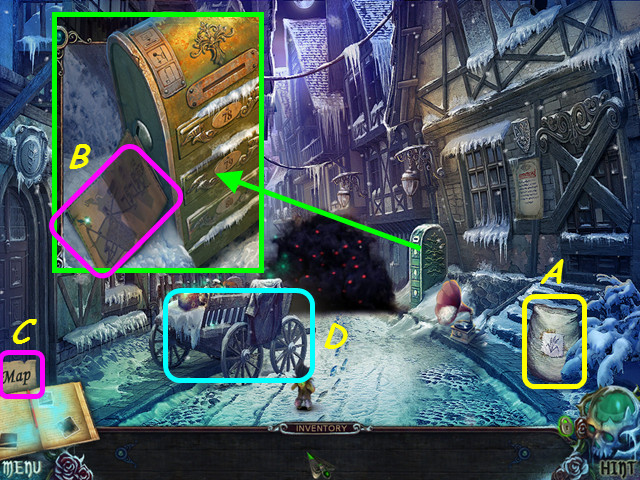
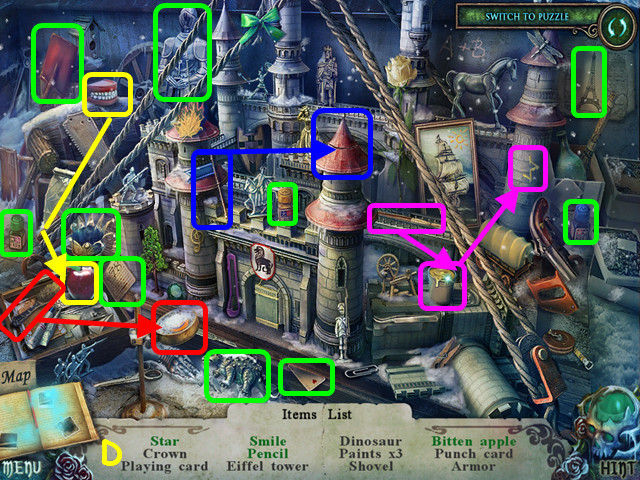
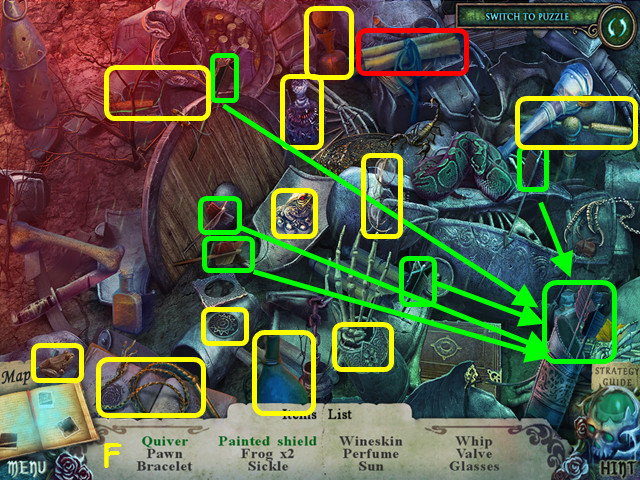
- Take the BAG OF HAY (A).
- Look at the lockbox and take the MAP (B).
- The map is now located above the journal (C).
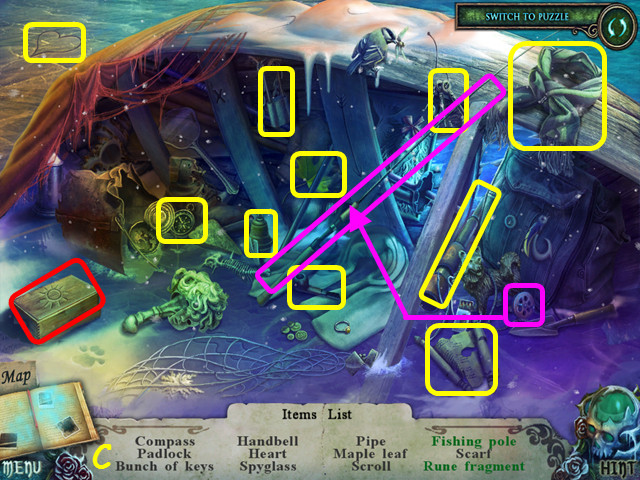
- Select the wagon for a HOP (D).
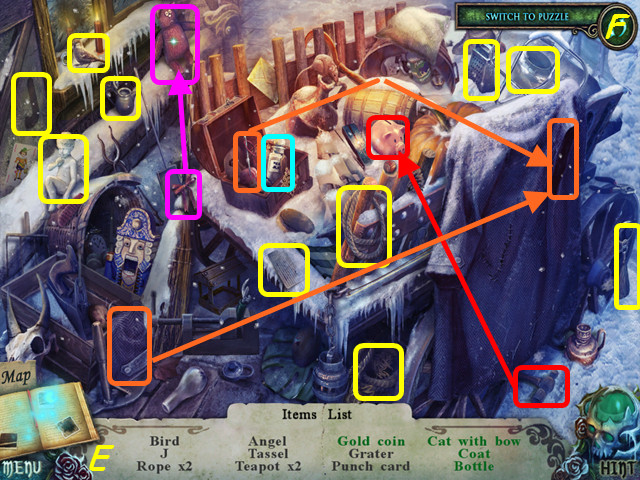
- Locate all the items on the list (E).
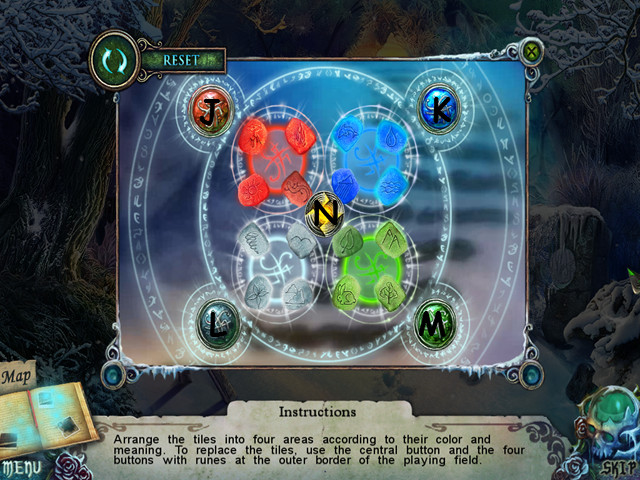
- Select the ‘Switch to puzzle’ button to play the alternate game (F).
- The instructions for the alternate game are located in the General Tips.
- You will earn PUNCH CARD #80.
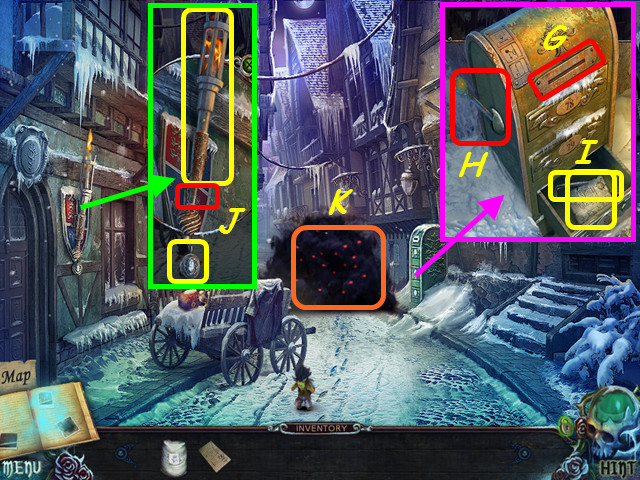
- Look at the lockbox and place PUNCH CARD #80 in the slot (G).
- Take the lever, place it on the side, and pull it down (H).
- Take the PLANETS DIAGRAM and the SAW (I).
- Look at the sconce and use the SAW to cut the torch; take the TORCH and the AIR MEDALLION (J).
- Use the TORCH on the dark cloud (K).
- Walk forward.
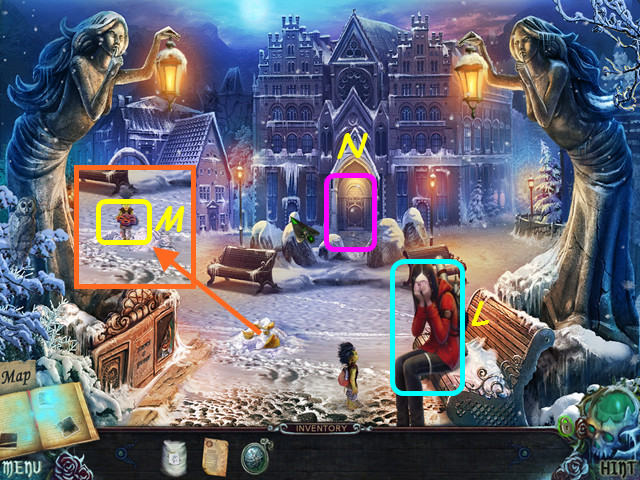
- Talk to Lynn (L).
- Select the snow pile, and then take the VALVE from the imp (M).
- Note the mini-game on the door (N).
- Walk to the right.
- Talk to Lynn (O).
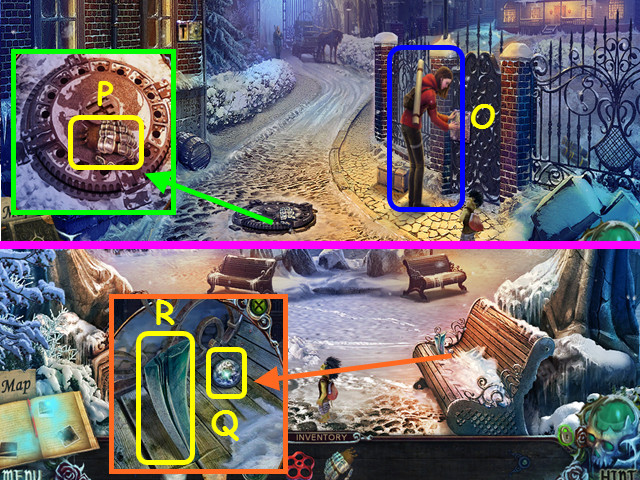
- Look at the manhole and take the GLOVE (P).
- Walk down.
- Look at the bench and take the EARTH (Q).
- Use the GLOVE to take the BLADE (R).
- Walk to the right.
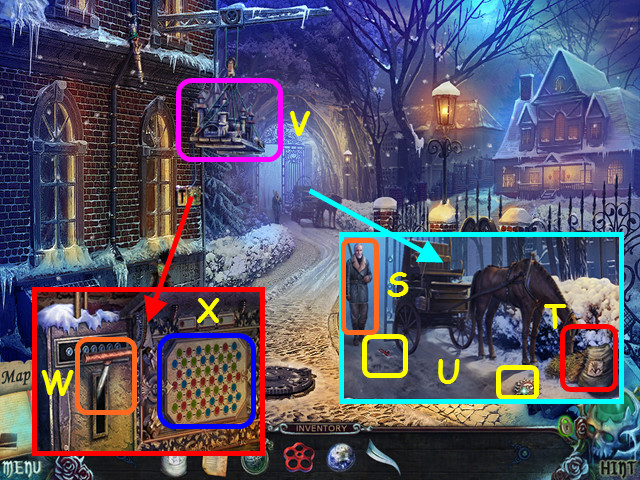
- Look at the gate and talk to the guard (S).
- Give the BAG OF HAY to the horse and use the BLADE on the hay (T).
- Take the BREAKER HANDLE and the SUN (U).
- Note the platform (V).
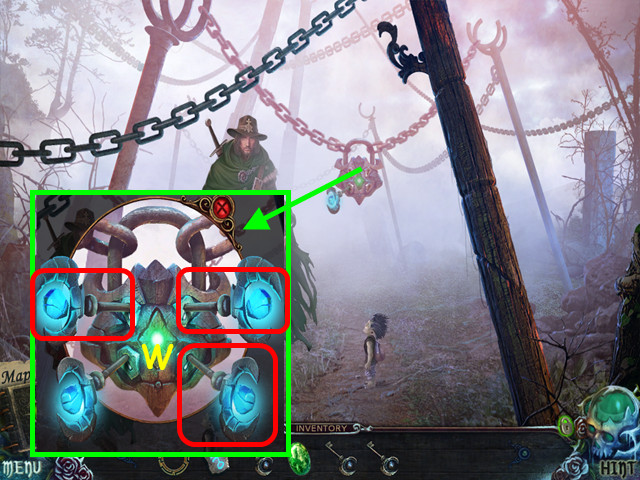
- Look at the control, use the BREAKER HANDLE on the slot, and lift the handle (W).
- Select the panel for a mini-game (X).
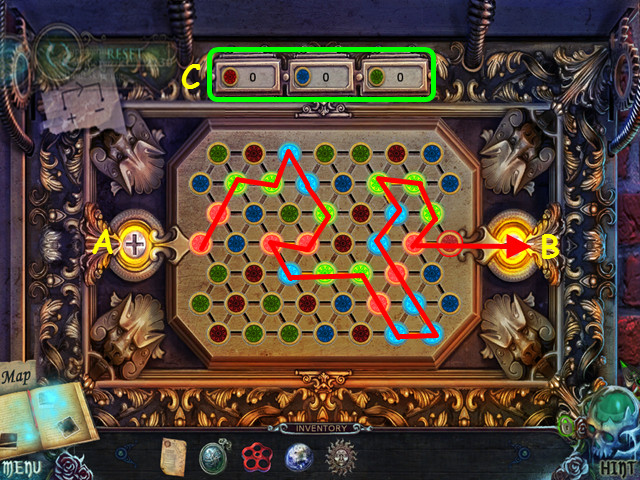
- Find a path from the left (A) to the right (B).
- Use the amount of each color in the path as shown at the top (C).
- Select the platform for a HOP.
- Locate all the items on the list (D).
- You will earn the PUNCH CARD #78.
- Walk down twice.
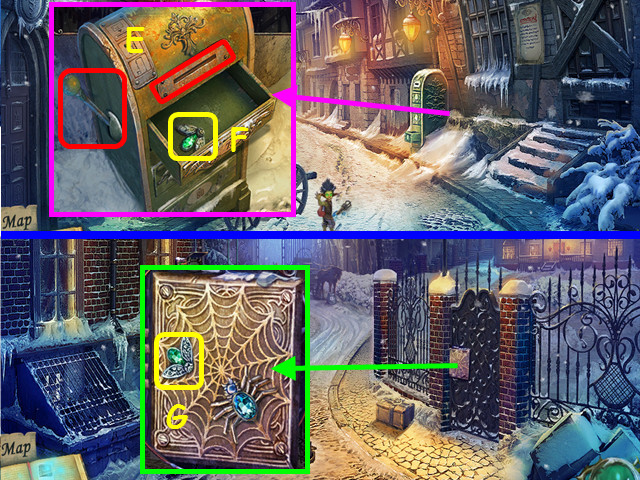
- Look at the lockbox, place PUNCH CARD #78 in the slot, and pull the handle (E).
- Take the FLY (F).
- Walk forward and right.
- Look at the gate and place the FLY on the web (G).
- Open the gate and walk to the right.
- Take the SHOVEL (H).
- Knock on the front door (I).
- Talk to Morgana and take the BAT (J).
- Walk down.
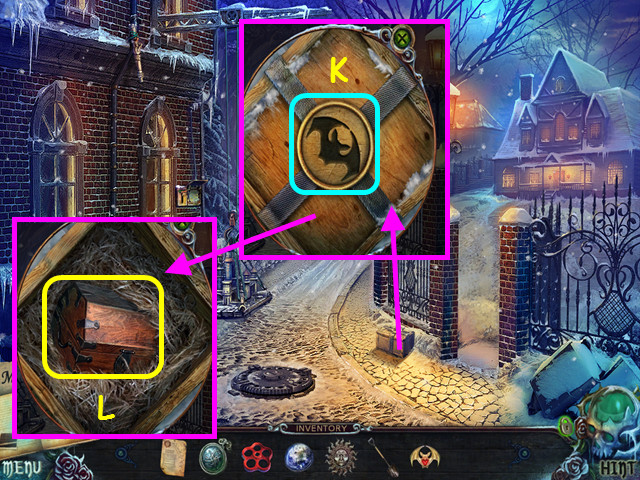
- Look at the crate and place the BAT in the lock (K).
- Remove the crate lid and take TOM’S THINGS (L).
- Walk to the right.
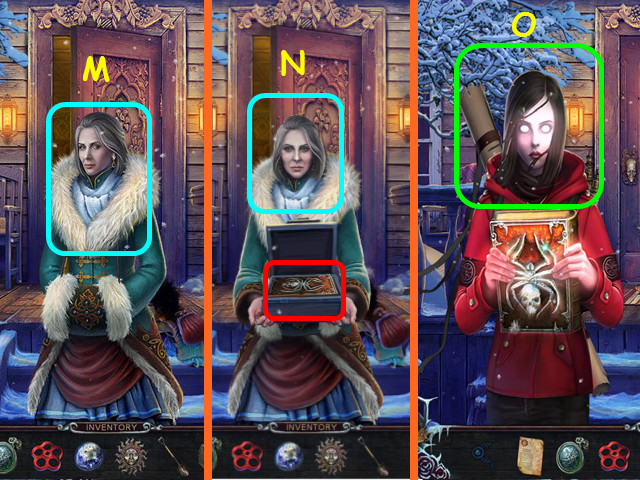
- Give TOM’S THINGS to Morgana (M).
- Talk to Morgana and look inside the box (N).
- Talk to Lynn (O).
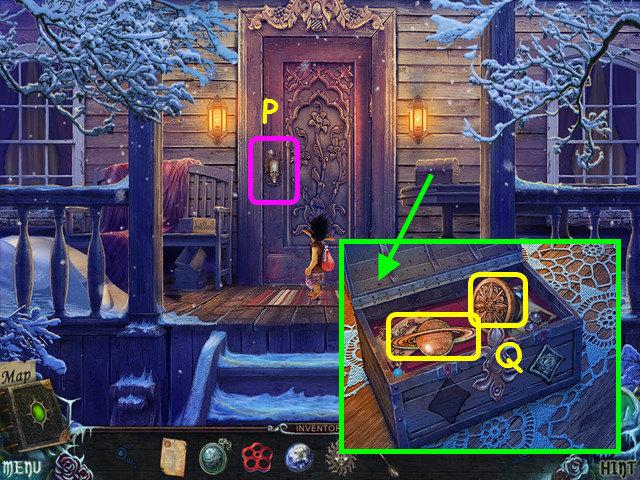
- Note the unusual lock on the door (P).
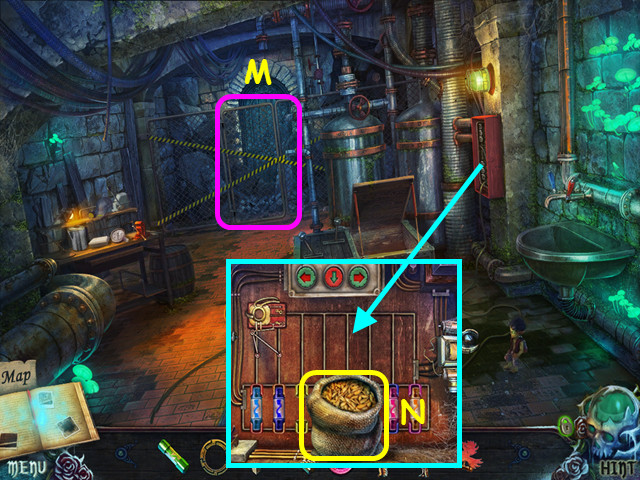
- Look at the box; open the lid, take SATURN, and the OFFICE DOORKNOB (Q).
- Walk down twice and look at the mini-game on the door.
Chapter 3: The University
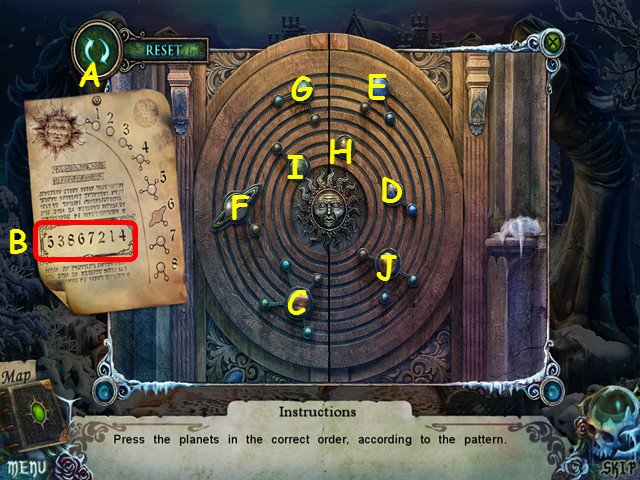
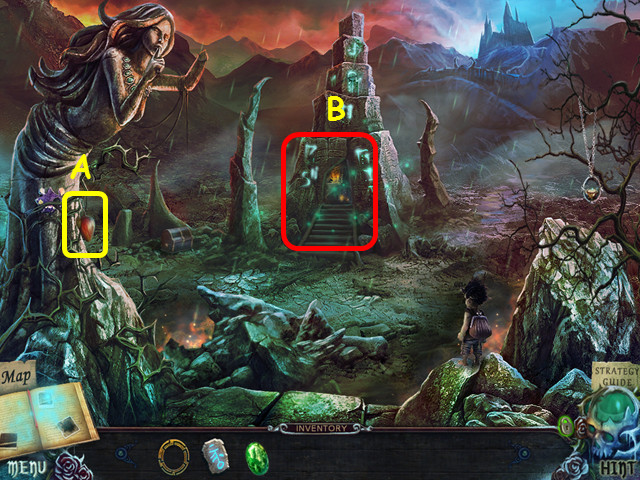
- Place the PLANETS DIAGRAM, the EARTH, SATURN, and the SUN on the board to activate the mini-game.
- Using the guide (A), press the planets in the order listed (B).
- Press the planets C, D, E, F, G, H, I, and J.
- Walk forward.
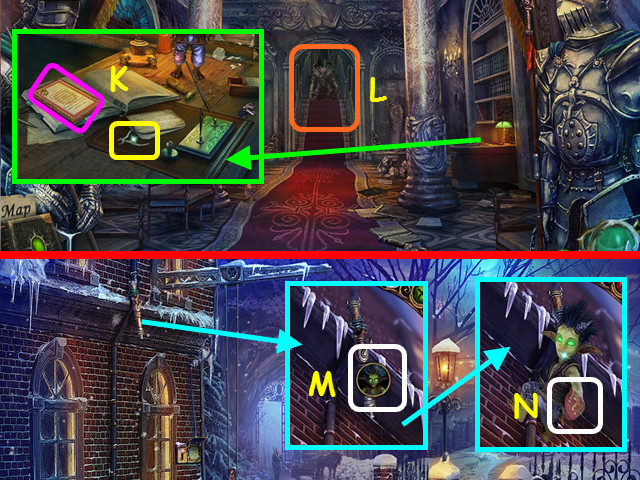
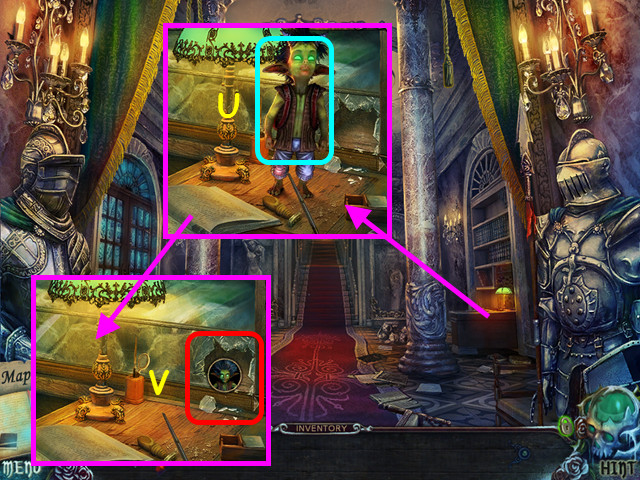
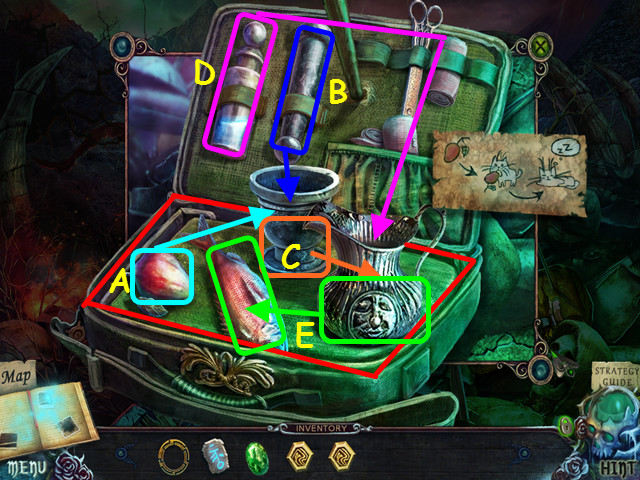
- Look at the desk; take the SMALL PLIERS and read the certificate (K).
- Note the stairs (L).
- Walk down and right.
- Look at the ledge and select the nozzle to send the imp (M).
- Give the SMALL PLIERS to the imp to get the FIREHOSE NOZZLE (N).
- Walk down, go forward, and look at the stairs.
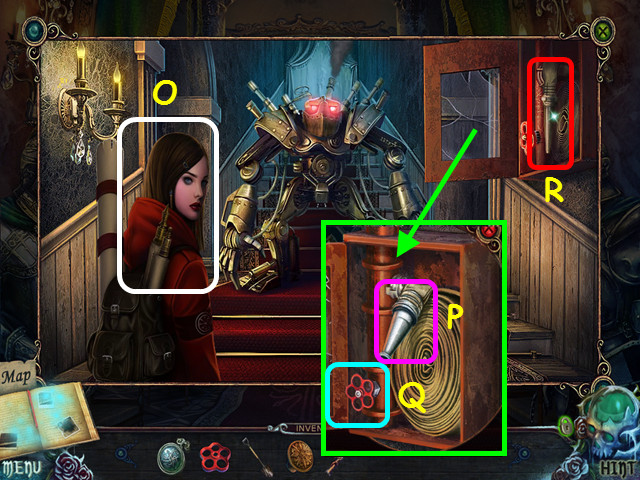
- Talk to Lynn twice (O).
- Open the cabinet and look inside; attach the FIREHOSE NOZZLE to the hose (P).
- Place the VALVE on the stem (Q).
- Take the hose (R).
- After the cut-scene, walk forward.
- Take the 1/2 BAS-RELIEF (S).
- Note the office door (T).
- Select the 2nd door on the left for a HOP (U).
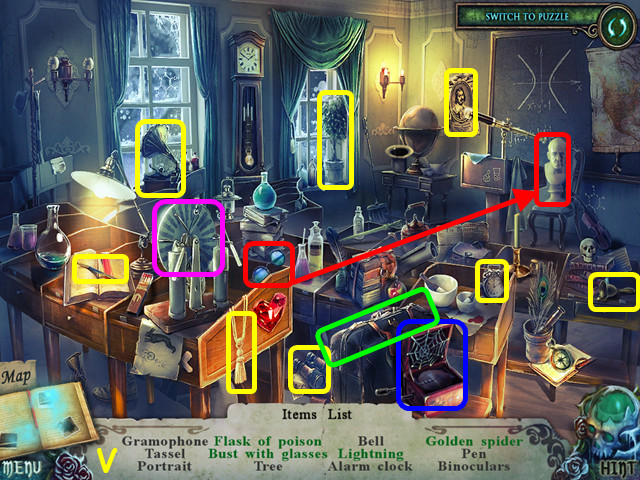
- Locate all the items on the list (V).
- You will earn the GOLDEN SPIDER.
- Look at the office door for a mini-game.
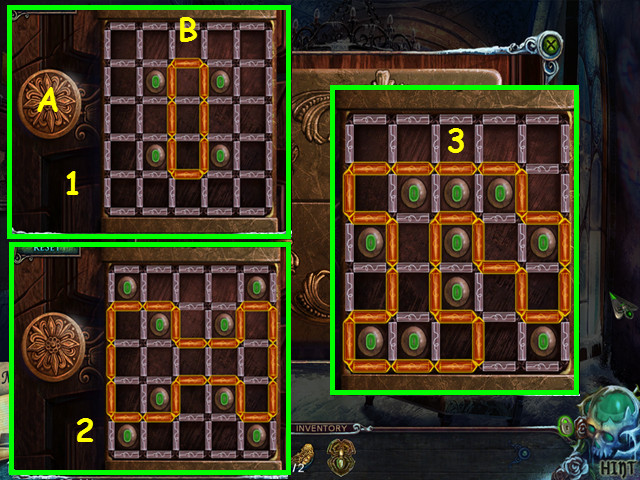
- Place the OFFICE DOORKNOB on the left to activate the mini-game (A).
- Create a connected path on the grid that touches the circles (B) the number of times indicated.
- The number will change to a green zero once you have the correct amount of sides used in the path.
- There are 3 levels to complete (1-3).
- Walk left to the office.
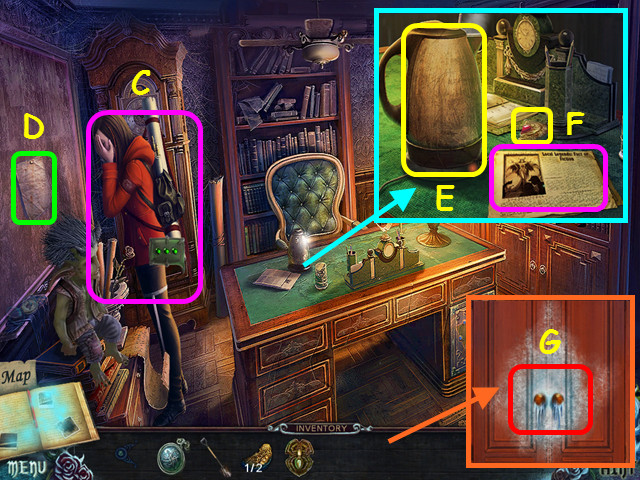
- Talk to Lynn (C).
- Read the note on the wall (D).
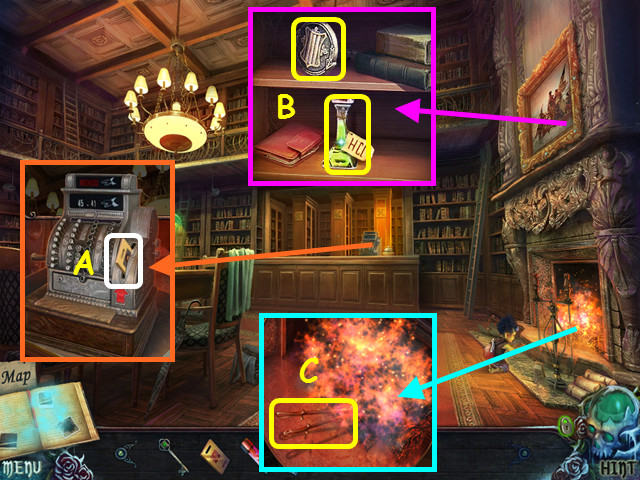
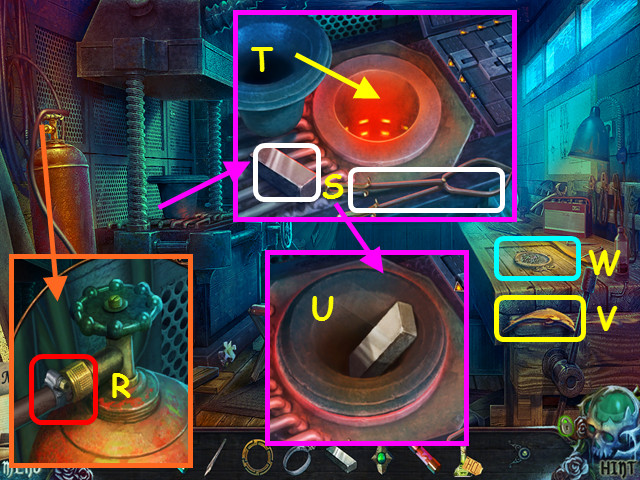
- Look at the desk, turn on the kettle, and then take the HOT KETTLE (E).
- Take the 1/2 HEART LOCKET and read the newspaper (F).
- Look down at the door and use the HOT KETTLE on the door handles (G).
- Walk down.
- Use the HOT KETTLE on the ice (H).
- Take the RUBY (I).
- Walk to the left.
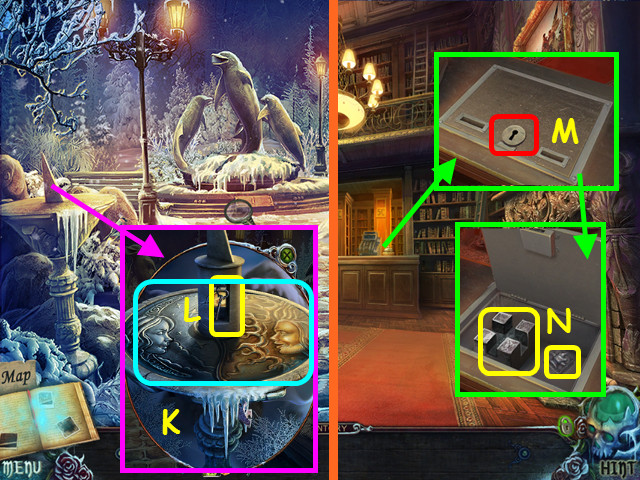
- Look at the safe on the bookcase, place the RUBY in the hole, and press the ruby (J).
- Take PUNCH CARD #79 and the FIRE MEDALLION (K).
- Walk down 4 times.
- Look at the lockbox, place PUNCH CARD #79 in the slot, and pull the handle (L).
- Take the STONE-CLOCK PIECE (M).
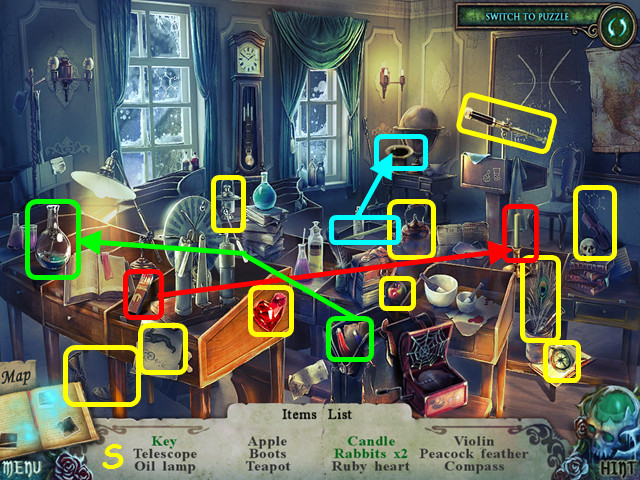
- Select the cart for a HOP (N).
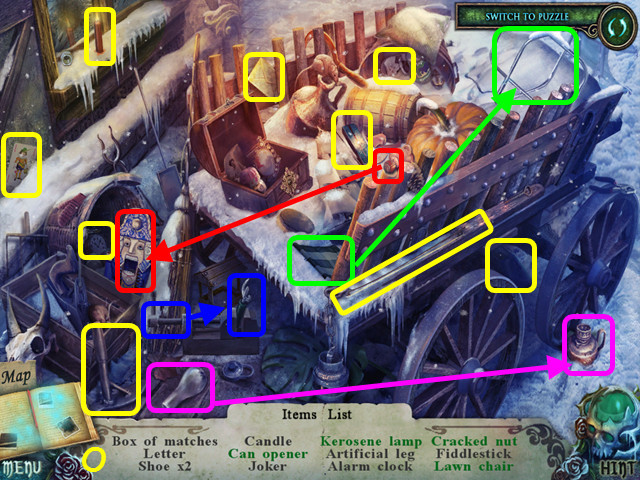
- Locate all the items on the list (O).
- You will earn the BOX OF MATCHES.
- Walk forward.

- Look at the statue base and place the STONE-CLOCK PIECE in the frame, and then push the tile (P).
- Take the HALF OF A TILE (Q).
- Walk forward twice.
- Look at the frame and place the HALF OF A TILE in the opening (R).
- Swap the tile pieces to form the number (S).
- Take the TOY TORCH and the DYNAMITE (T).
- Walk down.
- Look at the desk and hand the imp the TOY TORCH (U).
- Select the hole in the glass for a mini-game (V).
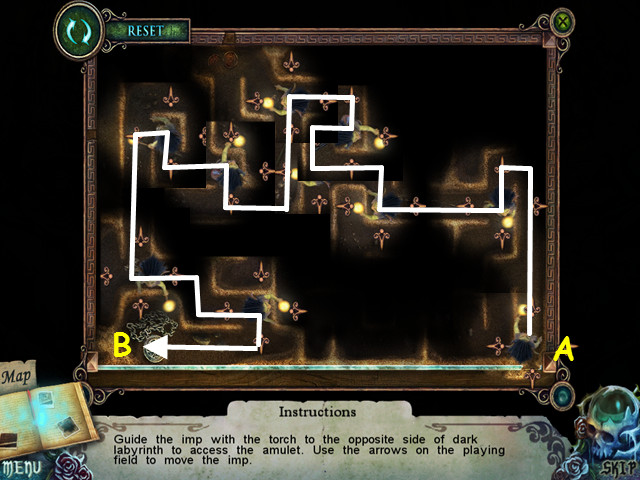
- Move the imp (A) through the maze by selecting the arrows.
- Continue through the maze to get the WATER MEDALLION (B).
- Walk down and try to walk to the right.
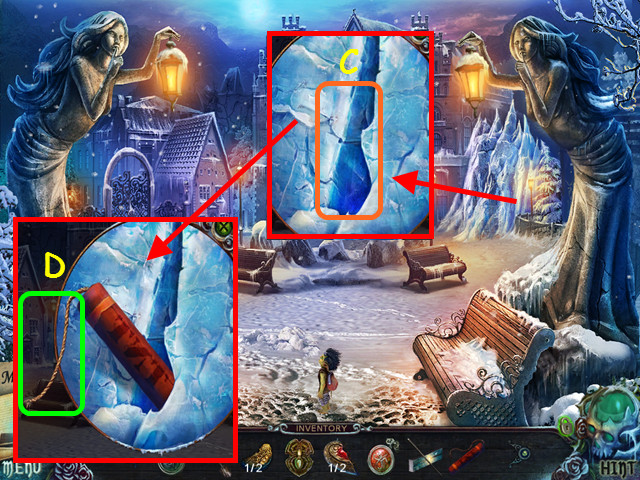
- Look at the ice and place the DYNAMITE in the crack (C).
- Use the BOX OF MATCHES on the fuse (D).
- Walk to the right and go forward.
- Select the medallion with the imp icon, and then take the EARTH MEDALLION (E).
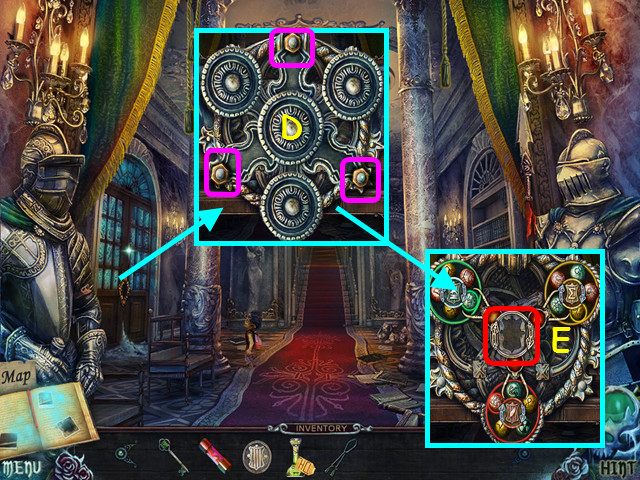
- Look at the rings and place the FIRE MEDALLION in the upper left circle (F).
- Place the AIR MEDALLION in the lower left circle (G).
- Place the WATER MEDALLION in the upper right circle (H).
- Place the EARTH MEDALLION in the lower right circle (I).
- This will trigger a mini-game.
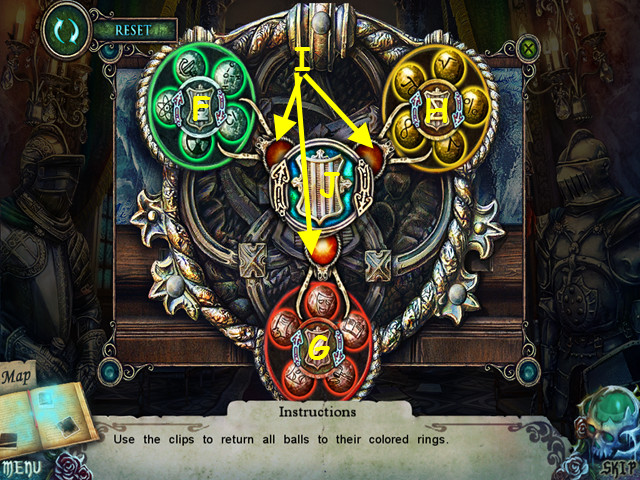
- Use the buttons to move the colored tiles to the same color circle.
- Press the 4 outer buttons to rotate the circles; press the center button to rotate the 4 tiles in the center.
- Press the tiles in this order: J, M, N, Kx2, L, M, Nx2, M, Nx3, K, Nx3, J, Nx3, Lx2, N, J, and Nx3.
- Walk forward.
Chapter 4: The Lake
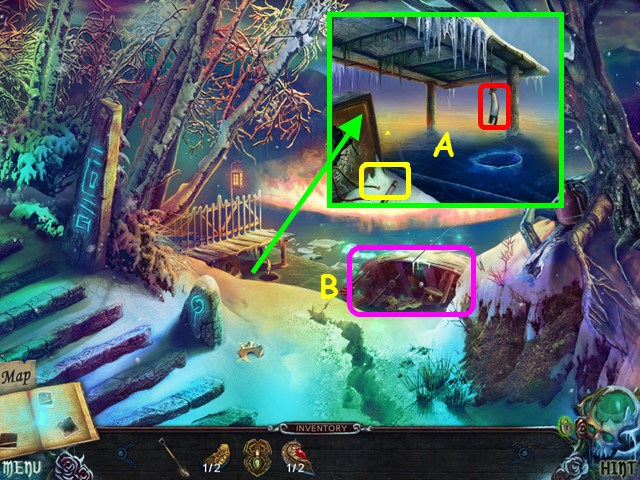
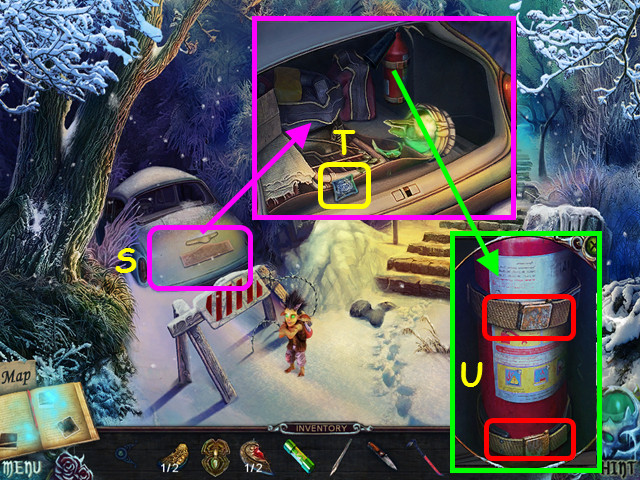
- Look at the pier; take the 1st THERMAL FUSE and try to take the horn (A).
- Select the boat for a HOP (B).
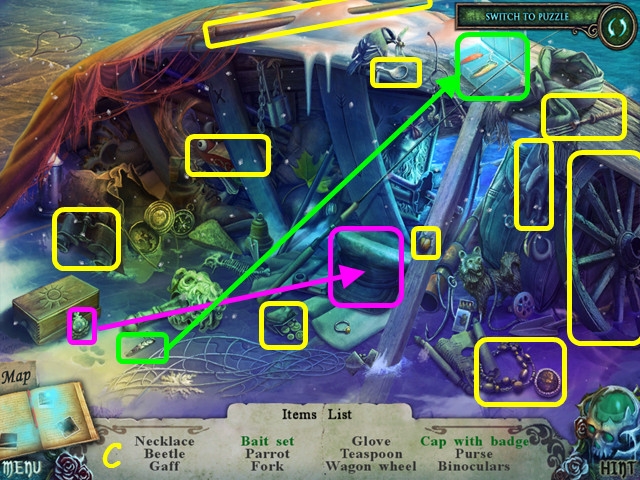
- Locate all the items on the list (C).
- You will earn the GAFF.
- Walk to the left.

- Take the FOLDING KNIFE (D).
- Take the LEVER (E).
- Talk to the tree (F).
- Walk forward (G).
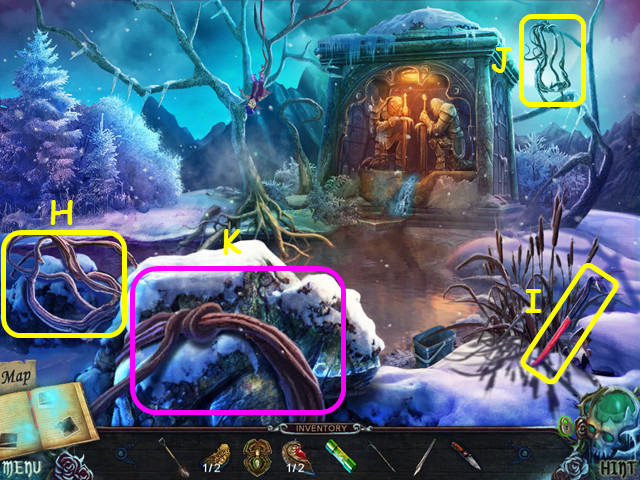
- Take the 1/2 VINE (H).
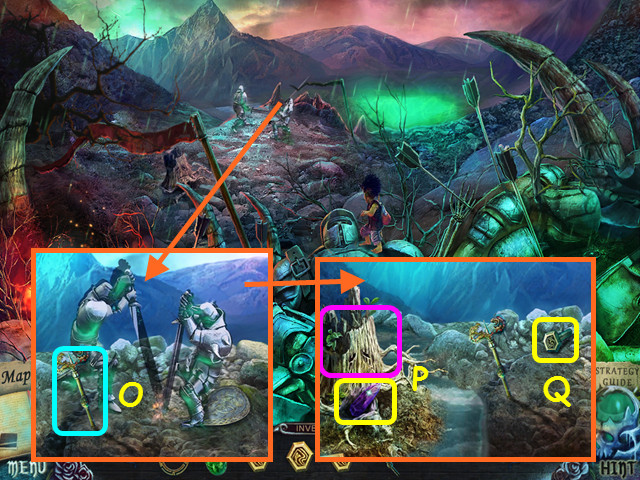
- Take the CROWBAR (I).
- Use the GAFF to take the 2/2 VINE (J).
- Use the VINE on the boulder (K).
- Walk down.
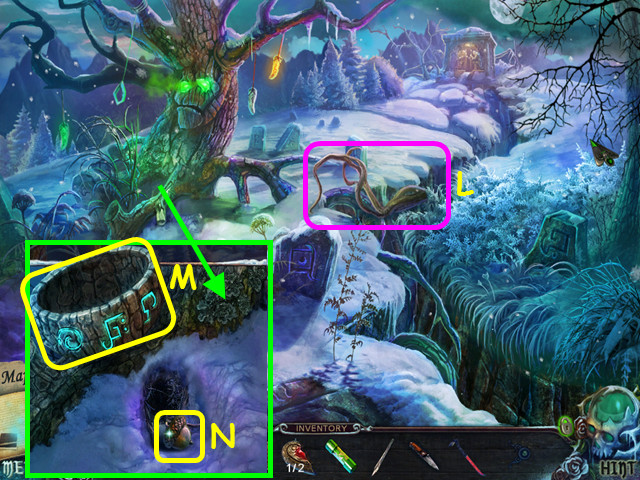
- Give the vine to the tree (L).
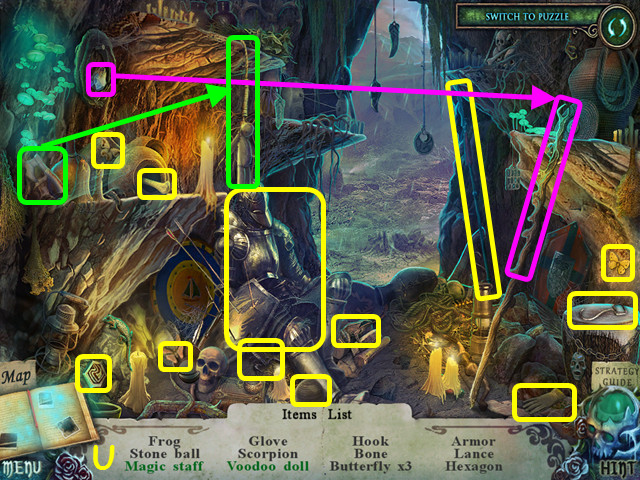
- Look at the roots and take the BOWL (M).
- Use the SHOVEL on the snow and take the ACORN (N).
- Walk forward.
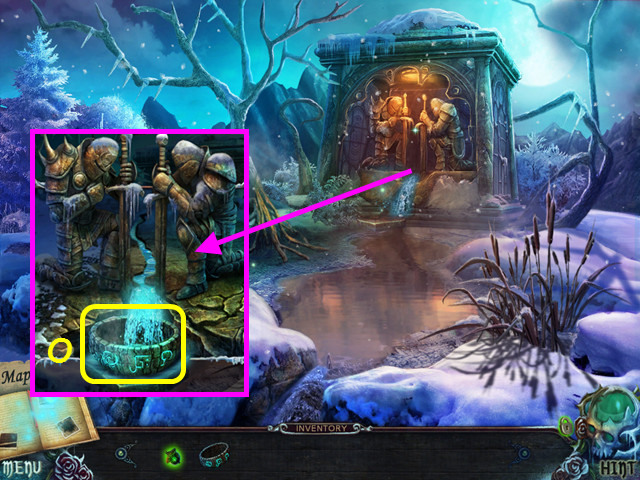
- Look at the temple and place the BOWL at the feet of the knights to get the FILLED BOWL (O).
- Walk down twice.
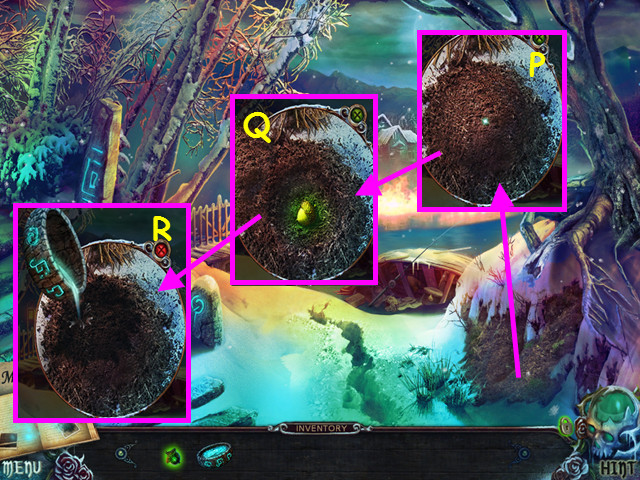
- Look at the soil and use the SHOVEL to dig a hole (P).
- Place the ACORN in the hole (Q), and then use the SHOVEL to cover it up.
- Use the FILLED BOWL on the soil (R).
- Walk down.
- Use the CROWBAR on the trunk (S).
- Look in the trunk and take the CHEST EMBLEM (T).
- Look at the extinguisher, use the FOLDING KNIFE to cut the 2 straps, and take the EXTINGUISHER (U).
- Walk down and right.
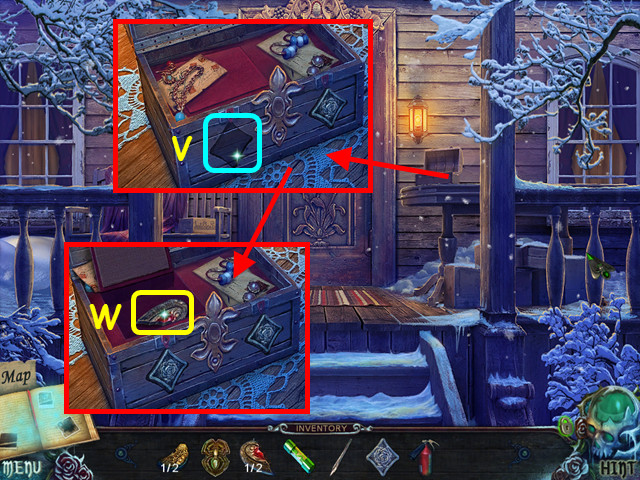
- Look at the chest and place the CHEST EMBLEM on the front (V).
- Take the 2/2 HEART LOCKET (W).
- Walk down, and then go forward twice.
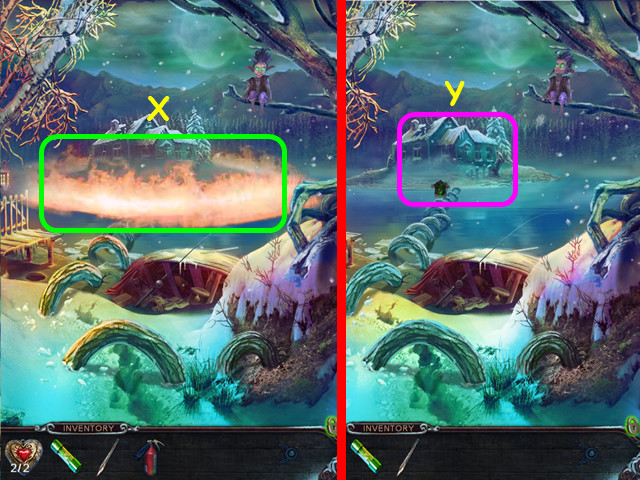
- Use the EXTINGUISHER on the ring of fire (X).
- Walk forward (Y).
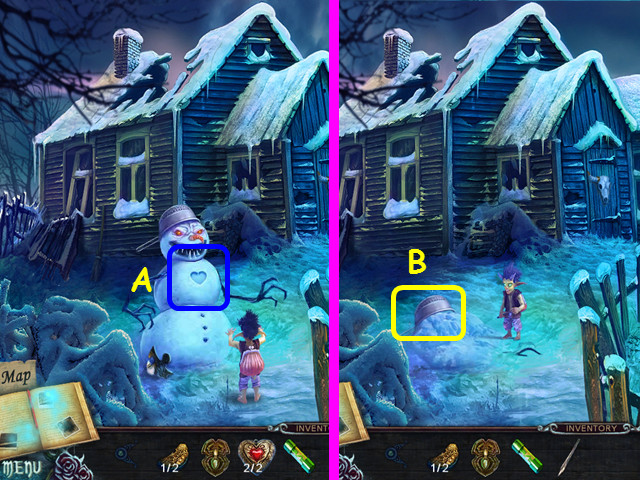
- Place the HEART LOCKET in the chest of the snowman (A).
- Take the COLANDER (B).
- Walk down and select the boat for a HOP.
- Locate all the items on the list (C).
- You will earn the 1/2 TRIANGULAR RUNE.
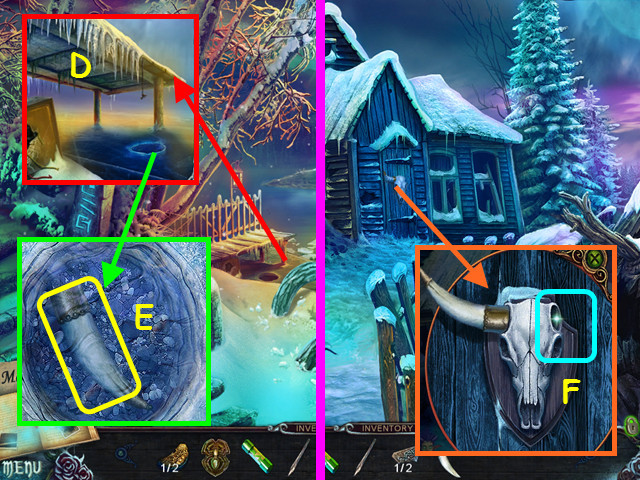
- Look at the pier (D); zoom into the hole, and use the COLANDER to take the HORN (E).
- Walk forward.
- Look at the door and place the HORN on the skull (F).
- Open the door and enter the Witches House.
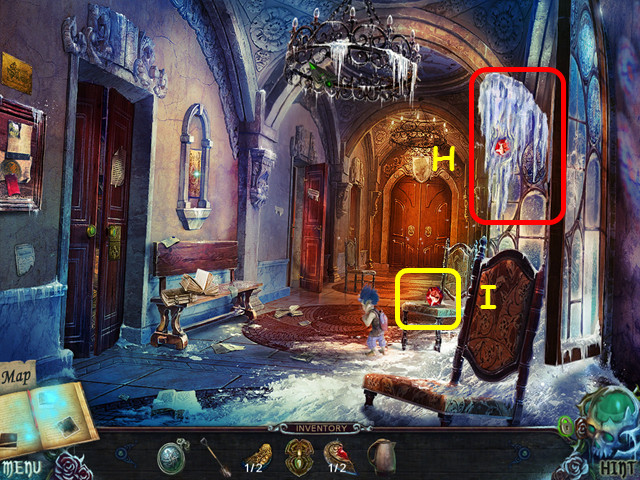
Chapter 5: The Witches House
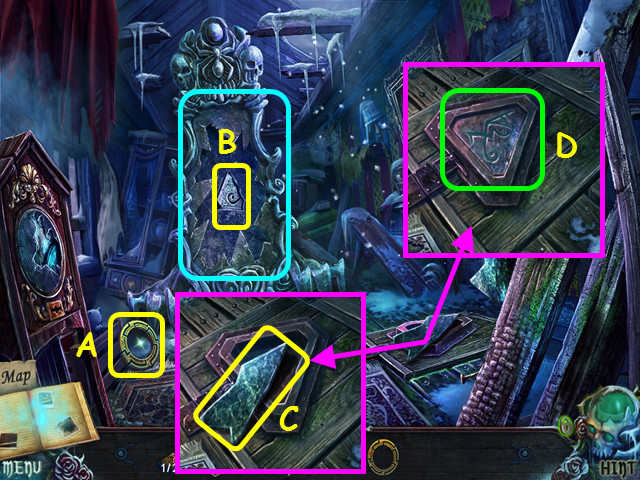
- Take the DISC PART (A).
- Touch the mirror so it breaks, and then zoom into the mirror and take the 2/2 TRIANGLULAR RUNE (B).
- Look at the trapdoor and take the 1/4 MIRROR FRAGMENTS (C).
- Place the TRIANGULAR RUNE in the frame (D).
- Enter the trapdoor.
- Take the 2/4 MIRROR FRAGMENTS (E).
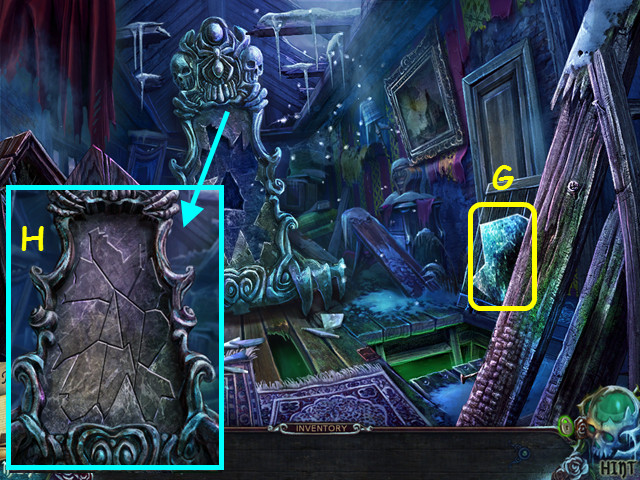
- Note the spider mini-game on the shelves (F).
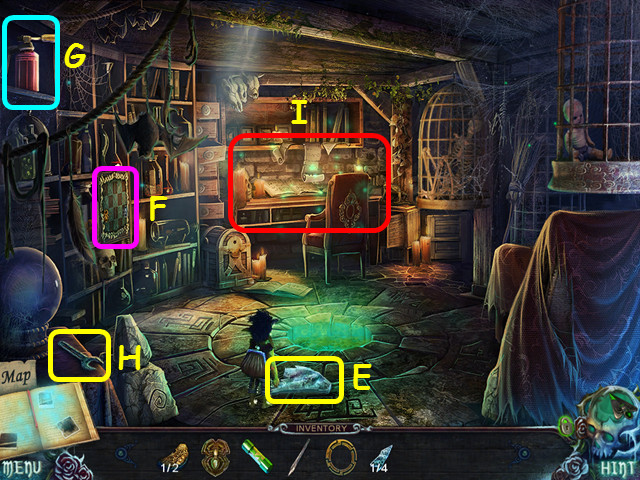
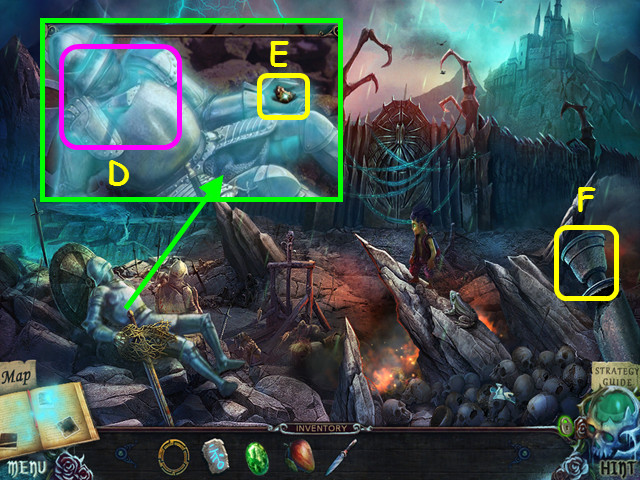
- Use the imp in the upper left corner to get the GAS BURNER (G).
- Take the WRENCH (H).
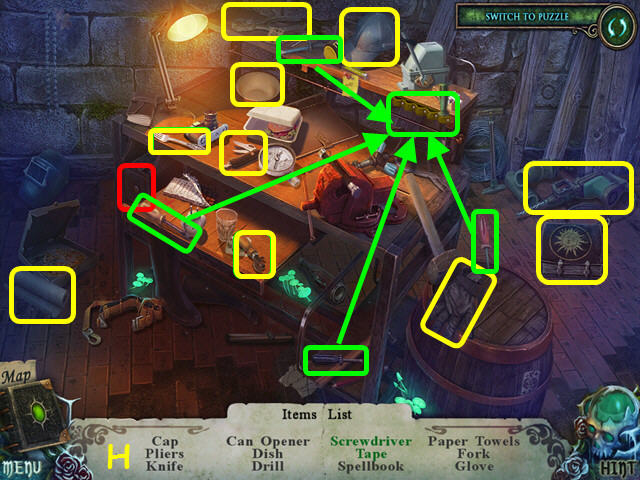
- Select the desk for a HOP (I).
- Locate all the items on the list (J).
- You will earn the CLOCKWORK KEY.
- Walk down.
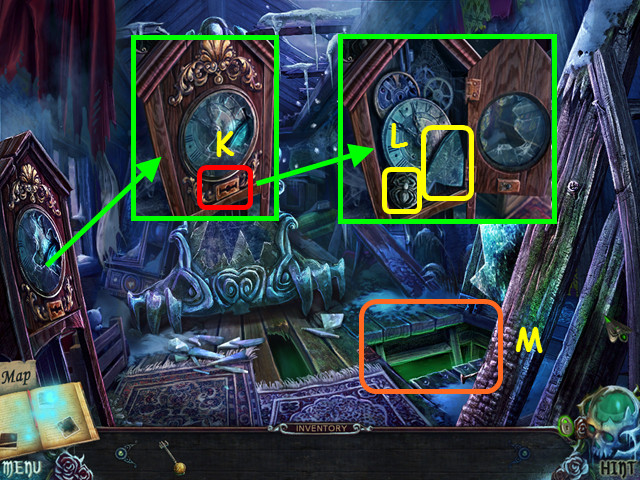
- Look at the clock and use the CLOCKWORK KEY in the slot (K).
- Take the SILVER SPIDER and the 3/4 MIRROR FRAGMENTS (L).
- Enter the trapdoor (M).
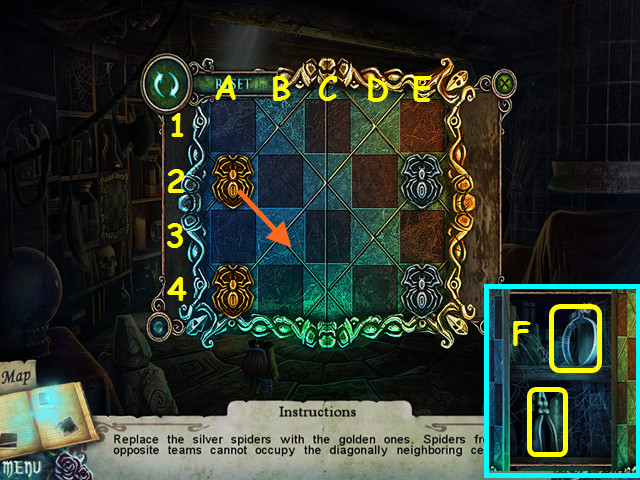
- Look at the spider mini-game on the shelves; place the GOLDEN SPIDER and the SILVER SPIDER on the board to activate the mini-game.
- Swap the golden spiders with the silver spiders by making the following moves: A2 to B3, E2 to D3, B3 to D1, D3 to B1, A4 to B3, B3 to C4, D1 to E2, E4 to C2, C2 to A4, B1 to C2, C4 to A2, E2 to C4, C2 to D1, A2 to B1, B1 to E4, C4 to D3, D1 to B3, B3 to A2, and D3 to E2.
- Take the HOSE CLAMP and the PLIERS (F).
- Walk down.
- Use the PLIERS to take the 4/4 MIRROR FRAGMENTS (G).
- Look at the mirror and place the 4 MIRROR FRAGMENTS into the frame (H).
- Arrange the fragments jigsaw style to restore the mirror.
- Select a piece to rotate it in place; drag the pieces into position.
- Enter the mirror.
- Talk to Wolfgang and he will give you the BOOK EMBLEM (I).
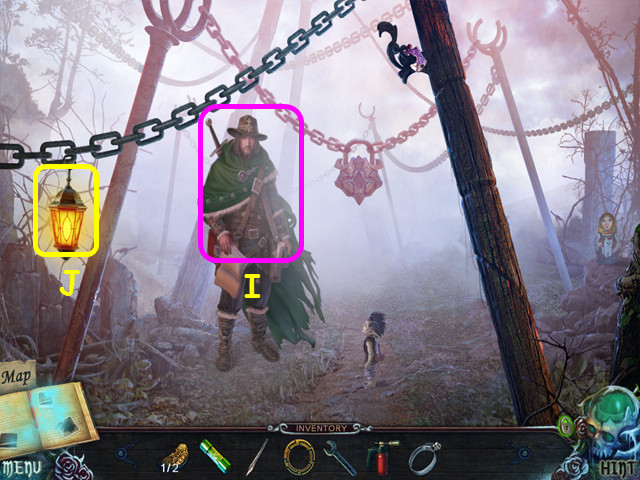
- Take the LANTERN (J).
- Walk down and enter the trap door.
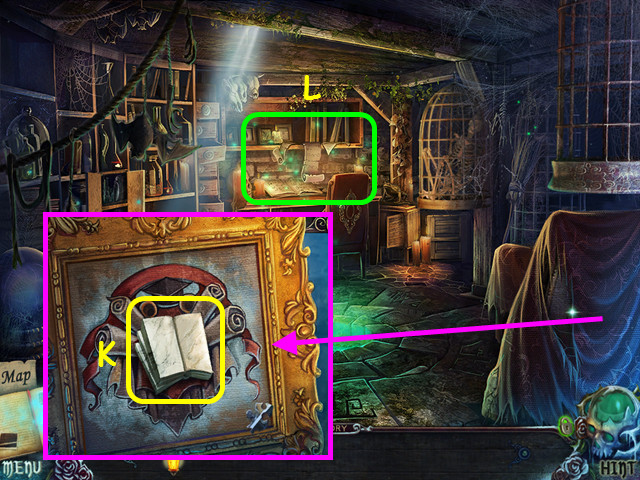
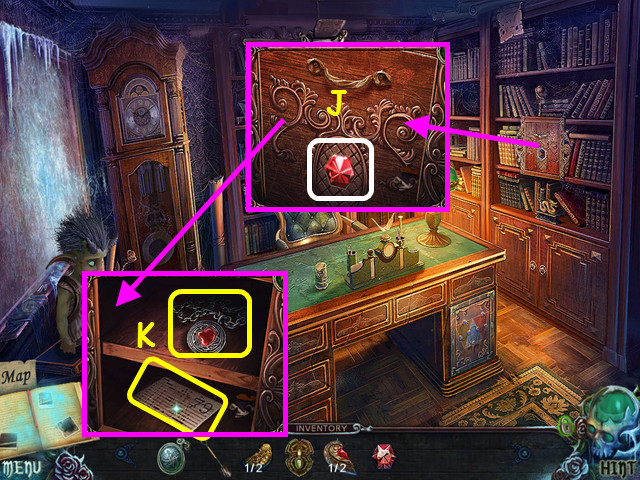
- Zoom in, remove the covering, and place the BOOK EMBLEM in the center, and then select the book to take the 1/2 COAT OF ARMS (K).
- Look at the desk for a HOP (L).
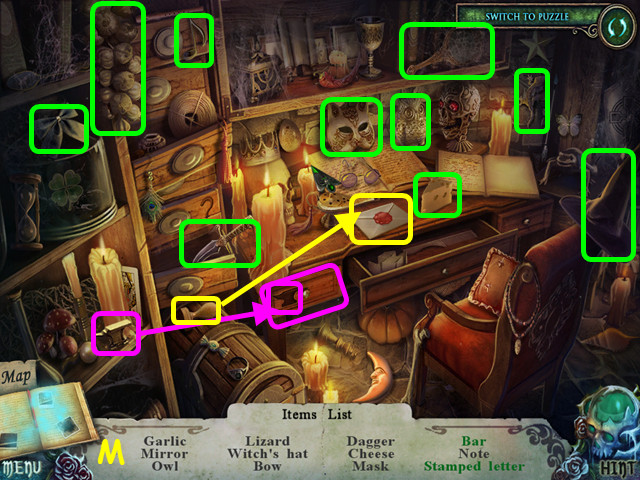
- Locate all the items on the list (M).
- You will earn the BAR.
- Walk down twice.
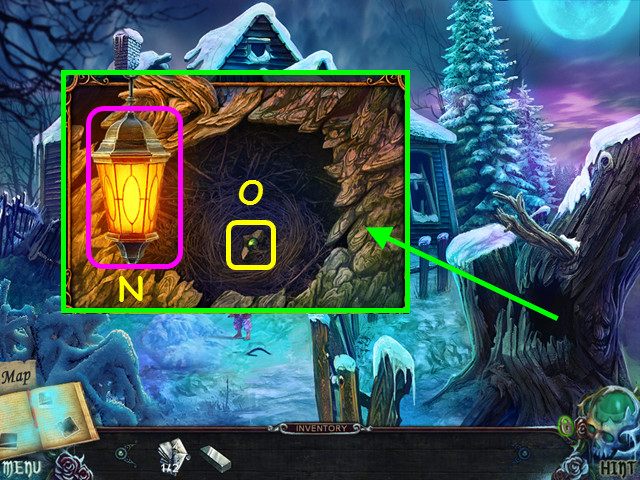
- Look at the stump hollow and hang the LANTERN on the left (N).
- Move the material aside and take the MAGIC CRYSTAL (O).
- Walk down twice.
Chapter 6: Return to the University
- Use the GAS BURNER on the ice and take the 2/2 COAT OF ARMS (P).
- Walk down twice and go forward twice.
- Look at the plaque and place the COAT OF ARMS in the indentation (Q).
- Select the second door on the left for a HOP (R).
- Locate all the items on the list (S).
- You will earn the WORKSHOP KEY.
- Walk forward through the double doors at the end of the hall.
- Take the 2/2 BAS-RELIEF (T).
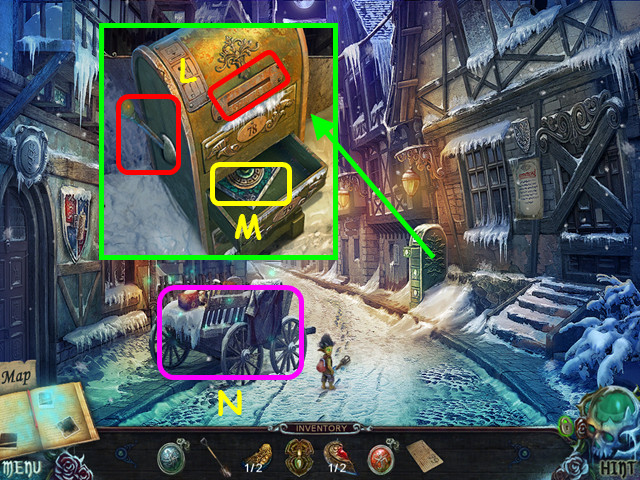
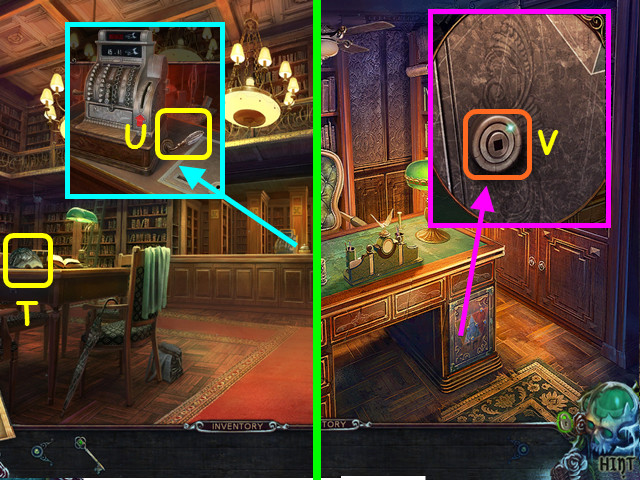
- Look at the counter and take the SAFE HANDLE (U).
- Walk down and go left.
- Look at the front of the desk and insert the SAFE HANDLE in the hole for a mini-game (V).
- Use the 6 buttons to move the characters to the correct location.
- Select the buttons: A, E, C, B, F, C, F, C, B, and F.
- Take the ACCESS CARD, 2nd THERMAL FUSE, and the SHAWL (G).
- Walk down and forward.
- Look at the counter and use the ACCESS CARD on the register (A).
- Look in the opening; take the ACID and the LOCK PART (B).
- Look at the fire and use the SHAWL to take the TONGS (C).
- Walk down twice.
- Look at the door and use the WRENCH to remove the 3 bolts (D).
- Place the LOCK PART in the center for a mini-game (E).
- Move the runes to the correct coat of arms; green science symbols go with the microscope (F), the red arts symbols go with the quill (G), and the yellow math symbols go around the sigma (H).
- The runes will highlight when around the correct coat of arms.
- Press the outer coat of arms (F, G, and H) to rotate the runes around them; press the clips (I) to grab the runes, and then press the center coat of arms (J) to rotate them around to the correct location.
- Walk to the left.
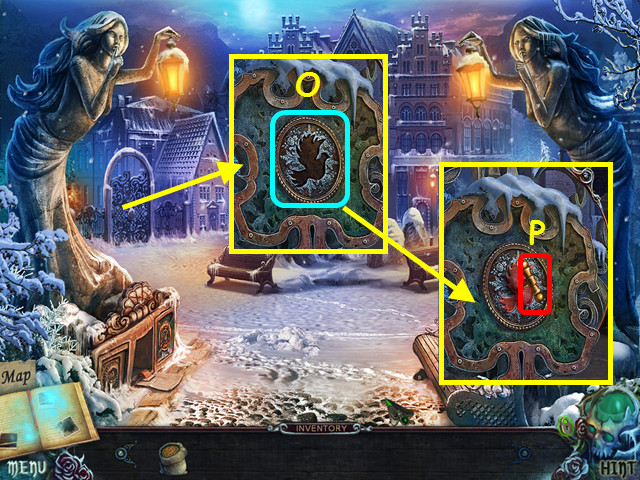
- Look at the sundial and place the BAS-RELIEF on top (K).
- Take the IRON KEY (L).
- Walk down and go forward twice.
- Look at the counter and use the IRON KEY on the lock (M).
- Take the 1st MOLD PART and the ANVIL EMBLEM (N).
- Walk down twice and go to the left.

- Look at the book; move the leaf and take the CHIP (O).
- Look at the door and place the ANVIL EMBLEM at the top (P).
- Use the WORKSHOP KEY in the lock (Q).
- Walk forward.
- Look at the tank, attach the hose, and then use the HOSE CLAMP on the hose (R).
- Look at the hearth; place the BAR and the TONGS on the counter (S).
- Move the bowl over the heat (T).
- Put the bar in the bowl (U).
- Take the DOLPHIN SYMBOL (V).
- Note the mini-game on the bench (W).
- Walk down.
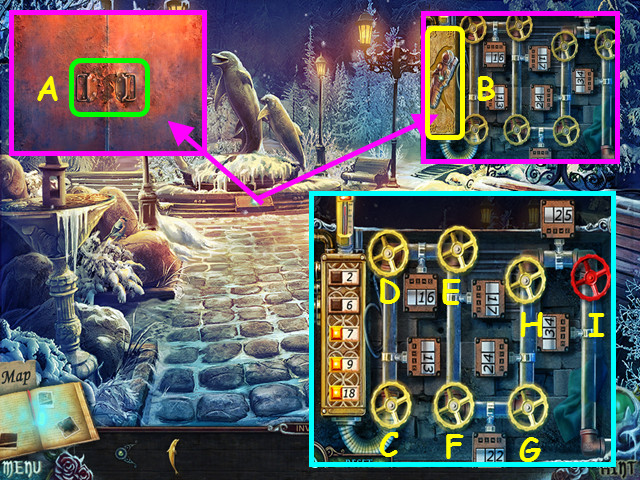
- Look at the base of the fountain and use the ACID to open the rusted doors (A).
- Take the ASTRONAUT and place the DOLPHIN SYMBOL in the indentation (B).
- Press the 6 and 7, and then turn the valve (C).
- Press the 7 and 9, and then turn the valve (D).
- Press the 2, 6, and 9, and then turn the valve (E).
- Press the 6, 7, and 9, and then turn the valve (F).
- Press the 2, 6, 7, and 9, and then turn the valve (G).
- Press the 7 and 18, and then turn the valve (H).
- Press the 7, 9, and 18, and then turn the valve (I).
- Take the 2nd MOLD PART (J).
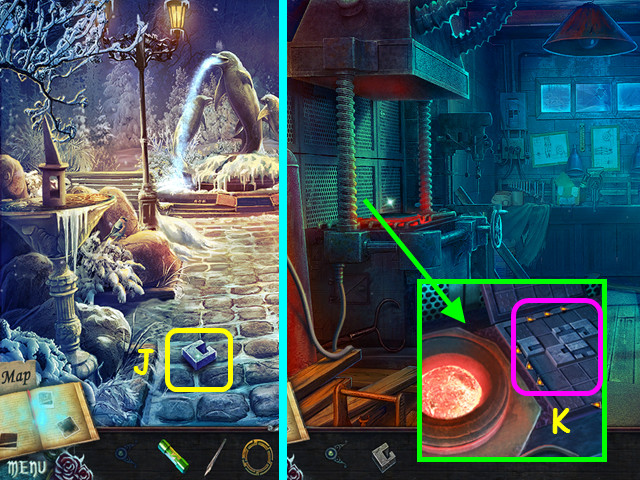
- Go forward.
- Look at the furnace; look at the grid for a mini-game (K).
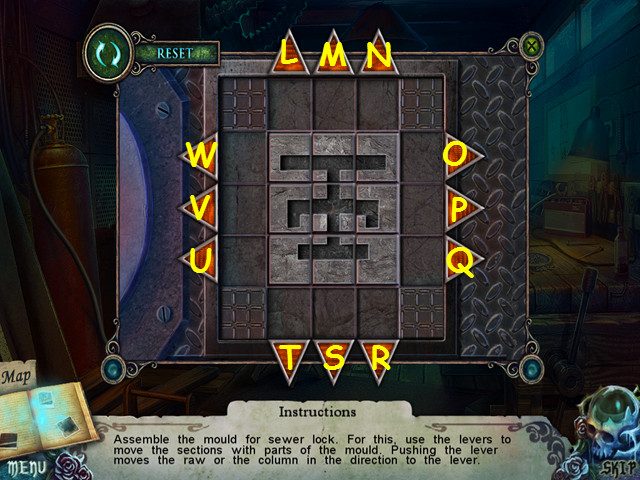
- Place the 2 MOLD PARTS into the grid to activate the mini-game.
- Restore the mold by pressing the following buttons: V, Mx2, Q, P, O, M, N, T, S, W, L, M, U, R, Q, O, T, U, V, W, N, W, Tx2, Sx2, Vx3, Lx2, Mx2, O, P, and Q.
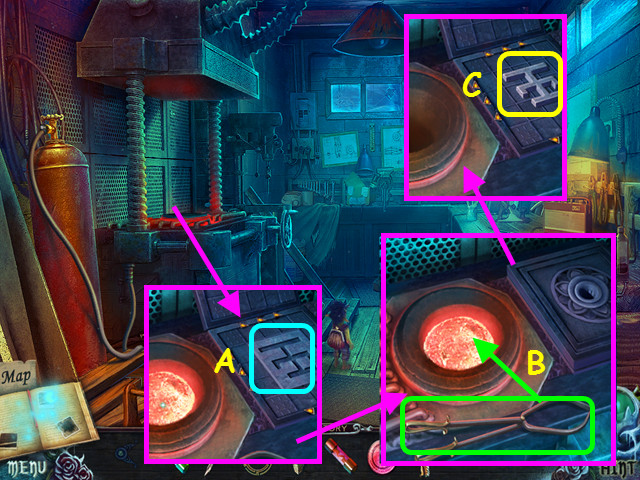
- Press the grid mold (A).
- Take the tongs to pour the molten metal into the grid (B).
- Take the SEWER KEY (C).
- Walk down 3 times, and then go right.
Chapter 7: The Sewer
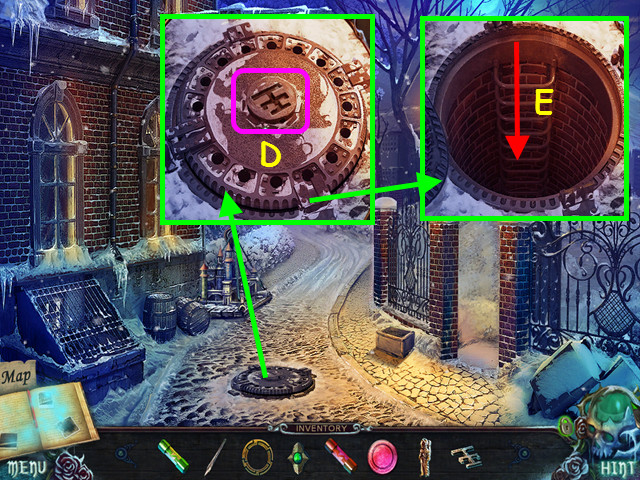
- Look at the manhole cover and use the SEWER KEY on the center (D).
- Enter the manhole (E).

- Take the KNIGHT (F).
- Note the mini-game on the wall (G).
- Walk forward.
- Open the cover and take the BIRD KEY (H).
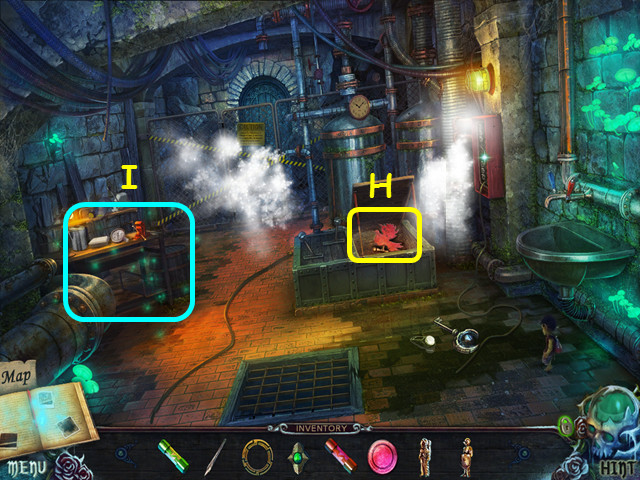
- Select the worktable for a HOP (I).
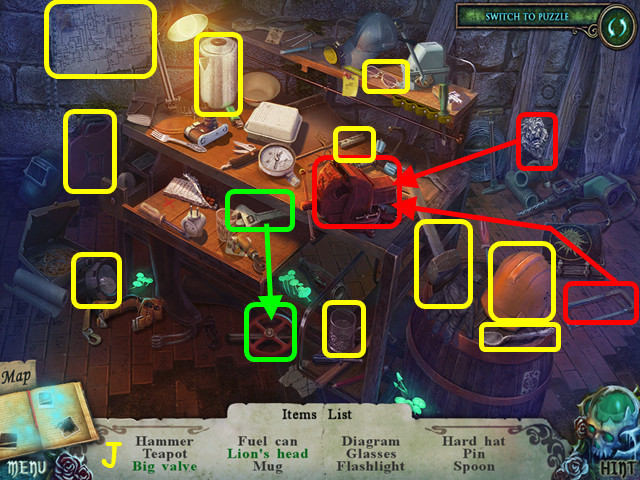
- Locate all the items on the list (J).
- You will earn the BIG VALVE.
- Walk down.
- Place the BIG VALVE on the stem (K).
- Use the LEVER on the big valve (L).
- Walk forward.
- Open the fence and note the door (M).
- Look at the panel and take the SEEDS (N).
- Walk down 3 times.
- Look at the gate and use the BIRD KEY on the indentation (O).
- Pull the lever (P).
- Walk to the left.
- Look at the cage and take the 3rd THERMAL FUSE (Q).
- Note the hungry dog (R).
- Note the mini-game on the door (S).
- Walk down, go right, enter the manhole, and walk forward.
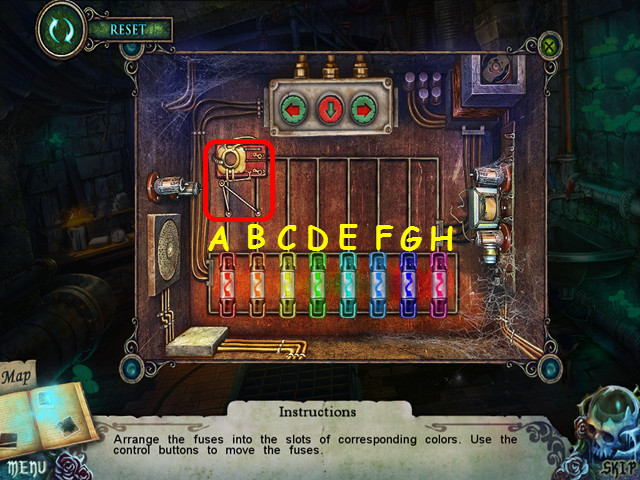
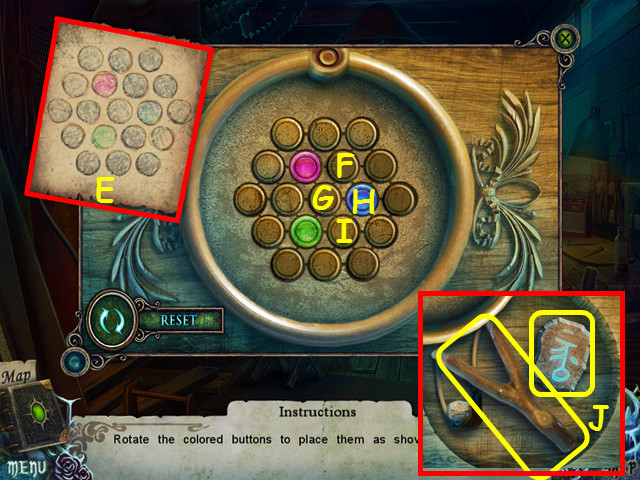
- Look at the panel for a mini-game.
- Place the 3 THERMAL FUSES in the holders.
- Use the left and right arrows to move the carrier cartridge left and right; use the down arrow to have the carrier cartridge take/place the fuses.
- Move the cartridge over F and G, and then press the down arrow. Move the cartridge over G and H, and then press the down arrow.
- Move the cartridge over A and B, and then press the down arrow. Move the cartridge over F and G, and then press the down arrow.
- Move the cartridge over B and C, and then press the down arrow. Move the cartridge over D and E, and then press the down arrow.
- Move the cartridge over C and D, and then press the down arrow. Move the cartridge over A and B, and then press the down arrow.
- Take the LOCK PART and the 1st DIMENSIONAL KEY (I).
- Walk down.
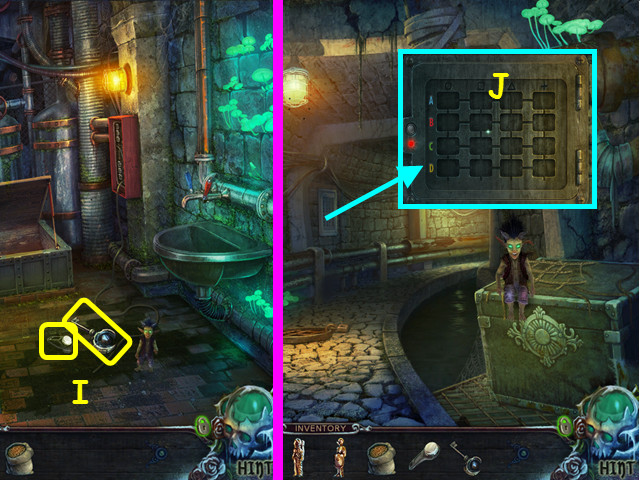
- Look at the panel and use the LOCK PART on it for a mini-game (J).
- Move the tiles so they have the color and/or symbol for the position (K).
- Select 2 adjacent tiles to swap positions.
- Take the CRO-MAGNON and the 1st LION BAS-RELIEF (L).
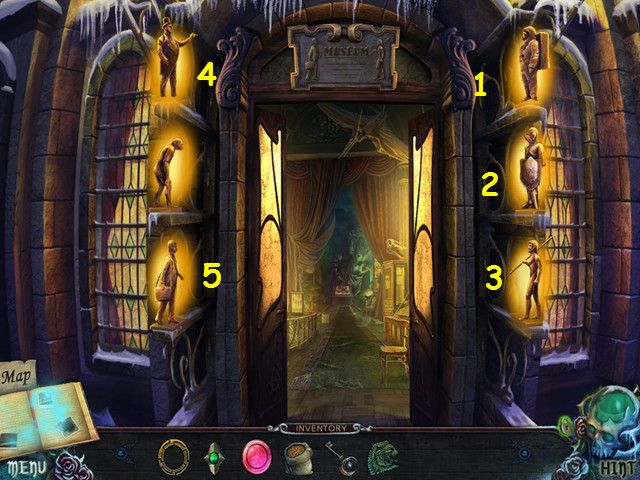
- Walk down twice, go left, and look at the door mini-game.
- Place the CRO-MAGNON, KNIGHT, and ASTRONAUT on the shelves to trigger the mini-game.
- Turn the figurines so they face inward.
- Select the figures in numerical order (1-5).
- Walk forward.
Chapter 8: The Museum

- Take the DIAGRAM (M).
- Look at the statue and take the TWIG KEY (N).
- Walk down.
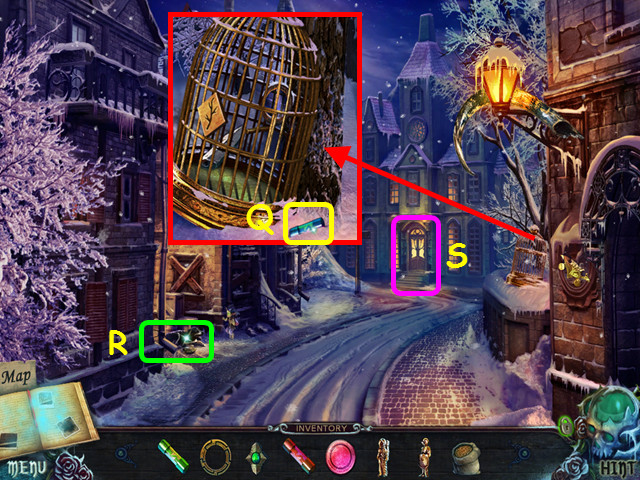
- Look at the cage and place the TWIG KEY in the lock (O).
- Take the SPEARHEAD, and then place the SEEDS inside the cage (P).
- Take the CAGED BIRD (Q).
- Walk forward.
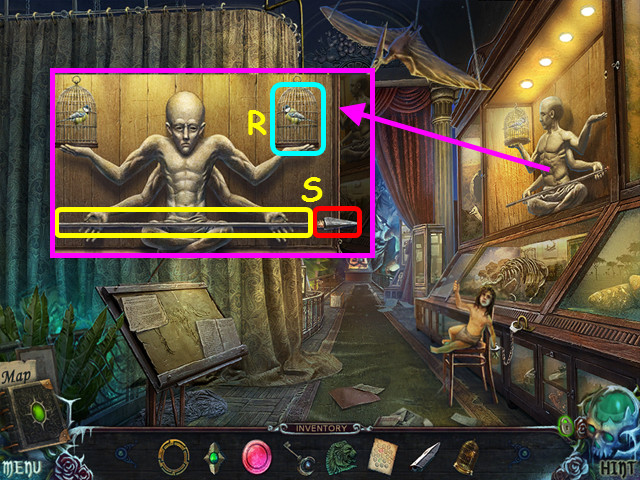
- Look at the statue and place the CAGED BIRD on the right (R).
- Place the SPEARHEAD on the shaft and take the SPEAR (S).
- Walk forward.
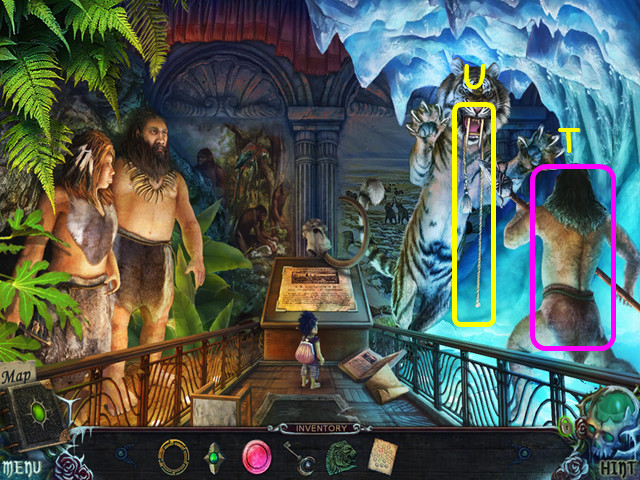
- Give the SPEAR to the man on the right (T).
- Take the CURTAIN TIE from the tiger (U).
- Walk down.
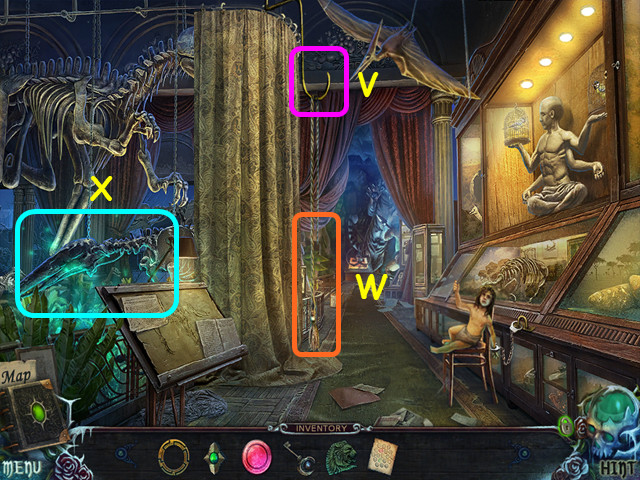
- Place the CURTAIN TIE on the hook (V).
- Pull on the rope (W).
- Select the dinosaur for a HOP (X).
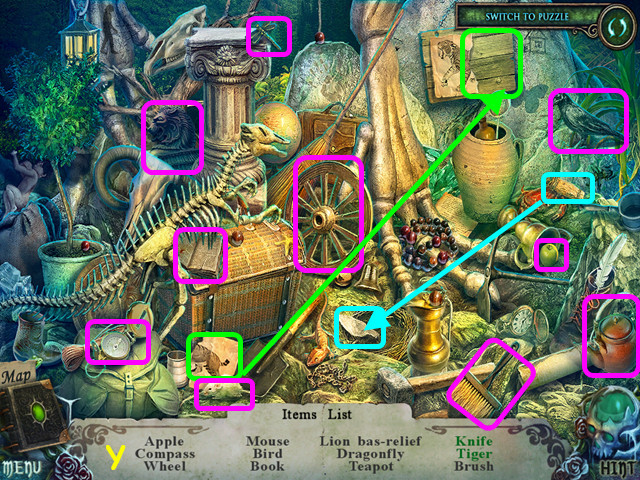
- Locate all the items on the list (Y).
- You will earn the 2nd LION BAS-RELIEF.
- Walk down twice, go right, enter the manhole, and go forward.
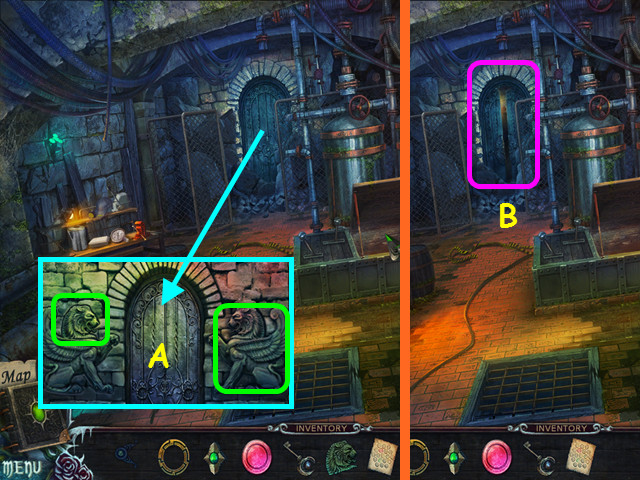
- Look at the door and place the 2 LION BAS-RELIEFS in the indentations (A).
- Walk forward (B).
- Take the PICKAXE (C).
- Look at the figure and take the HAIRPIN (D).
- Walk down 4 times, go forward, left, and forward.
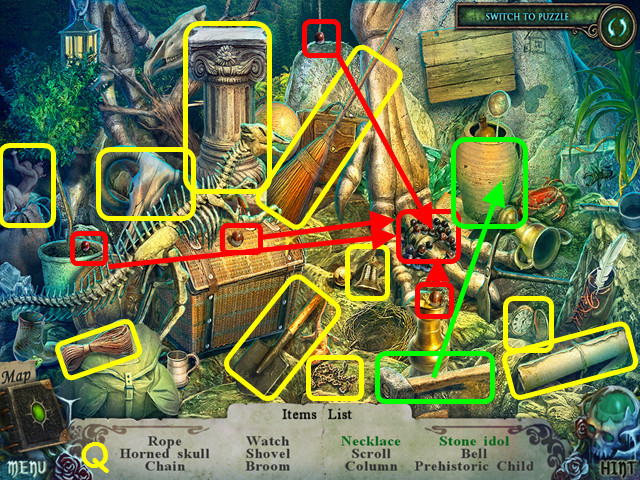
- Look at the mini-game on the right worktable; add the DIAGRAM and the CHIP to activate it.
- Press the chips to rotate the surrounding chips and move the colored chips to match the scheme (E).
- Press: H, Fx4, Ix2, Gx5, Hx2, and Ix5.
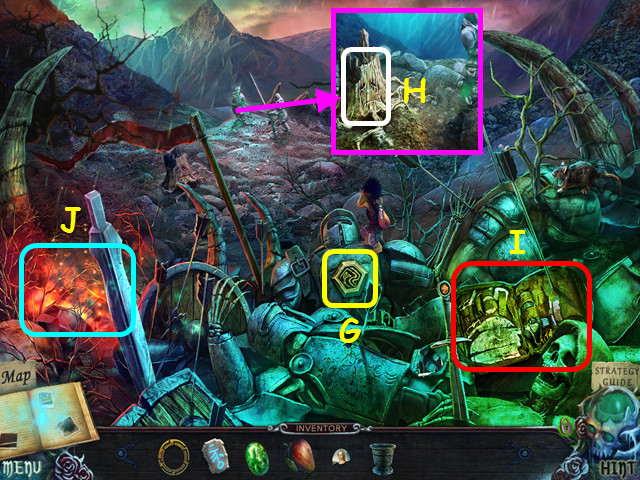
- Take the SLINGSHOT and the STONE RUNE (J).
- Walk down 3 times, and go to the left.
- Use the SLINGSHOT to take the TUSK (K).
- Walk forward.
- Look at the child figure and use the HAIRPIN on the handcuffs (L).
- Take the 1st PREHISTORIC CHILD (M).
- Walk forward.
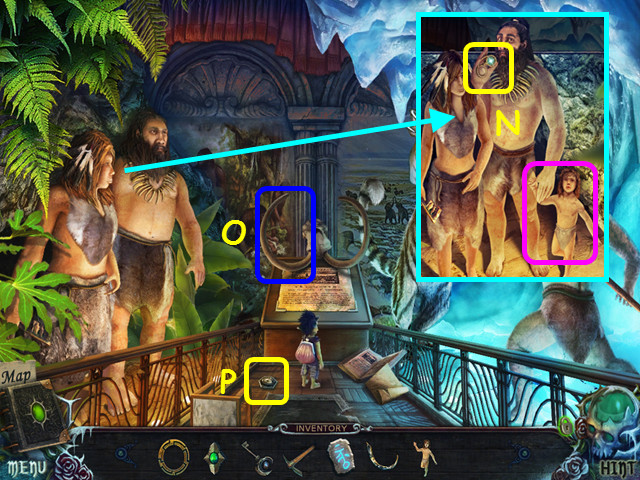
- Look at the couple; give them the 1st PREHISTORIC CHILD and take the GLASSES (N).
- Place the TUSK on the head (O).
- Take the STONE EYE (P).
- Walk down and select the dinosaur for a HOP.
- Locate all the items on the list (Q).
- You will earn the 2nd PREHISTORIC CHILD.
- Walk forward.

- Look at the couple and give them the 2nd PREHISTORIC CHILD (R).
- Take the 2nd DIMENSIONAL KEY (S).
- Walk down 3 times, and go right twice.
Chapter 9: Morgana’s House
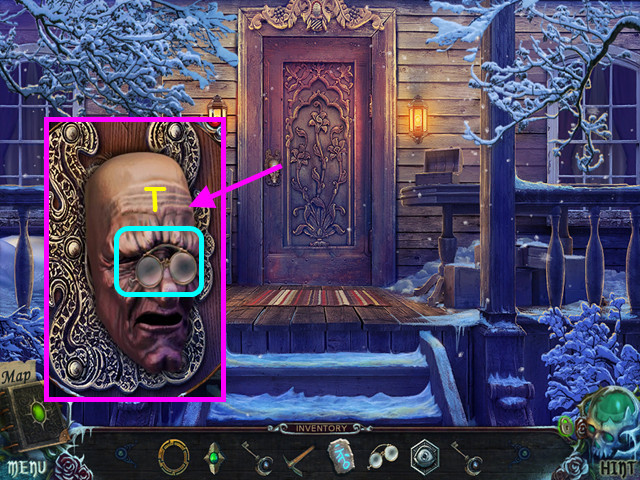
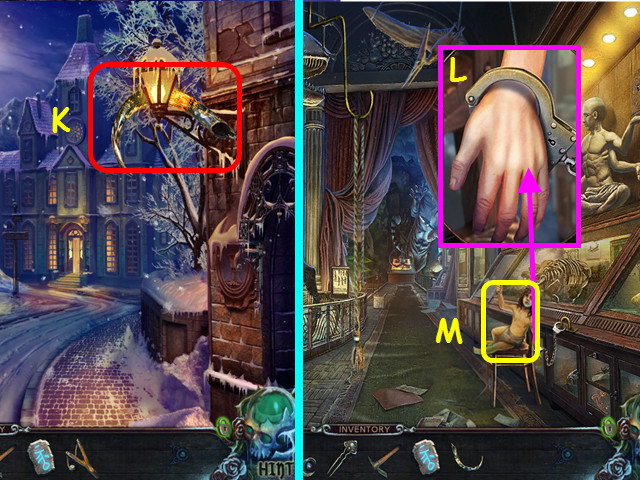
- Look at the door and place the GLASSES on the face (T).
- Walk forward.
- Take the BONE (U).
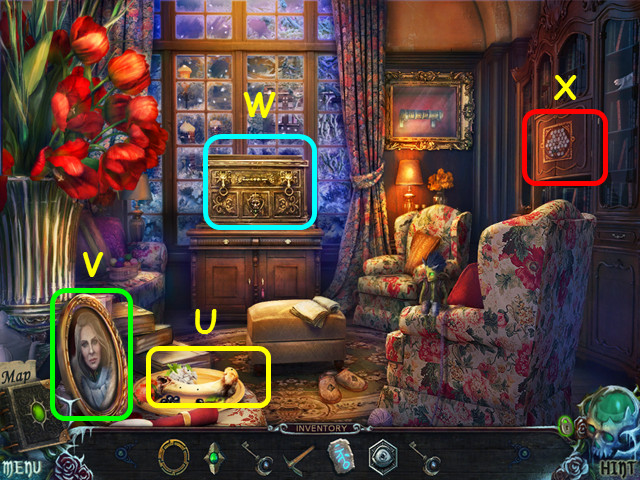
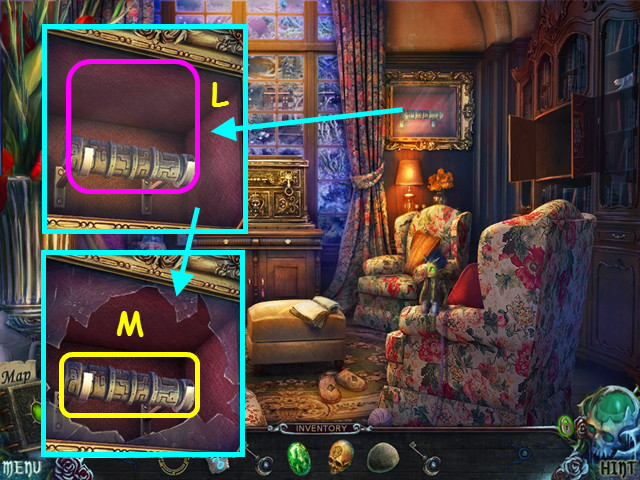
- Zoom into the photo (V).
- Note the mini-game on the chest (W).
- Look at the mini-game on the cabinet (X).
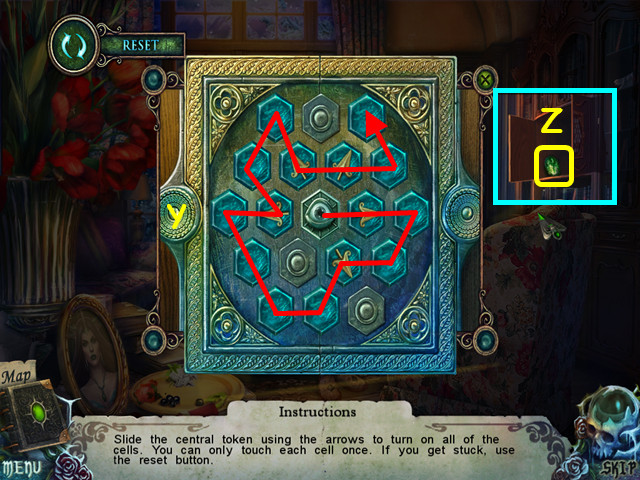
- Place the STONE EYE in the center to activate the mini-game.
- Select an arrow to slide the eye in a direction; the eye will slide until it hits an obstacle.
- Slide the eye to hit all the cells once (Y).
- Take the GREEN GEM (Z).
- Walk down 3 times, and go left.
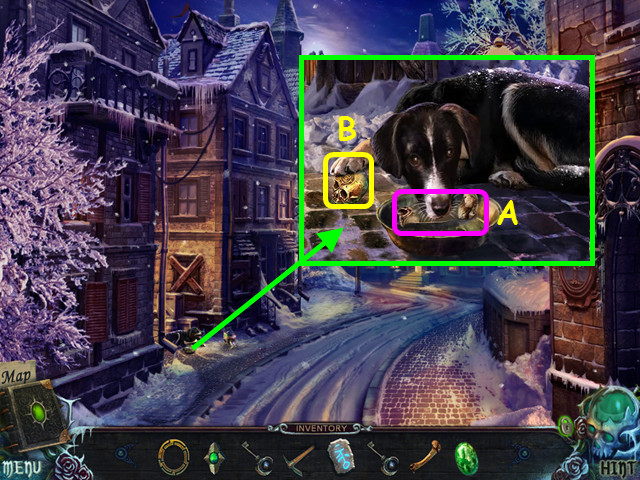
- Look at the dog and place the BONE in the dish (A).
- Take the SECOND SKULL (B).
- Walk down, go right, go forward 4 times, and then enter the mirror.
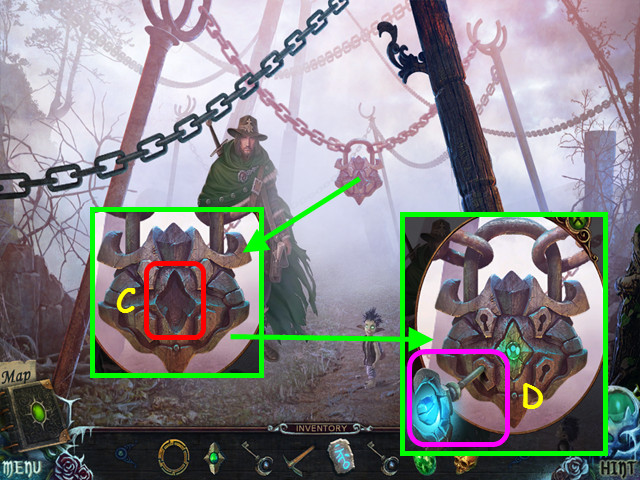
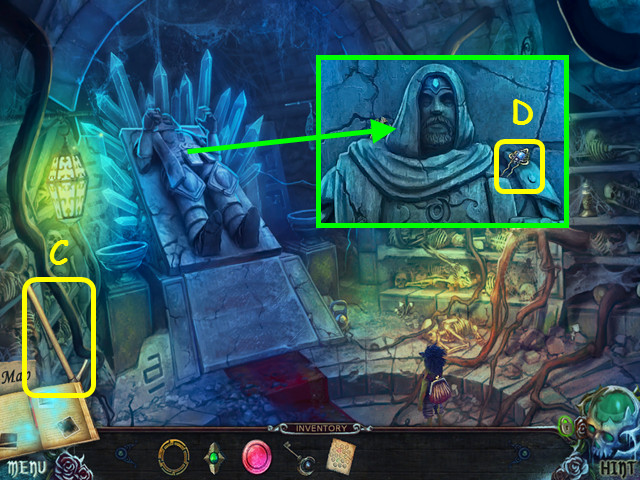
- Look at the lock and place the MAGIC CRYSTAL in the center (C).
- Place the 1st DIMENSIONAL KEY in a lock (D).
- You will earn the SWORD HILT.
- Walk down 5 times and enter the manhole.
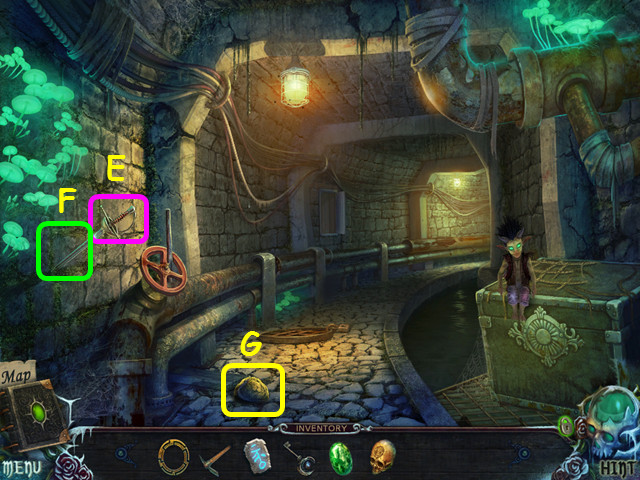
- Place the SWORD HILT on the blade (E).
- Use the PICKAXE to take the SWORD (F).
- Take the STONE (G).
- Walk forward and select the workbench for a HOP.
- Locate all the items on the list (H).
- You will earn the SPELLBOOK.
- Walk forward.
- Look at the figure and place the SWORD in the left hand (I).
- Place the SPELLBOOK in the right hand (J).
- Take the 3rd DIMENSIONAL KEY (K).
- Walk down 3 times, go right, and forward.
- Look at the case and use the STONE to break the glass (L).
- Take the BATON (M).
- Walk down twice and select the platform for a HOP.
- Locate all the items on the list (N).
- You will earn the BOTTLE.
- Walk forward.

- Look in the trunk and use the BOTTLE on the green liquid, and then take the BOTTLE OF GLOWING LIQUID (O).
- Look at the statue and place the BATON in the hands (P).
- Take the FIRST SKULL (Q).
- Walk down, go right, and forward.
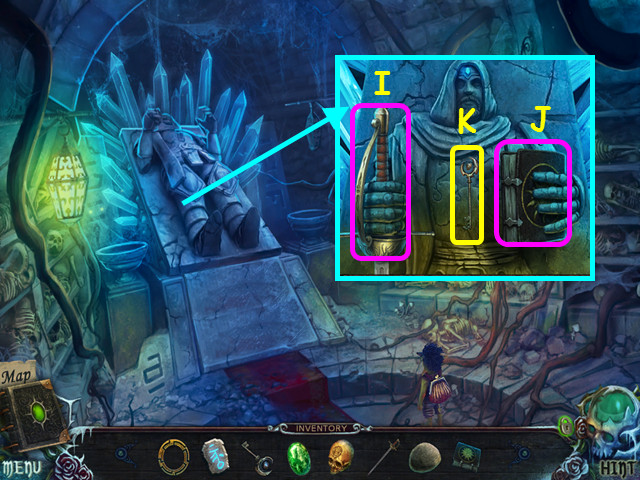
- Look at the chest; place the FIRST SKULL and the SECOND SKULL on the outer circles (R).
- Use the BOTTLE OF GLOWING LIQUID on the receptacle (S).
- Select the center for a mini-game (T).
- Rotate the rings to connect the skulls (U).
- Take the 4th DIMENSIONAL KEY (V).
- Walk down twice, go forward 4 times, and then enter the mirror.
- Look at the lock and use the 3 DIMENSIONAL KEYS in the keyholes (W).
- Walk forward.
Chapter 10: The Mystic World
- Take the SLEEPY FRUIT (A).
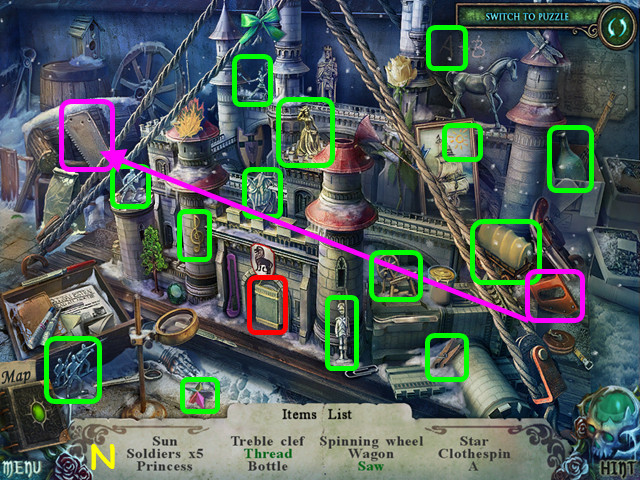
- Select the structure for a HOP (B).
- Locate all the items on the list (C).
- You will earn the DAGGER.
- Walk forward.
- Zoom into the knight and talk to him (D).
- Take the PENDANT WITHOUT CHAIN (E).
- Use the DAGGER to take the STONE BOWL (F).
- Walk to the left.
- Take the 1st HEXAGON (G).
- Zoom in and talk to the stump (H).
- Note the case (I).
- Select the flames for a HOP (J).

- Locate all the items on the list (K).
- You will earn the ENCHANTED SWORD.
- Walk forward.
- Take the SMALL JUG (L).
- Walk down 3 times.
- Look at the tree, place the PENDANT WITHOUT A CHAIN on the chain, and take the PENDANT (M).
- Walk forward.

- Look at the knight and give him the PENDANT (N).
- Take the BATTLE NET (O).
- Look at the gate and use the ENCHANTED SWORD on the chains (P).
- Walk forward.
- Take the 2nd HEXAGON (Q).
- Look at the water and use the BATTLE NET to catch a FISH (R).
- Note the mini-game on the door (S).
- Note the mini-game in the archway (T).
- Walk down, go left, and look at the case.
- Place the SMALL JUG, STONE BOWL, FISH, and the SLEEPY FRUIT on the surface.
- Place the fruit in the stone bowl (A) then use the pestle on the stone bowl (B).
- Pour the contents of the stone bowl into the small jug (C).
- Pour the vial into the small jug (D).
- Use the small jug on the fish (E).
- Take the FISH WITH SLEEPING POTION.
- Select the burning area on the left for a HOP.
- Locate all the items on the list (F).
- You will earn the WHIP.
- Walk forward.
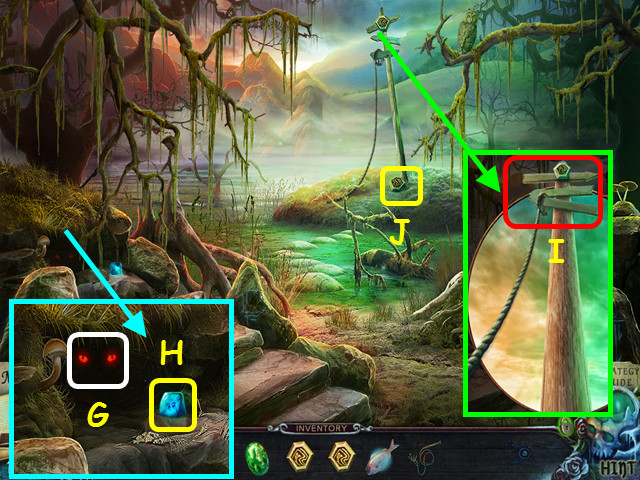
- Look at the cave and give the FISH WITH SLEEPING POTION to the cat (G).
- Take the CHARGED CRYSTAL (H).
- Look at the signpost and use the WHIP on the boards (I).
- Select the boards again so the imp climbs the whip.
- Take the 3rd HEXAGON (J).
- Walk down twice then go forward.
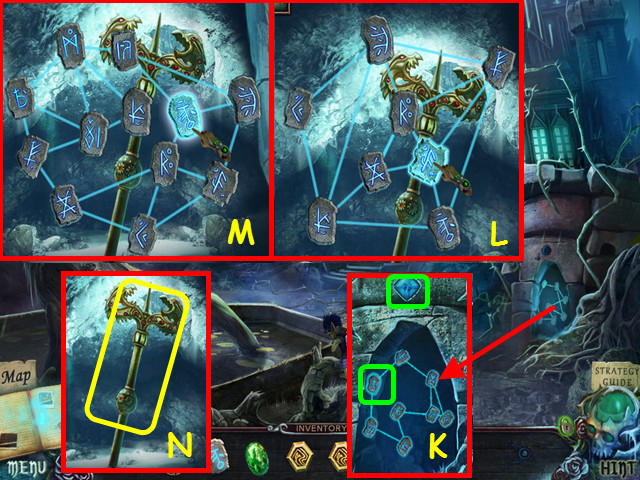
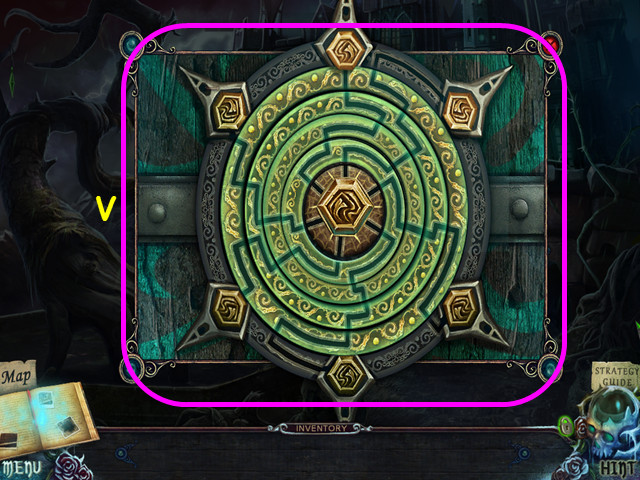
- Look at the archway; place the CHARGED CRYSTAL in the top opening and place the STONE RUNE on the strings for a mini-game (K).
- Drag the runes so none of the lines cross (L).
- Do the same for the second set of runes (M).
- Take the SACRED WAND (N).
- Walk down and left.
- Look at the knights and use the SACRED WAND on the ground (O).
- Talk to the tree stump and take the JEWEL (P).
- Take the GATE HANDLE (Q).
- Walk down twice.

- Look at the statue; place the JEWEL and the GREEN GEM in the necklace (R).
- Take the 4th HEXAGON (S).
- Select the structure for a HOP (T).
- Locate all the items on the list (U).
- You will earn the 5th HEXAGON.
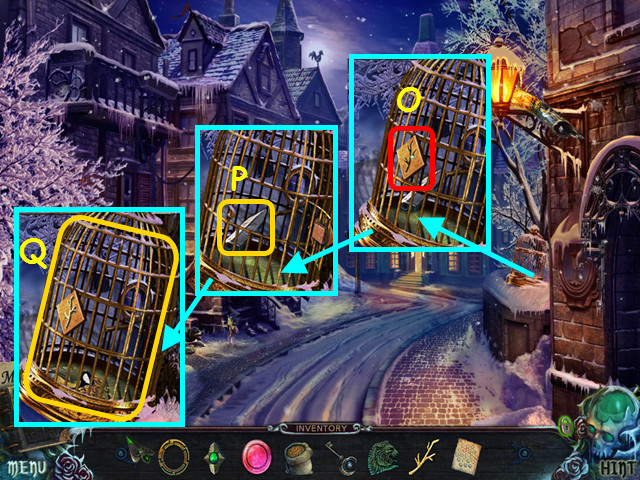
- Walk forward twice and look at the doors for a mini-game.
- Place the DISC PART, the 5 HEXAGONS, and the GATE HANDLE on the mechanism to activate the mini-game.
- Drag the discs to complete the paths to the center (V).
- Walk forward.
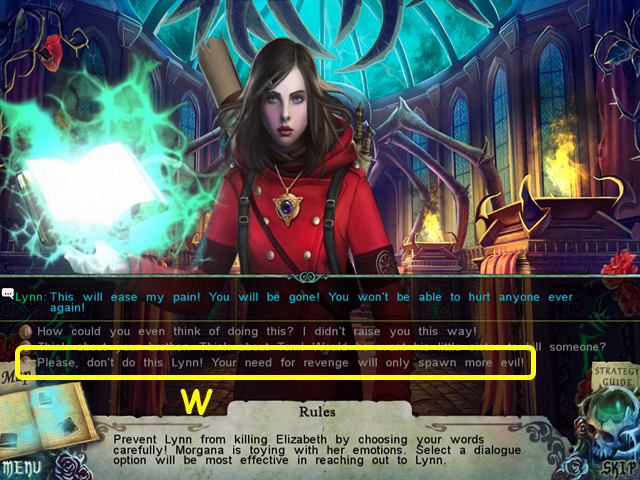
- When talking to Lynn you must choose the correct responses to progress in the conversation (W).
- Select the responses numbered 3, 1, 2, 1, and 3.
- Congratulations, you have completed Witches’ Legacy: Lair of the Witch Queen.


 Tiger Eye - Part I: Curse of the Riddle Box Walkthrough, Guide, & Tips
 Small Town Terrors: Pilgrim's Hook Walkthrough, Guide, & Tips
 Dark Dimensions: Homecoming Walkthrough, Guide, & Tips
 Golden Trails 2: The Lost Legacy Walkthrough, Guide, & Tips
 Dark Alleys: Penumbra Motel Walkthrough, Guide, & Tips