Small Town Terrors: Pilgrim's Hook Walkthrough, Guide, & Tips
Small Town Terrors: Pilgrim’s Hook Walkthrough

Welcome to the Small Town Terrors: Pilgrim’s Hook Walkthrough
There’s a dark force at work in Pilgrim’s Hook. Return to your childhood home and save your twin brother from the evil that lives beneath the sea.
Whether you use this document as a reference when things get difficult or as a road map to get you from beginning to end, we’re pretty sure you’ll find what you’re looking for here.
This document contains a complete Small Town Terrors: Pilgrim’s Hook game walkthrough featuring annotated screenshots from actual gameplay!
We hope you find this information useful as you play your way through the game. Use the walkthrough menu below to quickly jump to whatever stage of the game you need help with.
Remember to visit the Big Fish Games Forums if you find you need more help. Have fun!
This walkthrough was created by BrownEyedTigre, and is protected under US Copyright laws. Any unauthorized use, including re-publication in whole or in part, without permission, is strictly prohibited.
General Tips

- This is the official guide for Small Town Terrors: Pilgrim’s Hook.
- Select Options to adjust Music, Effects, Ambient and Voice Volume. You can also adjust Full Screen Mode and Custom Cursor.
- The Hidden-object puzzles will be referred to as HOP throughout the guide. Items labeled in light blue in the find list require an extra step to find.
- Puzzles may be skipped after a short wait; some puzzles are random.
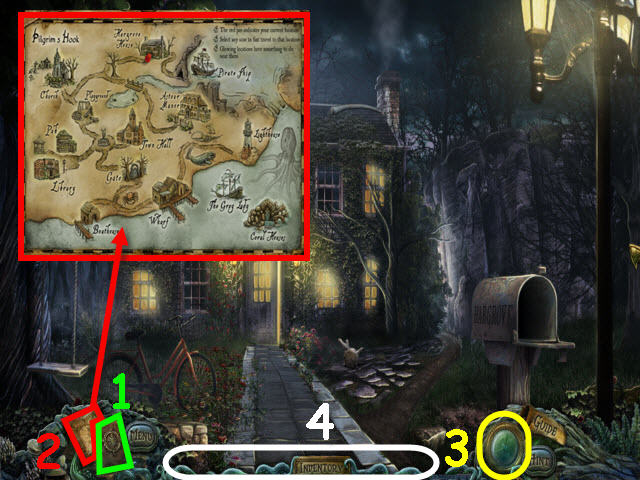
- Open your journal (1) to view your notes and objectives.
- There are some instances where multiple items that can be used to accomplish the same task. Since the game is not linear, the alternates are listed in the guide regardless if they have been acquired or already used if following the guide.
- Select the Map (2) to see what locations have tasks to complete. You can also fast travel to any location by selecting the desired area on the map.
- You may select the Hint button (3) for help in game play or HOP areas. The hints are unlimited but you must wait for it to recharge between uses.
- Move your cursor to the bottom of the screen to pull up the Inventory Bar (4).
Chapter 1: Welcome to Pilgrim’s Hook
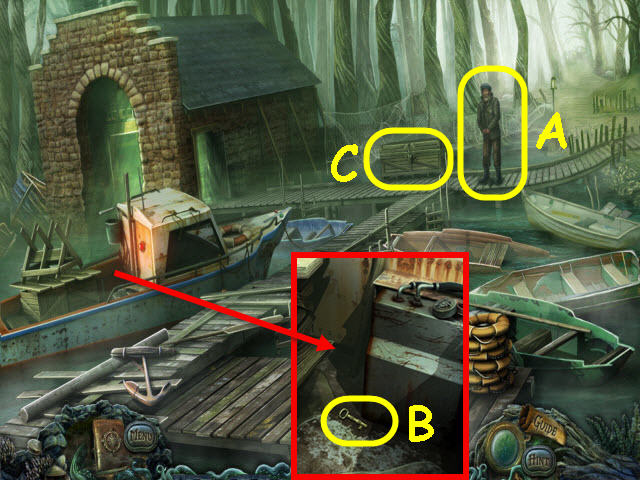
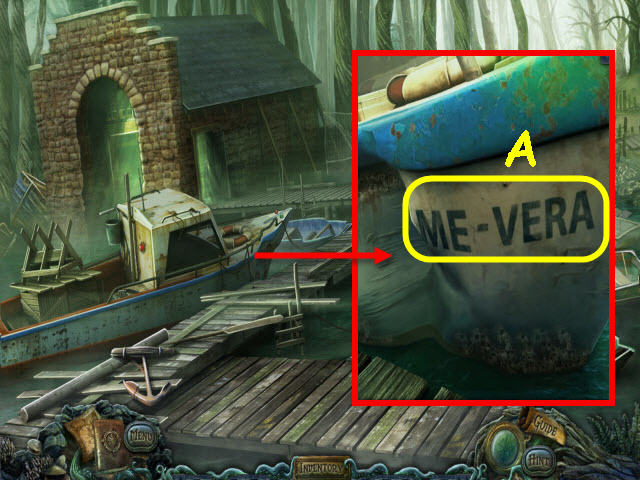
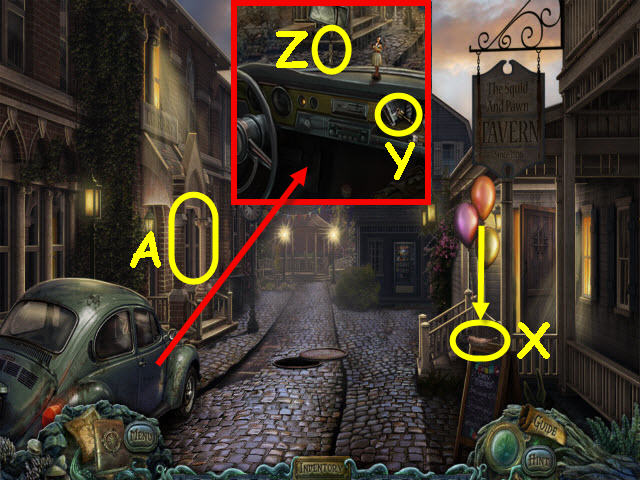
- Talk to the Boatman (A).
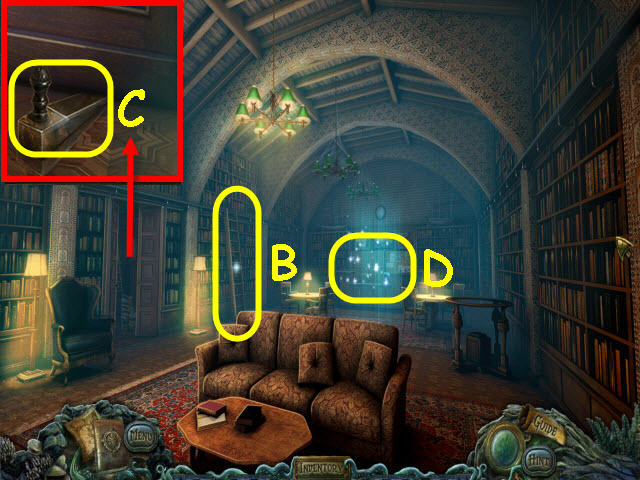
- Examine the boat; take the TRUNK KEY (B).
- Examine the trunk and use the TRUNK KEY on the lock; turn the key (C).
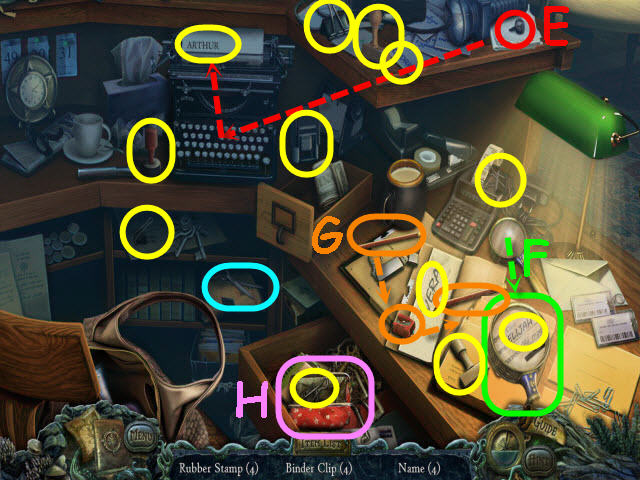
- Examine the opened trunk to access a HOP.
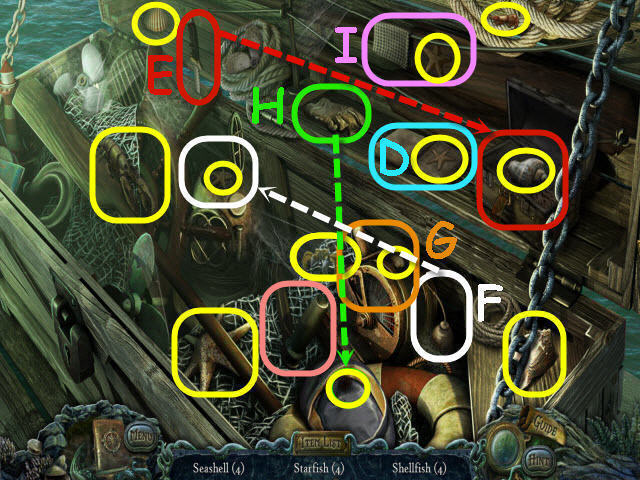
- Find the items listed.
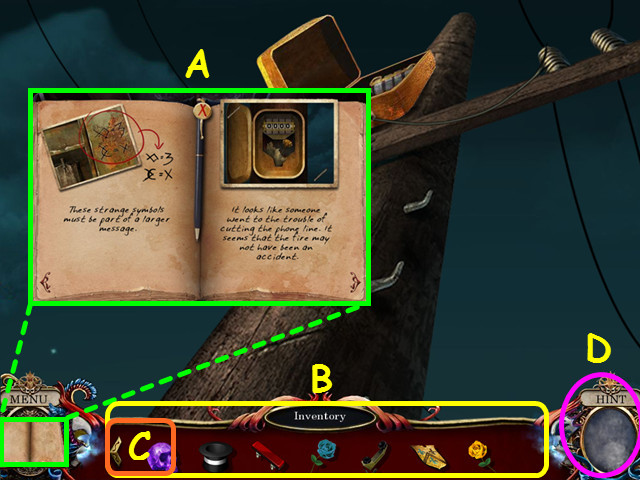
- Open the book to get a starfish (D).
- Use the knife on the strap to get a seashell (E).
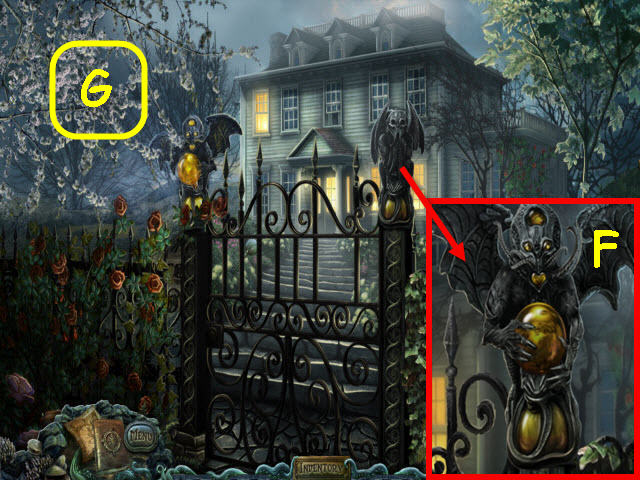
- Use the oilcan on the helmet to get a starfish (F).
- Move the lever to get a seashell (G).
- Use the glove to get the shellfish (H).
- Move the cloth to get a starfish (I).
- You will earn a WINCH HANDLE.
- Go left into the boat house.
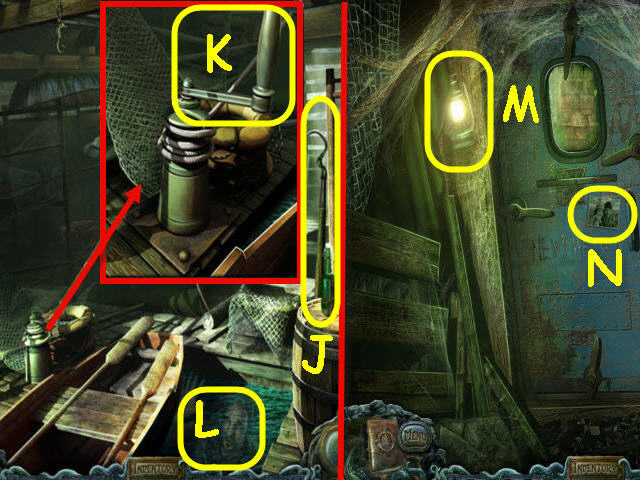
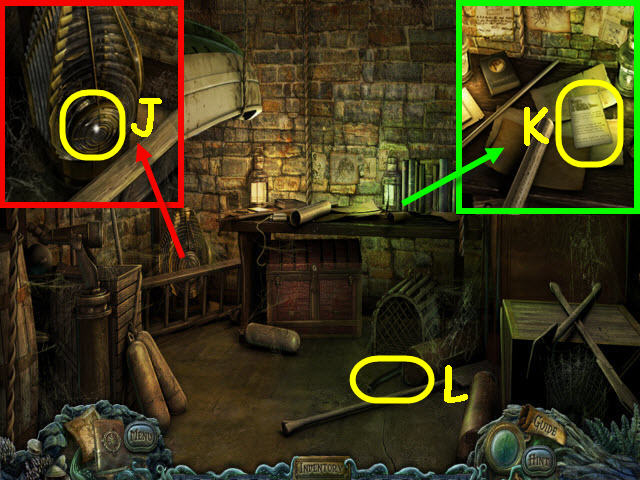
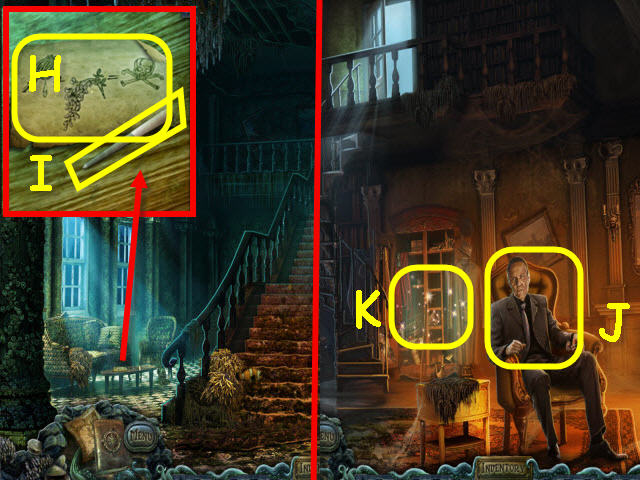
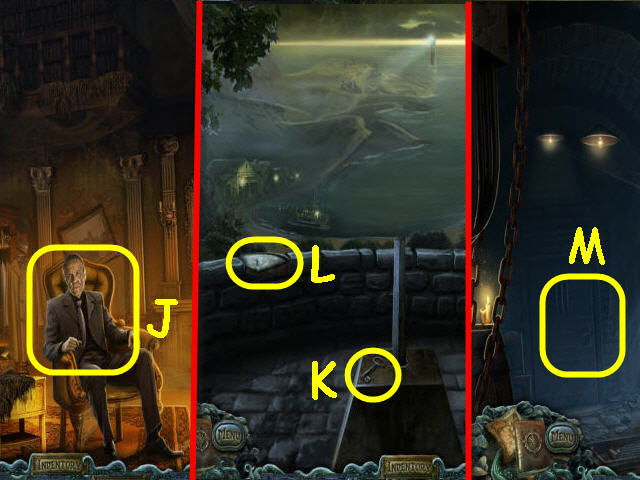
- Take the POLE HOOK (J).
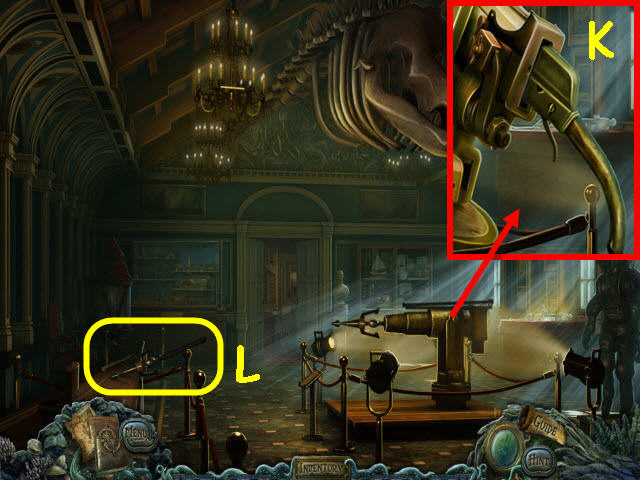
- Examine the winch and place the WINCH HANDLE on it; turn the handle (K).
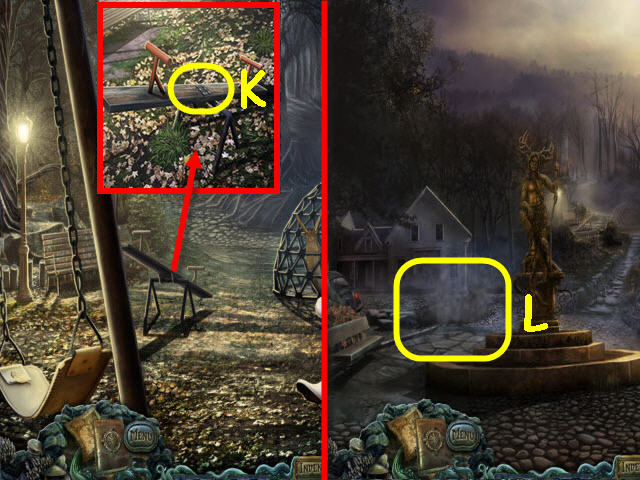
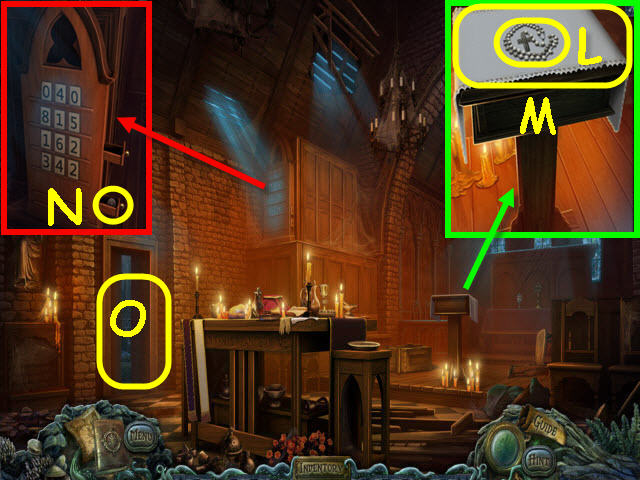
- Examine the apparition (L).
- Go forward into the cellar.
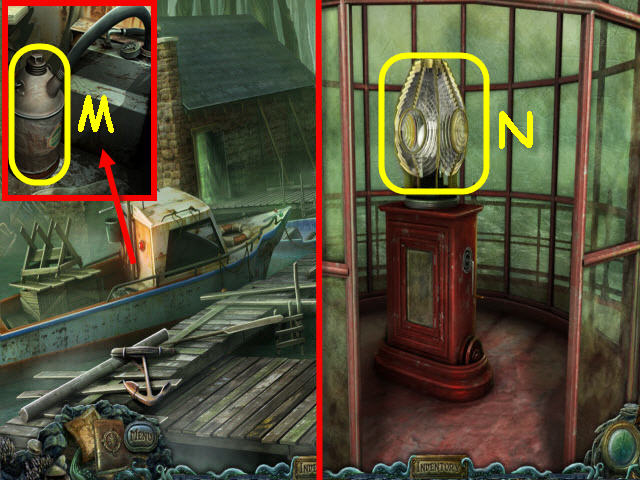
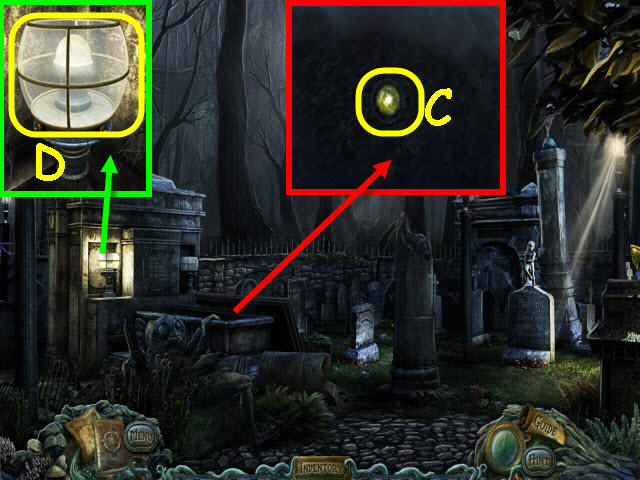
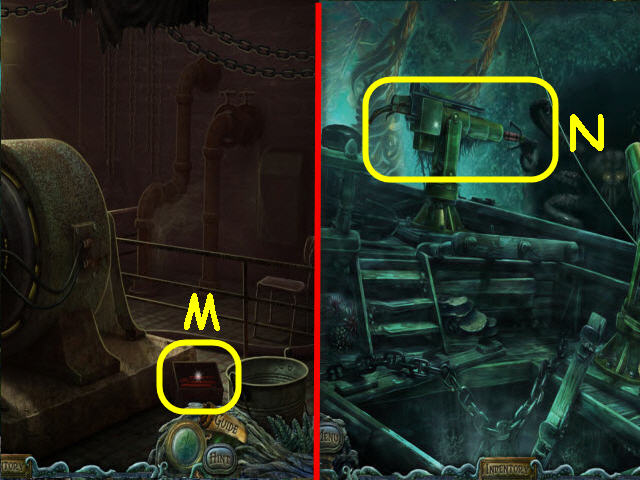
- Take the LANTERN (M) and the photo (N).
- Back out twice.
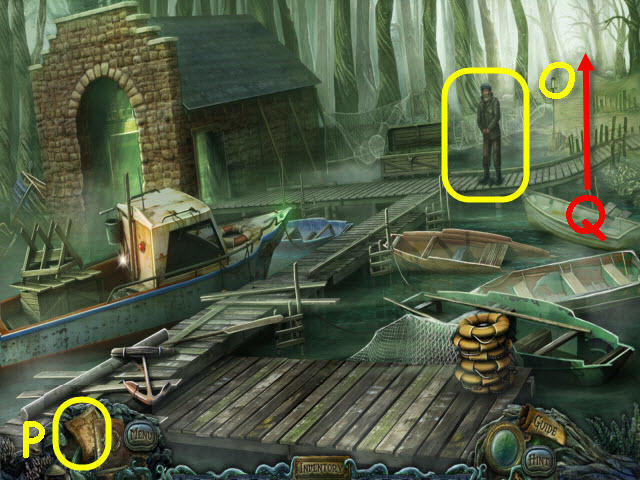
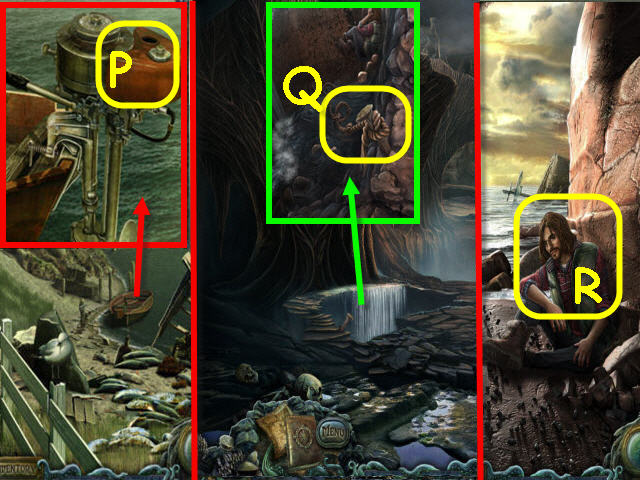
- Give the LANTERN to the boatman (O); get a map which will be added to your toolbar (P).
- Go forward to the beach (Q).
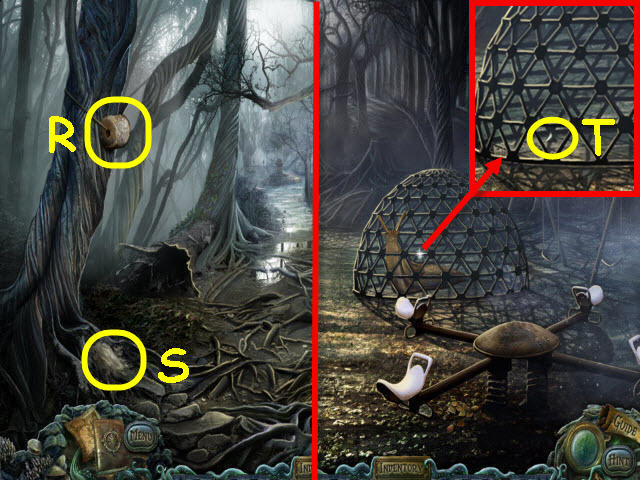
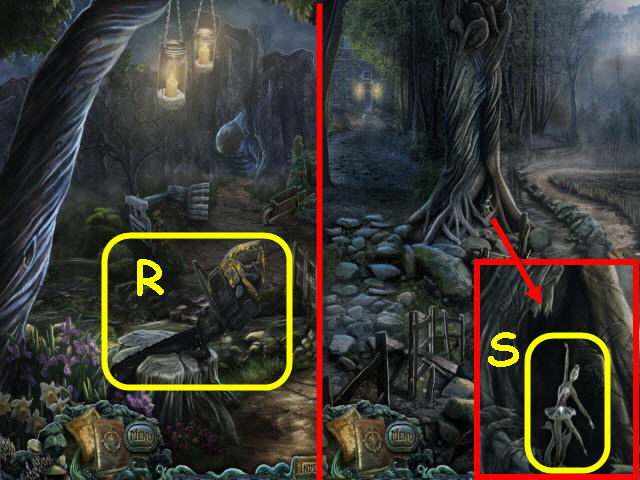
- Take the ROCK (R).
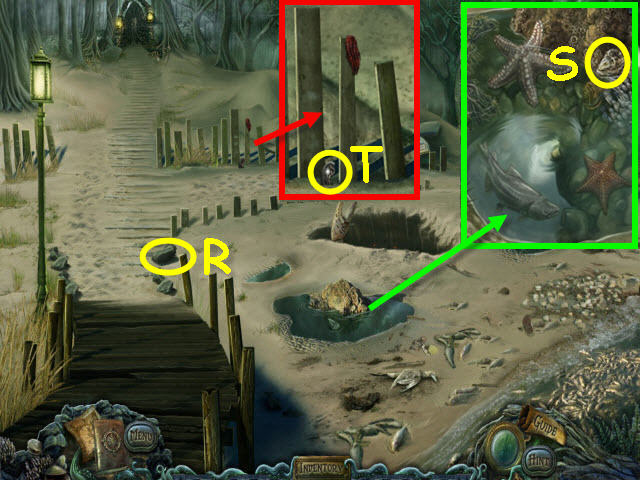
- Examine the puddle; take the OYSTER (S).
- Examine the fence; take the SIGIL PIECE (T).
- Go up the path on the left.
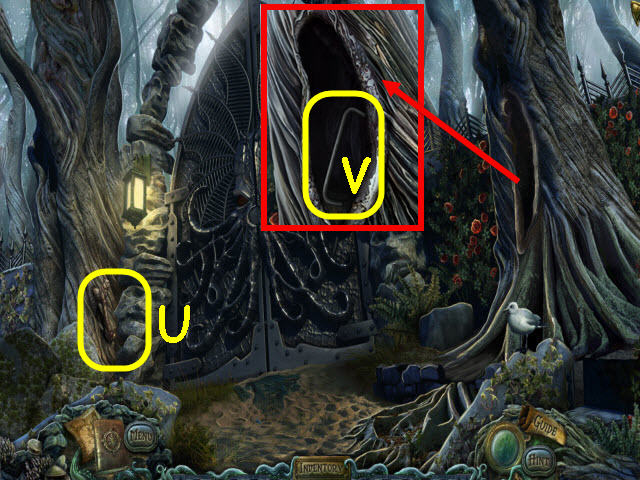
- Take the AXE (U).
- Examine the tree hollow; take the IRON RUNGS 1/4 (V).
- Back out and go right to the wharf.
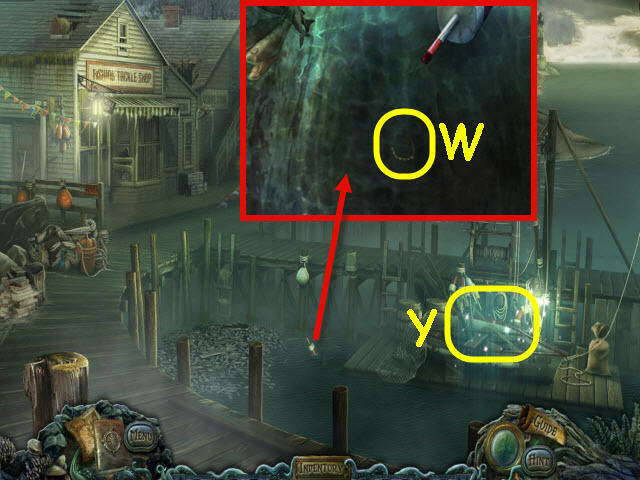
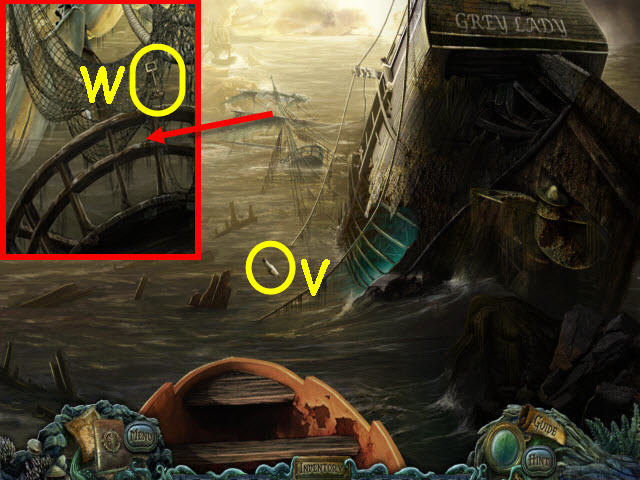
- Examine the buoy; use the POLE HOOK to get the SHELL BRACELET (W).
- Examine the boat to access a HOP (Y).
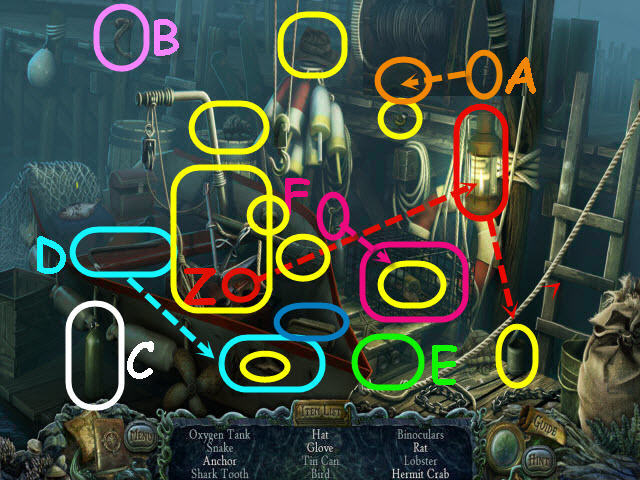
- Find the items listed.
- Use the lighter on the lantern to get the tin can (Z).
- Connect the hook to the helmet to get a bird (A).
- Move the bucket to get the snake (B).
- Move the cloth to get an oxygen tank (C).
- Use the crowbar on the sign to get a shark tooth (D).
- Move the 3 bricks to get the binoculars (E).
- Use the key on the cage to get a lobster (F).
- You will earn an IRON RUNG 2/4.
- Go forward twice to the lighthouse.
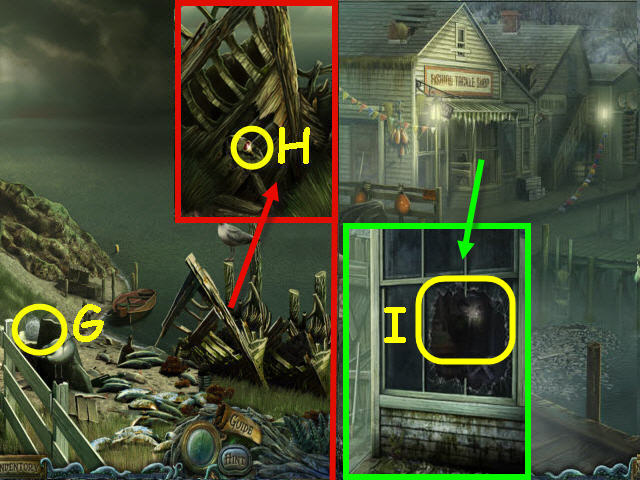
- Take the FISHING LINE (G).
- Examine the smashed boat and use the ROCK or AXE on it; take the REGISTER KEY (H).
- Back out twice.
- Examine the tackle shop and use the ROCK or AXE on the window; enter through the broken window (I).
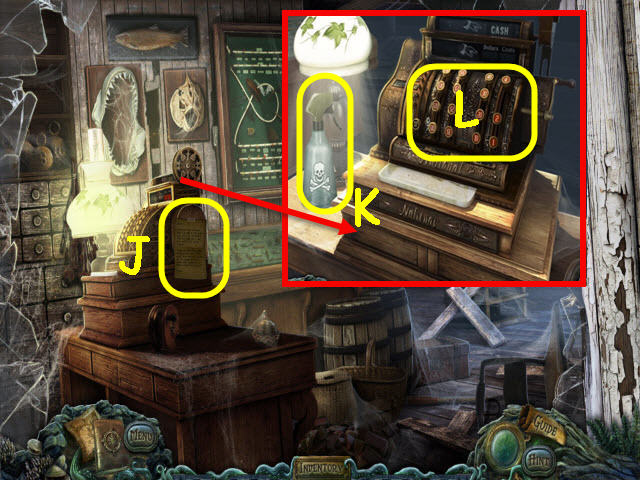
- Take the note (J).
- Examine the cash register; take the EMPTY SPRAY BOTTLE (K).
- Place the REGISTER KEY on the register to trigger a puzzle (L).
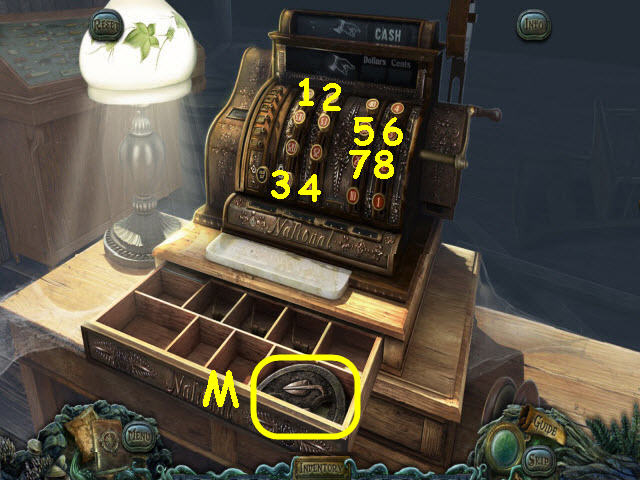
- Press all the keys in.
- To solve the puzzle, select the keys in the order marked: 1-8.
- Take the 2nd SIGIL PIECE (M).
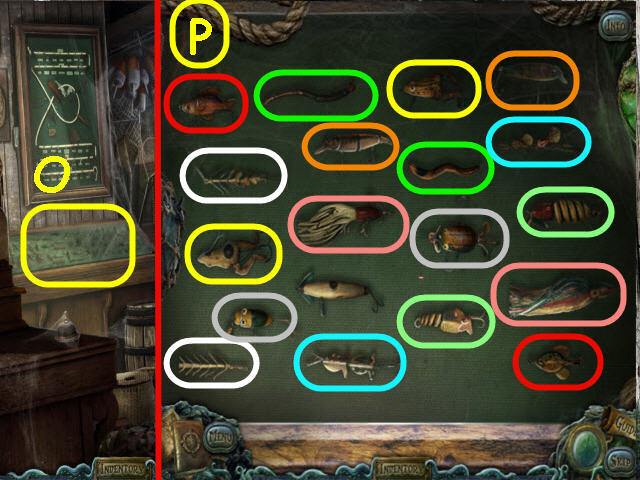
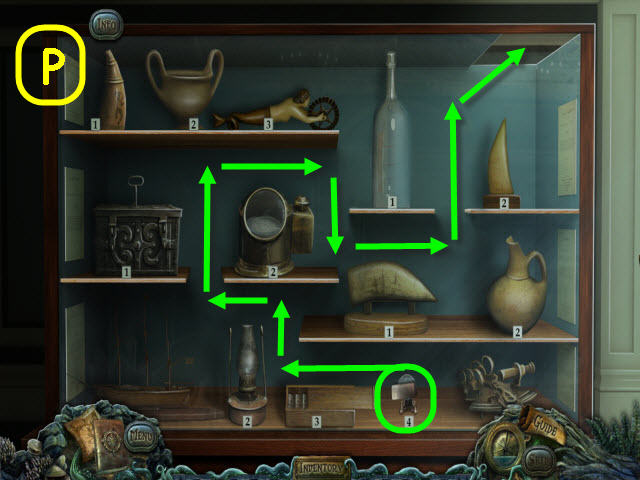
- Examine the display case to trigger a puzzle (O).
- Find the matching pairs.
- See screenshot for solution (P).
- Take the remaining FISHING LURE.
- You will automatically combine the FISHING LINE and the FISHING LURE to create a FISHING GEAR.
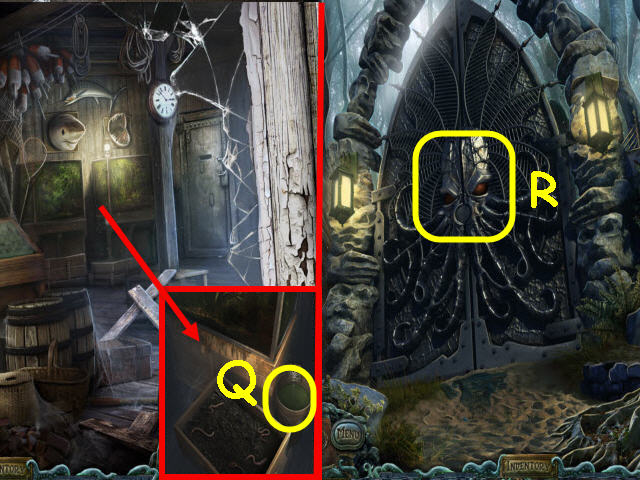
- Examine the aquariums; use the EMPTY SPRAY BOTTLE on the bucket to get WEED KILLER (Q).
- Back out twice and go up to the Gate.
- Examine the gate and place the 2 SIGIL PIECES on it (R).
- Go forward through the newly-opened gate.
Chapter 2: Finding Arthur
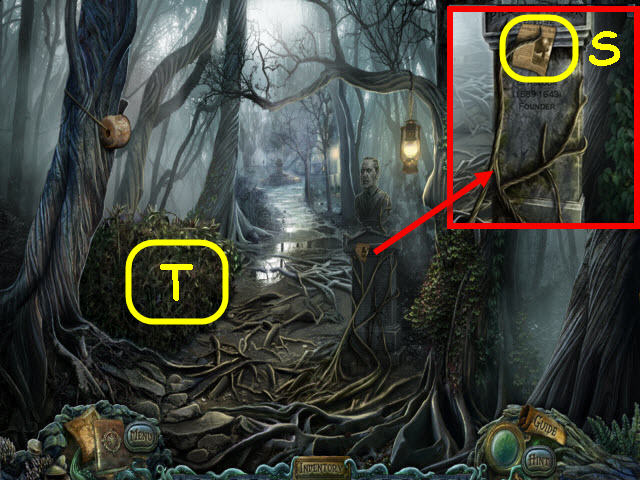
- Examine the statue and take the note (S).
- Use the WEED KILLER on the weeds (T).
- Examine the tree hollow from behind the weeds to access a HOP.
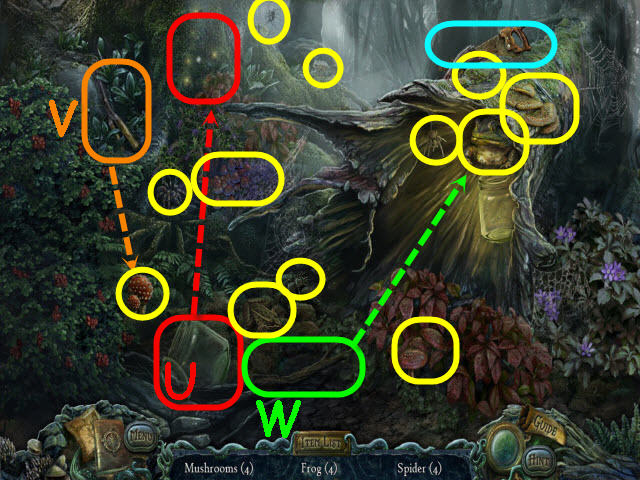
- Find the items listed.
- Use the jar on the fireflies to get a spider (U).
- Use the pruning shears on the bushes to get mushrooms (V).
- Use the stick on the tree hollow to get a frog (W).
- You will earn a HAND SAW.
- Go forward three times.
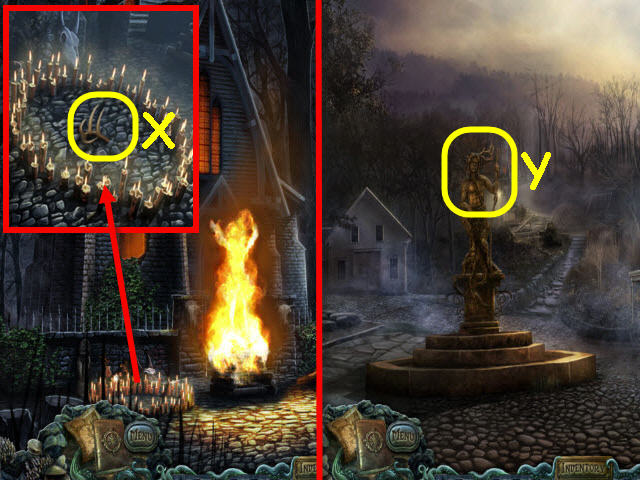
- Examine the ritual ring; take the ANTLER (X).
- Back out twice.
- Place the ANTLER on the statue and receive a WHALE AMULET (Y).
- Back out three times and go right twice.
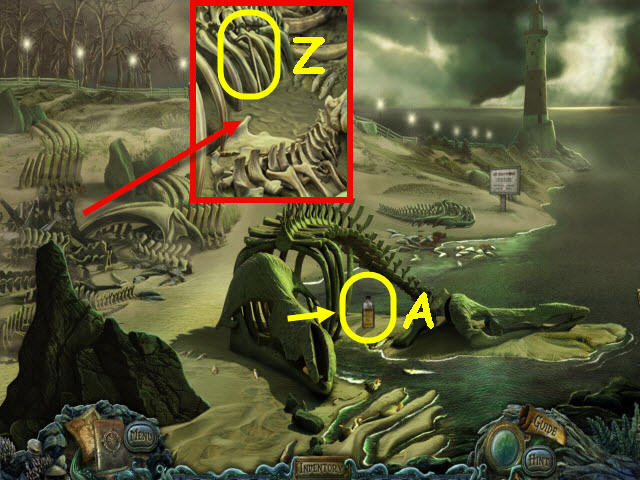
- Examine the WHALE BONES; take the IRON RUNGS 3/4 (Z).
- Use the WHALE AMULET on the whale skeleton; take the WHALE OIL (A).
- Go to the playground.
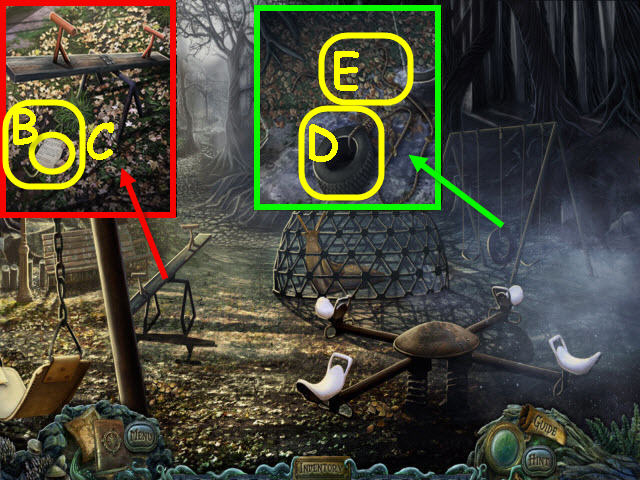
- Examine the seesaw and use the WHALE OIL on the center; move the seesaw. Take the note (B) and the IRON RUNGS 4/4 (C).
- Examine the tire swing and use the HAND SAW on the rope; take the CAR TIRE (D) and the KNOTTED ROPE (E).
- Go to the lighthouse.
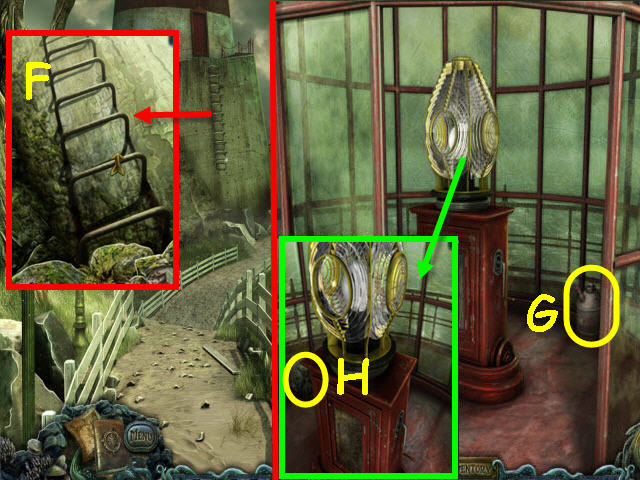
- Examine the lighthouse ladder and place the IRON RUNGS on it; go up (F).
- Take the EMPTY GAS CAN (G).
- Examine the light; take the NAUTICAL COMPASS (H).
- Go to the boathouse; go left to enter it and then enter the cellar.
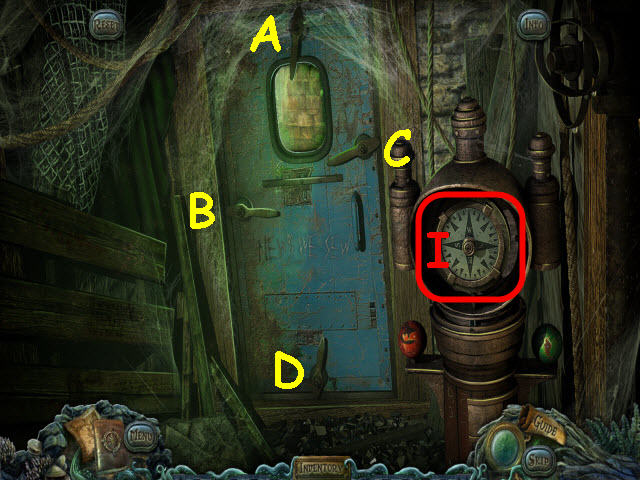
- Place the NAUTICAL COMPASS in the mechanism to trigger a puzzle (I).
- Select the levers in the correct order.
- To solve the puzzle, select the following levers: C, D, A, B, A, D, B, D and A.
- Go forward through the newly-opened door.
- Examine the bulb; take the FOCUSING LENS (J).
- Examine the right side of the desk; take the note (K).
- Take the LENGTH OF HOSE (L).
- Back out three times.
- Examine the boat; use the EMPTY GAS CAN and the LENGTH OF HOSE on the tank. Take the FULL GAS CAN (M).
- Go to the lighthouse and up the ladder.
- Examine the bulb and place the FOCUSING LENS on it to trigger a puzzle (N).
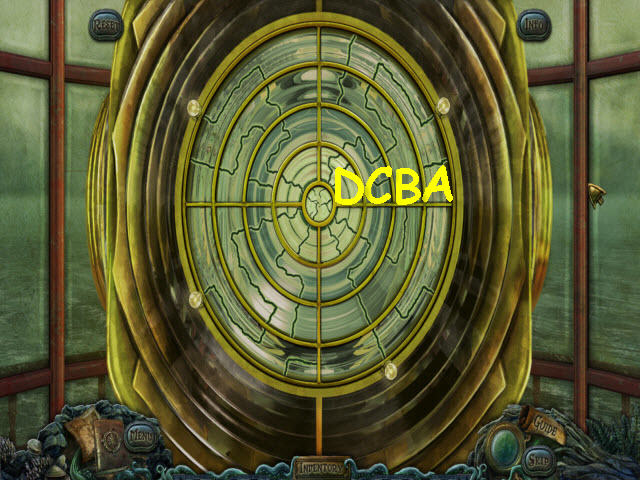
- Rotate the rings to complete the circuits.
- To solve the puzzle, select the following rings: A x 13, B x 18, C x 9 and D x 12.
- Back out.
- Examine the boat; remove the gas cap and use the FULL GAS CAN on the tank (P).
- Go to the Grey Lady with the boat and then to the upper left Coral Houses.
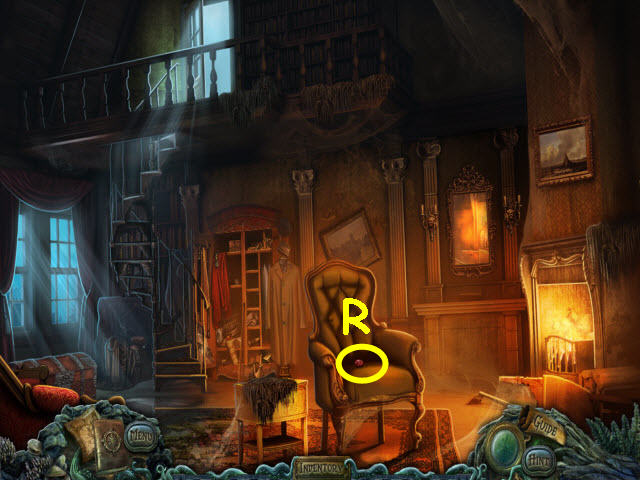
- Examine the hole; tie the KNOTTED ROPE on the spike (Q) and go down.
- Talk to Arthur (R).
Chapter 3: Unlocking Arthur’s Treasure
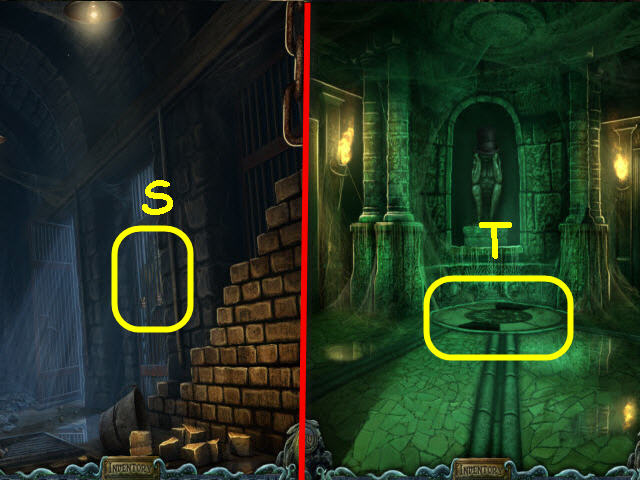
- Pick up ARTHUR’S CELL PHONE (S).
- Examine the broken bottles to trigger a puzzle (T).
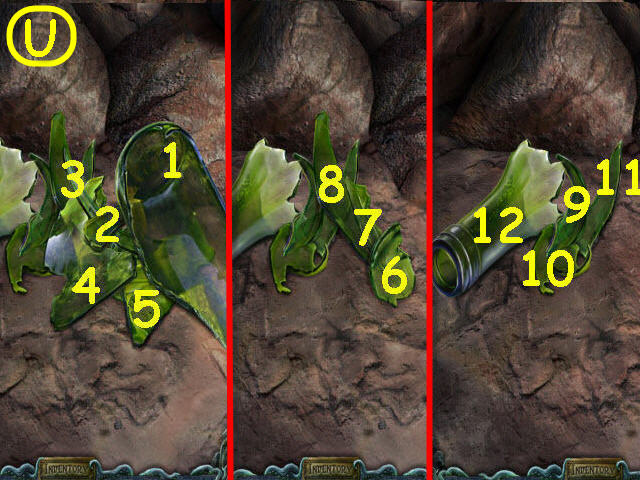
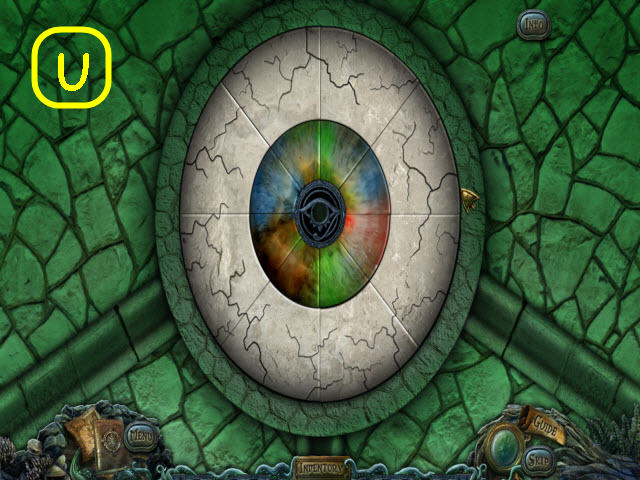
- Pick up the bottle pieces.
- To solve the puzzle, remove the pieces in the order marked (U).
- You will earn a BROKEN BOTTLE.
- Back out twice.
- Examine the bottle and take the note (V).
- Examine the rigging and use the BROKEN BOTTLE or the SHARP LETTER OPENER on the entangled key; take the KEY (W).
- Back out four times.
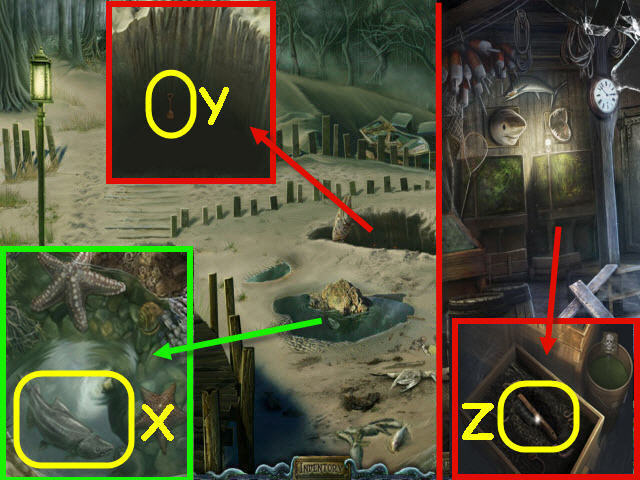
- Examine the tide pool and use the FISHING GEAR to get the STRIPED BASS (X).
- Examine the crab hole and use the STRIPED BASS in it. Reexamine the hole and take the PLASTIC SHOVEL (Y).
- Go to the wharf and enter the tackle shop.
- Examine the aquariums and use the PLASTIC SHOVEL on the dirt; take the WIRE BRUSH (Z).
- Go to the boathouse.
- Examine the hull and use the WIRE BRUSH on the barnacles; note the name of the boat (A).
- Enter the boathouse and go forward twice to the cellar.
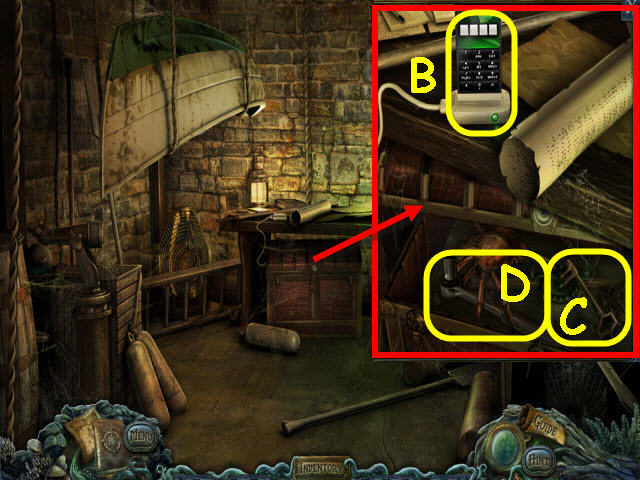
- Examine the trunk; place ARTHUR’S CELL PHONE on the charger (B).
- Examine the phone and enter the boat name on it; select the numbers 8,3,7,2 to spell Vera.
- Take the TOWN HALL KEY (C), and the SOCKET WRENCH (D).
- Go to the Town Hall.
Chapter 4: Meeting the Townsfolk
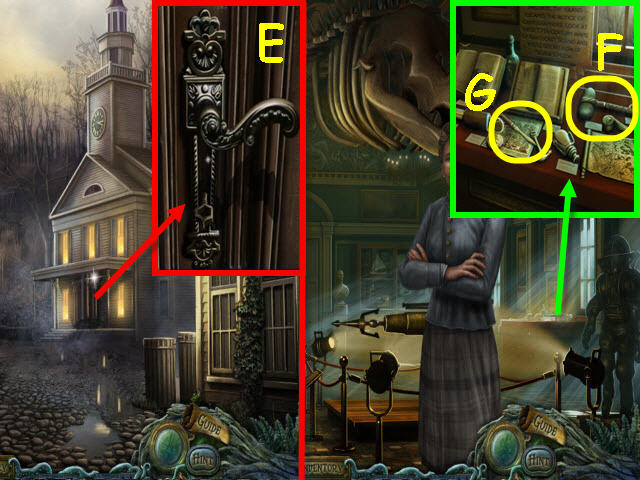
- Examine the door and use the TOWN HALL KEY on the lock; turn the key and pull the handle (E).
- Enter the Town Hall.
- Speak to the woman.
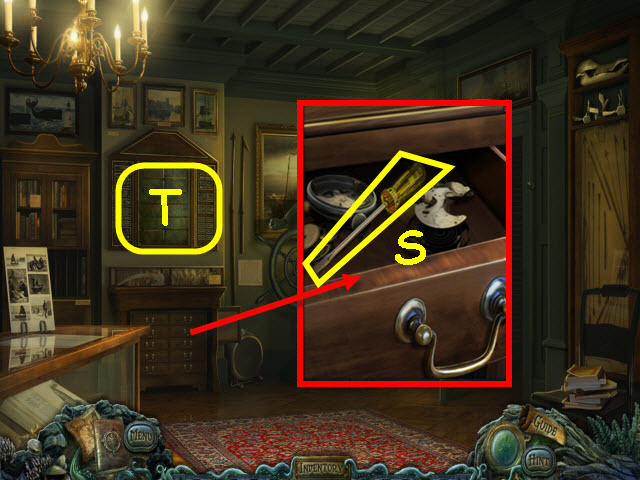
- Examine the display; take the STONE HAMMER (F) and the SHARP LETTER OPENER (G).
- Go to the wharf and enter the tackle shop.
- Examine the door and use the KEY on the lock; turn the key and the handle (H).
- Enter the newly-opened treasure room.
- Take the SCOOP (I).
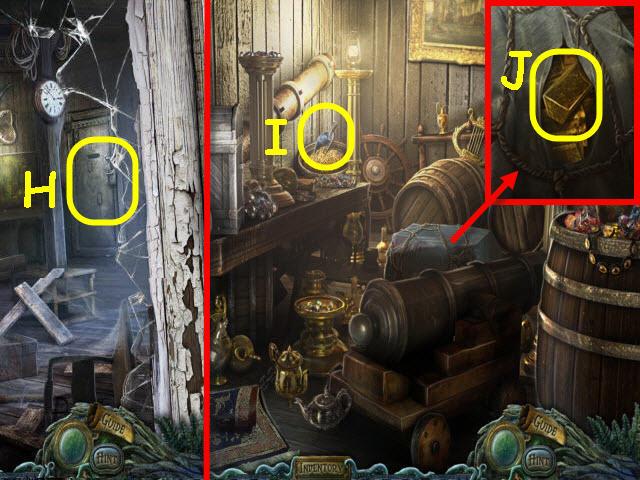
- Examine the covered pallet and use the SHARP LETTER OPENER or the BROKEN BOTTLE on the cloth; take the GOLD BAR (J).
- Go to the playground.
- Examine the seesaw and use the SOCKET WRENCH on the bolts (K); get a SEESAW PLANK.
- Back out and attempt to go left.
- Place the SEESAW PLANK on the hole (L).
- Go left.
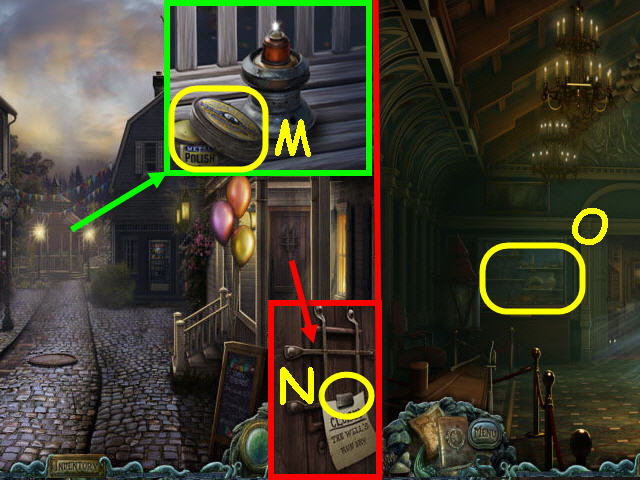
- Examine the gazebo; take the BRASS POLISH (M).
- Examine the tavern door; take the MAGNET (N).
- Speak to the barkeeper.
- Back out and enter the Town Hall.
- Examine the display case and place the MAGNET on the coin on the bottom shelf to trigger a puzzle (O).
- Guide the coin to the exit.
- See screenshot for path (P).
- You will earn a COMMEMORATIVE COIN.
- Back out and go left.
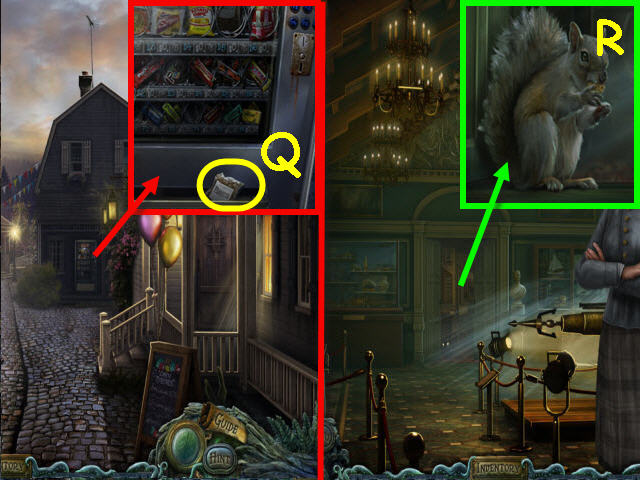
- Examine the vending machine and place the COMMEMORATIVE COIN in the coin slot; take the BAG OF PEANUTS (Q).
- Back out and go right into the Town Hall.
- Examine the doorway and give the BAG OF PEANUTS to the beast (R).
- Go forward to the back room.
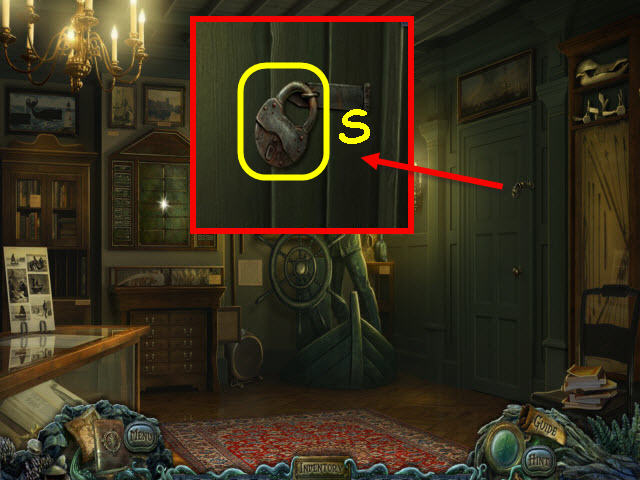
- Examine the padlock and use the GOLD BAR or STONE HAMMER on it (S).
- Examine the opened door to access a HOP.
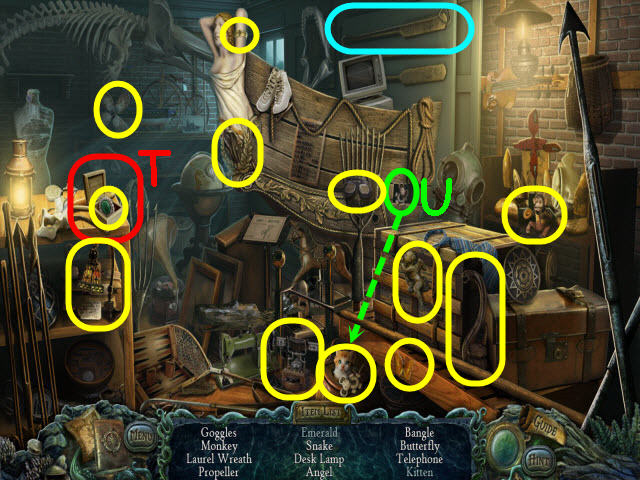
- Find the items listed.
- Open the box to get an emerald (T).
- Place the mouse on the basket to get a kitten (U).
- You will earn a MANHOLE HOOK.
- Go to the library.
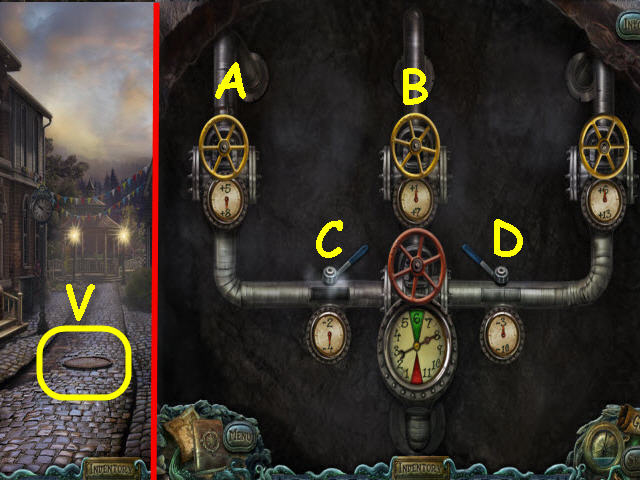
- Use the MANHOLE HOOK on the manhole cover (V).
- Examine the opened manhole to trigger a puzzle.
- Adjust the temp so the dial points to the green area.
- To solve the puzzle, turn the following valves and handles: B, D, A and C.
- You will earn a VALVE HANDLE.
- Back out.
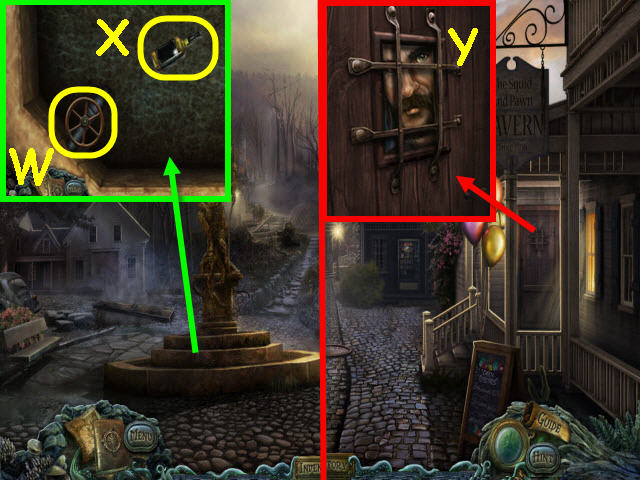
- Examine the fountain and place the VALVE HANDLE on the stem (W).
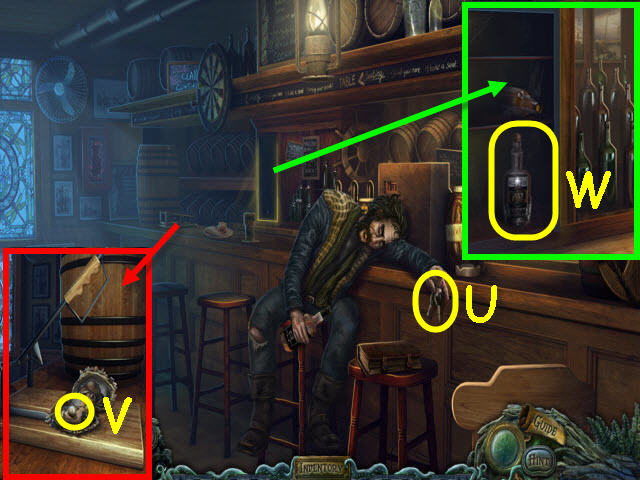
- Turn the valve; take the FIFTH OF WHISKEY (X).
- Go left.
- Examine the tavern door; give the FIFTH OF WHISKEY to the barkeeper (Y).
- Enter the tavern.

- Speak to the barkeeper (Z).
- Take the DART (A).
- Examine the fire extinguisher case and use the STONE HAMMER or GOLD BAR on the glass; take the FIRE EXTINGUISHER (B).
- Examine the shelves to access a HOP (C).
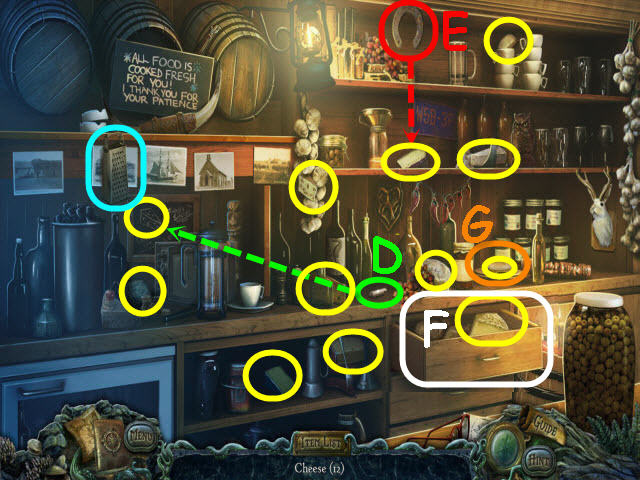
- Find the items listed.
- Use the chalk on the chalkboard to get a cheese (D).
- Knock down the horseshoe to get a cheese (E).
- Open the drawer to get a cheese (F).
- Remove the hamburger bun to get a cheese (G).
- You will earn a CHEESE GRATER.
- Go to the church.
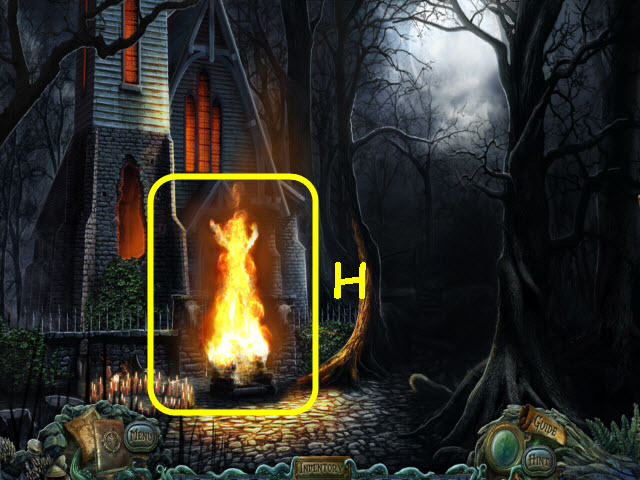
- Use the FIRE EXTINGUISHER on the flames (H).
- Enter the church.
Chapter 5: Through the Woods

- Speak to the priest (I).
- Examine the altar; take the CANDLE HOLDER (J).
- Examine the table to access a HOP (K).
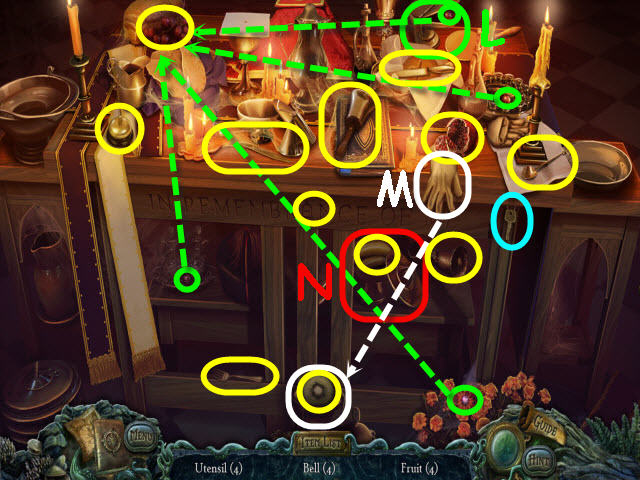
- Find the items listed.
- Open the vessel to get a grape; place the 4 grapes circled in green on the bunch of grapes to get a fruit (L).
- Use the glove on the incense burner to get a fruit (M).
- Remove the bowl lid to get fruit (N).
- You will earn a CABINET KEY.
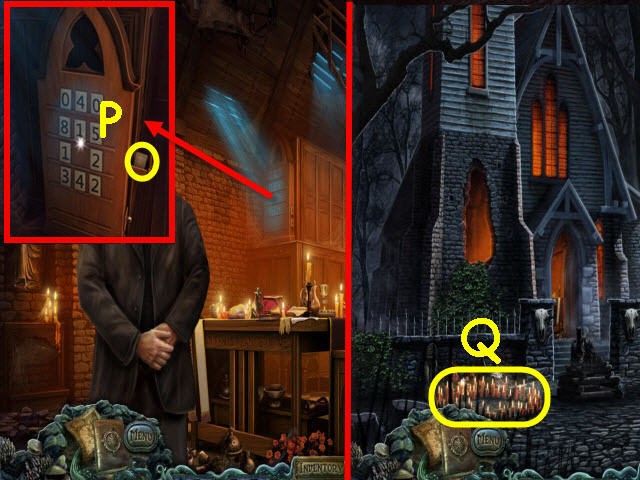
- Examine the hymnal board; open the side drawer and take the BLANK TILE (P).
- Back out.
- Examine the ritual ring and use the CANDLE HOLDER on it; get a LIT CANDLE (Q).
- Back out three times.
- Use the CHEESE GRATER on the salt lick (R).
- Take the MOUND OF SALT (S).
- Go forward twice.
- Examine the slug and use the MOUND OF SALT on it; take the SHUCKING BLADE (T).
- Back out and go left; enter the tavern.
- Take the CAR KEYS (U).
- Examine the shucker and place the SHUCKING BLADE on it. Place the OYSTER under the blade and pull the handle; take the PEARL (V).
- Examine the cabinet and use the CABINET KEY on the lock; turn the key and take the 190 PROOF ALCOHOL (W).
- Back out.
- Use the DART on the balloons; take the QUILL (X).
- Use the CAR KEYS on the car; examine the opened car door. Open the glove box; take the LIBRARY KEY (Y) and the CROSS (Z).
- Examine the library door and use the LIBRARY KEY on the lock; turn the key and pull the handle (A).
- Enter the library.
- Take the LADDER (B).
- Examine the doorway; take the DOOR STOP (C).
- Examine the desk to access a HOP (D).
- Find the items listed.
- Place the typewriter key on the typewriter to get a name (E).
- Use the magnifying glass on the card to get a name (F).
- Use the unsharpened pencil on the sharpener; use the sharpened pencil to get a name (G).
- Open the coin purse to get a binder clip (H).
- You will earn SCISSORS.
- You will automatically use the SCISSORS on the SHELL BRACELET to get a LANTERN WICK.
- Go left into the office.
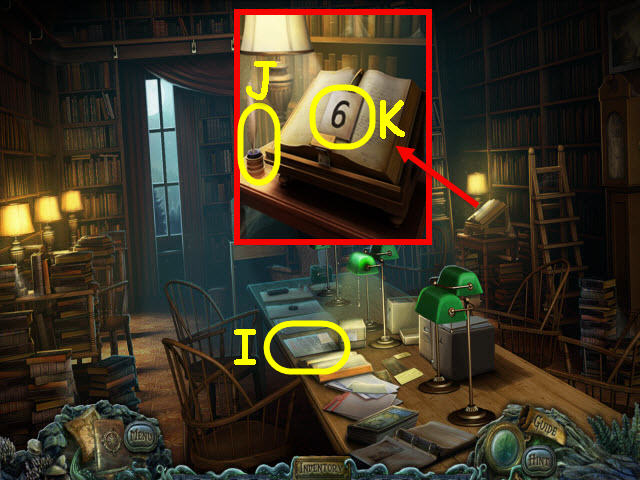
- Take the note (I).
- Examine the book stand; place the QUILL in the ink well (J) and the BLANK TILE on the holder. Select the quill; take the NUMBERED TILE (K).
- Go to the church and enter it.
- Examine the altar and place the PEARL and CROSS on the broken rosary. Take the ROSARY (L) and the LINEN CLOTH (M).
- Examine the hymnal board band place the NUMBERED TILE on it; take the ANCHOR MEDALLION (N).
- Give the ROSARY to the priest.
- Go out the door on the left (O).

- Examine the gravestone; take the ROSES (P), and the BIBLE (Q).
- Go to the Town Hall.
- Examine the trashcans and use the ROSES on it; take the DRAWER HANDLE (R).
- Enter the Town Hall and go straight into the back room.
- Examine the drawers and place the DRAWER HANDLE on it. Pull the handle; take the SCREWDRIVER (S).
- Examine the plaques and use the BRASS POLISH and LINEN CLOTH on them to trigger a puzzle (T).
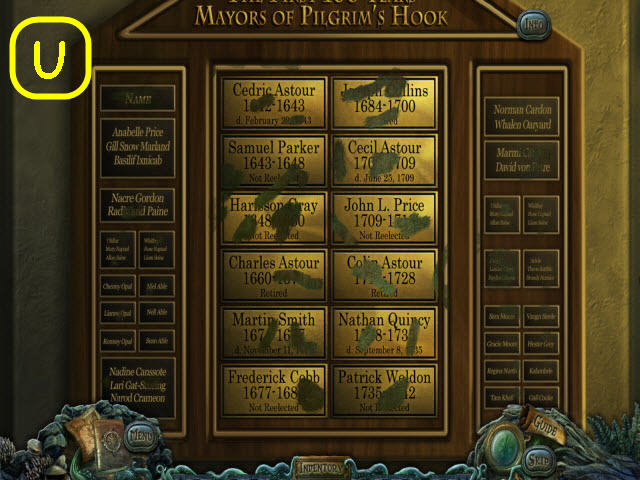
- Place the plaques in chronological order.
- See screenshot for solution (U).
- You will get a date of death plaque in your journal.
- Go to the library and enter it; go left into the back room.
- Examine the bookshelf and place the BIBLE on it; take the GAVEL (V) and the note (W).
- Back out twice.
- Place the LADDER against the pole; examine the clock face and note the steering wheel configuration (X).
- Go to the Town Hall; enter the hall and go to the back room.
- Examine the statue to trigger a puzzle (Y).
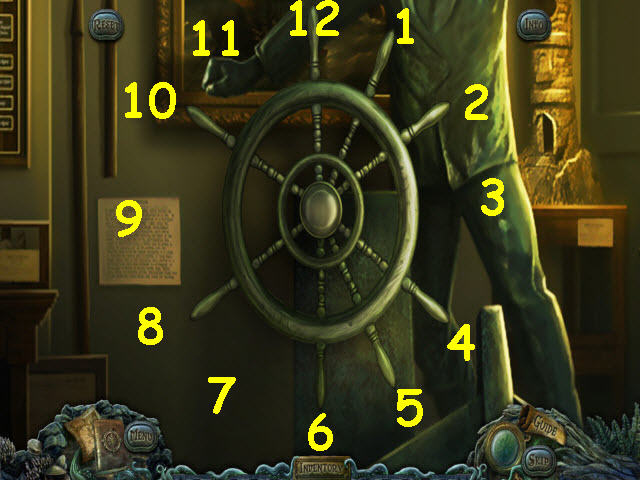
- Set the wheel to match the clock face at the library.
- To solve the puzzle, select the handles as follows: 2, 1, 4, 3, 2, 5, 4, 3, 6, 5, 4, 7, 6, 5, 8, 7, 6, 9, 8, 7, 10, 9, 8, 11, 10, 9, 12, 11, 10, 1 and 12.
- You will earn a LANTERN TOP.
- Go to the church and enter it; go out the left door to the graveyard.
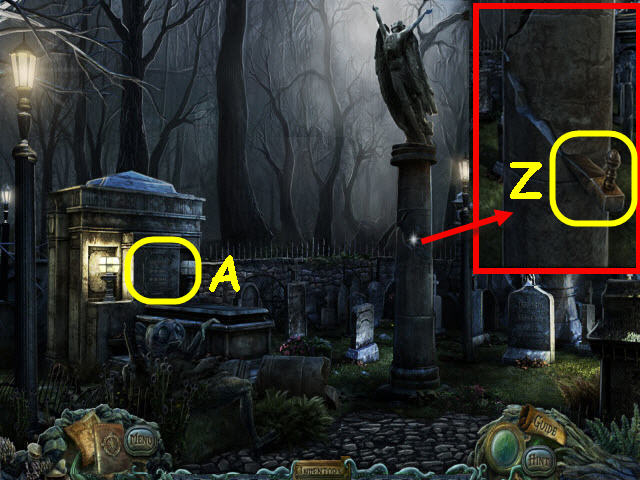
- Examine the pillar and use the DOOR STOP in the crack; use the GAVEL on the DOOR STOP (Z).
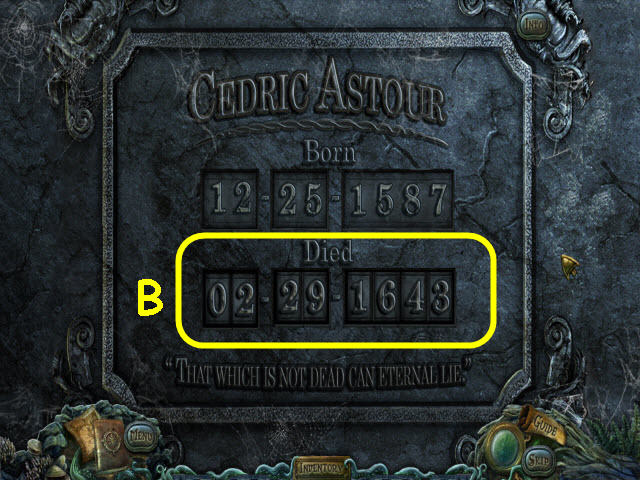
- Examine the grave to trigger a puzzle (A).
- Set the correct date of Cedric’s death.
- To solve the puzzle, change the date to: 02-29-1643 (B).
- Examine the opened coffin; take the EYE OF CASTOR (C).
- Examine the lantern and use the SCREWDRIVER on the screws; take the LANTERN GLOBE (D).
- Go to the library.
- Examine the gazebo and in this order; place the LANTERN WICK, 190 PROOF ALCOHOL, LIT CANDLE, LANTERN GLOBE and LANTERN TOP on the lantern base. Take the LANTERN (E).
- Go to the church.
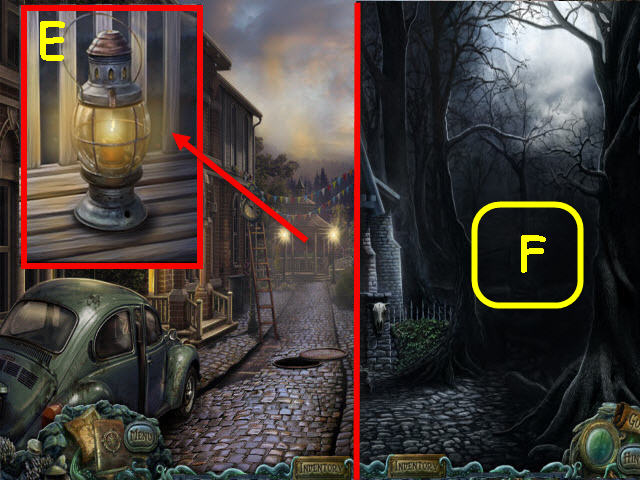
- Use the LANTERN on the dark path (F).
- Go right up the path.
Chapter 6: Saving the Deer
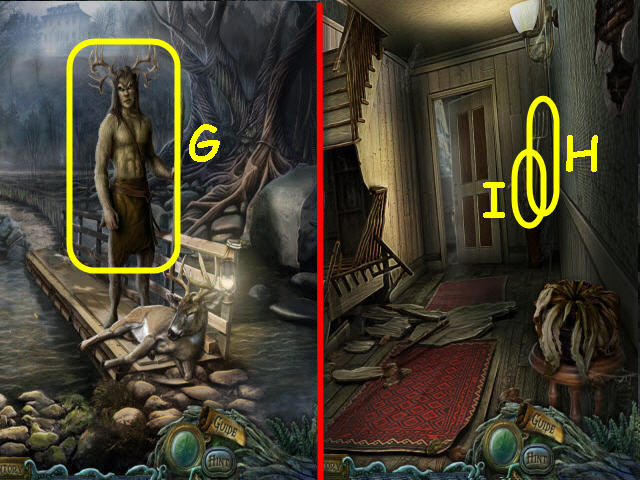
- Speak to the prophet (G).
- Go up the path on the left and enter the house.
- Take the PITCHFORK (H) and UMBRELLA (I).
- Go forward into the kitchen.
- Examine the kitchen table to access a HOP.

- Find the items listed.
- Open the cookbook to get a nut (J).
- Use the sponge on the cereal bowl to get a nut (K).
- Open the jar to get a pepper (L).
- Use the spoon on the dirt to get an egg (M).
- You will earn a POTHOLDER.
- Back out twice and go up the path on the right.
- Take the WATER BOTTLE (N).
- Examine the wheel well and place the CAR TIRE on the axle; take the CAR JACK (O).
- Use the PITCHFORK on the compost pile (P).
- Move the wheelbarrow; use the PITCHFORK on the moved wheelbarrow (Q).
- Examine the fertilized garden to trigger a puzzle (R).

- Arrange the seeds per the rules.
- Select the watering can when complete.
- See screenshot for solution (S).
- You will earn an ONION.
- Go forward.
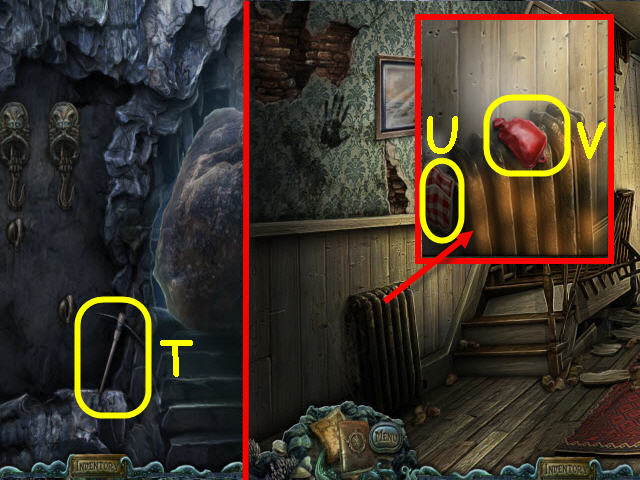
- Take the PICKAXE (T).
- Back out twice and go forward.
- Examine the radiator and use the POTHOLDER on the valve (U).
- Place the WATER BOTTLE on the radiator; take the HOT WATER BOTTLE (V).
- Go forward.
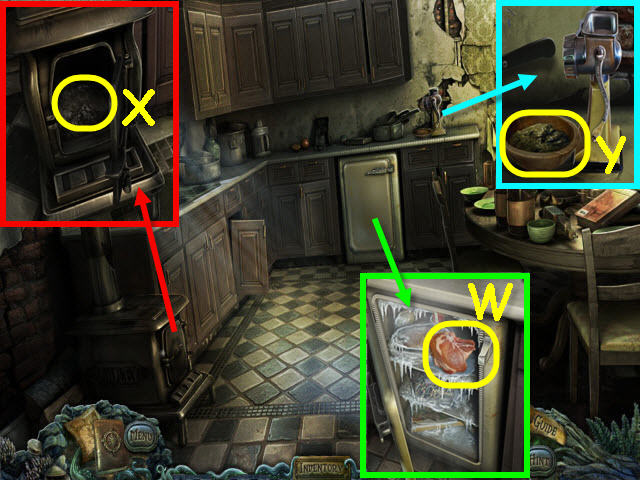
- Examine the icebox and open it. Use the HOT WATER BOTTLE on the meat; take the STEAK (W).
- Examine the stove and open it; use the SCOOP to get WOOD ASH (X).
- Examine the grinder and place the ONION, STEAK, and WOOD ASH in the top. Turn the handle; take the POULTICE (Y).
- Back out three times.
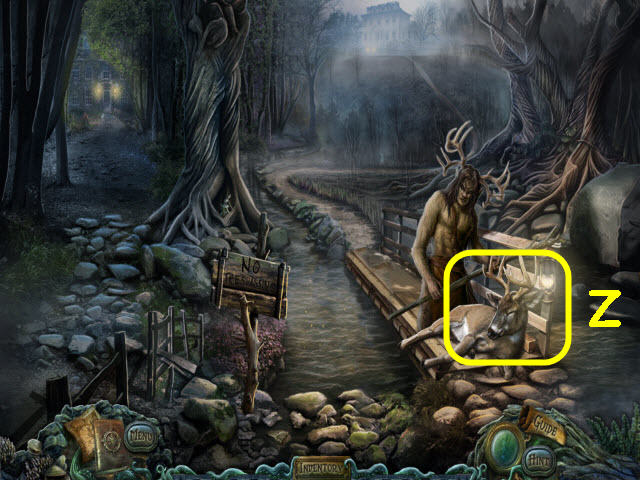
- Examine the deer and give him the POULTICE (Z).
- Go forward.
Chapter 7: Discovering Your Past
- Take the METAL BAR (A).
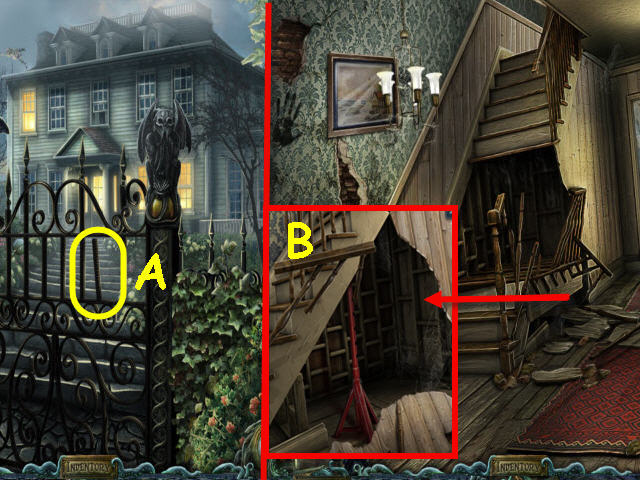
- Go to Hargrove house and enter it.
- Examine the stairs and place the CAR JACK under them; use the METAL BAR on the car jack (B).
- Go up the stairs.
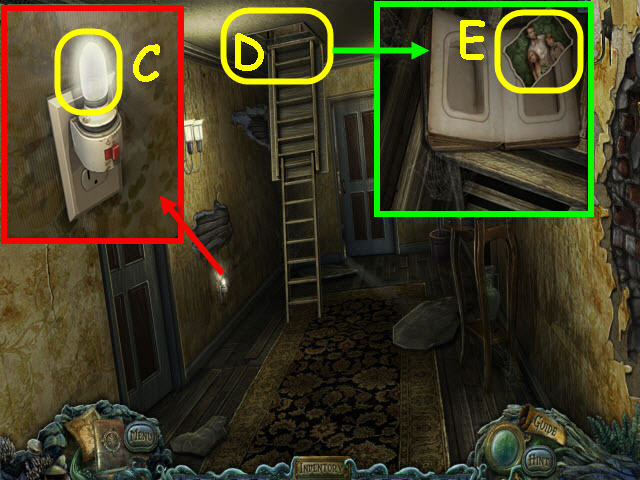
- Examine the nightlight; take the SMALL LIGHT BULB (C).
- Use the UMBRELLA on the attic latch; examine the opened hatch (D).
- Open the book; take the FAMILY PHOTOS 1/3 (E).
- Go forward.
- Examine the toy chest to access a HOP.
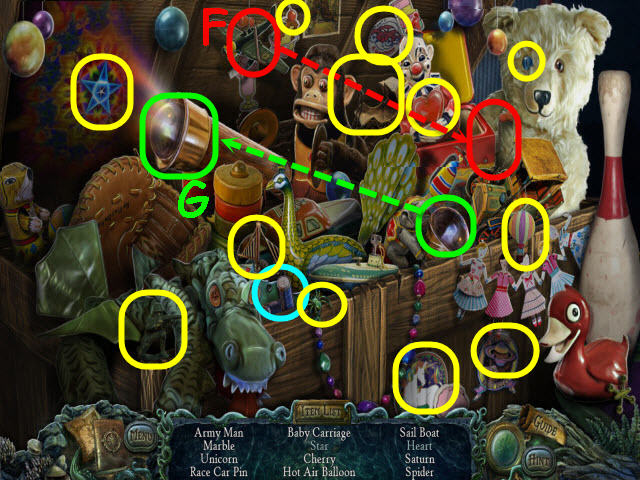
- Find the items listed.
- Place the crank on the jack in the box to get a heart (F).
- Place the lens on the kaleidoscope to get a star (G).
- You will earn BATTERIES.
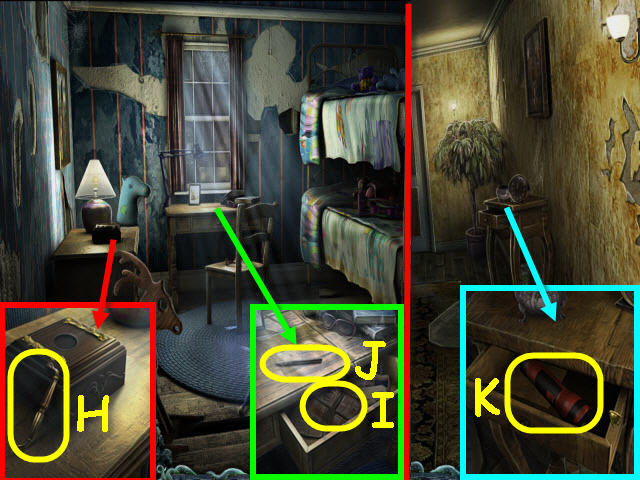
- Examine the dresser; take the CABINET HANDLE (H).
- Examine the desk and open the drawer. Select Arthur’s journal twice to take it (I); take the HOBBY KNIFE (J).
- Back out.
- Examine the hall table and open the drawer. Place the BATTERIES in the flashlight; take the FLASHLIGHT (K).
- Enter the room on the left.

- Use the FLASHLIGHT under the bed; examine the box and open it. Open the card and take the FAMILY PHOTOS 2/3 (L).
- Take the HAIRBRUSH (M) and INSECTICIDE (N).
- Back out twice and go forward.
- Examine the cabinet and place the CABINET HANDLE on it (O).
- Examine the opened cabinet to trigger a puzzle.
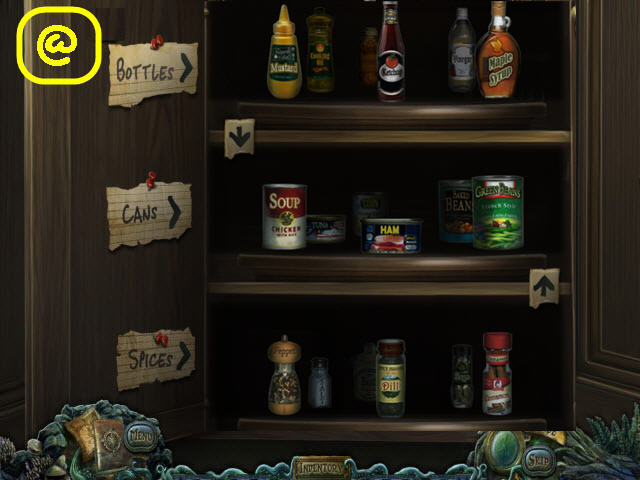
- Arrange the items so they are on their proper shelves.
- The starting layout is random.
- See screenshot for one solution (@).
- You will earn COOKING OIL.
- Back out twice.
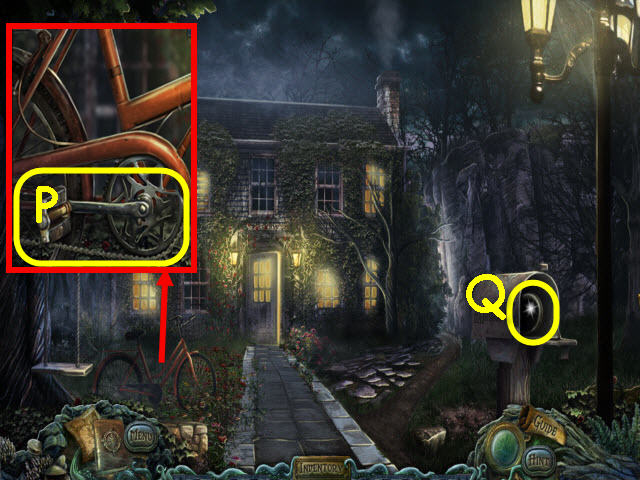
- Examine the bicycle and use the COOKING OIL on the chain; take the BICYCLE CHAIN (P).
- Open the mailbox and use the INSECTICIDE on the bugs; take the METAL EYELET (Q).
- Go up the path on the right.
- Use the BICYCLE CHAIN on the chainsaw and automatically get a CHAINSAW (R).
- Back out twice.
- Examine the tree roots and use the CHAINSAW on them; take the BALLERINA FIGURINE (S).
- Go to the library and enter it; go into the room on the left.
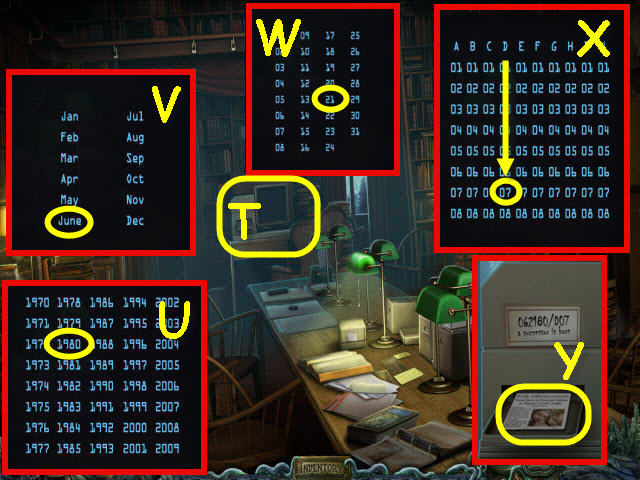
- Examine the microfiche machine and place the SMALL LIGHT BULB under the monitor to trigger a puzzle (T).
- Find the correct microfiche by using the clue above the tray.
- To solve the puzzle, select the following: 1980 (U), June (V), 21 (W), D07 (X), and then select print.
- Take the BIRTH ANNOUNCEMENT (Y).
- You will automatically use the HOBBY KNIFE on the BIRTH ANNOUNCEMENT to get the FAMILY PHOTOS 3/3.
- Go to the upstairs hall of Hargrove house.
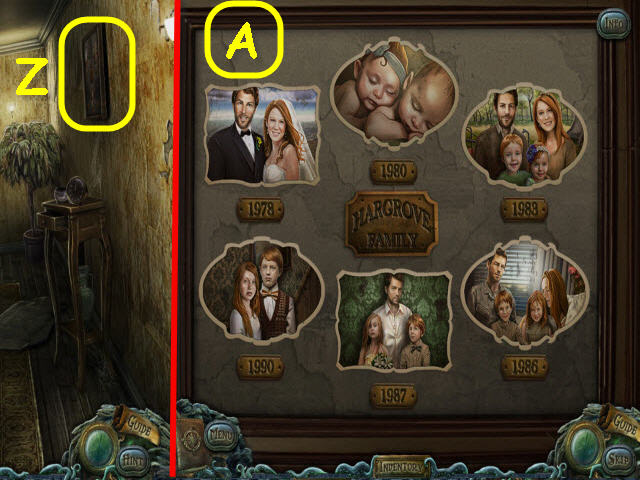
- Examine the picture frame and place the FAMILY PHOTOS on it to trigger a puzzle (Z).
- Arrange the pictures in chronological order.
- See screenshot for solution (A).
- Take the SAFE COMBINATION 1/2.
- Go forward.
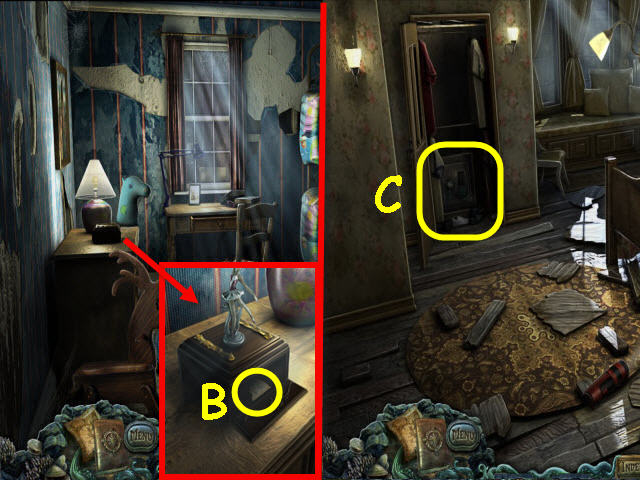
- Examine the dresser and place the BALLERINA FIGURINE on the box; take the SAFE COMBINATION 2/2 (B).
- Back out and go left.
- Open the closet door and move the clothes; place the SAFE COMBINATION on the safe to trigger a puzzle (C).
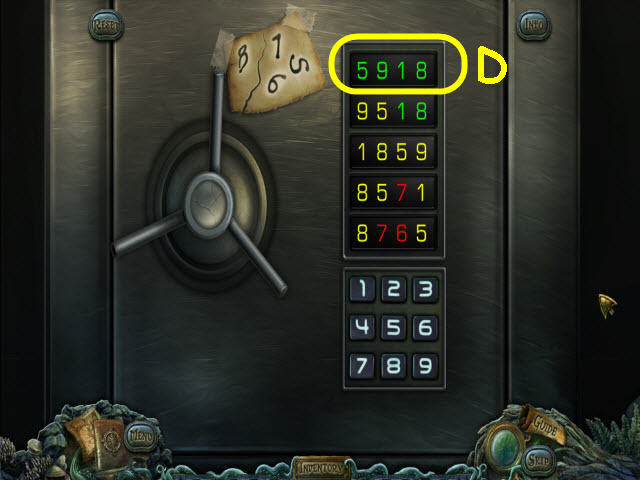
- Enter the correct combination to open the safe.
- To solve the puzzle, enter the following code: 5918 (D).
- Read the note and take the CAR KEY.
Chapter 8: Pirates!
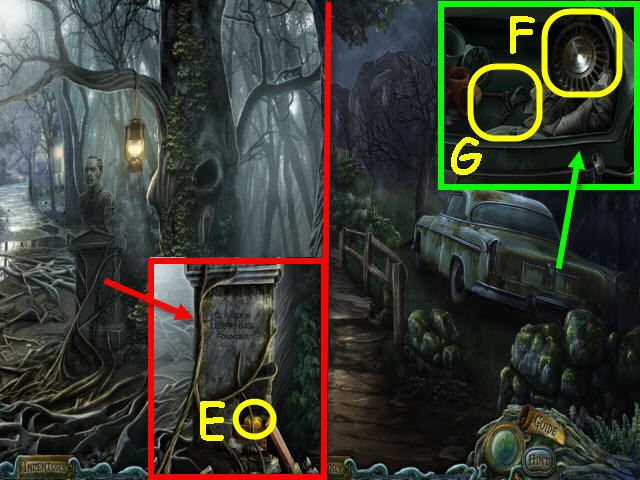
- Go to the Gate and then forward.
- Examine the statue and use the PICKAXE on the base; open the box and take the HEART OF CASTOR (E).
- Go to Hargrove House and up the path on the right.
- Examine the trunk and use the CAR KEY on the lock; take the HUBCAP (F) and PRUNERS (G).
- Go forward.
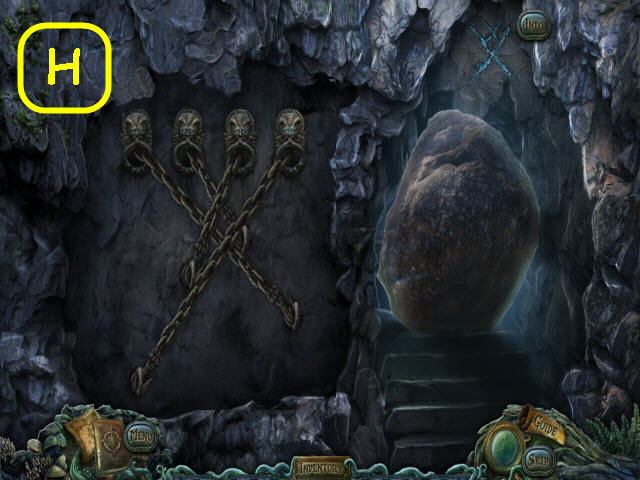
- Place the METAL EYELET on the rocks to trigger a puzzle.
- Pull the chains to the hooks to match the clue above the boulder.
- See screenshot for solution (H).
- Go forward through the newly-opened passage.

- Examine the shore; take the PRY BAR (I).
- Back out four times.
- Use the PRY BAR on the loose board; get a WOODEN BOARD (J).
- Examine the stream; use the HUBCAP on the nuggets to get GOLD NUGGETS (K).
- Return to the pirate ship.
- Place the WOODEN BOARD on the gap (L).
- Go across the board to enter the ship.
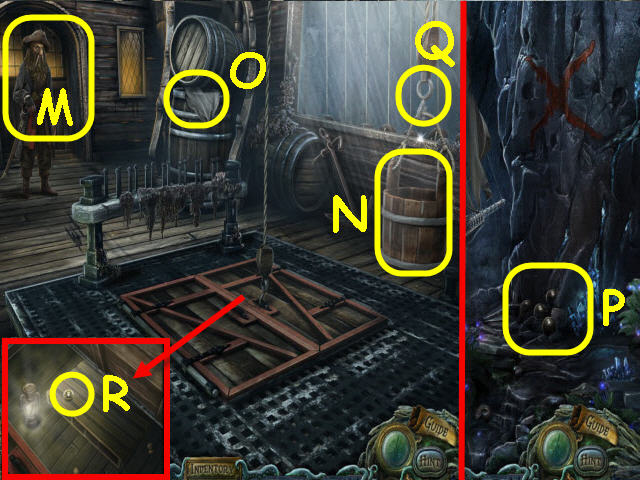
- Talk to the Captain (M).
- Take the EMPTY BUCKET (N) and BURLAP SACK (O).
- Back out.
- Examine the cannonballs and use the BURLAP SACK on them to get a BAG OF CANNONBALLS (P).
- Return to the pirate ship.
- Hang the BAG OF CANNONBALLS on the hook (Q).
- Examine the opened cargo hold; take the PIRATE MEDALLION (R).
- Speak to the Captain.
- Go forward into the Captain’s quarters.
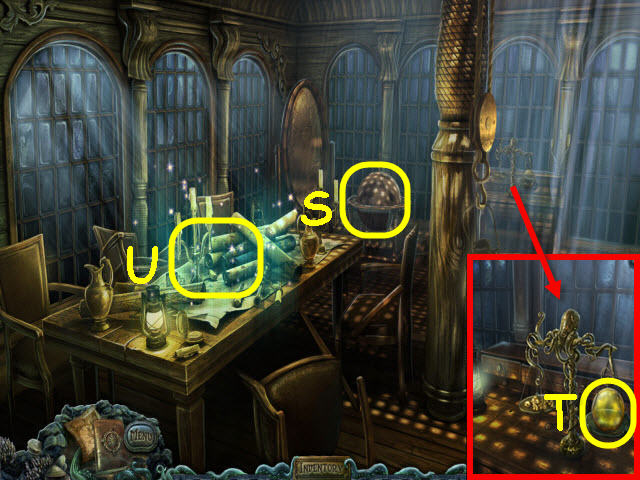
- Take the GLOBE (S).
- Examine the scale and place the GOLD NUGGETS on it; take the GREED OF CASTOR (T).
- Examine the table to access a HOP (U).
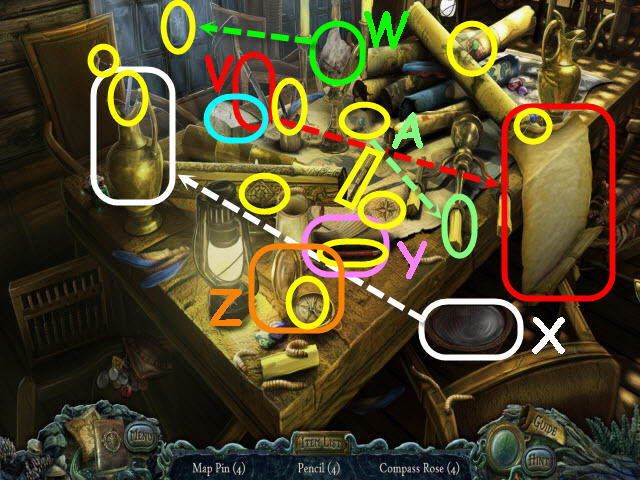
- Find the items listed.
- Use the knife on the scroll to get a map pin (V).
- Use the cloth on the window to get a compass rose (W).
- Use the bowl of water on the vase to get a pencil (X).
- Pick up the map to get a pencil (Y).
- Open the compass to get a compass rose (Z).
- Place the candle in the candelabra to get a map pin (A).
- You will earn a KEYSTONE.
- Go to the library and enter it.
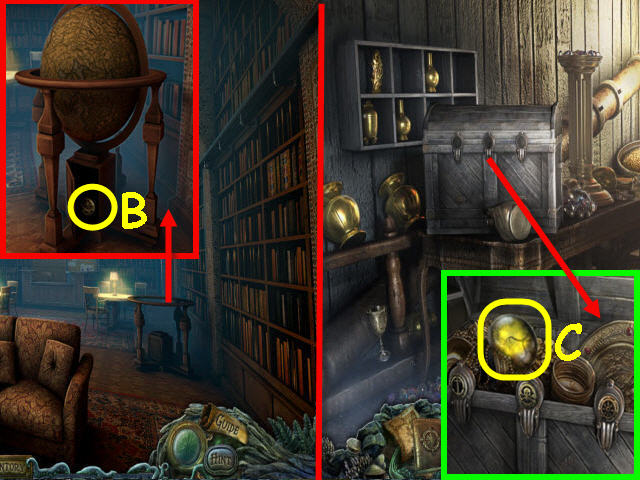
- Examine the stand and place the GLOBE in it; take the SHIP’S WHEEL MEDALLION (B).
- Go to the wharf; enter the tackle shop and go into the treasure room.
- Examine the chest and place the SHIP’S WHEEL MEDALLION, PIRATE MEDALLION and the ANCHOR MEDALLION in the slots; take the MIND OF CASTOR (C).
- Go to the pirate ship.
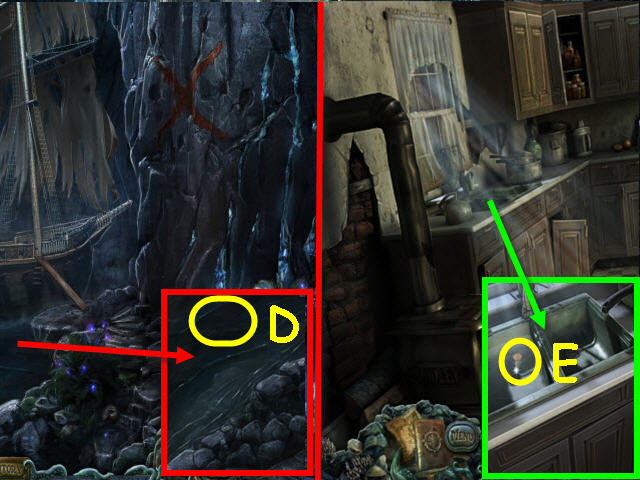
- Examine the shoreline; use the EMPTY BUCKET on the water away from the rocks to get a FULL BUCKET (D).
- Go to the kitchen of Hargrove house.
- Examine the sink and use the FULL BUCKET on the left bowl; take the CORK (E).
- Go to Astour Manor.
- Examine the gate guardian and place the following in the appropriate slots, in this order; the EYE OF CASTOR, MIND OF CASTOR, HEART OF CASTOR and GREED OF CASTOR (F).
- Use the PRUNERS to get BELLADONNA (G).
- Go forward.
Chapter 9: Killing the Avatar
- Examine the coffee table; take the recipe (H) and the NAIL FILE (I).
- Go up the staircase.
- Speak to Cedric (J); receive ASTOUR’S PIPE.
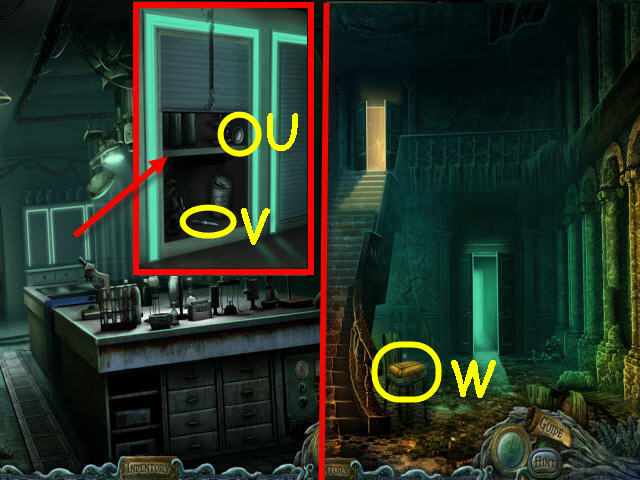
- Examine the armoire to access a HOP (K).
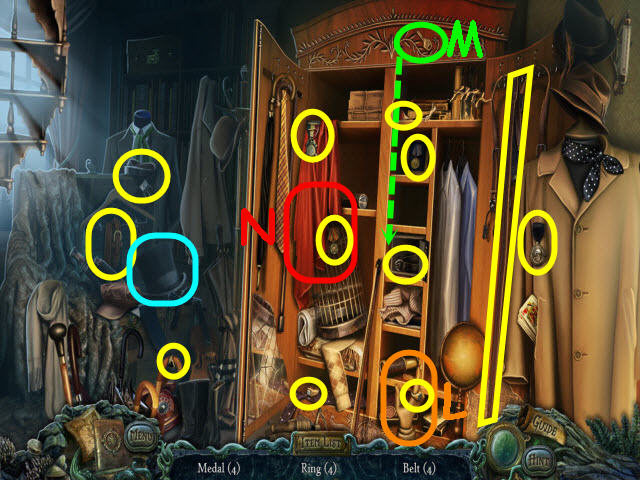
- Find the items listed.
- Move the glove to get a ring (L).
- Use the key on the safe to get a belt (M).
- Move the cloth to get a medal (N).
- You will earn a TOP HAT.
- Back out and go forward on the right.
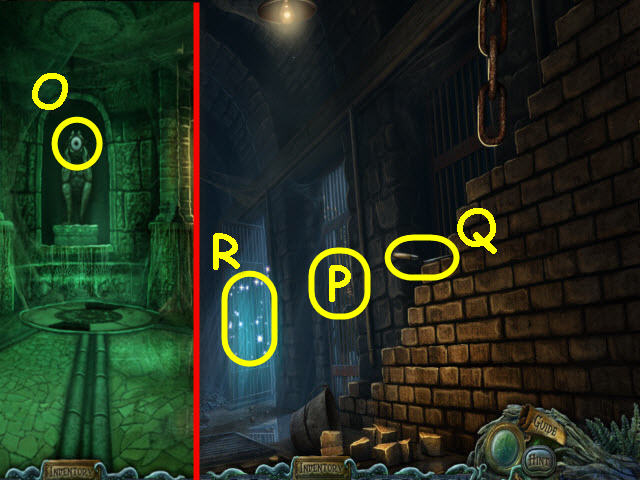
- Place the TOP HAT on the giant eye (O).
- Go left.
- Speak to the prophet and receive a code (P).
- Take the TROWEL (Q).
- Examine the open cell to access a HOP (R).
- Find the items listed.
- Place the saw handle on the blade to get a tool (S).
- Place the axe head on the handle to get a tool (T).
- You will earn a BUNGEE CORD.
- Back out and go right.
- Examine the cabinet and use the BUNGEE CORD on the door; take the MAGNIFYING LENS (U) and MEDICINE DROPPER (V).
- Back out twice.
- Examine the suitcase to trigger a puzzle (W).
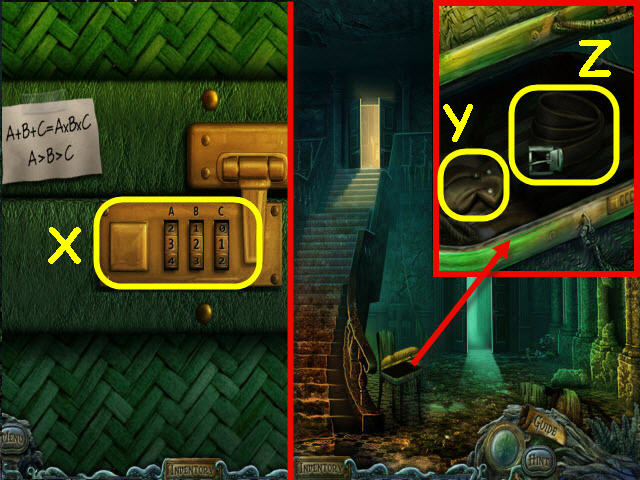
- Solve the equation and enter the correct code to open the suitcase.
- Solution: 3-2-1 (X).
- Examine the opened suitcase; take the PIPE TOBACCO (Y) and BELT (Z).
- Back out.
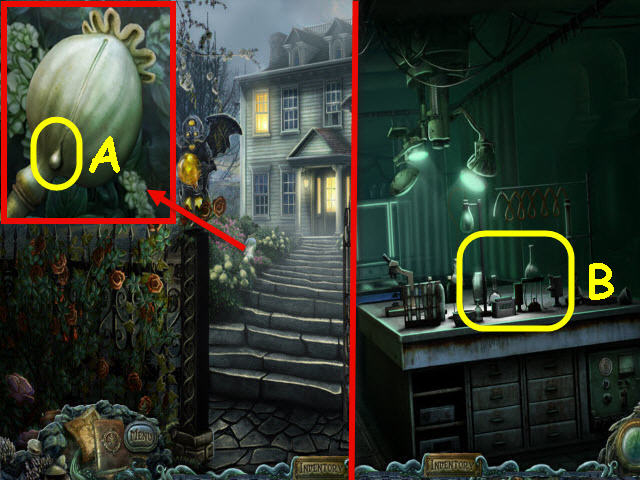
- Examine the poppy fruit and use the NAIL FILE on it. Use the MEDICINE DROPPER on the nectar; get POPPY TEARS (A).
- Go forward twice and then right to the lab.
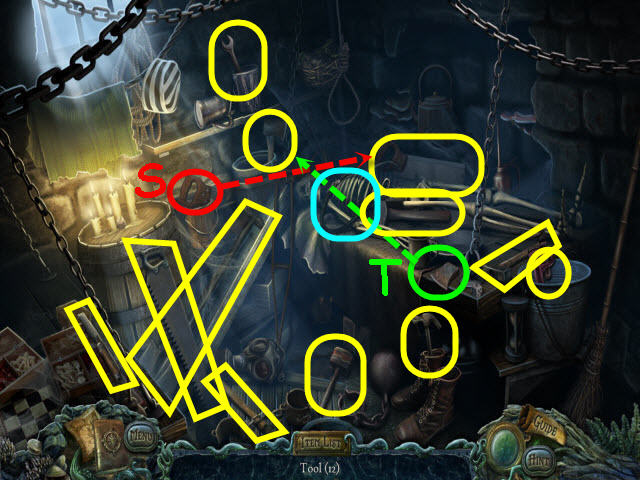
- Examine the lab table to trigger a puzzle (B).
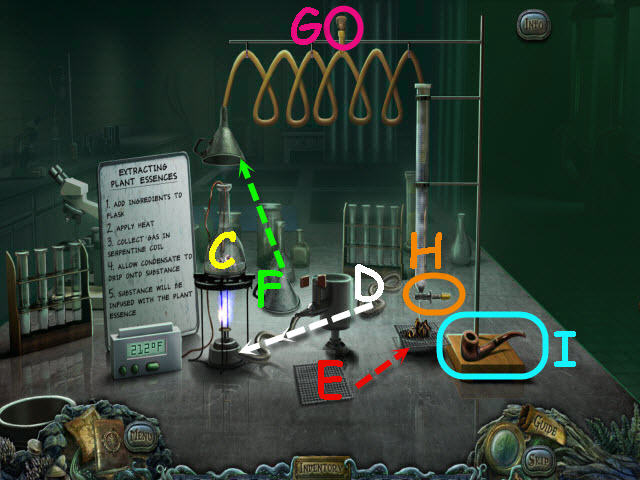
- Create a poisonous essence.
- Place the BELLADONNA and POPPY TEARS in the flask (C).
- Connect the hose (D) to the burner; turn the lever on the gas to ignite it.
- Place the screen (E) on the dish.
- Place the funnel (F) on the tubes.
- Use the CORK on the vent (G).
- Open the valve (H).
- Place the PIPE TOBACCO on the screen.
- Place ASTOUR’S PIPE on the wood (I).
- Place the poisoned tobacco in the pipe; take the POISONED PIPE.
- Back out twice and go up the stairs.
- Give the POISONED PIPE to Cedric (J).
- Use the HAIRBRUSH on Cedric to get ASTOUR’S HAIR.
- Go up the spiral staircase on the left.
- Take the DUNGEON KEY (K).
- Use the TROWEL on the loose wall to get the 2nd KEYSTONE (L).
- Back out twice and go forward on the right; go left.
- Examine the dungeon door and use the DUNGEON KEY on it; turn the key (M).
- Examine the opened door to access a HOP.
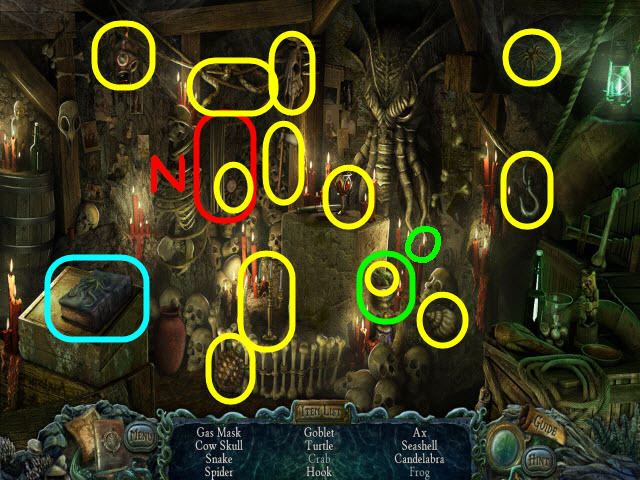
- Find the items listed.
- Move the cloth to get a crab (N).
- Open the urn lid to get the frog (O).
- You will earn the BOOK OF SOULS.
- Back out twice and go up the stairs.
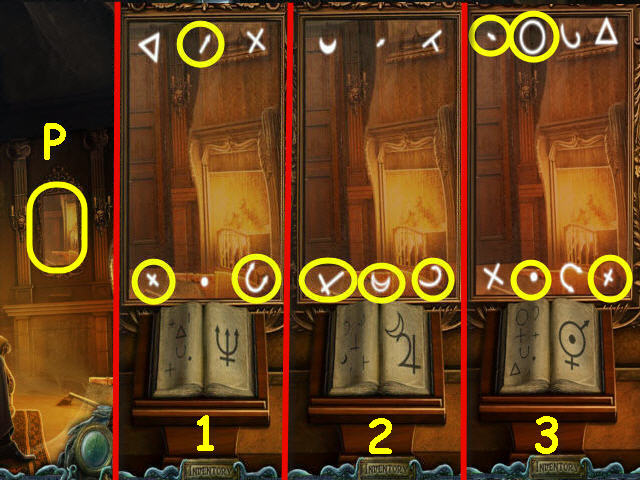
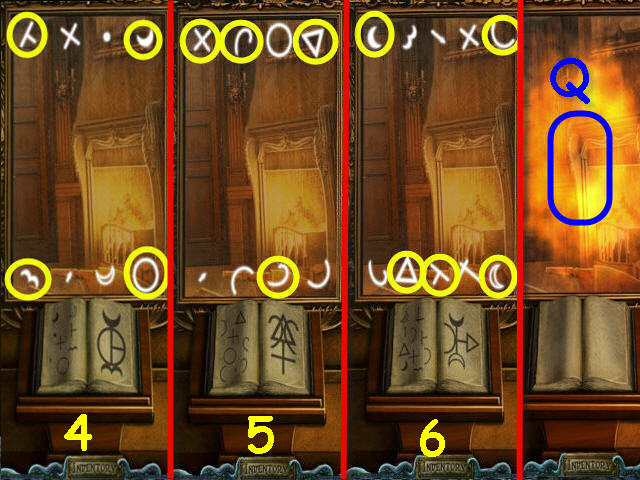
- Examine the mirror and place the BOOK OF SOULS on the stand to trigger a puzzle (P).
- Select the correct smaller symbols to make up a match to the larger symbol.
- See screenshot for the first three symbols (1-3).
- See next screenshot for the next three symbols (4-6).
- Use ASTOUR’S HAIR on the portal (Q).
- Take the WATCHER’S IRIS (R).
- Go down to the prison.
Chapter 10: Killing the One True Form
- Speak to the prophet (S); receive a MONOCLE.
- Back out.
- Examine the stone ring and place the 2 KEYSTONES on it to trigger a puzzle (T).
- Swap the stones to complete the pattern.
- See screenshot for solution (U).
- You will earn a WATCHER’S EYE.
- Back out and go up the stairs; go up the spiral staircase.
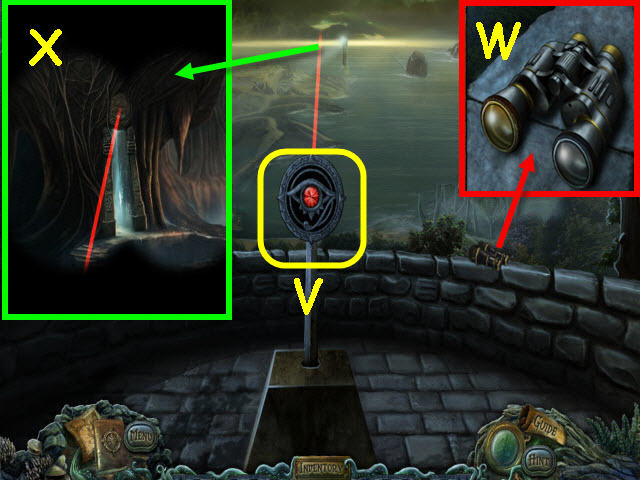
- Place the WATCHER’S EYE and then the WATCHER’S IRIS on top of the stand (V).
- Examine the binoculars and place the MAGNIFYING LENS and MONOCLE on it; take the BINOCULARS (W).
- Use the BINOCULARS on the end of the laser in the horizon; select the temple door (X).
- Back out twice and go forward on the right. Go right and then straight.
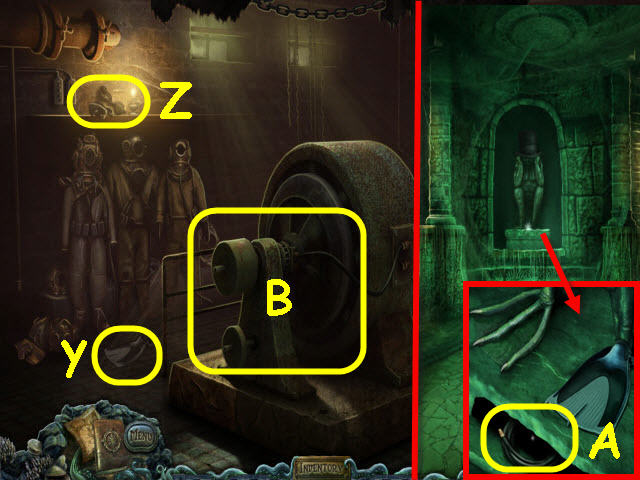
- Take the DIVING FIN (Y) and the SCUBA REGULATOR (Z).
- Back out twice.
- Examine the statue’s feet and place the DIVING FIN on it; take the GENERATOR HOSE (A).
- Return to the generator room.
- Place the BELT and the GENERATOR HOSE on the generator (B).
- Back out.
- Take the OXYGEN TANK (C).
- You will automatically combine the SCUBA REGULATOR and OXYGEN TANK to create SCUBA GEAR.
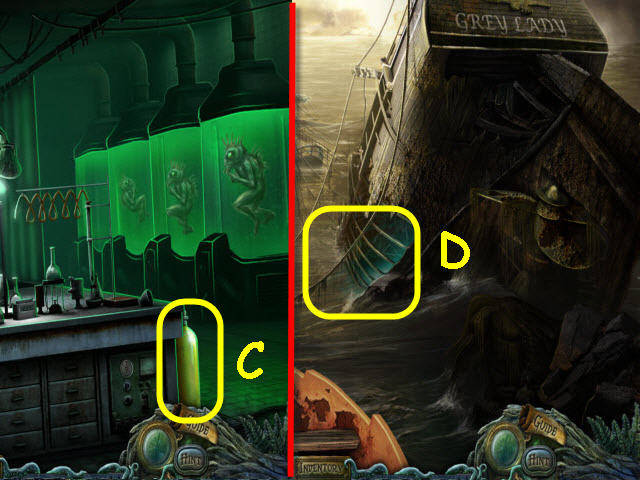
- Go to the Grey Lady.
- Use the SCUBA GEAR on the hole in the hull of the Grey Lady (D).
- Take the FISHING NET (E).
- Examine the harpoon gun; take the FIRING MECHANISM (F).
- Back out and go forward. Enter the Coral Houses (G).

- Use the FISHING NET on the guardian (H).
- Take the TRIDENT (I).
- Examine the bas-relief; press the stone button (J).
- Go to the Town Hall and enter it.
- Examine the harpoon and place the FIRING MECHANISM on it; pull the trigger (K).
- Take the HARPOON (L).
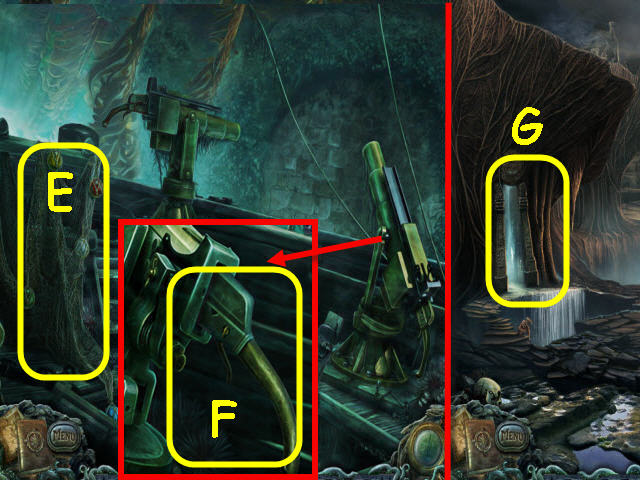
- Go to the generator room through the rear of the laboratory in Astour’s Manor.
- Place the TRIDENT on the TNT lid; take the UNDERWATER EXPLOSIVES (M).
- You will automatically combine the HARPOON with the UNDERWATER EXPLOSIVES to create an EXPLOSIVE HARPOON.
- Go to the Grey Lady and enter the hole in the hull.
- Place the EXPLOSIVE HARPOON on the harpoon launcher; select the launcher to fire (N).
- Congratulations! You have successfully completed Small Town Terrors: Pilgrim’s Hook.


 Strange Discoveries: Aurora Peak Walkthrough, Guide, & Tips
 Voodoo Chronicles: The First Sign Walkthrough, Guide, & Tips
 Timeless: The Forgotten Town Walkthrough, Guide, & Tips
 The Mirror Mysteries 2: Forgotten Kingdoms Walkthrough, Guide, & Tips
 Ominous Objects: Phantom Reflection Walkthrough, Guide, & Tips