Redemption Cemetery: Salvation of the Lost Walkthrough, Guide, & Tips
Redemption Cemetery: Salvation of the Lost Walkthrough

Welcome to the Redemption Cemetery: Salvation of the Lost Walkthrough
A late-night subway ride takes a bizarre turn into a mystical cemetery. You have been summoned by a strange entity to free the cemetery’s lost souls. Will you succeed, or is this the end of the line?
Whether you use this document as a reference when things get difficult or as a road map to get you from beginning to end, we’re pretty sure you’ll find what you’re looking for here.
This document contains a complete Redemption Cemetery: Salvation of the Lost game walkthrough featuring annotated screenshots from actual gameplay!
We hope you find this information useful as you play your way through the game. Use the walkthrough menu below to quickly jump to whatever stage of the game you need help with.
Remember to visit the Big Fish Games Forums if you find you need more help. Have fun!
This walkthrough was created by prpldva, and is protected under US Copyright laws. Any unauthorized use, including re-publication in whole or in part, without permission, is strictly prohibited.
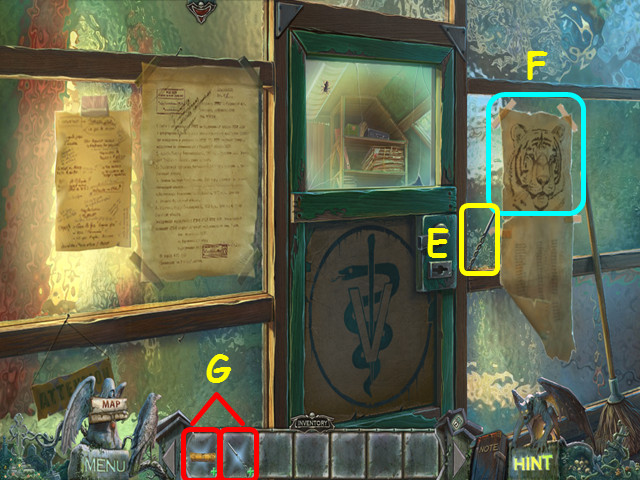
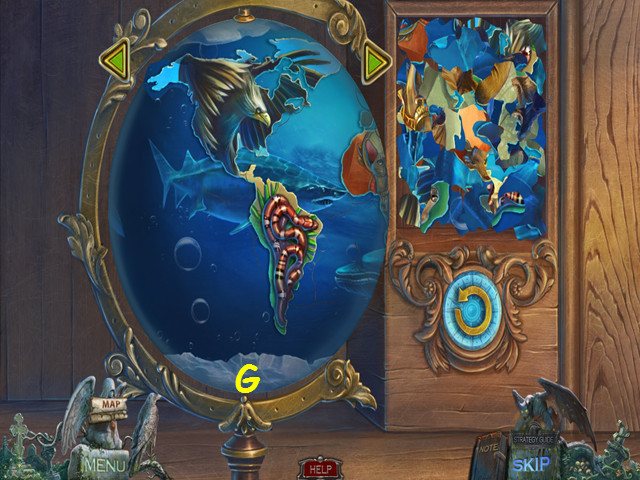
General Tips

- This is the official guide for Redemption Cemetery: Salvation of the Lost.
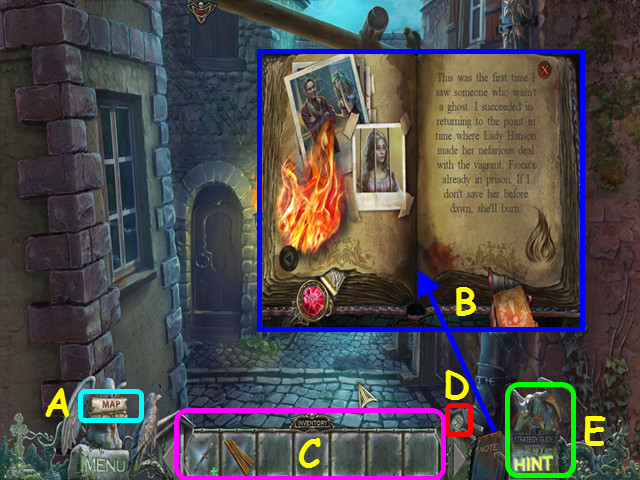
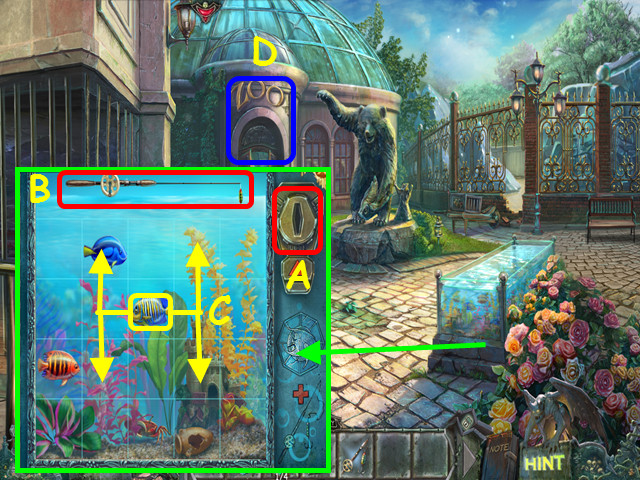
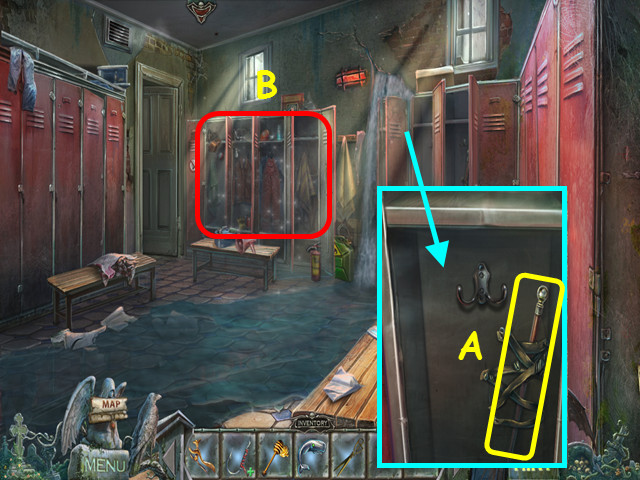
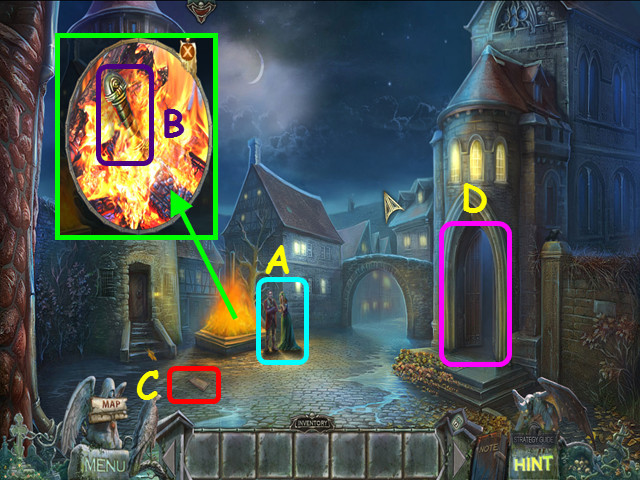
- Select the ‘Map’ scroll to see the interactive map (A).
- Look in your notes to read the adventure’s events, historical facts, and clues (B).
- Your inventory (C) is located in the lower panel; select an item to use it. The panel auto-hides; move you mouse down to bring it up. You can lock the panel in place with this lock (D).
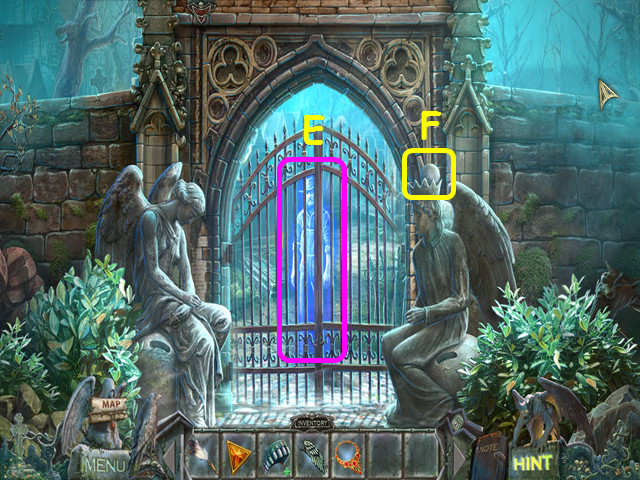
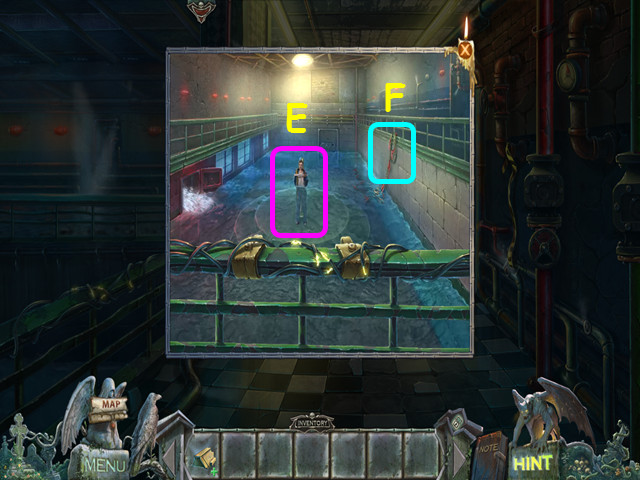
- Hints are unlimited, but you must wait for the meter to refill (E).
- Hidden-object puzzles are referred to as HOPs in this walkthrough.
- Mini-games and HOPs are sometimes randomized; your solutions may vary.
- Items listed in red are hidden, or require addition actions to locate.
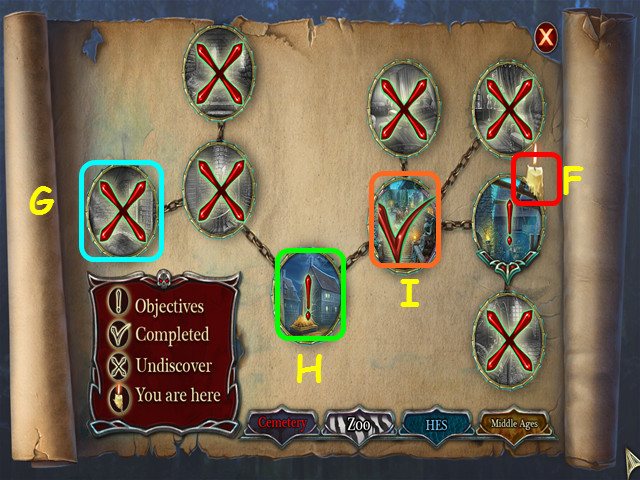
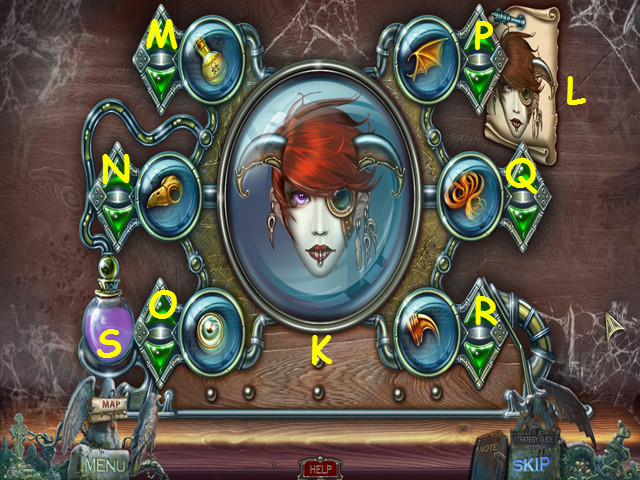
- Select the scroll from the menu bar to access the maps.
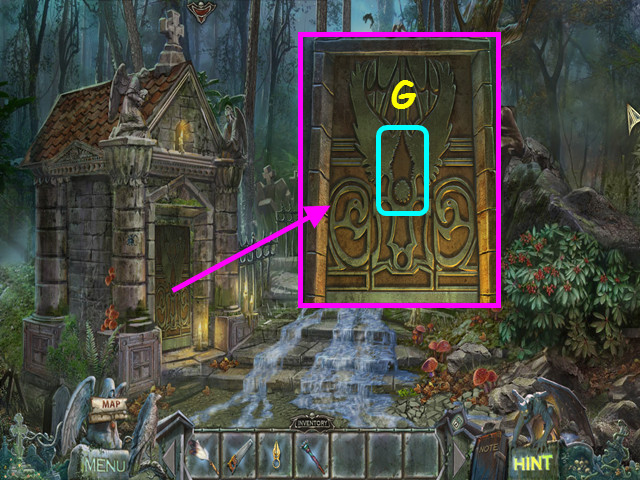
- A candle indicates your current location (F).
- An ‘X’ indicates a closed section (G).
- An exclamation point indicates you still have tasks to complete at that location (H).
- A checkmark indicates you have completed a location (I).
- Select a disc to travel to that location.
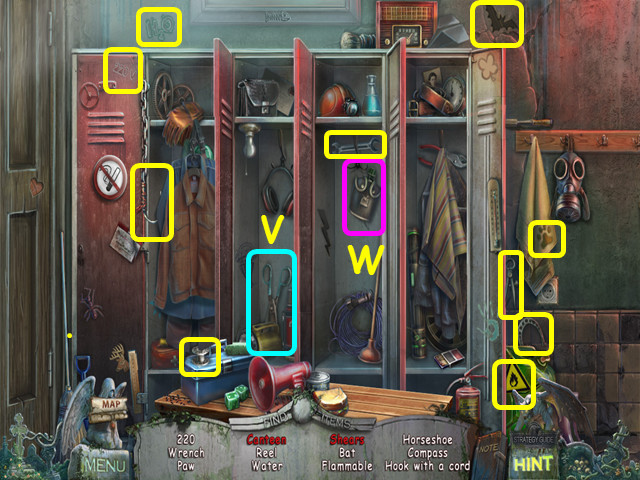
Chapter 1: The Cemetery
- You will have the option of some interactive help.
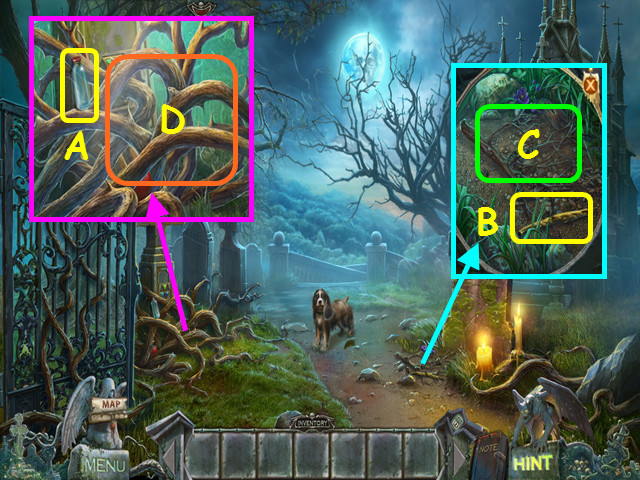
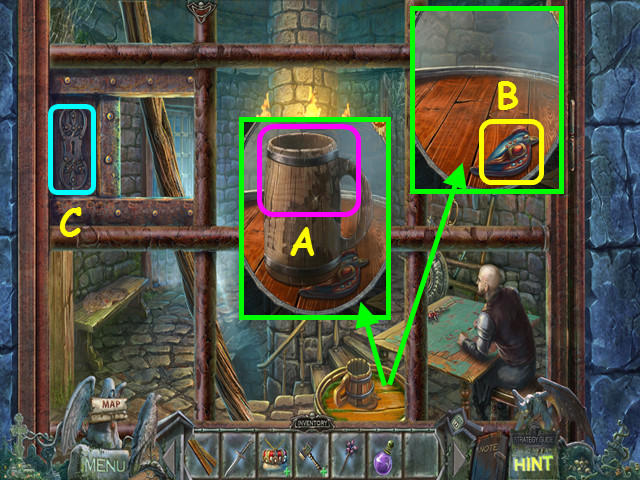
- Look at the branches and take the bottle (A).
- Look at the ground and take the BRANCH WITH WAX (B).
- Use the BOTTLE on the bugs to get the WOOD BORERS (C).
- Look at the branches again and use the WOOD BORERS on the branches (D).

- Take the BALL (E).
- Use the BALL on the dog (F).
- Take the FEATHERS (G).
- Combine the BRANCH WITH WAX and the FEATHERS in your inventory to make the DUSTER (H).
- Walk forward.
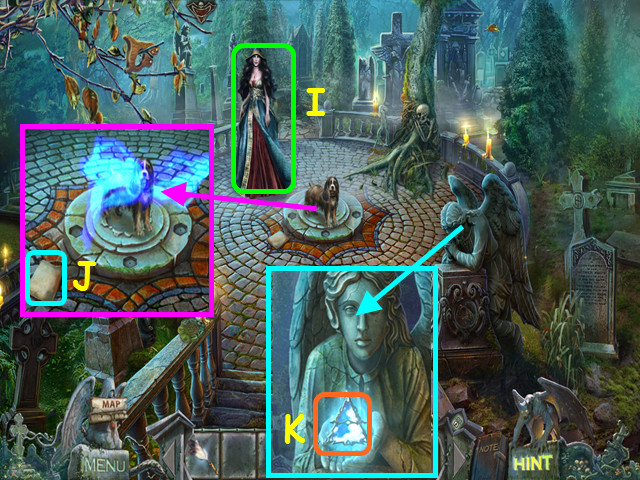
- Talk to Hina (I).
- Look at the dog and take the note (J).
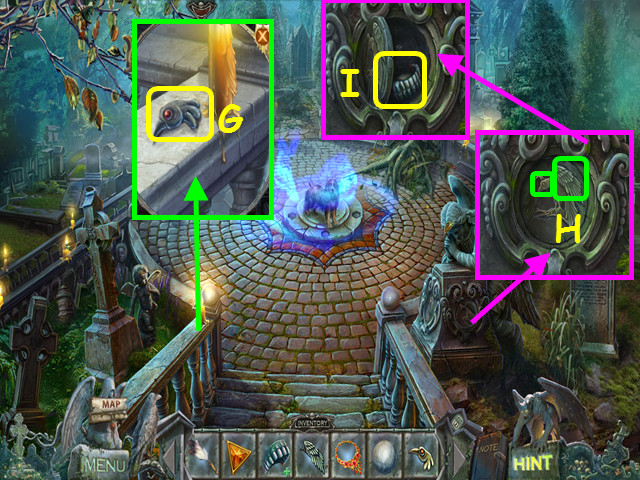
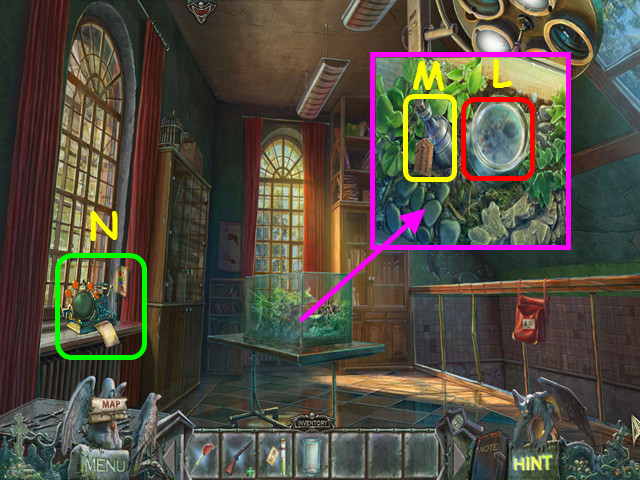
- Look at the angel statue and take the Power of Air for the raven (K).
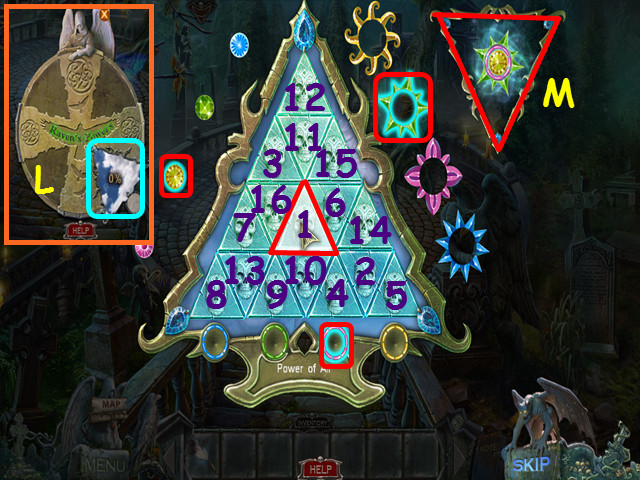
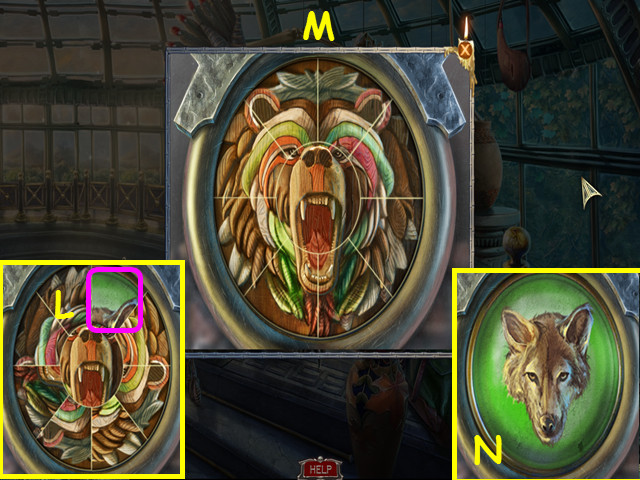
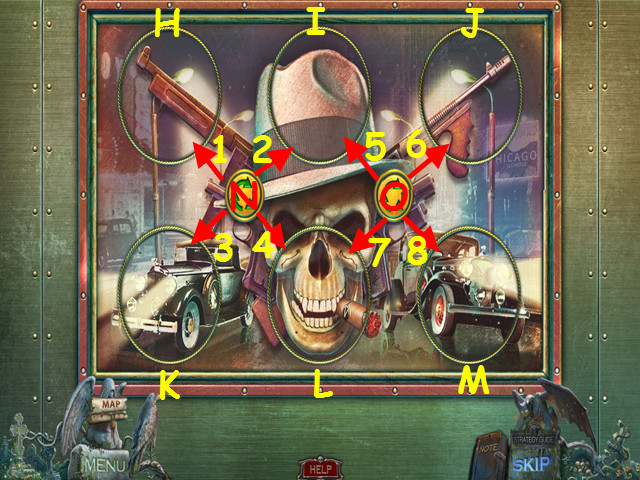
- Select the Power of Air triangle (L) to bring up a mini-game.
- Note the 3 pieces of the glowing symbol (M).
- Find the skull that highlights the 3 pieces (1).
- Find the remaining matches (2-16).
- This will charge the Power of Air ability for the raven.
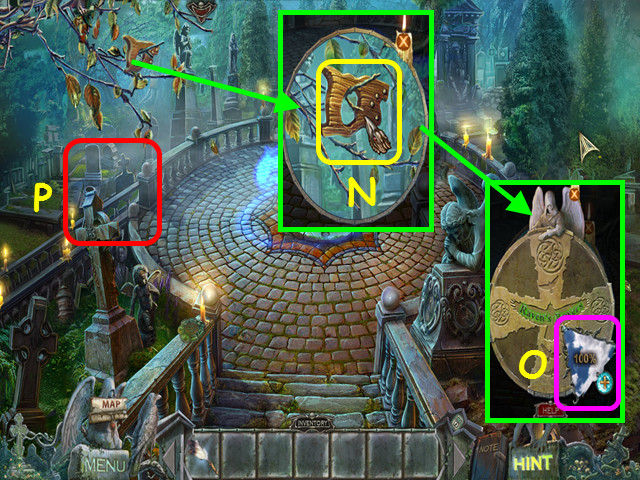
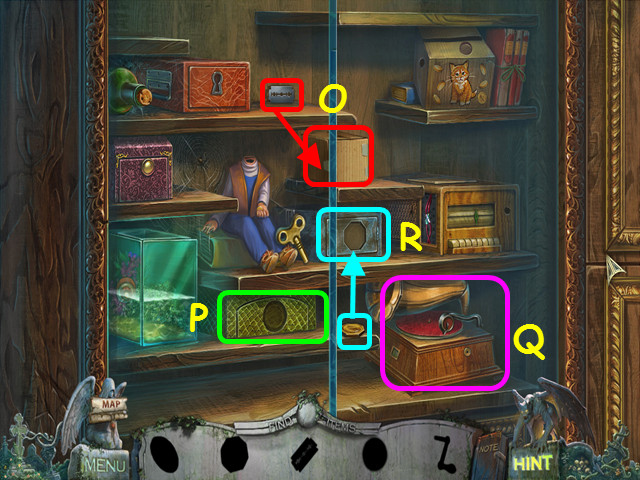
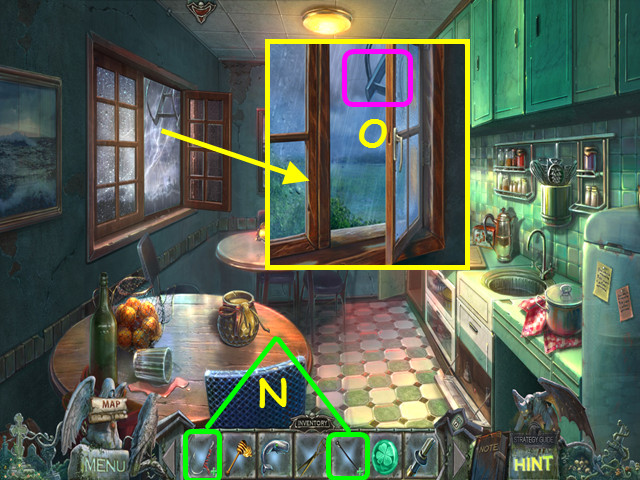
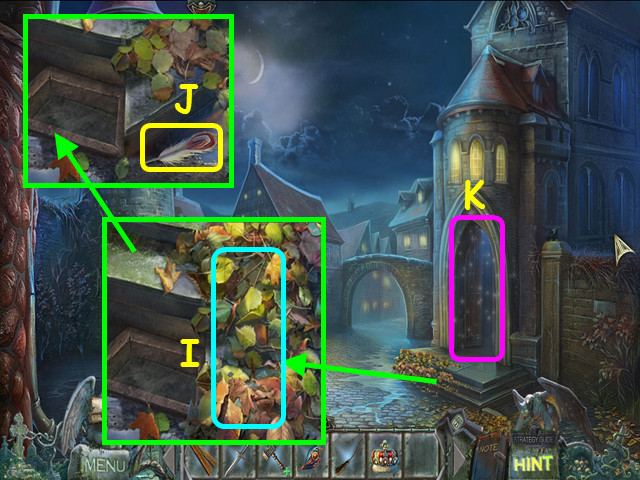
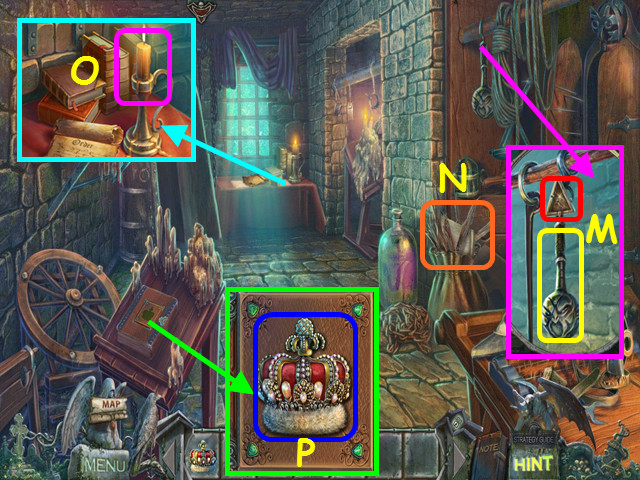
- Look at the branch and select the SAW HANDLE (N).
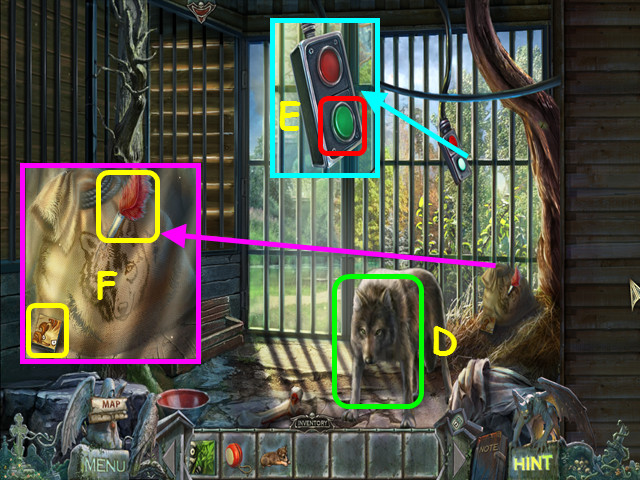
- Select the charged triangle to use the raven (O).
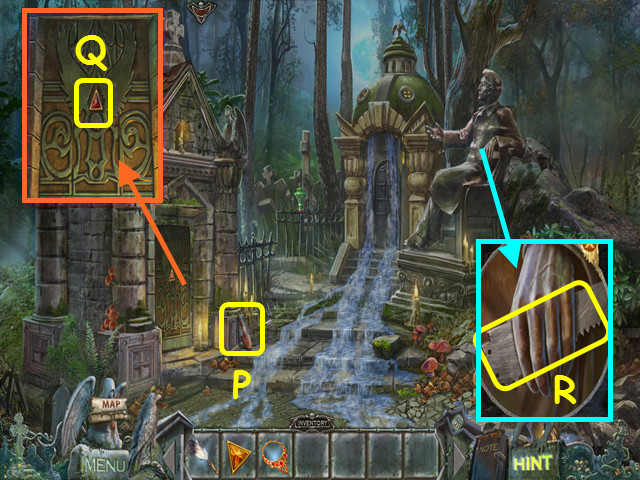
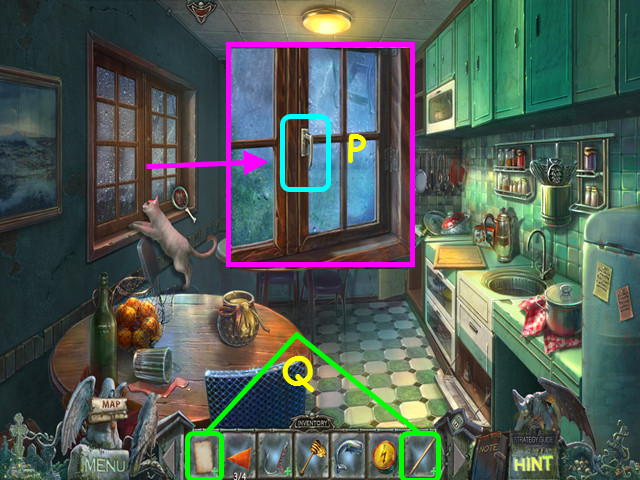
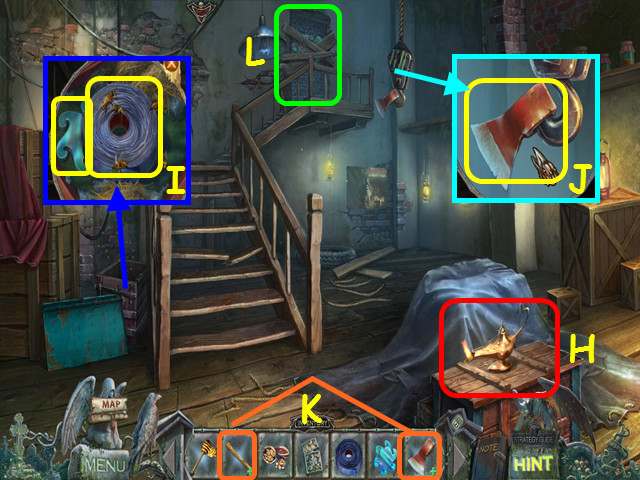
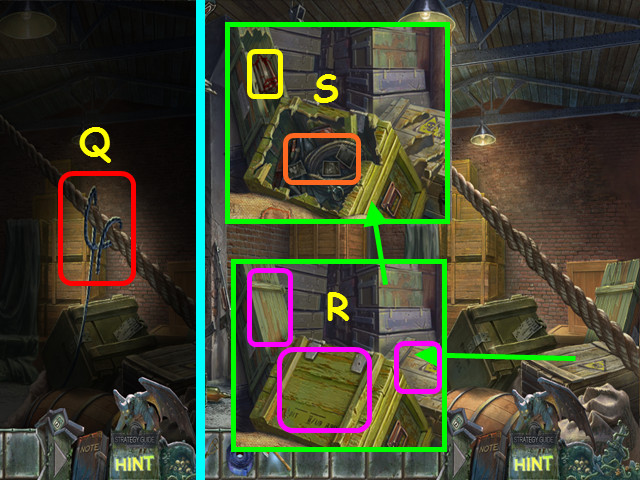
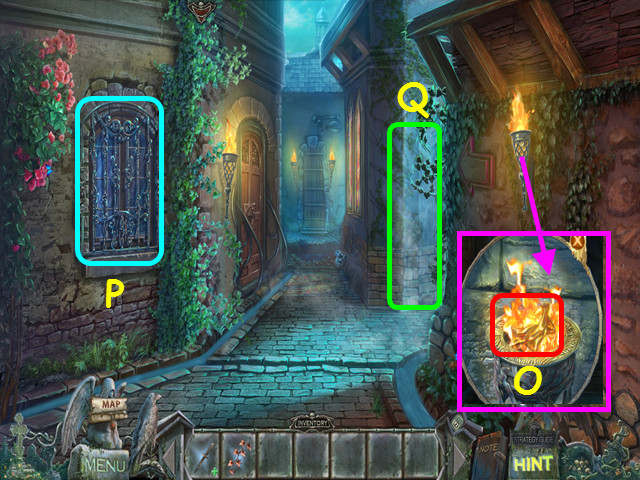
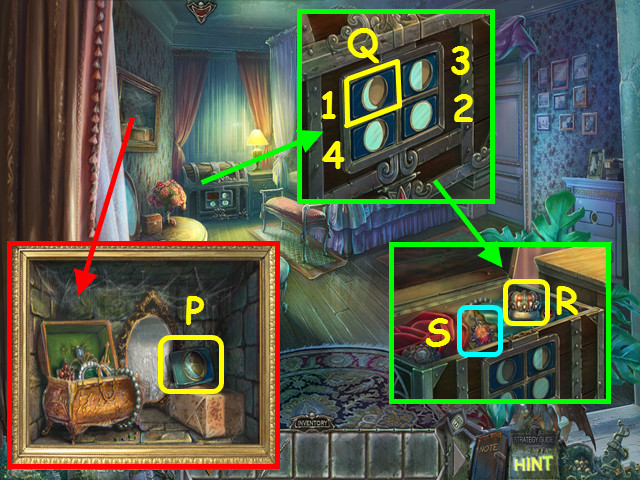
- Walk to the left (P).
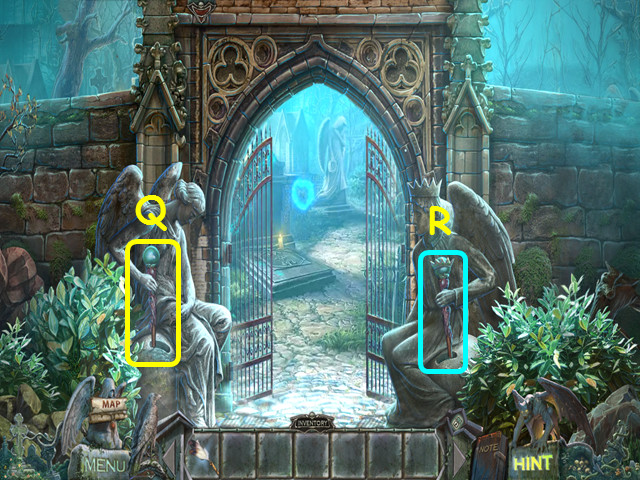
- Take the 1st CRYSTAL (Q).
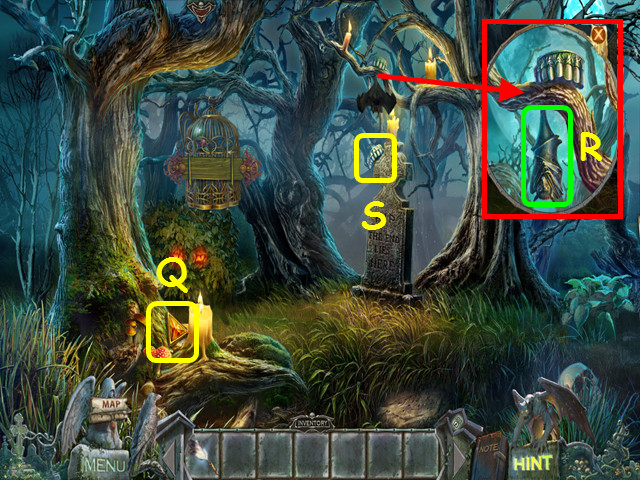
- Look at the bat and use the raven’s Power of Air (R).
- Take the UPPER JAW (S).
- Walk down and forward.
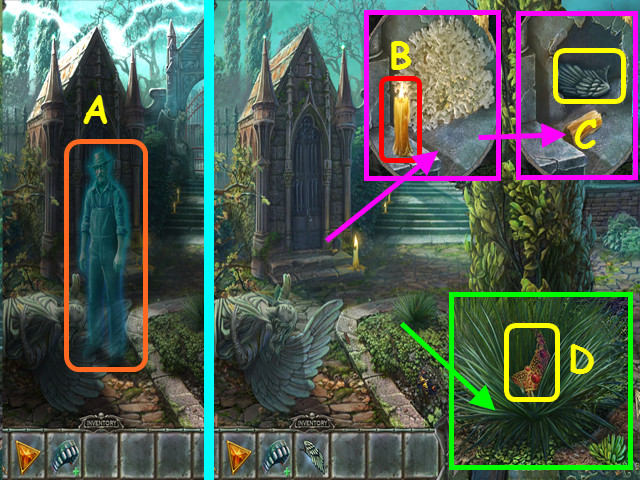
- Talk to the ghost (A).
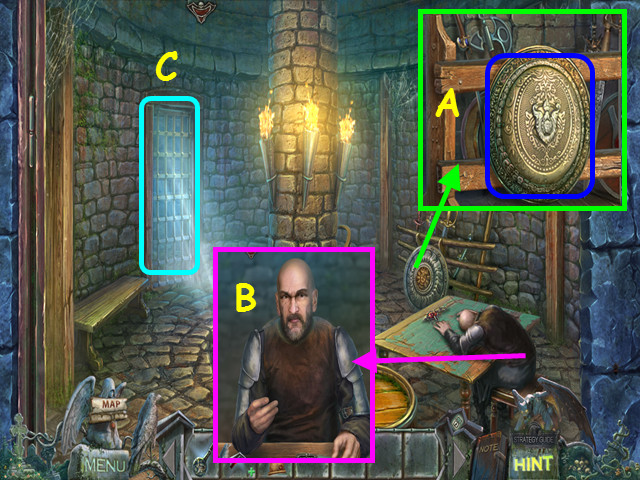
- Look at the crypt, take the medal (@), knock over the candle (B), and then take the CROW’S WING (C).
- Look at the ground, move the grass, and take the NECKLACE (D).
- Walk forward.
- Talk to the ghost (E).
- Take the 1st ORB (F).
- Walk down twice.
- Look at the rail; take the medal (@) and the CROW’S HEAD (G).
- Look at the pedestal; place the CROW HEAD and WING in the indentations (H).
- Take the LOWER JAW (I).
- Walk to the left.
- Combine the LOWER JAW and the UPPER JAW in your inventory to make the JAW (J).
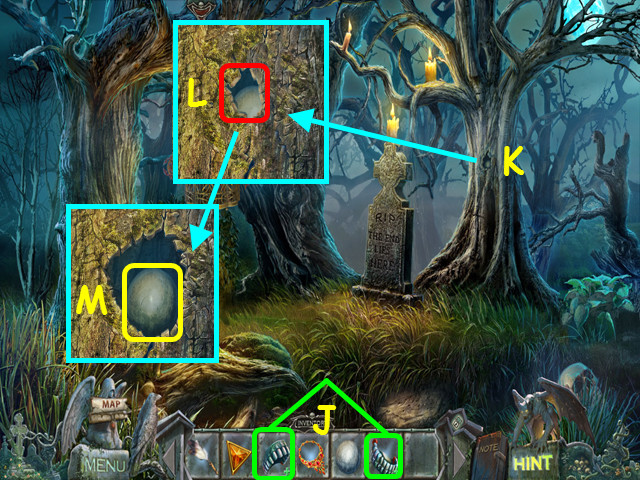
- Look at the tree hollow and scare away the snake (K).
- Use the JAW on the hollow in the tree (L).
- Take the 2nd ORB (M).
- Walk down.
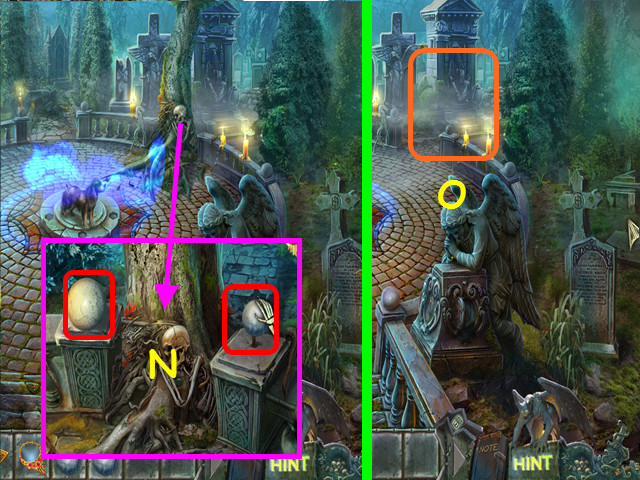
- Look at the skeleton and place the 2 ORBS on the posts (N).
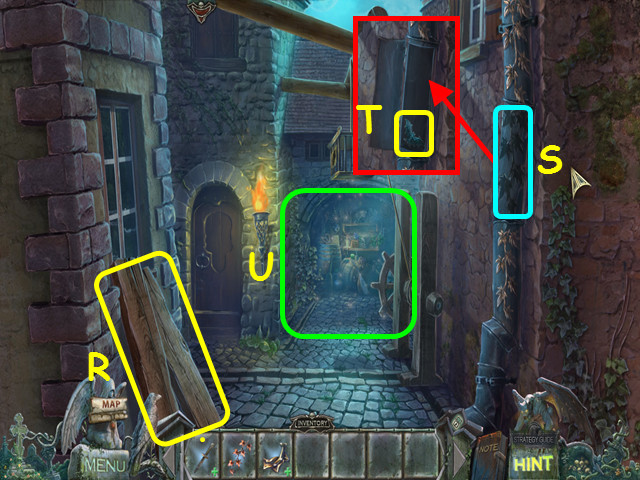
- Walk to the right (O).
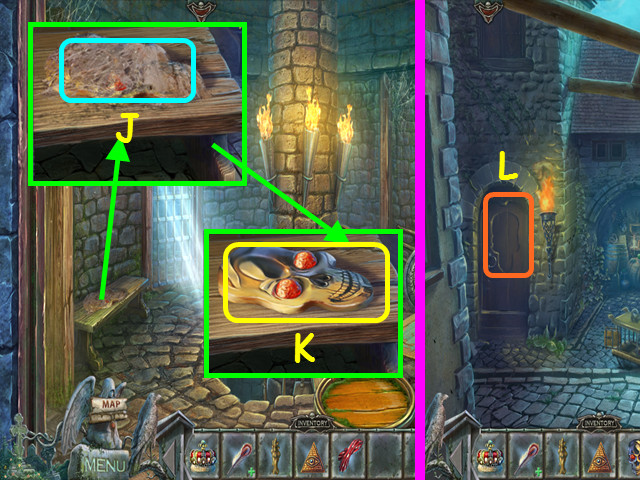
- Take the SHOVEL (P).
- Look at the door and take the 2nd CRYSTAL (Q).
- Look at the statue’s hand and take the SAW BLADE (R).
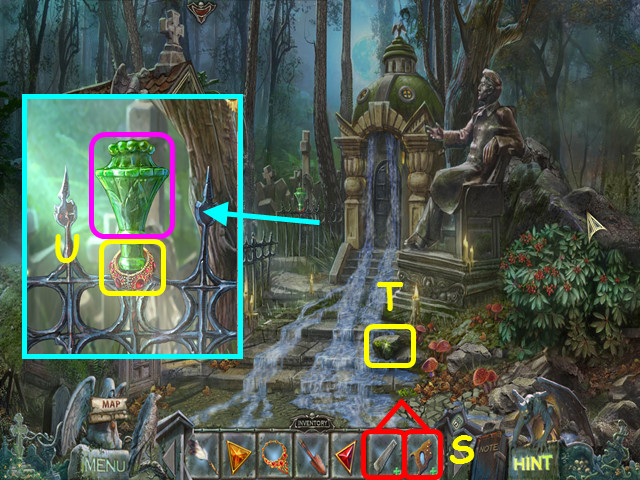
- Combine the SAW BLADE and the SAW HANDLE in your inventory to make the SAW (S).
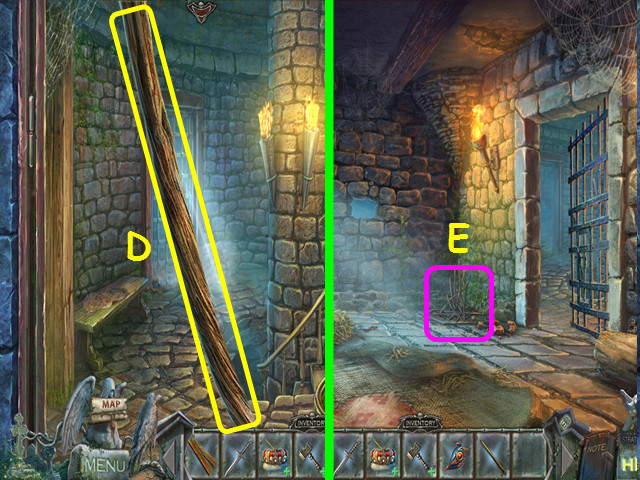
- Take the STONE (T).
- Look at the fence and use the STONE to break the green glass, and then take the BRACELET (U).
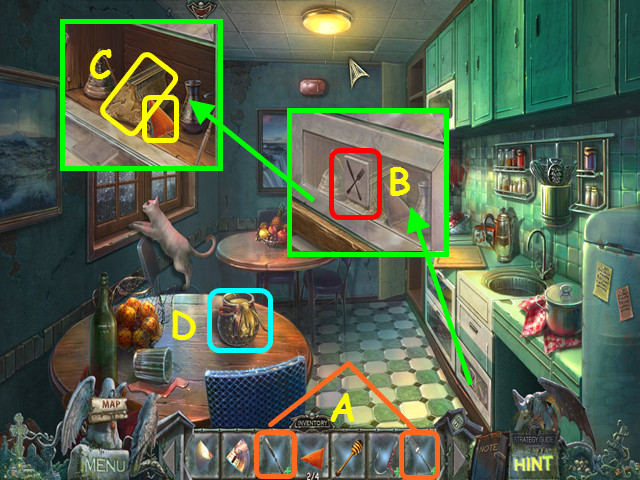
- Walk down, and then go forward.
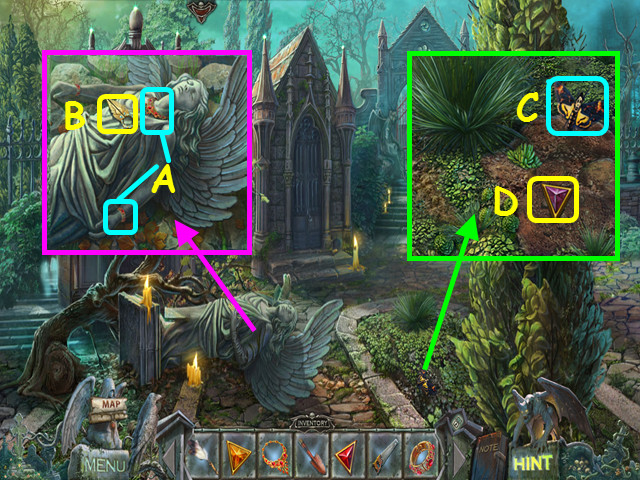
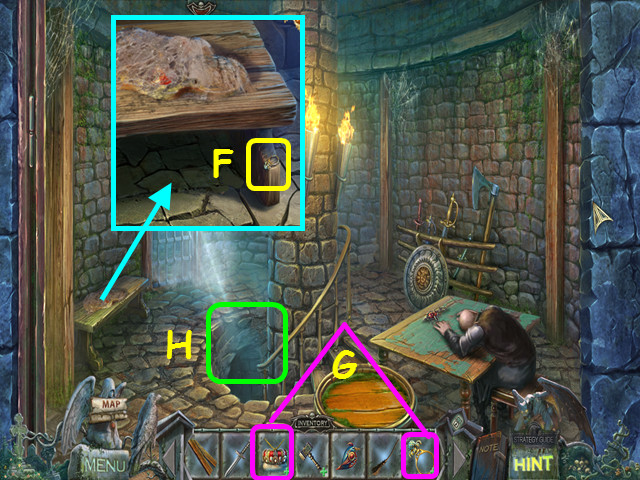
- Look at the statue and place the NECKLACE and BRACELET on her neck and wrist (A).
- Take the CRYPT KEY (B).
- Look in the dirt and shoo the moth away (C).
- Use the SHOVEL to dig up the 3rd CRYSTAL (D).
- Walk down twice.
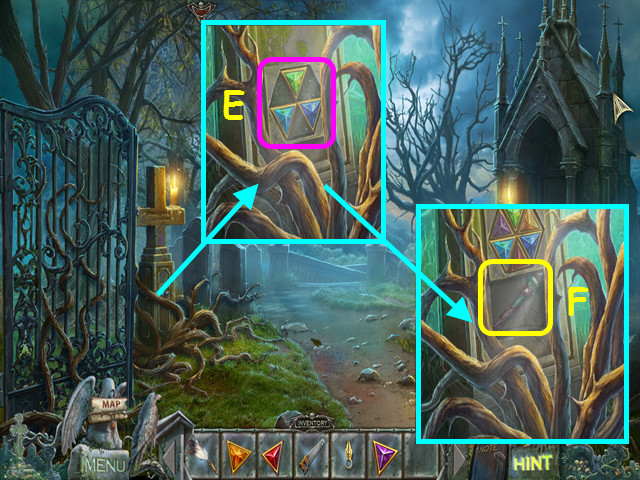
- Look at the tombstone and place the 3 CRYSTALS into the inlay (E).
- Take the 1st SCEPTER (F).
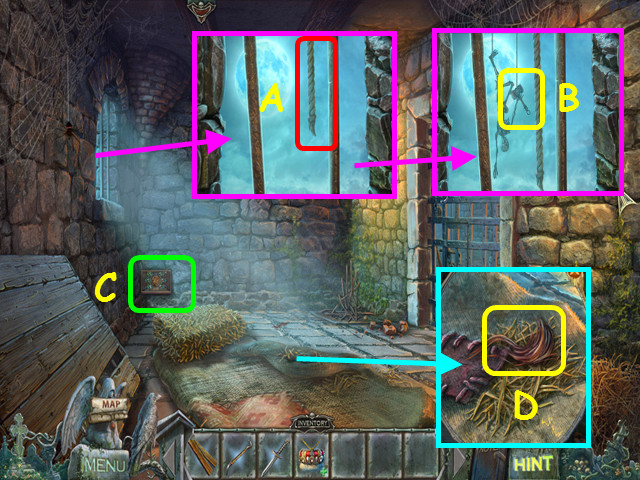
- Walk forward and right.
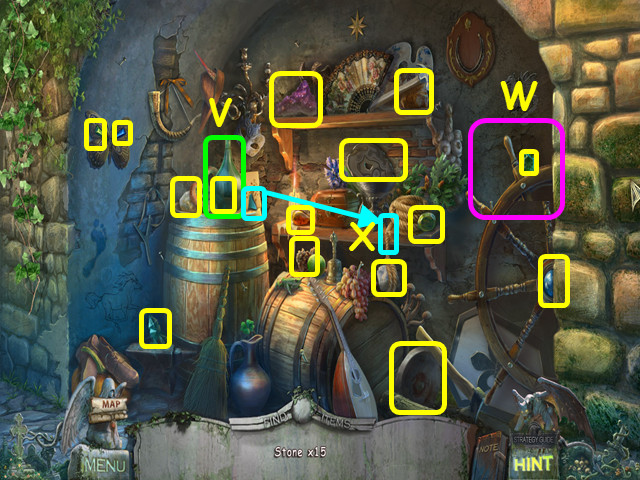
- Look at the left crypt door and place the CRYPT KEY in the center (G).
- Look inside the crypt for a HOP.
- Use the matches to light the torches (H).
- Locate all the items on the list.
- Tip over the vase to find the cylinder (I).
- Place the weight on the scale to find the chameleon (J).
- Place the piece in the frame to complete the fan (K).
- You will earn the CYLINDER.
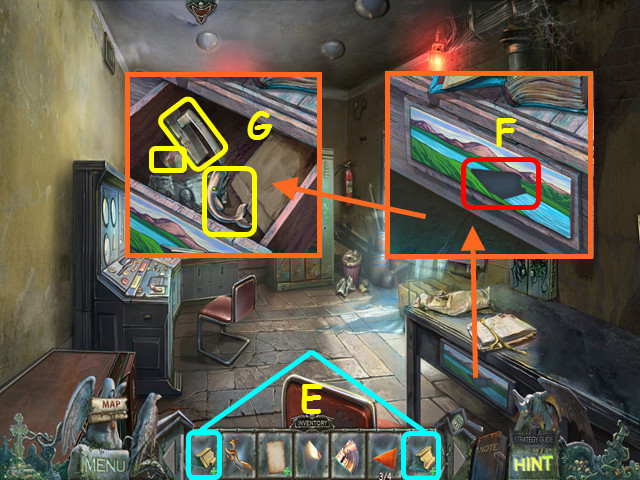
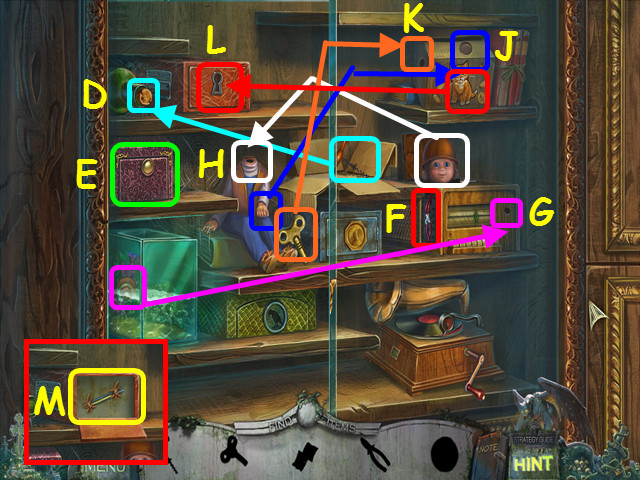
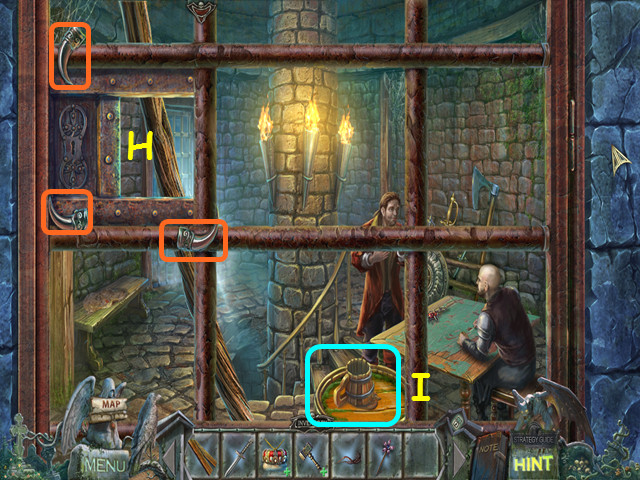
- Walk down and left.
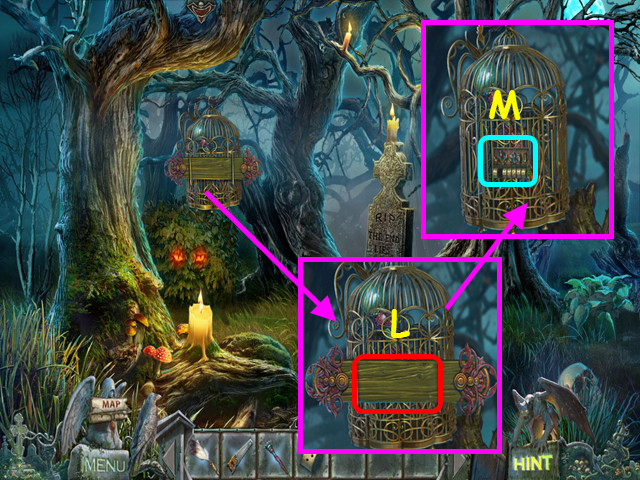
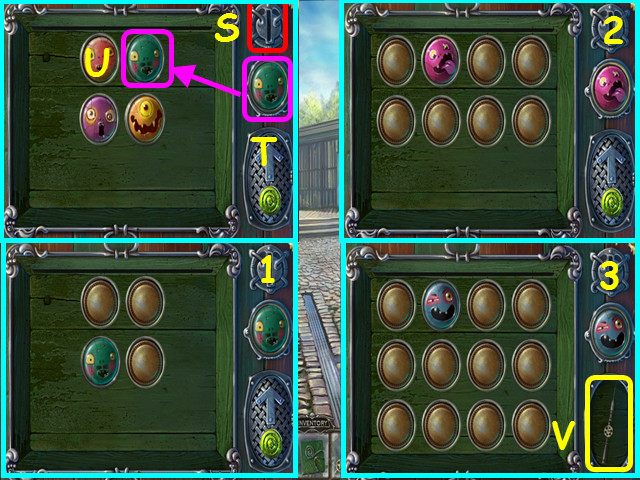
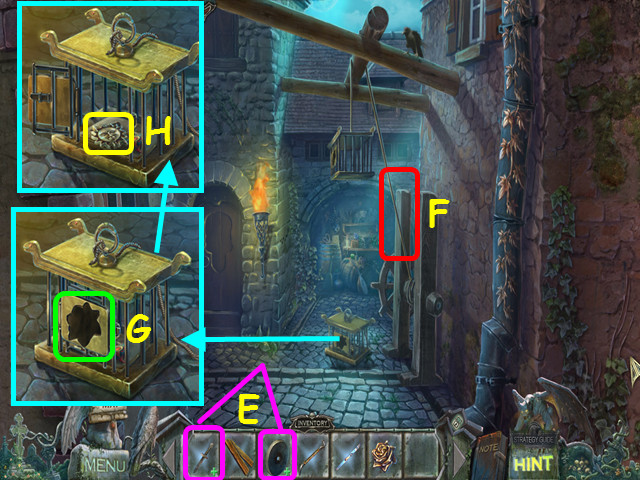
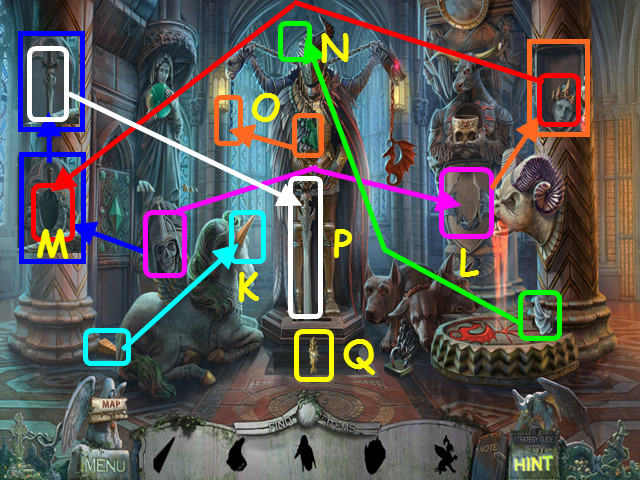
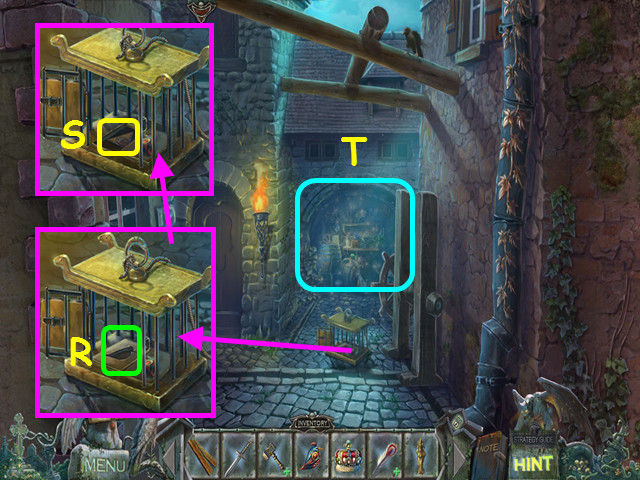
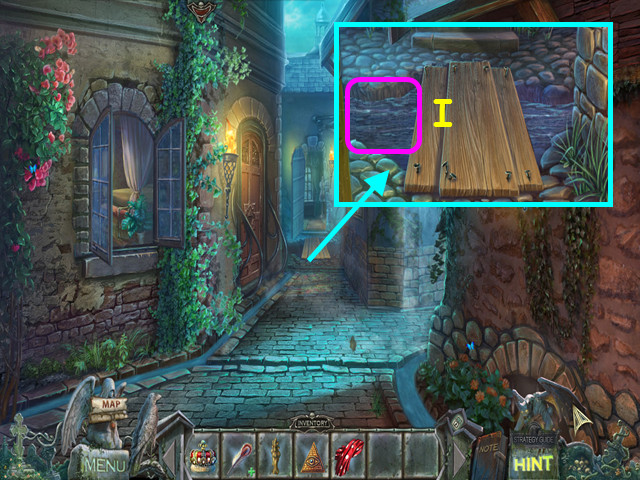
- Look at the cage and take the medal (@).
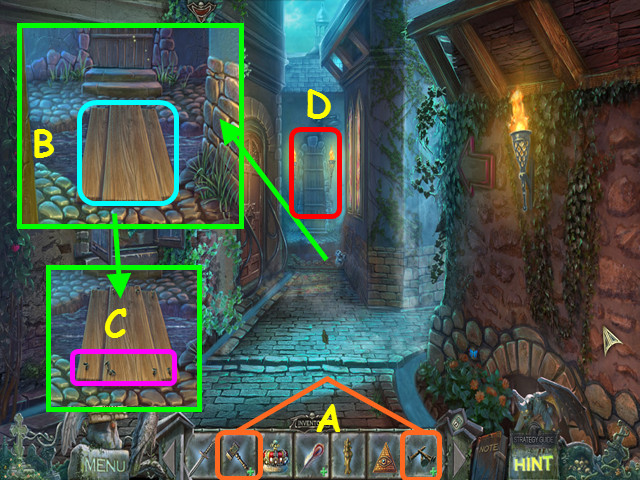
- Use the SAW on the board (L).
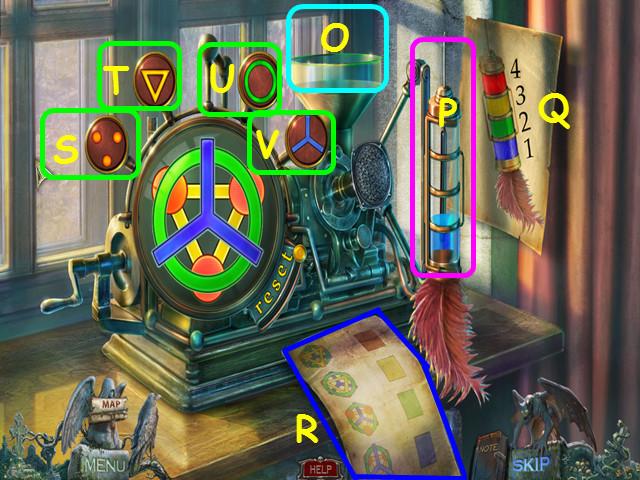
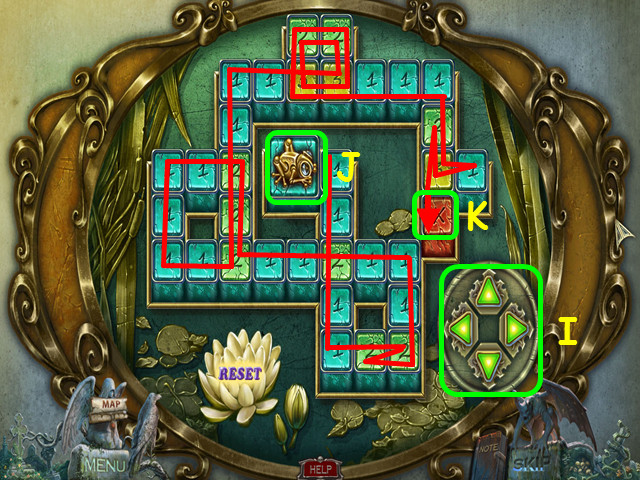
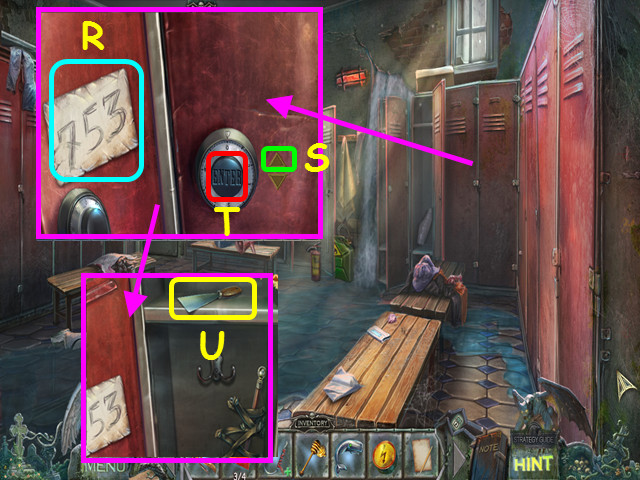
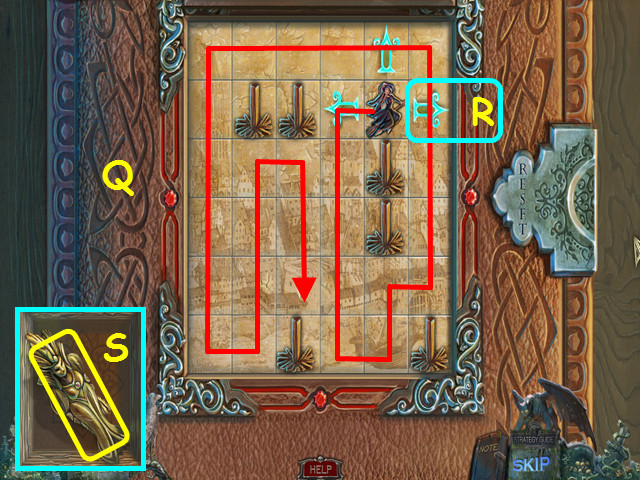
- Look at the lock for a mini-game (M).
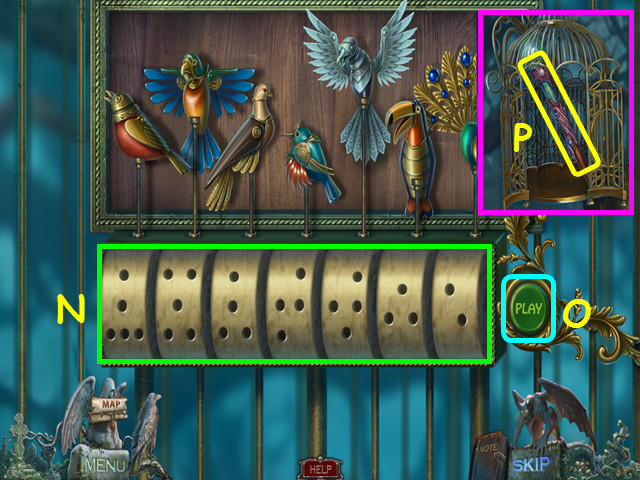
- Place the CYLINDER in the open space to trigger the mini-game.
- Change the cylinders so the birds above will move (N).
- Press the play button (O) to test the positions.
- Take the 2nd SCEPTER from the birdcage (P).
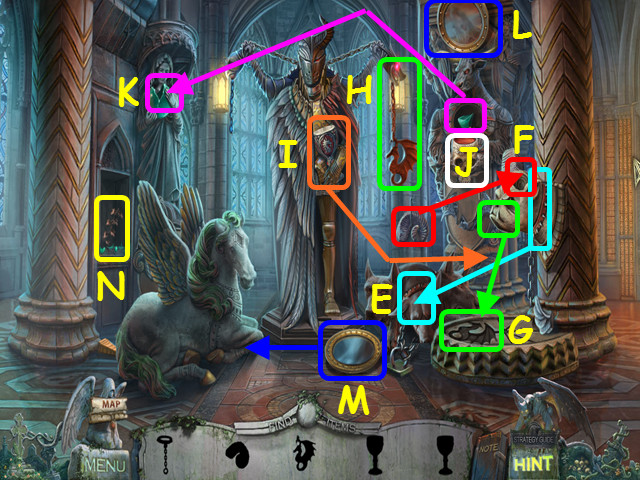
- Walk down, and then go forward twice.
- Place the 2nd SCEPTER in the left statue’s hand (Q).
- Place the 1st SCEPTER in the right statue’s hand (R).
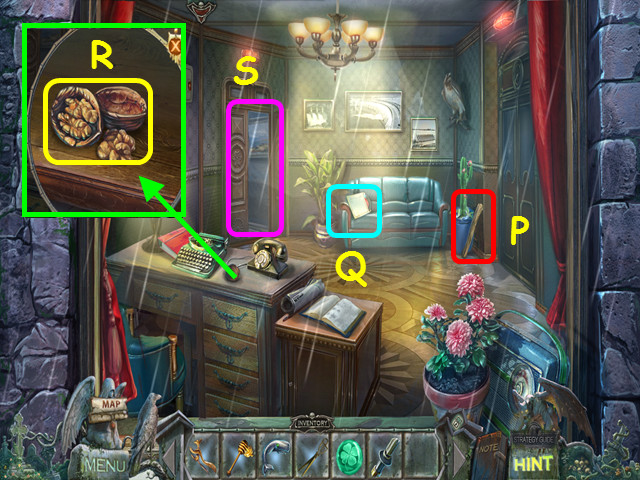
- Walk forward.
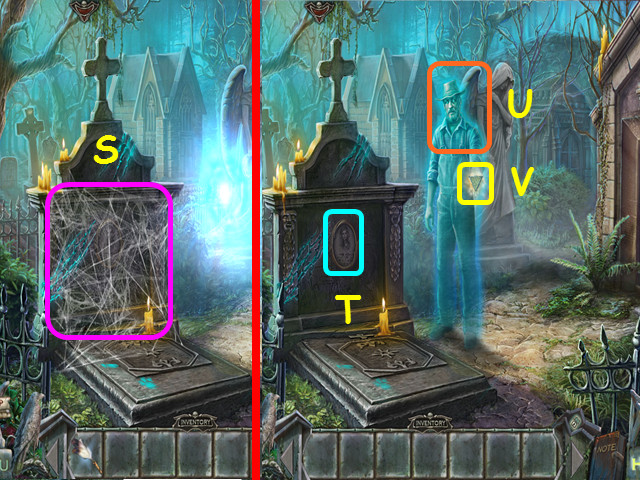
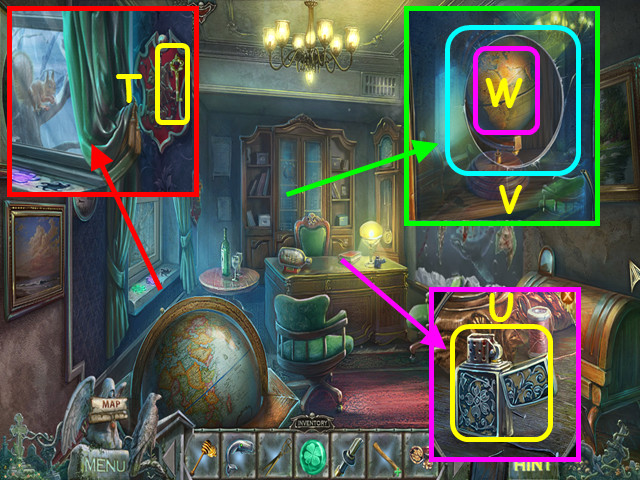
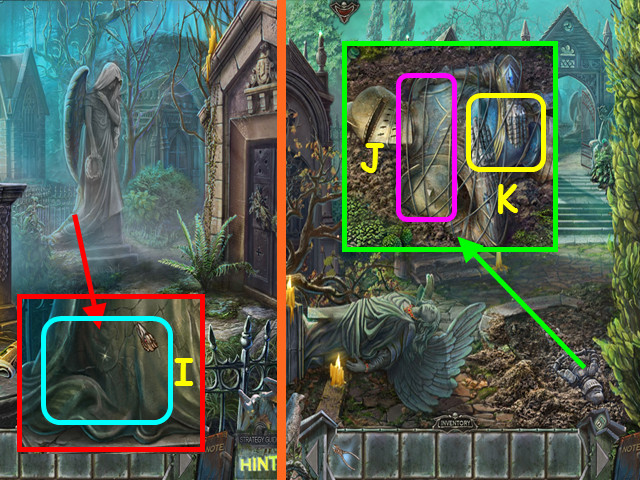
- Use the DUSTER on the spider webs (S).
- Read the plaque (T).
- Talk to the ghost (U).
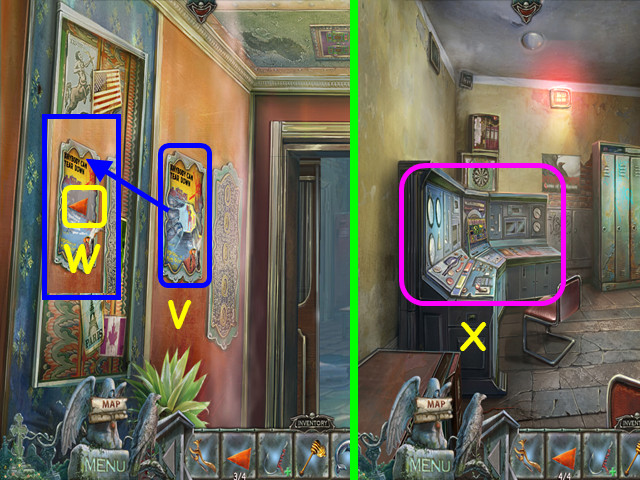
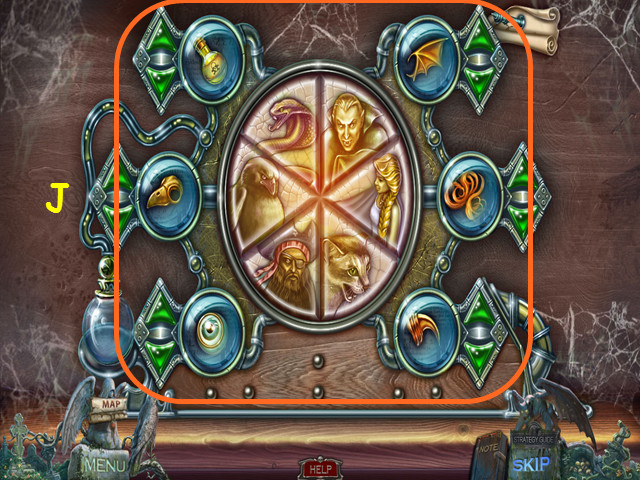
- Take the Power of Earth from the ghost (V).
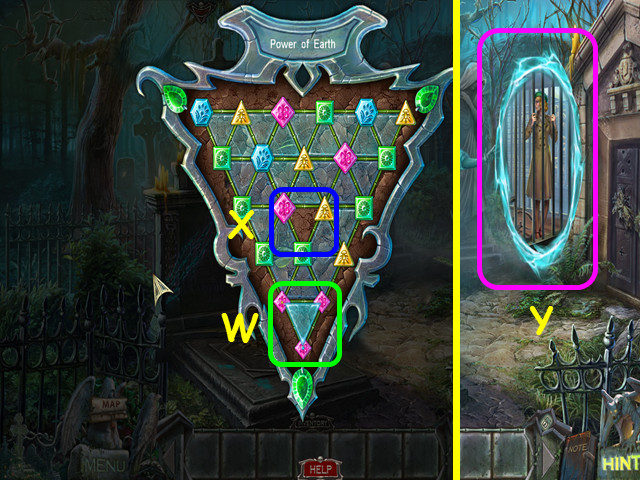
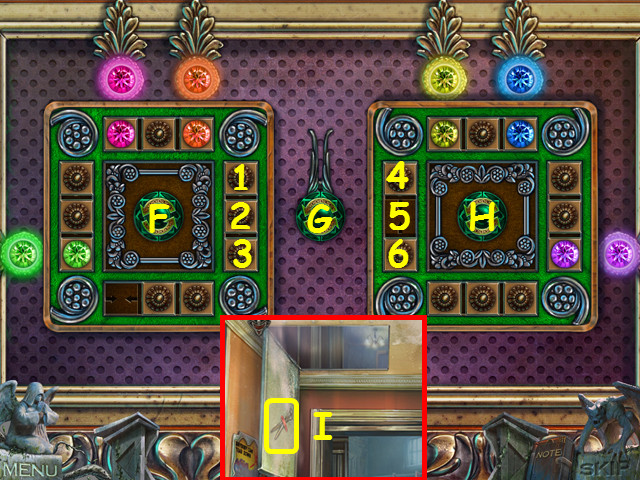
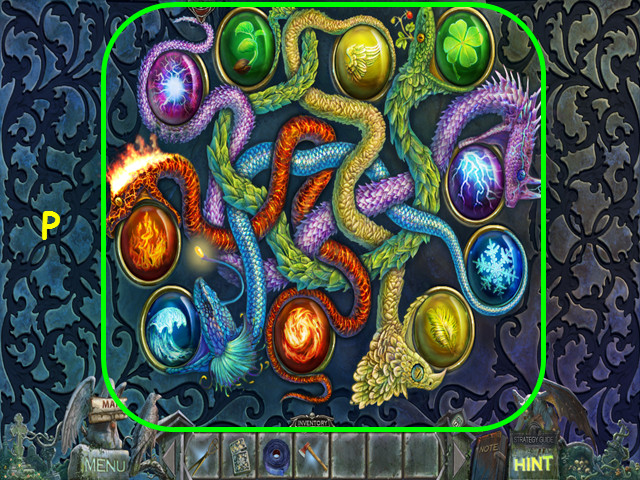
- Press the center of the triangles to rotate the outer gems to get 3 like gems at the 3 points of a triangle (W).
- This will shatter the glass in the triangle (X).
- Complete this process to clear all the glass and earn the Power of Earth for the raven.
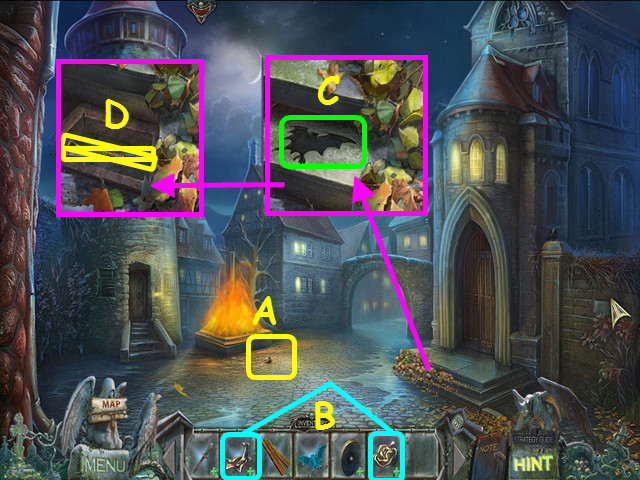
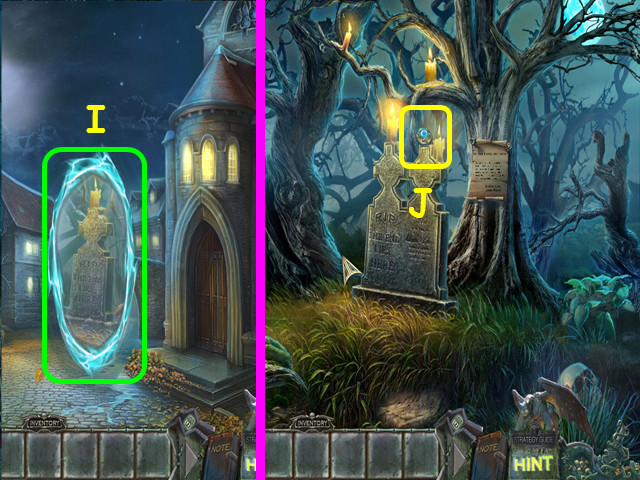
- Enter the portal (Y).
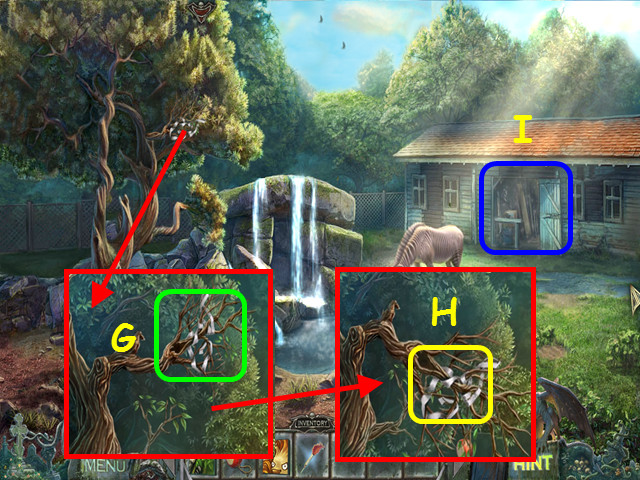
Chapter 2: The Zoo
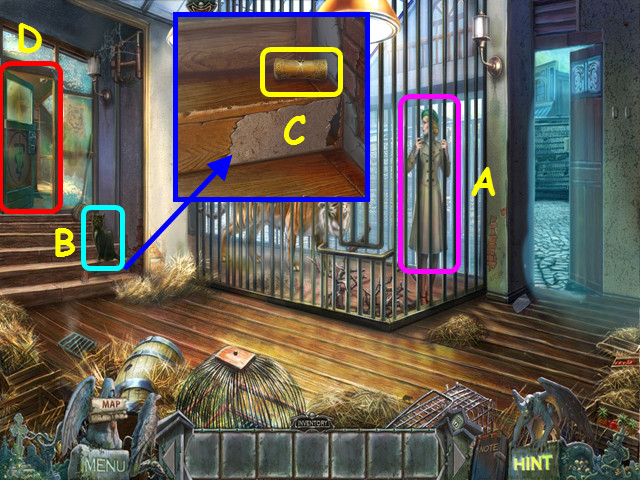
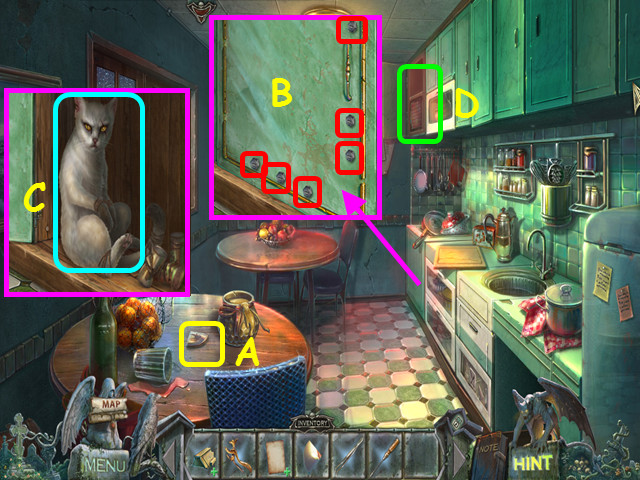
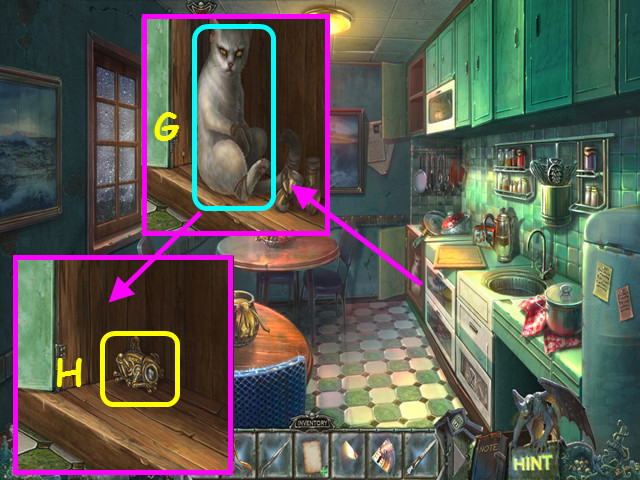
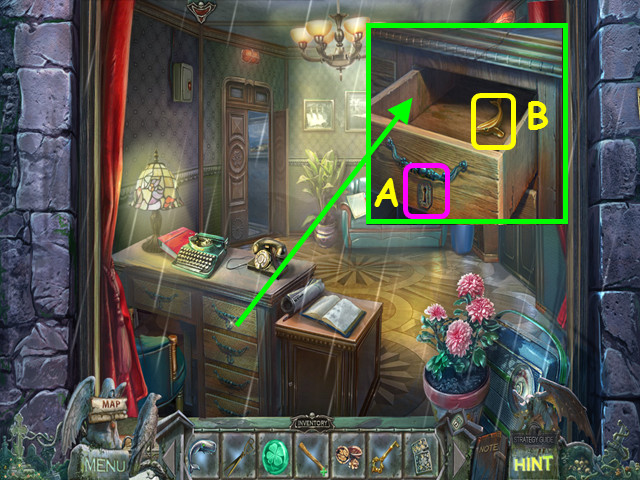
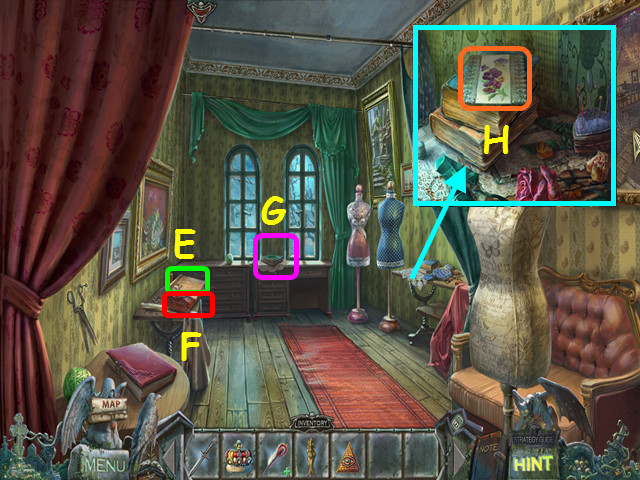
- Talk to the girl (A).
- Shoo the cat away (B).
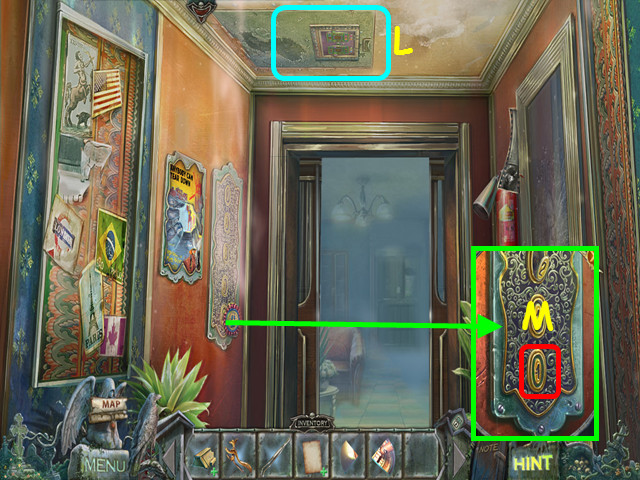
- Look at the stairs; take the medal (@) and the DRILL HANDLE (C).
- Look at the door (D).
- Take the DRILL BIT (E).
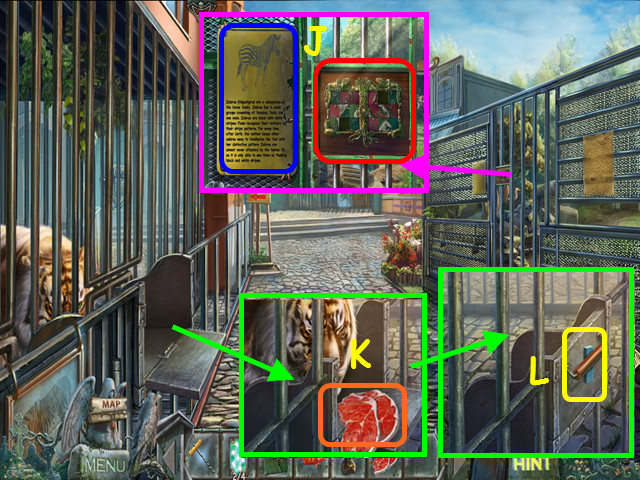
- Read the notes on tigers (F).
- Combine the DRILL BIT and the DRILL HANDLE in your inventory to make the CORKSCREW (G).
- Walk down, and then walk to the right.
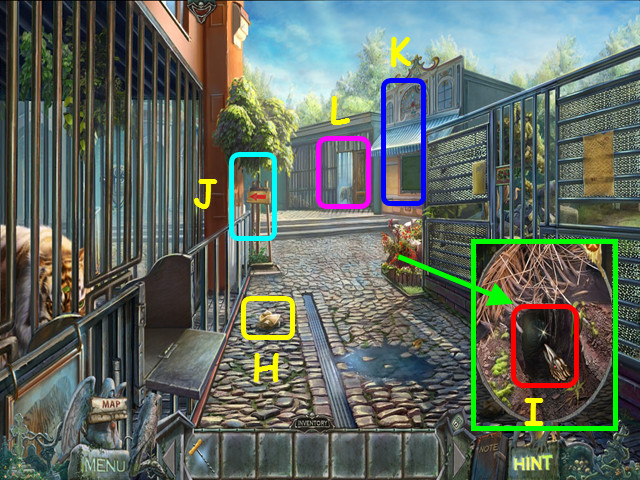
- Read the note on penguins (H).
- Look at the flowers; take the medal (@) and use the raven’s Power of Earth on the hole to get the AQUARIUM TOKEN (I).
- Note the path to the left (J).
- Note the arcade (K).
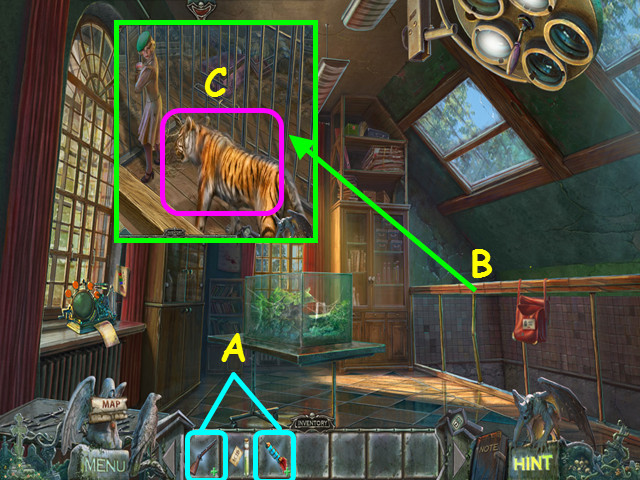
- Look at the wolf cage for a cut scene (L).
- Walk down, and then walk left.
- Look at the telescope and take the GAME TOKEN (M).
- Look at the bear statue’s raised paw and use the raven to take the 1/4 PIECE OF ICE (N).
- Note the hole in the fence (O).
- Look at the wheelbarrow (P).
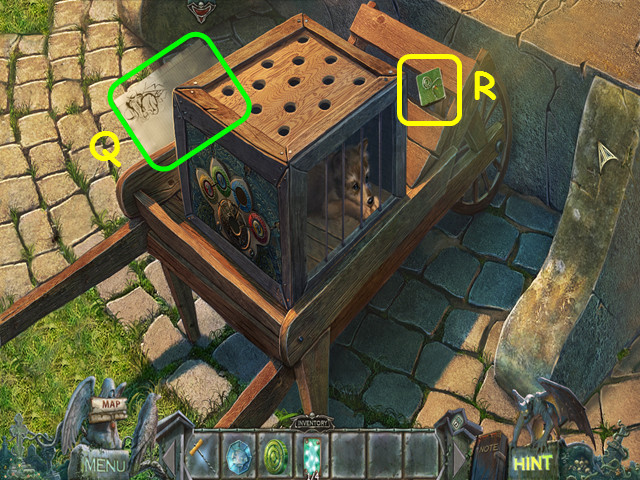
- Read the gorilla notes (Q).
- Take the medal (@) and the 1st ZEBRA MOSAIC PIECE (R).
- Walk down twice.
- Look at the arcade and place the GAME TOKEN in the slot (S).
- Note the face that appears on the right under the token slot (T).
- Quickly, note the location of the matching face on the left (U).
- The tokens will turn over and move; make sure you keep track of the one with the matching face.
- Once the tokens stop moving, select the one with the matching face.
- This mini-game is randomly generated. Your solution may vary. There are 3 levels to complete (1-3).
- Take the TOY FISHING ROD (V).
- Walk to the left.
- Look at the aquarium and use the AQUARIUM TOKEN on the slot (A).
- Use the TOY FISHING ROD on the aquarium (B).
- Capture all the fish.
- You will have to anticipate the way the fish move to capture them.
- The fish like to move one space forward or backwards and one space up or down (C).
- You will earn the FISH.
- Enter the building (D).
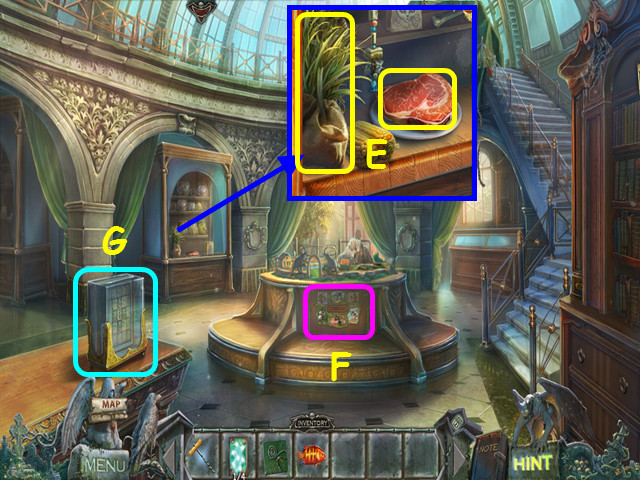
- Look in the cabinet; take the GRASS and MEAT (E).
- Note the mini-game on the center display (F).
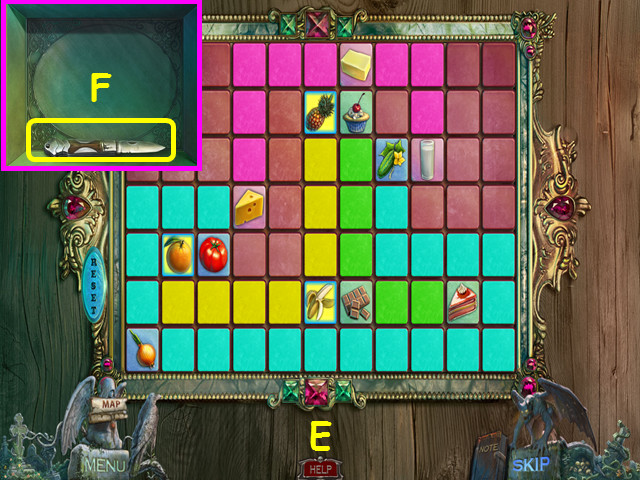
- Look at the glass cube for a mini-game (G).
- Select an arrow to move the ant and use the ant to push the blocks onto the 4 green dots (H).
- Move the ant left, up, left, and down (1).
- Move the ant up twice, right 3 times, down, and left (2).
- Move the ant right twice, down twice, left, and up (3).
- Move the ant left twice, down, and right (4).
- Move the ant down, left 3 times, up, and left (5).
- You will earn the 2/4 PIECE OF ICE (I).
- Walk down twice.
- Look at the gate; read the zebra information and note the mini-game (J).
- Look at the opening and give the MEAT to the tiger (K).
- Close the panel and take the SOFT PLASTIC (L).
- Walk down.
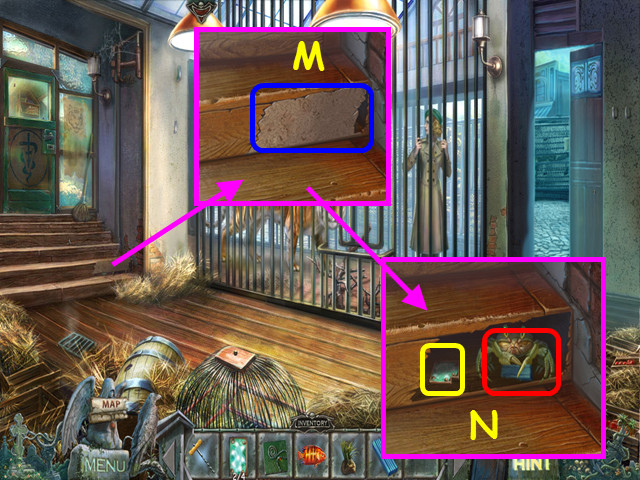
- Look at the stairs and use the CORKSCREW on the panel (M).
- Give the SOFT PLASTIC to the crab and take the 3/4 PIECE OF ICE (N).
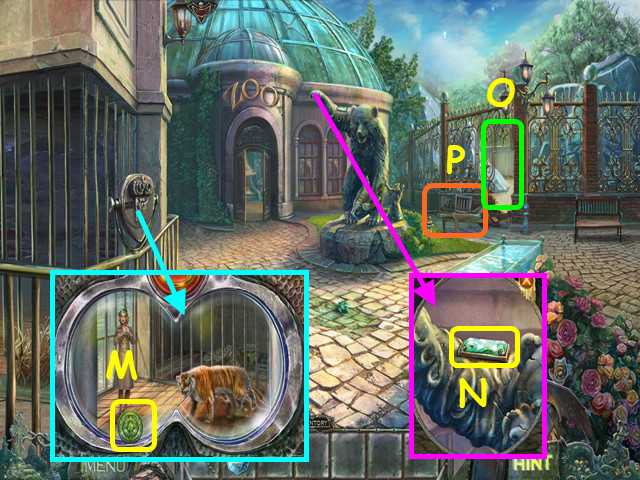
- Walk right, left, and then enter the hole in the fence.
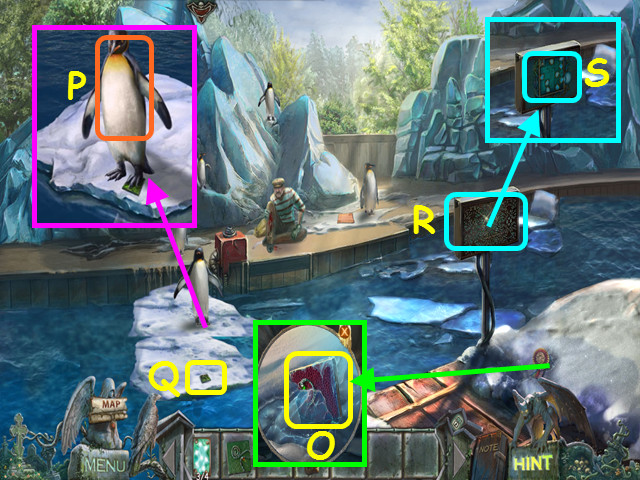
- Look at the snow, take the medal (@), and use the raven’s Power of Earth to retrieve the 2nd ZEBRA MOSAIC PIECE (O).
- Look at the penguin and give him the FISH (P).
- Zoom into the ice and take the 1st ANIMAL TILE (Q).
- Remove the control panel cover (R).
- Note the mini-game in the panel (S).
- Walk down twice.
- Look at the gate on the right and zoom into the mosaic for a mini-game.
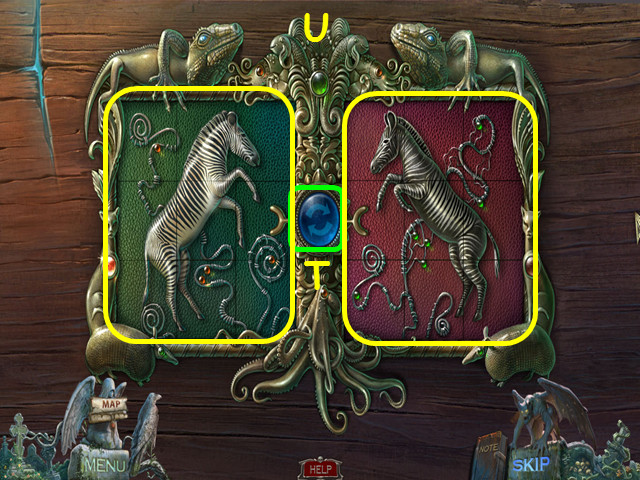
- Place the 2 ZEBRA MOSAIC PIECES in the panel to activate the mini-game.
- Select 2 pieces to swap positions; press the blue button to swap the tiles from each side (T).
- The center tile on each side does not move.
- Continue until you have restored both sides (U).
- Enter the gate.
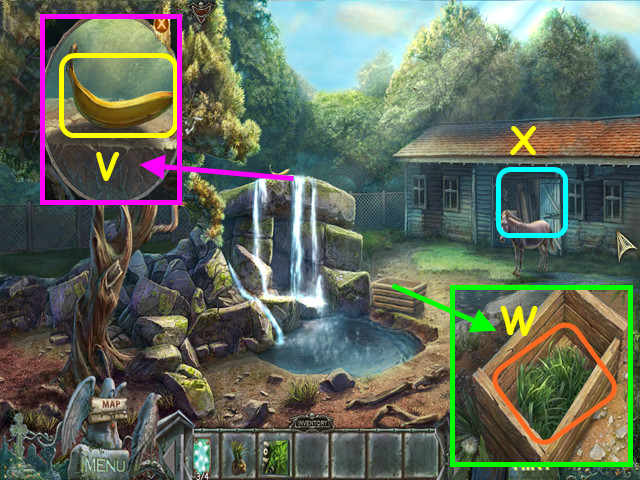
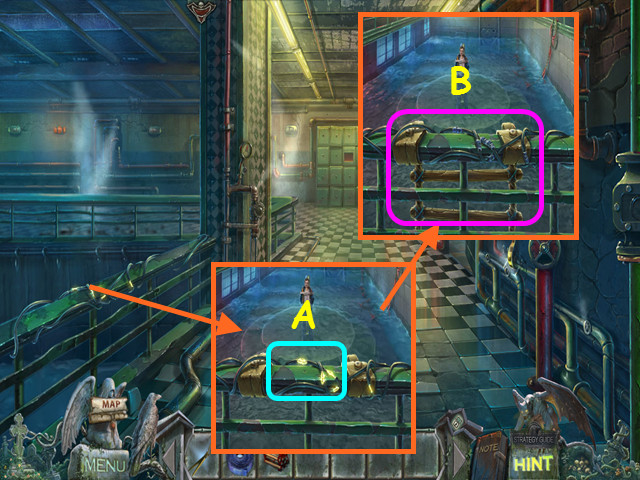
- Look at the waterfall and use the raven’s Power of Air to take the BANANA (V).
- Look in the trough; take the medal (@) and add the GRASS (W).
- Select the barn for a HOP (X).
- Find all the ice.
- Open the crate (Y).
- Use the fly on the web (Z).
- You will earn the 4/4 PIECE OF ICE.
- Walk down, left, and forward.
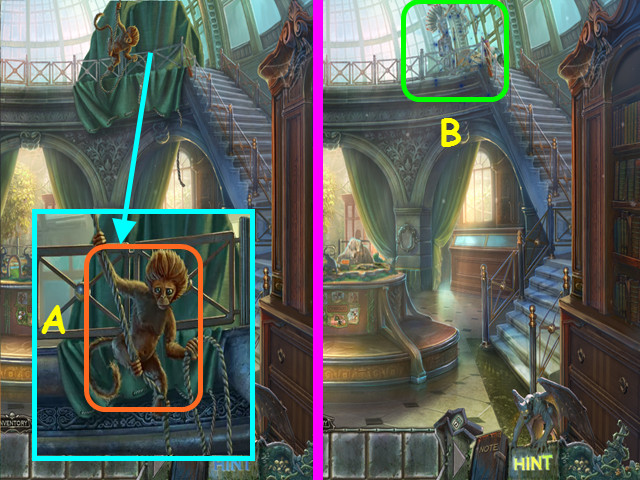
- Look at the monkey and give him the BANANA (A).
- Select the area at the top of the stairs for a HOP (B).
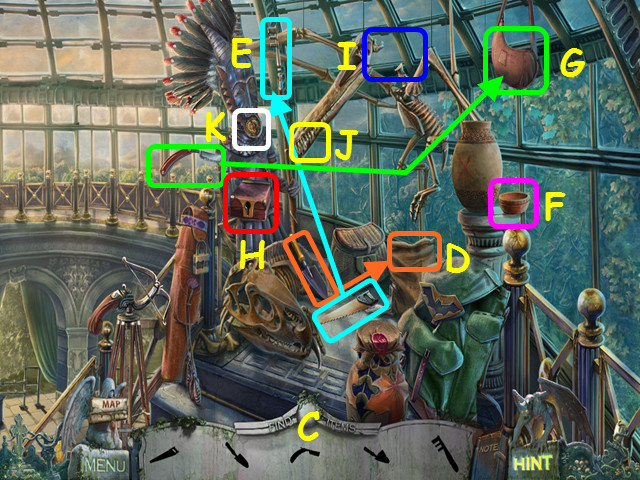
- Locate all the items on the list using their silhouettes (C).
- Use the shovel on the bag to get the shovel with gypsum (D).
- Use the saw on the spear to get the spearhead (E).
- Use the shovel with gypsum on the bowl (F).
- Use the razor on the water bag to get the bowl with gypsum (G).
- Use the spearhead to open the case, and then use the bowl with gypsum in the case (H).
- When the case opens, take the bone and place it on the skeleton (I).
- Take the game part (J).
- Look at the idol’s mouth for a mini-game (K).
- Place the game part in the circle to trigger the mini-game (L).
- Swap the outer pieces to restore the picture of the bear (M).
- Take the WOLF MEDALLION (N).
- Walk down, and then go right.
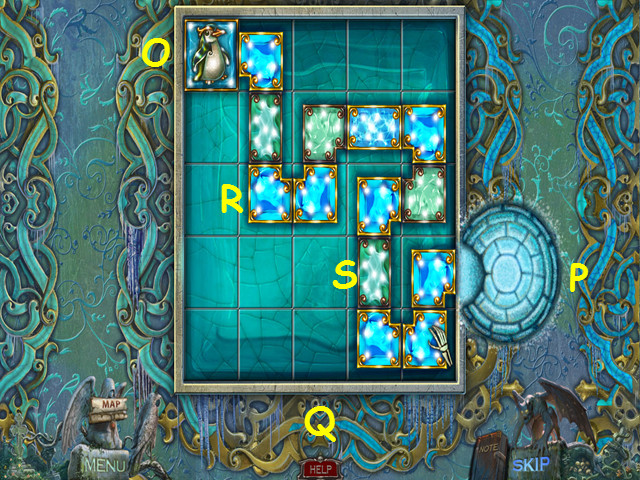
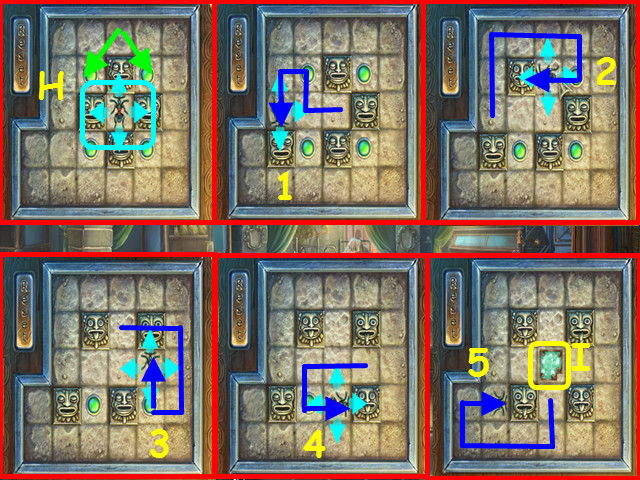
- Look at the control panel for a mini-game.
- Place the 4 PIECES OF ICE on the grid to trigger the mini-game.
- Create a path for the penguin (O) to walk to the end (P), using all the pieces (Q).
- The blue pieces can be moved (R), while the green pieces rotate in place (S).
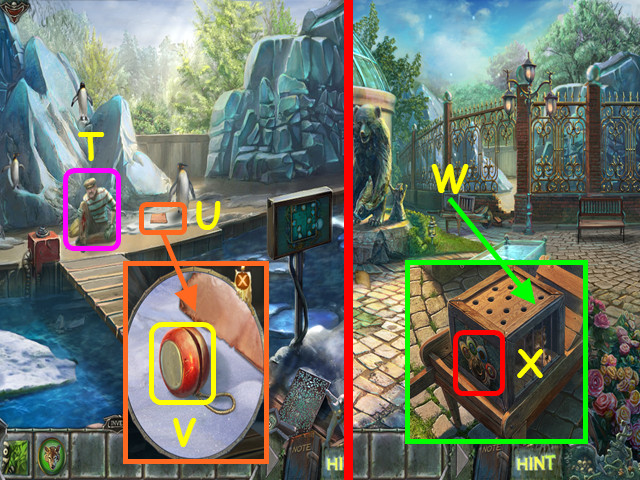
- Talk to the thief (T).
- Read the warning (U) and take the YO-YO (V).
- Walk down.
- Look at the wheelbarrow (W).
- Look at the end of the cage for a mini-game (X).
Chapter 3: Saving the Reporter
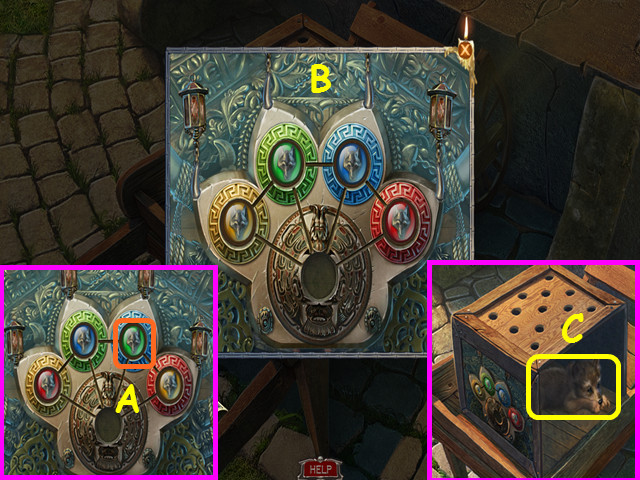
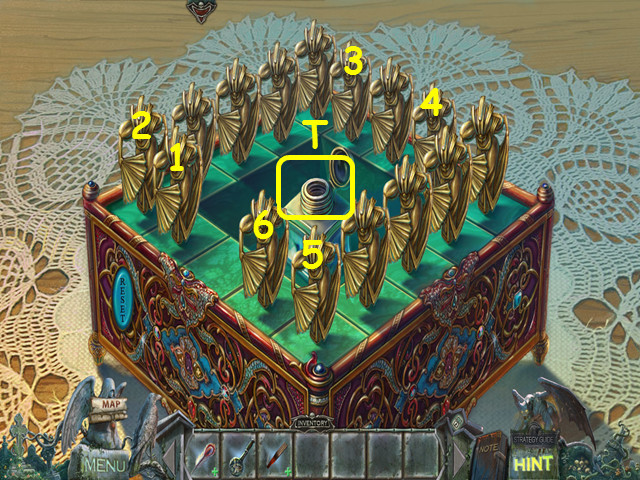
- Place the WOLF MEDALLION in the open circle to trigger the mini-game (A).
- Move the medallions to the circles with the same color (B).
- Select the medallions in this order: blue, red, blue, green, red, blue, green, yellow, red, blue, green, and yellow.
- Take the WOLF CUB (C).
- Walk down and enter the wolf cage.
- Give the WOLF CUB to the wolf (D).
- Look at the control and press the green button (E).
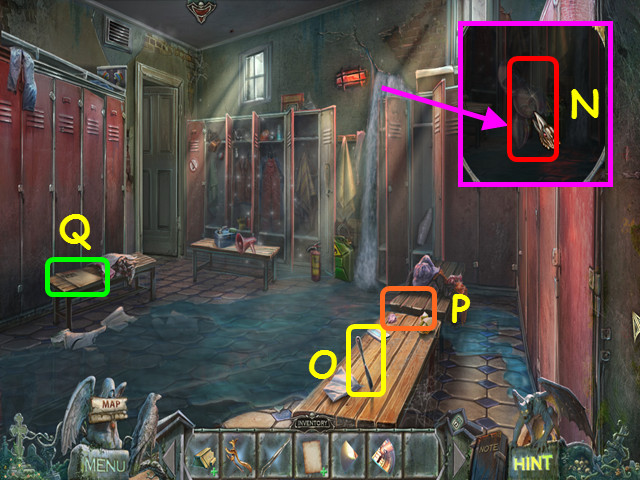
- Look at the corner; take the 2nd ANIMAL TILE and the DART (F).
- Walk down and right.
- Look at the tree and use the YO-YO on the branch (G).
- Take the BANDAGE (H).
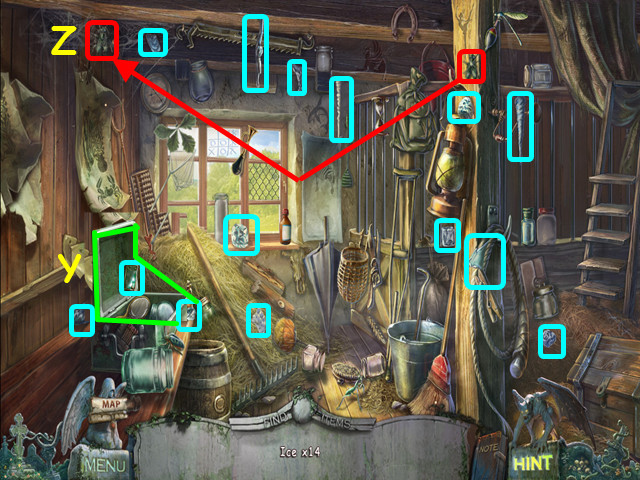
- Select the barn for a HOP (I).
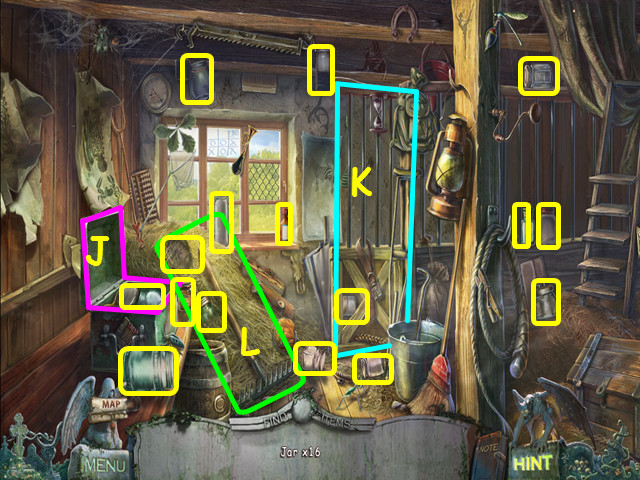
- Locate the 16 jars.
- Open the chest (J).
- Open the stall door (K).
- Use the rake (L).
- You will earn the HYDROGEN PEROXIDE.
- Walk down, left, and right.

- Combine the BANDAGE and the HYDROGEN PEROXIDE in your inventory to make the ANTIBACTERIAL BANDAGE (M).
- Use the ANTIBACTERIAL BANDAGE on the thief (N).
- Talk to the thief to get the KEYS.
- Walk down and go forward.
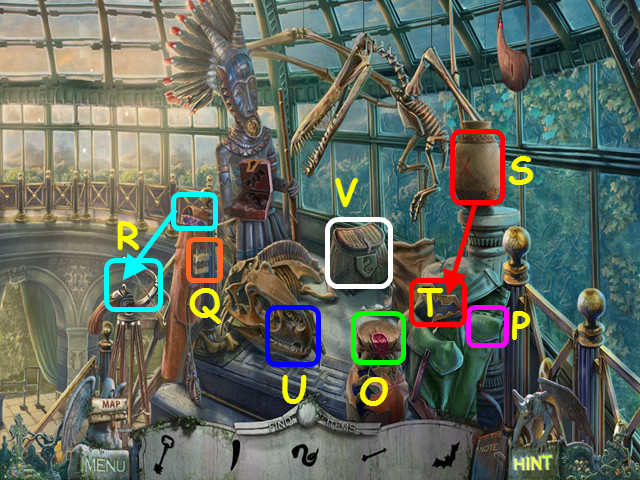
- Select the area at the top of the stairs for a HOP.
- Locate all the items using their silhouettes.
- Remove the lid from the vase to find the fang (O).
- Open the pocket to find the key (P).
- Use the key on the lock (Q).
- Take the arrow and use it on the crossbow (R).
- Fire the crossbow, and then take the bat from the broken vase (S).
- Use the bat on the backpack lock and take the flute (T).
- Use the fang on the skeleton head, and then take the gold snake (U).
- Use the gold snake on the basket, and then use the flute on the snake (V).
- Take the 3rd ANIMAL TILE once the snake leaves.
- Look at the mini-game on the center console.
- Place the 3 ANIMAL TILES in the squares to activate the mini-game.
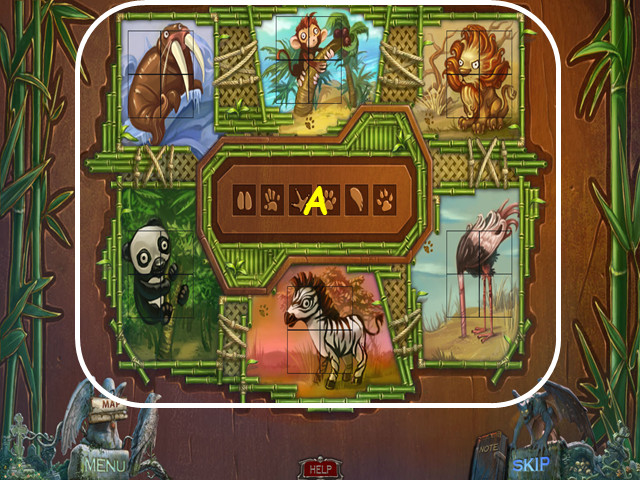
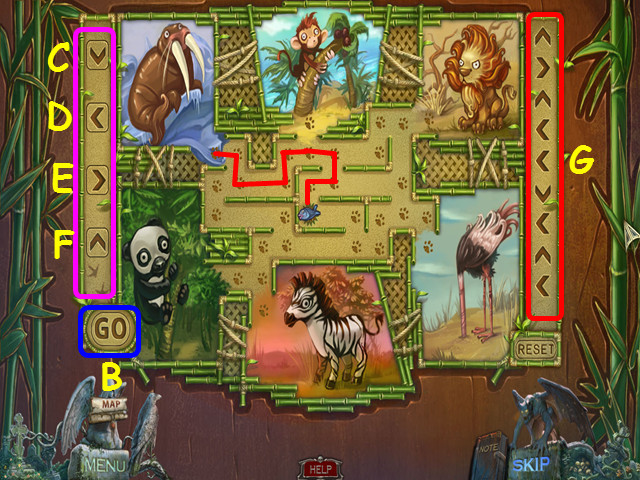
- Swap the tiles to complete the pictures (A).
- Press the arrow buttons (C-F) to move the fish to the walrus then press the go button (B).
- The directions you type will show on the right (G).
- Each paw print is a point where an arrow is needed.
- To feed the fish to the walrus, press: F, E, F, D, D, C, D, F, D, and B.
- Feed the banana to the monkey by pressing: F, E, F, D, F, and B.
- Feed the steak to the lion by pressing: F, E, E, F, E, and B.
- Feed the bamboo to the panda by pressing: E, C, D, D, C, D, and B.
- Feed the hay to the donkey by pressing: E, C, D, D, C, C, and B.
- Feed the worm to the ostrich by pressing: F, E, E, C, E, C, and B.
- Take the GUN when the panel opens.
- Walk down 3 times.
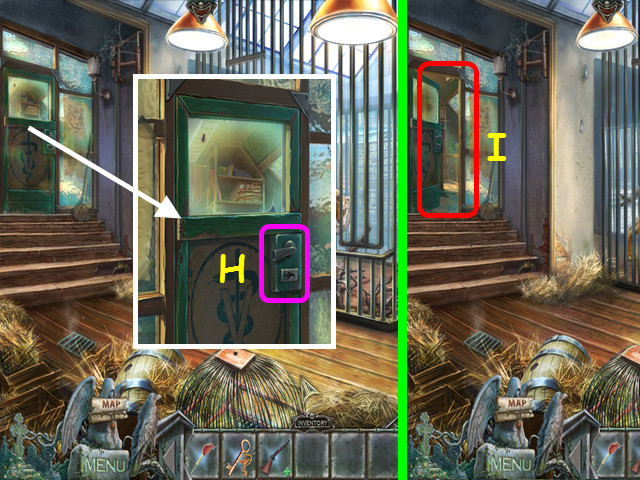
- Look at the door and use the KEY in the lock (H).
- Walk forward (I).
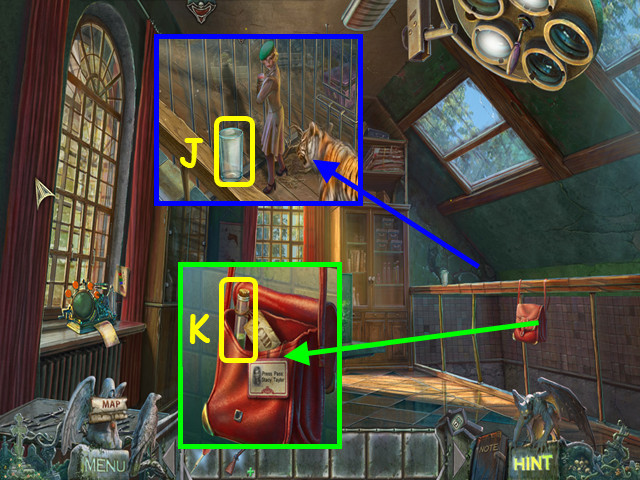
- Look down in the cage and take the GLASS (J).
- Zoom into the purse, open it, and take the ACID (K).
- Look at the terrarium and place the glass over the spider (L).
- Take the SLEEPING MEDICINE (M).
- Look at the machine on the windowsill (N).
- Pour the SLEEPING MEDICINE in the reservoir (O).
- Place the DART in the holder (P).
- Note the order in which the colors need to be added to the dart (Q).
- Look at the formula key and note the symbols for each color (R).
- Each symbol is made of the same pieces, just layered in a different order.
- For the blue layer, press V, U, S, and T.
- The green layer is S, U, V, and T.
- To make the yellow layer, press U, T, S, and V.
- The final, red layer is T, V, S, and U.
- Take the TRANQUILIZER DART.
- Combine the GUN and the TRANQUILIZER DART in your inventory to make the TRANQUILIZER GUN (A).
- Look down into the lion’s cage (B).
- Use the TRANQUILIZER GUN on the lion (C).
- Walk down.
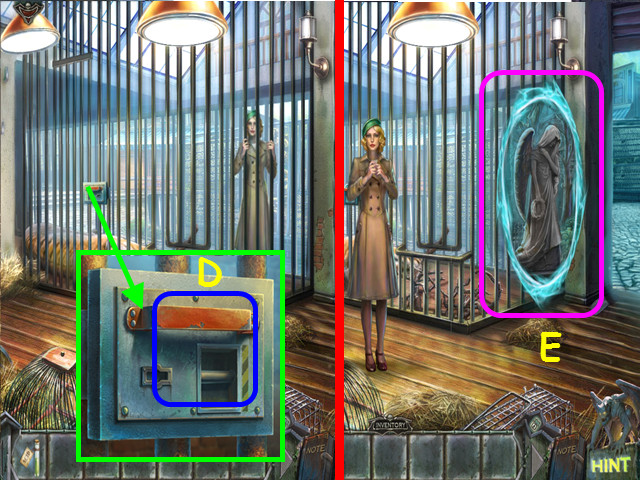
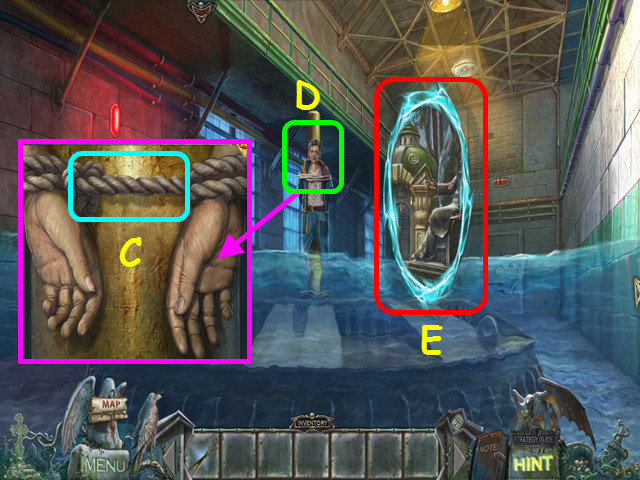
- Look at the cage door and use the ACID on the lock (D).
- Enter the portal (E).

- Take the DOG CRYSTAL and read the newspaper (F).
- Walk down twice.
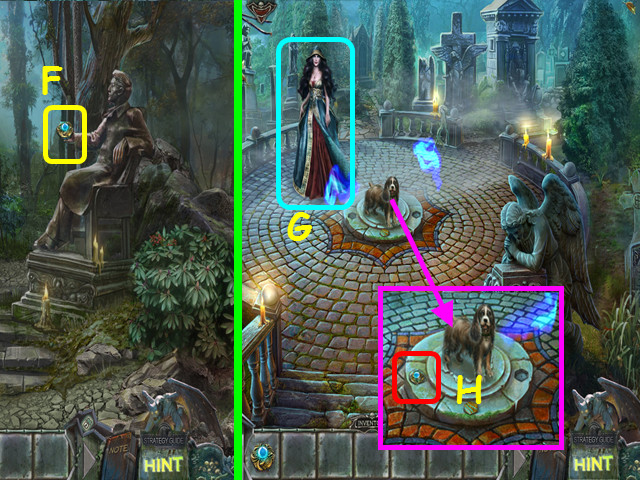
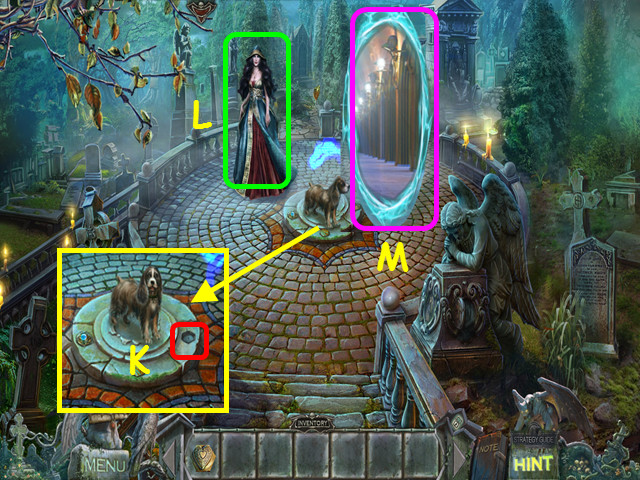
- Talk to Hina (G).
- Look at the dog and place the DOG CRYSTAL in the center opening (H).
- Walk to the right.
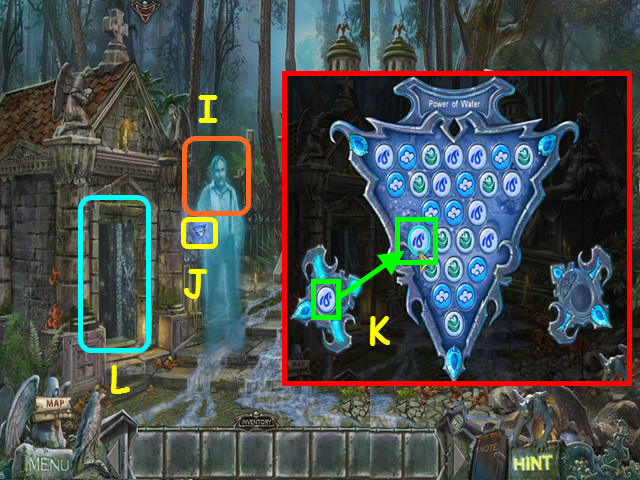
- Talk to the ghost (I).
- Take the Power of Water symbol for a mini-game (J).
- Use your mouse to aim at a ball with the same symbol (K).
- You will alternate between shooters.
- Shoot all the balls to charge the raven.
- Select the crypt for a HOP (L).
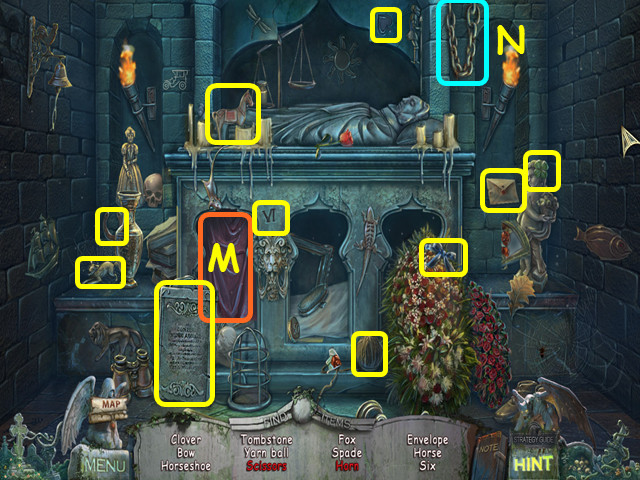
- Locate all the items on the list.
- Move the curtain to find the scissors (M).
- Pull down the chain to find the horn (N).
- You will earn a TOMBSTONE.
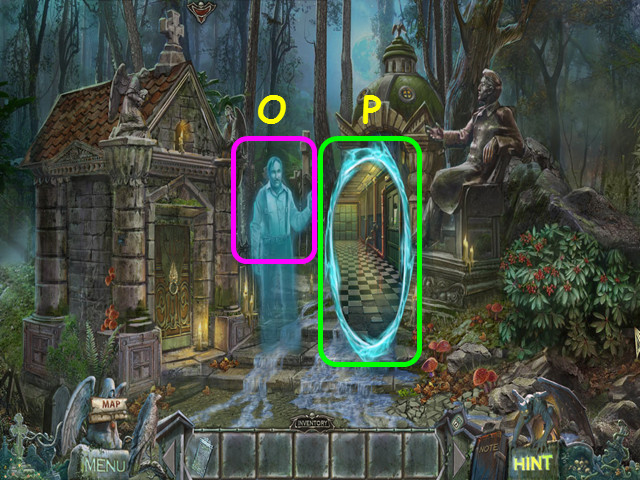
- Give the TOMBSTONE to the sprit (O).
- Enter the portal (P).
Chapter 4: The Hydroelectric Station
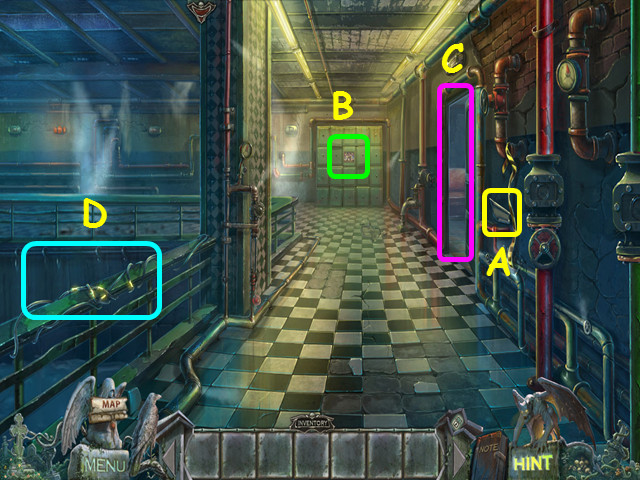
- Take the 1st PART OF THE DAM (A).
- Note the mini-game on the back wall (B).
- Note the door on the right (C).
- Look over the rail (D).
- Talk to the worker (E).
- Use the raven’s Power of Water to collect the NUTCRACKER (F).
- Enter the door on the right.
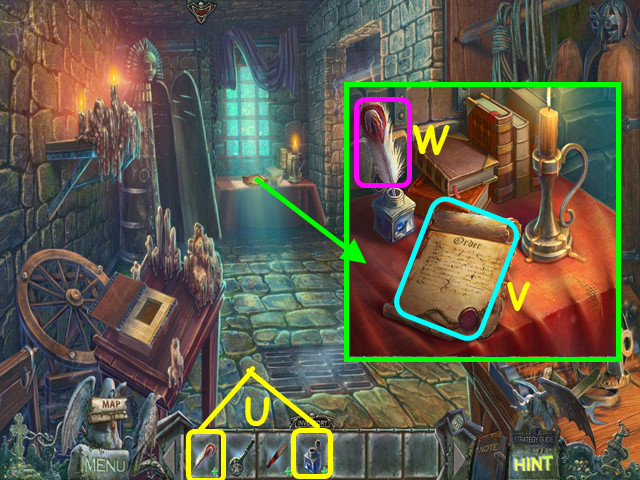
- Look at the table, open the envelope, take the SHEET OF PAPER and the 1st CHIP WITH THE IMAGE OF A CAR (G).
- Read the note on hydroelectric power (H).
- Look out the window and use the raven’s Power of Air to take the TWEEZERS (I).
- Note the mini-game next to the elevator (J).
- Select the cabinet for a HOP (K).
- Locate all the items by their silhouette.
- Use the magnet (L) to drag the handle (M) through the shelves and out through the hole in the glass.
- Use the handle on the circle in the glass, then slide the door to the right (N).
- Move the glass doors back and forth as needed.
- Use the blade to cut open the cardboard box; take the handle and the raven (O).
- Place the raven on the green box and take the record (P).
- Place the handle and the record on the phonograph, then turn the handle (Q).
- Take the medallion, place it upon the gray box, and take the SCREWDRIVER (R).
- Walk to the right.
- Take the 2nd CHIP WITH THE IMAGE OF A CAR (A).
- Look at the cabinet and use the SCREWDRIVER on the 6 screws (B).
- Note the mistreated cat in the cabinet (C).
- Select the upper cabinet for a mini-game (D).
- Connect the sets of 3 like items without crossing paths (E).
- Select an item and press the squares to the next in the set.
- Choose items from another set to change the colors.
- Take the PENKNIFE (F).
- Look at the cabinet and use the PENKNIFE to free the cat (G).
- Look again in the cabinet and take the TOAD (H).
- Walk down.
- Look at the mini-game next to the elevator and place the TOAD in the center to activate the mini-game.
- Use the green arrows (I) to move the toad (J) to the red square at the end (K).
- Each square indicates the number of times the toad must land on each square.
- Walk forward to enter the elevator.
- Note the mini-game on the trapdoor (L).
- Look at the control panel, take the medal (@), and press the bottom button (M).
- Walk forward.
- Look at the water and use the raven’s Power of Water to retrieve the BUNNY (N).
- Take the SYMBOL OF KNIFE (O).
- Read the note (P).
- Read the Prohibition note (Q).
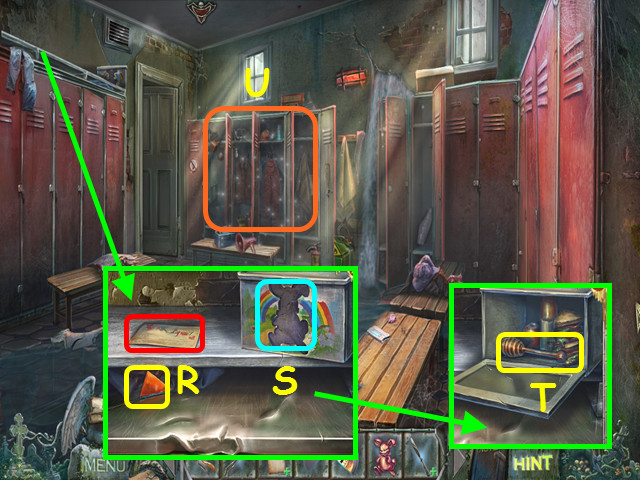
- Look at the top of the lockers; take the 1/4 CONTROL PANEL ELEMENT (triangle) and look at the note (R).
- Place the BUNNY on the lunchbox (S) and take the HONEY DIPPER (T).
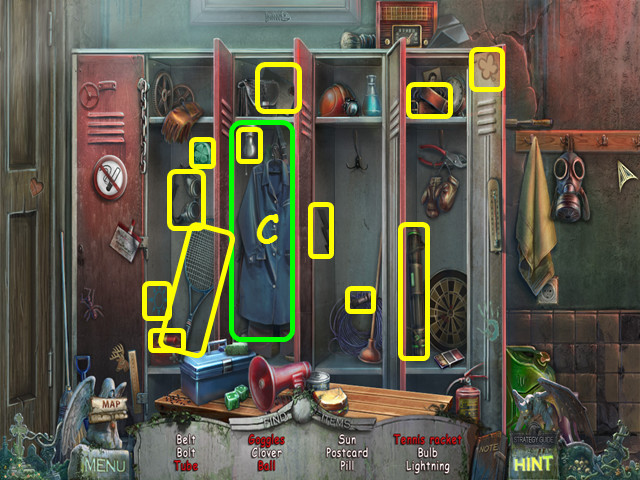
- Select the lockers for a HOP (U).
- Locate all the items on the list.
- Move the clothing form the 2nd locker to another to find the shears (V).
- Move the clothing from the 3rd locker to find the canteen (W).
- You will earn the ROPE WITH A HOOK.
- Enter the door on the left.
- Look at the window and take the SYMBOL OF A FORK (X).
- Look at the locker and use the TWEEZERS to take the 2/4 CONTROL PANEL ELEMENT (triangle) (Y).
- Walk down twice; look at the elevator control and push the 2nd button from the bottom.
- Walk forward and go right to the kitchen.
- Combine the SYMBOL OF A FORK and the SYMBOL OF A KNIFE in your inventory to make the FORK AND KNIFE (A).
- Look at the drawer and place the FORK AND KNIFE in the indentation (B).
- Take the 3/4 CONTROL PANEL ELEMENT (triangle) and the 2nd PART OF THE DAM (C).
- Use the HONEY DIPPER on the jar to get the HONEY DIPPER WITH HONEY (D).
- Walk down, enter the elevator, look at the controls, and push the bottom button.
- Walk forward and enter the door on the left.
- Combine the 1st PART OF THE DAM with the 2nd PART OF THE DAM in your inventory to make the DAM (E).
- Look at the drawer and place the DAM into the picture (F).
- Take the WINDOW HANDLE, 1st WHALE, and the 3rd CHIP WITH THE IMAGE OF A CAR (G).
- Walk down twice, press the 2nd button from the bottom on the elevator control, walk forward, and down.
- Look at the back wall for a mini-game.
- Place the 3 CHIPS WITH THE IMAGE OF A CAR in the circles to activate the mini-game.
- Select a large circle (H-M) to rotate it in place, select a yellow button (N-O) to highlight the pieces available to move, then select 2 pieces (1-8) to swap positions.
- Continue this process to restore the picture.
- Our solution is: J, O, 6, 7, Lx3, N, 3, 4, K, M, O, 7, 8, Lx3, N, 3, 4, K, Ix2, O, 5, 8, I, N, 2, 3, K, Hx2, N, 1, 4, M, L, O, 7, 8, Ix2, N, 2, 3, Kx2, Jx3, O, 5, 6, I, H, N, 1, 2, Hx3, Lx2, N, 1, 4, Jx2, I, O, 5, 6, I, Hx2, N, 1, 2, Hx2, J, Lx3, O, 6, 7, Jx2, O, 5, 6, Lx3, O, 6, 7, J, O, 5, 6, J, Mx2, Lx3, O, 7, 8, Mx3, Lx2 O, 7, 8, L, O, 5, 7, L, O, 5, 7, Lx2, and Mx2.
- Take the CONTROL PANEL ELEMENT (round) and the PENCIL.
- Walk to the right twice.
- Look at the window, take the medal (@), and use the WINDOW HANDLE to open the window (P).
- Combine the PENCIL and the SHEET OF PAPER in your inventory to make the PENCIL AND SHEET OF PAPER (Q).
- Walk down, enter the elevator, look at the elevator control, and press the bottom button. Walk forward.
- Look at the lockers and use the PENCIL AND SHEET OF PAPER on the left (R).
- Press the up arrow (S) 3 times to move the 7 to the top and press enter (T).
- Press the up arrow twice to move the 5 to the top and press enter.
- Press the up arrow twice to move the 3 to the top and press enter.
- Take the SCRAPER (U).
- Walk down.
- Use the SCRAPER on the poster (V).
- Take the 4/4 CONTROL PANEL ELEMENT (triangle) (W).
- Walk forward and left.
- Look at the control panel for a mini-game (X).
- Place the 4 CONTROL PANEL ELEMENTS (triangles) and the CONTROL PANEL ELEMENT (round) on the panel to activate the mini-game.
- Move the elements to the matching colored spaces (color-coded).
- Press the right (A) button 5 times; press the down (B) button once.
- Press the up (C) button once; press the left (D) button 5 times.
- Press the down button twice, press right twice, then press the down button.
- Take the ROTATION KNOB (E).
- Walk down twice.
- Look at the mini-game on the trap door and place the ROTATION KNOB on the square to activate the mini-game.
- Move the colored chips on the squares so they touch the same color outer chips.
- Press the buttons in this order: Hx3, F, 2, G, H, G, Hx3, 4, G, Fx2, G, 5, 6, G, Hx2, 2, G, Hx2, G, 5, 3, G, Hx2, 1, 4, G, 2, 3, G, 5, 6, G, 2, F, G, 5, F, G, Hx3, G, Fx2, 4, G, F, 1, G, H, G, 2, Fx2, and Hx3.
- Take the SCISSORS (I).
- Walk forward.
Chapter 5: Saving the Worker
- Look in the locker; use the SCISSORS on the ribbon and take the CANE (A).
- Select the lockers for a HOP (B).
- Locate all the items on the list.
- Move the clothing to/from each locker to find the hidden items (C).
- You will earn the GREEN BALL.
- Walk down to the elevator, and go up the trap door.
- Select the cabinet to the left of the elevator for a HOP.
- Locate all the items on the list by their silhouette.
- Slide the glass door back and forth as needed.
- Use the corkscrew on the cork (D).
- Open the drawer to find the tape and the nippers (E).
- Use the tape on the wires (F).
- Take the knob from the tank, place it on the radio, and turn the knob (G).
- Press the down 3 tabs (H).
- Take the head and place it on the doll (I).
- Take the coin from the doll’s hand and place it on the cat box (J).
- Use the winding key on the cat box and turn it (K).
- Take the KEY and use it on the lock (L).
- Use the nippers to cut the ties, then take the GLASS CUTTER (M).
- Walk to the right.
- Combine the CANE and the ROPE WITH A HOOK in your inventory to make the LONG HOOK (N).
- Look in the window and use the LONG HOOK on the fire escape (O).
- Go out the window.
- Zoom in and take the AXE HANDLE (P).
- Read the record case (Q).
- Look at the desktop and use the NUTCRACKER on the walnut, then take the NUT (R).
- Walk to the left (S).
- Look at the window and take the KEY (T).
- Look at the desk and take the LIGHTER (U).
- Look at the cabinet and use the GLASS CUTTER on the glass (V).
- Note the mini-game on the globe (W).
- Walk down.
- Look at the desk, take the medal (@), and use the KEY on the lock (A).
- Take the 2nd WHALE (B).
- Walk to the left, look in the cabinet at the globe for a mini-game.

- Place the 2 WHALES on the right (C).
- Place the pieces in the openings to complete the globe (D).
- Take a piece and place it on the button to rotate it in place (E).
- Use the arrows to spin the globe (F).
- The solution for the other half is shown here (G).
- Walk right, into the secret passage.
- Take the medal (@) and use the LIGHTER on the lamp (H).
- Look in the crate and use the HONEY DIPPER WITH HONEY on the bees; take the INSULATING TAPE and the WATER SYMBOL (I).
- Look at the winch and use the raven’s Power of Air to get the AXE BLADE (J).
- Combine the AXE HANDLE and the AXE BLADE in your inventory to make the AXE (K).
- Use the AXE on the boards (L).
- Note the mini-game on the door.
- Walk down.
- Look at the window and place the WATER SYMBOL on the sill (M).
- Give the NUT to the squirrel (N).
- Take the 2nd GREEN BALL from the squirrel (O).
- Walk to the right and look at the mini-game on the door.
- Place the 2 GREEN BALLS in the openings to trigger the mini-game.
- Find the 2 elements that match the snakes and place them at the head and tail of each snake (P).
- The snake themes are fire, water, air, earth, and electricity.
- Select 2 elements to swap positions; the snakes will color when correct.
- Enter the doorway.
- Use the LIGHTER on the fuse (Q).
- Look at the crates and use the AXE to open three (R).
- Take the ROPE LADDER and look at the photos (S).
- Walk down 6 times.
- Look at the rail and use the INSULATING TAPE on the wires (A).
- Hang the ROPE LADDER on the rail (B).
- Go forward.
- Look at the man and use the SCISSORS on his ropes (C).
- Talk to the man (D), and then enter the portal (E).
- Take the DOG CRYSTAL (F).
- Walk down.
- Talk to Hina (G).
- Look at the dog and place the DOG CRYSTAL on the pedestal (H).
- Walk forward twice.
- Look at the statue and use the raven’s Power of Earth to take the WIRE CUTTERS (I).
- Walk down.
- Look at the knight and use the WIRE CUTTERS on the wires (J).
- Move the knight’s hands and take the ASHES (K).
- Walk down and left.
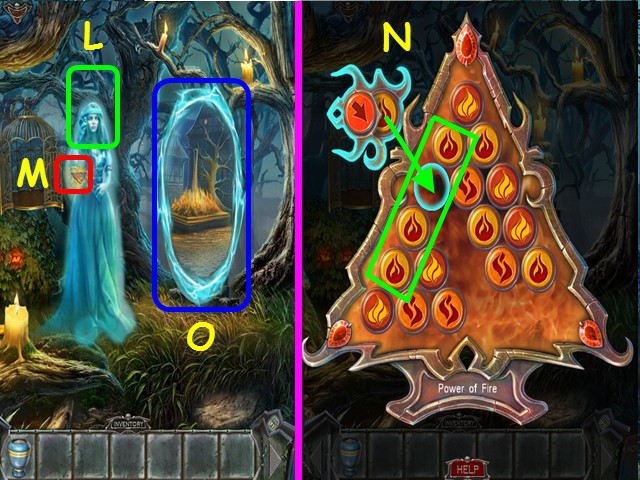
- Talk to the spirit (L).
- Take the Power of Fire from the spirit for a mini-game (M).
- Shoot the fireballs to make strings of three or more alike (N).
- Continue until the board is cleared.
- Give the ASHES to the spirit.
- Enter the portal (O).
Chapter 6: The Middle Ages
- Look at the ghosts (A).
- Look at the fire and use the raven’s Power of Fire to take the BLUNT KNIFE (B).
- Read the scroll (C).
- Look at the window and take the medal (@).
- Select the doorway for a HOP (D).
- Locate all the items based on their silhouettes.
- Take the collar and use it on the middle dog head (E).
- Take the horn and place it on the ram head (F).
- Close the mouth of the ram head, then take the dragon (G).
- Place the dragon on the red chain (H).
- Open the ram head, then use the cup on the lava (I).
- Use the cup with lava on the skull (J).
- Place the gem on the angel (K).
- Move the mirror on the wall down (L).
- Move the mirror on the floor to the left to aim the beam (M).
- Take the IVY (N).
- Walk forward.
- Look at the torch and use the raven’s Power of Fire to take the 1st PIECE OF THE ROSE (O).
- Look in the window (P).
- Walk to the right (Q).
- Take the PLANKS (R).
- Place the IVY on the pipe (S); take the BAT (T).
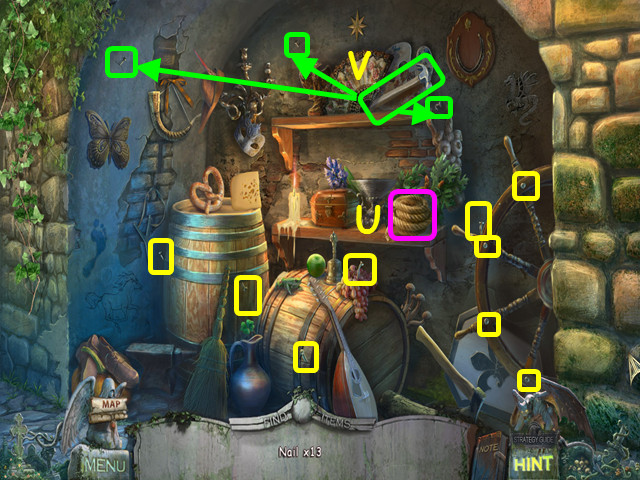
- Select the alcove for a HOP (U).
- Locate the 15 stones.
- Move the vase to find a stone (V).
- Turn the wheel to find a stone (W).
- Use the glass to cut the rope (X).
- You will earn the WHETSTONE.
- Walk down twice.
- Take the 2nd PIECE OF THE ROSE (A).
- Combine the 2 PIECES OF THE ROSE in your inventory to make the ROSE (B).
- Look at the steps and place the BAT in the indentation (C).
- Take the CROWBAR and the PICTURE PIECE (D).
- Walk forward and right.
- Combine the WHETSTONE and the BLUNT KNIFE in your inventory to make the KNIFE (E).
- Use the KNIFE on the rope (F).
- Look at the cage and place the ROSE in the indentation (G).
- Take the SUN (H).
- Walk down and look at the window for a mini-game.
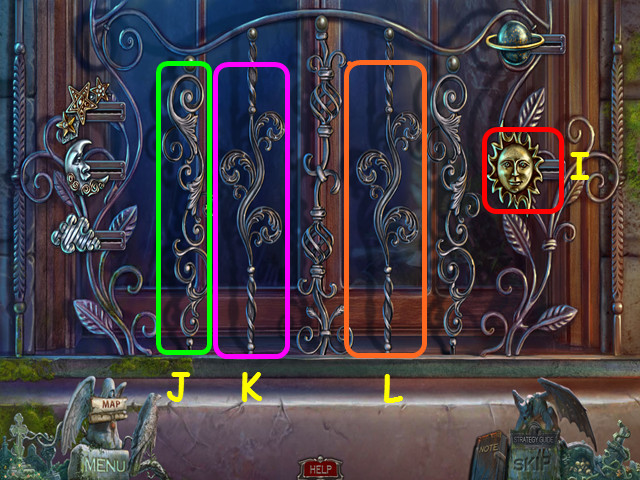
- Place the SUN on the right to activate the mini-game (I).
- Lower all the bars; select a bar to move it down.
- Moving some bars will move other bars.
- Move the bars in this order: J, K, and L.
- Enter the window.
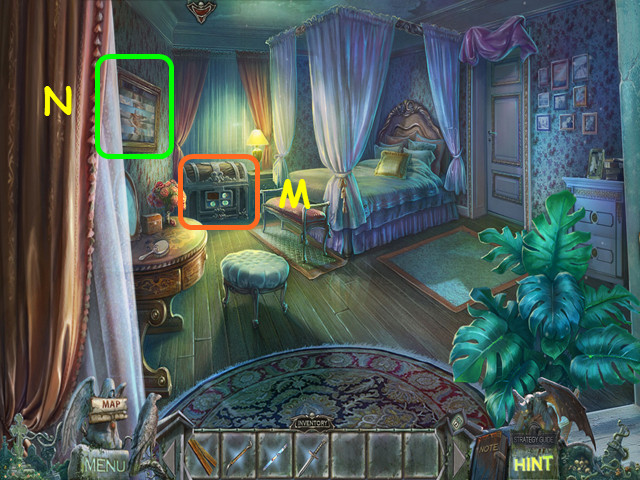
- Note the chest (M).
- Look at the frame for a mini-game (N).
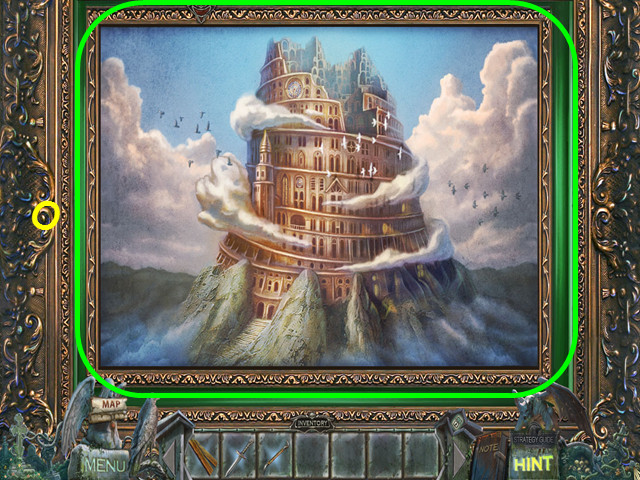
- Place the PICTURE PIECE in the frame to trigger the mini-game.
- Select two strips to swap positions.
- Drag the strips left and right to complete the painting (O).
- Look in the frame; take the medal (@) and the MOON (P).
- Look at the chest and place the MOON in the front panel (Q).
- Press the buttons in numerical order (1-4).
- Take the crown MEDALLION (R), then the demonic medallion (S).
- Should you take the demonic medallion first, you must come back later to get the crown medallion.
- Look out the window and pull the rope (A).
- Use the raven’s Power of Air to take the HAMMER (B).
- Move the bale of hay and note the mini-game on the wall (C).
- Lift up the blanket, zoom in and take the HAIR (D).
- Look at the wall and use the CROWBAR on the brick (E).
- Talk to the woman and you will earn the HAIRPIN (F).
- Look at the cell door (G).
- Take the CLAWS (H).
- Note the mug on the barrel (I).
- Return to the cell and look at the mini-game on the wall.
- Place the CLAWS and the HAIR in the empty circles to activate the mini-game.
- Swap the outer discs to match the creature in the center (J).
- Matches are similar to hair/ Rapunzel and poison/snake.
- Use the green buttons to change the features on the girl in the center (K) to match the picture (L).
- Press the buttons in this order: Mx3, Nx1, Ox3, Px1, Qx3, and Rx2.
- Take the SLEEPING POTION (S).
- Look at the cell door.
Chapter 7: Saving Fiona
- Look at the mug and pour the SLEEPING POTION inside (A).
- Look at the barrel and take the BIRD (B).
- Use the HAIRPIN on the lock (C).
- Take the STICK (D).
- Walk down.
- Use the STICK on the pile of branches to make the BROOM (E).
- Walk to the right.
- Look at the bench and take the RING (F).
- Combine the MEDALLION and the RING to make the KEY (G).
- If you did not get the medallion before you were thrown in prison, you will need to return to Fiona’s house once you escape.
- Walk down the steps (H).
- Look at the steps and use the BROOM on the leaves 3 times (I).
- Take the PEN (J).
- Select the doorway on the right for a HOP.
- Locate all the items using their silhouettes.
- Place the horn on the unicorn (K).
- Place the skull on the shield (L).
- Place the head on the pedestal (M).
- Place the wing on the helmet (N).
- Hang the griffin from the chain (O).
- Give the sword to the knight (P).
- Take the 1st DOLL (Q).
- Walk forward and right.
- Look in the cage and place the BIRD in the indentation (R).
- Take the ALL-SEEING EYE (S).
- Select the alcove for a HOP (T).
- Locate the 13 nails.
- Move the rope to find a nail (U).
- Use the hammer to pull the 3 nails (V).
- You will earn the NAILS.
- Walk down.
- Combine the HAMMER and the NAILS in your inventory to make the HAMMER AND NAILS (A).
- Look at the ground, take the medal (@), and place the PLANKS over the water (B).
- Use the HAMMER AND NAILS on the planks (C).
- Open the door and walk forward (D).
- Read the notes (E).
- Use the KNIFE on the cloth to get the RAG (F).
- Note the mini-game by the window (G).
- Look at the table; take the medal (@) and read the pile until you get to the love letters (H).
- Walk down.
- Look at the planks and use the RAG on the water to get the WET RAG (I).
- Walk down and enter the tower on the left.
- Look at the bench and use the WET RAG on the dirt (J).
- Take the SKULL (K).
- Go down the stairs, walk forward, and right.
- Use the SKULL on the door (L).
- Enter the door.
- Look at the rack; place the ALL-SEEING EYE in the lock and take the MACE (M).
- Zoom into the bag; take the KINDLING and read the notes (N).
- Look at the table and use the KINDLING on the candle to make the HOT KINDLING (O).
- Look at the book and place the CROWN on the cover for a mini-game (P).
- Start on any square and move the witch through all the squares (Q).
- The witch only stops when she reached an obstacle.
- Press the arrows (R) to move the witch.
- Take the 2nd DOLL (S).
- Walk down twice, then go forward.
- Look at the mini-game by the window.
- Place the 2 DOLLS on the board to activate the mini-game.
- Select certain dolls to make them all bow.
- Selecting a doll will move the 2 adjacent dolls.
- Select the dolls in numerical order (1-6).
- Take the INK (T).
- Walk down, go right and enter the skull door.
- Combine the INK and PEN in your inventory to make the PEN AND INK (U).
- Look at the table and use the PEN AND INK on the parchment to set it on the table (V).
- Select the pen to get the RELEASE ORDER (W).
- Walk down 3 times and enter the tower.
- Look at the weapons and use the MACE on the shield (A).
- Talk to the guard, then give him the order (B).
- He will give you the KEY TO FIONA’S CELL.
- Look at the cell door (C).
- Use the KEY TO FIONA’S CELL on the lock (D).
- Read the note (E).
- Look at Fiona’s feet; take the SEALING WAX and use the KEY TO FIONA’S CELL on the shackles (F).
- Combine the SEALING WAX and the HOT KINDLING in your inventory to get the MELTED WAX (G).
- Use the MELTED WAX to repair the key and open the shackles (H).
- Walk down.
- After the cut scene, enter the portal (I).
- Take the DOG CRYSTAL (J).
- Walk down.
- Look at the dog and place the DOG CRYSTAL on the pedestal (K).
- Talk to Hina (L).
- Enter the portal (M).
- Congratulations, you have completed Redemption Cemetery: Salvation of the Lost.


 Lost Legends: The Weeping Woman Walkthrough, Guide, & Tips
 Death Under Tuscan Skies: A Dana Knightstone Novel Walkthrough, Guide, & Tips
 Reflections of Life: Tree of Dreams Walkthrough, Guide, & Tips
 Break the Curse: The Crimson Gems Walkthrough, Guide, & Tips
 Revived Legends: Road of the Kings Walkthrough, Guide, & Tips