Death Under Tuscan Skies: A Dana Knightstone Novel Walkthrough, Guide, & Tips
Death Under Tuscan Skies: A Dana Knightstone Novel Walkthrough

Welcome to the Death Under Tuscan Skies: A Dana Knightstone Novel Walkthrough
Journey across Italy as best-selling novelist Dana Knightstone in Death Under Tuscan Skies: A Dana Knightstone Novel!
Whether you use this document as a reference when things get difficult or as a road map to get you from beginning to end, we’re pretty sure you’ll find what you’re looking for here.
This document contains a complete Death Under Tuscan Skies: A Dana Knightstone Novel game walkthrough featuring annotated screenshots from actual gameplay!
We hope you find this information useful as you play your way through the game. Use the walkthrough menu below to quickly jump to whatever stage of the game you need help with.
Remember to visit the Big Fish Games Forums if you find you need more help. Have fun!
This walkthrough was created by prpldva, and is protected under US Copyright laws. Any unauthorized use, including re-publication in whole or in part, without permission, is strictly prohibited.
General Tips

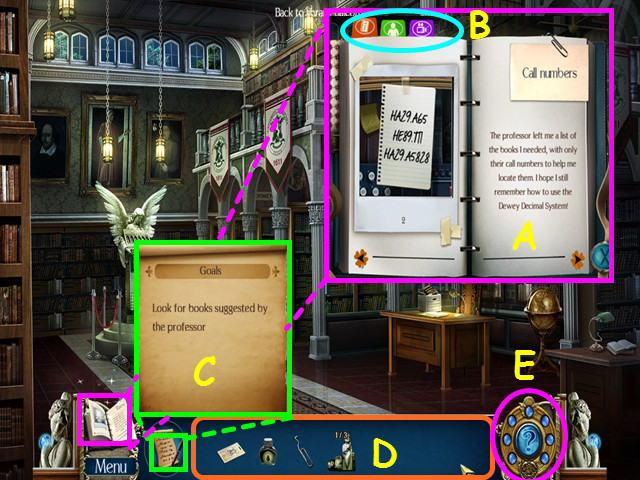
- Hidden Object Scenes will be referred to as HOS in this walkthrough.
- HOS and mini-games are often randomized – your solution may vary.
- Inside the journal you will find the clues and information you have found (A).
- Click on the tabs to view dossiers on the characters and previous cut-scenes (B).
- Select the goals button for your current tasks (C).
- Your inventory is in the bottom panel – click on an item to select it for use (D).
- Hints are unlimited, but you must wait for the hint meter to recharge (E).
Chapter 1: The University at Lucca

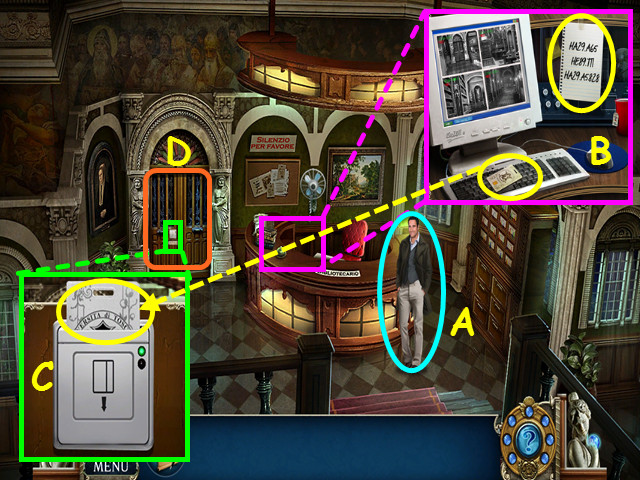
- You will have the option of some interactive help.
- Talk to Professor Romano (A).
- Look at the reception desk; take the KEY CARD and the LIST (B).
- The LIST will go into your journal.
- Look at the lock on the door then use the KEY CARD on the slot (C).
- Take the KEY CARD back then walk forward through the doors to the library balcony (D).

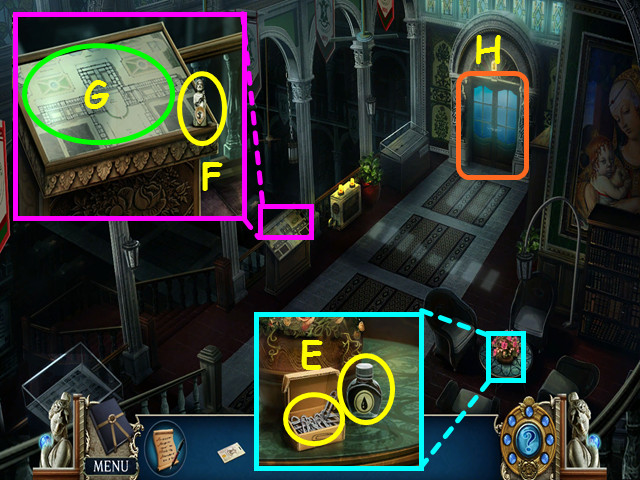
- Look at the table; take the PAPER CLIP and the INK BOTTLE (E).
- Look at the display and take the 1/3 HUMAN FIGURINES (F).
- Click on the map to learn the location of the literature and medical sections (G).
- Look at the door; click several times until the ghost is gone and the door opens (H).
- Walk forward to the literature section.

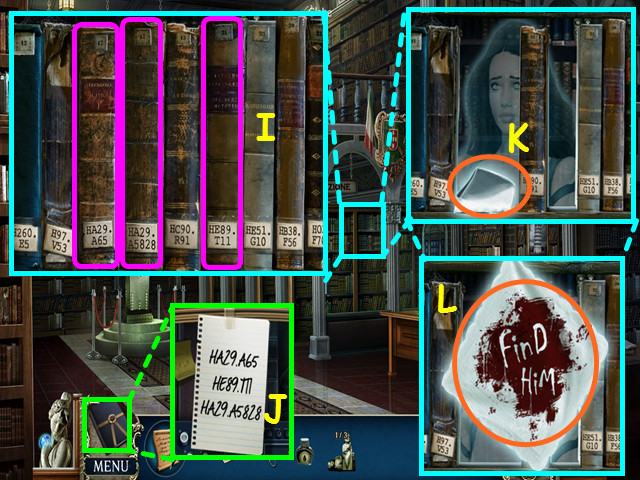
- Look at the bookshelf and click on the 3 books from the list (I).
- Refer to your journal for the list (J).
- Click on the handkerchief (K).
- Click on the bloody handkerchief (L).

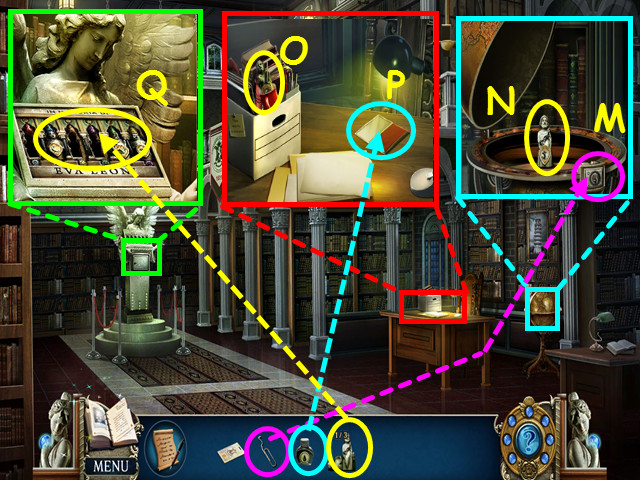
- Look at the globe and use the PAPER CLIP on the lock (M).
- Take the 2/3 HUMAN FIGURINES (N).
- Look at the desk and take the 3/3 HUMAN FIGURINES (O).
- Use the INK BOTTLE on the ink pad (P).
- Look at the angel and use the 3 HUMAN FIGURINES on the display for a mini-game (Q).

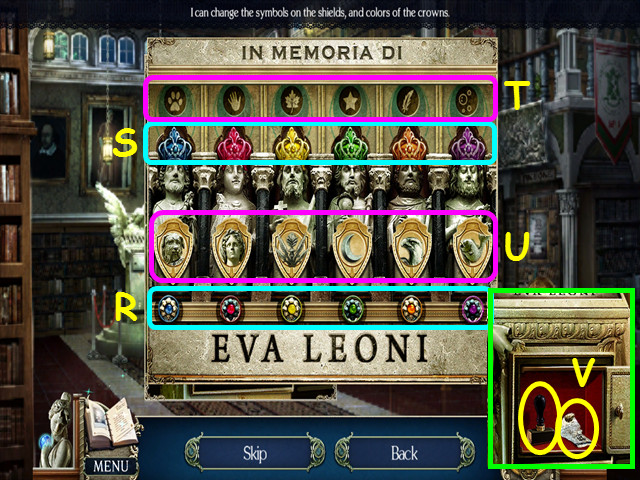
- The gems at the bottom (R) determine the color of the crowns (S); click on the crowns to change the color.
- The symbols at the top (T) determine the content of the shields (U); click on the shields to change the picture.
- For example, the paw print belongs to the dog and the star is over the moon.
- Take the WOODEN STAMP and the 1/3 TORN NEWSPAPER (V).

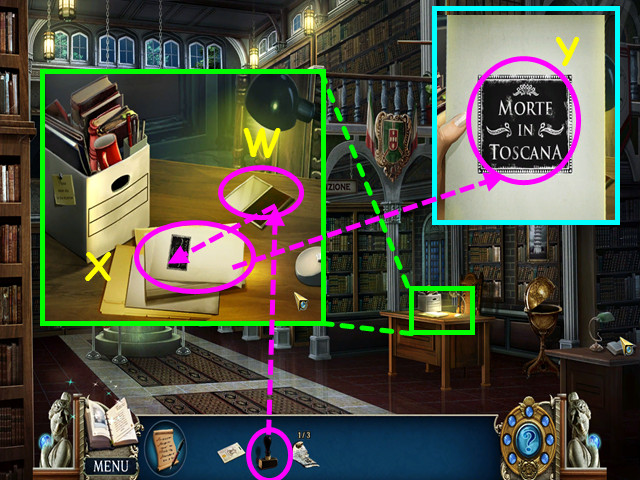
- Look at the desk and use the WOODEN STAMP on the ink pad (W).
- Next use it on the paper (X).
- Take the paper and click on the impression (Y).
- Talk to Professor Romano to learn it may be a book title.
- Walk down twice to return to the library reception.

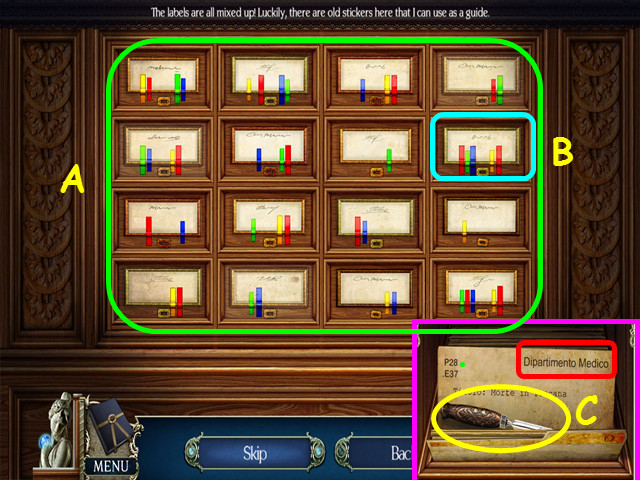
- Look at the card catalog on the right for a mini-game.
- Match the stripes on the labels to the drawers (A).
- Click on 2 labels to swap position.
- Look in the drawer that opens on the right and open the file (B).
- Take the LETTER OPENER and note the book is located in the medical section (C).
- Walk forward to the balcony.

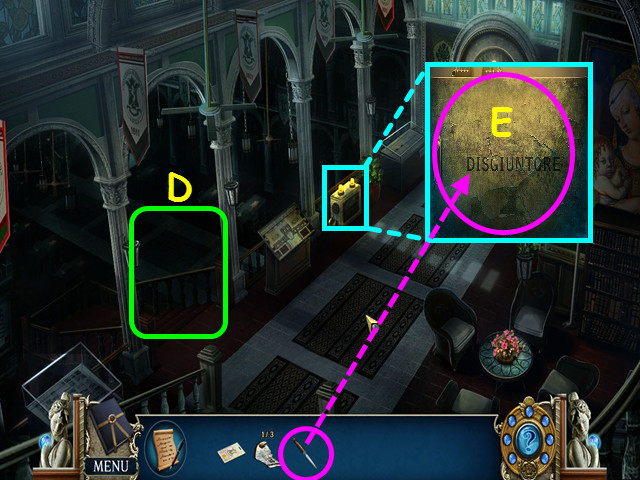
- Note the stairs to the main library (D).
- Look at the circuit breaker and use the LETTER OPENER on the cover for a mini-game (E).

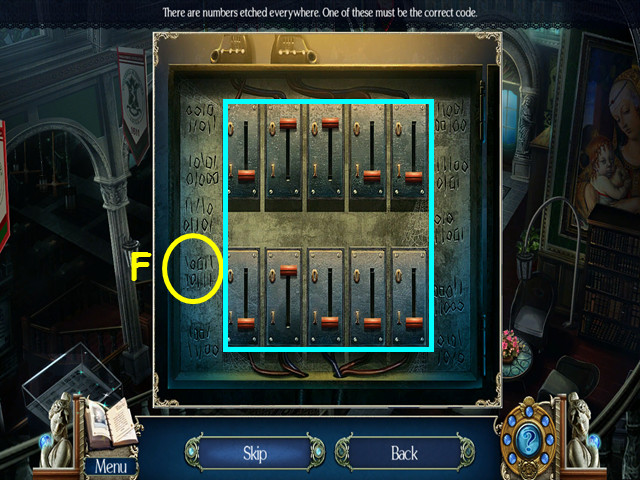
- Move the breakers to match one of the codes etched into the metal (F).
- Drag each breaker to the ’1′ or ’0′ position.
- Enter the main library.

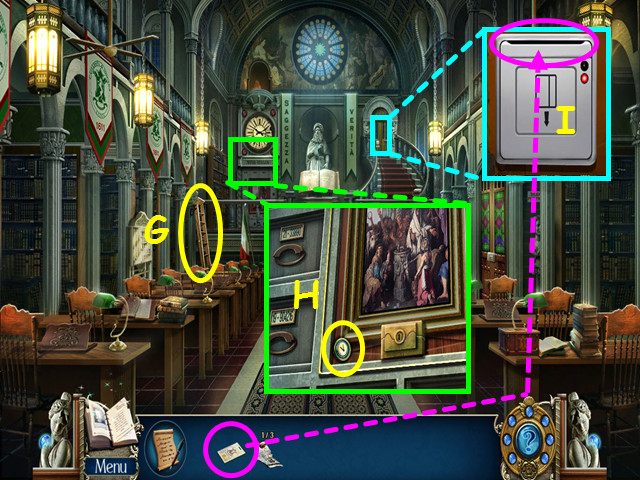
- Take the LADDER (G).
- Look at the painting and take the 1/3 NUMBERED KNOB (H).
- Look at the lock on the door then use the KEY CARD on the slot (I).
- Walk forward to the medical section.

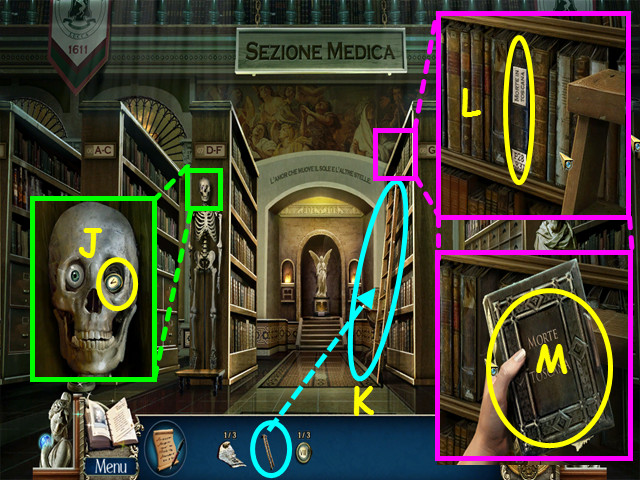
- Look at the skeleton and take the 2/3 NUMBERED KNOB (J).
- Place the LADDER on shelf L-P (K).
- Look at Shelf L-P and take the book (L).
- Open the book for a HOS (M).

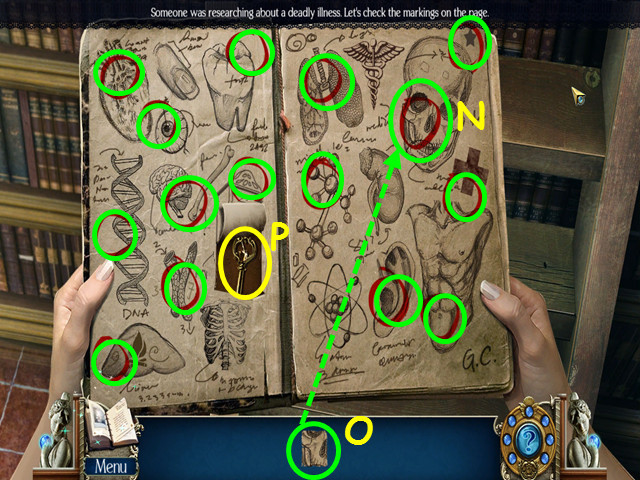
- Locate the spot (N) on the pages depicted by the scraps of paper (O).
- Take the SMALL IRON KEY (P).
- Walk down to the main library.

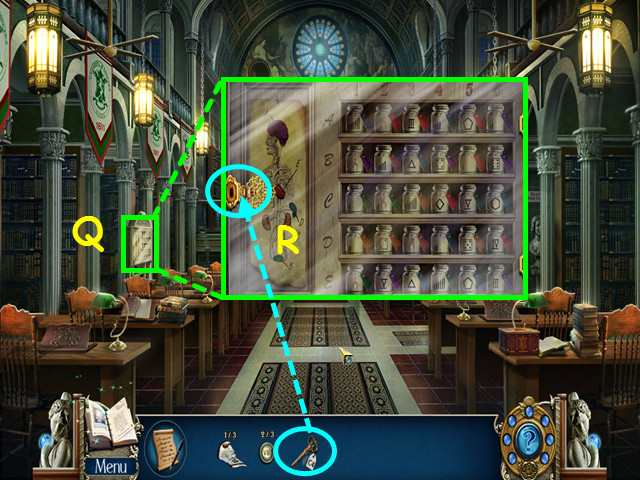
- Look at the cabinet on the left (Q).
- Use the SMALL IRON KEY in the lock for a mini-game (R).

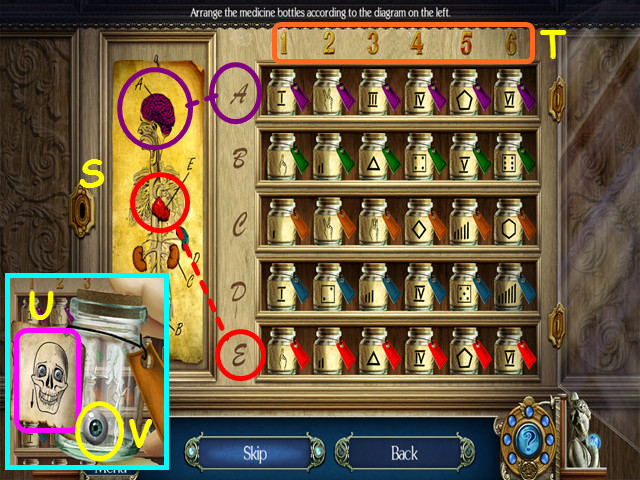
- Move the jars to the shelves indicated by the colors in the diagram (S).
- Place the jars in numerical order (T).
- Click on 2 jars to swap positions.
- Peel the label on the jar (U).
- Take the GLASS EYE (V).
- Return to the Medical section.

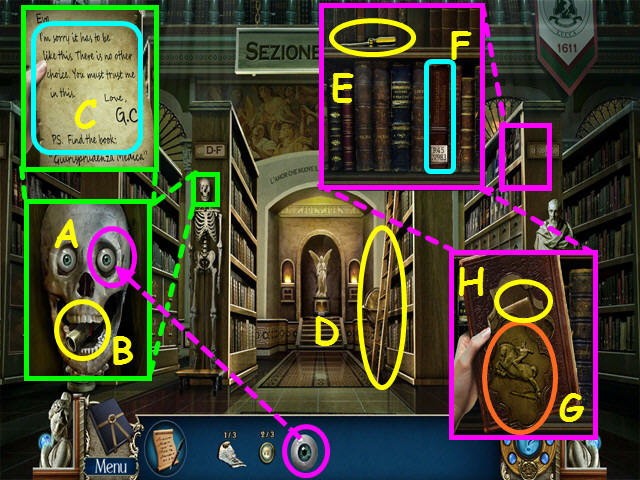
- Look at the skeleton and place the GLASS EYE in the socket (A).
- Take the scroll from the skeleton’s mouth (B); click on it to read about another book to find (C).
- Take the LADDER (D).
- Look at the Q-U shelf and take the SCREWDRIVER (E).
- Click on the book (F).
- Drag the brass plate down (G).
- Take the note; click on it several times to unfold, then read about the gardens (H).
- Walk down to the main library.

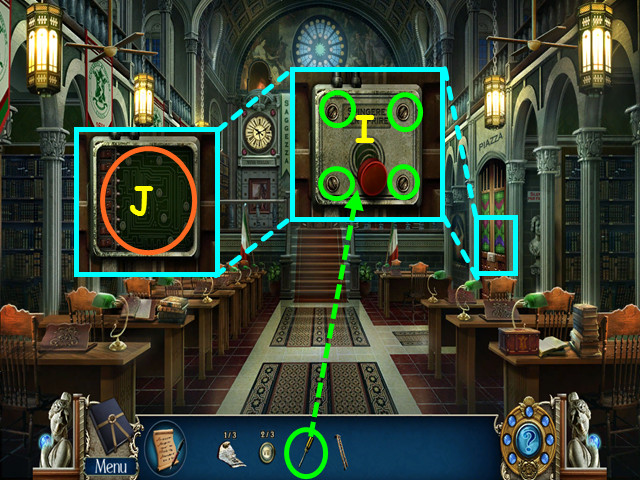
- Look at the garden doors and use the SCREWDRIVER on the 4 screws (I).
- Click on the circuitry for a mini-game (J).

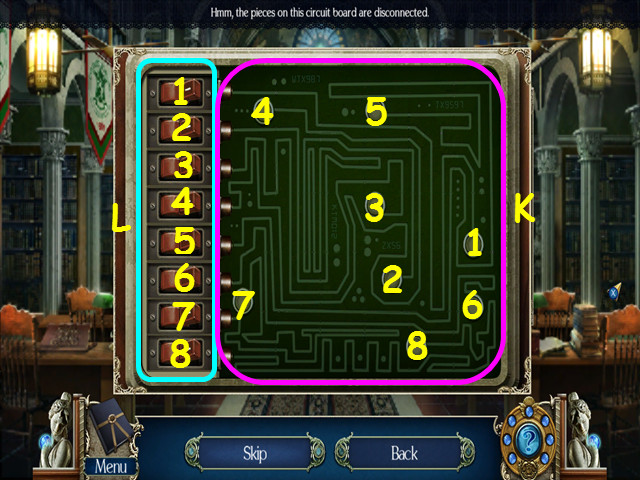
- For the first part of this mini-game, click on the green squares to rotate them and repair the circuit board so all lines are connected (K).
- For the second part, flip a switch on the left (L), then follow the line from the switch to the button at the end and press the button.
- Do this for all 8 switches (1-8).
- Walk to the right.

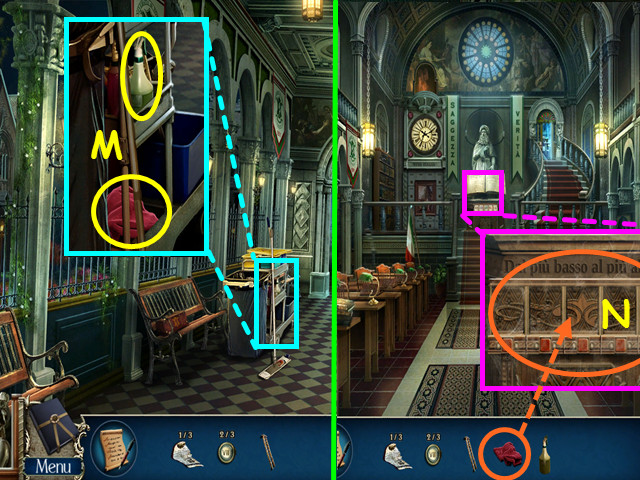
- Look at the cleaning trolley; take the CLEANING RAG and the GLASS CLEANING SOLUTION (M).
- Walk down to return to the main library.
- Look at the book stand and use the CLEANING RAG to remove the dust for a mini-game (N).

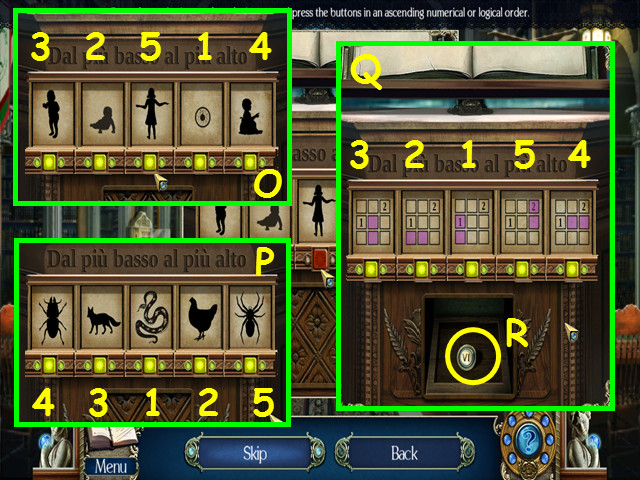
- Look at the figures and press the buttons in ascending order.
- The first set starts with an embryo and ends with a young girl (O).
- The second set is based on the number of legs (P).
- The third set is based on the position of the 2 light squares as they rotate in the grid (Q).
- Take the 3/3 NUMBERED KNOB (R).
- Walk right, then go forward to the plaza.

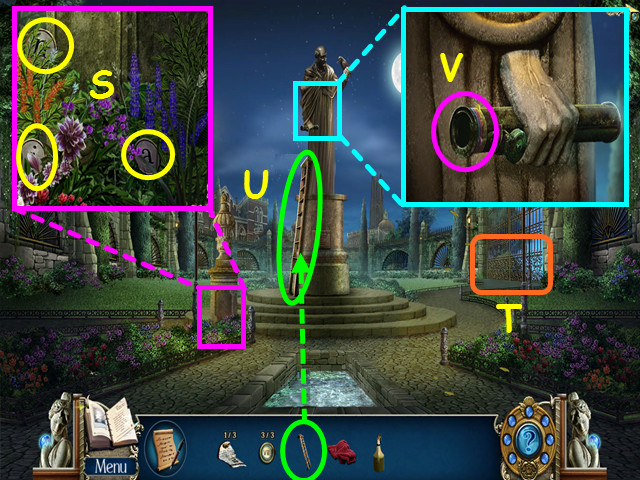
- Look at the base of the sculpture and take 3 of the 7 STONE LETTERS (S).
- Note the locked gate on the right (T).
- Place the LADDER on the statue (U).
- Zoom into the statue and look into the spyglass for a mini-game (V).

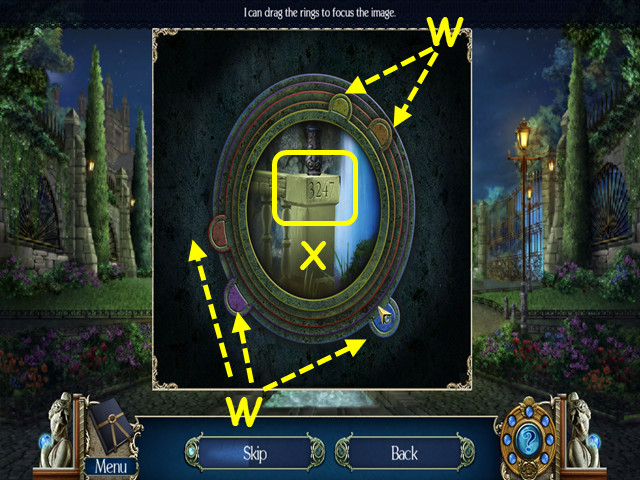
- Move the colored tabs to bring the object into focus (W).
- Note the number etched onto the bridge (X).
- Look at the gate for a mini-game.

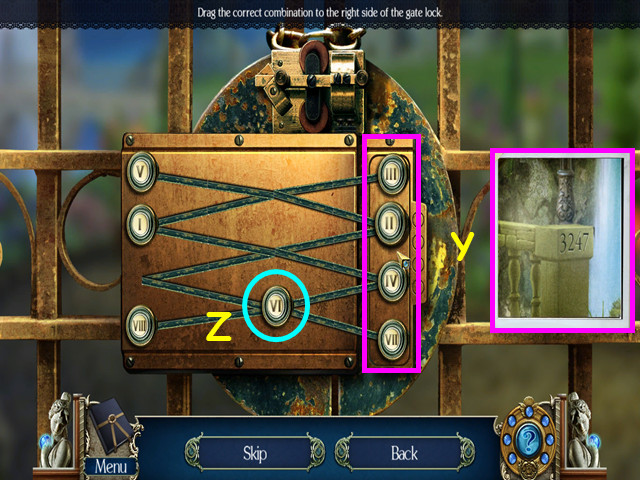
- Place the 3 NUMBERED KNOBS into the empty spaces to trigger the mini-game.
- Drag the knobs to reflect the number from the bridge that is noted in your journal (Y).
- Note that knobs can sit in the junctions (Z).

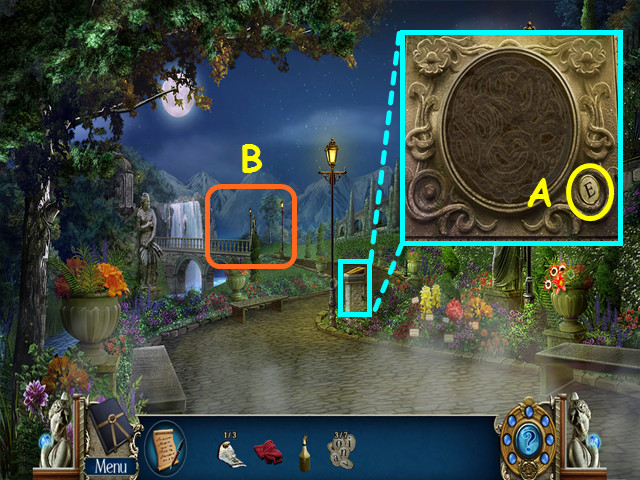
- Look at the plaque and take the 4/7 STONE LETTERS (A).
- Walk towards the bridge (B).

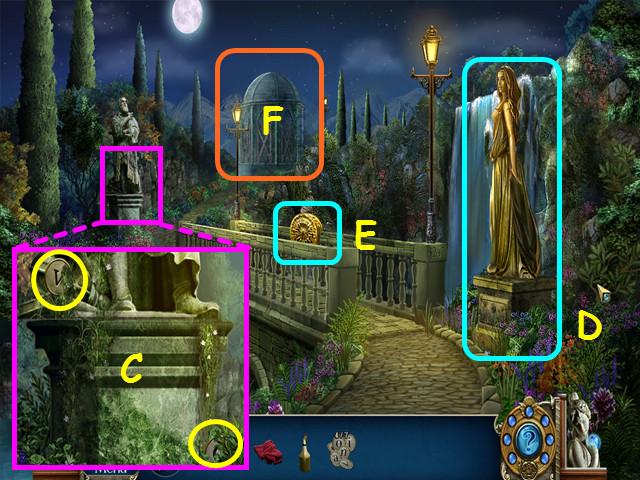
- Look at the statue and take the 5/7 and 6/7 STONE LETTERS (C).
- Note the statue of Eva (D).
- Note the ornament on the bridge (E).
- Walk towards the domed building (F).

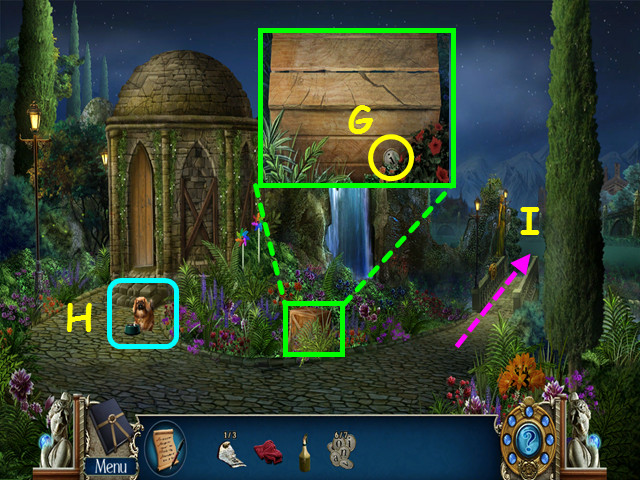
- Look at the crate and take the 7/7 STONE LETTERS (G).
- Note the dog guarding the domed building (H).
- Return to the bridge area (I).

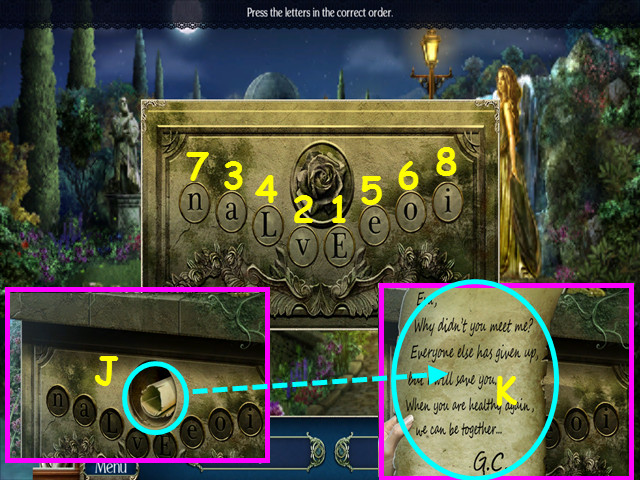
- Look at the statue of Eva and place the 7 STONE LETTERS on the plaque for a mini-game.
- Press the letters to spell E-v-a-L-e-o-n-i (1-8).
- Take the scroll (J); then click on the note to read it (K).
- After the ghost departs, look at the ornament on the bridge.

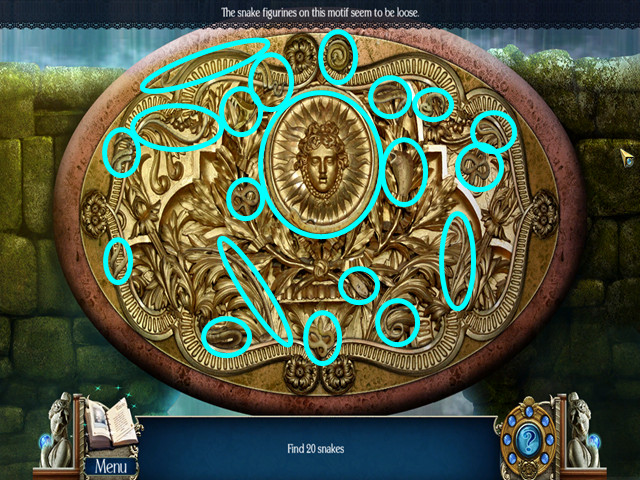
- Locate the 20 snakes.
- You will earn the SNAKE FIGURINE.
- Walk down.

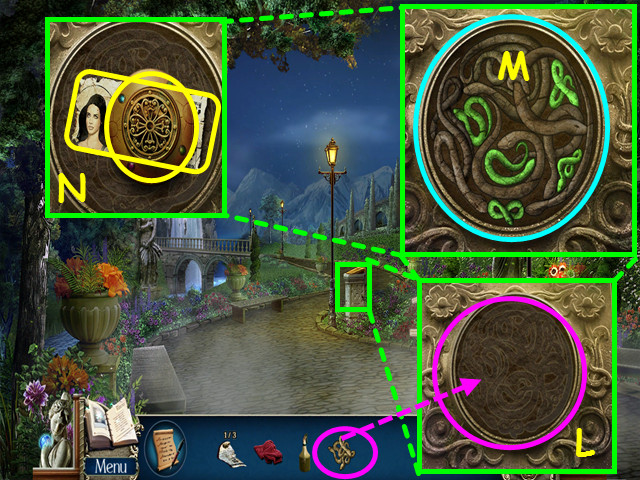
- Look at the plaque and place the SNAKE FIGURINE in the center (L).
- Click on any 5 snakes that are not next to each other (M).
- Take the COPPER DISK and the 2/3 TORN NEWSPAPER (N).
- Return to the medical section of the library.

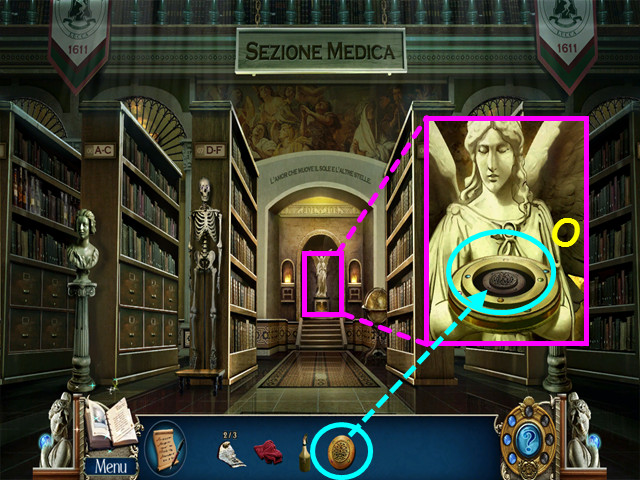
- Look at the angel and place the COPPER DISK into the center of the object she is holding (O).
- This will activate a mini-game.

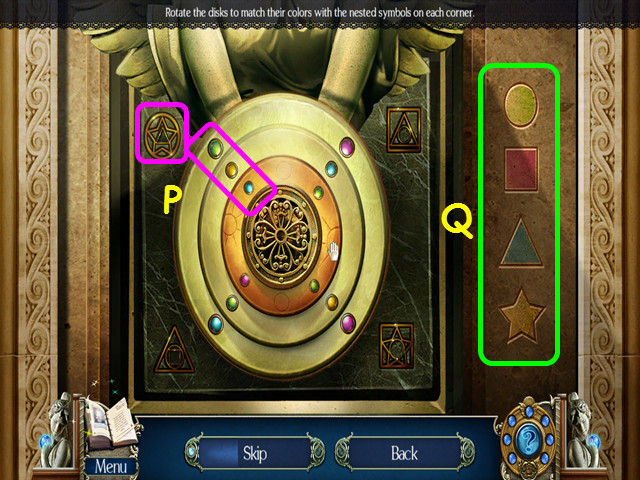
- Rotate the 3 dials so the colors in each corner correspond with the symbol in each corner (P).
- The circle is green, the star is yellow and the triangle is blue.
- Use the color legend on the right (Q).
- The statue will move to reveal a secret chamber.

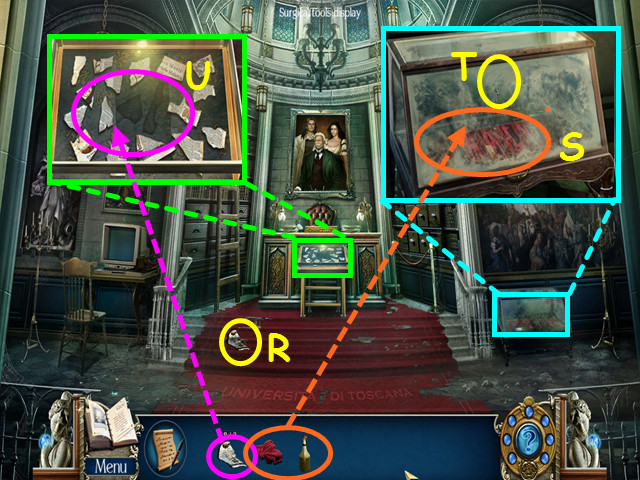
- Take the 3/3 TORN NEWSPAPER (R).
- Look at the display case and use the GLASS CLEANING SOLUTION, then the CLEANING RAG on the glass (S).
- Open the case and take the SILVER KEY (T).
- Look at the center case and use the 3 TORN NEWSPAPERS on it for a mini-game (U).

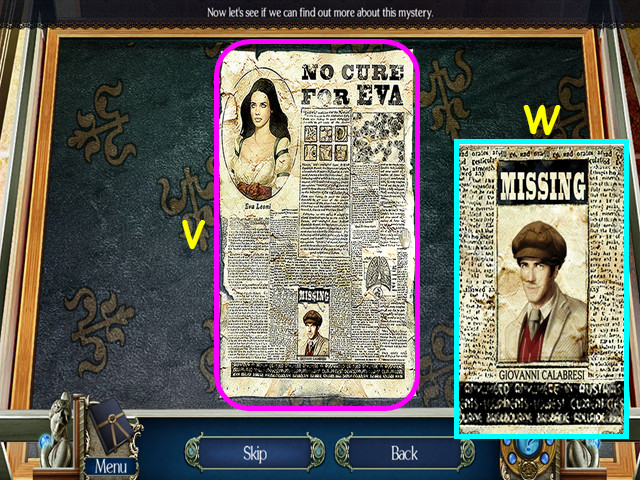
- Restore the torn newspaper by fitting the pieces into the rectangle (V).
- Click on a piece to rotate it to the correct orientation, then drag the piece into position.
- Look at the ‘Missing’ announcement (W).

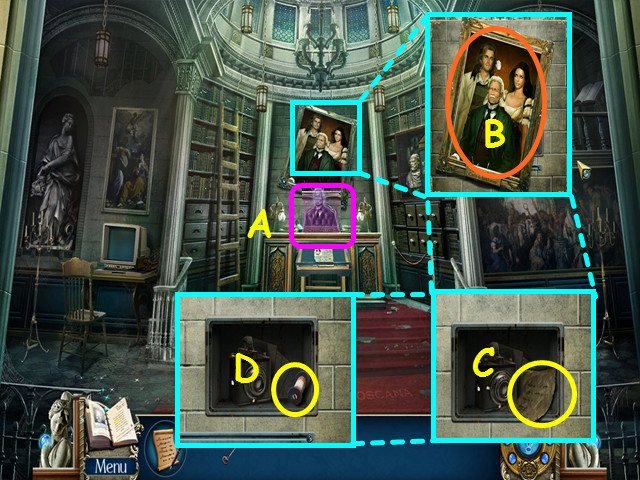
- Look at the ghost behind the desk (A).
- Zoom in on the family portrait, click on the portrait to reveal a compartment (B).
- Take the note (C).
- Take the UNDEVELOPED FILM (D).
- Walk down twice.

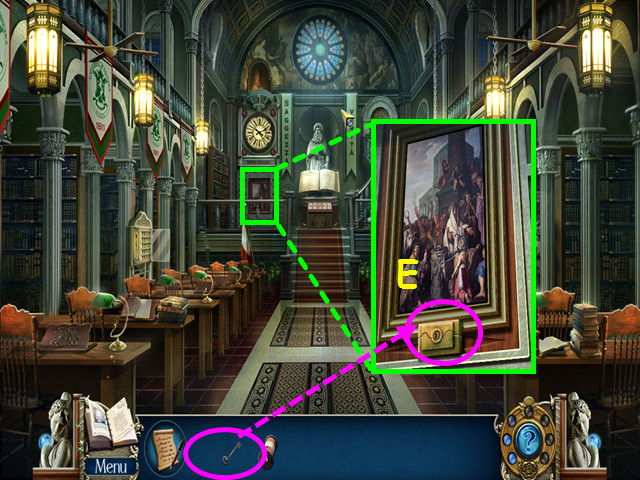
- Look at the painting and use the SILVER KEY on the lock (E).
- This will trigger a HOS.

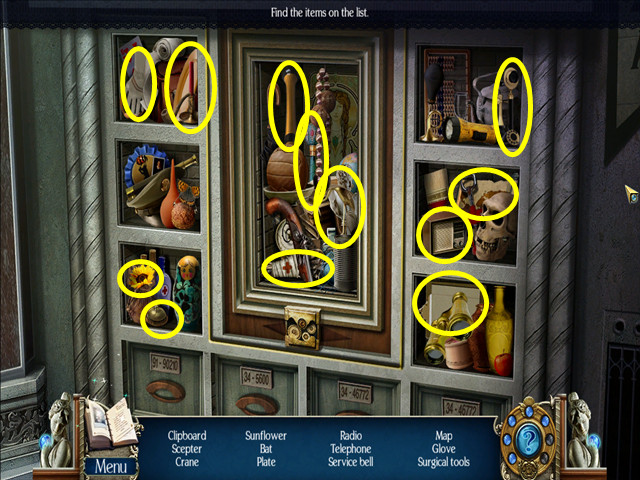
- Locate all the items on the list.
- You will earn the SURGICAL TOOLS.
- Return to the secret chamber.

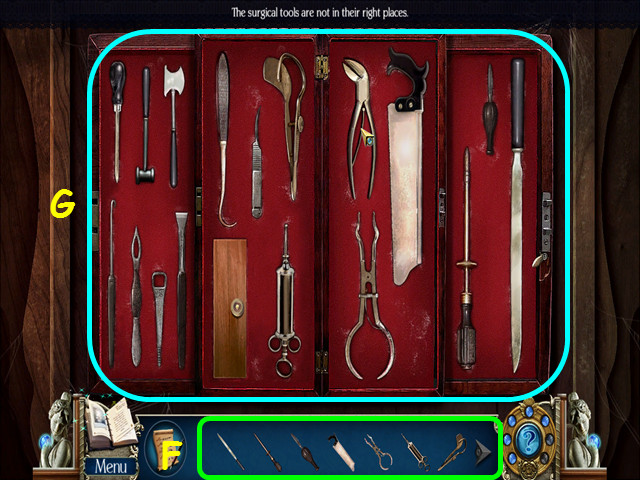
- Look at the display case on the right; use the SURGICAL TOOLS on the case for a mini-game.
- Place the tools from the bottom (F) into the matching spots in the top area (G).
- You will earn the SCISSORS.
- Walk down twice, then go to the right.

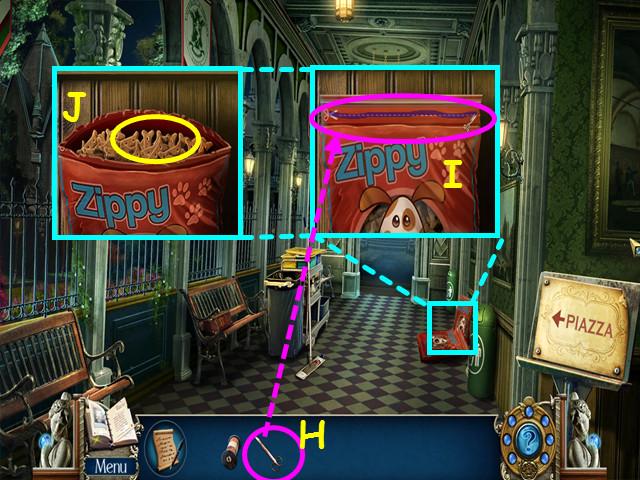
- Look at the dog biscuits and use the SCISSORS on them (H).
- Drag the point of the scissors over the dotted line (I).
- Take the DOG BISCUITS (J).
- Return to the domed building area.

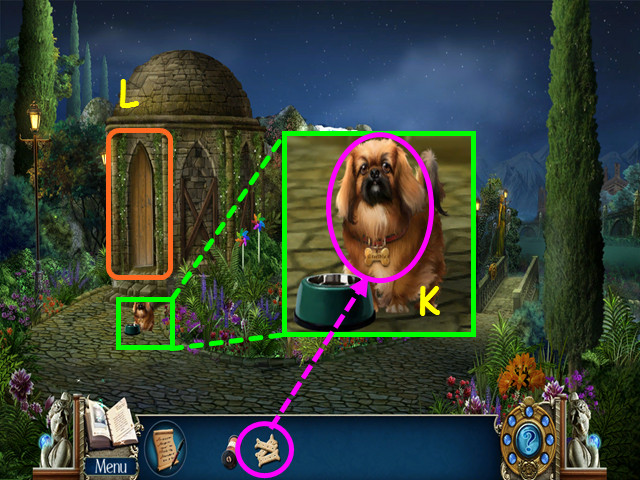
- Look at the dog and give him the DOG BISCUITS (K).
- Enter the domed building (L).

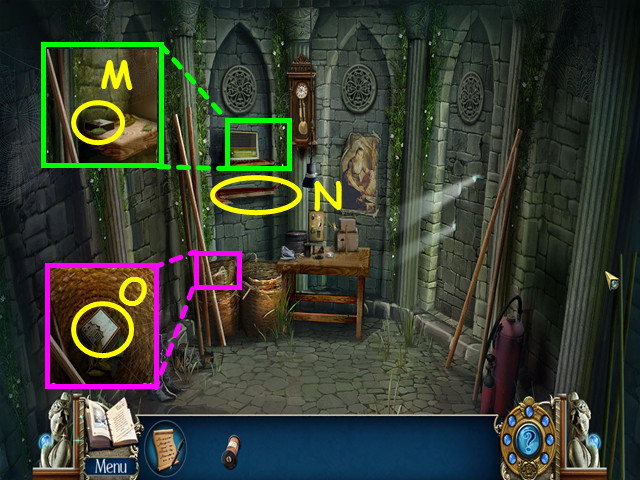
- Look on the radio shelf and take the 1/3 WOODEN CUBES (M).
- Take the CROWBAR (N).
- Look in the basket and take the 2/3 WOODEN CUBES (O).
- Exit the building.

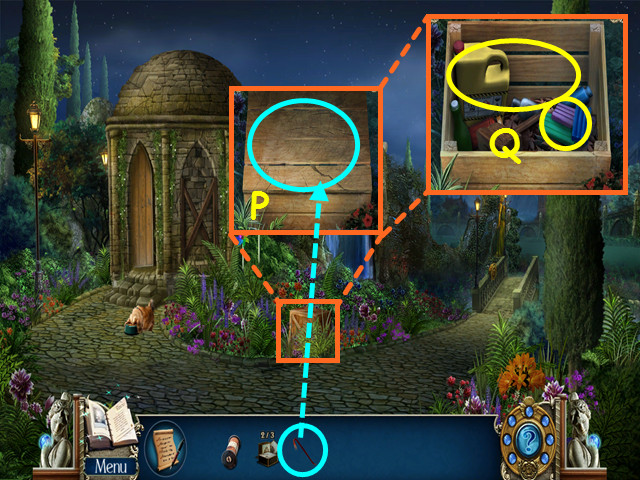
- Look at the crate and use the CROWBAR to open it (P).
- Take the MODELING CLAY and the FILM DEVELOPING CHEMICALS (Q).
- Enter the domed building.

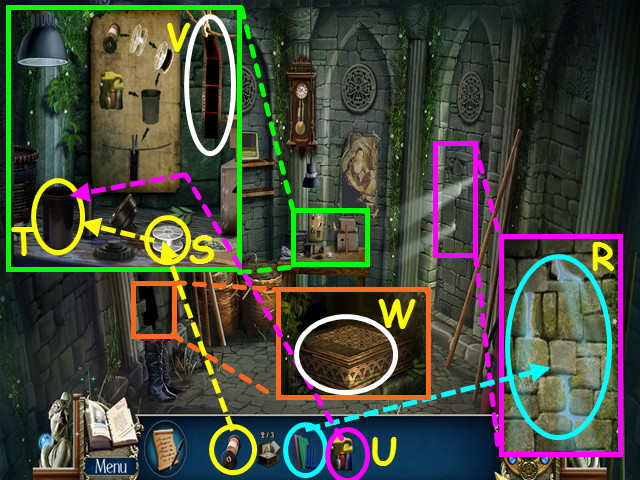
- Look at the gaps in the wall and use the MODELING CLAY 3 times to fill the holes (R).
- Look at the table and place the UNDEVELOPED FILM on the reel (S).
- Place the reel into the container (T).
- Place the FILM DEVELOPING CHEMICALS into the container (U).
- The WET FILM will go into your inventory; place it on the line to dry (V).
- Click on the dried film for a cut scene.
- Look in the hole in the wall and look at the box for a mini-game (W).

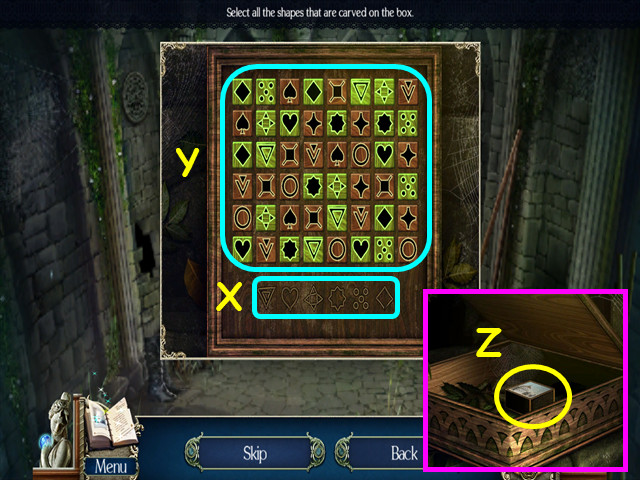
- Look at the symbols in the bottom section (X).
- Press all instances of the bottom symbols in the top section (Y).
- Take the 3/3 WOODEN CUBES (Z).
- Return to the secret chamber.

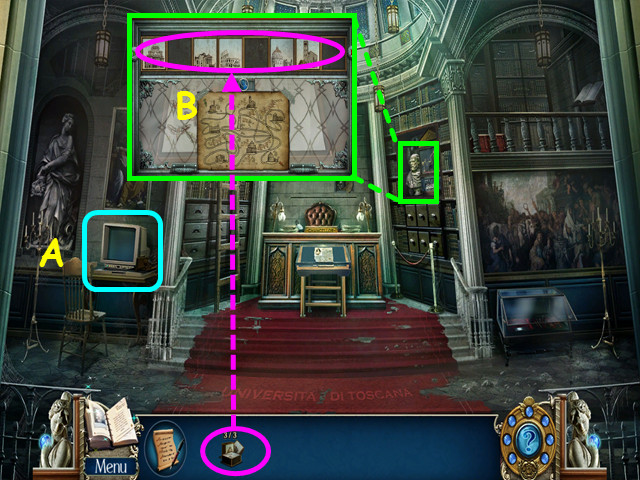
- Note the microfiche scanner on the left (A).
- Look at the collection display and use the 3 WOODEN CUBES on the top to trigger a mini-game (B).

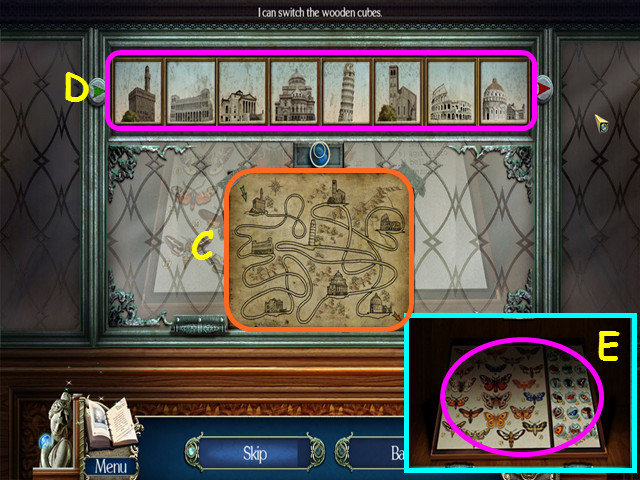
- Starting in the upper left of the map, note the buildings and the order they appear on the road (C).
- Click on the cubes to match the buildings in order as on the map (D).
- Select the moth collection for a mini-game (E).

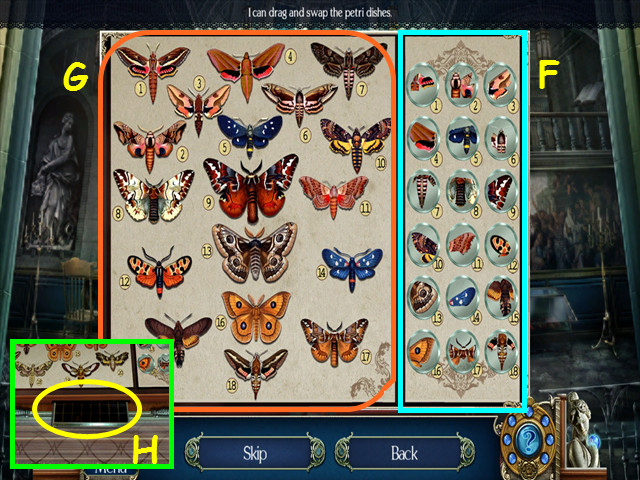
- Switch the petri dishes on the right (F) so the cross-section shown matches the numbered moth on the left (G).
- Click on 2 petri dishes to swap positions.
- Take the MICROFILM (H).
- Look at the microfiche scanner on the left.

- Place the MICROFILM into the scanner (I).
- Click on the image (J).
Chapter 2: The University Grounds

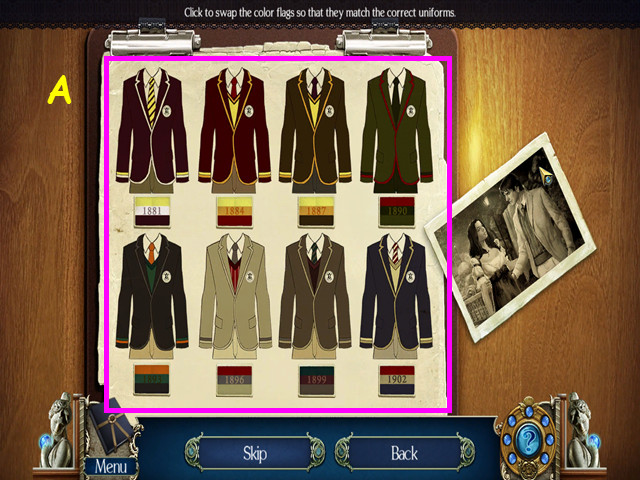
- Talk to Professor Romano for a mini-game.
- Put the flags in order by date (A).
- Click on 2 flags to swap position.
- Walk forward to the hall.


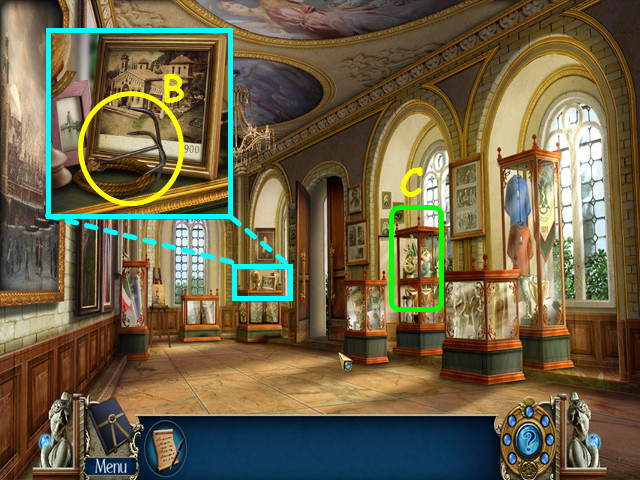
- Look at the display case and take the GRAPPLING HOOK (B).
- Look at the trophy display for a HOS (C).

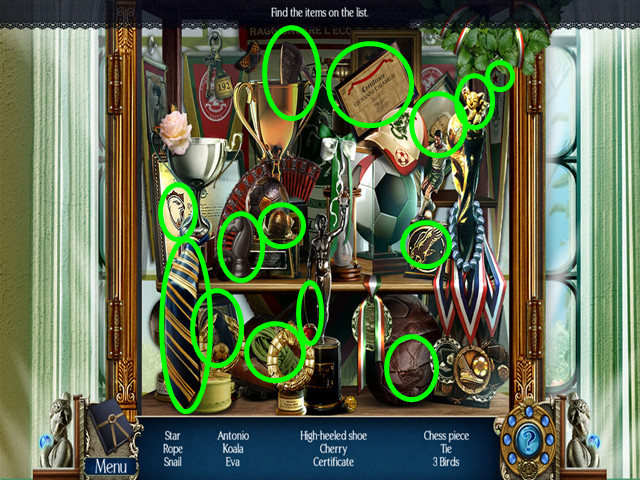
- Locate all the items on the list.
- You will earn GIOVANNI’S CERTIFICATE.
- Walk down to the record’s office.

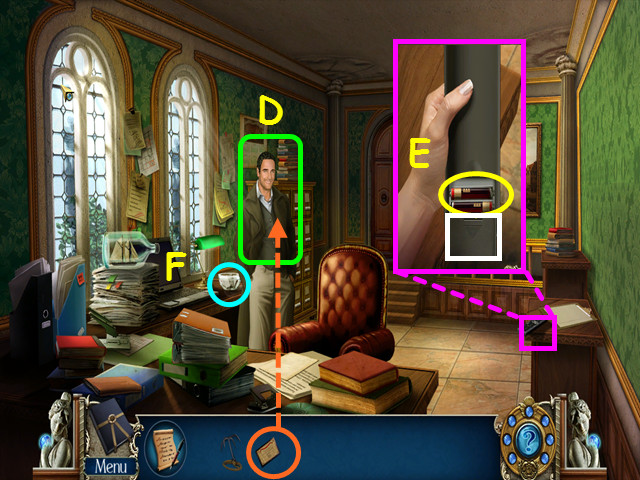
- Give GIOVANNI’S CERTIFICATE to Professor Romano (D).
- Look at the remote control, drag the cover down and take the BATTERIES (E).
- Look at the glass bowl for a mini-game (F).

- Click on matching pairs to remove them from the bowl.
- You will earn the MATCHES.
- Walk forward twice to the university grounds.

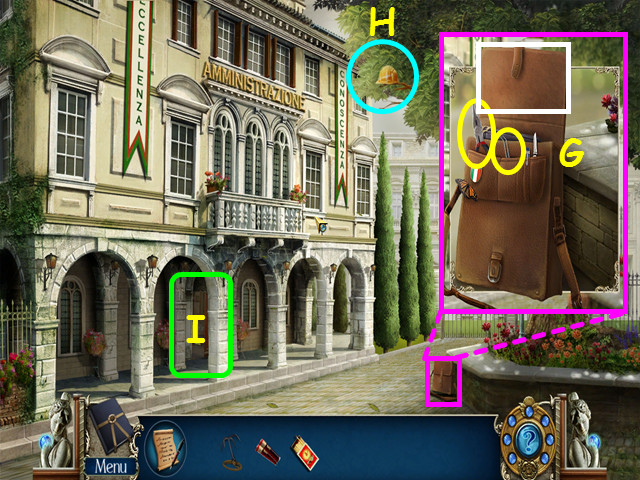
- Look at the student bag and open the flap; take the TWEEZERS and the WIRE CUTTERS (G).
- Note the helmet in the tree (H).
- Return to the Hall (I).

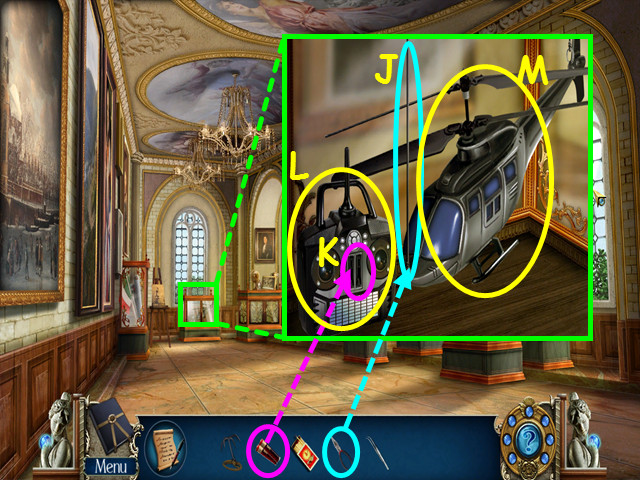
- Look at the student’s work display and use the WIRE CUTTERS on the wire (J).
- Place the BATTERIES into the controller (K).
- Take the controller (L) and the helicopter (M) to get the REMOTE-CONTROLLED HELICOPTER.
- Return to the records office.

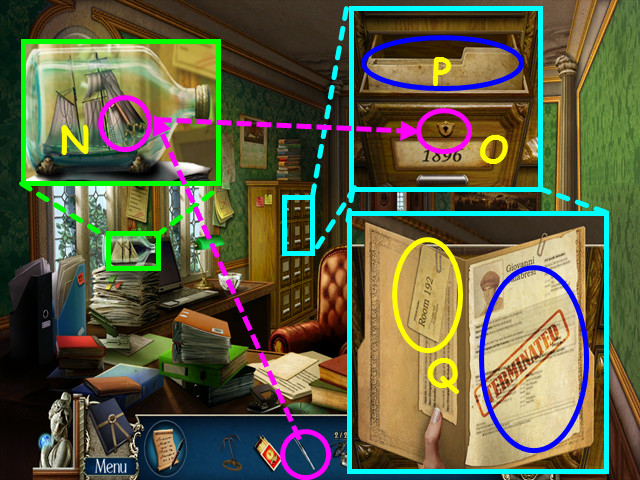
- Look at the ship in the bottle and use the TWEEZERS to get the CABINET KEY (N).
- Look at the cabinet and use the CABINET KEY on the lock (O).
- Click on the files (P).
- Take the DORM ADDRESS and read the termination letter (Q).
- Return to the University grounds.


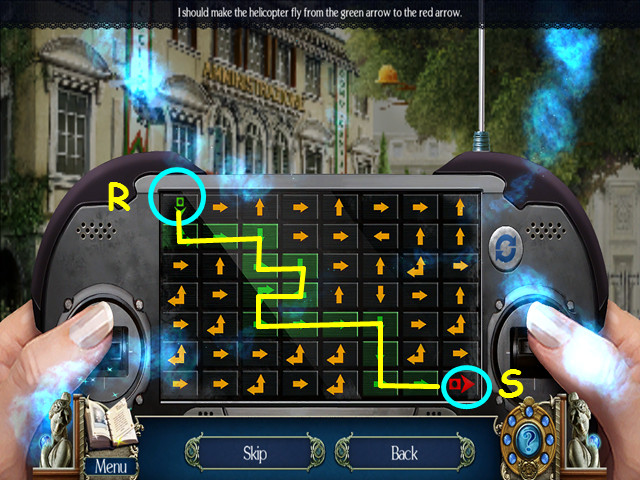
- Use the REMOTE-CONTROLLED HELICOPTER on the helmet for a mini-game.
- Make a path from start (R) to finish (S) by clicking on the arrows.
- Take the HELMET once it falls to the ground.
- Walk to the right.

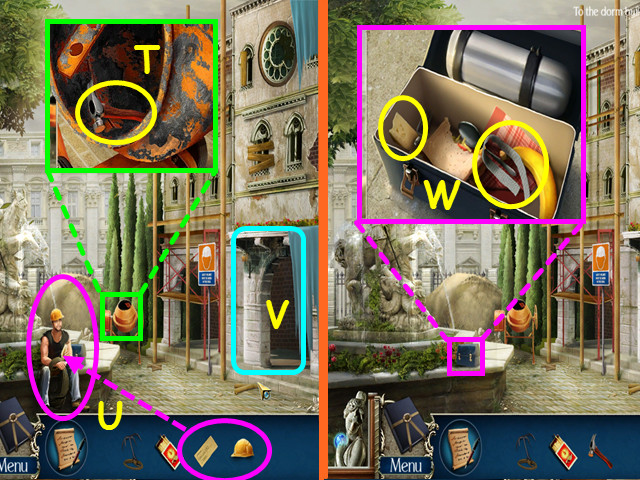
- Look in the cement mixer and take the HAMMER (T).
- Give the HELMET and the DORM ADDRESS to the construction worker (U).
- Enter the dorm lobby then exit immediately (V).
- Look at the lunch box; take the CHEESE and the WICK (W).
- Return to the dorm lobby.

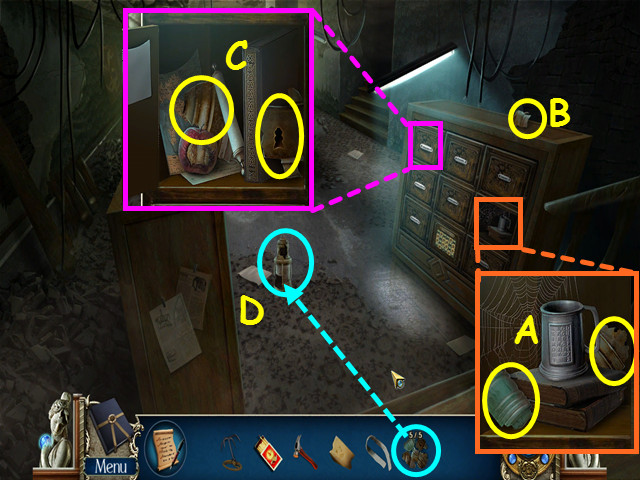
- Look in the open locker and take the 1/5 and 2/5 BROKEN GLASS (A).
- Take the 3/5 BROKEN GLASS (B).
- Look at the locker and open the door; take the 4/5 and 5/5 BROKEN GLASS (C).
- Use the 5 BROKEN GLASS on the lantern for a mini-game (D).

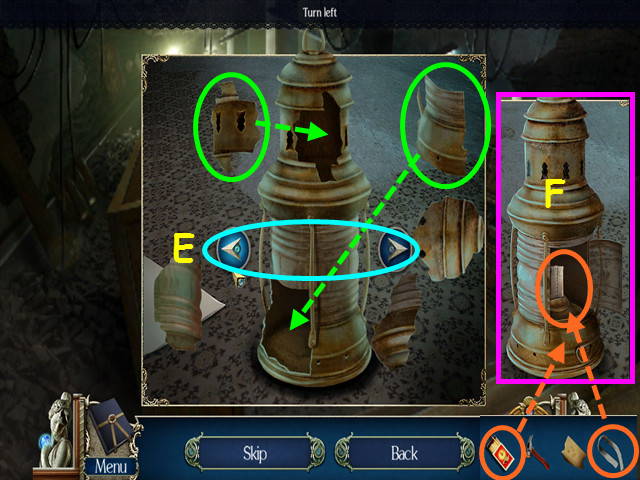
- Use the arrows to rotate the lantern (E).
- Click on a piece to rotate it to the correct orientation, then drag the piece into position.
- Place the WICK inside the lantern and use the MATCHES to light the wick (F).
- Take the LANTERN.
- Use the LANTERN on the stairs.

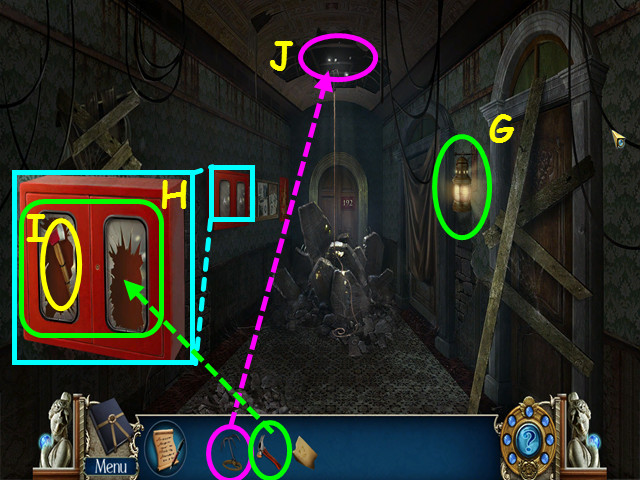
- Hang the lantern on the hook (G).
- Look at the emergency case and use the HAMMER on the glass panels (H).
- Take the FIRE AXE (I).
- Use the GRAPPLING HOOK on the ceiling rails (J).
- Move forward.

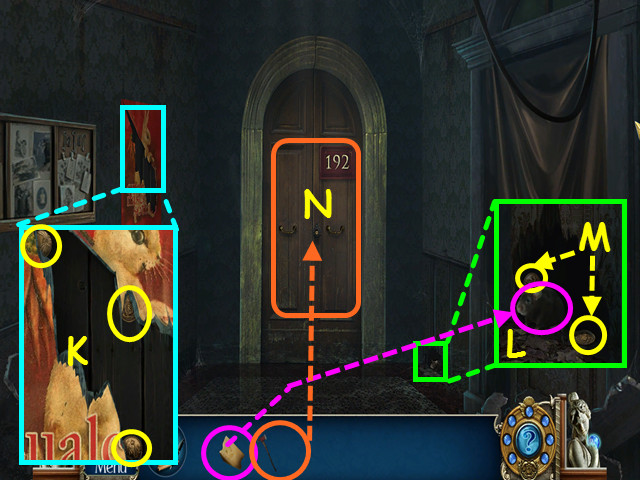
- Look at the poster and take the 1/5, 2/5, and 3/5 BRASS COINS (K).
- Look at the mouse hole and give the CHEESE to the mouse (L).
- Take the 4/5 and 5/5 BRASS COINS (M).
- Look at the door and use the FIRE AXE several times to create an opening (N).
- Walk down twice to the locker area then look at the bottom center locker for a mini-game.

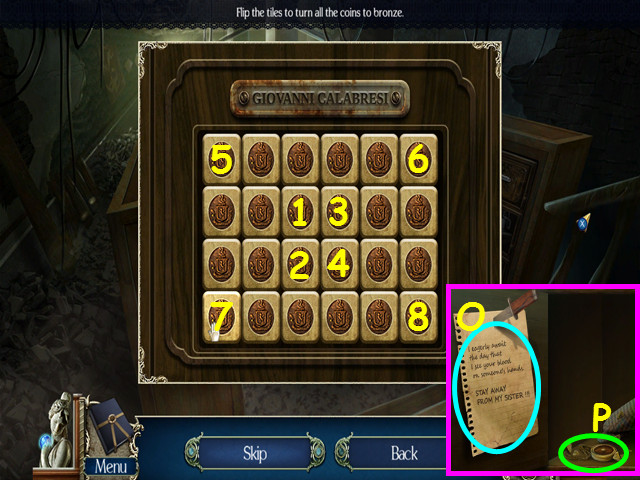
- Use the 5 BRASS COINS on the grid to activate the mini-game.
- Click on the coins to flip them all over to bronze.
- Each coin you flip will affect other coins.
- Click on the coins in numeric order (1-8).
- Read the note (O).
- Select the locket for a mini-game (P).

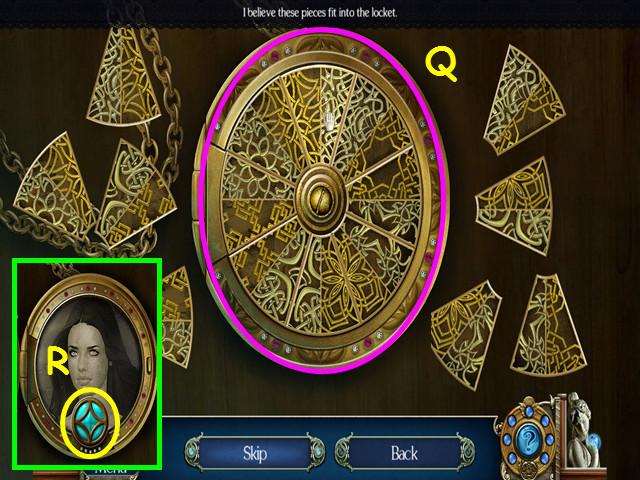
- Restore the front of the locket (Q).
- Click on a piece to rotate it to the correct orientation, then drag the piece into position.
- Pieces correctly placed will lock into position.
- Take the GEM (R).
- Return upstairs and enter room 192.

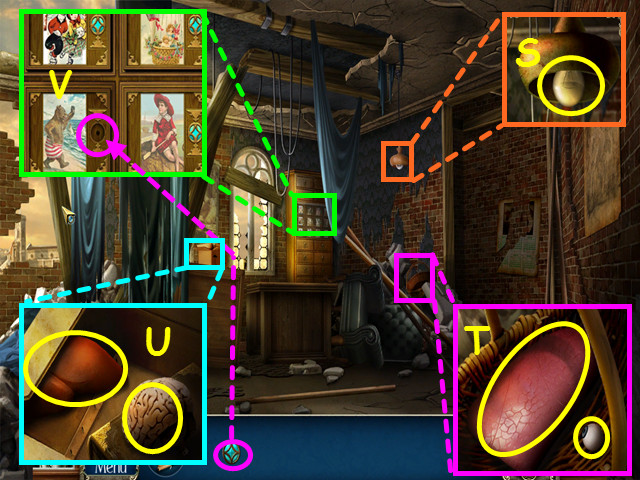
- Look at the lamp and take the LIGHT BULB (S).
- Look at the basket and take the 1/8 and 2/8 PLASTIC ORGANS (T).
- Look at the box and take the 3/8 and 4/8 PLASTIC ORGANS (U).
- Look at the cabinet and place the GEM in the empty circle for a mini-game (V).

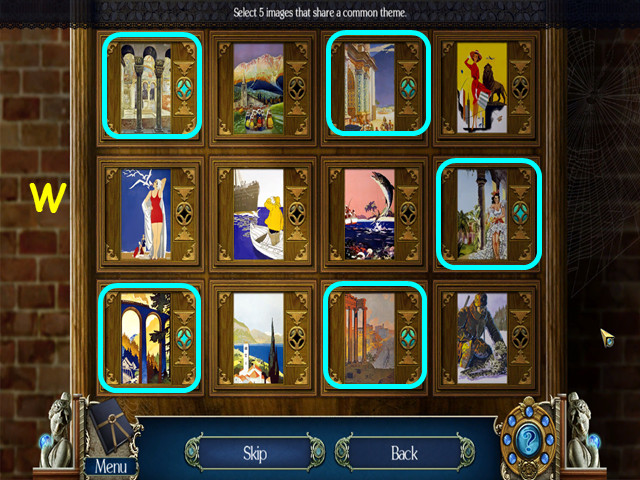
- This mini-game has 2 levels.
- Select 5 pictures with a common theme.
- Click on the pictures with columns (W).

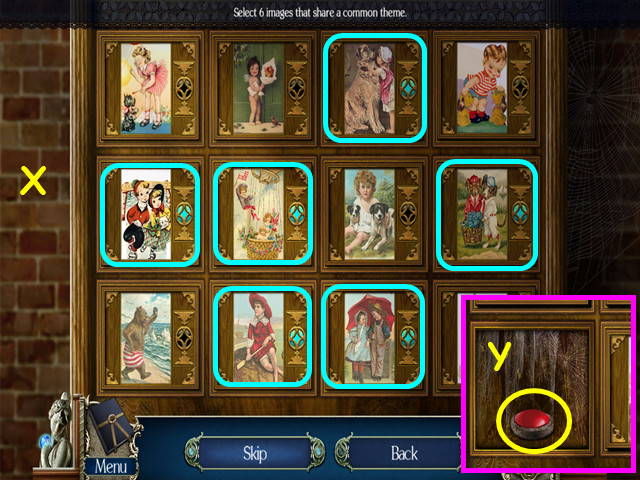
- For the second level, select 6 pictures with a common theme.
- Select the 6 pictures with hats (X).
- Press the red button (Y).
- Climb up the ladder to the secret attic.

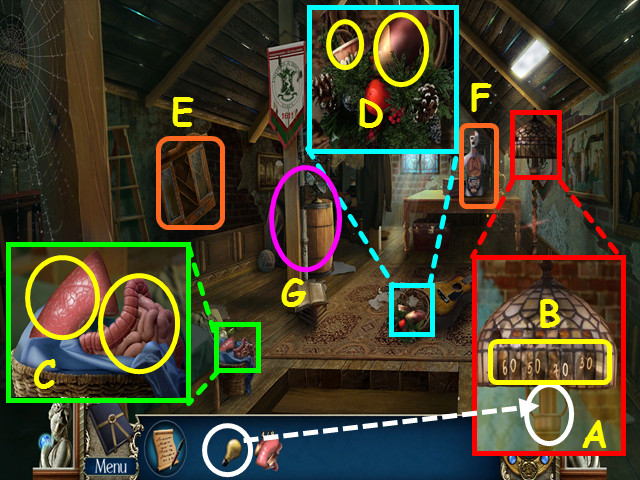
- Look at the lamp and place the LIGHT BULB in the socket (A).
- Note the code on the lampshade (B).
- Look at the basket and take the 5/8 and 6/8 PLASTIC ORGANS (C).
- Look at the wreath and take the 7/8 and 8/8 PLASTIC ORGANS (D).
- Note the cabinet on the left wall (E).
- Note the human anatomy model (F).
- Select the corner for a HOS (G).

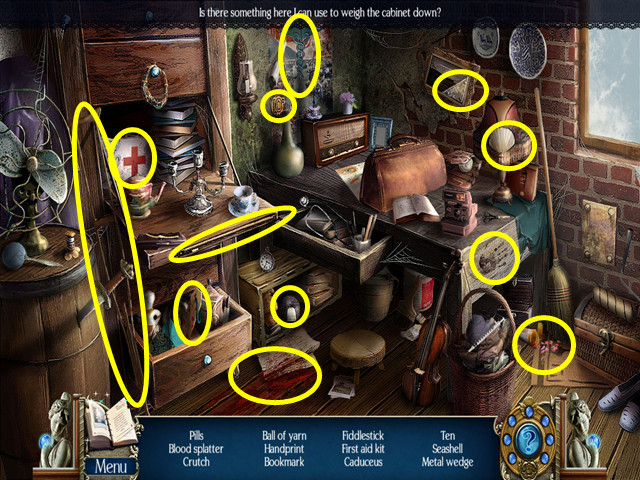
- Locate all the items on the list.
- You will earn the HEAVY BLOCKS.

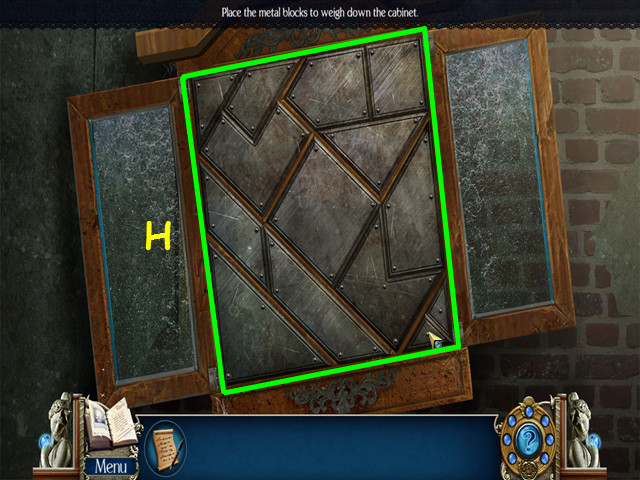
- Look at the cabinet on the left and use the heavy blocks to trigger a mini-game.
- Place the blocks into the grid so that all fit (H).

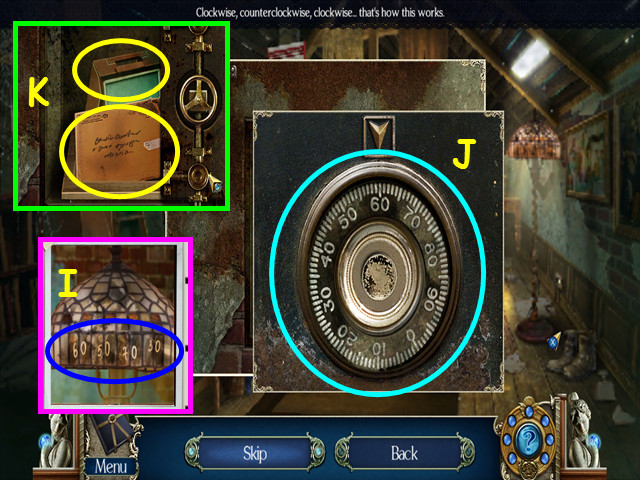
- Zoom into the safe dial and enter the code from the lampshade (I).
- Drag the dial clockwise to 60, counterclockwise to 50, clockwise to 70, and counterclockwise to 30 (J).
- Look at the envelope to get DOCTOR FERRO’S ADDRESS; also take the PORTABLE MICROFICHE VIEWER (K).

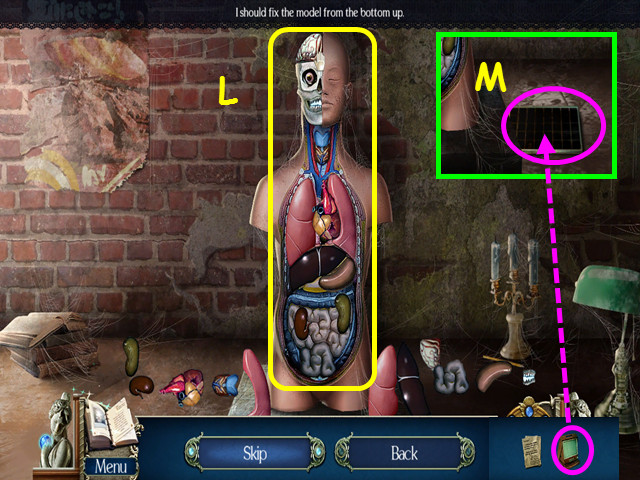
- Use the 8 PLASTIC ORGANS on the anatomy model.
- Starting from the bottom, place the organs into the model (L).
- Click on a piece to rotate it to the correct orientation, then drag the piece into position.
- Correctly placed pieces will lock into place.
- Use the PORTABLE MICROFICHE VIEWER on the microfilm (M).
Chapter 3: Casentino

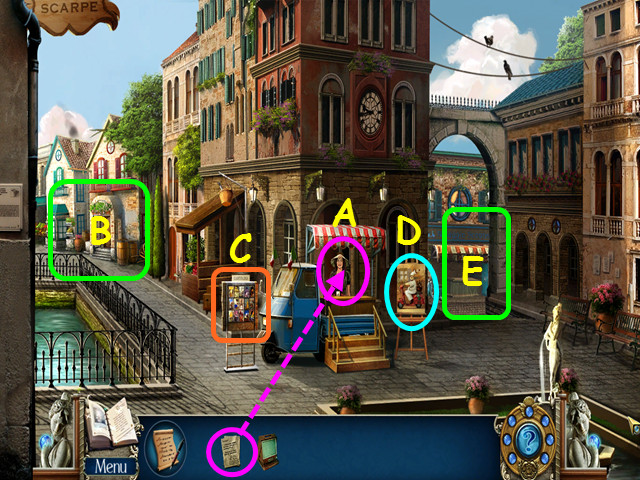
- Give DOCTOR FERRO’S ADDRESS to the tour guide (A).
- Note the path to the wine shop (B).
- Note the postcard stand (C).
- Look at the poster to learn about the contest (D).
- Walk to the scooter rental (E).

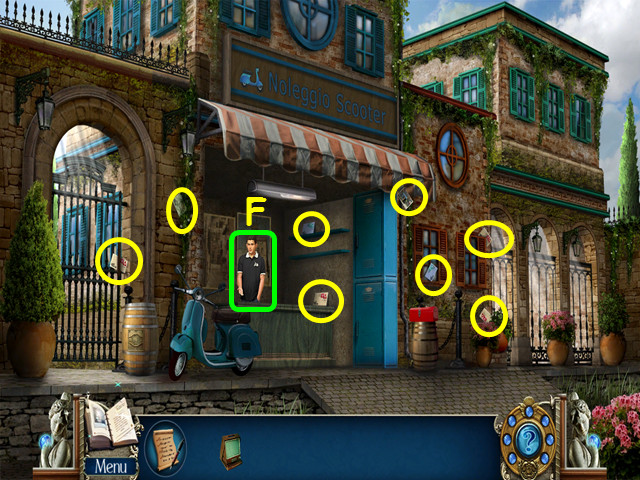
- Collect the 8 POSTCARDS (circled in yellow).
- Talk to the scooter rental owner (F).
- Walk down to the town center and give the 8 POSTCARDS to the tour guide for a mini-game.

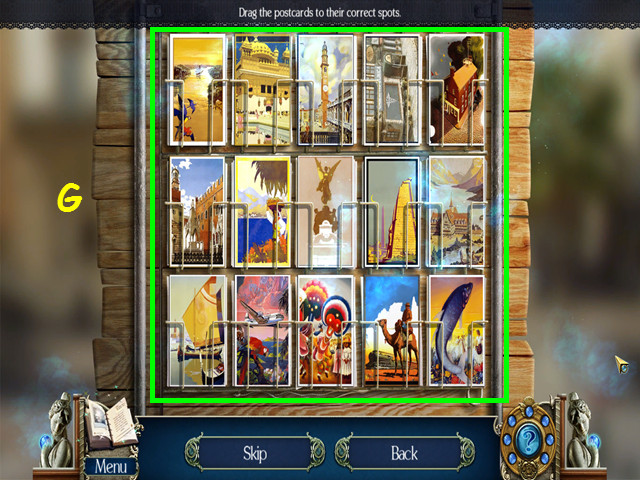
- Underneath each postcard is a small picture that represents the postcard that belongs in the slot.
- Drag postcards to the correct location; they will lock into place when correct (G).
- The tour guide will tell you about an old map at the wine shop.
- Walk forward on the left to the wine shop.

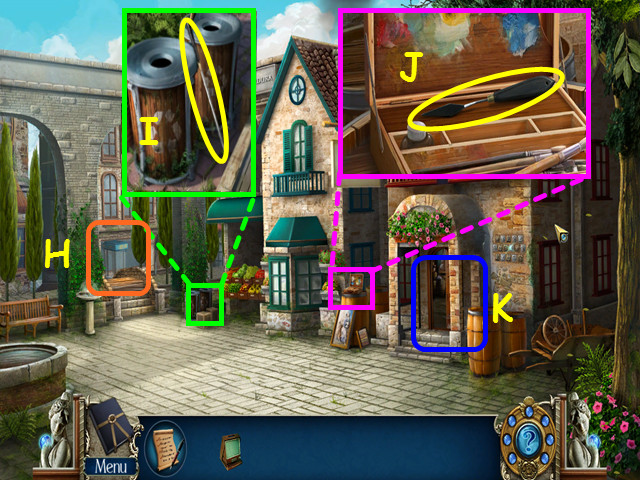
- Note the path to the toy shop (H).
- Look at the trash bins and take the LITTER PICKER (I).
- Look at the painting supplies and take the PALETTE KNIFE (J).
- Enter the wine shop (K).

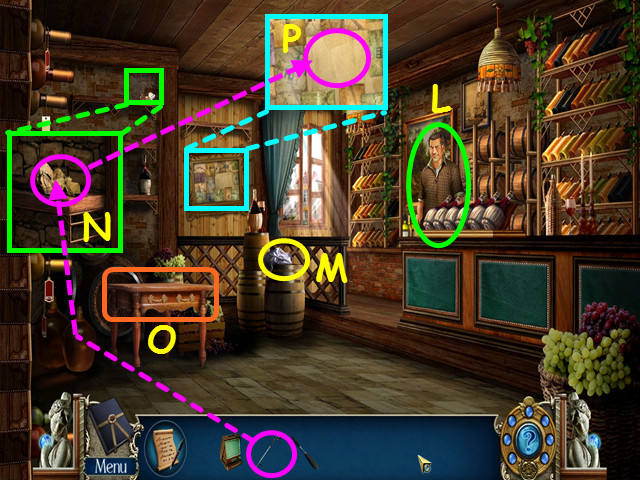
- Talk to the wine store owner (L).
- Take the RAG (M).
- Look at the shelf and use the LITTER PICKER to get the MAP PIECE (N).
- Note the wine rack (O).
- Look at the map and use the MAP PIECE on it for a mini-game (P).

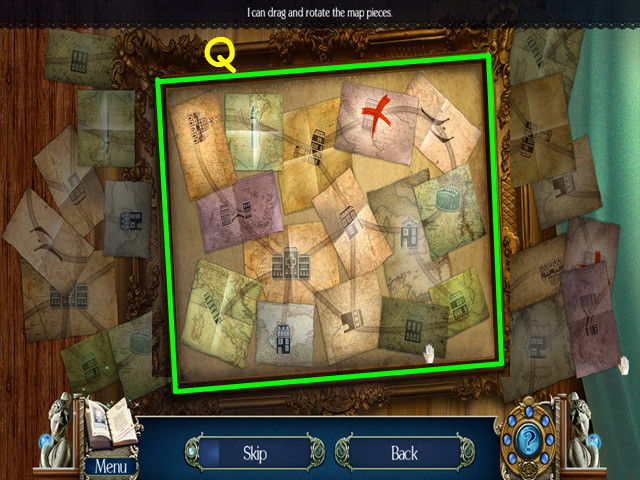
- Restore the map by placing the map pieces in the correct position (Q).
- Click on a piece to rotate it to the correct orientation, then drag the piece into position.
- Exit the wine shop and walk forward to the toy shop area.

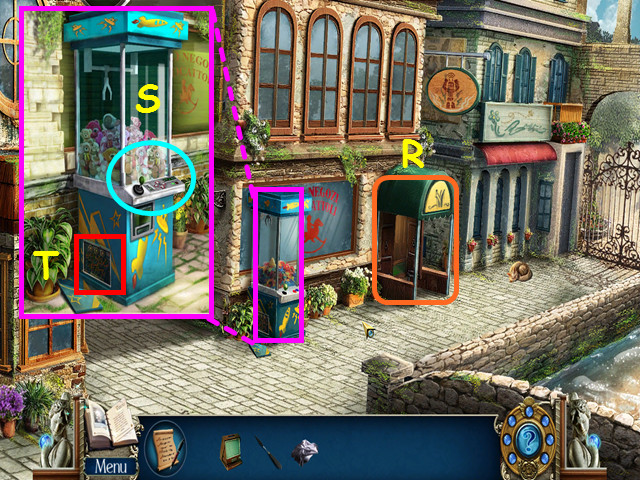
- Note the entrance to the toy shop (R).
- Look at the UFO Catcher game and try the controls (S).
- Look at the power panel for a mini-game (T).

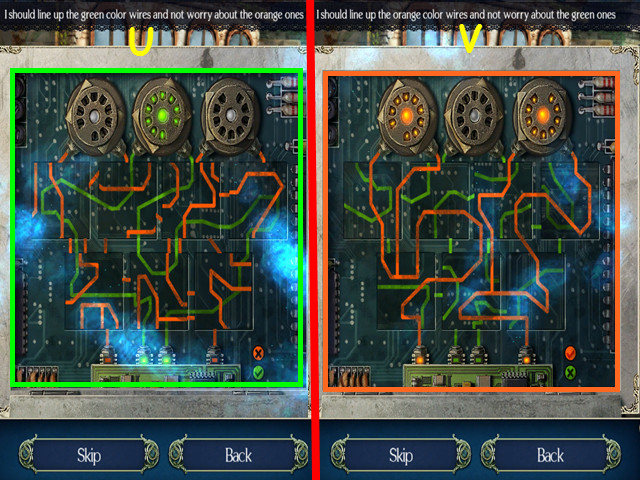
- For the first part of this mini-game, line up all the green wires (U).
- For the second part, line up all the orange wires (V).
- Click on 2 squares to swap positions; click on a square to rotate it in place.
- Enter the toy shop.

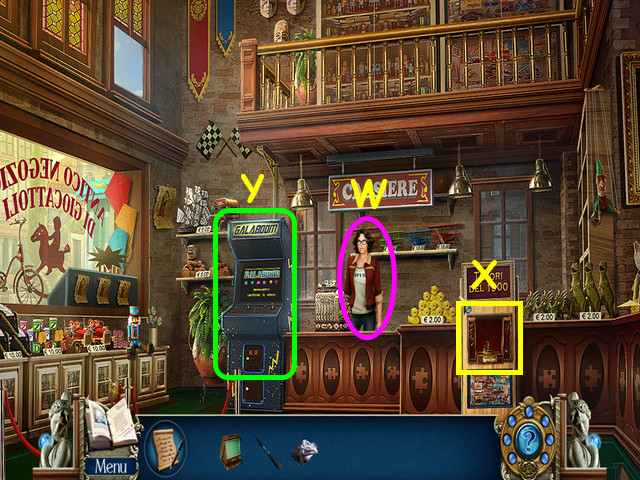
- Talk to the toy shop keeper (W).
- Look at the mechanical pigeon (X).
- Look at the arcade machine for a mini-game (Y).

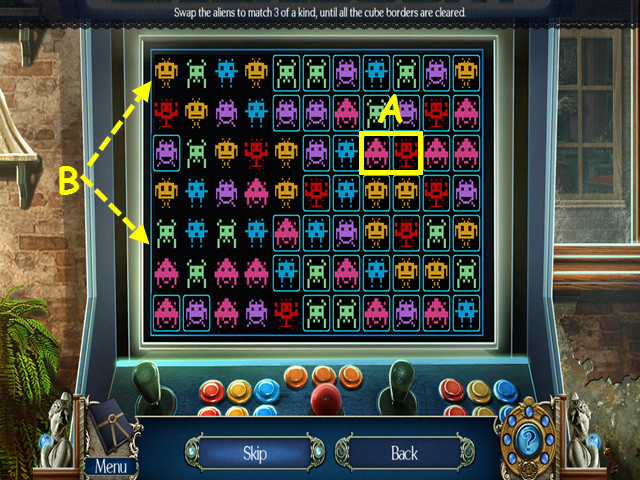
- Click on 2 adjacent aliens to swap positions and make a chain of 3 or more identical aliens (A).
- Continues this process the border around each of the aliens are gone (B).
- You will earn a PLASTIC EGG.

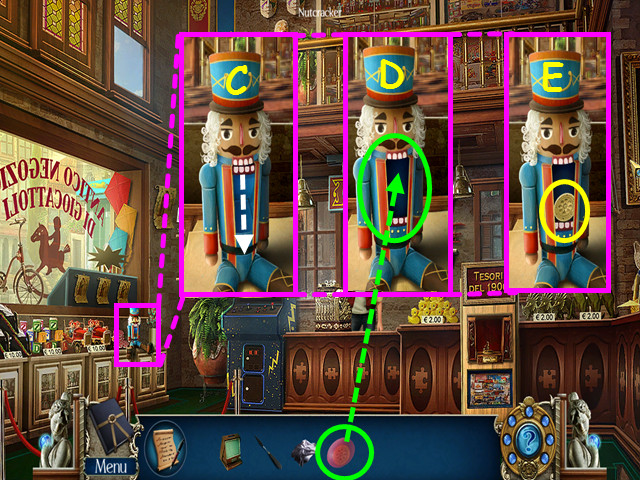
- Look at the nutcracker and drag his mouth open (C).
- Place the PLASTIC EGG inside the open mouth (D).
- Take the TOKEN (E).
- Exit the shop and look at the UFO game controls.

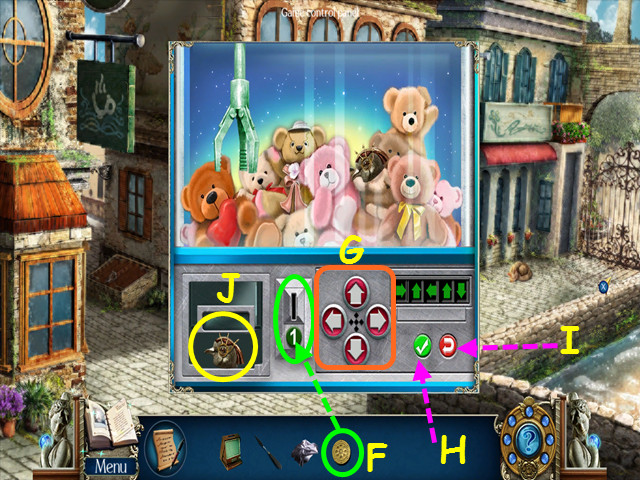
- Place the TOKEN in the slot for a mini-game (F).
- Press the arrow buttons to input 5 directions for the mechanical arm to get the bird head (G).
- Press the green check to see if you are correct (H).
- Tip: press 1 arrow then the green button until you find the correct first arrow. Then press the correct first arrow, another arrow and the green button until you have 2 correct.
- Press the red u-arrow to reset the game (I).
- Take the 1/3 MECHANICAL PIGEON PARTS (J).
- Return to the scooter rental area.

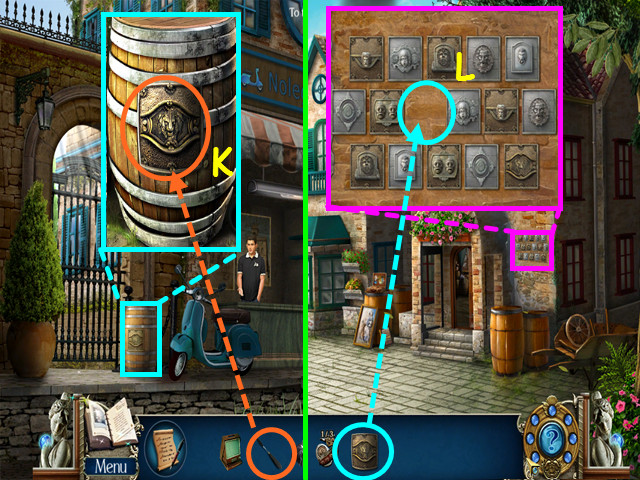
- Look at the barrel and use the PALETTE KNIFE to remove the EMBLEM (K).
- Return to the front of the wine shop.
- Look at the wall and place the EMBLEM in the empty spot for a mini-game (L).

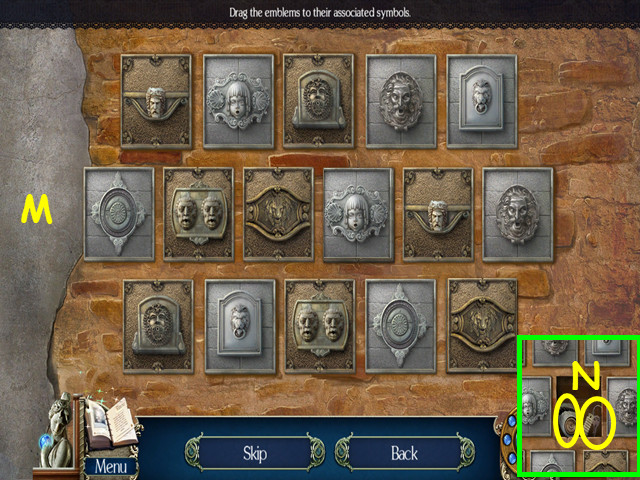
- Move the emblems to the correct position (M).
- Under each emblem is a symbol that relates to each emblem like a shell or door ring.
- Take the LOCKER KEY and the 2/3 MECHANICAL PIGEON PARTS (N).
- Return to the scooter rental area.

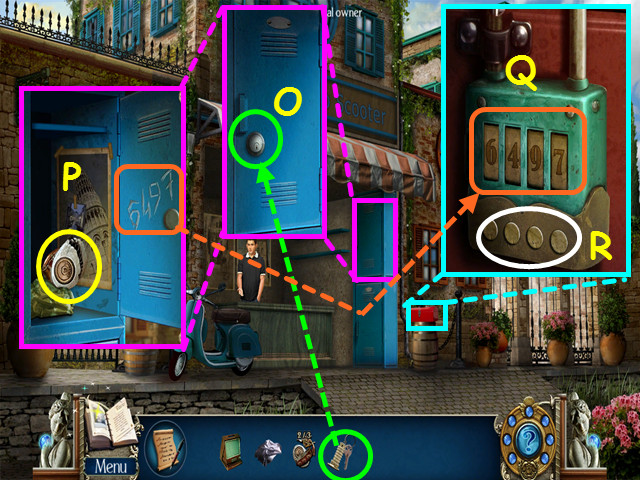
- Look at the locker and use the LOCKER KEY on the lock (O).
- Take the 3/3 MECHANICAL PIGEON PARTS and note the numbers scratched into the door (P).
- Look at the tool box and use the numbers from the locker door on the lock (Q).
- Push the buttons to change the numbers (R).

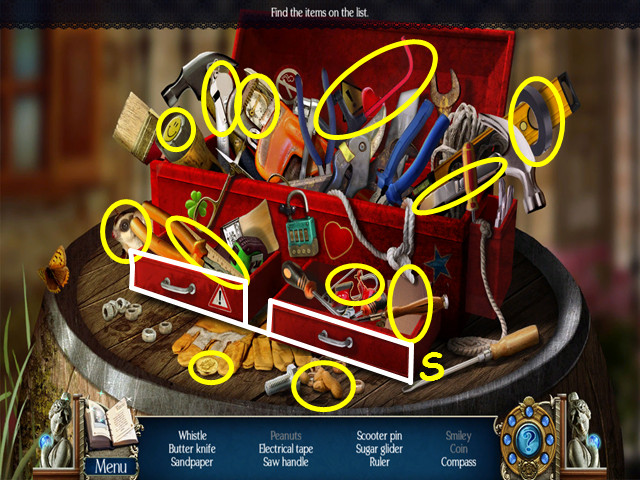
- Locate all the items on the list.
- Open the 2 drawers for more items (S).
- You will earn the SAW HANDLE.
- Return to the toy shop.

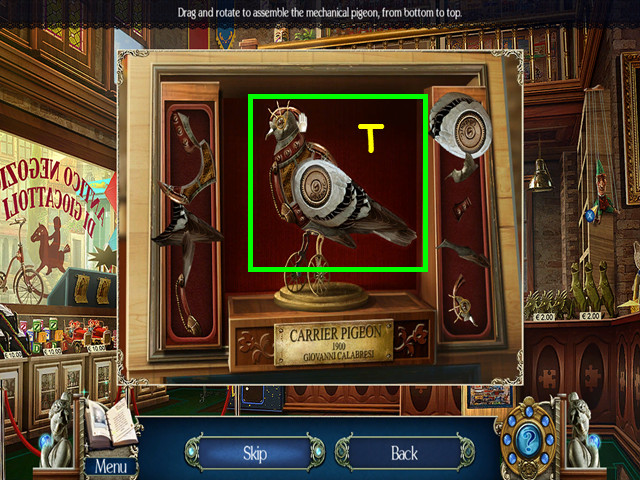
- Look at the mechanical pigeon and use the 3 MECHANICAL PIGEON PARTS on the display for a mini-game.
- Reassemble the pigeon from the bottom up (T).
- Click on a piece to rotate it to the correct orientation, then drag the piece into position.
- After the pigeon flies away, exit the toy shop.

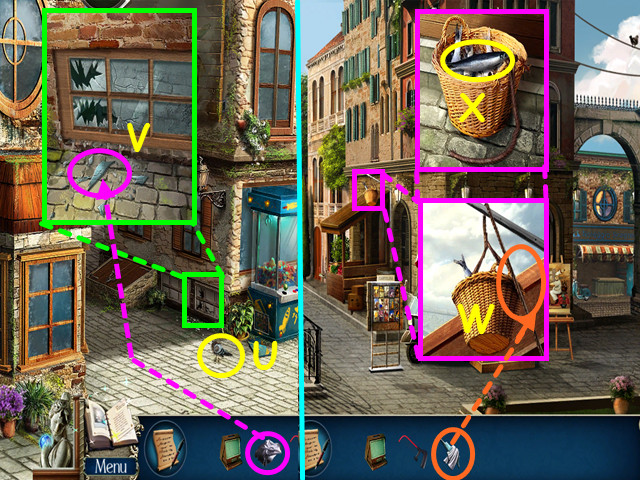
- Try to grab the pigeon, but it will fly into the basement window (U).
- Look at the broken window and use the RAG to take a GLASS SHARD (V).
- Return to the town center with the tour guide.
- Look at the basket and use the GLASS SHARD to cut it down (W).
- Take a FISH (X).
- Return to the front of the toy shop.

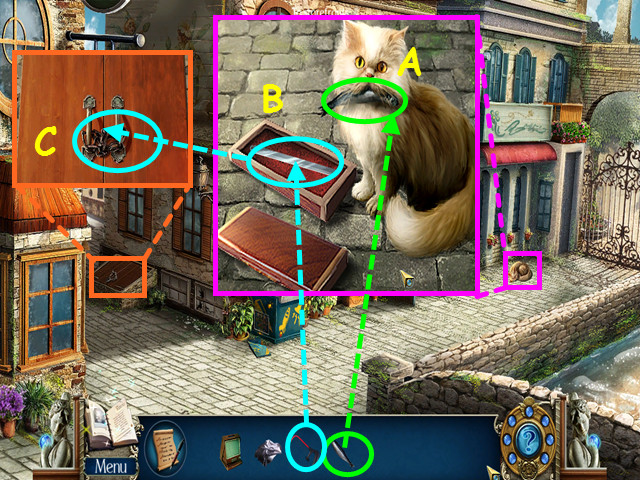
- Look at the cat and give him the FISH (A).
- Click on the box to open it then use the SAW HANDLE on the blade to get the HANDSAW (B).
- Look at the cellar doors and use the HANDSAW on the chain (C).
- Open the door and enter.

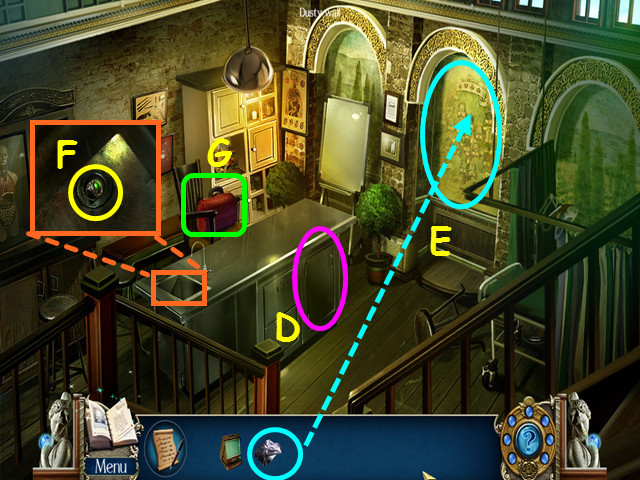
- Note the locked cabinet (D).
- Use the RAG to clean the alcove (E).
- Look in the sink and take the 1/3 RINGS (F).
- Select the doctor’s bag for a HOS (G).

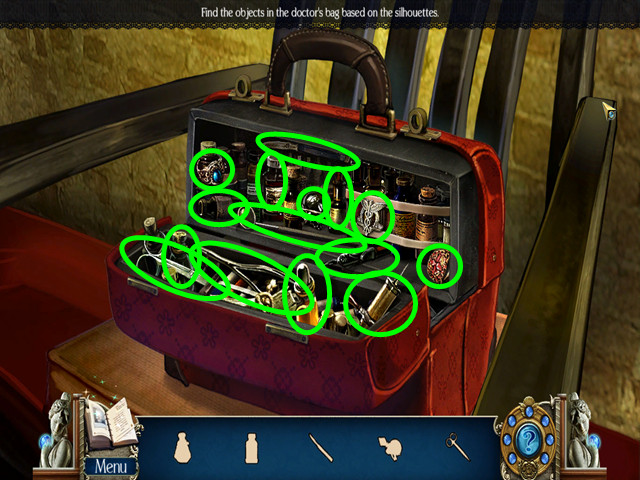
- Locate all the items on the list.
- You will earn the 2/3 and 3/3 RINGS.

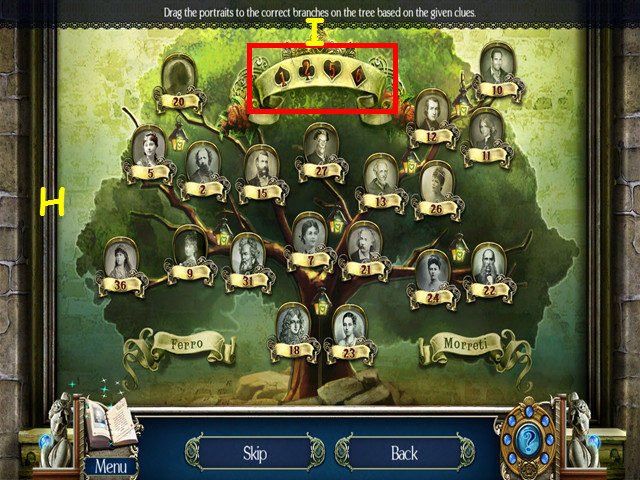
- Move the portraits to the correct branch of the family tree (H).
- Under each portrait is a set of suit symbols; using the legend at the top (I), find the total and move the same numbered portrait to that position.
- Portraits will ‘light’ when in the correct position.

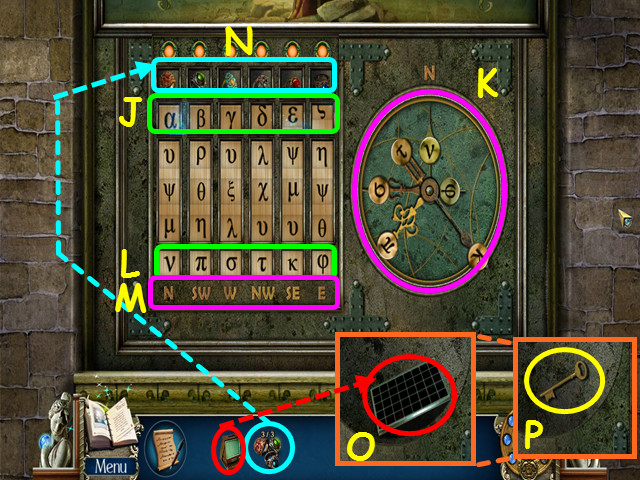
- Move the strips so the first 6 letters of the Greek alphabet are in the upper squares (J).
- Move the clock hand (K) with the symbol from the bottom squares (L) to the direction indicated below the squares (M).
- Repeat this process for all 6 symbols.
- Place the 3 RINGS into the slots at the top (N).
- Use the PORTABLE MICROFICHE VIEWER (O) on the microfiche, then take the CABINET KEY (P).

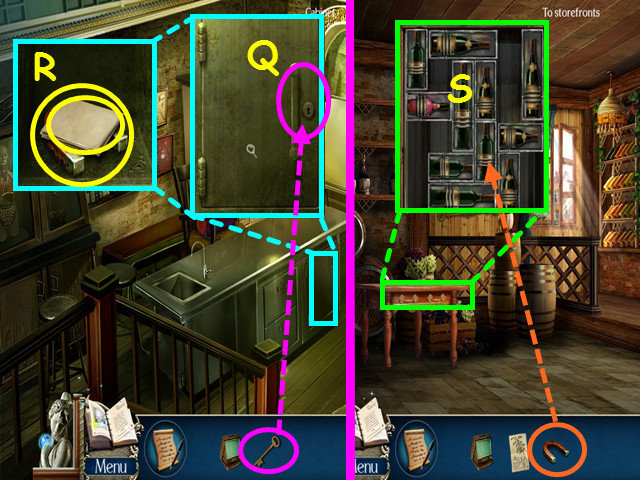
- Look at the cabinet and use the CABINET KEY on the lock (Q).
- Take GIOVANNI’S FORMULA and the MAGNET (R).
- Return to the inside of the wine shop.
- Look at the wine rack and use the MAGNET on it for a mini-game (S).

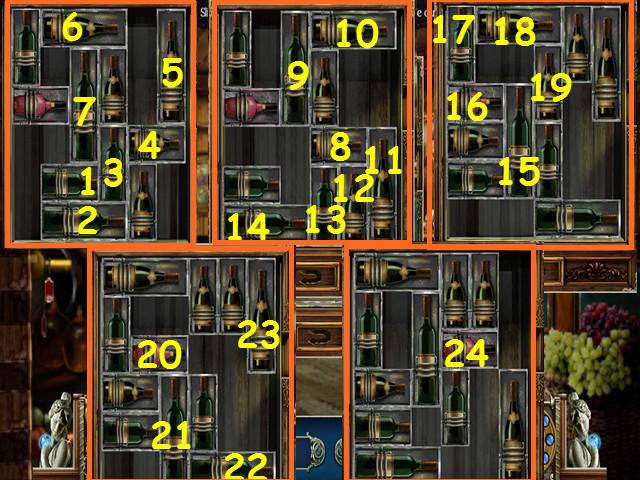
- Move the wine bottles around so you can slide the red bottle out on the right.
- Move the wine bottles in numerical order (1-24).
- You will earn the WINE.
- Return to the tour guide area.

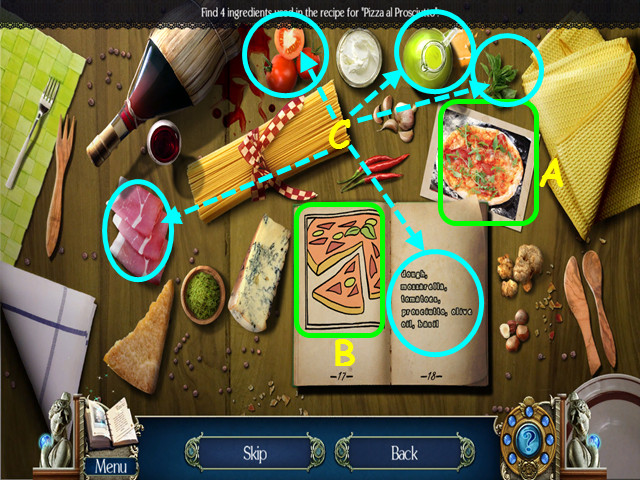
- Give the WINE to the tour guide for a mini-game.
- Look at the photograph (A), then find the recipe in the book (B).
- Click on the 4 available ingredients from the pizza recipe (C).
- There are 3 recipes to complete.

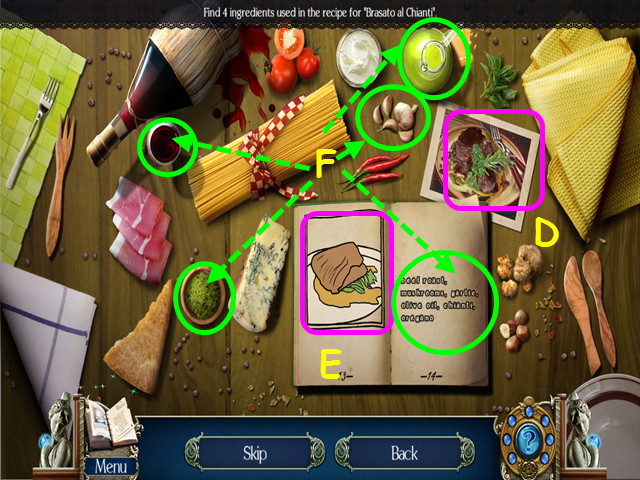
- Look at the photograph (D), then find the recipe in the book (E).
- Click on the available 4 ingredients from the brasato recipe (F).

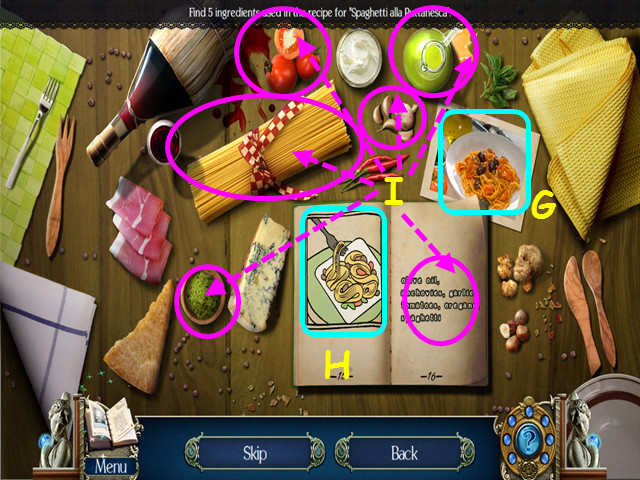
- Look at the photograph (G), then find the recipe in the book (H).
- Click on the available 5 ingredients from the spaghetti recipe (I).
- You will earn the SCOOTER VOUCHER.

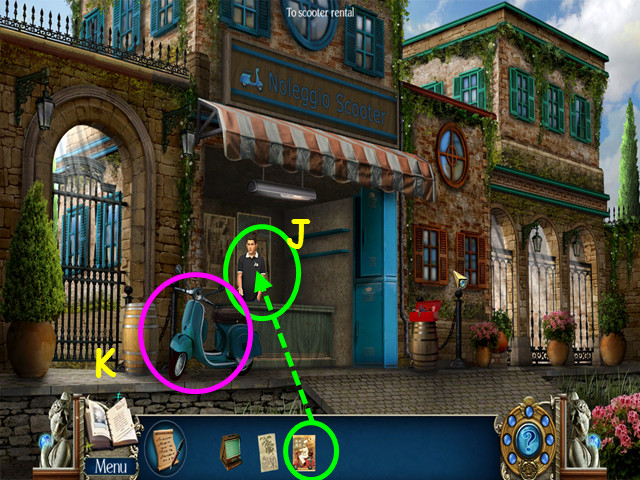
- Give the SCOOTER VOUCHER to the scooter rental owner (J).
- Click on the scooter (K).
Chapter 4: Monastery

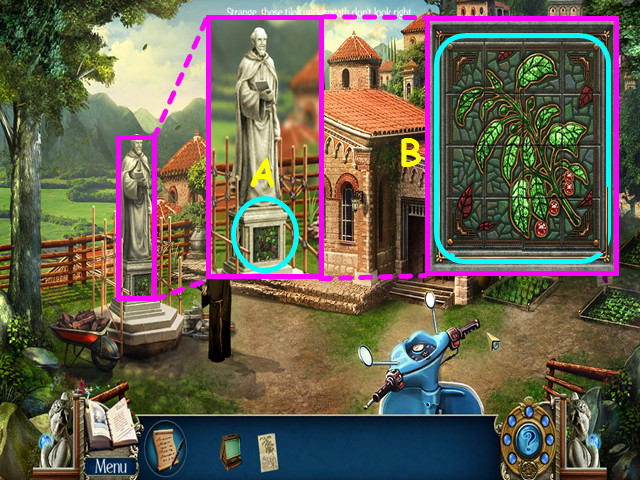
- After talking to the monk, look at the statue and click on the base (A).
- Restore the mosaic by moving the tile; click on 2 tiles to swap positions (B).
- Enter the doorway to the courtyard.

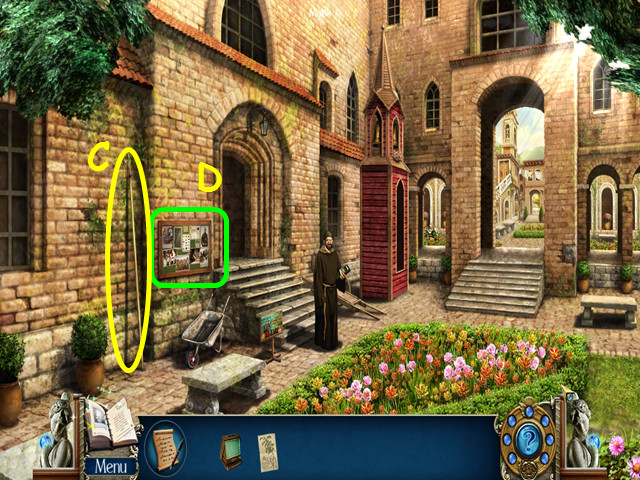
- Take the LONG STICK (C).
- Look at the bulletin board for a HOS (D).

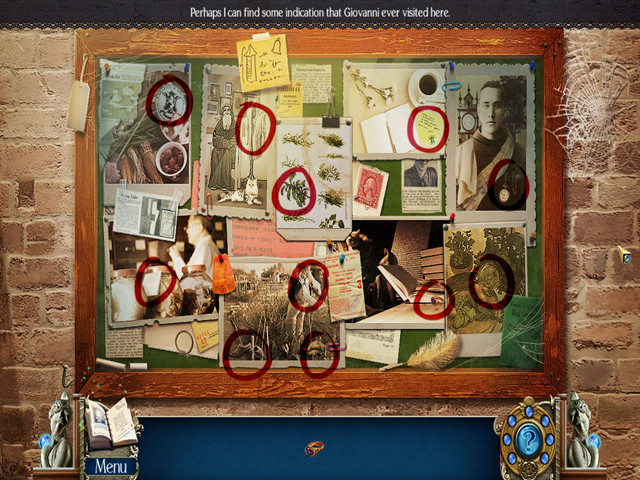
- Locate all the items on the list.
- You will learn Giovanni was at the monastery at one time.
- Walk forward to the outside tower.

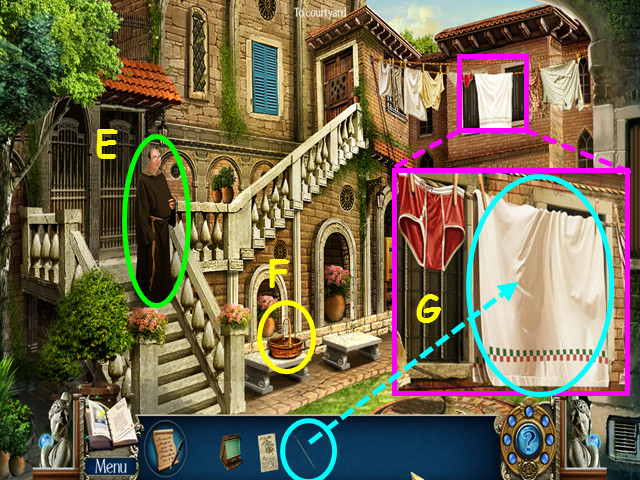
- Talk to the monk to learn no visitors are allowed upstairs (E).
- Take the BASKET (F).
- Look at the clothesline and use the LONG STICK to take the BLANKET (G).
- Walk down to return to the courtyard.

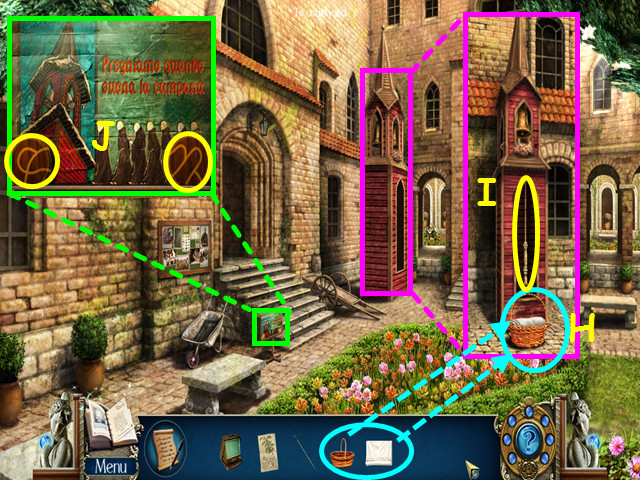
- Look at the prayer bell and place the BASKET, then the BLANKET on the ground (H).
- Ring the bell (I).
- Look at the prayer schedule; take the 1/8 and 2/8 WOODEN TILES (J).
- Return to the front of the monastery.

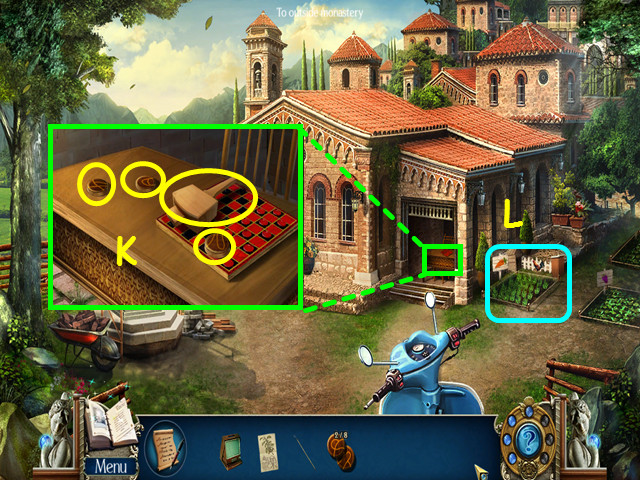
- Look at the table; take the 3/8, 4/8, 5/8 WOODEN TILES and the MALLET (K).
- Note the carrot patch (L).
- Enter the monastery then walk left to the herb garden.

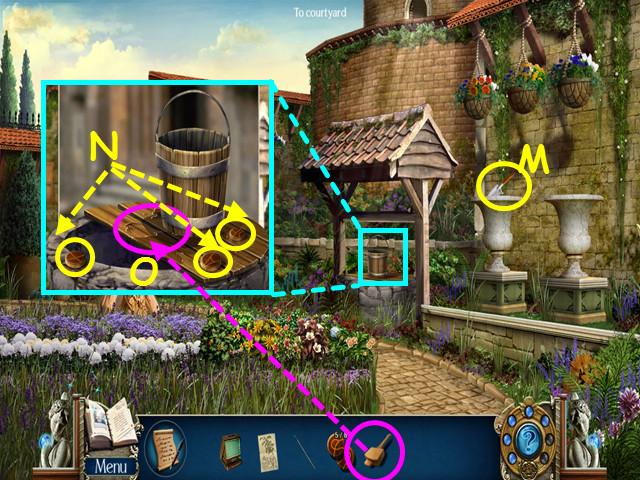
- Take the TROWEL (M).
- Look at the well; take the 6/8, 7/8 and 8/8 WOODEN TILES (N).
- Use the MALLET on the boards to get the BUCKET of WATER (O).
- Exit the garden, then walk forward.
- Look at the oak door at the top of the stairs for a mini-game.

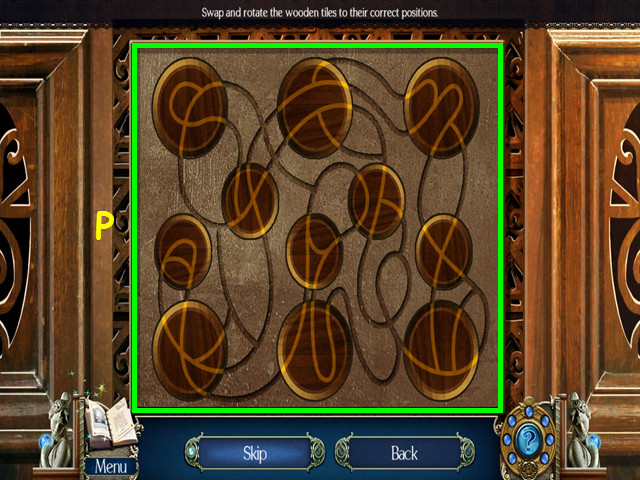
- Place the 8 WOODEN TILES onto the board.
- Click on a piece to rotate it to the correct orientation; click on 2 pieces to swap positions.
- Move the tiles so all the lines are connected (P).
- Enter the tower stairs.

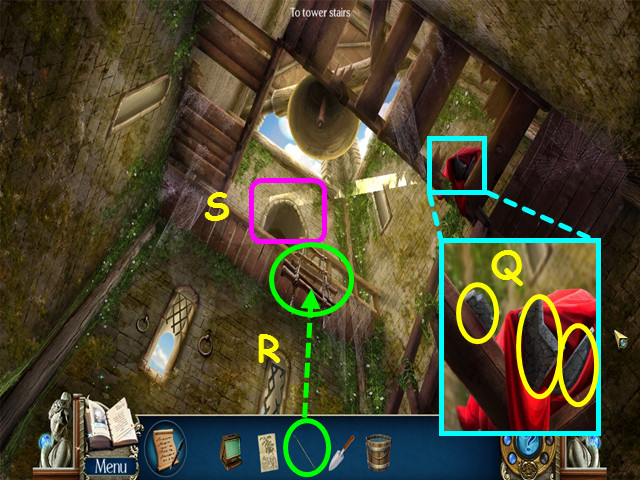
- Look at the cloth; take the 1/6, 2/6, and 3/6 MOSAIC PARTS (Q).
- Use the LONG STICK to pull down the ladder (R).
- Enter the Abbot’s room (S).

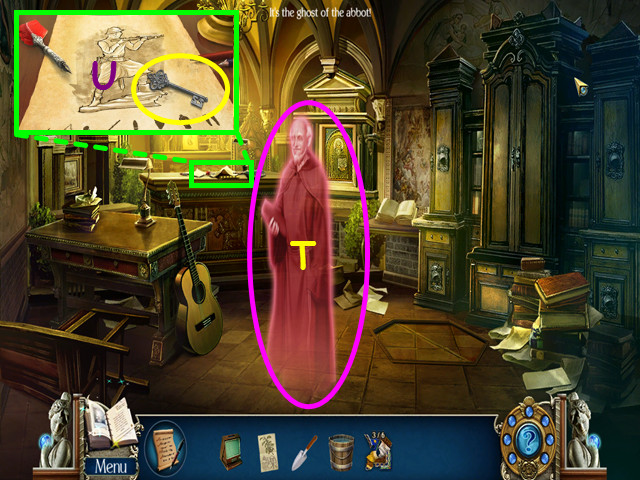
- Click on the ghost (T).
- Look at the table and take the SUPPLY KEY (U).
- Exit the tower completely.

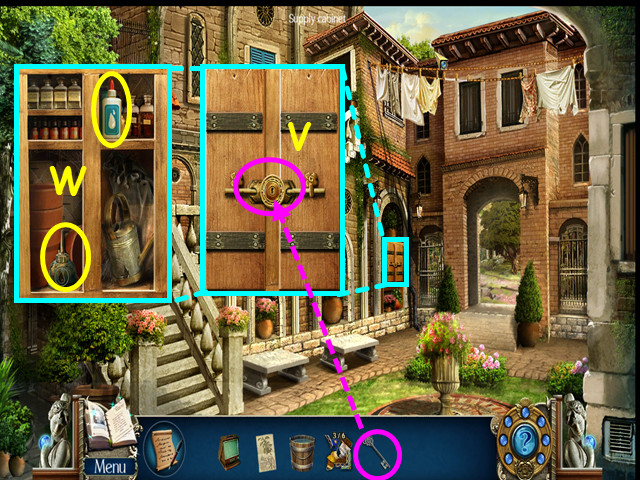
- Look at the supply cabinet: use the SUPPLY KEY on the lock (V).
- Take the GLUE and the OIL (W).
- Walk to the herb garden.

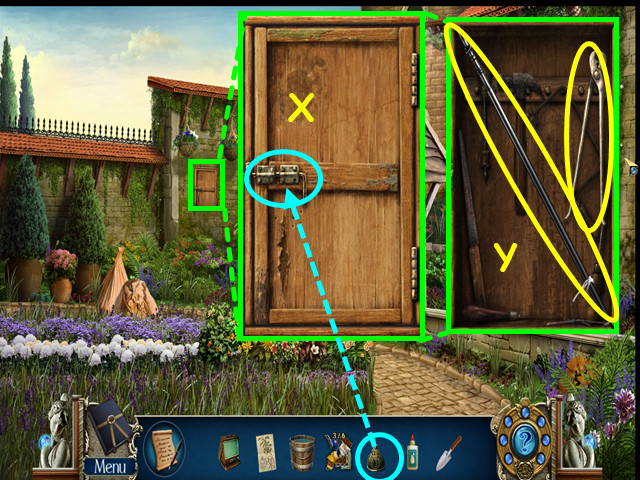
- Look at the tool cabinet and use the OIL on the latch (X).
- Take the WOODEN POLE and the NAIL PULLER (Y).
- Exit the herb garden and walk forward twice to the shady grove.

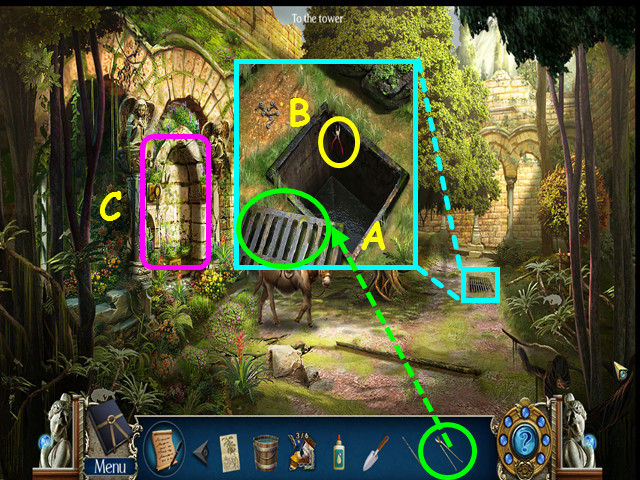
- Look at the drain and use the NAIL PULLER to remove the grate (A).
- Take the WIRE CUTTERS (B).
- Note the message on the wall and the fire ants (C).
- Exit the shady grove and enter the tower stairs.

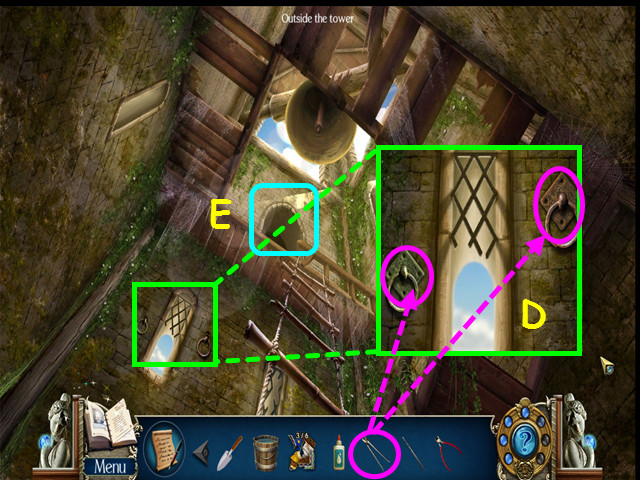
- Look at the window and use the NAIL PULLER to remove the 2 METAL RINGS (D).
- Enter the Abbot’s room (E).

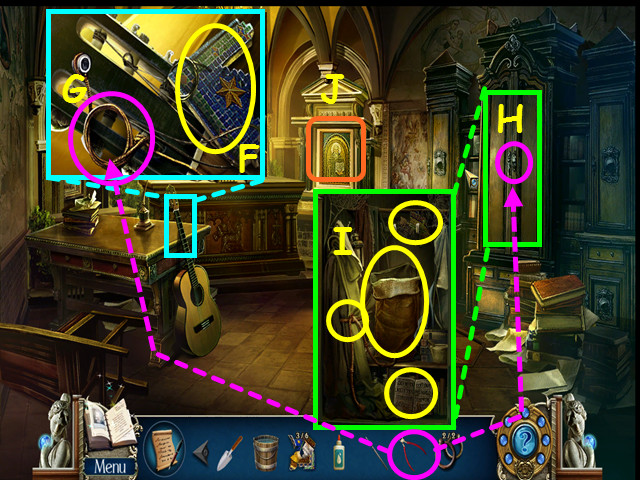
- Look at the guitar and take the 4/6 MOSAIC PARTS (F).
- Use the wire cutters on the string and it will combine with the wooden pole to make the POLE with STRING (G).
- Look at the wardrobe and use the WIRE CUTTERS to remove the wire (H).
- Click to open both doors and take the SACK, ROPE BELT, 5/6 and 6/6 MOSAIC PARTS (I).
- Look at the wall mosaic for a mini-game (J).

- Use the GLUE on the mosaic, then add the 6 MOSAIC PARTS (K).
- Restore the mosaic by placing the pieces in the empty spots (L).
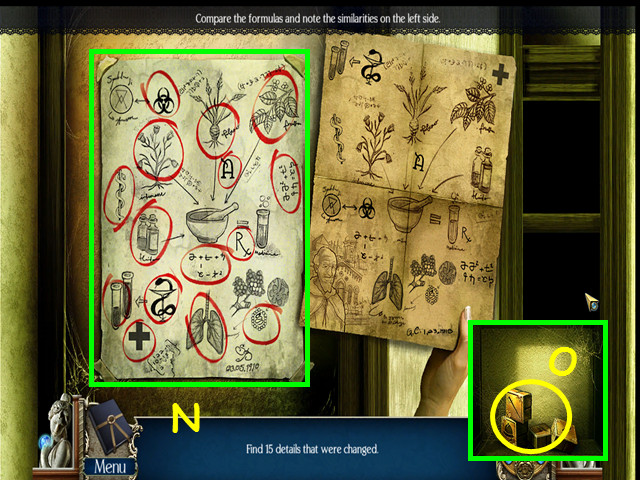
- Compare GIOVANNI’S FORMULA with the abbot’s formula for a mini-game (M).


- Compare the 2 formulas and click on the 15 differences (N).
- You will earn the FORGED FORMULA.
- Take the GOLDEN CUBES (O).
- Look at the table for a mini-game.

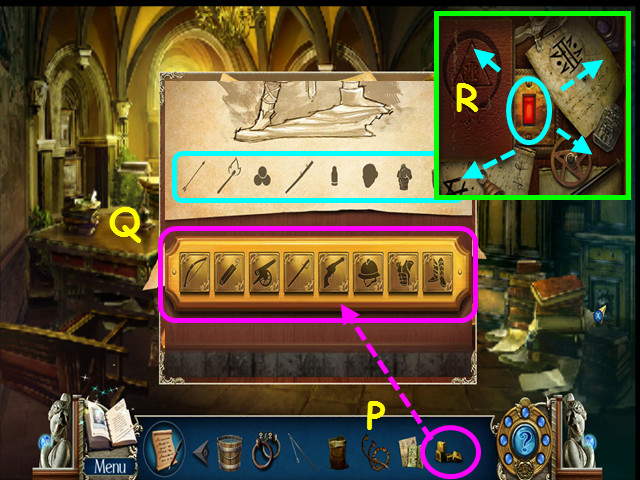
- Place the GOLDEN CUBES into the squares for a mini-game (P).
- Click on the cubes to change them to an icon that relates to the icon above each cube (Q).
- Drag the documents to the sides, then press the red switch (R).

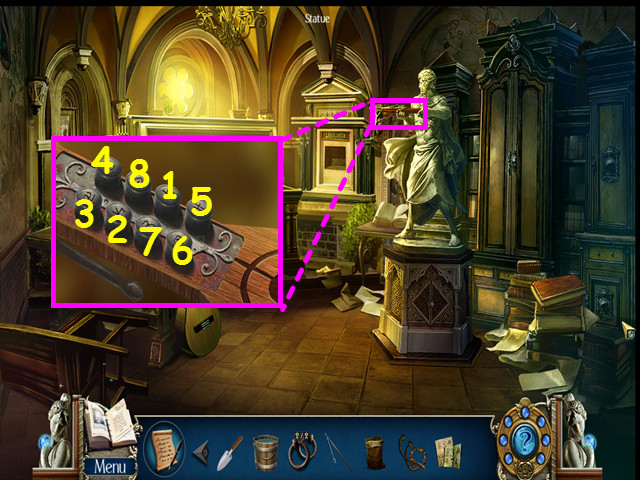
- Look at the statue; press the buttons in numeric order (1-8).
- After the arrow flies out the window, exit and return to the front of the monastery.

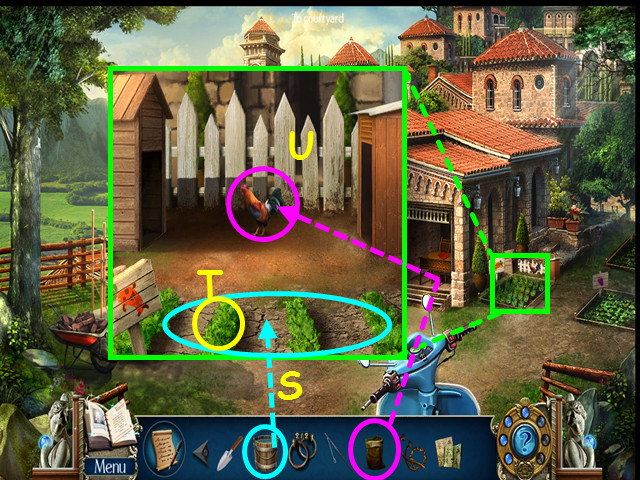
- Look at the carrot patch and use the BUCKET of WATER on the carrots (S).
- Take a CARROT (T).
- Use the SACK on the rooster to get the ROOSTER in a SACK (U).
- Enter the monastery, then go forward twice to the shady grove.

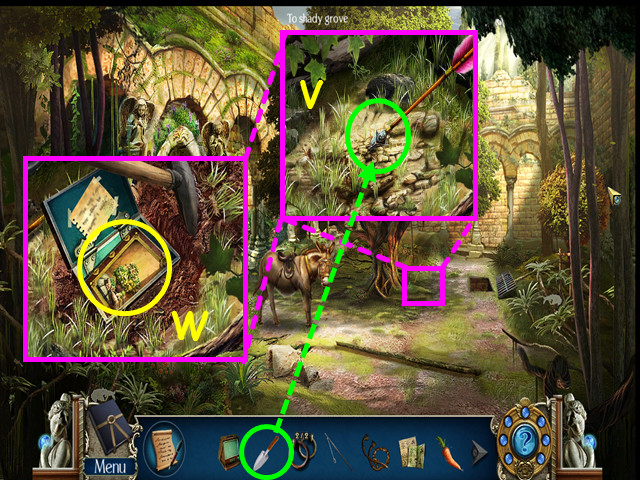
- Look where the arrow landed and use the TROWEL to dig a hole (V).
- Open the box and look at the herb guide to learn about an ant repellant (W).
- Return to the herb garden.

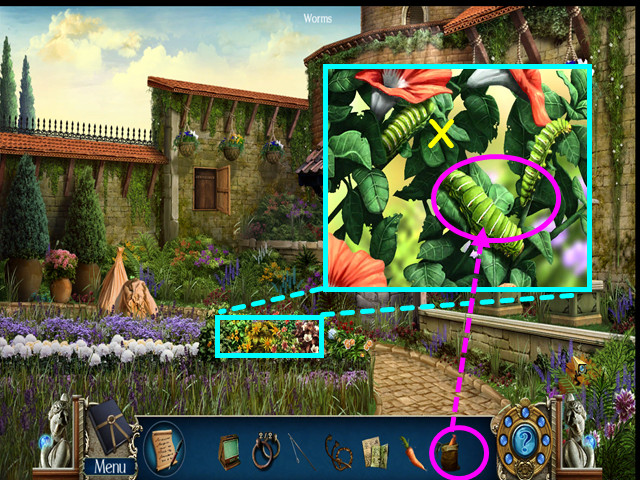
- Look at the herb patch and use the ROOSTER in a SACK to get rid of the worms (X).
- Select the herb patch again for a HOS.

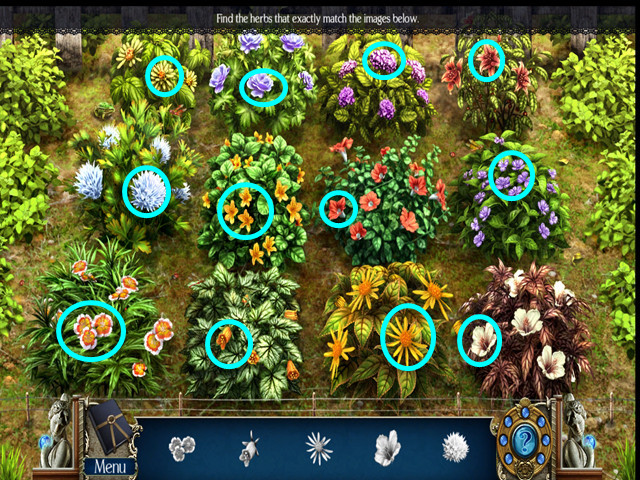
- Locate all the blossoms on the list.
- You will earn the NATURAL ANT KILLER.
- Return to the shady grove.

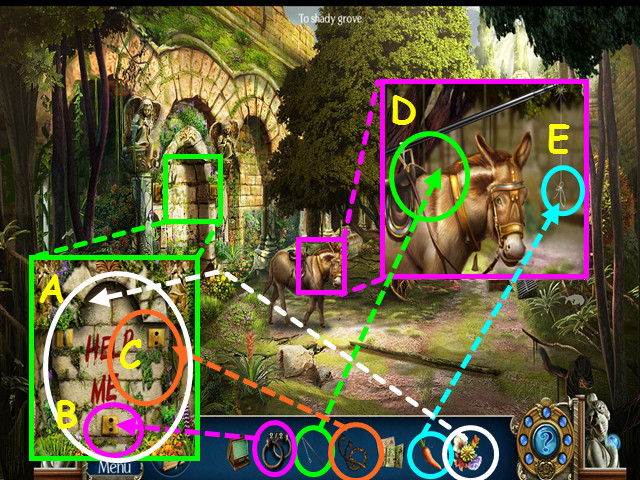
- Look at the wall and use the NATURAL ANT KILLER on it (A).
- Use the 2 METAL RINGS on the brackets (B), then attach the ROPE BELT (C).
- Look at the donkey and use the POLE with STRING on him (D).
- Attach the CARROT to the string (E).
- Look at the crypt behind the wall for a HOS.

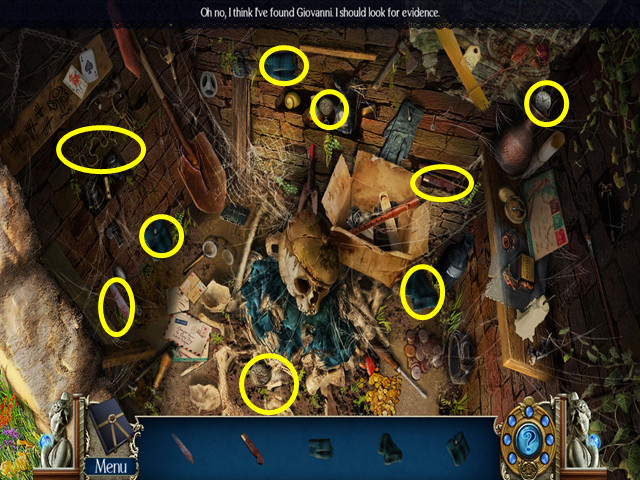
- Locate all the items on the list.
- You will earn the microfiche and the EVIDENCE.
Chapter 5: The University Grounds (Revisited)

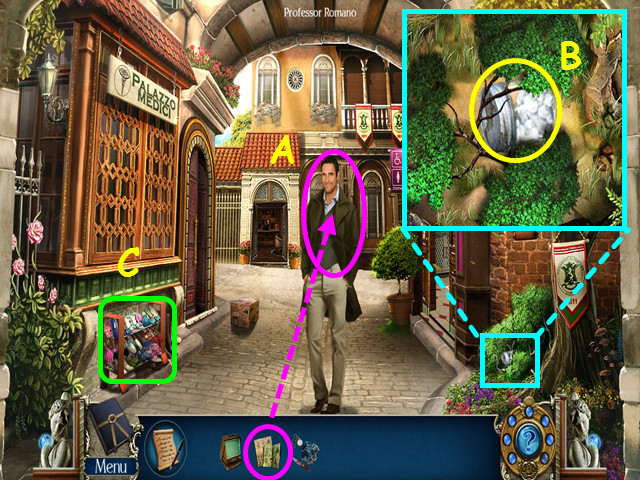
- Give the FORGED FORMULA to Professor Romano (A).
- Look in the bushes and take the COTTON (B).
- Select the shoe rack for a HOS (C).

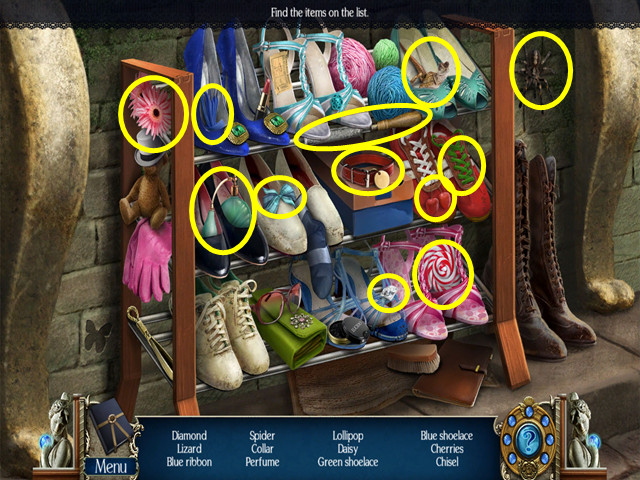
- Locate all the items on the list.
- You will earn the CHISEL.
- Enter the medical department on the left, then walk forward to the laboratory.

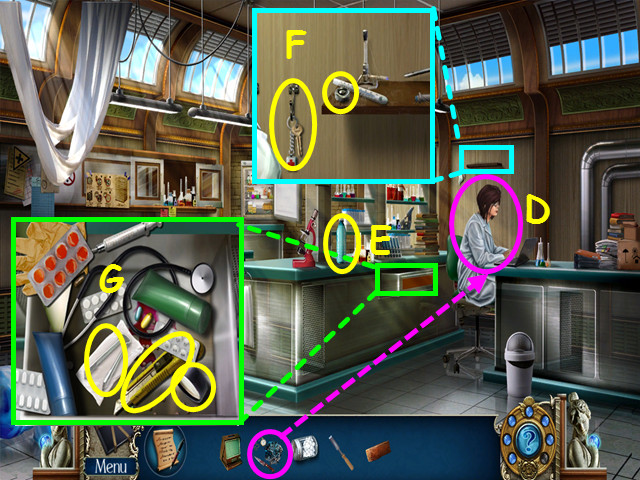
- Talk to the lab assistant; give her the EVIDENCE (D).
- Take the EMPTY BOTTLE (E).
- Look at the shelf; take the KEYS and the 1/3 MICROSCOPE PARTS (F).
- Look in the drawer and move the items to the side; take the TONGS, CUTTER, and 2/3 MICROSCOPE PARTS (G).

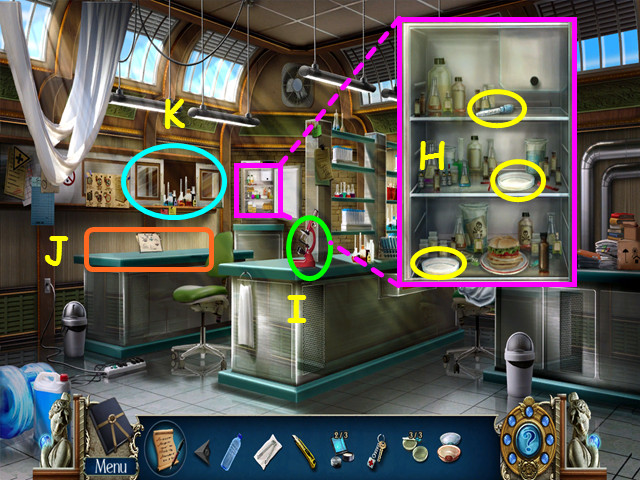
- Look in the fridge and take the 3 DIRTY LAB EQUIPMENT parts (H).
- Note the microscope (I).
- Note the counter (J).
- Select the cabinet for a HOS (K).

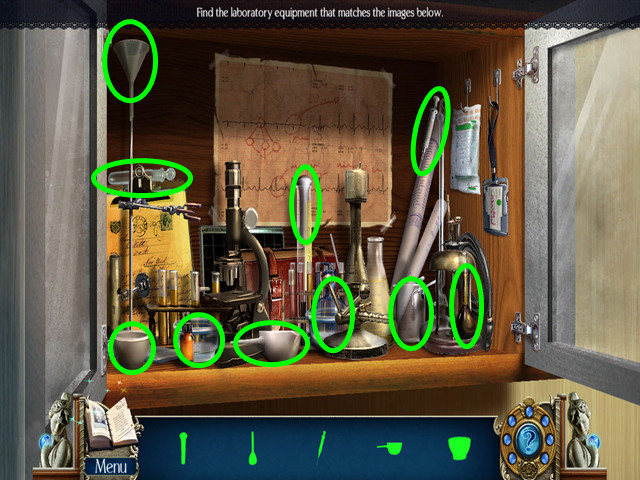
- Locate all the items on the list.
- You will earn the BOWLS.
- Exit the lab.

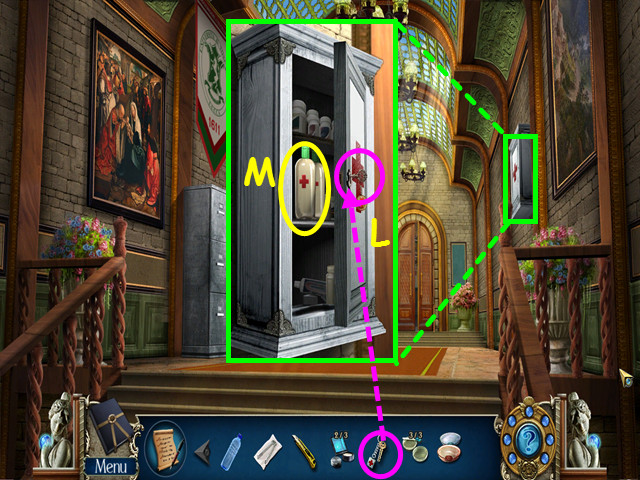
- Look at the medical cabinet and use the KEYS on the lock (L).
- Take the ALCOHOL (M).
- Walk down to exit the hall.

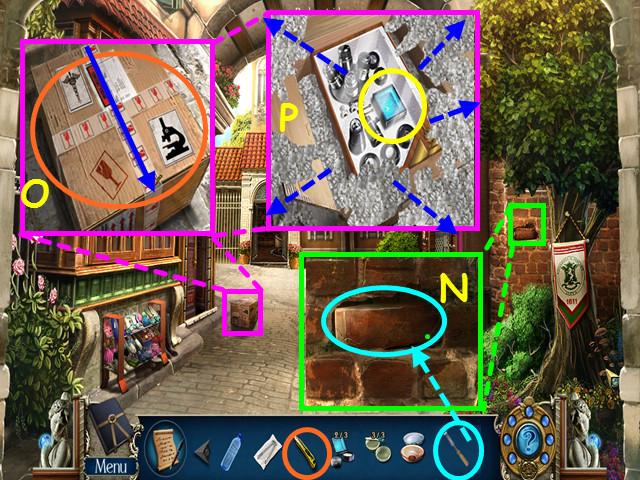
- Look at the brick wall and use the CHISEL to take the BRICK (N).
- Look at the cardboard box and use the CUTTER on it; drag the cutter down the tape (O).
- You will see a blue line where you drag the cutter.
- Drag the packing material to the sides and take the 3/3 MICROSCOPE PARTS (P).
- Walk right to enter the girl’s restroom.

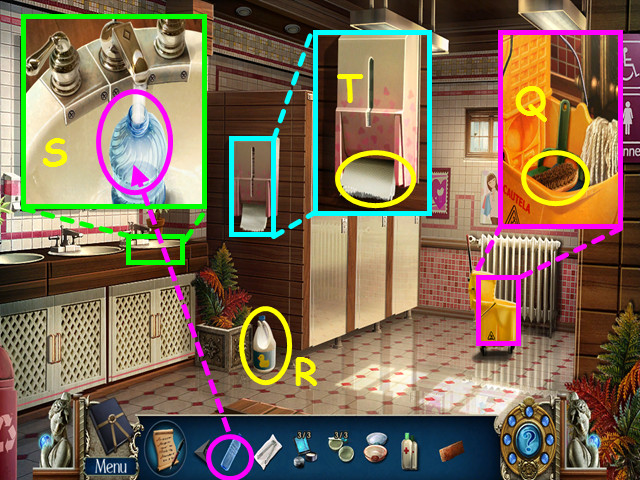
- Look at the mop bucket and take the BRUSH (Q).
- Take the BLEACH (R).
- Look in the sink; place the EMPTY BOTTLE in the sink then take the BOTTLE of WATER (S).
- Look at the dispenser and take 3 TISSUE (T).
- Return to the lab and look at the counter.

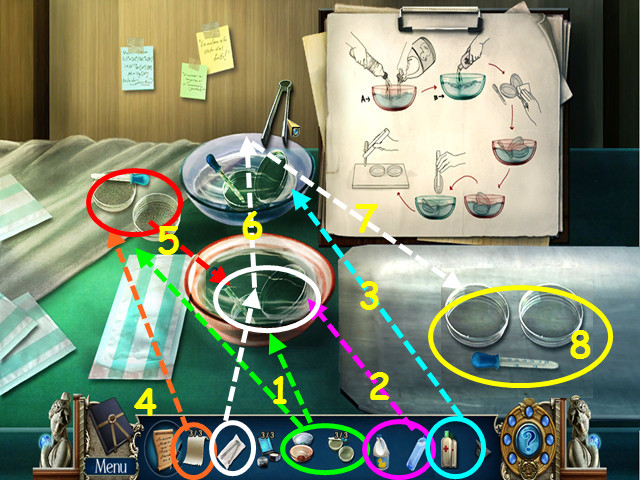
- Place the BOWLS and the 3 DIRTY LAB EQUIPMENT parts on the counter (1).
- Pour the BOTTLE of WATER and the BLEACH into the pink bowl (2).
- Pour the ALCOHOL into the blue bowl (3).
- Use the 3 TISSUES on the dirty lab equipment (4).
- Pick up the UNSTERILIZED LAB EQUIPMENT and place it into the pink bowl (5).
- Use the TONGS to move the lab equipment from the pink bowl to the blue bowl (6).
- Use the TONGS to lab equipment from the blue bowl to the tray (7).
- Take the TRAY with CLEAN EQUIPMENT (8).

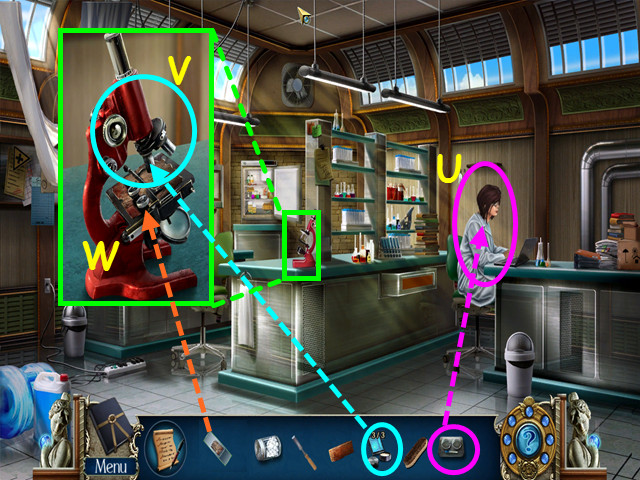
- Give the TRAY with CLEAN EQUIPMENT to the lab assistant (U).
- She will give you the CLOTH SPECIMEN.
- Look at the microscope and use the 3 MICROSCOPE PARTS on the device (V).
- Place the CLOTH SPECIMEN in the microscope for a mini-game (W).

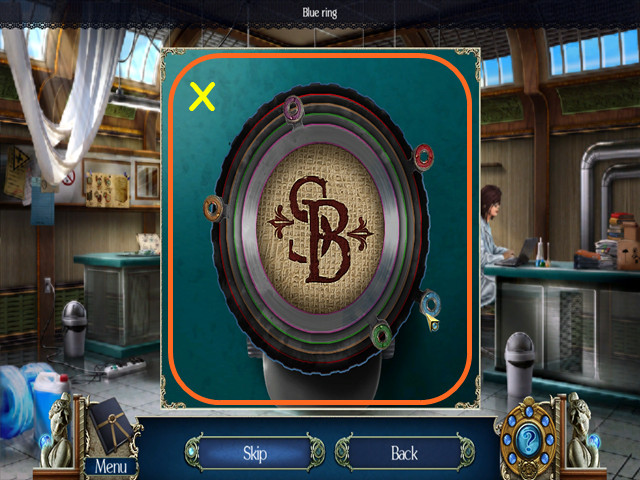
- Move the colored tabs to bring the monogram into focus (X).
- The lab technician will confirm it is the same monogram as on the knife and will also give you a POCKET WATCH.
- Exit the lab.

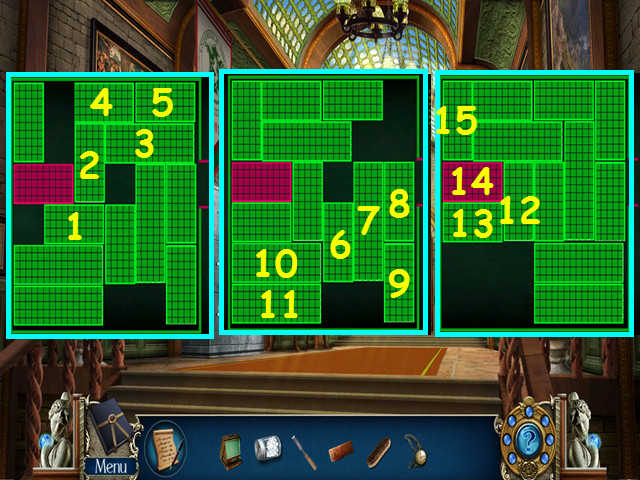
- Look at the records cabinet on the left and click on the screen in the center for a mini-game.
- Move the red bar to the exit on the right.
- Move the bars in numerical order (1-15).

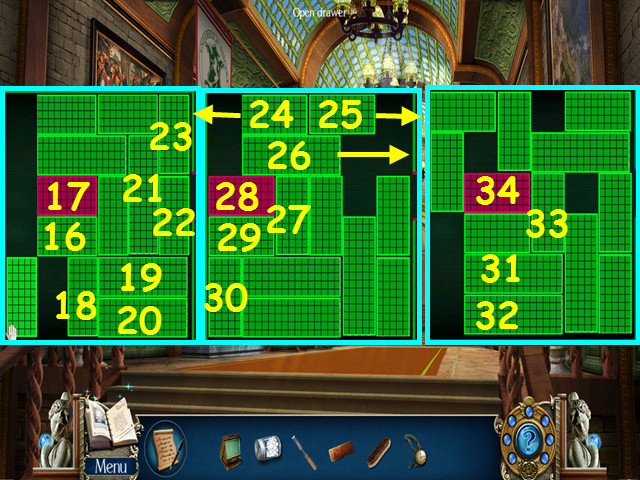
- Continue moving the bars to release the red bar.
- Move the bars in numerical order (16-34).

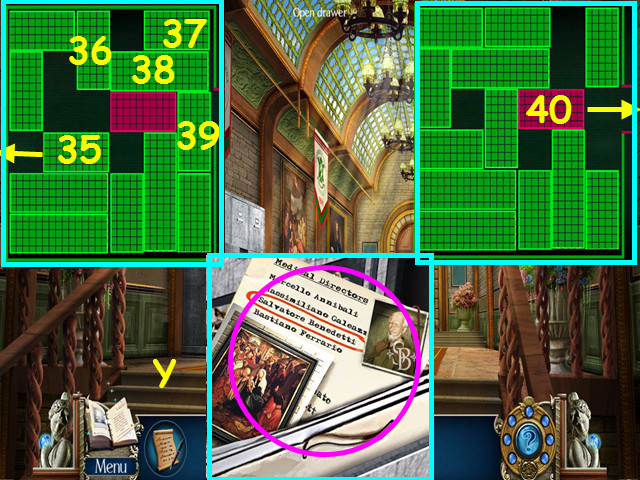
- Continue moving the bars to release the red bar.
- Move the bars in numerical order (35-40).
- Look in the open drawer, click on the files and read about the Abbot (Y).
- Return to the girl’s restroom.

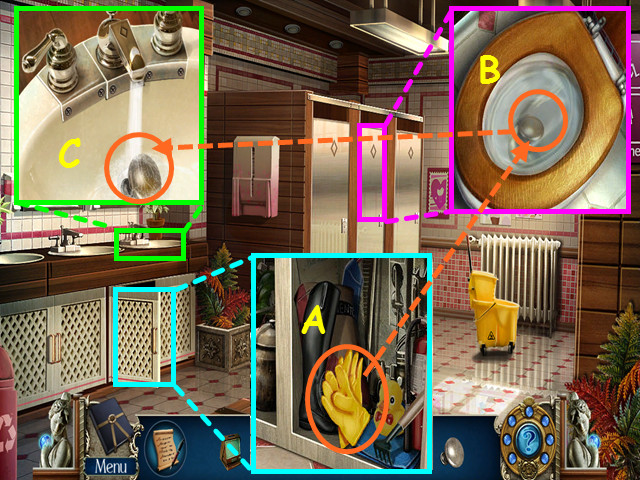
- Open the cabinet, look inside and take the RUBBER GLOVES (A).
- Look in the center stall and use the RUBBER GLOVES to retrieve the DIRTY KNOB (B).
- Look at the sink, place the DIRTY KNOB in the bowl, then take the CLEAN KNOB (C).
- Return to the medical building hall.

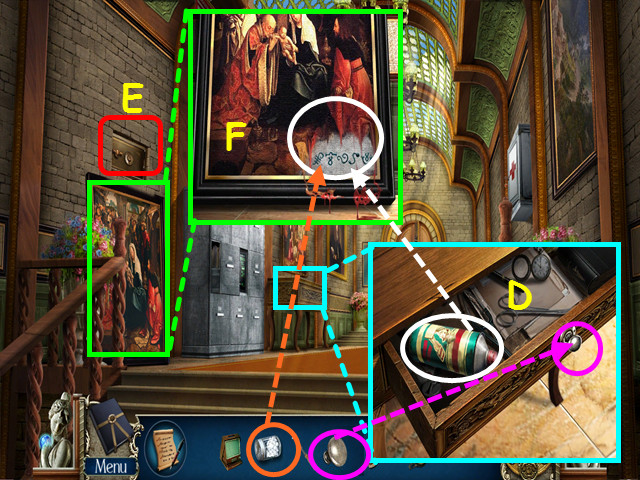
- Look at the desk and use the CLEAN KNOB on the drawer; take the THINNER (D).
- Look at the painting; remove it from the wall to find the safe (E).
- Look at the painting again; use the THINNER, followed by the COTTON to reveal a code (F).
- Zoom into the safe for a mini-game.

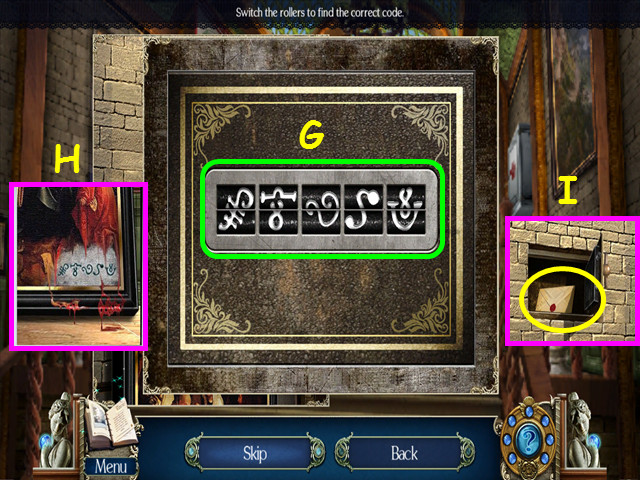
- Change the rollers (G) to reflect the code found on the painting (H).
- Take the letter from the safe (I).
- Click on the envelope to open it, then click on the letter to read it.

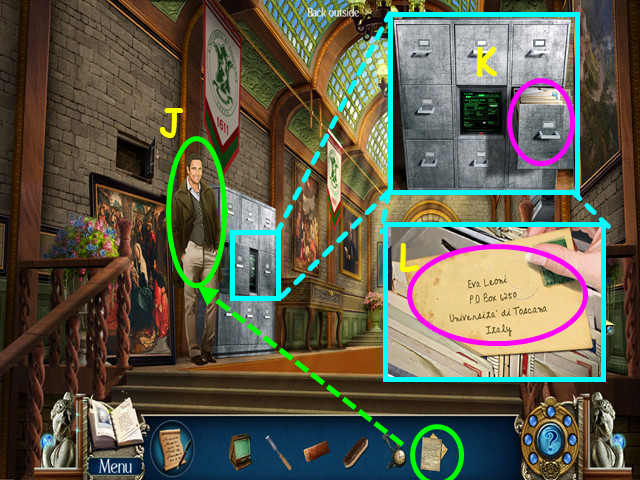
- Give the CONFESSION LETTER to Professor Romano (J).
- Look at the records cabinet and select the open drawer (K).
- Click on the files to search, then click on Eva’s letter to find EVA’S ADDRESS (L).
- Walk down, then go forward to the girls dorm.

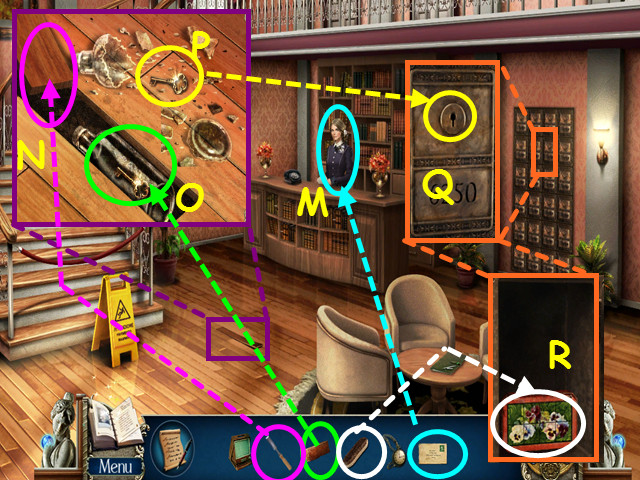
- Give EVA’S ADDRESS to the student representative (M).
- Look at the floorboard and use the CHISEL to pry up the board (N).
- Use the BRICK to break the bottle (O) then take the POST BOX KEY (P).
- Look at the post boxes and use the POST BOX KEY on the lock (Q).
- Use the BRUSH to clean the dirt off the box, then select the box for a mini-game (R).

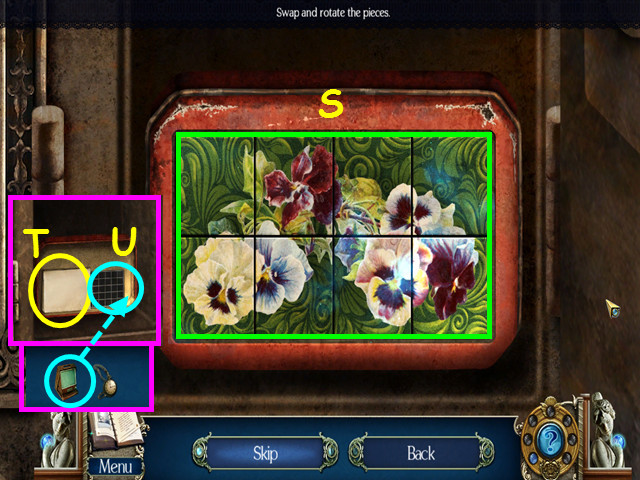
- Restore the mosaic on the box (S); click on 2 tiles to swap positions, click on a single tile to rotate in place.
- Read the letter (T).
- Use the PORTABLE MICROFICHE VIEWER on the microfiche (U).
Chapter 6: Chapel

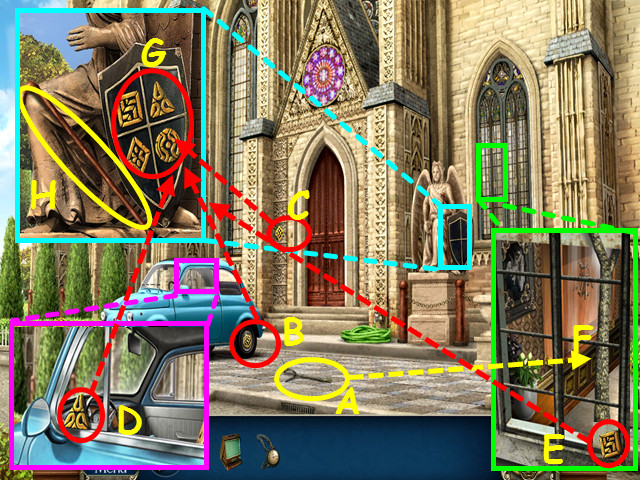
- Take the BRANCH (A), ROUND BADGE (B), and the DIAMOND BADGE (C).
- Look at the car and take the TRIANGLE BADGE (D).
- Look at the window and take the SQUARE BADGE (E).
- Use the BRANCH on the window (F).
- Look at the statue and place the 4 BADGES in to the same shape spots on the shield (G).
- Take the STAFF (H).

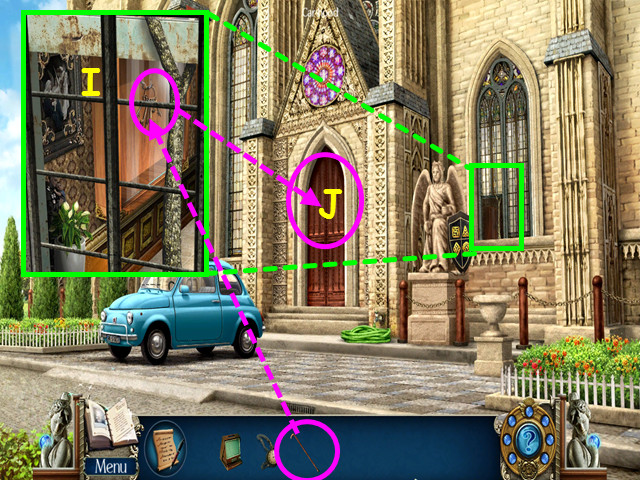
- Look in the window and use the STAFF to open the glass door and get the KEYS (I).
- Use the KEYS on the cathedral door for a mini-game (J).

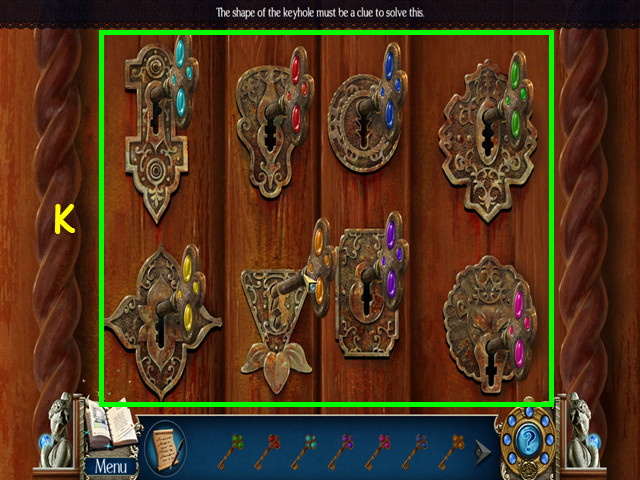
- Place the keys into the locks based on the shape of the keyhole (K).
- Enter the cathedral.

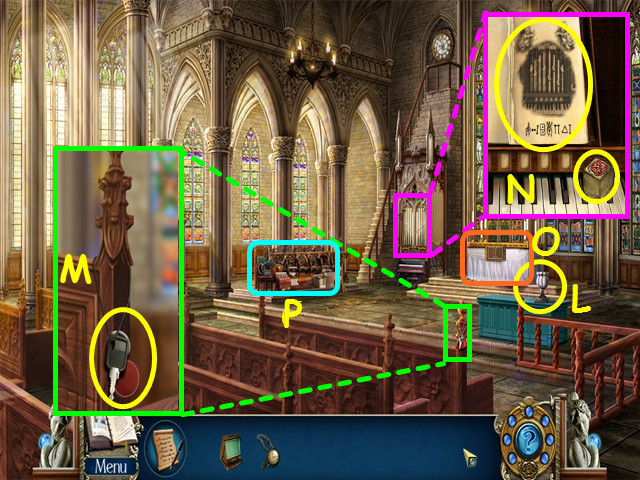
- Take the VASE (L).
- Look at the bench and take the CAR KEY (M).
- Look at the pipe organ; take the code sheet and the 1 /2 CUBE (N).
- Note the altar (O).
- Select the chorale area for a HOS (P).

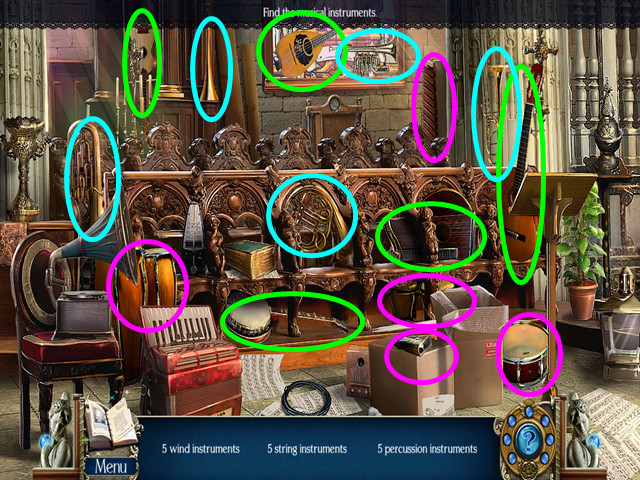
- Locate all the instruments on the list.
- You will earn the TRUMPET.
- Exit the cathedral.

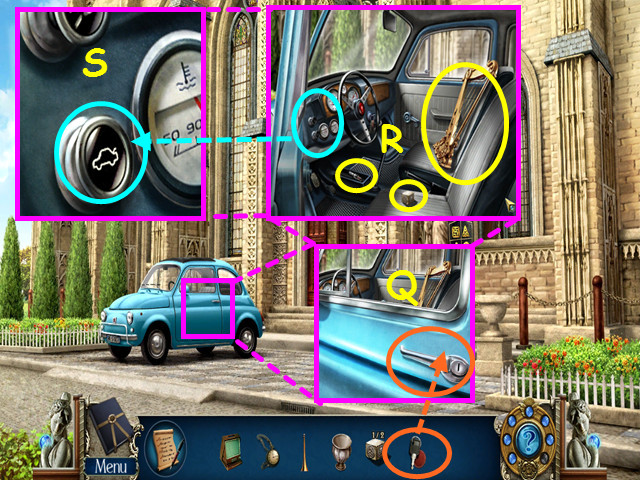
- Look at the car door and use the CAR KEY on the lock (Q).
- Take the SPARK PLUG, 2/2 CUBE and the HARP (R).
- Look at the dash and press the hood button (S).
- Enter the cathedral and look at the altar.

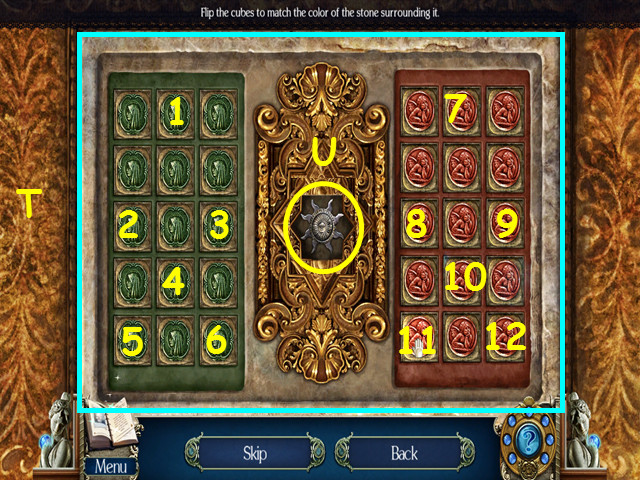
- Place the 2 CUBES into the squares to trigger the mini-game.
- Flip the cubes to match the surrounding stone (T).
- Clicking on a cube will affect other cubes.
- Click on the cubes in numerical order (1-12).
- Take the SUN DISK from the center (U).

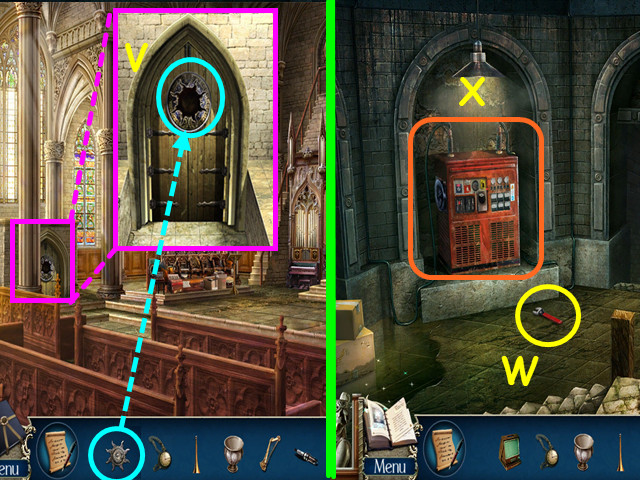
- Look at the door to the tunnels on the left.
- Place the SUN DISK in the door and enter the tunnels (V).
- Take the SPANNER (W).
- Note the generator (X).
- Exit the cathedral.

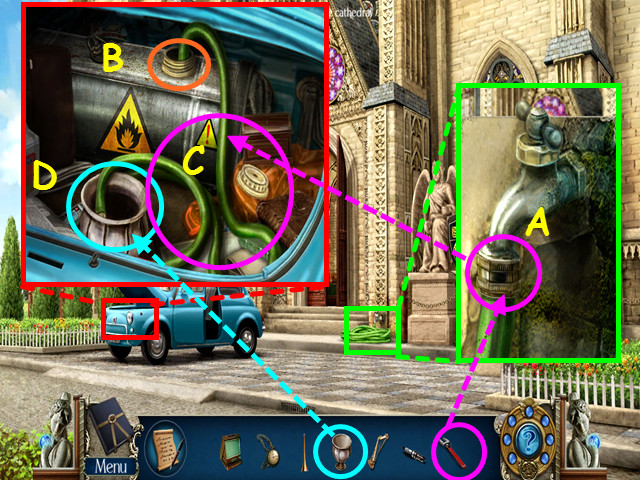
- Look at the spigot and use the SPANNER to take the HOSE (A).
- Look under the hood of the car and remove the fuel cap (B).
- Place the HOSE in the fuel tank (C).
- Use the VASE on the hose (D).
- Take the VASE with FUEL.
- Return to the tunnels and look at the generator.

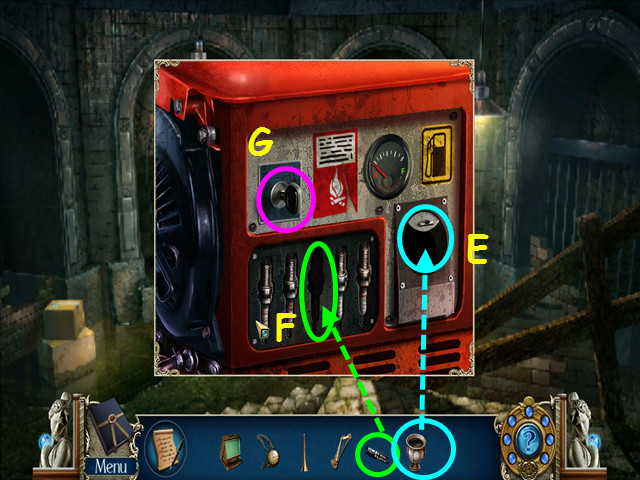
- Use the VASE with FUEL on the fuel hole (E).
- Place the SPARK PLUG in the empty slot (F).
- Turn the key (G).
- Walk forward into the catacombs.

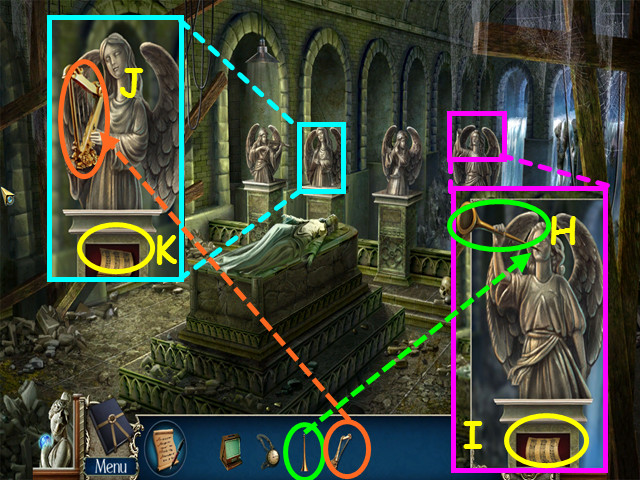
- Look at the right angel and place the TRUMPET in her arms (H).
- Take the 1 /2 MUSIC SHEET (I).
- Look at the second from the left angel and place the HARP in her hands (J).
- Take the 2/2 MUSIC SHEET (K).
- Walk down twice to return to the cathedral.

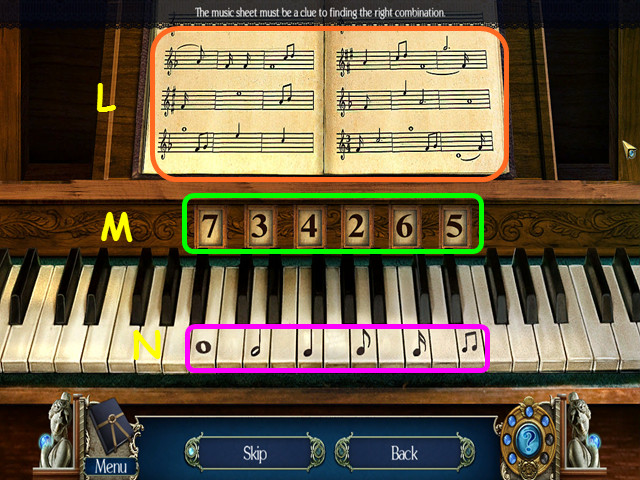
- Look at the pipe organ and place the 2 MUSIC SHEETS on the music book for a mini-game.
- Look at the music book (L), count how many of each note, then enter that number on the piano (M).
- Press the key under each number to change that number (N).

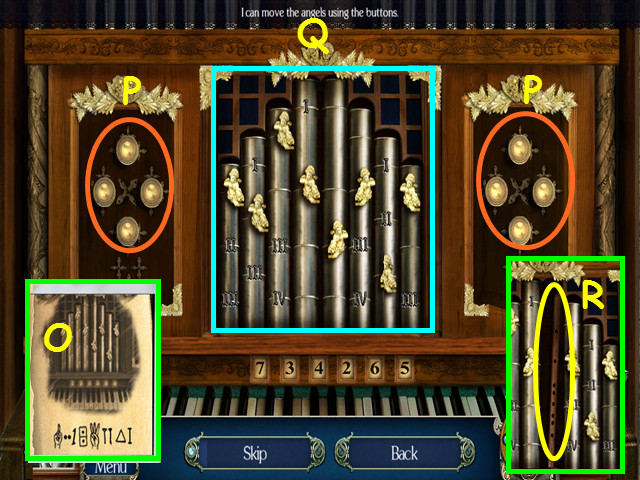
- Look at the code in your journal; the symbols at the bottom are 1-2-1-2-3-2-3-1 (O).
- Click on the left and right buttons (P) to raise or lower the angels to these numbers (Q).
- Take the FLUTE hidden inside one of the pipes (R).
- Return to the catacombs.

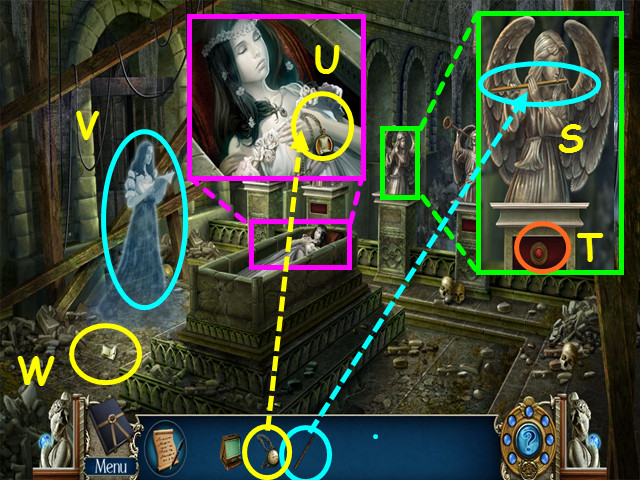
- Look at the second angel from the right and place the FLUTE in her hands (S).
- Press the hidden switch (T).
- Look at Eva and place the POCKET WATCH in her hands (U).
- Click on Eva’s spirit (V), then read the note (W) she drops about meeting Giovanni at 7:15.
- Return to the cathedral.

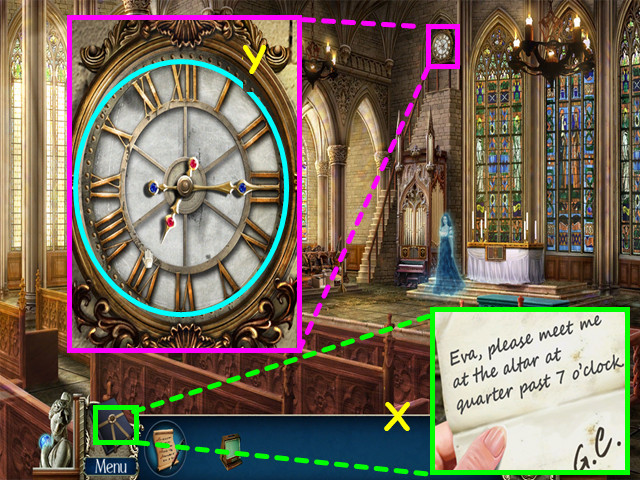
- Refer to your journal for the note found in the catacombs ( X).
- Look at the clock and set the time to 7:15 (Y).
- Congratulations! You have completed Death Under Tuscan Skies: A Dana Knightstone Novel Collector’s Edition!



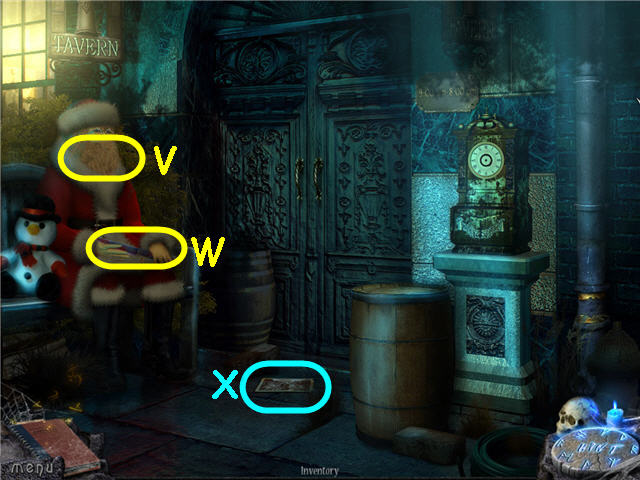
 The Fall Trilogy Chapter 2: Reconstruction Walkthrough, Guide, & Tips
 Maestro: Notes of Life Walkthrough, Guide, & Tips
 Escape the Museum 2 Walkthrough, Guide, & Tips
 Ghost Town Mysteries: Bodie Walkthrough, Guide, & Tips
 Rite of Passage: Child of the Forest Walkthrough, Guide, & Tips