Revenge of the Spirit: Rite of Resurrection Walkthrough, Guide, & Tips
Revenge of the Spirit: Rite of Resurrection Walkthrough
Welcome to the Revenge of the Spirit: Rite of Resurrection Walkthrough
The day famed mystery writer Adora Graves died the lights went out in Beacon. Cast light on the town or be stuck in the shadows!
Whether you use this document as a reference when things get difficult or as a road map to get you from beginning to end, we’re pretty sure you’ll find what you’re looking for here.
This document contains a complete Revenge of the Spirit: Rite of Resurrection game walkthrough featuring annotated screenshots from actual gameplay!
We hope you find this information useful as you play your way through the game. Use the walkthrough menu below to quickly jump to whatever stage of the game you need help with.
Remember to visit the Big Fish Games Forums if you find you need more help. Have fun!
This walkthrough was created by BrownEyedTigre, and is protected under US Copyright laws. Any unauthorized use, including re-publication in whole or in part, without permission, is strictly prohibited.
General Tips

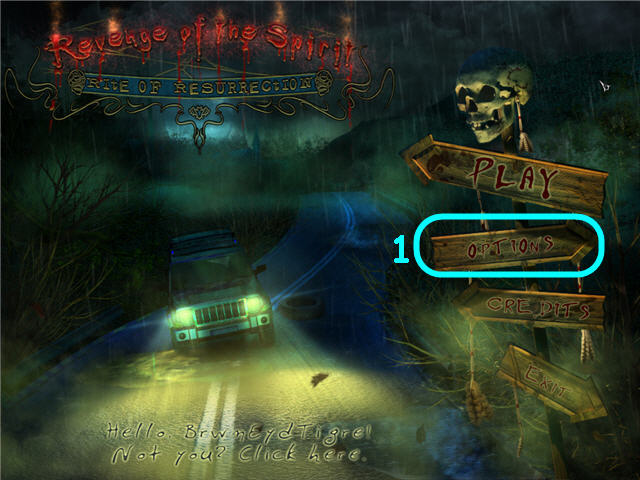
- Click on Options (1) to adjust the Music, Sound, Full Screen, Wide Screen and Software Cursor.
- You may set your difficulty level and choose between Casual or Expert Mode.
- A magnifying glass cursor indicates you can examine the area.
- A grabbing hand icon indicates you can take the item.
- A gear icon indicates you need to use an inventory item there.
- Examine the Journal in the lower left to access story updates and your current task.
- Throughout the guide, we will use the acronym ‘HOS’ for Hidden Object Scenes.
- There are no penalties for random clicking in HOS.
- Puzzles may be skipped.
- Click on the question mark above the journal to get instructions for the puzzles.
- Green items in the find list require an extra step in order to find; these steps will be marked in matching colors on the screenshots.
- You will need to activate HOS’s by your actions throughout the game. If you do not have one where I have them, please check to see what you may have missed.
Chapter 1 – Jailbreak

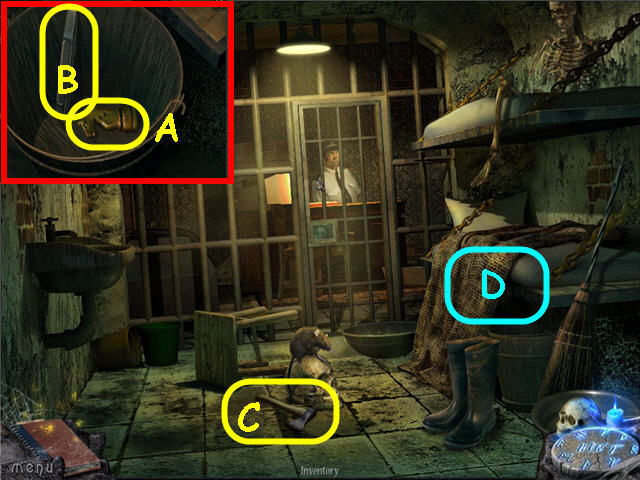
- Speak to the Officer.
- Examine the bucket; take the CHESS PIECE (A) and CHISEL (B).
- Take the AX (C).
- Move the blanket and examine the bunk (D) to access a HOS.

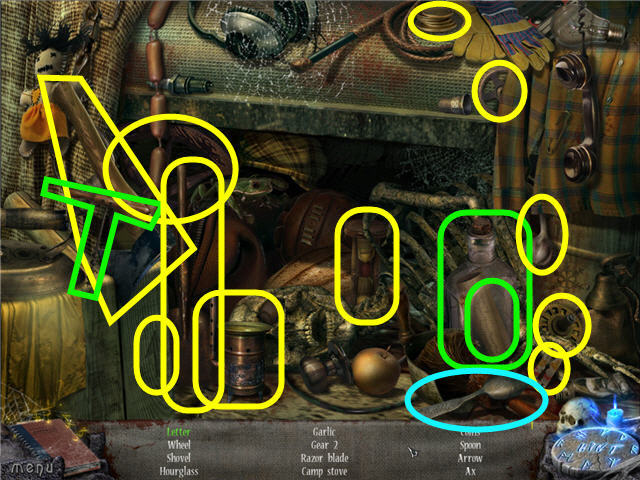
- Find the items listed.
- Use the corkscrew on the bottle to get the letter.
- You will earn a SPOON.

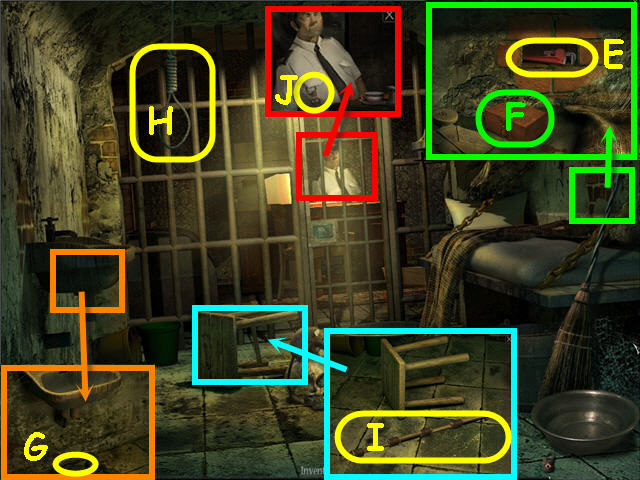
- Examine and place the chess piece in the wall; take the WRENCH (E).
- Use the SPOON on the brick (F) to get a SELF-MADE KNIFE.
- Examine the sink; use the WRENCH on the pipe; take the HOOK (G).
- Use the SELF-MADE KNIFE on the noose to get a ROPE (H).
- Examine and use the AX on the stool; assemble the 4 pieces.
- Place the HOOK and ROPE on the pieces; take the HOOKED STICK (I).
- Examine the Officer; use the HOOKED STICK to get the KEY (J).
- Examine and place the KEY in the cell lock.
- Use the CHISEL on the 3 corner brackets and click to trigger a puzzle.

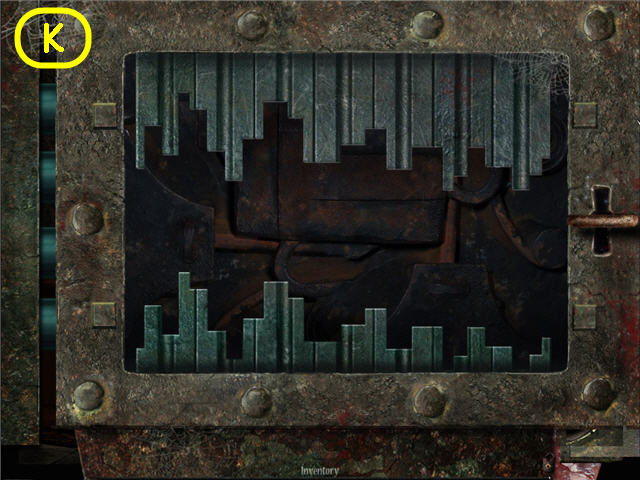
- Arrange the top teeth to match the bottom teeth.
- Turn the KEY when complete. See screenshot (K) for solution.
- Exit the cell.

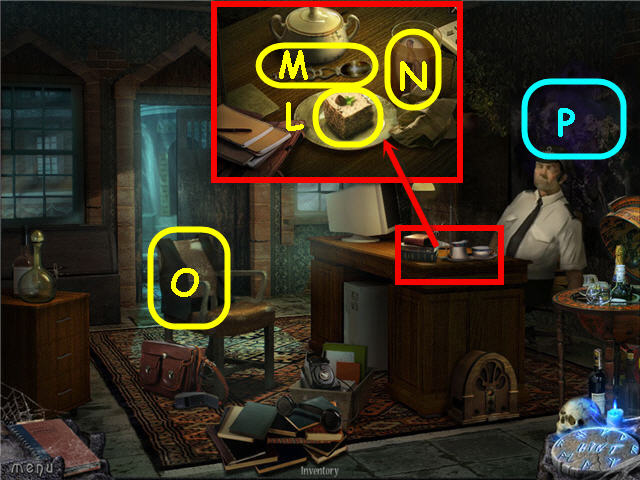
- Examine the desk; take the CAKE (L).
- Use the spoon (M) on the glass to get the MOSAIC PIECE (N).
- Take the VEST (O).
- Examine the map (P) to get a journal update.
- Exit the station.

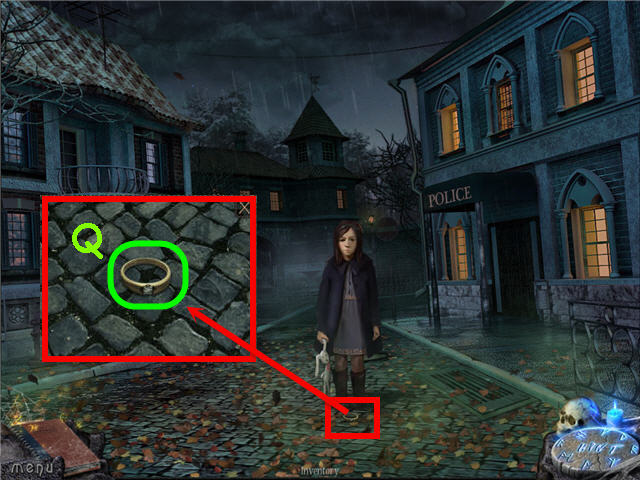
- Talk to the girl.
- Examine the ground; take the ring (Q) to get a journal update.
- Head right up the street around the police station and forward to the gate.

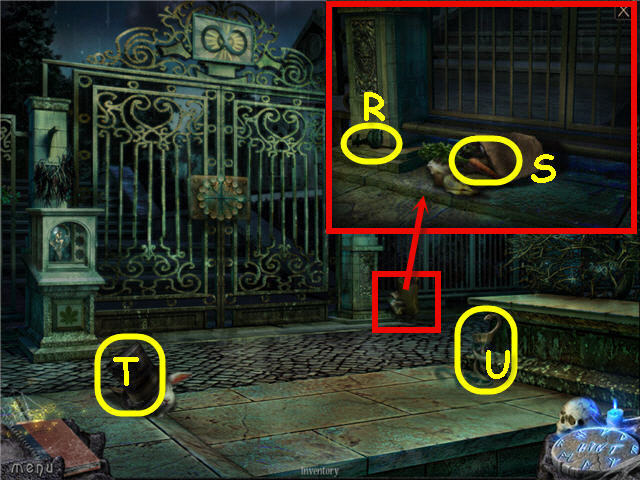
- Examine and knock over the bag; take the DOOR KNOB (R) and CARROT (S).
- Give the CARROT to the bunny; take the TOP HAT (T).
- Take the CADUCEUS (U).
- Examine the bushes to access a HOS.

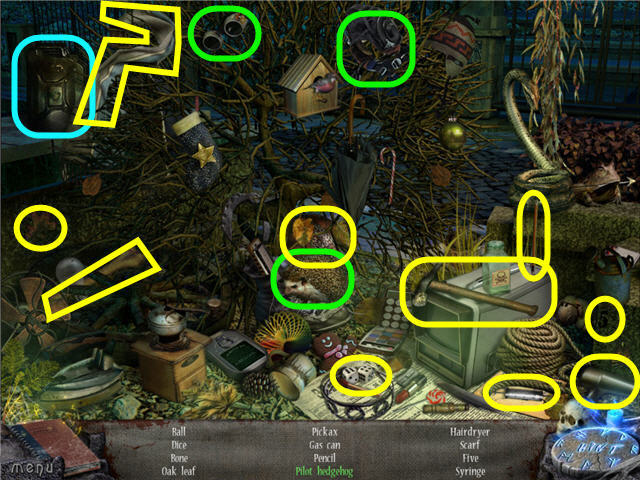
- Find the items listed.
- Place the helmet and goggles on the hedgehog to get a pilot hedgehog.
- You will earn an EMPTY GAS CAN.
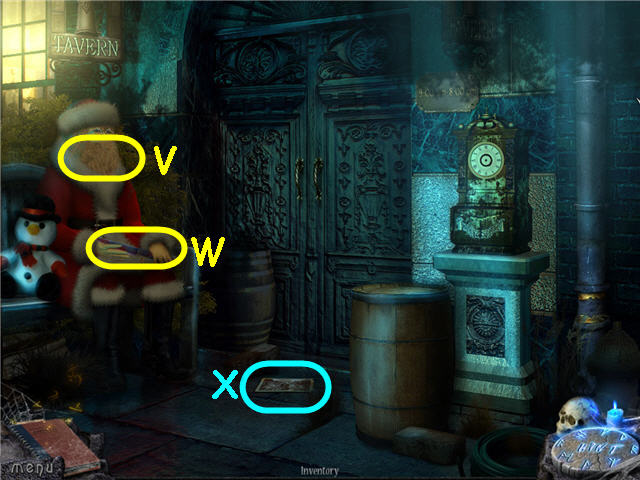
- Back out and head right to the tavern stairs.


- Take the WHITE BEARD (V) and KNIFE (W).
- Examine the photo (X) to get a journal update.
- Back out twice and head straight.

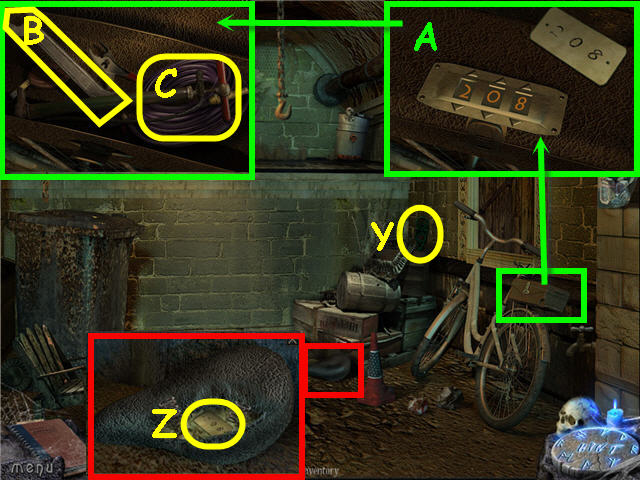
- Take the DOOR PLATE (Y).
- Examine and use the KNIFE on the bike seat; take the PASSWORD (Z).
- Examine and use the PASSWORD on the bike case; enter the code (A).
- Take the HOSE (B) and WRENCH (C).
- Back out.

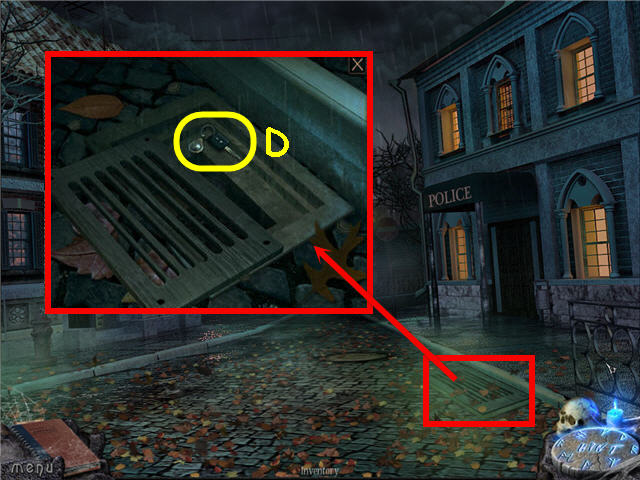
- Examine and use the WRENCH on the 4 bolts on the grate; remove the grate and take the CAR KEY (D).
- Head right around the police station.
- Examine the left wall; place the CADUCEUS in the center to trigger a puzzle.

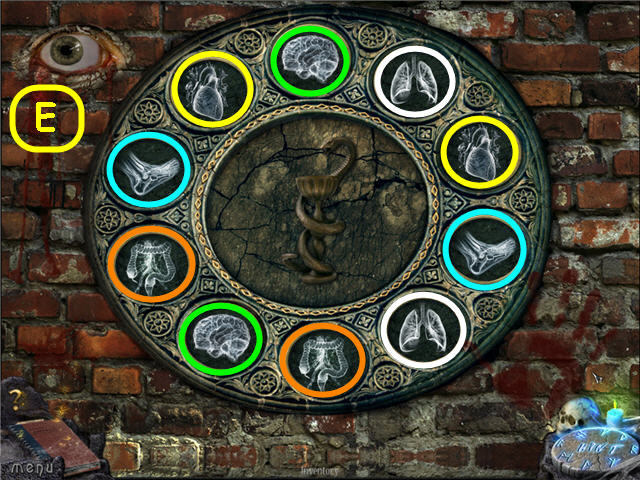
- Find the matching pairs.
- See screenshot (E) for solution.
- Head left into the newly-opened passage.
Chapter 2 – Mystery Woman

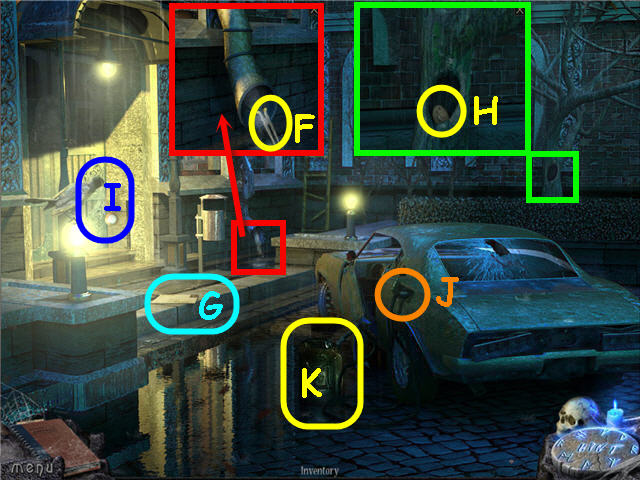
- Examine the downspout; take the WIRE CUTTER (F).
- Take the letter (G) to get a journal update.
- Examine the tree; take the 2nd MOSAIC PIECE (H).
- Give the CAKE to the crow; take the POCKET WATCH (I).
- Use the KNIFE on the gas tank door (J).
- Place the HOSE and EMPTY GAS CAN on the car gas tank; take the FULL GAS CAN (K).
- Use the CAR KEY on the trunk and examine to access a HOS.

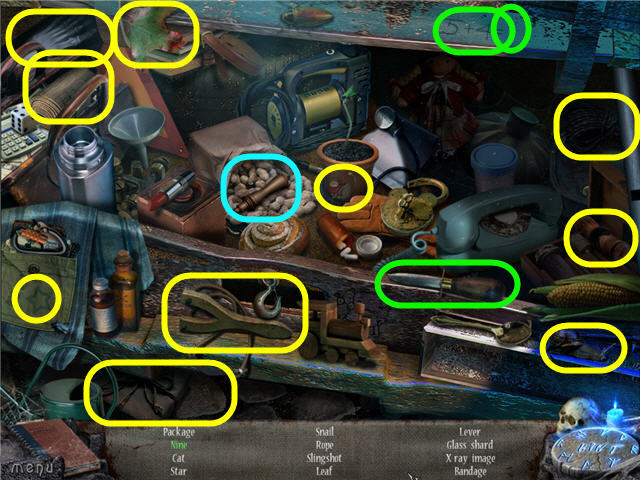
- Find the items listed.
- Use the knife on the equation to get a nine.
- You will earn a LEVER.
- Back out twice and right into the police station.
- Examine and use the WIRE CUTTER on the cabinet left of the door to access a HOS.

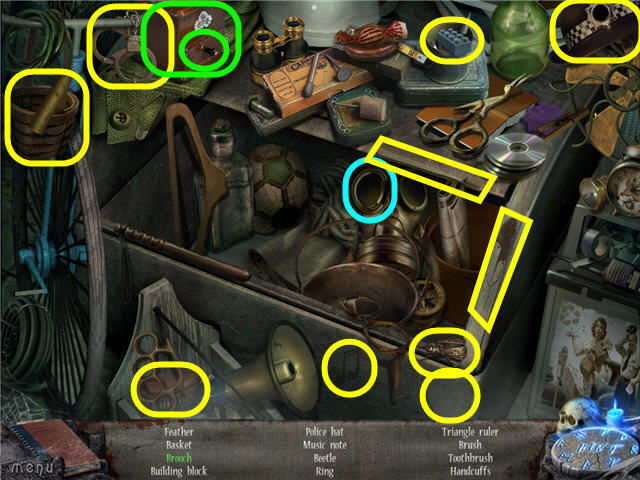
- Find the items listed.
- Open the drawer to get the brooch.
- You will earn a KNOCKER.
- Exit the station.
- Examine and place the KNOCKER on the library door on the left to trigger a puzzle.

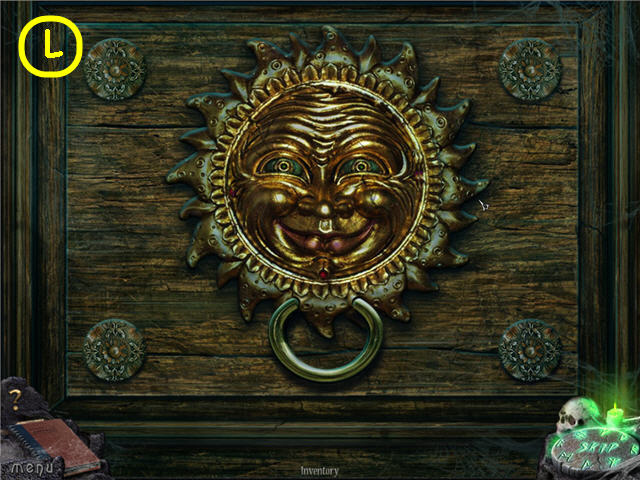
- Turn the rings to complete the picture.
- Tip: Set the outer ring first and the second from the center next since they turn others. See screenshot (L) for solution.
- Head into the library.

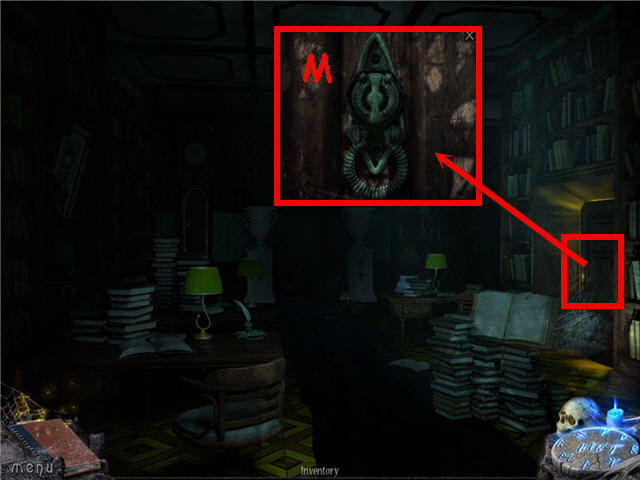
- Examine the door.
- Use the DOOR PLATE and DOOR KNOB on the door (M); turn to open.
- Head right.
- Examine the toolbox to access a puzzle.

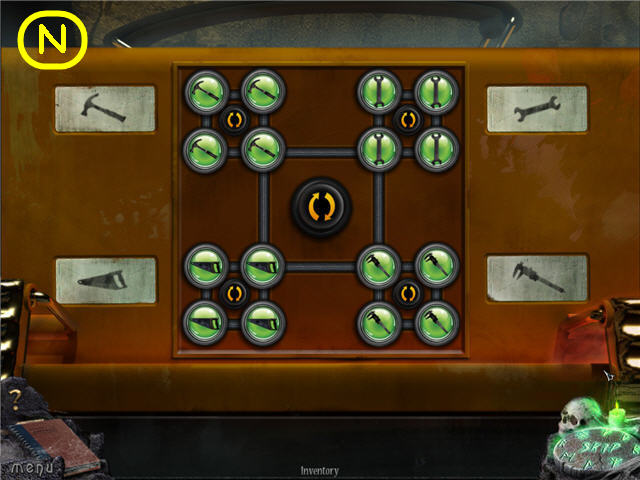
- Turn the yellow arrows to move all the matching tools to the 4 corners.
- The starting layout is random. See screenshot (N) for solution.
- Examine the open toolbox to access a HOS.

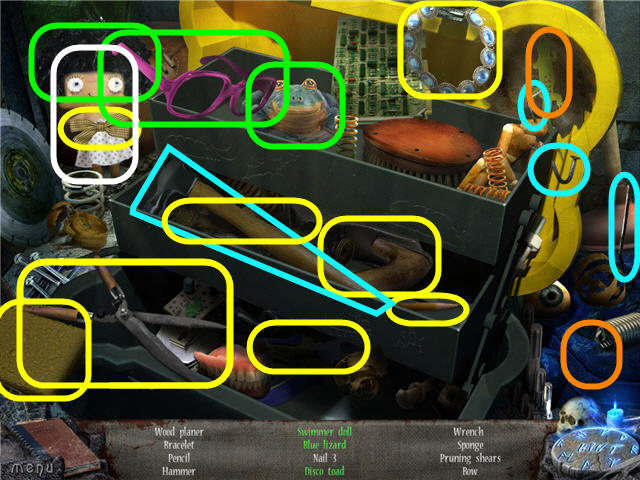
- Find the items listed.
- Place the glasses and hair on the toad to get a disco toad.
- Place the lizard in the blue ink to get a blue lizard.
- Remove the dolls dress to get a swimmer doll.
- You will earn a HAMMER and NAILS.

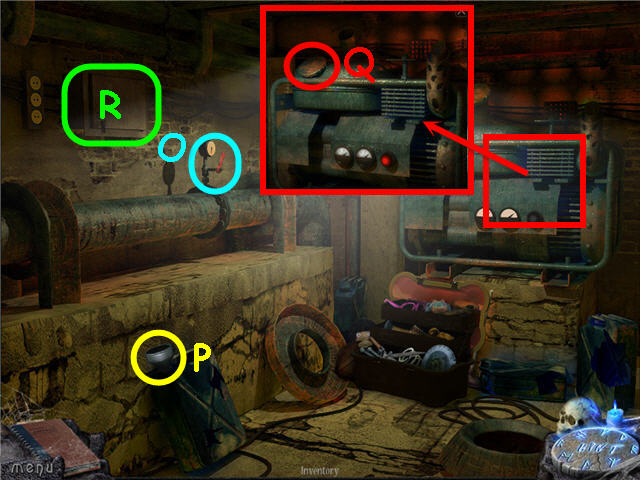
- Turn the lever (O).
- Take the FUNNEL (P).
- Examine the generator; open the tank cap (Q).
- Use the FUNNEL and FULL GAS CAN on the tank.
- Open the electrical panel (R); examine and pull the switch.
- Exit the room.
- Examine the door in the back to access a HOS.

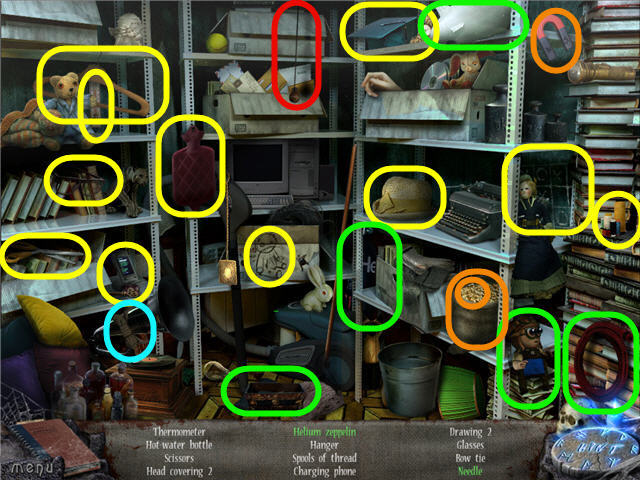
- Pull the switch marked in red to turn on the light.
- Find the items listed.
- Place the pilot, helium tank, zeppelin and hose on the basket to get a helium zeppelin.
- Use the magnet on the seed bag to get the needle.
- You will earn a BOW TIE.

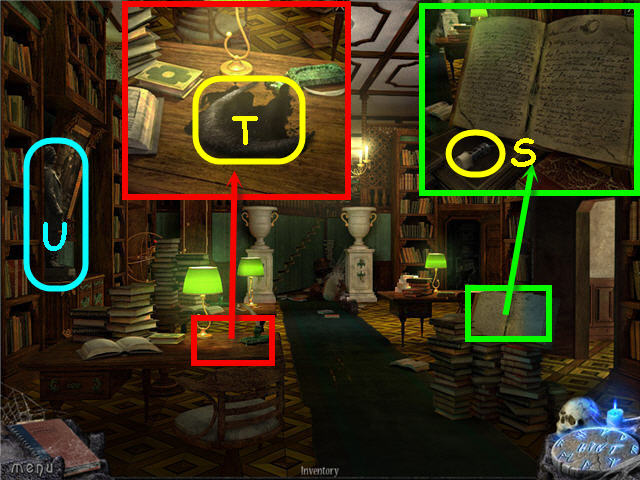
- Examine the open book; take the BUTTON (S).
- Examine the desk; knock over the inkwell.
- Place the WHITE BEARD in the ink; take the BLACK BEARD (T).
- Examine the statue (U).

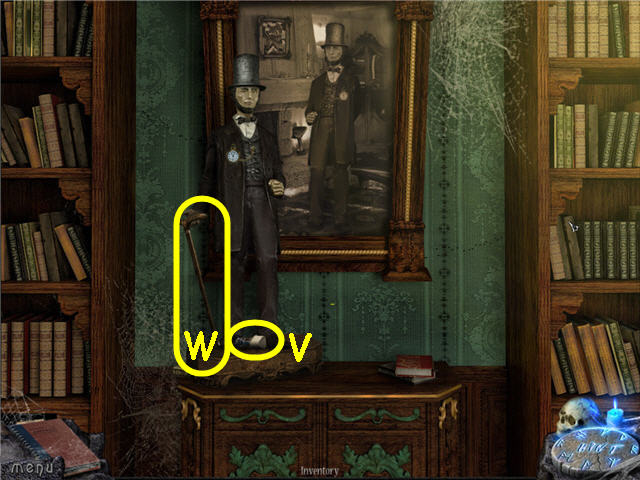
- Place the BLACK BEARD, VEST, POCKET WATCH, BOW TIE and TOP HAT on the statue.
- Take the 2nd BUTTON (V) and CANE (W).
- Back out and head straight.
- Place the LEVER and CANE in the two upper slots of the pillars to trigger a puzzle.

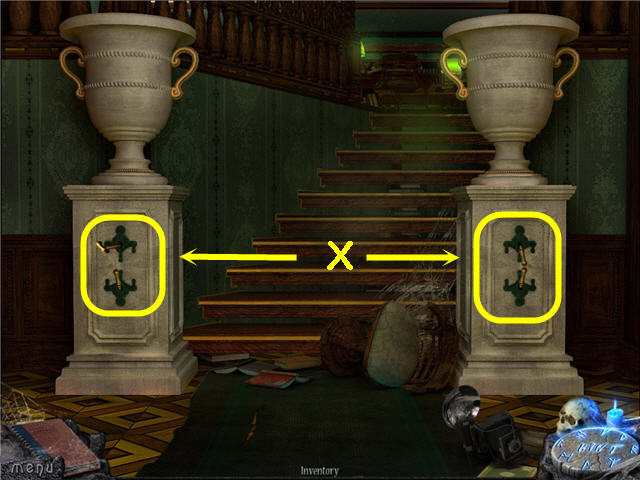
- Click the correct levers to complete the staircase.
- Solution: Click the top two levers down. See screenshot (X) for solution.
- Head upstairs.

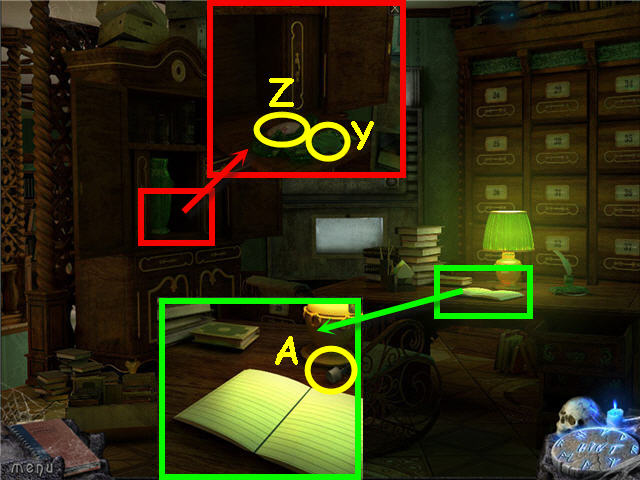
- Open the cabinet; move and examine the vase.
- Use the HAMMER on the vase; take the GREEN STAR (Y) and 3rd MOSAIC PIECE (Z).
- Examine the desk; take the 3rd BUTTON (A).
- Back out three times, head right around the corner and left.

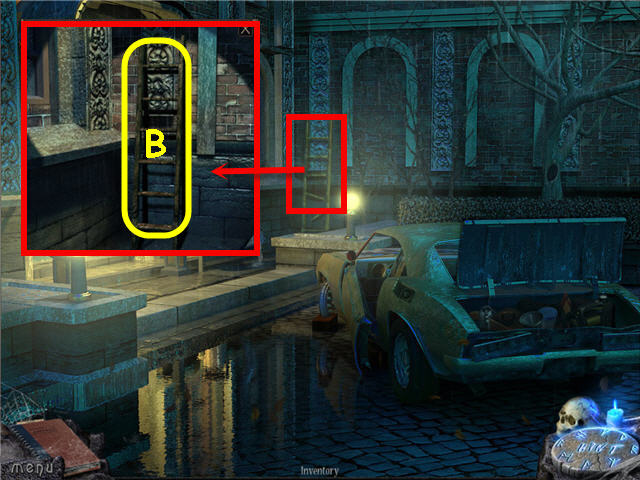
- Examine and use the NAILS and HAMMER on the broken ladder; take the LADDER (B).
- Back out twice and head straight.
- Place the LADDER against the ledge.
- Examine the ledge to access a HOS.

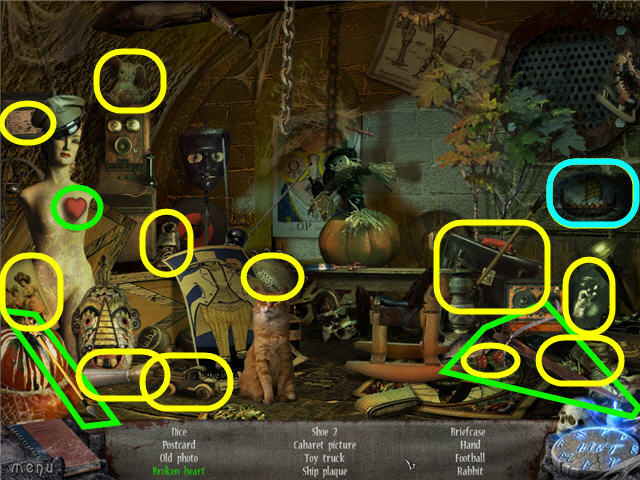
- Find the items listed.
- Place the arrow on the crossbow, click to shoot to get a broken heart.
- You will earn a SHIP.
- Back out and head right around the corner.
- Examine the fountain; place the SHIP in the slot to trigger a puzzle.

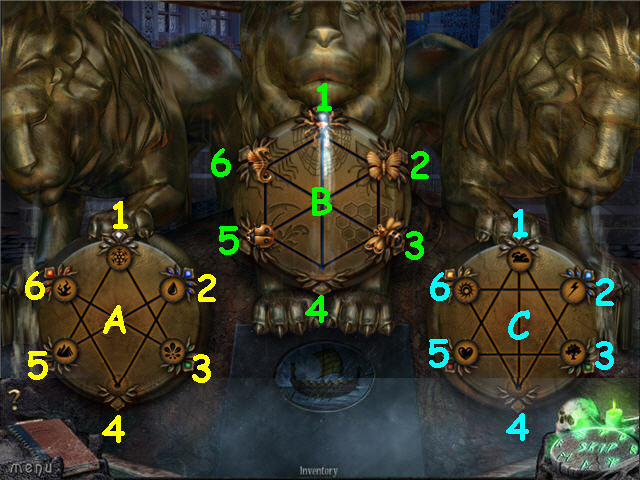
- Match the disks to their corresponding colors or pattern.
- Solution: Disk A; 6, 3, 1, 5, 2, 4, 6, 3, 1, 5, 2, 4, 6, 3, 1, 5, 2, 4.
- Disk B; 3, 6, 1, 4, 5, 2, 3, 4.
- Disk C; 1, 3, 5, 1, 4.
- See screenshot for solution.
- Take the HEADLINE CLIPPING and examine in inventory to get date.
- Back out; head left and straight twice.
- Examine the archive to trigger a puzzle.

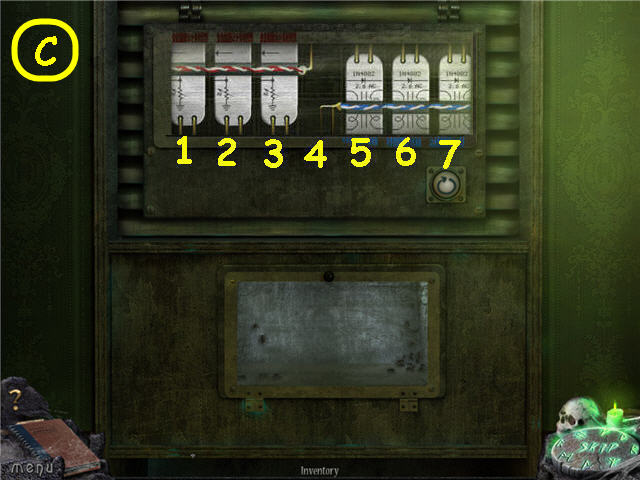
- Switch the red and blue panels.
- Solution: Click on the following spaces; 5, 3, 2, 4, 6, 7, 5, 3, 1, 2, 4, 6, 5, 3, 4.
- See screenshot (C) for solution.
- Place the 3 BUTTONS under the number panel.
- Note: You must have the HEADLINE CLIPPING in your inventory to continue to the next step.

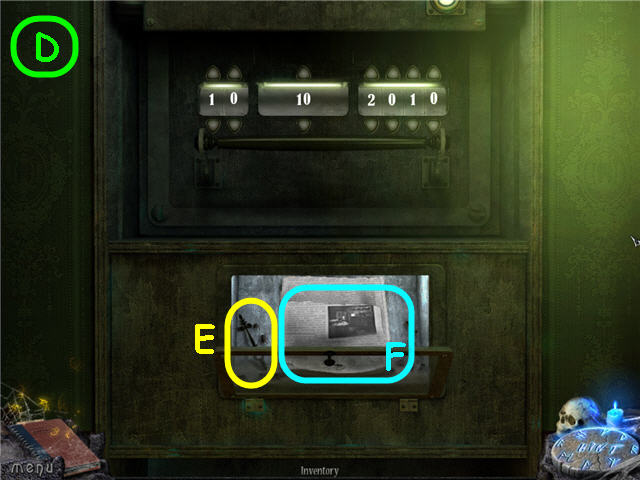
- Enter the date from the HEADLINE CLIPPING.
- Solution: 10-10-2010. See screenshot (D) for solution.
- Push the bar under the date.
- Take the WATCH HANDS (E).
- Examine the news clipping (F); place the HEADLINE CLIPPING on the top.
- Head to the fountain and right to the tavern porch.
Chapter 3 – Investigation

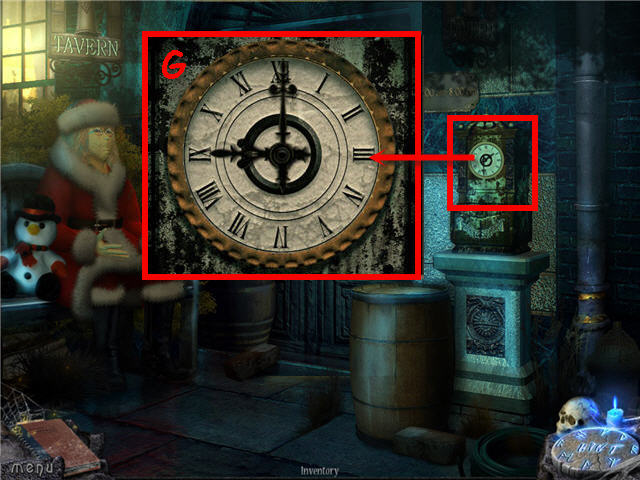
- Examine and place the WATCH HANDS on the clock.
- Note the tavern hours above the clock; set the clock hands to 9 o’clock (G).
- Enter the tavern.

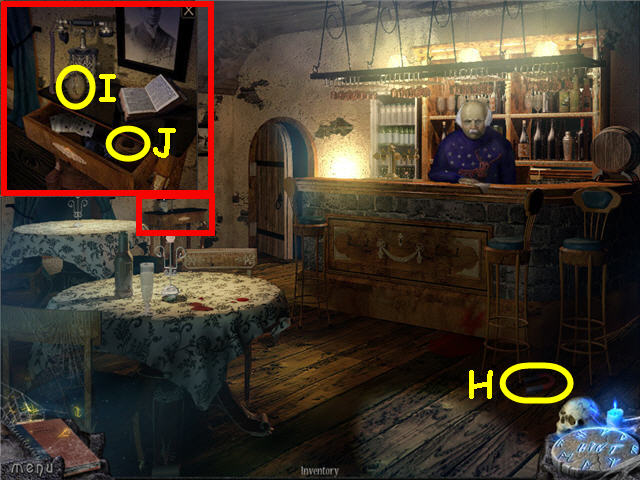
- Speak to the bartender.
- Take the MAGNET (H).
- Examine the console table; take the 4th MOSAIC PIECE (I).
- Open the drawer; take the ROPE (J).
- Head into the store room left of the bar.
- Examine the wheel on the left to access a HOS.

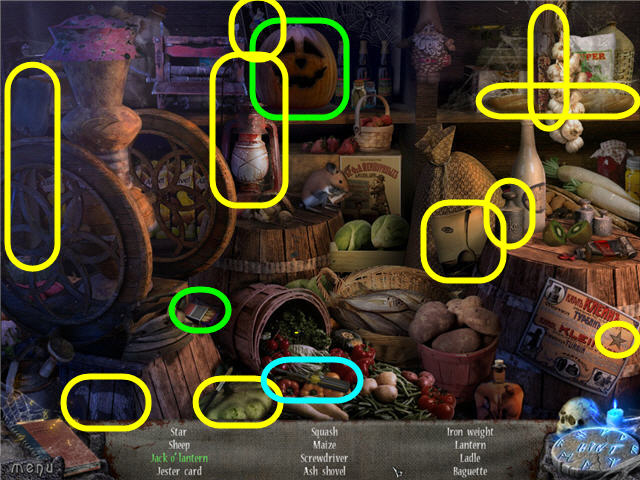
- Find the items listed.
- Take a match, strike it and use on the pumpkin to get a jack-o-lantern.
- You will earn a SCREWDRIVER.
- Examine the vent in the upper left of the room.
- Use the SCREWDRIVER on the screws on the panel to trigger a puzzle.

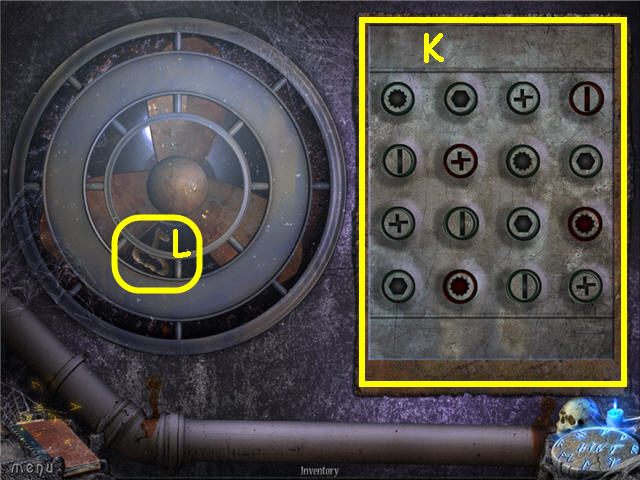
- Choose the symbols so that no two of the same in any row or column.
- Click on a circle and 4 choices will come up; the ones in red may not be moved.
- The starting layout is random. See screenshot (K) for my solution.
- Use the MAGNET to get the KEY (L).
- Back out.
- Examine and use the KEY on the cupboard in the front of the bar; turn to open.
- Examine the opened cupboard to access a HOS.

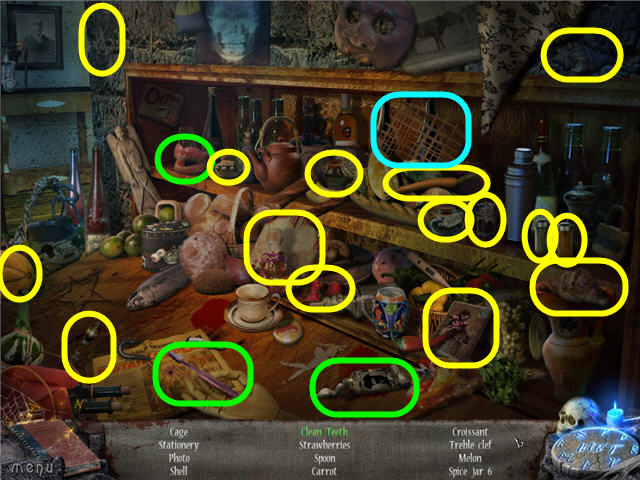
- Find the items listed.
- Use the toothbrush on the toothpaste; use the pasted toothbrush on the dentures to get clean teeth.
- You will earn a CAGE.
- Head into the store room.

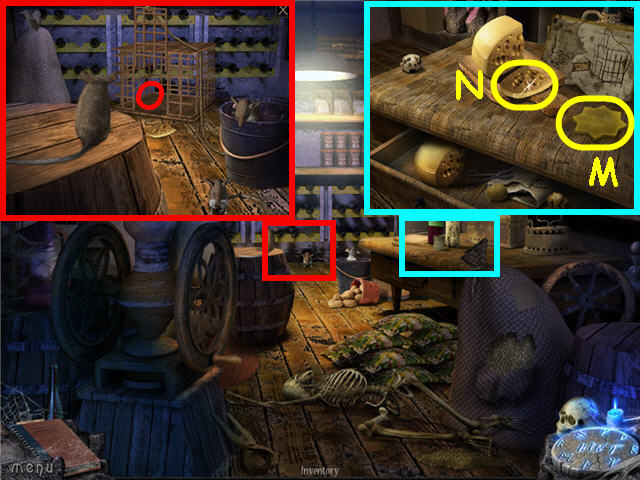
- Examine the table; take the YELLOW STAR (M).
- Open the drawer; drag the CHEESE to the cutting board.
- Use the KNIFE on the cheese; take the PIECE OF CHEESE (N).
- Examine the mouse hole.
- Place the CAGE, PIECE OF CHEESE and ROPE by the mouse hole (O) to trigger a puzzle.

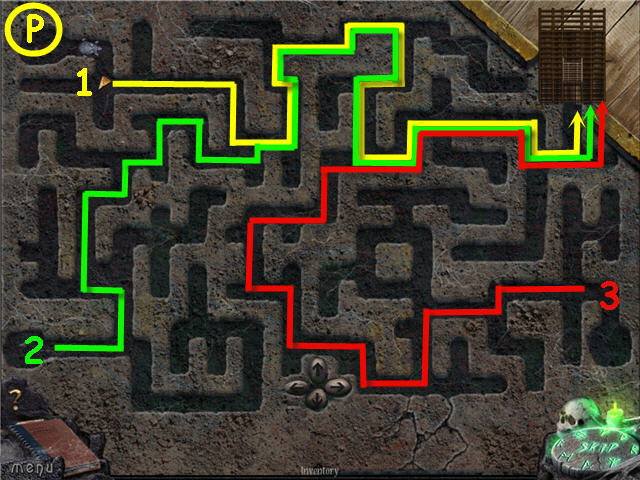
- Lead the mice to trap by moving the cheese to the cage.
- If you go too fast the mice will lose the scent and too slow the mouse will catch it and you will have to start over.
- See screenshot (P) for solution.
- Take the CAGE WITH MICE.
- Back out.
- Give the CAGE WITH MOUSE to the bartender; you will keep the CAGE WITH MICE.
- Back out twice, head left.
- Examine the hospital door; place the 4 MOSAIC on the sides to trigger a puzzle.

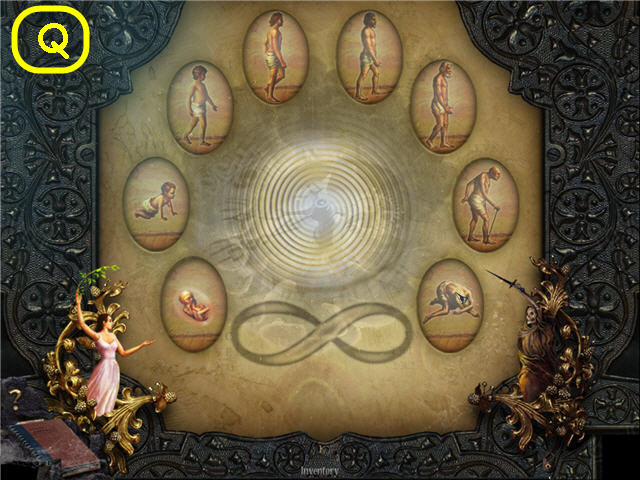
- Arrange the MOSAIC pieces in chronological order.
- See screenshot (Q) for solution.
- Enter the hospital.

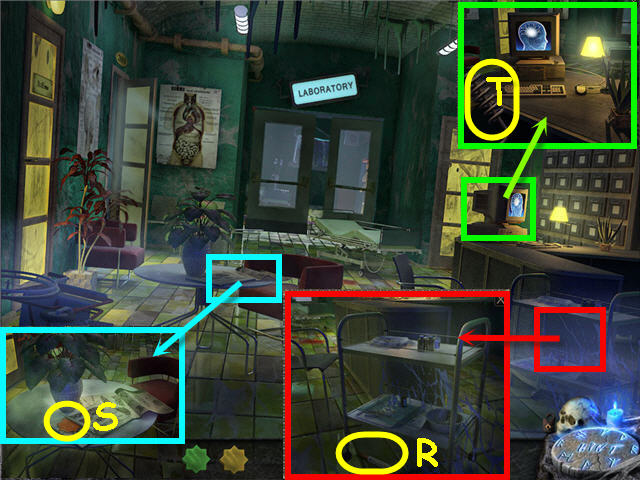
- Examine the cart; take the PINK HIGHLIGHTER (R).
- Examine the table; take the RED STAR (S).
- Examine the computer monitor; take the 1st DEVICE PART (SPIRAL TUBE) (T).
- Head left into room 205.

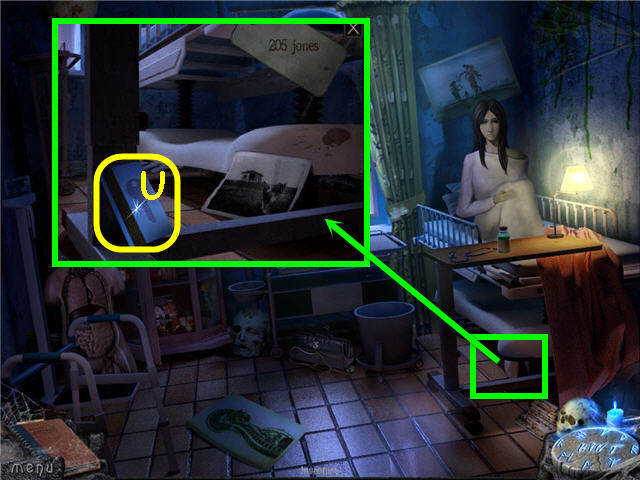
- Examine under the foot of the bed; take the ACCESS CARD (U).
- Speak to the patient.
- Examine the cabinet to access a HOS.

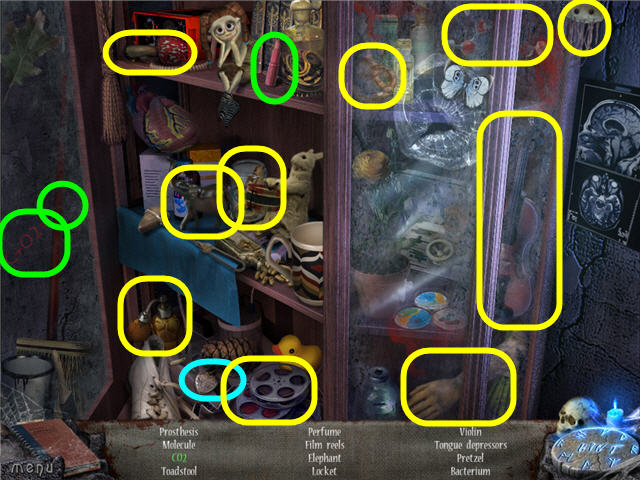
- Find the items listed.
- Use the marker on the equation to get the C02.
- You will earn an EMPTY LOCKET.
- Back out.
- Examine the drawers on the right; examine the key cabinet on the right of the drawers.
- Use the ACCESS CARD on the card reader to trigger a puzzle.

- Arrange the keys on the hook using the outlines as a guide.
- See screenshot (V) for solution.

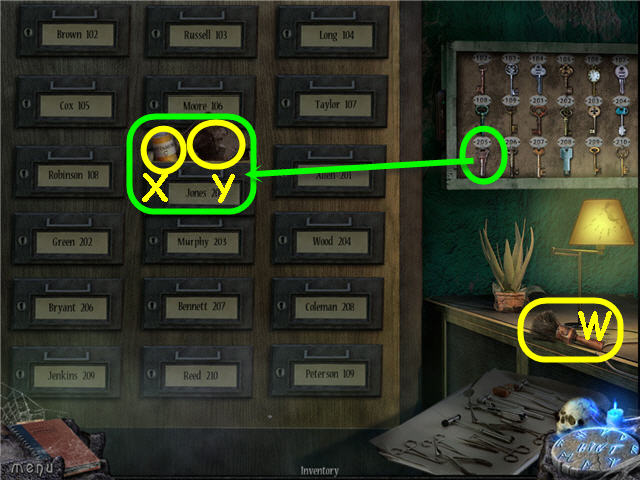
- Take the BRUSH (W).
- Use Key 205 on the Jones 205 box; take the VITAMIN C (X).
- Examine and click/hold/use the BRUSH on the photo to get the PHOTO (Y).
- Arrange the keys on the hook using the outlines as a guide.
- Head left into room 205.


- Examine the tray.
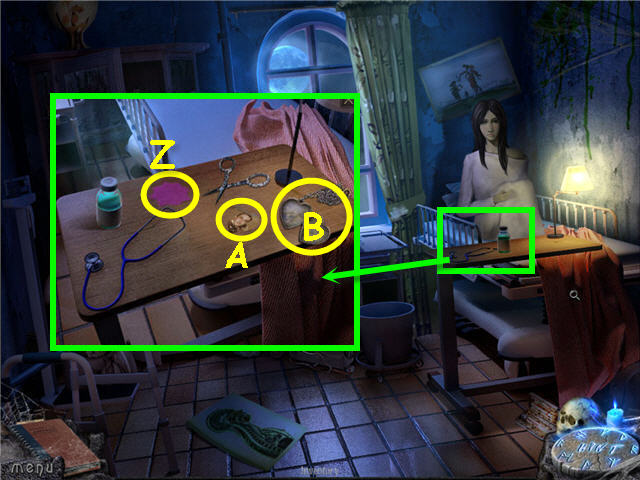
- Use the PINK HIGHLIGHTER on the star; take the PINK STAR (Z).
- Place the PHOTO and EMPTY LOCKET on the tray.
- Use the scissors on the tray on the PHOTO (A); place the cut photo in the EMPTY LOCKET (B).
- Close the locket; take the LOCKET WITH PHOTO.
- Give the LOCKET WITH PHOTO to the patient; get a DOLL.
- Back out and head straight.
Chapter 4 – Doctor

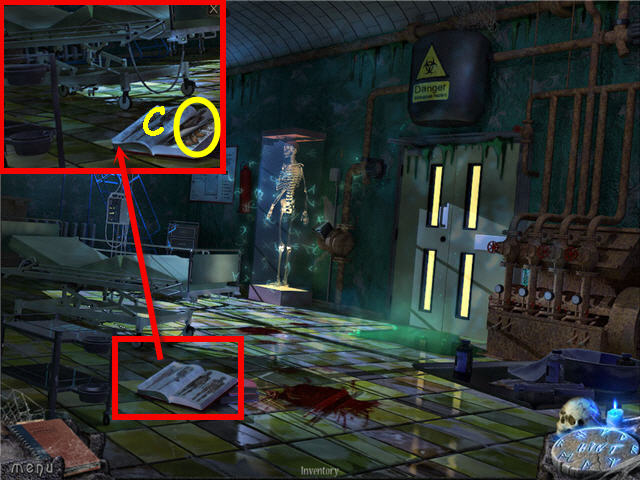
- Examine the book; take the LEAVES (C).
- Examine the skeleton to access a HOS.

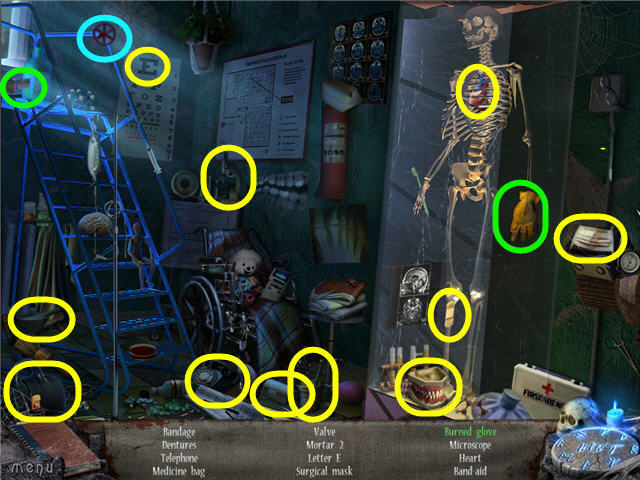
- Find the items listed.
- Use the lighter on the glove to get a burned glove.
- You will earn a VALVE.
- Examine and place the VALVE on the control panel right of the door.

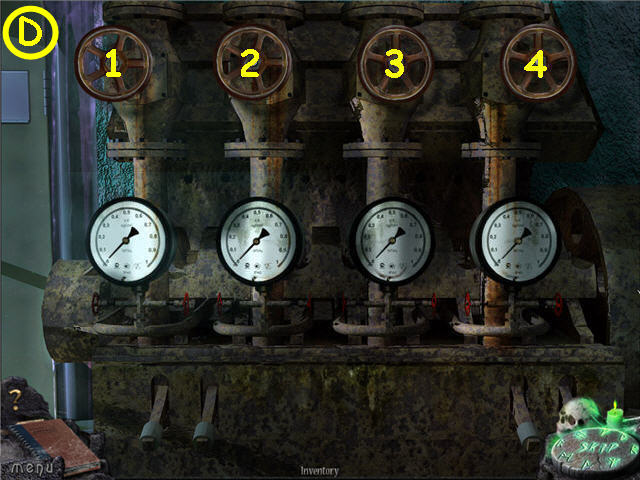
- Turn the valves to shut off all the pipes.
- Solution: Turn valve 2 and 4. See screenshot (D) for solution.
- Head through the newly opened doors.

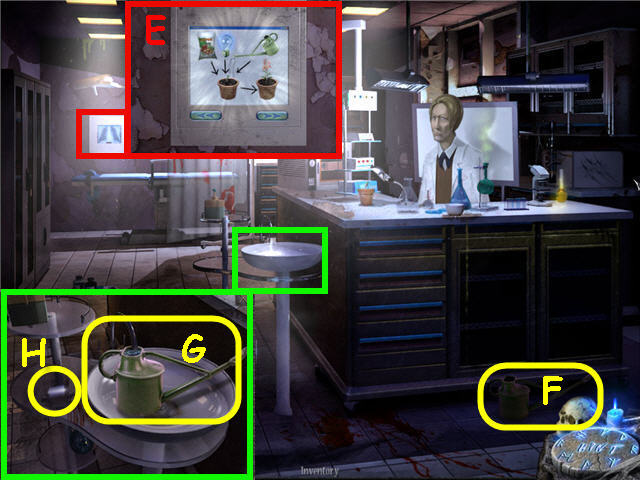
- Speak to the chemist.
- Give the CAGE WITH MICE to the chemist.
- Examine the lab counter, note the seedling and exit out.
- Examine the monitor and scroll through; note the plant growing process (E).
- Take the EMPTY WATERING CAN (F).
- Examine and place the EMPTY WATERING CAN in the sink; take the FULL WATERING CAN (G).
- Take the 2nd DEVICE PART (H).
- Head into the tavern.
- Examine the cabinet in the bar to access a HOS.

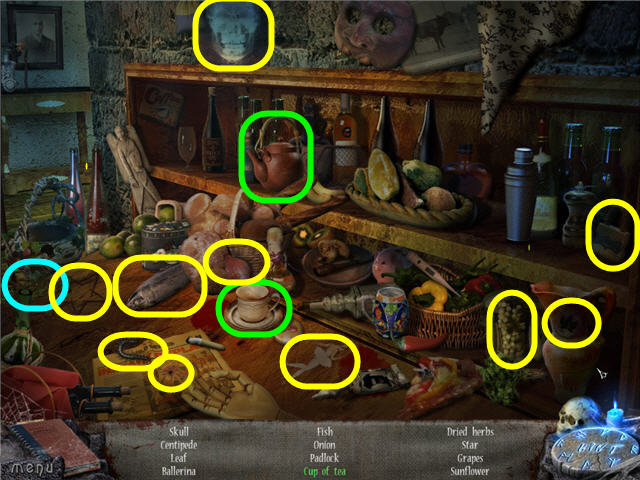
- Find the items listed.
- Use the teapot on the cup to get a cup of tea.
- You will earn DRIED HERBS.
- Enter the store room.
- Examine the wheel to access a HOS.

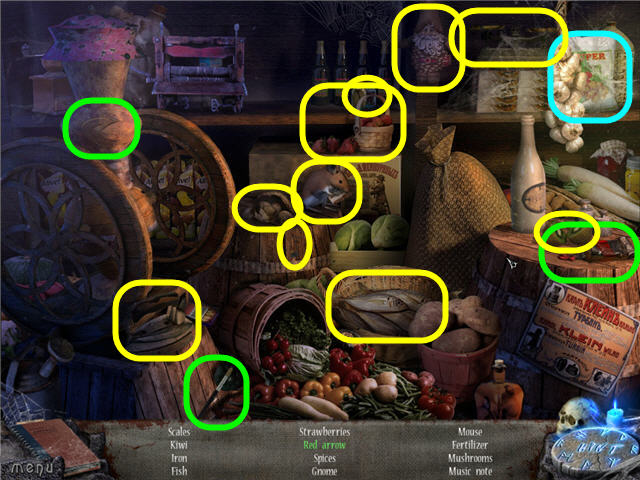
- Find the items listed.
- Dip the paintbrush in the red paint and paint the arrow to get a red arrow.
- You will earn FERTILIZER.
- Exit the tavern and head straight.
- Examine the bush to access a HOS.

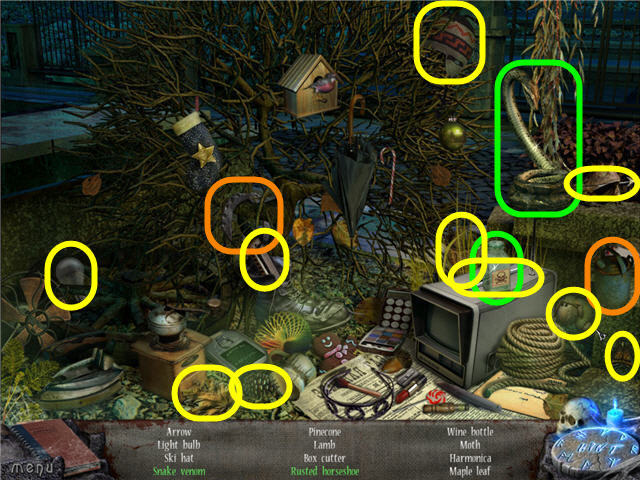
- Find the items listed.
- Use the bottle on the snake to get snake venom.
- Use the watering can on the horseshoe to get a rusted horseshoe.
- You will earn SNAKE VENOM.
- Head to the chemistry lab in the hospital.
- Examine the counter.

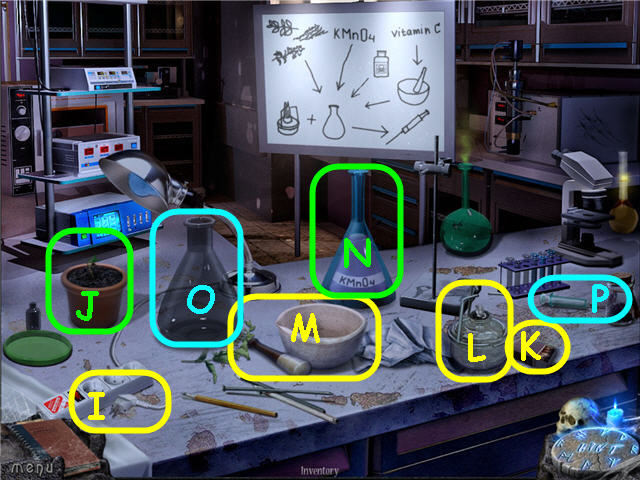
- Plug in the lamp (I).
- Use the FULL WATERING CAN and FERTILIZER on the seedling (J); take the FLOWER.
- Take a match (K), strike it and light the Bunsen burner (L).
- Place the VITAMIN C in the mortar (M); use the pestle to grind it.
- Place the LEAVES, DRIED HERBS and FLOWERS, KMn04 (N), SNAKE VENOM, and ground VITAMIN C in the gray beaker (O).
- Place the beaker in the Bunsen burner; use the syringe (P) on the beaker to get a SYRINGE WITH MEDICINE.
- Head into the police station.
- Use the SYRINGE WITH MEDICINE on the officer; get an OFFICE KEY.
- Examine the cabinet to access a HOS.

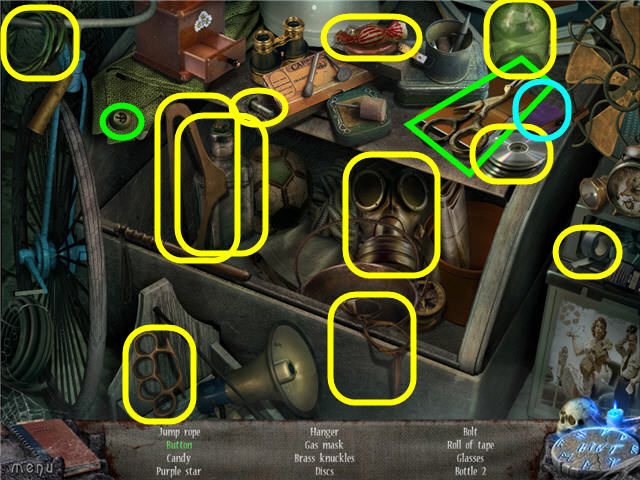
- Find the items listed.
- Use the scissors on the button to get the button.
- You will earn a PURPLE STAR.
- Head to the hospital lobby.

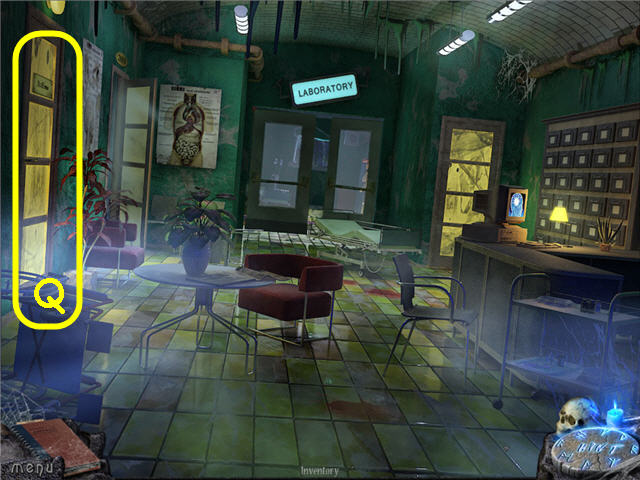
- Examine the doctor’s office door (Q); use the OFFICE KEY and turn the handle.
- Enter the office.

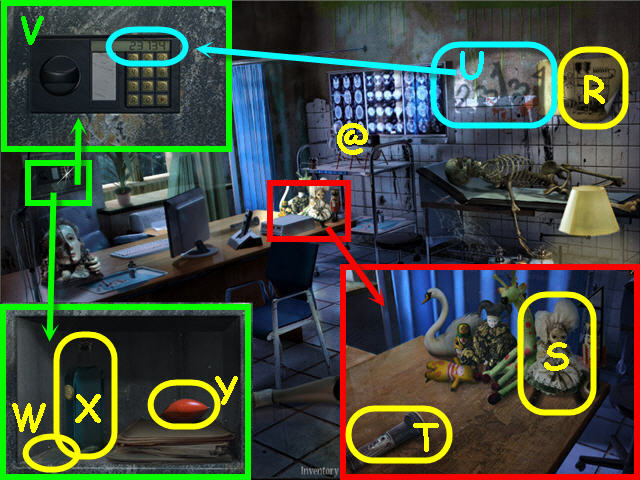
- Examine the schematic (R) on the wall.
- Open the curtain; examine and click on the device (@).
- Examine the toys; place the DOLL on the empty spot (S).
- Turn on the flashlight (T); note the code (U) on the wall.
- Examine the safe; enter the code from the wall and click the red arrow.
- Solution: 23134. See screenshot (V) for solution.
- Take the BLUE STAR (W), ADORA’S MEDICINE (X) and the 3rd DEVICE PART (Y).
- Back out and head straight.
- Examine the skeleton to access a HOS.

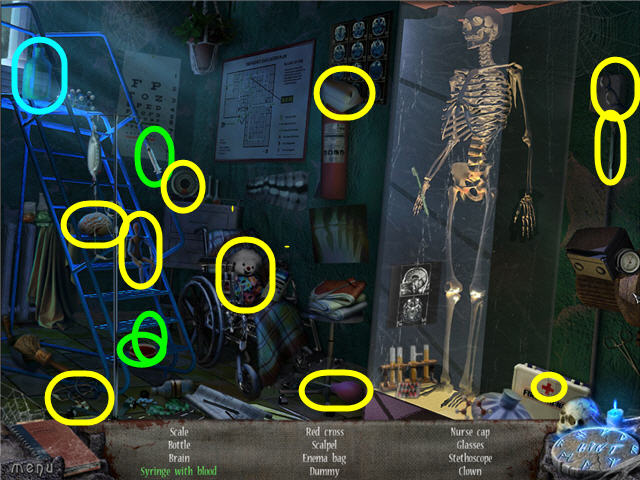
- Find the items listed.
- Use the syringe on the blood to get a syringe with blood.
- You will earn the 4th DEVICE PART.
- Back out and head left into room 205.
- Examine the cabinet to access a HOS.

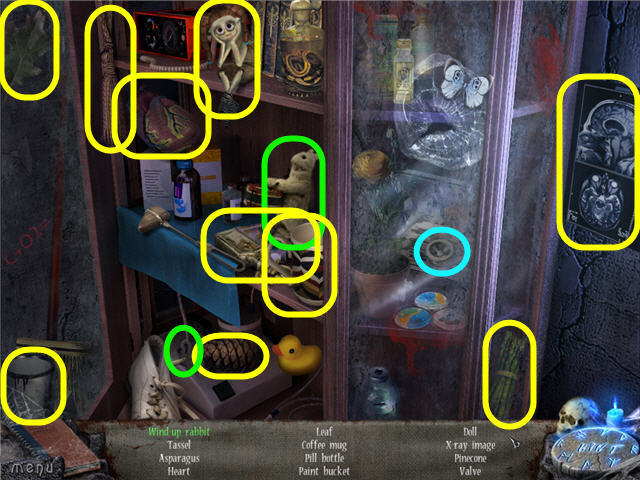
- Find the items listed.
- Use the key on the bunny to get a wind up rabbit.
- You will earn the 5th DEVICE PART.
- Back out and head left into the doctor’s office.
- Examine the device.

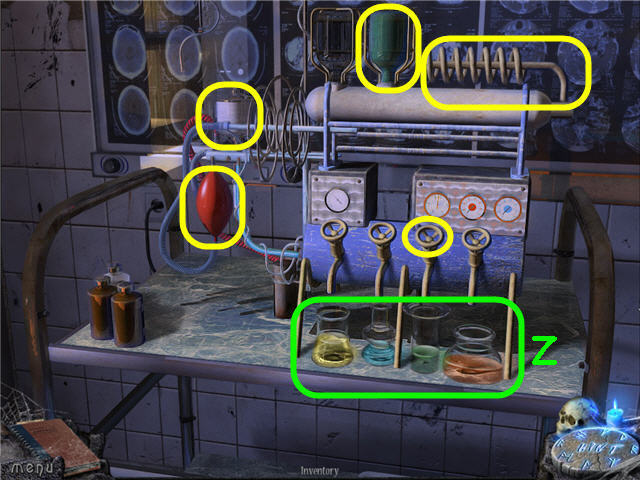
- Place the 5 DEVICE PARTS (including the SPIRAL TUBE) on the device; these are marked in yellow on the screenshot.
- Place ADORA’S MEDICINE on the valves; take the MEDICINAL CHEMICALS (Z).
- Head to the chemists lab.

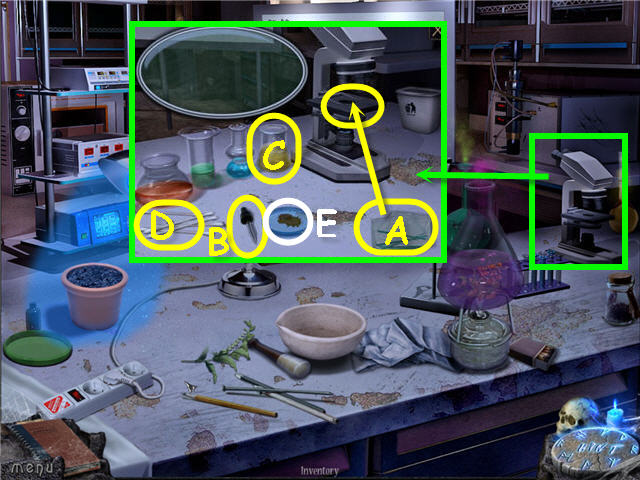
- Examine the lab counter.
- Examine and place the MEDICINAL CHEMICALS by the microscope.
- Place a slide (A) on the microscope.
- Use the dropper (B) on the yellow bottle (C); place on the microscope slide.
- Use a cotton swab (D) on the bacteria (E) and place on the microscope slide.
- Take the yellow beaker to get the POISONOUS SUBSTANCE.
Chapter 5 – Church

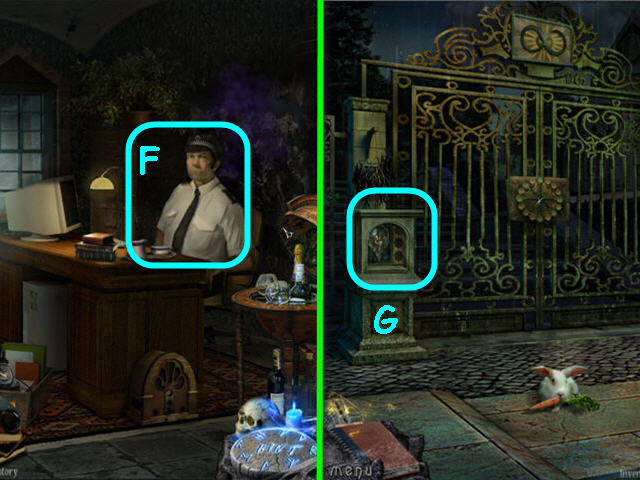
- Head into the Police station.
- Give the POISONOUS SUBSTANCE to the Officer (F); get the GATE KEYS.
- Head to the fountain and go straight.
- Examine the left pillar (G); place the BLUE STAR, PURPLE STAR, YELLOW STAR, RED STAR, GREEN STAR and PINK STAR in the corresponding colored slots to trigger a puzzle.

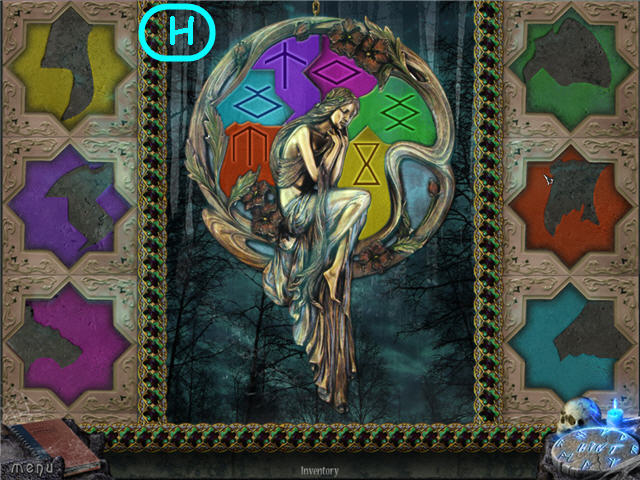
- Place the pieces of the star in the center to complete the border.
- See screenshot (H) for solution.
- Back out.
- Examine and place the GATE KEYS on the gates to trigger a puzzle.

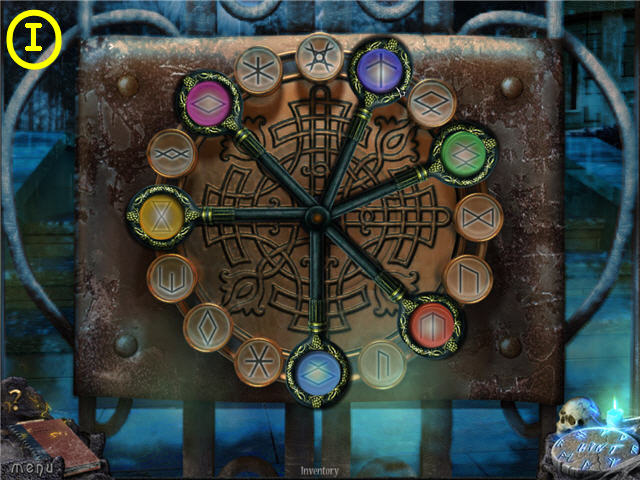
- Adjust the keys to match the color/symbols from the pillar.
- See screenshot (I) for solution.
- Head through the gates.
- Examine the back right fountain to access a HOS.

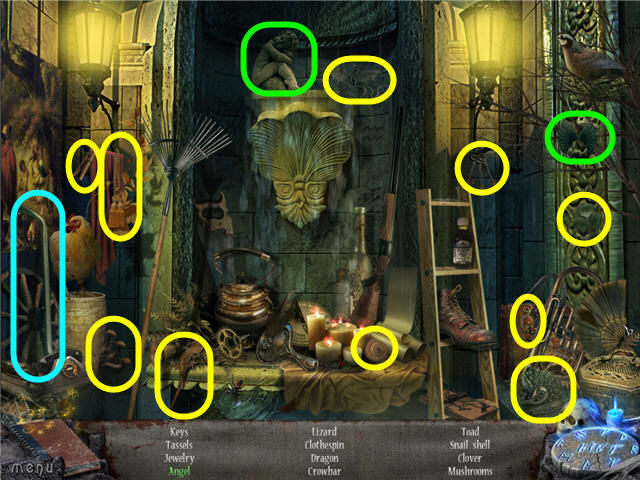
- Find the items listed.
- Place the wings on the cherub to get an angel.
- You will earn a CROWBAR.

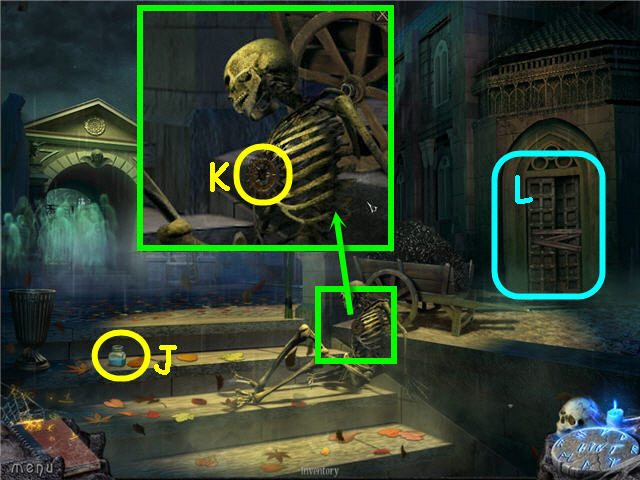
- Take the BLUE PAINT (J).
- Examine the skeleton; take the GEAR (K).
- Examine and use the CROWBAR on the door three times (L).
- Head right into the church.
- Speak to the monk.
- Examine the left to access a HOS.

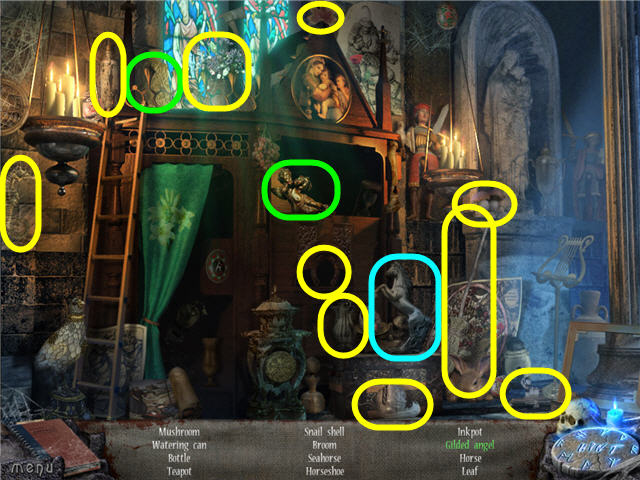
- Find the items listed.
- Place the gold leaf on the angel to get a gilded angel.
- You will earn a SILVER STATUE.

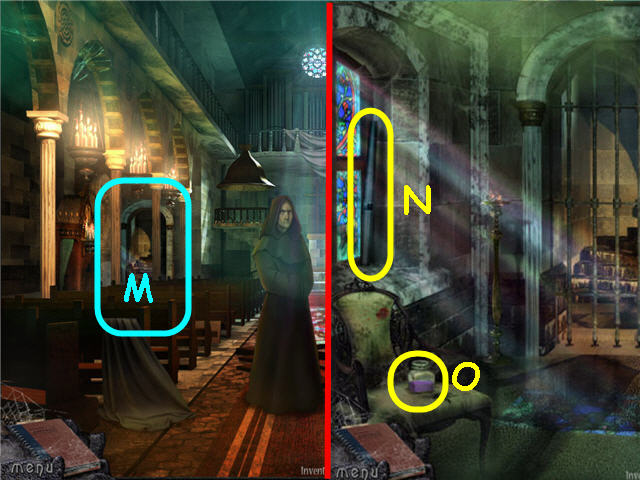
- Head through the left rear door (M).
- Take the ORGAN PIPE (N) and VIOLET PAINT (O).
- Back out.
- Head straight up to the balcony.

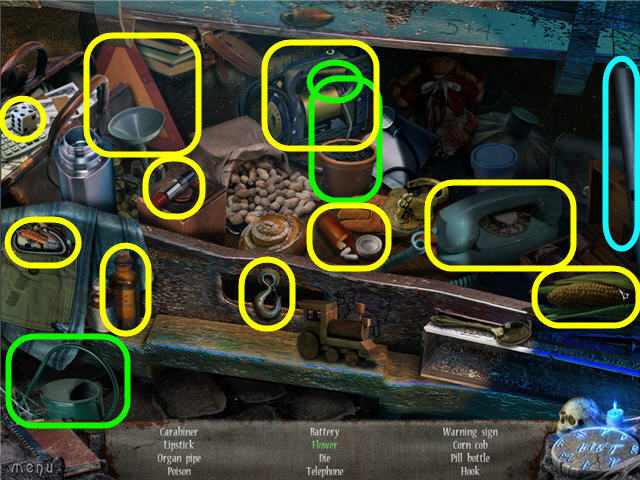
- Take the CANDLE (P) and WHITE PAINT (Q).
- Exit the church.
- Examine the fountain to access a HOS.

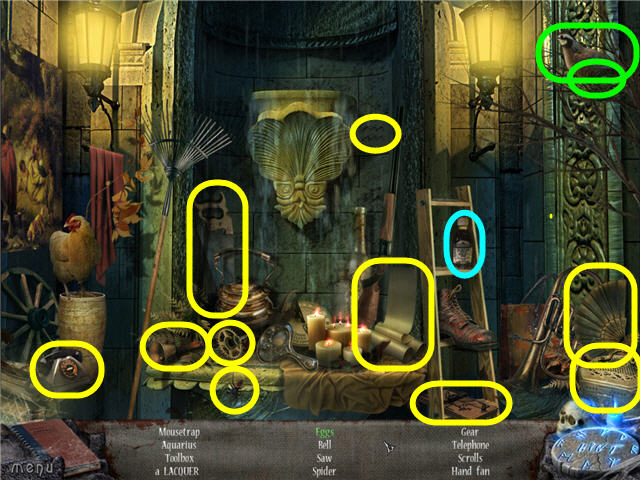
- Find the items listed.
- Move the bird to get the eggs.
- You will earn a BOTTLE OF LACQUER.
- Back out twice and head left.
- Examine the car trunk to access a HOS.


- Find the items listed.
- Use the watering can on the seedling to get a flower.
- You will earn the 2nd ORGAN PIPE.
- Back out twice and head straight.
- Examine the ledge to access a HOS.

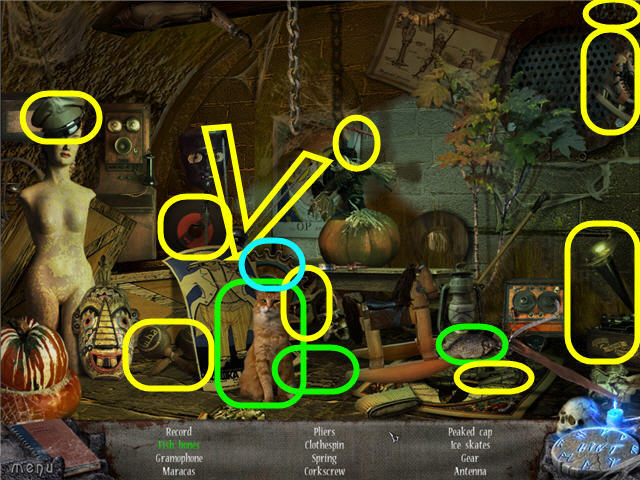
- Find the items listed.
- Give the fish to the cat to get fish bones.
- You will earn the 2nd GEAR.
- Head into left rear room of the church.
- Place the two GEARS on the mechanism to trigger a puzzle.

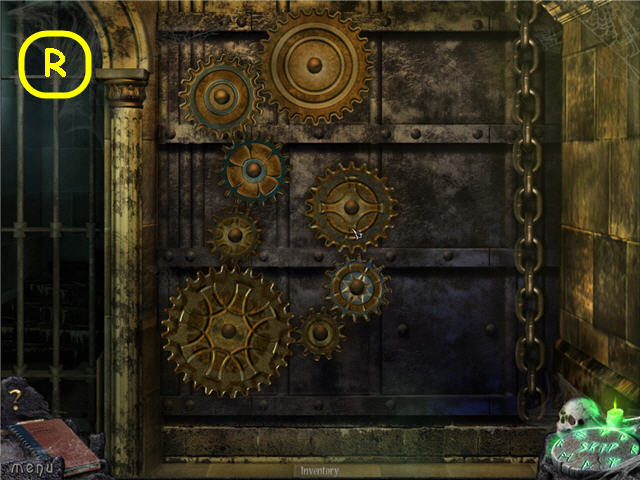
- Arrange the gears so that they are all turning.
- See screenshot (R) for solution.
- Head forward up the stairs one time.

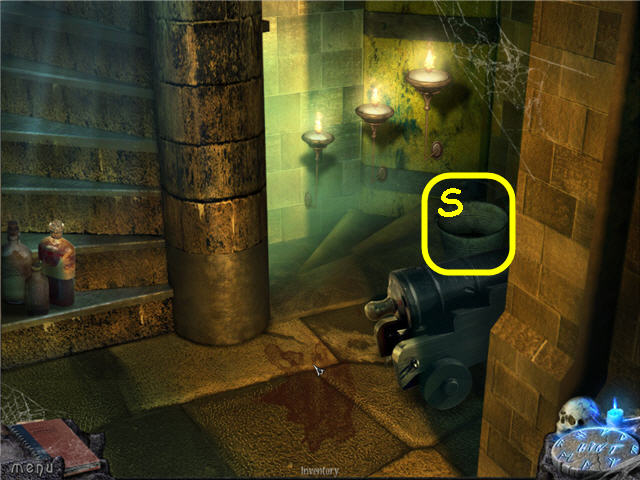
- Take the EMPTY BUCKET (S).
- Head upstairs.

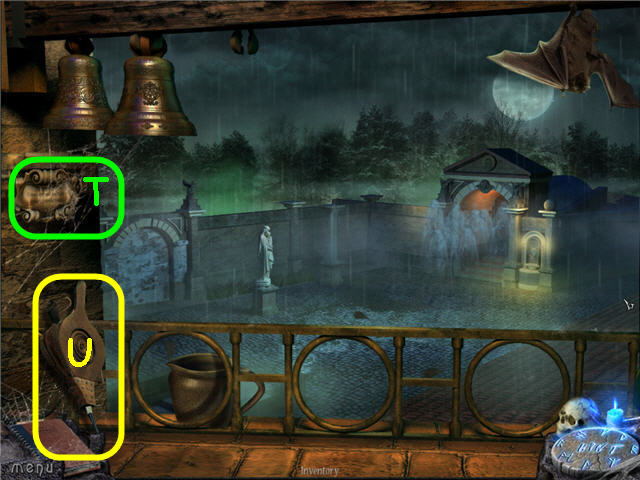
- Examine the plaque (T).
- Take the BELLOWS (U).
- Go downstairs once and back out three times.
Chapter 6 – Crypt

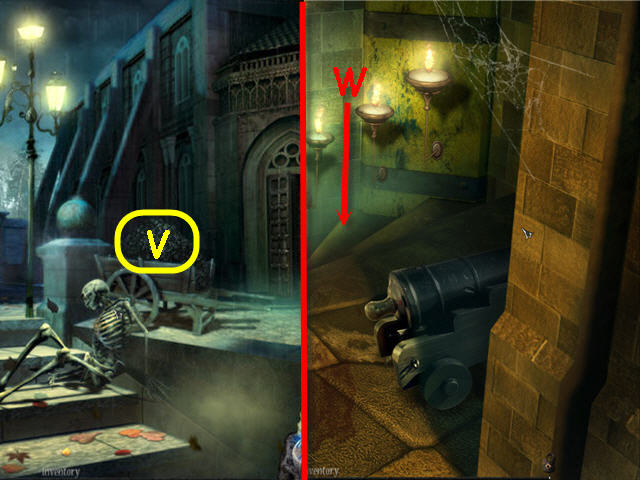
- Use the EMPTY BUCKET on the cart (V) to get a BUCKET OF COAL.
- Head back into the church stairwell and go downstairs (W).

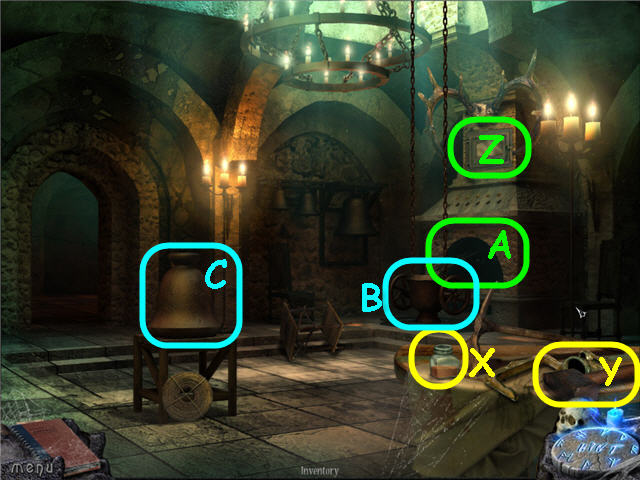
- Take the RED PAINT (X) and SLEDGHAMMER (Y).
- Open and place the SILVER STATUE in the oven (Z).
- Place the BUCKET OF COAL in the furnace (A).
- Use the CANDLE and BELLOWS on the coal.
- Move the pot (B) twice.
- Use the SLEDGEHAMMER on the mold (C); take the SILVER BELL.
- Back out and head upstairs.

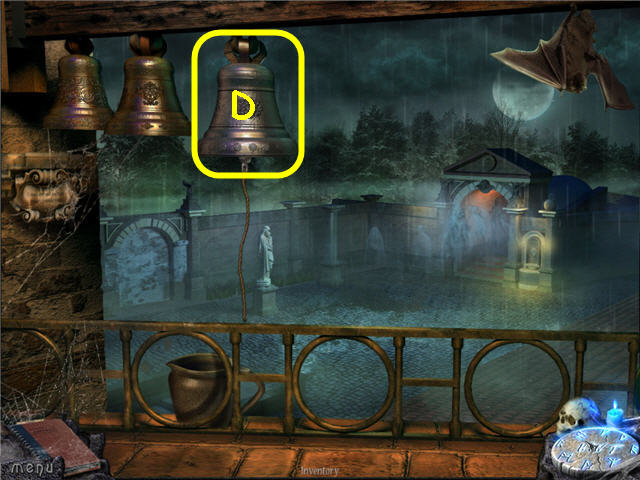
- Hang the SILVER BELL on the hook (D).
- Click the rope to ring the bell.
- Exit the church and head straight through the gates.
- Examine the wall to access a HOS.

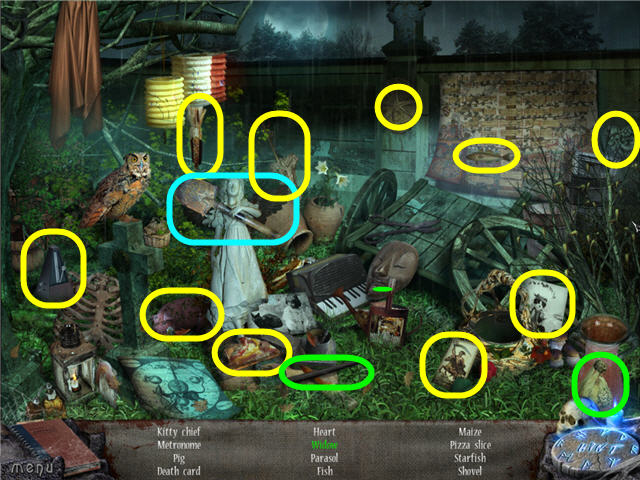
- Find the items listed.
- Use the charcoal on the bride to get a widow.
- You will earn a SPADE.

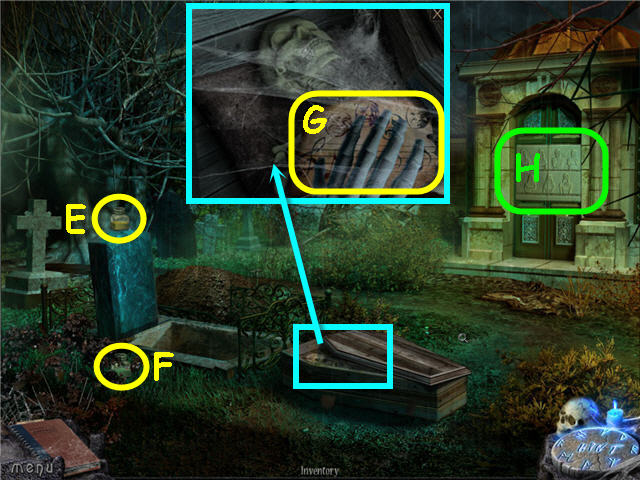
- Take the YELLOW PAINT (E) and GREEN PAINT (F).
- Use the SPADE on the grave.
- Open and examine the coffin; take the MUSIC PIECE (G).
- Examine the door (H).
- Head back into the church.
- Examine the stained glass on the right.
- Place the GREEN PAINT, YELLOW PAINT, RED PAINT, WHITE PAINT, VIOLET PAINT, BLUE PAINT and BOTTLE OF LACQUER on the table to trigger a puzzle.

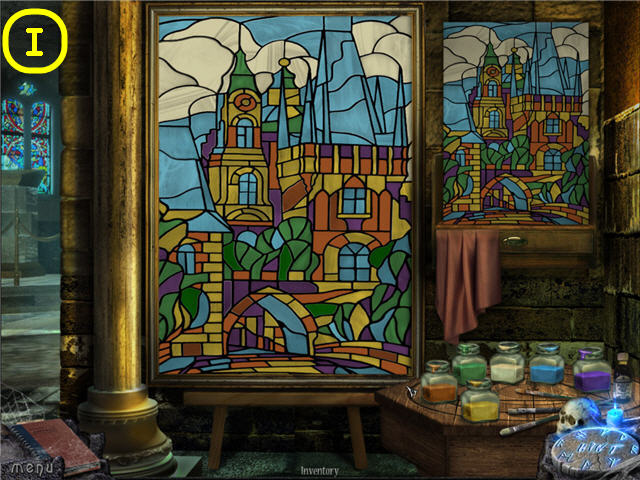
- Paint the gray pieces to match the stained glass on the right.
- You can change colors by dipping the brush in the color of your choice.
- See screenshot (I) for solution.
- Speak to the monk; get a 2nd MUSIC PIECE.
- Head straight up to the balcony.
- Place the 2 ORGAN PIPES on the pipes.
- Place the 2 MUSIC PIECES on the music stand to trigger a puzzle.

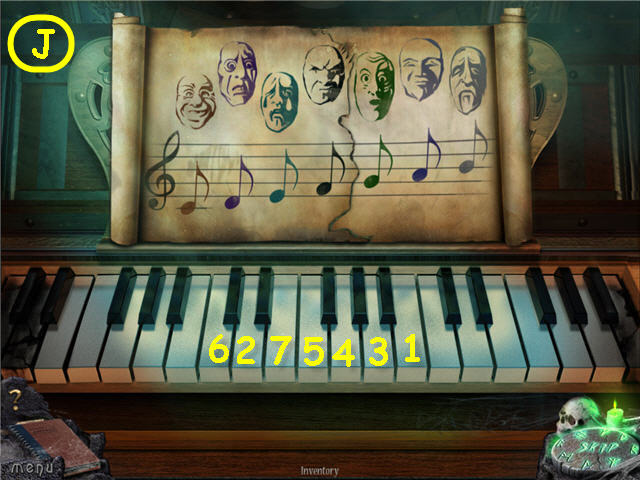
- Duplicate the 7 notes played.
- See screenshot (J) for solution.
- Back out twice; head straight and right into the crypt.

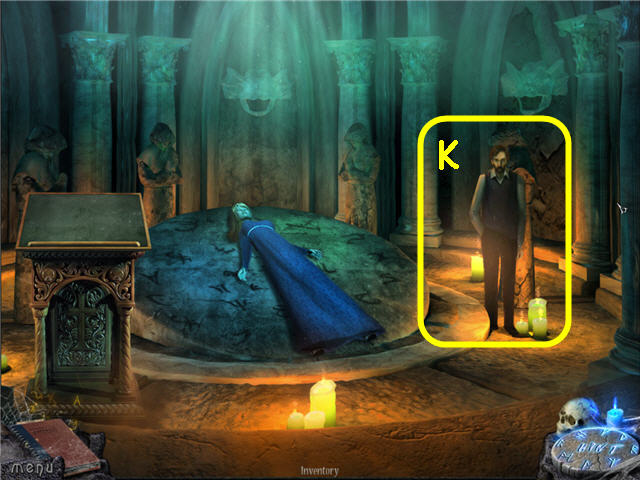
- Speak to the doctor (K).
- Go into the library.
- Examine the doorway under the bookcase to access a HOS.

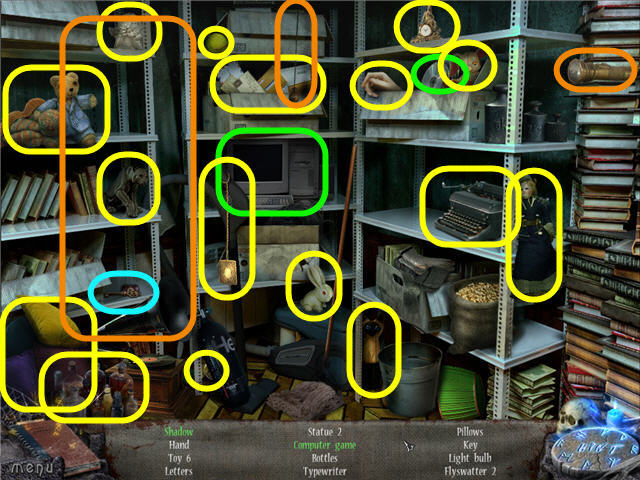
- Find the items listed.
- Click the monitor, place the disks in the computer, and click the monitor to get the computer game.
- Turn off the light; click on the flashlight to get the shadow.
- You will earn ARCHIVE KEY 26.
- Head straight upstairs twice.

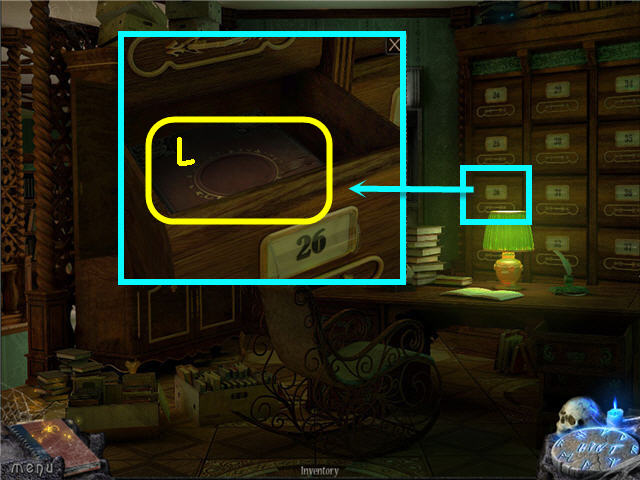
- Examine and use ARCHIVE KEY 26 on drawer number 26; take the ANCIENT BOOK (L).
- Head into the church.
- Examine the left pews to access a HOS.

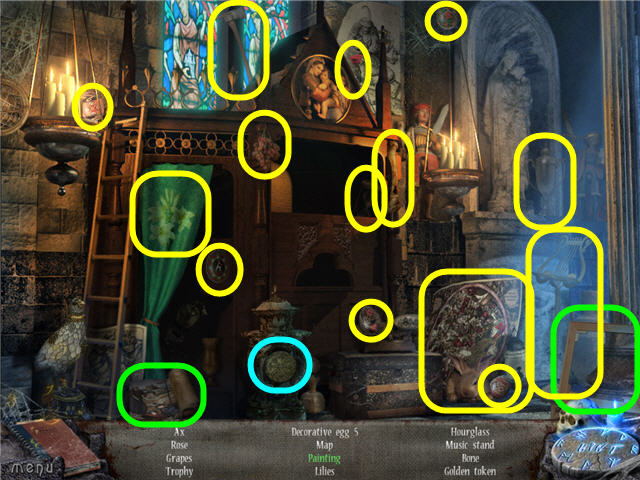
- Find the items listed.
- Place the canvas in the frame to get a painting.
- You will earn a MYSTERIOUS SIGN.
- Go into the crypt.

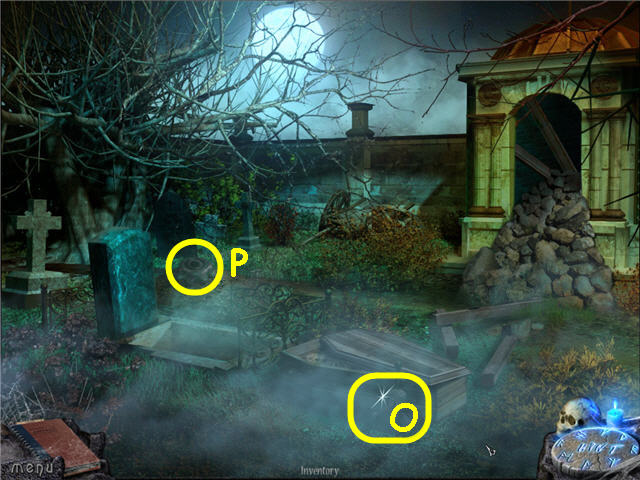
- Examine and place the ANCIENT BOOK on the stand.
- Place the MYSTERIOUS SIGN on the cover (M); click to open.
- Speak to the apparition to trigger a puzzle.

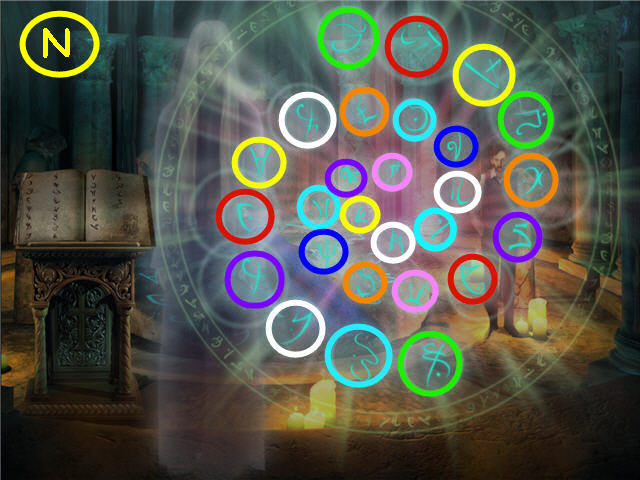
- Click on pairs of symbols that are related.
- See screenshot (N) for solution.
- Click on Adora.
Epilogue


- Take the HANDLE (O) and GEAR (P).
- Head left.

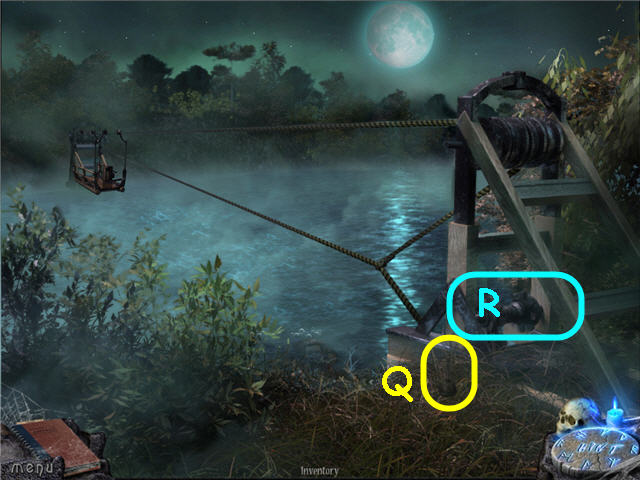
- Take the OILCAN (Q).
- Place the GEAR and HANDLE on the mechanism.
- Use the OILCAN on the gears (R); click the gears.
- Enter the cable car.

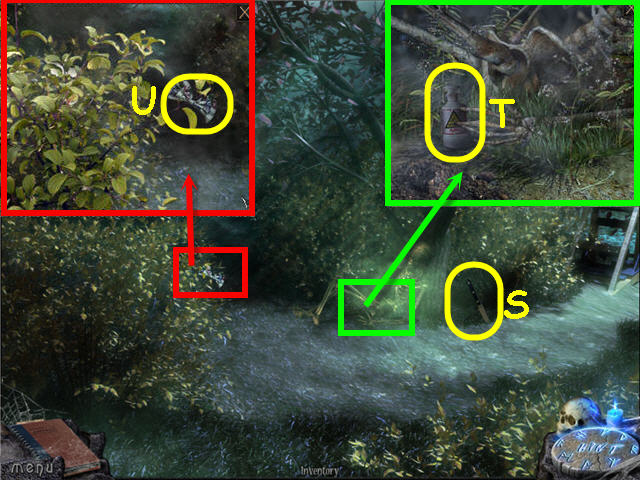
- Take the KNIFE (S).
- Examine the skeleton; take the ACID (T).
- Examine the bush; take the BOW (U).
- Head down the path and through the gate.
- Examine the well to access a HOS.

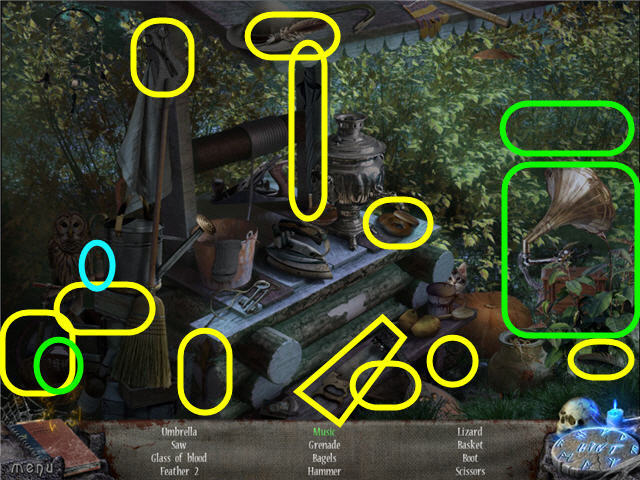
- Find the items listed.
- Place the record on the gramophone to get music.
- You will earn a VIAL OF BLOOD.

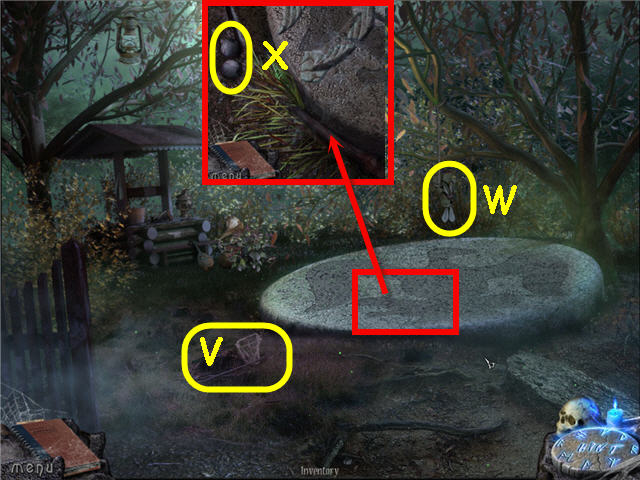
- Take the FISH NET (V).
- Use the KNIFE on the rope to get the RABBIT (W).
- Examine the stone mosaic; take the EYES (X).
- Back out to the house.

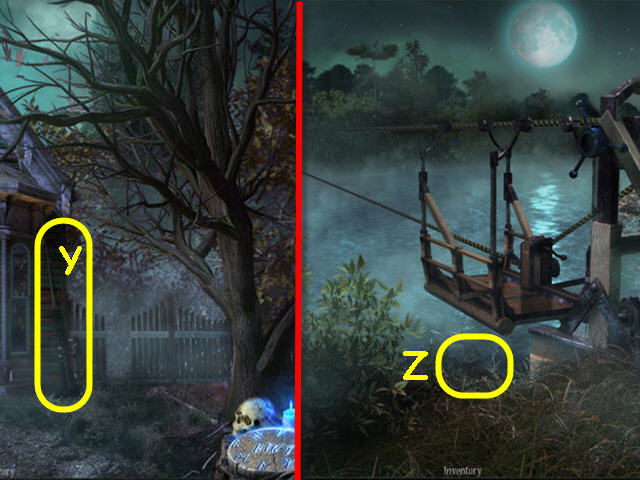
- Take the FISHING ROD (Y).
- Back out; head right and forward.
- Use the FISH NET to get the DOLL’S HEAD (Z).
- Take the cable car across; head straight.

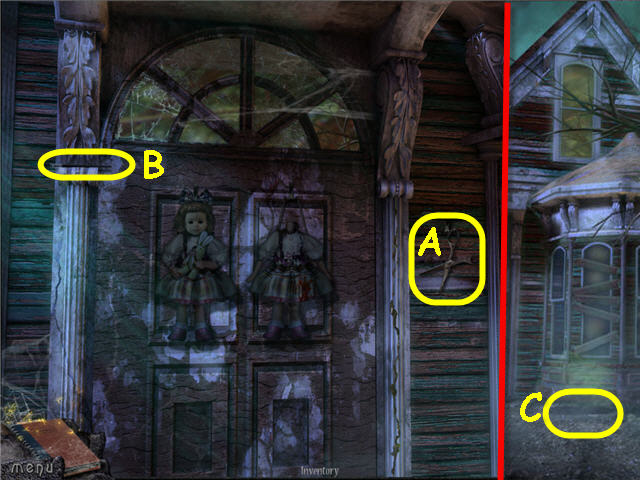
- Examine the doorway; take the SCISSORS (A) and BRUSH (B).
- Back out.
- Examine and use the BRUSH on the puddle (C) to get a BRUSH WITH PAINT.
- Examine the doorway and then examine the dolls.

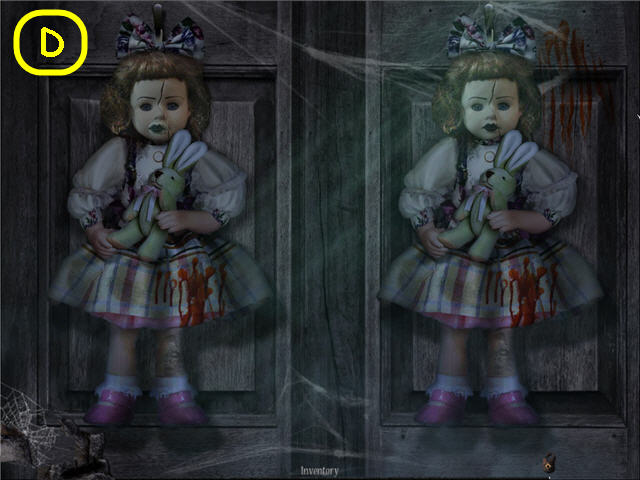
- Place the DOLL HEAD on the neck, RABBIT in the arms, and BOW on the head of the right doll.
- Use the SCISSORS on the right dolls hair.
- Place the EYES in the sockets, ACID on the leg and the VIAL OF BLOOD on the dress of the left doll.
- Use the BRUSH WITH PAINT on the left dolls lips.
- See screenshot (D) for solution.
- Head into the house.
- Examine the cabinet to access a HOS.

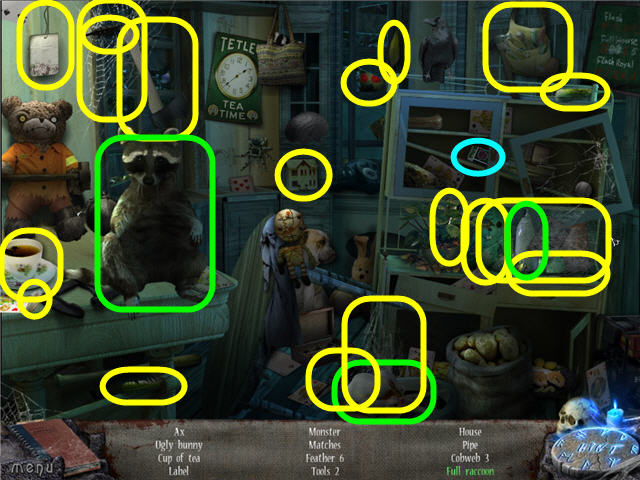
- Find the items listed.
- Give the milk bottle and chicken to the raccoon to get a full raccoon.
- You will earn MATCHES.

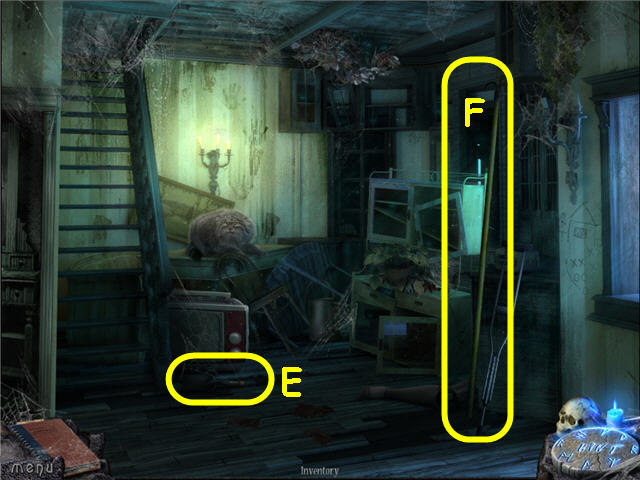
- Take the TROWEL (E) and GAFF (F).
- Back out and head through the gate.
- Examine the well to access a HOS.

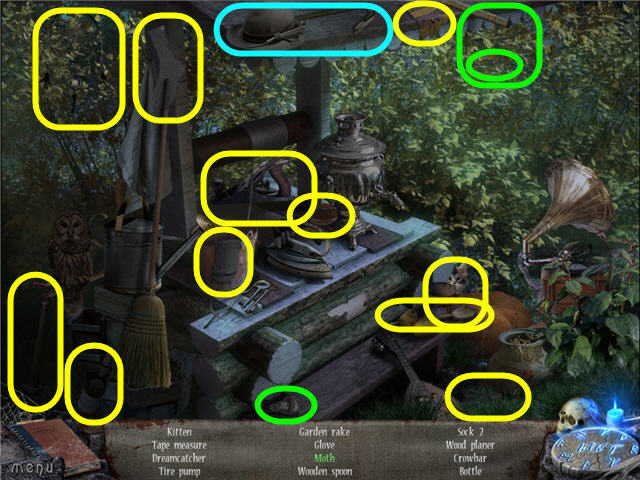
- Find the items listed.
- Place the light bulb in the lamp to get a moth.
- You will earn a CROWBAR.

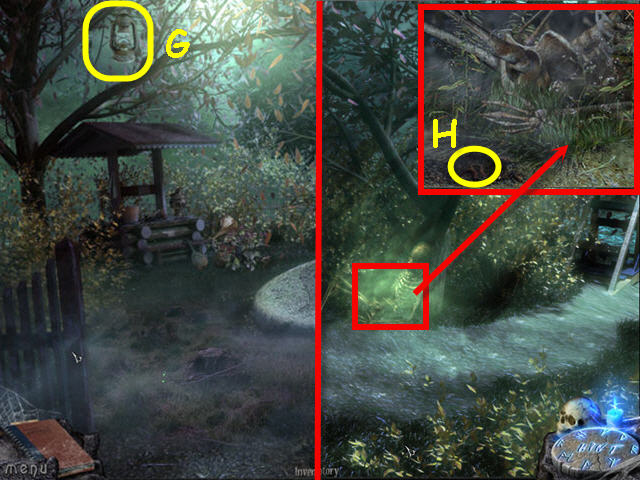
- Use the GAFF to get the LANTERN (G).
- Back out twice.
- Examine the skeleton.
- Use the TROWEL on the dirt; take the WORM (H).
- Head into the house.

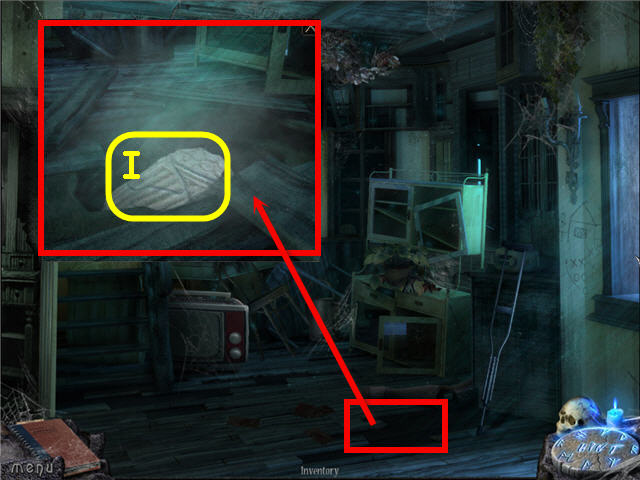
- Examine and use the CROWBAR on the floor; take the MOSAIC PIECE (I).
- Head left.

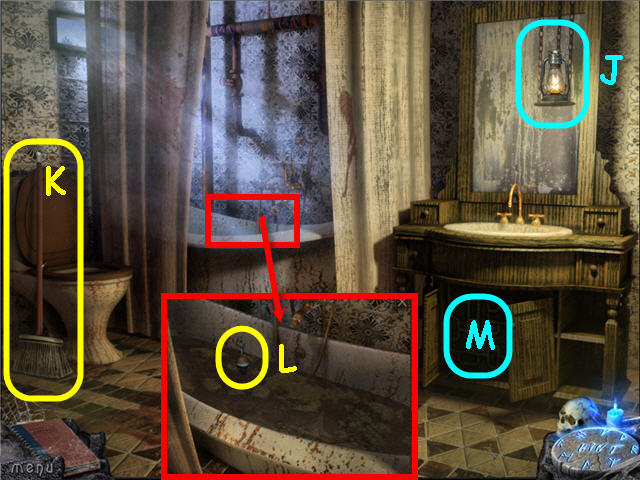
- Place the LANTERN on the hanger (J) and light with the MATCHES.
- Take the BROOM (K).
- Examine the tub; take the BOBBER (L).
- Examine the pipes (M) to trigger a puzzle.

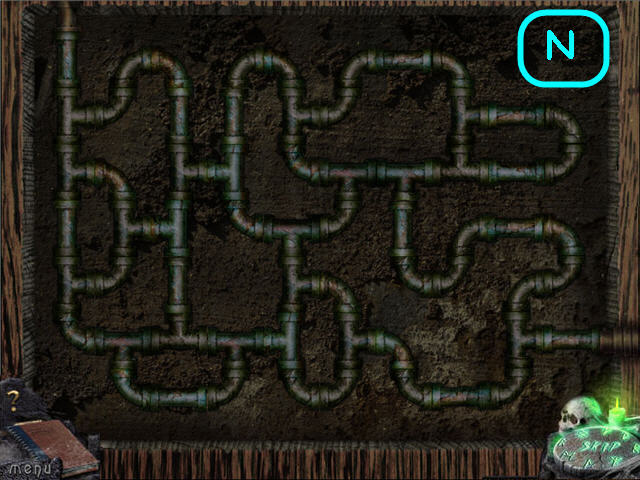
- Connect the pipes to complete the flow.
- See screenshot (N) for solution.
- Back out three times and head right.

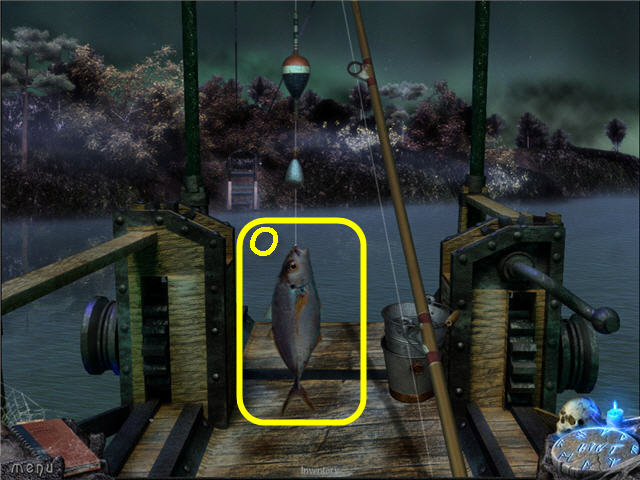
- Use the FISHING ROD on the water.
- Place the WORM and BOBBER on the line.
- Click the pole when the bobber gets tugged.
- Take the FISH (O).
- Back out and head straight into the house.

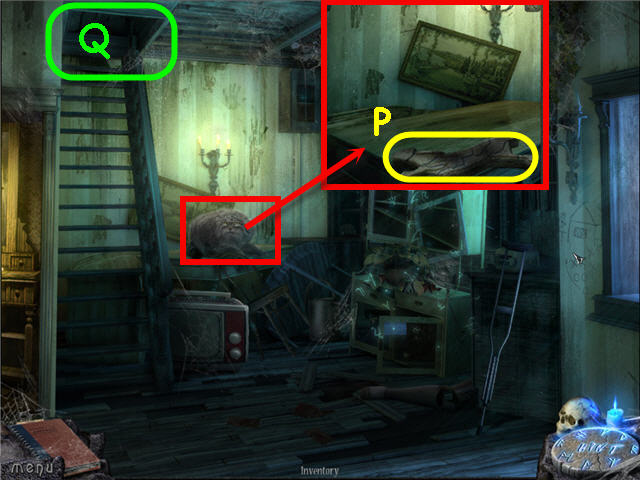
- Examine and give the fish to the cat; take the 2nd MOSAIC PIECE (P).
- Examine the attic door (Q).
- Use the BROOM on the cobwebs.
- Use the CROWBAR on the bar.
- Head up to the attic.

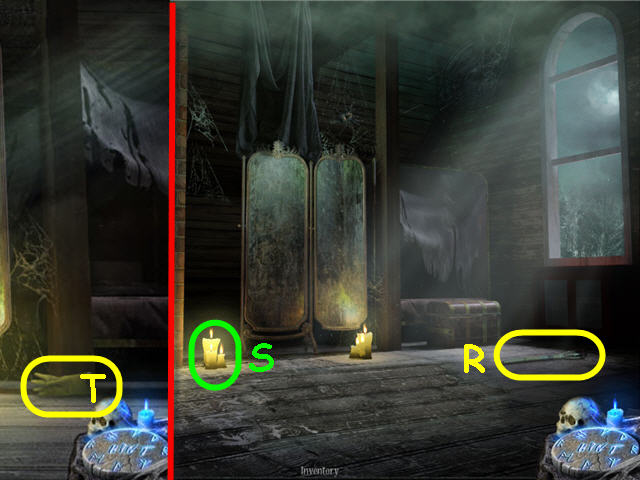
- Take the TORCH (R).
- Light the TORCH on the candles (S) to get a BURNING TORCH.
- Examine the mirror; take the GLOVE (T).
- Head to the bathroom.

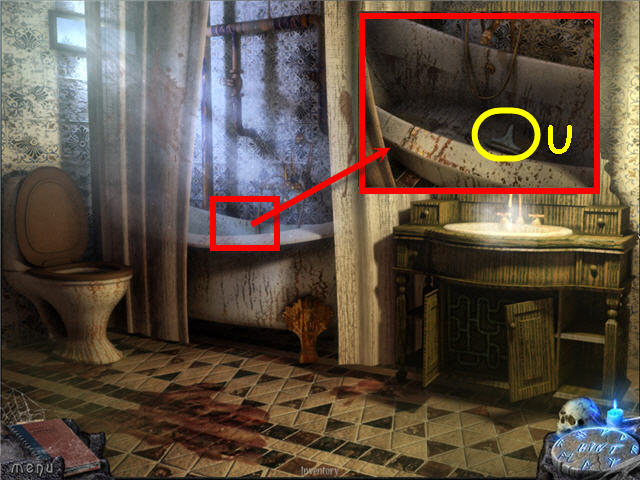
- Examine and use the GLOVE on the tub; take the 3rd MOSAIC PIECE (U).
- Back out.
- Examine the cabinets to access a HOS.

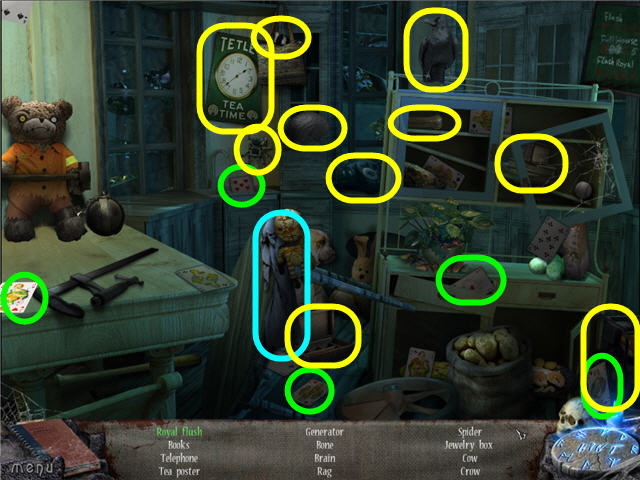
- Find the items listed.
- Gather the cards to get a royal flush.
- You will earn a RAG.
- Head left.
- Examine and use the RAG on the sink to get a WET RAG.
- Back out twice; head through the gate.
- Examine and place the 3 MOSAIC PIECES on the stone mosaic to trigger a puzzle.

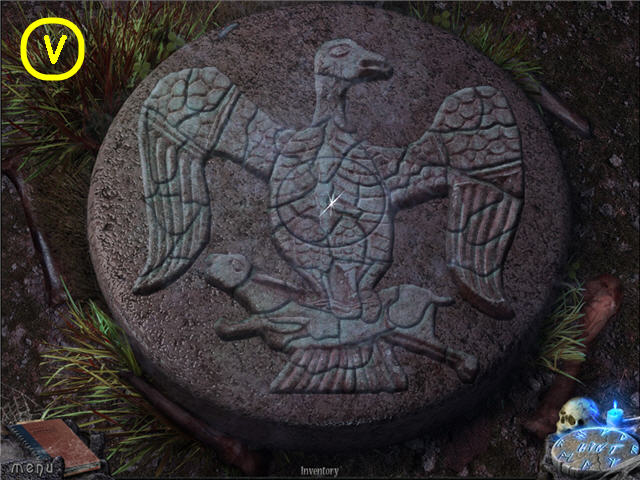
- Arrange the pieces to complete the mosaic.
- See screenshot (V) for solution.
- Remove the center; take the KEY.
- Go into the attic of the house.

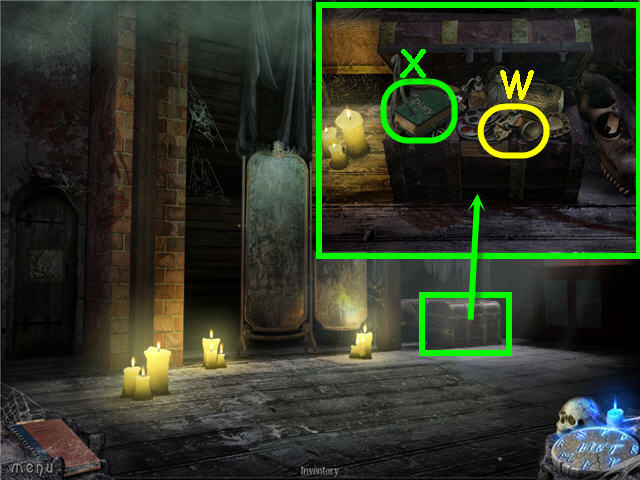
- Examine and use the KEY on the chest.
- Take the IMAGE PIECE (W) and click on the diary (X).
- Examine and place the IMAGE PIECE on the door to trigger a puzzle.

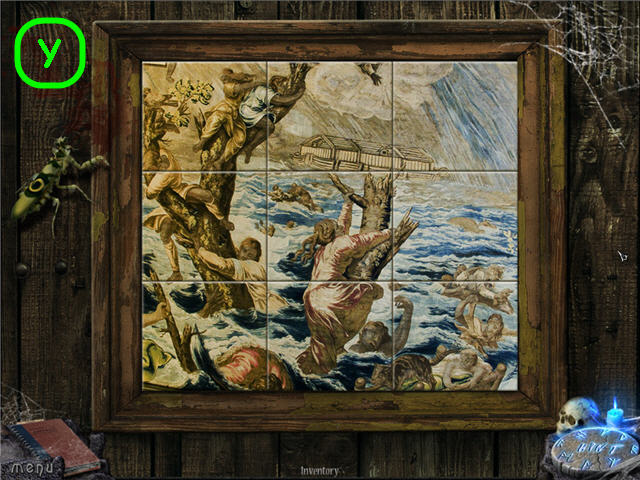
- Arrange the pieces to complete the image.
- See screenshot (Y) for solution.
- Examine the door to access a HOS.

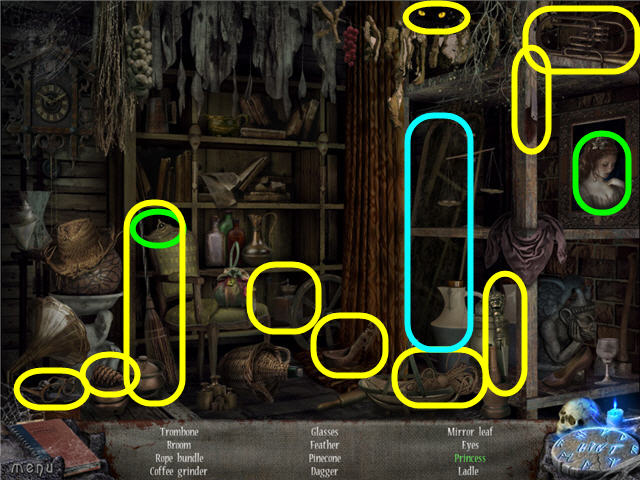
- Find the items listed.
- Place the crown on the picture to get a princess.
- You will earn a MIRROR’S LEAF.

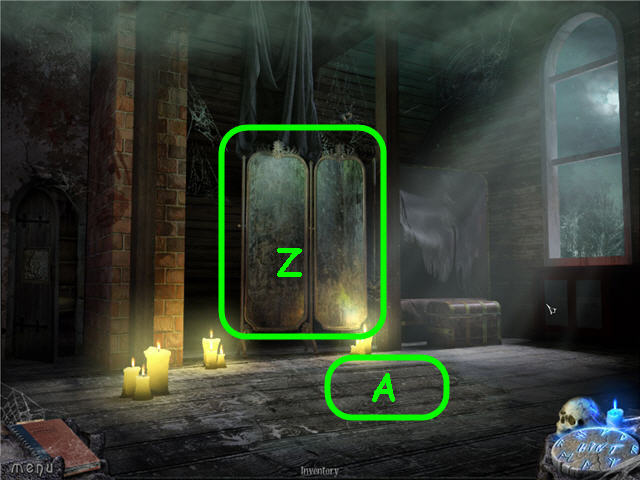
- Examine and place the MIRROR’S LEAF on the mirror (Z).
- Use the WET RAG on the mirror.
- Examine the floor boards (A).
- Examine the door to access a HOS.

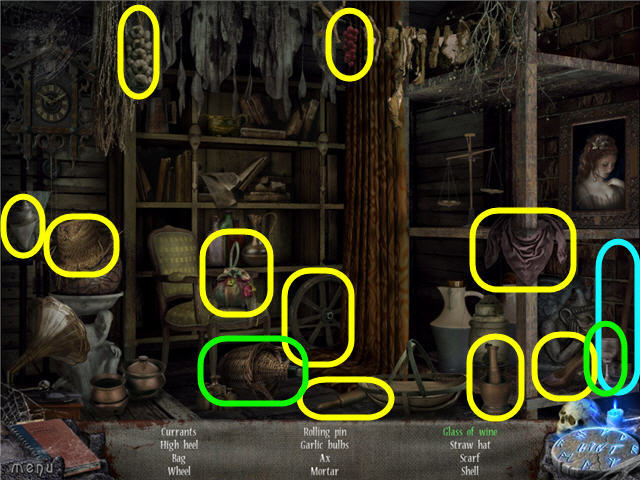
- Find the items listed.
- Use the glass of wine on the jug of wine; click on the cork to get a glass of wine.
- You will earn an AX.

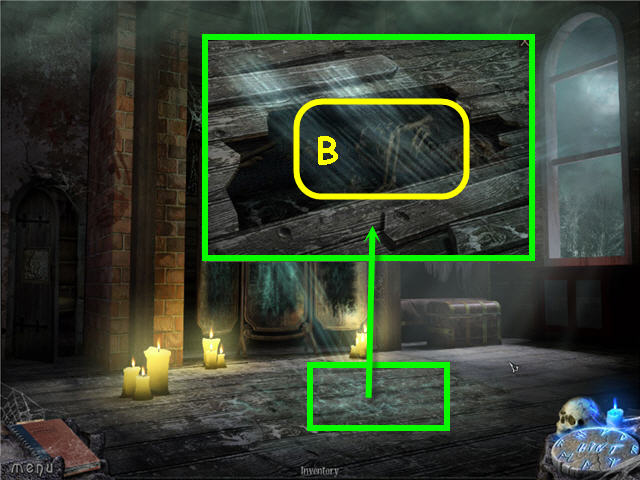
- Examine and use the AX on the floorboards a few times.
- Back out of the close-up and speak to the monk and get the CURSED BOOK.
- Examine the hole in the floor.
- Place the CURSED BOOK in the skeletons arms (B); use the BURNING TORCH on the skeleton.
- Congratulations! You have successfully completed Revenge of the Spirit: Rite of Resurrection.






 Infected: The Twin Vaccine Walkthrough, Guide, & Tips
 Christmas Eve: Midnight's Call Walkthrough, Guide, & Tips
 Emberwing: Lost Legacy Walkthrough, Guide, & Tips
 Brunhilda and the Dark Crystal Walkthrough, Guide, & Tips
 Witches' Legacy: Slumbering Darkness Walkthrough, Guide, & Tips