Christmas Eve: Midnight's Call Walkthrough, Guide, & Tips
Christmas Eve: Midnight’s Call Walkthrough

Welcome to the Christmas Eve: Midnight’s Call Walkthrough
Do you have what it takes to save Christmas?
Whether you use this document as a reference when things get difficult or as a road map to get you from beginning to end, we’re pretty sure you’ll find what you’re looking for here.
This document contains a complete Christmas Eve: Midnight’s Call game walkthrough featuring annotated screenshots from actual gameplay!
We hope you find this information useful as you play your way through the game. Use the walkthrough menu below to quickly jump to whatever stage of the game you need help with.
Remember to visit the Big Fish Games Forums if you find you need more help. Have fun!
General Tips
- This is the official guide for Christmas Eve: Midnight’s Call.
- This guide will not mention each time you have to zoom into a location; the screenshots will show each zoom scene.
- Hidden-object puzzles are referred to as HOPs. This guide will not show screenshots of the HOPs, but it will mention when a HOP is available and the inventory item you’ll collect from it.
- This guide will give step-by-step solutions for all puzzles that are not random. Please read the instructions in the game for each puzzle.
Chapter 1: A Mysterious Package

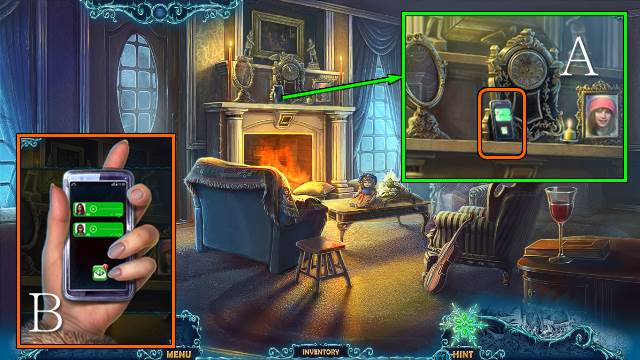
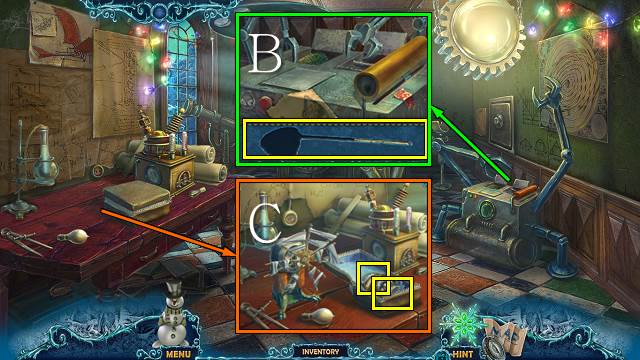
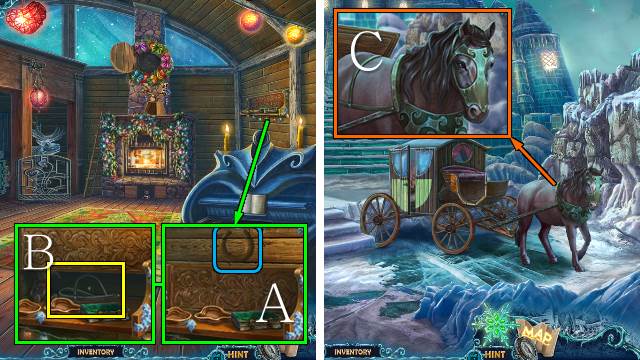
- Answer the phone (A).
- Play both messages (B).
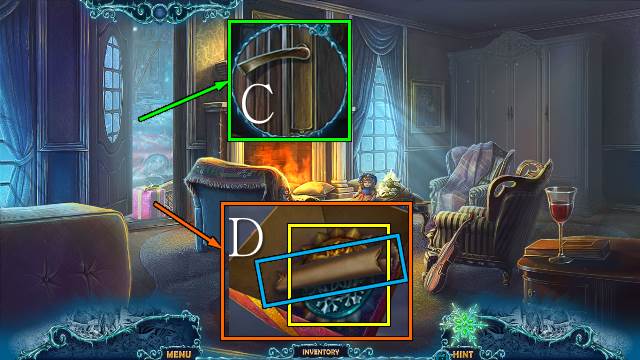
- Answer the door (C).
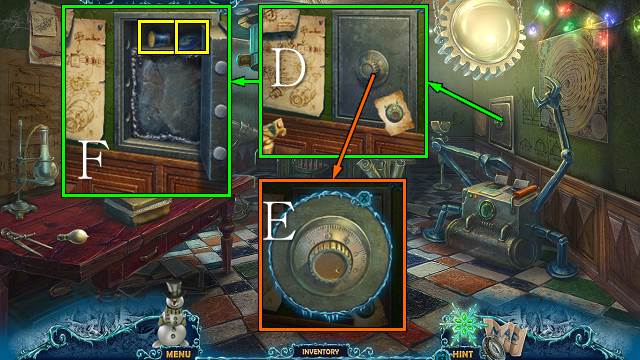
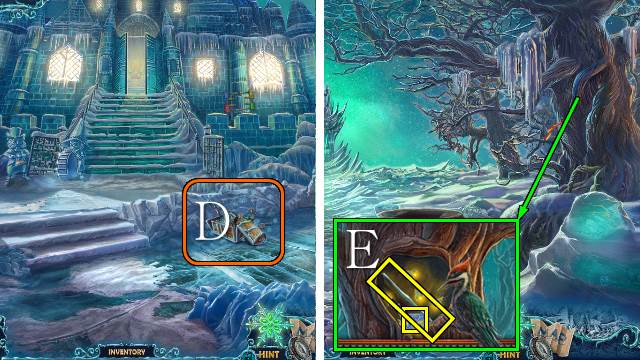
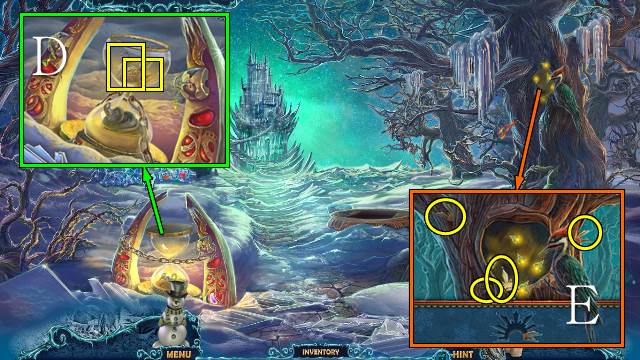
- Open the box; take the scroll and MEDALLION (D).
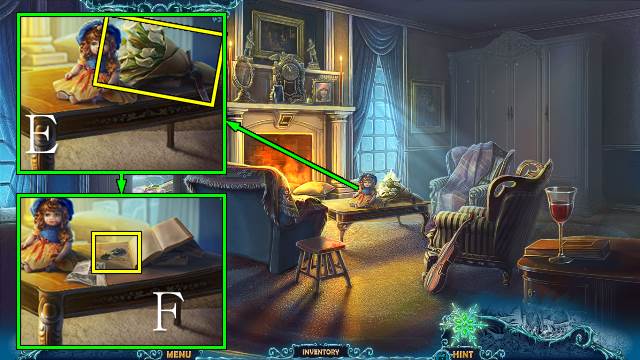
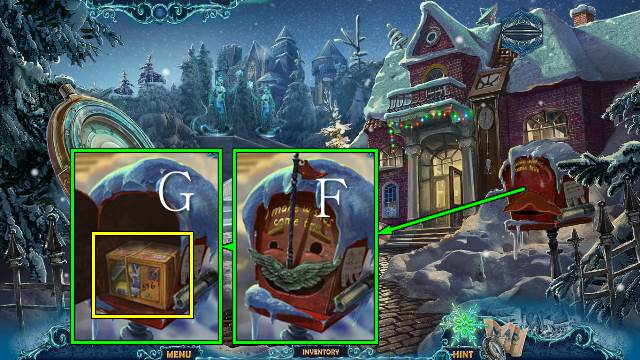
- Take the FLOWERS (E); move the doll and the clipping and take the CAR KEY (F).
- Go forward.
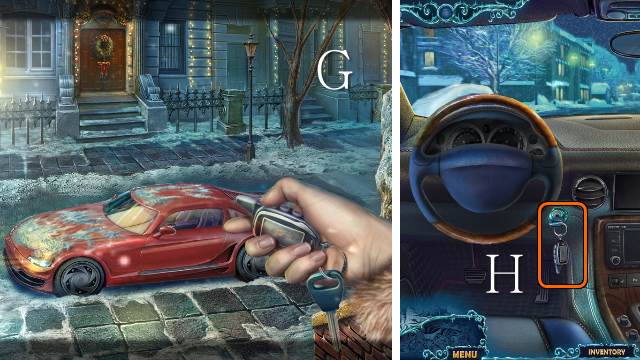
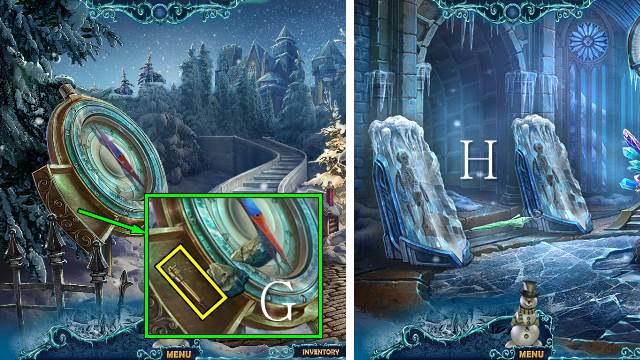
- Use the CAR KEY (G).
- Enter the car.
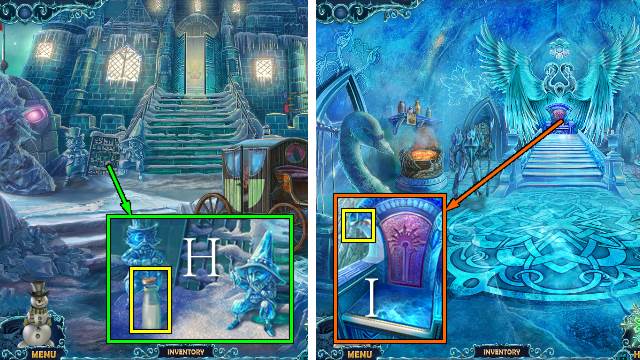
- Put the CAR KEY in the ignition and turn it (H).
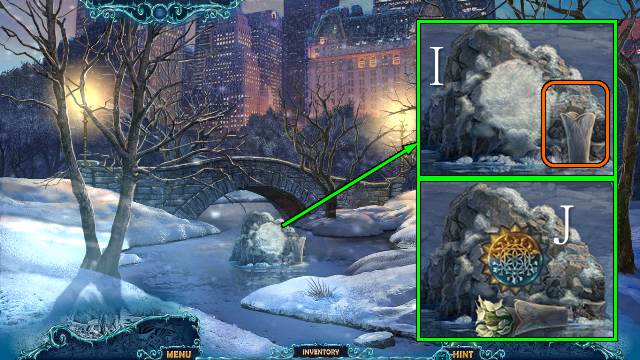
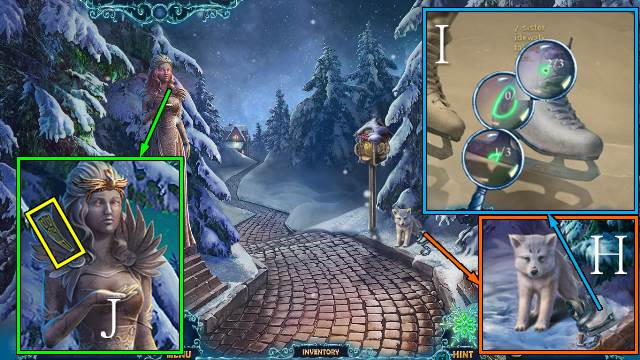
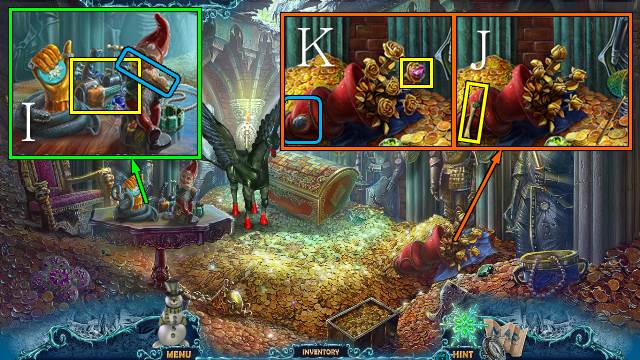
- Place the FLOWERS (I) and MEDALLION (J).
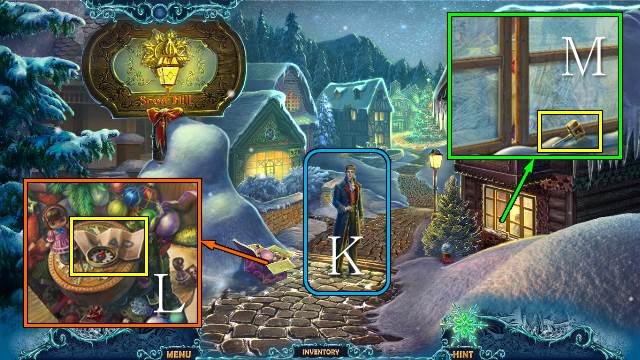
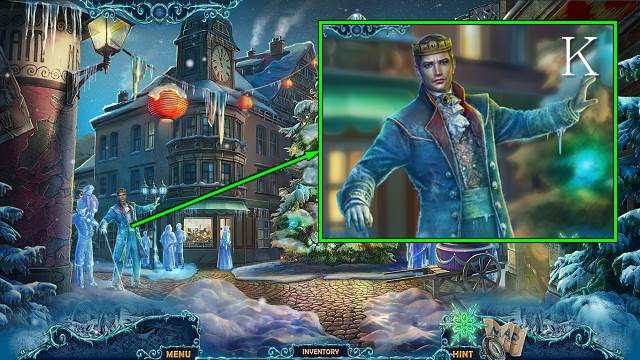
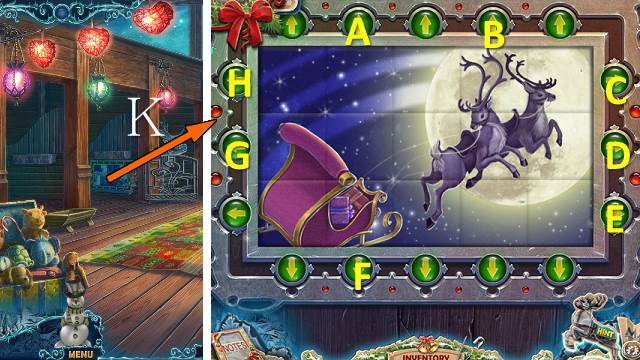
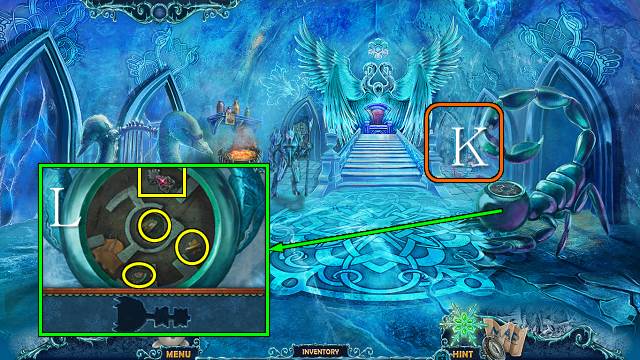
- Talk to the King (K).
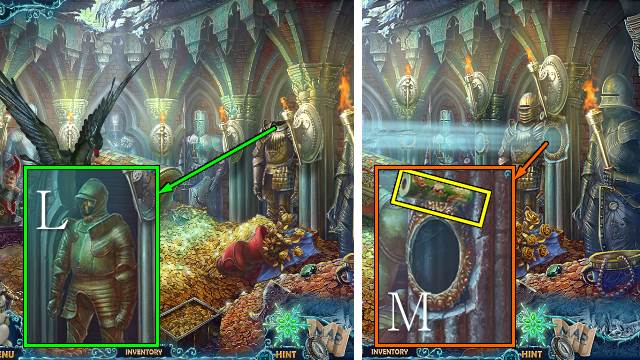
- Take the map (L).
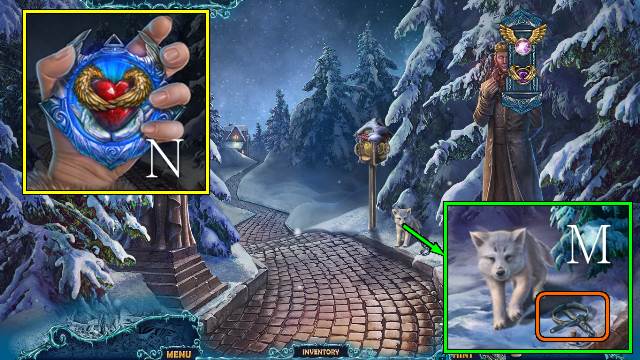
- Take the HAMMER (M).
- Go forward.
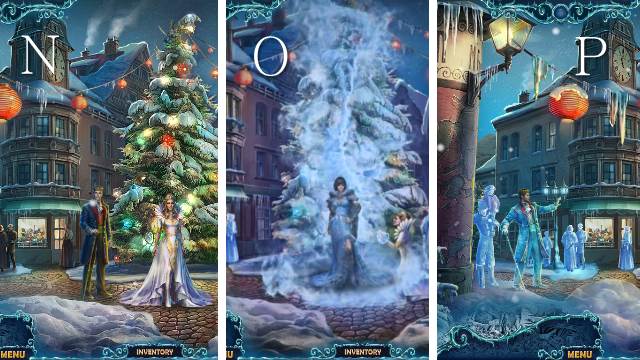
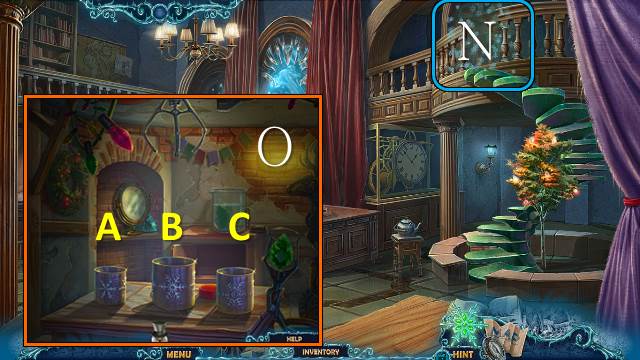
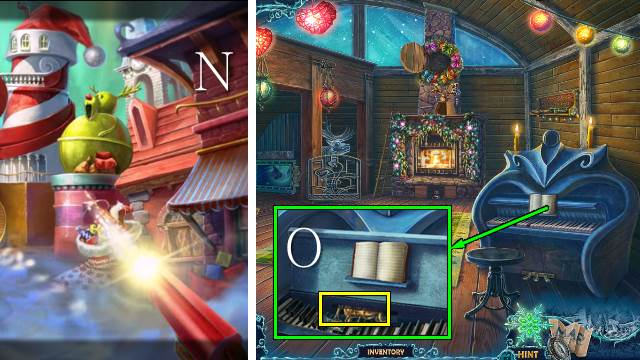
- Talk to the King and Queen (N).
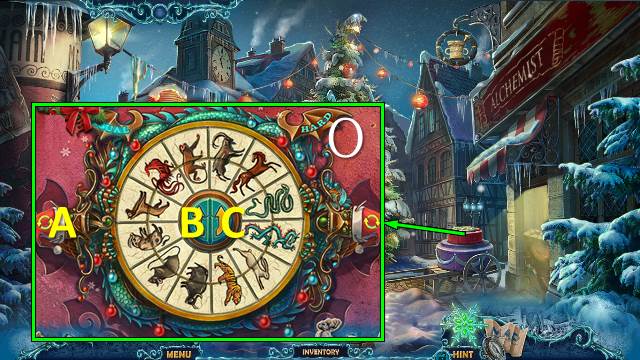
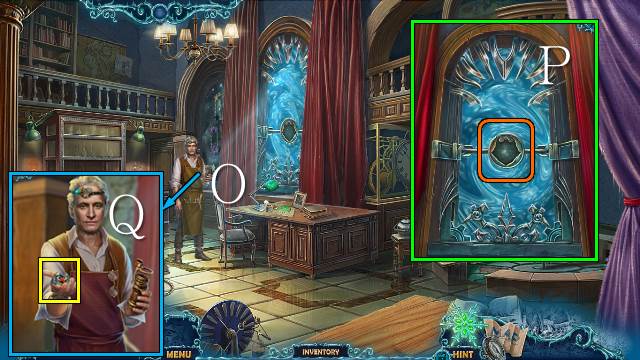
- Talk to the evil woman (O).
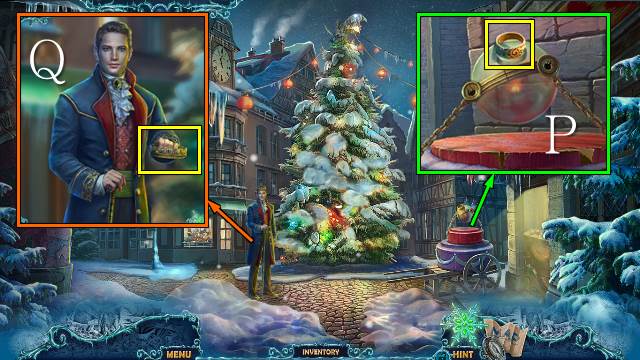
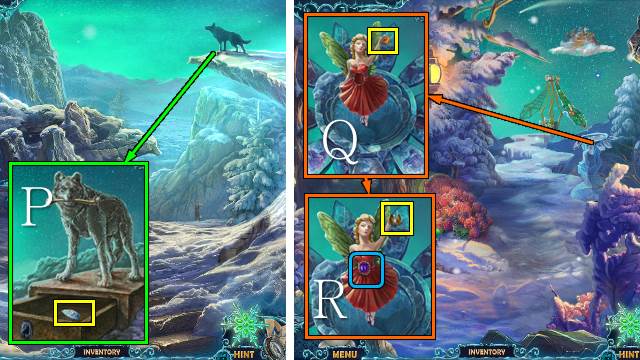
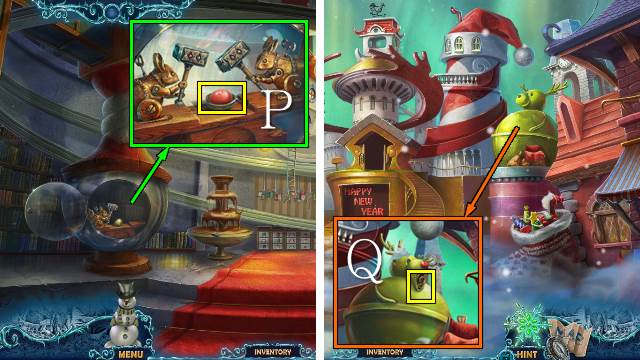
- Talk to the King (P).
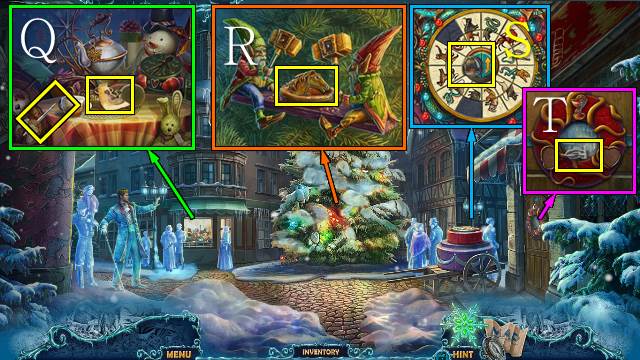
- Open the window; take the PAINTBRUSH and INSTRUCTIONS (Q).
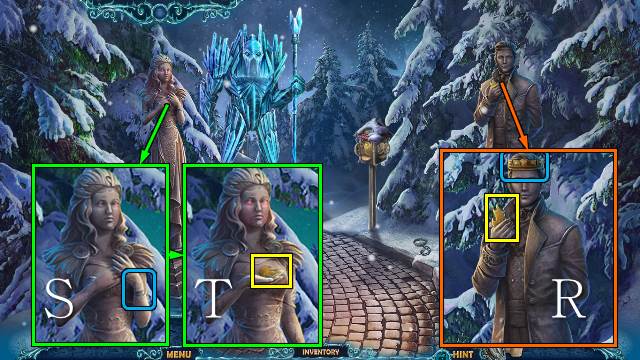
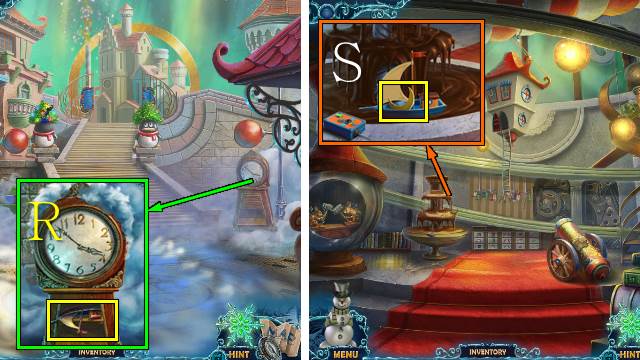
- Move the branches; place the HAMMER and take the HORSE EMBLEM (R).
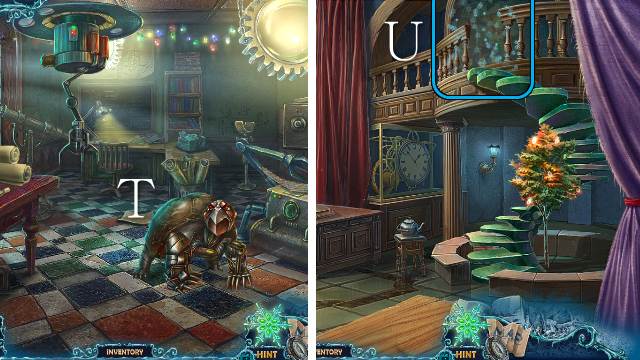
- Take the DOLL’S HEAD (S).
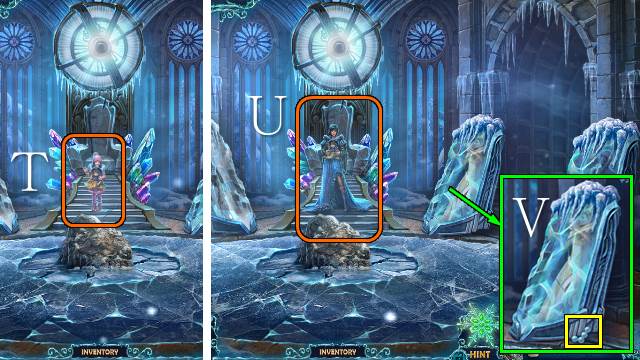
- Take the DOLL’S ARM (T).
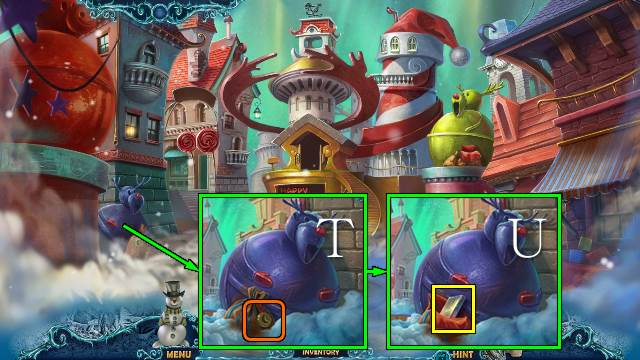
- Walk down.
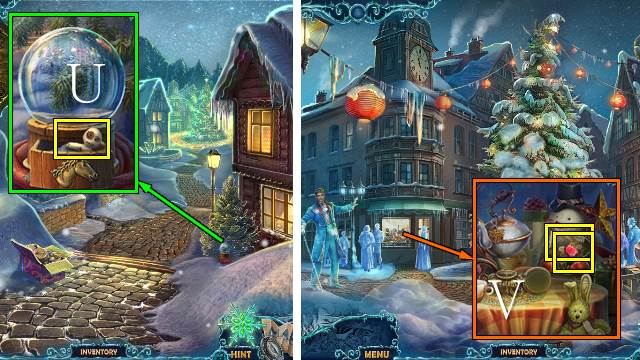
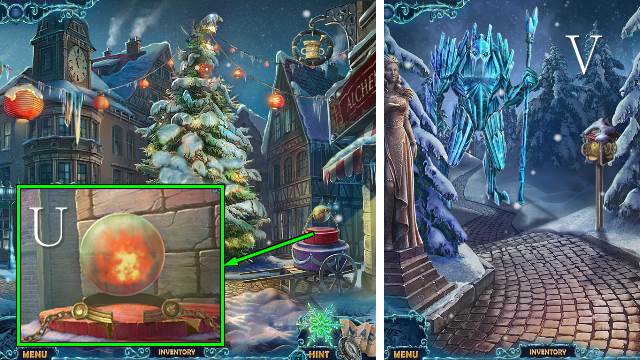
- Place the HORSE EMBLEM; take the VOODOO DOLL (U).
- Go forward.
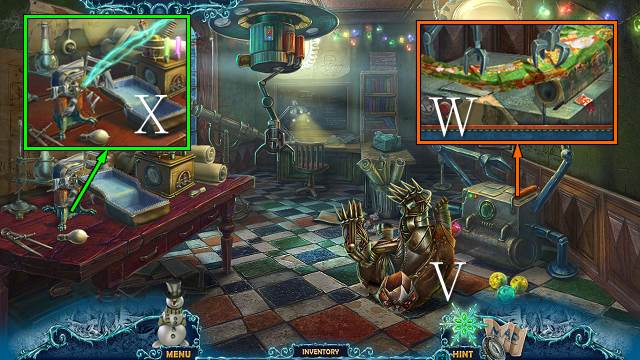
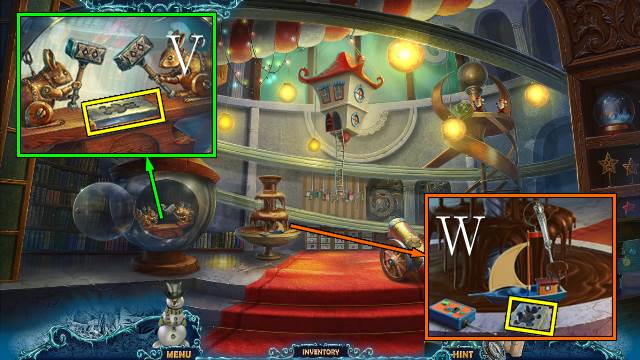
- Place the VOODOO DOLL; take the RED GEM and TAROT CARD (V).
- Walk down.
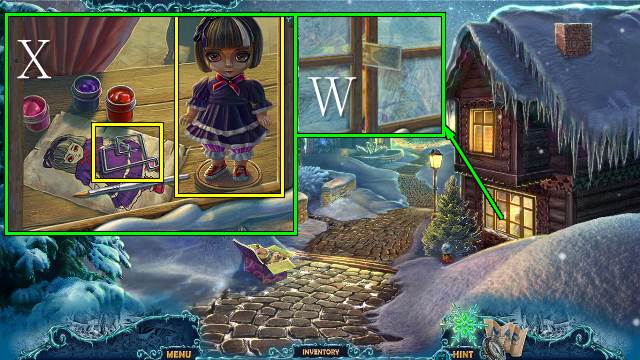
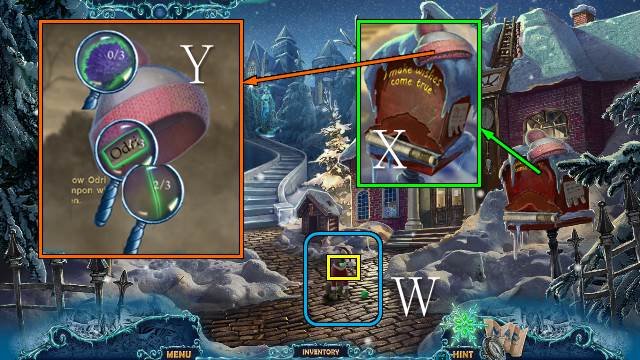
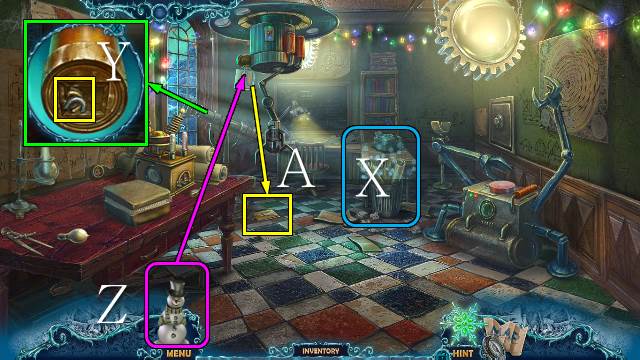
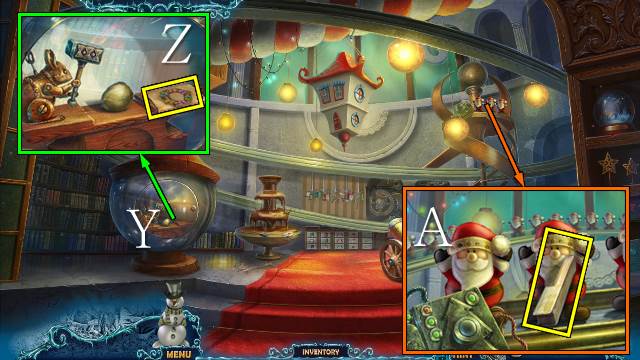
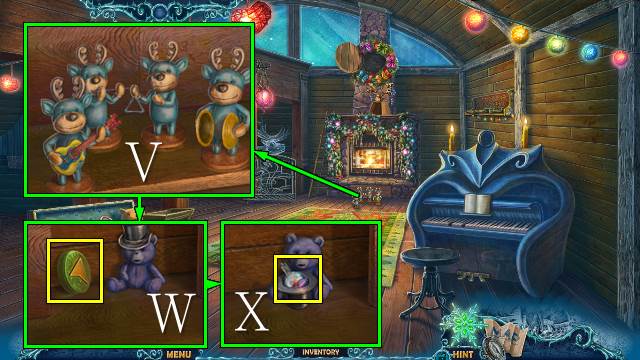
- Use the TAROT CARD and open the window (W); place the DOLL’S HEAD, DOLL’S ARM and PAINTBRUSH, paint the doll, bend the wire and take the DOLL and WIRE (X).
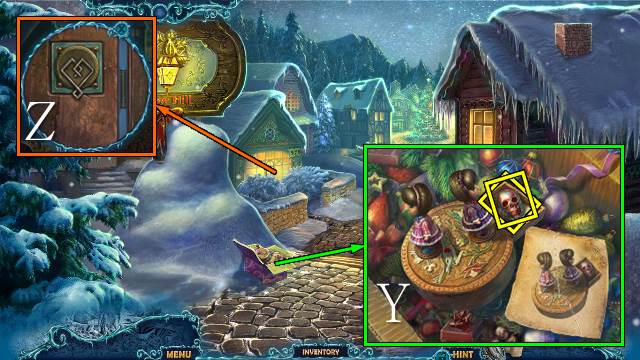
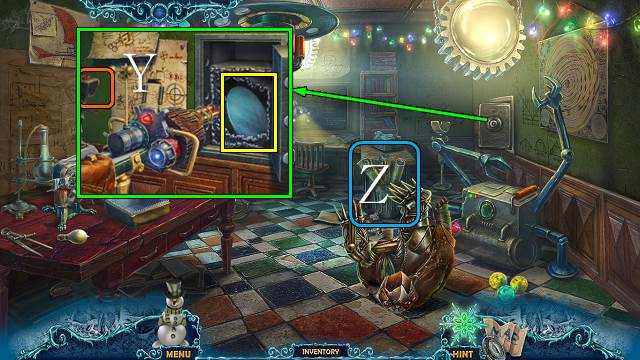
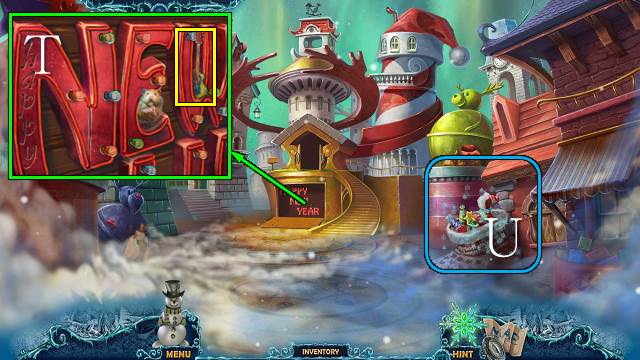
- Place the DOLL and INSTRUCTIONS; turn each doll three times and take the SKULL and CALENDAR PIECE (Y).
- Place the WIRE and turn the handle (Z).
- Go left.
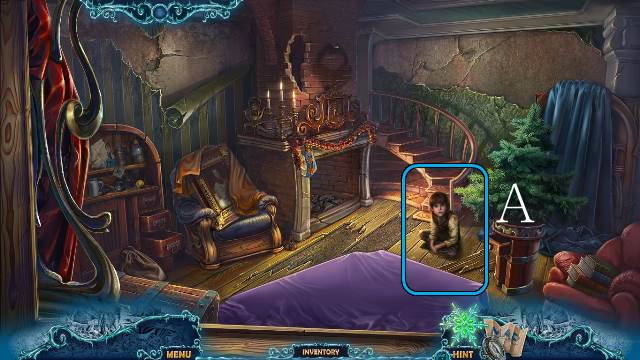
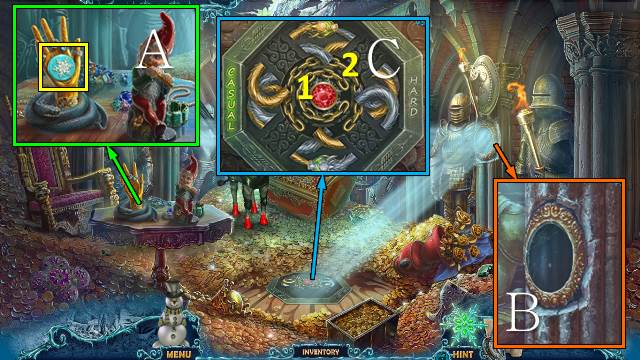
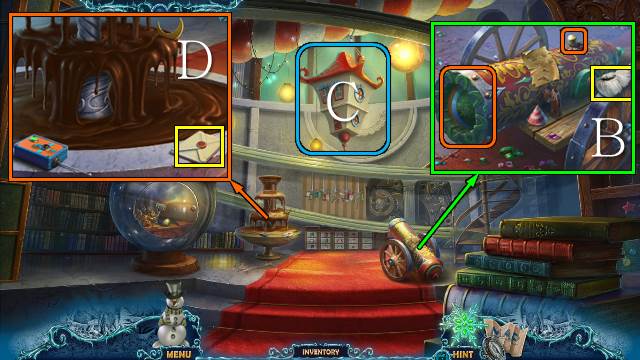
- Talk to the boy (A).
- Go down and forward.

- Place the RED GEM, move the hammers and take the HEART (B).
- Place the HEART and SKULL (C).
- Go right.
- Take the GLUE and read the paper (D).
- Use the GLUE for a mini-game (E).
- You receive the GROWTH POTION.
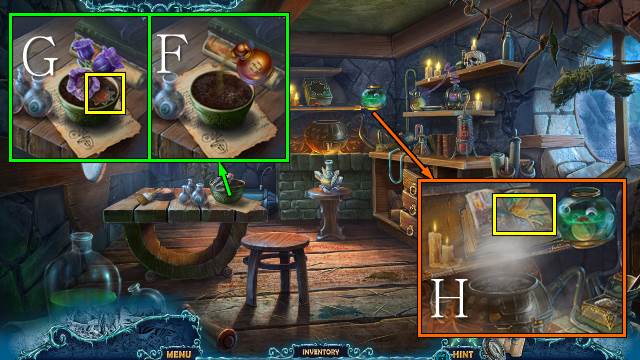
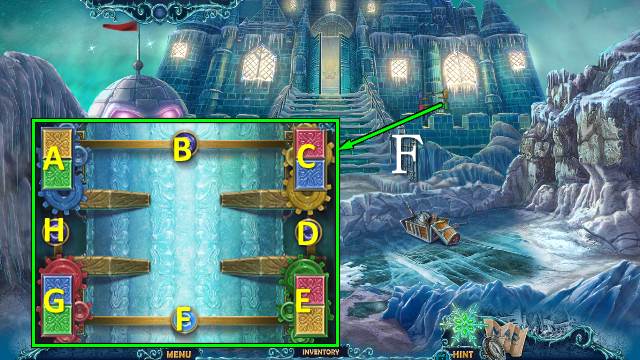
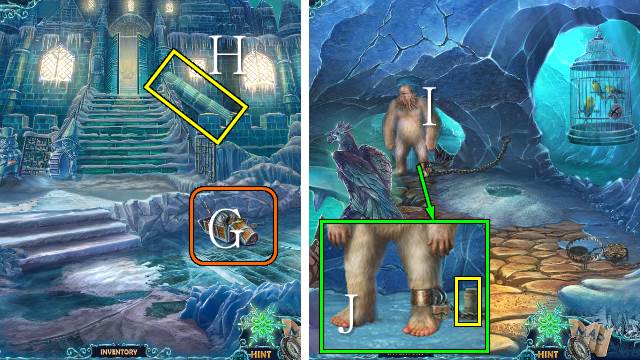
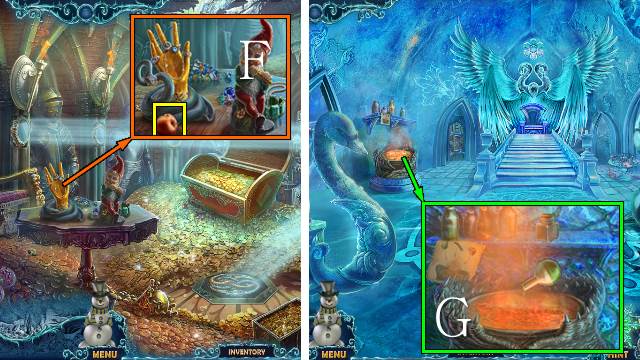
- Use the GROWTH POTION (F); take the BOOK KEY (G).
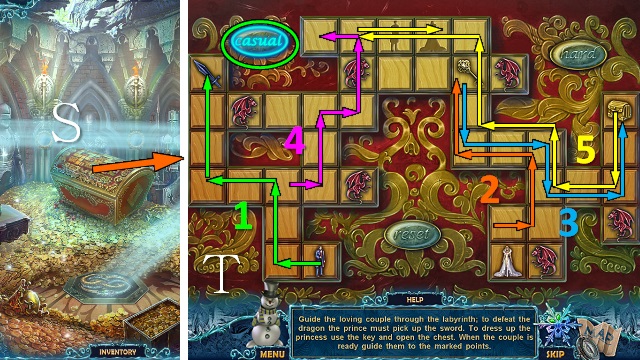
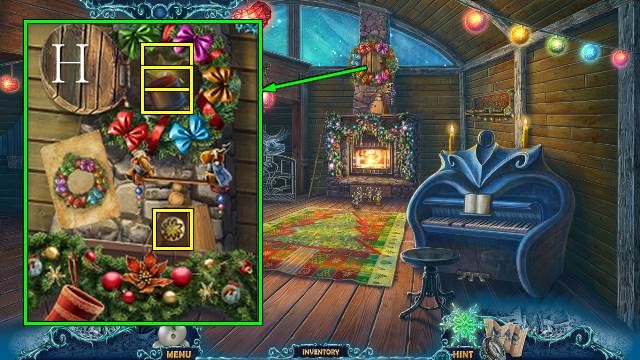
- Place the BOOK KEY; take the BIRDFEEDER KEY and play the mini-game (H).
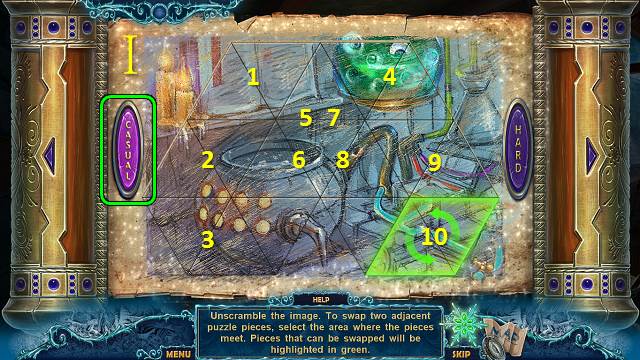

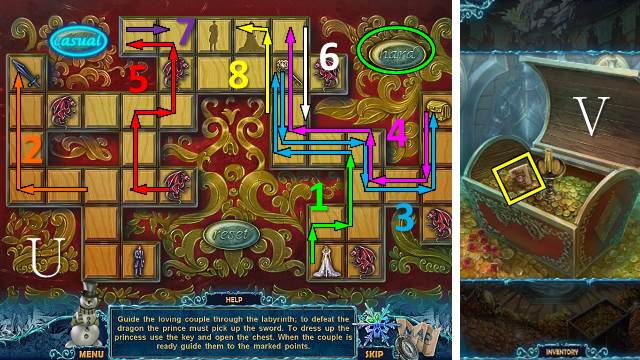
- Hard solution (J).
- Play the HOP.
- You receive the POTION.
- Walk down.
- Use the POTION (K).
- Go left.
- Try to walk forward.
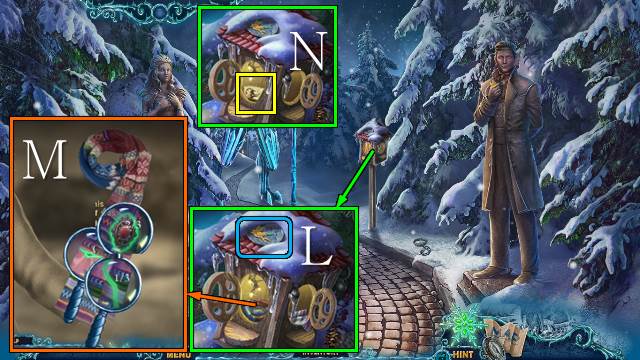
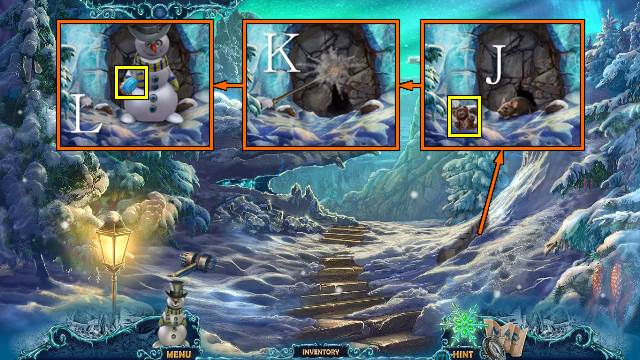
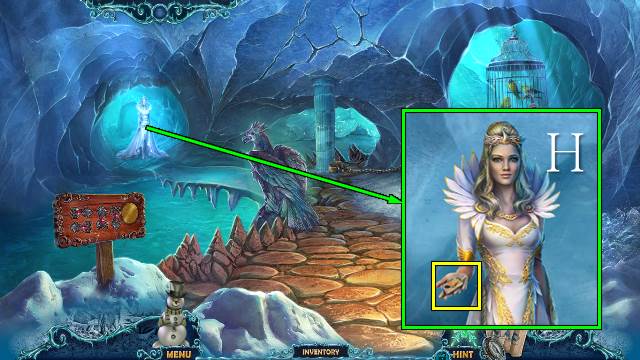
- Place the BIRDFEEDER KEY; take and inspect the scarf (L).
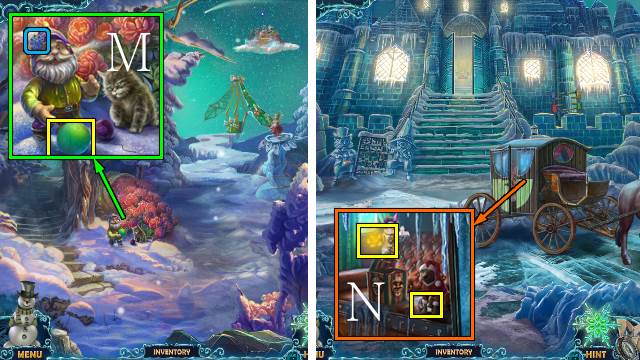
- Use the magnifying glass to find the clues (M).
- Take the CALENDAR PIECE (N).
- Walk down.
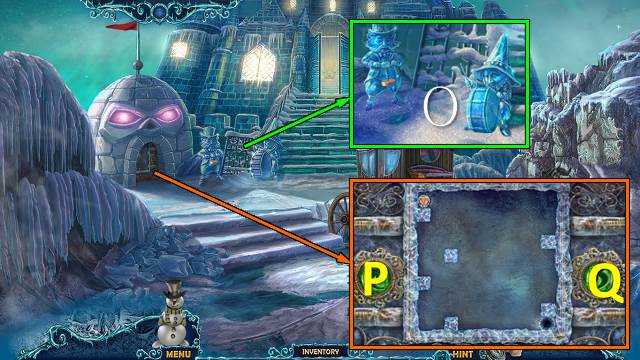
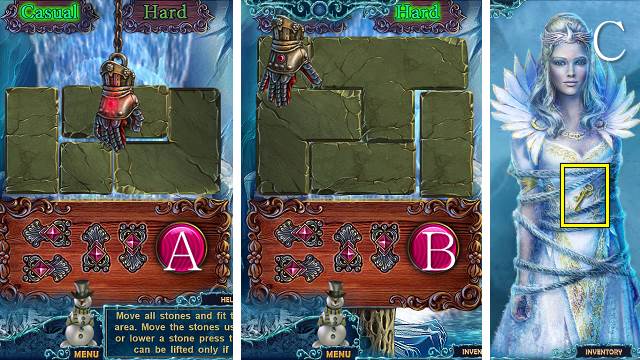
- Place the CALENDAR PIECES for a mini-game (O).
- Casual: C3-A-C-A-C-A-C-A-C5-A-B-A-C5-A-B-A-B-A-B-A-B-A-C2-A-B-A-C2-A-C-A-C6.
- Hard: B-A-B3-A-C-A-C-A-C2-A-B4-A-C-A-C-A-C-A-C5-A-B-A-B-A-C3-A-B-A-B-A-C3-A-B-A-B2.
- Take the BRACELET (P).
- Talk to the King; take the CROWN (Q).
- Go left.
- Place the CROWN; take the SYMBOL (R).
- Place the BRACELET (S); take the SYMBOL (T).
- Walk down.
- Place the SYMBOLS; take the FIRE SPHERE (U).
- Go left.
- Throw the FIRE SPHERE (V).
- Go forward.
Chapter 2: Two Good Deeds
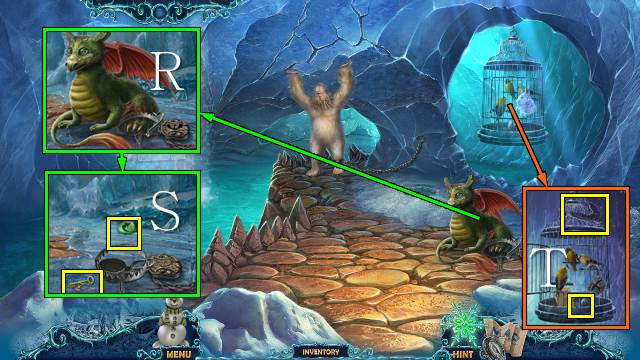
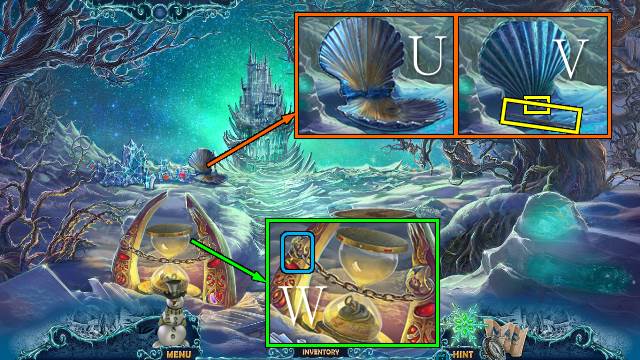
- Take BUTTON 1/2; interact twice with the dog (W).
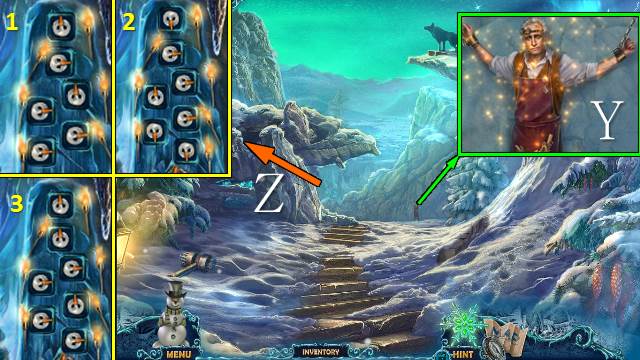
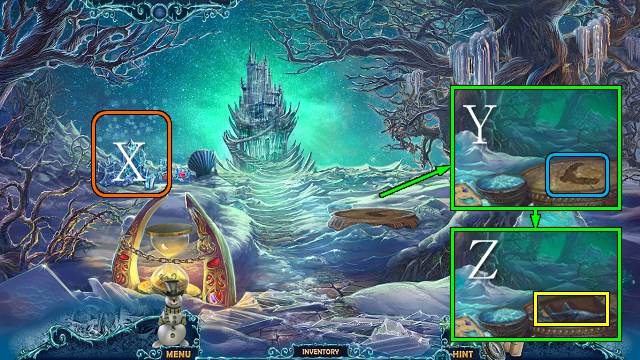
- Take the hat (X); search for the clues (Y).
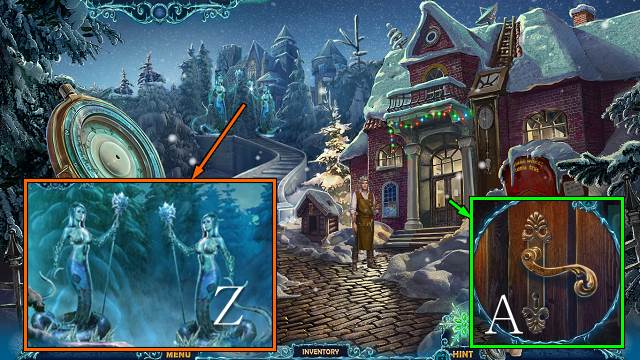
- Talk to the Lamias (Z).
- Turn the handle (A).
- Go right.
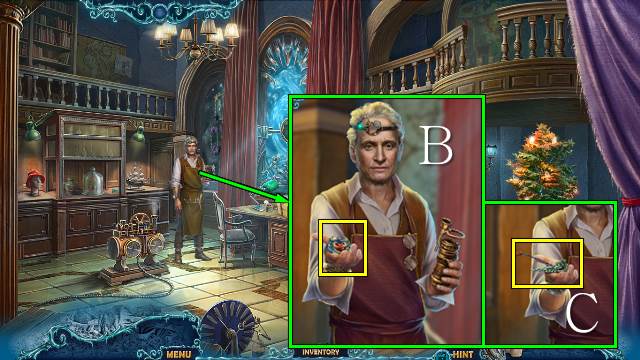
- Talk to Robert and take the medallion (B); take the MAILBOX KEY (C).
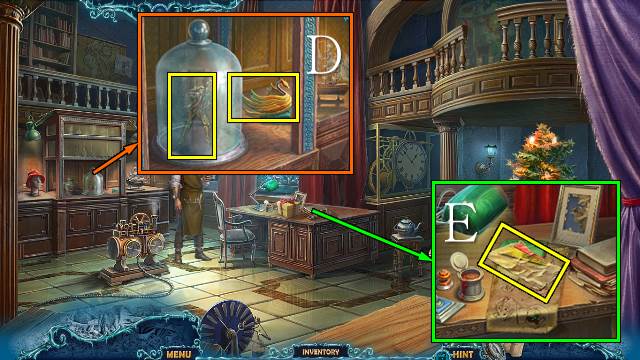
- Remove the glass; take the BOY STATUE and TIARA (D).
- Take the CODE SOLUTION (E).
- Walk down.
- Read the paper and use the MAILBOX KEY (F); take the PACKAGE FOR BOY (G).
- Walk down.
- Take the skates (H); search for clues (I).
- Place the TIARA; take the GRATE (J).
- Walk down twice and go left.

- Give the PACKAGE FOR BOY to the boy (K).
- Play the reverse HOP (L).
- Take the LATCH KEY (K).
- Go forward and left.
- Use the LATCH KEY (M).
- Take the MEDALLION (N).
- Go forward and right.
- Talk to Robert (O).
- Place the MEDALLION (P).
- Talk to Robert; take the MEDALLION (Q).
- Walk down.

- Use the MEDALLION (R).
- Go forward.
- Try to talk to Odri; open the door (S).
- Go forward.
- Talk to Odri again (T).
- Talk to Evil Odri (U).
- Take the PART OF SNOWFLAKE (V).
- Walk down twice.
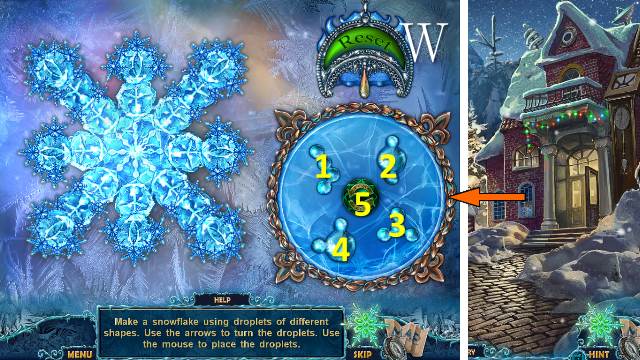
- Place the PART OF SNOWFLAKE for a mini-game (W).
- Solution: 1-5-1-5-1-5-1-3-5-3-5-3-5-3-4-5-4-5-2.
- Take the SNOWFLAKE.
- Go forward twice.
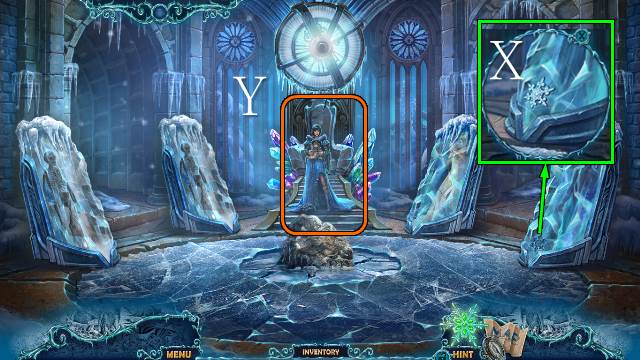
- Place the SNOWFLAKE (X).
- Try to go right.
- Talk to Odri (Y).
- Go right.
Chapter 3: The Flying Basket
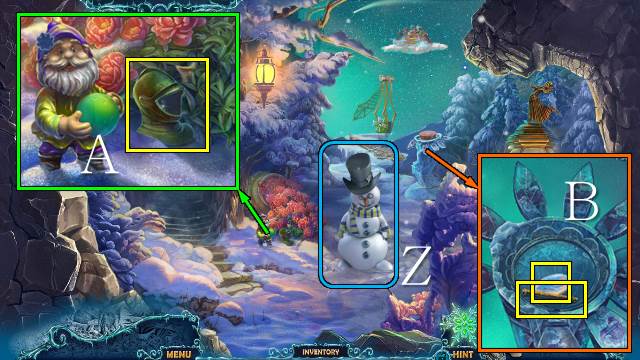
- Talk to the snowman; he will join you (Z).
- Take the KNIGHT’S HEAD (A).
- Take the FLUTE and ROSE INLAY (B).
- Take the BROKEN WING (C).
- Take the BROKEN FAN (D).
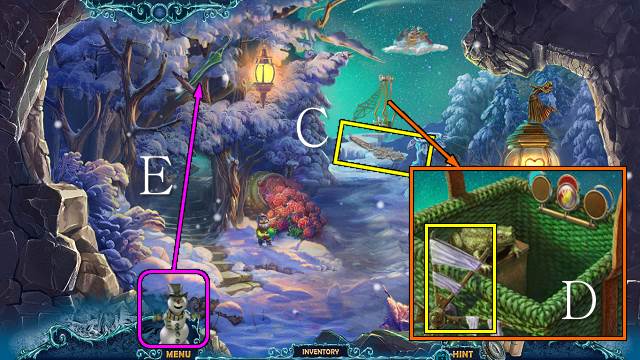
- Use the snowman on the umbrella (E).
- Take the UMBRELLA (F).
- Take the DOGHOUSE PIECE (G).
- Go left.
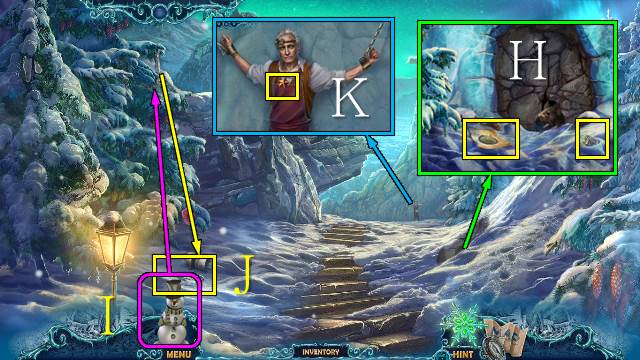
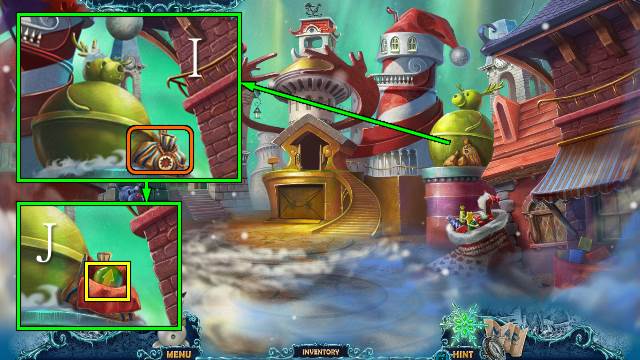
- Take the CODE and ZIPPER PULL (H).
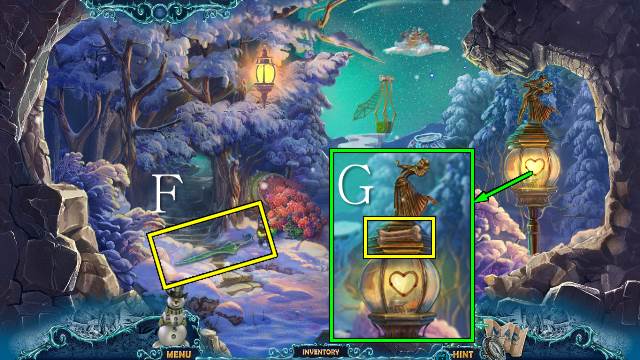
- Use the snowman on the tree (I); take the LADLE (J).
- Talk to Robert; take the STAR (K).
- Go to the yard At Robert’s House.
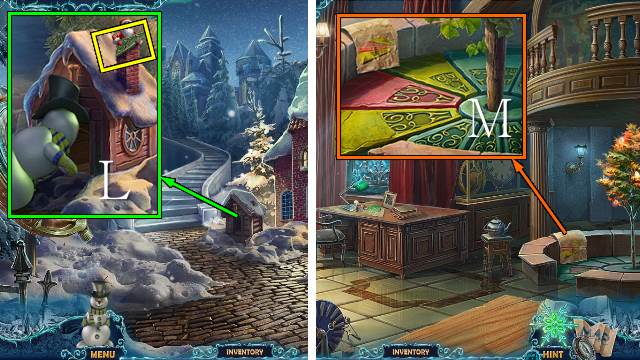
- Place the DOGHOUSE PIECE and take the STAIR; use the snowman to receive BUTTON 2/2 (L).
- Go right.
- Place the CODE SOLUTION, the STAIR and GRATE; change the colors of the steps (M).
- Play the HOP (N).
- HOP mini-game solution (O): A-B, C-A, B-A, B-C, A-B, A-C, B-C.
- You receive the COMPASS ARROW.
- Walk down.

- Place the COMPASS ARROW; take the PAGE WITH CLOVER (P).
- Go right.
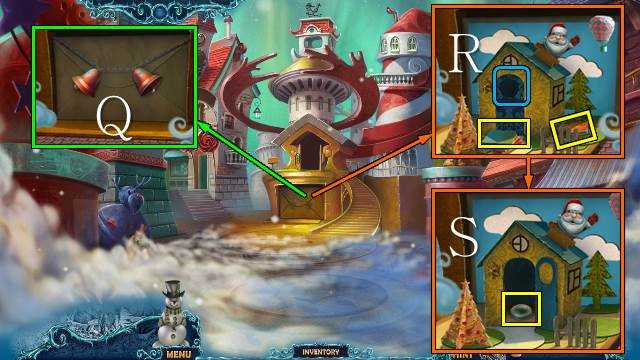
- Place the PAGE WITH CLOVER, fill and seal the envelope and take the LETTER (Q).
- Walk down.
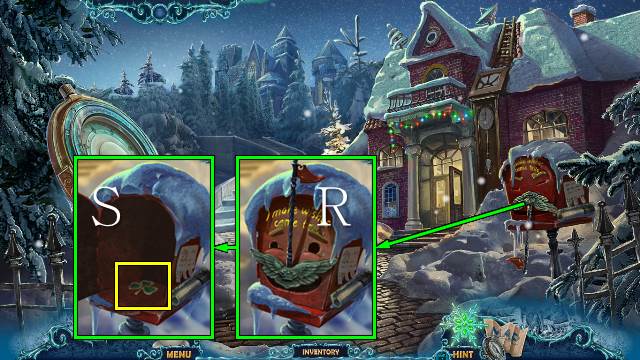
- Post the LETTER (R), open the mailbox and take the BOOK KEY (S).
- Go right.
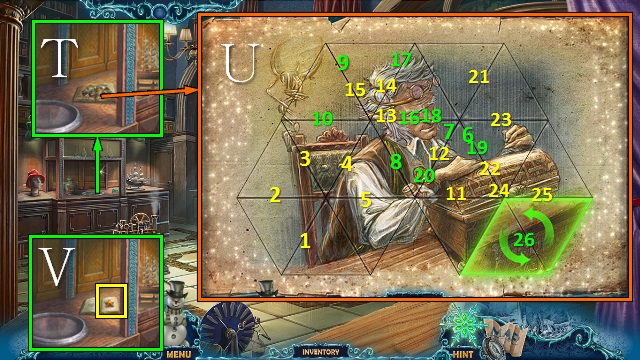
- Place the BOOK KEY and open the book (T); play the mini-game (U).
- Turn the pages twice and take the STAR (V).
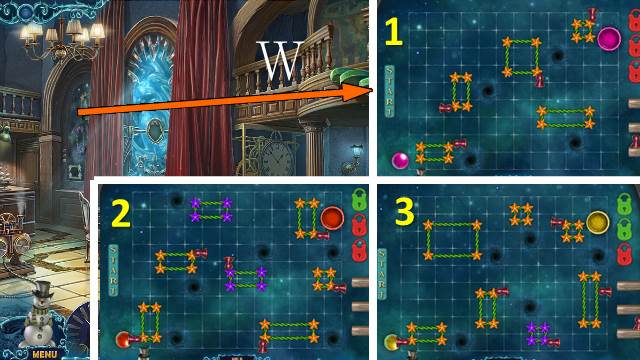
- Place the two STARS for a mini-game (W).
- Go forward.
- Play the HOP (X).
- You receive the FLINT.
- Open the telescope and take the PUZZLE PIECE; look through the telescope (Y).
- Use the snowman on the mechanism (Z).
- Take the GAME PIECE (A).
- Open the three compartments, take the items and take the BUTTERFLY NET (B).
- Place the BROKEN FAN and ZIPPER PULL; open the case and take the COG and PUZZLE PIECE (C).
- Place the CODE (D) and turn the knob to 10, 70 and 90 (E); take the PART OF APPARATUS and LEVER (F).
- Walk down twice.
- Use the FLINT; take the TORCH (G).
- Go forward twice.
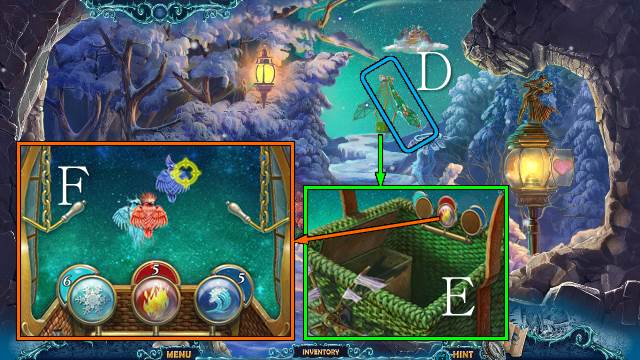
- Place the UMBRELLA and go left (H).
- Use the TORCH.
- Place the FLUTE and take the LASER (I).
- Take the STONE BONE and take the DRAGONFLY with the BUTTERFLY NET (J); place the ROSE INLAY and take the LANTERN GEM (K).
- Place the KNIGHT’S HEAD (L).
- Take the WRAPPING PAPER (M).
- Go down and right.
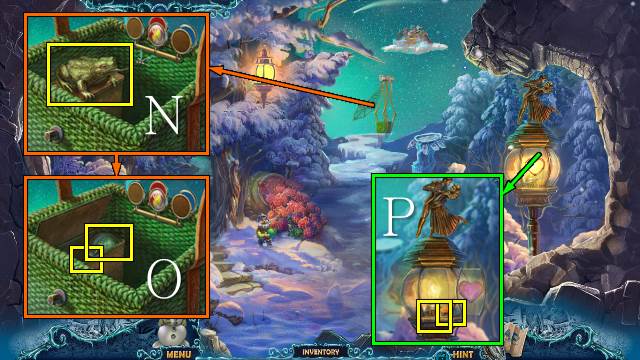
- Use the DRAGONFLY and take the FROG (N); take the CANNONBALL and POWER CORD (O).
- Place the BOY STATUE and LANTERN GEM; take the BRACELET and CARROT (P).
- Go left.
- Place the STONE BONE; take the GEM FLOWER (Q).
- Place the FROG and take the LEFT MITTEN (R); place the COG and LEVER and pull the lever (S).
- Go to Robert’s Secret Room.
- Interact with the creature (T).
- Walk down.
- Play the HOP (U).
- You receive the MARBLES.
- Go forward.
- Throw the MARBLES (V).
- Place the BROKEN WING and WRAPPING PAPER; take the WING (W).
- Plug in the POWER CORD and take the FAN (X).
- Place the LASER and push the button; take the MIRROR (Y).
- Play the HOP (Z).
- You receive the YARN.
- Go to the Treasure Vault.
- Place the BRACELET and take the PART OF MECHANISM (A).
- Place the MIRROR (B).
- Place your two PUZZLE PIECES for a mini-game (C).
- Casual: 1-2, 2-1-2, 2-1-2, 2-1-2.
- Hard: 2-1-2-1-2, 1, 1, 1.
- Go to the Garden.
- Place the WING (D).
- Place the FAN (E).
- Place the PART OF APPARATUS and PART OF MECHANISM for a mini-game (F).
Chapter 4: The Toy Factory
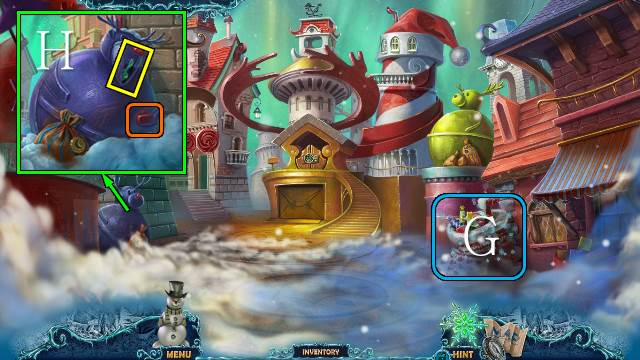
- Play the HOP (G).
- You receive a BUTTON.
- Place the LEFT MITTEN; take the MUSICAL NOTE (H).
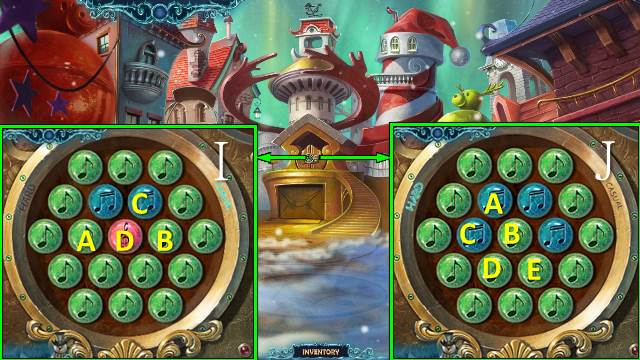
- Place your two BUTTONS for a mini-game.
- Casual (I): Ax2-Bx5-Cx3-Dx3.
- Hard (J): Ax1-Bx3-Cx4-Dx1-Ex1.
- Go forward.

- Talk to Santa; take the FLUTE (K).
- Place the MUSICAL NOTE (L); take the RIGHT MITTEN (M).
- Walk down.
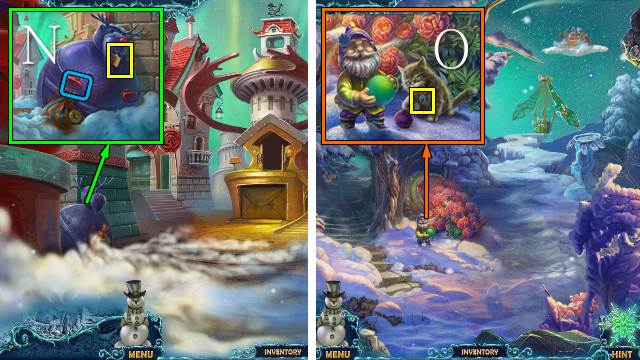
- Place the RIGHT MITTEN; take the ELF PIECE (N).
- Walk down.
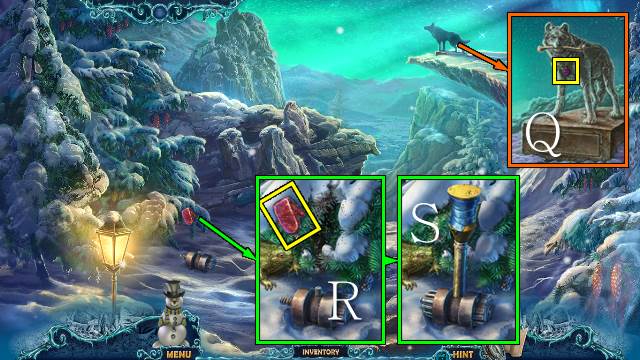
- Place the YARN; take the WOLF SYMBOL (O).
- Go left.
- Place the WOLF SYMBOL; take the GLASS PETAL (P).
- Walk down.
- Place the GLASS PETAL and take the ELF PIECE (Q); place the GEM FLOWER and take the CYMBALS (R).
- Go down and left.
- Place the GAME PIECE and ELF PIECE for a mini-game (S).
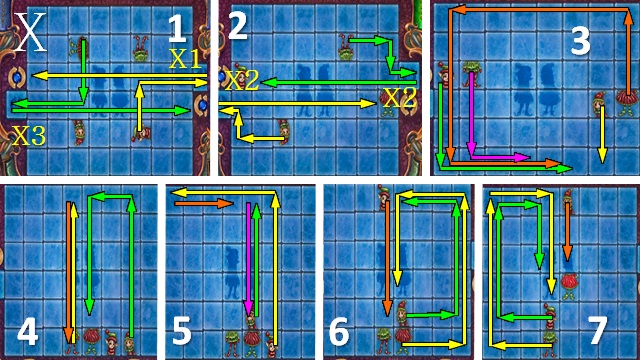
- Casual solution (T).
- Hard solution (U).
- Take the BUTTON (V).
- Go to Santa’s Square and go left.

- Place the square BUTTON and ELF PIECE for a mini-game (W).
- Casual solution.
- Hard solution (X).
- Go forward.
- Open the glass door (Y).
- Take the WREATH PICTURE (Z).
- Take the PIANO KEY (A).
- Take the WHITE FLUFF and move the streamer; place the CANNONBALL and push the button (B).
- Play the HOP (C).
- You receive a BOW.
- Take the ENVELOPE (D).
- Walk down.

- Use the WHITE FLUFF; take the SANTA TOY (E).
- Place the ENVELOPE (F); take the REINDEER (G).
- Go to the Reindeer Stable.
- Place the BOW, REINDEER and the WREATH PICTURE and change the colors of the bows to match the picture; take the HOUSING FOR FIRECRACKERS, YELLOW STAR and SUN (H).
- Walk down.
- Place the SUN (I); take the BUTTON (J).
- Go forward.
- Open the gate.
- Place the two BUTTONS for a mini-game (K).
- Solution: A-H-B-D-F-G-E-A-C.
- You receive a BIT OF CHRISTMAS FOLIAGE.
- Go down and left.
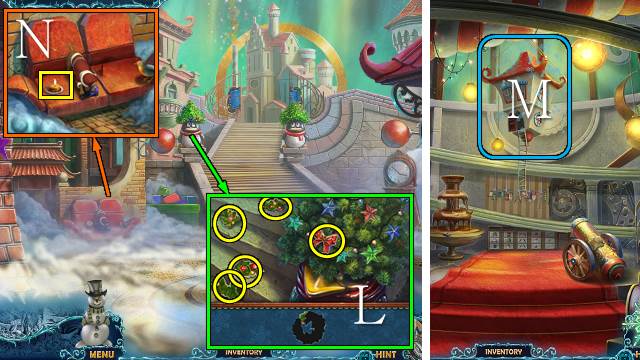
- Reconstruct the wreath, using the BIT OF CHRISTMAS FOLIAGE; take the WREATH (L).
- Go forward.
- Play the HOP (M).
- You receive some MATCHES.
- Walk down.
- Use the MATCHES; take the MELTED WAX (N).
- Go to the Treasure Vault.
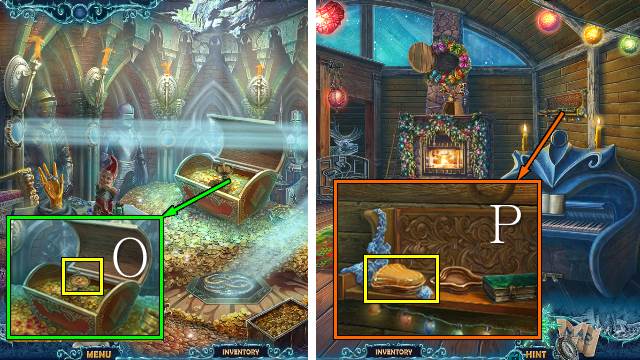
- Use the MATCHES; take the MELTED WAX (O).
- Go to the Reindeer Stable.
- Use the MELTED WAX and take the SMALL BELL; repeat (P).
- Walk down.
- Place the two SMALL BELLS (Q).
- Take the STACK OF PAPER and CARROT and place the WREATH (R); take the BUTTON (S).
- Take the GUITAR (T).
- Play the HOP (U).
- You receive a BARREL OF HONEY.
- Walk forward.
- Place the FLUTE, GUITAR and CYMBALS (V); take the BUTTON (W), place the BARREL OF HONEY and take the HEALING POTION (X).
- Go to the Cave.
- Give the HEALING POTION to Robert (Y).
- Place the two CARROTS for a mini-game (Z).
- Go left.
Chapter 5: The Road to the Ice Castle
- Move the paper and take the MEAT (A).
- Take the KEY TO CAGE (B).
- Use the snowman on the icy branch (C).
- Take the COLLAR (D).
- Go to the Street.
- Use the MEAT; take the FREEZING LIQUID (E).
- Go forward.
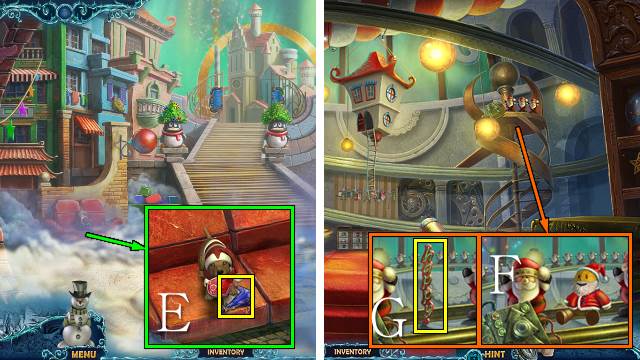
- Push the button and remove it, place the SANTA TOY and the new BUTTON and push it (F); take the HAPPY sign (G).
- Place the BUTTON with arrow for a mini-game (H).
- Take the NUT (I).
- Walk down twice.
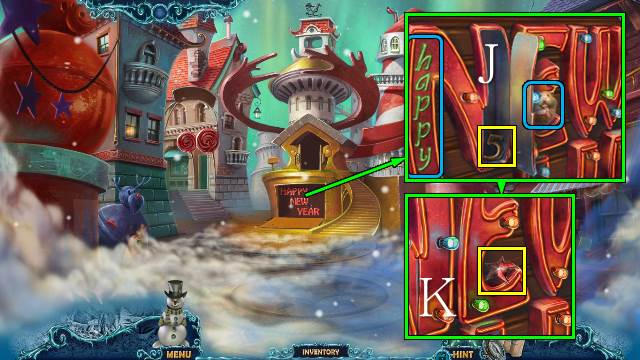
- Place the HAPPY sign and take the NUMBER 5 (J); give the NUT to the hamster and take the RED STAR (K).
- Go left.
- Place the YELLOW STAR and RED STAR and take the KEY; place the STACK OF PAPER, push the crocodile and take the CONFETTI (L).
- Go forward.
- Place the HOUSING FOR FIRECRACKERS and CONFETTI; place the cap and the trigger and take the FIRECRACKER (M).
- Walk down twice.
- Use the FIRECRACKER (N).
- Go forward.
- Place the PIANO KEY and KEY; take the SQUIRREL WITH HAMMER (O).
- Go to the Toy Factory.
- Place the SQUIRREL WITH HAMMER; take the RED NOSE (P).
- Walk down twice.
- Place the RED NOSE; take the NUMBER 12 (Q).
- Go left.
- Place the NUMBER 5 and NUMBER 12; take the SAILBOAT (R).
- Go forward.
- Place the SAILBOAT and push the button; take the MOON (S).
- Walk down twice.
- Place the MOON (T); take the METAL BAR (U).
- Go left and forward.
- Place the METAL BAR; take the CHOCOLATE MOLD (V).
- Place the CHOCOLATE MOLD and LADLE; take the CHOCOLATE BEAR (W).
- Go to the Cave.
- Interact twice with the dog (X).
- Go left.
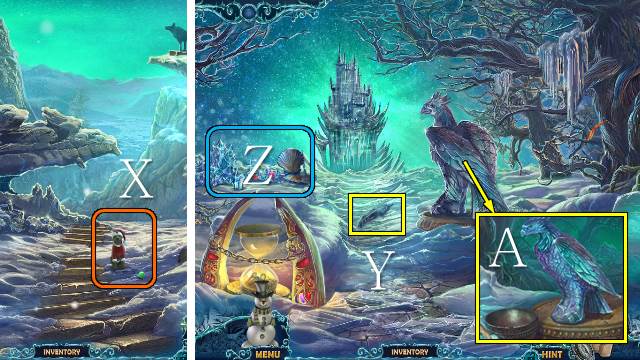
- Take the FEATHER OF BLACK SWAN (Y).
- Play the HOP (Z).
- You receive a CHIP.
- Use the FREEZING LIQUID; take the EAGLE (A).
- Go forward.
Chapter 6: Saving Christmas
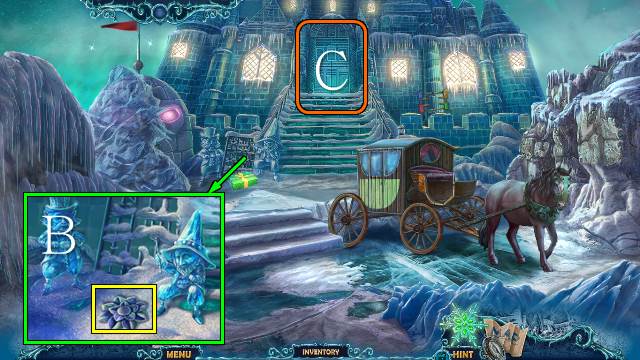
- Take the SMALL FLOWER (B).
- Open the doors (C).
- Go forward.
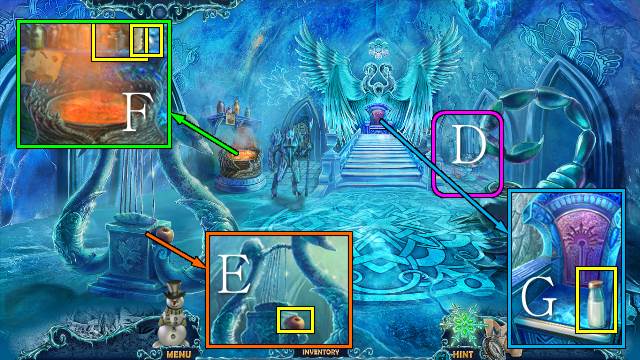
- Play the HOP (D).
- You receive a SCEPTER.
- Take the APPLE (E).
- Take the SOLUTION and FLASK OF HOT WATER (F).
- Take the MILK BOTTLE (G).
- Walk down.
- Place the MILK BOTTLE; take the MILK (H).
- Go forward.
- Use the MILK; take the KEY TO TRAP (I).
- Walk down three times.
- Place the CHOCOLATE BEAR (J) and SCEPTER (K) and use the snowman (L); you receive a MASK and DRUM.
- Walk down.
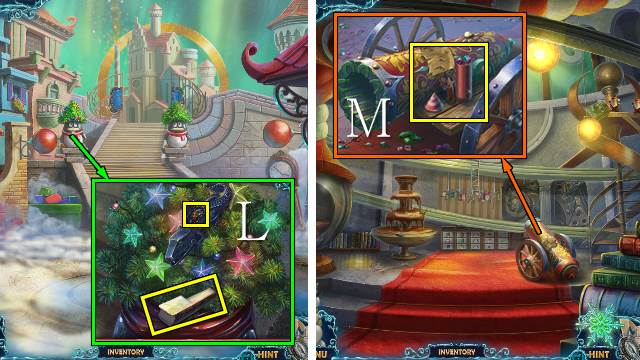
- Place the SMALL FLOWER; take the SMALL BALL (M).
- Go to the area Near Odri’s Castle.
- Open the carriage.
- Place the SMALL BALL and MASK; take the HORSESHOE and FIREFLIES (N).
- Place the DRUM (O).
- Place the CHIP for a mini-game.
- Solution: P-Qx2-Px6.
- Go left.
- Use the HEALING POTION and KEY TO TRAP (R); take the BUTTON and KEY (S).
- Use the FLASK OF HOT WATER and receive the FLASK; place the KEY TO CAGE and take the paper, ICE PEARL and EAGLE AMULET (T).
- Walk down twice.
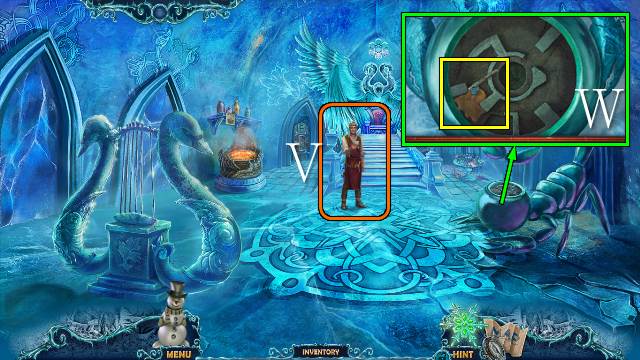
- Use the ICE PEARL (U); take the paper, PART OF KEY and BOW (V).
- Use the KEY (W).
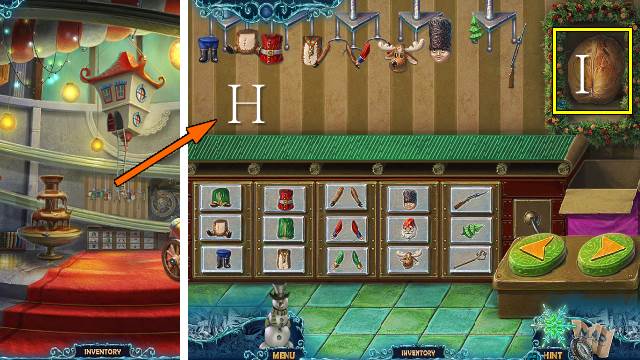
- Play the HOP (X).
- You receive a PISTOL WITH SUCTION CUP.
- Place the EAGLE AMULET (Y); take the SAWFISH (Z).
- Go to the Reindeer Stable.
- Place the HORSESHOE (A); take the HARNESS (B).
- Go to the area Near Odri’s Castle.
- Place the COLLAR and HARNESS (C).
- Play the HOP (D).
- You receive a WOODPECKER.
- Walk down.
- Place the WOODPECKER and FIREFLIES; take the ICICLE and TILE (E).
- Go forward.
- Place the TILE for a mini-game (F).
- Solution: E-F-C-B-H-D-E-G-F.
- Play the HOP (G).
- You receive a VIOLIN.
- Take the ICE COLUMN (H).
- Go left.
- Use the ICE COLUMN (I).
- Take the GLUE (J).
- Go down and forward.
- Play the HOP (K).
- You receive a FREEZING WEAPON.
- Use the GLUE; restore the key, using the PART OF KEY, and take the KEY and ARROW (L).
- Go down and left.
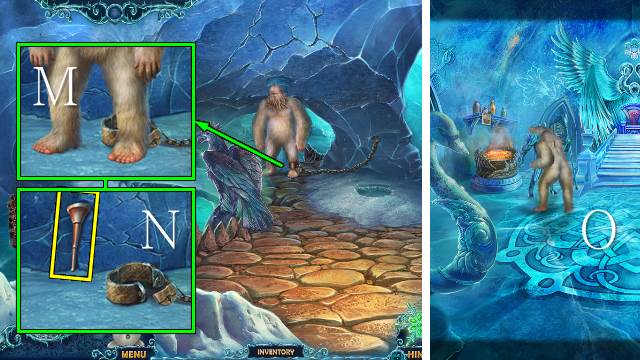
- Use the KEY and take the YETI (M) and HORN (N).
- Go down and forward.
- Release the YETI (O).

- Place the BUTTON for a mini-game.
- Solution: Q-Px3-Q-P-Qx2.
- Go forward.
- Use the FREEZING WEAPON (R).
- Take the TWEEZERS and retrieve the KEY with the PISTOL WITH SUCTION CUP (S).
- Take the ARROW (T).
- Walk down.
- Talk to Robert (U).
- Place the FLASK and take the SCORPION VENOM with the TWEEZERS (V).
- Walk down.
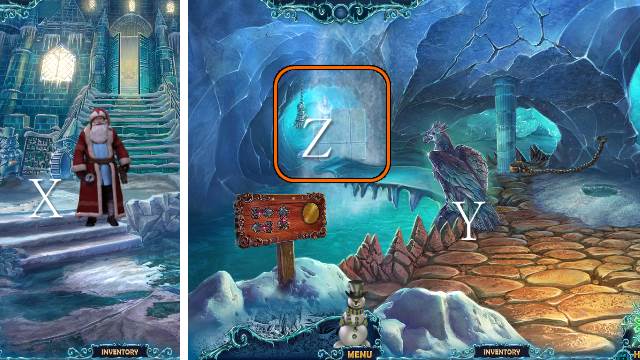
- Talk to Santa (X).
- Go left.
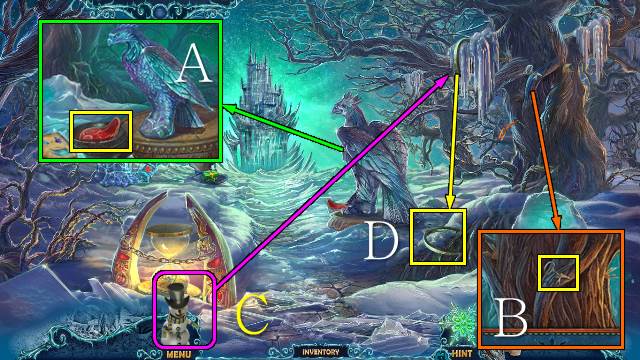
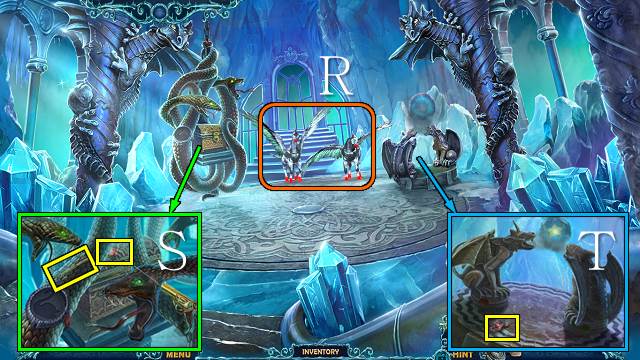
- Place the EAGLE (Y).
- Zoom in for a mini-game (Z).
- Place the two ARROWS to trigger the mini-game.
- Casual (A) and Hard (B) solutions.
- Take the PART OF HOURGLASS (C).
- Walk down twice.
- Place the KEY, turn the hourglass, open it with the PART OF HOURGLASS and take the KEY TO CAGE and PART OF CROWN (D).
- Restore the crown using the PART OF CROWN; take the CROWN (E).
- Go to the Treasure Vault.
- Use the HORN and the APPLE; take the POISONED APPLE (F).
- Go to the Hall.
- Use the FEATHER OF BLACK SWAN, POISONED APPLE and SCORPION VENOM; you receive the THAWING POTION (G).
- Go down and left.
- Use the THAWING POTION and SAWFISH; you receive the MUSICAL AMULET (H).
- Go down and forward.
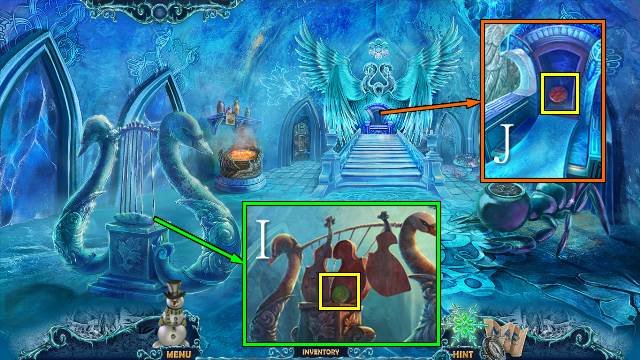
- Use the ICICLE and MUSICAL AMULET; place the VIOLIN and BOW and take the STATUE ORNAMENT (I).
- Place the CROWN; take the STATUE ORNAMENT (J).
- Go forward.
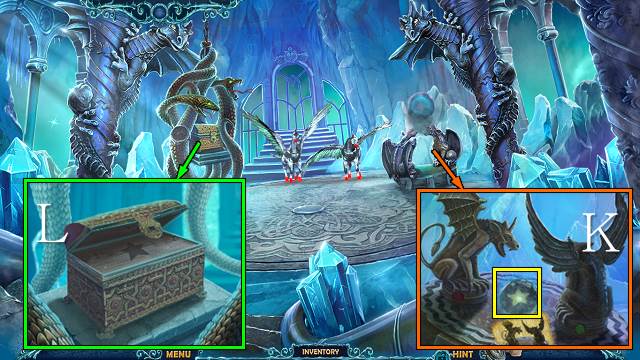
- Place the two STATUE ORNAMENTS and SOLUTION; move the gargoyle parts and take the STAR (K).
- Place the KEY TO CAGE, open the chest and place the STAR for a mini-game (L).
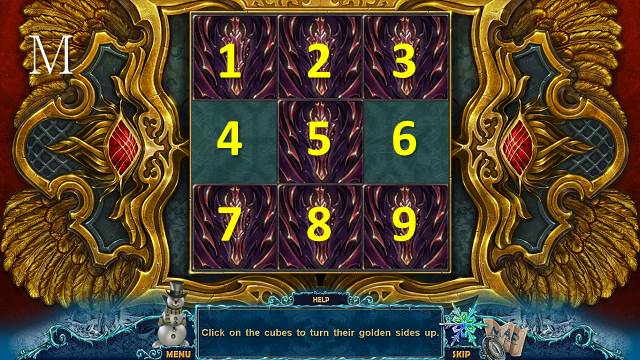
- Solution (M): 5(left)-8-7-4-5(left)-8-7-4-5(right)-8-5(left)-2-5(down)-4-5(up)-8-7(right)-1-4(down)-5-6-9-8-5-2(down)-3-2(left)-5-6(up)-8-5(right)-4-5(down).
- Congratulations, you’ve completed Christmas Eve: Midnight’s Call.


 Whispered Secrets: Into the Beyond Walkthrough, Guide, & Tips
 Elixir of Immortality Walkthrough, Guide, & Tips
 EcoRescue: Project Rainforest Walkthrough, Guide, & Tips
 Bedtime Stories: The Lost Dreams Walkthrough, Guide, & Tips
 Haunted Train: Frozen in Time Walkthrough, Guide, & Tips