Haunted Train: Frozen in Time Walkthrough, Guide, & Tips
Haunted Train: Frozen in Time Walkthrough

Welcome to the Haunted Train: Frozen in Time Walkthrough
Thieves have stolen Charon’s most powerful artifact: watches that can stop time. Now only you stand in their way.
Whether you use this document as a reference when things get difficult or as a road map to get you from beginning to end, we’re pretty sure you’ll find what you’re looking for here.
This document contains a complete Haunted Train: Frozen in Time game walkthrough featuring annotated screenshots from actual gameplay!
We hope you find this information useful as you play your way through the game. Use the walkthrough menu below to quickly jump to whatever stage of the game you need help with.
Remember to visit the Big Fish Games Forums if you find you need more help. Have fun!
This walkthrough was created by Chrysanne Westin, and is protected under US Copyright laws. Any unauthorized use, including re-publication in whole or in part, without permission, is strictly prohibited.
General Tips
- This is the official guide for Haunted Train: Frozen in Time.
- This guide will not mention each time you have to zoom into a location; the screenshots will show each zoom scene.
- Hidden-object puzzles are referred to as HOPs. This guide will not show HOP solutions. It will identify the location of the HOP and the inventory item acquired.
- This guide will show solutions for non-random puzzles. Please read the in-game instructions for each puzzle.
Chapter 1: Farrington

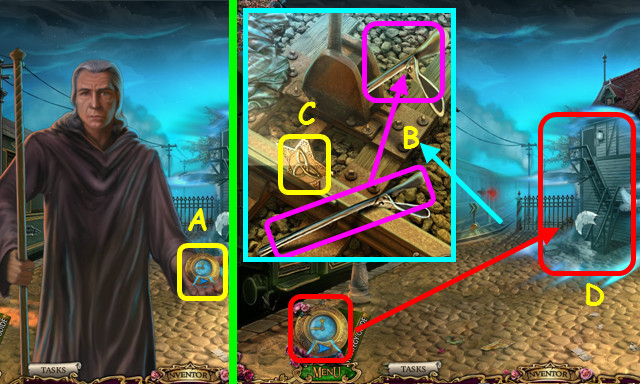
- Talk to Charon; take the CHRONOMETER (A).
- Move the lever to the switch; pull the lever (B).
- Take the STAR EMBLEM (C).
- Use the CHRONOMETER (D).

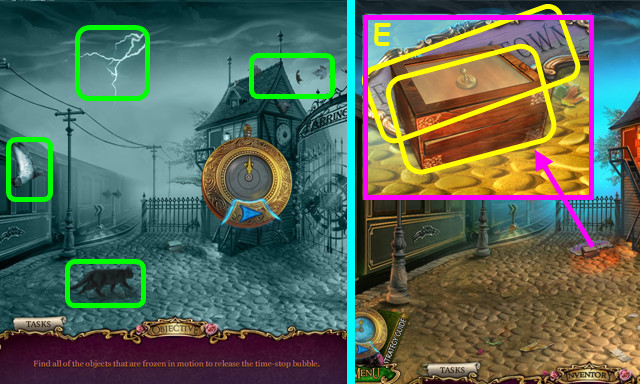
- Select the items frozen in motion (green).
- Take the BOX and RUINED SIGN (E).
- Open the box; take the 1st GOLDEN TOKEN (inventory).

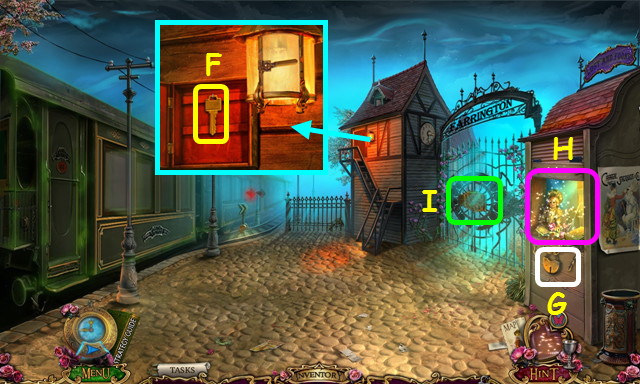
- Open the door; take the KEY (F).
- Use the KEY (G).
- Play the HOP; earn the 2nd GOLDEN TOKEN (H).
- Select the gate (I).

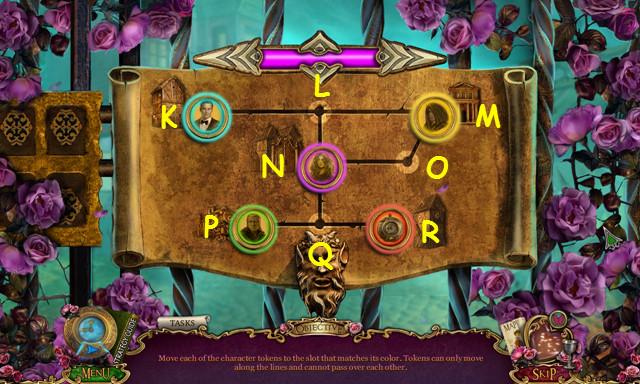
- Place the 2 GOLDEN TOKENS on the panel.
- Slide the tokens M-O, K-M, N-K, P-L, O-P, M-O, L-M, R-L, O-R, M-N, L-M.
- Walk right.

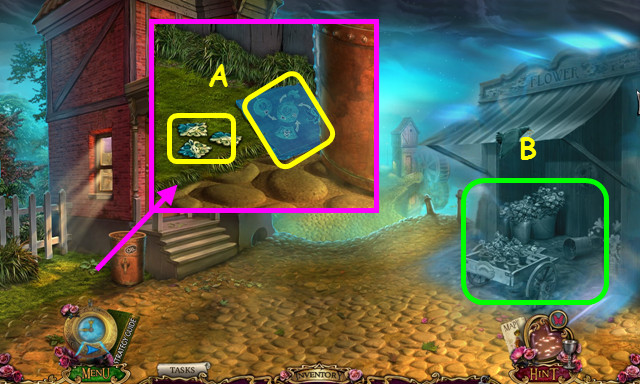
- Take the BUTTONS and CHRONOMETER BLUEPRINT (A).
- Use the CHRONOMETER (B).

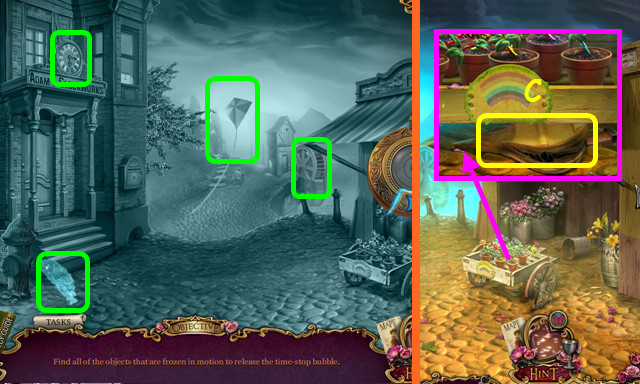
- Select the items frozen in motion (green).
- Take the TORN BELLOWS (C).
- Walk forward.

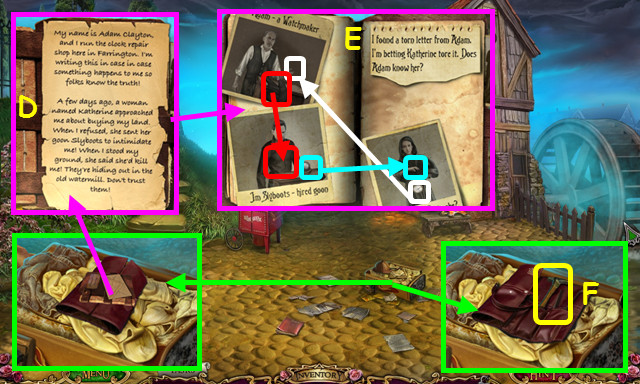
- Move the items to find the diary; restore the note (D).
- Restore the items (E).
- Place the STAR EMBLEM; take the HAMMER (F).

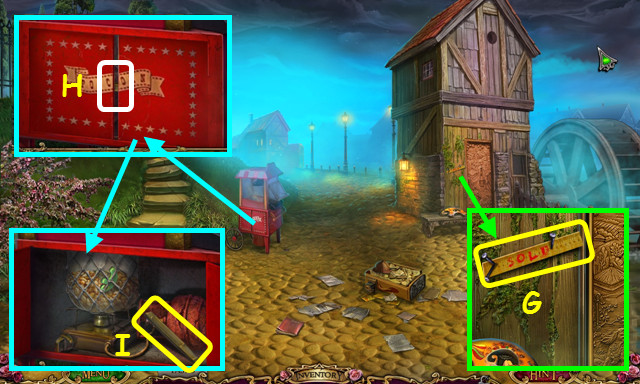
- Use the HAMMER 2x; take the RULER (G).
- Use the RULER (H).
- Take the WOOD CHISEL (I).
- Use the WOOD CHISEL and HAMMER on the RUINED SIGN to take the 1ST CHRONOMETER SHARD (inventory).
- Walk forward.

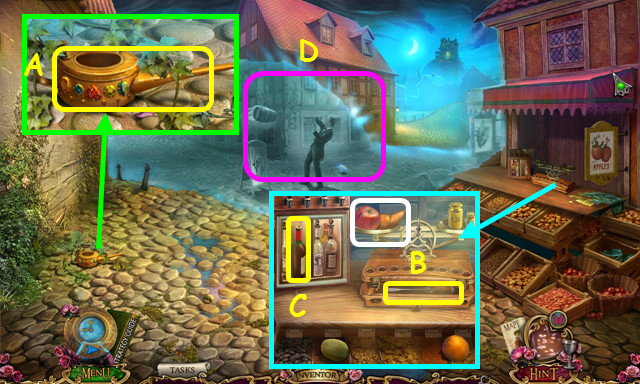
- Move the 2 vines; take the EMPTY OILCAN (A).
- Place the apple and pear on the scale; take the SCREWDRIVER (B).
- Open the case; take the WINE BOTTLE (C).
- Use the CHRONOMETER (D).

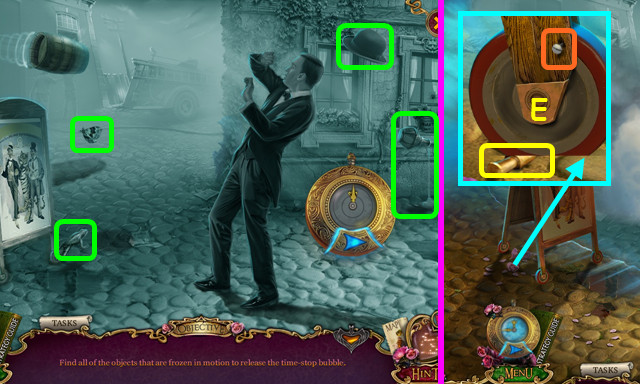
- Select the items frozen in motion (green).
- Use the SCREWDRIVER; take the VALVE (E).
- Walk down 3x.

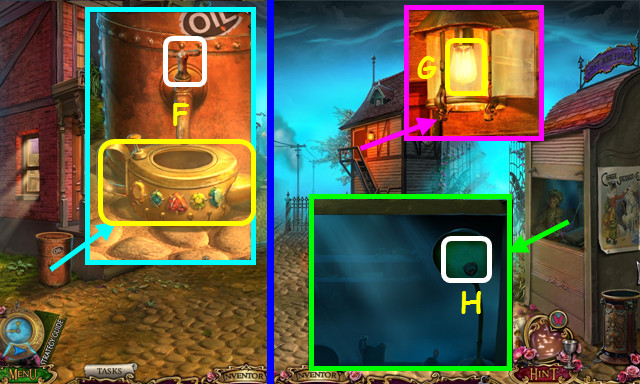
- Place the EMPTY OILCAN and VALVE; turn the valve and take the OIL (F).
- Walk down.
- Use the OIL; open the glass and take the LIGHT BULB (G).
- Place the LIGHT BULB (H).
- Play the HOP; earn the LEATHER GLOVE.
- Walk right.

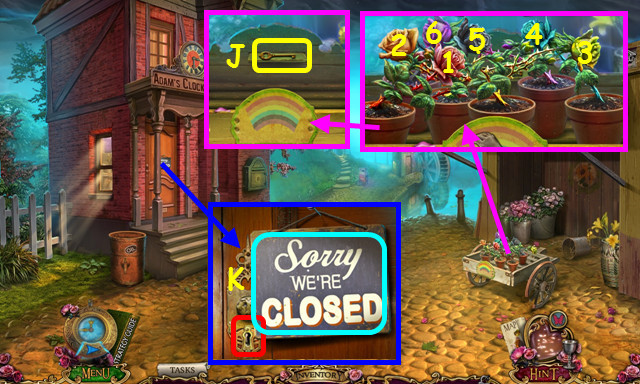
- Use the LEATHER GLOVE; select 1-6.
- Take ADAM’S HOUSE KEY (J).
- Remove the sign; use ADAM’S HOUSE KEY (K).
- Walk left.

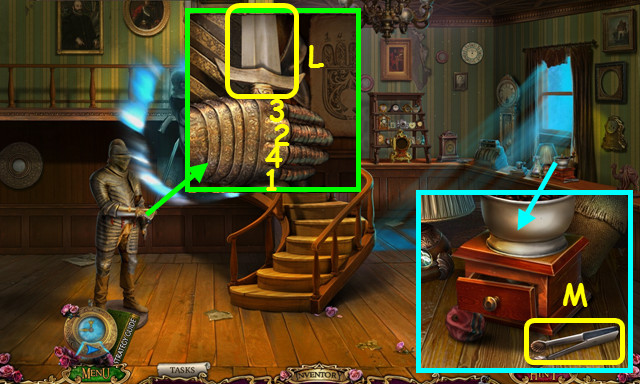
- Press 1-4; take the SHARP SWORD (L).
- Take the TWEEZERS (M).

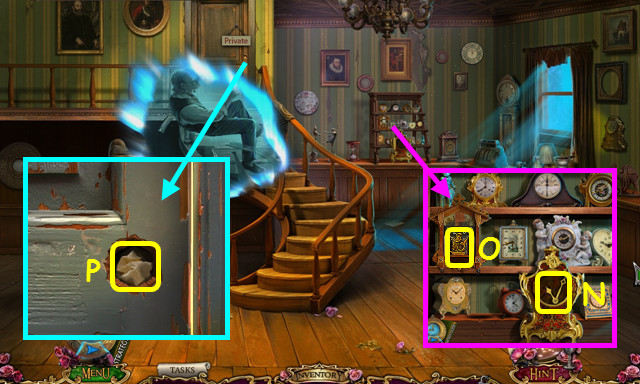
- Take the CLOCK HANDS (N).
- Select the clock; take the MERMAID MEDAL (O).
- Use the TWEEZERS; take the DOG MEDAL (P).
- Walk down.

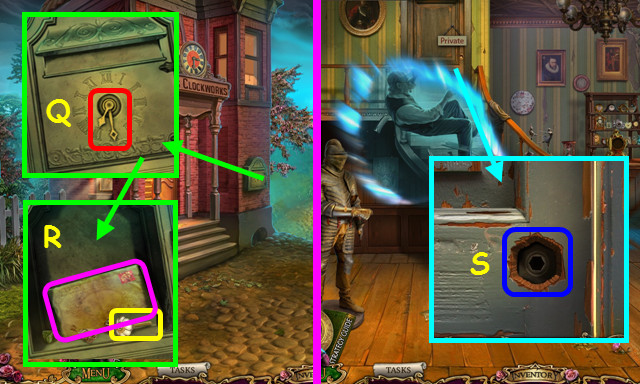
- Place the CLOCK HANDS; select them 4x (Q).
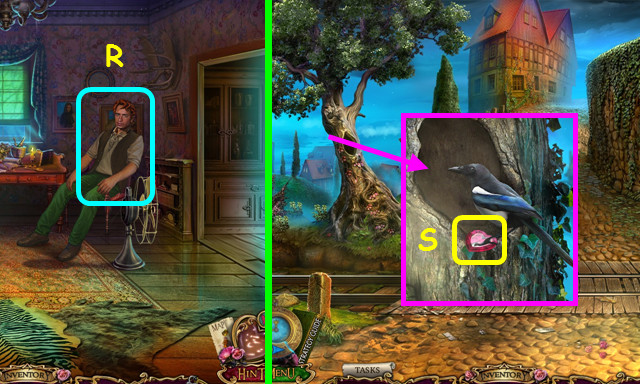
- Brush the webs; take the letter and DOOR HANDLE (R).
- Walk left.
- Use the DOOR HANDLE; walk forward (S).

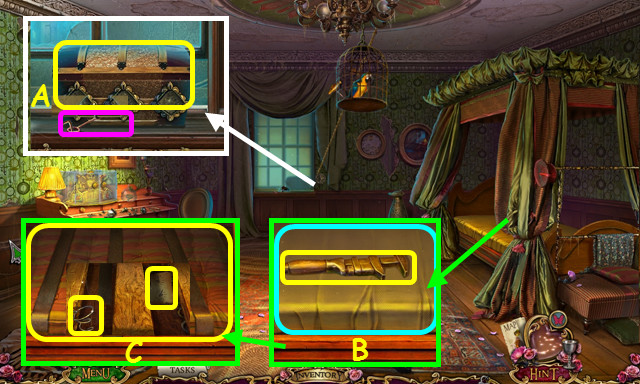
- Use the HAMMER; take the CHEST (A).
- Combine the CHEST and BUTTONS; press the buttons and take the NEEDLE AND THREAD (inventory).
- Combine the TORN BELLOWS with the NEEDLE AND THREAD to make the BELLOWS (inventory).
- Take the ADJUSTABLE WRENCH and remove the cover (B).
- Use the SHARP SWORD; take the MATTRESS, TORN NOTE, and SPRING (C).
- Walk down.

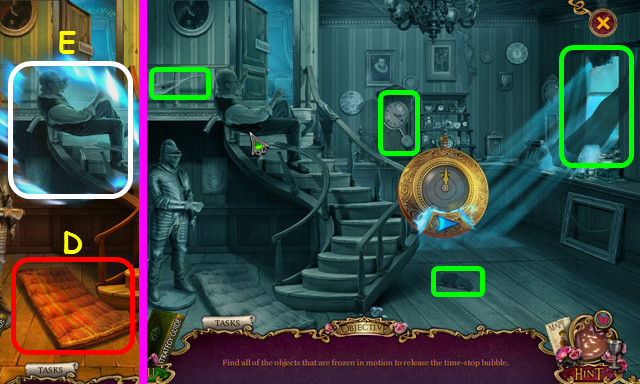
- Place the MATTRESS (D).
- Use the CHRONOMETER (E).
- Locate the items frozen in time (green).
- Talk to Adam.

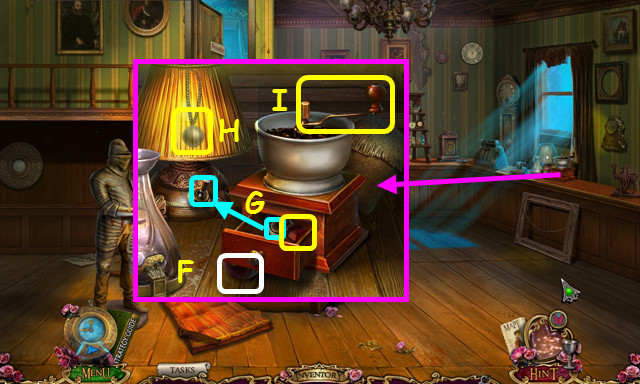
- Use the BELLOWS (F).
- Use the switch on the lamp; take the MAGNET (G).
- Take the GREEN GEM (H).
- Use the ADJUSTABLE WRENCH; take the HANDLE (I).
- Walk forward.

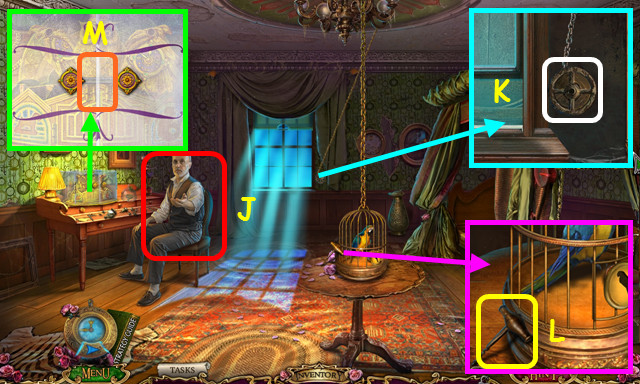
- Give the CHRONOMETER and CHRONOMETER BLUEPRINT (J).
- Place and turn the HANDLE (K).
- Take the CORKSCREW (L).
- Combine the WINE BOTTLE and CORKSCREW to find the WINE (inventory).
- Use the MAGNET (M).

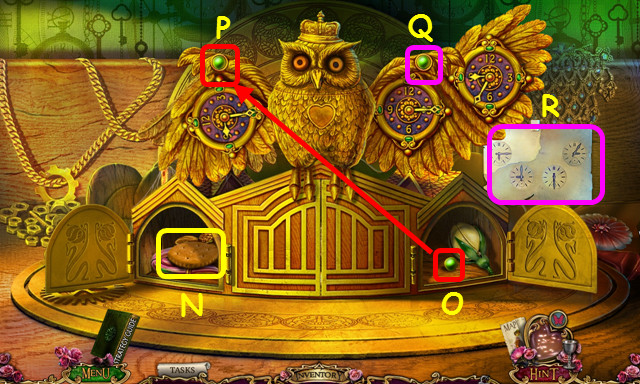
- Place the DOG MEDAL; take the CRACKER (N).
- Place the MERMAID MEDAL; move the green gem (O) to the wing (P).
- Place the GREEN GEM (Q) and TORN NOTE (R).
- Exit the owl mini-game and walk down.

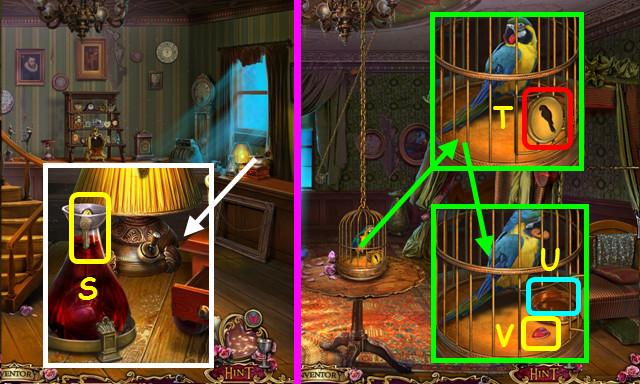
- Use the WINE; take the PARROT EMBLEM (S).
- Walk forward.
- Place the PARROT EMBLEM (T).
- Place the CRACKER (U).
- Take the CRYSTAL HEART (V).
- Return to the owl mini-game.

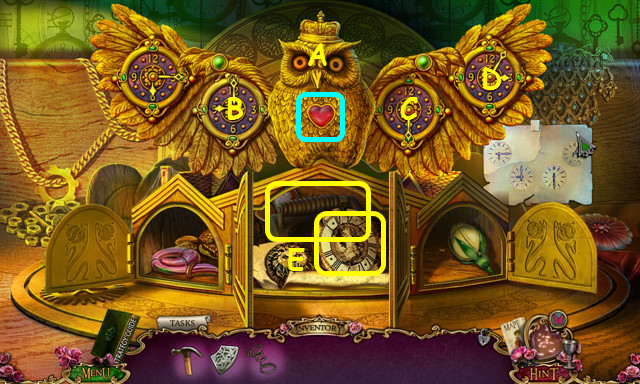
- Place the CRYSTAL HEART (A).
- Select Bx2-Cx3-Dx3.
- Take the CLOCK FACE and BROKEN BLOWTORCH (E).
- Walk down.

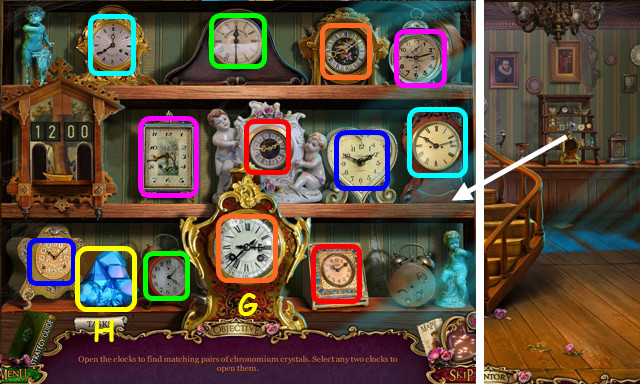
- Place the CLOCK FACE (G).
- Select pairs (color-coded).
- Take the CHRONOMIUM (H).
- Walk forward.

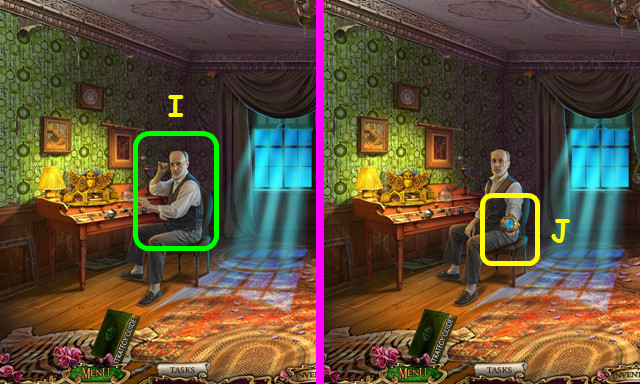
- Give the CHRONOMIUM (I).
- Play the HOP.
- Take the CHRONOMETER (J).
- Return to Town Square.

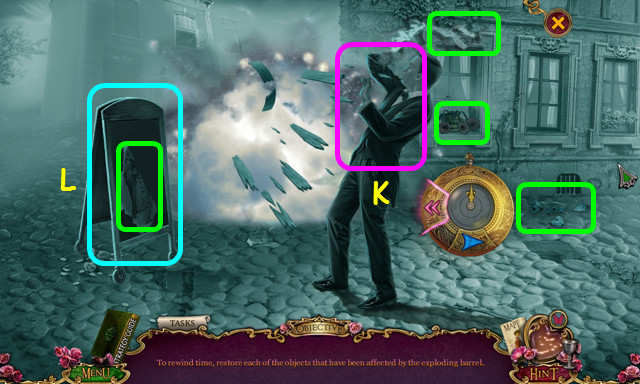
- Use the CHRONOMETER (K); restore the items (green).
- Move the signboard (L).
- Use the CHRONOMETER again.

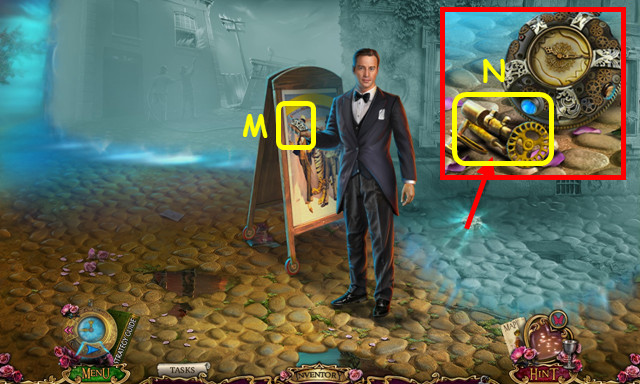
- Take the 2nd CHRONOMETER SHARD (M).
- Take the NOZZLE WITH VALVE (N).
- Combine the BROKEN BLOWTORCH and NOZZLE WITH VALVE to make the BLOWTORCH (inventory).
- Go to the River Walkway.
Chapter 2: The Watermill

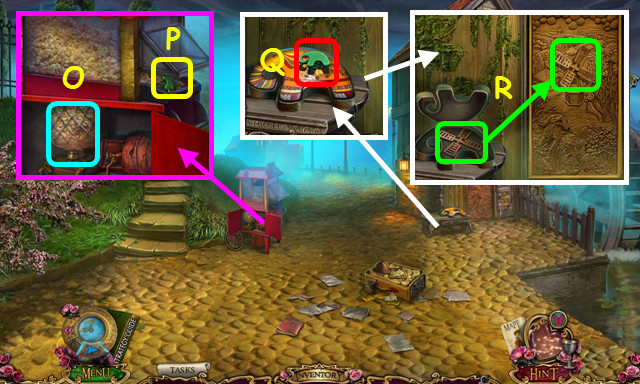
- Use the BLOWTORCH (O).
- Take the ELEPHANT BUTTON (P).
- Place and push the ELEPHANT BUTTON (Q).
- Move the windmill blades and open the door (R).
- Enter the Watermill.

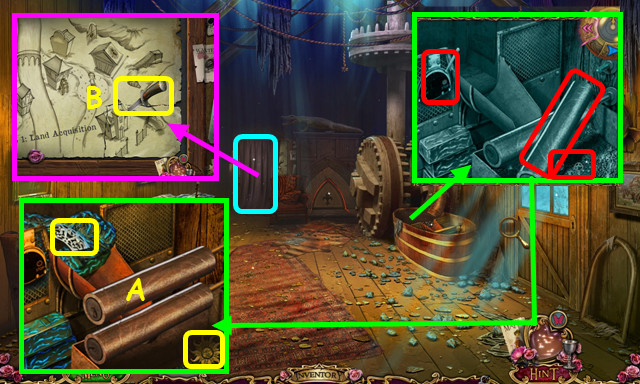
- Use the CHRONOMETER; select the items to restore (red).
- Take the 3rd CHRONOMETER SHARD and SUN (A).
- Remove the cover; take the DAGGER (B).

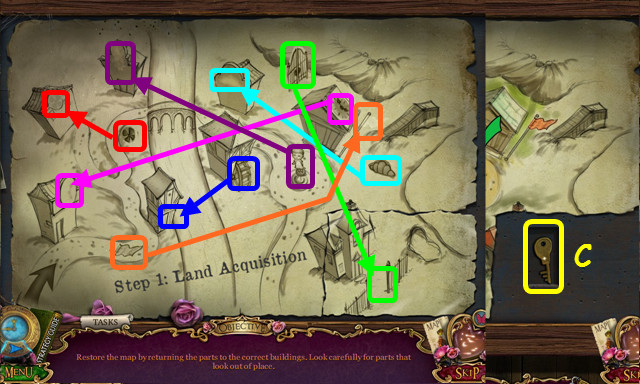
- Restore the map (color-coded).
- Take the WATERMILL KEY (C).

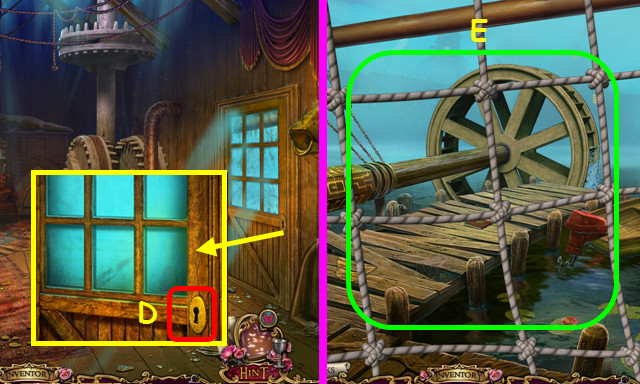
- Use the WATERMILL KEY; walk right (D).
- Use the DAGGER (E).

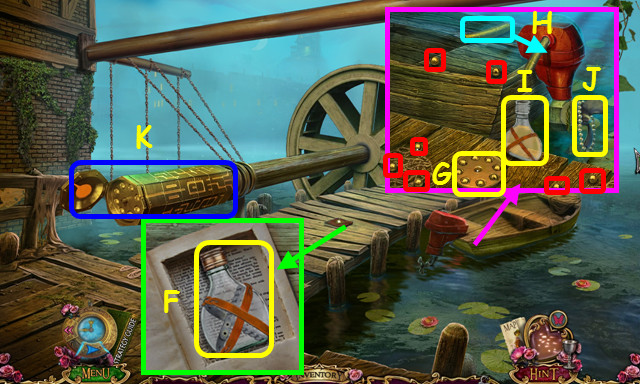
- Place the SUN; take the EMPTY FLASK (F).
- Move the bearings to the plate (red); take the BALL BEARING (G).
- Remove the cap and place the hose (H).
- Use the EMPTY FLASK; take the GAS FLASK (I).
- Use the DAGGER 2x; take the PEARL NECKLACE (J).
- Select (K).

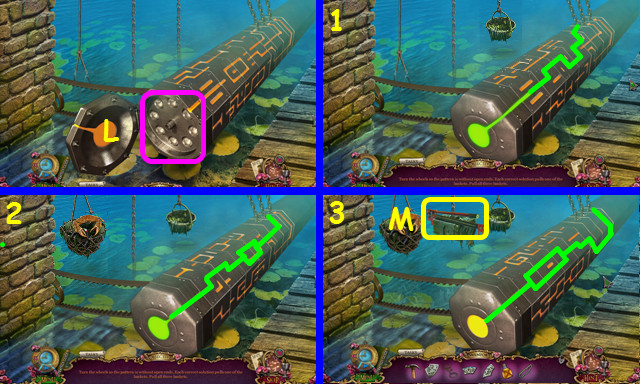
- Place the BALL BEARING (L).
- Restore the patterns (1-3).
- Take the JACK (M).
- Return to the Watermill.

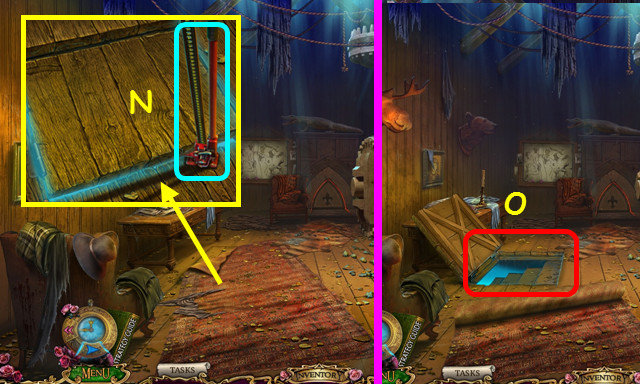
- Remove the rug; place and use the JACK (N).
- Enter the trapdoor (O).

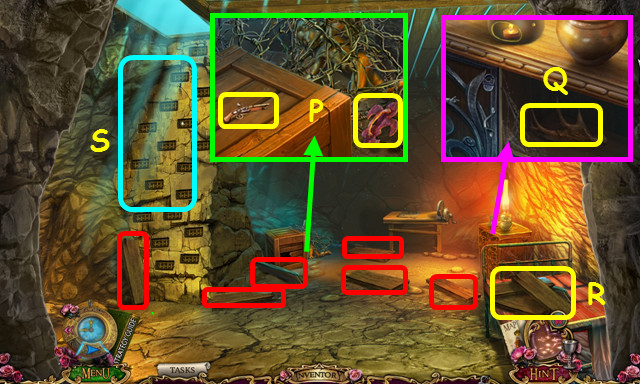
- Take the DUELING PISTOL and LILY HANDLE (P).
- Place the DUELING PISTOL; take the ELK HORN (Q).
- Select the 6 boards (red).
- Take the STAIRS (R).
- Select (S).

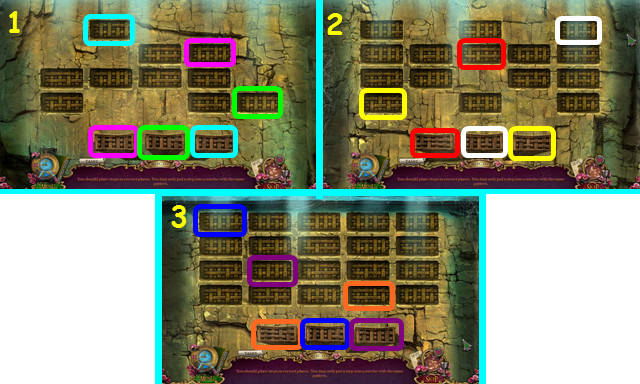
- Place the STAIRS on the wall.
- Place the stairs (color-coded) (1-3).

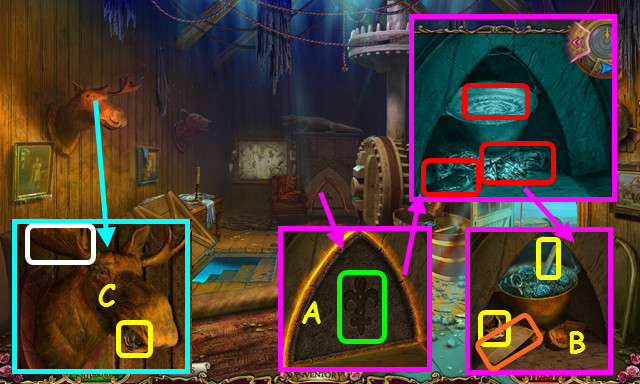
- Place the LILY HANDLE; remove the cover (A).
- Use the CHRONOMETER; restore the items (red).
- Take the note, 1st MEDALLION HALF, and BLUNT HACKSAW BLADE (B).
- Place the ELK HORN; take the 2nd MEDALLION HALF (C).
- Walk down.

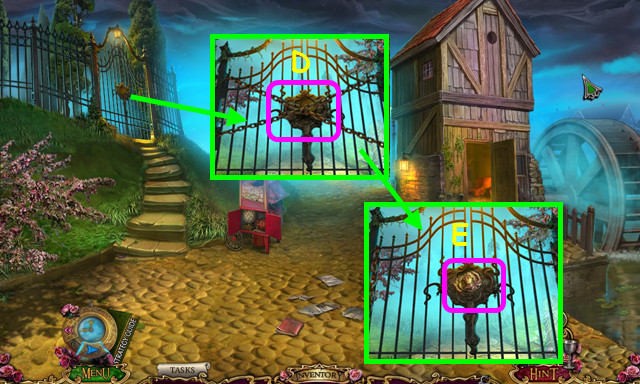
- Use the BLOWTORCH (D).
- Place the 2 MEDALLION HALVES (E).
- Walk left.

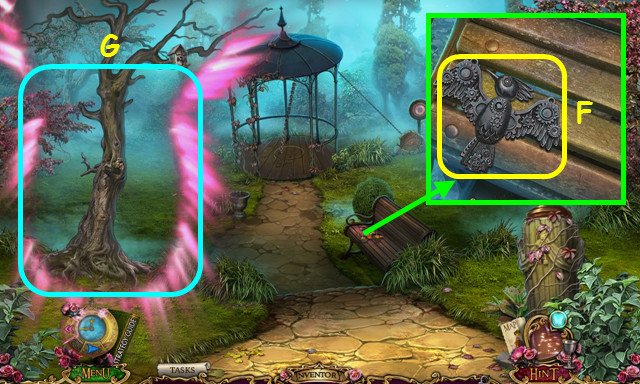
- Remove the leaves; restore and take the METAL BIRD (F).
- Use the CHRONOMETER (G).

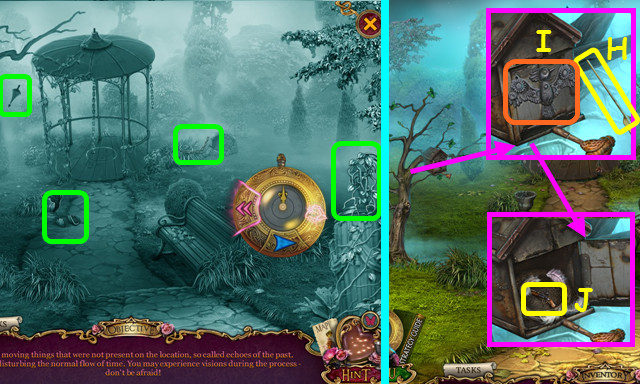
- Select the items (green).
- Take the ARROW (H).
- Place the METAL BIRD; adjust the wings (I).
- Move the feathers; take the DUELING PISTOL (J).
- Return to the Cellar.

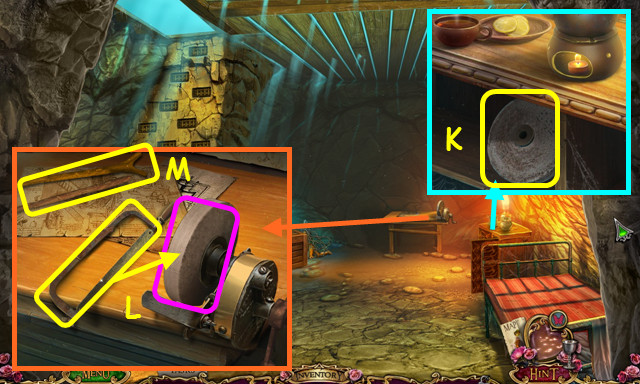
- Place the DUELING PISTOL; take the GRINDING STONE (K).
- Place the BLUNT HACKSAW BLADE and replace the GRINDING STONE (L).
- Select the blunt hacksaw and use it on the grinding stone to make the HACKSAW.
- Take the BROKEN STICK (M).
- Return to the Park.

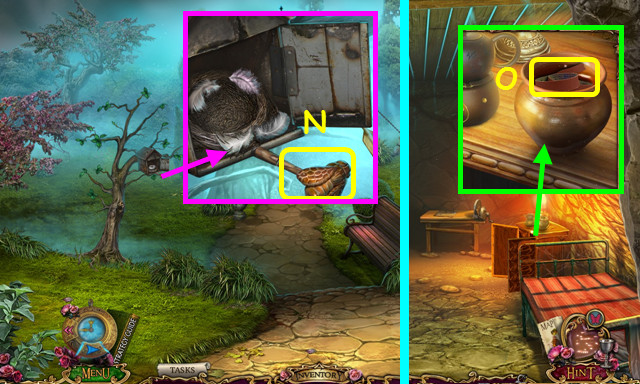
- Use the HACKSAW to take the WOODEN BEE (N).
- Return to the Cellar.
- Place the WOODEN BEE; take the TAPE (O).
- Combine the BROKEN STICK and TAPE to make the LONG STICK (inventory).
- Go to the Dock.

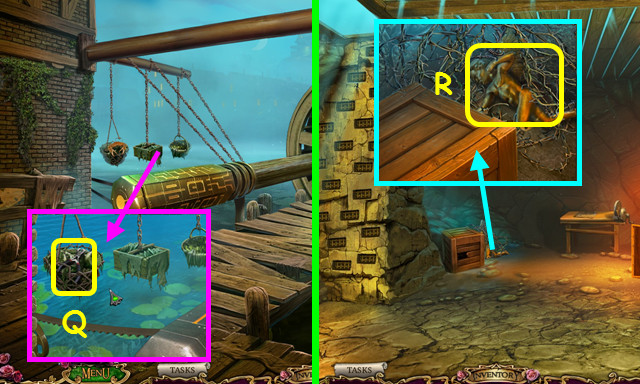
- Use the LONG STICK; take the NIPPERS (Q).
- Return to the Cellar.
- Use the NIPPERS; take the CUPID STATUE (R).
- Go to the Park.

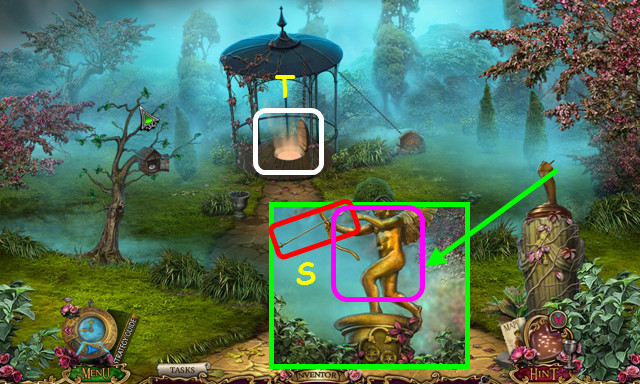
- Place the CUPID STATUE and ARROW (S).
- Enter the trapdoor (T).

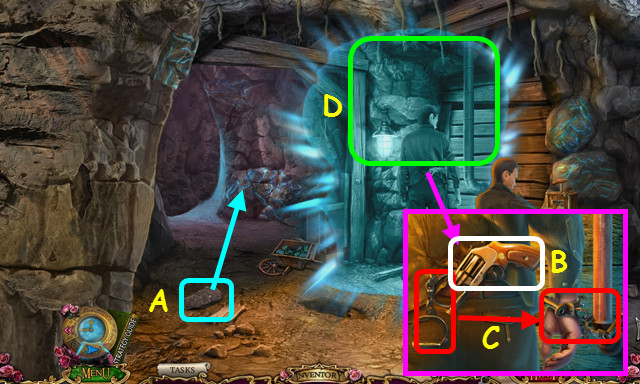
- Toss the rock (A).
- Select the revolver; remove the bullets (B).
- Use the handcuffs on the pipe (C).
- Use the CHRONOMETER (D).

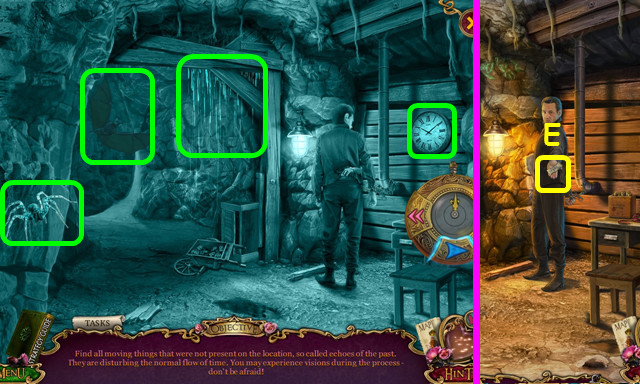
- Select the items (green).
- Take the TABLE CODE (E).

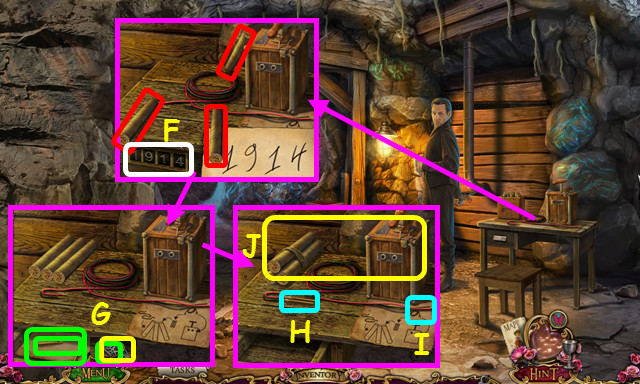
- Dump the box; select the 3 TNT sticks (red).
- Enter the code (F).
- Select the blasting caps, note, twine, and 4th CHRONOMETER SHARD (G).
- Select the blasting caps (H) and wire ends (I); take the DYNAMITE (J).

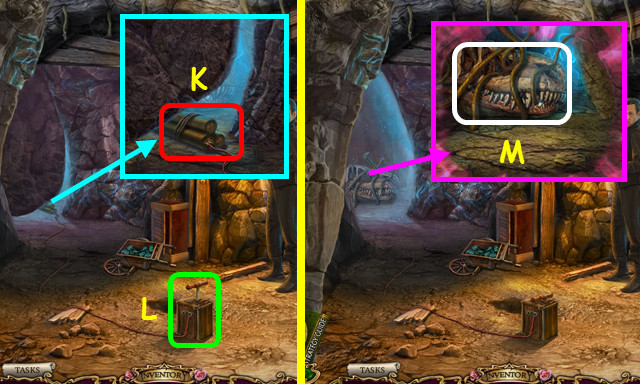
- Place the DYNAMITE (K).
- Push the plunger (L).
- Use the CHRONOMETER (M).

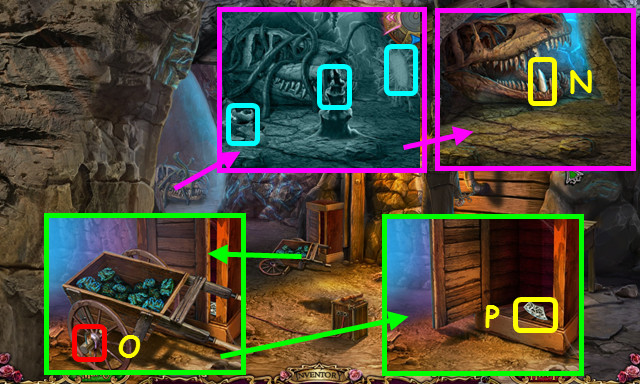
- Select the items (blue).
- Use the HAMMER; take the CANINE (N).
- Select the cart; use the CANINE (O).
- Push the cart, open the cabinet, and take the 5th CHRONOMETER SHARD (P).
- Return to Town Square.

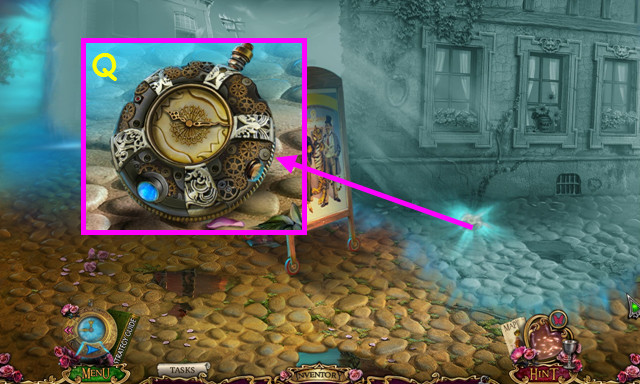
- Place the 5 CHRONOMETER SHARDS (Q).
- Walk right.
Chapter 3: The Bridge

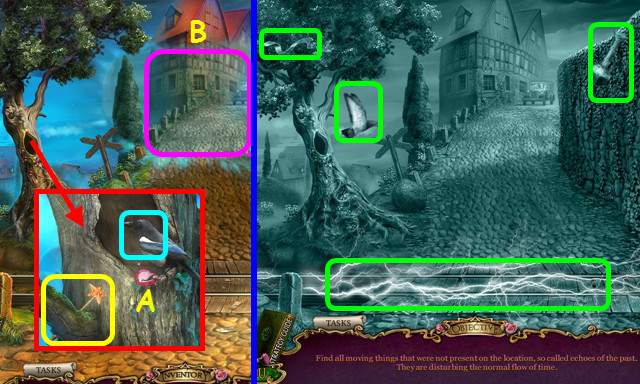
- Use the PEARL NECKLACE; take the Wand (A).
- Use the CHRONOMETER (B).
- Select the items (green).
- Walk forward.

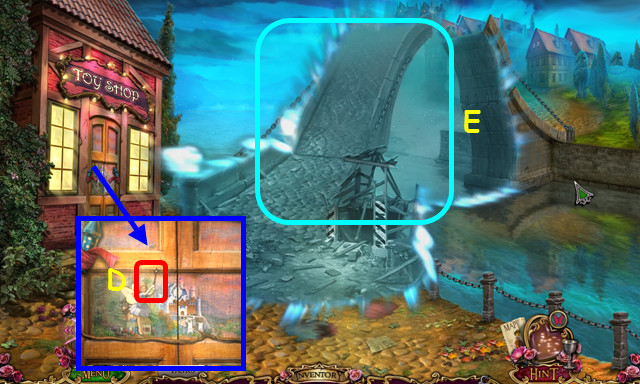
- Place the WAND (D).
- Use the CHRONOMETER (E).

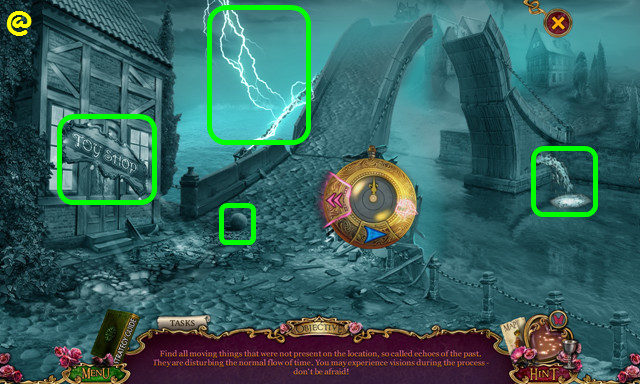
- Select the items (green) (@).
- Walk left.

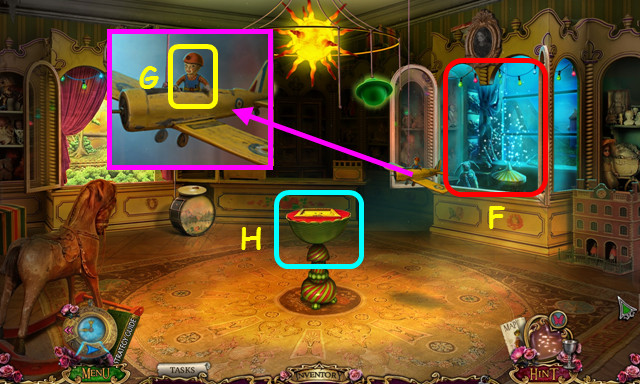
- Open the cabinet, play the HOP, and earn the TRAIN (F).
- Open the TRAIN; take the ENGINEER (inventory).
- Take the WORKER (G).
- Select (H).

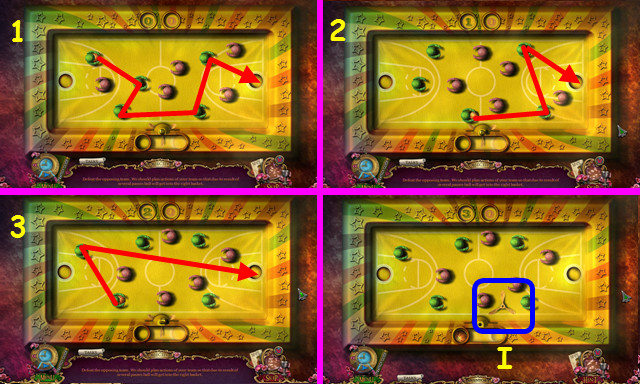
- Pass the ball (1-3).
- Take the PROPELLER (I).

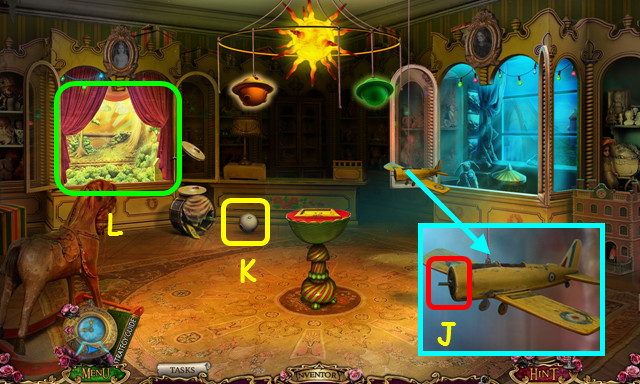
- Place the PROPELLER (J).
- Take the 1st PLANET (K).
- Select (L).

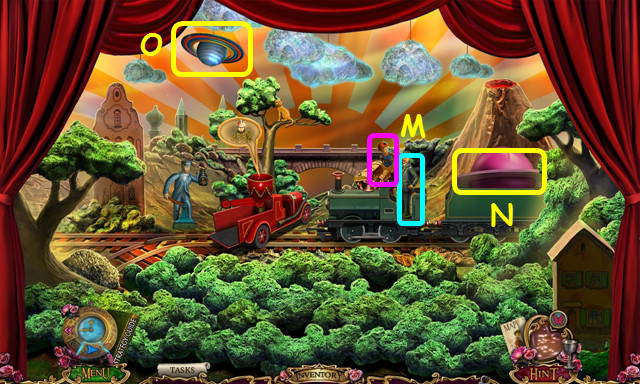
- Place the ENGINEER and WORKER (M).
- Take the 2nd PLANET (N).
- Move the 3 clouds; take the 3rd PLANET (O).
- Exit the diorama.

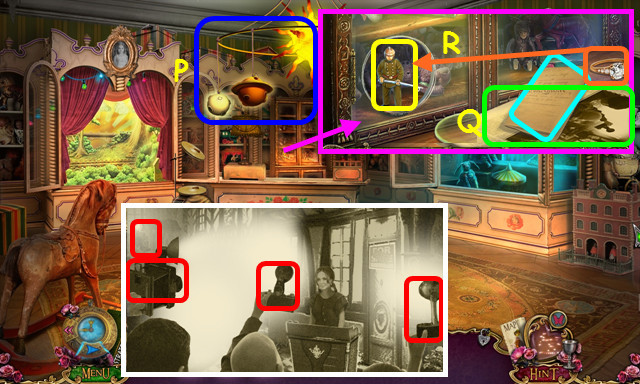
- Place the 3 PLANETS (P).
- Read the contract and paper (Q).
- Select the 4 cameras (red).
- Use the ring on the glass; take the FIREFIGHTER (R).
- Select the diorama.

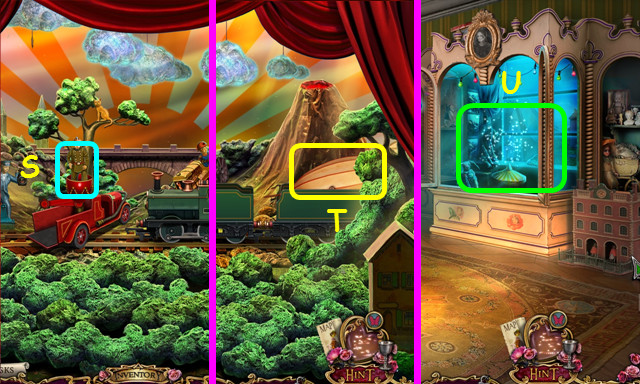
- Place the FIREFIGHTER; select the bucket 3x (S).
- Take the AIRSHIP (T).
- Play the HOP; earn the RED CROSS (U).
- Walk down.

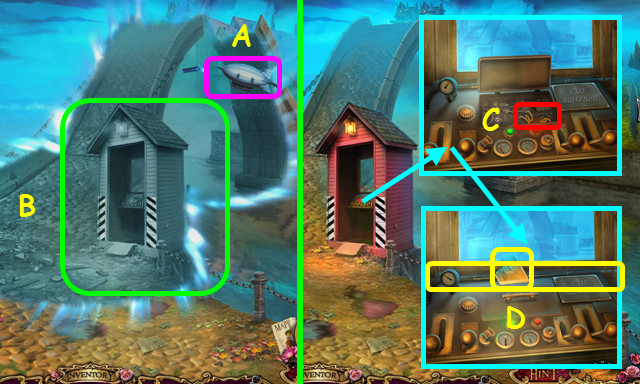
- Place the AIRSHIP (A).
- Use the CHRONOMETER (B).
- Replace the SPRING (C).
- Take the PHOTO and CANE (D).
- Walk down 2x, and go left.

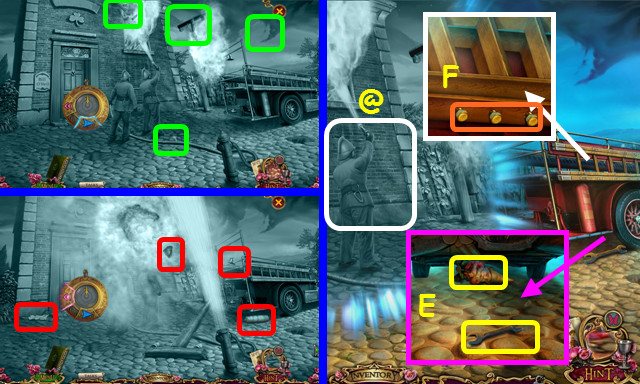
- Use the CHRONOMETER; select the items (green).
- Use the CHRONOMETER again; select the items (red).
- Use the CANE; take the GNOME and WRENCH (E).
- Use the WRENCH 3x (F).
- Use the CHRONOMETER (@).

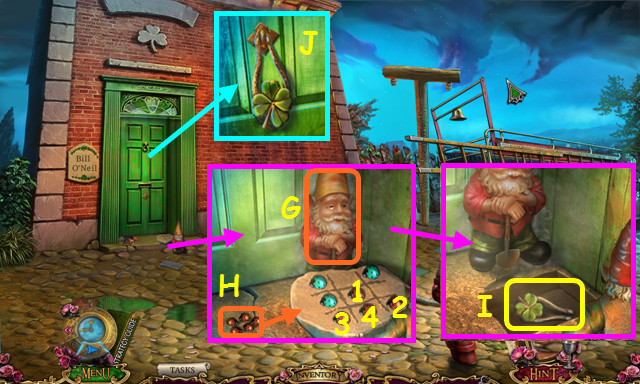
- Place the GNOME (G).
- Move the leaves; place a ladybug to play tic-tac-toe (H).
- Take the KNOCKER (I).
- Place and use the KNOCKER; walk forward (J).

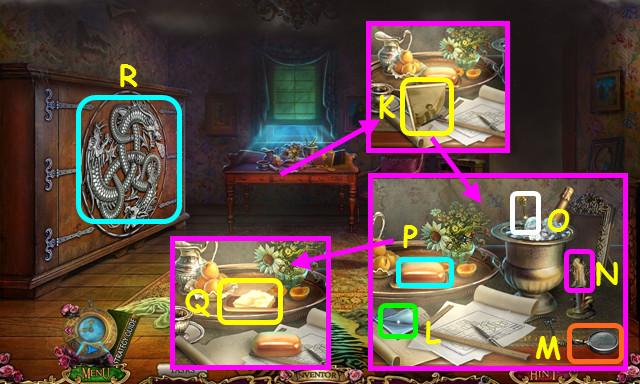
- Take the PHOTO PIECE (K).
- Combine the PHOTO and PHOTO PIECE to make the O’NEIL PHOTO (inventory).
- Use L-M, M-N, N-O, and O-P.
- Take the BUTTER (Q).
- Select (R).

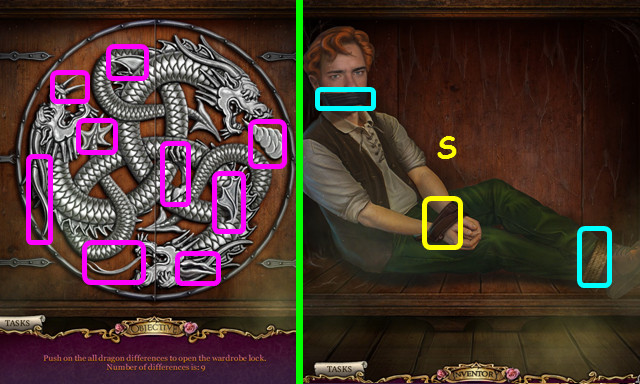
- Select the differences (pink).
- Untie the man; take the BELT (S).

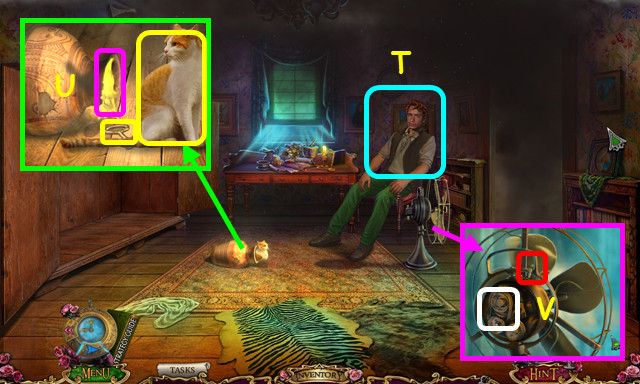
- Give the O’NEIL PHOTO (T).
- Use the BUTTER; take the CAT and FAN KEY (U).
- Use the FAN KEY; replace the BELT and flip the switch (V).
- Walk right.

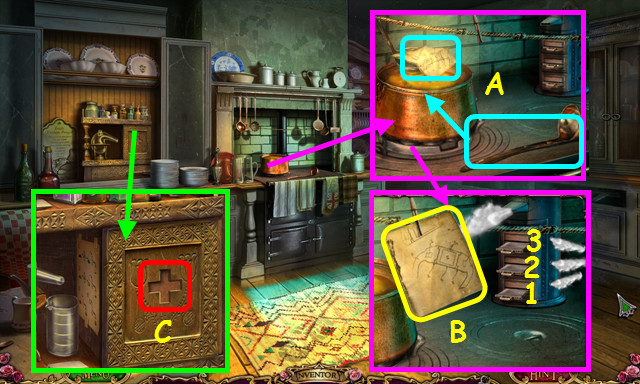
- Use the ladle 3x; select the scheme (A).
- Press 1-3.
- Take the SCHEMATIC PIECE (B).
- Place the RED CROSS (C).

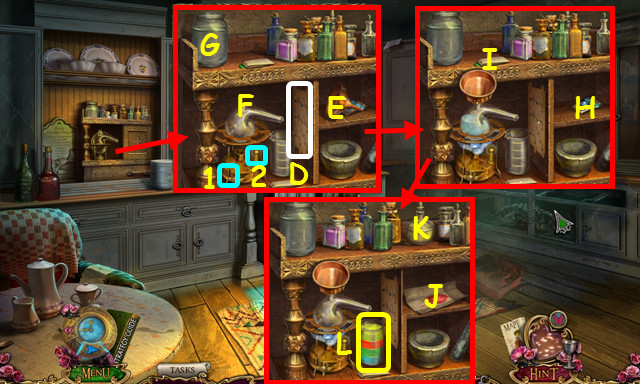
- Read the recipe (D); select (1-2).
- Move E-F, G-F.
- Select (H); move the paper and select (I).
- Open the paper and select (J); move the bottles and select (K).
- Take the MEDICINE (L).
- Walk down.

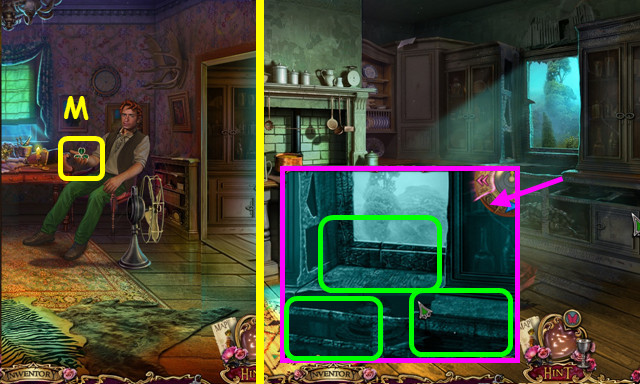
- Use the MEDICINE; take the CLOVER (M).
- Walk right.
- Use the CHRONOMETER; select the items (green).

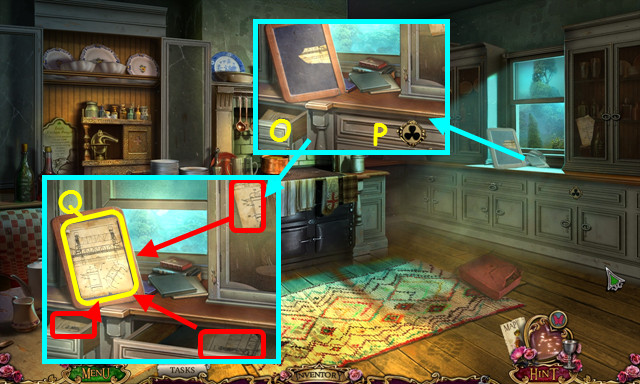
- Open the drawer (O).
- Place the CLOVER (P).
- Place the pieces on the board (red).
- Place the SCHEMATIC PIECE on the board; take the BRIDGE SCHEMATIC (Q).
- Walk down.

- Give the BRIDGE SCHEMATIC (R).
- Walk down 2x, go right.
- Use the CAT; take the RUBY HEART (S).
- Walk forward; after the cut-scene, cross the bridge and walk left.
Chapter 4: The Candy Shop

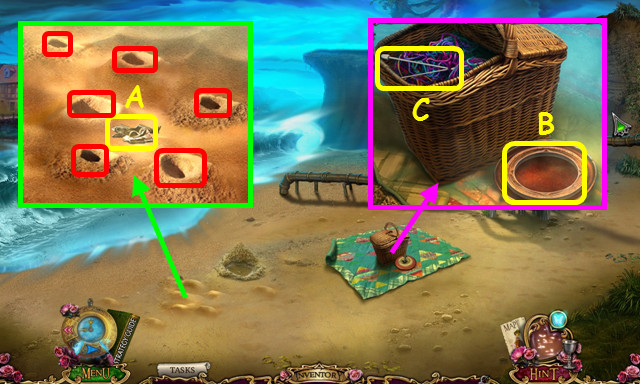
- Select the sand piles (red); take the FIGURINE PARTS (A).
- Restore the FIGURINE PARTS to make the FIGURINE (inventory).
- Remove the bolt and cover; take the DISC (B).
- Open the basket; take the PINS (C).

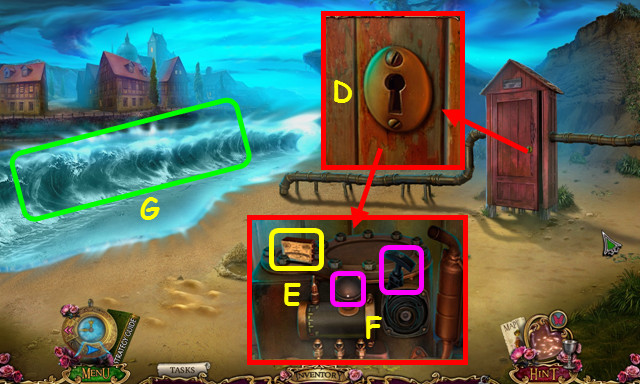
- Use the PINS (D).
- Take the MATCHES (E).
- Remove the gas cap; use the GAS FLASK and pull the cord (F).
- Use the CHRONOMETER (G).

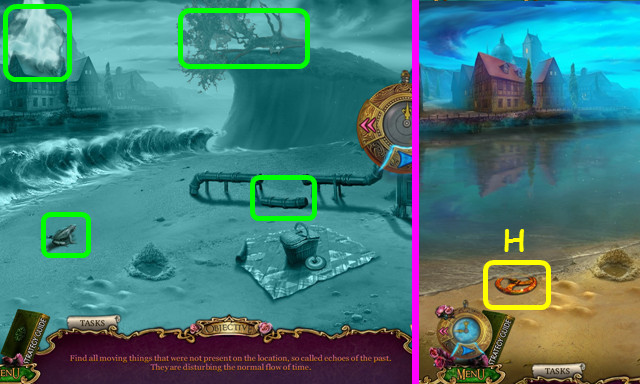
- Select the items (green).
- Take the VALVE (H).
- Walk down.

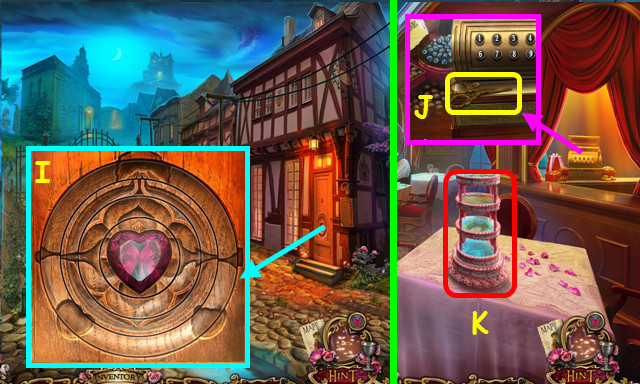
- Place the RUBY HEART and DISC; starting in the center, rotate the pieces to restore the lock (I).
- Walk right.
- Take the SCISSORS (J).
- Select the cake (K).

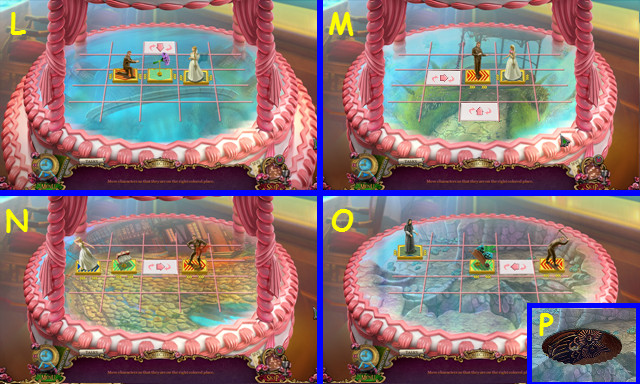
- Place the FIGURINE.
- Select the male 2x-flowers 4x-male 2x-female 2x (L).
- Select the female 2x-male-female-male-female-male (M).
- Select the luggage 3x-female 2x-male 3x (N).
- Select the cart-robe-cart-robe-man-robe-cart 3x (O).
- Remove the cover; take the OWL BADGE (P).

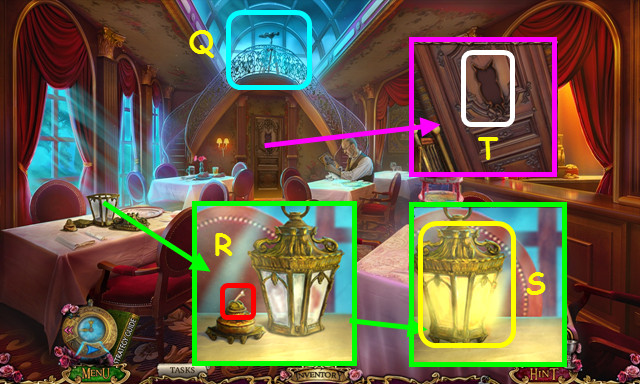
- Note the telescope (Q).
- Assemble the burner and cover; use the MATCHES (R).
- Place the cover on the burner; take the LANTERN (S).
- Place the OWL BADGE and walk forward (T).

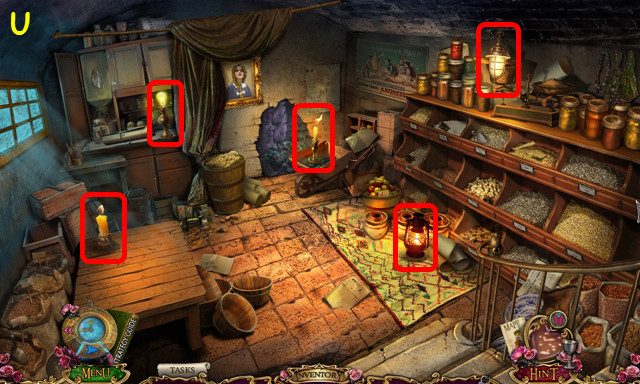
- Use the LANTERN 5x (U).
- Play the HOP; earn the PAPERS.
- Read the PAPERS to find the TABLET AND COIN (inventory).

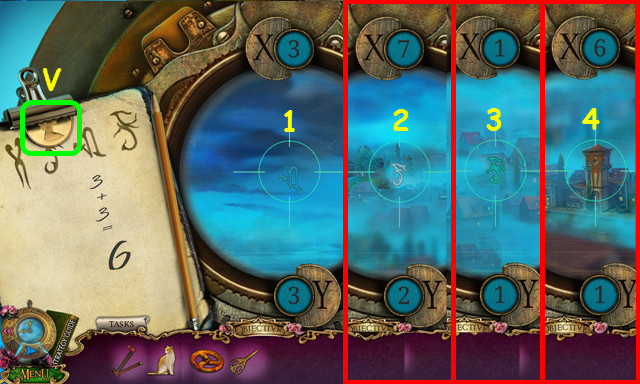
- Select the telescope.
- Place the TABLET AND COIN on the left; select the coin (V).
- Locate the 4 symbols (1-4).
- You earn the CODE.
- Exit the telescope.

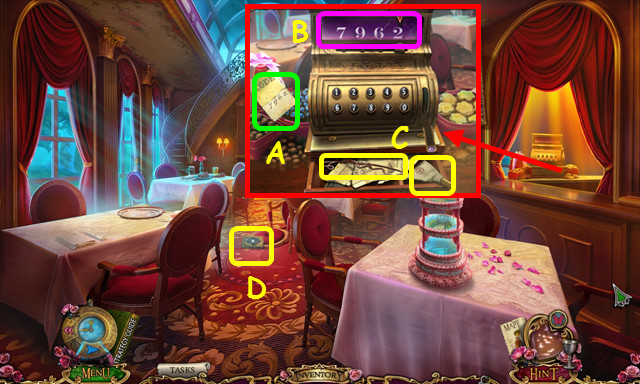
- Place the CODE (A).
- Set the code (B).
- Take the WIRE and PASTRY BAG (C).
- Bend the WIRE 4x to make the WIRE HOOK (inventory).
- Take the PORTRAIT (D).
- Use the SCISSORS 2x on the PORTRAIT to find the CORD (inventory).
- Walk down and left.

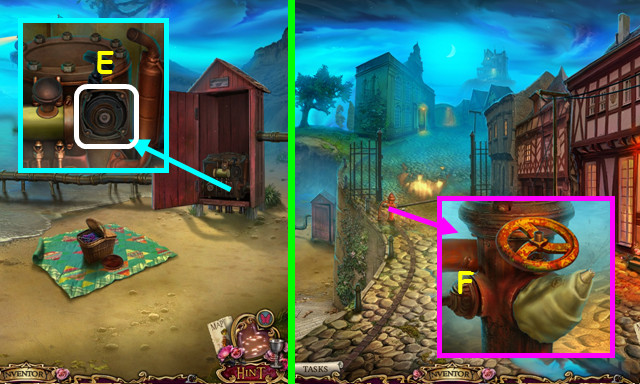
- Place the CORD and pull it (E).
- Walk down.
- Place the VALVE and PASTRY BAG (F).
- The VALVE returns to your inventory.
- Walk forward and left.

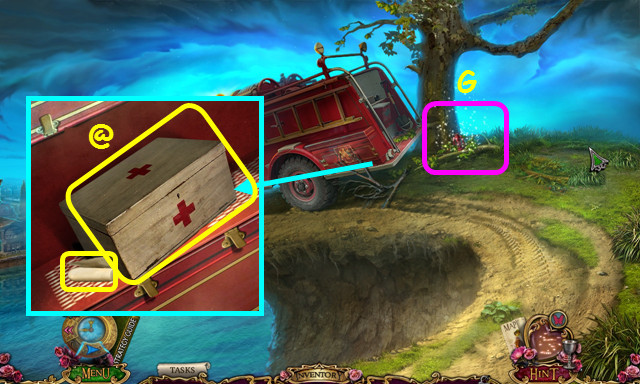
- Play the HOP; earn the AXE (G).
- Remove the 3 branches, open the 3 latches, and open the cover; take the BANDAGE and MEDICAL KIT (@).
- Open the MEDICAL KIT to find the AMMONIA (inventory).

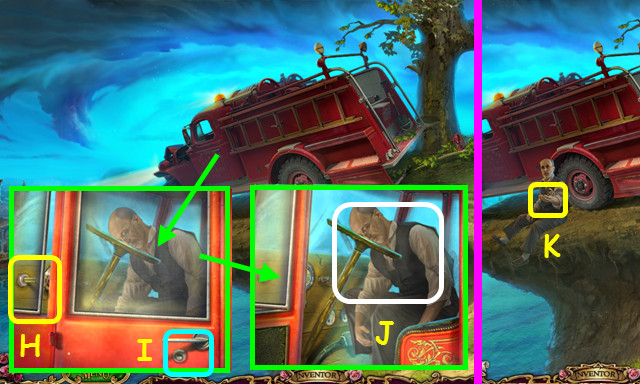
- Open the window; use the WIRE HOOK to take the FIRE TRUCK KEY (H).
- Use the FIRE TRUCK KEY (I).
- Use the AMMONIA (J).
- Give the BANDAGE; take the CITY HALL KEY (K).
- Walk down.

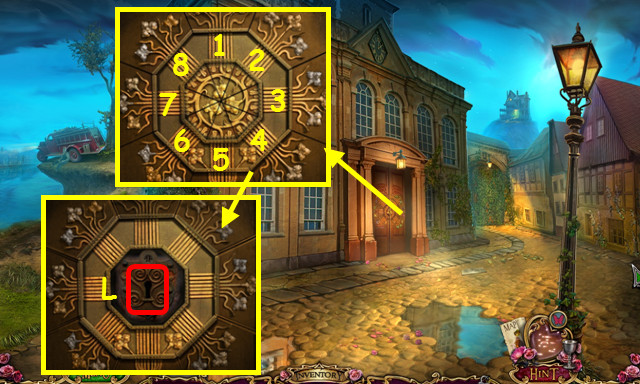
- Press 1-8.
- Use the CITY HALL KEY (L).
- Walk forward.

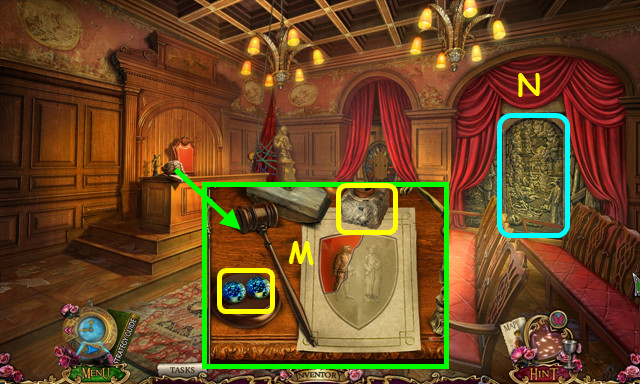
- Take the ROUND GEMS and INKPOT (M).
- Select the fresco (N).

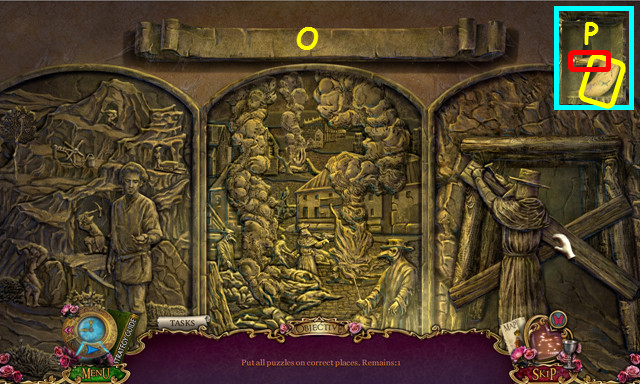
- Restore the panels (O).
- Pull the switch; take the TIES NOTE (P).
- Exit the fresco.

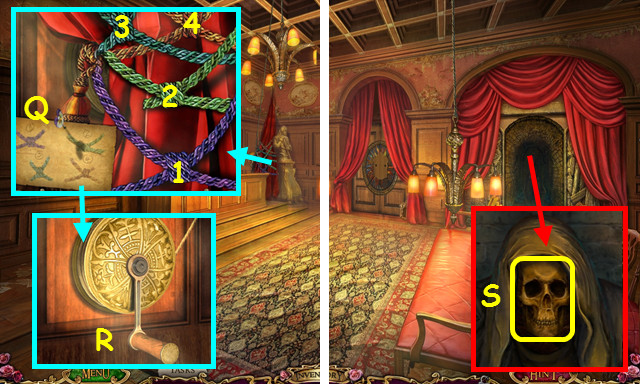
- Place the TIES NOTE (Q).
- Select the ties 1-4.
- Turn the crank (R).
- Take the SKULL (S).
- Combine the SKULL and ROUND GEMS to find the WINGED KEY (inventory).

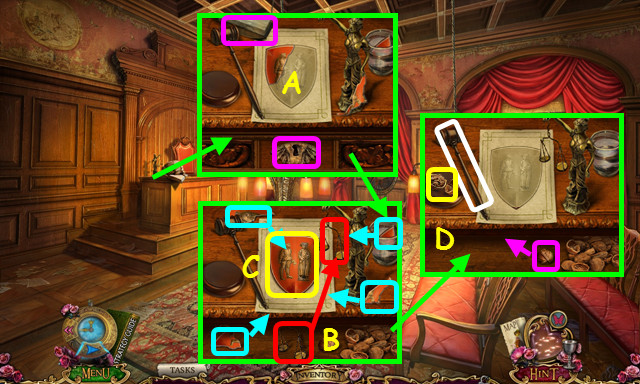
- Move the blotter and use the WINGED KEY (A).
- Move the nuts; place the scales on the figurine (B).
- Restore the pieces; take the COAT OF ARMS (C).
- Move the nut, use the gavel, and take the TASTY WALNUT (D).

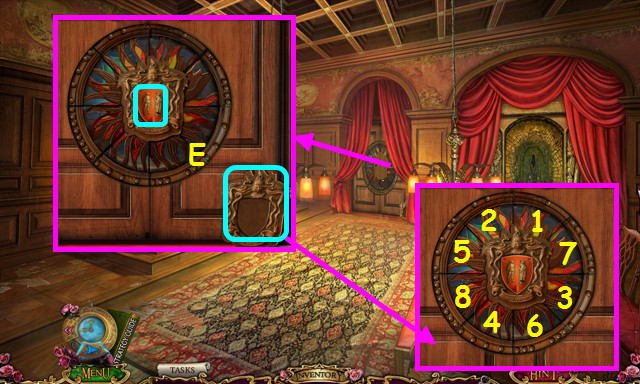
- Select the frame and place the COAT OF ARMS (E).
- Press 1-8.
- Walk forward.

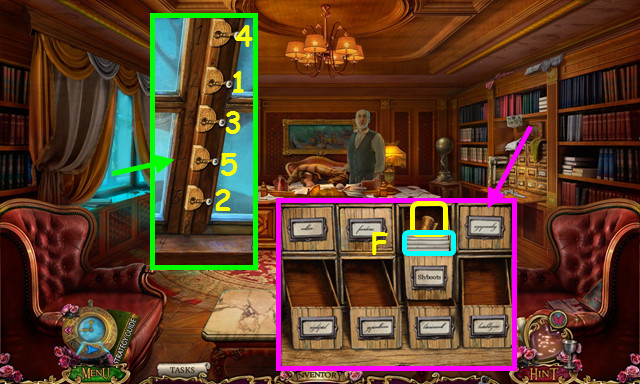
- Select 1-5.
- Restore the tags, read the papers, and take the SCROLL (F).
- Walk down 2x.

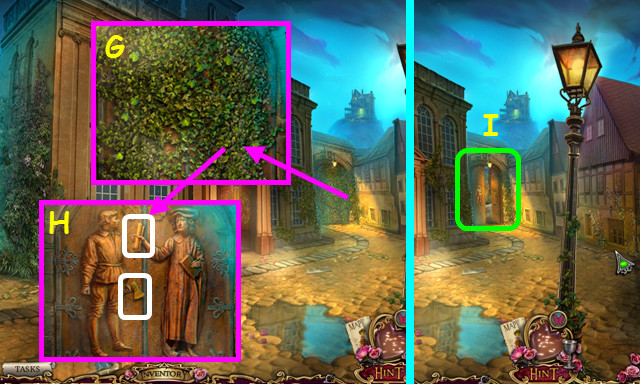
- Use the AXE 3 times (G).
- Place the AXE and SCROLL (H).
- Go forward on the right (I).

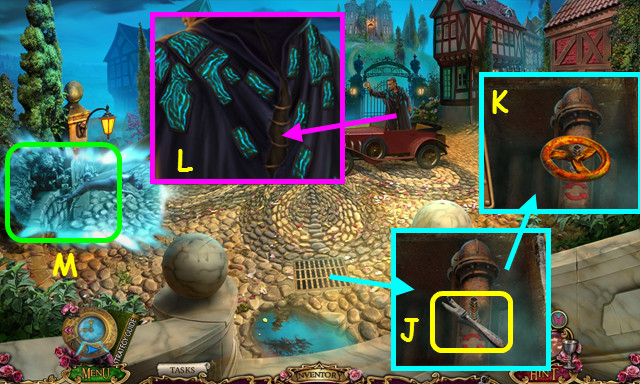
- Remove the grate; take the CAN OPENER (J).
- Place the VALVE and turn it (K).
- Remove the cloak (L).
- Use the CHRONOMETER (M).

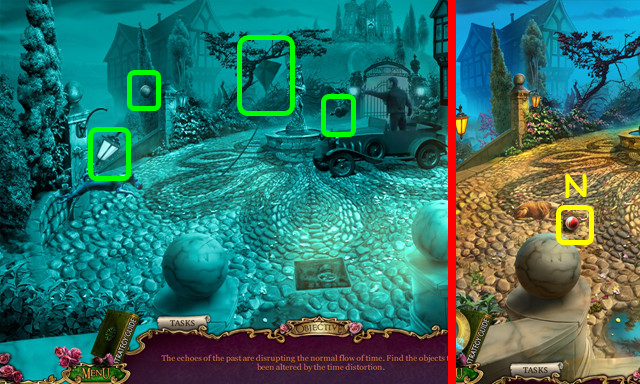
- Select the items (green).
- Use the CAT; take the BALL (N).

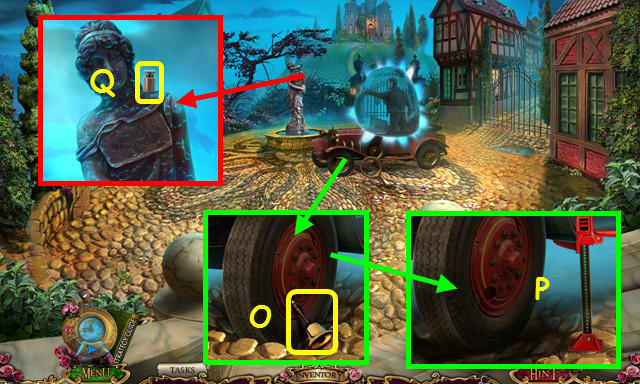
- Take the BELL (O).
- Place JACK and pump it 3x (P).
- Use the BELL; take the SMALL WEIGHT (Q).
- Walk left.

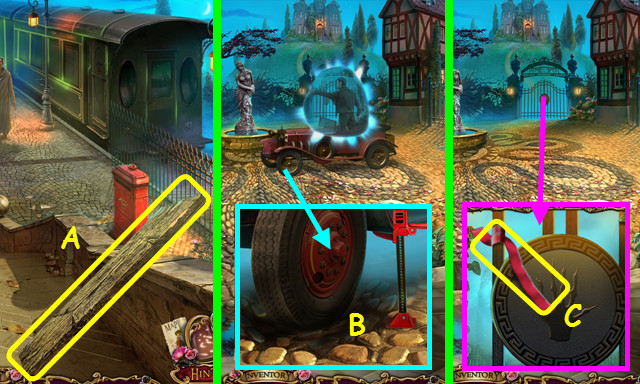
- Take the FIRM PLANK (A).
- Walk down.
- Place the FIRM PLANK (B).
- Take the CLOTH STRIP (C).
- Walk left.

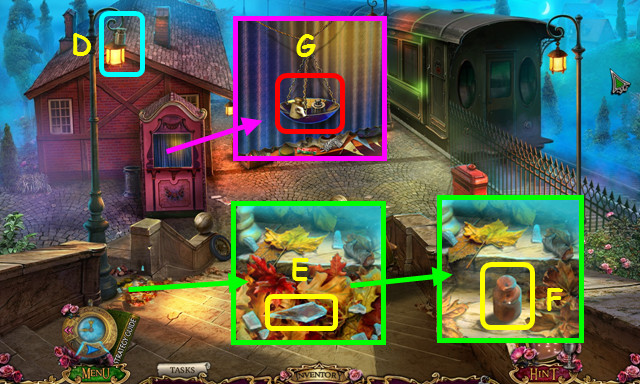
- Use the BALL (D).
- Use the CLOTH STRIP to take the SHARP SHARD (E).
- Move the leaves; take the MEDIUM WEIGHT (F).
- Place the MEDIUM WEIGHT and SMALL WEIGHT (G).
- Play the HOP to earn the SQUIRREL.
- Go to City Hall 2nd Floor.

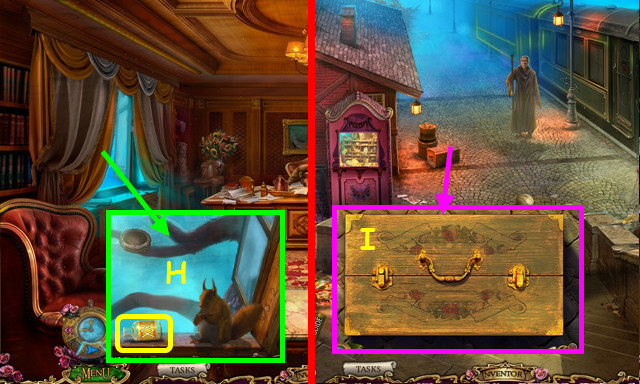
- Use the SQUIRREL and TASTY WALNUT; take the POISON BOTTLE (H).
- Return to the Train Station.
- Move the luggage; open and select the forensics kit (I).

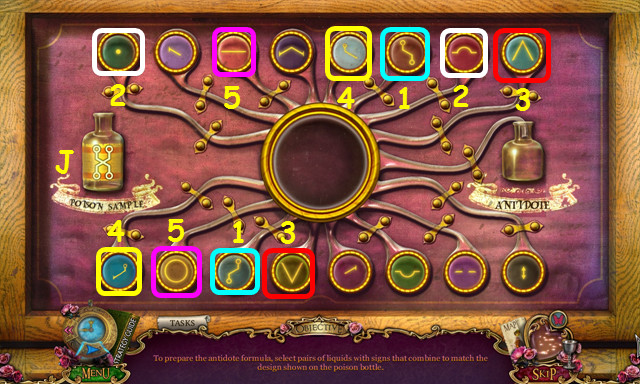
- Place the POISON BOTTLE (J).
- Select the symbol pairs (color-coded 1-8).
- You earn the ANTIDOTE.

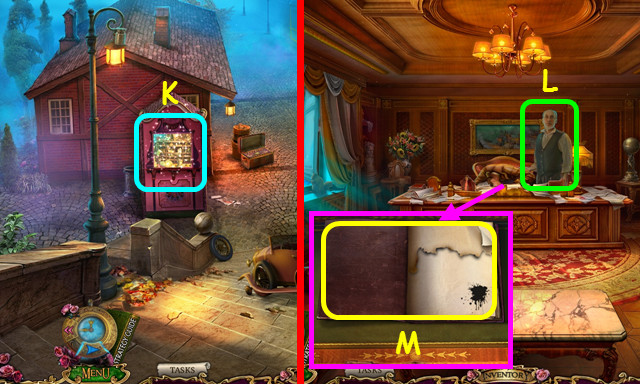
- Play the HOP; earn the CAN (K).
- Combine the CAN and CAN OPENER to find the CAN OF SARDINES (inventory).
- Go to City Hall 2nd Floor.
- Give the ANTIDOTE (L).
- Take the NOTEBOOK (M).
- Combine the NOTEBOOK and INKPOT to find the MAILBOX BADGE (inventory).
- Go to the Train Station.

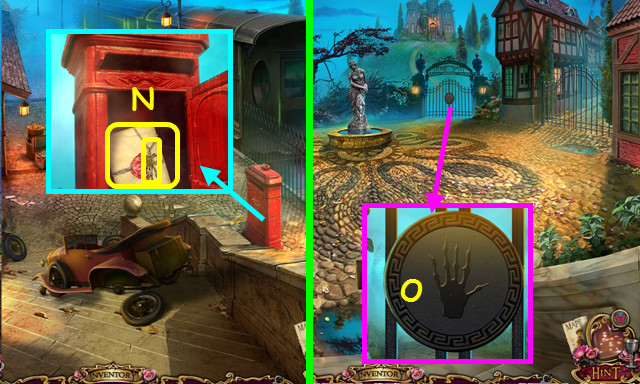
- Place the MAILBOX BADGE; take the HAND EMBLEM and LETTER (N).
- Combine the LETTER and SHARP SHARD to find the CHRONOMETER UPGRADE SCHEMATIC (inventory).
- Walk down.
- Place the HAND EMBLEM; walk forward (O).
Chapter 5: Katherine’s Estate

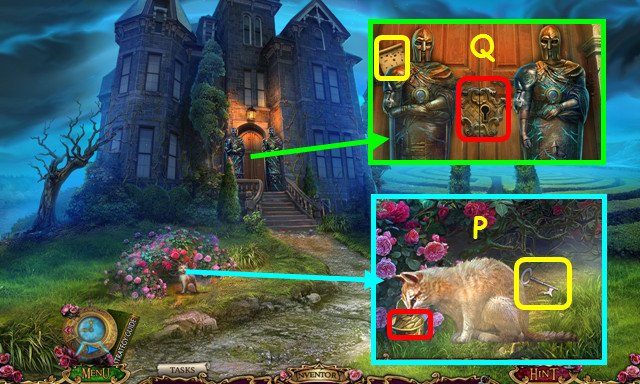
- Place the CAN OF SARDINES; take the ESTATE KEY (P).
- Use the ESTATE KEY; take the MAP (Q).
- Walk right.

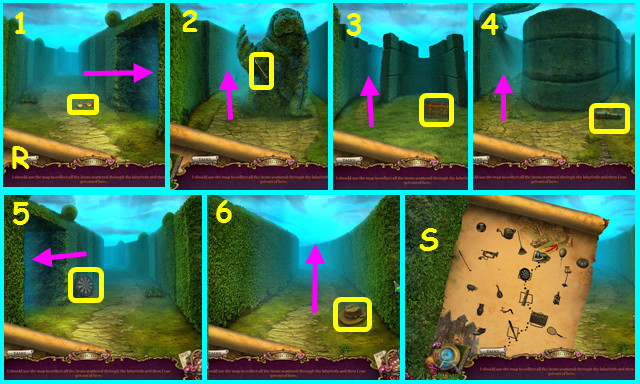
- Place the map (R).
- Walk right-left 3x- forward 2x; take the items as you see them (1-6).
- Map solution (S).

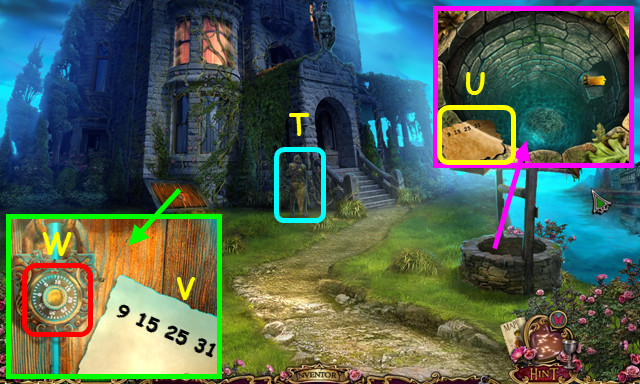
- Select the statue (T).
- Take the COMBINATION CODE (U).
- Place the COMBINATION CODE (V).
- Turn the dial to each of the numbers (W).
- Enter the Basement.

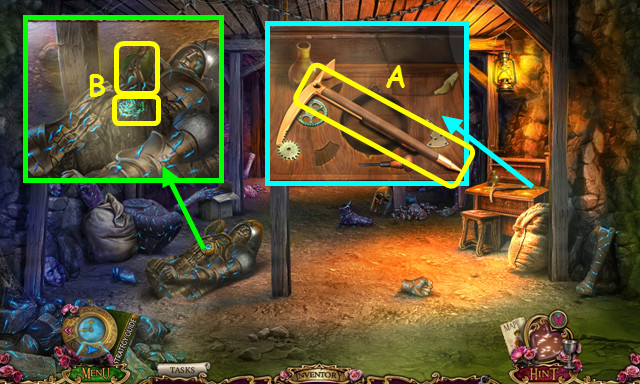
- Take the ICE AXE (A).
- Remove the chronometer and use the ICE AXE; take the PLANT and CHRONOMIUM (B).

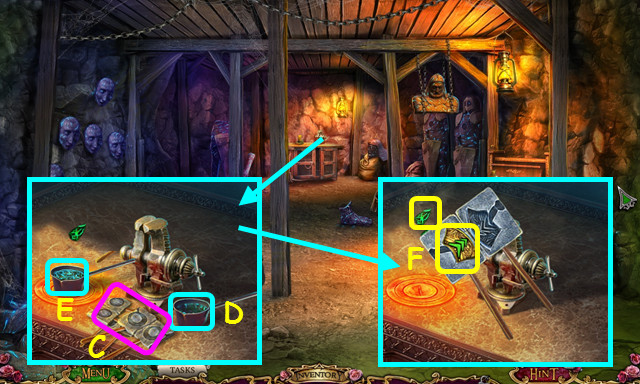
- Select the molds; look at each mold (C).
- Place the CHRONOMIUM (D); select the brazier (E).
- Take the CHRONO CRYSTAL and CHRONOMETER BUTTON (F).

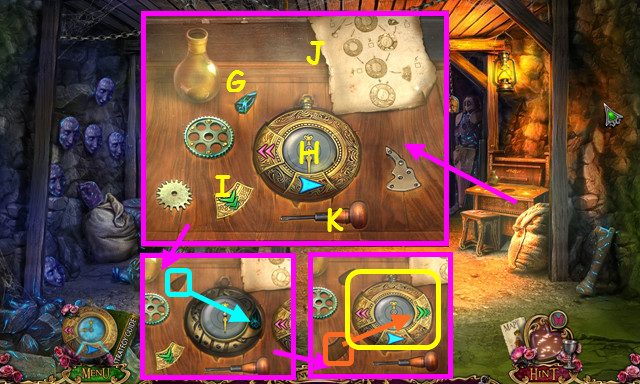
- Place the CHRONO CRYSTAL (G), CHRONOMETER (H), CHRONOMETER BUTTON (I), and CHRONOMETER UPGRADE SCHEMATIC (J).
- Use K-H; remove the face of (H).
- Move G-H and replace the face.
- Move I-H; take the CHRONOMETER.
- Walk down.

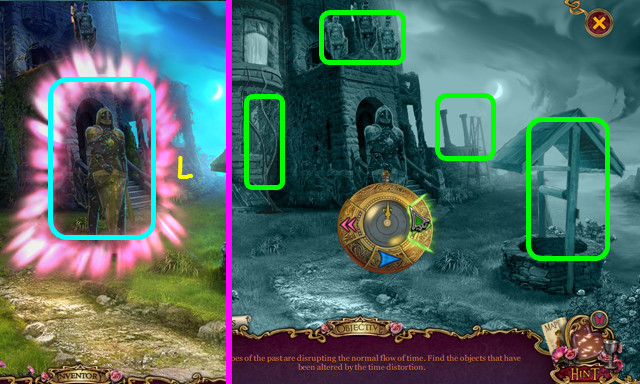
- Use the CHRONOMETER (L).
- Select the items (green).

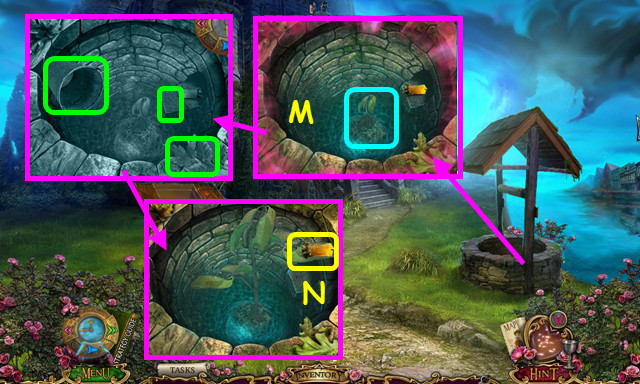
- Place the PLANT and use the CHRONOMETER (M).
- Select the items (green).
- Take the CANDLE (N).
- Walk forward and left.

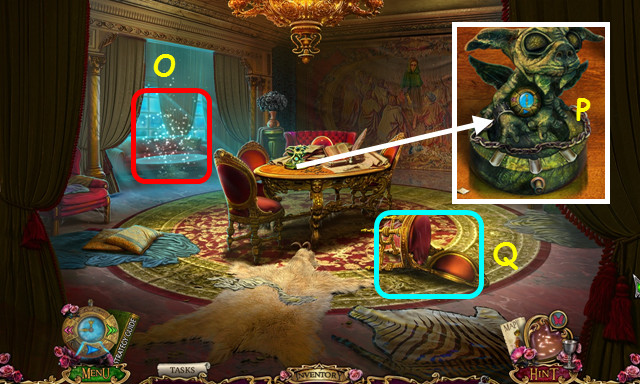
- Play the HOP; earn the HORN (O).
- Use the CANDLE to make the CANDLELIGHT (P).
- Move the chair (Q).
- Walk down.

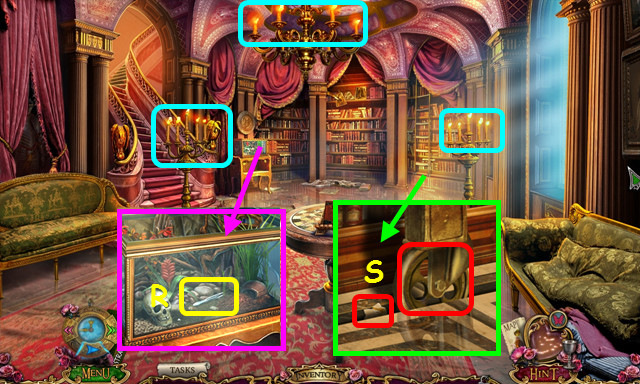
- Use the CANDLELIGHT 3x (blue).
- Open the lid, use the HORN, and take the TWEEZERS (R).
- Use the TWEEZERS; push the wheel (S).

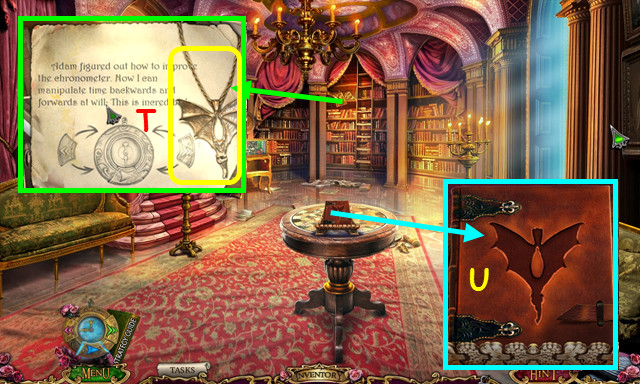
- Look at the photos and notes; take the BAT EMBLEM (T).
- Place the BAT EMBLEM; play the HOP to find the SKETCH (U).
- Remove the PAPER CLIP from the SKETCH (inventory).
- Walk left.

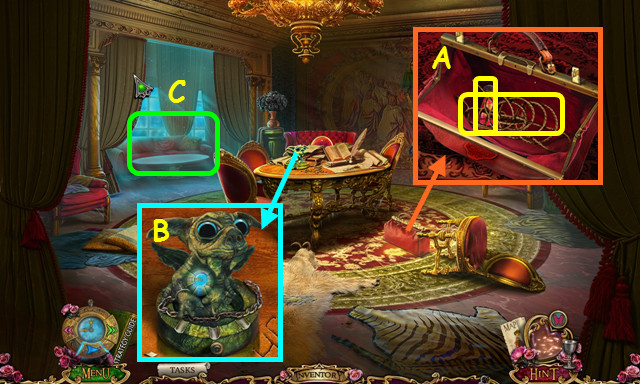
- Use the PAPER CLIP; move the items, take the ENTANGLED ROPE and ACID (A).
- Use the ACID (B).
- Play the HOP; earn the 1/3 FRESCO PIECE (C).
- Walk forward.

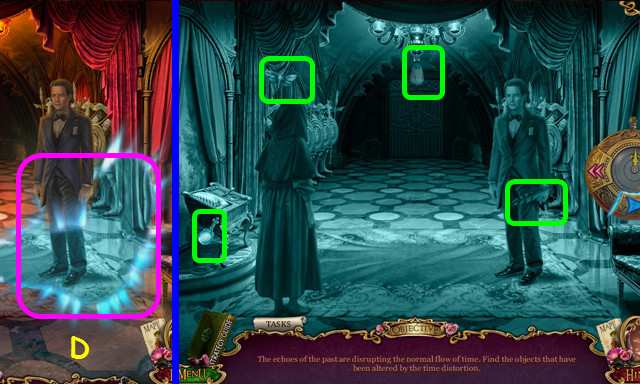
- Use the CHRONOMETER (D).
- Select the items (green).

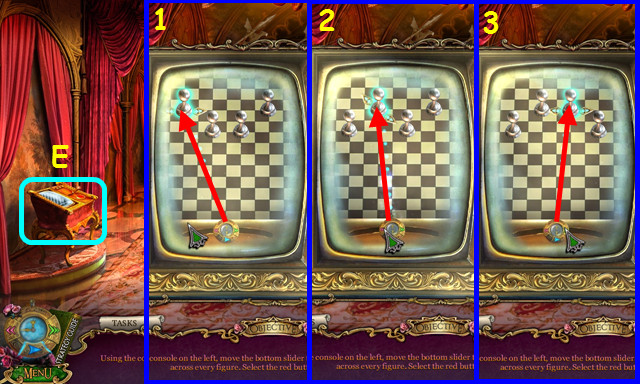
- Select the console (E).
- Move the beam (1-3).
- Open the door and walk forward.

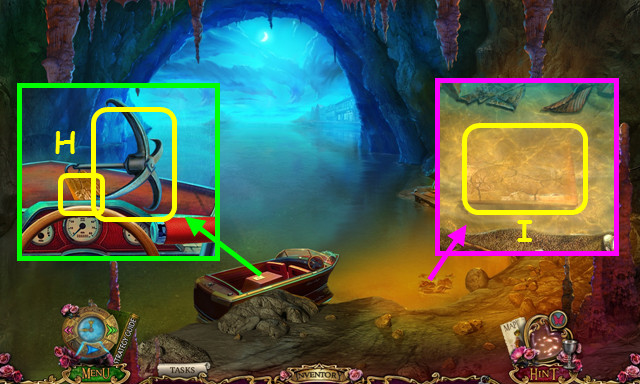
- Move the items; take the GRAPPLING HOOK and 2/3 FRESCO PIECE (H).
- Untangle the ENTANGLED ROPE and add the GRAPPLING HOOK to make the GRAPPLING HOOK (inventory).
- Move the leaves; take the 3/3 FRESCO PIECE (I).

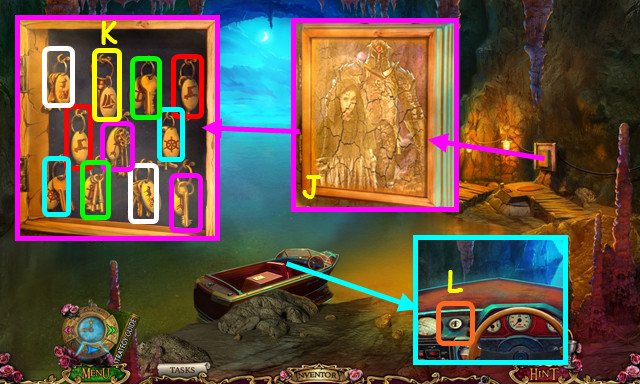
- Place the 3 FRESCO PIECES (J).
- Open the case, select pairs (color-coded), and take the BOAT KEY (K).
- Use the BOAT KEY (L).

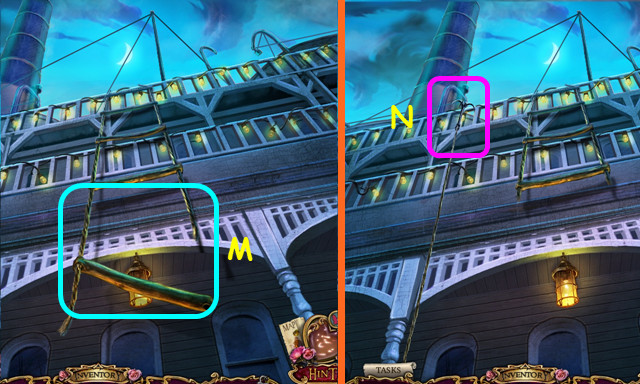
- Pull the broken ladder (M).
- Use the GRAPPLING HOOK (N).
- Climb up the rope.

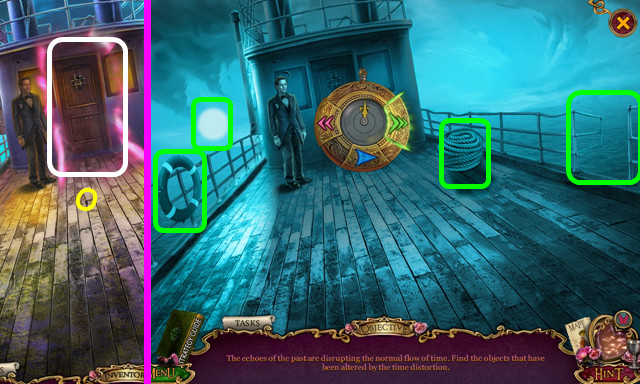
- Use the CHRONOMETER (O).
- Select the items (green).

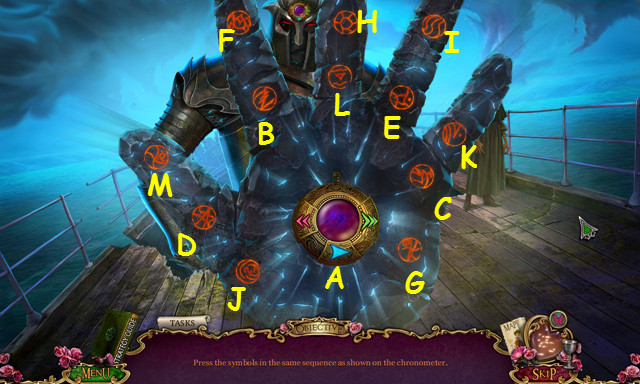
- Use the CHRONOMETER (A).
- Repeat the sequences-B-C-D, E-F-G-H, I-J-K-L-M.

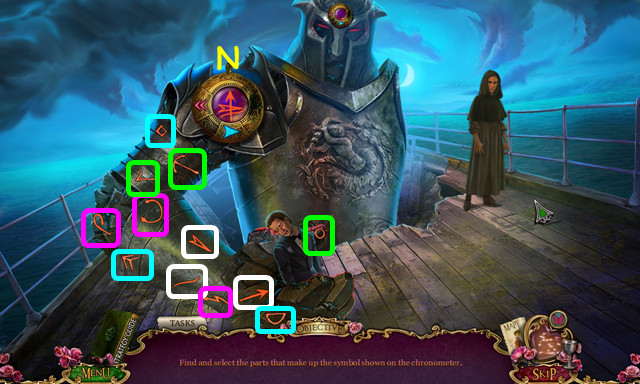
- Use the CHRONOMETER (N).
- Select the sets of 3 symbols (white-pink-green-blue).

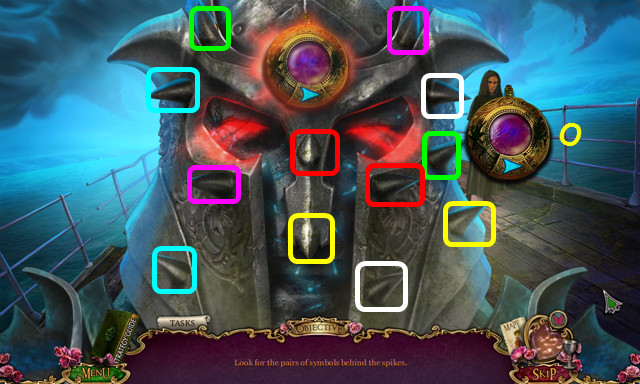
- Use the CHRONOMETER (O).
- Select the pairs (color-coded).
- Congratulations! You have completed Haunted Train: Frozen in Time!






 Drawn: Trail of Shadows Walkthrough, Guide, & Tips
 Steve the Sheriff 2: The Case of the Missing Thing ™ Walkthrough, Guide, & Tips
 Blue Madonna: A Carol Reed Mystery Walkthrough, Guide, & Tips
 The Clockwork Man: The Hidden World Walkthrough, Guide, & Tips
 Dark Mysteries: The Soul Keeper Walkthrough, Guide, & Tips