Sable Maze: Twelve Fears Walkthrough, Guide, & Tips
Sable Maze: Twelve Fears Walkthrough

Welcome to the Game Name Walkthrough
Your daughter’s lost in the Maze of Fears, but you’ll face more than her disappearance if you dare to enter.
Whether you use this document as a reference when things get difficult or as a road map to get you from beginning to end, we’re pretty sure you’ll find what you’re looking for here.
This document contains a complete Game Name game walkthrough featuring annotated screenshots from actual gameplay!
We hope you find this information useful as you play your way through the game. Use the walkthrough menu below to quickly jump to whatever stage of the game you need help with.
Remember to visit the Big Fish Games Forums if you find you need more help. Have fun!
This walkthrough was created by Nina de Boo, and is protected under US Copyright laws. Any unauthorized use, including re-publication in whole or in part, without permission, is strictly prohibited.
General Tips
- This is the official guide for Sable Maze: Twelve Fears.
- This guide will not mention each time you have to zoom into a location; the screenshots will show each zoom scene.
- Hidden-object puzzles are referred to as HOPs. This guide will not show screenshots of the HOPs, but it will mention when a HOP is available and the inventory item you’ll collect from it.
- This guide will give step-by-step solutions for all puzzles that are not random. Please read the instructions in the game for each puzzle.
Chapter 1: Twelve Fears: Fear of Drowning

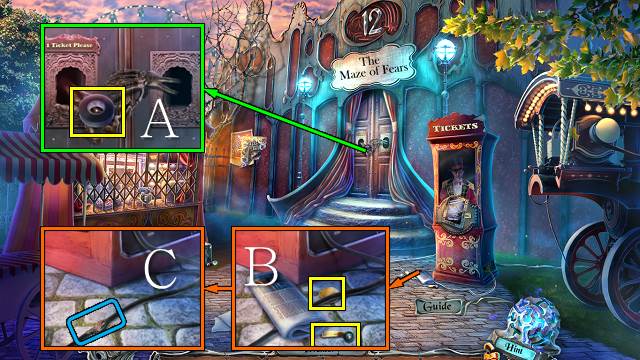
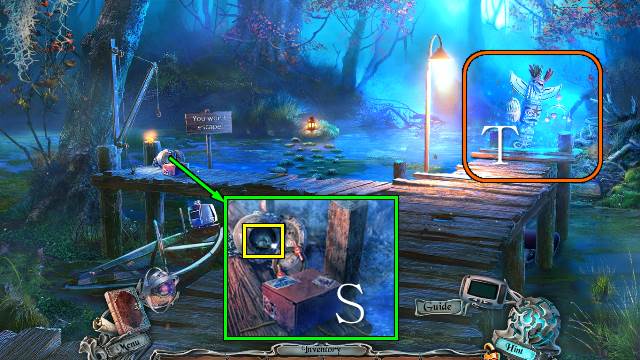
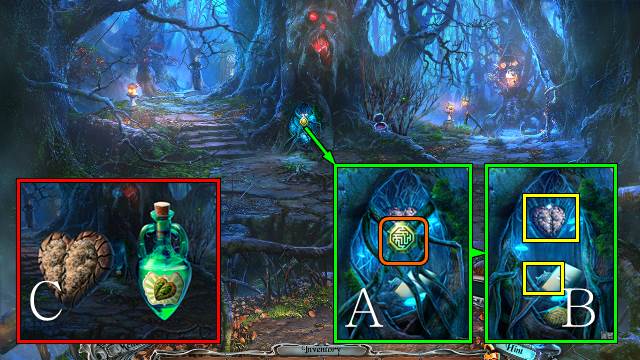
- Take the TAPE (A).
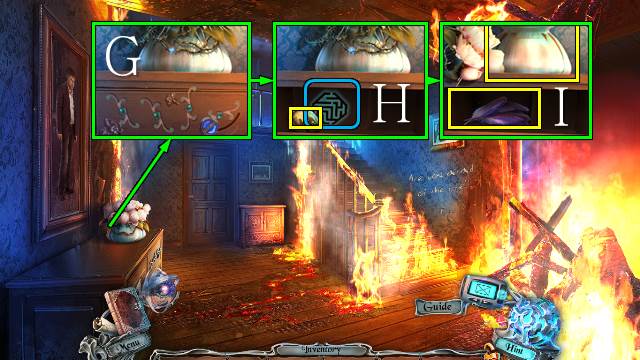
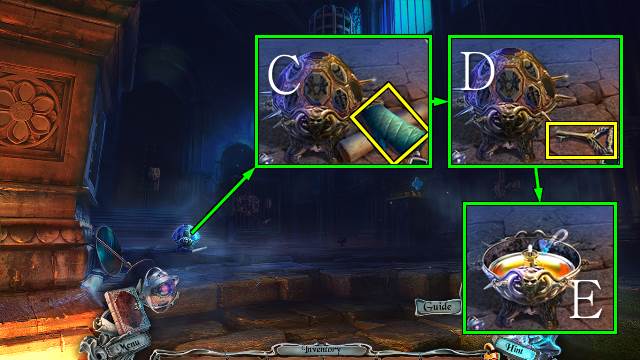
- Take the newspaper, CRANK and COIN 1/2 (B); use the TAPE (C).
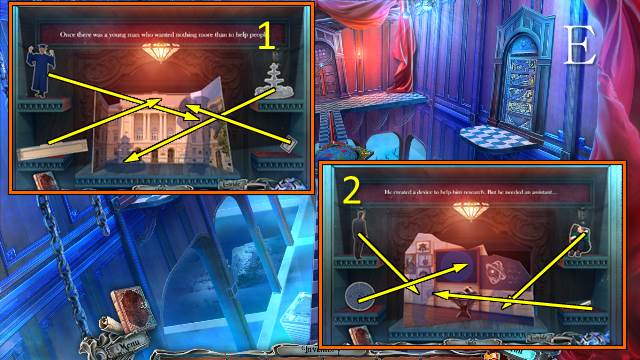
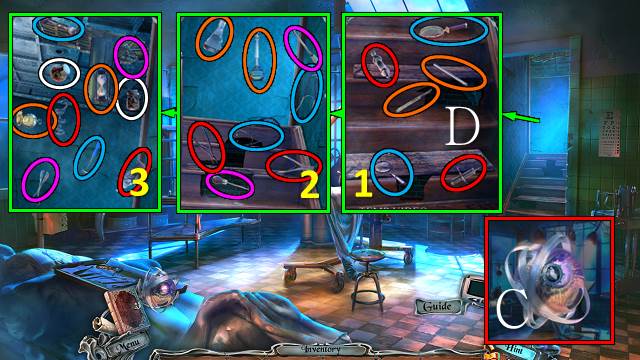
- Take the SPYGLASS LENS and BATTERY 1/2 (D); place the CRANK, turn it all the way around and take the POSTER PIECE (E).
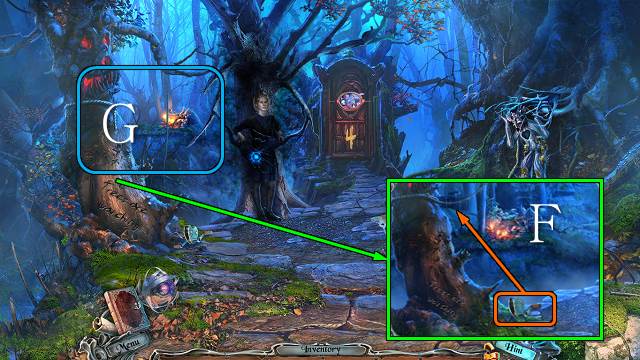
- Take the DRAGONFLY and place the POSTER PIECE (F); you receive a POSTER.
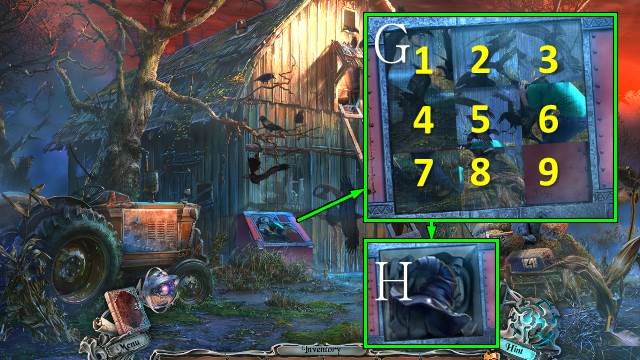
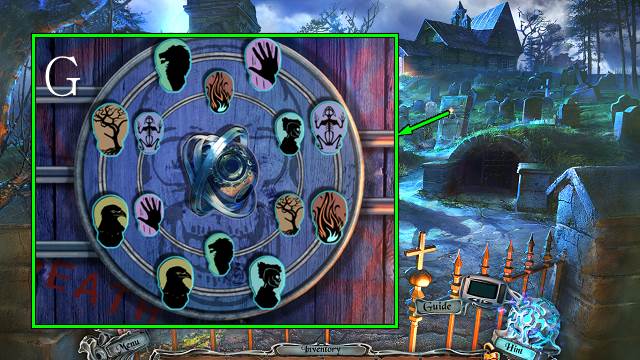
- Enter 4738 (G).
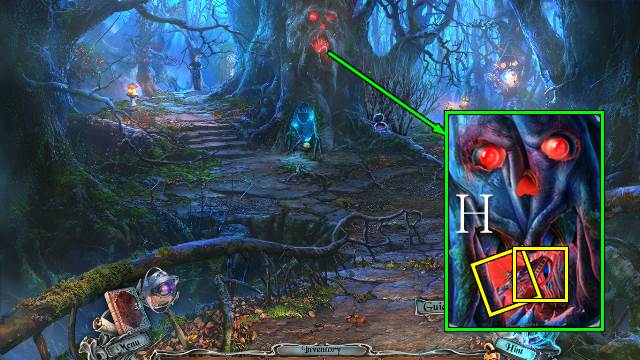
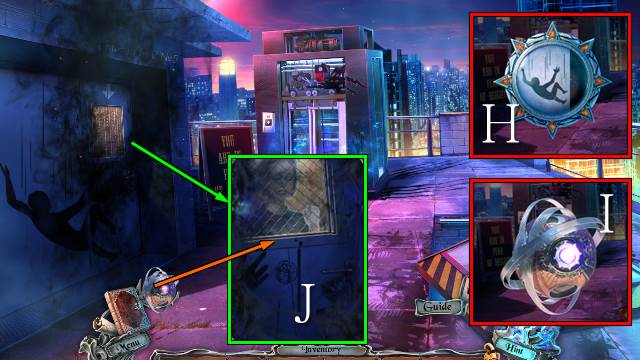
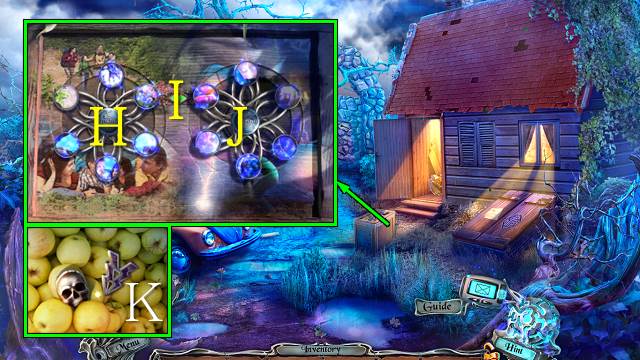
- Play the HOP (H).
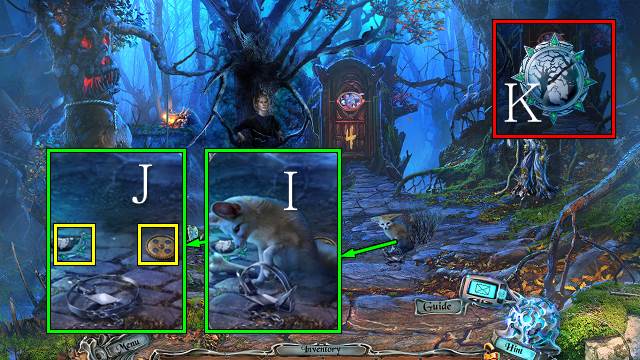
- You receive COIN 2/2.
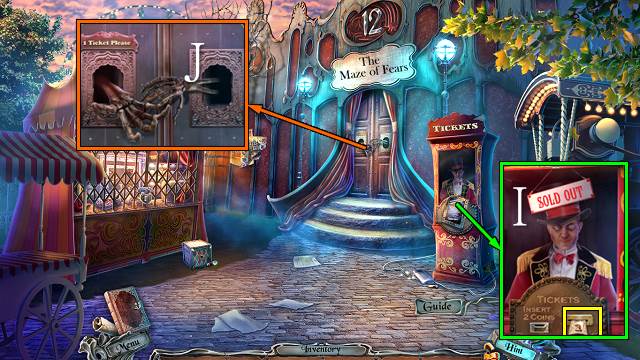
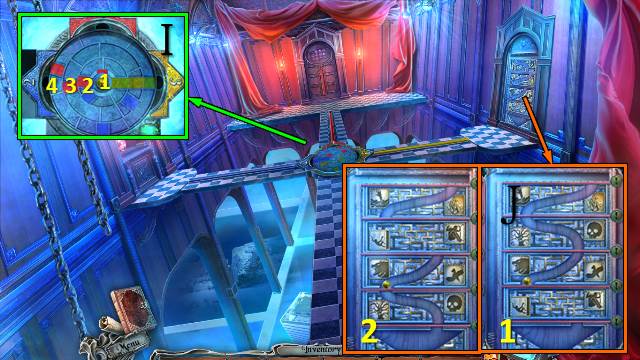
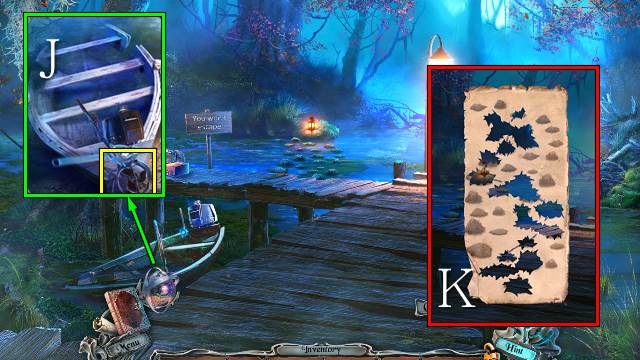
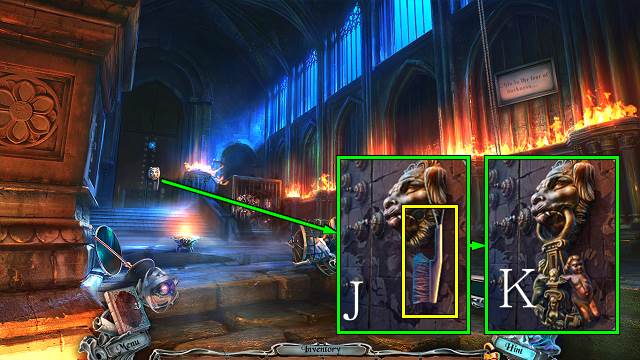
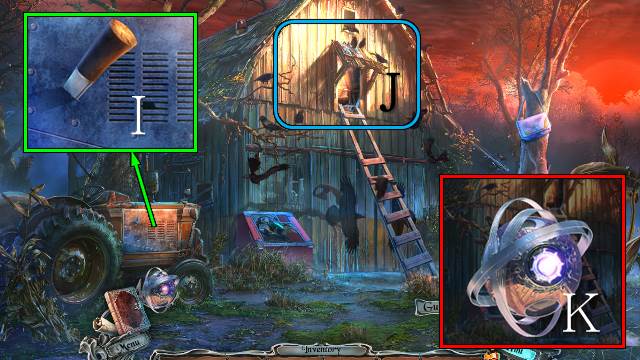
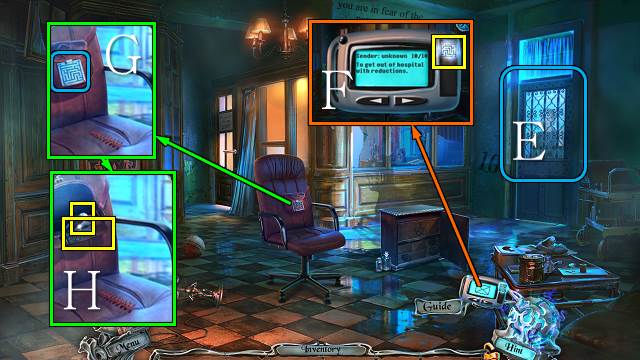
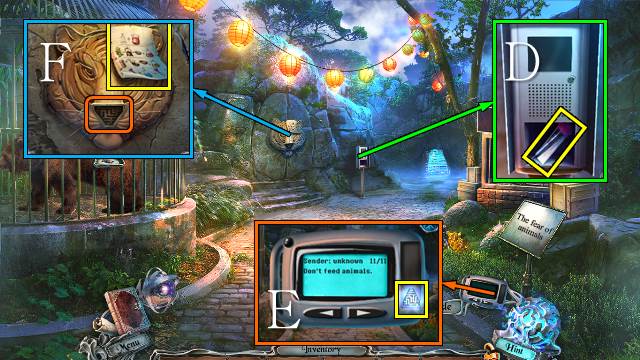
- Take the poster and insert the COINS; take the TICKET (I).
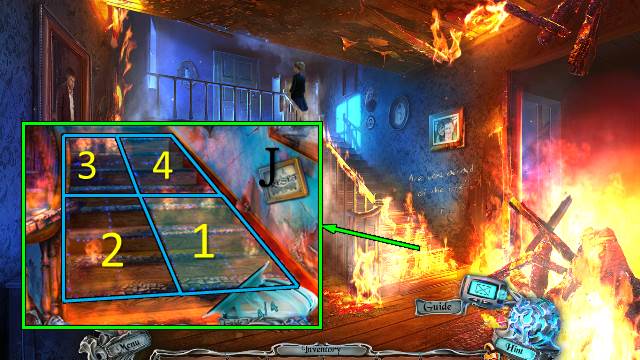
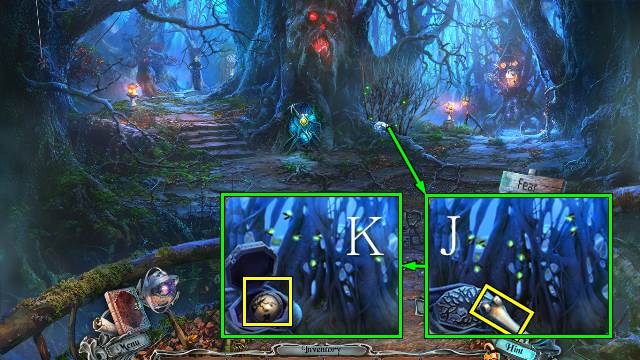
- Place the TICKET (J).
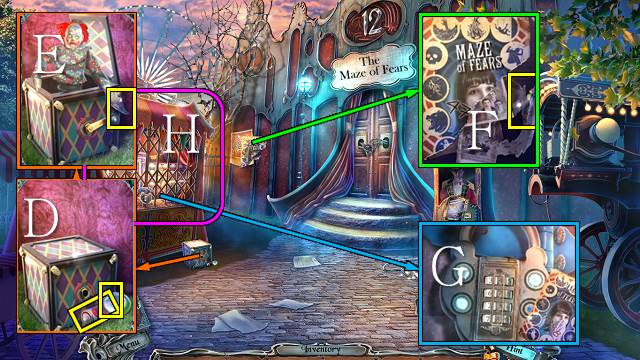
- Try to walk forward.
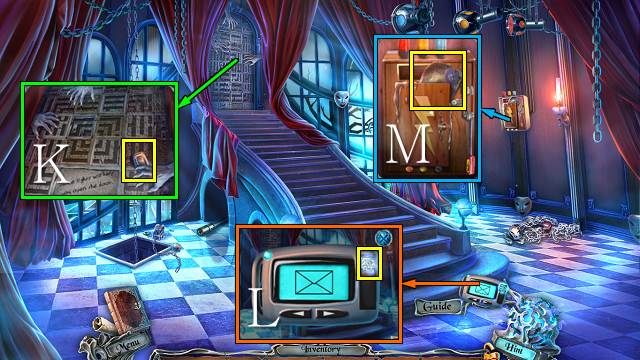
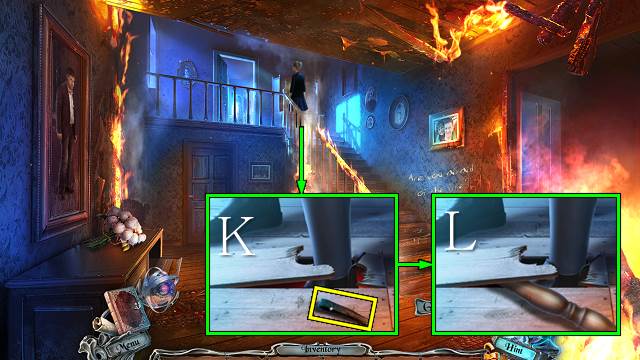
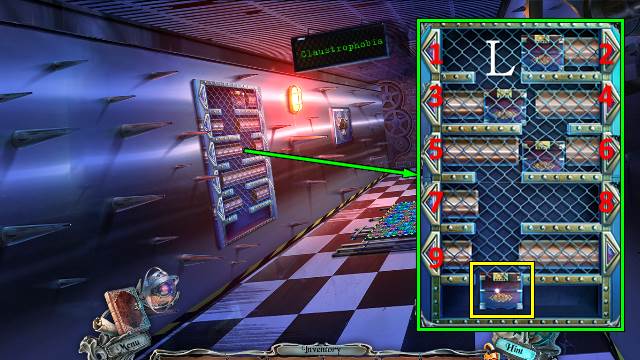
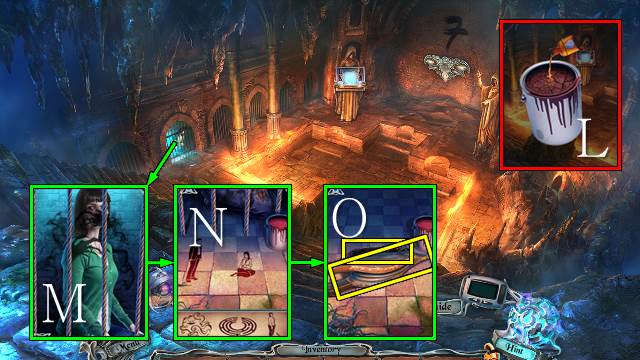
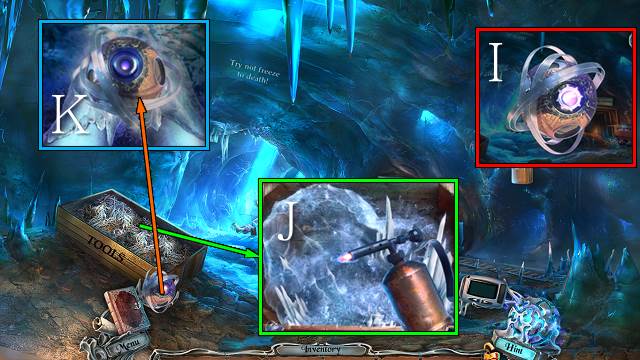
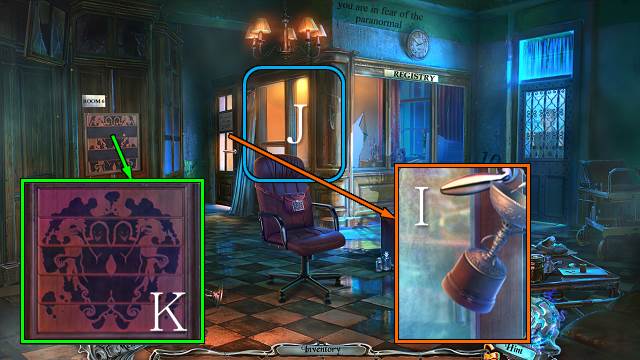
- Take the pager (K).
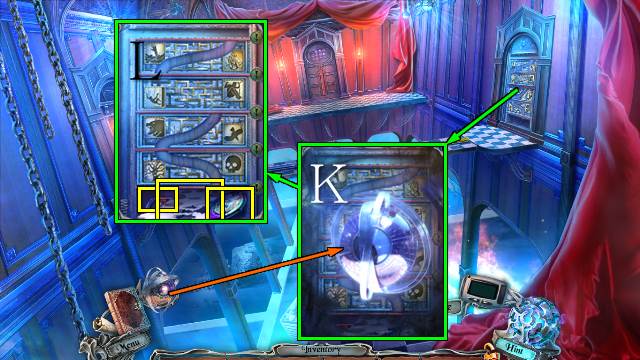
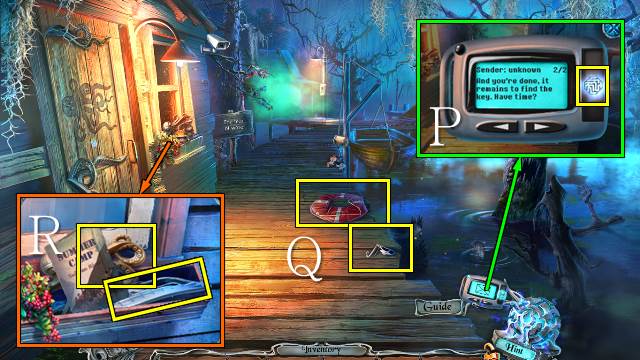
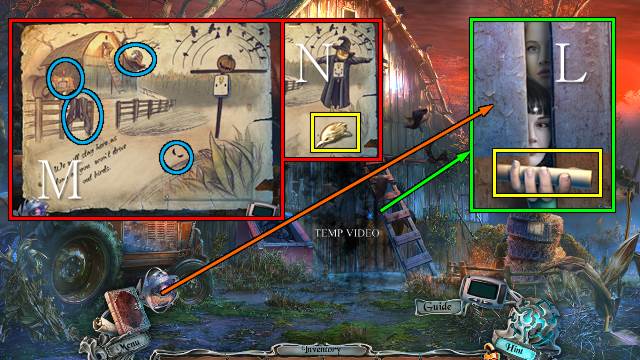
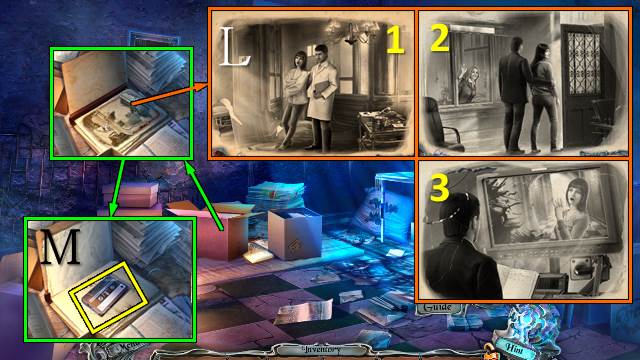
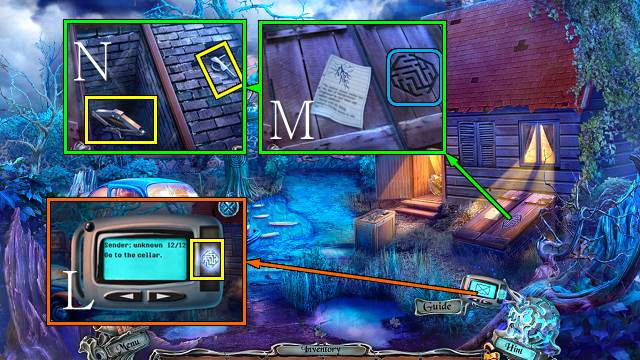
- Access the pager, read the message and take the MAZE (L).
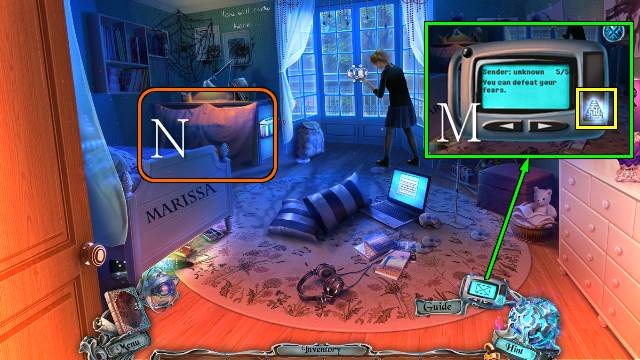
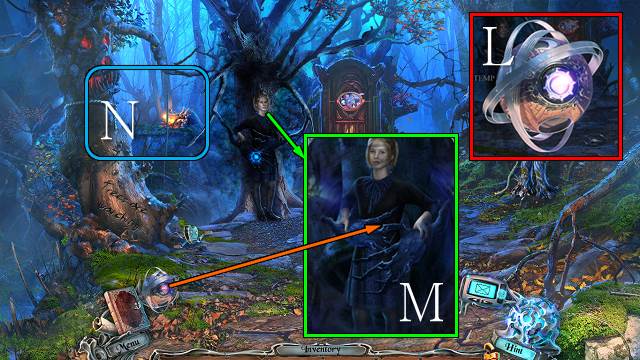
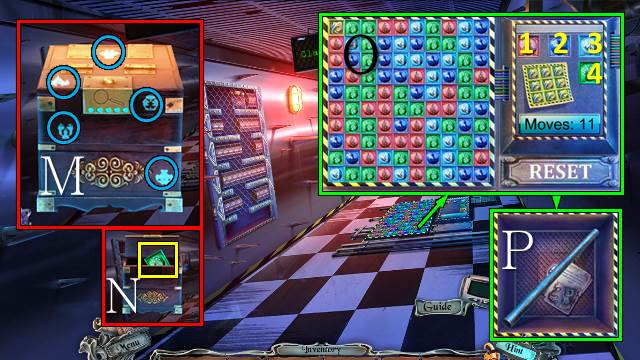
- Take the MAP LEGEND (M).
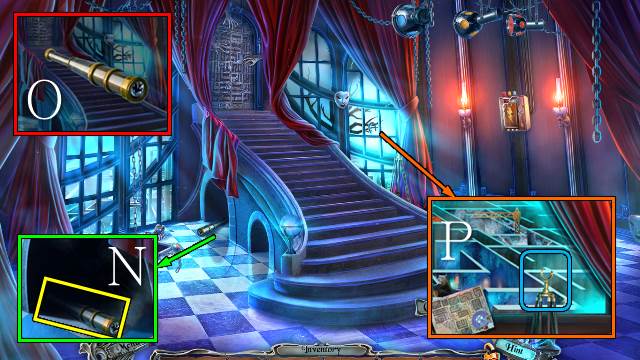
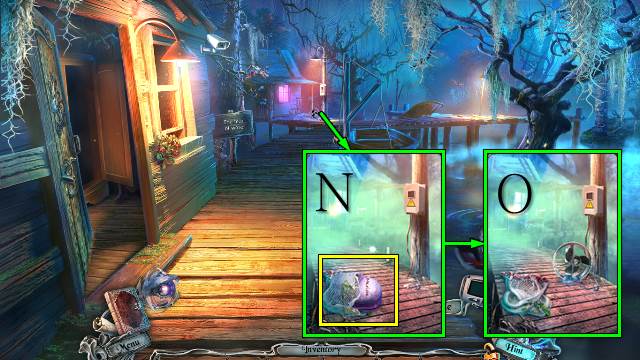
- Take the BROKEN SPYGLASS (N).
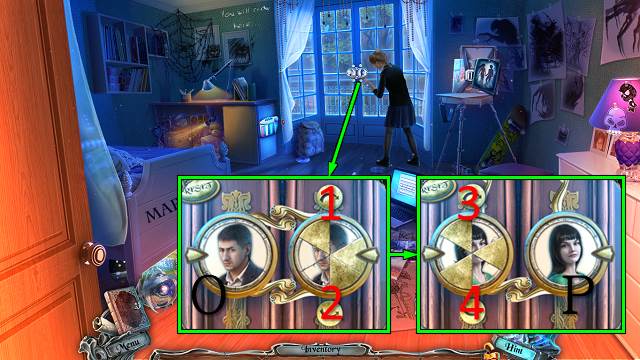
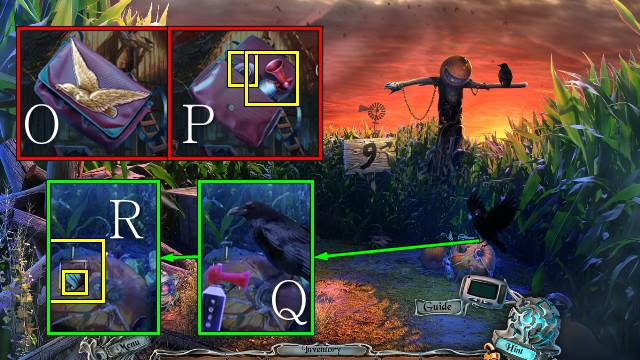
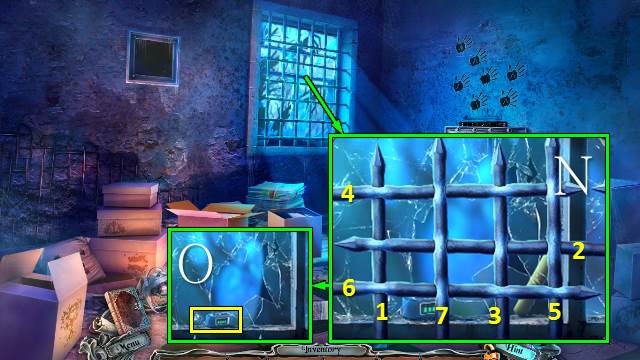
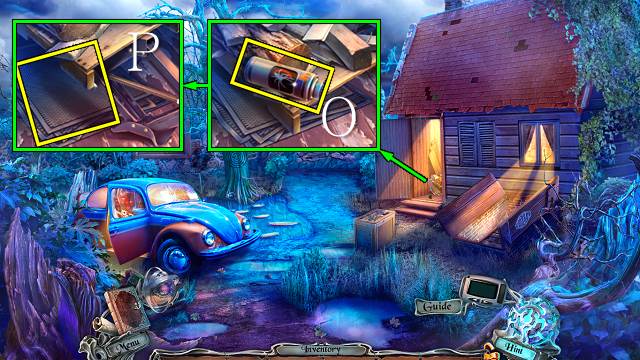
- Access the BROKEN SPYGLASS and place the SPYGLASS LENS; you receive a SPYGLASS (O).
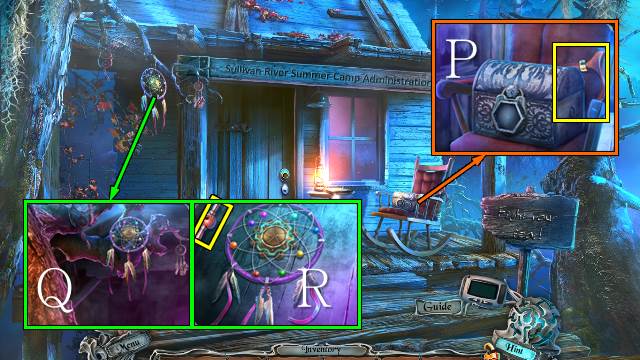
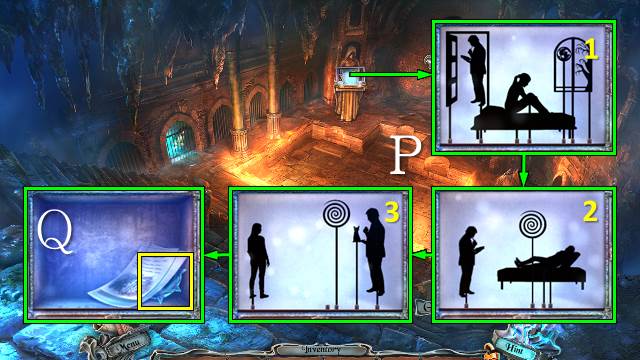
- Place the SPYGLASS for a mini-game (P).
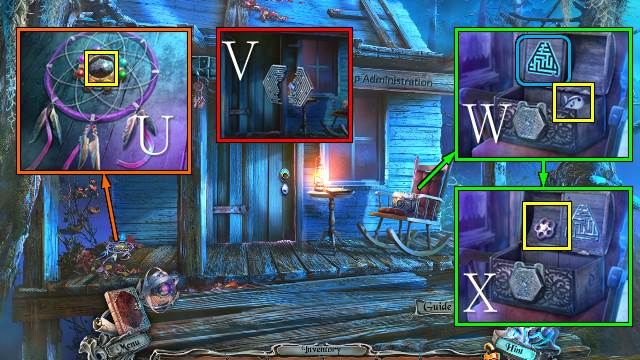
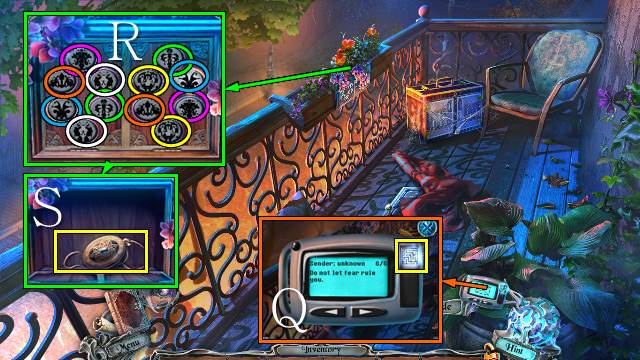
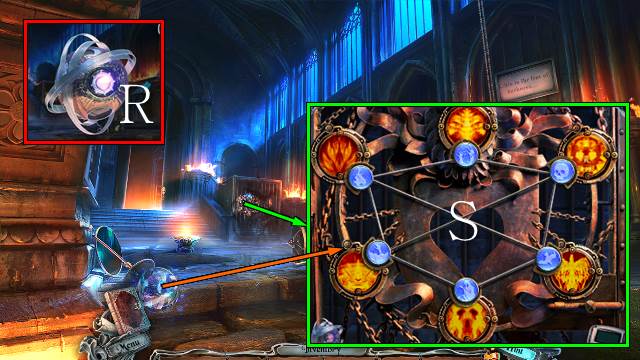
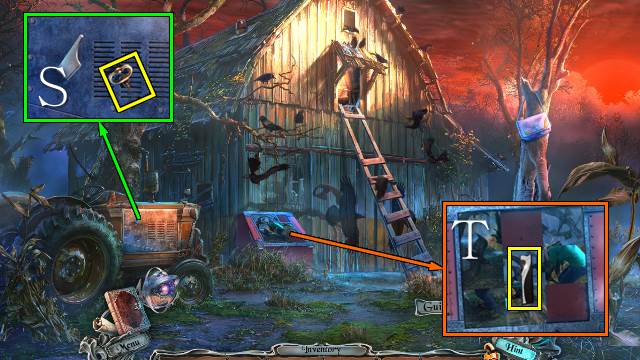
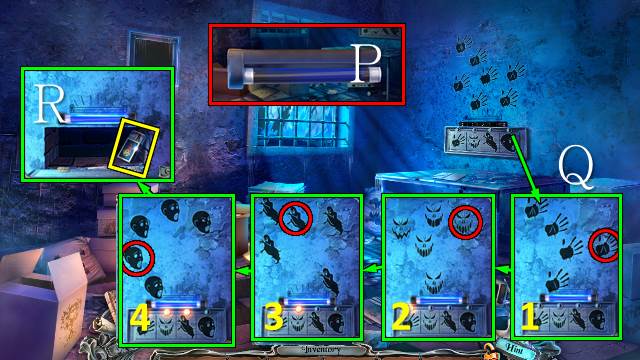
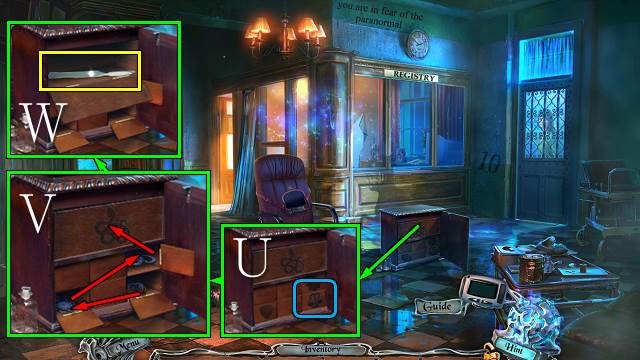
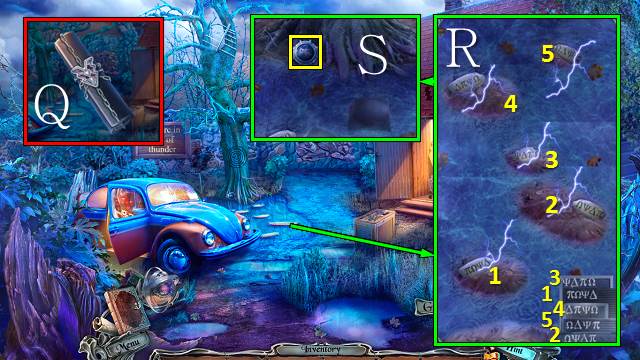
- Take the MAGNET (R).
- Use the MAGNET; take the SOLVENT and BATTERY 2/2 (S).
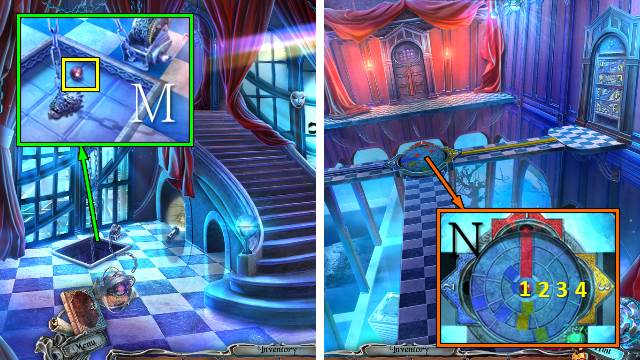
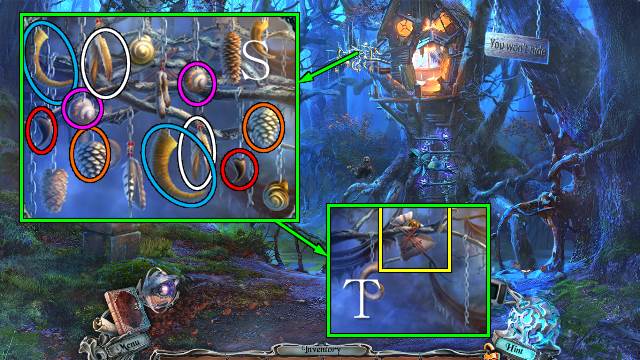
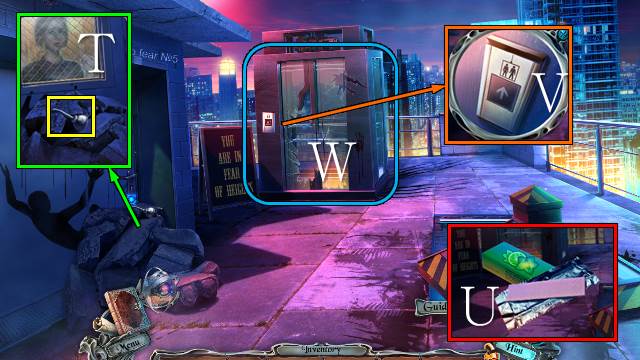
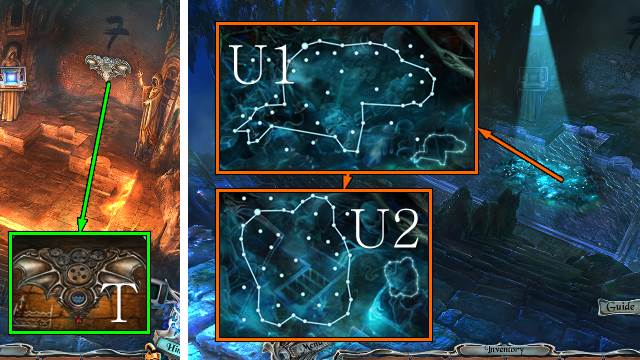
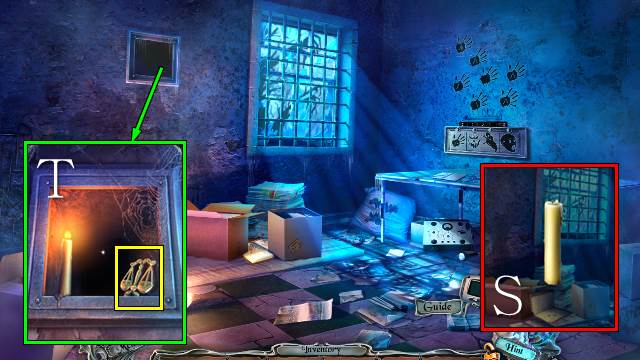
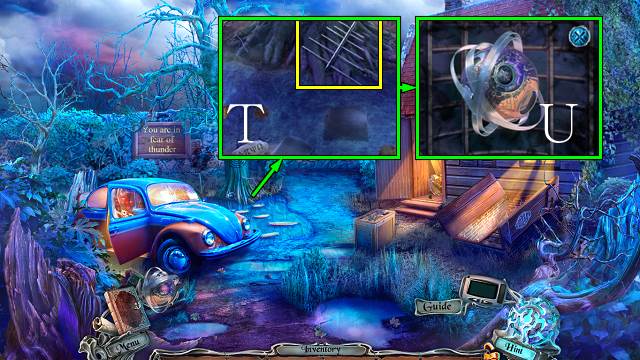
- Take the AMULET PIECE and PUZZLE PIECE 1/2 (T).
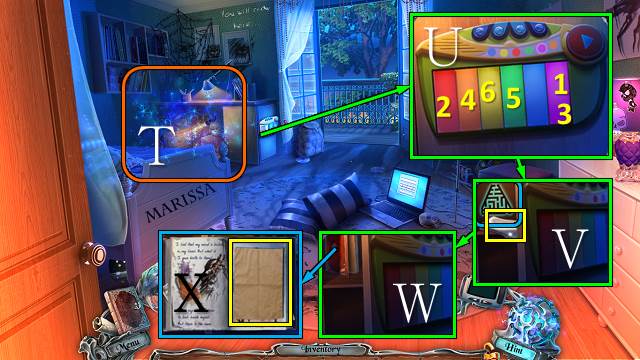
- Use the SOLVENT (U).
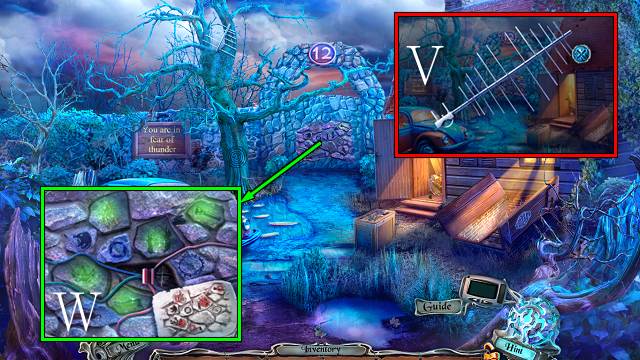
- Take the note and play the mini-game (V).
- Press ‘defeat’, ‘your’ and ‘fears’ (W).
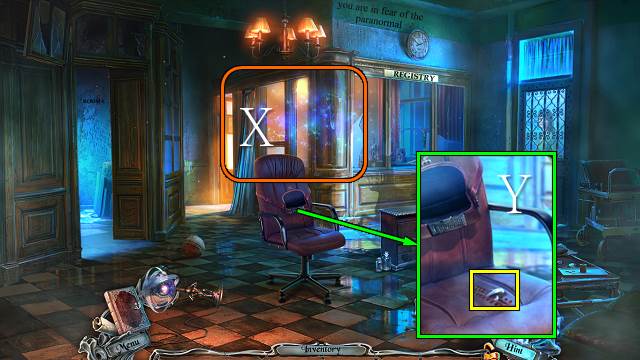
- Go forward.
- Try to move forward.
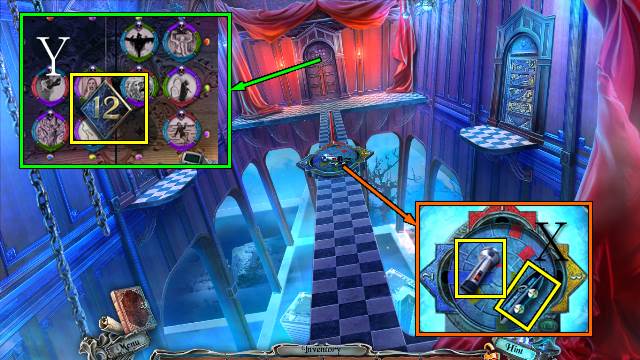
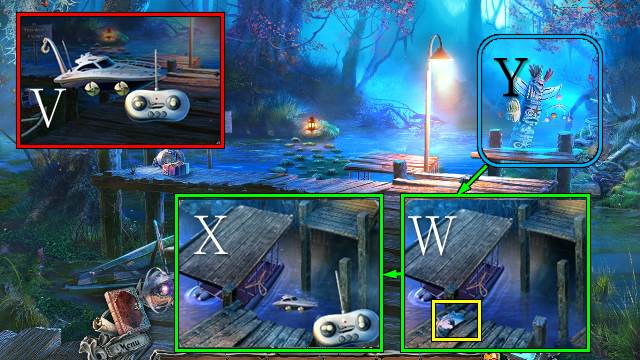
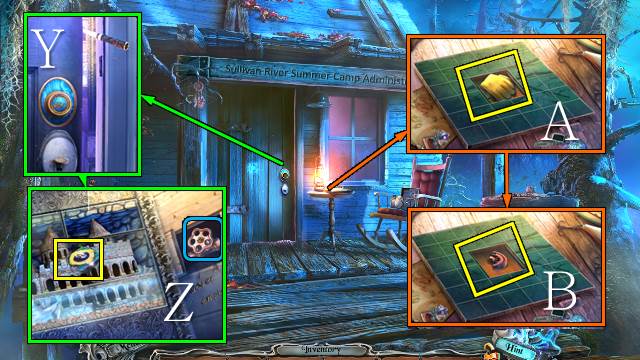
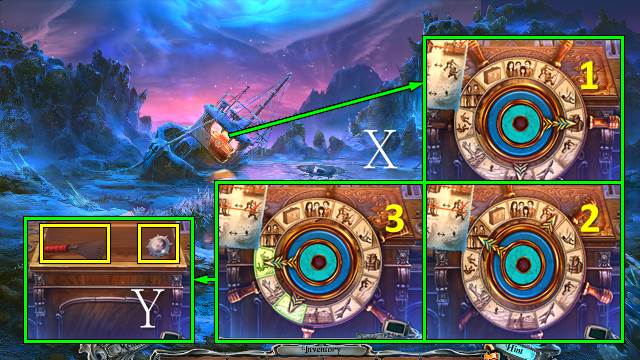
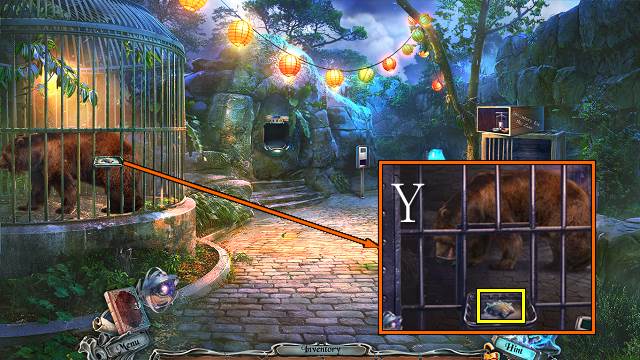
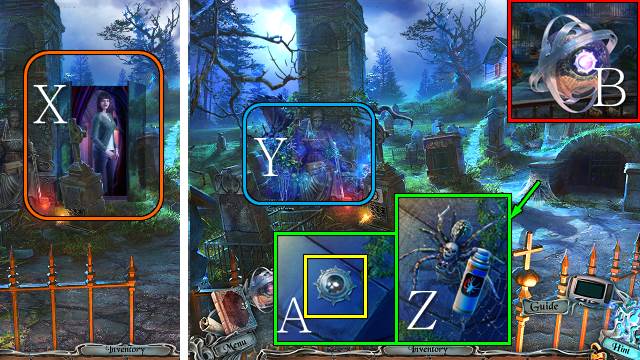
- Take the SHIP PART and FLASHLIGHT WITHOUT BATTERIES (X).
- Take the PART OF MINI-GAME (Y).
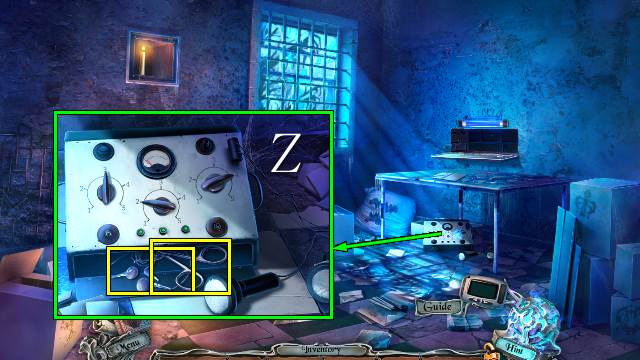
- Walk down.
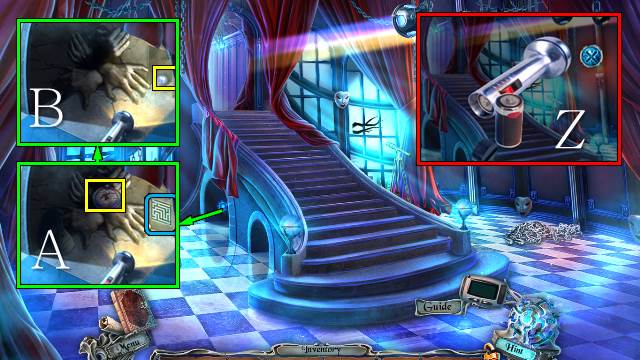
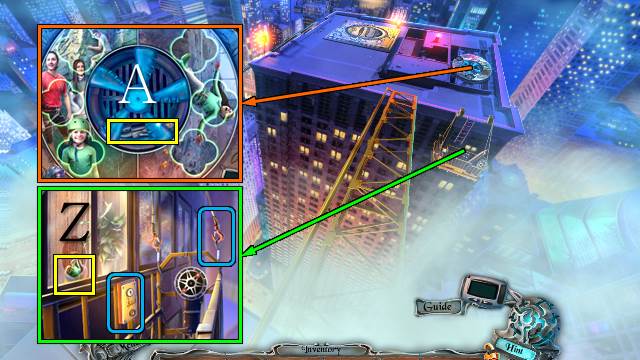
- Access the FLASHLIGHT WITHOUT BATTERIES and place the BATTERIES; you receive a FLASHLIGHT (Z).
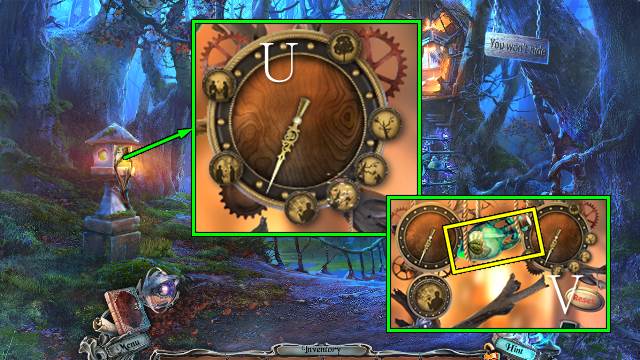
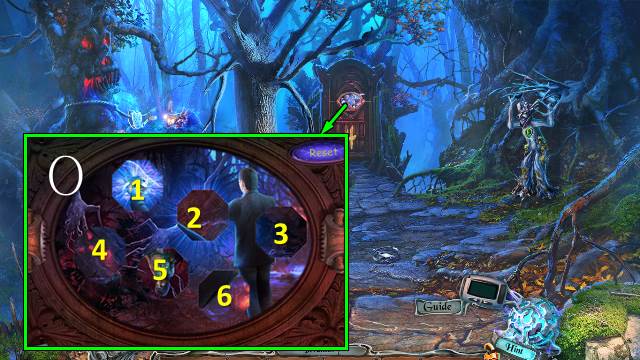
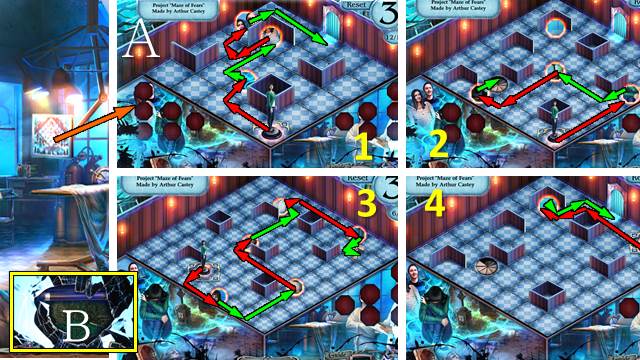
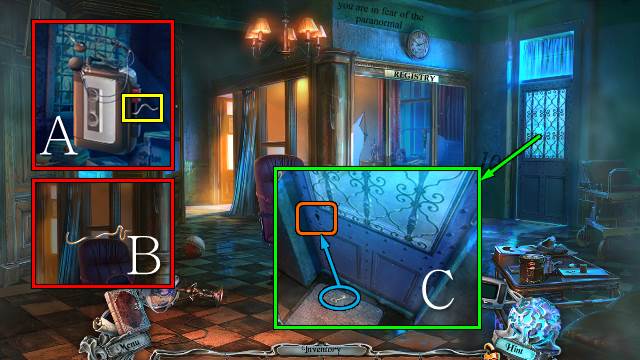
- Place the FLASHLIGHT, take PUZZLE PIECE 2/3 and place the MAZE (A); take the BLUE BALL (B).
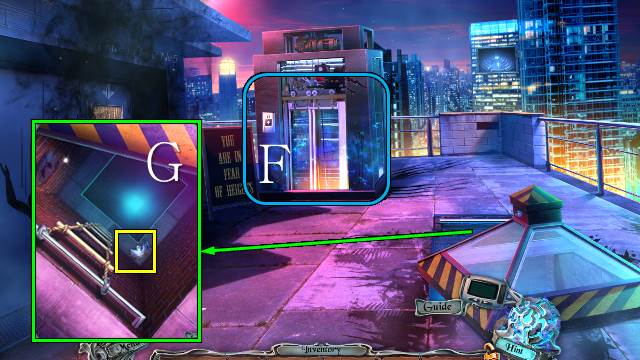
- Walk forward.

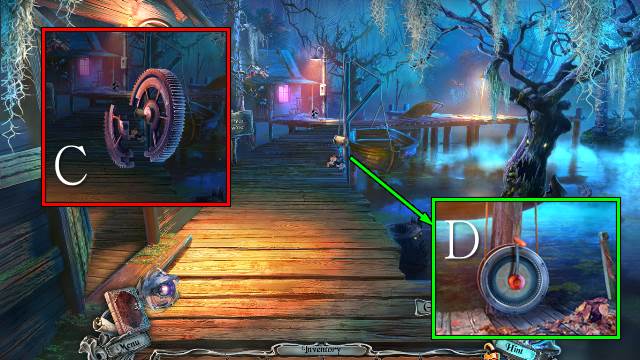
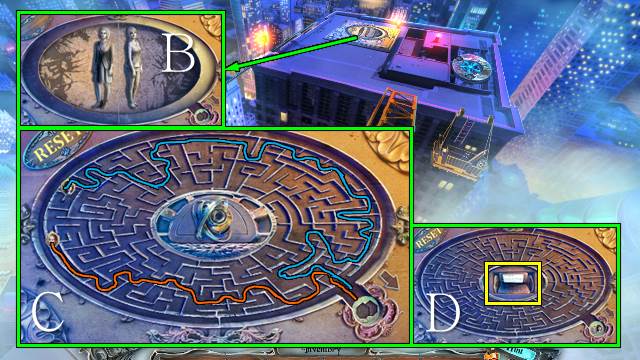
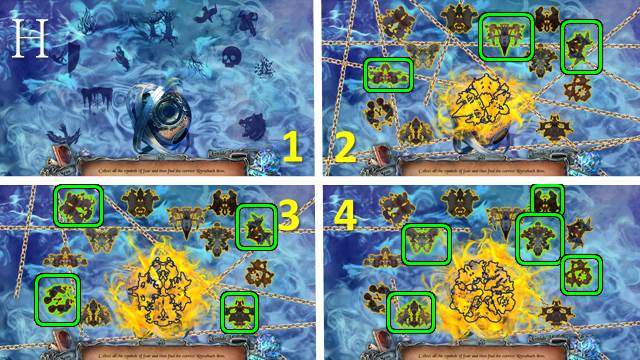
- Place the BLUE BALL for a mini-game (C).
- Solution: align ring 3, 2, 4, 1, press start.
- Place the PART OF MINI-GAME for a mini-game (D).
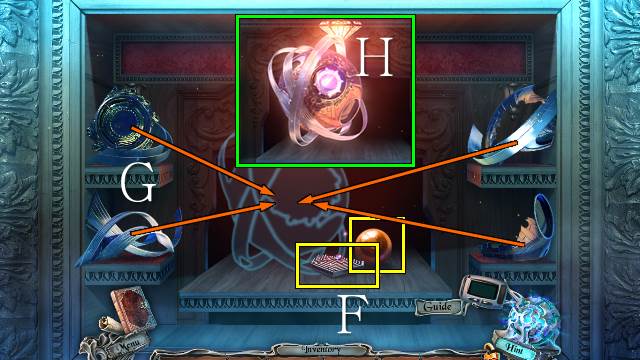
- Take the diagram, DIAL PIECE and YELLOW BALL (F), reconstruct the amulet (G) and place the AMULET PIECE (H); the amulet will appear next to your journal.
- Place the YELLOW BALL for a mini-game (I).
- Solution: align ring 1, 3, 2, 4, press start.
- Play the mini-game (J).
- Use the amulet (K).
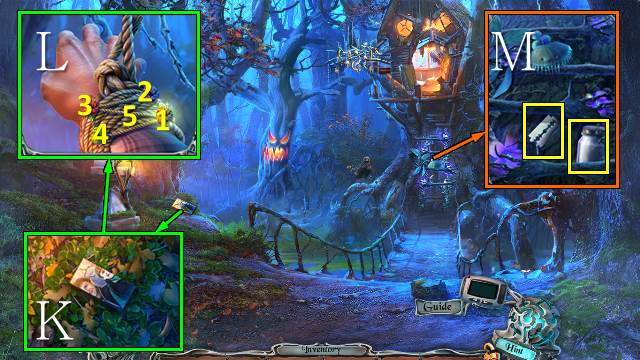
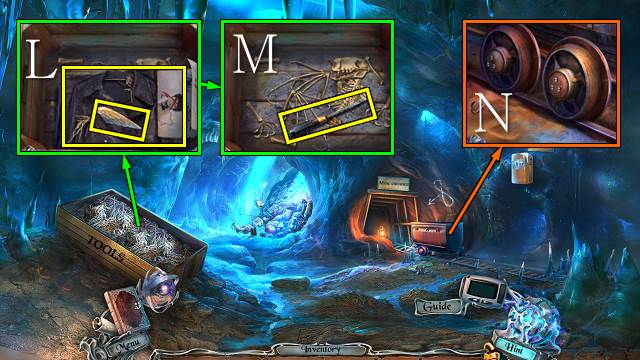
- Take PUZZLE PIECE 3/3, the BROKEN MAP and the CARABINER (L).
- Walk down.
- Place the CARABINER and take the RED BALL (M).
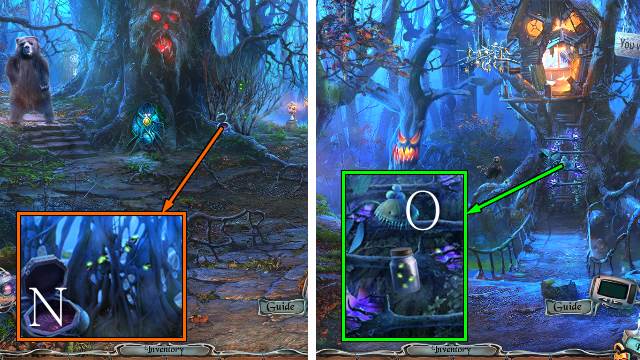
- Walk forward.
- Place the RED BALL for a mini-game (N).
- Solution: align ring 2, 1, 4, 3, press start.
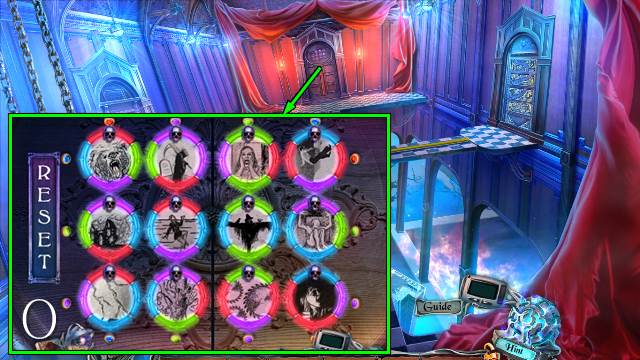
- Place the PUZZLE PIECES for a mini-game (O).
- Walk forward.
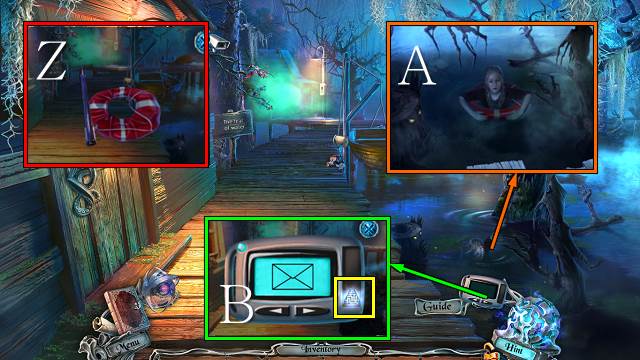
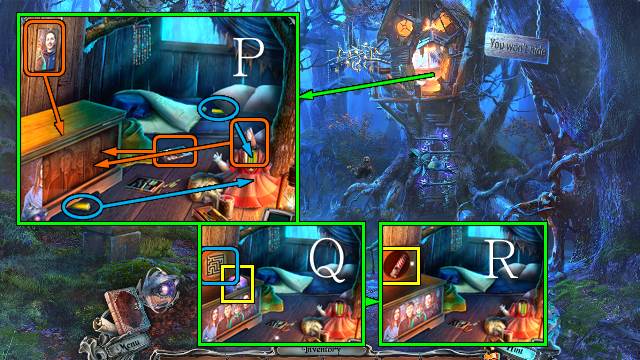
- Read the message on your pager and take the MAZE (P).
- Take the DEFLATED LIFEBUOY and SHIP’S CABIN (Q).
- Use the DRAGONFLY; take the invitation, SHIP’S DECK and OCTOPUS (R).
- Go right.

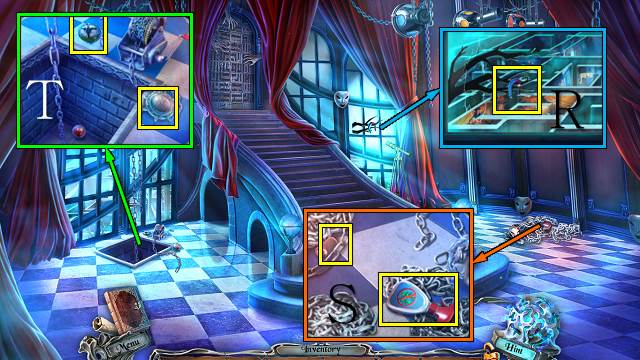
- Take the PUMP and SAILOR KNOT DIAGRAM (S).
- Find the knots (T); take GAME PIECE 1/2 and the REMOTE CONTROL (U).
- Access the SHIP PART and palace the SHIP’S DECK, SHIP’S CABIN and REMOTE CONTROL; you receive a SHIP (V).
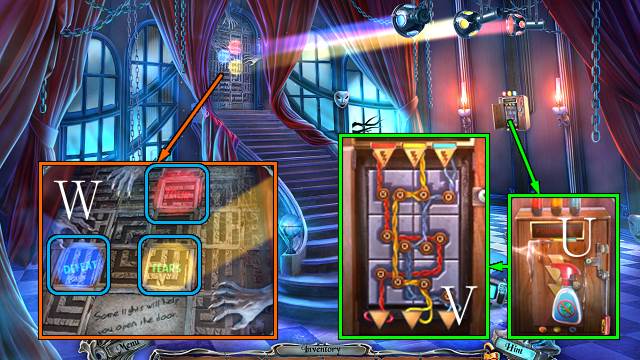
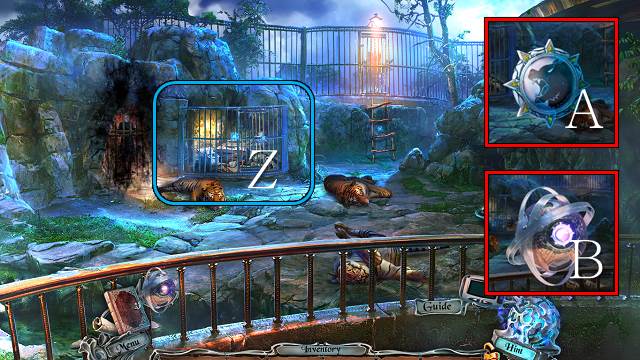
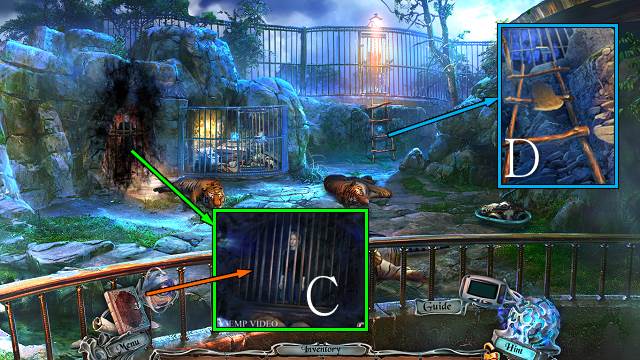
- Take the BROKEN FEAR SYMBOL (W); use the SHIP and activate the remote control (X).
- Play the HOP (Y).
- You receive a LANTERN.
- Walk down.
- Access the DEFLATED LIFEBUOY and use the PUMP; you receive a LIFEBUOY (Z).
- Use the LIFEBUOY (A).
- Read the message on your pager and take the MAZE (B).
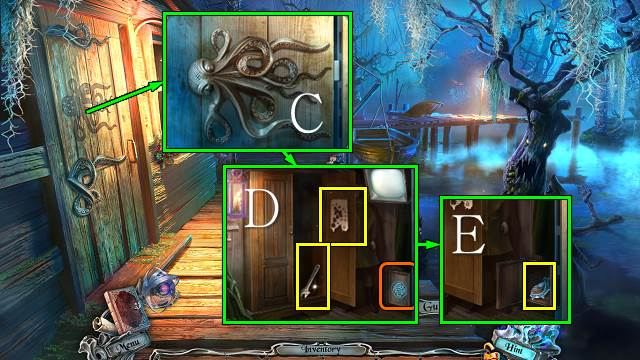
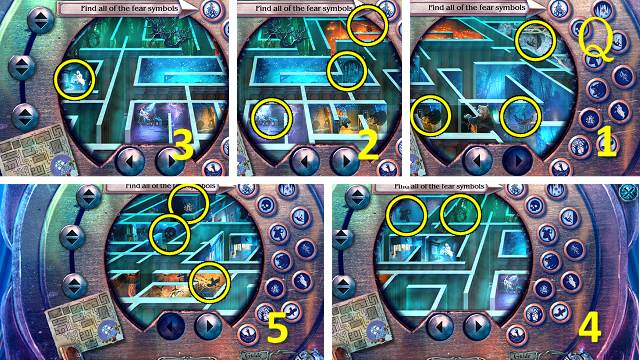
- Place the OCTOPUS and move its tentacles (C); place the LANTERN, open the door and take the MAP PIECE and WRENCH (D), place the MAZE and take the FEAR SYMBOL PIECE (E).

- Access the BROKEN FEAR SYMBOL and place the FEAR SYMBOL PIECE; you receive a SYMBOL FOR THE AMULET (F).
- Access the amulet and place the SYMBOL FOR THE AMULET (G).
- Use the AMULET (H); take the BROKEN GEAR (I).
- Go right.
- Use the WRENCH and take the FAN (J).
- Access the BROKEN MAP and place the MAP PIECE; you receive the SWAMP MAP (K).
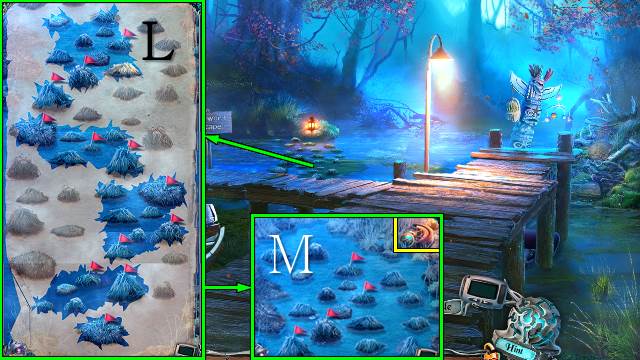
- Place flags on the solid turf (L); take the note, PART OF DOOR and GEAR PIECE (M).
- Walk down.
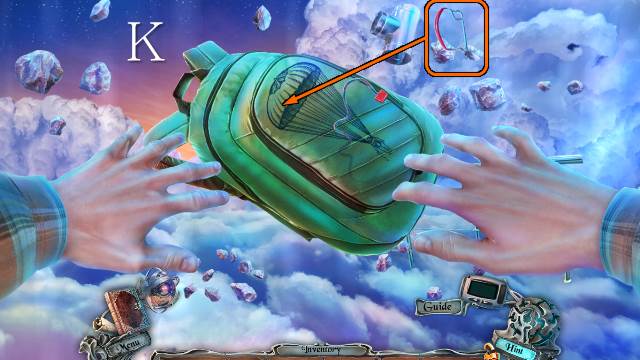
- Pull in the net and take the BACKPACK (N); place the FAN (O).
- Walk forward.
- Take the CANE (P).
- Use the CANE (Q).
- Take the HELMET HANDLE (R).
- Walk down and right.
- Place the HELMET HANDLE and take the DREAMCATCHER PART (S).
- Play the HOP (T).
- You receive the MOUTHPIECE.
- Go down and forward.
- Place the DREAMCATCHER PART and move all the beads; take the PART OF BOX LOCK (U).
- Access the DIAL PIECE and place the PART OF BOX LOCK; you receive the DIAL PART (V).
- Place the DIAL PART, take the MOUSE WITHOUT A KEY and place the MAZE (W); take the VALVE (X).
- Place the PART OF DOOR and use the MOUTHPIECE (Y); place the VALVE and take GAME PIECE 2/2 (Z).
- Go through the papers and place the GAME PIECES for a mini-game; the solution is random.
- Take the GLOVE (A) and GEAR PIECE (B).
- Walk down.
- Access the BROKEN GEAR and place the two GEAR PIECES; you receive a GEAR (C).
- Move the leaves, place the lever and place the GEAR (D).
Chapter 2: Fear of Fire and Forests

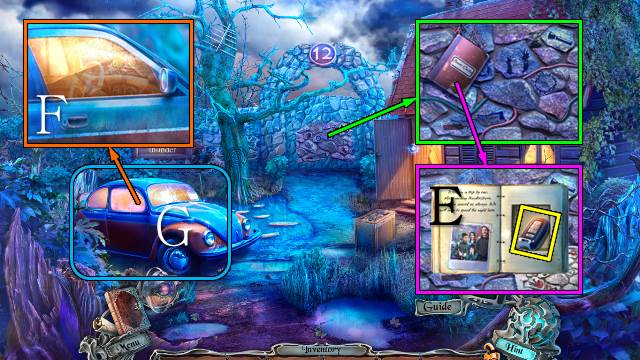
- Read your pager and take the MAZE (E).
- Try to take the baluster, move the pieces and take the BALUSTER (F).
- Move all four ornaments (G), take MECHANISM PART 1/3 and place the MAZE (H); use the GLOVE and take the VASE WITH WATER and BROKEN BRUSH (I).
- Use the VASE WITH WATER for a mini-game (J).
- Take the PIECE OF COAL (K); use the BALUSTER (L).
- Read your pager and take the MAZE (M).
- Remove the curtain and play the HOP (N).
- You receive the HANDLE PIECE.
- Place the HANDLE PIECE for a mini-game.
- Solution 1 (O): 1-1-2-2-2-1-1.
- Solution 2 (P): 3-4-4-4-4-3-3.
- Read your pager and take the MAZE (Q).
- Move the flowers and match the symbols (R); take the CLOSED MEDALLION (S).
- Walk down.
- Play the HOP (T).
- You receive the PIANO KEY.
- Place the PIANO KEY and play them in the indicated order (U); take the NAPKIN, place the MAZE (V), open the book (W) and take the BLANK SHEET OF PAPER (X).
- Walk down.
- Turn over the picture, place the BLANK SHEET OF PAPER, place and move the PIECE OF COAL and take the DIAGRAM (Y).
- Use the NAPKIN (Z) and do the jigsaw (A); take the science magazine and MOUSE KEY (B).
- Go forward.
- Access the MOUSE WITHOUT A KEY and place the MOUSE KEY; you receive a CLOCKWORK MOUSE (C).
- Use the CLOCKWORK MOUSE and take the NAIL FILE (D).
- Access the CLOSED MEDALLION, use the NAIL FILE and take the note; you receive an OPEN MEDALLION (E).
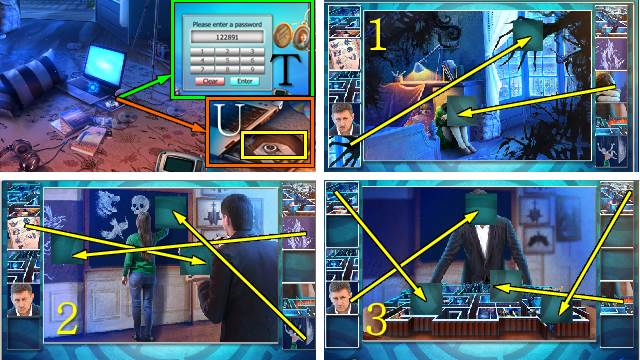
- Enter 122891 for a mini-game (T).
- Take the WIRE (U).
- Walk forward.
- Access the BROKEN BRUSH and place the WIRE; you receive a BRUSH (V).
- Move the brush until all cobwebs are gone and turn the latches in the indicated order (W).
- Place the MAZE (X); take the SCARY TREE and HANDLE 1/2 (Y).
- Move the lever according to the diagram (Z); take the papers and SLIDER (A).
- Walk down.
- Access the BACKPACK, place the SLIDER and take HANDLE 2/2 (B).
- Take the drawing; place the HANDLES and move the handles (C).
- Play the mini-game (D); take the PART OF FEAR SYMBOL (E).
- Walk forward.
- Access the amulet and place the PART OF FEAR SYMBOL (F).
- Interact with Amber and use the amulet (G).
- Try to go left.
- Read your pager and take the MAZE (H).
- Take the GRAPNEL (I).
- Take the BONE (J); place the SCARY TREE and take MECHANISM PART 2/3 (K).
- Go right.
- Try to take the MAP PART for a mini-game (K).
- Solution: 1-2-3-4-1-5 (L).
- Take the EMPTY JAR and BLADE (M).
- Walk down.
- Use the EMPTY JAR to get a JAR WITH FIREFLIES (N).
- Go right.
- Use the JAR WITH FIREFLIES (O).
- Put the batteries in the doll, move the drawings and blanket, place the three tiles and your MAP PART (P); take DOOR PART 1/3, place the MAZE (Q) and take the EMPTY PETARD (R).
- Match the items (S); use the BLADE to receive MECHANISM PART 3/3 and the POWDER (T).
- Place the MECHANISM PARTS for a mini-game (U).
- Take the ELIXIR (V).
- Walk down.
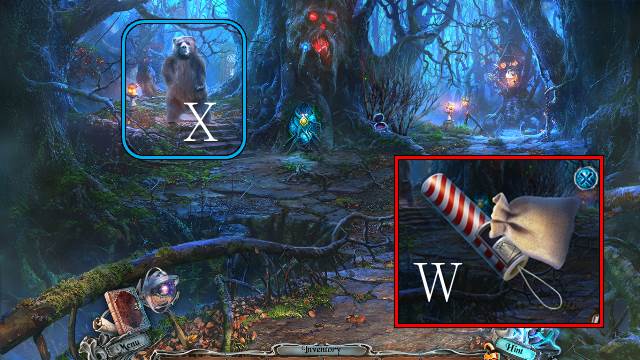
- Access the EMPTY PETARD and fill it with POWDER; you receive a PETARD (W).
- Throw the PETARD at the bear (X).
- Go left.
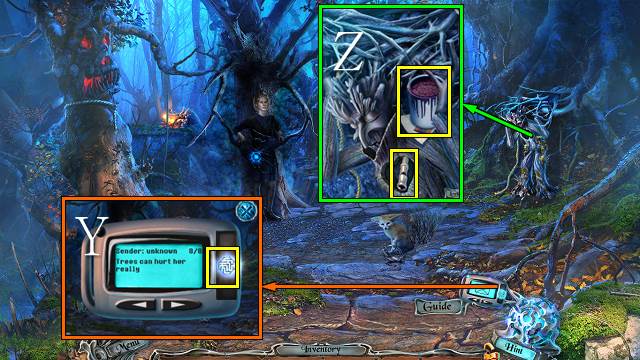
- Read your pager and take the MAZE (Y).
- Take the WHISTLE and DRIED PAINT (Z).
- Walk down.
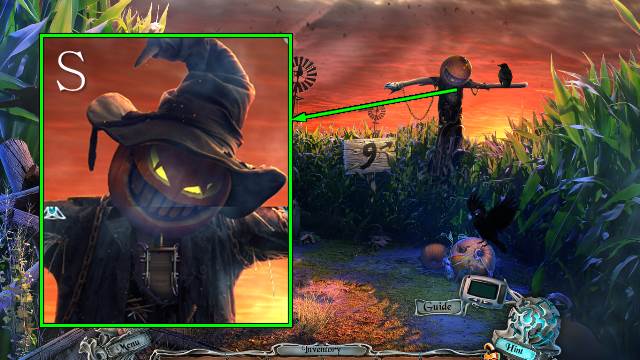
- Place the MAZE (A); read the folder and take the FEAR OF FOREST SYMBOL and WITHERED HEART (B).
- Access the WITHERED HEART and use the ELIXIR; you receive the TREE HEART (C).
- Go left.

- Place the TREE HEART and take the ROPE (D).
- Access the GRAPNEL and place the ROPE; you receive a GRAPNEL WITH ROPE (E).
- Use the GRAPNEL WITH ROPE and place the pulley (F).
- Play the HOP (G).
- You receive the EYE OF TREE.
- Walk down.
- Place the EYE OF TREE and take the RESTRAINT HARNESS and CROWBAR (H).
- Go left.
- Use the BONE and CROWBAR (I); take GEAR 1/2 and the PART OF THE SYMBOL OF FEAR (J).
- Access the FEAR OF FOREST SYMBOL and place the PART OF THE SYMBOL OF FEAR; you receive the FEAR OF THE FOREST SYMBOL (K).
- Access the amulet and place the FEAR OF THE FOREST SYMBOL (L).
- Interact with Amber and use the amulet (M); you receive DOOR PART 2/3.
- Play the HOP (N).
- You receive DOOR PART 3/3.
- Place the DOOR PARTS for a mini-game (O).
- Solution: swap 1-2, 3-6, 1-6, 4-5, 1-5; turn 1×1, 2×6, 3×7, 4×4, 5×3, 6×5.
- Go forward.
Chapter 3: Fear of Heights, Claustrophobia and Fear of Darkness
- Take the CONTROL PANEL (P); place the RESTRAINT HARNESS for a mini-game (Q).
- Take the BOARDS (R).
- Take the STICKY GUM and BUTTON and place the BOARDS (S).
- Go left.
- Take the OIL and move the rubble (T).
- Access the STICKY GUM and take some CHEWING GUM (U).
- Use the CHEWING GUM and place the BUTTON and push it (V).
- Play the HOP (W).
- You receive a TROWEL.

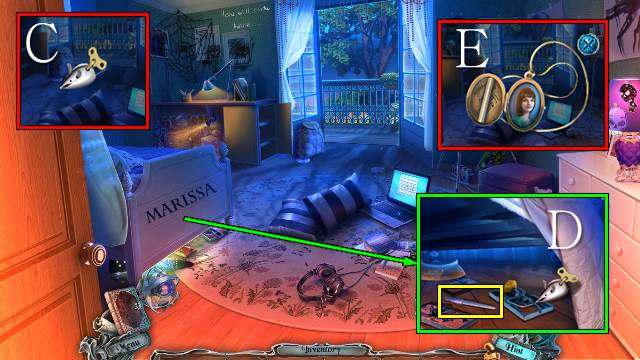
- Take TILE OF FALL 1/2 (X).
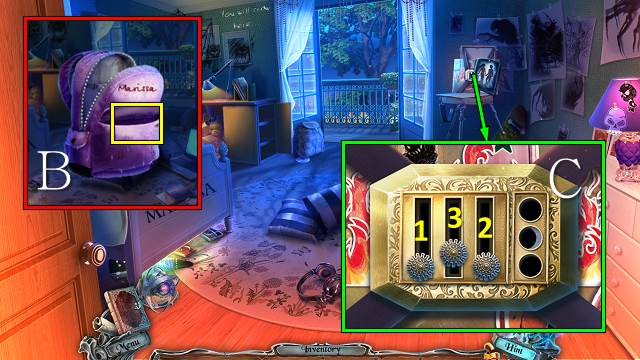
- Use the WHISTLE and take the MAGNIFIER and GLASS CUTTER; use the TROWEL and take the MARISA FIGURE (Y).
- Walk down.
- Place the CONTROL PANEL, use the GLASS CUTTER and take the SOLVENT and TILE OF FALL 2/2; move the cable and push the button (Z).
- Place the TILES OF FALL for a mini-game; take the AMBER FIGURE (A).
- Place the MARISA FIGURE and AMBER FIGURE (B) for a mini-game (C).
- Take the palmtop and CODE (D).
- Go left.

- Push the tiles in the right order (D) and take the PART OF THE SYMBOL OF FEAR (E).
- Play the HOP (F).
- You receive a ROPE LADDER.
- Place the ROPE LADDER and take the BROKEN SYMBOL OF FEAR (G).
- Access the BROKEN SYMBOL OF FEAR and place the PART OF THE SYMBOL OF FEAR; you receive the SYMBOL OF FALL (H).
- Access the amulet and place the SYMBOL OF FALL (I).
- Use the amulet (J).
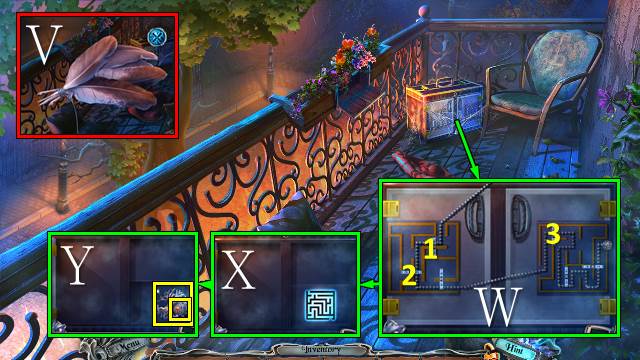
- Move the rubble, place the handle and take the parachute (K).
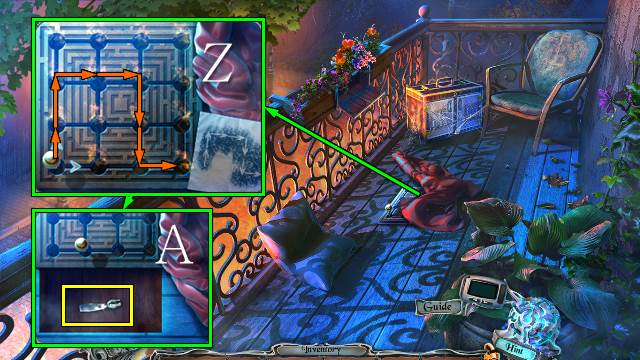
- Push pistons 1-3-4-6-6-5-7-7-9; take the CASKET WITH A SECRET (L).
- Access the CASKET WITH A SECRET and move the MAGNIFIER over it to find the five symbols (M); take the BUTTON (N).
- Place the BUTTON for a mini-game (O).
- Solution: 4-1-2-4-1-3-4-2-1-4-3.
- Take the ROD and notes (P).

- Take the note and place the ROD (Q); take the BROKEN CLAUSTROPHOBIA SYMBOL and MECHANISM PART (R).
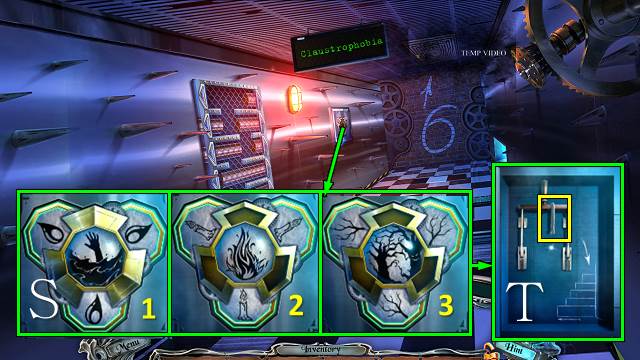
- Place the MECHANISM PART and change the outer symbols to match the image in the center (S); take the WICK and pull the lever (T).
- Take the BROKEN CLAUSTROPHOBIA SYMBOL and put it back together; you receive the CLAUSTROPHOBIA SYMBOL (U).
- Access the amulet and place the CLAUSTROPHOBIA SYMBOL (V).
- Use the amulet (W).
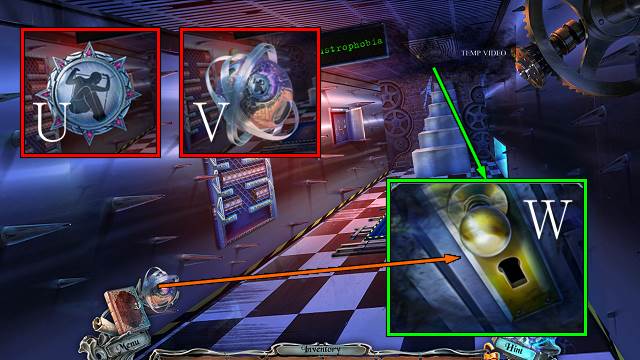
- Read your pager and take the MAZE (X).
- Place the MAZE (Y); take the FLINT and LOCK PICK (Z).
- Use the LOCK PICK for a mini-game (A).
- Solution: 5-2-4-3-1 (B).
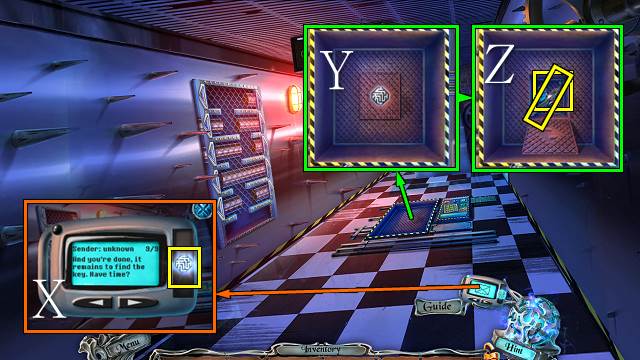
- Go up.
- Take the POTHOLDER (C), note and LEVER (D); push the buttons and use the OIL, WICK and FLINT (E).

- Place the LEVER (F).
- Play the HOP (G).
- You receive a TRIANGULAR AMULET.
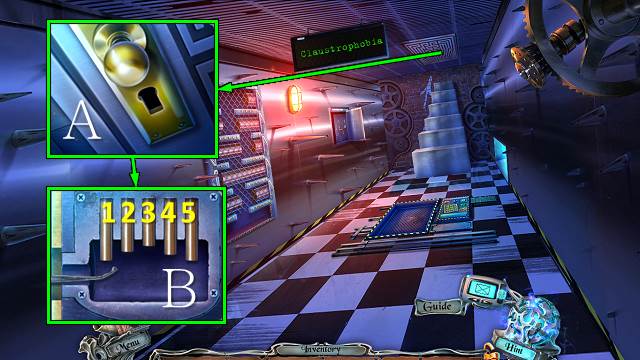
- Place the TRIANGULAR AMULET and turn the rings until all triangles point down (H); take the note, FLAG and DOOR HANDLE PART (I).
- Take the BRUSH (J); place the DOOR HANDLE PART (K).
- Go forward.
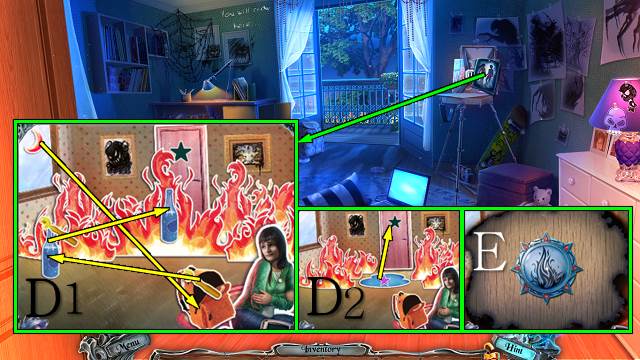
- Access the DRIED PAINT and use the SOLVENT; you receive the PAINT (L).
- Look down (M); place the PAINT, select the maze, Marissa and shadows (N) and take the BELLOWS and FIGURE OF THE THEATER (O).
- Place the FIGURE OF THE THEATER and spin it for a mini-game (P).
- Take the notes and FEAR OF THE DARK SYMBOL (Q).
- Walk down.
- Access the amulet and place the FEAR OF THE DARK SYMBOL (R).
- Use the amulet.
- Move the tokens to their matching shadows; you receive GEAR 2/2 (S).
- Go forward.
- Place the GEARS and activate them (T).
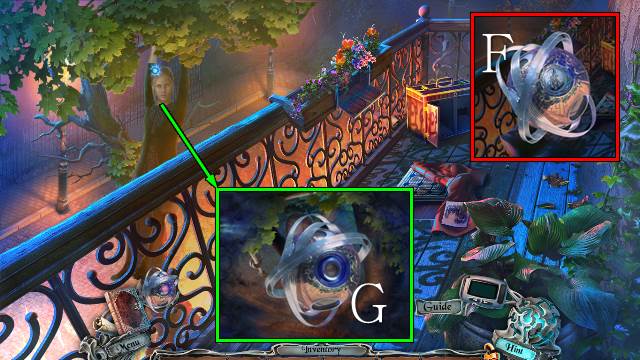
- Zoom in for a mini-game (U).
- Go forward.
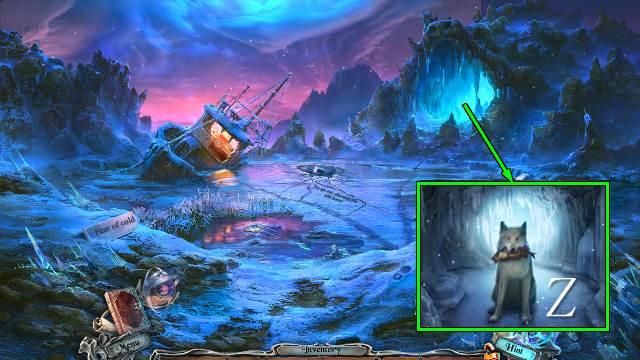
Chapter 4: Fear of the Cold, Birds and the Paranormal
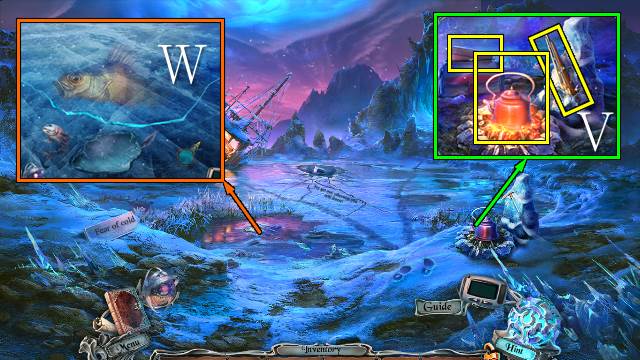
- Take the electronic diary, use the BELLOWS and take the HARPOON GUN; take the TEAPOT WITH HOT WATER with the POTHOLDER (V).
- Touch the ice; use the TEAPOT WITH HOT WATER to receive the ARROW and FROZEN FISH (W).
- Put the FROZEN FISH on the fire to get a FISH (V).
- Place the ARROW for a mini-game (X).
- Take the paper, ICE SCRAPER and FEAR OF THE COLD SYMBOL (Y).
- Throw the FISH (Z).
- Go forward.
- Try to go into the mine entrance.
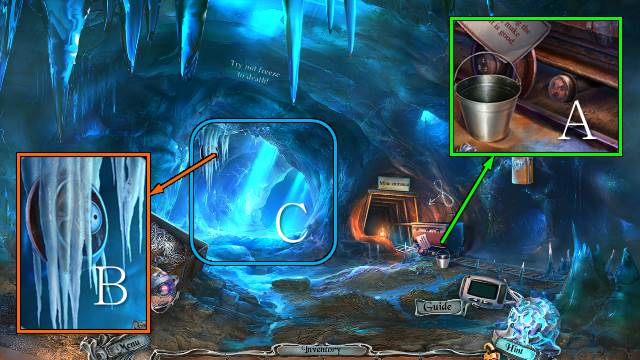
- Take the note and EMPTY BUCKET (A).
- Remove the icicles to receive a WHEEL (B).
- Play the HOP (C).
- You receive a HARPOON.
- Walk down.
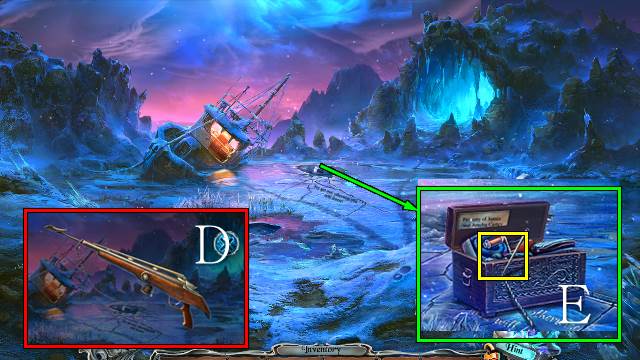
- Access the HARPOON GUN and add the HARPOON; you receive a HARPOON (D).
- Use the HARPOON, open the chest and take the letter and HANDLE (E).
- Go forward.
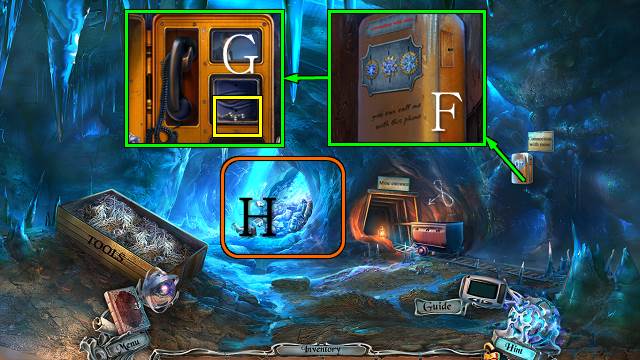
- Use the ICE SCRAPER and place the HANDLE (F).
- Go through the dialog; take the BOLTS (G).
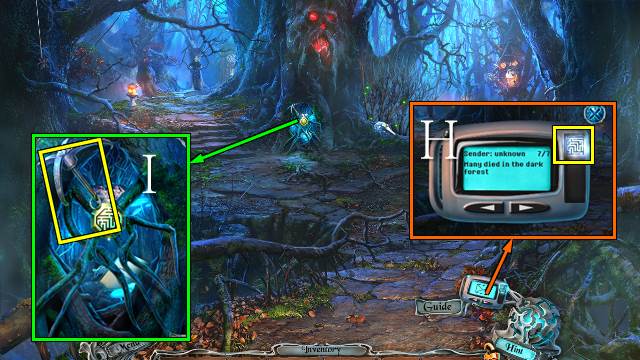
- Play the HOP (H).
- You receive a BURNER.
- Access the amulet and place the FEAR OF THE COLD SYMBOL (I).
- Move the wood shavings and try to take the items; use the BURNER (J).
- Use the amulet (K).
- Take the METAL WING, note, RAINCOAT (L) and SCREWDRIVER (M).
- Place the WHEEL and BOLTS and use the SCREWDRIVER (N).
- Take the WATER PUMP HANDLE (O).
- Take DOOR PART 1/2, place the FLAG and drag it down (P).
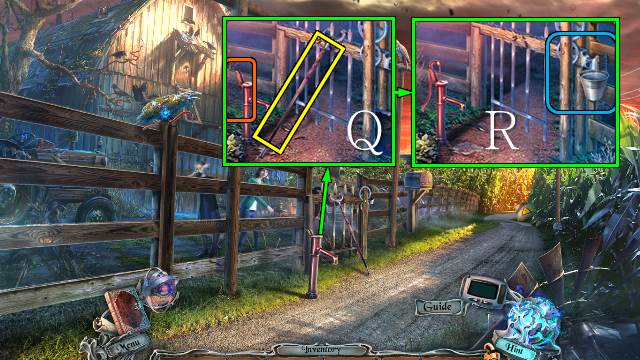
- Take the STICK, place the WATER PUMP HANDLE and EMPTY BUCKET and move the handle to get a BUCKET OF WATER (Q); hang the BUCKET OF WATER from the beam (R).
- Go forward to the Barn.
- Take the KEY (S).
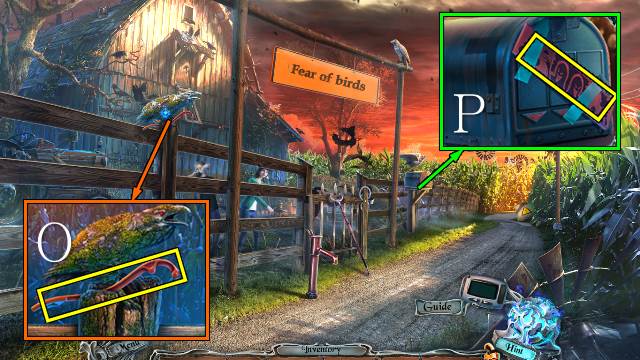
- Take the MAILBOX PART (T).

- Take the HAMMER and move the hay bales in numerical order (U); take the LOCKED BAG with the STICK (V).
- Use the HAMMER (W).
- Play the HOP (X).
- You receive the TONGS.
- Walk down.
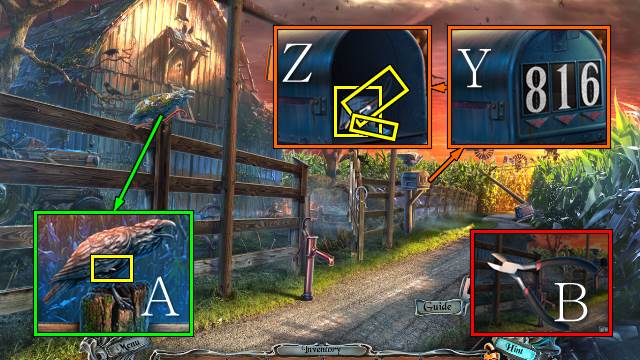
- Place the MAILBOX PART and push the arrows to complete the numbers (Y); take the letter, DIAL PART 1/2, TOOL PART and PART OF LOCK (Z).
- Use the BRUSH and take the BROKEN TOOL with the TONGS (A).
- Access the BROKEN TOOL and add the TOOL PART; you receive WIRE CUTTERS (B).
- Try to walk down the path.
- Open the power box for a mini-game (C).
- Use the WIRE CUTTERS (D).
- Walk forward.
- Use the KEY (E); take the KNIFE HANDLE (F).
- Go to the Barn.
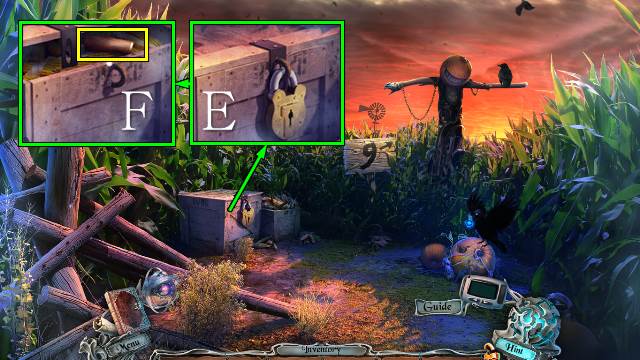
- Place the PART OF LOCK for a mini-game (G).
- Solution: 8-7-4-1-2-5-6-9.
- Take the HAT (H).
- Place the KNIFE HANDLE; you receive a KNIFE (I).
- Play the HOP (J).
- You receive the FEAR OF BIRDS SYMBOL.
- Access the amulet and place the FEAR OF BIRDS SYMBOL (K).
- Interact with the girls and use the amulet; you receive the SCROLL (L).
- Access and open the SCROLL and move the objects onto the scarecrow (M); take the METAL HEAD (N).
- Walk down and forward.
- Access the LOCKED BAG and place the METAL WING and METAL HEAD (O); take the INSULATING TAPE and AIR HORN (P).
- Use the AIR HORN (Q); take DIAL PART 2/2 and the LEVER (R).
- Use the KNIFE and place the HAT, look down and place the LEVER and RAINCOAT; pull the lever (S).
- Interact with the clock.
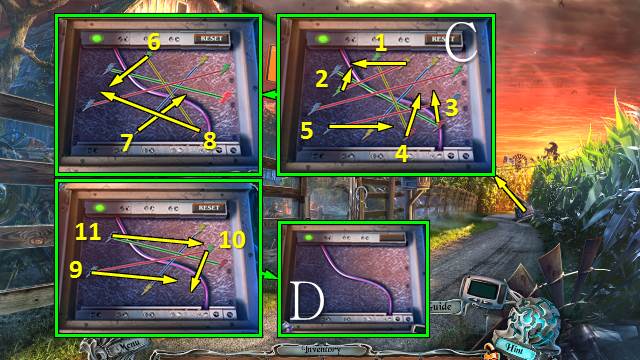
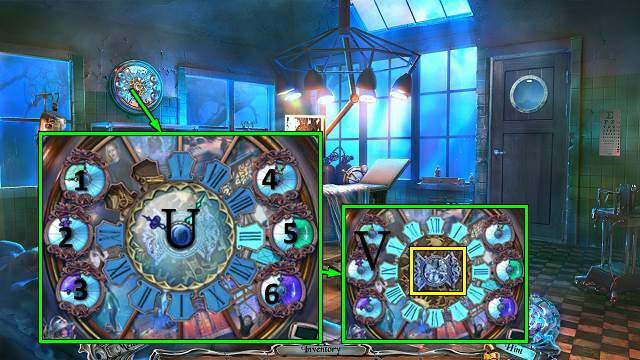
- Place the DIAL PARTS for a mini-game.
- Solution: 2-3-U-5-2-3-U-1-2-3-U-4-6-2-3-U-2-4-U-4-U-4-U-4-U-4-6-3-2-2-U.
- Take the MECHANISM PART (V).
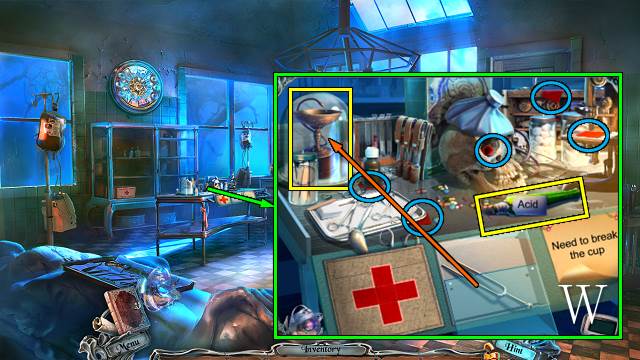
- Take the ACID, find all the red squares and use the tuning fork on the glass; take the STATUETTE (W).
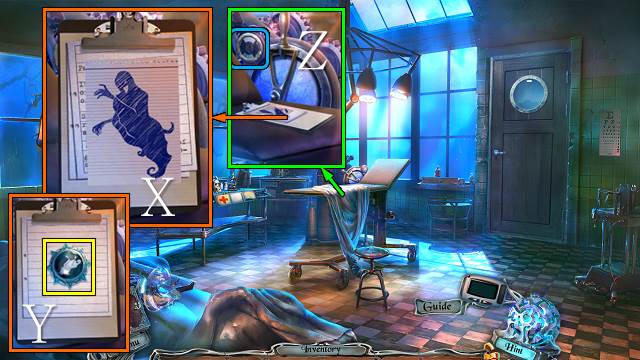
- Do the jigsaw (X), move the papers and take the FEAR OF GHOSTS SYMBOL (U); place the MECHANISM PART (Z).
- Play the mini-game (A).
- Take the LAMP WITHOUT BATTERIES (B).
- Access the amulet and place the FEAR OF GHOSTS SYMBOL (C).
- Open the door.
- Use the amulet (D); match the objects.
- Go right.
- Interact with the door (E).
- Read your pager and take the MAZE (F).
- Place the MAZE (G); take the TAPE RECORDER and SLEEPING PILLS (H).
- Use the STATUETTE (I).
- Play the HOP (J).
- You receive DOOR PART 2/2.
- Place the DOOR PARTS for a mini-game (K).
- Go left.
- Move the papers and play the jigsaws (L); put the pieces in the right place then swivel them around.
- Take the CASSETTE (M).
- Remove the bars one by one to receive a CANDLE (N); take the LAMP BATTERY (O).
- Access the LAMP WITHOUT BATTERIES and place the LAMP BATTERY; you receive a LAMP (P).
- Place the LAMP for a mini-game (Q).
- Take the MATCHES (R).
- Access the CANDLE and use the MATCHES; you receive a LIT CANDLE (S).
- Use the LIT CANDLE; take the SCALES TILE (T).
- Walk down.
- Place the SCALES TILE (U); take and place the tiles as you find them (V) and then take the SCALPEL (W).
- Play the HOP (X).
- You receive SWITCH 1/2.
- Use the SCALPEL and take SWITCH 2/2 (Y).
- Go left.
- Place the SWITCHES and turn them to 3, 2 and 4; take the HEADPHONES and SCISSORS (Z).
- Walk down.
- Access the TAPE RECORDER and place the CASSETTE and HEADPHONES; take the WIRE (A).
- Access the WIRE and bend it into a LOCKPICK (B).
- Use the LOCKPICK, pull the mat and take the KEY; open the door with the KEY (C).
Chapter 5: Fear of Animals, Thunder and Death
- Take the CARD WITHOUT PHOTO and BLOW DART 1/3; go through the dialog (D).
- Read your pager and take the MAZE (E).
- Take the INSTRUCTION and place the MAZE (F).
- Play the mini-game (G).
- Take the PRUNER and BLOW DART 2/3 (H).
- Use the PRUNER (I).
- Go forward.
- Take BLOW DART 3/3 (J).
- Walk down.
- Use the ACID and play the HOP (K).
- You receive MELISSA and a LADLE.
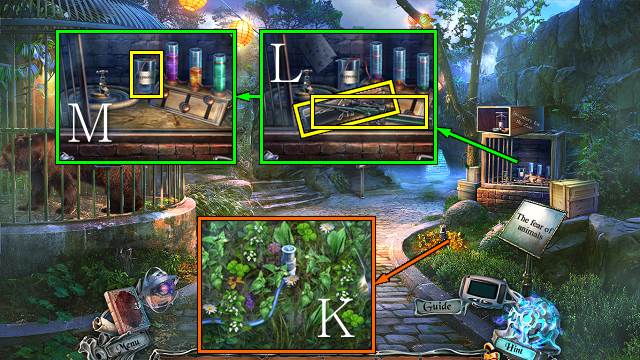
- Take the EMPTY TRANQUILIZER GUN and CARPET ROLL (L); place the LADLE and use it on the cylinders, move the sliders and take the HYPNOTIC (M).
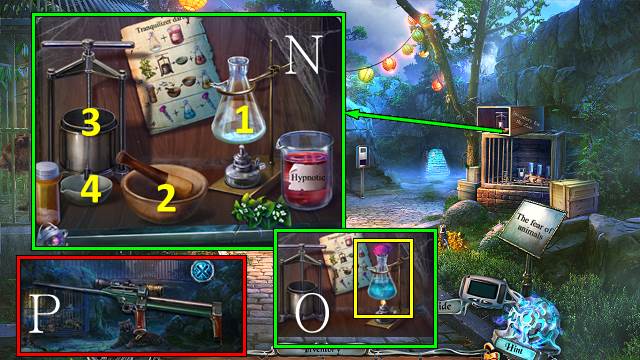
- Place the HYPNOTIC, MELISSA and SLEEPING PILLS, put the hypnotic in the flask (1), the pills in the mortar (2) and the melissa in the press (3) and add the juice (4) and pills to the flask (N); place the BLOW DARTS in the flask and take the BLOW DARTS WITH TRANQUILIZER (O).
- Access the EMPTY TRANQUILIZER GUN and place the BLOW DARTS WITH TRANQUILIZER; you receive the LOADED TRANQUILIZER GUN (P).
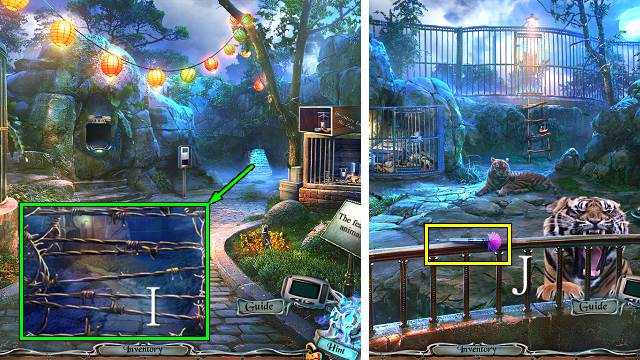
- Walk forward.
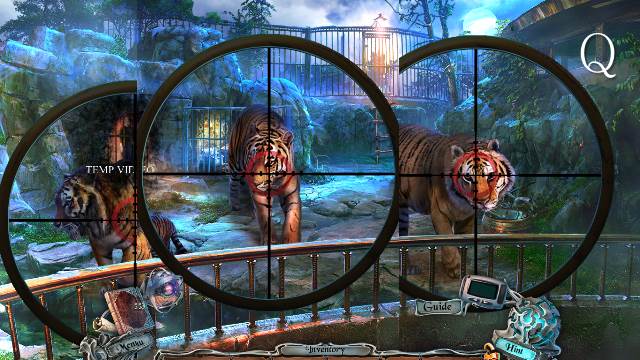
- Place the LOADED TRANQUILIZER GUN and shoot the tigers (Q).
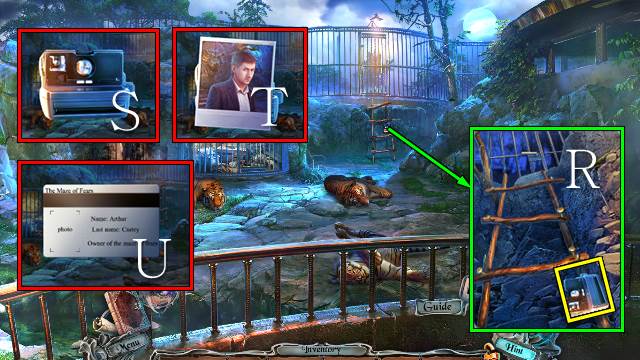
- Take the SNAPSHOT (R).
- Access the SNAPSHOT and develop the pictures; go through the pictures and take the PHOTOS OF ARTHUR (S).
- Access the PHOTOS OF ARTHUR and use the SCISSORS; you receive the PHOTOS OF ARTHUR (T).
- Access the CARD WITHOUT PHOTO and place the PHOTOS OF ARTHUR; you receive the CARD (U).
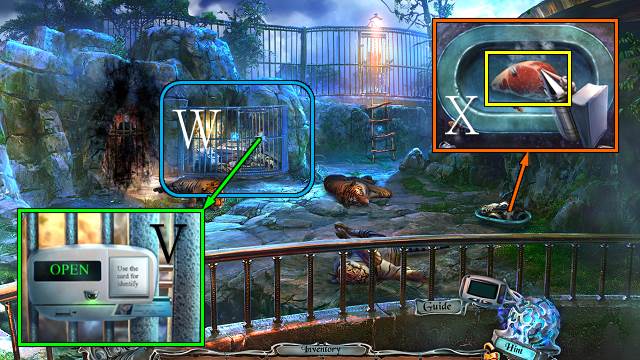
- Take the paper and use the CARD (V).
- Play the HOP (W).
- You receive the SMOKER.
- Use the SMOKER; take the BEEF (X).
- Walk down.
- Try to take the symbol; place the BEEF and take the ROUND PICURES and BROKEN SYMBOL OF FEAR (Y).
- Go forward.
- Play the HOP (Z).
- You receive the SYMBOL OF FEAR.
- Access the BROKEN SYMBOL OF FEAR and place the SYMBOL OF FEAR; you receive the FEAR OF ANIMALS SYMBOL (A).
- Access the amulet and place the FEAR OF ANIMALS SYMBOL (B).
- Use the amulet; you receive a FLAT STONE (C).
- Use the FLAT STONE and go up (D).
- Open the notebook and take the KEY CAR (E).
- Use the KEY CAR (F).
- Play the HOP (G).
- You receive a BROKEN ANTENNA.
- Place the ROUND PICTURES for a mini-game.
- Solution: I-H-J-I-H-J-I-H-J-I-H-J-I-H-J-I-Hx5-Jx3.
- Take the CLASP OF BELTS and SKULL 1/3 (K).
- Read your pager and take the MAZE (L).
- Take the note, place the MAZE and open the hatch (M); take the FIRST PART OF THE ANTENNA and JACK SCREW (N).
- Take the BUG SPRAY (O), place the JACK SCREW and take RUBBER MAT 1/2 (P).
- Access the CARPET ROLL and place the CLASP OF BELTS; you receive RUBBER MAT 2/2 (Q).
- Place the rubber mats on the places with matching symbols (R), take the FEAR OF LIGHTNING SYMBOL (S).
- Take the SECOND PART OF THE ANTENNA (T); access the amulet, place the FEAR OF LIGHTNING SYMBOL and use the amulet (U).
- Access the BROKEN ANTENNA and place the FIRST PART OF THE ANTENNA, SECOND PART OF THE ANTENNA and the INSULATING TAPE; you receive a LIGHTNING ROD (V).
- Push the indicated flagstones and place the LIGHTNING ROD (W).
- Talk to Marissa (X).
- Play the HOP (Y).
- You receive SKULL 2/3.
- Use the BUG SPRAY (Z); take the FEAR OF DEATH SYMBOL (A).
- Access the amulet and place the FEAR OF DEATH SYMBOL (B).
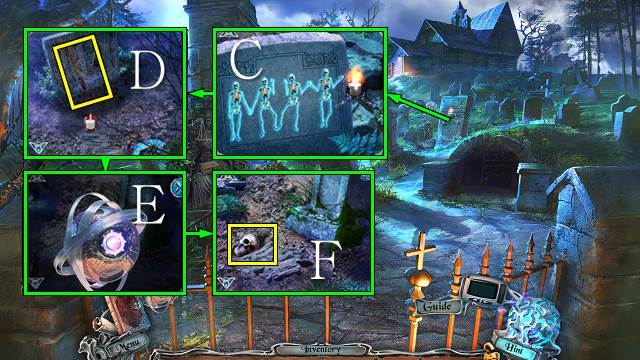
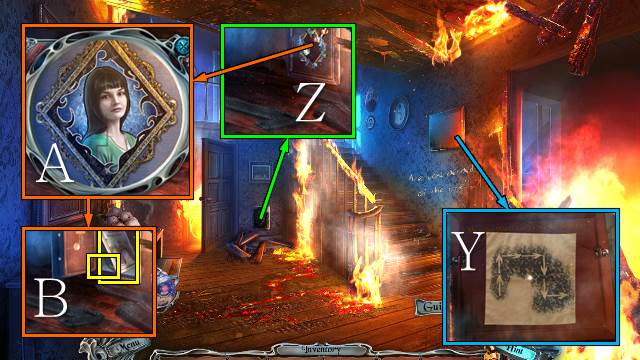
- Move the skeletons and take the CANDLE (C), scroll up twice, use the CANDLE and take the RAKE (D), scroll down, use the RAKE, use the amulet (E) and take SKULL 3/3 (F).
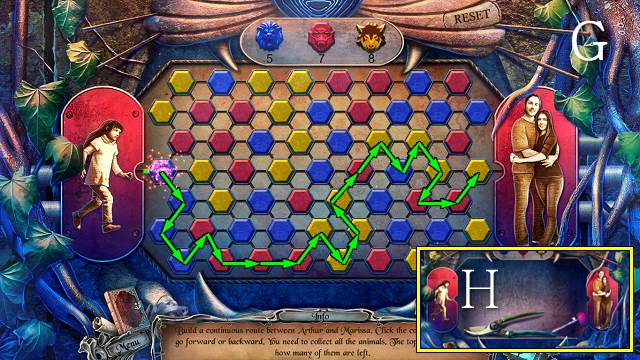
- Place the SKULLS for a mini-game (G).
- Play the mini-game (H).
- Congratulations, you have completed Sable Maze: Twelve Fears.


 RealMYST Walkthrough, Guide, & Tips
 AGON: The Lost Sword of Toledo Walkthrough, Guide, & Tips
 House M.D. Walkthrough, Guide, & Tips
 Fear for Sale: Endless Voyage Walkthrough, Guide, & Tips
 Theatre of the Absurd Walkthrough, Guide, & Tips