Theatre of the Absurd Walkthrough, Guide, & Tips
Theatre of the Absurd Walkthrough
Welcome to the Theatre of the Absurd Walkthrough
Help Scarlet Frost outwit evil itself in a dark and mysterious theatre to save an innocent girl’s soul from the most sinister of perils.
Whether you use this document as a reference when things get difficult or as a road map to get you from beginning to end, we’re pretty sure you’ll find what you’re looking for here.
This document contains a complete Theatre of the Absurd game walkthrough featuring annotated screenshots from actual gameplay!
We hope you find this information useful as you play your way through the game. Use the walkthrough menu below to quickly jump to whatever stage of the game you need help with.
Remember to visit the Big Fish Games Forums if you find you need more help. Have fun!
This walkthrough was created by Margie B, and is protected under US Copyright laws. Any unauthorized use, including re-publication in whole or in part, without permission, is strictly prohibited.
General Tips

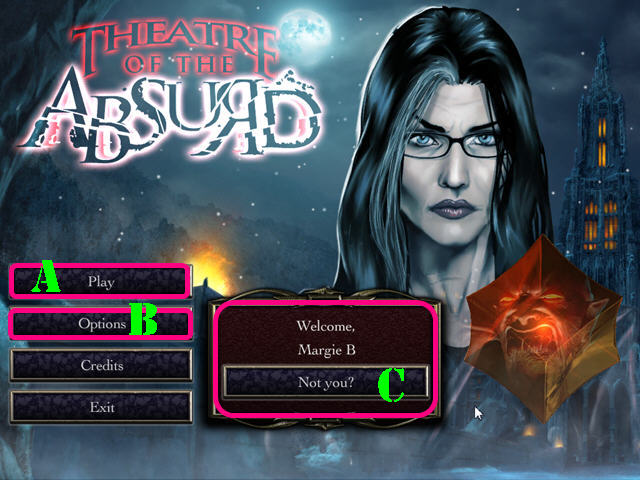
- Select ‘Play’ (A) to begin your quest.
- The ‘Options’ (B) button allows you to adjust the screen size, volume, and difficulty level.
- The ‘Not you?’ button (C) can be used to manage your profiles in the game.
- Use the ROOSTER to help you grab out of reach objects. Use the MINER to take care of tasks that require strength.
- This guide will refer to Hidden Object Scenes as ‘HOS’.
- Click on the hand to view a hint.
- Open the book in the lower left to view your tasks.
Chapter 1: The Bell Tower

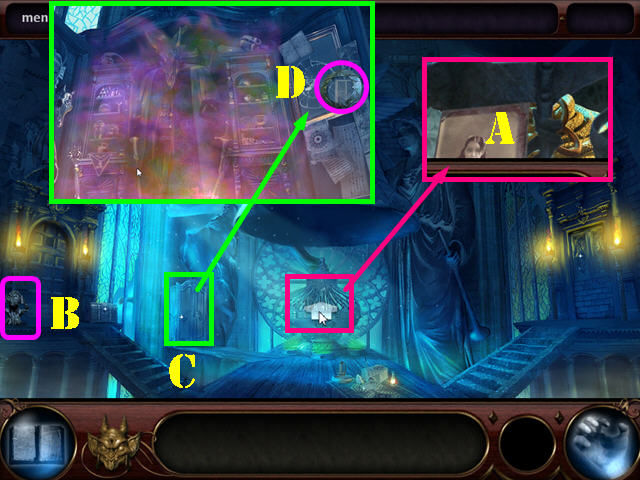
- Move towards the cage.
- Approach the cage again and pick up the PICTURE OF BETHANY (A).
- Pick up the HEAR NO EVIL statue (B).
- Investigate the Dresser to open it, then move to it (C).
- Pick up the JADE RING (D).

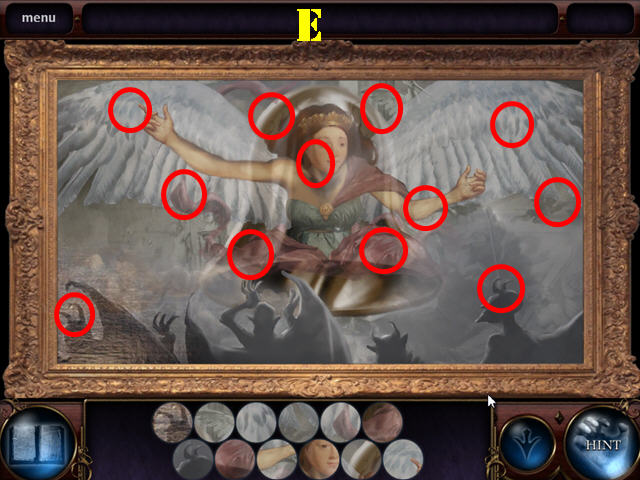
- Investigate the Angel Portrait.
- Find the images shown at the bottom of the scene in the picture.
- Please look at the screenshot for the solution (E).
- You will receive the JADE RING.

- Zoom into the objects on the ground to play a HOS.
- Complete this scene to obtain a GARGOYLE KEY, a JADE RING, and a GOLDEN EYE.


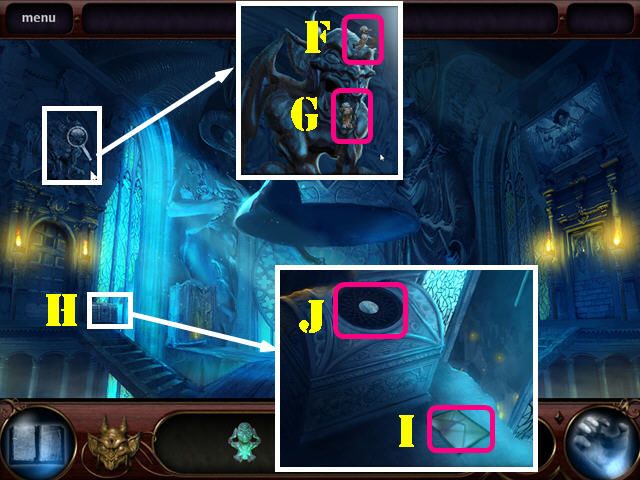
- Investigate the Gargoyle in the upper left.
- Use the GARGOYLE KEY on the keyhole (F), then pick up the SPEAK NO EVIL statue (G).
- Investigate the small chest (H).
- Pick up the LETTER (I).
- Investigate the top of the chest (J) for a puzzle.

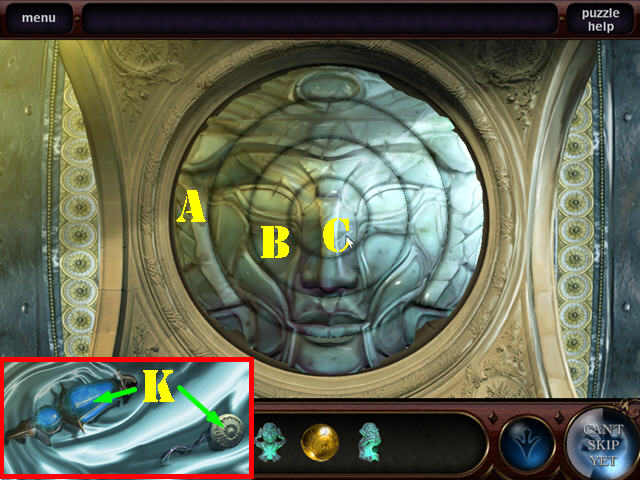
- Place the 3 JADE RINGS into the circle.
- To solve the puzzle, move the rings in this order: A x 3, B x 6, and C x 3.
- Pick up the WATER OF HORUS and the PUSH BUTTON (K).

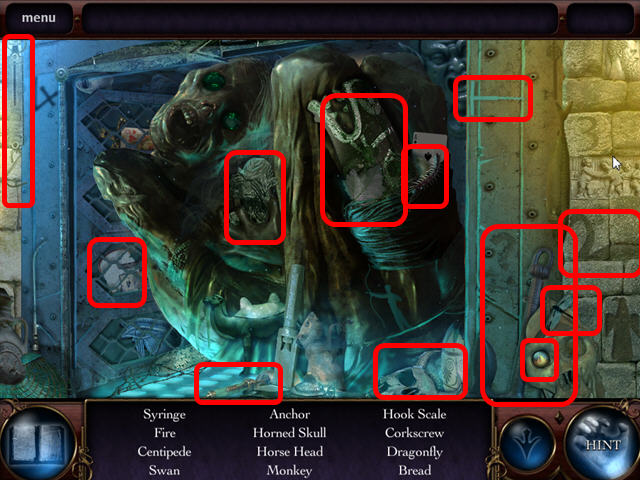
- Investigate the Dumbwaiter on the right.
- Place the PUSH BUTTON into the hole and push it to activate a HOS.
- Complete this scene to obtain the SEE NO EVIL statue, the DEMON SKULL, and the FIRE ICON.

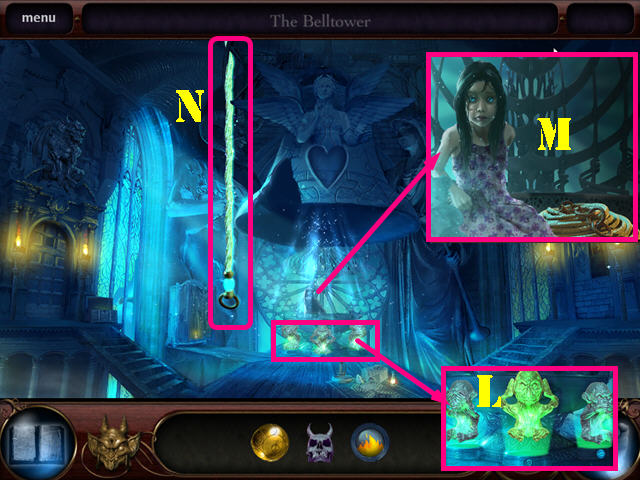
- Investigate the Cage Base.
- Place the statues on their bases: SEE NO EVIL on the left, HEAR NO EVIL in the middle, and SPEAK NO EVIL on the right (L).
- Move to the open Cage.
- Give Bethany the WATER OF HORUS to calm the demon inside her (M).
- Receive the MAGIC ROPE.
- Place the MAGIC ROPE on the Bell and you will be given the power to clear Demon Smoke (N).

- Move to the Dresser on the left.
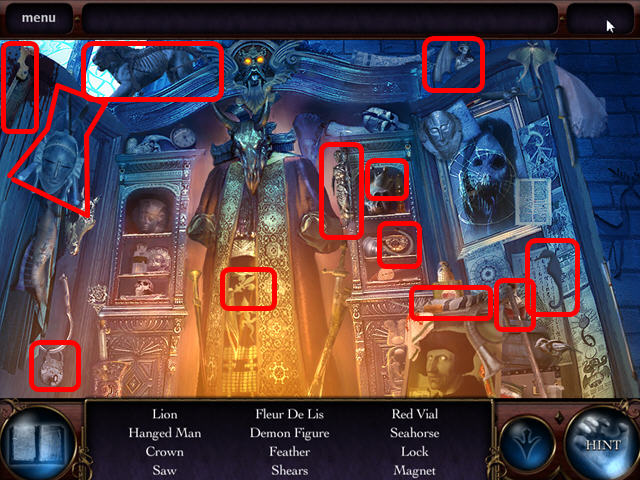
- Use your hand to dispel the Demon Smoke and activate a HOS.
- Complete the scene to obtain the SHARP SHEARS, a DEMON FIGURINE, a HANGED MAN FIGURE, and a MAGNET.

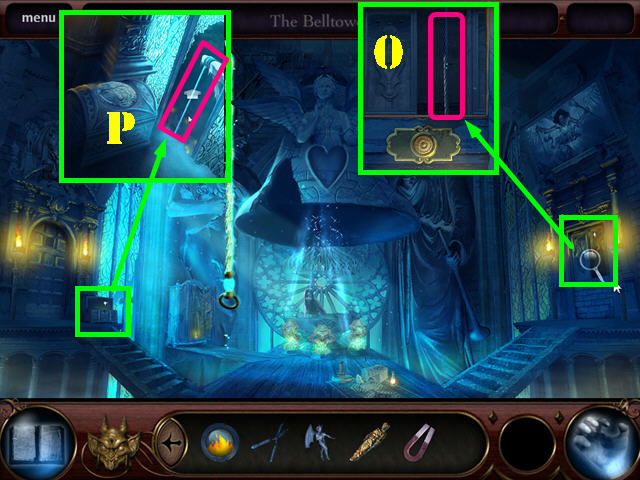
- Investigate the Dumbwaiter.
- Use the SHARP SHEARS on the dumbwaiter cable to obtain a CABLE (O).
- Investigate the Chest.
- Use the CABLE on the Beam (P) outside the window; exit the Bell Tower.
Chapter 2: The Hall and the Library

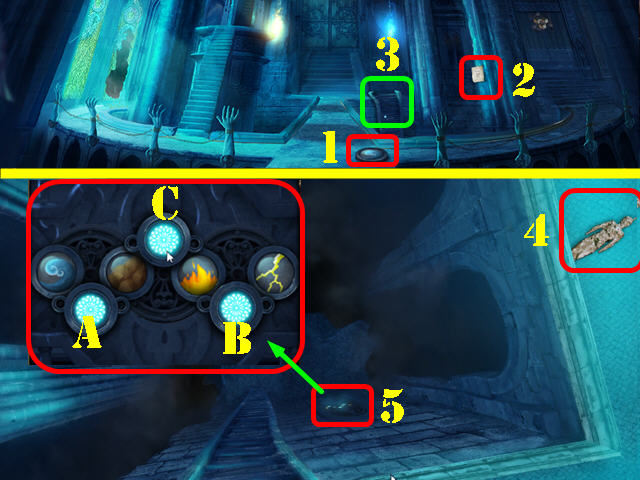
- Pick up the WATER ICON (1).
- Pick up the NOTE (2).
- Move down the Ladder (3).
- Pick up the HANGED MAN FIGURE (4).
- Investigate the Door (5).
- Place the FIRE ICON and WATER ICON into the mechanism to activate a puzzle.
- To solve the puzzle, click on the buttons in this order: A, B, and C.
- Move into the Boiler Room.

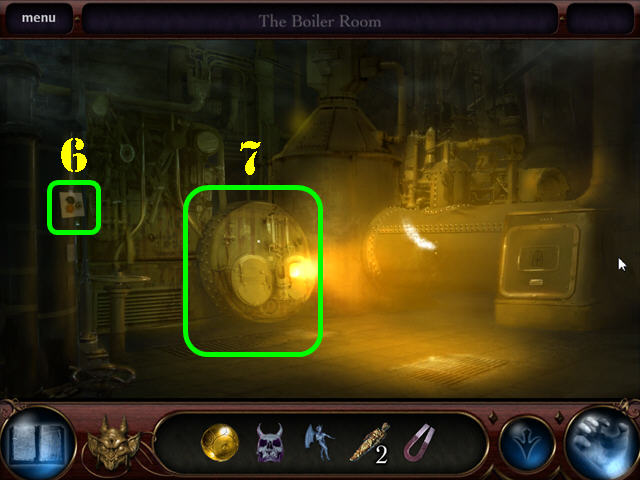
- Pick up the NOTE (6).
- Investigate the Boiler (7) to activate a HOS.

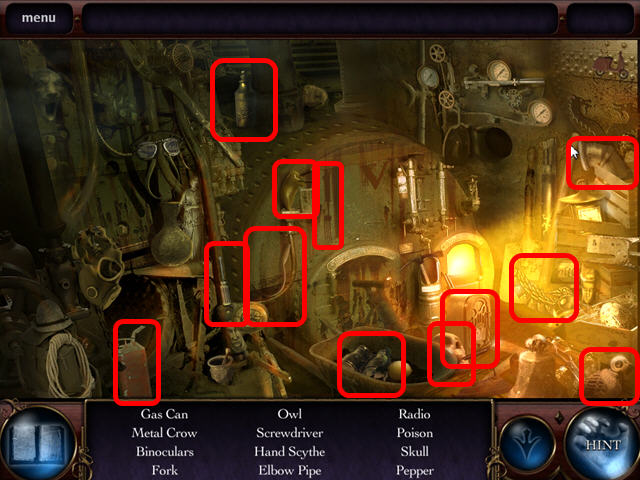
- Complete this scene to obtain a CROW EMBLEM, SCREWDRIVER, and ELBOW PIPE.
- Walk down twice; go up the left staircase and up the ladder.

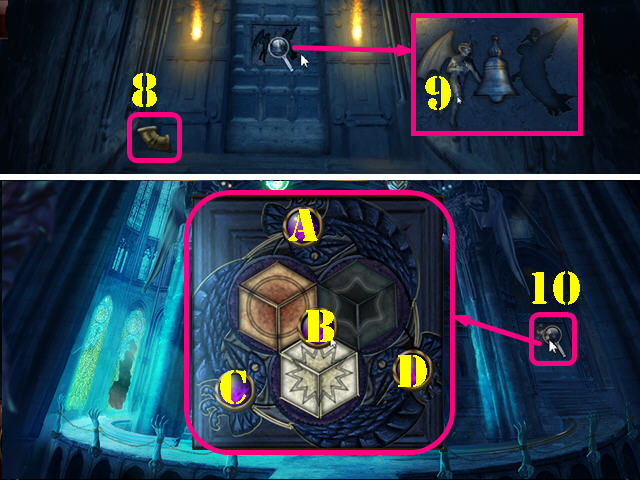
- Pick up the ELBOW PIPE (8).
- Investigate the door; place the DEMON FIGURINE into its slot (9).
- Walk down twice.
- Investigate the Right Door; place the CROW EMBLEM into the empty slot to activate a puzzle (10).
- Assemble the image correctly.
- To solve the puzzle, press on the buttons in this order: B x 2, C, A, D, and B.
- Proceed through to the Library.

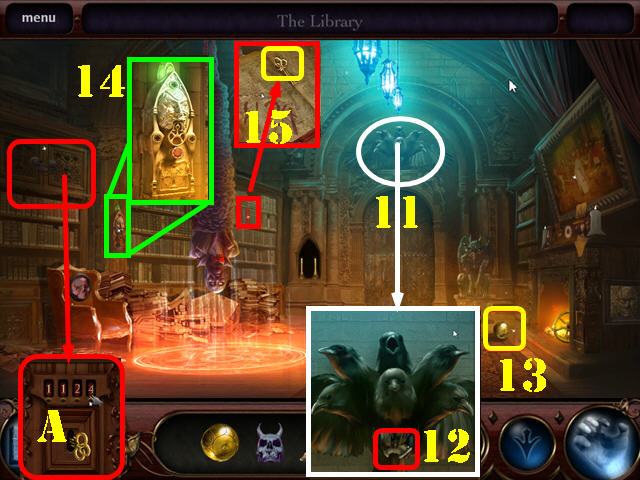
- Use your hand to dispel the Demon Smoke above the door.
- Investigate the Crow Statue (11) and take the ELBOW PIPE (12).
- Pick up the GOLDEN EYE (13).
- Investigate the intercom; press the button for a clue (14).
- Investigate the Red Book and take the CABINET KEY (15).
- Investigate the Locked Cabinet. Insert the CABINET KEY into the keyhole, and enter the code 1124 (A).
- Click on the KEY to unlock the door and activate a HOS.

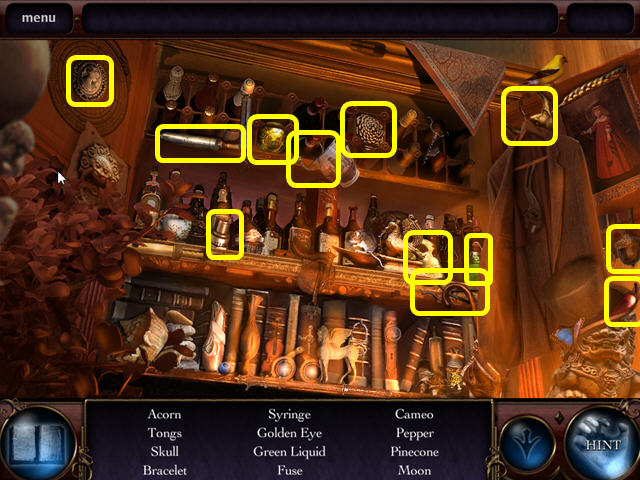
- Play the cabinet HOS.
- Complete this scene to obtain the FIREPLACE TONGS, a FUSE, and a GOLDEN EYE.

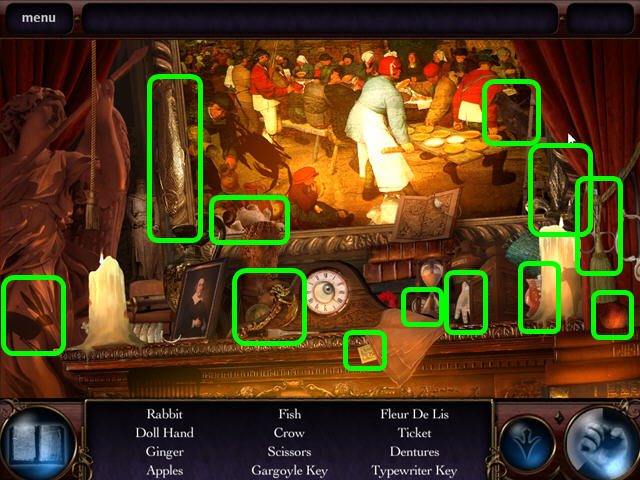
- Investigate the Fireplace Mantel for a HOS.
- Complete this scene to obtain a GARGOYLE KEY.

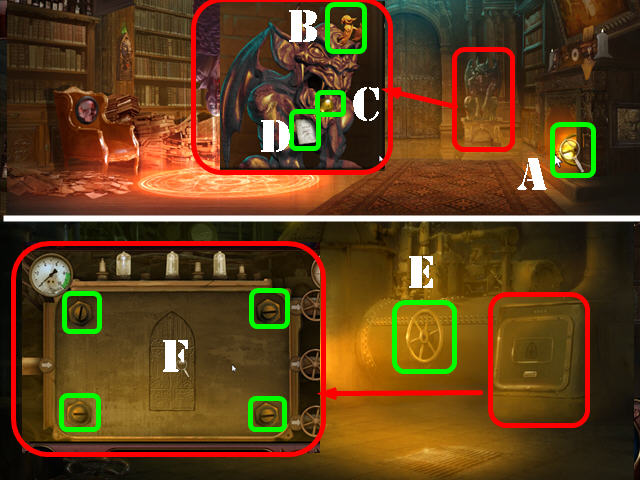
- Use the FIREPLACE TONGS on the Fireplace to recover the STEAM VALVE (A).
- Investigate the Gargoyle; put the GARGOYLE KEY (B) in the lock and take the GOLDEN EYE (C).
- Collect the NOTE (D) on the gargoyle.
- Return to the Boiler Room.
- Place the STEAM VALVE onto the Boiler (E).
- Investigate the Machine Panel; use your SCREWDRIVER to unscrew all 4 screws (F).


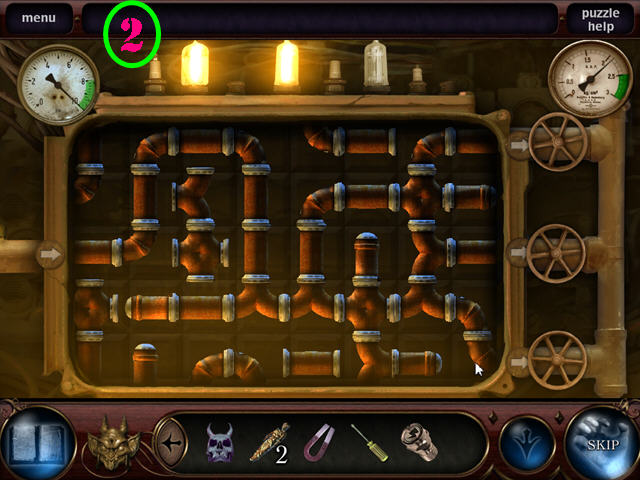

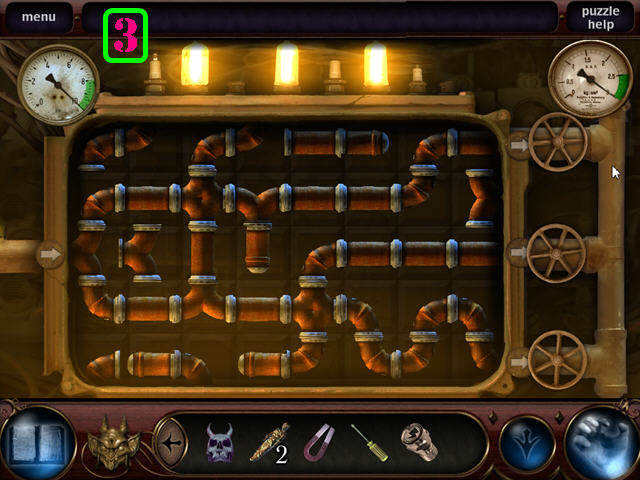
- Place the 3 ELBOW PIPES on the pipes to activate a puzzle.
- Press on each pipe to rotate it.
- You have to solve 3 rounds of this puzzle.
- Please look at the screenshots for the solution (1, 2, and 3).

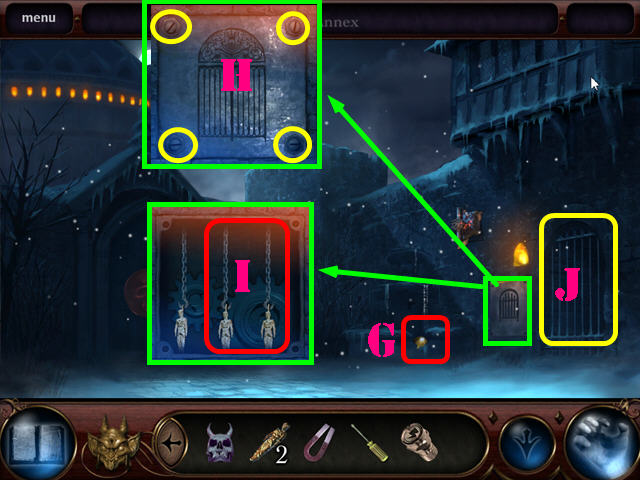
- Return to the Main Hall and then go through the middle door to access the Annex.
- Pick up the GOLDEN EYE (G).
- Investigate the Gate Sign. Use your SCREWDRIVER to unscrew all 4 screws (H).
- Place a HANGED MAN FIGURE onto each of the two empty hooks (I).
- Go through the gate to activate a HOS (J).

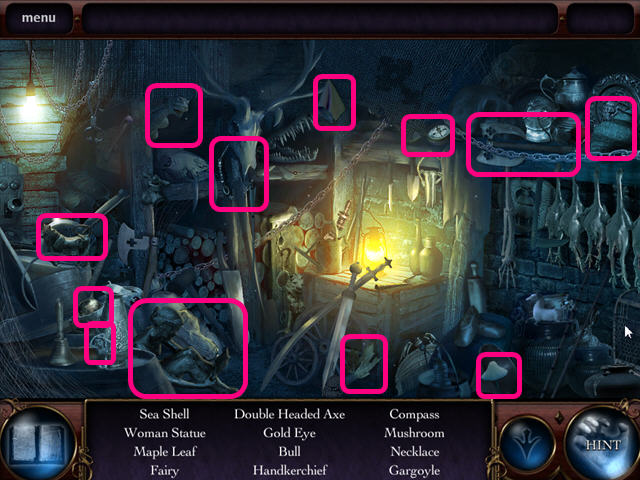
- Play the HOS.
- Complete this scene to obtain a GOLDEN EYE and a CLOTH.


- Go back to the Library.
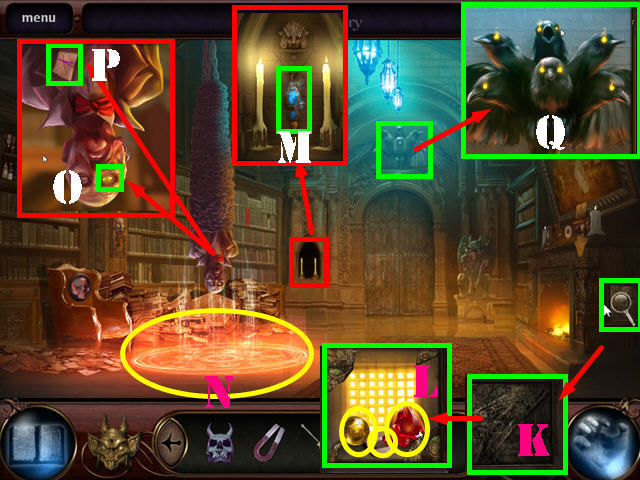
- Investigate the Dirty Plaque; use the CLOTH to clean the 5 grimy patches (K).
- Pick up the GOLDEN EYE, MATCHES, and A RED FRAGMENT (L).
- Investigate the Small Nook. Use the MATCHES to light the candles and collect the WATER OF HORUS (M).
- Use the WATER OF HORUS on the Magic Circle (N).
- Investigate Corvus; collect his GOLDEN EYE (O) and the LETTER (P).
- Investigate the Crow Statue; place the 8 GOLDEN EYES into the eye sockets (Q).
- Try to move through the open door and a puzzle will appear.

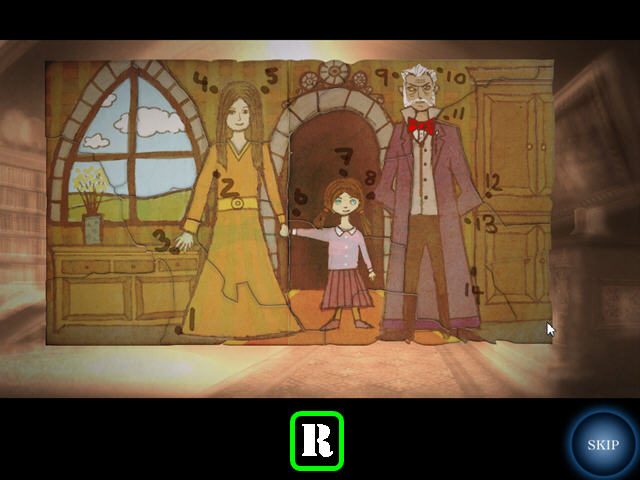
- Assemble the picture as shown in the screenshot (R).
- Press on the numbers in the sequence shown on the picture.
- Go through the door to access Corvus’ Study.

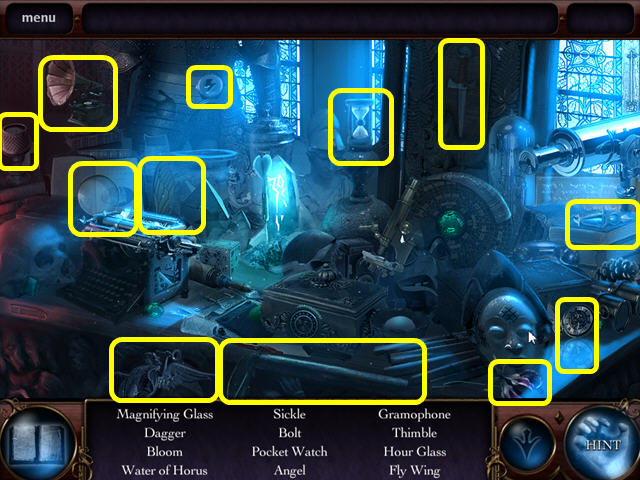
- Investigate Corvus’ Desk to activate a HOS.
- Complete this scene to obtain the DAGGER, WATER OF HORUS, a FUSE, and an ANGEL FIGURINE.

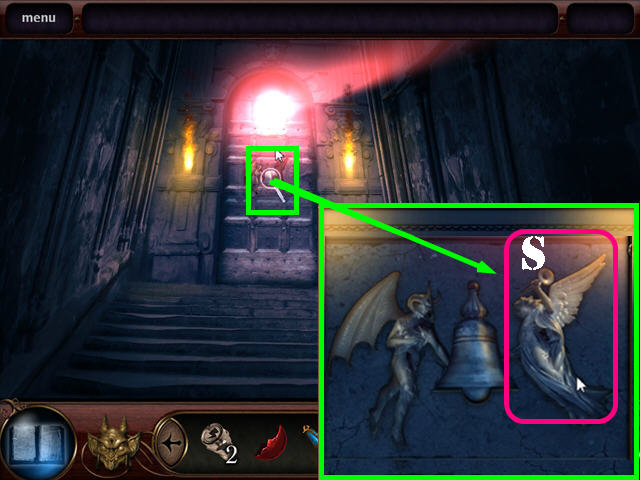
- Return to the Main Hall; go up the left steps, and up the ladder to access the Bell Tower.
- Investigate the Door; place the ANGEL FIGURINE into its slot (S).
- Go through the door.
Chapter 3: The Secret Lab

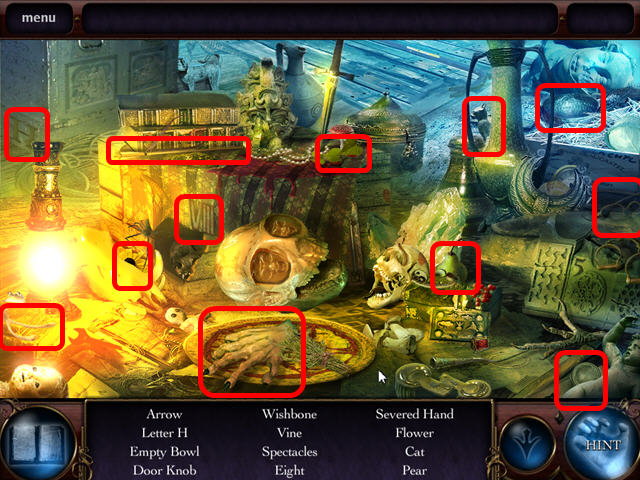
- After scaring off the demon, give Bethany the WATER OF HORUS.
- Walk down.
- Investigate the Rite of Possession Site on the ground for a HOS.
- Complete this scene to obtain the NUMBER 8.

- Return to Corvus’ Study.
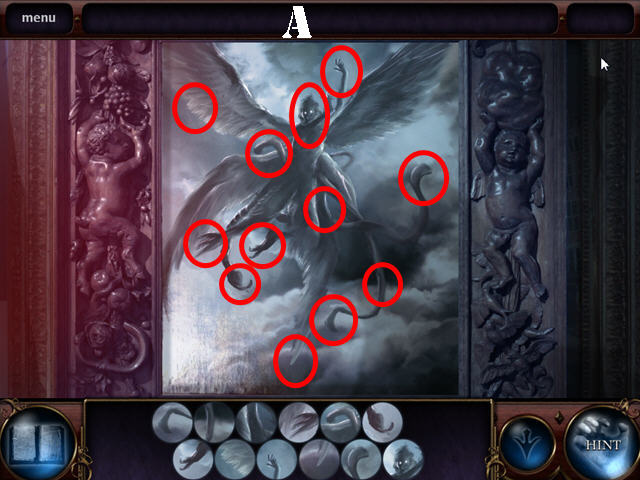
- Investigate the Painting on the ground for a puzzle.
- Find the images shown at the bottom of the scene in the picture.
- Please look at the screenshot for the solution (A).
- Complete this scene to obtain the NUMBER 7.

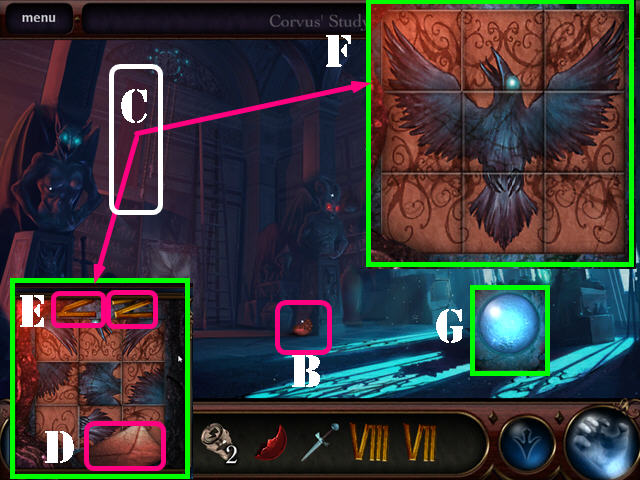
- Pick up the RED FRAGMENT on the floor (B).
- Investigate the Banner to discover a crack in the wall. Use your DAGGER on the crack. Dispel the Demon Smoke (C).
- Collect the LETTER (D), the NUMBER 4 and THE NUMBER 5 (E).
- Rotate the different sections of the panel to form an image of a crow. Rotating one tile affects others.
- Please look at the screenshot for the solution (F).
- Grab the BLUE CRYSTAL SPHERE (G).

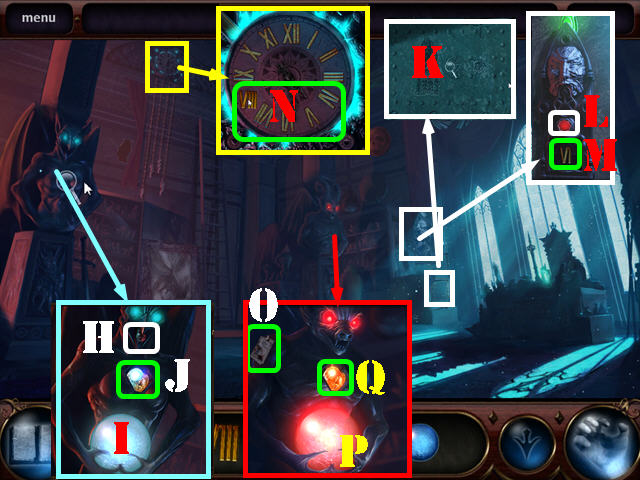
- Investigate the Blue Demon Statue and take the FUSE (H). Place the BLUE CRYSTAL SPHERE into its hands (I), then pick up the BLUE DEMON’S HEART (J).
- Investigate the Small Panel; use the Dagger to pry off the panel (K).Place the 3 FUSES into their holes and press the button on the Intercom to receive a clue (L).
- Collect the NUMBER 6 on the intercom (M).
- Investigate the Clock; place the NUMBERS 4, 5, 6, 7, and 8 into their respective slots to obtain the RED FRAGMENT (N).
- Investigate the Red Demon Statue; collect the NOTE (O).
- Place the 3 RED FRAGMENTS into the Red Demon Statue’s hands (P) and take the RED DEMON’S HEART (Q).
- Place the BLUE DEMON’S HEART into the chest of the Red Demon Statue.
- Zoom into the Blue Demon Statue; put the RED DEMON’S HEART into its chest.
- Proceed into the secret passage in the upper left.

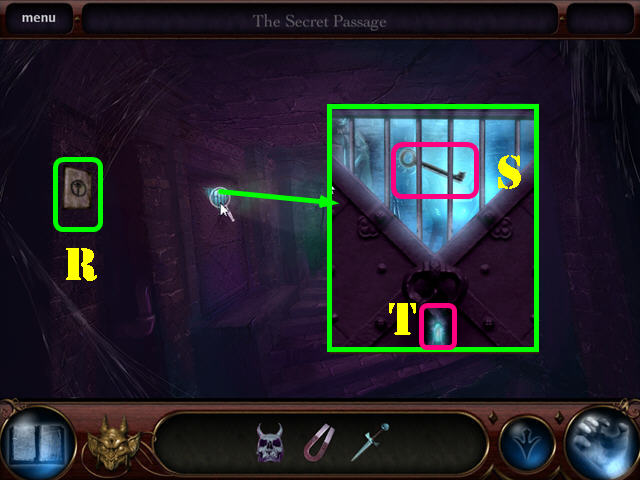
- Pick up the NOTE (R).
- Investigate the Door. Use the MAGNET to get the CELL KEY (S).
- Use the CELL KEY in the lock (T).
- Go through the door access the Cold Room.

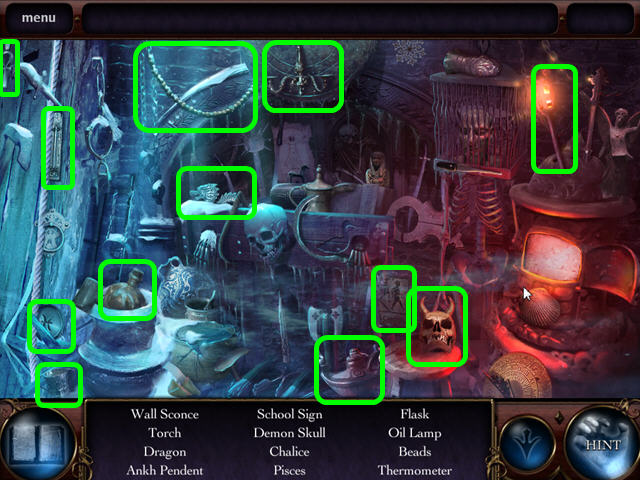
- Investigate the cell on the right to activate a HOS.
- Complete the scene to collect the TORCH, a ZODIAC BUTTON, and a DEMON SKULL.

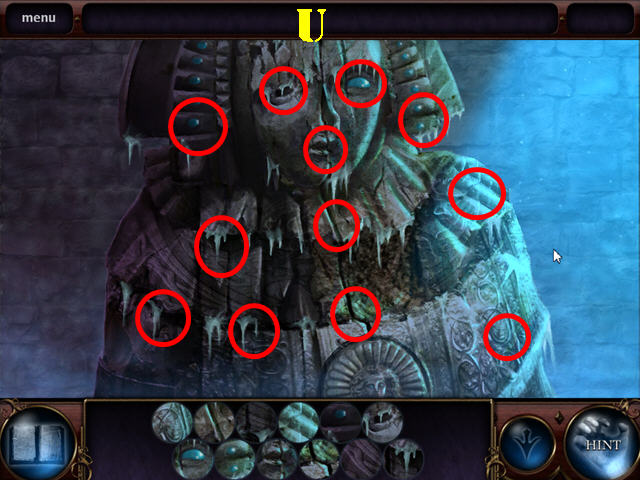
- Investigate the Iron Maiden.
- Find the images shown at the bottom of the scene in the picture.
- Please look at the screenshot for the solution (U).

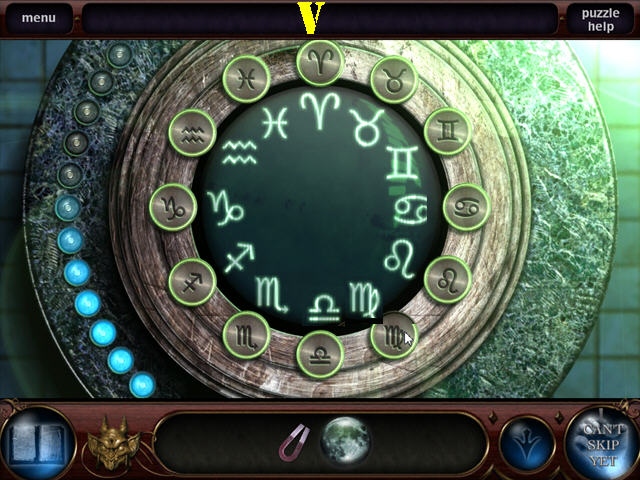
- Pick up the NOTE (A).
- Pick up the 2 ZODIAC BUTTONS (B and C).
- Collect the DEMON SKULL (D).
- Walk down to the Secret Passage.
- Use the TORCH to light the two torches on the wall (E and F).
- Proceed through the Open Gate to reach the Astrology Lab (G).

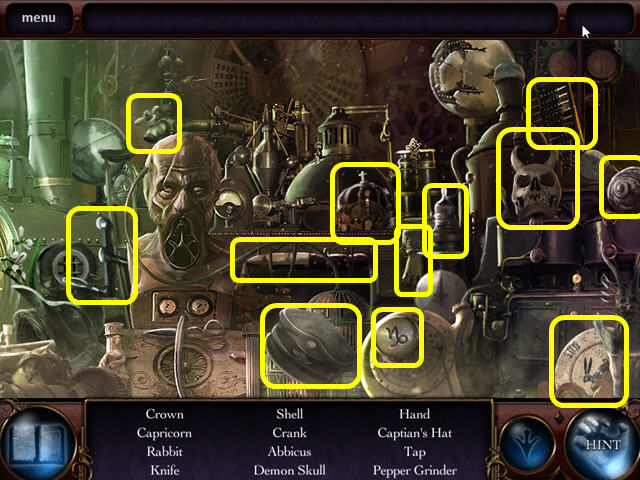
- Investigate the Lab Desk for a HOS.
- Complete the Scene to collect a ZODIAC BUTTON, a DEMON SKULL, and the TELESCOPE CRANK.

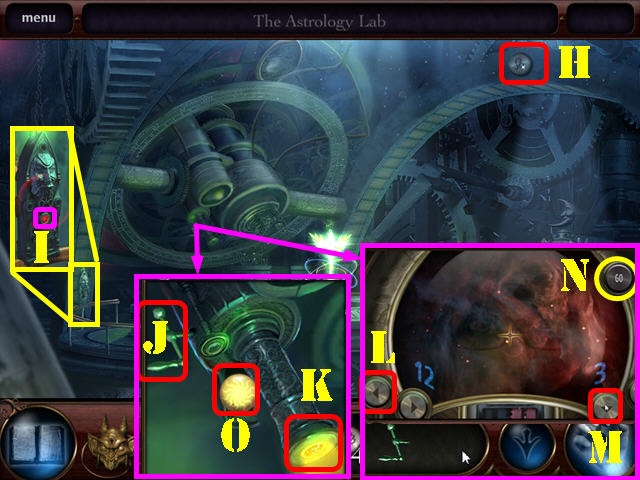
- Pick up the ZODIAC BUTTON (H).
- Investigate the Intercom and press the button (I) to hear a clue.
- Investigate the Telescope; place the TELESCOPE CRANK into its slot (J).
- Investigate the Eye Piece (K).
- Use the Left Arrow Key to adjust the Telescope to the Number 12 (L).
- Use the Down Arrow Key to adjust the Telescope to the Number 3 (M).
- Hit the Go Button (N).
- Take the EYE OF THE SUN (O).
- Walk down.

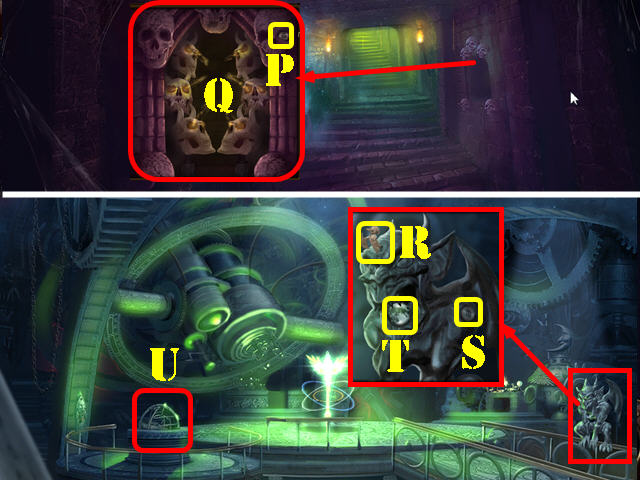
- Investigate the alcove; pick up the ZODIAC BUTTON (P).
- Place the 4 DEMON SKULLS on the glowing crystals (Q).
- Collect the GARGOYLE KEY.
- Go forward.
- Investigate the Gargoyle. Use the GARGOYLE KEY in the lock (R).
- Pick up the ZODIAC BUTTON (S) and collect the EYE OF THE MOON (T).
- Investigate the Zodiac Pedestal (U).


- Place the7 ZODIAC BUTTONS into the slots to activate the puzzle.
- Press the buttons to swap adjacent symbols until all the symbols are next to their matching buttons.
- Please look at the screenshot for the solution (V).
- You will get the EYE OF THE EARTH.

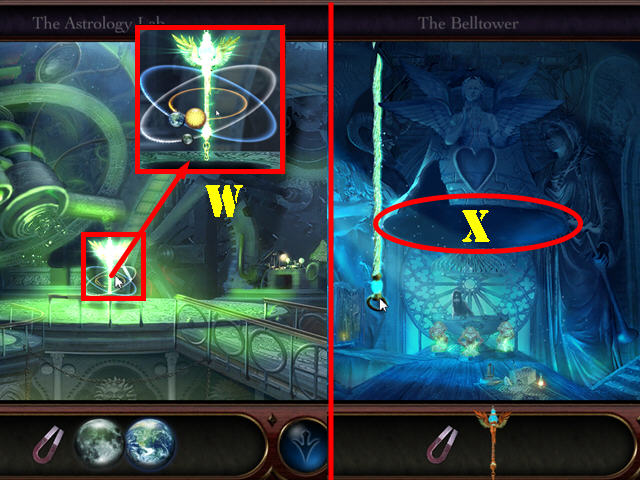
- Investigate the Celestial Mace. Place the EYE OF THE SUN, the EYE OF THE EARTH and the EYE OF THE MOON (W).
- Collect the CELESTIAL MACE.
- Return to the Bell Tower.
- Place the CELESTIAL MACE in the bell (X), and receive a new ability to break red skull seals.
Chapter 4: The Courtyard and Lounge

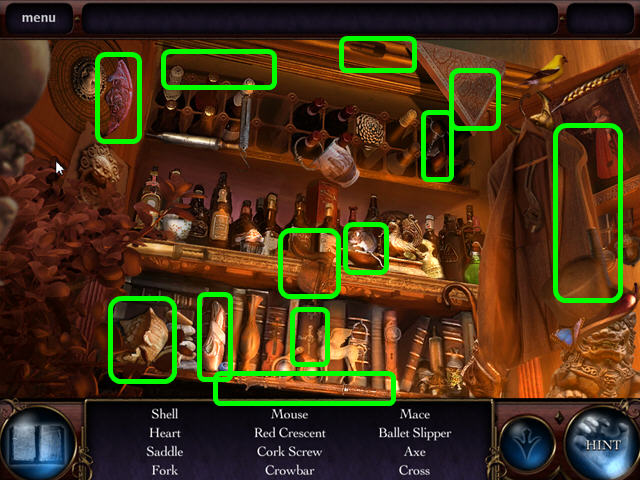
- Return to the Library.
- Investigate the Open Cabinet for a HOS.
- Complete the scene to receive the CROWBAR, and EMBLEM PIECE.

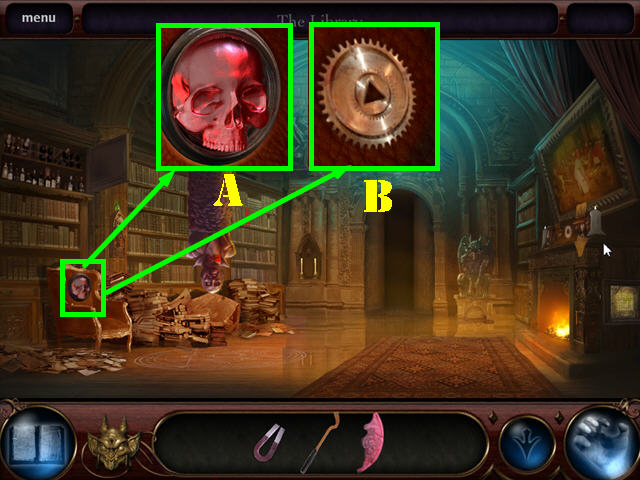
- Investigate the Red Skull Seal; use your hand to break the Skull Seal (A).
- Take the GEAR (B).
- Proceed to the Study.

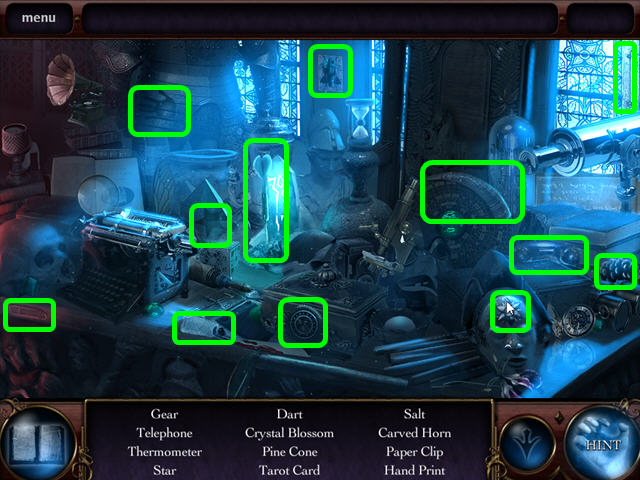
- Investigate the Desk for a HOS.
- Complete the scene to collect the TAROT CARD and the CRYSTAL BLOSSOM.

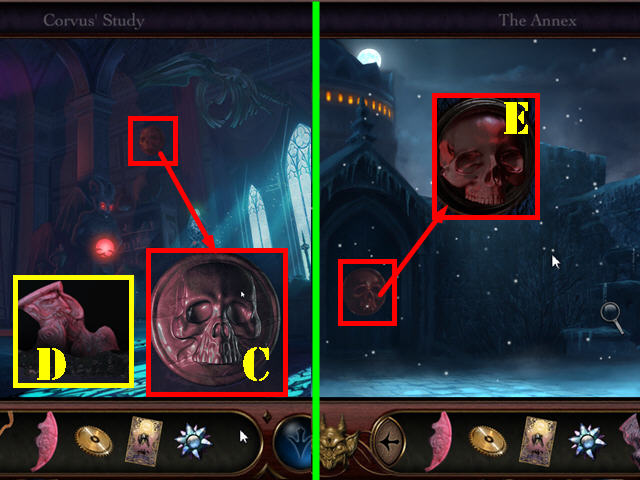
- Investigate the Red Skull Seal. Use your hand to break the Skull Seal (C).
- Collect the EMBLEM PIECE (D).
- Return to the Annex.
- Investigate the Red Skull Seal. Use your hand to break the Skull Seal (E).
- Go through the door to access the Courtyard.

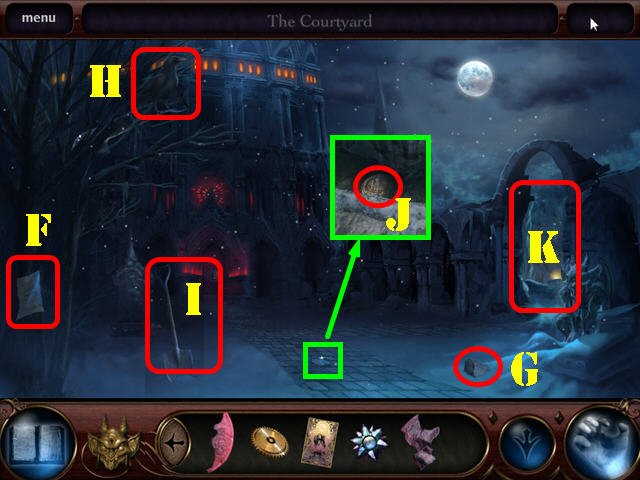
- Pick up the NOTE (F).
- Pick up A ROCK (G).
- Throw the ROCK at the Crow (H).
- Collect the SHOVEL (I).
- Investigate the Flagstone. Use the SHOVEL to move the Flagstone. Take the GOLD COIN (J).
- Go through the entryway (K) and then proceed across the bridge to the Castle Crypt.

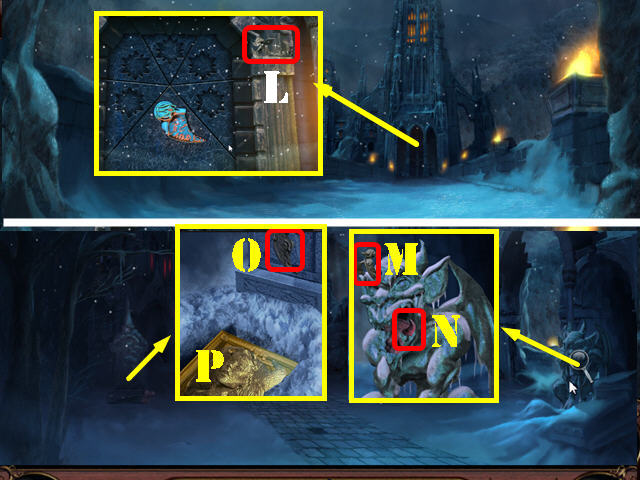
- Pick up the GARGOYLE KEY (L).
- Head Back to the Courtyard.
- Investigate the Gargoyle; use the GARGOYLE KEY in the lock (M) and take the EMBLEM PIECE (N).
- Investigate the Grave; pick up the EMBLEM PIECE (O).
- Use the SHOVEL to move the snow and press on Golden Coffin to activate a puzzle (P).

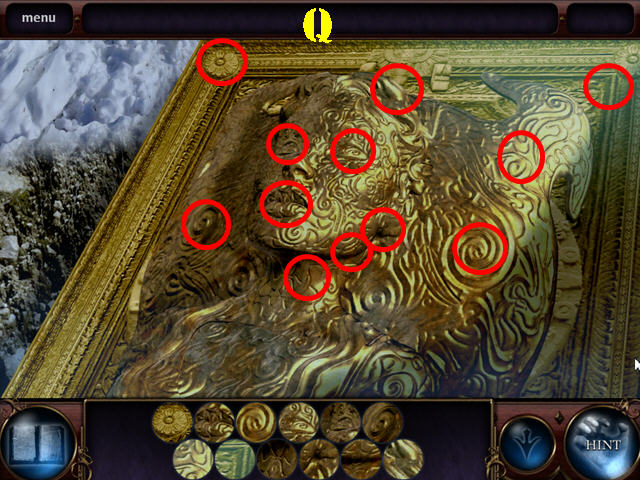
- Find the images shown at the bottom of the scene in the picture.
- Please look at the screenshot for the solution (Q).
- Complete this scene to receive the EMBLEM PIECE.
- Return to the Annex.

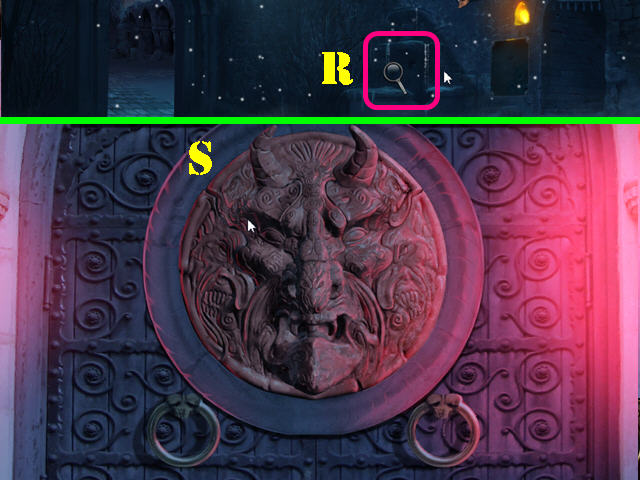
- Use the GOLD COIN at the Fountain to receive the EMBLEM PIECE (R).
- Go back into The Courtyard. Proceed to the Theatre door.
- Place the EMBLEM PIECES into the proper slots and arrange them as shown in the screenshot (S).
- You now have access to the Theatre Lounge.

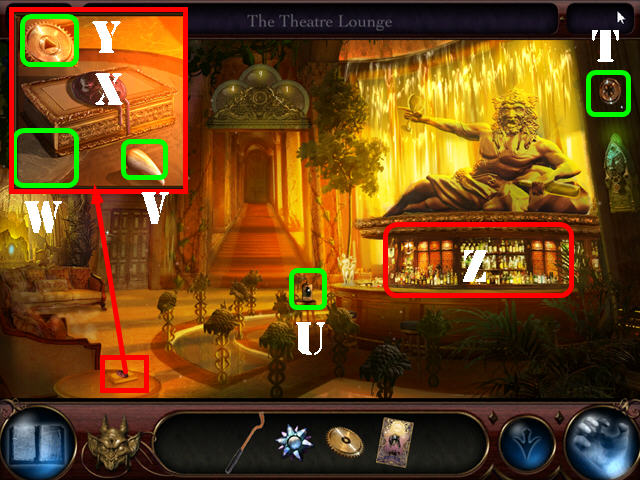
- Pick up the GEAR (T).
- Pick up the VACUUM TUBE (U).
- Investigate the Small Box; collect the TOOTH (V) and the LETTER (W).
- Use your hand to break the Skull Seal (X) and collect the GEAR (Y).
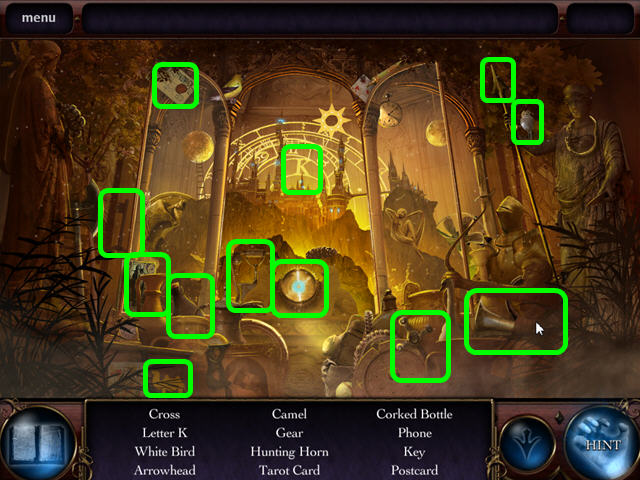
- Investigate the bar for a HOS (Z).

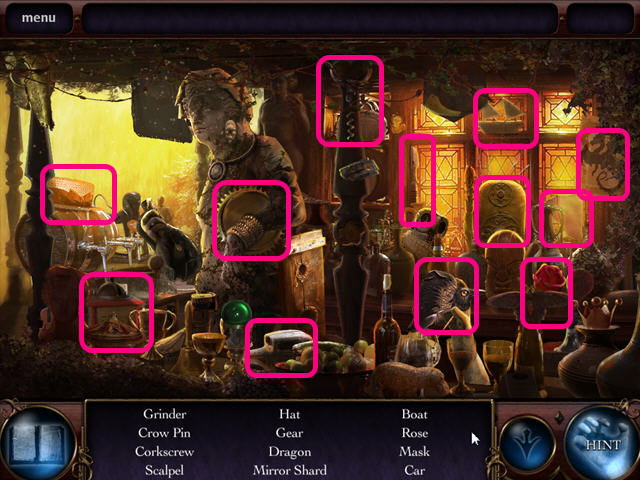
- Play the HOS.
- Complete the scene to collect a GEAR, the SMALL CROW PIN, and A SHARD OF MIRROR.

- Investigate the Cabinet on the far left. Use the SMALL CROW PIN to pick the Lock to activate a HOS.
- Complete the scene to collect the GEAR and the TAROT CARD.

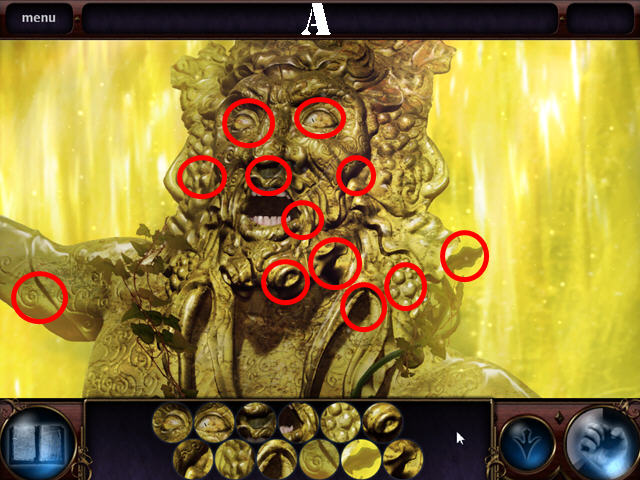
- Investigate the Bacchus Statue on the right.
- Find the images shown at the bottom of the scene in the picture.
- Please look at the screenshot for the solution (A).
- Complete the scene to able to fix the timer.

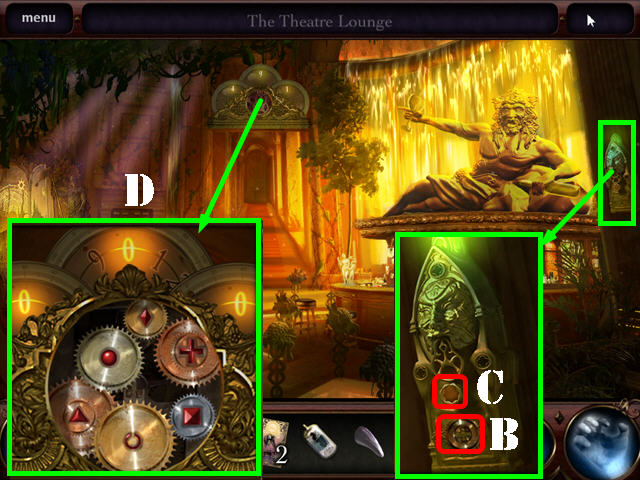
- Investigate the intercom; pick up the GEAR (B).
- Press the Button to receive a clue (C).
- Investigate the Timer; place the 6 GEARS on the proper symbols to unlock the door (D).
- Proceed through the door to access the Theatre of the Absurd.
Chapter 5: The Theatre

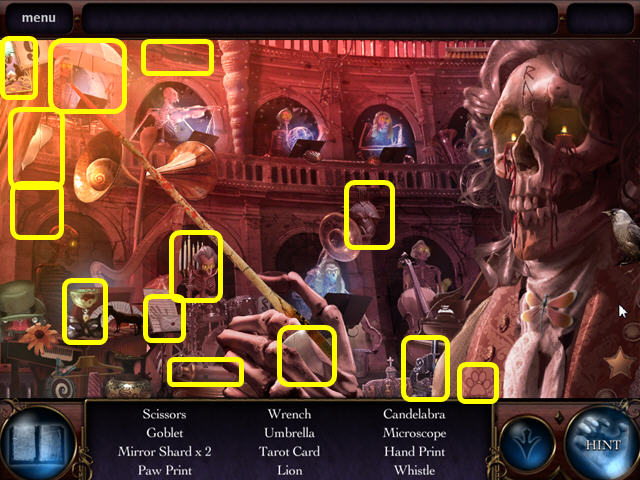
- Investigate the Orchestra Pit for a HOS.
- Complete the scene and receive Two SHARDS OF MIRROR, and a TAROT CARD.

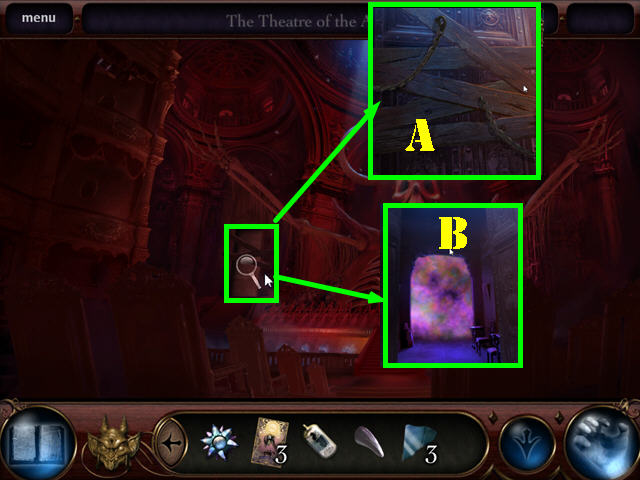
- Investigate the Barred Door. Use the CROWBAR to pry off the boards (A).
- Use your hand to dispel the Smoke (B).
- Proceed through the Door to reach Backstage.

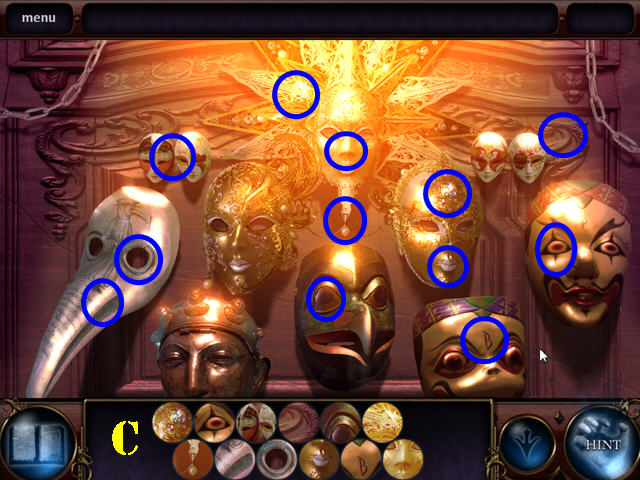
- Investigate the Mask Alcove for a puzzle.
- Find the images shown at the bottom of the scene in the picture.
- Please look at the screenshot for the solution (C).
- Finish the scene to receive the SPOTLIGHT LAMP.

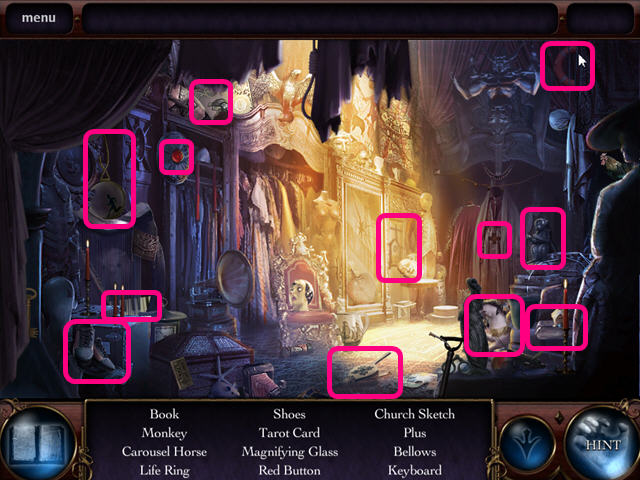
- Investigate the Back Room for a HOS.
- Finish the scene to receive A POWER BUTTON and a TAROT CARD.

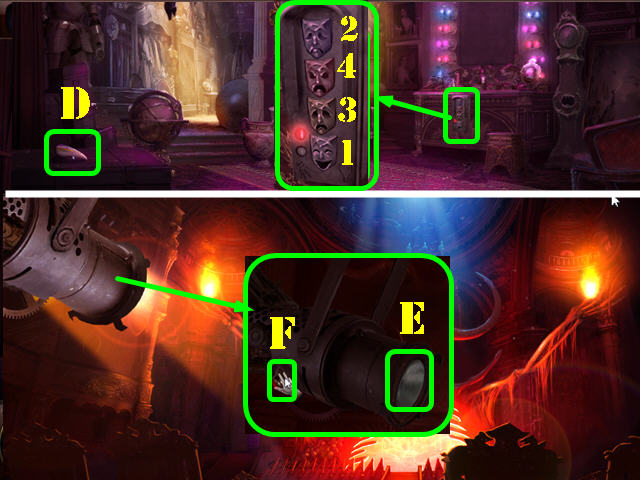
- Pick up the TOOTH (D).
- Investigate the Dresser under the Mirror. Solve the Puzzle by pressing the Mask Buttons in sequence: 1, 2, 3, and 4.
- Walk down to the Theatre.
- Investigate the Spotlight. Place the SPOTLIGHT LAMP (E) and the POWER BUTTON (F) on the spotlight.
- Press the button.

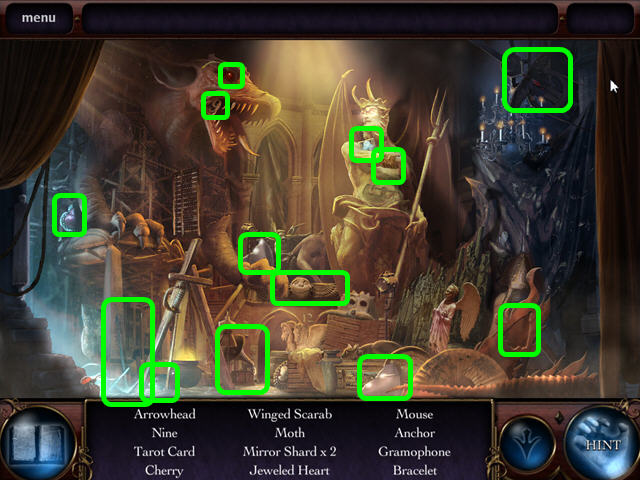
- Investigate the Stage for a HOS.
- Complete the scene to receive two SHARDS OF MIRROR and a TAROT CARD.
- Return to the Backstage.

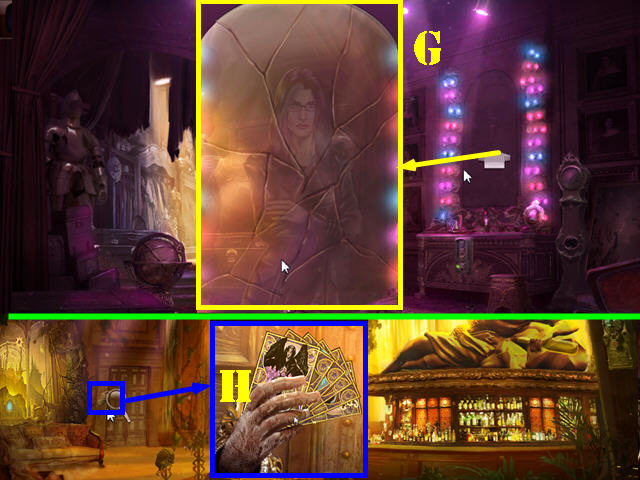
- Investigate the Mirror. Place the 5 SHARDS OF MIRROR into the correct places (G).
- Receive a TAROT CARD.
- Return to the Theatre Lounge.
- Investigate the Hand. Place the 6 TAROT CARDS in the Hand (H).
- Proceed through the Open Door to reach the VIP Room.

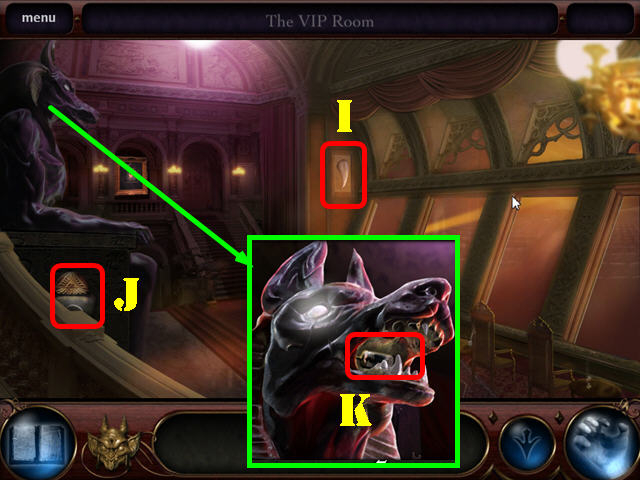
- Pick up the TOOTH (I).
- Pick up the CANOPIC JAR (KIDNEY) (J).
- Investigate the Anubis Statue. Pick up the VACUUM TUBE (K).
- Return to the Lounge.

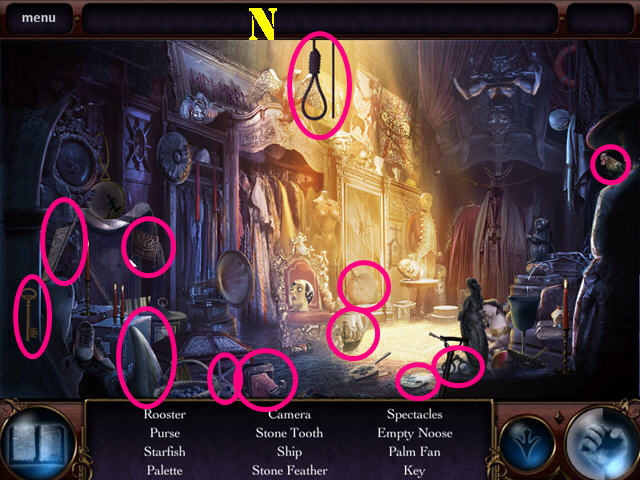
- Investigate the Cabinet for a HOS.
- Finish the scene to receive a TOOTH, MUSIC NOTE, and a STONE FEATHER (L).

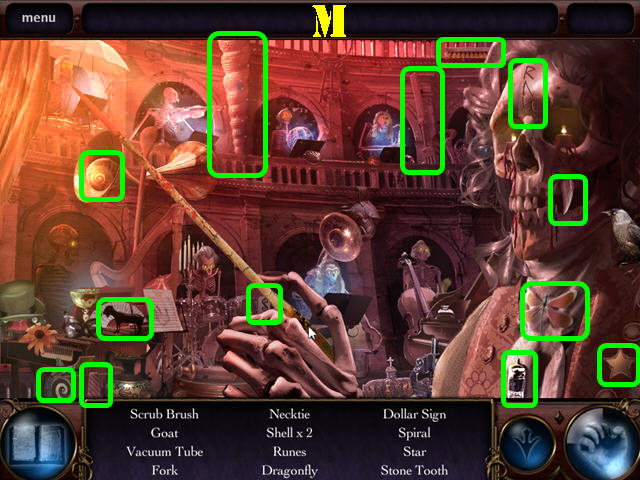
- Proceed to the Theatre.
- Investigate the Orchestra Pit for a HOS.
- Complete the scene and receive a TOOTH, and a VACUUM TUBE (M).


- Proceed to the Backstage.
- Investigate the Large Backstage Alcove for a HOS.
- Finish the scene to receive a TOOTH and a STONE FEATHER (N).

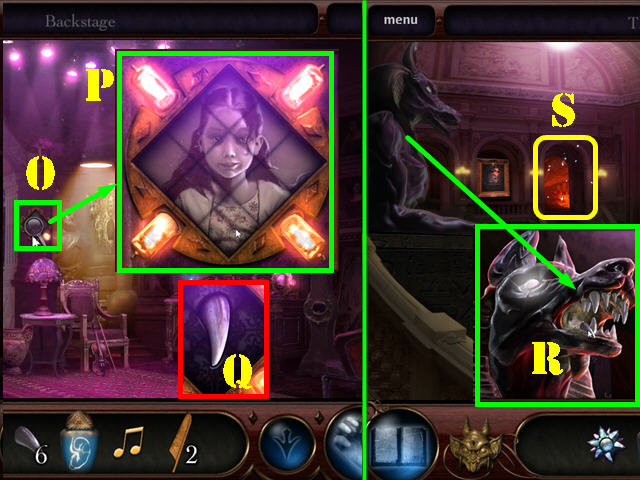
- Investigate the Pillar (O).
- Place the 3 VACUUM TUBES in the slots to activate a puzzle.
- Rotate the puzzle pieces to make an image of Bethany; rotating one piece affects another.
- Please look at the screenshot for the solution (P).
- Collect the TOOTH (Q).
- Proceed back to the VIP Room.
- Investigate the Anubis Statue. Place the 7 TEETH in the Mouth of the Statue (R).
- Proceed into the Open Door (S). Go forward to access Under the Theatre (S).
Chapter 6: Under the Theatre

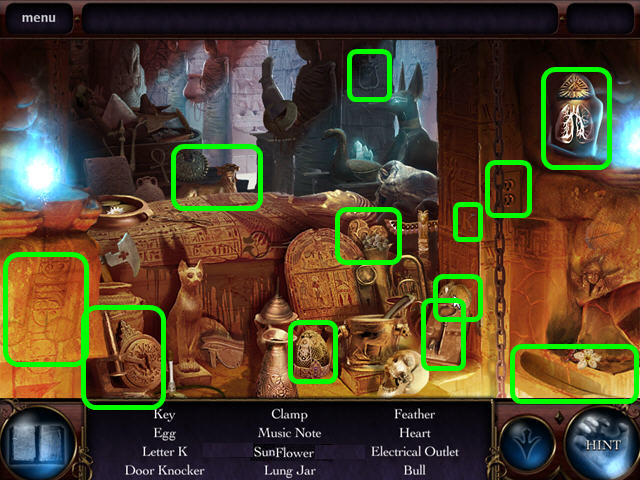
- Investigate the Left Alcove for a HOS.
- Complete the scene to receive a MUSIC NOTE, a CANOPIC JAR (LUNGS), and an EYE OF HORUS PIECE.

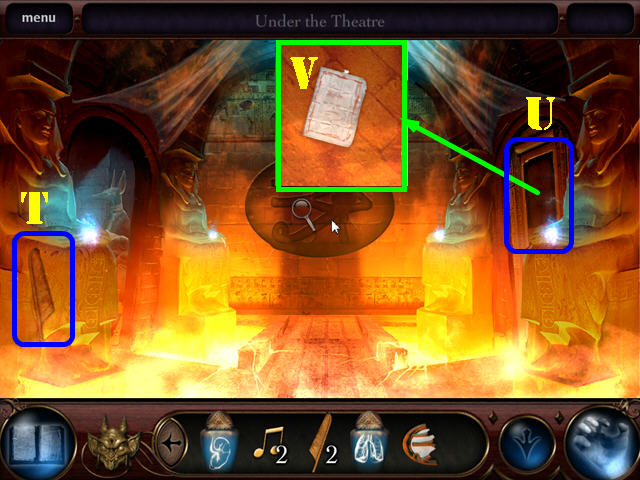
- Pick up the Stone Feather (T).
- Investigate the Right Alcove (U). Pick Up the Note (V).

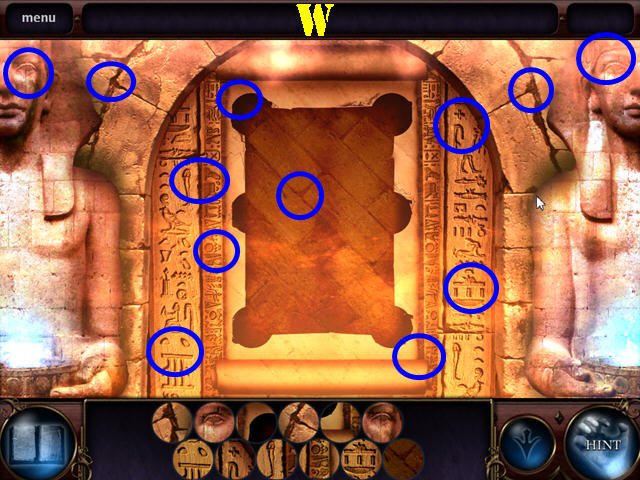
- Find the images shown at the bottom of the scene in the picture.
- Please look at the screenshot for the solution (W).
- Complete the scene to get the EYE OF HORUS PIECE.

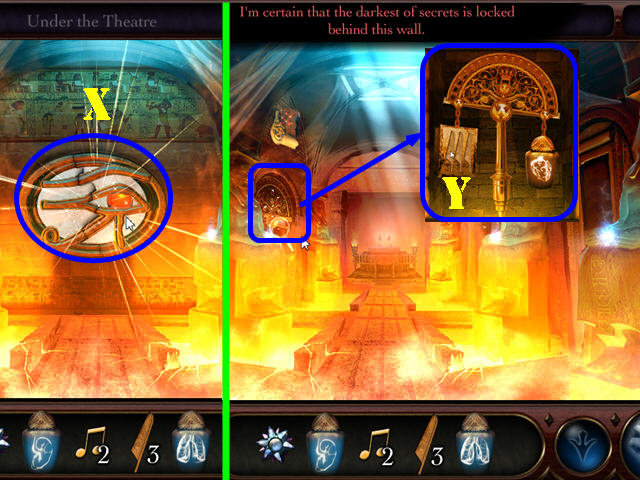
- Walk down to Under the Theatre.
- Place the 2 EYE OF HORUS PIECES in the slot on the wall (X).
- Investigate the Second Left Alcove; place the STONE FEATHERS into the Slots (Y) to receive the CANOPIC JAR (HEART).
- Investigate the Back Chamber.

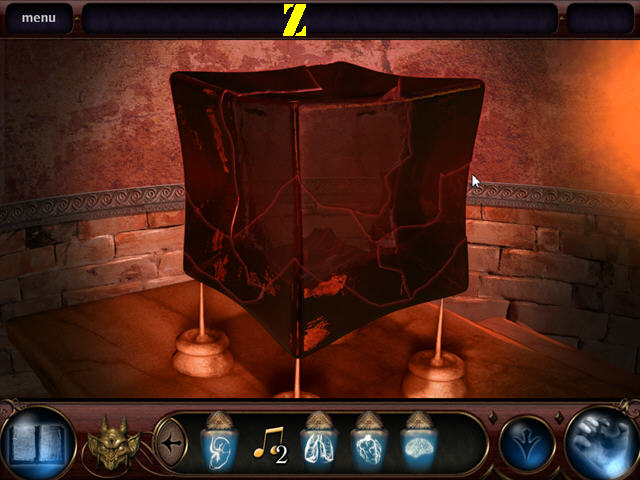
- Fix the Cube by fitting the pieces together as shown in the screenshot (Z).
- Receive the CANOPIC JAR (BRAIN) and the HAPSBURG CUBE (FRACTURED).
- Walk down.

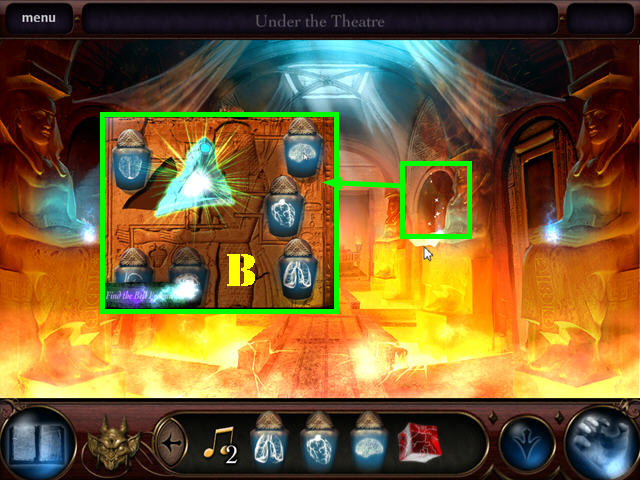
- Investigate the Second Right Alcove.
- Place the CANOPIC JAR (KIDNEY), CANOPIC JAR (LUNGS), CANOPIC JAR (HEART), and the CANOPIC JAR (BRAIN) into the proper places (B).
- Receive the BELL FRAGMENT.
Chapter 7: The Crypt and Finale

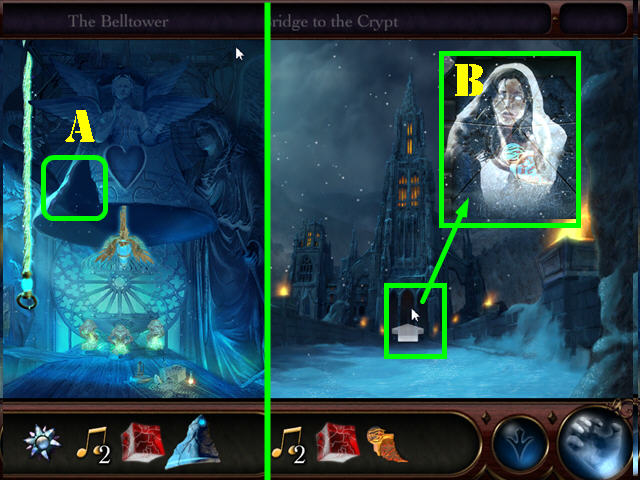
- Head Back to the Bell Tower.
- Place the BELL FRAGMENT in the Bell (A).
- Go back to the Bridge to the Crypt and zoom into the door.
- Use your hand to get the JEWELED TABLET (B).

- Go to the Annex.
- Investigate the Open Gate for a HOS.
- Complete the scene to receive the CRYSTAL BLOSSOM.

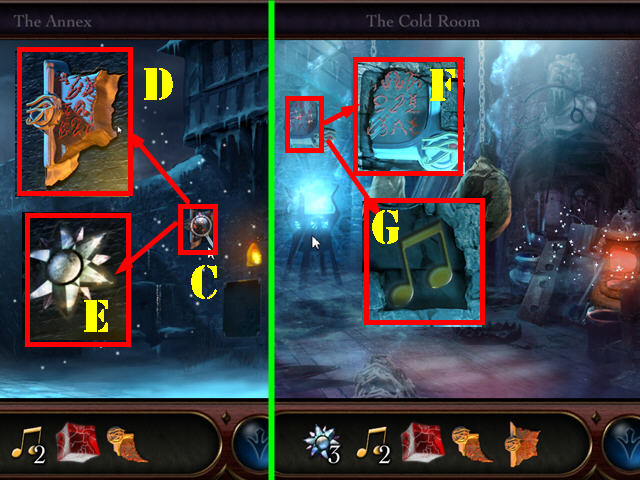
- Investigate the Plaque (C).
- Use your hand to unlock the JEWELED TABLET (D).
- Pick up the CRYSTAL BLOSSOM (E).
- Return to the Cold Room, in the Secret passage. Note: You can access it by going through Corvus’ Study.
- Investigate the Plaque. Use your hand to unlock the JEWELED TABLET (F).
- Collect the MUSIC NOTE (G).

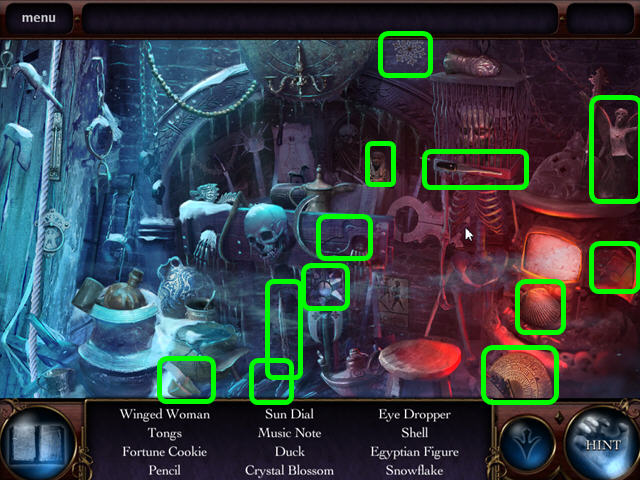
- Investigate the Cold Room Cell for a HOS.
- Complete the scene to collect the CRYSTAL BLOSSOM, and the MUSIC NOTE.


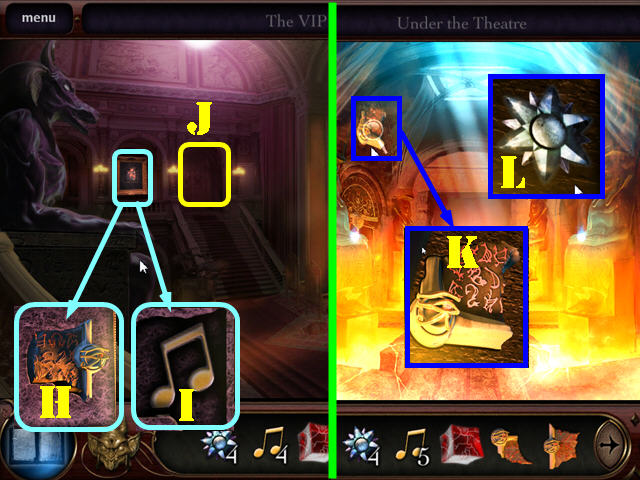
- Head to the VIP Room in the theatre.
- Investigate the Plaque. Use your hand to unlock the JEWELED TABLET (H).
- Collect the MUSIC NOTE (I).
- Proceed through the door (J) and then go forward to reach Under the Theatre.
- Investigate the Plaque. Use your hand to unlock the JEWELED TABLET (K).
- Collect the CRYSTAL BLOSSOM (L).

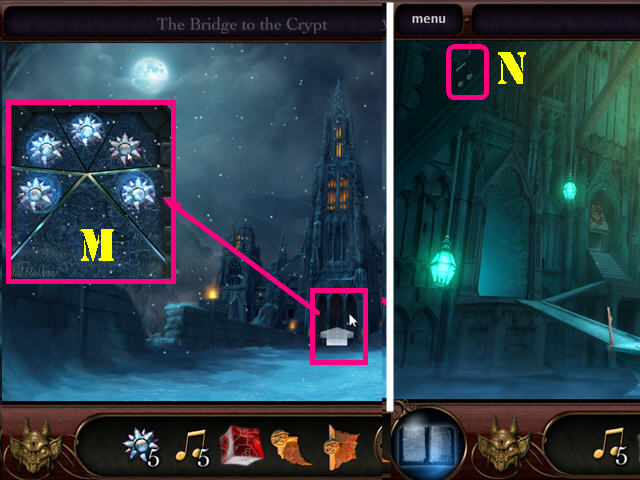
- Head back to the Bridge to the Crypt and zoom into the door.
- Place the 5 CRYSTAL BLOSSOMS into the slots (M).
- Proceed through the open door to access Her Crypt.
- Pick up the MUSIC NOTE (N) in the upper left.

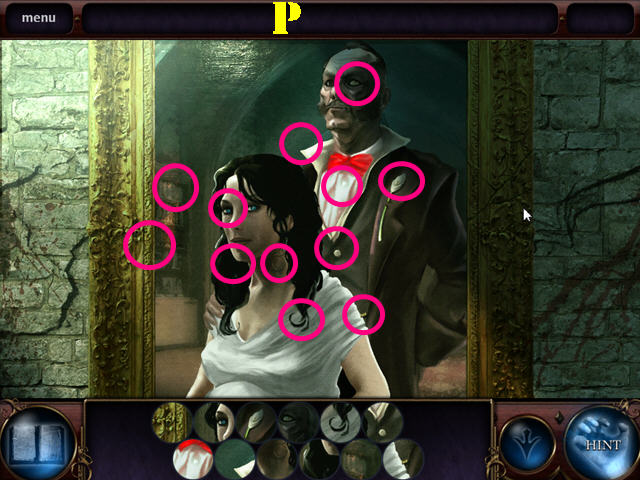
- Investigate the Painting.
- Find the images shown at the bottom of the scene in the picture.
- Please look at the screenshot for the solution (P).
- Finish the scene to light one of the torches.

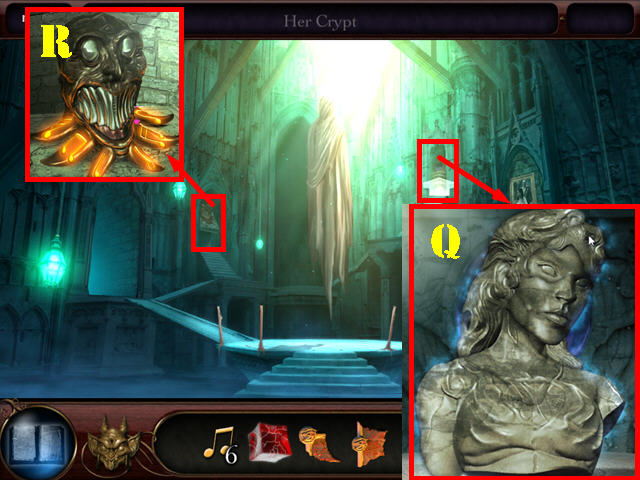
- Investigate the right Pedestal Alcove.
- Assemble the Bust pieces.
- Please look at the screenshot for the solution (Q).
- Finish the scene to Light one of the torches.
- Investigate the Small left Alcove. Place the 6 MUSIC NOTES in the slots to light one of the torches (R).

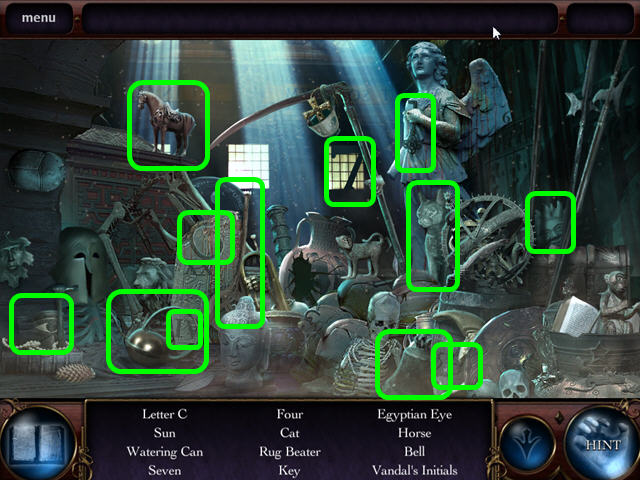
- Investigate the large Alcove on the left for a HOS.
- Complete the scene to light one of the torches.
- Collect the Final JEWELED TABLET.

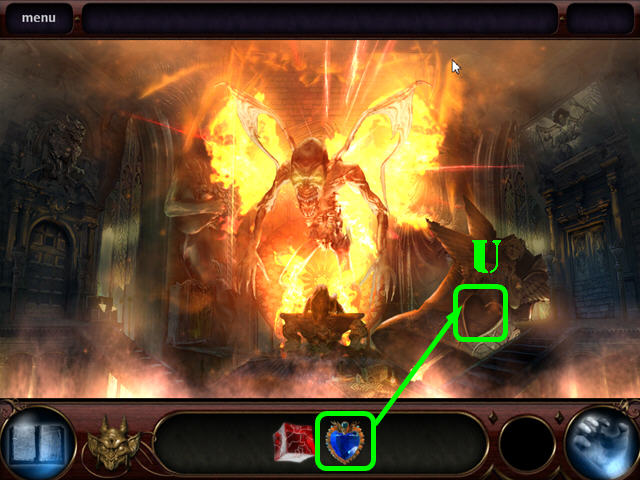
- Proceed to Under the theatre.
- Investigate the First Right Alcove. Place the 5 JEWELED TABLETS in the correct Slots to open the hidden door (S).
- Proceed forward to the Coffin (T). Receive the CRYSTAL BELL HEART.


- Go back to the Bell Tower.
- Place the CRYSTAL BELL HEART into the Bell slot (U).
- Congratulations, you have completed Theatre of the Absurd!




 Grim Facade: The Cost of Jealousy Walkthrough, Guide, & Tips
 Sister's Secrecy: Arcanum Bloodlines Walkthrough, Guide, & Tips
 Princess Isabella: A Witch's Curse Walkthrough, Guide, & Tips
 Angela Young 2: Escape the Dreamscape Walkthrough, Guide, & Tips
 Dark Tales: Edgar Allan Poe's The Masque of the Red Death Walkthrough, Guide, & Tips