Grim Facade: The Cost of Jealousy Walkthrough, Guide, & Tips
Grim Facade: The Cost of Jealousy Walkthrough

Welcome to the Grim Facade: The Cost of Jealousy Walkthrough
A simple murder investigation in Spain becomes a puzzling whodunit filled with intrigue.
Whether you use this document as a reference when things get difficult or as a road map to get you from beginning to end, we’re pretty sure you’ll find what you’re looking for here.
This document contains a complete Grim Facade: The Cost of Jealousy game walkthrough featuring annotated screenshots from actual gameplay!
We hope you find this information useful as you play your way through the game. Use the walkthrough menu below to quickly jump to whatever stage of the game you need help with.
Remember to visit the Big Fish Games Forums if you find you need more help. Have fun!
This walkthrough was created by MargieB, and is protected under US Copyright laws. Any unauthorized use, including re-publication in whole or in part, without permission, is strictly prohibited.
General Tips:

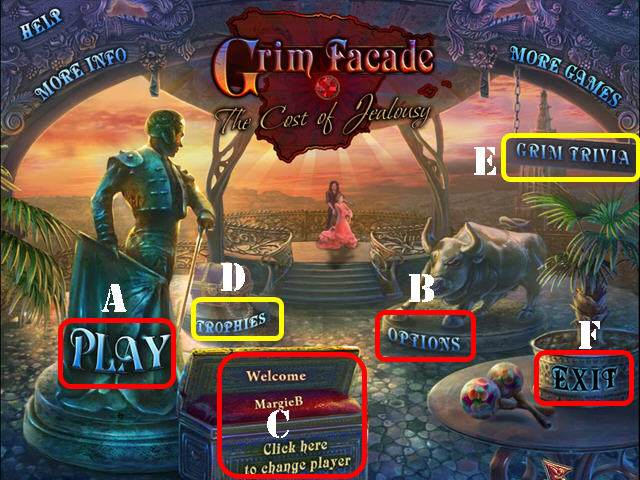
- This is the official guide for Grim Façade: The Cost of Jealousy.
- Select ‘Play’ (A) to begin your adventure.
- The ‘Options’ (B) button allows you to adjust the screen, music, cursor, and sound.
- Select ‘Click here to change player’ button (C) can be used to add or delete a player.
- The ‘Trophies’ (D) and ‘Grim Trivia’ (E) are only accessible in the Collector’s Edition.
- Exit the game here (F).
- In this guide we will use the acronym ‘HOS’ for Hidden Object Scenes and ‘HOP’ for Hidden Object Puzzles.
- Items written in red in HOS require an extra step or two. The HOS are random; our lists may vary from yours.
Chapter 1: Meet Aidan
- Talk to Aidan; take the photo from his hand and then the scroll.
- Talk to Gabriela and take the SIGNET from her hand.
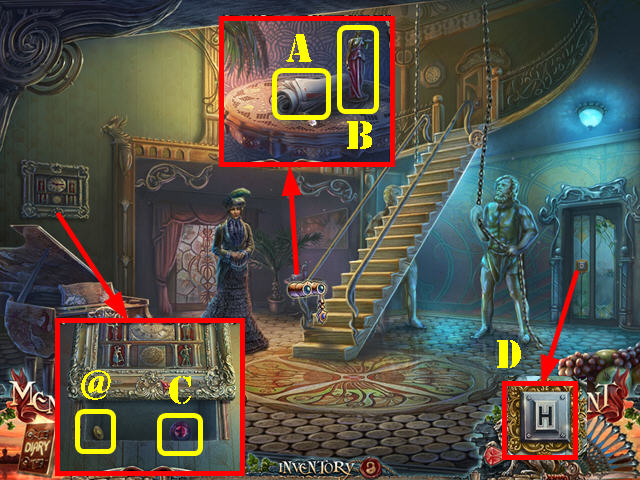
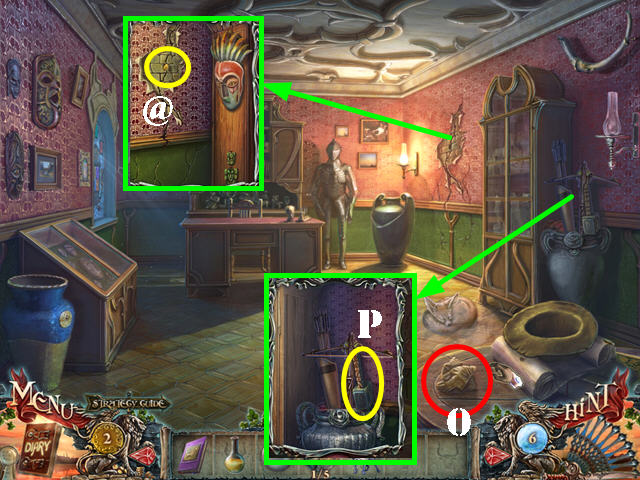
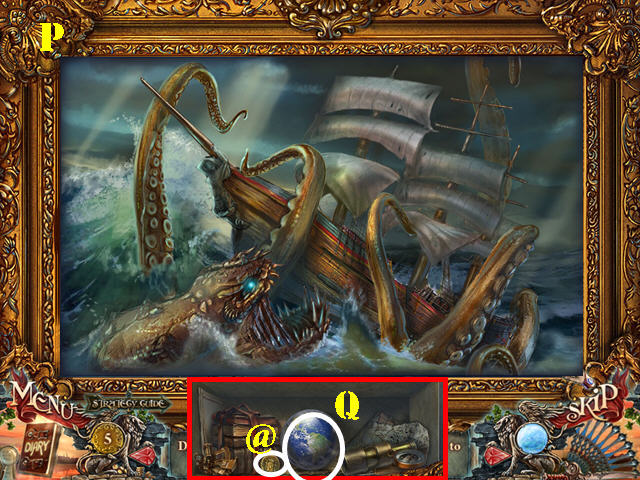
- Zoom into the table; take the newspaper (A) and the FRAGMENT 1/4 below it. Grab the STATUETTE (B).
- Zoom into the picture and touch it; take the GOLD COIN (@) and the SNAKE EYE (C).
- Zoom into the keyhole and use the SIGNET on it (D).
- Go through the door.
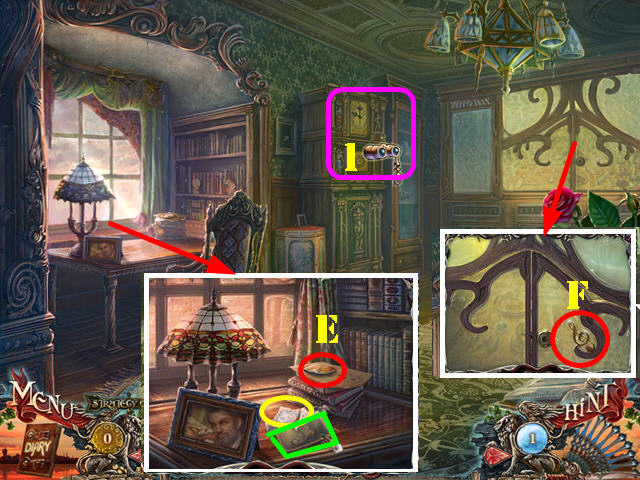
- Zoom into the desk; take the photo (green), the FRAGMENT 2/4 (E) and the MUSIC NOTES below it.
- Grab the HANDKERCHIEF (yellow).
- Talk to Aidan. Check the list of suspects during your investigation to keep track of important clues and track down the murderer.
- Look at the window; take the TREBLE CLEF (F).
- Zoom into the clock (1) and place the STATUETTE into the slot to activate a puzzle.
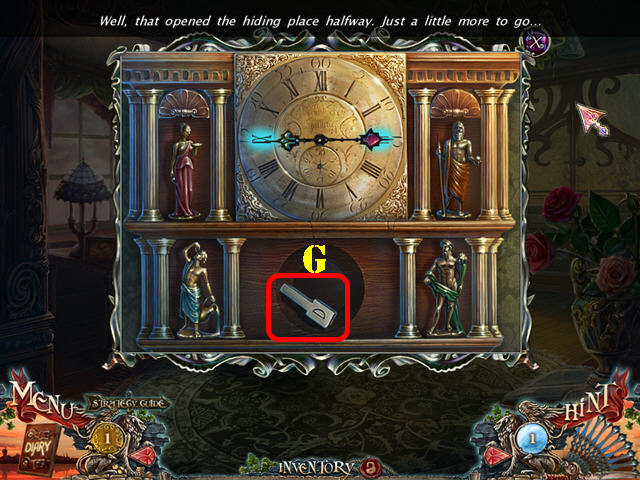
- Swap the statuettes in the slots shown on the screenshot.
- Select the clock hands in this order: blue x 1 and red x 3. When the two hands are together, make sure you highlight the right one.
- Take the PIANO KEY (G).
- Walk down.
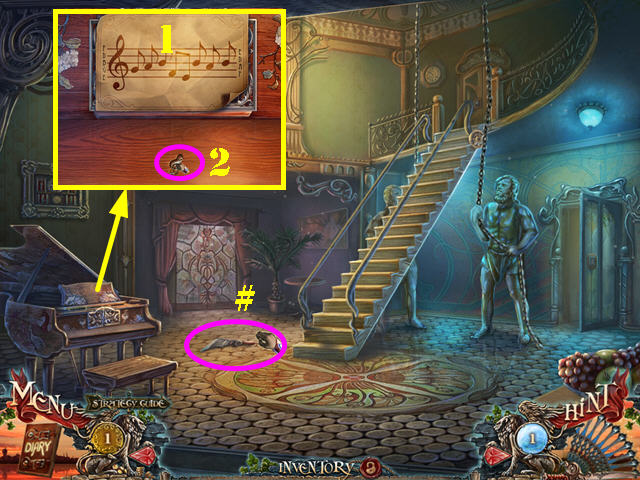
- Take the Fan (#).
- Zoom into the piano; place the MUSIC NOTE (1) on it and then clean the dust with the HANDKERCHIEF.
- Place the TREBLE CLEF in the slot (2) and then the PIANO KEY on the keyboard to activate a puzzle.

- Play the right melody using the music sheet as a clue.
- To solve the puzzle, select the keys in this order: G, A, B, F, E, B, A, and B.
- Take the note (3) and the HAIRPIN below it.
- Go through the right door.
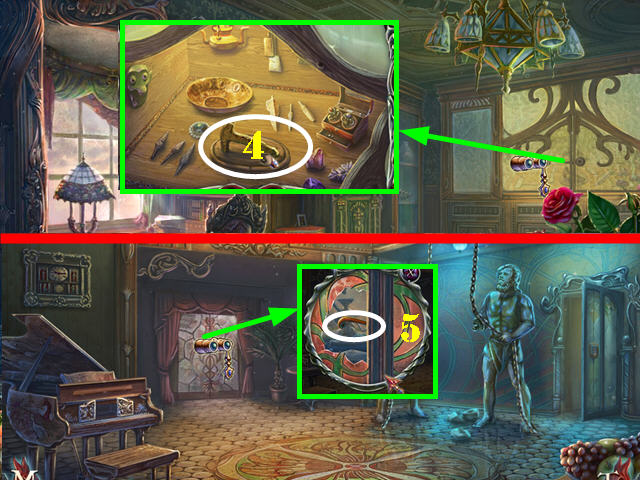
- Zoom into the window; use the HAIRPIN in the lock and take the HAMMER (4).
- Walk down.
- Zoom into the glass door; break it with the HAMMER (5).
- Pull the handle and go through the door.
- Talk to Aidan.
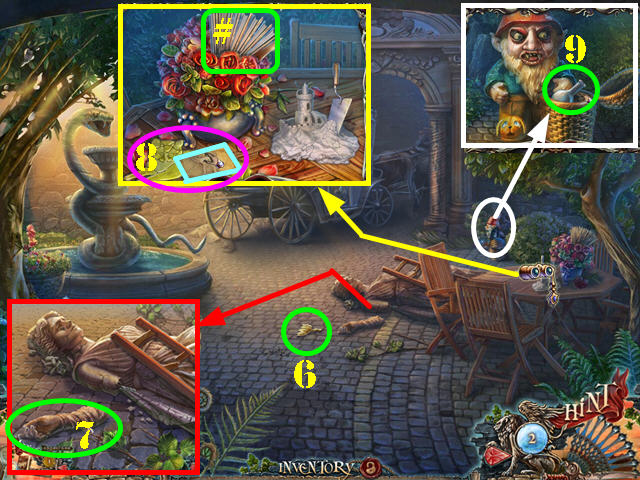
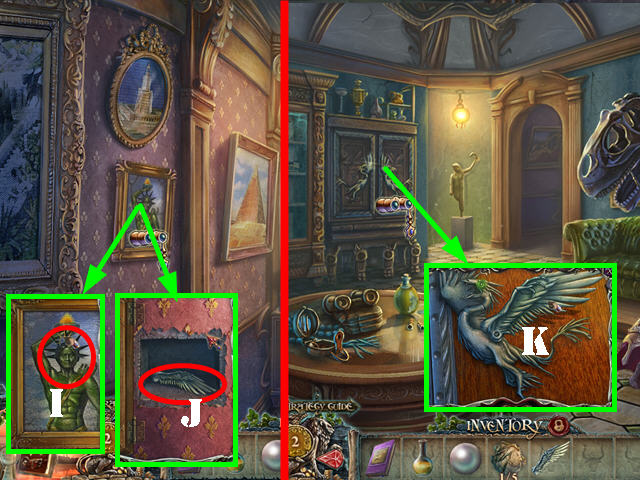
- Take the LILY (6).
- Zoom into the statue; remove the stones and take the STATUE ARM (7).
- Look on the table; touch the photo and flip it over (light blue).
- Take the CAT (8) and the Fan (#).
- Look at the gnome; open the basket and take the FLASK (9).
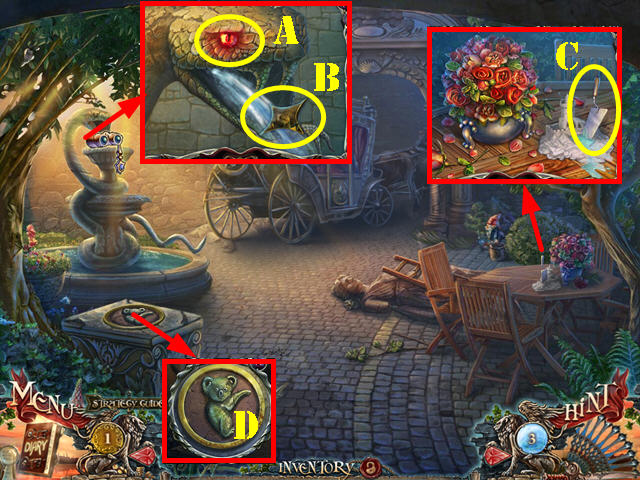
- Zoom into the snake; place the SNAKE EYE in the socket (A) and take the FRAGMENT 3/4 (B).
- Place the FLASK in the water to receive the FLASK WITH WATER.
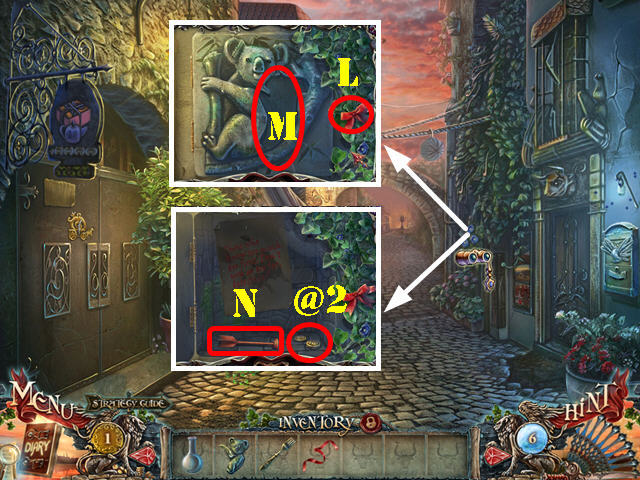
- Zoom into the table; use the FLASK WITH WATER on the sand; take the TROWEL (C).
- Zoom into the pedestal; lift the KOALA with the TROWEL (D).
- Walk down.
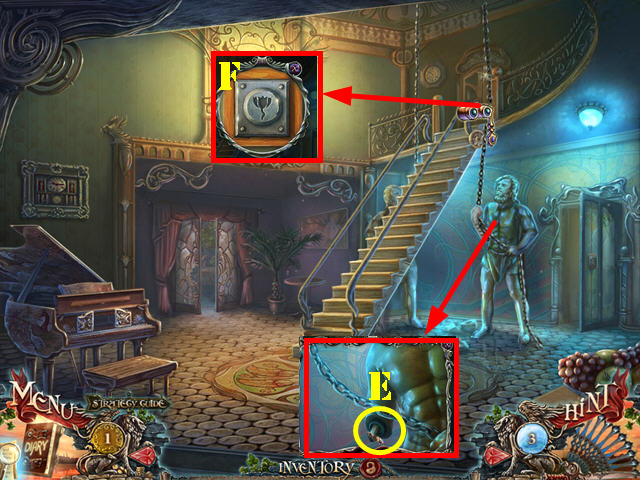
- Zoom into the right statue and place the STATUE ARM on it (E).
- Zoom into the top door; use the LILY in the keyhole (F) and go through the door.
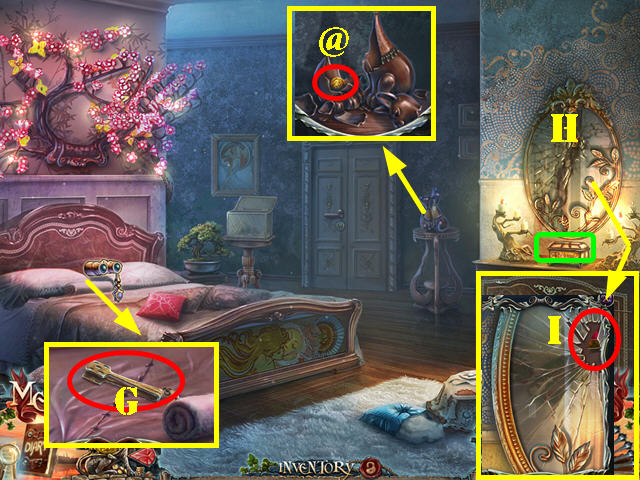
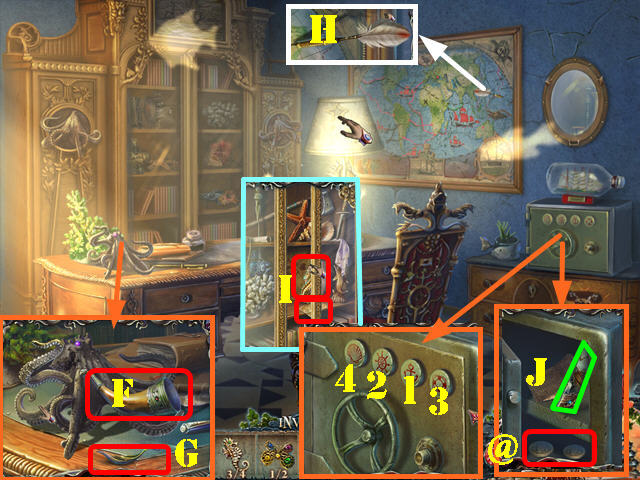
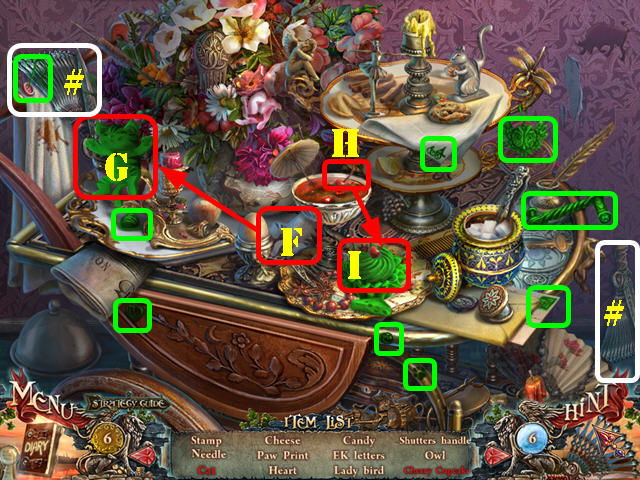
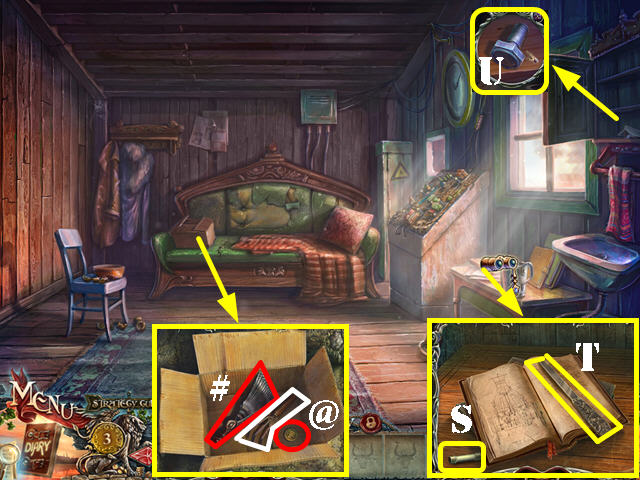
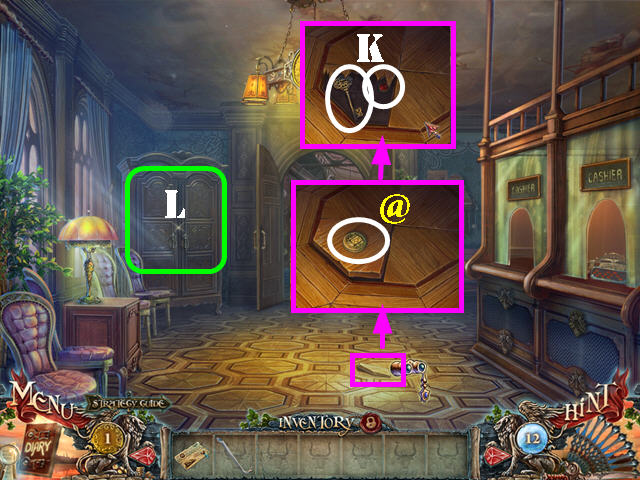
- Take a closer look at the pillow and remove it; take the diary and the PINCERS below it (G).
- Take a closer look at the cats; use the HAMMER on them and take the GOLD COIN (@).
- Take a closer look at the mirror (H) and then talk to Aidan. Zoom back into the mirror and use the PINCERS to get the FRAGMENT 4/4 (I).
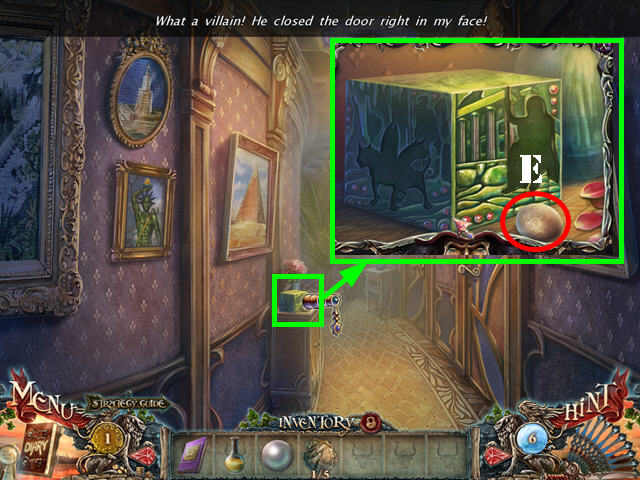
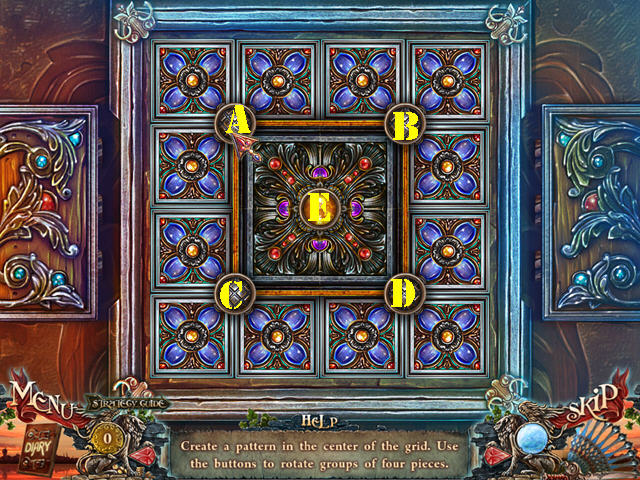
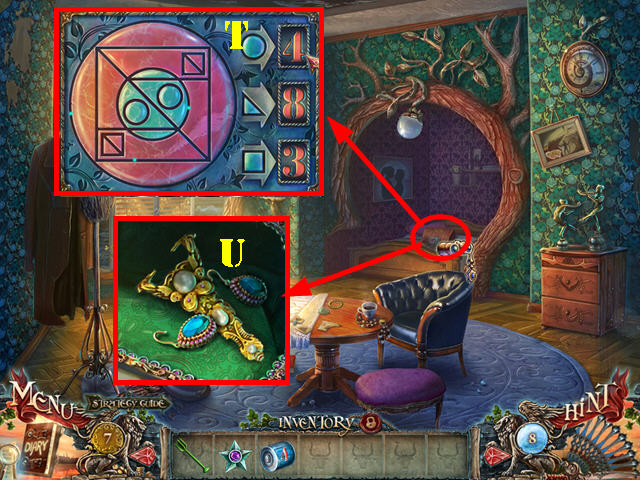
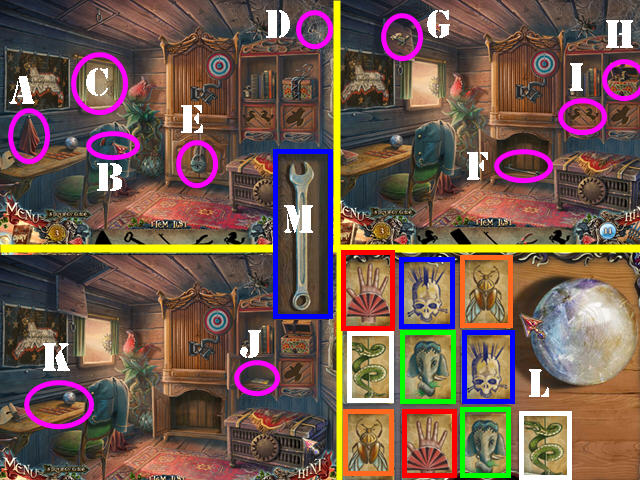
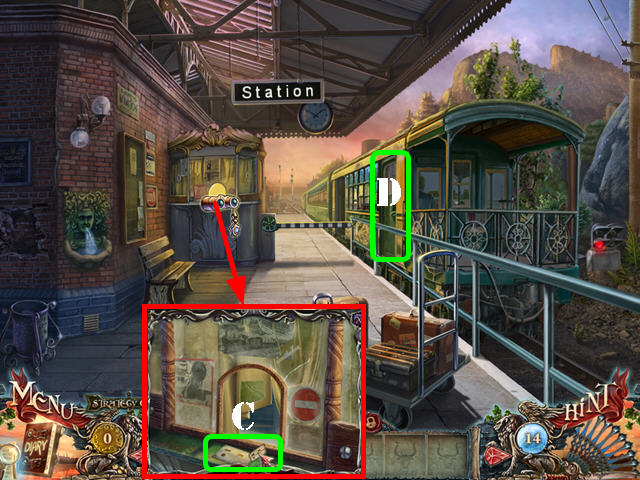
- Zoom into the box (green); place the 4 FRAGMENTS on the box to activate a puzzle.
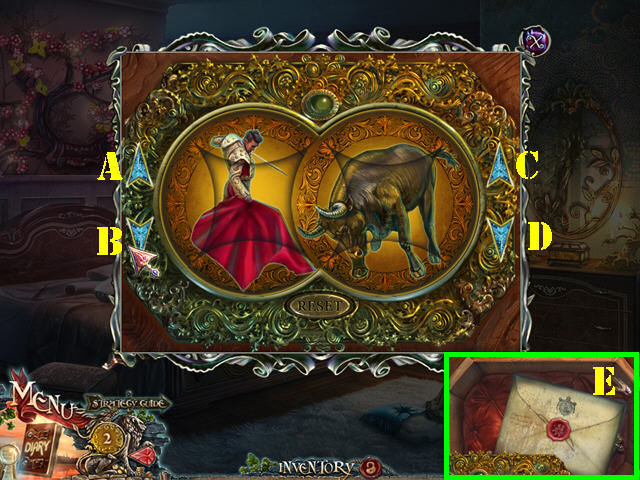
- Use the arrows to rotate the pieces into place.
- To solve the puzzle, select the arrows in this order: C, B, C, A x 3.
- Open the envelope and take ESMERALDA’S LETTER (E). Take the KEY below the letter.
- Zoom into the door lock; use the KEY in the lock and go through the door.
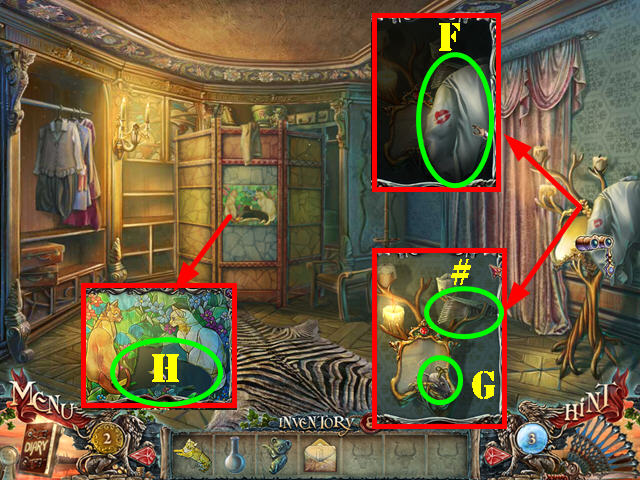
- Zoom into the shirt and then touch it (F).
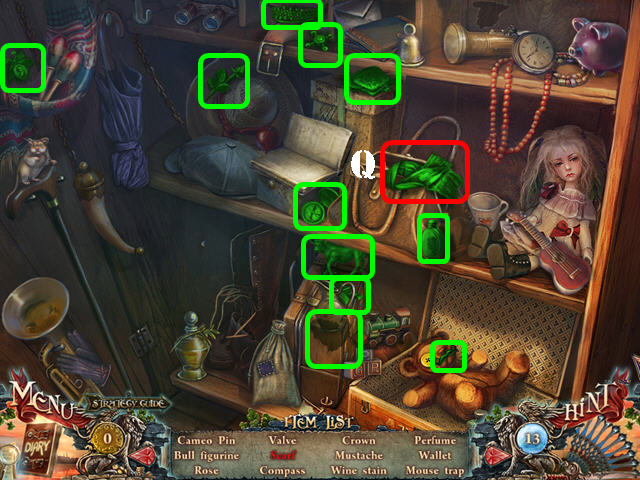
- Take the Fan (#) and the MOUSE (G).
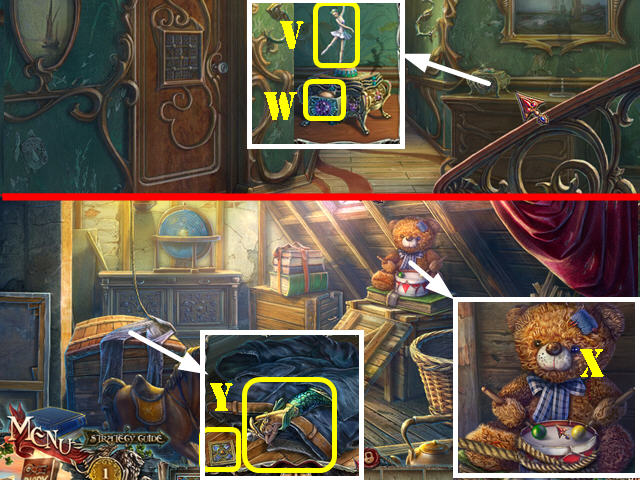
- Examine the divider and place the CAT in the slot (H) to activate a HOS.
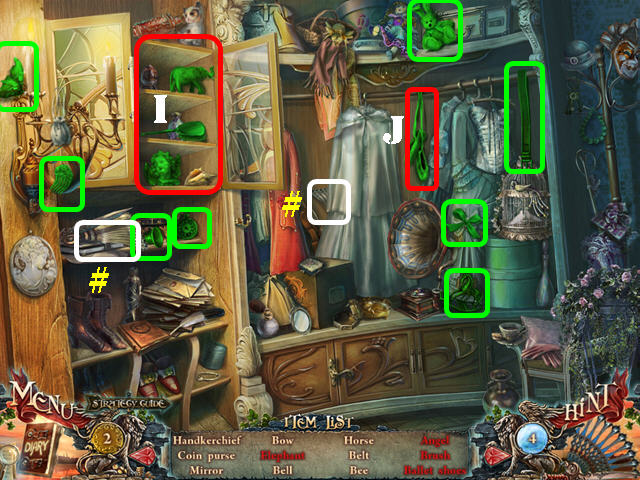
- Play the HOS.
- Take the 2 Fans (#).
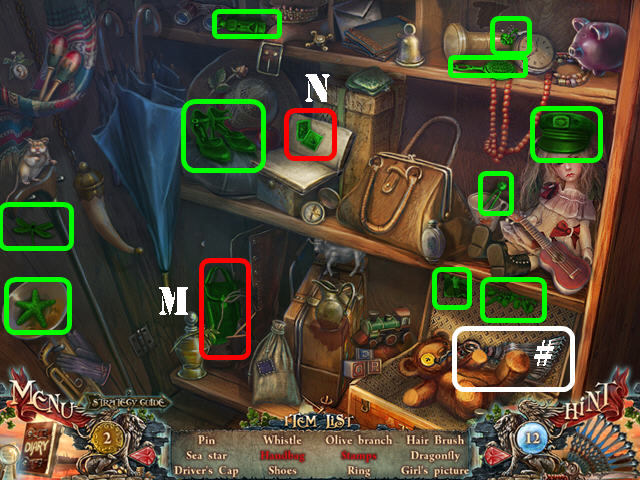
- Open the door and take the all the items in the cabinet (I).
- Move the dress and take the ballet shoes (J).
- You will receive the BELT.
- Walk Down.
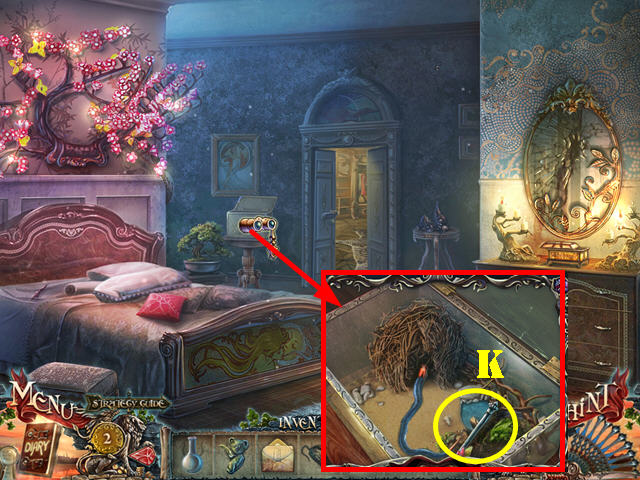
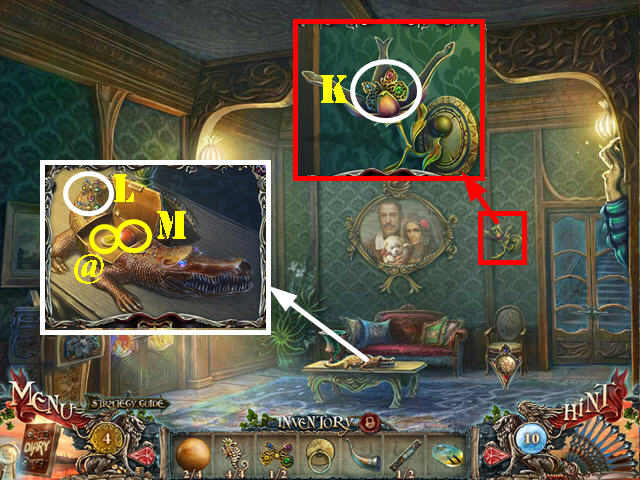
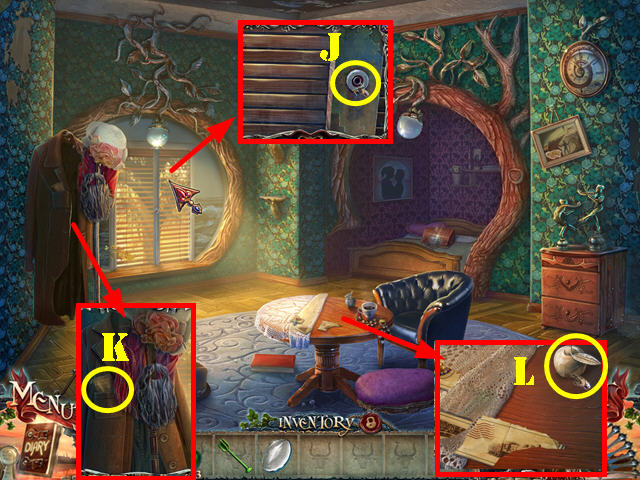
- Zoom into the tank and place the MOUSE in it. Take the CURTAIN ROD (K).
- Go through the door.
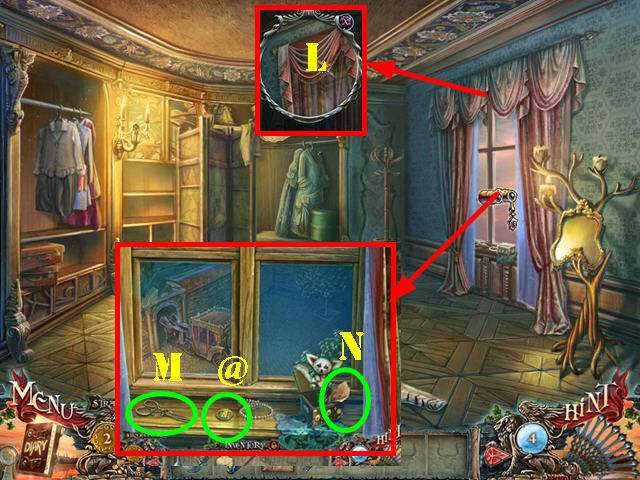
- Zoom into the top of the curtains and place the CURTAIN ROD on it (L).
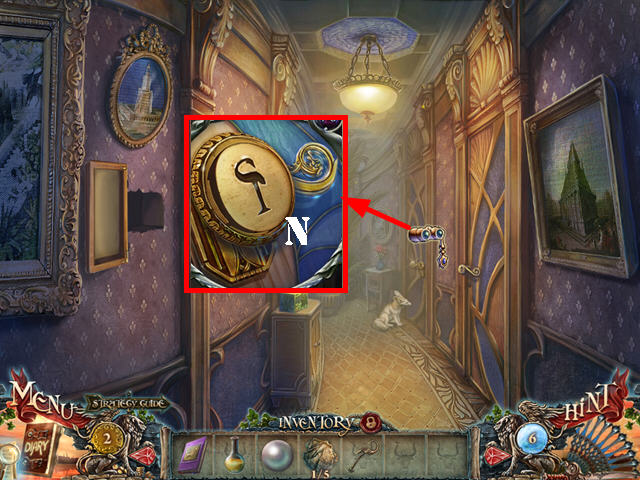
- Zoom into the window; take the GOLD COIN (@) and the SCISSORS (M).
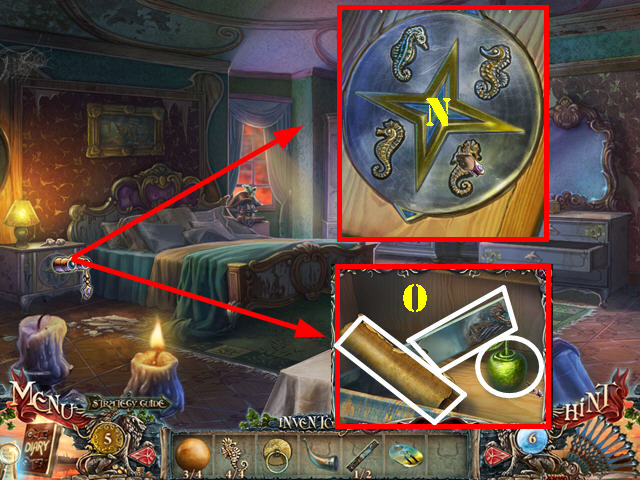
- Open the box and take the note (N).
- Talk to Aidan.
- Walk down.
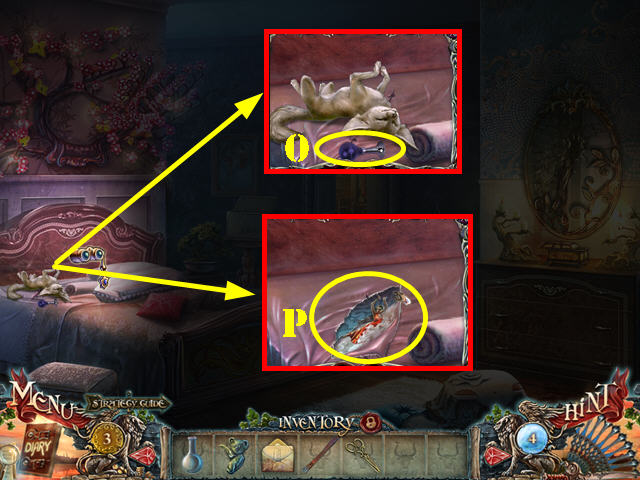
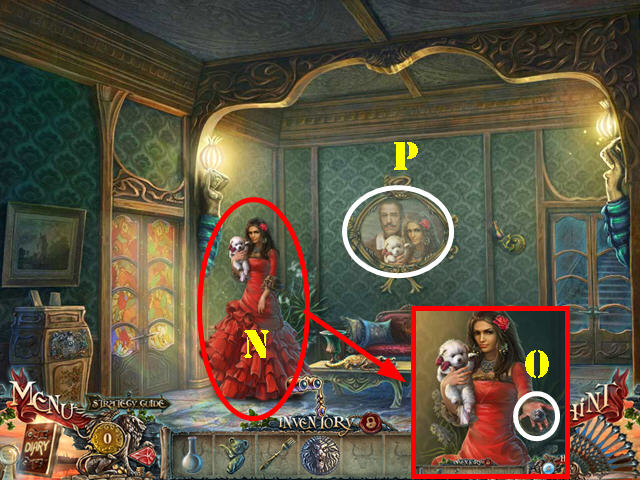
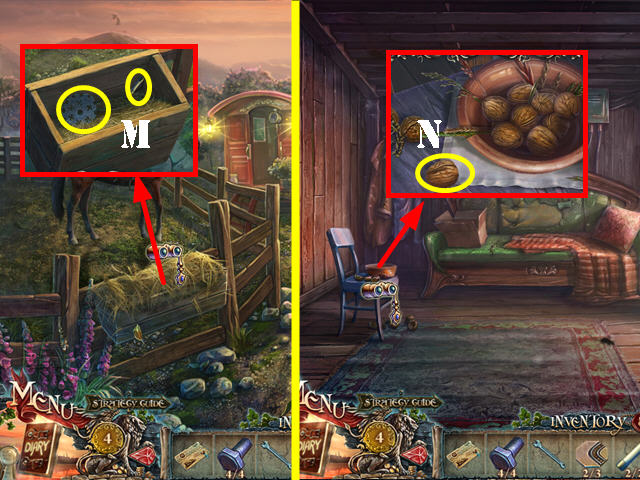
- Zoom into the bed and blow the horn (O).
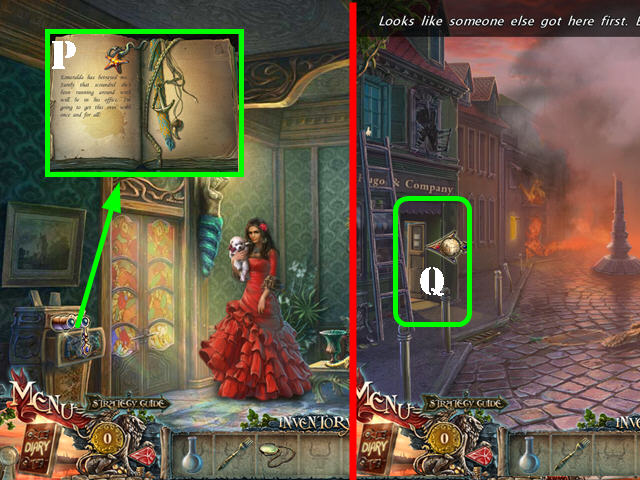
- Cut the sheet with the SCISSORS and take the LADY IN RED (P).
- Walk down and go out the front door.
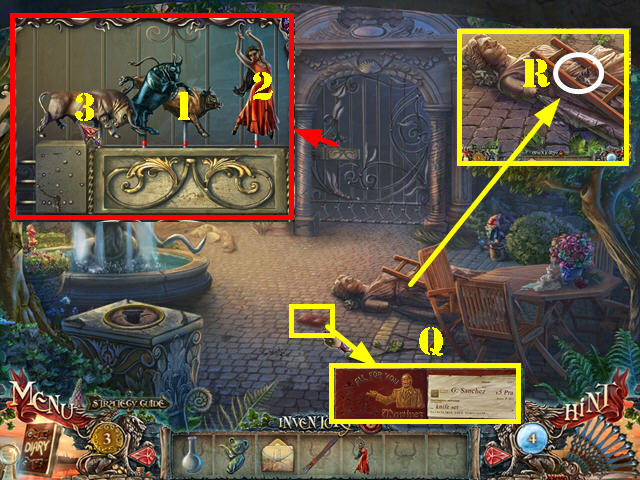
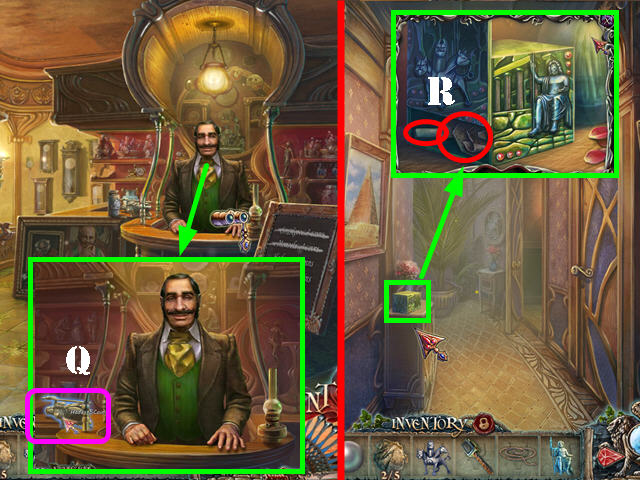
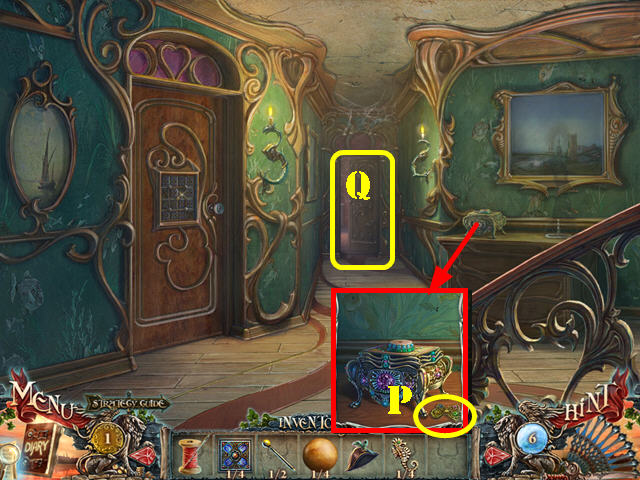
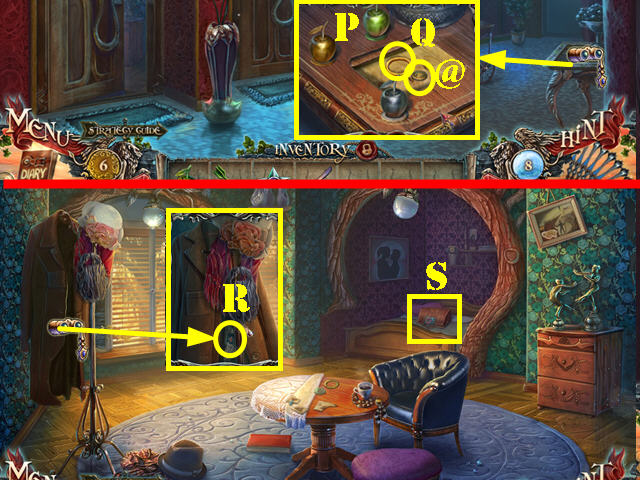
- Take the wallet; open it and then take it (Q).
- Talk to Aidan.
- Zoom into the statue; add the BELT to the broken rung and take the LADDER (R).
- Zoom into the gate and place the LADY IN RED on it to activate the puzzle.
- Touch the statues in the right order until they all line up. To solve the puzzle, select the statues in the order shown on the screenshot (1-3).
- Go forward twice.
Chapter 2: Esmeralda’s House
- A note will appear on the screen that states Cortez is the murderer.
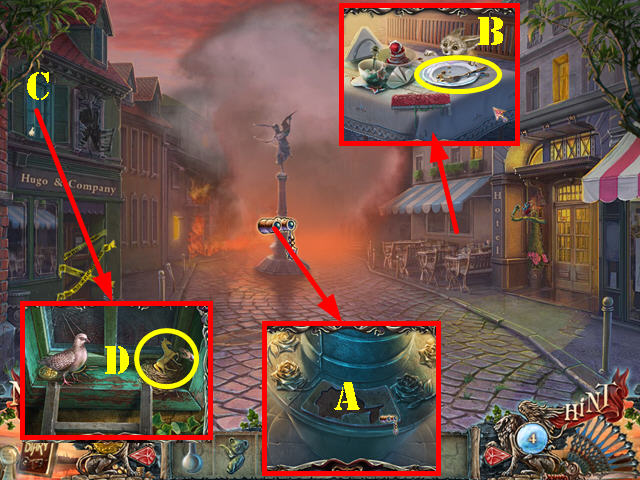
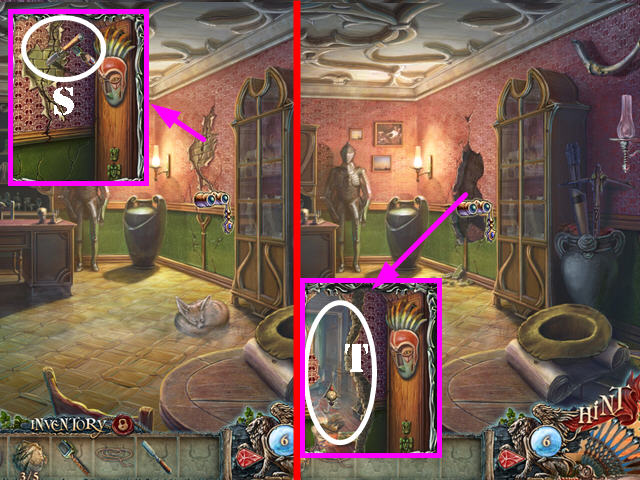
- Talk to Aidan and then zoom into the base of the statue (A).
- Zoom into the table and take the FORK (B).
- Examine the window and put down the LADDER (C). Take the HORSE (D).
- Walk down.

- Zoom into the left door; place the HORSE on the carriage and go through the door (E).
- Look at the sign (F).
- Talk to Martinez, the shop owner. Select the smoker (G) and then the coins (H). Give the COINS to Martinez to automatically receive the SMOKER.
- Exit the shop.
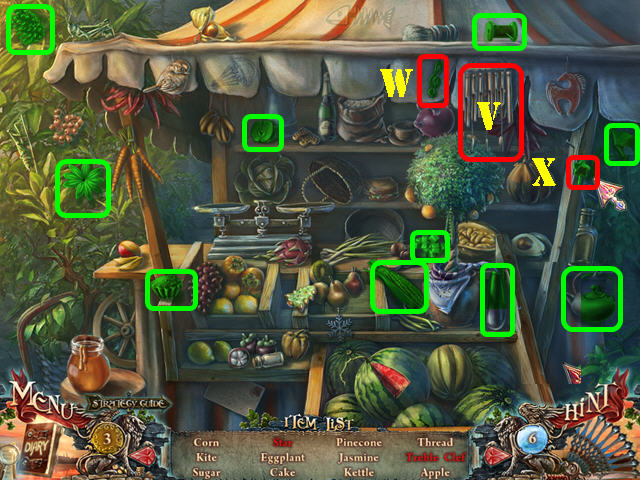
- Use the SMOKER on the bees to activate a HOS (I).
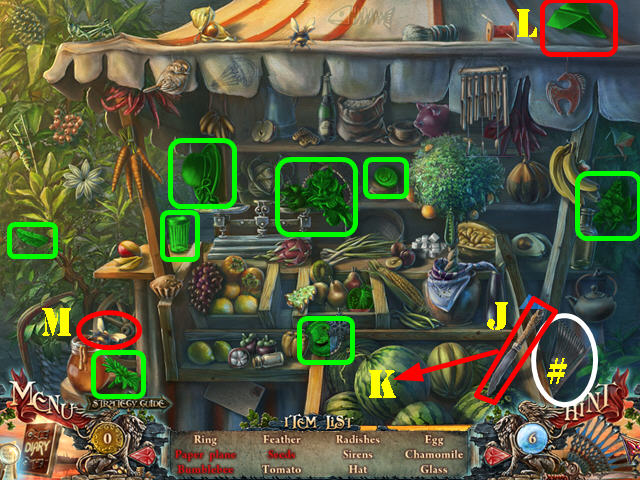
- Play the HOS.
- Take the Fan (#).
- Use the knife (J) on the watermelon (K) and take the seeds.
- Touch the paper and take the paper plane (L).
- Remove the cover from the honey jar and take the bumblebee (M).
- You will receive the FEATHER.
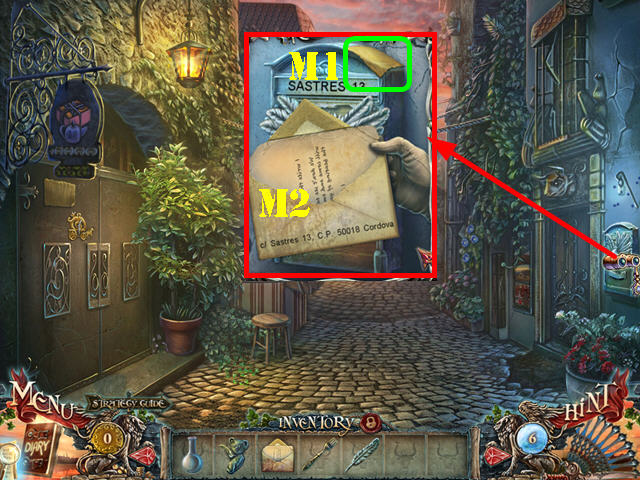
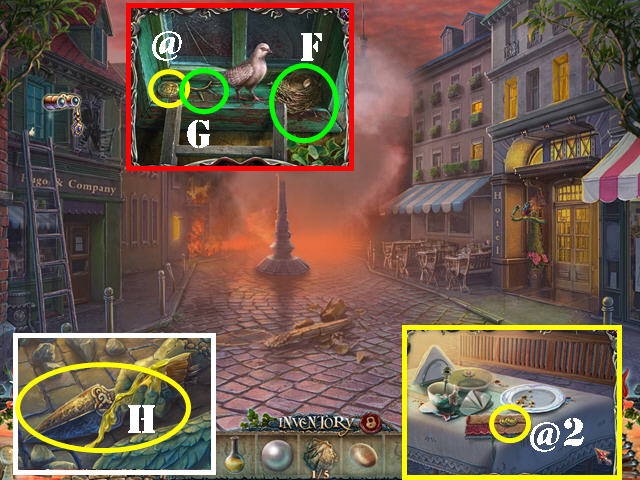
- Zoom into the mailbox; take the note (M1).
- Place the FEATHER on the bird and place ESMERALDA’S LETTER on the mailbox (M2).
- Go through the right door.
- Talk to Esmeralda and then give her ESMERALDA’S LETTER (N).
- Take the CHIP from her hand (O).
- Look at the picture (P).

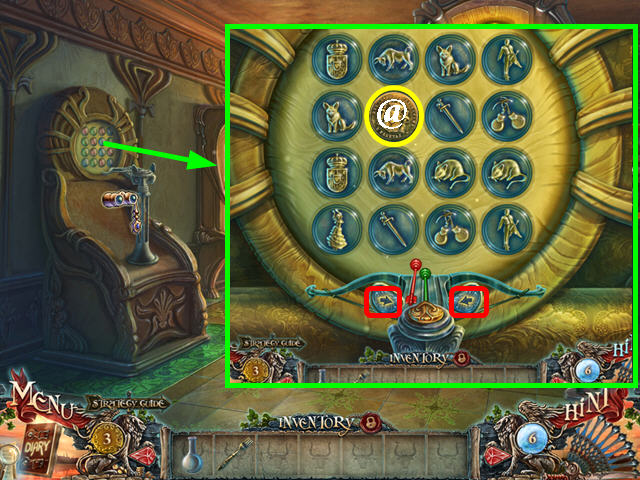
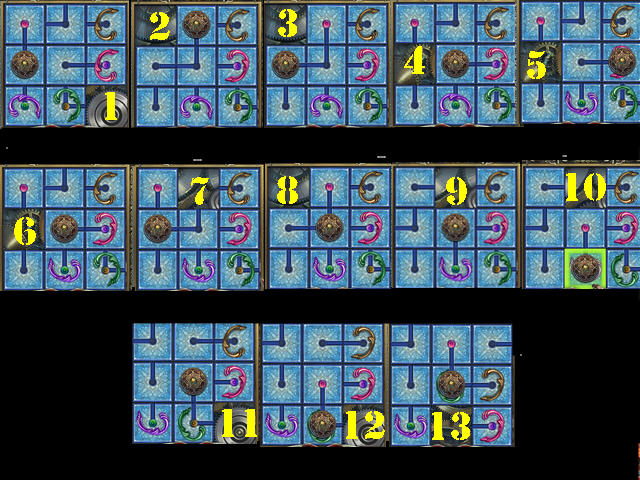
- Examine the device and place the CHIP on it to activate a puzzle.
- Move the chips through the rails until all the images are in the right spots.
- To solve the puzzle, select the chips in this order: B, C, I, J, D, F, I, B, F, I, C, B, I, F, B, D, F, B, A, D, F, B, D, F, B, I, D, and F.

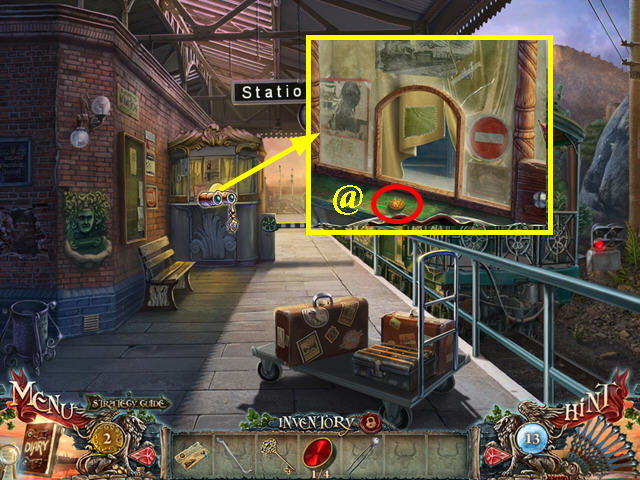
- Look in the drawer; open the book and take the GOLD COIN (@).
- Grab the RED RIBBON (K).
- Walk down.
- Zoom into the flowers and tie them with the RED RIBBON (L).
- Place the KOALA in the niche (M).
- Take the 2 GOLD COINS (@2) and the SUCKER DART (N).
- Return to Martinez’ shop.
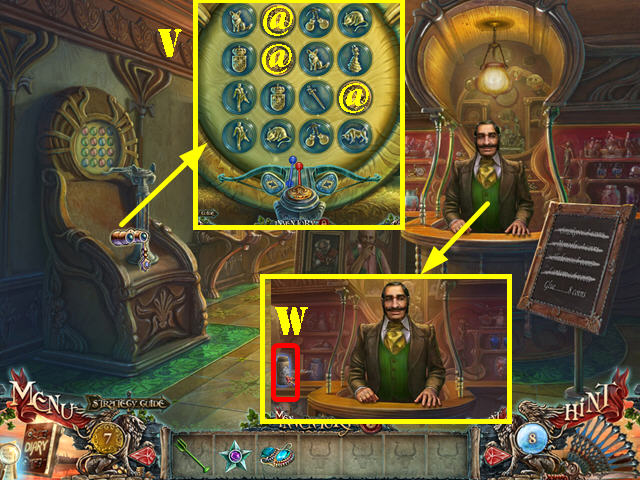
- Zoom into the machine and put down the SUCKER DART to activate a puzzle.
- Use the arrows (red) to rotate the darts and then select a chip of the same color to view what’s behind it.
- Eliminate two matching symbols from the board but keep in mind that they may be behind 2 different colored chips.
- The solution is random.
- Take the GOLD COIN (@).
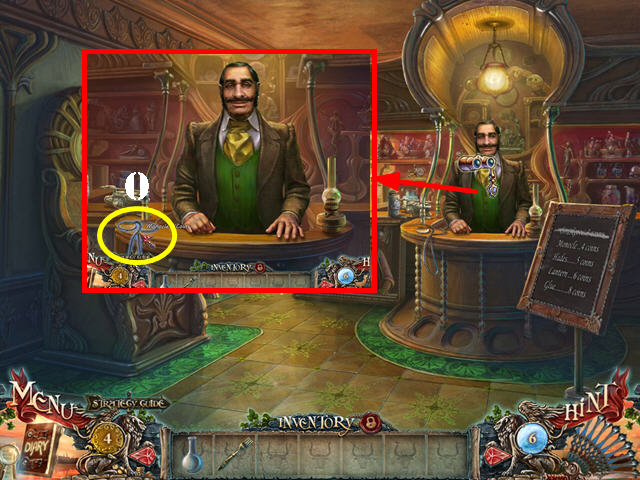
- Talk to Martinez.
- Select the MONOCLE and then buy it for 4 GOLD COINS (O).
- Exit the shop and go through the right door.
- Examine the drawer and open the book.
- Use the MONOCLE on the left page (P) and then touch the page.
- Walk down.
- Talk to Aidan; go forward and then go through the door on the left (Q).
Chapter 3: Hugo’s Office
- Touch anywhere on the scene to activate a cut scene.
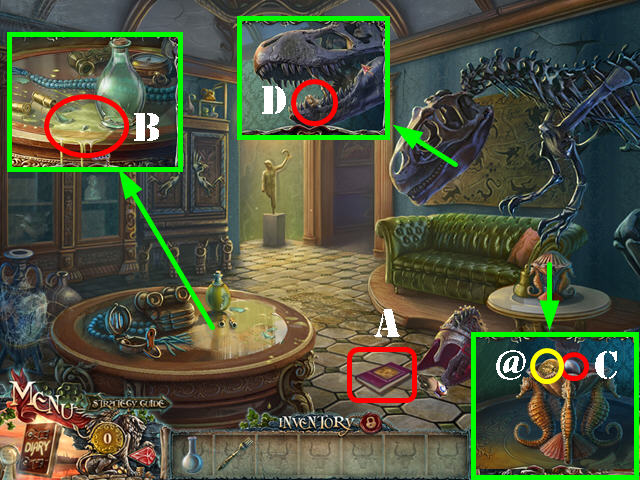
- Take the BOOK (A).
- Zoom into the large table; use the FLASK on the oil to get the FLASK WITH OIL (B).
- Zoom into the small table; open the shell and take the GOLD COIN (@) and the PEARL (C).
- Take a closer look at the dinosaur’s mouth; insert the FORK in it and take the MAP FRAGMENT 1/5 (D).
- Go through the doorway.
- Zoom into the box on the table and take the EGG (E).
- Walk down twice.
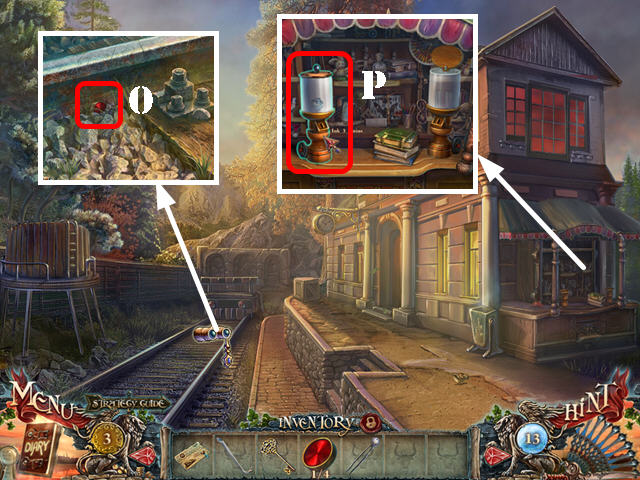
- Zoom into the window; place the EGG in the nest (F) and take the GOLD COIN (@) and the CROWN (G).
- Take a closer look at the stone hand; use the FLASK WITH OIL on it and take the SPEARHEAD (H).
- Zoom into the table; open the purse with the SPEARHEAD and take the 2 COINS (@2).
- Go back into the office and then go through the doorway.
- Zoom into the painting; place the CROWN on the painting (I) and take the WING (J).
- Walk down.
- Zoom into the cabinet; place the WING on the bird and pull the wing to activate a HOS (K).
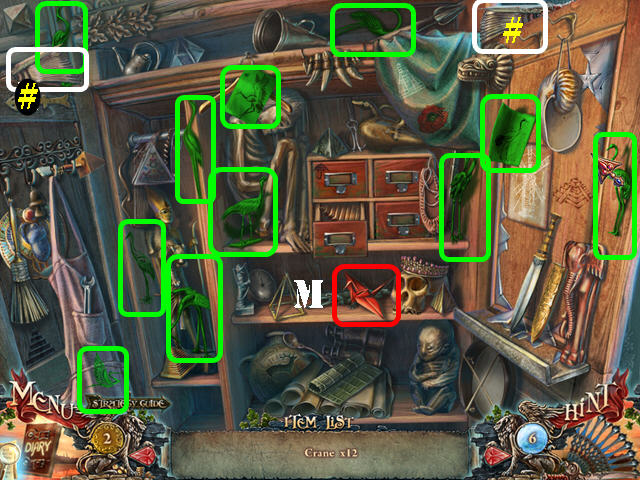
- Play the HOS.
- Take the 2 Fans (#).
- Find the 12 cranes in the scene. Touch the paper 4 times and take the crane (M).
- You will receive the CRANE.
- Go through the door.
- Zoom into the right door by the fox; use the CRANE in the lock (N).
- Go through the door.
- Play the HOP.
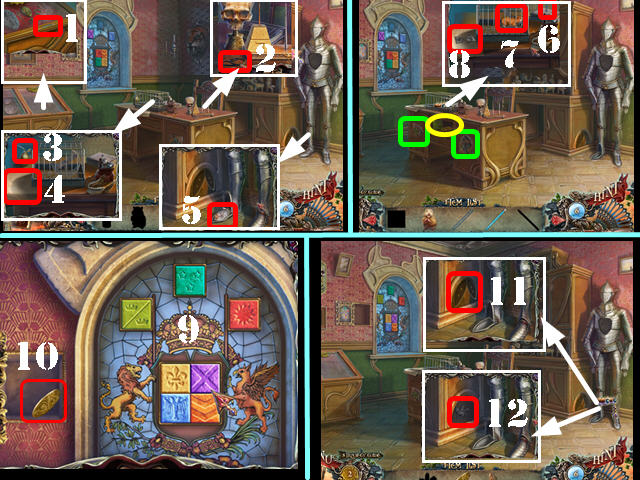
- Zoom into the case and take the pencil (1).
- Examine the right side of the desk and take the belt (2).
- Zoom into the cage and take the oiler (3). Slide the paper (4).
- Examine the knight’s feet; use the oiler on the foot and take the hamster (5).
- Zoom back into the cage. Place the pencil in the sharpener (6) and attach the belt on the cage. Place the hamster in the cage (7) and take the sharpened pencil.
- Use the sharpened pencil on the paper to view the shield images (8).
- Turn the shields on the desk as shown here (green).
- Take the stained glass and the embellishment (yellow).
- Examine the window; place the stained glass on it to activate a mini-game. Select two tiles to swap them; arrange them as shown in the screenshot (9).
- Take the embellishment (10).
- Examine the knight’s feet; use the 2 embellishments in the slot (11) and take the CERBERUS (12).
- Move the hat and take the MAP FRAGMENT 2/5 (O).
- Examine the stand and take the HAMMER (P).Use the SPEARHEAD on the crossbow strings to get the BOWSTRING.
- Examine the wall; take the GOLD COIN (@).
- Return to Martinez’ shop.
- Zoom into Martinez and buy HADES for 5 COINS (Q).
- Return to the hallway.
- Zoom into the box; place HADES and CERBERUS into the slots. Take the MAP FRAGMENT 3/5 and the CHISEL (R).
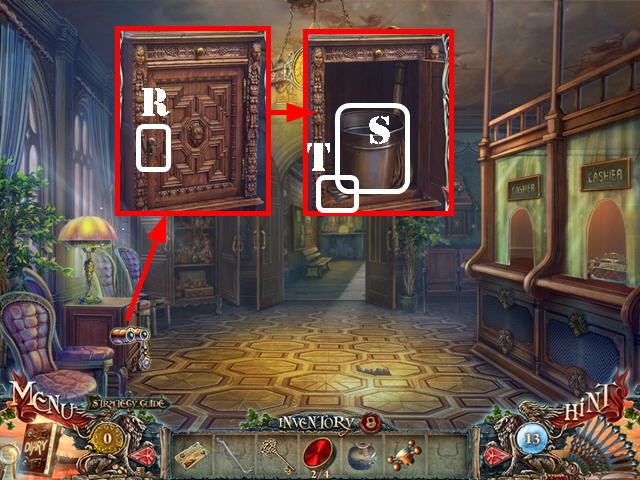
- Go through the open door.
- Zoom into the wall; use the CHISEL on the crack and then the HAMMER on the chisel (S).
- Zoom into the broken wall. Go through the hole in the wall to access Hugo’s office (T).
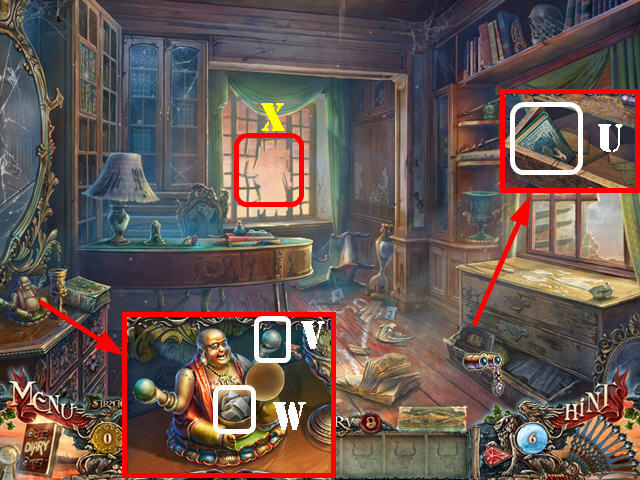
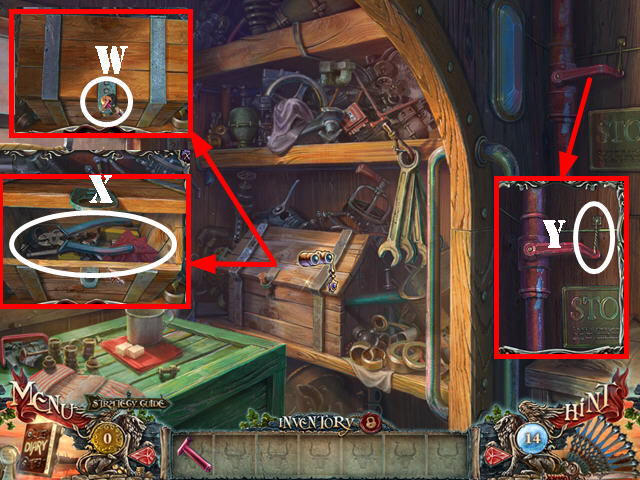
- Look in the drawer and take the BOOK (U).
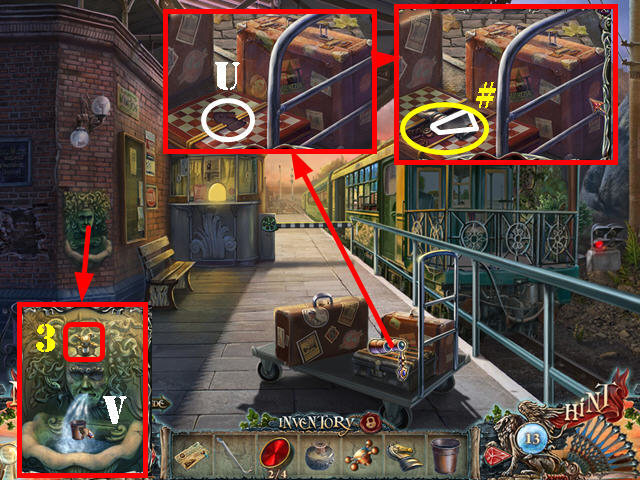
- Zoom into the Buddha; place the PEARL in his hand (V) and take the MAP FRAGMENT 4/5 (W).
- Go out the window (X).
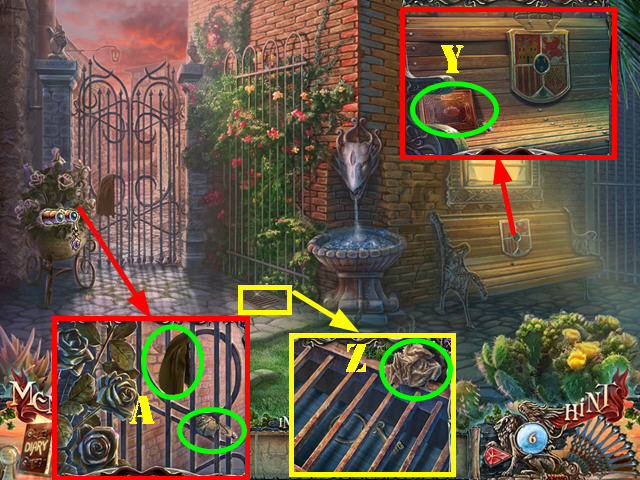
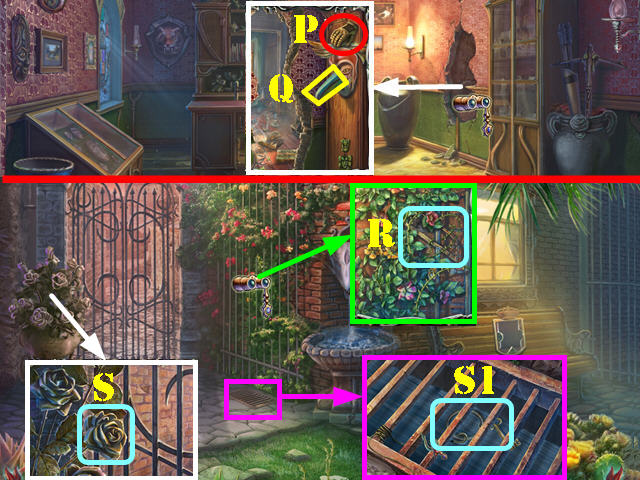
- Zoom into the bench and take the BOOK (Y).
- Zoom into the drain; take the note (Z).
- Talk to Aidan.
- Zoom into the roses; take the COAT FLAP and the MAP FRAGMENT 5/5 (A).
- Walk down.
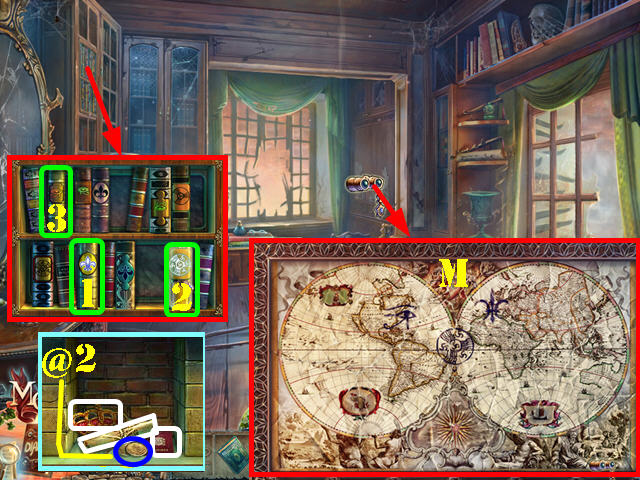
- Zoom into the frame; place the 5 MAP FRAGMENTS on it to activate a puzzle.
- Put the map back together. Please look at the screenshot for the solution (M).
- Zoom into the bookcase and place the 3 BOOKS on the shelf to activate a puzzle. Select the books in the order shown (1-3).
- Take the 2 COINS (@2).
- Grab the note, the passport, and the CROWN (white).
- Talk to Aidan.
- Go through the hole in the back window.

- Zoom into the bench; use the CROWN on the coat of arms. Take the GOLD COIN (@) and the BEAK (N).
- Walk down twice.

- Play the HOP.
- Take a closer look at the cage and take the jaw (B).
- Zoom into the right side of the desk; place the jaw on the skull (C).
- Take the nut (D); place it in the jaw and take the peeled nut (E).
- Zoom into the hamster; give it the peeled nut and take the crystal (F).
- Examine the case; cut the glass with the crystal and take the shield (G).
- Place the shield on the knight’s chest (H) and take the pyramid (I).
- Zoom into the right side of the desk; put down the PYRAMID to activate a mini-game (J).
- Touch a pyramid piece and then select a pole to place it there. Move all the pieces onto the pole on the right in the same order (K). A large piece can’t go over a smaller piece.
- Take the HOOK (L).
- Zoom into the wall; place the BEAK on the mask (P) and take the GLOVE (Q).
- Return to the garden.
- Zoom into the flowers; use the GLOVE to get the SAW (R).
- Zoom into the roses. Use the SAW to get the ROSE (S).
- Zoom into the drain and tie the BOWSTRING on it. Attach the hook to the end of the bowstring to get the LOCKPICK (S1).
- Walk down 4 times.
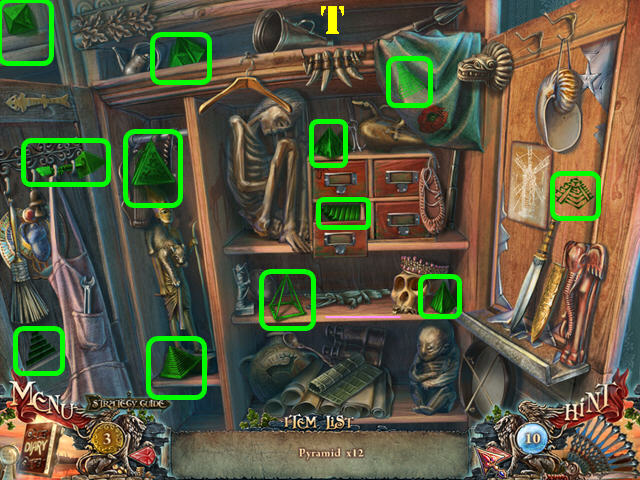
- Play the HOS.
- Find the 12 pyramids (T).
- You will receive the GLASS CUTTER.
- Walk down.
- Examine the base of the statue; place the ROSE in the slot and take the GARDEN SHOVEL (U).
- Walk Down.
- Play the HOS.
- Touch the wind chimes (V) and take the treble clef (W).
- Remove the bananas and take the star (X).
- You will receive the THREAD.

- Zoom into the right door; use the LOCKPICK on the lock and enter Esmeralda’s house (A).
- Examine the table; take the SUCKER DART (B).
- Look at the plant and then touch it; take the NAIL PULLER and the MOSAIC PIECE 1/4 (C).
- Go through the left door.
Chapter 4: The Attic
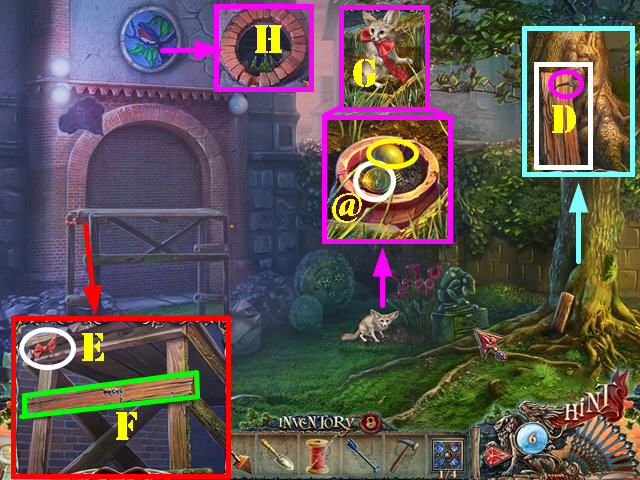
- Examine the base of the tree; use the NAIL PULLER to get the NAIL and then take the PLANK (D).
- Examine the scaffolding; take the BOW (E). Place the PLANK and the NAIL on and then use the NAIL PULLER on the nail (F).
- Zoom into the fox; place the BOW on it (G). Use the GARDEN SHOVEL on the ground. Remove the cover; take the GOLD COIN (@) and the DRUMSTICK 1/2 (yellow).
- Examine the window and cut the glass with the GLASS CUTTER (H). Place the COAT FLAP over the shards and touch the coat flap. Go through the window.
- You need a light source.
- Return to Martinez’ shop.
- Zoom into the machine and put down the SUCKER DART to activate a puzzle.
- Use the arrows to rotate the darts and then select a chip of the same color to view what’s behind it.
- Eliminate two matching symbols from the board but keep in mind that they may be behind 2 different colored chips.
- Please look at the screenshot for the random solution (I).
- Take the 2 COINS (@).
- Talk to Martinez.
- Select the LANTERN and then buy it for 6 GOLD COINS (J).
- Return to the attic.
- Use the LANTERN you bought at the shop on the scene.
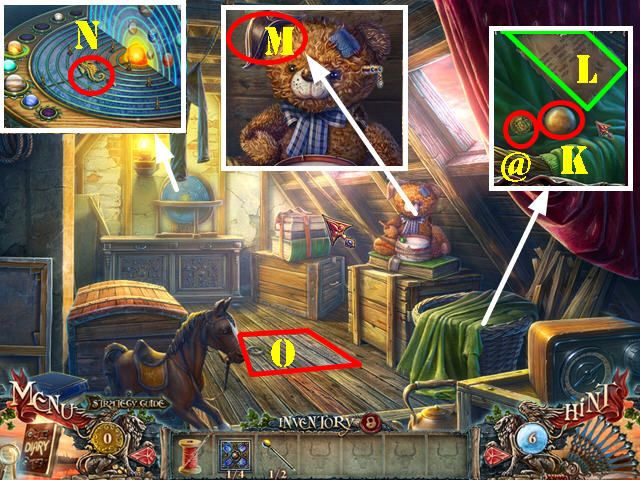
- Zoom into the hamper and remove the clothes. Take the GOLD COIN (@), the PLANET 1/4 (K), and the note (L).
- Examine the bear; take the PIRATE HAT (M).
- Zoom into the solar system and take the SEA HORSE 1/4 (N).
- Open the trapdoor and go through it (O).
- Zoom into the music box and take the BUTTERFLY 1/2 (P).
- Go through the back door (Q).
- Zoom into bed; take the DANCER (R) and the note below it.
- Zoom into the window; place the PIRATE HAT on the head (S) and take the SEA HORSE 2/4 (T).
- Take the DRUMSTICK 2/2 (yellow).
- Zoom into the dresser; take the MOSAIC PIECE 2/4 (U).
- Walk down.
- Zoom into the music box and place the DANCER on it (V); touch the dancer and take the PLANET 2/4 (W) and the MOSAIC PIECE 3/4 below it.
- Walk down.
- Zoom into the bear; Use the THREAD on the arm and place the 2 DRUMSTICKS on it (X).
- Zoom into top of the chest; take the MOSAIC PIECE 4/4 and the CANDELABRUM (Y).
- Go down the hatch.
- Place the CANDELABRUM on the table (A). Note that the candelabrum shapes resemble numbers (yellow).
- Touch the candelabrums in this order (2, 3, 1).
- Zoom into the safe and open it; take the GOLD COIN (@), the RING HANDLE (green), and the DOLPHIN (green).
- Go forward.
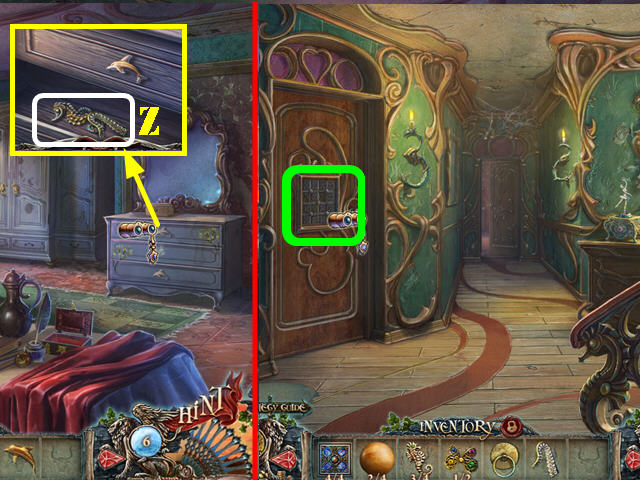
- Zoom into the dresser drawer; place the DOLPHIN on it and remove the photos. Take the TENTACLE and the SEA HORSE 3/4 (Z).
- Walk down.
- Zoom into the left door (green); place the 4 MOSAIC PIECES into the slots to activate a puzzle.
- Use the buttons to create the correct pattern.
- To solve the puzzle, select the buttons in this order: Ax2, Bx2, Dx3, E, and A.
- Go through the door.
- Zoom into the octopus; place the TENTACLE on it. Move the tentacle and take the HORN (F).
- Take the LEAF (G).
- Examine the map and take the DART (H).
- Zoom into the cabinet and insert the DART on the door; take the SEA HORSE 4/4 and the note below it (I).
- Take a closer look at the safe; select the buttons in this order (1-4).
- Take the 2 GOLD COINS (@) and the note (J).
- Talk to Aidan.
- Look in the safe again and take the NUMBER PLATE and the PUZZLE STRIP 1/2 (green).
- Walk down 4 times.
- Zoom into the sconce; place the LEAF on it and take the BUTTERFLY 2/2 (K).
- Zoom into the table; place the 2 BUTTERFLIES on the tail and touch the butterflies (L).
- Take the GOLD COIN (@) and the PLANET 3/4 (M).
- Return to the bedroom in the basement.
- Zoom into the night table; place the 4 SEA HORSES in the slots.
- Place the sea horses into the right silhouettes as shown in the screenshot (N).
- Take the PUZZLE STRIP 2/2, the APPLE 1/3, and the note (O).
- Zoom into the picture; place the PUZZLE PIECE on it to activate a puzzle.
- Slide the pieces up or down until the right image is formed.
- Please look at the screenshot for the solution (P).
- Take the PLANET 4/4 (Q) and the GOLD COIN (@).
- Walk down twice.
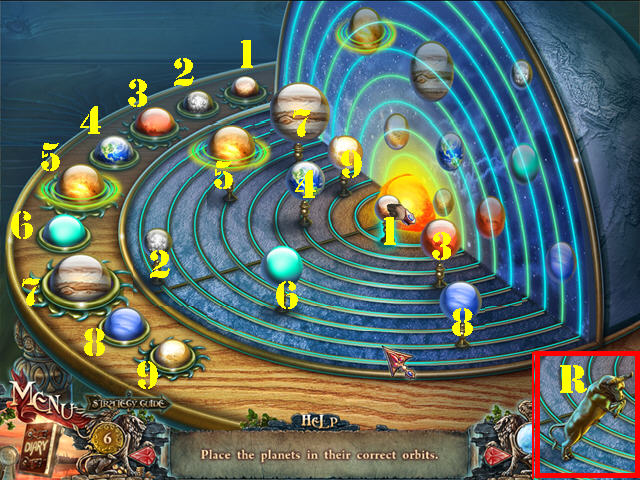
- Zoom into the solar system; place the 4 PLANETS on it to activate a puzzle.
- Place the planets into their orbits.
- Please look at the screenshot for the solution (1-9).
- Take the BULL (R).
- Walk down 3 times and go forward.
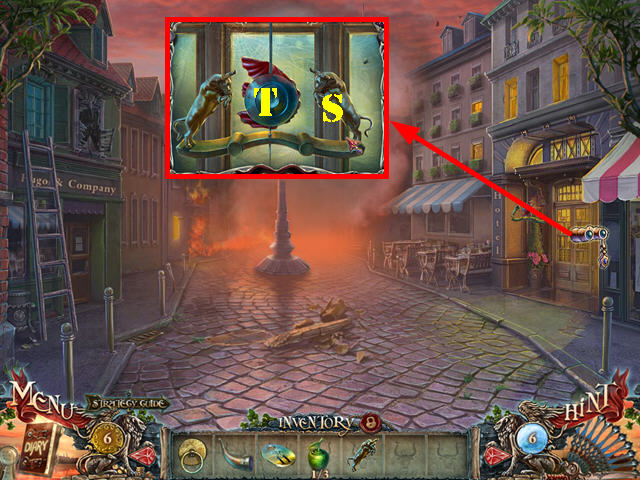
- Zoom into the hotel door. Place the BULL on the stand (S) and touch the gong (T).
- Enter the hotel.
Chapter 5: The Hotel
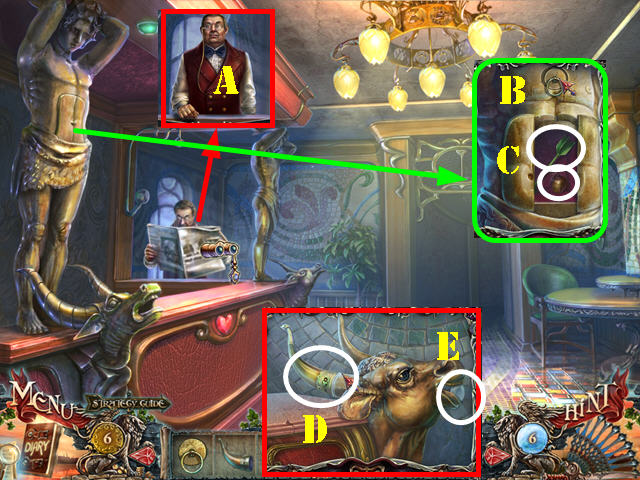
- Talk to the concierge; give him the NUMBER PLATE to receive the KEY (A).
- Zoom into the statue and place the RING HANDLE on the slot (B).
- Take the APPLE 2/2 and the SUCKER DART (C).
- Examine the bull; place the BULL HORN on it (D) and take the LENS (E).
- Go forward.
- Play the HOS.
- Take the 2 Fans (#).
- Place the cat piece (F) on the cat (G) and take the cat.
- Place the cherry (H) on the cupcake (I) and take the cherry cupcake.
- You will receive the SHUTTERS HANDLE.
- Zoom into door 11; insert the KEY in the lock; turn the key and go through the door.
- Zoom into the shutters and place the SHUTTERS HANDLE in the slot and turn the handle (J).
- Zoom into the coat; take the note (K) and talk to Aidan. Zoom back into the coat and take the STAR in the pocket.
- Zoom into the table; take the 3/3 APPLE (L).
- Walk down.
- Play the HOS.
- Place the wing (M) on the horse (N) and take Pegasus.
- Remove the lid; take the card and the kitchen knife (O).
- You will receive the KITCHEN KNIFE.
- Zoom into the table; place the 3 APPLES on it.
- Place the apples on their matching colors (P).
- Take the GOLD COIN (@) and the GLASS FRAME (Q).
- Go into Room 11.
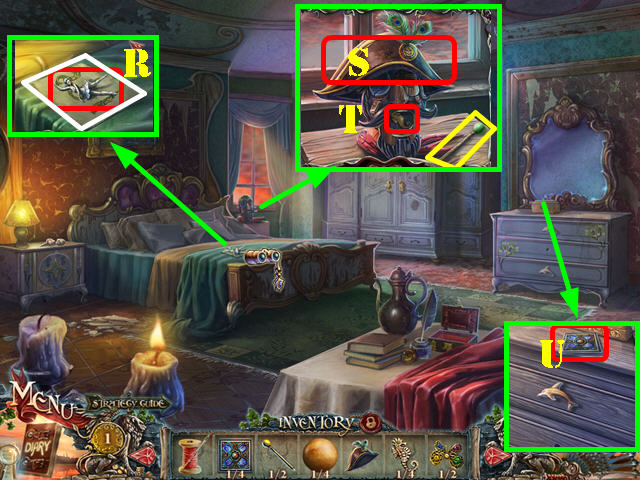
- Zoom into the coat. Use the KITCHEN KNIFE to cut the lining; take the NUMBER DIAL (R).
- Zoom into the safe on the bed (S) and put the NUMBER DIAL on it to activate a puzzle.
- Calculate and enter the correct number of circles, squares, and triangles.
- The solution from top to bottom is 483 (T).
- Take ESMERALDA’S EARRING and the JEWELED HANDLE (U).
- Return to the shop.
- Zoom into the machine and put down the SUCKER DART to activate a puzzle.
- Use the arrows to rotate the darts and then select a chip of the same color to view what’s behind it.
- Eliminate two matching symbols from the board but keep in mind that they may be behind 2 different colored chips.
- Please look at the screenshot for the random solution (V).
- Take the 3 GOLD COINS (@).
- Talk to Martinez.
- Select the GLUE and then buy it for 8 COINS (W).
- Return to room 11.
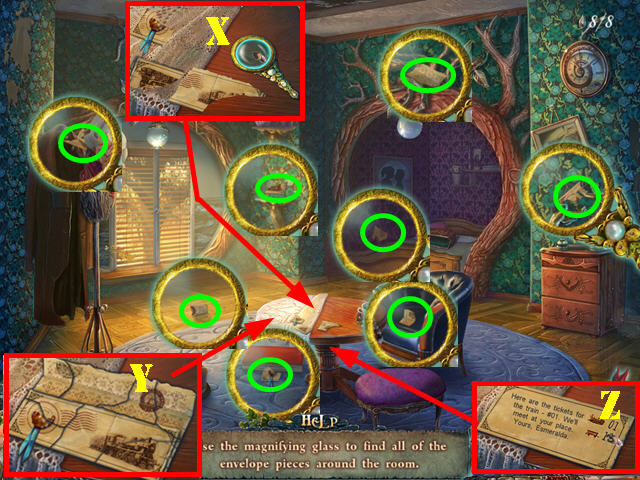
- Zoom into the table; put down the LENS, the JEWELED HANDLE and the GLASS FRAME.
- Place the glass frame on the handle. Put the lens in the frame and take the magnifying glass (X).
- Use the magnifying glass to find all the 8 PIECES OF ENVELOPE in the room. Once you find a fragment; line it up with the lens and select it. The approximate locations of all the envelope pieces are marked in green.
- Zoom into the table; place the 8 PIECES OF ENVELOPE on the table.
- Put the envelope pieces back together. Select a piece and then click on it to rotate it. Drag the pieces into place.
- Please look at the screenshot for the solution (Y). Use the GLUE on the ENVELOPE and then take it (Z).
- Talk to Aidan.
- Walk down 3 times and go forward.
Chapter 6: The Basement
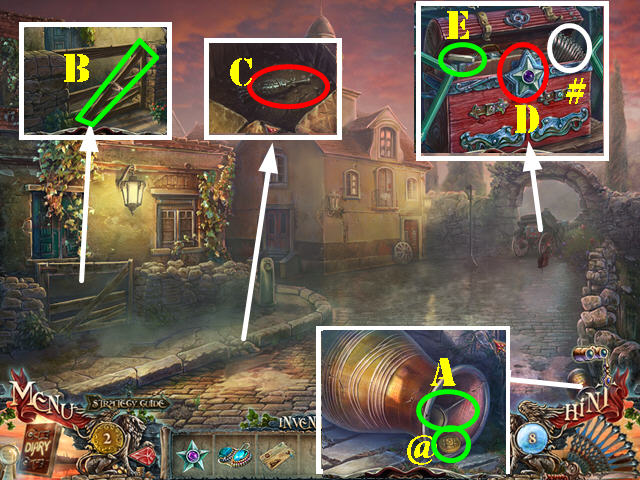
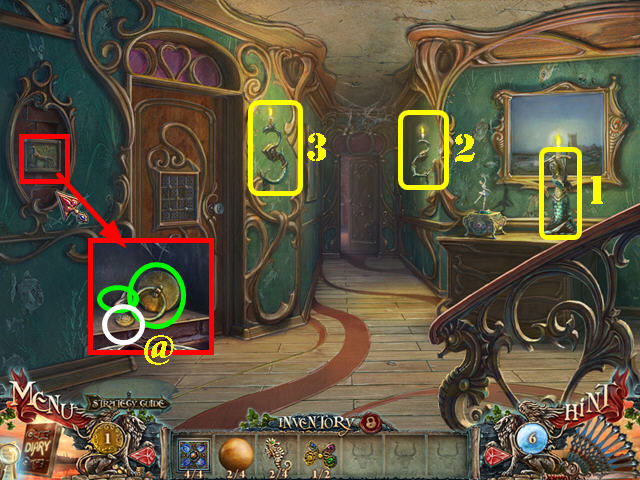
- Zoom into the vase; take the GOLD COIN (@) and the OILER (A).
- Examine the fence; take the PLANK (B).
- Zoom into the curb; lift the stone with the PLANK and take the SCREWDRIVER (C).
- Take a closer look at the chest; insert the STAR into the slot and use the OILER on the bolts (D).
- Remove the screws with the SCREWDRIVER. Take the Fan (#) and the PIECE OF CHALK (E).
- Talk to Aidan.
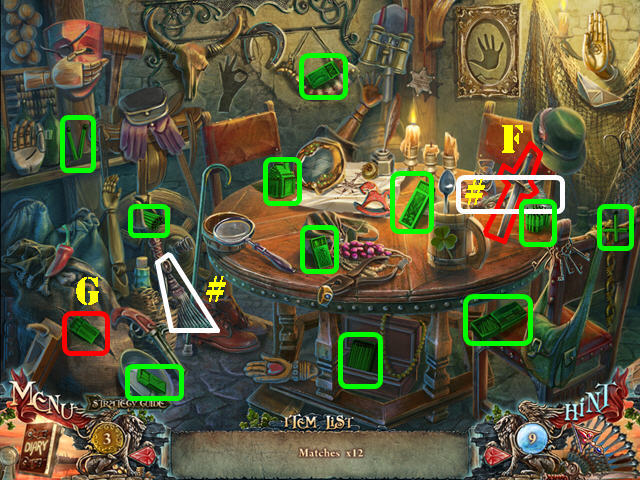
- Play the HOS.
- Take the 2 Fans (#).
- Find the 12 matches.
- Cut the bag with the dagger (F) and take the matches (G).
- You will receive the MATCHES.
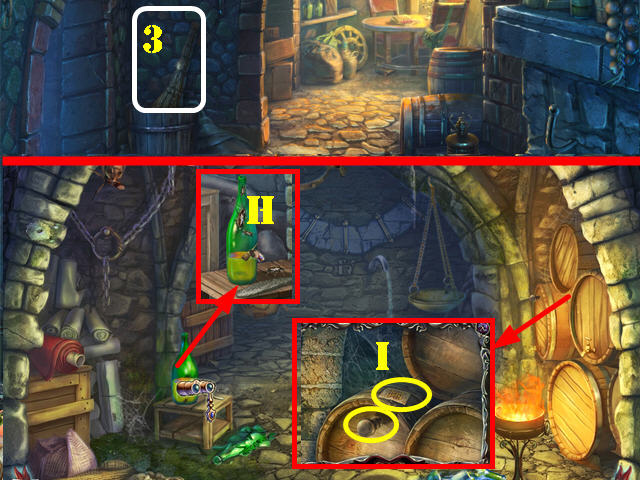
- Grab the BROOM (3).
- Go through the left door.
- Zoom into the bottle; remove the bugs with the BROOM and take the BOTTLE OF KEROSENE (H).
- Take a closer look at the barrel; take the SOLUTION and the SICKLE HANDLE (I).
- Walk down.
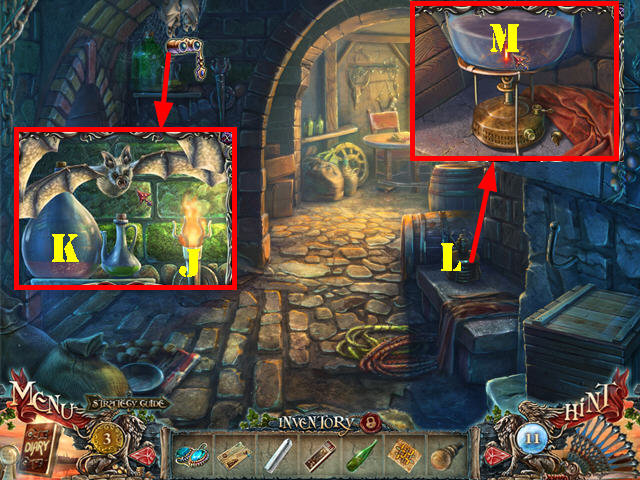
- Zoom into the bats; light the torch with the MATCHES to scare away the bats (J).
- Take the BOTTLE OF WATER (K).
- Zoom into the burner (L); use the BOTTLE OF KEROSENE on it and then light it with the MATCHES. You will automatically receive the EMPTY BOTTLE.
- Place the BOTTLE OF WATER on the burner and take the EMPTY BOTTLE (M).
- Go through the left door.
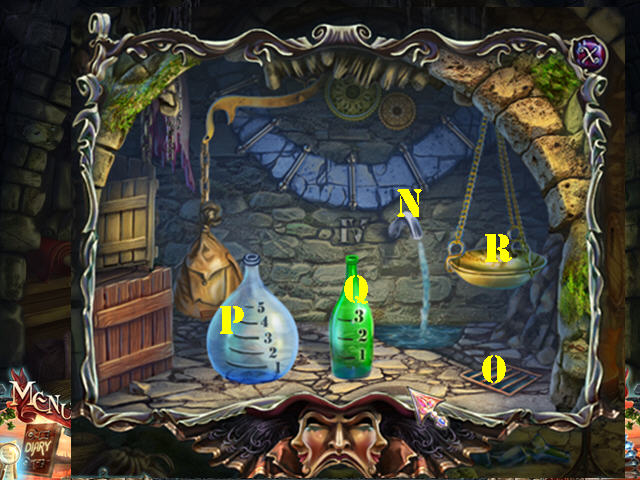
- Zoom into the back wall and put down the 2 EMPTY BOTTLES to activate a puzzle.
- Use the water from the tap (N) to fill a bottle. Pour the water out in the drain (O).
- To solve the puzzle follow these steps: Fill the blue bottle (P) on the tap (N) and then pour it into the green bottle (Q).
- Throw the water from the green bottle (Q) into the drain (O).
- Pour the water from the blue bottle (P) into the green bottle (Q).
- Fill the blue bottle (P) on the tap (N) and then pour the water from it into the green bottle (Q).
- Place the blue bottle (P) on the scale (R).
- Go through the hatch.
- Zoom into the stone and take the BOLT 1/4 (S).
- Use the PIECE OF CHALK on the stone to reveal a clue (T).
- Put the SICKLE HANDLE on the blade and take the BLUNT SICKLE (U).
- Walk down twice.
- Use the BLUNT SICKLE on the grindstone to get the SHARP SICKLE (V).
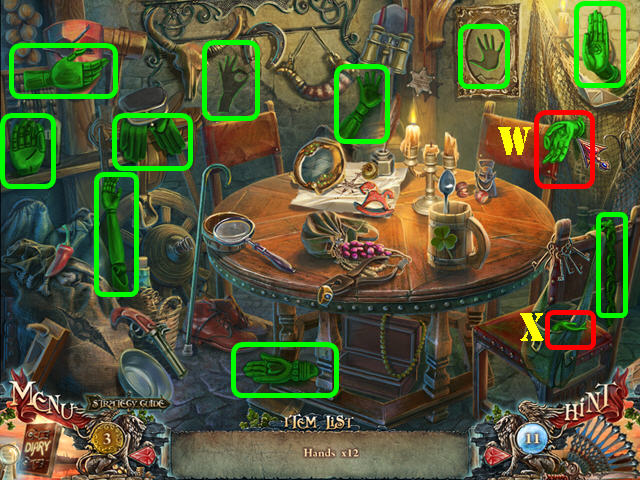
- Play the HOS.
- Find the 12 hands.
- Remove the hat and take the hand (W).
- Open the purse and take the hand (X).
- You will receive the CHAIN.
- Return to the basement.
- Open the box and zoom into the mechanism; place the CHAIN and the SOLUTION on it to activate a puzzle.
- Use the 5 levers to move the chains until they match the solution on the right.
- To solve the puzzle, select the levers in this order: C, Ex2, A, and D.
- Use the SHARP SICKLE to remove the vines (F).
- Go forward to the ravine.
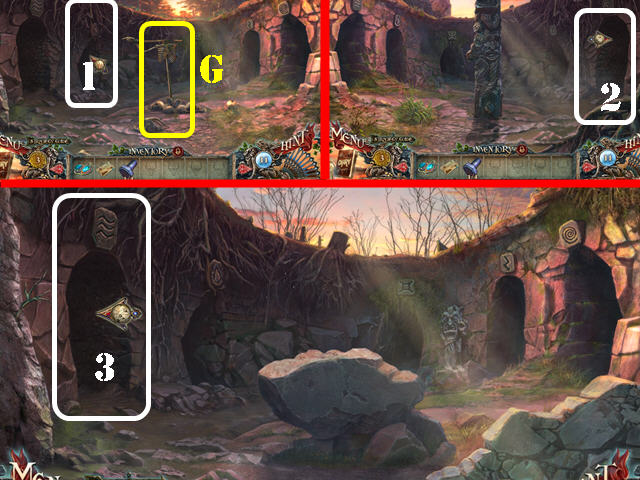
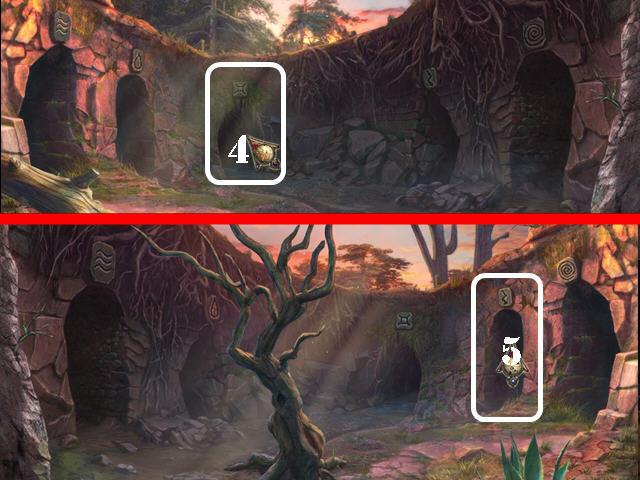
- Touch the skeleton (G).
- Go through the labyrinth as shown in the screenshots until you reach the Gypsy camp (1-5).
- Play the HOP.
- Take the rag (A) and the nippers (B).
- Open the curtain and clean the window with the rag (C).
- Take the key (D).
- Use the key in the lock (E) and take the hook (F).
- Use the hook on the hatch and take the right horse (G).
- Cut the wire with the nippers and take the left horse (H).
- Place the left horse and the right horse into the slots (I). Take the tarot (J).
- Zoom into the tarot cards and place the tarot card to activate the puzzle (K).
- Find the two cards that match the image in the crystal ball.
- Please look at the screenshot for the solution (L). Take the WRENCH (M).

- Zoom into the gypsy and give him ESMERALDA’S EARRING. Take the BOLT 2/4 from him his hand (N).
- Talk to Aidan.
- Go down the road.
- Zoom into the fuse box; remove the BOLT 3/4 with the WRENCH (O).
- Take the RAILROAD SWITCH 1/3 (P).
- Zoom into the tree hole; take the RAILROAD SWITCH 2/3 (Q).
- Enter the house (R).
- Zoom into the table and take the FUSE 1/2 (S).
- Open the book and take the KNIFE (T).
- Look at the shelf; remove the handkerchief and take the BOLT 4/4 (U).
- Zoom into the box and cut it with the KNIFE. Take the GOLD COIN (@), the Fan (#), and the RAKE (white).
- Walk down twice.
- Play the HOP.
- Move the books and take the raven (A).
- Place the raven in the slot (B) and take the knife (C).
- Touch the top of the armoire and take the glass cutter (D).
- Use the glass cutter on the window and take the sun (E).
- Place the sun into the niche (F) and take the part of puzzle (G).
- Throw the knife at the target (H) and take the axe (I).
- Remove the picture and then remove the boards with the axe (J).
- Zoom into the picture and put the part of puzzle on it to activate a puzzle. Rotate the pieces into place as shown in the screenshot (K).
- Take the NUTCRACKER (L).
- Zoom into the hay and use the RAKE on it 3 times; take the GEAR and the FUSE 2/2 (M).
- Return to the house.
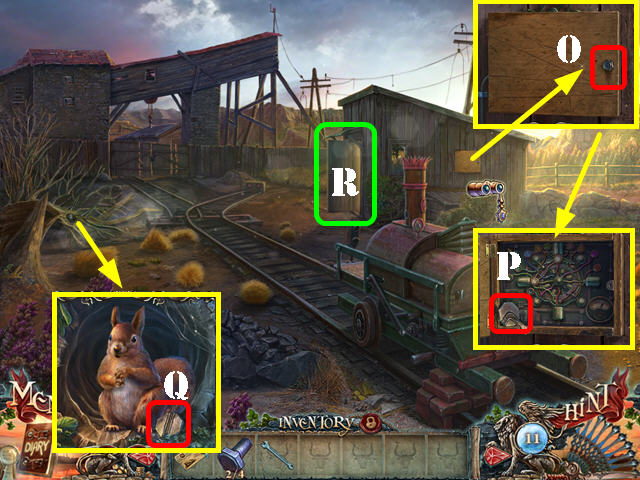
- Zoom into the bowl; use the NUTCRACKER on the nut and take the NUT (N).
- Walk down.
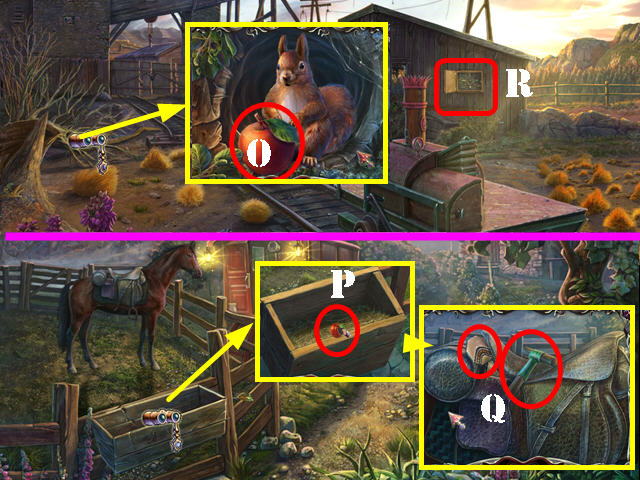
- Zoom into the squirrel; give it the NUT and take the APPLE (O).
- Walk down.
- Zoom into the box and put down the APPLE for the horse (P).
- Zoom into the horse; take the LEVER and the RAILROAD SWITCH 3/3 (Q).
- Go down the road.
- Zoom into the fuse box; place the 2 FUSES on it to activate a puzzle (R).
- Turn on all the lights to start the generator.
- Please look at the screenshot for the solution, and select the buttons in the order shown in the screenshot (1-5).
- Go back into the house.
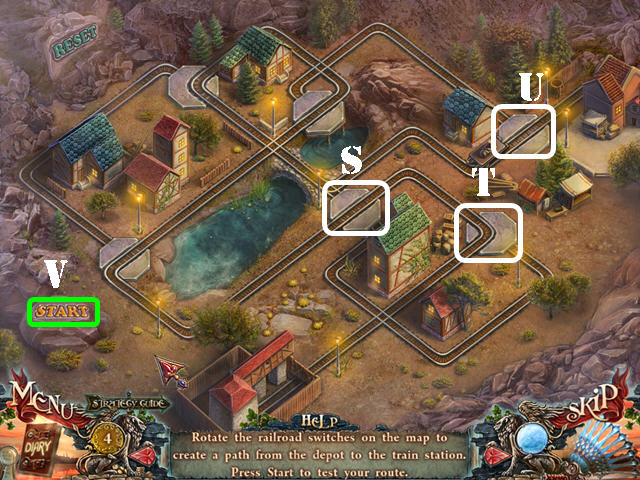
- Zoom into the train model and put down the 3 RAILROAD SWITCHES to activate a puzzle.
- Touch the rails switches to turn them into position. Once all the pieces are in place, select the start button.
- Select the railroad switches on the screenshot (S, T, U) and then press Start (V).
- Walk down.
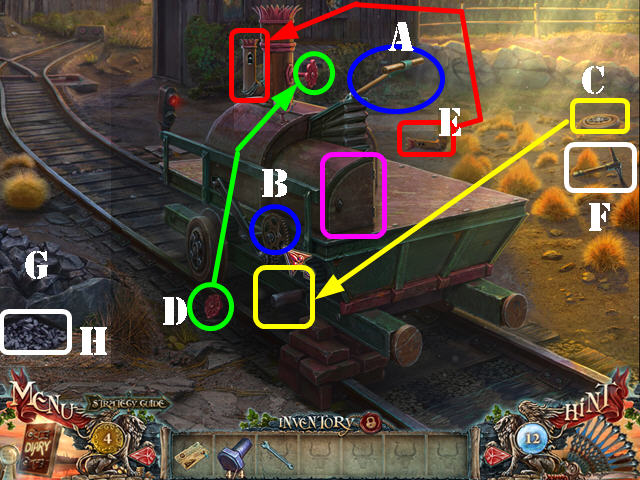
- Zoom into the handcar; place the LEVER (A) and GEAR (B) as shown in the screenshot.
- Place the wheel on it and then add the BOLTS to the wheel. Fasten the bolts with the WRENCH (C).
- Put the valve (D) and the pipe (E) into place.
- Use the pickaxe (F) on the coals (G); open the cover and insert the coals (H).
- Pull the lever and then turn the valve.
- Go forward.
Chapter 7: The Train Depot
- Zoom into the shop.
- Buy the CROWBAR for 3 GOLD COINS (I).
- Go into the depot lobby (J).
- Look on the floor; take the GOLD COIN (@).
- Use the CROWBAR on the plank; take the BUTTON 1/4 and the KEY (K).
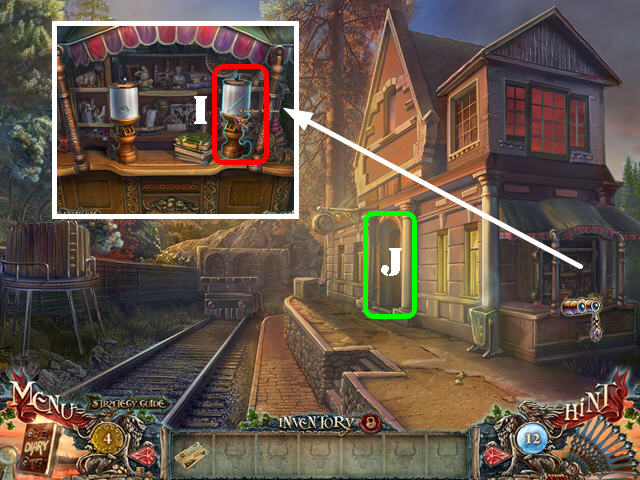
- Open the armoire and zoom into it to activate a HOS (L).
- Take the Fan (#).
- Close the umbrella; take the handbag (M).
- Open the book and take the stamps (N).
- You will receive the PIN.
- Go forward.
- Zoom into the ticket booth; take the GOLD COIN (@).
- Walk down twice.
- Zoom into the tracks; use the PIN to get the BUTTON 2/4 (O).
- Zoom into the shop and buy the INK for 3 GOLD COINS (P).
- Go back into the depot lobby.
- Play the HOS.
- Open the purse and take the SCARF (Q).
- You will receive the VALVE.
- Zoom into the cabinet; use the KEY in the lock (R).
- Take the EMPTY BUCKET (S).
- Remove the rag and take the HORSE (T).
- Go forward.
- Zoom into the suitcases; place the HORSE on the lock (U).
- Take the Fan (#).
- Grab the HEART HALF, and the 3/4 BUTTON (yellow).
- Zoom into the fountain; place the VALVE on it and turn the valve (3). Place the EMPTY BUCKET in it to receive the BUCKET OF WATER (V).
- Walk down twice.
- Zoom into the barrel and put the BUCKET OF WATER into the barrel; you will automatically receive the EMPTY BUCKET (W).
- Return to the platform and zoom into the fountain.
- Put the EMPTY BUCKET in the fountain to get the BUCKET OF WATER (X).
- Walk down twice.
- Zoom into the barrel and put the BUCKET OF WATER into the barrel. Take the BUTTON 4/4 (Y).
- Return to the lobby.
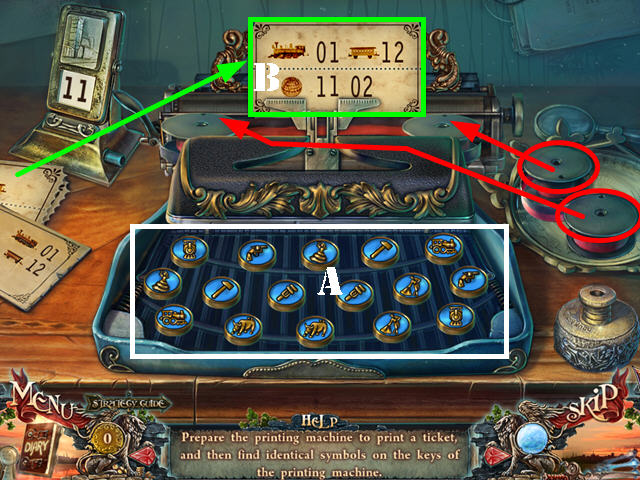
- Zoom into the right cashier (Z) and put the 4 BUTTONS on the typewriter.
- Put down the INK, the ENVELOPE, and the 4 BUTTONS to activate a puzzle.
- Use the ink on the ribbons and put the ribbons into place (red).
- Place a ticket on the typewriter (green).
- Find identical keys on the keyboard. Select two buttons to view what is on them. Pieces will rotate when matching pairs are not selected.
- The solution to this puzzle is random (A).
- Take the TICKET (B).
- Go forward.
- Zoom into the ticket booth and place the TICKET in the window (C).
- Board the train (D).
- Talk to Aidan.

- Zoom into the hammer and use the CROWBAR to get the HAMMER (E).
- Zoom into the lion and take the HEART HALF 2/2 (F).
- Zoom into the box; place the 2 HEART HALVES into the slot (G) and take the METAL FRAGMENT (H).
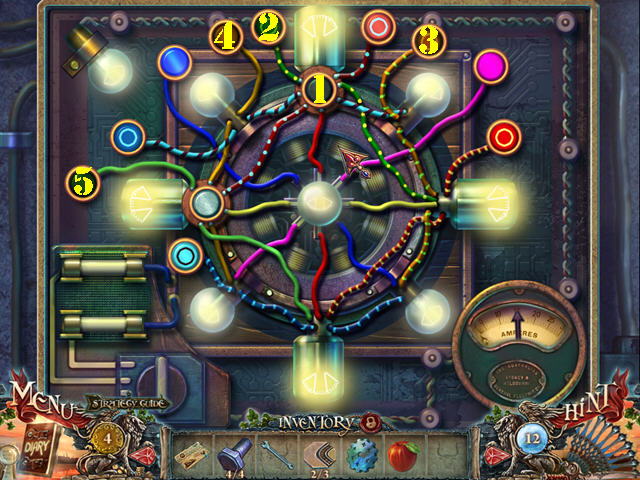
- Zoom into the back door and place the METAL FRAGMENT on it to activate a puzzle.
- Move the large ball to the square with the gold lock.
- Placing the large ball over a small one will rotate the lock of the same color.
- To solve the puzzle, move the pieces as shown in the screenshot 1-13.
- Go Forward.
- Zoom into the crate; use the HAMMER on the wedge (W).
- Open the crate and take the CUTTING PLIERS (X).
- Zoom into the emergency stop valve; cut the wires with the CUTTING PLIERS (Y). Pull the valve.
- Walk down to view the ending scene.
- Congratulations, you have completed Grim Facade: The Cost of Jealousy.


 Otherworld: Shades of Fall Walkthrough, Guide, & Tips
 Dark Strokes: Sins of the Fathers Walkthrough, Guide, & Tips
 Witch Switch Tips and Tricks, Guide, & Tips
 Myths of the World: Spirit Wolf Walkthrough, Guide, & Tips
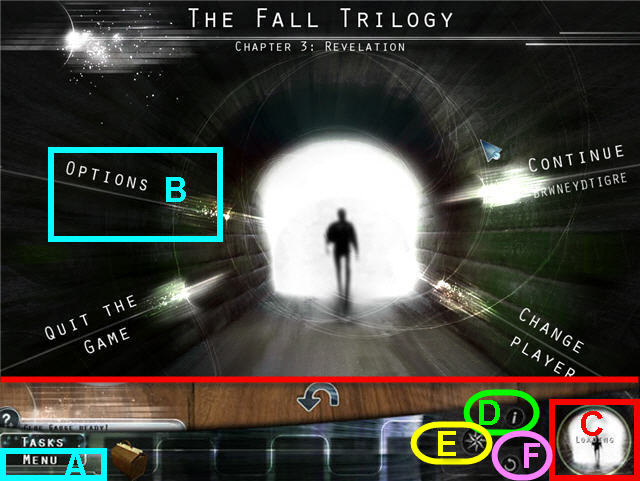 The Fall Trilogy - Chapter 3: Revelation Walkthrough, Guide, & Tips