The Keepers: The Order's Last Secret Walkthrough, Guide, & Tips
The Keepers: The Order’s Last Secret Walkthrough

Welcome to the The Keepers: The Order’s Last Secret Walkthrough
The Order’s most closely-guarded secret sleeps deep beneath the ancient Spanish streets. What lies within this mysterious box?
Whether you use this document as a reference when things get difficult or as a road map to get you from beginning to end, we’re pretty sure you’ll find what you’re looking for here.
This document contains a complete The Keepers: The Order’s Last Secret game walkthrough featuring annotated screenshots from actual gameplay!
We hope you find this information useful as you play your way through the game. Use the walkthrough menu below to quickly jump to whatever stage of the game you need help with.
Remember to visit the Big Fish Games Forums if you find you need more help. Have fun!
This walkthrough was created by Lucky Smile, and is protected under US Copyright laws. Any unauthorized use, including re-publication in whole or in part, without permission, is strictly prohibited.
General Tips

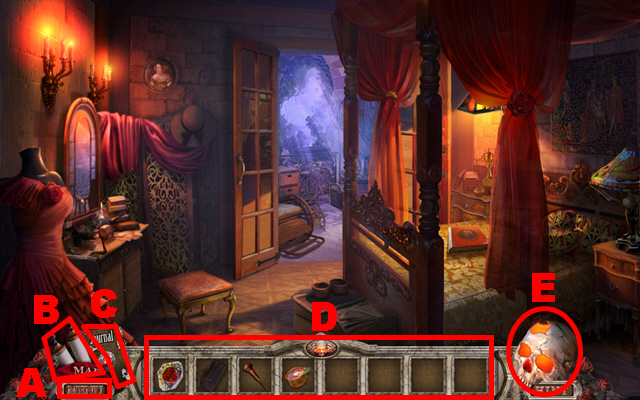
- Access the menu (A) to leave the game or to adjust the game settings.
- Select the map (B) to travel to any available location.
- The journal (C) reviews the current state of the storyline.
- Inventory items will be stored in the inventory bar (D).
- Press the hint button (E) whenever you need help.
- There are 3 grades of difficulty you can choose from in the beginning: casual, advanced, and hardcore mode.
- Hidden-object scenes will be referred to as HOS throughout this guide.
Chapter 1: The Museum

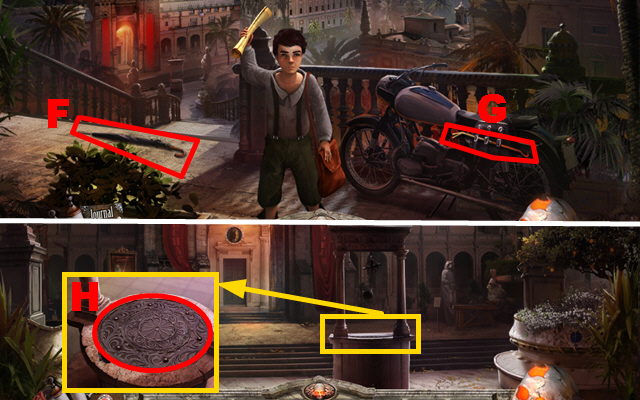
- Take the UMBRELLA (F) and the CROWBAR (G).
- Move forward.
- Zoom into the fountain; remove the cover with the CROWBAR (H).
- Play the HOS.

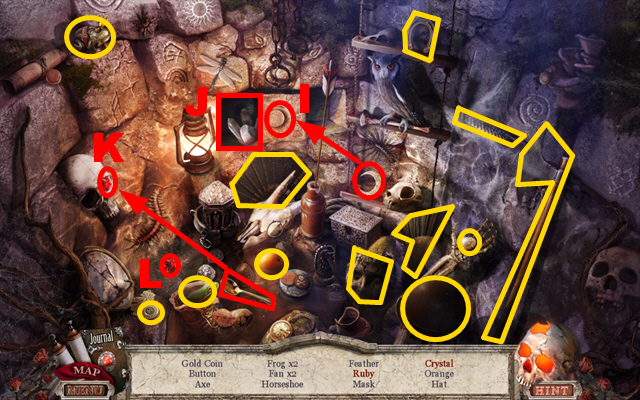
- Take the moon, put it into the niche (I), and take the crystal (J).
- Take the spoon, use it to pull out the ruby (K), and then take the ruby (L).
- You will receive ONE PESO.
- Walk down.

- Zoom into the boy; talk to him (M).
- Give ONE PESO to the boy.
- Zoom into the bag; take the ROSE SYMBOL (N) and read the newspaper (O).
- Move forward.

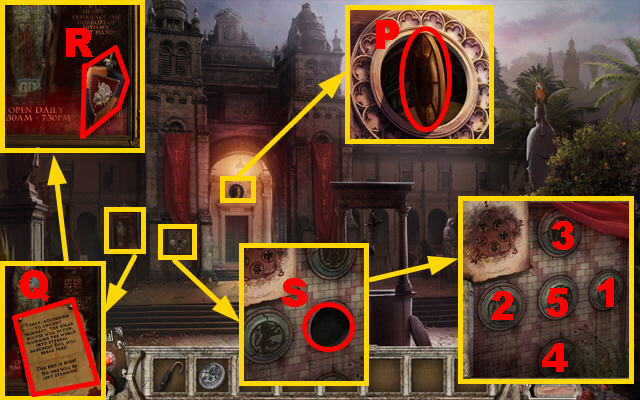
- Zoom into the window; use the UMBRELLA to turn the window (P).
- Zoom into the poster; take the note (Q) and the SMALL SHIELD (R).
- Zoom into the wall; put down the ROSE SYMBOL (S).
- Press the symbols in sequence 1-5.
- Move forward.

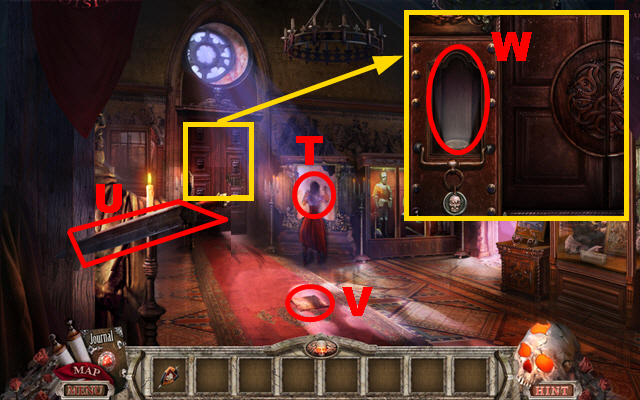
- Talk to the woman (T).
- Take the BLUNT DAGGER (U) and read the note (V).
- Zoom into the door; put down the SMALL SHIELD (W).
- Play the mini-game.

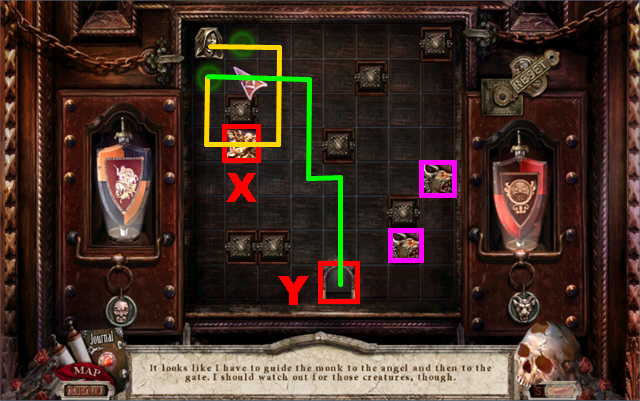
- To solve this puzzle, the monk has to collect the angel (X) and reach the gate (Y) without getting caught by the creatures marked in purple.
- The lines indicate the path you have to take to solve this puzzle.
- Turn left.


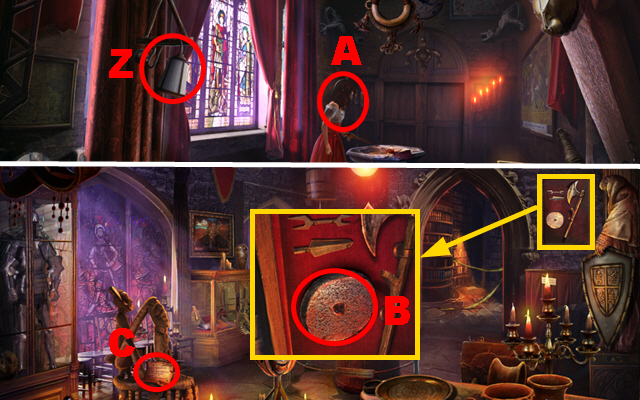
- Take the LAMP (Z) and talk to the woman (A).
- Walk down and turn right.
- Zoom into the display; take the GRINDSTONE (B).
- Take the note (C).
- Walk down twice.

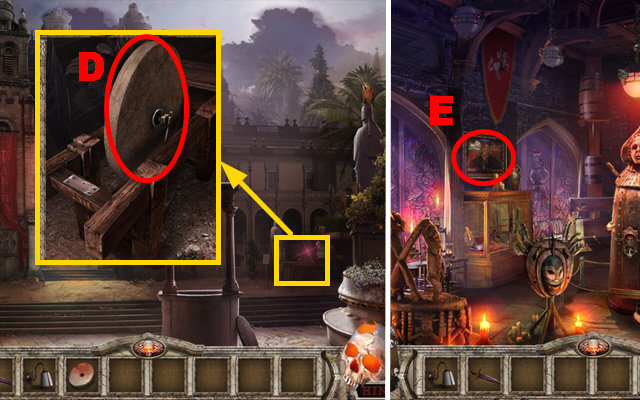
- Zoom into the blade sharpener and put down the GRINDSTONE (D); hold the BLUNT DAGGER next to the grindstone to acquire the DAGGER.
- Move forward and turn right.
- Take a look at the painting (E).
- Move forward.

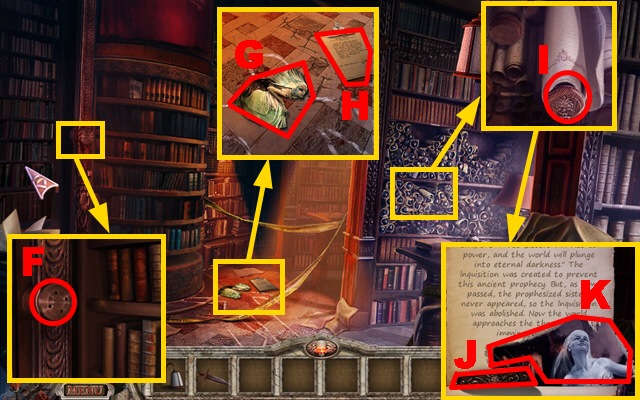
- Zoom into the bookshelf and put down the LAMP (F); switch on the lamp.
- Zoom into the floor; take the WATER WITCH (G) and take a look at the police report (H).
- Zoom into the scrolls and open the scroll (I); take the PLATE (J) and the 1/3 CANVAS (K).
- Walk down.

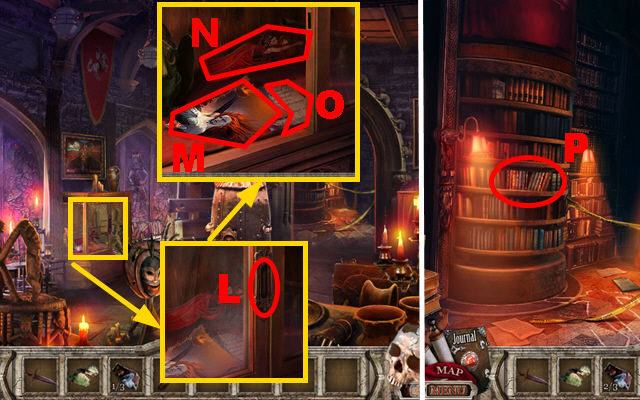
- Zoom into the showcase; put the PLATE into the slot (L).
- Take the 2/3 CANVAS (M), the AIR WITCH (N), and read the note (O).
- Move forward.
- Zoom into the bookshelf (P) to play a mini-game.

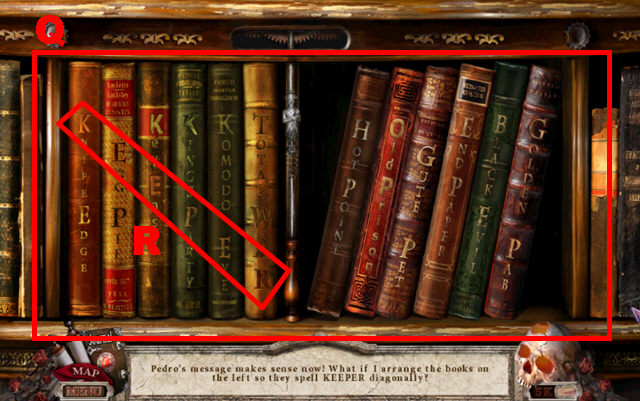
- To solve this puzzle (Q), rearrange the books on the left side in a way so that they spell ‘Keeper’ diagonally (R).

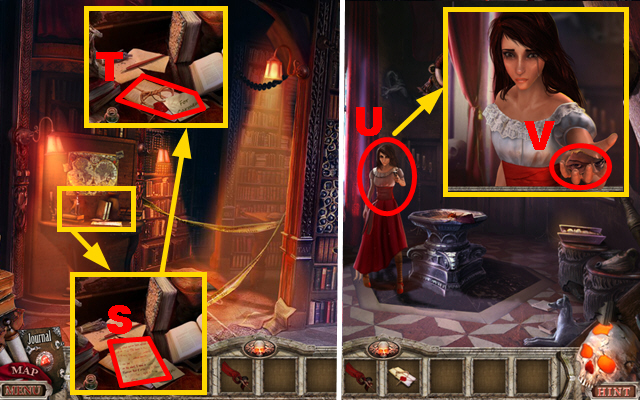
- Zoom into the desk; take the note (S) and PEDRO’S LETTER (T).
- Walk down twice and turn left.
- Give PEDRO’S LETTER to the woman (U); take the 3/3 CANVAS (V).
- Walk down.

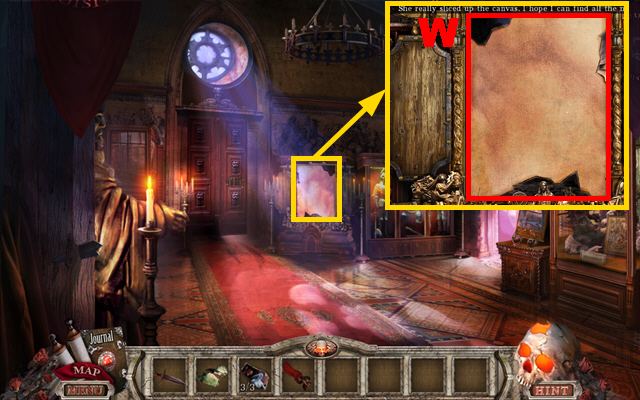
- Zoom into the sliced canvas; put down the 3 CANVAS (W).
- Play the mini-game.

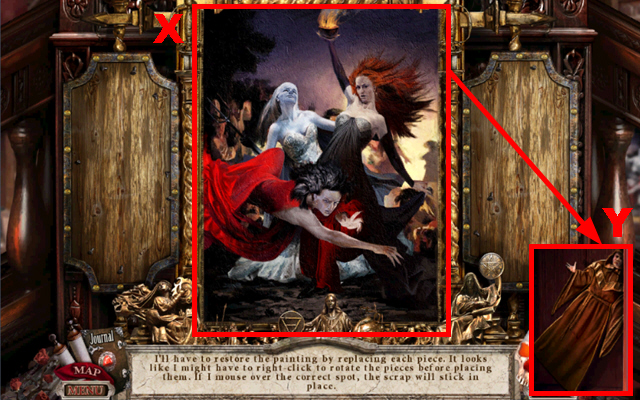
- To solve this puzzle (X), put the canvas pieces back into their correct places.
- Right-click on a canvas piece to rotate it; correctly placed canvas pieces will lock in place.
- Take the MONK DOLL (Y).
- Turn left.

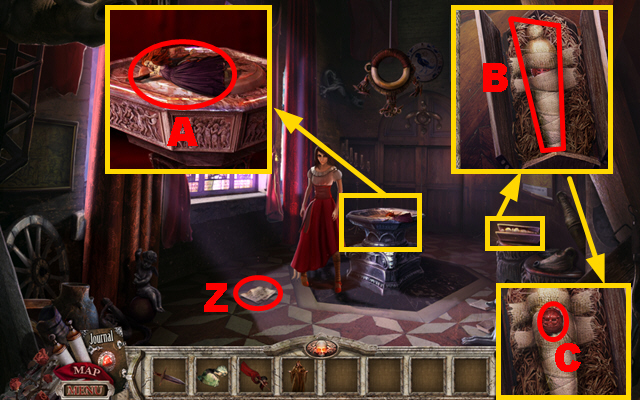
- Read the note (Z).
- Zoom into the pedestal; take the FIRE WITCH (A).
- Zoom into the crate and cut open the bandages with the DAGGER (B); take the SEAL (C).
- Walk down and turn right.

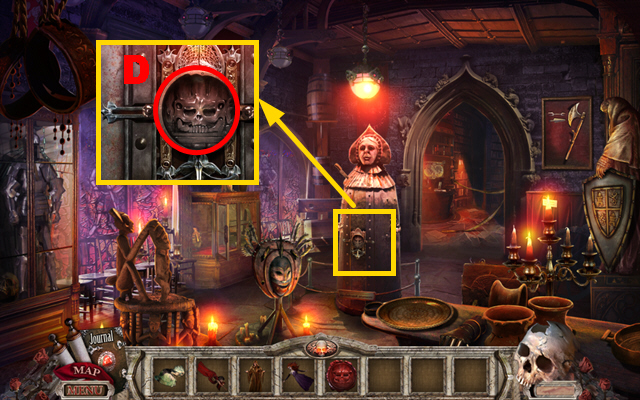
- Zoom into the iron maiden; put the SEAL into the slot (D).
- Play the HOS.

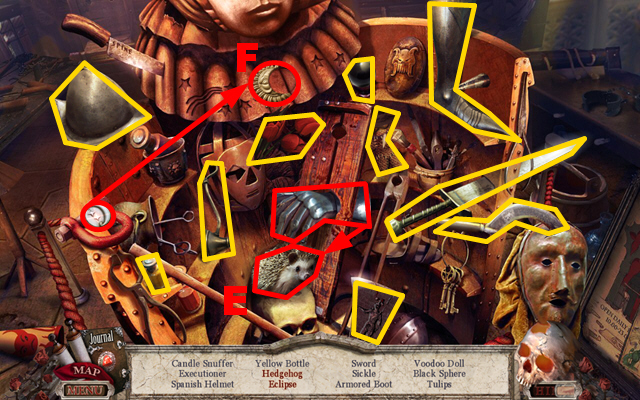
- Take the gauntlet and use it to take the hedgehog (E).
- Take the moon emblem, put it into the slot, and take the eclipse (F).
- You will receive the CANDLE SNUFFER.
- Walk down and turn left.

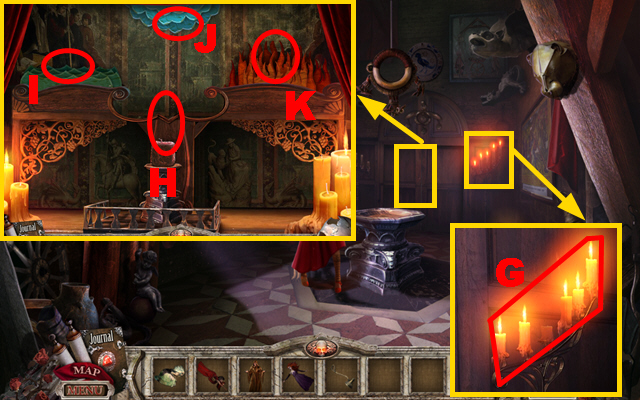
- Zoom into the candles; use the CANDLE SNUFFER to put out the candles (G).
- Open and then zoom into the door; place the MONK DOLL (H), the WATER WITCH (I), the AIR WITCH (J), and the FIRE WITCH (K).
Chapter 2: The City Square

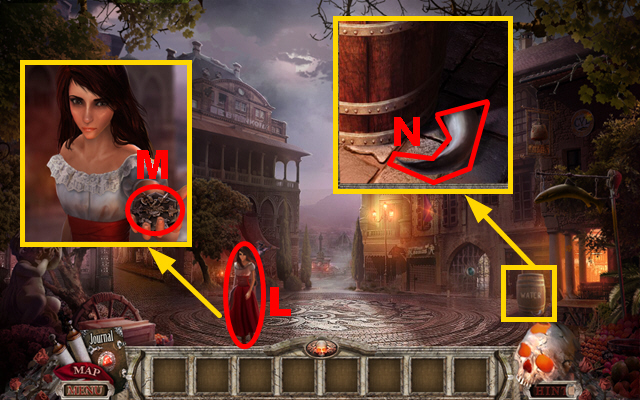
- Talk to the woman (L); take the 1/2 DOOR PART (M).
- Zoom into the barrel; take the 1/2 BULLHORN (N).
- Turn left and move forward.
- Play the HOS.

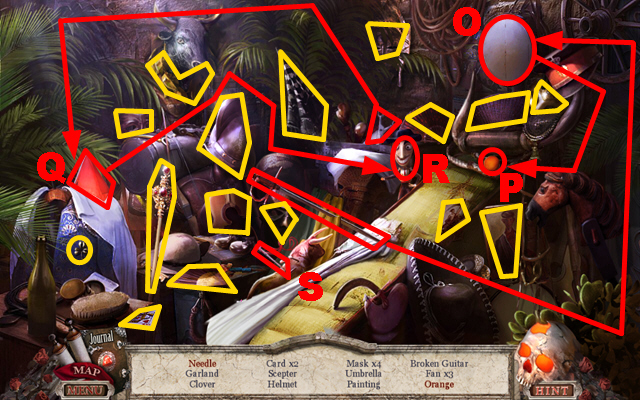
- Take the dagger; use it to cut the cloth (O), and take the orange (P).
- Take the scissors, cut the flag with it (Q), give the flag piece to the doll (R), and take the needle (S).
- You will receive the NEEDLE.

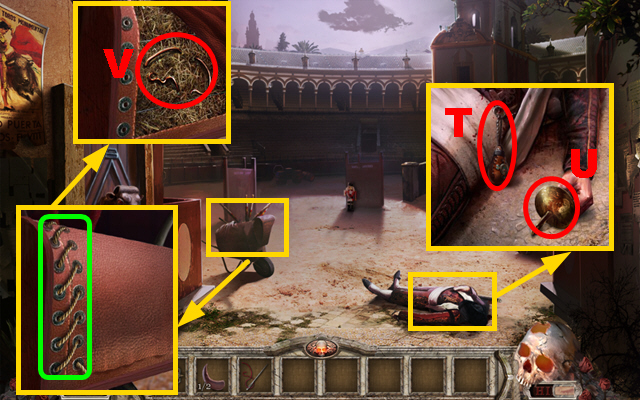
- Zoom into the matador; take the HOLY WATER (T) and the SWORD HILT (U).
- Zoom into the dummy; remove the rope marked in green and take the WIRE (V).
- Walk down twice and move forward.

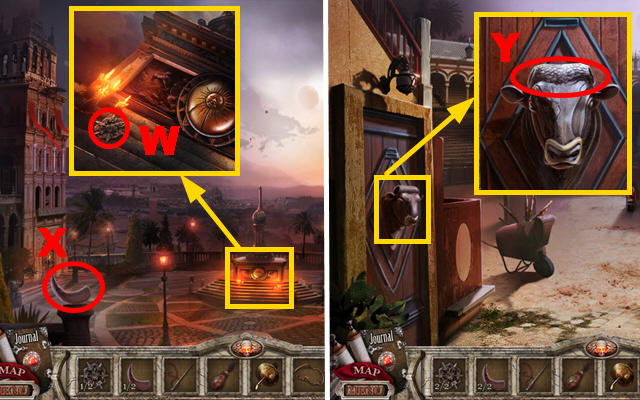
- Zoom into the statue; take the 2/2 DOOR PART (W).
- Take the 2/2 BULLHORN (X).
- Walk down, turn left, and move forward.
- Zoom into the bull; put down the 2 BULLHORNS (Y).
- Turn left.

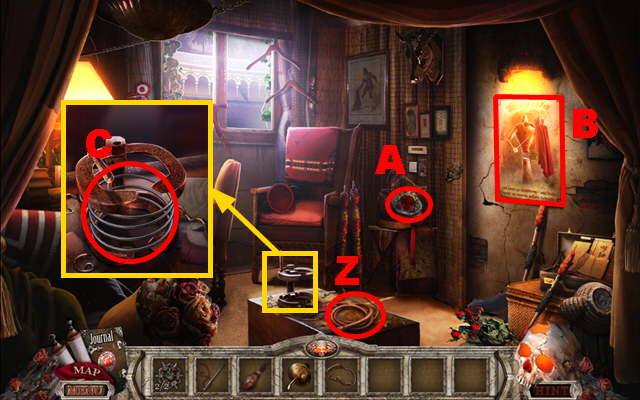
- Take the WHIP (Z) and the GLASS (A).
- Take a look at the poster (B).
- Zoom into the device and put down the WIRE; take the SPRING (C).
- Walk down three times and move forward.

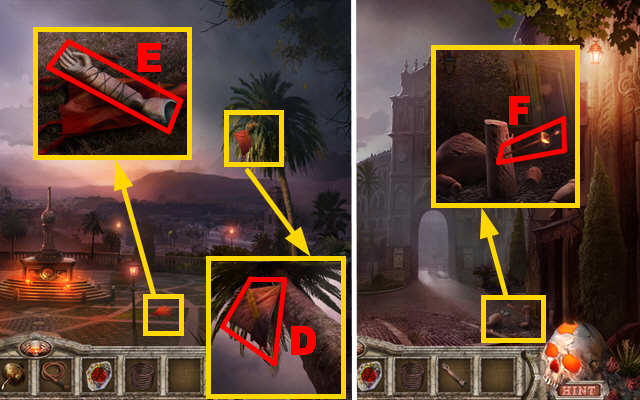
- Zoom into the palm tree; pull down the kite with the WHIP (D).
- Zoom into the kite; take the HAND (E).
- Walk down and turn left.
- Zoom into the broken dummy; connect the SWORD HILT to the blade and take the MATADOR’S SWORD (F).
- Walk down.

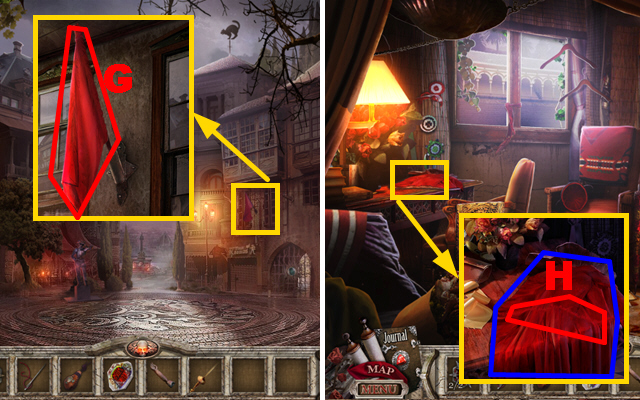
- Zoom into the flag; cut the flag with the MATADOR’S SWORD (G) to acquire the RED CLOTH.
- Turn left, move forward, and turn left.
- Zoom into the desk and put down the RED CLOTH; sew the cloth with NEEDLE (H), pour the HOLY WATER over the cloth, and take the MULETA marked in blue.
- Walk down twice.

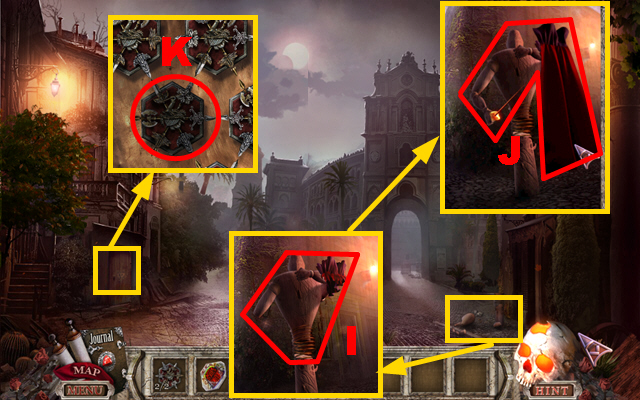
- Zoom into the broken dummy; put down the SPRING and put the dummy parts on it (I).
- Connect the HAND, the MULETA, and the MATADOR’S SWORD to the dummy (J).
- Zoom into the door; put down the 2 DOOR PARTS (K).
- Play the mini-game.

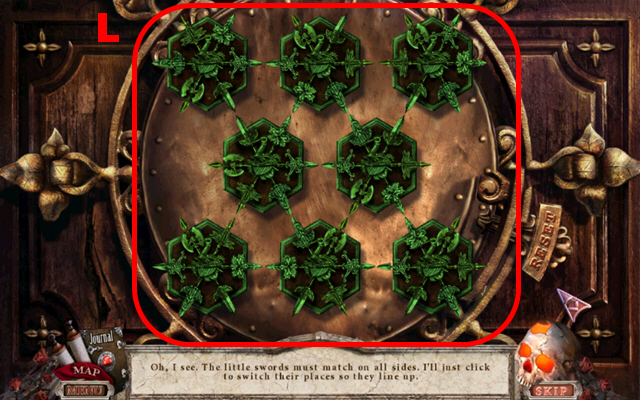
- To solve this puzzle (L), switch the door parts so that each connected sword matches.
- Turn left.

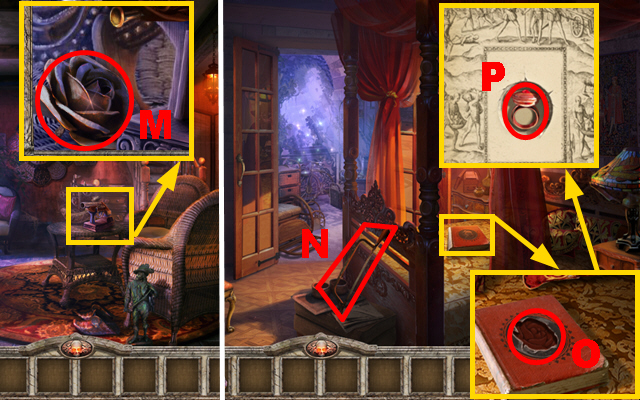
- Zoom into the pistol; take the METAL ROSE (M).
- Go upstairs.
- Take the HACKSAW (N).
- Zoom into the book and put the METAL ROSE into the niche (O); open the book and take the RING (P).
- Play the HOS.

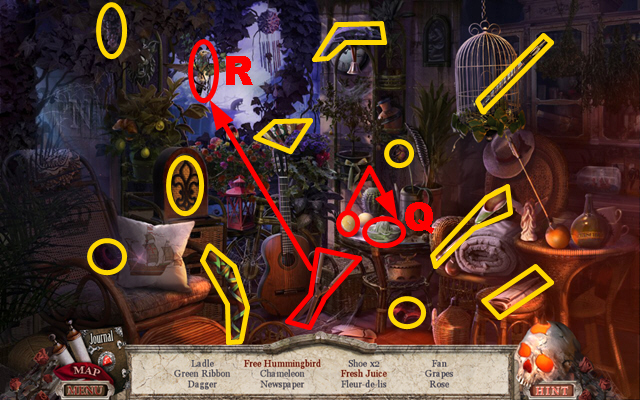
- Take the lemon, squeeze it on the juicer (Q), and take the fresh juice.
- Take the clippers, cut the branches with it, and take the free hummingbird (R).
- You will receive the EMPTY LADLE.
- Walk down three times.

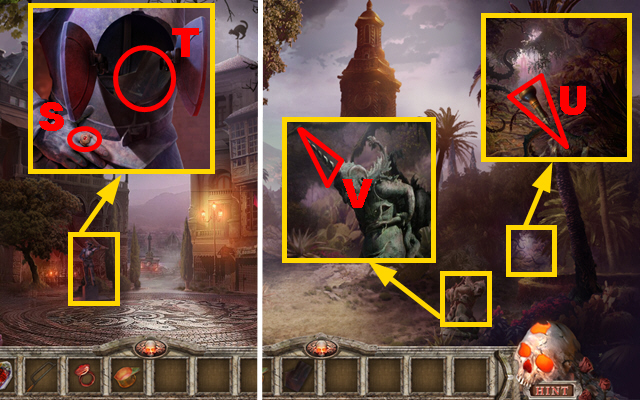
- Zoom into the statue and put the RING on the finger (S); take the MIRROR SHARD (T).
- Turn left and move to the Marillo Gardens.
- Zoom into the roots; take the AWL (U).
- Zoom into the statue; cut the horn with the HACKSAW (V) to acquire the IRON HORN.
- Play the HOS.

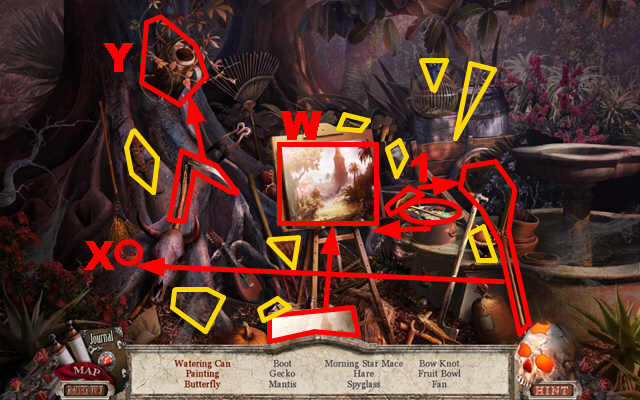
- Put the canvas on the easel, use the color palette to paint the canvas, and take the painting (W).
- Take the net below the color palette (1), put it into the scoop, and use it to catch the butterfly (X).
- Take the scythe, cut the branches with it, and take the watering can (Y).
- You will receive the EMPTY WATERING CAN.
- Walk down twice.

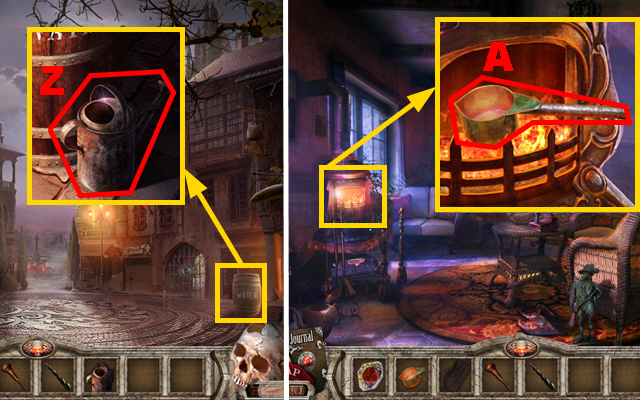
- Zoom into the barrel; put down the EMPTY WATERING CAN (Z).
- Turn left and go through the door.
- Zoom into the oven and put down the EMPTY LADLE (A); put the IRON HORN into the ladle to acquire the FULL LADLE.
- Go upstairs.

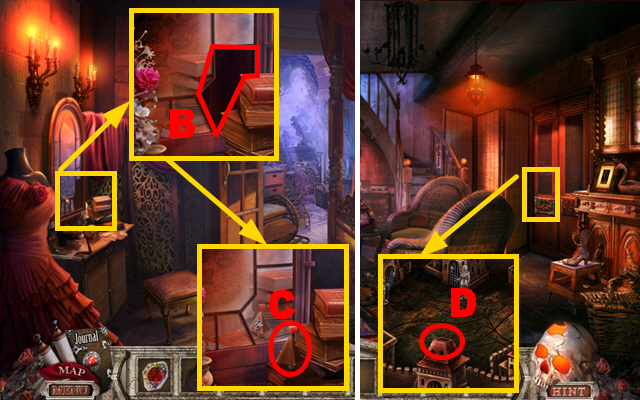
- Zoom into the mirror and put the MIRROR SHARD into the empty niche (B); move the books aside and take the PYRAMID (C).
- Walk down.
- Zoom into the door; put down the PYRAMID (D).
- Play the mini-game.

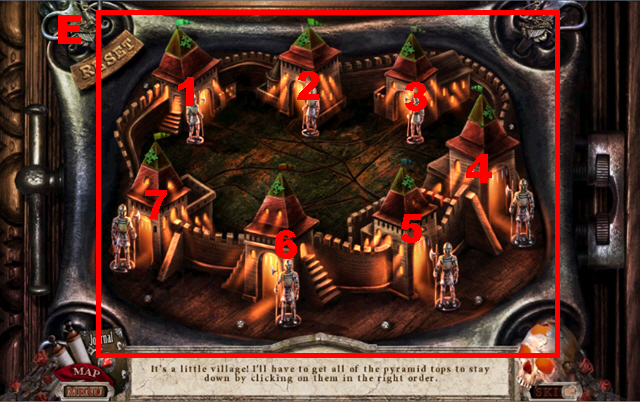
- To solve this puzzle (E), select the pyramids in the following sequence: 3, 2, 6, 7, 5, 2, and 1.
- Turn right.

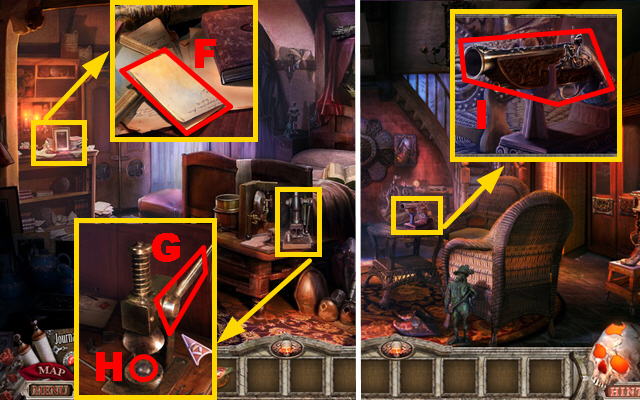
- Zoom into the desk; take the note (F).
- Zoom into the mold and pour the FULL LADLE into it; turn the lever (G) and take the BULLET (H).
- Walk down.
- Zoom into the pistol and put the BULLET into it (I); take the LOADED PISTOL.
- Walk down twice.

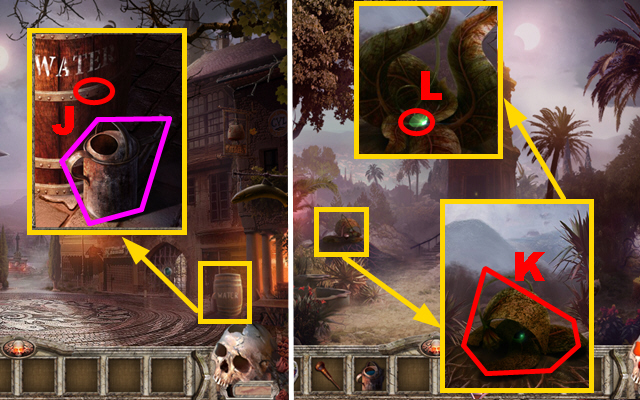
- Zoom into the barrel and shoot the LOADED PISTOL at it (J); take the FULL WATERING CAN marked in purple.
- Turn left and move to the Marillo Gardens.
- Zoom into the flower and pour the FULL WATERING CAN over it (K); take the GREEN GEM (L).
- Walk down, turn left, and turn right.

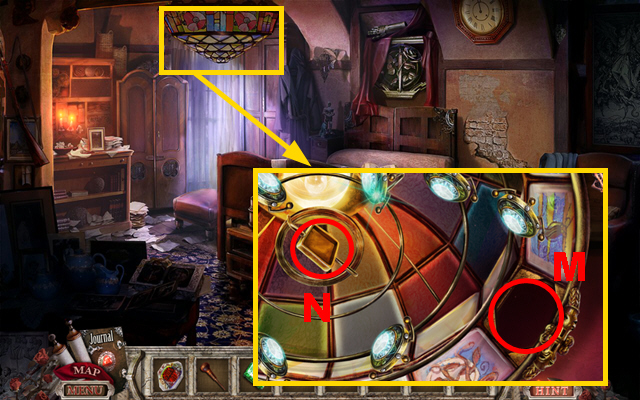
- Zoom into the lamp; put down the GLASS (M) and the GREEN GEM (N).
- Play the mini-game.

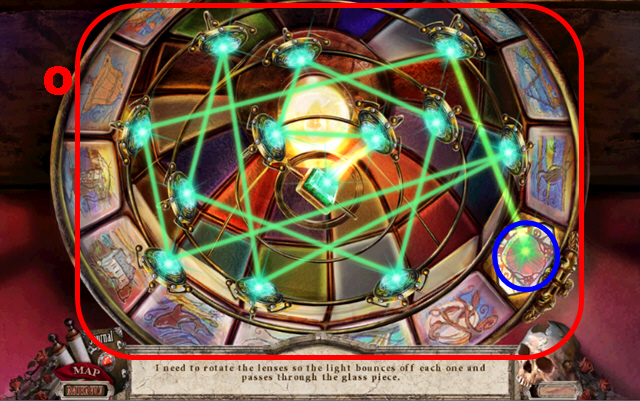
- To solve this puzzle (O), rotate the lenses so that the light ray passes the glass fragment marked in blue.
- Turn right.

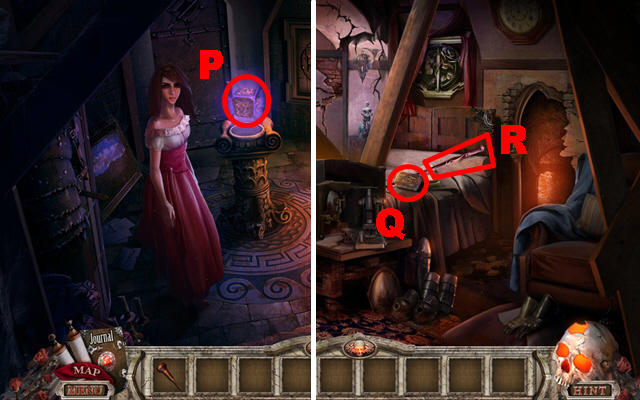
- Try to take the box (P).
- Walk down.
- Take the GOLD BAR (Q) and the POLE (R).
- Play the HOS.

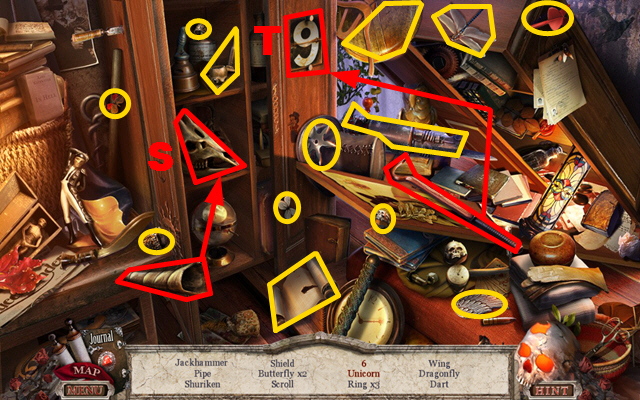
- Open the left cabinet door.
- Take the horn, put it into the skull, and take the unicorn (S).
- Take the nail puller, remove the nails with it, and take the 6 (T).
- You will receive the JACKHAMMER.
- Move forward.

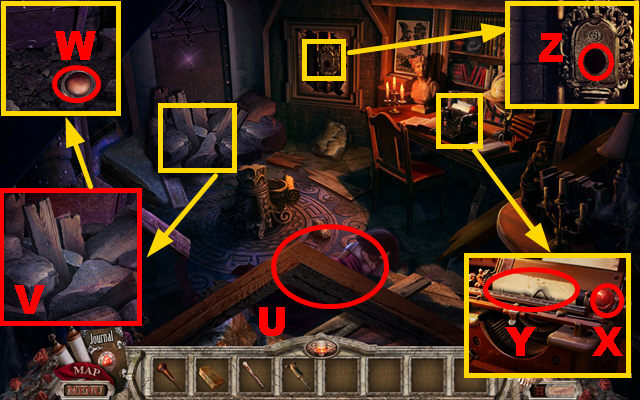
- Remove the boards with the POLE to free Carmen (U).
- Zoom into the debris; use the JACKHAMMER to remove the debris (V).
- Take MARS (W).
- Zoom into the desk; take the BUTTON (X) and the note (Y).
- Zoom into the panel; put the BUTTON into the slot (Z) and press it.
- Move forward.
Chapter 3: The City In Danger

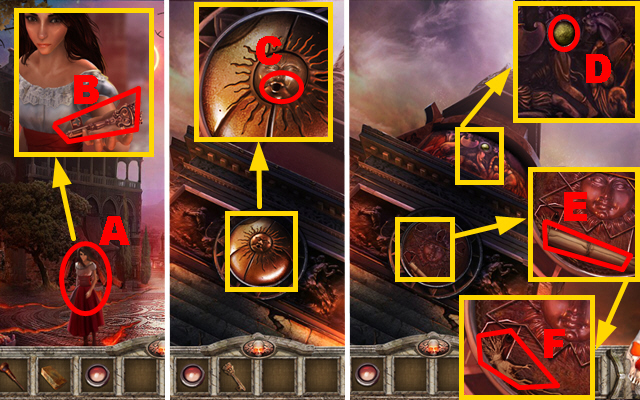
- Talk to Carmen (A) and take CARMEN’S KEY (B).
- Move forward twice.
- Zoom into the lock; put CARMEN’S KEY into the lock (C) and turn it.
- Zoom into the mural; take SATURN (D).
- Zoom into the sun; read the scroll (E) and take the MANDRAGORA ROOT (F).
- Walk down twice and turn left.

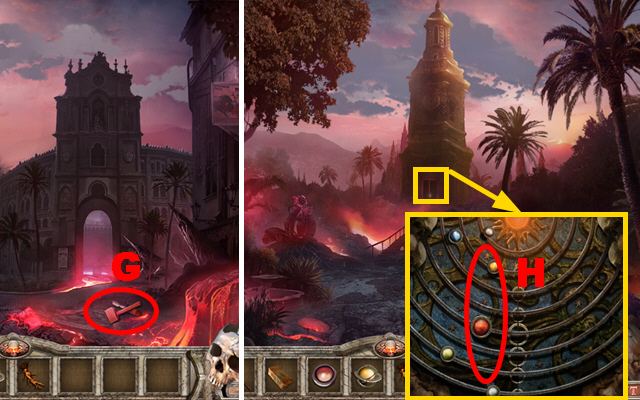
- Take the TOOLS (G).
- Turn left.
- Zoom into the door; put down SATURN and MARS (H).
- Play the mini-game.

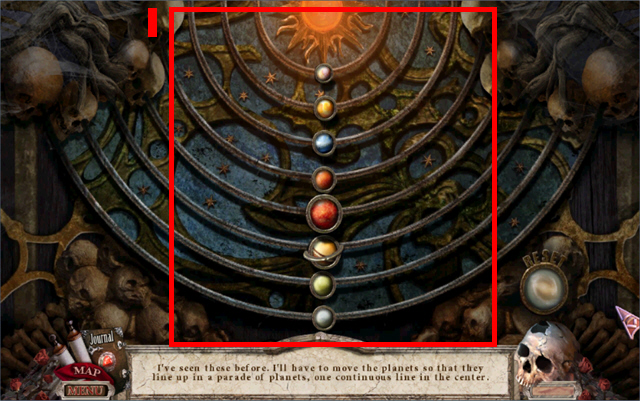
- To solve this puzzle (I), move the planets until they constitute a continuous line in the center.
- Move forward.
- Play the HOS.

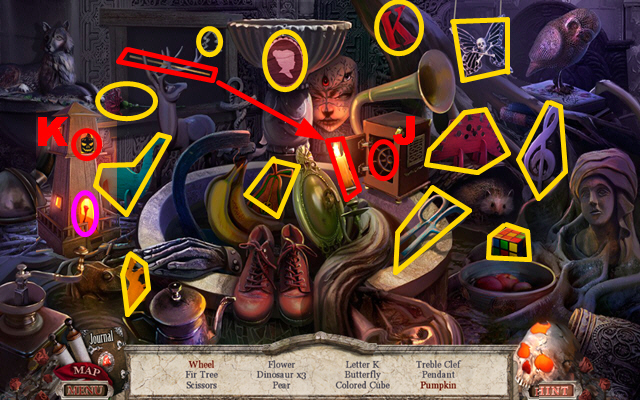
- Open the small door and take the wheel (J).
- Take the stick, hold it next to the candle to light it, set the fuse marked in purple on fire, and take the pumpkin (K).
- You will receive the WHEEL.

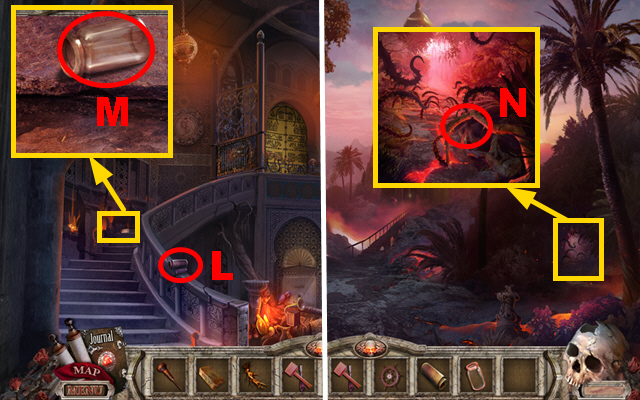
- Take the SANDPAPER (L).
- Zoom into the stairs; take the EMPTY BOTTLE (M).
- Walk down.
- Zoom into the roots; hold the EMPTY BOTTLE below the root (N) to acquire the FULL BOTTLE.
- Move forward and turn right.

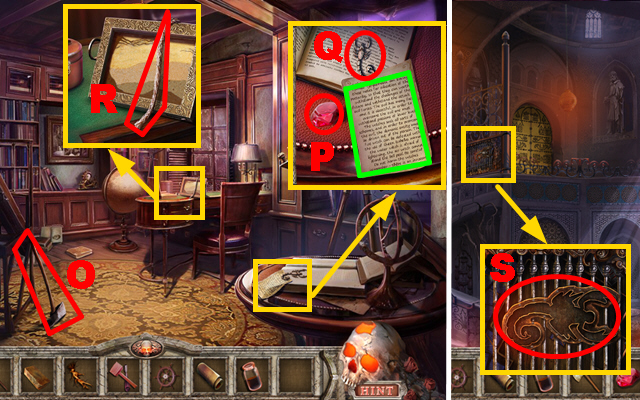
- Take the AXE (O).
- Zoom into the table; take the RED JEWEL (P), the SCORPION (Q), and the note marked in green.
- Zoom into the desk; take the FUSE (R).
- Walk down.
- Zoom into the grid; put the SCORPION into the slot (S).
- Play the mini-game.

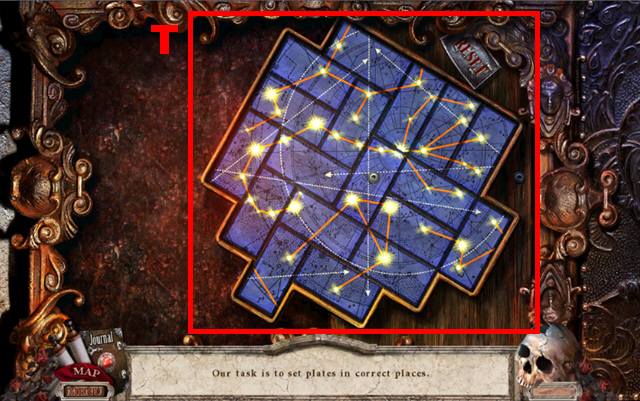
- To solve this puzzle (T), set the plates into the correct spots.
- Go upstairs.

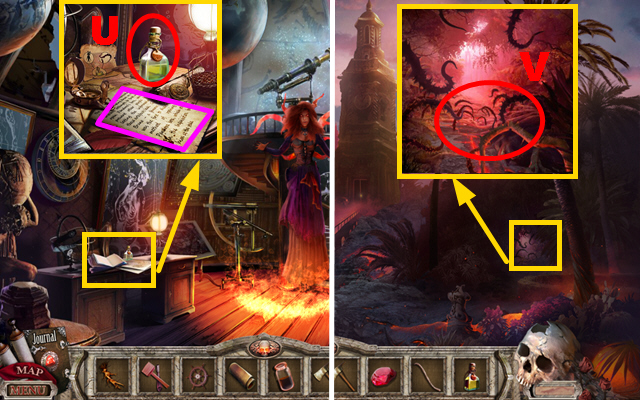
- Zoom into the desk and read the note marked in purple; put the MANDRAGORA ROOT and the FULL BOTTLE into the empty flask (U).
- Take the HERBICIDE.
- Walk down twice.
- Zoom into the roots; pour the HERBICIDE over the roots (V).
- Turn right.

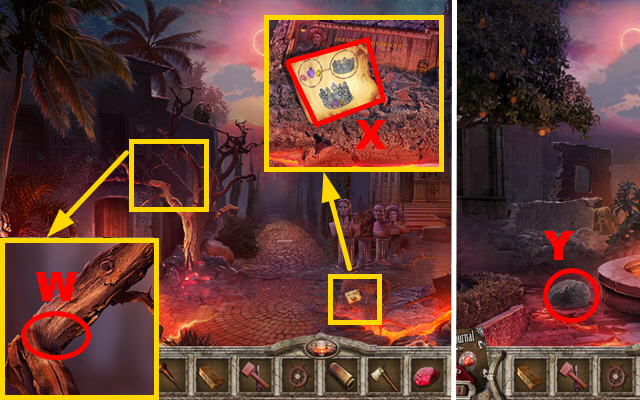
- Zoom into the old tree; cut the branch with the AXE (W) to acquire the FIREWOOD.
- Zoom into the floor; take the PAPER WITH CLUE (X).
- Move forward.
- Take the MARBLE PIECE (Y).

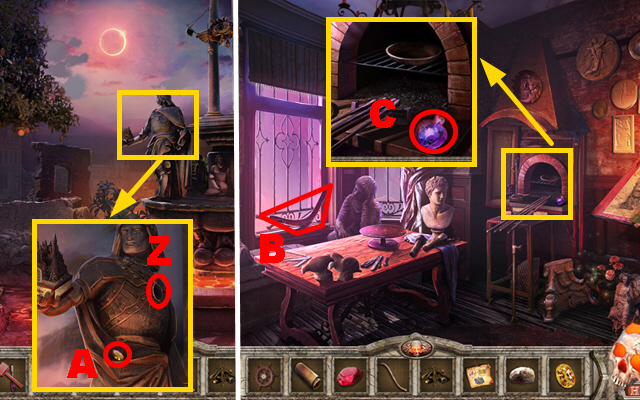
- Zoom into the left statue and remove the jewel with the AWL (Z); take the YELLOW JEWEL (A).
- Walk down and turn left.
- Take the BOOMERANG (B).
- Zoom into the fireplace; take the VIOLET JEWEL (C).
- Play the HOS.

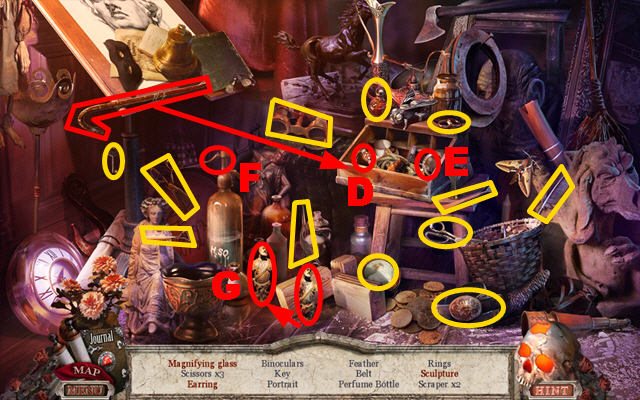
- Take the crowbar and open the crate with it; take the earring (D) and the magnifying glass (E).
- Take the sculpture, put it next to the water container, press the handle (F), and take the sculpture (G).
- You will receive the MAGNIFIER.

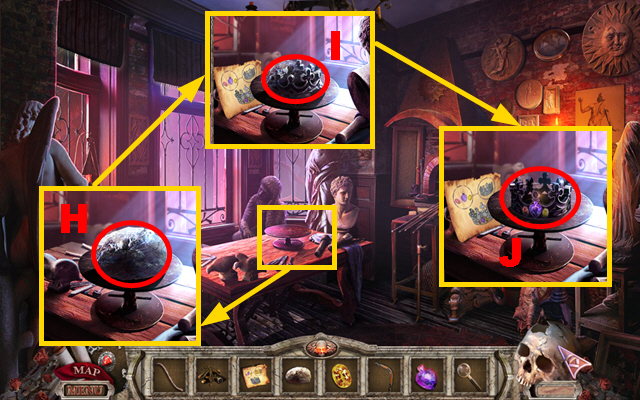
- Zoom into the table; put down the MARBLE PIECE and the PAPER WITH CLUE; use the TOOLS to shape the marble piece (H).
- Use the SANDPAPER to finish the crown (I).
- Put the RED JEWEL, the YELLOW JEWEL, and the VIOLET JEWEL into the crown; take the CROWN (J).
- Walk down and move forward.

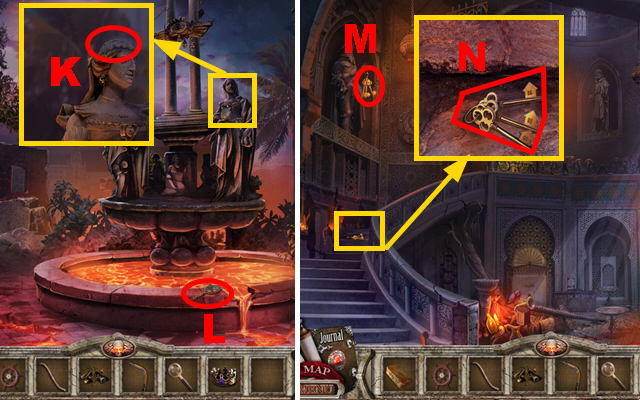
- Zoom into the right statue; put the CROWN on the statue’s head (K).
- Take the MIRROR FRAME (L).
- Walk down twice and move forward.
- Throw the BOOMERANG at the keys (M).
- Zoom into the stairs; take the KEYS TO SEVILLA (N).
- Walk down, turn right, and move forward.

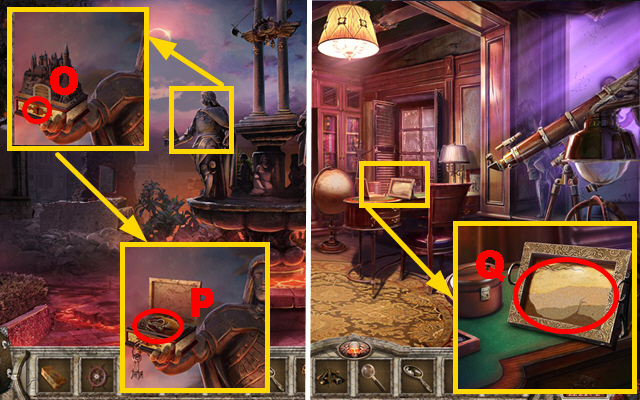
- Zoom into the left statue, put the KEYS TO SEVILLA into the lock (O), and turn the keys; take the EMPTY POUCH (P).
- Walk down twice, move forward, and turn right.
- Zoom into the sand picture; hold the EMPTY POUCH next to it (Q) to acquire the POUCH OF SAND.
- Walk down twice, turn right, and turn left.

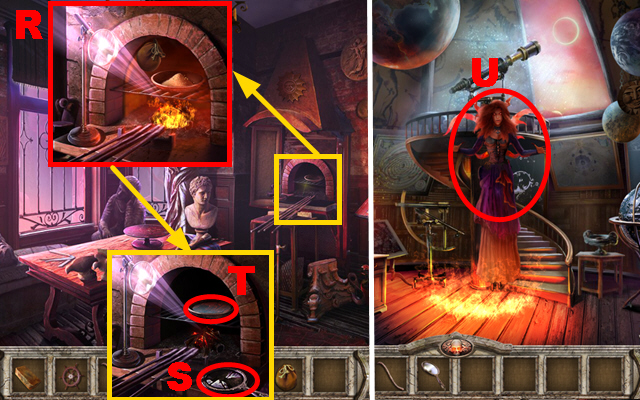
- Zoom into the fireplace; put down the FIREWOOD, the MAGNIFIER, and the POUCH OF SAND (R).
- Put down the MIRROR FRAME (S), take the glass (T), put it into the mirror frame, and take ISABELLA’S MIRROR.
- Walk down twice, move forward, and go upstairs.
- Hold ISABELLA’S MIRROR next to Emilia (U).

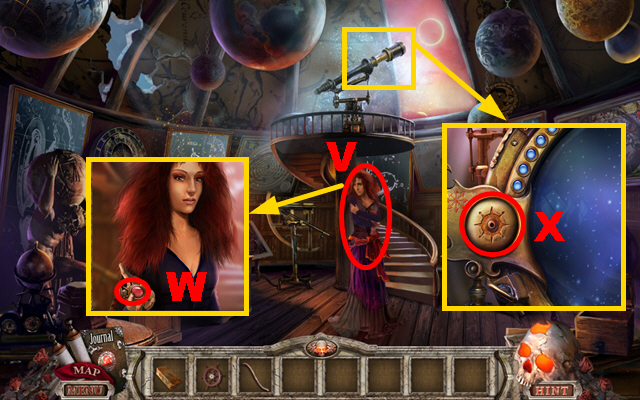
- Talk to Emilia (V); take the TELESCOPE HANDLE (W).
- Zoom into the telescope; put down the TELESCOPE HANDLE (X).
- Play the mini-game.

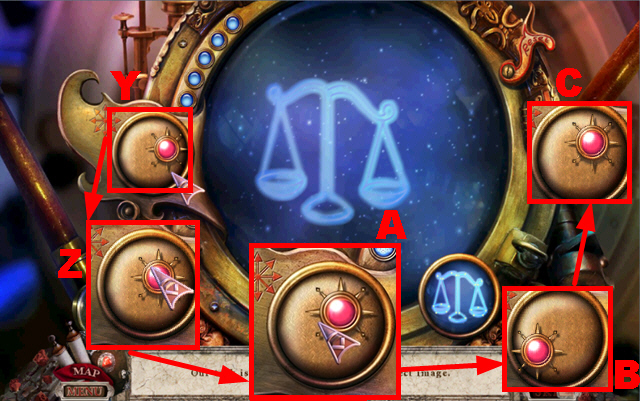
- To solve this puzzle, hover the telescope handle into the positions Y-C to create the correct constellations.

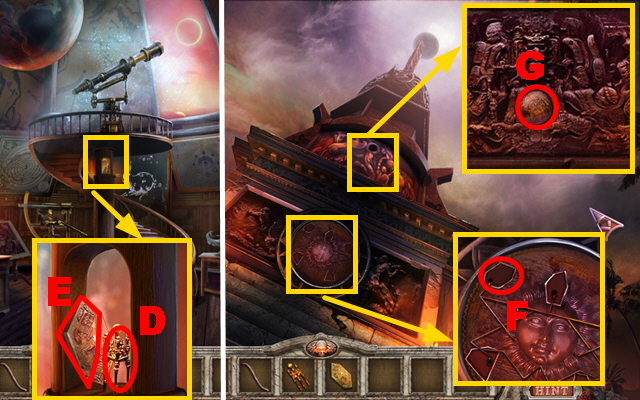
- Zoom into the column; take the DOME TOP (D) and the FIRST SEAL (E).
- Go to the Right of the square and move forward.
- Zoom into the sun and put the FIRST SEAL into the slot (F).
- Zoom into the mural; take the BALL (G).
- Walk down twice.

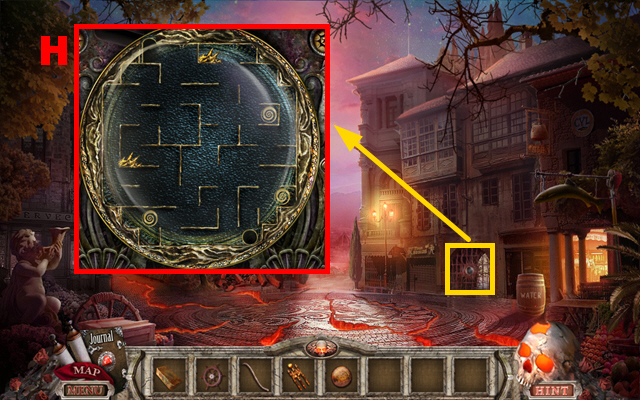
- Zoom into the gate; put down the BALL (H).
- Play the mini-game.

- To solve this puzzle (I), press the buttons in the following sequence: K, J x2, K x6, J, K x2, J x2, and K.
- Turn right.
Chapter 4: The Port


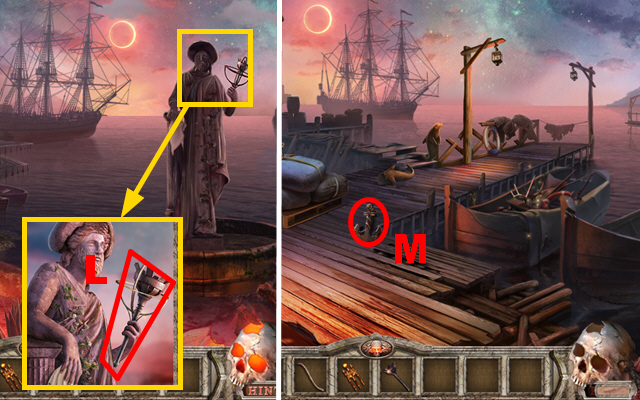
- Zoom into the statue; take the TORCH (L).
- Turn left.
- Take the ANCHOR (M).
- Play the HOS.

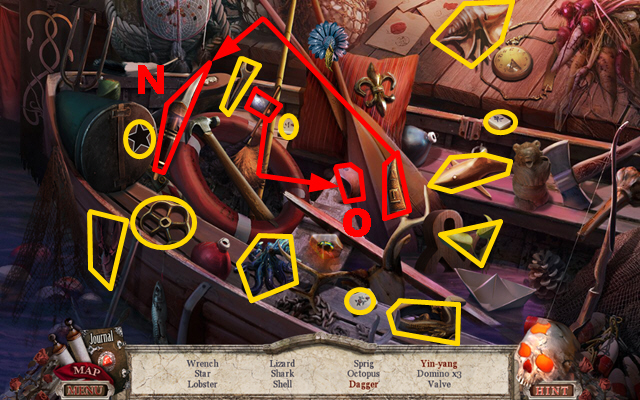
- Take the cover, put it onto the dagger, and take the dagger (N).
- Take the yin, put it next to the yang, and take the yin-yang (O).
- You will receive the WRENCH.
- Go to the Observatory.

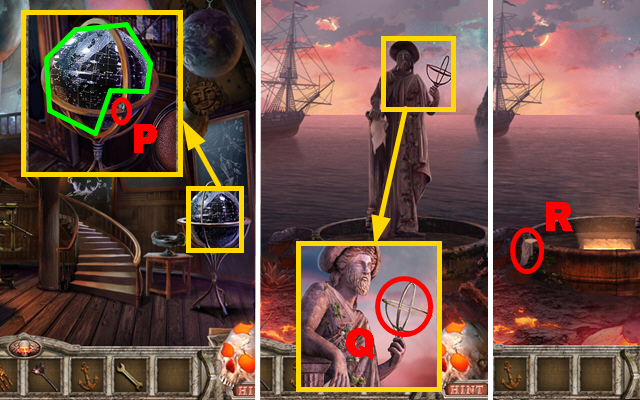
- Zoom into the globe; remove the bolt with the WRENCH (P) and take the GLOBE marked in green.
- Go to the Port.
- Zoom into the statue; put down the GLOBE (Q).
- Take the SAIL (R).
- Go to the Monuments.

- Zoom into the ship; put down the WHEEL (S), the SAIL (T), and the ANCHOR (U).
- Take the DIVING MASK (V).
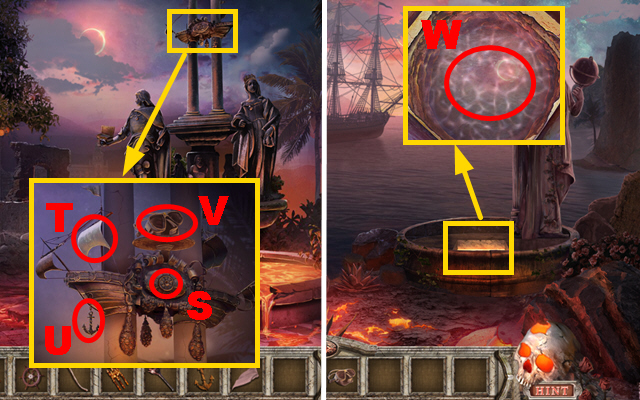
- Go to the Port.
- Zoom into the well; put down the DIVING MASK to look into the water (W).

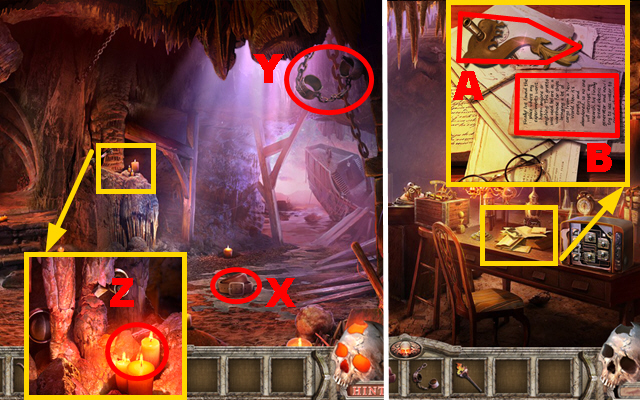
- Take the BELT (X) and the SHACKLES (Y).
- Zoom into the wall; hold the TORCH next to the candles (Z) to acquire the FIRE TORCH.
- Turn left.
- Zoom into the desk; take the DOOR HANDLE (A) and read the note (B).
- Walk down and turn right.

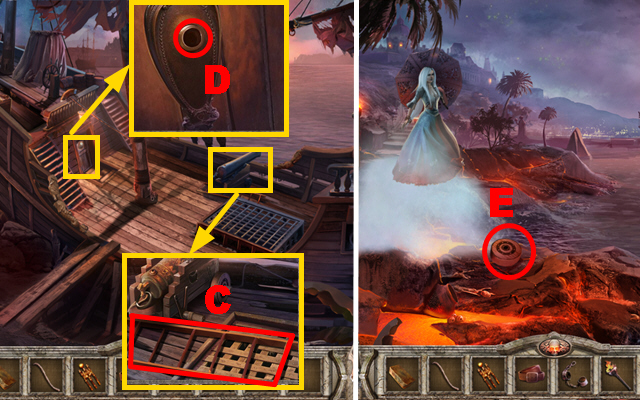
- Zoom into the cannon; take the LADDER (C).
- Zoom into the door; put the DOOR HANDLE into the slot (D).
- Move forward.
- Take the WHEEL (E).
- Walk down.
- Play the HOS.

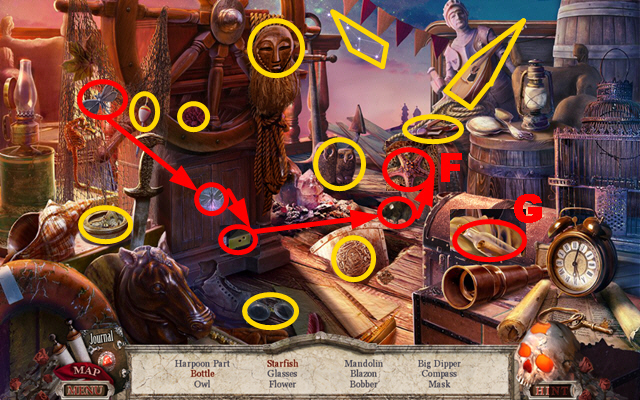
- Take the emblem, put it into the slot, take the cheese, give it to the rat, and take the starfish (F).
- Open the chest and take the bottle (G).
- You will receive the HARPOON PART.
- Walk down and turn left.

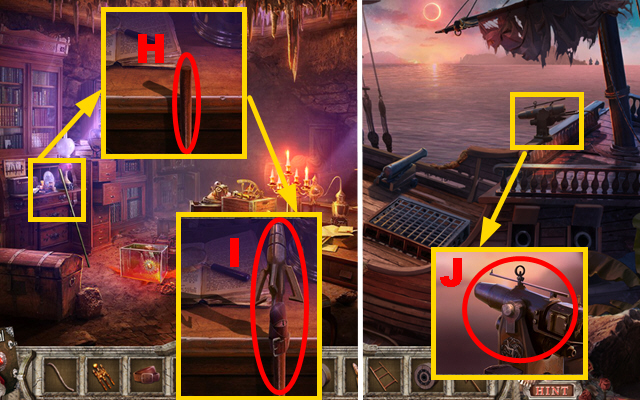
- Zoom into the cabinet; connect the HARPOON PART and the BELT to the stick (H).
- Take the HARPOON (I).
- Go to the Galleon.
- Zoom into the device; put the HARPOON into it (J).
- Go through the door.

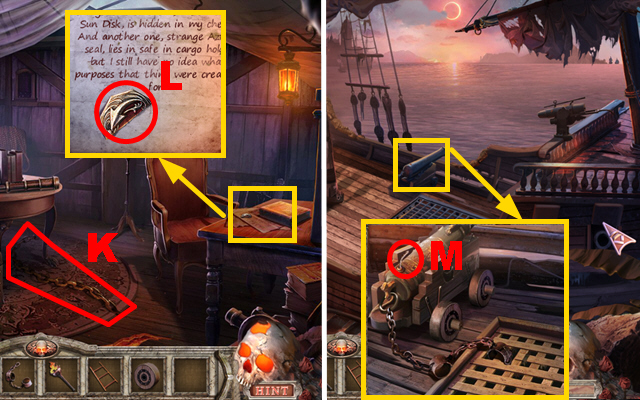
- Take the CHAIN (K).
- Zoom into the desk; take the 1/2 CHEST PLATE (L).
- Walk down.
- Zoom into the cannon; put down the WHEEL, the CHAIN, the SHACKLES, and the FUSE.
- Light the fuse with the FIRE TORCH (M).
- Go through the opening.

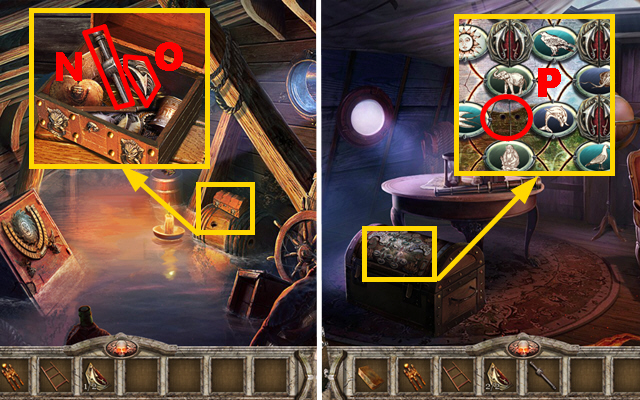
- Zoom into the chest, open it, and move the items aside; take the VISE HANDLE (N) and the 2/2 CHEST PLATE (O).
- Walk down and go through the door.
- Zoom into the chest; put down the 2 CHEST PLATES (P).
- Play the mini-game.

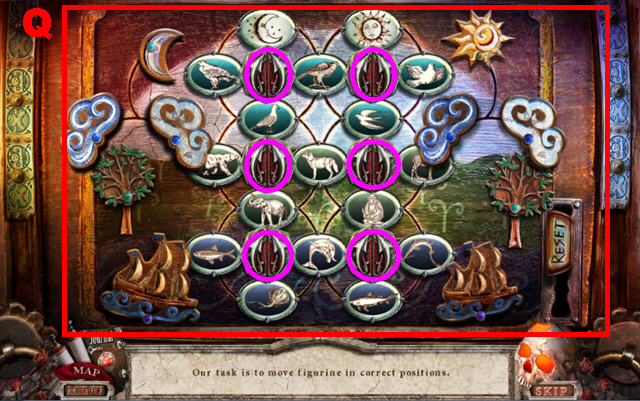
- To solve this puzzle (Q), move the figurines into the correct positions by pressing the arrow buttons marked in purple.

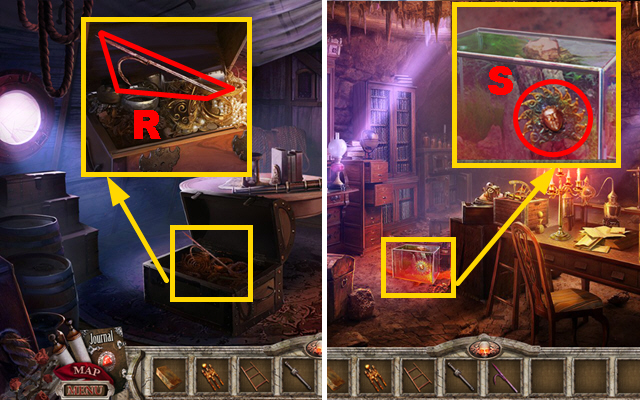
- Zoom into the chest; take the GAFF (R).
- Walk down twice and turn left.
- Zoom into the glass container; use the GAFF to acquire the GOLDEN SUN (S).
- Walk down, turn right, and go down the ladder.

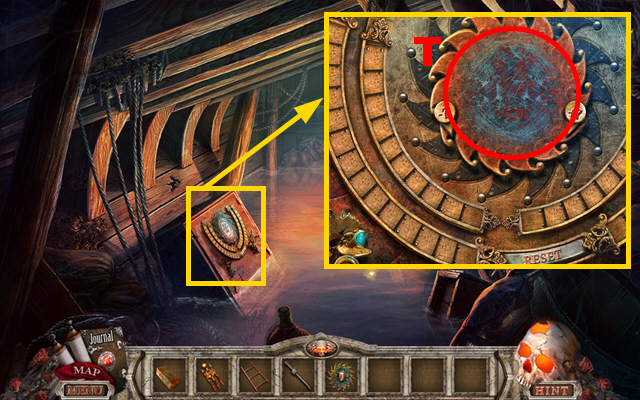
- Zoom into the safe; put down the GOLDEN SUN (T).
- Play the mini-game.

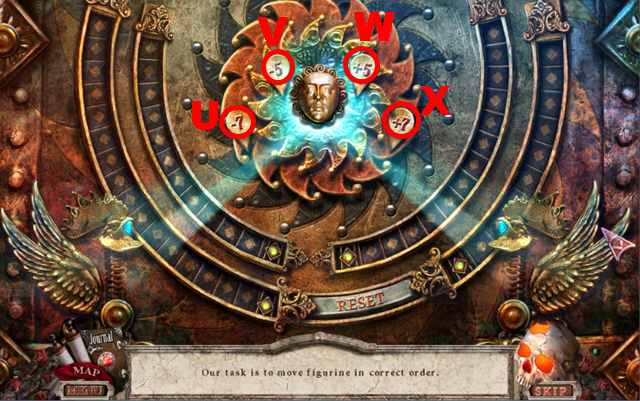
- To solve this puzzle, press the buttons in the following sequence: X, V, X; Ux2, X, W, U; W, X, Vx2, X, Wx2, X, W; X, W, Vx2, W, and U.

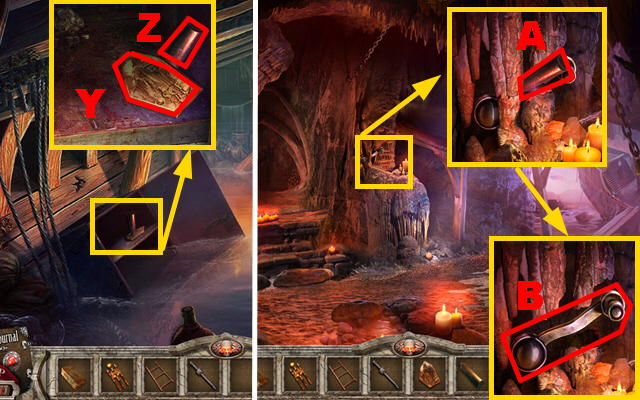
- Zoom into the safe; take the SECOND SEAL (Y) and the WEDGE (Z).
- Walk down twice.
- Zoom into the wall and put down the WEDGE (A); hit the GOLD BAR against the wedge.
- Take the HANDLE (B).
- Turn left.

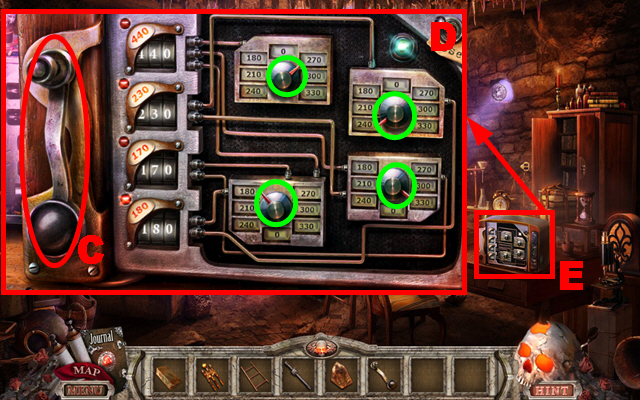
- Zoom into the device; connect the HANDLE to the device (C).
- Play the mini-game.
- To solve this puzzle (D), set each bar marked in green to the correct amount of voltage.
- Take the GENERATOR (E).
- Go to the Seashore.

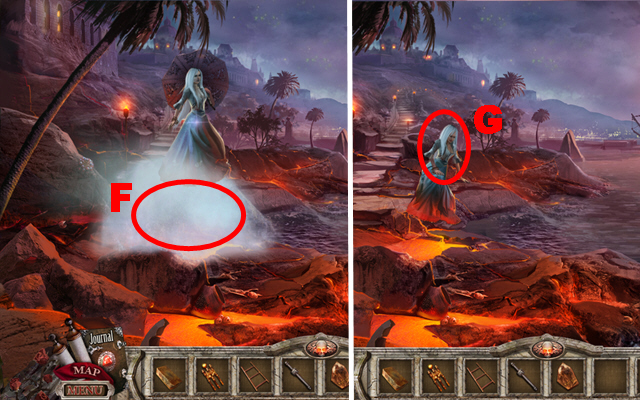
- Throw the GENERATOR at Milagrosa (F).
- Talk to Milagrosa (G).
- Move forward.
- Play the HOS.

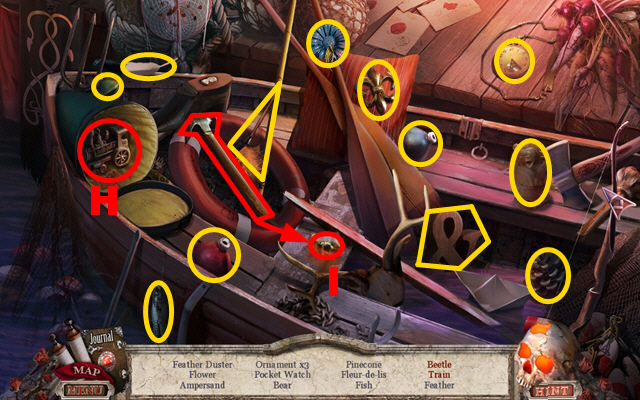
- Open the bag and take the train (H).
- Take the hammer, break the stone with it, and take the beetle (I).
- You will receive the FEATHER DUSTER.
- Walk down twice and move forward twice.

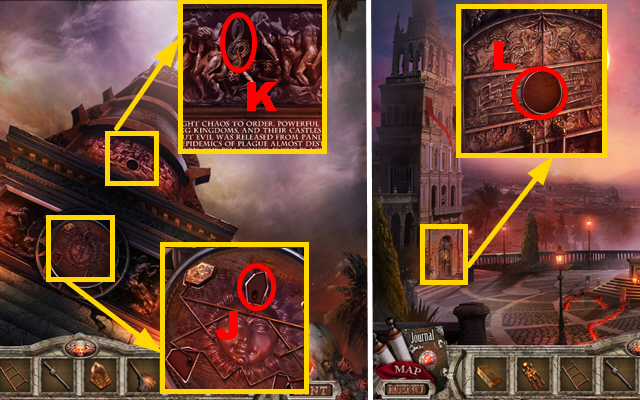
- Zoom into the sun; put down the SECOND SEAL (J).
- Zoom into the mural; take the TREBLE CLEF (K).
- Walk down.
- Zoom into the door; put the TREBLE CLEF into the slot (L).
- Turn left.
Chapter 5: The Bell Tower

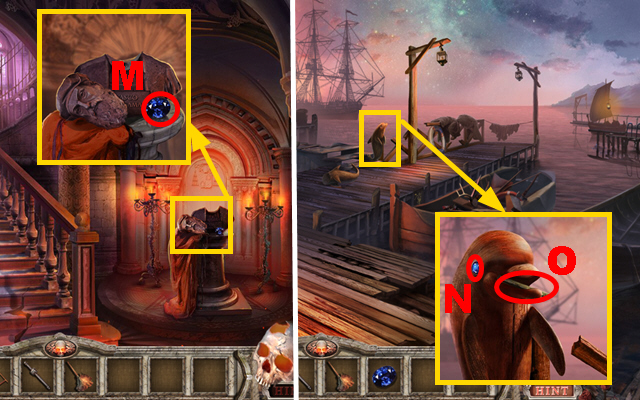
- Zoom into the pedestal; take the DOLPHIN EYE (M).
- Walk down twice, turn right, and move forward.
- Zoom into the dolphin and put the DOLPHIN EYE into the slot (N); take the ROD (O).
- Go to the Columbus Alley.

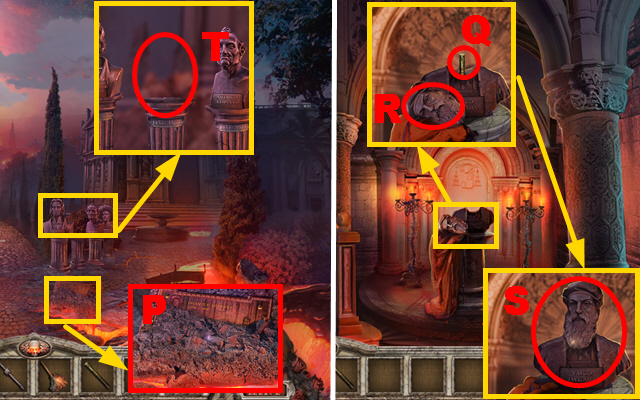
- Zoom into the floor; use the FEATHER DUSTER to remove the ashes (P).
- Go to the Bell Tower.
- Zoom into the pedestal; put the ROD into the statue (Q), put the head (R) on the rod, and take the BUST (S).
- Go to the Columbus Alley.
- Zoom into the busts; put down the BUST (T).
- Play the mini-game.

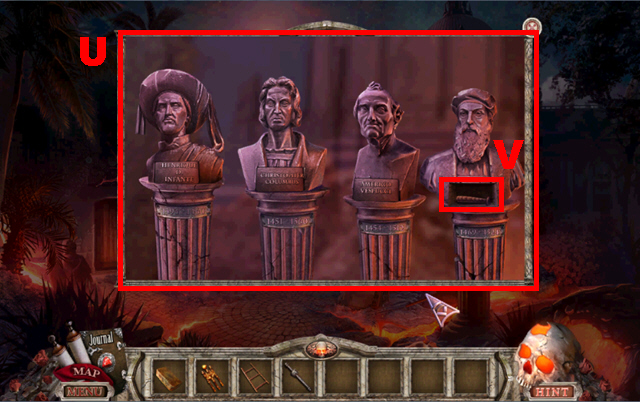
- To solve this puzzle (U), switch the busts so that each is connected to the correct time period.
- Take the LEVER (V).
- Go to the Bell Tower.

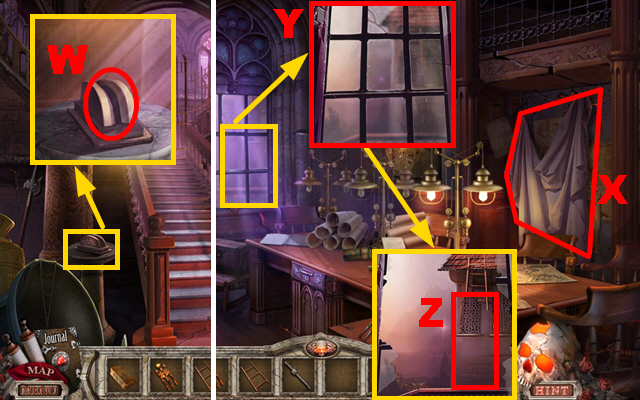
- Zoom into the device; put the LEVER into the slot (W) and pull it.
- Go upstairs.
- Take the CANVAS (X).
- Zoom into the window; break the window with the GOLD BAR (Y).
- Put down the LADDER (Z).
- Move forward.

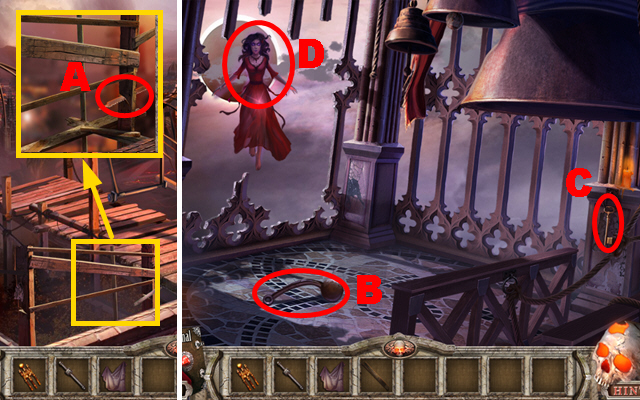
- Zoom into the boards; take the HACKSAW BLADE (A).
- Turn right.
- Take the BENT BELL CLAPPER (B) and the TABLE KEY (C).
- Try to talk to the woman (D).
- Walk down twice.

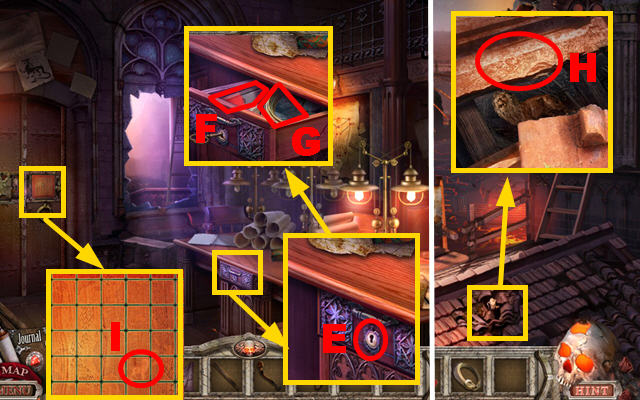
- Zoom into the drawer, put the TABLE KEY into the lock (E), and turn it; take the MAGNET (F) and the CABLE (G).
- Move forward.
- Zoom into the crack; hold down the MAGNET (H) to acquire the LION FIGURINE.
- Walk down.
- Zoom into the door; put down the LION FIGURINE (I).
- Play the mini-game.

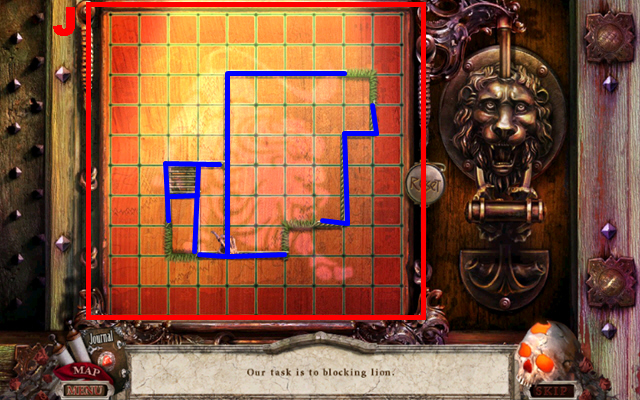
- To solve this puzzle (J), construct the walls marked in blue to cage the lion.
- Turn left.
- Play the HOS.

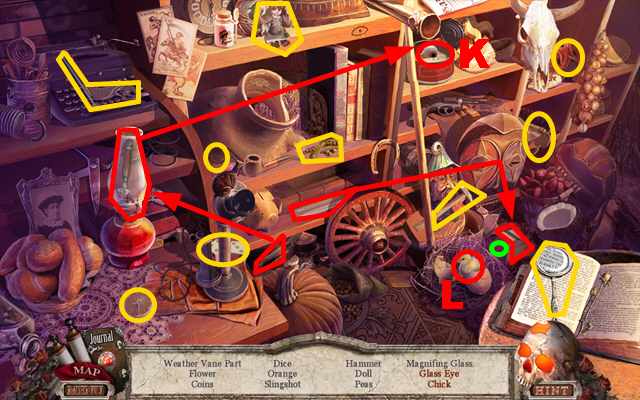
- Take the tongs, acquire the can opener with it, open the can, and take the glass eye (K).
- Take the bulb, put it into the lamp, press the button marked in green, and take the chick (L).
- You will receive the WEATHER VANE PART.

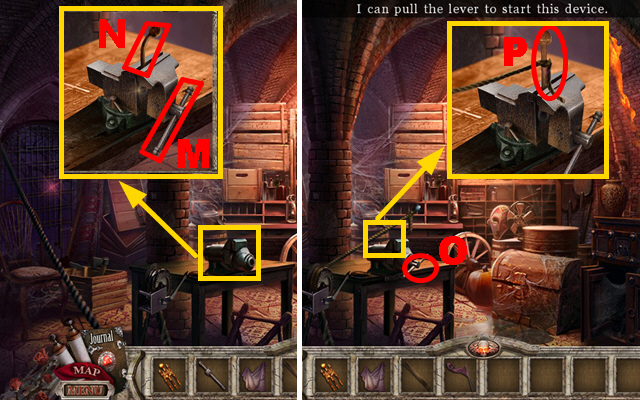
- Zoom into the device and put down the VISE HANDLE (M); put down the BENT BELL CLAPPER (N) and connect the CABLE to the bent bell clapper.
- Turn the vise handle (O).
- Zoom into the device; take the BELL CLAPPER (P).
- Walk down, move forward, and turn right.

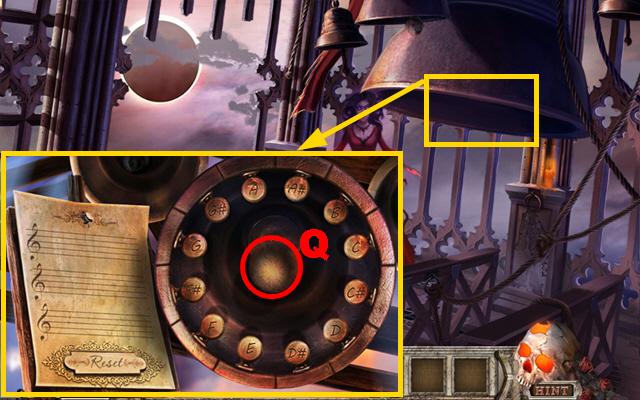
- Zoom into the bell; put down the BELL CLAPPER (Q).
- Play the mini-game.
- To solve this puzzle, press the buttons in the following sequence: E, A, and G.
- A, E, G, A, and E.
- B, E, A, G, F#, D, and E.

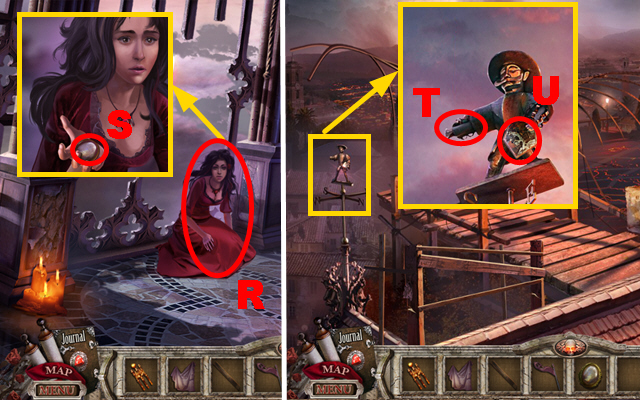
- Talk to Julia (R); take the MOON STONE (S).
- Walk down.
- Zoom into the weather vane; connect the WEATHER VANE PART to it (T) and take the THIRD SEAL (U).
- Walk down.

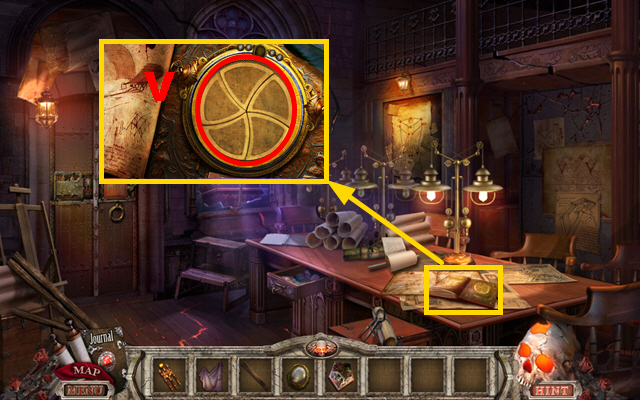
- Zoom into the open book; put down the MOON STONE (V).
- Play the mini-game.

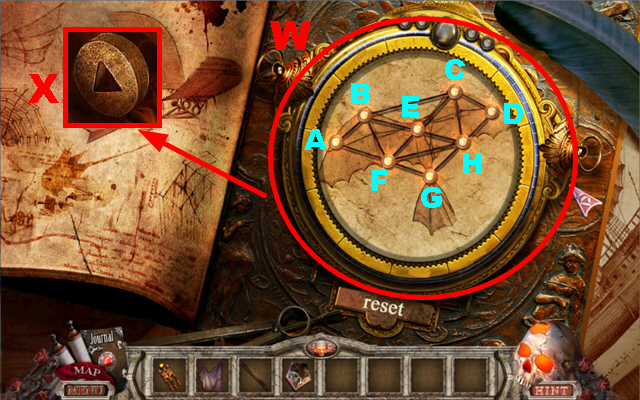
- To solve this puzzle (W), press the emblems in the following sequence: A, B, F, E, H, D, C, E, B, C, H, G, F, and H.
- Take the DA VINCI SYMBOL (X).
- Turn left.

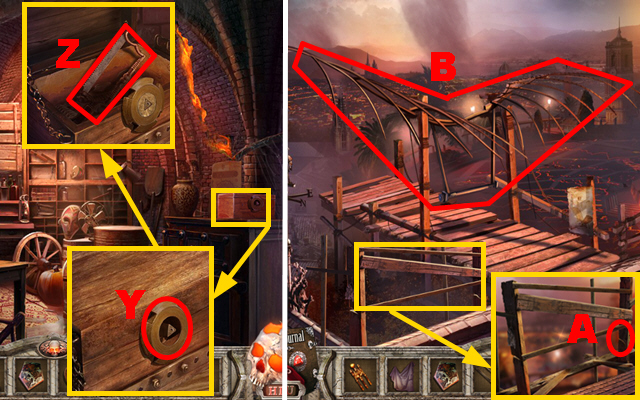
- Zoom into the chest and put the DA VINCI SYMBOL into the slot (Y); connect the HACKSAW BLADE to the handle and take the HACKSAW (Z).
- Walk down and go through the window.
- Zoom into the boards; cut the boards with the HACKSAW (A) to acquire the BOARDS.
- Connect the BOARDS and the CANVAS to the flying device (B).
- Move forward twice.

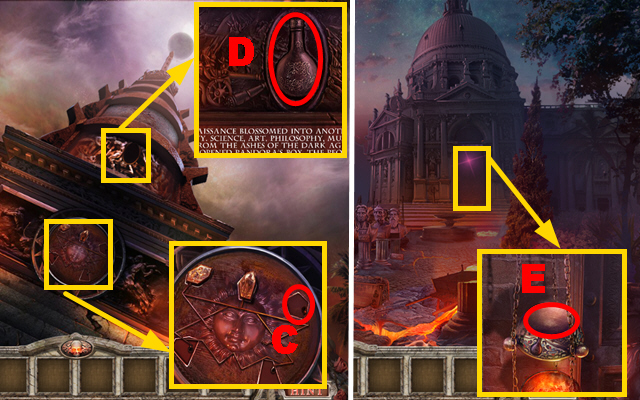
- Zoom into the sun; put down the THIRD SEAL (C).
- Zoom into the mural; take the INCENSE (D).
- Go to Columbus Alley.
- Zoom into the right door; pour the INCENSE into the lamp (E).
- Turn right and then turn left.

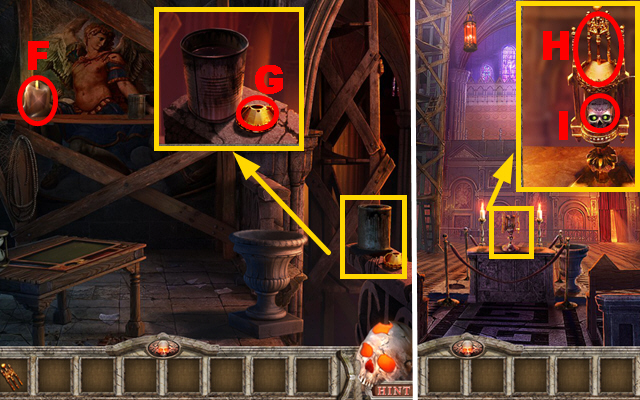
- Take the CANDLE (F).
- Zoom into the railing; take the DOME BOTTOM (G).
- Walk down.
- Zoom into the altar; put down the DOME BOTTOM and the DOME TOP (H).
- Take the SKULL (I).
- Move forward.

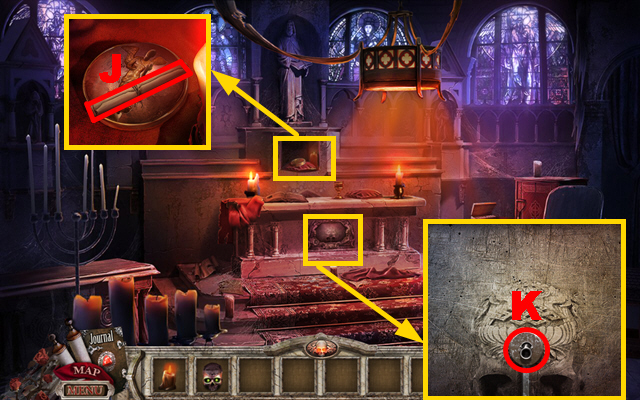
- Zoom into the opening; read the scroll (J).
- Zoom into the panel; put down the SKULL (K).
- Play the mini-game.

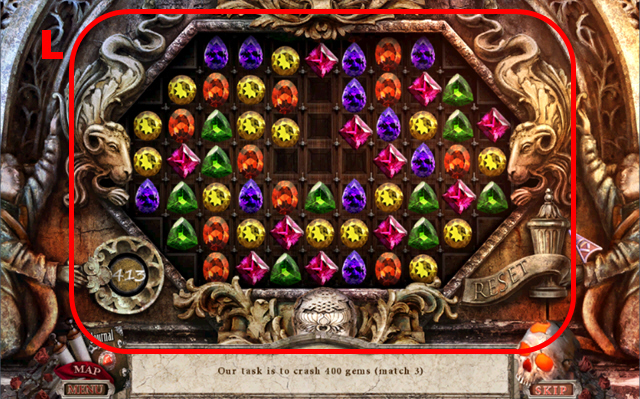
- To solve this puzzle (L), crash 400 gems by creating matches of three or more similar gems.
- Move forward.
Chapter 6: The Basement

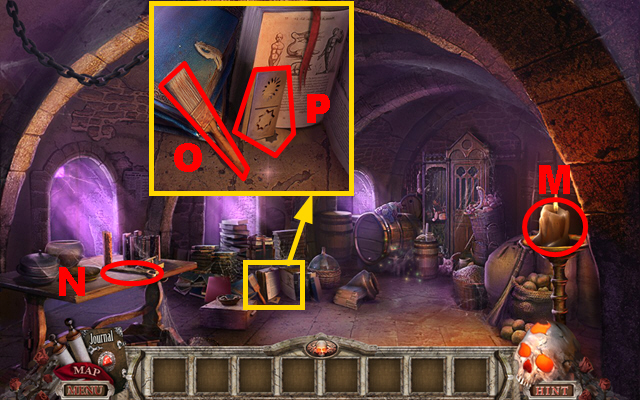
- Put down the CANDLE (M).
- Take the CRANK (N).
- Zoom into the floor and turn the page of the book; take the BRUSH (O) and the DOMINO STENCILS (P).
- Play the HOS.

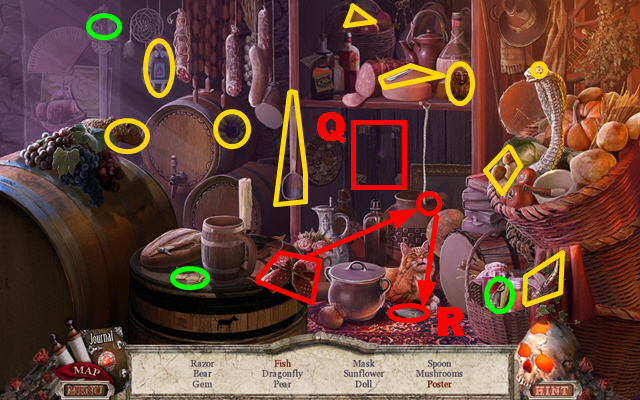
- Collect the 3 poster pieces marked in green, connect them to the torn poster, and take the poster (Q).
- Connect the ribbon to the rope and take the fish (R).
- You will receive the RAZOR.
- Walk down twice and go up the ladder.

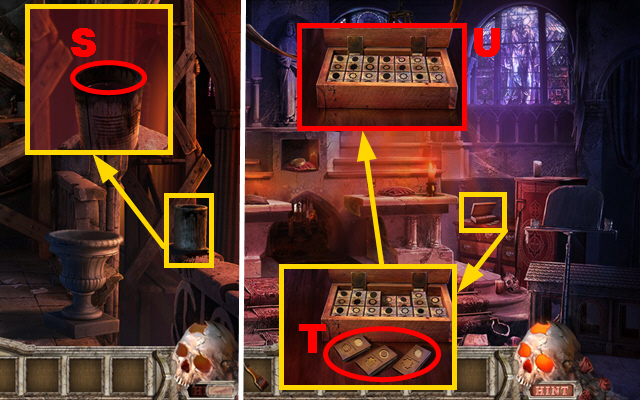
- Zoom into the railing; dip the BRUSH into the paint (S) to acquire the BRUSH WITH PAINT.
- Walk down and move forward.
- Zoom into the domino box and put the DOMINO STENCILS on the dominoes (T); paint the dominoes with the BRUSH WITH PAINT.
- Put the dominoes into the box and take the DOMINOES (U).
- Go to the Port.

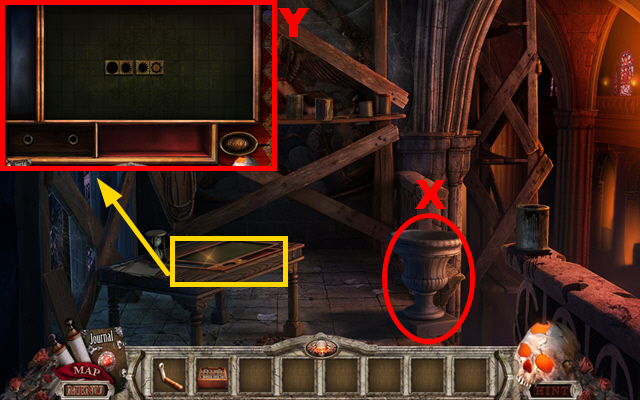
- Zoom into the net and cut the ropes marked in blue with the RAZOR; take the NET (V).
- Go to the Santa Maria Cathedral.
- Put down the NET (W).
- Go up the ladder.


- Push the vase (X).
- Zoom into the table; put down the DOMINOES (Y).
- Play the mini-game.

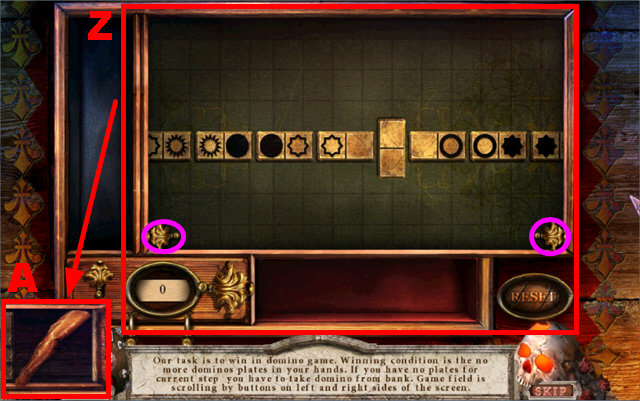
- To solve this puzzle (Z), connect the dominoes in your hand to dominoes with similar symbols on the game field.
- Press the arrow buttons marked in purple to scroll through the game field.
- The solution for this puzzle is randomized.
- Take the ANGEL’S LEG (A).
- Walk down.

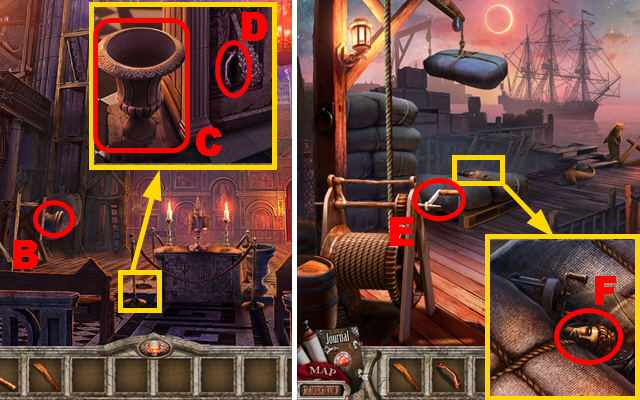
- Take the VASE (B).
- Zoom into the altar and put down the VASE (C); take the ANGEL’S HAND (D).
- Go to the Docks.
- Connect the CRANK to the device (E) and turn it.
- Zoom into the packages; take the ANGEL’S HEAD (F).
- Go to the Cathedral.

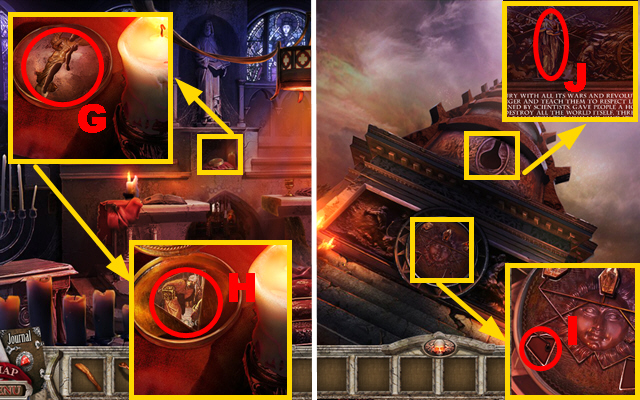
- Zoom into the opening; put down the ANGEL’S HEAD, the ANGEL’S LEG, and the ANGEL’S HAND (G).
- Take the FOURTH SEAL (H).
- Go to the Right of the Square and move forward.
- Zoom into the sun; put down the FOURTH SEAL (I).
- Zoom into the mural; take the PANDORA STATUE (J).
- Walk down and turn right.

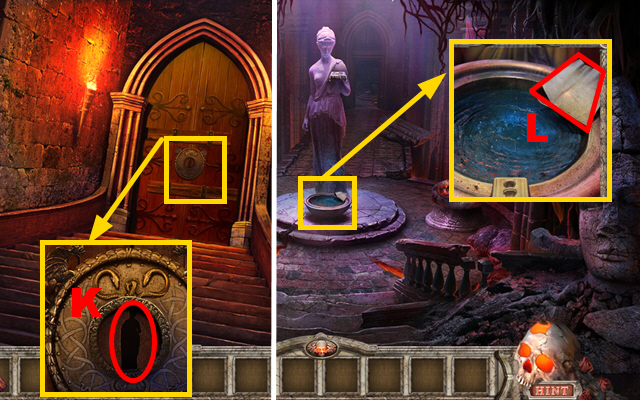
- Zoom into the door; put the PANDORA STATUE into the niche (K).
- Zoom into the bottom of the statue; take a look at the note (L).
- Move forward and turn left.

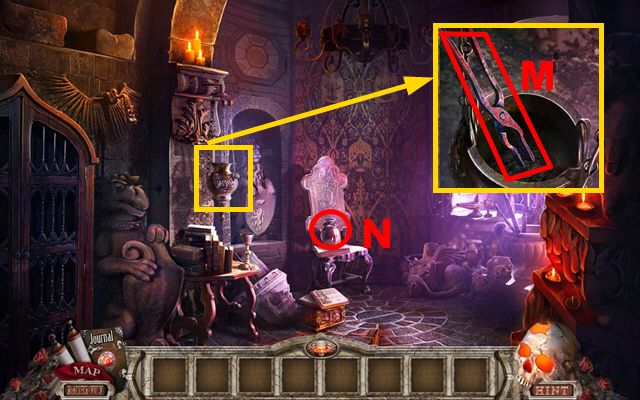
- Zoom into the censer; take the TONGS (M).
- Take the SULFUR OXIDE (N).
- Play the HOS.

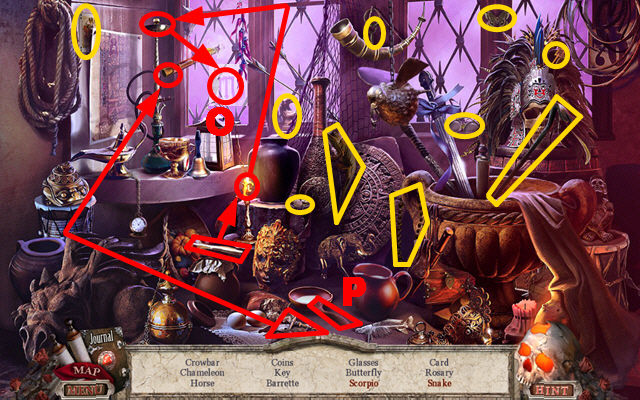
- Take the stick, hold it next to the candle, light the lamp with the burning stick, and take the Scorpio sign (O).
- Take the corkscrew, remove the cork from the flute, and take the snake (P).
- You will receive the CROWBAR.
- Walk down.

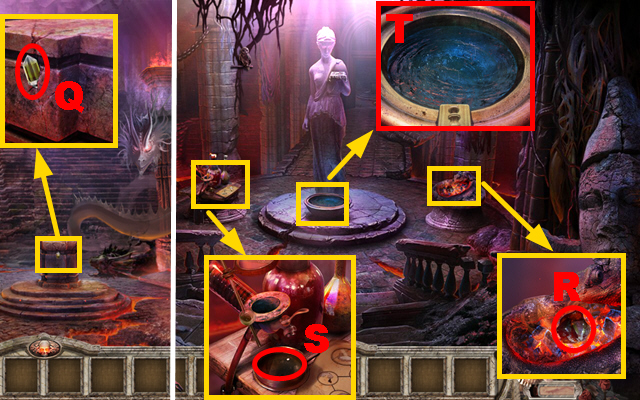
- Zoom into the pedestal; remove the crystal with the CROWBAR (Q) to acquire the CRYSTAL.
- Walk down.
- Zoom into the salamander; acquire the SALAMANDER STONE with the TONGS (R).
- Zoom into the device; put down the CRYSTAL (S).
- Zoom into the water; pour the SULFUR OXIDE into the water (T).

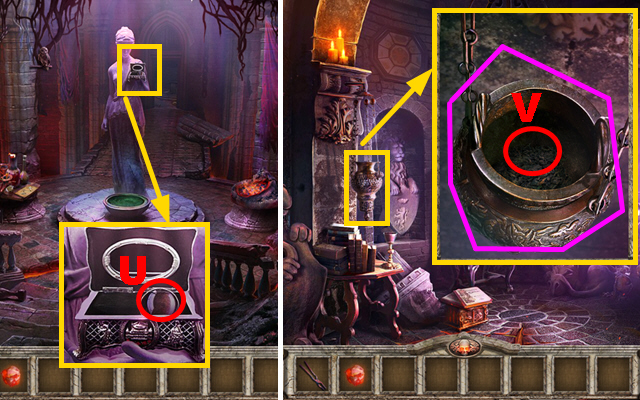
- Zoom into the statue; take the LENS (U).
- Move forward and turn left.
- Zoom into the censer; put down the SALAMANDER STONE (V); take the BURNING CENSER marked in purple.
- Walk down.

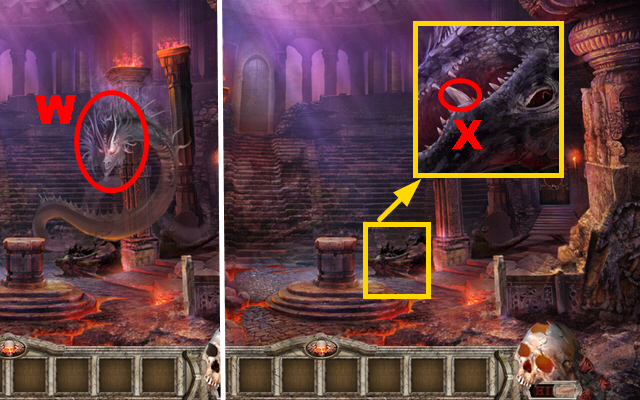
- Throw the BURNING CENSER at the creature (W).
- Zoom into the creature; acquire the BASILISK TOOTH (X) with the TONGS.
- Walk down.

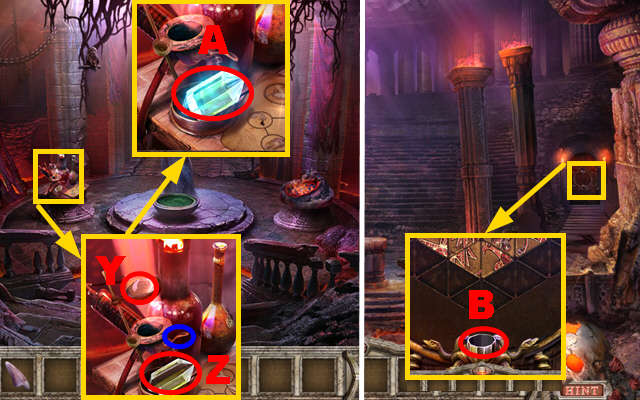
- Zoom into the device; put down the LENS (Y) and the BASILISK TOOTH (Z).
- Turn the handle marked in blue.
- Take the CHARGED CRYSTAL (A).
- Move forward.
- Zoom into the right door; put down the CHARGED CRYSTAL (B).
- Play the mini-game.

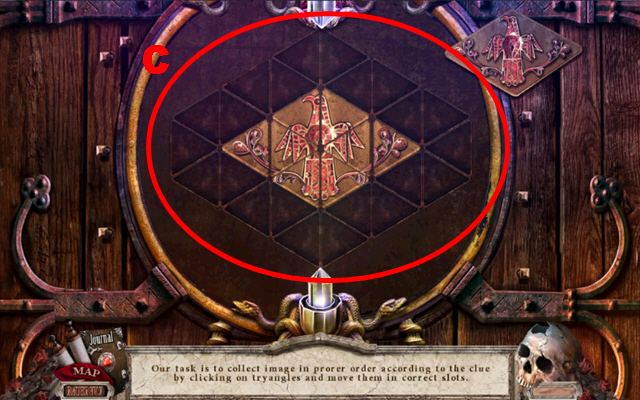
- To solve this puzzle (C), rotate the triangles to recreate the correct picture.
- Turn right.

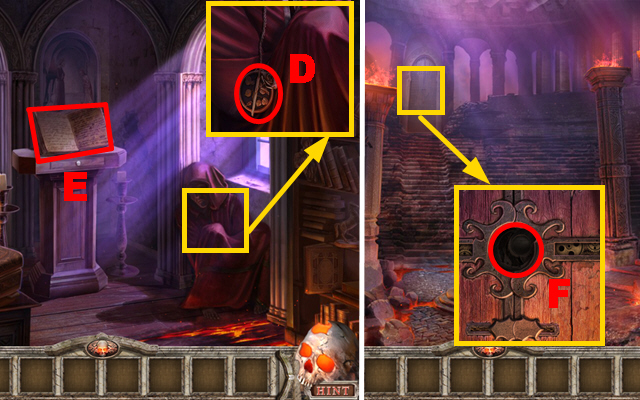
- Zoom into the keeper; take the MASTER MEDALLION (D).
- Take a look at the book (E).
- Walk down.
- Zoom into the central door; put the MASTER MEDALLION into the slot (F).
- Move forward.

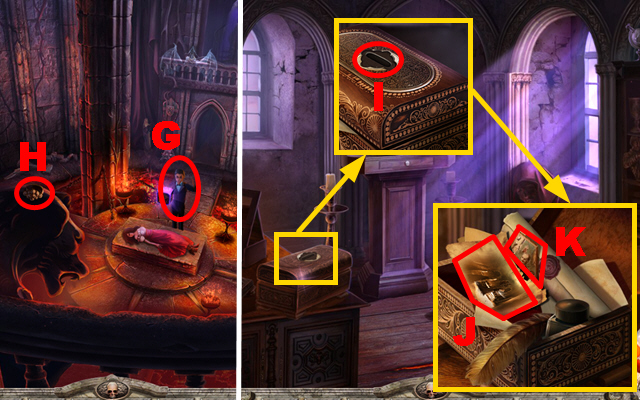
- Talk to the boy (G).
- Take the MASTER RING (H).
- Walk down and turn right.
- Zoom into the chest and put the MASTER RING into the slot (I); take a look at the picture (J) and take the FIFTH SEAL (K).
- Go to the Right of the Square and move forward.

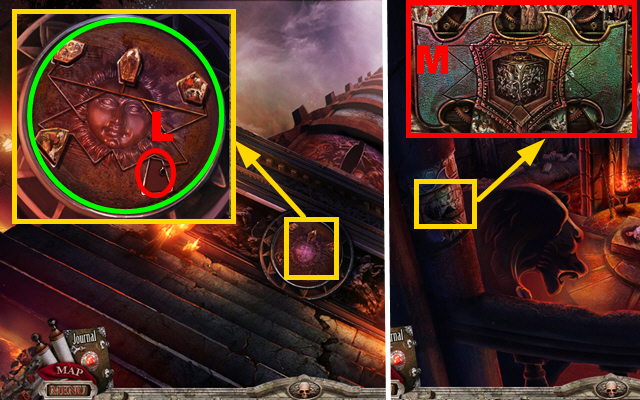
- Zoom into the sun; put down the FIFTH SEAL (L).
- Take the PLATE WITH SEALS marked in green.
- Go to the Ceremonial Hall.
- Zoom into the column; put down the PLATE WITH SEALS (M).
- Play the mini-game.

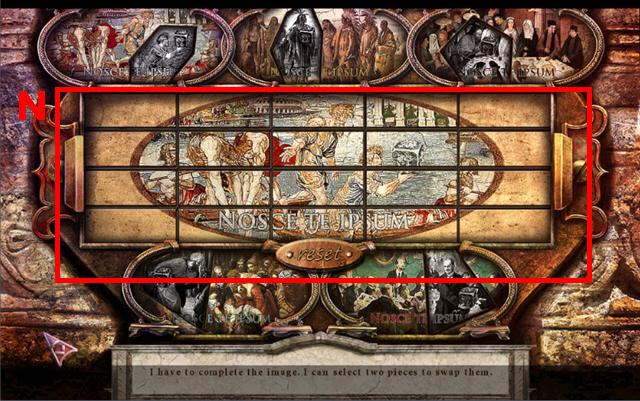
- To solve this puzzle (N), swap the picture pieces to recreate the correct picture.

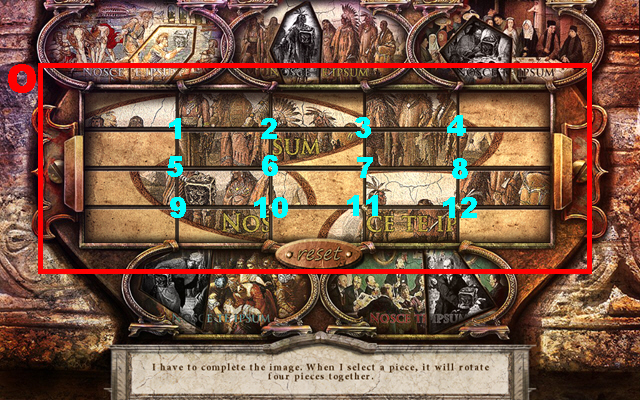
- To solve this puzzle (O), press the rotation buttons in between picture pieces in the following sequence: 7, 7, 11, 8, 3, 6, 6, and 1.

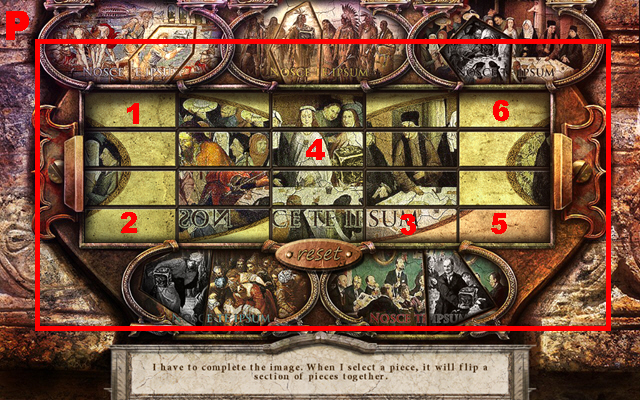
- To solve this puzzle (P), press the picture parts in sequence (1-6).
- Pressing any tile will turn it around as well as all adjacent tiles.

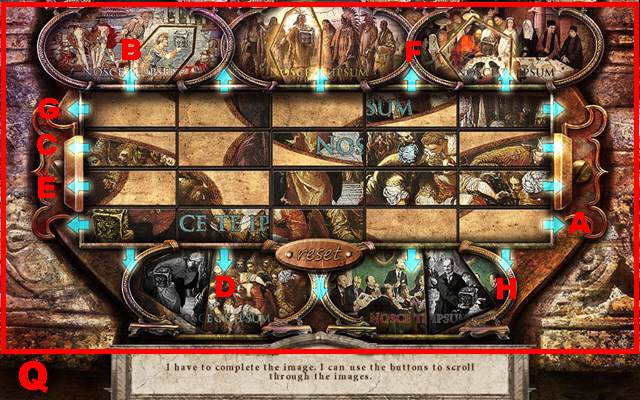

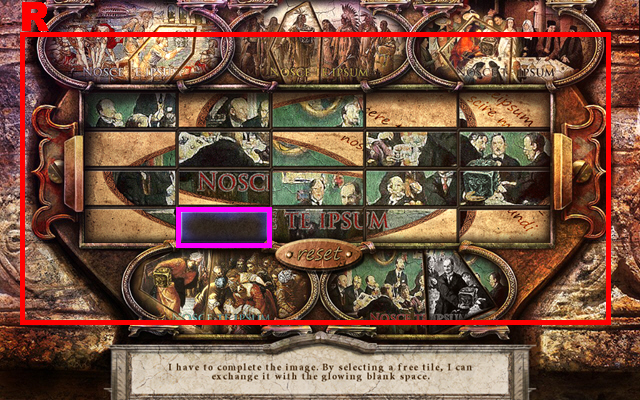
- To solve this puzzle (Q), press the arrow buttons in the following sequence: A, B, C, D x2, E, F, G x2, and H.
- To solve this puzzle (R), move the empty tile marked in purple in the following directions: up x3, left, down, right, up, right, down x2, right, up, right, up, left x2, down x2, right x2, and down.
- Congratulations, you have completed The Keepers: The Orders’s Last Secret!





 Dark Romance: Vampire in Love Walkthrough, Guide, & Tips
 Hidden in Time: Looking-glass Lane Walkthrough, Guide, & Tips
 PuppetShow: Lost Town Walkthrough, Guide, & Tips
 Web of Deceit: Black Widow Walkthrough, Guide, & Tips
 Small Town Terrors: Pilgrim's Hook Walkthrough, Guide, & Tips