Web of Deceit: Black Widow Walkthrough, Guide, & Tips
Web of Deceit: Black Widow Walkthrough

Welcome to the Web of Deceit: Black Widow Walkthrough
You’re drawn into a web of deceit when your train stops in Andville, where the Black Widow lies in wait…
Whether you use this document as a reference when things get difficult or as a road map to get you from beginning to end, we’re pretty sure you’ll find what you’re looking for here.
This document contains a complete Web of Deceit: Black Widow game walkthrough featuring annotated screenshots from actual gameplay!
We hope you find this information useful as you play your way through the game. Use the walkthrough menu below to quickly jump to whatever stage of the game you need help with.
Remember to visit the Big Fish Games Forums if you find you need more help. Have fun!
This walkthrough was created by prpldva, and is protected under US Copyright laws. Any unauthorized use, including re-publication in whole or in part, without permission, is strictly prohibited.
General Tips

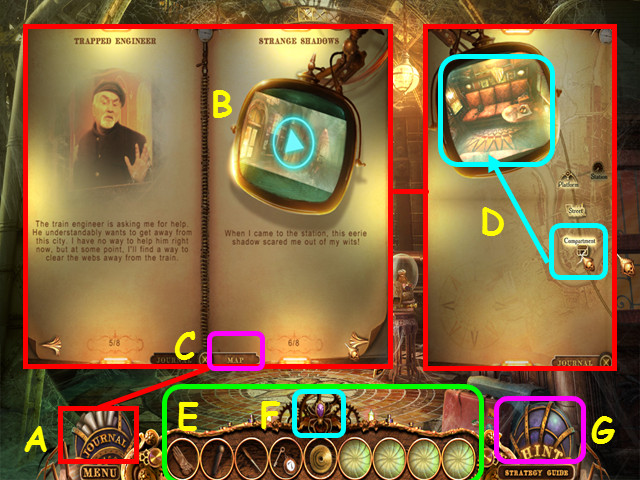
- Read your journal for important clues that you have found (A).
- You may also replay cut-scenes you have seen in the game (B).
- Select the ‘Map’ button to view the map (C).
- Hover your mouse over a location to view it in the monitor (D).
- The darkened location is your current position; select another location to travel there.
- Your inventory (E) is located in the lower panel – select an item to use it.
- The panel auto-hides, so move your mouse towards the bottom of the scene to reveal the panel.
- Select the spider to lock the panel in the up position (F).
- Hints are unlimited, but you must wait for the meter to refill (G).
- Hidden Object Scenes and mini-games are often randomized – your solution may vary.
- Hidden Object Scenes will be referred to as HOS in this walkthrough.
- Hidden Object items listed in green are hidden or require additional steps.
Chapter 1: Arrival in Andville

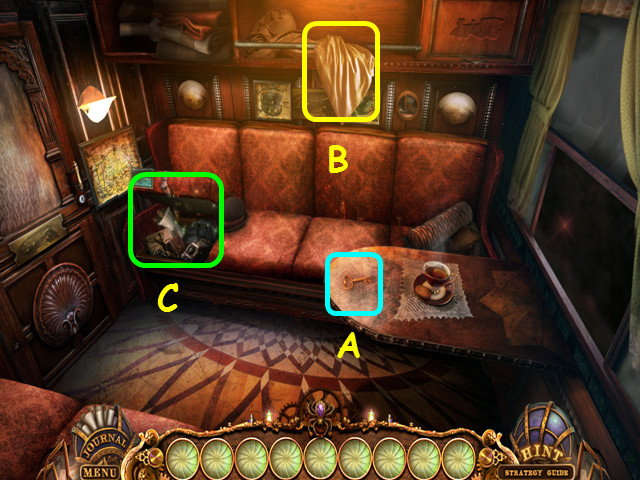
- You will have the option of some interactive help.
- Try to take the key (A).
- Take the BED SHEET (B).
- Lift the seat cushion and look inside for a HOS (C).

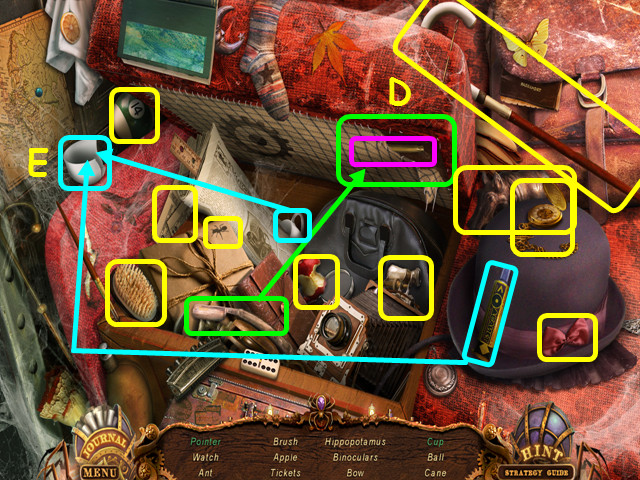
- Locate all the items on the list.
- Use the razor to cut open the cloth; in it you will find the pointer (D).
- Use the glue on the cup, then place the broken piece on the cup (E).
- You will earn the POINTER.

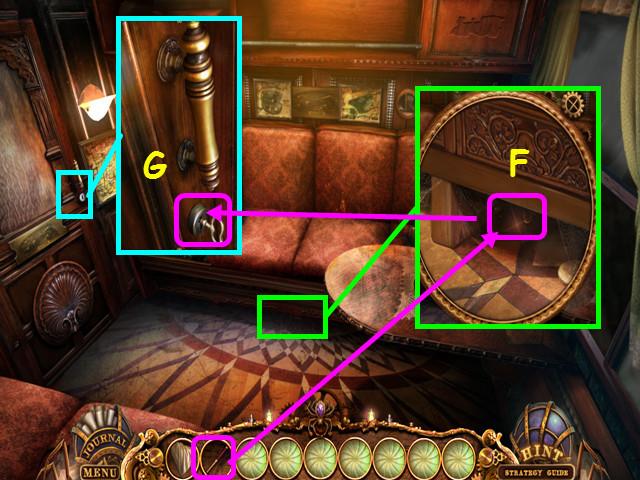
- Look under the seat and use the POINTER to retrieve the DOOR KEY (F).
- Look at the door; use the DOOR KEY in the lock and turn the key (G).

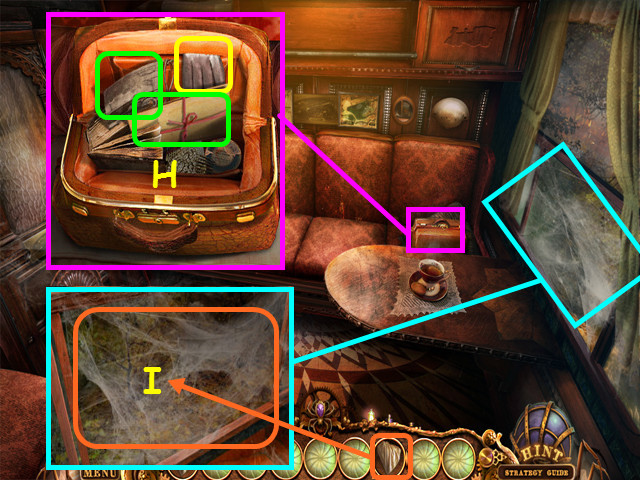
- Look at and open the bag; look at the letter and photo, then take the GLOVE (H).
- Look at the window and use the GLOVE 3 times to remove the cobwebs (I).

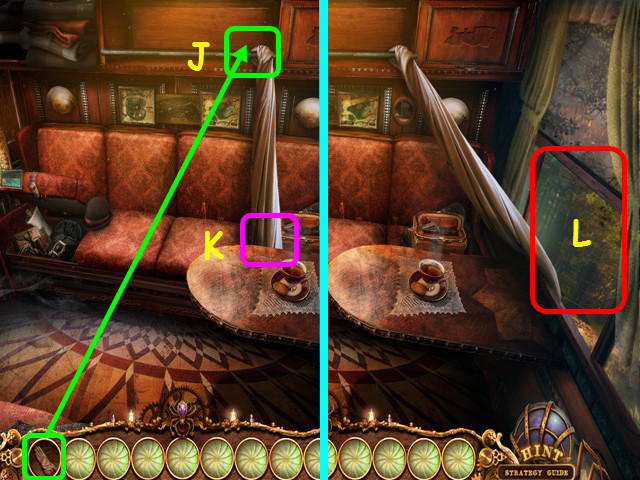
- Use the BED SHEET on the bar (J).
- Select the end of the bed sheet (K), then go right, out the window (L).

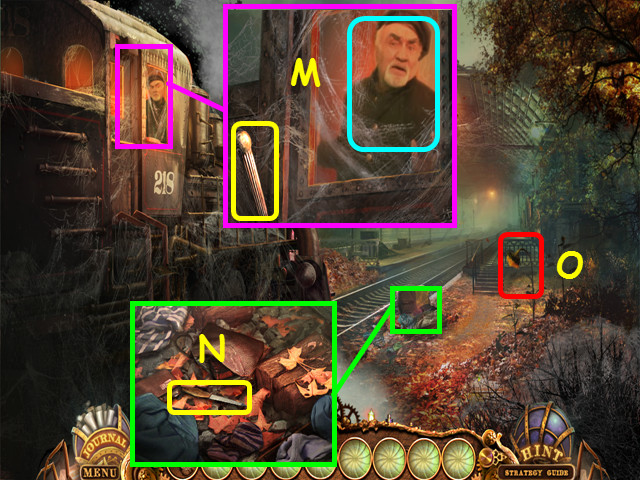
- Look at the window; take the LEVER and talk to the engineer (M).
- Look at the suitcase and take the NAIL FILE (N).
- Note the sunflower (O).
- Walk forward.

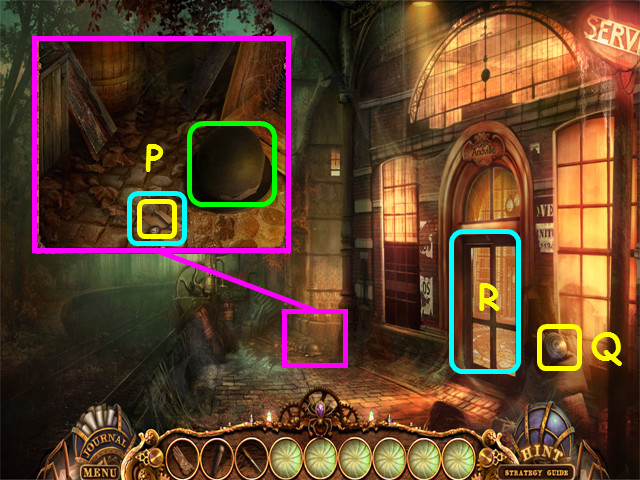
- Look in the corner where you saw the man; move the hat aside, then take the KEY #7 and read the note (P).
- Take the GEAR (Q).
- Enter the station (R).

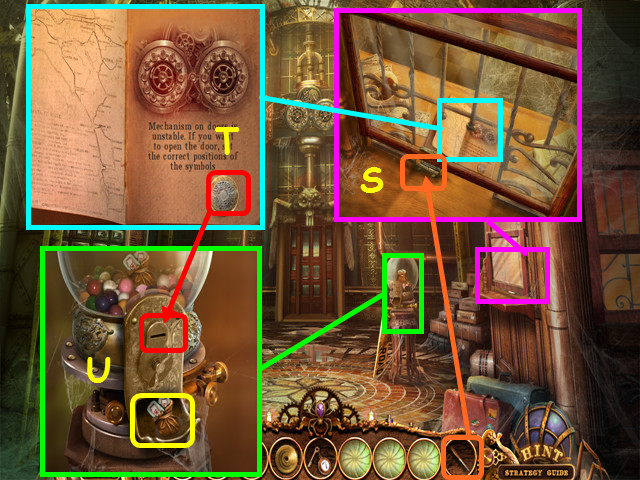
- Look at the ticket window and use the NAIL FILE on the latch (S).
- Open the window, look at the notebook and take the COIN (T).
- Look at the gumball machine, use the COIN in the slot, then take the POUCH WITH TAGS (U).

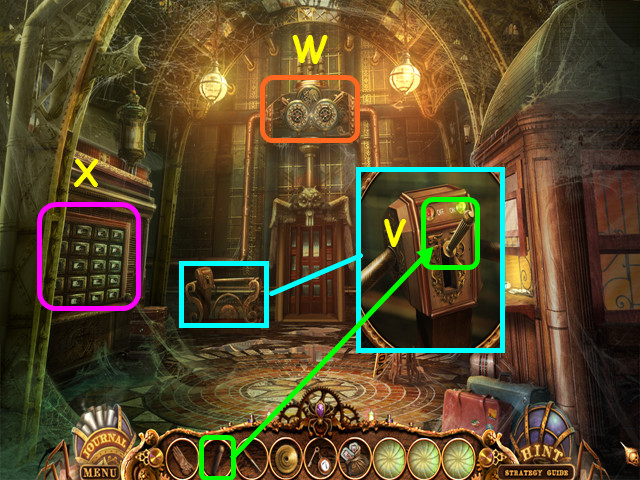
- Look at the control and place the LEVER in the slot, then pull the lever (V).
- Note the clocks (W).
- Select the boxes for a mini-game (X).

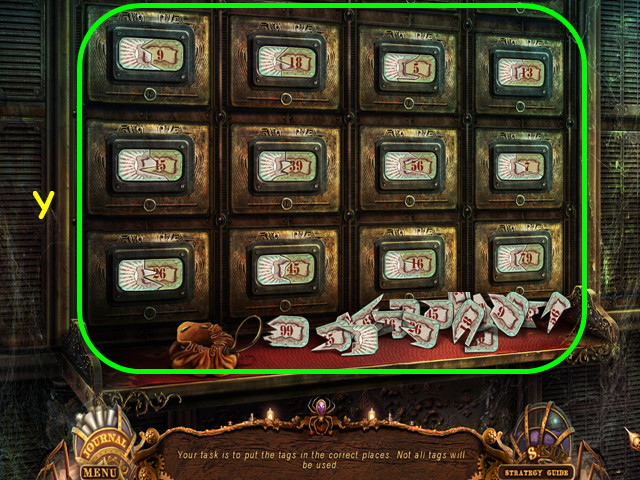
- Use the POUCH WITH TAGS on the drawers to trigger the mini-game.
- Place the broken tags onto the drawers based on their shapes (Y).

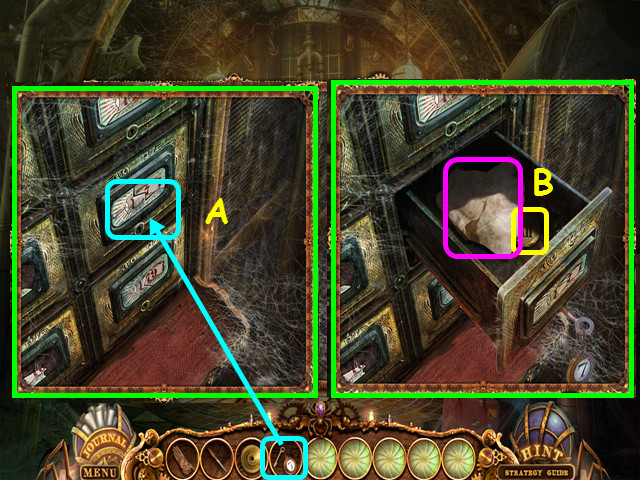
- Use the KEY #7 on the drawer (A).
- Read the note and take the BUTTON 12 (B).
- Look at the clocks over the door for a mini-game.

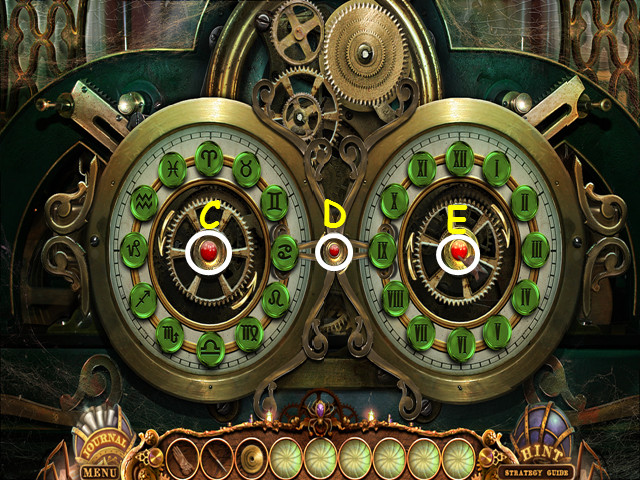
- Place BUTTON 12 on the clock face and the GEAR on the upper gears to trigger the mini-game.
- Move the buttons to the correct clock face in the correct positions.
- Press the left red button to rotate the left clock face (C).
- Press the center red button to swap 2 buttons (D).
- Press the right red button to rotate the right clock face (E).
- Buttons will turn green when in the correct position.
- Press the buttons in this order: Ex4, Cx5, Dx1, Ex2, Cx5, Dx1, Ex2, Cx10, Dx1, Ex3, Cx4, Dx1, and Ex1.
- Walk forward.

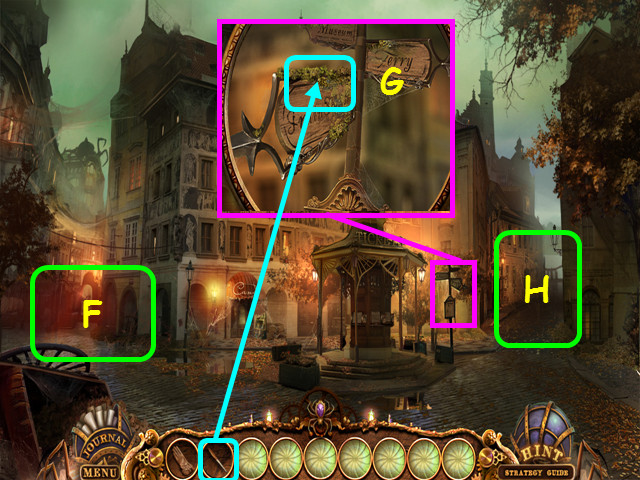
- Try to walk to the left (F).
- Look at the signpost; use the NAIL FILE to take the GREEN MOSS (G).
- Walk to the right (H).

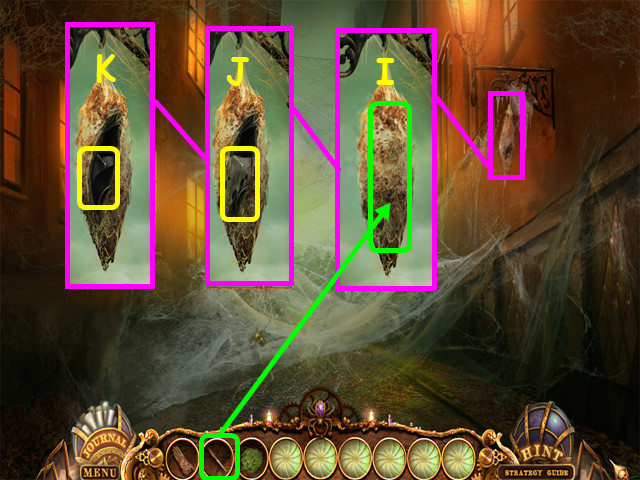
- Look at the spider pod and use the NAIL FILE to cut it open (I).
- Take the SPIDER WEB (J) and the ELECTRICAL TAPE (K).
- Walk down.

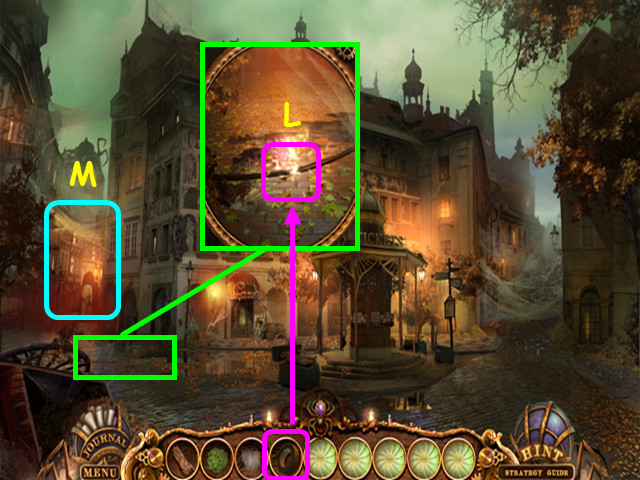
- Look at the downed wire and use the ELECTRICAL TAPE on the wire (L).
- Walk to the left (M).

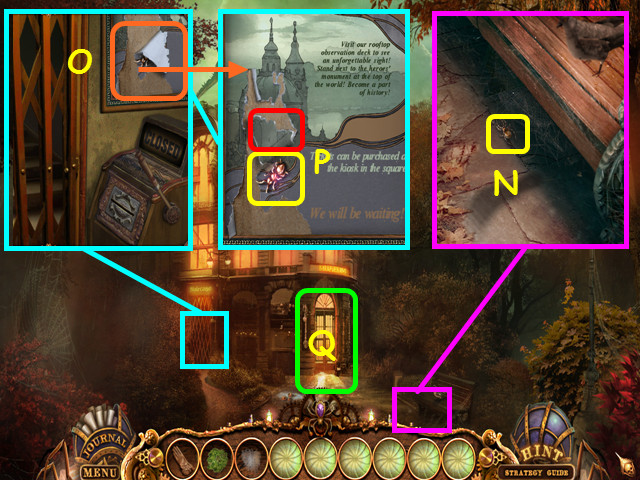
- Look at the bench and take the TOY SPIDER (N).
- Look at the gate, then look at the poster (O).
- Lift the tear on the poster and take the TOY ANT (P).
- Enter the museum (Q).
Chapter 2: The Museum

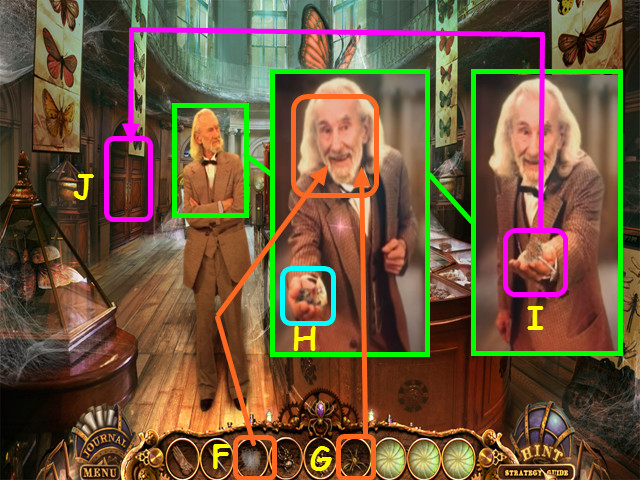
- Talk to Jacob (A).
- Take the FLYPAPER (B).
- Note the mini-game on the right set of doors (C).
- Walk down once.

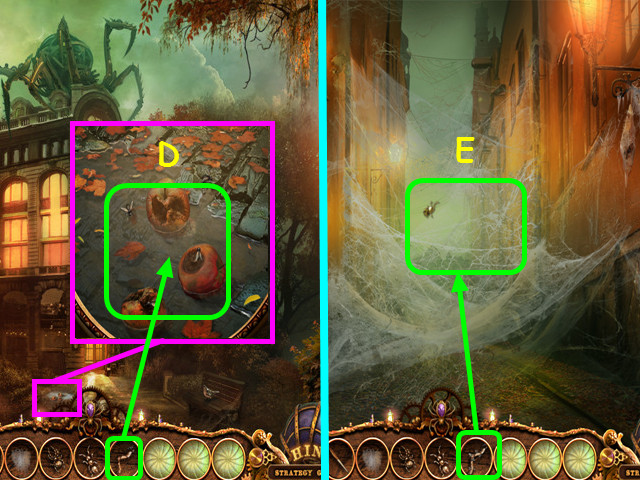
- Look at the puddle and use the FLYPAPER on the flies to get the FLYPAPER WITH FLIES (D).
- Walk down, then walk to the right.
- Use the FLYPAPER WITH FLIES on the web to get the MECHANICAL SPIDER (E).
- Use the map to return to the museum.


- Look at Jacob; give him the SPIDER WEB (F), then give him the MECHANICAL SPIDER (G).
- Take the acid recipe (H), then take the LABORATORY KEY (I) from Jacob.
- Zoom into the left doors and use the LABORATORY KEY in the lock (J).
- Walk left to the laboratory.

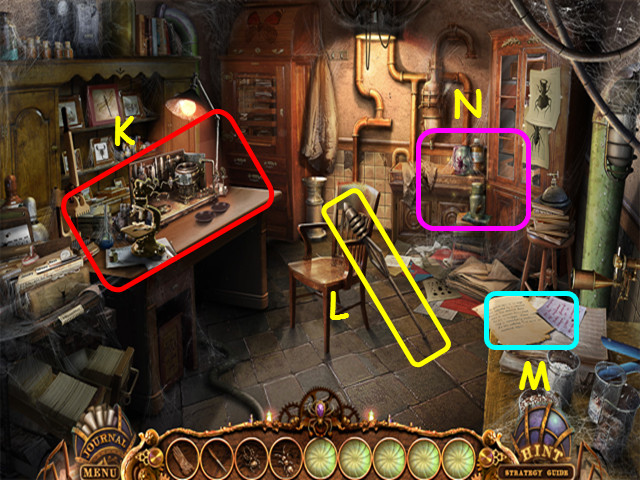
- Note the work table (K).
- Take the LIGHTNING ROD (L).
- Read the note (M).
- Select the area with the jars for a HOS (N).

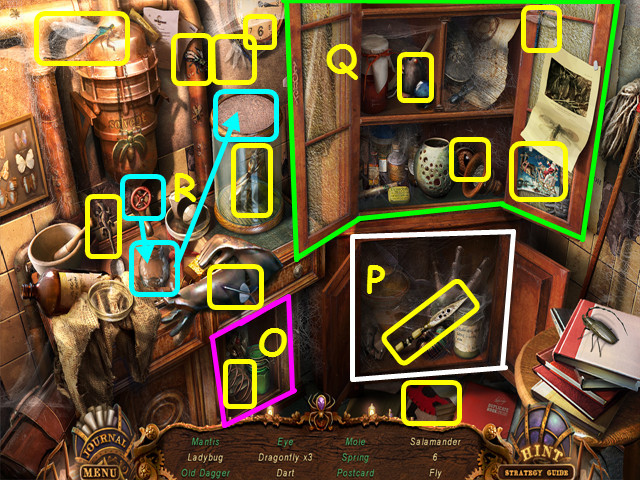
- Locate all the items on the list.
- Open the left cabinet to find the spring (O).
- Open the lower right cabinet to find the old dagger (P).
- Open the upper right cabinet to find a dragonfly, eye, mole, and postcard (Q).
- Turn the valve to put solvent in the jar, then use the jar on the mesh lid to find the mantis (R).
- You will earn the TOY MANTIS.
- Walk down and look at the doors on the right for a mini-game.

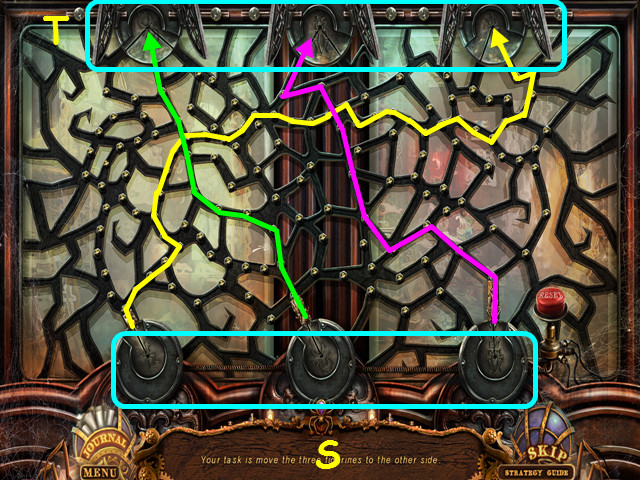
- Place the TOY MANTIS, TOY SPIDER, and the TOY ANT on the device to trigger the mini-game.
- Select one of the insects; you will see possible moves lit in green.
- Move all 3 insects from the bottom (S) to their places on the top (T).
- Walk right to enter the facilities.

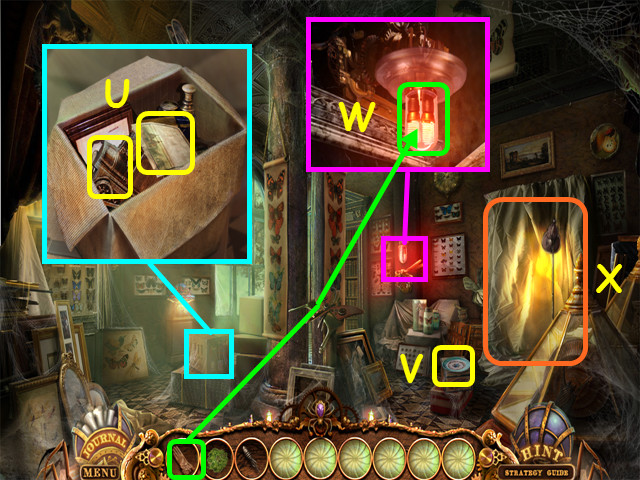
- Look at and open the box; take the BLANK TICKET and the TRAIN PART 1 (U).
- Take the PLATE (V).
- Look at the lantern; use the GLOVE to take the RED BULB (W).
- Pull aside the drapes for a HOS (X).

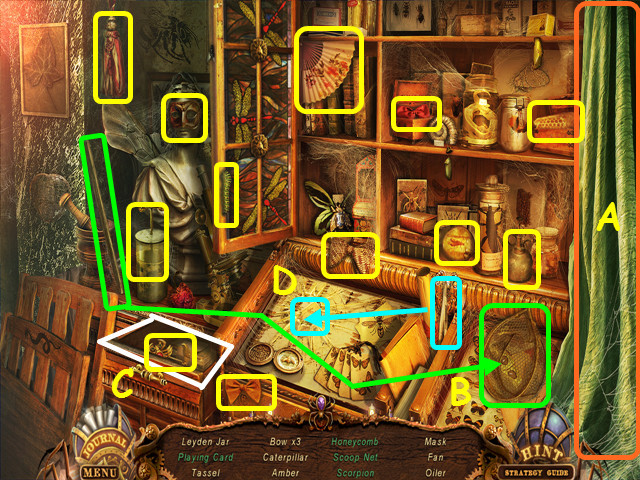
- Locate all the items on the list.
- Pull the drapes aside (A).
- Place the pole on the net to make the scoop net (B).
- Open the drawer to find the scorpion (C).
- Use the tweezers to get the playing card (D).
- You will earn the EMPTY LEYDEN JAR.
- Walk down.

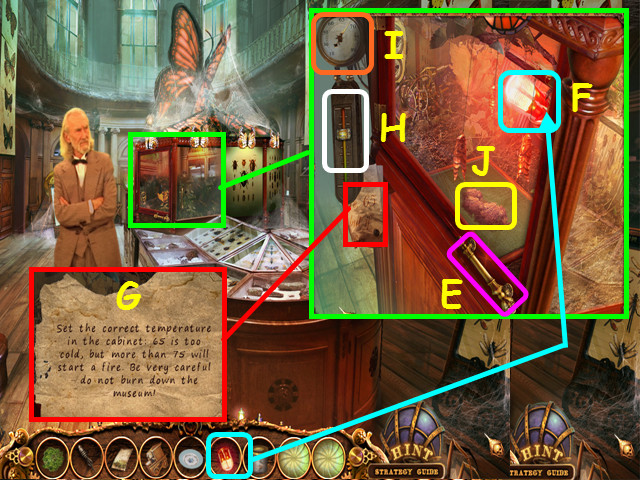
- Look at the case; pull the handle to open the door (E).
- Place the RED BULB in the socket (F), then close the door.
- Read the instructions (G).
- Slide the button up on the thermometer (H) until the gauge reads 70 (I).
- After the cut-scene, open the door and take the BUTTERFLY DUST (J).
- Use the map to travel to the street next to the train.

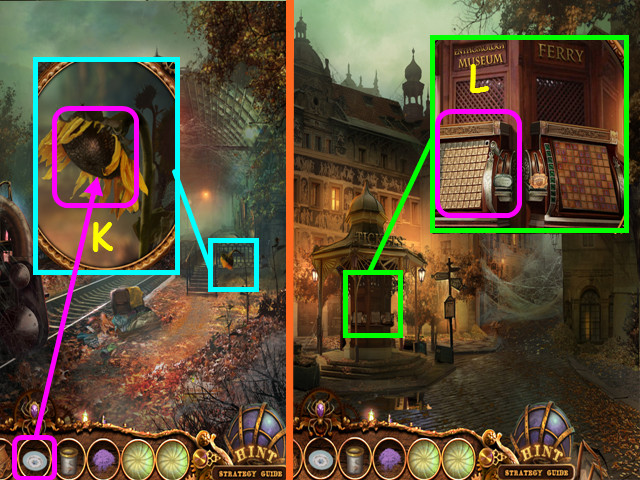
- Look at the sunflower and use the PLATE on it to get the PLATE WITH SEEDS (K).
- Travel to the square.
- Look at the kiosk and select the left machine for a mini-game (L).

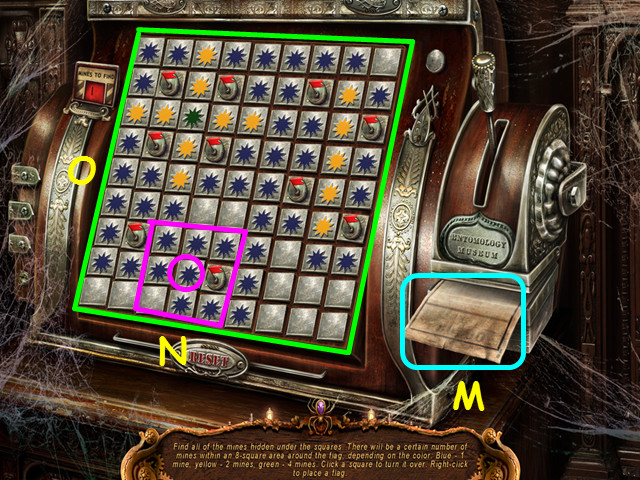
- Place the BLANK TICKET into the slot (M).
- You will need to locate 10 mines on the grid.
- Click anywhere on the grid to start; if you hit a mine the grid will reset.
- Left-click on squares you know have no mines and right-click on squares that have mines to place a flag.
- The color on a revealed square indicates the number of bombs in the 8 squares surrounding it.
- A blue mark indicates there is only one bomb in the 8 squares surrounding the blue mark (N).
- Yellow indicates 2 mines and green means 3 mines in the 8 squares surrounding the mark.
- Mark the entire board this way, until all the squares with ‘X’ are gone (O).
- Take the PUNCHED TICKET from the slot.
- Walk to the left.

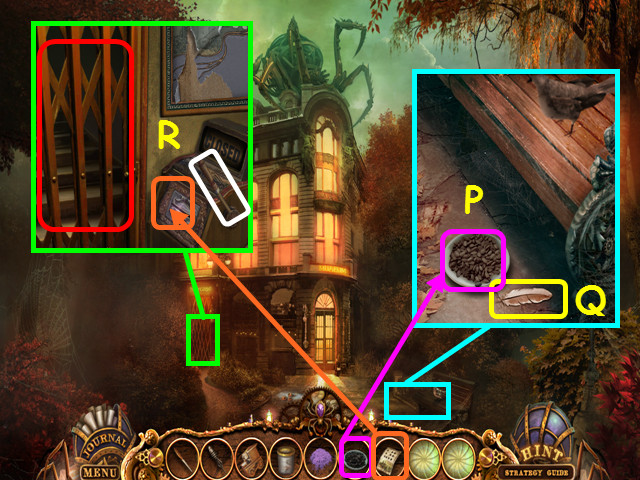
- Look at the bench and place the PLATE WITH SEEDS on the ground (P).
- Take the FEATHER once the bird leaves (Q).
- Look at the gate and place the PUNCHED TICKET into the slot; pull the lever, then enter the gate to the roof (R).

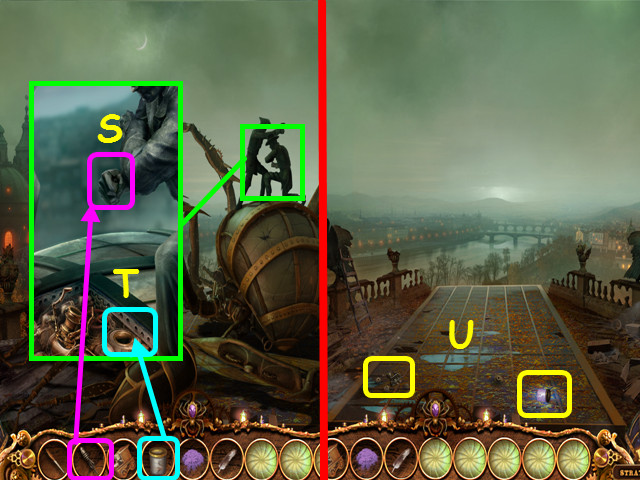
- Look at the statue and place the LIGHTNING ROD in his hand (S).
- Place the EMPTY LEYDEN JAR into the machine (T).
- Take the TRAIN PART 2 and the CHARGED LEYDEN JAR (U).
- Use the map to travel to the train compartment.

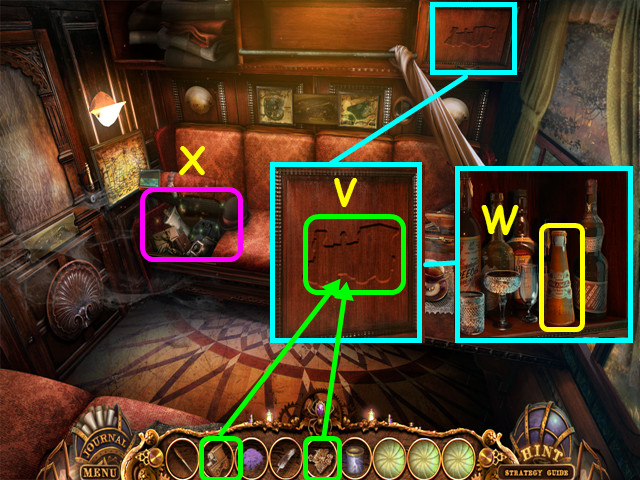
- Look at the overhead compartment; place the TRAIN PART 1 and TRAIN PART 2 into the outline (V).
- Take the ORANGE JUICE (W).
- Select the open seat for a HOS (X).

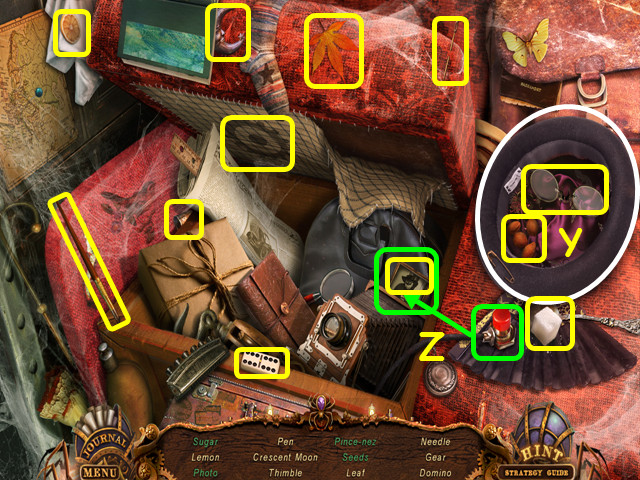
- Locate all the items on the list.
- Turn the hat over to find the sugar, pince-nez, and the seeds (Y).
- Press the red button to take the photo (Z).
- You will earn the SUGAR.
- Return to the square.

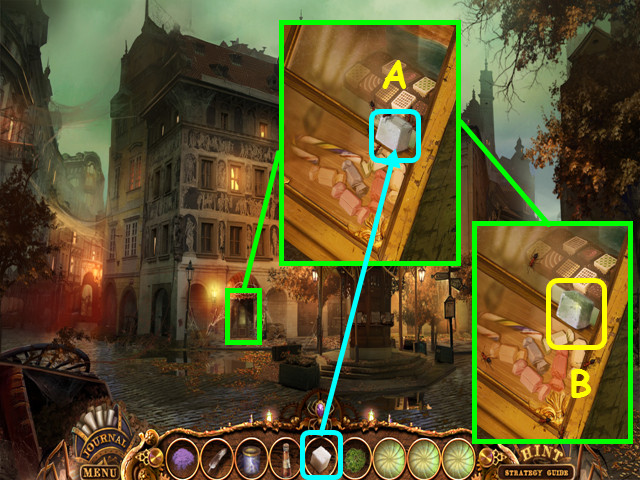
- Look at the candy store window and place the SUGAR on the window (A).
- Once the ants leave the cube, take the FORMIC ACID (B).
- Return to the laboratory and look at the work table on the left.

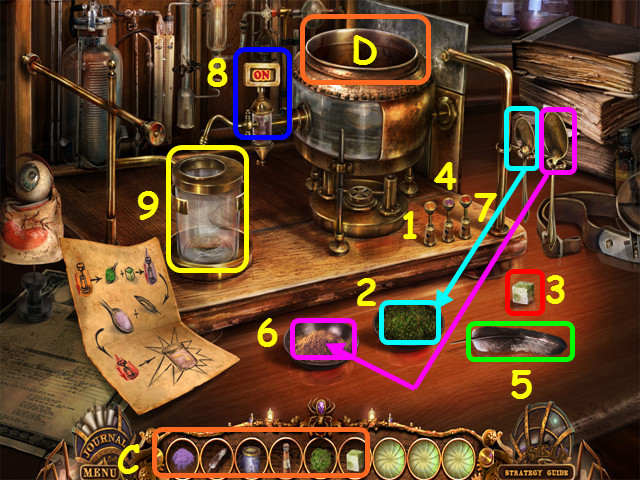
- Place the BUTTERFLY DUST, GREEN MOSS, FEATHER, ORANGE JUICE, FORMIC ACID, and the CHARGED LEYDEN JAR on the counter (C).
- Jacob will appear, take the orange juice and leave instructions. Look at the table again.
- Place the items into the device (D) in the following order:
- Press the orange button (1).
- Use the teaspoon on the moss (2).
- Place the formic acid in the vat (3).
- Press the purple button (4).
- Place the feather in the vat (5).
- Use the tablespoon on the butterfly dust (6).
- Press the red button (7).
- Turn the spigot (8).
- Take JACOB’S ACID (9).
- Travel to the square, then walk to the right.

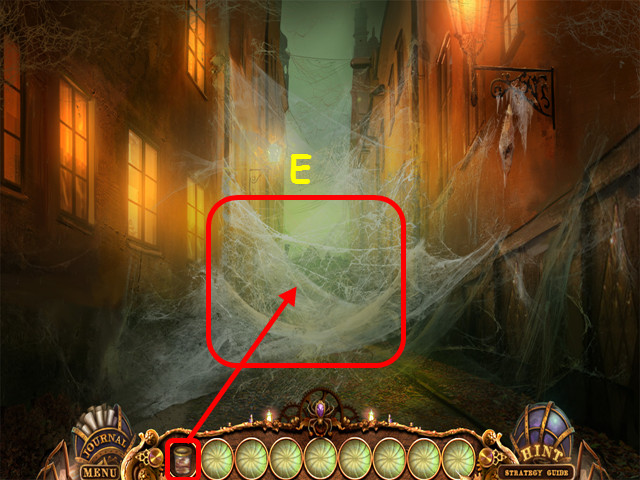
- Use JACOB’S ACID on the web (E).
- Walk forward to the ferry area.
Chapter 3: North Andville

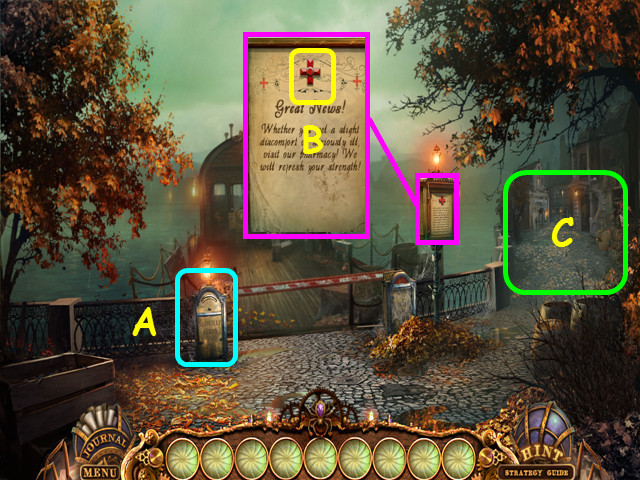
- Note the bar-lifting mechanism needs a lever (A).
- Look at the notice and take the RED CROSS (B).
- Walk to the right (C).

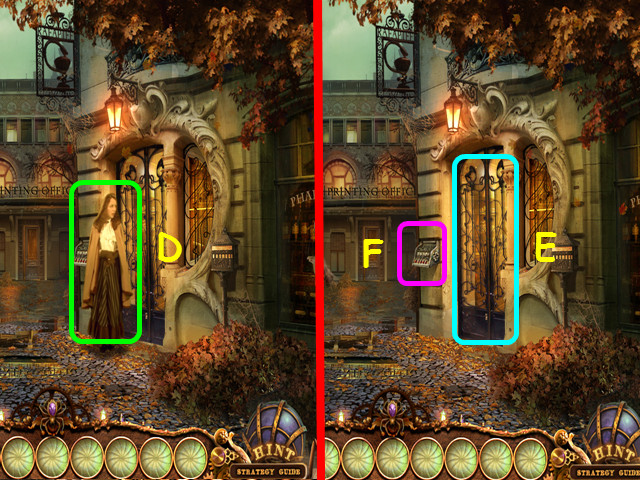
- Talk to the woman (D).
- Note the pharmacy door (E).
- Look at the device for a mini-game (F).

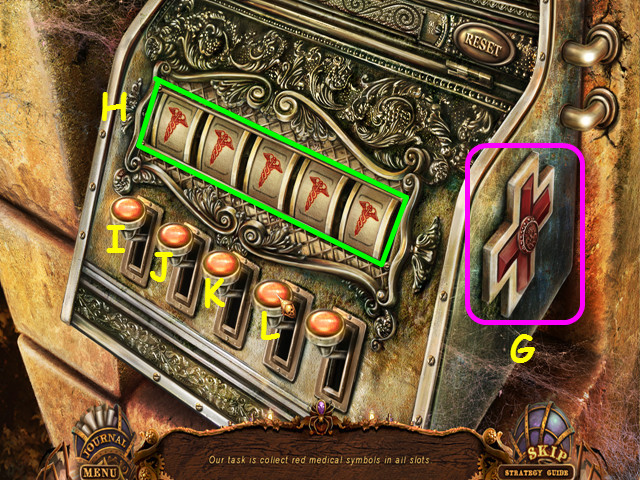
- Place the RED CROSS on the side to activate the mini-game (G).
- Press the buttons to get all red medical symbols (caduceus) showing (H).
- Press the buttons in this order: Kx1, Jx3, Ix1, and Lx4.
- Enter the pharmacy on the right.

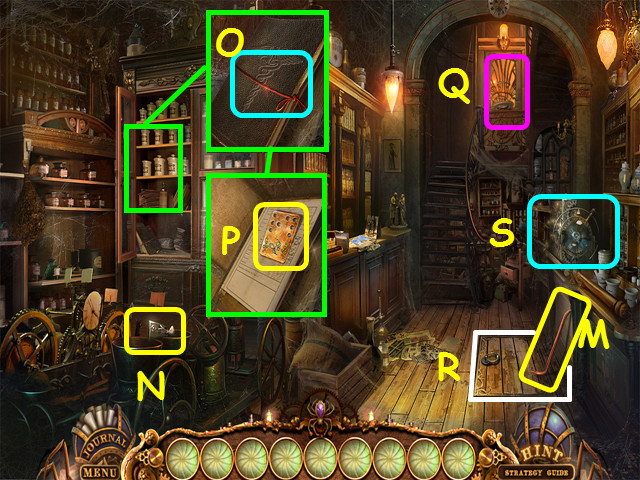
- Take the CROWBAR (M).
- Take the CUP (N).
- Look at the shelf; pull the string and open the book (O).
- Read all the papers until you find the CARD (P).
- Note the mini-game on the back door (Q).
- Open the trapdoor (R).
- Select the counter for a HOS (S).

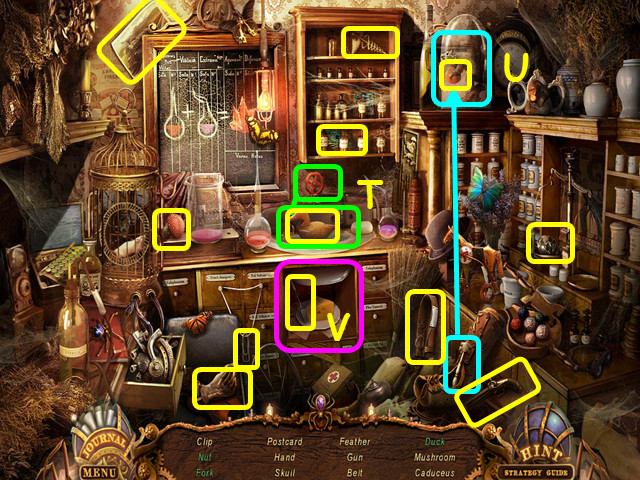
- Locate all the items on the list.
- Turn the valve to find the duck (T).
- Use the glass cutter on the dome to access the acorn (U).
- Open the cupboard to find the fork (V).
- You will earn the PAPER CLIP.
- Walk down.

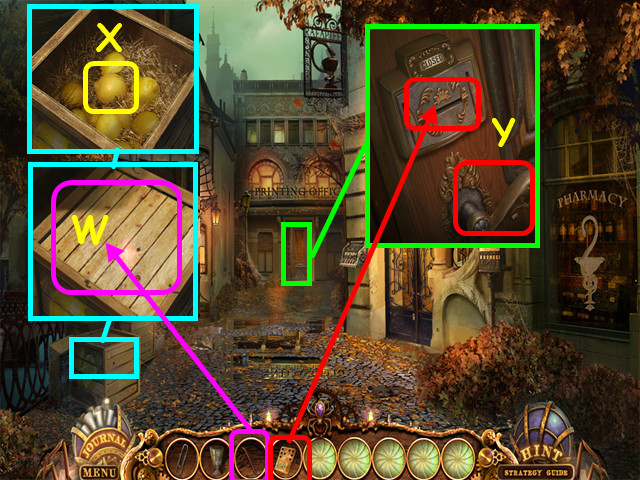
- Look at the crate and use the CROWBAR on the lid (W).
- Take a LEMON (X).
- Look at the door; use the CARD in the slot, then turn the handle (Y).
- Enter the editorial office.

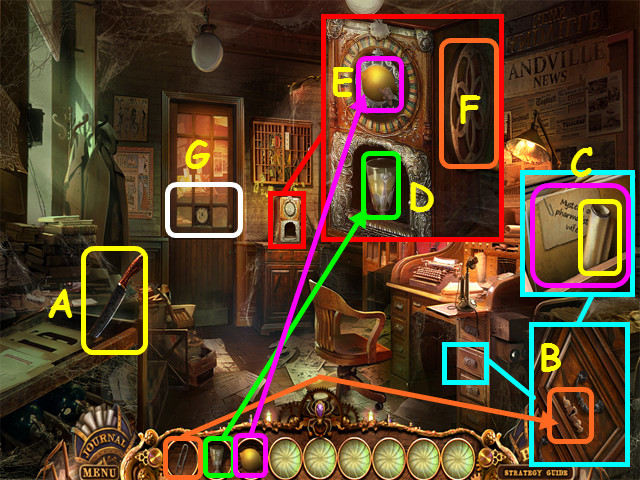
- Take the KNIFE (A).
- Look at the desk drawer and use the PAPER CLIP in the lock (B).
- Take the PAPER ROLL and read the journalist’s notes (C).
- Look at the lemon squeezer and place the CUP inside (D).
- Push the LEMON in the upper circle (E), then turn the crank (F).
- Take the LEMON JUICE.
- Note the mini-game on the back door (G).
- Return to the pharmacy.

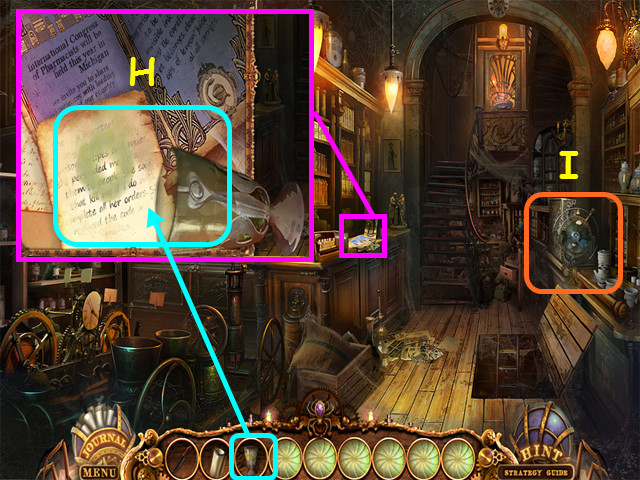
- Look at the counter and use the LEMON JUICE on the paper (H).
- The paper will go automatically into your journal.
- Select the counter for a HOS (I).

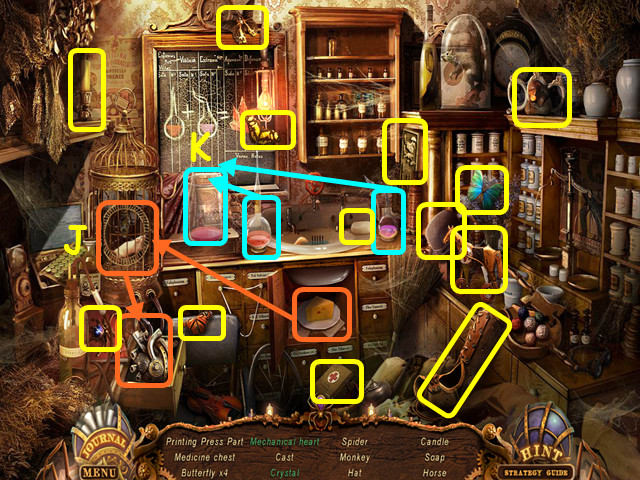
- Locate all the items on the list.
- Use the cheese on the cage to start the mechanical heart (J).
- Pour the 2 liquids into the beaker to make the crystal (K).
- You will earn the NEWSPRINT BLOCK.
- Walk down.

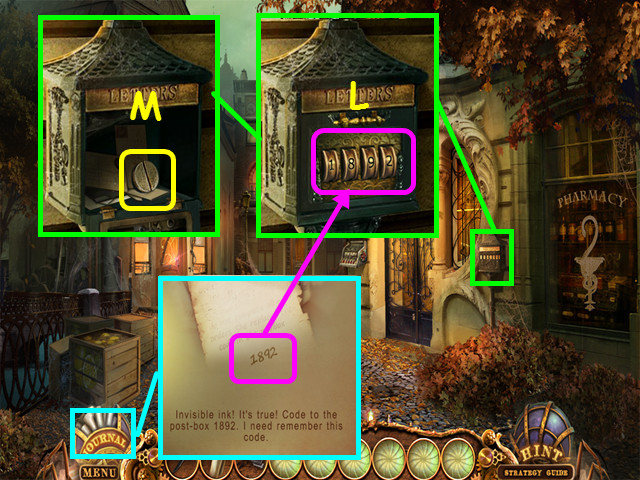
- Look at the mailbox and enter the code 1892 (L).
- Take the METAL TABLET (M).
- Enter the pharmacy and look at the back door for a mini-game.

- Place the METAL TABLET on the device to activate the mini-game.
- Move the tablet through all the circles (N).
- Green lights will show possible moves.
- The circles will light once the tablet passes through.
- Walk forward to the pharmacy 2nd floor.

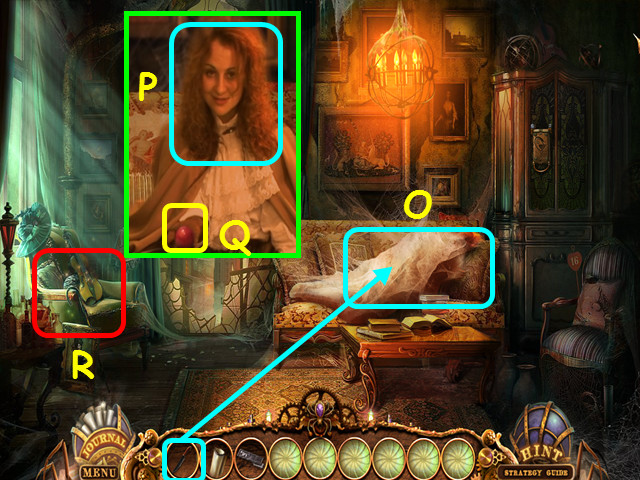
- Use the KNIFE on the cocoon (O).
- Talk to the pharmacist’s niece (P).
- Take the RED BALL (Q).
- Select the chair for a HOS (R).

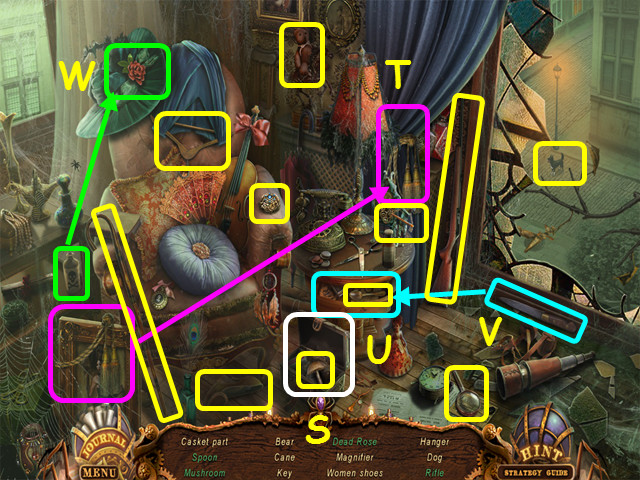
- Locate all the items on the list.
- Open the chest to find the mushroom (S).
- Use the tassels on the curtain to find the rifle (T).
- Try to open the drawer and the handle will fall off (U).
- Use the knife on the drawer to find the spoon (V).
- Use the poison on the hat to release the rose (W).
- You will earn the BOX GEM.
- Travel to the editorial office.
- Look at the back door for a mini-game.

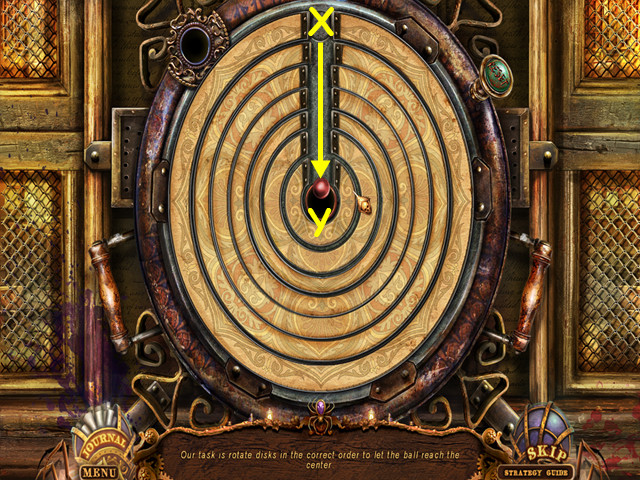
- Place the RED BALL in the device to trigger the mini-game.
- Drag the discs around to move the ball to the center (X).
- Start with the 3rd disc and drag it until the ball moves to the next disc.
- Continue this process until the ball is in the center (Y).
- Walk forward to the printing office.

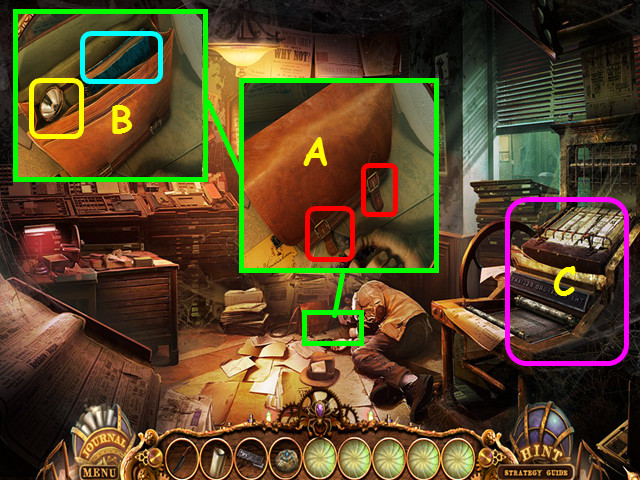
- Look at the floor near the journalist; open the 2 straps on the bag (A).
- Take the FLASHLIGHT and read the notes (B).
- Note the printing press (C).
- Return to the pharmacy and enter the trap door.

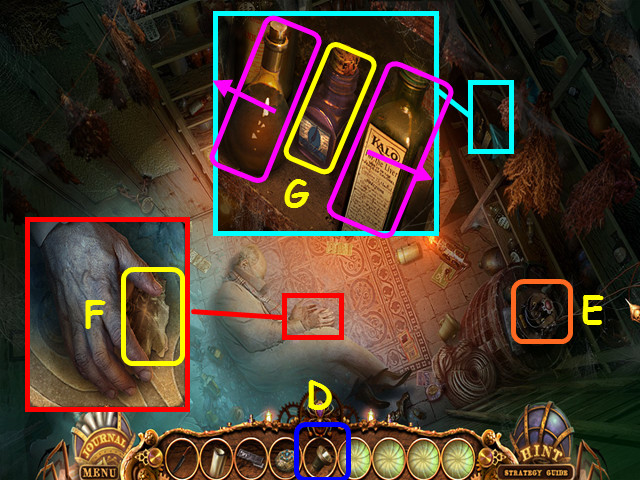
- Use the FLASHLIGHT anywhere on the darkness (D).
- Press the red button to turn on the lights (E).
- Look at the pharmacist and take the PICTURE PIECES from his hand (F).
- Look at the shelf, move the 2 bottles aside, then take the INK (G).
- Return to the printing office and look at the press.


- Place the NEWSPRINT BLOCK, PAPER ROLL, and the INK on the press (H).
- Restore the plate by placing the pieces in the correct position (I).
- Select a piece, then left-click to rotate it to the proper orientation.
- Hold the piece over a position and it will lock to the plate if correct.
- Press the red button (J).
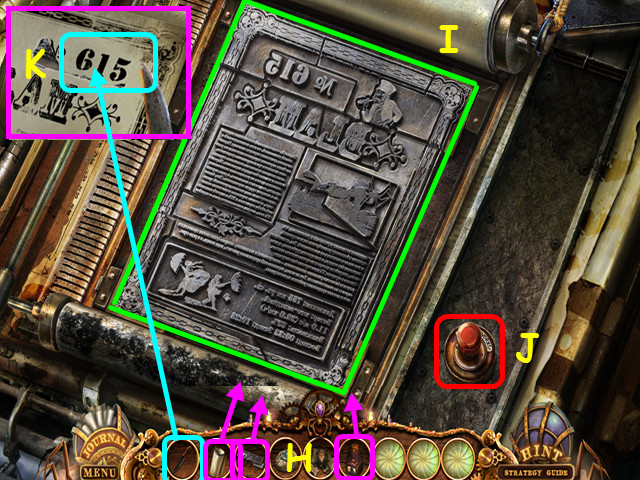
- Use the KNIFE to cut out 615 (K).
- Walk down twice and look at the door on the left for a mini-game.
Chapter 4: Santos and the Ferry

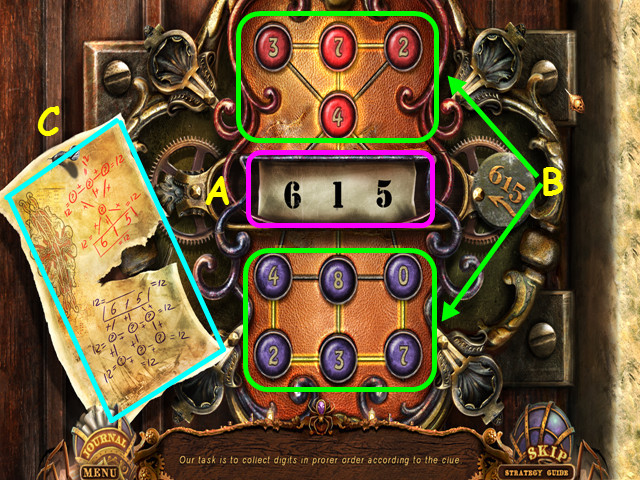
- Place the 615 in the device to activate the mini-game (A).
- Move the numbers so that all combinations add to 12 (B).
- Select 2 numbers to swap positions.
- Refer to the clue for the combinations (C).
- Enter Santo’s house.

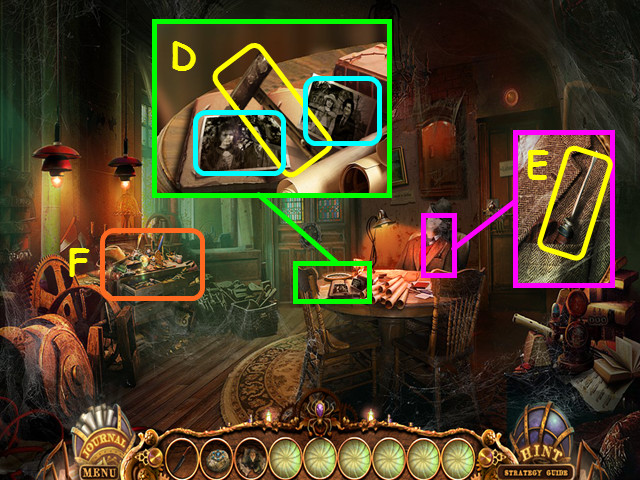
- Look at the table; look at the 2 photos and take the FERRY LEVER (D).
- Look at Santos and take the SCREWDRIVER (E).
- Select the desk for a HOS (F).

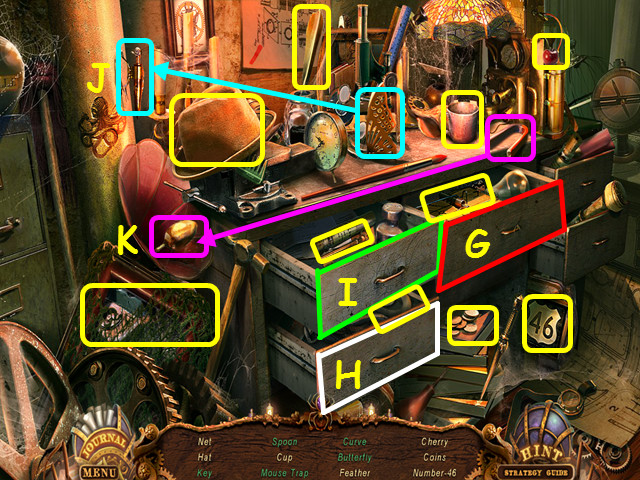
- Locate all the items on the list.
- Open the top center drawer to find the mousetrap (G).
- Open the bottom left drawer to find the curve (H).
- Open the top left drawer to find the key (I).
- Put the wings on the body to make the butterfly (J).
- Use the magnet to pull the spoon out (K).
- You will earn the NET.
- Return to the printing office.

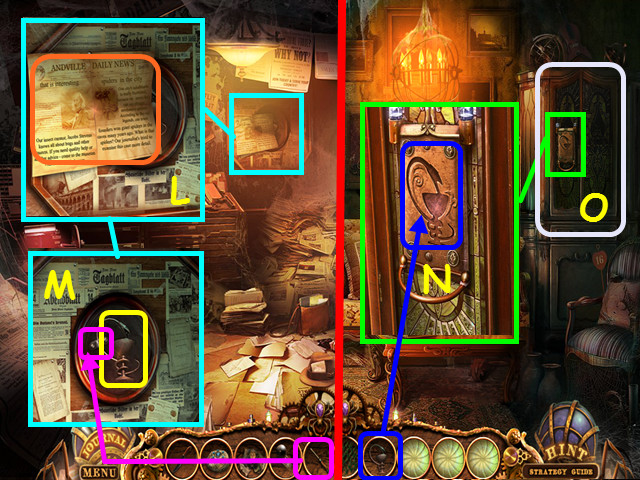
- Look at the bulletin board and remove the paper (L).
- Use the SCREWDRIVER on the clamp, then take the SNAKE IMAGE (M).
- Travel to the pharmacy 2nd floor.
- Look at the cabinet and place the SNAKE IMAGE in the indentation (N).
- Select inside the cabinet for a HOS (O).

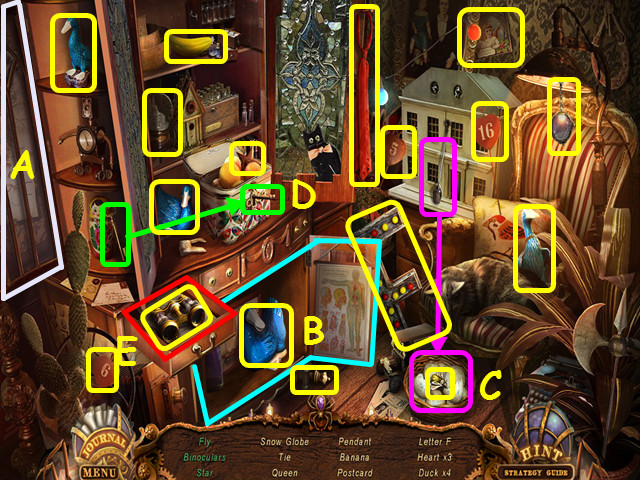
- Locate all the items on the list.
- Open the side door to find a duck (A).
- Open the lower doors to find a duck (B).
- Use the spoon on the eggs to find the fly (C).
- Use the key on the chest; turn the key several times to find the star (D).
- Open the drawer to find the binoculars (E).
- You will earn the FLY.
- Return to Santo’s house.
- Look at the double doors in the back left for a mini-game.

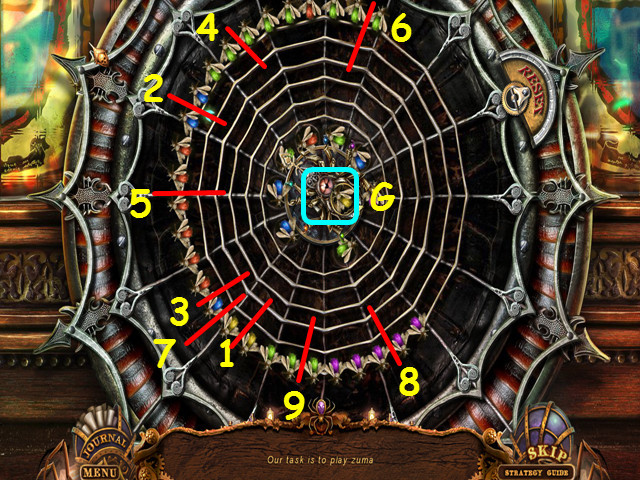
- Place the FLY in the center of the spider to trigger the mini-game (G).
- The object is to shoot all the flies out of the web.
- Note the color of the fly inside the spider, aim with your mouse and shoot it at flies of the same color.
- A small green arrow will show you where you are aiming.
- You have a limited number of flies to shoot, so you must plan accordingly.
- Shoot the flies in numerical order (1-9).
- Walk through the doors to Morgana’s room.

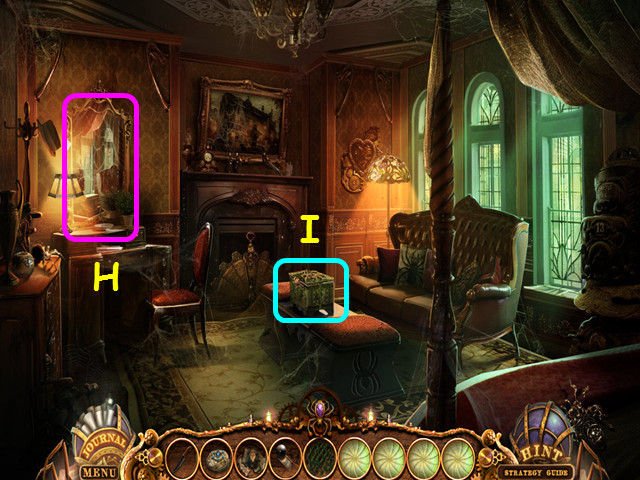
- Note you need something heavy to break the mirror on the vanity (H).
- Look at the casket for a mini-game (I).

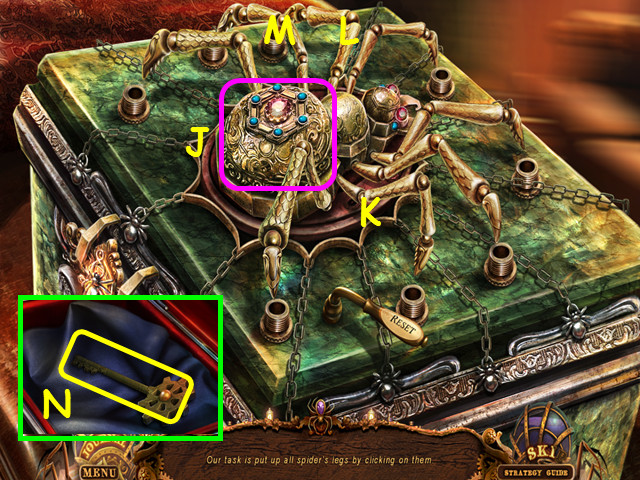
- Place the BOX GEM in the spider body to trigger the mini-game (J).
- Move all the spider legs to the up position by selecting the legs.
- Moving one leg may move other legs.
- Select the legs is this order: 2nd from the left on the bottom, 2nd from the right on the top, 2nd from the left on the top (K-L-M).
- Take the LABORATORY KEY (N).
- Walk down; look at the door on the right and use the LABORATORY KEY in the lock.
- Enter the workshop.

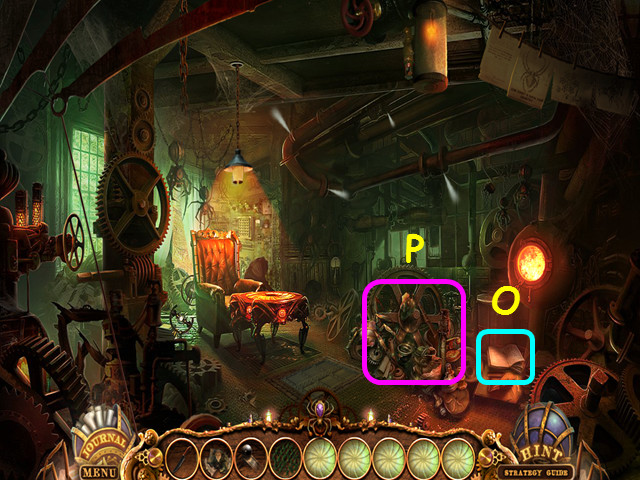
- Look at the diary and read the pages (O).
- Select the debris for a HOS (P).

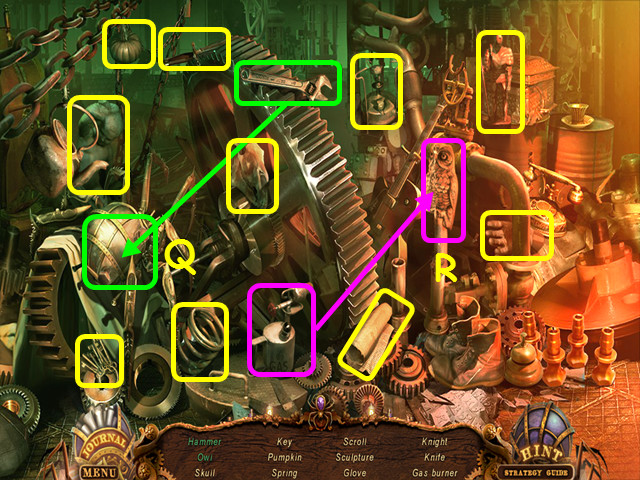
- Locate all the items on the list.
- Use the wrench on the bolts to find the hammer (Q).
- Use the blowtorch to take the owl (R).
- You will earn the HAMMER.
- Return to Morgana’s room.

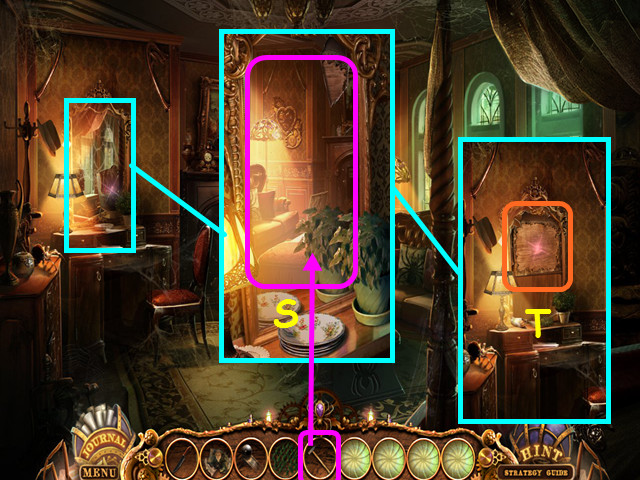
- Look at the vanity and use the HAMMER on the mirror (S).
- Look again at the vanity for a mini-game (T).

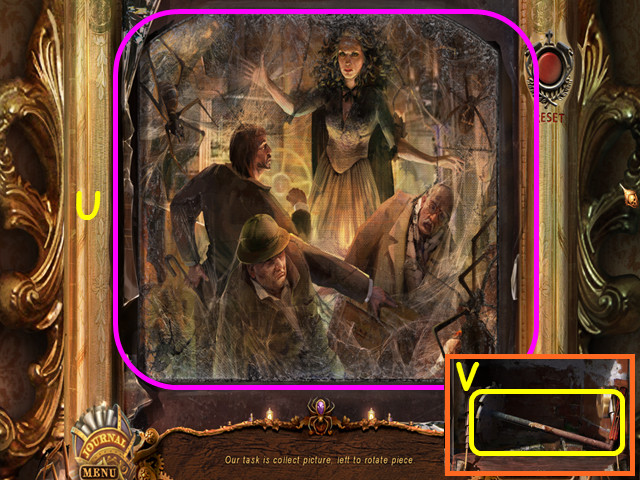
- Place the PICTURE PIECES on the board to activate the mini-game.
- Restore the picture by putting the pieces in the correct positions (U).
- Select a piece, then left-click to rotate it to the proper orientation.
- Hold the piece over a position and it will lock in place if correct.
- Take the HANDLE (V).
- Return to the workshop.

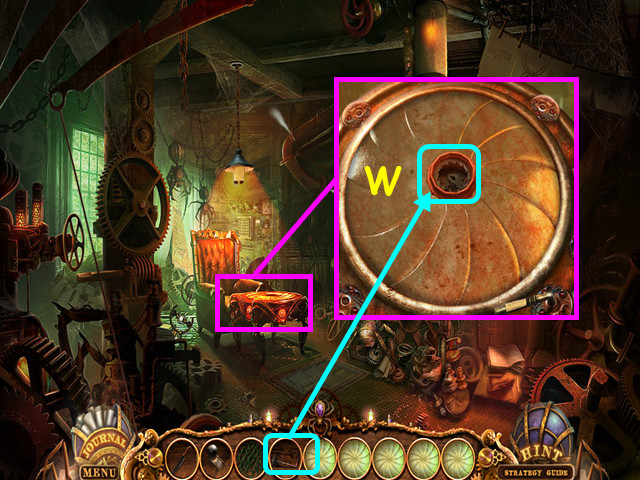
- Look at the table and place the HANDLE in the center (W).
- Look at the table again for a mini-game.

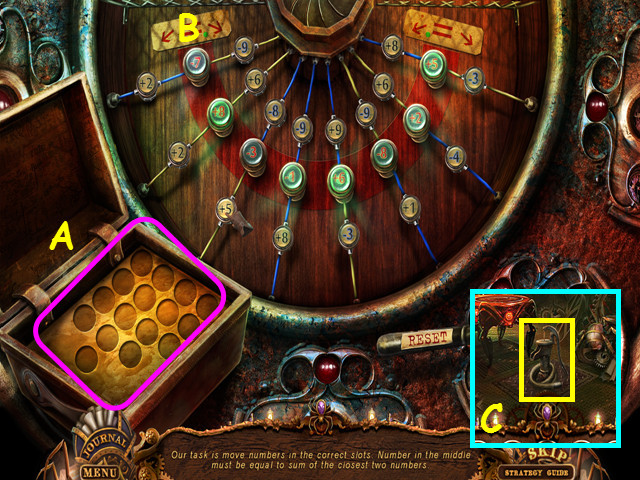
- Place two numbers from the box (A) above and below each number on the red band (B).
- The 2 outer numbers must equal the number on the red band and will light up when correct.
- Take the PUMP that rises from the floor (C).
- Return to the ferry.

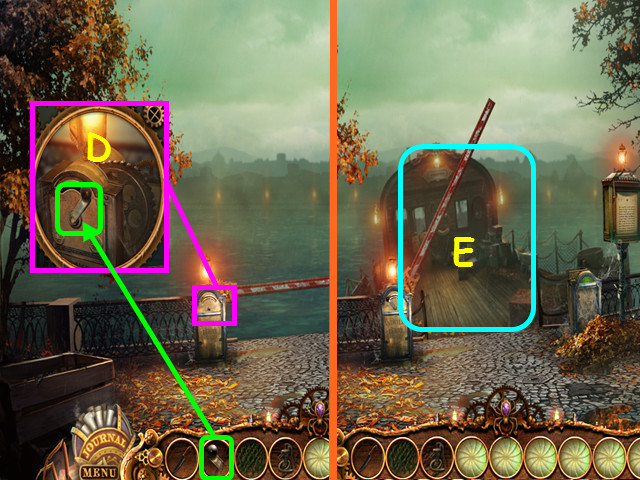
- Look at the bar-lifting mechanism and use the FERRY LEVER on the hole (D).
- Turn the lever to call the ferry.
- Walk forward to the ferry (E).

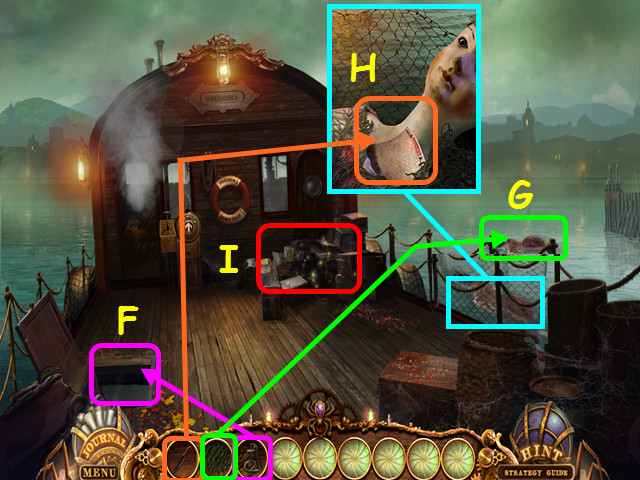
- Use the PUMP on the water-filled hold (F).
- Use the NET on the floating debris (G).
- Look at the net and use the KNIFE to uncover the BLANK FERRY TICKET (H).
- Select the crates for a HOS (I).

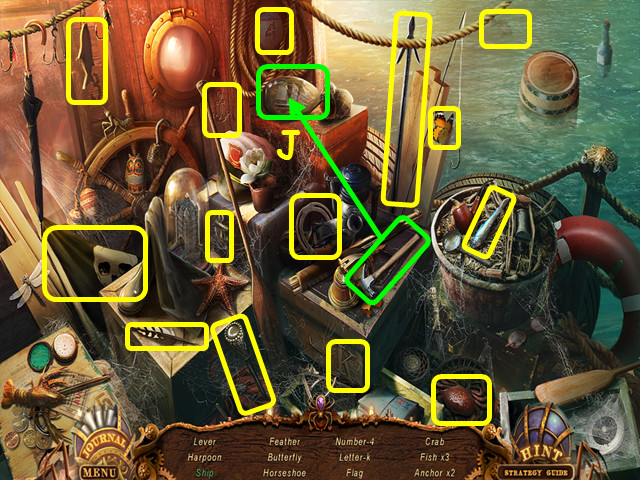
- Locate all the items on the list.
- Use the hammer on the bottle to find the ship (J).
- You will earn the LEVER.
- Travel to the square; look at the kiosk and select the machine on the right.

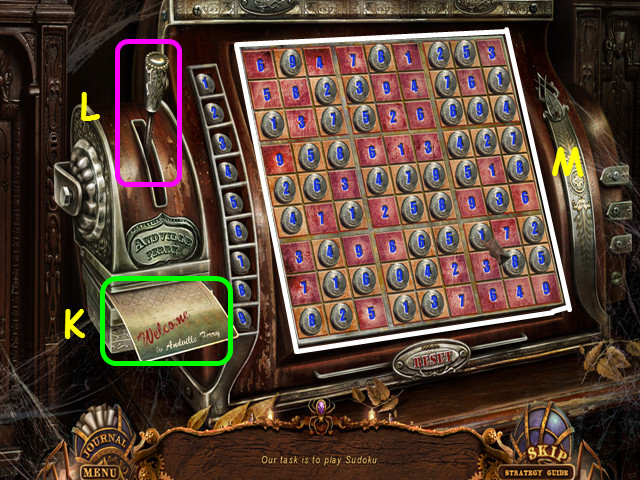
- Place the BLANK FERRY TICKET in the slot (K).
- Place the LEVER into the control to activate the mini-game (L).
- Place the numbers (M) onto the board so that none are repeated in each row, column, or 9×9 square.
- You will earn the FERRY TICKET.
- Return to Santo’s house and select the desk on the left for a HOS.

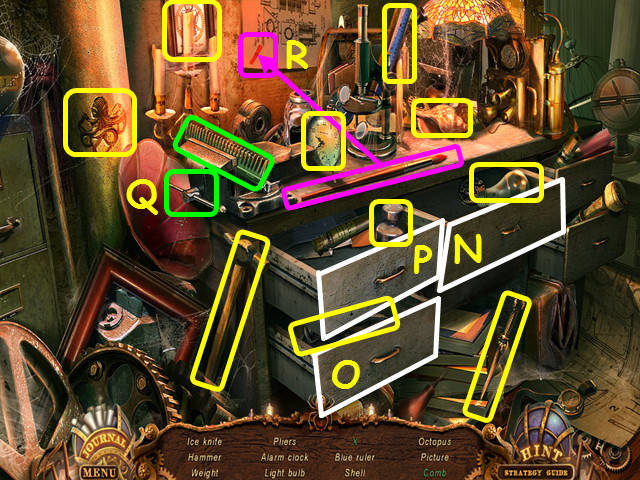
- Locate all the items on the list.
- Note – if you closed the drawers previously, you will need to reopen them.
- Take the light bulb from the center drawer (N).
- Take the pliers from the bottom left drawer (O).
- Take the weight from the upper left drawer (P).
- Open the vise to take the comb (Q).
- Use the brush on the red line to make the X (R).
- You will earn the ICE PICK.
- Travel to the cellar.

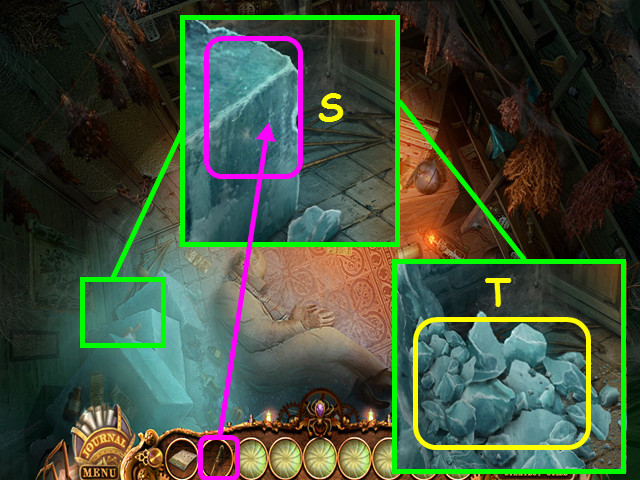
- Look in the corner and use the ICE PICK on the blocks (S).
- Take the ICE (T).
- Return to the inside ferry.

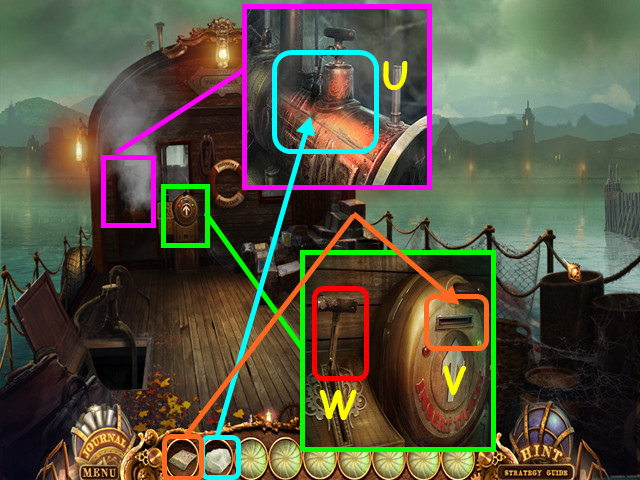
- Look at the engine and use the ICE to cool it down (U).
- Look at the control and use the FERRY TICKET on the slot (V).
- Pull down the lever for a mini-game (W).

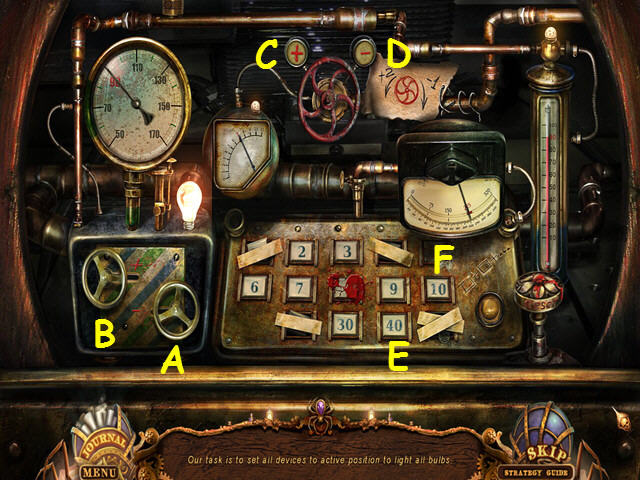
- Adjust all the gauges so the needles point to the red numbers.
- Turn the valves or press the following buttons: A-B-Cx4-D-Ex5-Fx2.
Chapter 5: Fire!

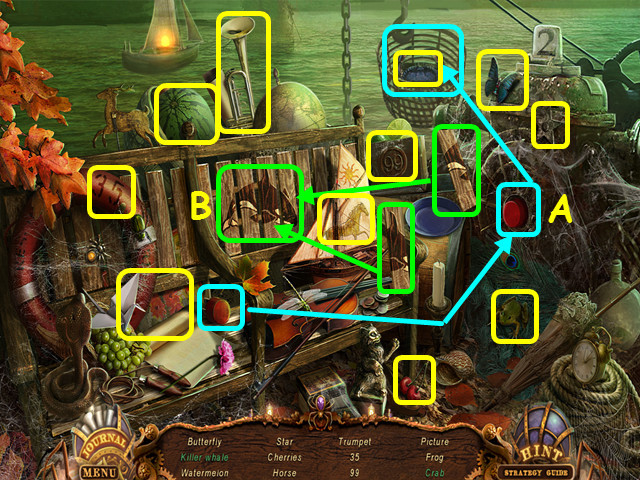
- Select the bench on the left for a HOS.
- Locate all the items on the list.
- Place the button in the socket; push it to find the crab (A).
- Place the slats on the bench to find the killer whale (B).
- You will earn the BUTTERFLY 1.
- Walk forward.

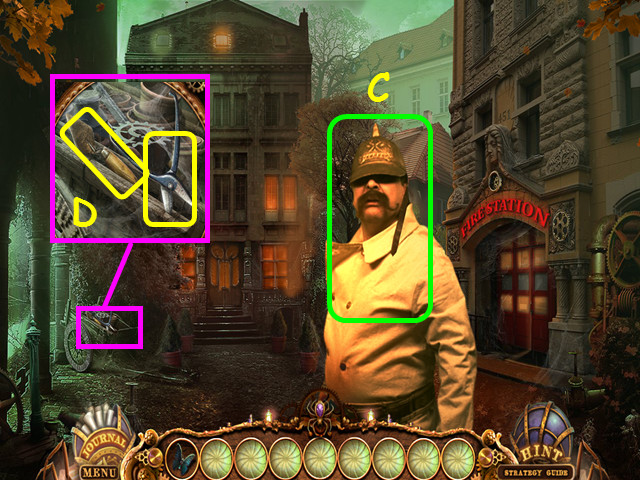
- Talk to the man (C).
- Look at the wheelbarrow; take the TROWEL and the SCISSORS (D).
- Walk down.

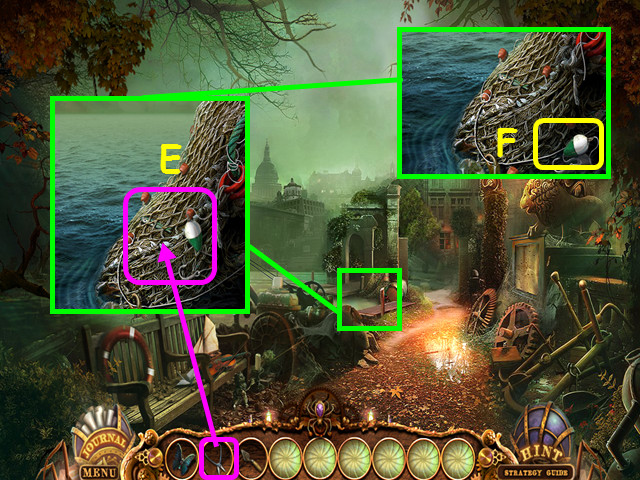
- Look at the bank and use the SCISSORS on the net (E).
- Take the BOBBER (F).
- Walk forward.

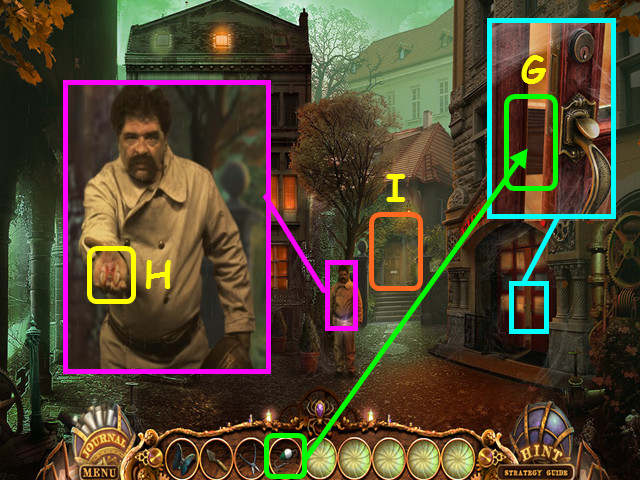
- Look at the fire station door and use the BOBBER on the beam (G).
- Talk to the fireman and he will give you BUTTERFLY 2 (H).
- Look at the door to the entomologist’s for a mini-game (I).

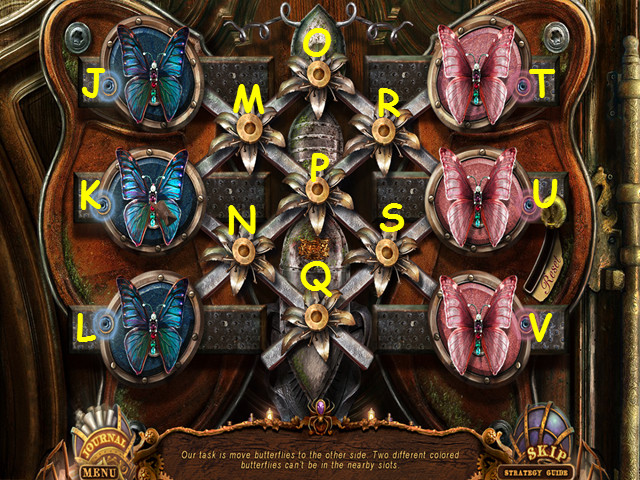
- Place the 2 BUTTERFLIES on the device to trigger the mini-game.
- Swap the positions of the blue and pink butterflies.
- 2 different colored butterflies cannot be next to each other.
- Move the butterflies in this order: K-N, J-M, M-K, U-R, R-O, V-S, S-U, U-R, N-Q, Q-S, S-V, K-N, N-Q, Q-S, L-N, N-Q, O-M, M-J, R-O, O-M, M-K, T-R, R-O, O-M, S-U, U-R, R-T, Q-S, S-U, K-N, N-L, and M-K
- Enter the entomologist’s house.

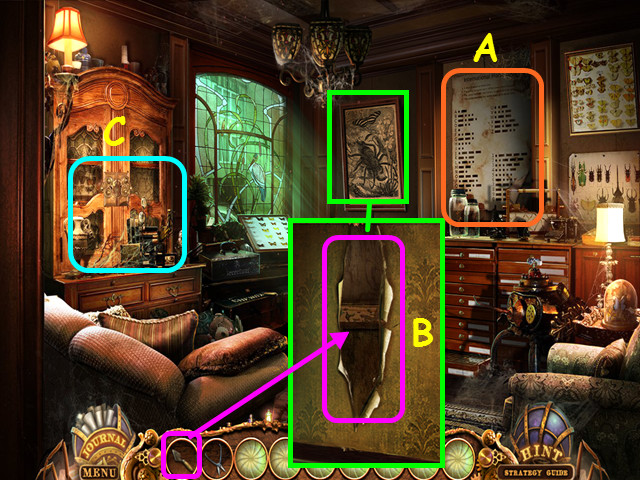
- Look at the Morse code poster (A).
- Remove the painting and zoom into the wall; use the TROWEL on the wallpaper twice (B).
- Exit the close-up, then select the cabinet for a HOS (C).

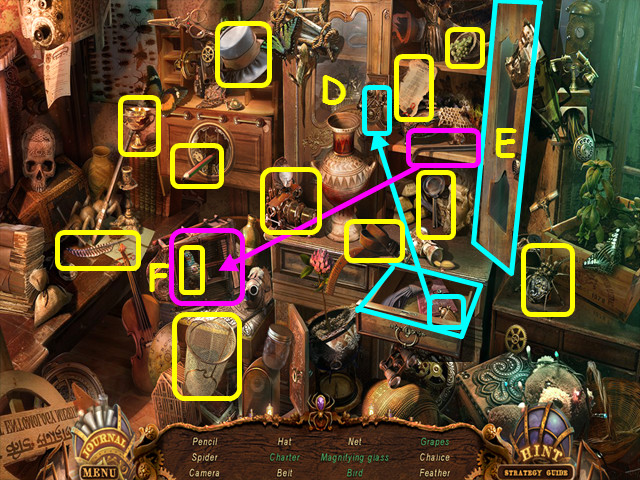
- Locate all the items on the list.
- Open the drawer, use the beetle on the cabinet (D).
- Open the cabinet to find the grapes, charter, and magnifier (E).
- Use the crowbar to open the cage and find the bird (F).
- You will earn the PENCIL.
- Walk down, then enter the burning house on the left.

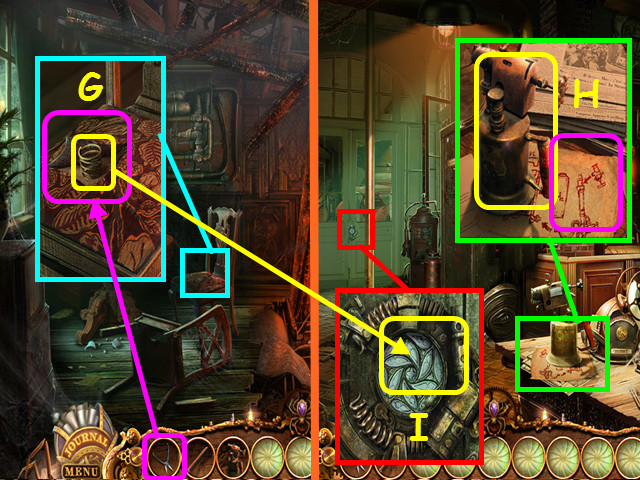
- Look at the chair; use the SCISSORS on the seat, then take the SPRING (G).
- Walk to the fire station.
- Look at the table; take the BLOWTORCH and read the instructions (H).
- Look at the back doors and use the SPRING in the lock (I).
- Walk forward to the garage.

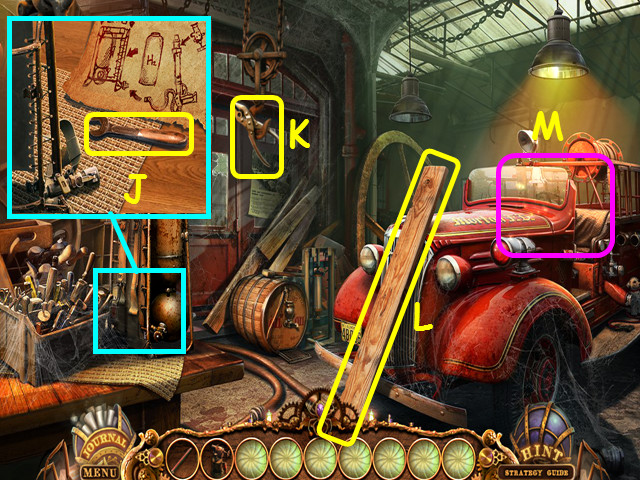
- Look at the table and take the WRENCH (J).
- Take the PLIERS (K).
- Take the BOARD (L).
- Select the cab of the fire truck for a HOS (M).

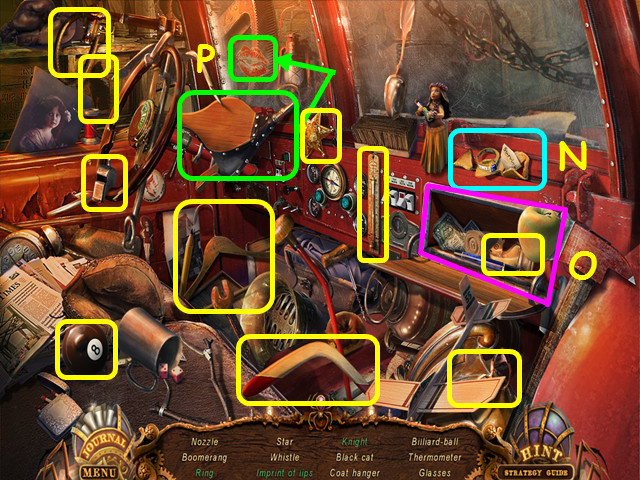
- Locate all the items on the list.
- Open the fortune cookie to find the ring (N).
- Open the glove box to find the knight (O).
- Use the bellows on the window to find the imprint of lips (P).
- You will earn the NOZZLE.
- Walk down.

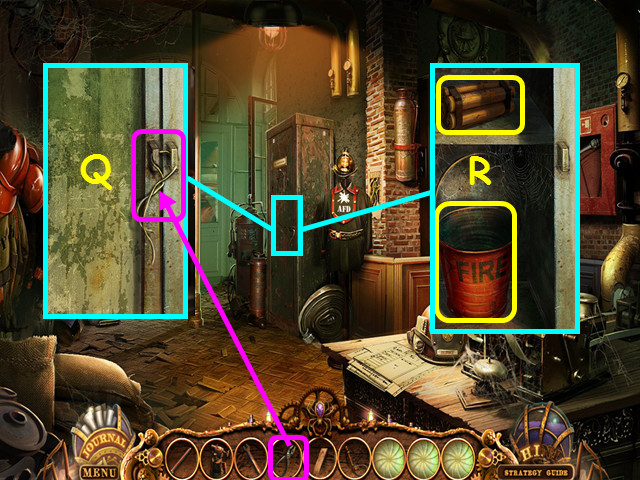
- Look at the locker and use the PLIERS on the wire (Q).
- Take the DYNAMITE and the EMPTY BUCKET (R).
- Walk down twice.

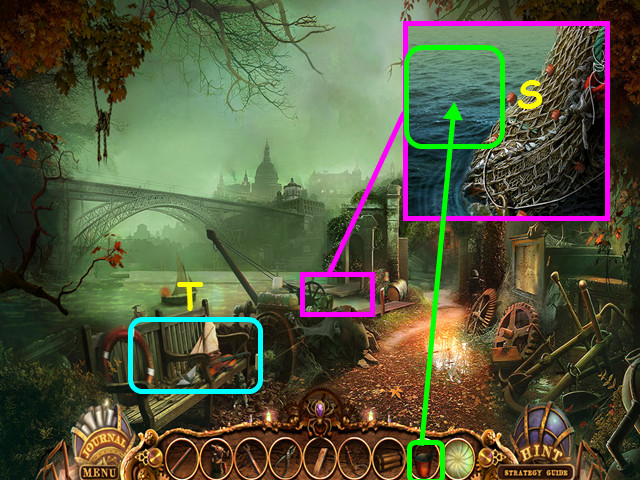
- Look at the bank and use the EMPTY BUCKET on the water to get the BUCKET WITH WATER (S).
- Select the bench for a HOS (T).

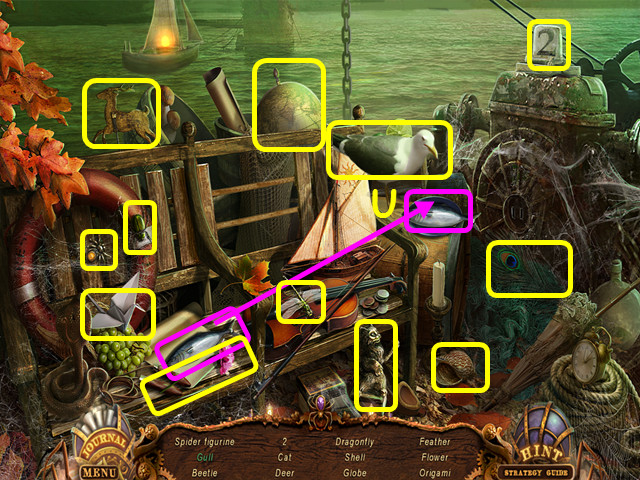
- Locate all the items on the list.
- Place the fish on the plate to bring the gull (U).
- You will earn the 1/9 SPIDER FIGURINE.
- Use the map to go to Morgana’s parent’s house.

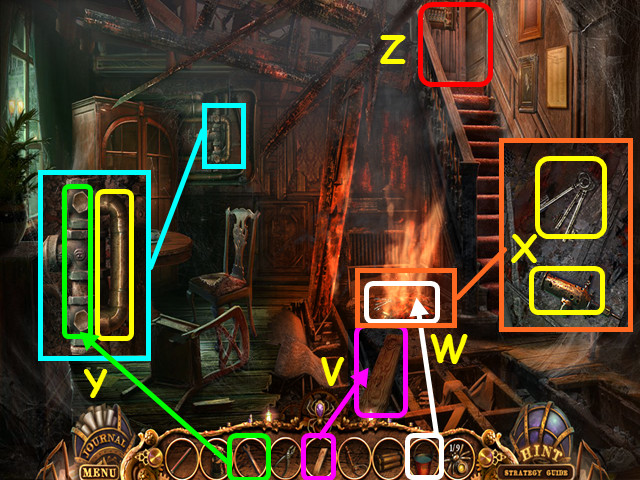
- Place the BOARD on the broken floor (V).
- Use the BUCKET WITH WATER on the flames (W).
- Look at the coals; take the KEYS and the IGNITER (X).
- Look at the wall; use the wrench on the bolts, then take the PIPE (Y).
- Look at the top of the stairs for a mini-game (Z).

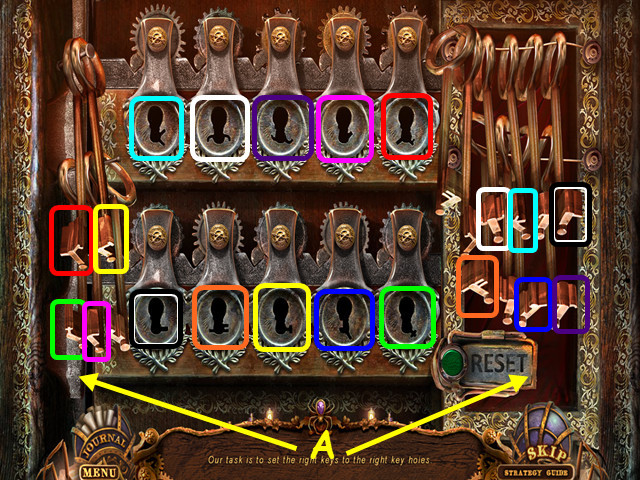
- Place the KEYS on the panel to trigger the mini-game.
- Take the keys from the left and right and use them on the keyholes (A).
- Not all the keys will be used.
- Find the 10 keys that match the keyholes (color-coded).
- Walk up the stairs to the nursery.

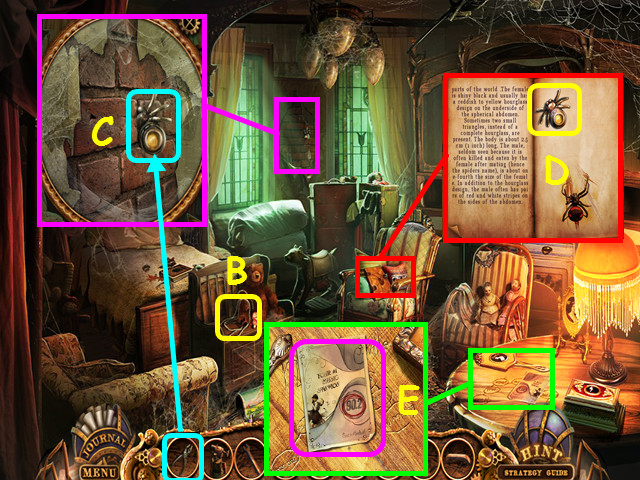
- Take the FUSE (B).
- Look at the wall and use the PLIERS to get the 2/9 SPIDER FIGURINE (C).
- Look at the chair, open the book, turn the page and take the 3/9 SPIDER FIGURINE (D).
- Look at the table and read the paper (E).
- Return to the entomologist’s house.

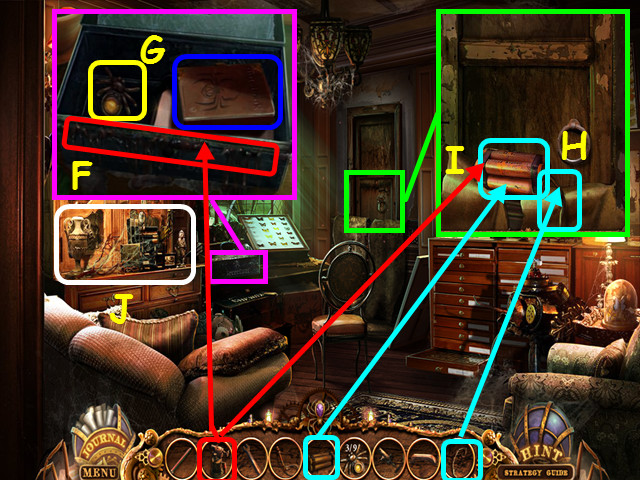
- Look at the table and use the BLOWTORCH on the box (F).
- Take the 4/9 SPIDER FIGURINE and read the book (G).
- Look at the wall; place the DYNAMITE, then the fuse by the door (H).
- Use the BLOWTORCH to light the dynamite (I).
- Select the cabinet for a HOS (J).

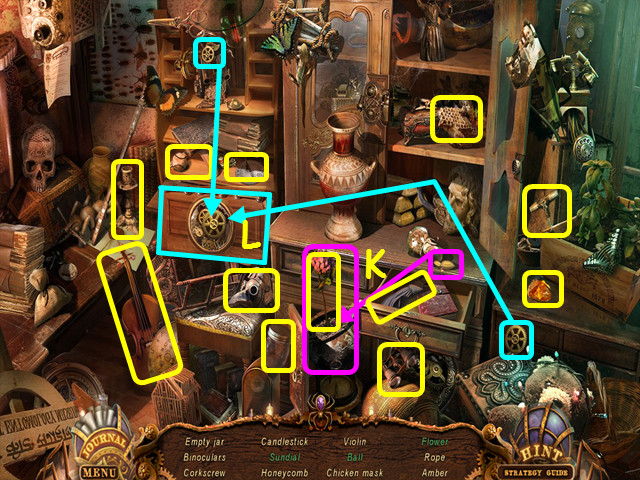
- Locate all the items on the list.
- Place the seed in the pot to make the flower (K).
- Place the 2 gears in the door, then open it to find the ball and the sundial (L).
- You will earn the empty jar.
- Walk forward through the hole in the wall.

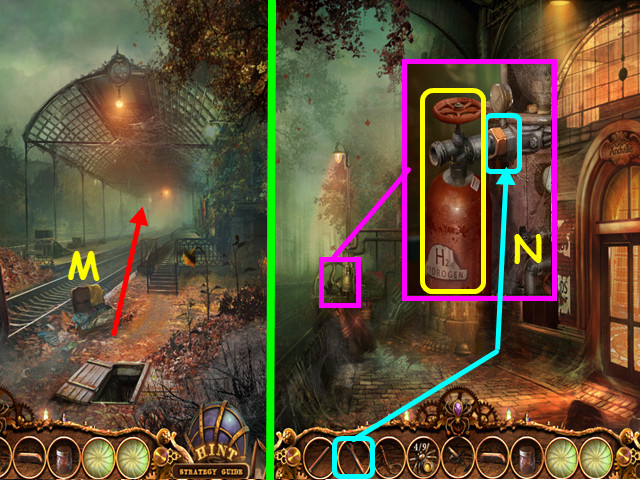
- Walk forward to the platform (M).
- Look at the apparatus; use the WRENCH on the bolt, then take the HYDROGEN TANK (N).
- Use the map to travel to the garage.

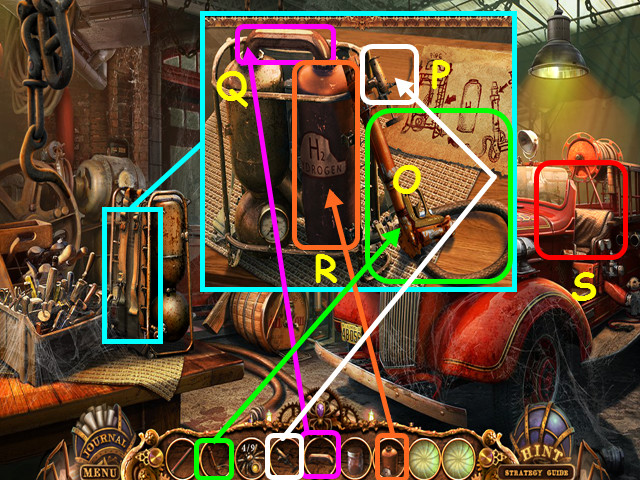
- Look at the table and place the HYDROGEN TANK in the frame (R).
- Place the NOZZLE on the coupling (O).
- Place the IGNITER at the end of the hose (P).
- Place the PIPE on the tanks (Q).
- Take the FLAMETHROWER.
- Select the fire truck cab for a HOS (S).

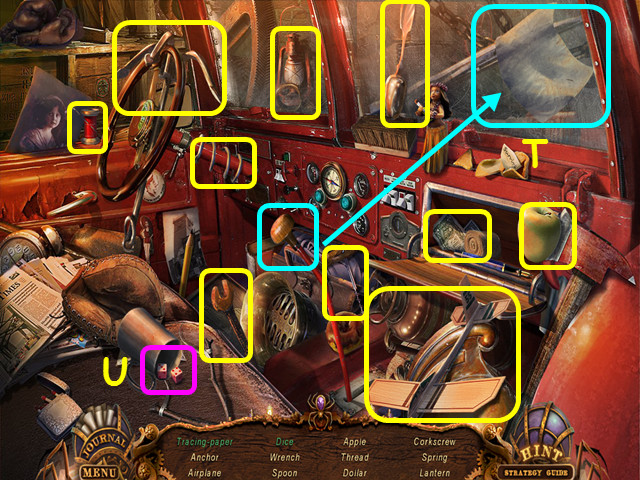
- Locate all the items on the list.
- Move the stick shift to find the tracing paper (T).
- Select the cup with dice for a quick shake and roll (U).
- You will earn the TRACING PAPER.
- Return to the nursery.

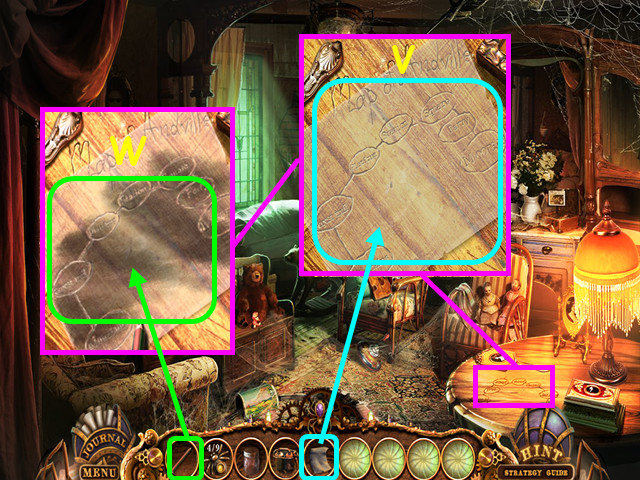
- Look at the table and place the TRACING PAPER on the surface (V).
- Use the PENCIL on the paper (W).
- The map will go into your journal.
- Travel to the street by the train.

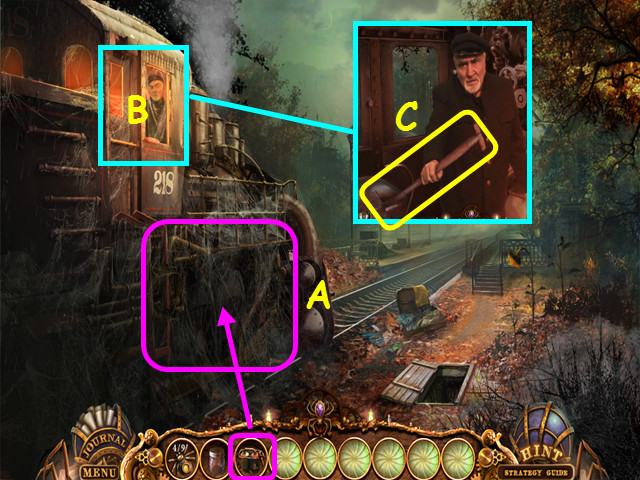
- Use the FLAMETHROWER on the webs (A).
- Enter the cab of the train (B) and talk to the engineer; he will give you a SPADE (C).

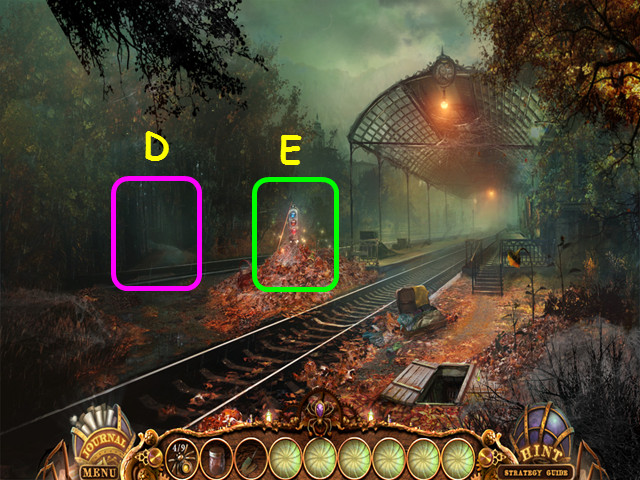
- Note the entrance to the forest (D).
- Select the signal for a HOS (E).

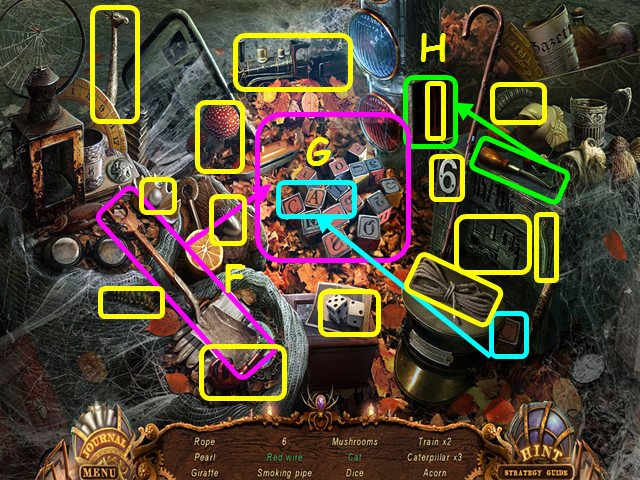
- Locate all the items on the list.
- Use the shovel to remove the leaves from the blocks (F).
- Place the ‘C’ block next to ‘A-T’ to make cat (G).
- Use the screwdriver on the panel to find the red wire (H).
- You will earn the ROPE.
- Enter the forest.
Chapter 6: The Forest

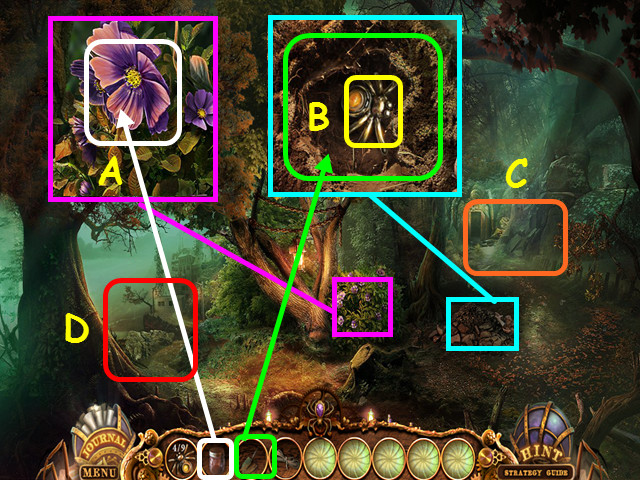
- Look at the bush; use the EMPTY JAR on the flowers to get the JAR WITH POLLEN (A).
- Look at the dirt pile and use the SPADE to uncover the 5/9 SPIDER FIGURINE (B).
- Note the path to the cave entrance (C).
- Take the left path to the mountains (D).

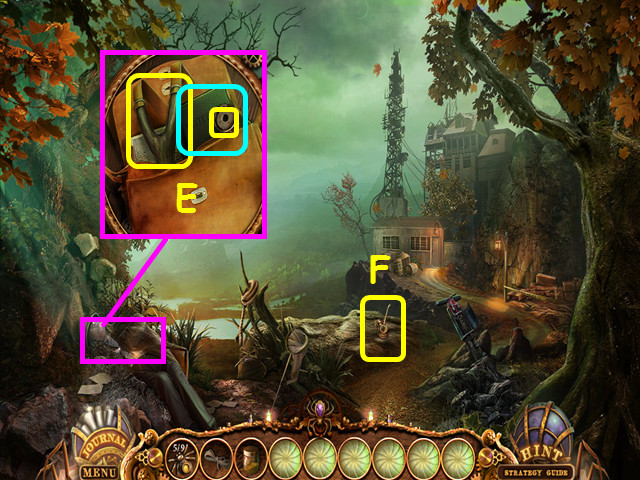
- Look at the body; open the pouch, take the SLINGSHOT, BUTTON, and read the notebook (E).
- Take the EMPTY OIL CAN (F).
- Return to the Forest Trail and then proceed to the cave entrance.

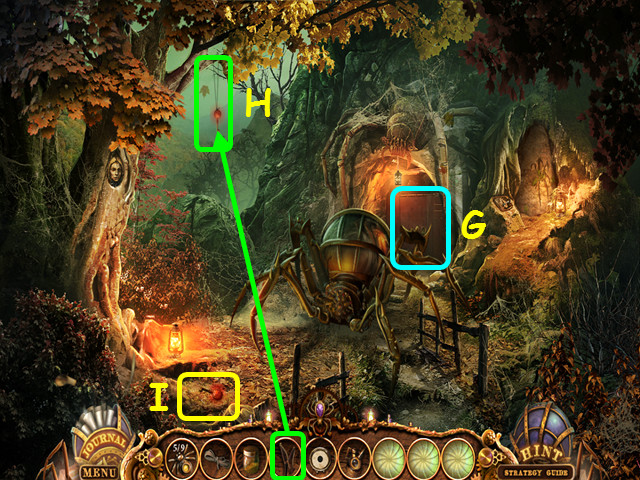
- Try the door to the cave (G).
- Use the SLINGSHOT to knock down the key (H), then take the RADIO TOWER KEY (I).
- Return to the garage.

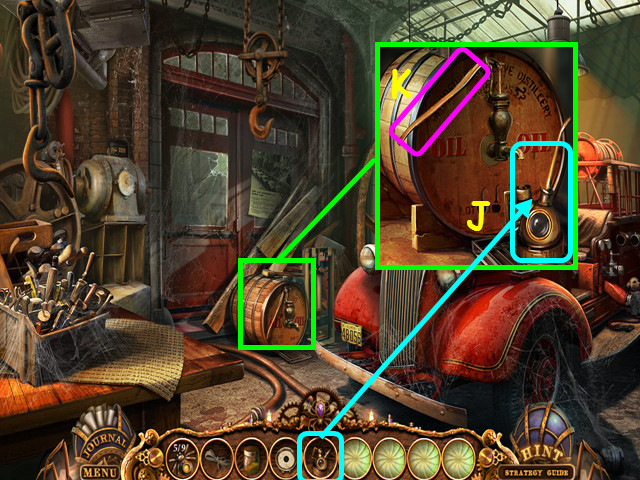
- Look at the barrel and place the EMPTY OIL CAN on the floor (J).
- Pump the handle (K), then take the FULL OIL CAN.
- Return to the mountains.

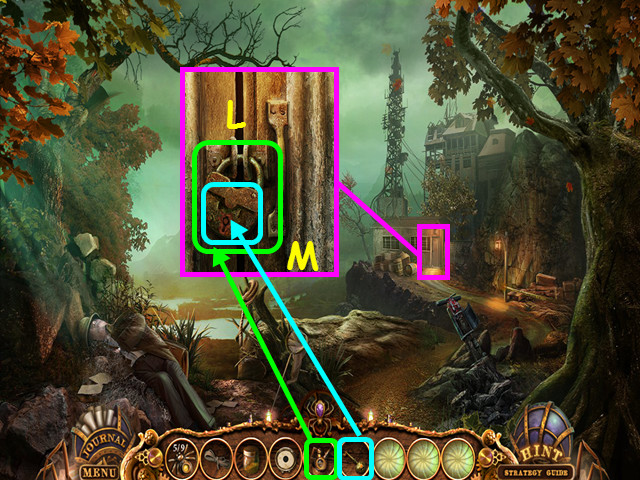
- Look at the door and use the FULL OIL CAN on the lock (L).
- Use the RADIO TOWER KEY on the lock (M).
- Turn the key, then enter the radio tower.

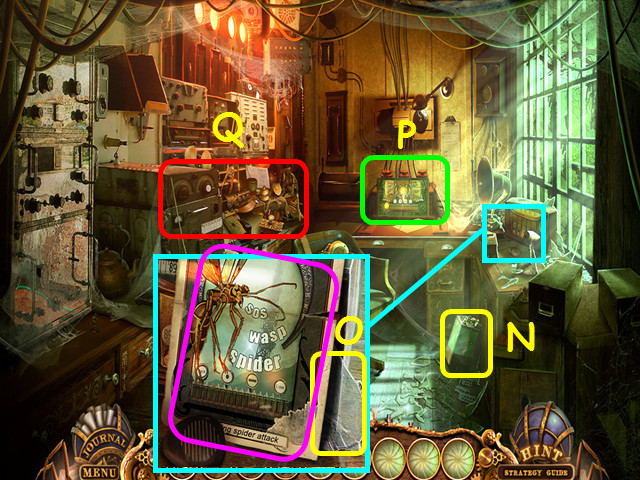
- Take the BATTERY (N).
- Look at the table and read the poster and take the GLASS PIECE (O).
- Note the mini-game on the back table (P).
- Select the area on the left for a HOS (Q).

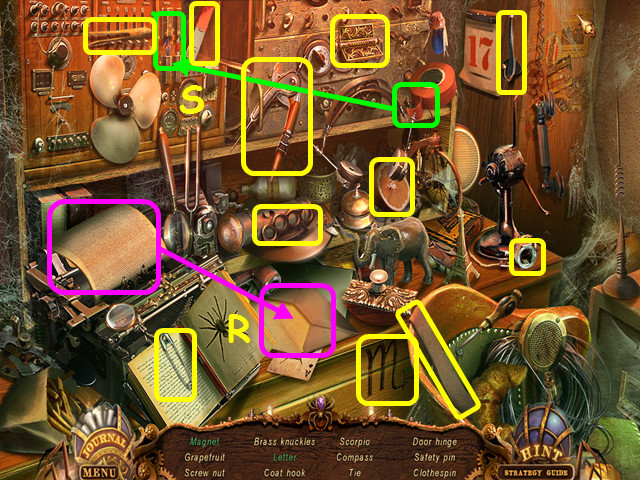
- Locate all the items on the list.
- Place the page in the envelope, then close the flap to make the letter (R).
- Use the tape on the wire to reveal the magnet (S).
- You will earn the MAGNET.
- Look at the mini-game on the back table.

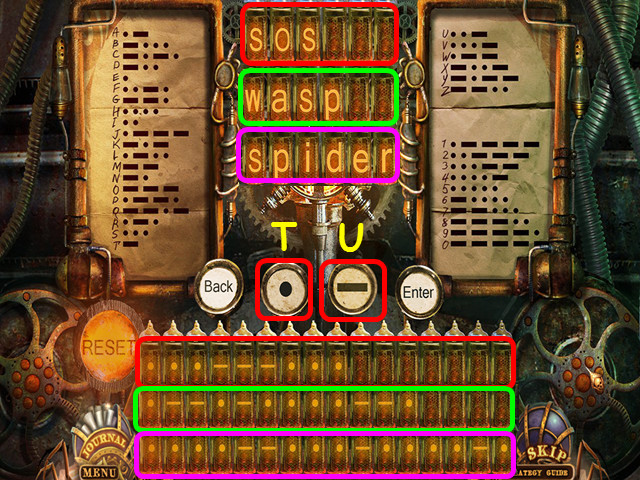
- Place the (dot) BUTTON on the device to activate the mini-game (T).
- A word will briefly appear at the top.
- Press the dot and dash (U) buttons to spell out the words in Morse code.
- You must spell SOS, WASP and SPIDER (color coded).
- Select the area on the left for a HOS.

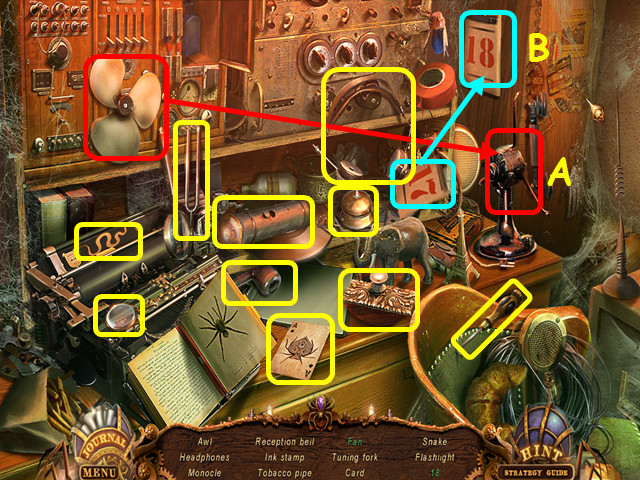
- Locate all the items on the list.
- Place the blades on the motor to make the fan (A).
- Tear off the page to find 18 (B).
- You will earn the AWL.
- Walk down.

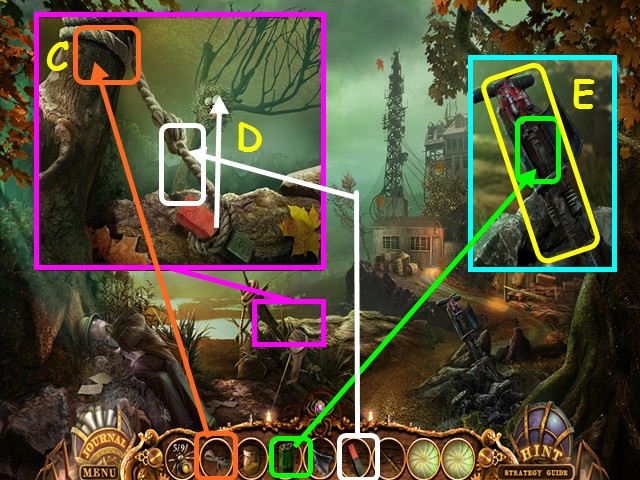
- Look at the ledge and use the ROPE on the branch (C).
- Put the MAGNET on the rope, then drop it on the nest to get the 6/9 SPIDER FIGURINE (D).
- Look at the jackhammer; place the BATTERY inside, close the cover, then take the JACKHAMMER (E).
- Return to the cave entrance.

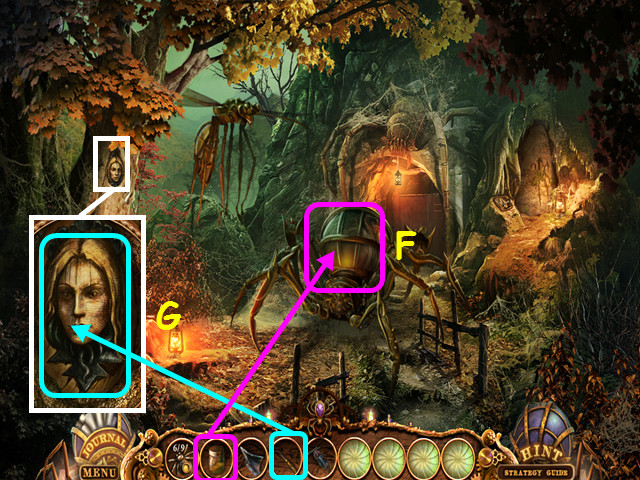
- Use the JAR WITH POLLEN on the spider (F).
- Look at the tree and use the AWL to take the WOODEN FACE (G).
- Return to the nursery.

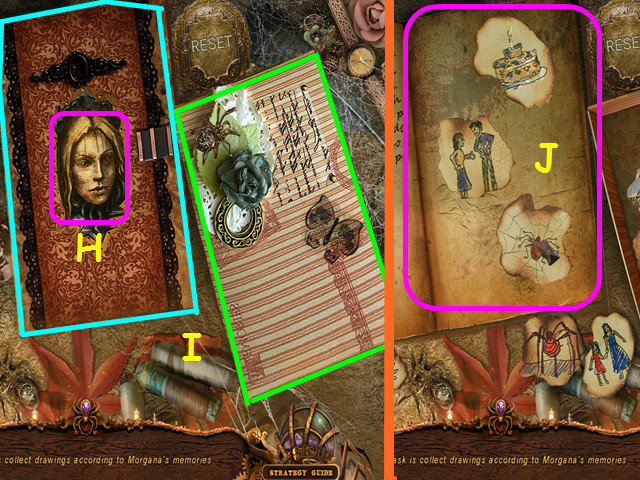

- Look at the mini-game on the bed.
- Place the WOODEN FACE in the indentation to trigger the mini-game (H).
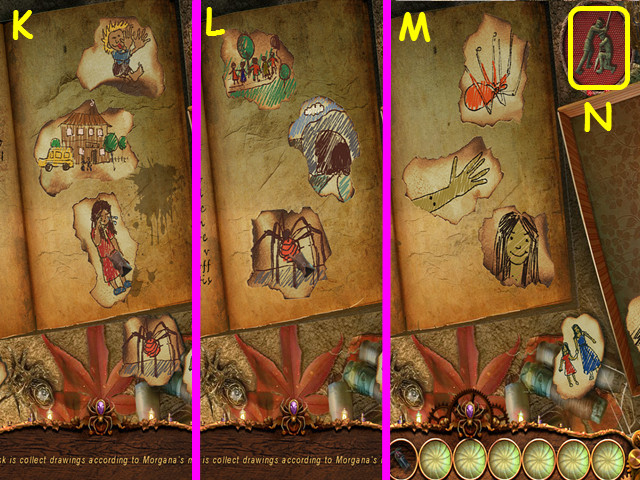
- Open the book and the box (I).
- Place the 3 pieces that match the outlines on the page (J).
- Turn the page, then place the next 3 pieces (K).
- Turn the page, then place the next 3 pieces (L).
- Turn the page, then place the next 3 pieces (M).
- Take the SEAL (N).
- Return to the cave entrance.

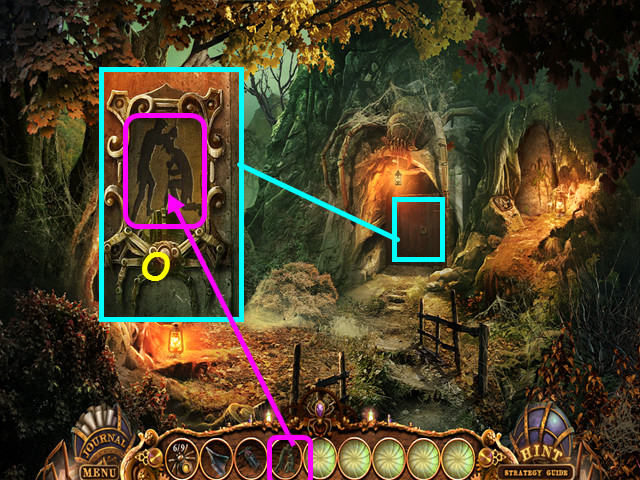
- Look at the door and place the SEAL in the indentation (O).
- Enter the Underground lake.

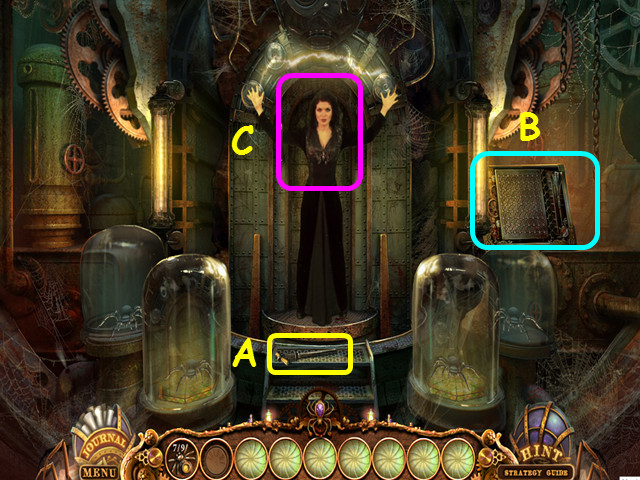
- Look at the cocoon and use the GLASS PIECE to cut it open (P).
- Talk to Maria; then take the 7/9 SPIDER FIGURINE from her (Q).
- Look at the rocks and use the JACKHAMMER to free the gem, then take the GEM (R).
- Take the RADIO KNOB (S).
- Look at the door in the back for a mini-game.

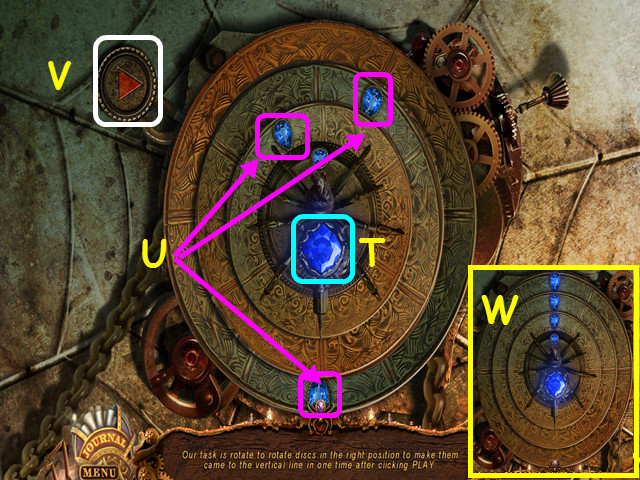
- Place the GEM in the center hole to activate the mini-game (T).
- Move the dials to the positions shown in the screenshot (U).
- Press the play button to align the gems (V).
- Your goal is to align all the gems (W).
- Walk forward to Morgana’s machine.


- Take the LEVER (A).
- Note the mini-game on the right (B).
- Look at Morgana (C).
- Walk down twice.

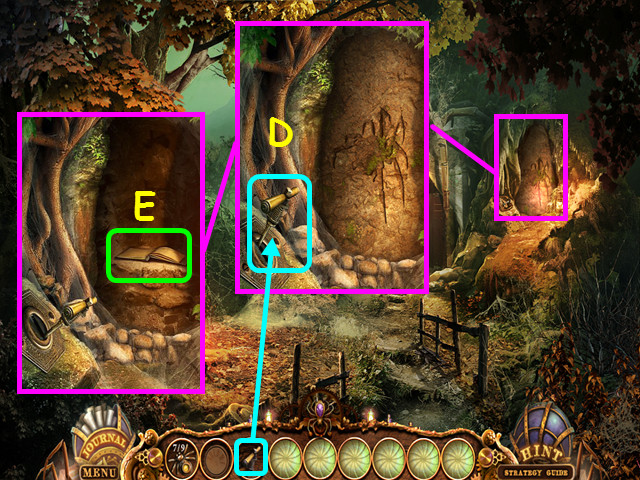
- Look at the niche and use the LEVER on the slot, then pull the lever (D).
- Look inside the niche, then look at the book for a mini-game (E).

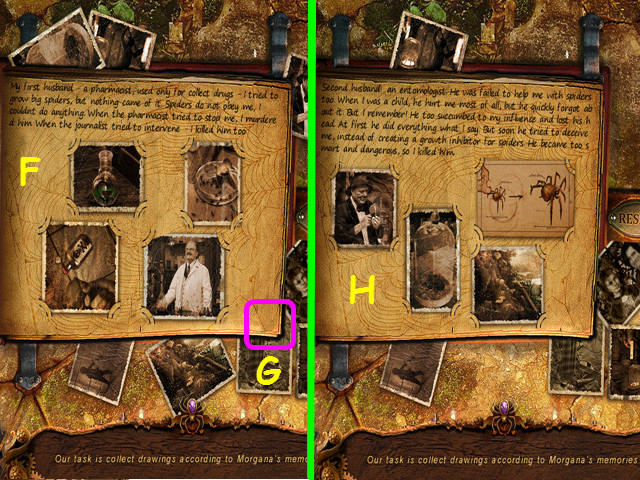

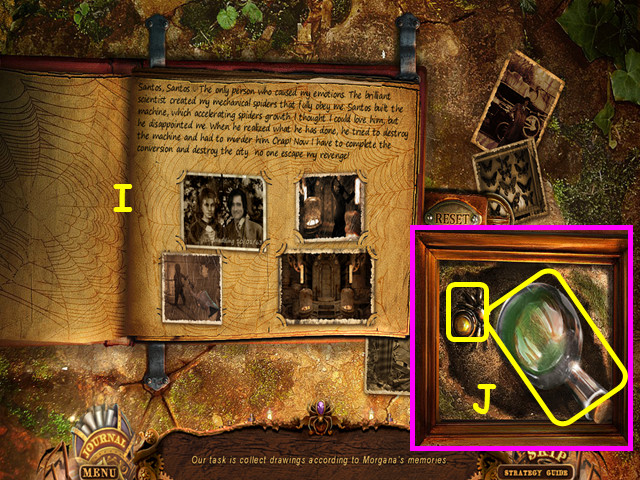
- Place 4 photos into the album based on the story and size of the photos (F).
- Use the faint outlines and the photo corners as your guide.
- Turn the page (G) and place 4 more photos (H), then turn the page.
- Place the final 4 photos (I).
- Take the INHIBITOR and the 8/9 SPIDER FIGURINE (J).
- Travel to the radio tower.

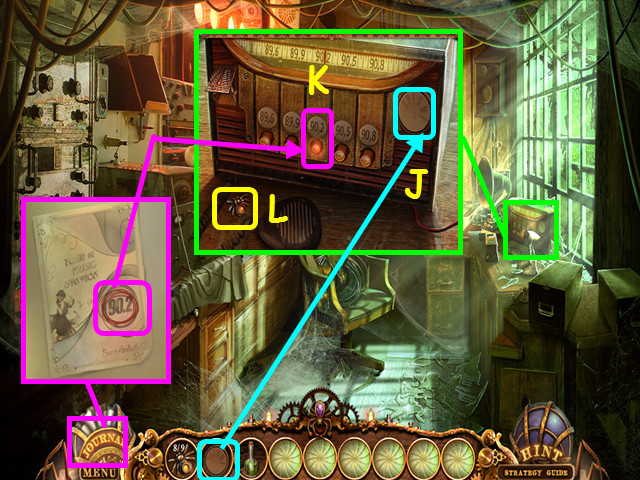
- Look at the radio and place the RADIO KNOB on the right (J).
- Turn the radio knob to turn on the radio.
- Press the 90.2 button per the clue in your journal (K).
- Take the 9/9 SPIDER FIGURINE (L).
- Travel to Morgana’s machine and look at the mini-game on the right.

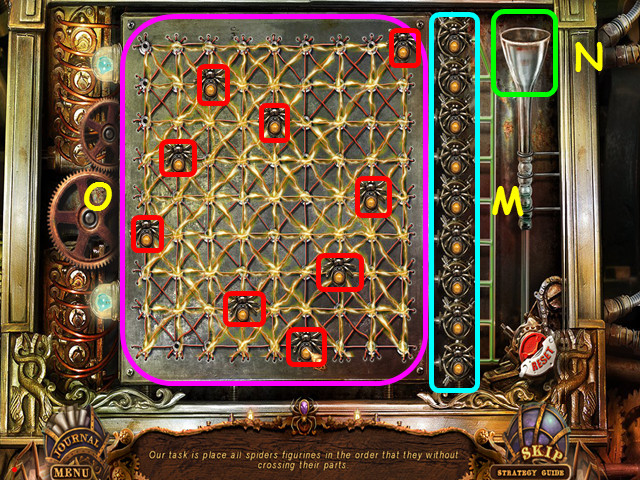
- Place the 9 SPIDER FIGURINES into the circles (M).
- Pour the INHIBITOR into the funnel (N).
- Place the 9 spiders on the grid so that none are on the same horizontal, vertical, or diagonal paths (O).
- Congratulations, you have completed Web of Deceit: Black Widow!






 Big Fish Casino Craps Tips and Tricks, Guide, & Tips
 Broken Hearts: A Soldier's Duty Walkthrough, Guide, & Tips
 Eternal Journey: New Atlantis Walkthrough, Guide, & Tips
 House M.D. Walkthrough, Guide, & Tips
 Mystery Case Files ®: 13th Skull ™ Walkthrough, Guide, & Tips