Eternal Journey: New Atlantis Walkthrough, Guide, & Tips
Eternal Journey: New Atlantis Walkthrough

Welcome to the Eternal Journey: New Atlantis Walkthrough
Travel from the deepest trenches of the Atlantic Ocean to the awe-inspiring wonders of Mars as you solve the greatest archeological puzzle known to man: the origin of Atlantis.
Whether you use this document as a reference when things get difficult or as a road map to get you from beginning to end, we’re pretty sure you’ll find what you’re looking for here.
This document contains a complete Eternal Journey: New Atlantis game walkthrough featuring annotated screenshots from actual gameplay!
We hope you find this information useful as you play your way through the game. Use the walkthrough menu below to quickly jump to whatever stage of the game you need help with.
Remember to visit the Big Fish Games Forums if you find you need more help. Have fun!
This walkthrough was created by Alawar, and is protected under US Copyright laws. Any unauthorized use, including re-publication in whole or in part, without permission, is strictly prohibited.
Chapter 1: Atlantis

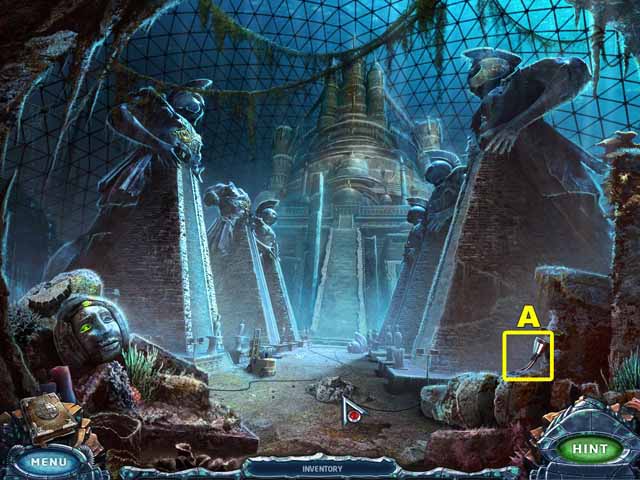

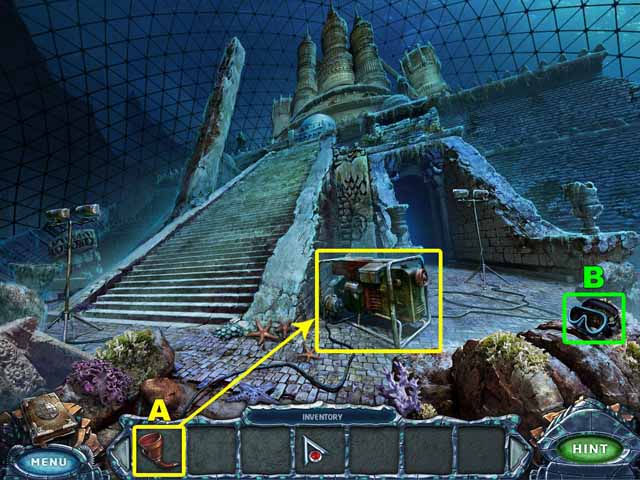

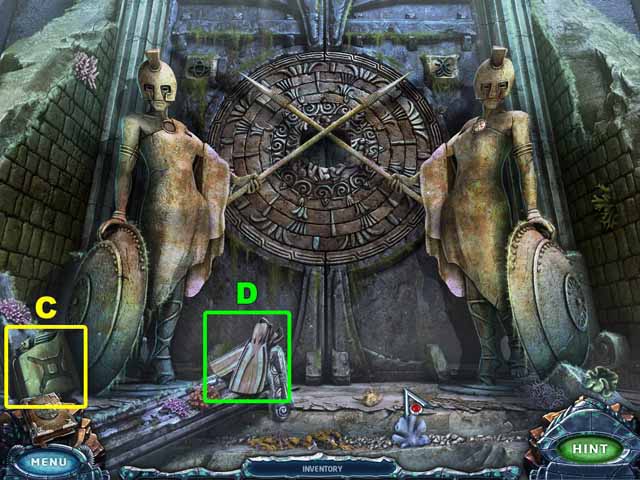
- Take the FUNNEL (A).
- Go to the base of the temple.
- Place the FUNNEL (A) in the generator.
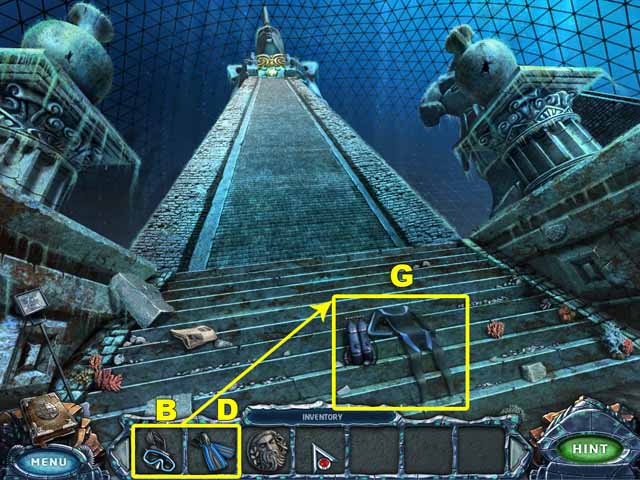
- Take the DIVING MASK (B).
- Go up the stairs to the temple entrance.
- Take the GAS CAN (С) and the FLIPPERS (D).
- Return to the base of the temple.

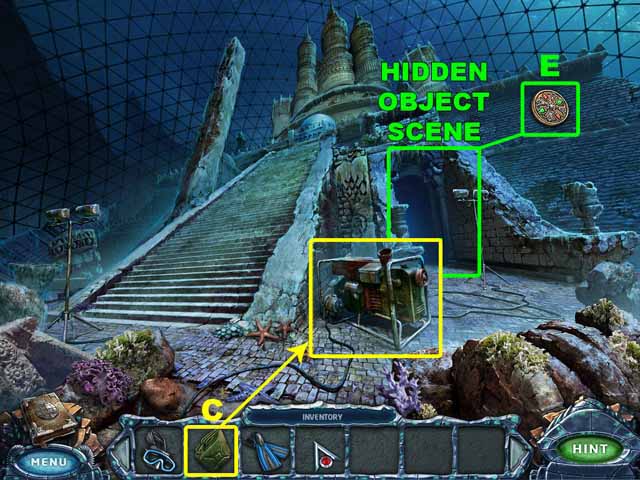

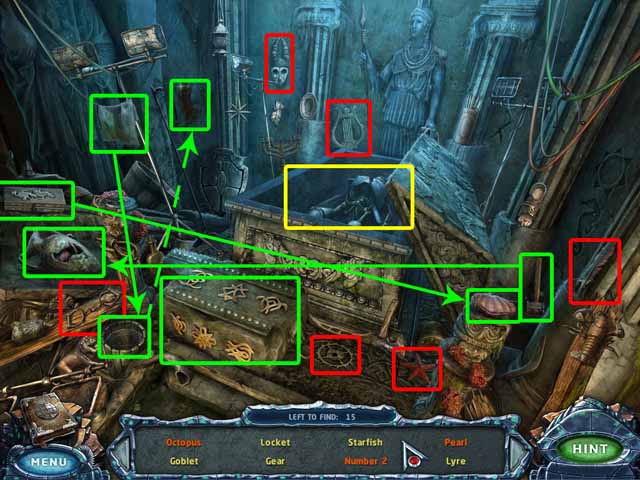

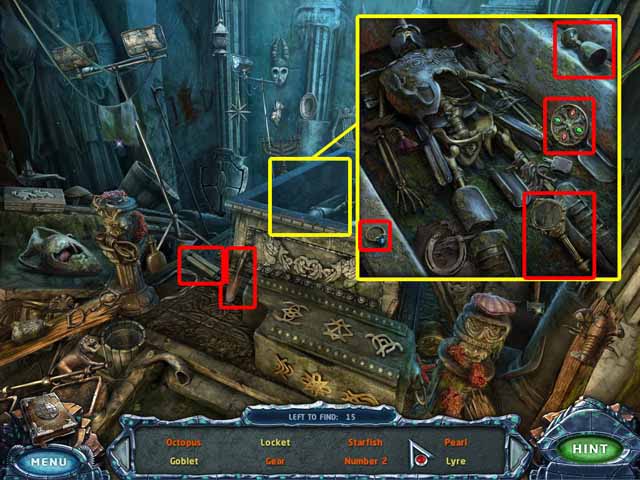
- Use the GAS CAN (С) on the generator.
- Pull the rope to turn on the lights.
- Click on the sparkles to access the hidden object area. Collect every object listed at the bottom of the screen to acquire the LOCKET (E).
- Go to the temple entrance.

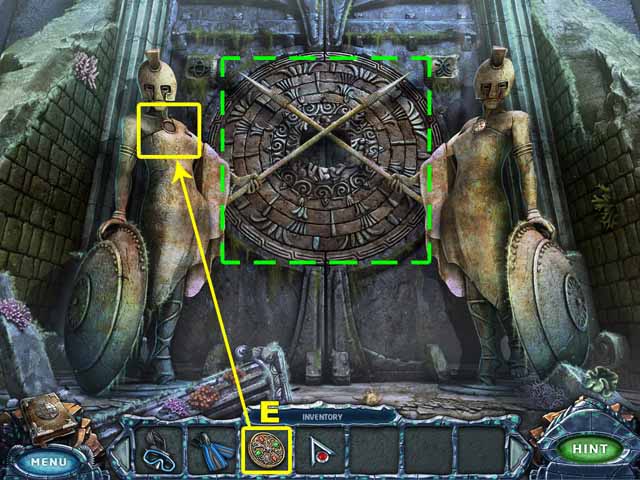


- Place the LOCKET (E) on the statue.
- The statues will withdraw their spears.
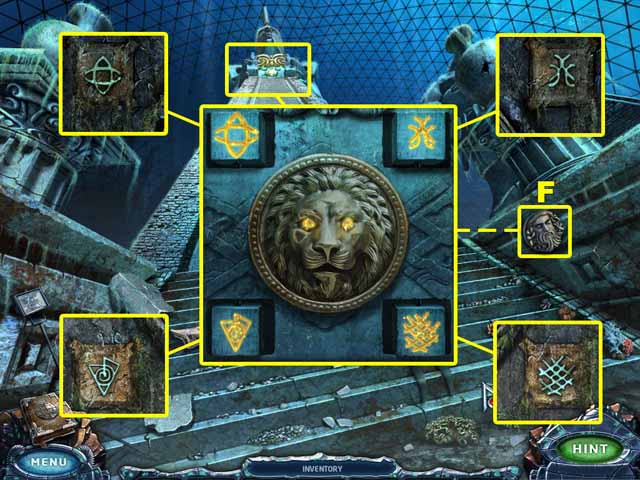
- Click on the door to see the symbols.
- Go to the top of the pyramid.
- Put the symbols in the correct position.
- Take the STONE DISK (F).
- Place the DIVING MASK (B) and FLIPPERS (D) near the diving suit.
- Take the DIVING GEAR (G).
- Go to the temple entrance.

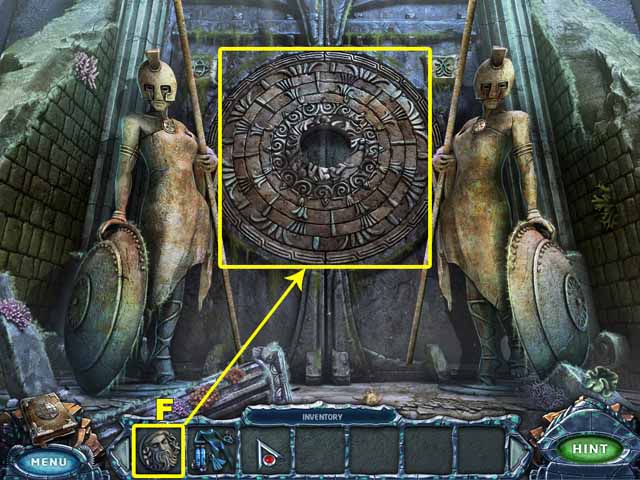

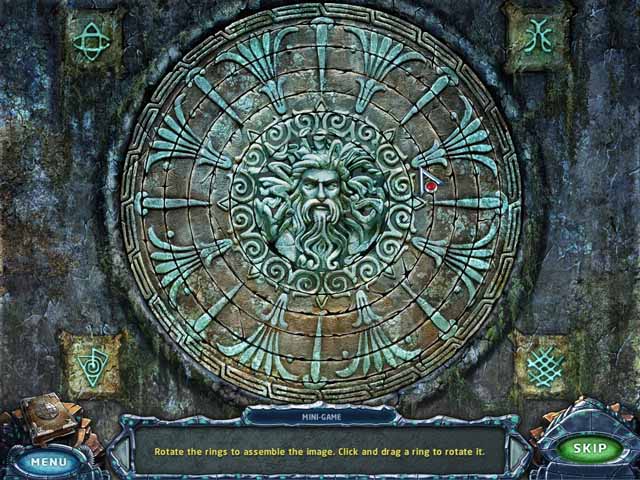

- Place the STONE DISK (F) in the lock.
- Rotate the discs to assemble the image.
- Enter the temple.
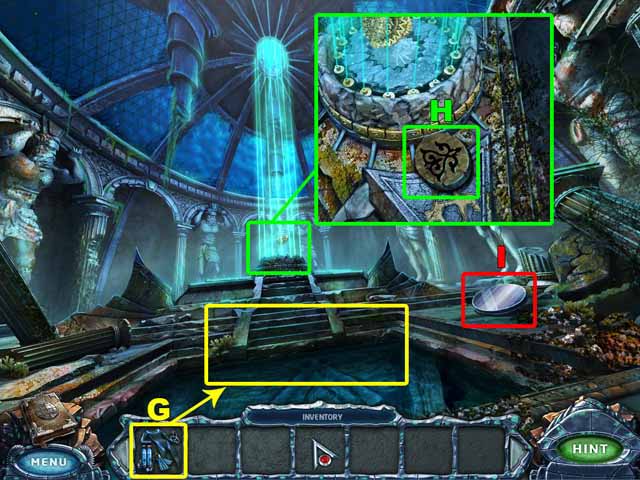
- Take the STONE DISK (H).
- Take the MIRROR (I).
- Use the DIVING GEAR (G) on the water.
- Enter the Underwater Cave.

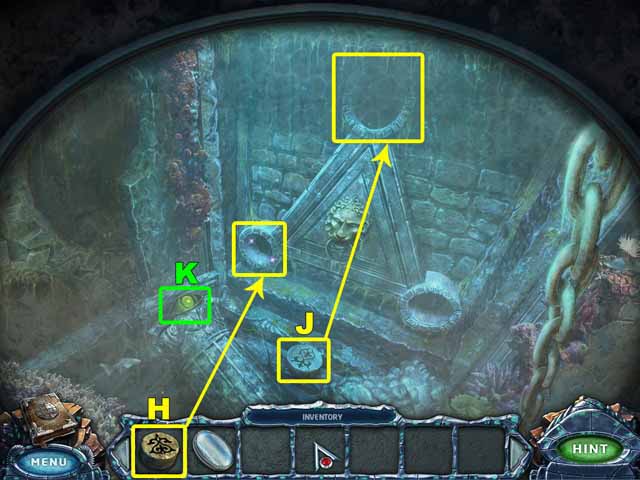

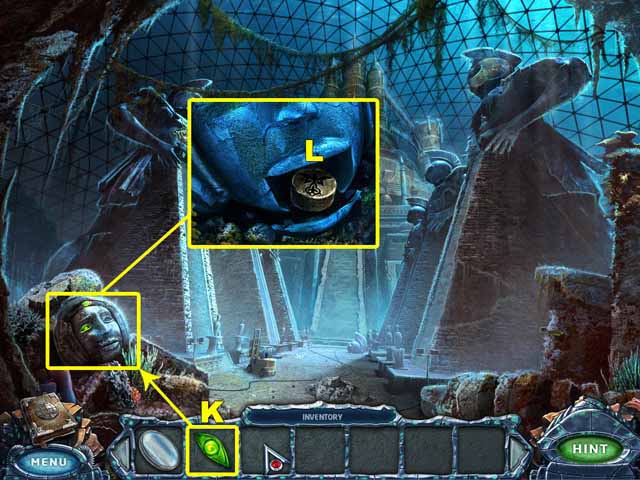

- Take the STONE DISK (J) and the EYE (K).
- Place the STONE DISKS (H and J) on the mechanism.
- Return to where you started.
- Place the EYE on the statue (K).
- Take the STONE DISK (L).
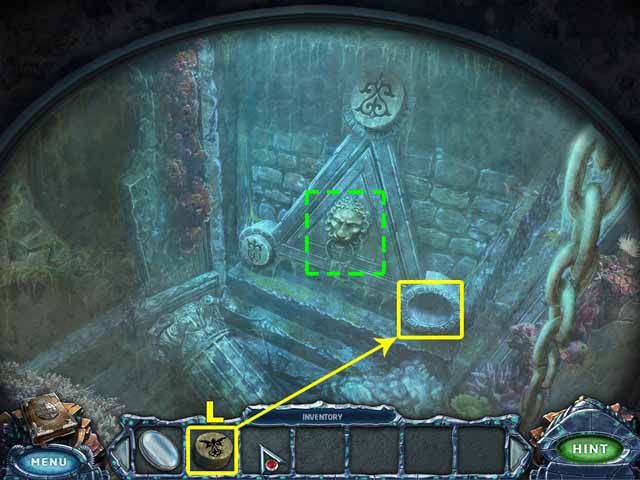
- Go to the Underwater Cave.
- Place the STONE DISK in the mechanism (L).
- Pull the ring.

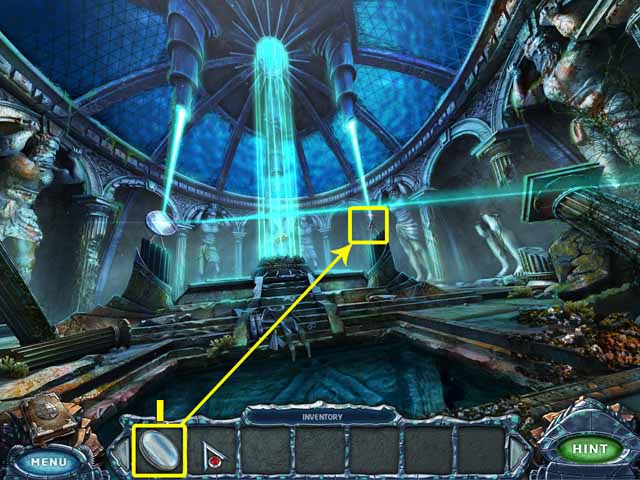

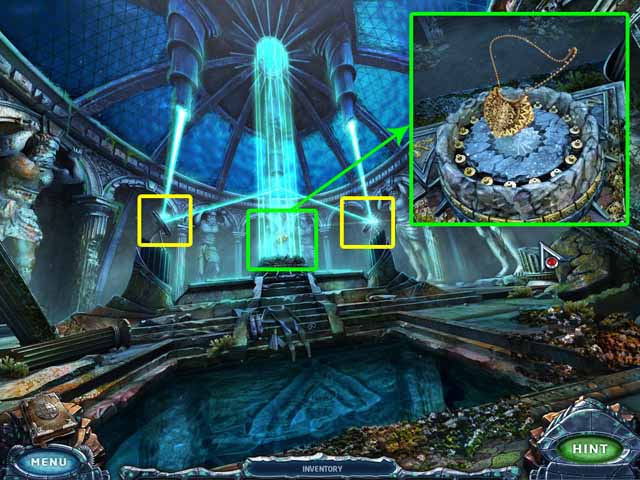
- Place the MIRROR (I) on the pedestal.
- Reposition the mirrors so the rays of lights are directed at the force field.
- Take Bellona’s Locket.
Chapter 2: Docking Station

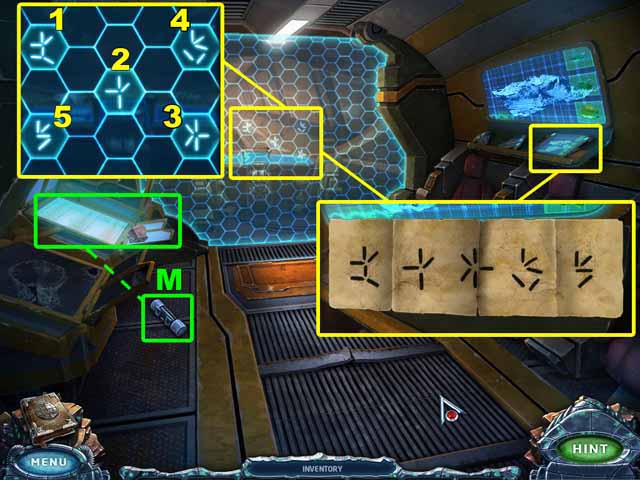

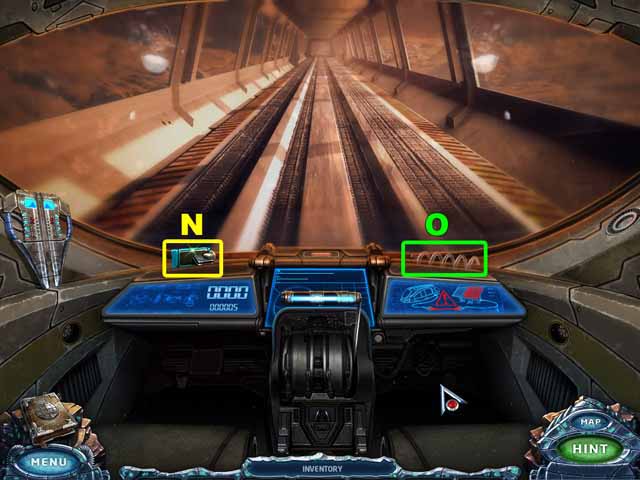
- Go to the Train.
- Take the MAP.
- Look at the piece of paper under the map.
- Take the stone and strike the glass with it.
- Take the FUSE (M).
- Click on the symbols in the same order as displayed on the piece of paper under the map.
- Enter the Train Cabin.
- Take the BLUE ACCESS CARD (N).
- Take the GLASS COIL (O).
- Return to the Dock.

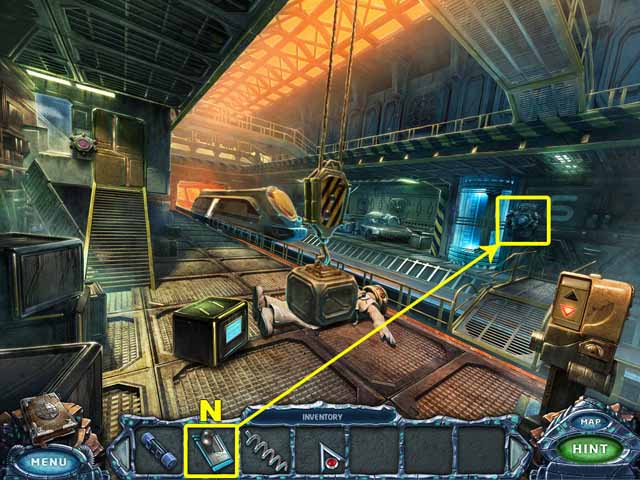

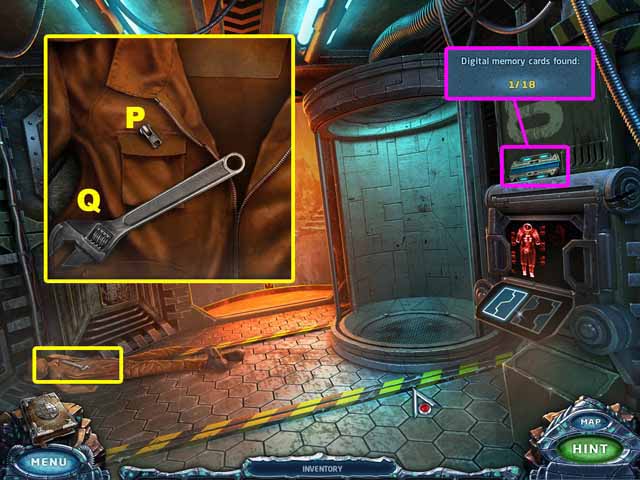
- Use the BLUE ACCESS CARD (N) to open the door to the Airlock.
- Enter the Airlock.
- Take the first Digital Memory Card.
- Take the ZIPPER (P).
- Take the WRENCH (Q).
- Go to the Dock.

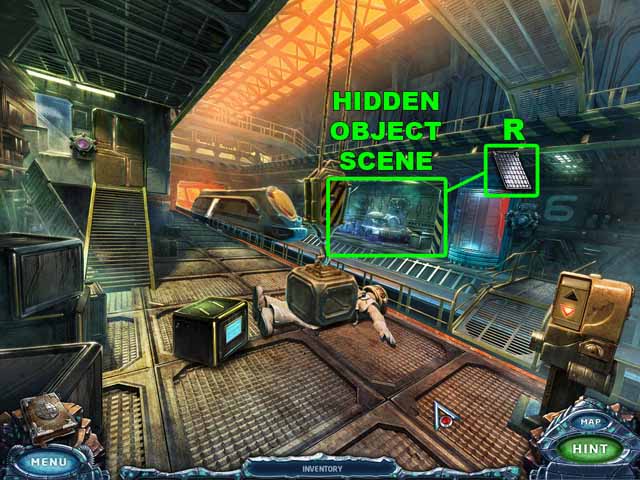

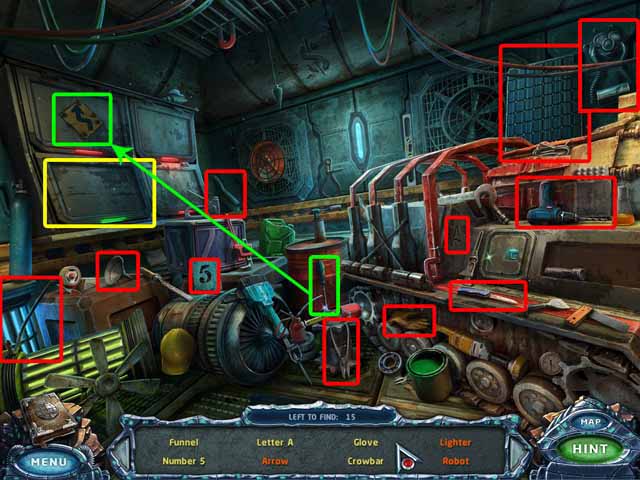

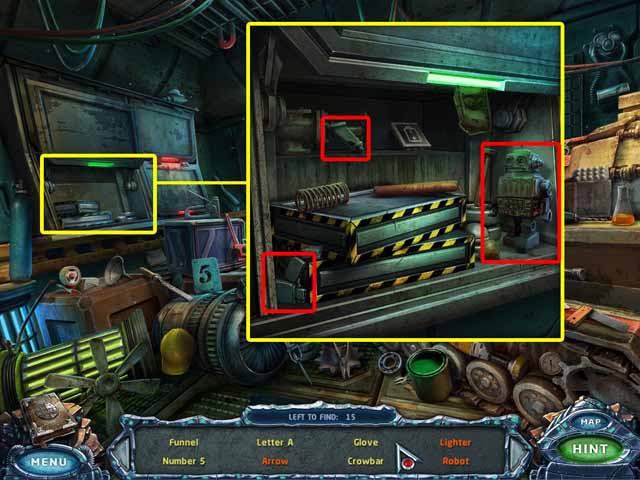
- Click on the sparkles to access the hidden object area. Collect every object listed at the bottom of the screen to acquire the SOLAR PANEL (R).
- Return to the Train.

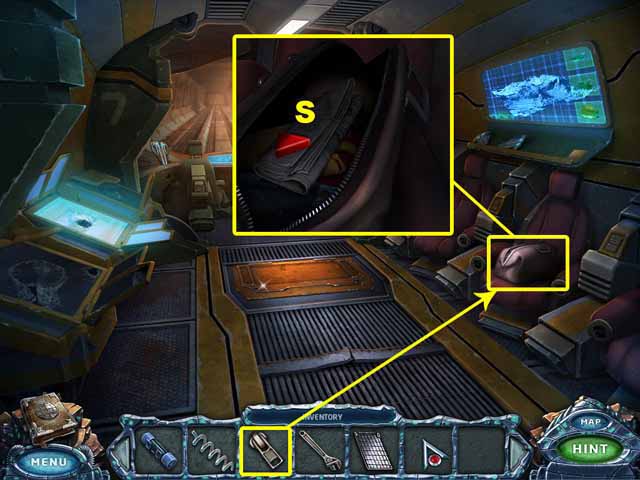


- Use the ZIPPER to open the bag.
- Take the UP BUTTON (S).
- Return to the Dock.
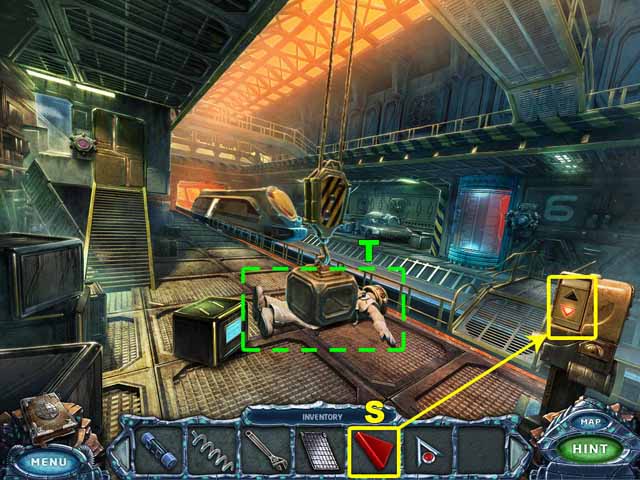
- Use the UP BUTTON (S) to activate the crane and lift the crate.
- Take the SPACESUIT (T).
- Go to the Airlock.
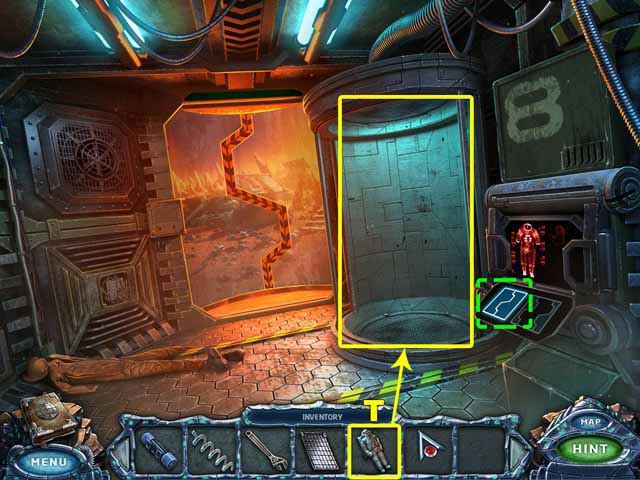
- Place the SPACESUIT (T) in the pressure chamber.
- Use the blue and white button to open the door to the Surface of Mars.
- Go out onto the Surface of Mars.

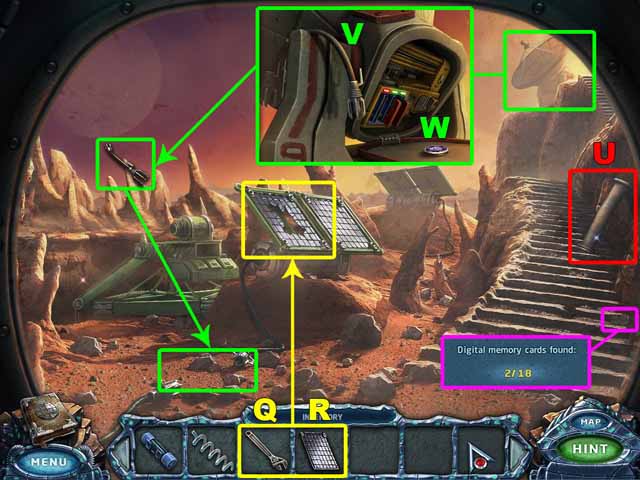

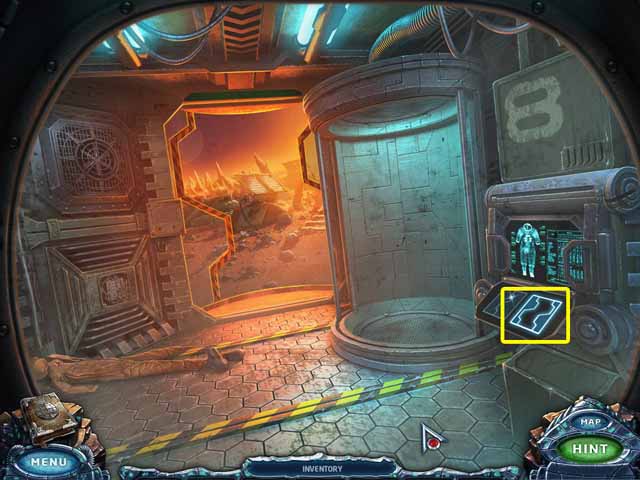

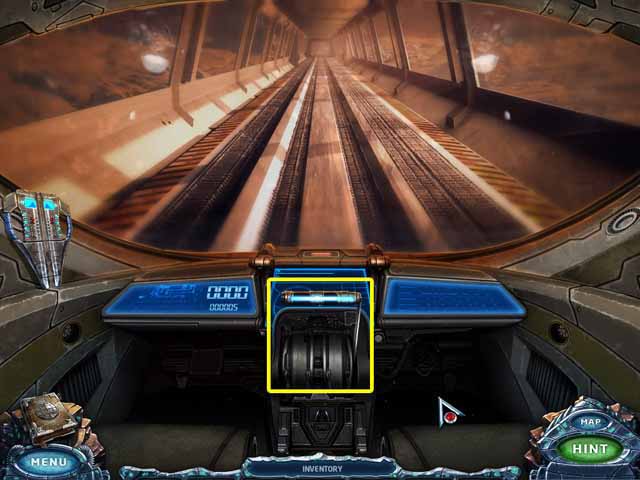
- Take the second Digital Memory Card.
- Use the WRENCH (Q) to remove the bolts holding the broken solar panel in place. Click on the panel to remove it.
- Install the new SOLAR PANEL (R).
- Place the bolts on the panel one by one. Use the WRENCH (Q) to tighten them.
- Take the PIPE (U).
- Take the CABLE (V) and the BUTTON (W).
- Use the CABLE (V) to connect the parts of the wire.
- Go to the Airlock.
- Close the door.
- Return to the Train.
- Pull the lever.
- Exit the train at the station.
Chapter 3: New Atlantis

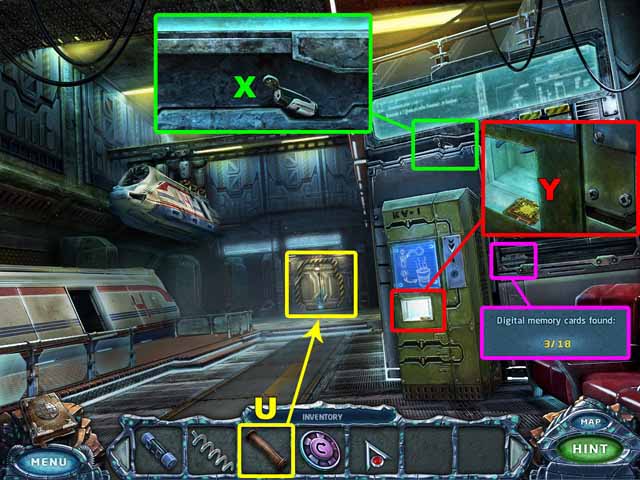


- Take the third Digital Memory Card.
- Take the LIGHTER (X).
- Take the MICROCHIP (Y).
- Place the PIPE (U) between the two doors.
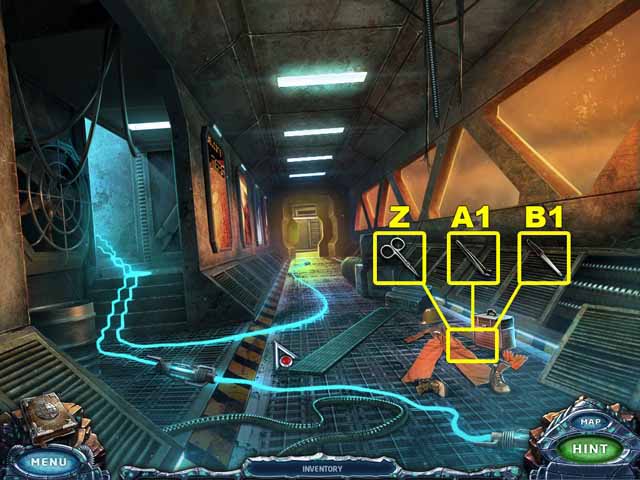
- Enter the Passage.
- Click on the tool case. Take the SCISSORS (Z), TWEEZERS (A1) and NAIL FILE (B1).
- Go to the First Floor.
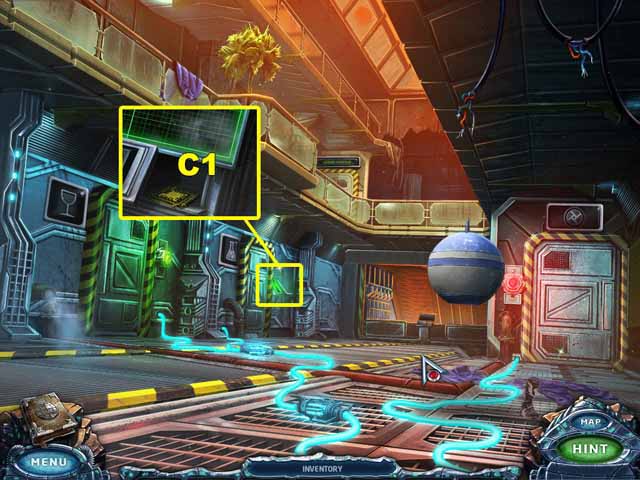
- Take the MICROCHIP (C1).
- Enter the elevator at the far end of the room.

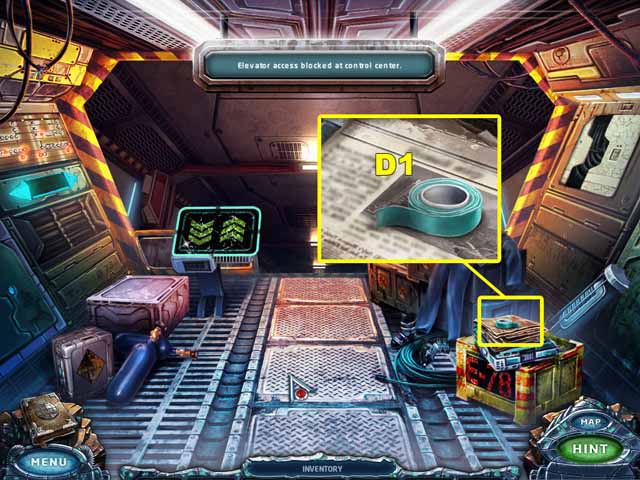


- Take the INSULATING TAPE (D1).
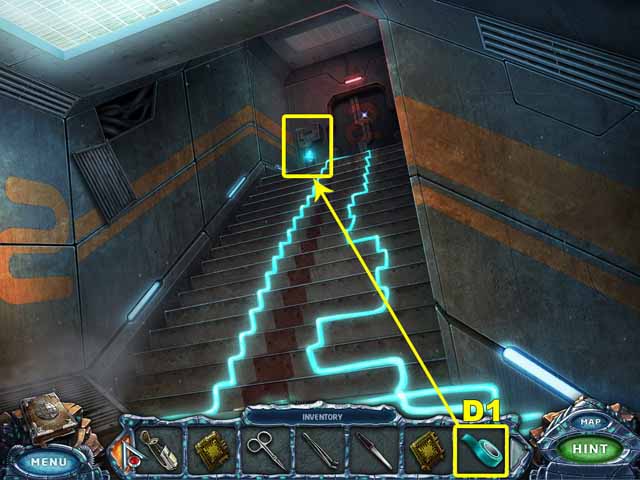
- Return to the Passage. Go left to walk up the stairs.
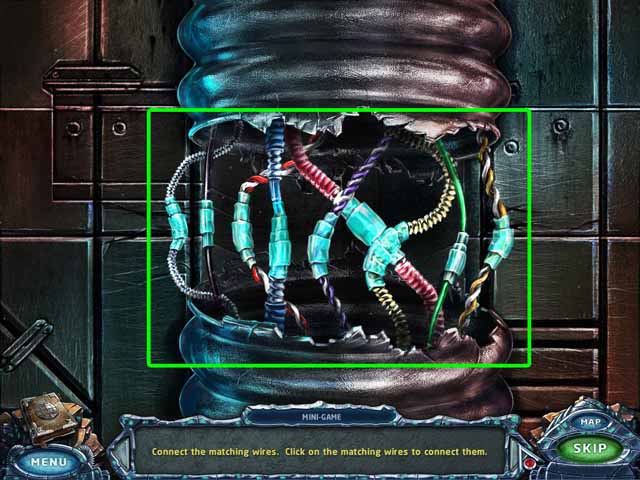
- Use the INSULATING TAPE (D1) to connect the exposed wires.
- Go to the Second Floor.

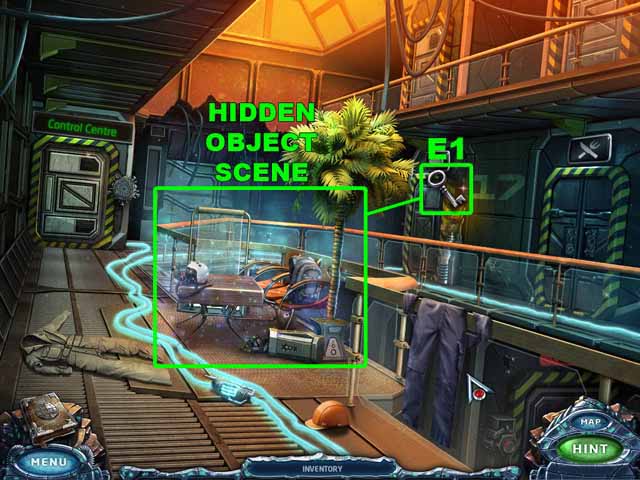

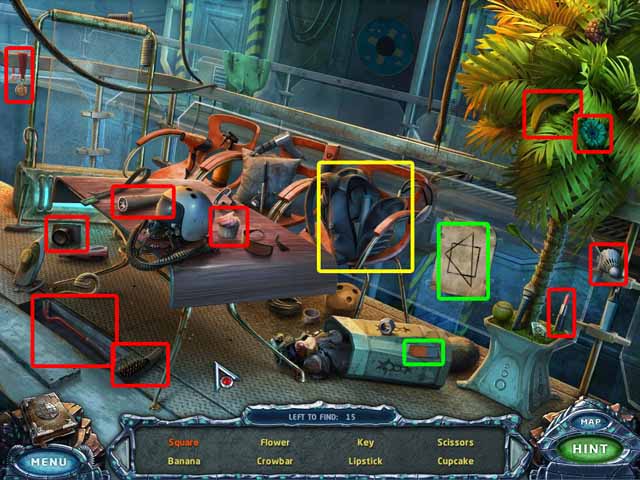

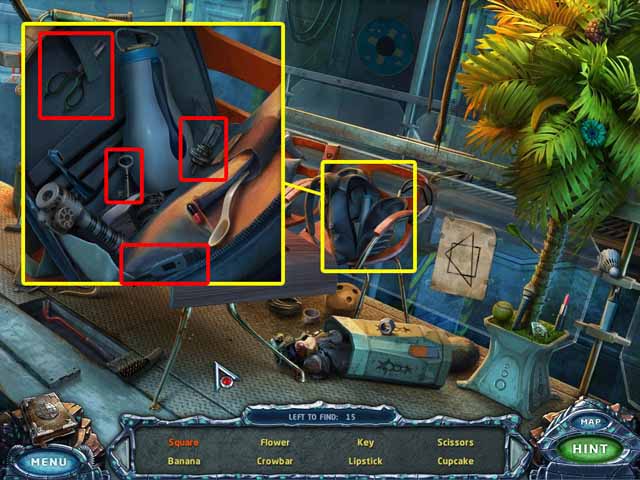
- Click on the sparkles to access the hidden object area. Collect every object listed at the bottom of the screen to acquire the KEY (E1).
- Go to the Passage.

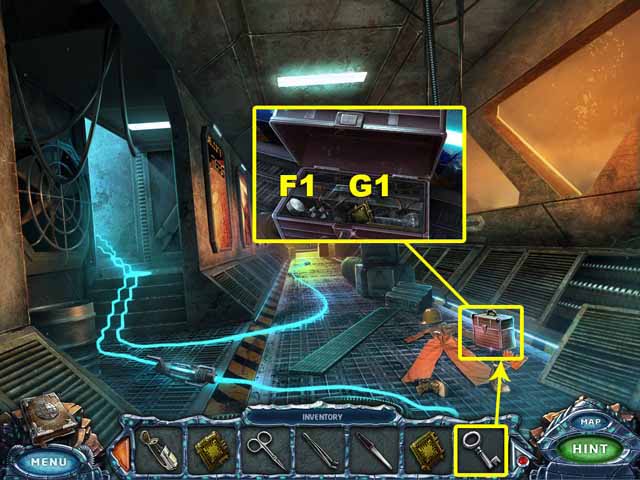

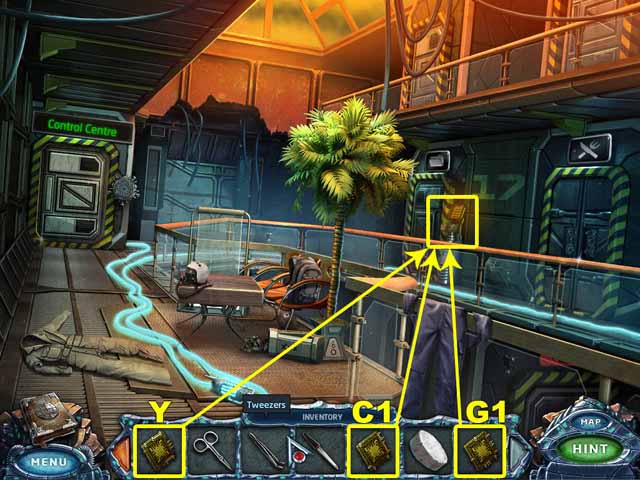
- Use the KEY to open the case.
- Take the SOLID FUEL (F1) and the MICROCHIP (G1).
- Go to the Second Floor.
- Place the MICROCHIPS (Y, C1 and G1) on the panel.

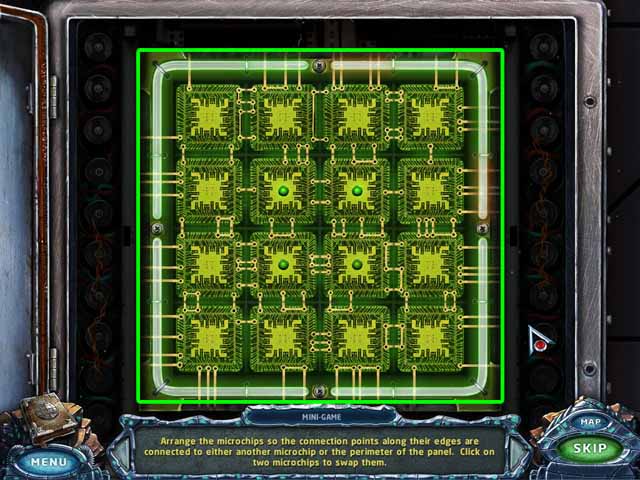

- Arrange the microchips in the correct configuration.
- Enter the Archives.
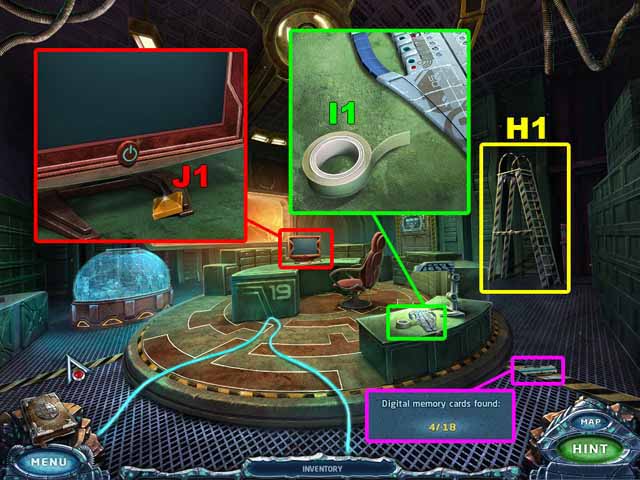
- Take the fourth Digital Memory Card.
- Take the LADDER (H1).
- Take the STICKY TAPE (I1).
- Take the GEM (J1).
- Switch on the screen.
- Return to the Station.

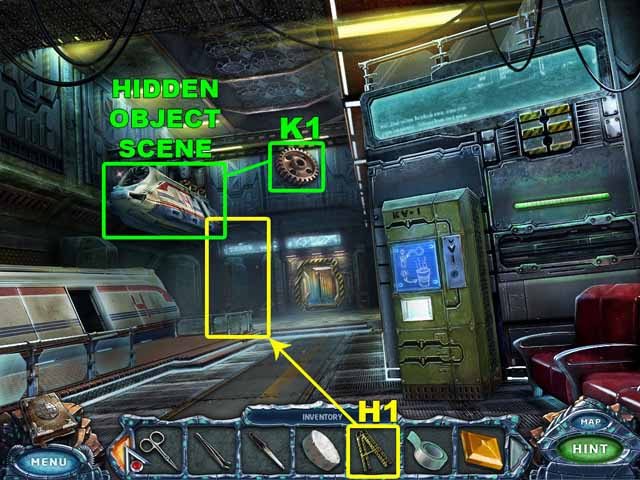

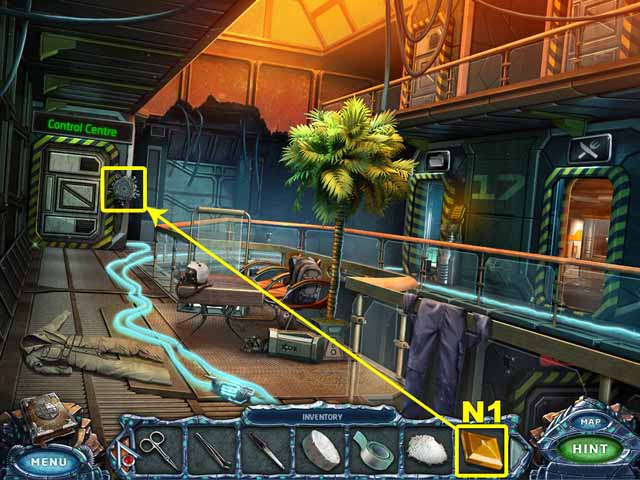

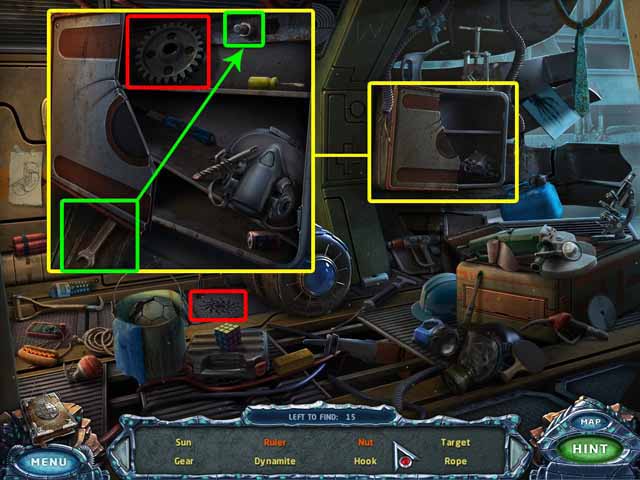
- Place the LADDER (H1) below the coach.
- Click on the sparkles to access the hidden object area. Collect every object listed at the bottom of the screen to acquire the GEAR (K1).
- Go to the Second Floor.

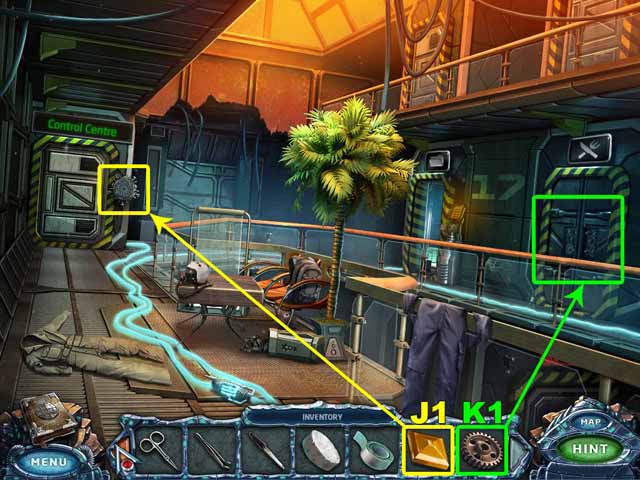

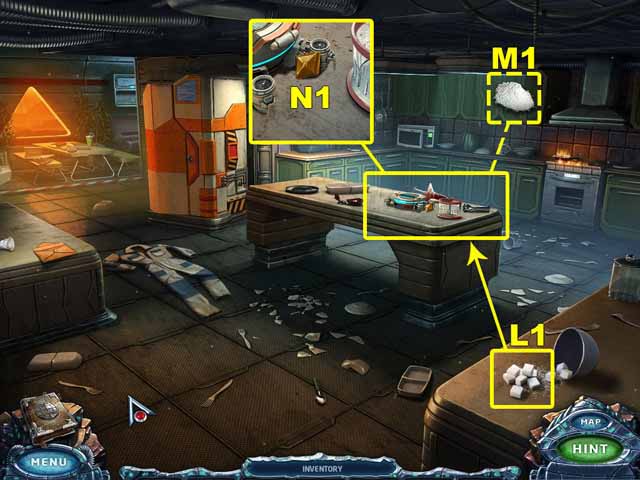


- Insert the GEM (J1) in the Control Center lock.
- Insert the GEAR (K1) into the Kitchen door.
- Enter the Kitchen.
- Take the SUGAR (L1). Grind it in the food processor to get POWDERED SUGAR (M1).
- Take the GEM (N1).
- Go to the Second Floor.
- Insert the GEM (N1) in the Control Center lock.
- Return to the Archives.

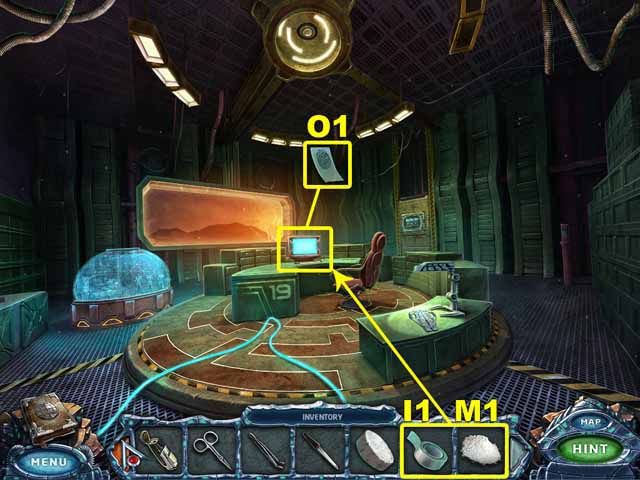

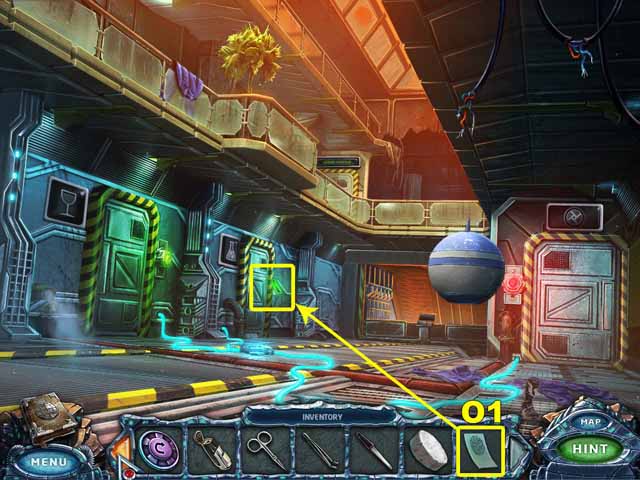
- Use the POWDERED SUGAR (M1) on the screen. Place the STICKY TAPE (I1) on the fingerprint.
- Take the FINGERPRINT (O1).
- Go to the First Floor.
- Use the FINGERPRINT (O1) to open the door to the Laboratory.
- Enter the Laboratory.

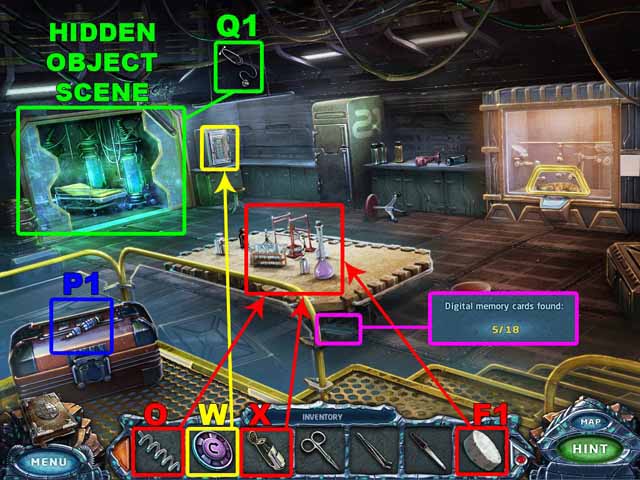


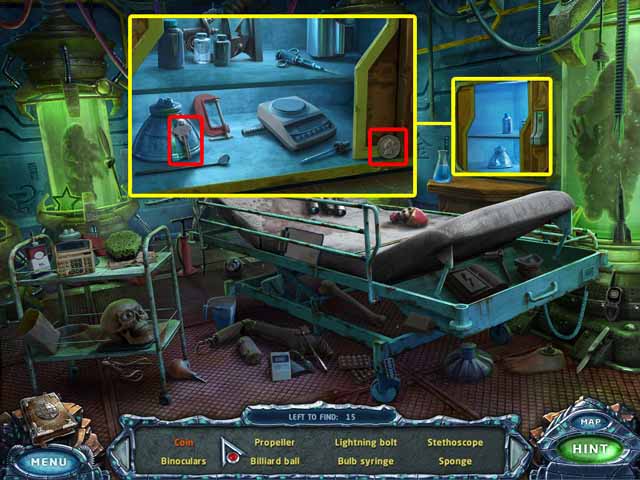
- Take the fifth Digital Memory Card.
- Place the BUTTON (W) on the safe.
- Place the GLASS COIL (O) on the chemistry set.
- Place the SOLID FUEL (F1) on the burner. Use the LIGHTER (X) to ignite it.
- Take the SCREWDRIVER (P1).
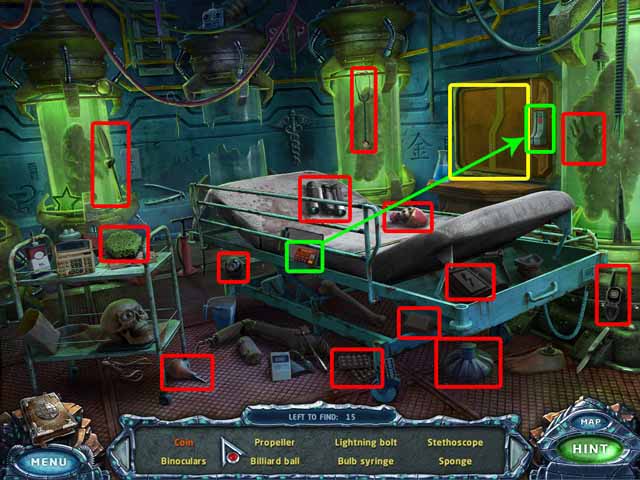
- Click on the sparkles to access the hidden object area. Collect every object listed at the bottom of the screen to acquire the STETHOSCOPE (Q1).
- Go to the Archives.

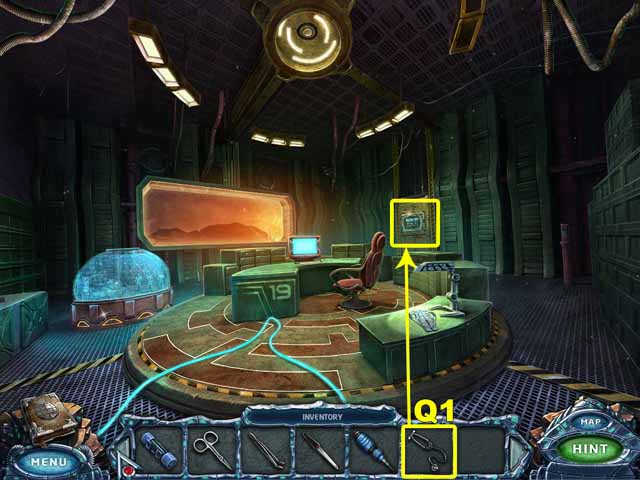

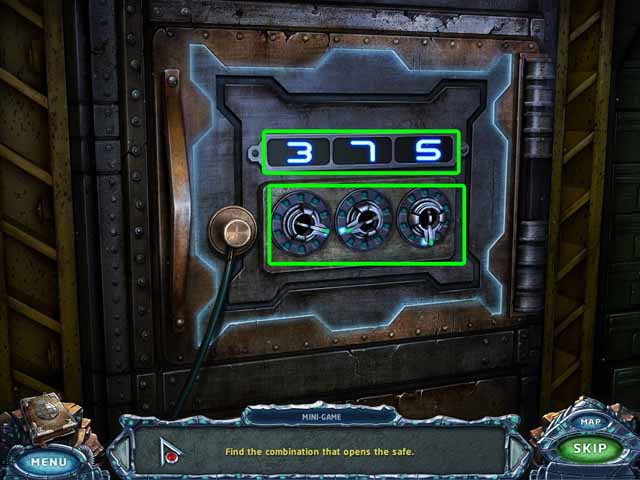

- Use the STETHOSCOPE (Q1) to open the safe.
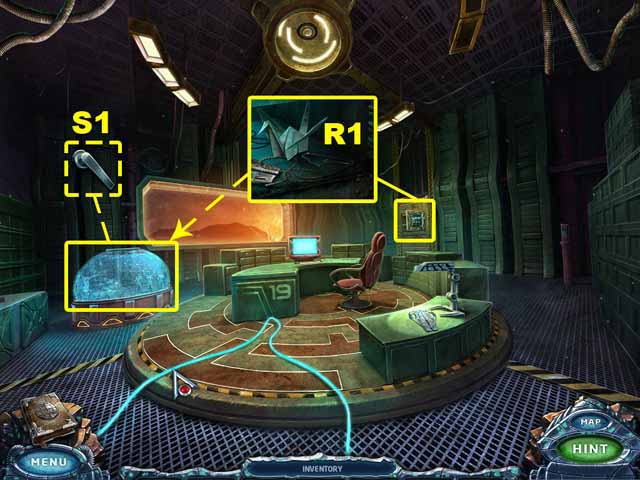
- Take the PAPERCLIP ON A STRING (R1).
- Use the PAPERCLIP ON A STRING (R1) to retrieve the HANDLE (S1).
- Go to the Dock.

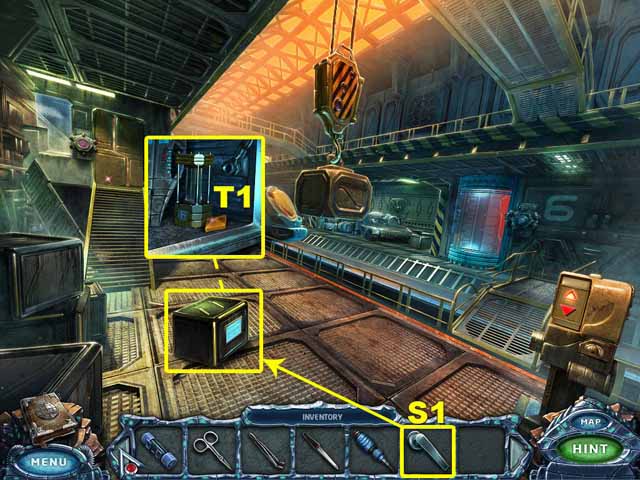

- Place the HANDLE (S1) on the case.
- Click on the handles to open the case.
- Take the GEM (T1).
- Go to the Train.
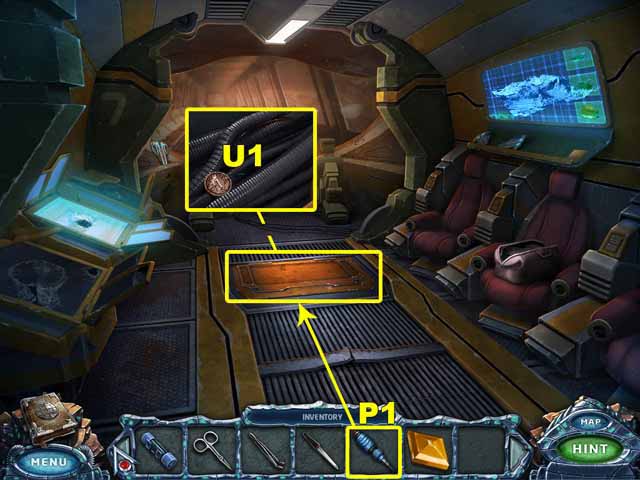
- Use the SCREWDRIVER (P1) to remove the cover on the floor. Take the COIN (U1).
- Go to the Station.

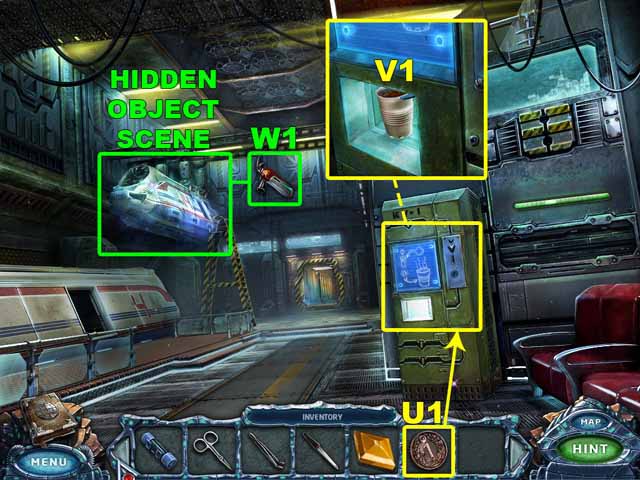


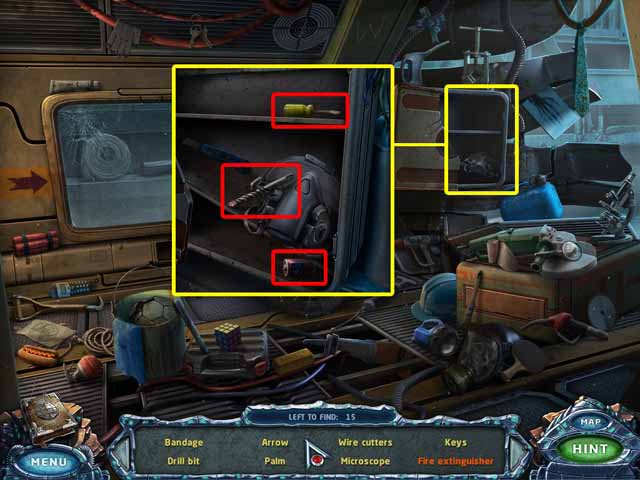
- Insert the COIN (U1) into the coffee machine. Click on the button below the coin slot. Take the CUP OF COFFEE (V1).
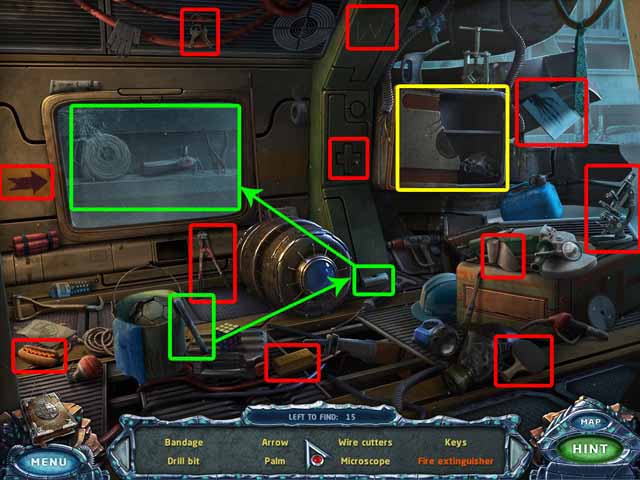
- Click on the sparkles to access the hidden object area. Collect every object listed at the bottom of the screen to acquire the FIRE EXTINGUISHER (W1).
- Go to the Second Floor.

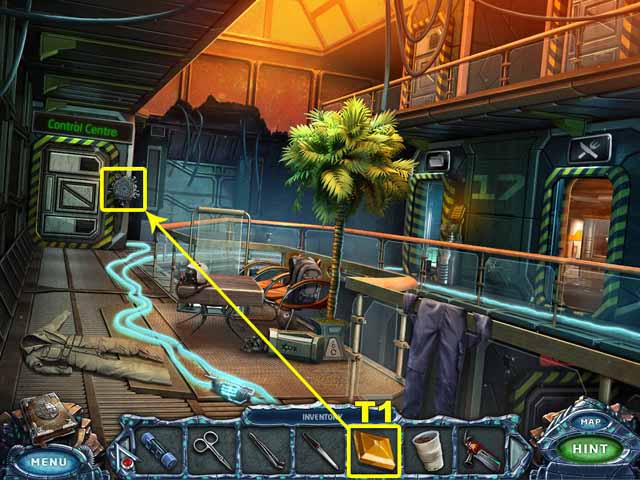

- Insert the GEM (T1) in the Control Center lock.
- Go to the Kitchen.
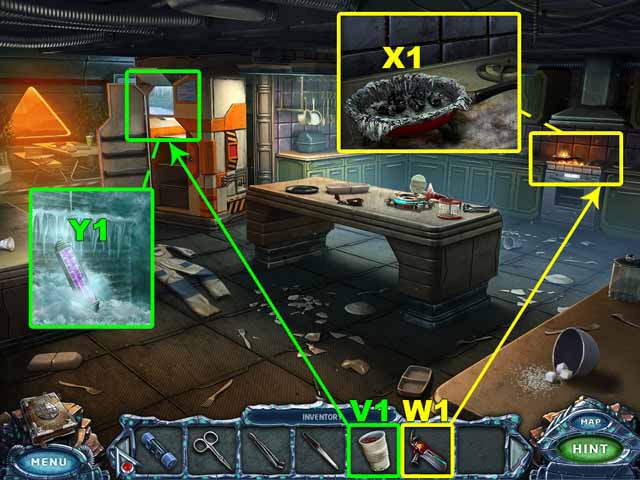
- Use the FIRE EXTINGUISHER (W1) to put out the fire on the oven. Take the FOIL (X1).
- Pour the CUP OF COFFEE (V1) on the ice in the freezer. Take the LIQUID ASPIRIN (Y1).
- Return to the Laboratory.

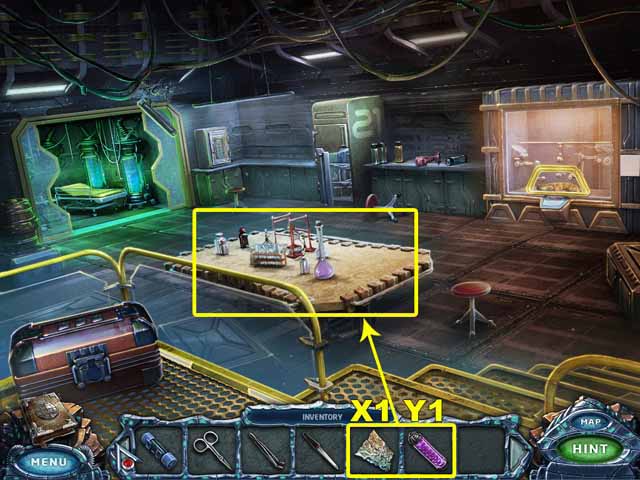

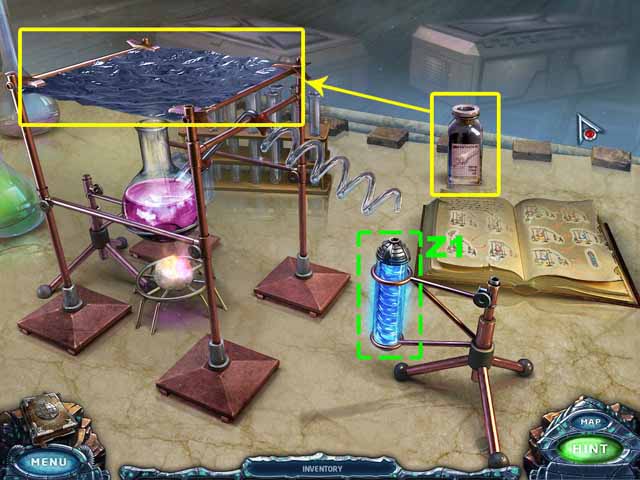

- Pour the LIQUID ASPIRIN (Y1) into the beaker.
- Place the FOIL (X1) over the beaker.
- Pour the nano-robots onto the foil.
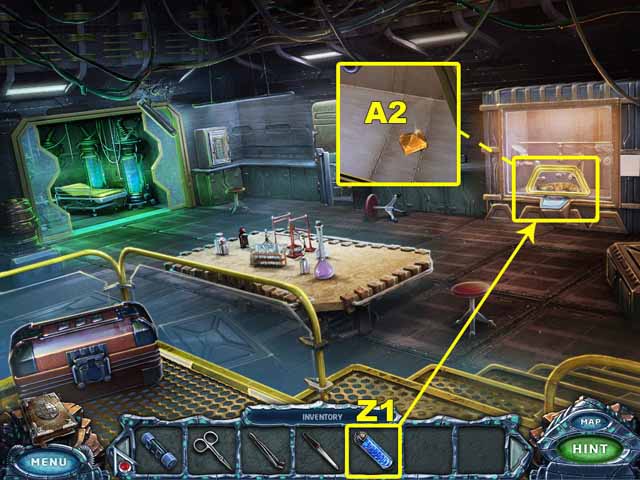
- Take the VACCINE (Z1).
- Place the VACCINE (Z1) in the slot below the medical pod to heal the cat.
- Take the GEM (A2).
- Go to the Second Floor.

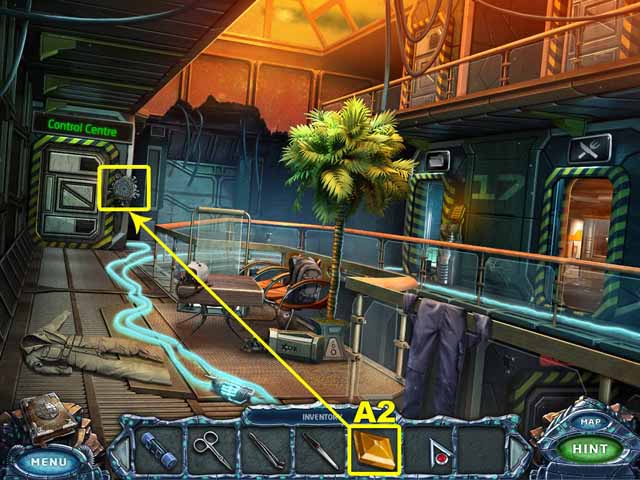
- Insert the GEM (A2) in the Control Center lock.
- Enter the Control Center.
Chapter 4: Lower Level

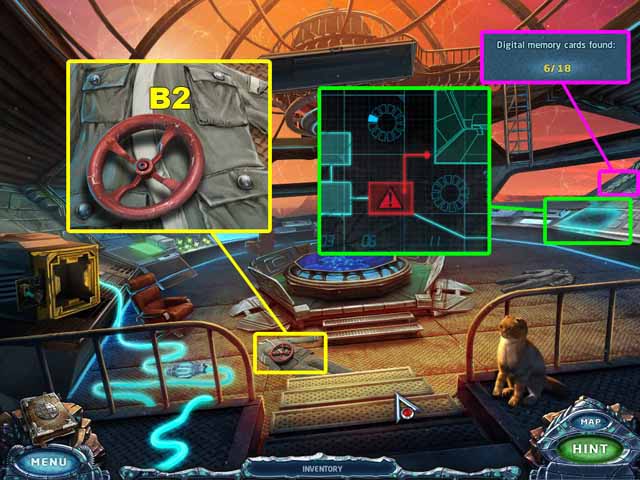

- Take the sixth Digital Memory Card.
- Take the VALVE HANDLE (B2).
- Use the right console to turn on the elevator.
- Go to the Elevator.
- Go down.
- Exit the Elevator.
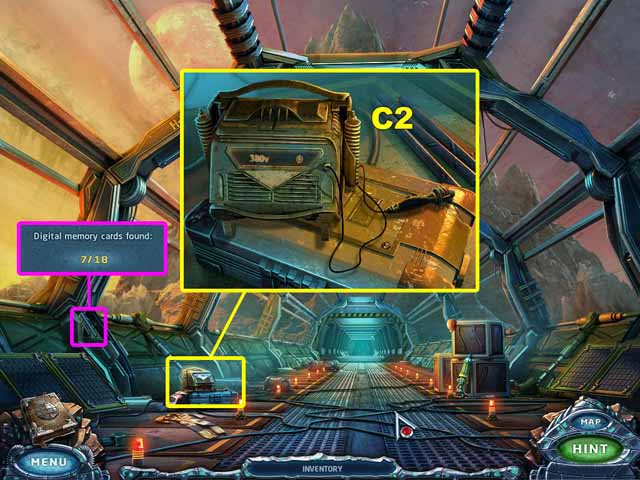
- Take the seventh Digital Memory Card.
- Take the WELDING DEVICE (C2).
- Go forward to the Excavation.

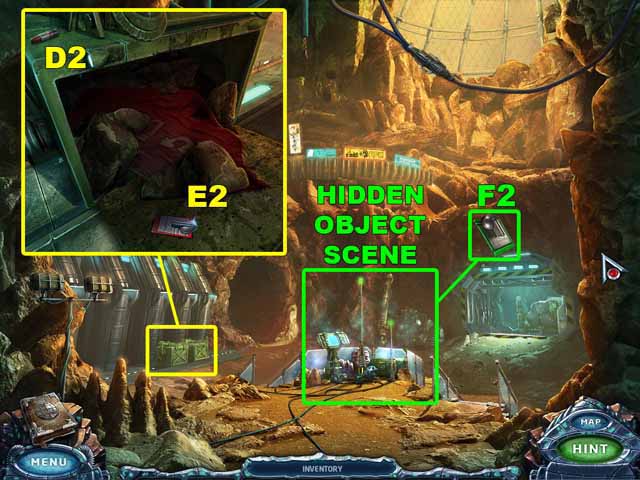


- Take the LIPSTICK (D2).
- Open the crate. Take the RED ACCESS CARD (E2). Examine the red banner.
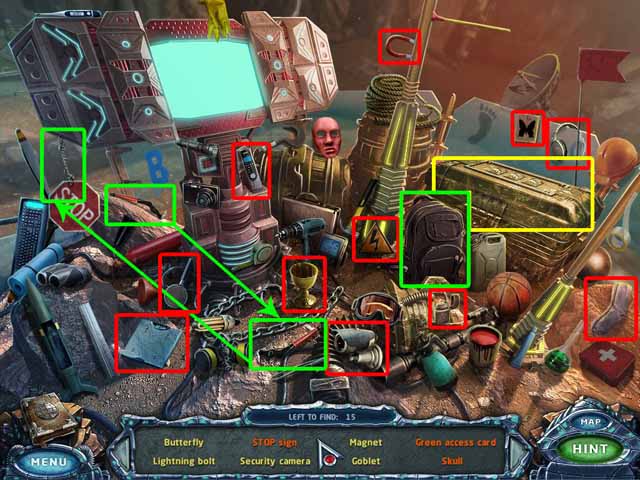
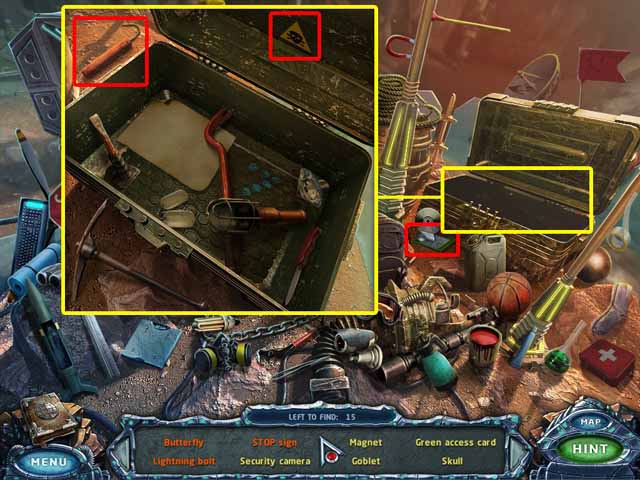
- Click on the sparkles to access the hidden object area. Collect every object listed at the bottom of the screen to acquire the GREEN ACCESS CARD (F2).
- Go right to enter the Garage.

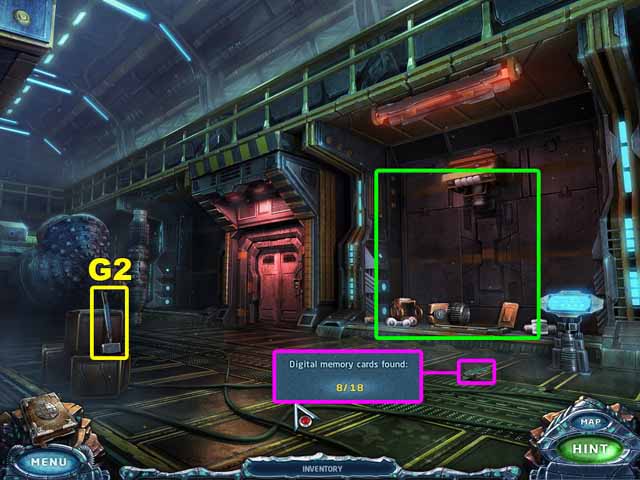

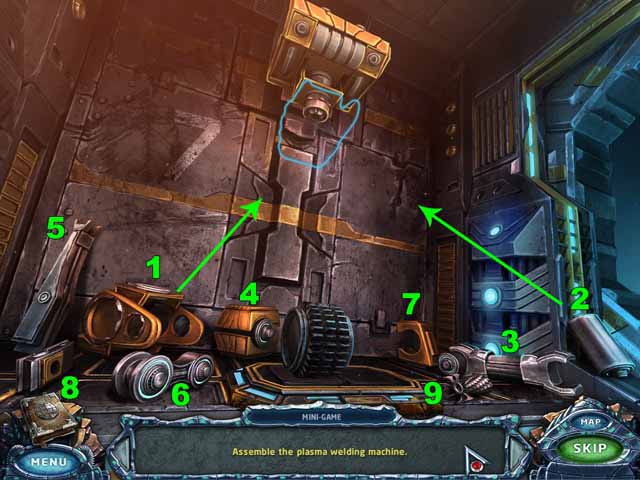

- Take the eighth Digital Memory Card.
- Take the SLEDGEHAMMER (G2).
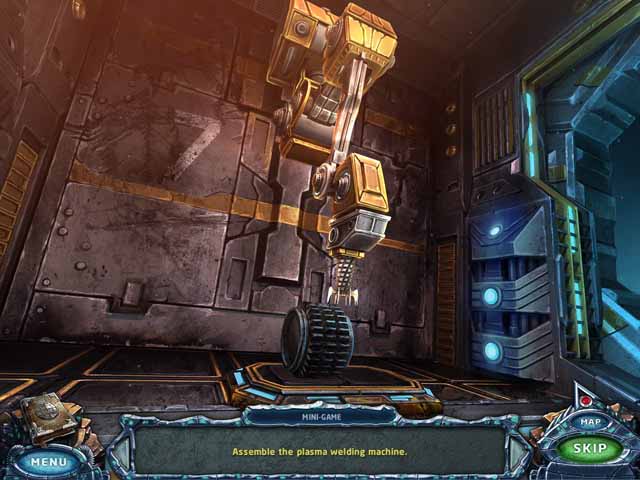
- Assemble the Plasma Welding Machine.
- Go to the First Floor.

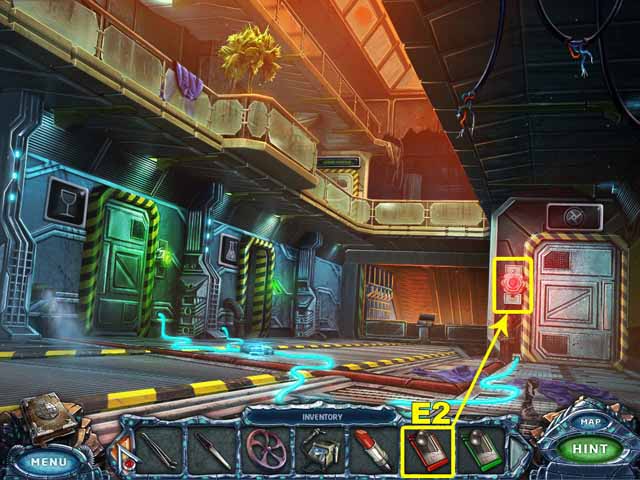

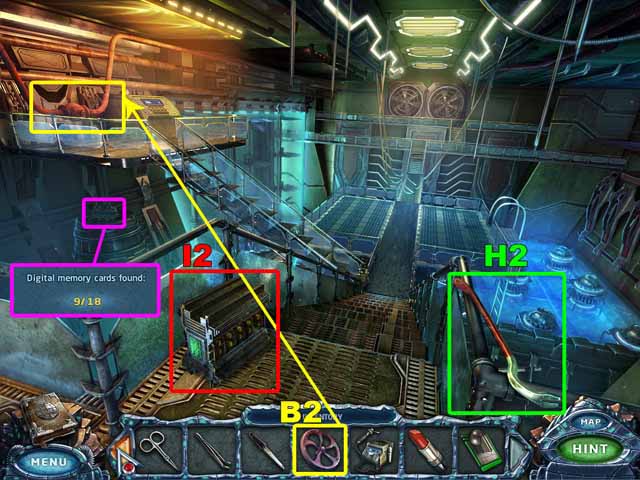
- Use the RED ACCESS CARD (E2) to open the Turbine Room.
- Enter the Turbine Room.
- Take the ninth Digital Memory Card.
- Take the CROWBAR (H2) and the BATTERY (I2).
- Place the VALVE HANDLE (B2) on the piping. Turn it to stop the flow of oxygen to the pipe on the First Floor.
- Go to the Second Floor.

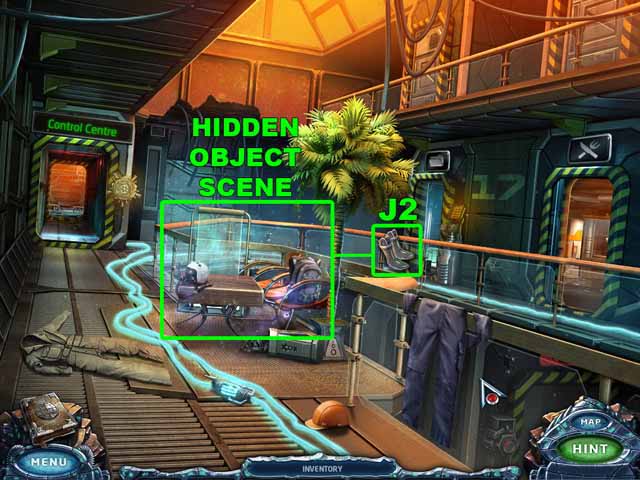

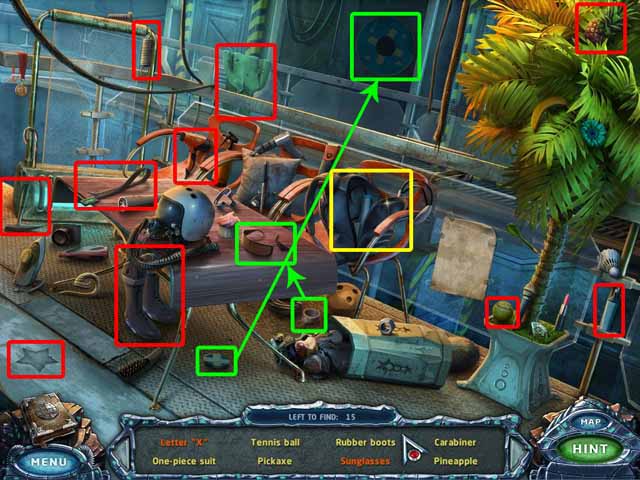

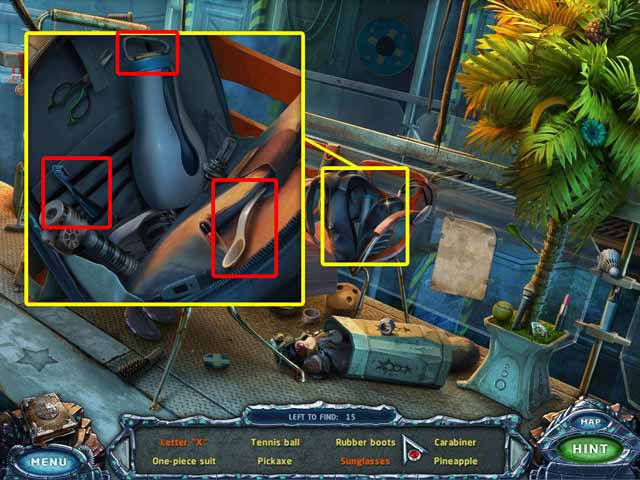
- Click on the sparkles to access the hidden object area. Collect every object listed at the bottom of the screen to acquire the RUBBER BOOTS (J2).
- Go to the Control Center.

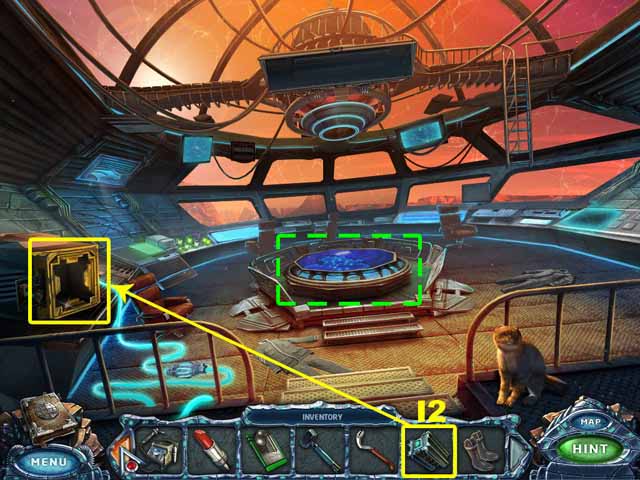

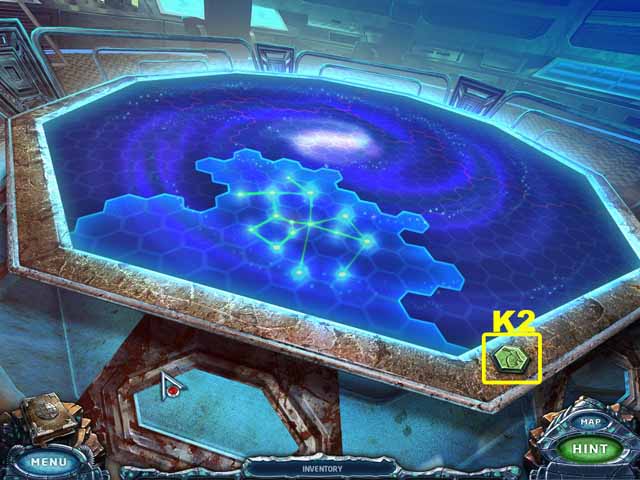

- Place the BATTERY (I2) in the slot.
- Take the TOKEN (K2).
- Go to the Turbine Room.
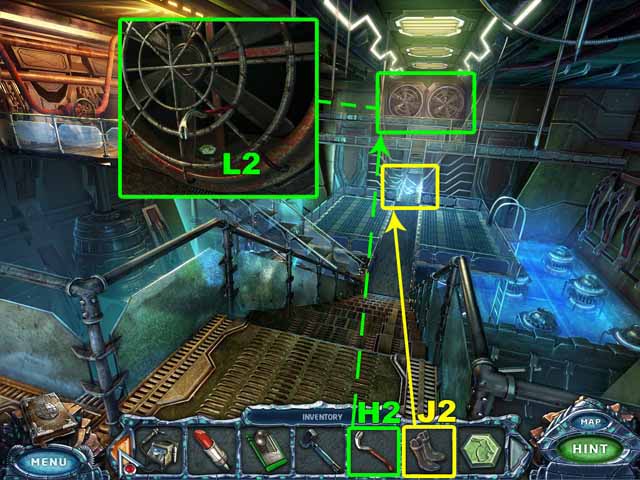
- Place the RUBBER BOOTS (J2) by the bridge.
- Shove the CROWBAR (H2) into the fan.
- Take the TOKEN (L2).
- Go to the First Floor.

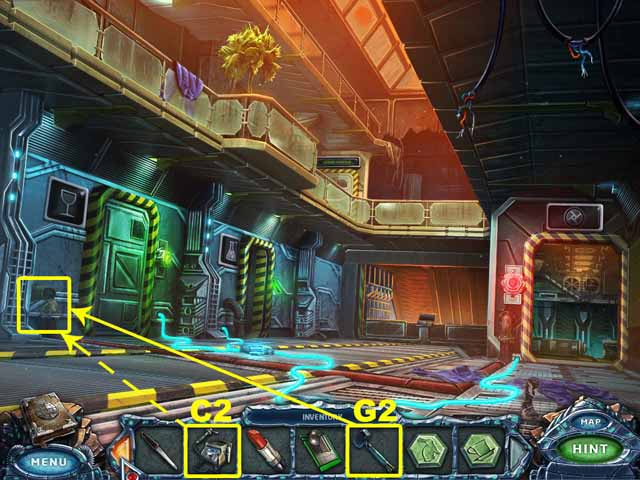

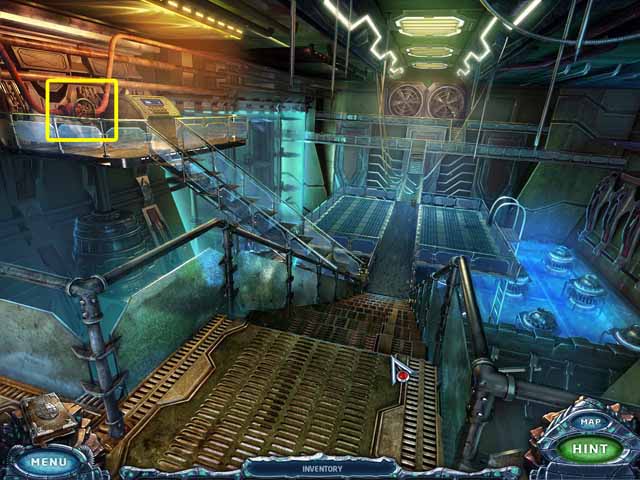

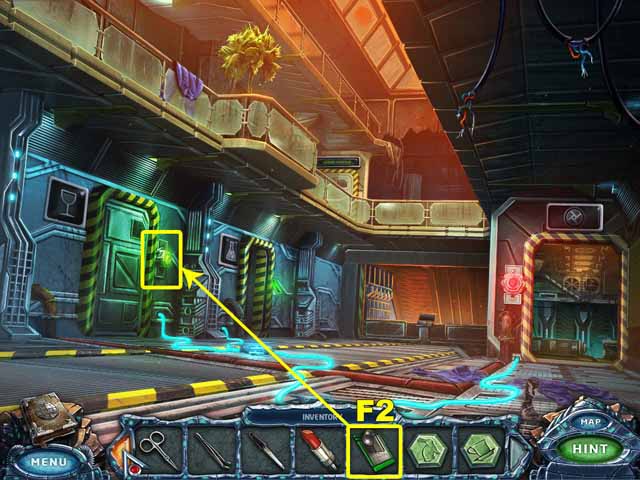
- Use the SLEDGEHAMMER (G2) to bend the pipe.
- Use the WELDING DEVICE (С2) to seal the pipe.
- Go to the Turbine Room.
- Turn the valve handle to start the flow of oxygen.
- Go to the First Floor.
- Use the GREEN CARD (F2) to open the door to the Bar.
- Enter the Bar.

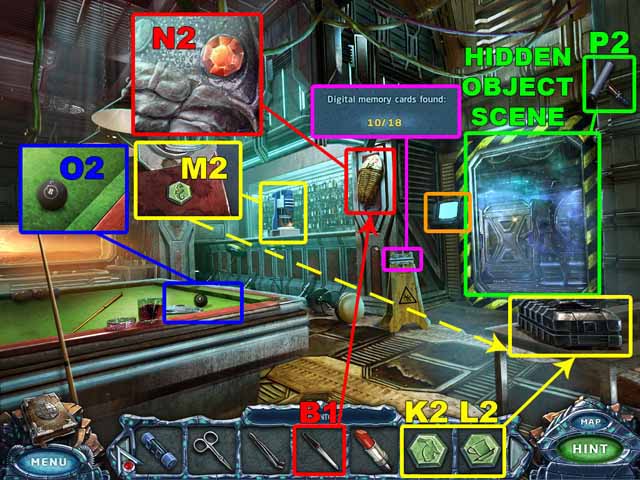


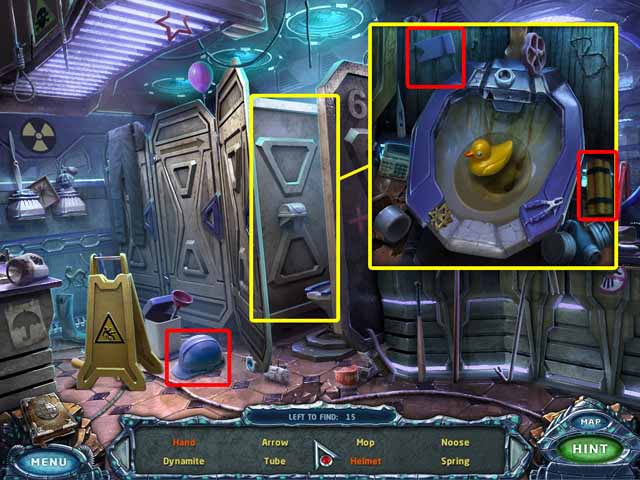
- Take the 10th Digital Memory Card.
- Take the BILLIARD BALL (O2).
- Use the NAIL FILE (B1) to get the GEM (N2).
- Take the TOKEN (M2) from the water cooler.
- Place the TOKENS (K2, L2 and M2) on the suitcase.
- Click on the control panel by the door.
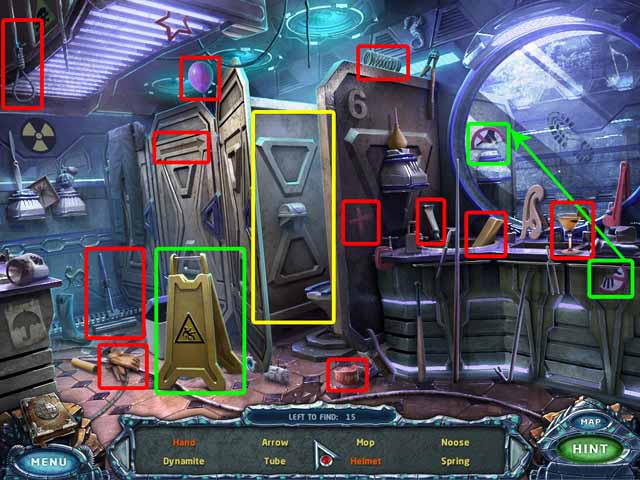
- Click on the sparkles to access the hidden object area. Collect every object listed at the bottom of the screen to acquire the MOP (P2).
- Return to the Control Center.

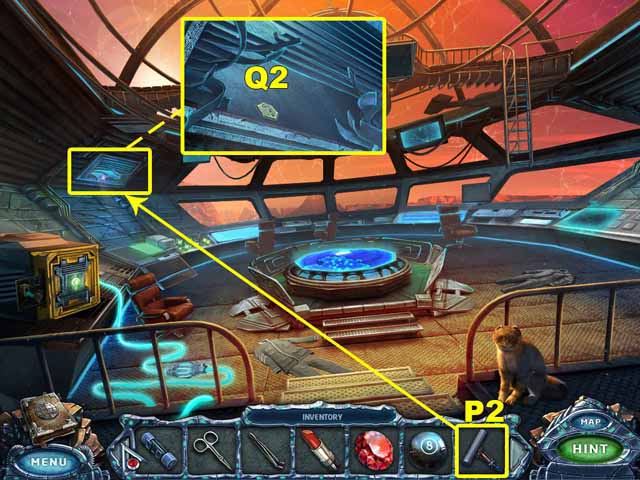

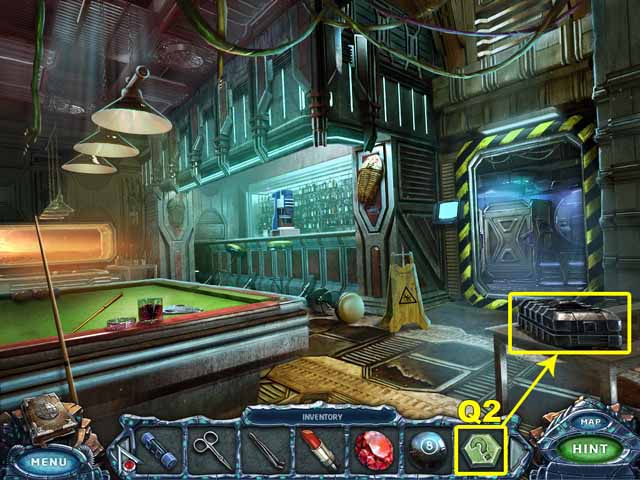
- Use the MOP (P2) to retrieve the TOKEN (Q2).
- Go to the Bar.
- Place the TOKEN (Q2) on the case.

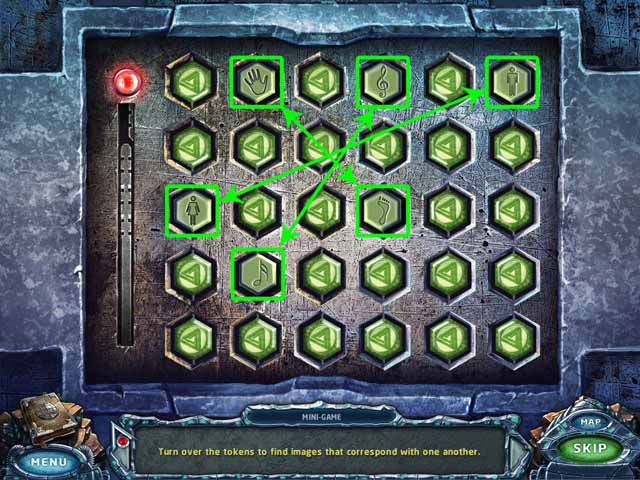

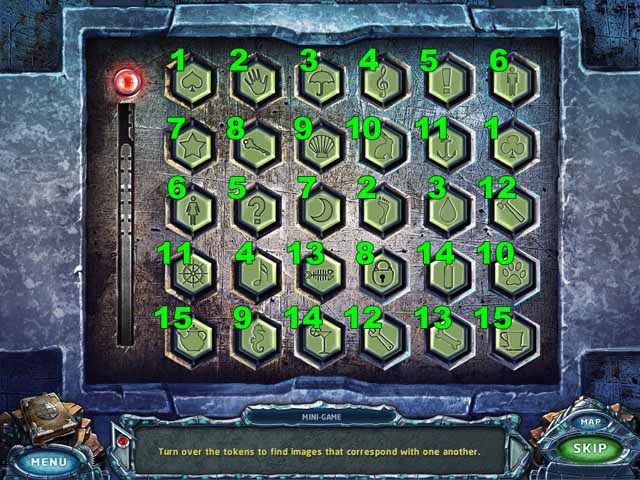

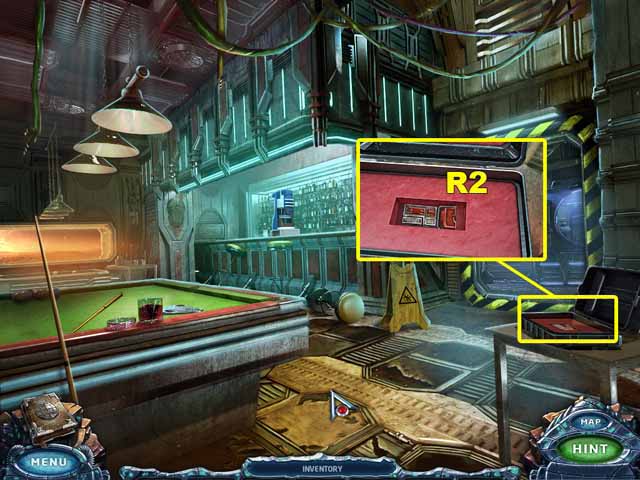
- Find the matching tokens.
- Take the ACCESS CARD (R2).
- Go to the Garage.

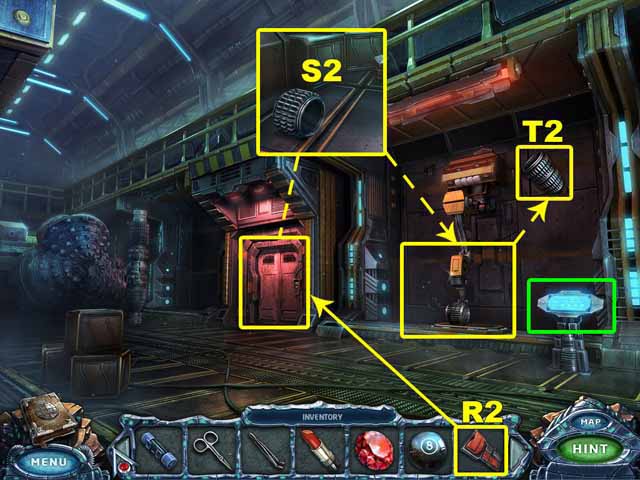

- Use the ACCESS CARD (R2) to open the closet.
- Take the DRILL BIT PART (S2).
- Place the DRILL BIT PART (S2) next to the other drill bit part.
- Turn on the Plasma Machine to weld the parts together and get the DRILL PART (T2).
- Go to the Cave Entrance.
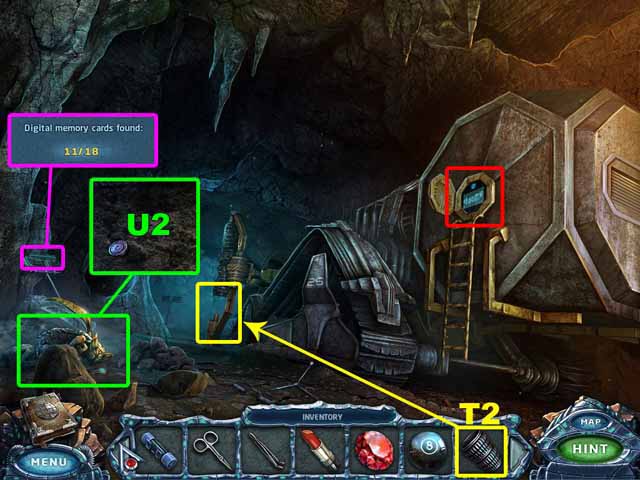
- Take the 11th Digital Memory Card.
- Take the BUTTON (U2).
- Place the DRILL PART (T2) on the drill.
- Click on the ‘On’ button to start the drill.
Chapter 5: Martian Caves

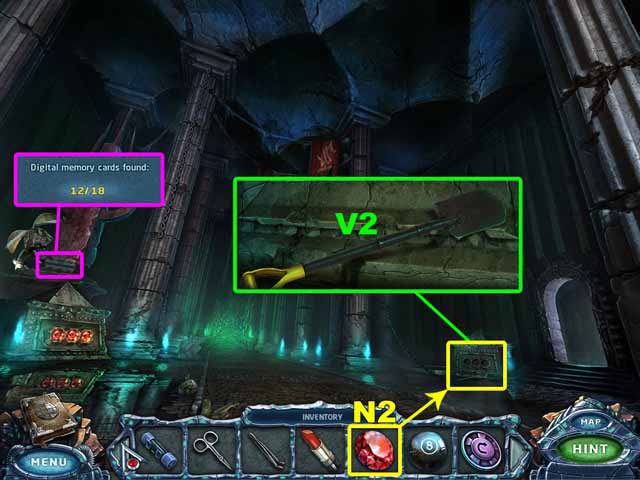
- You are in the Nave. Take the 12th Digital Memory Card.
- Insert the GEM (N2) into one of the slots on the base of the monument.
- Take the SHOVEL (V2).
- Enter the Crypt.

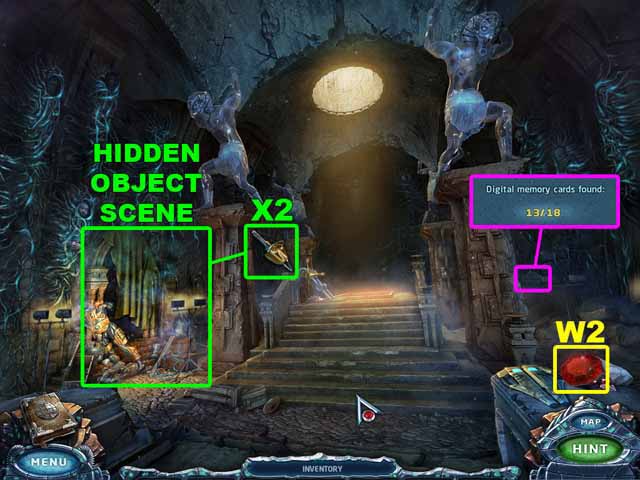

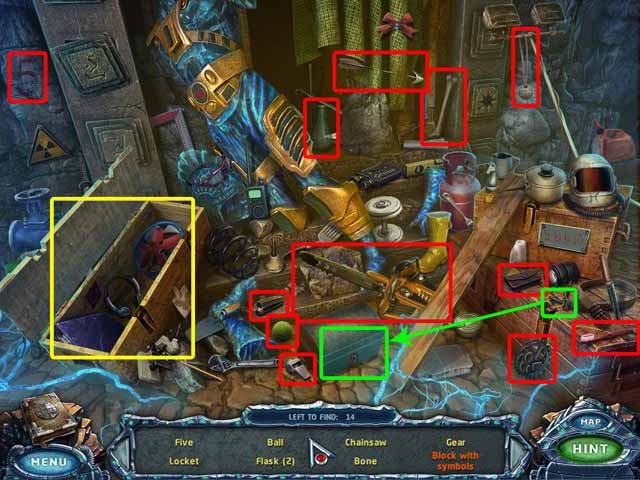

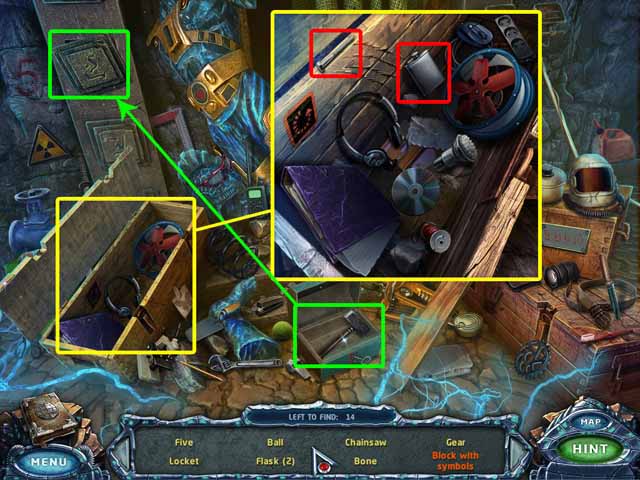
- Take the 13th Digital Memory Card.
- Take the GEM (W2).
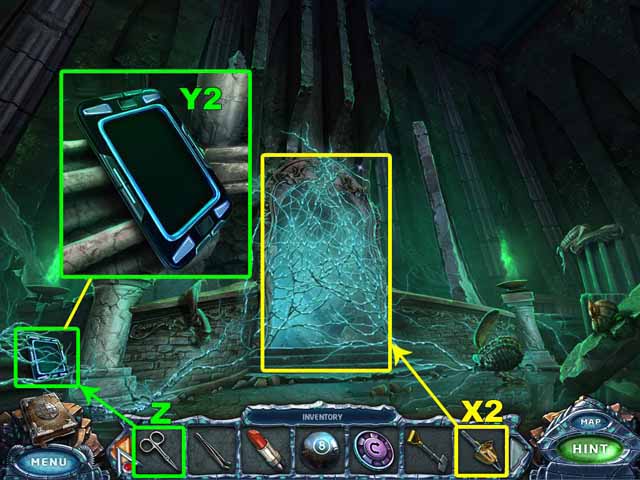
- Click on the sparkles to access the hidden object area. Collect every object listed at the bottom of the screen to acquire the CHAINSAW (X2).
- Return to the Nave.

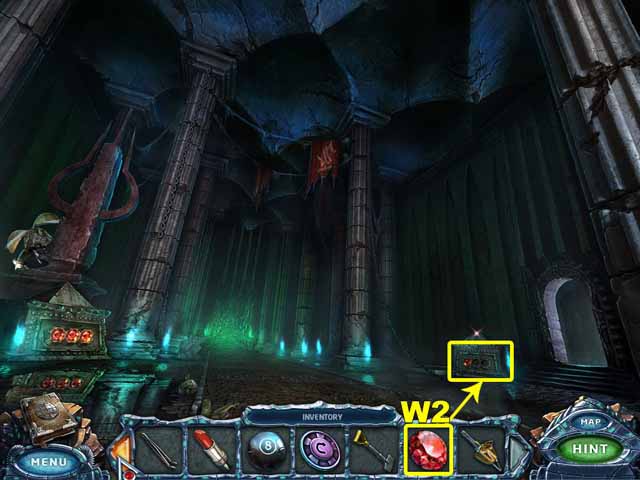


- Insert the GEM (W2) into one of the slots on the base of the monument.
- Go forward to the Nave Exit.
- Use the SCISSORS (Z) to remove the roots wrapped around the TRANSLATOR (Y2).
- Take the translator.
- Use the CHAINSAW (X2) to cut down the roots blocking the entrance to the Underground Hub.
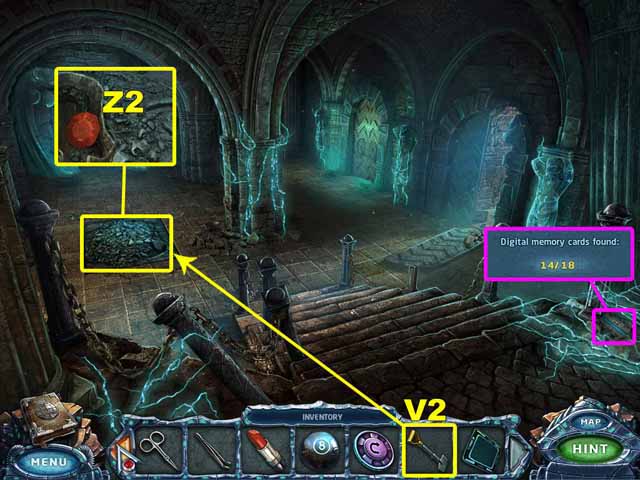
- Enter the Underground Hub. Take the 14th Digital Memory Card.
- Use the SHOVEL (V2) to dig up the GEM (Z2).
- Go right to enter the Crevice.

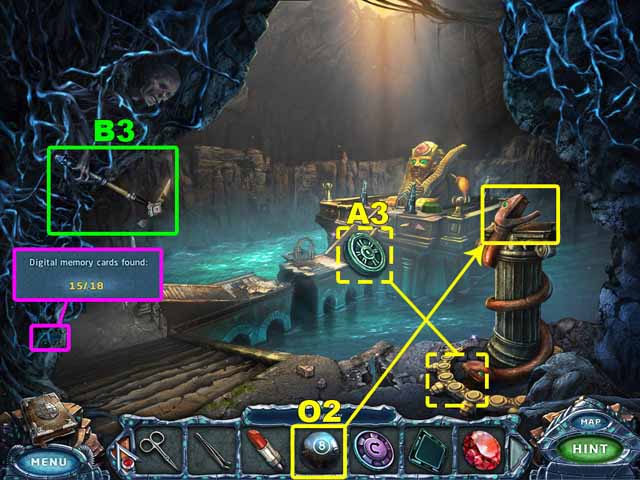

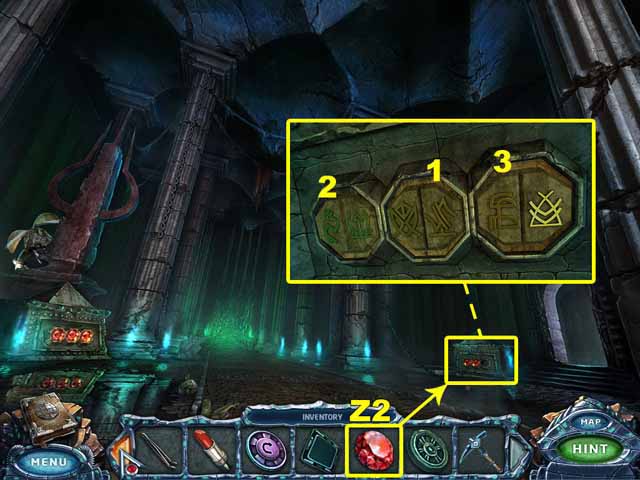

- Take the 15th Digital Memory Card.
- Drop the BILLIARD BALL (O2) in the snake’s mouth to get the DISC (A3).
- Take the PICKAXE (B3).
- Go to the Nave.
- Insert the GEM (Z2) into one the last slot on the base of the monument.
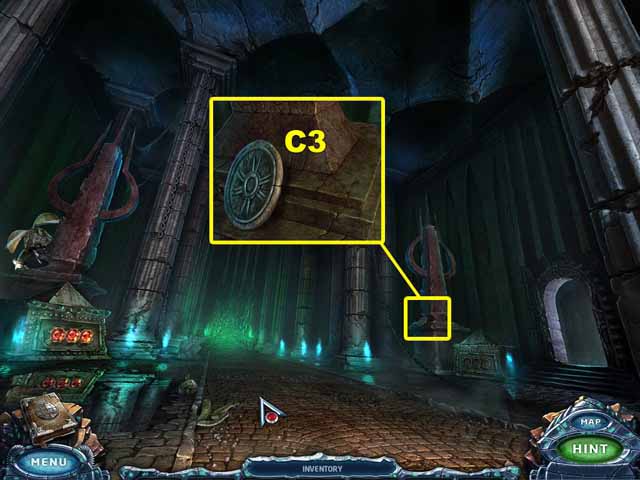
- Click on the symbols you saw on the banner in the Nave and on the banner in the crate in the Excavation.
- Take the DISK (C3).
- Go to the Underground Hub.

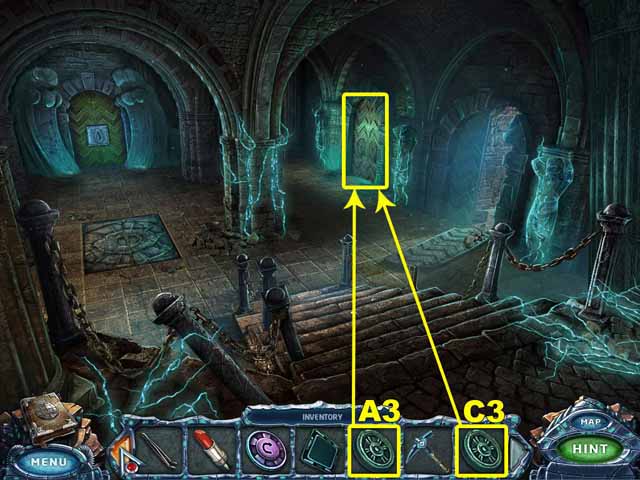

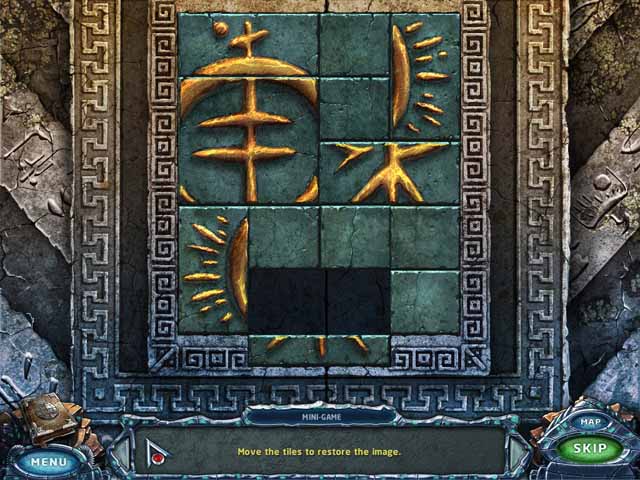

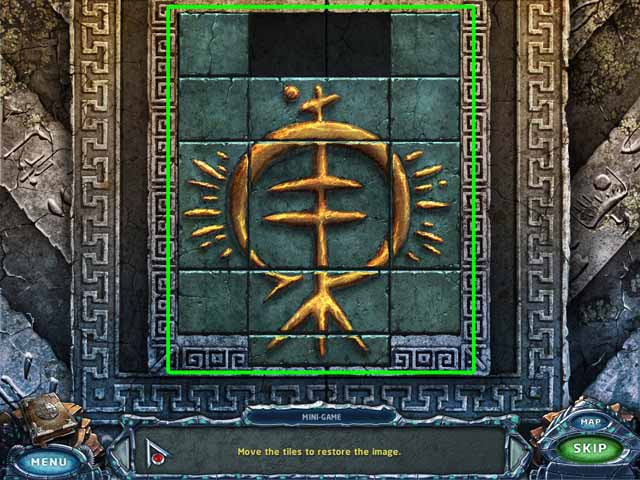
- Insert the DISKS (A3 and C3) on the door.
- Move the tiles to restore the image.
- Enter the Temple.

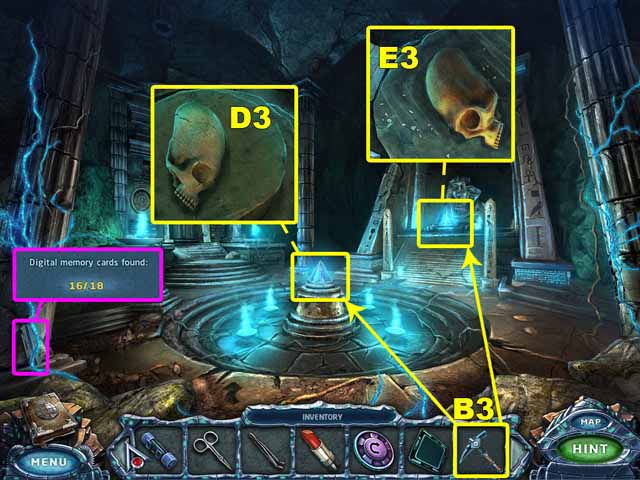

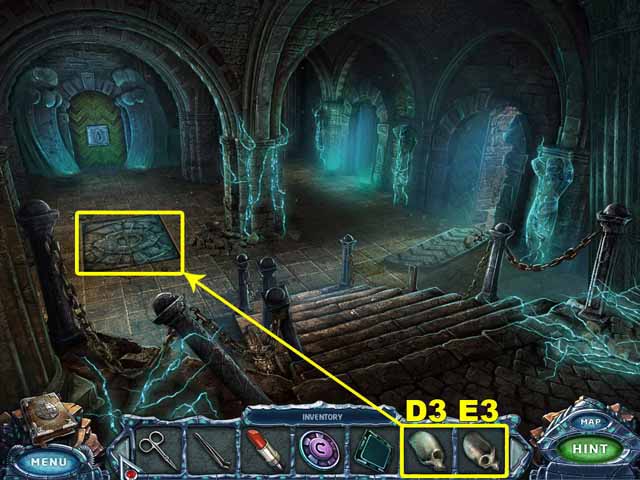
- Take the 16th Digital Memory Card.
- Use the PICKAXE (B3) to break the pyramids.
- Take the HALVES OF A SKULL (D3 and E3).
- Go to the Underground Hub.
- Place the PARTS OF A SKULL (D3 and E3) in the hatch.

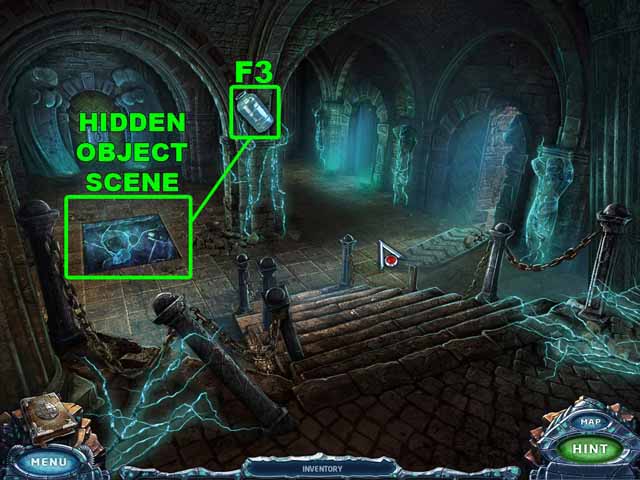

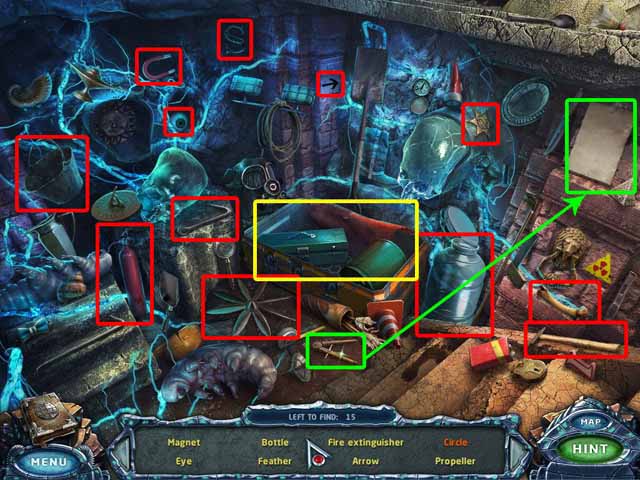

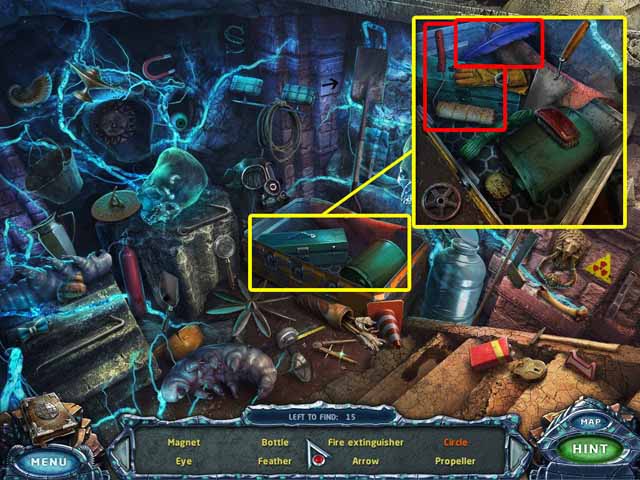
- Click on the sparkles to access the hidden object area. Collect every object listed at the bottom of the screen to acquire the BOTTLE (F3).
- Go to the Turbine Room.

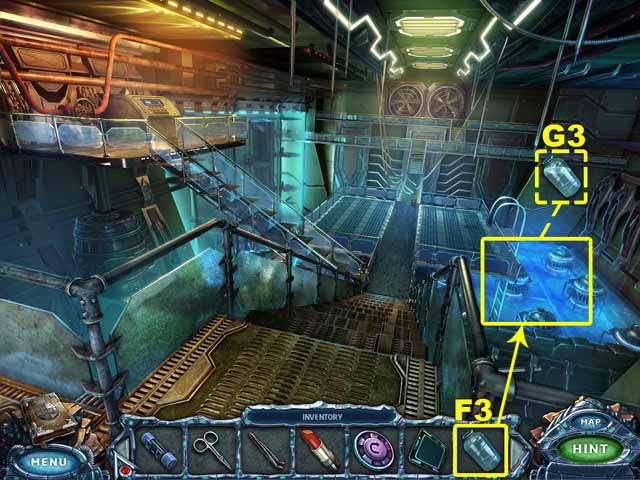
- Fill the BOTTLE (F3) with water. Take the BOTTLE OF WATER (G3).
- Go to the Bar.

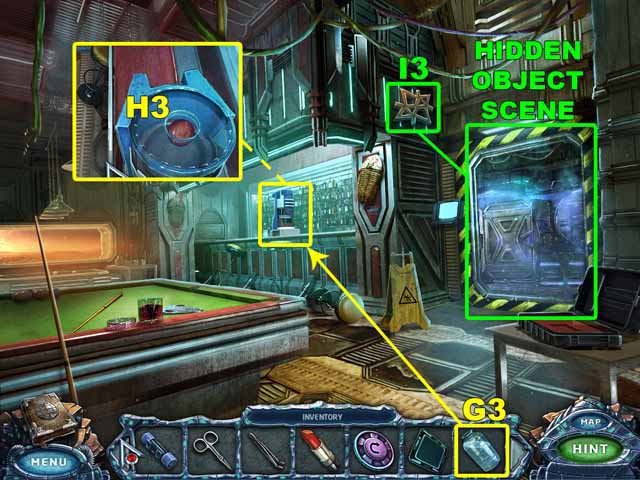

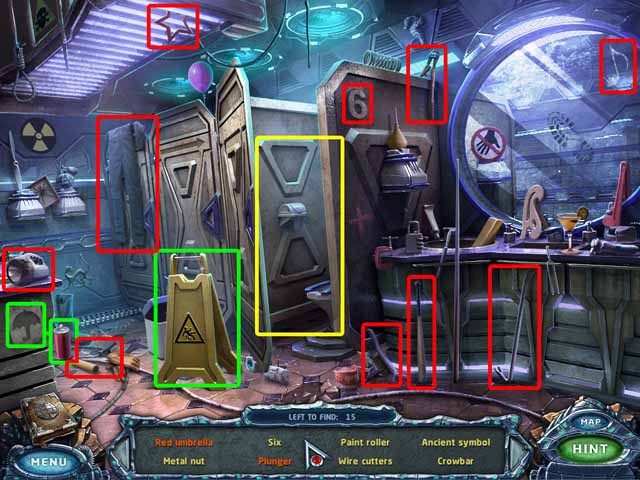

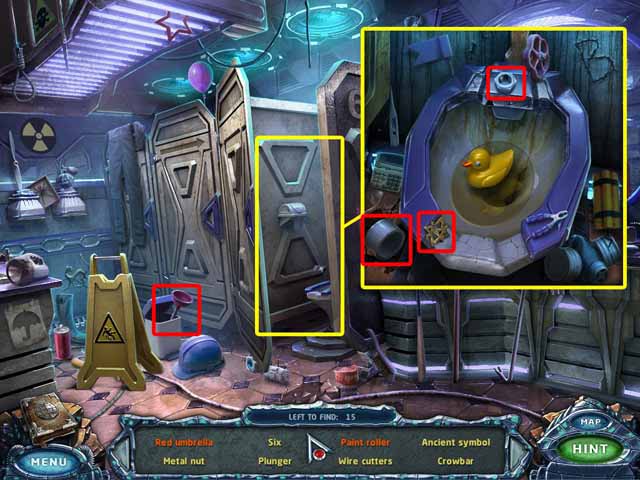
- Pour the BOTTLE OF WATER (G3) into the cooler. Take the MARS FIGURINE (H3).
- Click on the sparkles to access the hidden object area. Collect every object listed at the bottom of the screen to acquire the SYMBOL (I3).
- Go to the Temple.
Chapter 6: Two Keys

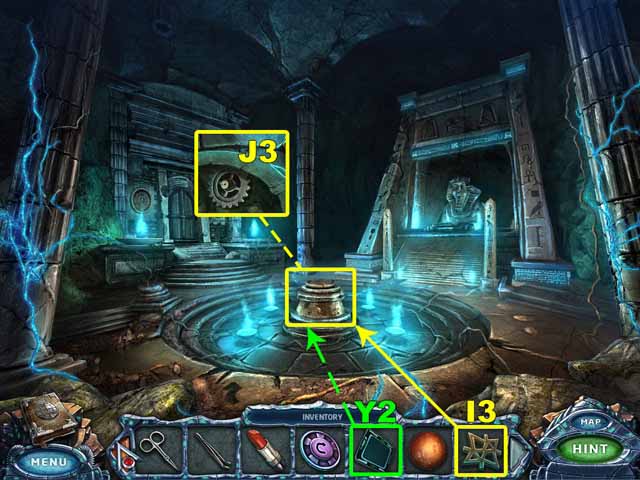



- Place the SYMBOL (I3) on the pedestal in the center of the room.
- Take the GEAR (J3).
- Use the TRANSLATOR (Y2) to read the symbols on the tablet.
- Go to the Crypt.
- Place the GEAR (J3) on the mechanism.
- Click on the handle to raise the coffin.
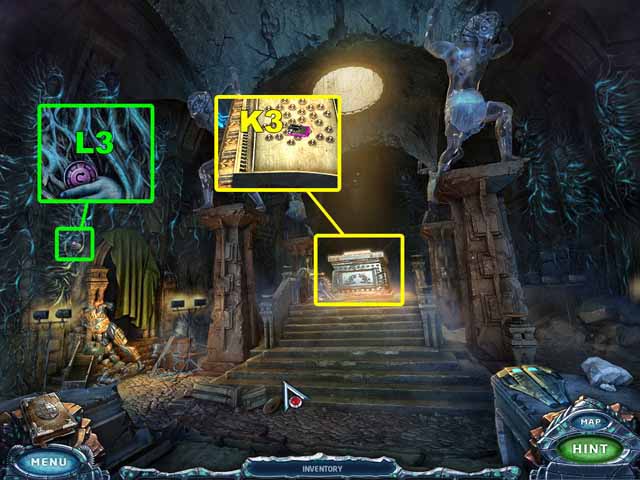
- Take the VIOLET ACCESS CARD (K3).
- Take the BUTTON (L3).
- Go forward to the Excavation.

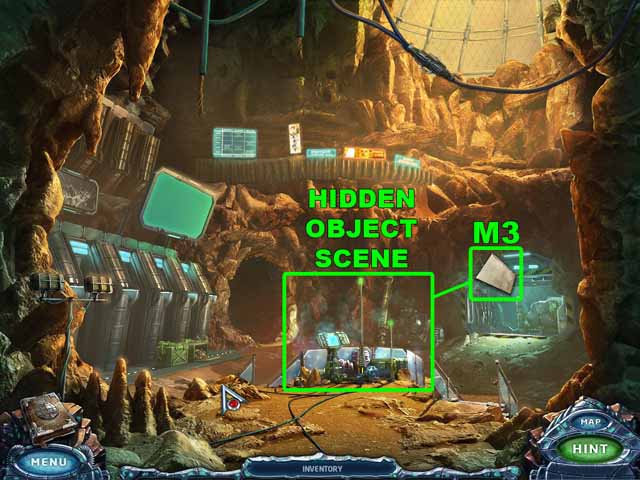

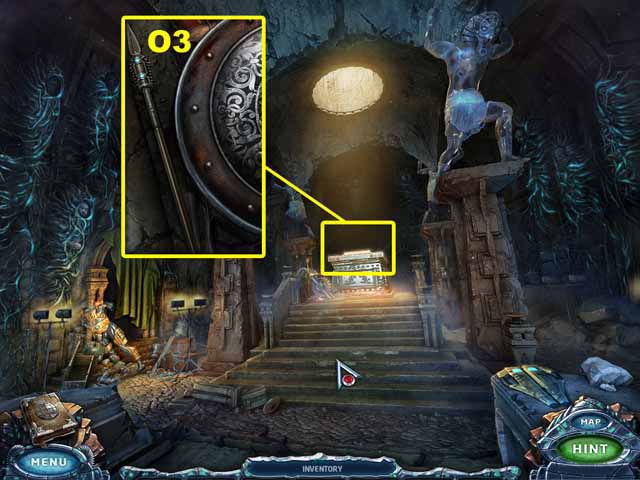

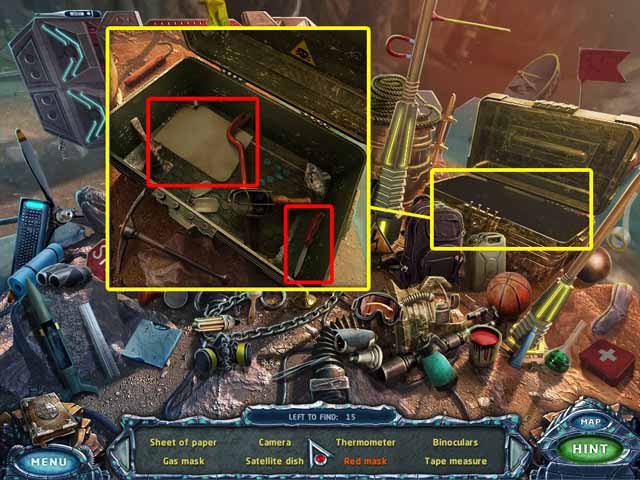
- Click on the sparkles to access the hidden object area. Collect every object listed at the bottom of the screen to acquire the SHEET OF PAPER (M3).
- Go to the Control Center.

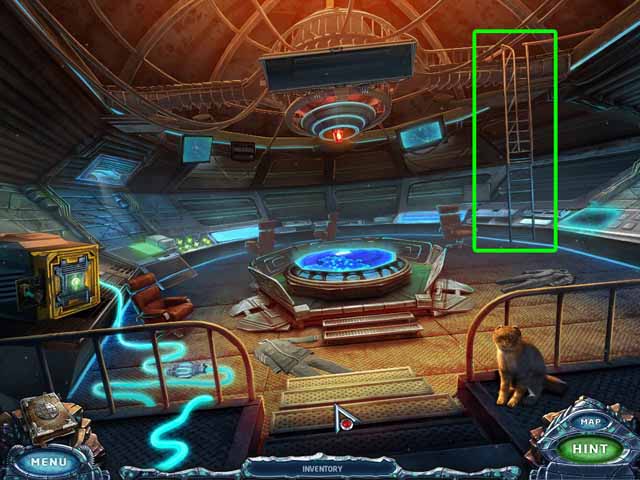

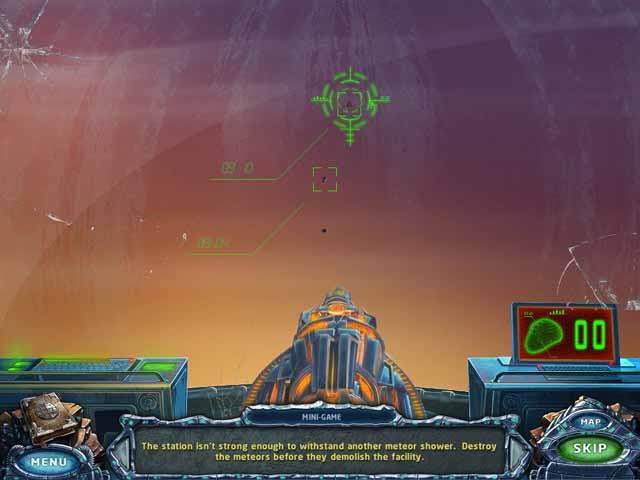

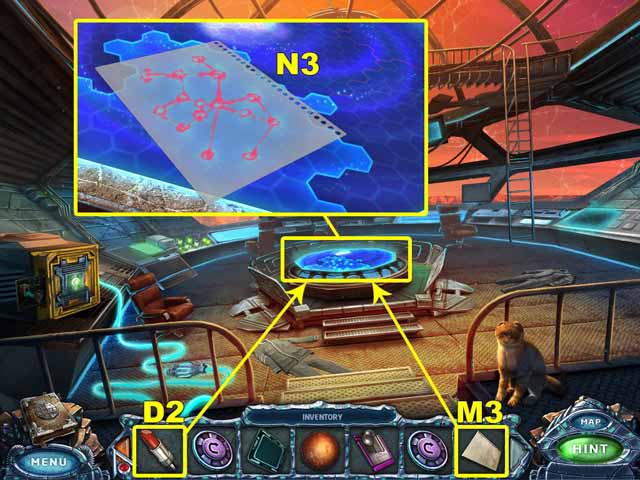
- Click on the top of the ladder. Win the meteorite mini-game.
- Place the SHEET OF PAPER (M3) on the star map. Use the LIPSTICK (D2) to trace the constellation.
- Take the CONSTELLATION (N3).
- Go to the Crypt.

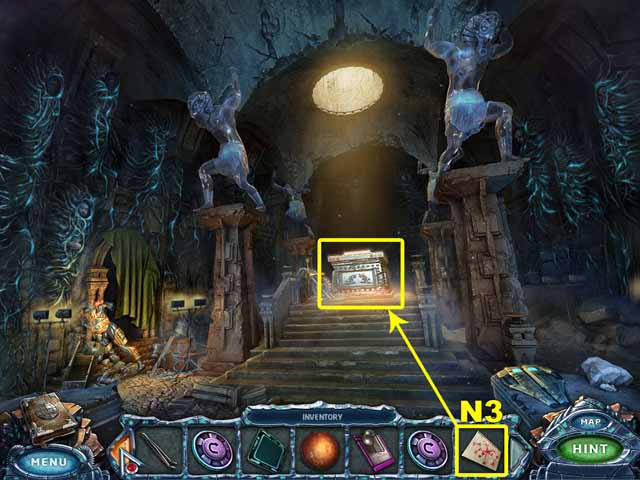

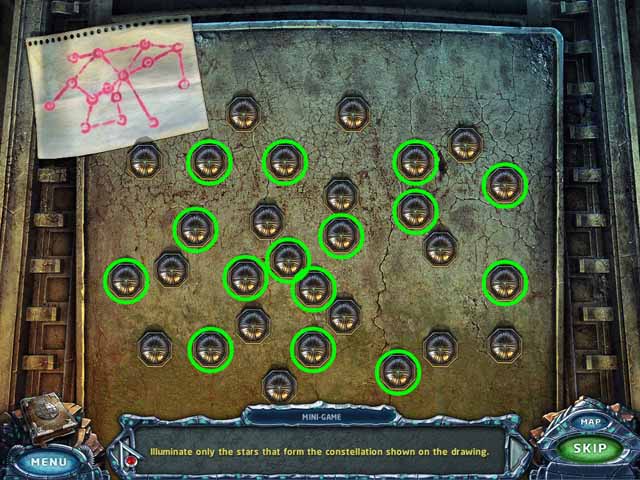


- Place the CONSTELLATION (N3) on the coffin.
- Re-create the constellation.
- Take the SPEAR (O3).
- Go to the Dock.

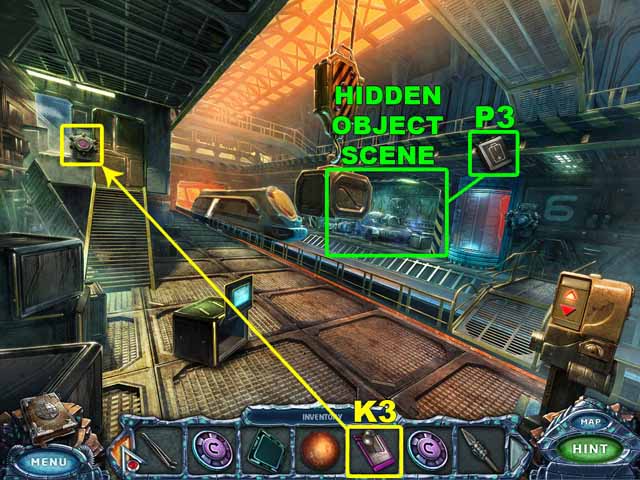

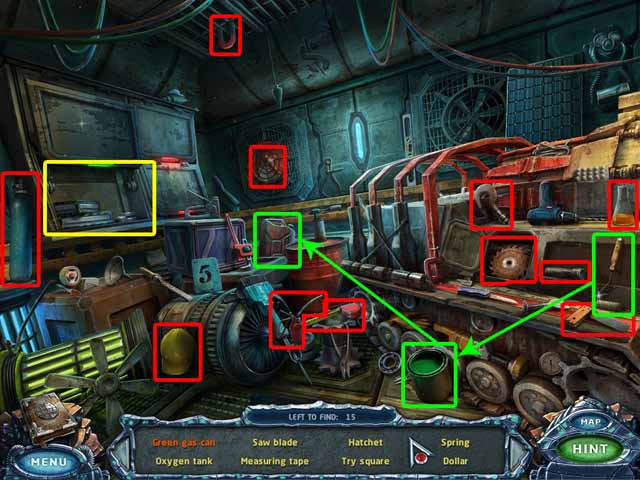

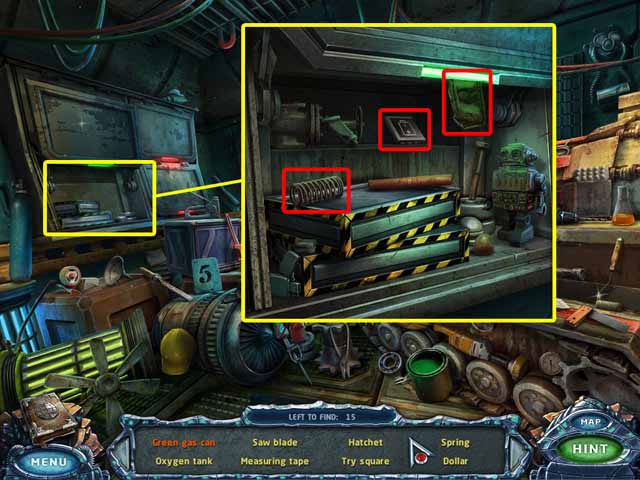
- Click on the sparkles to access the hidden object area. Collect every object listed at the bottom of the screen to acquire the BATTERY (P3).
- Use the VIOLET ACCESS CARD (K3) to unlock the door to the Control Office.
- Enter the Control Office.

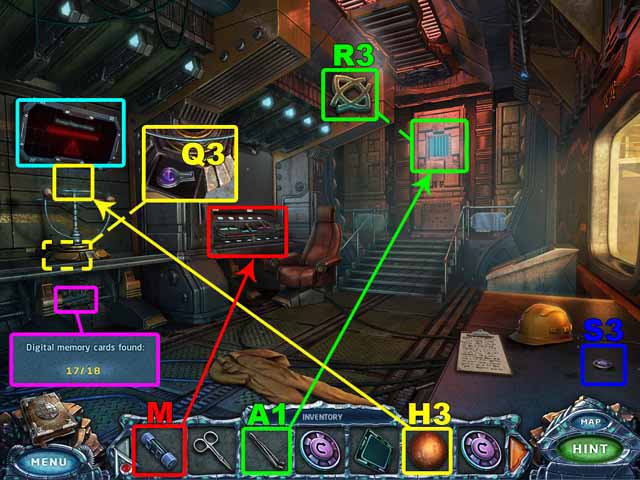
- Take the 17th Digital Memory Card.
- Insert the FUSE (M) in the control panel.
- Place the MARS FIGURINE (H3) where it belongs to open the cache.
- Take the FLASK FIGURINE (Q3).
- Use the TWEEZERS (A1) to take the SYMBOL (R3).
- Take the BUTTON (S3).
- Go to the Kitchen.

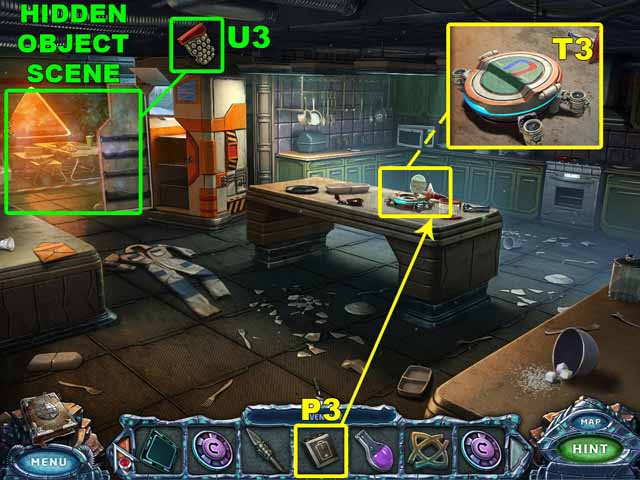


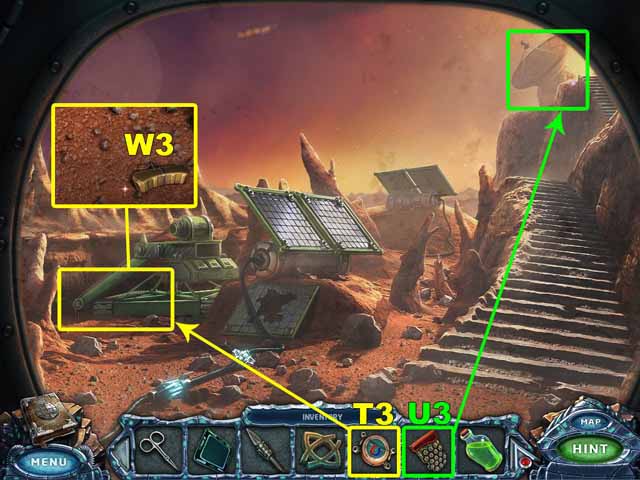
- Open the RADIO-CONTROLLED MAGNET (T3). Insert the BATTERY (P3).
- Close the magnet. Take it.
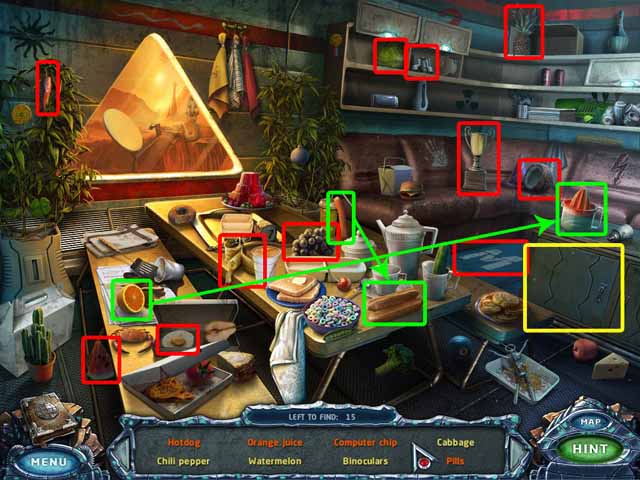
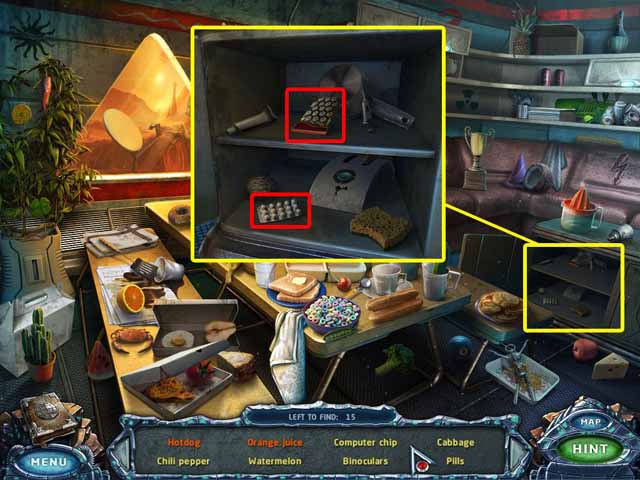
- Click on the sparkles to access the hidden object area. Collect every object listed at the bottom of the screen to acquire the COMPUTER CHIP (U3).
- Go to the Laboratory.

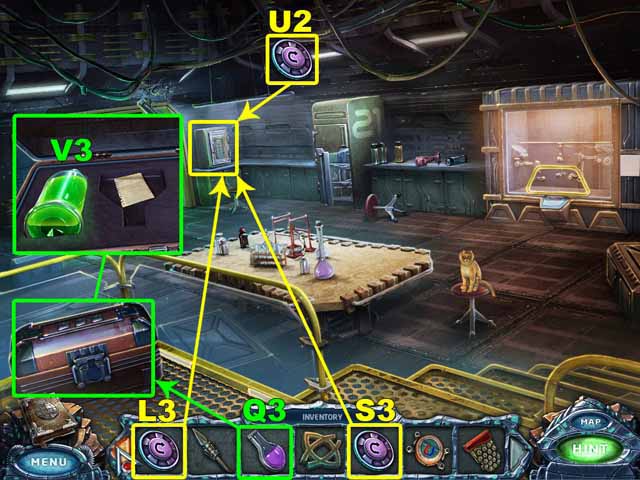


- Use the FLASK FIGURINE (Q3) to open the case.
- Take the ACID (V3).
- Place the BUTTONS (L3, S3 and U2) on the safe.
- Go to the Surface of Mars.
- Use the RADIO-CONTROLLED MAGNET (T3) to get the CONTROL KNOB (W3).
- Insert the COMPUTER CHIP (U3) into the antenna.
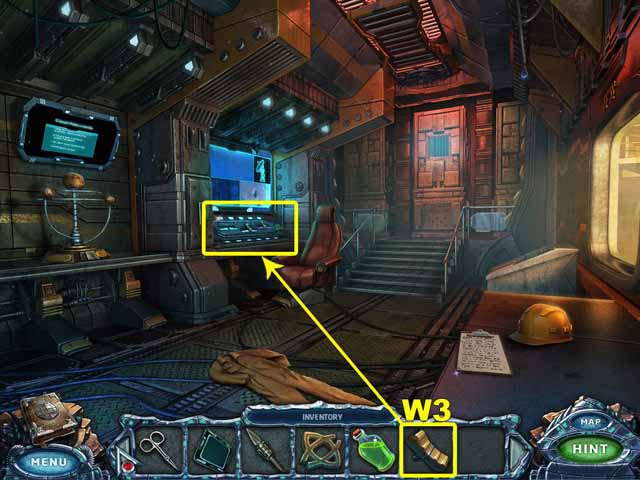
- Go to the Control Office.
- Place the CONTROL KNOB (W3) where it belongs.

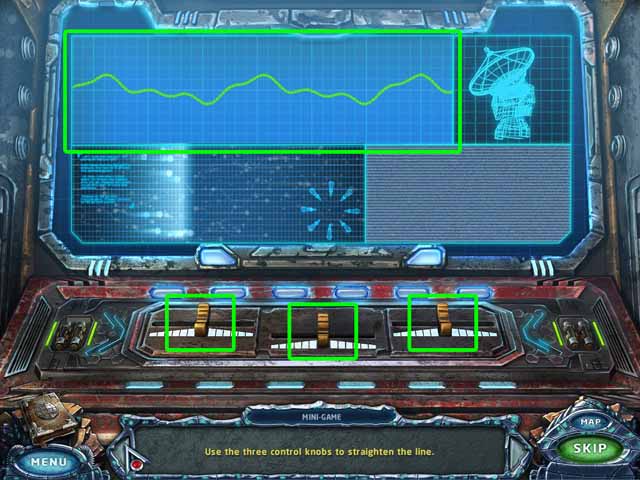

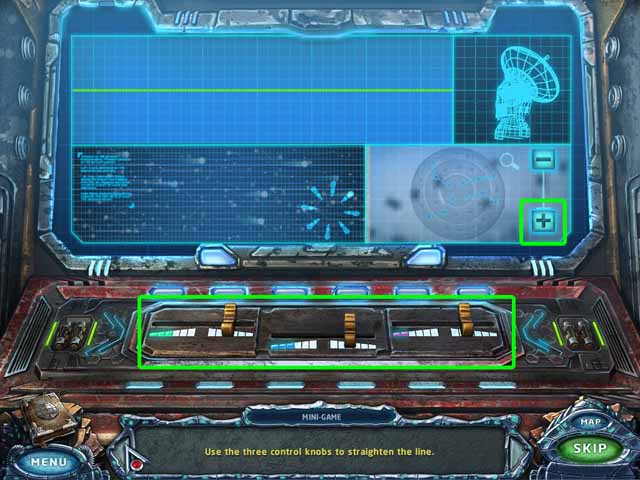

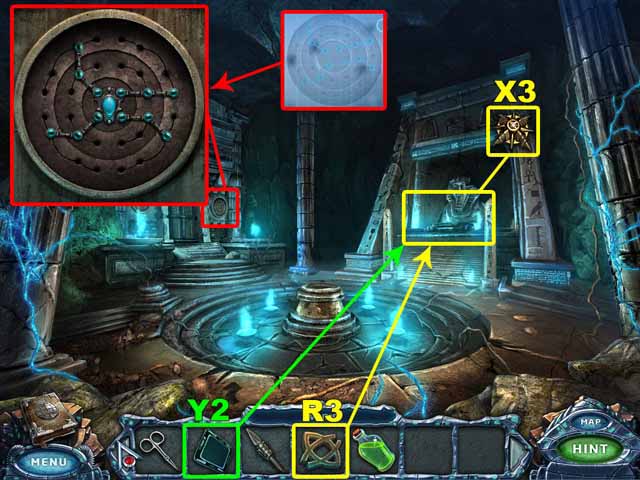
- Use the three control knobs to straighten the line.
- Click the ‘+’ button to zoom in on the image on the surface of the planet until you see the scheme on the forehead.
- Go to the Temple.
- To the right of the door, re-create the symbol you saw on the surface of the planet.
- Place the SYMBOL (R3) on the pedestal by the sphinx.
- Take the STAR (X3).
- Use the TRANSLATOR (Y2) to read the symbols on the tablet.
- Go to the Crypt.

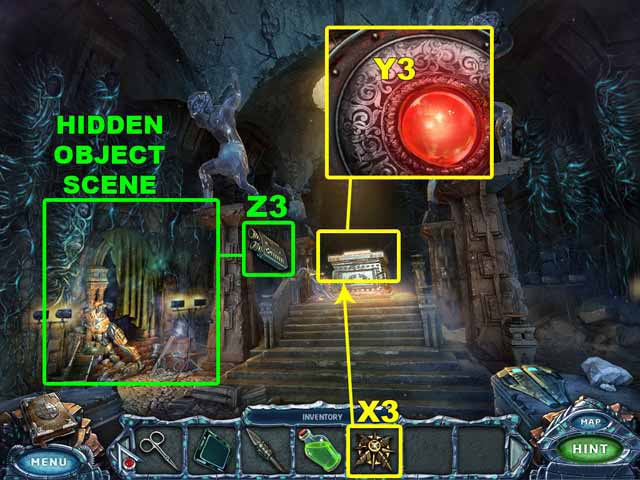

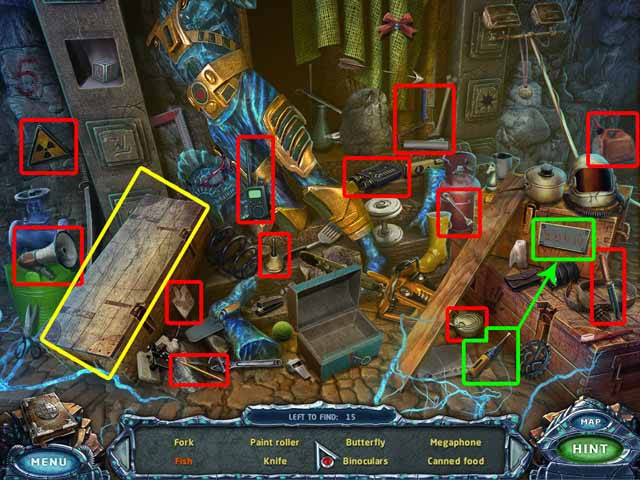

- Place the STAR (X3) on the shield in the coffin to open the cache. Take the RED SPHERE (Y3).
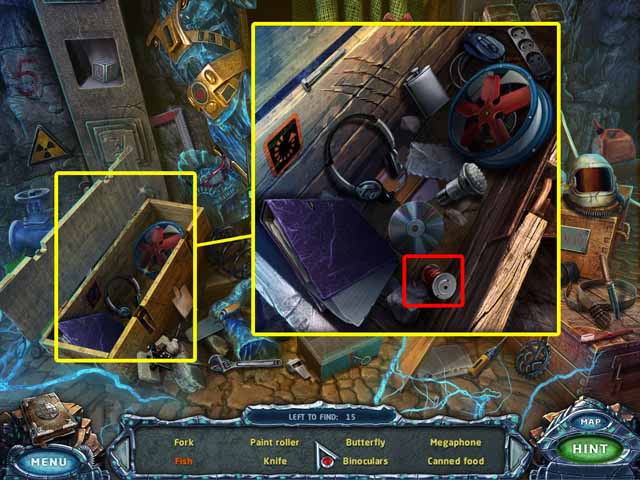
- Click on the sparkles to access the hidden object area. Collect every object listed at the bottom of the screen to acquire the BINOCULARS (Z3).
- Go to the Crevice.

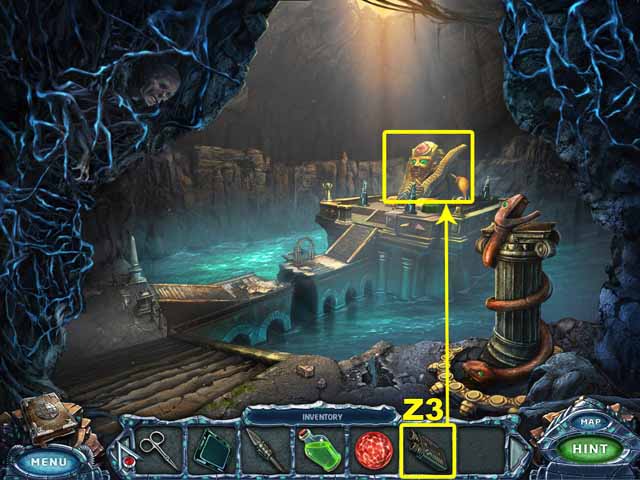

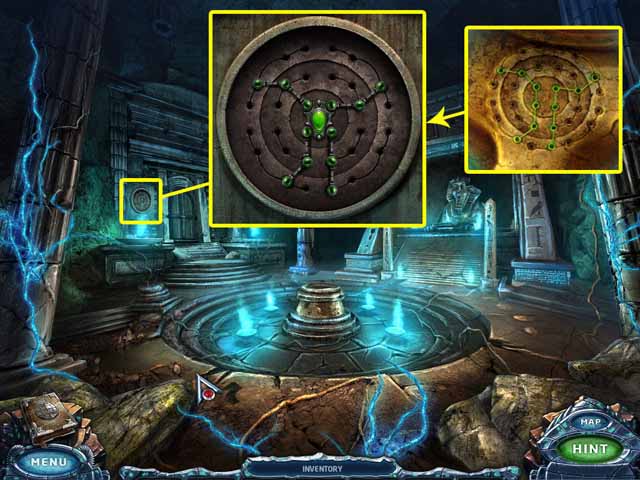

- Use the BINOCULARS (Z3) to look at the sphinx. Remember the symbol on its forehead.
- Go to the Temple.
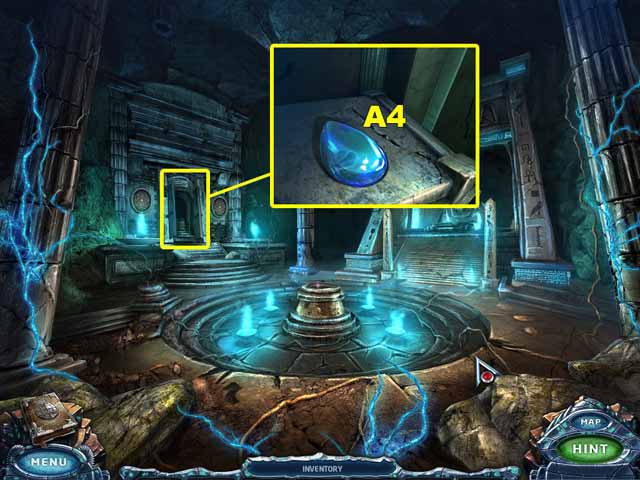
- To the left of the door, re-create the symbol you saw on the head of the sphinx.
- Take the DROP (A4).
- Go to the Underground Hub.
Chapter 7: Astral World

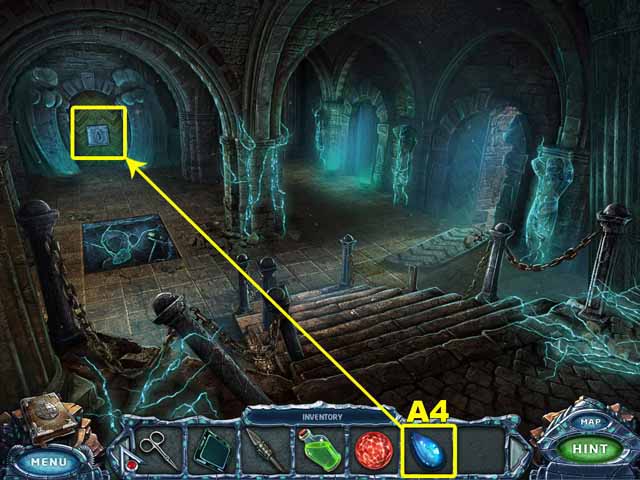

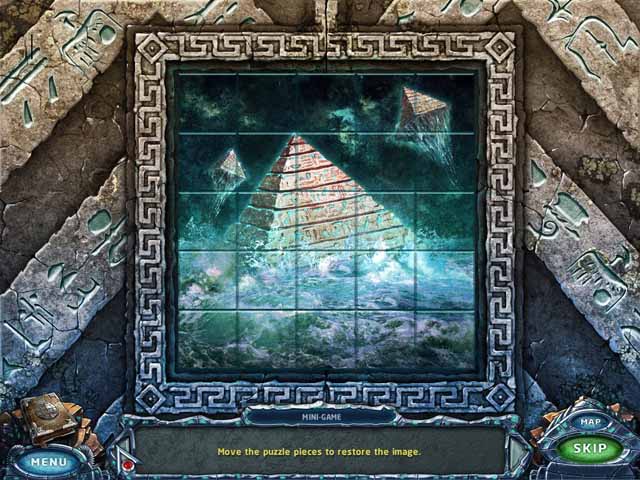
- Place the DROP (A4) on the door.
- Assemble the image on the door.
- Go to the Lake.

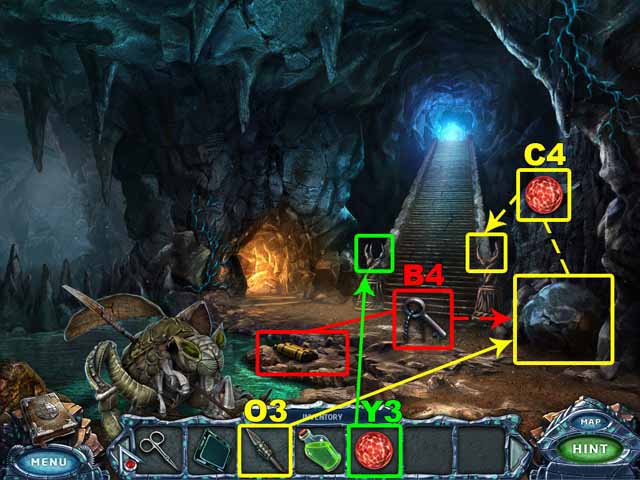


- Find the KEY (B4).
- Use the SPEAR (O3) to move the stone.
- Use the KEY (B4) to open the chest.
- Take the RED SPHERE (C4).
- Put the RED SPHERES (Y3 and C4) on the posts.
- Go to the Burrows.
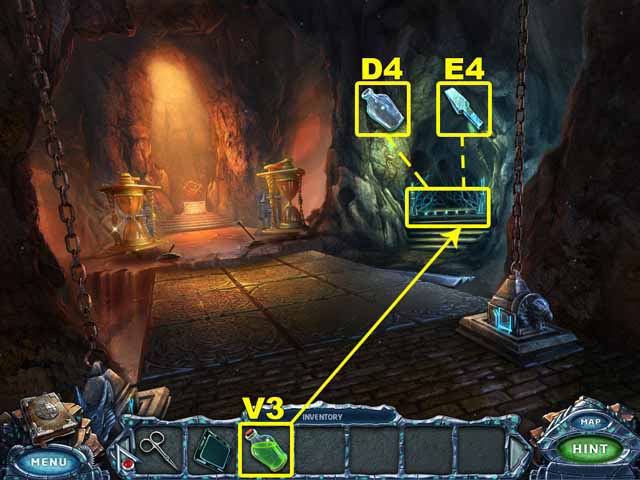
- Pour the ACID (V3) on the hatch.
- Take the EMPTY BOTTLE (D4).
- Take the SUPERSOLID DRILL BIT (E4).
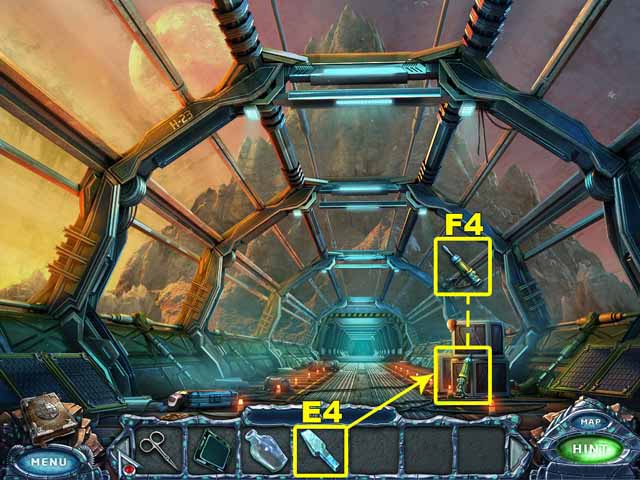
- Go to the Elevator Exit.
- Place the SUPERSOLID DRILL BIT (E4) on the broken jackhammer to get the JACKHAMMER (F4).
- Return to the Lake.

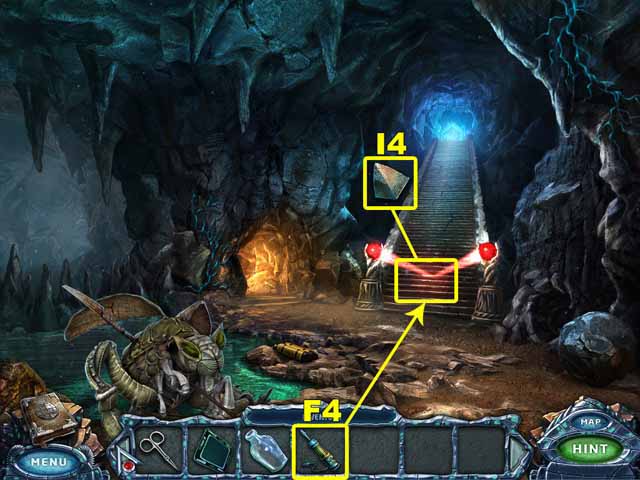


- Use the JACKHAMMER (F4) to break up the stairs.
- Take the PYRAMID (I4).
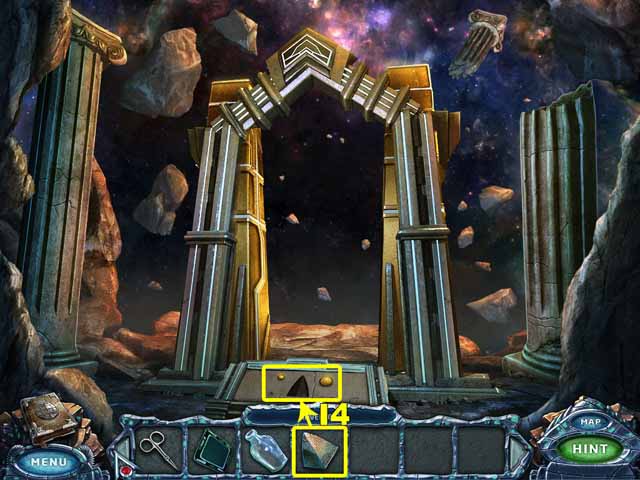
- Go to the Portal.
- Place the PYRAMID (I4) at the base of the portal.
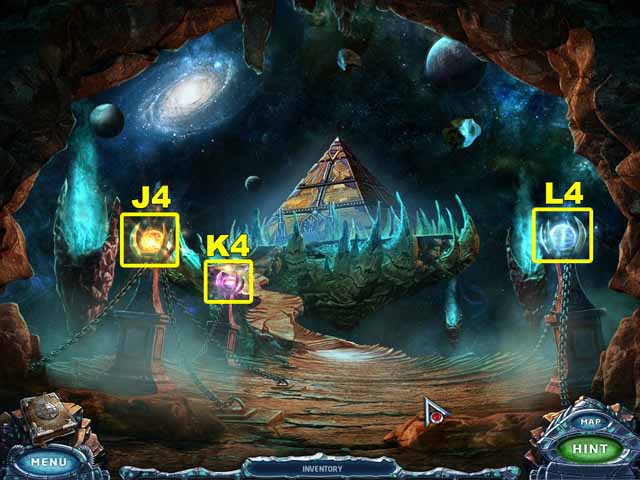
- Step into the Astral World.
- Take the planets (J4, K4 and L4).
- Go to the Pyramid Entrance.

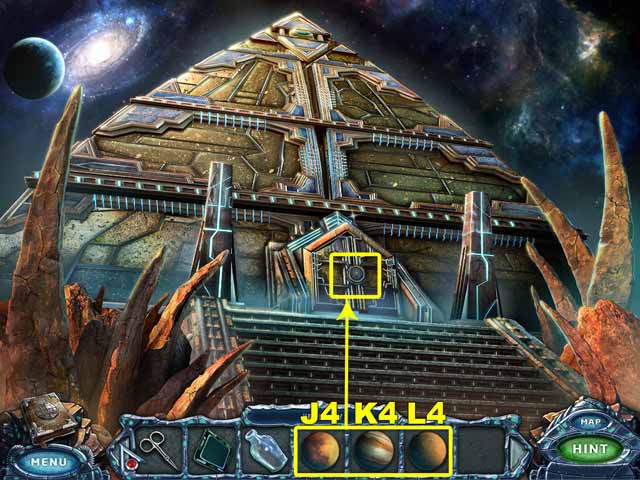

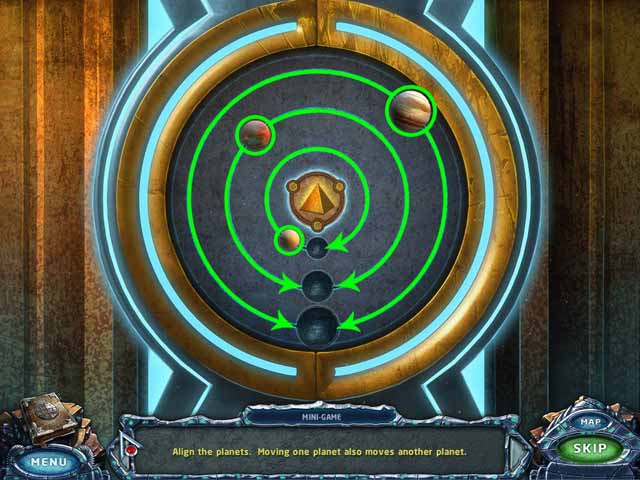

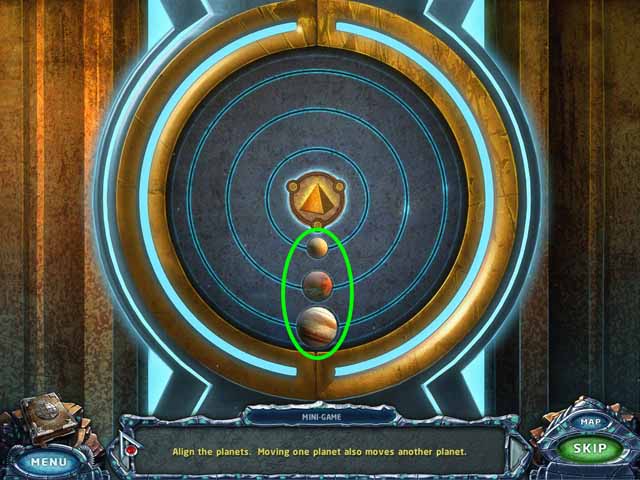
- Insert the PLANETS (J4, K4 and L4) in the door.
- Align the planets.
- Enter the Pyramid.

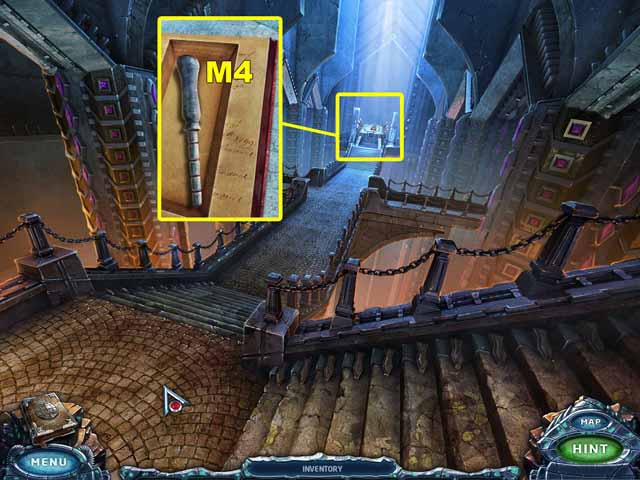

- Click on the cover of the book.
- Page through the book until you reach the end. Take the LEVER (M4).
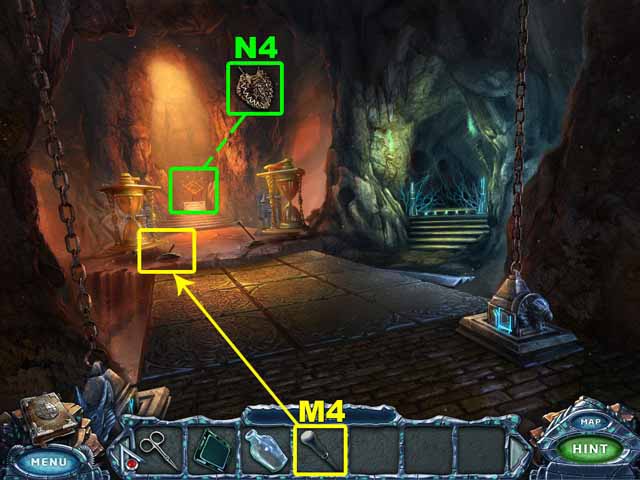
- Go to the Burrows.
- Place the LEVER (M4) where it belongs.
Chapter 8: Lair of the Bugs

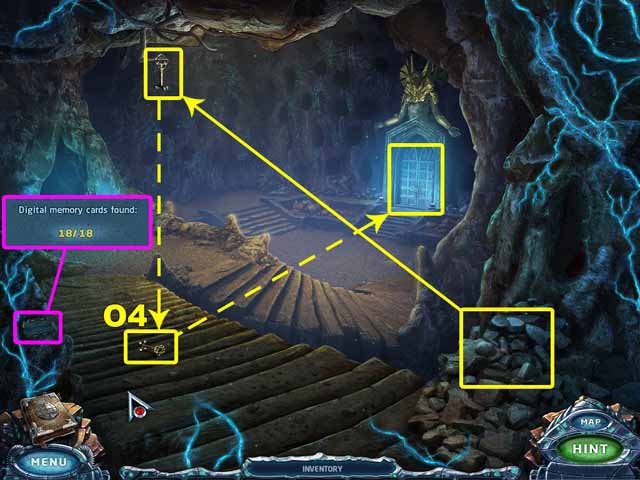

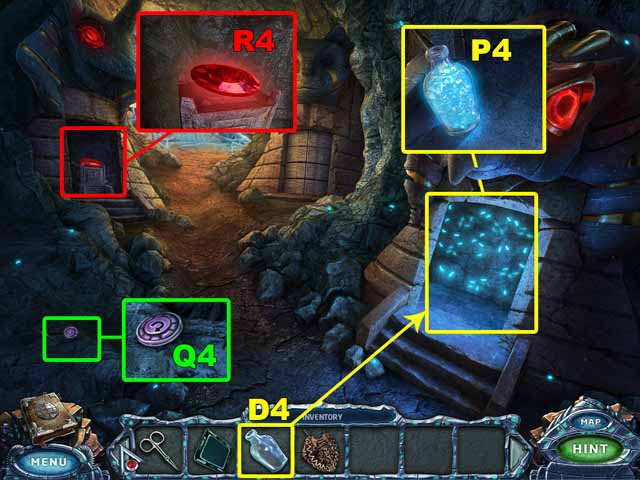

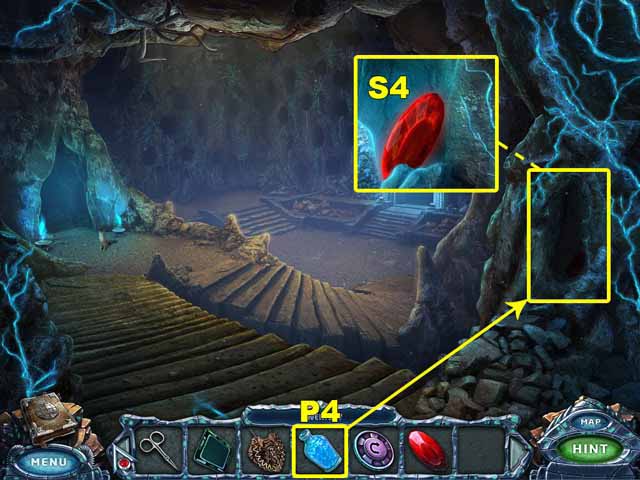
- Go left to enter the Heart of the Hive.
- Take the 18th Digital Memory Card.
- Use the stones to hit the KEY (O4).
- Open the door with the KEY (O4).
- Enter the Tunnel.
- Take the BUTTON (Q4).
- Take the GEM (R4).
- Place the EMPTY BOTTLE (D4) near the larvae.
- Click on the larvae to get the BOTTLE OF LARVAE (P4).
- Take the BOTTLE OF LARVAE (P4).
- Go to the Heart of the Hive.
- Use the BOTTLE OF LARVAE (P4) to illuminate the dark hole. Take the GEM (S4).
- Return to the Tunnel.

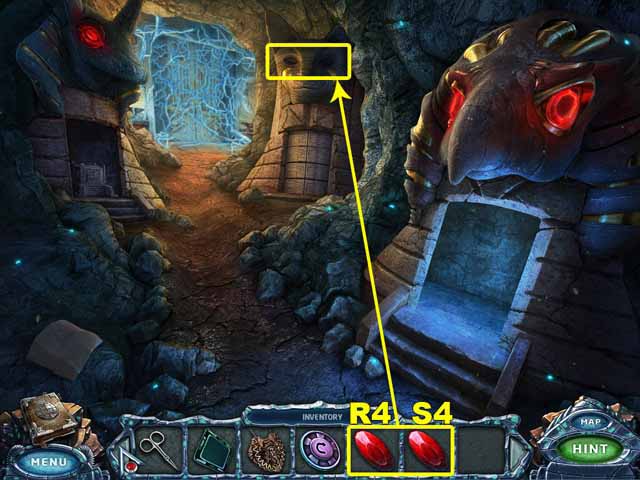

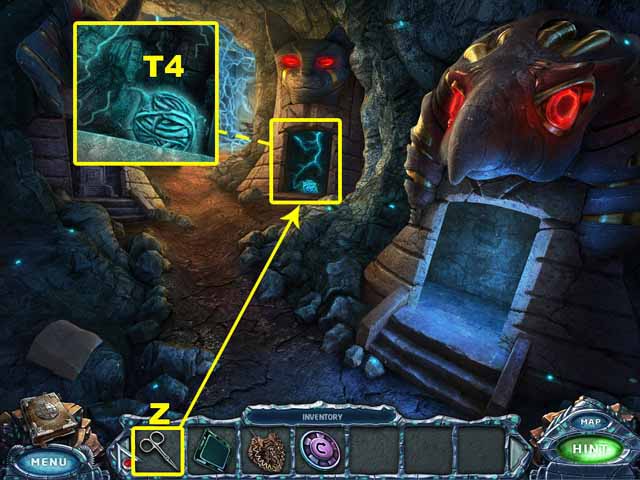

- Insert the GEMS (R4 and S4) into the eyes of the stone figure.
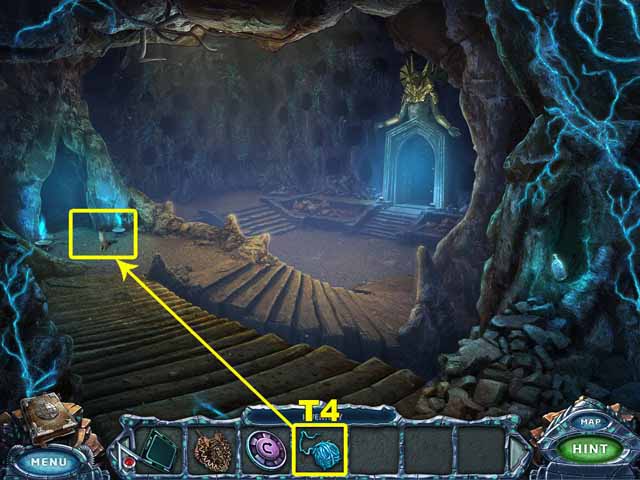
- Use the SCISSORS (Z) to cut the insect root.
- Take the ball of INSECT ROOT (T4).
- Go to the Heart of the Hive.
- Place the INSECT ROOT (T4) on the cat.
- Follow the cat into the tunnel.
- Go to the Laboratory.

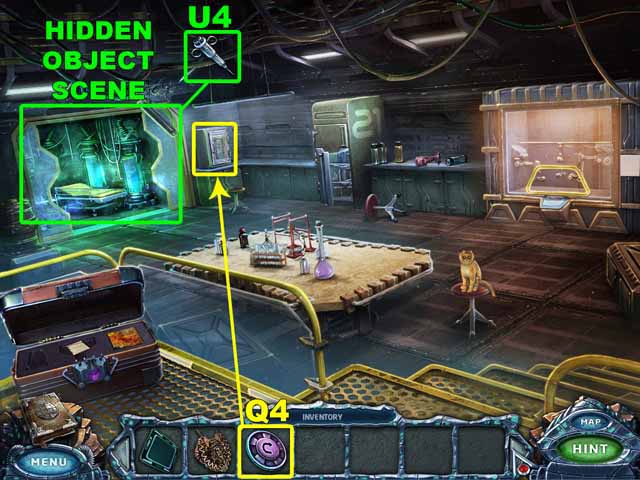

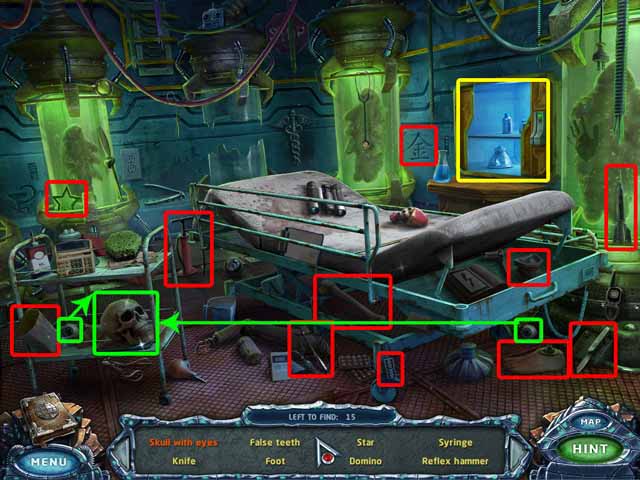

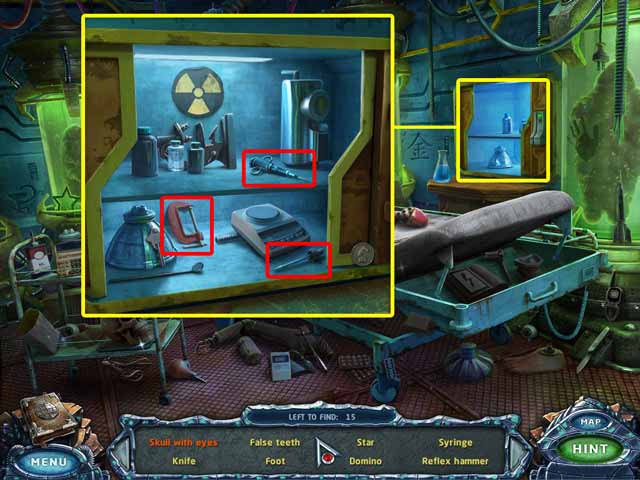
- Click on the sparkles to access the hidden object area. Collect every object listed at the bottom of the screen to acquire the SYRINGE (U4).
- Place the BUTTON (Q4) on the safe.

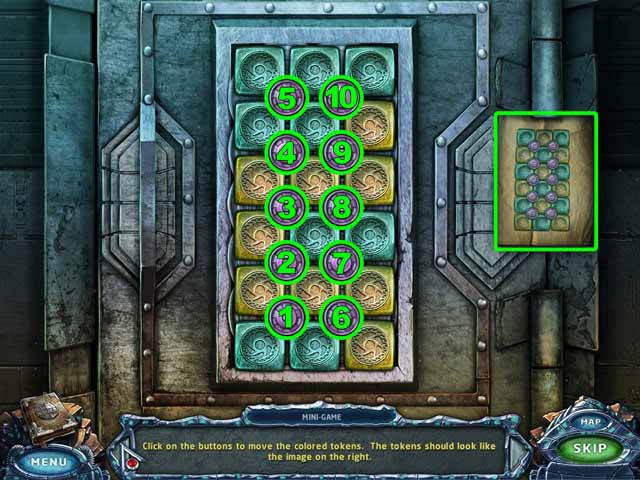

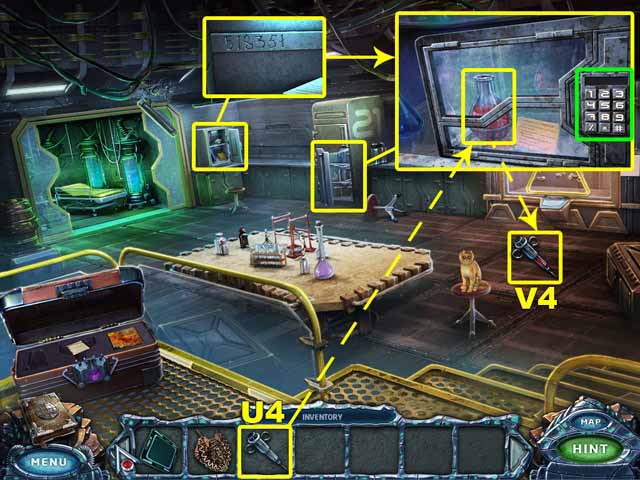


- Arrange the tokens on the pillar in the correct order.
- Click on the buttons in the following order: 4, 4, 10, 9, 1, 7, 6, 7, 2, 2, 6, 1, 1, 6.
- Remember the code in the safe.
- Enter the code to open the case containing the cat’s blood. Use the SYRINGE (U4) on the blood to acquire the SYRINGE OF BLOOD (V4).
- Go to the Queen’s Lair.
Chapter 9: Rescue

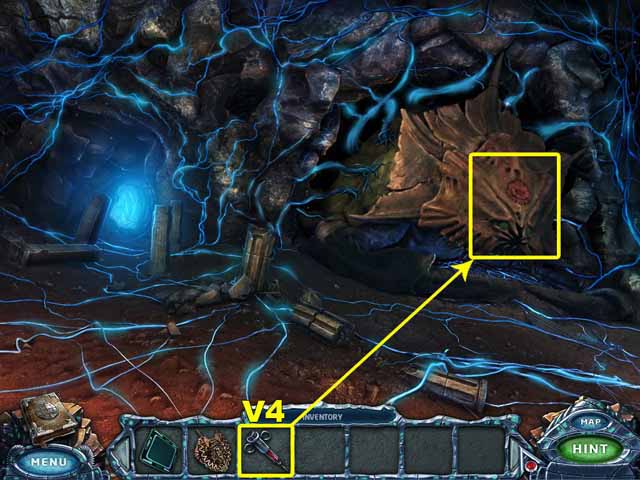

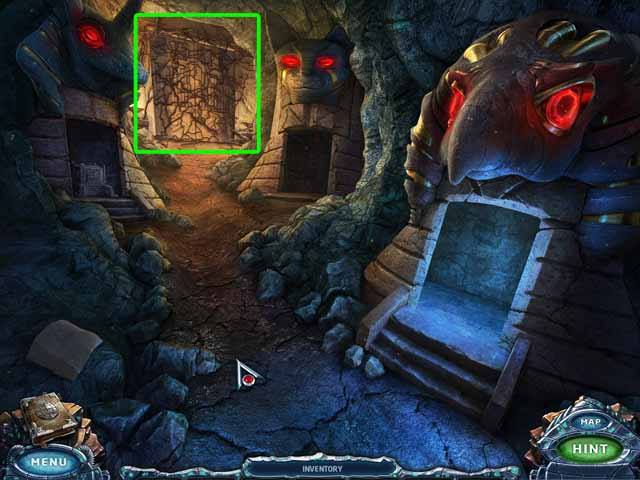

- Use the SYRINGE OF BLOOD (V4) on the Queen.
- Go to the Tunnel.
- Break the roots.
- Enter the Healing Room.
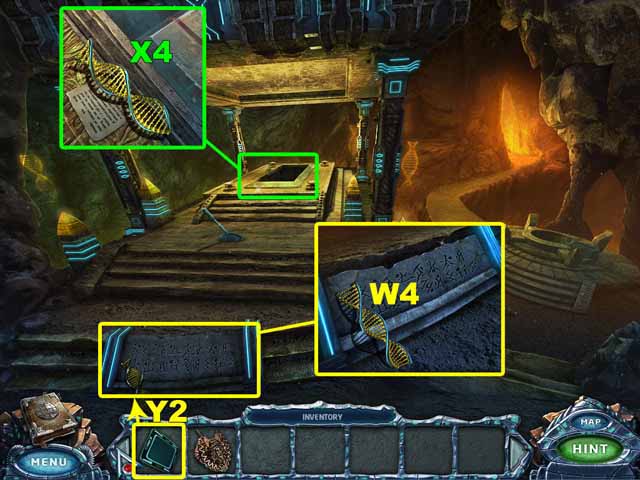
- Take the DNA (X4).
- Use the TRANSLATOR (Y2) to read the symbols on the tablet.
- Take the DNA (W4).
- Go to the Launch Pad.

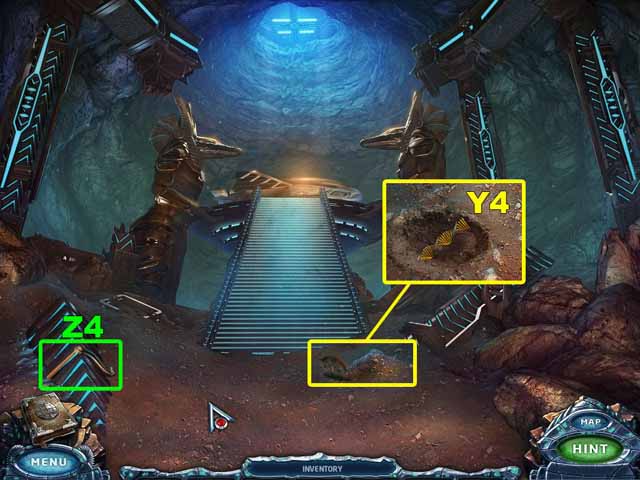


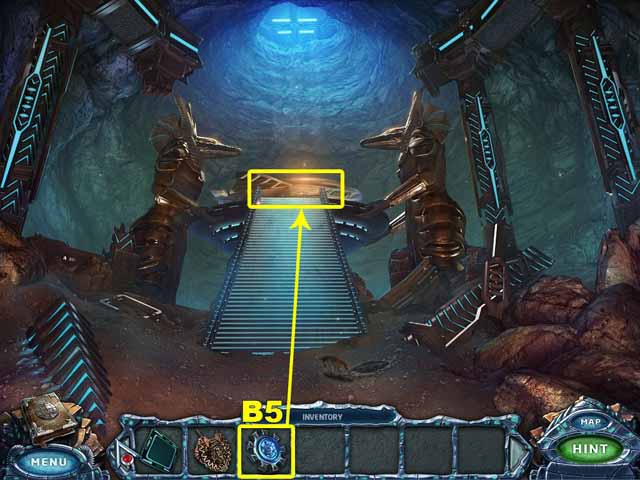
- Dig out the DNA (Y4).
- Take the HANDLE (Z4).
- Go to the Healing Room.
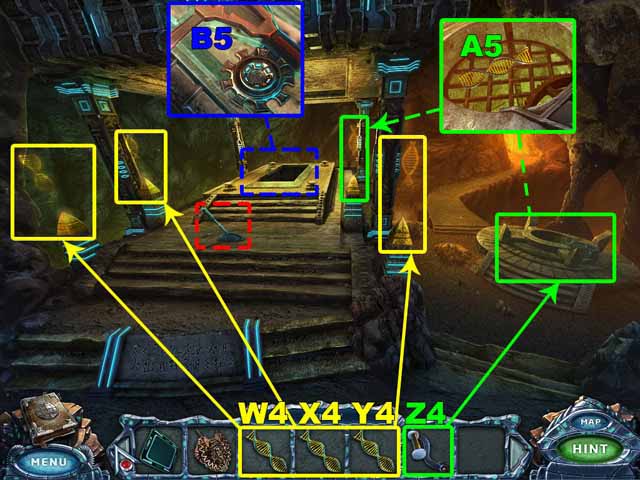
- Place the HANDLE (Z4) on the well.
- Click the handle.
- Take the DNA (A5).
- Put the DNA (W4, X4, Y4 and A5) where they belong.
- Pull the lever to lift the coffin.
- Take the KEY (B5).
- Go to the LAUNCH PAD.
- Use the KEY (B5) to open the space ship.
- Enter the Spaceship.

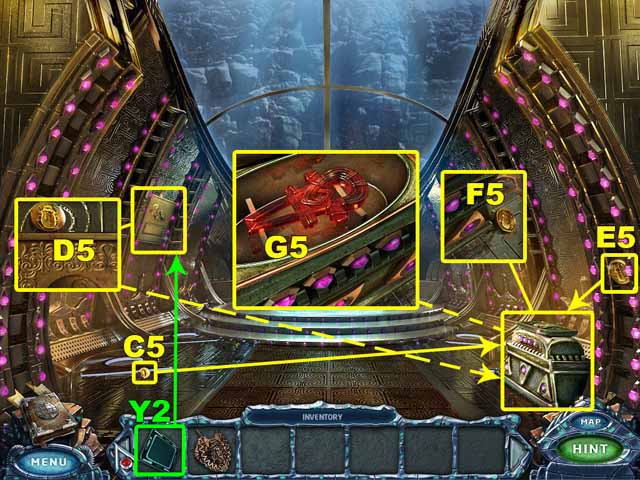

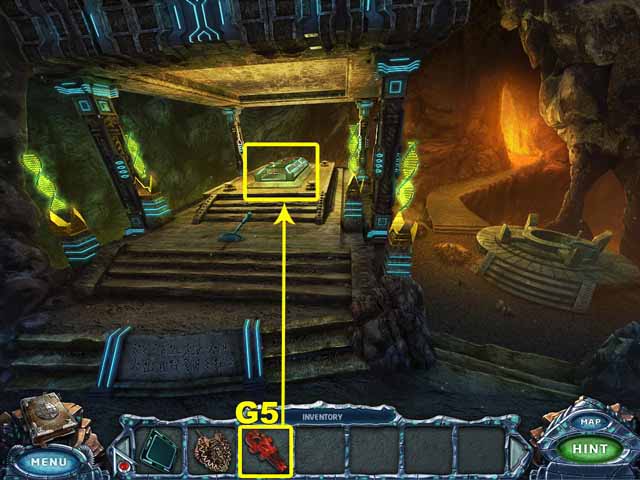
- Collect the COINS (C5, D5, E5 and F5).
- Put the COINS on the case.
- Take the ELIXIR (G5).
- Go to the Healing Room.
- Place the ELIXIR (G5) on the coffin.
- Congratulations, you have completed Eternal Journey: New Atlantis!


 Myths of the World: Of Fiends and Fairies Walkthrough, Guide, & Tips
 Dominic Crane 2: Dark Mystery Revealed Walkthrough, Guide, & Tips
 Mountain Trap: The Manor of Memories Walkthrough, Guide, & Tips
 May's Mysteries: The Secret of Dragonville Walkthrough, Guide, & Tips
 My Singing Monsters Tips and Tricks, Guide, & Tips