Shadow Wolf Mysteries: Cursed Wedding Walkthrough, Guide, & Tips
Shadow Wolf Mysteries: Cursed Wedding Walkthrough

Welcome to the Shadow Wolf Mysteries: Cursed Wedding Walkthrough
After being called to Paris, you find yourself in the middle of a shocking mystery involving an ancient werewolf hungry for revenge.
Whether you use this document as a reference when things get difficult or as a road map to get you from beginning to end, we’re pretty sure you’ll find what you’re looking for here.
This document contains a complete Shadow Wolf Mysteries: Cursed Wedding game walkthrough featuring annotated screenshots from actual gameplay!
We hope you find this information useful as you play your way through the game. Use the walkthrough menu below to quickly jump to whatever stage of the game you need help with.
Remember to visit the Big Fish Games Forums if you find you need more help. Have fun!
This walkthrough was created by Margie, and is protected under US Copyright laws. Any unauthorized use, including re-publication in whole or in part, without permission, is strictly prohibited.
General Tips

- This is the Official Guide for Shadow Wolf Mysteries: Cursed Wedding.
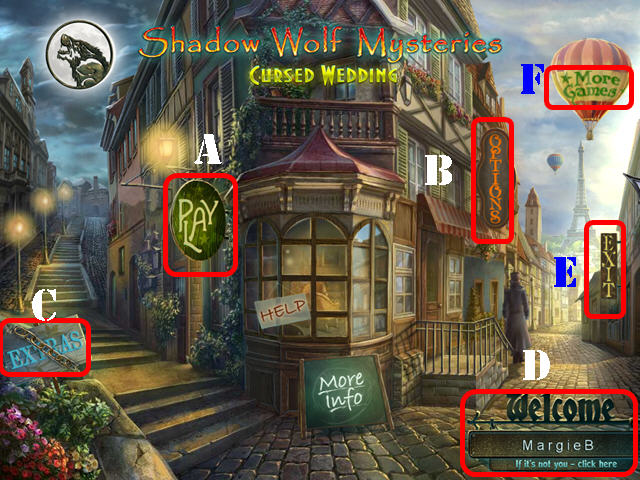
- Select Play (A) to begin your adventure.
- The Options (B) Button allows you to adjust the screen size, music, cursor, game mode, and sound.
- The Extras (C) Button is only accessible in the Collector’s Edition
.
- The ‘If it’s not you – click here’ button (D) can be used to manage your profiles in the game.
- Exit the game here (E).
- Go to ‘More Games’ (F) to view more titles by this developer.
- This guide will refer to Hidden Object Scenes as ‘HOS’.
- Items will stay in inventory until they are no longer needed.
- Some puzzle solutions and HOS are random. Items written in orange in HOS require an extra step of interaction.
- The HINT button is accessible in both HOS and in quest scenes but you must wait for it to charge in between uses.
- All mini-games can be skipped once the skip button has recharged. Most puzzles have a RESET button; use it if you want to follow the solutions shown in this guide.
Chapter 1: Veronica’s Mansion
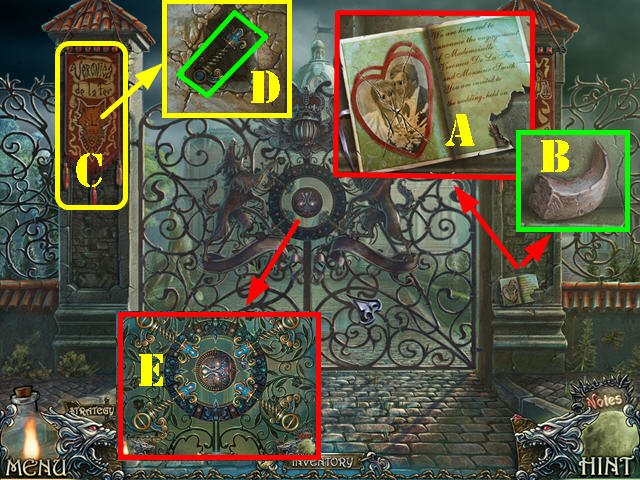
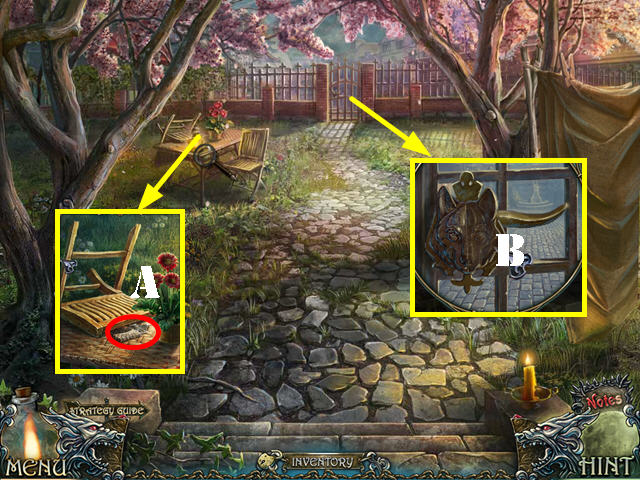
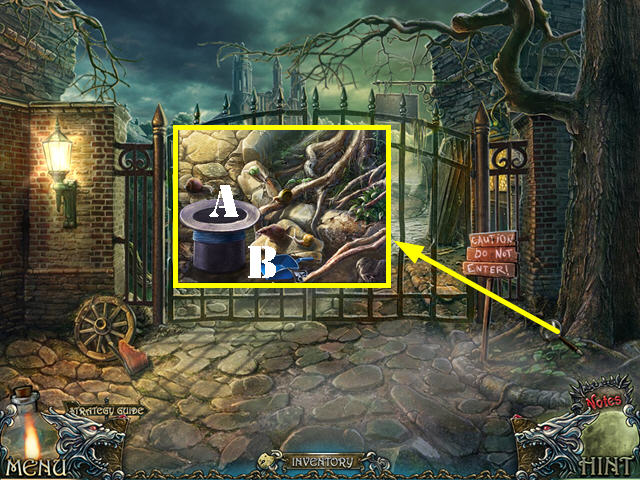
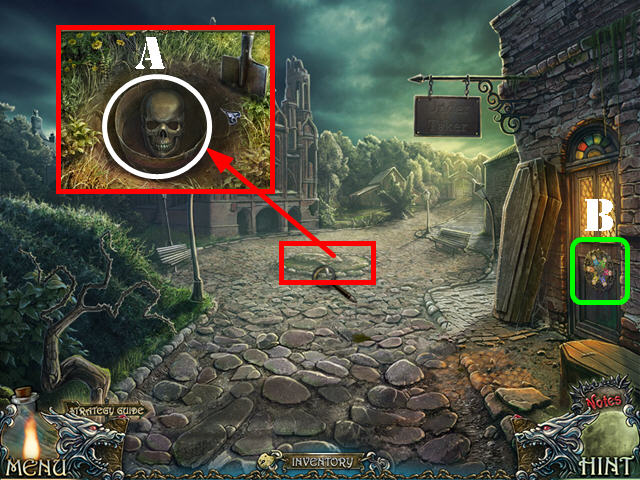
- Take a closer look at the note and take it (A), then take the STONE CLAW below it (B).
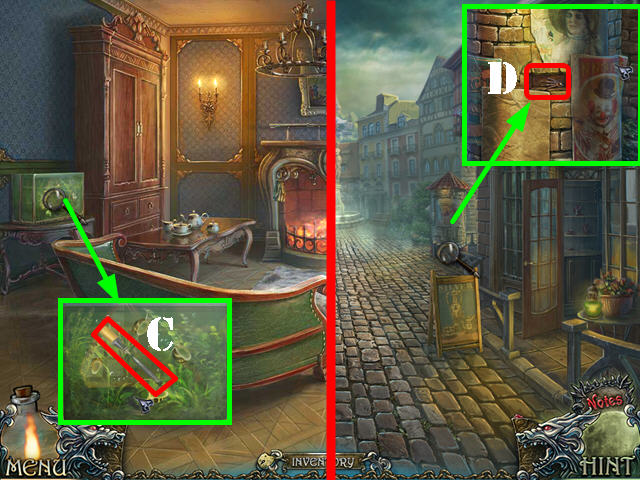
- Move the banner (C); zoom into the niche and take the PUZZLE PART (D).
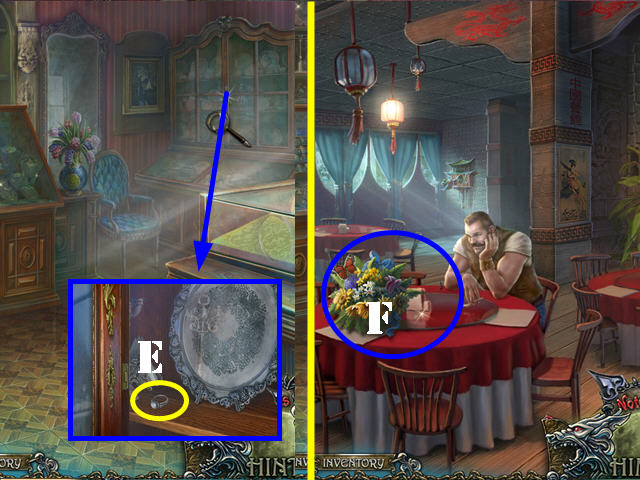
- Zoom into the gate; put the PUZZLE PART on the lock (E).
- Go through the gate.
- Talk to the gardener.
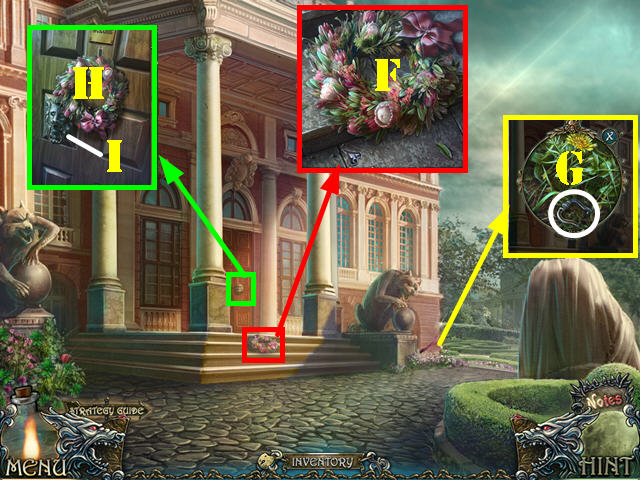
- Look at the steps; take the WREATH (F) and the NUMBER WHEEL 1/3 below it.
- Look at the ground; take the HANDLE (G).
- Zoom into the door; put the WREATH on the hook (H).
- Put the HANDLE on the lock (I). Pull the handle and go through the door.
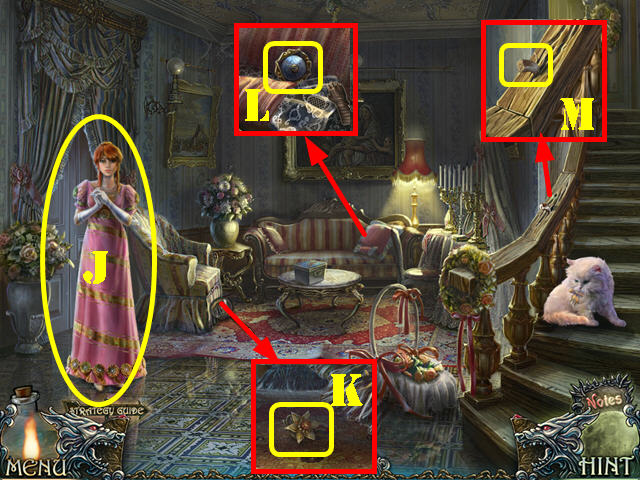
- Talk to Veronica to receive the GOLD LOUIS (J).
- Look under the chair and take the BROKEN EARRING (K).
- Look on the couch; take the CURTAIN BUCKLE (L).
- Zoom into the railing; take the STONE CLAW (M).
- Walk down.
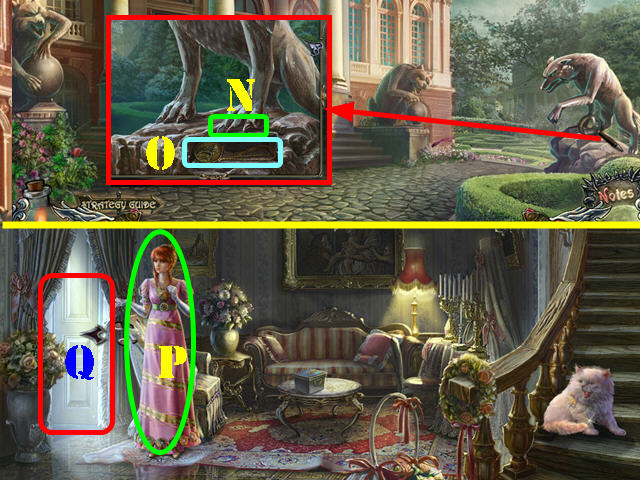
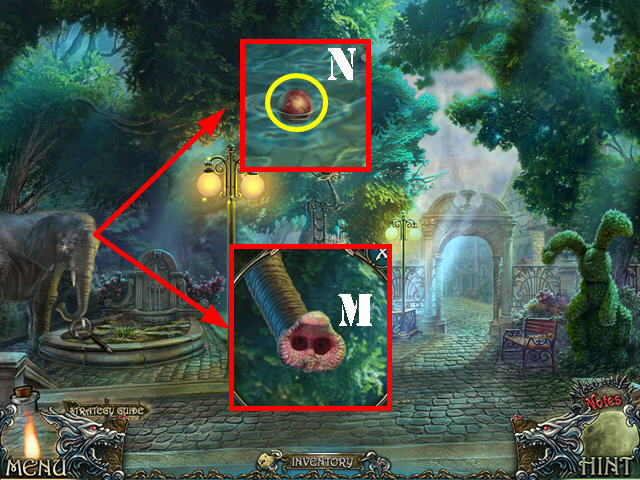
- Remove the cloth and zoom into the statue; put the 2 STONE CLAWS on the paw (N).
- Take the MEDALLION (O).
- Go back into the mansion.
- Give the MEDALLION to Veronica (P).
- Go through the left door to reach the library (Q).
- Talk to Mr. Smith.
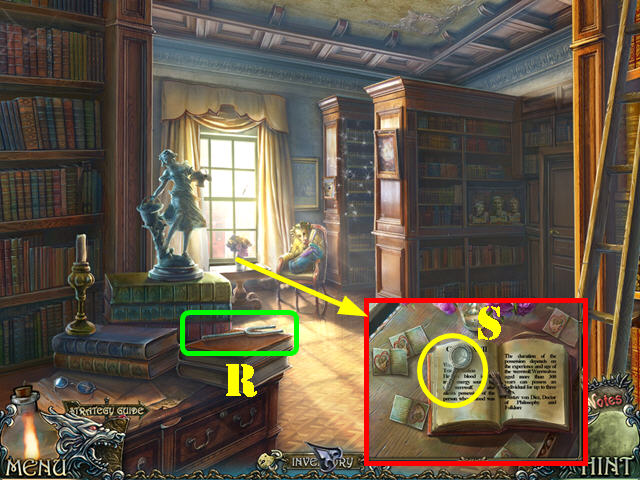
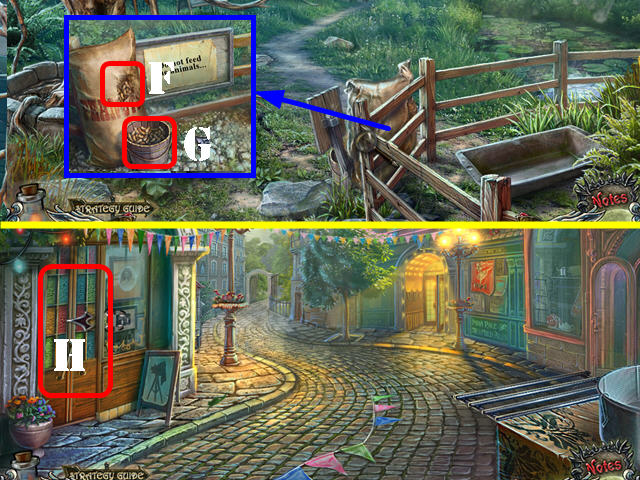
- Grab the TUNING FORK (R).
- Look at the book by the window; remove the items and take the MAGNIFYING GLASS (S).
- Play the HOS.
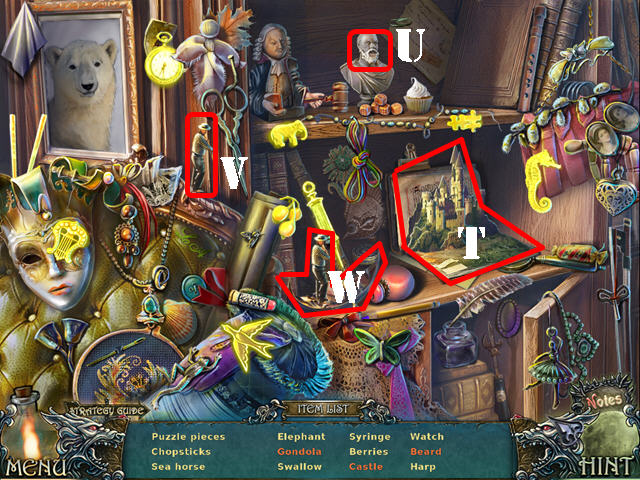
- Open the book; take the castle (T).
- Touch the bust and take the beard (U).
- Touch the gondolier (V) and take the gondola (W).
- You will receive the SWALLOW FIGURINE.
- Walk down.
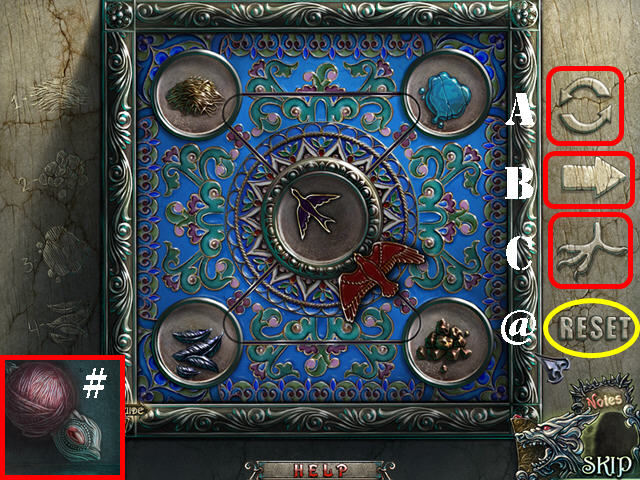
- Zoom into the box on the table; put the SWALLOW FIGURINE on it to activate a puzzle.
- Please read the in-game instructions for this puzzle. You can use the reset button (@) if you need to start over and use the solution below.
- To solve the puzzle, press the buttons in this order: B x 2, C, A, B x 2, A, B x 2, C, A x 3, B x 2, C, A, B x 2, A, B x 2, C, B x 2, A, C, B x 2, A, B x 2, C, A, B x 2, C, A, B x 2, A, B x 2, and C.
- Take the PEACOCK FEATHER and the BALL OF YARN (#).
- Give the BALL OF YARN to the cat on the stairs.
- Go up the stairs.
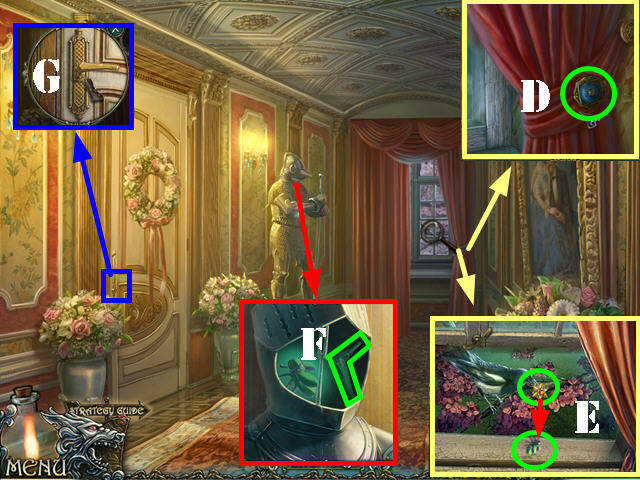
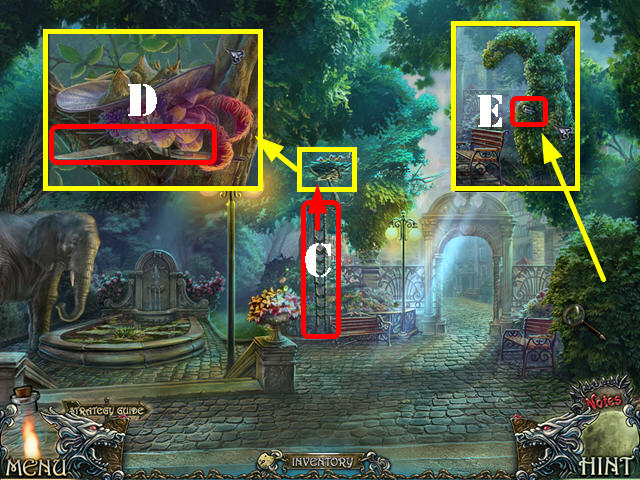
- Look at the curtain; put the CURTAIN BUCKLE on it and then look at the window (D).
- Open the latch; give the BROKEN EARRING to the bird and take the FIREFLY (E).
- Zoom into the statue; use the TUNING FORK on the helmet; put the FIREFLY in the helmet and take the HANDLE (F).
- Zoom into the left door; put the HANDLE on it, turn the handle and go through the door (G).

- Talk to Veronica.
- Zoom into the bed; take the ENVELOPE and the VEIL (H).
- Look at the box; put the PEACOCK FEATHER on it to activate a puzzle (I).
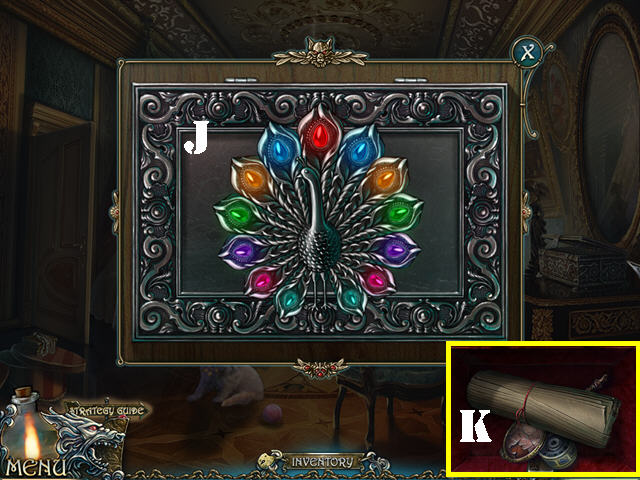
- Arrange the peacock’s tail feathers in the correct order.
- Select two feathers to swap their positions.
- Please look at the screenshot for the solution (J).
- Take the note, BROKEN MIRROR, and the NUMBER WHEEL 2/3 (K).
- Look through the left door.
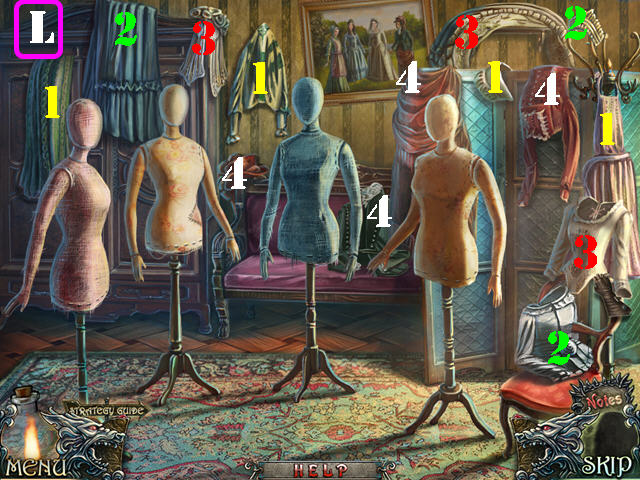
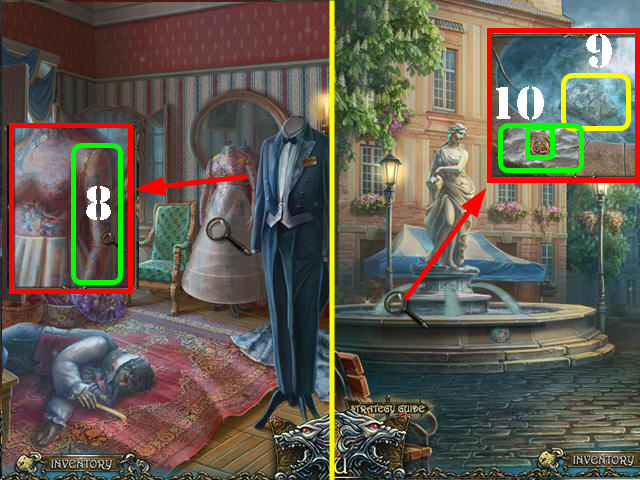
- Put the VEIL on the scene to activate a puzzle.
- Select an article of clothing and put it on the correct mannequin.
- The first screenshot shows the location of all the articles of clothing. The numbers on them represent on which mannequins those clothes should be placed (L).
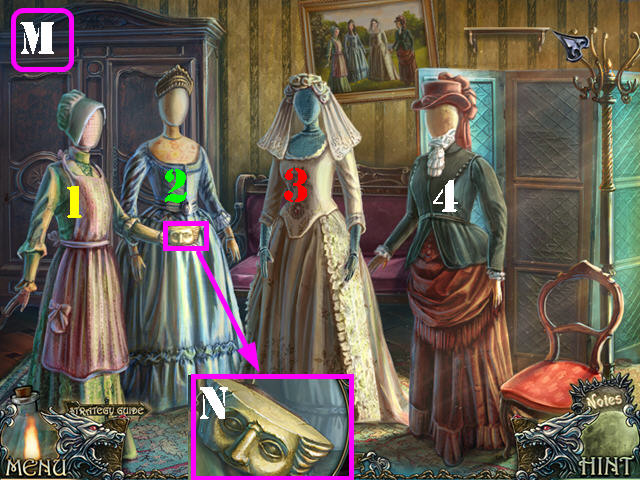
- The second screenshot shows the final solution (M).
- Take a closer look at the extended hand and take the PYTHAGORAS HEAD (N).
- Walk down for the wolf (O) to appear and then go back into the bedroom.
- Touch the wolf to make it leave the room (P).
- Veronica gives you a HAMMER.
- Return to the library.

- Play the HOS.
- Open the book and take the note (Q).
- Touch the gavel and take the judge (R).
- Touch the quill (S) and take the panda (T).
- The NUMBER WHEEL 3/3 will be added to inventory.
Chapter 2: The Weapons Shop

- Look at the busts on the bookshelf; put PYTHAGORAS HEAD on the scene to activate a puzzle.
- Arrange the busts in the correct order. Select a fragment and then select an arrow in the direction you want to move to.
- Follow the steps in the screenshot in this order of arrows: Green, Red, and White (1-4).
- Go through the door on the right.
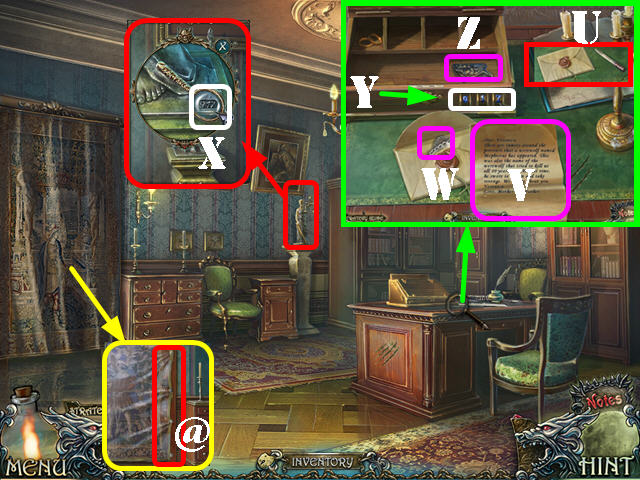
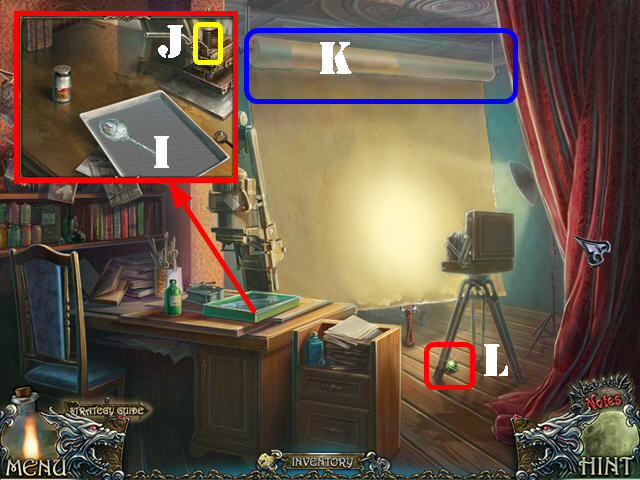
- Look at the desk; put the ENVELOPE on it.
- Open the letter with the letter opener on the desk (U); take the note (V) and the HANDKERCHIEF (W).
- Zoom into the statue and then on the base. Clean off the dust with the HANDKERCHIEF. Use the MAGNIFYING GLASS on the code (X).
- Zoom into the desk again; put the 3 NUMBER WHEELS on the box and change the code to 917 (Y).
- Take the WOLF HEAD HALF (Z).
- Look at the tapestry; remove the nails with the HAMMER (@). Open the door and then go through it.
- Touch the wolf.
- Look at the table; take the MOSAIC PIECE 1/2 (A) and the WOLF HEAD HALF below it.
- Zoom into the gate; put the 2 WOLF HEAD HALVES into the slot (B).
- Open the gate and go through it.

- Look at the grate; take the BUTTON (C).
- Look at the signpost; take the note (D).
- Go forward and then head right to the funicular station.
- Look at the railing and take the GLOVE (E).
- Look at the board; take the BULB (F) and the note (G).
- Walk down.
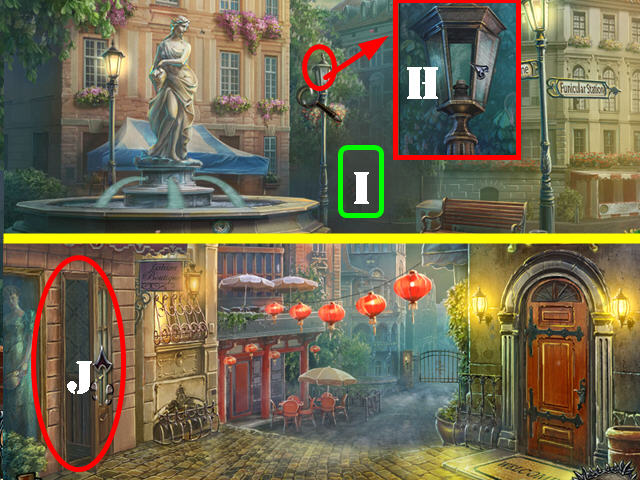
- Look at the lamppost; open the cover and put the BULB in it (H).
- Go forward (I); open the left door and go through it to access the boutique (J).
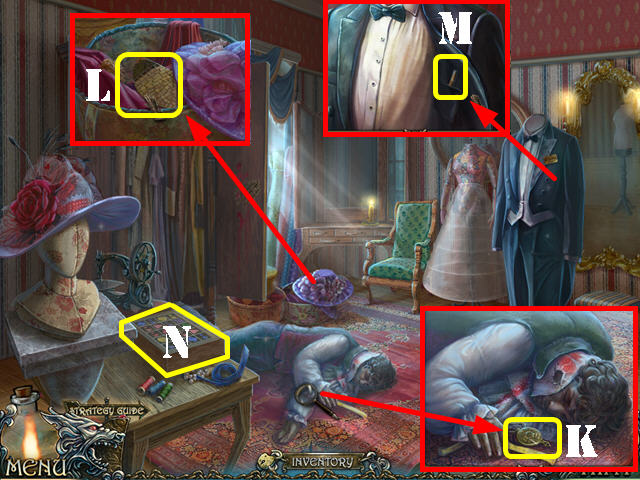
- Open the armoire and a man will fall out of it.
- Zoom into the man and take the MEDALLION 1/4 (K).
- Look at the hat box; remove the top and take MOSAIC PIECE 2/2 (L).
- Look at the tuxedo; open the jacket and take the CIGAR (M).
- Zoom into the box; put the BUTTON on it to activate a puzzle (N).
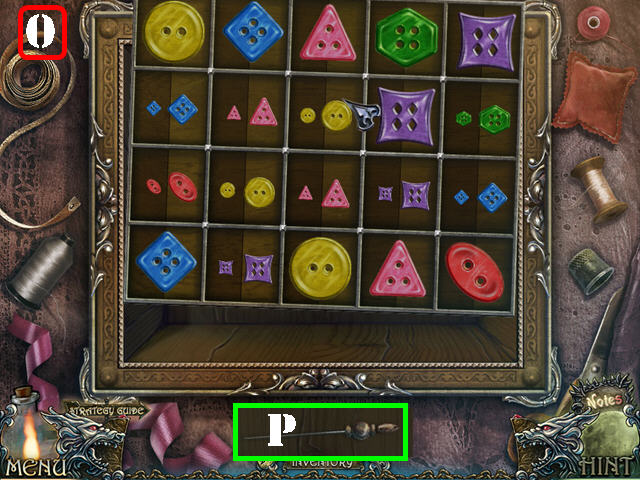
- Arrange the buttons so no rows have buttons of the same color and shape. You can have the same color in a row, but not the same shape.
- Select two buttons to swap their positions.
- Please look at the screenshot for the solution (O).
- Take the SEWING PIN (P).
- Walk down twice.
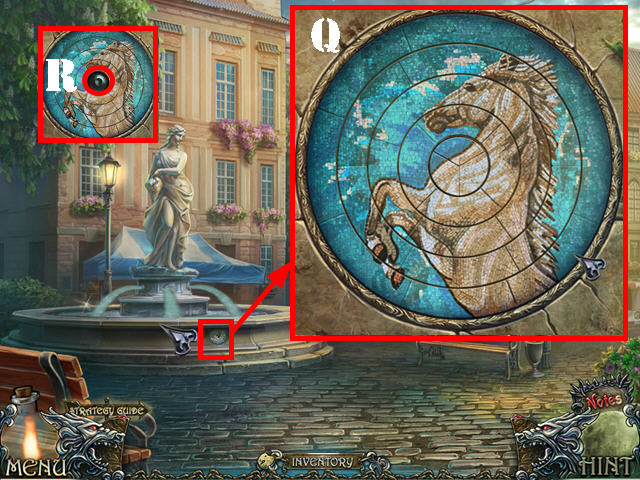
- Zoom into the mosaic on the fountain; put the 2 MOSAIC PIECES on it to activate a puzzle.
- Arrange the mosaic correctly.
- Drag the rings left and right; once a ring has been positioned correctly, it will lock in place.
- Please look at the screenshot for the solution (Q).
- Take the GLASS EYE (R).
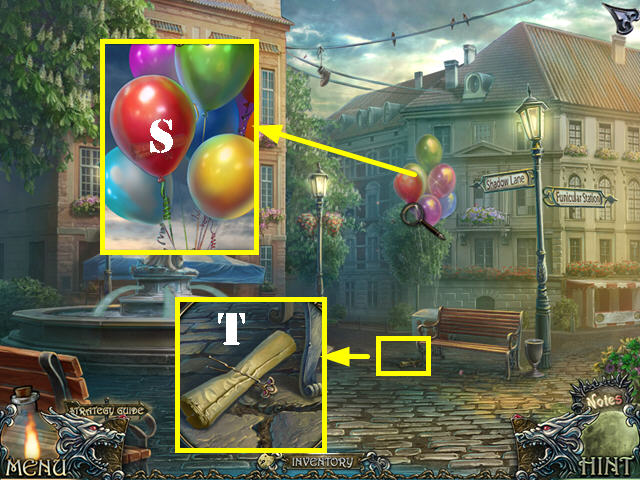
- Look at the balloons; pop them with the SEWING PIN (S).
- Look at the ground; take the PIN and the note (T).
- Walk down; open the left door and then go through it.
- Talk to Mr. Banks.
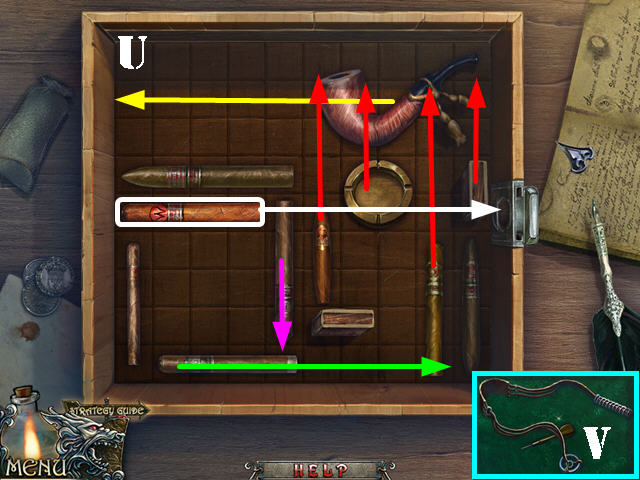
- Look at the cigar box on the left; remove the cover and put the CIGAR in it to activate a puzzle.
- Move the cigar to the cigar box.
- To solve the puzzle, follow the arrows in this order: Yellow, Red, Green, Purple, and White (U).
- Take the SLING and the DART (V).
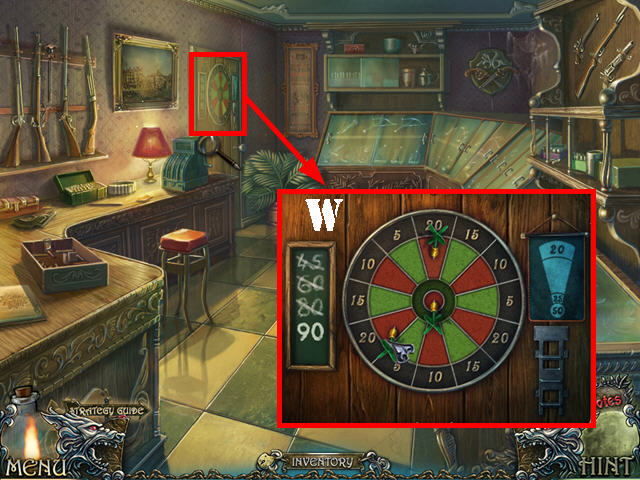
- Look at the door; put the DART on the holder to activate a puzzle.
- Put the darts on the board so the targets add up to more than 80.
- Select a dart and then select a spot on the board.
- Please look at the screenshot for the solution (W).
- Go through the door to access Mr. Banks’ office.
- Talk to Mr. Banks.
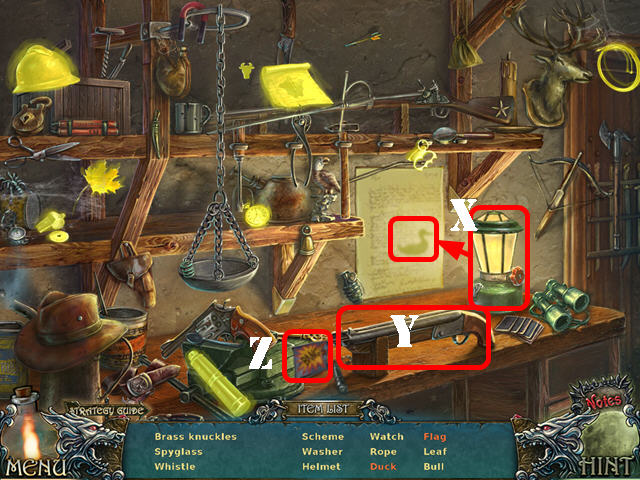
- Play the HOS.
- Touch the lamp and take the duck (X).
- Touch the gun (Y) and then take the flag (Z).
- The SCHEME will be added to inventory.

- Look at the shelf; take the STEEL SHEET (A).
- Look at the desk drawer; use the PIN on the lock (B).
- Open the top drawer and take the GUN (C).
- Walk down.
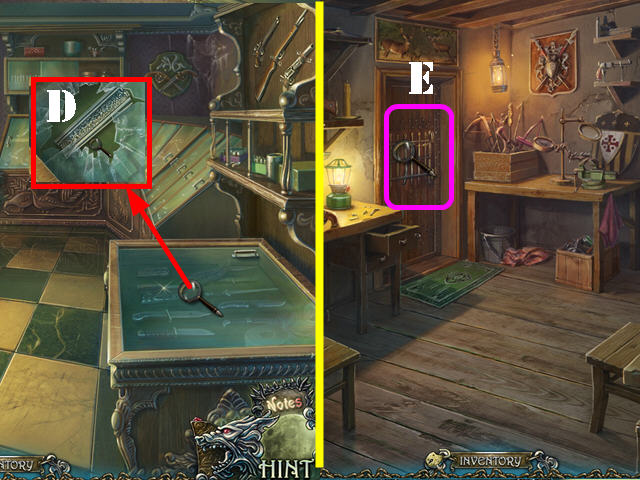
- Look at the glass case; use the GUN on it to break the glass. Use the GLOVE to get the PIECE OF SWORD (D).
- Go through the back door and then zoom into the left door (E).
- Put the PIECE OF SWORD in the slot to activate a puzzle.
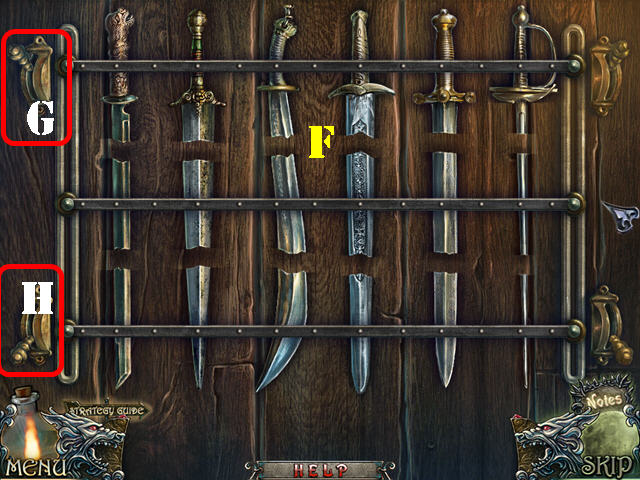
- Select two pieces from the same row to swap their positions; the center pieces can only be rotated.
- Arrange the pieces as shown in the screenshot (F) and then press on the two levers (G and H).
- Open the door and go through it.
Chapter 3: The Basement
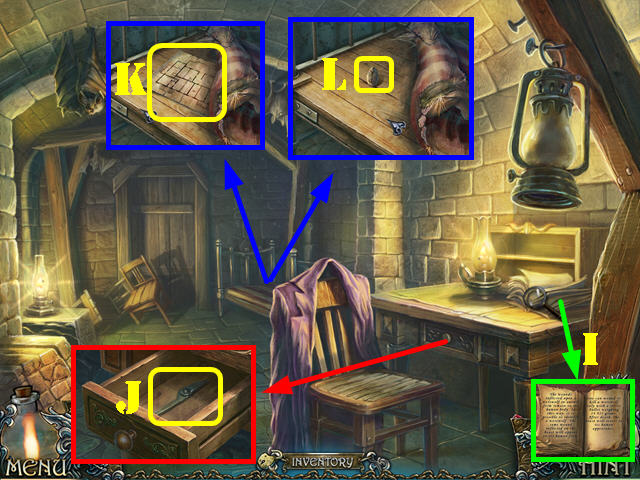
- Look at the book (I).
- Look at the drawer; open it and take the METAL SHEARS (J).
- Inspect the bed; pull the sheets back and take the note (K).
- Put the SLING on the stone to get the LOADED SLINGSHOT (L).
- Walk down and go through the right door.
- Open the armoire; look in it and take the TOP HAT (M).
- Look at the desk; take the note (N) and the RAZOR below it.
- Walk down twice.
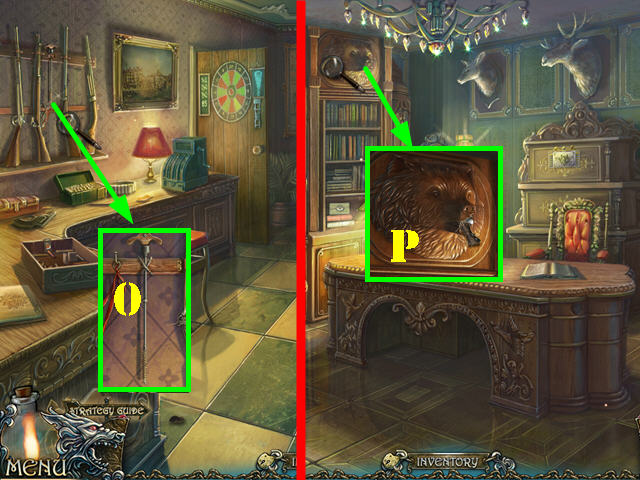
- Look at the gun rack; cut the rope with the RAZOR and take the RAMROD (O).
- Go through the door and then through the right door.
- Zoom into the top of the bookcase; open the bear’s mouth and insert the RAMROD in it to get the GRINDING WHEEL (P).
- Walk down.
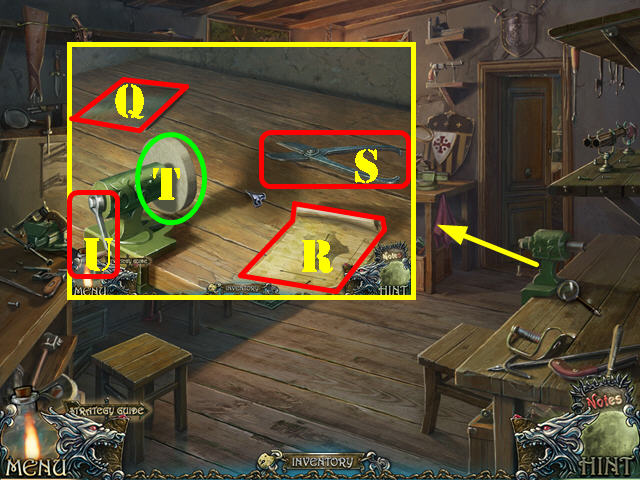
- Examine the table; put the STEEL SHEET (Q), SCHEME (R), and the METAL SHEARS (S) on it.
- Put the GRINDING WHEEL on the machine (T).
- Use the metal shears on the steel sheet.
- Turn the handle (U).
- Take the metal cutout and put it on the grinding wheel to get the SHIELD.
- Go through the right door.

- Examine the cabinet and put the SHIELD in the slot to activate a puzzle.
- Press the buttons in this order: A, B, C, A, and C.
- Pull the lever (D) and then take the TRAP PART (E).
- Walk down and then go through the left door.
- Look at the bear trap and then put the TRAP PART on it and take the SPRING (F).
- Walk down 3 times and go forward.
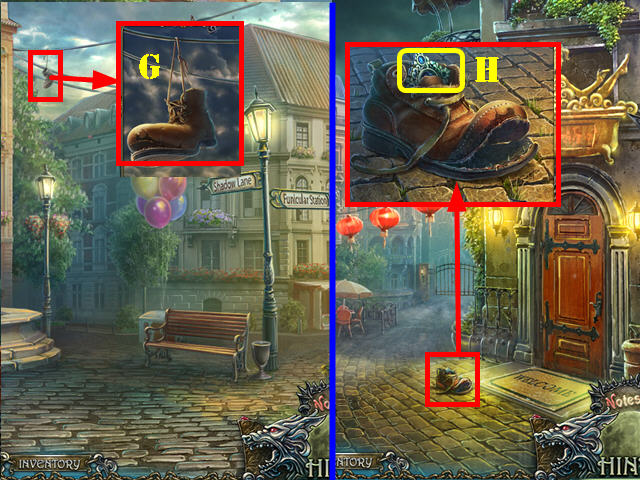
- Zoom into the boot; use the LOADED SLINGSHOT on it (G).
- Go forward.
- Look at the boot and take the DIAMOND BROOCH (H).
- Return to the office in the weapons shop.
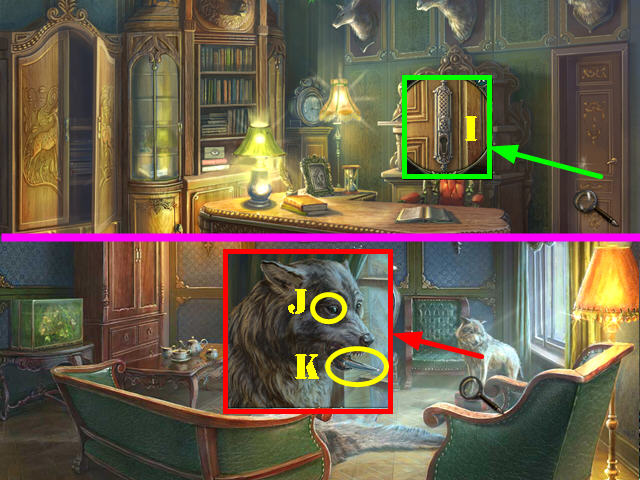
- Take a closer look at the door; use the SPRING in the lock (I).
- Go through the door.
- Take a closer look at the stuffed wolf; put the GLASS EYE in the eye socket (J) and take the FLOWER KNIFE (K).
- Walk down twice.
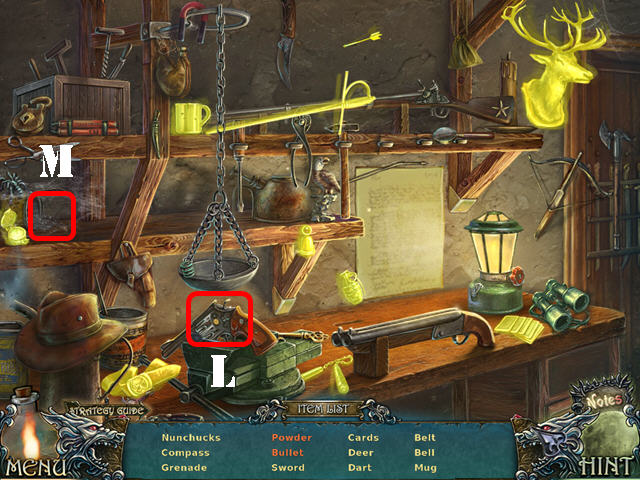
- Play the HOS.
- Open the gun and take the bullet (L).
- Open the can and take the powder (M).
- The NUNCHUCKS will be added to inventory.
- Walk down twice and then enter the jewelry shop on the right.
- Talk to the shop owner.
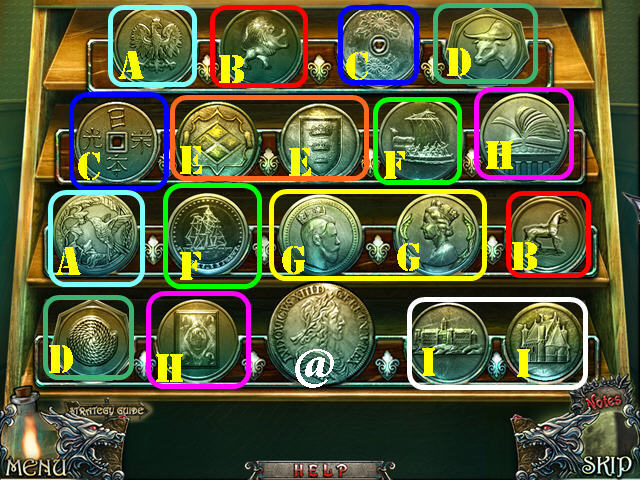
- Look at the glass case to activate a puzzle.
- Find pairs of related coins.
- Please look at the screenshot for the solution (A – I).
- Touch the last coin left on the board (@).
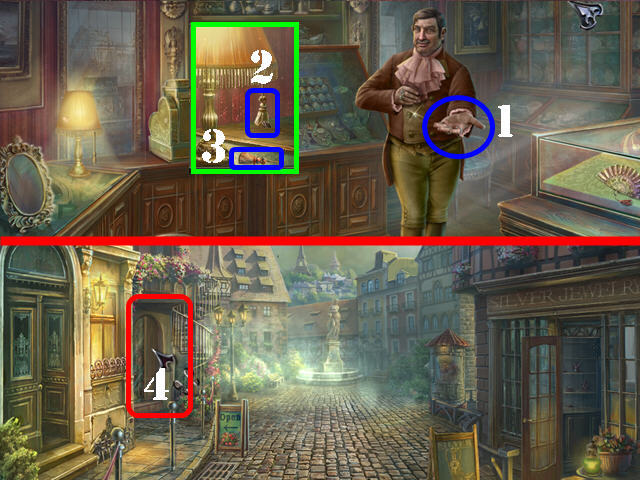
- Give the GOLD LOUIS to the shop owner to get the SILVER ECU 1/2 (1).
- Take a closer look at the lamp; pull on the TASSEL (2) and then take it (3).
- Walk down and then enter the flower shop on the left (4).
Chapter 4: Flower Shop
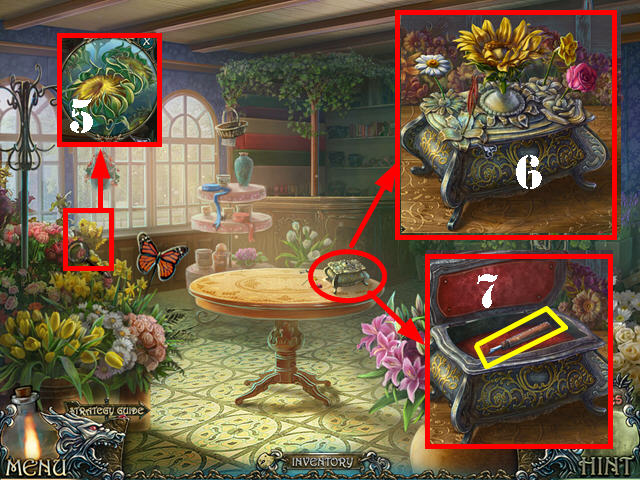
- Take a closer look at the sunflower; cut it with the FLOWER KNIFE to get the SUNFLOWER (5).
- Look at the box on the table; put the SUNFLOWER on the table to activate a puzzle.
- Put the flowers into the slots shown in the screenshot (6).
- Take the SEAM RIPPER (7).
- Return to the boutique.
- Look at the dress; use the SEAM RIPPER on the sleeve to get the MANNEQUIN HAND (8).
- Return to the fountain.
- Zoom into the fountain; use the MANNEQUIN HAND on the paper in the water (9).
- Open the paper; take the MEDALLION 2/4 and the WET NOTE (10).
- Return to the fireplace room.
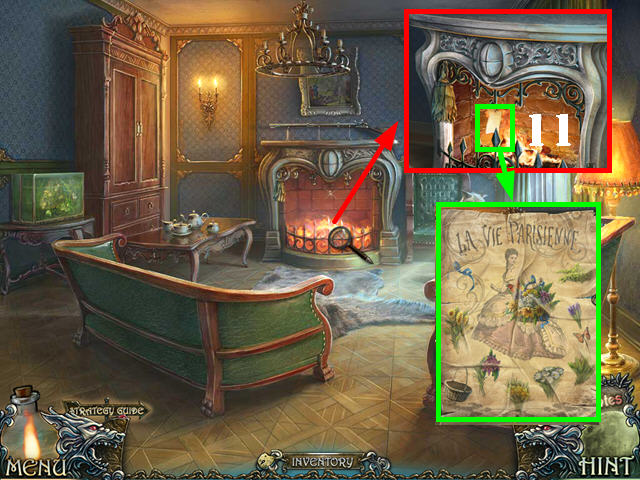
- Zoom into the fireplace; put the WET NOTE in it and then take the BOUQUET DESIGN (11).
- Return to the flower shop.
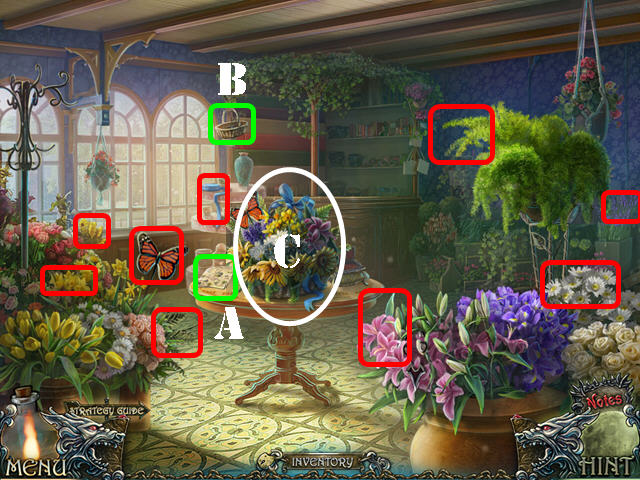
- Put the BOUQUET DESIGN on the table and then look at it (A).
- Touch the basket to automatically put it on the table (B).
- Grab the rest of the items marked in red to add them to the basket.
- Take the BOUQUET after all the items have been picked up (C).
- Walk down; go forward and then go right.
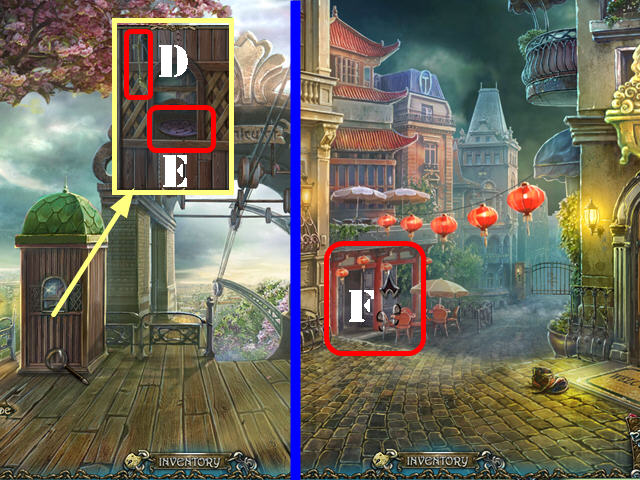
- Zoom into the booth.
- Put the TASSEL on the cord (D) and then take the CHINESE PLATE (E).
- Walk down; go forward and then enter the restaurant on the left (F).
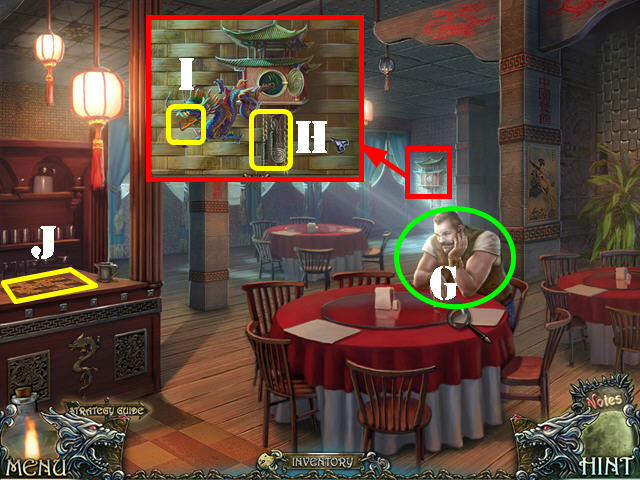
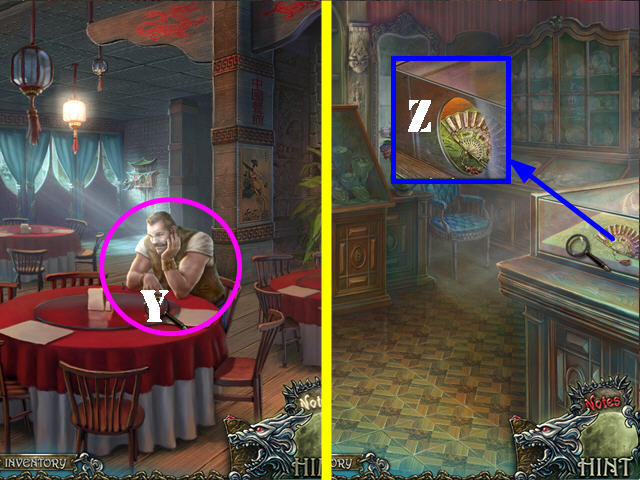
- Talk to Claude (G).
- Take a closer look at the clock; put the NUNCHUCKS on the weight (H) and take the MAHJONG TILE (I).
- Look at the mahjong board and put the MAHJONG TILE on it to activate a puzzle (J).
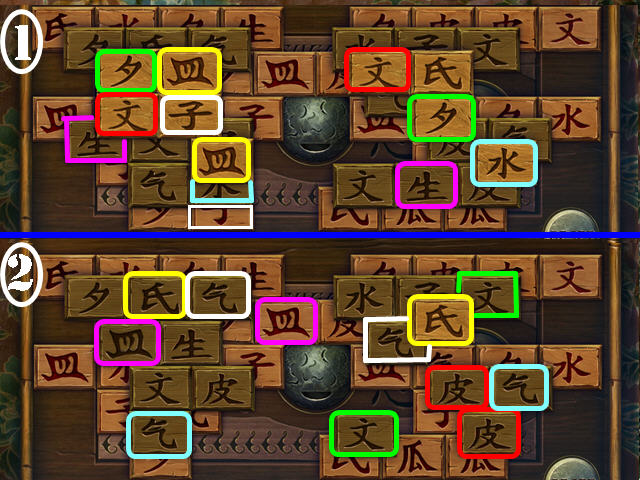
- Select visible matching pairs of tiles.
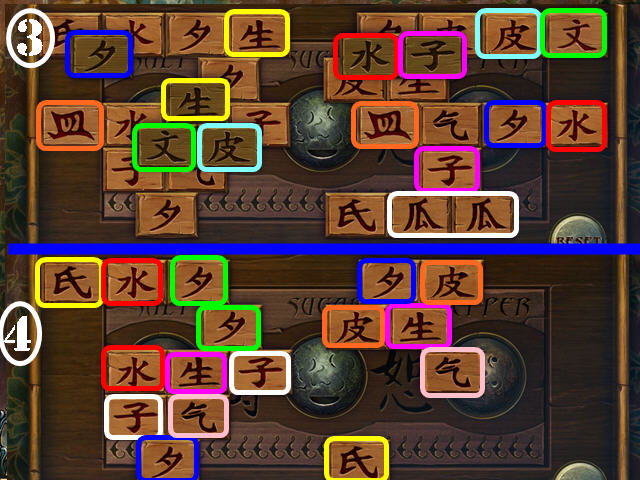
- Pick up the tiles on the screenshot in this order: Yellow, Red, Green, Purple, Light Blue, White, Orange, Dark Blue, and Pink (1-4).
- Take the SUGAR.
- Go to the kitchen in the back of the restaurant.
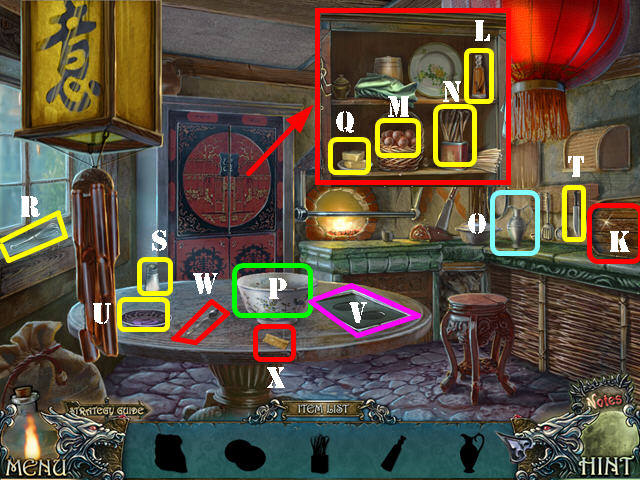
- Put the CHINESE PLATE and the SUGAR on the table to activate a HOS.
- Open the breadbox to get the flour (K).
- Zoom into, and then open the cabinet. Move the plate and take the almond oil (L). Touch the green cloth and take the eggs (M). Take the vanilla beans (N).
- Take the pitcher (O). Put the flour, eggs, vanilla beans, almond oil, and pitcher into the bowl (P).
- Zoom into the cabinet and take the grease (Q).
- Pick up the whisk (R), sugar (S), and knife (T). Put the sugar in the bowl and then use the whisk in the bowl.
- Put the grease on the Chinese plate (U); cut the grease with the knife to get the grease part.
- Grease the cookie sheet (V) with the grease part.
- Take the spoon (W) and the note (X) on the table. Use the spoon in the bowl to add the dough to the cookie sheet.
- Put the note on the cookie sheet.
- You will receive the COOKIE.
- Give the COOKIE to Claude (Y).
- Return to the jewelry shop.
- Zoom into the glass case and cut it with the DIAMOND BROOCH; take the FAN (Z).
- Return to the outside of the restaurant and go into the right door to access the bath.
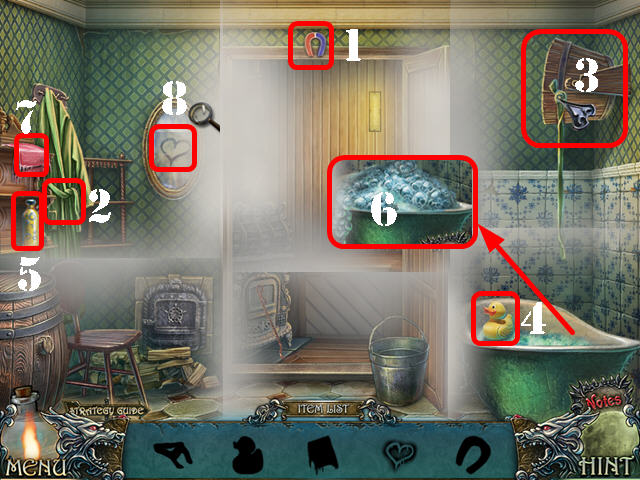
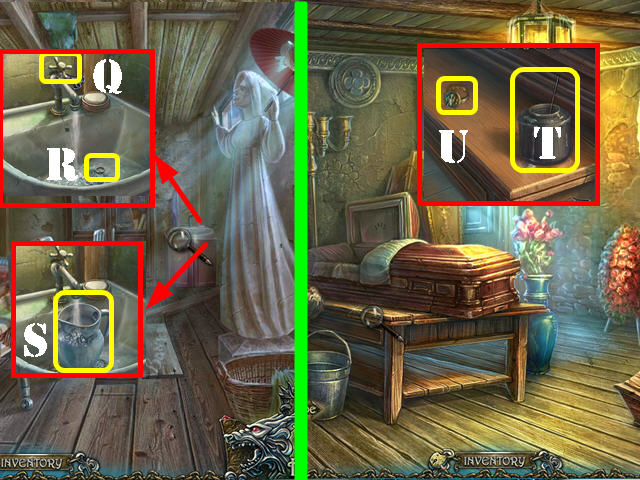
- Click the FAN on the scene to dispel the smoke one section at a time. As you fan out certain areas, look for items to pick up and items to interact with.
- Take the magnet (1) in the upper center.
- Use the fan in the upper-left and take the belt (2).
- Put the belt on the bucket and then tip the bucket (3).
- Take the duck (4) in the tub.
- Pick up the bubble bath (5); put it in the tub and take the foam (6).
- Use the magnet in tub to get the scoop.
- Take the rag (7); use the rag on the mirror and take the heart (8).
- The SCOOP will be added to inventory.
- Go forward.
- Zoom into the base of the tree; put down the TOP HAT (A).
- Put down the SCOOP to collect the snails (B); take the HAT WITH SNAILS.
Chapter 5: The Chapel
- Return to the fireplace room.
- Look in the fish tank and add the HAT WITH SNAILS to it; take the CHISEL (C).
- Walk down 4 times.
- Zoom into the signpost; remove the brick with the CHISEL and take the LOCKPICK (D).
- Go into the jewelry shop.
- Zoom into the cabinet; use the LOCKPICK in the lock and take the RING (E).
- Return to the restaurant.
- Put the BOUQUET and the RING on the table to get the LEAKY UMBRELLA (F).
- Walk down and go into the bath on the right.
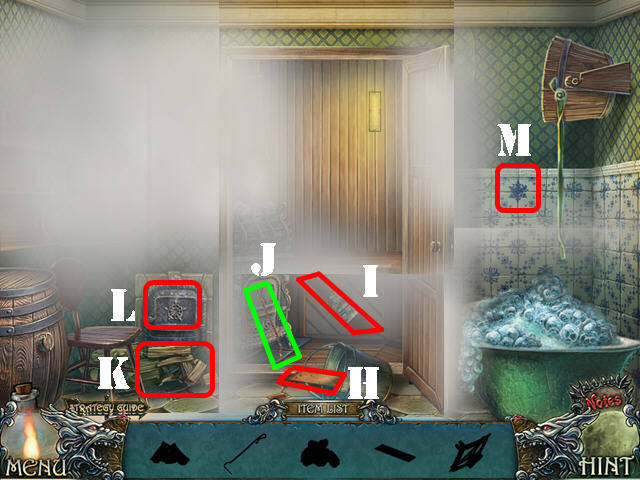
- Use the FAN on the scene to dispel the smoke one section at a time. As you fan out certain areas, look for items to pick up and items to interact with.
- Spill the bucket and take the board (H).
- Use the board in the niche to get the jack (I).
- Take the poker (J) and the firewood (K).
- Open the stove (L) and put the firewood in it. Open the stove and take the coal with the poker.
- Take the snowflake on the tile (M).
- The JACK will be added to inventory.
- Go forward.
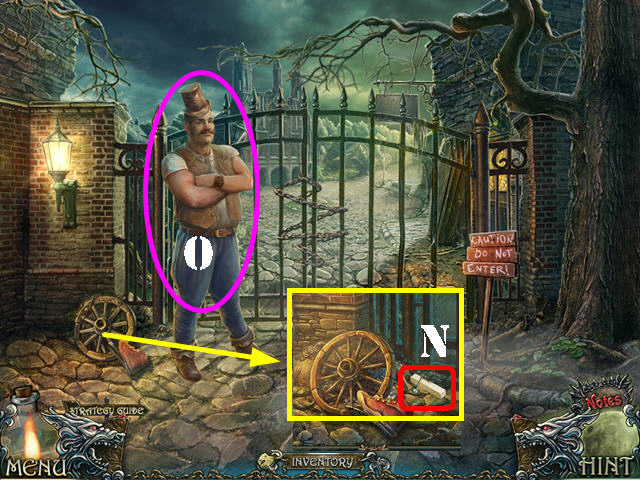
- Zoom into the wheel; put the JACK on it and take the first ORGAN KEY (N).
- Talk to Claude (O); he will open the gate for you. Go through the gate and then go forward to the chapel.
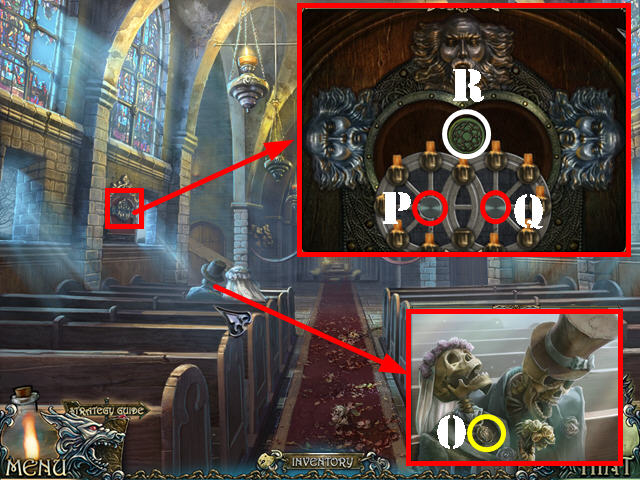
- Look at the skeletons and take the MEDALLION 3/4 (O).
- Look at the puzzle on the left to activate it.
- Select the center buttons to rotate the wheel; (P and Q) the side figures will blow out the candles, while the top one will re-light them.
- To solve the puzzle. Select the buttons in this order: Q x 2, P x 2, Q x 2, P and Q.
- Take the RUNE MEDALLION 1/4 (R).
- Walk down and take the right path.
- Look at the bench and take the WIRE (S).
- Go into the building on the right (T).
- Take the SHOVEL (U).
- Put the LEAKY UMBRELLA in the statue’s hand (V).
- Look on the ground; remove the floorboard and take the RUNE MEDALLION 2/ 4 (W).
- Walk down and go left into the zoo.
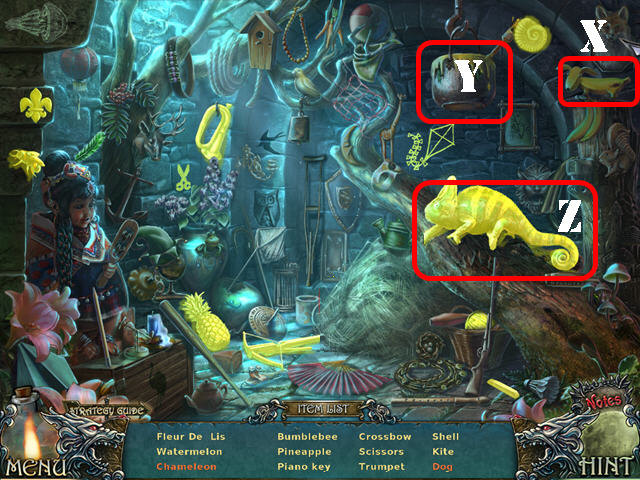
- Play the HOS.
- Touch the bananas and take the dog (X).
- Touch the pot (Y) and take the chameleon (Z).
- You will get the second ORGAN KEY.
- Walk down twice.
- Zoom into the ground; use the SHOVEL in it.
- Open the hat box; open the skull’s jaw; take the RUNE MEDALLION 3/4 and the JAW (A).
- Look at the door on the right (B); put the JAW on it to activate a puzzle.

- Put the jaws in the correct spots.
- To solve the puzzle, select the jaws in this order: C, E, G, I, F, D, C, I, H, F, D, I, H, G, E, I, G, H, F, and I.
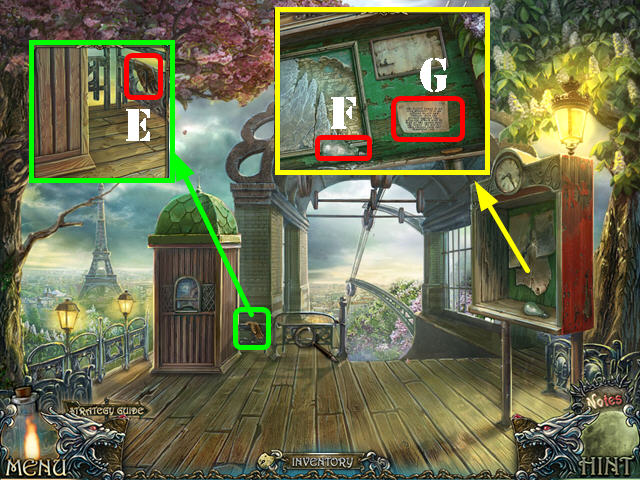
- Go through the door.
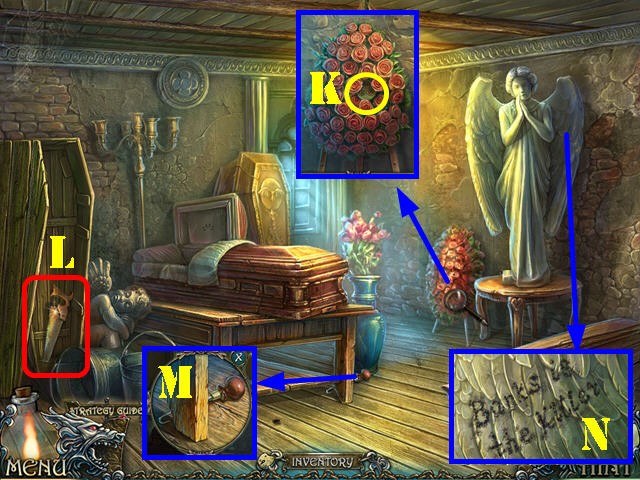
- Look at the flowers; take the RUNE MEDALLION 4/4 (K).
- Grab the SAW (L).
- Zoom into the foot of the table; take the HOOK (M).
- Look on the right wing to view a message: ‘Banks is the killer’ (N).
- Return to the chapel.
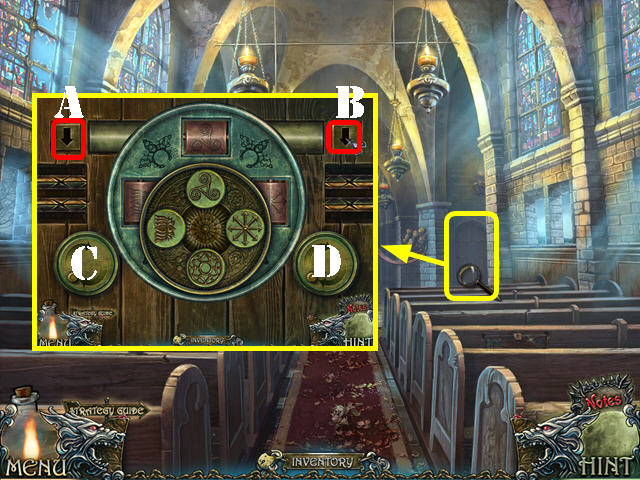
- Zoom into the right door; put the 4 RUNE MEDALLIONS on it to activate a puzzle.
- Match the runes with the right buttons.
- To solve the puzzle, select the knobs in this order: A, D, A x 3, C, B, C, and B x 3.
- Go through the door.
- Take the JUG (E).
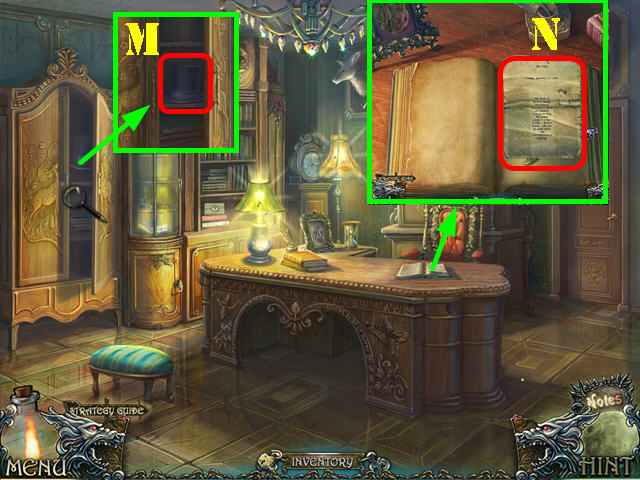
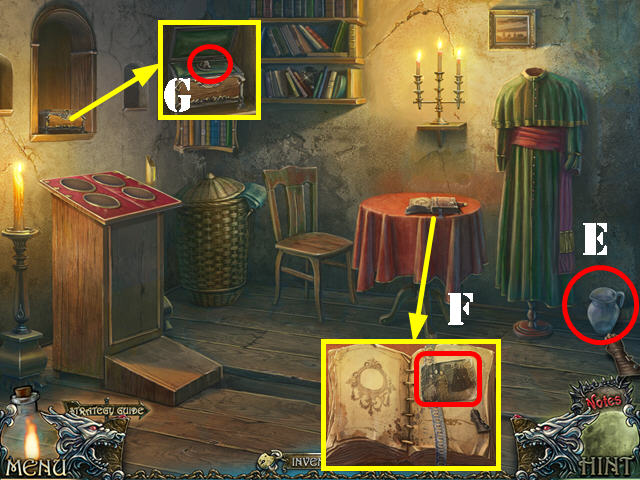
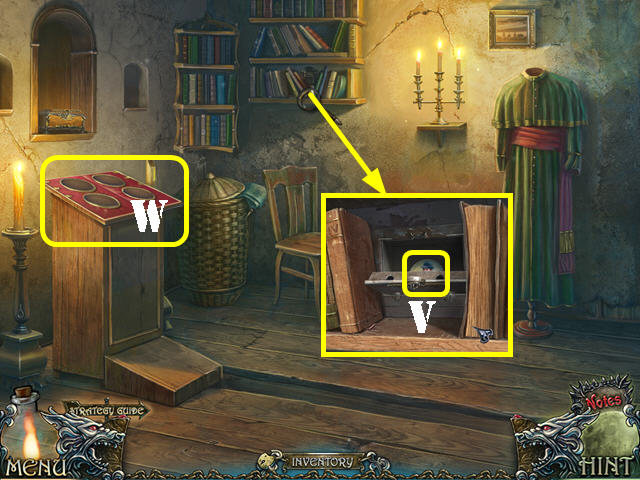
- Look at the book; open it and take the PHOTO (F).
- Look in the niche; open the box and take the WOLF RING PART (G).
Chapter 6: The Zoo
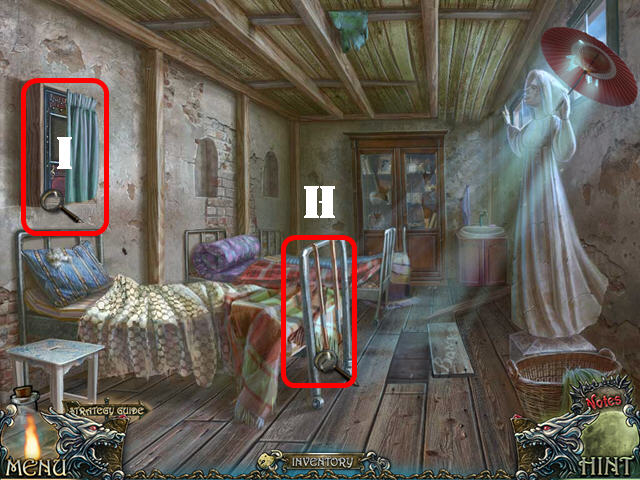
- Return to the bedroom.
- Use the HACKSAW on the foot of the bed to get the PICKAXE HANDLE (H).
- Pull the curtain and zoom into the cabinet; put the PHOTO on it to activate a puzzle (I).
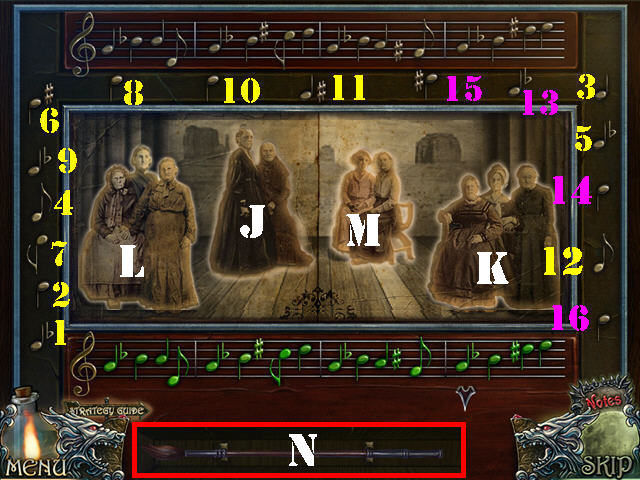
- Complete the melody using the solution shown at the top of the puzzle.
- A note will turn green when placed correctly and red when it is incorrect.
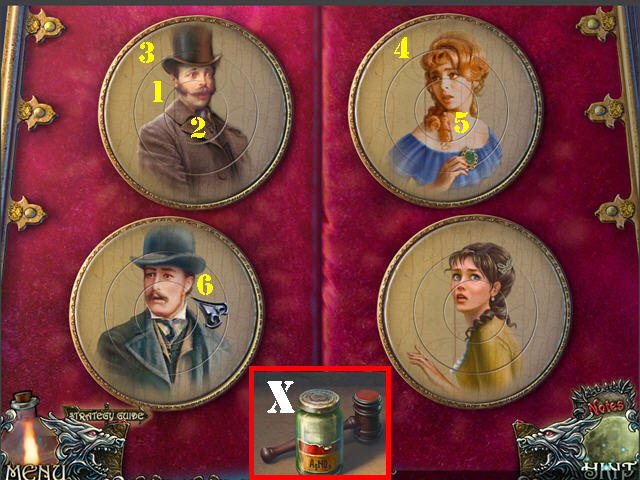
- To solve the first part of the puzzle, drag the notes into the bottom lines as shown in the screenshot (1-16).
- To solve the second part of the puzzle, select the people in the photo in this order: J, K, L, and M.
- Take the BRUSH (N).
- Walk down.
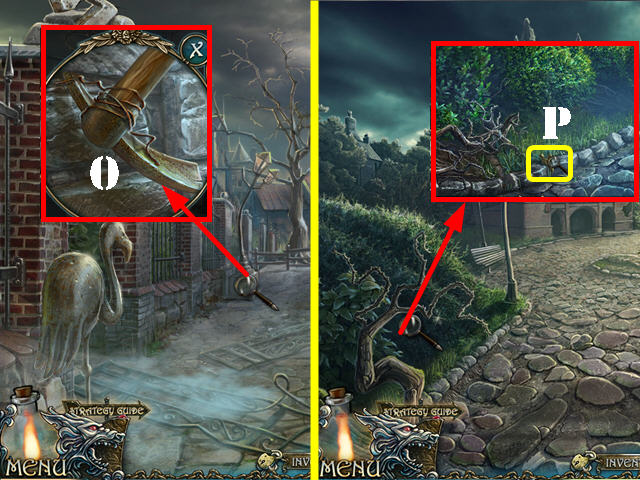
- Examine the lamppost base; put the PICKAXE HANDLE on the axe head. Wrap the wire around the handle and take the PICKAXE (0).
- Walk down.
- Examine the bushes; use the PICKAXE on the stone and then take the VALVE (P).
- Return to the bedroom across from the zoo.
- Zoom into the sink; put the VALVE on the faucet and turn the faucet on (Q).
- Use the HOOK on the faucet and take the RING PART (R).
- Put the JUG in the sink and take the JUG WITH WATER (S).
- Walk down twice and go through the right door.
- Zoom into the table; put the BRUSH in the glue jar (T).
- Put the WOLF RING PART and the RING PART on the table.
- Touch the brush and then take the WEREWOLF RING (U).
- Return to the chapel and go through the right door.
- Examine the shelf; move the books aside and insert the WEREWOLF RING into the niche. Take the MEDALLION 4/4 (V).
- Zoom into the podium (W); insert the 4 MEDALLIONS into the slots to activate a puzzle.
- Rotate the rings until they have all been placed correctly. Rotating one ring will affect other rings on different pictures (the affected rings will light up).
- To solve the puzzle, rotate the rings into place in this order (1-6).
- Take the SILVER NITRATE and the HAMMER (X).
- Walk down.
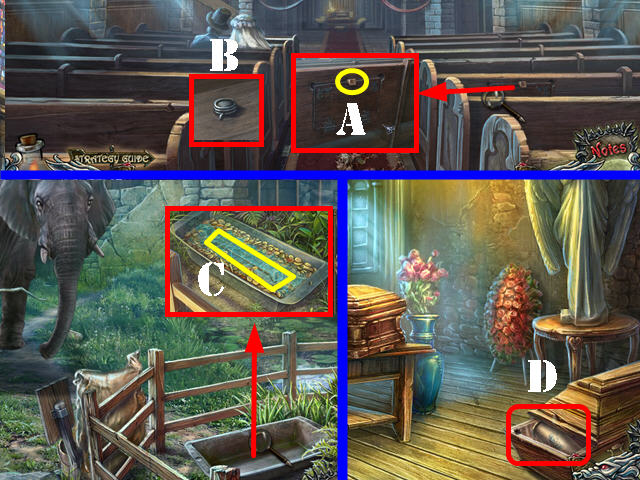
- Examine the pew; use the HAMMER on the wedge (A) and take the ORGAN BUTTON (B).
- Walk down; take the right path and then go left.
- Take a closer look at the trough; put the JUG WITH WATER in it and take the PRY BAR (C).
- Walk down twice and go through the right door.
- Use the PRY BAR on the coffin and take the MUSIC ROLL (D).
- Return to the chapel.
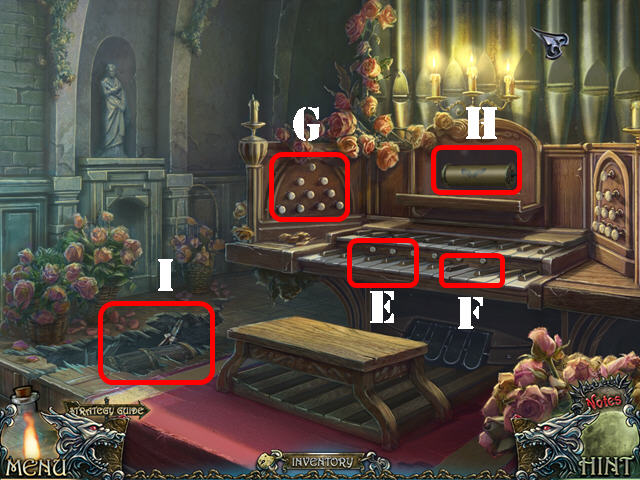
- Zoom into the organ; put the 2 ORGAN KEYS (E and F), ORGAN BUTTON (G), and the MUSIC ROLL (H) into the appropriate slots.
- Take the CHEST and the PLIERS (I).
- Return to the zoo.
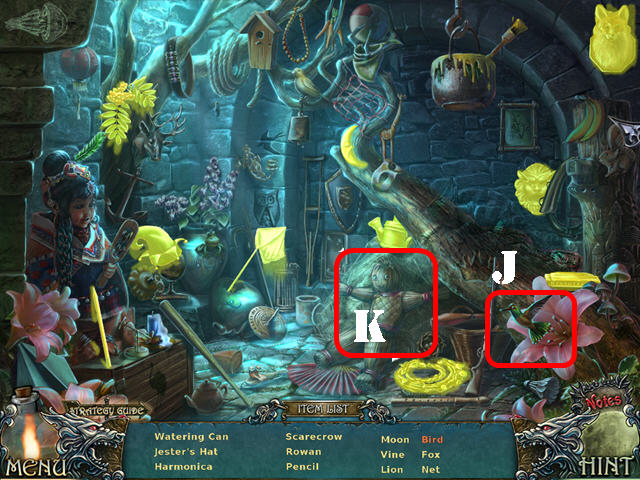
- Play the HOS.
- Open the flower and take the bird (J).
- Touch the hay and take the scarecrow (K).
- The LIANA will be added to inventory.
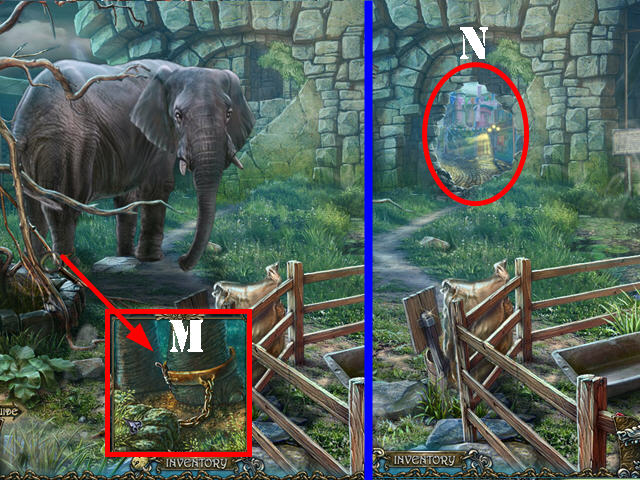
- Look at the elephant’s foot and cut the chain with the PLIERS (M).
- Go through the hole in the wall (N).
Chapter 7: The Finale
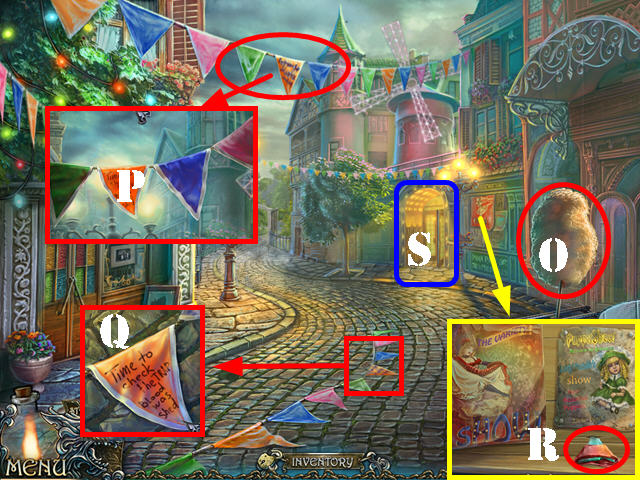
- Take the COTTON CANDY (O).
- Zoom into the flags; use the LIANA on them (P).
- Zoom into the flags on the ground and take the FLAG (Q).
- Examine the bulletin board; put the FLAG on the shard and take the GLASS SHARD (R).
- Enter the saloon on the right (S).
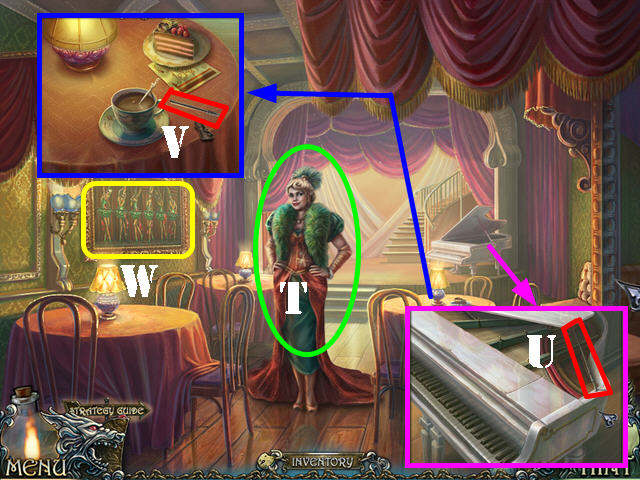
- Talk to the performer (T).
- Look at the piano; take the STICK (U).
- Take a closer look at the table; put the COTTON CANDY into the cup and take the SPRING (V).
- Zoom into the picture to activate a puzzle (W).
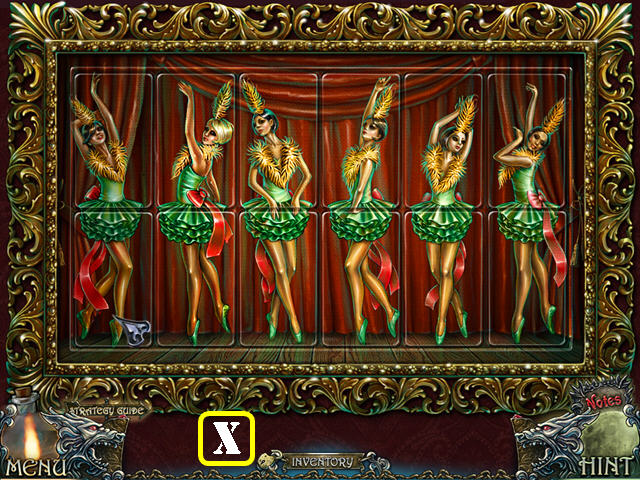
- Select two sections in the same row to swap their positions.
- You will know when a piece is in the right place because the image will no longer be blurry.
- Please look at the screenshot for the solution (X).
- You will receive the BONNET.
- Walk down and then go forward.
- Look in the pond; take the TWEEZERS (Y).
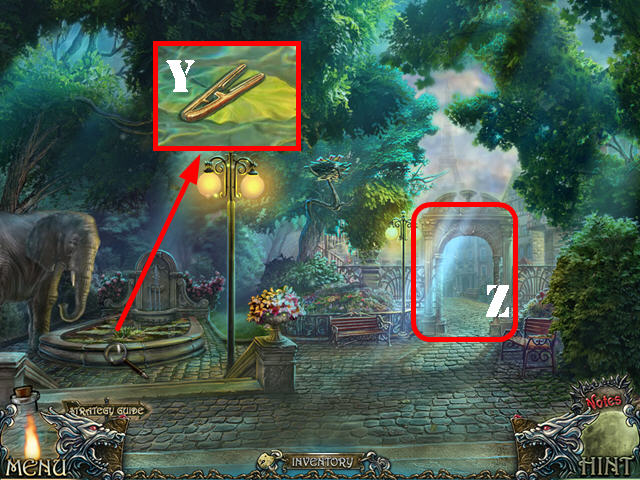
- Go through the arch (Z).
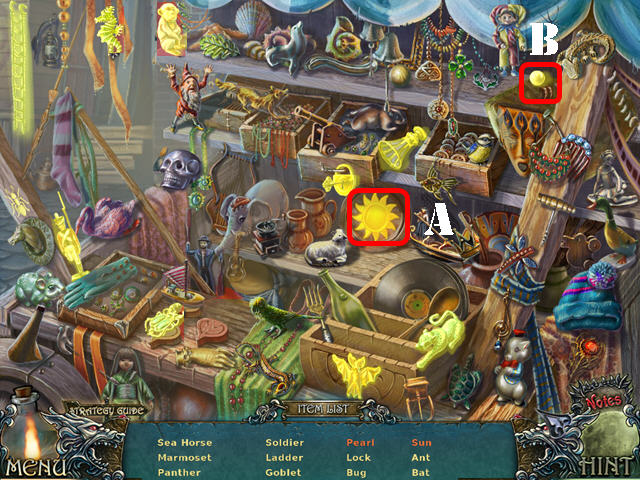
- Play the HOS.
- Touch the plate and take the sun (A).
- Touch the crab and take the pearl (B).
- The LADDER will be added to inventory.
- Walk down.
- Put the LADDER on the nest (C) and then zoom into the nest.
- Put the BONNET on the nest and take the PRUNERS (D).
- Look at the bush; use the PRUNERS on them and take the PEDAL (E).
- Walk down twice.
- Examine the peanut bag; cut it with the GLASS SHARD (F) and take the PEANUTS (G).
- Go forward and then enter the photo studio on the left (H).
- Examine the table; put the SILVER NITRATE in the tray (I), put the SPRING in the vise (J) and then add the BROKEN MIRROR to the tray.
- Use the TWEEZERS on the broken mirror to get the MIRROR.
- Use the STICK on the screen (K).
- Take SATURN (L).
- Walk down and go forward.
- Zoom into the elephant and give him the PEANUTS (M).
- Look in the fountain and take MARS (N).
- Go through the arch.
- Play the HOS.
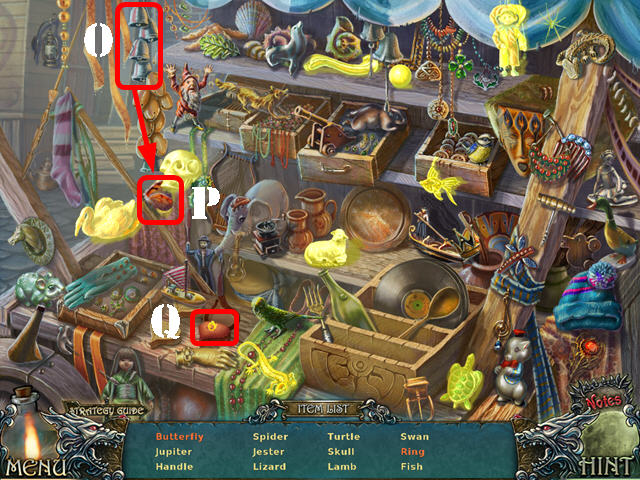
- Touch the bells (O) and take the butterfly (P).
- Open the box and take the RING (Q).
- JUPITER will be added to inventory.
- Walk down twice and go into the saloon on the right.
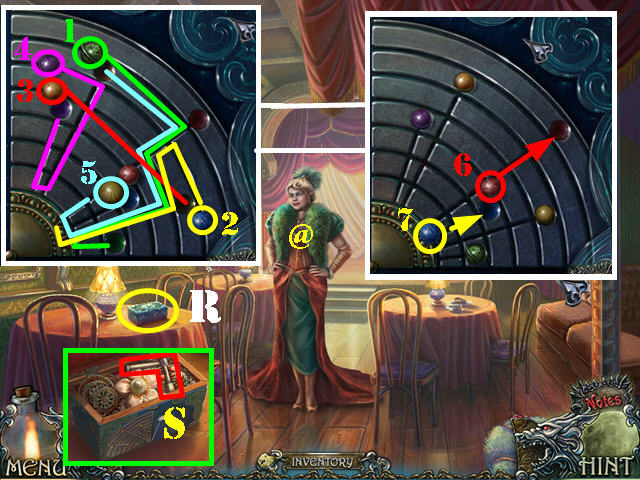
- Give the CHEST to the performer (@).
- Take a closer look at the chest on the table and then zoom into it (R).
- Put SATURN, JUPITER, and MARS on the box to activate a puzzle.
- Drag the planets into the right orbits. A planet will lock in place once it is in the right spot.
- Please look at the screenshot for the solution (1-6).
- Take the HANDLE (S). You will automatically receive the SILVER ECU 2/2.
- Walk down; go forward and through the arch.
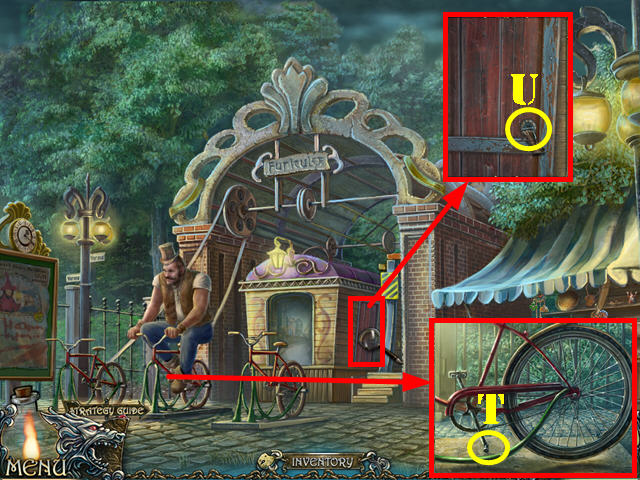
- Zoom into the bicycle (T); put the PEDAL on it for Claude to appear.
- Talk to Claude.
- Zoom into the door (U); put the HANDLE on it and go through the door. Walk down twice after you reach the top. Go through the next 2 left doors.
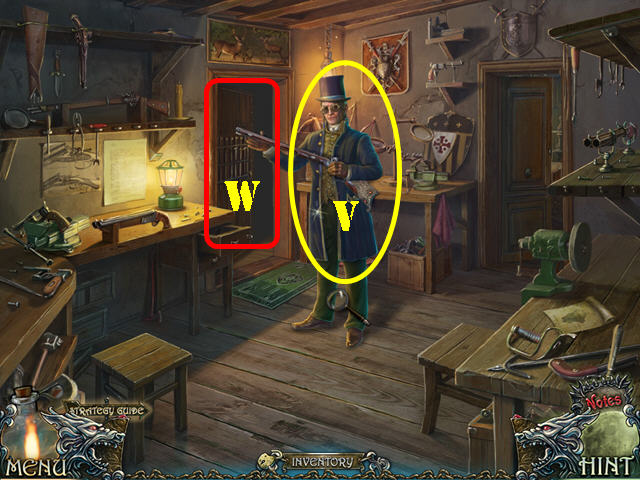
- Give the 2 SILVER ECUS to Mr. Banks to receive the RIFLE (V).
- Go through the left door (W). The MIRROR and the RIFLE will be automatically used once you go through the door.
- Congratulations, you have completed Shadow Wolf Mysteries: Cursed Wedding!


 Skymist: The Lost Spirit Stones Walkthrough, Guide, & Tips
 James Patterson's Women's Murder Club: Little Black Lies Walkthrough, Guide, & Tips
 The Stroke of Midnight Walkthrough, Guide, & Tips
 Grim Tales: Bloody Mary Walkthrough, Guide, & Tips
 Echoes of the Past: The Citadels of Time Walkthrough, Guide, & Tips