Cruel Games: Red Riding Hood Walkthrough, Guide, & Tips
Cruel Games: Red Riding Hood Walkthrough

Welcome to the Cruel Games: Red Riding Hood Walkthrough
The wolf has returned and Red Riding Hood is in danger – but this is no fairytale!
Whether you use this document as a reference when things get difficult or as a road map to get you from beginning to end, we’re pretty sure you’ll find what you’re looking for here.
This document contains a complete Cruel Games: Red Riding Hood game walkthrough featuring annotated screenshots from actual gameplay!
We hope you find this information useful as you play your way through the game. Use the walkthrough menu below to quickly jump to whatever stage of the game you need help with.
Remember to visit the Big Fish Games Forums if you find you need more help. Have fun!
This walkthrough was created by Lucky Smile, and is protected under US Copyright laws. Any unauthorized use, including re-publication in whole or in part, without permission, is strictly prohibited.
General Tips


- This is the official guide for Cruel Games: Red Riding Hood.
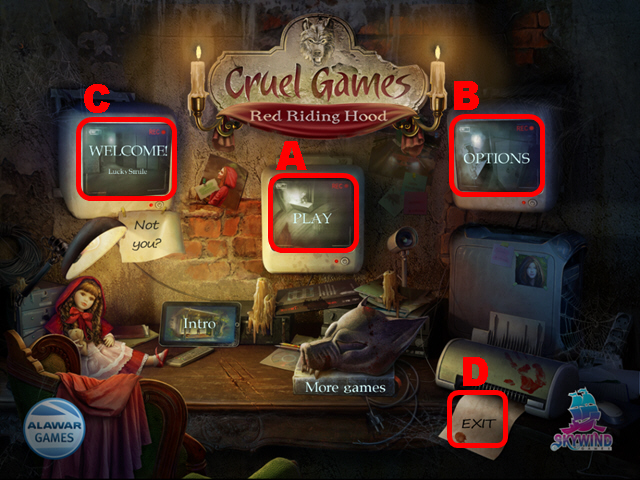
- Press Play (A) to begin the game.
- Access Options (B) to adjust the volume and the display mode.
- Select your current profile (C) to edit, delete, or create a profile.
- You can Exit here (D).
- You can choose between two grades of difficulty: casual and expert.
- Hidden Object scenes will be referred to as HOS throughout this guide.
Chapter 1: The Cemetery


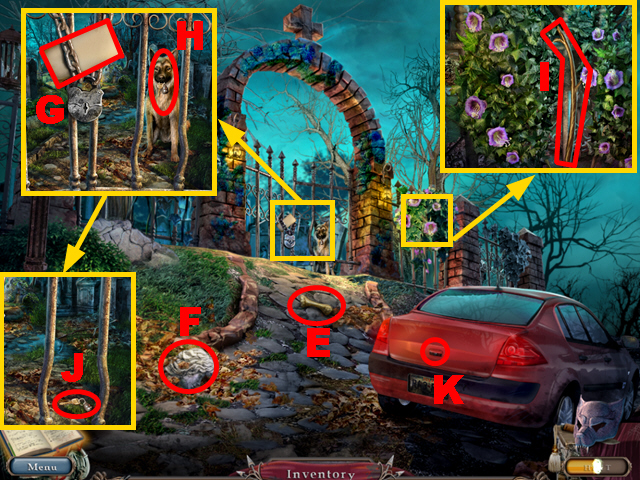
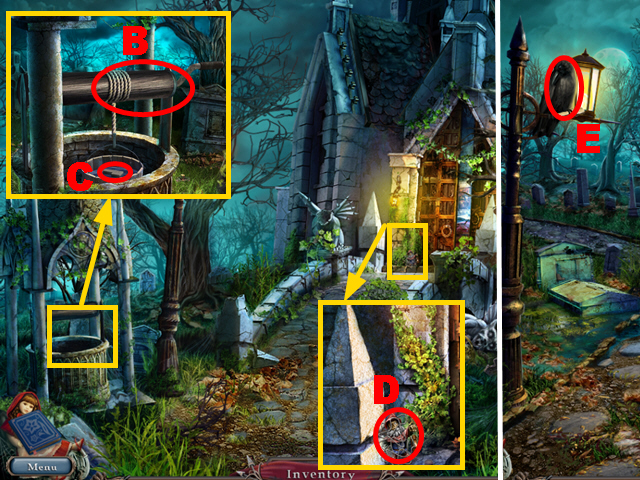
- Take the BONE (E) and the ANGEL’S HEAD (F).
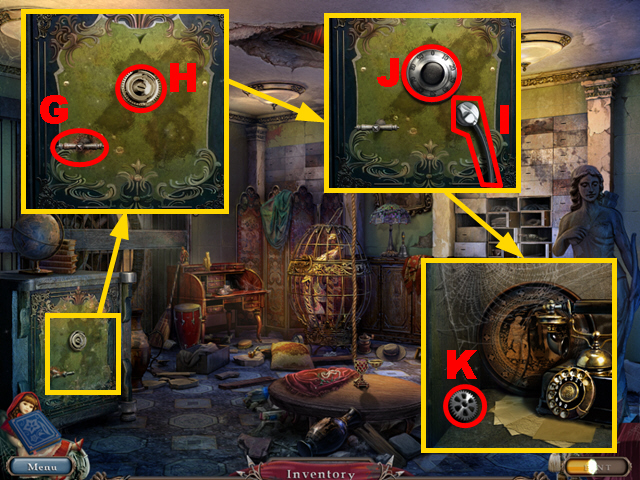
- Zoom into the gate; take the note (G) and give the BONE to the dog (H).
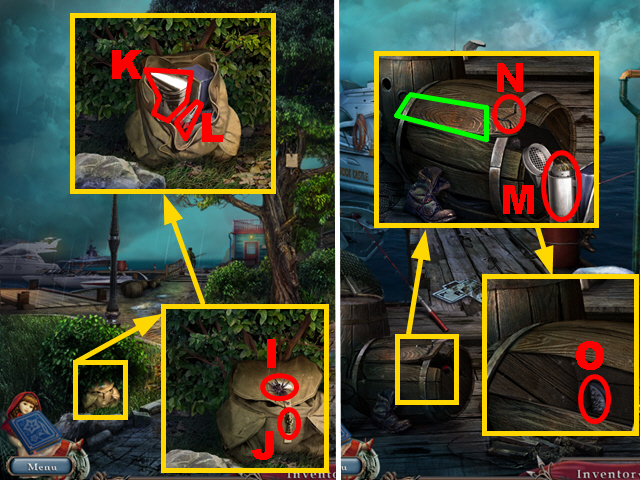
- Zoom into the bush; remove the leaves once and take the BRANCH (I).
- Zoom into the gate; use the BRANCH on the key (J) and take the KEY.
- Use the KEY on the trunk lock (K).
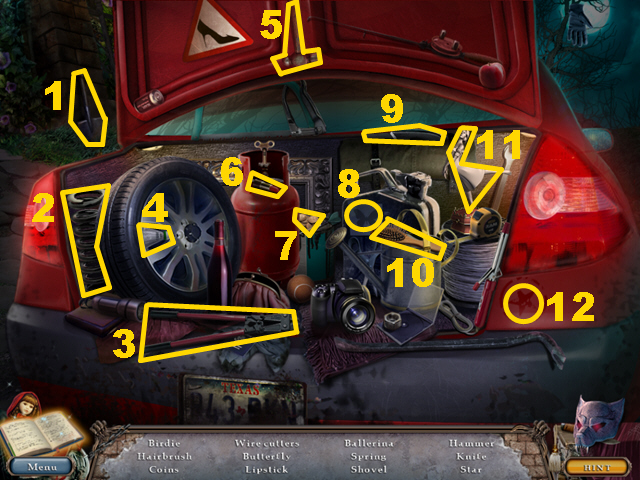
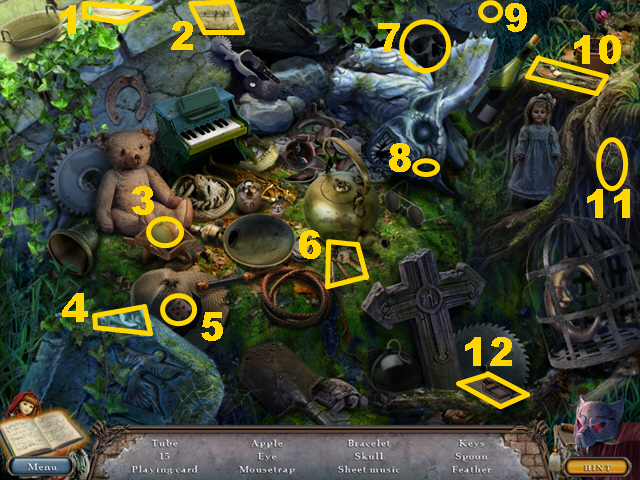
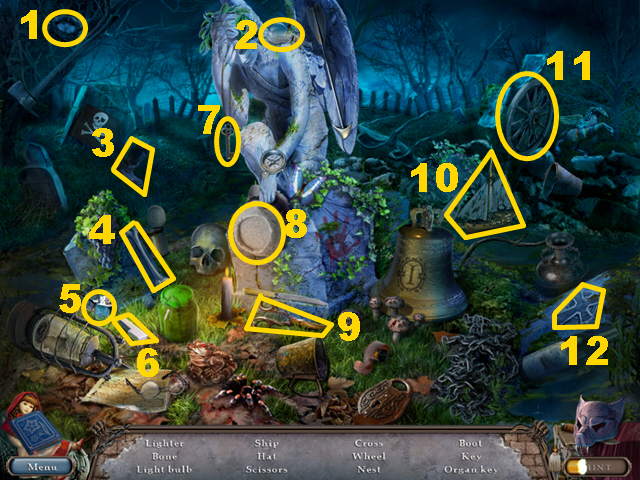
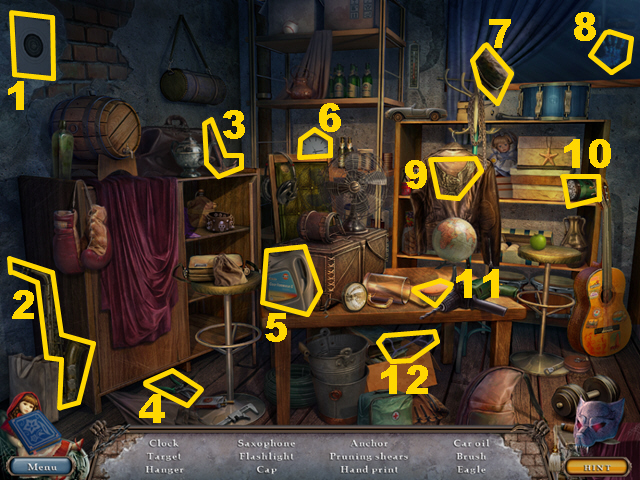
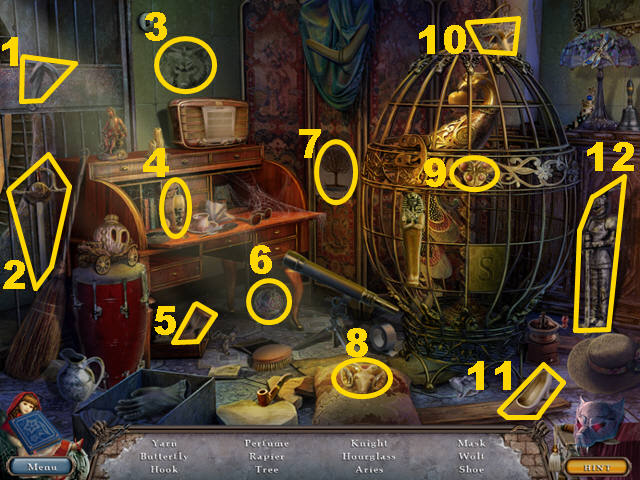
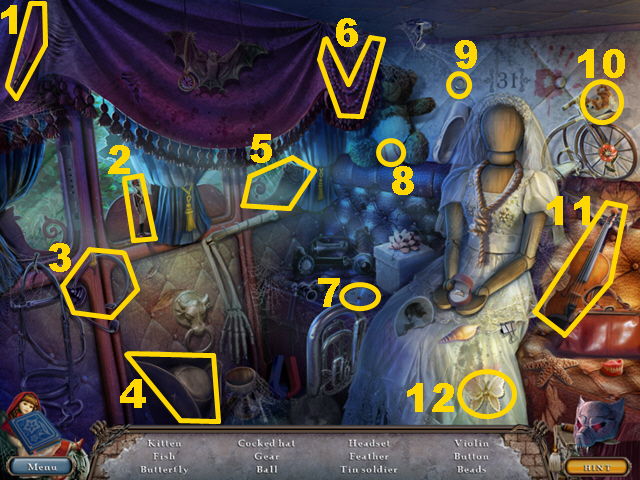
- Play the HOS.


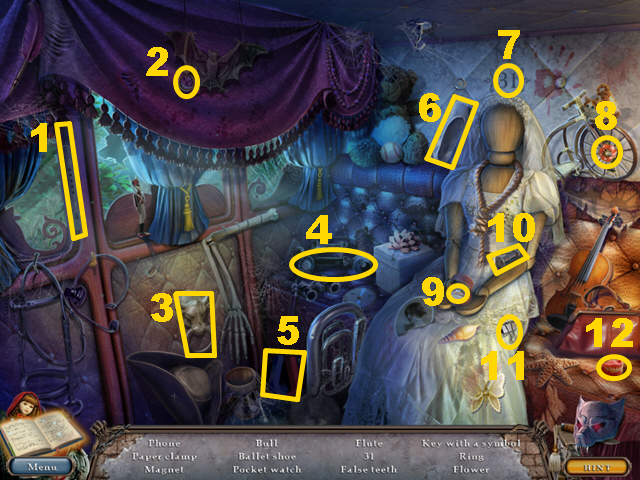
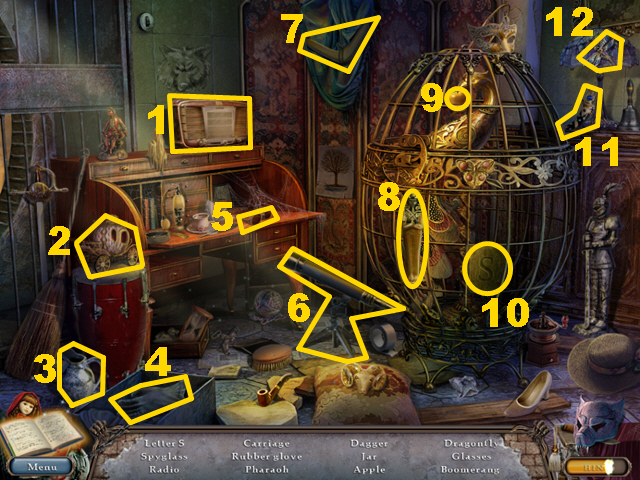
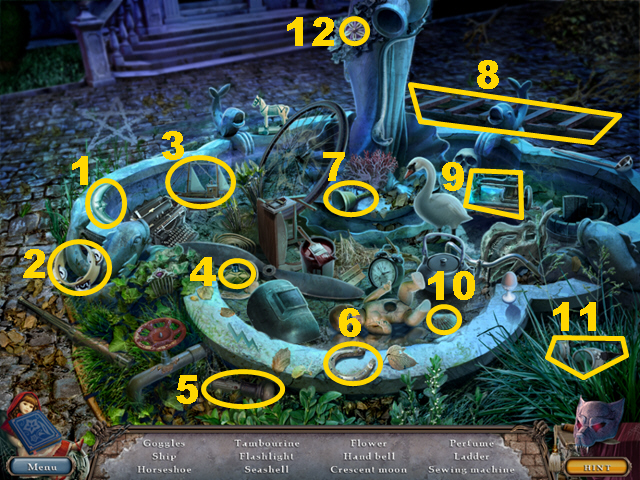
- Find the items listed 1-12.
- The WIRE CUTTERS will be acquired.


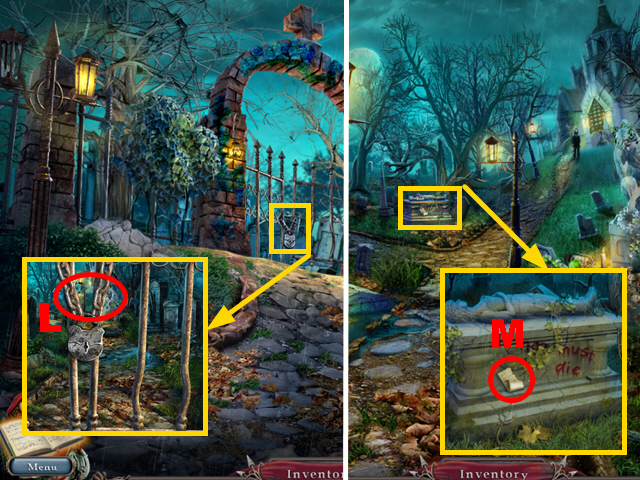
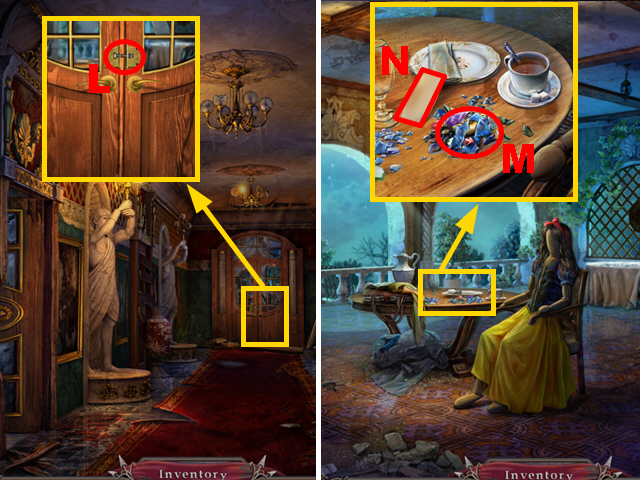
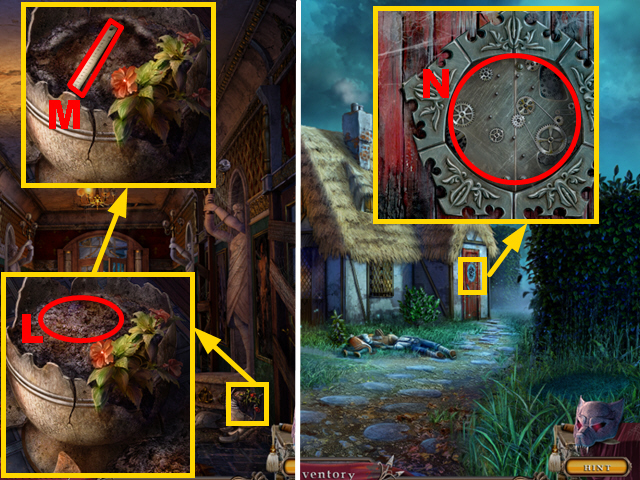
- Zoom into the gate; use the WIRE CUTTERS on the chain (L) to break the lock.
- Move forward.
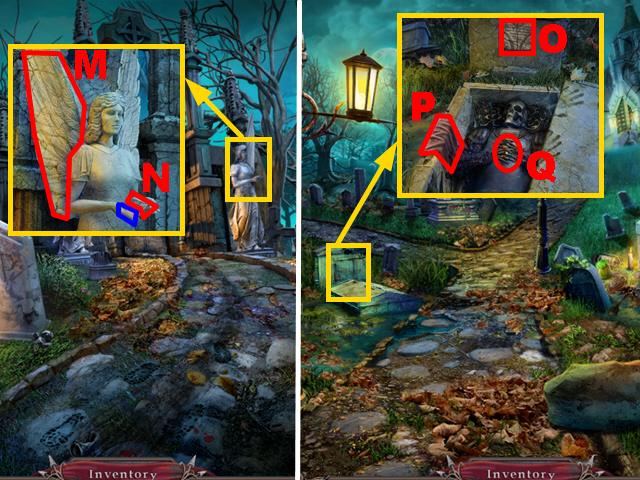
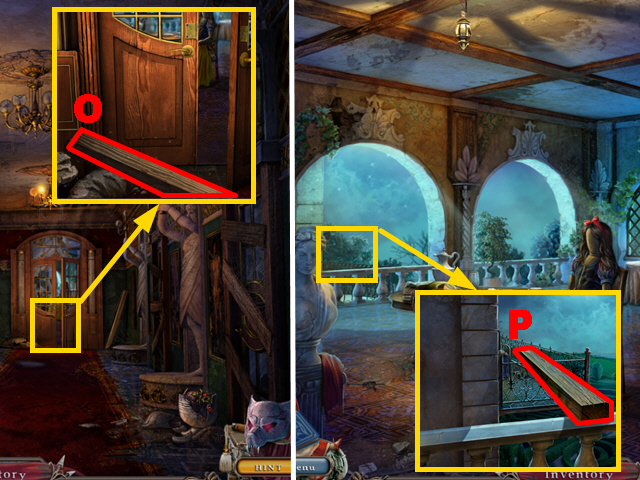
- Zoom into the pedestal; take the 1/2 SHEET MUSIC (M).
- Turn left.


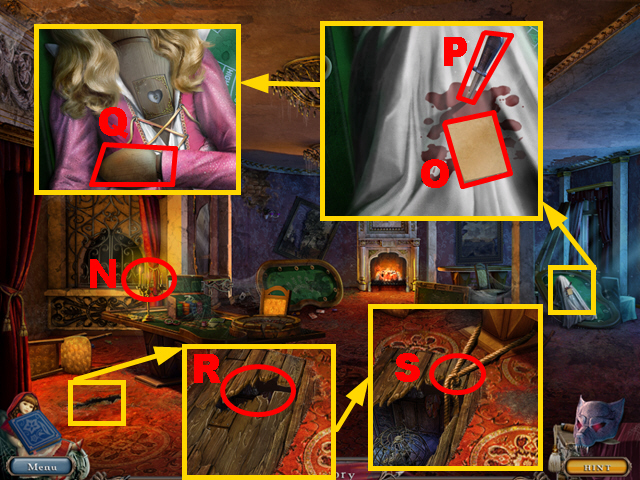
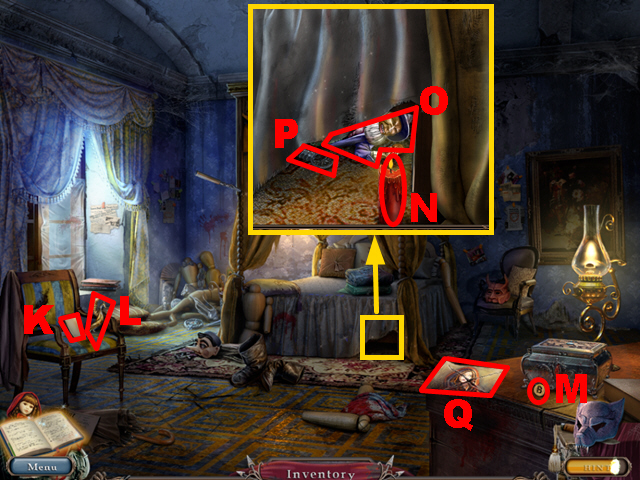
- Take the HANDLE (N).
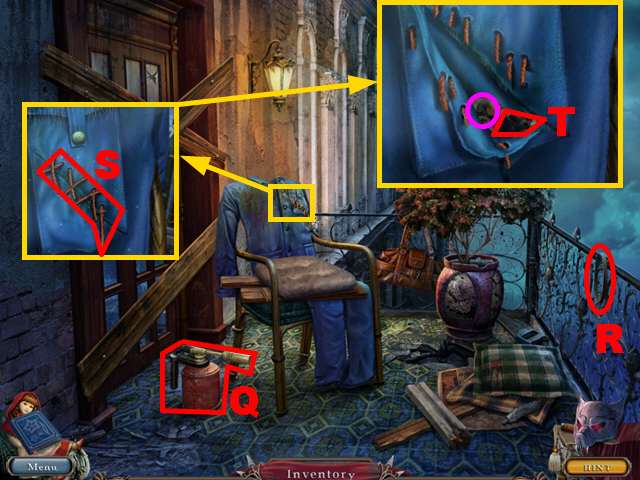
- Zoom into the left angel; put the ANGEL’S HEAD on it (O).
- Take the note (P) and the 1/3 FIGURINE (Q).
- Walk down and move forward.
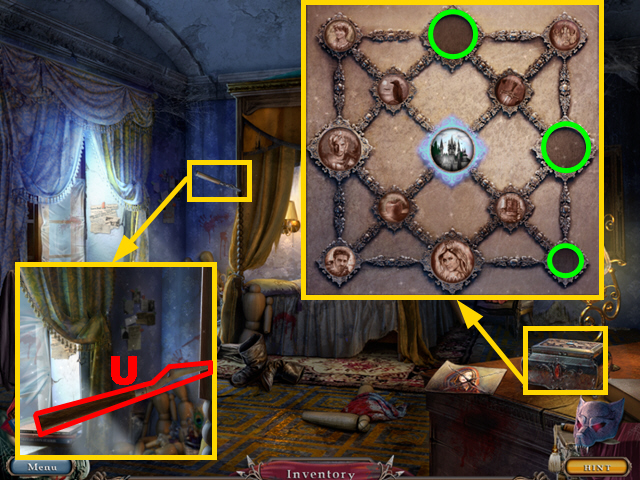
- Zoom into the fountain; take the first PART OF THE SIGN UNDER THE PAINTING (R).
- Zoom into the door; take the note (S).
- Play the HOS.


- Find the items listed 1-12.
- The 2/2 SHEET MUSIC will go into inventory.
- Walk down twice.
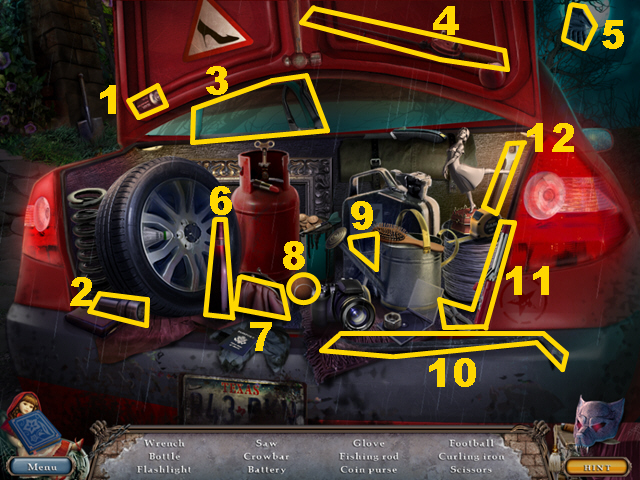
- Play the HOS.


- Find the items listed 1-12.
- The CROWBAR will be acquired.
- Move forward.


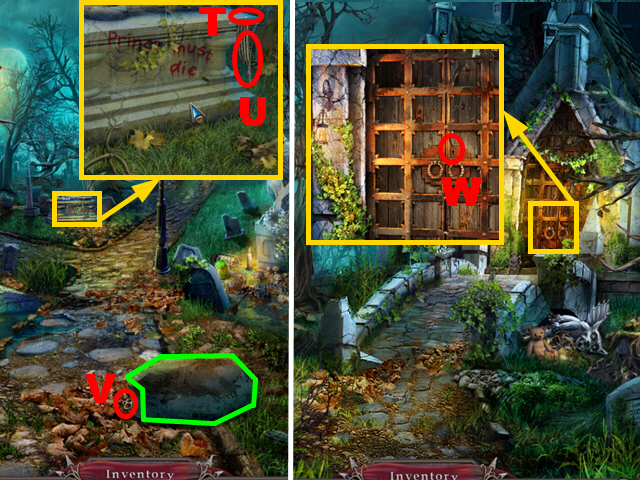
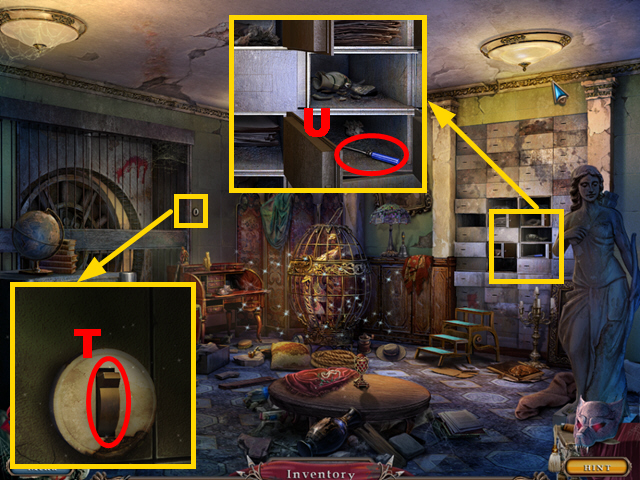
- Zoom into the pedestal; use the CROWBAR to break the stone (T) and take the ROPE (U).
- Use the CROWBAR to lift the large rock marked in green; take the CHAPEL KEY (V).
- Move forward.
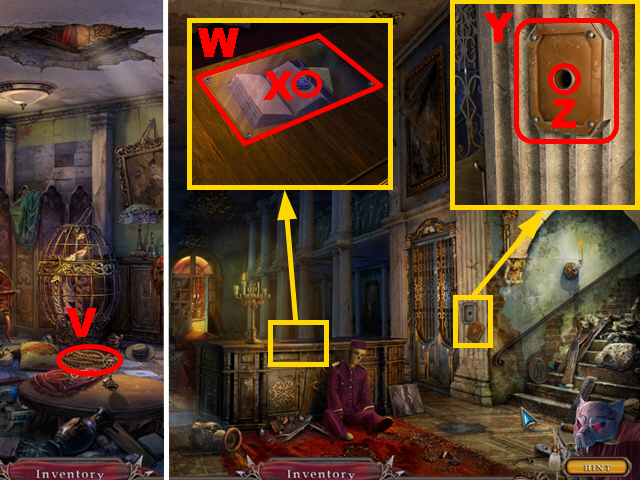
- Zoom into the door; put the CHAPEL KEY into the lock (W).
- Move forward.


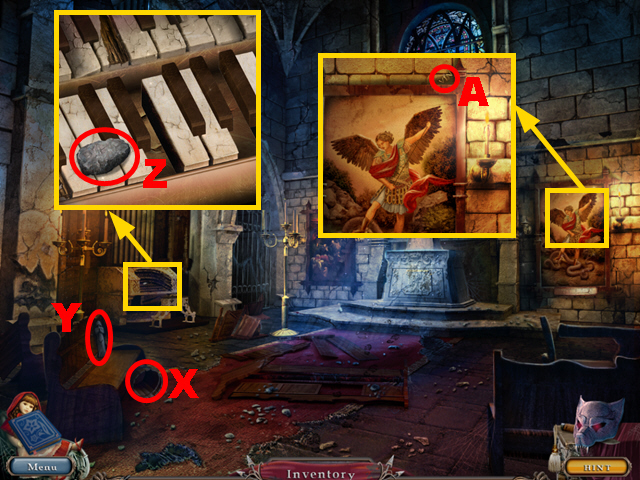
- Take the BUCKET (X) and the 2/3 FIGURINE (Y).
- Zoom into the piano; take the STONE (Z).
- Zoom into the painting; take the second PART OF THE SIGN UNDER THE PAINTING (A).
- Walk down.


- Zoom into the fountain; add the HANDLE, the ROPE, and the BUCKET to the fountain (B).
- Press the handle twice and take the 1/2 ORGAN KEY (C).
- Zoom into the door; use the WIRE CUTTERS on the gnome (D) and take the 1/7 GARDEN GNOME.
- Walk down.
- Throw the STONE at the crow (E).
- Play the HOS.


- Find the items listed 1-12.
- The 2/2 ORGAN KEY will be acquired.
- Move forward twice.


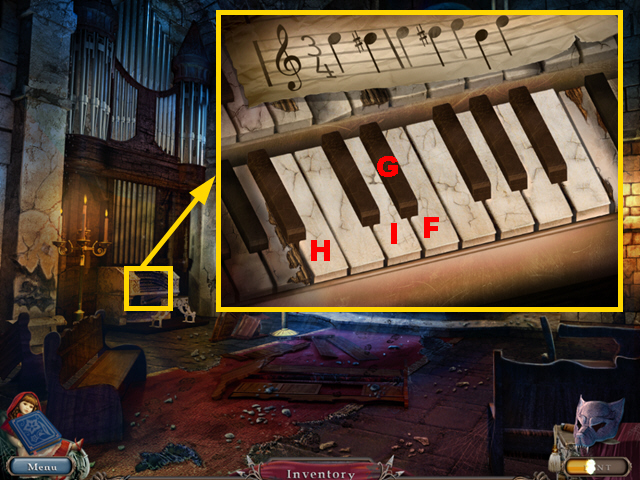
- Zoom into the piano; add the 2 ORGAN KEYS and the 2 MUSIC SHEETS to the piano to play a mini-game.
- Select the keys in the following sequence to complete the mini-game: F, G, F, G, F, H, and I.


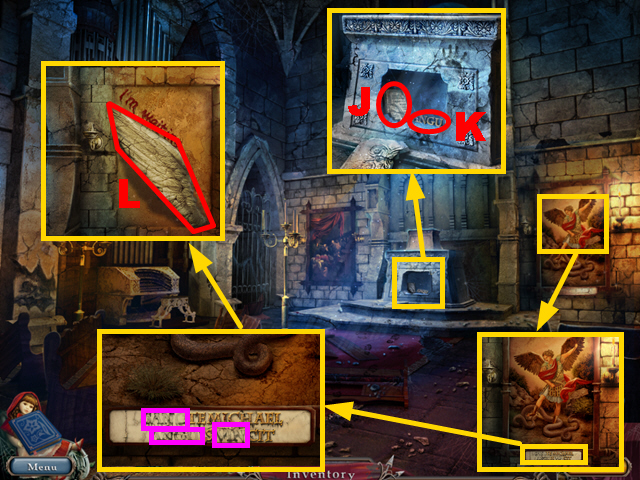
- Zoom into the altar; take the first PART OF THE EPITAPH (J) and the third PART OF THE SIGN UNDER THE PAINTING (K).
- Zoom into the painting and then zoom into the sign; put the first, the second, and the third PART OF THE SIGN UNDER THE PAINTING into the niches marked in purple.
- Take the WING (L).
- Walk down twice and turn left.


- Zoom into the right angel; put the WING on it (M).
- Take the note marked in blue and the second PART OF THE EPITAPH (N).
- Walk down.
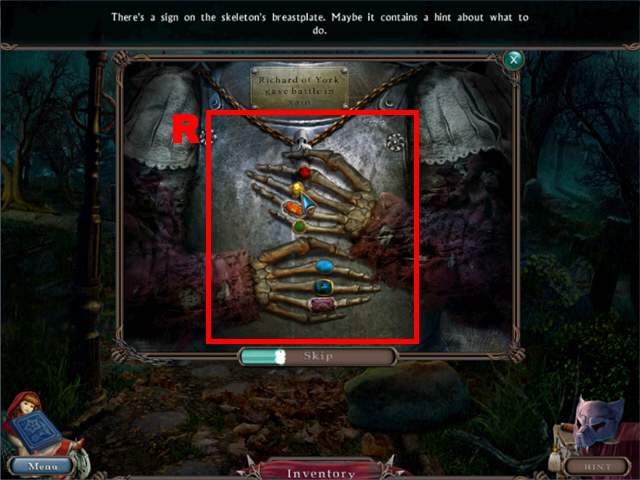
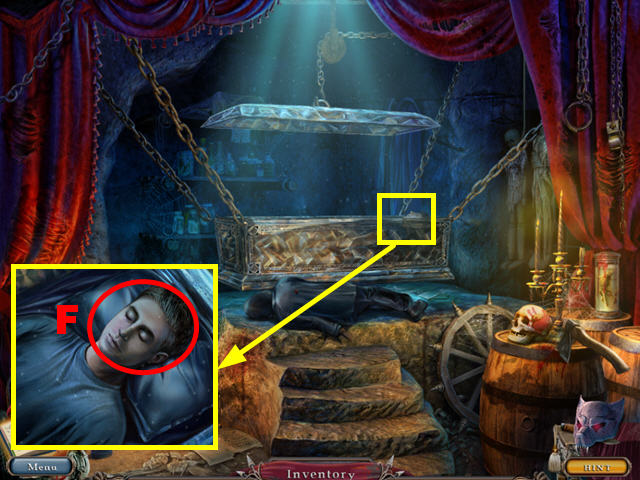
- Zoom into the grave; put the first and the second PART OF THE EPITAPH into the niche (O).
- Take the RAG (P).
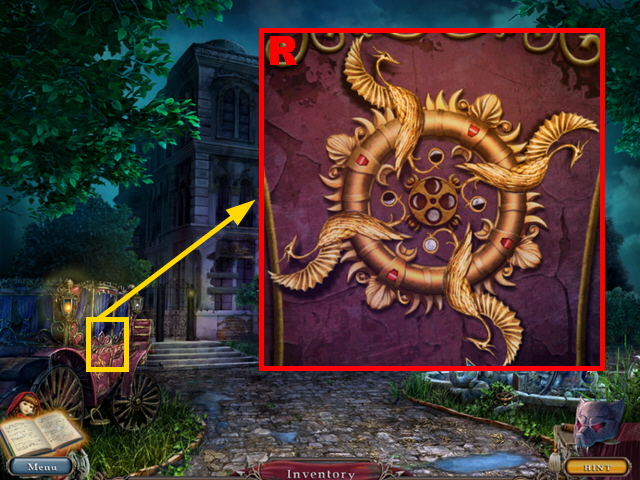
- Zoom into the skeleton’s hands (Q) to play a mini-game.


- To solve this puzzle (R), switch the rings to align them correctly.
- The 3/3 FIGURINE will go into inventory.
- Turn left.


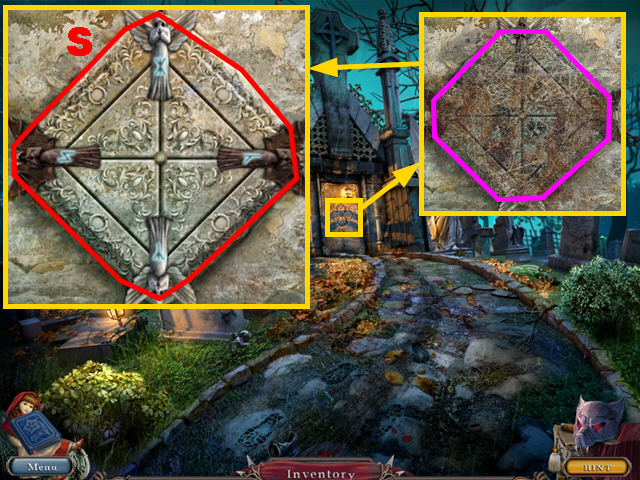
- Zoom into the door; use the RAG to remove the cobwebs marked in purple.
- Add the 3 FIGURINES to the board to play a mini-game.
- To solve this puzzle (S), move the figurines into their corresponding slots.
- Move forward.


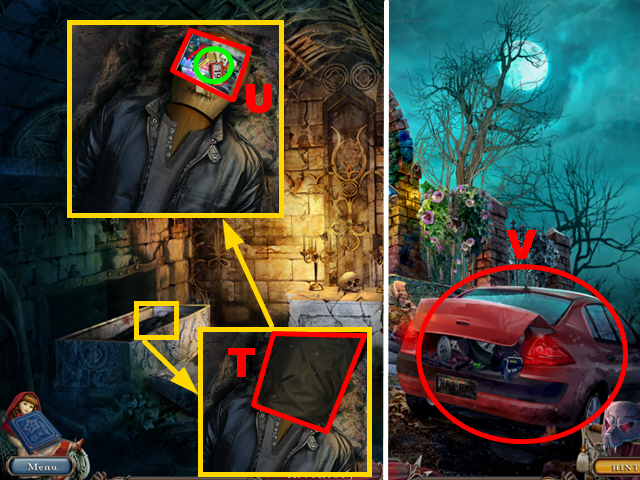
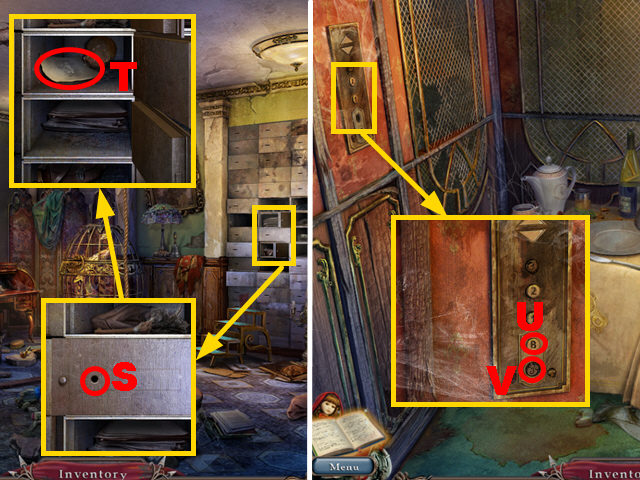
- Zoom into the coffin; remove the blanket (T).
- Take the ROOM KEY marked in green and zoom into the photo (U).
- Walk down three times.
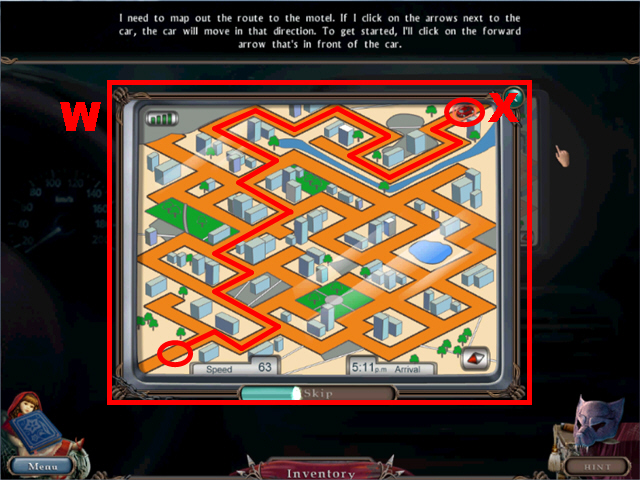
- Zoom into the car (V) to play a mini-game.


- To solve this puzzle (W), move the car to the designated spot (X) by pressing the arrow buttons.
Chapter 2: The Town


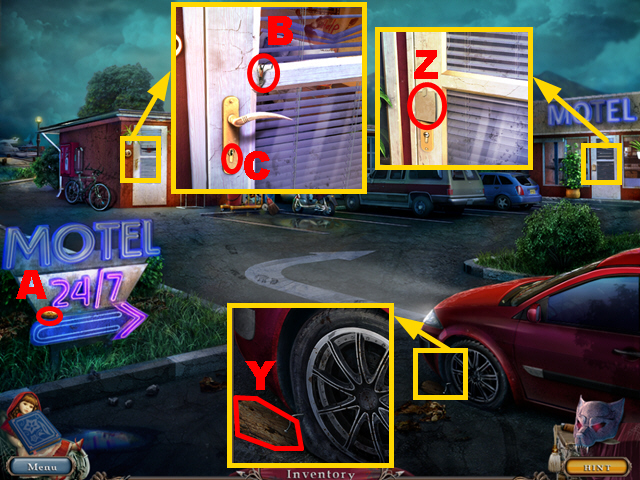
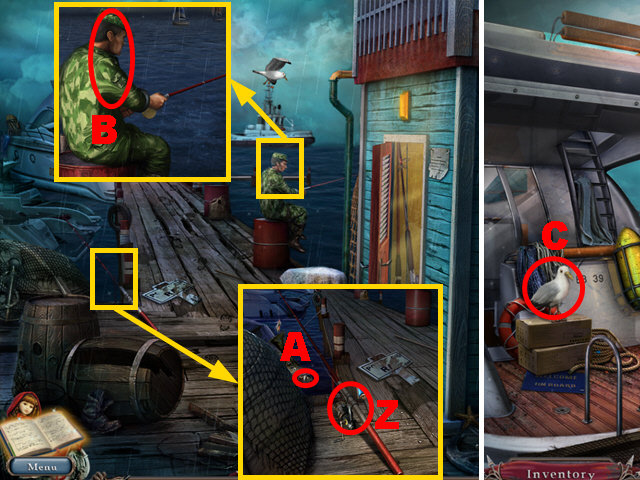
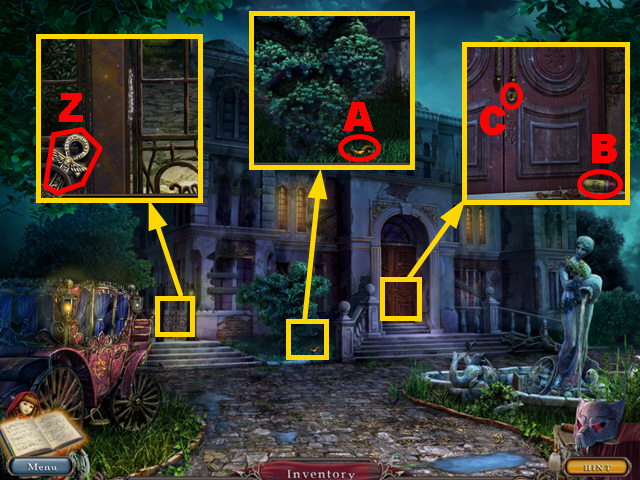
- Zoom into the car; take the DECAYED WOOD (Y).
- Zoom into the right door; take the note (Z).
- Take the 1/3 PUZZLE FRAGMENT (A).
- Zoom into the left door; take the FISH HOOK (B) and put the ROOM KEY into the lock (C).
- Turn left.


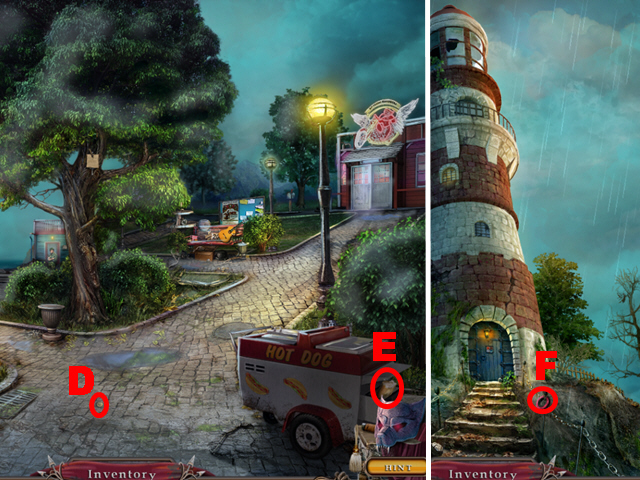
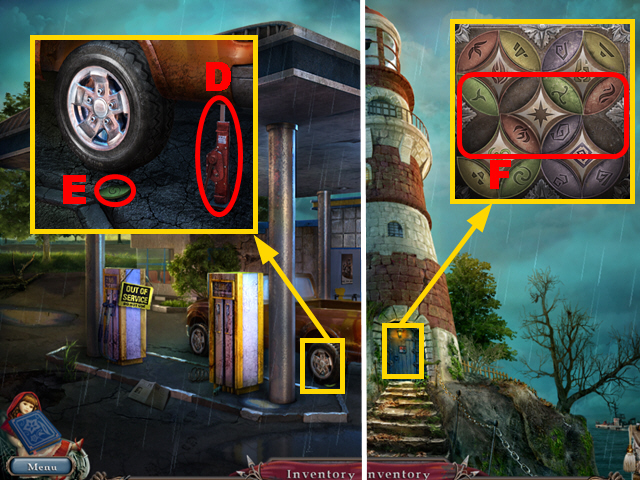
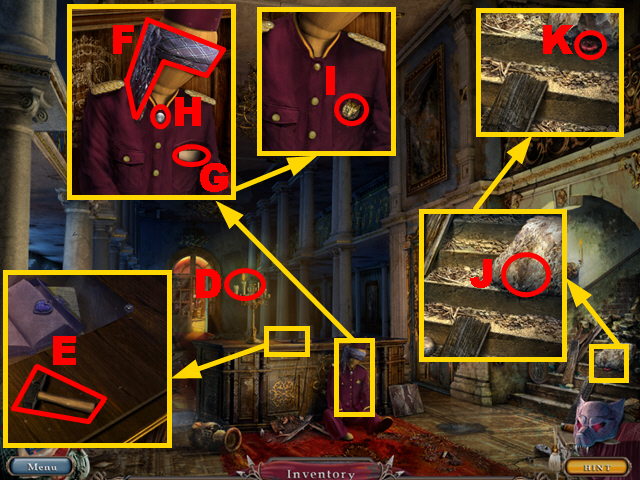
- Take the first COIN (D) and the PIECE OF BREAD (E).
- Turn left.
- Take the INSULATING TAPE (F).
- Walk down, turn right, and turn left.


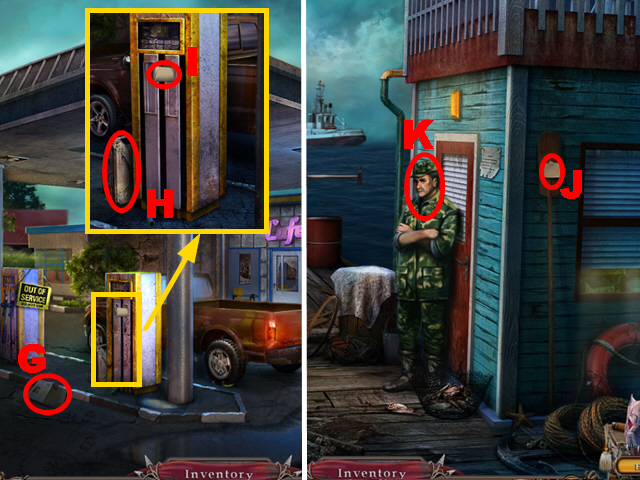
- Read the newspaper (G).
- Zoom into the gas pump; take the EMPTY GAS CAN (H) and the note (I).
- Walk down twice and move forward.
- Take the note (J) and talk to the man (K).
- Walk down and turn right.


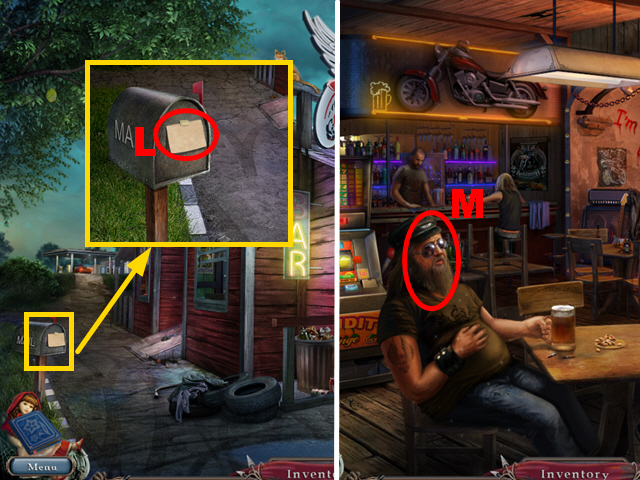
- Zoom into the mailbox; take the note (L).
- Enter the bar.
- Talk to the guy (M).
- Walk down three times.
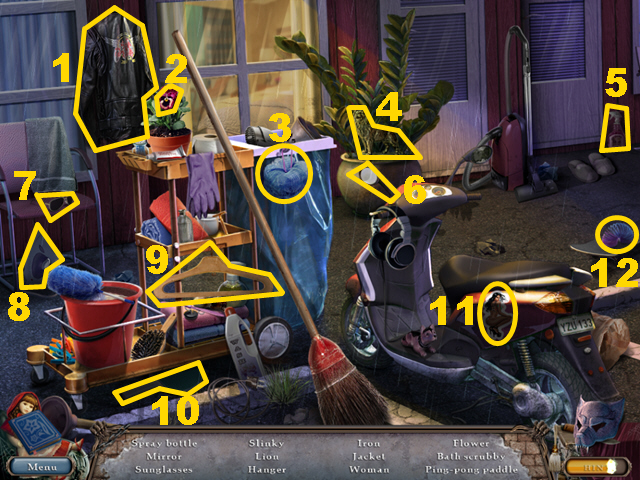
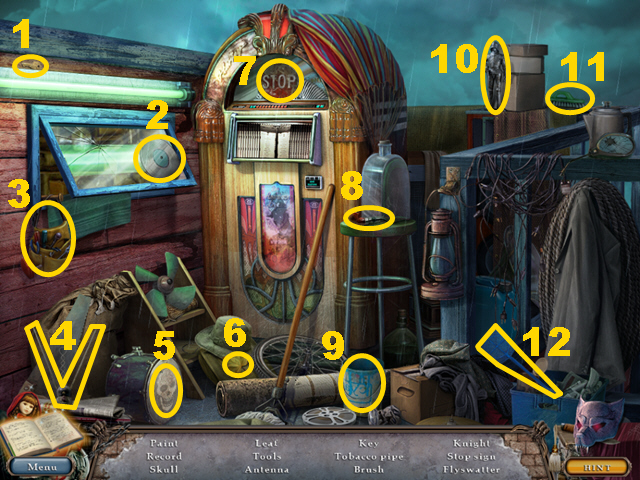
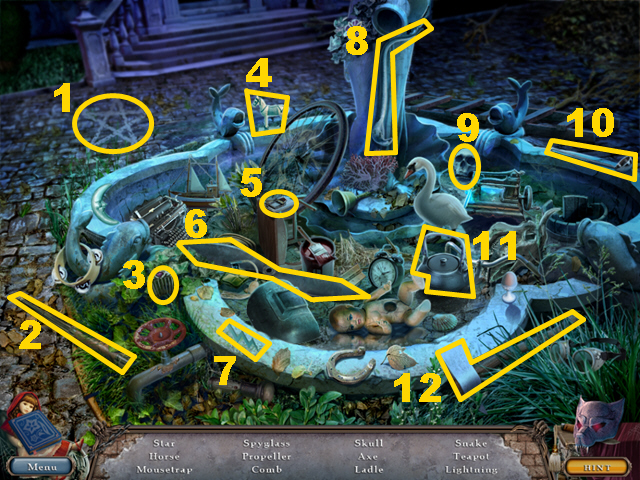
- Play the HOS.


- Find the items listed 1-12.
- The LEATHER JACKET will go into inventory.
- Turn left, turn right, and enter the bar.


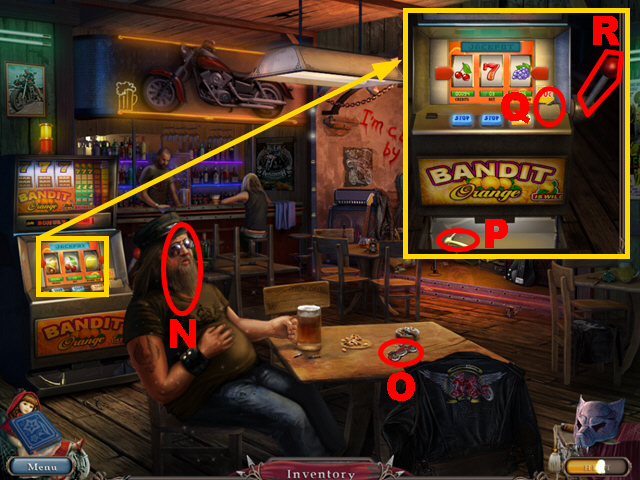
- Give the LEATHER JACKET to the man (N) to acquire the permission to enter.
- Take the BIKE-SHAPED KEY (O).
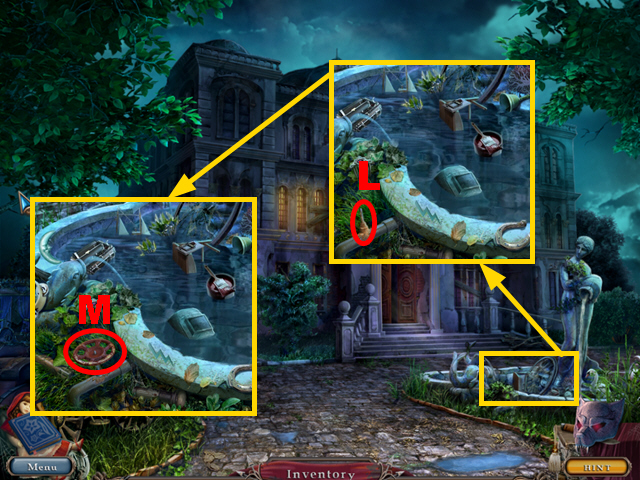
- Zoom into the slot machine; take the HANDLE (P), put the first COIN into the slot (Q), and press the lever (R).
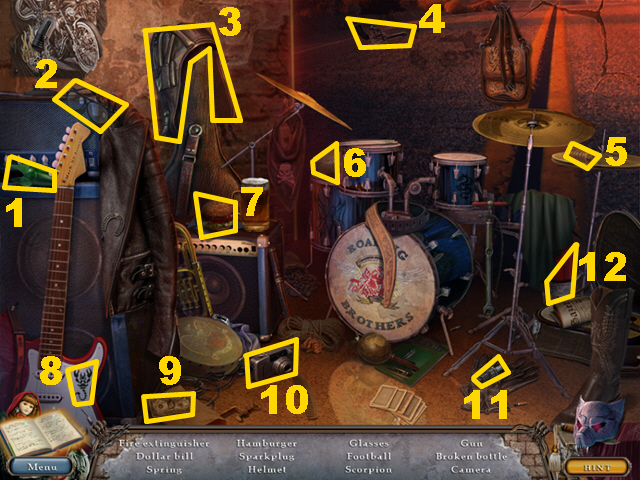
- Play the HOS.


- Find the items listed 1-12.
- The BROKEN BOTTLE will go into inventory.
- Walk down.


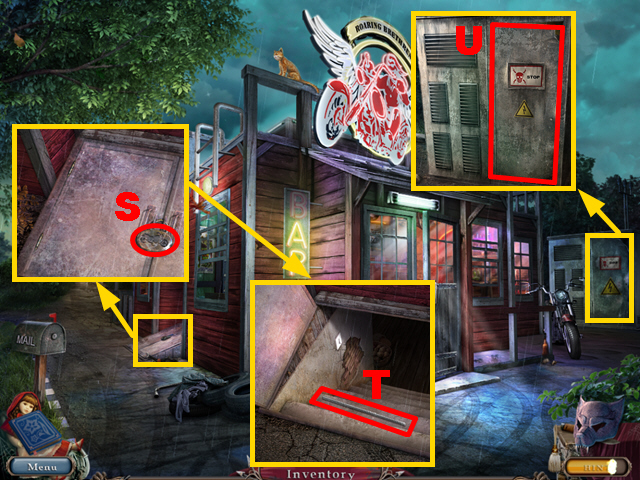
- Zoom into the trapdoor; put the BIKE-SHAPED KEY into the niche (S).
- Open the door and take the METAL BAR (T).
- Zoom into the metal box; remove the door with the METAL BAR (U).
- Walk down twice.


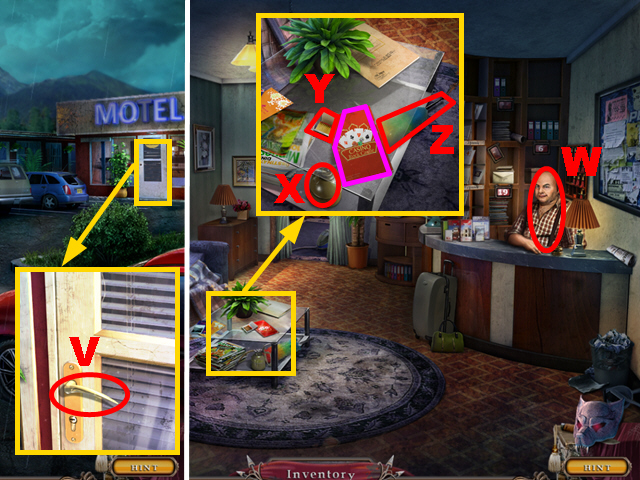
- Zoom into the right door; put the handle into the niche (V) and press the handle.
- Enter the motel.
- Talk to the man (W).
- Zoom into the table; take the OILER (X), the brochure marked in purple, the MATCHES (Y), and the FEATHER DUSTER (Z).
- Walk down, turn left, turn right, and turn left.


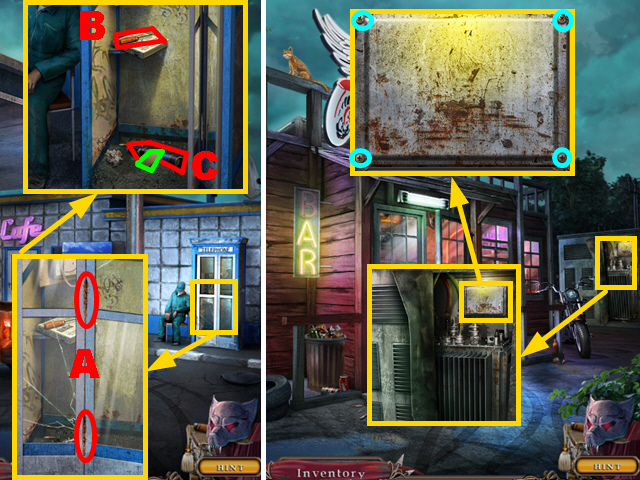
- Zoom into the phone booth; use the OILER on the door twice (A) and move the door aside.
- Take the SCREWDRIVER (B), the note marked in green, and the TELESCOPE (C).
- Walk down.
- Zoom into the metal box and then zoom into the panel; use the SCREWDRIVER to remove the screws marked in blue.
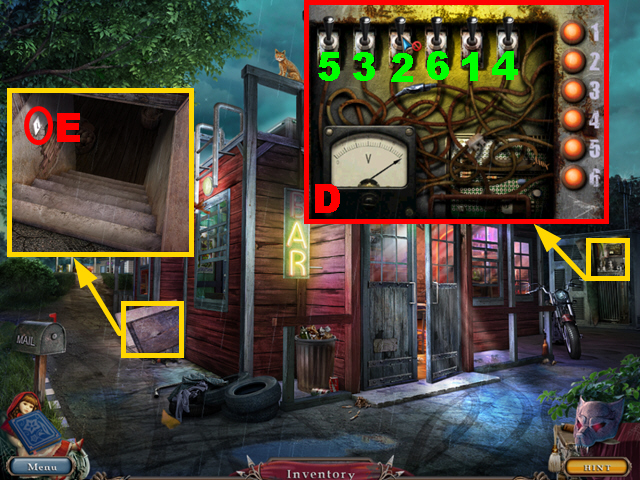
- Play the mini-game.


- To solve this puzzle (D), press the switches in the sequence 1-6.
- Zoom into the trapdoor; press the light switch (E).
- Go down.
- Play the HOS.


- Find the items listed 1-12.
- The PRUNING SHEARS will be acquired.


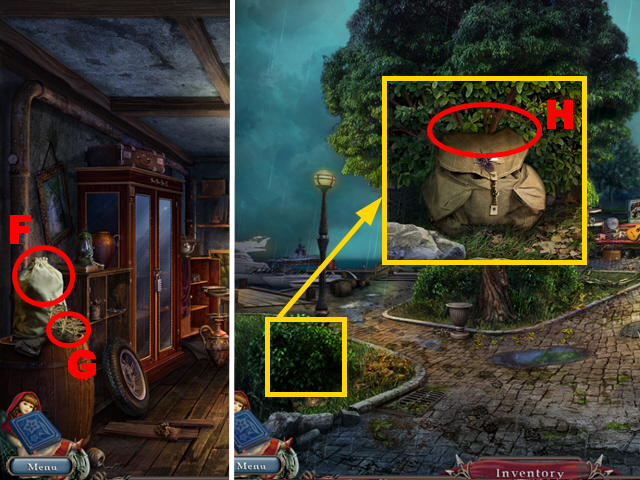
- Cut open the sack with the BROKEN BOTTLE (F).
- Take the STRAW (G).
- Walk down twice.
- Zoom into the bush; remove the leaves with the PRUNING SHEARS (H).
- Move forward.
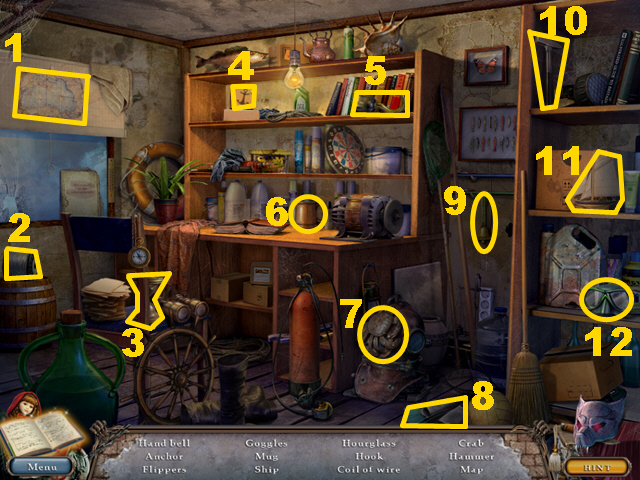
- Play the HOS.


- Find the items listed 1-12.
- The HAMMER will be acquired.
- Walk down, turn right, and enter the bar.
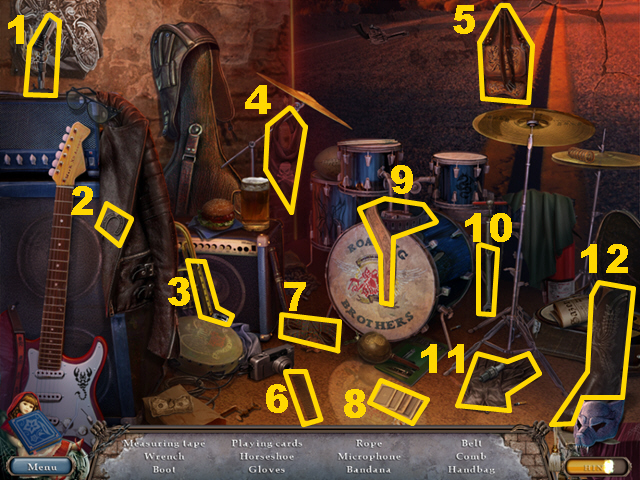
- Play the HOS.


- Find the items listed 1-12.
- The GLOVES will go into inventory.
- Walk down twice.


- Zoom into the bush; remove the spider with the GLOVES (I) and cut the rope with the BROKEN BOTTLE (J).
- Take the SMOKER (K) and the PLIERS (L).
- Move forward.
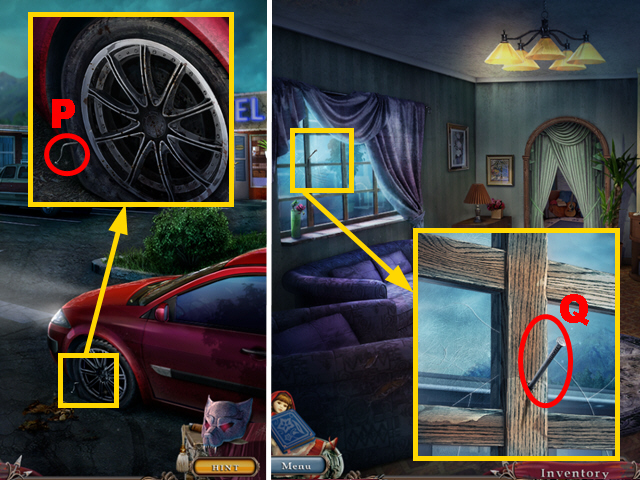
- Zoom into the barrel; put the SMOKER next to it (M) and put the DECAYED WOOD and the STRAW into the smoker.
- Use the MATCHES to set the straw on fire and use the PLIERS twice to remove the nails (N); the 1/4 NAIL and the 2/4 NAIL will be acquired.
- Take the first PLANK marked in green and the HALF OF A LOCKET (O).
- Walk down twice.


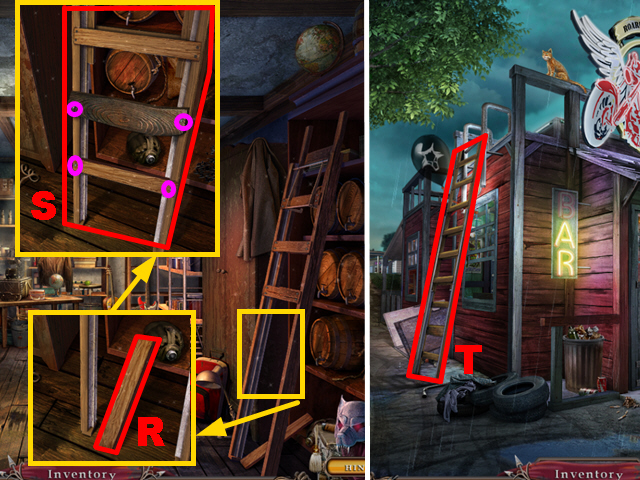
- Zoom into the car; use the PLIERS on the nail (P) to get the 3/4 NAIL.
- Enter the motel.
- Zoom into the window; use the PLIERS on the nail (Q) to acquire the 4/4 NAIL.
- Walk down, turn left, turn right, and go down the trapdoor.


- Zoom into the ladder; take the second PLANK (R).
- Put the first and the second PLANK on the ladder; add the 4 NAILS to the planks.
- Use the HAMMER to fix the nails marked in purple.
- Take the LADDER (S).
- Walk down.
- Put down the LADDER next to the bar (T).
- Climb up the ladder.
Chapter 3: The Bar’s Roof


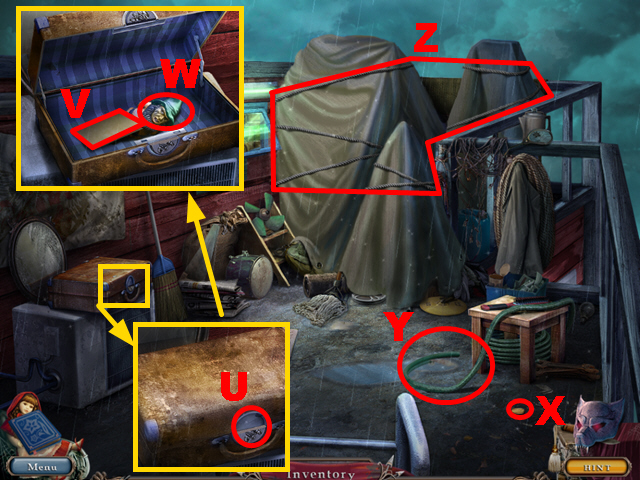
- Zoom into the suitcase; put the HALF OF A LOCKET into the niche (U).
- Take the note (V) and the 2/7 GARDEN GNOME (W).
- Take the second COIN (X).
- Use the BROKEN BOTTLE to cut the hose (Y) and take the HOSE.
- Use the BROKEN BOTTLE to cut the rope (Z).
- Play the HOS.


- Find the items listed 1-12.
- The MAILBOX KEY will go into inventory.
- Walk down.


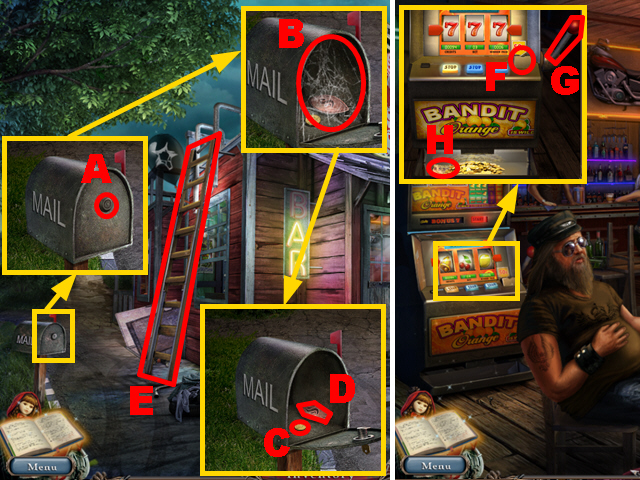
- Zoom into the mailbox; put the MAILBOX KEY into the lock (A) and use the FEATHER DUSTER to remove the cobwebs (B).
- Take the third COIN (C) and the 2/3 PUZZLE FRAGMENT (D).
- Take the LADDER (E).
- Enter the bar.
- Zoom into the slot machine; put the second COIN into the slot (F) and press the lever (G).
- Put the third COIN into the slot and press the lever; take the note (H).
- Walk down and go down the trapdoor.
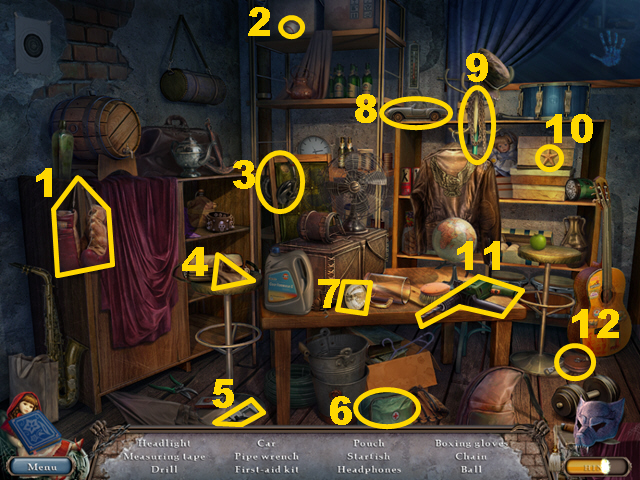
- Play the HOS.


- Find the items listed 1-12.
- The POUCH will be acquired.


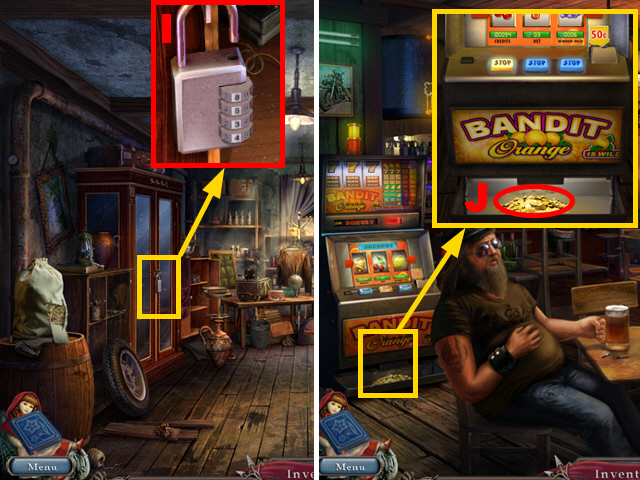
- Zoom into the cabinet; enter the code 8534 into the lock (I) to acquire the JACK.
- Walk down and enter the bar.
- Zoom into the slot machine; collect the coins with the POUCH (J) to acquire the COINS.
- Walk down twice.


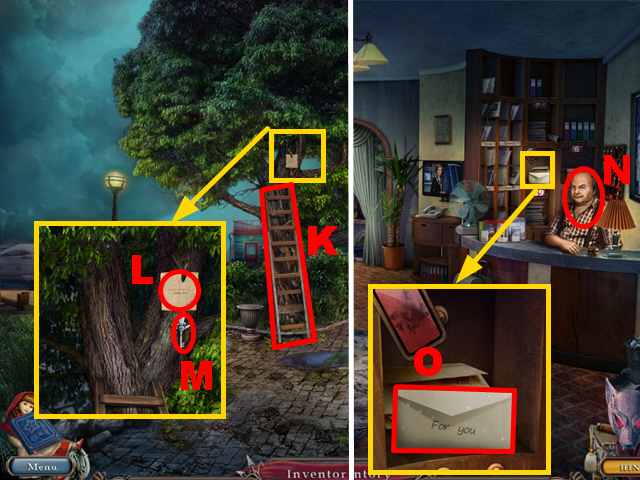
- Put down the LADDER next to the tree (K).
- Zoom into the tree; take the note (L) and the STRANGE KEY (M).
- Take the LADDER.
- Walk down and enter the motel.
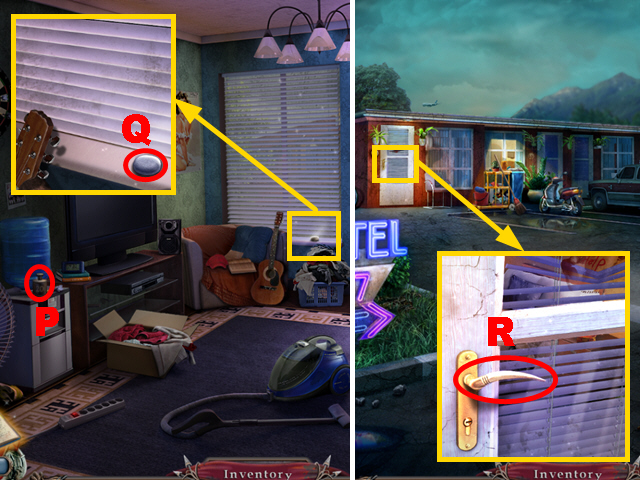
- Give the COINS to the owner (N).
- Zoom into the shelf; open the letter (O) to acquire a note and the KEY.
- Move forward.


- Take the 1/5 WEIGHT (P).
- Zoom into the window; take the 1/3 STONE (Q).
- Walk down twice.
- Zoom into the left door; press the handle (R).
- Enter the room.
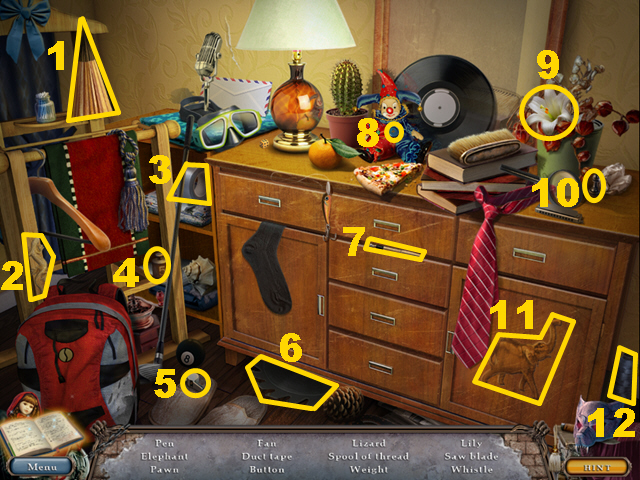
- Play the HOS.


- Find the items listed 1-12.
- The 2/5 WEIGHT will go into inventory.


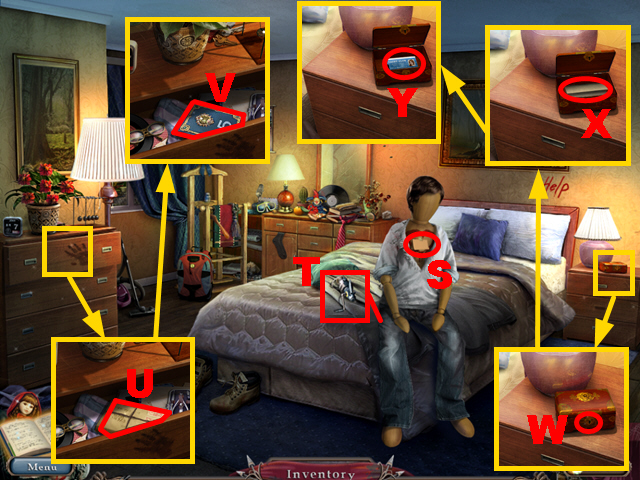
- Take the note (S) and the FISHING REEL hidden under the mannequin (T).
- Zoom into the dresser; open the drawer, move aside six objects, and open the parcel with the BROKEN BOTTLE (U).
- Take the BOOK (V).
- Zoom into the nightstand; put the KEY into the lock (W); take the note (X) and the MEMBERSHIP CARD (Y).
- Walk down, turn left, and move forward.


- Zoom into the fishing rod; combine the FISHING REEL with the rod (Z), and connect the FISH HOOK to the fishing reel.
- Take the 3/5 WEIGHT (A).
- Zoom into the man; give the MEMBERSHIP CARD to him (B).
- Move forward.
- Give the PIECE OF BREAD to the seagull (C).
- Walk down twice, turn right, and turn left.


- Zoom into the car; put down the JACK (D), turn its lever to lift it, and take the 3/3 PUZZLE FRAGMENT (E).
- Walk down twice and turn left.
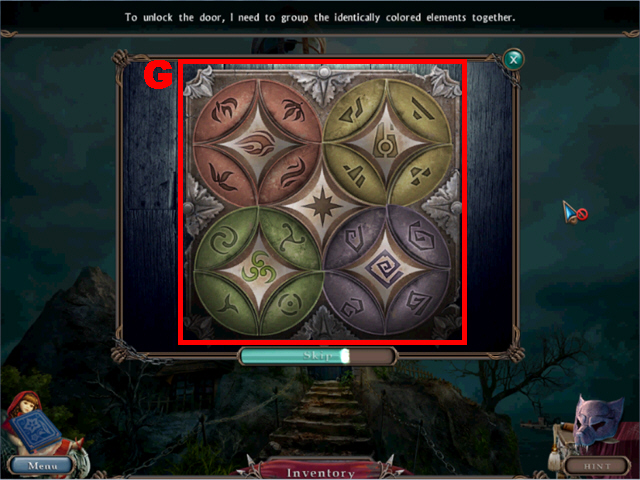
- Zoom into the lighthouse; add the 3 PUZZLE FRAGMENTS to the board (F) to play a mini-game.


- To solve this puzzle (G), rotate the five circles to group identically colored pieces together.
- Move forward.


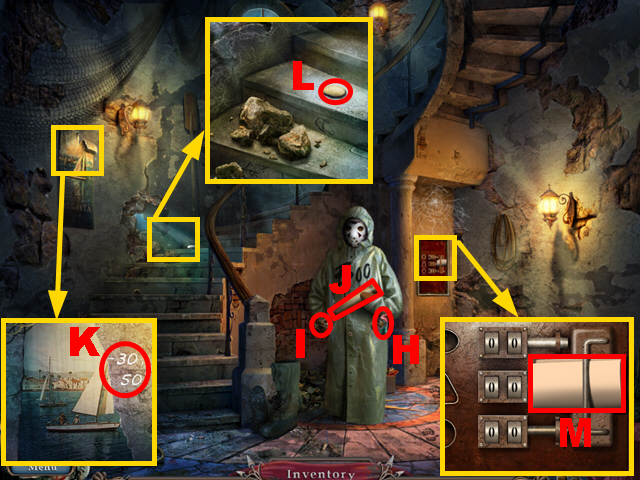
- Turn around the mannequin; take the 3/7 GARDEN GNOME (H) and cut the rope with the BROKEN BOTTLE (I).
- Take the BAT (J).
- Zoom into the poster; tear it apart and make note of the code (K).
- Zoom into the stairs; take the 2/3 STONE (L).
- Zoom into the safe; take the note (M).
- Go upstairs.


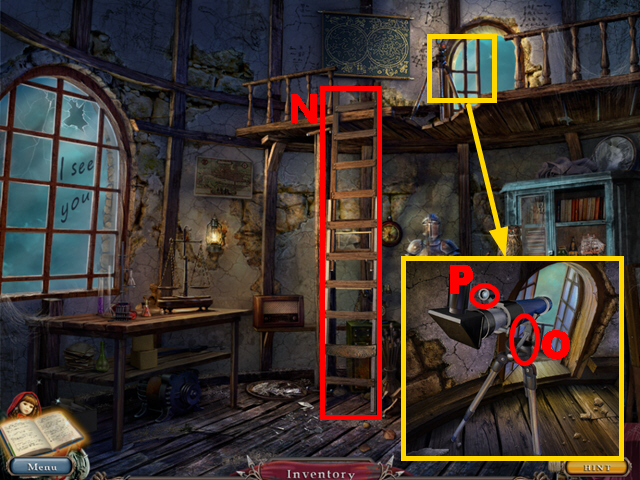
- Put down the LADDER (N).
- Zoom into the upper window; connect the TELESCOPE to the tripod (O) and look into it (P) to play a mini-game.


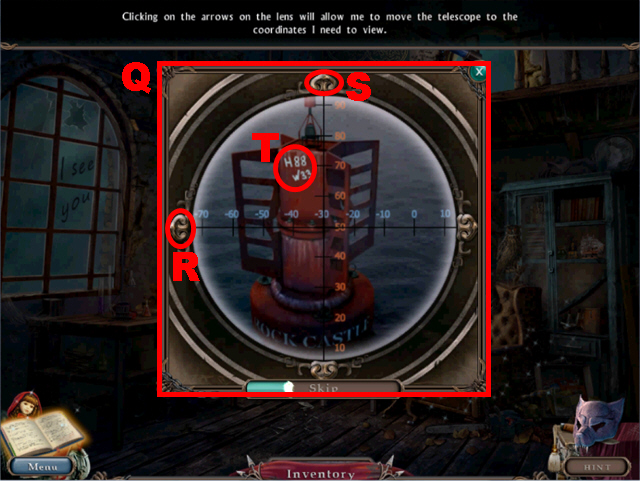
- To solve this puzzle (Q), press the arrow button (R) three times and the arrow button (S) five times.
- Make note of the coordinates (T).
- Zoom anywhere to activate the HOS.
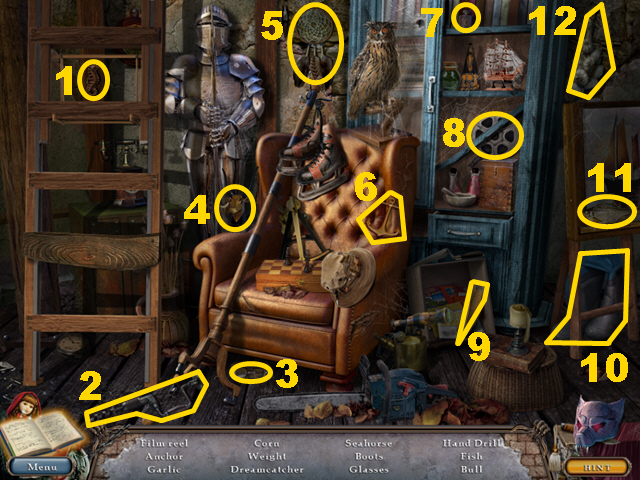
- Play the HOS.


- Find the items listed 1-12.
- The 4/5 WEIGHT will be acquired.
- Walk down three times.
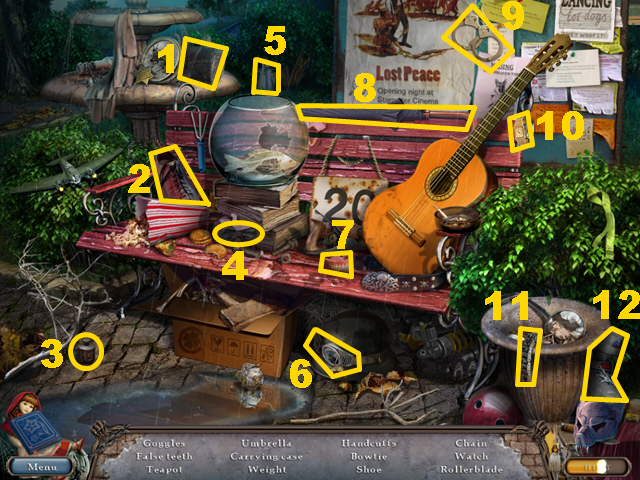
- Play the HOS.


- Find the items listed 1-12.
- The 5/5 WEIGHT will go into inventory.
- Move forward twice.


- Use the BAT to break the glass door (U).
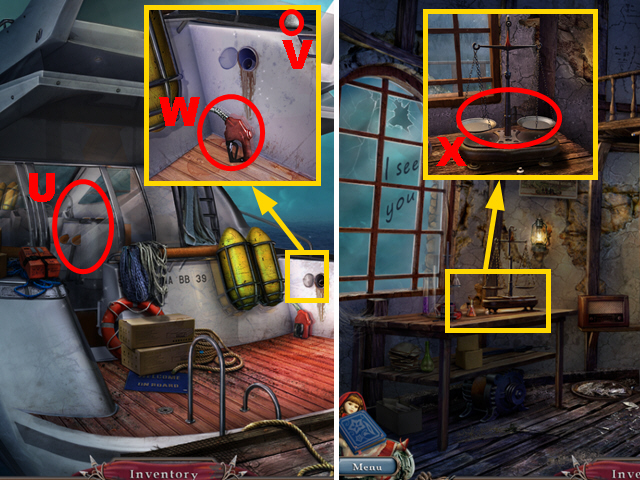
- Zoom into the railing; take the 3/3 STONE (V) and the FUEL NOZZLE (W).
- Walk down twice, turn left, move forward, and go upstairs.
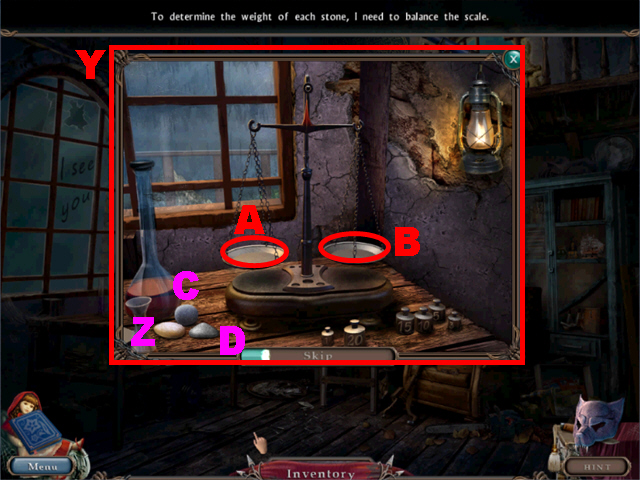
- Zoom into the table; add the 5 WEIGHTS and the 3 STONES to the scale (X) to play a mini-game.


- To solve this puzzle (Y), put the stone (Z) on the platform (A) and the 20, the 5, and 1 weights on the platform (B).
- Put the stone (C) on the platform (A) and the 20, the 15, the 5, and the 1 weights on the platform (B).
- Put the stone (D) on the platform (A) and the 20 and the 15 weights on the platform (B).
- Walk down.


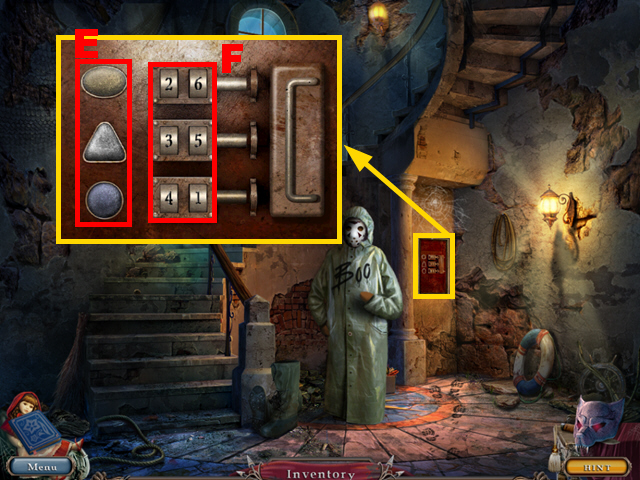
- Zoom into the safe; put the 3 STONES into the niches (E) and enter the code 26, 35, and 41 (F) to open the safe.
- The YACHT IGNITION KEY will be acquired.
- Walk down twice, turn right, and turn left.


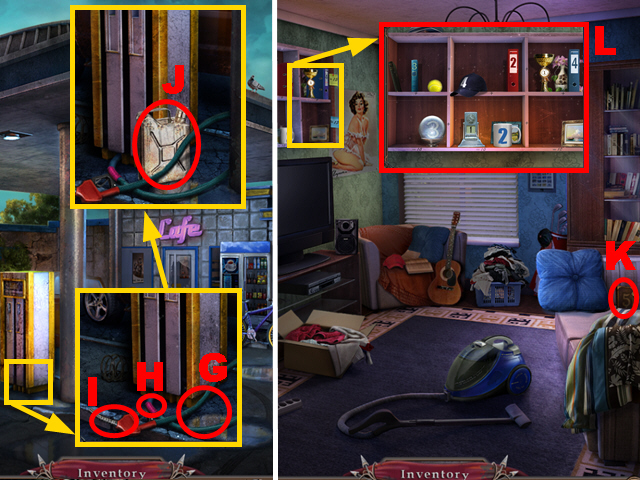
- Zoom into the gas pump; connect the HOSE to the gas pump (G), fix it with the INSULATING TAPE (H), and combine the hose with the FUEL NOZZLE (I).
- Fill the EMPTY GAS CAN with the fuel nozzle and take the CAN OF GAS (J).
- Walk down three times, enter the motel, and move forward.
- Move aside the pillow; take the BOOK (K).
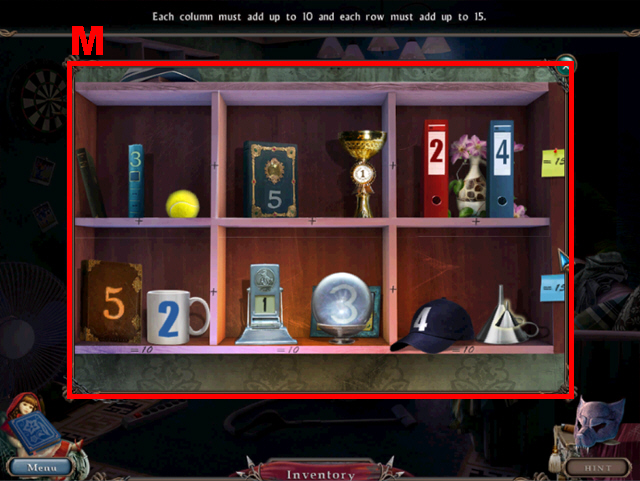
- Zoom into the shelf; put the two BOOKS into the shelf (L) to play a mini-game.


- To solve this puzzle (M), switch the items so that each column sums up to 10 and each row sums up to 15.
- The FUNNEL will be acquired.
- Walk down twice, turn left, and move forward twice.


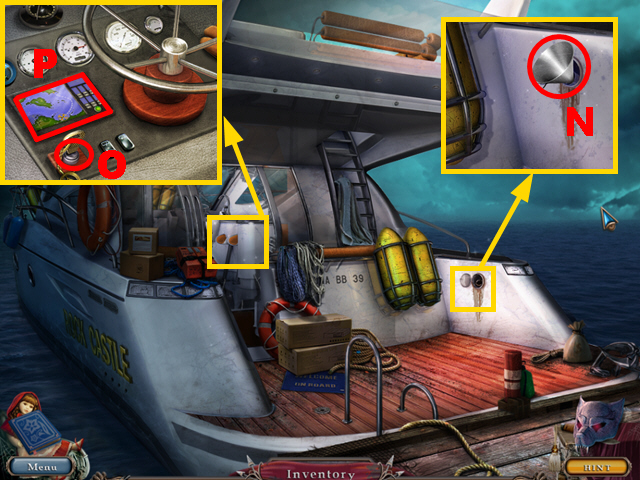
- Zoom into the railing; put the FUNNEL into the opening (N) and pour the CAN OF GAS into the funnel.
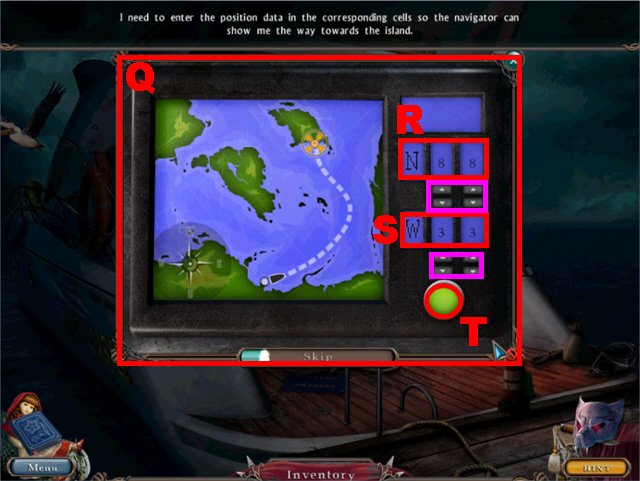
- Zoom into the broken door; put the YACHT IGNITION KEY into the lock (O) and zoom into the panel (P) to play a mini-game.


- To solve this puzzle (Q), enter 88 for North (R) and 33 for West (S) by pressing the arrow buttons marked in green.
- Press the button (T) to get the yacht going.
Chapter 4: The Casino


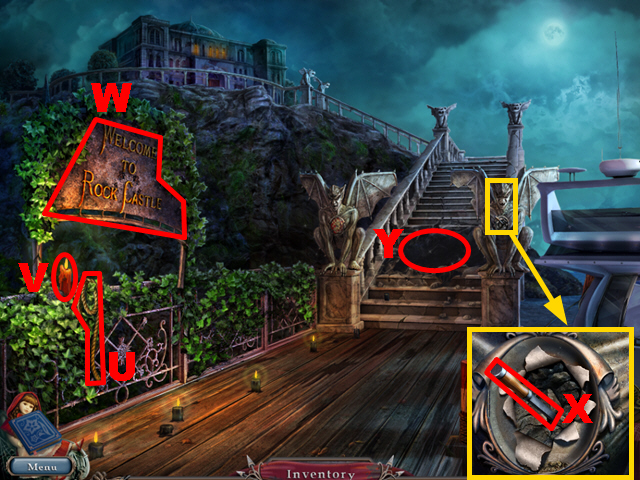
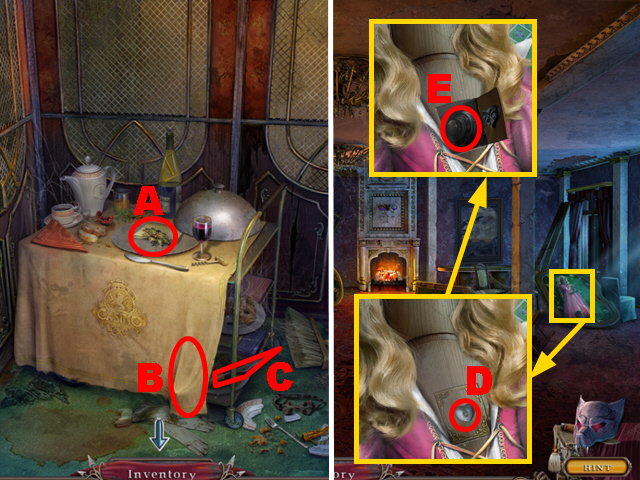
- Take the ROPE (U) and the CANDLE (V).
- Press the sign three times (W) to acquire the SIGN.
- Zoom into the right gargoyle; take the 1/2 HAMMER AND CHISEL (X).
- Put down the SIGN on the gap (Y).
- Move forward.


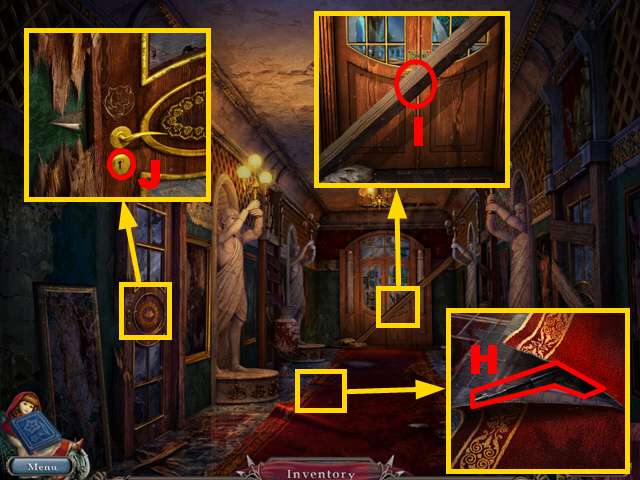
- Zoom into the gate; take the ANKH (Z).
- Zoom into the bush; take the PHOENIX (A).
- Zoom into the door; take the ANTI-RUST SPRAY (B) and put the STRANGE KEY into the lock (C).
- Enter the castle.


- Use the CANDLE to light the candlestick (D).
- Zoom into the table; take the 2/2 HAMMER AND CHISEL (E).
- Zoom into the mannequin; take the SCARF (F), the note (G), and the ELEVATOR BUTTON (H).
- Take the ROOM KEY (I).
- Zoom into the stairs; use the 2/2 HAMMER AND CHISEL to break the large rock (J).
- Take the VALVE (K).
- Walk down.


- Zoom into the pool; use the ANTI-RUST SPRAY on the pipe (L) and clean the pipe with the SCARF.
- Put the VALVE on the pipe (M).
- Turn the valve.
- Play the HOS.


- Find the items listed 1-12.
- The AXE will be acquired.
- Move forward twice.


- Use the CANDLE to light the candlestick (N).
- Zoom into the broken table; take the note (O) and the KNIFE (P).
- Remove the blanket and move down the mannequin’s arms (Q).
- Zoom into the floor; cut open the carpet with the KNIFE and remove the planks with the AXE (R).
- Fix the ROPE next to the opening (S).
- Climb down the rope.


- Zoom into the wall; press the light switch (T).
- Zoom into the cabinet; open all the doors and take the SCREWDRIVER (U).
- Play the HOS.


- Find the items listed 1-12.
- The GRAPPLING HOOK will go into inventory.


- Connect the GRAPPLING HOOK to the rope (V).
- Climb up the rope and walk down.
- Zoom into the table; remove the glass display with the SCREWDRIVER (W); the SCREWS will be acquired.
- Take the LOCKET (X).
- Zoom into the elevator panel; put the SCREWS into the display, fix the display with the SCREWDRIVER (Y), and put the ELEVATOR BUTTON into the niche (Z).
- Enter the elevator.


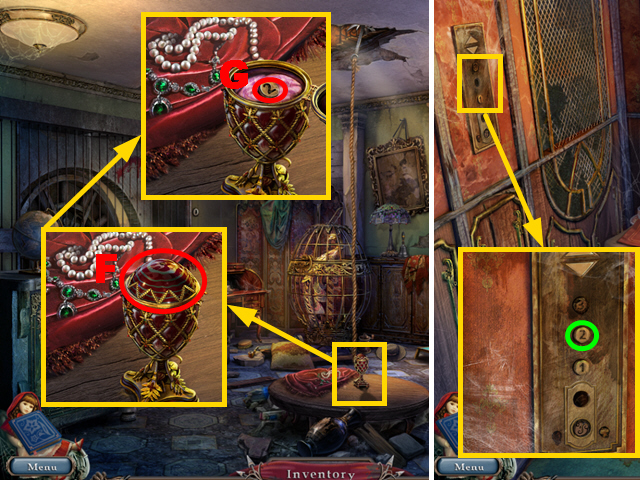
- Remove the lid; take the EGG TOP (A) and the note below it.
- Remove the blanket (B) and take the 1/2 PRUNING SHEARS PART (C).
- Walk down and move forward.
- Zoom into the broken table; put the LOCKET into the niche (D) and take the SAFE DIAL (E).
- Climb down the rope.


- Zoom into the table; put the EGG TOP on the egg (F) and take the SECOND FLOOR BUTTON (G).
- Climb up the rope, walk down, and enter the elevator.
- Zoom into the panel; put the SECOND FLOOR BUTTON into the slot marked in green and press it.


- Zoom into the carpet; cut open the carpet with the KNIFE and take the 1/2 TRANQUILIZER GUN (H).
- Zoom into door at the end of the hall; break the plank with the AXE (I).
- Zoom into the front door; put the ROOM KEY into the lock (J).
- Turn left.
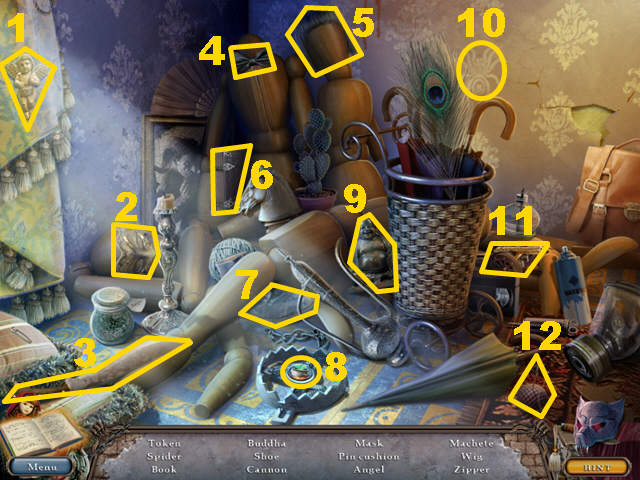
- Play the HOS.


- Find the items listed 1-12.
- The 1/3 TOKEN will be acquired.


- Take the note (K), the PHOENIX (L), and the CELLAR BUTTON (M).
- Zoom into the lower part of the bed; put down the CANDLE (N); take the 4/7 GARDEN GNOME (O), the SAFETY DEPOSIT BOX KEY (P), and the CANDLE.
- Take a look at the photo (Q).
- Walk down twice, press the first floor button, and walk down.


- Zoom into the carriage; add the first and the second PHOENIX to the board to play a mini-game.
- Rotate the lock twice to solve this puzzle (R).
- Play the HOS.


- Find the items listed 1-12.
- The KEY WITH A SYMBOL will go into inventory.
- Enter the castle, move forward, and climb down the rope.
- Play the HOS.


- Find the items listed 1-12.
- The RUBBER GLOVE will be acquired.


- Zoom into the deposit cabinet; put the SAFETY DEPOSIT BOX KEY into the lock (S).
- Take the drawing (T).
- Climb up the rope, walk down, and enter the elevator.
- Zoom into the panel; put the CELLAR BUTTON into the slot (U) and the KEY WITH A SYMBOL into the slot (V).
- Press the cellar button.


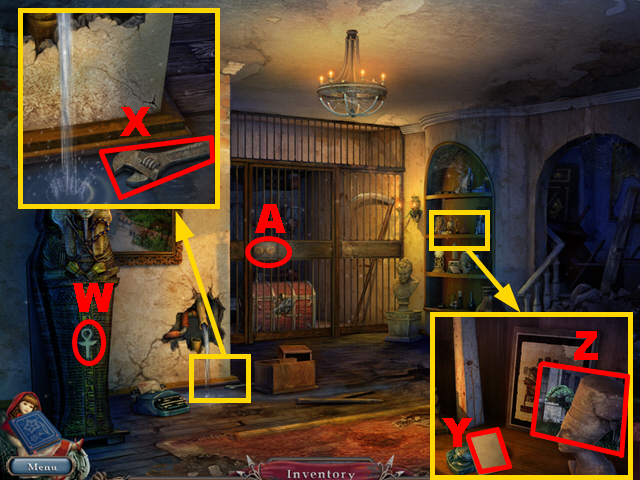
- Put the ANKH into the sarcophagus (W).
- Zoom into the wall; take the WRENCH (X).
- Zoom into the shelf; take the note (Y) and the picture (Z).
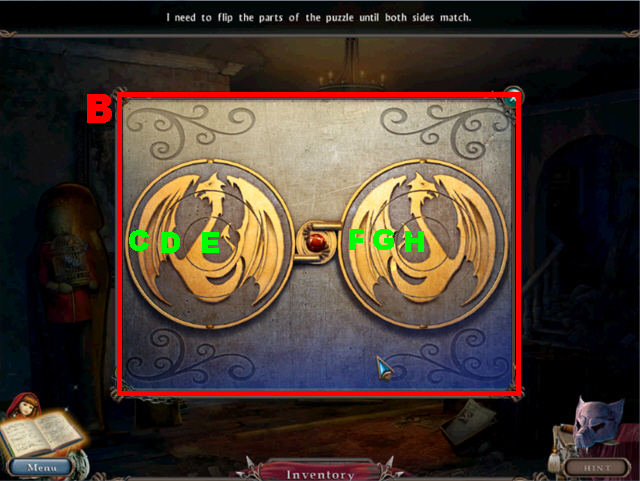
- Zoom into the grille (A) to play a mini-game.


- To solve this puzzle (B), press the circle parts in the following sequence: C, F, E, G, and C.


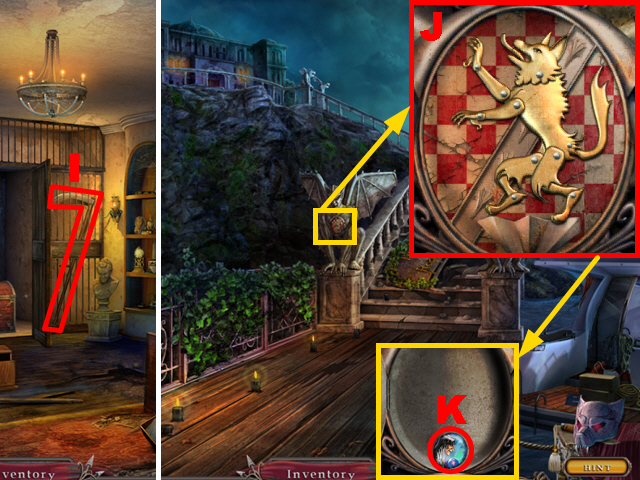
- Take the SCYTHE (I).
- Walk down, press the first floor button, and walk down twice.
- Zoom into the left gargoyle to play a mini-game.
- To solve this puzzle (J), rearrange the gargoyle into the correct position.
- Take the 2/3 TOKEN (K).
- Move forward twice, enter the elevator, and press the second floor button.


- Zoom into the door; use the WRENCH to remove the bolt (L) and press the handle.
- Move forward.
- Zoom into the table; remove the shards with the RUBBER GLOVE (M) to acquire the WIND-UP BIRD and take the note (N).
- Walk down.


- Zoom into the door; take the BEAM (O).
- Move forward.
- Zoom into the balcony; put down the BEAM (P).
- Move forward.
Chapter 5: The Balcony


- Take the BLOWTORCH (Q) and the RUBBER BELT (R).
- Zoom into the jacket; use the KNIFE to cut the stitches (S).
- Take the 2/2 PRUNING SHEARS PART (T) and the 3/3 TOKEN marked in purple.
- Walk down twice and turn left.


- Zoom into the bedpost; connect the 2 PRUNING SHEARS PARTS to the other half (U) to acquire the PRUNING SHEARS.
- Zoom into the box; put the 3 TOKENS into the slots marked in green to play a mini-game.


- To solve this puzzle (V), switch the tokens until each token is placed correctly.
- Take the maze walkthrough (W).
- Walk down twice, press the first floor button, and walk down.


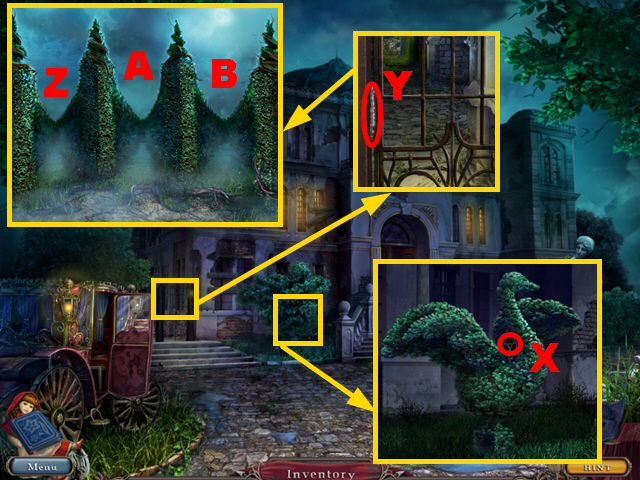
- Zoom into the bush; use the PRUNING SHEARS to trim the bush eleven times and take the 1/3 GEAR (X).
- Zoom into the gate; use the BLOWTORCH to open it (Y).
- Zoom into the gate; to get through the maze, take the passages in the following sequence: A, Z, B, A, A, and B.


- Take the SHOVEL (C).
- Zoom into the mannequin; take the STETHOSCOPE (D).
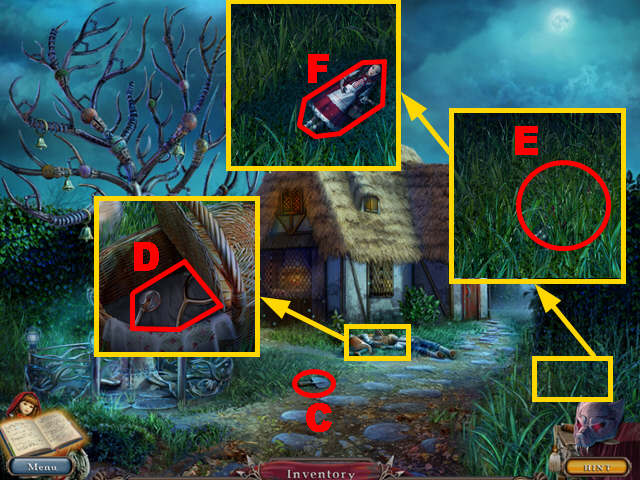
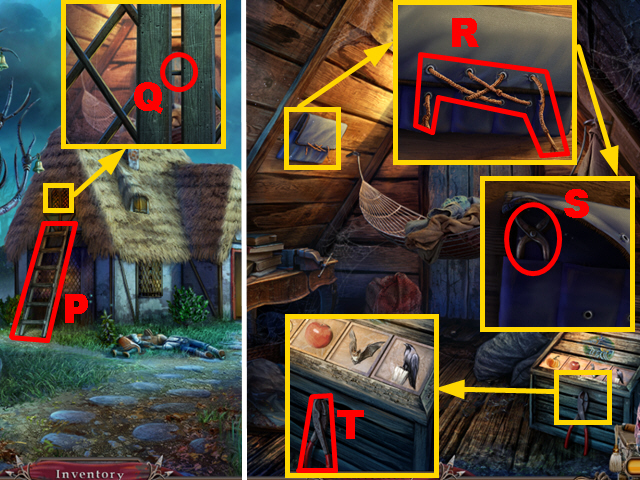
- Zoom into the grass; use the SCYTHE to remove the grass (E) and take the DOLL (F).
- Walk down.
- Play the HOS.


- Find the items listed 1-12.
- The LADDER will go into inventory.
- Move forward twice and climb down the rope.


- Zoom into the safe; use the ANTI-RUST SPRAY on the handle (G) and put the SAFE DIAL on the safe (H).
- Put down the STETHOSCOPE (I).
- Turn the dial (J) to 30, 60, and 50.
- Take the 2/3 GEAR (K).
- Climb up the rope and walk down twice.
- Play the HOS.


- Find the items listed 1-12.
- The 3/3 GEAR will be acquired.
- Enter the castle, go into the elevator, and press the second floor button.


- Zoom into the flowerpot; use the SHOVEL to remove the soil (L) and take the RULER (M).
- Walk down, press the first floor button, walk down, and go through the gate.
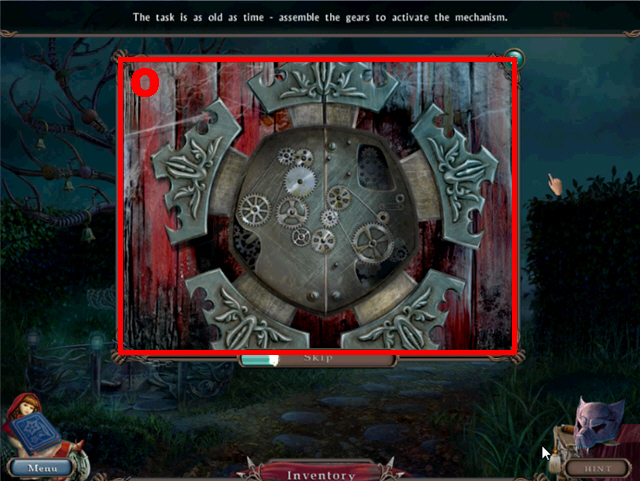
- Zoom into the door; add the 3 GEARS and the RUBBER BELT to the mechanism (N) to play a mini-game.


- To solve this puzzle (O), switch and align the gears so that the mechanism starts working.


- Put down the LADDER (P).
- Zoom into the window; use the RULER to open the window (Q).
- Go through the window.
- Zoom into the bag; remove the rope one by one (R) and take the TONGS (S).
- Zoom into the chest; take the WIRE CUTTERS (T).
- Walk down and enter the house through the front door.


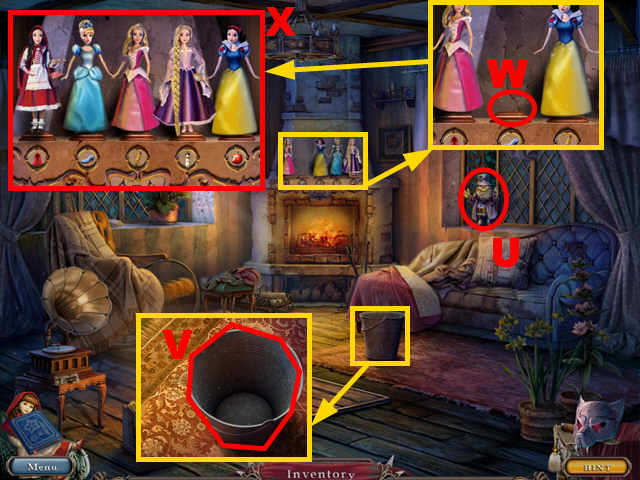
- Take the 5/7 GARDEN GNOME (U).
- Zoom into the bucket; remove four bricks and take the BUCKET (V).
- Zoom into the fireplace; put down the DOLL (W).
- Switch the dolls so that each doll matches its symbol (X).
- Walk down twice, enter the castle, go into the elevator, and press the cellar button.


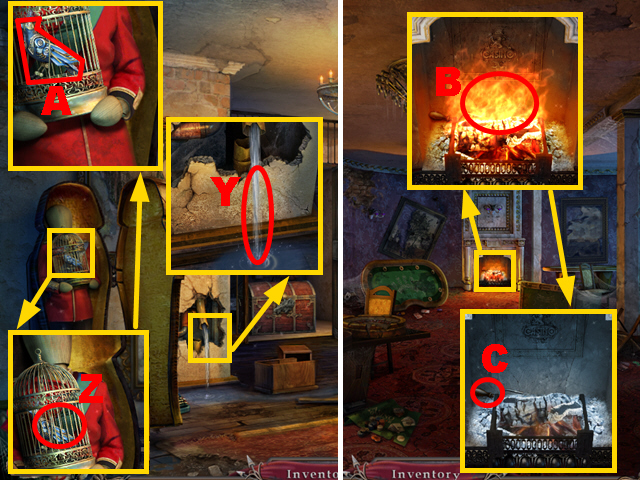
- Zoom into the wall; put down the BUCKET (Y) to acquire the BUCKET OF WATER.
- Zoom into the cage; use the WIRE CUTTERS to open the cage (Z) and take the second WIND-UP BIRD (A).
- Walk down, press the first floor button, and move forward.
- Zoom into the fireplace; extinguish the fire with the BUCKET OF WATER (B) and use the TONGS to get the GRAMOPHONE HANDLE (C).
- Walk down twice and go through the gate.


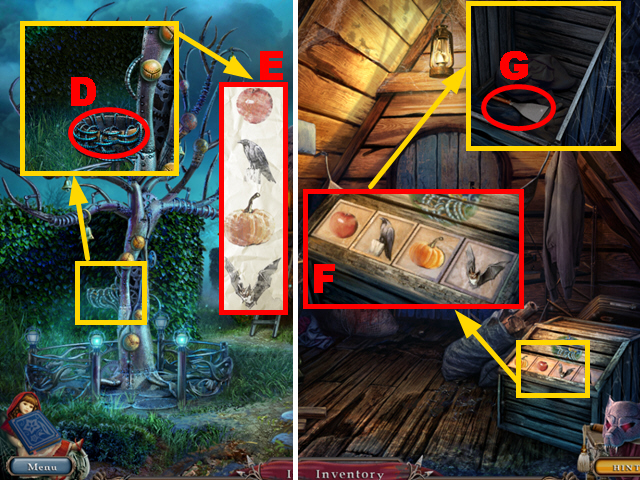
- Zoom into the tree; put both the WIND-UP BIRDS into the nest (D) and make note of the symbol pattern (E).
- Go through the window.
- Zoom into the chest; switch the pictures to align them correctly (F) and take the SPATULA (G).
- Walk down and go through the door.


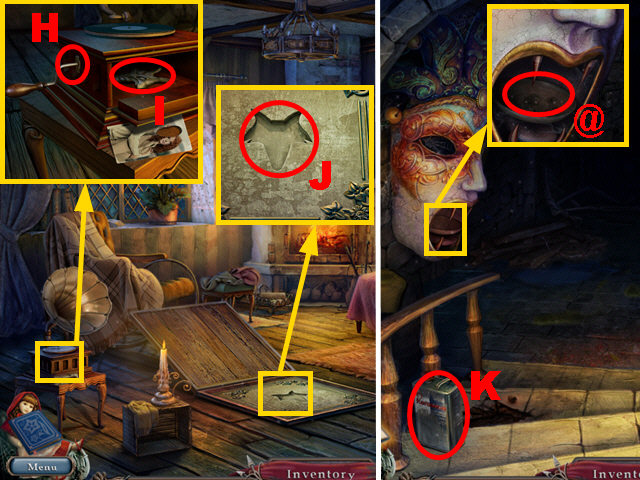
- Zoom into the gramophone; connect the GRAMOPHONE HANDLE to it (H), turn the handle, and take the WOLF HEAD (I).
- Zoom into the trapdoor; put the WOLF HEAD into the niche (J).
- Go downstairs.
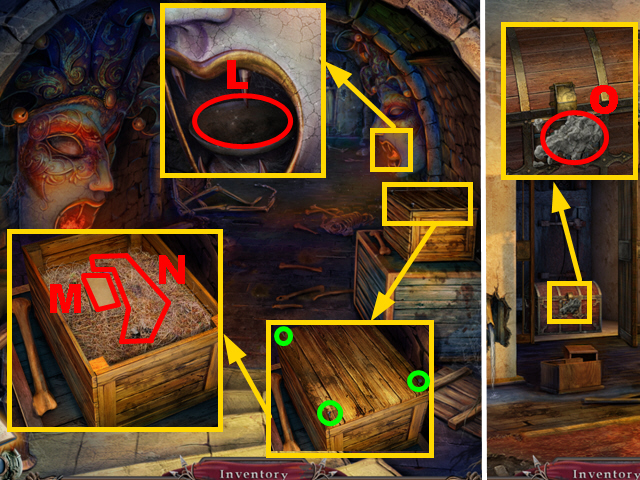
- Take the KEROSENE (K).
- Zoom into the head; pour the KEROSENE into the bowl (L) and light it with the CANDLE.


- Zoom into the second head; pour the KEROSENE into the bowl (L) and light it with the CANDLE.
- Zoom into the crate; use the TONGS to remove the nails marked in green.
- Remove the lid and take the note (M).
- Remove the straw three times and take the 6/7 GARDEN GNOME (N).
- Walk down three times, enter the castle, go into the elevator, and press the cellar button.
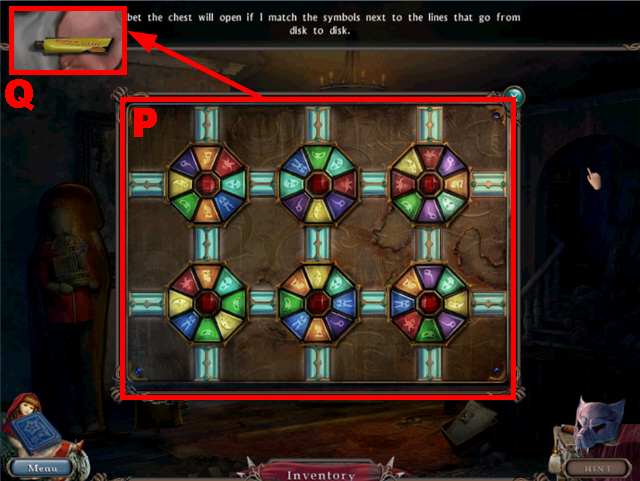
- Zoom into the chest; use the SPATULA to remove the plaster (O).
- Play the mini-game.


- To solve this puzzle (P), rotate the disks so that each line between the disks connects two similar symbols.
- Take the GLUE (Q).
- Walk down, press the second floor button, and move forward.


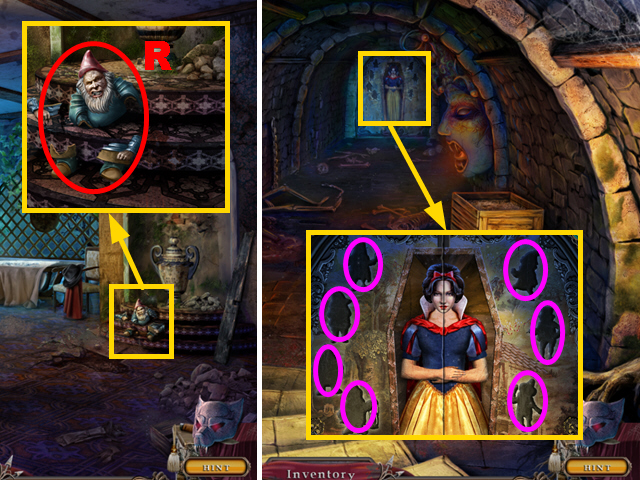
- Zoom into the stairs; fix the gnome with the GLUE (R) to acquire the 7/7 GARDEN GNOME.
- Walk down twice, press the first floor button, walk down, go through the gate, enter the house, and go through the trapdoor.
- Zoom into the end of the tunnel; put the 7 GARDEN GNOMES into the niches marked in purple.
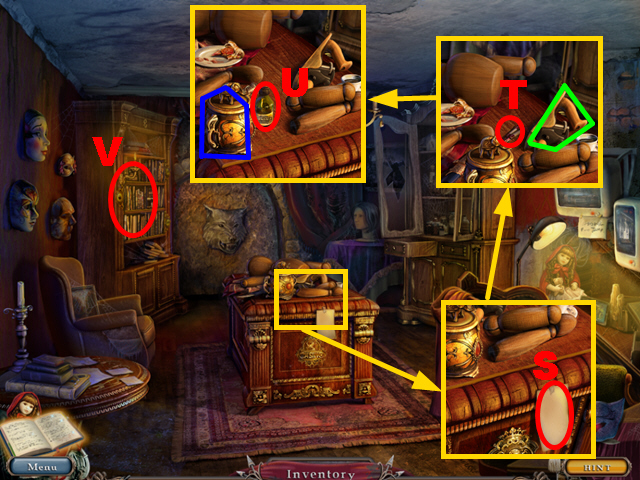
- Move forward.


- Zoom into the desk; take the note (S), move aside the wooden piece marked in green, and take the 2/2 LOADED TRANQUILIZER GUN (T).
- Move aside the lamp marked in blue and take the SMELLING SALTS (U).
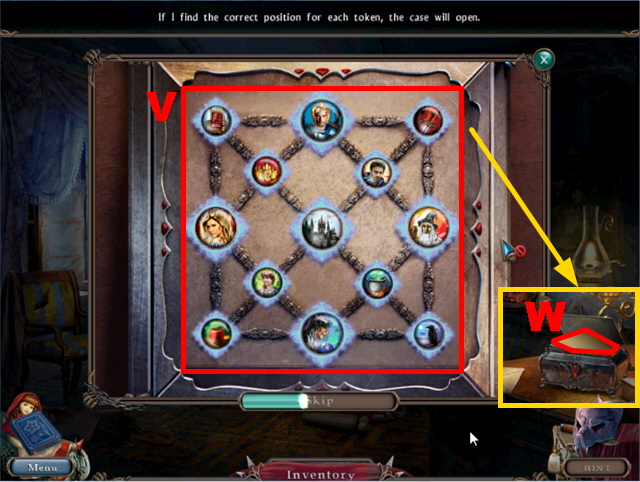
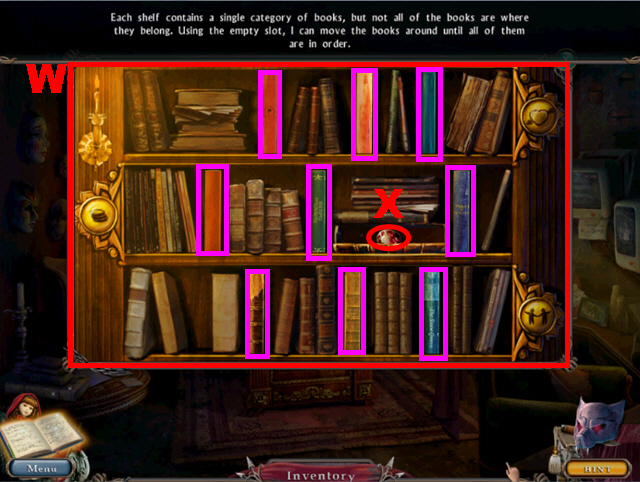
- Zoom into the bookshelf (V) to play a mini-game.


- To solve this puzzle (W), switch all the books marked in purple so that each is placed in the correct row.
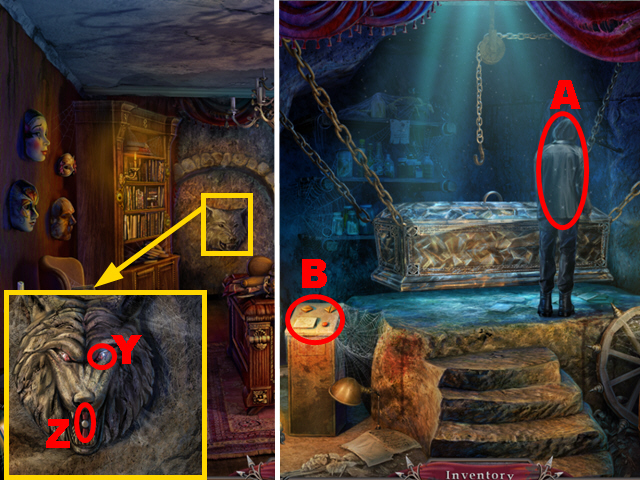
- Take the GEM (X).


- Zoom into the wolf head; put the GEM into the slot (Y) and turn the lever (Z).
- Move forward.
- Fire the LOADED TRANQUILIZER GUN at the man (A).
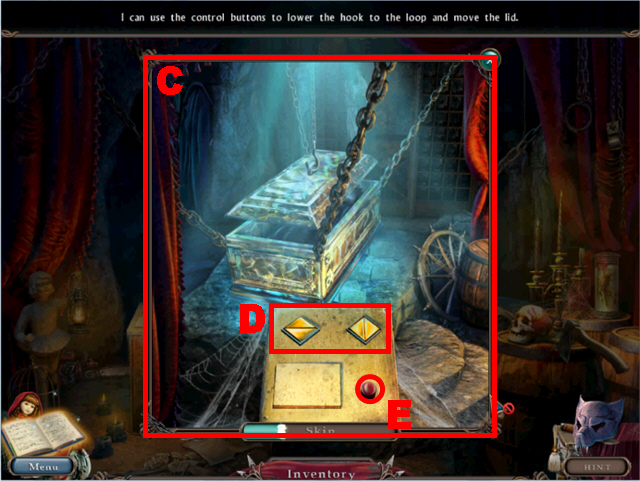
- Zoom into the control panel (B) to play a mini-game.


- To solve this puzzle (C), press the arrow buttons (D) in the following sequence: right, down, right, down, up, and left.
- Press the button (E) to lift the lid.


- Zoom into the sarcophagus; use the SMELLING SALTS on the man (F) to wake him up.
- Congratulations, you have completed Cruel Games: Red Riding Hood!


