Twilight Phenomena: The Lodgers of House 13 Walkthrough, Guide, & Tips
Twilight Phenomena: The Lodgers of House 13 Walkthrough

Welcome to the Twilight Phenomena: The Lodgers of House 13 Walkthrough
An evil villain is luring people to his beautiful mansion and preparing them for a terrible ritual. Can you keep your head on the shoulders?
Whether you use this document as a reference when things get difficult or as a road map to get you from beginning to end, we’re pretty sure you’ll find what you’re looking for here.
This document contains a complete Twilight Phenomena: The Lodgers of House 13 game walkthrough featuring annotated screenshots from actual gameplay!
We hope you find this information useful as you play your way through the game. Use the walkthrough menu below to quickly jump to whatever stage of the game you need help with.
Remember to visit the Big Fish Games Forums if you find you need more help. Have fun!
This walkthrough was created by MargieB, and is protected under US Copyright laws. Any unauthorized use, including re-publication in whole or in part, without permission, is strictly prohibited.
General Tips

- This is the official guide for Twilight Phenomena: The Lodgers of House 13.
- This is an Adventure Puzzle Game.
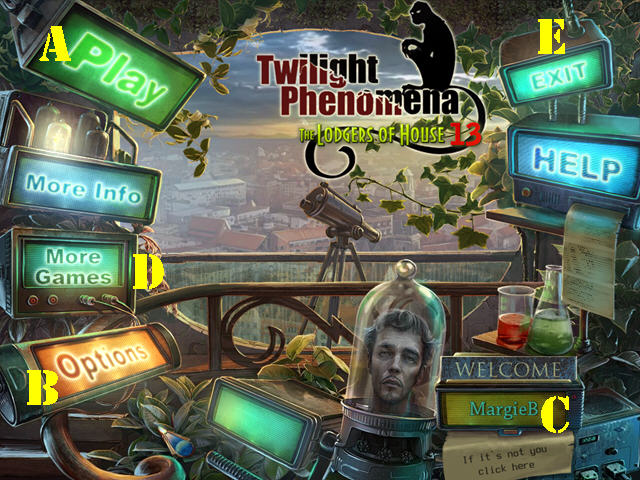
- Select ‘Play’ (A) to begin your adventure.
- The ‘Options’ (B) button allows you to adjust the screen, music, cursor, and sound.
- The ‘if this is not you, click here’ button (C) can be used to add or delete a player.
- Select ‘More Games’ (D) to view other titles by this developer. ‘Exit’ the game here (E).
- You can skip a puzzle once the ‘SKIP’ button fills.
- Click on the eye icon when it appears to take a closer look at a section, or to read information regarding the game.
- Read the Notes to view the information you collect along the way.
- The CAT HOLOGRAM can be activated by selecting the remote control in the lower left side of each scene. Use the cat hologram to help you obtain out of reach items.
Chapter 1: Welcome to House 13
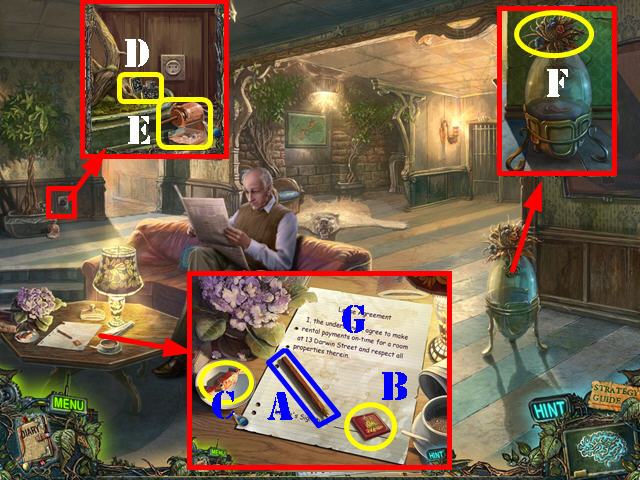
- Talk to the house owner.
- Look at the table; take the BROKEN PENCIL (A) and the BONFIRE EMBLEM (B). Unwrap the chocolate candy and then eat it (C).
- Look at the potted tree; take the LIGHTER (D).
- Put the BROKEN PENCIL in the pencil sharpener and take the PENCIL (E).
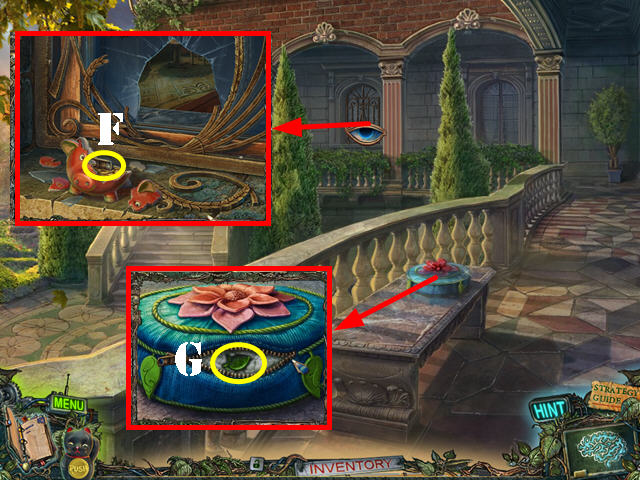
- Look at the pod; take the DRY FLOWERS (F).
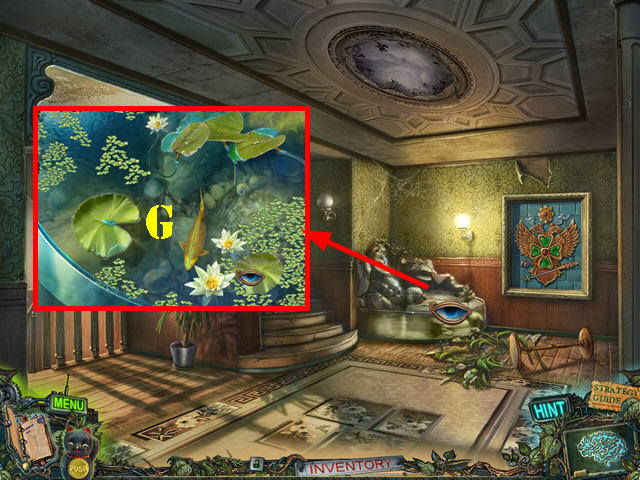
- Zoom into the table; use the PENCIL on the lease agreement (G). Take the note and the ROOM KEY below it.
- Go through the doorway.
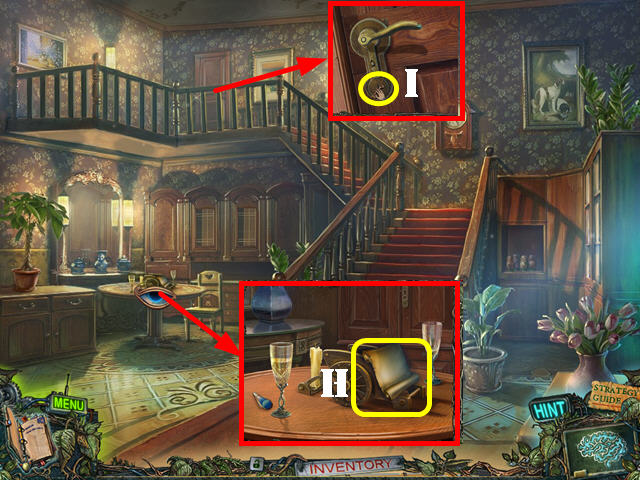
- Take a closer look at the table; take the note (H).
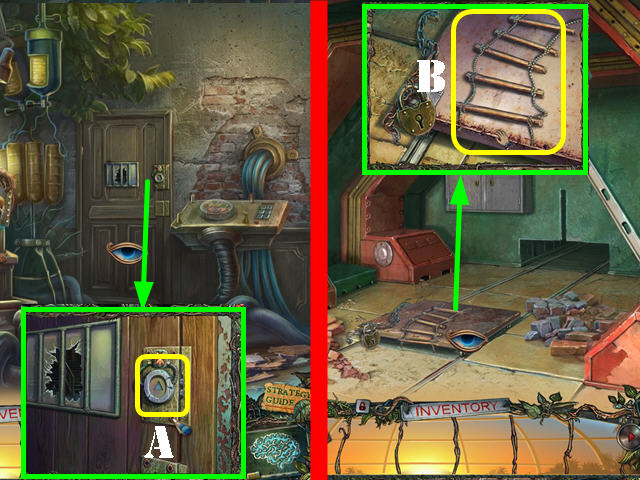
- Zoom into the top door; use the ROOM KEY in the lock (I) and then go through the door.
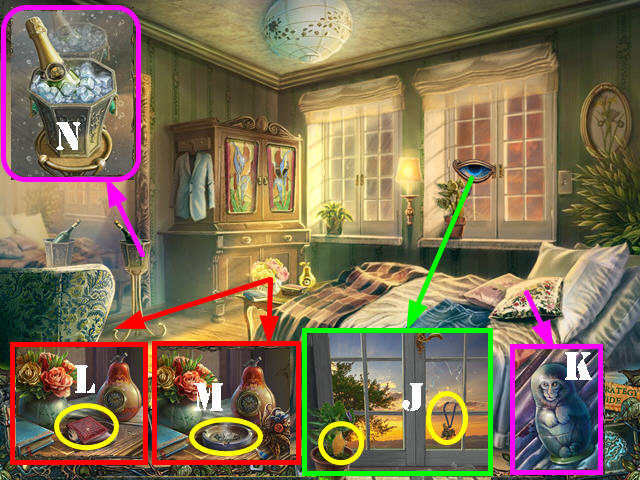
- Open the curtain and take a closer look at the window. Take the METAL GLADIATOR and the STAINED GLASS (J).
- Move the pillow and zoom into the bed; take the MONKEY (K).
- Look at the small table and take the passport (L).
- Put the DRY FLOWERS in the ashtray; light the flower with the LIGHTER. Take the ASHES (M).
- Take a closer look at the bucket and take the CHAMPAGNE (N).
- Walk down.
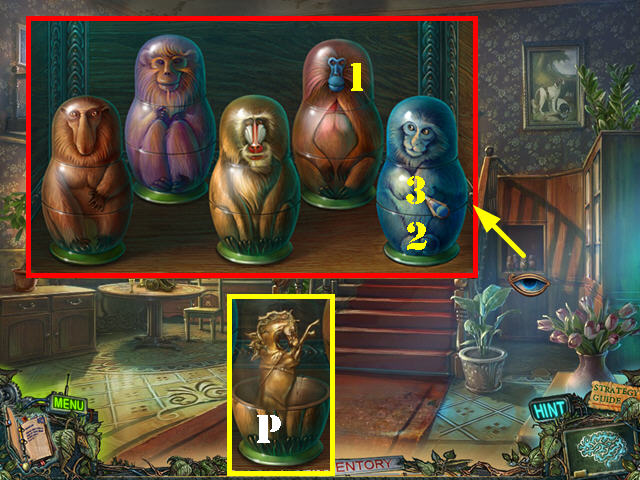
- Look in the niche; put the MONKEY in it to activate a puzzle.
- Click on the monkey sections until all of them are facing forward.
- When you touch one segment all affected pieces light up.
- To solve the puzzle, press on the sections in the order shown in the screenshot (1-3).
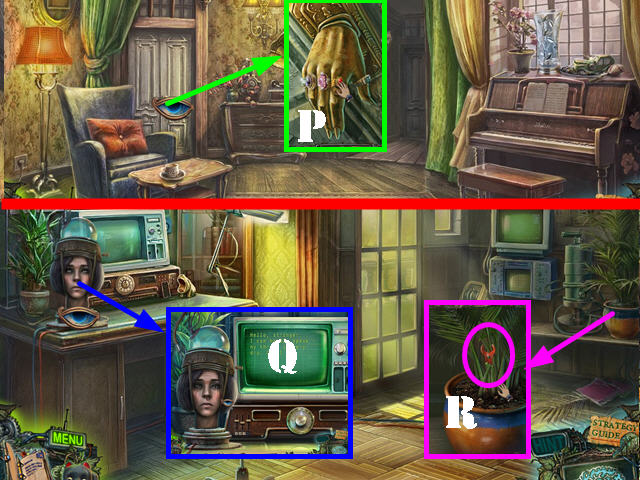
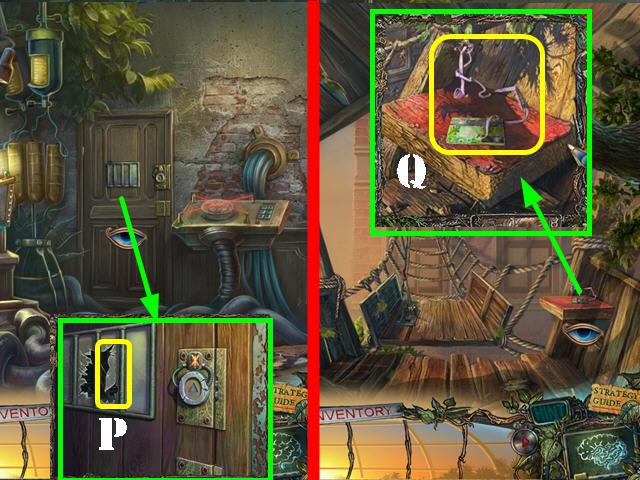
- Take the METAL HORSE (P).
- Zoom into the table; use the LIGHTER on the candle (Q). Put the CHAMPAGNE BOTTLE in the holder.
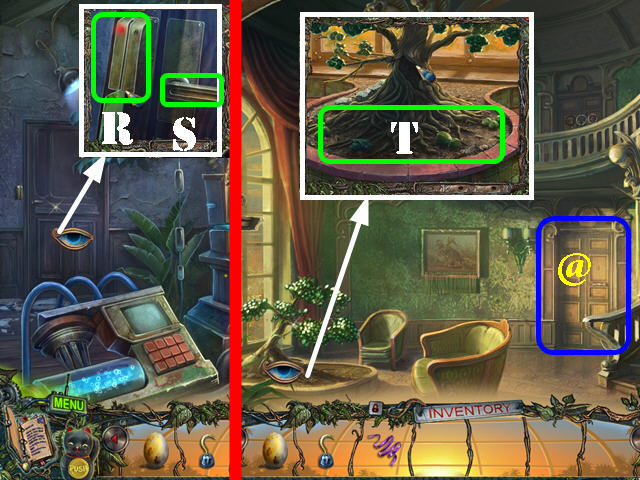
- Look at the table again and take the OPENED CHAMPAGNE (R).
- Zoom into the mirror and touch it. Take the STAINED GLASS and the IRON (S).
- Walk down.
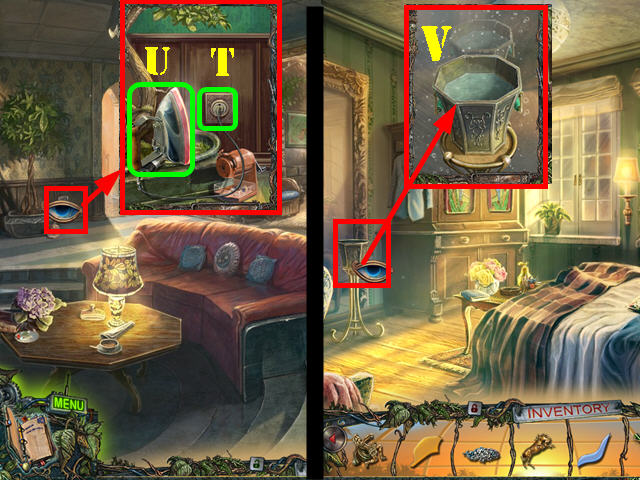
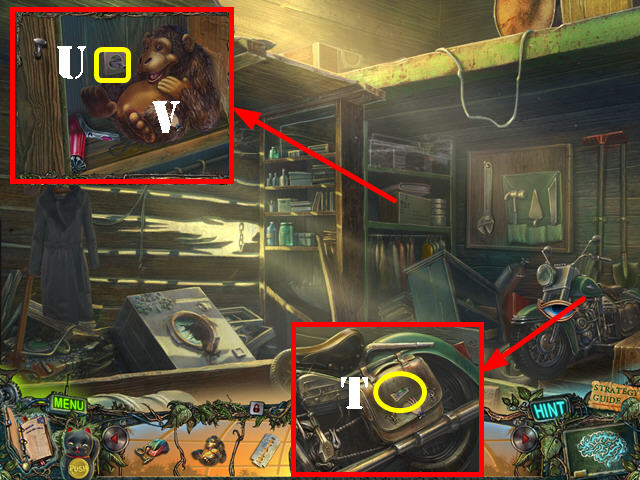
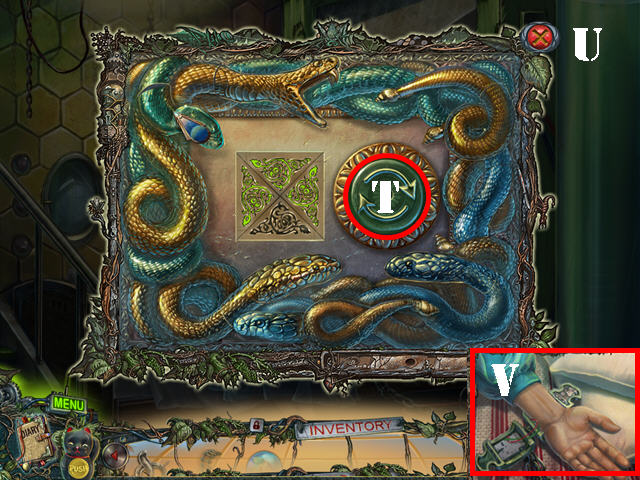
- Zoom into the outlet; plug the IRON into it (T).
- Take the HOT IRON (U).
- Return to your room.
- Zoom into the bucket; put the HOT IRON on the ice and take the WATER (V).
- Walk down twice.

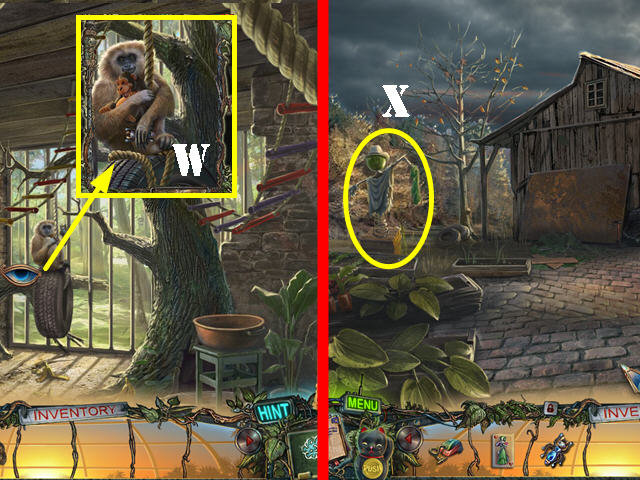
- Zoom into the pod; pour the WATER and the OPENED CHAMPAGNE into it.
- Look inside the pod and take the WOODEN CAT (W).
- Return to you room.
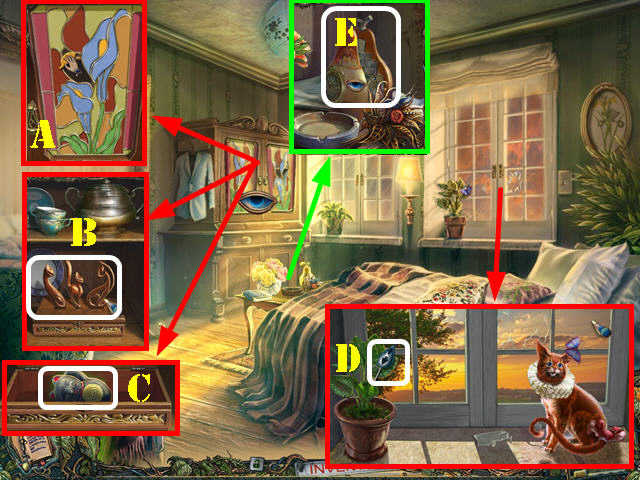
- Take a closer look at the stained glass; put the 2 STAINED GLASS pieces on the door (A).
- Put the WOODEN CAT on the box (B); open the box and take the REMOTE CONTROL (C).
- Press on the remote control to activate the CAT HOLOGRAM and then zoom into the window (C).
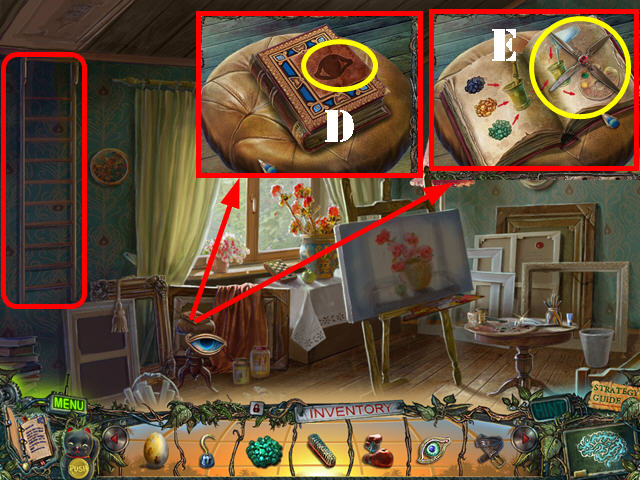
- Take the SEED BUTTON (D).
- Zoom into the table; open the pod and put the SEED BUTTON on it (E).
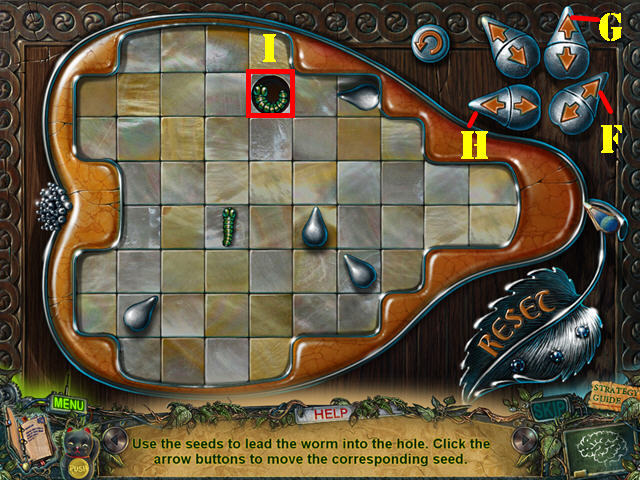
- Use the arrows to move the seeds and eventually push the worm into the hole.
- To solve the puzzle, select the arrows in this order: F x 3, G x 2, and H.
- Take the WORM and the GOLDEN SYMBOL behind it (I).
- Walk down twice.
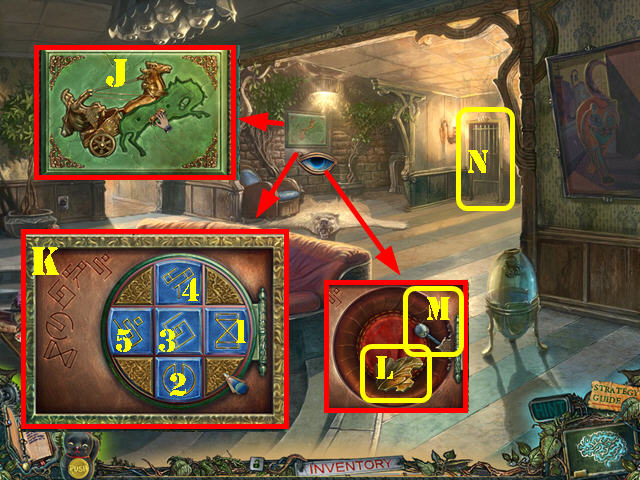
- Zoom into the picture; put the METAL HORSE and the METAL GLADIATOR on it (J).
- Put the ASH on the side of the board (K).
- Insert the GOLDEN SYMBOL into the niche.
- Press the symbols in the right order (1-5).
- Take the BRONZE LEAF (L).
- Pull on the handle (M) and go through the door (N).
Chapter 2: The Forbidden Right Wing
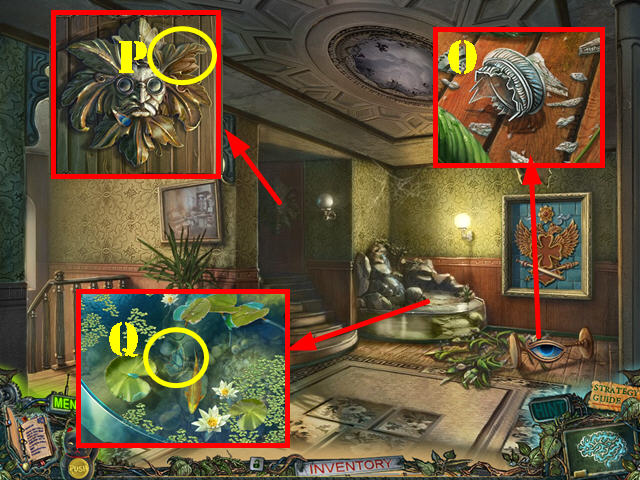
- Look on the ground and take the SHARP GLASS (O).
- Take a closer look at the door; put the BRONZE LEAF on it (P).
- Look in the pond; put the WORM in it and take the BUTTERFLY WING (Q).
- Go down the stairs.
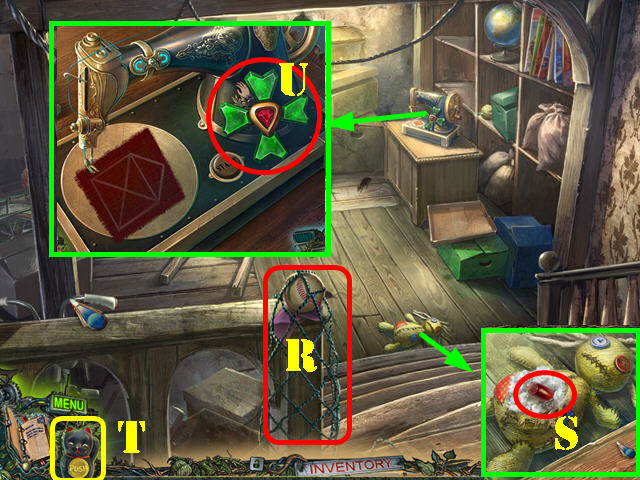
- Take the NET (R).
- Look at the doll; cut it with the SHARP GLASS and take the SHOVEL HANDLE (S).
- Use the CAT HOLOGRAM in the scene to chase the mice away (T).
- Look at the sewing machine and take the CLOVER (U).
- Walk down.

- Zoom into the plaque; put the CLOVER on it and take the BAT (V).
- Return to the basement.
- Hit the ball with the BAT (W) and take the MOUSTACHE PART (X).
- Walk down.
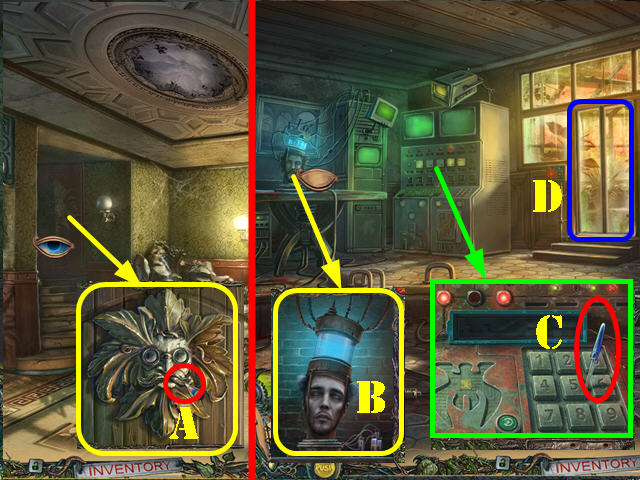
- Examine the door; put the MOUSTACHE PART on the door and then go through it (A).
- Talk to the head to receive the code 1365 (B).
- Look at the controls; take the NAIL FILE (C).
- Open the door and go through it (D).
- Take a closer look at the cabinet door; use the NAIL FILE on it (E).
- Take the NEEDLE and the EMPTY CUP (F).
- Walk down twice.
- Zoom into the pond; put the EMPTY CUP in the water to get the CUP WITH WATER (G).
- Return to the porch.
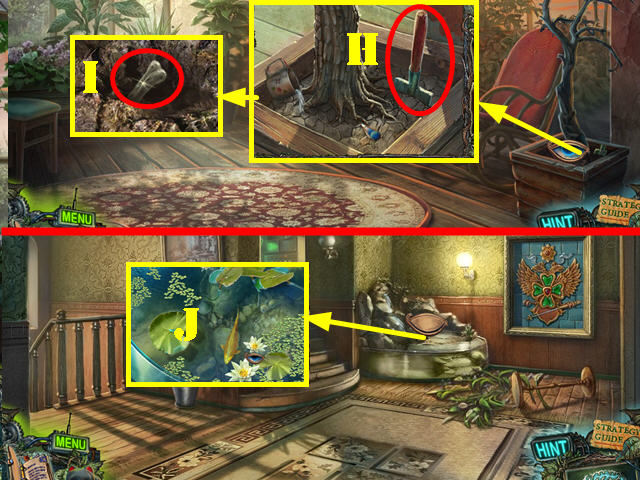
- Zoom into the tree; pour the CUP WITH WATER into the soil. Attach the SHOVEL HANDLE to the shovel head (H).
- Touch the shovel and take the DIRTY BONE (I).
- Walk down twice.
- Zoom into the pond; put the DIRTY BONE in the water to get the CLEAN BONE (J).
- Return to the basement.
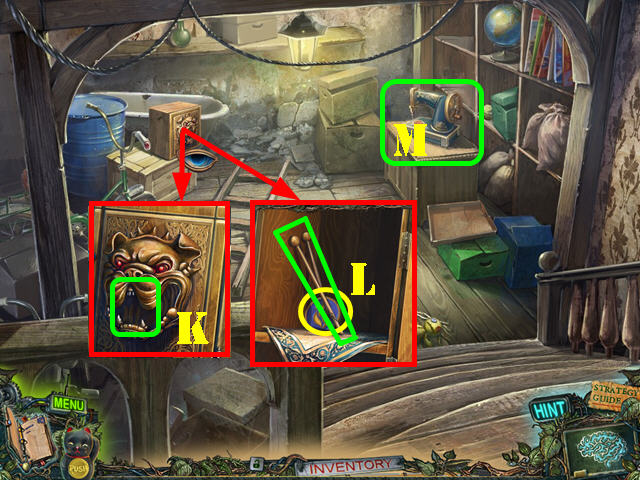
- Zoom into the safe; put the CLEAN BONE in the dog’s mouth (K).
- Take the DRUMSTICKS and the FIRE EMBLEM (L).
- Zoom into the sewing machine and put the NEEDLE on it to activate a puzzle (M).
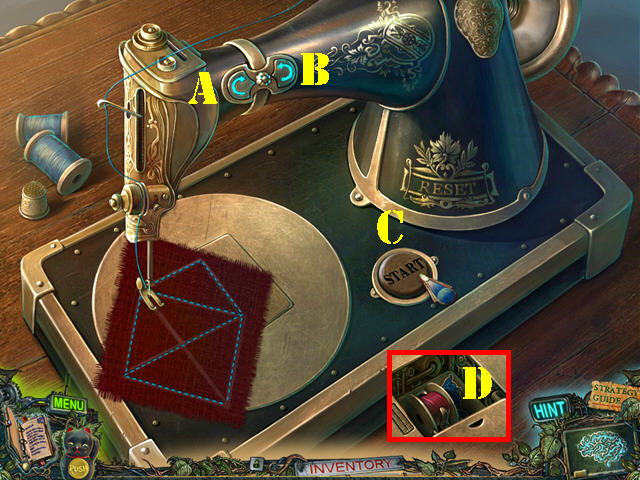
- Sew a single path through the design without overlapping the sewn lines.
- Press on the arrows to turn the piece of cloth and select the start button to begin sewing.
- To solve the puzzle, press on the buttons in this order: C, B x 6, C, A x 3, C, B x 3, C, B x 2, C, B x 5, C, B x 6 C, B x 6, and C.
- Take the SPOOL OF THREAD and the BUTTERFLY WING (D).
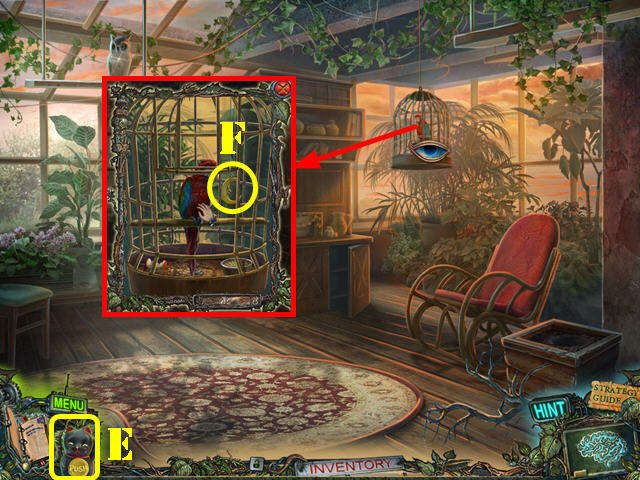
- Go to the porch.
- Zoom into the birdcage; open the cage and use the CAT HOLOGRAM in the cage (E).
- Zoom into the cage again and take the MOON (F).
- Walk down.
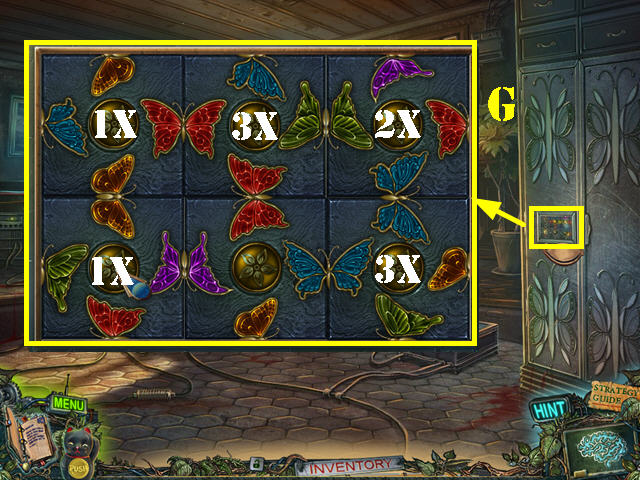
- Zoom into the panel; put the 2 BUTTERFLY WINGS on it to activate a puzzle.
- Press on the buttons to rotate the wings until they all match up.
- To solve the puzzle, press on the buttons the amount of times indicated on the screenshot (G).
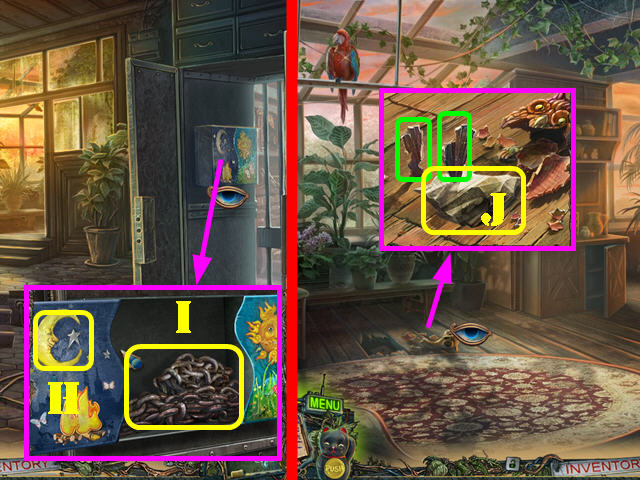
- Zoom into the box and put the MOON on it (H); take the CHAIN and the ANCHOR EMBLEM behind it (I).
- Return to the porch.
- Look on the ground.
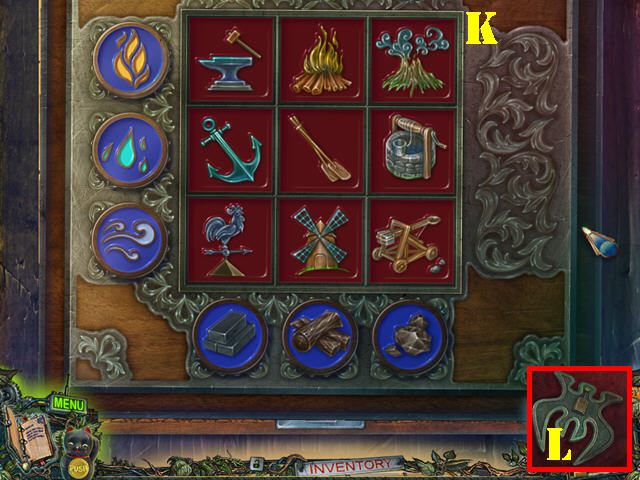
- Take the note (J) and then touch the 2 shards (green). Zoom into the box; put the FIRE EMBLEM, ANCHOR EMBLEM, and BONFIRE EMBLEM to activate a puzzle.
- Your goal is to arrange the red tiles so the item has something in common with the 2 blue chips they intersect.
- Select two tiles to swap their positions.
- Please look at the screenshot for the solution (K).
- Take the ACTIVATOR (L).
- Walk down.
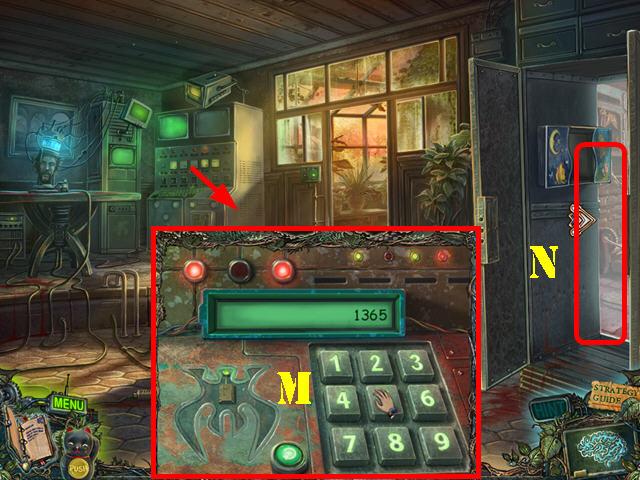
- Zoom into the control panel; put the ACTIVATOR on it and enter the code 1365 (M).
- Go through the door on the right (N).
Chapter 3: The Angry Landlord
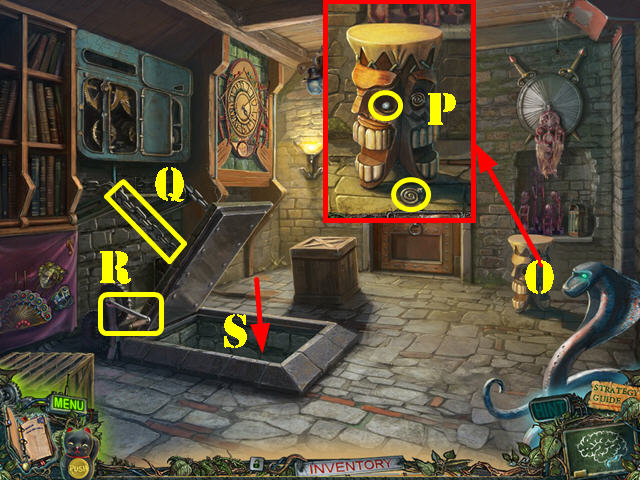
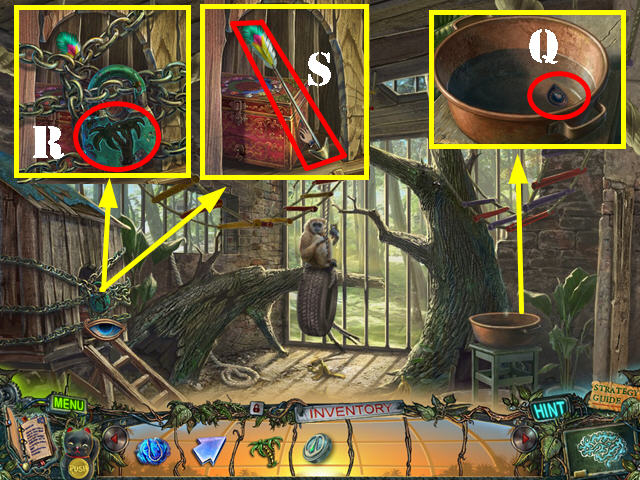
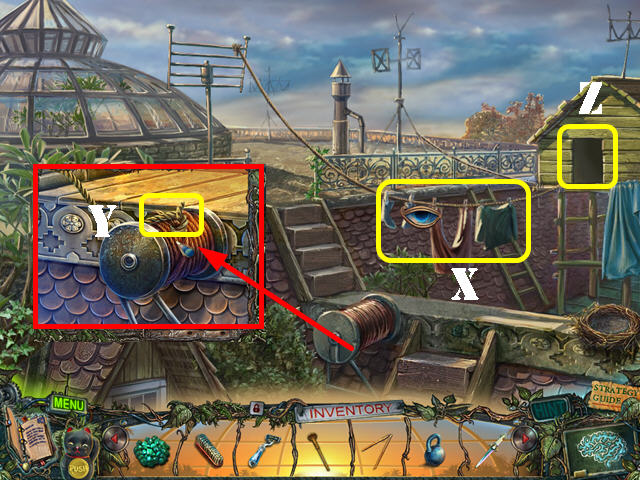
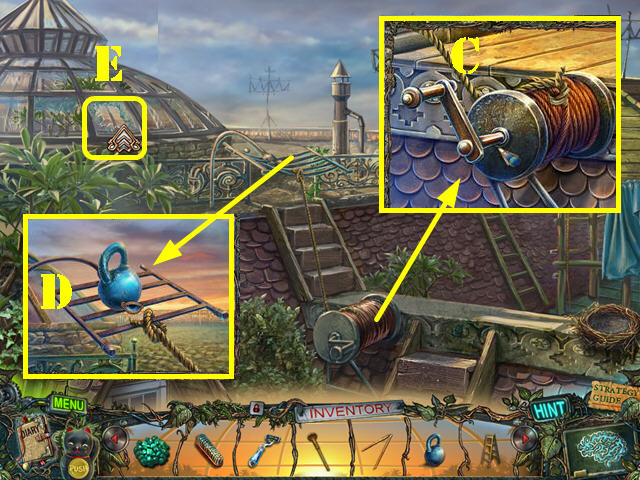
- Zoom into the drum and use the DRUMSTICKS on it (O).
- Take the SPIRAL and the PEARL (P).
- Put the CHAIN on the mechanism (Q) and pull on the lever (R).
- Go down the hatch (S).
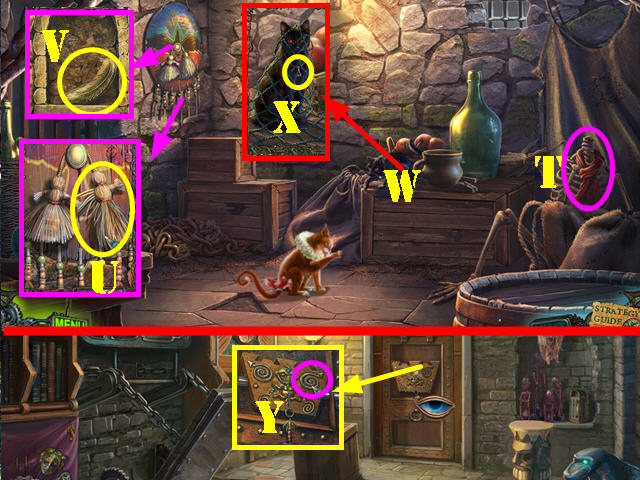
- Take the SCARF (T).
- Look at the dolls; put the SPOOL OF THREAD on the right one (U) and then take the FEATHER (V).
- Use the CAT HOLOGRAM in this room; put the NET on the cat (W).
- Take the EARRING (X) and then remove the net from the cat.
- Walk down.
- Zoom into the back door; put the SPIRAL in the lock; pull the feather and go through the door (Y).
- You will be confronted with the owner.
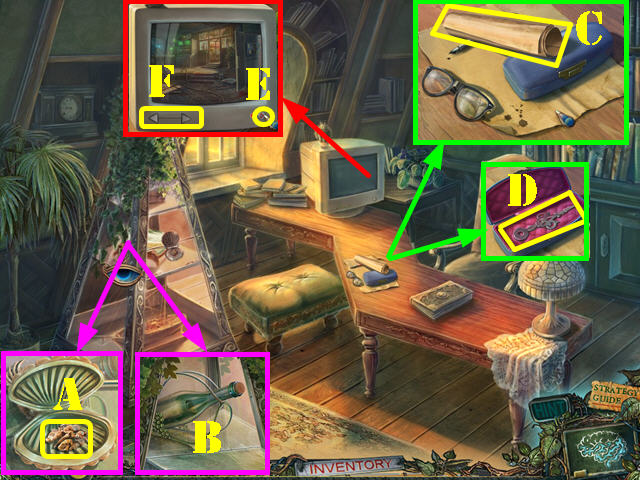
- Look at the stand and take the NUT (A). Put the PEARL in the shell and then take the BOTTLE WITH NOTE (B).
- Look at the desk and take the note (C). Open the case and take the CLOCK HAND (D).
- Zoom into the computer and press on the button (E). Select the arrows to view different parts of the house (F).
- Walk down.
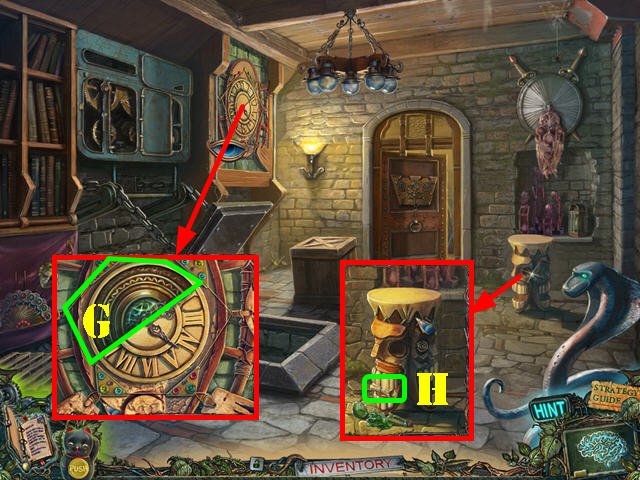
- Zoom into the clock and put the CLOCK HAND on it.
- Touch the top half of the clock and take the GOLDEN SEMICIRCLE (G).
- Zoom into the drum and put the BOTTLE WITH NOTE on it and then add the DRUMSTICKS to it. Take the note and the CAMEO behind it (H).
- Go through the door.
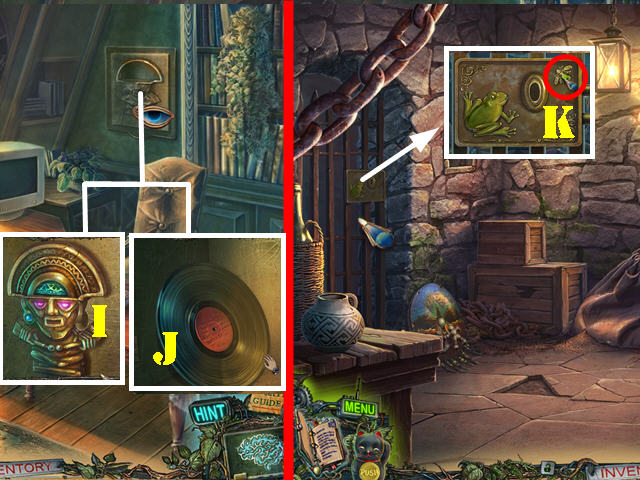
- Take a closer look at the plaque; put the EARRING and the GOLDEN SEMICIRCLE on it (I).
- Take the RECORD and the FLY behind it (J).
- Walk down and go into the hatch.
- Zoom into the cell; put the FLY in the niche and then go through the door (K).
- Talk to Dizzy.
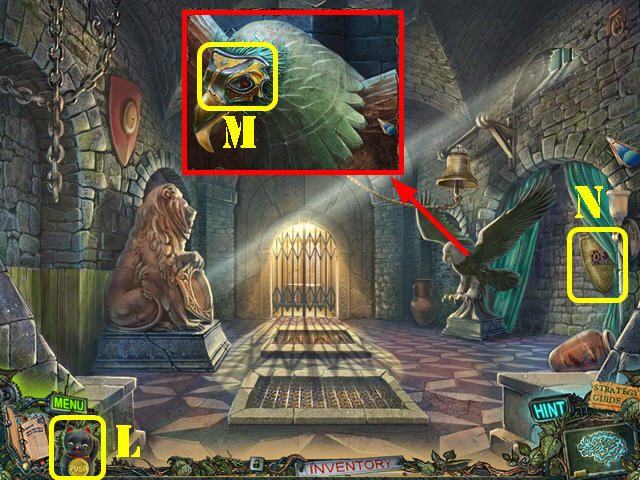
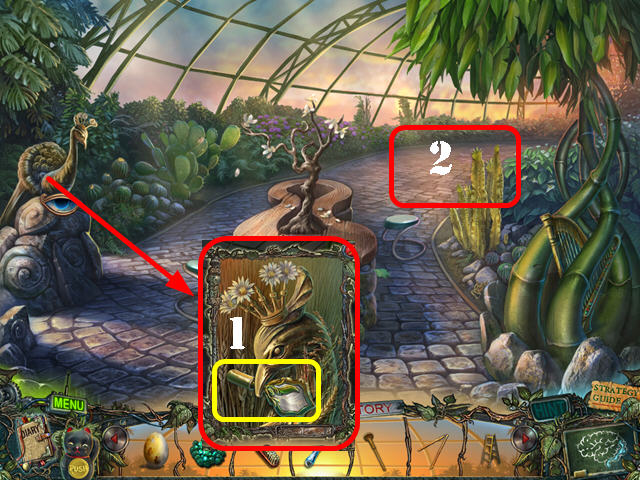
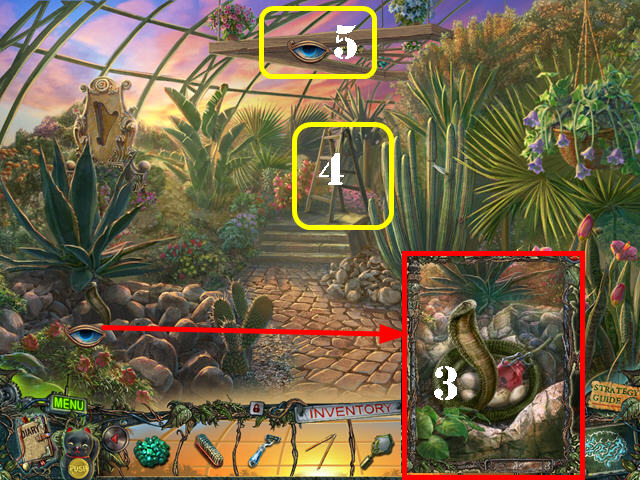
- Use the CAT HOLOGRAM in this scene to chase away the bats (L).
- Look at the eagle statue and take the MASK (M).
- Open the curtain and zoom into the shield (N).
- Put the CAMEO on the shield to activate a puzzle.
- Drag a cameo to the right spot; it will lock in place once placed correctly.
- Please look at the screenshot for the solution (O).
- Take the BUTTON (P).
- Walk down twice.
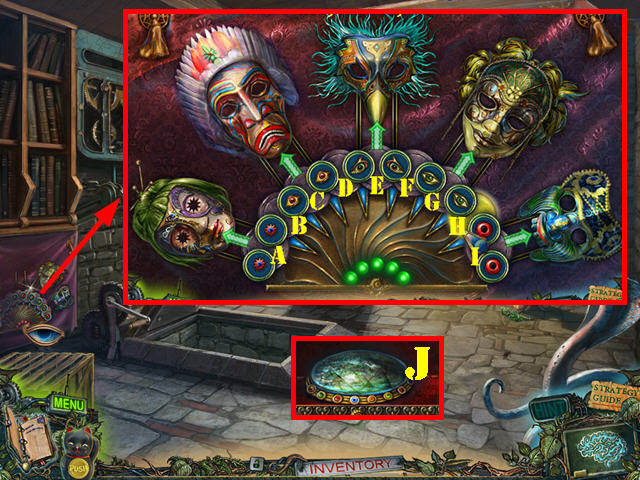
- Zoom into the masks; put the MASK on the board to activate a puzzle.
- Place the eyes below the correct masks and then use the arrow to insert the eyes into the mask.
- Select the circle in between the circles to rotate the eyes.
- To solve the puzzle, select the circles in this order: A, D, C, B, I, H, F, E, G, F, I, and H. Then, select each arrow to insert the eyes to the masks.
- Take the SHIELD PART (J).
- Go down the hatch and then through the left doorway.
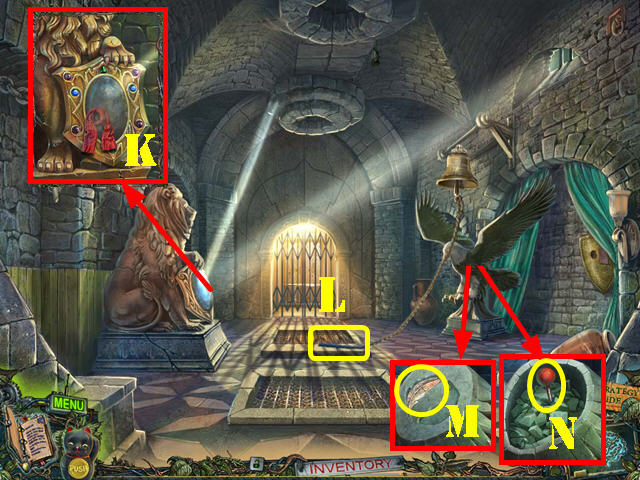
- Take a closer look at the lion statue; put the SHIELD PART on the shield and then wipe it with the SCARF (K).
- Pull the end of the rope attached to the bell (L).
- Look at the eagle statue; put the FEATHER in the niche (M) and pull on the lever (N).
- Enter the elevator.
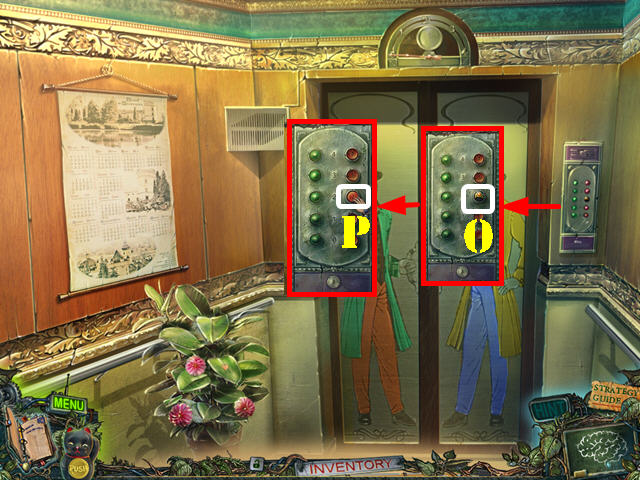
- Take a closer look at the elevator panel and take the RING (O).
- Put the BUTTON in the niche and then press on the button (P).
- Exit the elevator as soon as the door opens.
Chapter 4: The Second Floor

- Look at the door and take the credit card (Q).
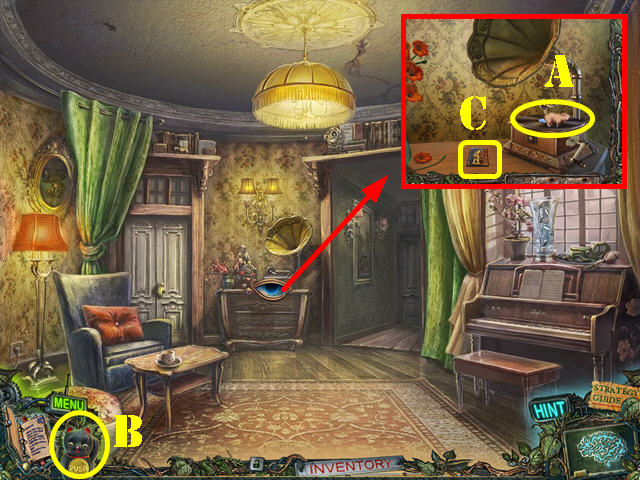
- Take a closer look at the gramophone; take the SOLVENT (R).
- Look at the piano; take the SUCTION CUP (S).
- Go through the doorway.
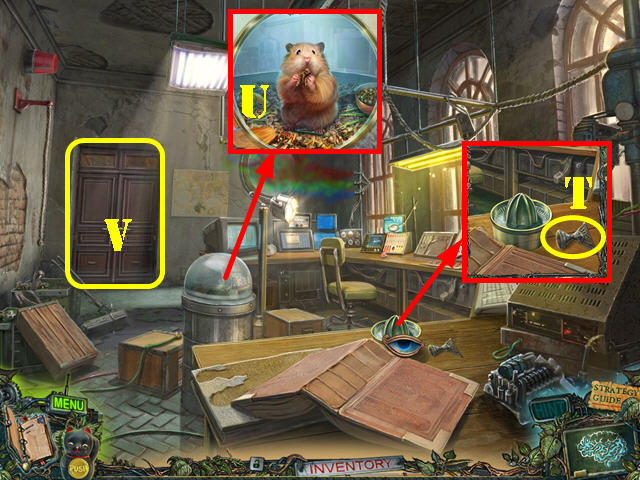
- Take a closer look at the table and take the FISH TAIL (T).
- Take a closer look at the hamster; use the SUCTION CUP on the glass. Give the NUT to the hamster.
- Take the HAMSTER and the PICTURE TILE below it (U).
- Open the back door and go through it (V).
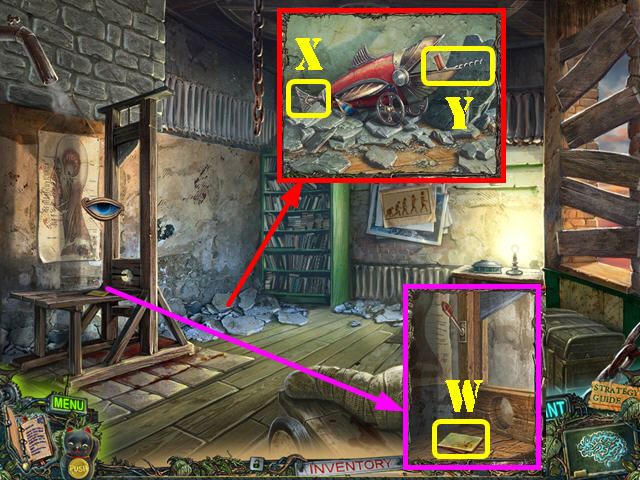
- Zoom into the guillotine; take the HANDKERCHIEF (W).
- Take a closer look at the stones and remove the extra ones. Put the FISH TAIL on the mechanical fish (X) and take the CORKSCREW (Y).
- Walk down twice.
- Zoom into the gramophone.
- Put the RECORD on the turntable and then put the HAMSTER on the record (A).
- Use the CAT HOLOGRAM in this close-up (B).
- Take the NEANDERTHAL (C).
- Walk down.
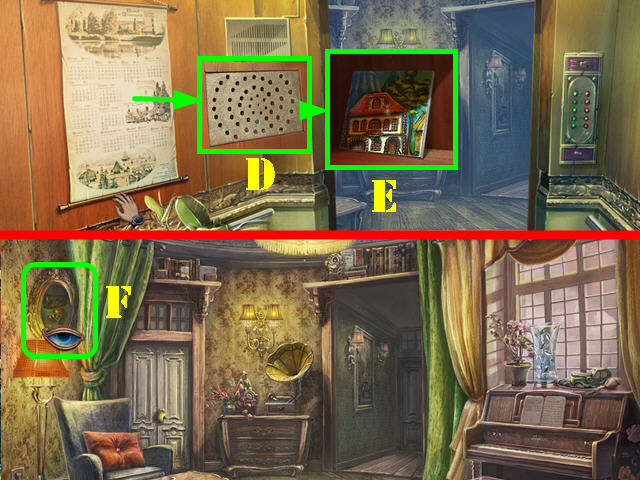
- Pull the calendar and zoom into the wall; use the CORKSCREW to remove the board (D).
- Take the PICTURE TILE (E).
- Exit the elevator.
- Take a closer look at the frame (F); put the 2 PICTURE TILES on the picture to activate a puzzle.
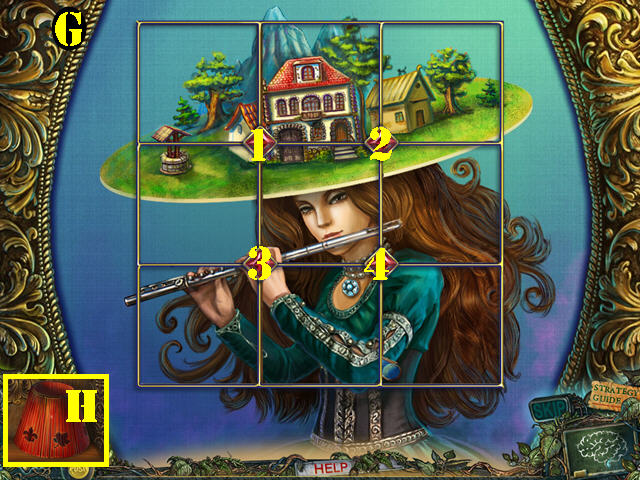
- Select the buttons to flip the tiles; then press on the tiles to rotate the image.
- To solve the puzzle, follow these steps: Press on buttons 1, 2, 3, and 4 one time each and then rotate the pictures to the image shown on the screenshot (G).
- Take the LAMPSHADE (H).
- Return to the guillotine room.
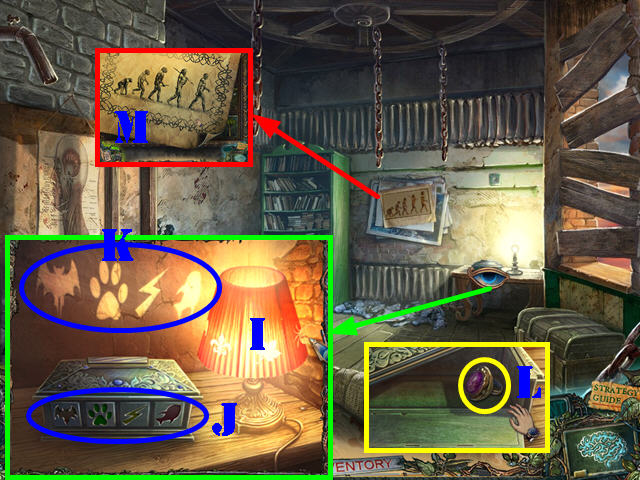
- Zoom into the table; put the LAMPSHADE on the light (I).
- Change the buttons on the box (J) to reflect the symbols shown on the wall (K).
- Take the RING (L).
- Take a closer look at the poster on the wall; remove it and put the NEANDERTHAL in the slot to activate a puzzle (M).
- Arrange the tiles in order of human evolution.
- Select two tiles in the same row to swap their positions.
- Please look at the screenshot for the solution (N).
- Take the SCISSORS and the WHEEL (O).
- Walk down twice.
- Zoom into the door; put the 2 RINGS on the fingers and go through the door (P).
- Zoom into the head; read the message on the monitor (Q).
- Examine the plant; use the SCISSORS on it and then take the WRENCH (R).
- Walk down.
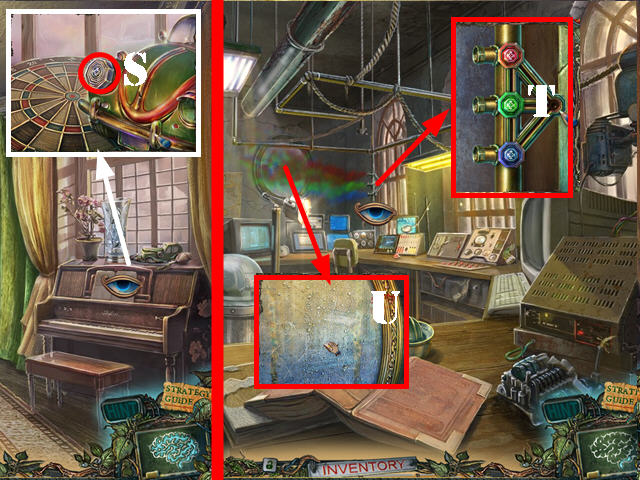
- Zoom into the piano; use the WRENCH on the bolt and then take the BLUE BOLT (S).
- Go through the right door.
- Zoom into the steam pipes; put the BLUE BOLT on the pipe. Move the bolts next to the steam of the same color (T).
- Zoom into the mirror and wipe it with the HANDKERCHIEF (U).
Chapter 5: Ruth Hamilton

- Move the green pin to the hole (1) and then pull on the lever (2).
- Touch the rope twice and then drag it to the second lever (3).
- Pull on the end of the rope and go down (4). Walk down again to reach the lab.
- Take a closer look at the mirror and take the CANE (5).
- Walk down; go through the left door. Open the door and go through it to go outside.

- Use the CANE to knock down 3 the pots (yellow).
- Look at the window and take the BEAR (V).
- Zoom into the mop; use the SOLVENT on it and take the MOP (W).
- Go left.
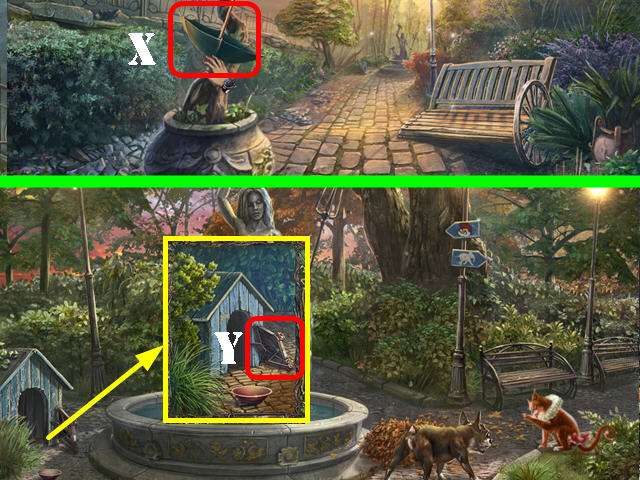
- Take the UMBRELLA (X).
- Go forward.
- Use the CAT HOLOGRAM in this scene to distract the dog.
- Look inside the dog house; take the JACK (Y).
- Walk down.
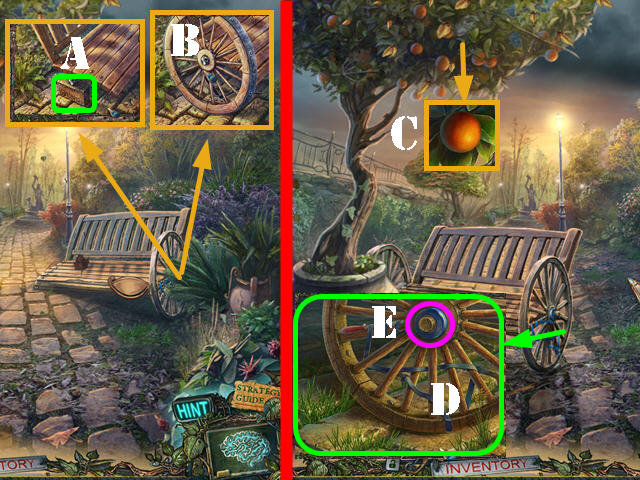
- Zoom into the bench; use the JACK on it and take the BRICK (A).
- Press on the jack and put the WHEEL on the bolt (B).
- Move the bench and zoom into the tree; take the ORANGE (C).
- Look at the wheel; touch the end of the tape 4 times and take the FILE (D).
- Take the TAPE (E).
- Walk down.
- Zoom into the window; use the FILE on the bars. Break the window with the BRICK and then touch the piggy bank. Break the piggy bank with the BRICK and take the ZIPPER PULL (F).
- Take a closer look at the container; put the ZIPPER PULL on the zipper. Pull the zipper and take the LEAVES (G).
- Return to the guillotine room.
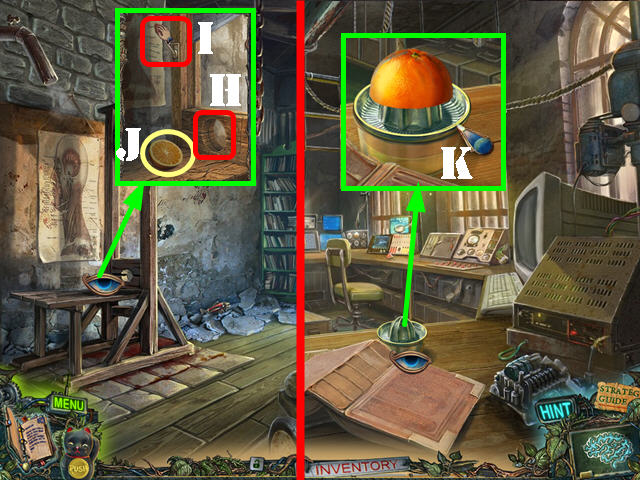
- Zoom into the guillotine and put the ORANGE in the hole (H). Pull the handle (I) and take the HALF AN ORANGE (J).
- Walk down.
- Zoom into the juicer; put the HALF AN ORANGE on it (K); remove the orange and the juicer and take the ORANGE JUICE.
- Walk down and go through the left door.
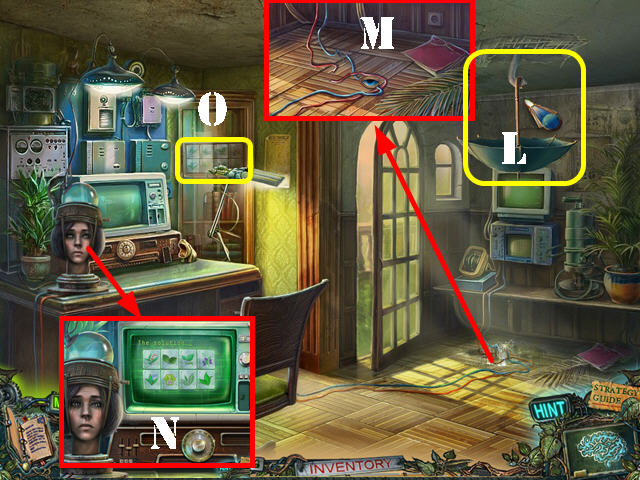
- Put the UMBRELLA on the pipe (L).
- Zoom into the wires and use the MOP on the water. Put the TAPE on the wires (M).
- Zoom into Ruth’s head; give her the ORANGE JUICE; note the solution on the monitor (N).
- Zoom into the tiles; put the LEAVES on them to activate a puzzle (O).
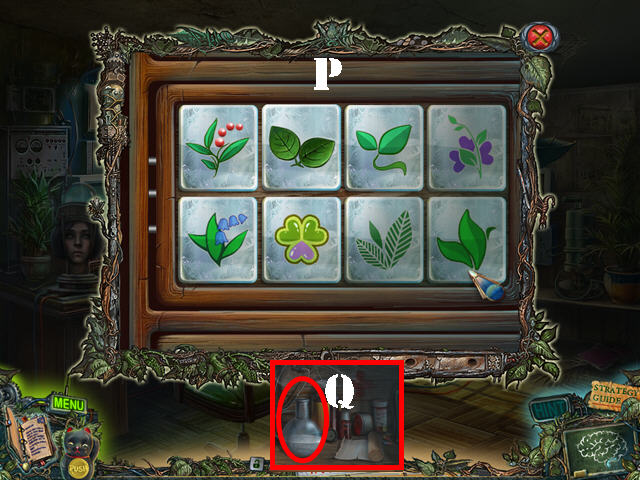
- Arrange the tiles in the same order shown on the monitor. Select two tiles to swap their positions.
- Please look at the screenshot for the solution (P).
- Take the SLEEPING MIXTURE (Q).
- Return to the fountain.
- Zoom into the dog house; put the SLEEPING MIXTURE in the bowl (R). Exit the close-up scene so the dog will go to the bowl.
- Zoom back into the dog house; take the DOG BOWL.
- Go right.
- Zoom into the pond; use the CAT HOLOGRAM in the pond and then take the COMB (S).
- Walk down and then take the path behind the fountain.
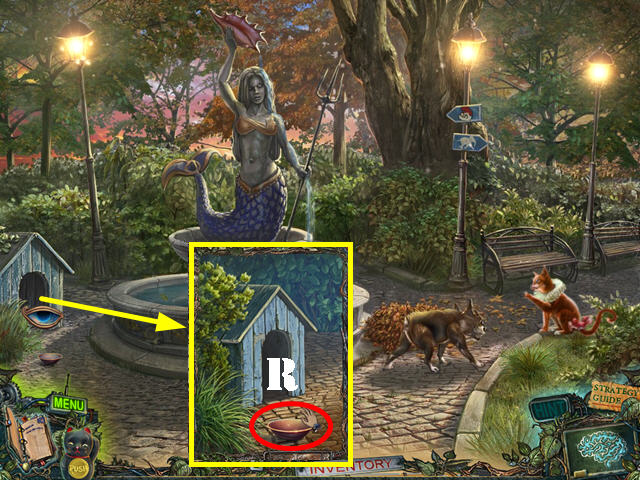
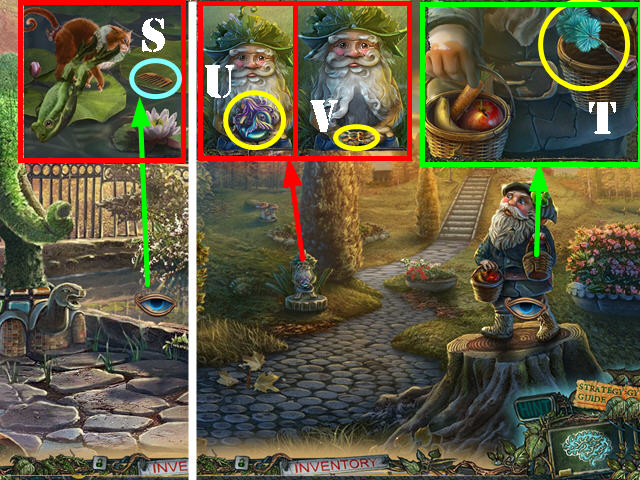
- Take a closer look at the large gnome and take the BRUSH (T).
- Look at the small gnome and take the PURPLE MERMAID (U).
- Use the COMB on the gnome’s beard; take the TURTLE SYMBOL (V).
- Go forward.

- Take a closer look at the door; take the HOSE (W).
- Look at the pump; take the CARROT (X). Clean the pump out with the BRUSH and then attach the HOSE to it.
- Pump the handle (Y).
- Take a closer look at the door; put the BEAR in the niche to activate a puzzle (Z).
- Drag a plank over another to swap their postilions.
- Please look at the screenshot for the solution (A).
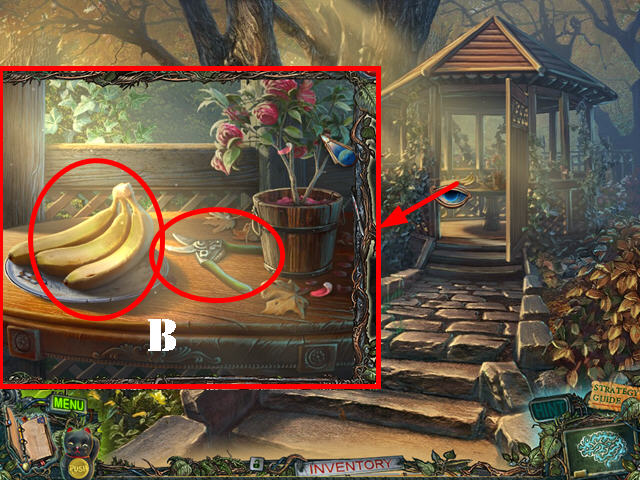
- Look through the door; take the BANANAS and the PRUNERS (B).
- Walk down.
- Zoom into the bush; use the PRUNERS on it and take the TUSK (C).
- Walk down and go right to reach the pond.
Chapter 6: The Bomb Shelter
- Put the TUSK on the elephant topiary (D).
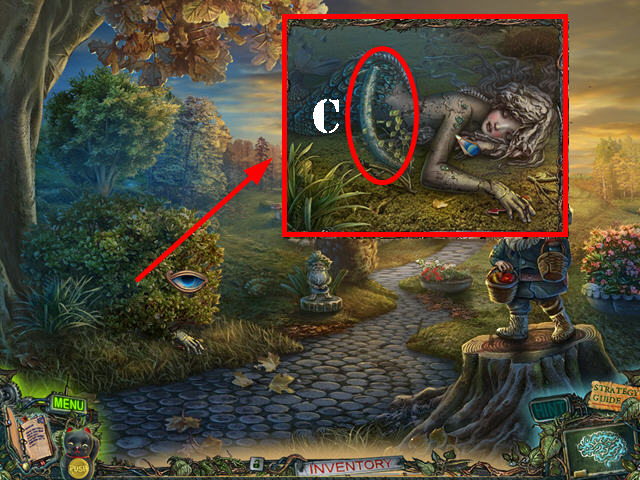
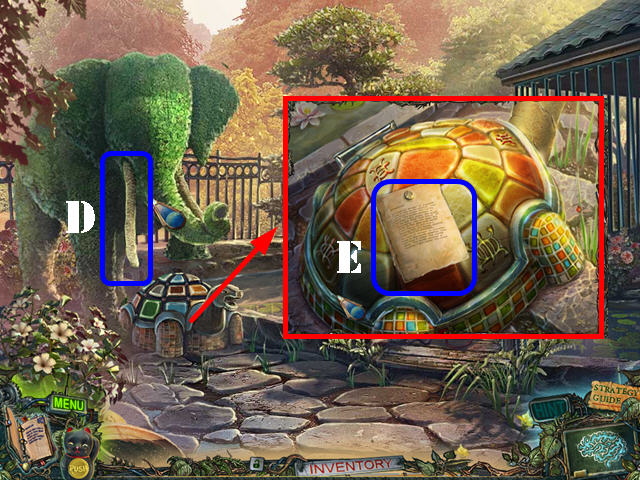
- Look at the turtle; take the note (E) and the MATCHES below it.
- Walk down.
- Zoom into the pile of leaves; use the MATCHES on them and take the SHELL PART (F).
- Use the FILE on the grid and then zoom into it. Put the PURPLE MERMAID on the board to activate a puzzle.
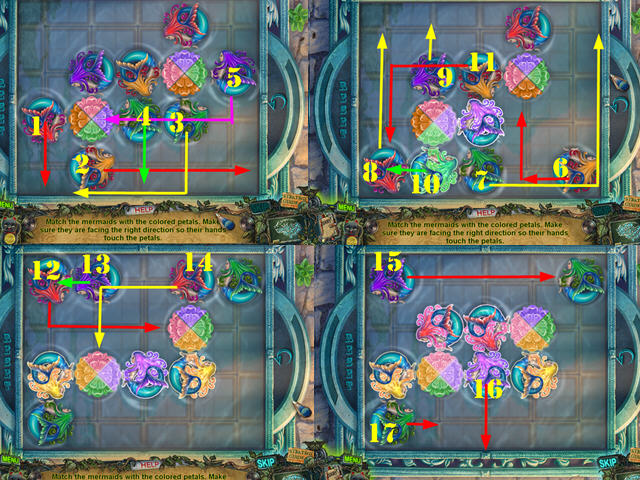
- Place the mermaids so their hands are touching the petals of the same color. Highlight a mermaid and then choose the arrow in the direction you want to move to.
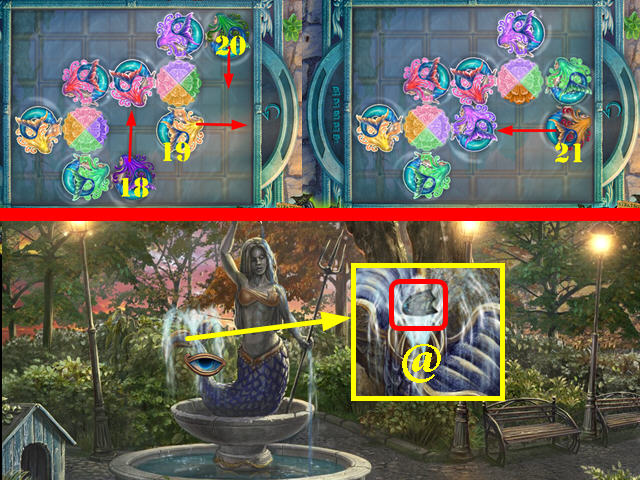
- To solve the puzzle, follow the steps on the screenshot (1-21).
- Take a closer look at the mermaid’s tale; take the SCALE (@).
- Take the path behind the fountain.
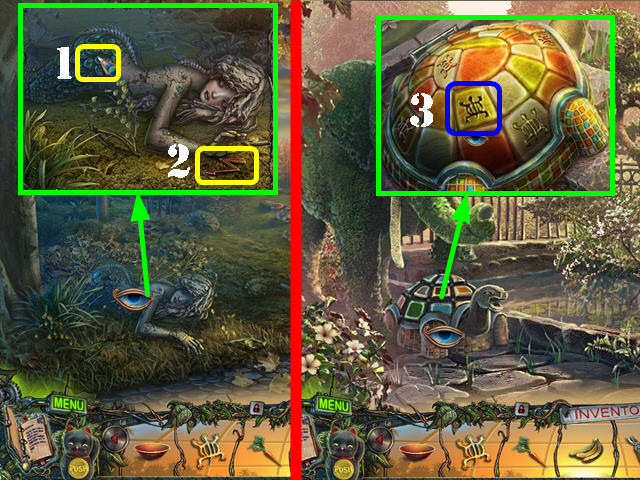
- Zoom into the mermaid; put the SCALE on her (1) and take the LIGHTNING (2).
- Walk down and go right.
- Zoom into the turtle; put the SHELL PART on its shell and then put the TURTLE SYMBOL on top of that (3).
- Go down the hatch to reach the bomb shelter.
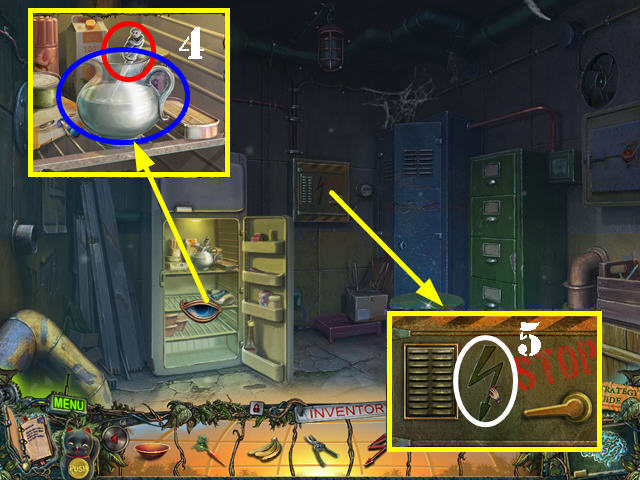
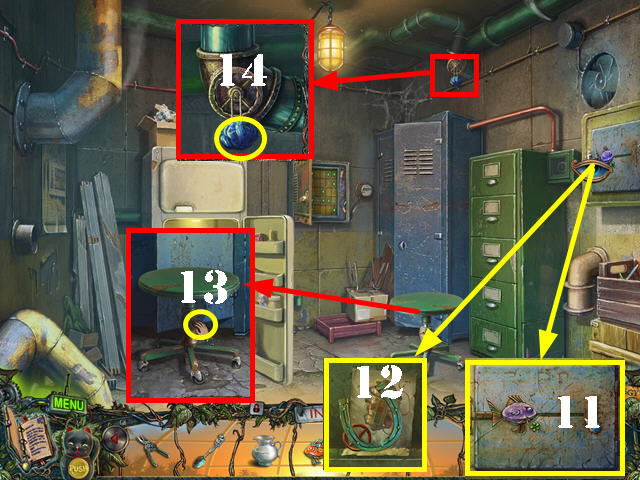
- Open the fridge and look in it; take the MONKEY SPOON and the CREAM (4).
- Zoom into the power box and put the LIGHTNING on the door to activate a puzzle (5).
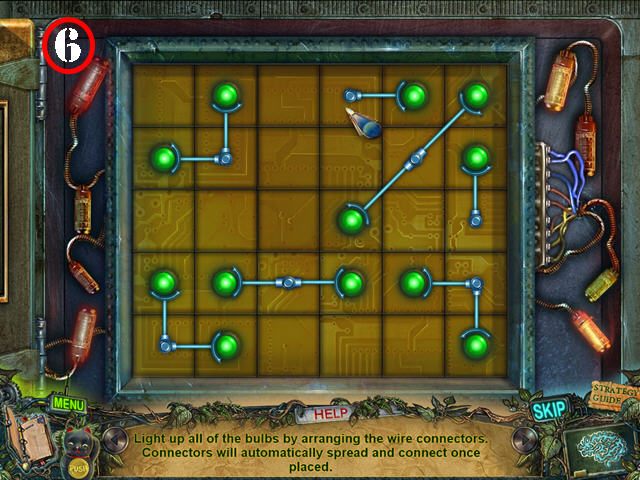
- Arrange all the bulbs correctly until all the wire connectors are in the right spots.
- Please look at the screenshot for the solution (6).
- Return to the gazebo.
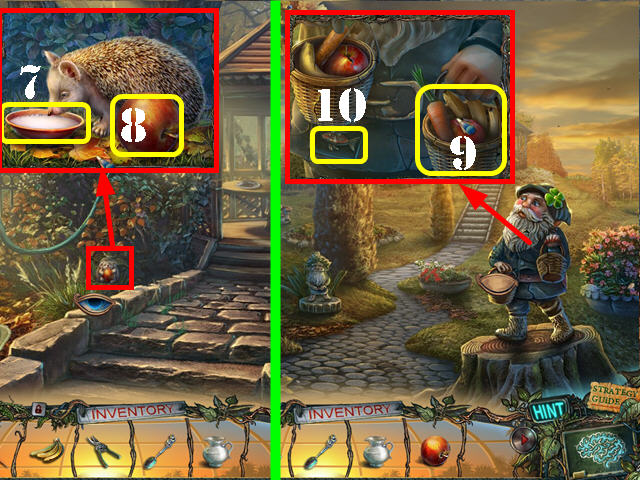
- Zoom into the hedgehog; put down the DOG BOWL and then put the CREAM in it (7).
- Take the APPLE (8).
- Walk down.
- Zoom into the large gnome; put the BANANAS, CARROT, and the APPLE in the basket (9).
- Take the FISH SYMBOL (10).
- Return to the bomb shelter.
- Zoom into the panel; put the FISH SYMBOL on it (11).
- Take the HORSESHOE, VALVE, and the note (12).
- Take a closer look at the chair; put the VALVE in the slot and turn the valve (13).
- Take a closer look at the pipe and take the MESH SPONGE (14).
- Walk down.
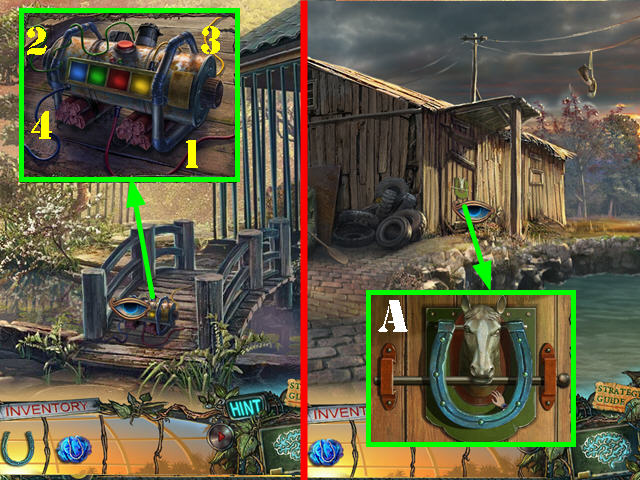
- Zoom into the bomb; cut the wires with the PRUNERS in the following order: Red, Green, Yellow, and Blue (1-4).
- Take the small bridge and then go right.
- Zoom into the door; use the HORSESHOE on the door. Knock on the horseshoe and then pull out the bar (A).
- Go through the door.
Chapter 7: The Cabin
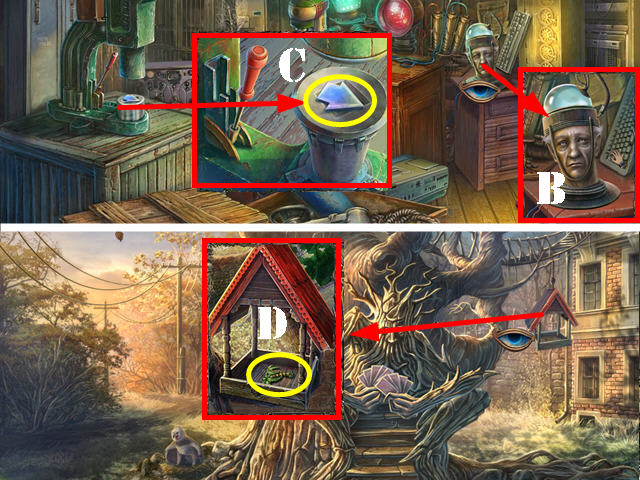
- Talk to the head (B).
- Look at the press and take the ARROW (C).
- Walk down twice and go left.
- Zoom into the birdhouse; take the PALM TREES (D).
- Go left to reach the playground.
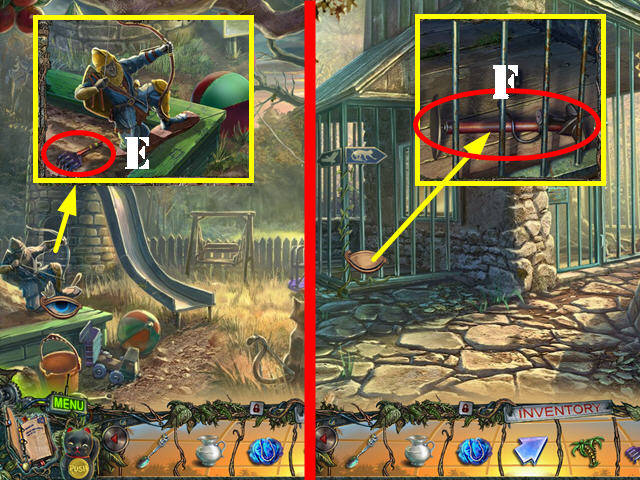
- Take a closer look at the archer and take the RAKE (E).
- Walk down twice.
- Zoom into the left side of the cage; use the RAKE on the pump and then take the PUMP (F).
- Go right.
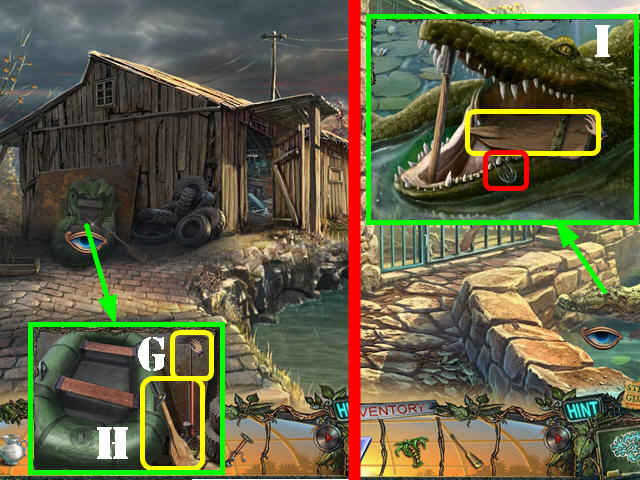
- Zoom into the boat; attach the PUMP to the boat and then pump the handle 3 times (G).
- Take the OAR (H).
- Walk down.
- Zoom into the alligator and open its mouth; put the OAR in it. Take the OAR PART and the WHISK (I).
- Remove the stick from the alligator’s mouth.
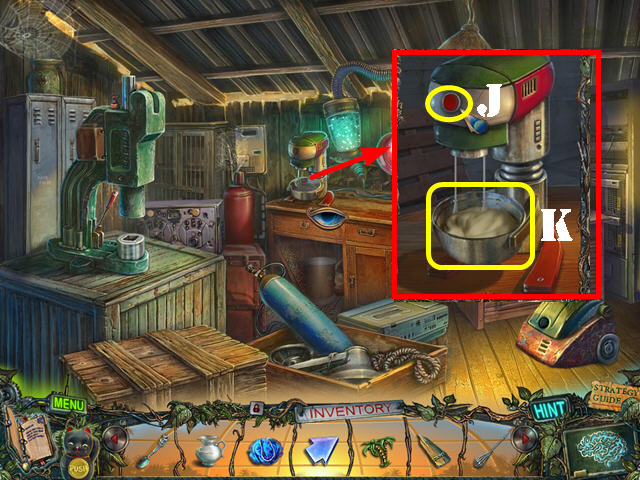
- Return to the shed.
- Take a closer look at the mixer; put the CREAM in the bowl and the WHISK on the mixer.
- Press the button (J) and then take the BUTTER (K).
- Return to the playground.
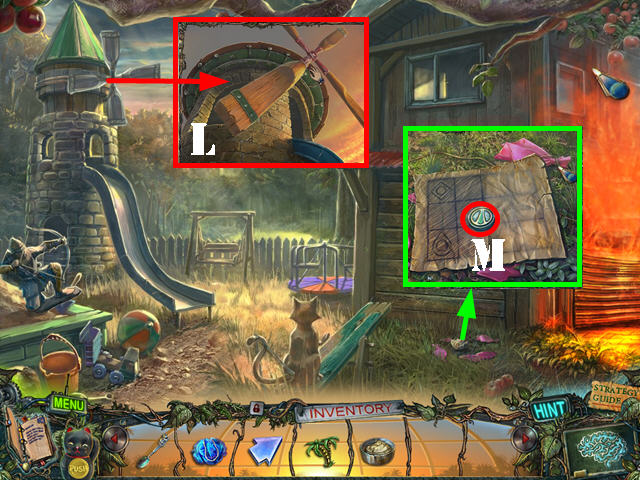
- Zoom into the windmill; put the OAR PART on it and then spin the blades (L).
- Examine the paper on the ground; open it and take the CONTROL KNOB (M).
- Return to the bomb shelter.
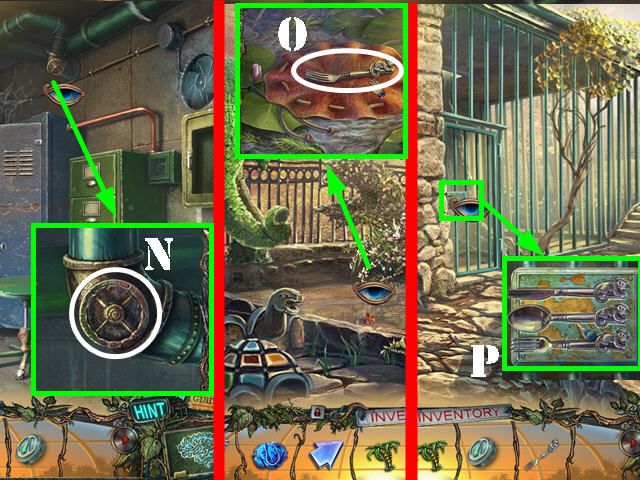
- Zoom into the pipe; use the BUTTER on the valve and turn the valve (N).
- Exit the bomb shelter.
- Take a closer look at the pond; open the bag and take the MONKEY FORK (O).
- Take the small bridge.
- Zoom into the right gate; put the MONKEY FORK and the MONKEY SPOON in the slots (P).
- Enter the cage.
- Zoom into the pot; take the MEDAL (Q).
- Take a closer look at the lock; put the PALM TREES on the lock (R).
- Open the lock and take the ARROW (S).
- Walk down and go right.
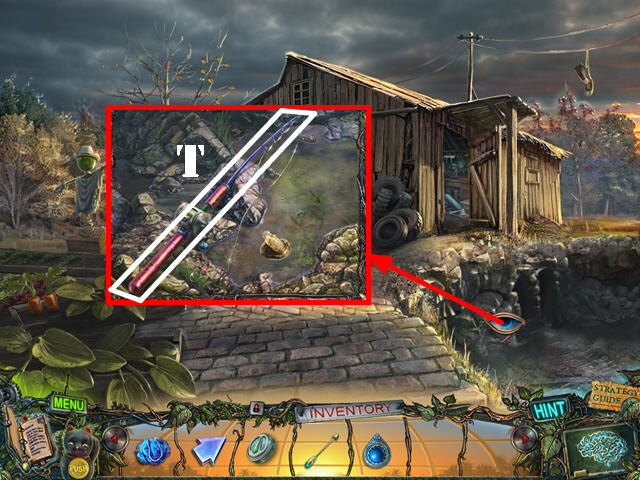
- Look in the ditch and take the FISHING ROD (T).
- Walk down and then go left for a brief cutscene.
- Go left once the cutscene ends.
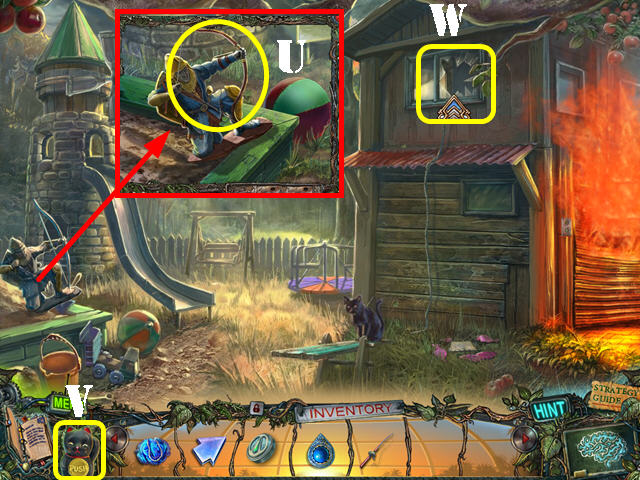
- Zoom into the archer; put the ARROW on the bow (U).
- Use the CAT HOLOGRAM in the scene (V).
- Go through the window to enter the garage’s upper level (W).
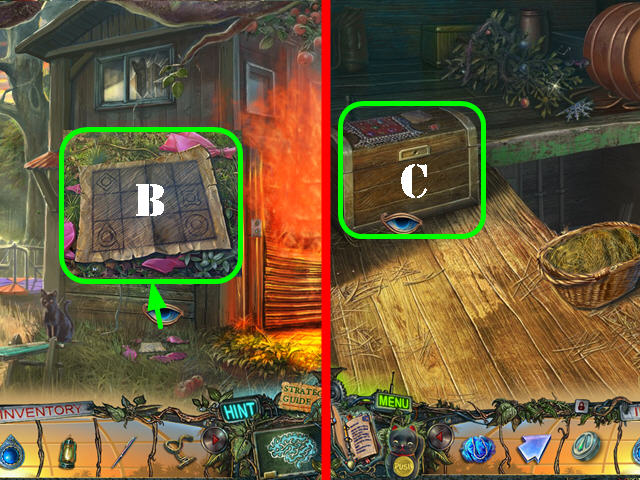
- Look at the Christmas tree; take the note (X).
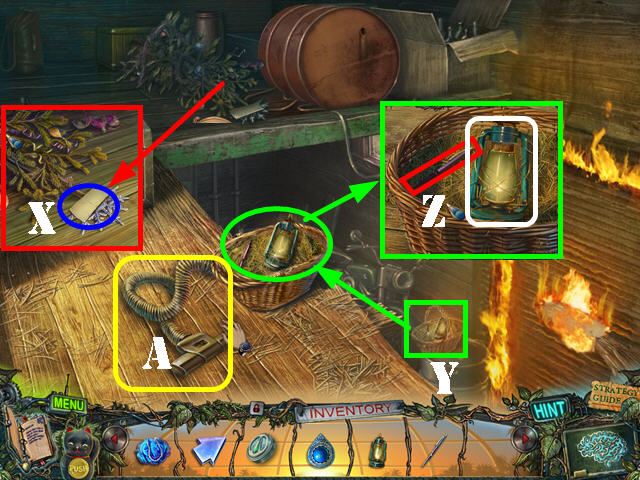
- Use the FISHING ROD on the basket (Y) and then zoom into it; take the LANTERN and the PEN (Z).
- Press on the hay 3 times and take the VACUUM HOSE (A).
- Walk down.
- Zoom into the paper; use the PEN on it and take the note (B).
- Go back into the garage.
- Take a closer look at the chest and put the MEDAL on it to activate a puzzle (C).
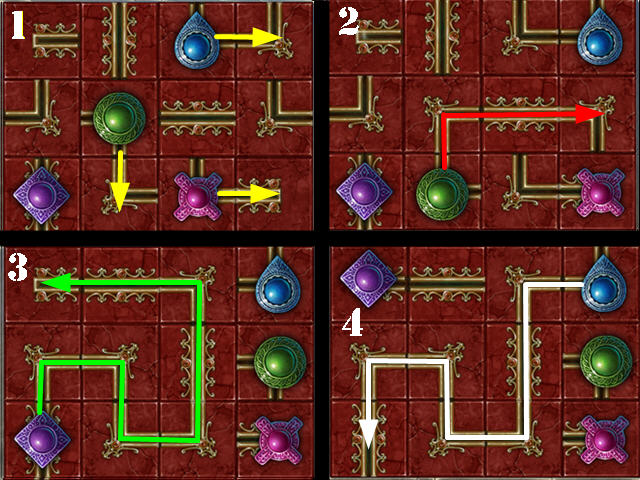
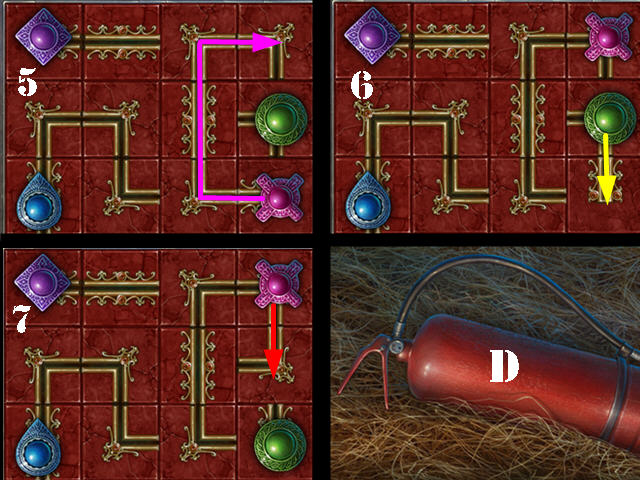
- Arrange the medals using the solution shown on the piece of paper.
- Select a medal and then an arrow to move it in that direction.
- Please follow the steps on the screenshot to solve the puzzle (1-7).
- Take the FIRE EXTINGUISHER (D).
- Walk down.
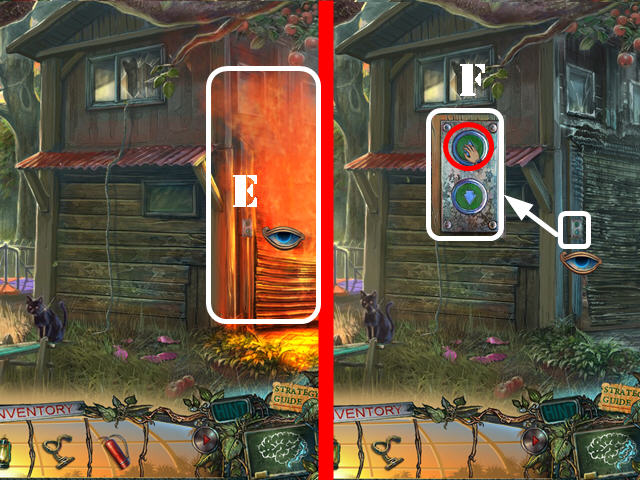
- Use the FIRE EXTINGUISHER on the fire (E).
- Zoom into the control panel; put the ARROW on the panel. Push the up button and go into the garage (F).
Chapter 8: The Garage
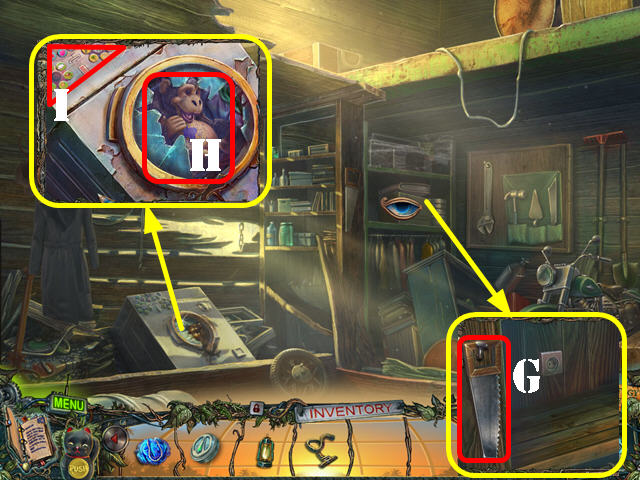
- Look at the shelf; take the SAW (G).
- Zoom into the washing machine; take the DIRTY TOY (H).
- Zoom into the control knobs (I); put the CONTROL KNOB in the slot to activate a puzzle.
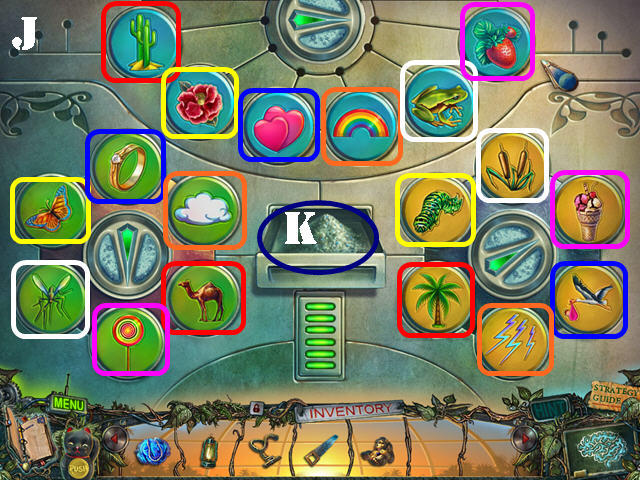
- Choose 3 related items by pointing them to an element in each circle.
- Please look at the screenshot for the color-coordinated solution (J).
- Take the LAUNDRY DETERGENT (K).
- Walk down and then go through the window.

- Zoom into the Christmas tree; use the SAW on the stick and take the SNOWFLAKE (L).
- Return to the shed.
- Zoom into the vacuum cleaner; put the VACUUM HOSE on it (M).
- Take the VACUUM CLEANER and the SUN SYMBOL below it.
- Return to the inside of the cage.
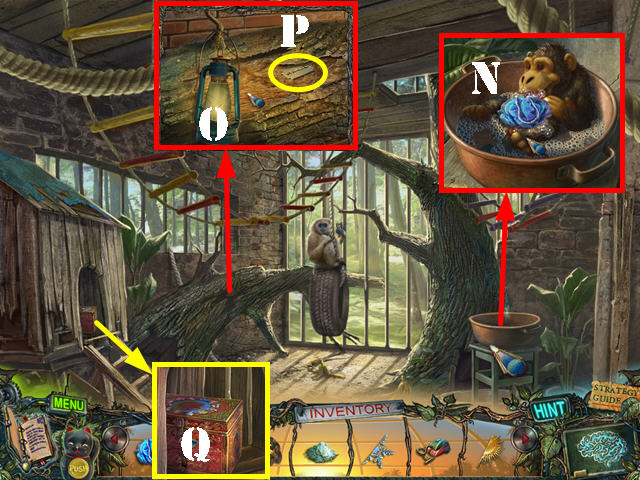
- Zoom into the pot; put the DIRTY TOY and the LAUNDRY DETERGENT in it. Use the MESH SPONGE on the toy; take the WET TOY (N).
- Examine the tree hollow; use the LANTERN in it (O) and take the BLADE (P).
- Zoom into the box (Q); put the SUN SYMBOL and the SNOWFLAKE into the slots to activate a puzzle.
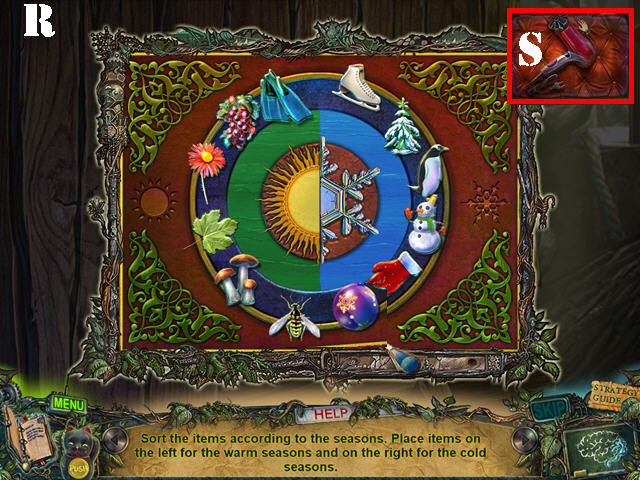
- Select a symbol to switch it with another until all the warm weather items are on the left and the cold ones on the right.
- Please look at the screenshot for the solution (R).
- Take the HAIRDRYER (S).
- Return to the lower side of the garage.
- Zoom into the motorcycle; cut the bag with the BLADE and take the PLAYING CARD (T).
- Zoom into the shelf; plug in the HAIRDRYER (U).
- Put the WET TOY on the shelf; turn on the hairdryer and take the TOY (V).
- Return to the inside of the cage.
- Zoom into the monkey; give him the TOY and take the BUG (W).
- Walk down and go right.
- Examine the scarecrow and then select the box; put the BUG on it to activate a puzzle (X).
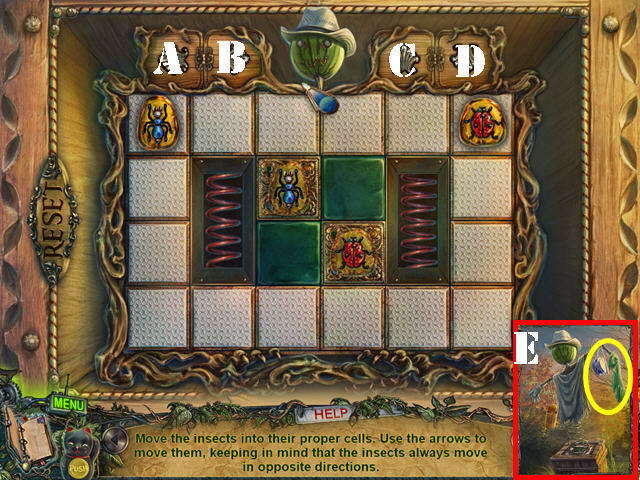
- Move the insects into their matching cells by using the 4 arrows on top.
- To solve the puzzle, press on the arrows in this order: C x 3, B x 2, and D.
- Take the RUBBER GLOVE and the TIN OF FISH (E).
Chapter 9: The Tree House
- Return to the shed.
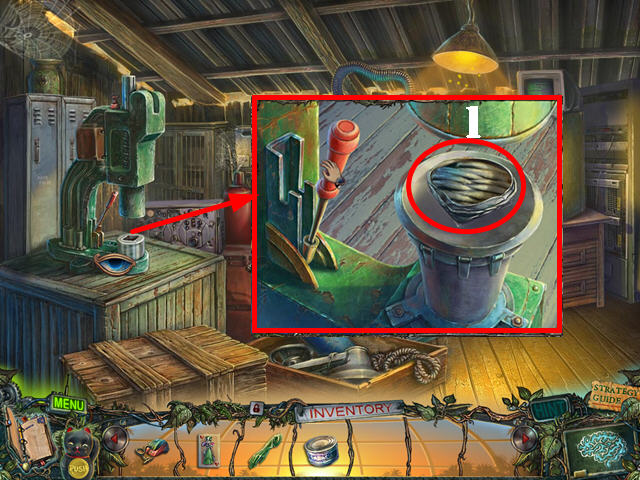
- Zoom into the press; put the TIN OF FISH on it and press on the lever.
- Take the FISH (1).
- Walk down twice and turn left.
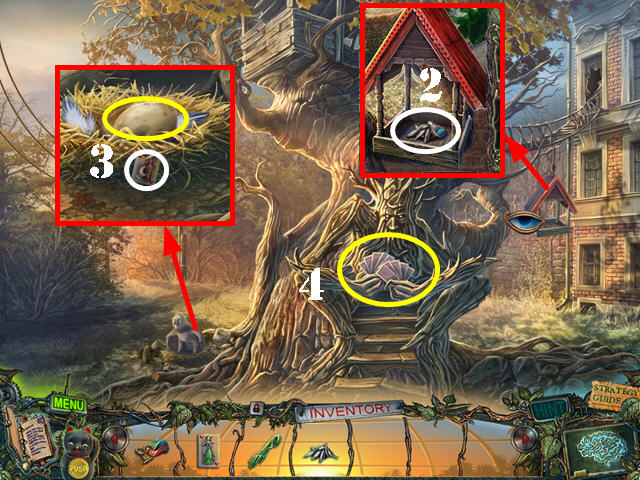
- Examine the birdhouse and put the FISH in it (2).
- Take a closer look at the nest; take the EGG and the PLAYING CARD (3).
- Zoom into the cards (4); put the 2 PLAYING CARDS next to the others to activate a puzzle.
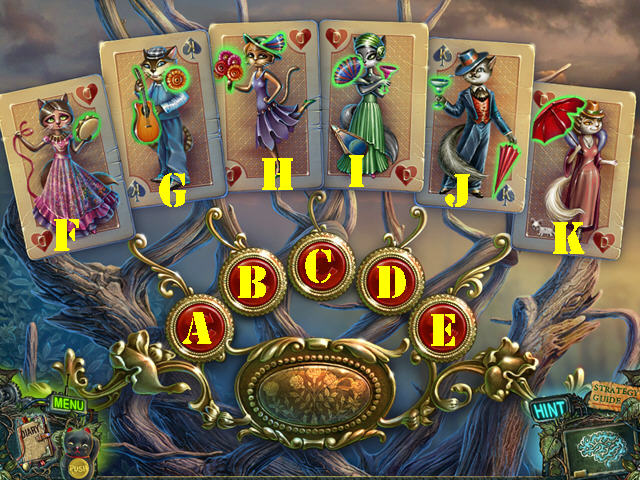
- Place the cards next to the ones that hold similar items.
- Press on a card to flip it and use the buttons to swap the cards.
- To solve the puzzle, press the buttons and cards in this order: E, B, A, C, D, B, F, and I.
- Go into the tree house.
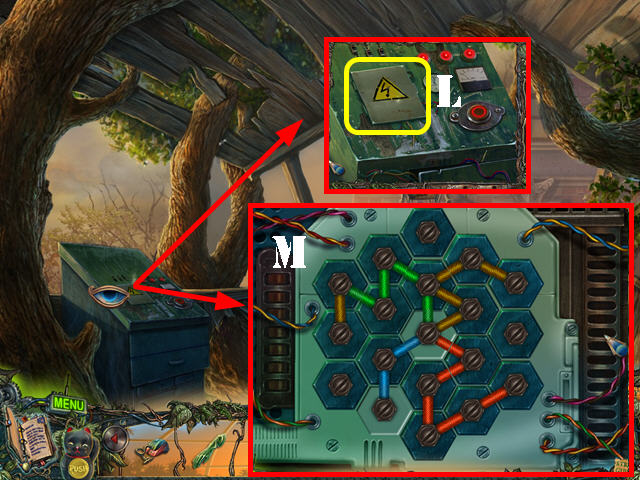
- Zoom into the control panel; use the RUBBER GLOVE to open the panel (L).
- Connect the wires of the same color; swap one plate over the other to swap their positions.
- Please look at the screenshot for the solution (M).
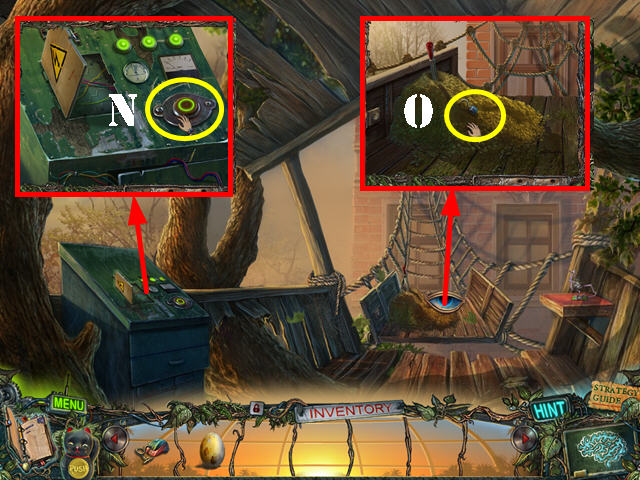
- Push the button (N). Zoom into the platform and take the HOOK (O).
- Use the VACUUM CLEANER on the sand.
- Go forward.
- Zoom into the right door and look at the glass; take the GLASS SHARD (P).
- Walk down.
- Zoom into the table on the right; cut the ribbon with the GLASS SHARD. Take the RIBBON and the MAGNETIC CARD (Q).
- Go forward.
- Zoom into the left door; swipe the MAGNETIC CARD on the reader (R).
- Pull on the handle (S) and go through the door.
- Zoom into the tree; touch it and then take the MALACHITE STONES (T).
- Open the lower door (@) and go through it.
- Look at the table by the window and take the BRUSH (U).
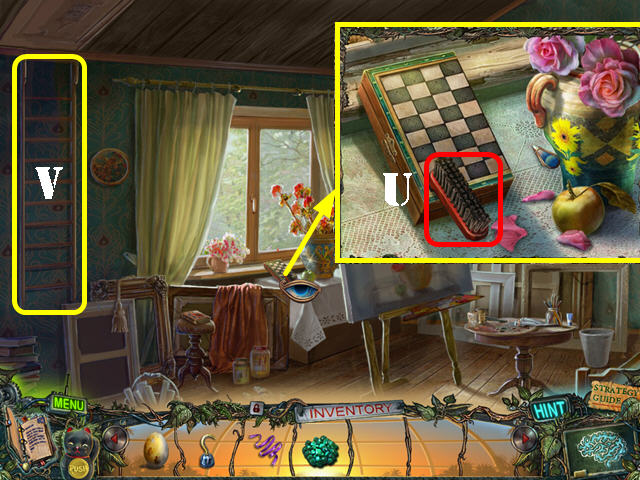
- Go up the ladder (V).
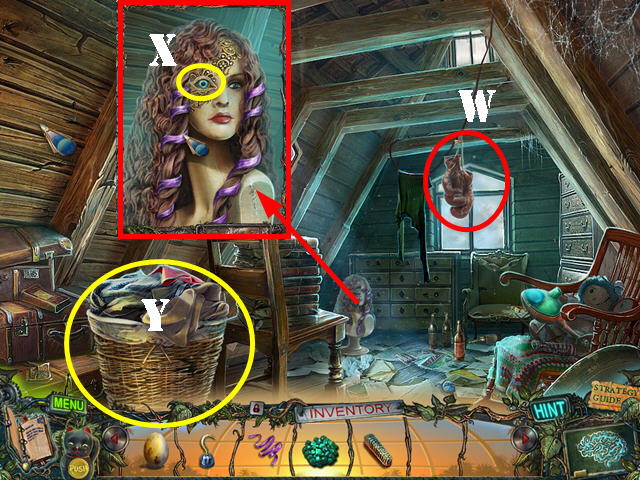
- Take the BOXING GLOVES (W).
- Zoom into the wig; put the RIBBON on it and take the EYE (X).
- Zoom into the hamper to activate a puzzle (Y).
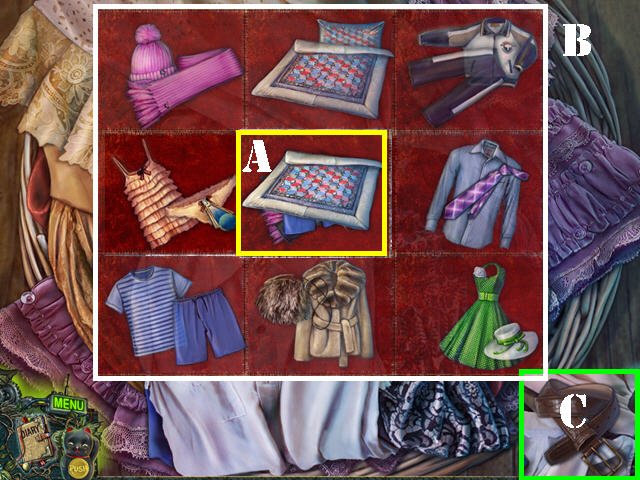
- Select a panel to see what is behind it, select an article of clothing from the center (A), and place it on the right article of clothing.
- Please look at the screenshot for the solution (B).
- Take the BELT (C).
- Walk down.
Chapter 10: The Gym
- Zoom into the stool; put the EYE on the book (D).
- Take the ROTOR BLADES and look at the instructions (E).
- Go up the ladder.
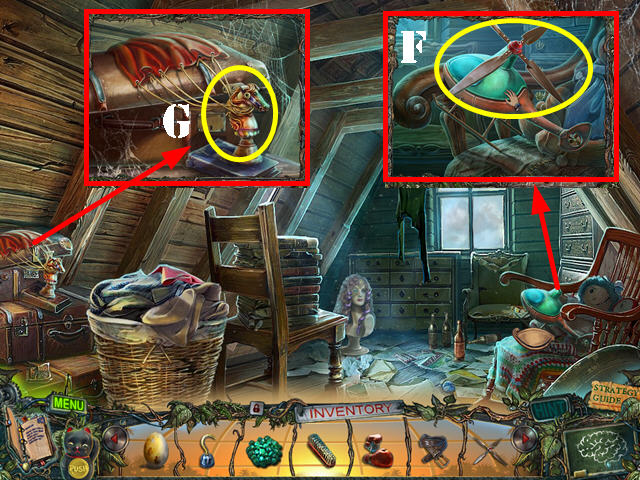
- Zoom into the helicopter; put the ROTOR BLADES on it and then click on the blades (F).
- Examine the parachute and take the KNIGHT (G).
- Walk down.
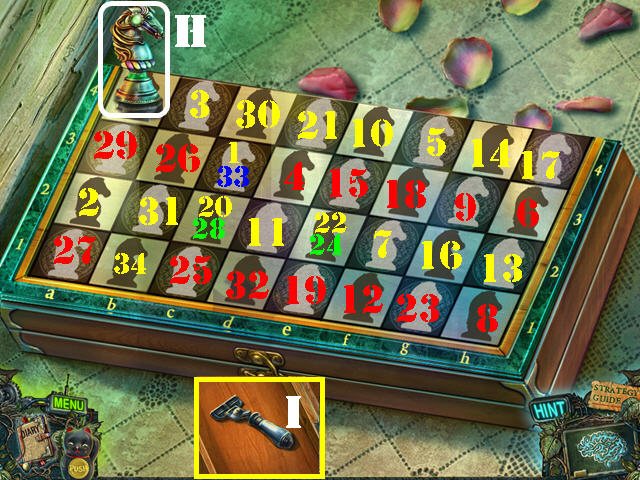
- Inspect the chessboard by the window; zoom into it and put the KNIGHT on it to activate a puzzle.
- Move the knight around the board until it has touched every square on the board.
- Select the knight and then move it to a lit space.
- Select the knight first (H) and then move it in the order shown in the screenshot (1-34).
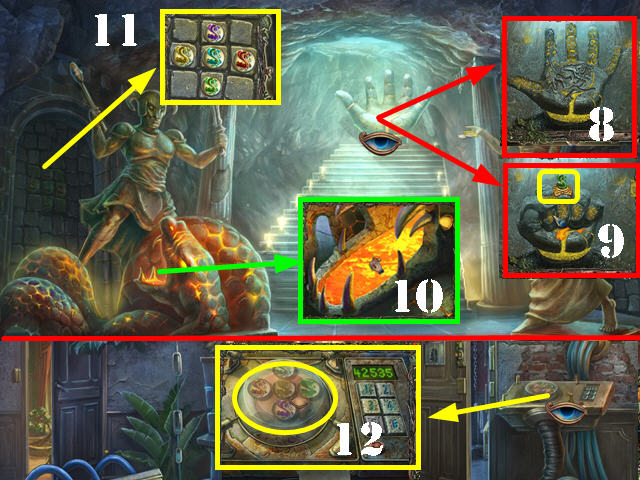
- Take the RAZOR (I).
- Walk down twice.
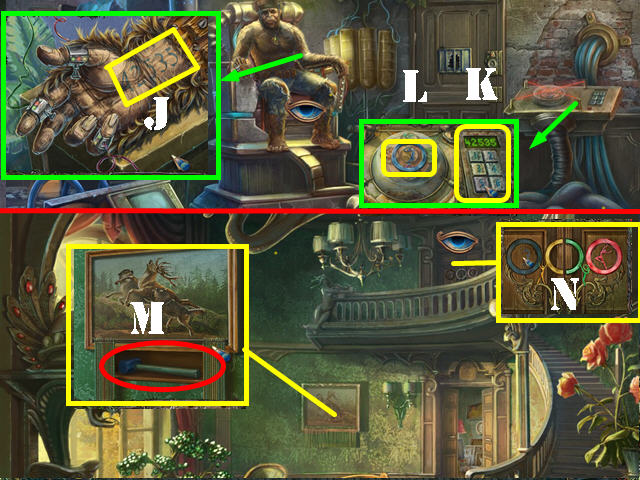
- Zoom into the monkey; shave his wrist with the RAZOR to get the code (J).
- Examine the control panel; look at the note and then enter the code 42535 on the keypad (K).
- Take the RING (L).
- Go through the left door.
- Zoom into the picture; pull the fringes apart and take the HAMMER (M).
- Zoom into the top door; put the RING on the door and then go through it to access the gym (N).
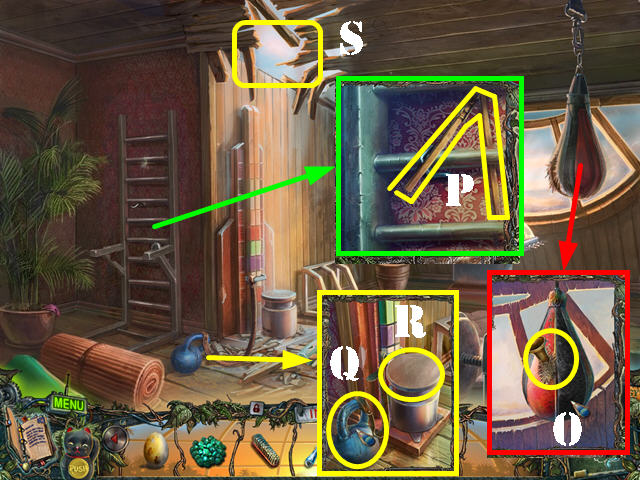
- Zoom into the punching bag; use the BOXING GLOVES on it and take the FLUTE (O).
- Examine the ladder and take the FLAIL (P). Put the HOOK on the ladder.
- Zoom into the weight; attach the BELT to it (Q).
- Use the HAMMER on the test of strength machine (R).
- Zoom into the weight; remove the belt and take the WEIGHT.
- Move the ladder and go up to the roof (S).
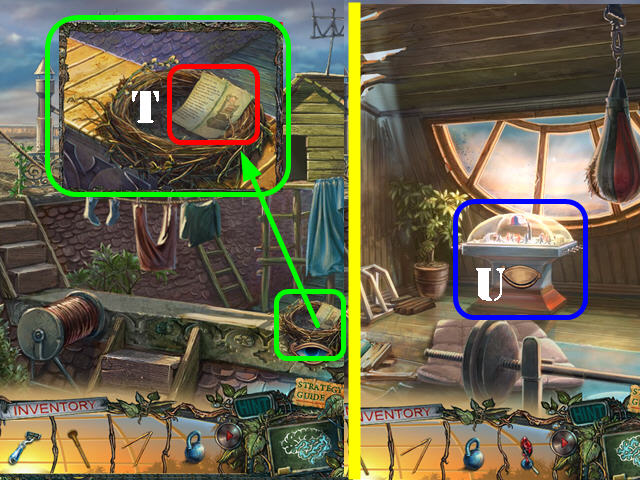
- Zoom into the nest; take the note and the HOCKEY PLAYER below it (T).
- Walk down.
- Zoom into the hockey table game; put the HOCKEY PLAYER on it to activate a puzzle (U).
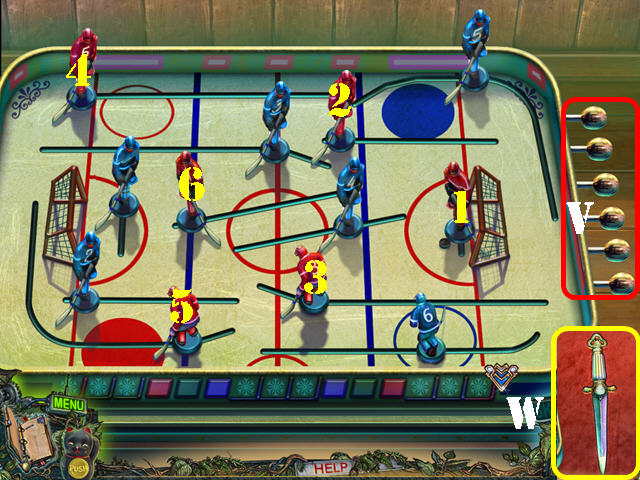
- Use the levers on the right to position the players and then select the players to activate them.
- To solve the puzzle, pull each of the 6 levers marked in red one time (V) and then select the players in the order shown on the screenshot (1-6).
- Take the KNIFE (W).
- Go back up to the roof.
- Cut the rope on the clothesline with the KNIFE (X).
- Zoom into the winch and attach the rope to it (Y).
- Go into the dovehouse (Z).

- Take the STEPLADDER (A).
- Zoom into the trough; use the CAT HOLOGRAM on the pigeons.
- Take the CRANK (B).
- Walk down.
- Zoom into the winch; put the CRANK on it and turn it (C).
- Zoom into the antenna and put the WEIGHT on it (D).
- Zoom back into the winch and pull the crank.
- Go into the greenhouse (E).
Chapter 11: The Greenhouse
- Zoom into the peacock and take the MIRROR (1).
- Take the stone path (2).
- Examine the snake; use the FLUTE on it. Take the STONE COBRA and the PESTICIDES (3).
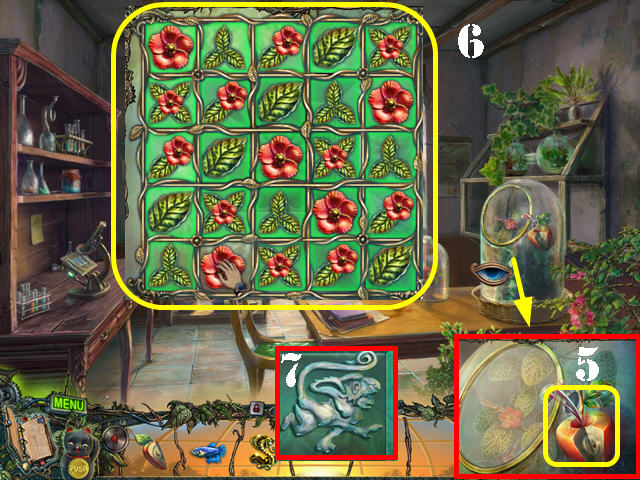
- Put the STEPLADDER on the steps (4) and then zoom into the flower pots to activate a puzzle (5).

- Move the flower pots next to their matching plants on the beams.
- Select a flower to move it to an empty space.
- To solve the puzzle, select the flowers in this order: F, B, D, E, H, C, A, B, J, G, H, E, I, H, C, D, B, J, I, E, D, B, F, J, I, D, B, and F.
- Take the LADYBUG TILE (K).
- Walk down.
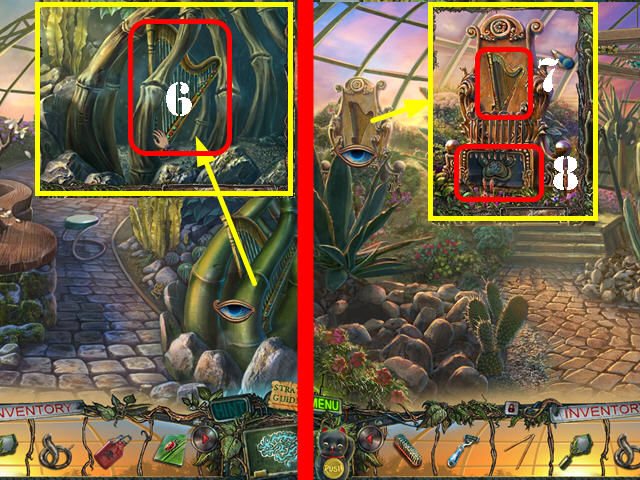
- Examine the tree trunk; use the PESTICIDES on it and take the HARP (6).
- Take the stone path ahead.
- Zoom into the sculpture; put the HARP in the indentation (7).
- Take the PAWPRINT (8).
- Return to the dovehouse.

- Zoom into the cage and remove the broken mirror. Put the MIRROR in the holder (9).
- Take the SHARK TILE (10).
- Return to the greenhouse.
- Zoom into the mossy area and clean it with the BRUSH (11).
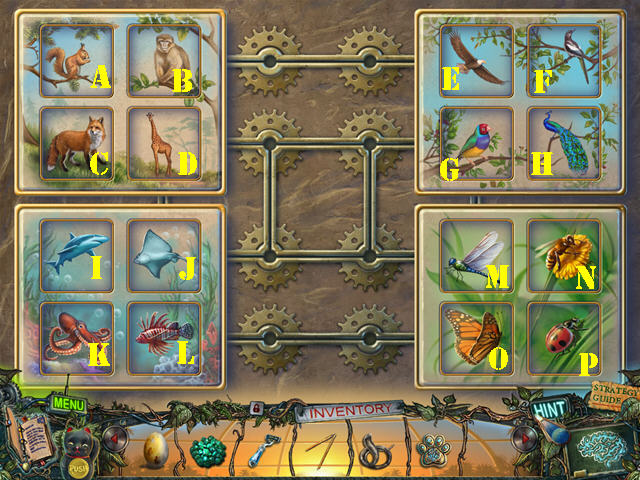
- Put the LADYBUG TILE and the SHARK TILE on the board to activate a puzzle. Put all the animals into the right environment. Select a tile, and then an arrow, to move it along the tracks.
- To solve the puzzle, select the animal wherever it is on the board and move it according to these instructions: OCTOPUS (K): Right, Down, Right; LADYBUG (P): Down, Right x 2; PARAKEET (G): Right, Up, Right x 2; MONKEY (B): Up x 2; BEE (N): Right x 2; OCTOPUS (K): Left x 2, Down; DRAGONFLY (M): Right x 3; EAGLE (E): Up, Right x 2; OCTOPUS (K): Left.
- SHARK (I): Down, Right, Down, Left; EAGLE (E): Up; BEE (N): Left x 2 and Up; RED FISH (L): Left x 3; PEACOCK (H): Left x 2; SQUIRREL (A): Down; FOX (C): Down; DRAGONFLY (M): Right x 2; MONKEY (B): Left.
- EAGLE (E): Left, Up, Right; MONKEY (B): Right; SQUIRREL (A): Up, Left x 2 Up, Left x 2, Up; FOX (C): Left, Up, Left x 2, Up, Left x 2; DRAGONFLY (M): Down; BEE (N): Right X 4; PEACOCK (H): Right, Up, Left x 2, Up.
- DRAGONFLY (M): Left x 2; LADYBUG (P): Down, Right, Down, Right; DRAGONFLY (M): Right, Up, Left x 2; BUTTERFLY (O): Left, Down, Right, Down; DRAGONFLY (M): Right x 2; PEACOCK (H): Down, Right; GIRAFFE (D): Left x 4.
- MANTA (J): Down, Left x 3, Down, Left; BIRD (F): Right; PEACOCK (H): Up, Right x 2; PARAKEET (G): Right, Down and EAGLE (E): Right x 2.
- You will earn the MAGPIE CHARM.
- Return to the dovehouse.
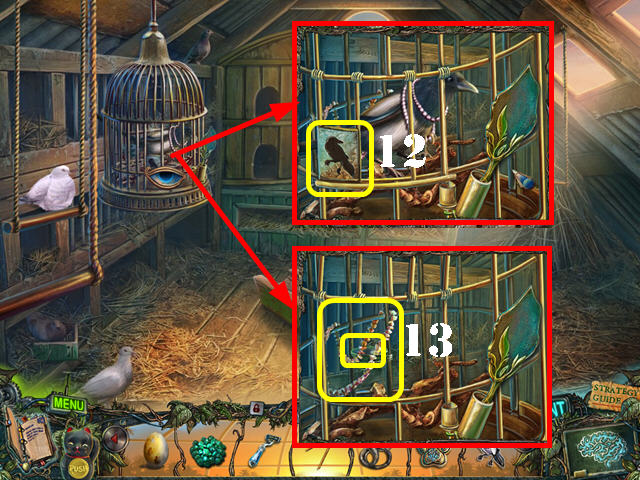
- Zoom into the cage; put the MAGPIE CHARM in the indentation and the bird will fly away (12).
- Take the AMBER NECKLACE and the DRINKING BOWL (13).
- Return to the greenhouse and take the stone path ahead.
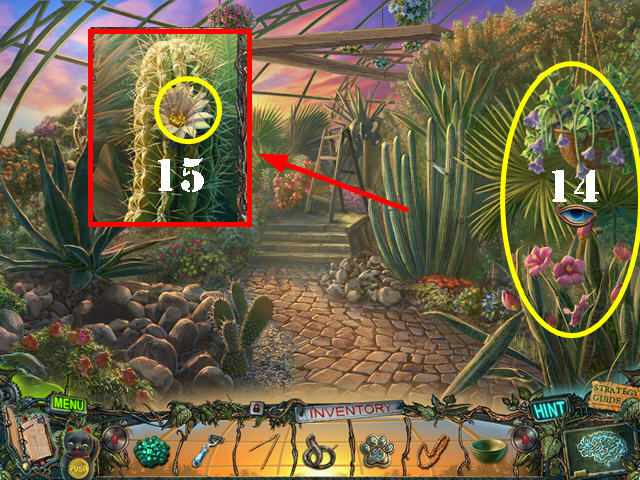
- Use the DRINKING BOWL on the plants to receive the DEW (14).
- Examine the cactus; put the DEW on it to make the flower bloom.
- Cut the flower with the RAZOR to receive the CACTUS FLOWER (15).
- Walk down.
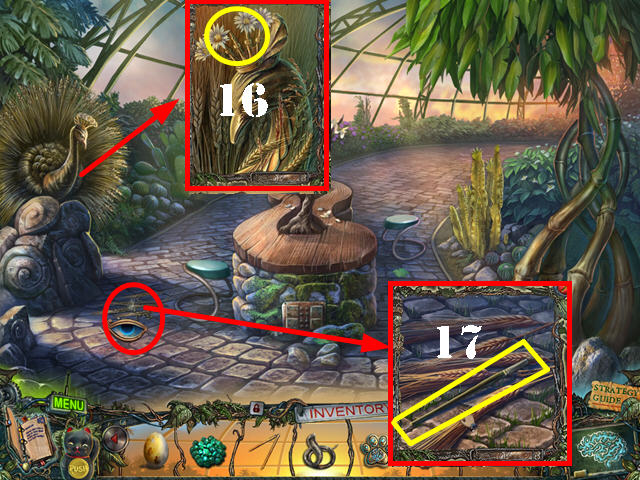
- Zoom into the stone peacock; put the CACTUS FLOWER in the crown (16).
- Examine the ground and take the PAINTBRUSH (17). Use the FLAIL on the wheat and take the WHEAT GRAINS.
- Walk down.
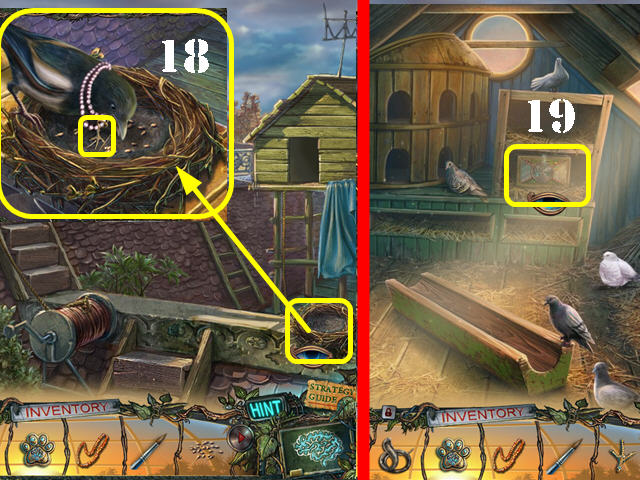
- Zoom into the nest; put the WHEAT GRAINS in it and take the BIRD’S FOOT (18).
- Go into the dovehouse.
- Zoom into the chest (19); put the BIRD’S FOOT and the PAWPRINT in the slots to activate a puzzle.
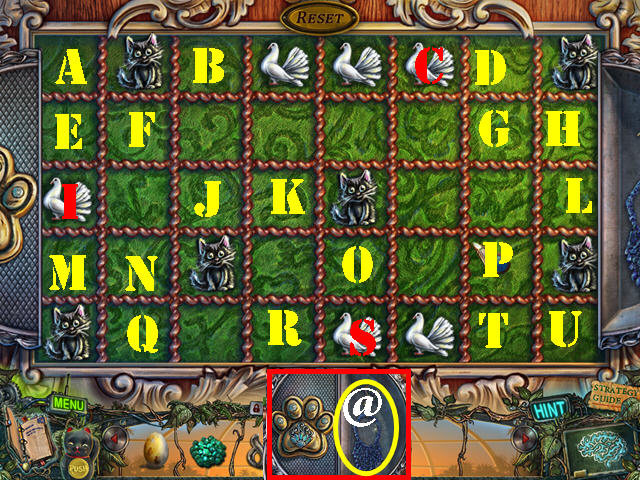
- Keep the doves away from the cats by placing them in the right spots; doves cannot be positioned adjacent to or diagonally from a cat.
- Select a dove and then an arrow to move the dove in that direction.
- To solve the puzzle, please move the doves in this order: A Down, H Left, E Down, Q Right, T Up, L Up, H Left, I Right, K Up, D Left, B Down, J Right, K Down, R Right, T Up, D Left, C Down, U Left, T Up, D Left, E Down, M Right, N Down, and Q Right.
- Take the LAZURITE STONES (@).
- Walk down 3 times and go through the lower door.
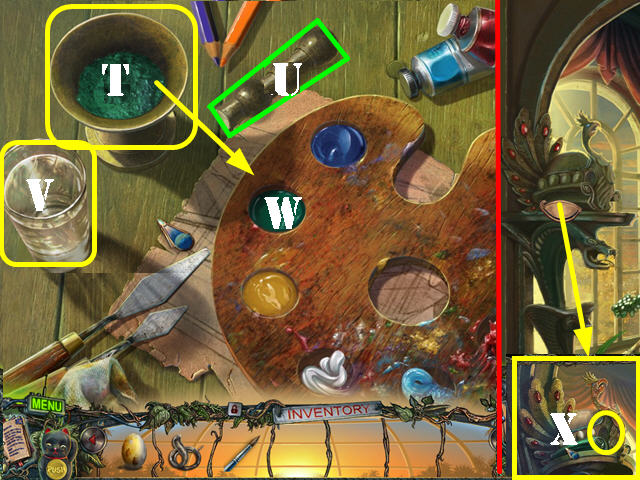
- Zoom into the small round table.
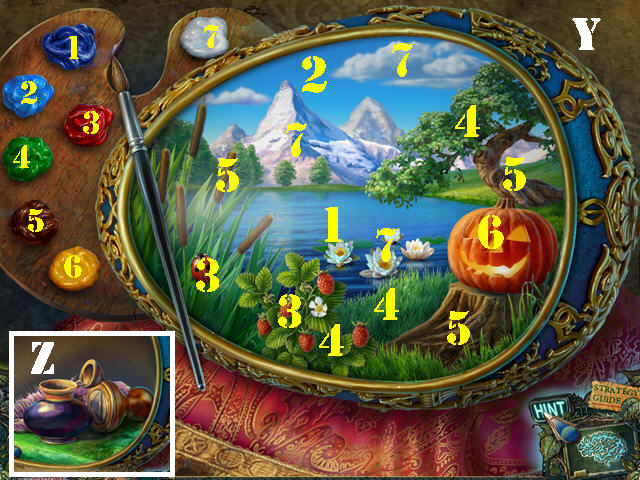
- Put the MALACHITE STONES in the mortar (T) and then drag the pestle (U) into the mortar to grind the stones. Drag the water cup (V) to the mortar and then drag the green paint to the palette (W).
- Put the AMBER NECKLACE in the mortar and then drag the pestle into the mortar to grind the stones. Drag the water cup to the mortar and then drag the yellow paint to the palette.
- Put the LAZURITE STONES in the mortar then drag the pestle into the mortar to grind the stones. Drag the water cup to the mortar and then drag the blue paint to the palette.
- Take the PALETTE.
- Walk down.
- Take a closer look at the peacock statue; put the EGG in the slot (X).
- Zoom into the egg and put the PALETTE and the BRUSH down to activate a puzzle.
- Pick up the brush and click it onto one of the colors to add that color to the brush.
- Use the colored brush to paint the right parts of the painting.
- Please look at the screenshot for the solution (Y). Please note that when you color in one section, others will be painted automatically.
- Take the INKPOT and the TRIANGLE STAMP (Z).
- Walk down.
- Examine the right door; put the TRIANGLE STAMP on the lock (A).
- Go through the door and then go through the right door.
- Zoom into the hatch and take the ROPE LADDER (B).
- Walk down; open the left door and go through it.
Chapter 12: The Finale
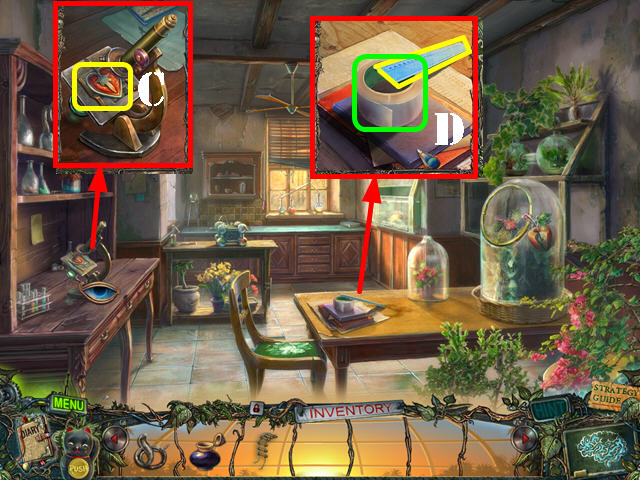
- Zoom into the microscope; take the HEART (C).
- Examine the table; take the RULER and the CLEAR TAPE (D).
- Walk down.
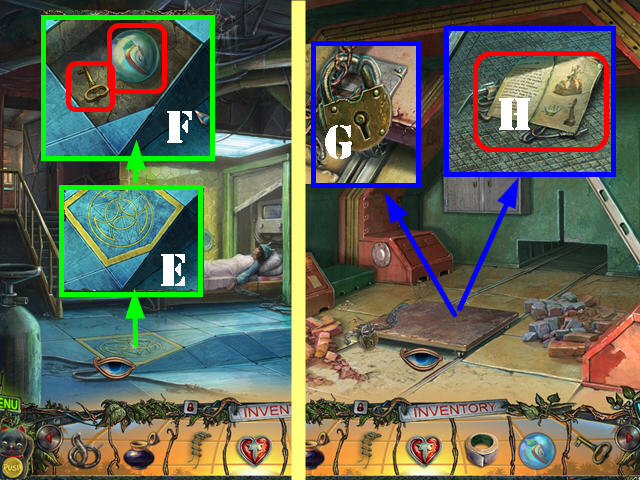
- Look at the tile and use the RULER to lift it (E).
- Take the APPLE and the KEY (F).
- Go through the right door.
- Zoom into the hatch; use the KEY in the lock and turn the key twice (G).
- Remove the board; take the note and the SOLDERING IRON (H).
- Walk down twice.
- Zoom into the monkey; use the INKPOT on his fingers and then use the CLEAR TAPE on them (I). Take the FINGERPRINTS.
- Go through the right door.
- Zoom into the machine; put the FINGERPRINTS on the scanner (J).
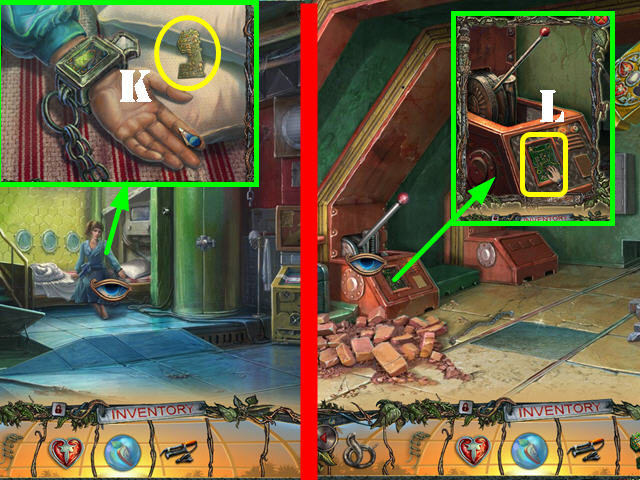
- Talk to Dizzy. Zoom into the pillow; take the CIRCUIT BOARD PART (K).
- Back out of the bed scene and go through the right door.
- Zoom into the machine; put the CIRCUIT BOARD PART in it and take the BROKEN CIRCUIT BOARD (L).
- Walk down and go through the left door to access the lab.
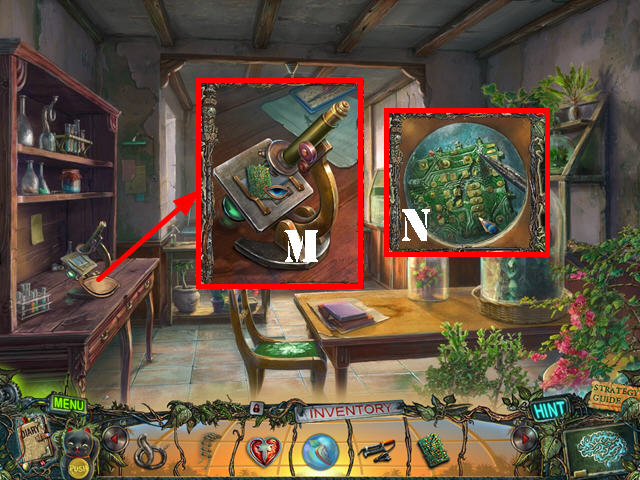
- Examine the microscope; put the BROKEN CIRCUIT BOARD on it and then zoom into the circuit board (M).
- Use the SOLDERING IRON on the broken circuit board (N) and then take the CIRCUIT BOARD.
- Walk down and go through the right door.
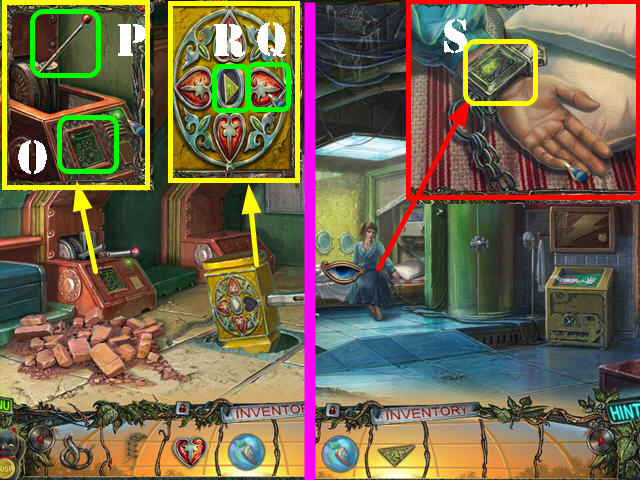
- Zoom into the machine; put the CIRCUIT BOARD in the slot (O) and pull the lever (P).
- Zoom into the hammer; put the HEART in the slot (Q) and take the TRIANGLE (R).
- Walk down and zoom into Dizzy. Zoom into her wrist and then on her bracelet (S); put the TRIANGLE on the bracelet to activate a puzzle.
- Reconstruct the snake puzzle. Place the puzzle pieces on the wheel (T) and press on them to rotate the piece.
- Please look at the screenshot for the solution (U).
- Remove the bracelet to set her free (V).
- Talk to Dizzy.
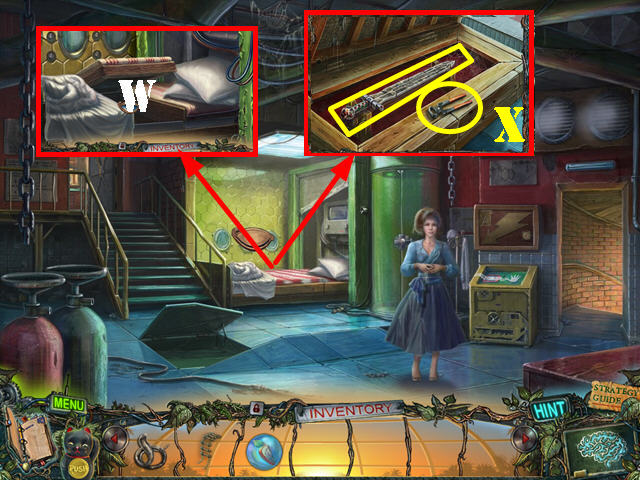
- Zoom into the bed; open the bed (W).
- Take the STONE SWORD and the PLIERS (X).
- Go through the right door.
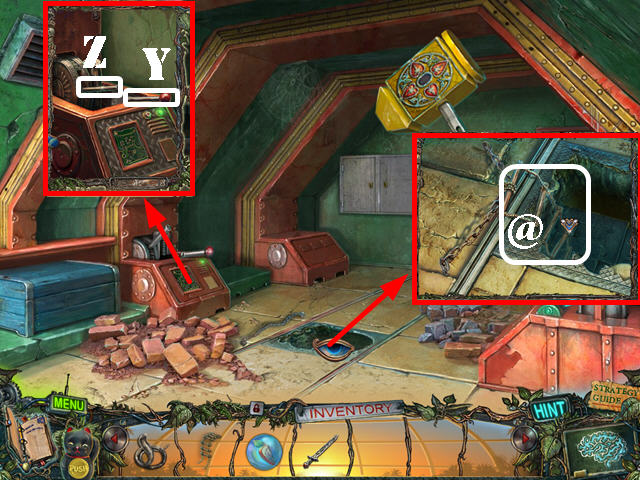
- Zoom into the machine; remove the broken lever (Y) and use the PLIERS on the stick (Z).
- Zoom into the niche; put the ROPE LADDER in it and go down to reach the secret rituals room (@).
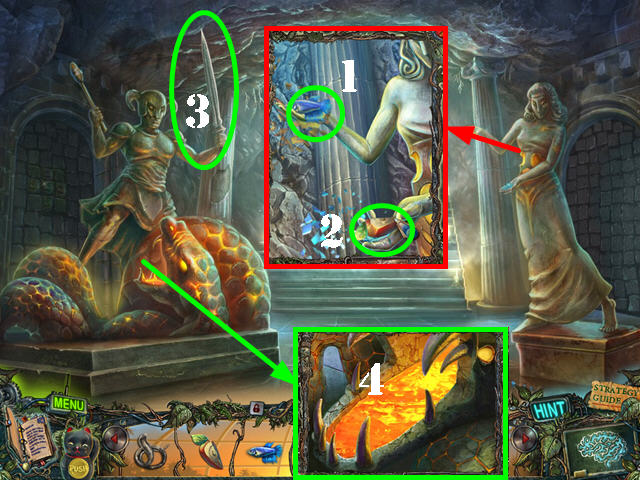
- Examine the female statue and put the APPLE in her empty hand; take the FISH (1) and the APPLE SLICE (2).
- Give the STONE SWORD to the left statue (3).
- Zoom into the snake’s mouth; dip the STONE COBRA in the gold to get the GOLD COBRA (4).
- Return to the lab.
- Zoom into the jar and put the APPLE SLICE on the apple (5). Touch the apple.
- Remove the lid and zoom into the contents to activate a puzzle.
- Arrange the plants so no two symbols are repeated in any row or column.
- Please look at the screenshot for the solution (6).
- Take the IRON MONKEY (7).
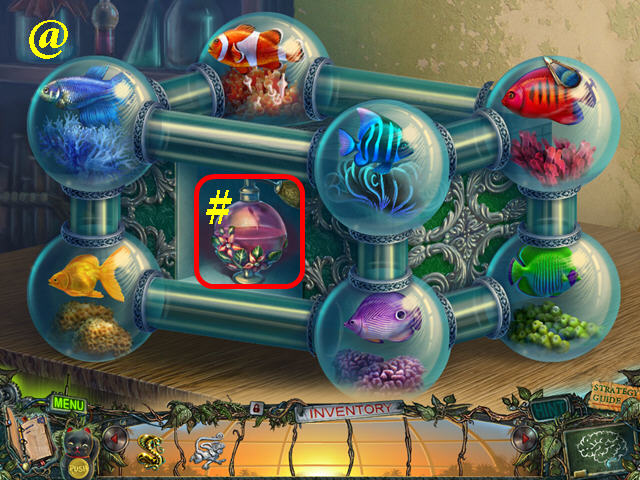
- Examine the small fish tank and put the FISH in it to activate a puzzle.
- Put the fish in their matching environment.
- Select two adjacent fish to swap their positions.
- Please look at the screenshot for the solution (@).
- Take the AROMATIC OIL (#).
- Return to the secret rituals room.
- Zoom into the hand; put the IRON MONKEY on it (8).
- Take the GREEN COBRA (9).
- Zoom into the snake’s mouth and use the AROMATIC OIL in the melted gold (10).
- Zoom into the wall for a clue (11).
- Walk down 3 times.
- Zoom into the device and then zoom into the cover; put the GOLD COBRA and the GREEN COBRA on it to activate a puzzle (12).
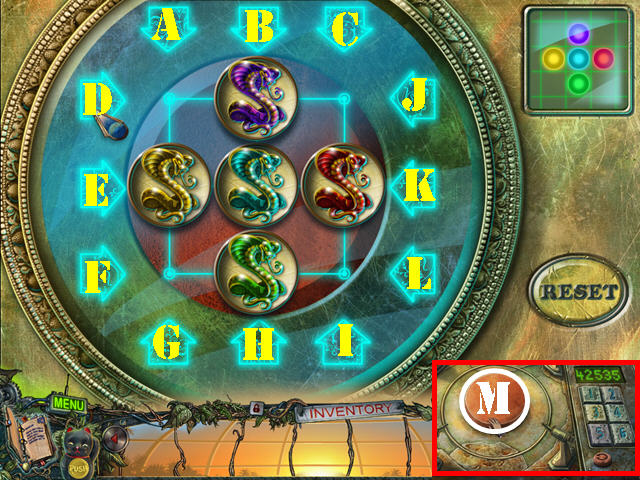
- Arrange the cobras on the board according to the clue in the upper right. Please note that you have to uncover the clue on the wall in the secret rituals room for this puzzle to unlock.
- Use the arrows to move the cobras around.
- To solve the puzzle, press on the buttons in this order: D, C, G, L, D, D, G, G, K, C, and D.
- Press the button (M).
- Congratulations, you have completed Twilight Phenomena: The Lodgers of House 13!


 Queen's Tales: Sins of the Past Walkthrough, Guide, & Tips
 Cascade Tips and Tricks, Guide, & Tips
 Mystery Agency: A Vampire's Kiss Walkthrough, Guide, & Tips
 Spirits of Mystery: Amber Maiden Walkthrough, Guide, & Tips
 Riddles of Fate: Into Oblivion Walkthrough, Guide, & Tips