Sonya Walkthrough, Guide, & Tips
Sonya Walkthrough
Welcome to the Sonya Walkthrough!
Help Sonya save her sister from unknown villains! After Lily’s life force is stolen it’s up to Sonya to get it back!
Whether you use this document as a reference when things get difficult or as a road map to get you from beginning to end, we’re pretty sure you’ll find what you’re looking for here.
This document contains a complete Sonya game walkthrough featuring annotated screenshots from actual gameplay!
We hope you find this information useful as you play your way through the game. Use the walkthrough menu below to quickly jump to whatever stage of the game you need help with.
Remember to visit the Big Fish Games Forums if you find you need more help. Have fun!
This walkthrough was created by BrownEyedTigre, and is protected under US Copyright laws. Any unauthorized use, including re-publication in whole or in part, without permission, is strictly prohibited.
General Tips

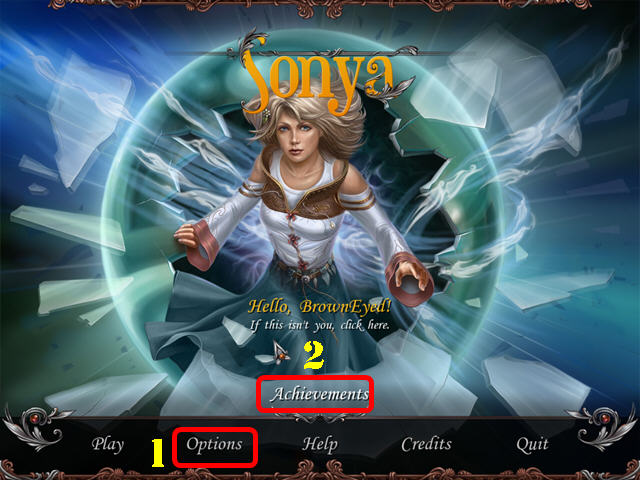
- Click on Options (1) to adjust the Volume, Screen size and Hardware Cursor.
- Your Achievements (@) can be accessed from the Main Menu.
- A hand cursor means you can pick up or move an item.
- A gear cursor signifies you can use an Inventory Item on that area.
- An eye cursor lets you examine an area closer.
- Puzzles may be skipped after a brief wait.

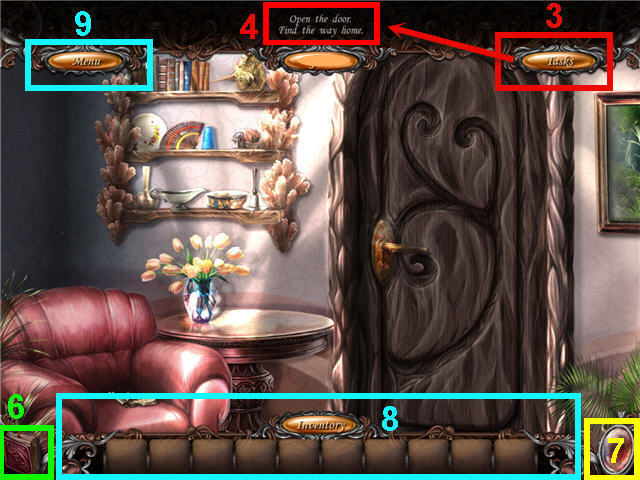
- Click on tasks (3) to lower the bar and see your current tasks (4).
- Click on the diary (6) to get story updates, Sonya’s thoughts and tips. The Diary will sparkle when there is a new update.
- Click on the red locket after it finishes sparkling (7) to get a hint in regular game play or a Hidden Object Scene. To get a hint in a Hidden Object Scene, click on the red locket, and then click on the item name in the list you wish to find.
- Move your cursor over the bottom of the screen to access the inventory bar (8).
- Inventory Items with a ‘+’ next to them can be combined. Drag and drop the item on the item you wish to combine it with.
- There are items that must be examined in order to trigger Hidden Object Scenes. If you do not have a Hidden Object Scene where it is listed in the walkthrough, please check the guide for anything you may have missed.
- Click on menu (9) to exit the game.
Chapter 1- Kidnapped

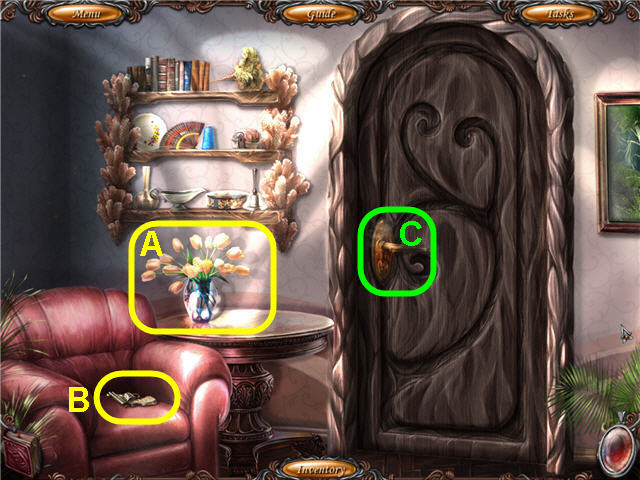
- Take the VASE WITH WATER (A) and the UNLOADED REVOLVER (B).
- Use the VASE WITH WATER on the door handle (C).
- Back out.

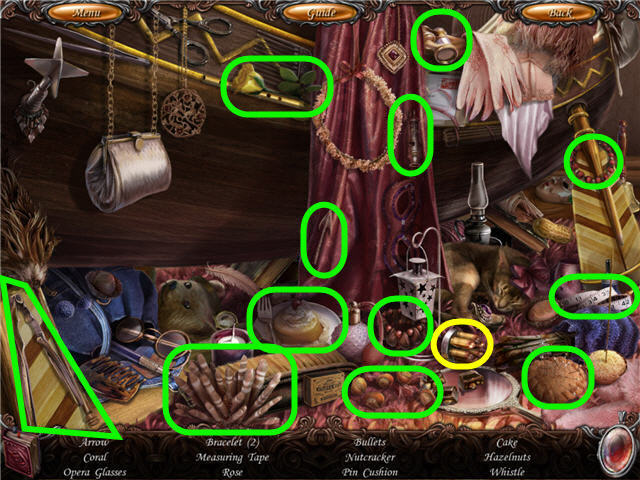
- Click on the bed to access a Hidden Object Scene.
- Find the items listed and get BULLETS.
- In Inventory; combine the BULLETS with the UNLOADED REVOLVER to get a REVOLVER.

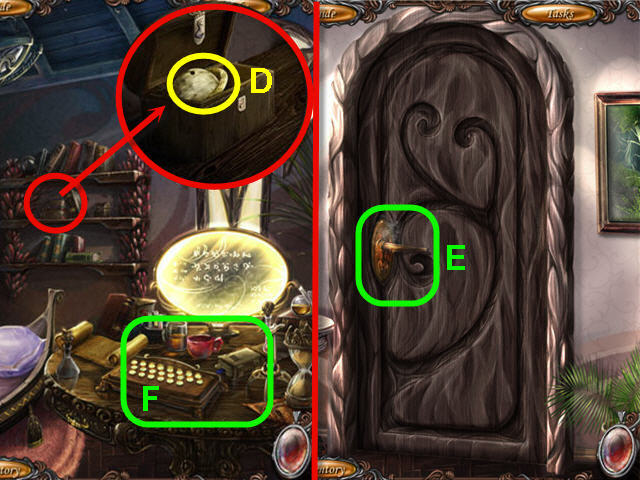
- Examine the shelves; open the chest and take the JUPITER MODEL (D).
- Back out.
- Use the REVOLVER on the door handle (E).
- Back out.
- Click on the table (F) to access a Hidden Object Scene.

- Find the fragments and get a KEY, FLASK, LIGHTER, REAGENT and FLASK HOLDER.
- Move the pedestal (G) to get a reagent.
- Assemble the KEY and use on the box (H); take the flask and reagent piece.
- Place the FLASK HOLDER and FLASK on the stand (I).
- Place the REAGENT in the flask and light with the LIGHTER.
- Take the EXPLOSIVE.
- Back out.
- Use the EXPLOSIVE and the REVOLVER on the door handle.

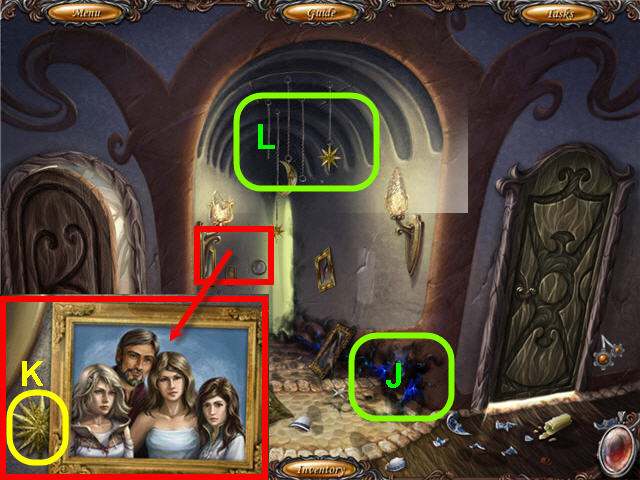
- Click on the right door.
- Examine the blue orb (J); click on it.
- Examine the picture; take the SUN (K).
- Place the JUPITER MODEL and SUN by the hanging moon (L) to trigger a puzzle.

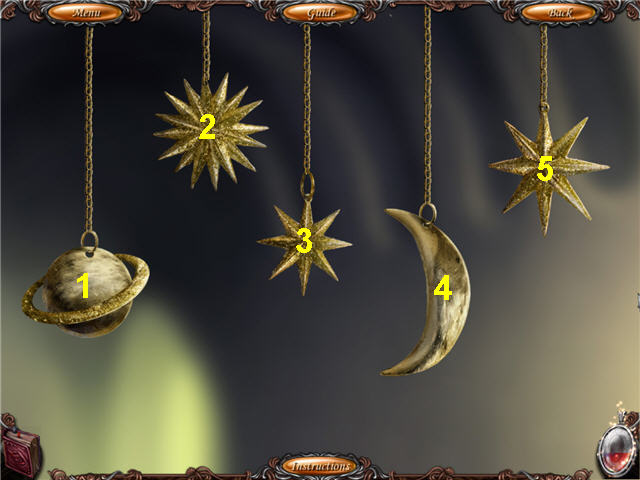
- Watch the stars and planets light up and duplicate the sequences.
- My solution is; 4535, 32451, 425424.
- Examine the hatch above the hanging stars.
- Head into the left room.
- Click on the wardrobe to access a Hidden Object Scene.

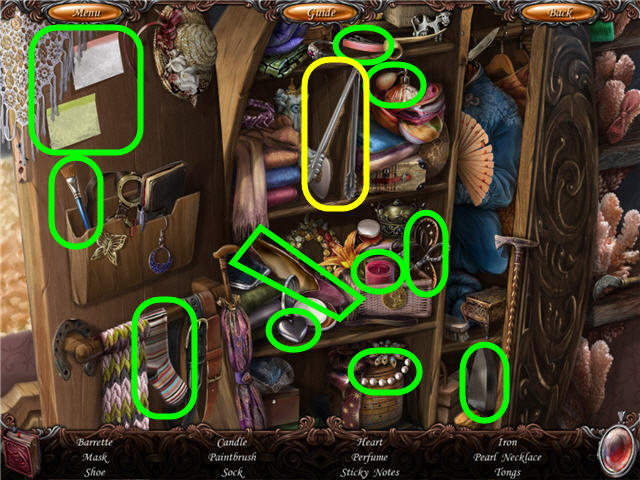
- Find the items listed and get TONGS.
- Back out.


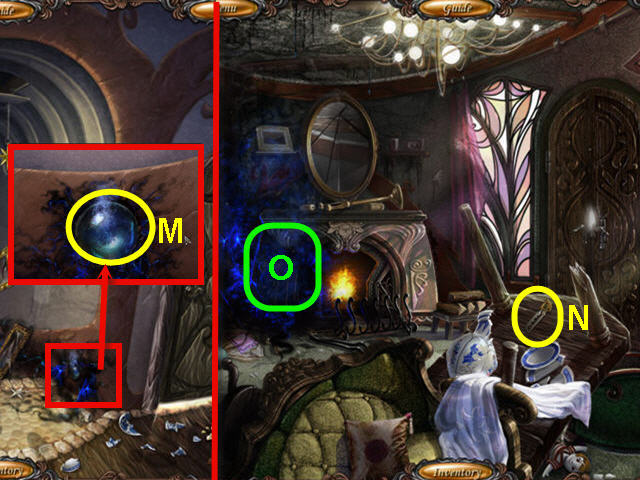
- Examine the orb; use the TONGS to get the BLUE ORB (M).
- Head forward.
- Examine the table; take the ELECTRIC CARD KEY (N).
- Use the BLUE ORB on the blue smoke (O) to get a LOADED BLUE ORB.
- Click on the fireplace to access a Hidden Object Scene.

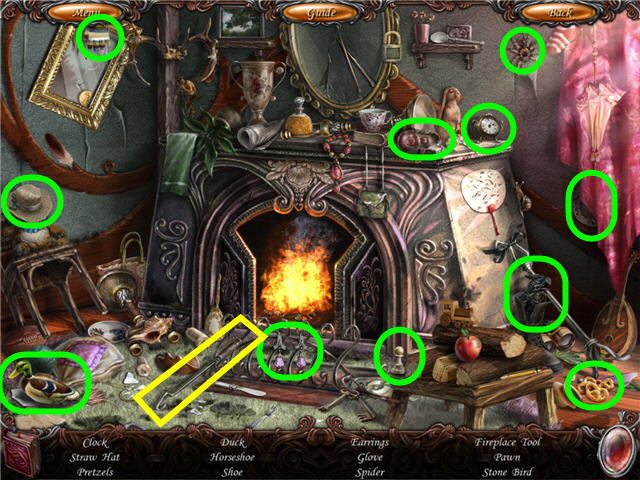
- Find the items listed and get a FIREPLACE TOOL.
- Back out.
- Use the FIREPLACE TOOL on the attic hatch and examine it.
- Head into the left door.
- Click on the bed to access a Hidden Object Scene.

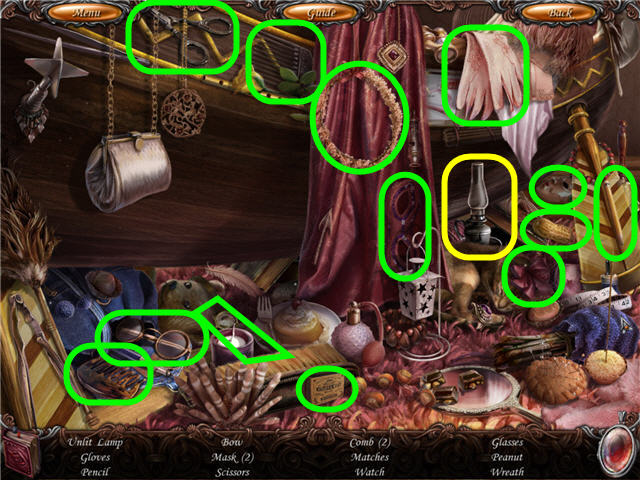
- Find the items listed and get an UNLIT LAMP.
- Back out and head forward.
- Use the UNLIT LAMP on the fireplace to get a LIT LAMP.
- Back out.

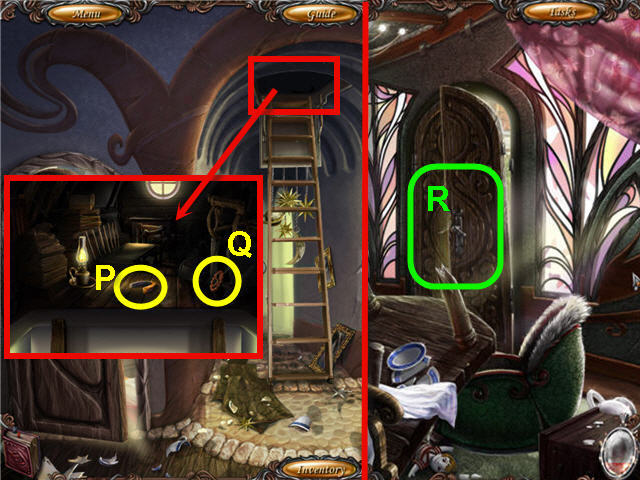
- Examine and use the LIT LAMP on the hatch.
- Take the MAGNET (P) and VALVE (Q).
- Head straight.
- Use the FIREPLACE TOOL on the door (R) and head through.
- Examine the fountain; click on the cover.
- Place the VALVE on the stem to trigger a puzzle.

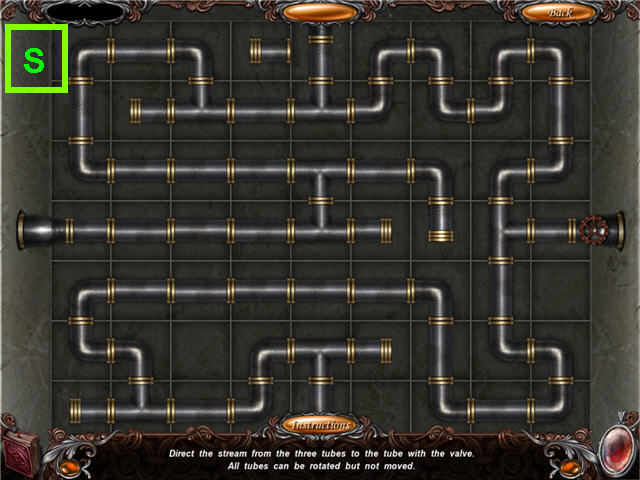
- Connect the pipes so that no steam escapes.
- See screenshot (S) for solution.

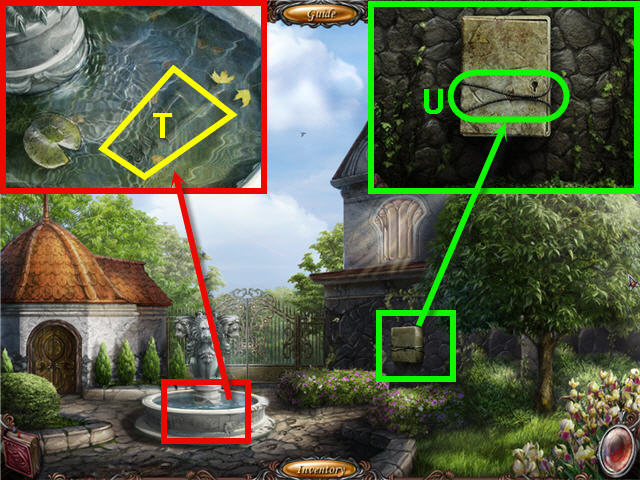
- Examine the fountain; take the WIRE CUTTER (T).
- Examine and use the WIRE CUTTER on the electrical box (U).
- Open the electrical box and examine to trigger a puzzle.

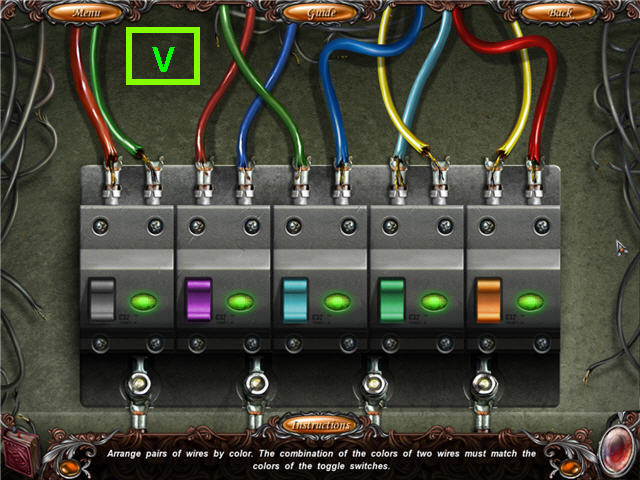
- Connect the wires so that the combinations of the colored wires create the color of the switches.
- See screenshot (V) for solution.

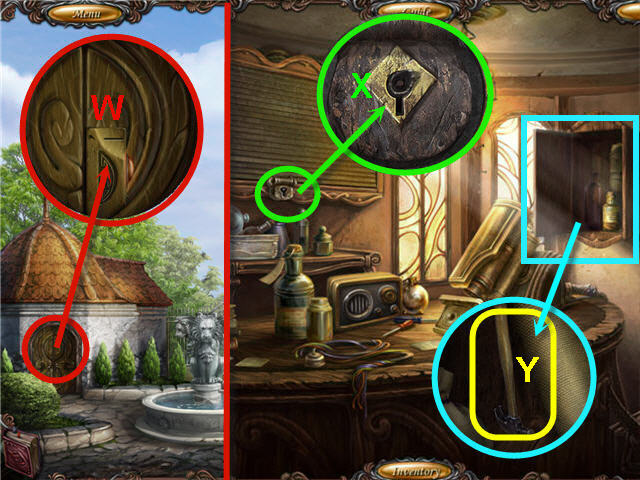
- Examine the workshop door; use the ELECTRIC KEY CARD on the slot (W).
- Enter the workshop.
- Examine the lock; use the MAGNET on the stuck key (X).
- Open the cabinet; examine and take the CLAW HAMMER (Y).
- Back out two times.
- Click on the fireplace to access a Hidden Object Scene.

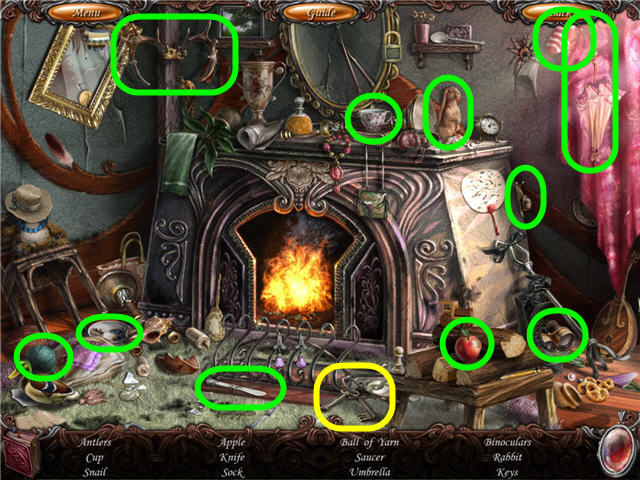
- Find the items listed and get KEYS.
- Head into the workshop.
- Examine and use the KEYS on the locked cabinet.
- Click on the opened cabinet to access a Hidden Object Scene.

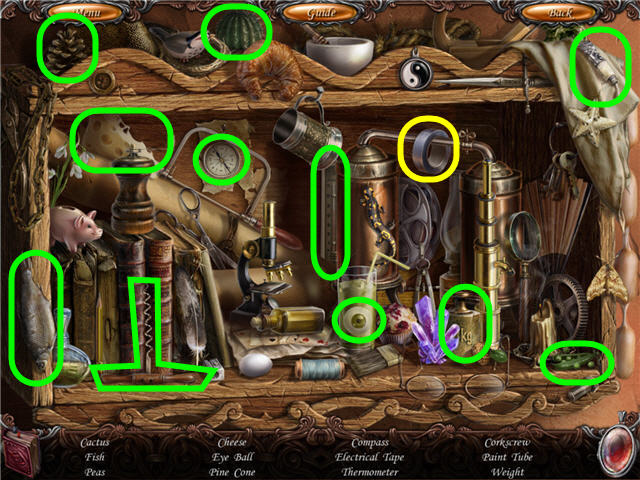
- Find the items listed.
- Get the ELECTRICAL TAPE.

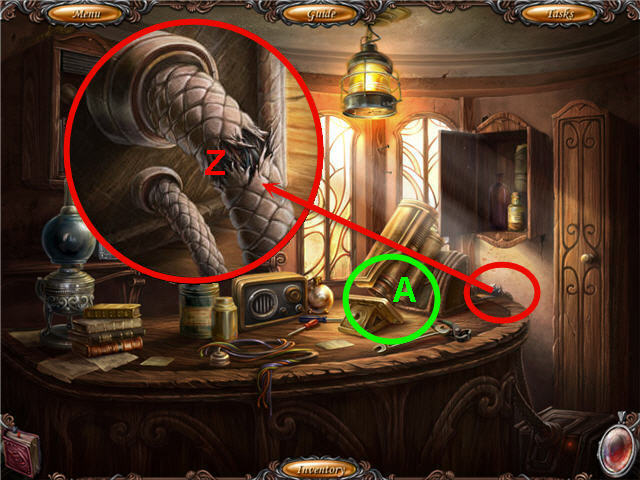
- Examine and use the ELECTRICAL TAPE on the broken wire. (Z).
- Click on the laser (A) to access a Hidden Object Scene.

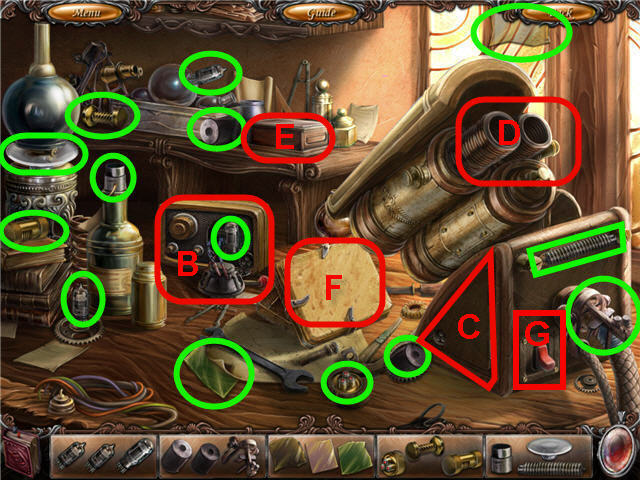
- Find the fragments and get a LAMP TRANSISTOR, LASER PART, GLASS, SCREWDRIVER and SUCTION CUP.
- Use the SCREWDRIVER on the radio (B) and take the lamp transistor part.
- Use the SCREWDRIVER on the panel (C).
- Place the LAMP TRANSISTOR in the open panel and place the LASER PART on the top (D).
- Place the SUCTION CUP on the box (E); take the glass piece.
- Place the GLASS on the holder (F) and flip the switch (G).
- Take the GLASS LENSES.
- Head back to the bedroom.
- Click on the wardrobe to access a Hidden Object Scene.

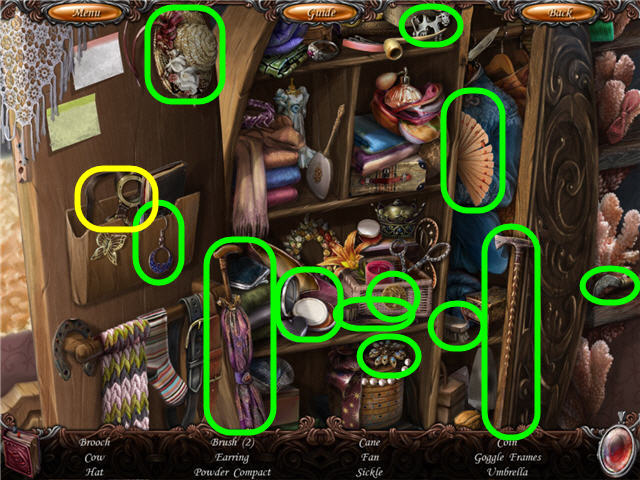
- Find the items listed and get GOGGLE FRAMES.
- In Inventory; combine the GOGGLE FRAMES and GLASS LENSES to get PROTECTIVE GLASSES.
- Back out.
- Use the PROTECTIVE GLASSES on the right door.
- Click on the apparition of Lily.
Chapter 2 – The Forest Man

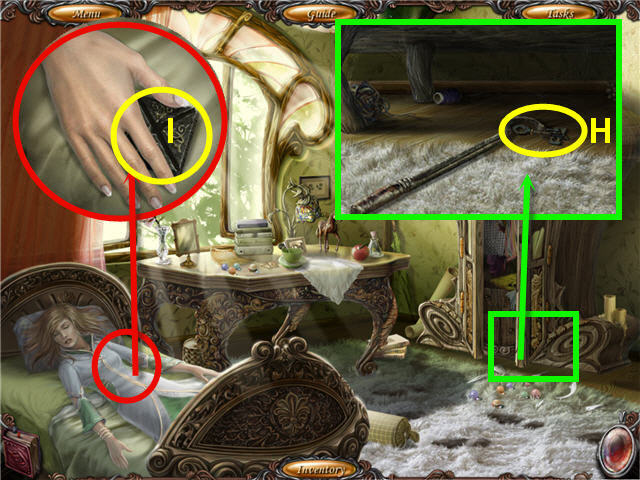
- Examine the wardrobe; use the FIREPLACE TOOL to get the KEY (H).
- Examine Lily; take the GATE’S LOCK PART (I).
- Head outside.
- Examine the gate; place the GATE’S LOCK PART on the lock to trigger a puzzle.

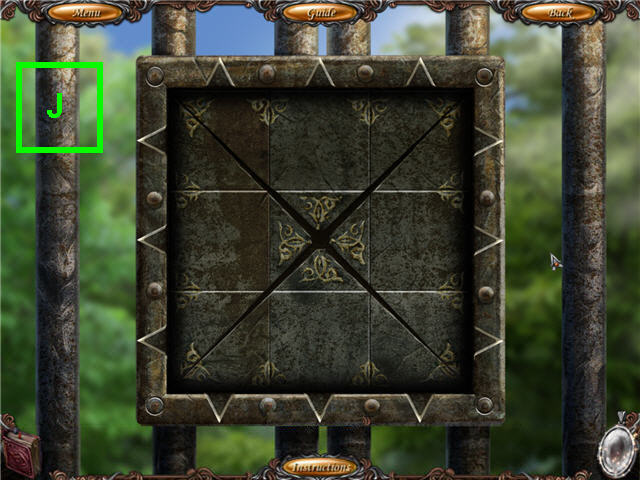
- Move the pieces using the arrows to complete the lock.
- The starting layout is random; see screenshot (J) for solution.
- Examine the gate; insert the KEY and enter.

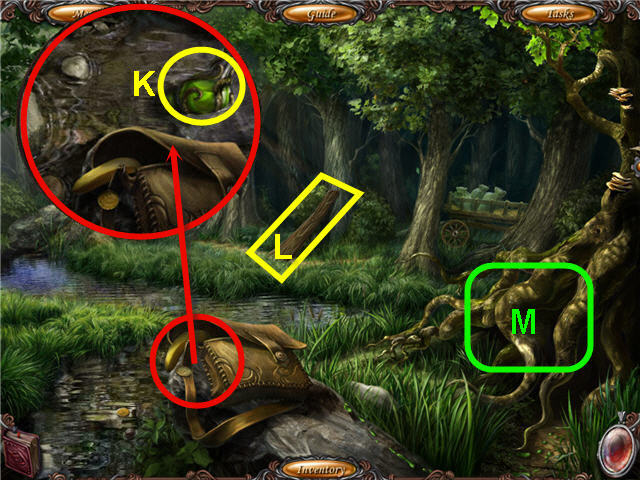
- Examine the knapsack; take the GREEN POTION (K).
- Take the LONG BOARD (L).
- Use the GREEN POTION on the roots (M) to trigger a puzzle.

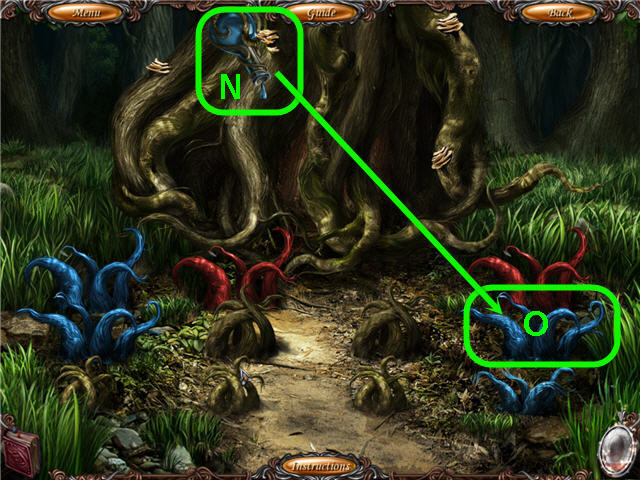
- Watch the color changes of the bottle (N) and click on a matching colored root (O) to eliminate it. See screenshot for example.
- You now have a NEAR-EMPTY VIAL in inventory.

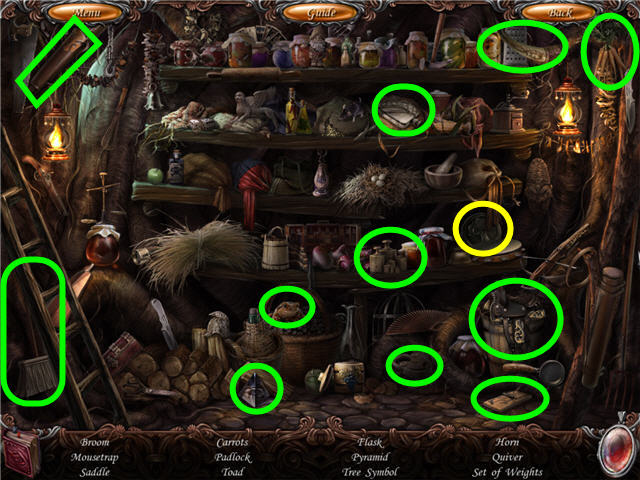
- Enter the tree to access a Hidden Object Scene.
- Find the items listed.
- Get a TREE SYMBOL.

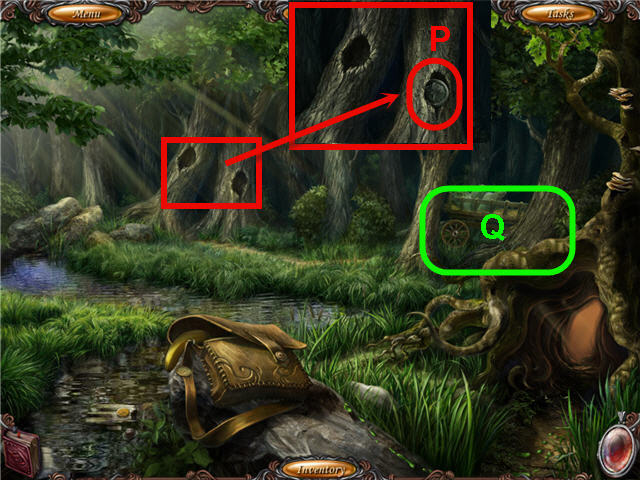
- Examine the tree holes; place the TREE SYMBOL in the right hole (P).
- Click on the cart (Q) to access a Hidden Object Scene.

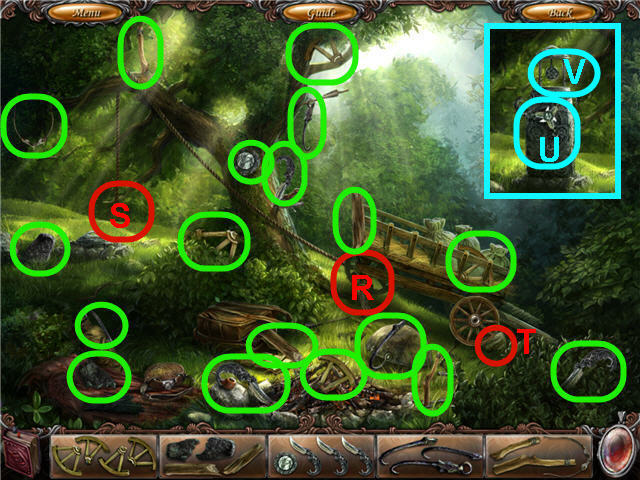
- Find the fragments and get a WHEEL, HAMMER, VALVE-HANDLE, HOOK and SLINGSHOT.
- Place the WHEEL on the cart axle (R).
- Place the HOOK on the rope (S).
- Use the HAMMER on the stone (T).
- Use the VALVE-HANDLE on the pedestal; turn the valve (U).
- Try and take the symbol (V); use the SLINGSHOT on the crow.
- Take the dropped FLOWER SYMBOL.
- Examine the holes in the tree; place the FLOWER SYMBOL in the left hole.
- Head straight through the trees.

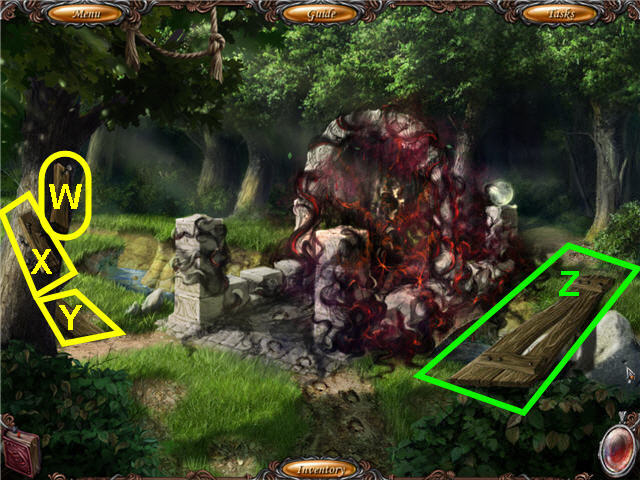
- Use the CLAW HAMMER on the boards (W-X) to get 2 SHOT BOARDS and NAILS.
- Take the 2nd LONG BOARD (Y).
- Place the 2 LONG BOARDS and the 2 SHOT BOARDS right of the bridge (Z).
- Use the NAILS and CLAW HAMMER on the SHOT BOARDS.
- Head across the boards.

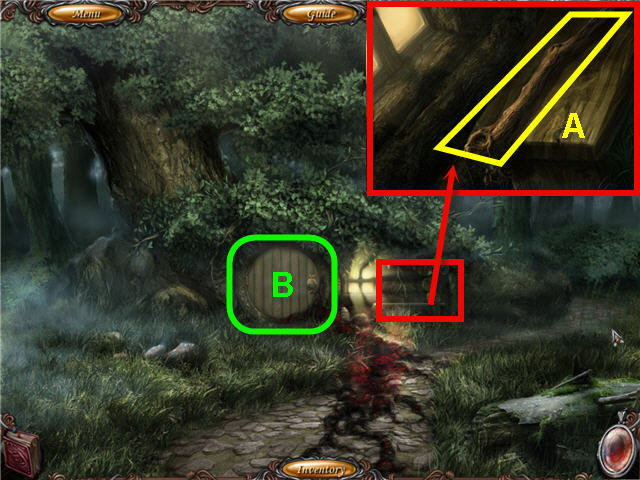
- Examine the bench; take the CANE (A).
- Open the tree house door (B) and use the PROTECTIVE GLASSES to enter.

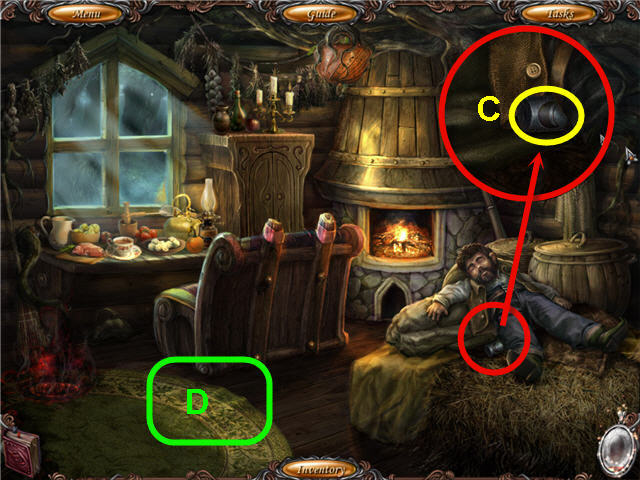
- Click on the two apparitions.
- Examine the forest man; take the CHEST DIGIT (C).
- Move the rug off the hatch (D) and click on it.
- Back out two times.

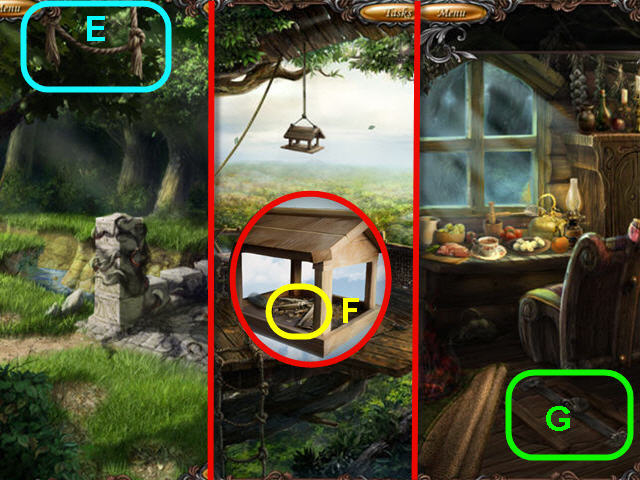
- Use the CANE on the rope ladder (E); head up.
- Examine the birdhouse; take the KEYS (F).
- Head to the tree house.
- Use the KEYS on the hatch (G) and click on the opened hatch.

- Back out three times. Head into the tree to access a Hidden Object Scene.
- Find the items listed and get a LADDER.
- Head into the tree house.
- Use the LADDER on the hatch.
- Enter the hatch to access a Hidden Object Scene.

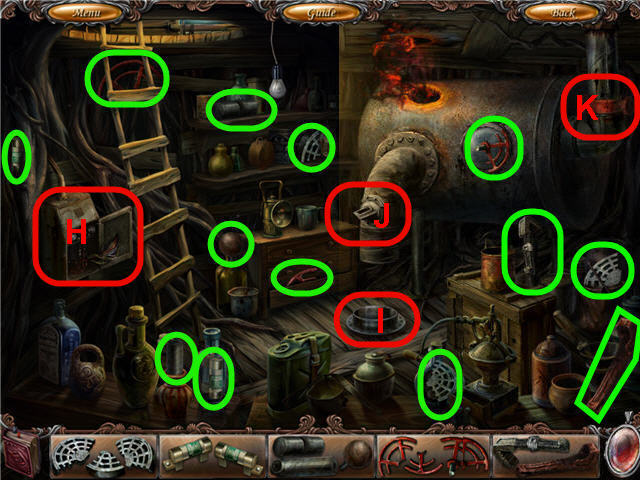
- Find the fragments to get a FILTER, FUSES, SWITCH HANDLE, VALVE and WRENCH.
- Place the FUSES in the box (H).
- Place the SWITCH HANDLE on the box and pull it to find the remaining fragments.
- Place the FILTER on the hole (I).
- Place the VALVE on the stem (J).
- Use the WRENCH on the bolt (K).
- Turn the VALVE; take the RED ORB.
- Back out two times.

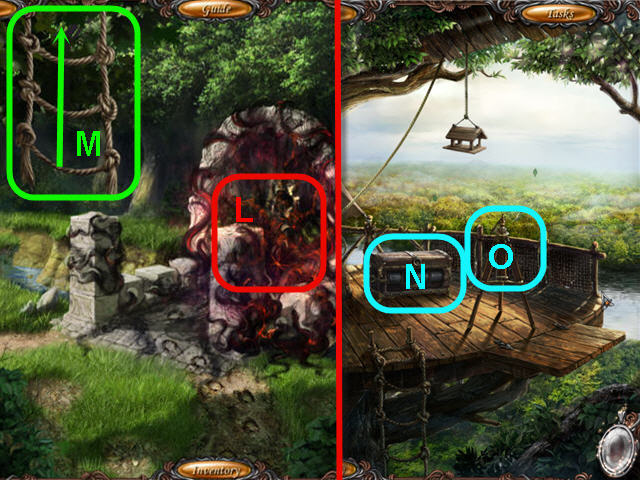
- Use the RED ORB on the red fog (L) to get a LOADED RED ORB.
- Head up the ladder (M).
- Examine the chest (N); place the CHEST DIGIT on the slot and note we need the combination.
- Click on the tripod (O).
- Go to the workshop.
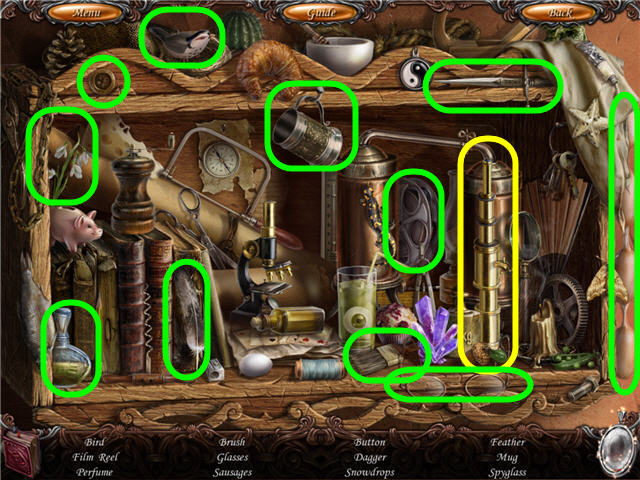
- Click on the shelf to access a Hidden Object Scene.


- Find the items listed and get a SPYGLASS.
- Head back to the observation deck.
- Place the SPYGLASS on the tripod and look through.

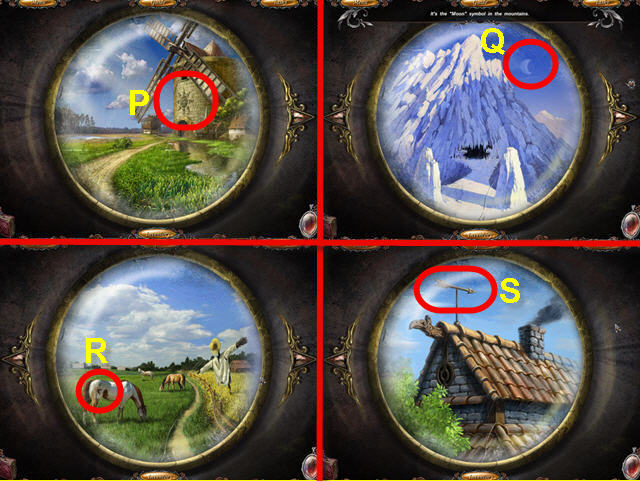
- Find the location of the sun (P), moon (Q), star (R), and arrow (S) in the scenes by using the side arrow.
- Back out of the spyglass only.

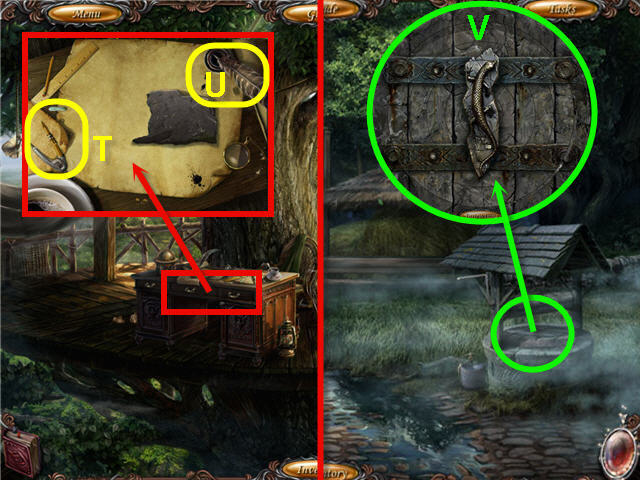
- Examine the desk; take the SHEET OF PAPER (T) and INK (U).
- Go down the path right of the tree house.
- Click on the well to trigger a puzzle.
- Turn the rings to complete the picture. See screenshot (V) for solution.
- Open the shutter on the window left of the door.
- Examine the window; remove the pin to access a Hidden Object Scene.

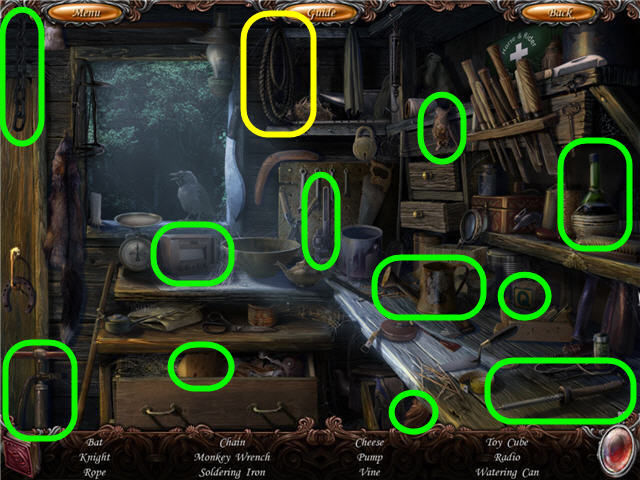
- Find the items listed and get a ROPE.
- Open the drawer to get the cheese.

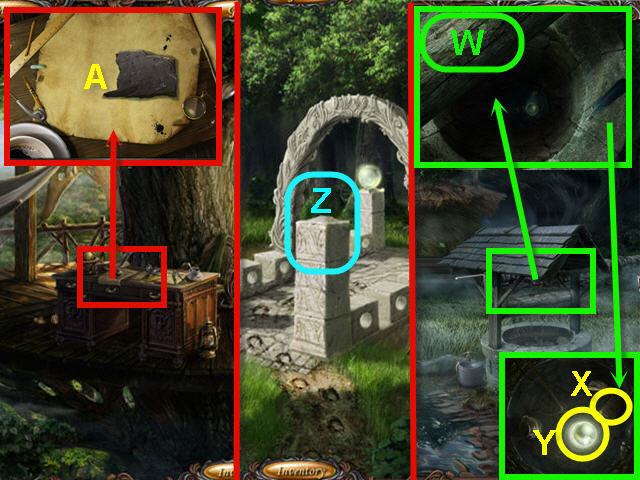
- Examine the well; tie the ROPE to the beam (W).
- Click down the well twice.
- Take the STONE PLATE PART (X) and BRIDGE SPHERE (Y).
- Exit the well and back out twice.
- Place the BRIDGE SPHERE on the pillar (Z).
- Climb up the rope.
- Examine the desk; place the STONE PLATE PART on the desk (A).
- Place the INK and the SHEET OF PAPER on the stone plate.
- Exit and head into the tree house.
- Click on the table to access a Hidden Object Scene.

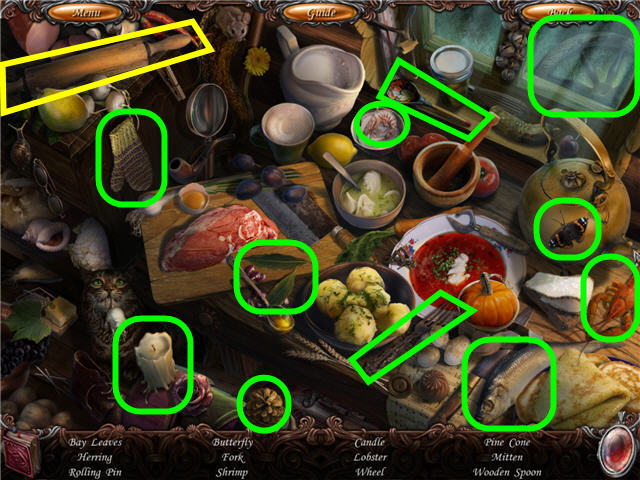
- Find the items listed and get a ROLLING PIN.
- Go to the observation deck.

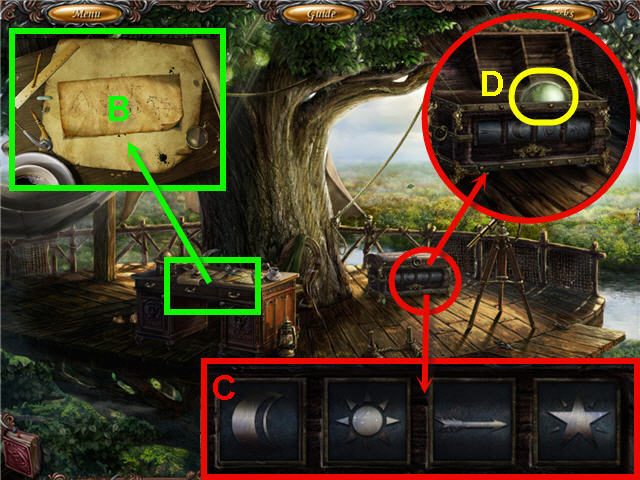
- Examine the desk; use the ROLLING PIN on the paper (B).
- Examine the chest; use the code from the desk and the spyglass to arrange the symbols (C).
- Solution: Moon, Sun, Arrow, Star.
- Examine the chest; take the BRIDGE SPHERE (D).
- Exit the deck and place the BRIDGE SPHERE on the pillar.
- Click on a sphere to trigger a puzzle.

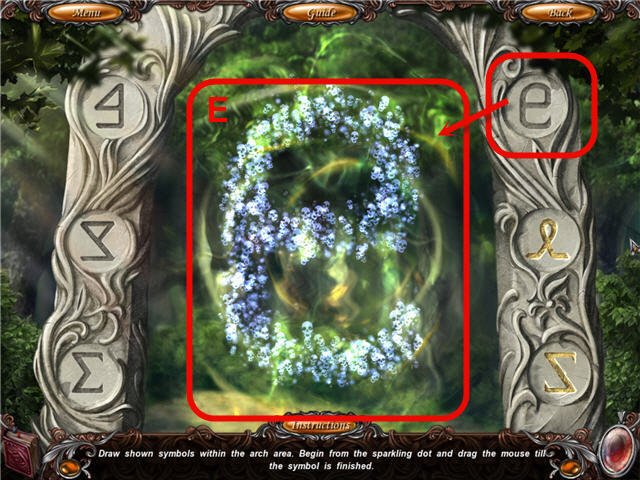
- Duplicate the symbol shown by click-hold and dragging your cursor in the same pattern (E). Repeat for all 6 symbols.
- Enter through the portal.
Chapter 3 – The Portal

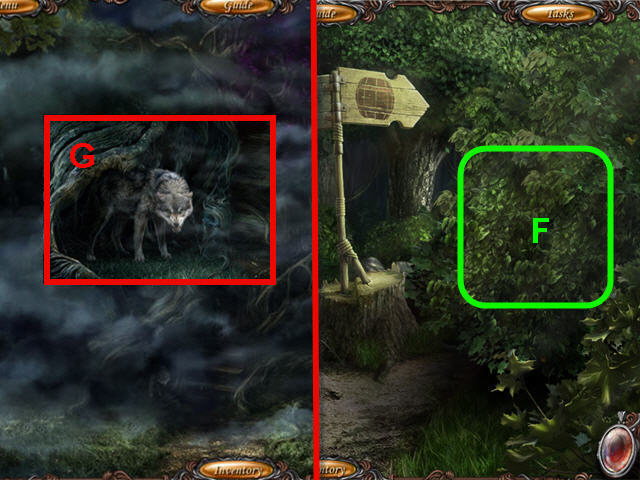
- Click on the bushes (F).
- Head left and click anywhere to see the wolf; click on the wolf (G).
- Back out to the bridge and head to the shed behind the tree house.
- Click on the door to access a Hidden Object Scene.

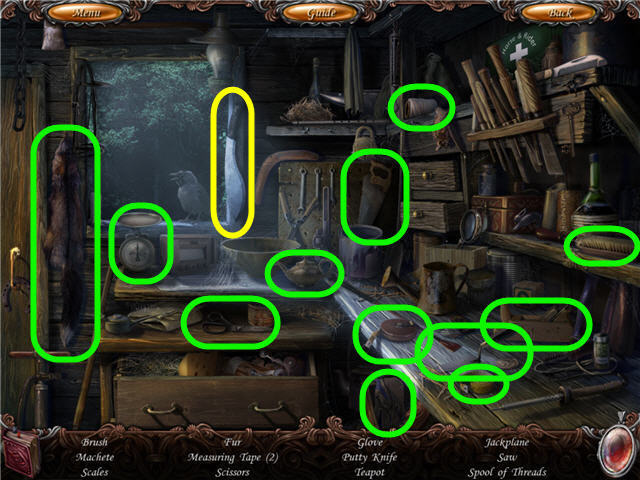
- Find the items listed and get a MACHETE.
- Back out and head into the tree house.
- Click on the table to access a Hidden Object Scene.

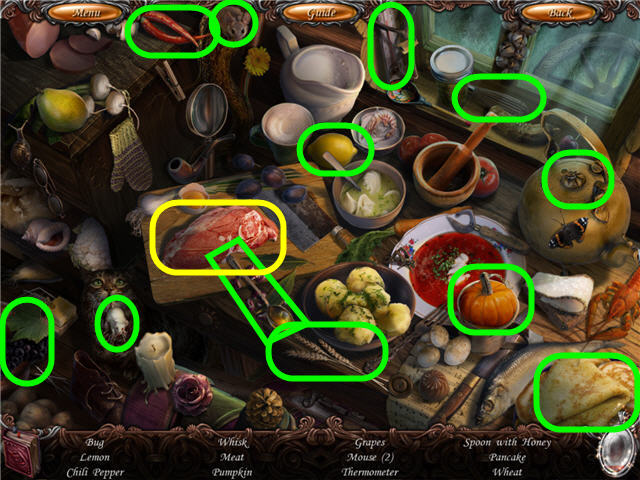
- Find the items listed and get MEAT.
- Open the kettle to find the bug.
- Go back through the portal; head left.

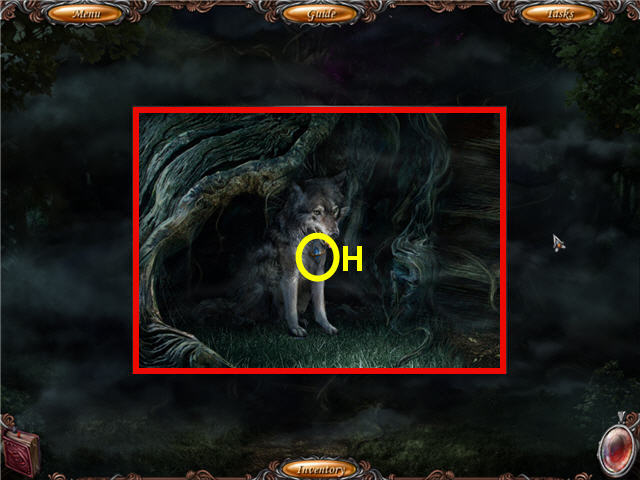
- Examine the area; give the MEAT to the wolf.
- Take the WOLF’S CRYSTAL (H).
- Back out to the crossroad.
- Use the MACHETE on the bushes three times and head right.
- Click on the barrel to access a Hidden Object Scene.

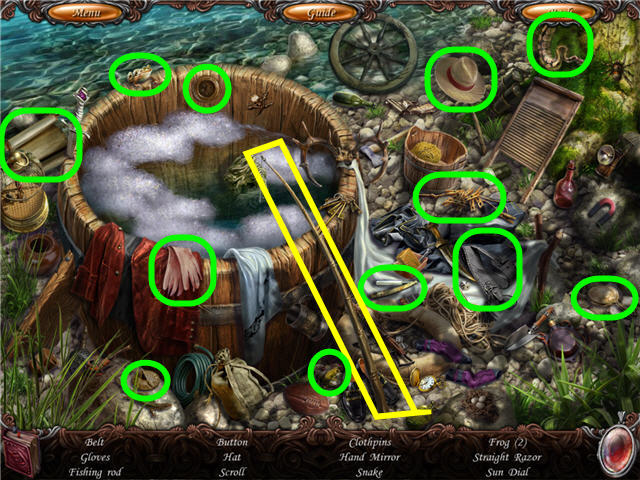
- Find the items listed and get a FISHING ROD.
- Combine the WOLF’S CRYSTAL and the FISHING ROD to get ROD WITH A CRYSTAL.

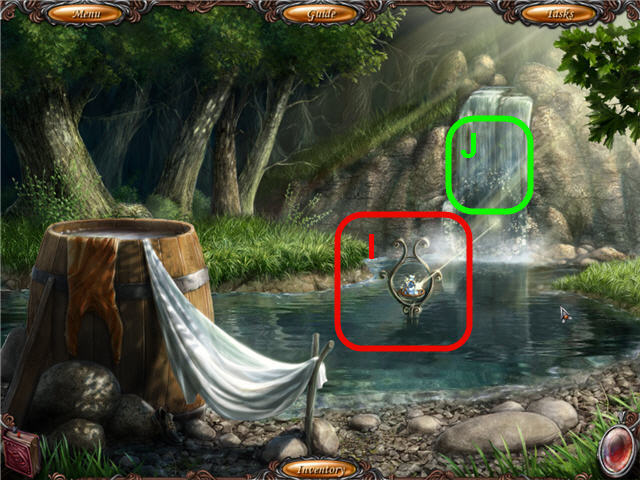
- Use the ROD WITH A CRYSTAL on the stand (I).
- Head to the waterfall (J) to access a Hidden Object Scene.

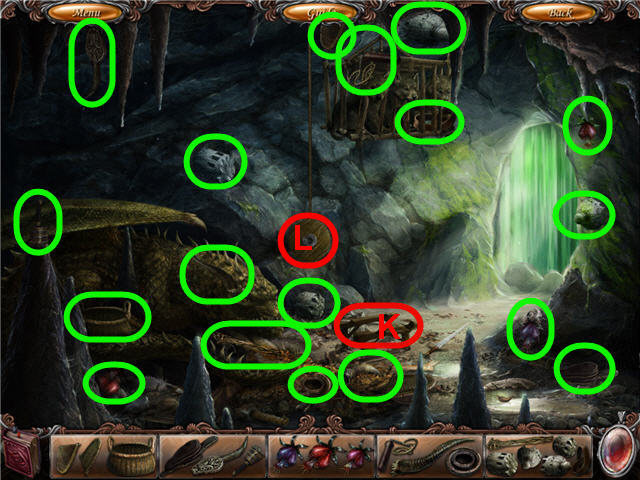
- Find the fragments to get a BASKET, BELLOWS, SOPORIFIC HERBAGE, HANDLE and MILLSTONES.
- Place the MILLSTONES and the SOPORIFIC HERBAGE on the stand (K).
- Click on the SOPORIFIC HERBAGE to crush them; use the BELLOWS on the dust on the ground.
- Place the HANDLE on the wheel (L) and crank it to lower the cage.
- Open the cage; use the BASKET on the cubs to get WOLF’S CUBS.
- Go to the wolf.
- Examine the area; give the WOLF’S CUBS to the wolf.

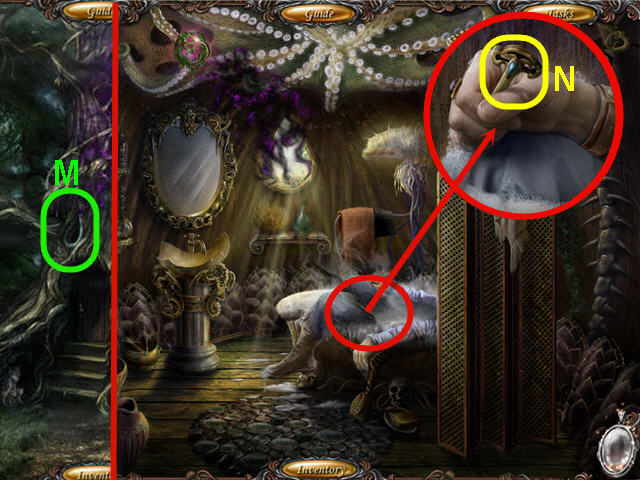
- Enter through the bath window (M).
- Examine the body; take the WATER KEY (N).
- Exit the room; enter the sailor’s room.
- Click on the ship to access a Hidden Object Scene.

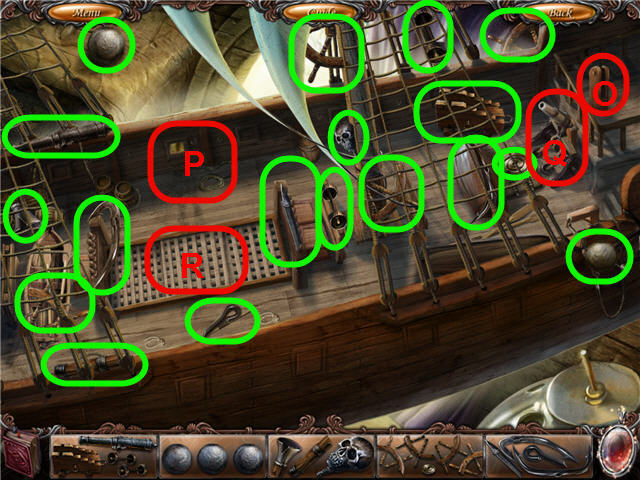
- Find the fragments and get a CANNON, CANNONBALLS, TORCH, WHEEL and HOOK.
- Place the WHEEL on the helm (O) and click on it; take the cannonball.
- Place the CANNON on the deck (P).
- Place the CANNONBALLS and TORCH on the cannon.
- Place the HOOK on the right cannon (Q); click to fire.
- Click on the hook in the hole (R); take the SAILOR KEY.

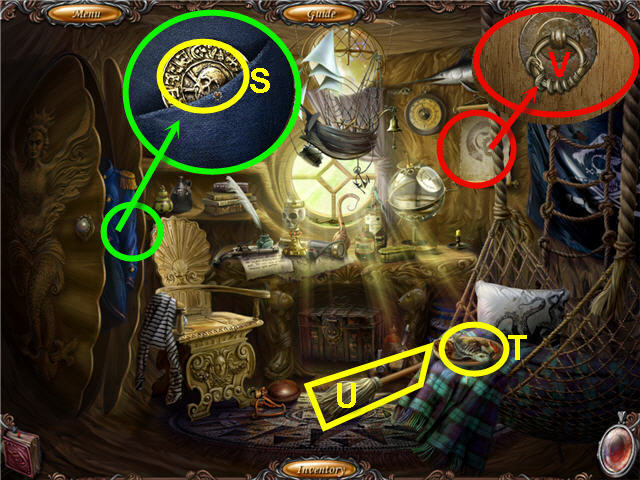
- Examine the sailor uniform; take the GOLDEN COIN (S).
- Take the FISH SKELETON (T) and MOP (U).
- Examine the scroll; click on it to expose the dragon mold (V).
- Back out.
- Enter the bath window.

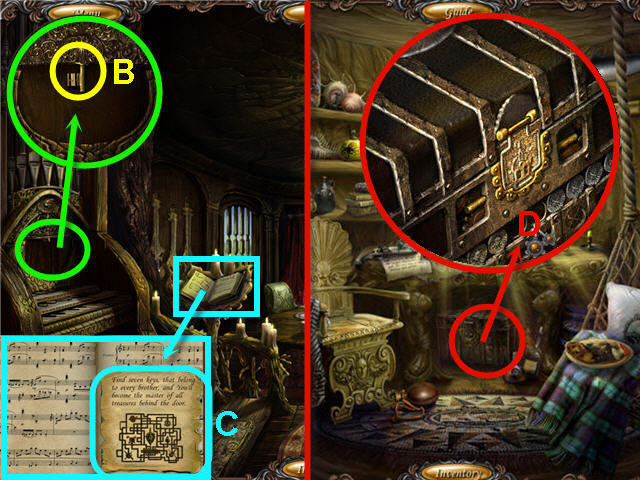
- Take the TOWEL (W).
- Use the MOP and the TOWEL on the violet orb to get the WRAPPED DIRTY ORB (X).
- Examine and place the WRAPPED DIRTY ORB in the sink.
- Take the SOAP (Y).
- Turn the faucet on and take the PURPLE ORB (Z).
- Back out of the room.
- Use the PURPLE ORB on the purple fog to get a LOADED PURPLE ORB.
- Head into the musicians window.
- Click on the shelves at the far end to access a Hidden Object Scene.

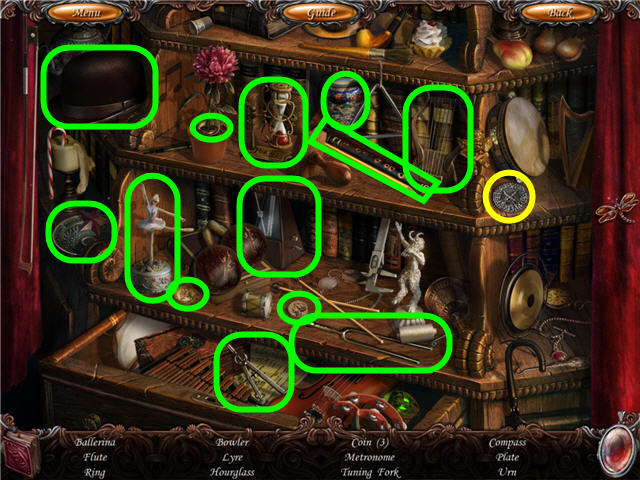
- Find the items listed and get a SILVER COIN.
- Click on the piano to trigger a puzzle.

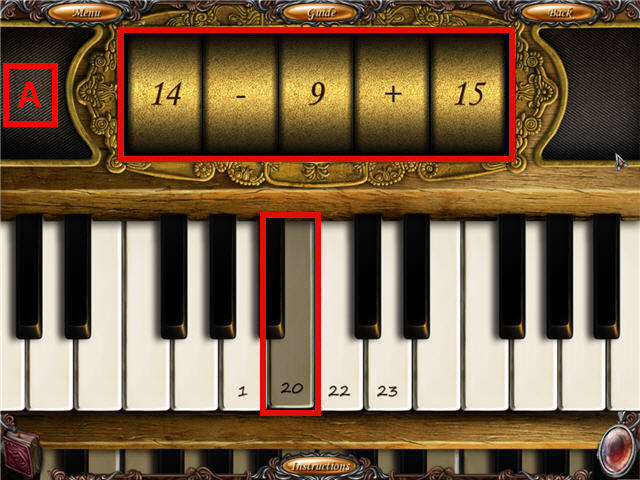
- Rotate the digits above to make a mathematical equation that equals a number on a key below.
- Press the key when solution is complete and the key will stay down. Repeat for all numbered piano keys.
- The numbers are random. See screenshot (A) for example.


- Examine the top panel of the piano; pull down and take the MUSIC KEY (B).
- Examine the music stand; click on the note (C).
- Go into the sailor’s window.
- Examine the chest.
- Place the SILVER COIN and GOLD COIN in the slots (D) to trigger a puzzle.

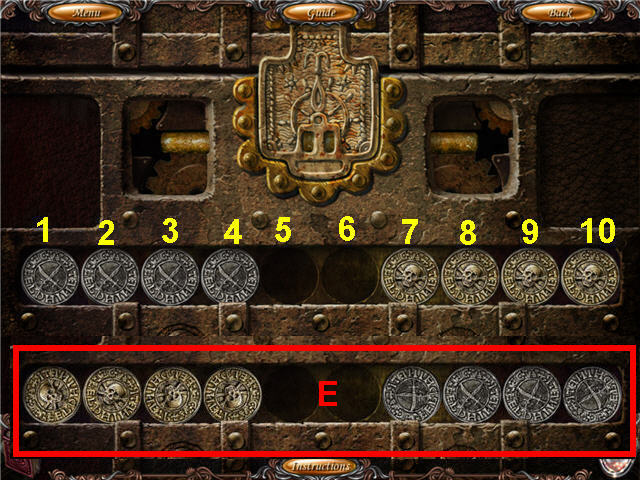
- The goal is to move the silver coins to the right and the gold coins to the left (E).
- Solution: click the following spaces from left to right; 4, 7, 5, 3, 6, 5, 8, 9, 7, 4, 5, 2, 4, 3, 6, 1, 2, 8, 10, 9, 7, 4, 6, 5, 8, 6, 3, 4, 5, 7, 5. 6.
- Examine the chest; take the MERMAID STATUETTE.
- Head into the leader’s window; examine the fireplace mantel.
- Go into the hunter’s window.
- Click on the chests to access a Hidden Object Scene.

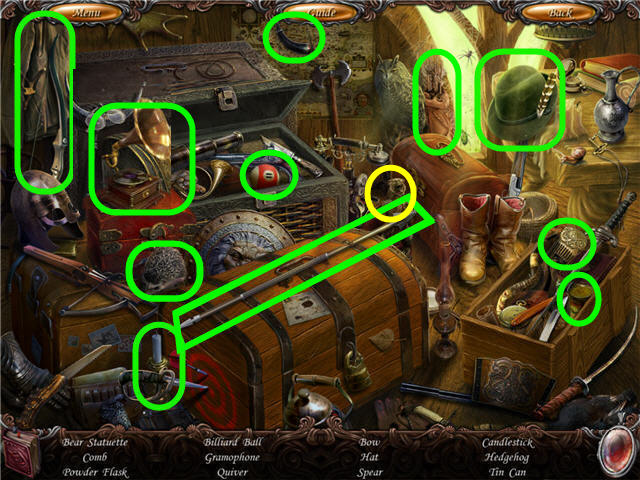
- Find the items listed and get a BEAR STATUETTE.
- Open the right box to get the comb.
- Open the top chest to get the billiard ball.

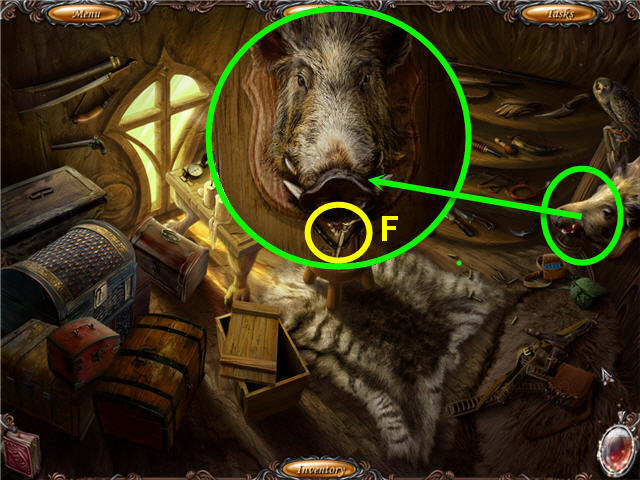
- Examine the boar head.
- Click on the boar’s nose; take the HUNTER KEY (F).
- Go into the musician’s window.
- Click on the shelves in the back to access a Hidden Object Scene.

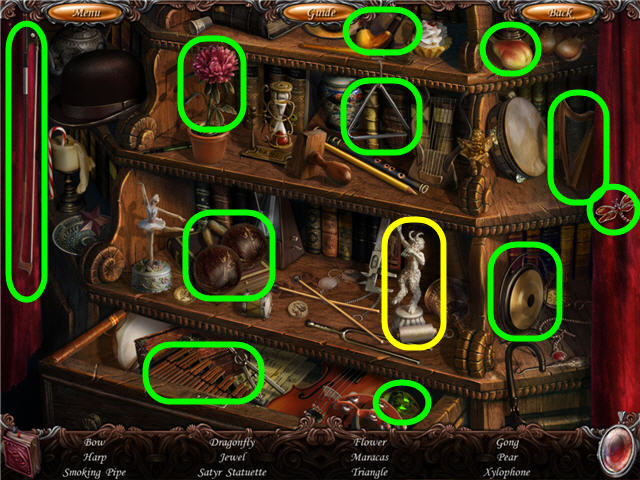
- Find the items listed and get a SATYR STATUETTE.
- Go into the kitchen window.

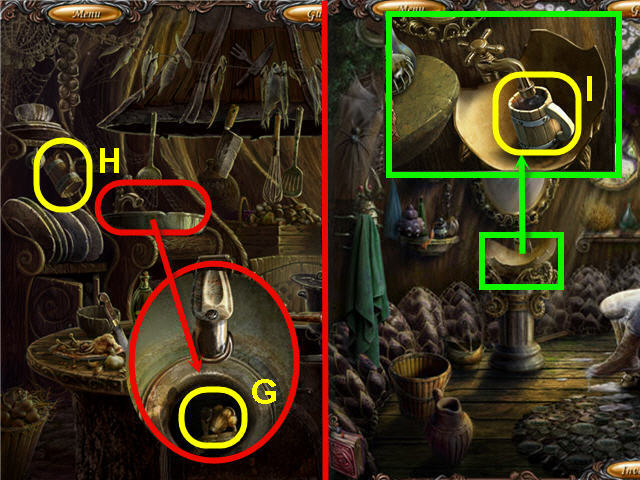
- Examine the sink; remove the strainer.
- Use the MAGNET to get the COOKER KEY (G).
- Take the MUG (H).
- Go into the bath window.
- Examine the sink; place the MUG in the sink and turn on the tap.
- Take the MUG WITH WATER (I).
- Head into the artist window.

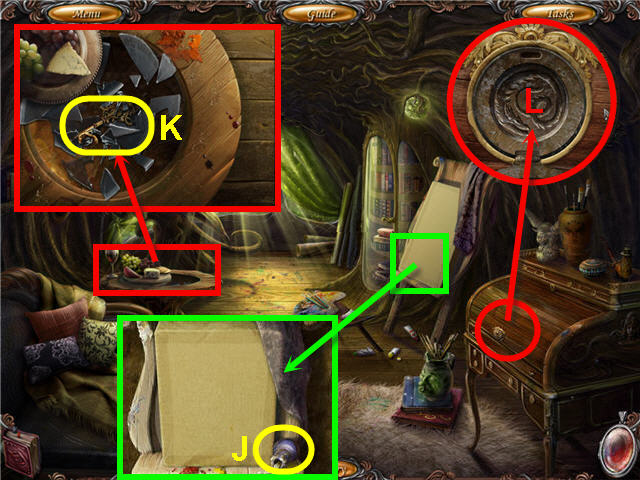
- Examine the easel; take the GLUE (J).
- Examine the table; use the CLAW HAMMER on the glass three times.
- Take the ARTIST KEY (K).
- Examine the desk; click on the lock (L).
- Go into the kitchen window.
- Click on the cabinet to access a Hidden Object Scene.

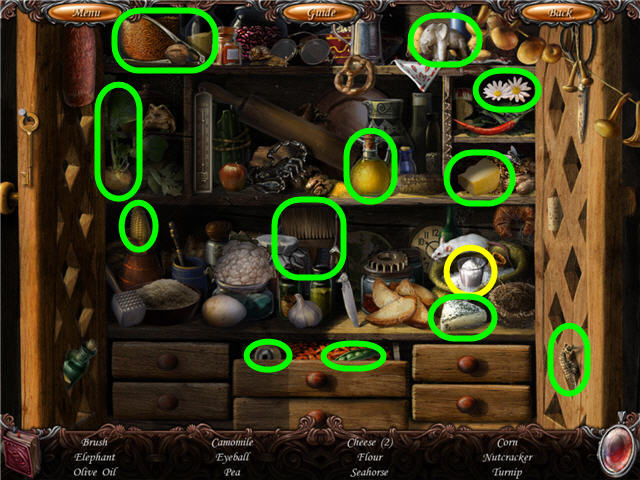
- Find the items listed and get FLOUR.
- Open the middle drawer to get the eyeball and pea.

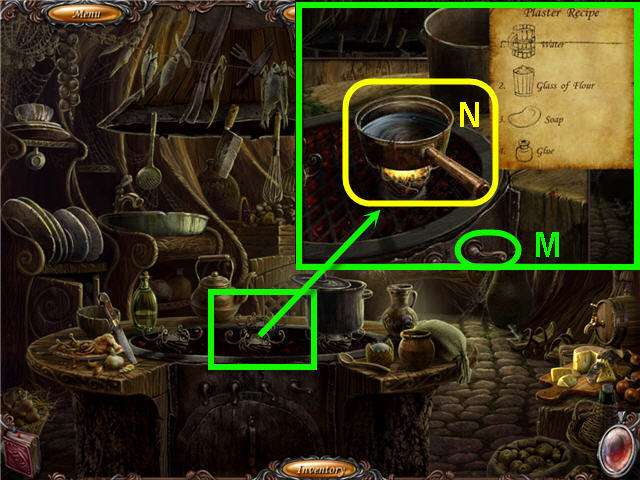
- Examine the stove.
- Place the MUG WITH WATER in the pot; click the handle (M) to turn on the burner.
- Place the FLOUR, SOAP and GLUE into the pot.
- Turn off the burner; take the PLASTER (N).
- Head to the sailor’s room.

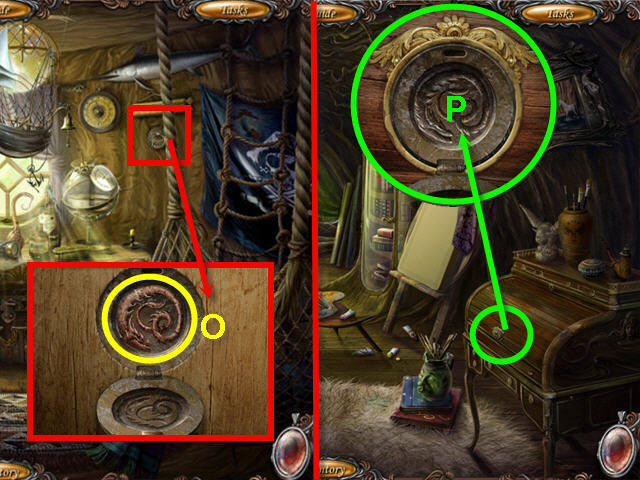
- Examine the metal form; use the PLASTER on the bottom.
- Click to close the form; click to open.
- Take the DRAGON KEY (O).
- Head to the artists room.
- Examine the desk; place the DRAGON KEY in the lock.
- Click on the desk to access a Hidden Object Scene.

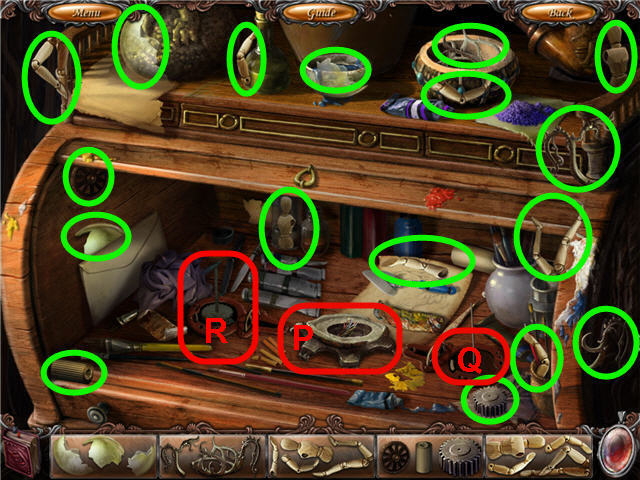
- Find the fragments and get a BULB BOWL, BULB BOWL HOLDER, LEFT PUPPET, RIGHT GEAR and RIGHT PUPPET.
- Open the bowl to get a bulb holder piece.
- Place the BULB BOWL HOLDER and BULB BOWL on the stand (P).
- Place the RIGHT GEAR and RIGHT PUPPET on the right spindle (Q).
- Place the LEFT PUPPET on the left spindle (R).
- Take the OWL STATUETTE.
- Head to the leader’s room.

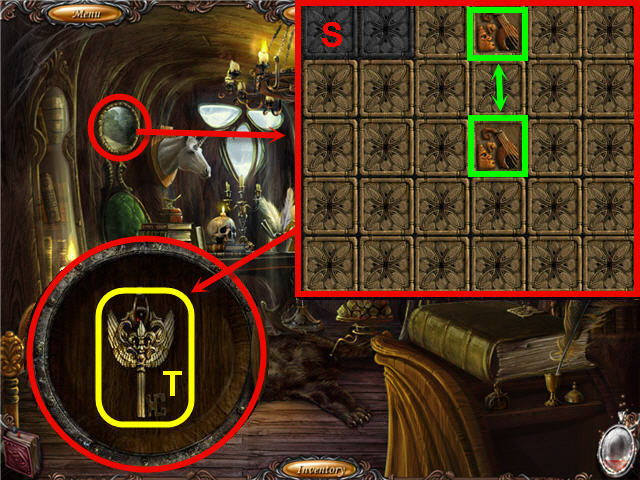
- Remove the mirror; zoom in to trigger a puzzle.
- Click on any two squares to find the matching sets. See screenshot (S) for example.
- Examine the area when complete and take the LEADER KEY (T).
- Examine the fireplace mantle.
- Place the OWL STATUETTE, SATYR STATUETTE, MERMAID STATUETTE and BEAR STATUETTE on the pedestals to trigger a puzzle.

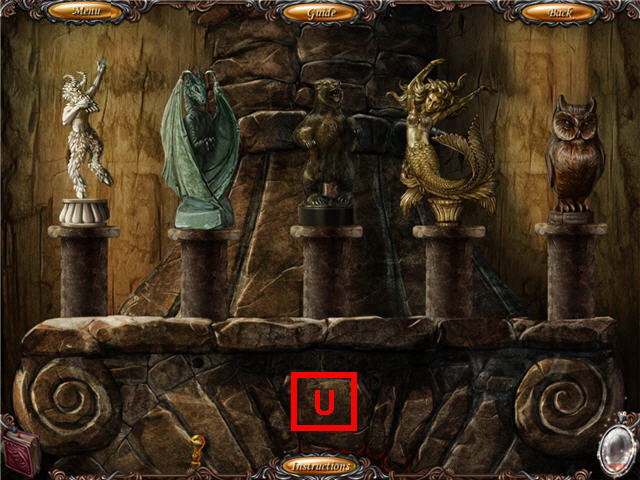
- Arrange the statuettes so that all the bases are equal height.
- Solution: from left; satyr, dragon, bear, mermaid, owl. See screenshot (U) for solution.
- Head down the newly-opened passage.

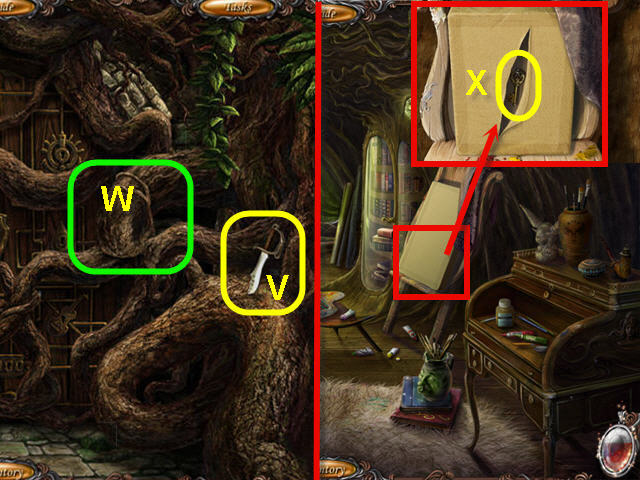
- Take the KNIFE (V).
- Use the NEAR-EMPTY VIAL on the roots (W) to get an EMPTY VIAL.
- Head to the artists room.
- Examine the easel; use the KNIFE on the canvas.
- Take the SMALL KEY (X).
- Head to the leader’s room.

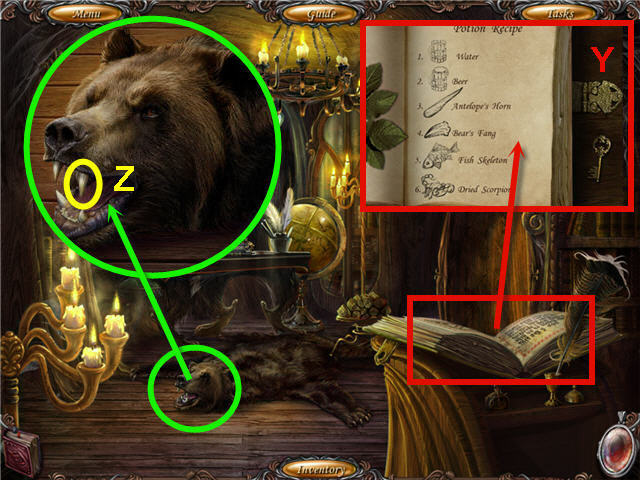
- Examine the book; use the SMALL KEY on the lock and note the recipe (Y).
- Examine the bear rug; use the WIRE CUTTER to get a BEAR’S FANG (Z).
- Head to the hunter’s room.
- Click on the chests to access a Hidden Object Scene.

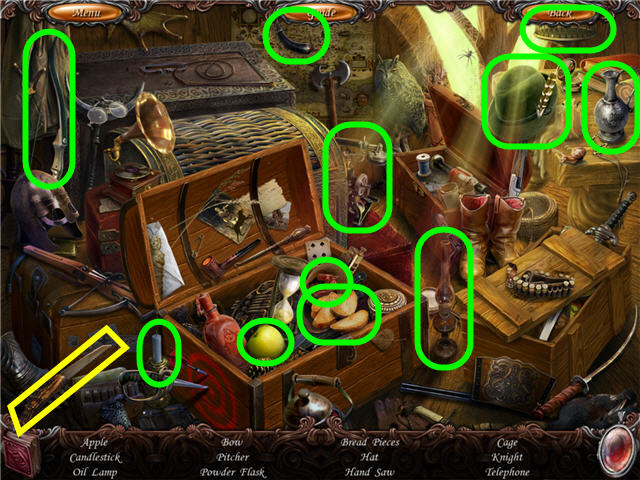
- Find the items listed and get a HAND SAW.
- Open the two chests to get hidden items.

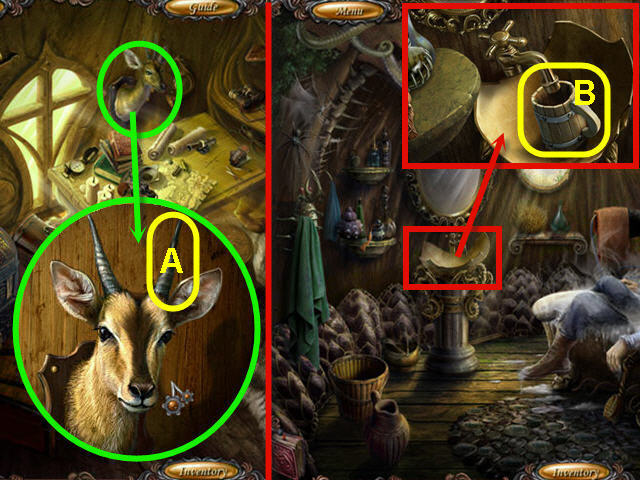
- Examine the antelope; use the HAND SAW to get the ANTELOPE’S HORN (A).
- Go into the bath window.
- Examine the sink; use the MUG on the sink.
- Turn on the faucet; take the MUG WITH WATER (B).
- Head to the kitchen.
- Click on the cupboard to access a Hidden Object Scene.

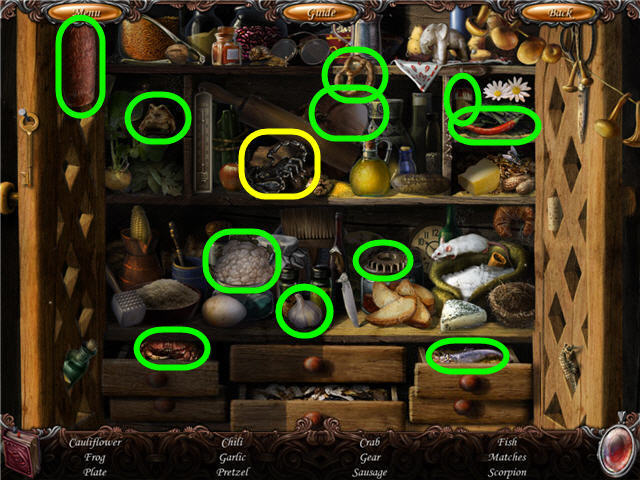
- Find the items.
- Get a SCORPION.

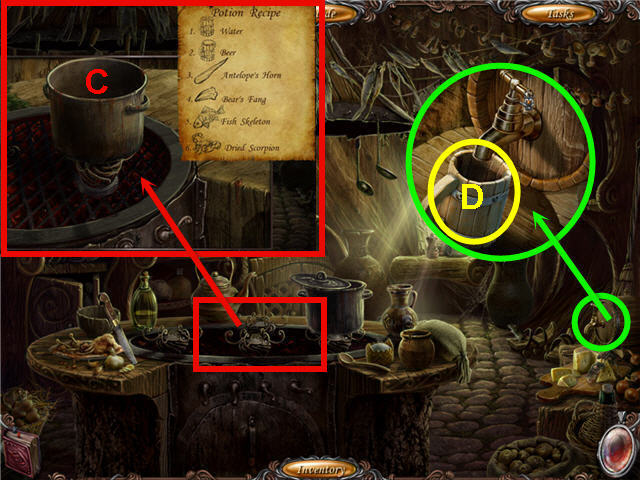
- Examine the stove; move the pot behind the recipe.
- Place the MUG WITH WATER in the pot (C) and get a MUG.
- Back out of the stove close-up only.
- Examine and use the MUG on the keg; turn the spigot.
- Take the MUG WITH BEER (D).
- Examine the stove; click the handle to turn on the burner.
- Place the MUG WITH BEER, ANTELOPE’S HORN, BEAR’S FANG, FISH SKELETON and SCORPION in the pot.
- Turn off the burner; use the EMPTY VIAL on the pot to get a MAGIC POTION.
- Head to the leader’s room and down the passage.

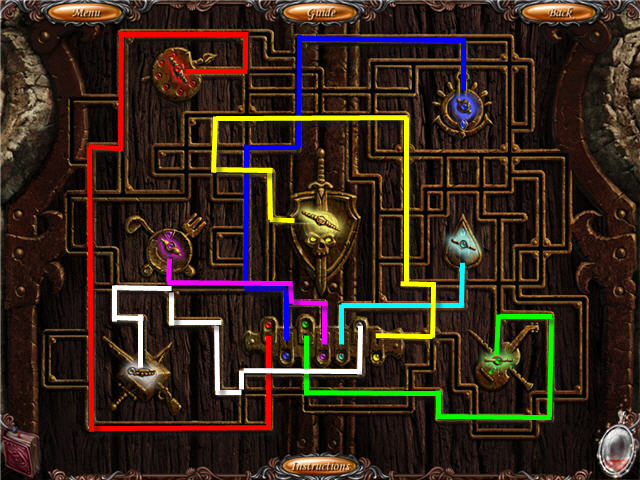
- Use the MAGIC POTION on the roots.
- Place the ARTIST KEY, SAILOR KEY, WATER KEY, MUSIC KEY, HUNTER KEY, and COOKER KEY in the keyholes clockwise from upper left.
- Place the LEADER KEY in the center lock to trigger a puzzle.
- Move the keys to their matching colored slots.
- Your path will be blocked at random points; see screenshot for an example only.

- Enter through the portal.
- Watch the cutscene.
Chapter 4 – Weather Hall


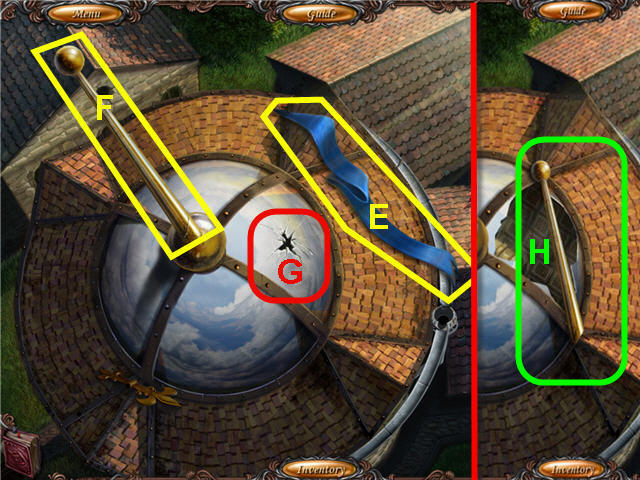
- Take the FLAG (E) and SPIRE (F).
- Use the SPIRE on the broken dome (G) three times.
- Place the FLAG on the SPIRE (H); climb down.

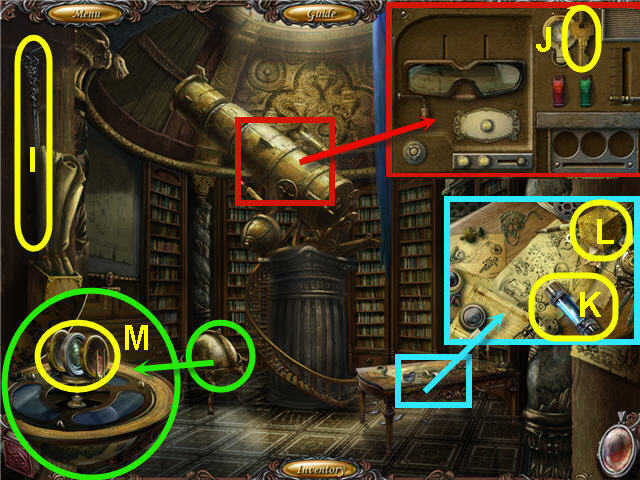
- Take the METAL CANE (I).
- Combine the METAL CANE and MAGNET to get a CANE WITH MAGNET.
- Examine the telescope; take the KEY (J).
- Examine the table; take the FUSE (K) and GOLDEN CUBE (L).
- Examine the globe; use the KEY to unlock and take the LENSES (M).
- Back out of the room to trigger a puzzle.

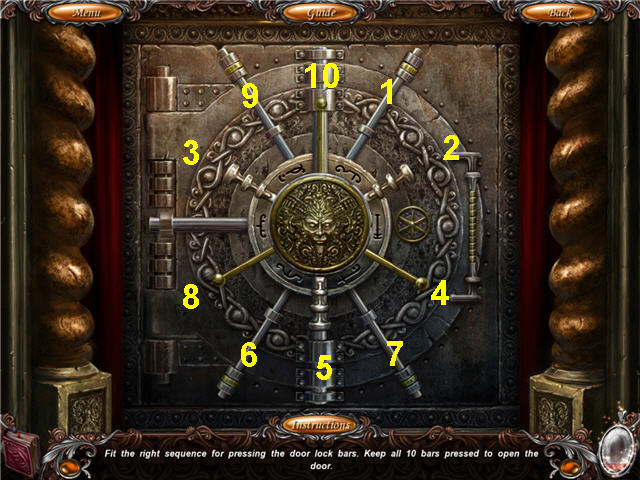
- Click on the pins in the correct order to keep them all in.
- If an incorrect pin is clicked all pins will reset.
- The order is random; see screenshot for my solution.

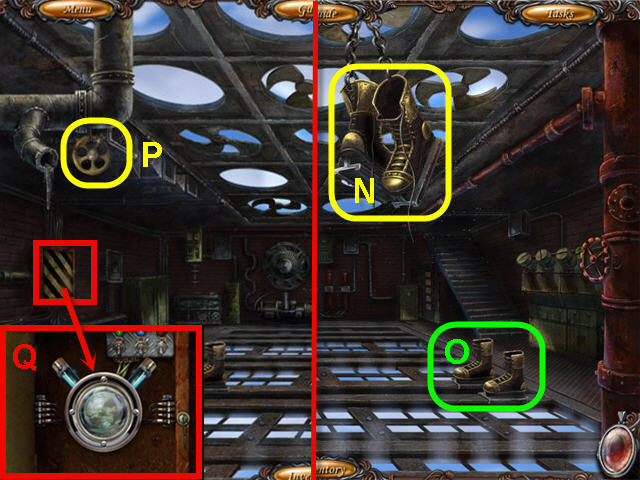
- Use the CANE WITH MAGNET to get the SPECIAL SKATES (N).
- Use the SPECIAL SKATES on the rails (O).
- Head left.
- Take the VALVE (P).
- Examine and open the fuse box; place the FUSE inside (Q).
- Head right, go upstairs.

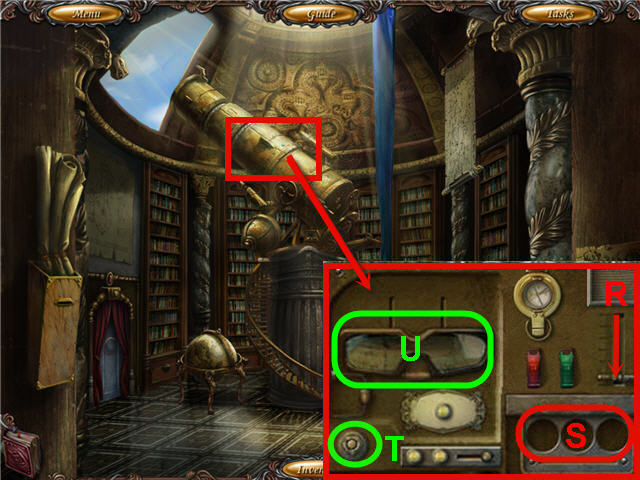
- Examine the telescope.
- Slide the lever down (R); place the LENSES in the slots (S).
- Place the VALVE on the stem (T) and turn it.
- Click on the sunglasses (U) to trigger a puzzle.

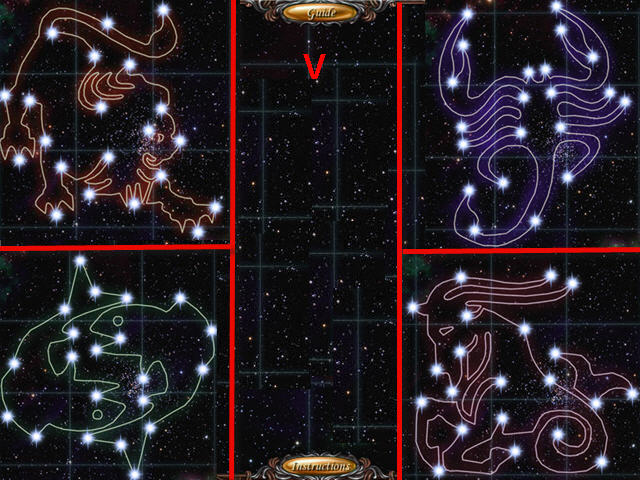
- Duplicate the constellation on the right by placing the stars on the grid.
- See screenshot (V) for my solutions.

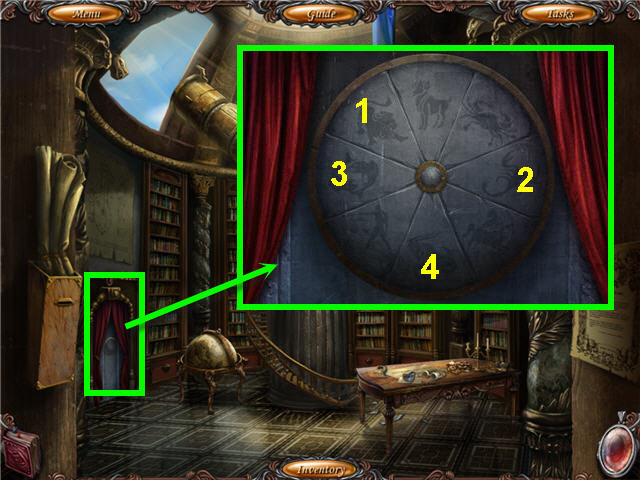
- Examine the door.
- Press in the panels that match the constellations that you completed in the telescope puzzle.
- See screenshot for my solution.
- Click on the door and enter when complete.

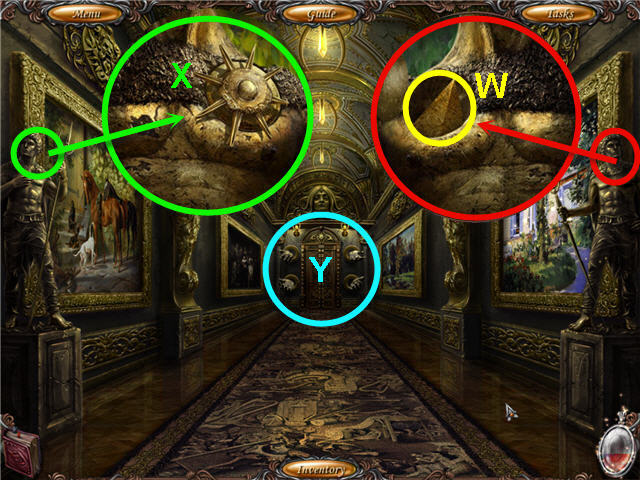
- Examine the right statue; open the brooch; take the GOLDEN PYRAMID (W).
- Examine the left statue; try and take the brooch (X).
- Examine the door (Y) and click on it.
- Click on the right painting to access a Hidden Object Scene.

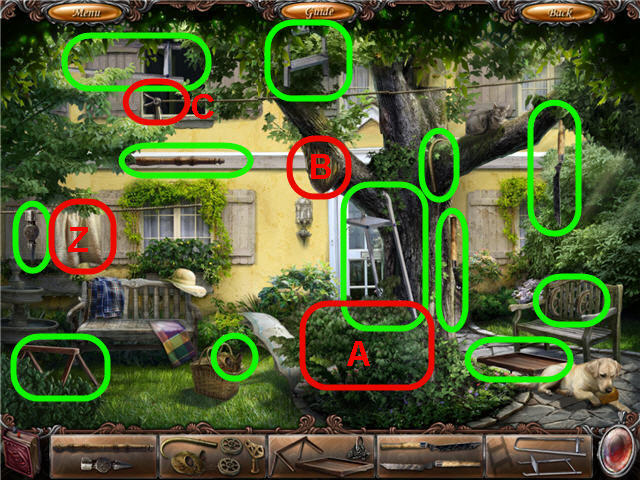
- Find the fragments and get a HAMMER, MECHANICAL MOUSE, PLATFORM, PRUNERS and STEPLADDER.
- Move the towel (Z) to get the hammer part.
- Use the PRUNERS to trim the bushes (A); take the platform part.
- Use the HAMMER on the beehive (B) to get the mechanical mouse part.
- Use the STEPLADDER on the pulley (C).
- Hang the PLATFORM on the rope.
- Place the MECHANICAL MOUSE on the PLATFORM; take the GOLDEN CYLINDER the dog dropped.
- Click on the left painting to access a Hidden Object Scene.

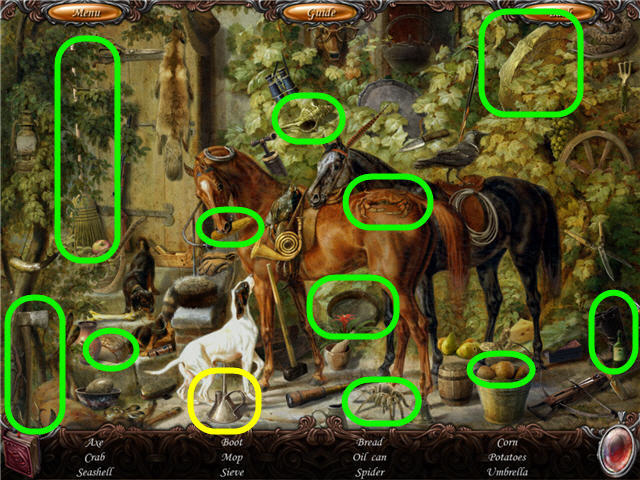
- Find the items listed.
- Get an OIL CAN.

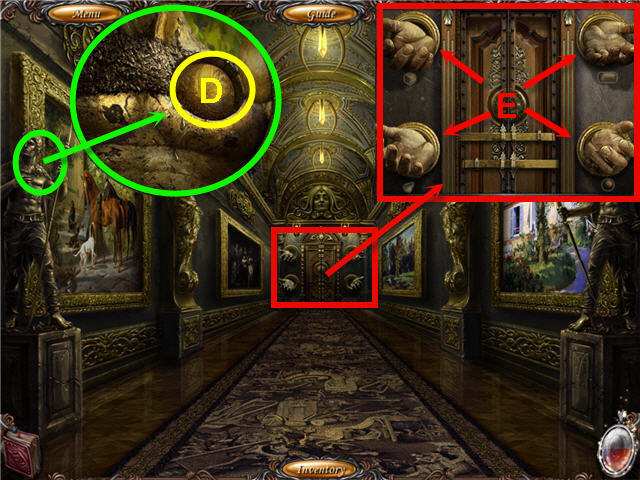
- Examine the left statue; use the OIL CAN on the brooch.
- Open the brooch; take the GOLDEN SPHERE (D).
- Examine the door.
- Place the place the GOLDEN CUBE, GOLDEN CYLINDER, GOLDEN SPHERE and GOLDEN PYRAMID in the hands (E) clockwise from upper left.
- Head straight through the door.

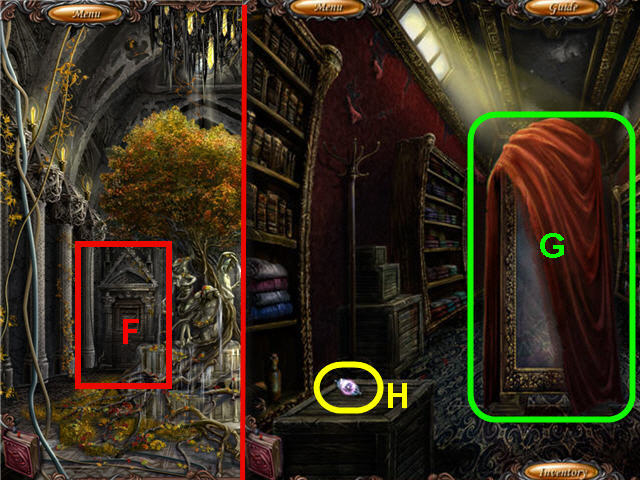
- Head into the left door (F).
- Remove the cover (G); click on the slot on the top of the mirror.
- Take the TRANSISTOR (H).
- Back out.
- Click on the fountain to access a Hidden Object Scene.

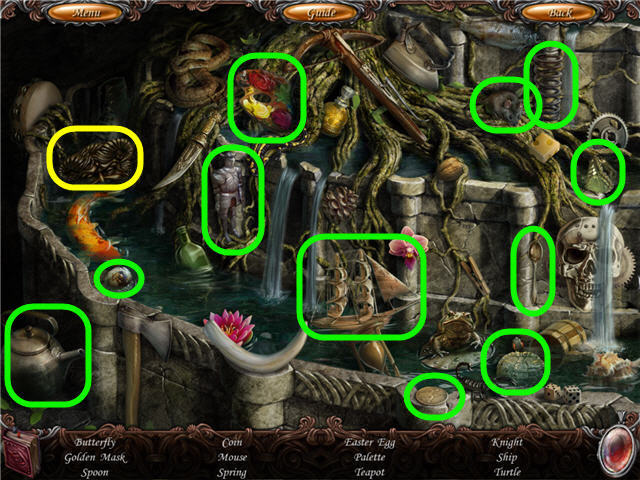
- Find the items listed and get a GOLDEN MASK.
- Head into the left door.

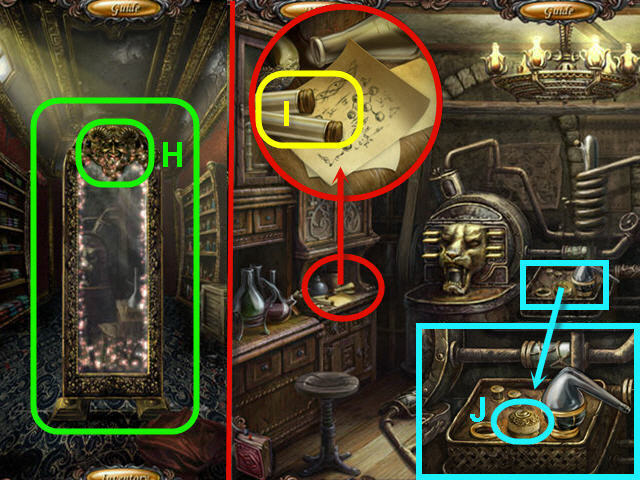
- Place the GOLDEN MASK on the top of the mirror (H).
- Enter into the mirror.
- Examine the cabinet; take the EMPTY BULBS (I) and look at the note.
- Examine the console; remove the plug (J).
- Back out; take the GOLDEN MASK (H) from the mirror.
- Back out two times.
- Click on the left painting to access a Hidden Object Scene.

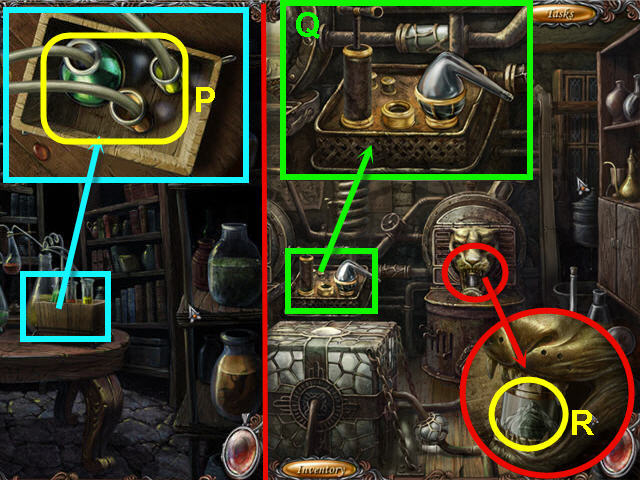
- Find the items listed.
- Get a PUMP.

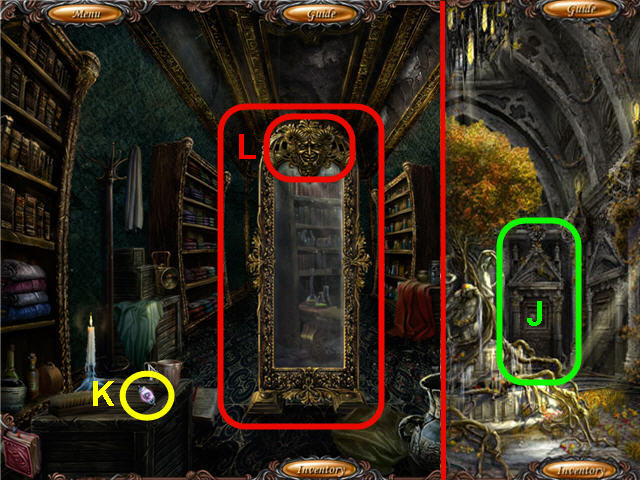
- Head straight; go through the right rear door (J).
- Take the TRANSISTOR (K).
- Remove the cover off the mirror.
- Place the GOLDEN MASK on the top of the mirror (L).
- Enter the mirror.

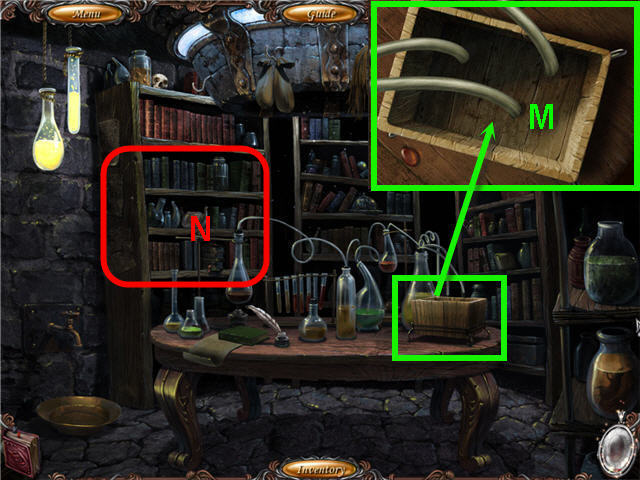
- Examine the holder; place the EMPTY BULBS inside (M).
- Click on the left bookshelf (N) to trigger a puzzle.

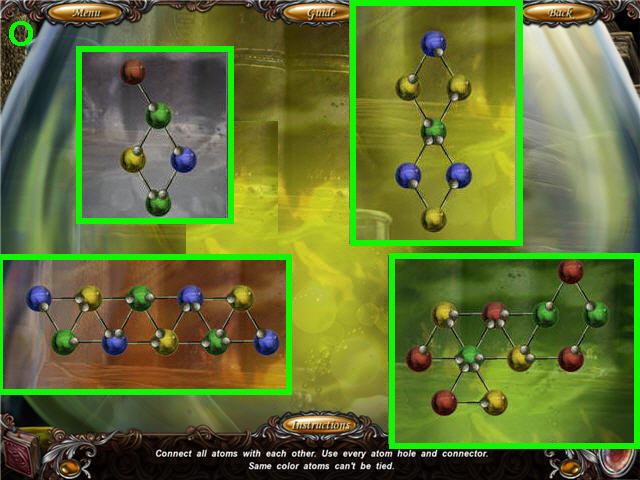
- Connect all the atoms by using every hole and connector.
- See screenshot (O) for solution.


- Examine the holder; take the RESTORING POTION COMPONENTS (P).
- Back out; take the GOLDEN MASK from the mirror.
- Back out; head into the left room.
- Place the GOLDEN MASK on the mirror and enter through.
- Examine the console.
- Place the PUMP and the RESTORING POTION COMPONENTS on the console (Q).
- Click the PUMP handle to activate.
- Examine the right lion when the machine finishes processing.
- Take the RESTORING POTION (R).
- Back out; take the GOLDEN MASK from the mirror.
- Back out and enter the door on the far right.

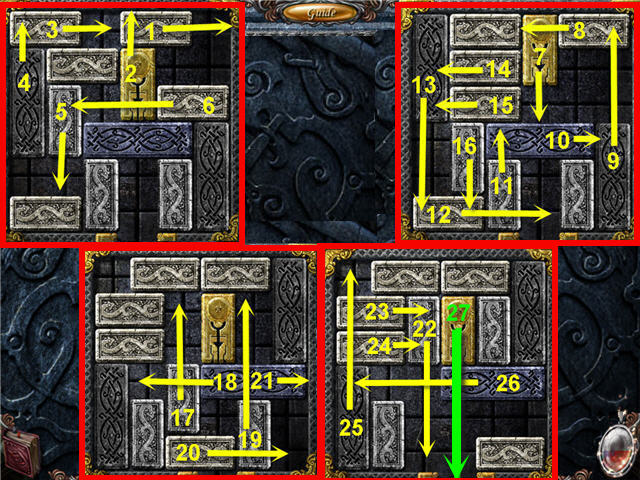
- Move the cover off the mirror (S).
- Use the RESTORING POTION on the broken mirror.
- Place the GOLDEN MASK on the top of the mirror and enter through.
- Examine the doorway; place the 2 TRANSISTORS on the junction box (T).
- Examine the piano to trigger a puzzle.

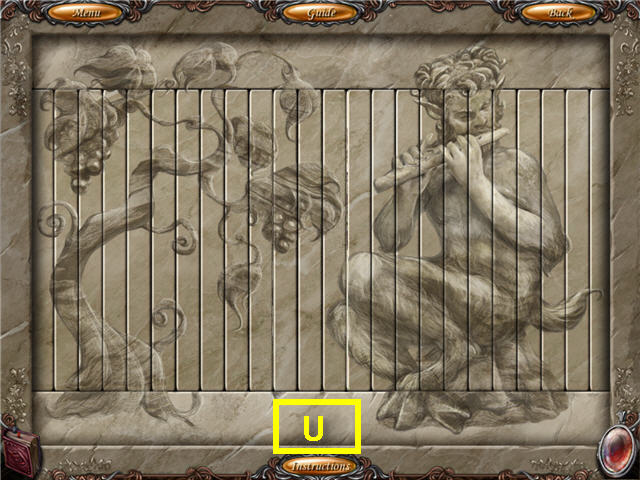
- Arrange the pieces to complete the picture.
- Click on any two to switch them. See screenshot (U) for solution.

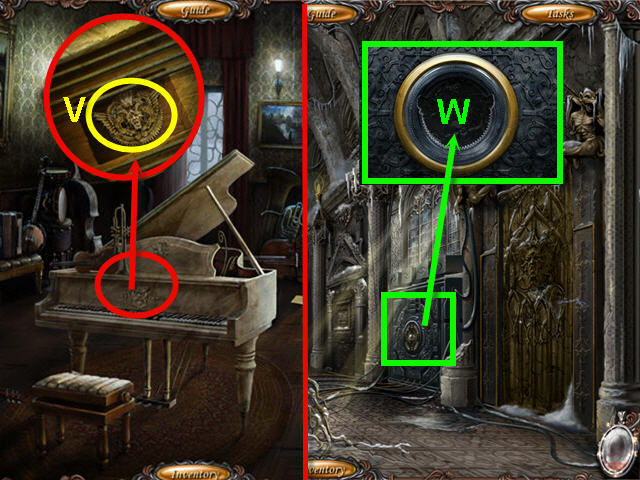
- Examine the piano; click the panel; take the MASK KEY (V).
- Back out two times.
- Examine the metal door.
- Place the MASK KEY in the slot (W) to trigger a puzzle.


- Slide the tiles to make a passage for the gold tile to exit.
- See screenshot for solution.
- Enter into the gold door on the right.

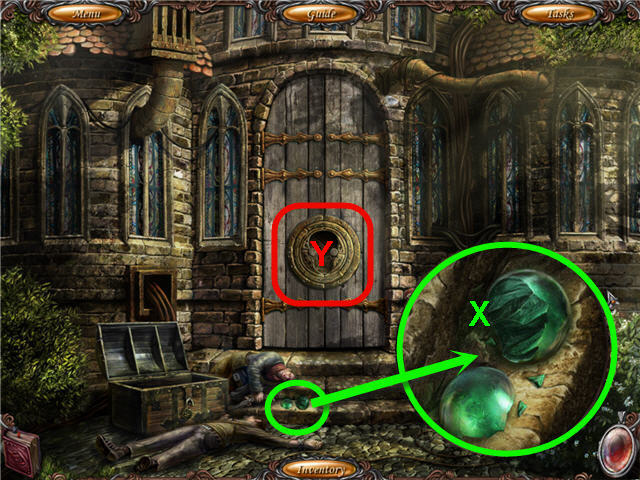
- Examine and use the RESTORING POTION the broken orb (X); take the LOADED GREEN ORB.
- Examine the door lock (Y).
- Back out.
- Click on the fountain to access a Hidden Object Scene.

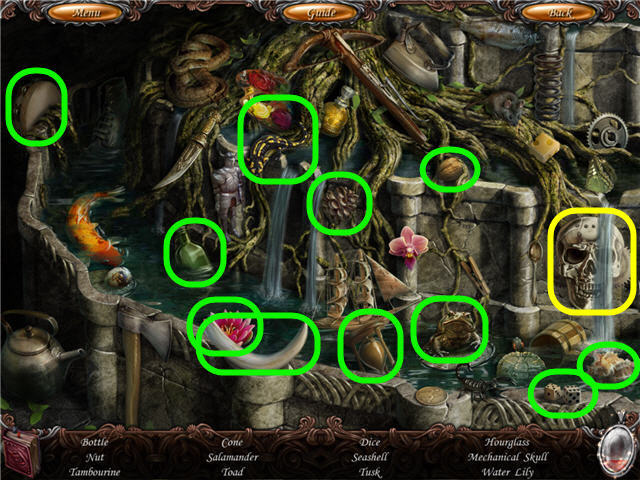
- Find the items listed and get a MECHANICAL SKULL.
- Go through the gold door.
- Examine the door; place the MECHANICAL SKULL on the lock and enter.

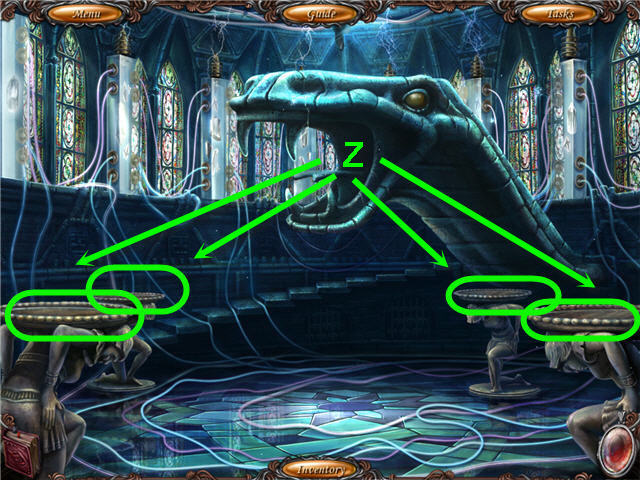
- Place the LOADED BLUE ORB, LOADED RED ORB, LOADED PURPLE ORB and LOADED GREEN ORB on the stands (Z).
- Congratulations! You have successfully completed Sonya Standard Edition.




 Hidden Mysteries: The Forbidden City Walkthrough, Guide, & Tips
 Rita James and the Race to Shangri La Walkthrough, Guide, & Tips
 Living Legends: Wrath of the Beast Walkthrough, Guide, & Tips
 The Seawise Chronicles: Untamed Legacy Walkthrough, Guide, & Tips
 Shadow Wolf Mysteries: Cursed Wedding Walkthrough, Guide, & Tips