Hidden Mysteries: The Forbidden City Walkthrough, Guide, & Tips
Hidden Mysteries: The Forbidden City Walkthrough

Welcome to the Hidden Mysteries: The Forbidden City Walkthrough!
Uncover the Hidden Mysteries of the Forbidden City!
Whether you use this document as a reference when things get difficult or as a road map to get you from beginning to end, we’re pretty sure you’ll find what you’re looking for here.
This document contains a complete Hidden Mysteries: The Forbidden City game walkthrough featuring annotated screenshots from actual gameplay!
We hope you find this information useful as you play your way through the game. Use the walkthrough menu below to quickly jump to whatever stage of the game you need help with.
Remember to visit the Big Fish Games Forums if you find you need more help. Have fun!
This walkthrough was created by BrownEyedTigre, and is protected under US Copyright laws. Any unauthorized use, including re-publication in whole or in part, without permission, is strictly prohibited.
General Tips

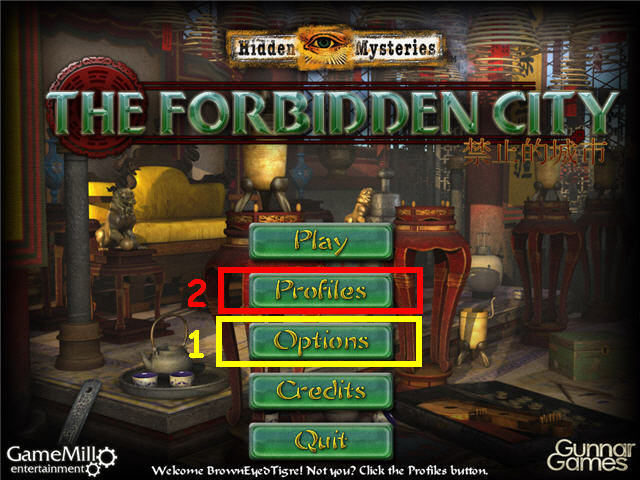
- Click on Options (1) to adjust the Music and Sound Volume, Full Screen and Custom Cursor.
- Click on Profile (2) to add or change profiles.
- There are no penalties for random clicking.
- A magnifying glass cursor signifies you can further examine the area.
- A gear cursor signifies you can use an inventory item there.
- A sparkling area signifies a Hidden Object Scene.
- Wave the cursor over each scene to find the outline of where inventory items are to be placed.
- Click on the arrows on the sides of the inventory bar to scroll to see hidden inventory items.
- Click on the question mark in the upper right of the puzzles for instructions and tips.
- Puzzles may be skipped by clicking on the skip button on the lower right after a short wait.
- Hints are unlimited after a short recharge period.
- Some puzzles in the game are random and my solutions may be different from yours.
- Click on menu in the lower left to exit the game.
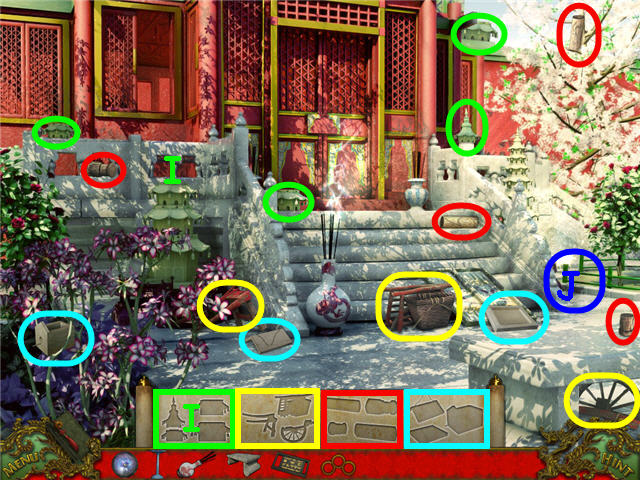
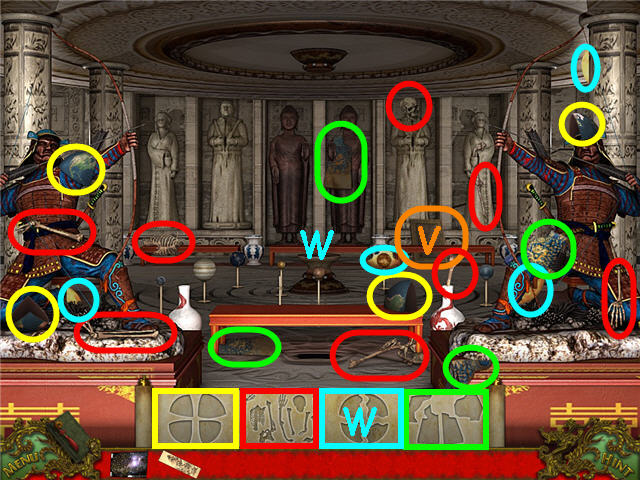
Chapter 1 – Father’s House
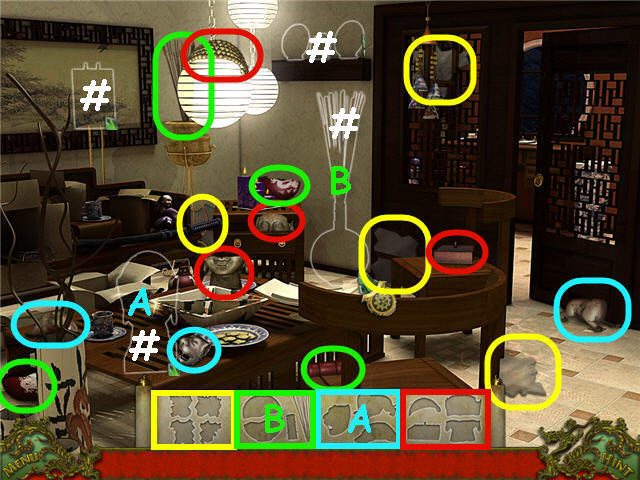
- Find the fragments and get a BUDDHA HEAD, VASE, TIGER STATUE and WINDOW.
- Wave your cursor around the area to locate the areas to place the items (#).
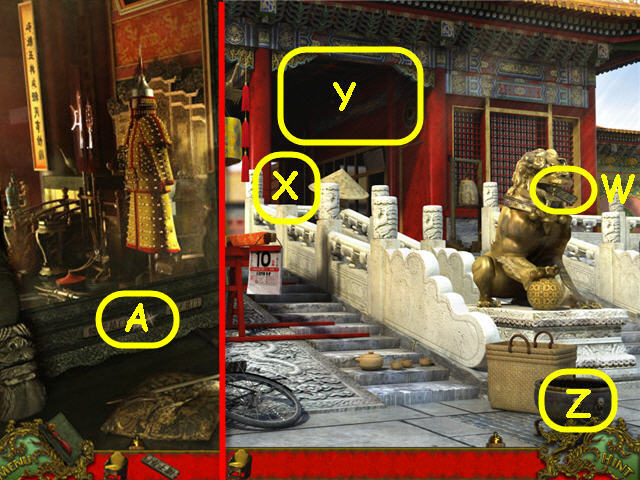
- Place the BUDDHA HEAD (A) on the table and the VASE (B) on the floor.
- Head right through the doors.

- Find the fragments and get a LAMP, BONSAI TREE, CLOCK and partial plates.
- Place the WINDOW in the frame (C).
- Place the TIGER STATUE on the shelf (D).
- Place the BONSAI TREE on the paper tray (E).
- Place the CLOCK (F) on the desk.
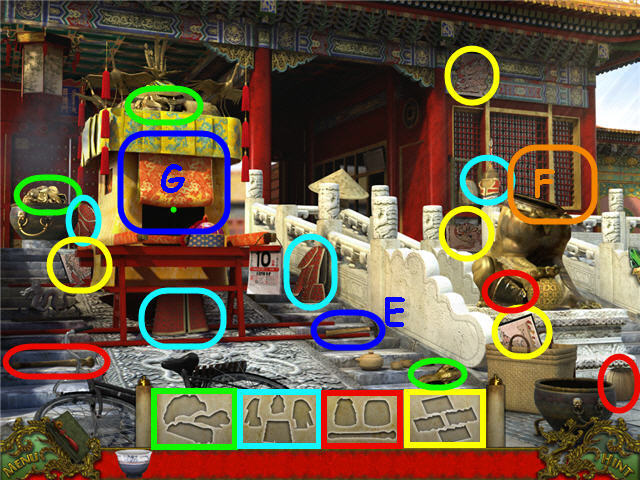
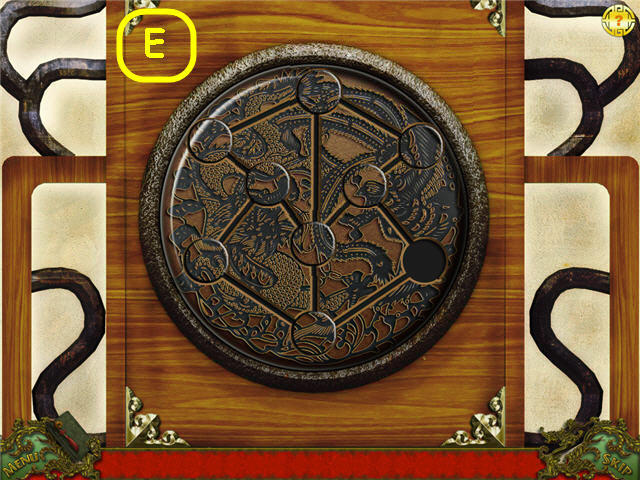
- Examine the middle desk drawer (G) to trigger a puzzle.
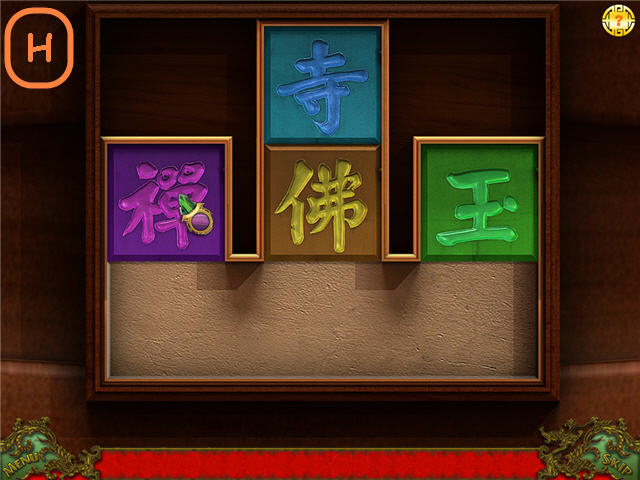
- Place the colored tiles on its matching colored space.
- Solution: Move the tiles in this order; blue – down, left 2x; green – down, right, up; purple, down 2x, right; blue – right, up 2x; yellow – down, right, up; purple – left 2x, up. See screenshot (G) for solution.
- Take the JOURNAL, which will automatically be added to your taskbar to the right of the menu button.
- Back out.
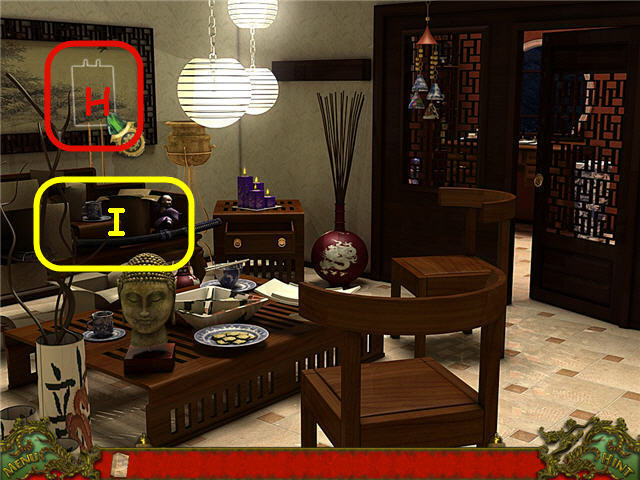
- Hang the LAMP (H).
- Examine the area below the lamp (I) to access a Hidden Object Scene.
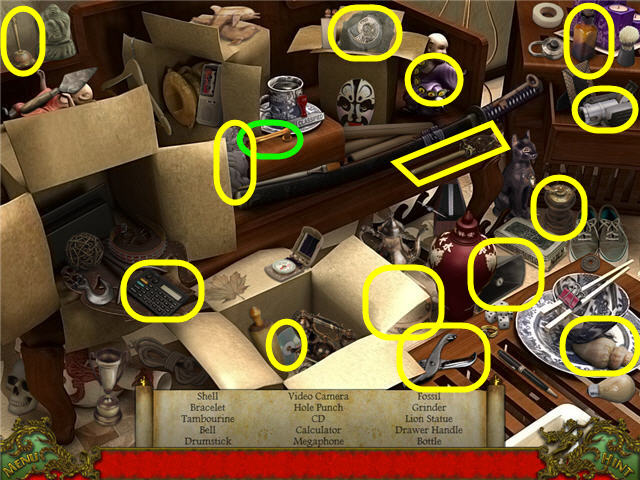
- Find the items listed and get a DRAWER HANDLE.
- Head through the doors.
- Examine and place the DRAWER HANDLE on the drawer.
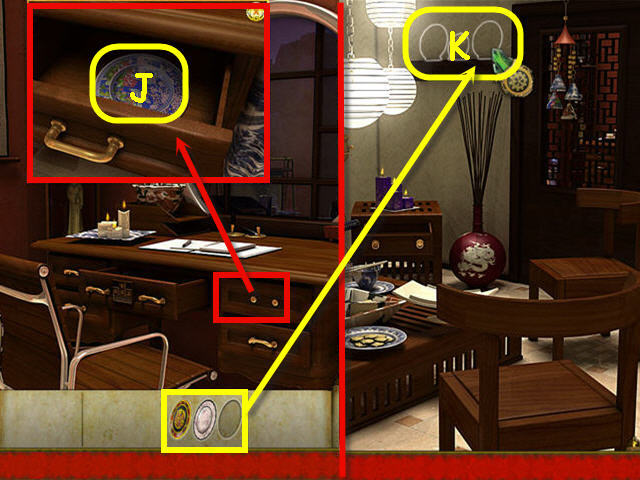
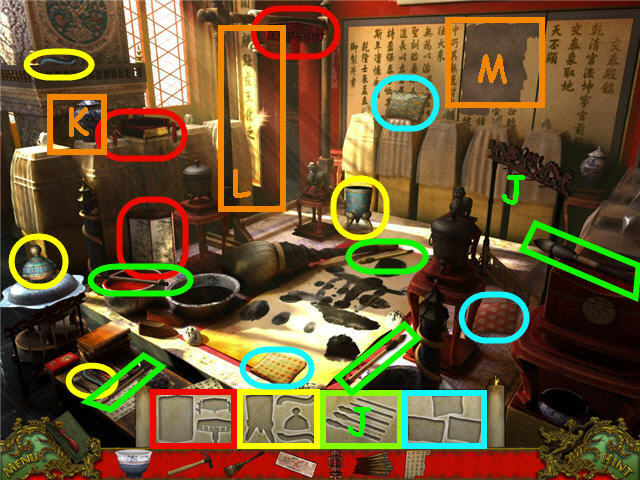
- Take the fragment to get PLATES (J).
- Back out.
- Place the PLATES on the shelf (K).
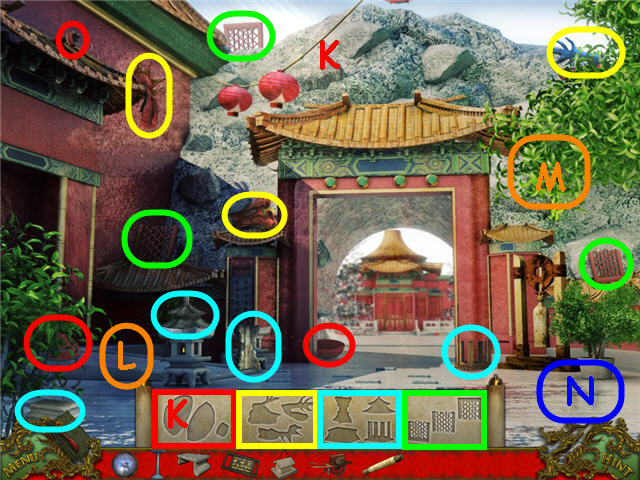
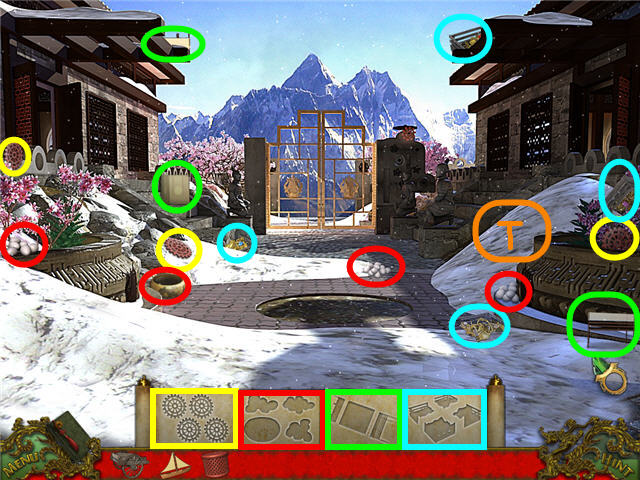
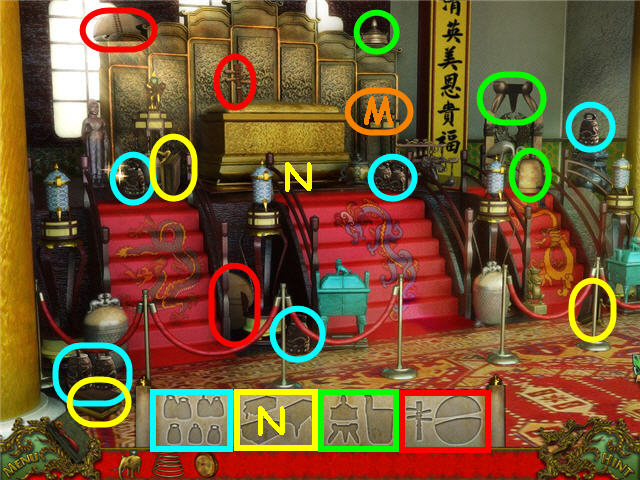
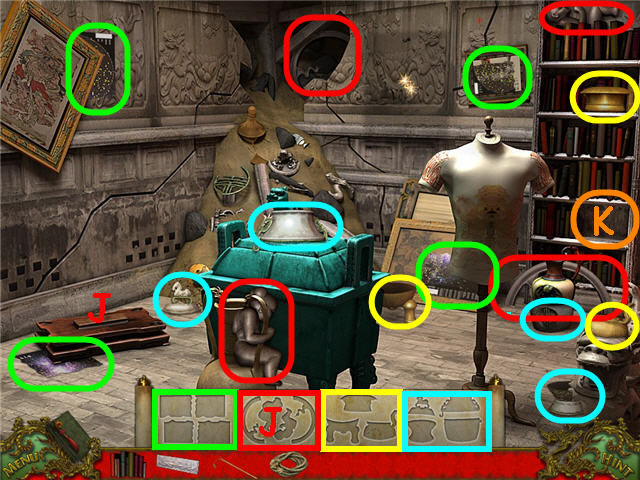
Chapter 2 – Forbidden City
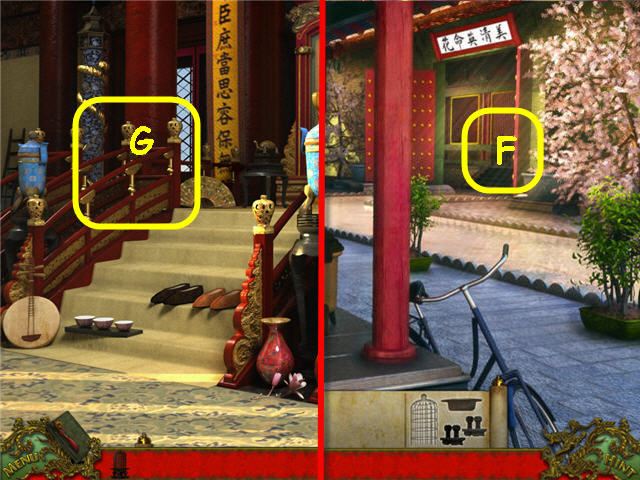
- Head right.
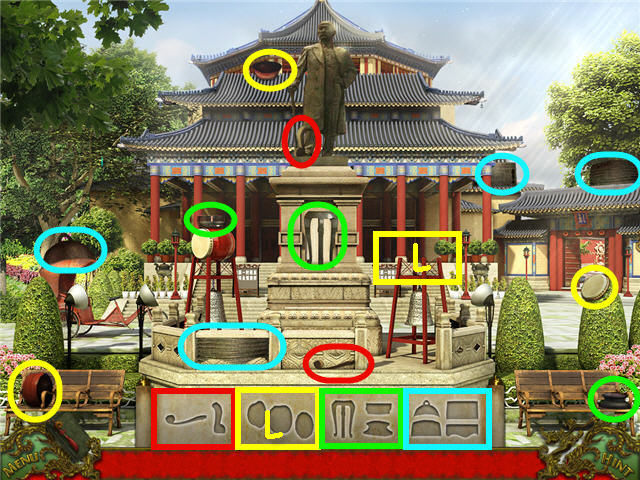
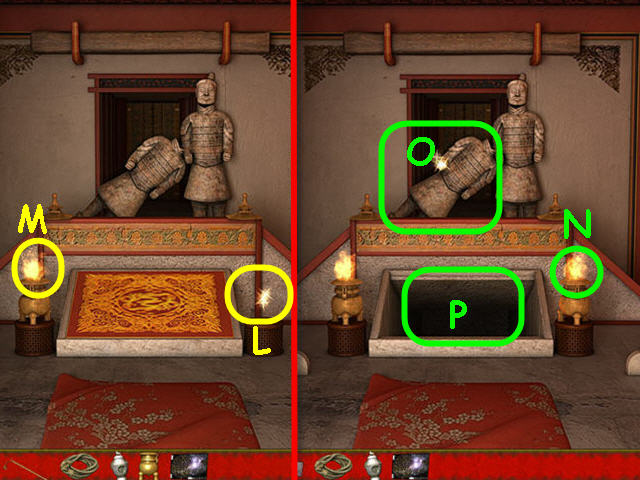
- Find the fragments and get a DRUM, CHAIR ARM, TABLE and STONE BELL.
- Place the DRUM on the stand (L).
- Head right.
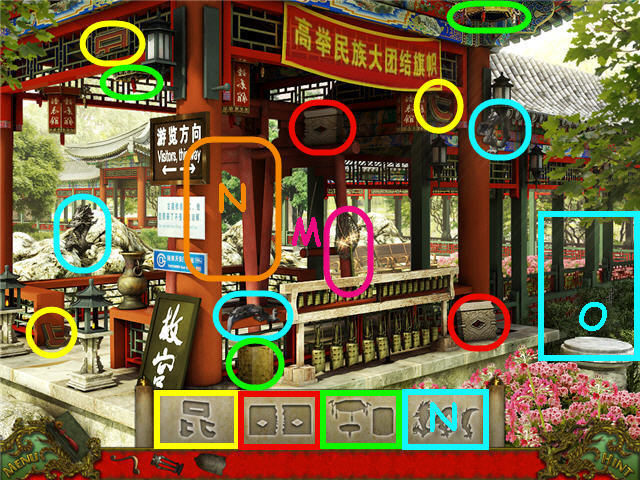
- Take the FISHING NET (M).
- Find the fragments and get a STONE WALL, DRAGON, PAPER LANTERN and CHINESE SYMBOL.
- Hang the STONE BELL from the rafters (N).
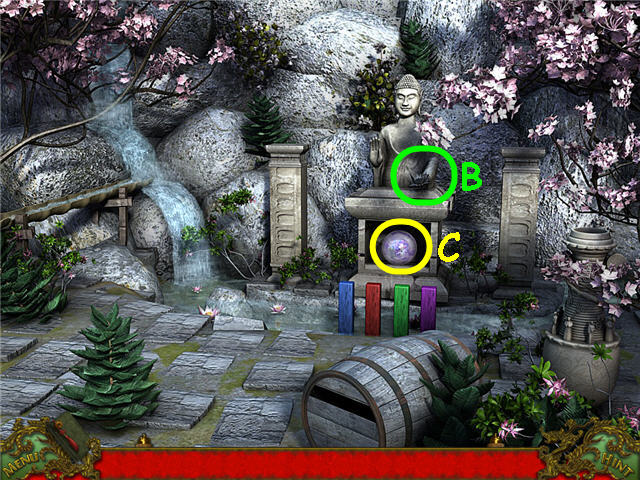
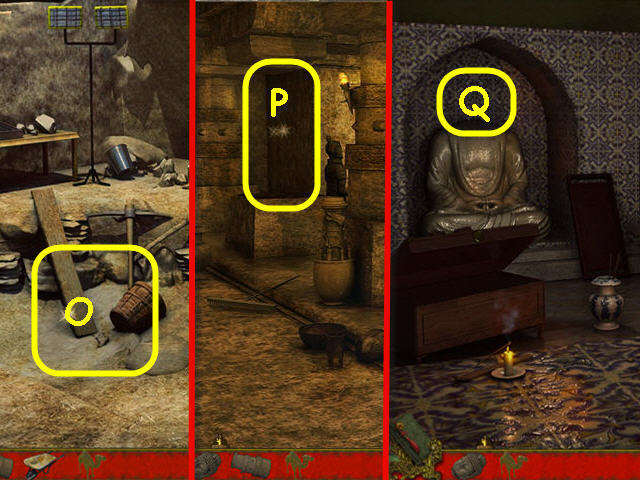
- Place the DRAGON on the pedestal (O).
- Back out two times and head forward.
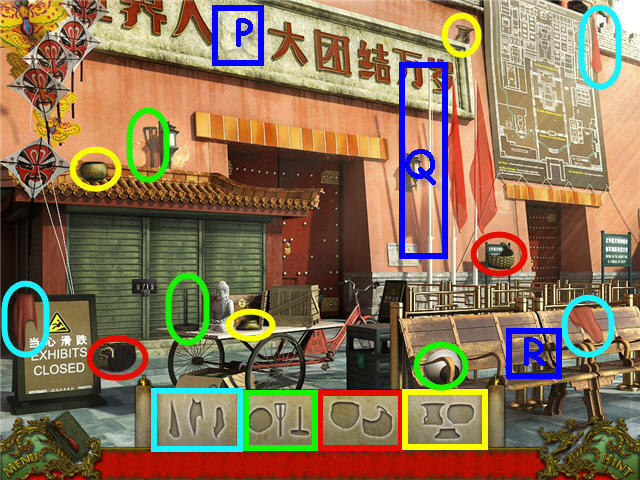
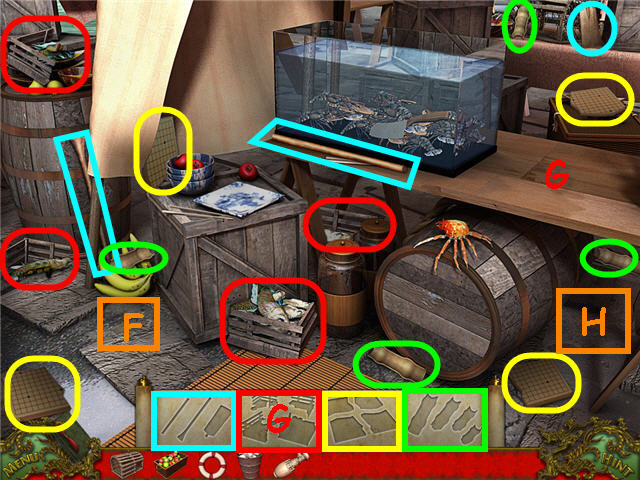
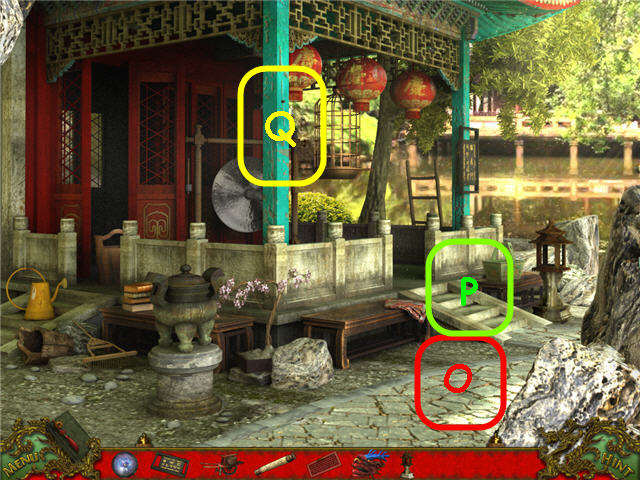
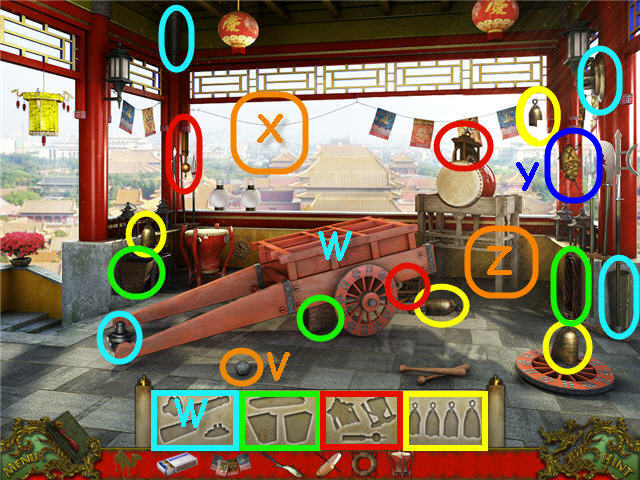
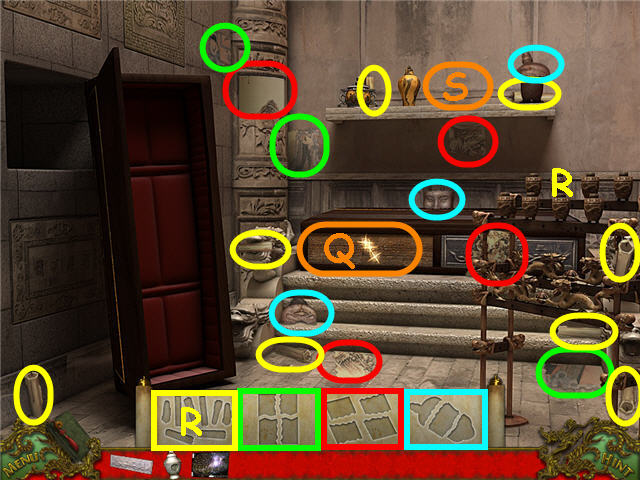
- Find the fragments and get a VASE, FLAG, WICKER BASKET and SPOTLIGHT.
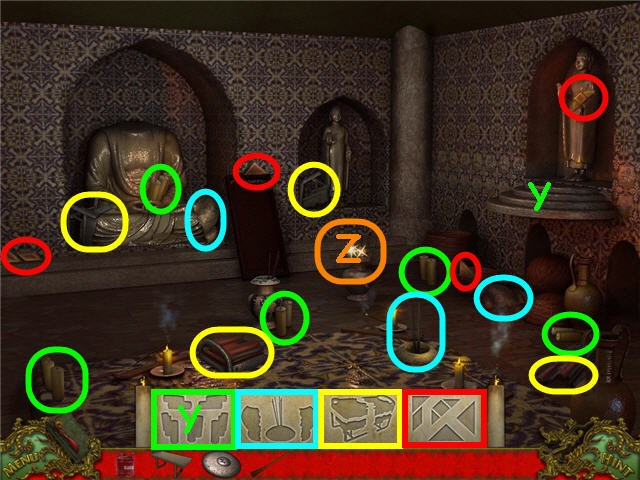
- Place the CHINESE SYMBOL on the sign (P).
- Place the FLAG on the pole (Q).
- Place the CHAIR ARM on the seat (R).
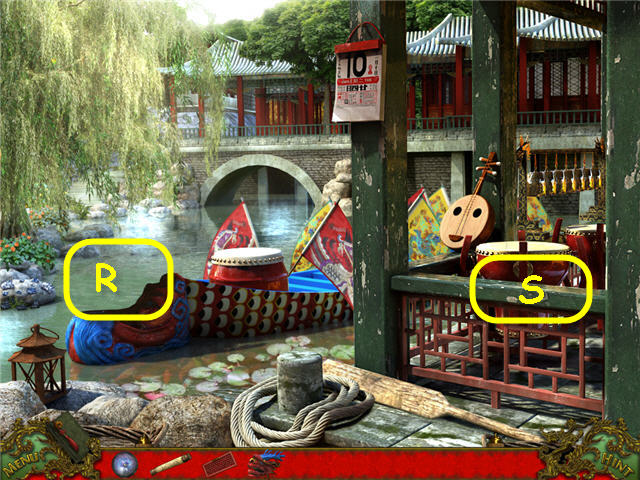
- Back out and head left.
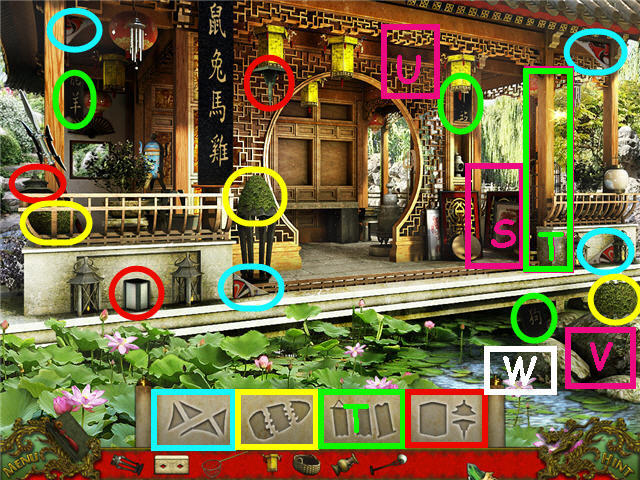
- Find the fragments and get a KITE, FAROL, SHRUB, and SCROLL.
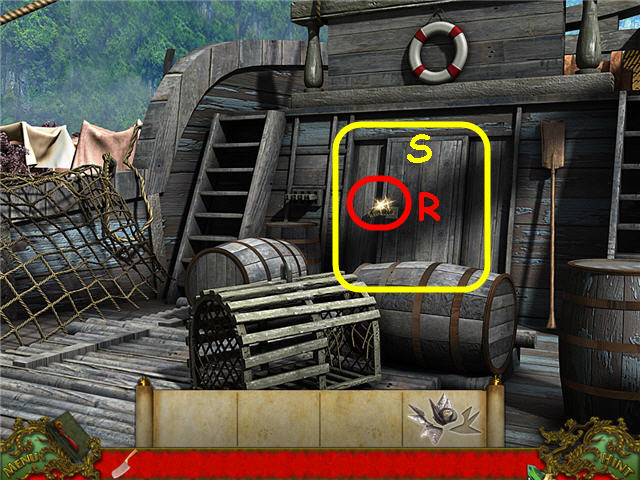
- Place the TABLE on the porch (S).
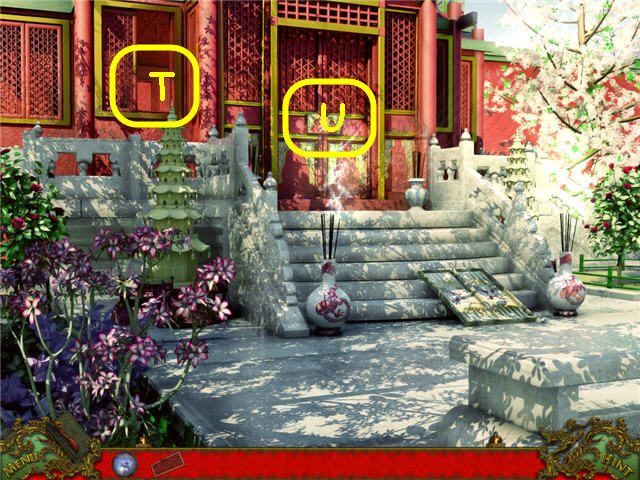
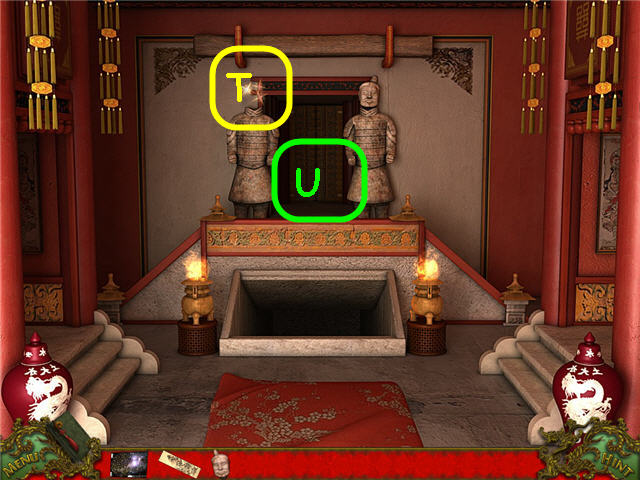
- Place the SCROLL on the right column (T).
- Hang the PAPER LANTERN from the eaves (U).
- Place the WICKER BASKET on the rocks (V).
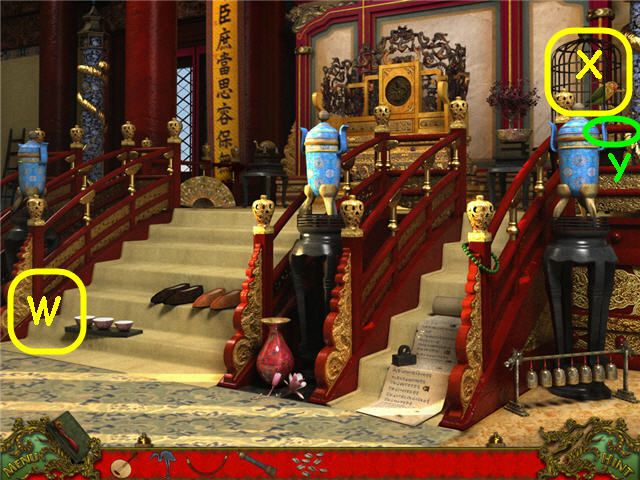
- Use the FISHING NET on the water (W) to get a KEY. The net will pulsate when over the correct spot.
- Back out, head right two times.
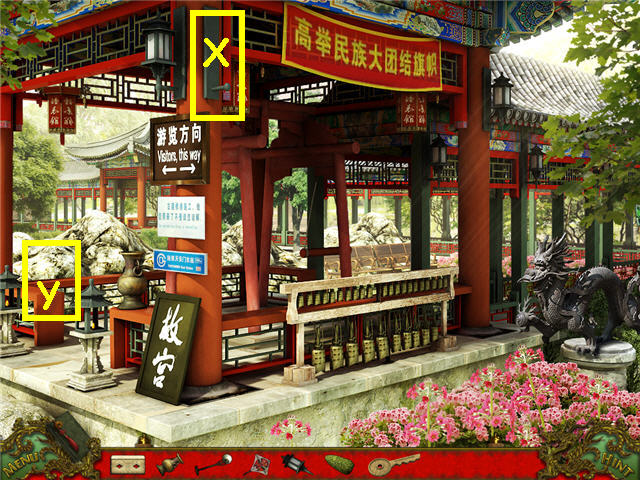
- Place the FAROL on the mount (X).
- Place the VASE on the rail (Y).
- Back out.
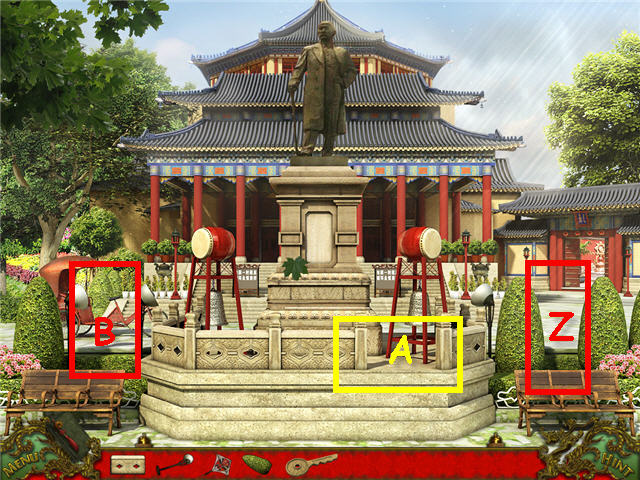
- Place the SPOTLIGHT by the bushes (Z).
- Place the STONE WALL by the wall (A).
- Place the SHRUB on the left (B).
- Back out and head forward.

- Place the KITE on the left (C).
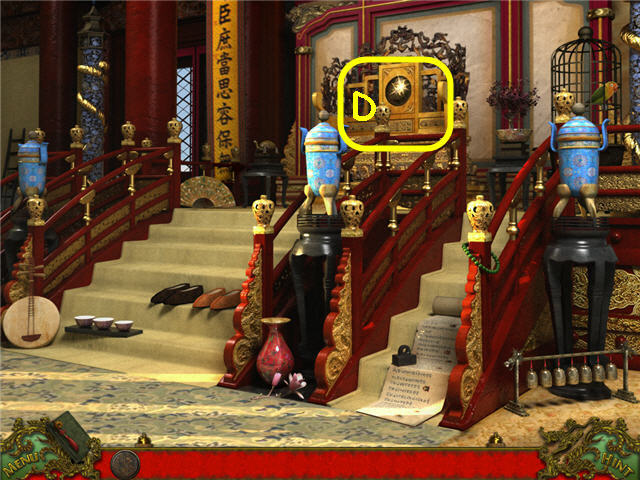
- Use the KEY on the lock (D).
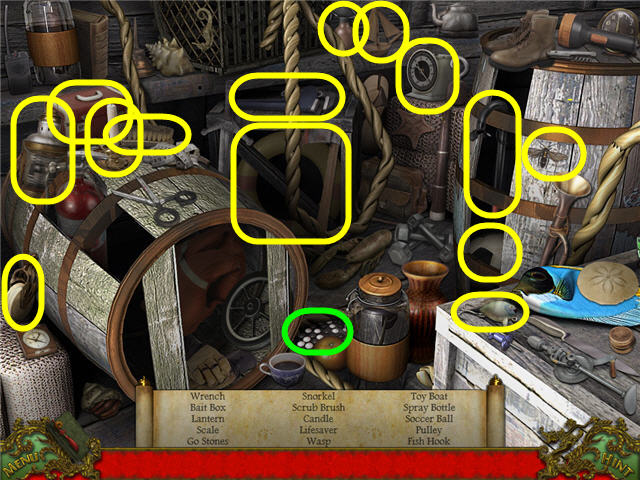
- Examine the stand to access a Hidden Object Scene.
- Find the items listed and get DOOR RIVETS.
- Place the DOOR RIVETS on the door to the right of the stand to trigger a puzzle.
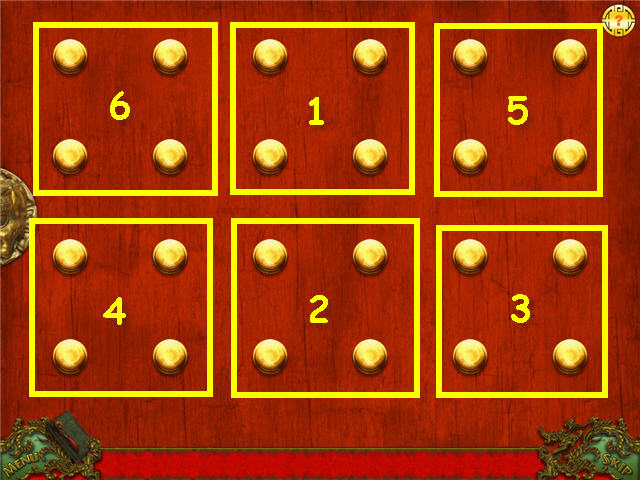
- The goal is to get all buttons pushed in.
- One button pushes in three others. See screenshot for groupings.
- Push in any button in the group of 4 in the screenshot. You need to push 6 buttons to complete the puzzle. See screenshot for my solution, yours may be different.
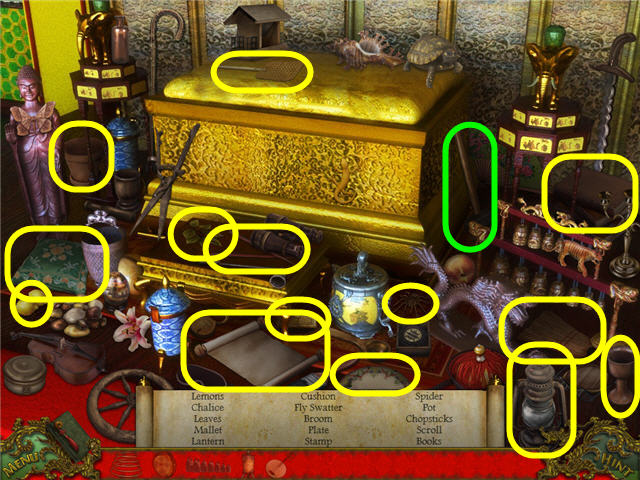
Chapter 3 – Doctor Fang
- Head right.
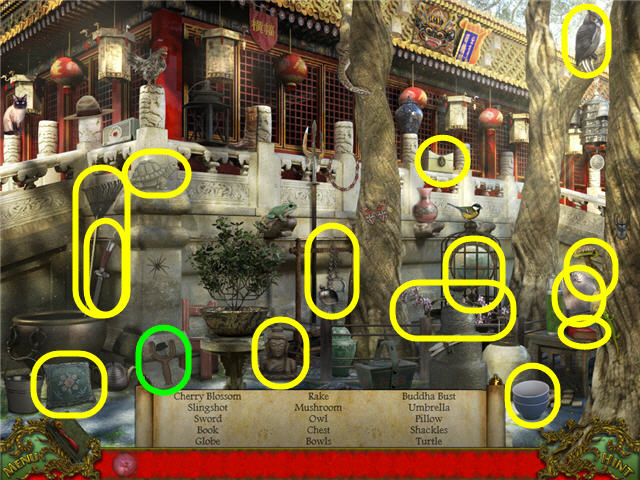
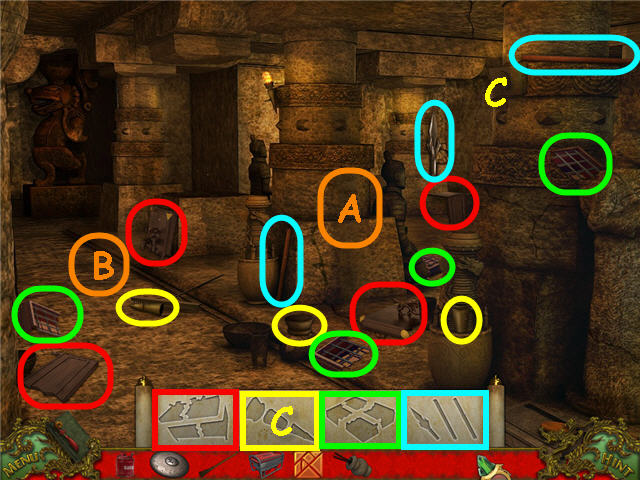
- Find the fragments and get a LARGE BRUSH, LION HEAD, WALL CANVAS and ARMOR.
- Take the HAMMER (E).
- Place the LION HEAD on the lion (F).
- Examine the litter (G) to access a Hidden Object Scene.
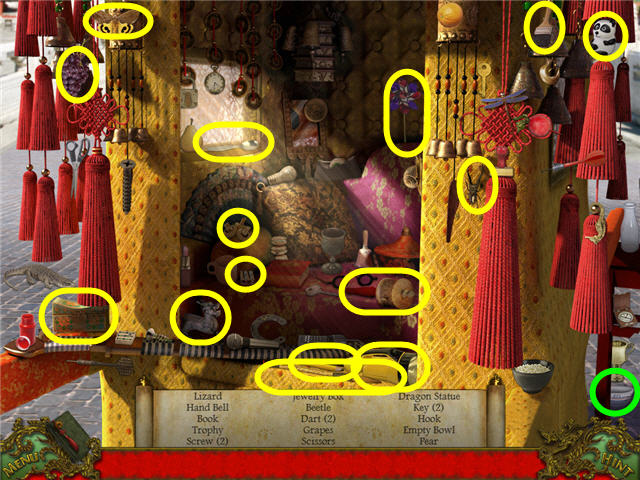
- Find the items listed and get a BOWL.
- Head straight into the building.
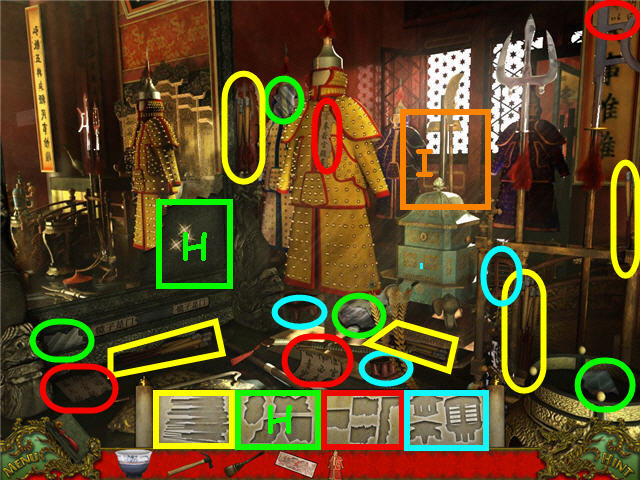
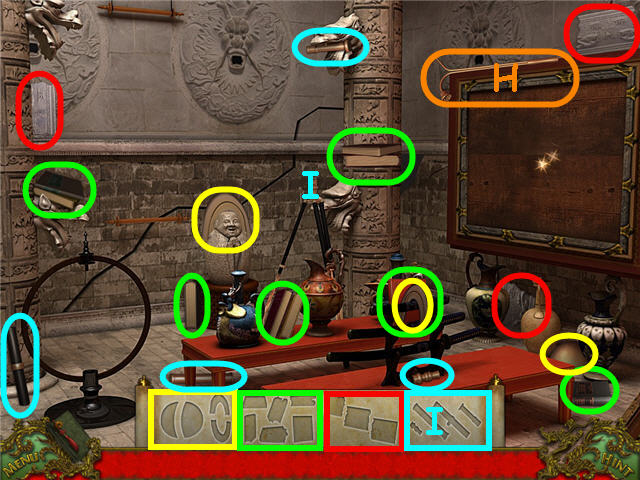
- Find the fragments and get WRITINGS, FLARES, INCENSE BURNER and MIRROR PIECE.
- Place the MIRROR PIECE on the mirror (H).
- Place the ARMOR on the stand (I).
- Back out two times, head straight.
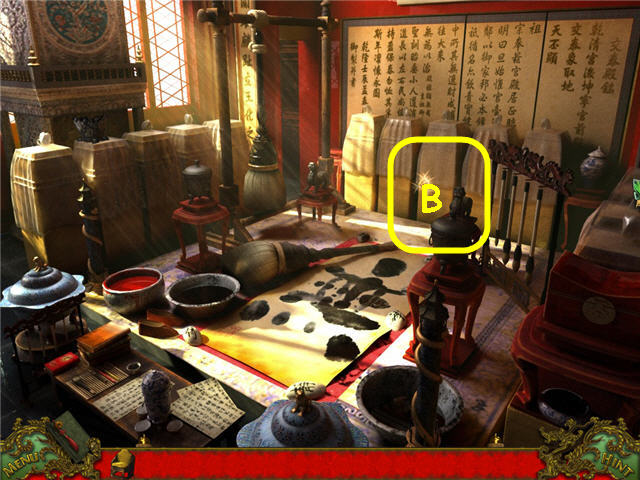
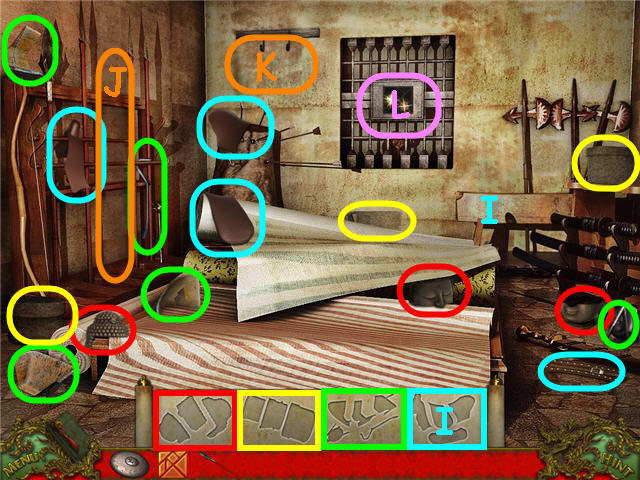
- Find the fragments and get PILLOWS, URN, BRUSHES, and PAPER LANTERN.
- Place the brushes on the rack (J).
- Use the HAMMER on the vase (K) and take the KEY.
- Place the LARGE BRUSH on the rack (L).
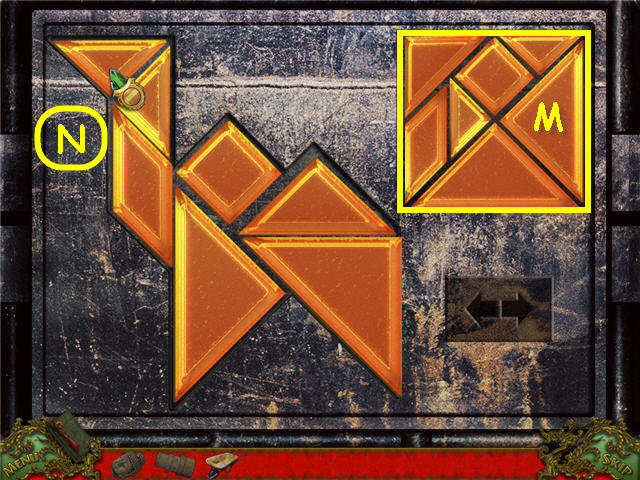
- Place the WRITINGS on the wall (M) to trigger a puzzle.
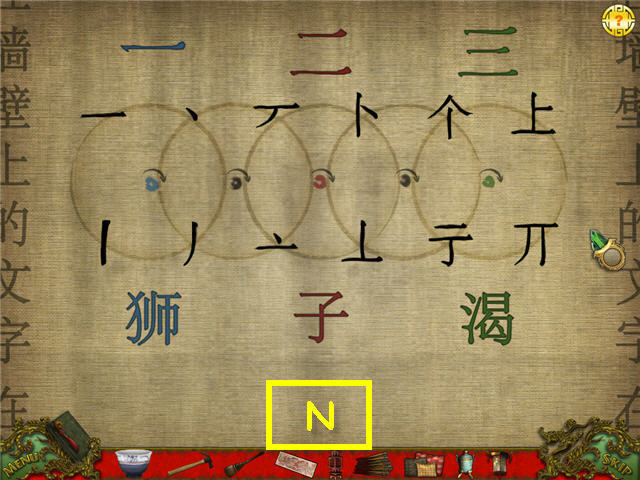
- Rotate the rings to place all symbols that require one brush stroke around the first circle, the symbols that require two brush strokes around the second, and three brush strokes around the right circle.
- The starting layout is random, see screenshot (N) for one solution.
- Note the saying ‘The Lion is Thirsty’ when complete.
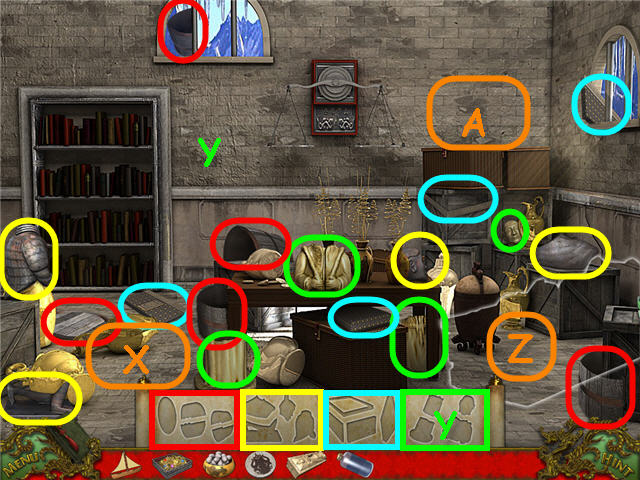
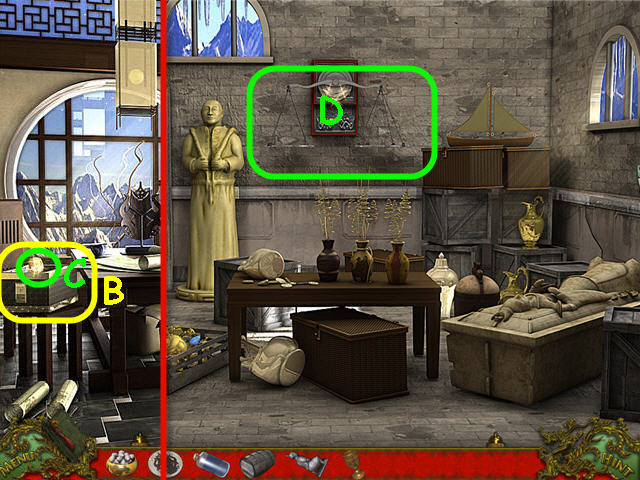
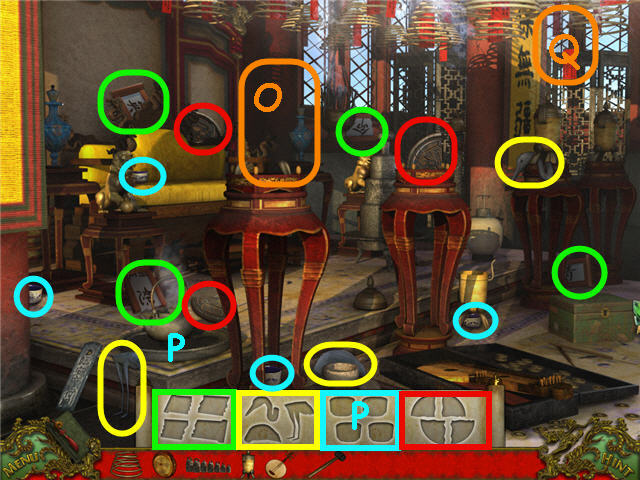
- Back out and head left.
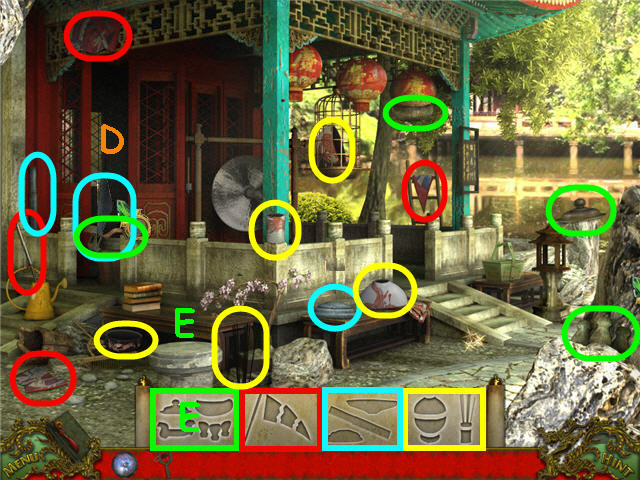
- Find the fragments and get a STONE PILLAR, THRONE, HANGING LANTERN, and a GUAN DAO.
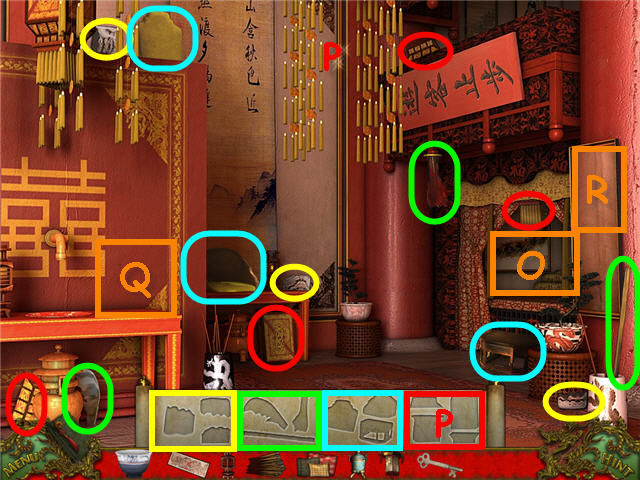
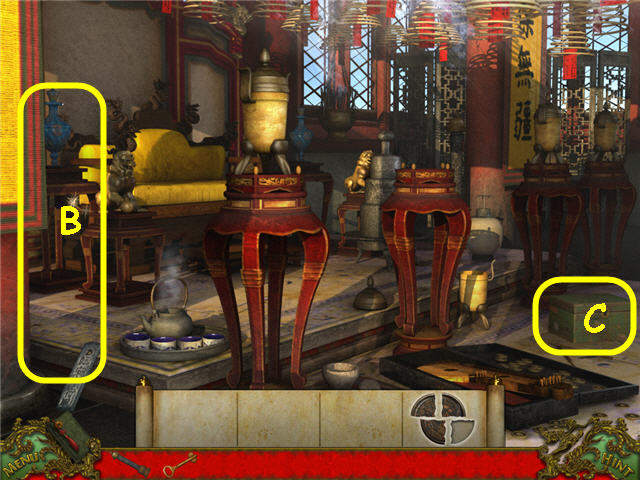
- Place the PILLOWS in the alcove (O).
- Place the HANGING LANTERN by the chimes (P).
- Place the INCENSE BURNER by the sink (Q).
- Place the WALL CANVAS in the frame (R).
- Back out, head right and enter the building.
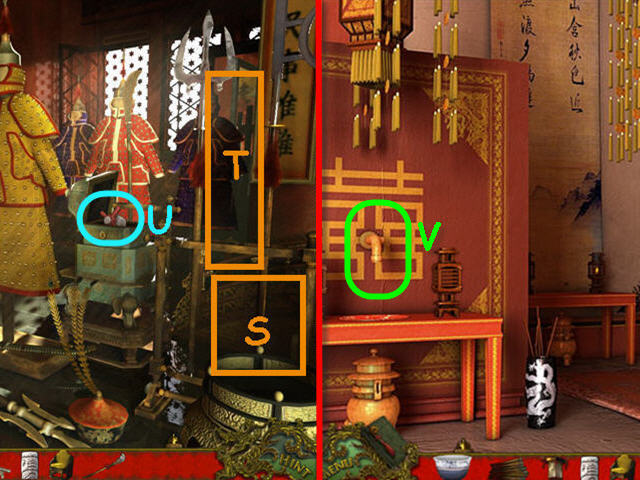
- Place the URN on the stand (S).
- Place the GUAN DAO on the rack (T).
- Use the KEY on the box; take the FAUCET HANDLE (U).
- Back out two times and head left.
- Place the FAUCET HANDLE on the spigot (V).
- Use the BOWL on the water to get a BOWL OF WATER.
- Back out and head right.
- Use the BOWL OF WATER on the lions face; take the SCRIPTURE TABLET (W).
- Place the STONE PILLAR on the wall (X).
- Hang the PAPER LANTERN on the doorway (Y).
- Place the FLARES in the stand (Z).
- Enter the building.
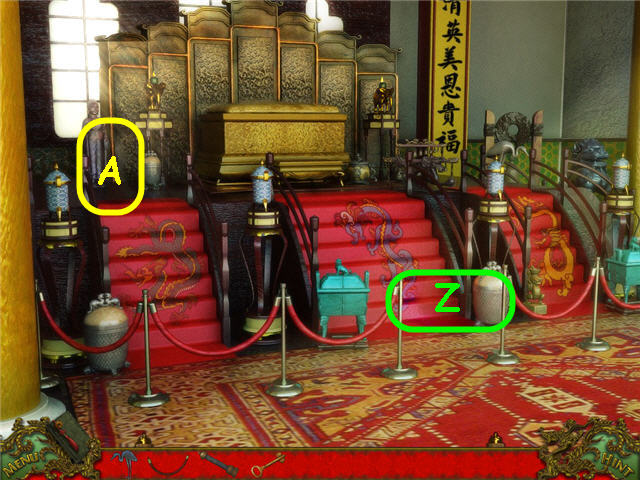
- Place the SCRIPTURE TABLET under the mirror (A).
- Back out two times then head straight.
- Place the THRONE in the center (B).
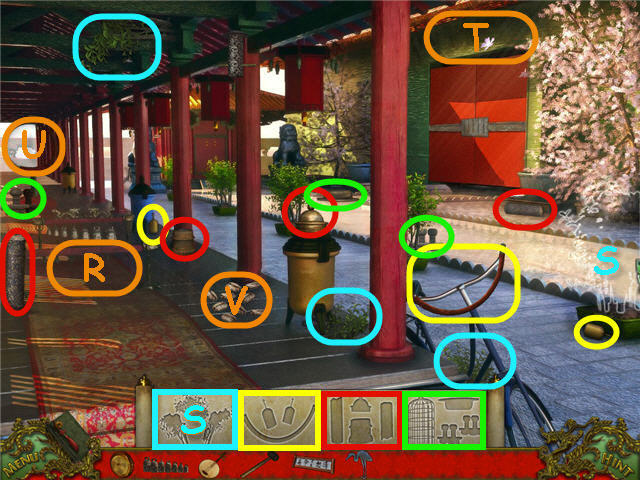
Chapter 4 – Lotus Orb
- Head right.
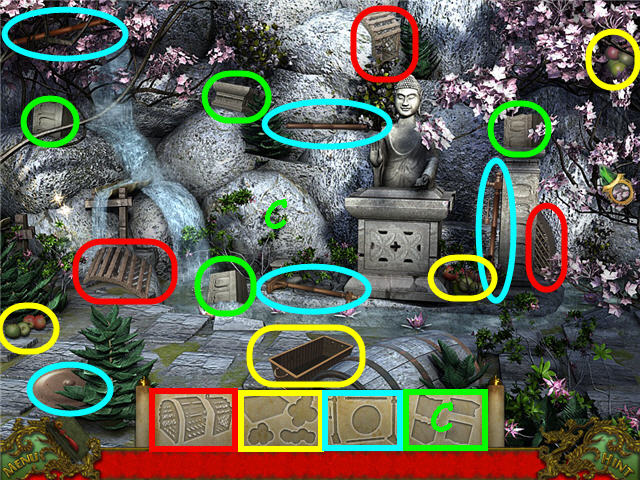
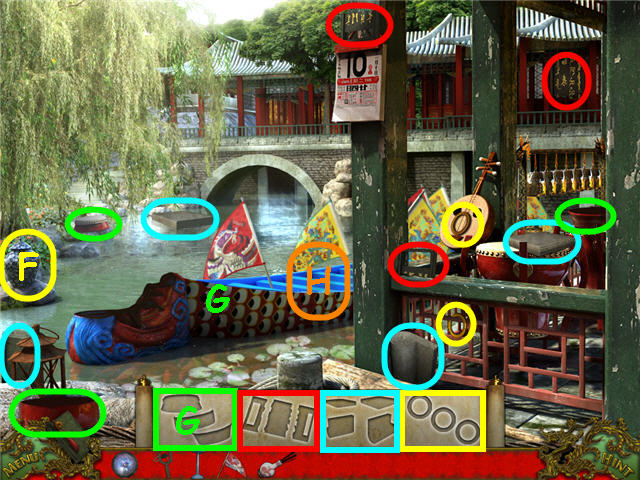
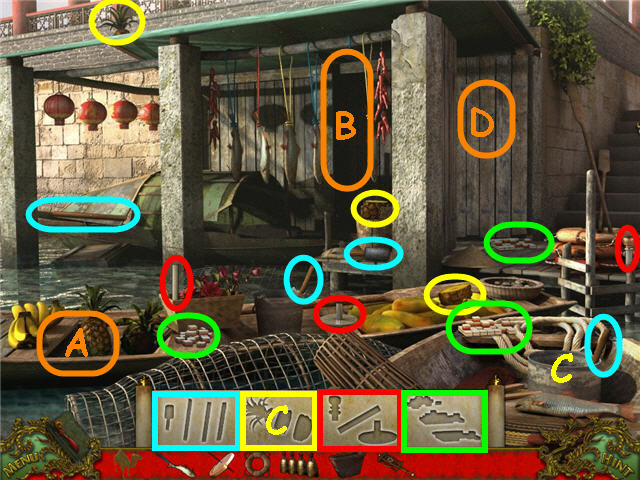
- Find the fragments and get a GONG, LOBSTER TRAP, APPLES and STONE PILLAR.
- Place the STONE PILLAR on the pedestal (C).
- Back out and head into the building.
- Find the fragments and get a LIFE RING, CLAMS, DECORATIVE POT and PAINTING.
- Place the GONG on the left (D).
- Place the PAINTING in the frame (E).
- Back out and head straight to the left of the building.
- Find the fragments and get a GO BOARD, OAR, BAMBOO PIPE, and FISH CRATE.
- Place the APPLES on the floor (F).
- Place the FISH CRATE on the shelf (G).
- Place the CLAMS under the shelf (H).
- Back out and head left.
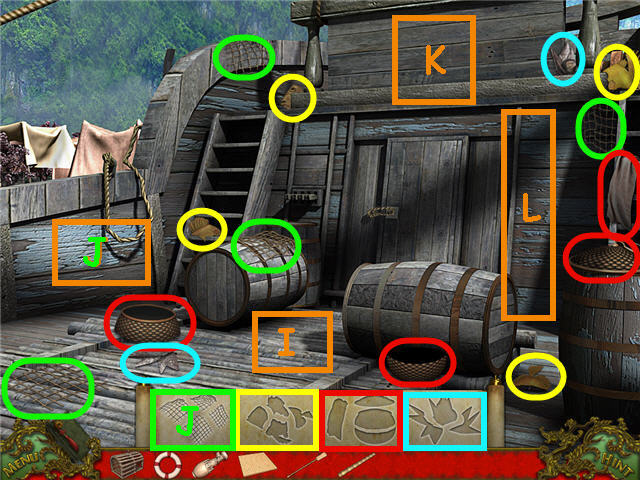
- Find the fragments and get a FISH, FISHING NET, WICKER BASKET and a partial stone flower.
- Place the LOBSTER TRAP on the deck (I).
- Place the FISHING NET on the left side (J).
- Hang the LIFE RING above the door (K).
- Place the OAR right of the door (L).
- Back out and head right.
- Place the DECORATIVE POT on the right (M).
- Place the BAMBOO PIPE on the trough (N).
- Back out.
- Take the HOOK from the puddle (O).
- Head straight.
- Place the FISH on the plate (P).
- Use the HOOK to get the CLEAVER (Q).
- Back out and head left.
- Use the CLEAVER on the rope (R).
- Click on the opened door (S) to access a Hidden Object Scene.
- Find the items listed and get GO STONES.
- Back out and head into the building.

- Place the WICKER BASKET on the floor (T).
- Place the GO BOARD on the table (U).
- Place the GO STONES on the GO BOARD to trigger a puzzle.
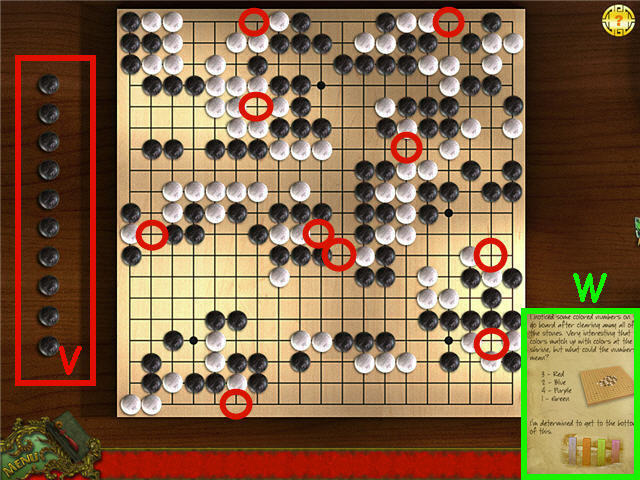
- Arrange the 10 black dots (V) on the left on the board so that they block in a white dot.
- Your layout may differ from mine. See screenshot for my solution.
- Get a journal update with a puzzle clue (W).
- Back out and head left.
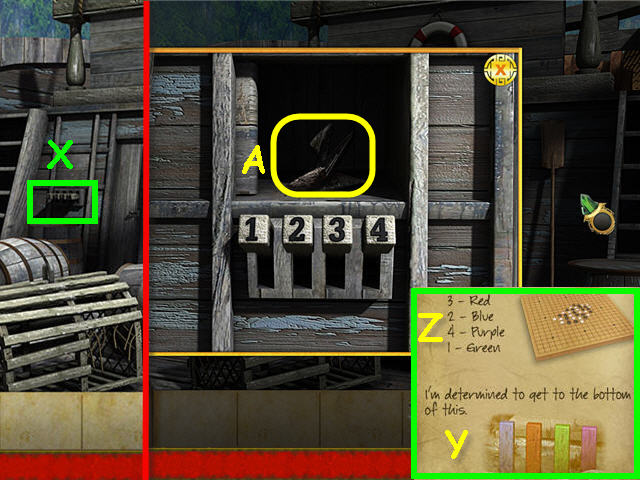
- Examine the numbered levers (X) on the left of the door.
- Using the code from the journal, note the order of the colors (Y) (blue, red, green, purple) and match that to the number of the lever (Z).
- Solution: Move the levers in the following order; 2-3-1-4.
- Take the last piece of STONE FLOWER (A).
- Back out and head right.
- Place the STONE FLOWER in the statue’s hand (B).
- Take the LOTUS ORB (C).
Chapter 5 – Imperial Garden
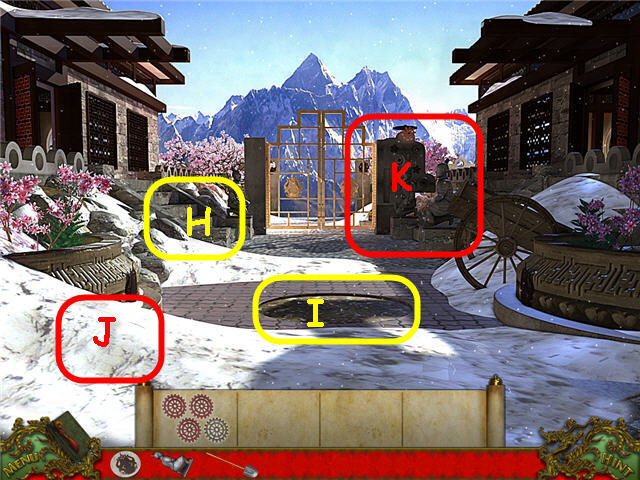
- Click on the staircase on the left to access a Hidden Object Scene.
- Find the items listed and get a SLINGSHOT.
- Head right.
- Open the door (D).
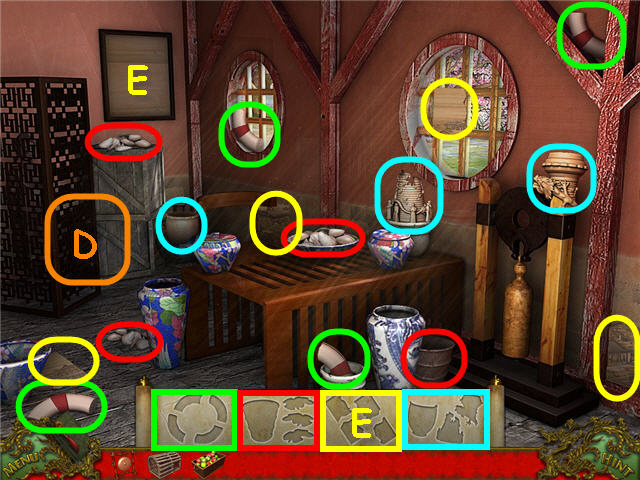
- Find the fragments to get a BIRD BATH, FLAG, VASE, and URN.
- Place the URN on the pedestal (E).
- Head to the upper right.
- Use the SLIGSHOT on the vase (F).
- Find the fragments and get GOLD RINGS, DRUM, WRITINGS BOARD and STONE BENCH.
- Place the DRUM (G) and the FLAG (H) in the boat.
- Back out two times and head straight two times.
- Find the fragments and get a BIRD HOUSE, PAGODA, CART and SCROLL.
- Place the PAGODA on the pagoda (I).
- Place the VASE on the right of the stairs (J).
- Back out.
- Find the fragments and get a PAPER LANTERN, INCENSE BURNER, DRAGON HEAD and WINDOW SHUTTER.
- Place the PAPER LANTERN on the rope (K).
- Place the BIRD BATH on the left (L).
- Place the BIRD HOUSE in the tree (M).
- Place the STONE BENCH on the right (N).
- Back out and head right.
- Place the CART near the rock (O).
- Place the INCENSE BURNER by the stairs (P).
- Place the WRITINGS BOARD on the pillar (Q).
- Head to the upper right.
- Place the DRAGON HEAD on the boat (R).
- Place the SCROLL on the railing (S).
- Click on the SCROLL to get a journal update.
- Back out two times and head forward twice.
- Place the WINDOW SHUTTER on the window (T).
- Place the GOLD RINGS on the door (U) to trigger a puzzle.
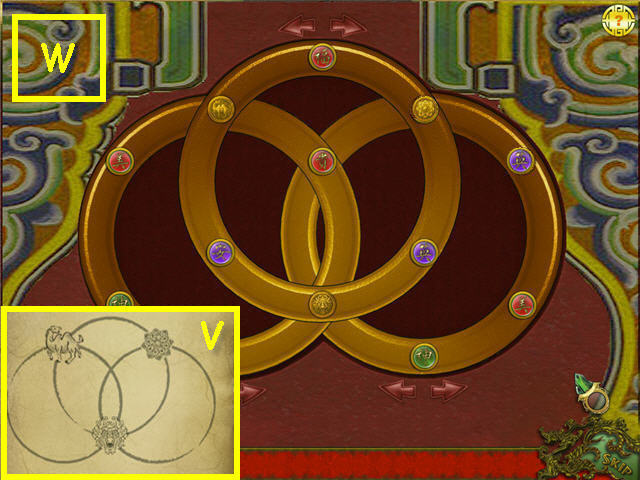
- Turn the rings to arrange the gold lion, camel and lotus flower as depicted in your journal from the scroll (V).
- Use the arrows on the top and the bottom left and right to turn the rings.
- Solution: Click the arrows as follows; lower right arrows – left 2x, lower left arrows – left 2x, top arrows – right 1x, lower left arrows – left 3x, top arrows – right 2x. See screenshot (W) for solution.
- Place the LOTUS ORB on the pedestal.
Chapter 6 – Camel Statue
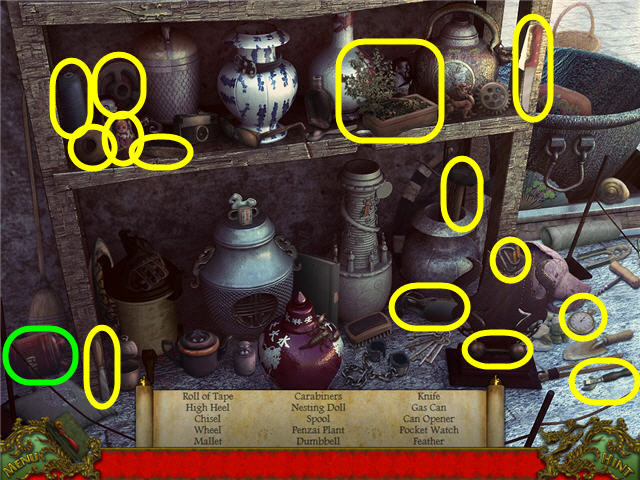
- Click on the shelves to access a Hidden Object Scene.
- Find the items listed and get a GAS CAN.
- Head right.
- Find the fragments to get a SPOTLIGHT, TABLE, SHIELD and BROOM.
- Place the SPOTLIGHT on the stand (X).
- Back out and head forward.
- Find the fragments to get a GENERATOR, CANDLES, PUZZLE PIECES and URN.
- Place the CANDLES on the shelf (Y).
- Place the TABLE in the corner (Z).
- Back out and head left.
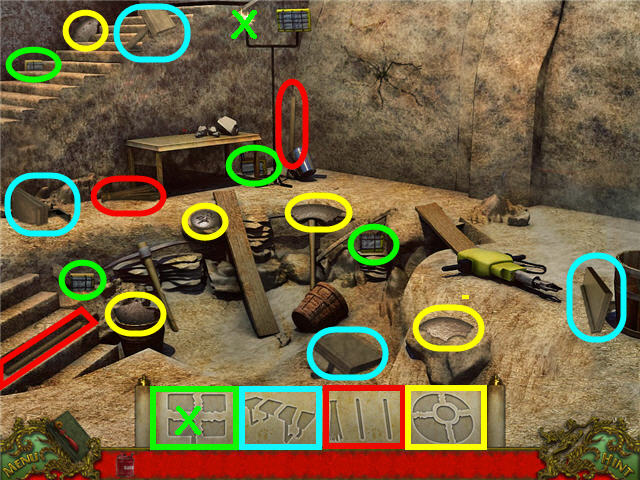
- Find the fragments to get a TORCH, WOODEN CHEST, SIFTING BOX and SPEAR.
- Place the BROOM against the pillar (A).
- Place the URN on the ground (B).
- Place the TORCH on the holder (C).
- Back out and head straight.

- Place the WOODEN CHEST on the left.
- Open the WOODEN CHEST; take the JACKHAMMER BIT (D).
- Back out and head right.
- Place the GENERATOR on the ground (E).
- Use the GAS CAN on the GENERATOR.
- Place the SIFTING BOX on the table (F).
- Place the JACKHAMMER BIT on the jackhammer; take the JACKHAMMER (G).
- Use the JACKHAMMER on the wall (H).
- Head into the newly opened area.
- Find the fragments and get a BUDDHA HEAD, STONE PILLAR, SADDLE and WHEELBARROW.
- Place the SADDLE on the trestle (I).
- Place the SPEAR on the rack (J).
- Place the SHIELD on the wall (K).
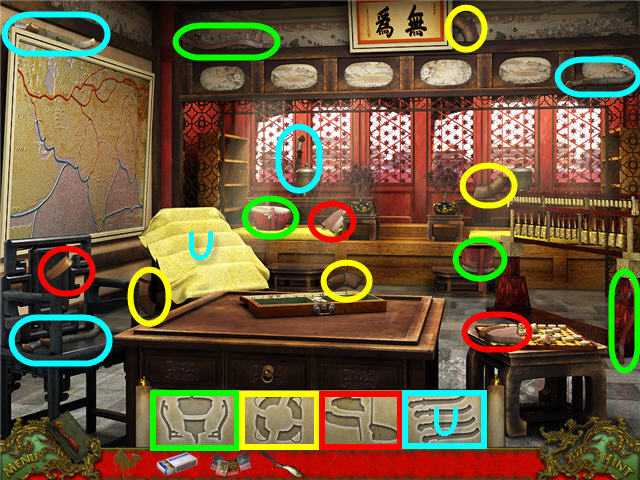
- Place the PUZZLE PIECES on the grate (L) to trigger a puzzle.
- Arrange the pieces from the right (M) into the spaces on the left so they all fit.
- Right click the pieces to turn them. See screenshot (N) for solution.
- Take the CAMEL STATUE.
- Back out.
- Place the WHEELBARROW in the pit (O).
- Back out and head left.
- Place the STONE PILLAR on the left (P).
- Back out and head forward.
- Place the BUDDHA HEAD on the statue (Q).
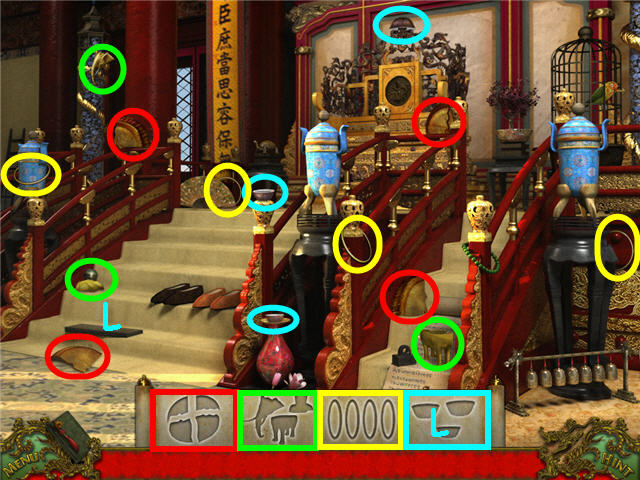
Chapter 7 – Hall of Clocks
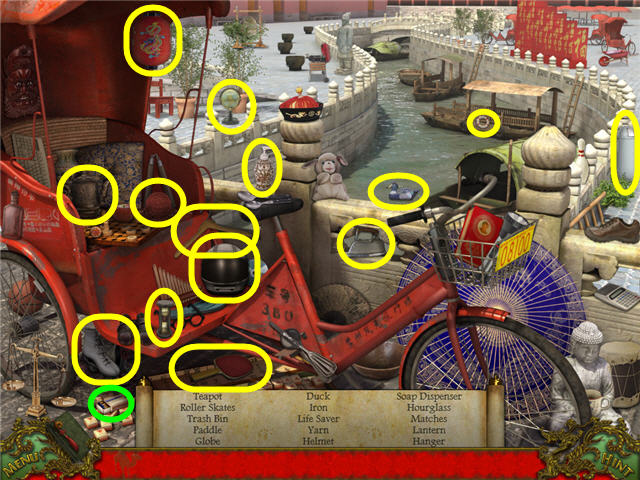
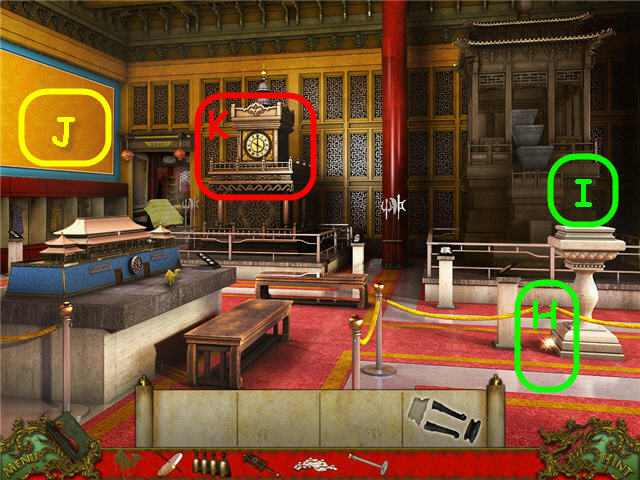
- Click on the rickshaw to access a Hidden Object Scene.
- Find the items listed and get MATCHES.
- Head right into the building.
- Find the fragments and get FLAGS, FISH, BUILDING and partial pedestal.
- Place the BUILDING on the model (R).
- Examine the camel (S) and note the roman numerals.
- Head through the left rear door (T).
- Find the fragments and get a DRUM, SWORDS, LIFE RING, and SUNDIAL.
- Place the SWORDS on the rack (U).
- Back out two times and head straight.
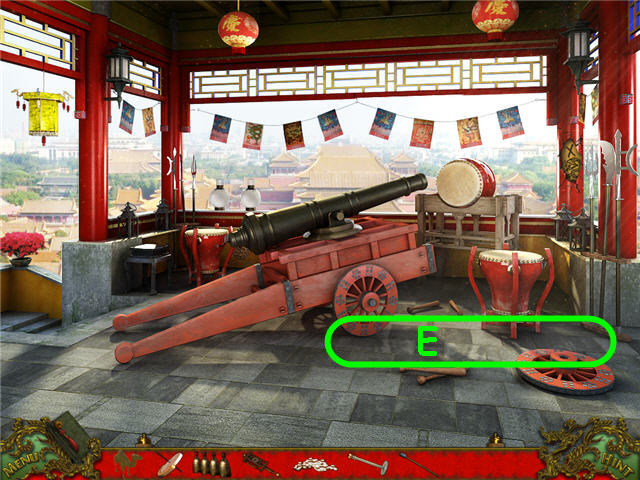
- Find the fragments and get a CANNON, CLOCK, BASKET, and BELLS.
- Place the FLAGS on the line (X).
- Take the CANNONBALL (V).
- Place the CANNON on the cart (W).
- Place the CANNONBALL in the cannon.
- Use the MATCHES on the CANNON and note the code on the pillar (Y).
- Place the DRUM in the corner (Z).
- Head down the left stairs.
- Find the fragments and get a PINEAPPLE, MAHJONGG TILES, STANCHION and TAMPING ROD.
- Place the BASKET in the boat (A).
- Hang the FISH on the line (B).
- Place the PINEAPPLE in the pot (C).
- Hang the LIFE RING on the door (D).
- Head up the right stairs.
- Place the TAMPING ROD on the floor (E).
- Back out and head right into the building and through the left rear door.
- Hang the BELLS on the rack (F).
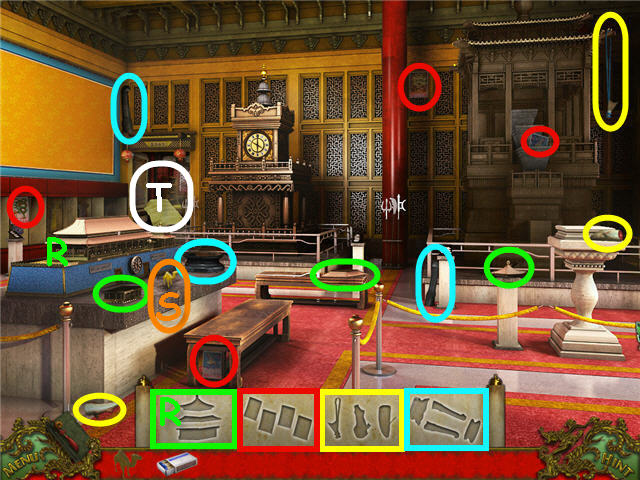
- Place the MAHJONGG TILES on the board (G) to trigger a puzzle.
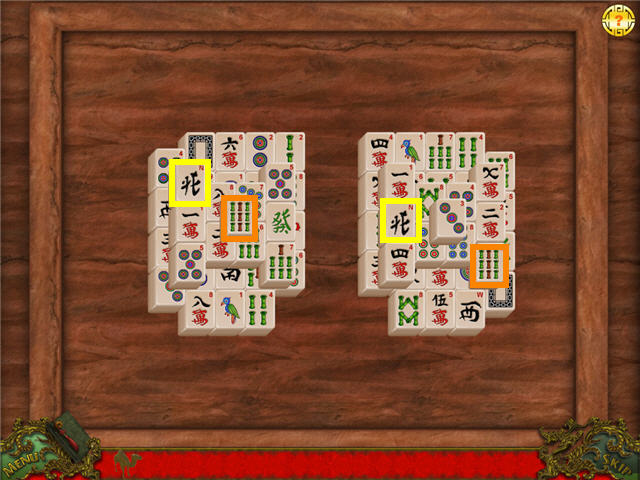
- Remove the tiles from the board by clicking on two matching free tiles.
- The tiles must match by number and symbol and must be free on a left or right side and top in order to be removed. See screenshot for examples.
- Note the two remaining tiles and get a journal update.
- Back out.
- Place the STANCHION by the ropes (H).
- Place the SUNDIAL on the pedestal (I).
- Place the CLOCK on the wall (J).
- Click on the large clock (K) to trigger a puzzle.
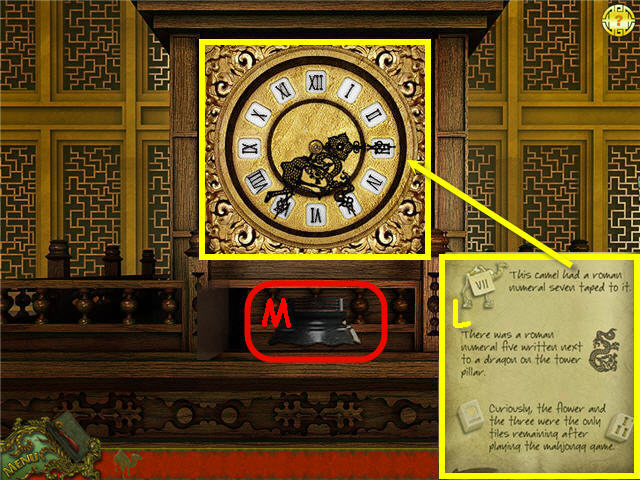
- Set the clock hands to the correct Roman numeral using the clues from the clock, pillar and mahjongg game entered in the journal (L).
- Solution: Camel hand = VII, Lotus = 3. Dragon = V.
- Take the final piece to the PEDESTAL (M).
- Head forward through the left door.

- Place the PEDESTAL on the floor (N).
- Place the CAMEL STATUE on the pedestal. .
Chapter 8 – Escape
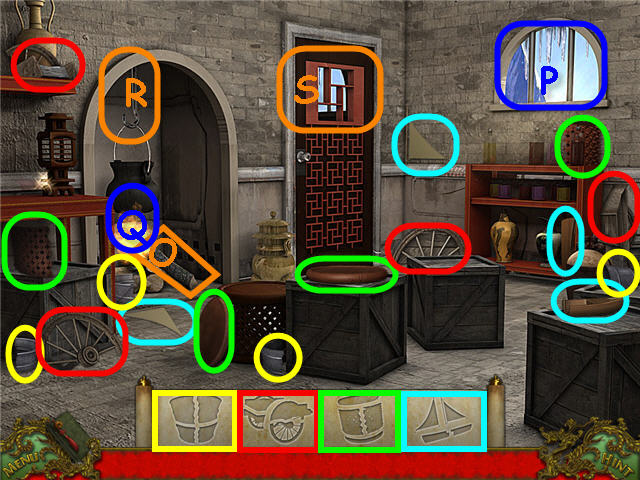
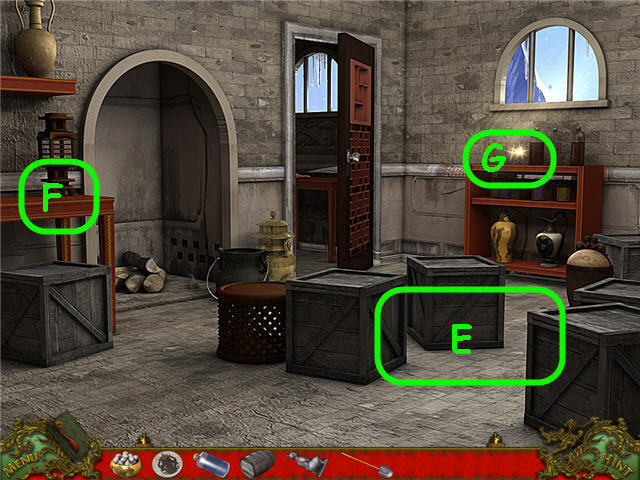
- Find the fragments and get a STOOL, SAILBOAT, EMPTY BUCKET and WAGON.
- Take the BURNING LOG (O).
- Place the EMPTY BUCKET and BURNING LOG in the window (P); take the FULL BUCKET.
- Use the FULL BUCKET on the fire (Q).
- Remove the pot and take the LONG HOOK (R).
- Examine the door window (S); use the LONG HOOK to get the MASTER KEY.
- Use the MASTER KEY on the door and exit.
- Find the fragments and get a TREASURE, EGGS, LANTERN and partial gears.
- Place the WAGON on the snow pile (T).
- Head right.
- Find the fragments and get a MEDALLION, VASE, TOMB, and BOTTLE.
- Place the vase on the right (U).
- Place the STOOL by the table (V).
- Hang the LANTERN (W).
- Back out and head upper left.
- Find the fragments and get a BARREL, CHEST, KNEELING STATUE, and STANDING STATUE.
- Place the TREASURE (X), the STANDING STATUE (Y) and TOMB (Z) on the floor.
- Place the SAILBOAT on the chests (A).
- Back out and head right.
- Place the CHEST on the stool (B); click to open.
- Take the CHALICE (C).
- Back out and head left.
- Examine the scales (D).
- Place the CHALICE on the bottom shelf to trigger a puzzle.
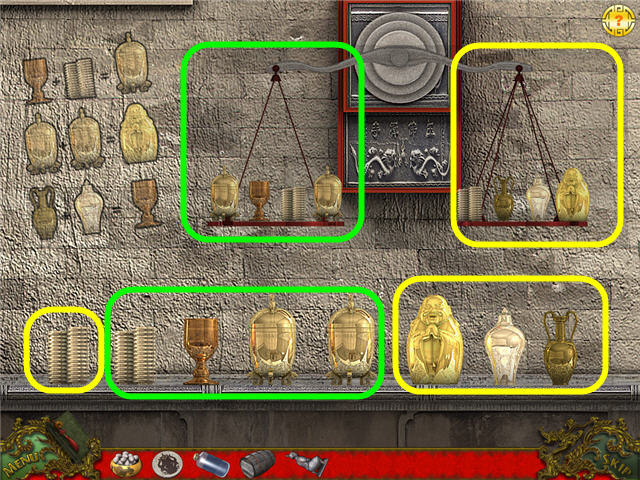
- Balance the scale by placing four relics on each side.
- Use the code on the wall to decipher the weights.
- See screenshot for solution.
- Press the red flashing light when correct.
- Examine the newly opened room to access a Hidden Object Scene.

- Find the items listed and get a SHOVEL.
- Back out two times.
- Place the BARREL by the crates (E).
- Place the EGGS on the table (F).
- Place the BOTTLE on the shelf (G).
- Head straight out the door.
- Place the KNEELING STATUE on the stairs (H).
- Place the MEDALLION in the slot (I).
- Use the SHOVEL on the snow pile (J) and take the final GEARS.
- Place the GEARS on the mechanism (K).
Chapter 9 – Dragon Medallion
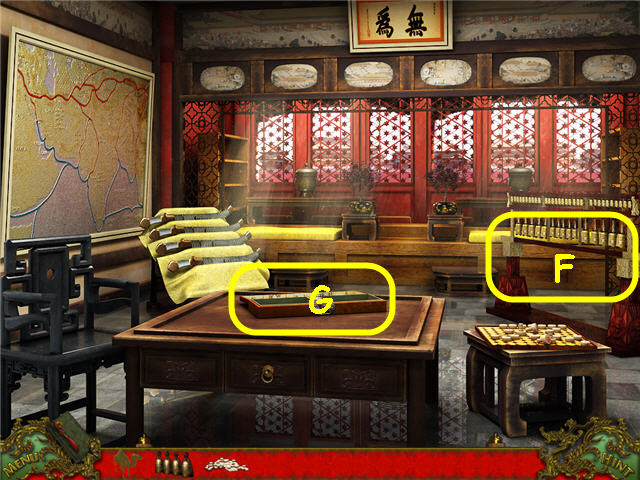
- Head right.
- Find the fragments and get an ELEPHANT, GOLD RINGS, RICE BOWLS and GONG.
- Place the RICE BOWLS on the tray (L).
- Back out and head straight up the right staircase.
- Find the fragments and get BELLS, URN, STOOL, and RUAN.
- Place the ELEPHANT on the pedestal (M).
- Place the STOOL in front of the chest (N).
- Examine the chest to access a Hidden Object Scene.
- Find the items listed and get a RUBBER MALLET.
- Back out and head straight up the left stairs.
- Find the fragments and get a BANNER, CRANE STATUE, TEA CUPS, and a partial dragon medallion.
- Place the URN on the stand (O).
- Place the TEA CUPS on the tray (P).
- Hand the GOLD RINGS on the ceiling (Q).
- Back out and head left.
- Find the fragments and get a VELVET ROPE, SHRUB, PILLAR and partial bird cage.
- Hang the BELLS on the rack (R).
- Place the SHRUB in the plantar (S).
- Hand the BANNER above the door (T).
- Place the GONG on the stand (U).
- Use the RUBBER MALLET on the GONG; pick up the BIRD SEEDS (V).
- Back out and head right.
- Place the RUAN on the bottom of the stairs (W).
- Give the BIRD SEEDS to the bird (X); take the SMALL KEY (Y).
- Back out and head straight up the right stairs.
- Hook the VELVET ROPE on the stanchions (Z).
- Place the CRANE STATUE on the landing (A).
- Back out and head straight up the left stairs.
- Place the PILLAR on the left (B).
- Use the SMALL KEY on the chest (C); take the final piece of the DRAGON MEDALLION.
- Back out and head right.
- Place the MEDALLION in the slot (D) to trigger a puzzle.
- Arrange the pieces to complete the dragon medallion picture.
- The starting layout is random. See screenshot for solution (E).
- Take the OIL CAN when complete.
- Back out and head left.
- Use the OIL CAN on the large red doors; take the final BIRD CAGE piece (F).
- Back out and head right.
- Place the BIRD CAGE on the upper left (G).
Chapter 10 – Treasure
- Head right.
- Find the fragments and get BOOKS, COFFIN PLAQUE, TELESCOPE and partial Saturn.
- Take the CANDLE LIGHTER (H).
- Place the TELESCOPE on the tripod (I).
- Back out and head left.
- Examine the debris to access a Hidden Object Scene.
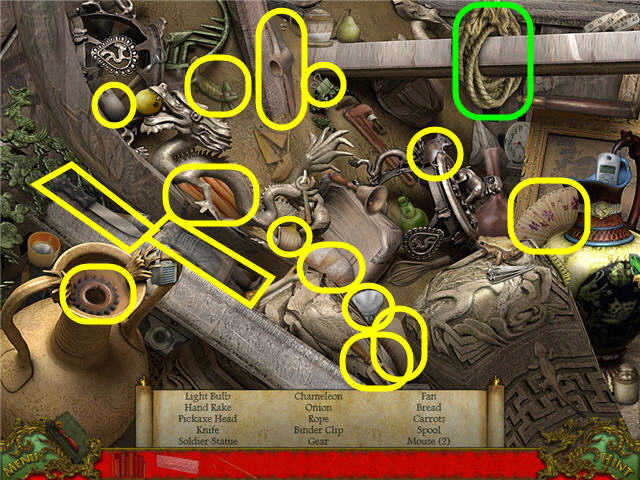
- Find the items listed and get a ROPE.
- Find the fragments and get STAR CHART, TORCH LAMP, URN and SCULPTURE.
- Place the SCULPTURE on the pedestal (J).
- Place the BOOKS on the bookshelf (K).
- Back out.
- Place the TORCH LAMP on the pedestal (L).
- Use the CANDLE LIGHTER on the flames (M) to get a LIT CANDLE LIGHTER.
- Use the LIT CANDLE LIGHTER on the TORCH LAMP (N).
- Use the ROPE on the fallen statue (O).
- Head down into the passage (P).
- Find the fragments and get a SCROLL, CANDLES, STATUE HEAD and partial painting.
- Place the COFFIN PLAQUE on the coffin (Q).
- Place the CANDLES on the holders (R).
- Place the URN on the shelf (S).
- Back out.
- Place the STATUE HEAD on the left statue (T).
- Enter in the passage (U).
- Find the fragments and get a GLOBE, SUN, ROBE and SKELETON.
- Take the PICTURE FRAME (V).
- Place the SUN in the center (W).
- Back out and head right.
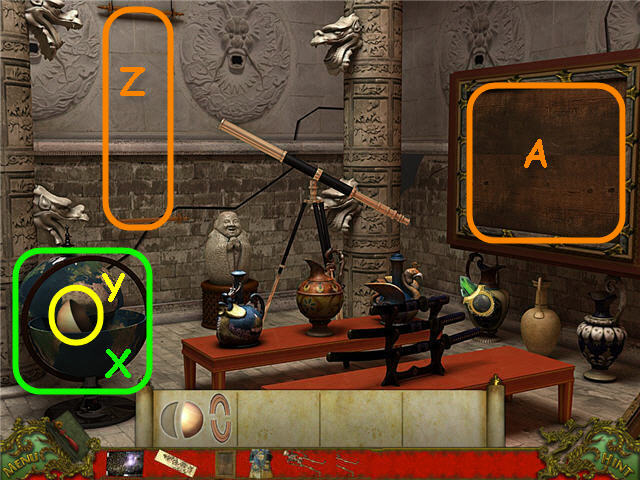
- Place the GLOBE on the axis (X).
- Click on the GLOBE to open; take the final piece of SATURN (Y).
- Hang the SCROLL on the hanger (Z).
- Place the STAR CHART in the frame (A).
- Back out and head straight down.

- Place the SKELETON in the coffin (B).
- Click on the coffin twice to return it to the vault.
- Take the final piece of the PAINTING (C).
- Back out and head left.
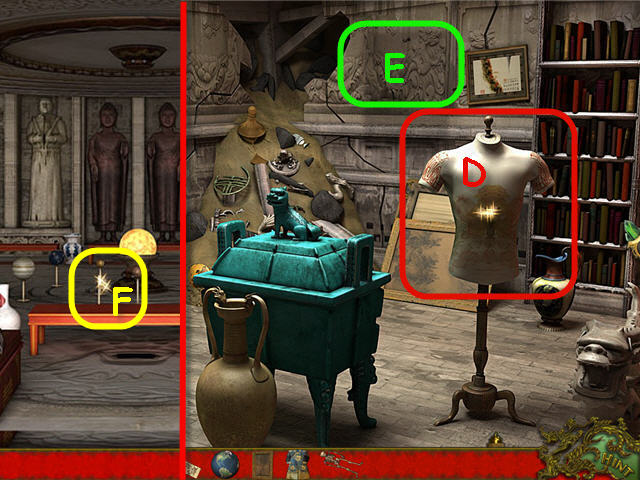
- Place the ROBE on the form (D).
- Place the PICTURE FRAME on the wall (E).
- Place the PAINTING in the PICTURE FRAME.
- Back out and head straight between the statues.
- Place the SATURN on the spindle (F) to trigger a puzzle.
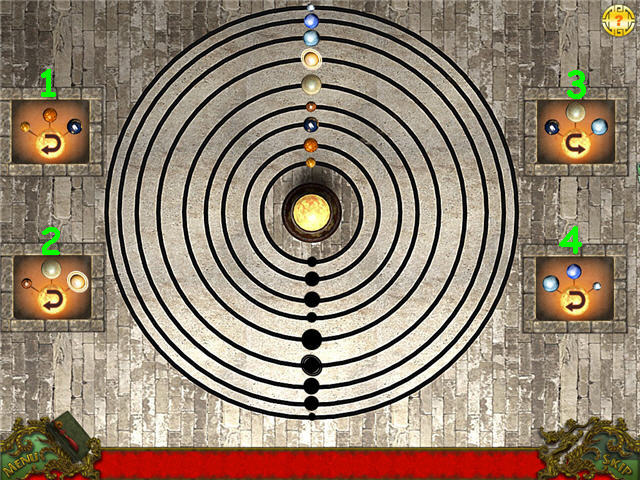
- Align all the planets to the black holes on the opposite side.
- Each of the 4 buttons turns 3 planets. Click on the center to reset the puzzle.
- Solution: Click the following buttons in this order; 1-2-3-4×2-1-2-3-4×2-2-1×2-2×3-1×8.
- Congratulations! You have successfully completed Hidden Mysteries: The Forbidden City.


 Shaolin Mystery: Revenge of the Terracotta Warriors Walkthrough, Guide, & Tips
 Whispered Secrets: Golden Silence Walkthrough, Guide, & Tips
 Awakening: The Sunhook Spire Walkthrough, Guide, & Tips
 Forgotten Kingdoms: The Ruby Ring Walkthrough, Guide, & Tips
 Skymist: The Lost Spirit Stones Walkthrough, Guide, & Tips