Whispered Secrets: Golden Silence Walkthrough, Guide, & Tips
Whispered Secrets: Golden Silence Walkthrough
Welcome to the Whispered Secrets: Golden Silence Walkthrough
A man has gone missing in the town of Rockshire, but the townspeople deny he was ever there. What dark secret are they hiding?
Whether you use this document as a reference when things get difficult or as a road map to get you from beginning to end, we’re pretty sure you’ll find what you’re looking for here.
This document contains a complete Whispered Secrets: Golden Silence game walkthrough featuring annotated screenshots from actual gameplay!
We hope you find this information useful as you play your way through the game. Use the walkthrough menu below to quickly jump to whatever stage of the game you need help with.
Remember to visit the Big Fish Games Forums if you find you need more help. Have fun!
This walkthrough was created by Anita Cule, and is protected under US Copyright laws. Any unauthorized use, including re-publication in whole or in part, without permission, is strictly prohibited.
General Tips
- This is the official guide for Whispered Secrets: Golden Silence.
- This guide will not mention when you have to zoom into a location; screenshots will show each zoom scene.
- The screenshots will show where to play a Hidden-Object Puzzle (HOP) and what inventory item will be received.
- A match-3 game can be played instead of an HOP.
- Some inventory items require further actions.
- This guide will give step-by-step solutions for all puzzles which are not random. Read the instructions in the game for each puzzle.
Chapter 1: Rockshire

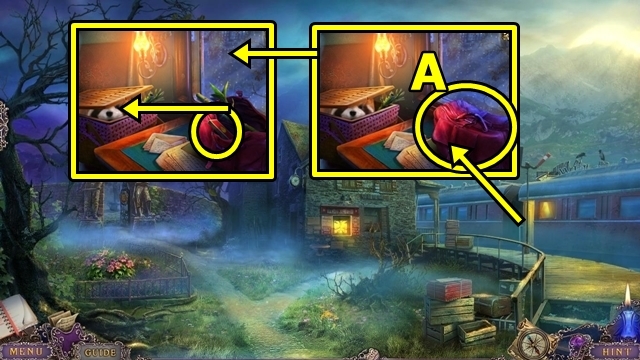
- Open the bag (A). Take the PHOTO OF BILL. Offer the bamboo. Take the MATCHES.

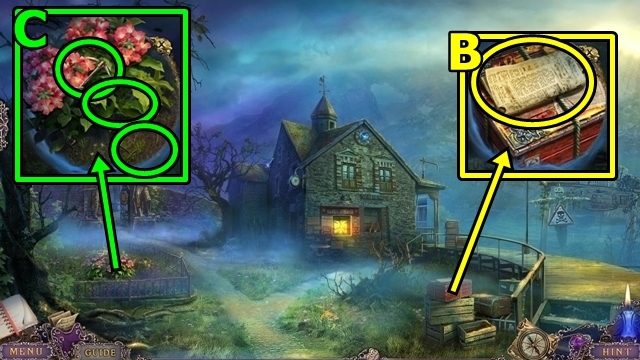
- Read the newspaper (B). Remove the rope; open the lid; take the HONEY.
- Place the HONEY (C); remove the lid. Move the leaves; take the MINER.

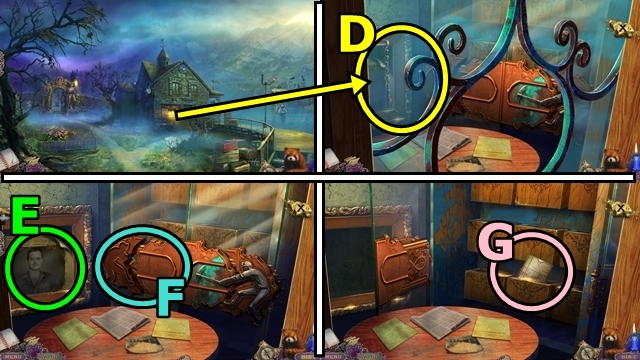
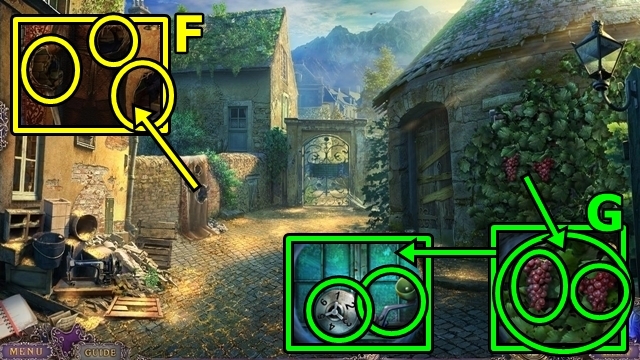
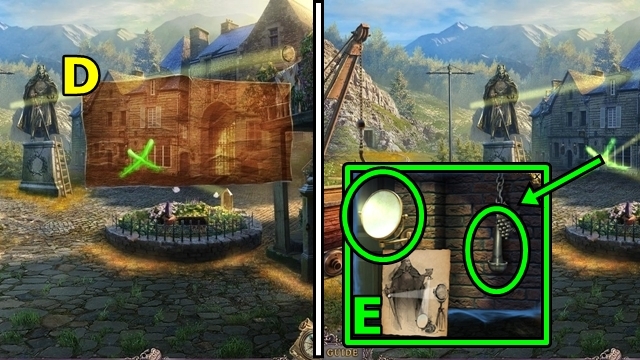
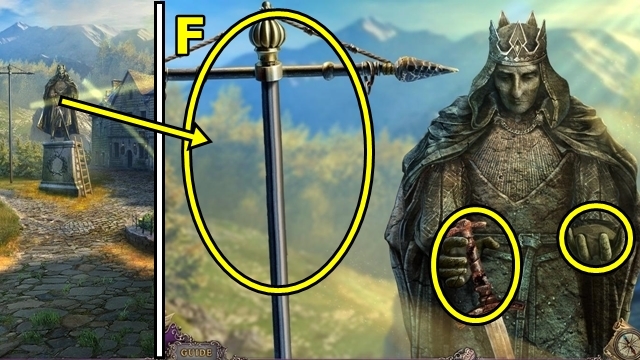
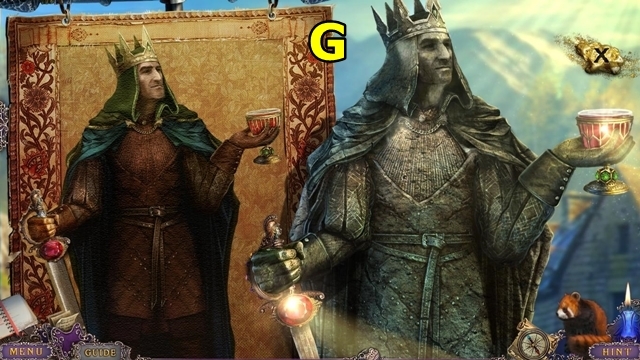
- Use the panda (D). Move the certificate (E); take the GOLDEN DISK (1/3). Insert the MINER (F). Open the doors; take the ticket (G); take the GOLDEN DISK (2/3).

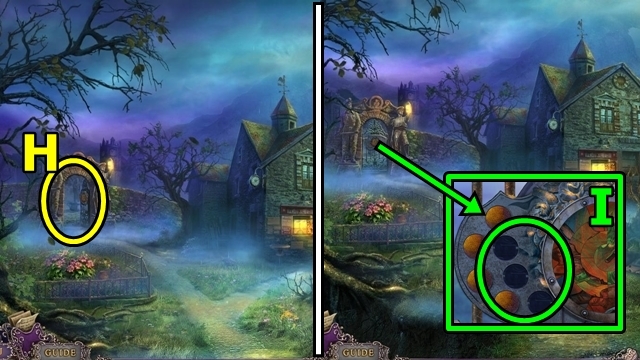
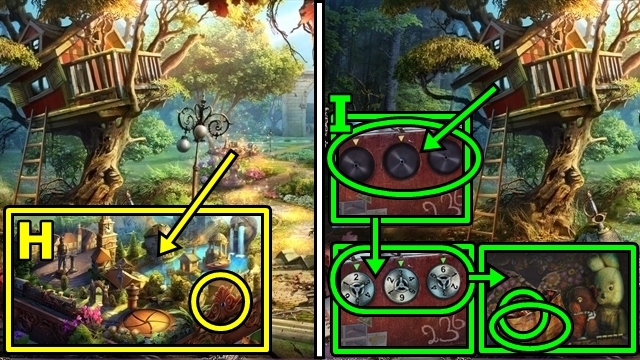
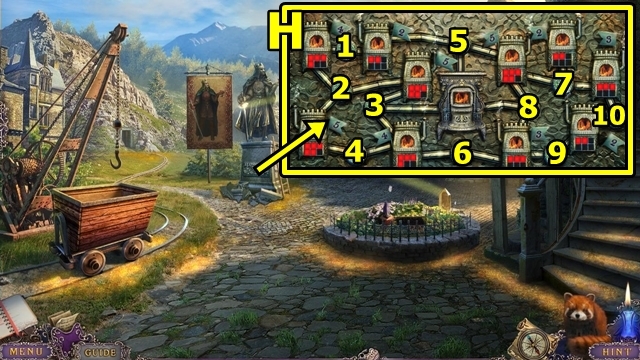
- Approach the gate (H). Play the HOP; receive the GOLDEN DISK (3/3).
- Insert the three GOLDEN DISKS (I); play the mini-game.

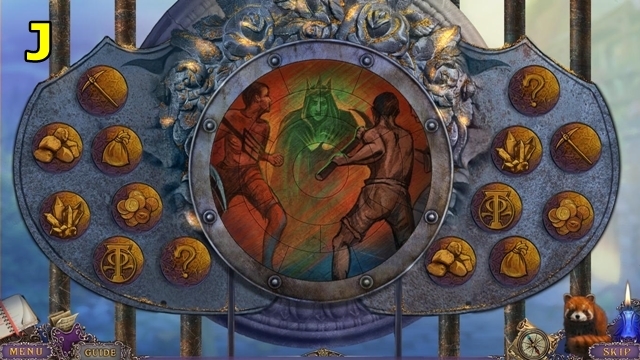
- Solution: (J).
- Move forward.

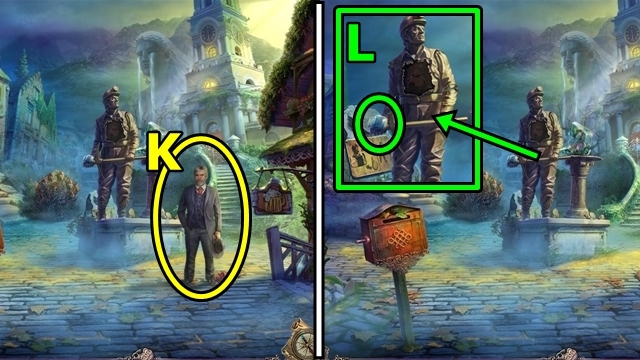
- Talk to the Mayor (K).
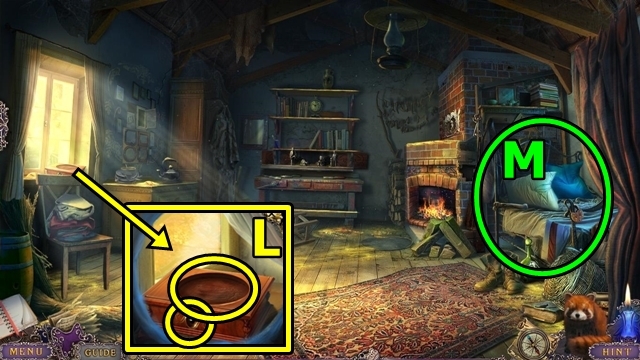
- Take the LAMP GLASS (L).
- Enter the Rockshire: Inn.

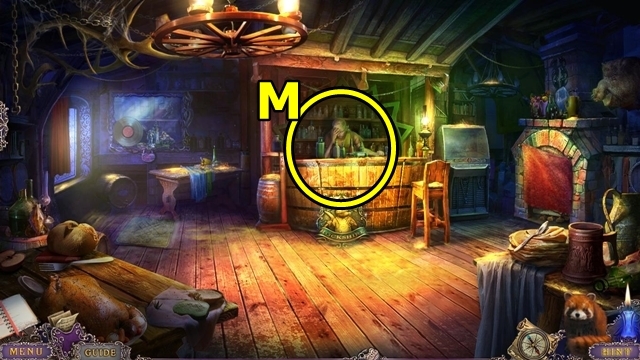
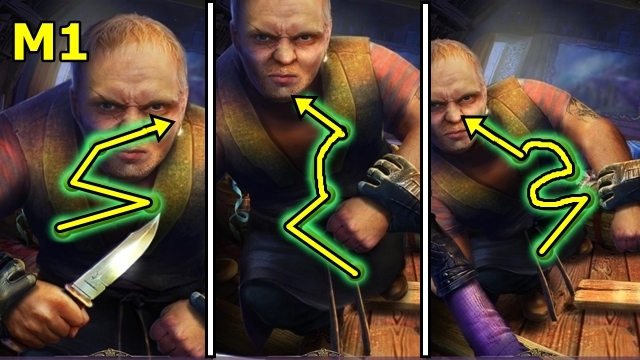
- Talk to the bartender (M); play the HOP.
- Play the mini-game.


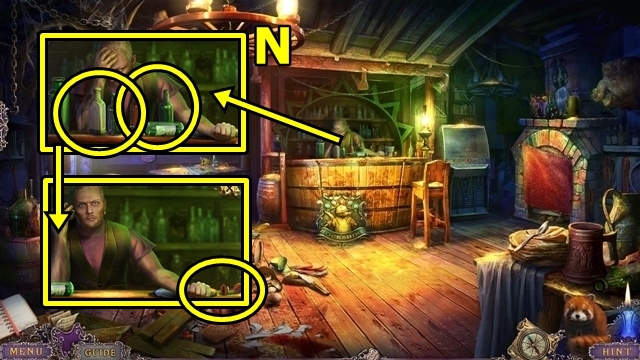
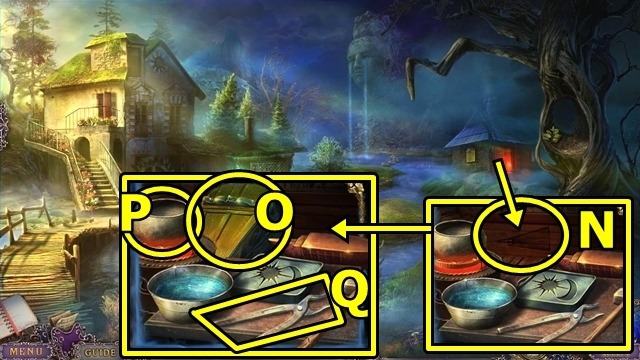
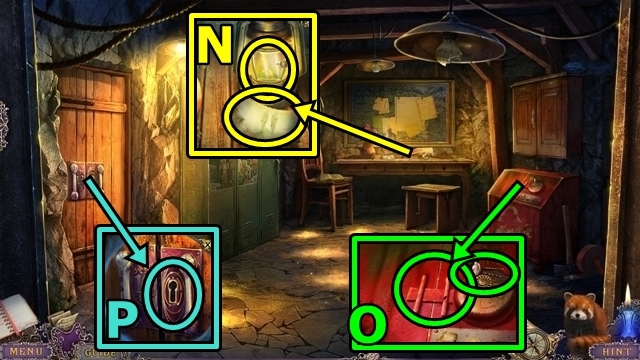
- Move the bottles (N); talk to the bartender; receive the BUTTON. Take the JUKEBOX KEY.

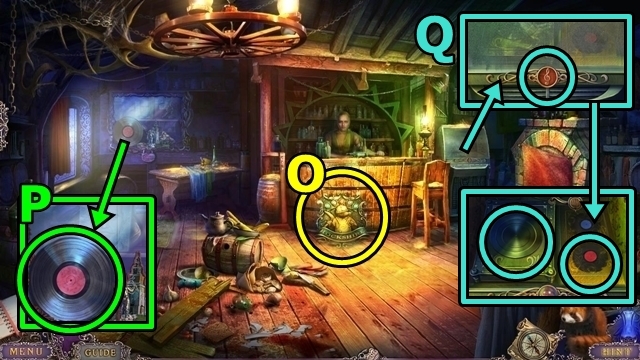
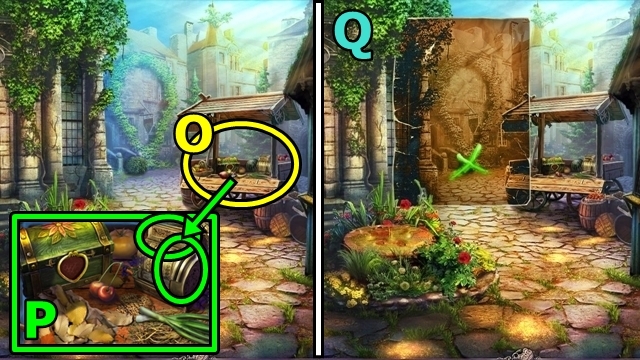
- Take the FURNACE DOOR (O).
- Take the RECORD (P).
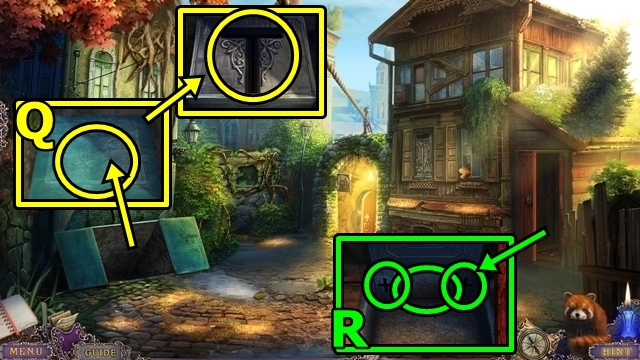
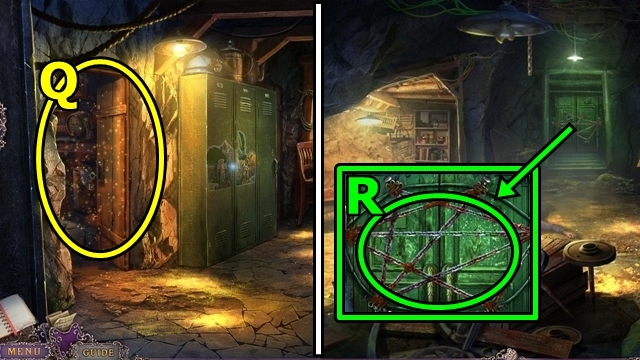
- Insert the JUKEBOX KEY (Q). Add, then play the RECORD. Take the PICTURE HINT.

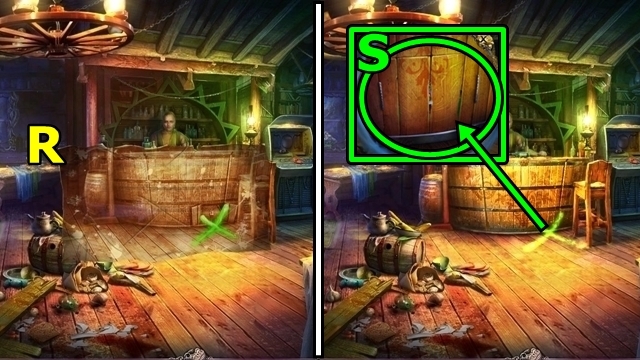
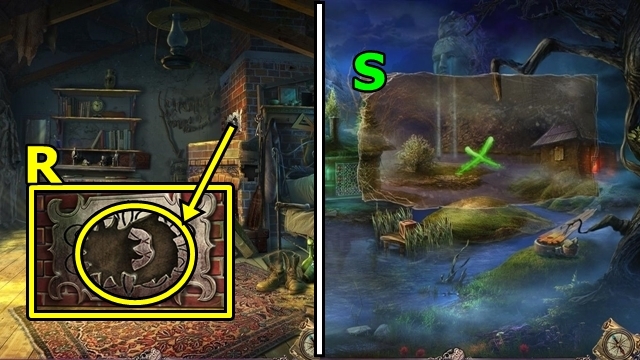
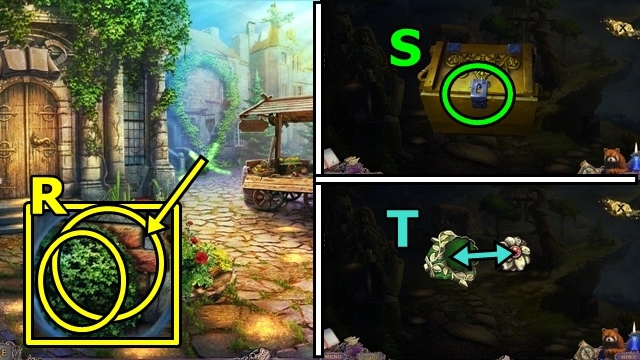
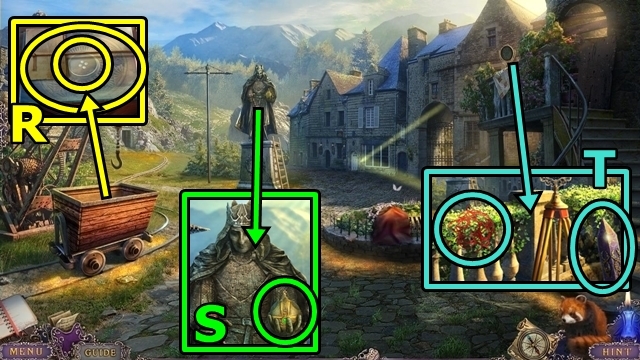
- Use the PICTURE HINT (R).
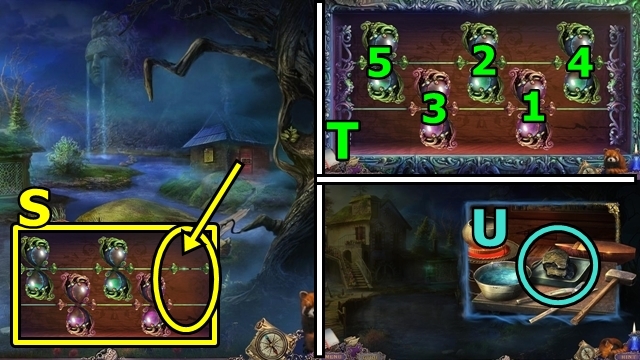
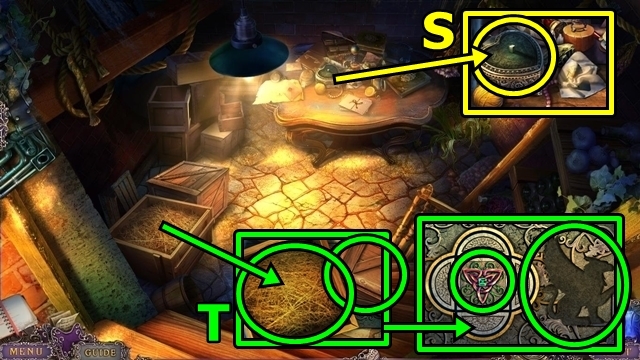
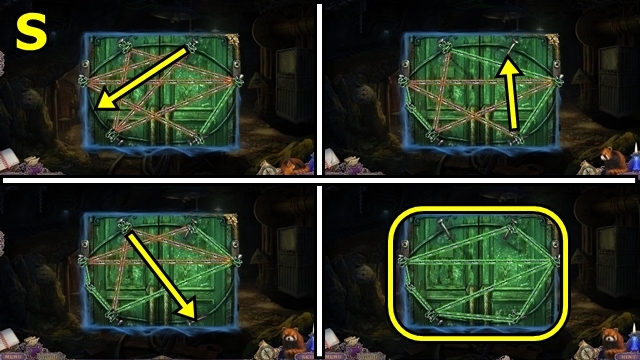
- Open the panel (S); take the SECRET BOX.

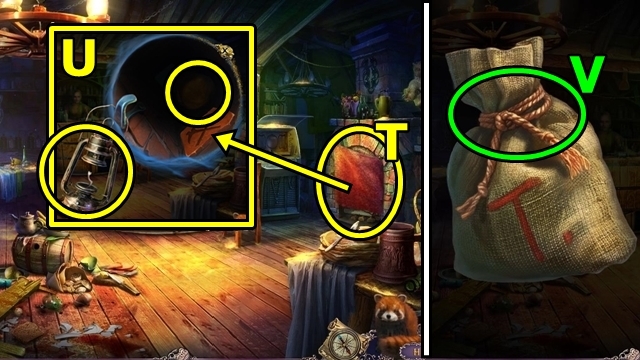
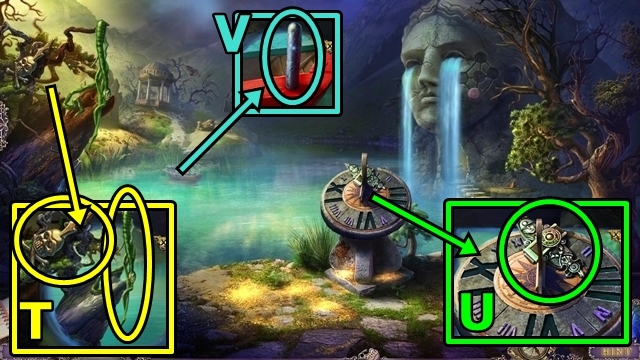
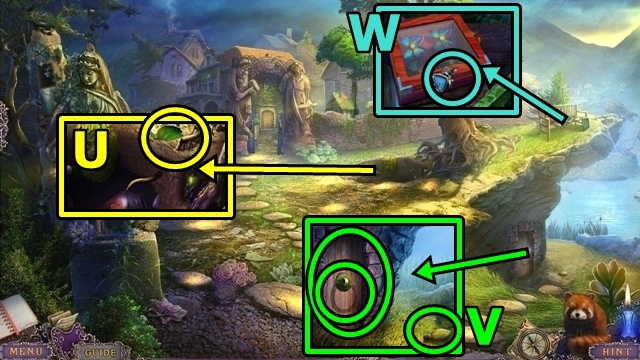
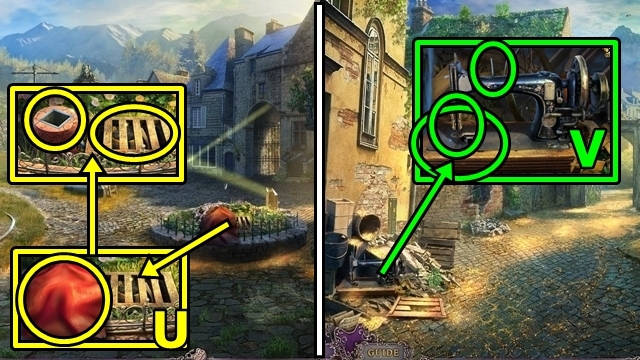
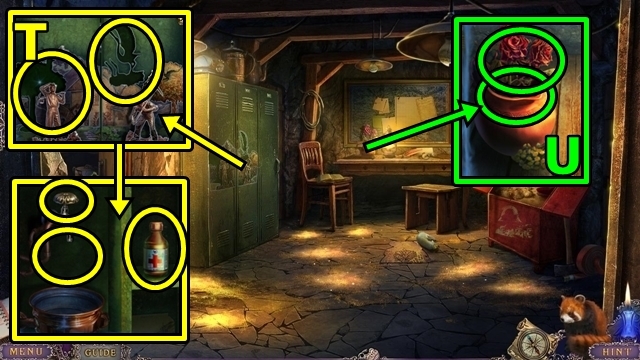
- Remove the cloth (T). Use the MATCHES (U); add the LAMP GLASS. Take the BAG.
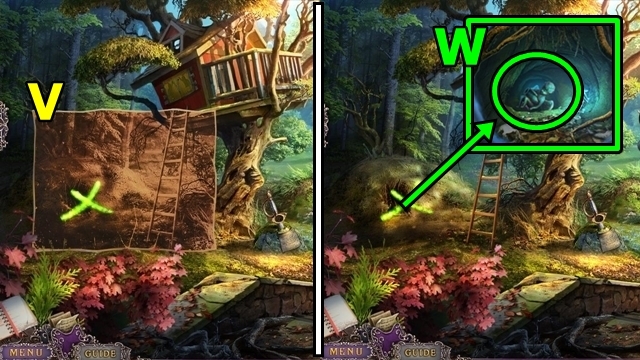
- Remove the rope (V), then open the BAG (inventory); take the MAILBOX LEVER and PICTURE HINT.

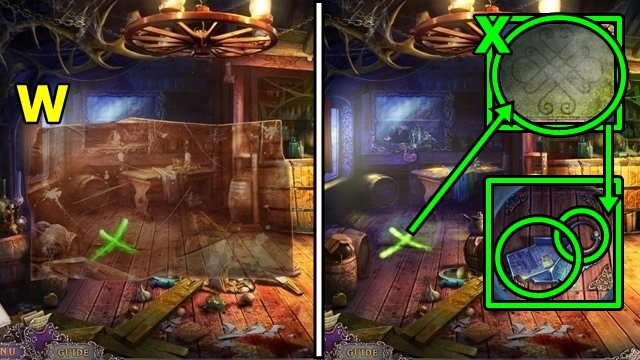
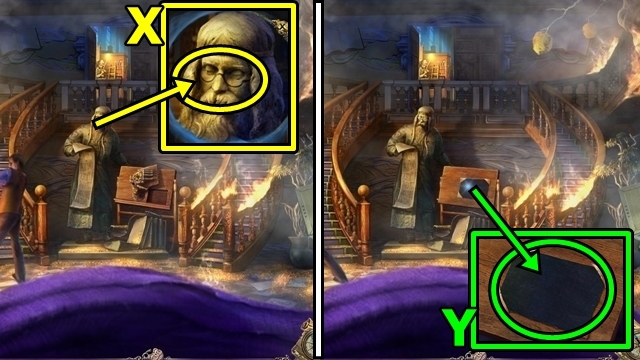
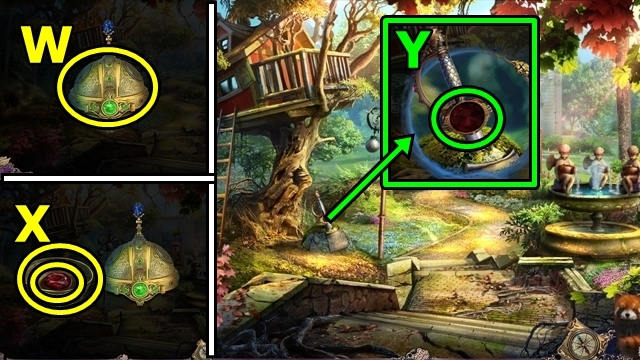
- Use the PICTURE HINT (W).
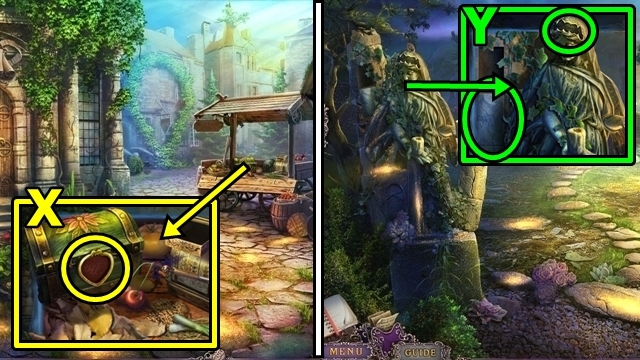
- Lift the rug (X); take the INN BAS-RELIEF. Lift the hatch; take the SECRET BOX.
- Move down.

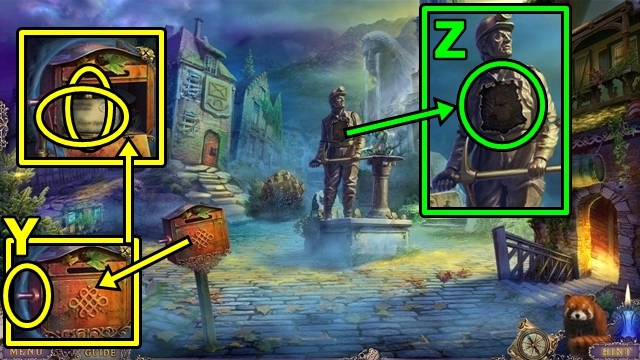
- Add the MAILBOX LEVER (Y); pull the lever. Take the letter and LIGHTER FLUID.
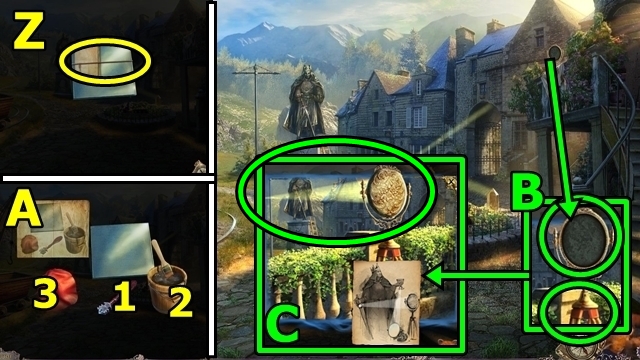
- Insert the FURNACE DOOR (Z); take the HOSE.

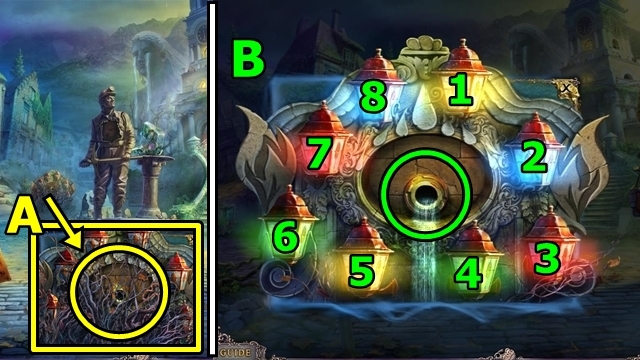
- Use the LIGHTER FLUID (A) and MATCHES; play the mini-game.
- Solution: 1-2-3-4-5-6-7-8 (B). Insert the HOSE.

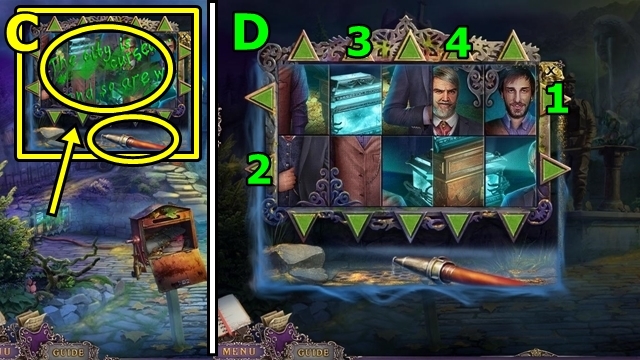
- Use the hose (C) on the paint. Play the mini-game.
- Solution: (D). Take the POST-OFFICE BAS-RELIEF and the PICTURE HINT.

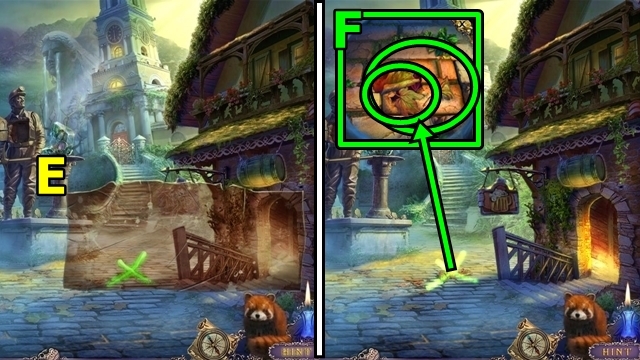
- Use the PICTURE HINT (E).
- Move the leaves (F); lift the bricks; take the SECRET BOX.
- Go right.

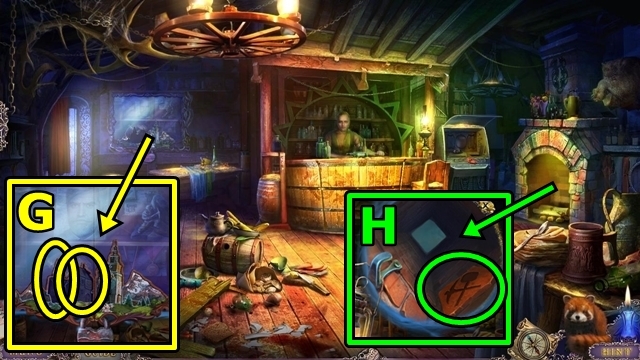
- Insert the INN BAS-RELIEF (G) and the POST-OFFICE BAS-RELIEF. Open the doors. Take the PICK AND HAMMER, PORTRAIT, and HEAD LAMP.
- Insert the PICK AND HAMMER (H); take the PICTURE HINT.
- Move down twice.

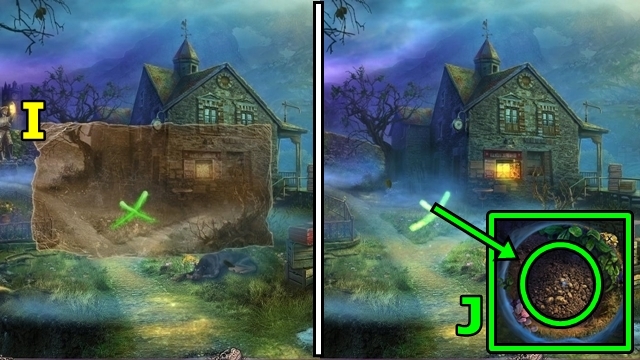
- Use the PICTURE HINT (I).
- Use the panda (J); receive the SECRET BOX.
- Move forward.

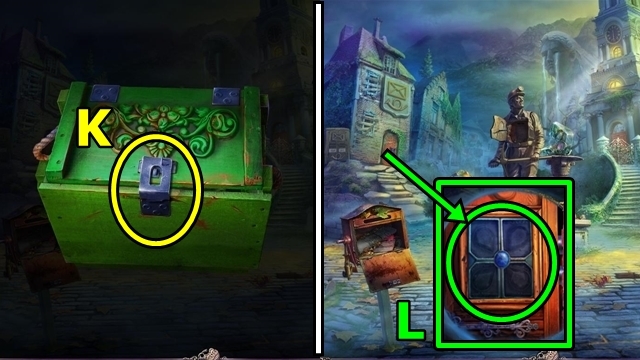
- Open the four SECRET BOXES (inventory) (K); read the note; take the LOCK PART (4/4).
- Insert the four LOCK PARTS (L).
- Enter the Rockshire: Post Office.

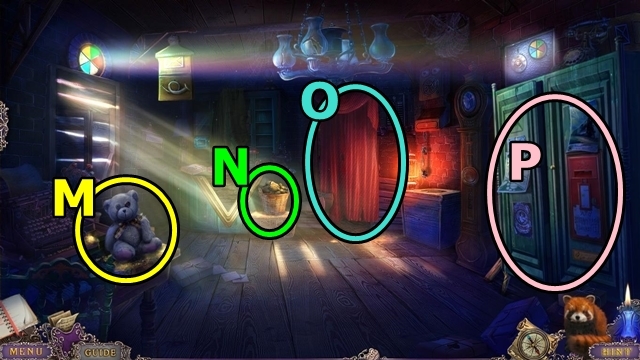
- Take the TORN TEDDY BEAR (M).
- Take the COAL (N).
- Move the curtain (O); play the HOP; receive the NEEDLE.
- Topple the cabinet (P).

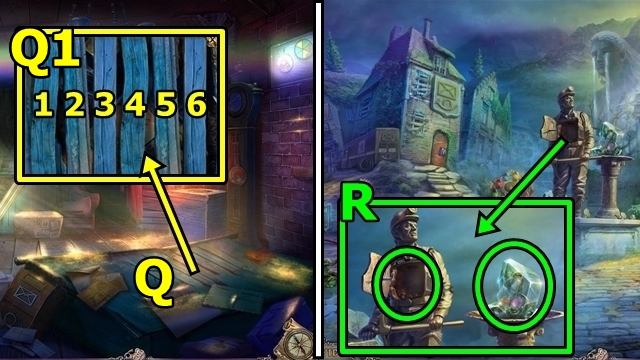
- Play the mini-game (Q).
- Solution: 1-4, 2-5, 3-6 (Q1). Play the HOP; receive the BLUE GLASS.
- Move down.
- Add the COAL (R) and MATCHES. Take the HOURGLASS. Move the glass, take the PICTURE HINT.
- Go right.

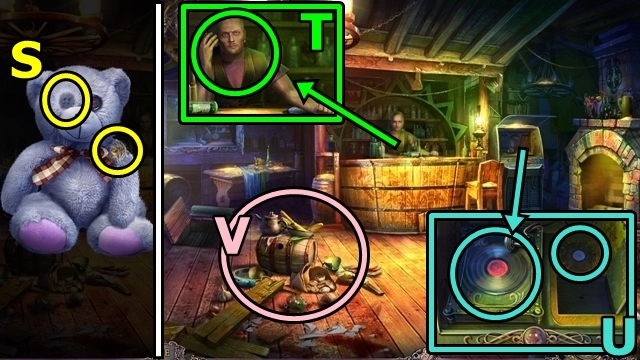
- Put the BUTTON (S) on the TORN TEDDY BEAR (inventory); place the NEEDLE; select the teddy bear twice. Take the TEDDY BEAR.
- Offer the TEDDY BEAR (T); receive the RECORD 2.
- Remove the record (U); add and play RECORD 2. Take the YELLOW GLASS.
- Play the HOP (V); receive the FOLDED PAPER.
- Return to the Rockshire: Post Office.

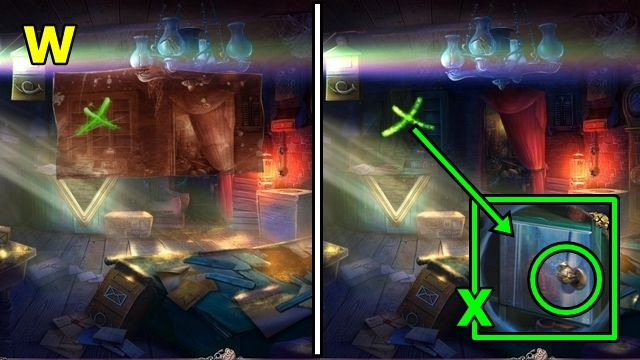
- Use the PICTURE HINT (W).
- Open the panel (X); take the SECRET BOX.

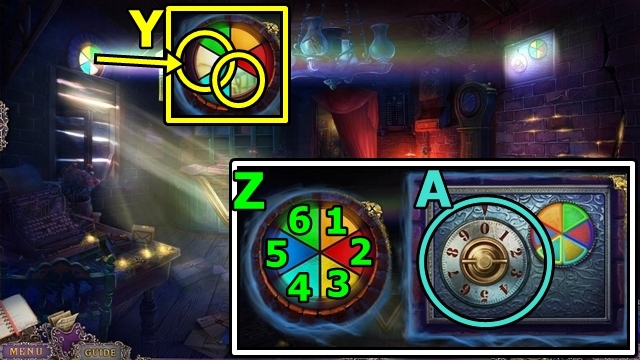
- Insert the BLUE GLASS (Y) and YELLOW GLASS.
- Solution: 3-1, 5-1, 6-5 (Z). Turn the dial to 5-3-8 (A). Select the box. Take the MASK WITH CROWN.
- Move down.

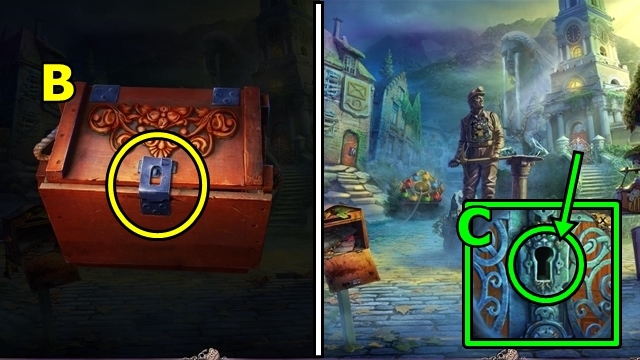
- Open the SECRET BOX (inventory) (B). Read the note; take the CITY HALL KEY.
- Insert and turn the CITY HALL KEY (C).
- Enter Rockshire: City Hall.
Chapter 2: City Hall

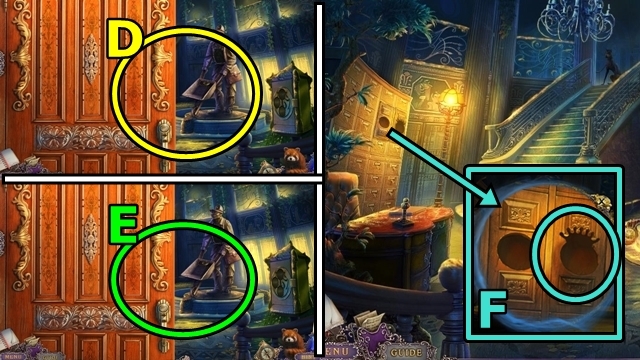
- Move right (D).
- Move right (E).
- Insert the MASK WITH CROWN (F). Open the cupboard; take the FOLDED PAPER.
- Return to the Rockshire: Post Office.

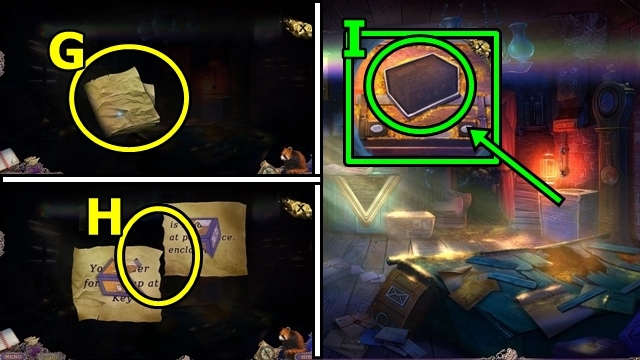
- Unfold the FOLDED PAPER (inventory) (G); add and unfold the FOLDED PAPER. Attach (H) and take the MAILBOX KEY.
- Insert the MAILBOX KEY (I); take the MINER’S CHESTPLATE and BOX.
- Return to Rockshire: City Hall.

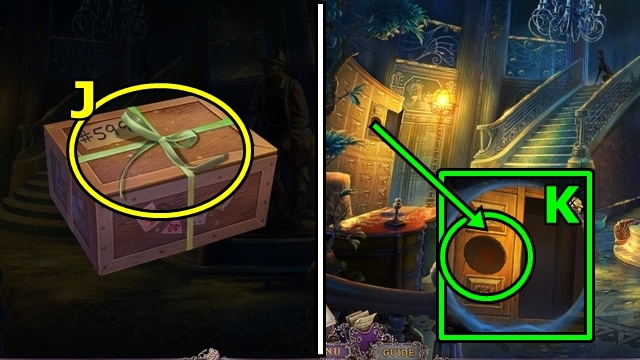
- Undo the ribbon (J) on the BOX (inventory); lift the lid; remove the straw; take the MINING HELMET TOKEN (1/2) and MASK.
- Insert the MASK (K). Open the cupboard; take the MINING HELMET TOKEN (2/2).

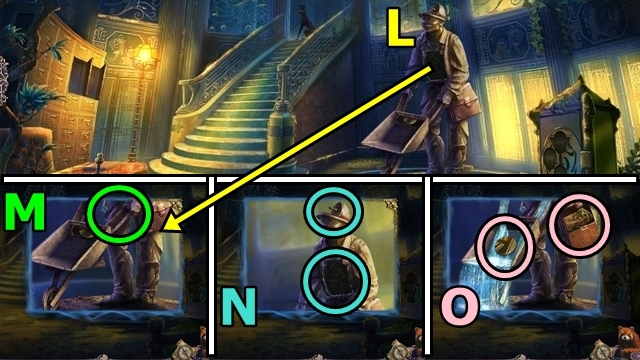
- Examine the statue (L). Look up (M); insert the MINER’S CHESTPLATE (N) and HEAD LAMP. Take the CIRCULAR IMAGE (O) and PICTURE HINT.
- Return to the Rockshire: Post Office.

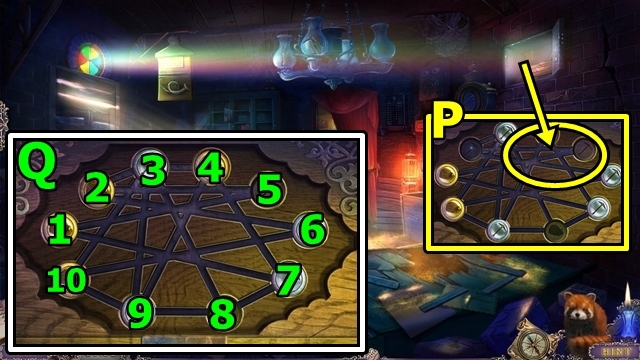
- Insert the two MINING HELMET TOKENS (P). Play the mini-game.
- Solution: Easy 3-8, 9-3, 4-9, 7-4, 1-7, 2-5, 6-2, 5-1, 2-5, 3-2, 8-3, 7-8, 1-7 (Q). Hard 10-6, 5-1, 2-5, 6-2, 3-10, 9-3, 4-9, 7-4, 1-7, 5-1, 2-5, 3-2, 8-3, 7-8, 1-7. Take the CIRCULAR IMAGE.

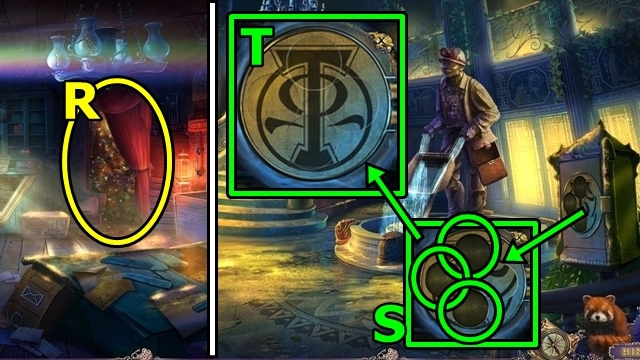
- Play the HOP (R); receive the CIRCULAR IMAGE.
- Return to the Rockshire: City Hall.
- Insert the three CIRCULAR IMAGES (S); play the mini-game.
- Solution: (T). Take the BOOK PAGE.

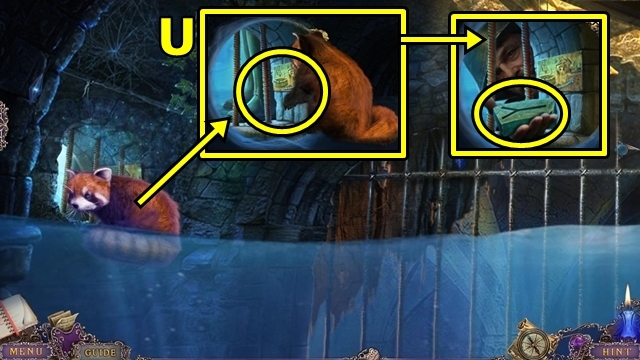
- Use the panda (U). Take the WELL CAPSTONE.
- Move right.

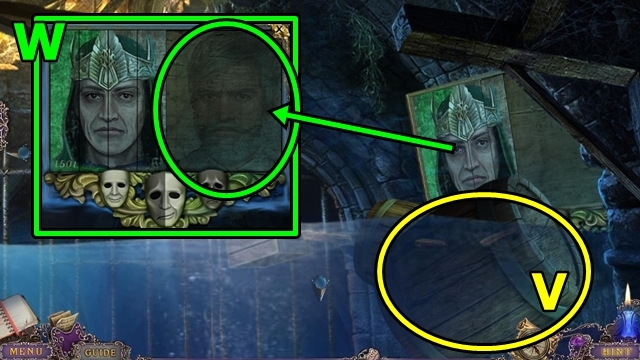
- Move the barrels (V).
- Add the PORTRAIT (W); play the mini-game.

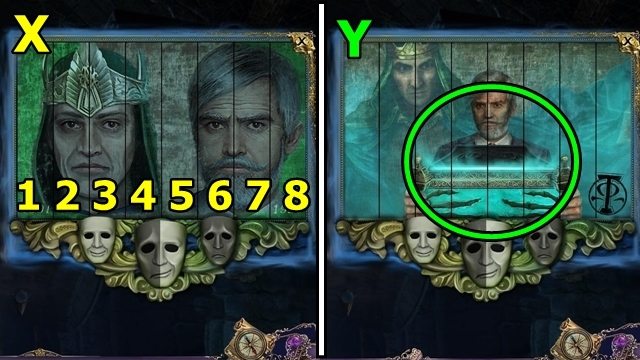
- Solution: 1-3, 2-4, 5-7, 6-8 (X). Open the panel (Y); take the WELL CAPSTONE.
- Move down, then left.

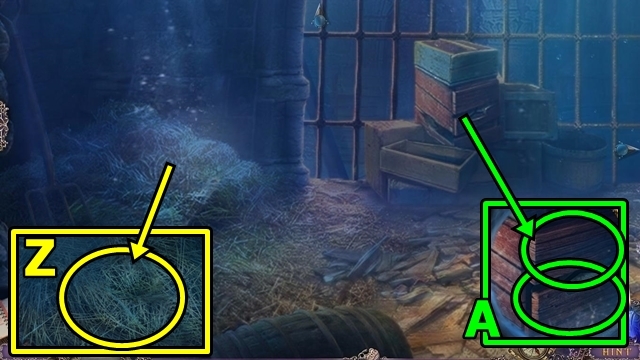
- Move the straw (Z); move the stone; take the WELL CAPSTONE.
- Remove the boards (A); take the WELL CAPSTONE.
- Move right.

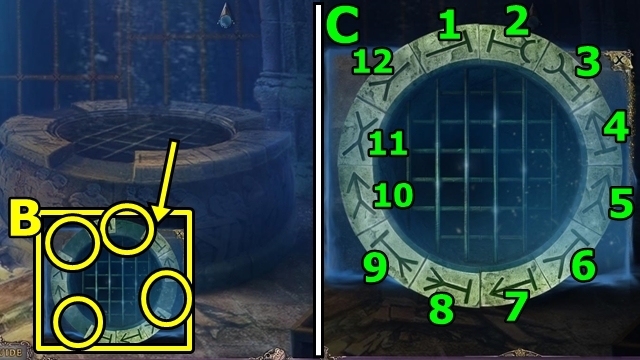
- Add the four WELL CAPSTONES (B); play the mini-game.
- Solution: 4-7, 6-10 (C).
- Move forward.

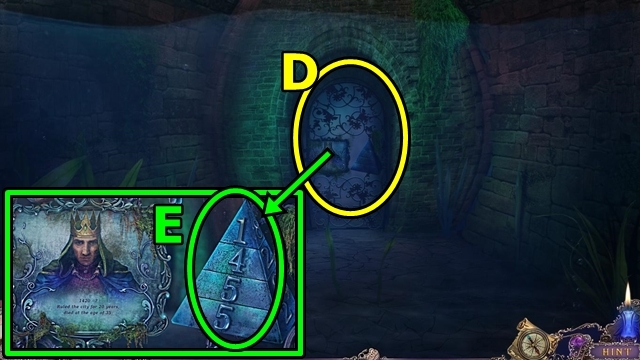
- Move forward (D); play the mini-game.
- Solution: (E).
- Move forward; play the mini-game.

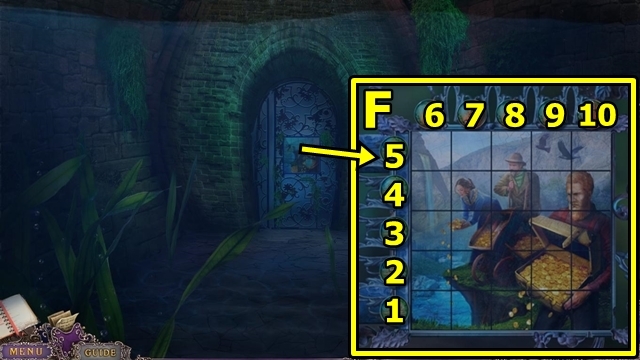
- Solution: 3-5, 3-4, 3-1, 7-10, 9-10 (F).
Chapter 3: Bill’s House

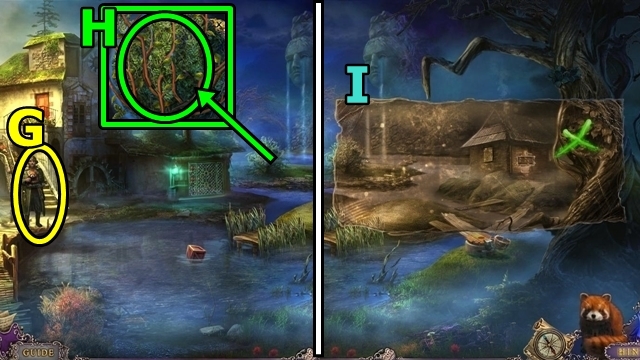
- Talk to the fisherman (G).
- Gather and take the BUNCH OF TWIGS (H).
- Use the PICTURE HINT (I).

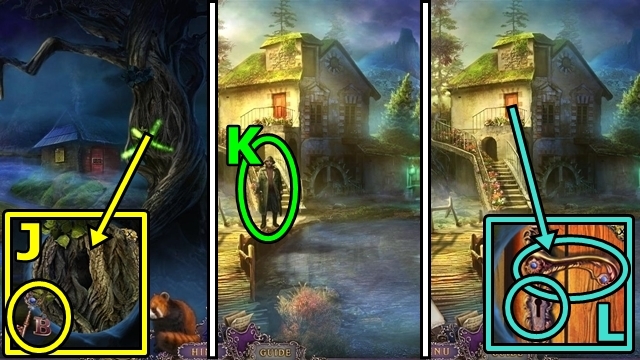
- Use the panda (J); receive BILL’S KEY.
- Offer BILL’S KEY (K).
- Insert BILL’S KEY (L); turn the handle; enter Bill’s House.

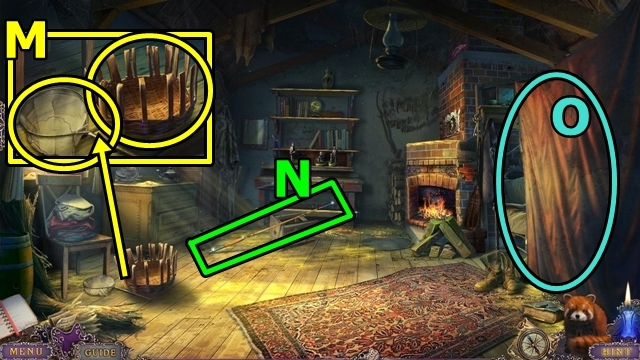
- Take the NET (M); add the BUNCH OF TWIGS; take the BASKET.
- Take the FISHING ROD (N).
- Move the curtain (O); play the HOP; receive the TOOL KIT.
- Move down.

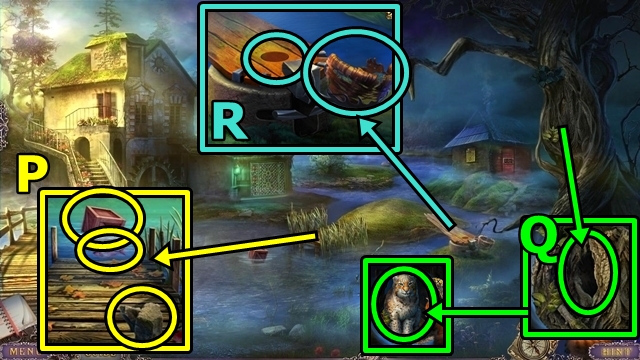
- Take the ROCKS (P). Use the FISHING ROD; receive the FISH. Use the FISHING ROD. Open the crate; take the BRONZE NUGGET.
- Use the panda (Q). Offer the FISH; take the BOOK.
- Remove the basket (R); add the BASKET, then the ROCKS. Press the button.

- Add the HOURGLASS (S); play the mini-game.
- Solution: Quickly flip the hourglasses (T). Repeat if necessary. Take the COAL (U).
- Return to Bill’s House.

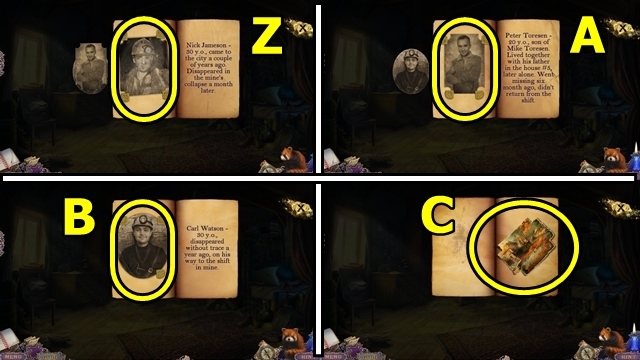


- Open the BOOK (inventory) (V); add the BOOK PAGE (W); add the pictures (X-B). Take the PICTURE (C) from the last page.

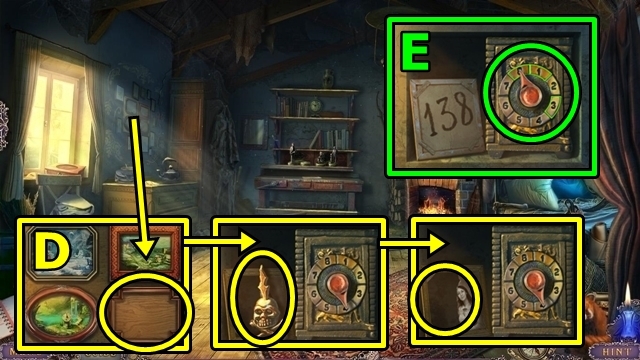
- Insert the PICTURE (D); take the MOHAWK SKULL. Add the PHOTO OF BILL; play the mini-game.
- Solution: Turn the dial to 1-3-8 (E). Take the FAMILY FIGURE.

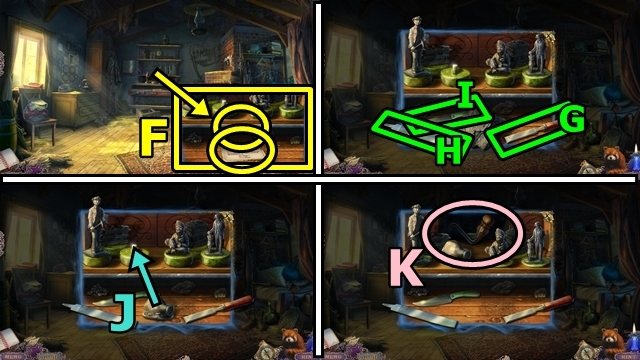
- Read the note (F). Add the COAL and TOOL KIT. Use the chisel (G), file (H), then knife (I). Move the sculpture (J). Take the MUSIC BOX HANDLE (K).

- Place the FAMILY FIGURE (L) and MUSIC BOX HANDLE. Turn the handle; take BILL’S NAME and the BLUE EMBLEM.
- Play the HOP (M); receive the BELLOWS.
- Move down.

- Add the BELLOWS (N). Press the bellows (O). Add the BRONZE NUGGET (P); use the tongs (Q) twice. Take the EMBLEM.
- Return to Bill’s House.

- Insert the EMBLEM (R); take the ELEMENT BUTTONS (1/3) and PICTURE HINT.
- Move down.
- Use the PICTURE HINT (S).
- Move forward.

- Use the panda (T); receive the MOHAWK SKULL. Use the NET; take the VINE.
- Take the LATCH (U).
- Use the VINE (V).

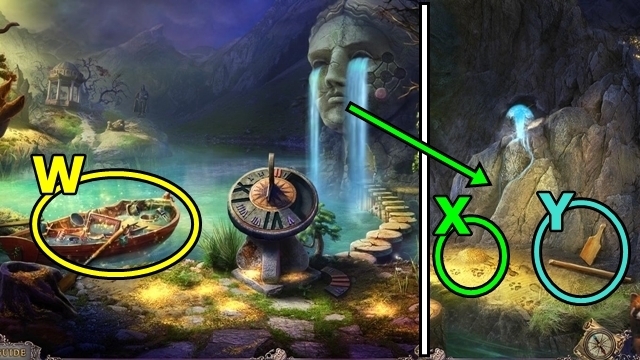
- Play the HOP (W); receive the GOLDFISH.
- Take the SAND (X) and the BROKEN PADDLE (Y).
- Move down twice.

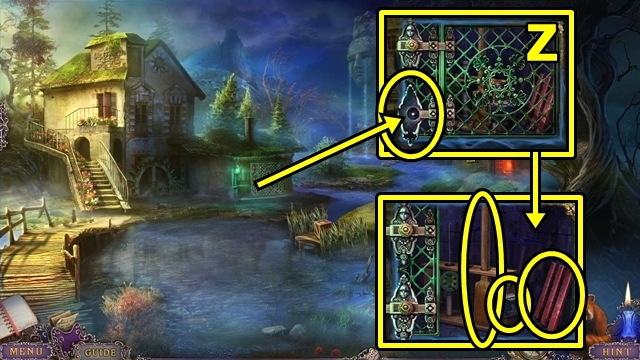
- Add the LATCH (Z); open the grate. Take the NUMBER III. Insert the GOLDFISH; open the lock; take the PADDLE.
- Move forward.

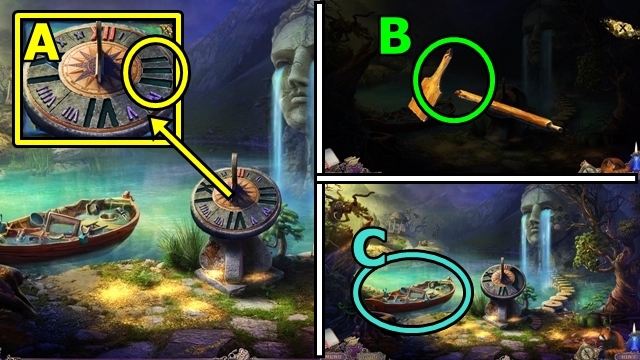
- Insert the NUMBER III (A); take the METAL PIPE.
- Add the METAL PIPE (B) to the BROKEN PADDLE (inventory); take the PADDLE.
- Add the two PADDLES (C); play the HOP.
- Move forward.

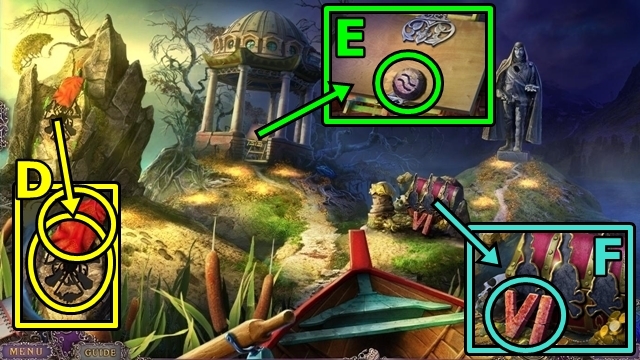
- Take the HANDKERCHIEF (D); insert the BLUE EMBLEM. Take the CROWN.
- Take the ELEMENT BUTTONS (2/3) (E).
- Take the NUMERAL VI (F).
- Move down.

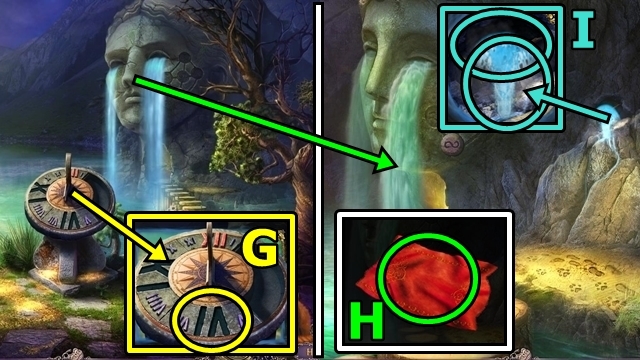
- Insert the NUMERAL VI (G); take the KING’S BROOCH.
- Put the SAND (H) in the HANDKERCHIEF (inventory); tie and take the POUCH.
- Use the POUCH (I); take the MOHAWK SKULL.
- Return to the Little Island.

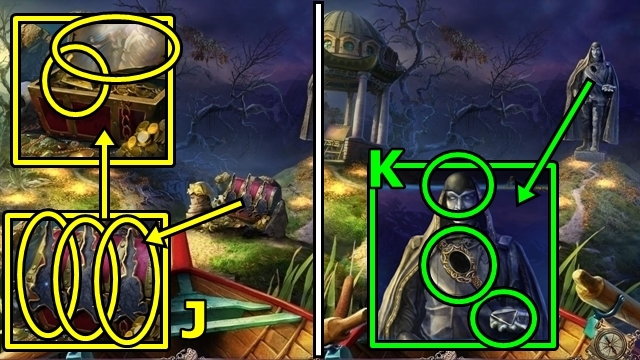
- Add the three MOHAWK SKULLS (J). Examine the picture; play the HOP. Take the GOLD.
- Add the CROWN (K); take the RED BUTTON. Add the KING’S BROOCH; take the SNAKE FIGURE. Place the GOLD; take the ELEMENT BUTTONS (3/3).
- Move down.

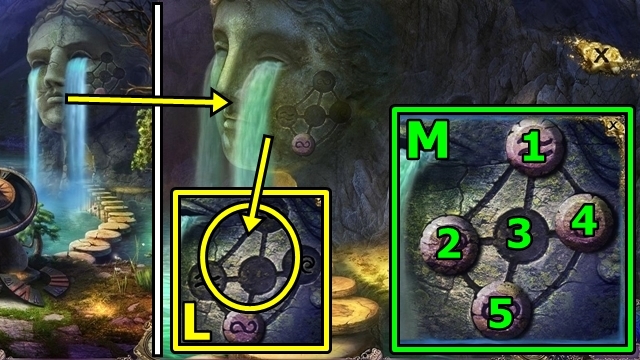
- Insert the three ELEMENT BUTTONS (L); play the mini-game.
- Solution: 2-3, 1-2, 4-1, 5-4, 3-5, 1-3, 4-1, 5-4, 3-5 (M).

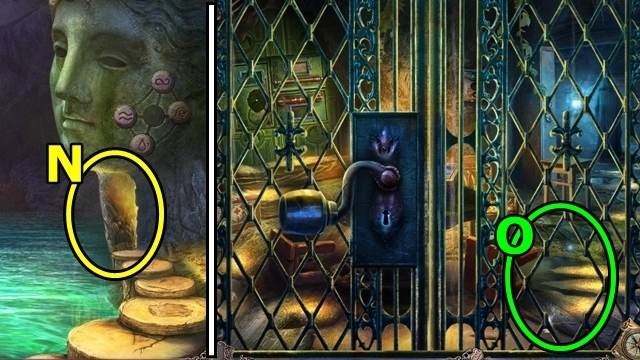
- Enter the cave (N).
- Use the panda (O); play the mini-game.

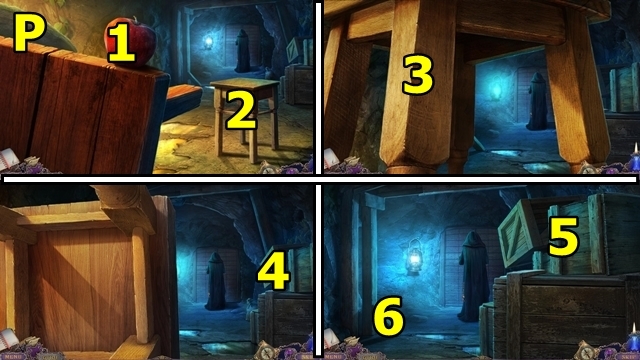

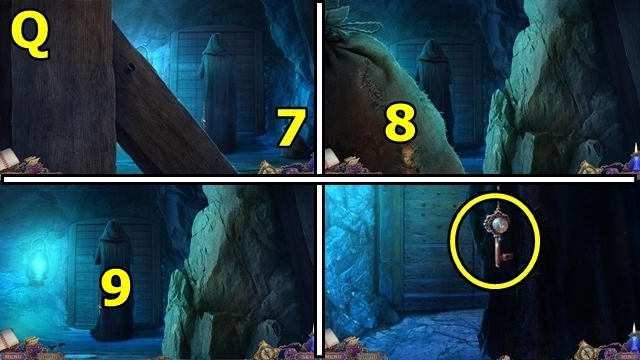
- Solution: Move when the man isn’t looking (P-Q). Receive the BRILLIANT KEY.
Chapter 4: The Cave

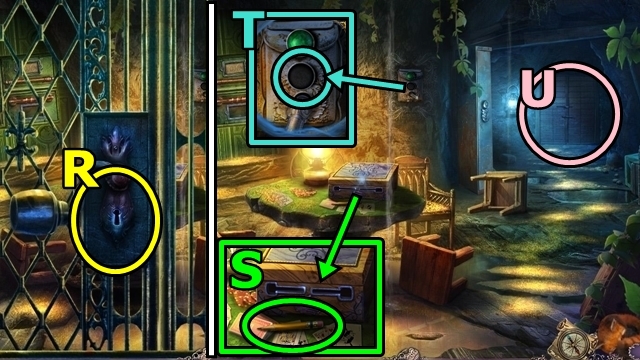
- Insert and turn the BRILLIANT KEY (R).
- Take the PENCIL (S).
- Insert the RED BUTTON (T); take the FLORAL ORNAMENT.
- Open the door (U); move forward.

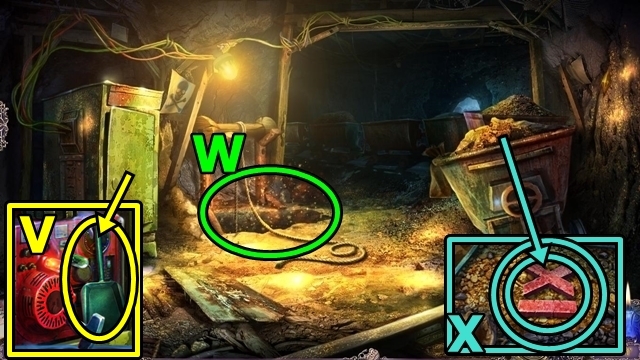
- Open the panel (V); take the SCOOP.
- Play the HOP (W); receive the LEFT HAND.
- Take the NUMBER IX (X). Use the SCOOP; take the RIGHT HAND.
- Return to the Little Island.

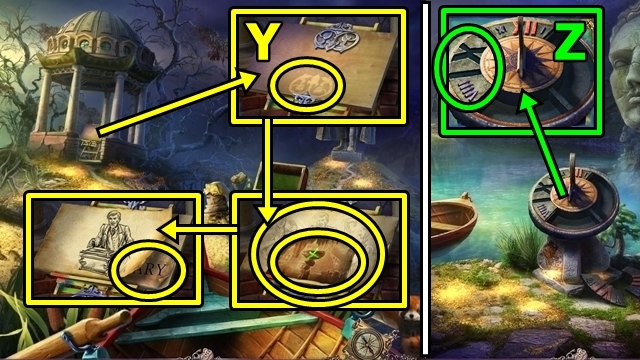
- Add the FLORAL ORNAMENT (Y); lift the panel. Take the PICTURE HINT. Use the PENCIL; take LARRY’S NAME.
- Move down.
- Insert the NUMBER IX (Z); take the LION DOOR HANDLE.
- Return to the Cave.

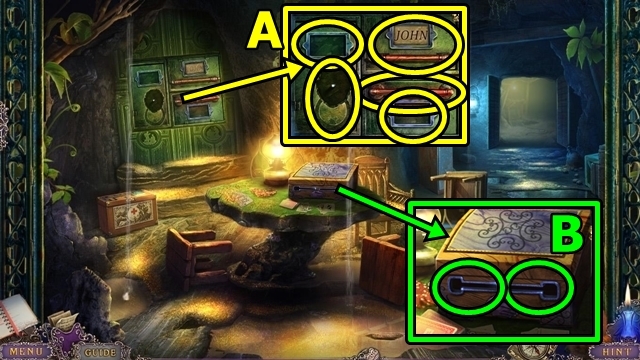
- Insert LARRY’S NAME (A) and LION DOOR HANDLE; open the panel; take the FUEL and the CROSS. Lift the panel; take the IRON SYMBOL. Insert BILL’S NAME; pull the panel; examine the picture. Play the HOP. Take the LOCKET.
- Insert the LEFT HAND (B) and RIGHT HAND; take the RUBBER GLOVES.

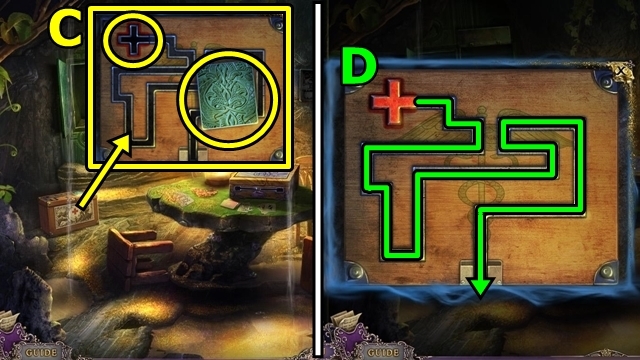
- Take the BUTTON (1/2) (C). Insert the CROSS; play the mini-game.
- Solution: (D). Take the BANDAGES.
- Move forward.

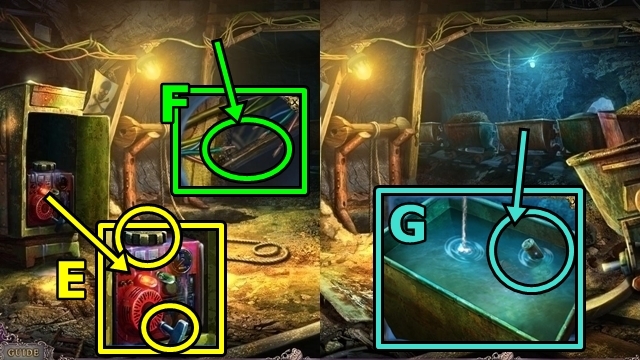
- Remove the cap (E); add the FUEL. Pull the starter.
- Use the RUBBER GLOVES (F) and BANDAGES.
- Take the WARDROBE KEY (G).
- Move down.

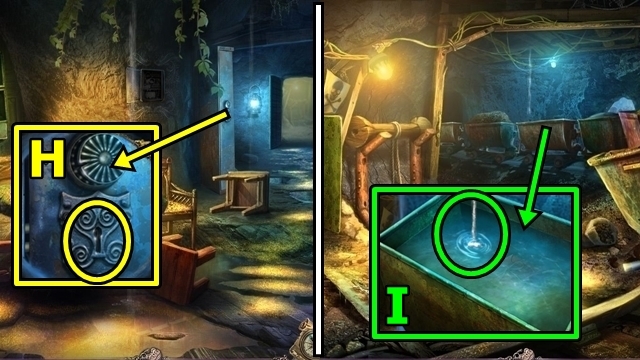
- Insert the WARDROBE KEY (H); take the HARD HAT.
- Move forward.
- Use the HARD HAT (I); take the PACKAGE and the WHEEL.

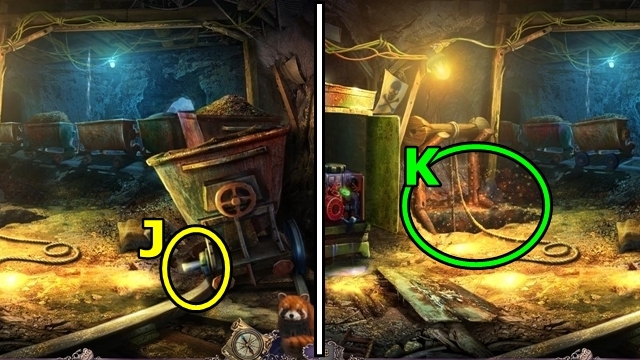
- Attach the WHEEL (J).
- Play the HOP (K); receive the DETONATOR.
- Move forward.

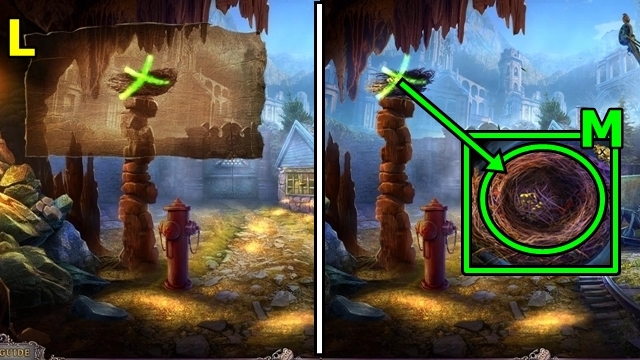
- Use the PICTURE HINT (L).
- Use the panda (M); receive the DICE.
- Move down twice.

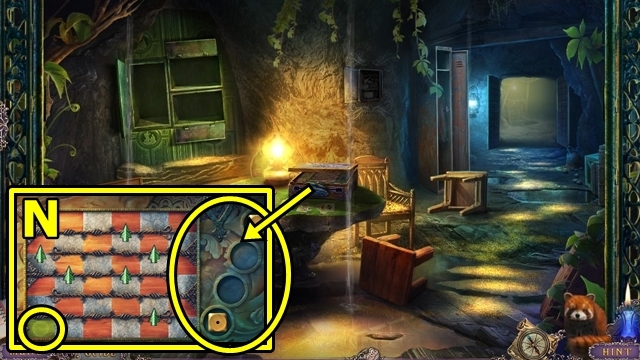
- Add the SNAKE FIGURE (N) and the DICE; play the mini-game.

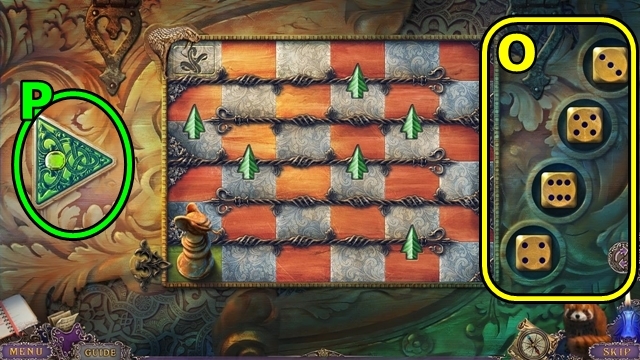
- Solution: Set the dice (O), press play (P). Take the FIRE RING.
- Move forward twice.

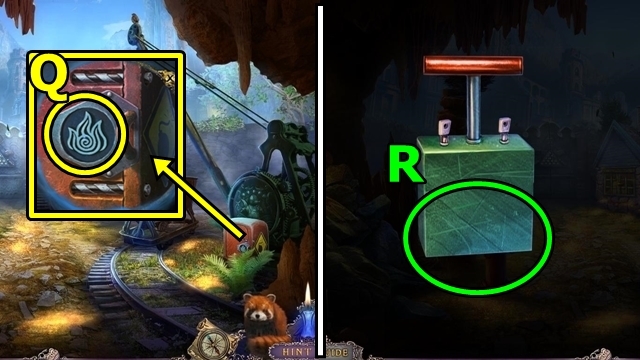
- Insert and turn the FIRE RING (Q); take the DYNAMITE.
- Attach the DYNAMITE (R) to the DETONATOR (inventory); take the TNT.

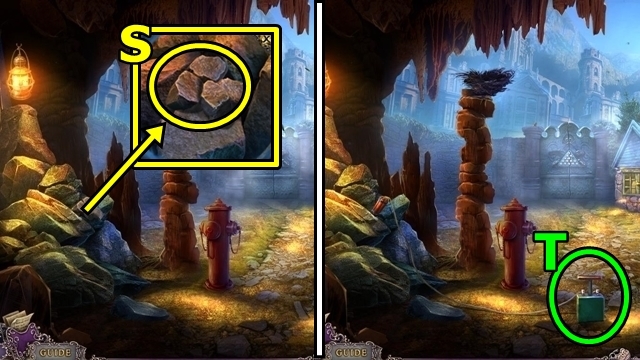
- Move the rocks (S); take the COIN. Add the TNT.
- Press the plunger (T).
- Move left.

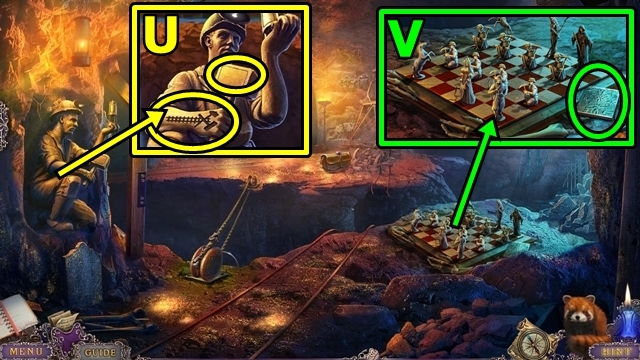
- Insert the IRON SYMBOL (U); take the COIN.
- Take the BUTTON (2/2) (V).
- Move down three times.

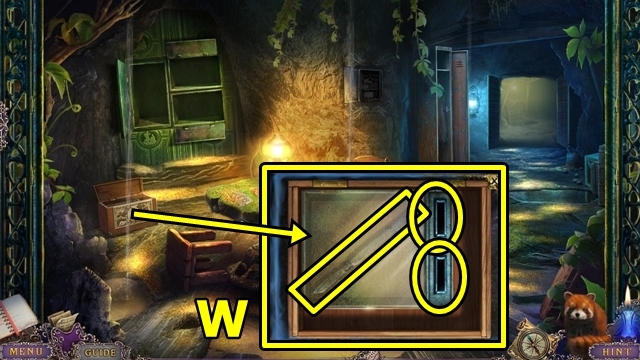
- Insert the two COINS (W); take the SCALPEL.
- Move forward twice.

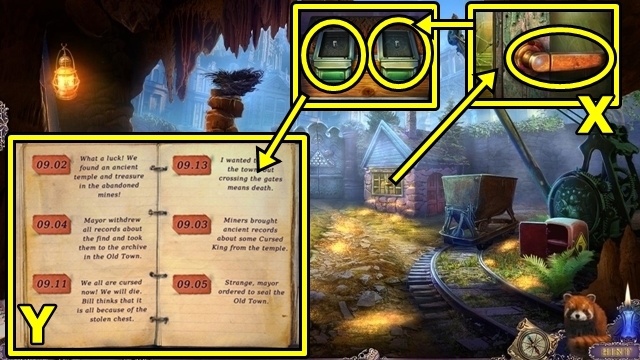
- Pull the handle (X); insert the two BUTTONS. Open the book. Replace the dates (Y). Take the WHITE KING.
- Move left.

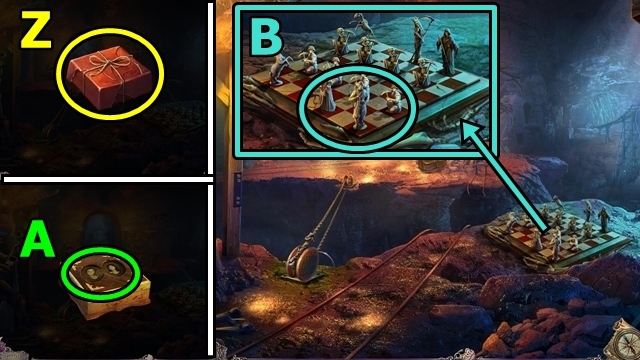
- Open the PACKAGE (inventory) (Z); take BILL’S CHEST.
- Insert the LOCKET (A) into BILL’S CHEST (inventory). Open; read the note; take the BLACK KING.
- Add the WHITE KING (B) and BLACK KING; play the mini-game.

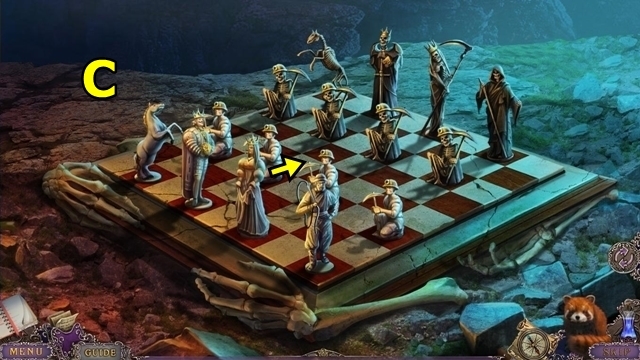

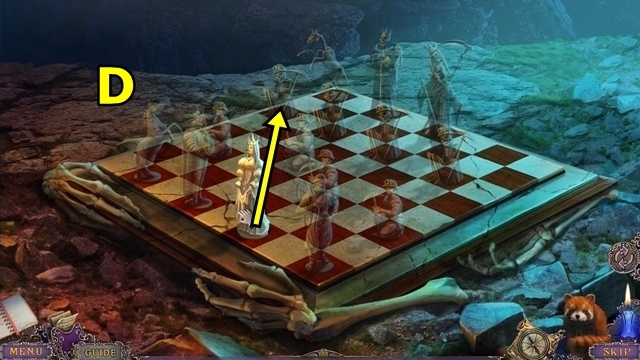
- Solution: This puzzle is random, a possible solution is shown (C-D).

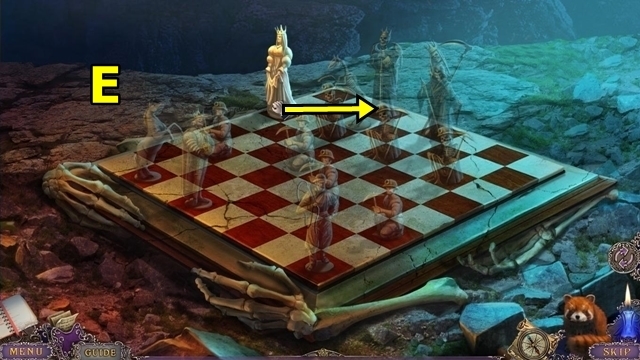
- Solution: (E). Take the STONE HAND.

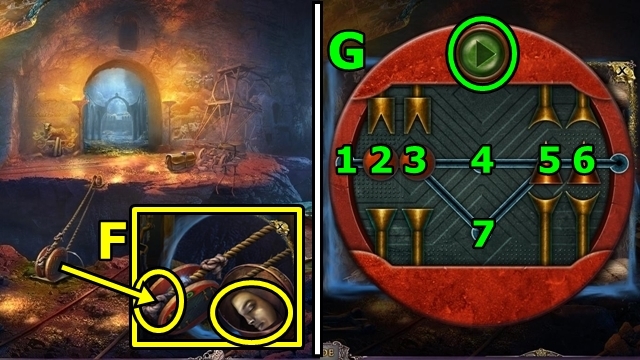
- Take the HALF OF MASK (F). Use the SCALPEL and panda. Play the mini-game.
- Solution: 3-7, 5-4, 4-3, 6-5, 5-4, 7-5, 5-6, 3-7, 7-5, 2-3, 3-7, 4-3, 3-2, 5-4, 4-3, 7-5, press Play (G).

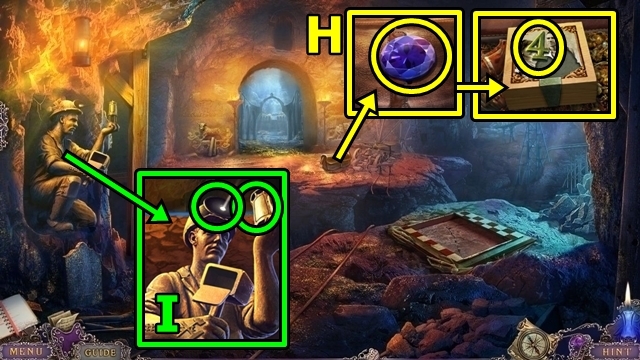
- Take the BLUE PRISM (H). Open the bag; take the NUMBER 4.
- Insert the BLUE PRISM (I); take the CRYSTAL BUTTON.
- Move down.

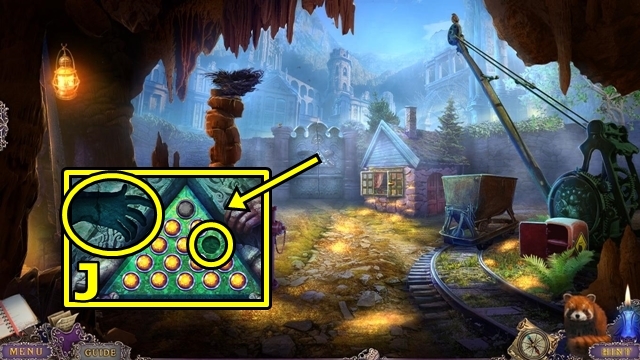
- Insert the CRYSTAL BUTTON (J) and STONE HAND; play the mini-game.

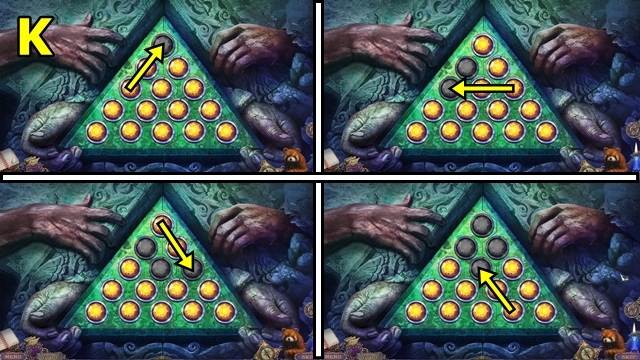

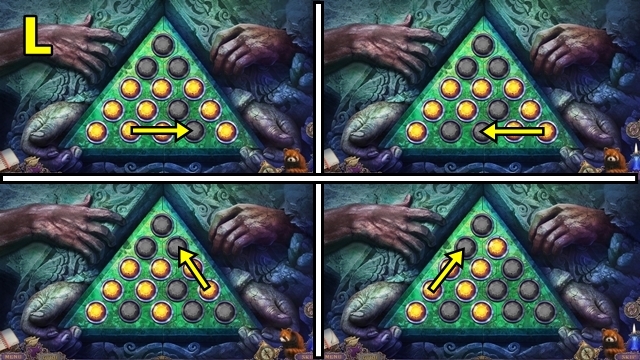

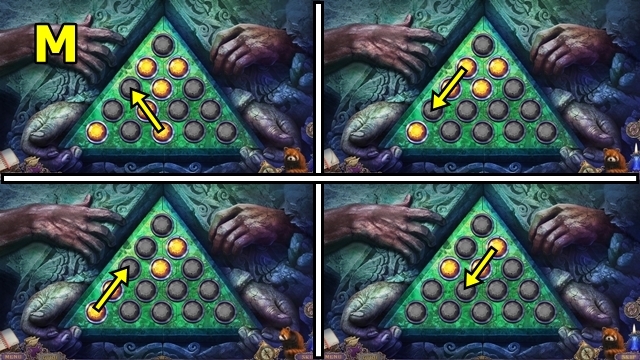

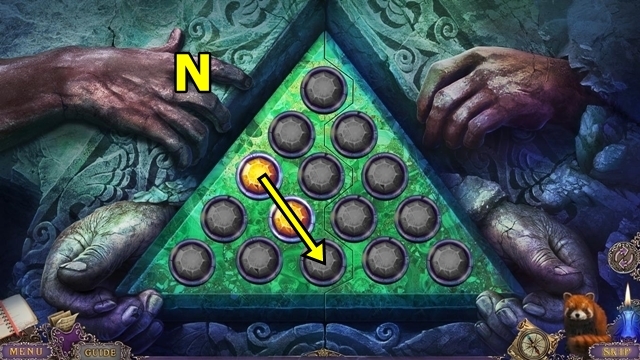
- Solution: (M-N).
- Move forward.
Chapter 5: The Ghost Town

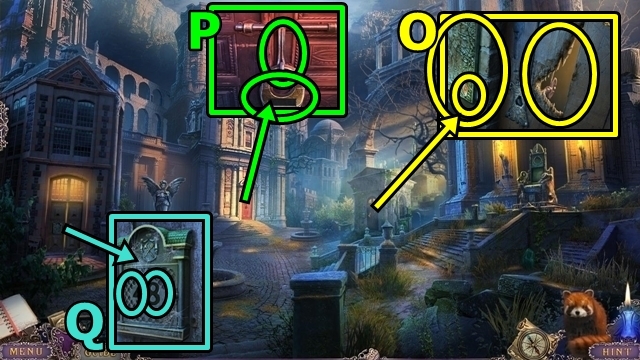
- Look closer (O). Move the plaque; take the GOLD NUGGET.
- Insert the GOLD NUGGET (P); remove the lock; unhook the latch. Take the NUMBER EIGHT.
- Insert the NUMBER 4 (Q) and NUMBER EIGHT. Open the envelope; read the note; take the CHILDREN’S PHOTO.
- Return to the Ancient Temple: Main Gate.

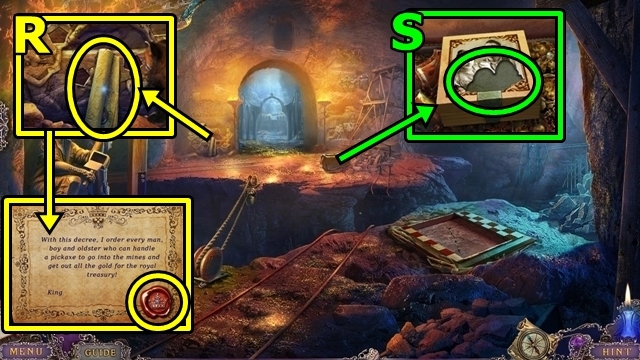
- Open the scroll (R); take the SEALING WAX.
- Insert the CHILDREN’S PHOTO (S); take the CHAIN.
- Return to the Ghost Town.

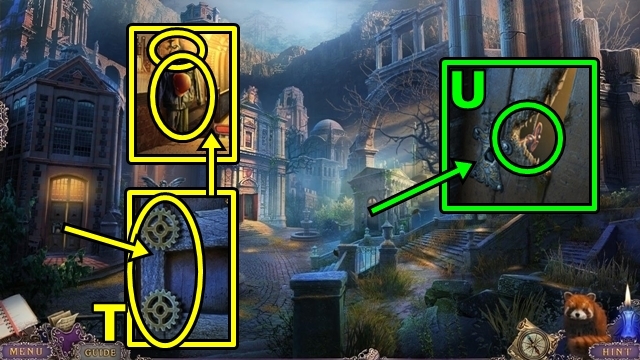
- Insert the CHAIN (T). Remove the clothing; take the HANGER.
- Use the HANGER (U); turn the key.
- Enter the Crypt.
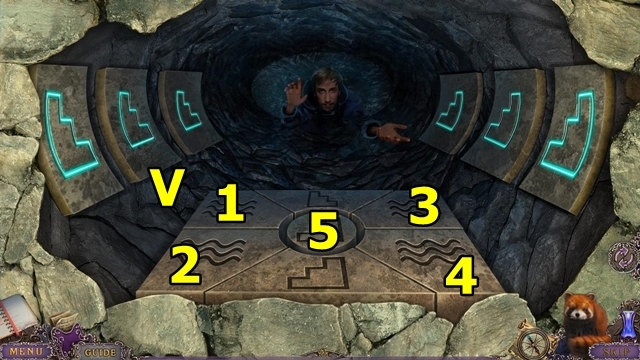
- Play the mini-game.


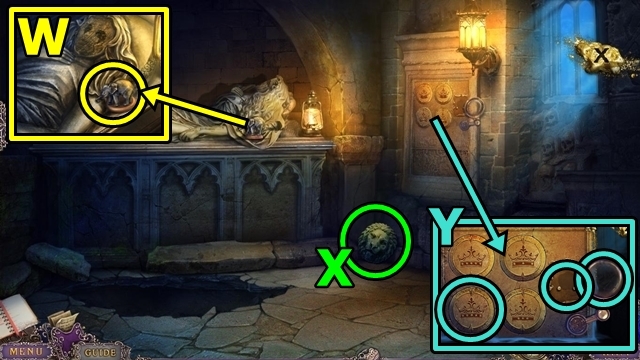
- Take the ELEPHANT (W).
- Take the LION’S HEAD (X).
- Add the SEALING WAX (Y); move the magnifying glass; loosen, then take the ROYAL EMBLEM.
- Move down.

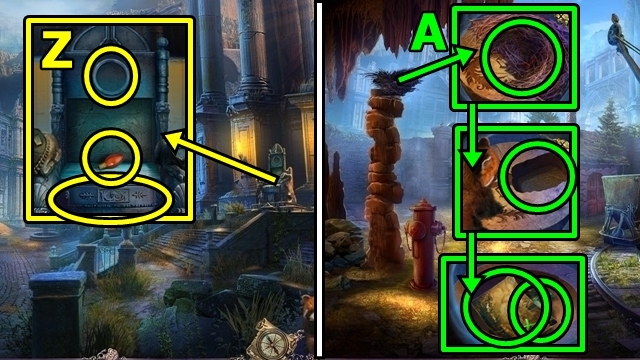
- Take the RED BULB (Z). Insert the ROYAL EMBLEM; take the STONE EAGLE.
- Move down.
- Use the panda (A); insert the EAGLE STONE. Take the PICTURE HINT and SACK OF GEMS.
- Move left.

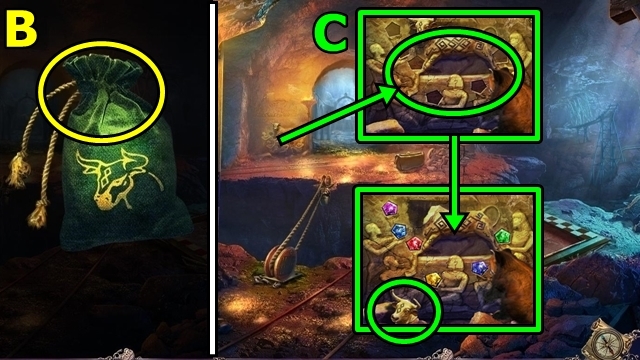
- Empty the SACK OF GEMS (inventory) (B); take the GEMSTONES.
- Insert the GEMSTONES (C); take the BULL’S HEAD.
- Return to the Ghost Town.

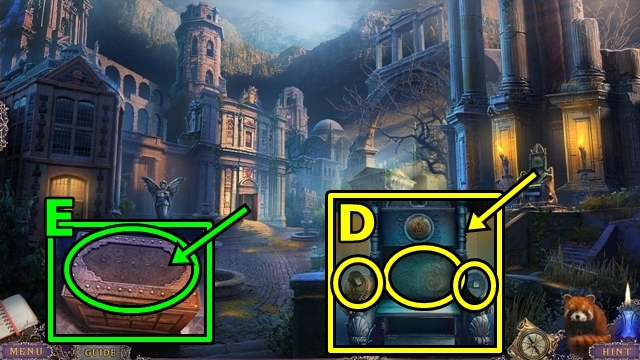
- Insert the BULL’S HEAD (D) and LION’S HEAD; take the PICTURE.
- Insert the PICTURE (E); take the HALF OF MASK.
- Enter the Crypt.

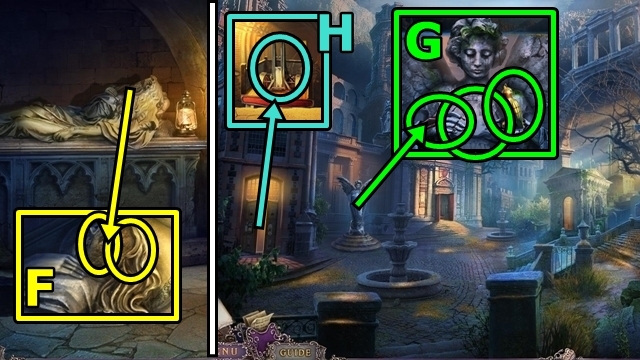
- Add the two HALF OF MASKS (F). Take the GOLDEN GLOVES.
- Take the METAL BIRD (G). Add the GOLDEN GLOVES; take the GEAR.
- Add the GEAR (H). Move forward; play the HOP.

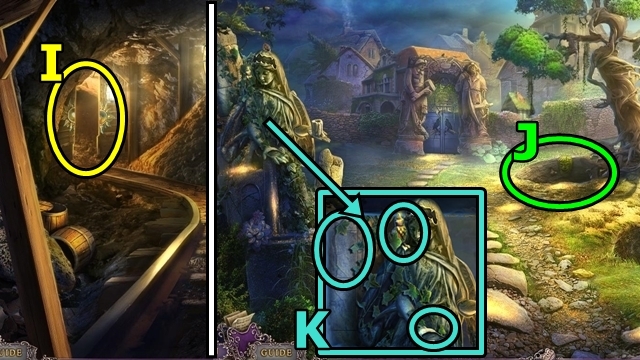
- Move forward (I).
- Play the HOP (J); receive the STONE CANDLE.
- Take the METAL BIRD (K). Place the STONE CANDLE; take the METAL FLOWER.

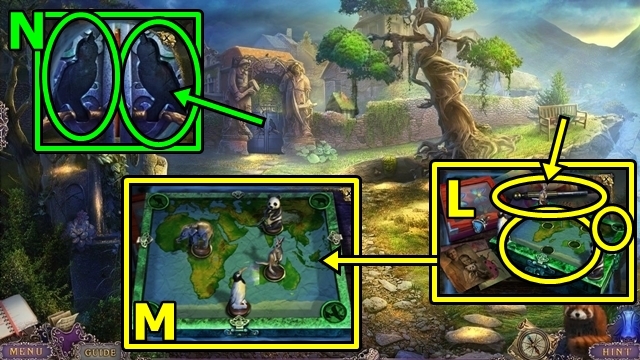
- Take the CASH REGISTER LEVER (L). Add the ELEPHANT. Play the mini-game.
- Solution: (M). Take the TAPE.
- Insert the two METAL BIRDS (N).
- Move forward.

- Play the HOP (O); receive the BUTTERFLY WING.
- Insert the CASH REGISTER LEVER (P); take the METAL RING.
- Use the PICTURE HINT (Q).

- Remove the leaves (R) and bricks; take the YELLOW BOX.
- Move down.
- Open the YELLOW BOX (inventory) (S). Read the note; take the FLOWER DECORATION.
- Use the METAL FLOWER (T) on the FLOWER DECORATION (inventory), then attach it. Take the METAL FLOWER.

- Wipe the sand (U); insert the METAL FLOWER. Open the chest; take the STRAWBERRY.
- Take the YELLOW BULB (V); add the METAL RING. Open the door; take the KNOB (1/3) and the TICKET BOOTH HANDLE.
- Insert the BUTTERFLY WING (W). Open the box; take the PINS.
- Move forward.

- Insert the STRAWBERRY (X); take the STONE WREATH.
- Move down.
- Insert the STONE WREATH (Y); take the BLUE BULB.
- Move forward.

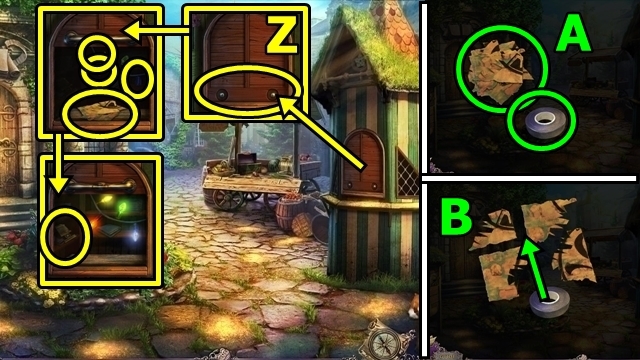
- Insert the TICKET BOOTH HANDLE (Z). Raise the panel; take the BROKEN ADVERTISEMENT. Insert the YELLOW BULB, RED BULB and BLUE BULB. Take the WAGON HALF.
- Use the TAPE (A-B) on the BROKEN ADVERTISEMENT (inventory); take the ADVERTISEMENT.

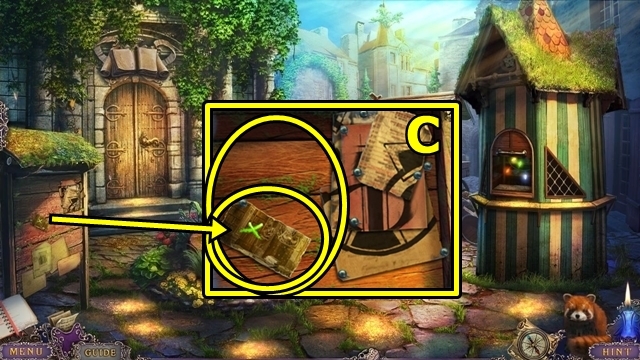
- Take the PICTURE HINT (C). Add the ADVERTISEMENT and PINS; play the mini-game.

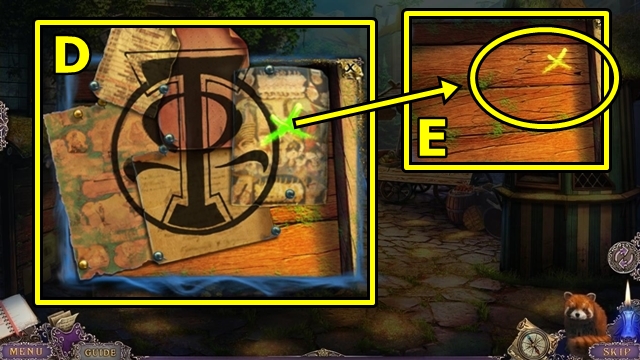
- Solution: (D). Remove the boards (E); take the WAGON HALF.

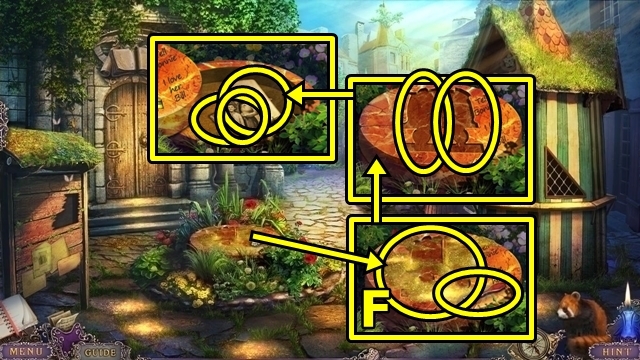
- Take the GLASS CUTTER (F). Wipe the moss; insert the two WAGON HALVES. Move the stone; take the photo; read the note; take the BOOKMARK.
Chapter 6: The Archive

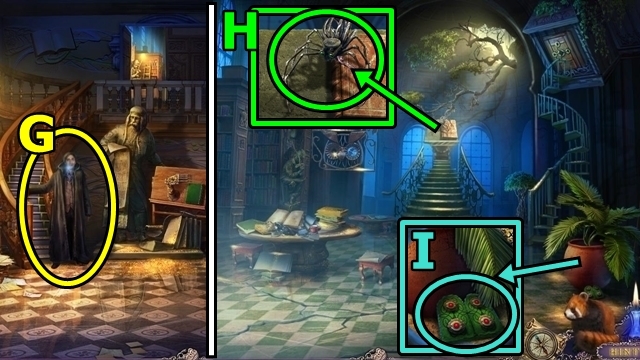
- Talk to Tom (G).
- Move up.
- Take the METAL SPIDER (H).
- Take the MECHANISM (I).
- Move down.

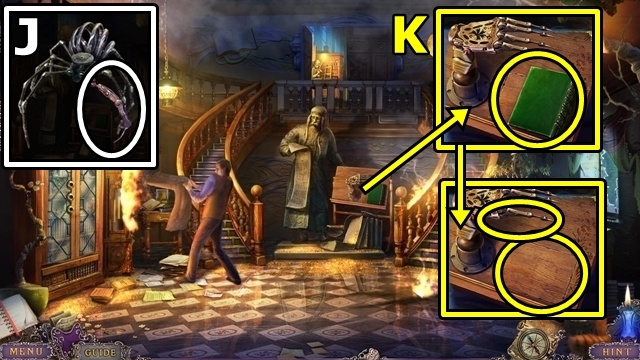
- Remove the SPIDER LEG (J) from the METAL SPIDER (inventory).
- Take BOOK II (K). Attach the SPIDER LEG; take the KNOB (2/3).

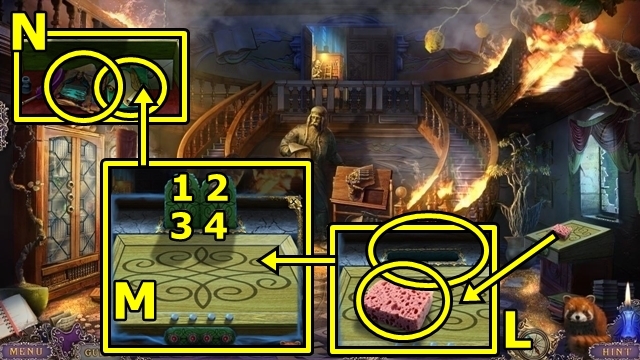
- Take the SPONGE (L). Insert the MECHANISM; play the mini-game.
- Solution: 1-4-3-2 (M). Take the ENGRAVINGS and SCROLL TOKEN (1/4) (N).
- Move up.

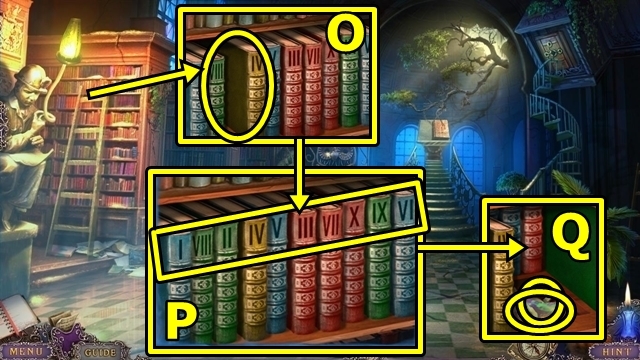
- Insert BOOK II (O); play the mini-game.
- Solution: II-VIII, VIII-III, VIII-VI, X-VIII, I-II, I-II, I-II, I-II, I-II, I-II (P). Examine the picture (Q); play the HOP. Take the KNOB (3/3).

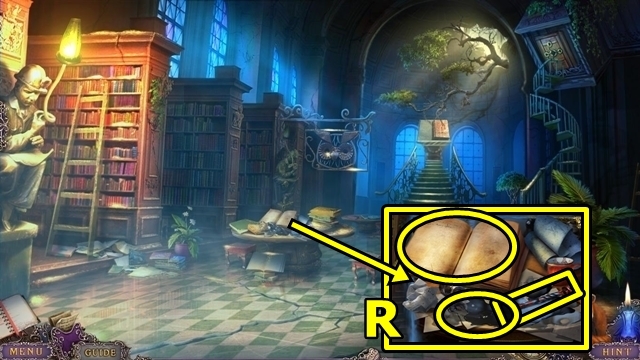
- Use the SPONGE (R); take the STYLUS. Examine the book; add the ENGRAVINGS.

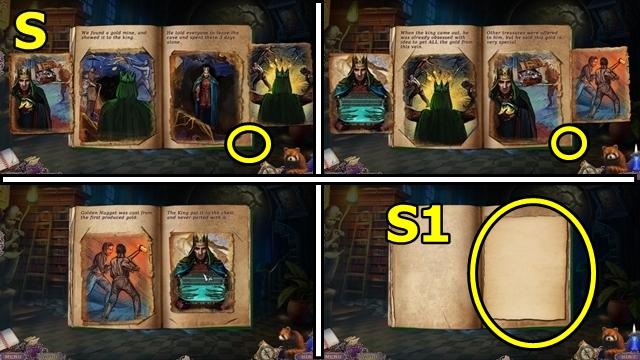
- Place the pictures (S); turn the page each time. Take the PLAIN PAPER (S1).
- Move down.

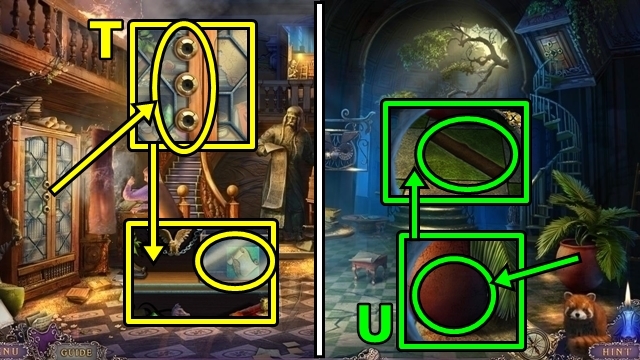
- Insert, then turn the three KNOBS (T). Play the HOP; receive the SCROLL. Use the GLASS CUTTER; take the SCROLL TOKEN (2/4).
- Move up.
- Move the planter (U). Insert the SCROLL; take the GLASSES.

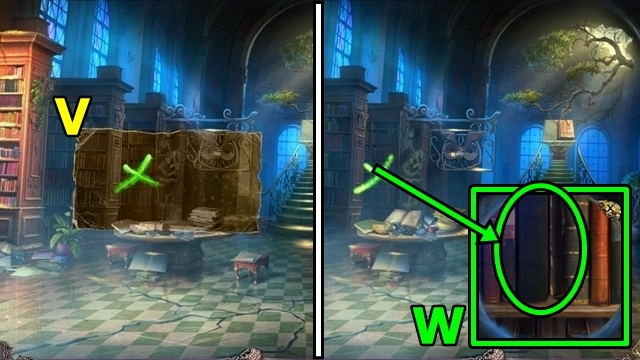
- Use the PICTURE HINT (V).
- Move the books (W); take the VIOLET BOX.
- Move down.

- Place the GLASSES (X).
- Take the CARBON PAPER (Y).
- Move up.

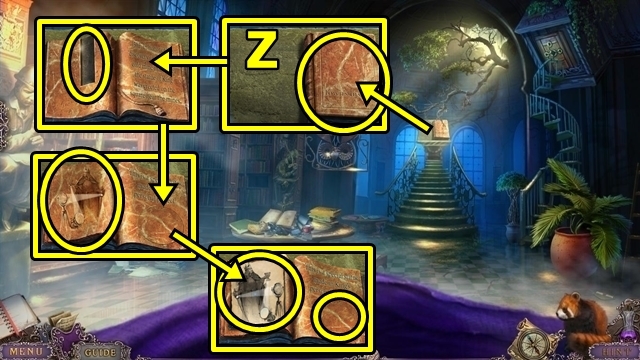
- Open the book (Z). Insert the BOOKMARK. Place the CARBON PAPER, PLAIN PAPER and STYLUS. Take the MIRROR SCHEME and the SCROLL TOKEN (3/4).

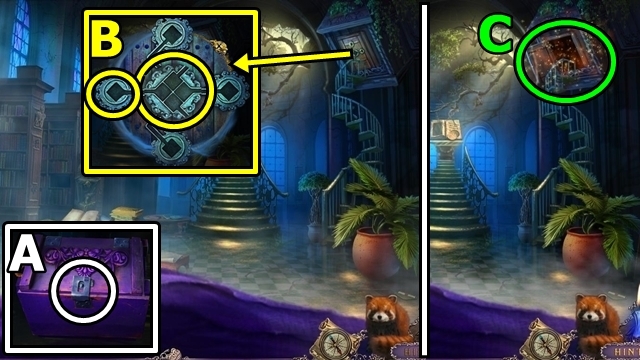
- Open the VIOLET BOX (inventory) (A); read the note; take the SPRING and SCROLL TOKEN (4/4).
- Insert the four SCROLL TOKENS (B). Turn the center piece twice.
- Play the HOP (C); receive the PAINTED CAT.
- Receive the SCARF.
Chapter 7: The Palisades

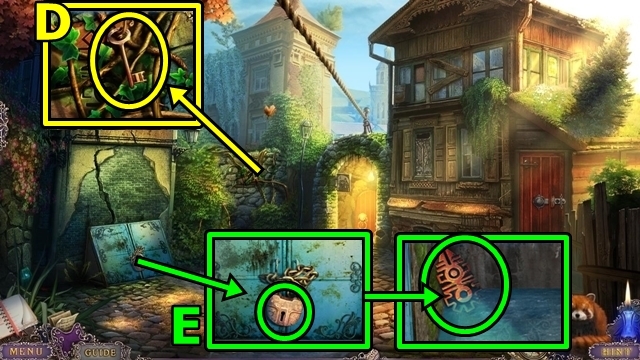
- Take the RUSTY KEY (D).
- Insert and turn the RUSTY KEY (E). Open the panel; take the FENCE KEY.

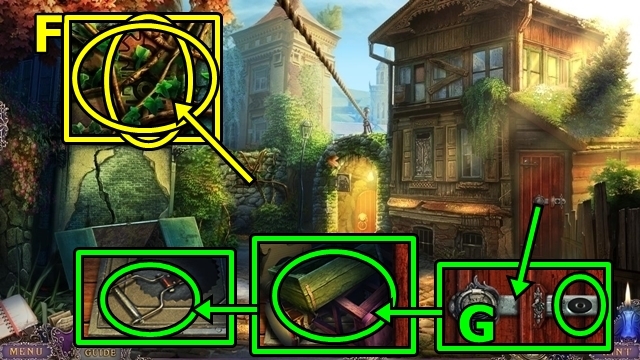
- Remove the branches (F). Insert the FENCE KEY; take the RING HANDLE.
- Insert the RING HANDLE(G). Pull the handle; open the door; remove the items; take the ELECTRIC SWITCH.

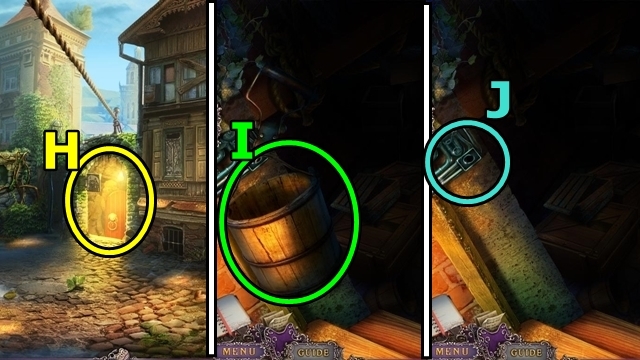
- Open the door (H); go into the Palisade: Cellar.
- Take the BUCKET (I).
- Insert the ELECTRIC SWITCH (J); flip the switch.

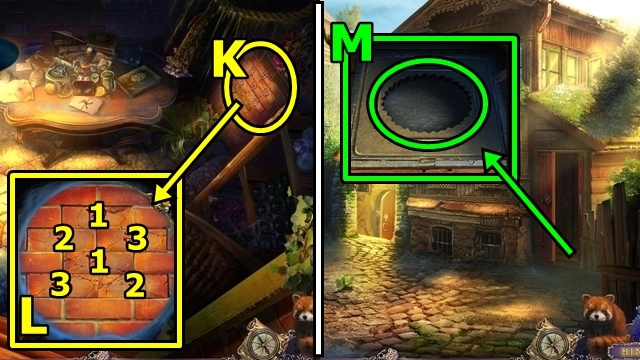
- Play the mini-game (K).
- Solution: (L). Take the HANDLE.
- Move down.
- Insert the HANDLE (M); open the compartment. Take the TORN PAGES and CROWBAR.
- Go into the Cellar.

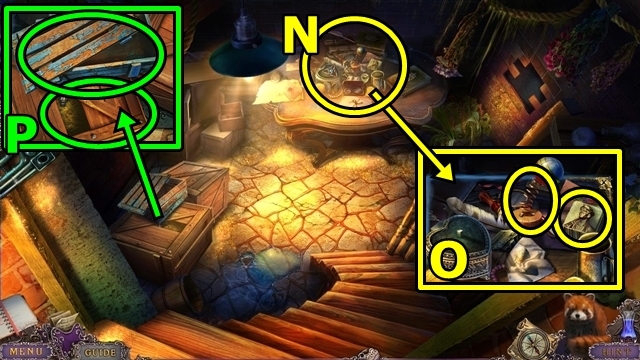
- Play the HOP (N); receive the SYMBOL. Remove the spring (O); add the SPRING; flick the ball; take the CROSS KEY (1/2).
- Move the crate (P); use the CROWBAR. Take the TOOL T.
- Move down.

- Use the BUCKET (Q). Insert the TOOL T; open the chest; take the CROSS KEY (2/2).
- Insert the two CROSS KEYS (R); take the HEART.
- Go into the Cellar.

- Insert the HEART (S); lift the lid. Take the PICTURE HINT and GRIFFIN.
- Move the crates (T); examine the panel. Insert the SYMBOL and GRIFFIN; play the mini-game.

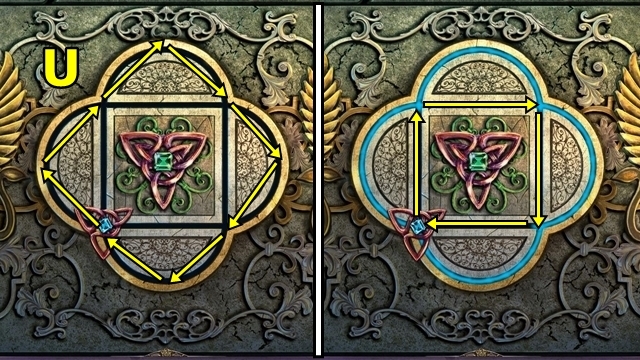
- Solution: (U).
- Go down the stairs.

- Use the PICTURE HINT (V).
- Take the ANGEL (W).

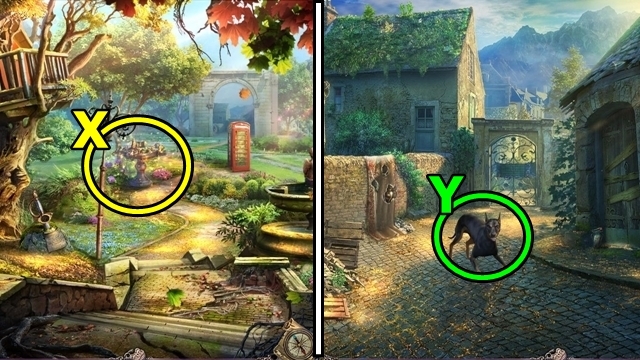
- Play the HOP (X); take the TAPESTRY FRAGMENT (1/3).
- Move forward.
- Offer the SCARF (Y).

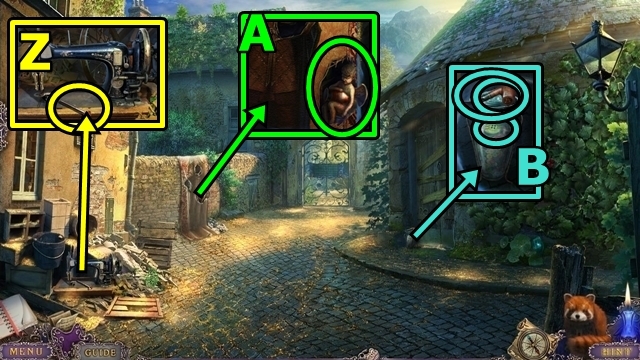
- Take the SCREW (Z).
- Take the ANGEL (A).
- Take the PIPE (B). Remove the lid; take the BUTTON.
- Move down.

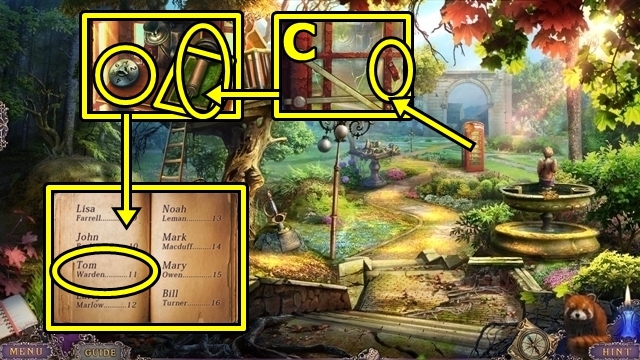
- Insert the SCREW (C). Take the LOCK (1/3). Answer the phone. Open the book; insert the TORN PAGES; examine the book; circle Tom’s name. Take the TAPESTRY FRAGMENT (2/3).

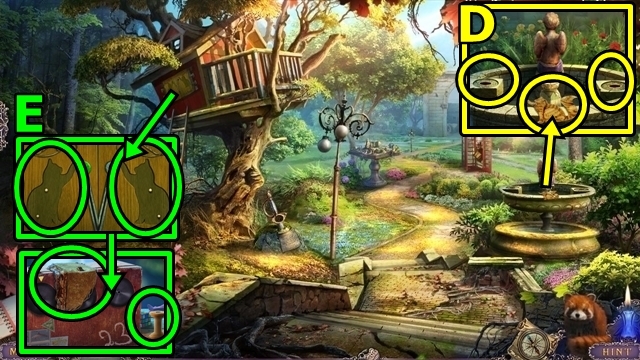
- Take the PAINTED CAT (D); place the two ANGELS. Take the METAL PLATE.
- Insert the two PAINTED CATS (E). Take the TAPESTRY FRAGMENT (3/3) and the EMPTY SPOOL.
- Move forward.

- Insert the three TAPESTRY FRAGMENTS (F); take the TORN TAPESTRY. Take the GOBLET. Insert the METAL PLATE; open the chest; take the LOCK (2/3).
- Use the GOBLET (G); receive the GOBLET WITH GRAPES. Move the leaves; open the shutters. Take the LOCK (3/3) and HANDLE.
- Move down.

- Insert the HANDLE (H); play the HOP; take the TROLLEY.
- Insert the three LOCKS (I). Turn the dials to 2-3-6. Take the PICTURE HINT and TRAIN.
- Move forward.

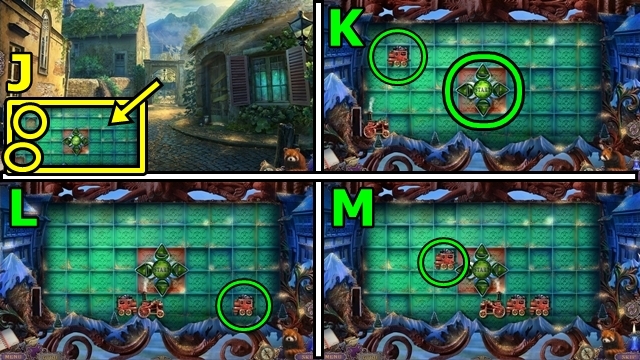

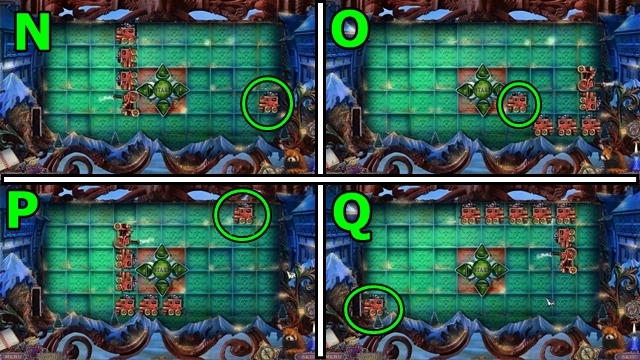
- Insert the TROLLEY (J) and TRAIN; play the mini-game.
- Solution: Press START; use the arrows to guide the train to each trolley (K-Q). In Hard mode, the train moves faster.
- Move forward.

- Take the GLASS (R). Insert the BUTTON; take the NEEDLE.
- Take the ORB (S).
- Use the EMPTY SPOOL (T); receive the SPOOL OF THREAD. Take the OBELISK.

- Take the RAG (U). Insert the OBELISK, then press it. Take the RESIN.
- Move down.
- Add the SPOOL OF THREAD (V), NEEDLE and TORN TAPESTRY. Sew the tapestry; receive the KING’S TAPESTRY.
- Move down.

- Open the ORB (inventory) (W); take the RUBY (X) and BOWL.
- Insert the RUBY (Y); take the SWORD HANDLE.
- Move forward twice.

- Remove the string (Z) from the GLASS (inventory). Add the RAG, GLASS CUTTER and RESIN. Use the glass cutter, resin, then rag (A). Take the MIRROR.
- Insert the MIRROR (B). Add the MIRROR SCHEME. Arrange the mirror (C).

- Use the PICTURE HINT (D).
- Arrange the mirror (E). Add the GOBLET WITH GRAPES; receive the GOBLET WITH WINE.

- Hang the KING’S TAPESTRY (F). Remove the sword handle; add the SWORD HANDLE and GOBLET WITH WINE.

- Arrange the king’s statue (G).

- Play the mini-game.
- Solution: 5-7-7-10-9-8-8-1-2-2-2-4-4-3-3 (I). Take the TREASURE CHEST.
Chapter 8: The Mine

- Play the HOP (J); receive the BUTTON 2.
- Take the KEY 13 (K).
- Enter the Working Mine: Lift (L).
- Insert the BUTTON 2 (M); press 2.
- Move forward.


- Examine the picture (N); play the HOP. Use the PIPE; receive the SMOKING PIPE.
- Take the HAIRPIN (O). Use the SMOKING PIPE; take the METAL STORK.
- Insert and turn KEY 13 (P).

- Play the HOP (Q); receive the OILCAN.
- Return to the Working Mine: Mine Hall.
- Use the OILCAN (R); play the mini-game.

- Solution: (S). Open the cupboard. Take the METAL TREE.
- Return to the Working Mine: Living Rooms.

- Insert the METAL TREE (T) and the METAL STORK. Take the HYDROGEN PEROXIDE. Turn the tap; add the BOWL; receive the BOWL WITH WATER.
- Remove the roses (U); add the BOWL WITH WATER; take the BUTTON 3.
- Return to the Working Mine: Mine Hall.

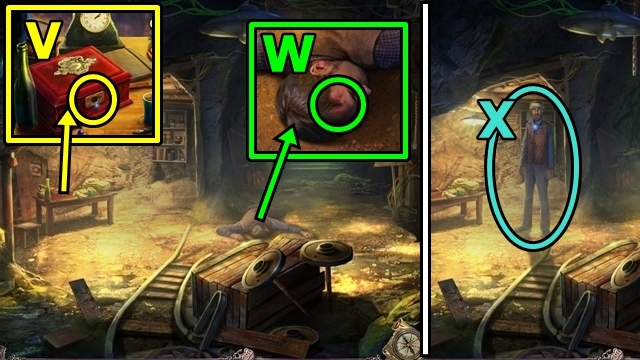
- Use the HAIRPIN (V); take the BANDAGE.
- Use the HYDROGEN PEROXIDE (W) and BANDAGE.
- Talk to Tom (X); receive the HEART.
- Enter the WorkingMine: Lift.

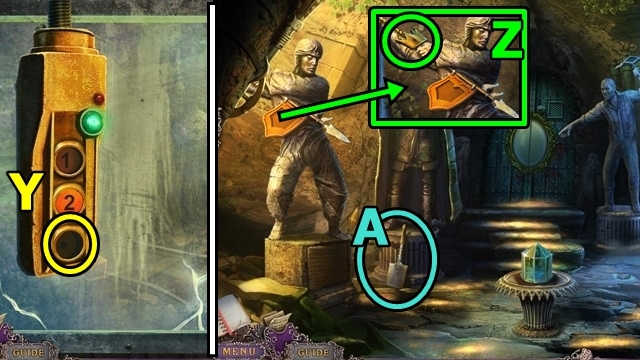
- Insert the BUTTON 3 (Y); press 3.
- Move forward.
- Take the CROWN (Z).
- Take the SHOVEL (A).
- Return to the Working Mine: Living Rooms.

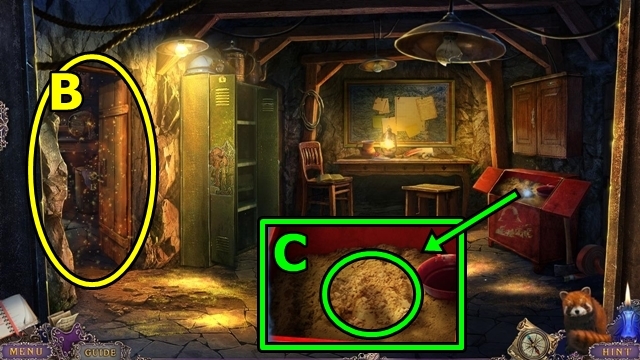
- Play the HOP (B); receive the BRACER.
- Use the SHOVEL (C); take the STONE FLAG.
- Return to the Working Mine: Mine Hall.

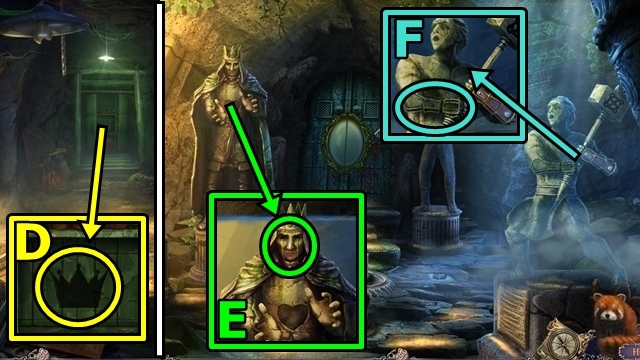
- Insert the CROWN (D); take the VIAL.
- Return to the Working Mine: Mine.
- Use the VIAL (E); receive the LIQUID GOLD.
- Add the BRACER (F); take the MOSAIC PIECES.
- Return to the Working Mine: Living Rooms.

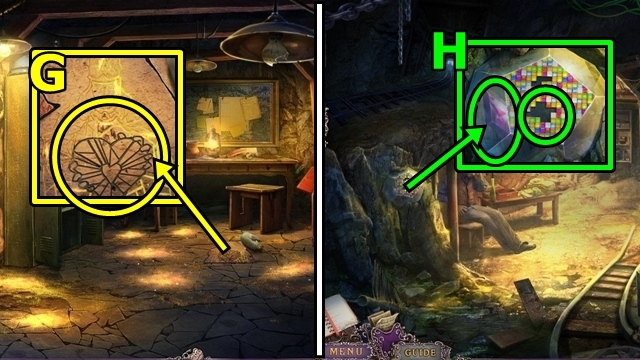
- Add the LIQUID GOLD (G); take the EMBLEM.
- Return to the Working Mine: Mine Hall.
- Add the MOSAIC PIECES (H); take the CRYSTAL.
- Return to the Working Mine: Mine.

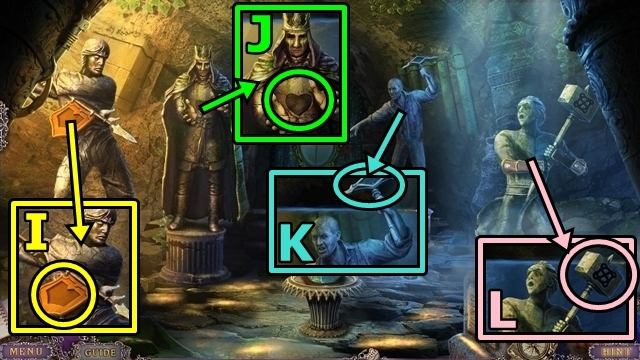
- Add the STONE FLAG (I).
- Add the HEART (J).
- Add the CRYSTAL (K).
- Add the EMBLEM (L).
- Move forward.

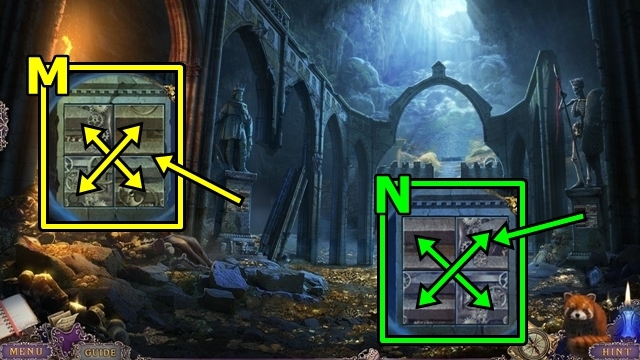
- Play the mini-game.
- Solution: (M).
- Play the mini-game.
- Solution: (N).

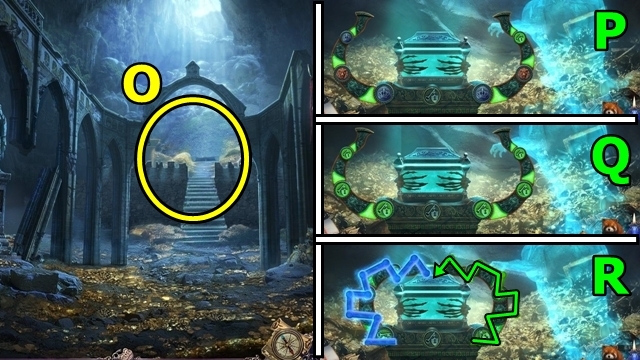
- Place the TREASURE CHEST (O).
- Play the mini-game.
- Solution: (P-R).

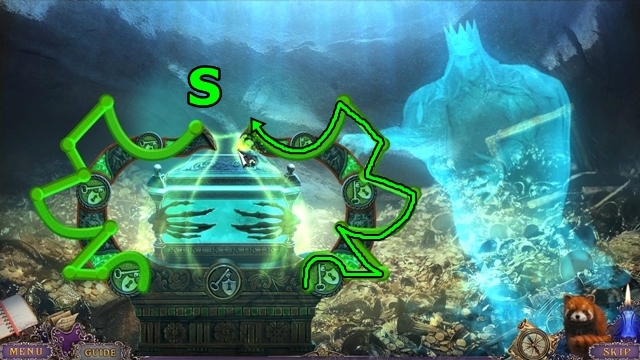

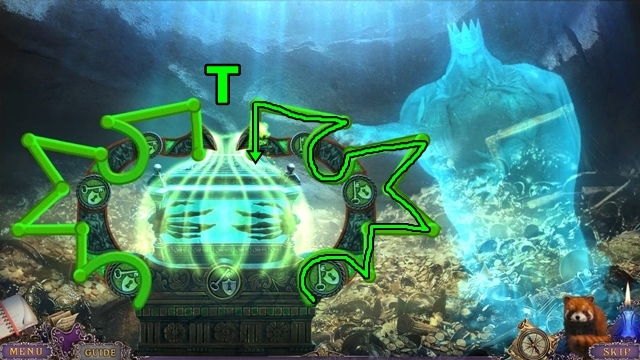
- Solution: (S-T).
- Congratulations! You’ve completed Whispered Secrets: Golden Silence.




 Howlville: The Dark Past Walkthrough, Guide, & Tips
 Farm Frenzy 3: American Pie Walkthrough, Guide, & Tips
 Reflections of Life: Equilibrium Walkthrough, Guide, & Tips
 Dark Parables: Ballad of Rapunzel Walkthrough, Guide, & Tips
 Sea of Lies: Burning Coast Walkthrough, Guide, & Tips