Mystery Trackers: Winterpoint Tragedy Walkthrough, Guide, & Tips
Mystery Trackers: Winterpoint Tragedy Walkthrough

Welcome to the Mystery Trackers: WInterpoint Tragedy Walkthrough
Answer a distress call at an arctic research lab where scientists have made a chilling discovery!
Whether you use this document as a reference when things get difficult or as a road map to get you from beginning to end, we’re pretty sure you’ll find what you’re looking for here.
This document contains a complete Mystery Trackers: WInterpoint Tragedy game walkthrough featuring annotated screenshots from actual gameplay!
We hope you find this information useful as you play your way through the game. Use the walkthrough menu below to quickly jump to whatever stage of the game you need help with.
Remember to visit the Big Fish Games Forums if you find you need more help. Have fun!
This walkthrough was created by Nina de Boo, and is protected under US Copyright laws. Any unauthorized use, including re-publication in whole or in part, without permission, is strictly prohibited.
General Tips
- This is the official guide for Mystery Trackers: Winterpoint Tragedy.
- This guide will not mention each time you have to zoom into a location; the screenshots will show each zoom scene.
- Hidden-object puzzles are referred to as HOPs. This guide will not show screenshots of the HOPs, but it will mention when a HOP is available and the inventory item you’ll collect from it.
- This guide will give step-by-step solutions for all puzzles that are not random. Please read the instructions in the game for each puzzle.
Chapter 1: Winterpoint Station

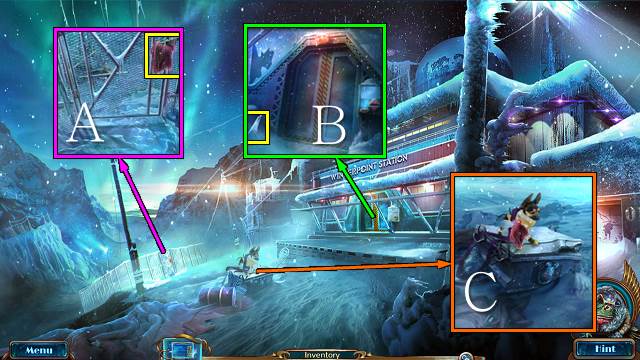
- Take the RAG (A).
- Move the GLASS SHARD and take it with the RAG (B).
- Use the GLASS SHARD and take ELF (C).

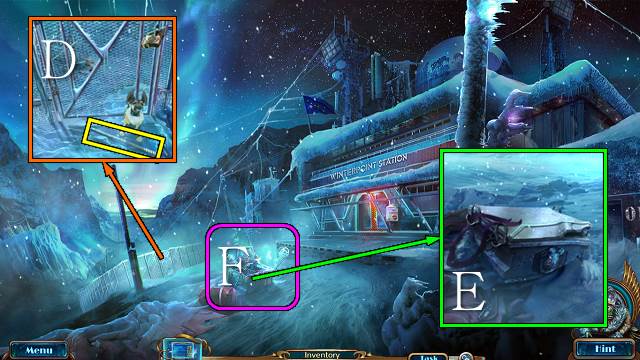
- Use ELF; take the METAL ROD (D).
- Use the METAL ROD (E).
- Play the HOP (F).
- You receive the SUITCASE.

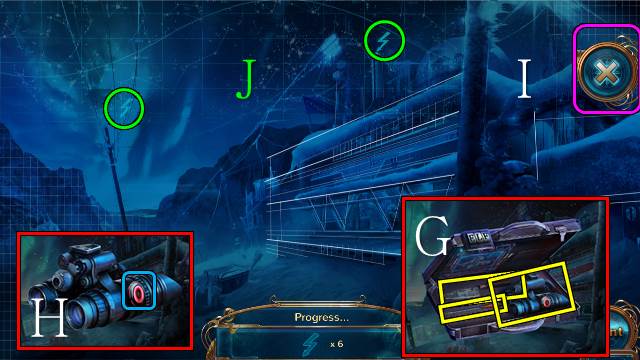
- Access the SUITCASE; enter the word ‘ELF’ and take the VISOR, KNIFE and SCREWDRIVER (G).
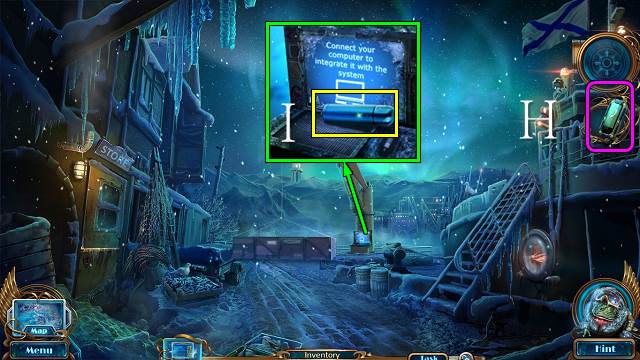
- Access the VISOR and push the red button (H).
- Push the Visor button (I).
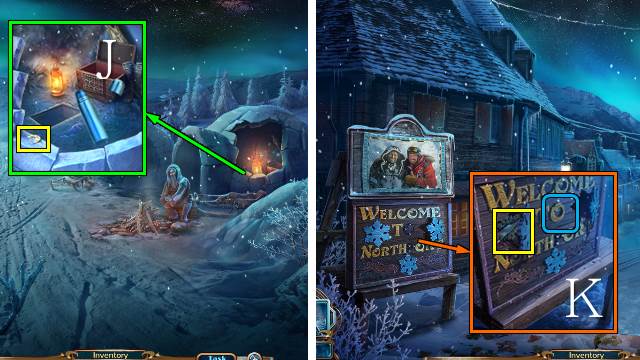
- Find the lightning bolts (J).

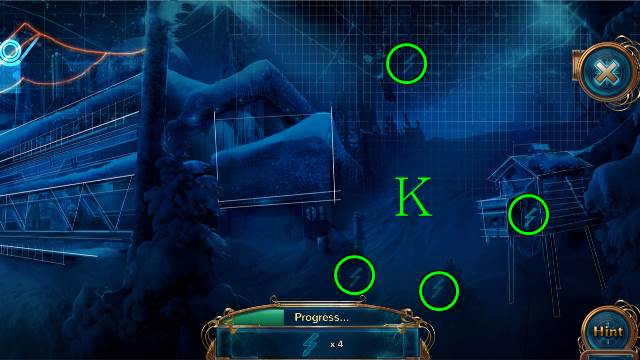
- Find the lightning bolts (K).

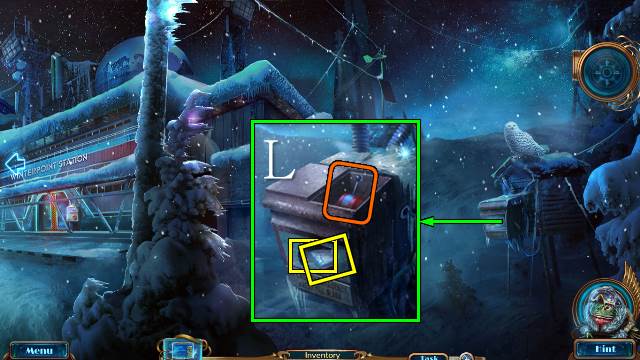
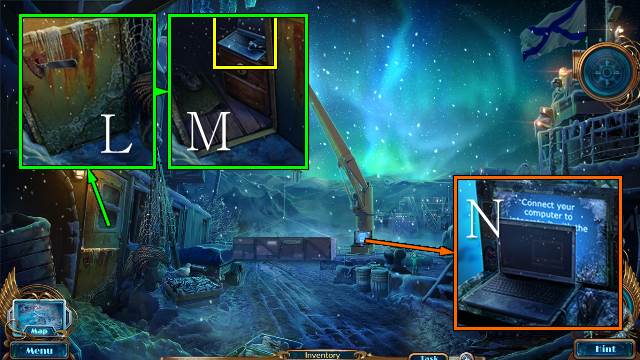
- Take the tablet and LOCK CODE; use the SCREWDRIVER and pull the lever (L).
- Scroll left.

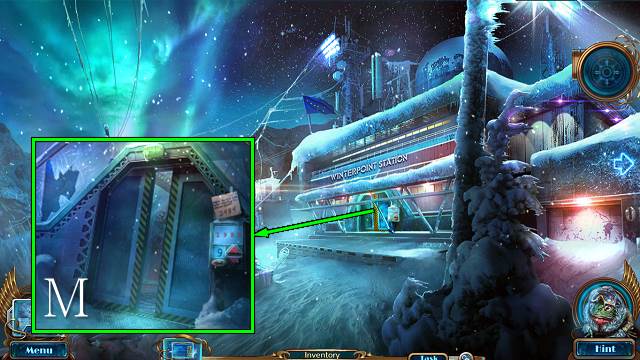
- Place the LOCK CODE; use the arrows to scroll through the numbers and enter the code (M).
- Walk forward.

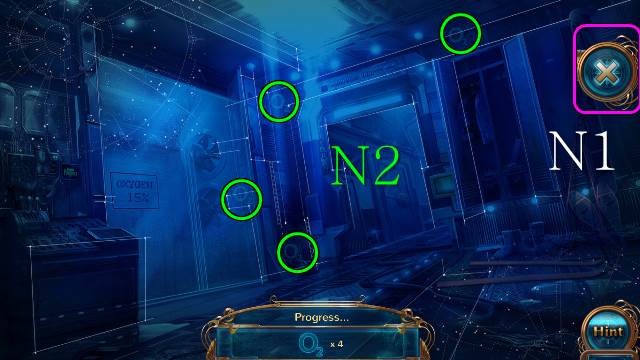
- Try to interact with Agent Shade.
- Select the Visor (N1); find the O2 symbols (N2).

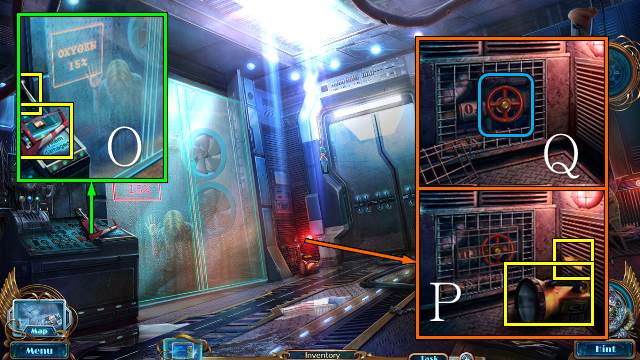
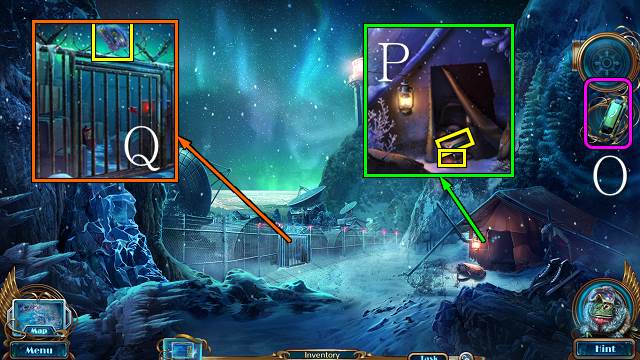
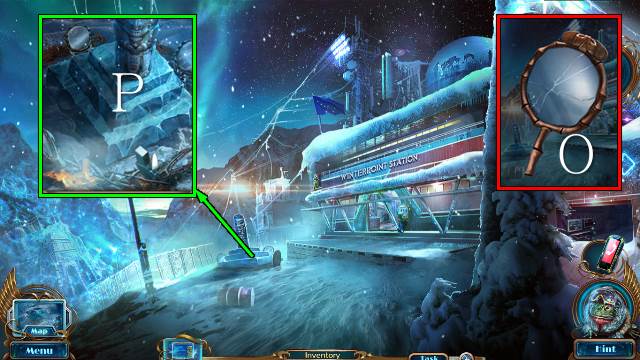
- Take the SAW and DOOR HANDLE (O).
- Take the LANTERN and LOCK PART (P); use the SAW and turn the valve (Q).

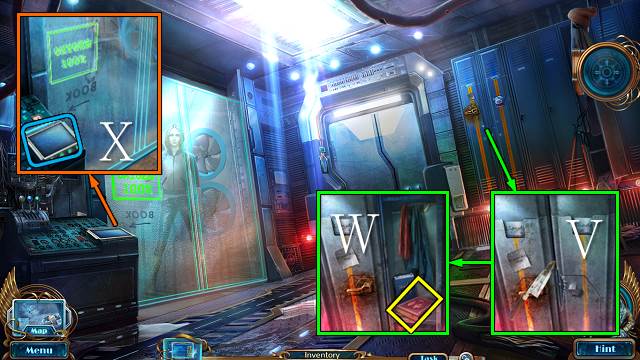
- Use the KNIFE (V); take the BOOK and check the diary (W).
- Place the BOOK for a mini-game (X).

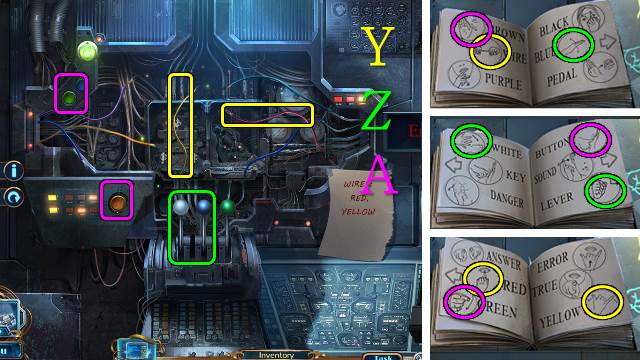
- Select red, yellow, wire, then connect the red and yellow wires (Y); select lever, blue, white, then pull the blue and white levers (Z); select buttons, green, brown, then push the brown and green buttons (A).

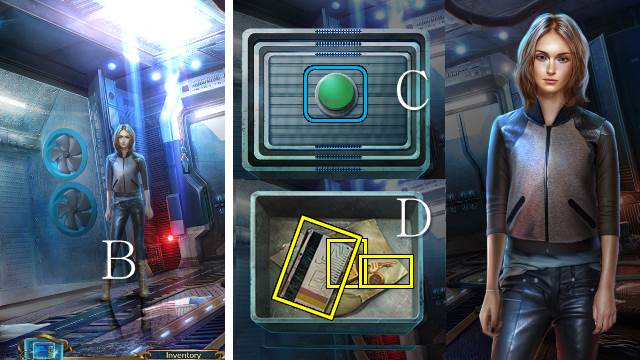
- Talk to Agent Shade (B).
- Push the button (C); inspect the picture and take the LOCK PART, GATE KEY and KEY CARD (D).

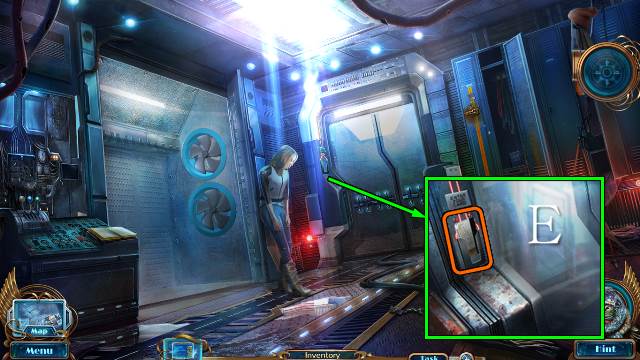
- Use the KEY CARD (E).
- Go forward.

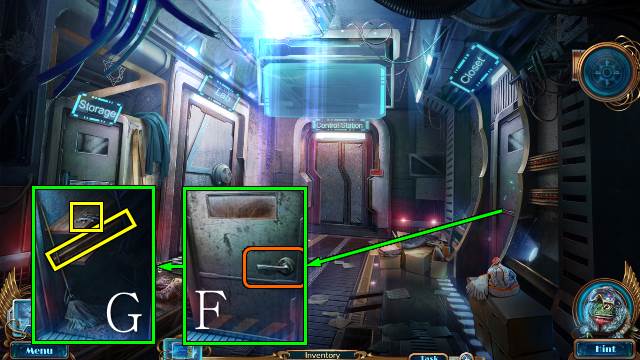
- Try to go forward.
- Place the DOOR HANDLE and open the door (F); take the NAILS and STICK (G).
- Walk down twice.

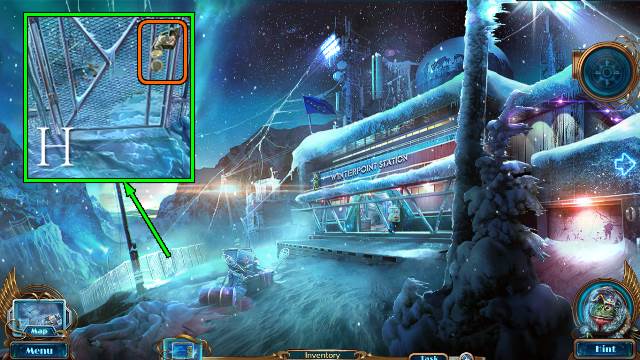
- Open the lock with the GATE KEY (H).
- Go left.

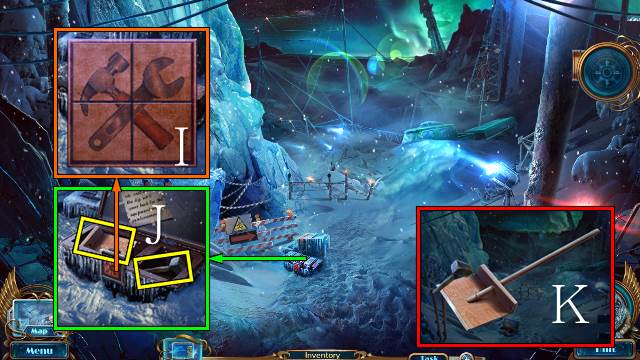
- Turn the tiles to open the case (I); take the HAMMER and SHOVEL (J).
- Access the SHOVEL and attach the STICK; use the NAILS and HAMMER and take the SNOW SHOVEL (K).

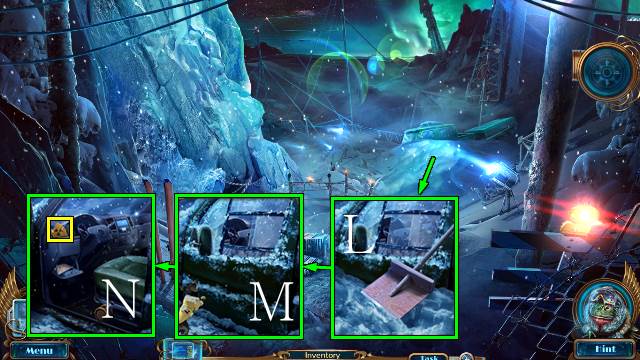
- Use the SNOW SHOVEL (L), open the window and release ELF (M); take the LOCK PART and read the letter (N).
- Go to the Corridor.

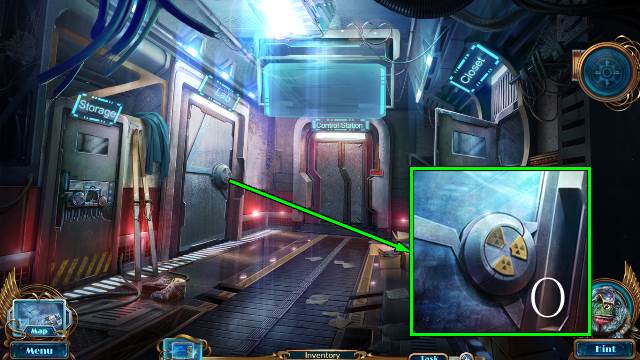
- Place the three LOCK PARTS (O).
- Go left.

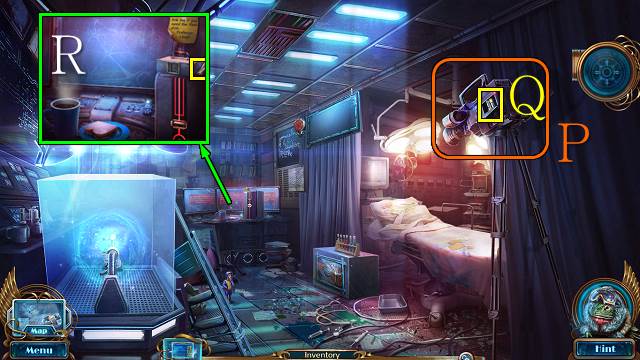
- Watch the video (P).
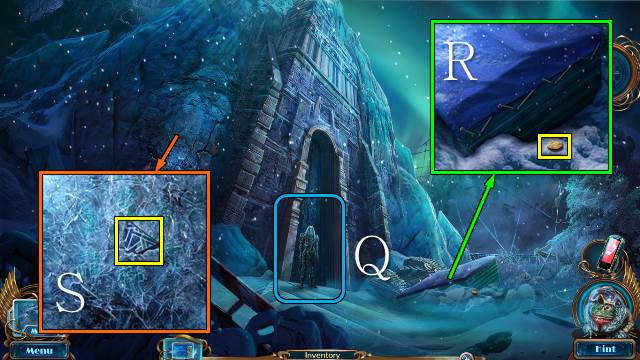
- Take the BATTERY (Q).
- Take the TRIANGLE KEY (R).

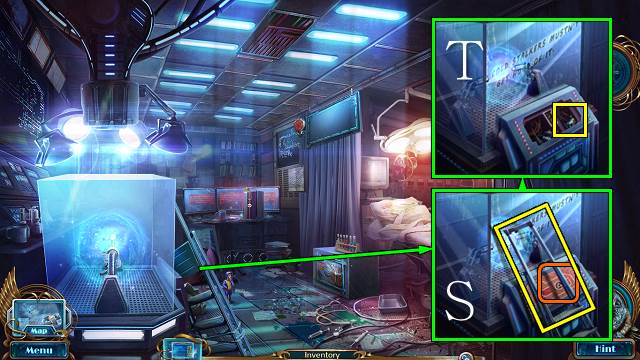
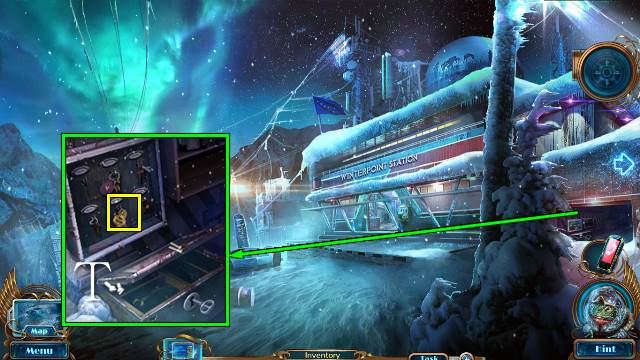
- Take the LADDER and place the TRIANGLE KEY and turn it (S); take the CONNECTOR (T).
Chapter 2: Professor Lloyd

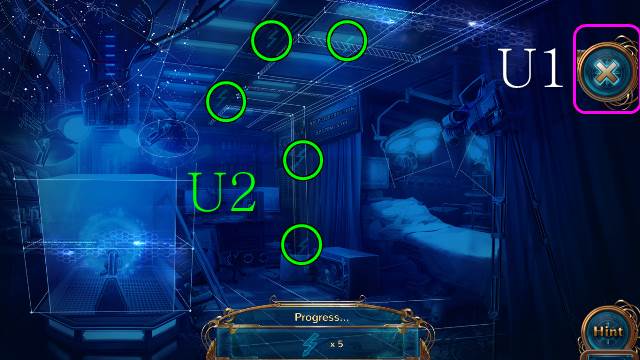
- Select the Visor (U1); find the lightning bolts (U2).

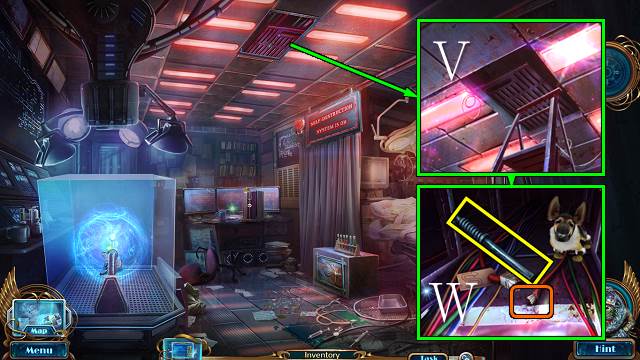
- Place the LADDER and move the panel (V); take the LEVER, release ELF and place the CONNECTOR (W).
- Walk down.

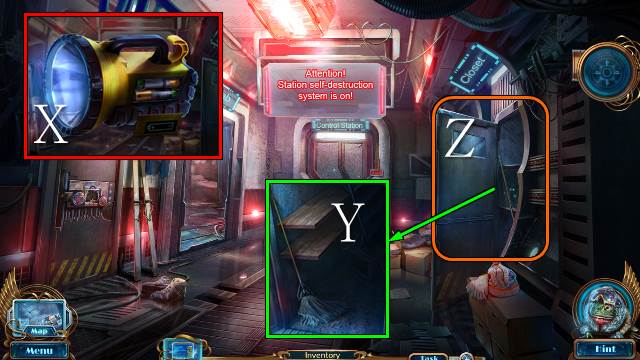
- Access the LANTERN, remove the panel, place the BATTERY and take the WORKING LANTERN (X).
- Place the WORKING LANTERN (Y).
- Play the HOP (Z).
- You receive a BOX.
- Go down twice and left.

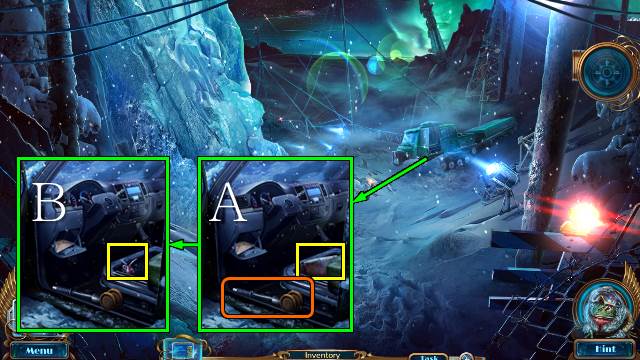
- Place and pull the LEVER and take the BAG (A); take the OIL CAN (B).
- Go to the Station Hall.

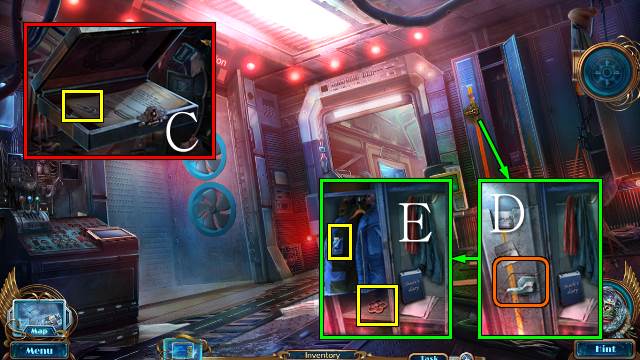
- Access the BOX, use the SCREWDRIVER and take the CLIP (C).
- Use the OIL CAN and open the locker (D); use the CLIP and take the FLASH DRIVE and VALVE KNOB (E).
- Go to the Laboratory.

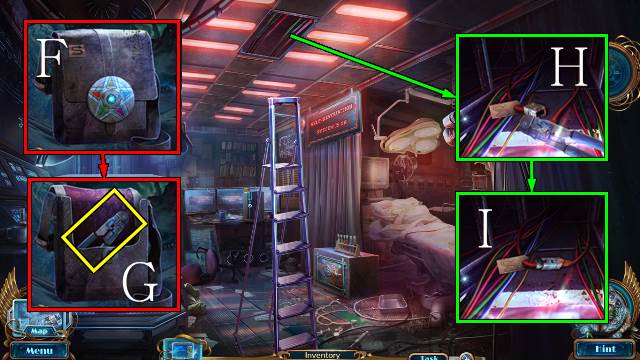
- Access the BAG for a mini-game (F); take the CRIMPING PLIERS (G).
- Use the CRIMPING PLIERS (H) and connect the cables (I).

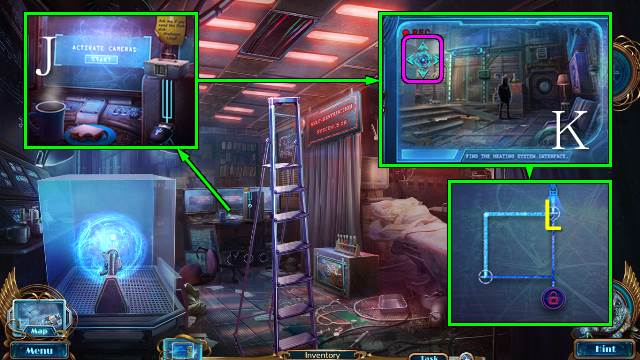
- Place the FLASH DRIVE, close the two tabs and push Start for a mini-game (J).
- Level 1: move the crosshairs to the indicated spot (K); turn L.

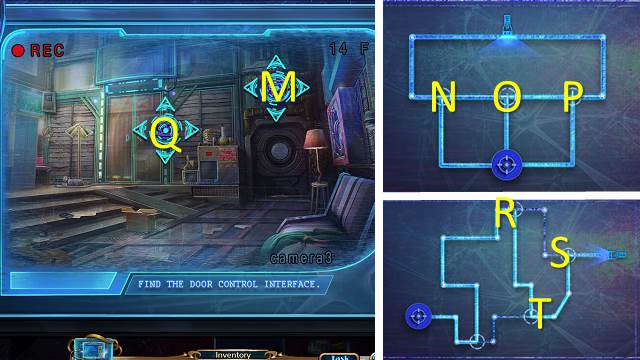
- Level 2: move the crosshairs to M, turn N-O-P.
- Level 3: move crosshairs to Q, turn Rx3-S-T.
- Walk down.

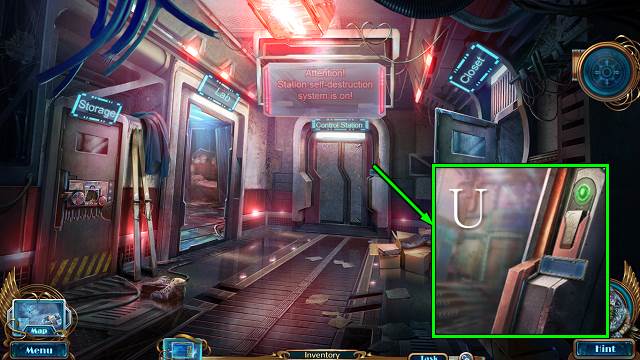
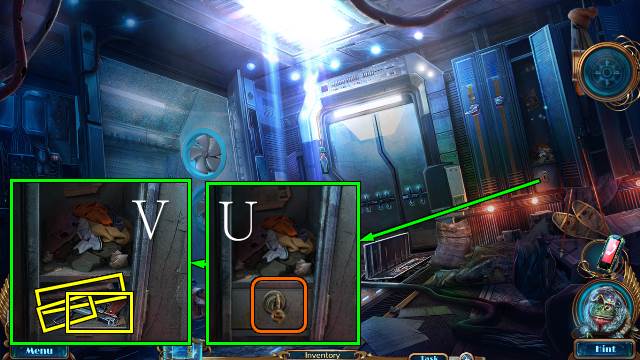
- Use the KEY CARD (U).
- Go forward.

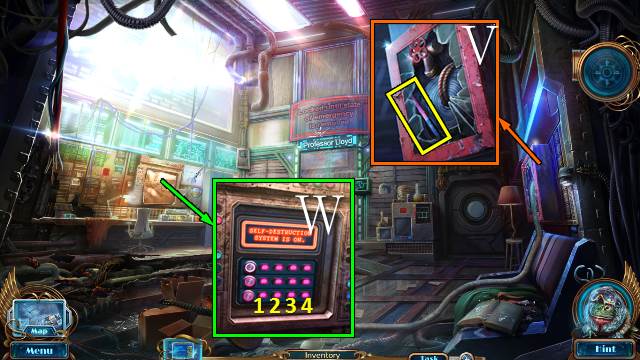
- Place the VALVE KNOB, take the CROWBAR, use the KNIFE and turn the knob (V).
- Use the CROWBAR for a mini-game (W).
- Solution: 3-4-1-2; 2-1-4-3; 1-3-2-4.
- Go forward.

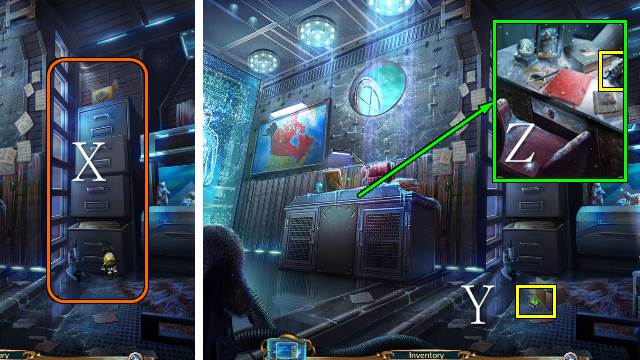
- Open the drawers, bottom to top, and release ELF (X).
- Take MICROCHIP 1/2 (Y).
- Inspect the items on the desk and take the SWITCH (Z).
- Go to the Laboratory.

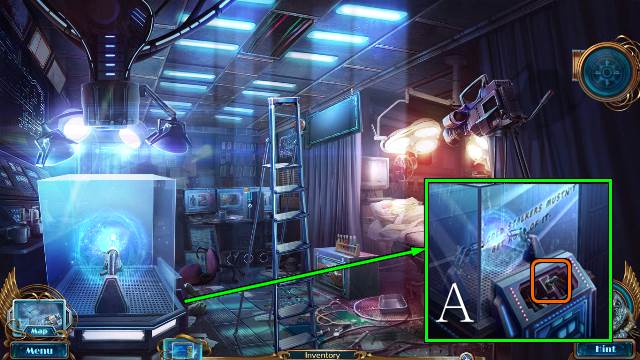
- Place the SWITCH and flick it (A).

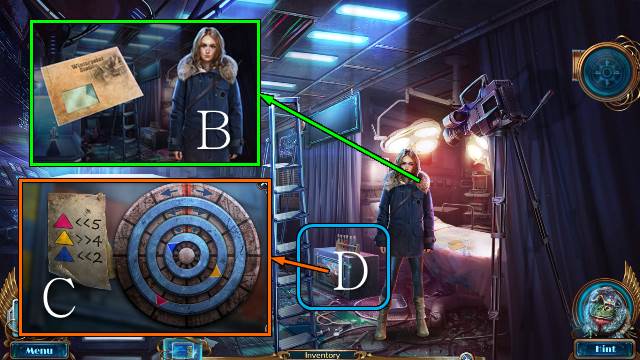
- Talk to Agent Shade; open the envelope and take the SAFE CODE (B).
- Place the SAFE CODE for a mini-game (C).
- Play the HOP (D).
- You receive the TABLE KEY.
- Go to the Study.

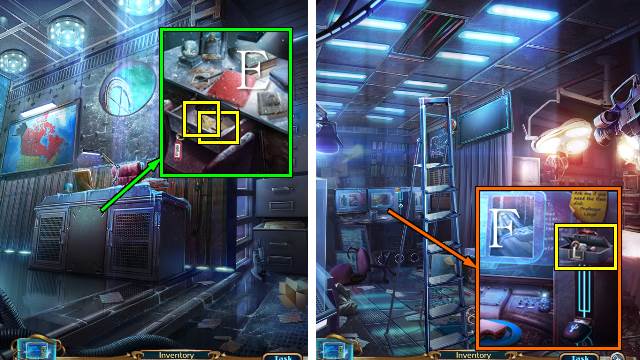
- Use the TABLE KEY; take ALASKA and the LETTER L (E).
- Go to the Laboratory.
- Place the LETTER L; take the ESKIMO FIGURINE (F).
- Go to the Study.

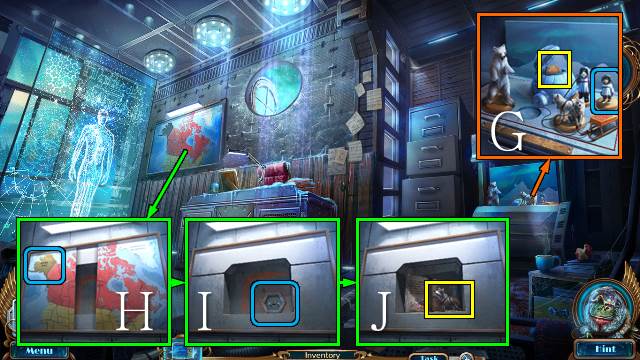
- Place the ESKIMO FIGURINE and take the BUTTON (G).
- Place ALASKA (H) and the BUTTON (I); read the book and take the DOG FIGURINE (J).

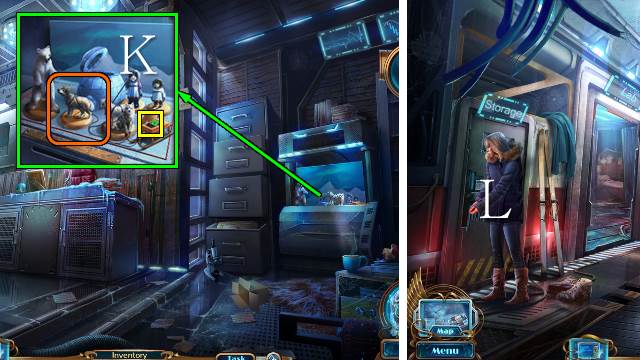
- Place the DOG FIGURINE and take MICROCHIP 2/2 (K).
- Walk down twice.
- Give the MICROCHIPS to Agent Shade (L).

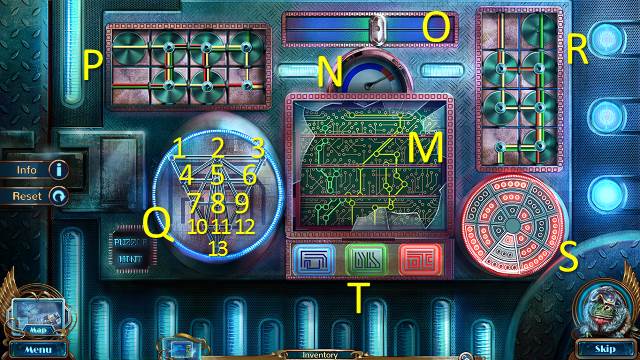
- Play the mini-game.
- Push Activate and swap the panels to make a consecutive image (M).
- Stop the arrow in the red zone (N), stop the slider in the green zone (O).
- Turn the tiles to connect the wires (P).
- 13-11-12-13-10-11-8-9-12-2-3-6-2-9-6-5-2-1-4-2-7-4-5-8-7-10-2 (Q).
- Turn the tiles to connect the wires (R).
- Select 1 and 5 red dots (S).
- Find the indicated buttons (T).

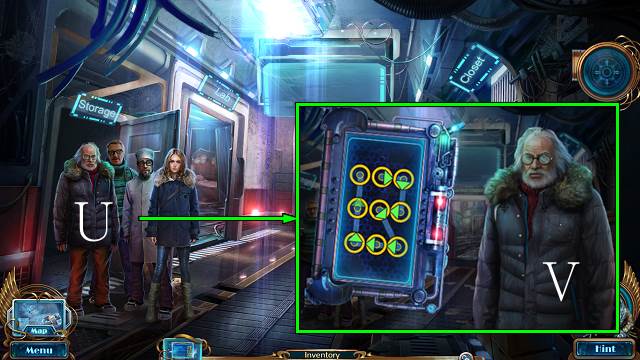
- Talk to the scientists (U).
- Follow the arrows and go through the images (V).

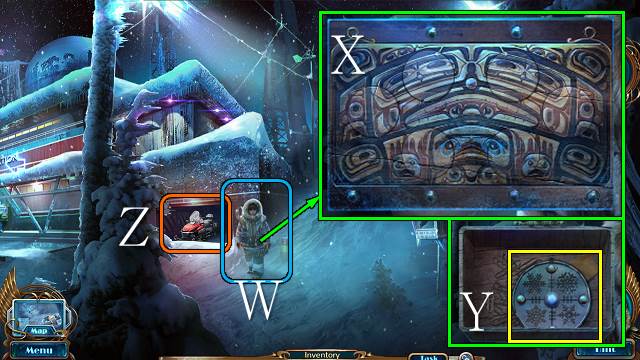
- Talk to the Shaman’s Apprentice (W).
- Play the mini-game (X).
- Take the AMULET (Y).
- Select the scooter for a mini-game (Z).

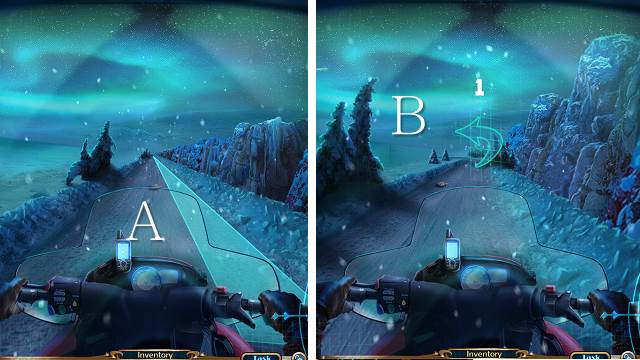
- Select a highlighted lane to move there; push the arrow on 0 (B).
Chapter 3: Northport

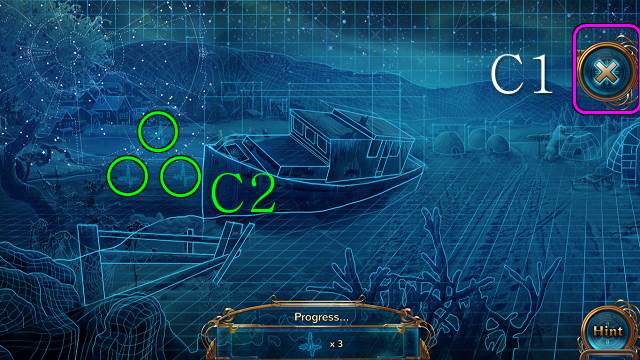
- Try to walk forward.
- Select the Visor (C1); find the heartbeats (C2).

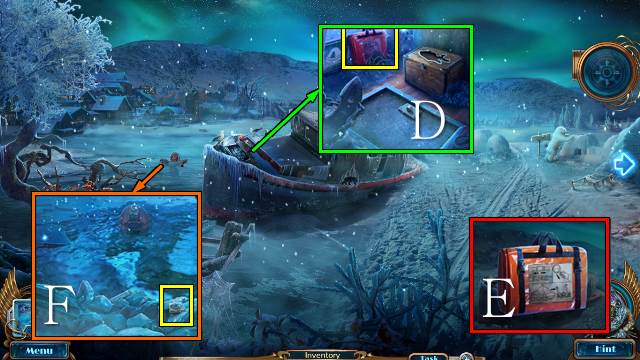
- Take the LIFE RAFT (D).
- Access and inflate the LIFE RAFT (E).
- Use the LIFE RAFT; take the CHEST PIECE (F).
- Scroll right.

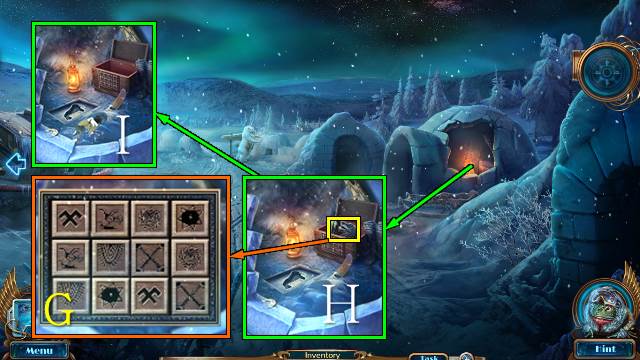
- Place the CHEST PIECE for a mini-game (G).
- Take the WOLF TALISMAN and FISH EMBLEM (H); use ELF and take the SLED RUNNER (I).
- Scroll left.

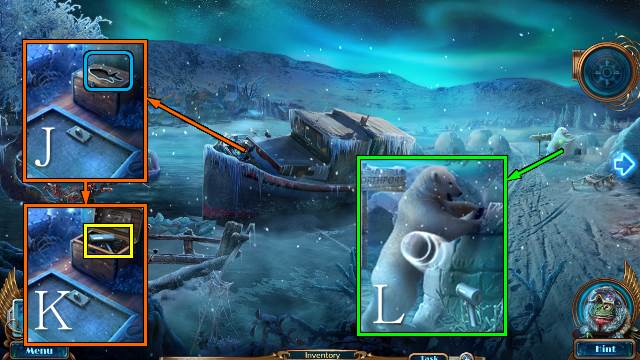
- Use the FISH EMBLEM (J); take the ULTRASONIC DETERRENT (K).
- Use the ULTRASONIC DETERRENT (L).
- Walk forward.

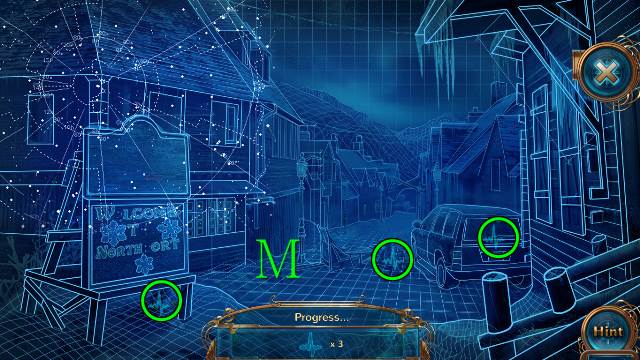
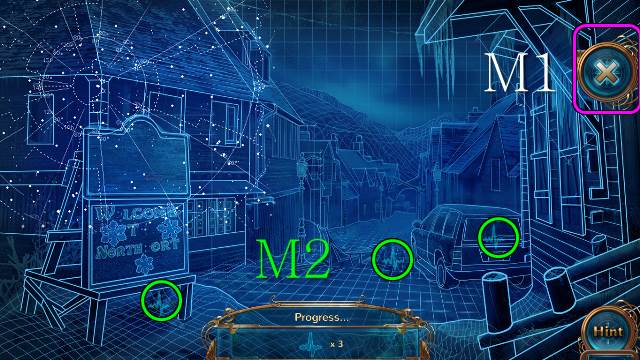
- Select the Visor (M1); find the heartbeats (M2).

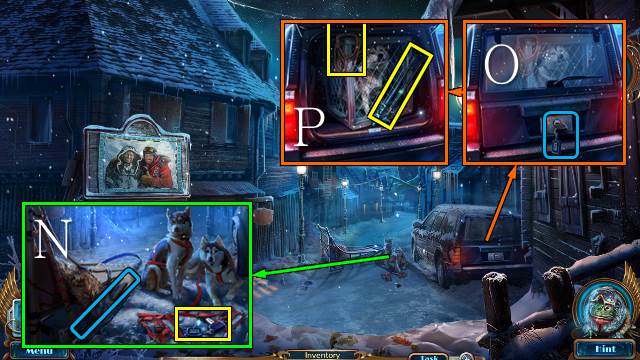
- Take the JEEP KEYS and place the SLED RUNNER (N).
- Use the JEEP KEYS (O); take the FLAMETHROWER and ROPE, use the SCREWDRIVER and take the HUSKY (P).
- Walk down.

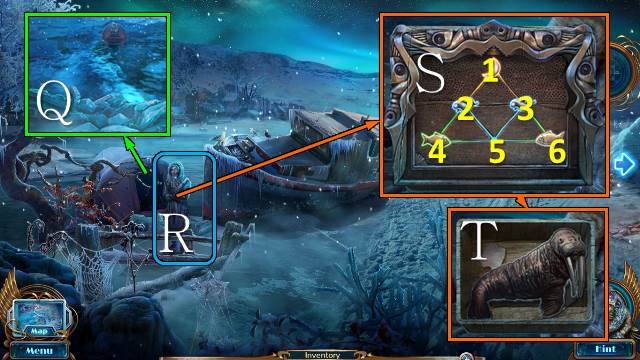
- Use the ROPE (Q).
- Talk to the Shaman (R).
- Play the mini-game: 3-1-2-4-5-3-6-5 (S).
- Take the WALRUS (T).
- Scroll right.

- Place the WALRUS (U); take the ESKIMO CHRONICLE (V).
- Give the ESKIMO CHRONICLE to the Shaman; play the HOP (W).
- Take the ANCIENT SYMBOL and LETTER (X).
- Walk forward.

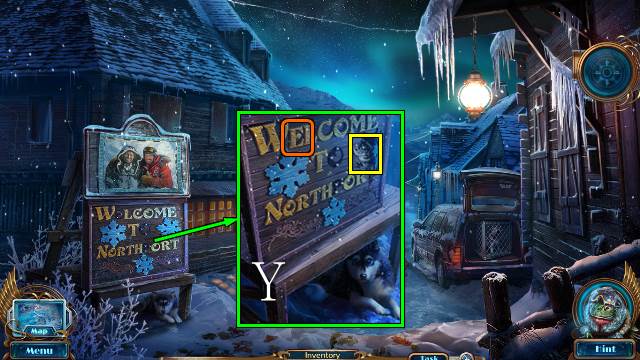
- Place the LETTER; take the RING and ANCIENT SYMBOL (Y).
- Walk down and scroll left.

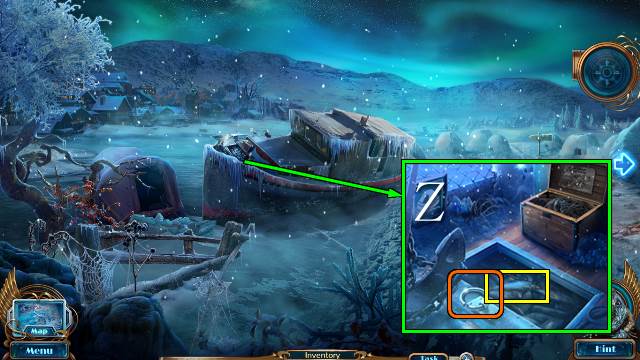
- Place the RING, open the hatch and take the FISH (Z).
- Walk forward.

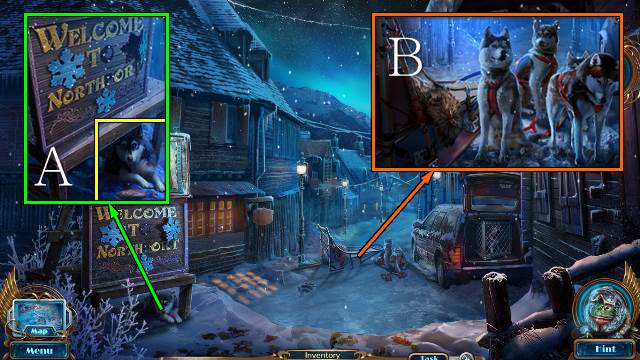
- Use the FISH and receive the HUSKY (A).
- Place the two HUSKIES (B).
- Walk forward.
Chapter 4: The Cave

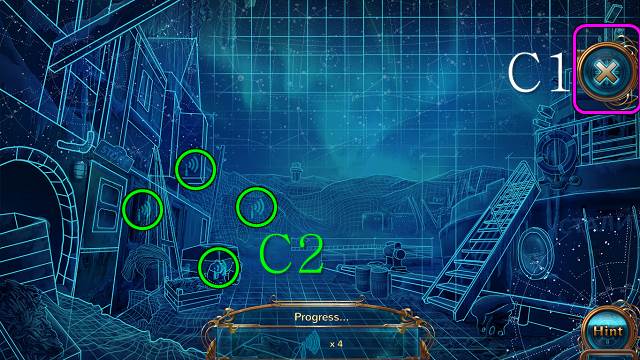
- Select the Visor (C1); find the symbols (C2).

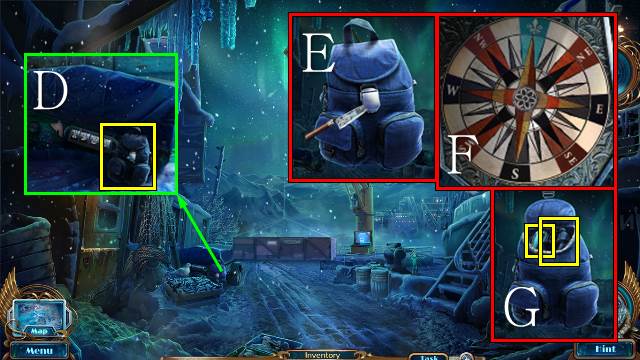
- Take the BACKPACK (D).
- Access the BACKPACK and use the KNIFE (E) for a mini-game (F).
- Take the POP-BINOCULARS and phone (G).

- Answer your phone (H).
- Take the BEVERAGE CONTAINER (I).
- Walk down twice and scroll right.

- Use the BEVERAGE CONTAINER and take the LETTER (J).
- Walk forward.
- Place the LETTER; take the LOCKPICK and ANCIENT SYMBOL (K).
- Walk forward.

- Use the LOCKPICK (L); take the LAPTOP (M).
- Place the LAPTOP for a HOP (N).
- Walk forward.

- Answer your phone (O).
- Use the KNIFE; take the WRENCH and STRIKER (P).
- Take the CLOTH (Q).
- Walk down.

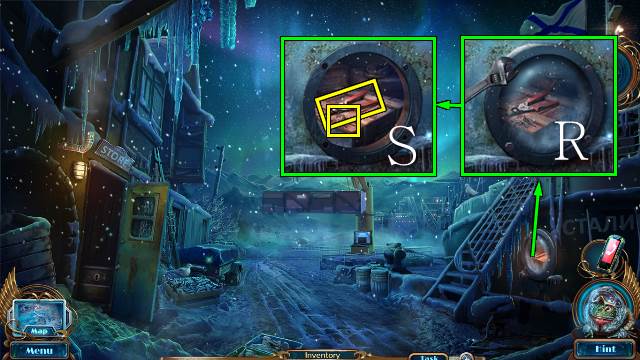
- Use the WRENCH (R); take the TIN SNIPS and MATCH (S).
- Walk forward.

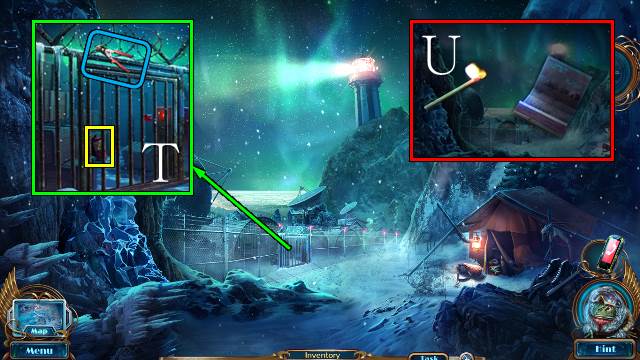
- Use the TIN SNIPS and ELF; take the FUEL TANK (T).
- Access the STRIKER and strike the MATCH; take the LIT MATCH (U).

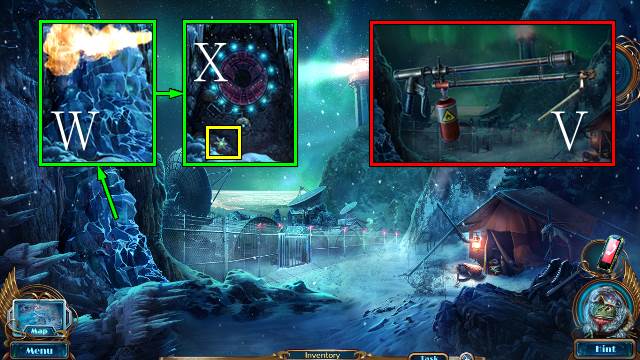
- Take the FLAMETHROWER, remove the empty canister, place the FUEL TANK and use the LIT MATCH; take the LIT FLAMETHROWER (V).
- Use the LIT FLAMETHROWER (W); take the ANCIENT SYMBOL (X).

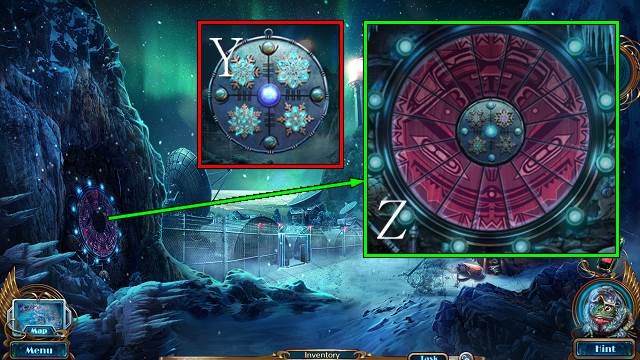
- Access the AMULET and place the four ANCIENT SYMBOLS; take the ESKIMO AMULET (Y).
- Place the ESKIMO AMULET for a mini-game (Z).
- Go left.

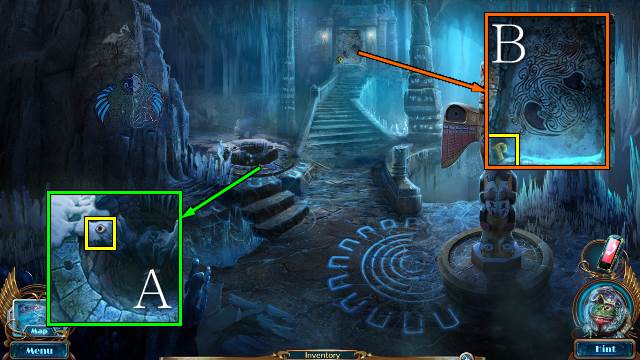
- Try to walk forward.
- Take the TOTEM’S EYE (A).
- Take the LETTER (B).
- Go to Northport.

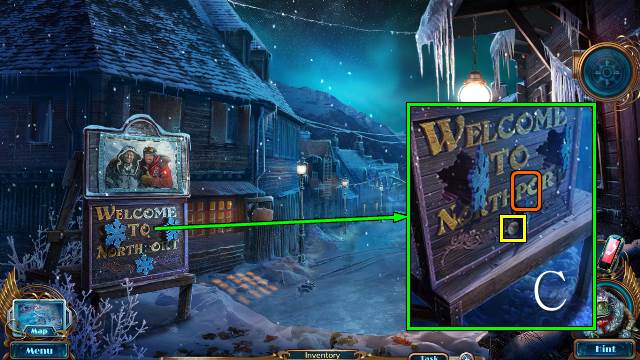
- Place the LETTER; take the PEG and DRAWER KEY (C).
- Walk forward.

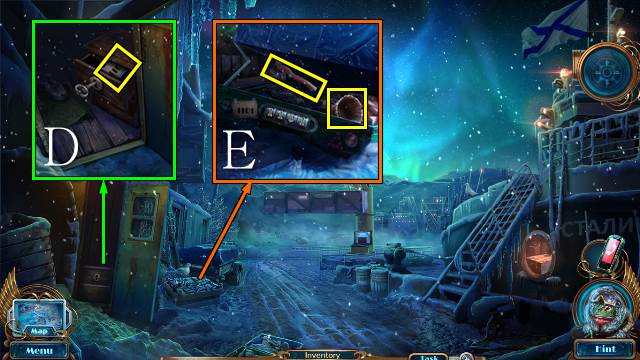
- Use the DRAWER KEY, open the drawer and take the TRAILER CODE (D).
- Place the TRAILER CODE, enter the 1101 and take the AXE and BUCKET (E).
- Go forward and left.

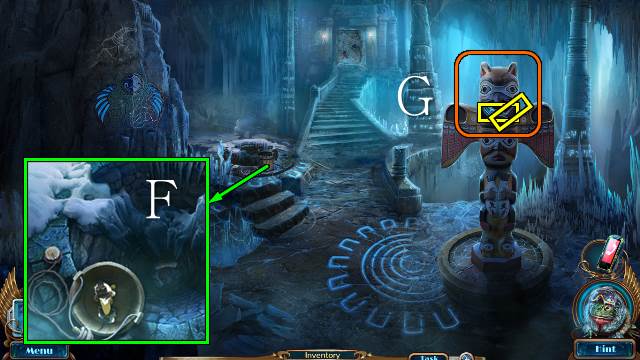
- Place the BUCKET, ROPE and PEG and attach the rope; place ELF for a HOP (F).
- You receive another TOTEM’S EYE.
- Place the two TOTEM’S EYES; take the GATE ELEMENT and CHARCOAL (G).

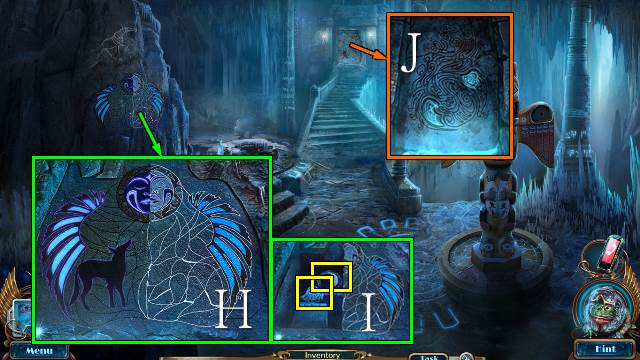
- Place the CHARCOAL for a mini-game (H).
- Take the GATE ELEMENT and MOON (I).
- Place the two GATE ELEMENTS (J).
- Walk forward.

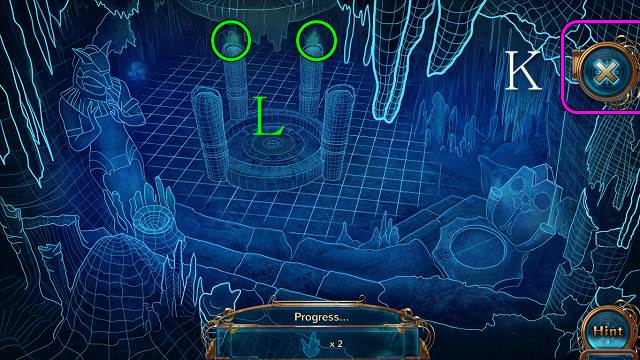
- Select the Visor (K); find the ice crystals (L).

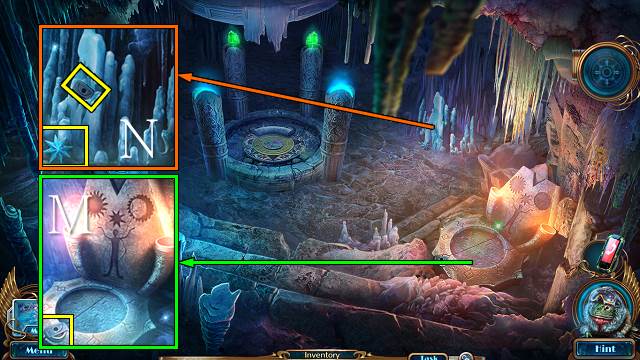
- Take the TOTEM’S EYE (M).
- Use the AXE and take the TOTEM’S EYE and STAR (N).
- Walk down.

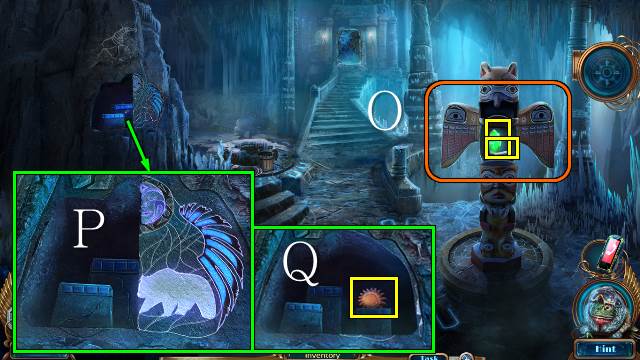
- Place the two TOTEM’S EYES and take the TELEPORT CRYSTAL and CHALK PIECE (O).
- Place the CHALK PIECE for a mini-game (P).
- Take the SUN (Q).
- Walk forward.

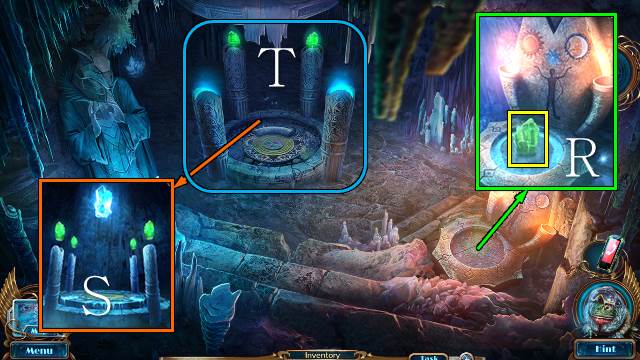
- Place the SUN, MOON and STAR; take the TELEPORT CRYSTAL (R).
- Place the two TELEPORT CRYSTALS (S).
- Zoom into the portal for a mini-game (T).

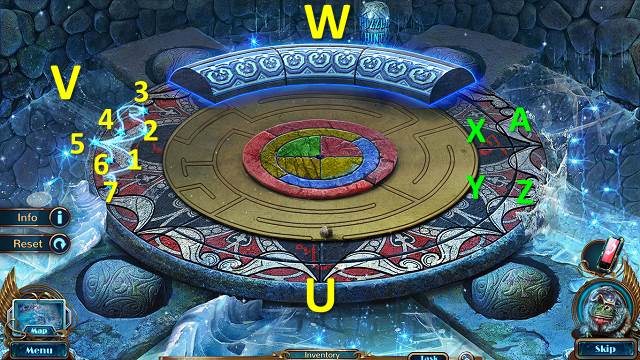
- Complete the mosaic (U).
- Connect the stars (V).
- Complete the pattern (W).
- Select X, Y, Z, A.

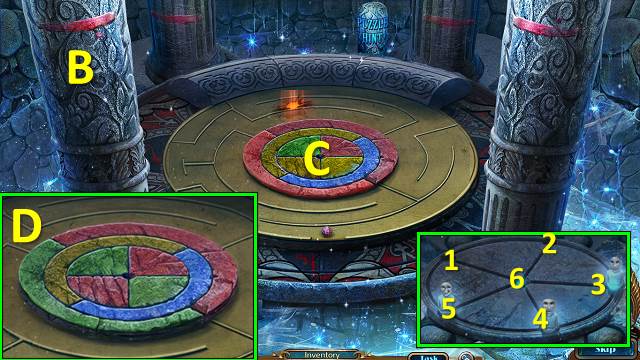
- Make a continuous red line (B).
- Guide the ball to the holes (C).
- Change the colors (D).
- Move 6-4, 2-6-5, 1-6-3.
Chapter 5: The Cold Stalkers’ Den

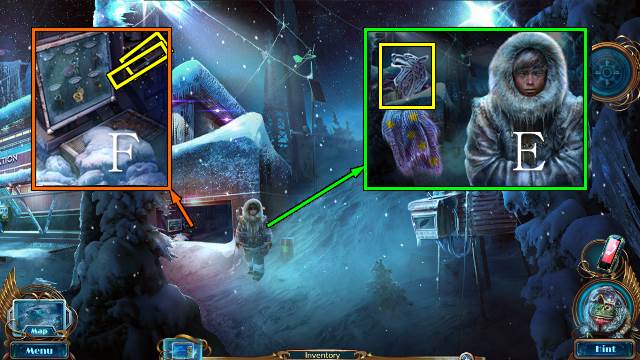
- Talk to the Apprentice; select the symbol (E).
- Take the CROWBAR and MIRROR FRAME (F).
- Scroll left and walk forward.

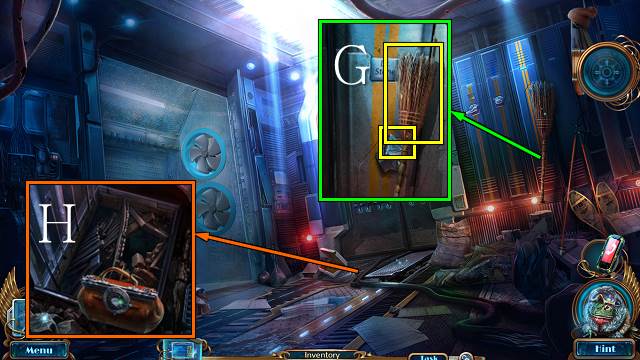
- Take the BROOM and GATE FRAGMENT 1 (G).
- Use the CROWBAR and ELF; take the BAG (H).

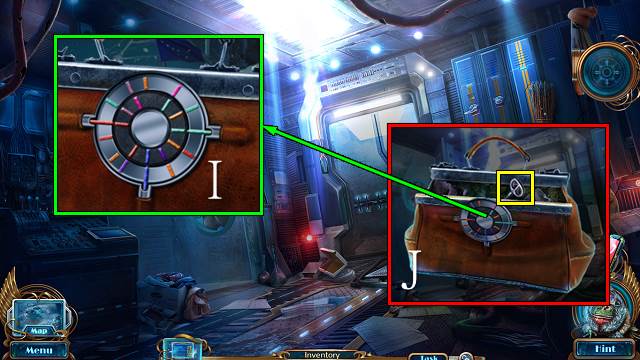
- Access the BAG for a mini-game (I).
- Take the CHEST KEY (J).
- Walk down.

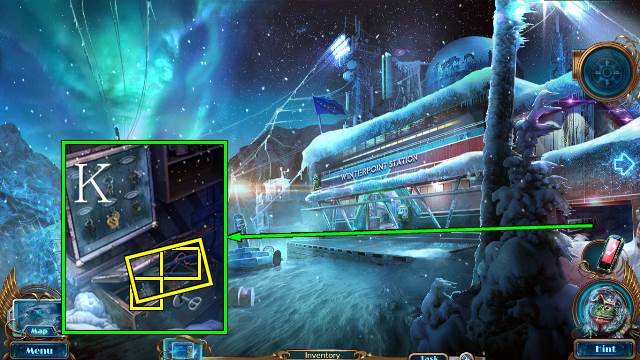
- Use the BROOM and CHEST KEY; take the PLIERS, LIGHTER and PAPER CLIP (K).
- Go forward.

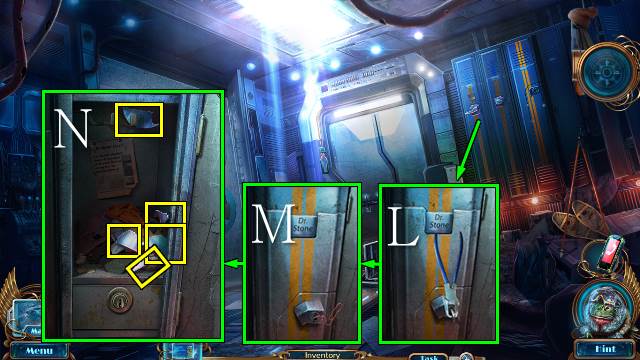
- Use the PLIERS (L) and PAPER CLIP (M); take the five MIRROR SHARDS with the CLOTH (N).
- Walk down.

- Access the MIRROR FRAME, place the MIRROR SHARDS and take the MIRROR (O).
- Place the MIRROR and use the LIGHTER (P).
- Go left.

- Interact with the Cold Stalker (Q).
- Take the COIN (R).
- Move and take GATE FRAGMENT 2 (S).
- Walk down.

- Use the COIN and take the LOCKER KEY (T).
- Go forward.

- Use the LOCKER KEY (U); take the GUN, SCISSORS and HAMMER (V).
- Go down and left.

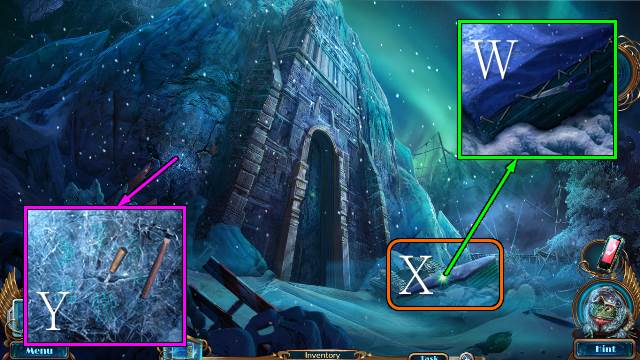
- Use the SCISSORS (W).
- Play the HOP (X).
- You receive the CHISEL.
- Place the CHISEL and HAMMER for a mini-game (Y).

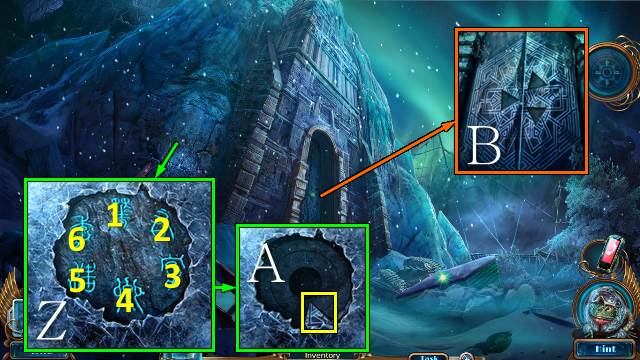
- Solution: 4-1-3-5-2-6 (Z).
- Take GATE FRAGMENT 3 (A).
- Place the three GATE FRAGMENTS (B).
- Go forward.

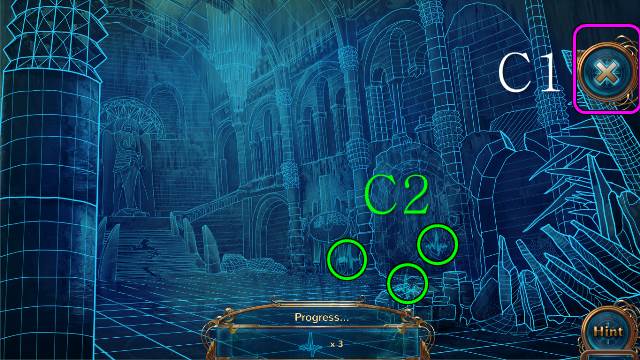
- Try to walk forward.
- Select the Visor (C1); find the heartbeats (C2).

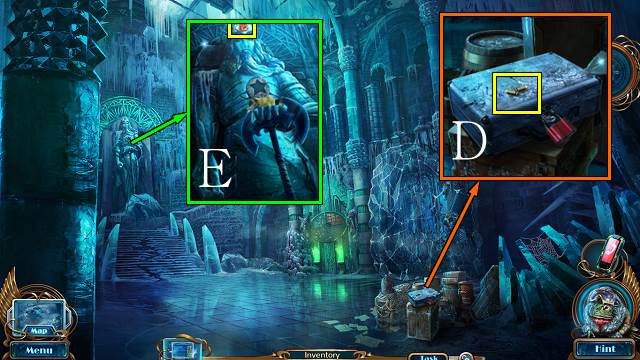
- Take the CARTRIDGES (D).
- Send ELF to get the CHARM (E).

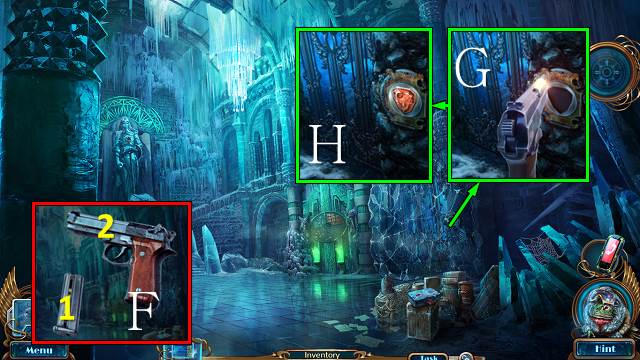
- Access the GUN, place the CARTRIDGES in the magazine (1), place the magazine, pull the barrel slide (2) and take the LOADED GUN (F).
- Use the LOADED GUN (G); place the CHARM and turn it for a mini-game (H).

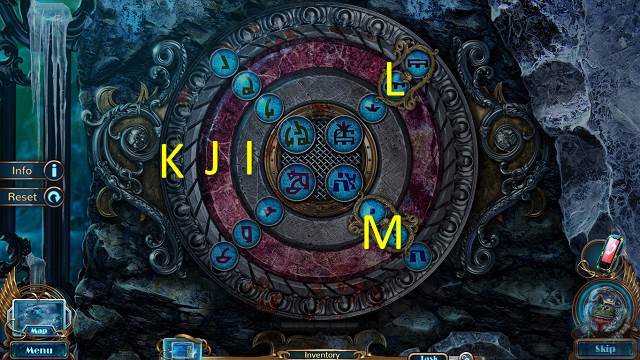
- Solution: I2-M-J2-L-J3-L-J-K3-L-K-L-K3.
- Go forward.

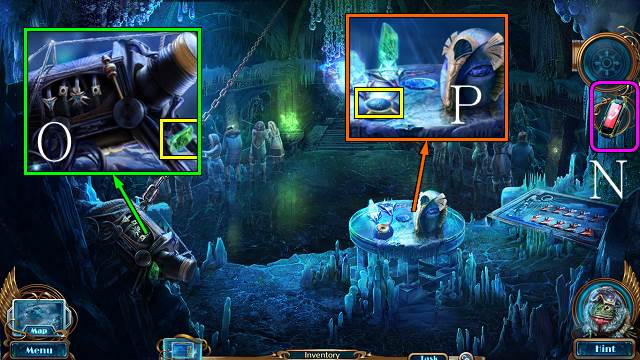
- Try to walk forward.
- Answer your phone (N).
- Take the CRYSTAL (O).
- Place the CRYSTAL and take the GLYPH (P).
- Walk down twice.

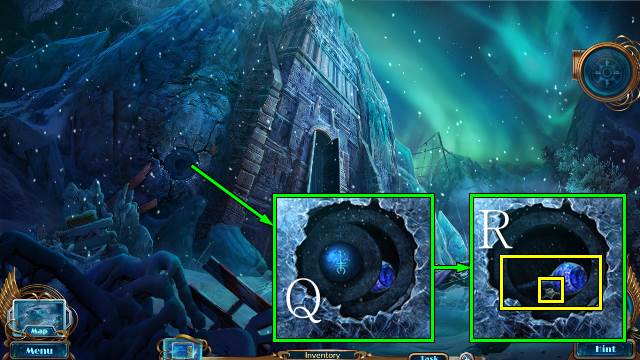
- Place the GLYPH (Q); take the SCEPTER and HOIST PART 1 (R).
- Walk forward.

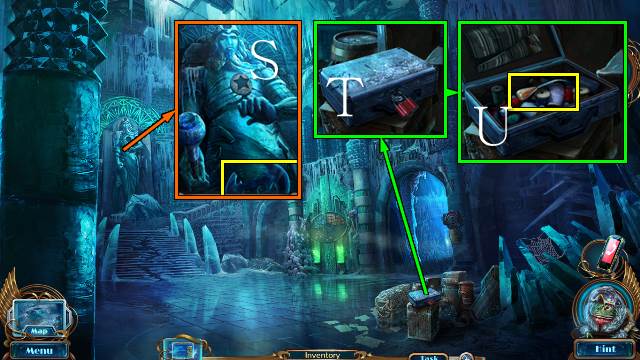
- Place the SCEPTER and take the AXE (S).
- Use the AXE (T); take the AWL (U).
- Walk forward.

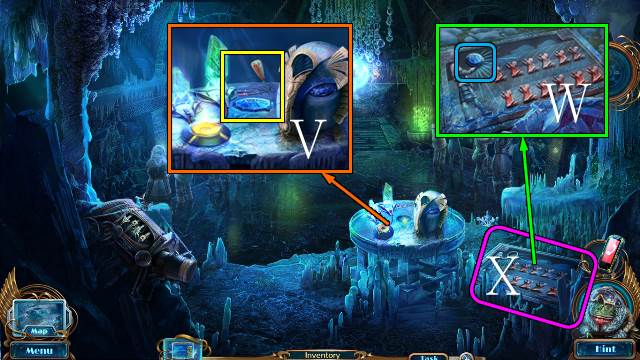
- Use the AWL and take the STALKER’S AMULET (V).
- Place the STALKER’S AMULET (W).
- Play the HOP (X).
- You receive HOIST PART 2.

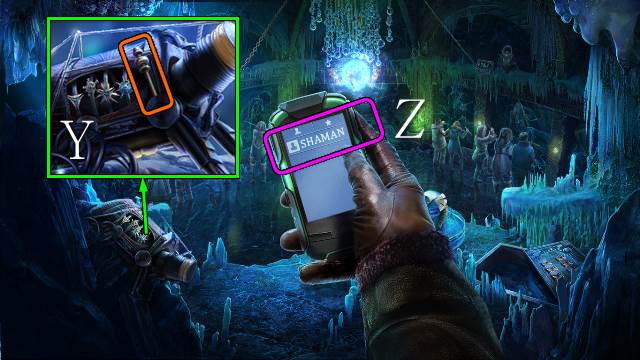
- Place HOIST PARTS 1 and 2 (Y).
- Call the Shaman (Z).
- Pull the lever (Y).

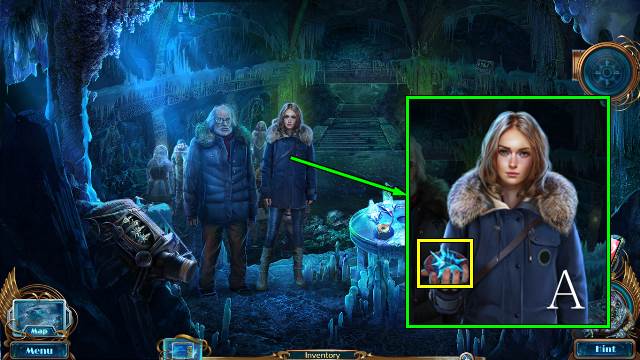
- Talk to Agent Shade; take the ICE GATE KEY (A).
- Walk down.

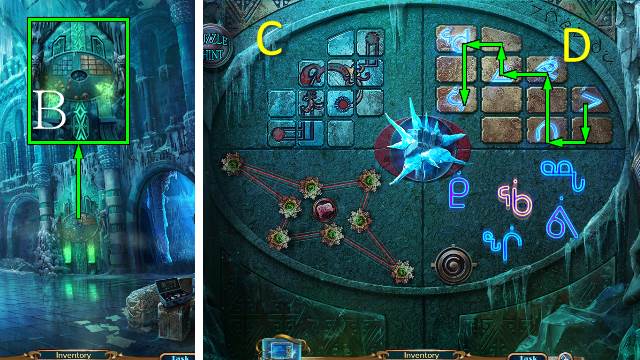
- Place the ICE GATE KEY for a mini-game (B).
- Complete the mosaic (C).
- Follow the arrows (D).

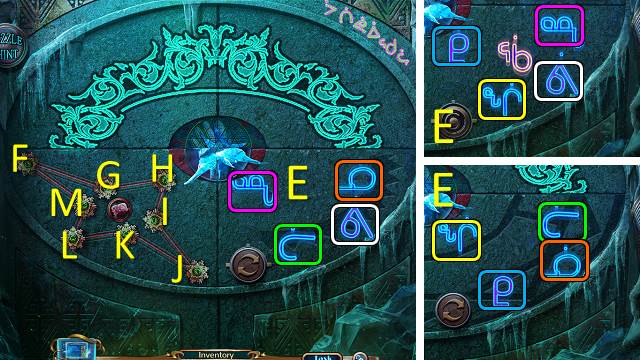
- Find the matching pairs (E).
- Turn: F-G2-H2-I-J2-K2-L2-M2.

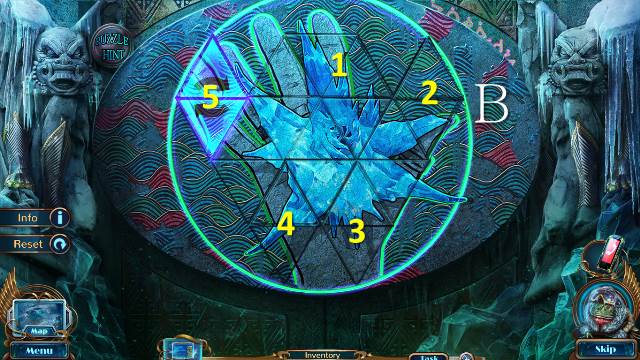
- Solution (B).
- Go to the Shore.
Chapter 6: The Cold Stalker

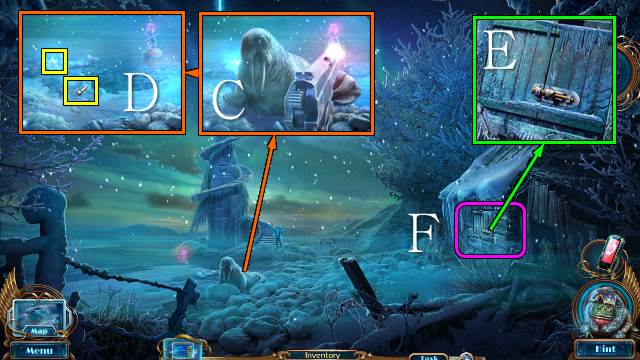
- Try to walk forward.
- Use the LOADED GUN (C).
- Use ELF and take the WARRIOR’S TALISMAN and LATCH HANDLE (D).
- Place the LATCH HANDLE and open the latch (E).
- Play the HOP (F).
- You receive an OLD HARPOON.
- Walk down.

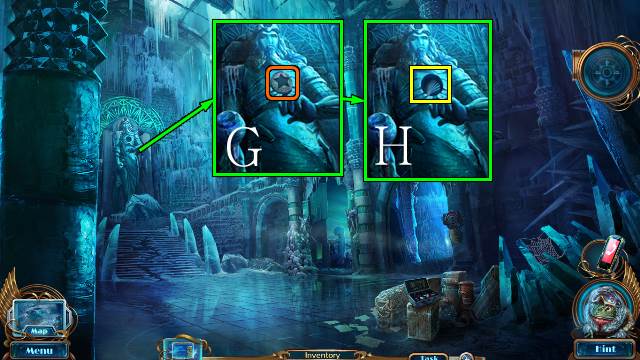
- Place the WARRIOR’S TALISMAN (G); take the WARRIOR’S AMULET (H).
- Go to the Cryonics Chamber.

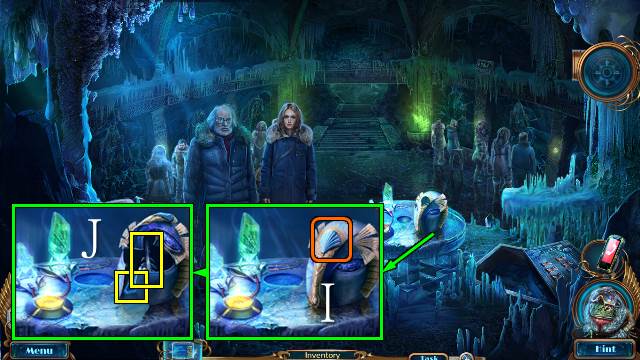
- Place the WARRIOR’S AMULET (I); take MAGICAL TIP and CLIMATE CONTROL ARTIFACT 1 (J).
- Go to the Shore.

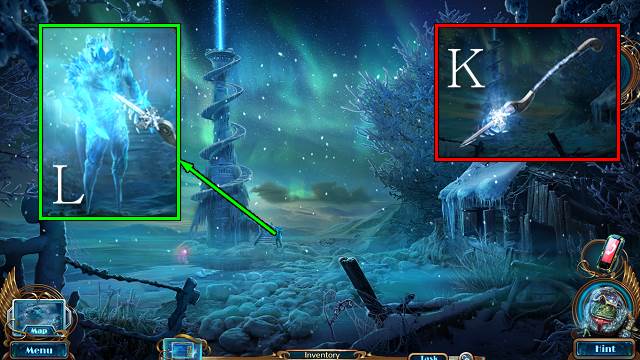
- Access the OLD HARPOON and place the MAGICAL TIP; take the ENCHANTED HARPOON (K).
- Use the ENCHANTED HARPOON (L).
- Walk forward.

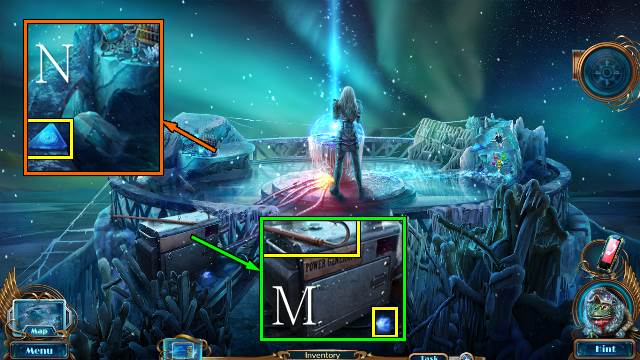
- Try to walk forward.
- Take the POLE and MAGIC SOURCE ELEMENT (M).
- Take CLIMATE CONTROL ARTIFACT #2 and release ELF (N).

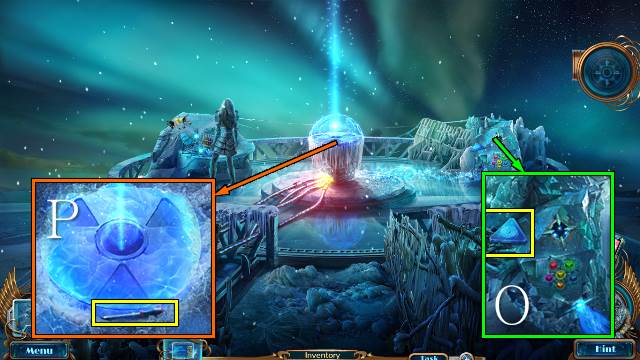
- Take CLIMATE CONTROL ARTIFACT #3 (O).
- Take the SCREWDRIVER (P).
- Walk down.

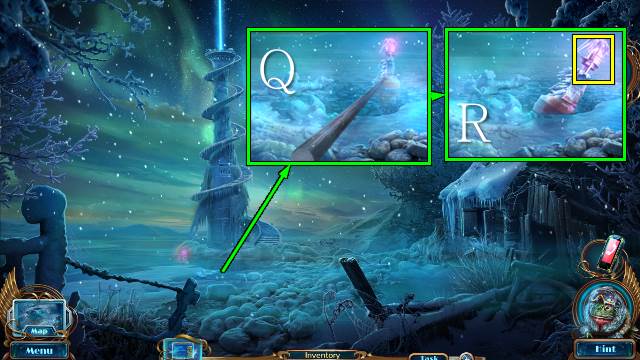
- Use the POLE (Q); use the SCREWDRIVER and take the LIT LAMP (R).
- Walk forward.

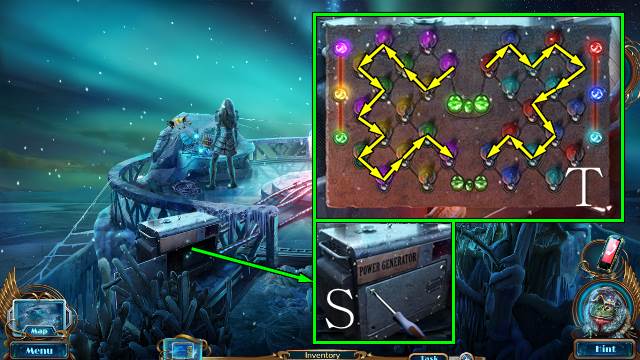
- Use the SCREWDRIVER (S); place the LIT LAMP for a mini-game (T).

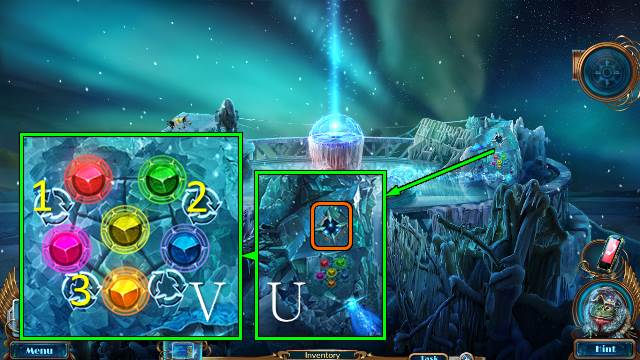
- Place the MAGIC SOURCE ELEMENT for a mini-game (U).
- Solution: 3-1-3-2 (V).

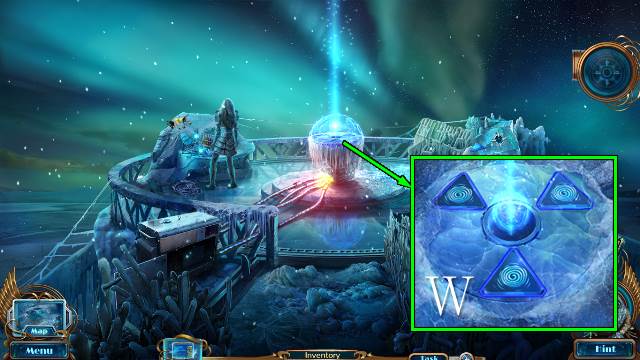
- Place the three CLIMATE CONTROL ARTIFACTS (W).
- Zoom into the Cold Stalker for a mini-game.

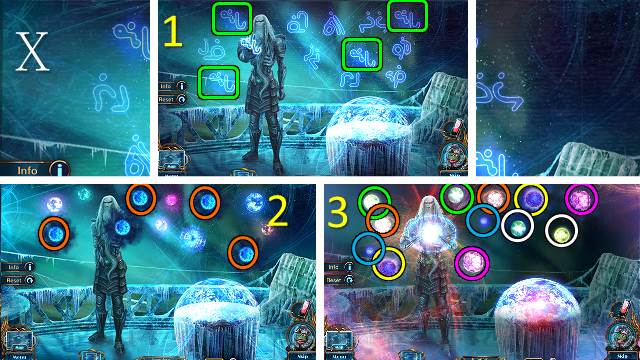
- Solutions (X).
- Congratulations, you have completed Mystery Trackers: Winterpoint Tragedy.




 Romance of Rome Walkthrough, Guide, & Tips
 Dead Reckoning: Brassfield Manor Walkthrough, Guide, & Tips
 Secrets of the Seas: Flying Dutchman Walkthrough, Guide, & Tips
 Dark Canvas: A Murder Exposed Walkthrough, Guide, & Tips
 The Mysterious Past of Gregory Phoenix Walkthrough, Guide, & Tips