Maze: Subject 360 Walkthrough, Guide, & Tips
Maze: Subject 360 Walkthrough

Welcome to the Maze: Subject 360 Walkthrough
From the makers of the Rite of Passage series comes a ground-breaking new series that’s as creepy as it gets.
Whether you use this document as a reference when things get difficult or as a road map to get you from beginning to end, we’re pretty sure you’ll find what you’re looking for here.
This document contains a complete Maze: Subject 360 game walkthrough featuring annotated screenshots from actual gameplay!
We hope you find this information useful as you play your way through the game. Use the walkthrough menu below to quickly jump to whatever stage of the game you need help with.
Remember to visit the Big Fish Games Forums if you find you need more help. Have fun!
This walkthrough was created by prpldva, and is protected under US Copyright laws. Any unauthorized use, including re-publication in whole or in part, without permission, is strictly prohibited.
General Tips
- This is the official guide for Maze: Subject 360.
- This guide will not mention each time you have to zoom into a location; the screenshots will show each zoom scene.
- Hidden-object puzzles are referred to as HOPs. This guide will not show HOP solutions. It will identify the location of the HOP and the inventory item acquired.
- This guide will show solutions for non-random puzzles. Please read the in-game instructions for each puzzle.
Chapter 1: Where Am I?

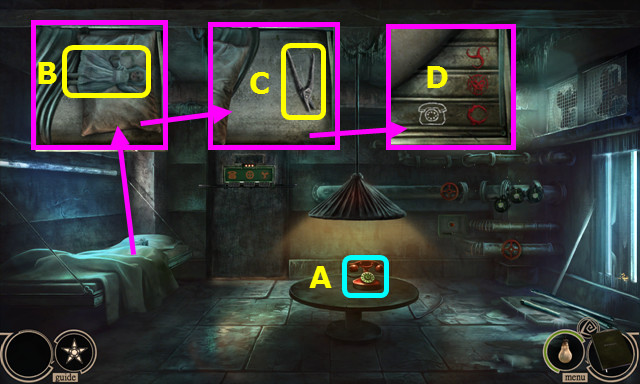
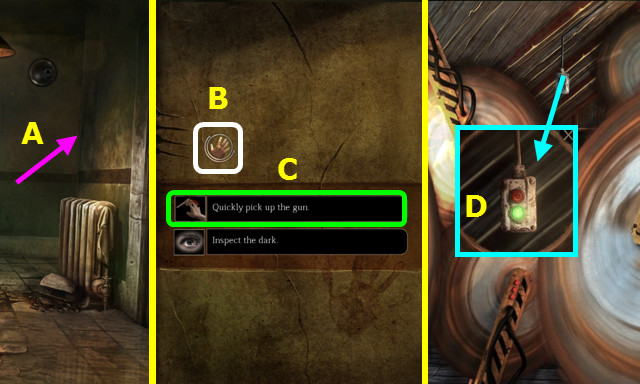
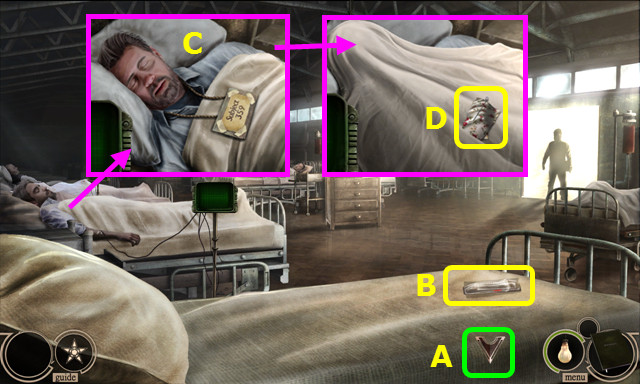
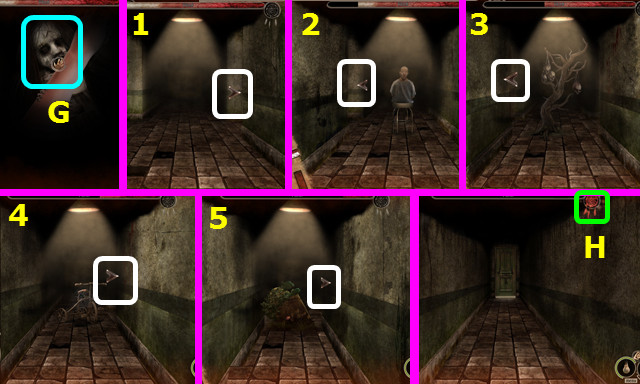
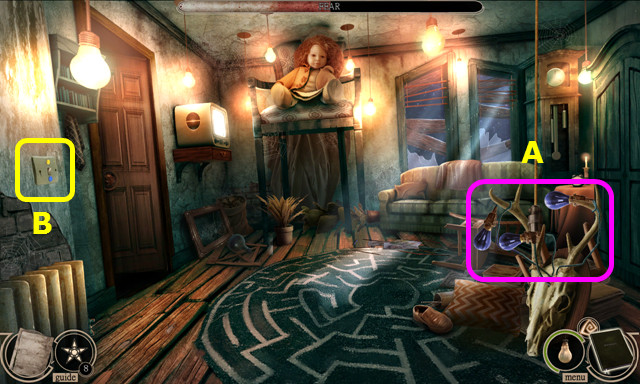
- Select (A).
- Move the blanket; take the DOLL (B).
- Move the pillow; take the WIRE CUTTERS (C).
- Move the mattress; look at the code (D).
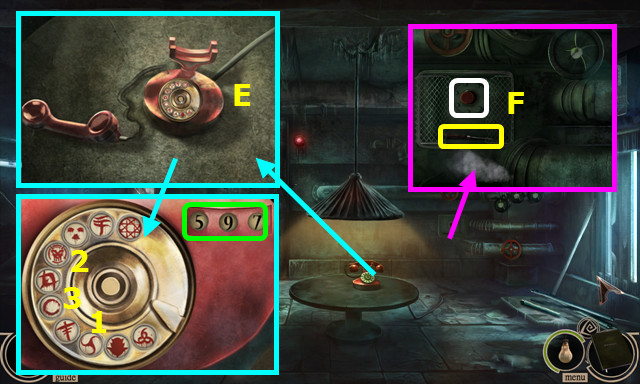
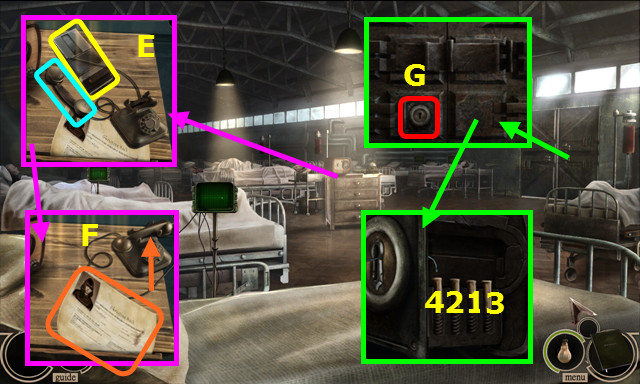
- Remove the receiver; touch the dial (E).
- Select 1-3; note the code 5-9-7.
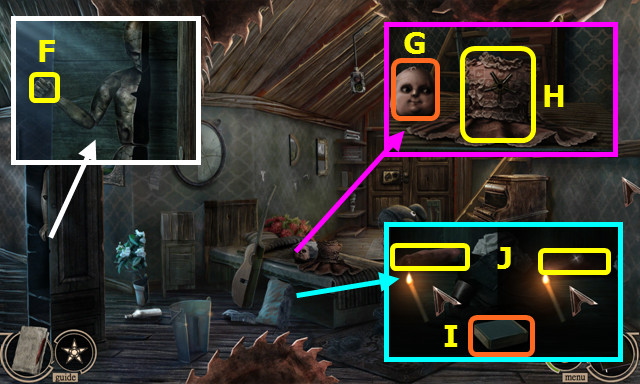
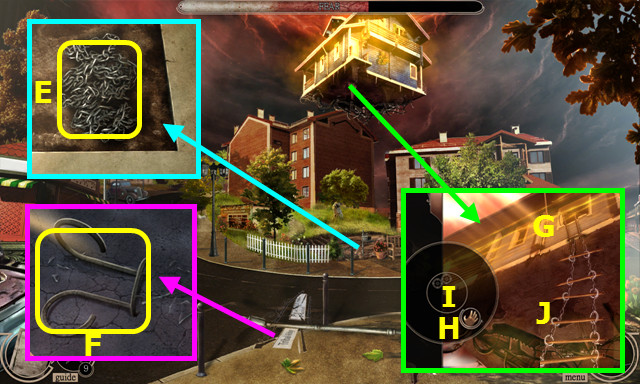
- Use the WIRE CUTTERS; take the SCREWDRIVER and push the button (F).
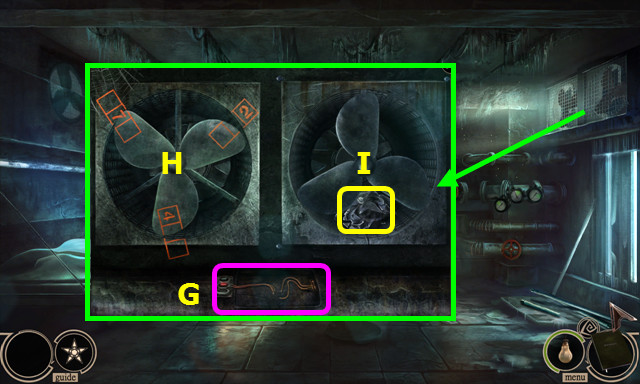
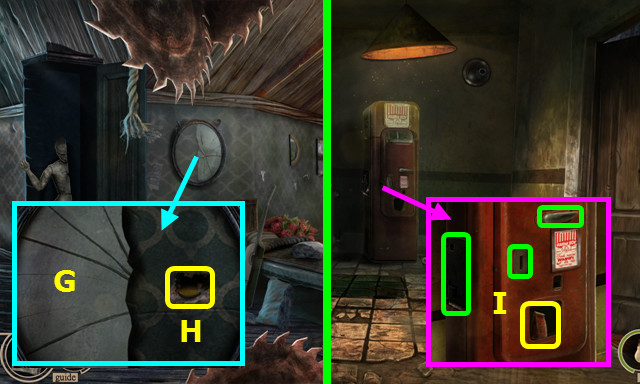
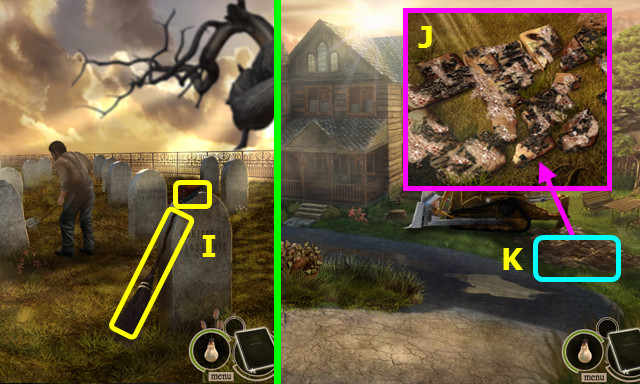
- Use the SCREWDRIVER, and then the WIRE CUTTERS (G).
- Use the SCREWDRIVER; rotate the blades as shown and note code 4-7-2 (H).
- Use the SCREWDRIVER, remove the grill, turn the blades, and take the WRINKLED PAPER (I).
- Open the WRINKLED PAPER to find the VALVE and BLANK PAPER (inventory).
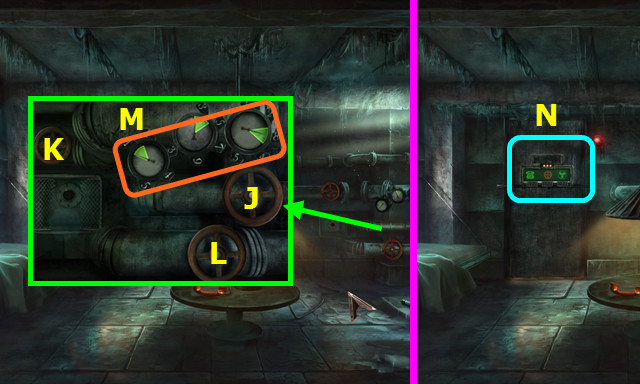
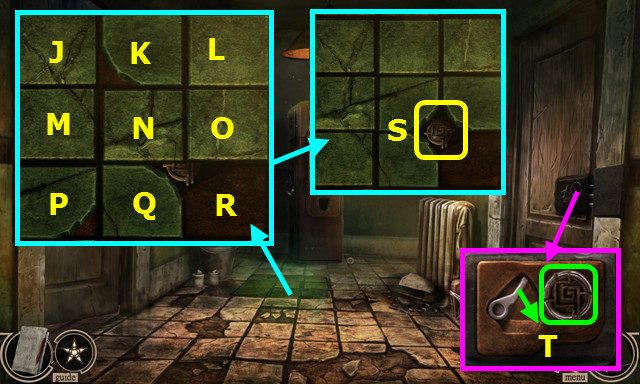
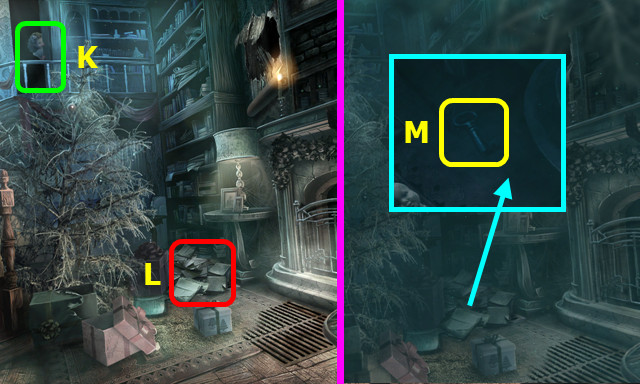
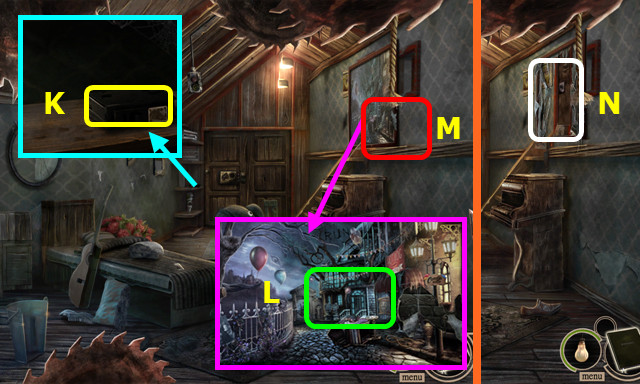
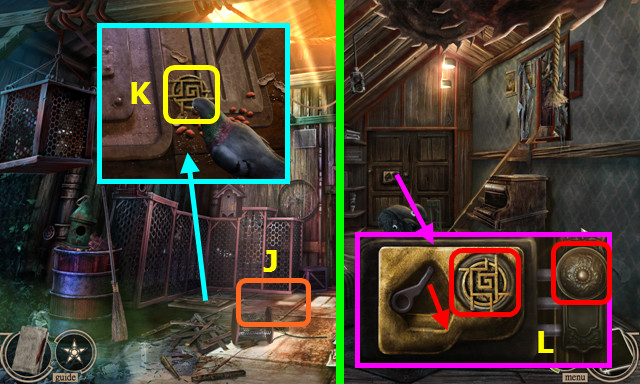
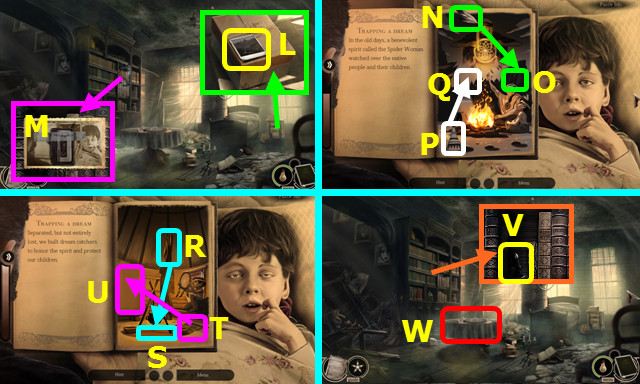
- Place the VALVE (J).
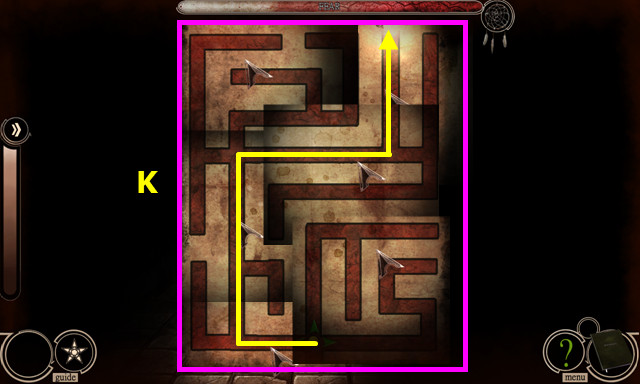
- Turn Kx6, Lx2.
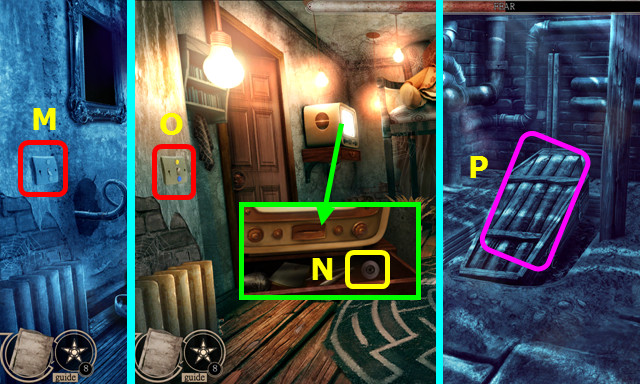
- Note code 1-3-8 (M).
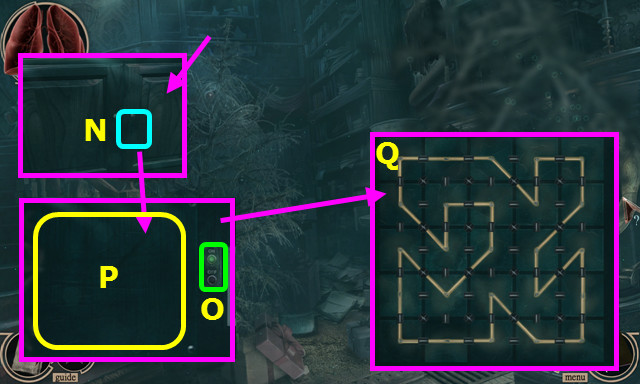
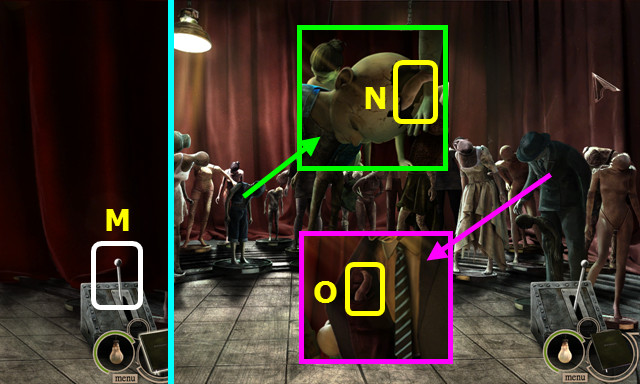
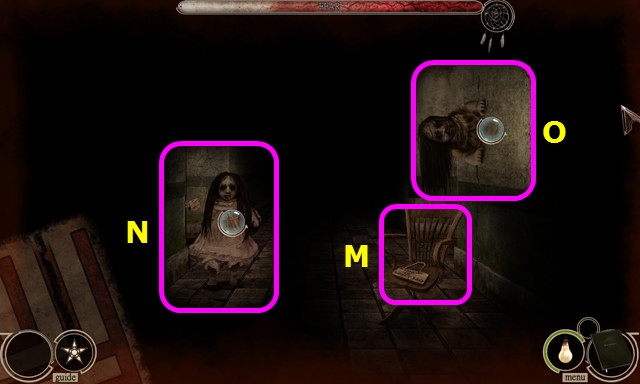
- Select (N).
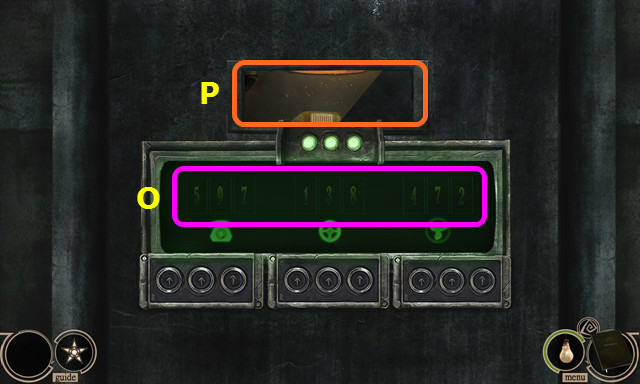
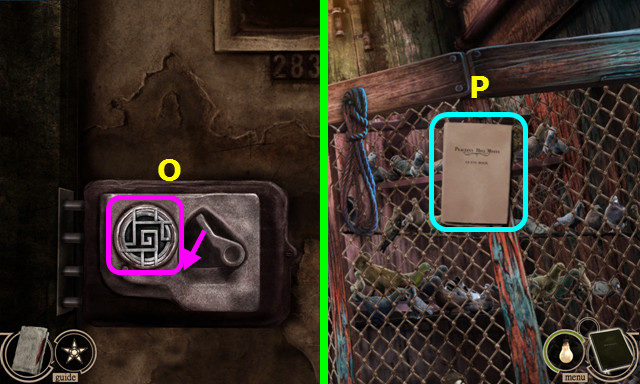
- Enter the 3 codes (O).
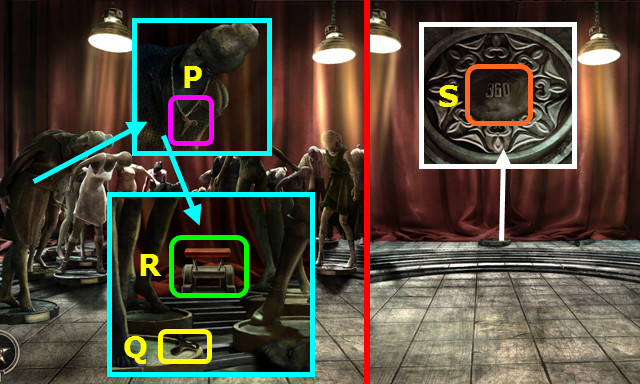
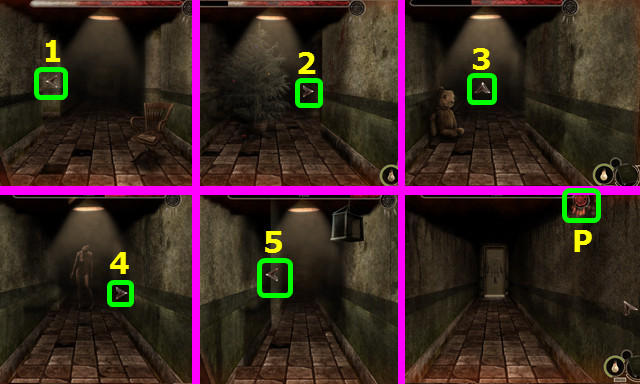
- Select the peephole (P).
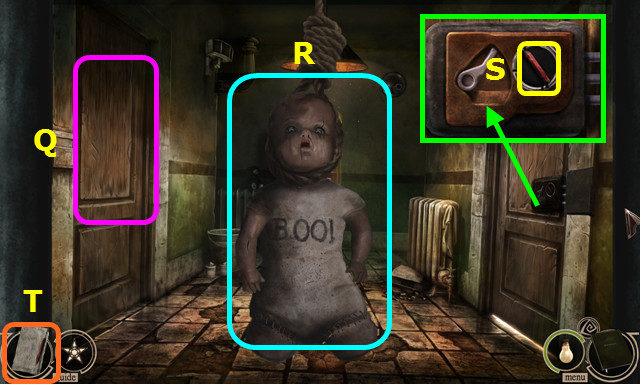
- Select the door (Q).
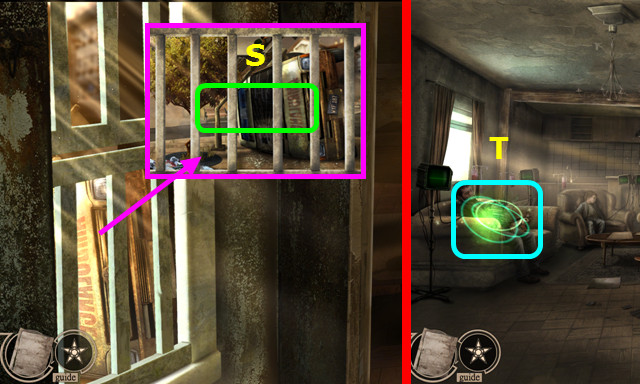
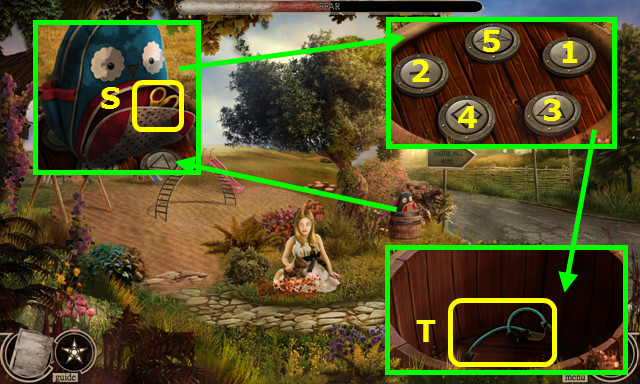
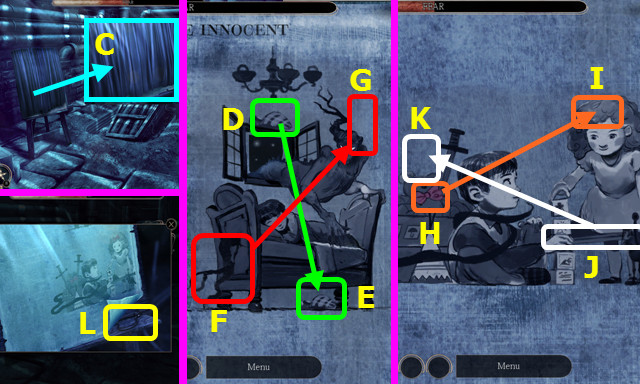
- Move the hanging doll (R).
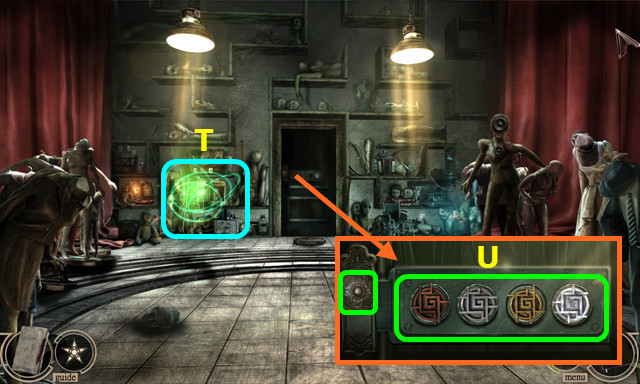
- Take the PENCIL (S).
- The BLANK PAPER and PENCIL will form the MAP (T).

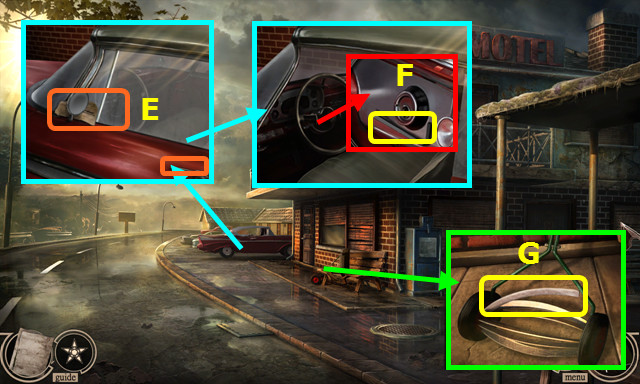
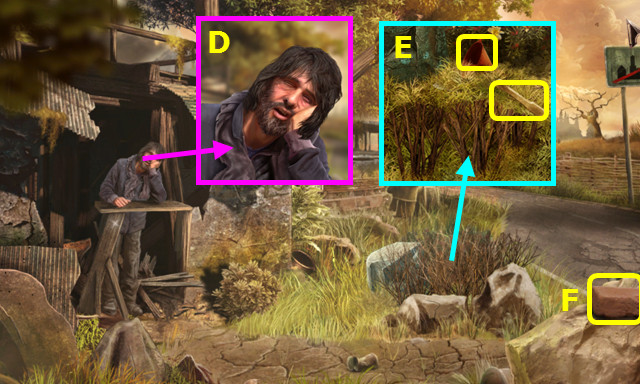
- Take the METAL TUBE (A).
- Take the BULLET CASING (B).
- Select the METAL TUBE; take the SPRING (inventory).
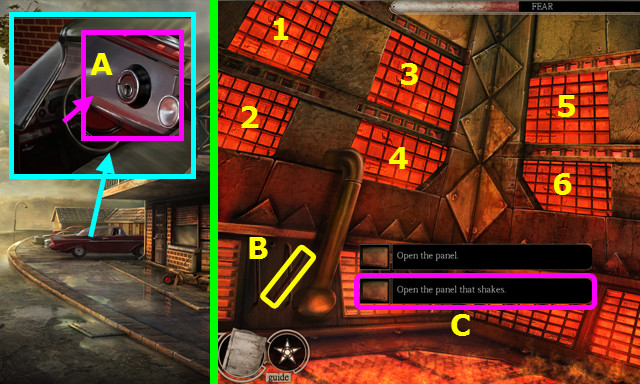
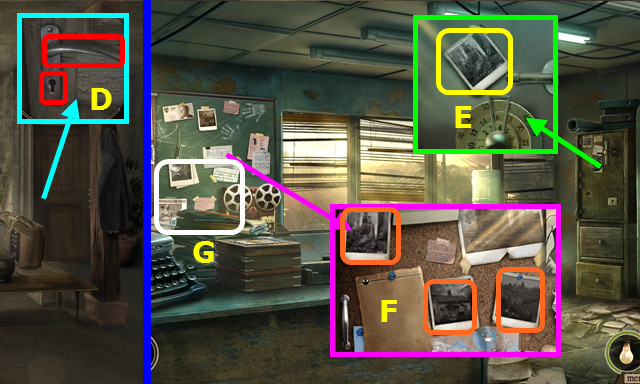
- Select and touch the car (C).
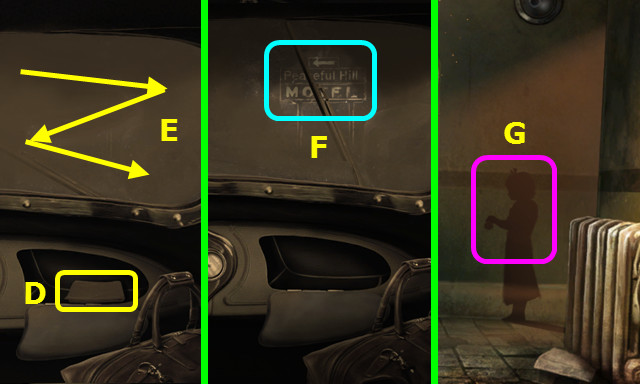
- Open the glovebox, take the rag (D), and drag it on the windshield (E).
- Select (F).
- Select (G).
- Walk to the left.
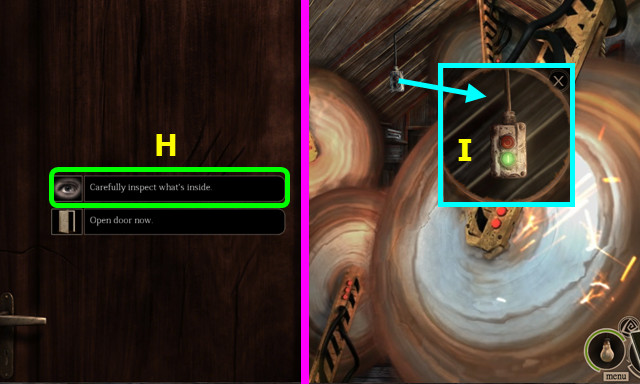
- Select the door; select (H).
- Select the scene; look at the control box (I).
- Walk down.
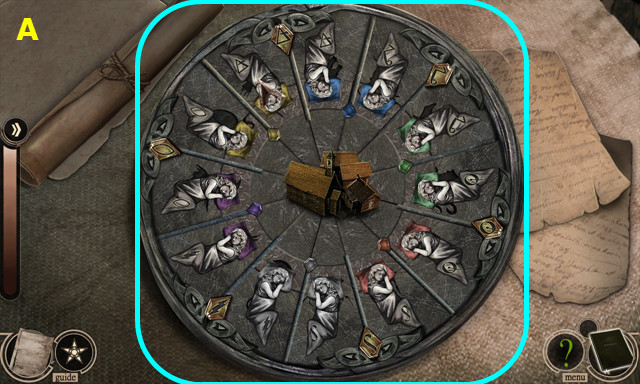
- Select Q-P-M-N-K-L-O-N-Q-R.
- Take the BRONZE TOKEN (S).
- Place the BRONZE TOKEN: turn the lever (T).
- Walk right.
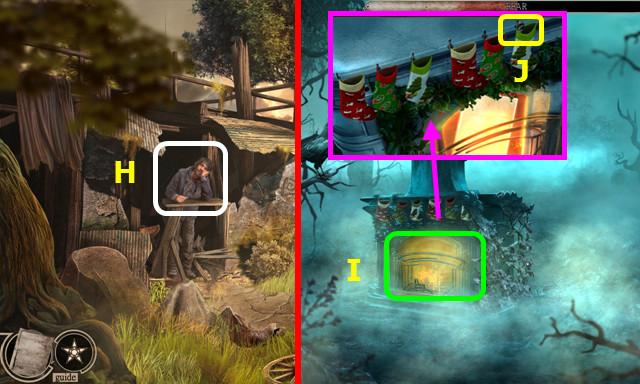
- Select the door; select (A).
- Select the Christmas tree (B).
- Move the lid; take the 1/2 CERAMIC FIGURINES (C).
- Move 2 gifts; take the RED PRESENT (D).
- Select the tree skirt (E).
- Play the HOP; earn the GREEN PRESENT (F).
- Open the GREEN PRESENT; take the 2/2 CERAMIC FIGURINE (inventory).
- Take the SCALPEL and BOX OF FIREWORKS (G).
- Open the BOX OF FIREWORKS; touch the 2 firecrackers and take the GUNPOWDER (inventory).
- Combine the RED PRESENT and SCALPEL; take the RUBBER PELLET (inventory).
- Combine the BULLET CASING, GUNPOWDER, and RUBBER PELLET to make the BULLET (inventory).
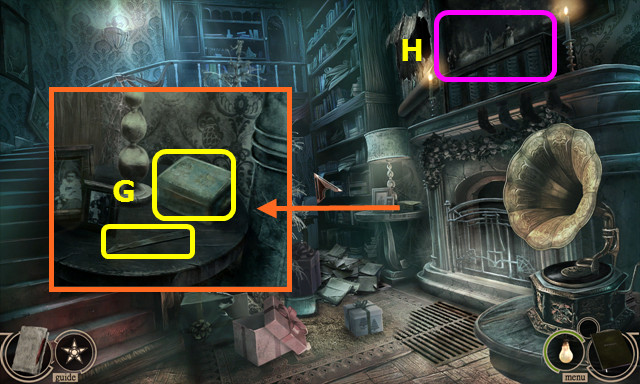
- Select (H).
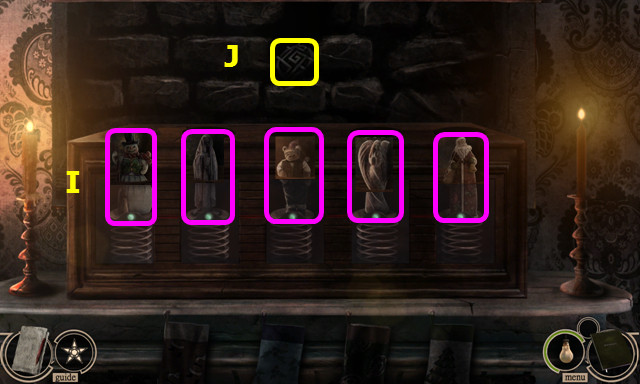
- Place the 2 CERAMIC FIGURINES; swap as shown (I).
- Take the SILVER TOKEN (J).
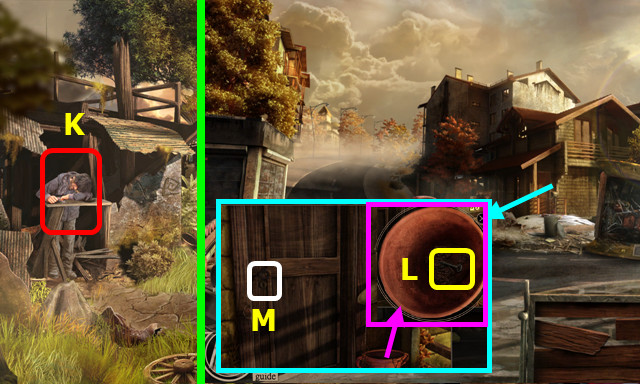
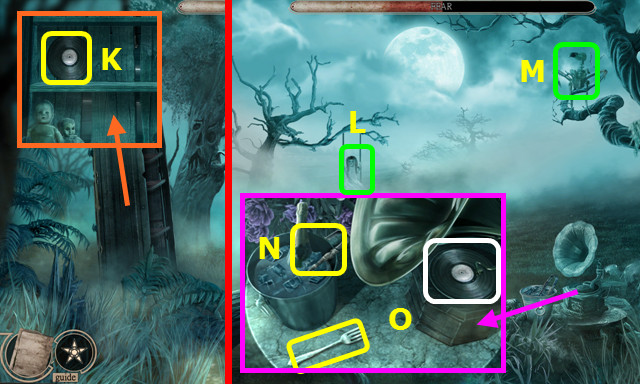
- Select (K).
- Select (L).
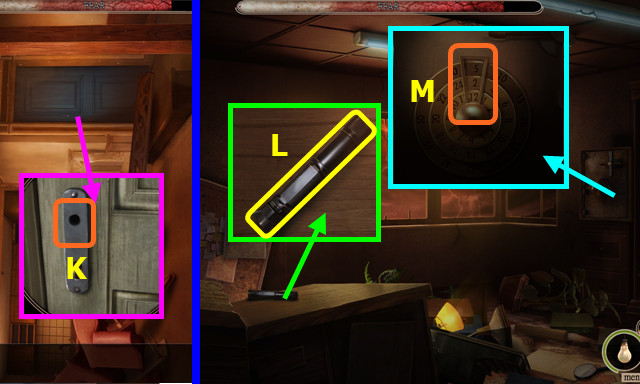
- Take the CABINET KEY (M).
- Use the CABINET KEY; open the door (N).
- Zoom in and press the button (O).
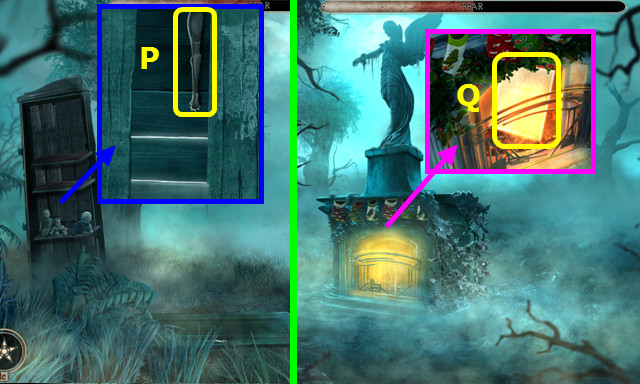
- Use the SCREWDRIVER; remove the panel (P).
- Solution (Q).
- Walk down.
- Select the Right Hallway (A).
- Select the wall (B).
- Select (C).
- Combine the REVOLVER and BULLET to make the REVOLVER (inventory).
- Walk down and left.
- Use the REVOLVER (D).
- Select the door; take the MATCHES (F).
- Select (G); take the MECHANICAL DOLL (H).
- Place the MATCHES; select a match (I).
- Move the items; take the RIGHT MECHANICAL DOLL ARM and the LEFT MECHANICAL DOLL ARM (J).
- Take additional matches as needed.
- Take the POWER UNIT (K).
- Touch the painting 2x; use the SCALPEL (L).
- Play the HOP; earn the DIAMOND TOKEN HALF (M).
- Select (N); walk right.
- Place the SILVER TOKEN; pull the lever (O).
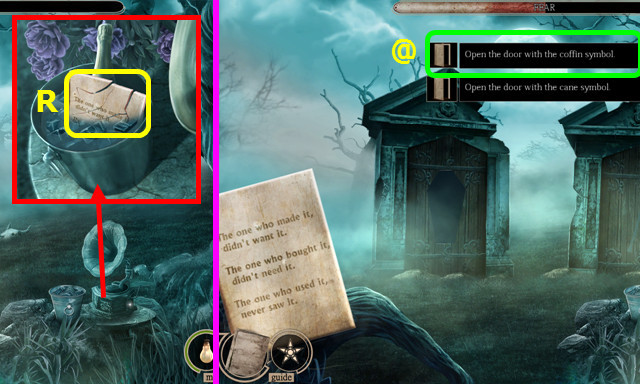
- Select and read the guest book (P).
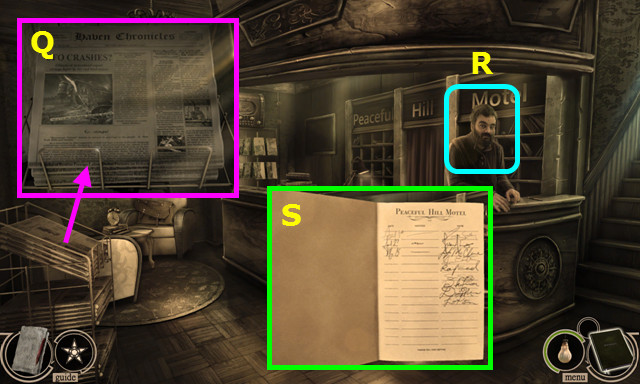
- Look at the newspaper (Q).
- Talk to Tom (R).
- Sign the guest book (S).
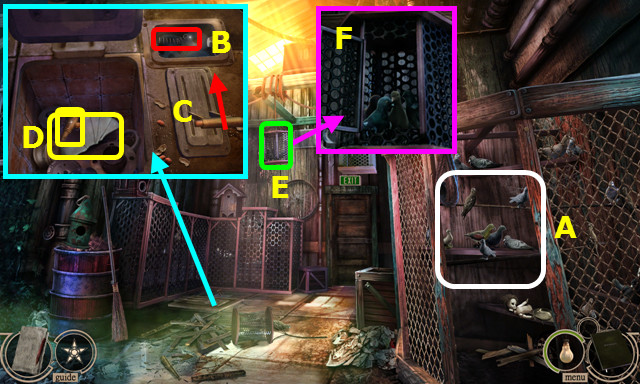
- Use the WIRE CUTTERS; play the HOP to earn the NUMBER-ENGRAVED PLATE (A).
- Remove the old spring; place the SPRING (B).
- Flip the lever (C).
- Move the items; take the MIRROR HALF and PIGEON WHISTLE (D).
- Use the PIGEON WHISTLE (E).
- Open the cage (F).
- Walk down.
- Place and select the MIRROR HALF (G).
- Take the COIN (H).
- Walk down.
- Place the POWER UNIT and COIN; pull the lever and take the BAG OF PEANUTS (I).
- Go left and right.
- Use the BAG OF PEANUTS (J); take the GOLD TOKEN (K).
- Walk down.
- Place the GOLD TOKEN, switch the lever, and turn the knob (L).
- Go forward.
- Pull the lever (M).
- Remove the hat; take the LEFT MECHANICAL DOLL LEG (N).
- Open the jacket; take the RIGHT MECHANICAL DOLL LEG (O).
- Touch the chain (P); take the WINDING KEY (Q).
- Combine the MECHANICAL DOLL, LEFT MECHANICAL DOLL LEG, RIGHT MECHANICAL DOLL LEG, RIGHT MECHANICAL DOLL ARM, LEFT MECHANICAL DOLL ARM, and WINDING KEY to make the WIND-UP DOLL (inventory).
- Use the WIND-UP DOLL (R).
- Place the NUMBER-ENGRAVED PLATE (S).
- Play the HOP; earn the PART OF DIAMOND TOKEN (T).
- Combine the DIAMOND TOKEN HALF and PART OF DIAMOND TOKEN to make the DIAMOND TOKEN (inventory).
- Place the BRONZE TOKEN, SILVER TOKEN, GOLD TOKEN, and DIAMOND TOKEN; turn the knob (U).
- Go forward.
Chapter 2: Into the Maze
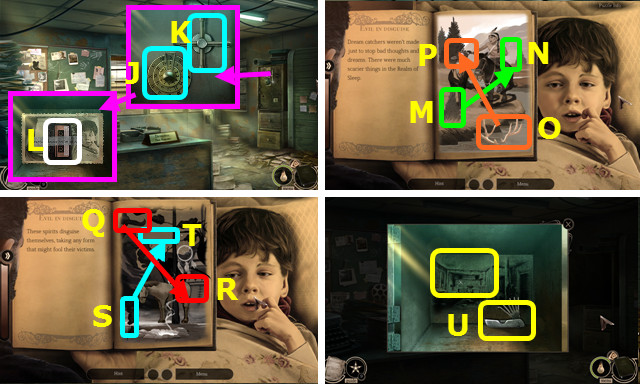
- Try to walk down (A).
- Select (B).
- Select (C).
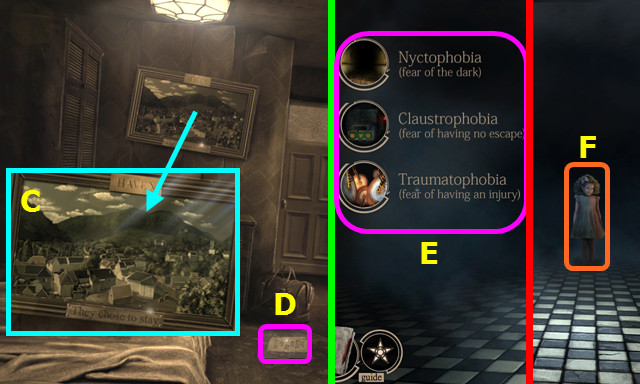
- Read the note (D).
- Turn right.
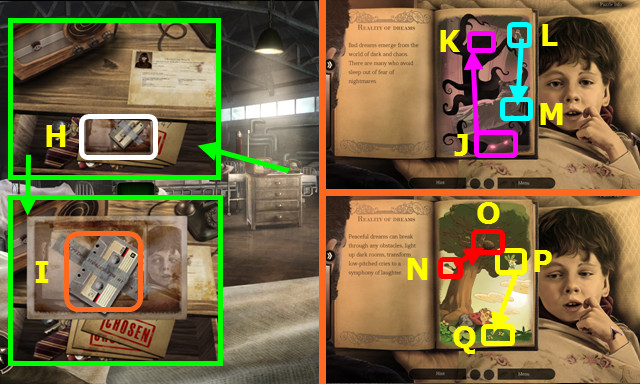
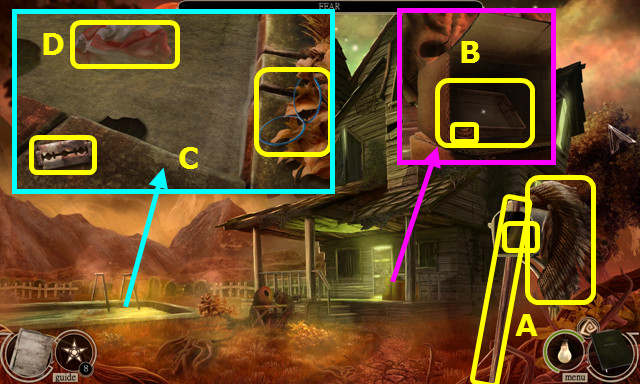
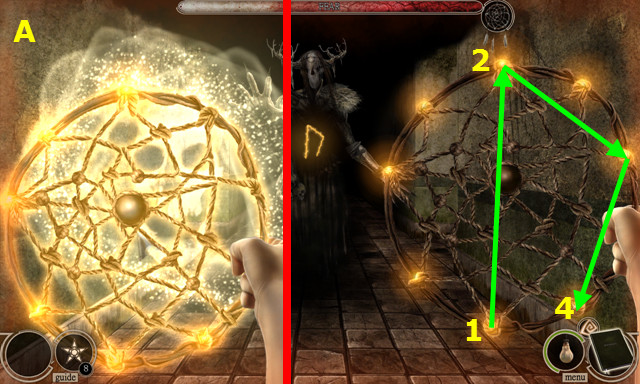
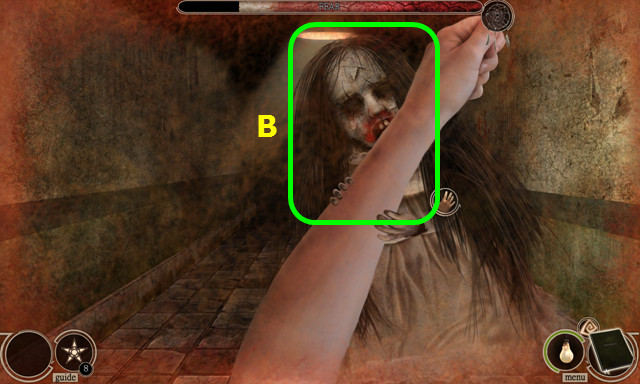
- Select a fear (E).
- Give the DOLL (F).
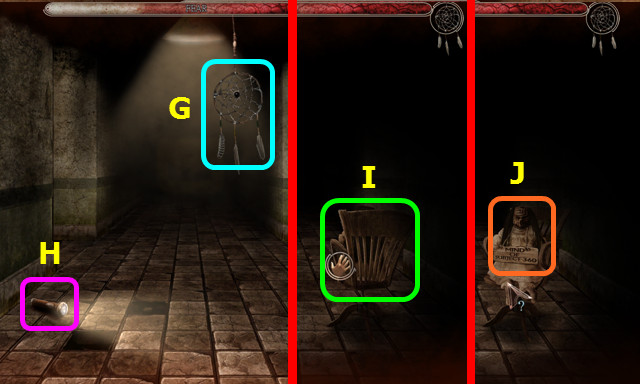
- Select the dreamcatcher (G).
- Select the flashlight (H).
- Select the chair (I).
- Select (J).
- Solution (K).
- Select the map.
- Look at the chair (M).
- Select (N).
- Select (O).
- Go left-right-forward-right-left (1-5).
- Select (P).
- Go forward.
- Duck down (A).
- Take the SYRINGE (B).
- Touch the man 3x (C).
- Pull up the blanket; take the HANDKERCHIEF (D).
- Take the HAIRPIN from the HANDKERCHIEF (inventory).
- Bend the HAIRPIN 2x to make the IMPROVISED LOCKPICK (inventory).
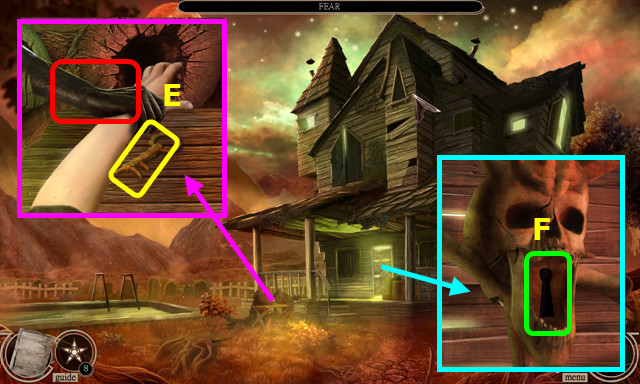
- Select the receiver; take the DICTAPHONE (E).
- Move the phone; pull and read the record (F).
- Use the IMPROVISED LOCKPICK (G).
- Select 1-4.
- Walk forward.

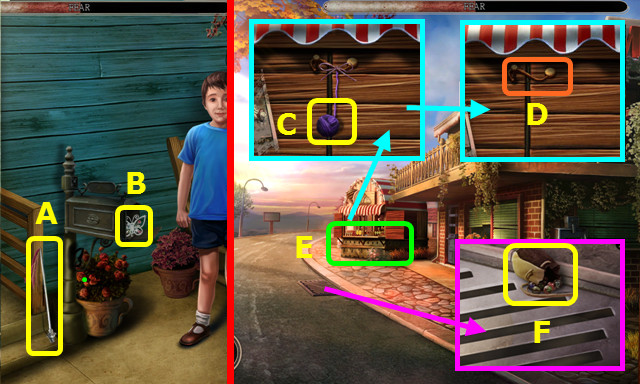
- Take the MAP (A).
- Go forward.
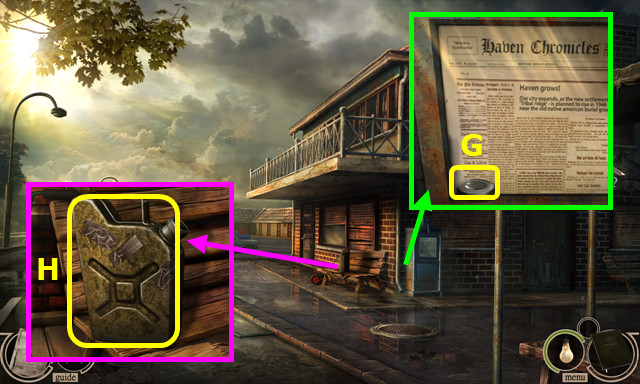
- Read the newspaper (B).
- Open the mailbox; pull and take the MAIL (C).
- Sort and open the MAIL; take the 1/3 INVESTIGATION CLUE (inventory).
- Walk right.
- Read the clipping; open the door (E).
- Take the ALLEN WRENCH (F).
- Take the MOWER BLADE (G).
- Walk down 2x.
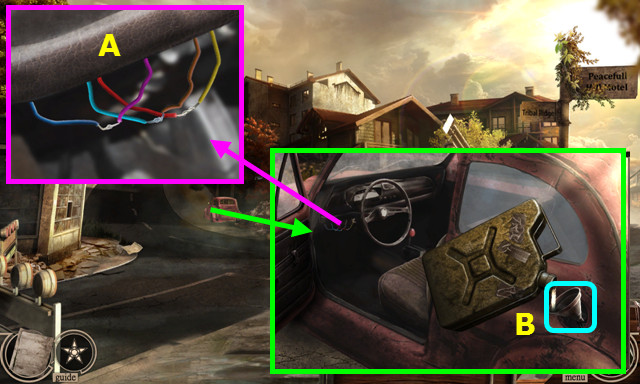
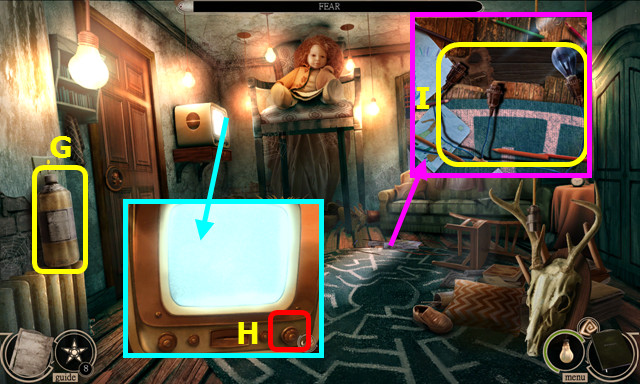
- Use the ALLEN WRENCH; select (H).
- Use the DICTAPHONE (I).
- Move J-K, L-M, N-O, P-Q.

- Select (R); take the 1/2 SLEEPER FIGURINE (S).
- Move the 3 folders; take the NECKTIE (T).
- Move the last folder; take the PILE OF KEYS (U).
- Combine the MOWER BLADE and NECKTIE to make the IMPROVISED MACHETE (inventory).
- Sort the PILE OF KEYS; take the CAR KEYS (inventory).
- Go forward and right.
- Use the CAR KEYS (A).
- Take the crowbar (B).
- Select 1-6.
- Select (C).
- Talk to Howard; slap him 2x (D).
- Use the IMPROVISED MACHETE 3x; take the DOOR HANDLE and FUNNEL (E).
- Take the BRICK (F).
- Walk down.
- Drag the HANDKERCHIEF to clean the glass; use the BRICK and take the DUCT TAPE (G).
- Use the DUCT TAPE; take the GAS CANISTER (H).
- Walk down.

- Use the DOOR HANDLE (I).
- Play the HOP; earn the ADRENALINE BOTTLE (J).
- Combine the SYRINGE and ADRENALINE BOTTLE to make the ADRENALINE SYRINGE (inventory).
- Go right and forward.
- Use the ADRENALINE SYRINGE (K).
- Walk down 2x.
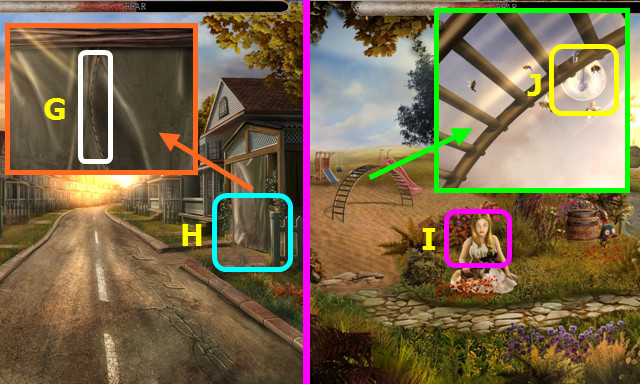
- Move the plant; take the DETECTIVE’S HOUSE KEY (L).
- Use the DETECTIVE’S HOUSE KEY and open the door (M).
- Walk forward.
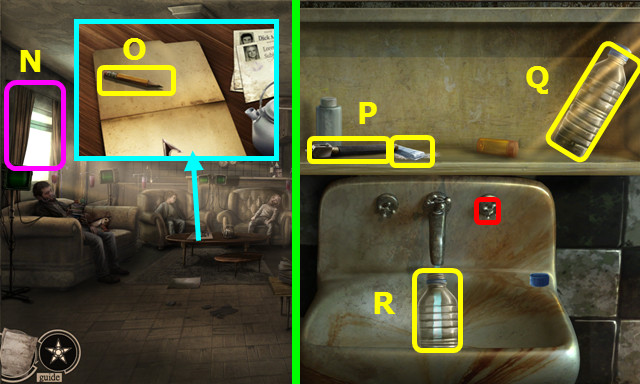
- Open the curtains (N).
- Go through the file; take the PENCIL (O).
- Walk right.
- Open both doors; take the BROKEN GLASS CUTTER and DRY ICE (P).
- Move the items; take the EMPTY BOTTLE (Q).
- Place the EMPTY BOTTLE, turn on the tap, and take the BOTTLE OF WATER (R).
- Combine the BOTTLE OF WATER and DRY ICE to make the DRY ICE BOMB (inventory).
- Use the DRY ICE BOMB (S).
- Go forward.
- Play the HOP; earn the DETECTIVE’S NOTEBOOK (T).
- Combine the DETECTIVE’S NOTEBOOK and PENCIL to find the hotwire instructions (inventory).
- Walk down.
- Open the door; connect the wires as shown (A).
- Remove the cap, use the FUNNEL and GAS CANISTER; remove the funnel and replace the cap (B).
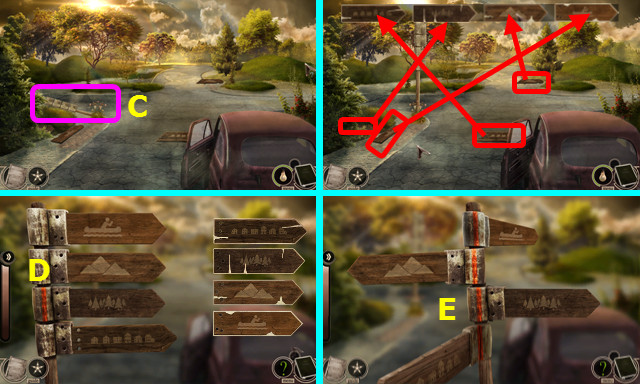
- Select (C).
- Select the 4 signs and place as shown (red).
- Place the signs as shown (D).
- Rotate the signs as shown (E).
- Go left.
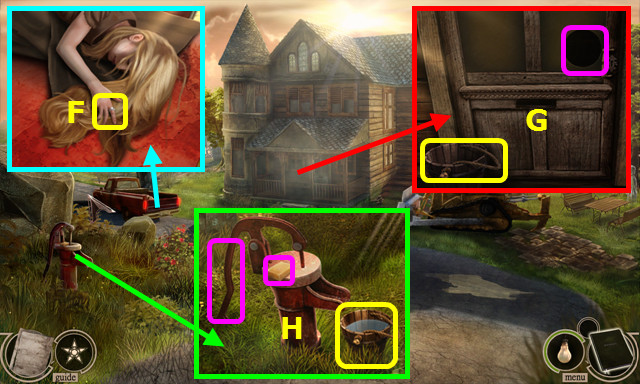
- Open the tailgate, open the blanket, and take the DIAMOND RING (F).
- Remove the DIAMOND from the DIAMOND RING (inventory).
- Combine the BROKEN GLASS CUTTER and DIAMOND to make the GLASS CUTTER (inventory).
- Take the BUCKET; use the GLASS CUTTER, push the glass, and open the door (G).
- Place the BUCKET, select the pump handle 2x, select the soap, and take the BUCKET OF SOAPY WATER (H).
- Walk left.
- Take the BROOM and CLEANING BRUSH (I).
- Walk down.
- Use the BUCKET OF SOAPY WATER and CLEANING BRUSH (J).
- Play the HOP; earn the 2/2 SLEEPER FIGURINE (K).
- Go forward.
- Read the notes; take the 2/3 INVESTIGATION CLUE (L).
- Use the BROOM; move the items and use the DICTAPHONE (M).
- Move N-O, P-Q, R-S, T-U.
- Select the photo; take the HAMMER (V).
- Select (W).
- Place the 2 SLEEPER FIGURINES on the board.
- Solution (A).

- Solution (B).
- Take the DETECTIVE’S OFFICE KEY (C).
- Walk down 2x; go forward.
- Use the DETECTIVE’S OFFICE KEY; turn the handle (D).
- Walk forward.
- Read the note; take the 3/3 INVESTIGATION CLUE (E).
- Place the 3 INVESTIGATION CLUES (F).
- Play the HOP; earn the TIN BOX (G).
- Combine the TIN BOX and HAMMER; move the items and take the CAFFEINE PILLS (inventory).
- Walk down 2x; go right and forward.
Chapter 3: Dream Haven
- Talk to Howard; use the CAFFEINE PILLS (H).
- Walk forward.
- Play the HOP (I).
- Select each of the stockings; locate the CLOSET HANDLE (J).
- Walk down.
- Use the CLOSET HANDLE; move the dolls and take the RECORD (K).
- Walk forward 2x.
- Select (L).
- Touch (M).
- Take the BROKEN TONGS (N).
- Place the RECORD and take the FORK (O).
- Walk down 2x.
- Use the FORK 3x; take the TONG PART (P).
- Combine the BROKEN TONGS and TONG PART to make the TONGS (inventory).
- Walk forward.
- Use the TONGS to take the BURNING PLATE (Q).
- Walk forward.
- Place the BURNING PLATE; take the BROKEN PLATE (R).
- Restore the BROKEN PLATE (inventory).
- Select (@).
- Open the zipper; take the KID SCISSORS (S).
- Remove the backpack; select 1-5.
- Take the SLING (T).
- Walk right, down, and forward.
- Take the BUTTERFLY STAFF HANDLE (A).
- Open the mailbox; take the BUTTERFLY TOP (B).
- Combine the BUTTERFLY STAFF HANDLE and BUTTERFLY TOP to make the BUTTERFLY STAFF (inventory).
- Walk down and right.
- Take the BALL OF TWINE (C); use the BUTTERFLY STAFF (D).
- Play the HOP; earn the HORSE BALLOON (E).
- Take the MARBLES (F).
- Walk forward 2x.
- Use the KID SCISSORS (G).
- Play the HOP; earn the WASP SPRAY (H).
- Walk down.
- Talk to the girl; use the HORSE BALLOON (I).
- Use the WASP SPRAY; take the VACUUM HOOK (J).
- Go right and down.
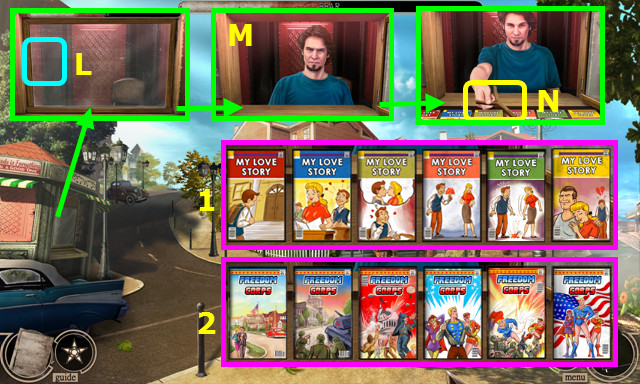
- Use the VACUUM HOOK (L).
- Talk to the man (M).
- Arrange the comic sets (1-2).
- Take the SLINGSHOT (N).
- Combine the SLINGSHOT, SLING, and MARBLES to make the LOADED SLINGSHOT (inventory).
- Walk right and forward.
- Use the LOADED SLINGSHOT (O).
- Select (P) when the crosshair is in (Q) 2x.
- Take STANLEY (R).
- Walk right, down, and forward.
- Give STANLEY (S).
- Take the ENCHANTED CHALK (T).
- Use the ENCHANTED CHALK, open the door, and go forward (U).
- Take the MAGNET and turn the handle (A).
- Combine the BALL OF TWINE and MAGNET to make the TWINE WITH MAGNET (inventory).
- Walk forward. After the cut-scene, walk right.
- Use the TWINE WITH MAGNET; take the WRENCH (B).
- Go forward.
- Use the WRENCH; take the 6 METAL BARS (C).
- Walk right, down, and forward.
- Use the ENCHANTED CHALK (D).
- Take the CHAIN (E).
- Take the METAL HOOK (F).
- Combine the METAL HOOK and CHAIN to make the GRAPPLING CHAINS (inventory).
- Use the GRAPPLING CHAINS (G).
- Select (H) 2x when the crosshair is in the center of (I).
- Add the 6 METAL BARS (J).
- Go up the ladder and try to go forward.
- Play the HOP; earn the DOOR HANDLE.
- Use the DOOR HANDLE; go forward (K).
- Take the FLASHLIGHT (L).
- Use the FLASHLIGHT; note the combination 5-2-12 (M).
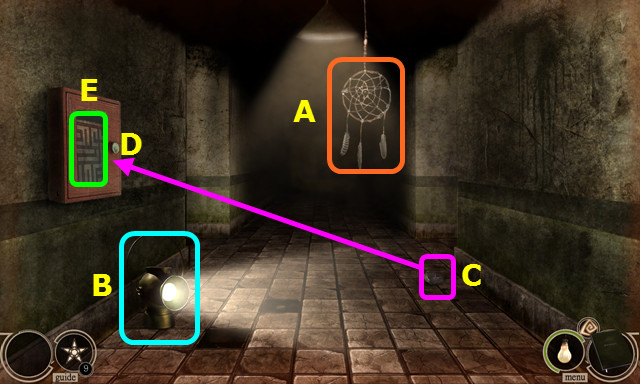
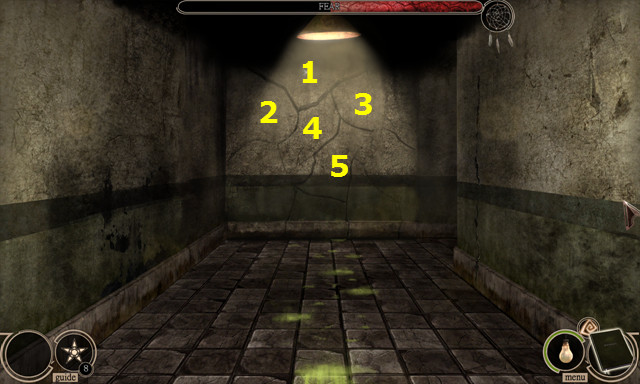
- Select the dreamcatcher (A).
- Take the lamp (B), select the rock (C), and use it on the glass (D).
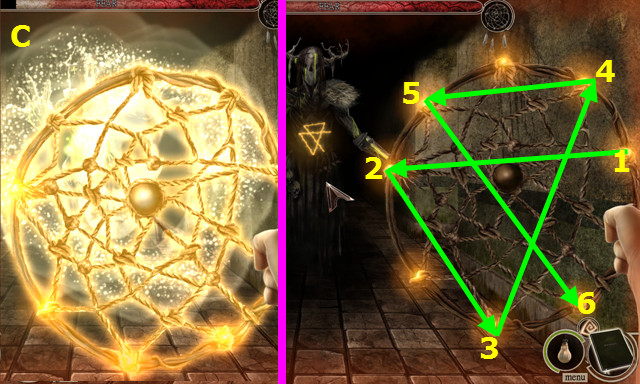
- Select the maze map (E).
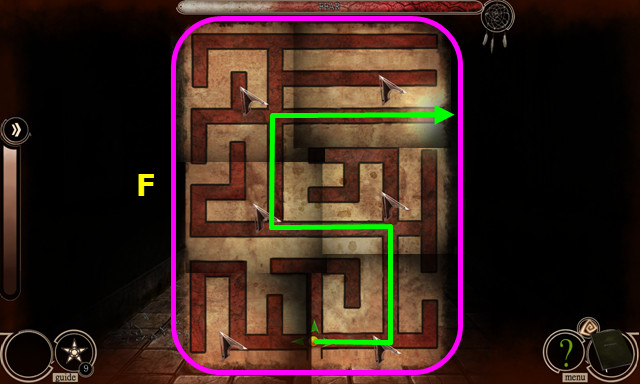
- Solution (F).
- Select the map.
- Hit the doll 3x (G).
- Go right-left-left-right-right (1-5).
- Select the dreamcatcher (H).
- Go forward.
- Walk down 2x; go forward 2x.
- Select the dial 3x (J); turn the handle (K).
- Read the notes; use the DICTAPHONE (L).
- Move M-N, O-P, Q-R, S-T.
- Take the LOCKPICK SET and photo (U).
- Walk down.
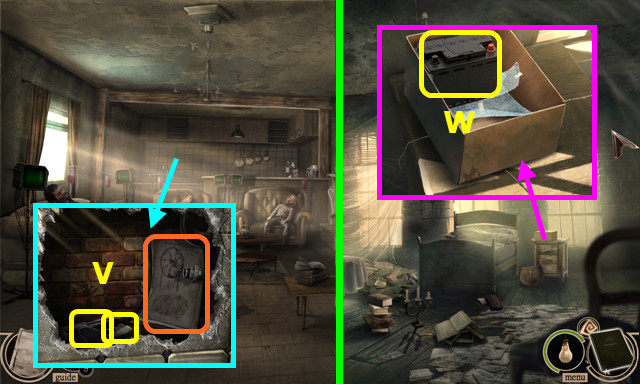
- Use the HAMMER 3x; take the LOADED GUN, TILE SHARD, and read the notes (V).
- Walk down, left, and forward.
- Use the TILE SHARD, open the box, and take the BULLDOZER BATTERY (W).
- Walk down.
- Use the LOCKPICK SET (A).
- Open the panel; place the BULLDOZER BATTERY and connect the leads (B).
- Use the LOCKPICK KIT again.
- Restore the 4 items (C).
- Place and push the totem (D).
- Play the HOP; earn the SHAMAN’S DREAMCATCHER (E).

- Use the LOADED GUN (F).
- Select (G).
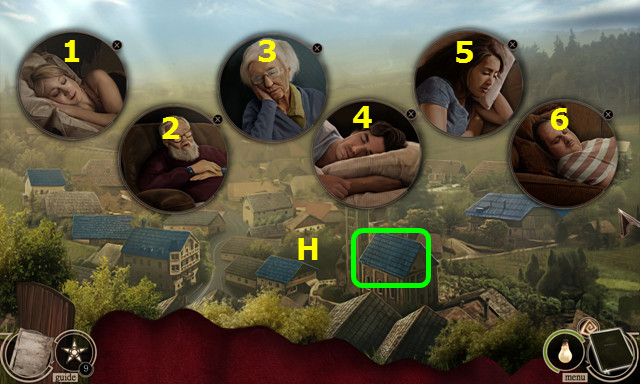
- Select a home (H).
- Use the SHAMAN’S DREAMCATCHER on each person (1-6).
Chapter 4: The First Sleeper
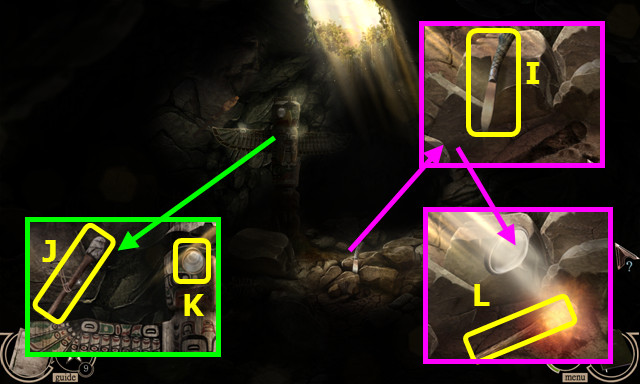
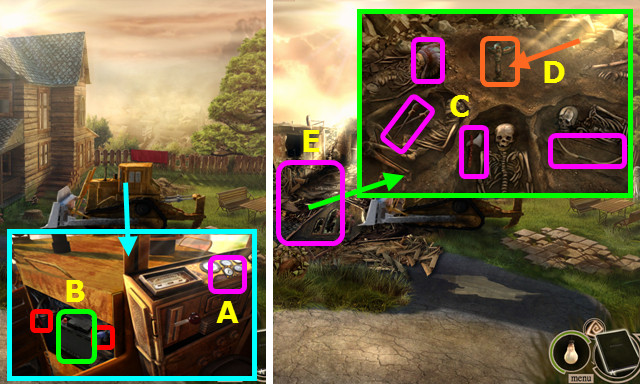
- Move the 3 rocks; take the NATIVE BLADE (I).
- Use the NATIVE BLADE to take the TORCH (J).
- Take the MAGNIFYING GLASS (K).
- Use the TORCH and MAGNIFYING GLASS; take the lit torch (L).
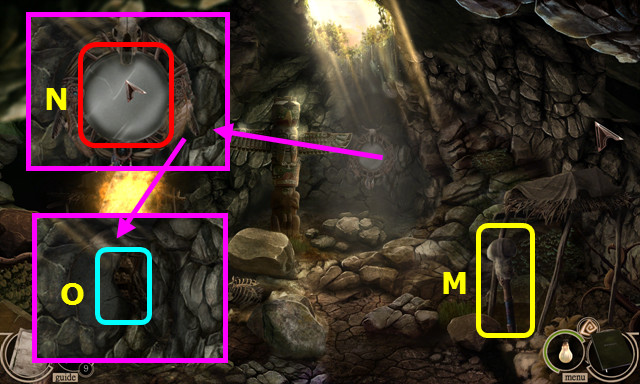
- Take the TOMAHAWK (M).
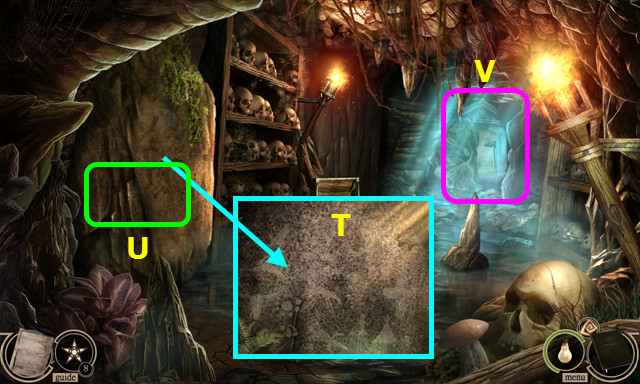
- Restore the mirror pieces (N).
- Use the TOMAHAWK (O).
- Go forward.

- Select (P) and (Q).
- Use the TOMAHAWK and open the lid; play the HOP to earn the 6 NATIVE SYMBOL PARTS (R).
- Restore the NATIVE SYMBOL PARTS to make the NATIVE SYMBOL (inventory).
- Walk down.
- Place the NATIVE SYMBOL; take the BAG OF POWDER (S).
- Walk forward.
- Use the BAG OF POWDER (T).
- Play the HOP; earn the PICKAXE (U).
- Use the PICKAXE (V).
- Go forward.
- Take the NATIVE HEADDRESS and NET HANDLE; open the mailbox and take the DAD’S HAT (A).
- Take 5 FEATHERS from the NATIVE HEADDRESS (inventory).
- Open the box; take the NET BASKET and TELEVISION KNOB (B).
- Remove the box.
- Take the RAZOR BLADE and ELASTIC BAND (C).
- Combine the NET HANDLE, NET BASKET, and ELASTIC BAND to make the NET (inventory).
- Use the NET; take the DEFLATED BALL (D).
- Combine the DEFLATED BALL and RAZOR BLADE; take the NATIVE DOLL (inventory).
- Combine the NATIVE DOLL and 5 FEATHERS to make the CHIEF DOLL (inventory).
- Place the CHIEF DOLL; select the arm 3x and take the BONE KEY (E).
- Use the BONE KEY (F).
- Go forward.
- Take the POOL CLEANER (G).
- Place and turn the TELEVISION KNOB (H).
- Move the drawings; take the ULTRAVIOLET LIGHT RIG (I).
- Walk down.
- Use the POOL CLEANER (J).
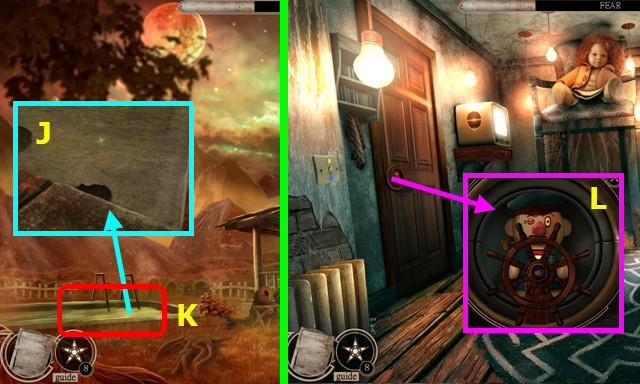
- Play the HOP; earn the MINIATURE SHIP WHEEL (K).
- Go forward.
- Place and turn the MINIATURE SHIP WHEEL (L).
- Walk left.
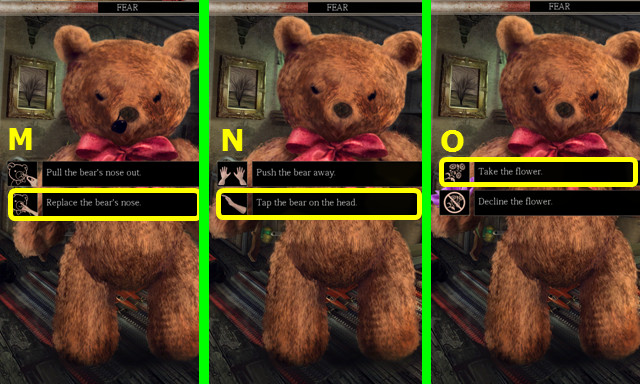
- Select the bear; choose (M).
- Select the bear; choose (N).
- Select the bear; choose (O).
- Take the TOY FISHING ROD (P).
- Take the VACUUM CLEANER HOSE (Q).
- Take the TOY HOOK; use the RAZOR, move feathers 2x, and take the 1/2 ULTRAVIOLET LIGHTBULB (R).
- Combine the TOY FISHING ROD and HOOK to make the TOY FISHING ROD (inventory).
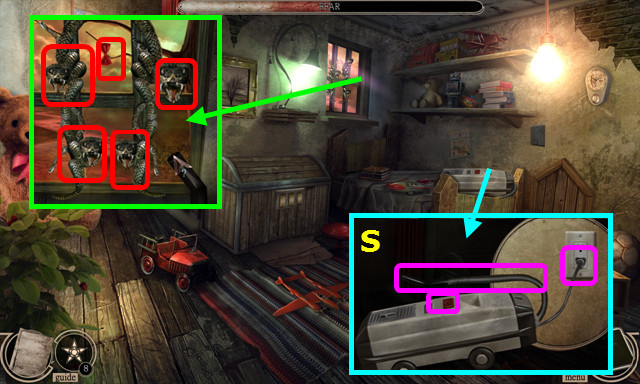
- Place the VACUUM CLEANER HOSE, plug in the cord, and push the button (S).
- Use the vacuum in 5 places (red); you earn the VACUUM CLEANER.
- Open the VACUUM CLEANER; take DAD’S BOWTIE (inventory).
- Walk down.
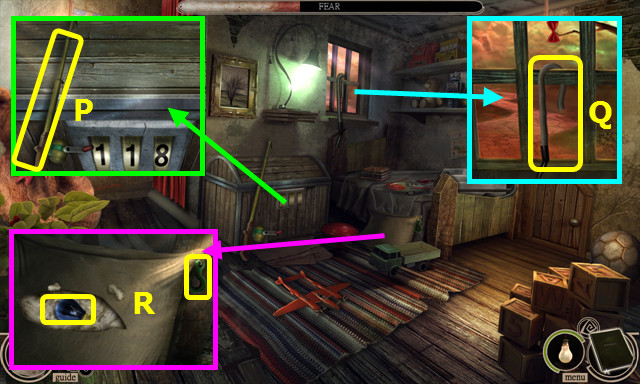
- Use the TOY FISHING ROD to take the code (T).
- Walk left.
- Change the code to 0-0-0; open the chest (U).
- Play the HOP; earn the 2/2 ULTRAVIOLET LIGHTBULB (V).
- Combine the ULTRAVIOLET LIGHT RIG and 2 ULTRAVIOLET LIGHTBULBS to make the ULTRAVIOLET LIGHT RIG (inventory).
- Walk down.
- Place the ULTRAVIOLET LIGHT RIG (A).
- Select (B).
- Go forward.
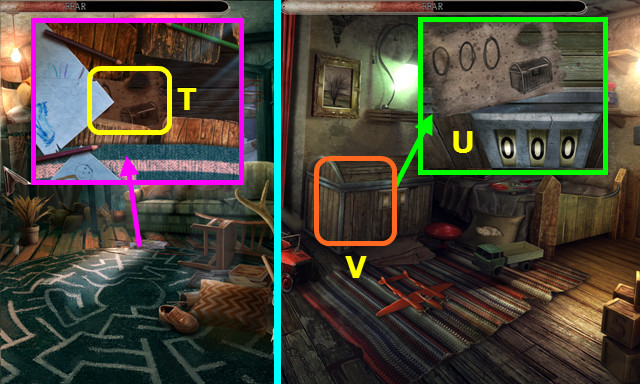
- Remove the curtain; select the picture (C).
- D-E, F-G, H-I, J-K.
- Lift the corner; take the DRAWER HANDLE (L).
- Walk down.
- Select (M).
- Use the DRAWER HANDLE; open the drawer and take the GLASS EYE (N).
- Select (O).
- Walk forward.
- Select (P).

- Place the gears as shown, pull the handle (Q).
- Place the DAD’S HAT, DAD’S TIE, and GLASS EYE (R).
- Walk down.
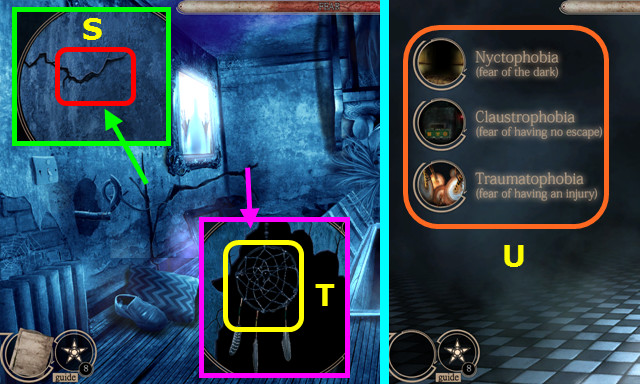
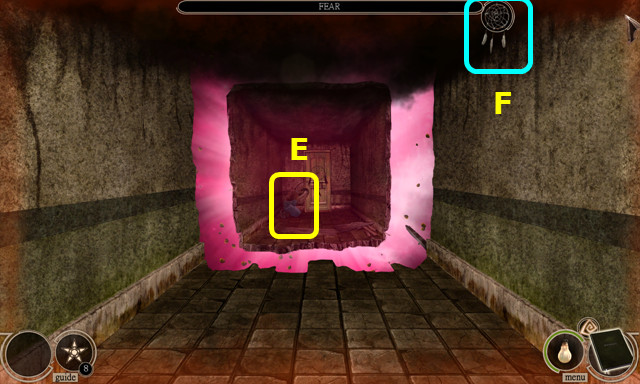
- Select the crack (S).
- Select the crack; select the dreamcatcher (T).
- Enter the hole in the wall.
- Select a fear (U).
- Use the dreamcatcher to capture 4 consecutive light blasts (A).
- Select 1-4.
- Walk right and forward.
- Hit the doll 3x (B).
- Walk right.
- Use the dreamcatcher to capture 6 consecutive light blasts (C).
- Select 1-6.
- Walk left and right.
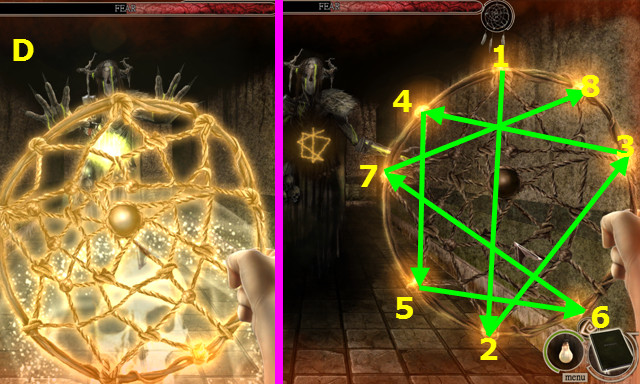
- Use the dreamcatcher to capture 8 consecutive light blasts (D).
- Select 1-8.
- Talk to Tom (E).
- Select the dreamcatcher (F).
- Go forward.

- Talk to Tom (G).
- Talk to Howard (H).
- Open the car door and enter the car (I).
- Congratulations! You have completed Maze: Subject 360!


 Artifacts of the Past: Ancient Mysteries Walkthrough, Guide, & Tips
 Small Town Terrors: Pilgrim's Hook Walkthrough, Guide, & Tips
 Beyond the Unknown: A Matter of Time Walkthrough, Guide, & Tips
 Hidden in Time: Looking-glass Lane Walkthrough, Guide, & Tips
 Fear for Sale: Endless Voyage Walkthrough, Guide, & Tips