Hidden in Time: Looking-glass Lane Walkthrough, Guide, & Tips
Hidden in Time: Looking-glass Lane Walkthrough
Welcome to the Hidden in Time: Looking-glass Lane Walkthrough!
After using your Ancestor’s Mirror to explore Castle Fairwich, you are sent back in time on a brand new quest!
Whether you use this document as a reference when things get difficult or as a road map to get you from beginning to end, we’re pretty sure you’ll find what you’re looking for here.
This document contains a complete Hidden in Time: Looking-glass Lane game walkthrough featuring annotated screenshots from actual gameplay!
We hope you find this information useful as you play your way through the game. Use the walkthrough menu below to quickly jump to whatever stage of the game you need help with.
Remember to visit the Big Fish Games Forums if you find you need more help. Have fun!
This walkthrough was created by Rebekah, and is protected under US Copyright laws. Any unauthorized use, including re-publication in whole or in part, without permission, is strictly prohibited.
General Tips

- You can choose to play in Casual Mode, hints recharge faster, and active areas sparkle. Advanced Mode has no sparkles and the hint button recharges slower.
- Until you have played all the way through the game you can only play “Regular”. After you complete the game you can choose between Regular and Mirrored play.
- Mirrored play is the exact same play; however items that were on the right will now be on the left and so on.
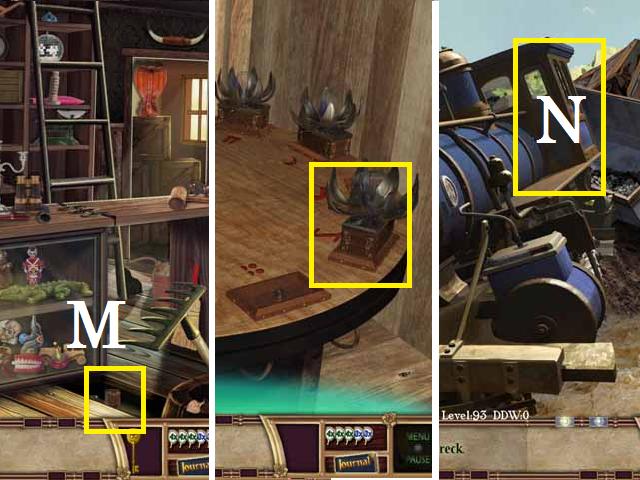
- Click on the Menu (M) button in the lower right corner to exit, pause or resume the game. You can also adjust your options (sound, music, and screen size).
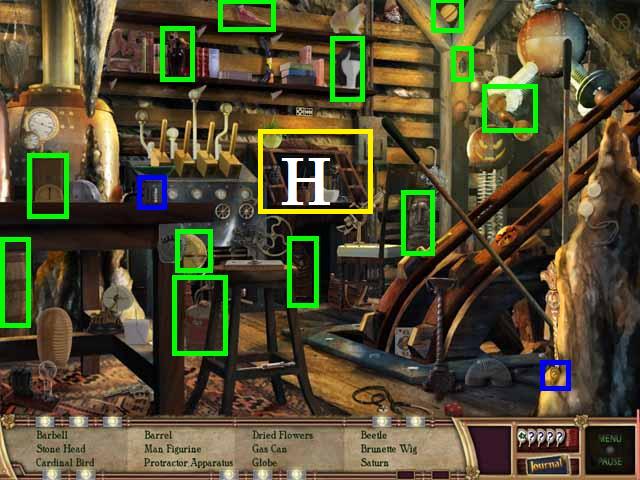
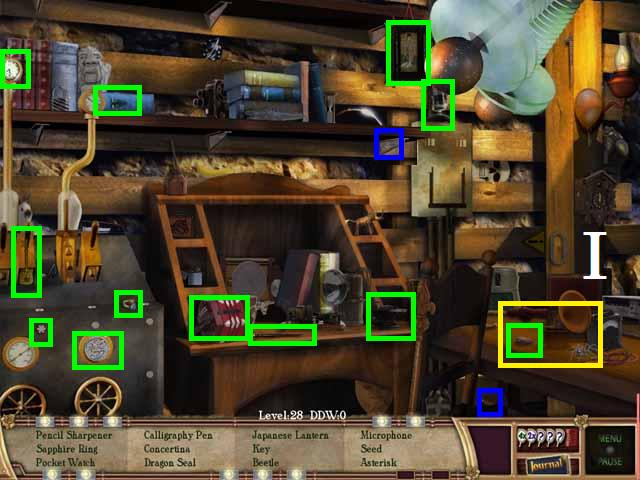
- The Hint Mirror (H) will show you where a hidden object is, or reveal the next step, if you are down to 1 Hint Mirror it will slowly recharge after its use.
- Additional Hint Mirrors are hidden in every scene and can only be used once. All Hint Mirrors will be marked in blue, in the screenshots, unless otherwise noted.
- You can zoom into your Journal (J) to review what you have done and find clues to help figure out puzzles.
- Your inventory bar (I) will show what your current tasks is or a list of item you need to collect.
- If an item appears in the inventory bar in blue it requires an action before you can pick it up.
- In this walkthrough all inventory items will be marked in green in the screenshots unless otherwise noted.
- When an inventory item is needed later it will be place on the bar (N), next to the Journal.
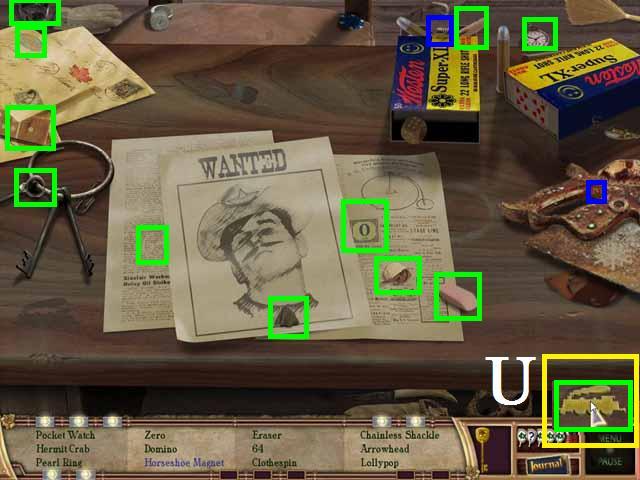
- In every Hidden Object scene is a TIN CAN. Collect all 59! You will see a red can (C) without the check mark, next to the Hint Mirrors when one is available.
- When you scroll over a TIN CAN your cursor will change to a crosshairs.
- All TIN CANS will be marked in blue, in the screenshots, unless otherwise noted.
- Puzzles can be skipped once the Skip Button (S) is full.
- If you scroll over an object that can be moved to reveal another object or used to obtain another object, your cursor will slightly grow and glow.
- If you click randomly too many times your cursor will be unavailable for a short time.
- In between chapters you can hit next to move the storyline ahead or skip it altogether.
- Each time you play a Hidden Object Scene the items in the inventory list may change. The screenshots in this walkthrough shows the items as listed during gameplay at the time.
Box 1
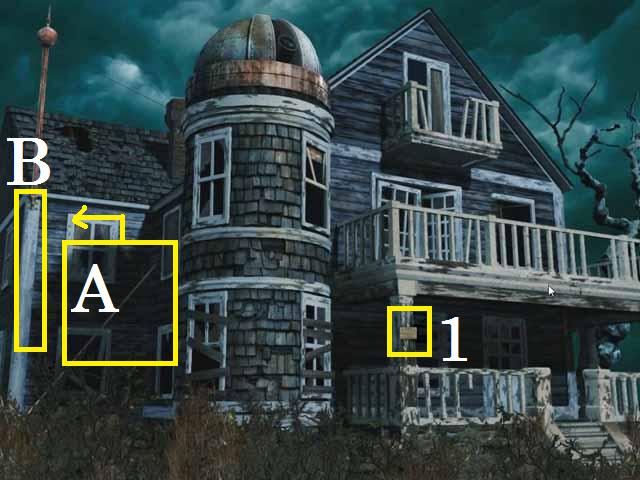
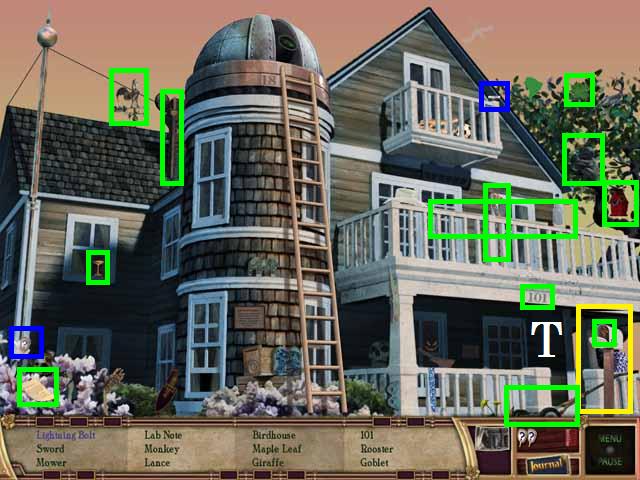
- Place the LIGHTING ROD POLE (A) in place (B).
- You can pick up the NOTE (1).
- Pick up the TIN CAN marked in blue in the screenshot. (NOTE: all TIN CANS will be marked blue in this walkthrough).
- Open the Shutters (C) to pick up the DOLL marked in green.
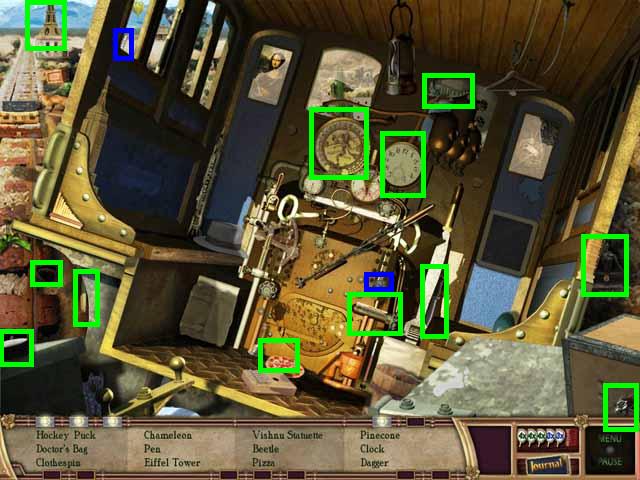
- Pick up the remaining items in the inventory bar, all are marked in green in the screenshot.
- Zoom into the front porch (D).
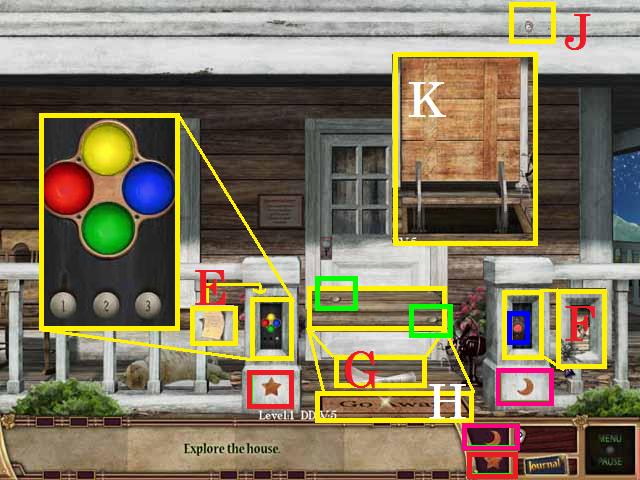
- You can pick up the letter (E) then place the STAR (red) and MOON (pink) in the pillars (red, and pink) as shown in the screenshot.
- Pick up the PAPER (F) that is inside the left pillar (2) then click the button (marked in blue) which was behind the PAPER.
- Pick up the NEWSPAPER (G) and click on it to close it.
- Pick up the #1 BUTTON (marked green).
- Pick up the #2 BUTTON (marked green) from underneath the “go away” mat (H).
- Zoom into the right pillar (red) and place the BUTTONS, ordered 1- 2- 3, in the holes.
- Hit the #3 button one time, followed by the #1 once and the #2 two times.(If you open your journal and flip one page back to the left you will see the PAPER you picked up with the positions the colors should be in).
- Roll over the spider (J) to move it and pick up the HINT MIRROR.
- Go down the hatch (K).
- Pick up the TIN CAN and HINT MIRROR both marked in blue in the screenshot.
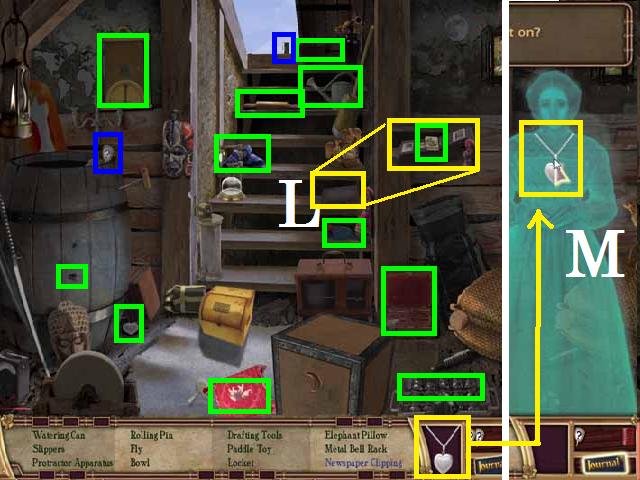
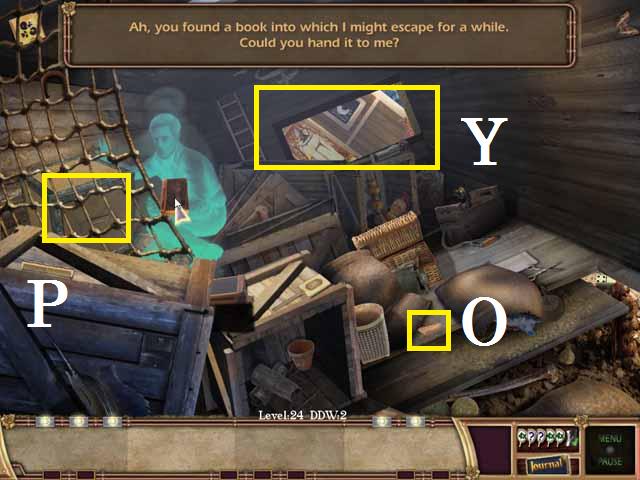
- Open the photo album (L) and pick up the NEWSPAPER CLIPPING marked in green in the screenshot.
- Pick up the remaining items, all marked in green.
- Place the LOCKET (M) on the ghost’s neck.
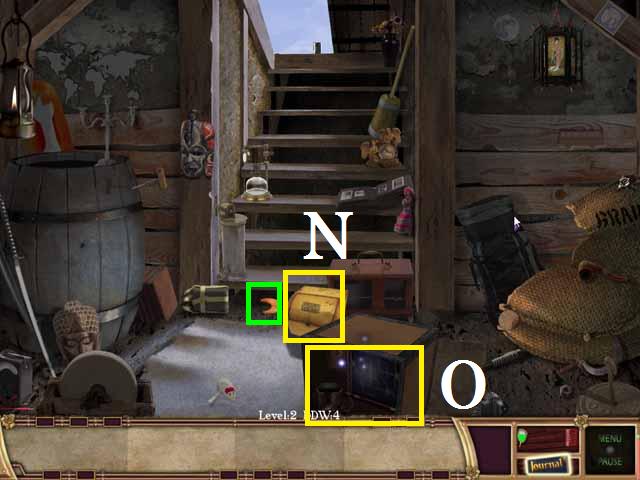
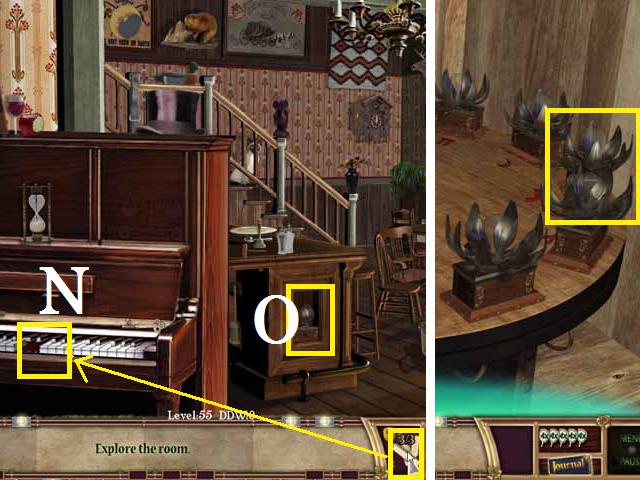
- Move the breadbox (N) and pick up the MOON marked in green.
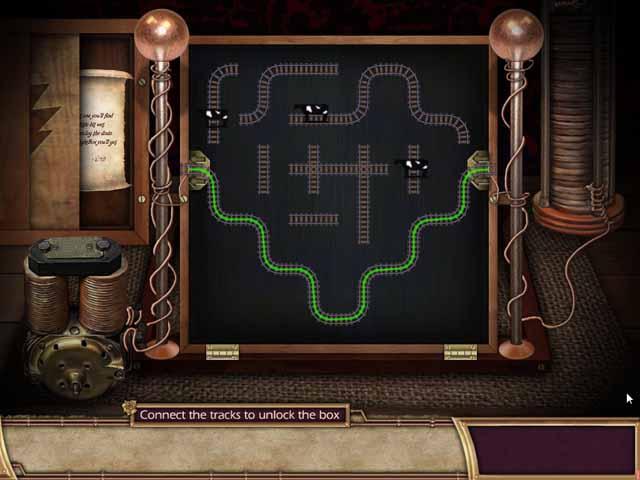
- Place the MOON on the box (O) and zoom in.
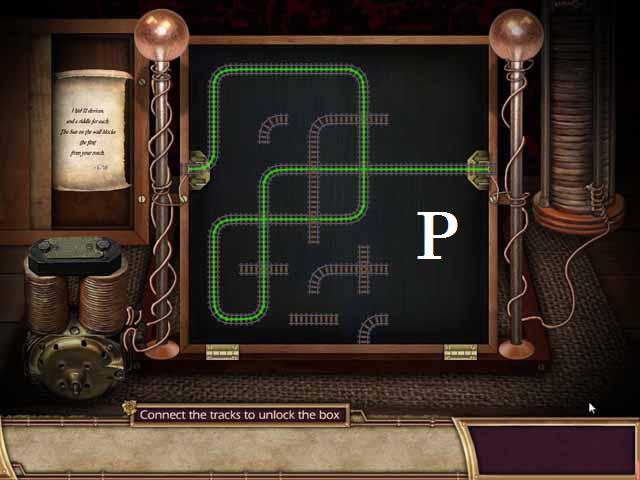
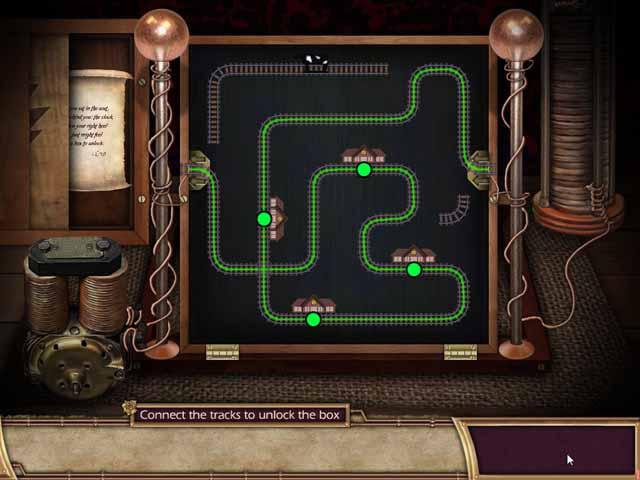
- Solve the puzzle by clicking on the track to change the pieces positions to connect the two sides (P).
- See the screenshot for the solution.
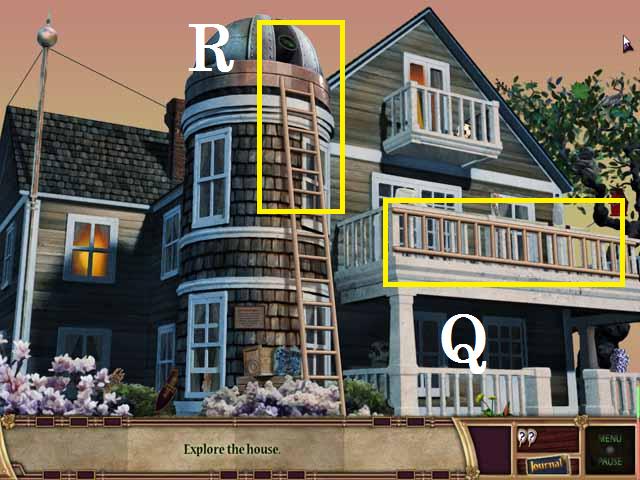
- Exit the basement and place the LADDER (Q) under the observatory (R) .
- Enter it the observatory.
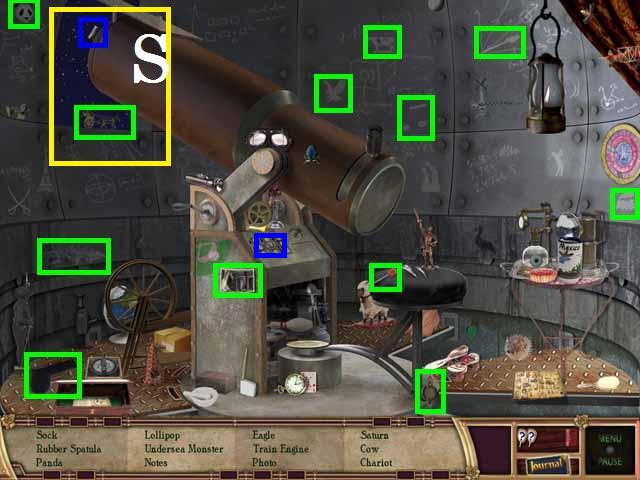
- Pick up the Hint Mirror and the TIN CAN.
- Pick up the items in the inventory list then exit the room through the window (S).
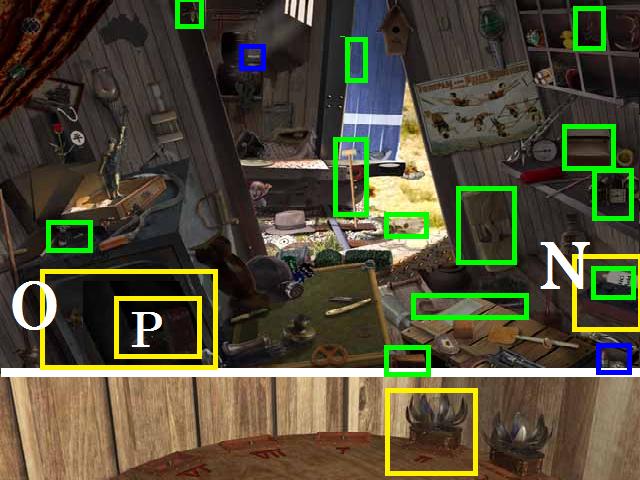
- Pick up the Hint Mirror and the TIN CAN.
- Open the mailbox (T) and pick up all of the items in the list.
- Zoom back into the porch and enter the basement.
- Move through the basement by clicking the right edge of the scene.
- Roll over the spider to pick up the HINT MIRROR (marked in blue).
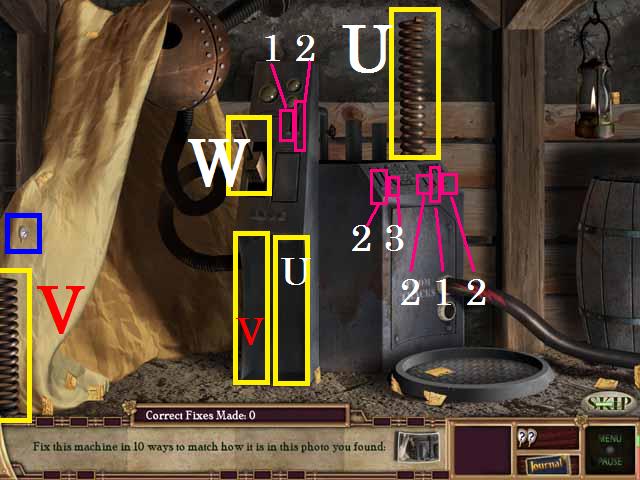
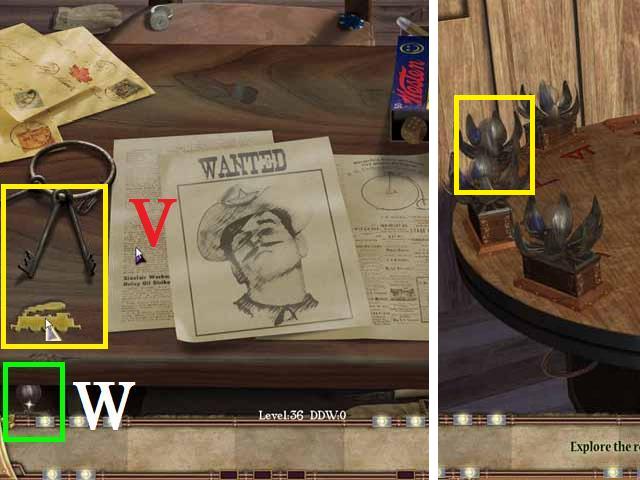
- Pick up the two SPRINGS (U and V) and place on the machine (U and V).
- Click the handle (W) one time.
- There are seven levers on the machine marked in the screenshot with green and the number of times you need to click each one.
- From left to right the 1st one you click one time, 2nd two times, 3rd two times, 4th three times, 5th two times, 6th one times, 7th two times.
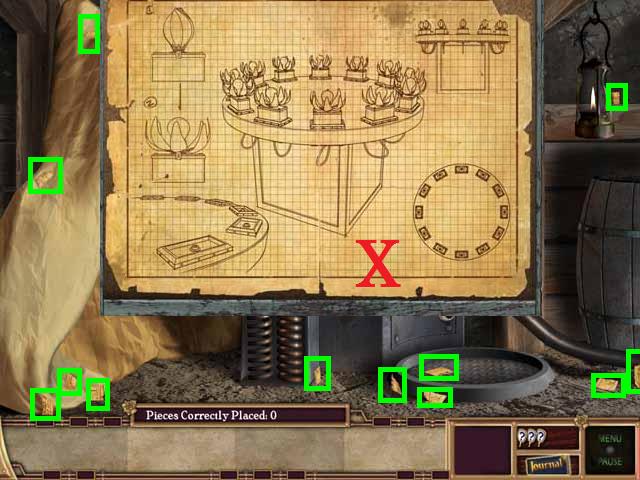
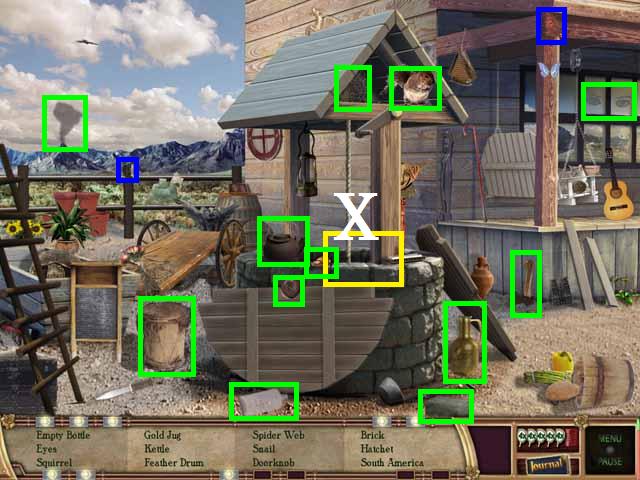
- Open and close the note on the corkboard.
- Pick up the twelve PAPER PIECES marked in green and place on the corkboard.
- You can change the orientation of each piece by right clicking it. Arrange the pieces as seen in the screenshot (X).
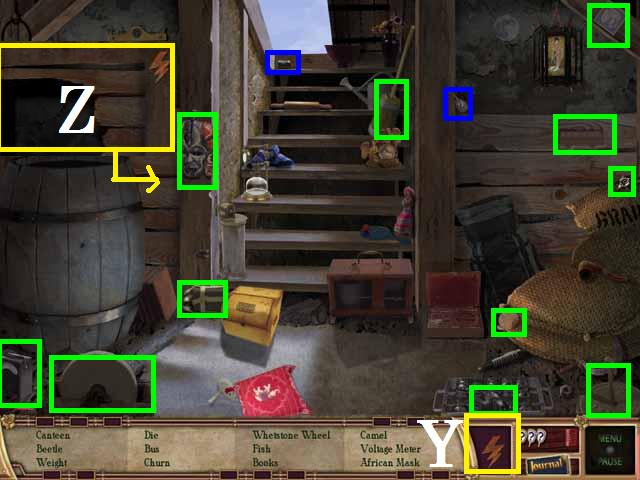
- Pick up the Hint Mirror and the TIN CAN.
- Pick up all of the items in the inventory list.
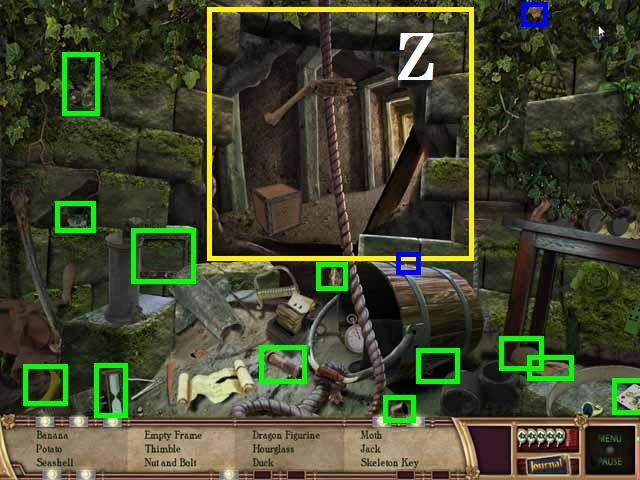
- Place the LIGHTING BOLT (Y) on the wall (Z), where the MASK was, and go through the hole.
- Turn the light on (1) and open the hidden panel (2).
- Pick up the KEY marked in green then exit at the bottom of the scene.
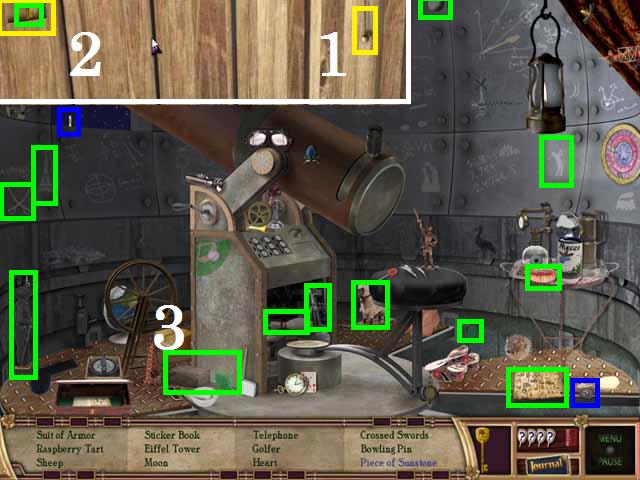
- Return to the observatory and pick up the Hint Mirror and the TIN CAN.
- Move the brick (3) to pick up the SANDSTONE, marked in green, then pick up the remaining items.

- Zoom into the picture wheel (4) and place the SANDSTONE in to empty space (marked in red).
- Click the outer most ring (yellow) three times, the next one in (purple) two times and the middle ring (blue) two times.
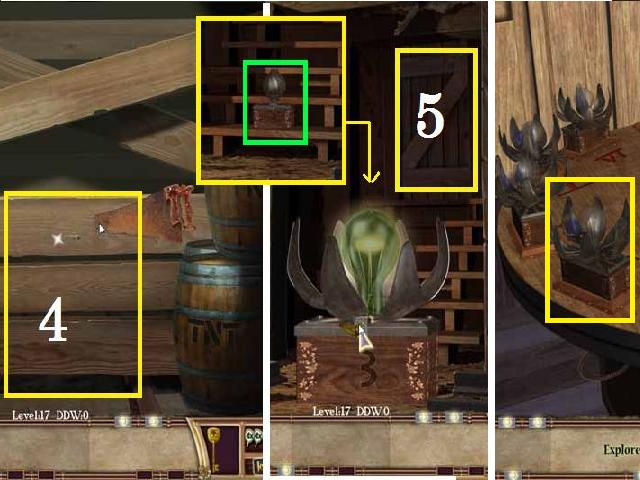
- Zoom into the BOX (5) and unlock it with the KEY.
- You may choose to place the box now or skip it. Place the box as seen in the screenshot.
- Zoom into the box (6).
- Change the orientation of the squares until you have unscrambled the picture. Each square can be flipped up and down and front to back.
- If you click on a side of the square that is shared with another it will change both squares. Begin with the inner squares then change the perimeter one’s last, see the screenshot for the final image.
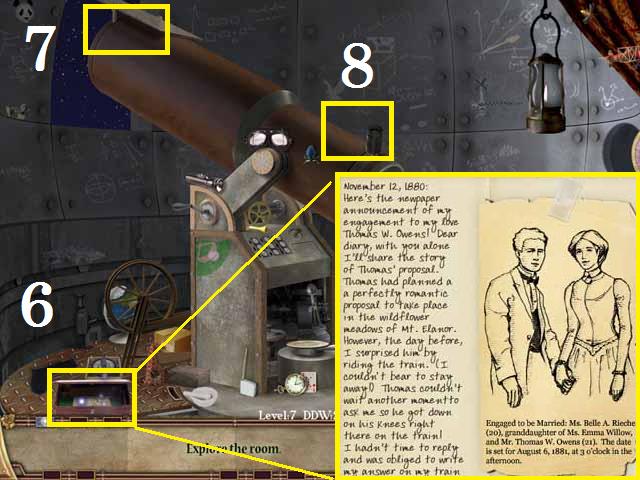
- Click on the telescopes mirror (7) then the eyepiece (8).
- Pick up the Hint Mirror and the TIN CAN.
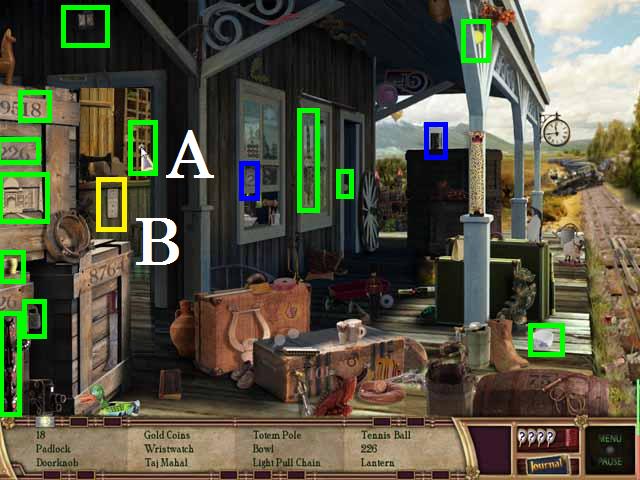
- Pull the CHAIN (A).
- Pick up the remaining items in the inventory bar.
- Pick up the CLIPPING (B) enter the station through the doorway.

- Pick up the 10 Pieces (marked in green) and unscramble the note.
- Click on the numbers (D) on the mermaid poster.
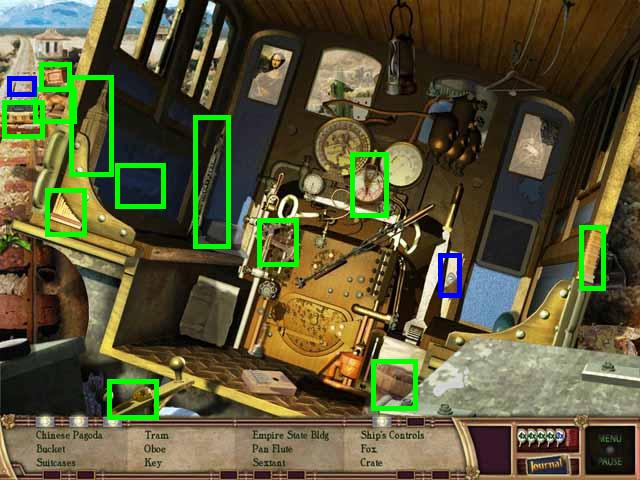
- Zoom into the train (E) then to the train car on the right.
Box 2
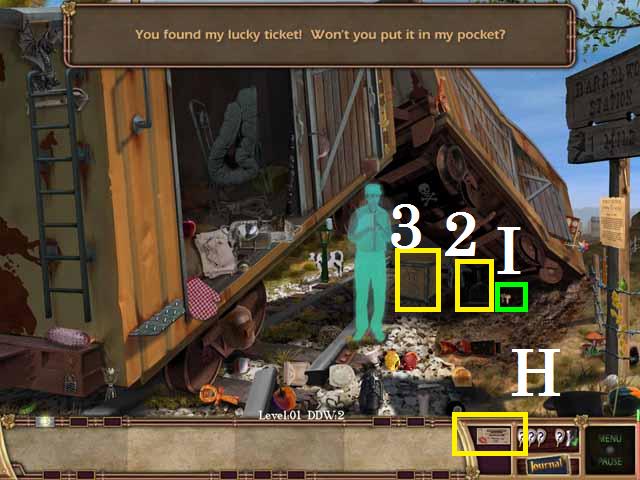
- Pick up the Hint Mirror and the TIN CAN.
- Place the CORN (F) over the fire (G) to get the POPCORN.
- Pick up the remaining items in the inventory bar.
- Give the TICKET (H) to the ghost.
- Move the dustpan (2).
- Place the SYMBOL (I) on the box (3) and zoom in.
- Solve the puzzle by connecting the tracks as seen in the screenshot.
- Exit right screen for the next scene.
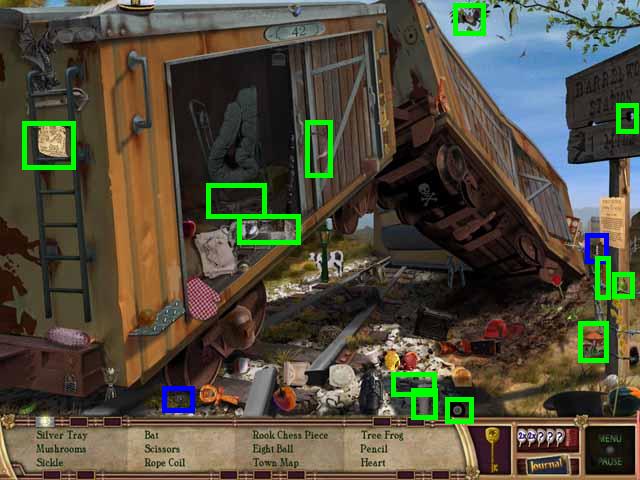
- Pick up the Hint Mirror and the TIN CAN.
- Move the pistol (J) to pick up the PAPERCLIP.
- Pick up the remaining items in the inventory bar.
- Exit the scene through the open back of the boxcar the click in the upper right corner of the next scene to the depot.
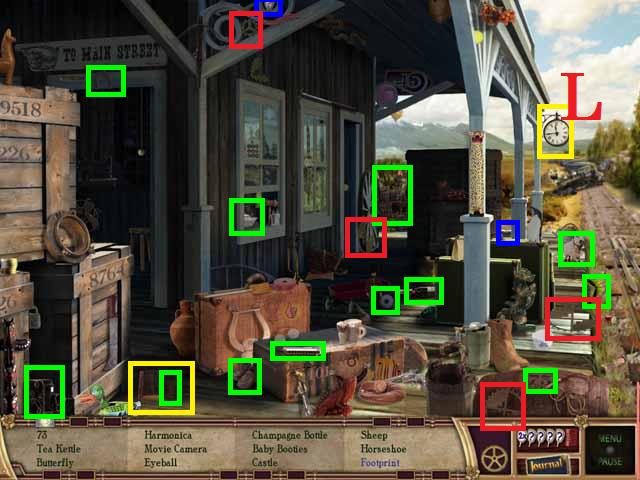
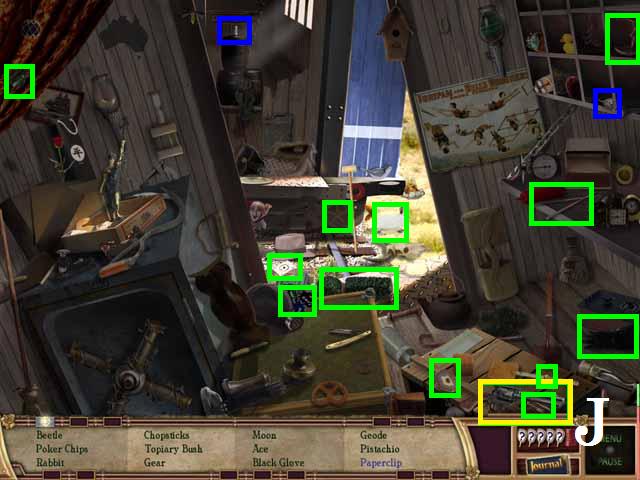
- Pick up the Hint Mirror and the TIN CAN.
- Move the book (K) to pick up the FOOTPRINT.
- Pick up the remaining items in the inventory bar.
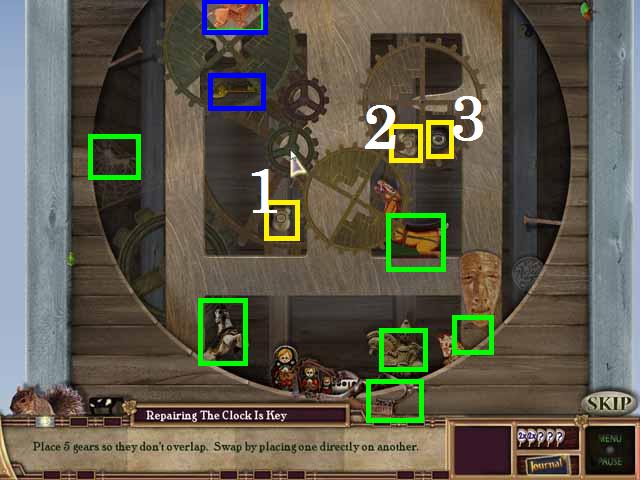
- Pick up the 4 GEARS (marked in red).
- Zoom into the clock (L).
- Place the gears as shown in the screenshot (M).
- The Buttons are not all visible at once.
- Push the #3 button one time, the #1button 2 times and the #2 button one time.
- Pick up the ORIGAMI PEGASUS (blue).
- Push the #3 button one time and pick up the KEY (blue).
- Pick up the remaining inventory items (green).
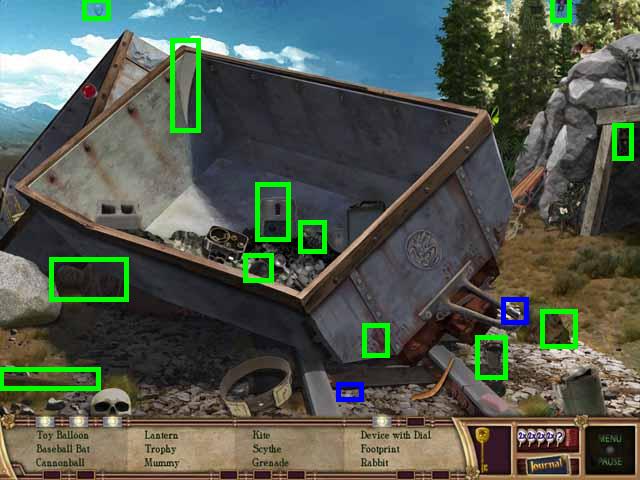
- Zoom back into the train wreck and the right train car.
- Pick up the Hint Mirror and the TIN CAN.
- Pick up all of the items in the inventory bar.
- Exit right screen.
- Pick up the Hint Mirror and the TIN CAN.
- Move the box (N) to pick up the BOTTLE of ACID.
- Pick up the remaining items in the inventory bar.
- Click on the safe (O) and pour the ACID on it.
- Open the BOX (P) with the KEY and place it as shown in the screenshot.
- From the train depot enter Main St by clicking in the upper left corner of the scene.
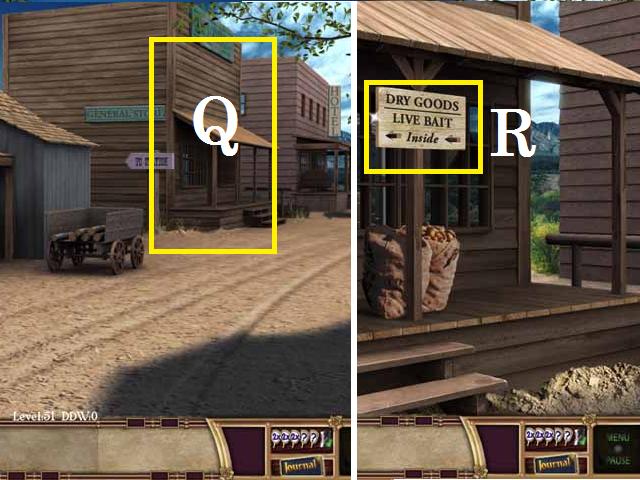
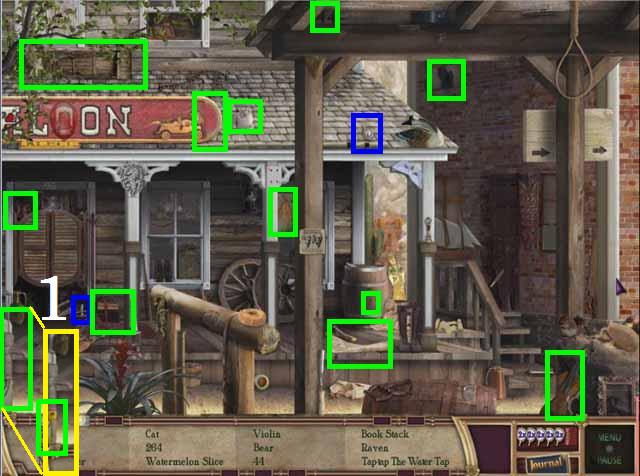
- Zoom into the general store (Q) and click on the sign (R).

- Pick up the Hint Mirror and the TIN CAN.
- Pick up all of the items in the inventory bar.

- Back on Main St. zoom into the hotel (S).
- In the lobby you can zoom into the guest book (T).
- Pick up the #3 KEY (U) and go upstairs by exiting right screen.
- Open the door (V) with the KEY.
Box 3
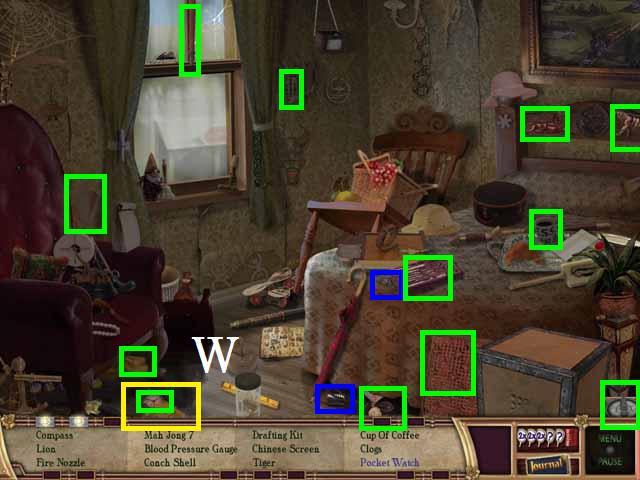
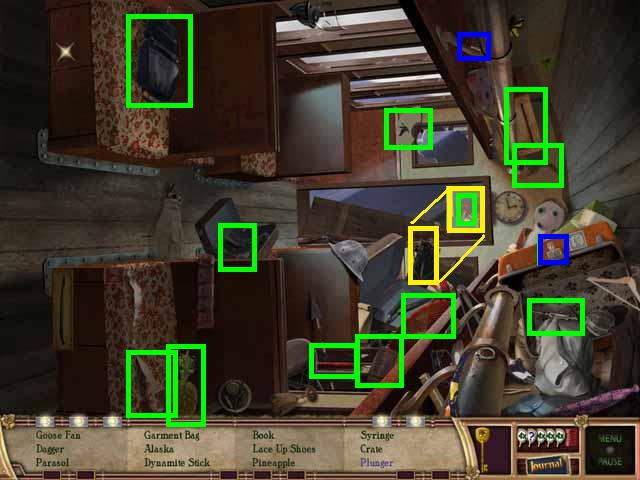
- Pick up the Hint Mirror and the TIN CAN.
- Move the box (W) to pick up the POCKET WATCH.
- Pick up the remaining items in the inventory bar.
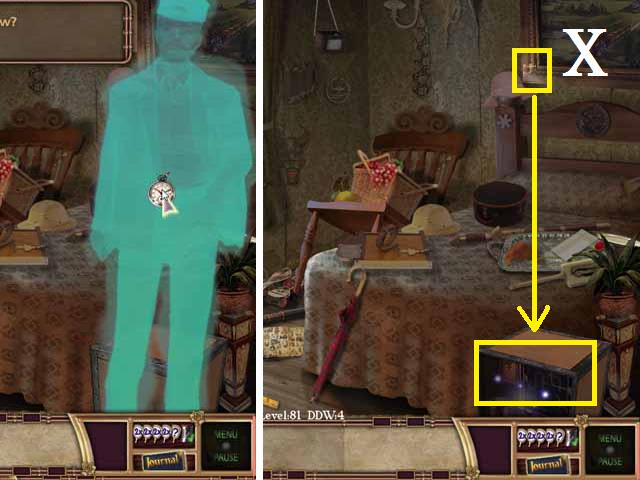
- Give the POCKET WATCH to the ghost.
- Place the SYMBOL (X) on the box and zoom in.
- Solve the puzzle by connecting the tracks as seen in the screenshot.
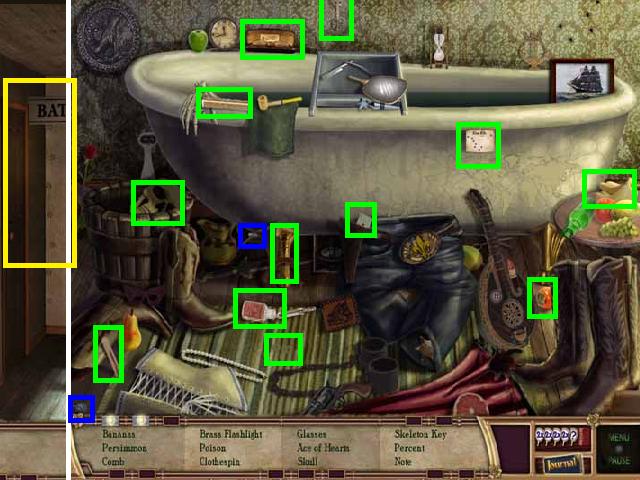
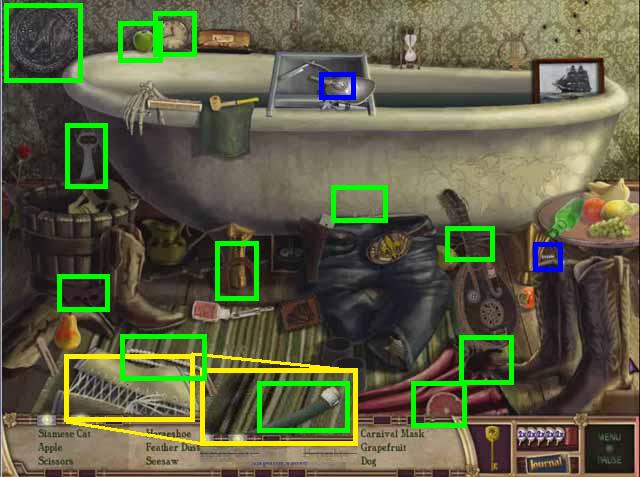
- Exit the room and enter the bathroom (Y).
- Pick up the Hint Mirror and the TIN CAN.
- Pick up all of the items in the inventory bar.
- Return to room #3.

- Pick up the Hint Mirror and the TIN CAN.
- Pick up all of the items in the inventory bar.
- Zoom into the painting (A).
- Place the CARDS as seen in the screenshot (Z).
- Exit the hotel.
- Pick up the Hint Mirror and the TIN CAN.
- Pick up all of the items in the inventory bar.
- Click on the pump (1) a second time and pick up the KEY.
- Return to the hotel and enter the bathroom.
- Pick up the Hint Mirror and the TIN CAN.
- Move the corset (2) and pick up the SYPHON HOSE.
- Pick up all of the items in the inventory bar.
- Place the HOSE in the bathe tub over the barrel (3).
- Pick up the BOX (4) and open with the KEY. Place the BOX as shown in the screenshot.
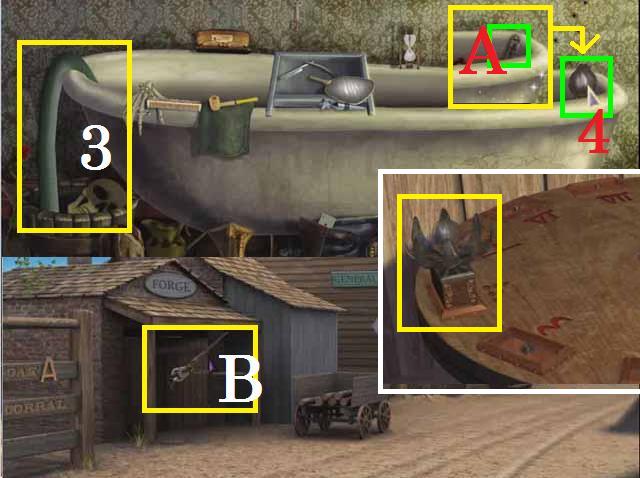
- Pick up the BOLT CUTTERS (A).
- Exit the hotel.
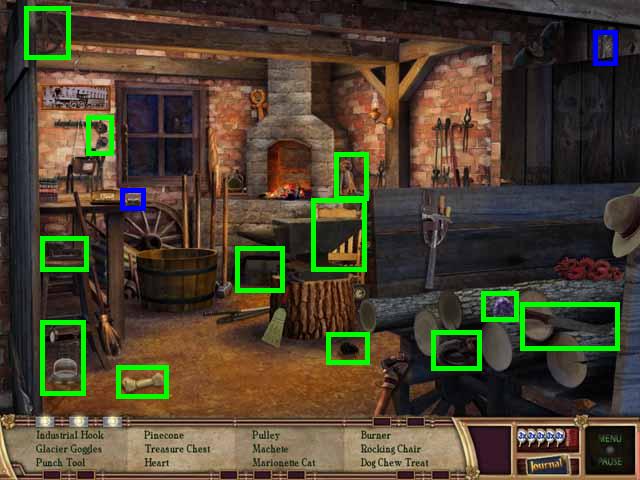
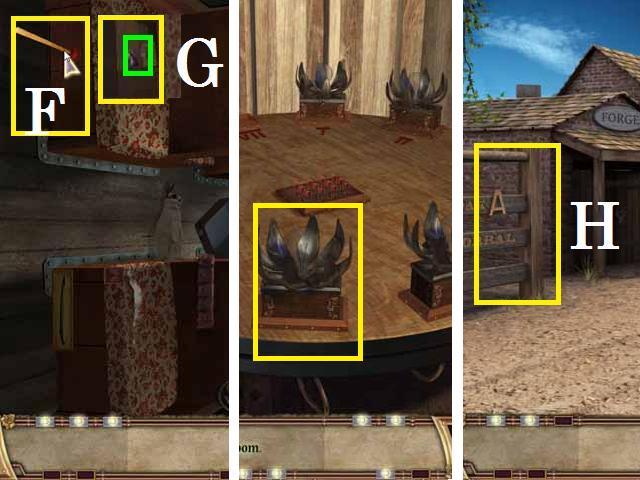
- Cut the chain (B) on the forges’ door with the BOLT CUTTER and enter it.
- Pick up the Hint Mirror and the TIN CAN.
- Move the photo (C) and pick up the SKELETON KEY.
- Pick up all of the items in the inventory bar.
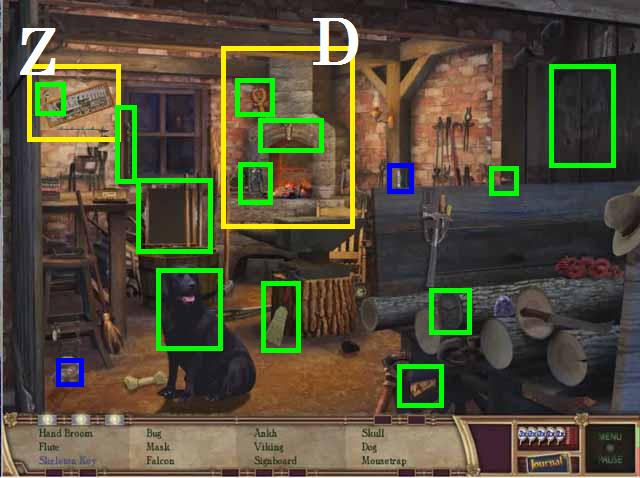
- Zoom into the fireplace (D).
Box 4
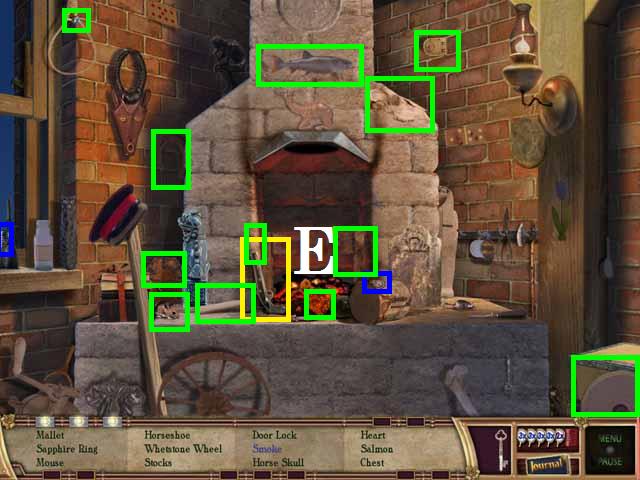
- Pick up the Hint Mirror and the TIN CAN.
- Click the pistol (E) and pick up the Smoke.
- Pick up all of the items in the inventory bar.
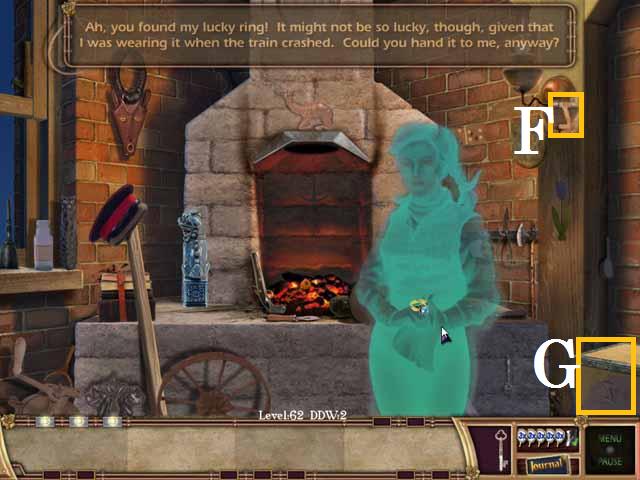
- Give the RING to the ghost.
- Place the SYMBOL (F) on the box (G) and zoom in.

- Solve the puzzle by connecting the tracks as seen in the screenshot.
- Go back to the general store and unlock the door with the KEY.
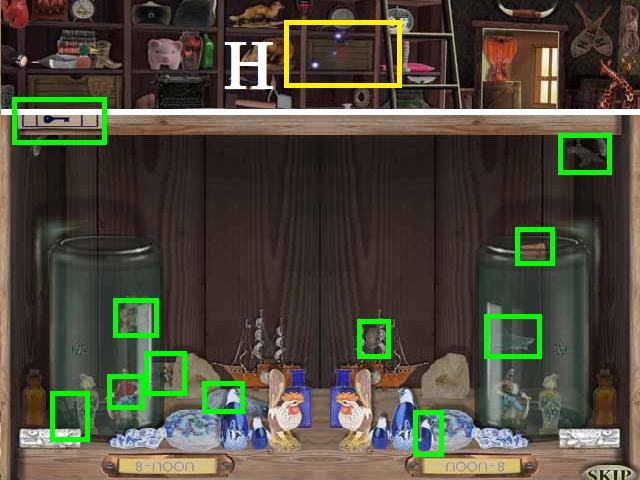
- Zoom into the box (H) on the shelf behind the counter.
- Pick up the eleven items that are not mirrored on both sides (all are marked in green).
- Go to the forge.
- Pick up the Hint Mirror and the TIN CAN.
- Pick up all of the items in the inventory bar.
- Zoom back into the fireplace.
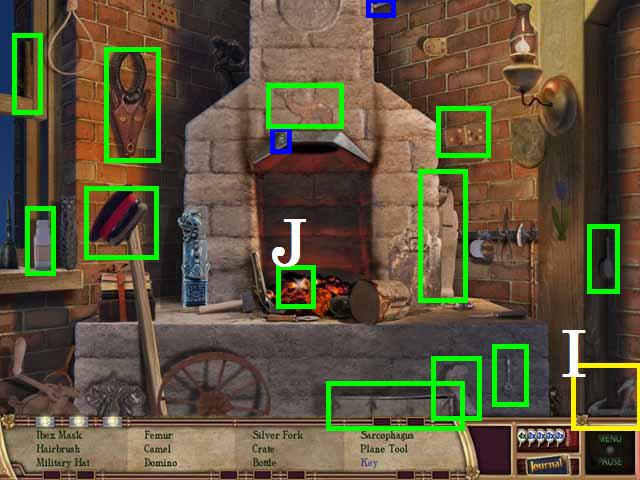
- Pick up the Hint Mirror and the TIN CAN.
- Pick up the METAL TONGS (I) and pick up the KEY (J) from the fire with them.
- Pick up all of the items in the inventory bar.
- Return to the general store and give the BONE (K) to the DOG (L).
- Pick up the Hint Mirror and the TIN CAN.Pick up all of the items in the inventory bar.
- Push on the floorboard and pick up the BOX (M).
- Open the box with the KEY.
- Place the box as shown in the screenshot.
- Go to the train depot and zoom into the train wreck.
- Zoom into the caboose (N).
Box 5
- Pick up the Hint Mirror and the TIN CAN.
- Pick up all of the items in the inventory bar.

- Give the PEN to the ghost.
- Place the SYMBOL (O) on the box (P) and zoom in.
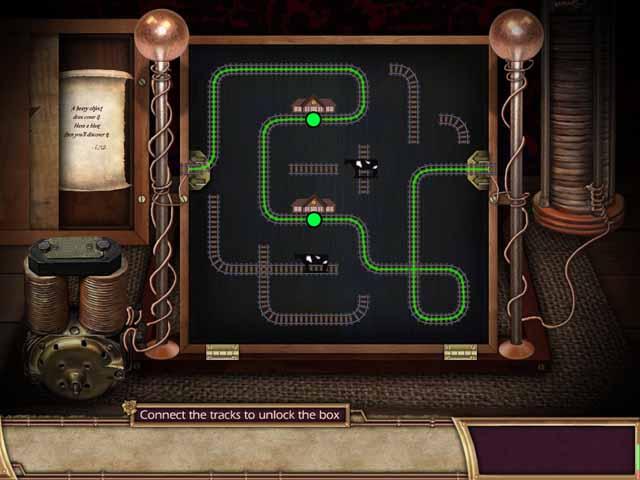
- Solve the puzzle by connecting the tracks as seen in the screenshot.
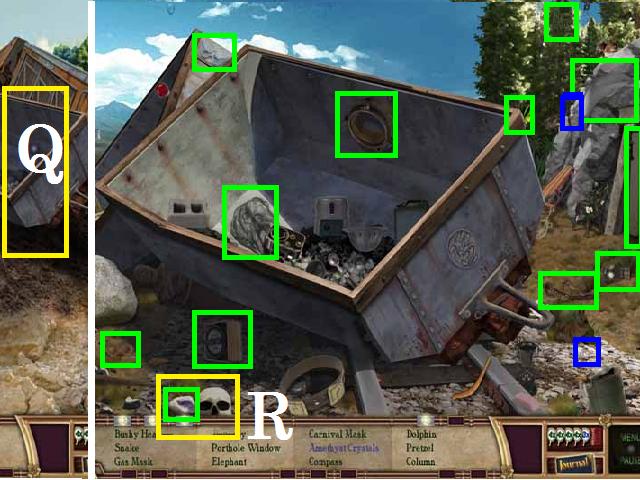
- Zoom into the coal car (Q).
- Pick up the Hint Mirror and the TIN CAN.
- Move the skull (R).
- Pick up all of the items in the inventory bar.
- Return to the caboose.
- Pick up the Hint Mirror and the TIN CAN.
- Pick up all of the items in the inventory bar.
- Return to the coal car.
- Pick up the Hint Mirror and the TIN CAN.
- Move the helmet (S) and pick up the GRENADE.
- Pick up all of the items in the inventory bar.
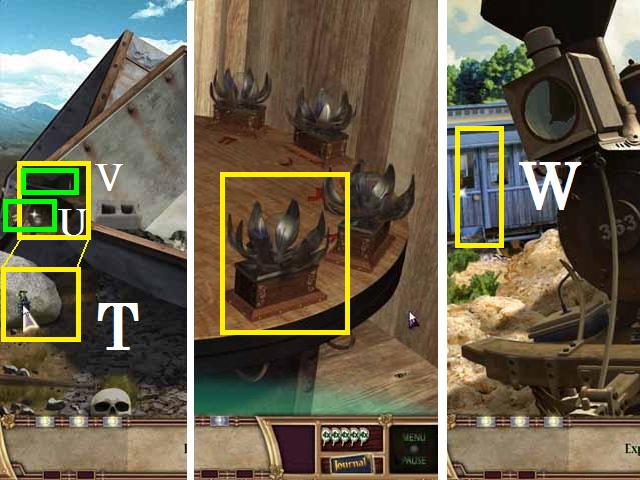
- Blow up the rock (T) with the GRENADE and pick up the BOX (U).
- Open the BOX with the KEY and place it as shown in the screenshot.
- Pick up the CROW BAR (V) outside the coal car.
- From the front view of the wreck, drag the CROWBAR over the door (W) to the wooden boxcar and enter into the dining car.
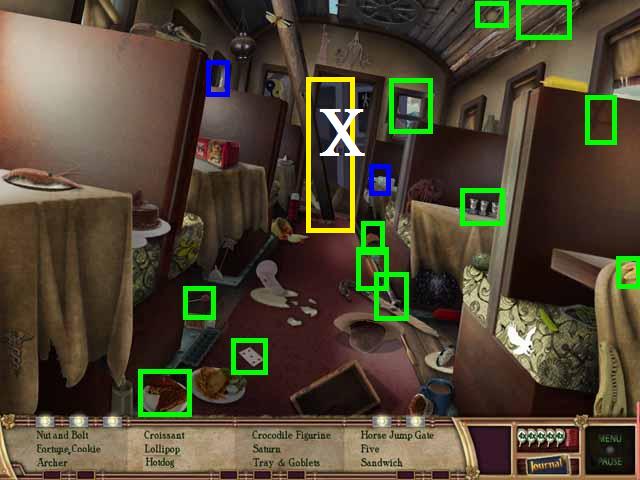
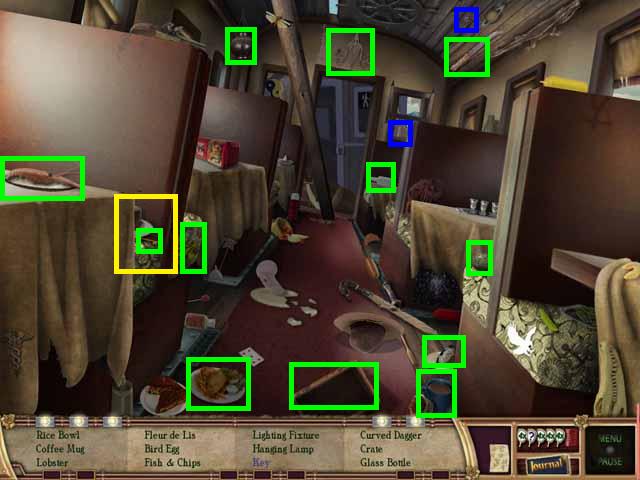
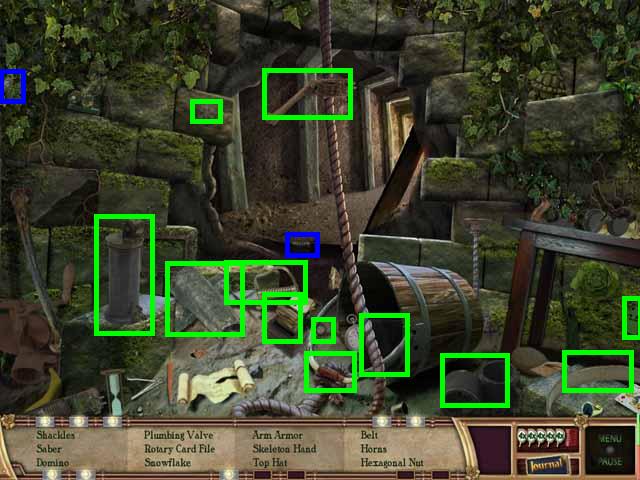
- Pick up the Hint Mirror and the TIN CAN.
- Pick up all of the items in the inventory bar.
- Go through the doorway (X) in the back of the dining car.
Box 6
- Pick up the Hint Mirror and the TIN CAN.
- Pick up all of the items in the inventory bar.
- Give the BOOK to the ghost.
- Place the SYMBOL (O) on the box (P) and zoom in.
- Solve the puzzle by connecting the tracks as seen in the screenshot.
- Go through the doorway (Y) in the back of the boxcar.
- Pick up the Hint Mirror and the TIN CAN.
- Move the box (Z).
- Pick up all of the items in the inventory bar.
- Return to the dining car.
- Pick up the Hint Mirror and the TIN CAN.
- Move the Cake (A).
- Pick up all of the items in the inventory bar.
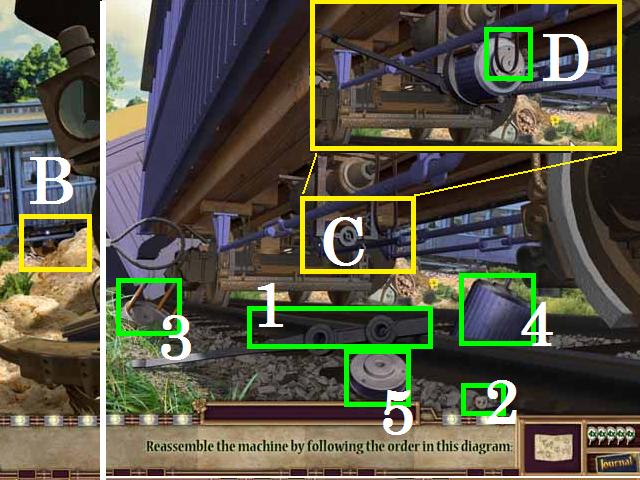
- Go back outside and zoom in under the dining car (B).
- Pick up the five parts, all marked in green, one at a time in the order of the number next to it, (1- 5) and place on the machine (C).
- Click the belt (D).
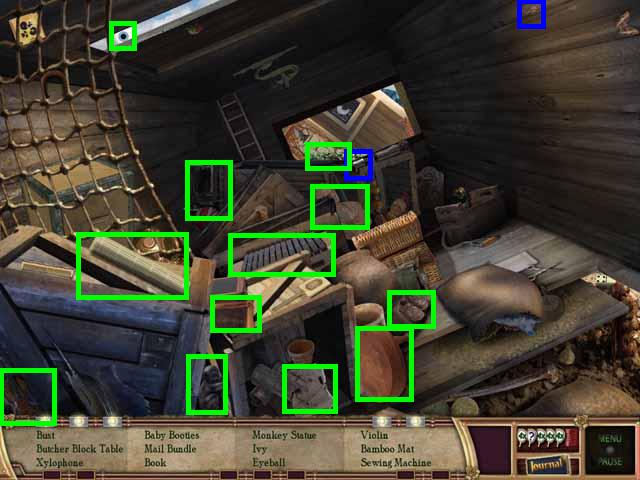
- Enter the dining car then the box car through the backdoor.
- Pick up the Hint Mirror and the TIN CAN.
- Pick up all of the items in the inventory bar.
- Move to the next car through the back door.
- Pick up the Hint Mirror and the TIN CAN.
- Move the golf bag (E).
- Pick up all of the items in the inventory bar.
- Use the PLUNGER to open the panel (F).
- Pick up the BOX (G) and open it with the KEY.
- Place the box as shown in the screenshot.
- Return to Main St.
- Zoom into the Oak A coral (H).
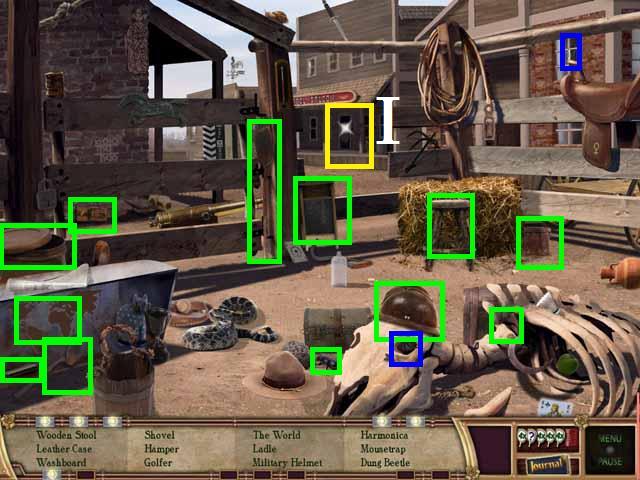
- Pick up the Hint Mirror and the TIN CAN.
- Pick up all of the items in the inventory bar.
- Zoom into the saloon (I).
Box 7
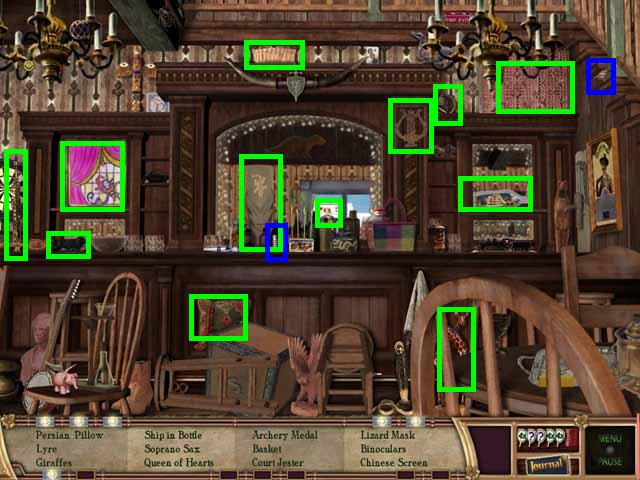
- Pick up the Hint Mirror and the TIN CAN.
- Pick up all of the items in the inventory bar.

- Give the BINOCULARS to the ghost.
- Place the SYMBOL (J) on the box (K) and zoom in.
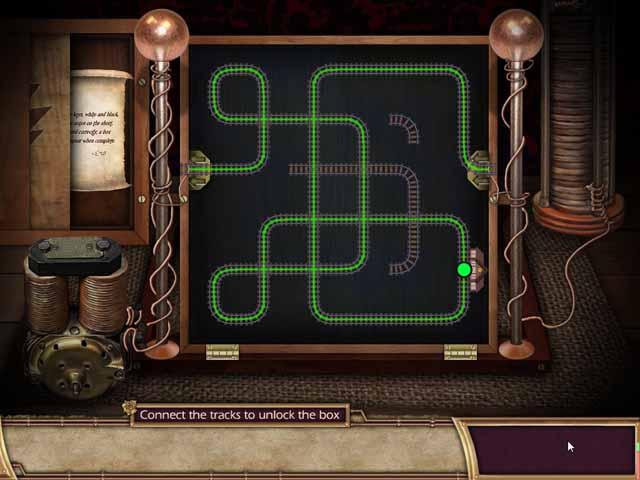
- Solve the puzzle by connecting the tracks as seen in the screenshot.
- Click left screen to move to another side of the bar.
- Pick up the Hint Mirror and the TIN CAN.
- Move the card (L).
- Pick up all of the items in the inventory bar.
- Exit back to the coral.

- Pick up the Hint Mirror and the TIN CAN.
- Move the hat (M).
- Pick up all of the items in the inventory bar.
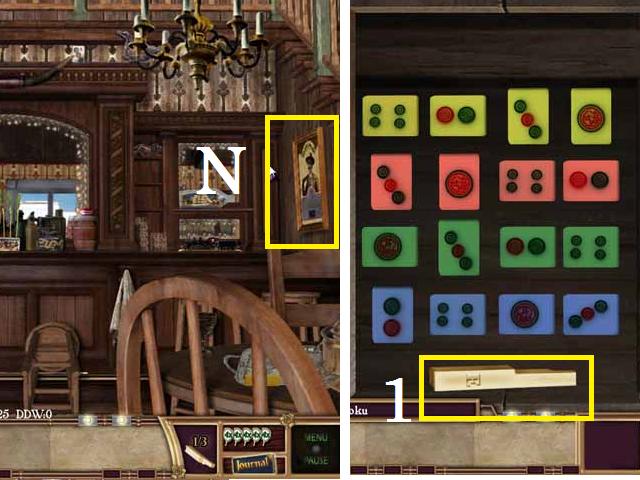
- Inside the main room of the saloon open the wall panel (N) and zoom in.
- Place the tiles as shown in the screenshot then pick up a PIANO KEY (1).
- Pick up the Hint Mirror and the TIN CAN.
- Pick up all of the items in the inventory bar.
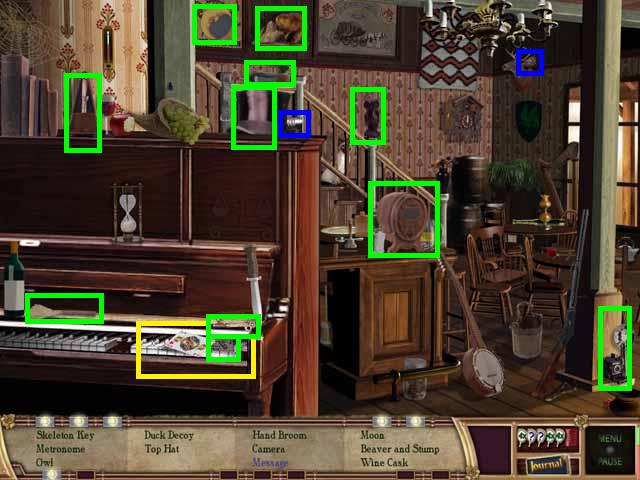
- Go back to the right side of the room.
- Pick up the Hint Mirror and the TIN CAN.
- Move the books (M).
- Pick up all of the items in the inventory bar.
- Drop the PIANO KEY”S over the piano (N).
- Pick up the BOX (O) and open it with the KEY.
- Place it as shown in the screenshot.
- Return to Main St. and exit to the right to enter the alley.
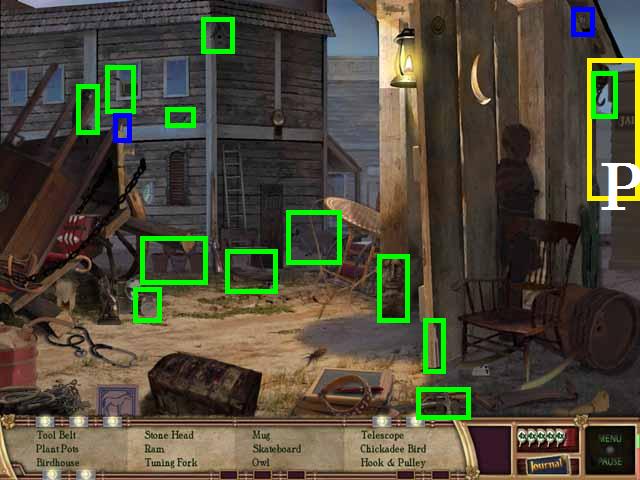
- Pick up the Hint Mirror and the TIN CAN.
- Pick up all of the items in the inventory bar.
- Zoom into the Jail (P) and enter the door.
Box 8
- Pick up the Hint Mirror and the TIN CAN.
- Pick up all of the items in the inventory bar.
- Give the HAT to the ghost.
- Place the SYMBOL (Q) on the box (R) and zoom in.

- Solve the puzzle by connecting the tracks as seen in the screenshot.
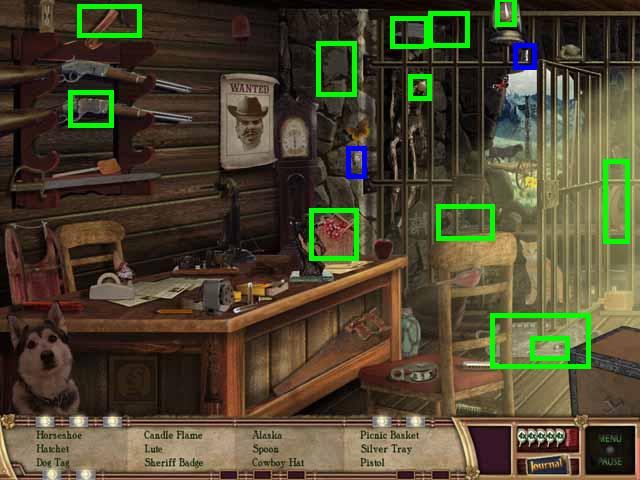
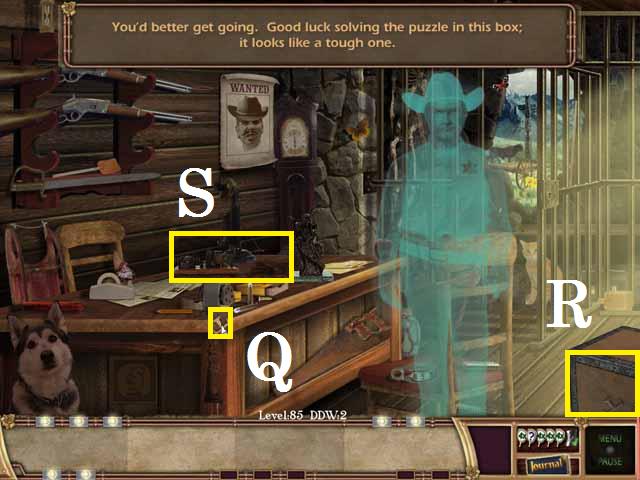
- Zoom into the desk (S).
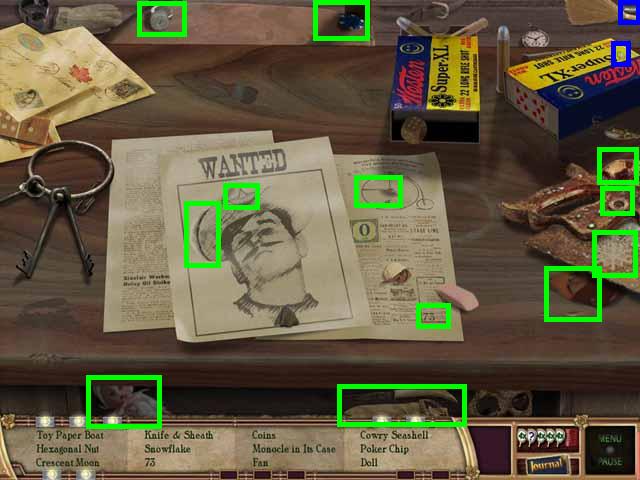
- Pick up the Hint Mirror and the TIN CAN.
- Pick up all of the items in the inventory bar.
- Zoom out back to the room and return to the alley.
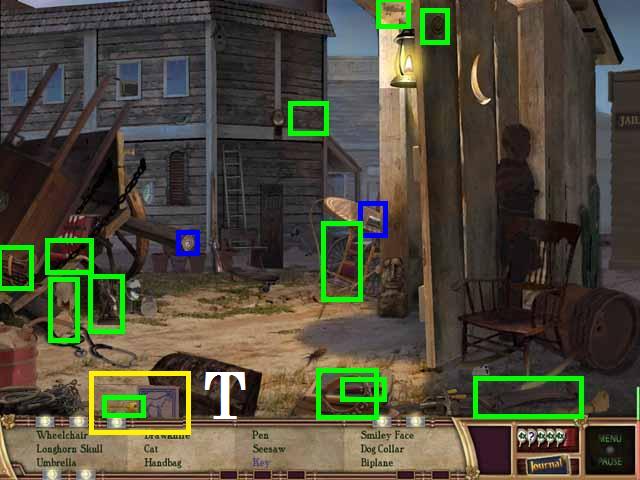
- Pick up the Hint Mirror and the TIN CAN.
- Move the horse picture (T).
- Pick up all of the items in the inventory bar.
- Return to the jail.
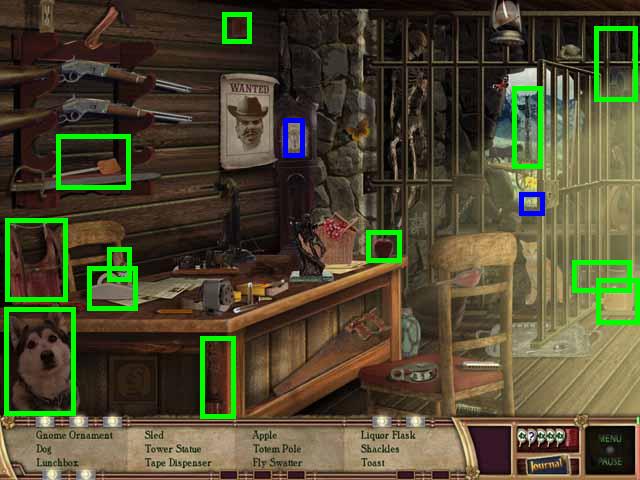
- Pick up the Hint Mirror and the TIN CAN.
- Pick up all of the items in the inventory bar.
- Zoom into the desk.
- Pick up the Hint Mirror and the TIN CAN.
- Open the panel (U) on the desk.
- Pick up all of the items in the inventory bar.
- Place the BRASS PIECE on the front left corner (V) of the desk to open a hidden panel.
- Pick up the BOX (W) and unlock with the KEY.
- Place the box as shown in the screenshot.
- At the jails front door, exit to the right to, go to the well.
Box 9
- Pick up the Hint Mirror and the TIN CAN.
- Pick up all of the items in the inventory bar.
- Zoom into the inside of the well (X).
- Click on the wall (Z) three times.
- Pick up the Hint Mirror and the TIN CAN.
- Pick up all of the items in the inventory bar.
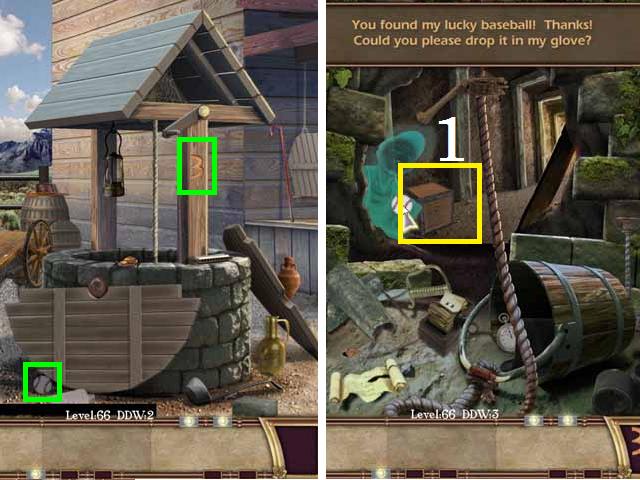
- Exit the well and pick up the BASEBALL (green) and the NUMBER 3 (green).
- Go down the well and give the BASEBALL to the ghost.
- Place the NUMBER 3 on the box (1) and zoom in.
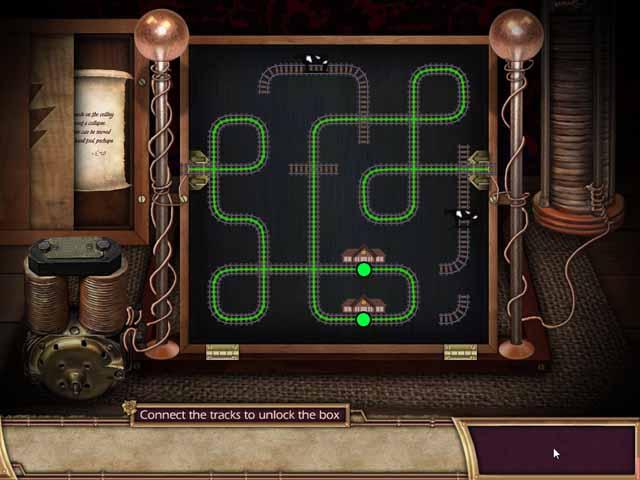
- Solve the puzzle by connecting the tracks as seen in the screenshot.
- Go through the hole in the wall.
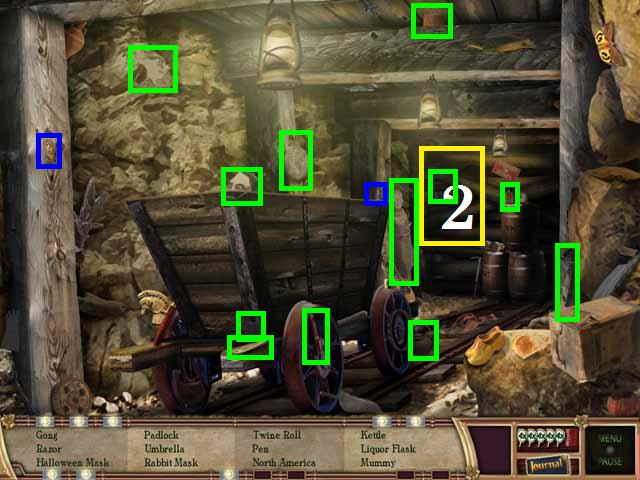
- Pick up the Hint Mirror and the TIN CAN.
- Pick up all of the items in the inventory bar.
- Zoom into the back of the tunnel (2).
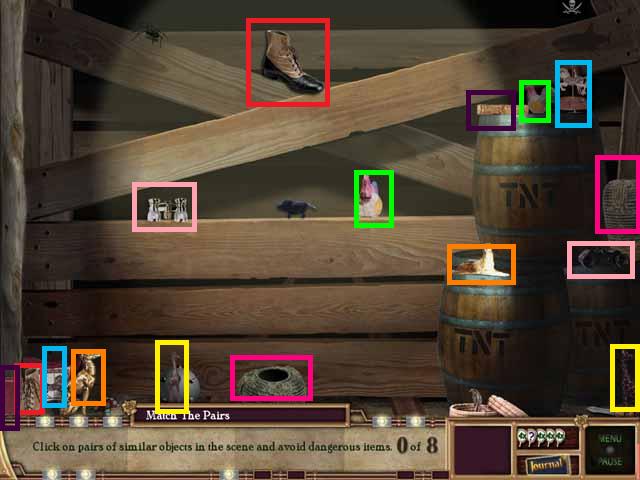
- Pick up the eight pairs of similar items (color coded in the screenshot).
- Go back to just inside the well.
- Pick up the Hint Mirror and the TIN CAN.
- Pick up all of the items in the inventory bar.
- Return through the hole in the wall.
- Pick up the Hint Mirror and the TIN CAN.
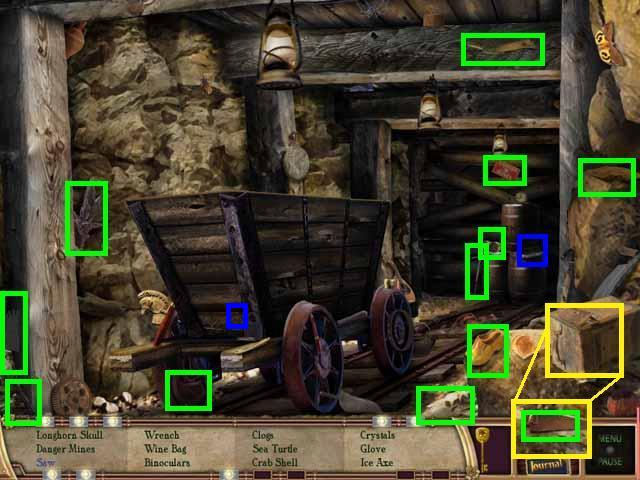
- Move the box (3).
- Pick up all of the items in the inventory bar.
- Move back down the tunnel and SAW all three of the boards (4) off and walk through.
- Open the BOX (green) on the stairs with the KEY.
- Open the door (5) and go through into the kitchen.
Box 10
- Pick up the Hint Mirror and the TIN CAN.
- Pick up all of the items in the inventory bar.
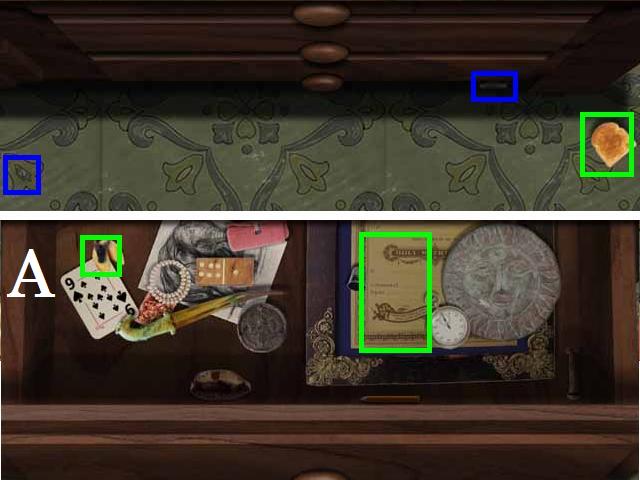
- Zoom into the dry sink (6).
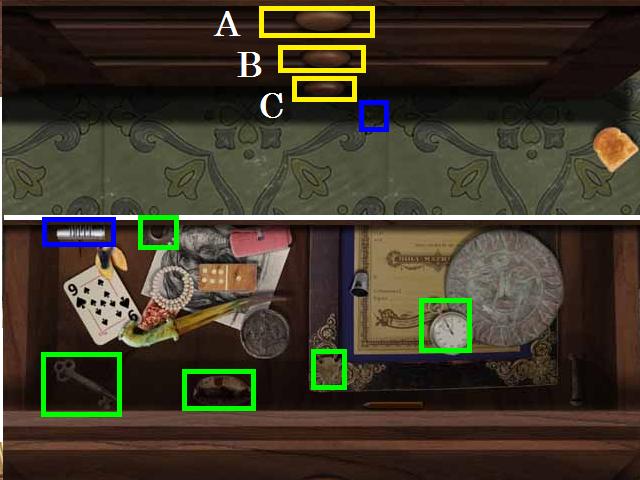
- Pick up the HINT MIRROR.
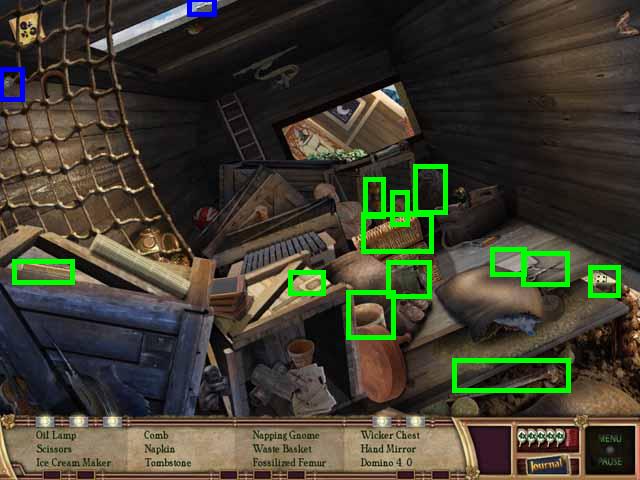
- Open the top drawer (A) and pick up the inventory items marked in green in the screenshot.
- Pick up the TIN CAN marked in blue.
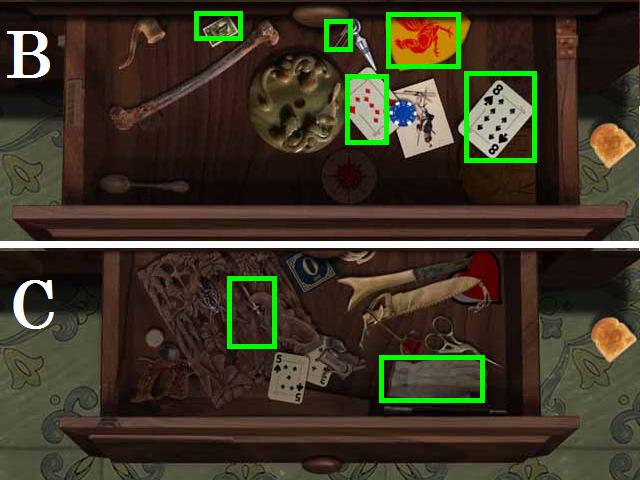
- Open the middle drawer (B) and pick up the items marked in green.
- Open the bottom drawer (C) and pick up the items marked in green.
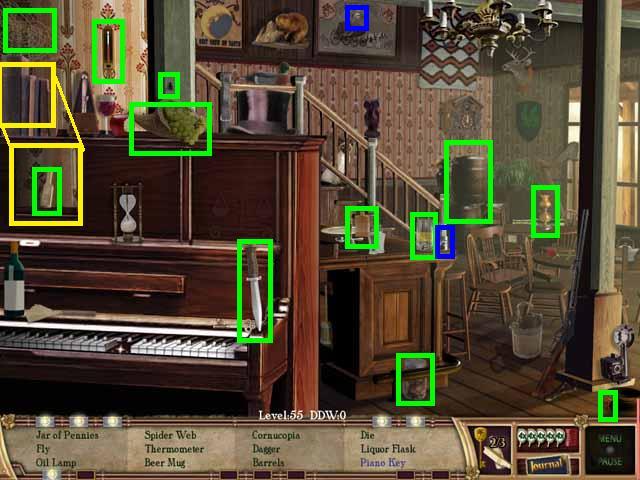
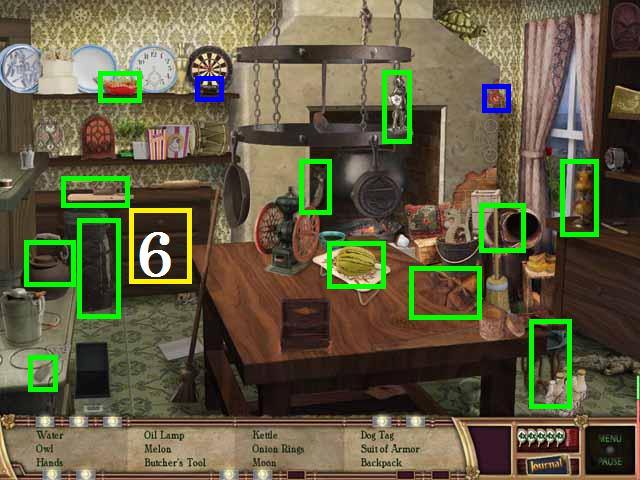
- Exit the kitchen to the left into the living room.
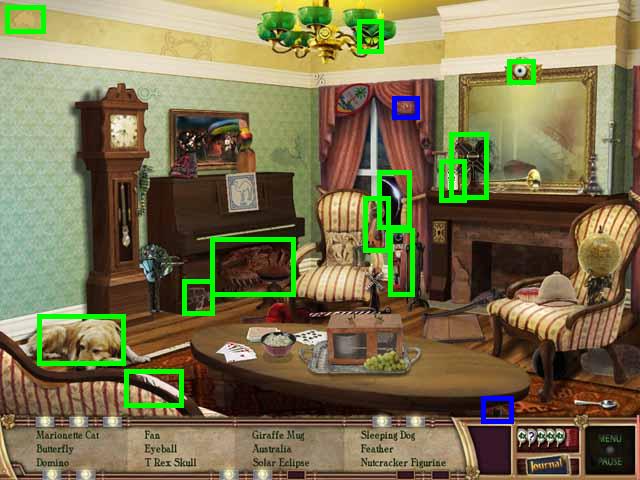
- Pick up the Hint Mirror and the TIN CAN.
- Pick up all of the items in the inventory bar.
- Return to the kitchen.
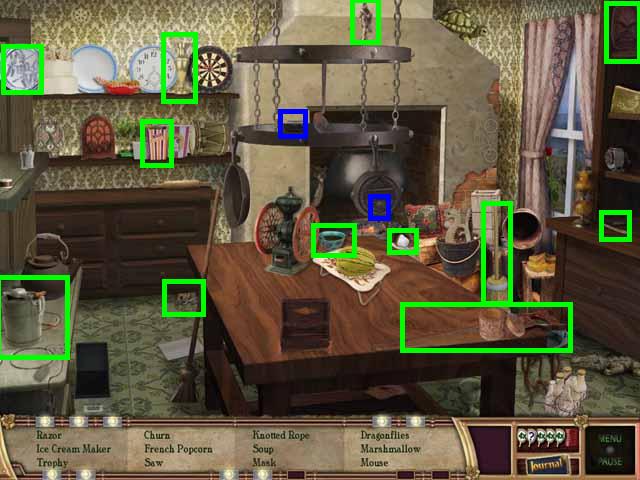
- Pick up the Hint Mirror and the TIN CAN.
- Pick up all of the items in the inventory bar.
- Zoom into the dry sink.
- Pick up the TIN CAN (blue), the HINT MIRROR (blue) and the TOAST (green).
- Open the top drawer (A) and pick up the inventory items marked in green in the screenshot.
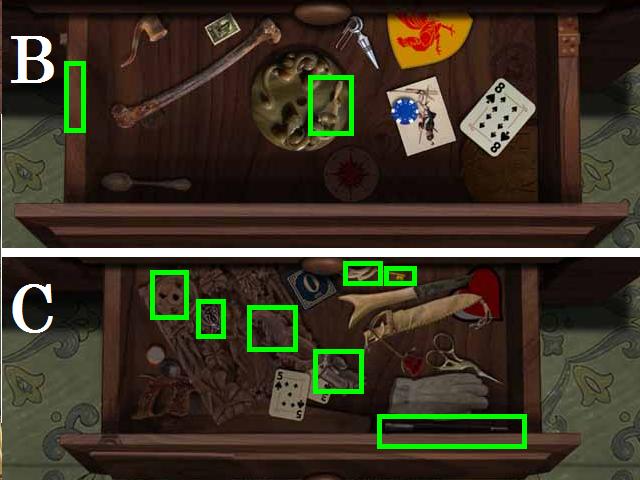
- Open the middle drawer (B) and pick up the items (green).
- Open the bottom drawer (C) and pick up the items (green).
- Return to the living room.
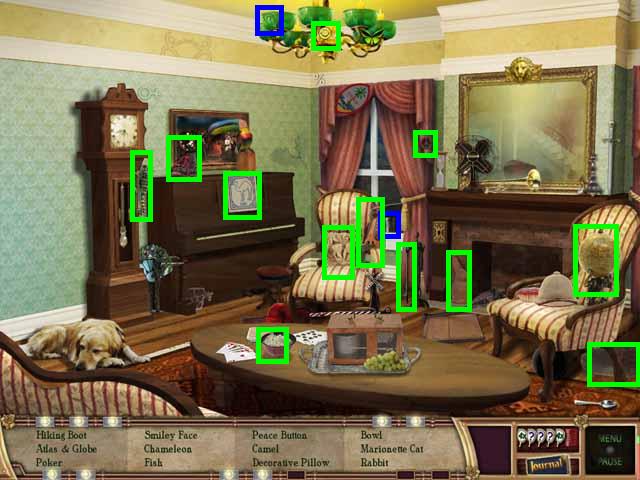
- Pick up the Hint Mirror and the TIN CAN.
- Pick up all of the items in the inventory bar.
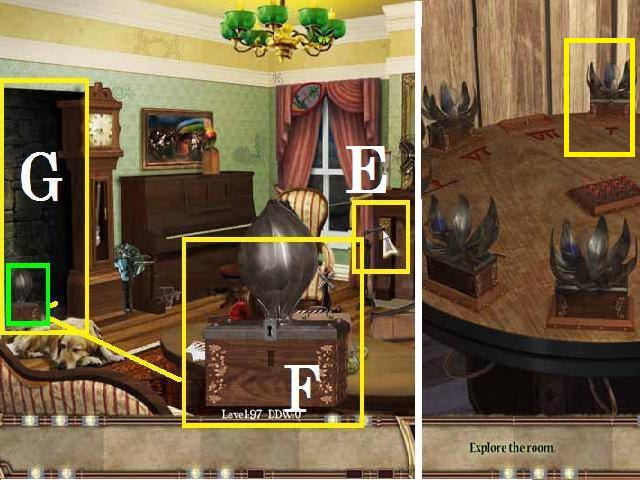
- Place the POCKER in the keyhole (E) on the fire place.
- Pick up the BOX (F) and open with the KEY.
- Place it as shown in the screenshot.
- Go down the hidden passageway (G).
Box 11
- Pick up the Hint Mirror and the TIN CAN.
- Pick up all of the items in the inventory bar.
- Zoom into the desk (H).
- Pick up the Hint Mirror and the TIN CAN.
- Move the mini megaphone (I).
- Pick up all of the items in the inventory bar.
- Zoom out to the main room.

- Pick up the Hint Mirror and the TIN CAN.
- Pick up all of the items in the inventory bar.
- Move the timer and pick up the BOX (K) then open it with the KEY.
- Place the box as shown in the screenshot.
- Zoom into the machine (L).
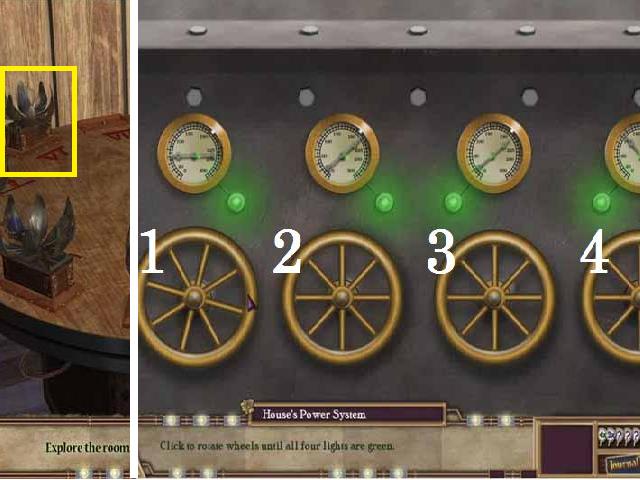
- From left to right turn the 4th wheel twice, the 2nd wheel twice, and the 1st wheel twice.
Box 12
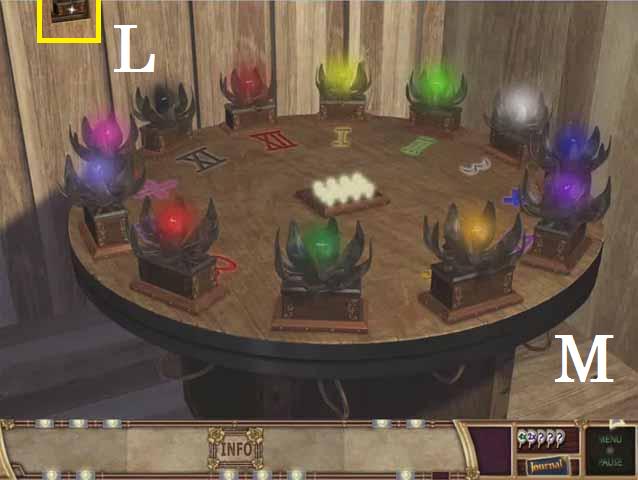
- Open the panel (M) and pick up the last box and place it on the table.
- Swap the light bulbs by clicking on one and then another. Arrange the colored bulbs as shown in the screenshot (N).
- Congratulations you have freed the town of Mirror wood!


 Calavera: Day of the Dead Walkthrough, Guide, & Tips
 Danse Macabre: Deadly Deception Walkthrough, Guide, & Tips
 Shaban Walkthrough, Guide, & Tips
 Haunted Train: Spirits of Charon Walkthrough, Guide, & Tips
 Tamara the 13th Walkthrough, Guide, & Tips