Danse Macabre: Deadly Deception Walkthrough, Guide, & Tips
Danse Macabre: Deadly Deception Walkthrough

Welcome to the Danse Macabre: Deadly Deception Walkthrough
Was Marion Ashworth murdered? Uncover the victim’s true identity!
Whether you use this document as a reference when things get difficult or as a road map to get you from beginning to end, we’re pretty sure you’ll find what you’re looking for here.
This document contains a complete Danse Macabre: Deadly Deception game walkthrough featuring annotated screenshots from actual gameplay!
We hope you find this information useful as you play your way through the game. Use the walkthrough menu below to quickly jump to whatever stage of the game you need help with.
Remember to visit the Big Fish Games Forums if you find you need more help. Have fun!
This walkthrough was created by Nina de Boo, and is protected under US Copyright laws. Any unauthorized use, including re-publication in whole or in part, without permission, is strictly prohibited.
General Tips
- This is the official guide for Danse Macabre: Deadly Deception.
- This guide will not mention each time you have to zoom into a location; the screenshots will show each zoom scene.
- Hidden-object puzzles are referred to as HOPs. This guide will not show screenshots of the HOPs, but it will mention when a HOP is available and the inventory item you’ll collect from it.
- This guide will give step-by-step solutions for all puzzles that are not random. Please read the instructions in the game for each puzzle.
Chapter 1: Death of a Ballerina

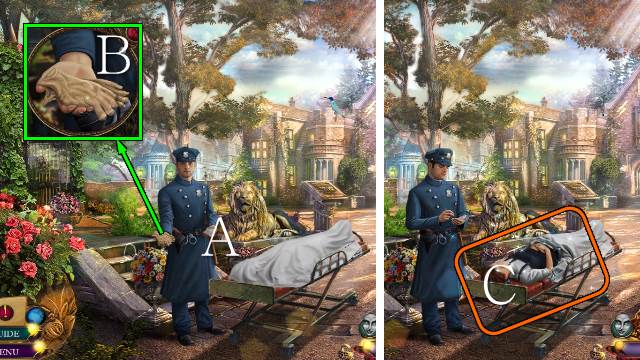
- Talk to the policeman (A); take the GLOVES (B).
- Use the GLOVES (C).

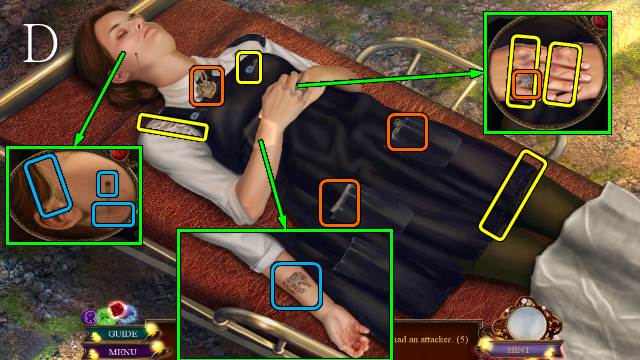
- Find the clues (D).
- You receive the VICTIM’S LOCKET.

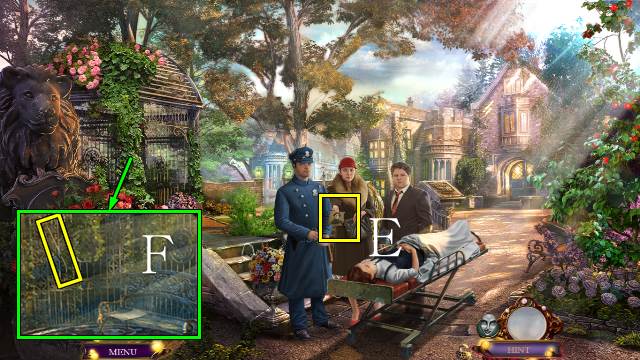
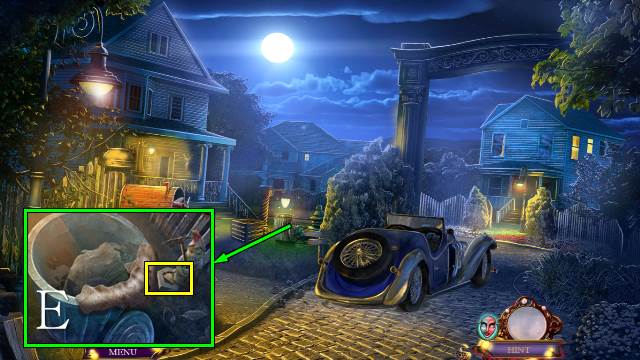
- Take MARION’S PHOTO (E).
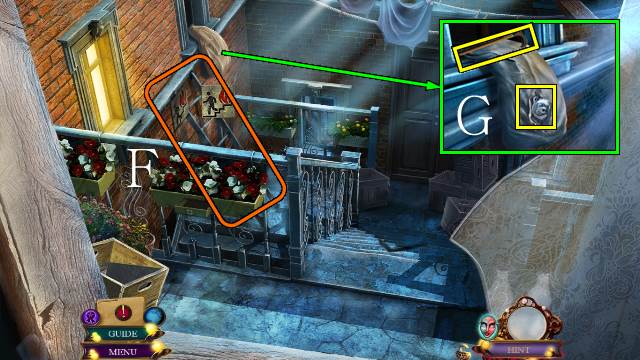
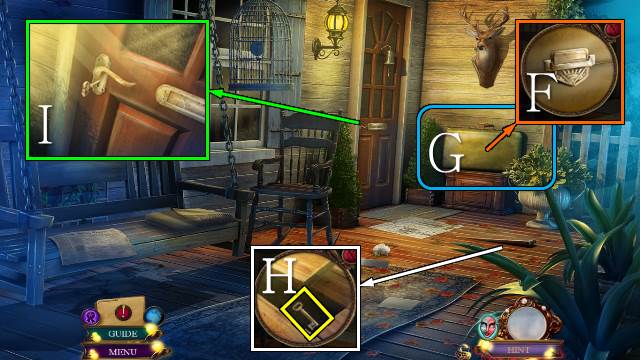
- Move and take the RUSTY BAR (F).
- Walk forward.

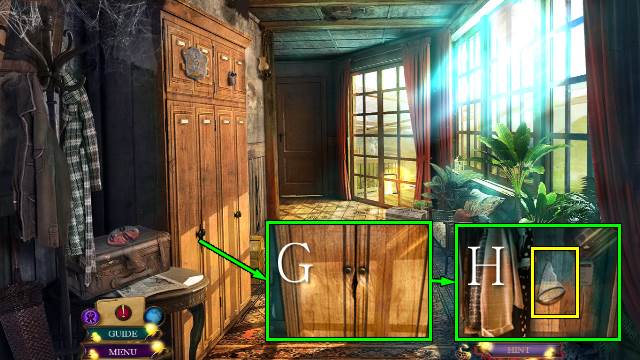
- Open the cupboard (G); move the coats and take the NET (H).
- Walk forward.

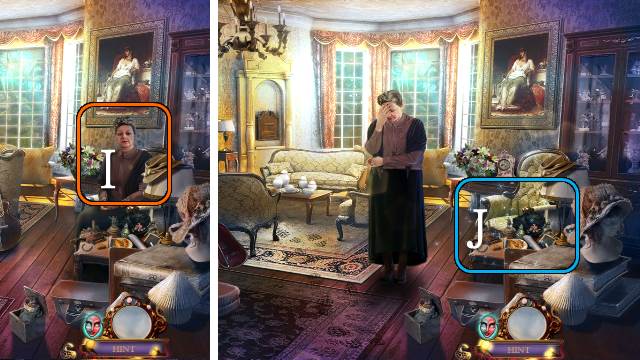
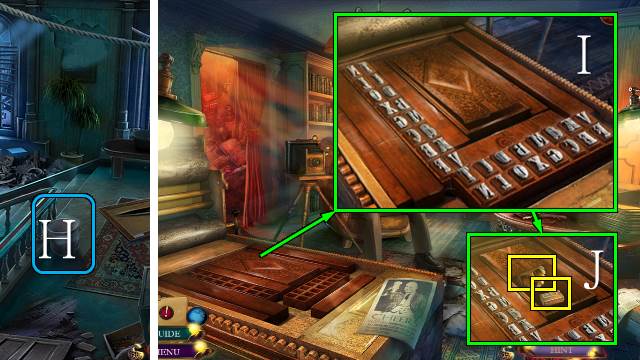
- Give Madame Compton MARION’S PHOTO (I).
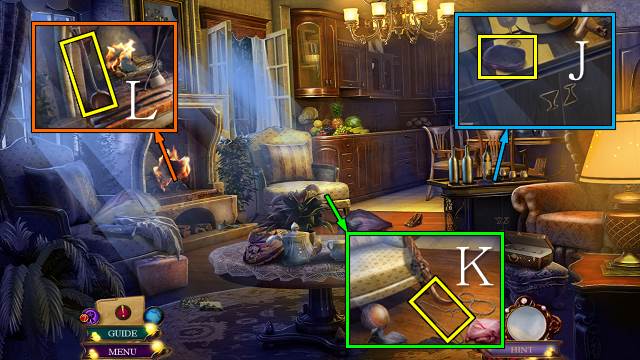
- Play the HOP (J).
- You receive FABRIC BUTTON 1/4.

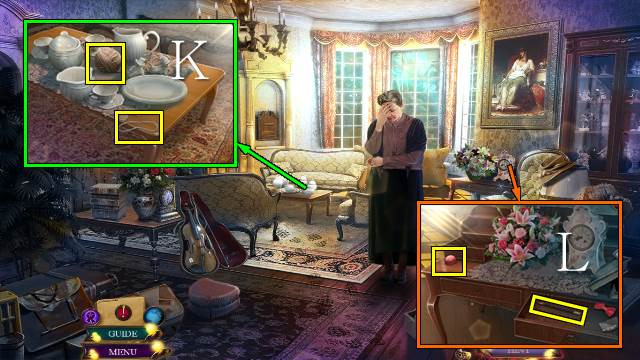
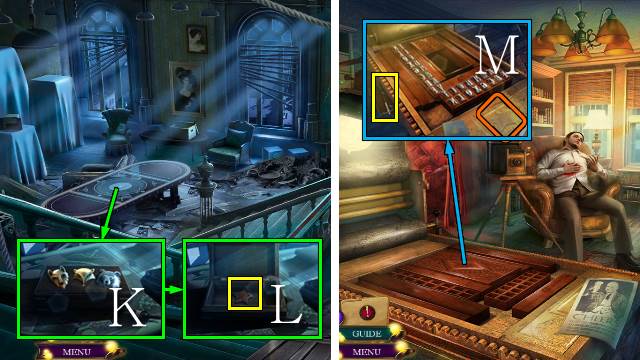
- Move the milk jug and take the RUBBER BAND and YARN (K).
- Open the drawer and take the PENCIL and FABRIC BUTTON 2/4 (L).
- Walk down twice.

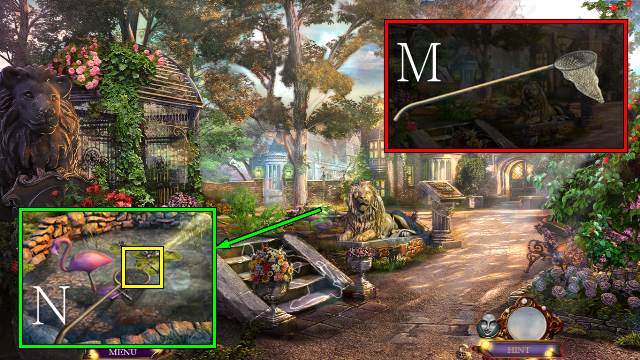
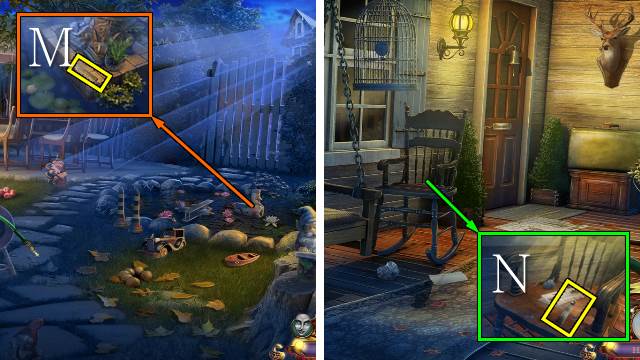
- Access the RUSTY BAR and attach the NET; you receive a BUTTERFLY NET (M).
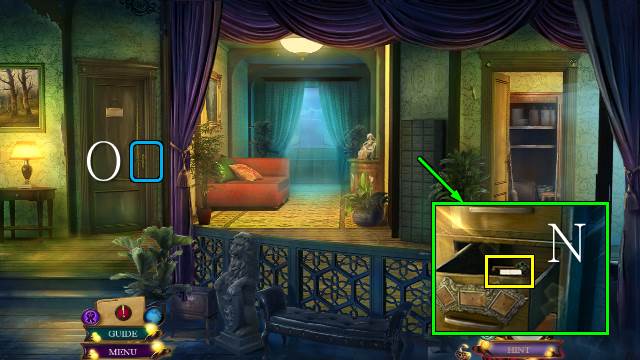
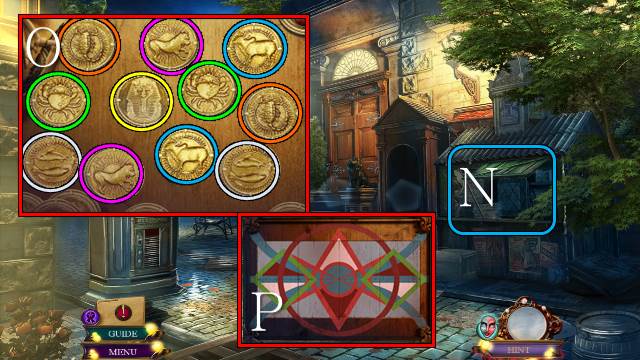
- Take the HAMMERS CHARM with the BUTTERFLY NET (N).
- Go forward.

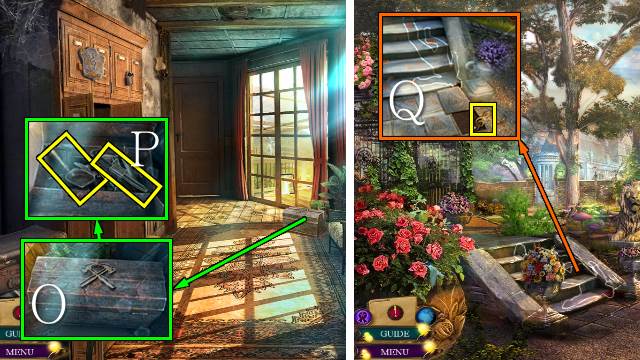
- Place the HAMMERS CHARM (O); take the SHOVEL and WRENCH (P).
- Walk down.
- Use the SHOVEL; take the TREBLE CLEF (Q).
- Walk forward.

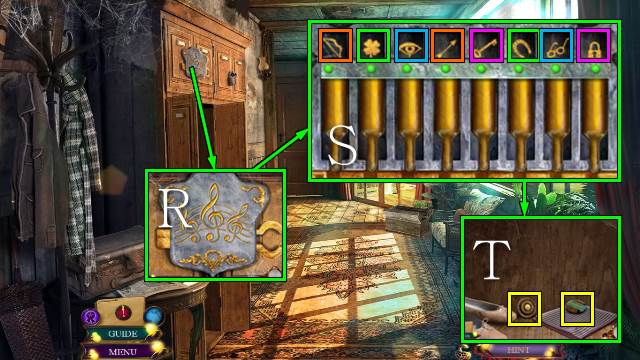
- Place the TREBLE CLEF (R) for a mini-game (S).
- Take the BRASS KNOB and COLORED DISC 1/3 (T).
- Walk forward.

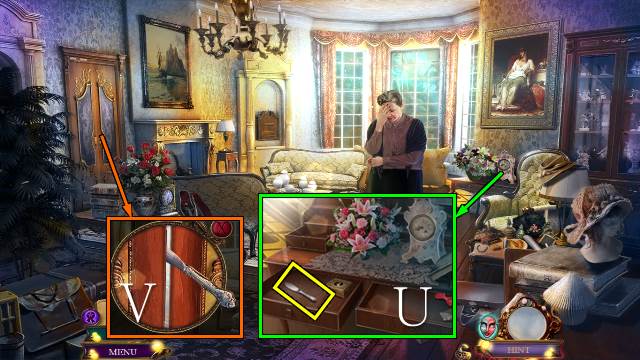
- Place the BRASS KNOB, open the drawer and take the BUTTER KNIFE (U).
- Use the BUTTER KNIFE (V).
- Go left.

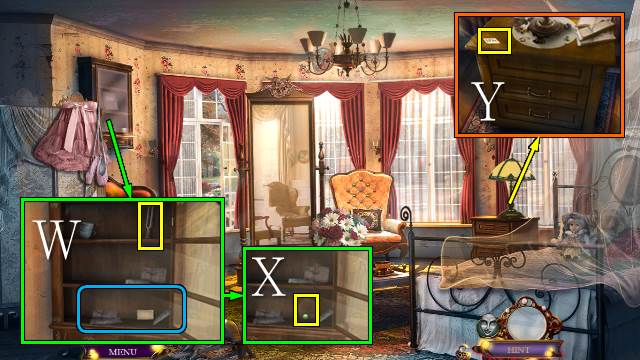
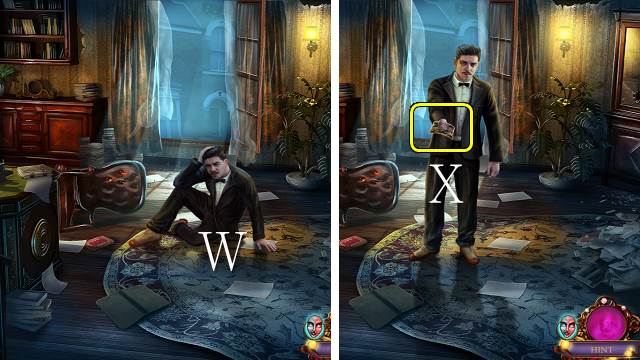
- Open the cabinet, move the letters, take the note and TUNING FORK (W), and FABRIC BUTTON 3/4 (X).
- Take the CODE (Y).
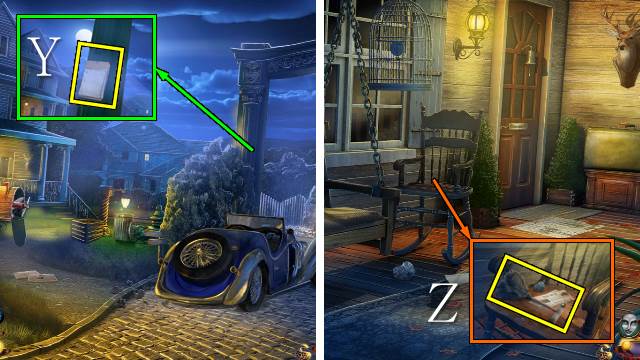
- Walk down.

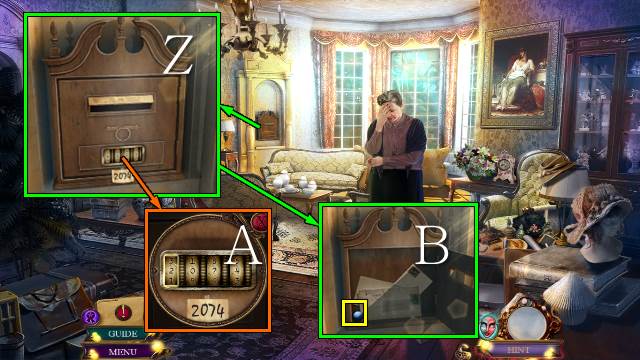
- Place the CODE (Z); enter 2074 (A) and take FABRIC BUTTON 4/4 (B).
- Go left.

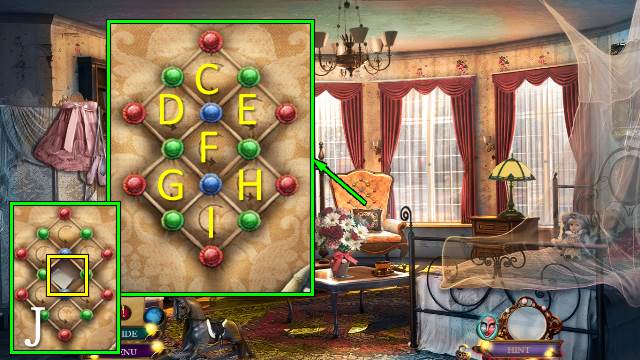
- Place the FABRIC BUTTONS for a mini-game.
- Solution: Cx2-D-Hx2-Ex3-Fx2-Hx2-G-Ix2.
- Take the THREATENING LETTER (J).
- Walk down.

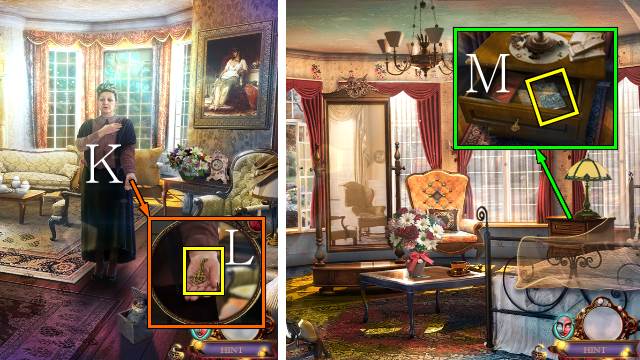
- Give the THREATENING LETTER to Madame Compton (K).
- Take the DRAWER KEY (L).
- Go left.
- Use the DRAWER KEY and open the drawer; take the VICTIM’S DIARY (M).
- Walk down.

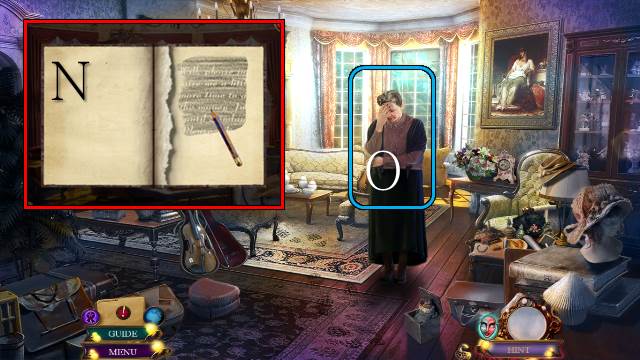
- Access and open the VICTIM’S DIARY; turn the page, use the PENCIL and take the LETTER FOR WILL (N).
- Show the LETTER FOR WILL to Madame Compton (O).
- Go forward.

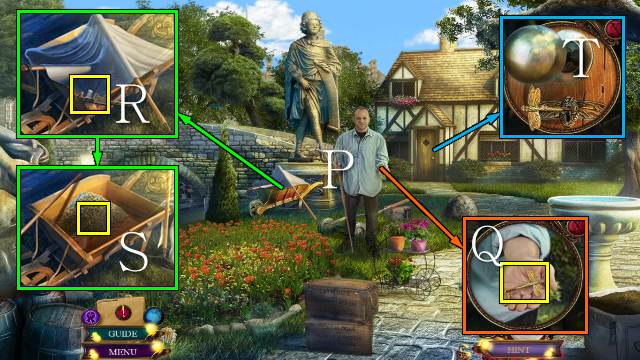
- Show the LETTER FOR WILL to Will (P).
- Take WILL’S KEY (Q).
- Use the WRENCH and take the GLASS CUTTER BLADE (R); move the tarp and take a PEBBLE (S).
- Place and turn WILL’S KEY (T).
- Walk forward.

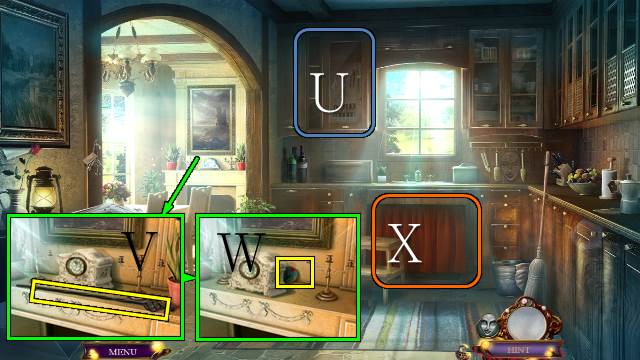
- Open the cabinet for a mini-HOP (U).
- You receive a FISHING LURE.
- Take the FIRE POKER (V), move the clock, read the notes and take COLORED DISC 2/3 (W).
- Open the curtain (X).
- Walk down.

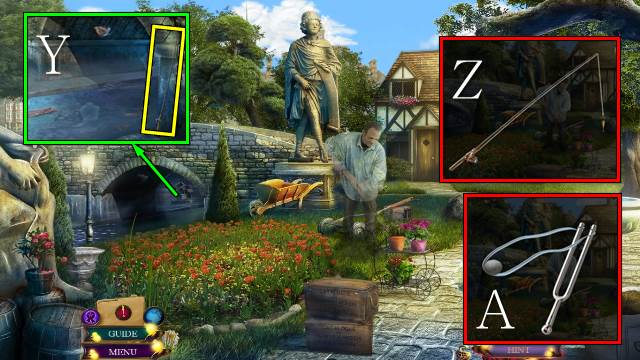
- Take the BROKEN FISHING POLE (Y).
- Access the BROKEN FISHING POLE and attach the YARN and FISHING LURE; you receive a FISHING POLE (Z).
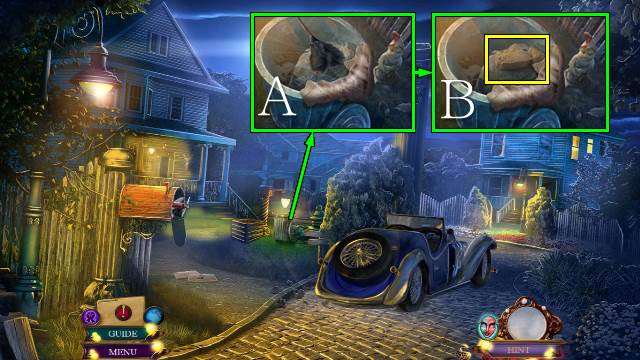
- Access the TUNING FORK, attach the RUBBER BAND and PEBBLE; you receive a SLINGSHOT (A).

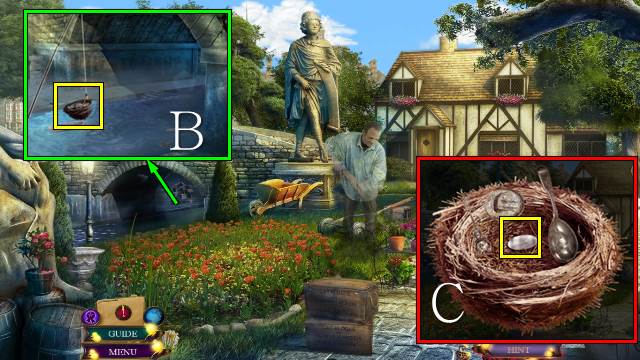
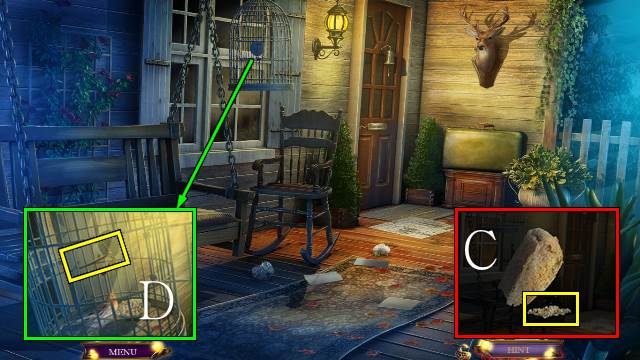
- Use the SLINGSHOT, then the FISHING POLE; take the BIRD’S NEST (B).
- Access the BIRD’S NEST, move the trinkets and take COLORED DISC 3/3 (C).
- Walk forward.

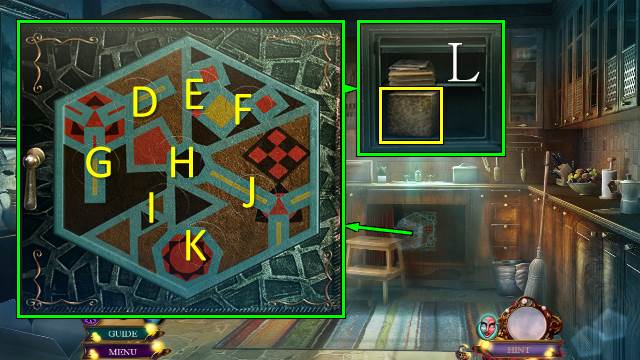
- Place the COLORED DISCS for a mini-game.
- Solution: swap D-J, E-I, F-H, G-K, turn Fx3-Kx2-Ex3-Dx3-Hx3-G.
- Take MARION’S POSSESSIONS (L).
- Walk down.

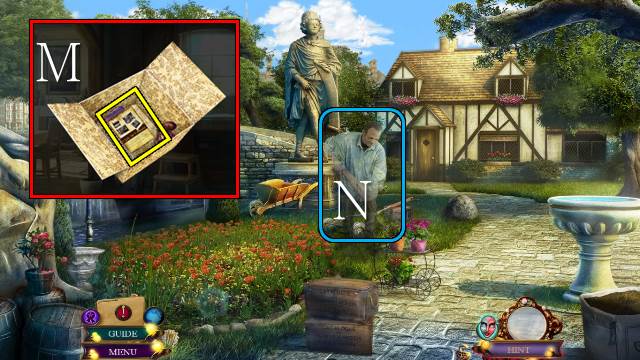
- Access MARION’S POSSESSIONS, open the box, move the items and take the CLUB DE CELESTE FLYER (M).
- Show the CLUB DE CELESTE FLYER to Will (N).
Chapter 2: Club de Celeste

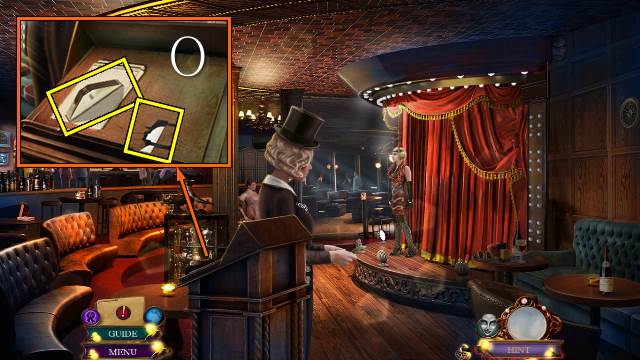
- Walk forward.
- Take the PAPERWEIGHT and PAPER CUTOUTS (O).
- Walk down.

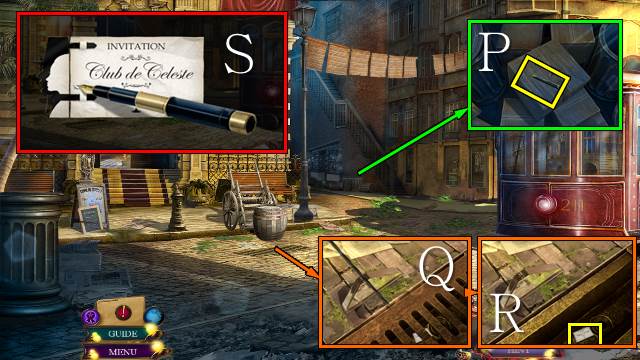
- Take the FOUNTAIN PEN (P).
- Place the PAPERWEIGHT and FIRE POKER (Q); take the DISCARDED INVITATION (R).
- Access the DISCARDED INVITATION, attach the PAPER CUTOUTS and use the FOUNTAIN PEN; you receive a CLUB DE CELESTE INVITATION (S).
- Go forward.

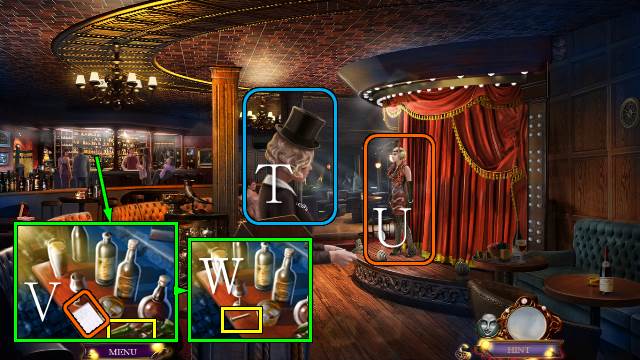
- Give the CLUB DE CELESTE INVITATION to the hostess (T).
- Talk to the dancer (U).
- Take the note, BROKEN BOTTLE (V) and STRIKER WHEEL (W).
- Walk down.

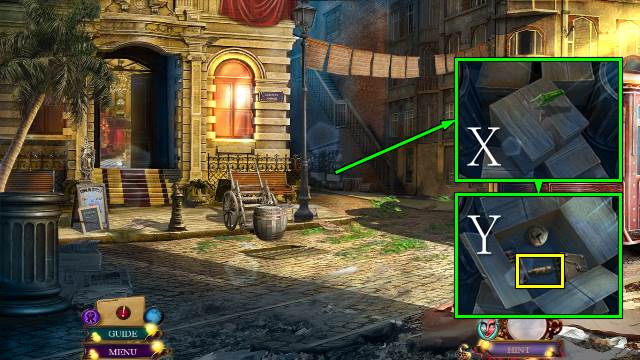
- Use the BROKEN BOTTLE (X); move the items and take the BROKEN LIGHTER (Y).
- Walk forward.

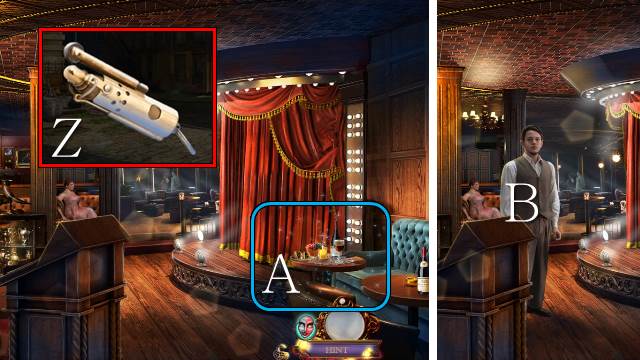
- Access the BROKEN LIGHTER and attach the STRIKER WHEEL; you receive a LIGHTER (Z).
- Use the LIGHTER and play the HOP (A).
- You receive a GEAR CUFFLINK.
- Show MARION’S PHOTO to Danny, then show him the VICTIM’S LOCKET (B).
- Go right.

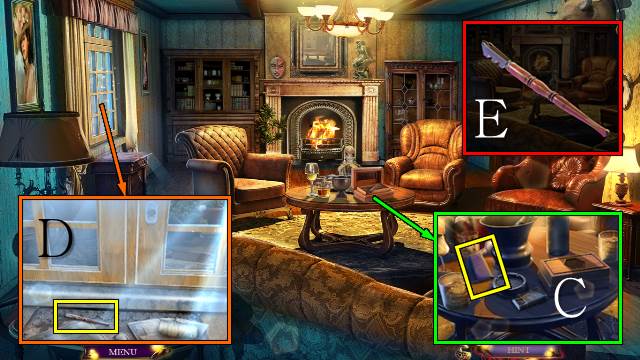
- Move the glass and box and take the WALLET (C).
- Take the CIGARETTE HOLDER (D).
- Access the GLASS CUTTER BLADE and attach the CIGARETTE HOLDER; you receive a GLASS CUTTER (E).

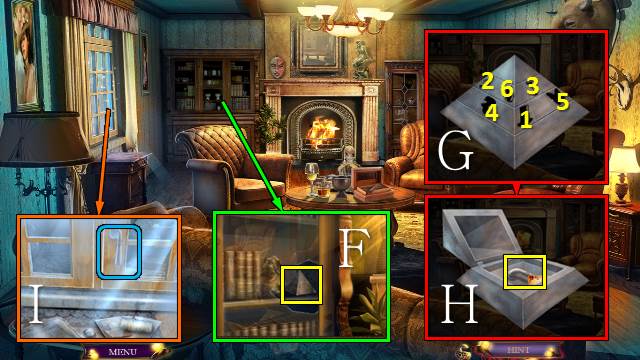
- Use the GLASS CUTTER; take the PYRAMID BOX (F).
- Access the PYRAMID BOX and push the symbols in the indicated order (G); take the note and WINDOW HANDLE (H).
- Place and turn the WINDOW HANDLE (I).
- Go left.

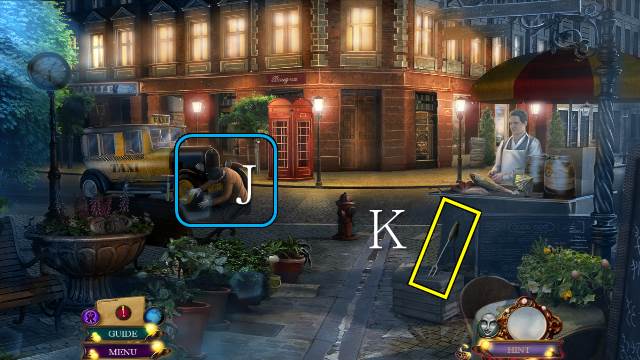
- Talk to the driver (J).
- Take the BARBECUE FORK (K).
- Go right.

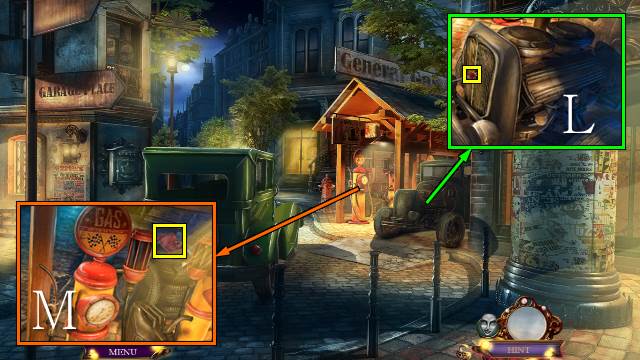
- Use the BARBECUE FORK; take the TELEPHONE EMBLEM (L).
- Take the SANDPAPER (M).
- Walk down.

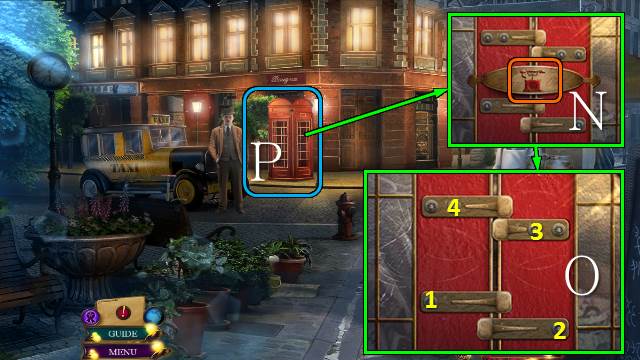
- Place the TELEPHONE EMBLEM (N) and move the latches by touching the bolts in the indicated order (O).
- Play the HOP (P).
- You receive a SMALL BAROMETER.
- Walk down.

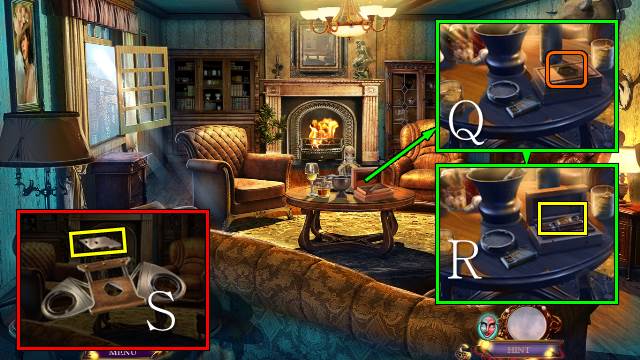
- Place the SMALL BAROMETER (Q); take the CIGAR CUTTER (R).
- Access the CIGAR CUTTER, dismantle it and take the CIGAR CUTTER BLADE (S).
- Go left.

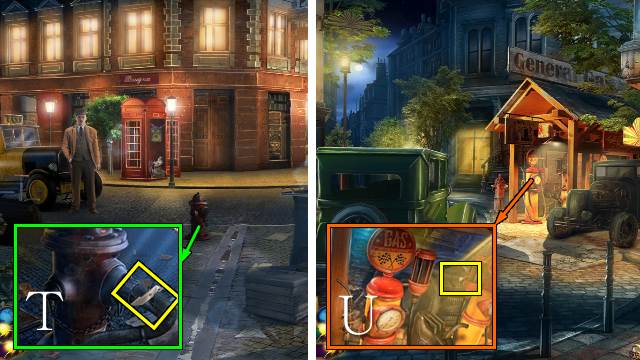
- Take the RUBBER HOSE PIECE with the CIGAR CUTTER BLADE (T).
- Go right.
- Use the CIGAR CUTTER BLADE and take the SOFT RUBBER (U).
- Walk down.

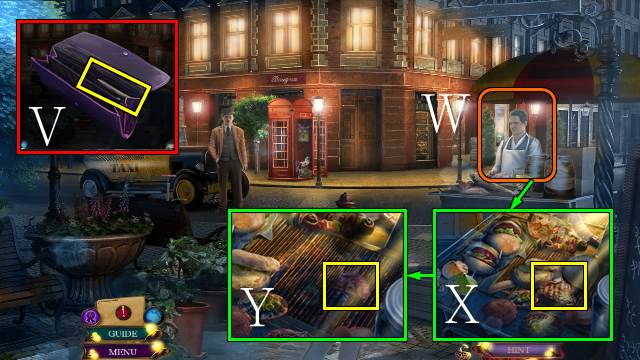
- Access the WALLET, open the zipper and take the DOLLAR (V).
- Talk to the vendor and give him the DOLLAR; you receive QUARTER 1/2 (W).
- Take the STEAK (X); move the items, place the SOFT RUBBER and take the MELTED SOFT RUBBER (Y).

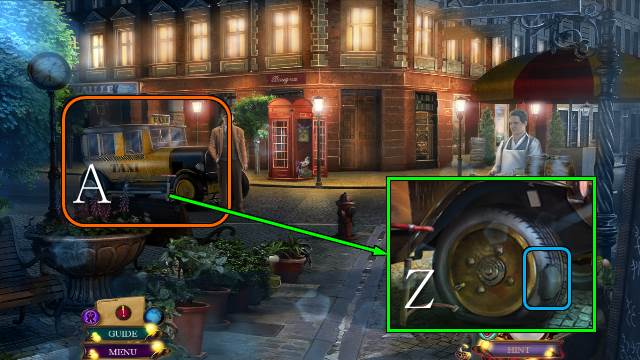
- Place the MELTED SOFT RUBBER and RUBBER HOSE PIECE; use the pump (Z).
- Get into the taxi (A).
Chapter 3: 45 Albion Road

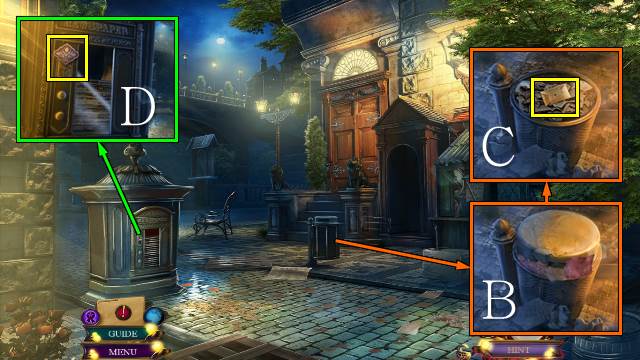
- Use the SANDPAPER (B); take BRASS LETTER 1/3 (C).
- Take the TILE CENTER (D).
- Go forward.

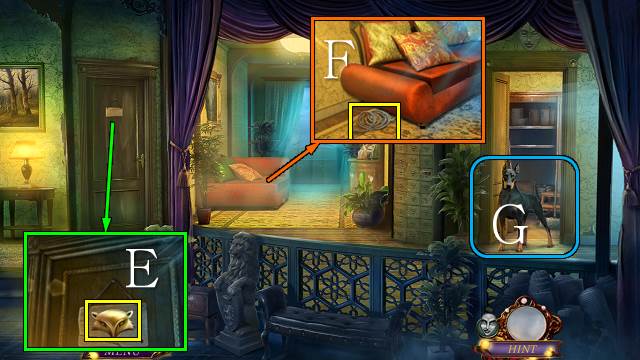
- Turn the sign and take the GOLD FOX (E).
- Move the couch three times and take the ROPE (F).
- Throw the STEAK to the dog; play the HOP (G).
- You receive the NIPPERS.
- Go forward.

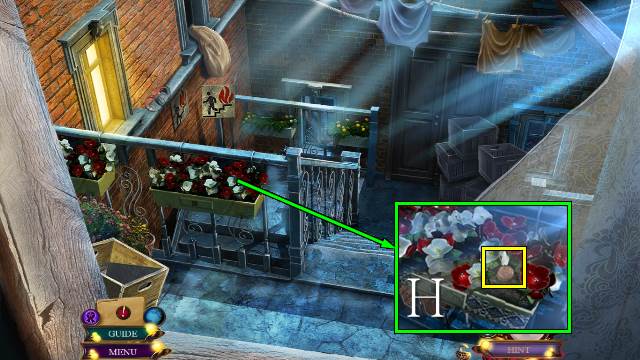
- Move the flowers and take QUARTER 2/2 (H).
- Walk down twice.

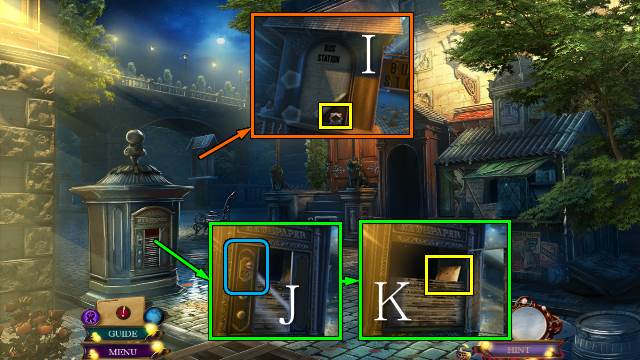
- Use the NIPPERS and take the HOLLOW TILE (I).
- Use the QUARTERS (J) and take BRASS LETTER 2/3 (K).
- Go forward twice.

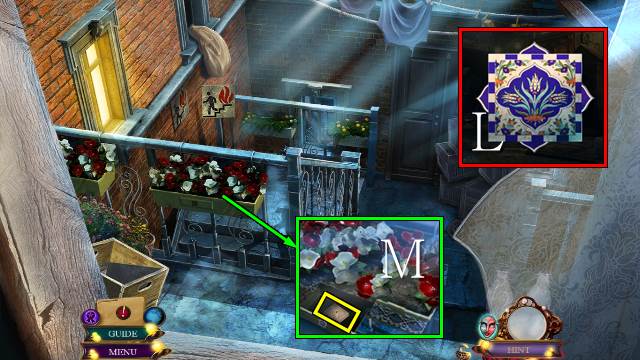
- Access the HOLLOW TILE and place the TILE CENTER; take the FLOWER TILE (L).
- Place the FLOWER TILE and take BRASS LETTER 3/3 (M).
- Walk down.

- Place the BRASS LETTERS; take the note and DANNY’S KEY (N).
- Place DANNY’S KEY (O).
- Go left.

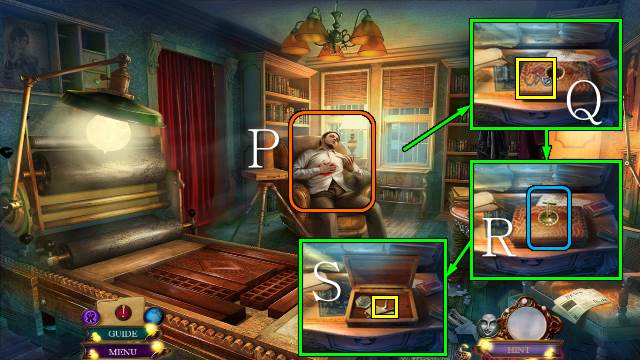
- Talk to Danny (P).
- Take the PENDANT (Q) and place the GEAR CUFFLINK (R); move the items and take the CUPID’S BOW (S).

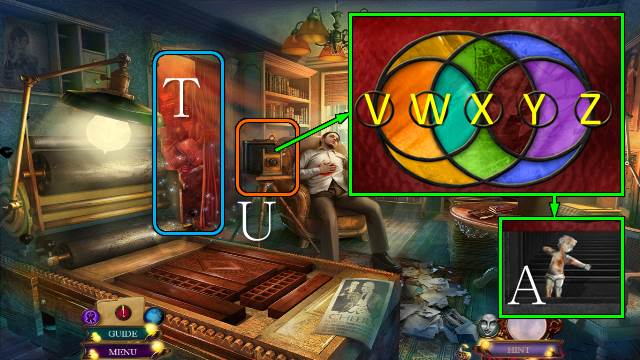
- Use the ROPE; play the HOP (T).
- You receive the LIQUID SILVER.
- Open the camera (U).
- Play the mini-game.
- Solution: V-Y, V-X, X-Z, X-V, W-Z, X-Z, W-Z.
- Take the RUSTY CUPID (A).
- Walk down and forward.

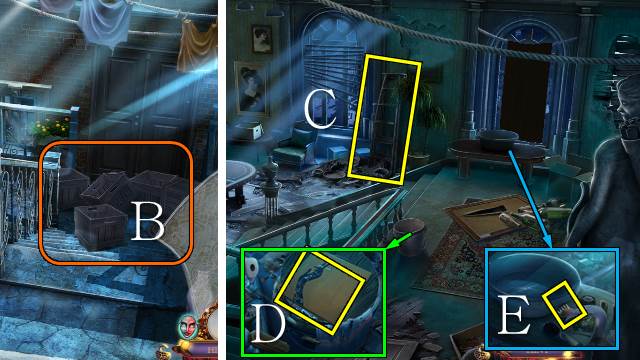
- Move the boxes (B).
- Go forward.
- Take the LADDER (C).
- Take the RECORD ALBUM (D).
- Read the note and take the RUSTY BACK SCRATCHER (E).
- Walk down.

- Place the LADDER (F).
- Use the CIGAR CUTTER BLADE, open the sack and take the SILVER BEAR and WALKING STICK (G).
- Go forward.

- Use the WALKING STICK for a mini-HOP (H).
- You receive a BAG OF LETTERS.
- Go to Danny’s Room.
- Place the BAG OF LETTERS for a mini-game (I).
- Take the MATCHES and BRONZE WOLF (J).
- Go to the Ruined Apartment.

- Place the GOLD FOX, SILVER BEAR and BRONZE WOLF (K); take the WOODEN STAR (L).
- Go to Danny’s Room.
- Move the paper and passport, place the WOODEN STAR; take the PAINTBRUSH (M).
- Walk down twice.

- Zoom into the kiosk and use the MATCHES for a HOP (N).
- HOP memory mini-game (O).
- HOP jigsaw mini-game (P).
- You receive a SMALL HAMMER.
- Go to the Ruined Apartment.

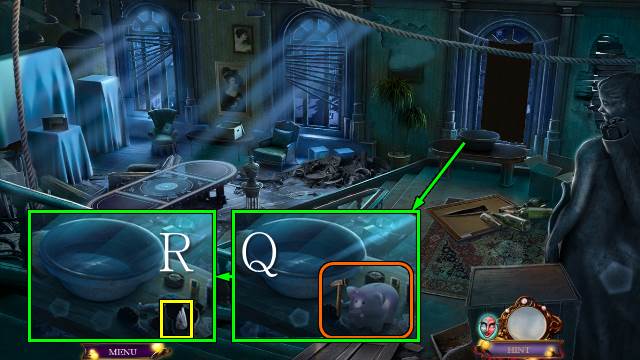
- Use the SMALL HAMMER (Q); take the CUPID’S WING (R).
- Go to Danny’s Room.

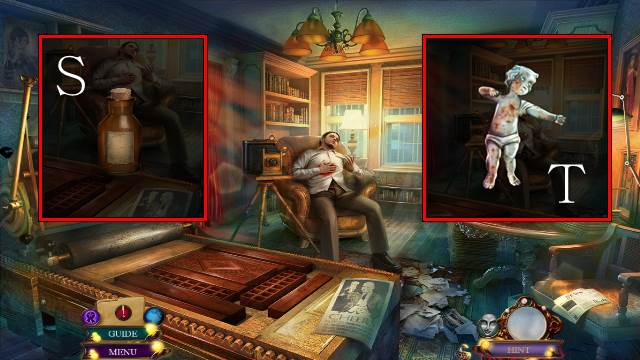
- Access the LIQUID SILVER, open the bottle and place the PAINTBRUSH; you receive a PAINTBRUSH WITH SILVER (S).
- Access the RUSTY CUPID and use the PAINTBRUSH WITH SILVER; you receive a CUPID (T).

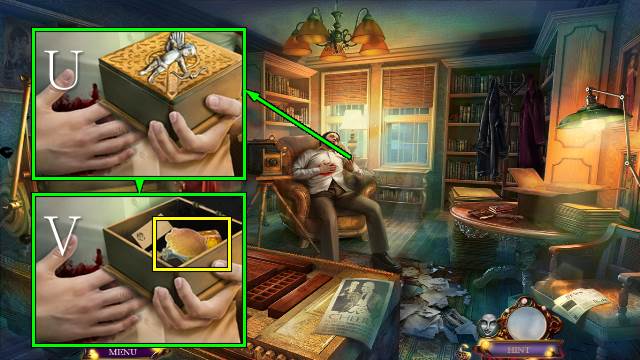
- Place the CUPID, CUPID’S BOW and CUPID’S WING (U); take the notes and FRAGRANCE OIL (V).
Chapter 4: Cotton Avenue Records

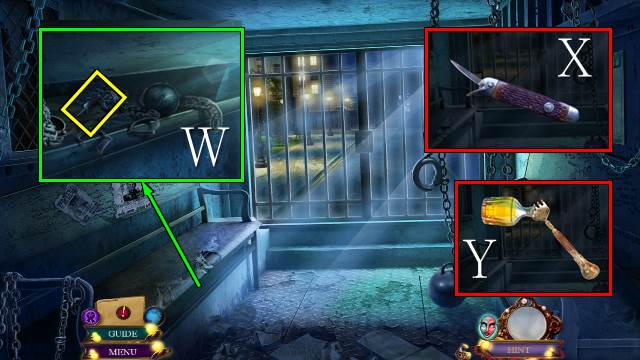
- Move the chains and take the UTILITY KNIFE (W).
- Access the UTILITY KNIFE, close the broken blade and open the small blade (X).
- Access the RUSTY BACK SCRATCHER and use the FRAGRANCE OIL on it; you receive the EXTENDED BACK SCRATCHER (Y).

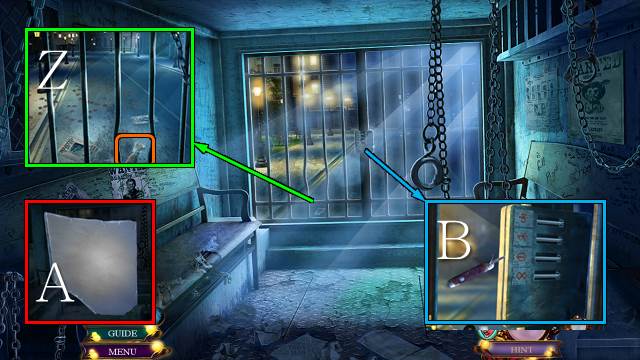
- Take the PIECE OF GLASS with the EXTENDED BACK SCRATCHER (Z).
- Access the PIECE OF GLASS and use the PAINTBRUSH WITH SILVER to get a MIRROR (A).
- Use the UTILITY KNIFE and place the MIRROR for a mini-game (B).

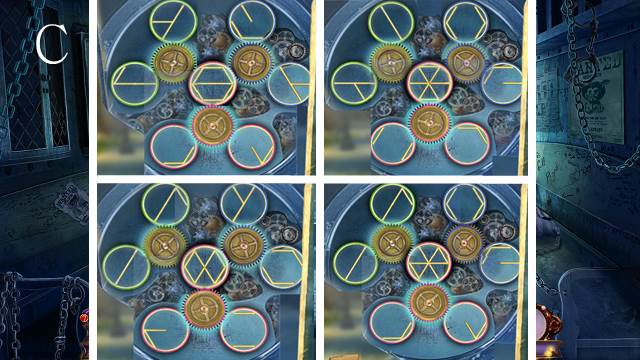
- Solution (C).
- Go forward.

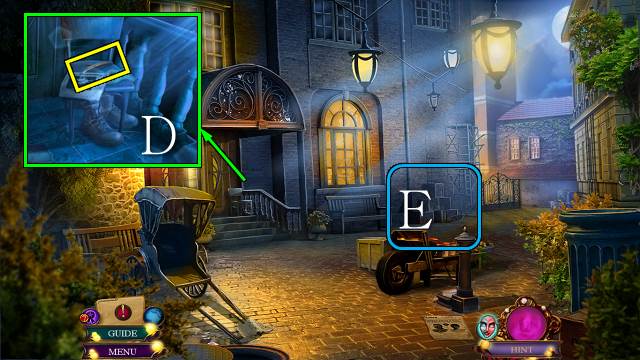
- Move the paper and take the GOLDEN FEATHER (D).
- Play the mini-HOP (E).
- You receive a CHISEL.
- Go forward.

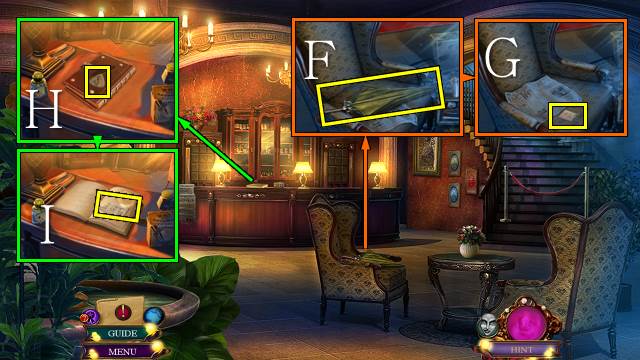
- Take the UMBRELLA (F), move the paper and take SAFE COMBINATION 1/2 (G).
- Take the SAXOPHONE TOKEN (H), place the GOLDEN FEATHER and take SAFE COMBINATION 2/2 (I).

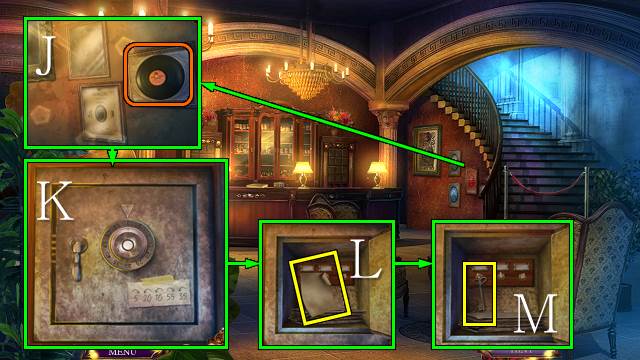
- Take the record and move the frame (J); place the SAFE COMBINATION for a mini-game (K).
- Take PHILLIP’S NOTE (L) and the GATE KEY (M).
- Walk down.

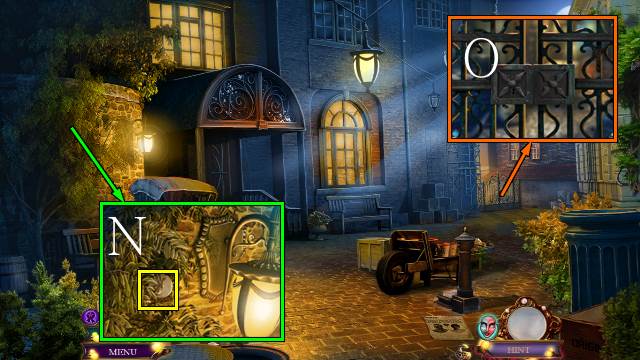
- Use the UMBRELLA and take the VIOLIN TOKEN (N).
- Go right.
- Use the GATE KEY (O).

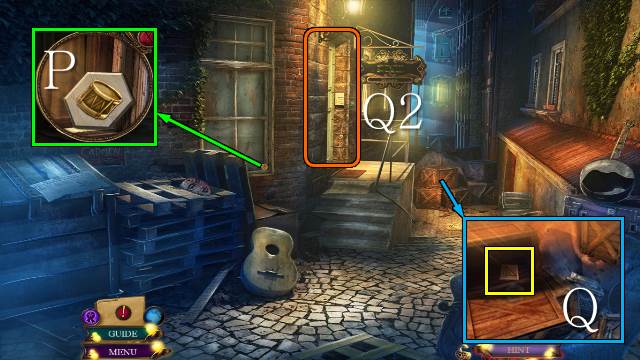
- Take the DRUMS TOKEN (P).
- Use the CHISEL; take the HARP TOKEN (Q).
- Zoom into the door for a mini-game (Q2).

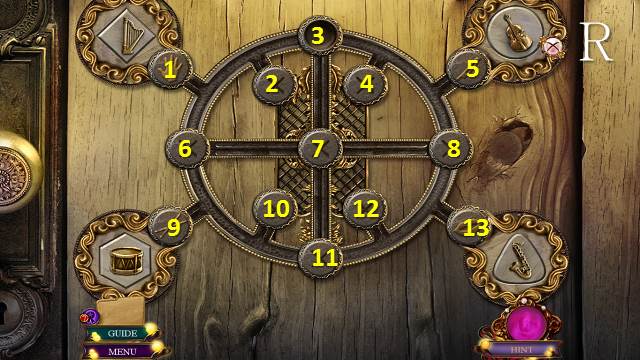
- Place the SAXOPHONE TOKEN, VIOLIN TOKEN, DRUMS TOKEN and HARP TOKEN(R).
- Solution: 11-13-8-7-3-5-8-7-6-1-3-6-9-11-12-8-7-6-9-11.
- Go left.

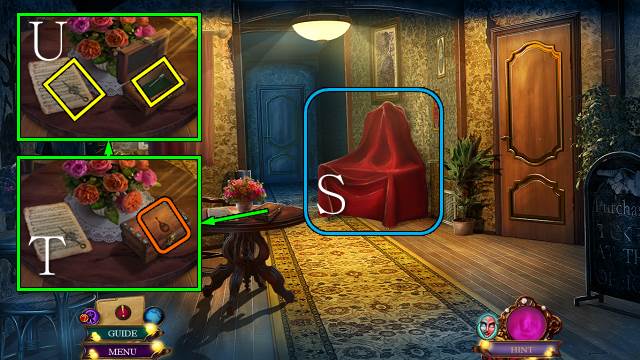
- Move the drape ; play the HOP (S).
- You receive CLOCK WEIGHT 1/2.
- Place the PENDANT (T); take the BOW SCREW and CLOCK HAND 1/2 (U).
- Go forward.

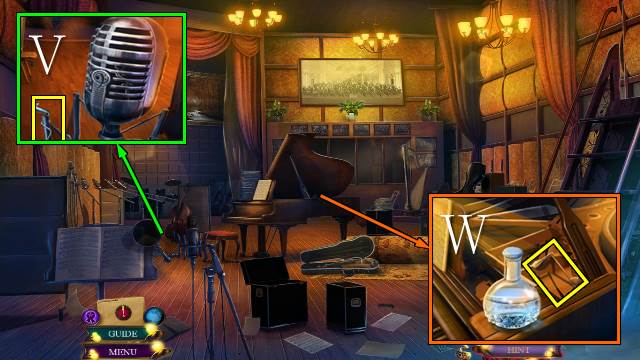
- Take SILVER SNAKE 1/2 (V).
- Take the PIANO HAMMER (W).
- Walk down.

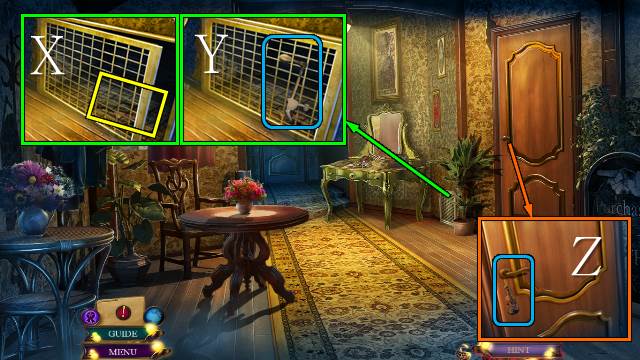
- Use the PIANO HAMMER (X); take the VIOLIN (Y).
- Place the VIOLIN (Z).
- Go right.

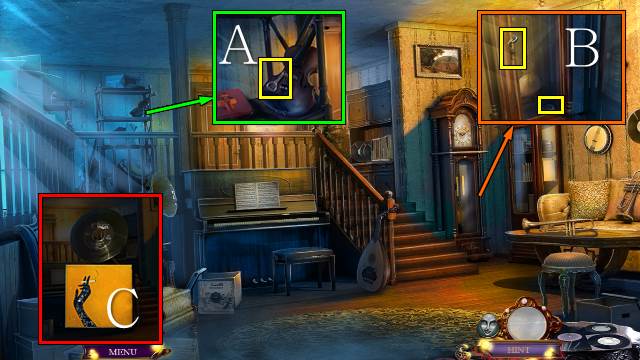
- Take the BOTTLE OPENER (A).
- Take SILVER SNAKE 2/2, open the clock and take the PHONOGRAPH NEEDLE (B).
- Access the RECORD ALBUM and take out the RECORD ALBUM (C).

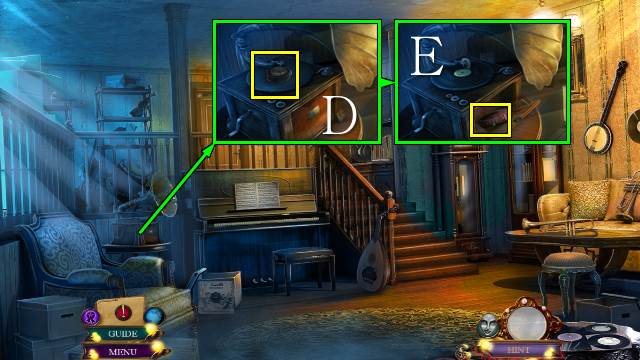
- Take the HANDTRUCK WHEEL (D), place the RECORD ALBUM and PHONOGRAPH NEEDLE and take the MUSIC BOX CYLINDER (E).
- Walk down and forward.

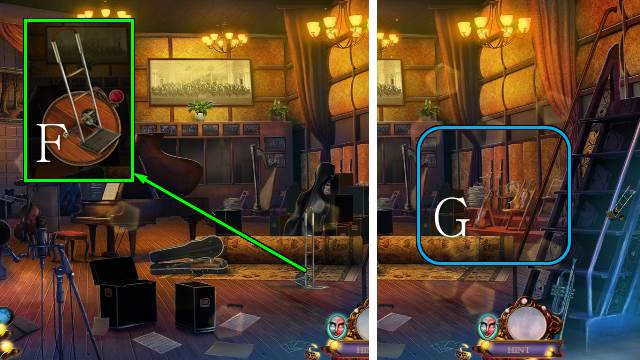
- Place the HANDTRUCK WHEEL; you receive the HANDTRUCK (F).
- Use the HANDTRUCK twice; play the HOP (G).
- You receive a BROKEN BOW.

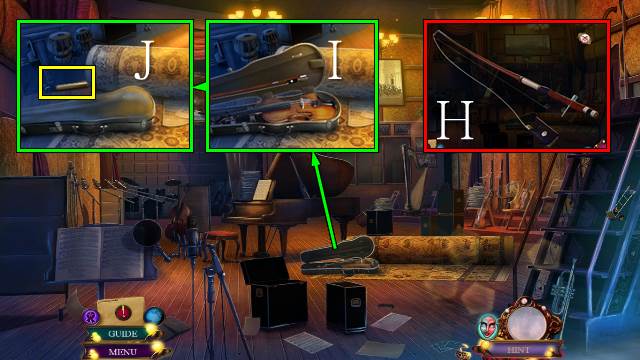
- Access the BROKEN BOW and use the BOW SCREW; you receive a VIOLIN BOW (H).
- Place the VIOLIN BOW (I) and take CLOCK WEIGHT 2/2 (J).
- Go down and right.

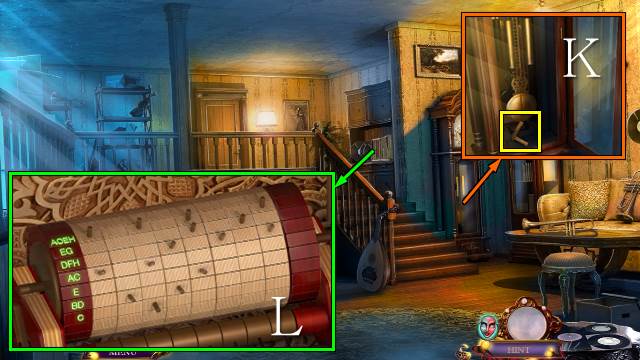
- Place the CLOCK WEIGHTS and take the SMALL CRANK (K).
- Place the MUSIC BOX CYLINDER and SMALL CRANK for a mini-game (L).
- Go forward.

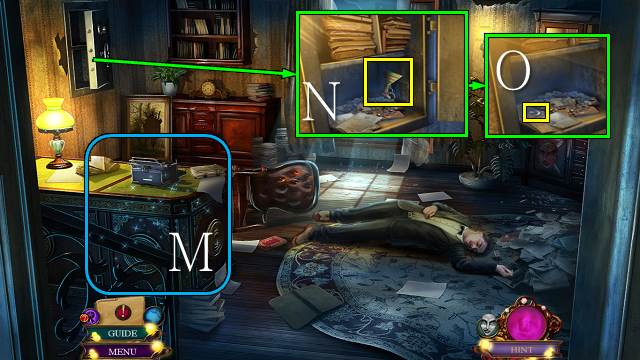
- Play the HOP (M).
- You receive a CRYSTAL GLASS.
- Open the safe and take KEY CHAIN 1/2 (N); move the papers and take the BASS CLEF (O).
- Go to the Recording Room.

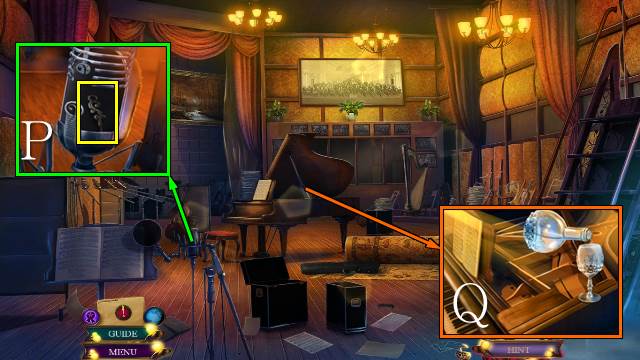
- Place the BASS CLEF; take CLOCK HAND 2/2 (P).
- Use the BOTTLE OPENER and CRYSTAL GLASS; you receive a GLASS OF WATER (Q).
- Go to Phillip’s Office.

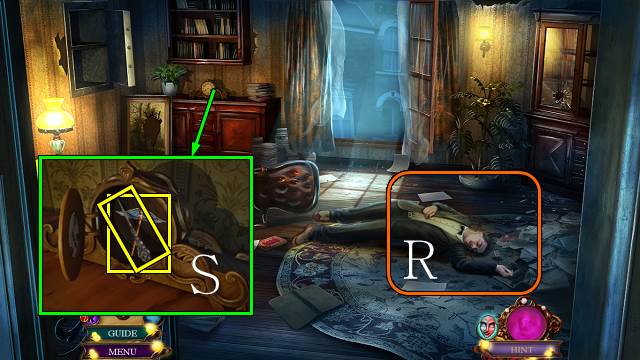
- Give the GLASS OF WATER to Phillip (R).
- Place the CLOCK HANDS; take the SHOE HOOK and INCOMPLETE CADUCEUS (S).
- Walk down.

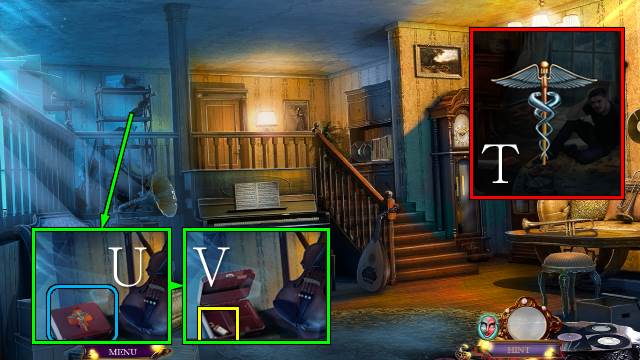
- Access the INCOMPLETE CADUCEUS and place the SILVER SNAKES; you receive the CADUCEUS SYMBOL (T).
- Place the CADUCEUS SYMBOL (U); take the PAINKILLERS (V).
- Go forward.

- Give the PAINKILLERS to Phillip (W).
- Give PHILLIP’S NOTE to Phillip.
- Take the picture (X).
Chapter 5: Fairfax Lodge

- Take the FLY REPELLENT RECIPE (Y).
- Go left.
- Take the DUSTER (Z).
- Walk down.

- Use the DUSTER (A) and take the BREAD (B).
- Go left.

- Access the BREAD, crumble it and take the BREADCRUMBS (C).
- Use the SHOE HOOK, place the BREADCRUMBS and take SMALL PICKAXE (D).
- Walk down.

- Place the SMALL PICKAXE and take the SUITCASE LOCK (E).
- Go left.

- Place the SUITCASE LOCK (F).
- Play the HOP (G).
- You receive a CORKSCREW.
- Use the CORKSCREW; take the LODGE KEY (H).
- Use the LODGE KEY (I).
- Go left.

- Take the PURSE (J).
- Move the items and take the WIRE HANGER (K).
- Take the FIREPLACE SHOVEL (L).
- Go left.

- Take the KNIFE HANDLE (M).
- Walk down twice.
- Place the KNIFE HANDLE to receive a KNIFE (N).
- Walk down.

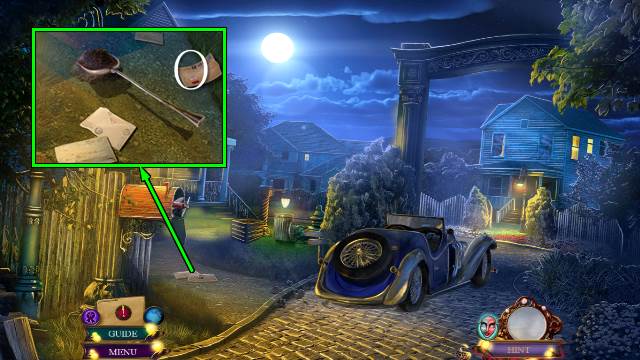
- Move the letters; take the PILE OF DIRT with the FIREPLACE SHOVEL (O).
- Go left twice.

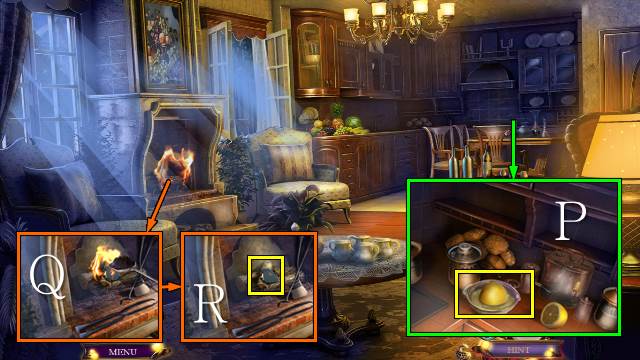
- Move the lemon, use the KNIFE, remove the lemon and take the LEMON JUICE (P).
- Use the PILE OF DIRT (Q); take the BURNED PAPERS (R).

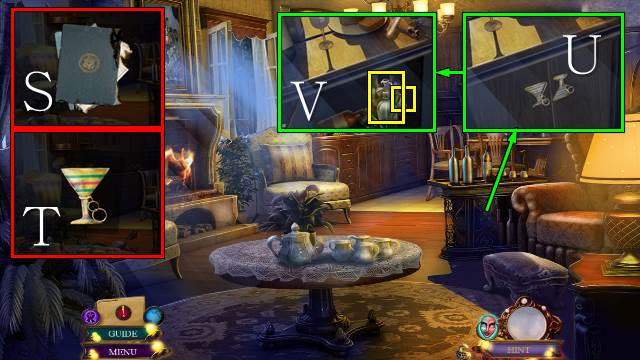
- Access the BURNED PAPERS (S), remove the notes and take the BURNED TICKET and KEY CHAIN 2/2 (T).
- Place the KEY CHAINS (U) and take the SIPHON BOTTLE and CLOVER LEAF 1/2 (V).
- Go left.

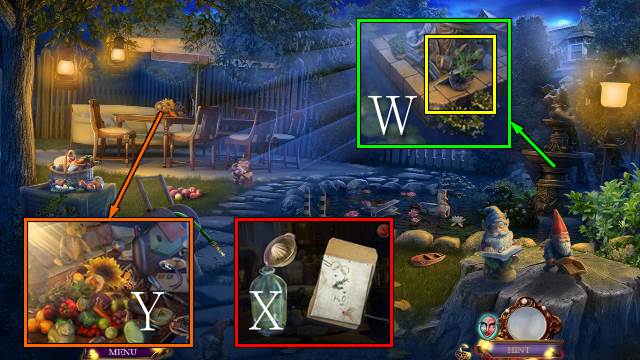
- Use the KNIFE and take the ROSEMARY (W).
- Access the SIPHON BOTTLE, place the FLY REPELLENT RECIPE, remove the bottle top, place the LEMON JUICE and ROSEMARY and take the FLY REPELLENT (X).
- Use the FLY REPELLENT for a mini-HOP (Y).
- You receive the ZIPPER PULL.

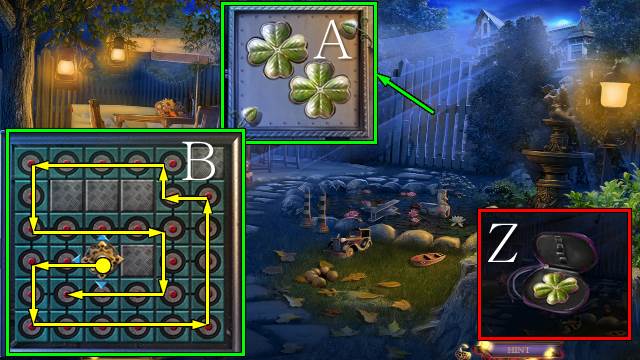
- Access the PURSE and place the ZIPPERPULL; take CLOVER LEAF 2/2 (Z).
- Place the CLOVER LEAVES (A) for a mini-game (B).
- Go forward.

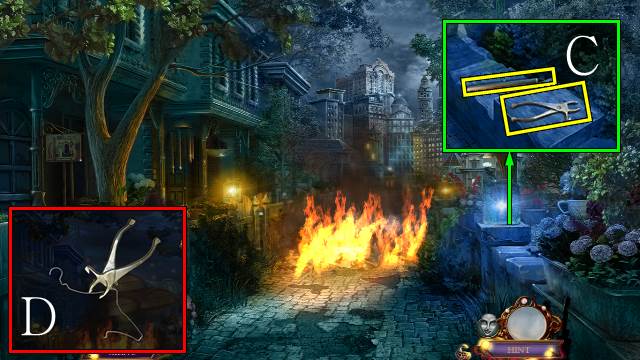
- Take the PLIERS and WIND CHIME 1/2 (C).
- Access the WIRE HANGER, use the PLIERS four times and take the LONG HOOK (D).

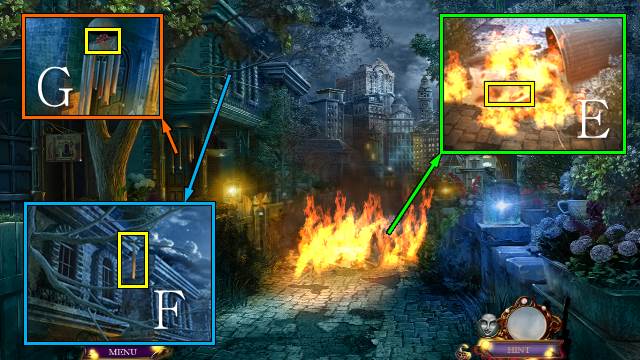
- Take the HOT CRANK HANDLE with the LONG HOOK (E).
- Take WIND CHIME 2/2 with the LONG HOOK (F).
- Place the WIND CHIMES and take the VALVE HANDLE (G).
- Walk down.

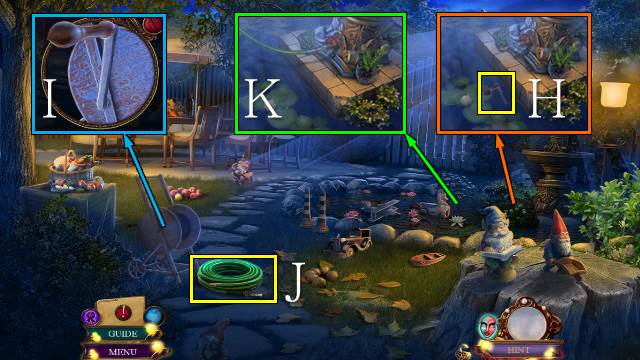
- Put the HOT CRANK HANDLE in the water to get a CRANK (H).
- Place the CRANK (I).
- Take the GARDEN HOSE (J).
- Place the VALVE HANDLE and GARDEN HOSE and turn the valve (K).
- Go forward.


- Pick up the hose and move it over the fire (L).
- Give the BURNED TICKET to the police man; you receive the WANTED POSTER (M).
- Go forward.

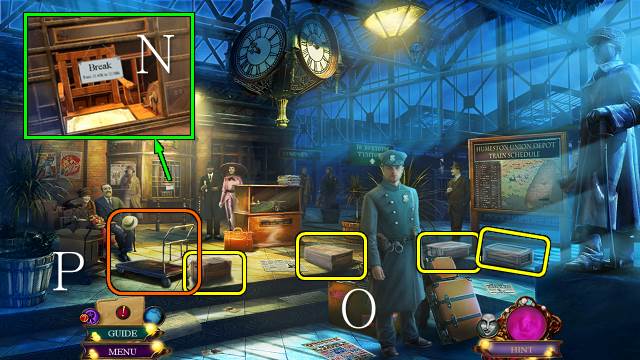
- Inspect the ticket booth (N).
- Collect the four boxes (O) and move the trolley (P).

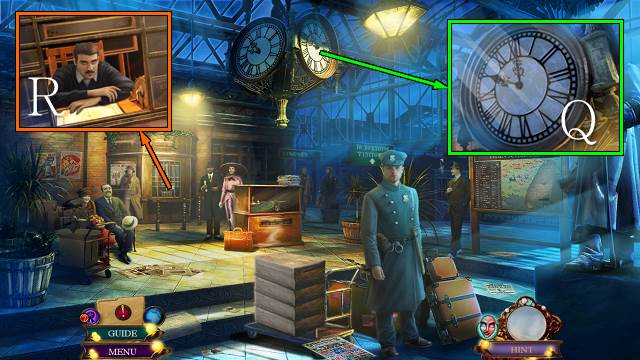
- Change the time to 10 o’clock (Q).
- Talk to the vendor; you receive the DISPLAY CASE KEY (R).

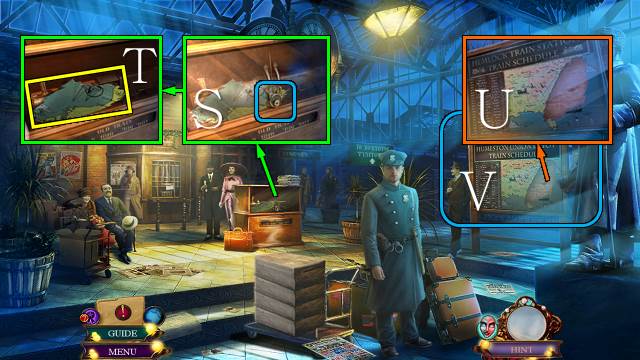
- Use the DISPLAY CASE KEY (S); take the MAP PIECE (T).
- Place the MAP PIECE (U).
- Play the HOP (V).
- You receive the TRAIN SCHEDULE.
- Give the TRAIN SCHEDULE to the policeman.
- Go forward.

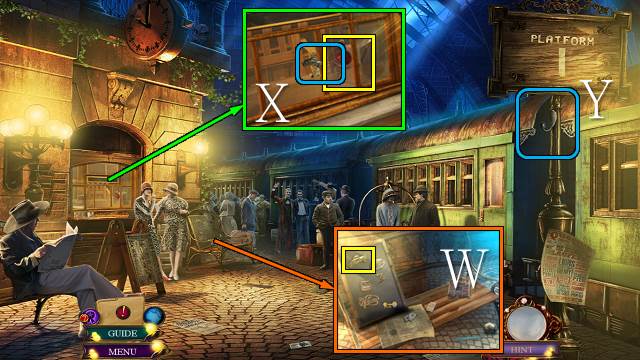
- Take the FRIDGE MAGNET (W).
- Use the FRIDGE MAGNET, open the window and take the SIGNAL LAMP (X).
- Place the SIGNAL LAMP (Y).

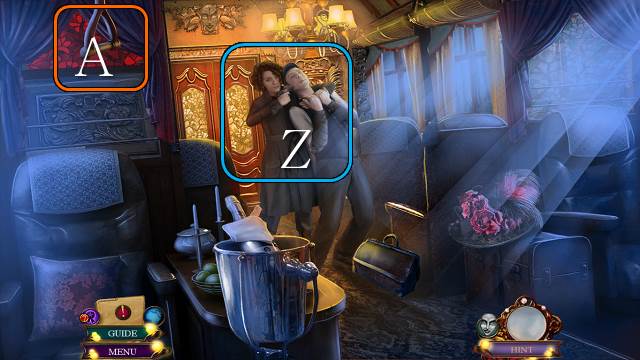
- Use the WANTED POSTER (Z).
- Pull the emergency brake (A).
- Congratulations, you have completed Danse Macabre: Deadly Deception.


 Mystery Case Files: Escape from Ravenhearst Walkthrough, Guide, & Tips
 Dark Tales: Edgar Allan Poe's The Premature Burial Walkthrough, Guide, & Tips
 Dark Realm: Princess of Ice Walkthrough, Guide, & Tips
 Hotel Walkthrough, Guide, & Tips
 Nemo's Secret: Vulcania Walkthrough, Guide, & Tips