Dark Tales: Edgar Allan Poe's The Premature Burial Walkthrough, Guide, & Tips
Dark Tales: Edgar Allan Poe’s The Premature Burial Walkthrough

Welcome to the Dark Tales: Edgar Allan Poe’s The Premature Burial Walkthrough!
A young man has hired Detective Dupin to solve a mysterious case in Dark Tales: Edgar Allan Poe’s The Premature Burial!
Whether you use this document as a reference when things get difficult or as a road map to get you from beginning to end, we’re pretty sure you’ll find what you’re looking for here.
This document contains a complete Dark Tales: Edgar Allan Poe’s The Premature Burial game walkthrough featuring annotated screenshots from actual gameplay!
We hope you find this information useful as you play your way through the game. Use the walkthrough menu below to quickly jump to whatever stage of the game you need help with.
Remember to visit the Big Fish Games Forums if you find you need more help. Have fun!
This walkthrough was created by MargieB, and is protected under US Copyright laws. Any unauthorized use, including re-publication in whole or in part, without permission, is strictly prohibited.
General Tips

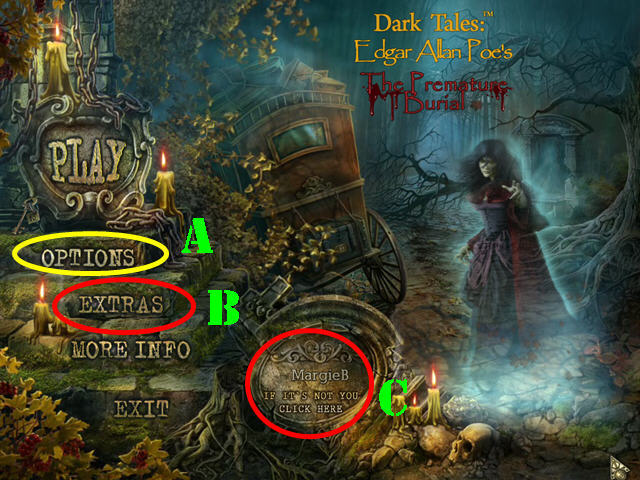
- This is the Official Guide for Dark Tales: Edgar Allan Poe’s Premature Burial Standard Edition.
- The Options (A) Button allows you to adjust the screen, music, cursor, and sound.
- The Extras (B) Button is only accessible in the Collector’s Edition.
- The ‘IF IT’S NOT YOU CLICK HERE’ button (C) can be used to manage your profiles in the game.
- This guide will refer to Hidden Object Scenes as ‘HOS’.
- Some puzzle solutions and HOS are random. Items written in red in HOS require an action to be performed before the item(s) can be visible.
- The HINT button is only accessible in HOS; not in quest scenes.
- There are 33 ROSES to find in the game; these can only be found in quest scenes, not in HOS.
- This guide marks all the ROSES with the ‘@’ symbol on the screenshots and in the guide. If you did not find all the ROSES you will have a chance to do so at the end of the game.
- All mini-games can be skipped once the skip button has recharged. Most puzzles have a RESET button; use it if you want to follow the solutions shown in this guide.
Chapter 1: The Broken Bridge

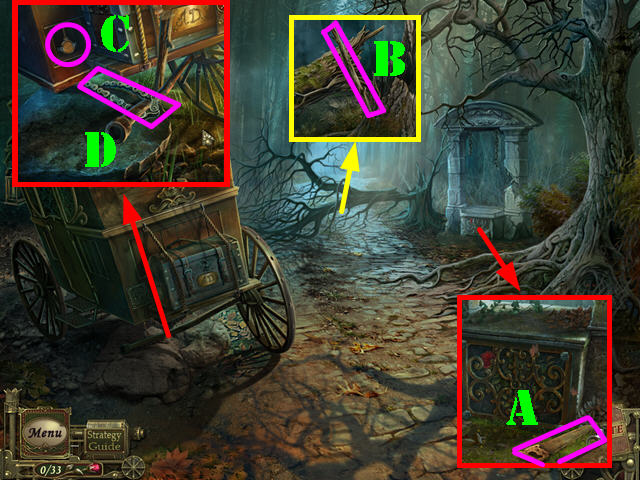
- Click on the ghost.
- Talk to the detective Dupin.
- Examine the fountain; knock down the sign and take the SAW (A).
- Zoom into the fallen branch; cut it with the SAW to obtain the STRONG STICK (B).
- SAW the branch again to clear the path.
- Examine the back of the coach; open the compartment and take the OIL CAN (C).
- Use the STRONG STICK on the lever and take the TRANSMISSION CHAIN (D).
- Go forward.

- Talk to the detective Dupin.
- Examine the newspaper; take the GAS FLASK (E).
- Examine the left wall; take the ROSE (@) and the BERRIES (F).
- Go forward.

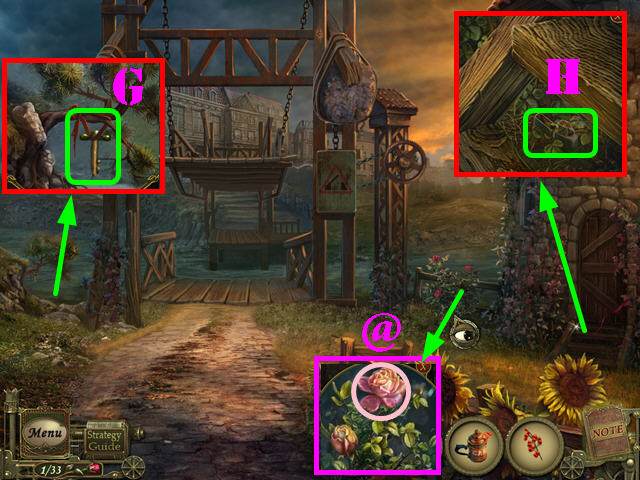
- Examine the bush; take the SWITCH-LEVER (G).
- Examine the steps; take the LIGHTER (H).
- Examine the roses; take the ROSE (@).
- Click down.

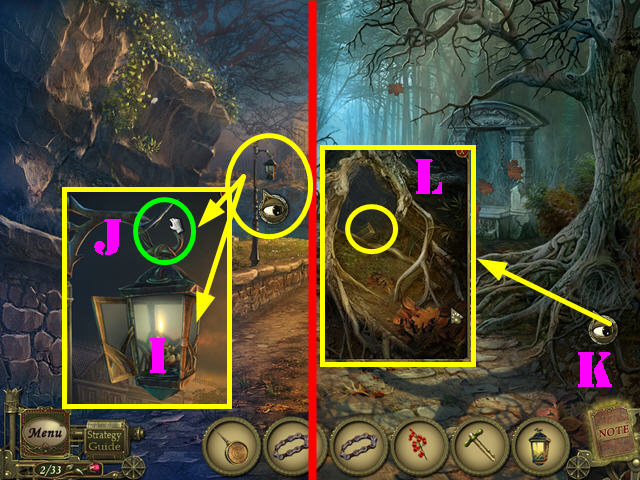
- Zoom into the lamppost; open the cover and insert the GAS FLASK (I).
- Use the LIGHTER on the gas flask.
- Close the cover; click on the hook and take the SHINING LAMP (J).
- Click down.
- Examine the tree hollow; use the SHINING LAMP in the tree (K).
- Put the BERRIES in the hole to lure the squirrel out and take the BRIDGE CONTROL PART (L).


- Return to the bridge.
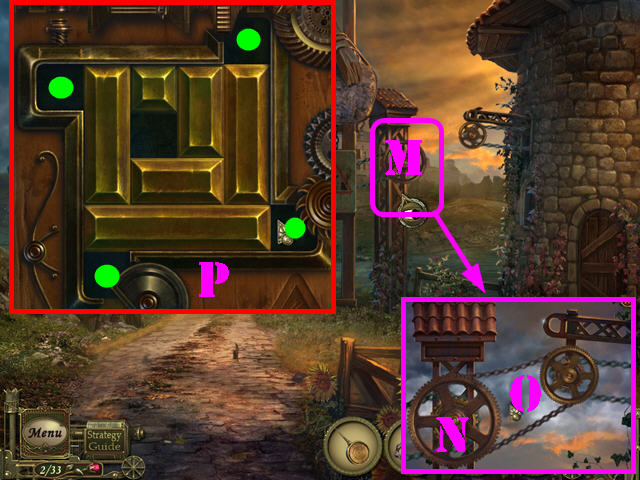
- Zoom into the gears (M); use the OIL CAN on the large gear (N).
- Attach the TRANSMISSION CHAIN to the 2 gears (O).
- Examine the control mechanism; insert the BRIDGE CONTROL PART on the mechanism to activate a puzzle.
- Slide the blocks out of the way so that all 4 green dots are showing.
- Please look at the screenshot for the solution (P).
- Cross the bridge.

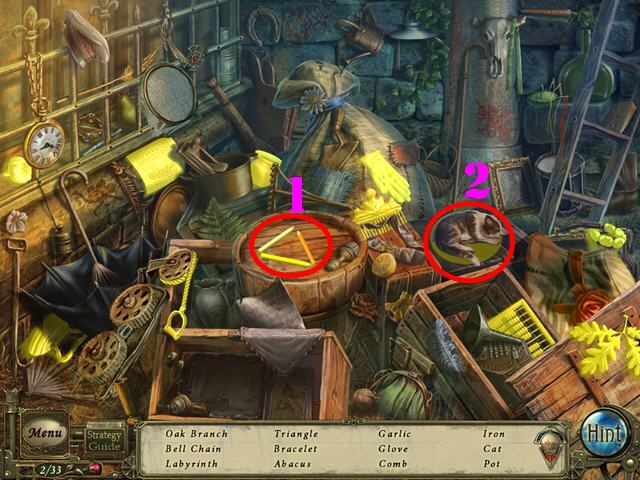
- Click on the ghost.
- Play the HOS.
- Click on the pencils; take the TRIANGLE (1).
- Move the hat; take the CAT (2).
- The BELL CHAIN will be added to inventory.

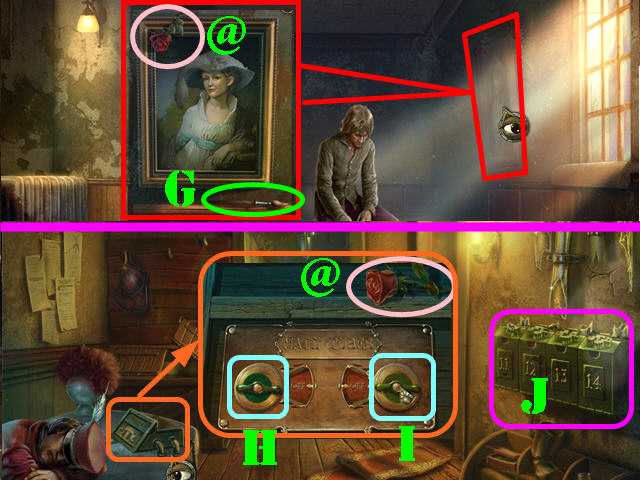
- Examine the front door; take the DOOR HANDLE (Q) and the SCREWDRIVER (R).
- Click down 3 times.
- Examine the fountain; use the SCREWDRIVER on the 4 screws (yellow) and take the BOLT (S). The bolt sometimes falls on different sides of the ground.
- Remove the lattice and take the ROSE (@).
- Go forward 3 times.

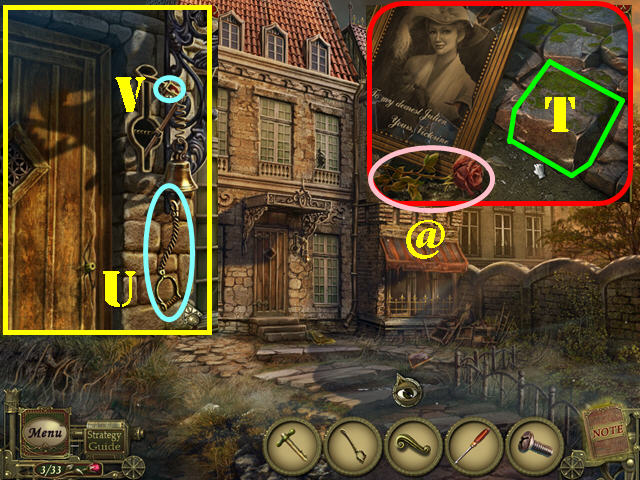
- Examine the ground; take the ROSE (@) and the BRICK (T). Note there is something in the ground that must be dug up later.
- Examine the door.
- Put the BELL CHAIN (U) and the BOLT (V) on the bell mechanism.
- Fasten the BOLT with the SCREWDRIVER.
- Ring the bell and go inside.
Chapter 2: Julien’s House


- Examine the cabinet; take the BUCKET (A).
- Open the door and take the SHOVEL (B).

- Exit the house.
- Play the HOS.
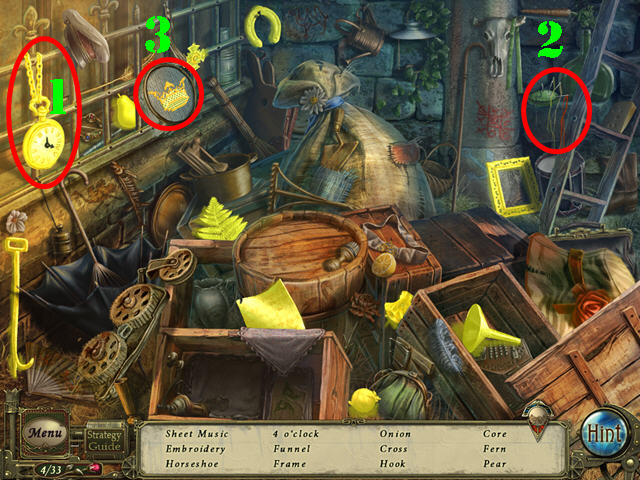
- Click on the clock 3 times; take the 4 O’CLOCK (1).
- Drag the needle (2) to the embroidery hoop; take the EMBROIDERY (3).
- The HOOK will be added to inventory.

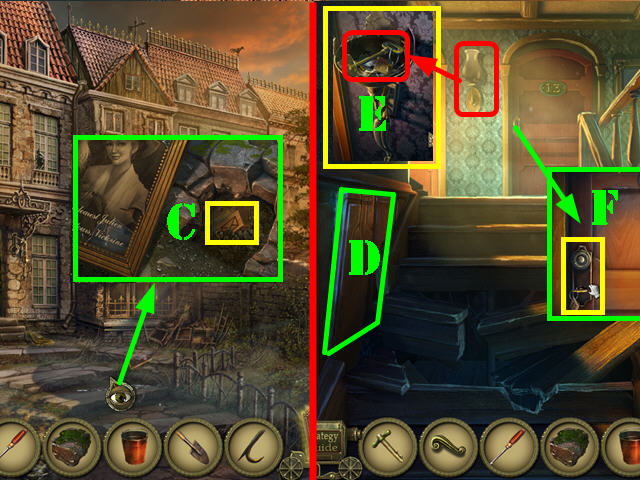
- Examine the ground; use the SHOVEL on the ground and take the WOODEN BLOCK (C).
- Go back into the house and head right.
- Click on the ghost. The steps will be destroyed.
- Pry off the board on the left with the HOOK to drop it on the steps (D).
- Zoom into the lamp; break the glass with the BRICK and take the ROOM 13 KEY (E).
- Examine door 13; use the ROOM 13 KEY in the lock (F).
- Turn the key and go through the door to access Julien’s room.

- Talk to Julien.
- Play the HOS.
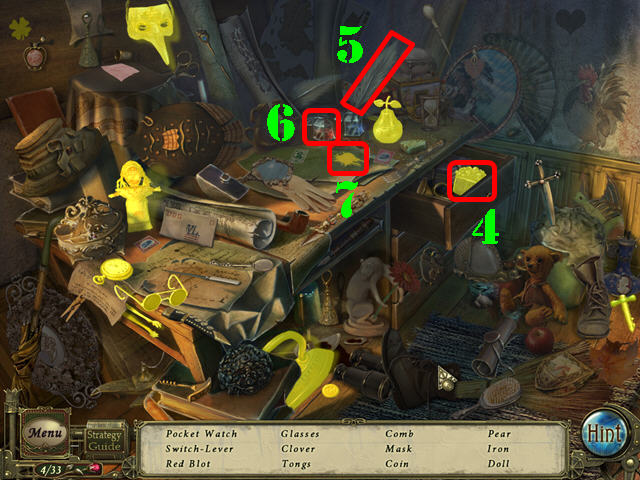
- Open the drawer; take the COMB (4).
- Drag the quill (5) to the red paint (6); take the RED BLOT (7).
- The SWITCH-LEVER will be added to inventory.


- Examine the portrait; take the ROSE (@) and the BRUSH (G).
- Click down twice.
- Examine the mechanism on the desk; take the ROSE (@).
- Put the 2 SWITCH LEVERS in the slots (H and I).
- Click on both levers.
- Zoom into the postal boxes (J).

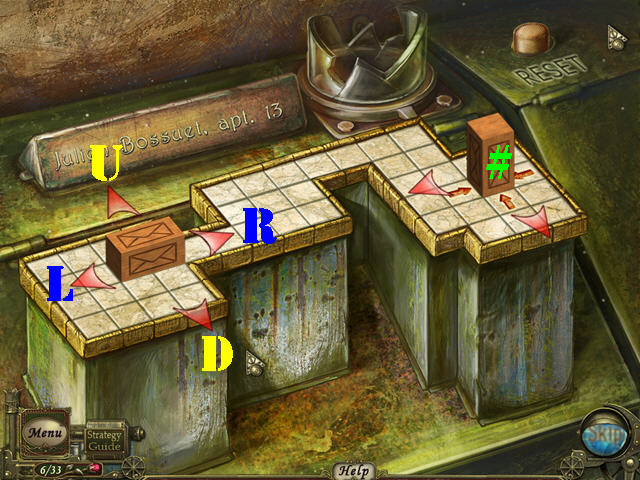
- Put the WOODEN BLOCK on the scene to activate a puzzle.
- Click on the arrows to move the block to the hole on the right (#).
- To solve the puzzle click on the arrows in this order: R x 4, U, L, D, R , U x 2, R x 3, D, L, D, R X 2, D, L, and U.

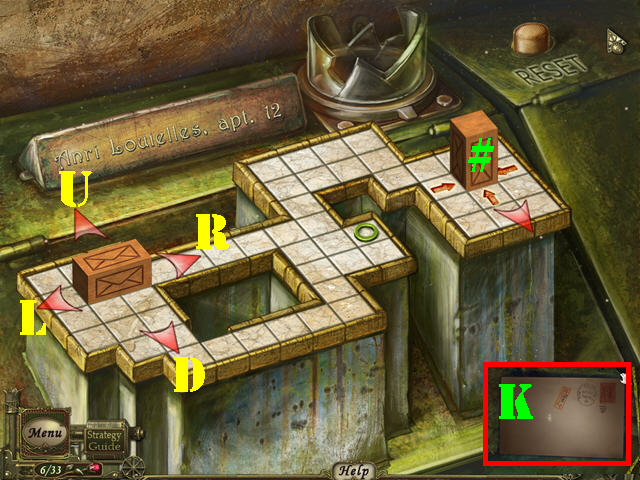
- The first box came up empty; a new puzzle appears.
- Click on the arrows to move the bar to the hole on the right (#).
- To solve the second puzzle click on the arrows in this order: R x 5, D, R, L, U, L x 5.
- D, R, D, R, D, R x 3, U x 2, R, D, L, U, R, U x 2, R x 3, D, R, D, R, D, L, and U.
- Take the LETTER (K).

- Return to Julien’s room; give him the LETTER.
- Julien will give you a ROPE.
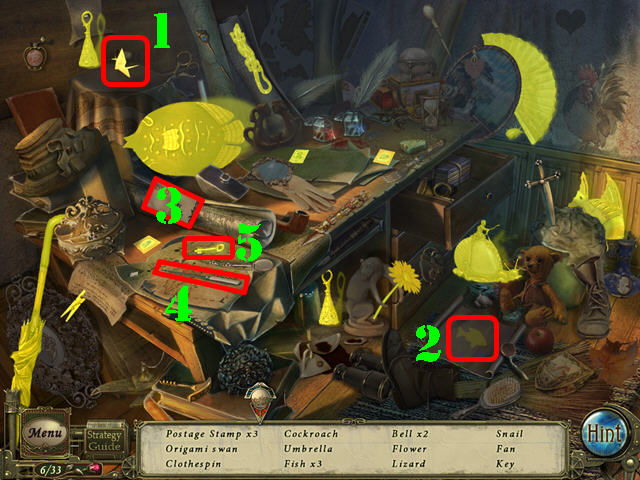
- Play the HOS.
- Click on the paper; take the ORIGAMI SWAN (1).
- Open the scroll; take the FISH (2).
- Open the letter (3) with the letter opener (4) and take the KEY (5).
- The BACK DOOR KEY will be added to inventory.

- Click down twice.
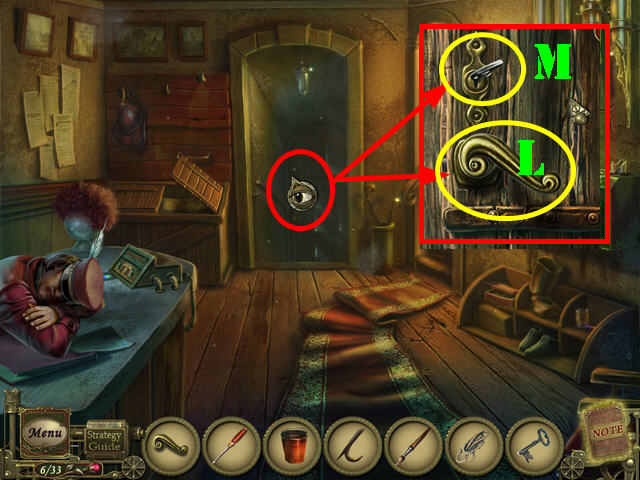
- Zoom into the door; put the DOOR HANDLE on the door (L).
- Use the BACK DOOR KEY in the lock (M).
- Click on the key and go through the door.

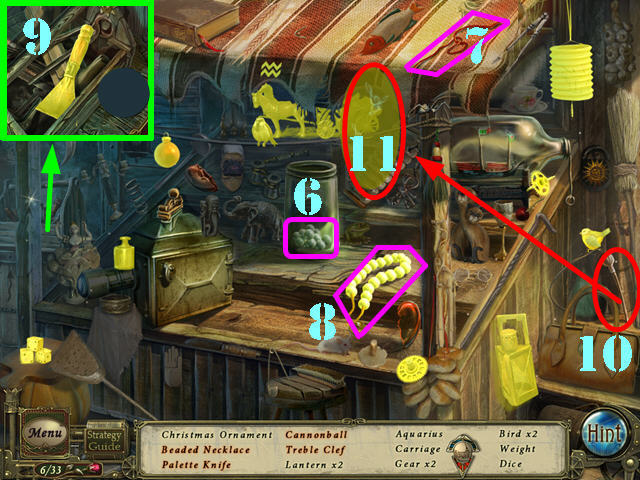
- Play the HOS.
- Click on the pearls (6); drag the string (7) to the pearls and take the BEADED NECKLACE (8).
- Examine the toolbox; take the PALETTE KNIFE (9).
- Drag the xylophone mallet (10) to the xylophone; take the TREBLE CLEF (11).
- The PALETTE KNIFE will be added to inventory.

- Head left.
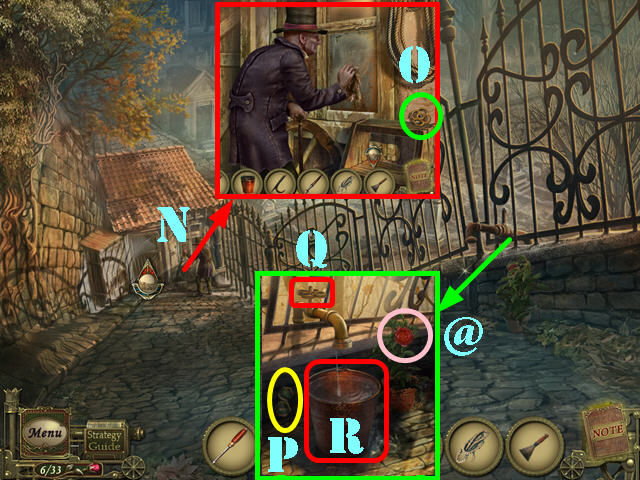
- Go towards the cemetery keeper’s hut; talk to the cemetery keeper (N).
- Take the VALVE (O).
- Click down.
- Examine the faucet; take the ROSE (@) and the PIECE OF BAS-RELIEF 1 (P).
- Zoom into the faucet; put the VALVE on it (Q).
- Put the BUCKET on the ground.
- Click on the valve and take the BUCKET WITH WATER (R).

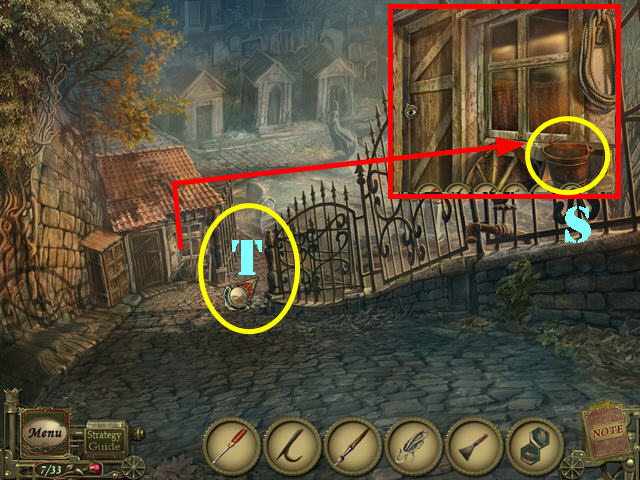
- Return to the cemetery keeper’s hut; give him the BUCKET WITH WATER.
- Take the BUCKET (S) after he is done using it.
- Click down and head through the gate to reach the cemetery (T).
Chapter 3: The Cemetery

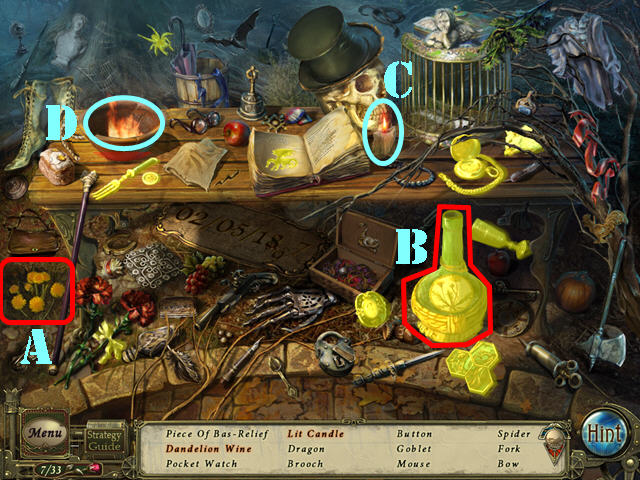
- Play the HOS.
- Drag the dandelions (A) to the wine bottle; take the DANDELION WINE (B).
- Drag the candle (C) to the fire (D); take the LIT CANDLE.
- The PIECE OF BAS-RELIEF 4 will be added to inventory.

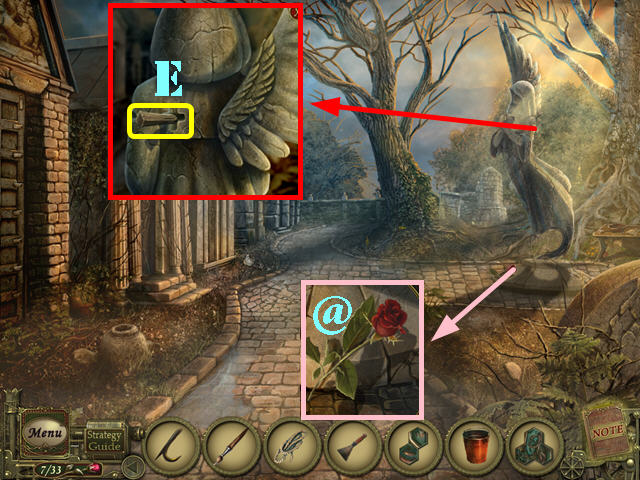
- Examine the base of the statue; take the ROSE (@).
- Examine the back of the statue; take the PEG (E).
- Go forward.

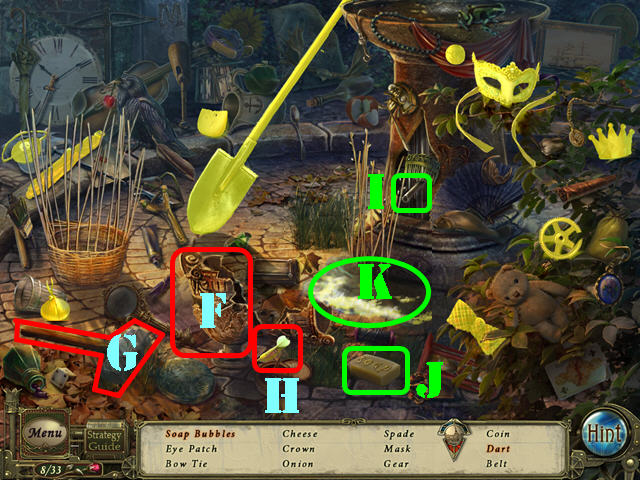
- Play the HOS.
- Break the vase (F) with the mallet (G); take the DART (H).
- Remove the cork (I); drag the soap (J) to the water and take the SOAP BUBBLES (K).
- The SPADE will be added to inventory.

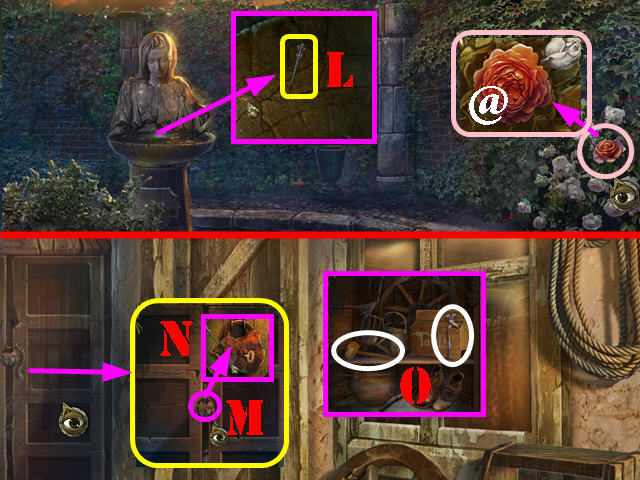
- Examine the ROSE (@) on the right and take it.
- Zoom into the statue’s bowl; take the HAIRPIN (L).
- Return to the cemetery keeper’s hut.
- Zoom into the left door; click on the lock (M).
- Use the HAIRPIN on the lock and open the doors (N).
- Take the PLIERS and the MALLET (O).
- Click down twice.

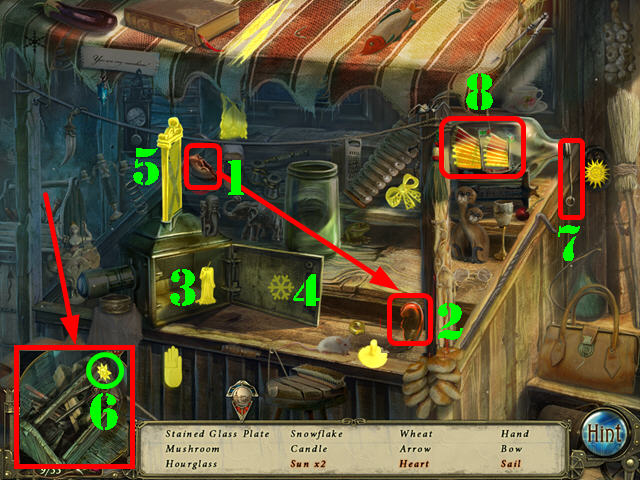
- Play the HOS.
- Drag the half heart (1) to the other half heart (2); take the HEART.
- Open the box; take the CANDLE (3), the SNOWFLAKE (4) and the STAINED GLASS PLATE (5).
- Zoom into the toolbox; take the SUN (6).
- Click on the string (7); take the SAIL (8).
- The STAINED GLASS PLATE will be added to inventory.

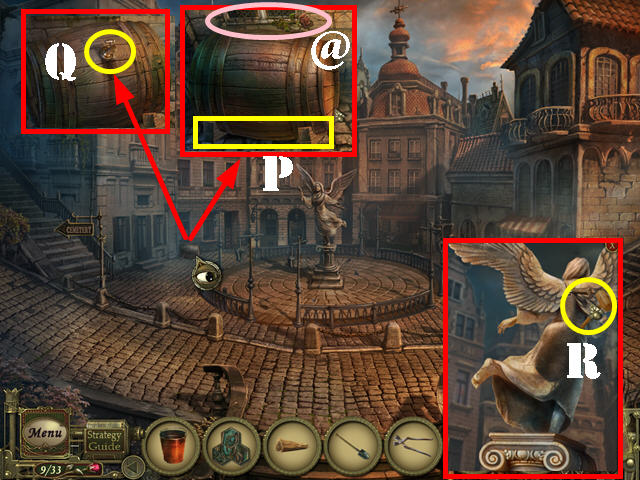
- Examine the barrel; take the ROSE (@).
- Use the MALLET at the bottom of the barrel (P).
- Take the COPPER VALVE (Q).
- Examine the statue; put the PEG on the wings (R).
- Use the MALLET on the peg to obtain the ANGEL’S WING.

- Return to the cemetery.
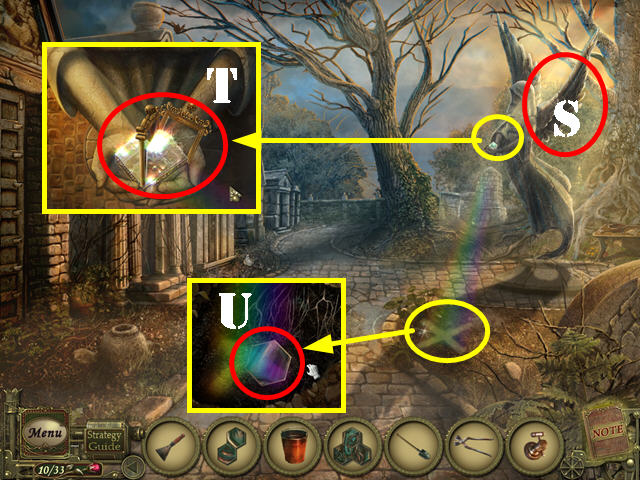
- Zoom into the statue’s wings and place the ANGEL’S WING on the back (S).
- Examine the statue’s hands; click on the plate and put the STAINED GLASS PLATE in the crystal (T).
- Examine the ‘X’ on the ground; use the SPADE on the ‘X’ twice and take the PIECE OF BAS-RELIEF 2 (U).

- Go into the crypt on the left.
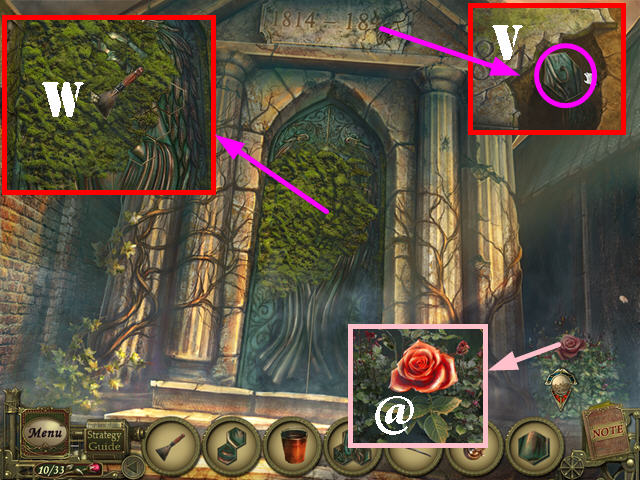
- Zoom into the top of the mausoleum; click on the stone and take the PIECE OF BAS-RELIEF 3 (V).
- Examine the ROSE (@) in the lower right and take it.
- Zoom into the back wall; use the PALETTE KNIFE on the moss 3 times (W).

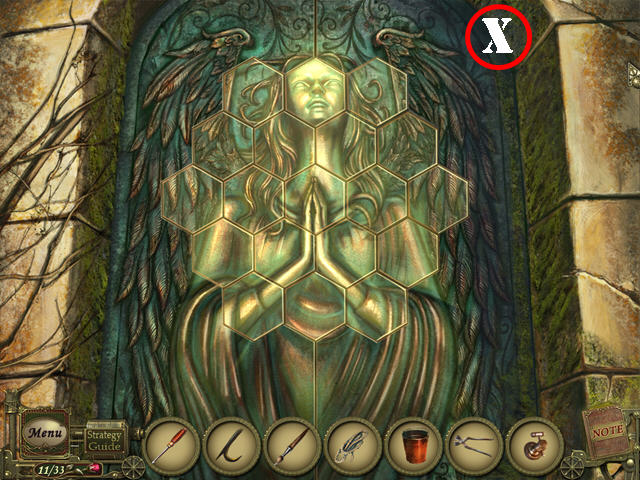
- Put the PIECES OF BAS-RELIEF 1 through 4 in the slots to activate a puzzle.
- Click on any 2 pieces to swap their positions. Right-click on a piece to rotate it.
- Please look at the screenshot for the solution (X).
- You will be automatically taken into the crypt.
Chapter 4: The Crypt

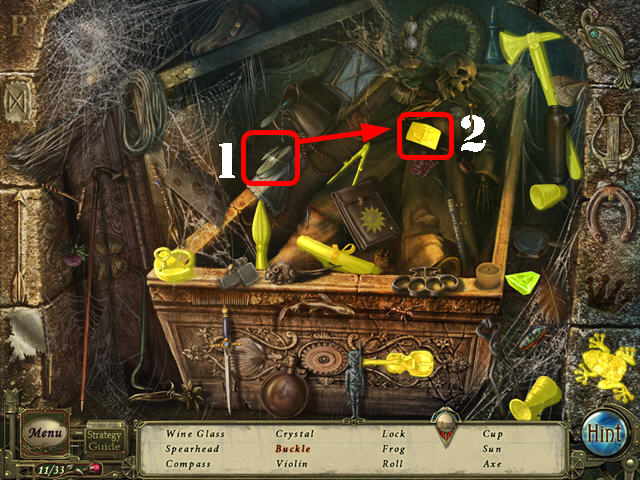
- Play the HOS.
- Use the brush (1) on the buckle; take the BUCKLE (2).
- The PUZZLE PART will be added to inventory.

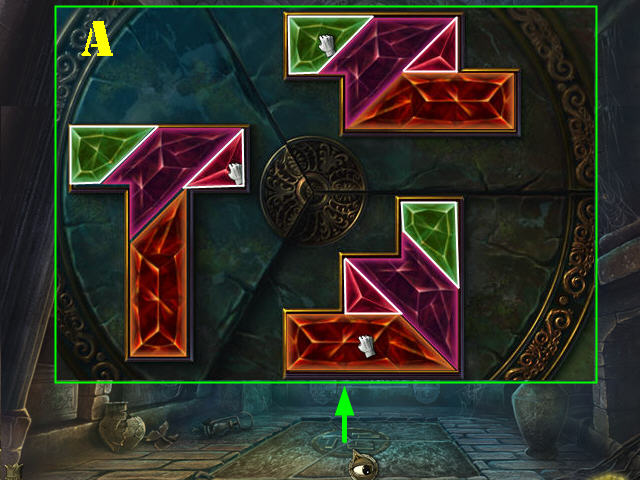
- Zoom into the ground; put the PUZZLE PART on the ground to activate a puzzle.
- Fill in the shapes with the crystals on the board.
- Right-click on a crystal to rotate it.
- Pieces will glow when placed in the correct spots.
- Please look at the screenshot for the solutions (A).

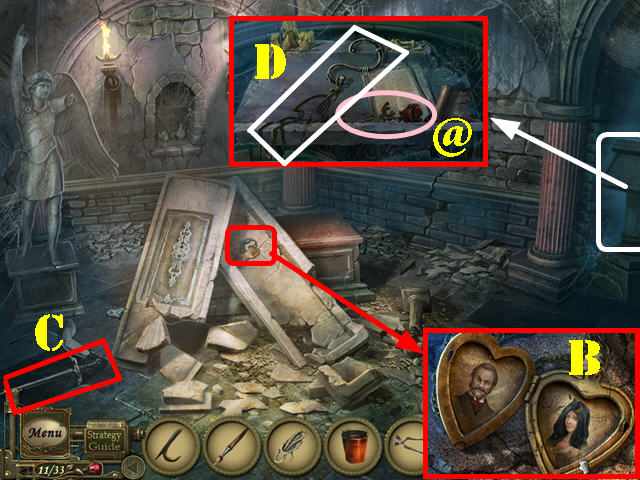
- Go into the crypt basement.
- Examine the MEDALLION; open it and take it (B).
- Louise’s ghost appears.
- Take the STONE SWORD (C) in the lower left.
- Zoom into the pedestal; take the ROSE (@).
- Click on the hook; place the ROPE next to the hook.
- Drag the hook over the rope and take the ROPE WITH HOOK (D).
- Click down.

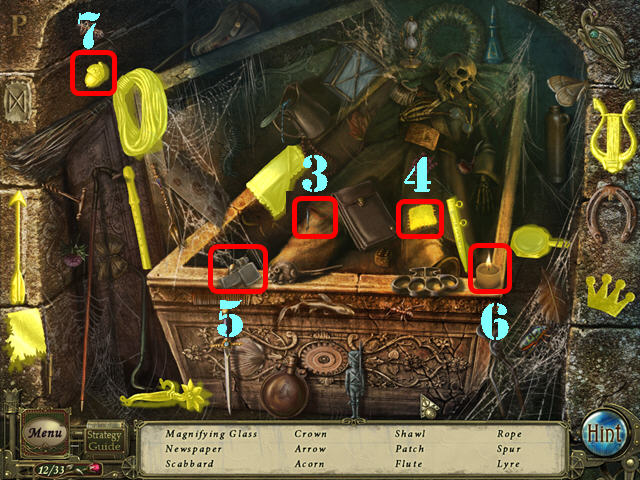
- Play the HOS.
- Drag the needle (3) to the pants; take the PATCH (4).
- Drag the lighter (5) to the candle (6). Use the lit candle on the spider web and take the ACORN (7).
- The GLOVE will be added to inventory.

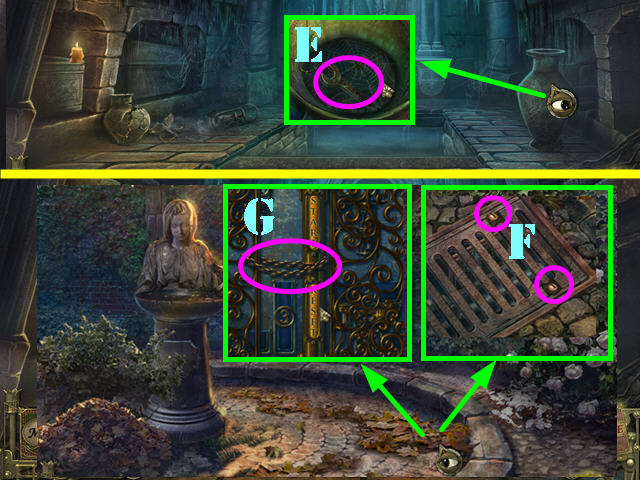
- Zoom into the vase; place the ROPE WITH HOOK inside of it to obtain the WRENCH (E).
- Click down twice and go forward.
- Zoom into the leaves; move the 3 piles aside.
- Remove the 2 screws with the SCREWDRIVER (F).
- Remove the grating and zoom into the hole.
- Cut the chain with the PLIERS to activate a puzzle (G).

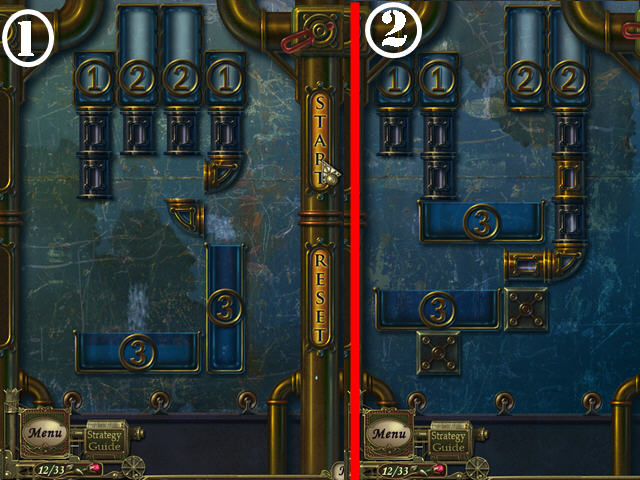
- You need to fill the troughs at the bottom of the screen with the amount of water written on each of them.
- The numbers on the top tubes represent the amount of water flow that each will dispense.

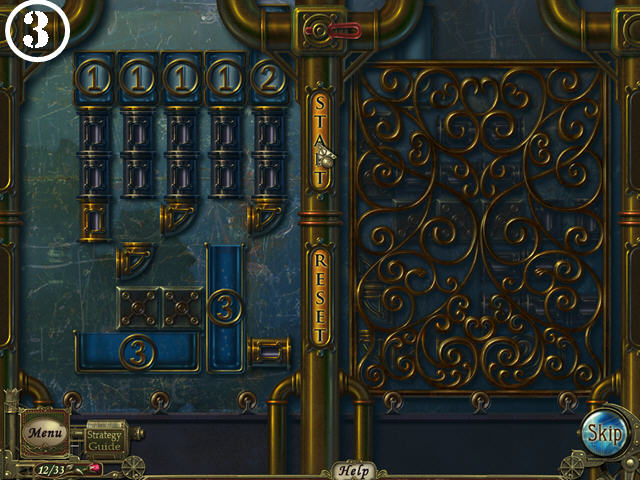
- The troughs can be moved around so they fall below the right area.
- Use the pipes to redirect the flow of water.

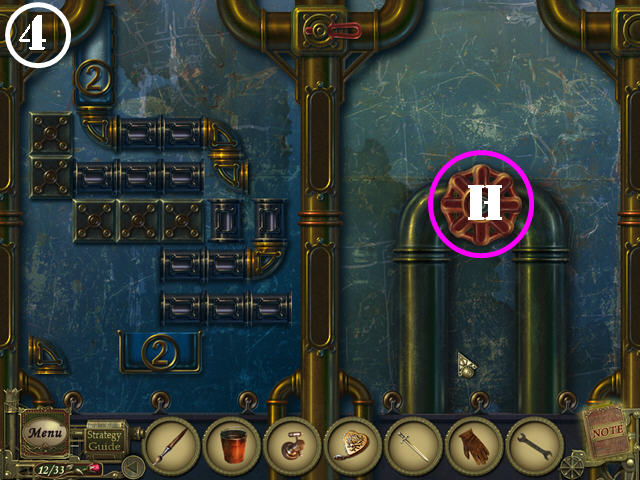
- Press START to begin the water flow.
- You have to beat four rounds of this puzzle.
- Please look at the screenshots for all four solutions (1, 2, 3 and 4).
- Click on the valve (H).

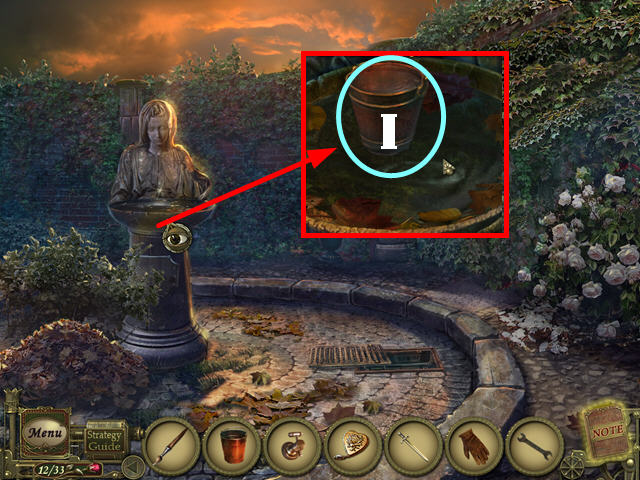
- Zoom into the statue’s bowl.
- Click on the leaves and put the BUCKET in the water to obtain the BUCKET WITH WATER (I).
- Click down.

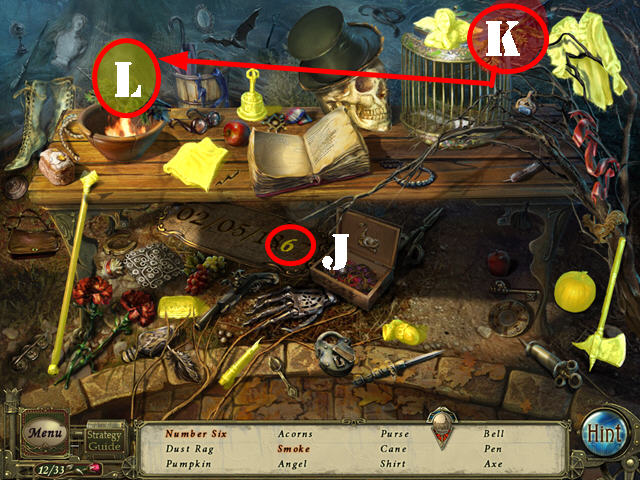
- Play the HOS.
- Click on the 9; take the NUMBER SIX (J).
- Drag the branch (K) to the fire; click on the SMOKE (L).
- The DUST RAG will be added to inventory.
Chapter 5: Unlocking the Town Gate

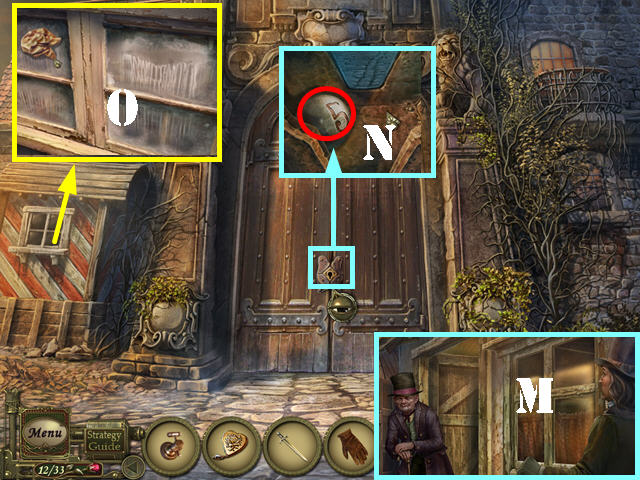
- Return to the cemetery keeper’s hut; detective Dupin will give him the news about Louise Fore (M).
- Click down twice and head right.
- Zoom into the door; take the METAL BALL (N).
- Examine the left window; use the BUCKET WITH WATER on the dirty windows (O).
- Use the DUST RAG on all 4 window panes.
- Use the HOOK on the window and click on it to open it.

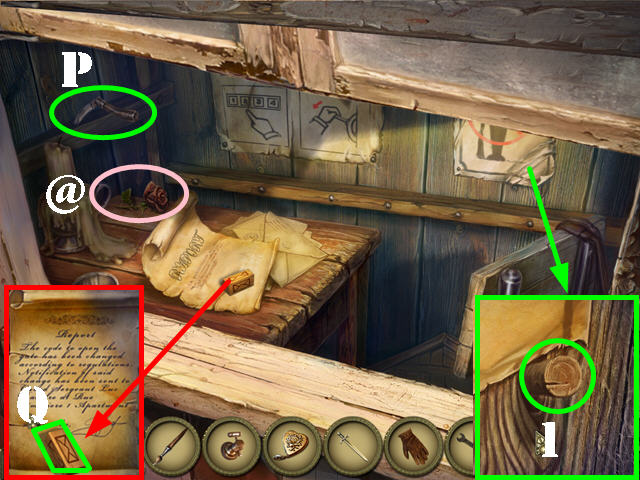
- Take the KNIFE (P).
- Zoom into the letter and take the MAILBOX BLOCK (Q).
- Take the ROSE (@).
- Zoom into the poster; cut the edge with the KNIFE and take the PUB HANDLE (1).

- Go back to Julien’s house.
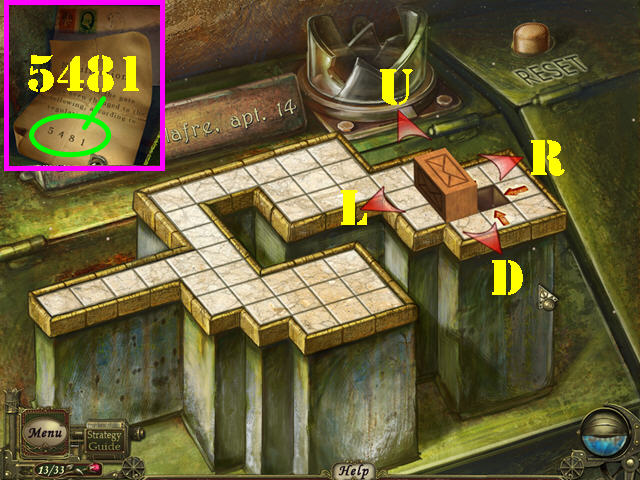
- Zoom into the mailboxes; put the MAILBOX BLOCK on the board to activate a puzzle.
- Click on the arrows to move the block to the hole on the right.
- To solve the puzzle click on the arrows in this order: R x 2, D, R, U x 3, R x 3, D x 2.
- R, D, R, D, R, U x 2, L, D, R, U, L, U, D x 2, and R.
- Click on the LETTER to view the town’s gate code (5481).

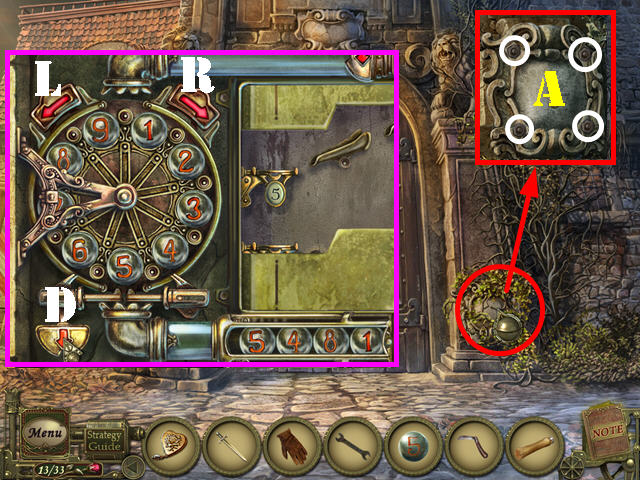
- Go through the back door and head right.
- Examine the right panel; cut the ivy with the KNIFE 3 TIMES.
- Remove the 4 bolts with the WRENCH (A).
- Examine the drum mechanism; place the METAL BALL on it to activate a puzzle. Note – The puzzle will not activate unless you’ve completed the second mailbox puzzle.
- Use the top arrows to move the numbers left and right. Use the bottom arrow to drop the ball.
- To solve the puzzle, click on the arrows in this order: R x 4, D, R x 2, D, R x 4, D, L, and D.

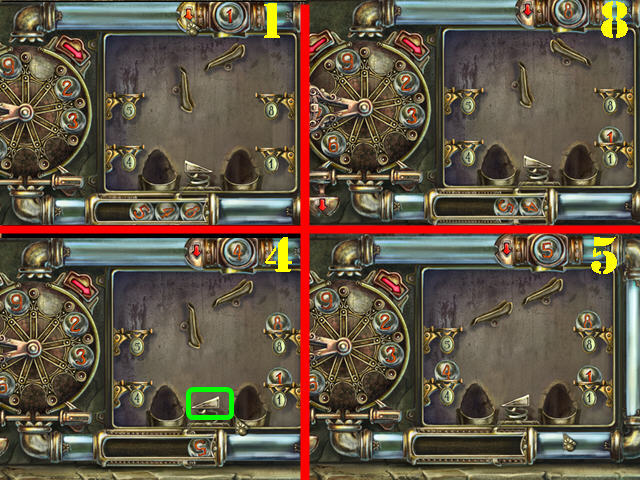
- The second part of this puzzle requires you to drop the balls into their matching pockets.
- Reposition the springs and the weights so the balls fall into the correct pockets.
- Click on the top arrow to release the balls.
- Please look at the screenshots for the solutions (1 8, 4, and 5). Note that on steps 4, you must flip the spring marked in green for the solution to work.

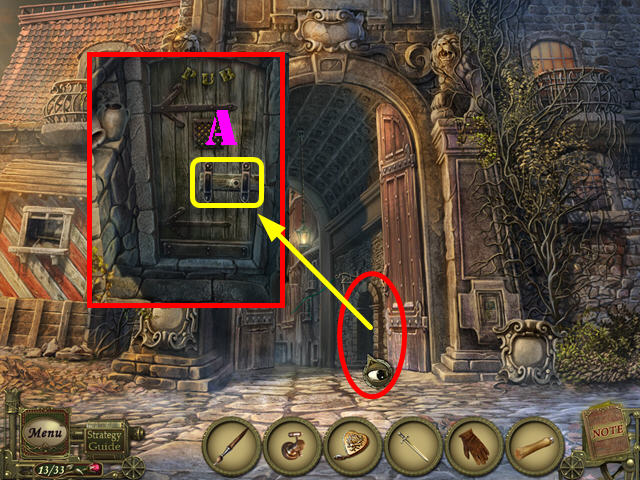
- Zoom into the pub door; put the PUB HANDLE on the door (A).
- Open the latch and go through the door.

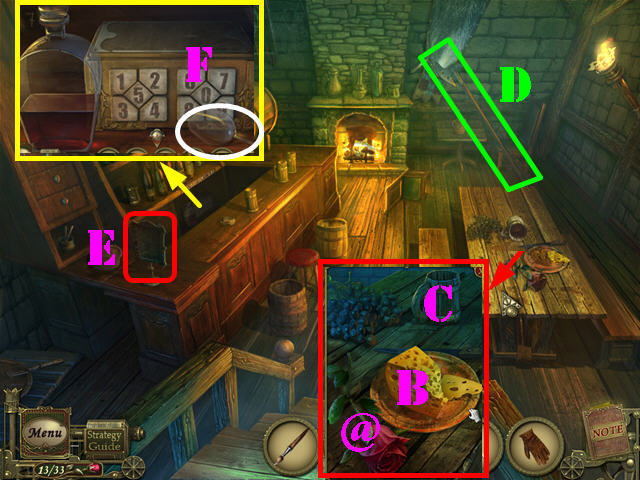
- Examine the table; take the ROSE (@) and the CHEESE (B).
- Click on the mug to spill its content (C).
- Knock down the weapon on the back wall (D).
- Click on the mirror (E).
- Zoom into the bar; take the GOBLET (F).

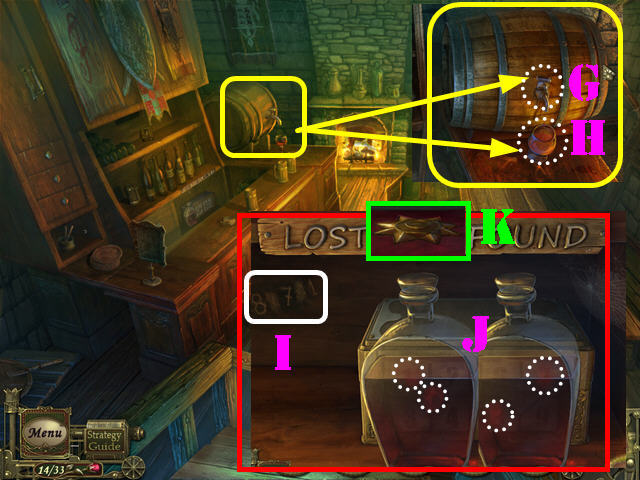
- Examine the barrel; put the COPPER VALVE on the tap (G).
- Put the GOBLET () down; click on the valve and take the GOBLET WITH WINE.
- Zoom into the bar; pour the GOBLET WITH WINE in the decanter.
- Move the decanter; the numbers on the side have been scratched out (I).
- Move the decanter twice; notice the numbers highlighted behind the bottle; that will give you a clue as to which numbers will fill up the empty spaces in the scratched out code (J).
- Enter the numbers 85781.
- Take the HORSEMAN’S MEDAL (K).
- Click down and head forward to the town square.
Chapter 6: The Town Square

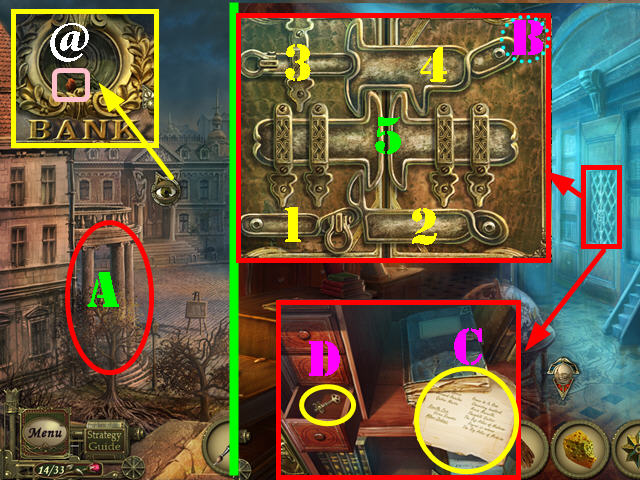
- Examine the bank; click on the cover and take the ROSE (@).
- Head left into the library (A).
- Zoom into the lock on the right; open the latches in the order shown in the screenshot (B).
- Take the NOTE (C).
- Open the drawer and take the SMALL KEY (D).

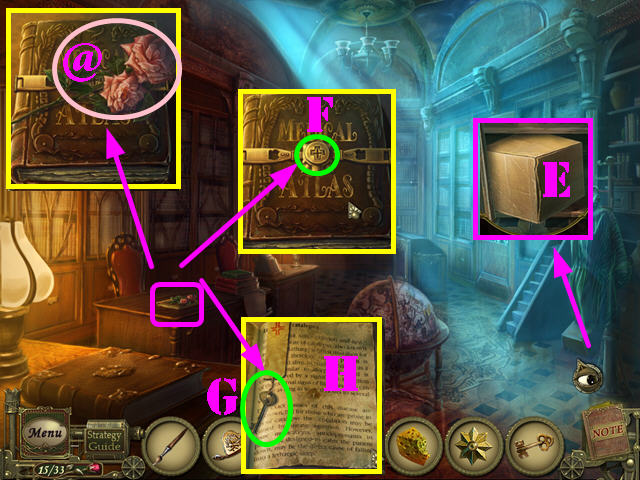
- Examine the lower right corner; take the BOX (E).
- Examine the desk; take the ROSE (@).
- Put the SMALL KEY on the lock on the book (F).
- Take the PHARMACY OFFICE KEY (G).
- Click on the NOTE (H).

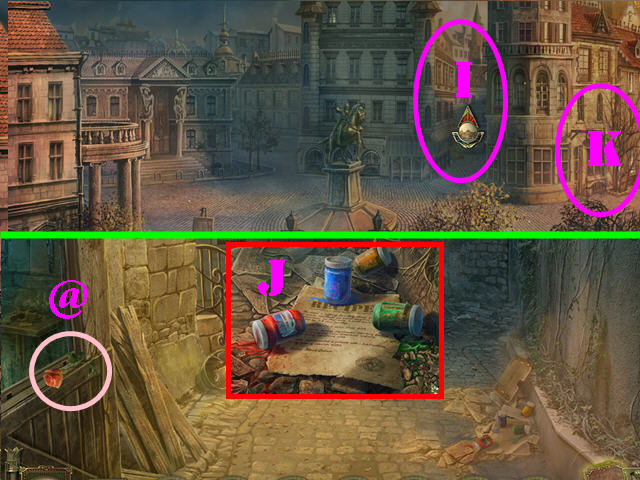
- Exit the library and head into the alley between the last 2 buildings (I).
- Take the ROSE (@) on the left.
- Examine the ground and take the PAINTS and the RECIPE (J).
- Click down and head right (K).

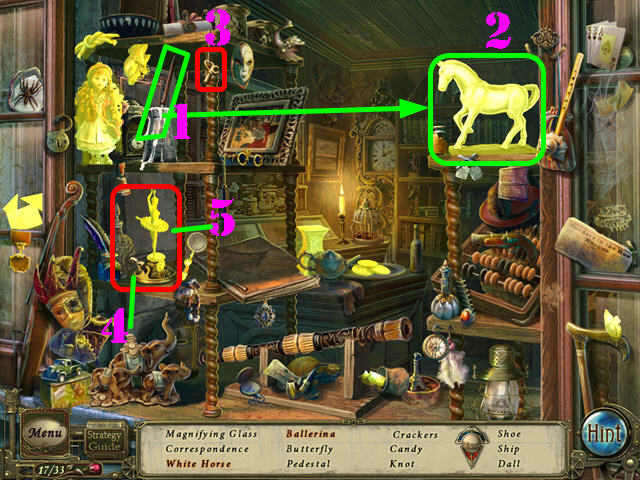
- Play the HOS.
- Drag the brush (1) to the horse; take the WHITE HORSE (2).
- Drag the wind-up key (3) to the ballerina music box (4); click on the key and take the BALLERINA (5).
- The CRACKERS will be added to inventory.

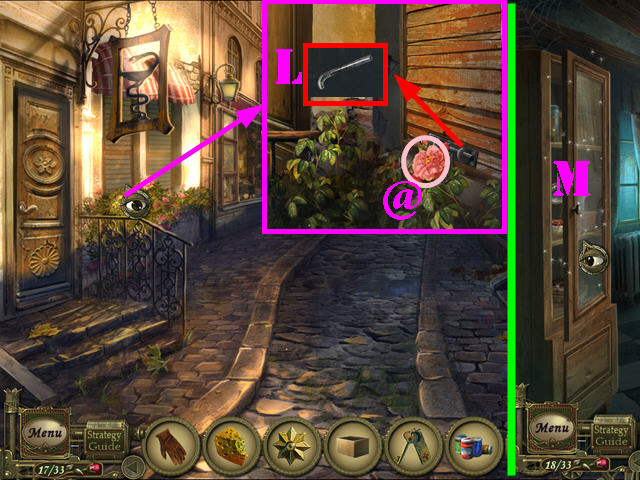
- Zoom into the shutters; take the ROSE (@) and the ROD (L).
- Open the shutters and go inside the pharmacy.
- Open the left cabinet door to activate a HOS; play it (M).

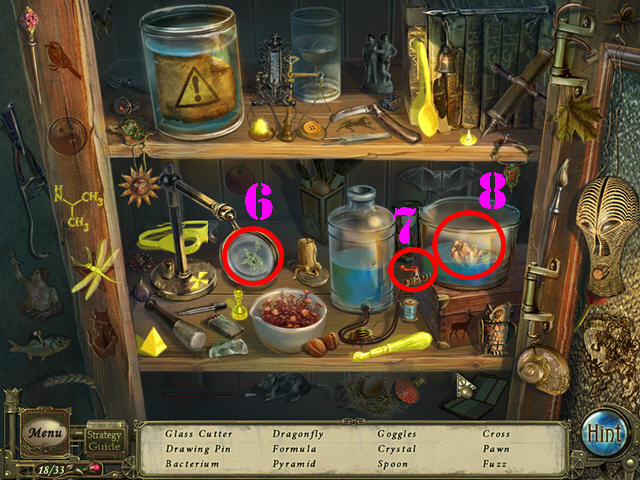
- Click on the magnifying glass; take the BACTERIUM (6).
- Click on the valve (7); take the CRYSTAL (8).
- The GLASS CUTTER will be added to inventory.

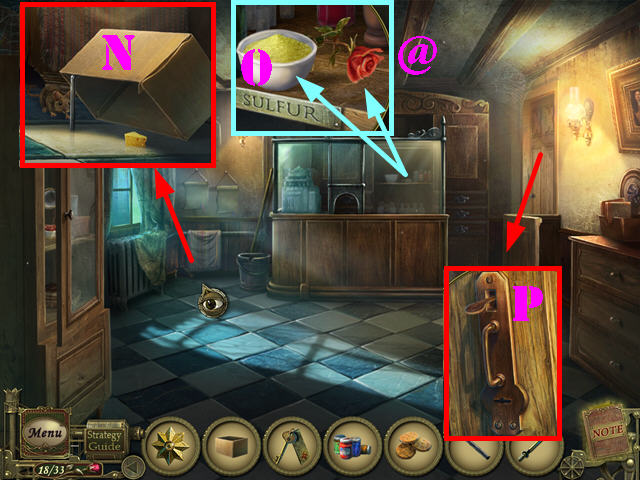
- Zoom into the mouse hole; place the BOX on the ground (N).
- Put the ROD on the box.
- Place the CHEESE below the box.
- Take the MOUSE IN A BOX after the mouse goes below the box.
- Examine the back shelf; take the SULFUR (O) and the ROSE (@).
- Zoom into the right door; use the PHARMACY OFFICE KEY in the lock (P).
- Go into the pharmacy office.

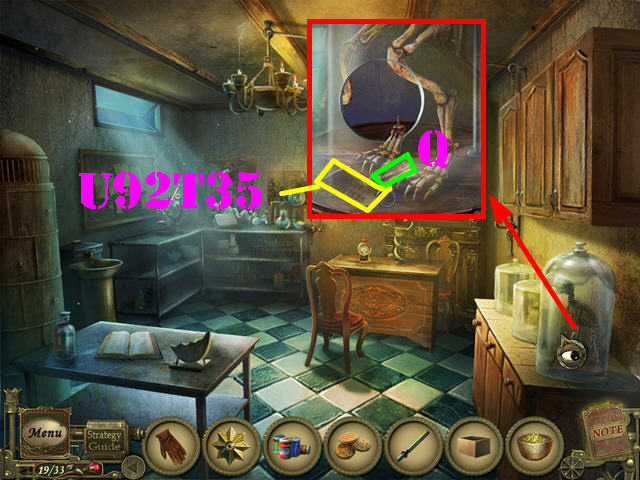
- Zoom into the small glass display case; use the GLASS CUTTER on the glass.
- Click on the bones and take the BONE (Q).
- Note the code (U92T35) on the paper.

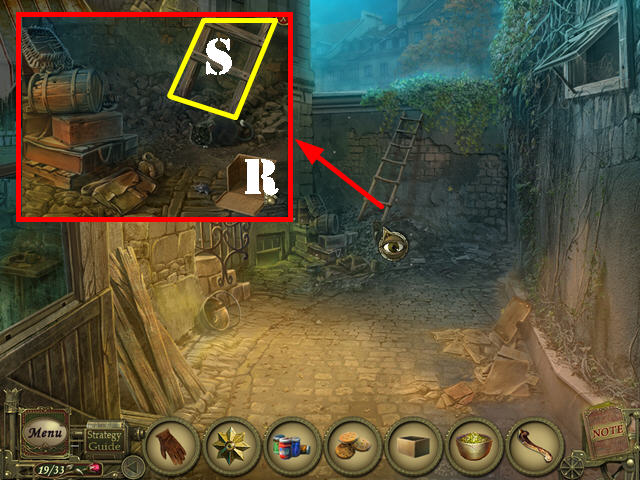
- Click down thrice and go into the alley.
- Zoom into the ladder.
- Put the MOUSE IN A BOX on the ground (R).
- Open the box for the mouse to get out and take the LADDER (S).

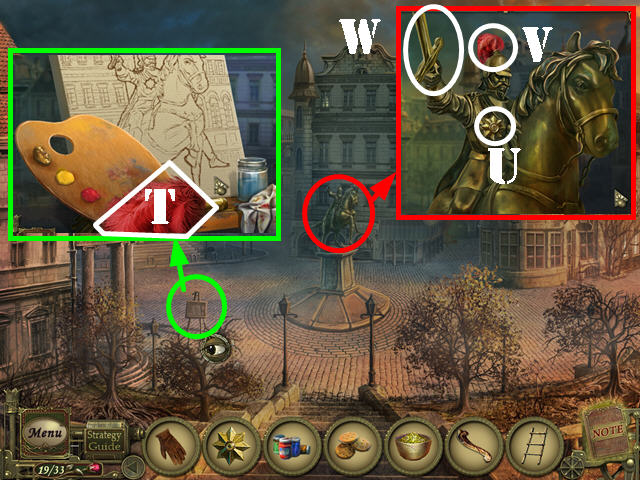
- Click down.
- Zoom into the easel; take the HORSEMAN’S PLUMAGE (T).
- Exit the easel.
- Zoom into the horseman; place the HORSEMAN’S MEDAL (U), HORSEMAN’S PLUMAGE (V), and STONE SWORD (W) on him.

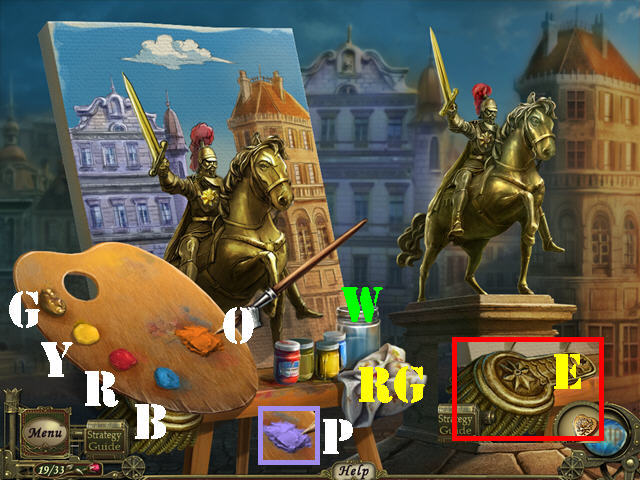
- Zoom into the easel again; put the PAINTS and the BRUSH on the easel to activate a puzzle.
- Dip the brush into the paint to add that color to the brush.
- Pass the brush on the rag (RG) to clean the brush.
- Use the lower right side of the palette to mix the paints. To mix colors, dip the brush into the desired color and dab it on the side of the palette. Dip the brush into the second color you want to mix and dab that onto the first color you added on the palette. Use that new color on the desired section.
- Click on the water (W) to wash off all the paint off the canvas. You can just paint over a part of the picture with the correct color instead of erasing all the colors.
- Mix red (R) and yellow (Y) to obtain orange; paint the right building with the orange (O).
- Mix the light blue (B) and the RED (R) together and paint the left building with the purple (P).
- Use the light blue (B) color on the sky.
- Use the gold paint (G) on the statue.
- Use the yellow (Y) paint on the SWORD and the MEDAL.
- Take the EPAULETTE after the puzzle has been solved (E).
- Zoom into the horseman; put the EPAULETTE on the horseman’s shoulder to trigger a HOS; play it.
Chapter 7: The Voodoo Shop

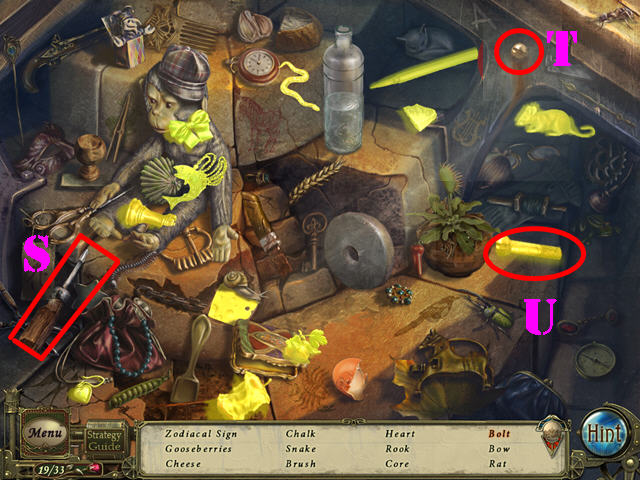
- Drag the screwdriver (S) to the screw (T) and take the BOLT (U).
- The ZODIAC SIGN will be added to inventory.

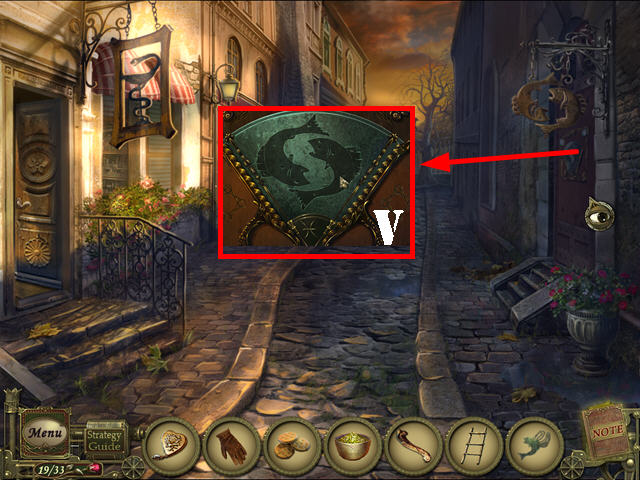
- Head right.
- Zoom into the right door; put the ZODIAC SIGN on the door to activate a puzzle (V).

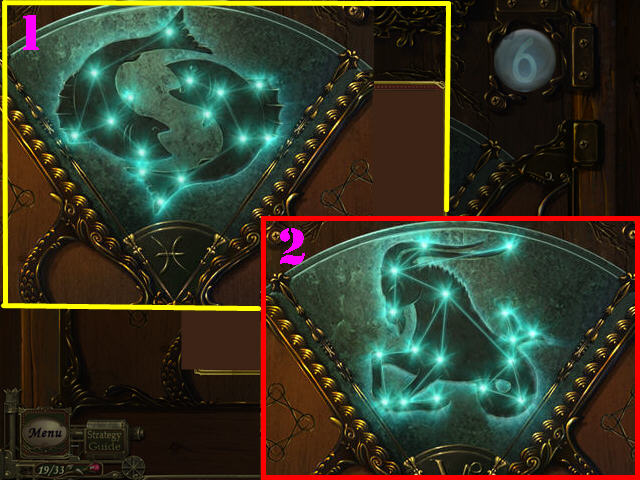
- Click on the dots to attach them to your cursor, drag the lines to the next dot, and click them in place to form the correct constellation.

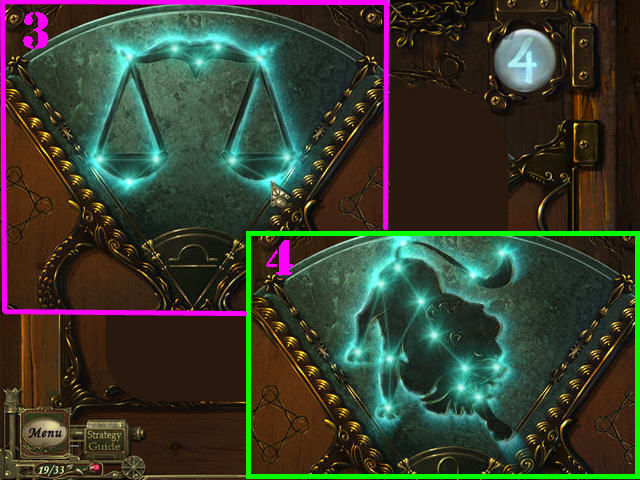
- A line will form from dot to dot when the connection is correct. You can click on a dot when you see the hand icon appear. As long as a hand icon appears it means that a connection can still be made.

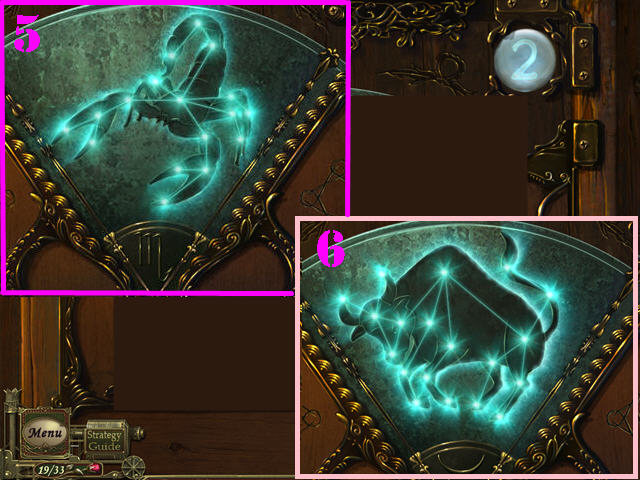
- Please look at the screenshot for the 6 solutions (1 through 6).

- Enter the voodoo shop.
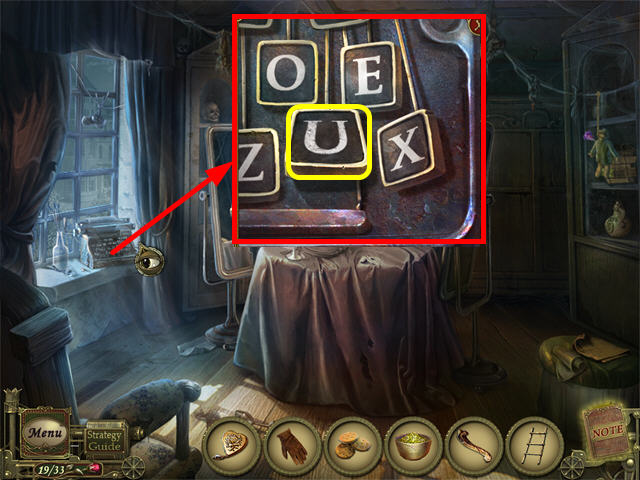
- Zoom into the typewriter; take the U KEY.

- Return to the town square.
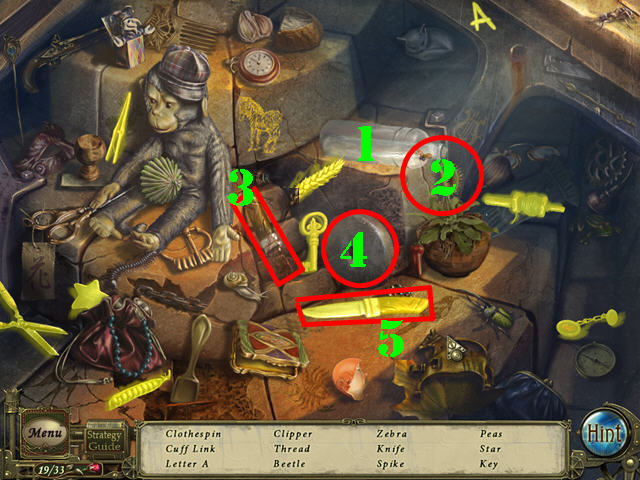
- Play the HOS.
- Spill the bottle (1); take the BEETLE (2).
- Drag the dull knife (3) to the sharpening stone (4); take the KNIFE (5).
- The CLIPPERS will be added to inventory.

- Return to the pharmacy.
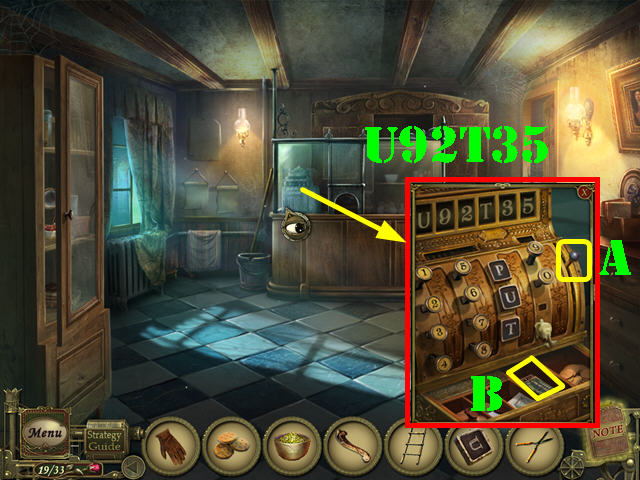
- Examine the cash register; put the U KEY on it.
- Push in the code: ‘U92T35′ to open the register. Clicking on the lever (A) resets the numbers.
- Take the MATCHES (B).

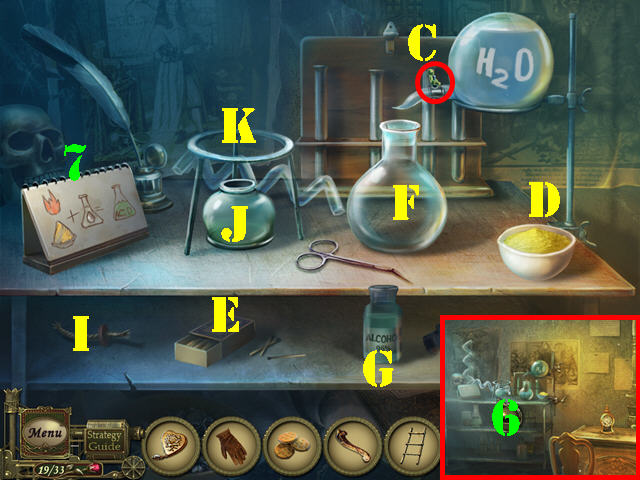
- Go into the pharmacy office.
- Examine the back table (6).
- Flip through the pages of the instructions on the left (7).
- Click on the valve to pour the water into the flask (C).
- Put the SULFUR (D) and the MATCHES (E) on the table.
- Pour the SULFUR (D) into the flask (F).
- Pour the alcohol (G) into the bottle (J).
- Drag the wick (I) into the bottle (J).
- Strike the MATCH (E); use the lit match to light the wick.
- Put the flask on the burner (K) and take the ACID.

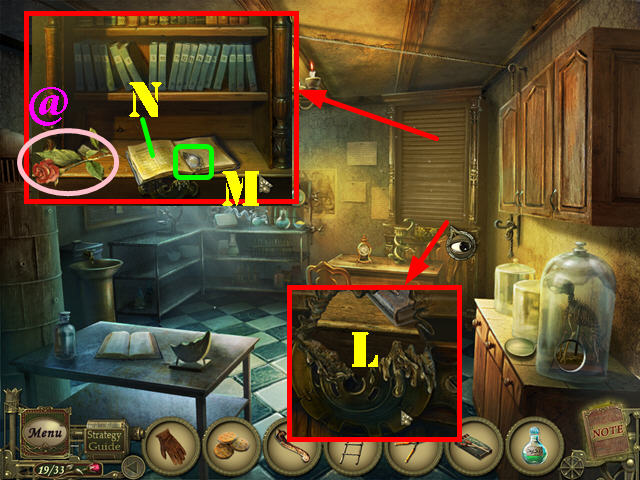
- Examine the lock; pour the ACID on the lock (L).
- Open the shelf and zoom into it.
- Take the ROSE (@).
- Open the book and take the PLANCHETTE (M).
- Click on the NOTE (N).

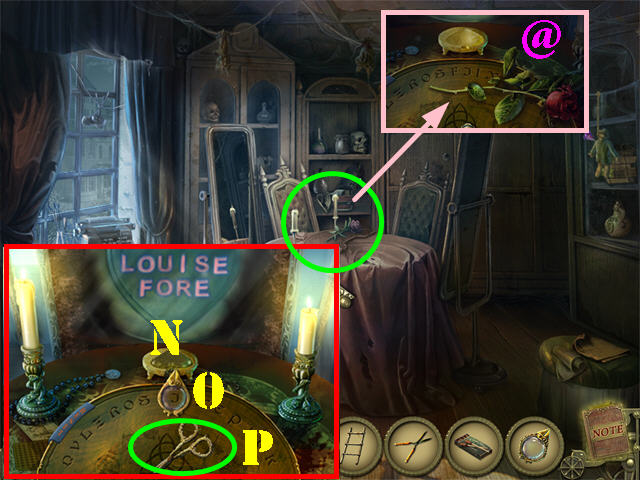
- Return to the voodoo shop.
- Examine the Ouija board on the table; take the ROSE (@).
- Put the MEDALLION (N) and the PLANCHETTE (O) as shown on the screenshot.
- Light the 2 candles with the MATCHES to activate the puzzle.
- Move the planchette around the board; click on the correct letters to form the words: ‘LOUISE FORE’.
- Take the SCISSORS (P).

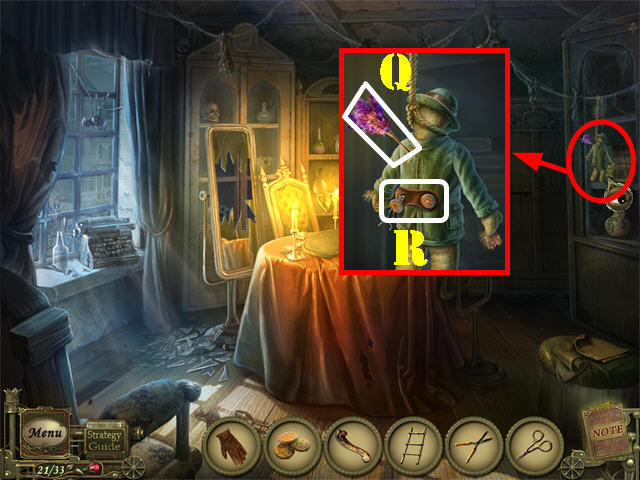
- Zoom into the voodoo doll; take the BLOWPIPE NEEDLE (Q).
- Cut the LEATHER FOR SLINGSHOT with the SCISSORS (R).
- Click down and go forward.

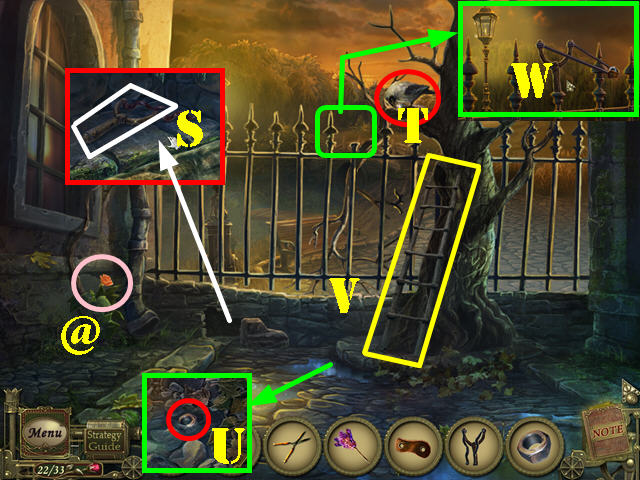
- Zoom into the bricks; remove the brick and take the SLINGSHOT (S).
- Take the ROSE (@).
- Give the CRACKERS to the raven (T).
- Examine the ground and take the NUT (U).
- Put the LADDER on the side of the tree (V).
- Zoom into the fence and put the SLINGSHOT on the fence (W).
- Put the LEATHER FOR SLINGSHOT on the slingshot.
- Place the NUT on the slingshot.
- Go over the fence.
Chapter 8: Renelle’s Courtyard

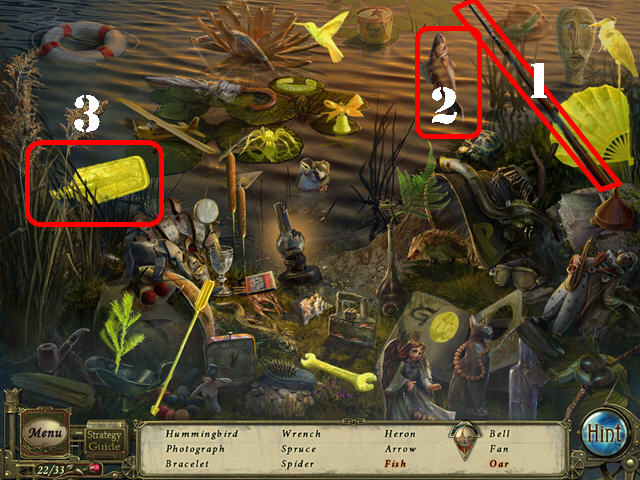
- Play the HOS.
- Click on the fishing rod (1); take the FISH (2).
- Click on the bushes; take the OAR (3).
- The UMBRELLA will be added to inventory.

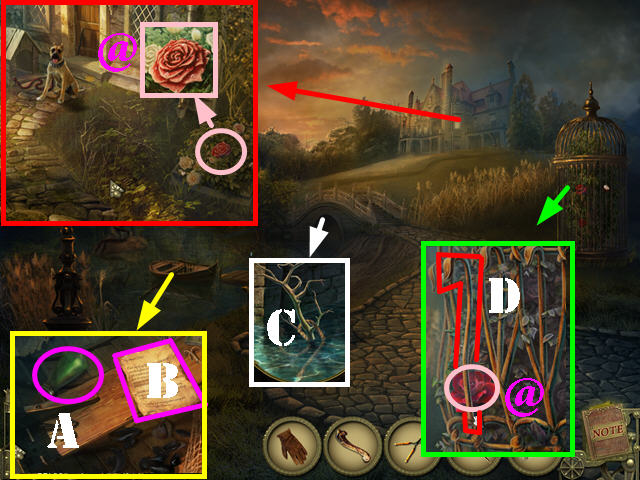
- Click on the boat, zoom into it; take the FLASK (A) and the NOTE (B).
- Examine the area under the bridge; take the ROPE with the UMBRELLA (C).
- Zoom into the cage; take the METAL STICK (D) and then the ROSE (@).
- Head towards Renelle’s house.
- Examine the ROSE (@) in the lower right and take it.
- Click down thrice.

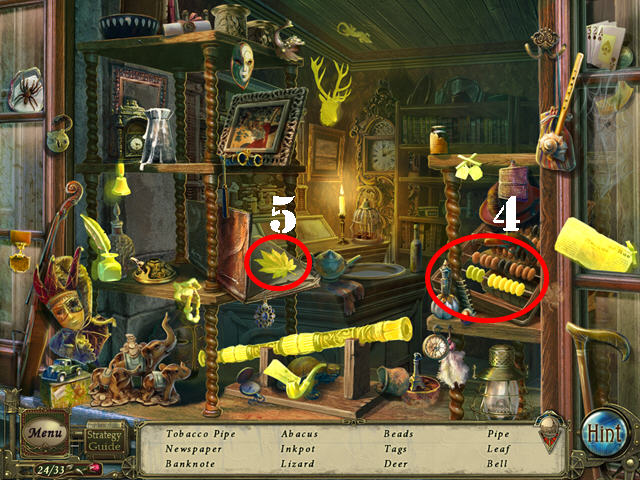
- Play the HOS.
- Click on the ABACUS (4) and take it.
- Open the book; take the LEAF (5).
- The BLOWPIPE will be added to inventory.

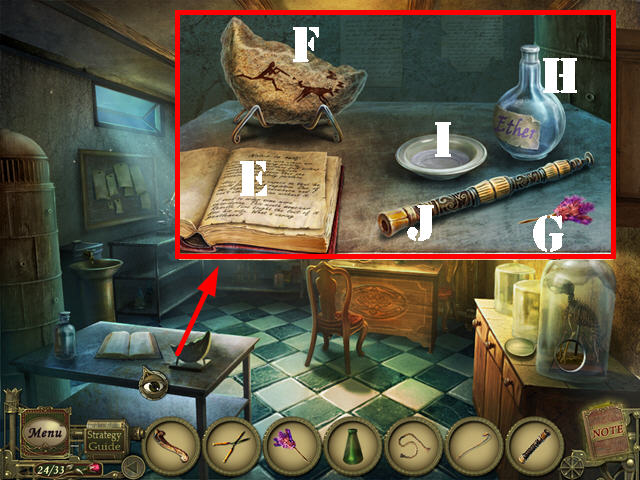
- Return to the pharmacy office.
- Examine the small table; take the NOTE (E).
- Note the image on the rock (F).
- Put the BLOWPIPE NEEDLE on the table (G).
- Remove the cork from the Ether bottle (H).
- Pour the Ether into the bowl (I).
- Dip the BLOWPIPE NEEDLE into the bowl.
- Put the BLOWPIPE on the table (J).
- Put the BLOWPIPE NEEDLE In the BLOWPIPE.
- Take the BLOWGUN.

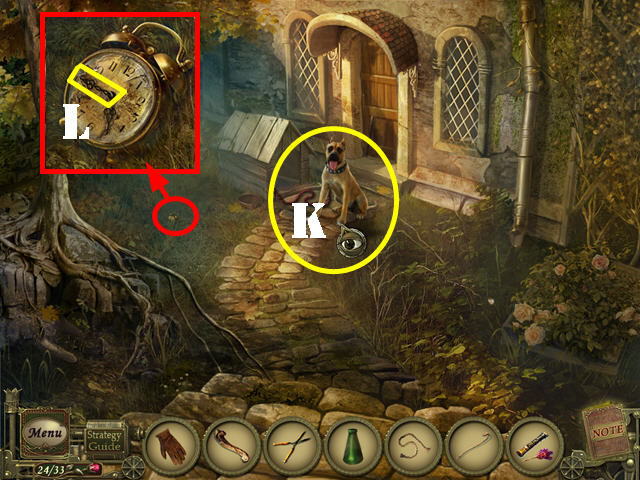
- Head back to Renelle’s house.
- Give the BONE to the dog (K).
- Use the BLOWGUN on the dog.
- Examine the clock; note the time and take the MINUTE HAND (L).

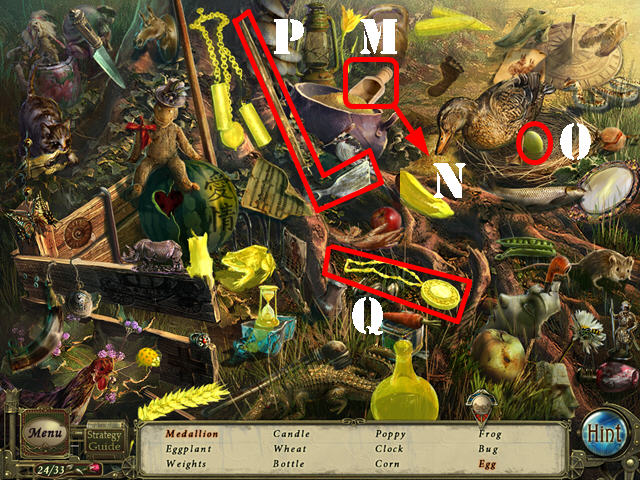
- Play the HOS.
- Drag the scoop (M) to the area in front of the duck (N); take the EGG (O) once the duck gets up to eat.
- Use the hoe tool (P) on the twig; take the MEDALLION (Q).
- The CLOCK WEIGHTS will be added to inventory.

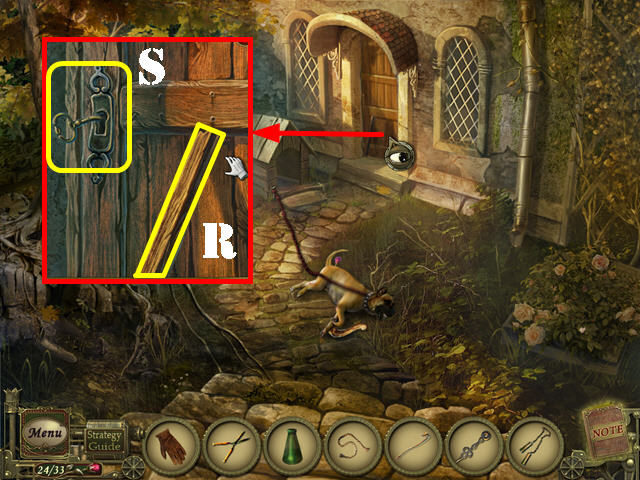
- Zoom into the door; take the WOODEN BAR (R).
- Click on the key in the lock and it will break (S).
- Use the METAL STICK on the lock and go inside the kitchen.

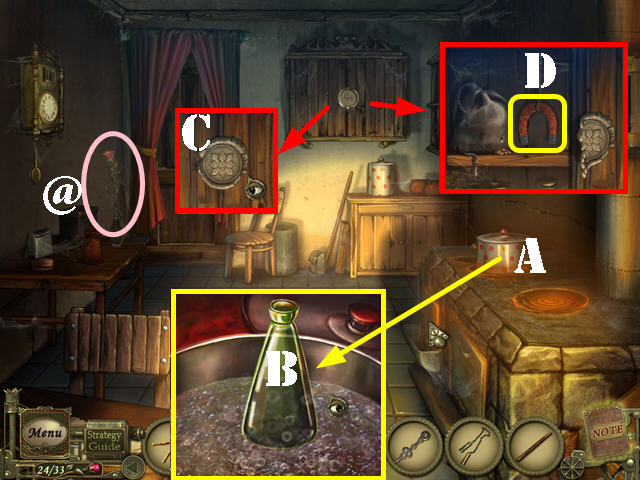
- Take the ROSE (@).
- Examine the pot on the stove (A).
- Open the lid and dip the FLASK in the boiling water.
- Use the GLOVE to take the FLASK WITH BOILING WATER (B).
- Zoom into the cabinet; use the FLASK WITH BOILING WATER on the seal (C).
- Open the door and take the MAGNET (D).
- Click down twice.

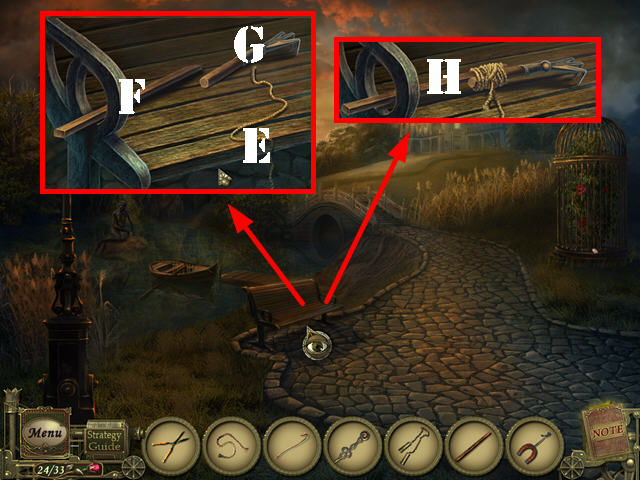
- Zoom into the bench; put the ROPE (E) and the WOODEN BAR (F) on the bench.
- Drag the wooden bar to the claw (G).
- Put the ROPE on the stick and take the HOOK (H).

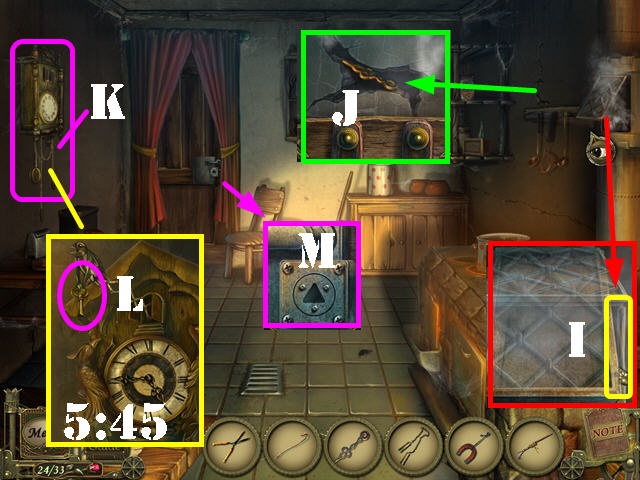
- Return to the kitchen.
- Zoom into the lattice; use the HOOK on the vent (I).
- Zoom into the steam and take the HOUR HAND (J).
- Put the CLOCK WEIGHTS on the clock (K).
- Zoom into the clock and put the MINUTE HAND and the HOUR HAND on the clock.
- Move the clock hands to the same time as the clock outside (5:45).
- Take the THREE-EDGED KEY (L) from the bird.
- Examine the door; use the THREE-EDGED KEY on the lock (M).
- Turn the key and go through the door.
Chapter 9: Inside the Beast’s Lair

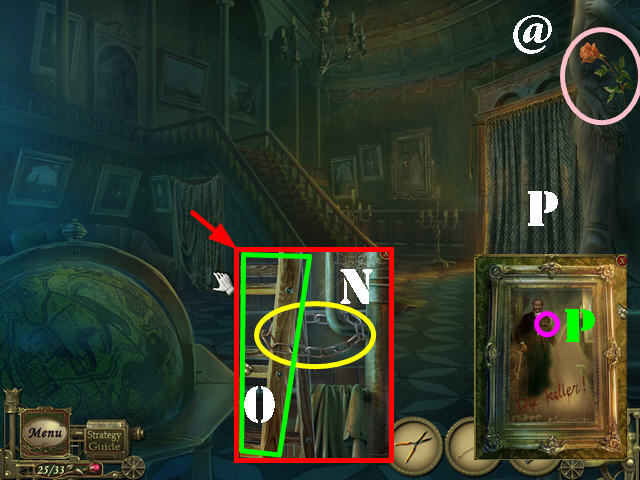
- Take the ROSE (@) in the upper right.
- Click on the cloth on the left and zoom into that area; break the chain with the METAL STICK (N).
- Take the LADDER (O).
- Examine the portrait; take the DAGGER (P).

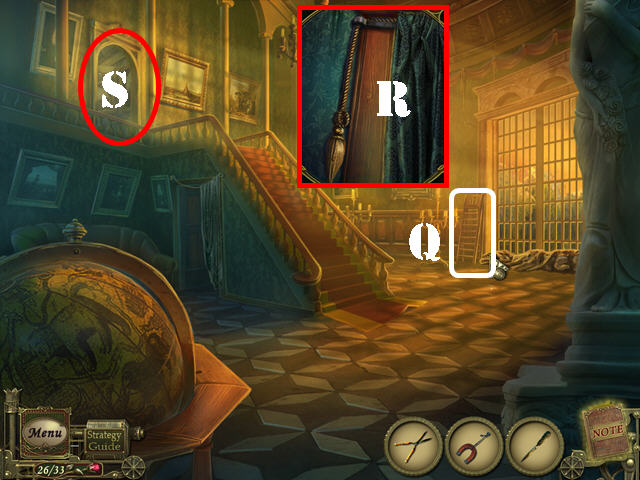
- Put the LADDER by the curtains (Q).
- Examine the top left side of the curtains.
- Cut the rope with the DAGGER to open the curtains (R).
- Go through the door above the steps (S).

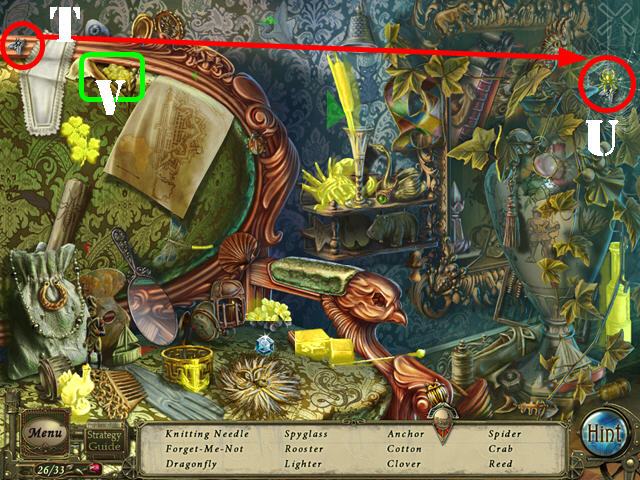
- Play the HOS.
- Tear the piece of cloth; take the COTTON (V).
- Drag the fly (T) to the spider web; take the SPIDER (U).
- The KNITTING NEEDLE will be added to inventory.

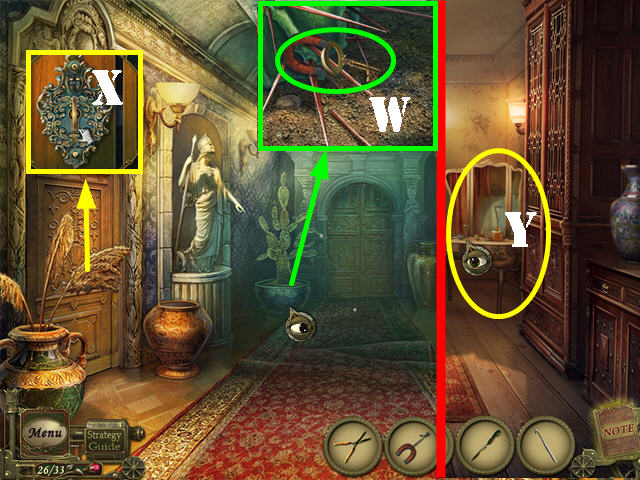
- Examine the potted plant; use the MAGNET to retrieve the KEY (W).
- Examine the left door; use the KEY in the lock (X).
- Turn the key and go through the door.
- Examine the table to activate a puzzle (Y).

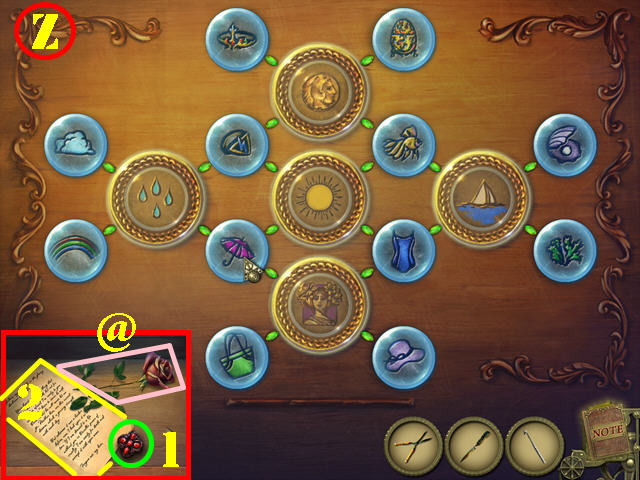
- Move the tokens around the symbols which have something in common.
- Click on a token to attach it to your cursor. Click on it again in the space you want to place it.
- Tokens placed correctly, will light up.
- Please look at the screenshot for the solution (Z).
- Take the ROSE (@), the BROOCH (1), and the NOTE (2).

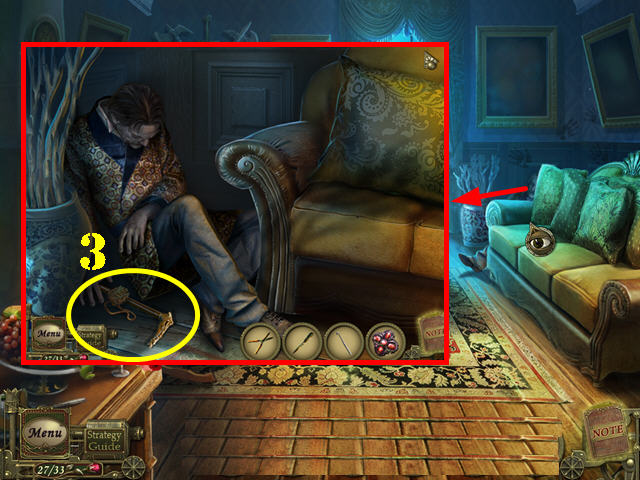
- Click down. Open the back door and go through it.
- Zoom into the man hiding behind the couch; talk to Mr. Fore.
- Take the MEDALLION PART and the CANE from Mr. Fore’s hand (3).
- Click down to exit Mr. Fore’s scene.

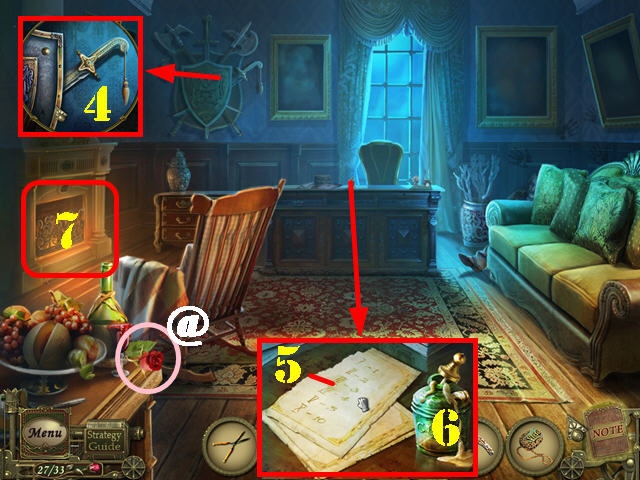
- Louise’s ghost appears.
- Take the ROSE (@) in the lower left.
- Examine the shield; take the SWORD (4).
- Examine the desk; take the CODE TABLE (5) and the GLUE (6).
- Examine the fireplace; use the CANE on the grid (7).

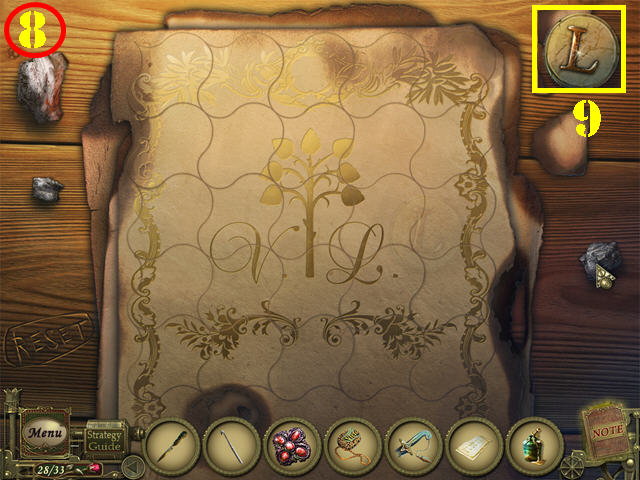
- Click on the piece of paper by the fireplace to activate a puzzle.
- Drag the rows and columns until you form the correct image.
- Please look at the screenshot for the solution (8).
- Take the LETTER L (9).

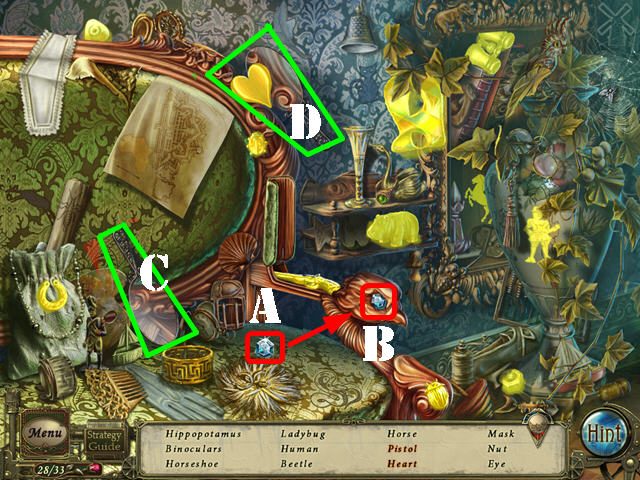
- Exit the puzzle and click down.
- Play the HOS.
- Drag the gem (A) to the hole in the chair arm; take the PISTOL (B).
- Drag the mirror (C) to the top of the chair; take the HEART (D).
- The NUT will be added to inventory.

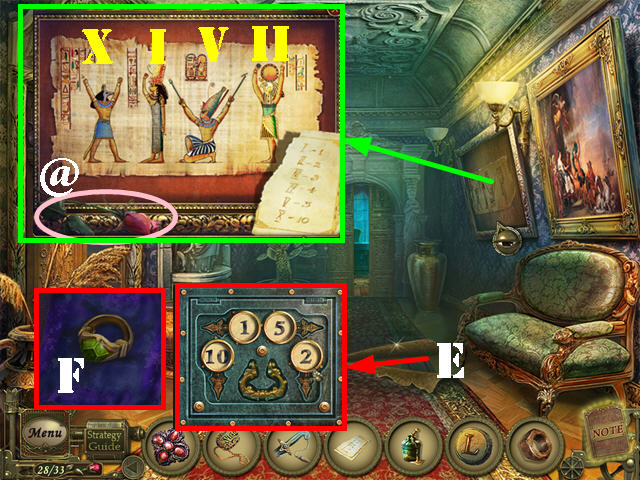
- Examine the portrait; take the ROSE (@).
- Put the CODE TABLE on the painting.
- You have to decipher the code using the table and the positions of the Egyptian characters.
- The code is 10 (X) -1 (I) – 5 (V) – 2 (II).
- Cut the carpet with the DAGGER (E).
- Zoom into the carpet and enter the code 10,1,5,2.
- Take the RING (F).

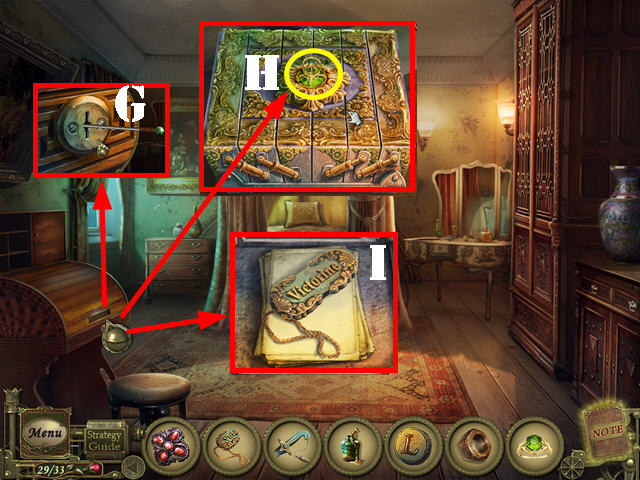
- Go into the bedroom on the left.
- Examine the roll-up desk; use the KNITTING NEEDLE in the lock (G).
- Take a closer look at the roll-up desk put the RING on the box (H).
- Open the box; put the MEDALLION PART on the desk and click on it.
- Use the GLUE on the medallion and take the VICTORINE’S CRYPT PLATE (I).
Chapter 10: The Old Graveyard

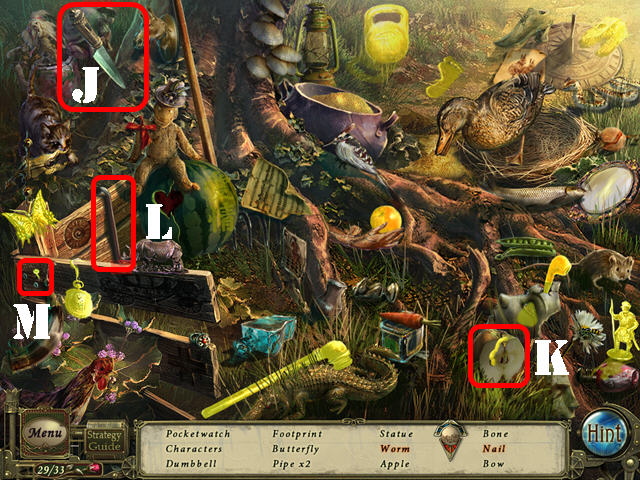
- Exit the house.
- Play the HOS.
- Drag the knife (J) to the apple; take the WORM K.
- Use the crowbar (L) on the nail; take the NAIL (M).
- The PIPE will be added to inventory.

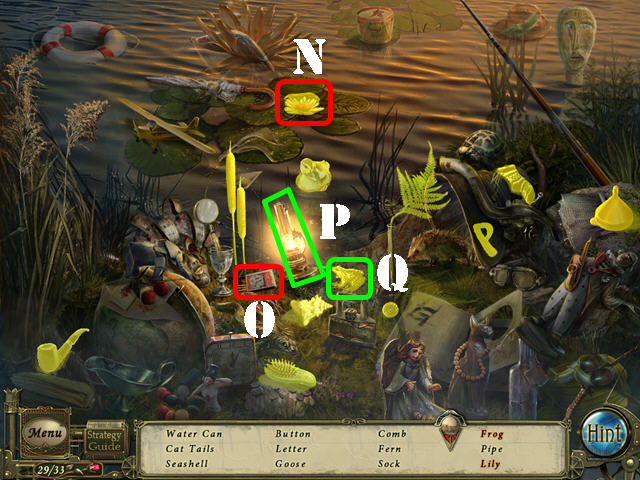
- Click down.
- Play the HOS.
- Click on the flower; take the LILY (N).
- Drag the matches (O) to the lantern (P); take the FROG (Q).
- The WRENCH will be added to inventory.

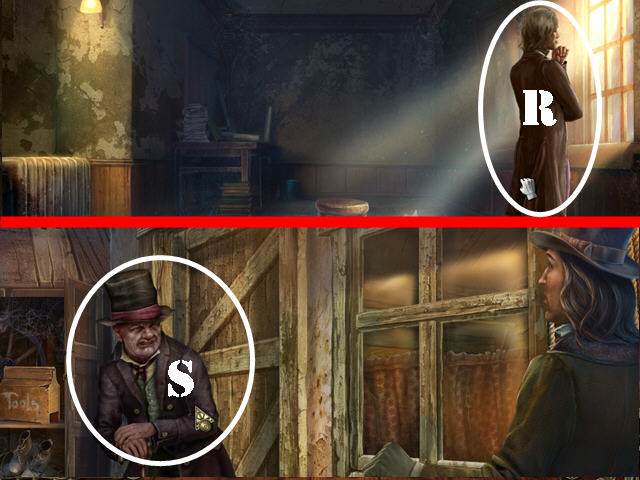
- Return to Julien’s room; talk to him (R).
- Return to the cemetery keeper’s hut; talk to him (S).
- Give the VICTORINE’S CRYPT PLATE to the cemetery keeper.
- Click down; go through the cemetery gate and head forward.

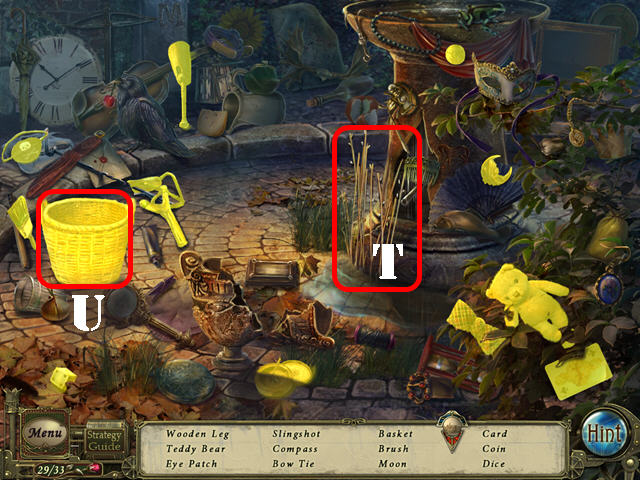
- Play the HOS.
- Drag the twigs (T) to the partial basket; take the BASKET (U).
- The TEDDY BEAR will be added to inventory.

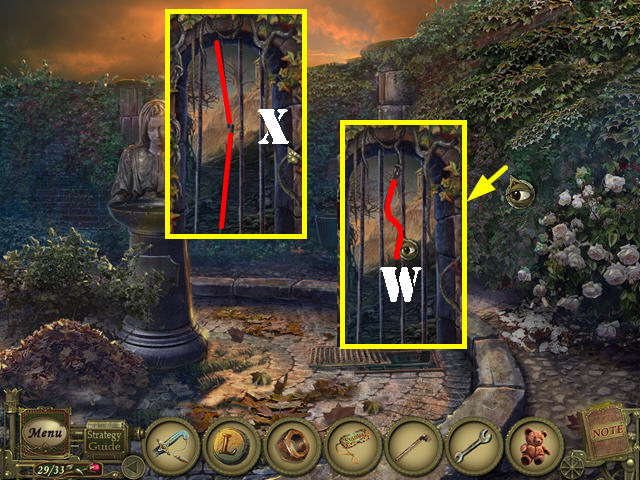
- Zoom into the ivy wall on the right; use the CLIPPERS on the ivy.
- Use the CLIPPERS on the vine and take the VINE (W).
- Use the VINE on the bars.
- Use the PIPE on the VINE.
- Click on the pipe to tighten up the rope (X).
- Click on the 2 loose bars and go through the bars.

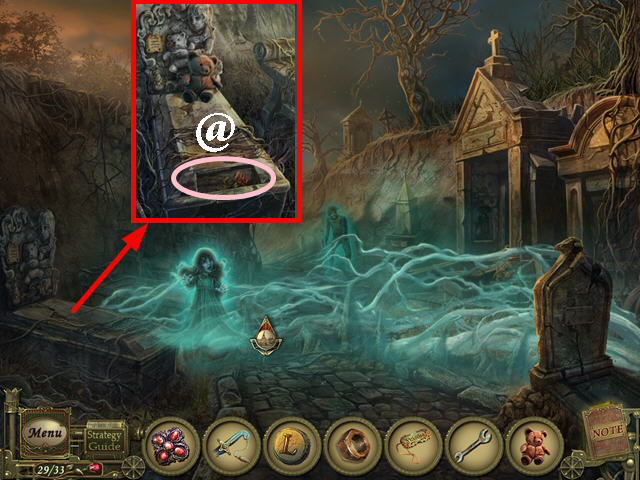
- Click in the center of the scene.
- Examine the casket; put the TEDDY BEAR on the grave.
- Examine the casket again and take the ROSE (@).

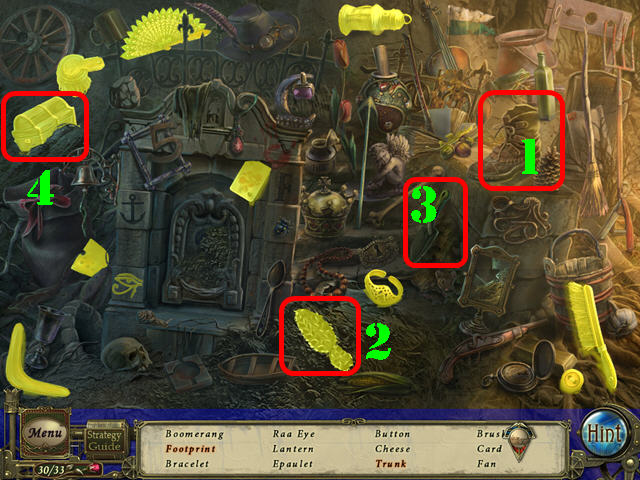
- Play the HOS.
- Put the boot (1) on the ground; take the FOOT PRINT (2).
- Drag the shovel (3) the patch of dirt; take the TRUNK (4).
- The BRUSH will be added to inventory.

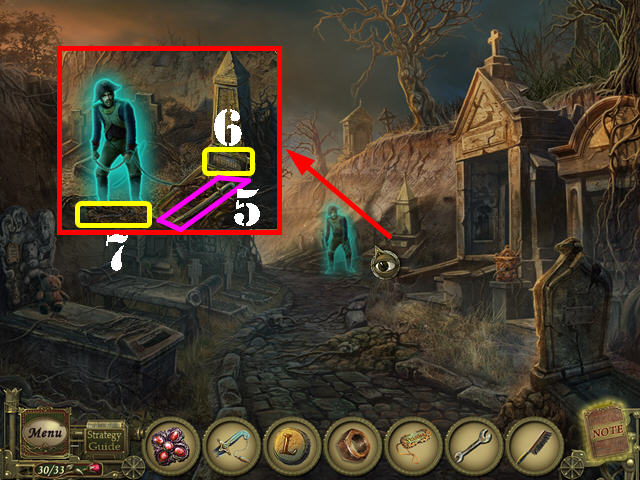
- Zoom into the ghost; put the SWORD on the grave (5).
- Examine the nameplate; clean it with the BRUSH (6).
- Take the SHACKLES (7).
- Head forward towards the gazebo.

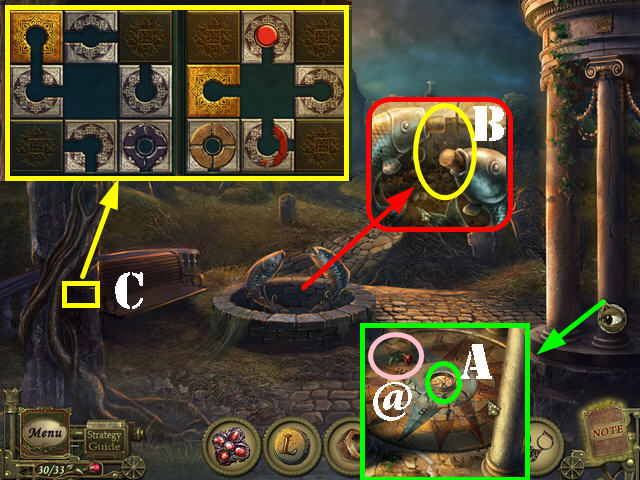
- Examine the column; take the ROSE (@) and the COMPASS (A). Click on the ground and note that the compass points in two directions.
- Zoom into the fountain; take the CORKS (B).
- Open the compartment and zoom into it (C).
- Put the BROOCH on the left puzzle to activate it.

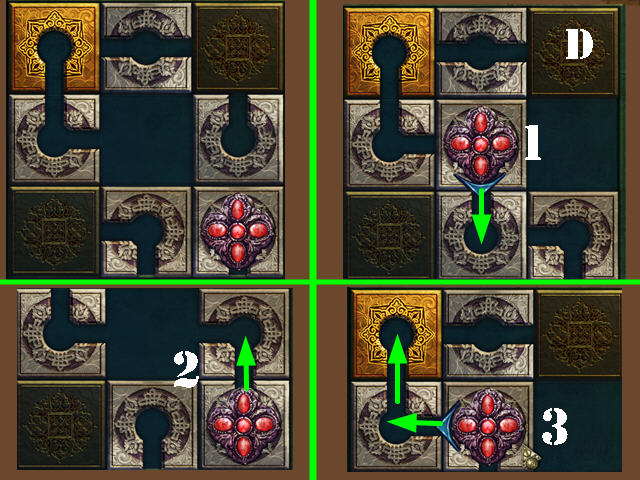
- Look at the left side for the first part of the puzzle.
- Drag the blocks by the edges. Click on brooch for the arrow to appear and then click on the arrow to move the brooch to an open space.
- Move the brooch and the blocks until the brooch reaches the golden block (D).
- Take the BROOCH once the puzzle has been solved.

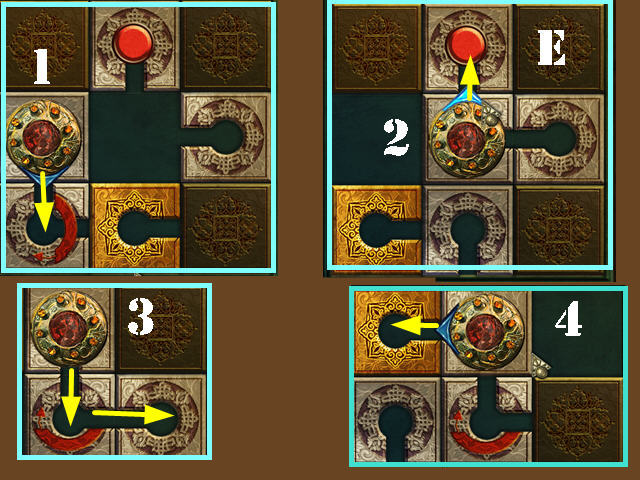
- Put the second BROOCH on the right side of the puzzle.
- Follow the steps in screenshot E to solve the puzzle.
- Take the LETTER F.
- Head forward.

- Play the HOS.
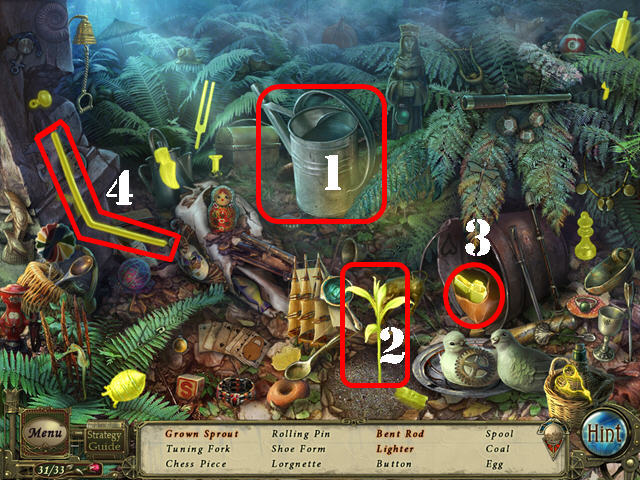
- Drag the watering can (1) to the plantlet; take the GROWN SPROUT (2).
- Click on the bag; take the LIGHTER (3).
- Click on the rock in the upper left; take the BENT ROD (4).
- The COAL will be added to inventory.

- Take the LADDER (G).
- Put the LADDER against the mausoleum (H).
- Examine the side of the mausoleum; take the TORCH (I) and the ROSE (@).
- Zoom into the tombstone; click on the cover and take the URN (J).
- Examine the top of the mausoleum; put the COMPASS in the slot (K).
- Point the arrows in the same direction as the compass in the gazebo (Northwest and South).
- Take the MANHOLE COVER PART (L).

- Click down twice.
- Play the HOS.
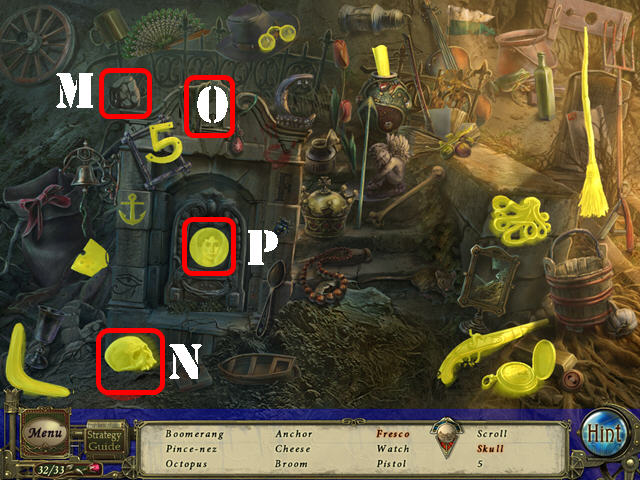
- Click on the SKULL (N) and then click on the rock (M); take the SKULL (N).
- Use the cloth (O) to clean the tombstone; take the FRESCO (P).
- The PAPER will be added to inventory.

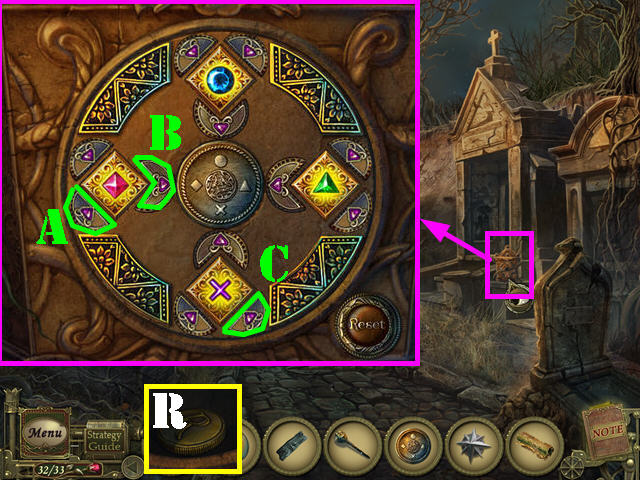
- Examine the box on the right; put the URN in the center to activate a puzzle.
- Click on the arrows to change the gems in the center. Once a gem is in the right place it will light up.
- To solve the puzzle click on the arrows in this order: A x 3, B x 3, and C x 3.
- Take the LETTER R (R).
- Head forward.


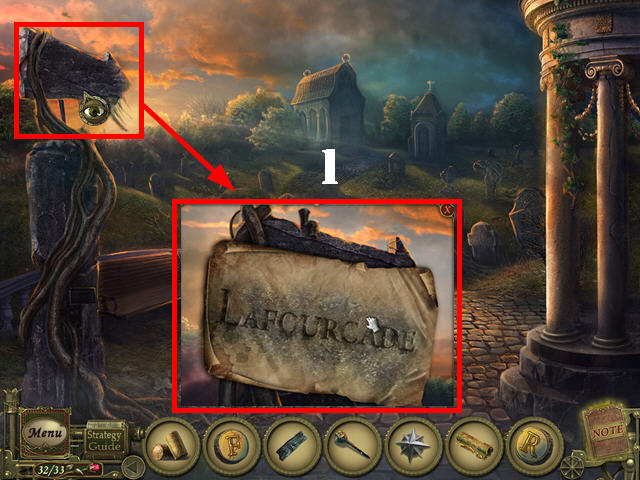
- Zoom into the sign; put the PAPER on it and then the COAL to reveal the word:’LAFOURCADE’ (1).
- Go forward.
Chapter 11: The Finale

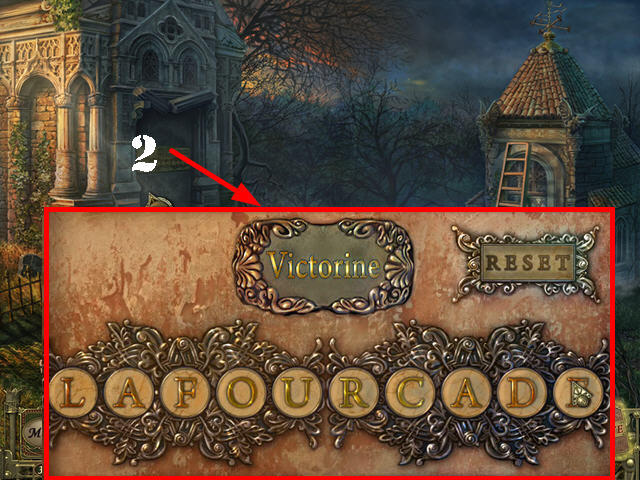
- Examine the left door; put the VICTORINE’S CRYPT PLATE on top (2).
- Put the LETTER F, LETTER L, and the LETTER R on the board to activate the puzzle.
- Click on the letters in this order: L, D, F x 2, and the last A in order to spell ‘LAFOURCADE’.
- Victorine will give you the CRYPT KEY after the puzzle has been solved.

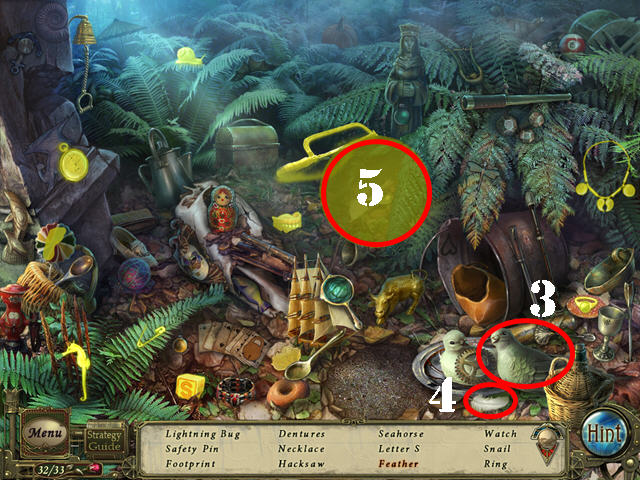
- Play the HOS.
- Click on the right dove (3) and take the FEATHER (4).
- Click on the leaves; take the LIGHTNING BUG (5).
- The HACKSAW will be added to inventory.

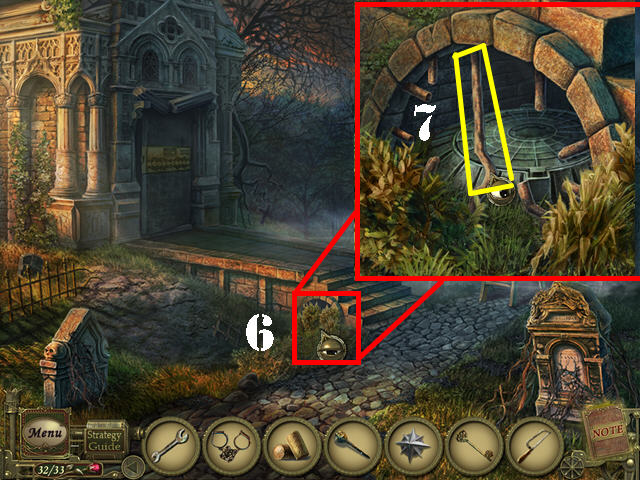
- Examine the area below the steps; click on the bushes (6).
- Use the HACKSAW on the bar (7).
- Put the MANHOLE COVER PART on the manhole cover.
- Open the manhole cover and go down.

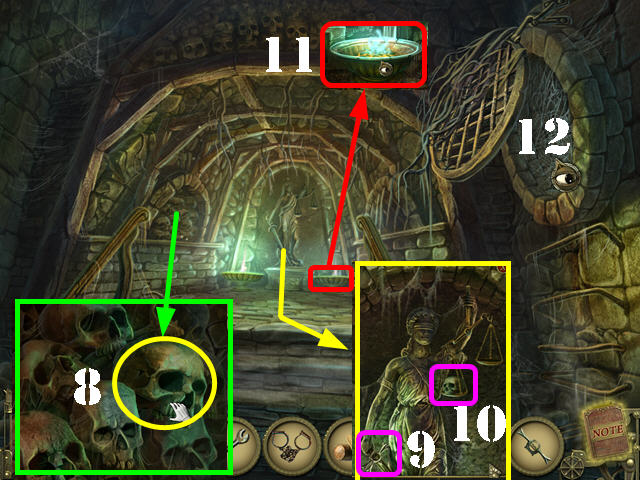
- Examine the skulls on left; take a SKULL (8).
- Examine the statue; take the LOCK COVER (9).
- Put the SKULL on the left scale (10).
- Examine the fire bowl; put the TORCH in it to obtain the BURNING TORCH (11).
- Zoom into the hole on the right; burn the spider web with the BURNING TORCH and go through the hole (12).

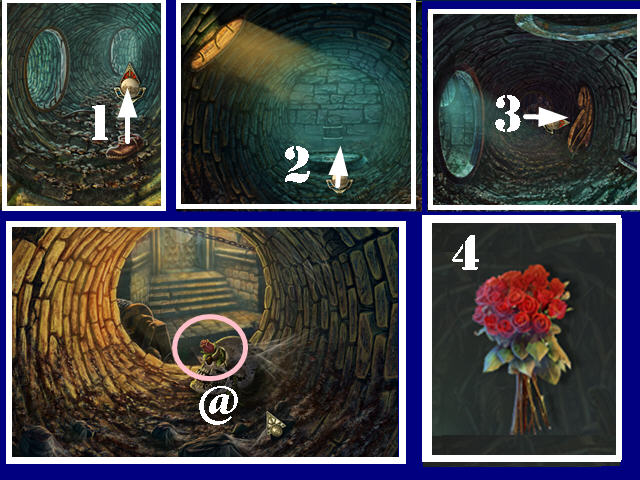
- You must now navigate through the tunnel.
- Go through the right tunnel (1); through the hole (2), and then right (3).
- Take the last ROSE (@). You have collected the BOUQUET OF ROSES (4). If you haven’t collected all the roses, you will have a chance to revisit the locations to collect the roses.
- Go forward.

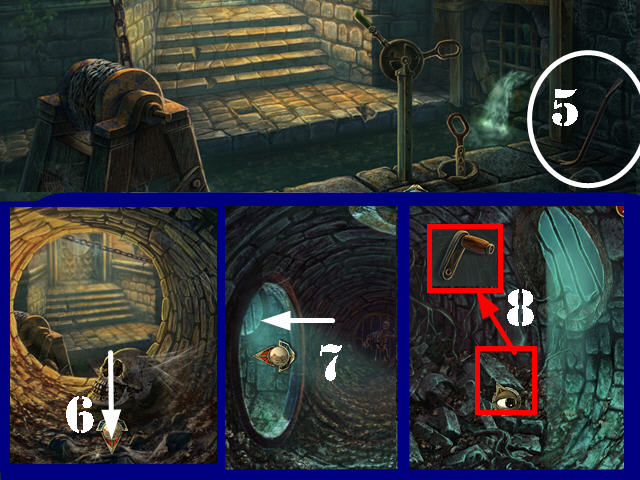
- Take the CROWBAR (5).
- Exit this scene; click down (6) and head left (7).
- Use the CROWBAR on the rock to take the HANDLE (8).

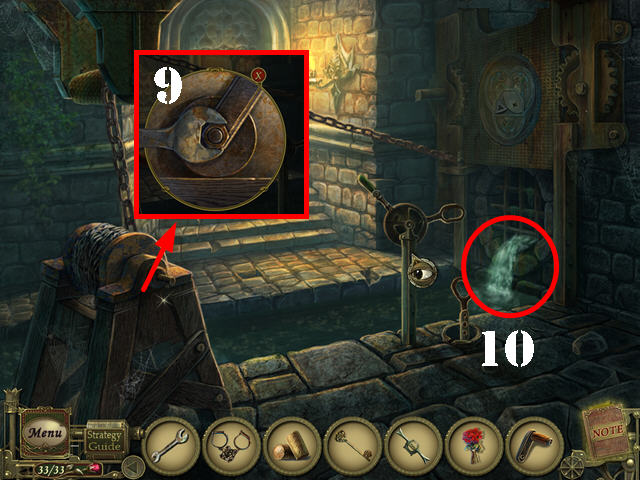
- Click down; head right and go forward.
- Zoom into the winch; put the HANDLE on the winch (9).
- Put the NUT on the handle and tighten the nut with the WRENCH.
- Click on the handle.
- Zoom into the water to activate a puzzle (10).

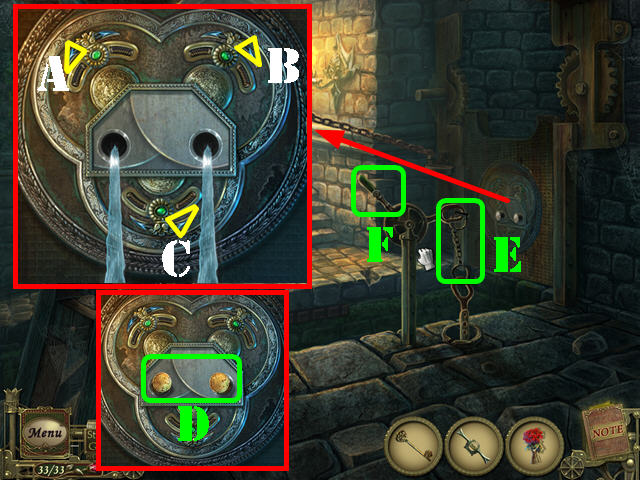
- Click on the arrows to put the shapes into the correct slots.
- To solve the puzzle click on the arrows in this order: A x 3, B x 4, and C x 4.
- Put the CORKS in the holes (D) to stop the flow of water.
- Put the SHACKLES on the mechanism (E).
- Click on the mechanism’s handle (F).

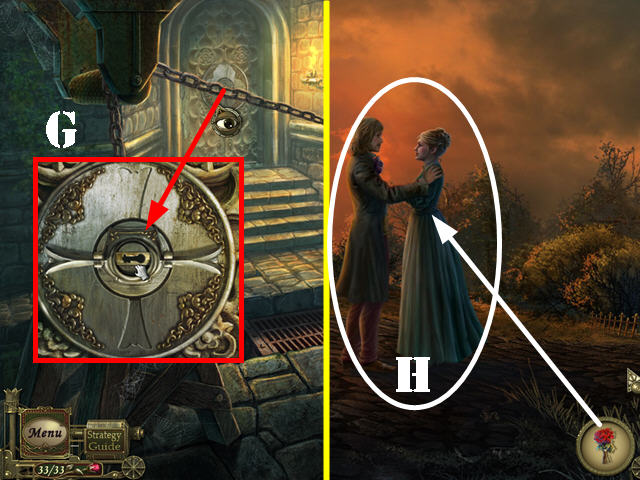
- Examine the back door; put the LOCK COVER in the keyhole (G).
- Click on the LOCK COVER and insert the CRYPT KEY in the lock and turn the key.
- Give the 33 ROSES to the happy couple (H). If you missed any roses you can go back through the game and pick them up.
- Congratulations! You have completed Dark Tales: Edgar Allan Poe’s Premature Burial!


 Eternal Night: Realm of Souls Walkthrough, Guide, & Tips
 Azada: Elementa Walkthrough, Guide, & Tips
 Grim Tales: The Vengeance Walkthrough, Guide, & Tips
 Witches' Legacy: Lair of the Witch Queen Walkthrough, Guide, & Tips
 Art of Murder: Deadly Secrets Walkthrough, Guide, & Tips