Hidden Expedition: The Uncharted Islands Walkthrough, Guide, & Tips
Hidden Expedition: The Uncharted Islands Walkthrough

Welcome to the Hidden Expedition: The Uncharted Islands Walkthrough!
After crash landing onto an extraordinary string of uncharted islands, you find yourself suddenly thrust into adventure!
Whether you use this document as a reference when things get difficult or as a road map to get you from beginning to end, we’re pretty sure you’ll find what you’re looking for here.
This document contains a complete Hidden Expedition: The Uncharted Islands game walkthrough featuring annotated screenshots from actual gameplay!
We hope you find this information useful as you play your way through the game. Use the walkthrough menu below to quickly jump to whatever stage of the game you need help with.
Remember to visit the Big Fish Games Forums if you find you need more help. Have fun!
This walkthrough was created by Margie B, and is protected under US Copyright laws. Any unauthorized use, including re-publication in whole or in part, without permission, is strictly prohibited.
General Tips

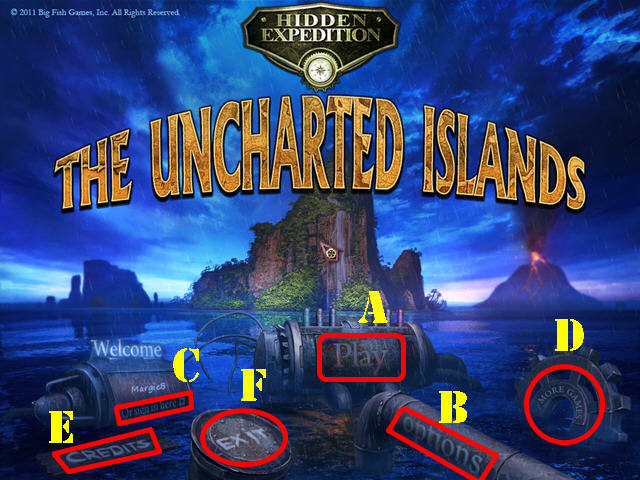
- Click on ‘Play’ (A) to access the main chapters in the game.
- The ‘Options’ (B) button allows you to adjust the screen, music, cursor, and sound.
- The ‘Or sign in here’ button (C) can be used to manage player profiles.
- Click on the ‘More Games’ (D) button to view previous titles from this series.
- The ‘CREDITS’ (E) button allows you to view the names of all the people who worked on this game.
- Click on ‘EXIT’ (F) to leave the game.
- Hidden Object Puzzles require you to find 4 items at a time. However, some of the items are hidden from view and require the use of inventory items to uncover them.
- The inventory Tray has 3 tabs, ‘INVENTORY’, ‘FIND’ and ‘OBJECTIVES’. These tabs allow you to toggle between the list of objects in a Hidden Object Scene, your inventory items, and the objectives.
- Mini-games can be skipped once the skip button has been filled in the upper center.
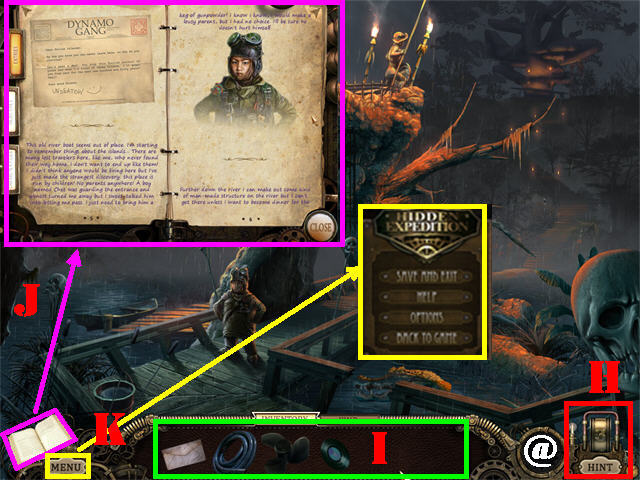
- The Hint button is in the lower right side of each scene (H). It will only light up in regular scenes when there is something that needs to be done there.
- Some inventory items need to be combined in order to be used. To combine items, drag one item over the other and click on them. If the pieces are meant to be combined, they will merge as one and will acquire a new name.
- You can click on a name on the list in a Hidden Object Scene and a silhouette of the item will appear in the lower right corner; use it as much as you want (@).
- You can click on a name on the list, and then on the HINT and the game will show you the exact location of the item you chose.
- Hover your mouse at the bottom of the screen to make the inventory tray appear (I).
- The Journal (J) is located in the lower left corner of each scene. It contains valuable information regarding the game.
- There are 3 tabs in the Journal, the ‘ENTRIES’, the ‘OBJECTIVES’ and the ‘CHARACTER FILES’.
- Click on the ‘MENU’ button (K) to access the options, help, or exit to the game.
Chapter 1: Strange Savages
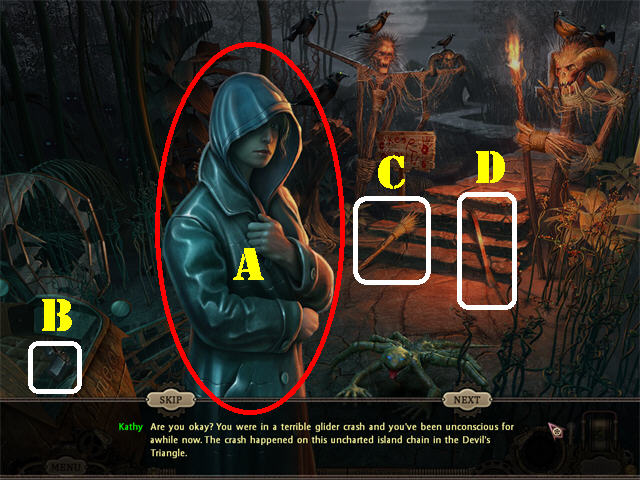
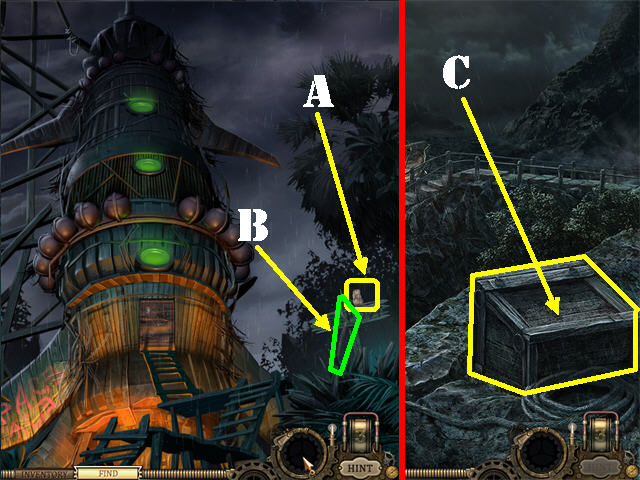
- Talk to Kathy (A).
- Take the LIGHTER (B) in the lower left.
- Grab the TORCH (C) and the CROWBAR (D) by the steps.
- Go up the steps.
- A large boulder falls and blocks your way.
- Talk to Kathy and she will hand you a Journal.
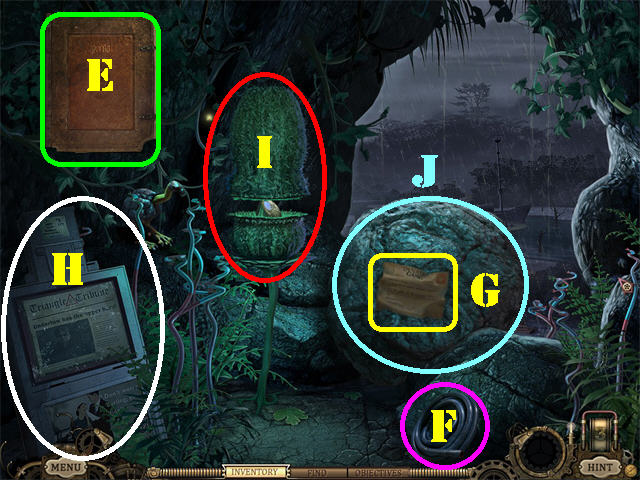
- Click on the JOURNAL (E) on the screen; it is now accessible for the duration of the game in the lower left corner.
- Take the RUBBER HOSE (F) in the lower right.
- Read the TELEGRAM (G) on the boulder; it’s from Undertow.
- Note the newspaper dispenser (H) on the left and the light-sensitive plant (I).
- Move the boulder with the CROWBAR (J).
- Head towards the right.
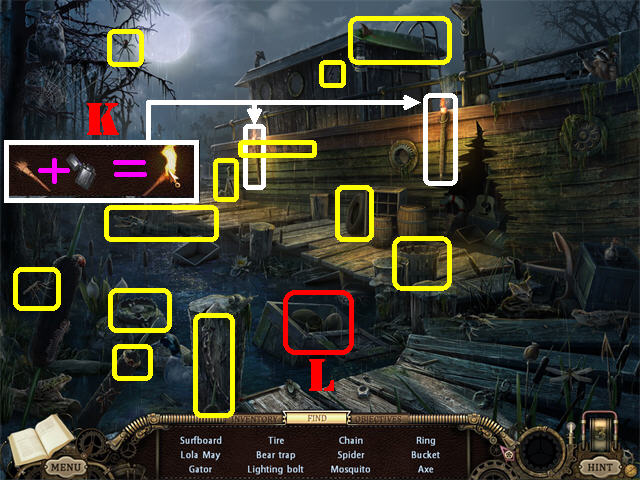
- From your inventory tray drag the TORCH over the LIGHTER to combine both pieces to create the TORCH WITH FIRE (K).
- Place the TORCH WITH FIRE on one of the torches on the side of the boat to trigger a Hidden Object Scene.
- Find all the items on the list.
- Grab the BOAT PROP (L) inside the crate.
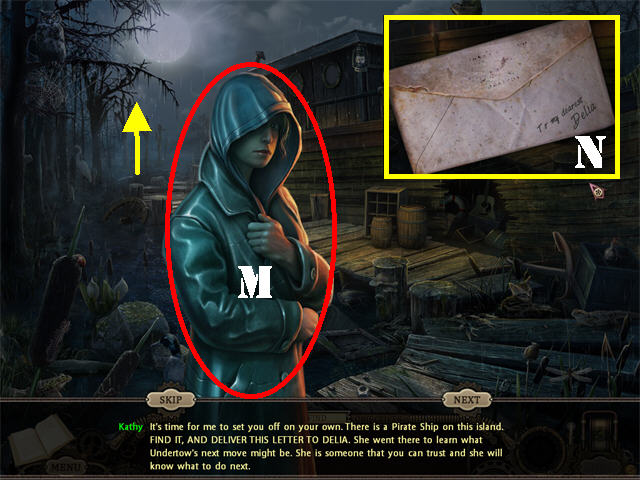
- Talk to Kathy (M).
- Click on the LETTER FOR DELIA (N) that appears on the screen after Kathy stops talking.
- Proceed to the left.
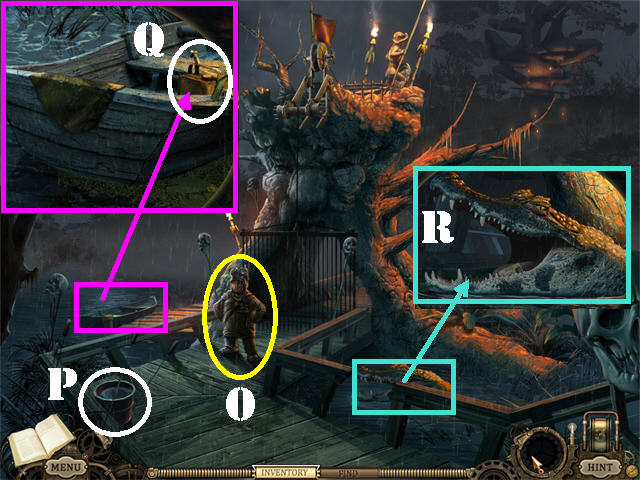
- Talk to the little boy Chet (O); he wants GUNPOWDER and the BUTTON OF POWER.
- Grab the BUCKET OF WATER (P) in the lower left.
- Zoom into the boat on the left; take the GAS CAN [EMPTY] (Q).
- Examine the alligator in the water. You need to find something to hold its mouth open; you can come back to this area later (R).
- Go through the newly-opened gate behind Chet.
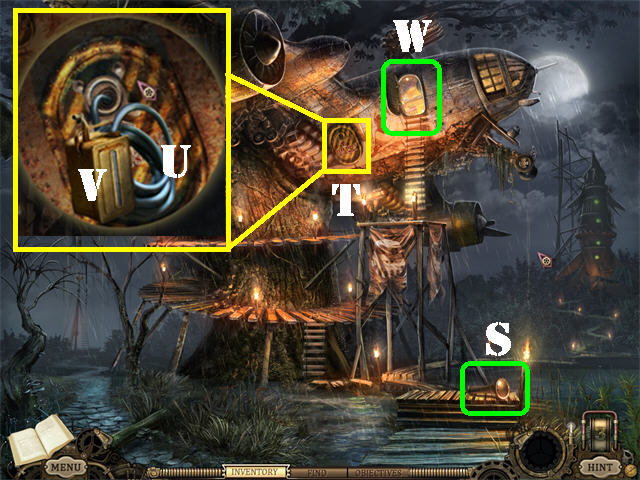
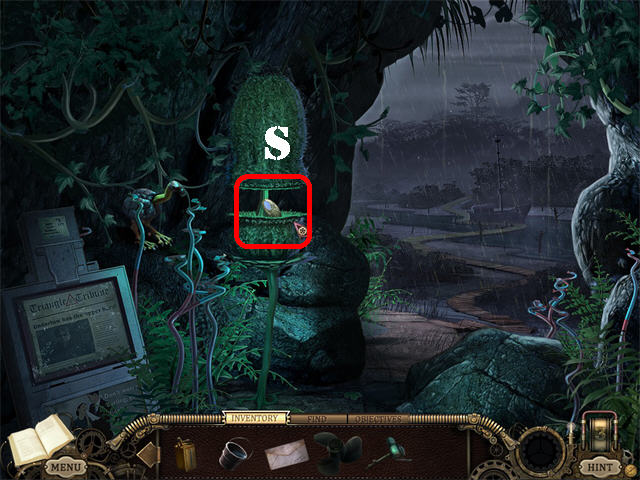
- Grab the FLASHLIGHT (S) on the ground.
- Zoom into the gas tank (T); place the RUBBER HOSE in the tank (U).
- Place the GAS CAN (EMPTY) on the hose (V). The GAS CAN (FULL) will be added to inventory automatically.
- Enter the Plane Tree House (W).
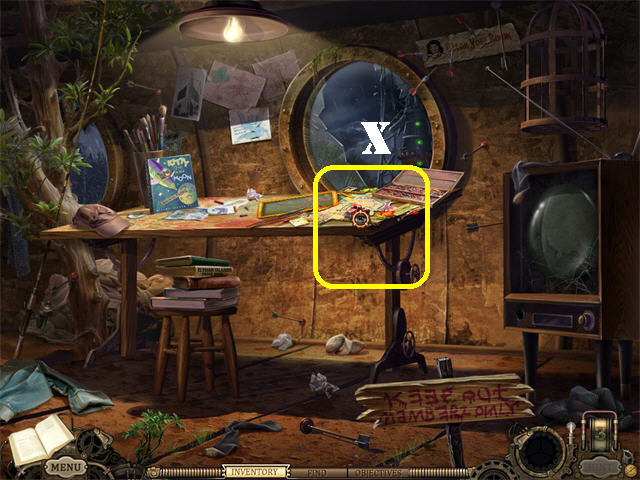
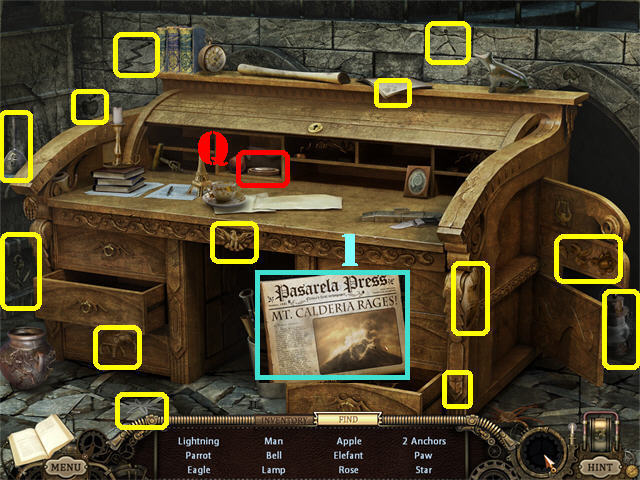
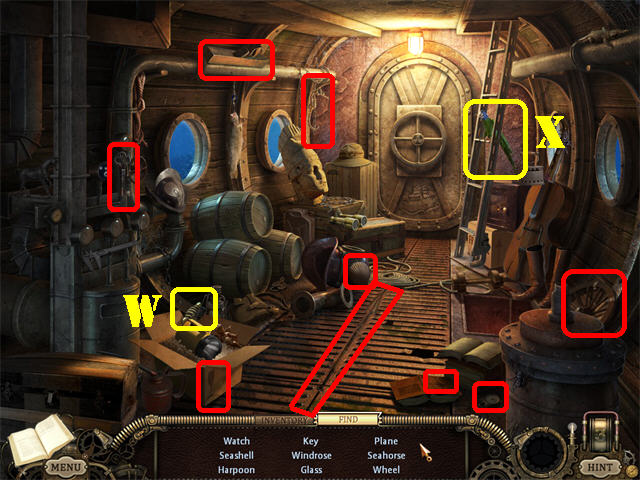
- Zoom into the right side of the table to access a Hidden Object Puzzle (X).
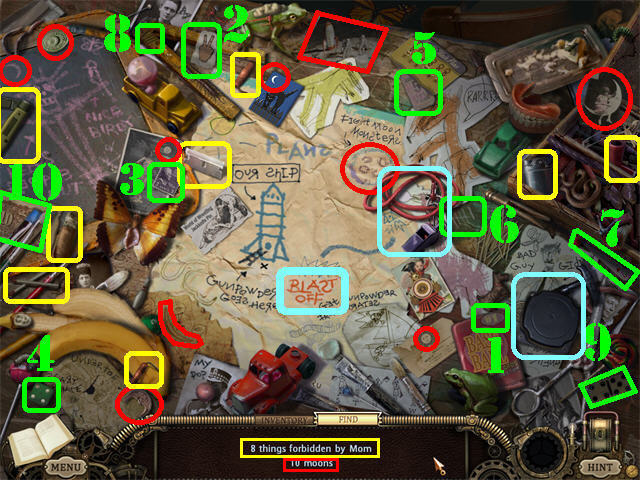
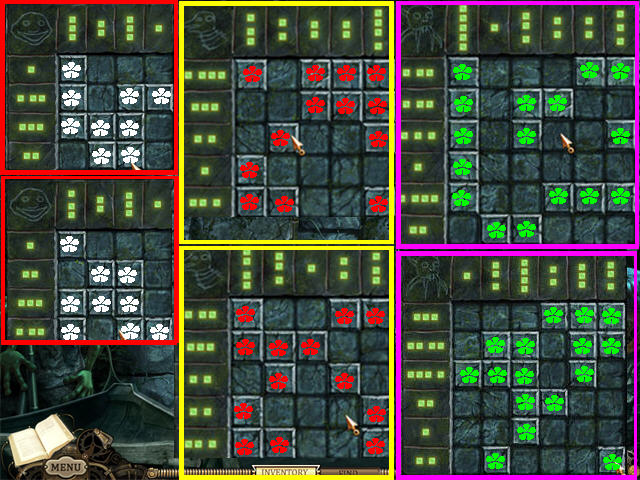
- The Hidden Object Puzzle lists may vary; we provide solutions here for several lists that you may encounter while playing.
- The 8 THINGS FORBIDDEN BY MOM are marked in yellow.
- The 10 MOONS are marked in red.
- The numbers 10 through 1 are marked in green.
- The words ‘Blast Off’, the PULL CORD and the HAMSTER WHISTLE are marked in light blue; the latter 2 items will be added to inventory.
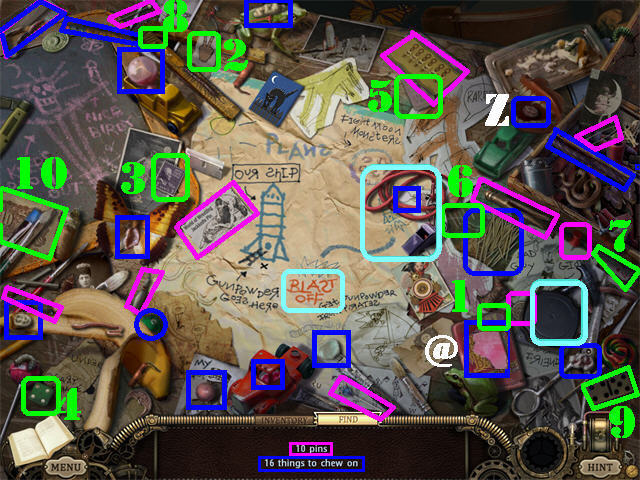
- The 16 THINGS TO CHEW ON are marked in blue.
- Open the set of teeth; take the chewing gum (Z).
- Click on the baseball card pack; take the gum (@).
- The 10 PINS are marked in purple.
- The numbers 10 through 1 are marked in green.
- The words ‘Blast Off’, the PULL CORD and the HAMSTER WHISTLE are marked in light blue; the latter 2 items will be added to inventory.
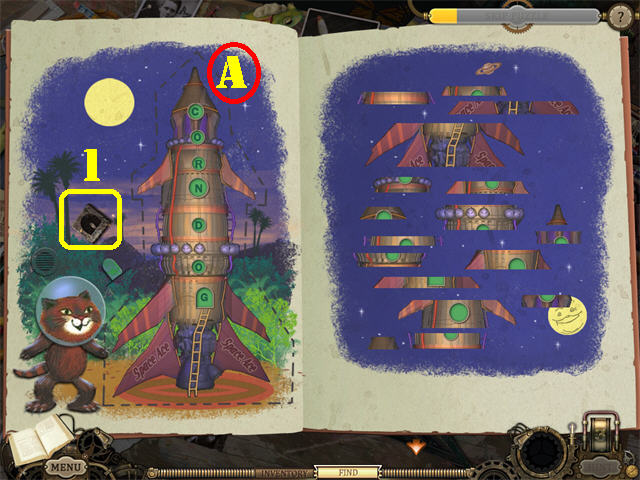
- Zoom into the Moon Book on the table.
- Open the book to activate a puzzle.
- Drag the rocket pieces from the right side of the page into the correct spots on the left.
- A piece placed correctly will lock in place.
- Please look at the screenshot for the solution (A).
- Take the LETTER ‘C’ from the left page(A).
- The words ‘CORN DOG’ will appear on the body of the rocket after the puzzle has been solved.
- Exit the Plane Tree House.
- Go right towards the rocket ship that resembles the puzzle you just completed.
- Use the HAMSTER WHISTLE on the hamster above the sign on the right (A); the whistle will automatically disappear once you’ve clicked on the hamster correctly.
- Click on the HAMSTER to add it to inventory.
- Take the EXTENDING GRABBER-HAND (B) on the sign in the lower right.
- Click down and head left.
- Examine the crate in the lower right to activate a Hidden Object Puzzle (C).
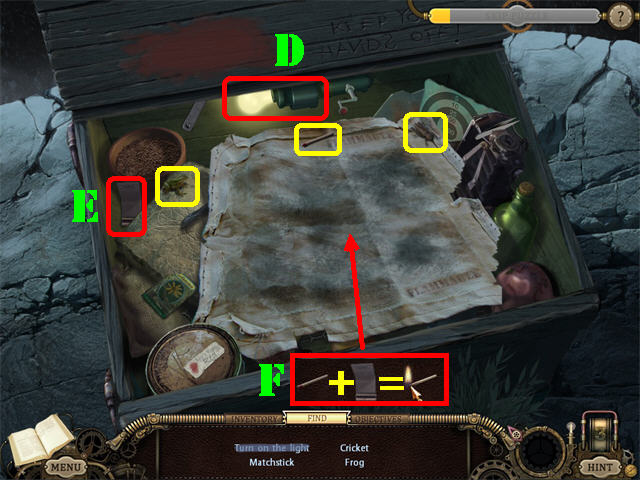
- Open the lid.
- Click on the LIGHT BULB (D) to turn on the light.
- The CRICKET, MATCHSTICK, and FROG are marked in yellow. Four new items will appear.
- Grab the MATCHBOOK (E) in the upper left.
- From inventory combine the MATCHSTICK and the MATCHBOOK to create the LIT MATCH (F).
- Place the LIT MATCH on the flammable cloth in the crate.
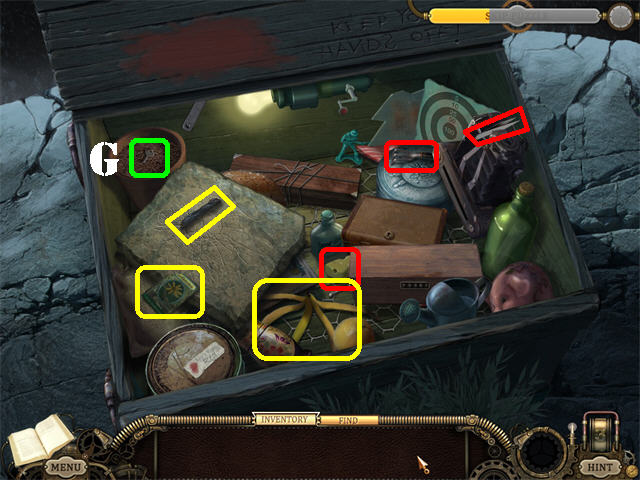
- Grab the CHEESE, TWEEZERS, and TINY RAKE marked in red.
- The BANANA PEEL, CHARCOAL, and SEEDS are marked in yellow.
- Place the TINY RAKE in the pot in the upper left; take the KEY (G).
- Place the KEY in the lock of the brown box; take the CORKSCREW (H) and the BAR OF SOAP (I) from inside the box.
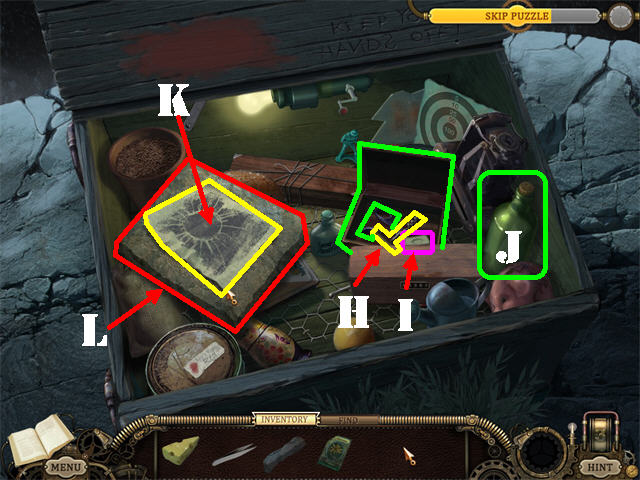
- Remove the green bottle’s cork on right with the CORKSCREW. Use the TWEEZERS to remove the PAPER from inside the green bottle (J).
- Place the PAPER over the stone tablet on left.
- Click the CHARCOAL onto the paper 4 times for the sun image to appear.
- Take the SUN IMAGE (K) on the paper.
- Take the STONE TABLET (L) marked in red.
- Take the GREEN BOTTLE, SCISSORS, and SMALL SUITCASE marked in green.

- Cut the string on the narrow wooden case.
- Open the narrow wooden case; take the SCREWDRIVER (M).
- Take the BOTTLE OPENER (N).
- Click on the RED BUTTON (O) attached to the camera to take a picture of the bird as it is flying by the scene.
- Take the BIRD PHOTO from the camera (P).
- Place the SCREWDRIVER on the screw in the upper left; take the SABRE (S) that appears.
- Take the CAMERA (Q).
- Take the NARROW WOODEN CASE (R).
- Put the SABRE on the loaf of bread; take the SLICED BREAD (T).
- Take the PAINT BRUSH that appears below the bread.
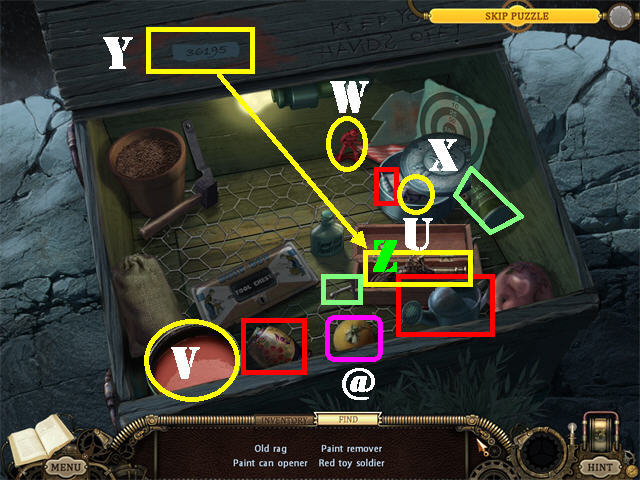
- Grab the PAINT REMOVER, and the PAINT CAN OPENER marked in green.
- Open the lid of the round box; take the OLD RAG (U).
- Use the PAINT CAN OPENER to remove the paint can’s lid in the lower left (V).
- Dip the PAINT BRUSH in the red paint; paint the toy soldier with it and take the RED TOY SOLDIER (W).
- Take the NESTED DOLLS, SUPER DUPER GLUE, and the WATERING CAN marked in red.
- Place the SUPER DUPER GLUE on the orange; take the FLY once it gets stuck on the orange (@).
- Take the ROUND BOX (X).
- Pick up the PAINT SCRAPER below the round box.
- Place the PAINT REMOVER over the red paint on the crate’s lid. Put the PAINT SCRAPER over the red paint; take the RIGHT COMBINATION (Y).
- Place the RIGHT COMBINATION on the brown box to open it; take the ANTIQUE PISTOL (Z).
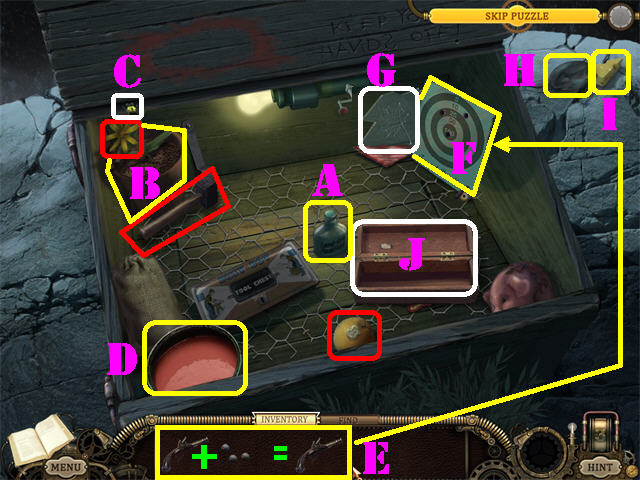
- Use the BOTTLE OPENER on the PLANT FOOD bottle; take the PLANT FOOD (A).
- Place the PLANT FOOD and the SEEDS into the flower pot (B).
- Click the WATERING CAN into the pot 5 times to make the flower grow.
- Take the BEE which lands on the flower (C).
- Take the PAINT CAN (D) in the lower left.
- Grab the AMMUNITION below the paint can.
- Take the ORANGE, HAMMER, and FLOWER marked in red.
- From inventory combine the AMMUNITION with the ANTIQUE PISTOL to create the ANTIQUE PISTOL WITH AMMO (E).
- Place the ANTIQUE PISTOL WITH AMMO on the target a total of 3 times; take the 135 POINTS (F).
- Grab the FLOWER POT (B).
- Take the UTILITY KNIFE behind the flower pot.
- Clean the glass shard with the OLD RAG; take the MAPLE LEAF (G) on the glass.
- Place the CHEESE in the upper right corner; take the MOUSE (H) when it comes to eat the cheese.
- Pick up the CHEESE AGAIN (I).
- Take the WOODEN BOX (J).
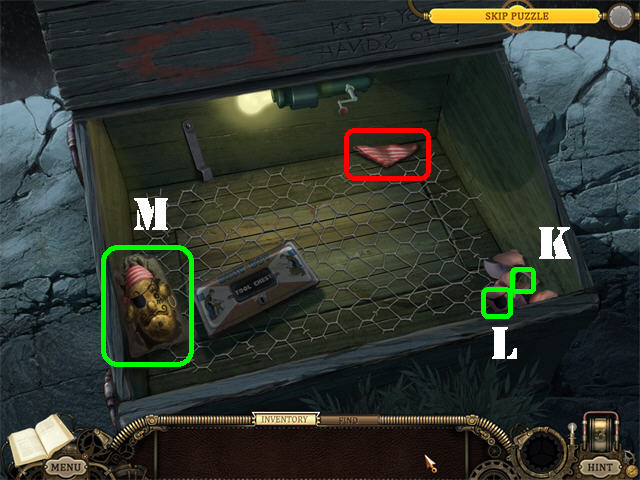
- Break the PIGGY BANK with the HAMMER; take the EARRING (K) and the EYE PATCH (L).
- Grab the BANDANA marked in red.
- Cut the SACK in the lower left with the UTILITY KNIFE for a potato head to appear.
- Place the BANDANA, EARRING, and the EYE PATCH on the potato.
- Take the PIRATE FACE (M).
- Take the BROKEN PIGGY BANK.
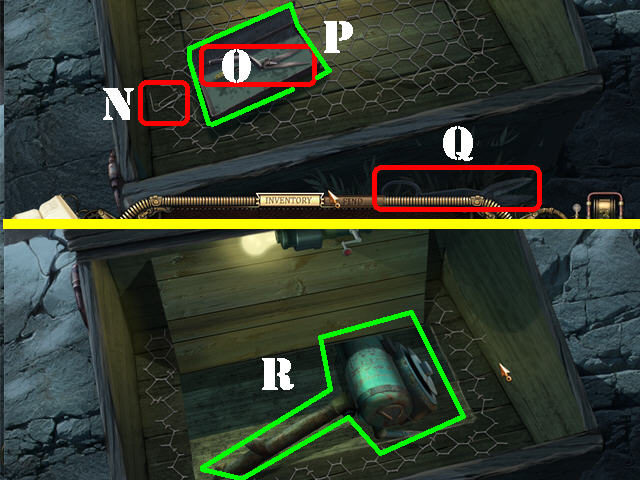
- Grab the PAPER CLIP (N) on left.
- Use the PAPER CLIP to unlock the metal box.
- Take the CLIPPERS from inside the metal box (O).
- Take the METAL BOX (P).
- Place the CLIPPERS on the patch of grass in the lower right 3 times; take the WIRE NIPPERS (Q).
- Cut the wire with the WIRE NIPPERS; click on the compartment at the bottom of the crate and take the SMALL MOTOR BODY (R).
- Click down 4 times.
- Place the FLASHLIGHT on the light-sensitive plant; take the BUTTON OF POWER (S).
- Go right and then head left.
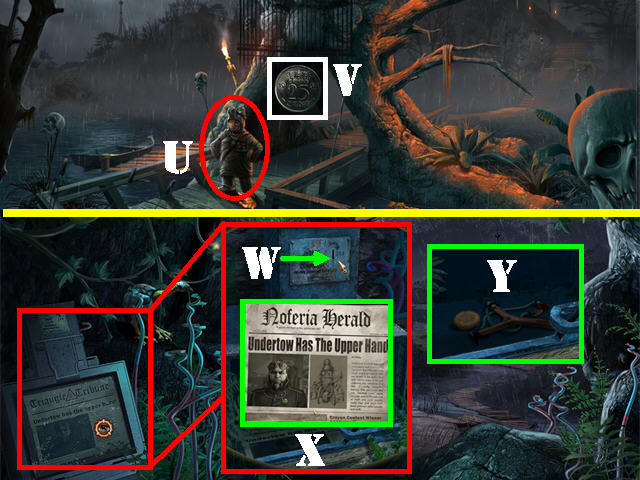
- Click on Chet (U) to automatically give him the BUTTON OF POWER.
- Take the QUARTER on the screen (V).
- Click down twice.
- Zoom into the newspaper dispenser; place the QUARTER in the coin slot to open the machine (W).
- Grab the NEWSPAPER (X).
- Take the SLINGSHOT from inside the machine (Y).
- Head towards the right; go left, forward and left.
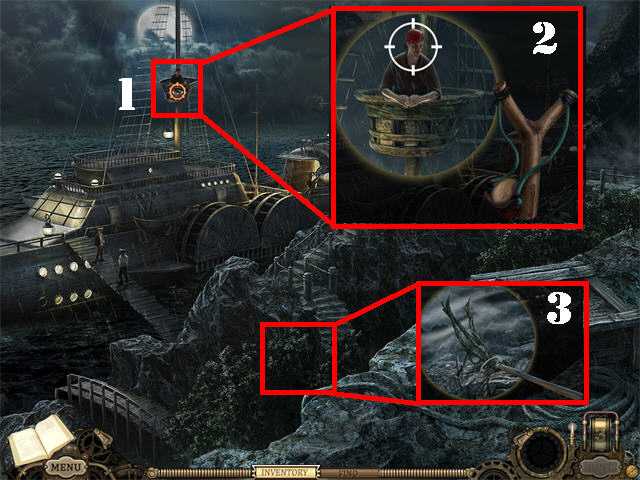
- Zoom into the guard by the looking tower (1).
- Use the SLINGSHOT on the tower to shoot the pirate down; you now can board the ship through an alternate path (2).
- Zoom into the bushes in the lower center.
- Place the EXTENDING GRABBER-HAND on the GRAPPLING HOOK to add it to inventory (3).
- Click down twice.
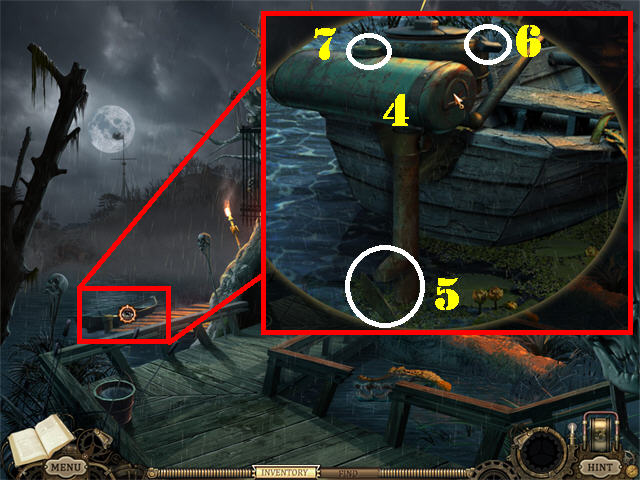
- Zoom into the boat on left.
- Place the SMALL MOTOR BODY (4) on the back of the boat.
- Attach the BOAT PROP (5) and the PULL CORD (6) as shown in the screenshot.
- Place the GAS CAN (FULL) into the engine; this boat can take you to the Pirate ship (7).
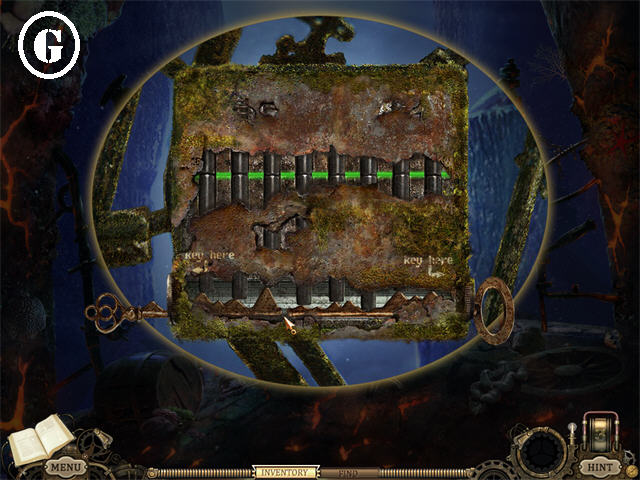
- Exit out of the pop-up window and click on the boat for a puzzle to appear.
- Click on the tiles according to the number of blue squares next to each row or column. When tiles are in the correct position the blue squares will light up green. If they are incorrect they will remain blue.
- When a space is present in between the blue tiles make sure to leave one or more spaces in between the stone tiles as you select them.
- The solution to this puzzle is random; this guide shows 2 random solutions for each round.
- After you solve the first puzzle, click on the lever in the upper center.
- Try to go through the gate, and another puzzle will appear. Follow the same steps as above to solve it
- After you solve the second puzzle, click on the lever on the left.
- Click through the gate, and another puzzle will appear. Follow the same steps as above to solve it.
- After you solve the third puzzle, click on the lever on the right.
- Go through the gate.
- Place the GRAPPLING HOOK on the side of the Pirate Ship (8).
- Board the ship.
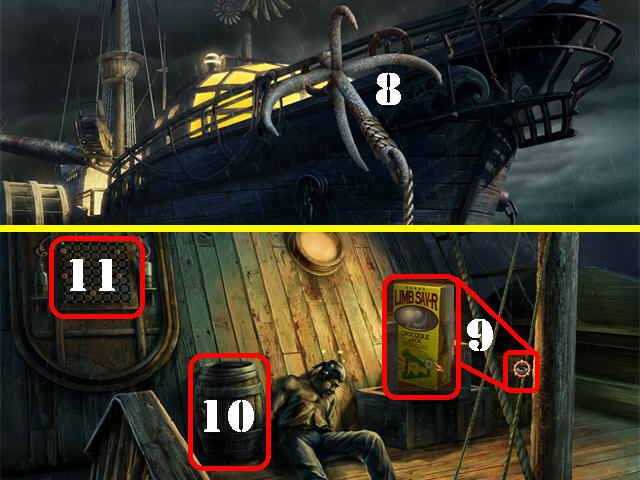
- Zoom into the crates; take the JACK (9).
- Take the KEG OF GUNPOWER (10) next to the man.
- Click on the door to activate a puzzle (11).
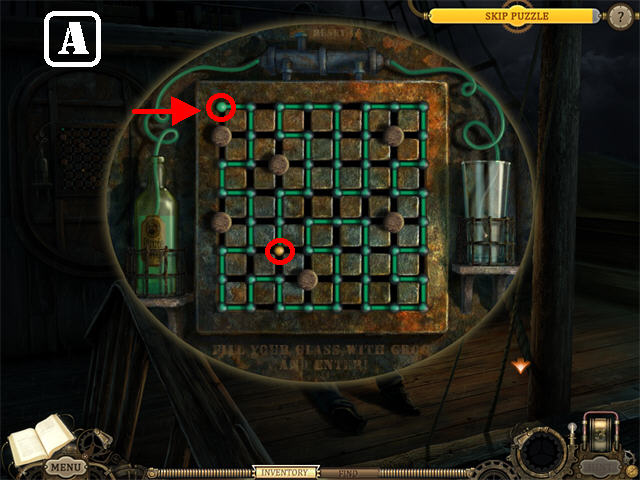
- Make a solid line between the starting point and the yellow light without crossing over a previous path.
- Click on a bulb to light it.
- You cannot click on the brown stoppers.
- There are many possible solutions for this puzzle.
- Please look at the screenshot for the solution and follow the path from the upper left corner (A) to the yellow bulb in the lower left.
- Enter the ship after the puzzle has been solved.
- Go into the right door.
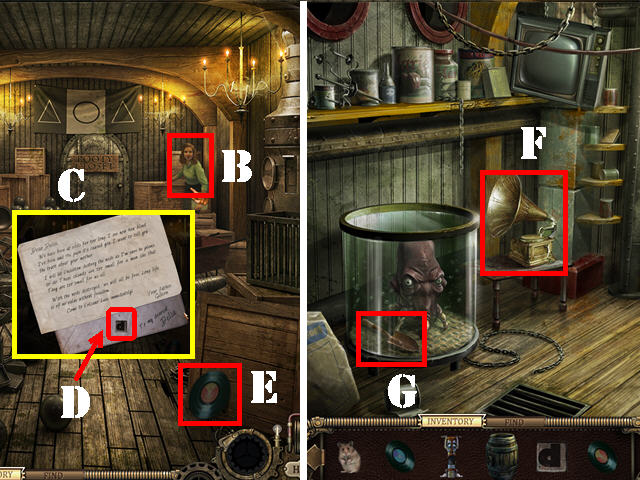
- Talk to Delia in the back (B); she will automatically read the LETTER FOR DELIA (C).
- Take the LETTER D on the envelope (D). Click on the letter and continue talking to Delia.
- Delia wants you to disable the cannons in this room and to meet her in Volcano Lake.
- Grab the LP in the lower right (E).
- Click down.
- Play the LP on the gramophone so you can put the squid in a better mood (F).
- Take the TROWEL from inside the squid’s tank (G).
- Click down 4 times.
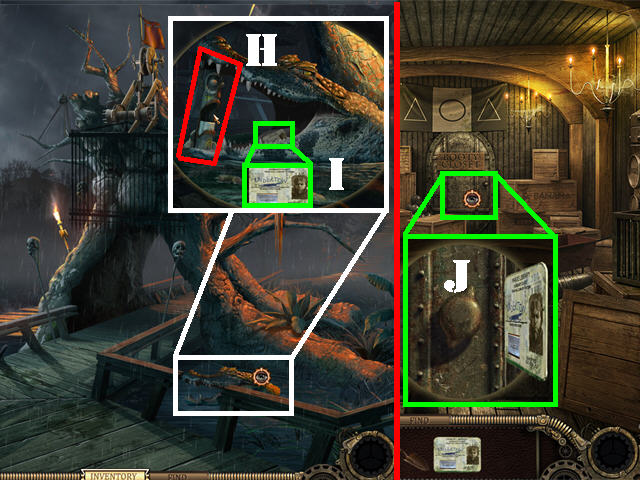
- Zoom into the alligator on the right.
- Place the JACK in the alligator’s mouth once his mouth is wide open. Please look at the screenshot for the correct position (H).
- Take UNDERTOW’S LIBRARY CARD (I) from inside the alligator’s mouth.
- Return to the cannon room aboard the Pirate ship.
- Zoom into the back door; place UNDERTOW’S LIBRARY CARD in the slot on the right (J).
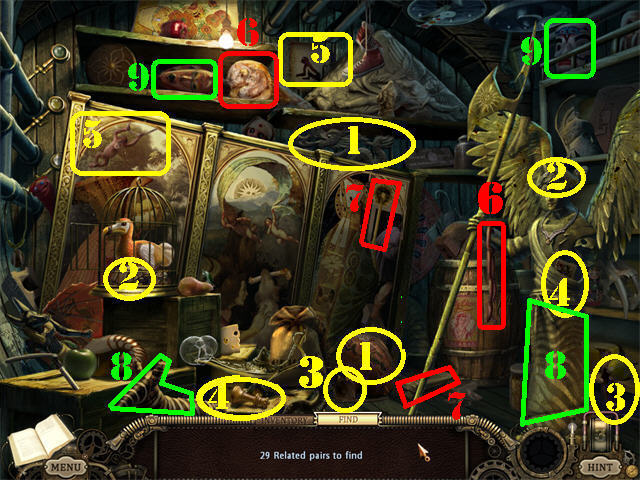
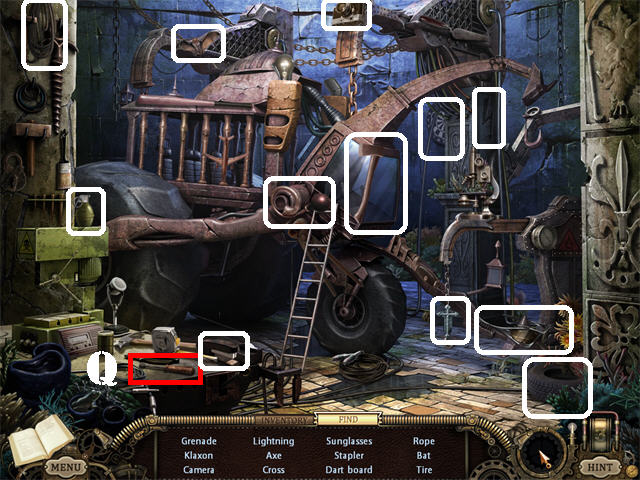
- You must find 19 out of 29 possible related pairs.
- The first screenshot shows you the locations of 9 related pairs.
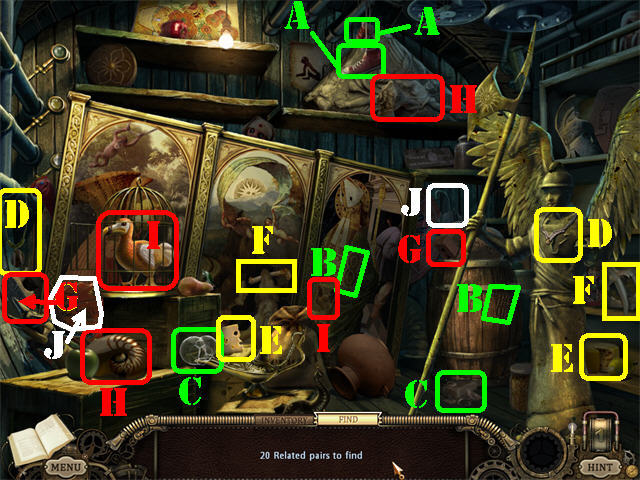
- The second screenshot shows you the locations of 10 more related pairs.
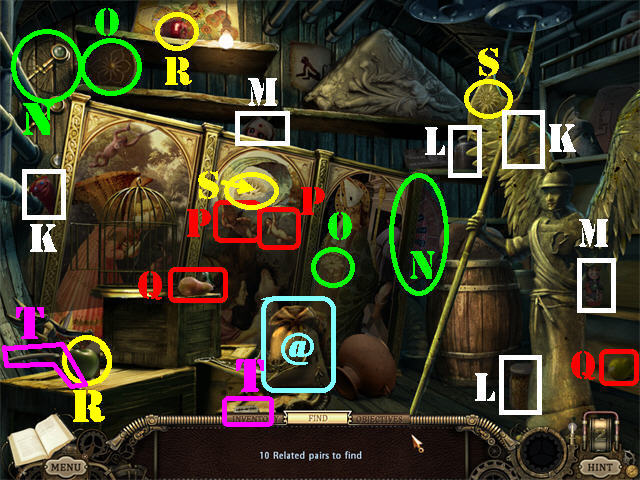
- The third screenshot shows you the locations of the last 10 related pairs.
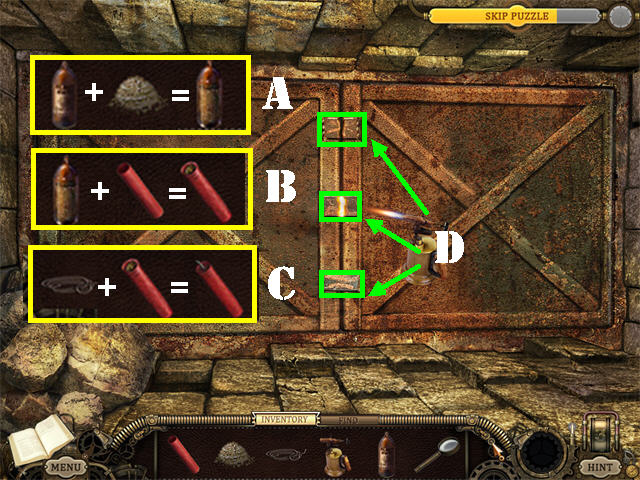
- Take the CEMENT (@) after all the pairs have been found.

- Click down.
- Place the CEMENT in the wheelbarrow (K).
- Pour the BUCKET OF WATER on the cement.
- Dip the TROWEL into the cement and place the TROWEL WITH CEMENT into each of the 3 cannons so you can clog them up.
- Return to the outside of the rocket ship.
- Zoom into the door; place the LETTER D and the LETTER C on the board to activate a puzzle.
- Spell out ‘CORN DOG’ on the board to unlock the rocket ship (L).
- Enter the rocket ship.
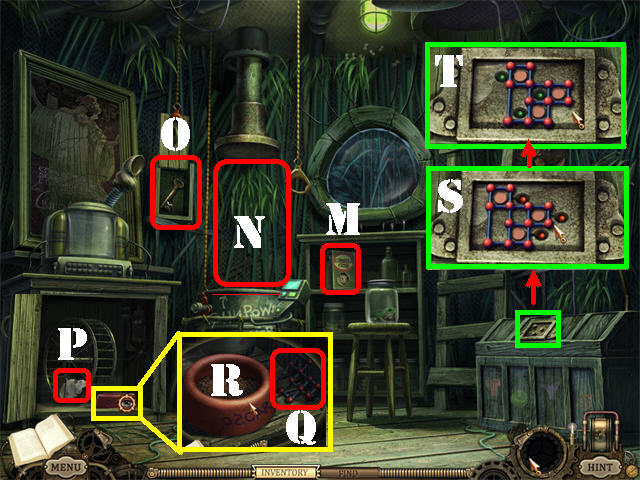
- Take the HAMSTER CHOW on the shelf (M).
- Place the KEG OF GUNPOWDER in the barrel on left; this action lifts the chain thus revealing a key (N).
- Take the KEY (O).
- Open the lock in the lower left with the KEY.
- Place the HAMSTER in the wheel (P).
- Zoom into the food bowl; take the TOY TOOL (Q). Fill the BOWL with the HAMSTER CHOW (R); the jukebox will begin to play.
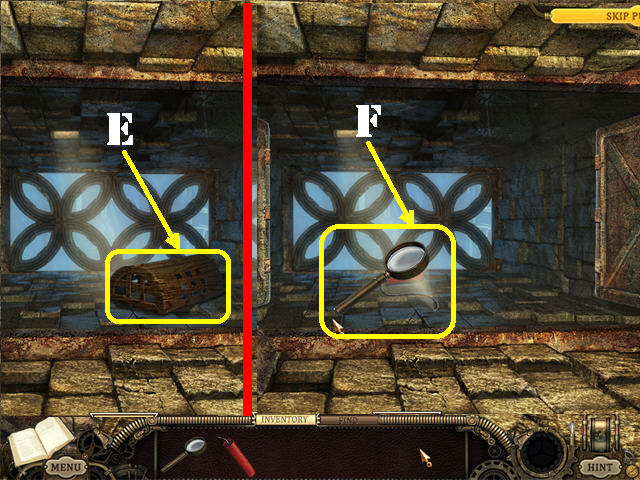
- Zoom into the chest on the right.
- Place the TOY TOOL on the lock as shown in the screenshot; all buttons must be in the left position (S).
- Drag the TOY TOOL to the right to unlock the chest (T).
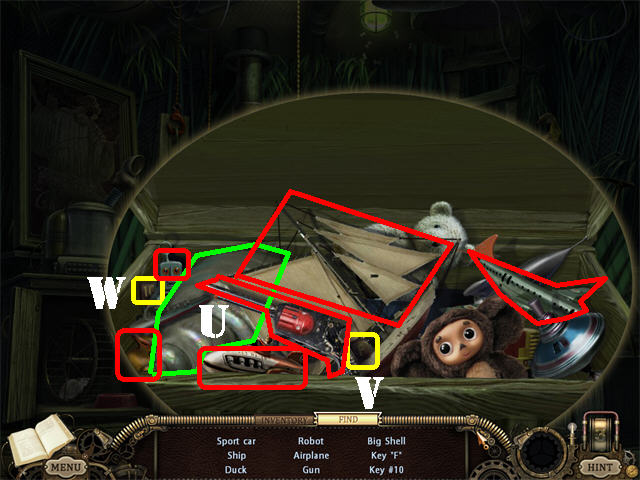
- Find all the items on the list.
- The BIG SHELL (U), KEY F (V), and KEY #10 (W) will be added to inventory.
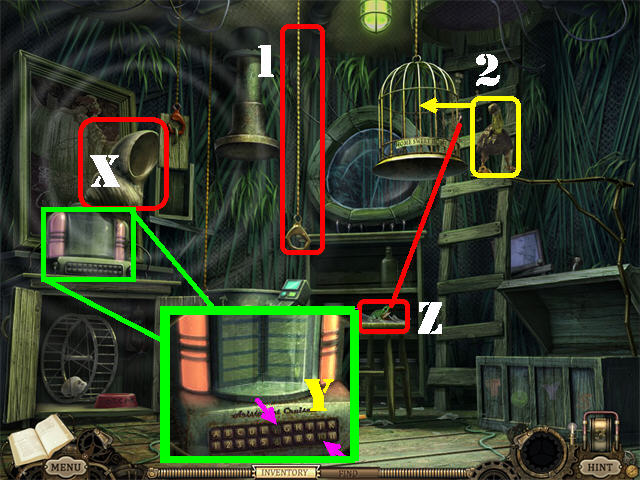
- Place the BIG SHELL over the small shell above the jukebox (X) to amplify its sound.
- Zoom into the jukebox.
- Place ‘KEY F’ and ‘KEY #10′ on the keyboard (Y).
- Once both keys have been placed a loud sound will emanate from the jukebox thus shattering the glass jar the frog is in (Z).
- Lower the cage by pulling on the handle (1); keep holding the handle down until the frog eats the flies and the bird enters the cage (2).
- Go up the ladder.
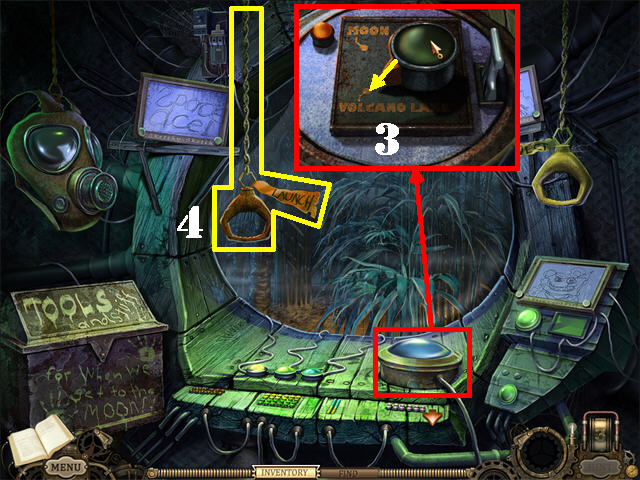
- Zoom into the button in the lower right; turn the dial to ‘VOLCANO’ (3).
- Exit the pop-up window.
- Pull on the handle marked ‘LAUNCH’ (4).
Chapter 2: A City Forgotten
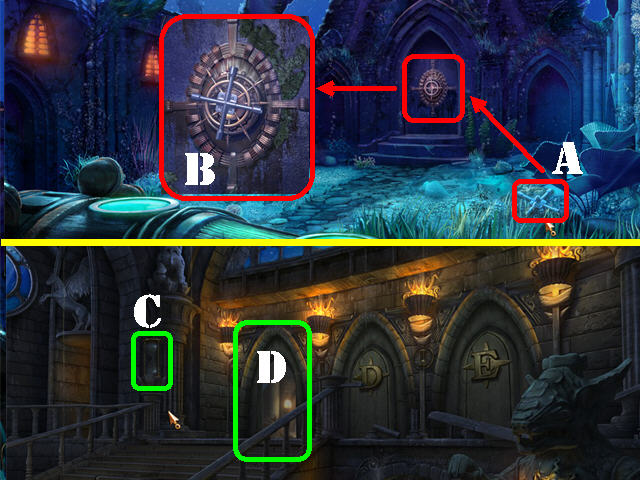
- Take the TIRE IRON (A) in the lower right.
- Zoom into the door; place the TIRE IRON on the lock (B).
- Go through the door.
- Take the HOURGLASS on the left (C).
- Go through the left door (D).
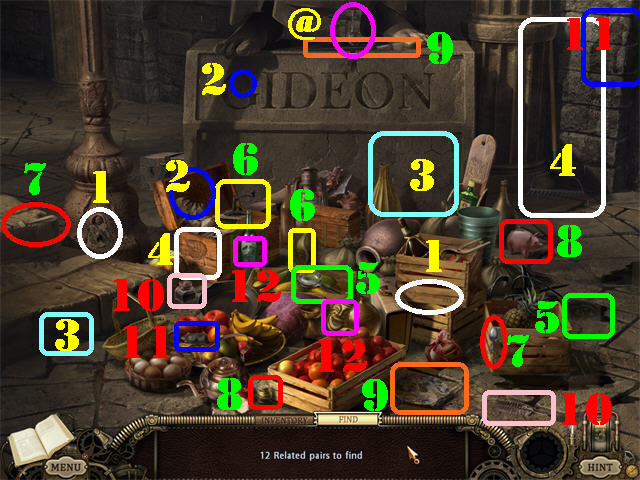
- Zoom into the pile of junk below the large statue on the right to access a Hidden Object Scene.
- Find the 12 related pairs of items such as a magnifying glass and an eye, a piggy bank and coins or a paintbrush and a palette.
- Take the SANDS OF TIME (@) after all the pairs have been found; exit the search scene.
- Go up the steps.
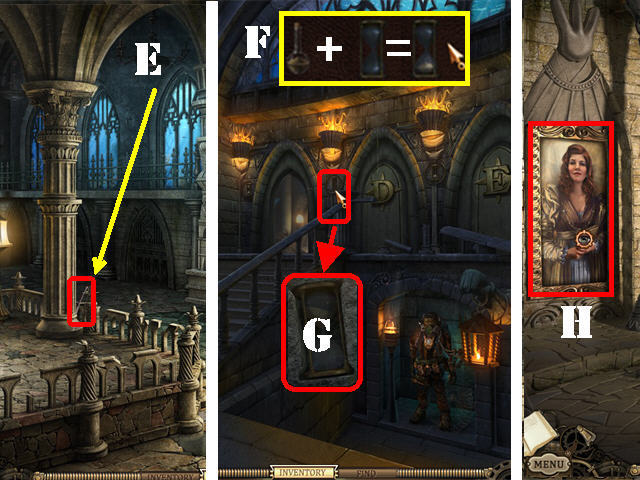
- Grab the BAT (E) on the left.
- Click down twice.
- Zoom into the crevice between the door on the left and the door in the middle.
- From the inventory tray, combine the HOURGLASS and the SANDS OF TIME to create the HOURGLASS WITH SAND (F).
- Place the HOURGLASS WITH SAND into the niche; go through the center door before the hourglass runs out of sand on one side (G). If the door closes, click on the hourglass again to open the door.
- Zoom into Delia’s picture on the left to activate a Hidden Object Scene (H).

- Find all the items on the list.
- Take the FLORIN COIN (I) in the lower left corner to add it to inventory.
- Exit the painting.
- Go through the right door.
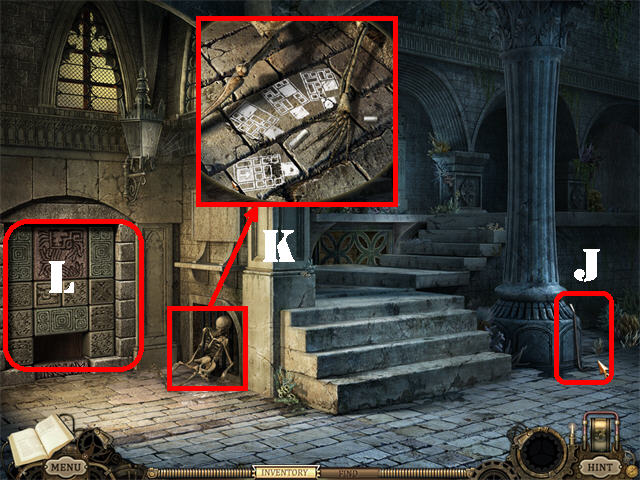
- Take the PRY BAR (J) in the lower right.
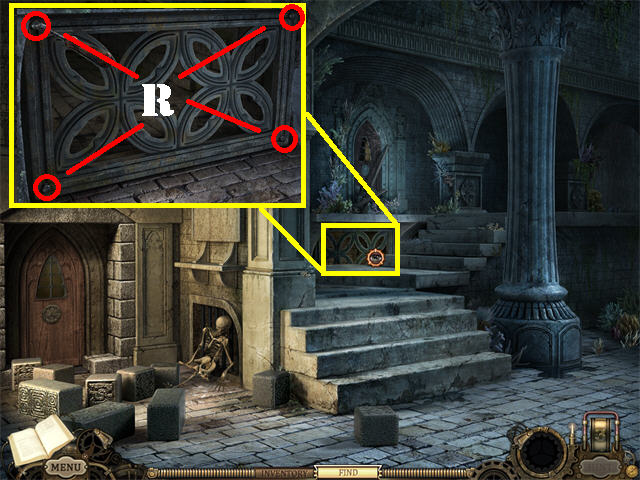
- Zoom into the skeleton on the ground; note the puzzle solution written in chalk (K).
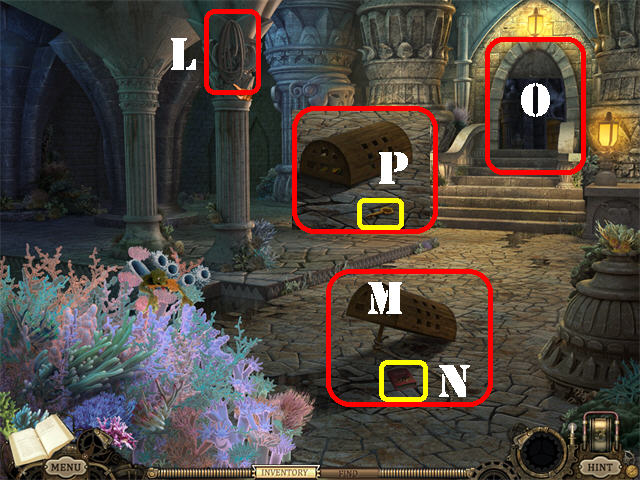
- Examine the door on the left to activate a slider puzzle (L).
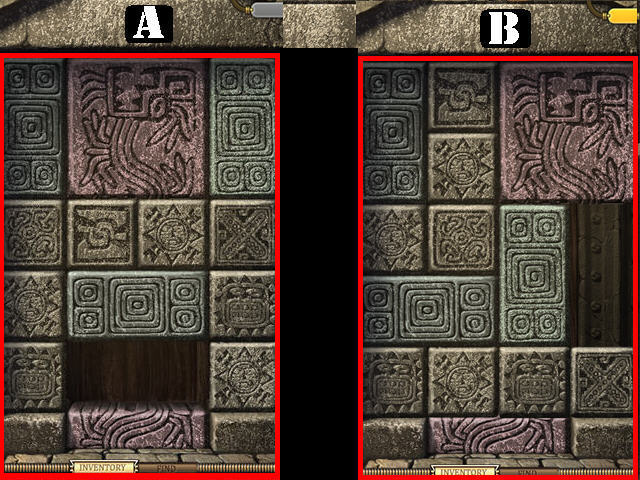
- Move the large block to the lower center by moving the surrounding small blocks out of the way.
- Screenshot section A shows you the beginning configuration of the puzzle.
- Slide the blocks to the same position as in section B.
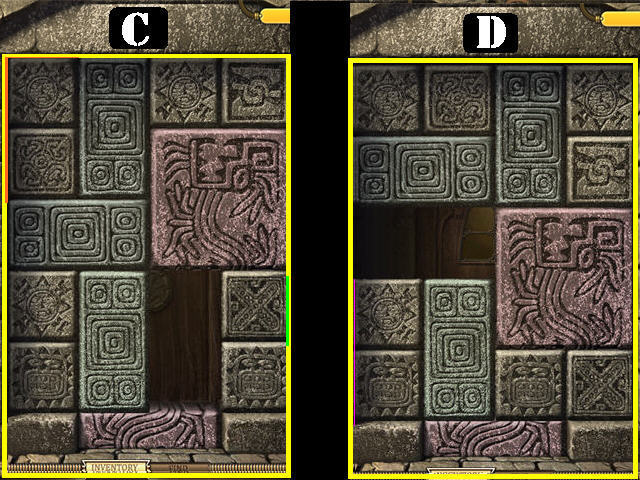
- Move the blocks as shown in sections C and D of the screenshot.
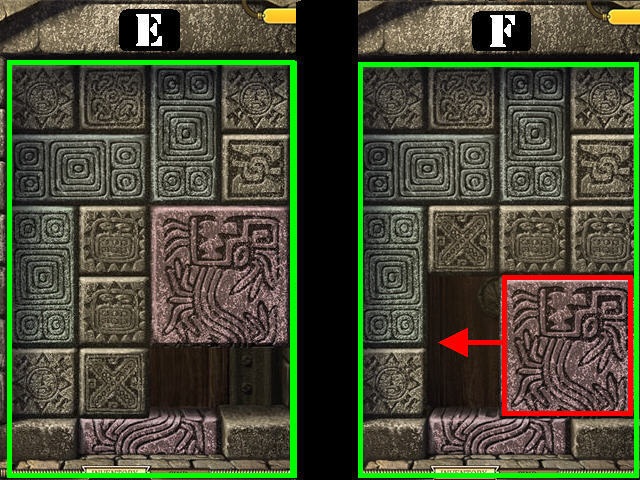
- Move the blocks as shown in sections E and F of the screenshot to complete the puzzle.
- Go through the door after the puzzle has been solved.
- Grab the HAMMER in the upper center (M).
- Zoom into the left alcove; knock the SUIT LEG with the HAMMER and take the SUIT LEG (N).
- Zoom into the right alcove; knock the SUIT ARM with the PRY BAR and take the SUIT ARM (O).
- Note the critter with the key in the lower left (P).
- Head left to access a Hidden Object Scene.
- Find all the items on the list.
- Grab the SCREWDRIVER (Q) in the lower left corner.
- Click down.
- Zoom into the grate by the steps.
- Remove the 4 screws marked in red with the SCREWDRIVER (R).
- Click on the grate to remove it.
- Go into the grate to access a Hidden Object Puzzle.
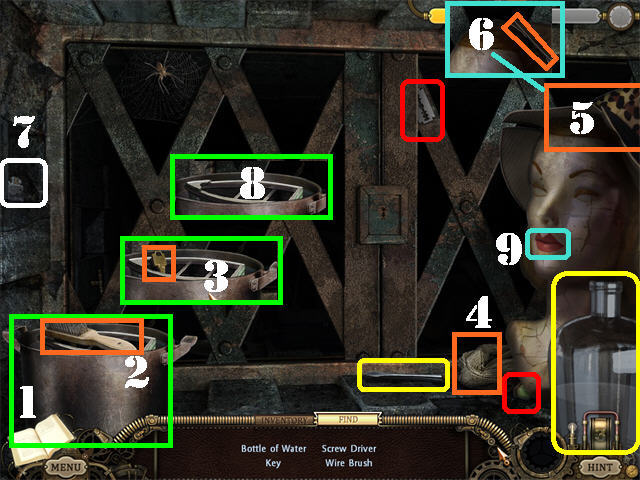
- Grab the BOTTLE OF WATER and the SCREWDRIVER marked in yellow.
- Fill the pot on the left with the BOTTLE OF WATER (1).
- Take the WIRE BRUSH (2) and the KEY (3) from inside the pot.
- Grab the RAG (4) and the LEOPARD SKIN (5).
- Take the BOBBYPIN on the mannequin’s head (6).
- Use the SCREWDRIVER on the loose brick on left and remove it; take the LIGHTER (7) from behind the brick.
- Grab the BLADE and the ACORN marked in red.
- Take the BOAT from inside the pot (8).
- Click on the mannequin’s lips to obtain the LIPSTICK (9).
- Take the MANNEQUIN.
- Grab the POT on left.
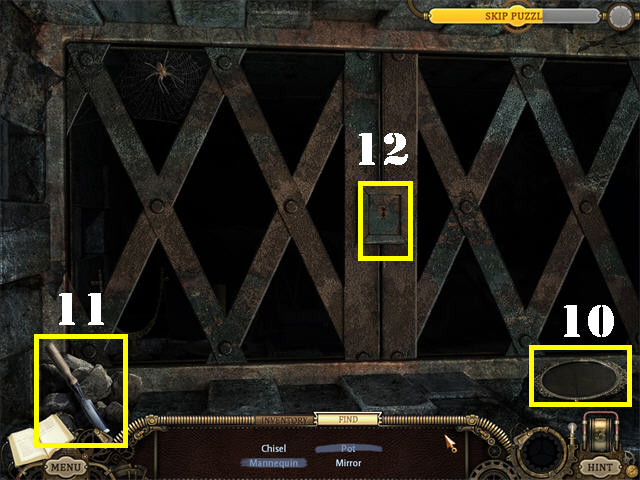
- Grab the MIRROR (10) in the lower right.
- Take the CHISEL (11) in the lower left.
- Clean the rusty lock with the WIRE BRUSH (12).
- Open the lock with the BOBBYPIN.
- Place the RAG in the hole on the left to stop the breeze (13).
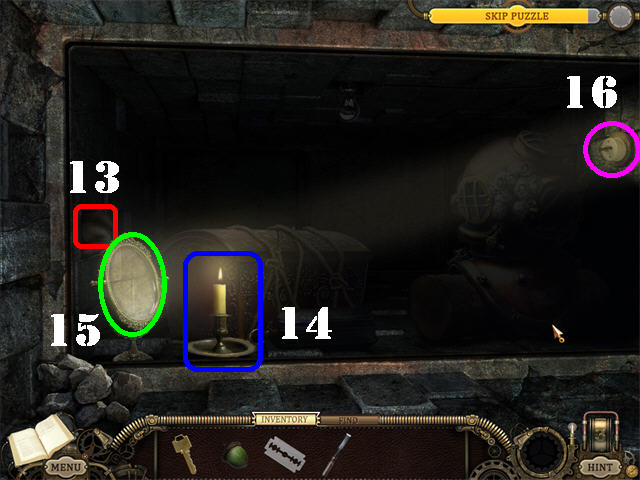
- Light the candle in the lower left with the LIGHTER (14).
- Place the MIRROR in the mirror frame (15). A light will shine on the switch in the upper right corner.
- Click on the switch to light up the area (16).
- Cut the rope on the red trunk with the BLADE to unlock the chest.
- Take the HAMMER and the PLUNGER from inside the trunk (17).
- Place the KEY on the small green box to unlock it; take the BALLOON (18).
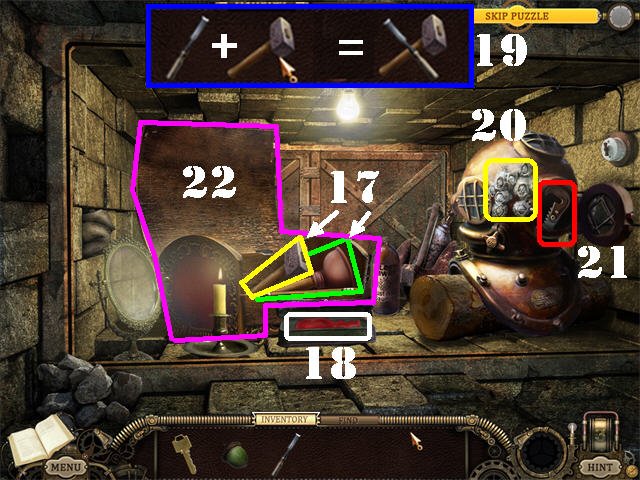
- Combine the HAMMER and the CHISEL to create the CHISEL AND HAMMER (19)
- Place the CHISEL AND HAMMER on the barnacle on the helmet (20).
- Open the helmet; take the SAW (21).
- Take the RED TRUNK (22).
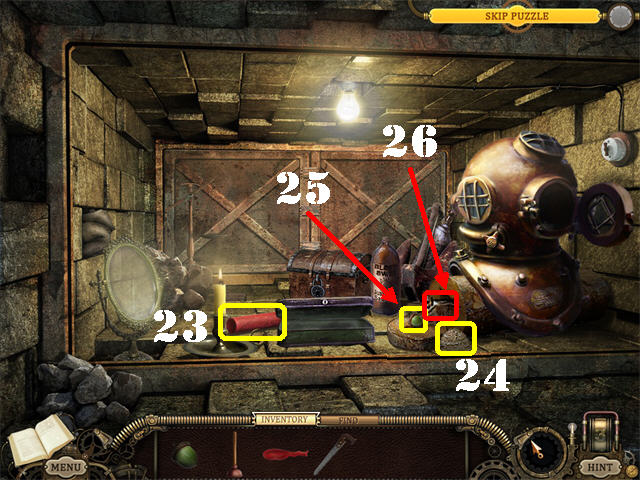
- Grab the RED TUBE (23).
- Use the SAW on the wooden log; take the SAWDUST (24).
- Place the ACORN on the cut piece of wood (25).
- Click on the CHIPMUNK (26) that comes out to eat the acorn.
- You will automatically move forward.
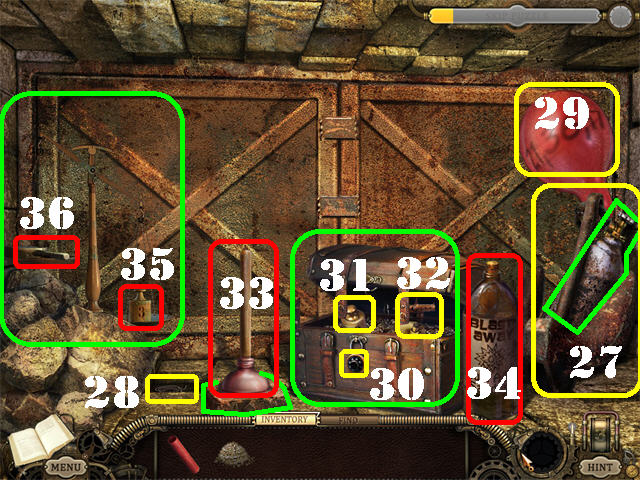
- Take the ANCHOR (27).
- Place the PLUNGER on the loose brick in the lower left; take the FUSE STRING (28).
- Place the BALLOON on the helium tank on right.
- Click on the tank’s handle to inflate the balloon; take the COMBINATION (29) written on the balloon.
- Place the COMBINATION on the lock (30) to open the chest; take the 3 LB WEIGHT (31) from inside the chest.
- Grab the BLOWTORCH (32) from inside the chest.
- Take the PLUNGER (33) and the GUNPOWDER (34).
- Place the 3 LB WEIGHT on the scale (35); take the MAGNIFYING GLASS (36) on the opposite scale.
- Take the HELIUM TANK, SCALE, BRICK, and THE SMALL CHEST marked in green.
- Combine the SAWDUST and the GUNPOWDER in inventory to create the EXPLOSIVE (A).
- Combine the RED TUBE and the EXPLOSIVE in inventory to create the TUBE WITH EXPLOSIVE (B).
- Combine the TUBE WITH EXPLOSIVE and the FUSE STRING to make a BOMB (C).
- Place the BLOWTORCH on the 3 hinges marked in green and click on each section (D). Click on the door to open it.
- Take the TRAP (E).
- Place the BOMB on the ground.
- Place the MAGNIFYING GLASS on the end of the fuse to light the BOMB (F).
- Go through the hole in the wall and then go right.
- Zoom into the door above the steps. Click on the latch and go through the door; you’ll find yourself outside again (G).
- Go through the left door (H) and then go up the steps.
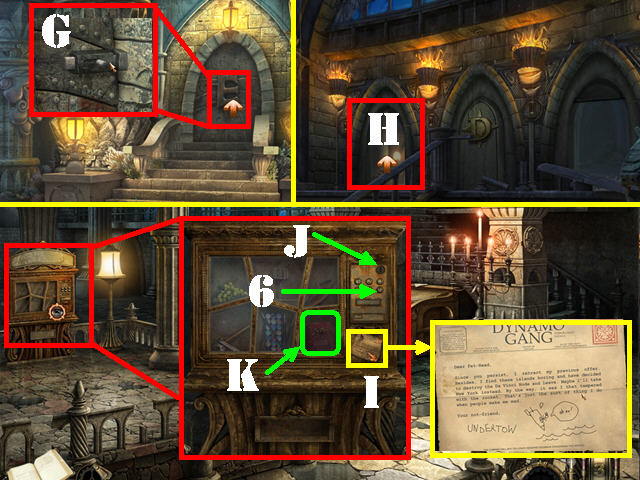
- Zoom into the vending machine on left; read UNDERTOW’S NOTE (I).
- Put the FLORIN COIN in the coin slot (J).
- Press the Number 6 (6) on the keypad so you can try to get the SUN-RAIS; they get stuck.
- Break the glass which houses the raisins with the BAT and take the SUN-RAIS (K).
- Exit the vending machine. Click down twice to go back outside; go through the right door.
- Grab the ROPE (L) on the column.
- Place the TRAP on the ground (M).
- Place the ROPE on the trap.
- Put the SUN-RAIS below the trap (N).
- Go out the door so you can trap the little critter (O).
- Head back in.
- Take the DESK KEY (P) next to the trap.
- Go out the door; go through the left door and go up the steps.
- Zoom into the desk.
- Unlock the desk with the DESK KEY to activate a Hidden Object Scene.
- Find the items on the list.
- Take the NAVIGATION DEVICE (Q) on the desk.
- Click on the NEWSPAPER that appears on the screen (1).

- Go back outside.
- Zoom into the map on the railing; place the NAVIGATION DEVICE on the map to activate the puzzle.
- Click on the red, yellow, and blue buttons to bring out the arrows.
- Line up the arrows so they fall on the dotted line that matches its color.
- The solution from left to right is ’180′.
- Zoom into the suit in the lower right.
- Using the code shown on the navigation device, change the dial so that ’180′ is at the bottom of the dial. This will place a circle around the LETTER ‘A’ and an arrow will point to ’43′.
- Change the code at the bottom of the dial to ‘A43′.
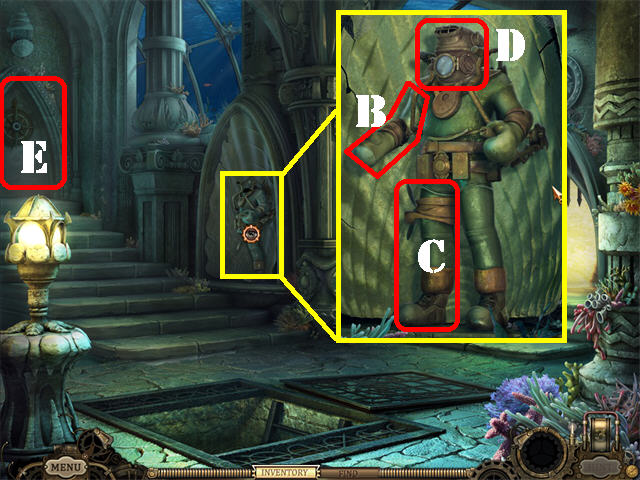
- Take the SUIT HELMET on the diving suit (A).
- Go through the right door and then click down.
- Zoom into the diving suit on the left; place the SUIT ARM (B), the SUIT LEG (C), and the SUIT HELMET (D) on the diving suit.
- Take the DIVING SUIT.
- Go through the door above the left steps to end this chapter (E).
Chapter 3: Beware of Undertow
- Go left.
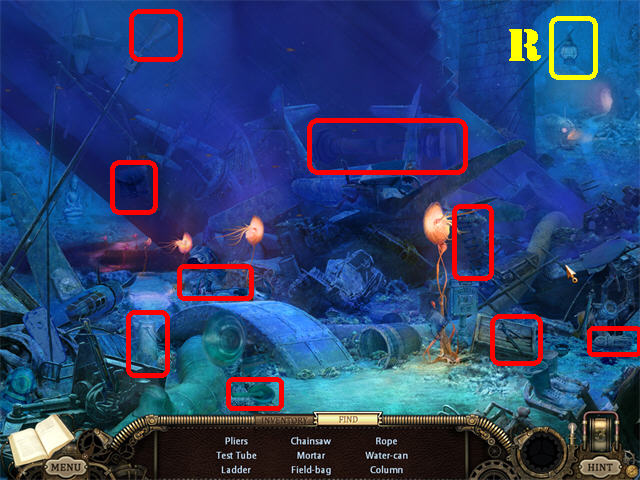
- Click on the puffer fish to trigger a Hidden Object Scene. The scene will stay blurry until you find all the items.
- Pick up all the items on the list.
- Take the ANTIDOTE (A) in the lower center; the scene should return back to normal.
- Head forward towards the gate.
- Take the CHAIN CUTTERS (B) on the ground.
- Click down twice and head right.
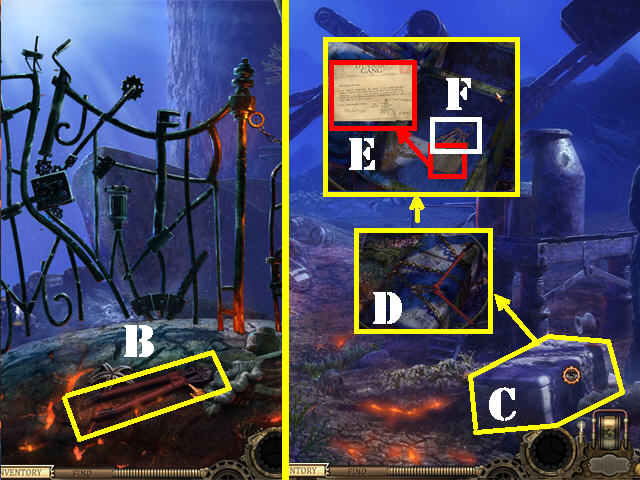
- Zoom into the locked chest in the lower right (C).
- Break the chains with the CHAIN CUTTERS (D).
- Open the chest and read Undertow’s message (E).
- Take the KEYS (F) from inside the chest and exit the trunk.
- Click down and go towards the gate in the back and then zoom into the gate.
- Place the KEYS on the gate to activate a puzzle.
- Grab one of the 4 keys and slide it into the slot below the lock pegs.
- Place the correct 2 keys in the lock. Move the keys so that the lines on each tumbler line up with the line on the board (green).
- Please see screenshot for the solution (G).
- Go through the gate after the puzzle has been solved.
- Head towards the house on the right and talk to Sheldon. He wants you to disable the submarine, take the power -cell from the engine room, and bring the power-cell to him.
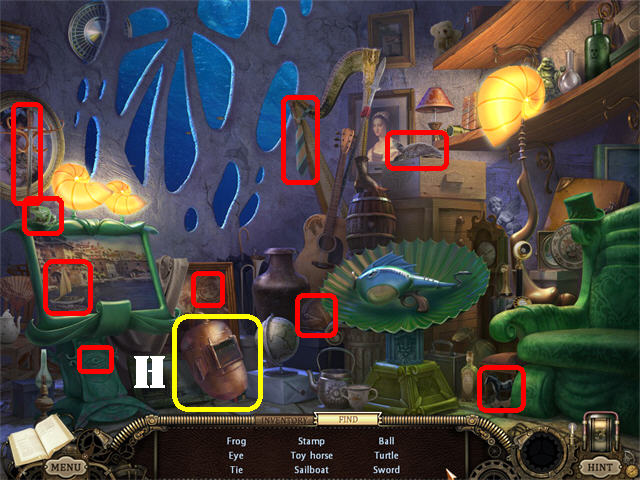
- Go into the house to activate a Hidden Object Scene.
- Find all the items on the list.
- Take the WELDER’S MASK (H) in the lower left.
- Back out once and then go left to access a Hidden Object Scene.
- Find all the items on the list.
- Take the CUTTING TORCH (I) in the lower left.

- Go into the upper right to access another Hidden Object Scene.
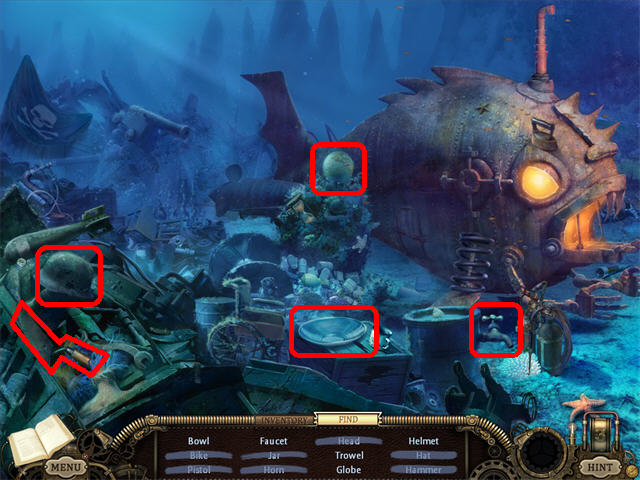
- You will have to scroll left and right to view all available items.
- Take the OXYGEN TANK (J) on the right side of the screen.
- Pan to the left side of the screen so you can see the complete large mechanical fish (Undertow’s sub).
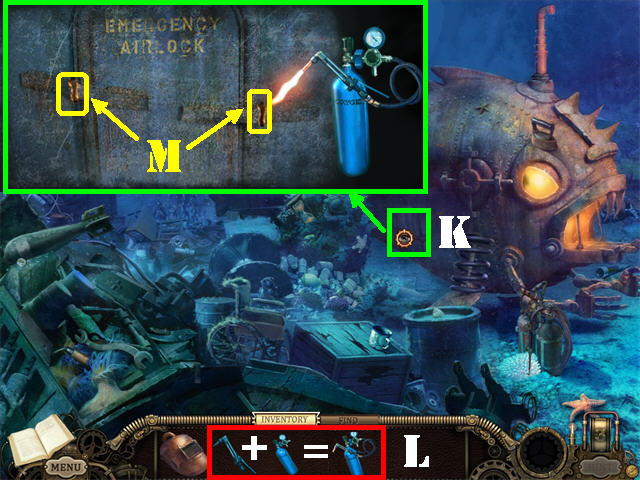
- Examine the door on the side of the sub (K).
- From inventory combine the OXYGEN TANK and the CUTTING TORCH to create the WELDER (L).
- Place the WELDER’S MASK on the door.
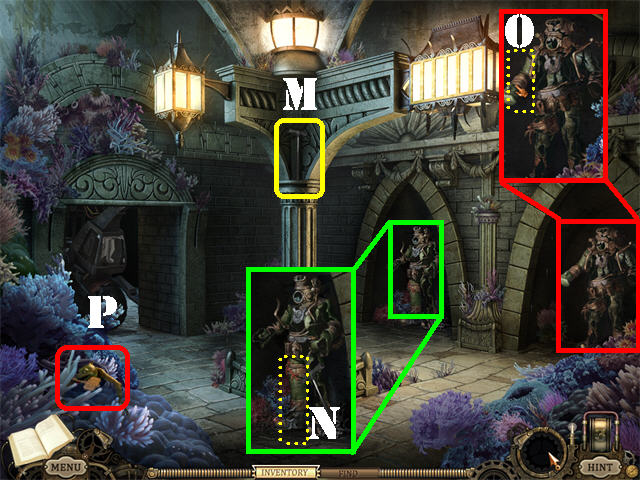
- Use the WELDER on the 2 areas marked in yellow in the screenshot (M).
- You will go through the door automatically.
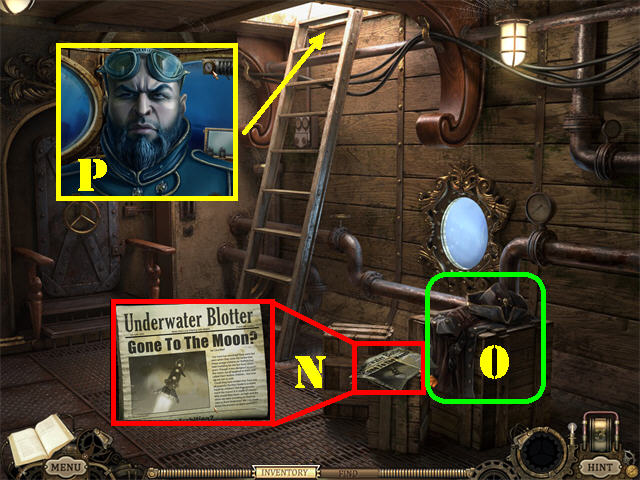
- Read the newspaper in the lower right (N).
- Click on the PIRATE UNIFORM (O) in the lower right to automatically wear it.
- Go up the ladder to encounter Undertow; talk to him. He wants you to help him find 3 things so he can get the Mechanical Mona working again (P).
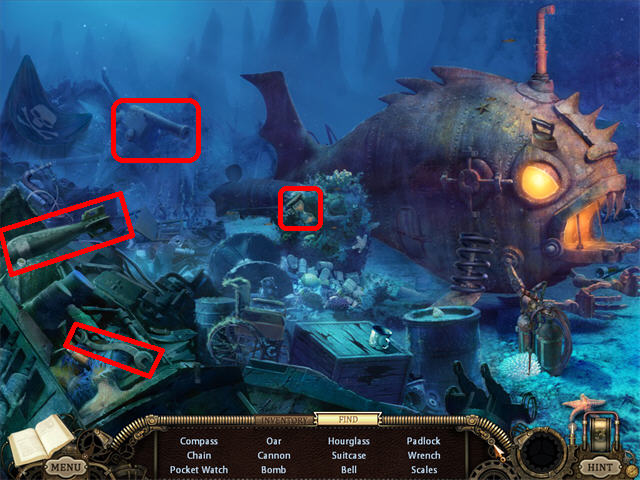
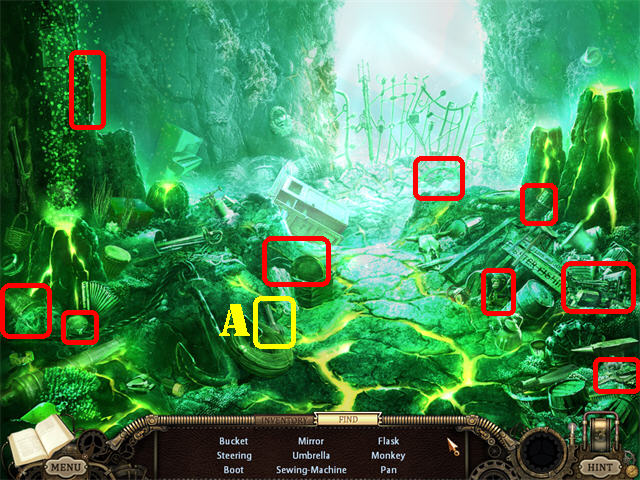
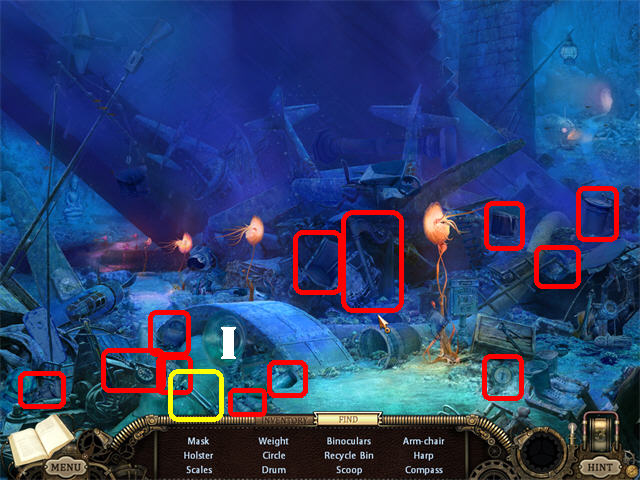
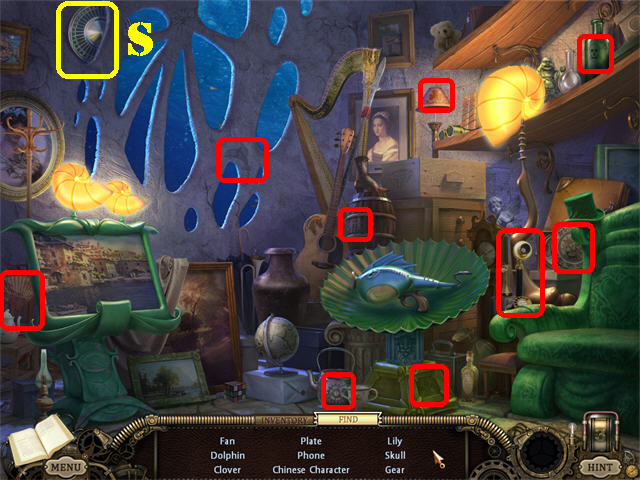
- Click down after you talk to Undertow to access a Hidden Object Scene.
- Find all the items on the list; make sure to pan left and right to view all available items.
- Take the GRATER (Q) in the lower right side of the right screen.
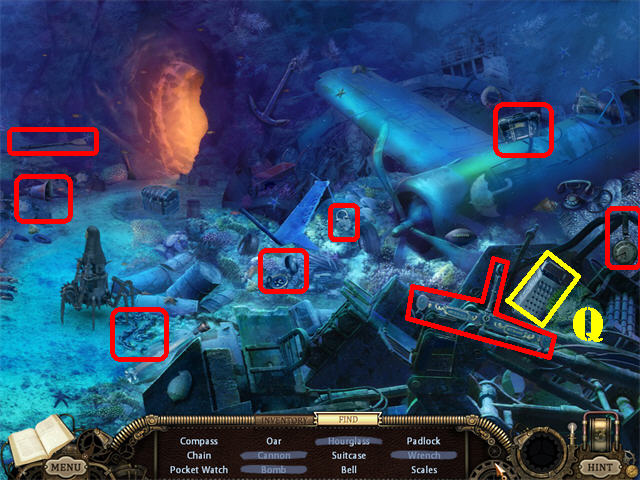
- Click down again to access another Hidden Object Scene.
- Find all the items on the list.
- Take the LANTERN (R) in the upper right.
- Click down. Go towards the house on the right and enter it.
- Find all the items on the list.
- Take the HUB CAP (S) in the upper left.
- Head left. Go right. Go straight into Undertow’s sub. Go up the ladder to return to Undertow. .
- He will automatically take the HUB CAP, GRATER, and the LANTERN.
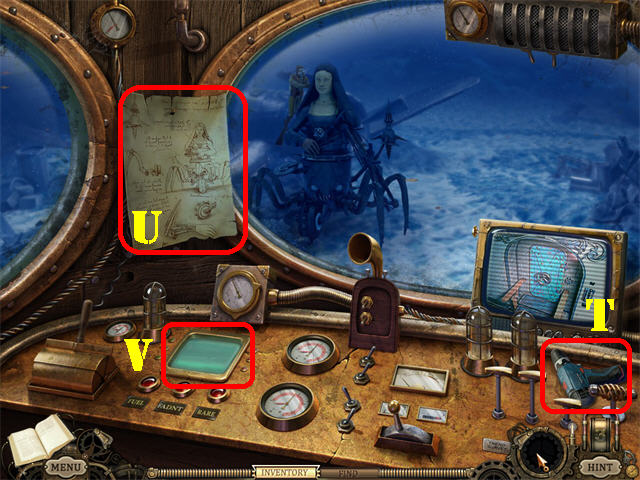
- Zoom into the controls.
- Take the DRILL (T) in the lower right.
- Look at the DIAGRAM (U) on left.
- Zoom into the small screen in the lower left to access a puzzle (V).
- Click on the screen to activate the puzzle.
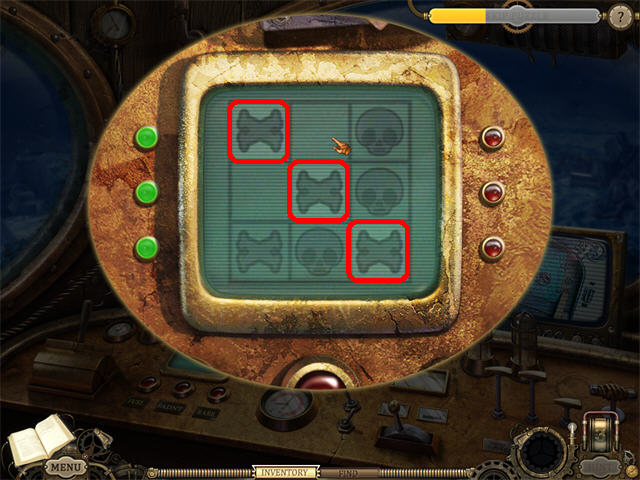
- This is a typical game of tic-tac-toe. Get 3 ‘X’s’ in a row before the computer gets 3 ‘O’s’ in a row to win that round.
- Win 3 rounds against your opponent to beat the game.
- You will always go first and you will always be the ‘X’.
- If no one wins a round no one will get the points.
- Once you beat the game; the downstairs door will open.
- Click down twice and go into the newly-opened left door to activate a Hidden Object Scene.
- Find all the items on the list.
- Take the CRANE KEY in the box in the lower left (W).
- Note the PARROT (X) on the ladder.
- Click down 7 times; head right and go into the crane on right.
- Look at the diagram in the upper center (1).
- Place the CRANE KEY in the ignition (2).
- Move the lever on the right (R) all the way to the LEFT slot.
- Move the lever on the left (L) down; then move it back up after it latches on to the weight.
- Move the lever on the right (R) to the MIDDLE slot.
- Move the lever on the left down so that the bundle covers the center steam vent; this action turns off one of the steam vents outside.
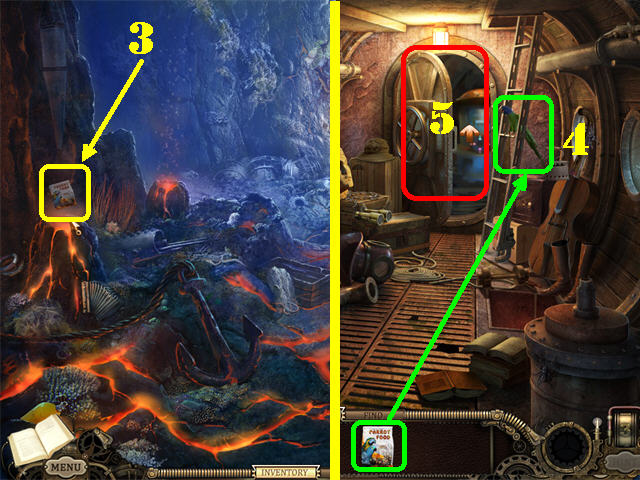
- Click down twice and head left.
- Take the PARROT FOOD (3) on the left steam vent. You will not be able to perform this action unless you solved the puzzle in the crane.
- Return to Undertow’s sub and go into the left door.
- Give the PARROT FOOD to the PARROT on the ladder (4). The parrot says that the password is ‘FZ27′.
- The door to the engine room is unlocked; go into it (5).
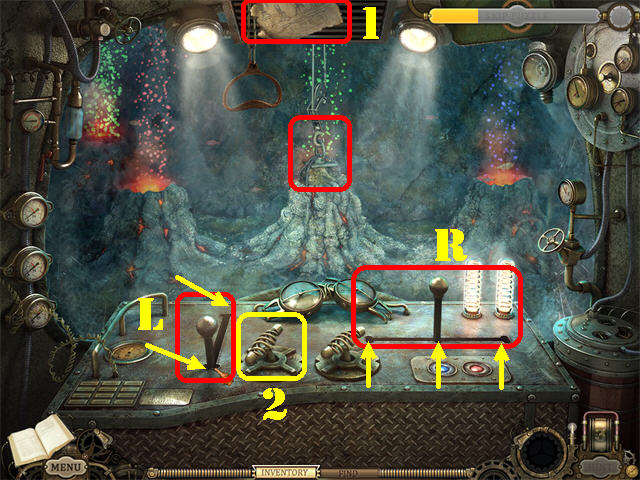
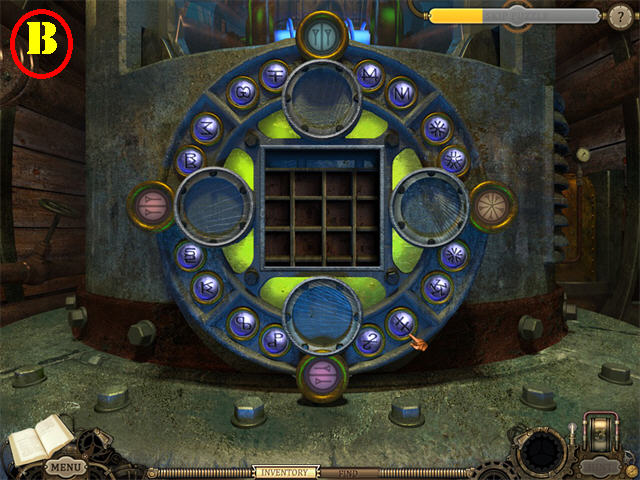
- Examine the power source to activate a puzzle.
- You must solve 3 stages of this puzzle to complete it.
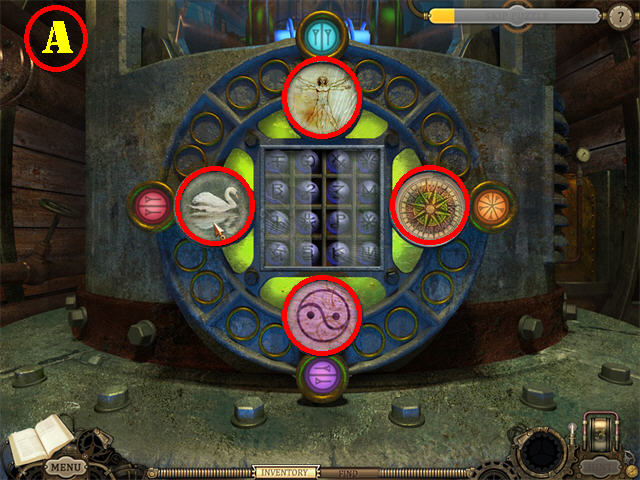
- In the first stage you must click on the large circles to change their images until you find the one that is related to the small circle above it.
- For example; the small circle at the bottom has the same symbol facing in the opposite directions. The solution for that circle is the yin and the yang.
- Please look at the screenshot for the solution (A).
- For the second stage of the puzzle you must place the blue stones from the center into the rounded slots surrounding the puzzle.
- Place stones with shapes that match the ones on the medium sized circles.
- Please look at the screenshot for the solution (B).
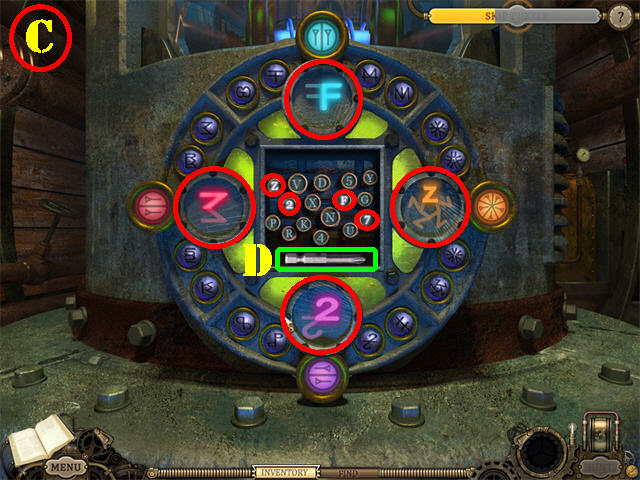
- For the third and final stage of this puzzle you must change the large circles to show the correct symbols. The correct symbols contain one of the characters in the password, ‘FZ27′.
- Symbols placed correctly will light up.
- Once the large circles have the right symbols, click on ‘F-Z-2-7′ on the small letters in the small square in the center.
- Please look at the screenshot for the solution (C).
- Take the DRILL BIT (D) after all 3 rounds have been completed.
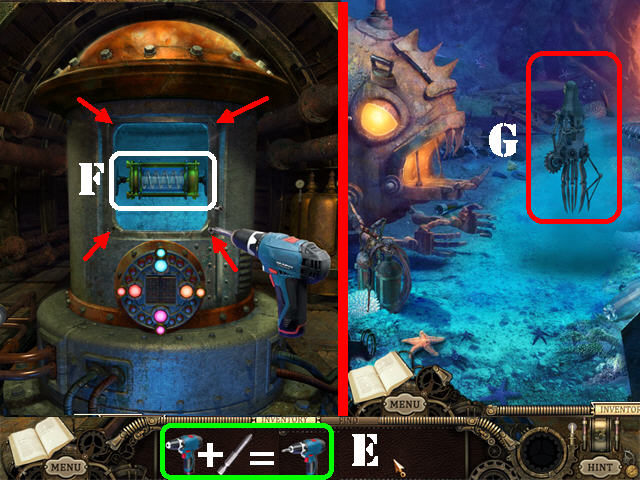
- From the inventory tray combine the DRILL and the DRILL BIT to create the CHARGED DRILL (E).
- Place the CHARGED DRILL on the 4 bolts on the machine marked with red arrows.
- Take the ECONO COIL (F).
- Click down 3 times and you will see the Mechanical Mona go up (G).
- Click down twice and head right towards Sheldon (H).
- Sheldon will automatically receive the ECONO COIL from your inventory.
- You will automatically enter the house once Sheldon stops talking.
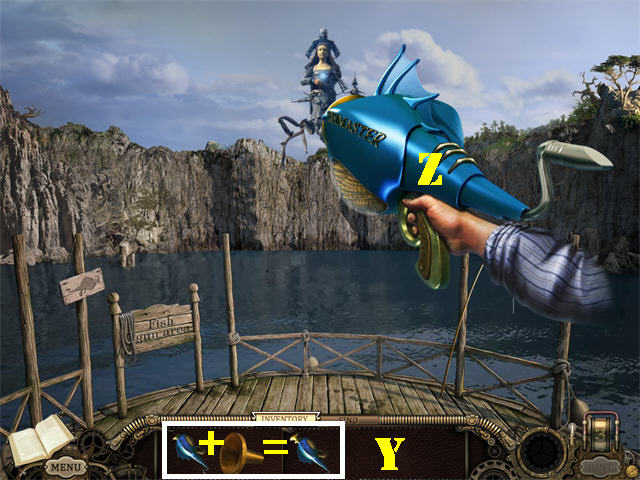
- Zoom into the fish; take the FISHMASTER (I).
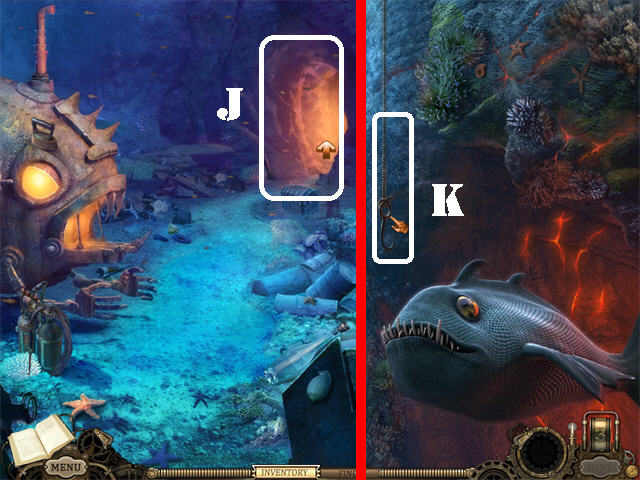
- Exit the house; go left and then right towards Undertow’s sub. Go into the cave on the right (J).
- Click on the hook above the large fish to watch a cut scene (K).
Chapter 4: Reunion

- The FISHMASTER will be in your inventory at the beginning of this chapter.
- Talk to Ralph.
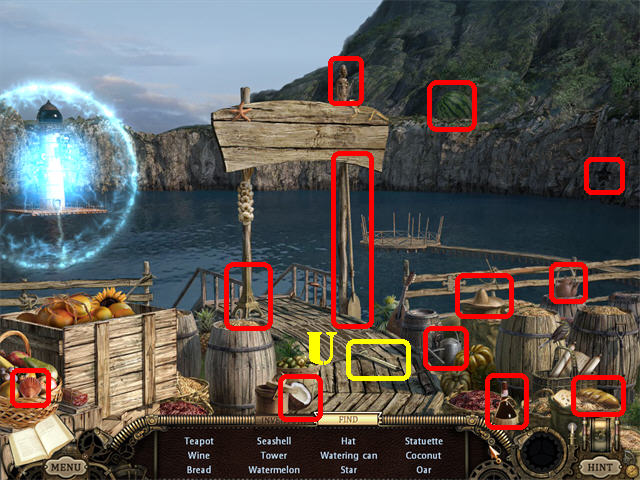
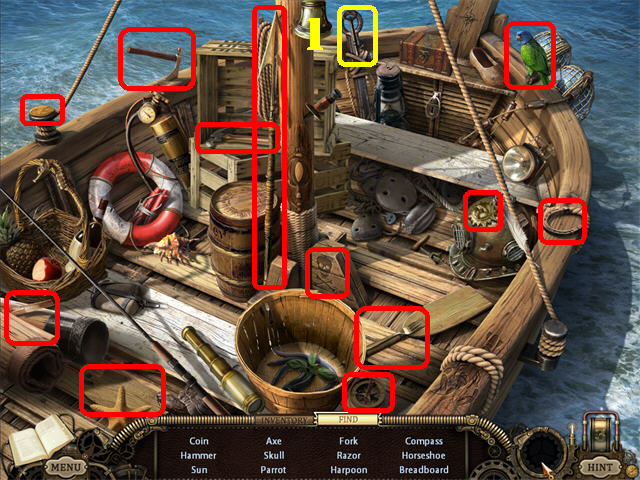
- Click on the boat to access a Hidden Object Scene.
- Find all the items on the list.
- Take the HOOK (A) and the GRABBER (B) in the boat at the end of your search.
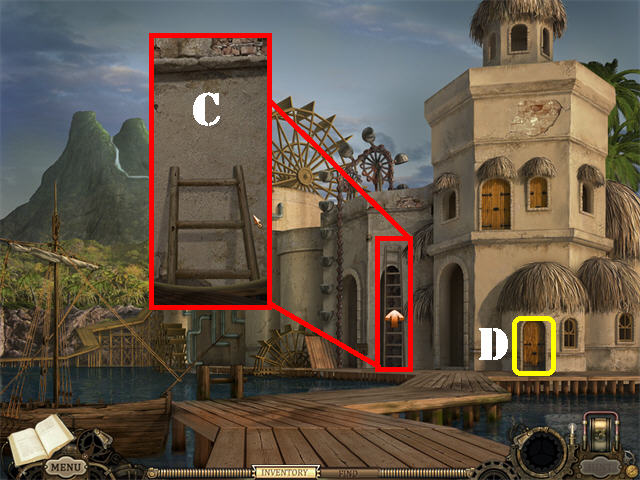
- Click on the ladder; it’s not tall enough to go up (C).
- Zoom into the right door and go through the door (D).
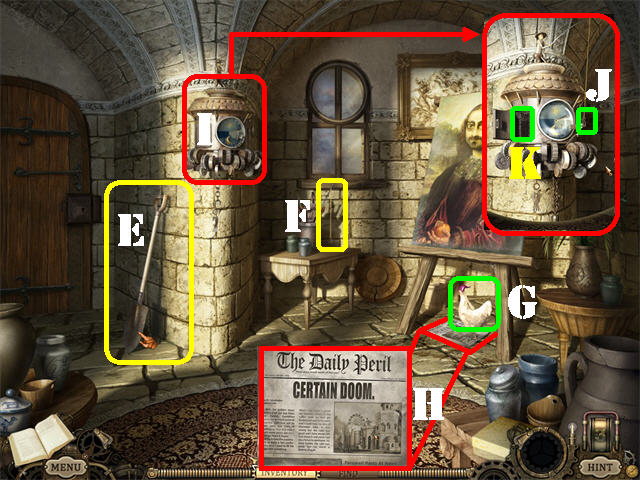
- Take the SHOVEL on the left (E).
- Grab the FISHING ROD on the table (F).
- Take the CHICKEN (G) that’s walking around the room.
- Read the NEWSPAPER in the lower right (H).
- Examine the clock in the upper left (I); place the FISHING ROD on the fisherman.
- Click on the winding key (J) on the right to make the fish swim around the clock.
- Click on the fisherman when the fish is close to the door to drop the line. If timed correctly, the fish will get caught on the fishing rod. Once the fish is caught the door on the left will open.
- Take the CHAIN from inside the small door (K).
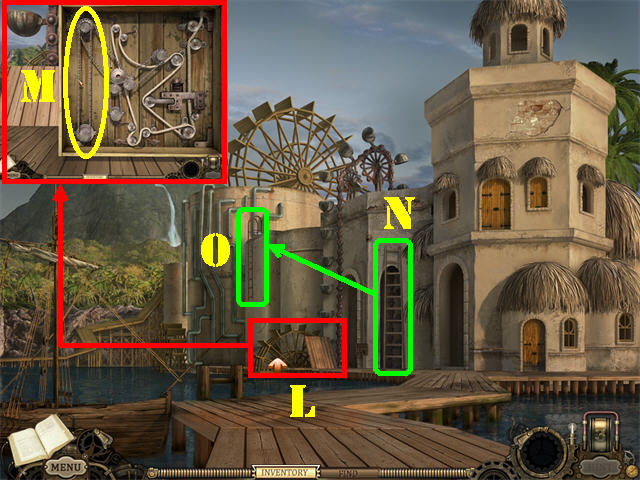
- Click down to go back outside.
- Zoom into the bridge mechanism in the lower center of the building (L).
- Place the CHAIN on the left side of the device to lower the bridge (M).
- Take the LADDER (N) after the bridge has been lowered.
- Place the LADDER below the other ladder (O); go up the ladder.
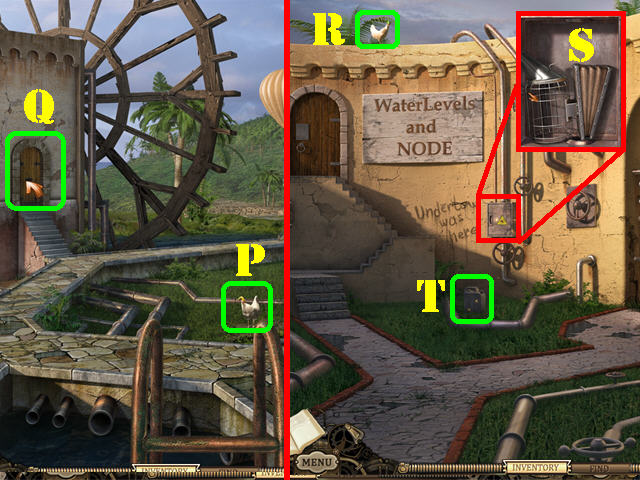
- Take the CHICKEN (P) that’s walking around the scene.
- Examine the left door and go through it (Q).
- Take the CHICKEN in the upper left with the GRABBER (R).
- Zoom into the power box on the left; open the lid and take the FUMIGATOR (S).
- Grab the PAINT REMOVER (T) in the lower left.
- Go through the left door and then go through the right door to access a Hidden Object Scene.
- Find all the items on the list.
- Take the WRENCH in the lower center (U).
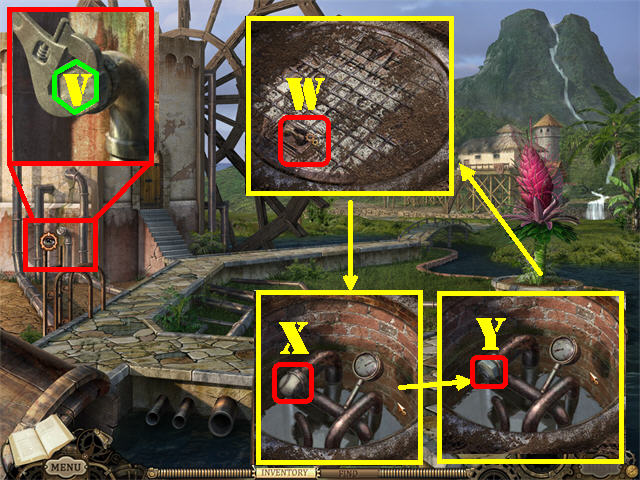
- Click down 3 times.
- Examine the pipes on the left; place the WRENCH on the CAP (V).
- Take the CAP to add it to inventory.
- Examine the large plant on the right.
- Use the SHOVEL on the soil.
- Examine the manhole cover; click on the dirt covering the manhole cover.
- Place the HOOK on the latch (W).
- Take the TENNIS BALL (X); the pressure starts dropping.
- Place the CAP on the open-ended pipe; the pressure stabilizes (Y).
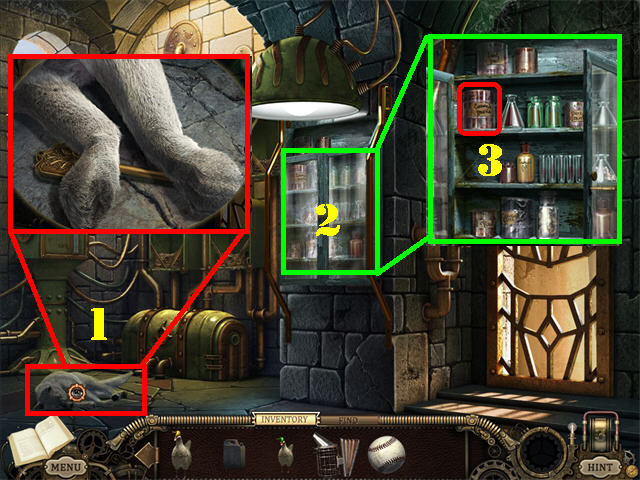
- Exit the plant; go through the next 2 left doors.
- Examine the dog in the lower left corner; a key is under his foot.
- Give the TENNIS BALL to the dog and he will chase after it; take the CABINET KEY on the ground (1).
- Zoom into the cabinet on the right; unlock it with the CABINET KEY (2).
- Open the cabinet and take the CANNED SMOKE (3).
- Click down.
- Zoom into the bee-infested cover.
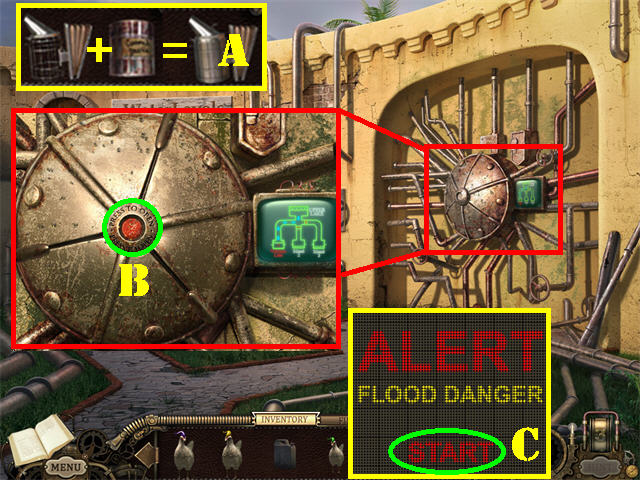
- Combine the FUMIGATOR and the CANNED SMOKE in inventory to create the FUMIGATOR WITH SMOKE (A).
- Place the FUMIGATOR WITH SMOKE on the bees covering the panel 3 times to get rid of them.
- Click on the red button to access the puzzle (B).
- Click on ‘START’ to begin the puzzle (C).
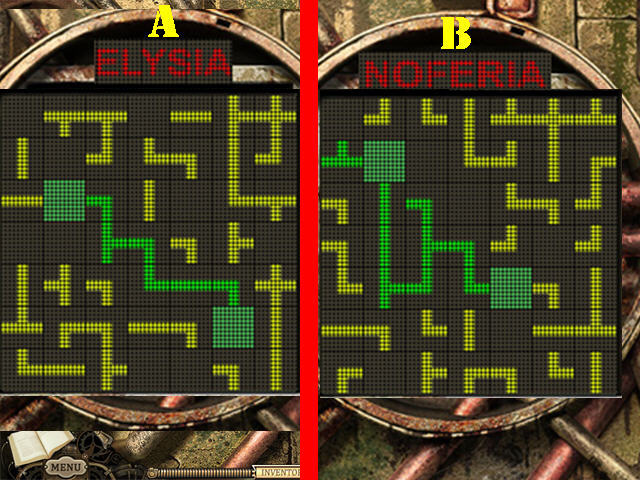
- Choose either ‘ELYSIA’ or ‘NOFERIA’ to begin the puzzle; for the purposes of this guide we’ll start with ‘ELYSIA’.
- You have to solve 2 pipe puzzles to complete this puzzle; all pipes do not have to be used in order to solve the puzzle.
- Click on the pipes to rotate them in order to form a solid line between the 2 solid blocks.
- Section ‘A’ on the screenshot shows you Elysia’s solution.
- Section ‘B’ on the screenshot shows you Noferia’s solution.
- Click down.
- Ralph is standing outside; talk to him.
- Click down twice.
- Zoom into the boat to access a Hidden Object Scene.
- Find all the items on the list.
- Take the GALLERY KEY in the upper center (1).
- Return to the Gallery.
- Open the left door with the GALLERY KEY.
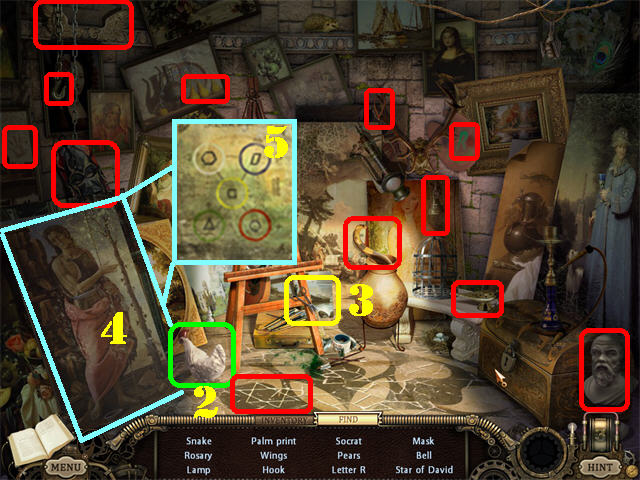
- Go through the door to access a Hidden Object Scene.
- Grab the CHICKEN walking around the scene (2).
- Find all the items on the list.
- Take the SCISSORS on the easel (3).
- Use the PAINT REMOVER on the large painting in the lower left corner (4).
- Take the DIAGRAM (5).
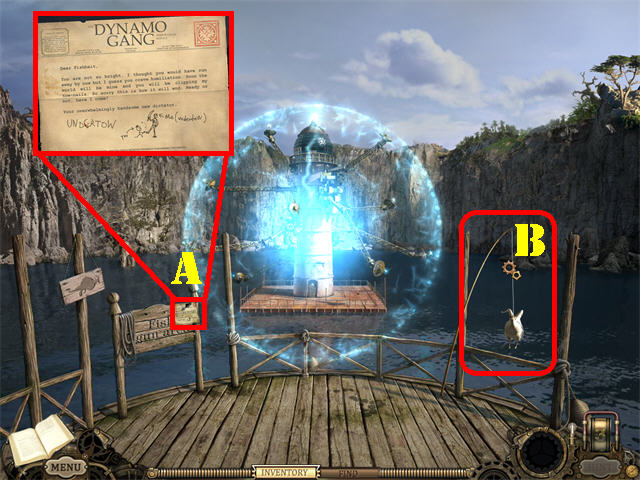
- Exit the Gallery; go up the ladder, through 2 left doors, through the right door and head towards the dock on the right.
- Read Undertow’s note in the lower left (A).
- Cut the string attached to the chicken with the SCISSORS to obtain the CHICKEN (B).

- Click down.
- Zoom into the egg-powered machine.
- Click on the DIAGRAM in your inventory to view the placement of the chickens.
- Place the chickens according to the color on their heads into the geometrical-shaped boxes shown on the diagram.
- To solve the puzzle place the chickens as shown in the screenshot.
- Click on the chickens in this order: Green, Purple, Yellow, Red and White so they can lay eggs in the correct order.
- Click on the levers on the left in this order: R-R-L-L-R.
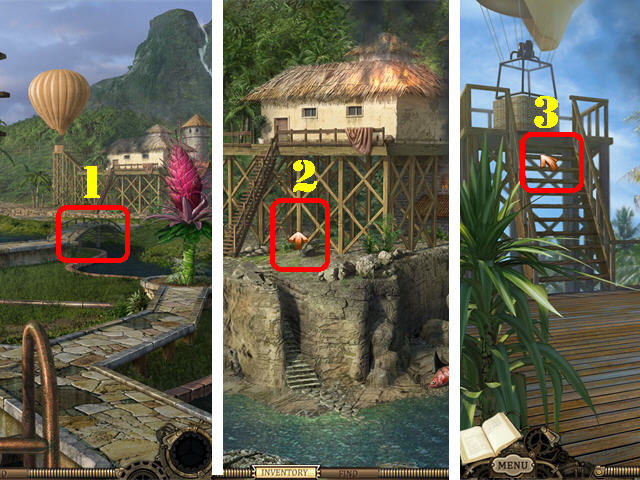
- Click down twice and cross the bridge on the right (1).
- The water level is now at an acceptable level, you can go across (2).
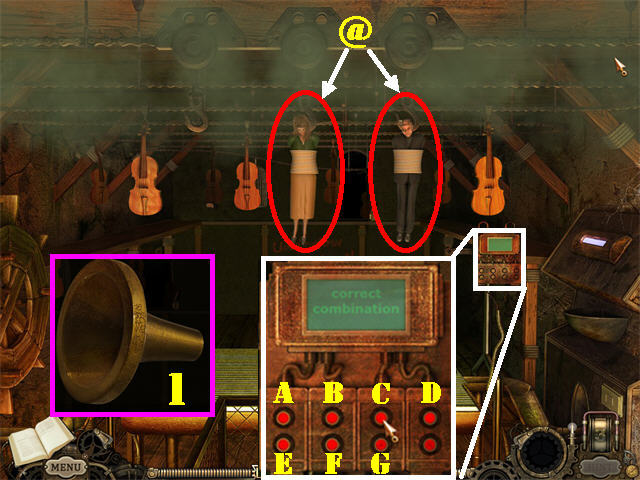
- Go up towards the hot air balloon in the upper left to access a Hidden Object Scene (3).
- Find the items on the list.
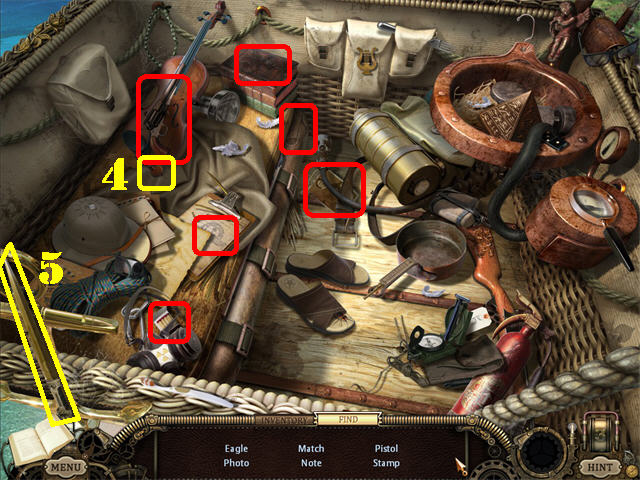
- Take the TUNING PEG (4) and the KNIFE (5) at the end of your search.
- Zoom into the violin shop door to access a puzzle.
- Place the TUNING PEG (D) on the violin to activate the puzzle.
- Use the tuning pegs and the arrows to move the letters ‘gdae’ into the center slot.
- Peg ‘A’ moves the second column.
- Peg ‘B’ moves the third column.
- Peg ‘C’ moves the first column.
- Peg ‘D’ moves the fourth column.
- The arrows move the center slot in the direction they are facing.
- To solve the puzzle, click on the TUNING PEGS in this order: D x 1, L x 2, B x 4, L x 1, C x 2, A x 3, and L x 2.
- Click on the FIDDLESTICK marked in red after the letters are in the correct spot.
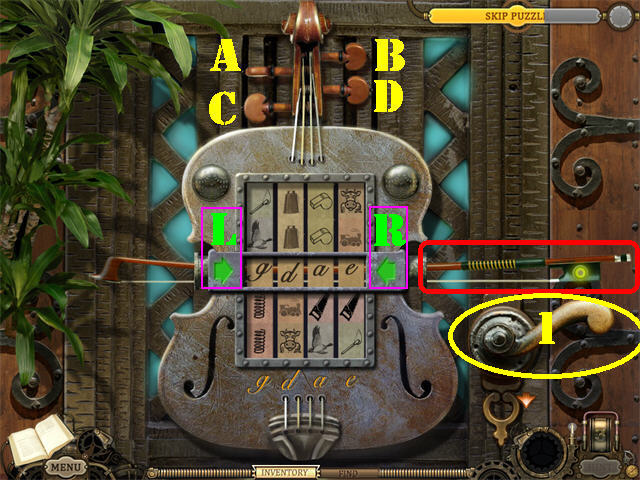
- Click on the handle to go through the door (1).
- Zoom into the panel on the right.
- Click on the correct buttons so they all turn red and empty the acid bowl.
- To solve the puzzle, click on the buttons in this order: A-E-F-G-F-B-C-E-G-E-F-C.
- Cut the ropes on Gideon and Delia with the KNIFE to release them; go through the dialogue with them (@).
- Take the AMPLIFYING CONE that appears in the center of the screen (1).
- Click down 3 times; go through 2 left doors, through the right door, and then towards the dock.
- From inventory combine the FISHMASTER and the AMPLIFYING CONE to complete the FISHMASTER (Y).
- Place the FISHMASTER on the mechanical Mona (Z).
- Talk to Gideon, Delia, and Emily.
- Congratulations! You have completed Hidden Expedition: The Uncharted Islands Standard Edition!


 Temple of Life: The Legend of Four Elements Walkthrough, Guide, & Tips
 Time Dreamer Walkthrough, Guide, & Tips
 The Agency of Anomalies: The Last Performance Walkthrough, Guide, & Tips
 Fear for Sale: Endless Voyage Walkthrough, Guide, & Tips
 Mystery of Mortlake Mansion Walkthrough, Guide, & Tips