Grim Tales: The Vengeance Walkthrough, Guide, & Tips
Grim Tales: The Vengeance Walkthrough

Welcome to the Grim Tales: The Vengeance Walkthrough
When his sister is murdered, you must prove your nephew’s innocence!
Whether you use this document as a reference when things get difficult or as a road map to get you from beginning to end, we’re pretty sure you’ll find what you’re looking for here.
This document contains a complete Grim Tales: The Vengeance game walkthrough featuring annotated screenshots from actual gameplay!
We hope you find this information useful as you play your way through the game. Use the walkthrough menu below to quickly jump to whatever stage of the game you need help with.
Remember to visit the Big Fish Games Forums if you find you need more help. Have fun!
This walkthrough was created by SeverineSnape, and is protected under US Copyright laws. Any unauthorized use, including re-publication in whole or in part, without permission, is strictly prohibited.
General Tips
- This is the official guide for Grim Tales: The Vengeance.
- This guide will not mention each time you need to zoom into a scene; the screenshots will show each zoom scene.
- Inventory items marked with a blue ‘+’ can be accessed and altered or combined with other items.
- We will use the acronym HOP for Hidden-object puzzles. Interactive items will be color-coded and some will be numbered; please follow the numbers in order.
- HOPs may be random: our lists may vary from yours.
- The Map is in your Diary and can be used to travel to locations.
Chapter 1: James’ Trial

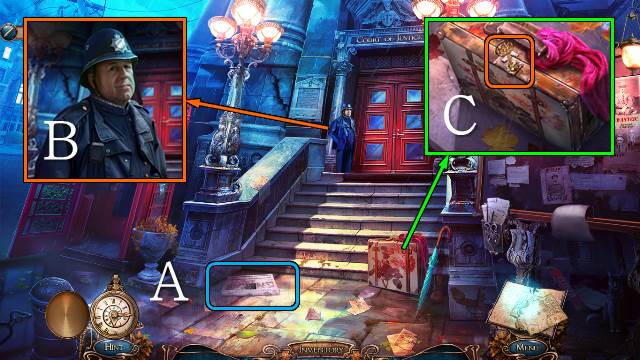
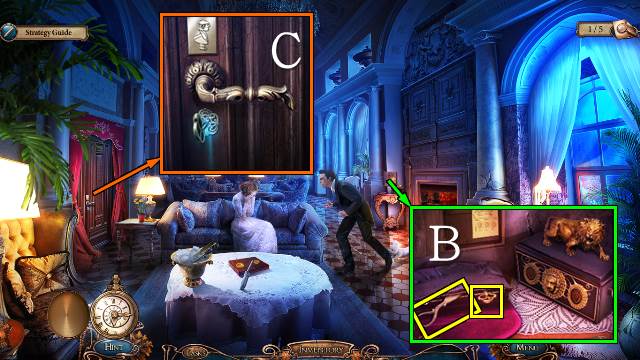
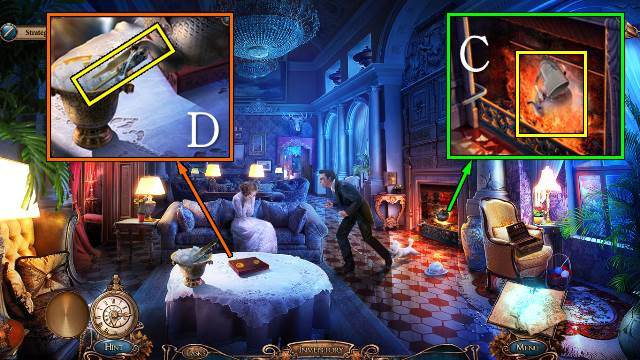
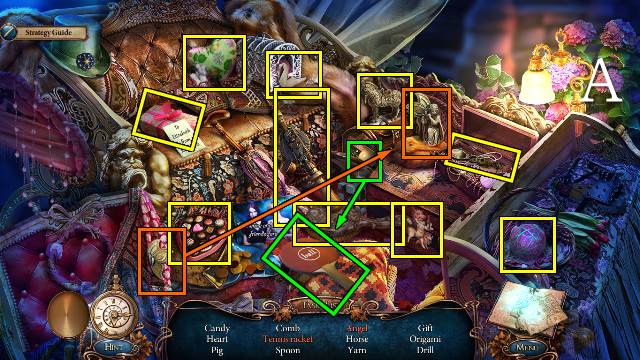
- Read the paper (A).
- Talk to the policeman (B).
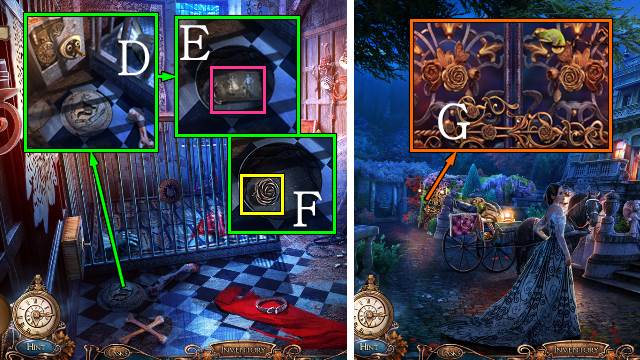
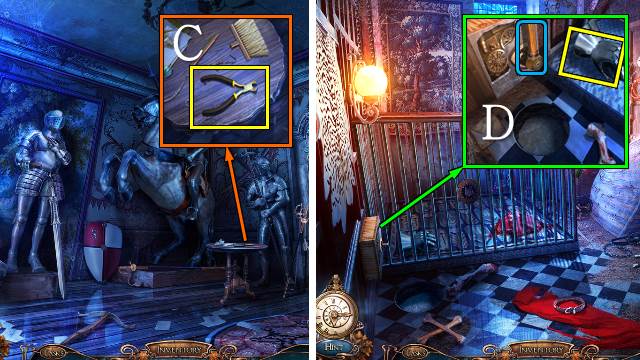
- Break and remove the key (C).
- Take the CLIP (D).
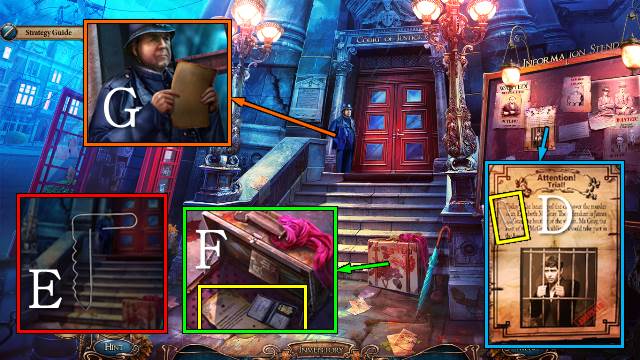
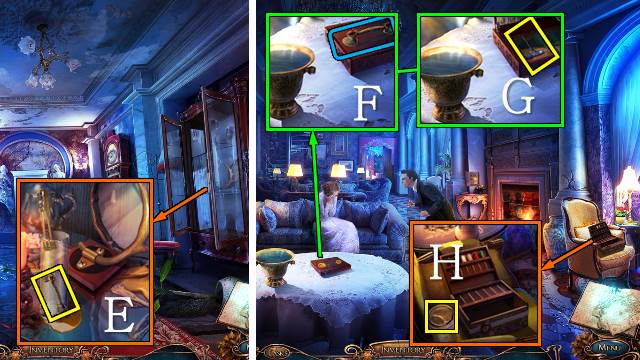
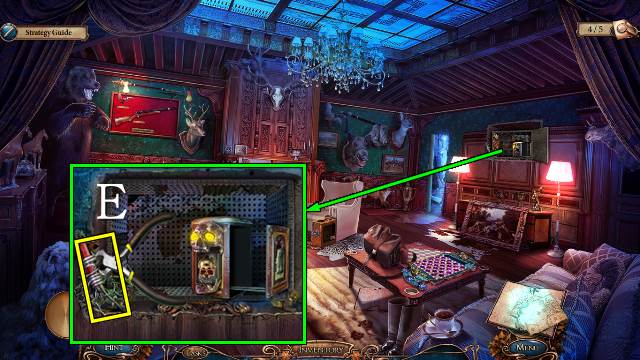
- Access the CLIP and bend it into a LOCKPICK (E).
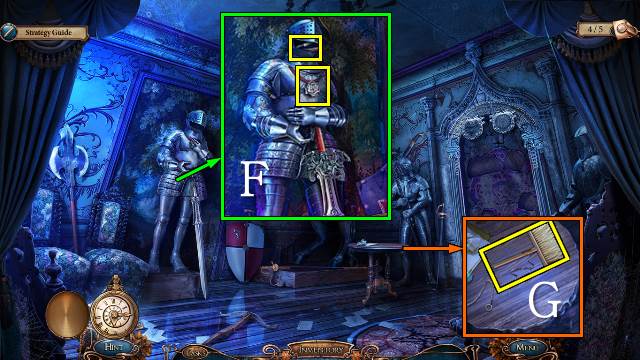
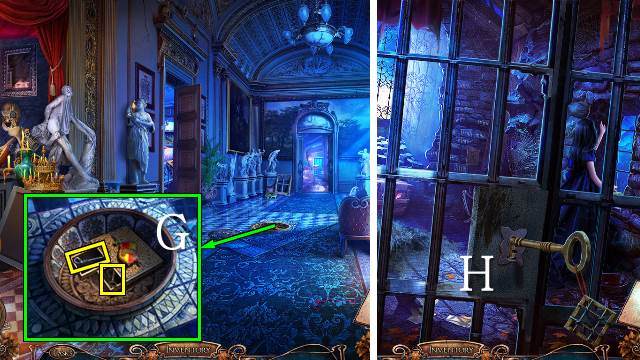
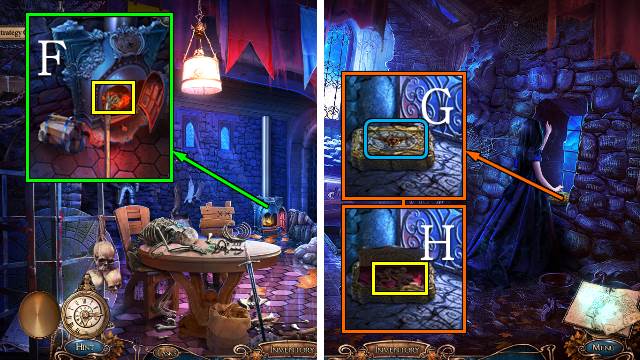
- Open the case with the LOCKPICK; take the SUBPOENA (F).
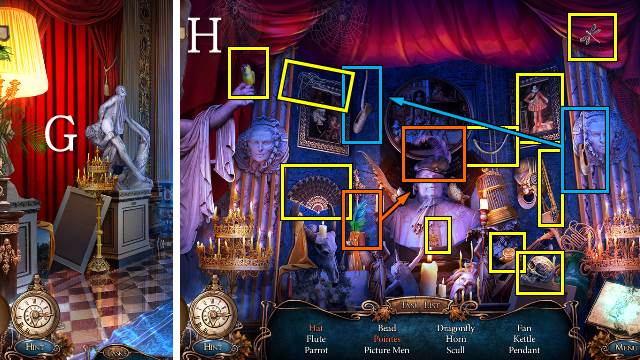
- Give the SUBPOENA to the policeman (G).
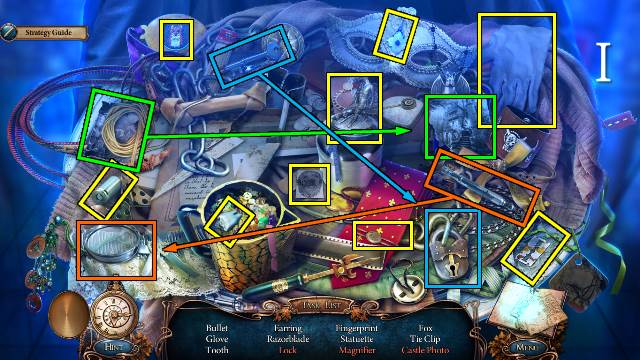
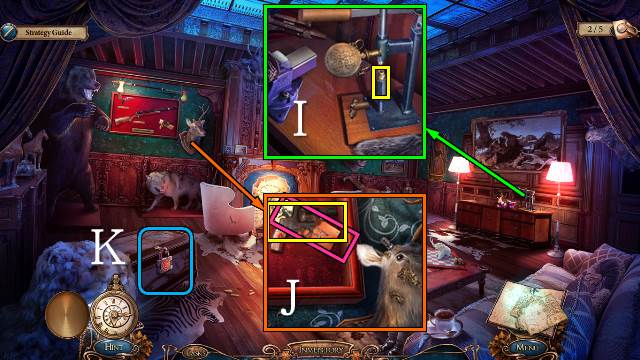
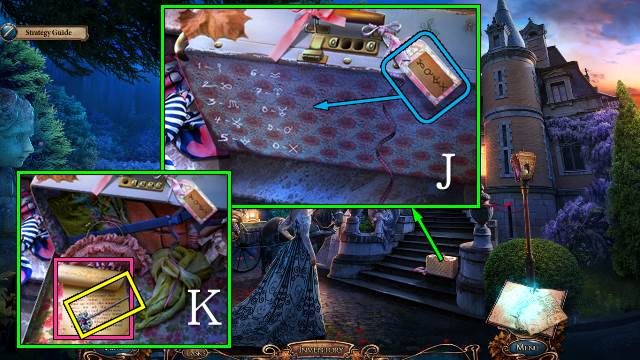
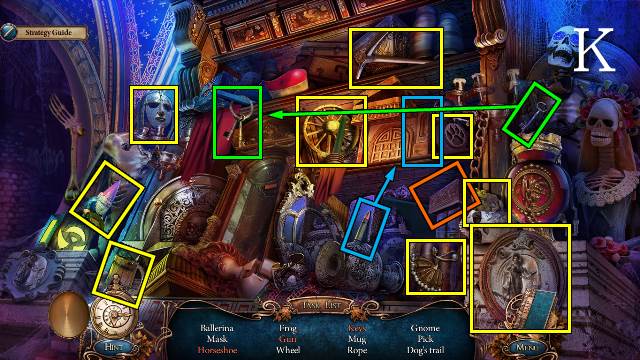
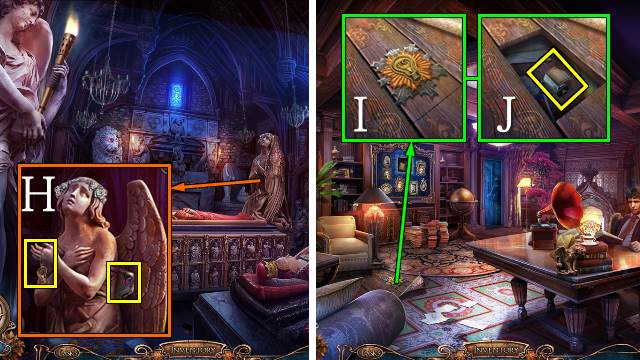
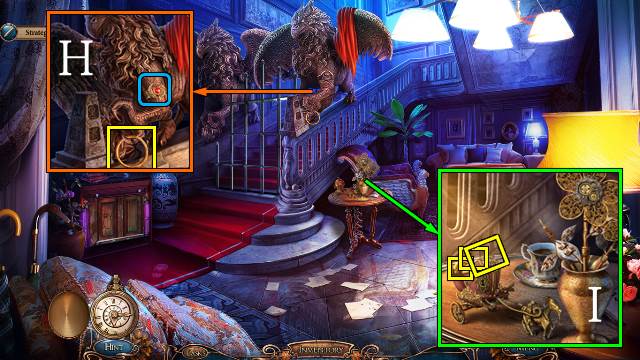
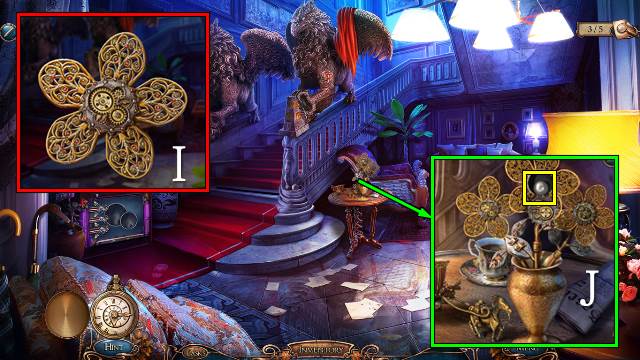
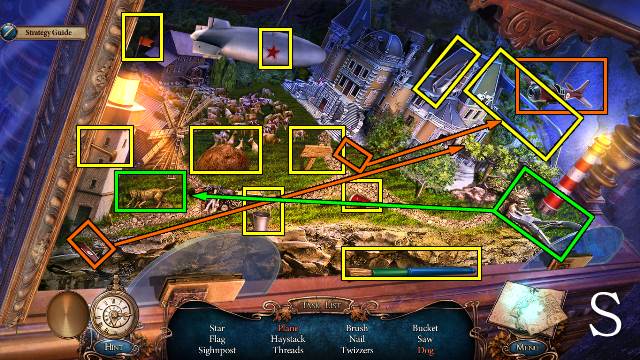
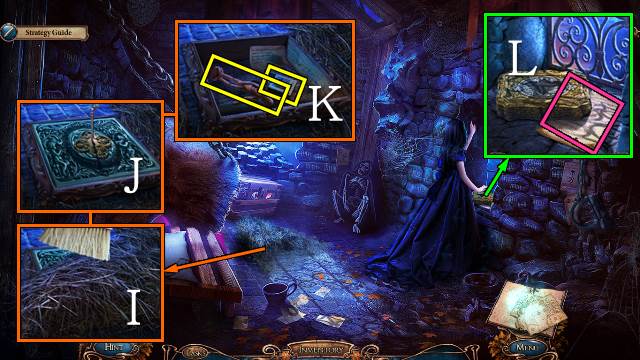
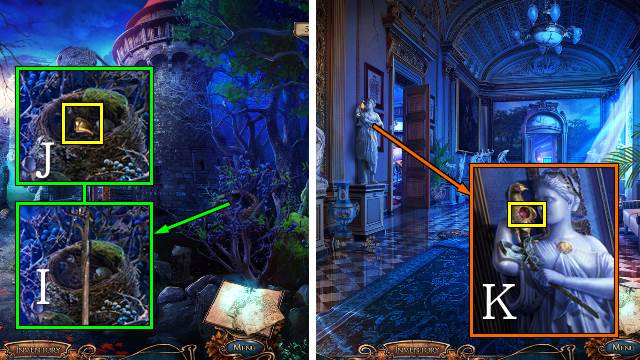
- Play the HOP (I).
- You receive the CASTLE PHOTO.
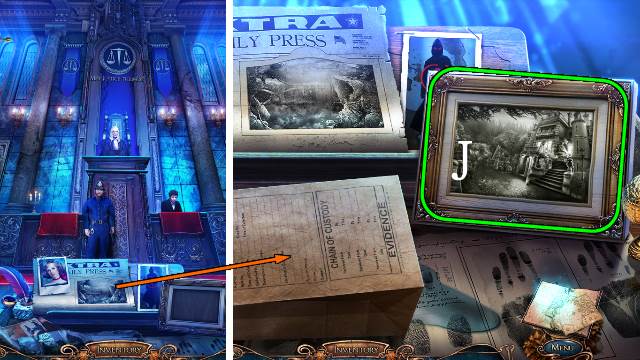
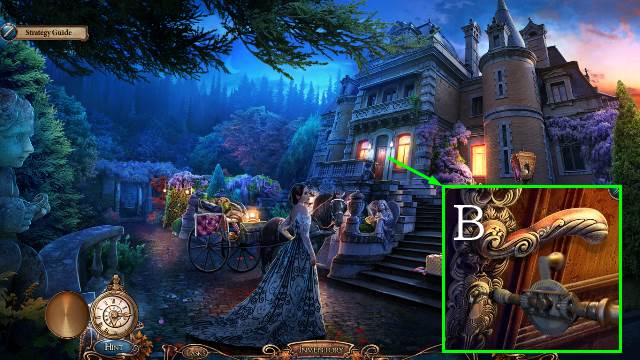
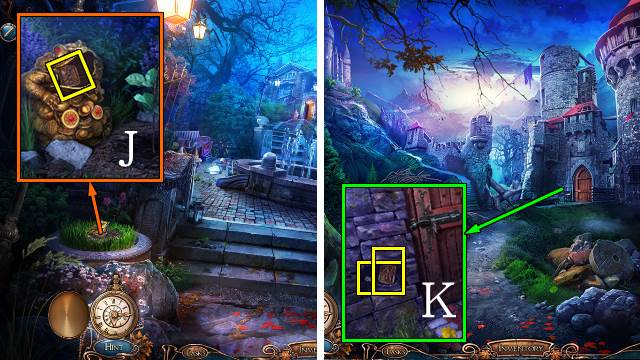
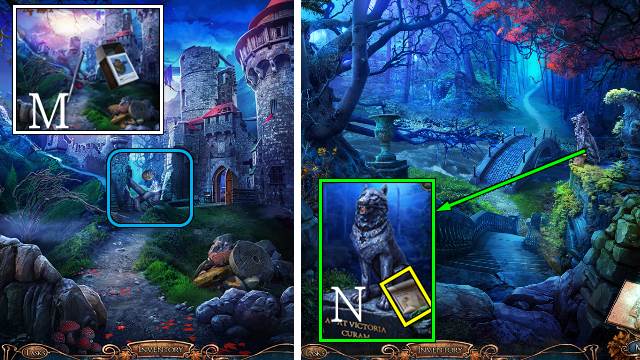
- Put the CASTLE PHOTO in the frame and enter the photo (J).
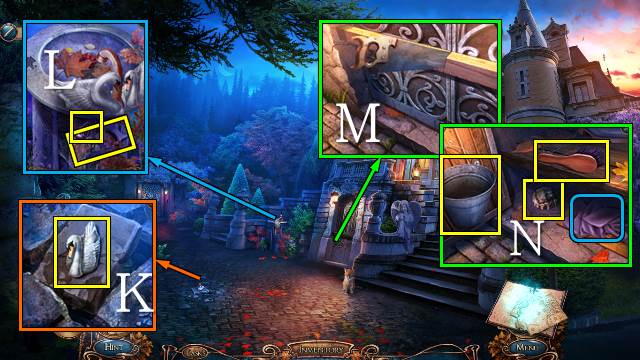
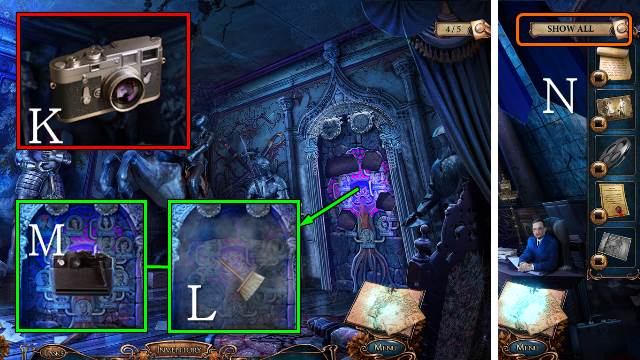
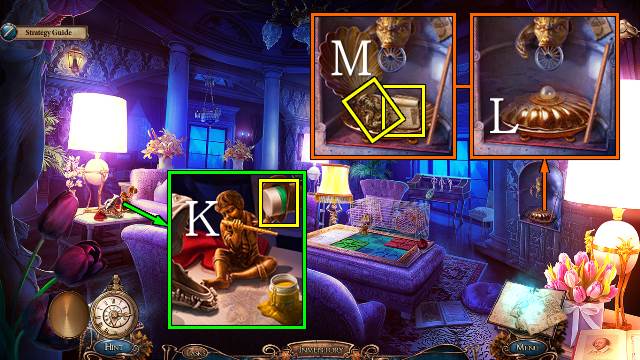
- Take the SWAN (K).
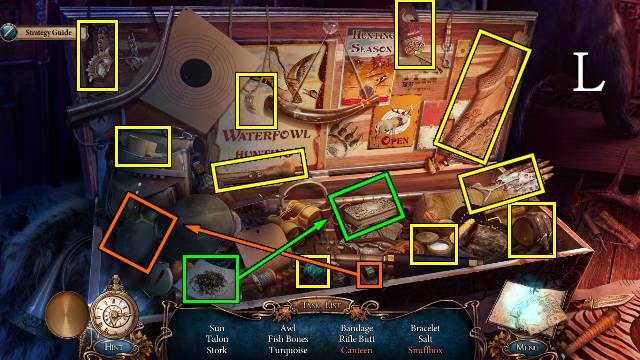
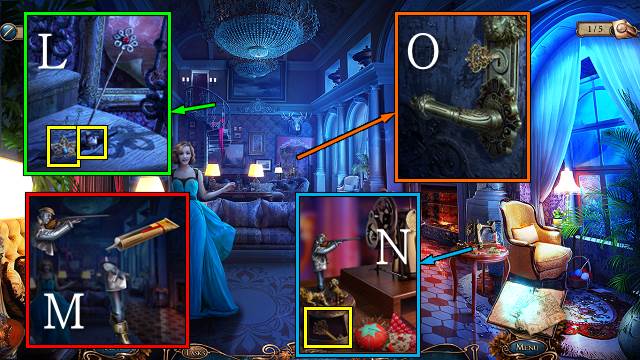
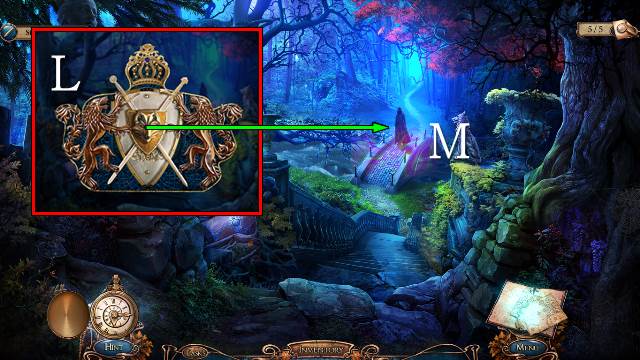
- Put the SWAN on the fountain; take the CRYSTAL and HANDSAW (L).
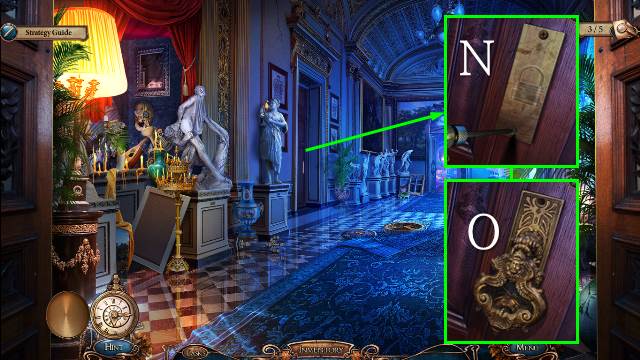
- Cut the beam with the HANDSAW (M); move the leaves, take the LION AMULET, BUCKET and BRUSH and move the rag (N).
- Walk forward.

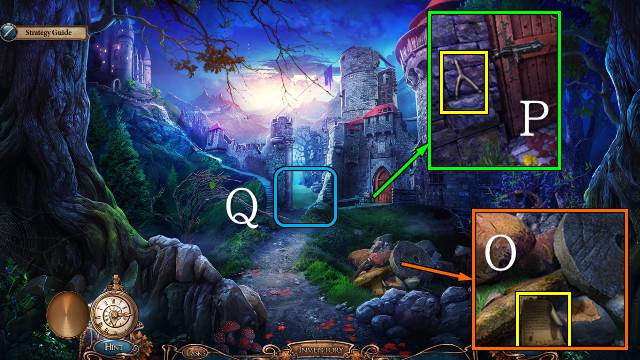
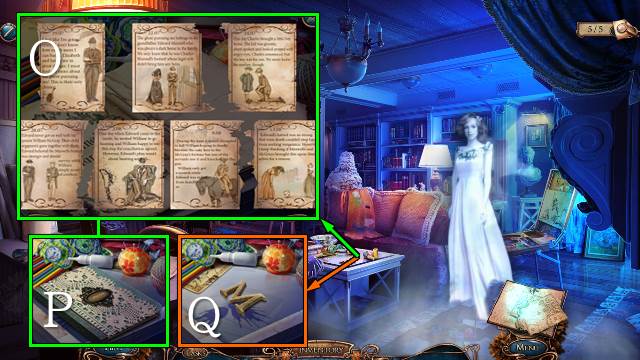
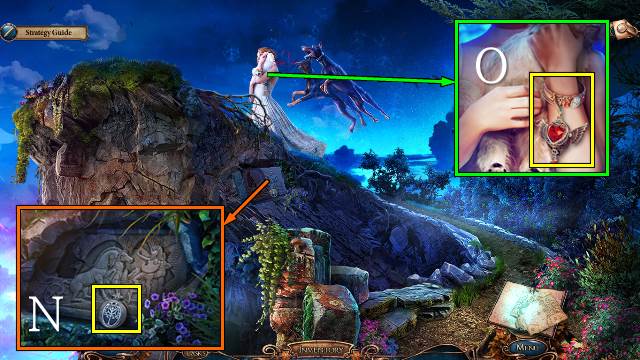
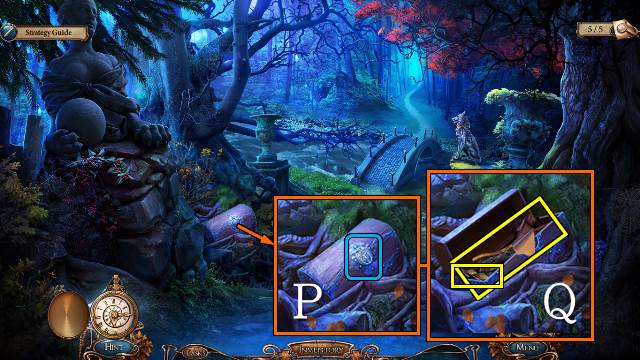
- Take the Book Clue (O).
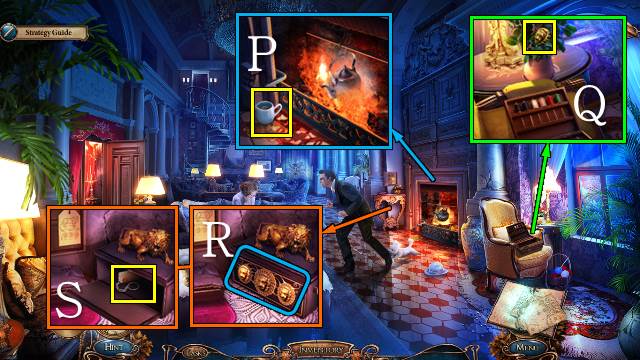
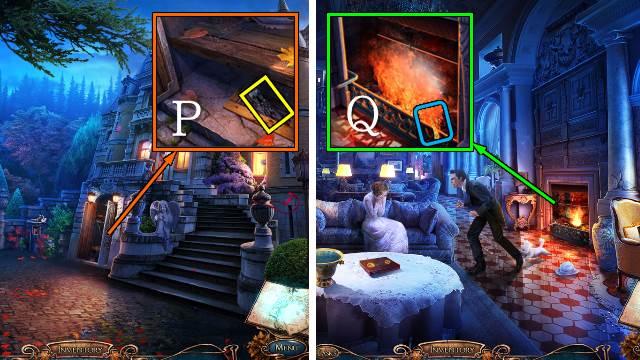
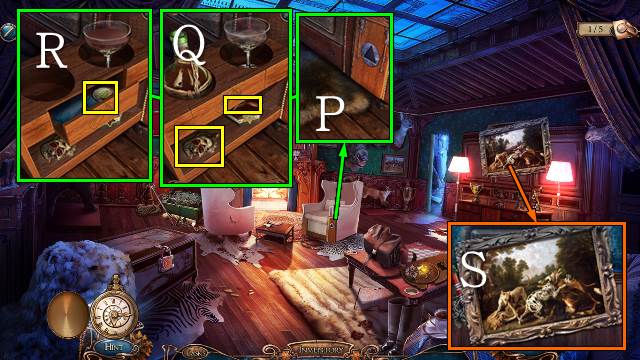
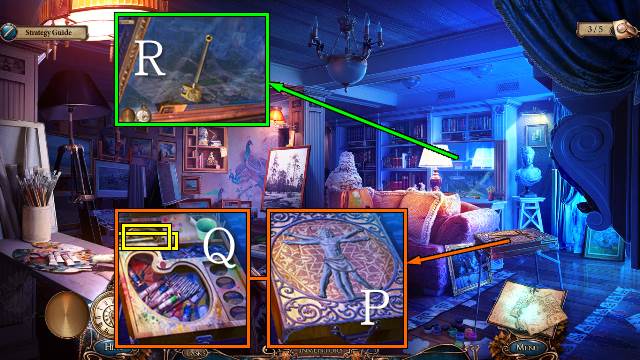
- Take the VALVE (P).
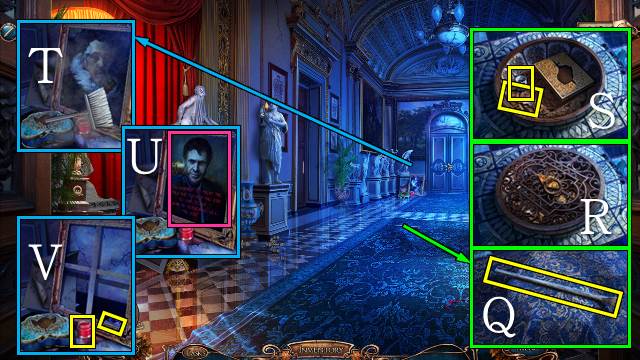
- Take the LOCK AMULET (Q).
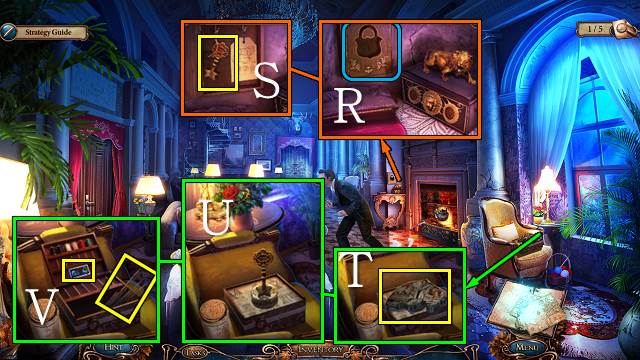
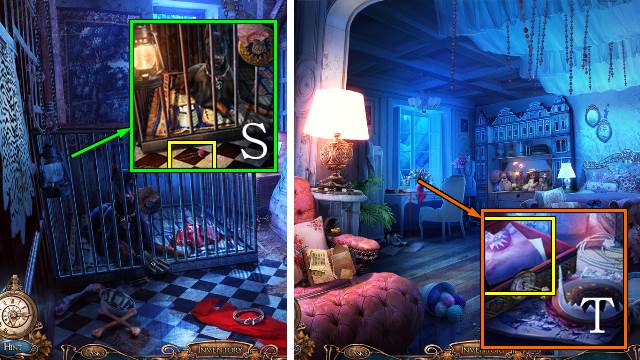
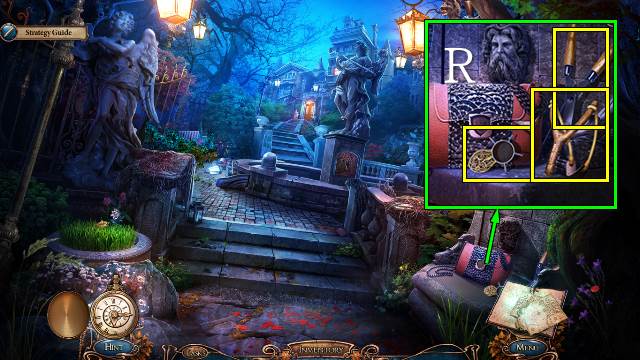
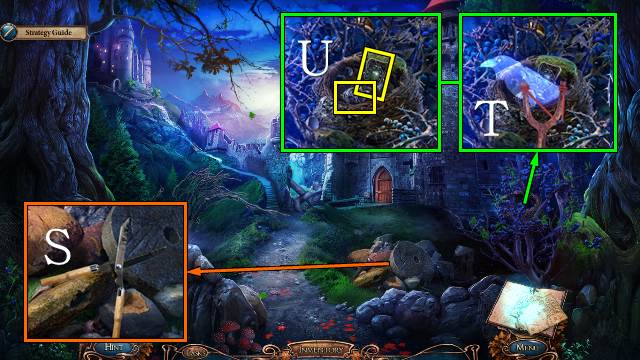
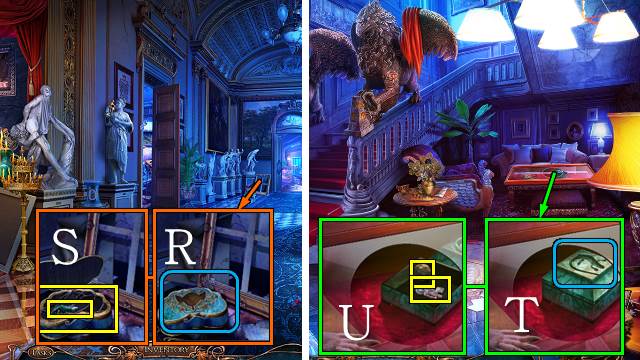
- Open the compartment with the LOCK AMULET (R); take the STAR KEY (S).
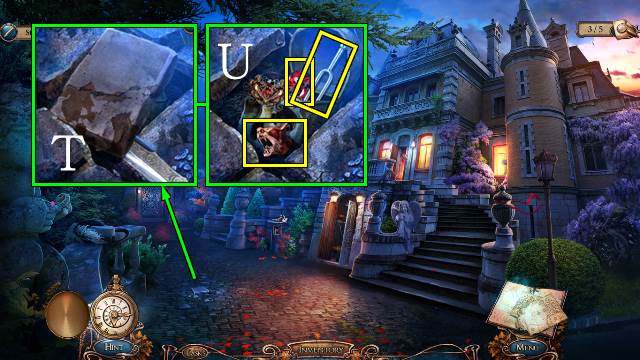
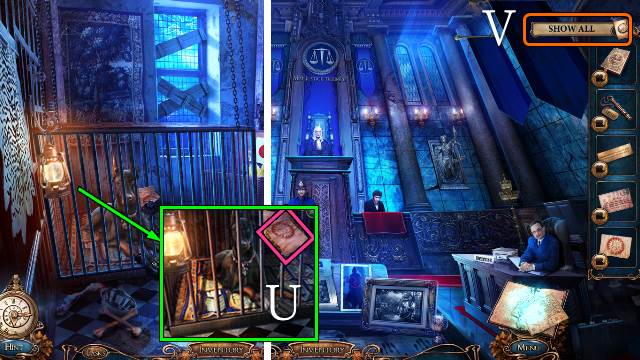
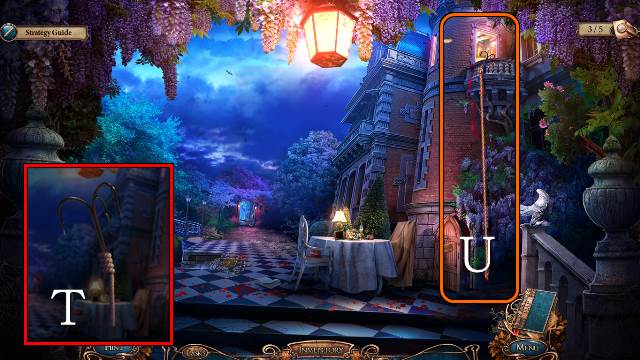
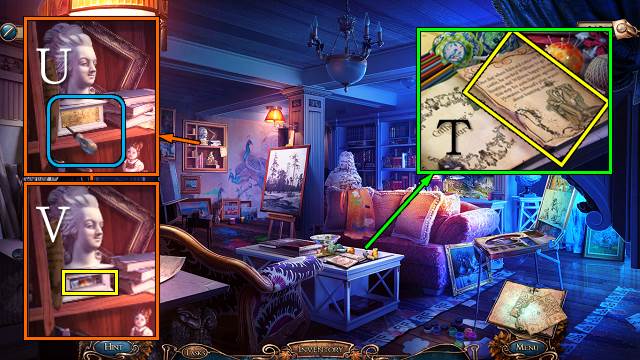
- Take the MURAL PIECE (T); open the box with the STAR KEY (U) and take the BROKEN RULER and WOLF DOMINO (V).
- Walk down.
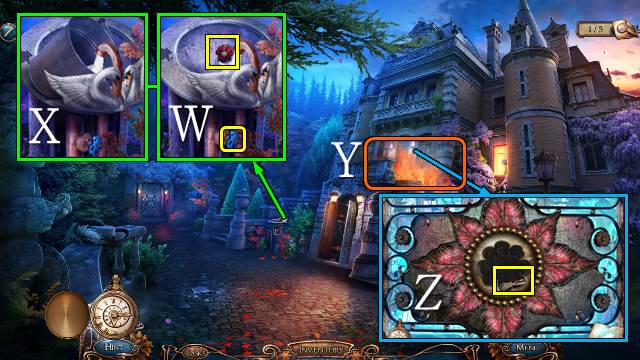
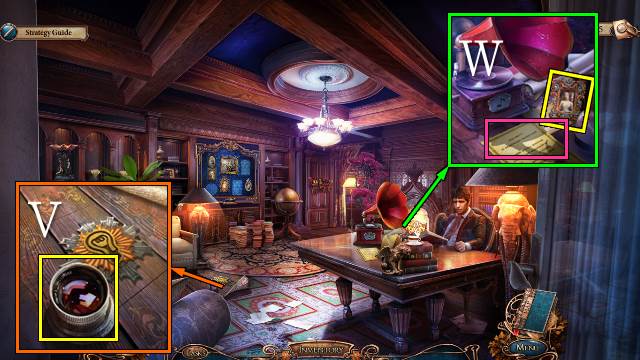
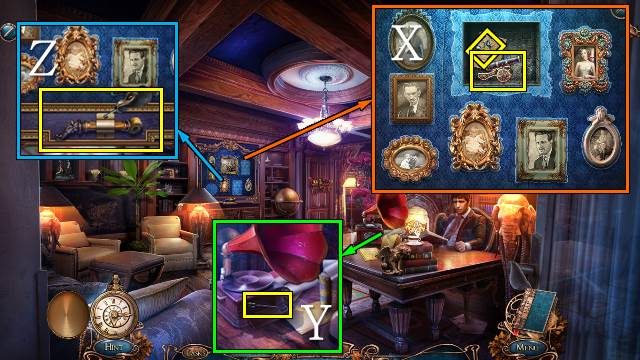
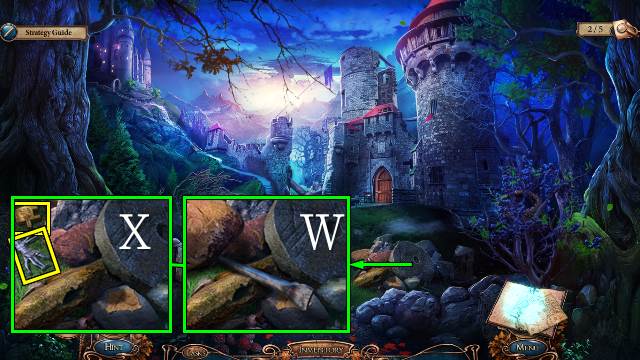
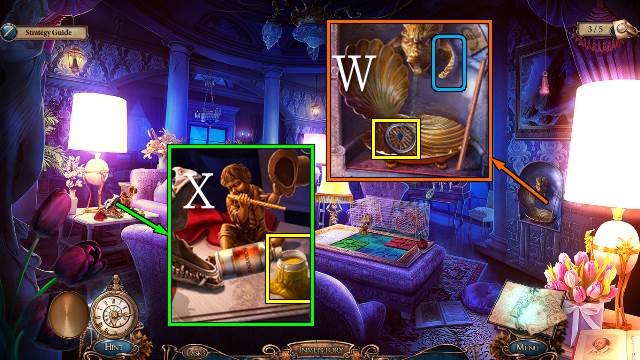
- Clean the fountain with the BRUSH, put the VALVE on it, turn the valve and take the RED STONE (W); fill the BUCKET to get a FULL BUCKET (X).
- Throw the FULL BUCKET on the fire (Y).
- Take the SLIDER and put the RED STONE in the hole for a mini-game (Z).

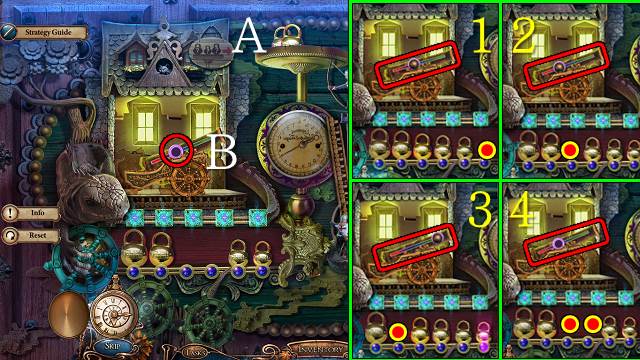
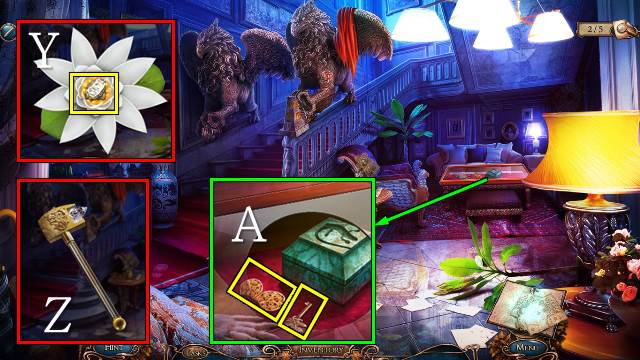
- Drag and drop the pieces into place (A).
- Walk forward.
- Put the SLIDER on the zipper and open it; take the SILVER KEY and SCISSORS HALF (B).
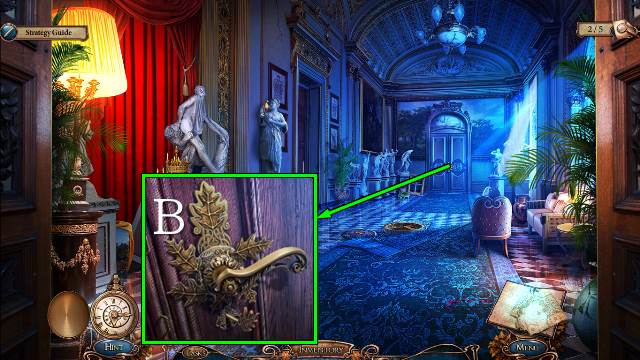
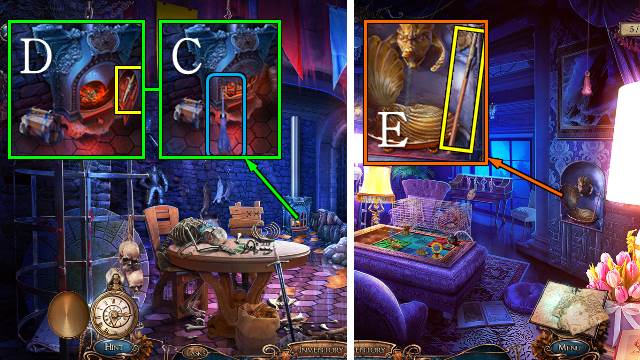
- Open the lock with the SILVER KEY; turn the handle (C).
- Go left.

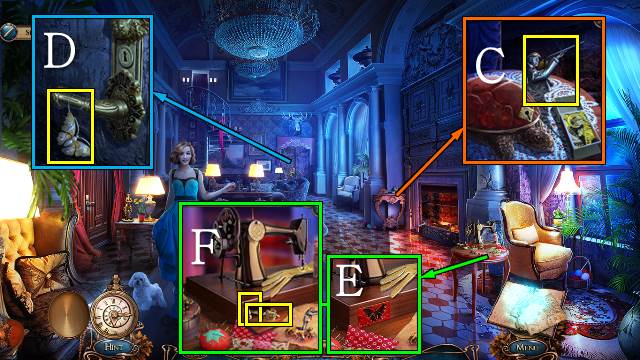
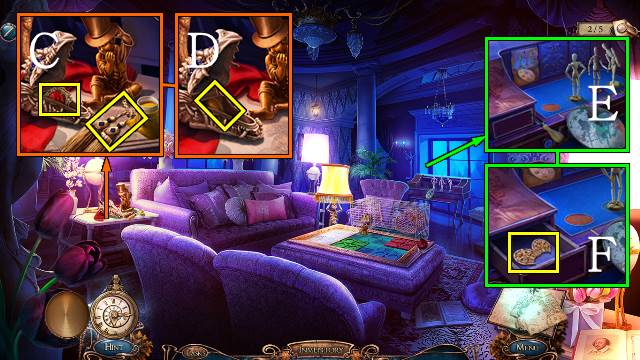
- Take the CROWN (D).
- Take the ADHESIVE TAPE (E).
- Access the BROKEN RULER; put the ADHESIVE TAPE on it and take the RULER (F).
- Open the latch with the RULER (G).
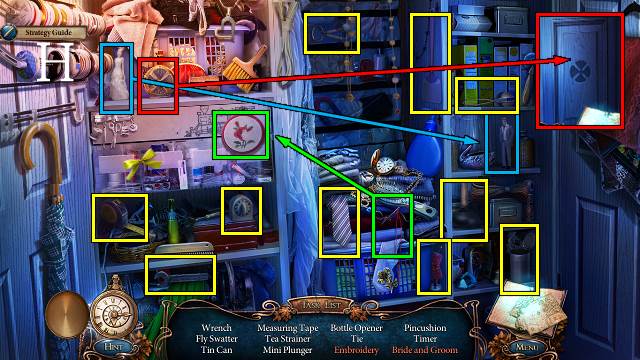
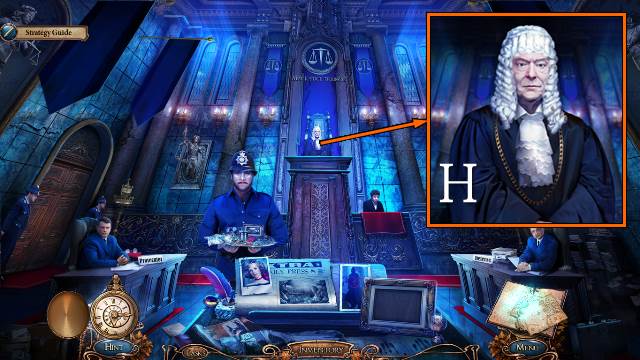
- Play the HOP (H).
- You receive the WRENCH.
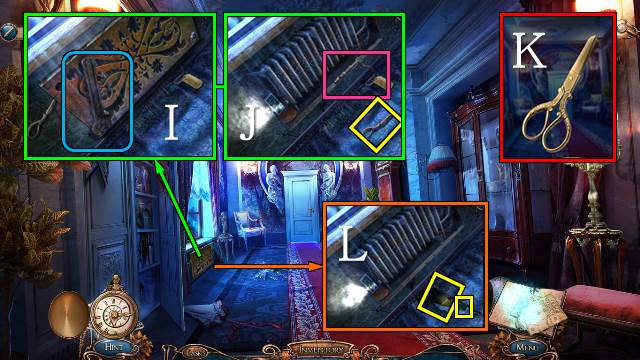
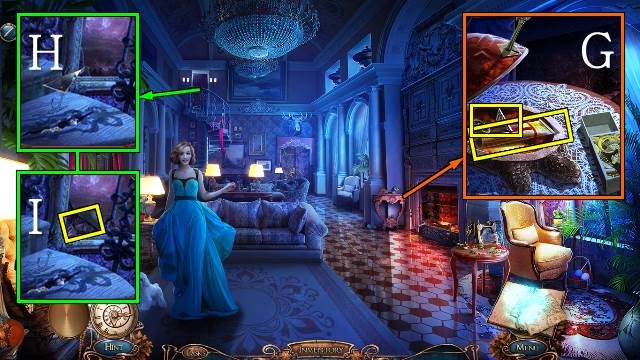
- Open the vent with the WRENCH (I); take the SCISSORS HALF and Whistle Clue (J).
- Access the first SCISSORS HALF and combine it with the other SCISSORS HALF; take the SCISSORS (K).
- Cut the carpet with the SCISSORS; take the PENDULUM and FOX DOMINO (L).
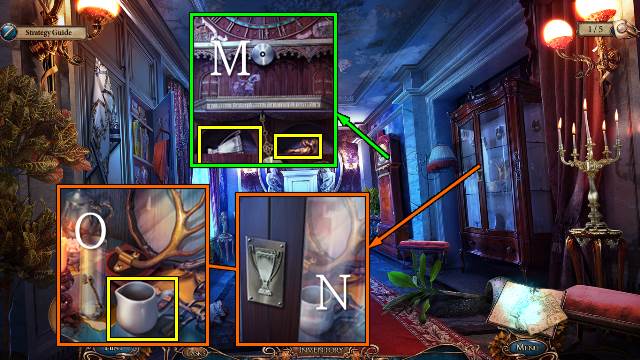
- Hang the PENDULUM from the clock; take the CUP AMULET and ANGEL AMULET (M).
- Open the cabinet with the CUP AMULET (N); take the MILK JUG (O).
- Walk down.
- Collect some OIL in the MILK JUG (P).
- Cut the roses with the SCISSORS; take the LION AMULET (Q).
- Put the two LION AMULETS on the box (R); take the CORK (S).
- Go left.

- Put the CORK in the radiator; take the BEAR DOMINO (T).
- Walk down.
- Pour the OIL on the lock (U).
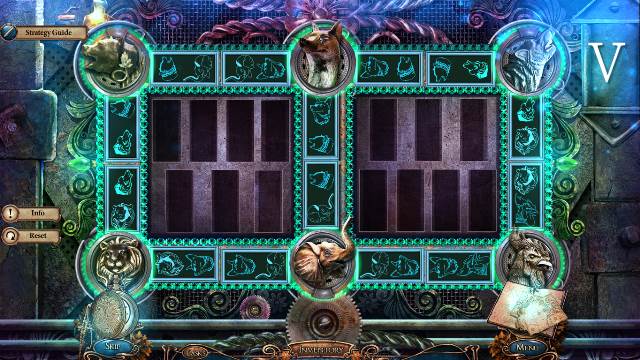
- Put the WOLF DOMINO, FOX DOMINO and BEAR DOMINO down for a mini-game.
- Place the tiles so that each image is next to an identical image (V).
- Walk forward.
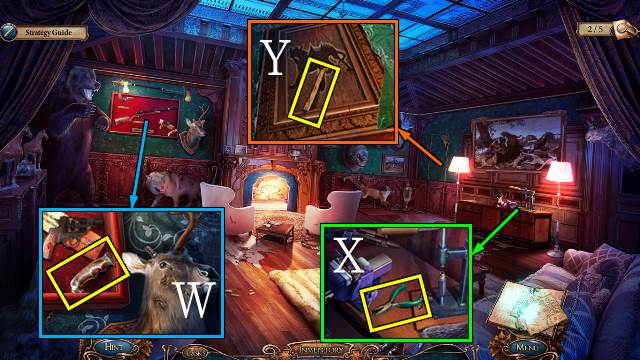
- Take the KNIFE GRIP (W).
- Take the PLIERS (X).
- Tear the wallpaper and take the STICK (Y).
- Walk down.
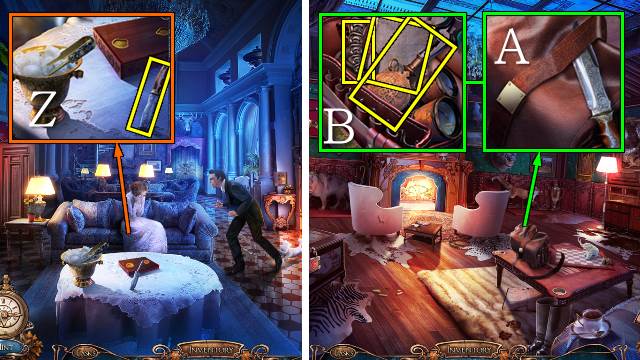
- Put the KNIFE GRIP on the knife and take the HUNTING KNIFE (Z).
- Walk forward.
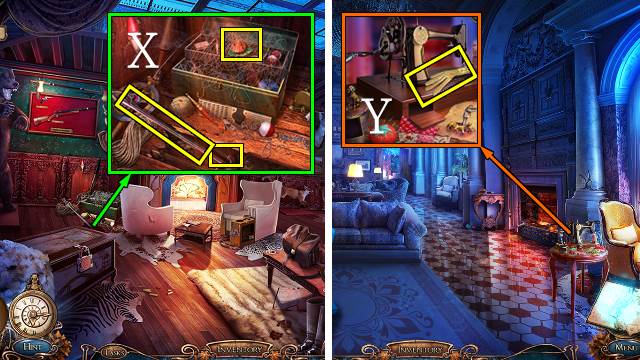
- Cut the bag with the HUNTING KNIFE and open it (A); take the METALLIC FEATHER and OVEN MITT, uncork the flask with the PLIERS and take the POWDER FLASK (B).
- Walk down.
- Take the HOT KETTLE with the OVEN MITT (C).
- Pour water from the HOT KETTLE into the ice bucket; take the ICE TONGS (D).
- Go left.
- Take the SHELL HANDLE with the ICE TONGS (E).
- Walk down.
- Open the box with the SHELL HANDLE (F); take the CORKSCREW (G).
- Open the jar with the CORKSCREW and take the MOON (H).
- Walk forward.
- Pour powder from the POWDER FLASK into the shell; pull the handle and take the BULLET (I).
- Put the BULLET in the REVOLVER and take it; take the Plaque Clue (J).
- Shoot the lock with the REVOLVER (K).
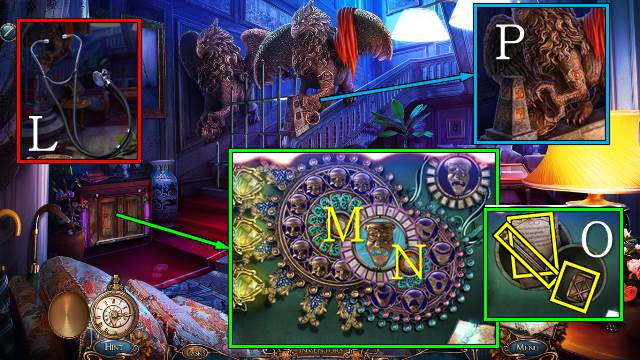
- Play the HOP (L).
- You receive the SUN.
- Go to the Corridor.
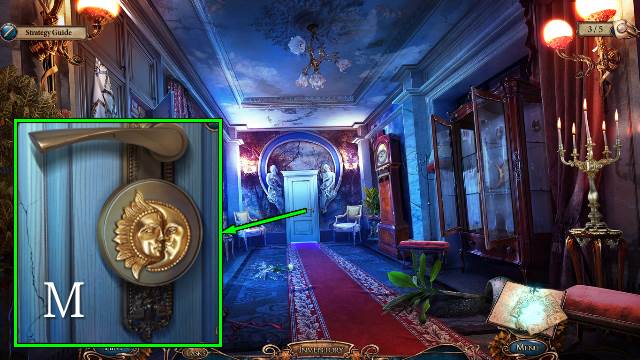
- Put the SUN and MOON on the lock and turn the handle (M).
- Walk forward.
Chapter 2: Elizabeth’s Room
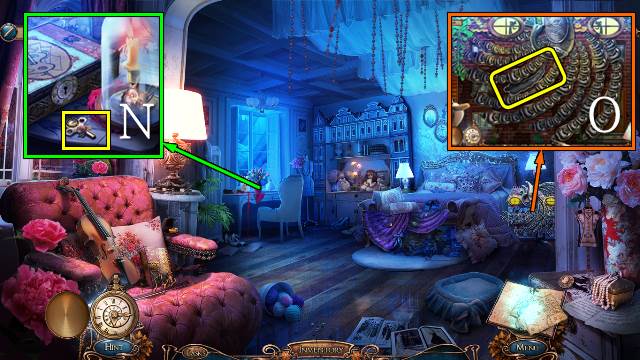
- Take the WIND-UP KEY (N).
- Put the METALLIC FEATHER on the doll’s house (O).
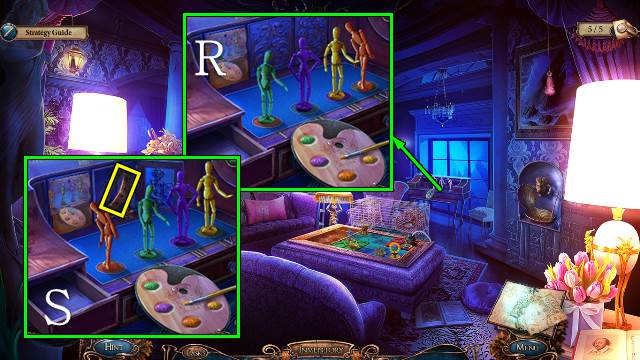
- Pull the tassel for a mini-game (P).
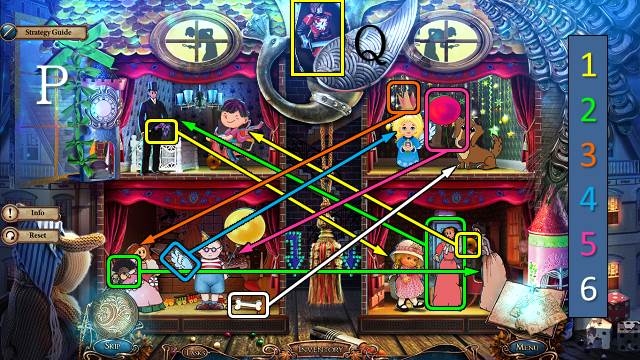
- Move the correct accessories to each puppet; each puppet can only hold one accessory at a time.
- Follow the colors by number.
- Take the PRINCE (Q).
- Walk down.
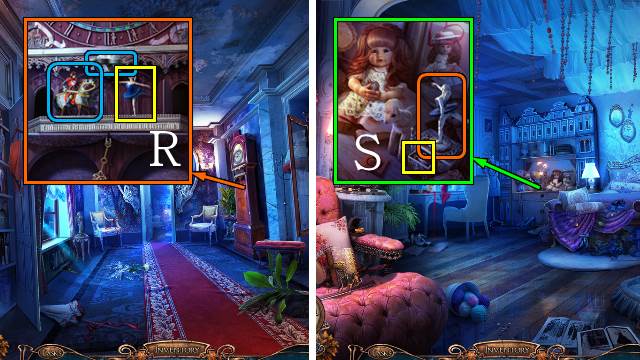
- Wind the clock with the WIND-UP KEY; put the PRINCE on the horse and take the DANCER (R).
- Walk forward.
- Put the DANCER on the music box; take the ANGEL AMULET (S).
- Go to the Castle Entrance.
- Move the stone with the HUNTING KNIFE (T); take DOG’S HEAD 1/3, put the two ANGEL AMULETS on the skull and take the CRYSTAL and TUNING FORK (U).
- Go to Elizabeth’s Bedroom.
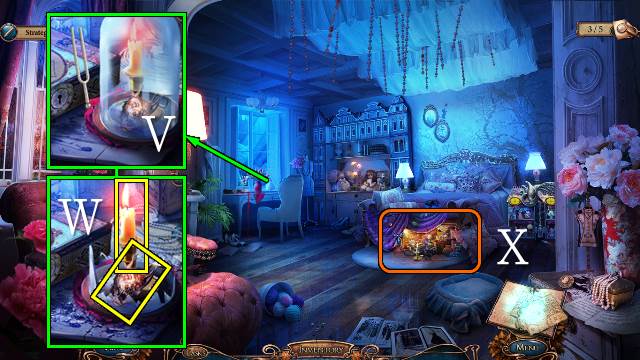
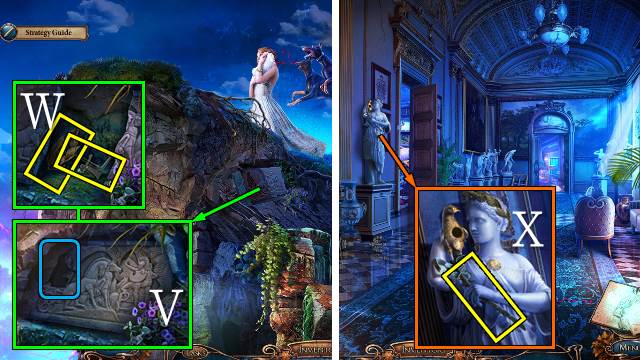
- Break the glass with the TUNING FORK (V); take DOG’S HEAD 2/3 and the CANDLE (W).
- Use the CANDLE under the bed (X).
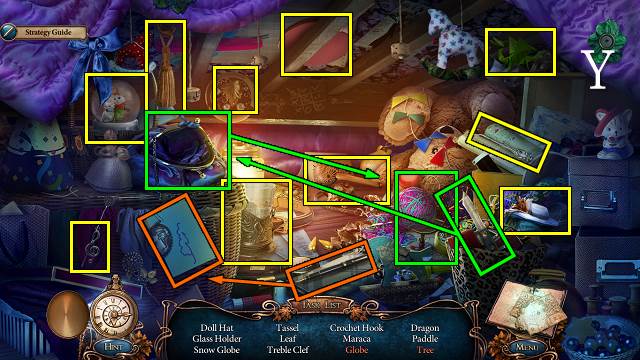
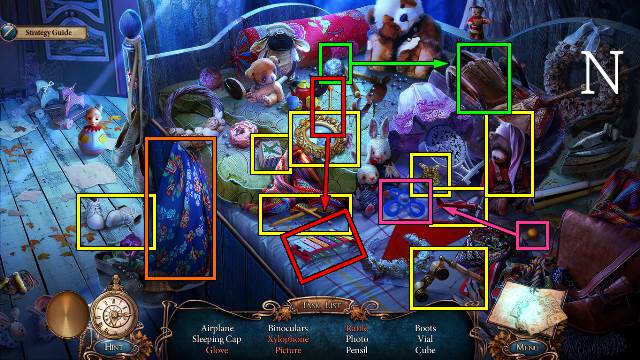
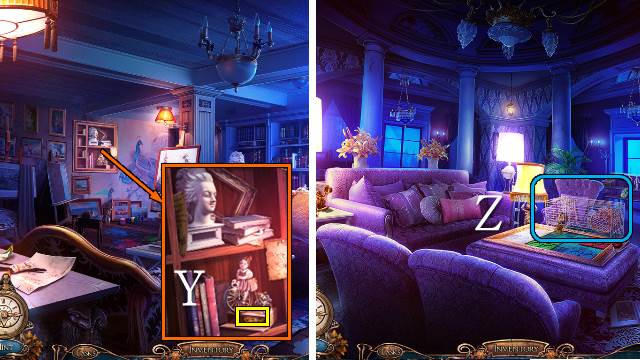
- Play the HOP (Y).
- You receive the DOLL HAT.
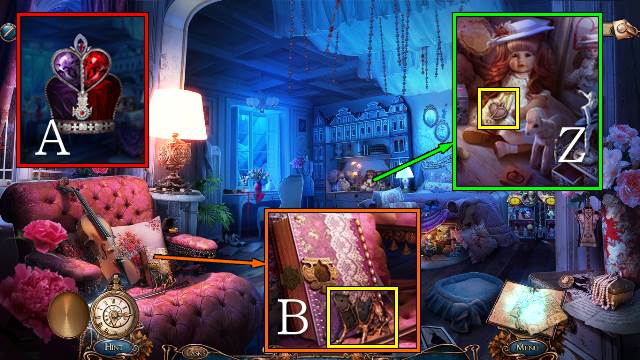
- Put the DOLL HAT on the doll; take the SILVER HEART (Z).
- Access the CROWN and put the SILVER HEART and two CRYSTALS on it; take the CROWNED HEART (A).
- Take the DOG AMULET; open the diary with the CROWNED HEART for a mini-game (B).
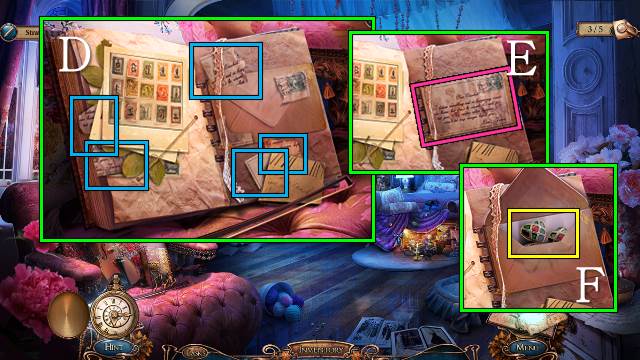
- Restore the note (D).
- Take the Note Clue (E).
- Take the CLOVER AMULET (F).
- Go to the Castle Entrance.
- Open the compartment with the CLOVER AMULET (G); take the VICE LEVER and remove the spring (H).
- Go to the Trophy Room.
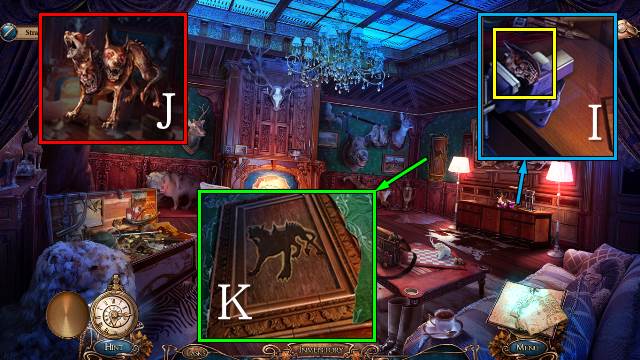
- Put the VICE LEVER on the vice and turn it; take DOG’S HEAD 3/3 (I).
- Access the DOG AMULET and put the DOG’S HEADS on it; take the THREE-HEADED DOG AMULET (J).
- Put the THREE-HEADED DOG AMULET on the secret door (K).
- Walk forward.
- Take the SCREWDRIVER (L).
- Go to the Corridor.
- Remove the screws with the SCREWDRIVER; take the HORN (M).
- Go to the Trophy Room.

- Put the HORN on the deer and turn it; take the CLOWN AMULET (N).
- Go to Elizabeth’s Bedroom.
- Open the box with the CLOWN AMULET; take the SPRING (O).
- Go to the Castle Entrance.
- Put the SPRING on the BOLT CUTTERS and pick it up (P).
- Walk forward.
- Light the STICK in the fire to get a BURNING STICK (Q).
- Go to the Kennels.

- Cut the chains with the BOLT CUTTERS for a mini-game (R).
- Move the columns of jewelled tiles up and down to create continuous tracks from left to right; move the jewel along the track to the slots on the other side.
- 1: default; 2: right tile 1 down; 3: left 3 down, middle 2 down, right 1 down.
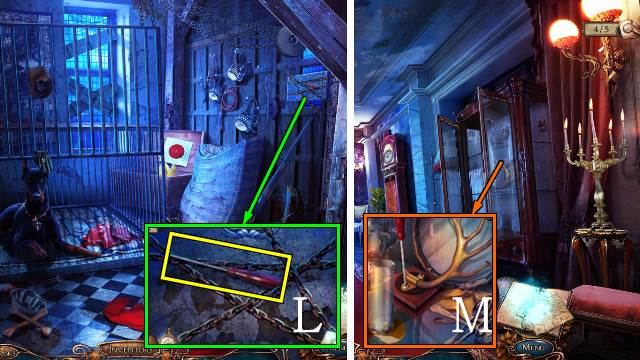
- Light the lamp with the BURNING STICK; take the HAIRPIN (S).
- Go to Elizabeth’s Bedroom.
- Pick the lock with the HAIRPIN; take the PICTURE HALF (T).
- Go to the Kennels.
- Put the PICTURE HALF with the other half and take the Coat of Arms Clue (U).
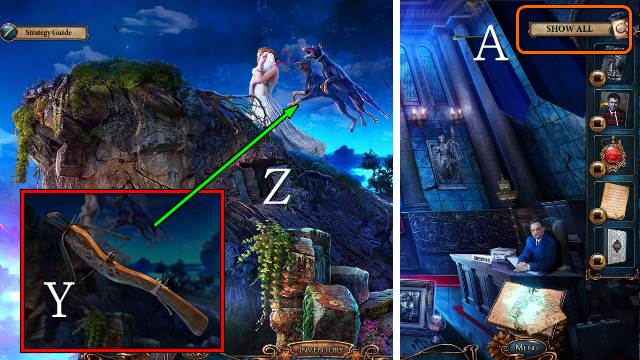
- Select the ‘Show All’ button (V).
Chapter 3: The Wolf Ring
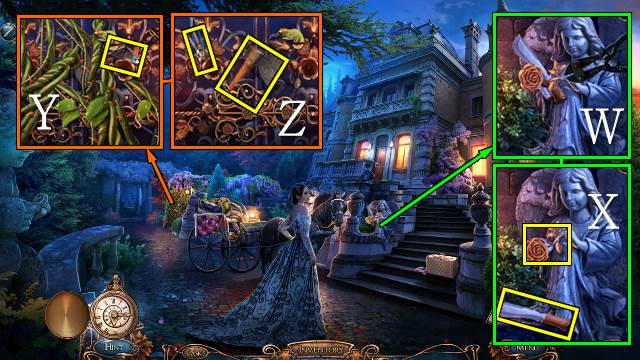
- Cut the rose with the BOLT CUTTERS (W); take the MACHETE and IRON FLOWER 1/2 (X).
- Take the PIECE OF GLASS (Y); cut the thorns with the MACHETE and take the HATCHET and CODE WHEEL (Z).
- Play the HOP (A).
- You receive the DRILL.
- Break the lock with the DRILL; turn the handle (B).
- Walk forward.
- Take STATUETTE PART (C).
- Take the BUTTERFLY AMULET (D).
- Put the BUTTERFLY AMULET on the sewing machine (E); take the CODE WHEEL and TORTOISE KEY (F).
- Open the tortoise box with the TORTOISE KEY; take the TRIANGLE KEY and GLUE (G).
- Cut the painting with the PIECE OF GLASS (H); take the HORSE FIGURE (I).
- Walk down.
- Put the two CODE WHEELS on the suitcase for a mini-game.
- Find the numbers corresponding with the symbols on the tag and enter them into the lock (J).
- Solution: 2950.
- Take the HAIR STICK and Letter Clue (K).
- Walk forward.
- Use the HAIR STICK on the stairs; take the STATUETTE PART and LIGHTNING AMULET (L).
- Access the top STATUETTE PART and put the bottom STATUETTE PART and GLUE on it; take the HUNTER (M).
- Put the HUNTER on the box and take the KEY TO THE TROPHY ROOM (N).
- Open the door with the KEY TO THE TROPHY ROOM (O).
- Walk forward.
- Open the compartment with the TRIANGLE KEY (P), open the box with the LIGHTNING AMULET and take the SEWING MACHINE LEVER and SKULL KEY (Q); open the bottle with the CORKSCREW, pour the wine and take the JUPITER MINIATURE (R).
- Remove the painting for a mini-game (S).
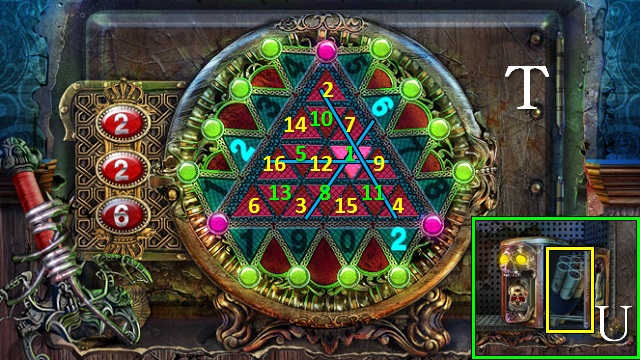
- Find the triangles at the intersection of the rows and columns indicated by the numbers on the left (T).
- Open the box with the SKULL KEY and take the DYNAMITE (U).
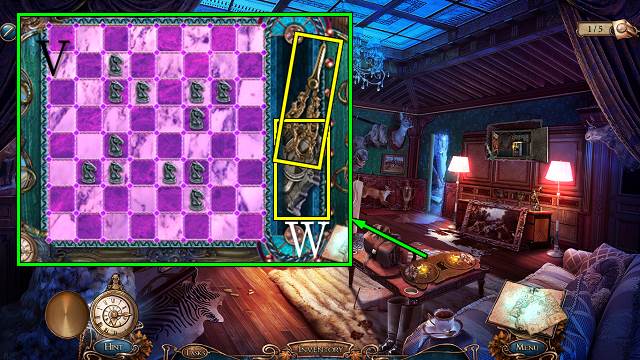
- Open the chess set with the HORSE FIGURE for a mini-game.
- Place the knights on the board until all squares are lit up (V).
- Take the SCISSORS and MURAL PIECE 2/4 (W).
- Cut the floorboards with the HATCHET and the fishing line with the SCISSORS; take the LADYBUG AMULET, HARPOON and HOOK PART (X).
- Walk down.
- Break the sewing machine, put the SEWING MACHINE LEVER on it and take the EMBROIDERED GLOVE (Y).
- Walk forward and right.
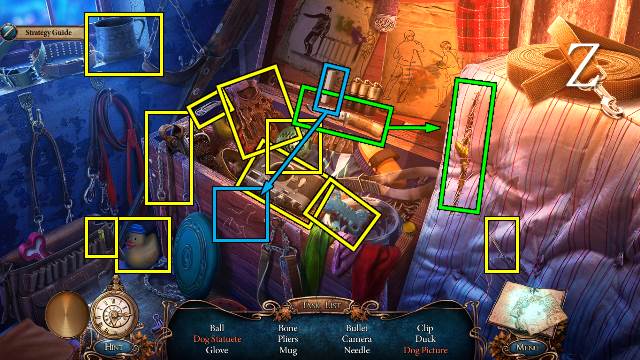
- Play the HOP (Z).
- You receive a BROKEN CAMERA.
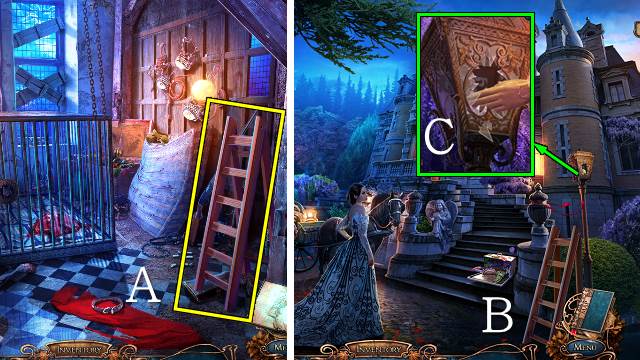
- Take the STEPLADDER (A).
- Go to the Castle Entrance.
- Put the STEPLADDER under the lamp (B).
- Take the FOX AMULET with the EMBROIDERED GLOVE (C).
- Go to the Kennels.
- Open the compartment with the FOX AMULET (D); take the Photo Clue (E).
- Take IRON FLOWER 2/2 (F).
- Go to the Castle Entrance.
- Open the gate with the IRON FLOWERS (G).
- Go through the gate.
- Get the net with the HARPOON for a mini-game (H).
- Move the knots until no lines are crossing.
- Take the HOOK PART and EARTH MINIATURE (I).
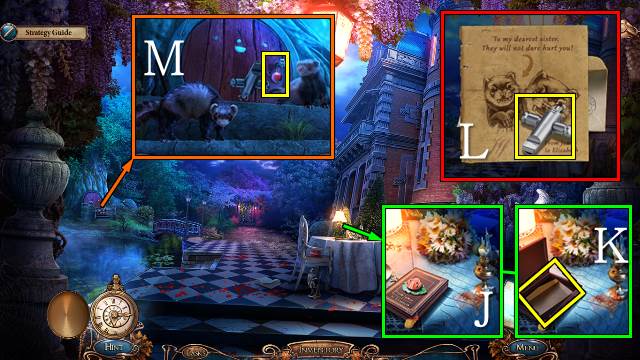
- Open the book with the LADYBUG AMULET (J); take the LETTER IN ENVELOPE (K).
- Access the LETTER IN ENVELOPE, open it and take the WHISTLE (L).
- Scare the ferrets with the WHISTLE; take the MARS MINIATURE and open the door (M).
- Go left.
- Play the HOP (N).
- You receive the CHILDREN’S PHOTO.
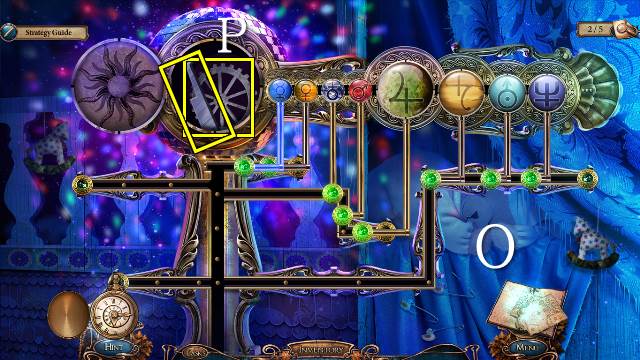
- Put the JUPITER MINIATURE, EARTH MINIATURE and MARS MINIATURE on the telescope for a mini-game (O).
- Put the planets in the correct orbit according to the solar system; correctly placed planets will light up green.
- Select a symbol and use the arrows to move it along the tracks; selecting the circle at the base of the symbol will flip it around.
- Strategy: place the planets from right to left; move the other planets out of the way to clear a path.
- Take the MASTER KEY and GEAR (P).
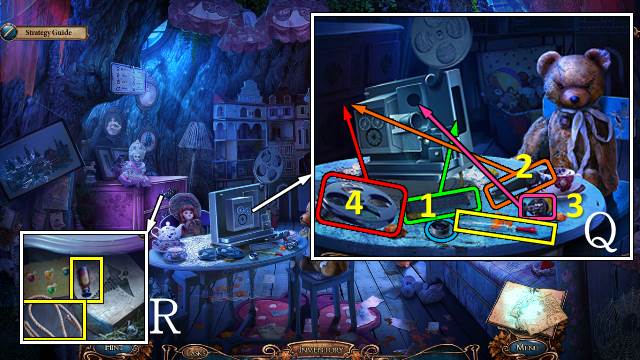
- Take the PIPETTE (Q); put the GEAR and lens on the camera for a mini-game.
- Restore the camera.
- You receive the Film Clue.
- Open the drawer with the MASTER KEY; take the ROPE and FLASK WITH A COVER (R).
- Walk down.
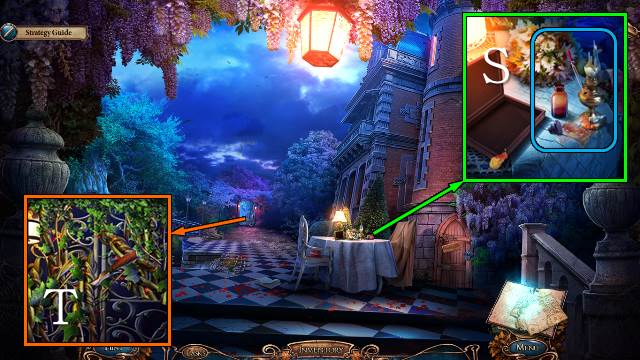
- Put the FLASK WITH A COVER on the table; transfer kerosene from the lamp with the PIPETTE and take the VIAL OF KEROSENE (S).
- Cut the vines with the MACHETE (T).
- Walk forward.
Chapter 4: The Mural
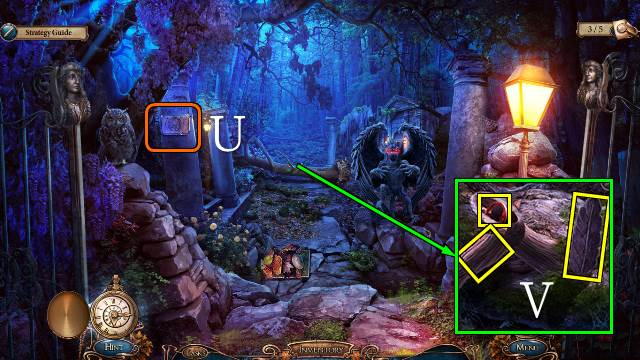
- Read the clue (U).
- Cut the branch with the MACHETE and take the STONE FEATHER, MASSIVE KEY and BRANCH (V).
- Walk down.
- Open the lock with the MASSIVE KEY (W); put the BRANCH on the rake and take the RAKE and NUT AMULET (X).
- Walk forward.
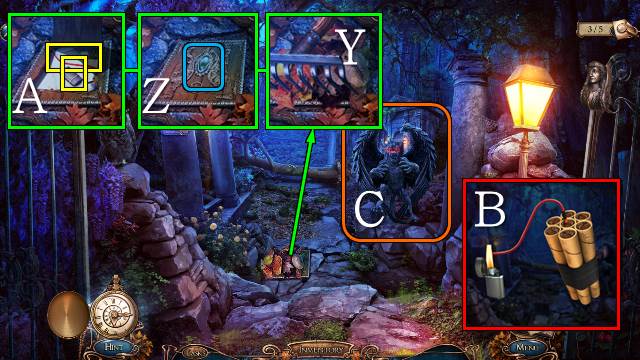
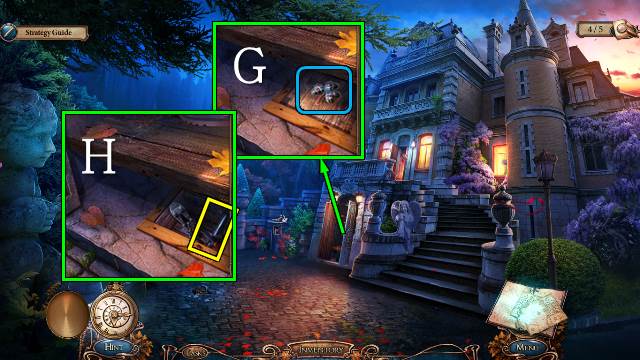
- Move the leaves with the RAKE (Y) and open the hatch with the NUT AMULET (Z): take the FUSE and LIGHTER (A).
- Access the DYNAMITE, put the FUSE on it and light it with the LIGHTER; you receive some EXPLOSIVES (B).
- Throw the EXPLOSIVES at the demon (C).
- Walk forward.
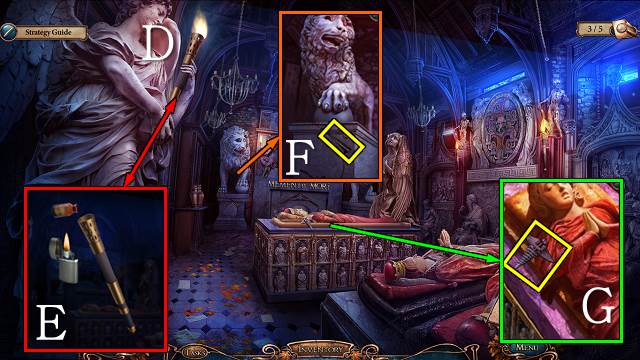
- Take the EXTINGUISHED TORCH (D).
- Access the EXTINGUISHED TORCH, pour kerosene from the VIAL OF KEROSENE in it and light it with the LIGHTER; you receive a LIT TORCH (E).
- Put the LIT TORCH in the holder.
- Take the NAIL (F).
- Take the MEDICINE AMULET (G).
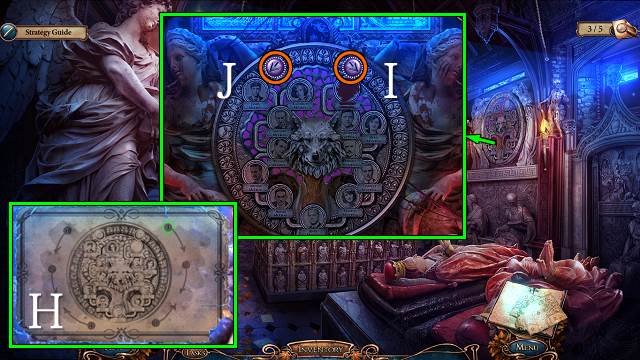
- Play the mini-game.
- Push the arrow buttons to rotate the plaque according to the clue you found on the road (H).
- Solution: I, I, J, I, J, J.
- Play the HOP (K).
- You receive a PICK.
- Go to the Treehouse.
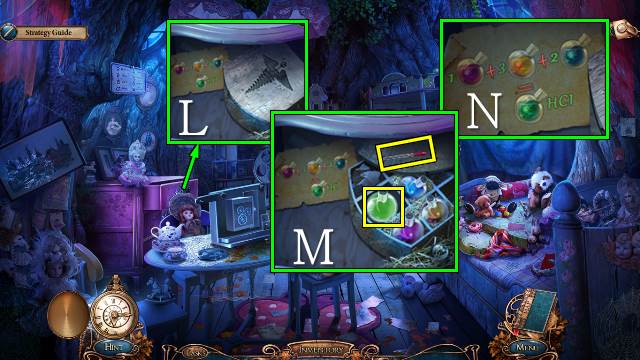
- Open the box with the MEDICINE AMULET (L); put the PIPETTE down for a mini-game (M).
- Use the pipette to add solutions to the empty flask as indicated (N).
- Solution: 1x purple, 3x yellow, 2x blue.
- Take the HYDROCHLORIC ACID and PIPETTE (M).
- Walk down.
- Melt the lock with the HYDROCHLORIC ACID (O); take the CROWBAR (P).
- Go to the Vault.
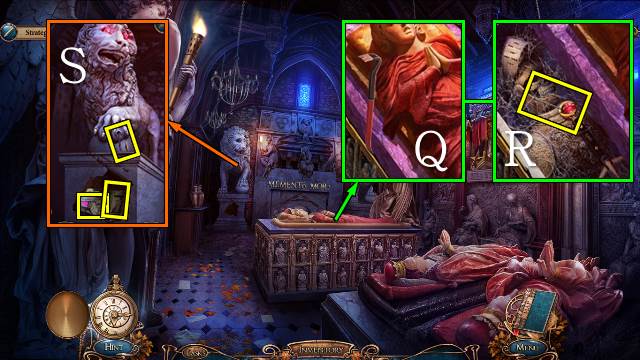
- Open the sarcophagus with the CROWBAR (Q); remove the ruby with the NAIL and take the RUBY (R).
- Break the pedestal with the PICK and put the RUBY on the lion; take the HOOK PART, MAN’S PHOTO and MURAL PIECE 3/4 (S).
- Walk down twice.
- Access the first HOOK PART and attach the other two parts and the ROPE to it; take the GRAPPLING HOOK (T).
- Throw the GRAPPLING HOOK over the balcony (U).
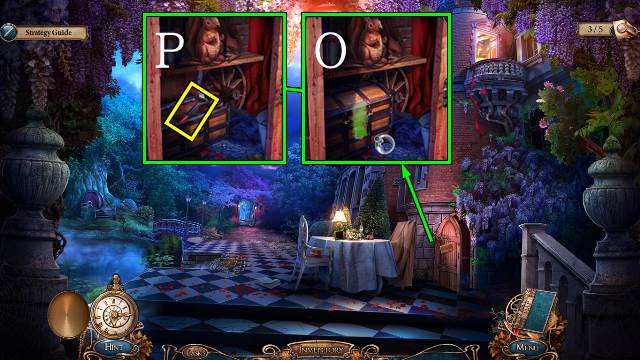
- Go right.
- Take the CAMERA LENS (V).
- Take ELIZABETH’S PHOTO and Disclaimer Clue (W).
- Hang the MAN’S PHOTO, CHILDREN’S PHOTO and ELIZABETH’S PHOTO on the wall for a mini-game.
- Swap the pictures according to the outlines on the wall (X).
- Take the DECORATIVE BOOK and NOTE AMULET.
- Open the phonograph with the NOTE AMULET and take the SCREWDRIVER (Y).
- Remove the screws with the SCREWDRIVER and take the CAGE LEVER (Z).
- Put the DECORATIVE BOOK on the door for a mini-game.
- Place weights on the scale (A) to change the angle on the cannon, move the cannonball to change its velocity (B) and shoot the ball into the four towers.
- Walk forward.
- Take the CLIPPERS (C).
- Go to the Kennels.
- Put the CAGE LEVER on the mechanism, pull it and take the IRON GLOVE (D).
- Walk down.
- Remove the wire with the CLIPPERS and take the HILT (E).
- Go to the Heraldic Armory.
- Put the IRON GLOVE on the suit of armor and the HILT on the sword; take the STRAIGHT RAZOR and use it to cut the necklace to get the SILVER ROSE and CORD (F).
- Fix the brush with the CORD and take the DUST BROOM (G).
- Go to the Vault.
- Put the SILVER ROSE and STONE FEATHER on the angel; take the LIGHTBULB and MURAL PIECE 4/4 (H).
- Go to the Study.
- Open the hatch with the LIGHTBULB (I); take the FILM (J).
- Walk forward.
- Access the BROKEN CAMERA, put the CAMERA LENS and FILM on it and take the CAMERA (K).
- Clean the mural with the DUST BROOM (L), put the MURAL PIECES on it and take a picture with the CAMERA to get the Picture Clue (M).
- Select the ‘Show All’ button (N).
Chapter 5: Catherine’s Diary
- Take CATHERINE’S DIARY PAGE 1/7 (O).
- Take the STICK (P).
- Try to walk forward (Q).
- Go left.
- Take the DULL SHEARS and MECHANICAL FLOWER BASE; put the STICK on the sling and take the SLINGSHOT (R).
- Walk down.
- Sharpen the DULL SHEARS on the whetstone; you get GARDENING SHEARS (S).
- Touch the skeleton and shoot the bird with the SLINGSHOT (T); take the AMPHORA AMULET and BUTTON (U).
- Go left.
- Cut the grass with the GARDENING SHEARS; take the CASTLE DOOR HANDLE (V).
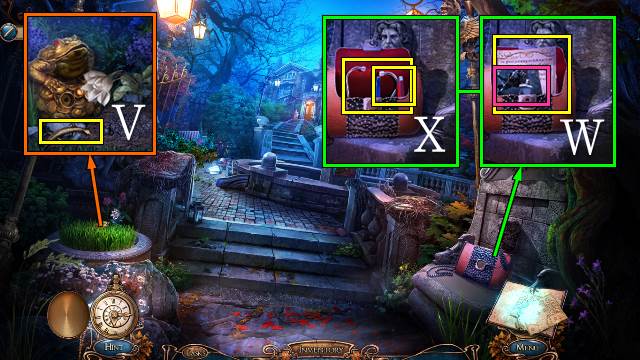
- Open the bag with the BUTTON; take the Picture Clue, CATHERINE’S DIARY PAGE 2/7 (W), MAGNET and STETHOSCOPE HEADSET (X).

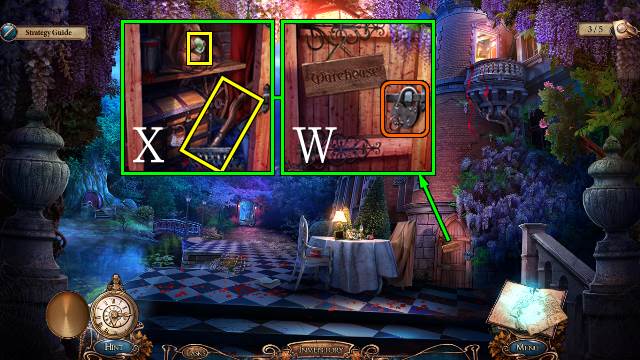
- Open the grid with the AMPHORA AMULET (Y); take the CASTLE DOOR HANDLE and GOLDEN KEY (Z).
- Cut the ivy with the GARDENING SHEARS (A).
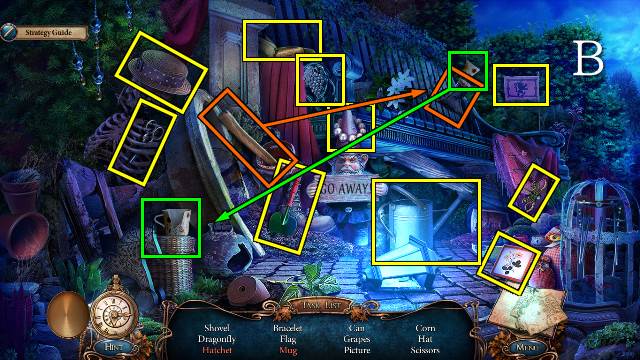
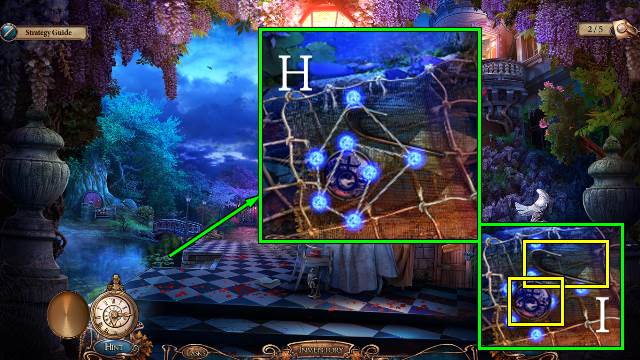
- Play the HOP (B).
- You receive the WATERING CAN.
- Walk down.
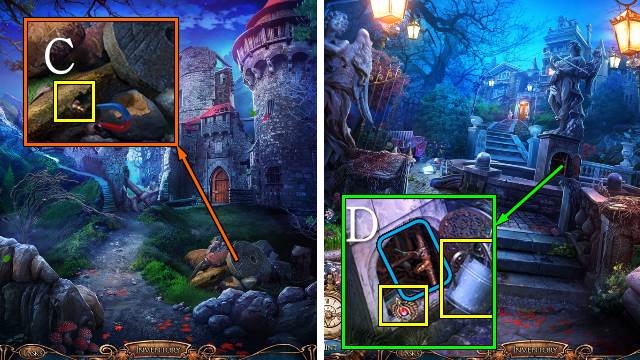
- Use the MAGNET and take the FOUNTAIN VALVE (C).
- Go left.
- Put the FOUNTAIN VALVE between the pipes and pull the lever; take the GRIFFIN BRACELET and fill the WATERING CAN to get a FULL WATERING CAN (D).
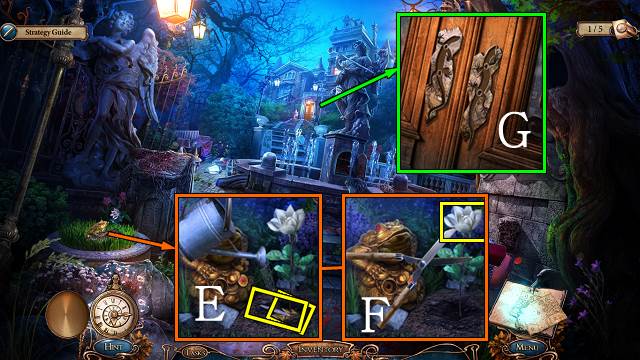
- Water the flower with the FULL WATERING CAN (E); cut the flower with the GARDENING SHEARS and take the PALETTE KNIFE, BRASS LEAF and BUD (F).
- Put the two CASTLE DOOR HANDLES on the door (G).
- Walk forward.
- Put the GRIFFIN BRACELET on the griffin; take the MANHOLE RING (H).
- Open the egg with the GOLDEN KEY; take the COIN, MECHANISM and RUNE 1/4 (I).
- Walk down.
- Put the COIN on the frog and take RUNE 2/4 (J).
- Walk down.
- Remove the stone with the PALETTE KNIFE; take RUNE 3/4 and STETHOSCOPE PART (K).
- Go to the Vestibule.
- Access the STETHOSCOPE HEADSET and attach the STETHOSCOPE PART to it; take the STETHOSCOPE (L).
- Put the STETHOSCOPE on the cabinet for a mini-game.
- Turn the dials to create the mask in the example.
- Solution 1: Mx8.
- Solution 2: Nx3.
- Solution 3: Mx1, Nx3.
- Take RUNE 4/4, CATHERINE’S DIARY PAGE 3/7 and the GLASS CUTTER BASE (O).
- Put the RUNES on the pillar (P).
- Walk forward.
- Take the STEEL ROD (Q), remove the carpet and put the MANHOLE RING on the manhole cover (R); take the BLUE PAINT and PENKNIFE (S).
- Use the DUST BROOM and PENKNIFE on the painting (T) and take the Picture Clue (U); take the RED PAINT and DRAGON EYE (V).
- Go down to By the Old Tower.
- Move the rock with the STEEL ROD (W); take the FORGED PATTERN and GLASS CUTTER PART (X).
- Go to the Vestibule.
- Access the BUD and open it; take the DIAMOND PESTLE (Y).
- Access the GLASS CUTTER BASE and put the GLASS CUTTER PART and DIAMOND PESTLE on it; take the GLASS CUTTER (Z).
- Cut the glass with the GLASS CUTTER and take the PETALS and TWISTED KEY (A).
- Walk forward.
- Put the BRASS LEAF on the door and unlock it with the TWISTED KEY; turn the handle (B).
- Walk forward.
- Take the CURTAIN TIE; open the dragon with the DRAGON EYE and take the Pendant Clue (C).
- Take the PAINT SPOON (D).
- Open the compartment with the SCREWDRIVER (E); take the PETALS (F).
- Walk down.
- Put the CURTIAIN TIE on the curtain (G).
- Play the HOP (H).
- You receive the FLUTE.
- Walk down.
- Access the MECHANICAL FLOWER BASE and put the MECHANISM and two PETALS on it; take the MECHANICAL FLOWER (I).
- Put the MECHANICAL FLOWER on the stem; take the PEARL (J).
- Walk forward twice.
- Give the statuette back his FLUTE and take the GREEN PAINT (K).
- Put the PEARL on the shell (L); take CATHERINE’S DIARY PAGE 4/7 and the FISH HANDLE (M).
- Walk down.
- Remove the screws with the SCREWDRIVER (N); put the FISH HANDLE on the door and pull the handle (O).
- Go left.
- Put the FORGED PATTERN on the box and open it (P); take the FISH FIN and BRUSH (Q).
- Cut the glass with the GLASS CUTTER (R).
- Play the HOP (S).
- You receive the SAW.
- Take CATHERINE’S DIARY PAGE 5/7 (T).
- Remove the screws with the SCREWDRIVER (U); take the PAINT SOLVENT (V).
- Go to the Guest Room.
- Put the FISH FIN on the fish and pull it; take the TOY WHEEL (W).
- Pour the PAINT SOLVENT on the jar and take the YELLOW PAINT (X).
- Go to the Workshop.
- Put the TOY WHEEL on the toy; take the COOKIES (Y).
- Go to the Guest Room.
- Give the COOKIES to the hamster for a mini-game (Z).
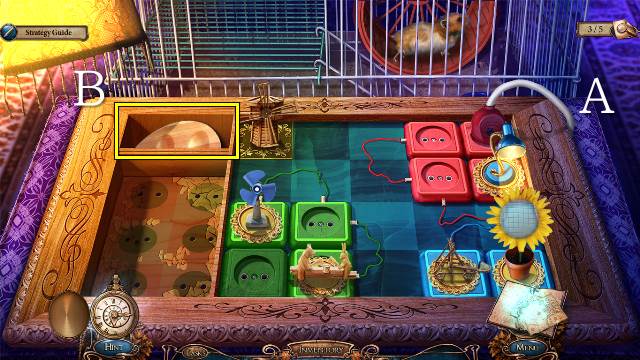
- Plug in the red plug to start the game (A).
- Connect the wires with the symbol plugs to make a logical circuit.
- Take the PALETTE (B).
- Go to the Workshop.
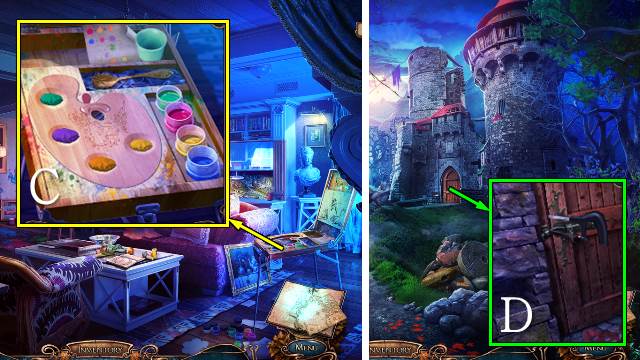
- Put the RED PAINT, BLUE PAINT, GREEN PAINT, YELLOW PAINT, PALETTE and PAINT SPOON in the box for a mini-game (C).
- Use the spoon to mix the paint according to the example.
- Take the PALETTE WITH PAINTS.
- Go to By the Old Tower.
- Cut through the latch with the SAW (D).
- Walk forward.
Chapter 6: Saving Elizabeth
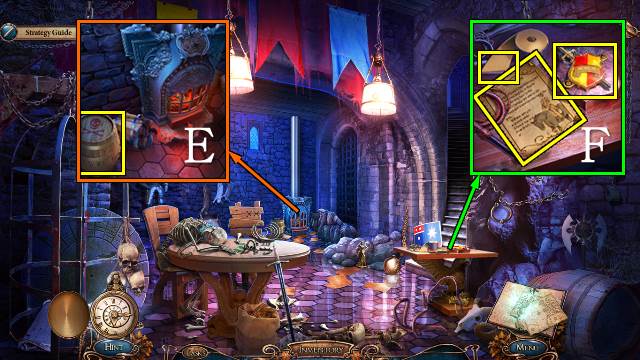
- Take the POWDER BARREL (E).
- Take CATHERINE’S DIARY PAGE 6/7 and cut a piece of SANDPAPER with the PENKNIFE and take it; remove the screws with the SCREWDRIVER and take the BADGE (F).
- Go to the Gallery.
- Open the box with the BADGE; take the PROBING ROD and CELL KEY (G).
- Go to Inside the Tower and walk forward.
- Open the cell with the CELL KEY (H).
- Remove the hay with the DUST BROOM (I) and open the hatch with the PROBING ROD (J); take the MATCHES and WOODEN DOLL (K).
- Take the Note Clue (L).
- Walk down twice.
- Pour the contents of the POWDER BARREL over the obstruction and light them with the MATCHES (M).
- Walk forward.
- Take CATHERINE’S DIARY PAGE 7/7 (N).
- Go to the Workshop.
- Put CATHERINE’S DIARY PAGES on the diary for a mini-game.
- Order the pages according to date and torn edges (O).
- Take the Diary Clue (P).
- You receive the FAMILY AMULET BASE.
- Take the LETTER M (Q).
- Go to the Guest Room.
- Put the WOODEN DOLL, PALETTE WITH PAINTS and BRUSH down for a mini-game.
- Step 1: Paint the wooden dolls according to the example; match the color to the shape of the doll (R).
- Step 2: Rearrange the dolls in the shown order (S).
- Take the WOLF COLLAR.
- Go to the Way to Precipice.
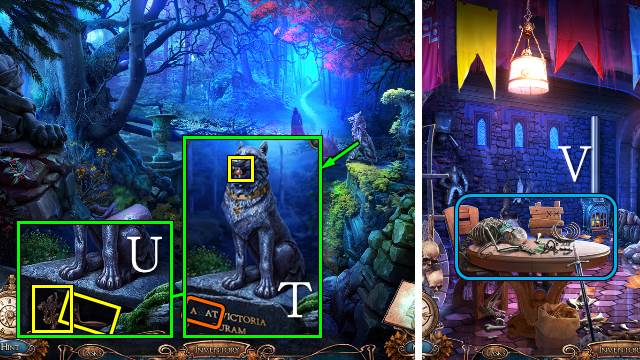
- Put the WOLF COLLAR on the wolf and take the SKELETON RING (T); put the LETTER M on the pedestal and take the OVEN HANDLE and GOLDEN WOLF (U).
- Go to the Inside the Tower.
- Put the SKELETON RING on the skeleton for a mini-game (V).
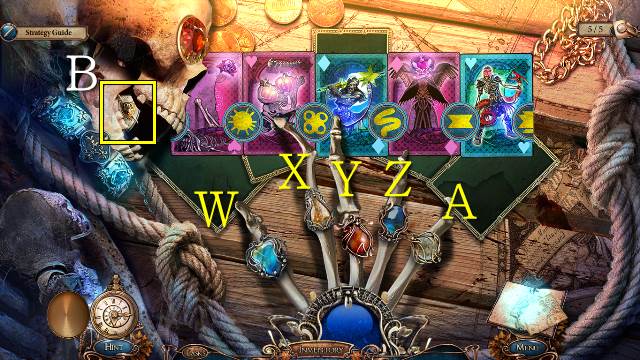
- Move the cards until the symbols on the edges line up; select a ring to turn a card over.
- Solution: Turn W, Y, A, swap Y/A, swap Z/A.
- Take the SHIELD AND SWORDS (B).
- Put the OVEN HANDLE on the oven and fix it with the SCREWDRIVER (C); take the POKER HOOK (D).
- Go to the Guest Room.
- Put the POKER HOOK on the stick and take the POKER (E).
- Go to Inside the Tower.
- Use the POKER on the fire and take the BAT AMULET (F).
- Walk forward.
- Open the box with the BAT AMULET (G); take the GOLDEN WOLF (H).
- Walk down twice.
- Use the POKER (I); take the GOLDEN BEAK (J).
- Go to the Gallery.
- Put the GOLDEN BEAK on the parrot; take the RUBY HEART (K).
- Go to the Way to Precipice.
- Access the FAMILY AMULET BASE and put the SHIELD AND SWORDS and two GOLDEN WOLVES on it; take the FAMILY AMULET (L).
- Throw the FAMILY AMULET at the ghost (M).
- Walk forward.
- Take the TREE AMULET (N).
- Put the RUBY HEART on the medallion and take ELIZABETH’S MEDALLION (O).
- Walk down.
- Open the chest with the TREE AMULET (P); use the SANDPAPER on the wood and take the CROSSBOW STOCK and GOLDEN WREATH PART (Q).
- Go to the Gallery.
- Open the box with ELIZABETH’S MEDALLION (R); take the BOW STRING and GOLDEN LIZARD (S).
- Walk down.
- Open the box with the GOLDEN LIZARD (T); take the ROMAN SOLDIER and BALLED NET (U).
- Go to the Precipice.
- Put the ROMAN SOLDIER on the plaque (V); put the GOLDEN WREATH PART next to the other and take the GOLDEN WREATH and TRIGGER (W).
- Go to the Gallery.
- Put the GOLDEN WREATH on the statue; take the BOW (X).
- Go to the Precipice.
- Access the CROSSBOW STOCK and put the TRIGGER, BOW, BOWSTRING and BALLED NET on it; take the CROSSBOW (Y).
- Shoot the dogs with the CROSSBOW (Z).
- Select the ‘Show All’ button (A).
- Congratulations, you’ve just completed Grim Tales: The Vengeance.


 Mystery Case Files: Fate's Carnival Collector's Edition Walkthrough, Guide, & Tips
 Nevertales: Smoke and Mirrors Walkthrough, Guide, & Tips
 Eternal Night: Realm of Souls Walkthrough, Guide, & Tips
 Mystery Heritage: Sign of the Spirit Walkthrough, Guide, & Tips
 Haunted Legends: The Dark Wishes Walkthrough, Guide, & Tips