Haunted Legends: The Dark Wishes Walkthrough, Guide, & Tips
Haunted Legends: The Dark Wishes Walkthrough

Welcome to the Haunted Legends: The Dark Wishes Walkthrough
Restore the threads of Fate, before they cause a disaster!
Whether you use this document as a reference when things get difficult or as a road map to get you from beginning to end, we’re pretty sure you’ll find what you’re looking for here.
This document contains a complete Haunted Legends: The Dark Wishes game walkthrough featuring annotated screenshots from actual gameplay!
We hope you find this information useful as you play your way through the game. Use the walkthrough menu below to quickly jump to whatever stage of the game you need help with.
Remember to visit the Big Fish Games Forums if you find you need more help. Have fun!
This walkthrough was created by Amanda Barrera, and is protected under US Copyright laws. Any unauthorized use, including re-publication in whole or in part, without permission, is strictly prohibited.
General Tips
- This is the official guide for Haunted Legends: The Dark Wishes.
- This guide will not show when you have to zoom into a location; the screenshots will show each zoom scene.
- Hidden-object puzzles are referred to as HOPs. This guide will not show screenshots of the HOPs, however, it will mention when an HOP is available and the inventory item you’ll collect from it.
- Use the Map to fast travel to a location.
Chapter 1: The Philosopher’s Stone

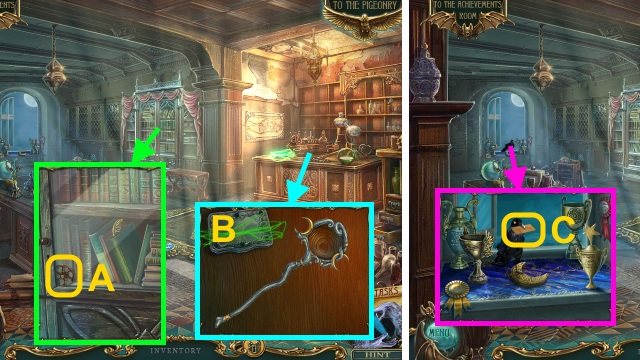
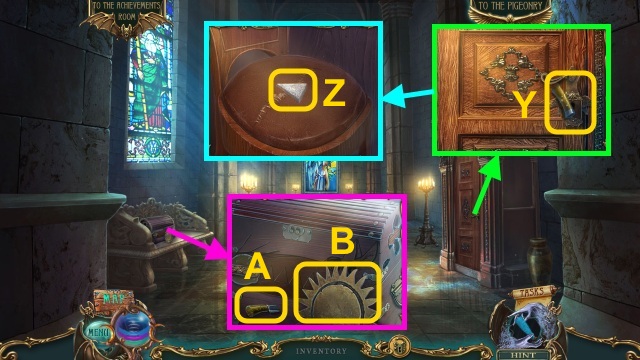
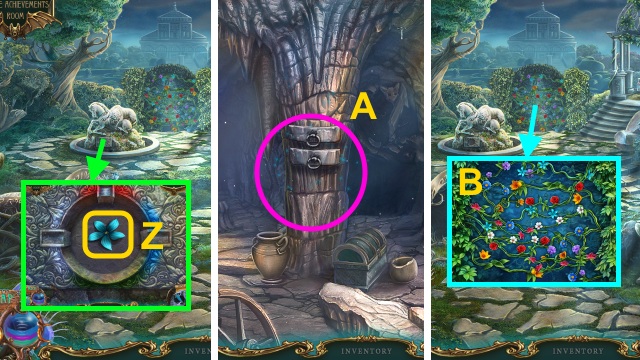
- Take the TOY WHEEL (A).
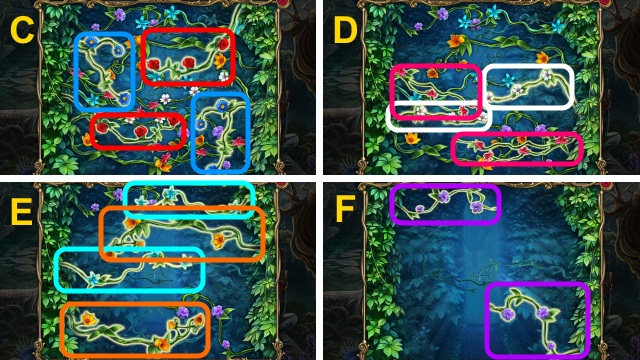
- Arrange the pieces (B).
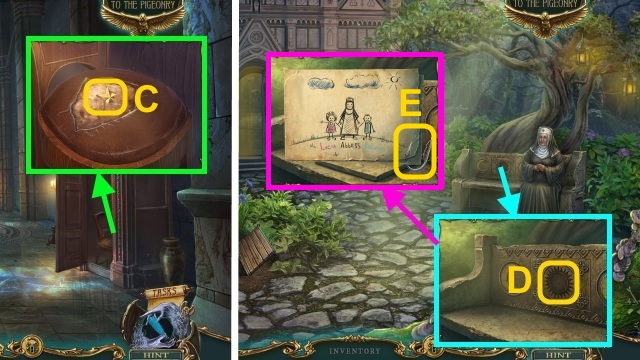
- Take the letter (C); open it.
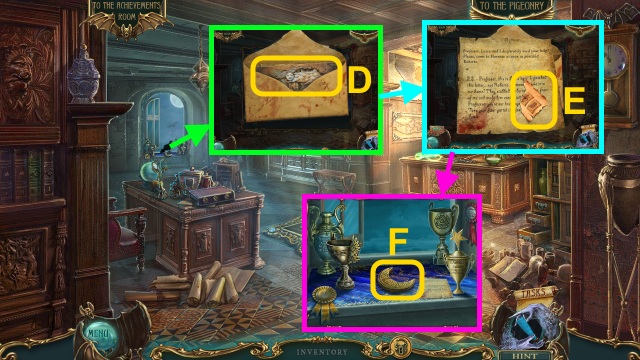
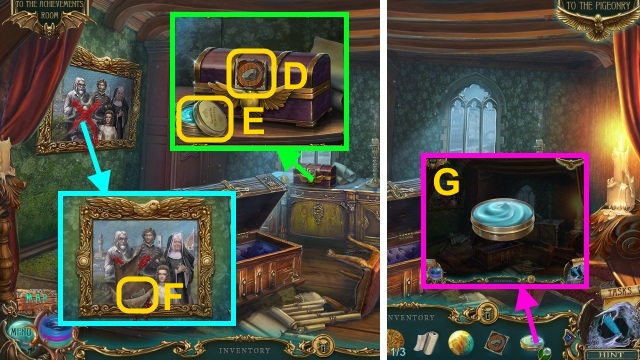
- Take the Map (D); open the letter.
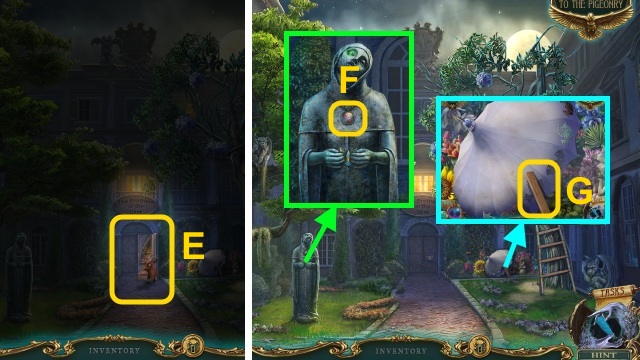
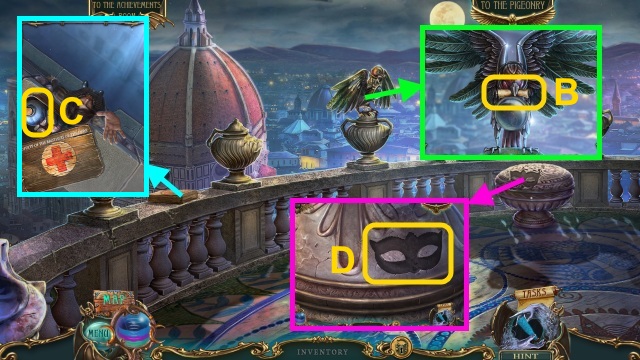
- Take the LOCK CODE (E).
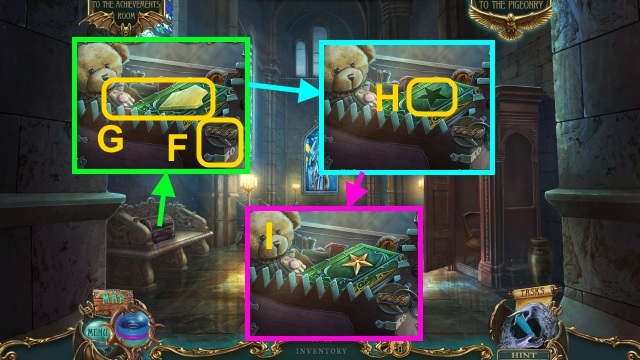
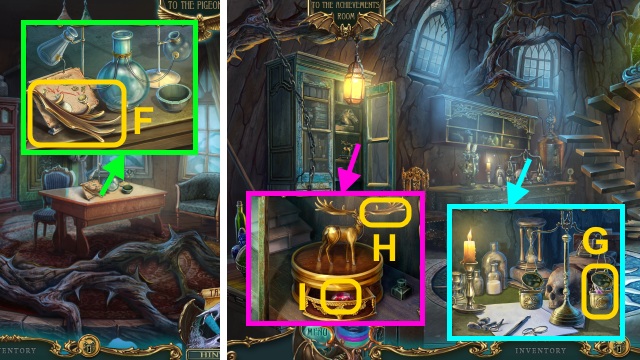
- Take the GOLDEN MOON (F).
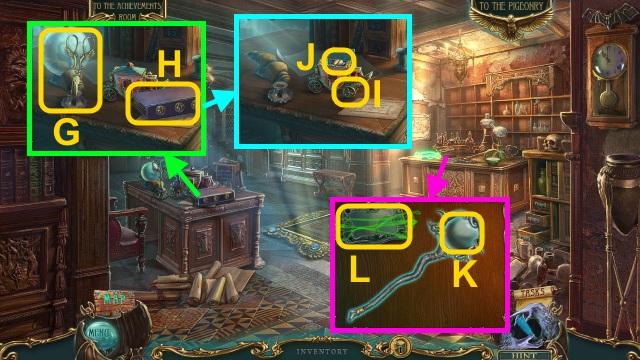
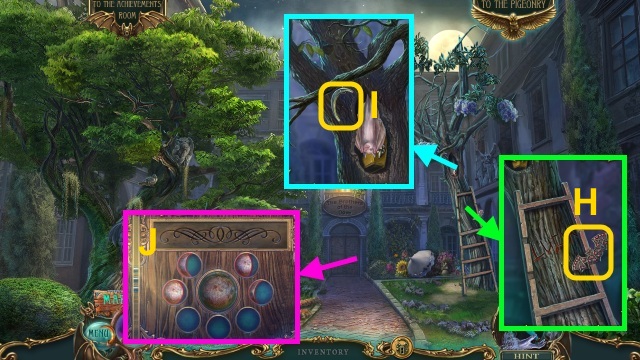
- Take the SCISSORS, MAGIC ORB (G), and VIOLET BOOK (H).
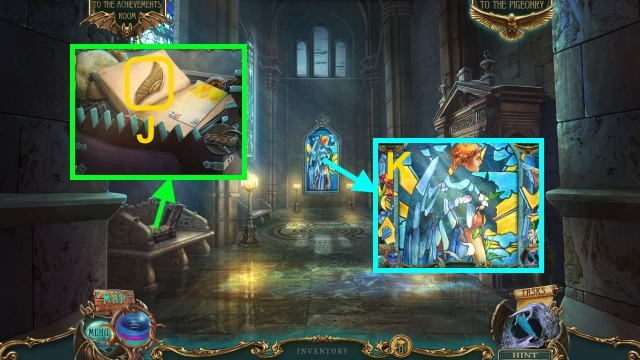
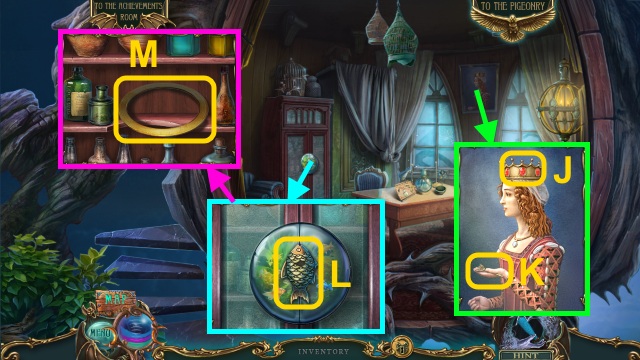
- Place the TOY WHEEL (I); take the BOOKCASE KEY (J).
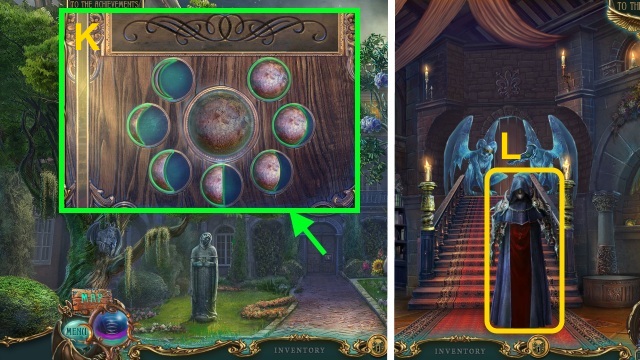
- Place the MAGIC ORB (K); take the Staff.
- Use the Staff for a mini-game (L).
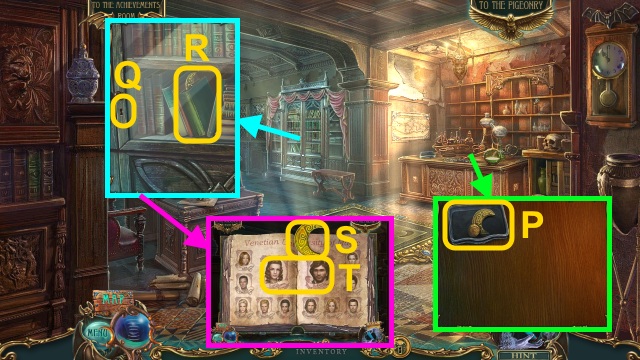
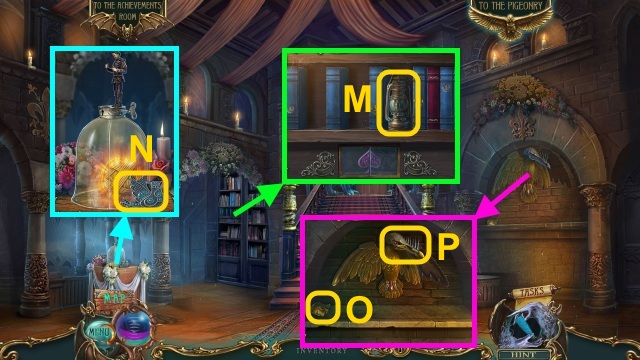
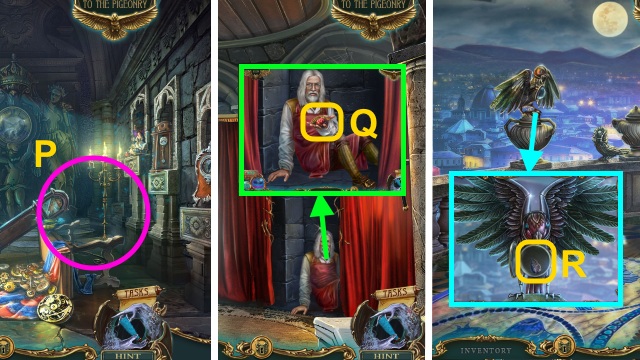
- Open the box; take the COIN (1/3) and GOLDEN MOON (P).
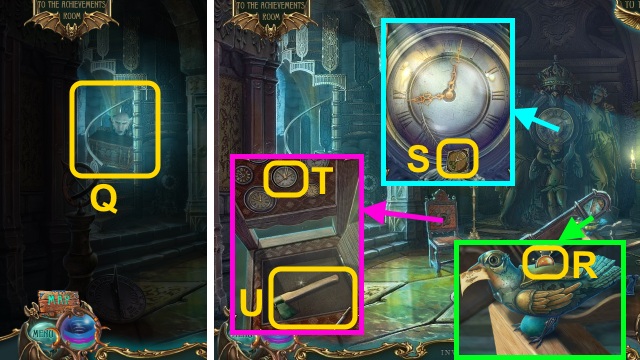
- Use the BOOKCASE KEY (Q); open the bookcase.
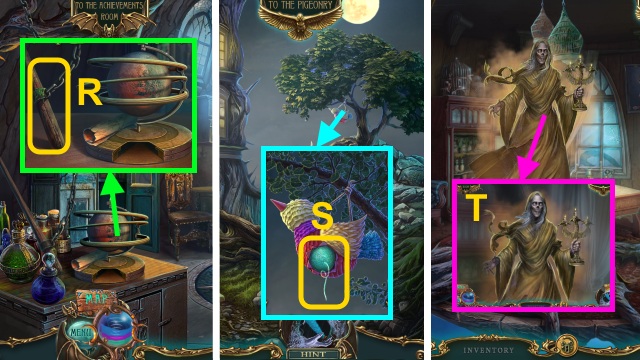
- Open the book (R).
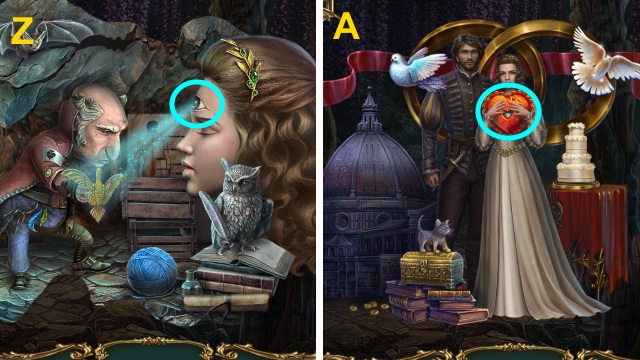
- Take the GOLDEN MOON (S); examine Lucia and Roberto (T).
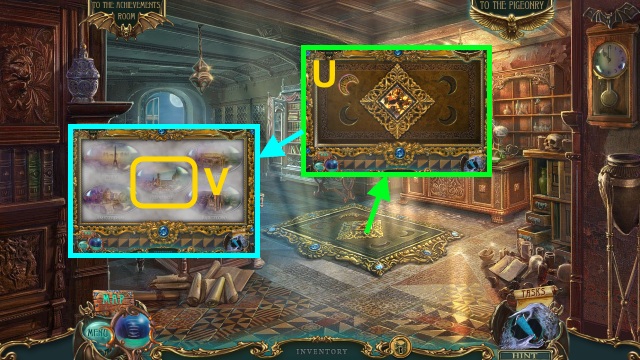
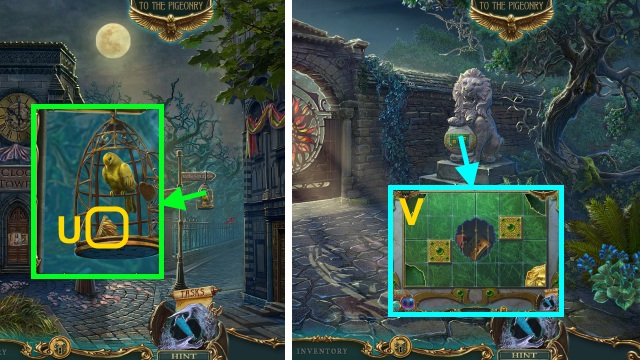
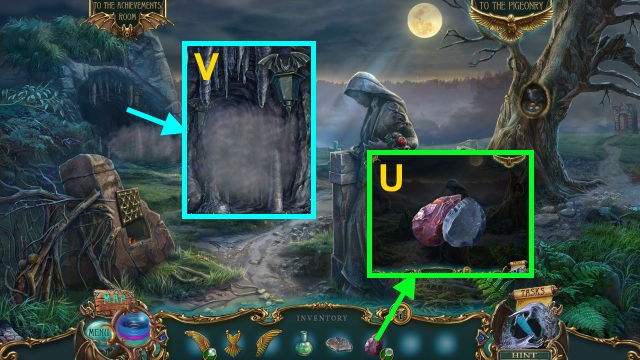
- Place the GOLDEN MOONS (U).
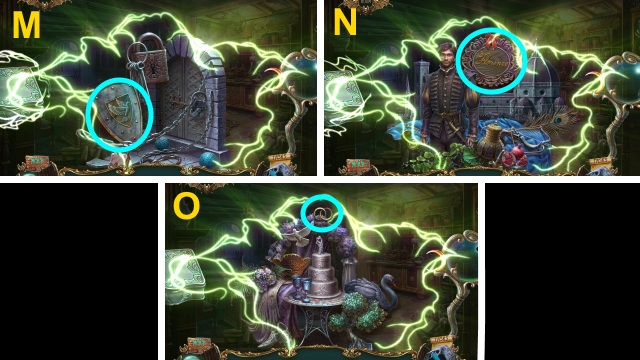
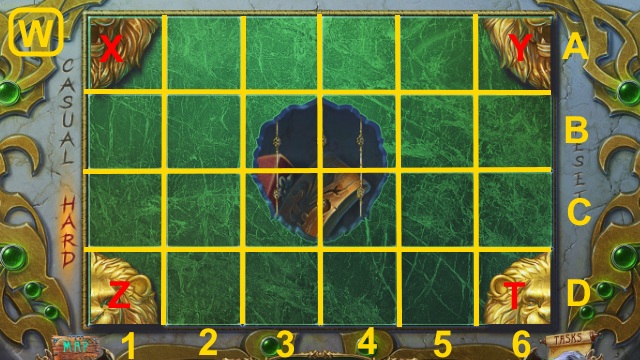
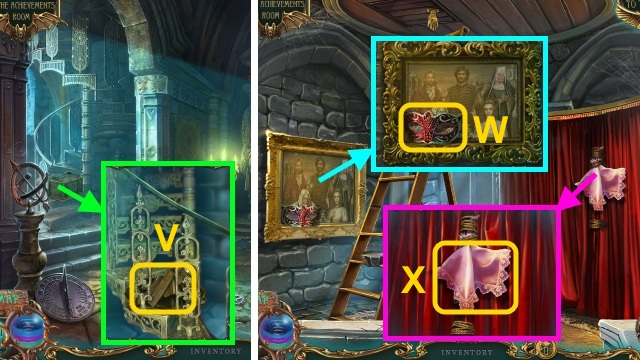
- Examine the portal for a mini-game (V).


- Casual solution: (W1).
- Hard solution: (W2).
- Go down.

- Talk to Lucia (X).
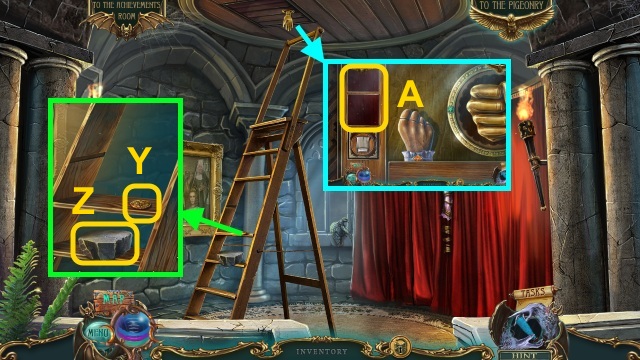
- Talk to the guard twice (Y).
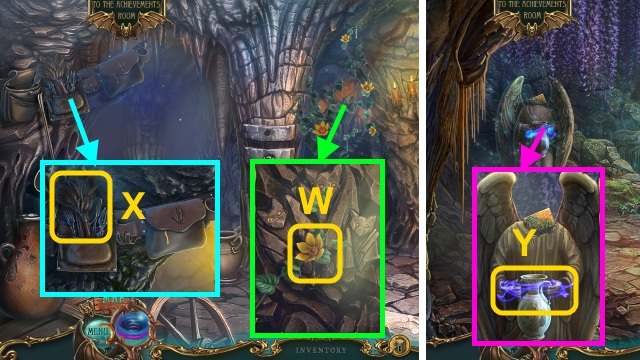
- Use the SCISSORS three times (Z); take the COIN (2/3) (A) and BOUQUET KEY (B).
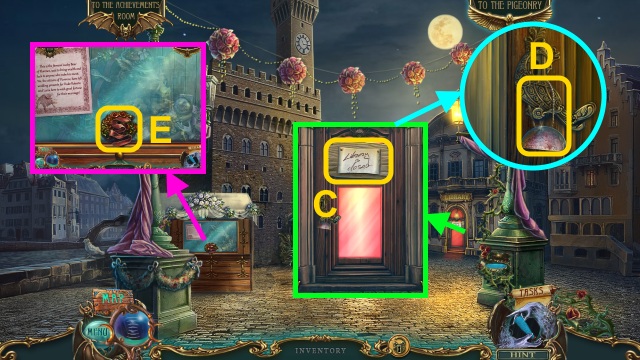
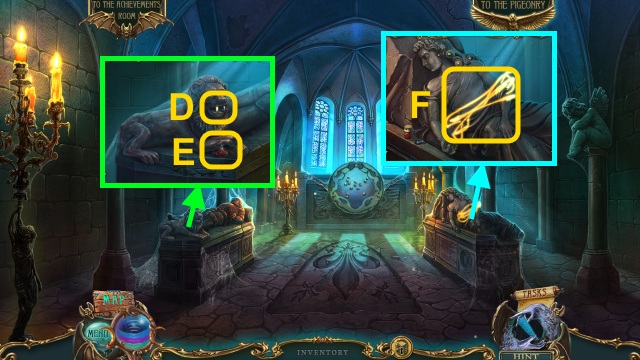
- Examine the sign (C); take the HALF MOON (D).
- Take the RED RIBBON (E); use the BOUQUET KEY.
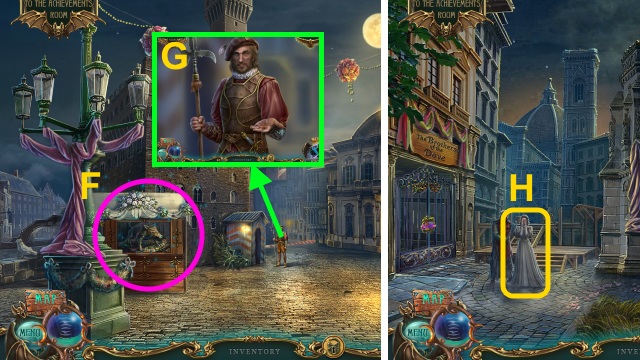
- Play the HOP to receive the COIN (3/3) (F).
- Give the COIN (3/3) (G).
- Walk forward.
- Talk to Lucia (H).
- Take the DRY SPONGE (I).
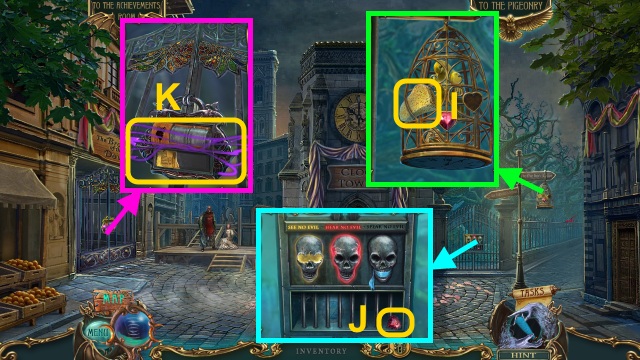
- Take the CRYSTAL HEART (1/2) (J).
- Use the Staff for a mini-game (K).
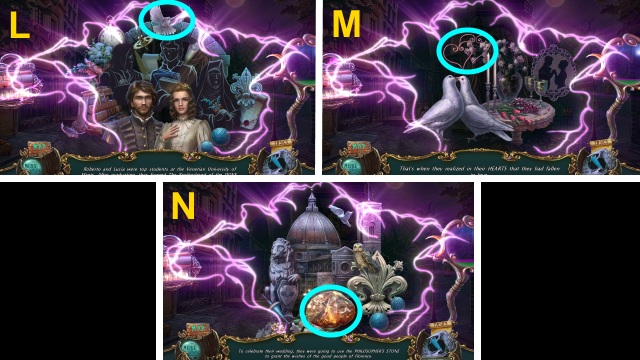
- Solution: (L-N).
- Walk down.
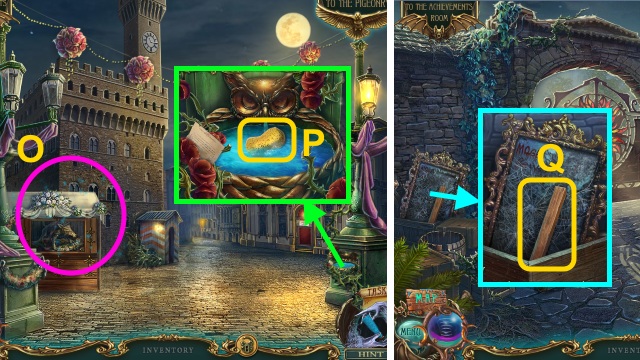
- Play the HOP to receive the LION EMBLEM (O).
- Use the DRY SPONGE to receive the WET SPONGE (P).
- Walk forward, then right.
- Take the PLANK (1/2) (Q); use the WET SPONGE.
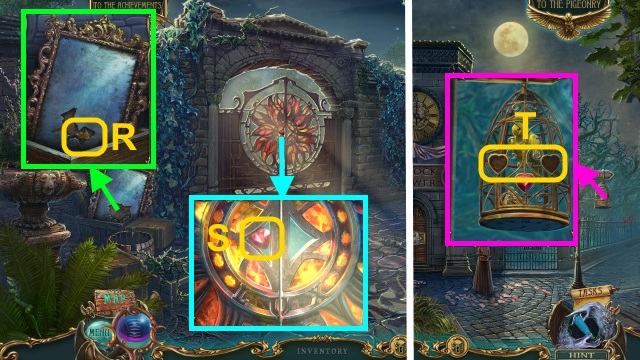
- Take the LION EMBLEM (R).
- Take the CRYSTAL HEART (2/2) (S).
- Walk down.
- Place the CRYSTAL HEART (2/2) (T).
- Take the LION EMBLEM (U).
- Walk right.
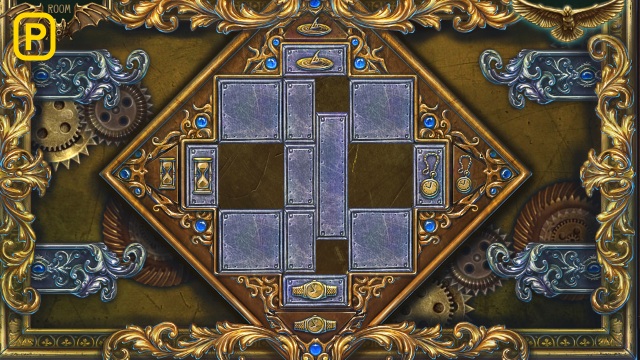
- Place the LION EMBLEMS for a mini-game (V).
- Solution: (W).
- Casual: Y-C6, Y-C3, T-A6, X-A5, Z-A1, Z-A4, T-D6, X-A6, X-C6, X-C4, T-D1, T-A1, T-A3, T-B3, Z-B4.
- Hard: Z-D5, X-D1, X-D4, T-B6, T-B1, T-D1, T-D3, T-A3, Z-D6, Z-B6, Y-A4, Y-C4, Y-C1, Y-D1, Y-D3, Y-B3, T-A1, T-D1, T-D3, Y-A3, T-B3, Y-A1, Y-D1, Y-D3, Y-C3, Z-B4, X-C4.
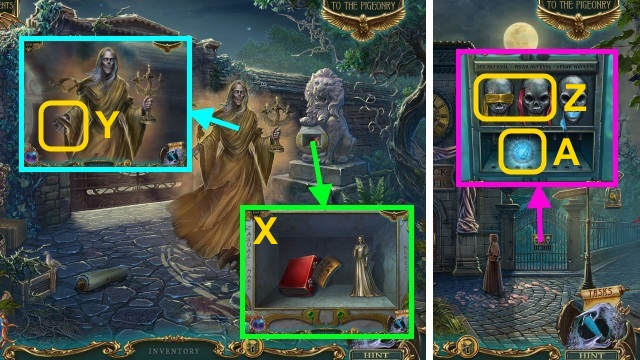
- Take the LUCIA FIGURINE, LOCK PART, and RED BOOK (X).
- Talk to the Fate; take the YELLOW RIBBON (Y).
- Walk down.
- Place the RED RIBBON and YELLOW RIBBON (Z); take the THREADS OF FATE (A).
- Walk right.
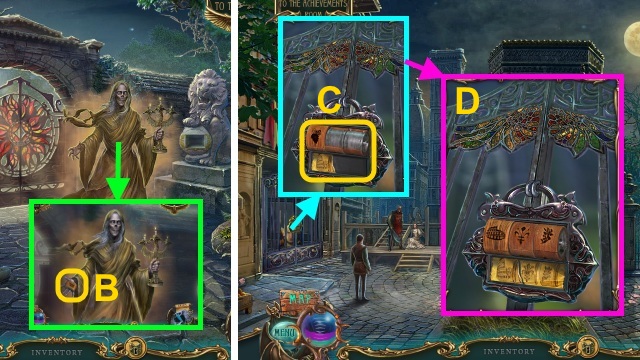
- Give the THREADS OF FATE; take the LOCK PART (B).
- Walk down.
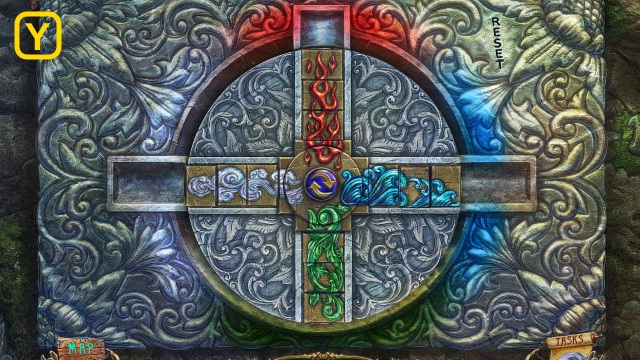
- Place the LOCK CODE and LOCK PARTS for a mini-game (C).
- Solution: (D).
- Walk left.
Chapter 2: Roberto’s House.
- Examine the door (E).
- Take The FULL MOON (F).
- Take the PLANK (2/2) (G).
- Take the JEWELED BAT (H); place the PLANK (2/2).
- Take the CRESCENT MOON (I).
- Place the HALF MOON, FULL MOON, and CRESCENT MOON for a mini-game (J).
- Solution: (K).
- Walk forward.
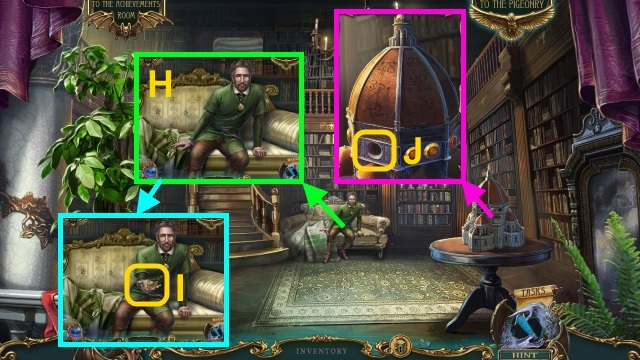
- Talk to the man (L).
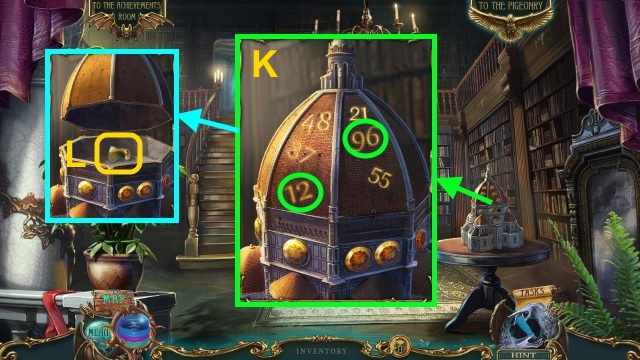
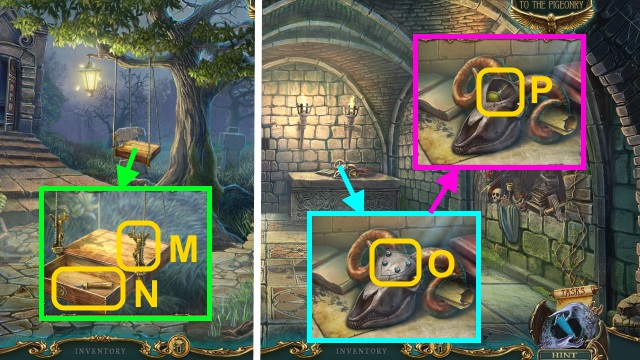
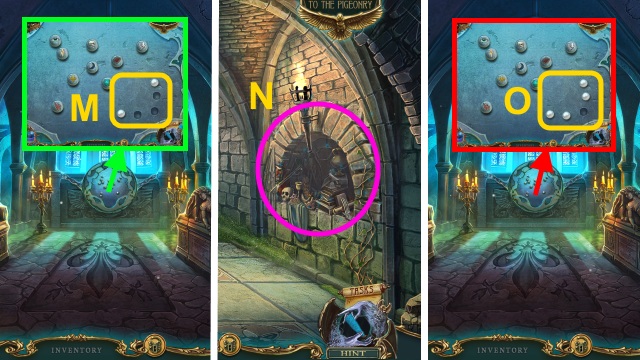
- Examine the lantern (M); turn it on to take the LANTERN.
- Take the JEWELED DOVE (N).
- Take the STATUETTE HEAD (O) and BIRD SKULL (P).
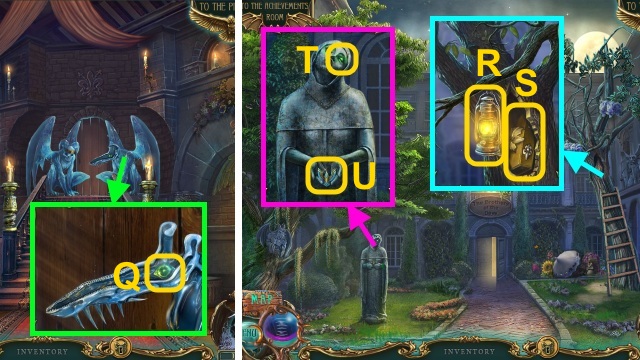
- Take the GREEN STONE (Q); place the BIRD SKULL.
- Walk down.
- Place the LANTERN (R); take the LILY EMBLEM and YELLOW BOOK (S).
- Place the GREEN STONE (T); take the BIRD FIGURE (U).
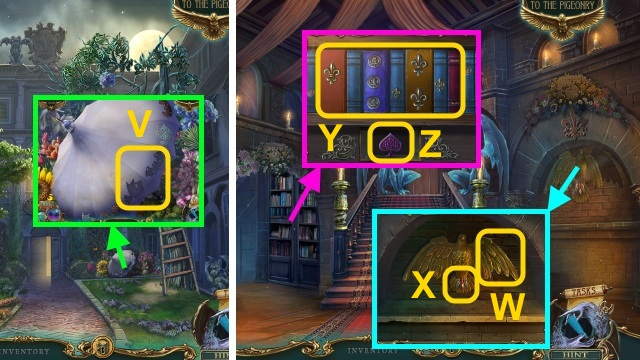
- Place the JEWELED BAT and JEWELED DOVE (V); play the HOP to receive the RIGHT WING.
- Walk forward.
- Place the RIGHT WING (W); take the BIRD FIGURE (X).
- Place the VIOLET BOOK, RED BOOK, and YELLOW BOOK (Y); take the SPADE EMBLEM (Z).
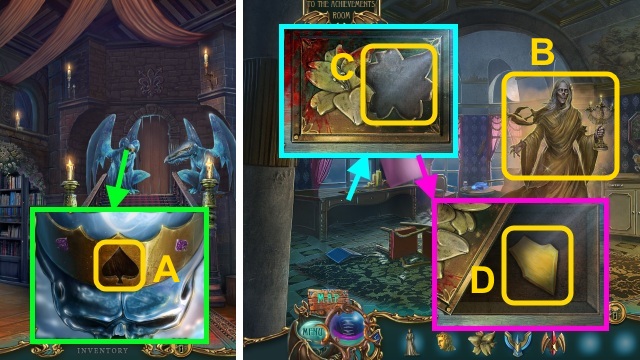
- Place the SPADE EMBLEM (A).
- Walk forward.
- Talk to the Fate (B).
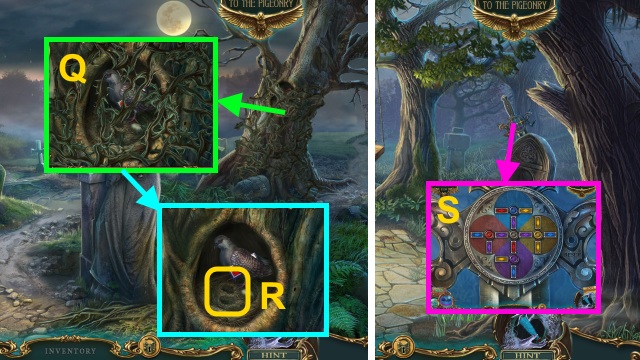
- Place the LILY EMBLEM (C); take the COLORED GLASS (D).
- Place the STATUETTE HEAD; take the KEY (E).
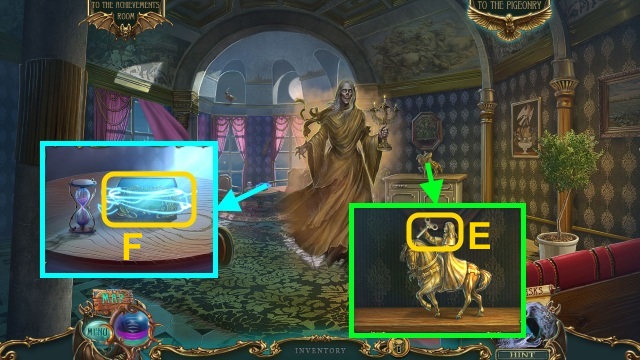
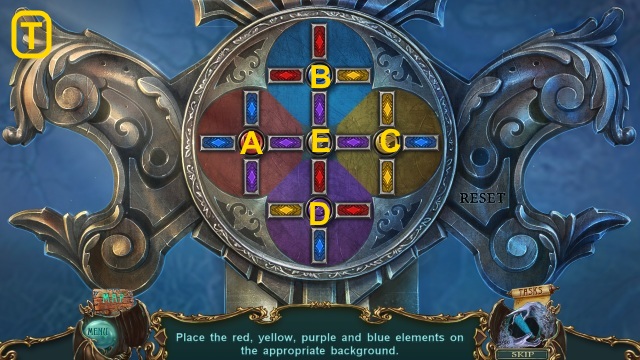
- Use the Staff for a mini-game (F).
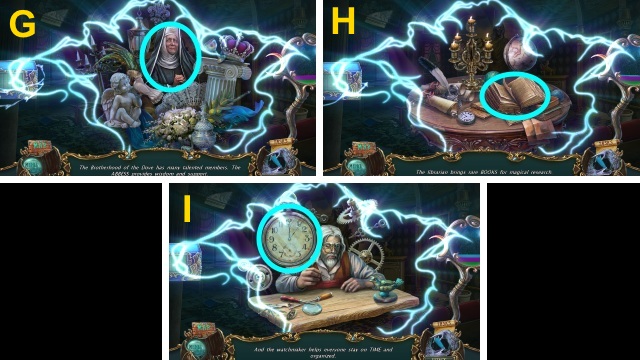
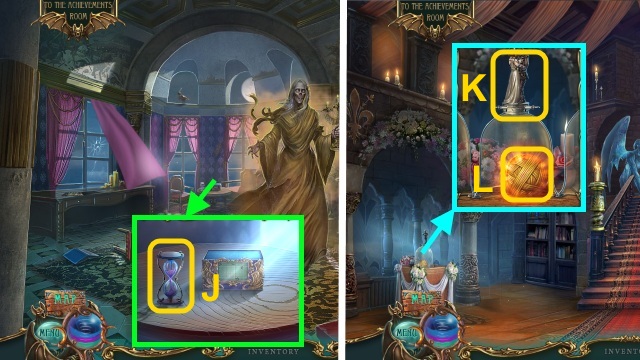
- Take the HOURGLASS (J).
- Walk down.
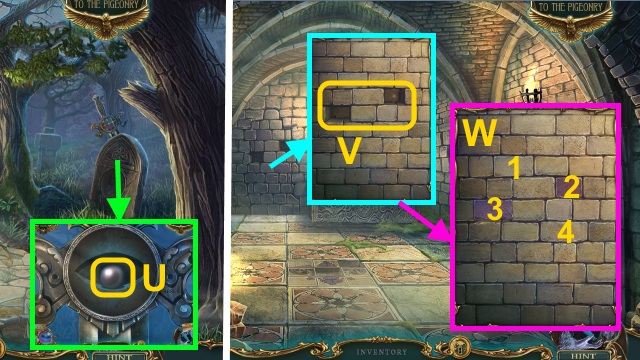
- Place the LUCIA FIGURINE and KEY; turn the keys (K).
- Take the THREADS OF FATE (L).
- Walk forward.
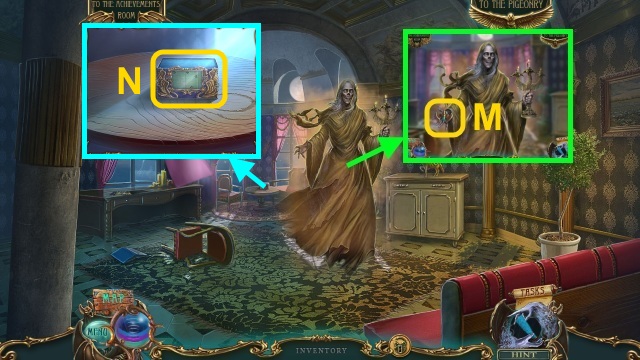
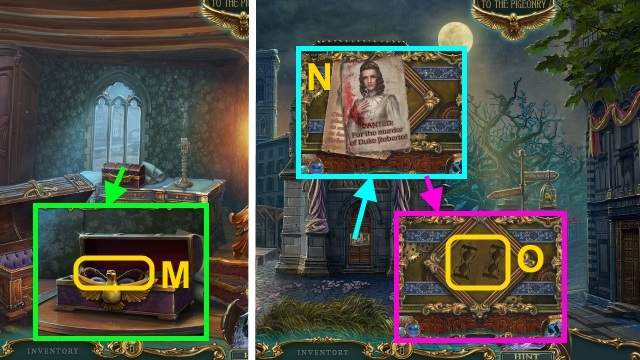
- Give the THREADS OF FATE; take the BIRD FIGURE (M).
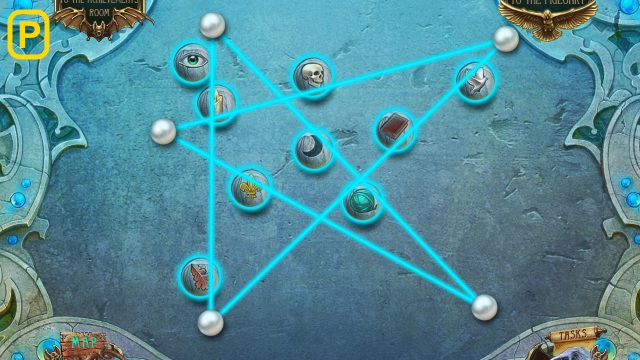
- Place BIRD FIGURES for a mini-game (N).
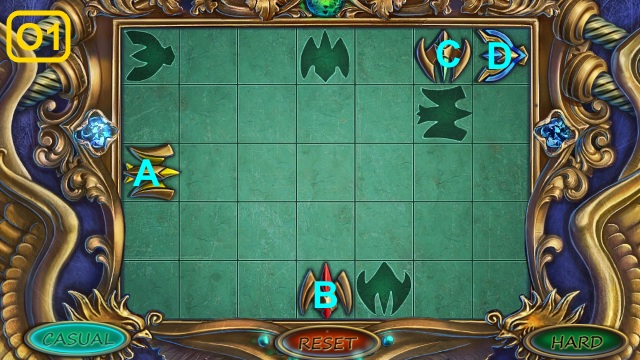
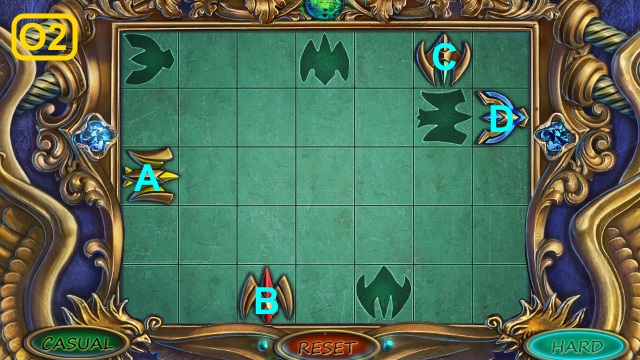
- Casual solution (O1): D, Cx4, Ax3, Bx2, Ax2, Dx5, Bx2.
- Hard solution (O2): C, A, Bx2, A, Dx2, C, D, A, B, Cx2, Dx3, Ax2, Bx2.
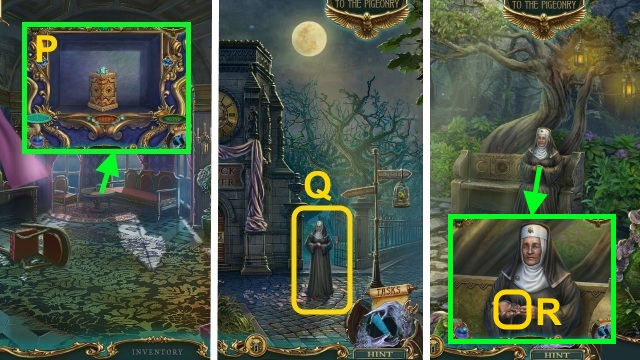
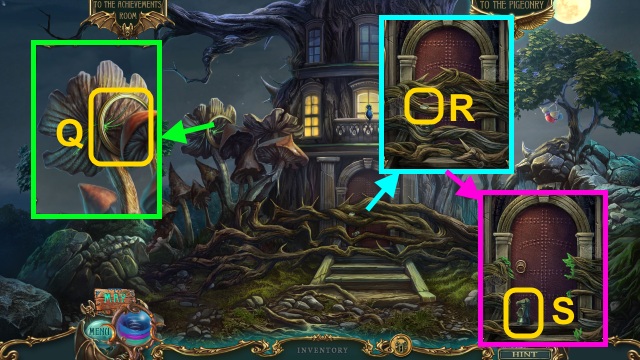
- Try to take the ring (P).
- Walk down three times.
- Talk to the woman (Q).
- Walk forward through the gate.
- Talk to the woman; take the CABINET KEY (R).
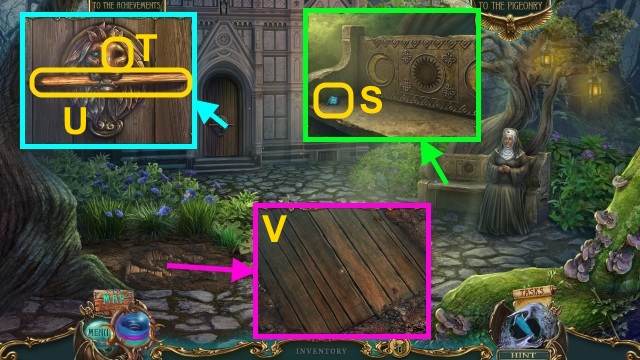
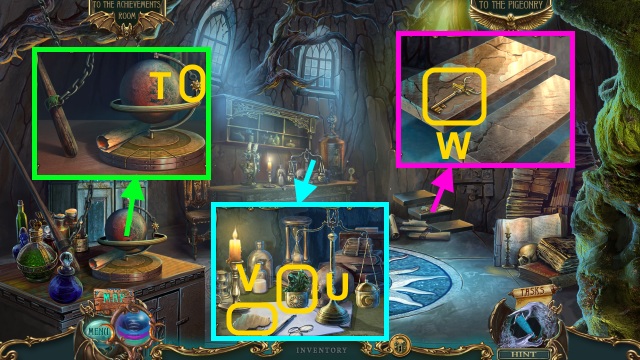
- Take the GEM EYE (S).
- Place the GEM EYE (T); take the LEVER (U).
- Move the dirt; use the LEVER (V).
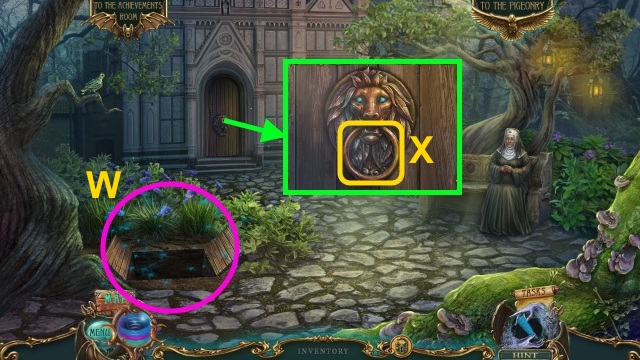
- Play the HOP to receive the ROUND HANDLE (W).
- Place the ROUND HANDLE (X); pull it.
- Walk forward.
Chapter 3: The Cathedral
- Take the KNIFE HANDLE (Y); use the CABINET KEY.
- Take the TRIANGLE (Z).
- Place the KNIFE HANDLE; take the KNIFE (A) and STONE SUN (B).
- Use the KNIFE (C); take the STAR EMBLEM.
- Walk down.
- Place the STONE SUN (D).
- Examine the picture; take the HOOK (E).
- Walk forward.
- Use the HOOK (F); take the COLORED GLASS and TOY RABBIT’S PAW (G).
- Place the STAR EMBLEM (H); play the HOP to receive the HAIRPIN (I).
- Take the PART OF THE PHILOSOPHER’S STONE (J).
- Place the pieces of COLORED GLASS for a mini-game (K).
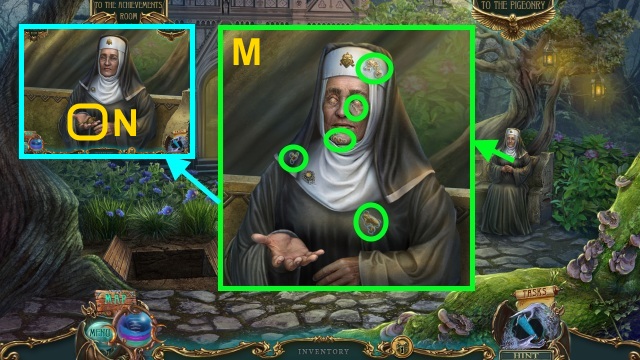
- Examine the woman for a mini-game.
- Solution (M).
- Take the LIBRARY KEY (N).
- Play the HOP to receive the TRIANGLE (O).
- Walk down twice.
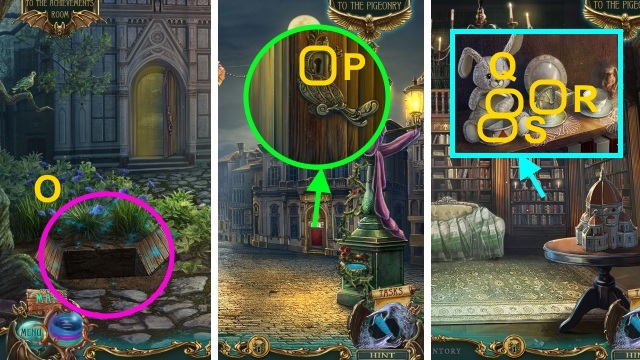
- Use the LIBRARY KEY (P).
- Walk right.
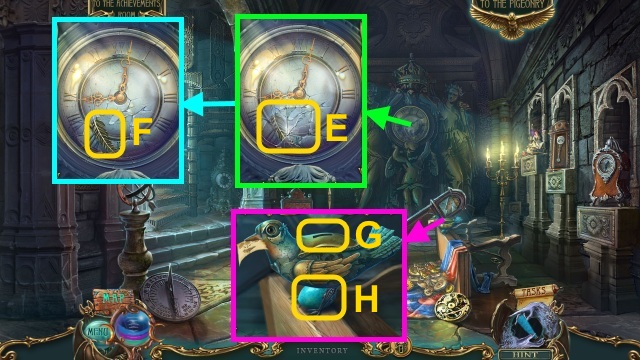
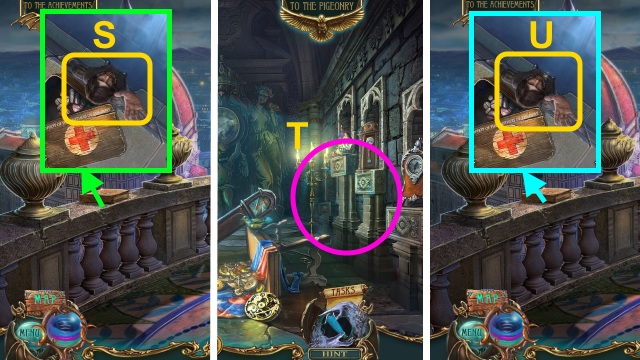
- Place the TOY RABBIT’S PAW (Q); take the HALF A CLOCK (R) and TRIANGLE (S).
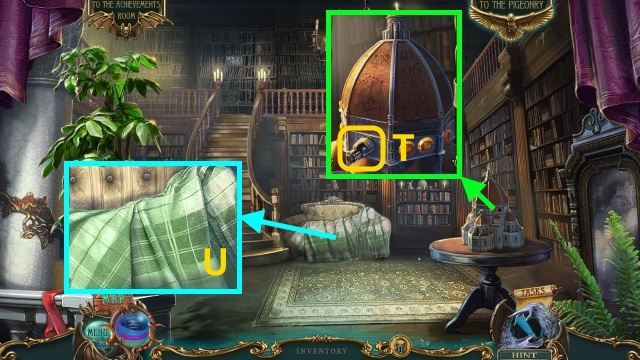
- Take the PILLS (T).
- Move the blanket for a mini-game (U).
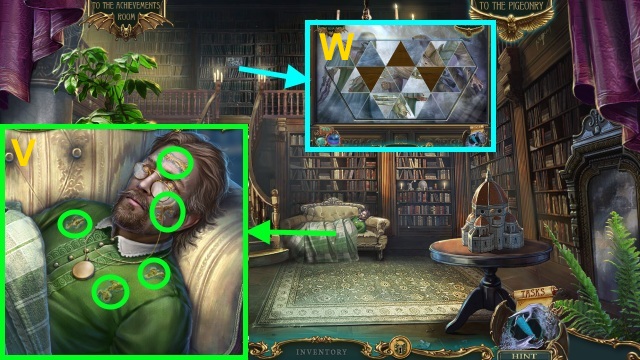
- Solution (V).
- Place the TRIANGLES for a mini-game (W).
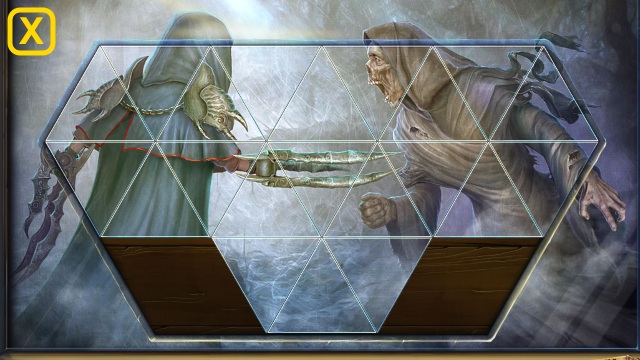
- Solution (X).
- Walk forward.
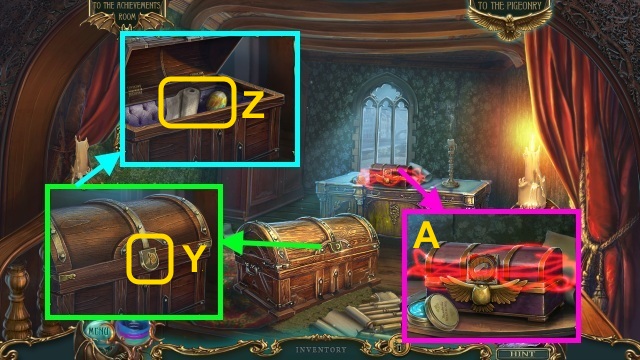
- Take the COIN (Y); use the HAIRPIN.
- Take the BANDAGE and ROUND GEM (Z).
- Use the Staff for a mini-game (A).
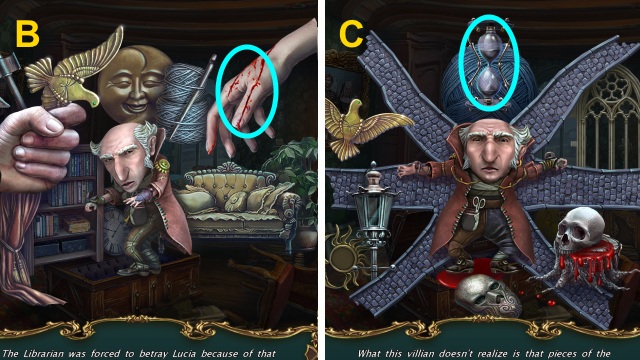
- Take the CHIP (D) and OINTMENT (E).
- Use the KNIFE; take the HALF OF A CLOCK (F).
- Use the BANDAGE on the OINTMENT to receive the BANDAGE WITH OINTMENT (G).
- Walk down.
- Give the BANDAGE WITH OINTMENT (H); take the LETTER X and PART OF THE PHILOSOPHER’S STONE (I).
- Place the ROUND GEM for a mini-game (J).
- Solution (K).
- Take the GOLDEN BIRD’s HEAD (L).
- Walk forward.
- Place the GOLDEN BIRD’S HEAD; take the HOURGLASS (M).
- Go to the Four Corners.
- Move the posters (N); place the HOURGLASSES for a mini-game (O).
- Solution (P).
- Walk forward.
Chapter 4: the Clock Tower
- Examine the stairs (Q).
- Take the BUTTON (R).
- Take the CHIP (S).
- Place the HALVES OF A CLOCK (T); take the AXE and EMPTY PIPETTE (U).
- Use the AXE; take the STEP (V).
- Go up.
- Take the MASK (W).
- Take the HANDKERCHIEF (X).
- Take the COIN (Y) and STONE (Z); place the STEP.
- Place the CHIPS for a mini-game (A).
- Solution is random.
- Go up.
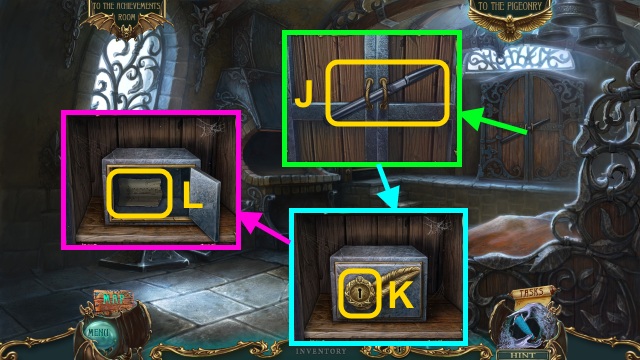
- Take the CODE (B).
- Open the box; place the PILLS (C).
- Take the FORTIFIED WATER.
- Place the MASK (D); play the HOP to receive the COIN.
- Walk down twice.
- Use the STONE; use the HANDKERCHIEF to take the SHARP GLASS (E).
- Take the FEATHER (F).
- Place the COINS (G); take the EGG (H).
- Go up.
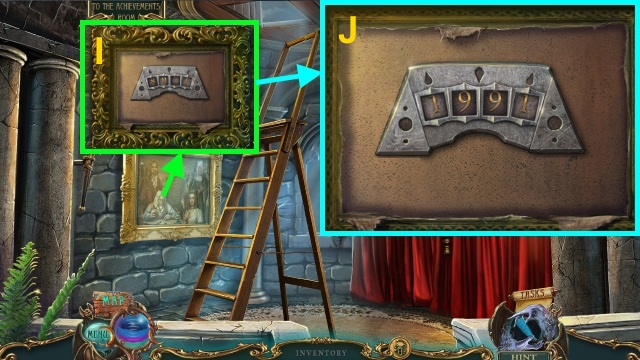
- Use the SHARP GLASS; place the CODE for a mini-game (I).
- Solution (J).

- Place the EMPTY PIPETTE to receive the EYE DROPS (K).
- Take the FEATHER (L).
- Use the SHARP GLASS (M).
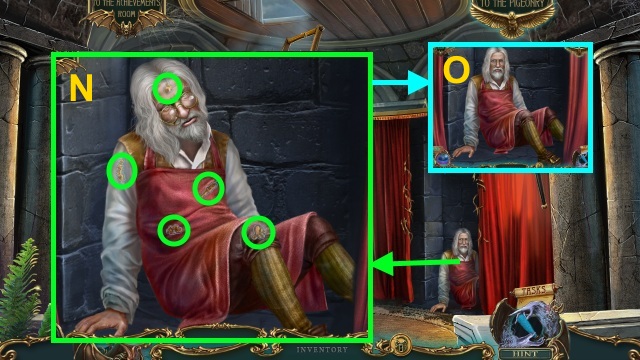
- Examine the man for a mini-game.
- Solution (N).
- Give the EYE DROPS (O).
- Walk down.
- Play the HOP to receive the BIRD BADGE (P).
- Go up.
- Give the BIRD BADGE; take the GLASS ROSE and PART OF THE PHILOSOPHER’S STONE (Q).
- Go up.
- Place the FEATHERS; take the FLINT (R).
- Talk to the man (S).
- Walk down twice.
- Play the HOP to receive the ROPE (T).
- Go up twice.
- Use the ROPE (U).
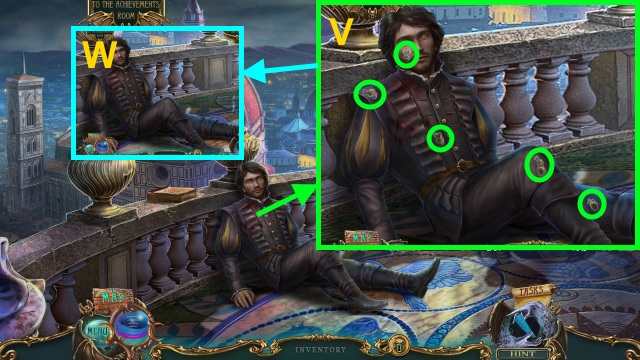
- Examine Roberto for a mini-game.
- Solution (V).
- Give the FORTIFIED WATER (W); take the LETTER L.

- Play the HOP to receive the LETTER U (X).
- Go to the Path.
- Place the LETTER L, LETTER U, and LETTER X (Y).
- Walk forward.
- Take the SWORD PART (Z).
- Take the TILE (A).
- Walk right.
- Take the CLOUD EMBLEM (B).
- Take the BRICK and BOTTLE (C).
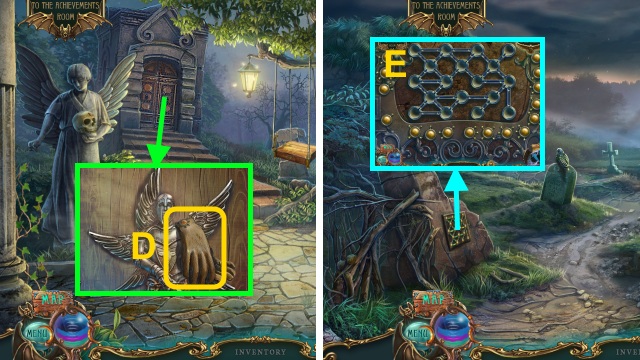
- Take the BUTTON and GLOVES (D).
- Walk down.
- Place the BUTTONS for a mini-game (E).
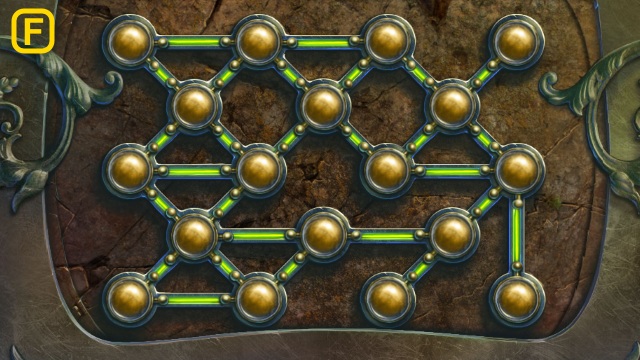
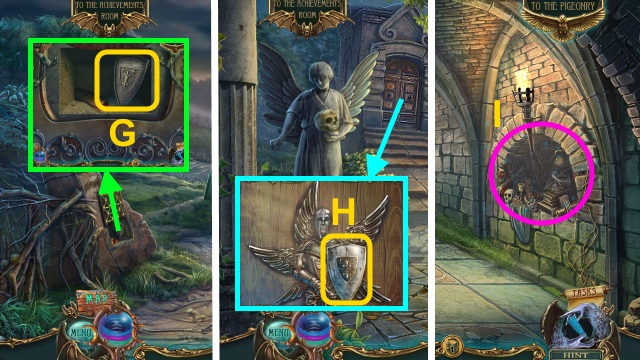
- Take the SHIELD (G).
- Walk right.
- Give the SHIELD (H); move the wings.
- Walk forward.
- Play the HOP to receive the BRICK (I).
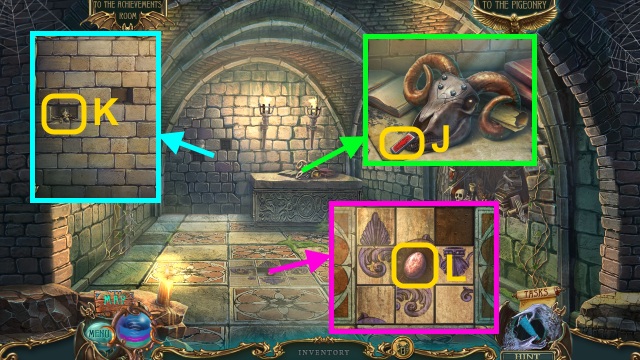
- Take the SWORD PART (J).
- Take the WOODEN DOLL (K).
- Take the EGG (L).
- Walk down.
- Place the WOODEN DOLL (M); take the SCREWDRIVER (N).
- Walk forward.
- Use the SCREWDRIVER (O); move the cover.
- Take the OILER (P).
- Walk down twice.
- Use the GLOVES (Q); place the EGGS to receive the SWORD PART (R).
- Walk right.
- Place the SWORD PARTS for a mini-game (S).
- Solution (T): E, D, E, D, E, A, D, E, B, Cx2, A, E, B, A, Ex2, B, E, C, Ex2, Cx3, Ex2.
- Take the PEARL (U).
- Walk forward.
- Place the bricks for a mini-game (V).
- Solution (W).
- Walk forward.
Chapter: 5: The Tree House
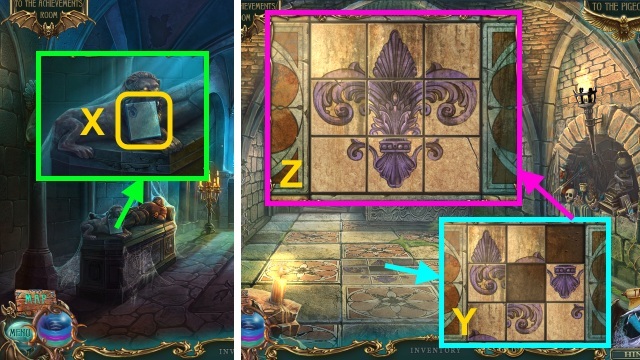
- Take the TILE (X).
- Walk down.
- Place the TILES for a mini-game (Y).
- Solution (Z).

- Take the SKULL KEY (A).
- Walk down.
- Use the OILER and SKULL KEY (B); take the FANG (C).
- Walk forward twice.
- Place the FANG (D); take the GLASS ROSE (E).
- Use the Staff for a mini-game (F).
- Solution (G, H).
- Walk down three times.
- Place the GLASS ROSES (I); take the VOTIVE CANDLE (J).
- Go to the Hidden Chapel.
- Take the CHESS PIECE (K); place the VOTIVE CANDLE.
- Take the PEARL (L).
- Place the PEARLS (M).
- Walk down.
- Play the HOP to receive the PEARL (N).
- Walk forward.
- Place the PEARL for a mini-game (O).
- Solution (P).
- Walk forward.
- Take the HOOP (Q); use the BOTTLE to receive the POISON.
- Take the FISH SCALE (R); use the POISON.
- Take the CHESS PIECE (S); open the door.
- Walk forward.
- Take the SUN (T).
- Place the SUN (U); Take the MINT and CLOUD EMBLEM (V).
- Take the DEER KEY (W); place the CLOUD EMBLEMS.
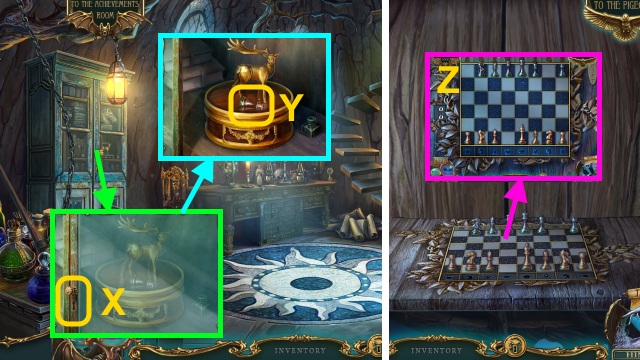
- Use the DEER KEY (X); take the CHESS PIECE (Y).
- Go up.
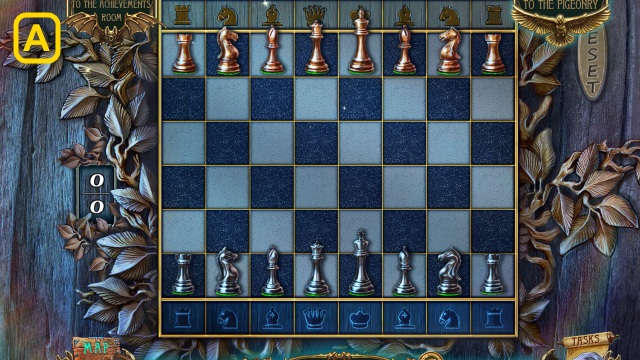
- Place the CHESS PIECES for a mini-game (Z).
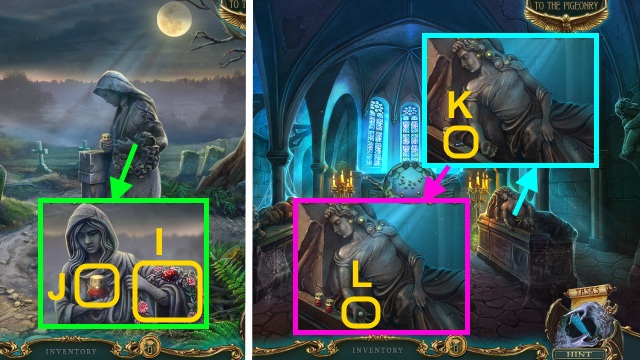
- Take the CRESCENT MOON BADGE (B).
- Use the Staff for a mini-game (C).
- Take the ANTLER (F).
- Walk down.
- Place the CRESCENT MOON BADGE; take the ELIXIR (G).
- Place the ANTLER (H); take the GEM STONE (I).
- Go up.
- Place the GEM STONE (J); take the FISH KEY (K).
- Place the FISH SCALE (L); use the FISH KEY.
- Take the HOOP (M).
- Walk down.

- Place the HOOPS (N); take the BEZOAR STONE (O).
- Go up.
- Place the POISON, BEZOAR STONE, MINT and ELIXIR. (P); take the ACID (Q).
- Walk down.
- Use the ACID (R); take the CLUB.
- Walk down.
- Use the CLUB; take the MAGIC THREAD (S).
- Go up twice.
- Give the MAGIC THREAD (T); you receive the FLINT.
- Place the FLINT on the FLINT to make the FLINT (U).
- Use the FLINT (V).
- Walk left.
Chapter 6: The Crypt
- Take the FLOWER (W).
- Take the FEATHER DUSTER (X).
- Walk right.
- Use the Staff for a mini-game (Y).

- Take the ELEMENT (B).
- Take the HEAD HALF (1/2) (C).
- Walk right.
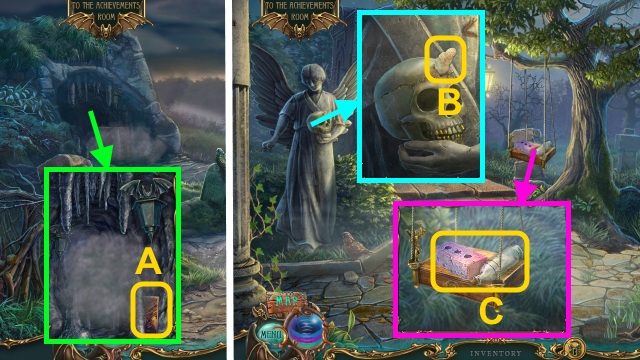
- Take the BUCKET (D).
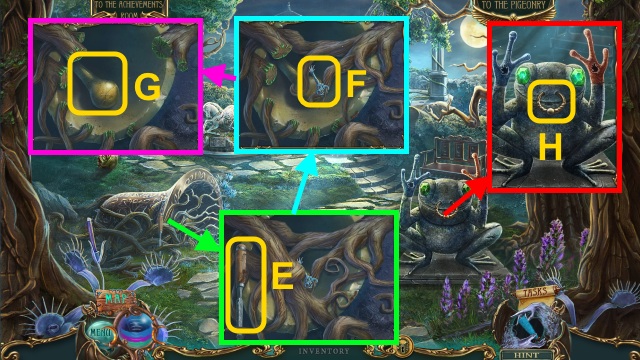
- Take the CHISEL (E); pour the ACID.
- Take the FROG KEY (F); pour the ACID.
- Take the BELL CLAPPER (G).
- Take the DRAWER PULL (H).
- Walk down twice.
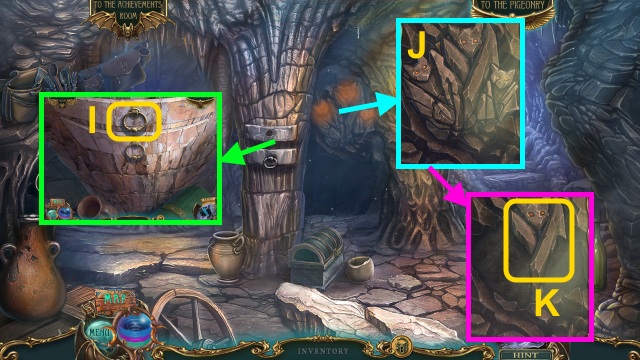
- Place the DRAWER PULL (I); open the drawer.
- Play the HOP to receive the SHOVEL.
- Examine the bats twice (J); use the CHISEL to receive the TILE (K).
- Walk right.
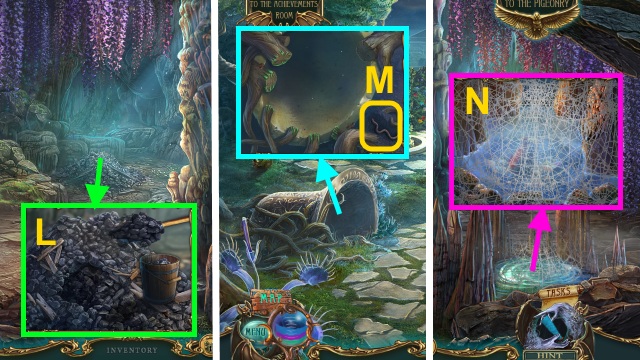
- Place the BUCKET; use the SHOVEL (L).
- Take the BUCKET OF COAL.
- Walk right.
- Use the SHOVEL; take the WORM (M).
- Walk down.
- Use the FEATHER DUSTER (N).
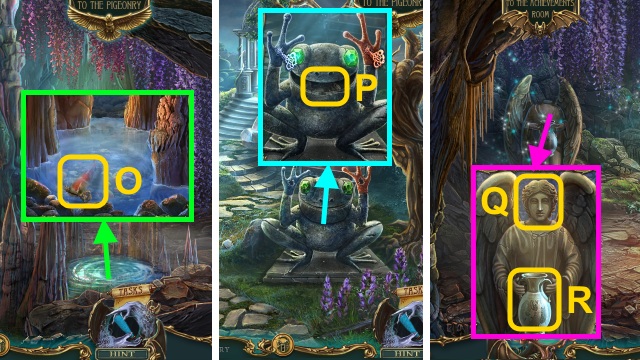
- Give the WORM; take the FROG KEY (O).
- Walk right.
- Use the FROG KEYS; take the HEAD HALF (2/2) (P).
- Walk down.
- Place the HEAD HALF (2/2) (Q); take the URN (R).
- Walk right.
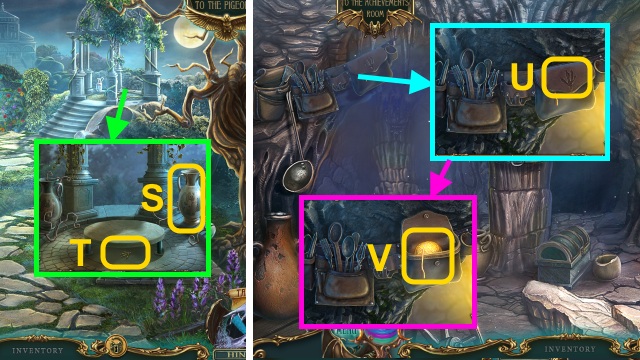
- Place the URN (S); take the BIRD CLAW (T).
- You receive the ELEMENT.
- Walk down twice.
- Place the BIRD CLAW (U); take the MAGIC THREAD (V).
- Walk right twice.
- Give the MAGIC THREAD (W); you receive the SHEET MUSIC PART (1/3).
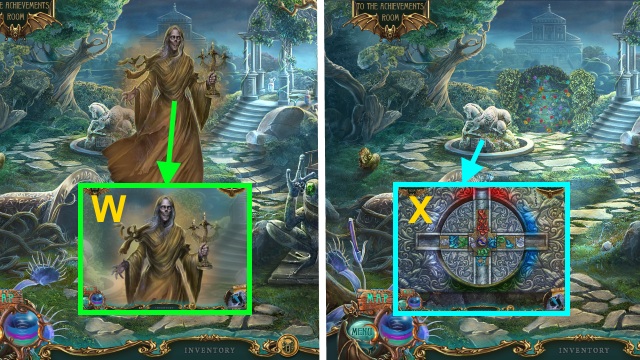
- Place the ELEMENTS and TILE for a mini-game (X).
- Take the FLOWER (Z).
- Walk down twice.
- Play the HOP to receive the FLOWER (A).
- Walk forward, then right.
- Place the FLOWERS for a mini-game (B).
- Solution (C-F).
- Walk forward.

- Play the HOP to receive the FEATHER KEY (G).
- Take the VOTIVE CANDLE (H).
- Take the HAMMER HANDLE (I).
- Walk right.
- Take the ORGAN PIPE (J); open the cupboard.
- Use the FEATHER KEY (K); take the SHEET MUSIC PART (2/3) (L).
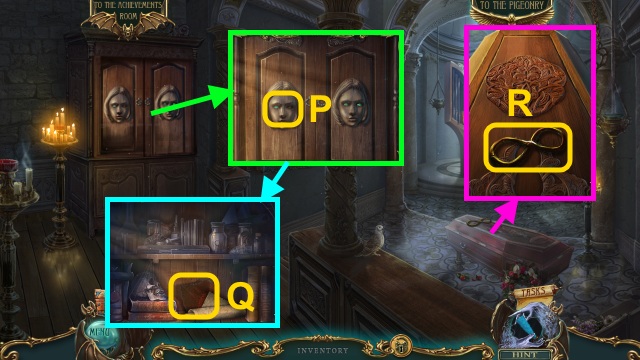
- Take the GREEN GEM (M).
- Take the OILER (N).
- Place the HAMMER HANDLE; take the HAMMER (O).
- Walk down, then left.
- Place the GREEN GEM (P); open the cupboard.
- Take the PATCH (Q).
- Take the INFINITY SYMBOL (R).
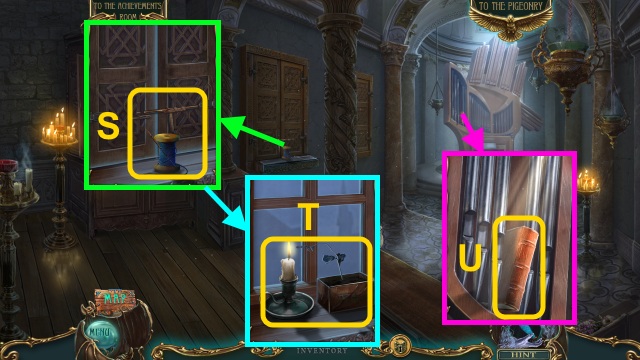
- Take the NEEDLE AND THREAD (S); use the OILER.
- Take the BOX and CANDLE (T).
- Take the PRAYER BOOK (U); place the ORGAN PIPE.
- Walk down.

- Place the PRAYER BOOK (V); take the BOTTLE OF WATER (W).
- Place the INFINITY SYMBOL (X); take the TONGS (Y).
- Walk right.
- Use the PATCH and NEEDLE AND THREAD; squeeze the bellows.
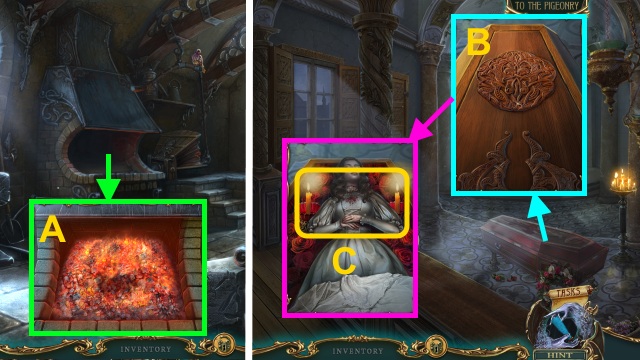
- Pour the BUCKET OF COAL; use the CANDLE (A).
- Walk down, then left.
- Open the coffin (B).
- Place the VOTIVE CANDLE; use the CANDLE (C).
- Walk down.
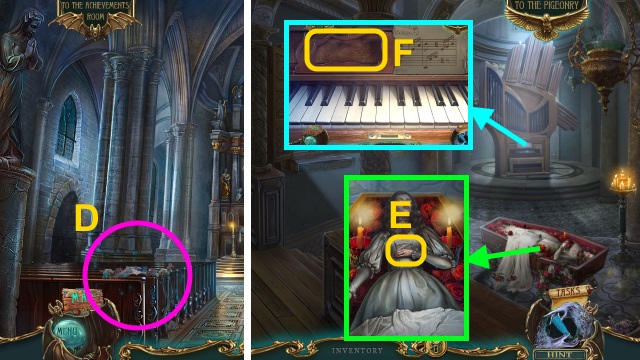
- Play the HOP to receive the FLORAL WREATH (D).
- Walk left.
- Place the FLORAL WREATH; take the SHEET MUSIC PART (3/3) (E).
- Place the SHEET MUSIC PART (3/3) for a mini-game (F).
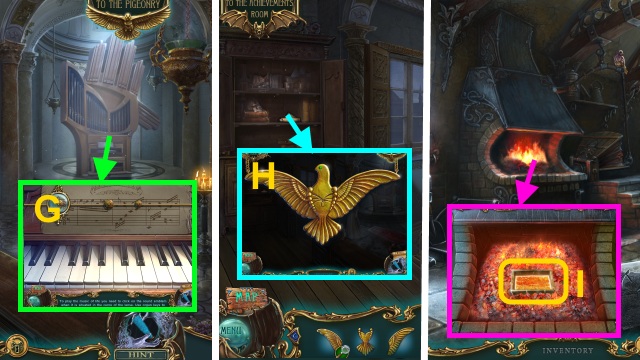
- Press any key when the notes align with the lens (G).
- You receive the PART OF THE PHILOSOPHER’S STONE.
- Place the PARTS OF THE PHILOSOPHER’S STONE on the PART OF THE PHILOSOPHER’S STONE; take the PHILOSOPHER’S STONE (H).
- Walk down, then right.
- Place the BOX, BELL CLAPPER; and PHILOSOPHER’S STONE; use the TONGS to take the MOLTEN METAL (I).

- Pour the BOTTLE OF WATER; place the MOLTEN METAL (J).
- Take the COOLED METAL.
- Place the HAMMER and COOLED METAL for a mini-game (K).
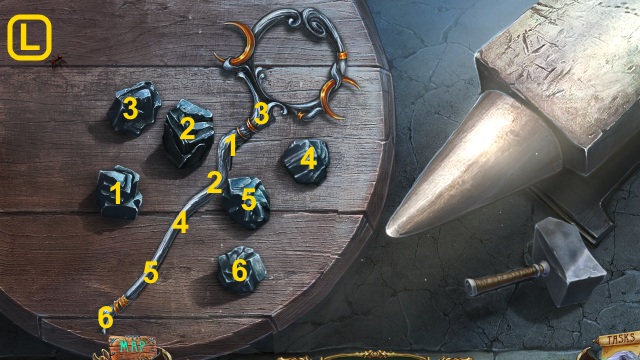

- Take the Staff (M).
- Walk down, then left.
- Use the Staff for a mini-game (N).
- Move the cursor over the symbols.
- Congratulations! You have completed Haunted Legends: The Dark Wishes.


 Dungeon Boss Tips and Tricks, Guide, & Tips
 Haunted Halls: Nightmare Dwellers Walkthrough, Guide, & Tips
 Joan Jade and The Gates of Xibalba Walkthrough, Guide, & Tips
 Enigma Agency: The Case of Shadows Walkthrough, Guide, & Tips
 Slingo Mystery 2: The Golden Escape Walkthrough, Guide, & Tips