Enigma Agency: The Case of Shadows Walkthrough, Guide, & Tips
Enigma Agency: The Case of Shadows Walkthrough
Welcome to the Enigma Agency: The Case of Shadows Walkthrough
Track down a missing detective and fight an evil curse!
Whether you use this document as a reference when things get difficult or as a road map to get you from beginning to end, we’re pretty sure you’ll find what you’re looking for here.
This document contains a complete Enigma Agency: The Case of Shadows game walkthrough featuring annotated screenshots from actual gameplay!
We hope you find this information useful as you play your way through the game. Use the walkthrough menu below to quickly jump to whatever stage of the game you need help with.
Remember to visit the Big Fish Games Forums if you find you need more help. Have fun!
This walkthrough was created by MargieB, and is protected under US Copyright laws. Any unauthorized use, including re-publication in whole or in part, without permission, is strictly prohibited.
General Tips
This is the official guide for Enigma Agency: The Case of Shadows.
Select ‘Play’ in the main menu to begin your adventure.
Select’ Options’ in the main menu to adjust sound, custom cursor, difficulty level, and screen size.
The ‘If this is not you, click here’ button in the main menu can be used to manage your profiles in the game.
Hidden-object puzzles will be referred to as HOPs throughout the guide. Mini-games and HOPs are sometimes randomized; your solution may vary.
Hints are unlimited, but you must wait for the meter to refill.
Your inventory is located in the lower panel; select an item to use it. The panel auto-hides; move your mouse down to bring it up.
Use the map located in the lower right to view all locations. The map is not interactive.
Look in your diary to read the adventure’s events and clues.
Chapter 1: The House

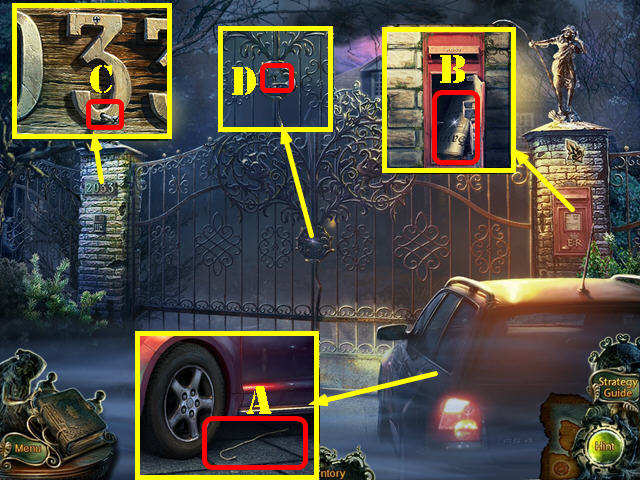
- Look under the car and take the WIRE (A).
- Use the WIRE on the mailbox; take the NEWSPAPER and the KEY TO THE GATE (B).
- Look at the sign and take the SCREW (C).
- Zoom into the gate; use the KEY TO THE GATE in the lock (D).
- Go forward to the Garden.
- Touch anywhere on the scene for a cut scene.
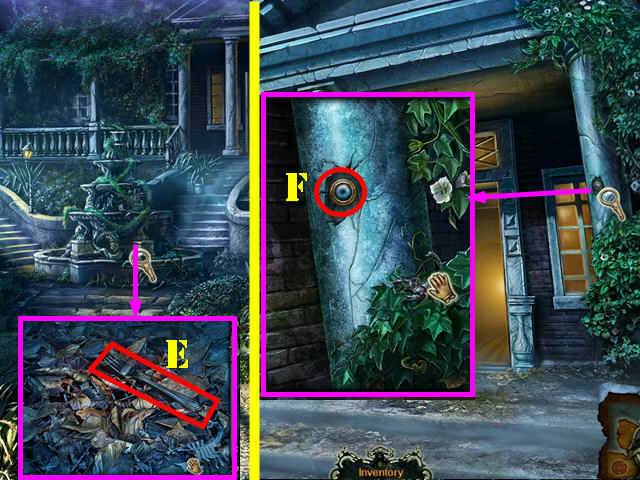
- Zoom into the fountain and take the FORK (E).
- Go forward to the House.
- Zoom into the pillar; take the SLIDER with the FORK (F).
- Go through the door to access the Lobby.
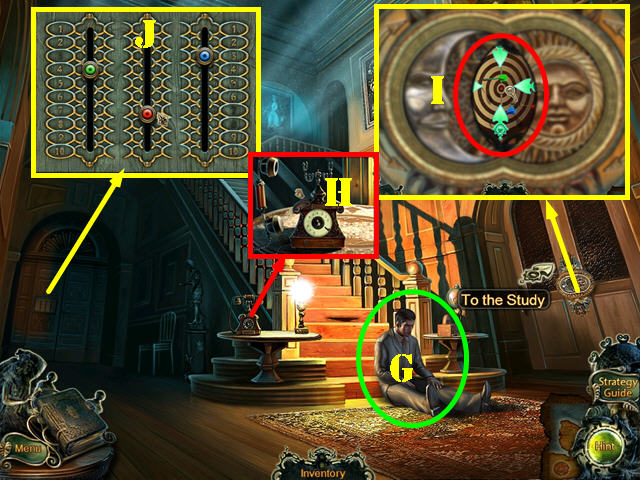
- Take a closer look at the man (G).
- Zoom into the phone (H).
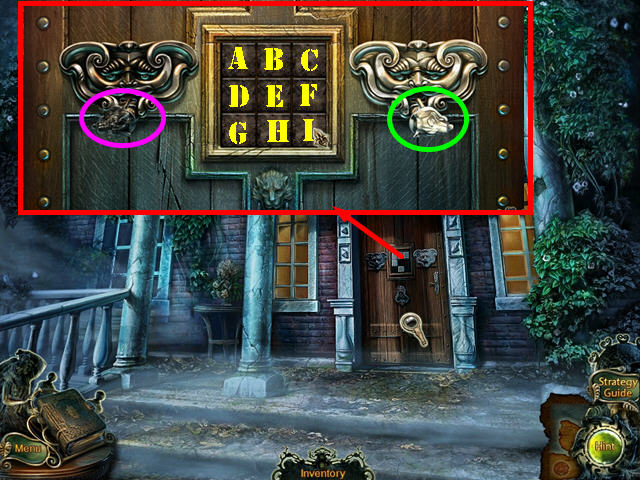
- Zoom into the right door to activate a puzzle.
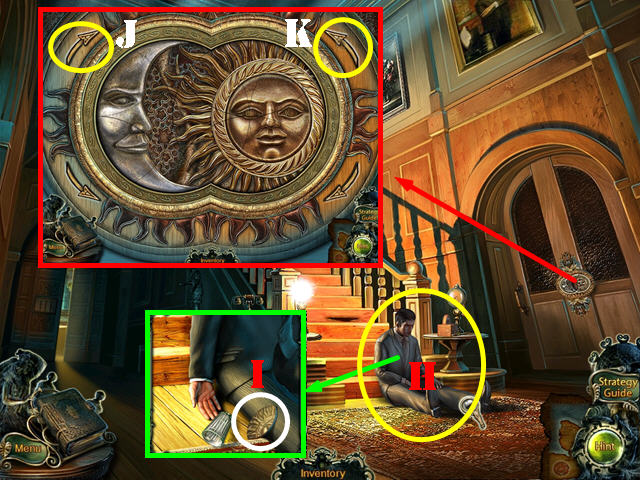
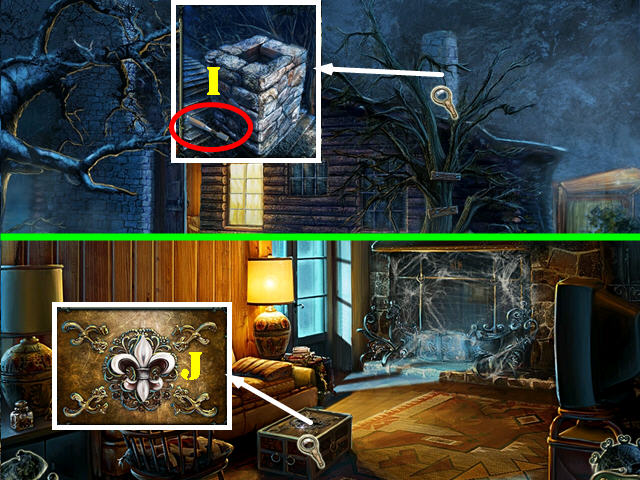
- Hover your mouse on the scene to look through the keyhole. Once you find the right area, select it (I).
- Please look at the screenshot for the solution and note the numbers by the darts: 4 (green), 7 (red), and 3 (blue).
- Zoom into the Kitchen door for a puzzle; place the SLIDER on it to activate a puzzle.
- Move the sliders to the solution found on the Study door: 4 (green), 7 (red), and 3 (blue) (J).
- Enter the Kitchen.
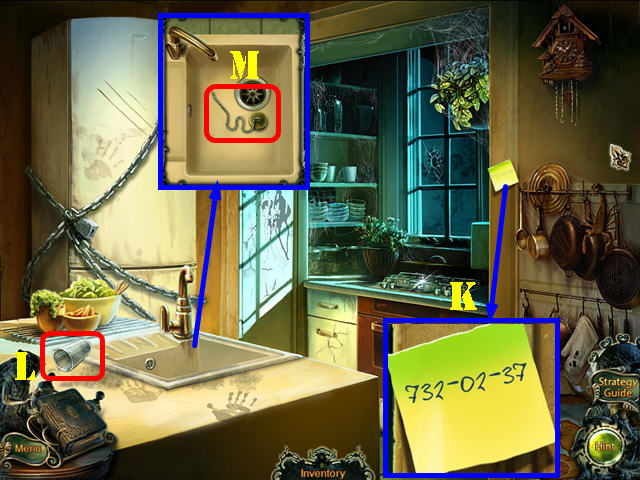
- Look at the note (K).
- Grab the GLASS (L).
- Look in the sink and take the PLUG (M).
- Walk down.
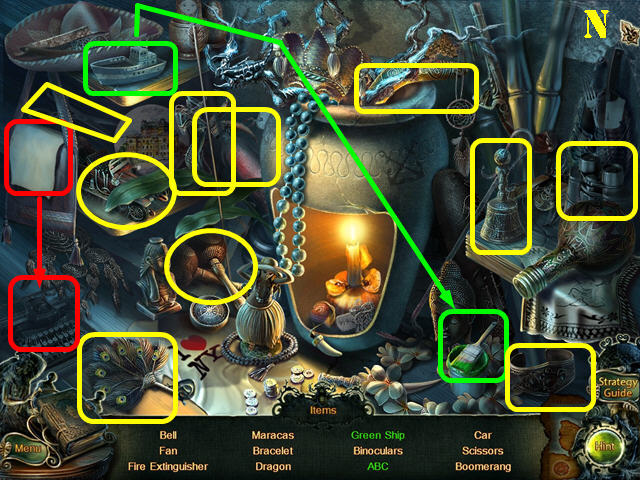
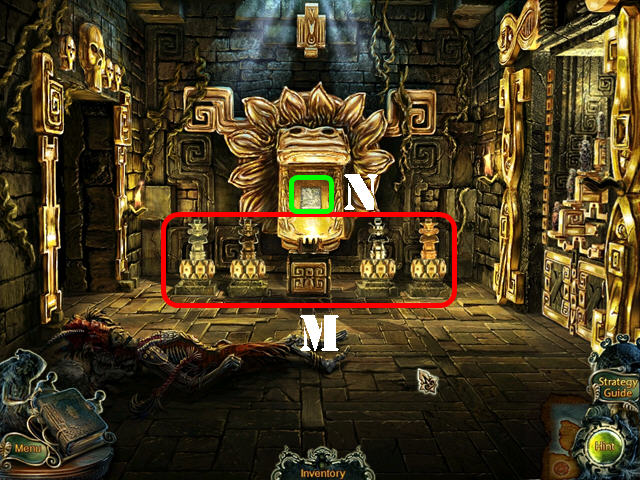
- Play the HOP.
- Interactive items are marked in the same color (N).
- You will receive the FIRE EXTINGUISHER.
- Try to exit the house and all the lights will turn off. Exit the house and go left to the Terrace.
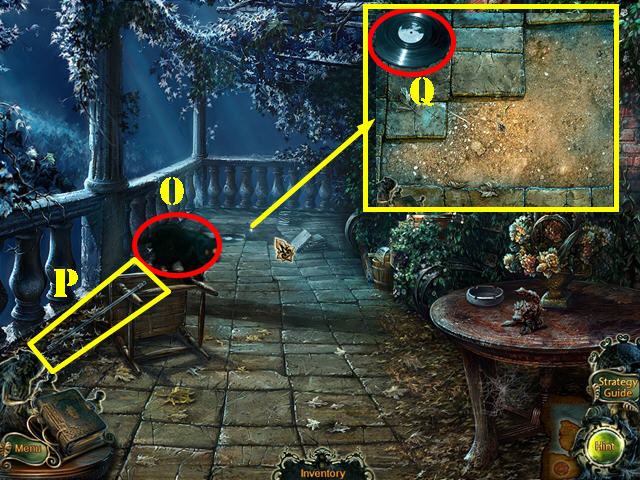
- Use the FIRE EXTINGUISHER on the cat (O) and take the WAND (P).
- Examine the ground and take the RECORD (Q).
- Back out and play the HOP.
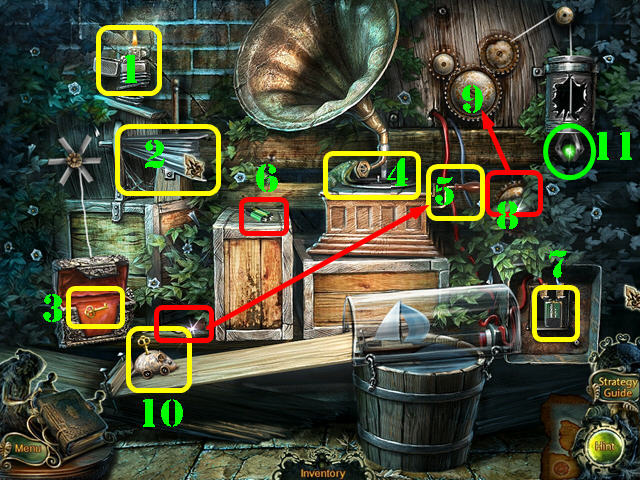
- Complete all the steps to find the green ball.
- Touch the lighter (1).
- Touch the bellows (2) and then take the WINDING KEY (3) as soon as the box opens.
- Put the RECORD (4) and the crank (5) on the gramophone. Turn the crank and grab the BATTERY as soon as the frog jumps up (6).
- Put the BATTERY in the slot (7).
- Place the gear (8) on the device (9).
- Place the WINDING KEY on the mouse (10) and touch the mouse.
- Take the GREEN BALL (11).
- Walk down twice.
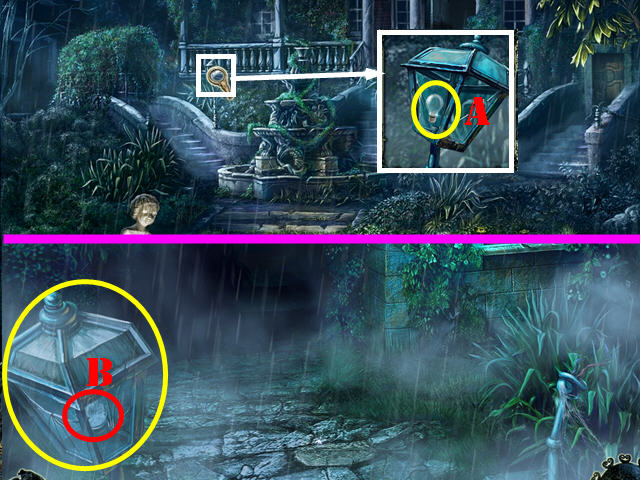
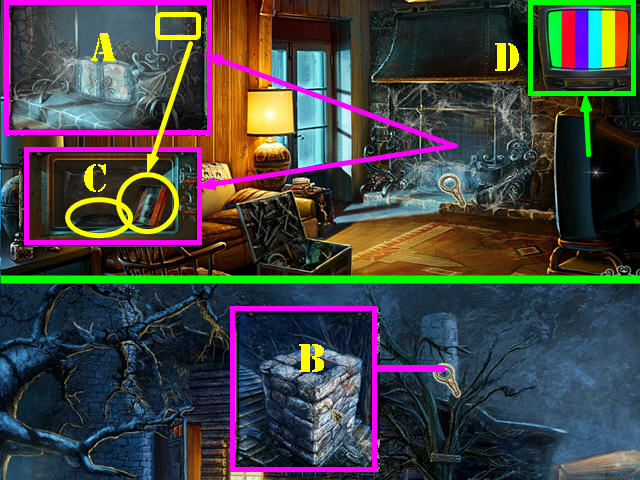
- Zoom into the lamppost and take the BULB (A).
- Go left to the Road to the Guest House.
- Place the BULB in the lantern (B).
- Walk down and go right to the Basement Entrance.
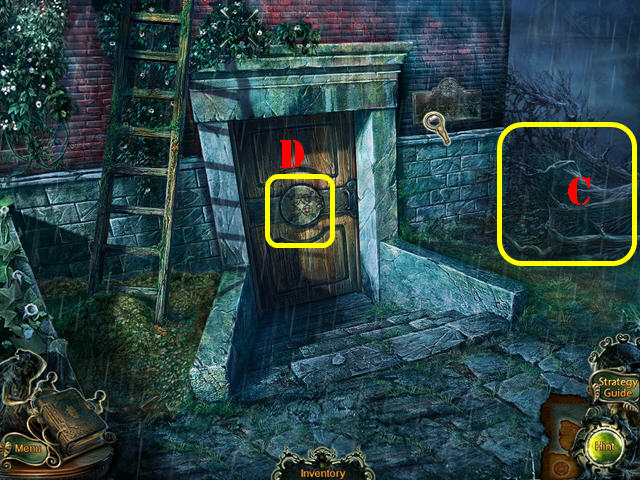
- Try to go right and a tree will fall blocking the road (C).
- Zoom into the door and place the GREEN BALL on it to activate a puzzle (D).
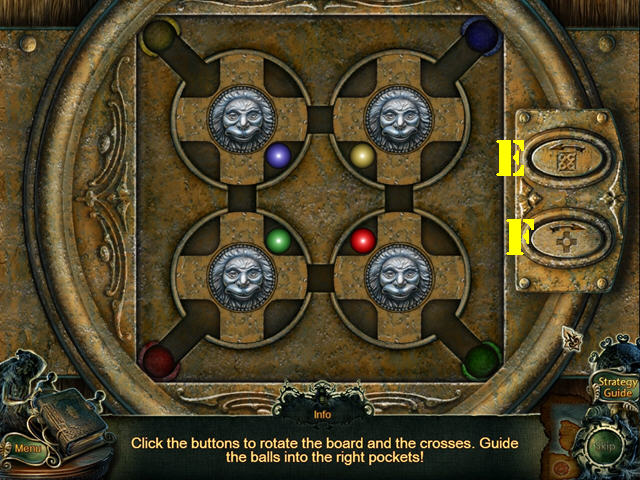
- Use the buttons to rotate the board and the crosses and ultimately put the balls in their matching slots.
- To solve the puzzle, select the buttons in this order: F, E, F, E, Fx2, E, Fx5, E, F, E, F, E, F, E x3, Fx2, Ex3, Fx2, Ex3, F, E, and Fx2.
- Enter the Basement.
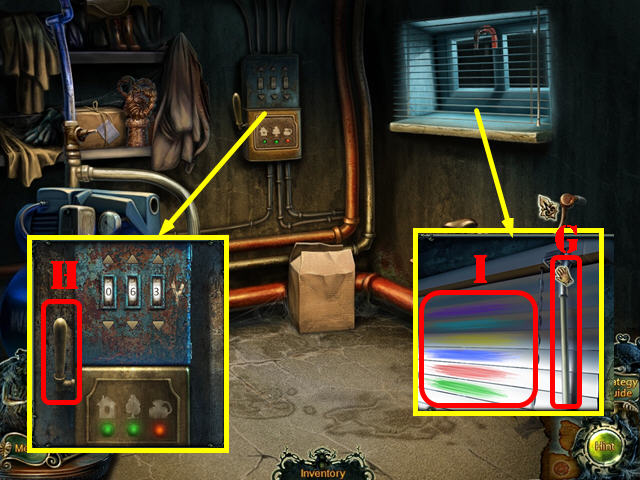
- Zoom into the blinds and place the WAND on it (G).
- Examine the fuse box and flip the handle (H).
- Zoom back into the blinds and then close the blinds. Note the colors on the blinds (I).
- Return to the Road to the Guest House.
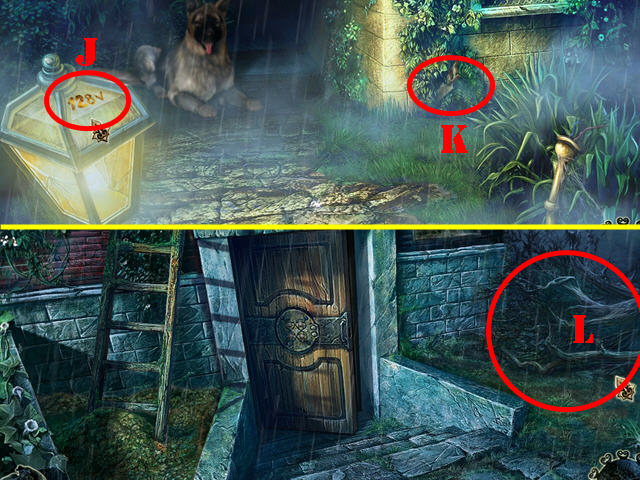
- Look at the numbers on the lamp: 128V (J).
- Take the SAW (K).
- Return to the Basement Entrance.
- Use the SAW on the fallen tree to receive the PIECE OF WOOD (L).
- Go right to the Shed.
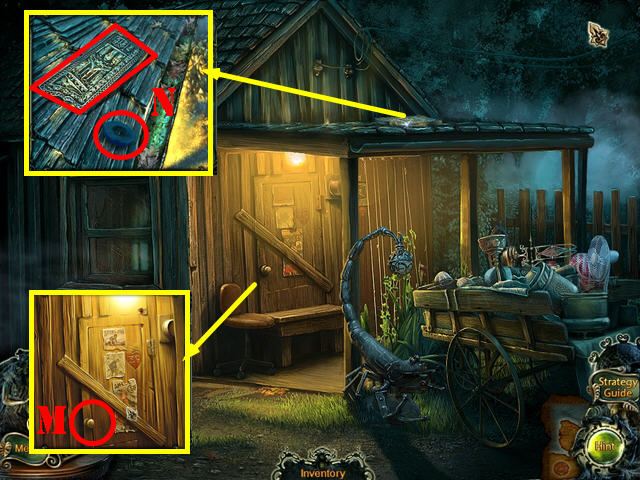
- Touch the door and take the DOORKNOB (M).
- Examine the roof and take the TRIPTYCH PANEL and the INSULATING TAPE (N).
- Play the HOP.
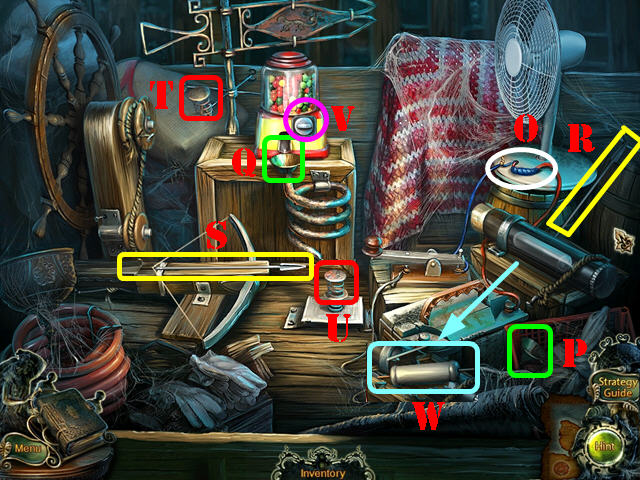
- Put the INSULATING TAPE on the wires (O).
- Place the funnel (P) over the coil pipe (Q).
- Place the arrow (R) on the crossbow (S).
- Place the spring (T) over the other one (U) and turn the handle (V).
- Take the FUSE (W).
- Return to the Basement.
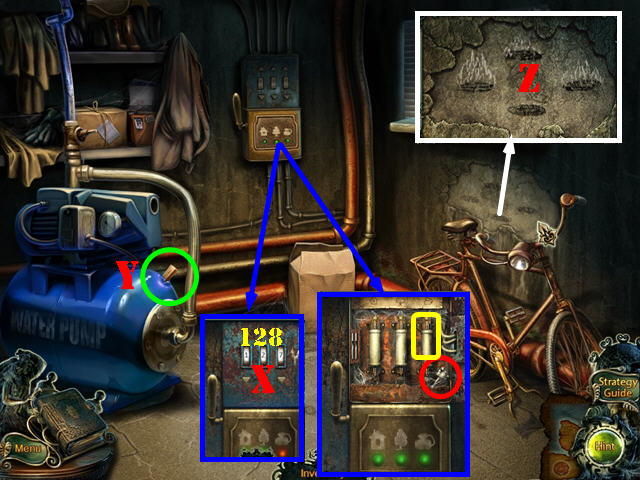
- Zoom into the fuse box; change the numbers to 128 (X).
- Put the FUSE in the slot (yellow) to trigger the water pump.
- Use the PIECE OF WOOD over the water hole (Y).
- Look at the wall for a drawing of stove burners (Z).
- Zoom back into the fuse box and take the WHITE KEY (red).
- Return to the Kitchen.

- Zoom into the sink; place the GLASS in the sink to obtain the GLASS OF WATER (A).
- Zoom into the stove; move the knobs B, C, E, and F to the positions shown and then press the D knob.
- Take the WINDOW HANDLE (G).
- Walk down.
- Give the GLASS OF WATER to John (H). Zoom back into John and take the LOCK PART (I).
- Zoom into the Study door; place the LOCK PART on it to activate a puzzle.
- Use the arrows to rotate the picture parts until they form the right image.
- To solve the puzzle, select the arrows in this order: J, Kx2, J, and Kx2.
- Enter the Study.
Chapter 2: The Study
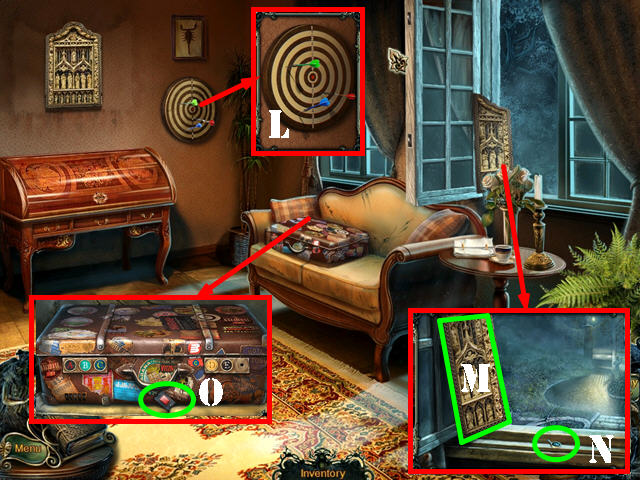
- Zoom into the dartboard; take the DARTS (L).
- Zoom into the window and the panel will fall (M). Take the KEYBOARD KEY (N).
- Examine the suitcase; take the TOGGLE SWITCH (O).
- Return to the Basement Entrance.
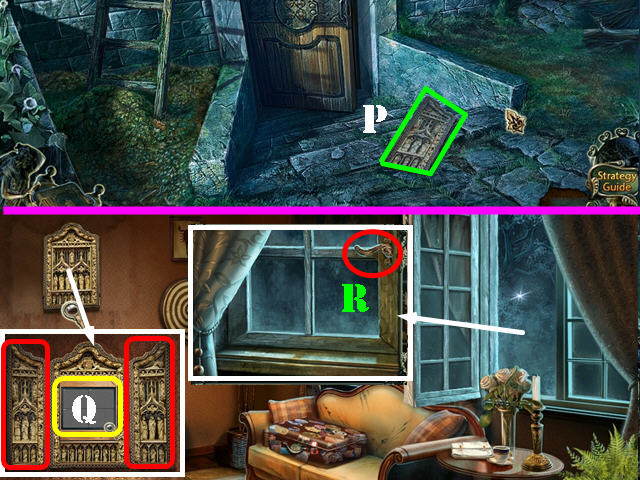
- Take the TRIPTYCH PANEL (P).
- Return to the Study.
- Zoom into the triptych and put the 2 TRIPTYCH PANELS on it (red) to uncover the hidden monitors; select the monitors (Q).
- Zoom into the window; close it and place the WINDOW HANDLE on the lock (R).
- Walk down for a cut scene.
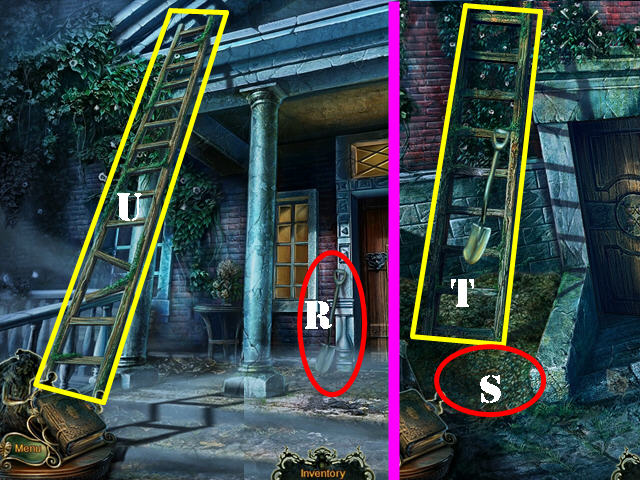
- Take the SHOVEL (R).
- Return to the Basement Entrance.
- Use the SHOVEL on the ground (S) and take the LADDER (T).
- Return to the House.
- Place the LADDER on the pillar; try to go up the ladder and it will beak (U).
- Return to the Gate.
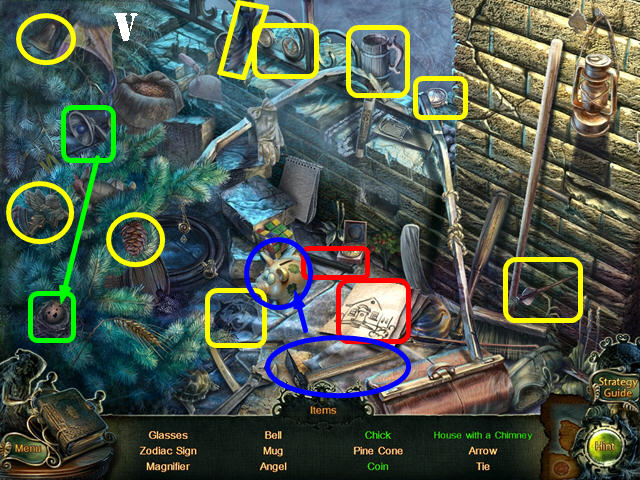
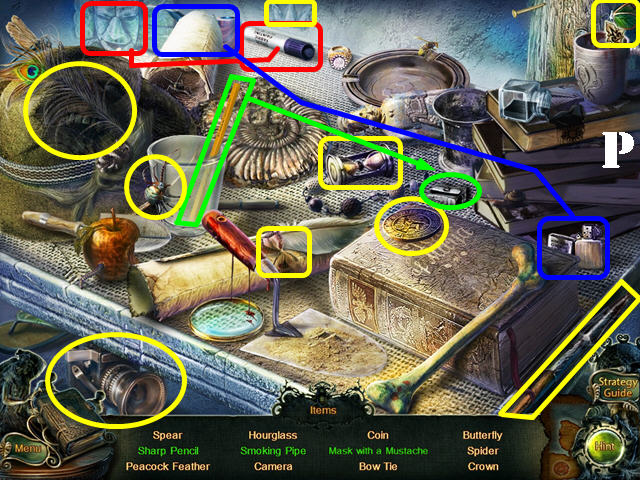
- Play the HOP.
- Interactive items are marked in the same color (V).
- You will receive the COIN.
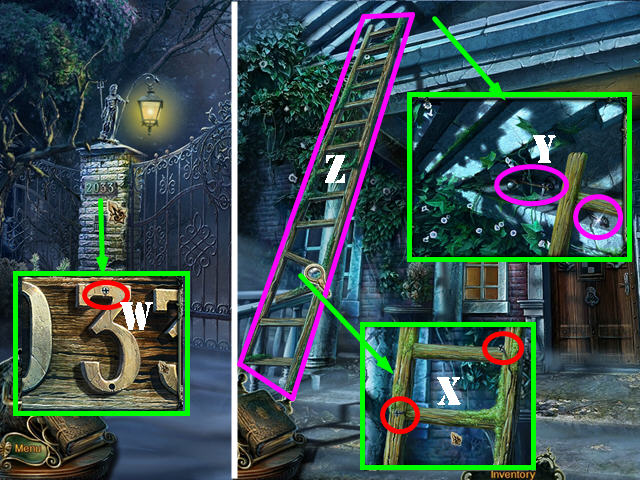
- Zoom into the sign; use the COIN to remove the screw (W); you will automatically receive the SCREW and the THREE.
- Return to the House.
- Zoom into the ladder; place the 2 SCREWS on it and then use the COIN on the 2 screws (X).
- Go up the ladder.
- Take the GLASS CUTTER and the BLACK KEY (Y).
- Take back the LADDER (Z).
- Return to the Shed.
- Zoom into the window; use the GLASS CUTTER on it, then drag the tool, without lifting your hand, in a circular pattern until you cut a round piece of glass.
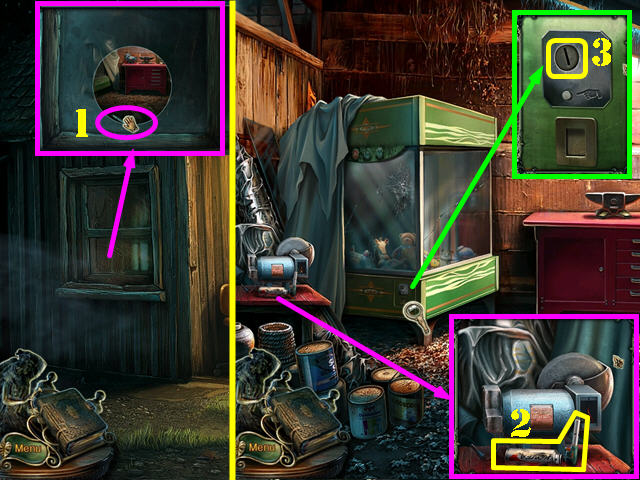
- Move the latch (1) and enter the Shed.
- Zoom into the whetstone and take the CUTTING TORCH (2).
- Remove the cloth; zoom into the coin slot and insert the COIN in it to activate a puzzle (3).
- Play the puzzle.
- Hold down the arrows to move the claw in the direction the arrows are pointing. Once you have the claw in the right position, push the red button to drop the claw.
- Move the left button 5 times (4), the up button 3 times (5) and the red button once (6) to take the CASINO CHIP (7).
- Return to the House.
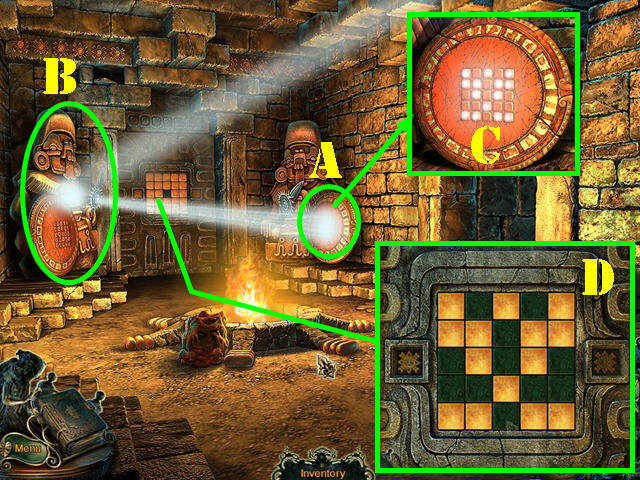
- Zoom into the door; place the BLACK KEY in the left lock (purple) and the WHITE KEY on the right lock (green) to activate a puzzle.
- Touch the tiles in this order to turn all the tiles all black and then turn them all white: A, D, E, F, and I for the first part and A, C, E, G, and I for the second part.
- Enter the Lobby.
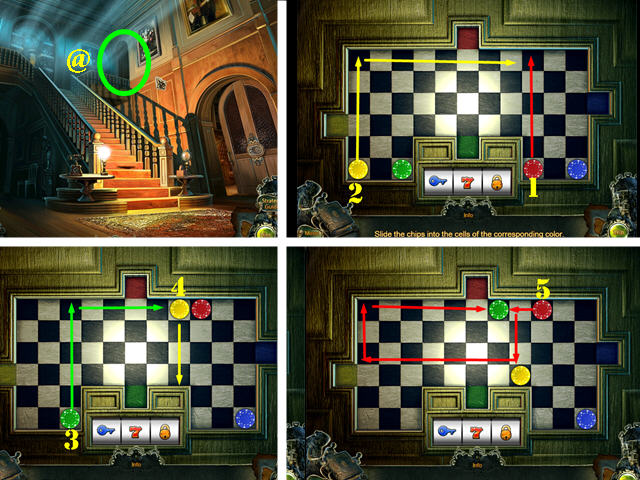
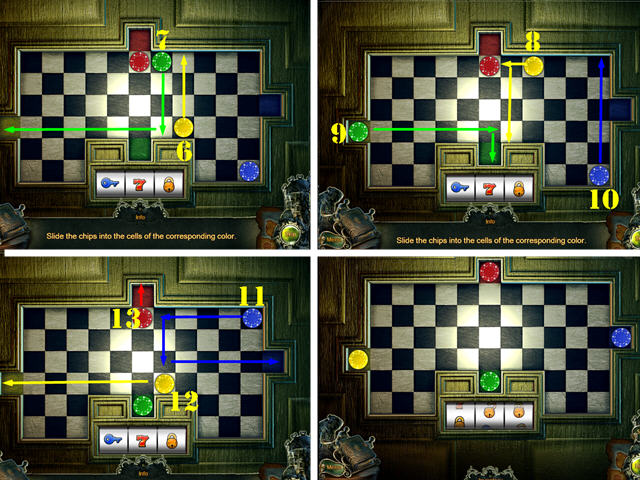
- Take a closer look at the Bathroom door (@); put down the CASINO CHIP to activate a puzzle.
- Hover over a chip and then select an arrow to move the chip in that direction.
- Move all the chips into the slots of the same color.
- Please look at the screenshot for the solution (1-13).
- Enter the Bathroom.
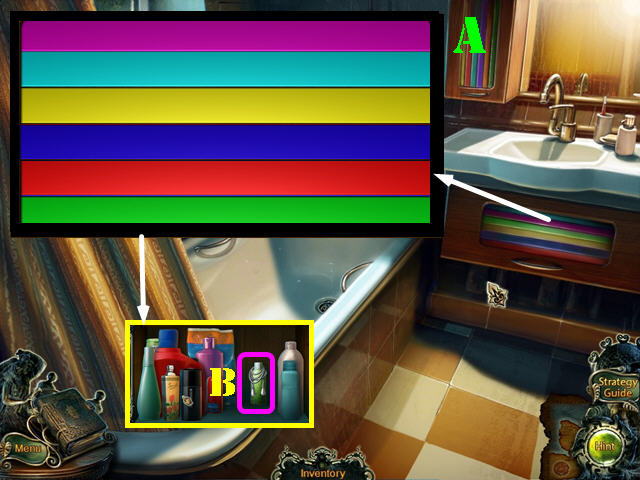
- Zoom into the cabinet to activate a puzzle. Note: this puzzle will not activate unless you’ve looked at the blinds in the Basement.
- Place your cursor over the stripes and then press on the arrows to swap the places of the stripes.
- Please look at the screenshot for the solution: purple, light blue, yellow, blue, red, green (A).
- Move the bottles aside and take the BLINDS STRING (B).
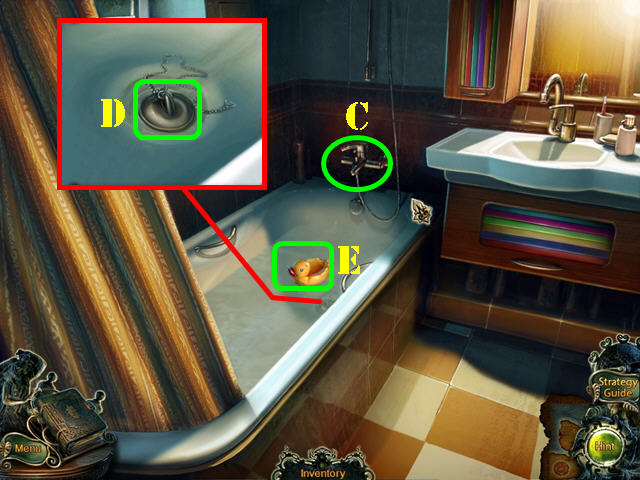
- Turn on the water (C).
- Zoom into the tub and put the PLUG on it (D).
- Take the RUBBER DUCK (E).
- Return to the Road to the Guest House.
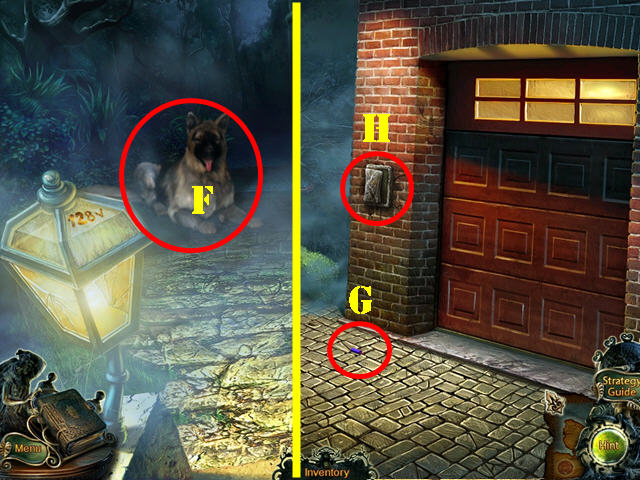
- Give the RUBBER DUCK to the dog (F).
- Go forward to the Garage Entrance.
- Take the RADIO PART (G).
- Zoom into the control panel (H) and place the RADIO PART on it to activate a puzzle.
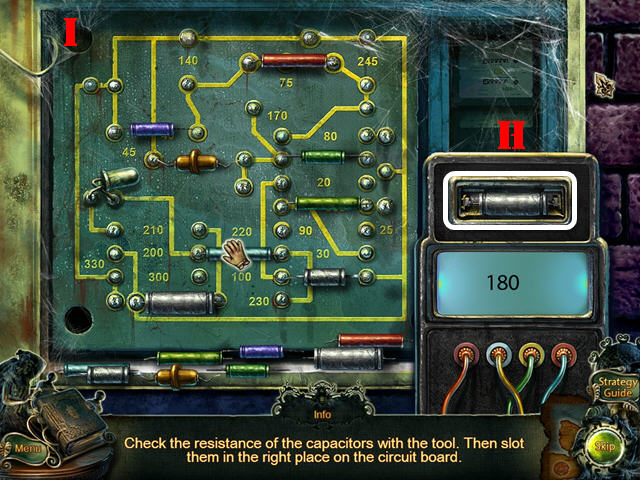
- Place the capacitors in the right spots.
- Place a capacitor into the slot (H) to see the number on the screen, then place the capacitor in the spot with the same number.
- Please look at the screenshot for the solution (I).
- Go into the Garage.
Chapter 3: The Garage
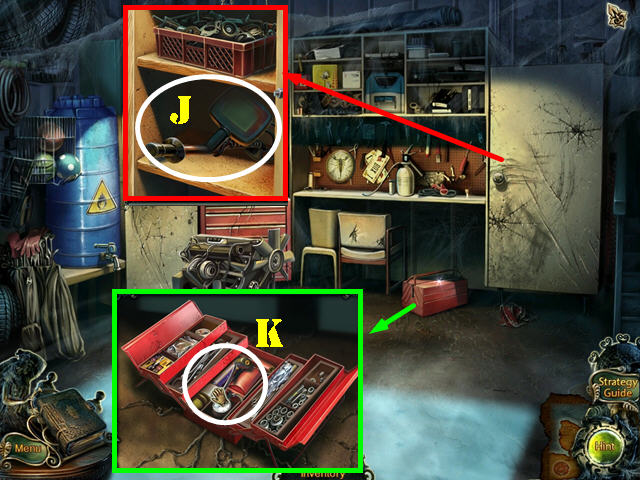
- Zoom into the shelf and take the METAL DETECTOR (J).
- Zoom into the toolbox; take the FISHING ROD PIECE (K).
- Walk down and go left to the Guest House Entrance.
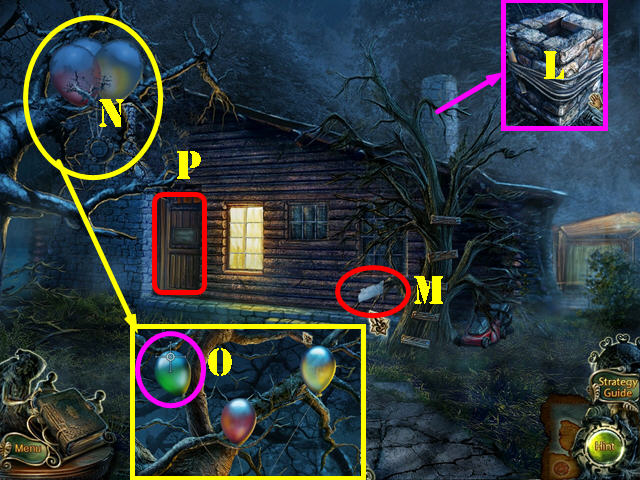
- Note the chimney (L).
- Take the SHEET OF PAPER (M).
- Use the DARTS on the balloons to activate a puzzle (N).
- The crosshairs will float around the scene; press it once it’s on one of balloons (O). Pop the 3 balloons to beat the puzzle.
- Zoom into the door to activate a puzzle (P).
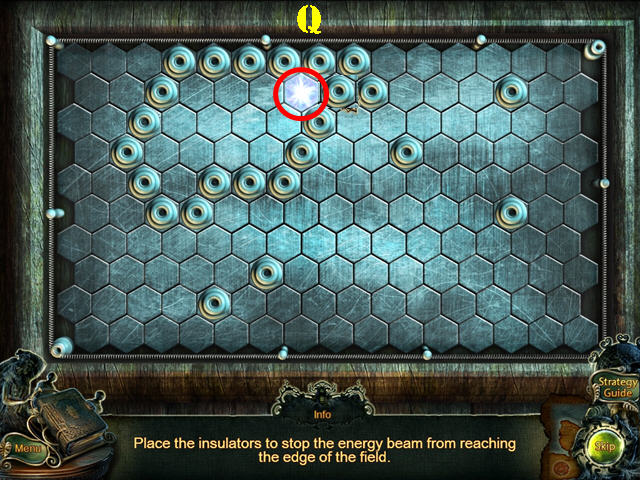
- Select an empty cell to place an insulator on it.
- Keep placing insulators until you block the energy beam from reaching the edge of the field.
- The solution to this puzzle is random (Q).
- Go inside the Guest House.
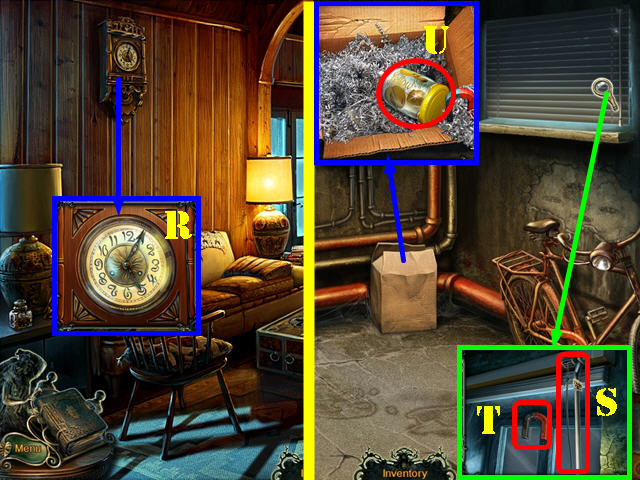
- Examine the clock; it shows 5:05 (R).
- Return to the Basement.
- Zoom into the blinds; use the BLINDS STRING on it (S).
- Open the blinds and take the MAGNET (T).
- Zoom into the box; use the MAGNET in it and take the PLASTIC JAR (U).
- Return to the Shed.
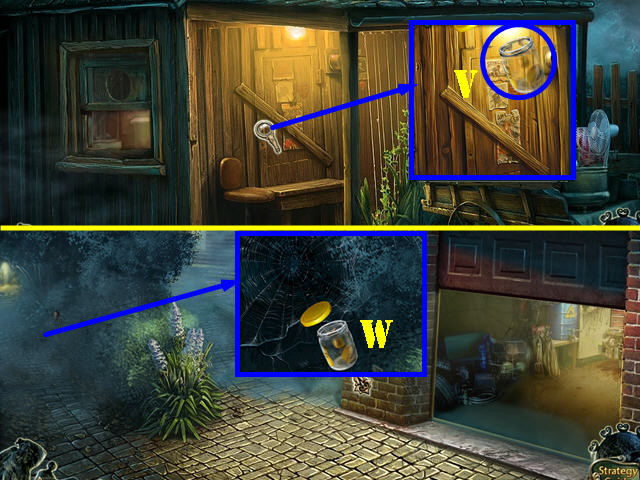
- Zoom into the door and use the PLASTIC JAR to get the MOTHS IN THE JAR (V).
- Return to the Garage Entrance.
- Zoom into the spider on the left. Use the MOTHS IN THE JAR on the spider web (W).
- Go left to the Lake.
- Take the EMPTY BUCKET (X).
- Place the EMPTY BUCKET in the water to get the BUCKET OF WATER (X1).
- Pull the rope (X2) several times until the boat has been pulled all the way to the pier.
- Zoom into the boat and take the BROOM (X3).
- Zoom into the fishing rod; place the THREE on the line and the FISHING ROD PIECE on the fishing rod (Z).
- Zoom back into the fishing rod to activate a puzzle.
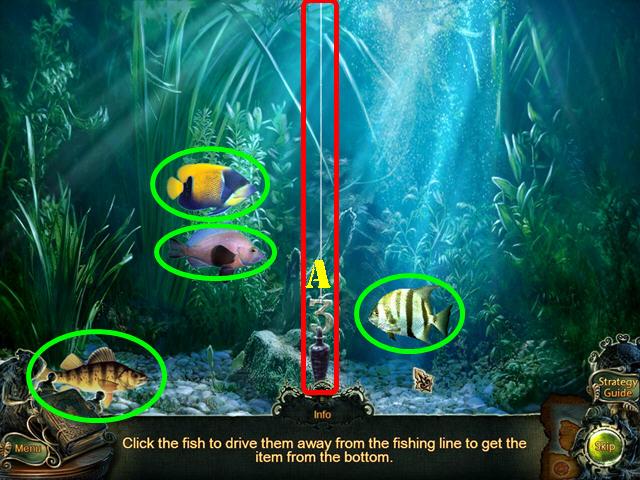
- Touch the fish (green) to drive them away from the line until you reach a clear path to the weight.
- Take the WEIGHT (A).
- Return to the Garden.
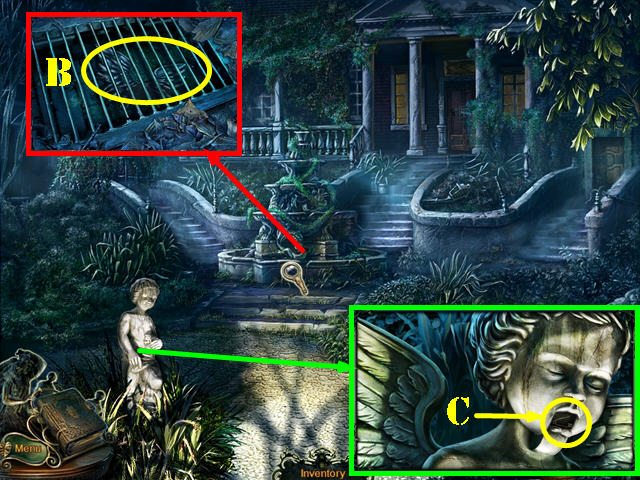
- Zoom into the fountain; use the BROOM on the leaves. Use the CUTTING TORCH on the grate to get the METAL ROD. Take the ANGEL WINGS (B).
- Zoom into the statue and place the ANGEL WINGS on it; take the SAFETY PIN (C).
- Return to the Road to the Guest House.
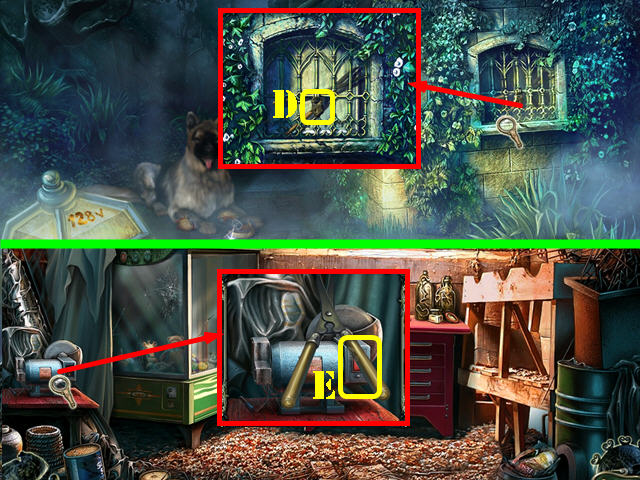
- Examine the window; use the SAFETY PIN on the lock (D) and take the GARDEN SHEARS.
- Return to the inside of the Shed.
- Zoom into the whetstone; place the TOGGLE SWITCH on it and push it (E).
- Use the GARDEN SHEARS on the whetstone to get the SHARP GARDEN SHEARS.
- Return to the Basement Entrance.
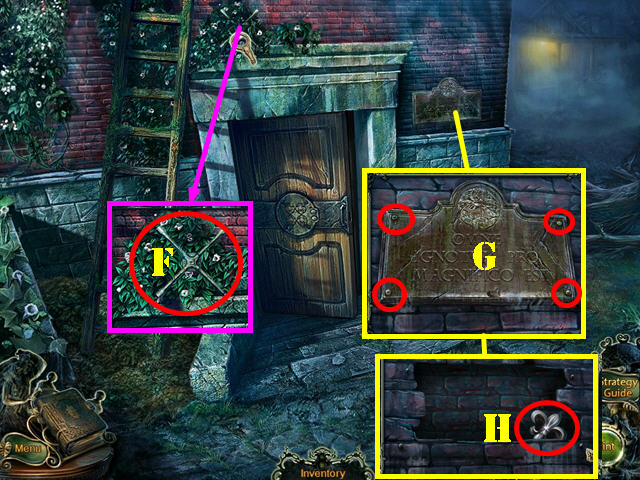
- Place the LADDER on the wall and zoom into the vines. Cut the vines with the SHARP GARDEN SHEARS and take the NUT WRENCH (F).
- Zoom into the plaque; remove the bolts with the NUT WRENCH (G) and take the FLEUR-DE-LIS KEY (H).
- Return to the Guest House Entrance.
- Zoom into the chimney; cut the rope with the SHARP GARDEN SHEARS and take the CHISEL (I).
- Go inside the Guest House.
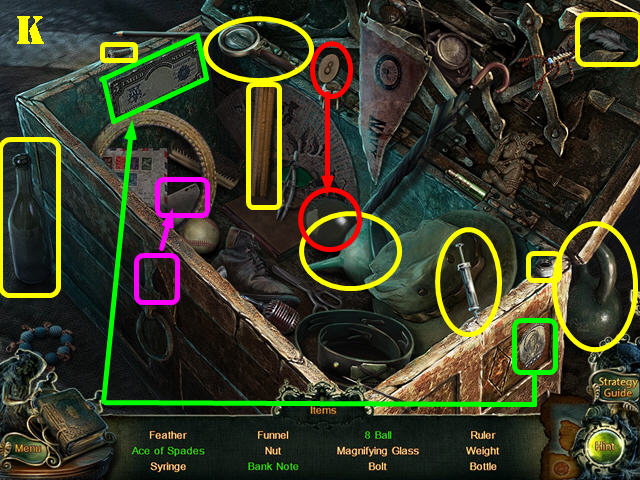
- Zoom into the chest; use the FLEUR-DE-LIS KEY in the lock (J) and press on it to activate a HOP.
- Interactive items are marked in the same color (K).
- You will receive the FUNNEL.
- Return to the Road to the Guest House.
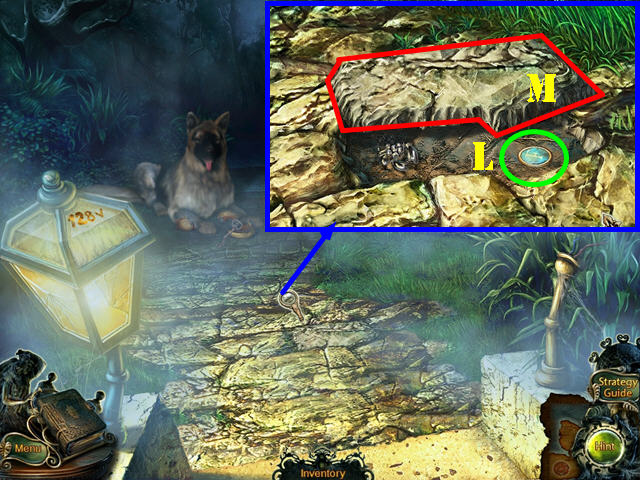
- Zoom into the ground; use the CHISEL on the loose stone; take the LOCK PART (L) and the STONE (M).
- Return to the Study.
Chapter 4: The Terrace
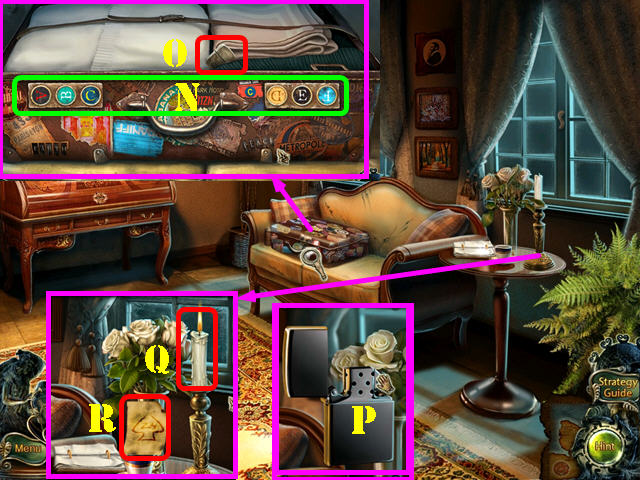
- Zoom into the suitcase and place the LOCK PART on it to activate a puzzle.
- Rotate the letters on the locks, so that their position is the same as the letters of the same color and background on the luggage stickers.
- Please look at the screenshot for the solution (N).
- Take the LIGHTER (O).
- Open the LIGHTER and flick the switch until it lights up (P).
- Zoom into the table and use the LIGHTER on the candle (Q). Place the SHEET OF PAPER over the candle to receive a clue (R).
- Return to the Terrace.

- Zoom into the ground; use the METAL DETECTOR on it until a jack appears on its screen. Select it to make an ‘X’ appear. Use the SHOVEL on the ‘X’ and take the JACK (S).
- Return to the Gate.
- Zoom into the car and place the JACK on the ground. Place the METAL ROD on the jack (T).
- Use the NUT WRENCH on the bolts to get the WHEEL (U).
- Return to the Guest House.
- Take a closer look at the fireplace and put the NEWSPAPER in it. Use the LIGHTER in the fireplace (A).
- Walk down.
- Zoom into the chimney; use the BROOM in it (B).
- Return to the inside of the Guest House.
- Take a closer look at the fireplace; use the BUCKET OF WATER in it to get the BUCKET (A).
- Zoom into the niche; take the LABYRINTH and the EXTENSION CORD (C).
- Use the EXTENSION CORD on the TV and then zoom into the TV for a clue (D).
- Return to the Lake.
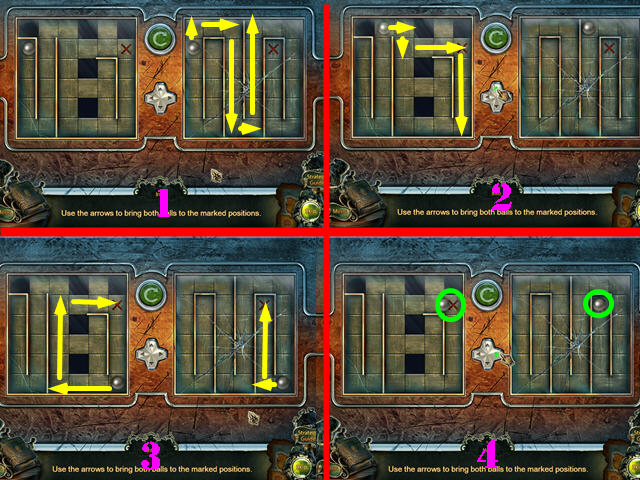
- Zoom into the boat; place the LABYRINTH in the niche to activate a puzzle.
- Use the arrows to move the ball through the labyrinth until both balls land on the red ‘X’s’.
- If the ball lands on the dark squares, the puzzle will reset.
- Both balls will move at the same time.
- Please look at the screenshot for the solution (1-4).
- Take the STETHOSCOPE.
- Return to the Garage.
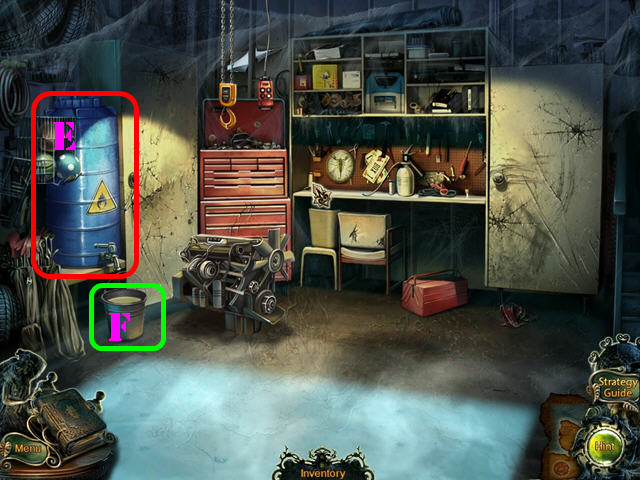
- Place the EMPTY BUCKET on the barrel and it will land below the barrel (E).
- Take the BUCKET OF FUEL (F).
- Return to the Guest House Entrance.
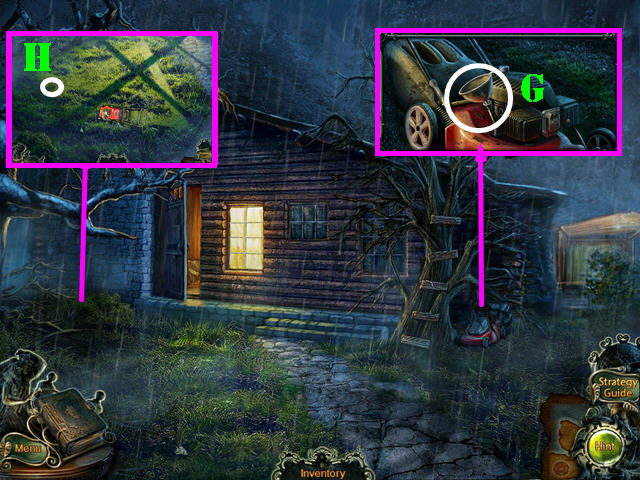
- Zoom into the lawnmower; place the FUNNEL in the hole and then pour the BUCKET OF FUEL in the funnel (G).
- You will receive the LAWN MOWER.
- Zoom into the high grass and place the LAWN MOWER on it to activate a puzzle.
- Touch the grass and the lawnmower will move to that spot. Keep cutting the grass until you find the telephone dial.
- Take the TELEPHONE DIAL (H).
- Return to the Lobby.

- Zoom into the phone and place the TELEPHONE DIAL on it to activate a puzzle (yellow).
- Dial 7320237 and then take the WEIGHT (I).
- Return to the Kitchen.

- Zoom into the clock and place the 2 WEIGHTS on it (green).
- Change the time to 5:05 and take the KEY (J).
- Use the KEY on the lock (K) to get the CHAIN and to activate a HOP.
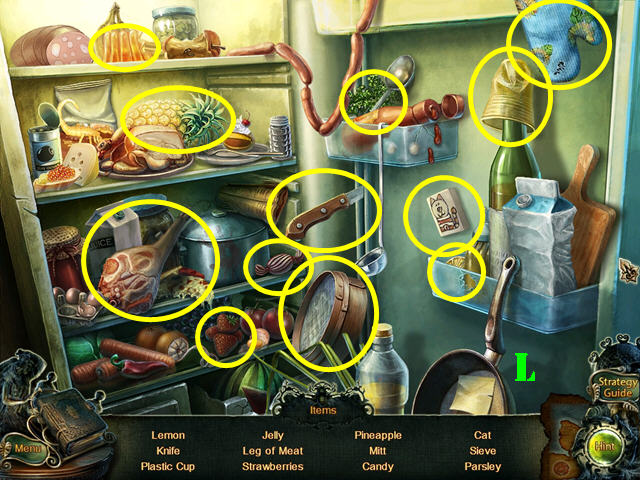
- Play the HOP.
- Find all the items on the list to receive the LEG OF MEAT (L).
- Return to the Road to the Guest House.
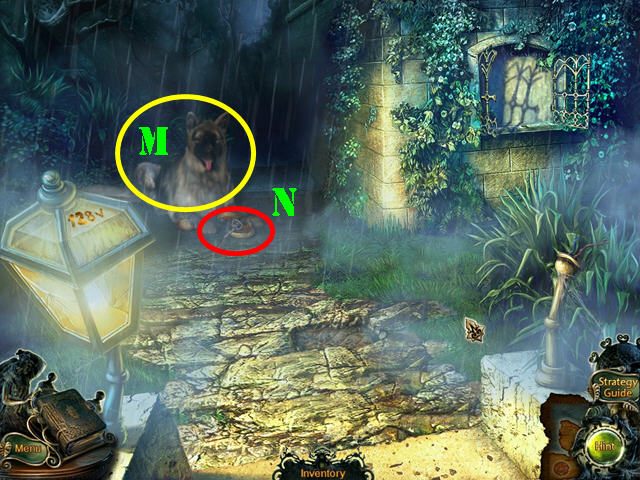
- Give the LEG OF MEAT to the dog (M).
- Take the BENT KEY (N).
- Go to the Garage.

- Zoom into the controls (O); and push the ‘down’ button. Place the CHAIN on the hook. Touch the following buttons to move the engine out of the way: up, right, and down.
- Zoom into the drawers and take the HAMMER (P).
- Zoom into the door and place the DOORKNOB on it (Q).
- Take the TONGS (R).
- Return to the Lobby.
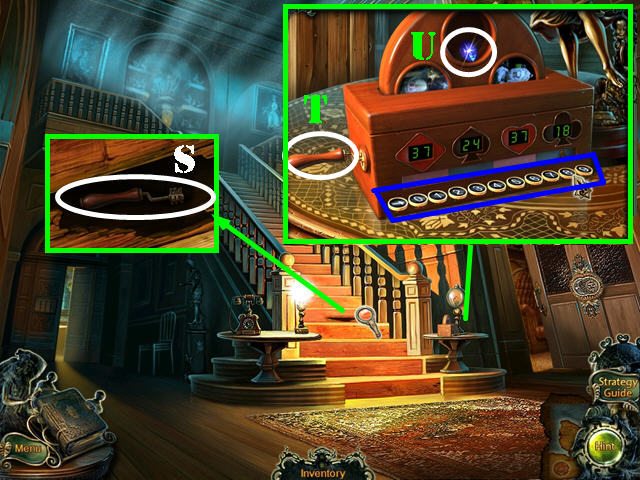
- Zoom into the steps; use the TONGS to get the WINDING KEY (S).
- Zoom into the table; place the KEYBOARD KEY (blue) and the WINDING KEY (T) on the device.
- Use the arrow to move up and down the line. Enter the right combination using the keys on the device. The answer can be found in your journal by looking at the numbers etched next to each symbol (diamond, spade, heart, and club).
- Enter the combination: 53, 24, 37, and 18.
- Take the GEM (U).
- Return to the inside of the Shed.
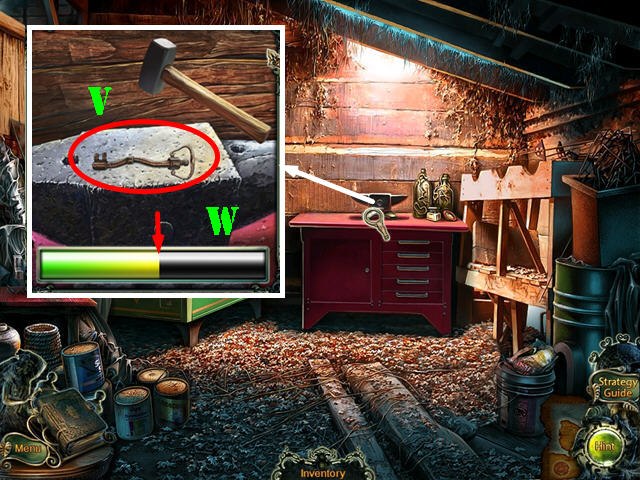
- Zoom into the anvil and place the BENT KEY on it (V).
- Use the HAMMER on the bent key to activate a puzzle.
- Touch the hammer when the meter is in the middle (W). Hit correctly to get the KEY.
- Return to the Study.
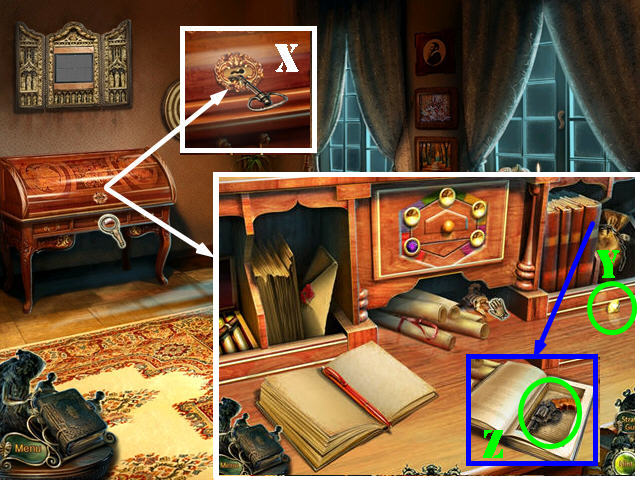
- Zoom into the desk; use the KEY in the lock (X) and then zoom into the desk again.
- Take the GEM (Y).
- Zoom into the book and open it; take the REVOLVER (Z).
- Return to the Guest House Entrance and then go right to the Shooting Range.
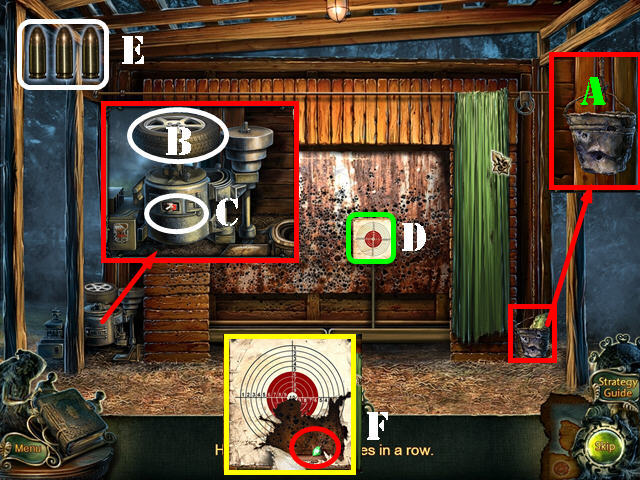
- Zoom into the bucket and place the STONE in it (A).
- Zoom into the drive shaft and place the WHEEL on it (B), then flip the button (C).
- Take the REVOLVER and use it to shoot the target 3 times (D). You have 3 bullets (E) to use up, once they are gone the puzzle will reset.
- Take the GEM (F).
- Return to the Bathroom.
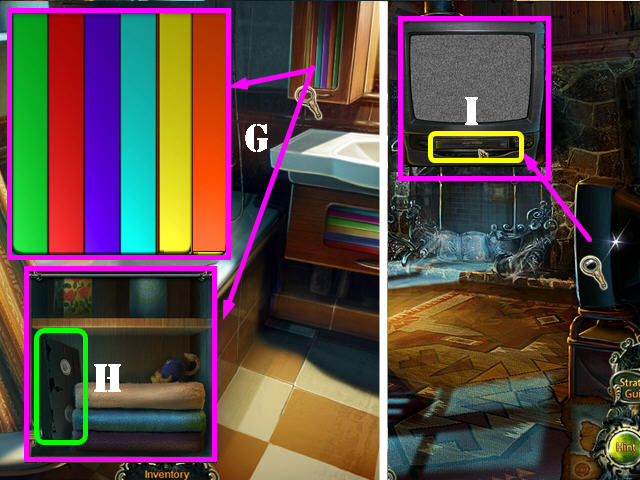
- Zoom into the upper cabinet to activate a puzzle. Note: this puzzle will not activate unless you plug in the extension cord to the TV.
- Place your cursor over the stripes and then press on the arrows to swap the places of the stripes.
- Please look at the screenshot for the solution: green, red, blue, light blue, yellow, and orange (G).
- Take the VIDEOCASSETTE (H).
- Return to the inside of the Guest House.
- Zoom into the TV and place the VIDEOCASSETTE in the slot (I).
- Return to the Study.
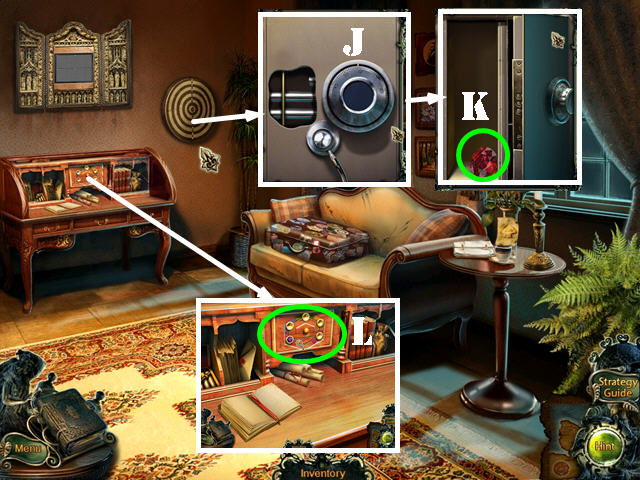
- Remove the target and zoom into the safe.
- Place the STETHOSCOPE on the safe (J).
- Rotate the dial clockwise until the first bar moves (at approximately number 59).
- Rotate the dial counterclockwise until the second bar moves (at approximately number 80).
- Rotate the dial clockwise until the third bar moves, at approximately number 22).
- Take the GEM (K).
- Zoom into the desk and then into the drawers (L); place the 4 GEMS in the slots.

- Move the gems to the spots of the same color.
- To solve the puzzle, select the gems in this order: A, E, D, C, B, A, E, D, C, B, A, F, E, D, C, B, A, E, D, C, B, A, E, D, C, B, A, F, E, D, C, B, A, and F.
- Touch the map pieces to activate a puzzle (G).
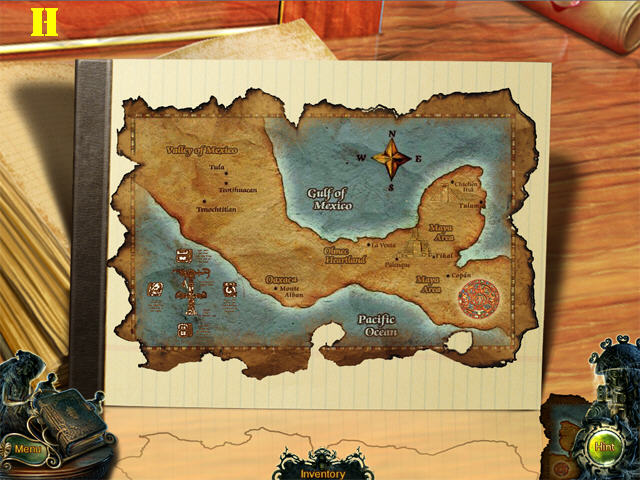
- Drag the pieces into place; pieces placed correctly will lock in place.
- Please look at the screenshot for the solution (H).
Chapter 5: The Tunnel
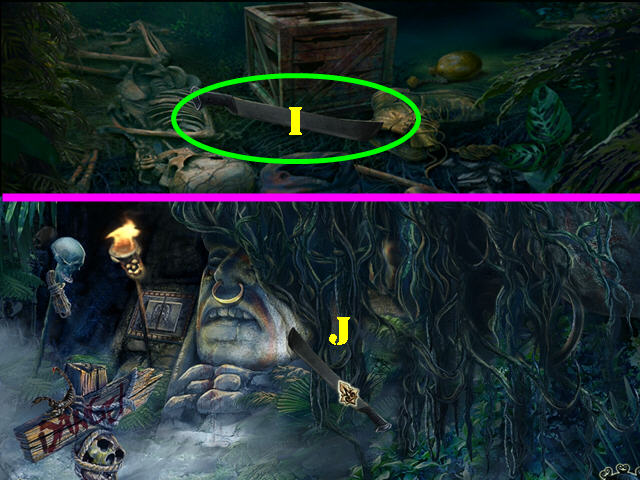
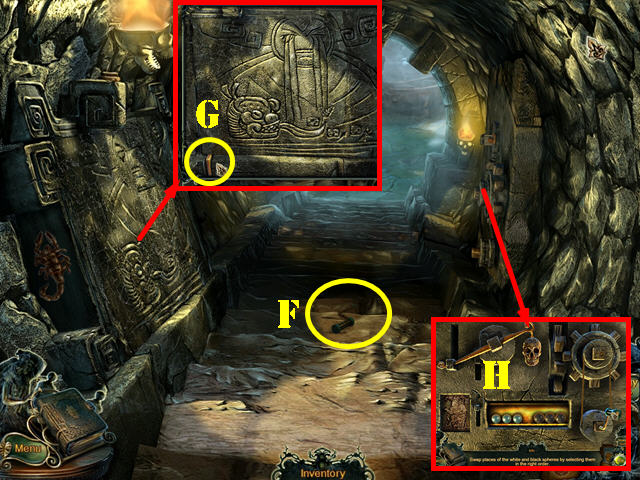
- Take the MACHETE (I).
- Use the MACHETE 3 times on the scene to clear the path (J).
- Zoom into the skull; take the ROPE (K).
- Use the ROPE on the stone face ring (L) and then pull on it.
- Take back the ROPE.
- Examine the door and take the FLASHLIGHT (M).
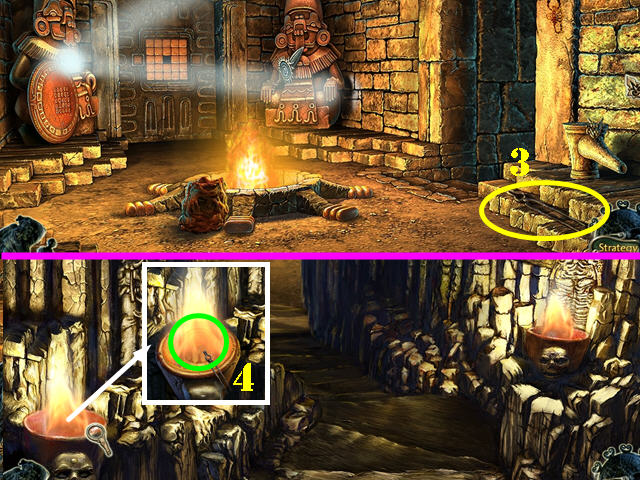
- Go into the Tunnel (N).
- Use your FLASHLIGHT on the scene.
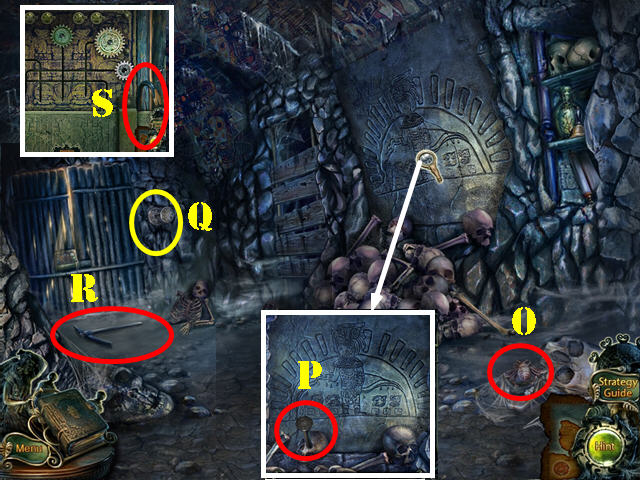
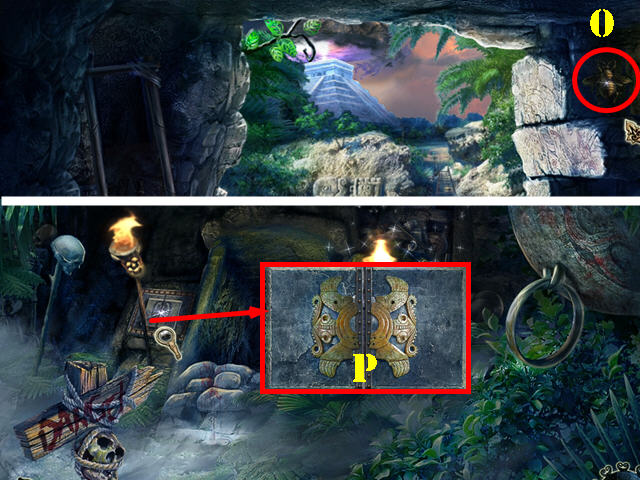
- Crack the skull and take the GOLDEN BEE 1/4 (O).
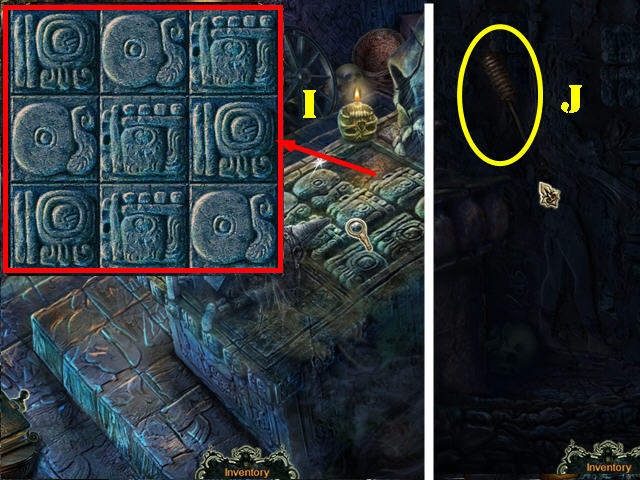
- Zoom into the wall and take the LEVER (P).
- Place the LEVER in the slot (Q) and then press it.
- Take the PICKAXE (R).
- Zoom into the gate to the Bridge and take the CROWBAR (S).
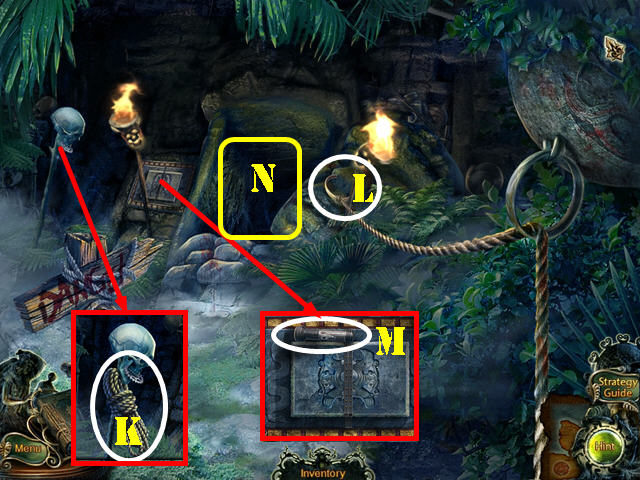
- Return to the Tunnel Entrance.

- Zoom into the skull; use the CROWBAR to get the GEAR (T).
- Return to the Tunnel.
- Zoom into the gate to the Bridge and place the GEAR on it to activate a puzzle (U).
- Use the knobs at the top to drop the gears in the right order so they move the bar all the way to the left.
- To solve the puzzle, select the knobs in this order: C, B, E, A, and D.
- Go to the Bridge.
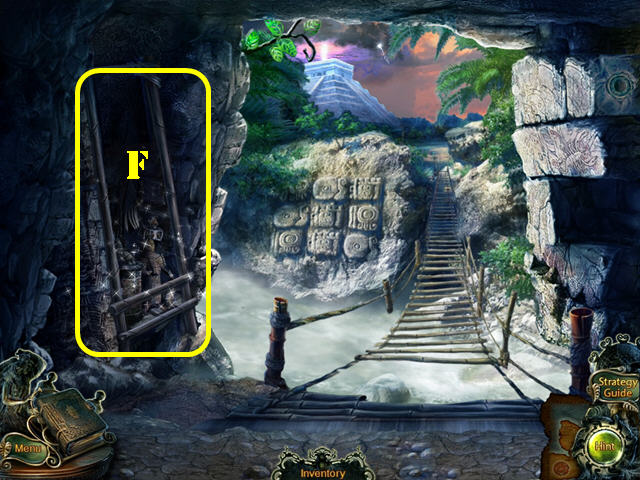
- Touch the wall for a cut scene (F).
- Use the PICKAXE 4 times on the wall to activate a HOP.
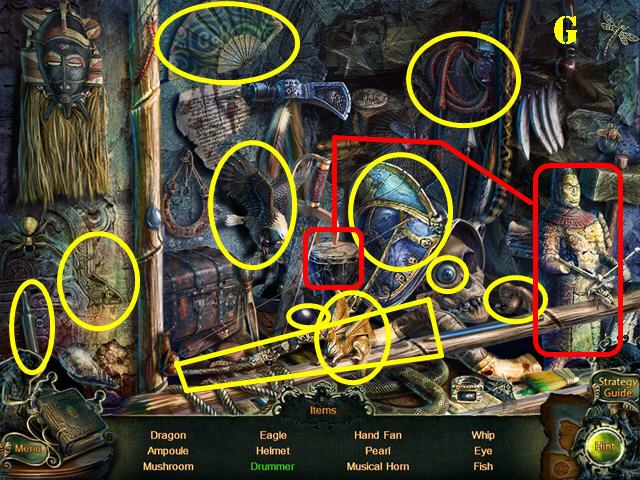
- Play the HOP.
- Interactive items are marked in the same color (G).
- You will receive the MUSICAL HORN.
- Walk down.
- Zoom into the boards; use the CROWBAR on it to get the PLANKS (H).
- Take the ACID (I).
- Return to the Bridge.
- Place the PLANKS on the bridge and then use the ROPE on them (J).
- Go forward to the Excavation Site.

- Touch anywhere for a cut scene.
- Take the FUEL CAN (K).
- Touch the awning pole and take the WIRES (L).
- Zoom into the drum and place the WIRES in it (M).
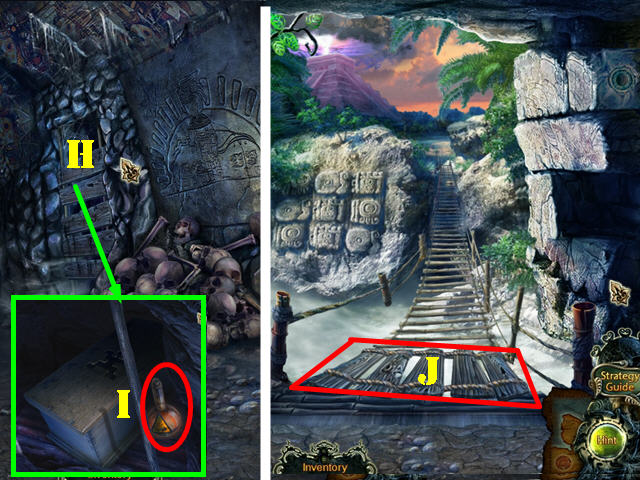
- Take a closer look at the note (N).
- Go into the Tent (O).
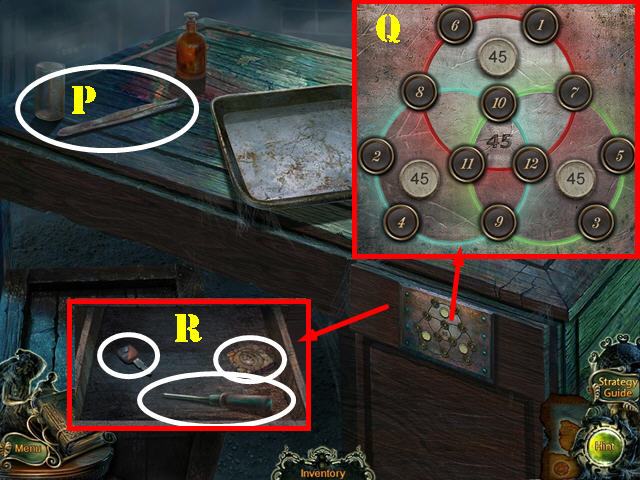
- Take the TWEEZERS (P).
- Zoom into the puzzle on the desk drawer and play it.
- Select two numbers to swap their positions until all the circles add up to 45.
- The numbers in the middle show the current sum of your combinations.
- Please look at the screenshot for the solution (Q).
- Look in the drawer; take the SCREWDRIVER, KEY, and the EYE (R).
- Walk down.
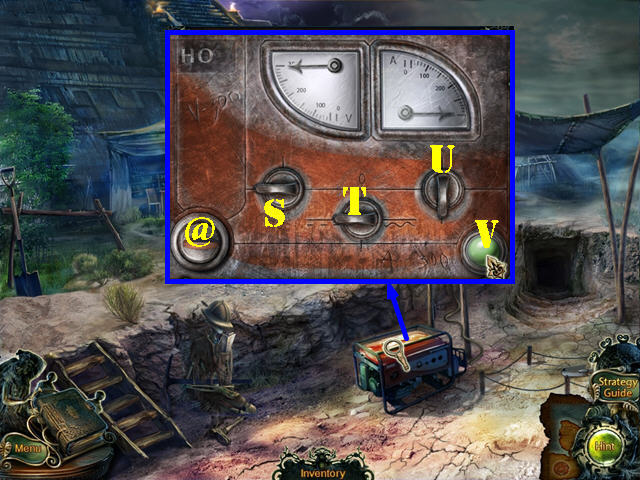
- Examine the generator; insert the KEY into the lock to activate a puzzle (@).
- Set the voltage to the right settings by using the knobs.
- To solve the puzzle, select the buttons in this order: Sx3, Tx3, Ux2, and V.
- Go up the steps to the Pyramid.
Chapter 6: The Pyramid
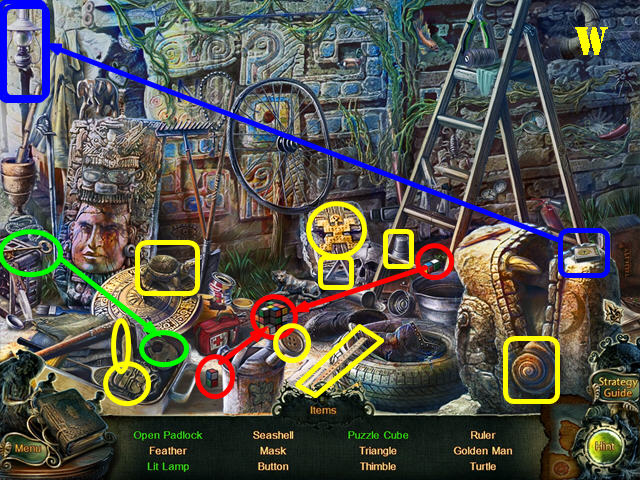
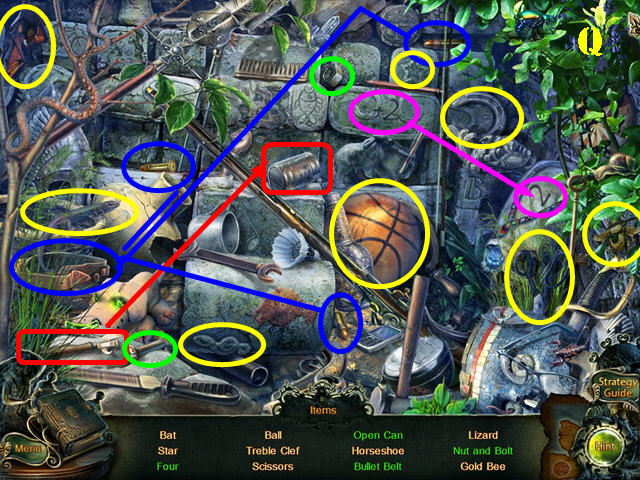
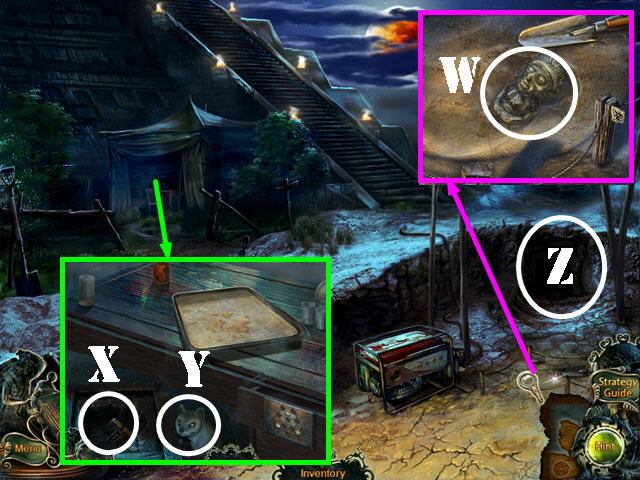
- Play the HOP.
- Interactive items are marked in the same color (W).
- You will receive the GOLDEN MAN.
- Take the KNIFE (X).
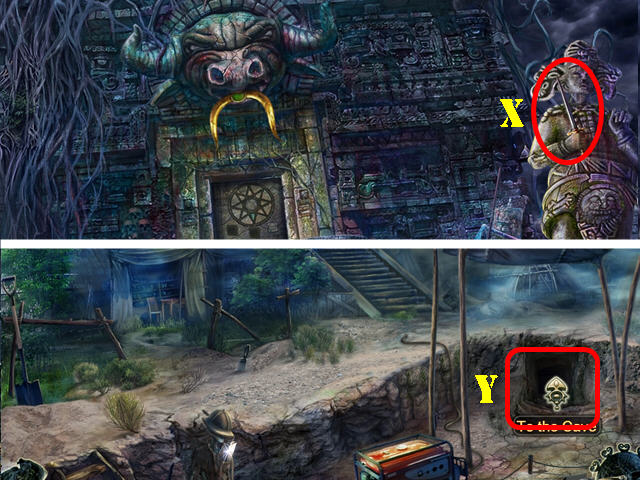
- Walk down and go into the Cave (Y).
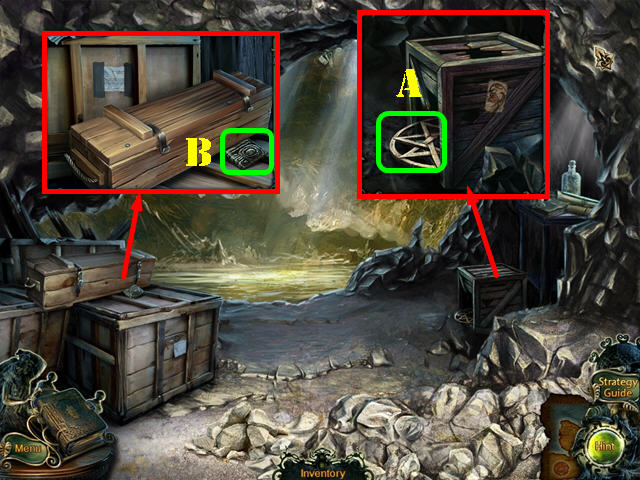
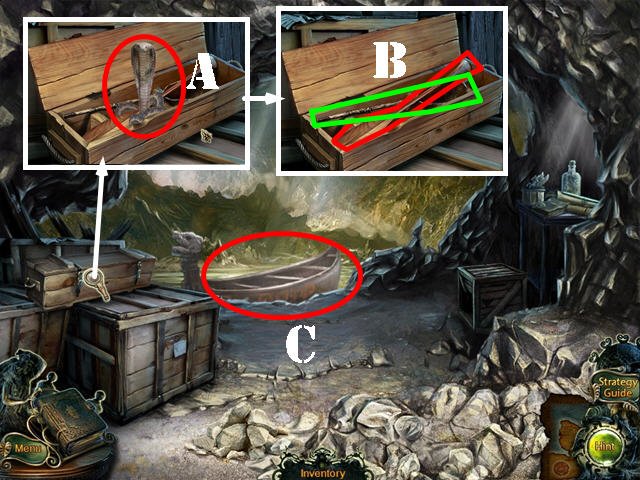
- Examine the crate and take the STAR (A).
- Examine the crate and take the HIEROGLYPH (B).
- Return to the Tunnel and then go to the Grotto.

- Place the GOLDEN MAN in the niche (C).
- Open the crate and take the NOSE (D).
- Return to the Pyramid.
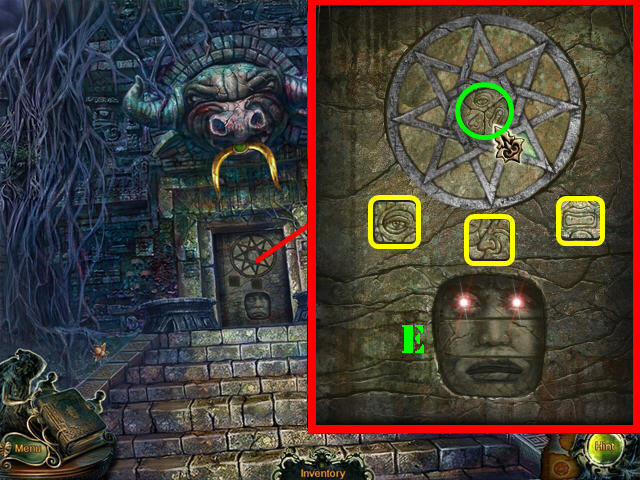
- Zoom into the back wall; place the EYE, STAR, and the NOSE in the slots.
- Select the nose, eye, and mouth tiles (yellow) and then select the circle in the middle (green) to sort through all the choices for that part of the face.
- Please look at the screenshot for the solution (E).
- Go into the Altar.
Chapter 7:The Altar
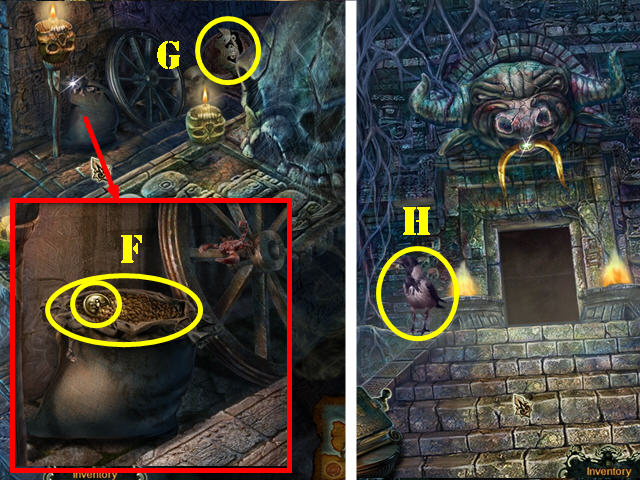
- Zoom into the sack; cut it with the KNIFE. Take the WHEAT and the BUTTON (F).
- Take the MEDALLION (G).
- Walk down.
- Try to take the bee and a bird will appear. Give the WHEAT to the bird and take the GOLDEN BEE 2/4 (H).
- Return to the Altar.
- Zoom into the tomb and place the HIEROGLYPH on it to activate a puzzle.
- Hover over the edge of two tiles and press on the arrows to swap those pieces.
- Please look at the screenshot for the solution (I).
- Go into the Secret Chamber.
- Use the FUEL CAN on the torch (J).
- Walk down.
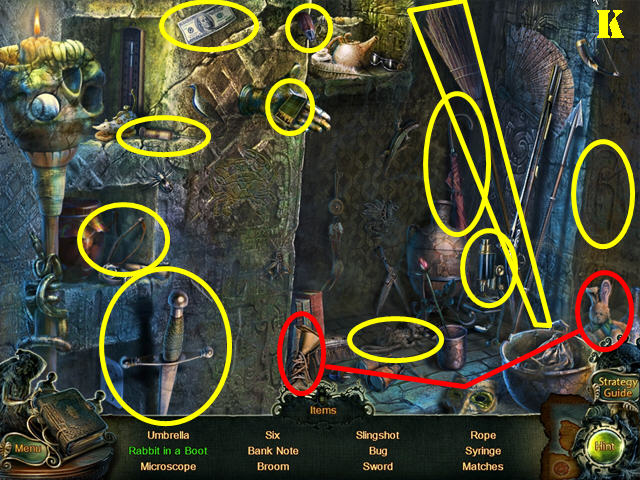
- Play the HOP.
- Interactive items are marked in the same color (K).
- You will receive the MATCHES.
- Go into the Secret Chamber.
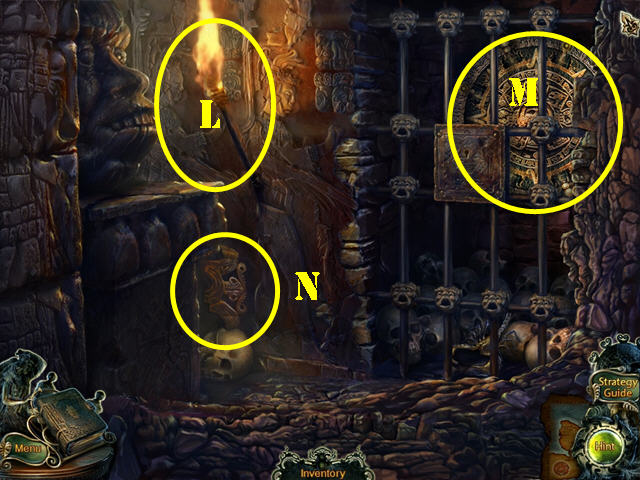
- Light the torch with the MATCHES (L).
- Touch the puzzle and the gate will close (M).
- Take the MEDALLION (N).
- Return to the Tunnel Entrance.
- Return to the Bridge.
- Place the BUTTON in the slot; press and hold it until the stone moves. Use the SCREWDRIVER to get the GOLDEN BEE 3/4 (O).
- Return to the Tunnel Entrance.
- Zoom into the panel and place the 2 MEDALLIONS in the slots to activate a puzzle (P).
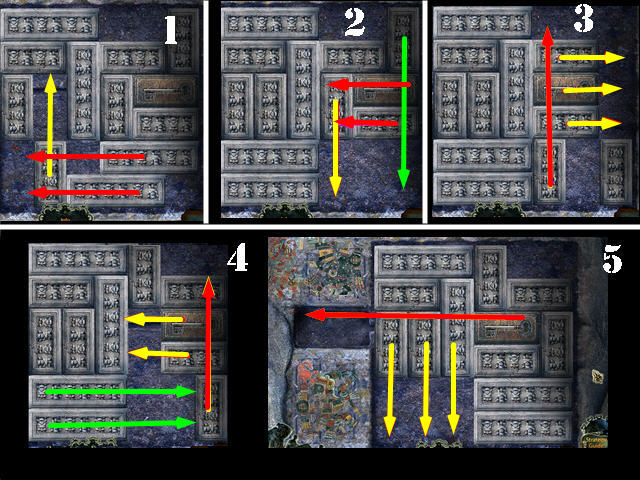
- Slide the blocks out of the way to make a clear path for the key.
- To solve the puzzle, follow the steps (1-5) in the screenshot. Move the arrows in this order: yellow, red, and green.
- You will receive the KEY IN A STONE.
- Play the HOP.
- Interactive items are marked in the same color (Q).
- You will receive the GOLDEN BEE 4/4.
- Return to the Tent.
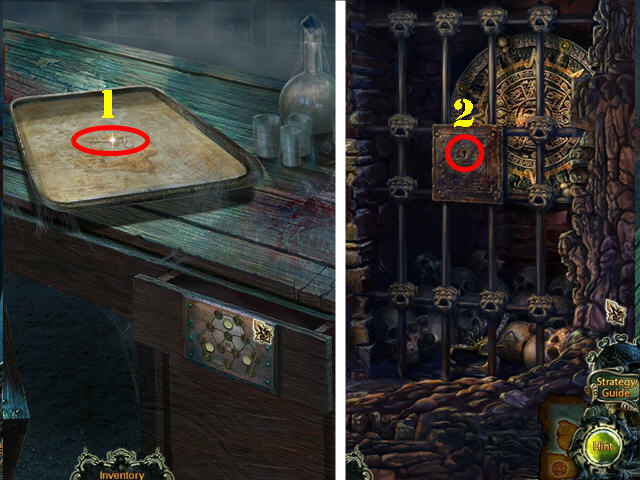
- Place the ACID in the tray. Put the KEY IN A STONE in the tray and use the TWEEZERS to take the KEY (1).
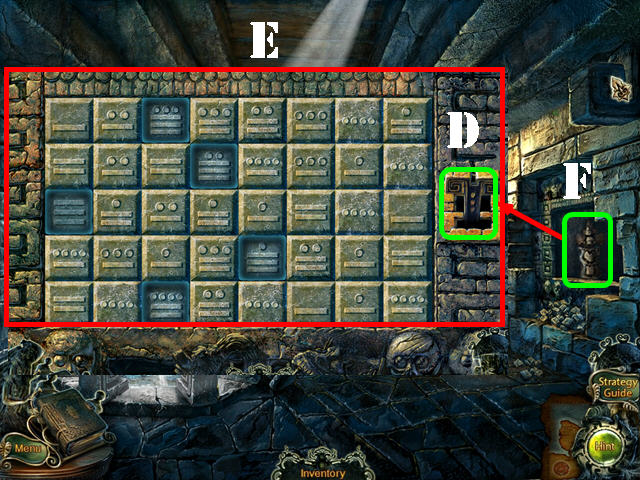
- Return to the Secret Chamber.
- Use the KEY in the lock (2).
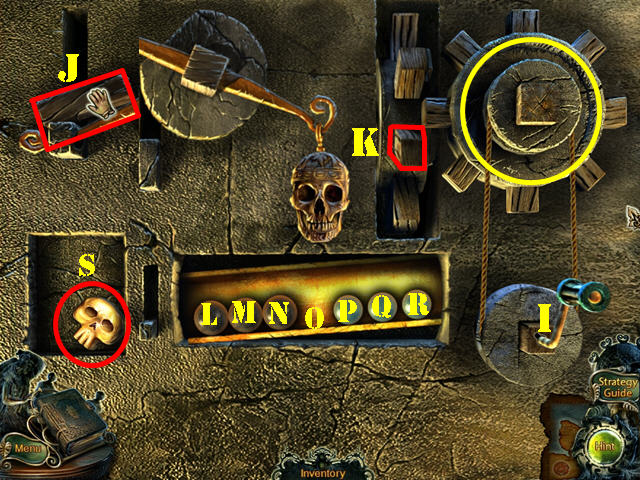
- Zoom into the puzzle and place the 4 GOLDEN BEES on it to activate a puzzle.
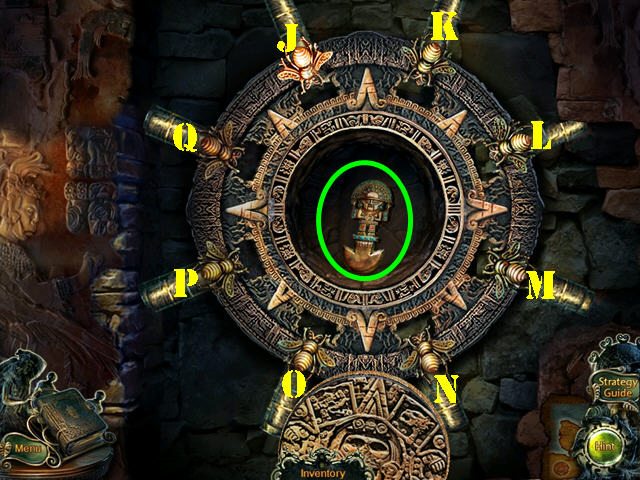
- Touch the bees the right order until you pull all the pins out.
- To solve the puzzle, select the bees in this order: K, M, O, L, N, O, P, O, P, Q, P, and J.
- Take the RITUAL KNIFE (green) to be automatically transported to the Dungeon.
Chapter 8: The Dungeon
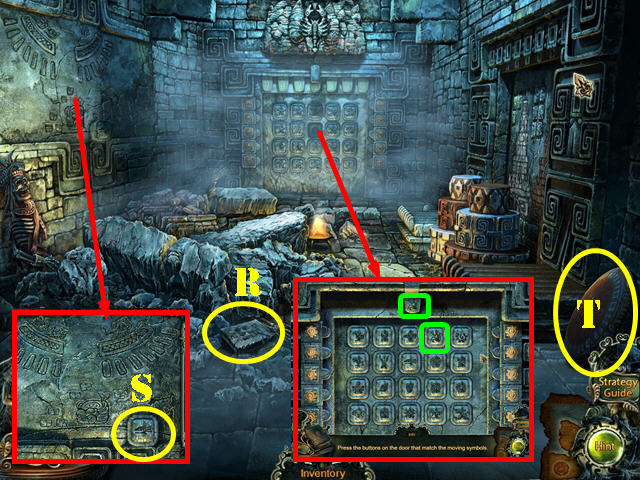
- Take the STONE WITH SYMBOLS 1/5 (R).
- Examine the wall; take the STONE SYMBOL (S).
- Take the SHIELD (T).
- Zoom into the back wall; place the STONE SYMBOL in the slot to activate a puzzle.
- Press on the symbols on the board that matches the ones appearing at the top of the puzzle (green) before it reaches the right end. You must hit 10 matching stones in a row to beat the puzzle. If you make a mistake, the puzzle will reset.
- The solution is random since it depends on how quickly you can hit the buttons.
- Go forward to the Prayer Room.
- Touch anywhere for a cut scene.
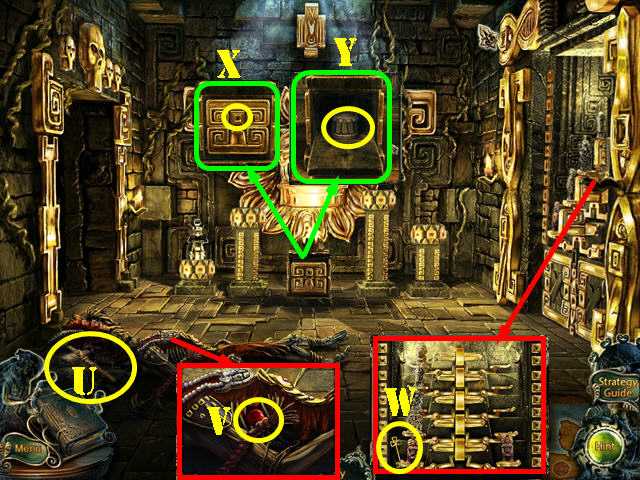
- Take the STONE AXE (U).
- Zoom into the skeleton; use the STONE AXE on the ribcage and take the RUBY (V).
- Zoom into the right wall and take the KEY (W).
- Zoom into the lock and use the KEY in it (X); take the PYRAMID PART (Y).
- Go left to the Marble Gallery.
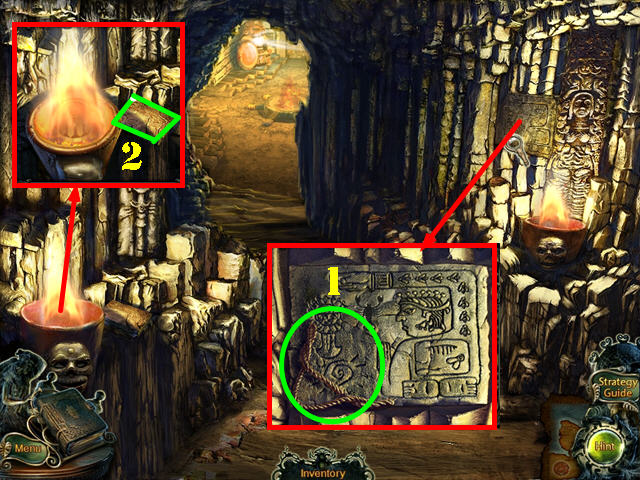
- Use the MUSICAL HORN on the scene to chase the bats away.
- Zoom into the right wall and take the ROPE LOOP (1).
- Examine the fire and take the STONE WITH SYMBOLS 2/5 (2).
- Go forward to the Guards Room.
- Take the TONGS (3).
- Walk down.
- Zoom into the fire and take the PYRAMID PART with the TONGS (4).
- Walk down twice and zoom into the right wall.
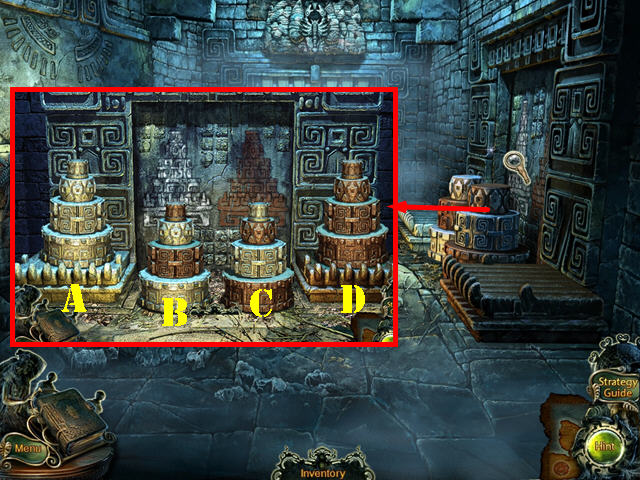
- Put down the 2 PYRAMID PARTS to activate a puzzle.
- Assemble the light pyramids on the left platform and the dark pyramids on the right platform.
- Pick up a pyramid piece and the spaces it can move to will light up.
- Please follow these steps to solve the puzzle: B-A, C-B, C-D, A-D, C-A, D-C, D-A, C-A, C-D, B-D, B-C, D-C, B-D, A-B, A-D, B-D, C-A, C-B, A-B.
- A-C, B-A, B-C, A-C, B-A, C-A, C-B, A-B, C-A, B-C, B-A, and C-A.
- Solving this puzzle activates a HOP.

- Play the HOP.
- Interactive items are marked in the same color (E).
- You will receive the GOLDEN IDOL.
- Return to the Guards Room and go right to the Granite Gallery.
- Take the WINCH (F).
- Zoom into the left wall and take the YELLOW SQUARE (G).
- Zoom into the right wall (H).
- Place the ROPE LOOP on the wheel (yellow).
- Place the WINCH in the slot (I).
- Put the wedge (J) in the slot (K).
- Turn the winch.
- Move the black spheres to the left and white ones to the right .To solve the puzzle, touch the spheres in this order: P, N, M, O, Q, R, P, M, L, M, O, Q, P, N, and O.
- Take the GOLDEN SKULL (S).
- Go forward to the Underground Quay.
- Take the GOLDEN IDOL (T).
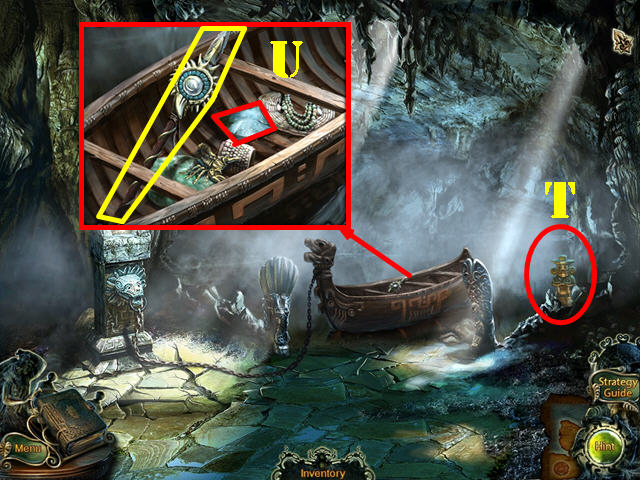
- Zoom into the boat; take the MAYAN SPEAR and the STONE WITH SYMBOLS 3/5 (U).
- Return to the Guards Room.
- Place the SHIELD on the right statue (A).
- Place the MAYAN SPEAR on the left statue (B).
- Examine the right shield for a clue (C).
- Zoom into the wall and place the YELLOW SQUARE in the slot. Flip the tiles as shown in the screenshot (D).
- Go forward to the Treasury.
Chapter: 9 The Finale
- Zoom into the right scale; touch the two items marked in yellow to get the GOLD PIECES (E).
- Zoom into the left scale; touch the three items marked in yellow to get the COPPER PIECES (F).
- Zoom into the center scale; touch the three items marked in yellow to get the SILVER PIECES (G).
- Return to the Guards Room.
- Take the CRUCIBLE (H) and place it in the fire (I).
- Zoom into the crucible; place the GOLD PIECES, COPPER PIECES and the SILVER PIECES into it (J).
- Use the STONE AXE on the mold and take the GOLDEN IDOL (K).
- Take the STONE WITH SYMBOLS 4/5 (L).
- Return to the Prayer Room.
- Place the 3 GOLDEN IDOLS on the pedestals.
- Select two idols to swap their positions until they are in the same spots as the screenshot (M).
- Take the STONE WITH SYMBOLS 5/5 (N).
- Return to the Underground Quay.

- Examine the altar (O) and place the 5 STONES WITH SYMBOLS on the puzzle to activate it.
- Hover over a stone slab (green) to raise it. Look at the piece marked in blue and press that piece on the field that is surrounded by the same pieces shown on the slab.
- You must lift the slabs in the order shown at the top (red).
- The solution to this puzzle is random.
- Take the Boat to the other side.
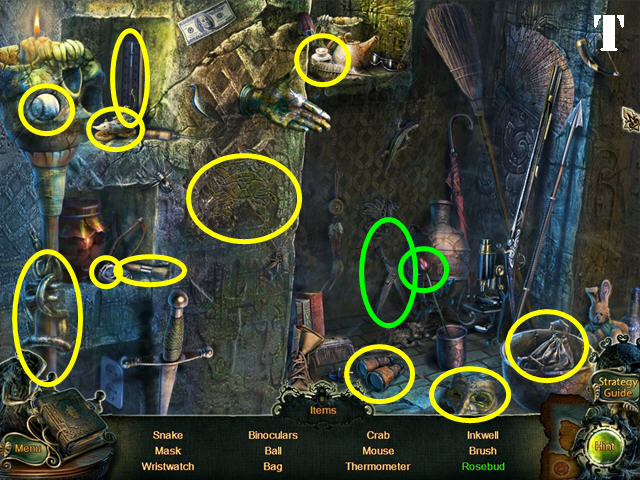
- Play the HOP.
- Interactive items are marked in the same color (P).
- You will receive the SPEAR.
- Walk down and try to go up the steps to the Pyramid.
- Go up the steps.

- Use the SPEAR on the horns (Q).
- Zoom into the horns (R) and open the prongs in the order shown (1-5).
- Take the EMERALD (S).
- Go into the Altar.
- Play the HOP.
- Interactive items are marked in the same color (T).
- You will receive the BRUSH.
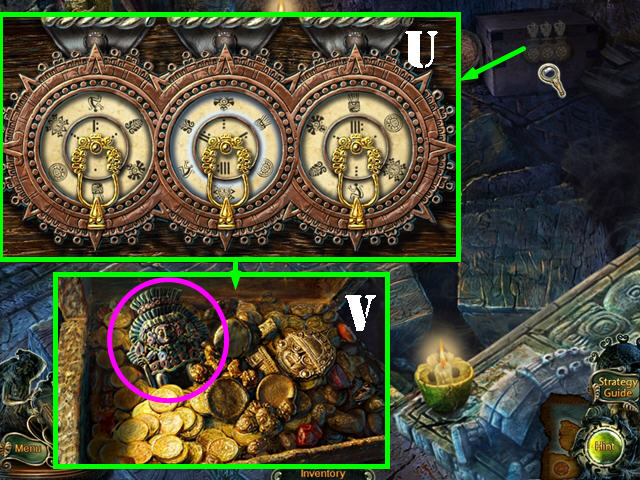
- Zoom into the discs.
- Rotate them into the correct positions.
- Please look at the screenshot for the solution (U).
- Zoom into the chest and take the ANCIENT FIGURINE (V).
- Return to the Excavation Site.
- Examine the ground; use the BRUSH on it twice and take the ANCIENT FIGURINE (W).
- Return to the tent.
- Touch the scene to wake up the mongoose.
- Take the LEVER (X).
- Press on the MONGOOSE on the scene to add it to inventory (Y).
- Return to the Cave (Z).
- Zoom into the crate and use the CROWBAR on the crate. Zoom into the crate and use the MONGOOSE on the snake (A).
- Zoom back into the crate; take the NET and the OAR (B).
- Place the OAR in the boat and take the Boat. Return to the Treasury (C).
- Zoom into the right wall and place the LEVER in the slot (D).
- Press on the 5 symbols that are different from the others.
- Please look at the screenshot for a random solution (E).
- Take the ANCIENT FIGURINE (F).
- Return to the Prayer Room.

- Zoom into the skull; place the GOLDEN SKULL in the slot. Arrange the small skulls as shown in the screenshot (G).
- Take the GOLDEN STOPPER (H).
- Return to the Treasury.
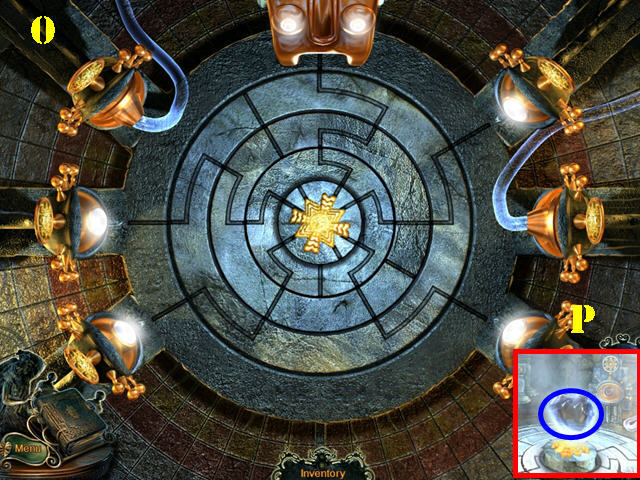
- Examine the fountain and place the GOLDEN STOPPER in the nozzle (I).
- Use the NET to get the SAPPHIRE (J).
- Return to the Dungeon.
- Examine the skeleton to activate a puzzle.
- Select the fingers in the right order until they are all up. To solve the puzzle, select the fingers in this order (1-8).
- Zoom into the puzzle; place the RUBY, EMERALD, and SAPPHIRE in the slots to activate a puzzle.
- Place the stones in the spots of the same color. Press on a stone (blue) and all the stones surrounding it will rotate.
- This puzzle is randomly generated. The screenshot shows the final image (K).
- Take the ANCIENT FIGURINE (L).
- Go forward to the Prayer Room.
- Zoom into the right wall and put down the 4 ANCIENT FIGURINES (M).
- Head right to the Ceremonial Chamber.
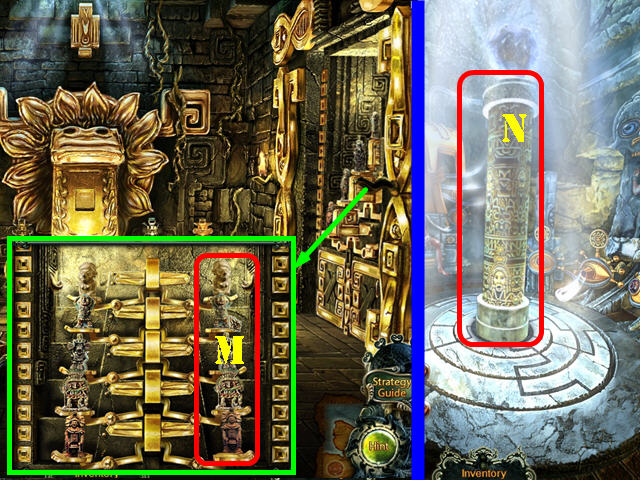
- Zoom into the column (N) to activate a puzzle.
- Line up the lines by rotating each ring into place.
- Please look at the screenshot for the solution (O).
- Use the RITUAL KNIFE on the stone (P).
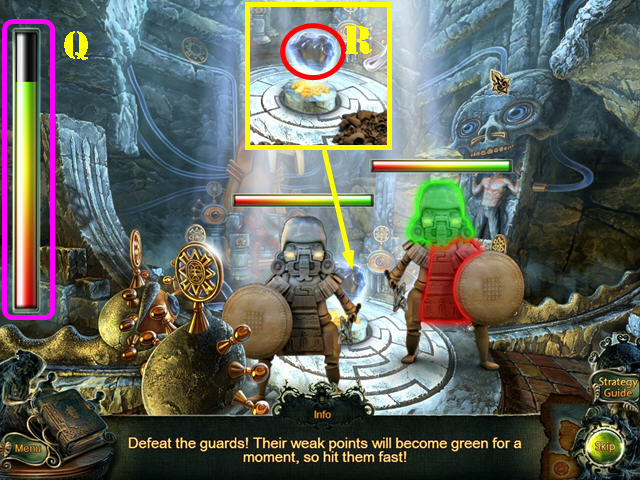
- Hit the guards in one of the green zones. If you hit them on the red zones your meter (Q) will decrease quickly.
- If you fail the level, just go back into the Ceremonial Chamber.
- Use the RITUAL KNIFE on the stone once more (R).
- Congratulations, you have completed Enigma Agency: The Case of Shadows.


 Virtual City Walkthrough, Guide, & Tips
 Nightmare Realm: In the End... Walkthrough, Guide, & Tips
 Pachinko Pop Tips and Tricks, Guide, & Tips
 Sea of Lies: Nemesis Walkthrough, Guide, & Tips
 Nightmares from the Deep: The Siren's Call Walkthrough, Guide, & Tips