Portal of Evil: Stolen Runes Walkthrough, Guide, & Tips
Portal of Evil: Stolen Runes Walkthrough
Welcome to the Portal of Evil: Stolen Runes Walkthrough
The gates to another world will open soon! You can stop the impending disaster – if you track down the stolen runes!
Whether you use this document as a reference when things get difficult or as a road map to get you from beginning to end, we’re pretty sure you’ll find what you’re looking for here.
This document contains a complete Portal of Evil: Stolen Runes game walkthrough featuring annotated screenshots from actual gameplay!
We hope you find this information useful as you play your way through the game. Use the walkthrough menu below to quickly jump to whatever stage of the game you need help with.
Remember to visit the Big Fish Games Forums if you find you need more help. Have fun!
This walkthrough was created by BrownEyedTigre, and is protected under US Copyright laws. Any unauthorized use, including re-publication in whole or in part, without permission, is strictly prohibited.
General Tips

- This is the official guide for Portal of Evil: Stolen Runes.
- Select Options to adjust Music, Sounds, and Ambient Audio. You can also adjust Full Screen, Widescreen, Window Cursor or screen resolution.
- You may choose between Casual and Expert.
- The Hidden-object puzzles will be referred to as HOP throughout the guide. Items labeled in red or blue in the find list require an extra step to find.
- Puzzles may be skipped after a short wait. Most puzzles may be reset by exiting out of the puzzle.
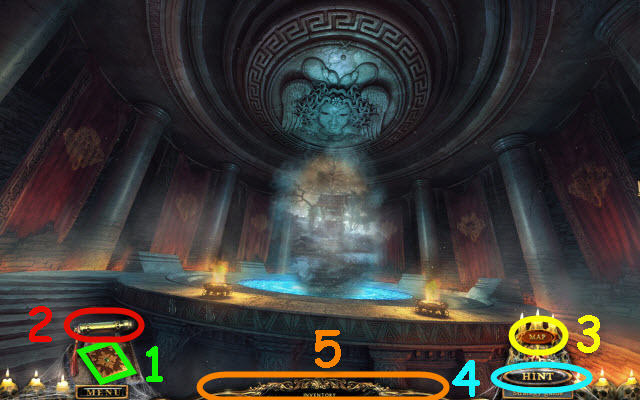
- Open your journal (1) to view your story updates and stored clues.
- There are 15 messages to collect and they will be stored in the holder (2) that you will find during gameplay.
- You will acquire a Map (3) in early gameplay which allow you to see what locations have tasks to complete. You can also fast travel to any location by selecting the desired area on the map.
- You may select the Hint button (4) for help in game play or HOP areas.
- Move your cursor to the bottom of the screen to pull up the Inventory Bar (5).
Chapter 1: The Order of Light
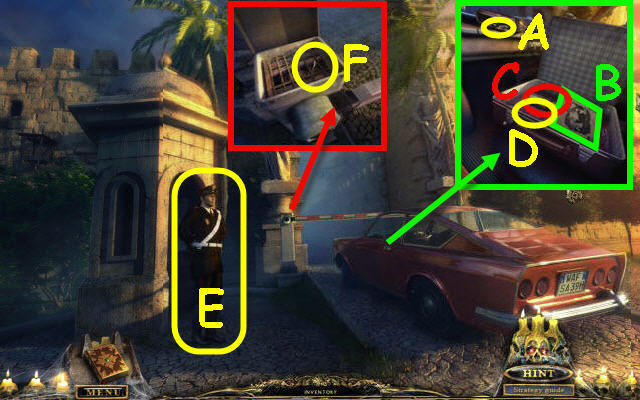
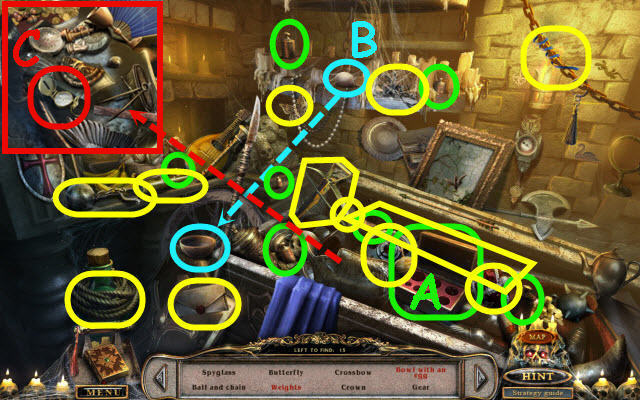
- Select anywhere in the scene to talk to the guard.
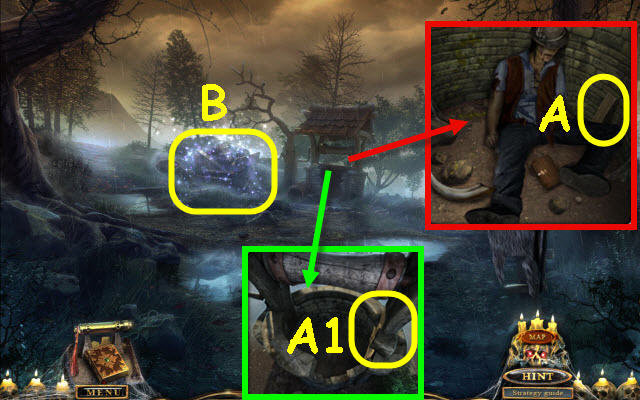
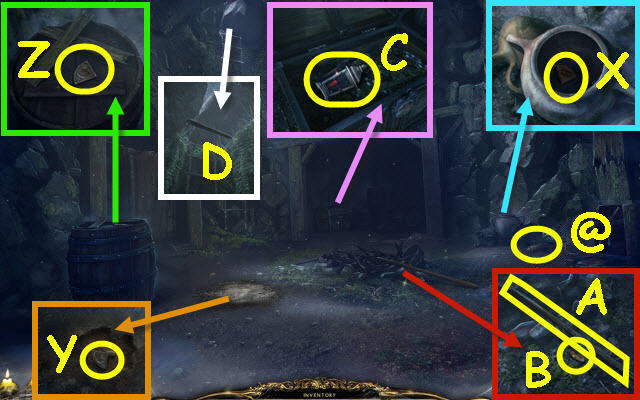
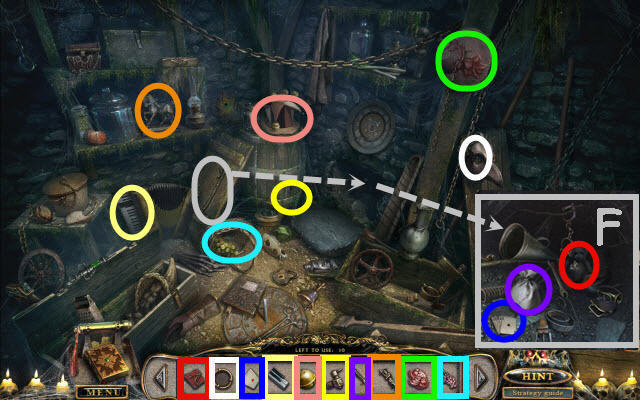
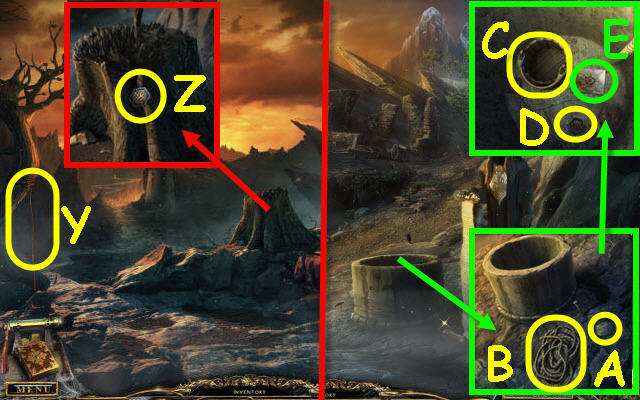
- Open the car door and examine the opened door. Open the clutch; take the KEY (A).
- Use the KEY on the suitcase; examine the photo (B) and take the INVITATION (C) and TWEEZERS (D).
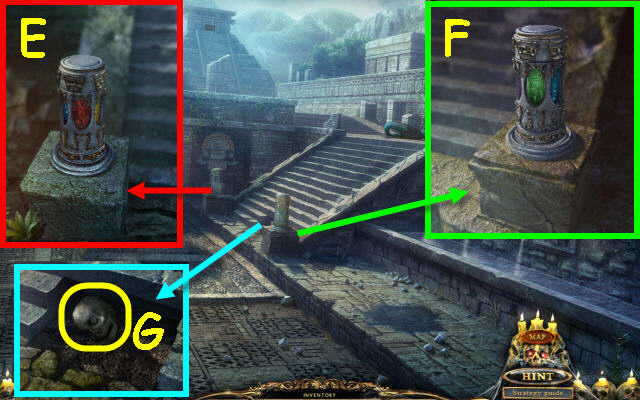
- Give the INVITATION to the guard (E); you will receive a SCREWDRIVER.
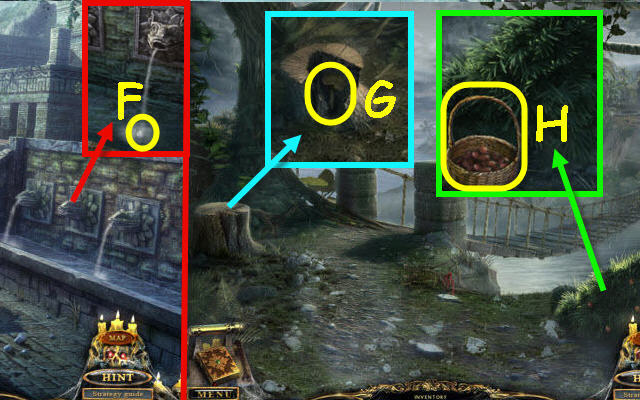
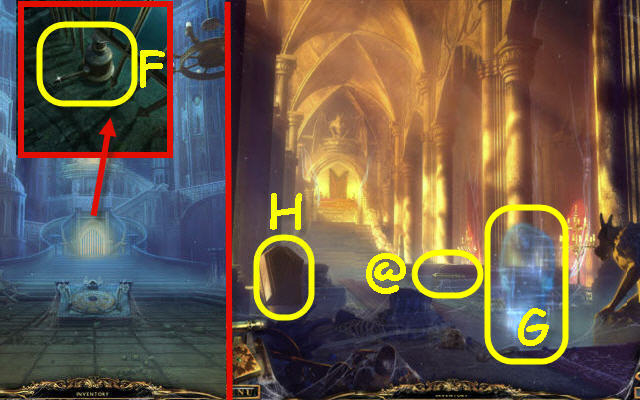
- Examine the gate mechanism and use the SCREWDRIVER on the bolts; lift the lid. Use the TWEEZERS to remove the twig (F).
- Go right at the end of the walkway after the cutscene.
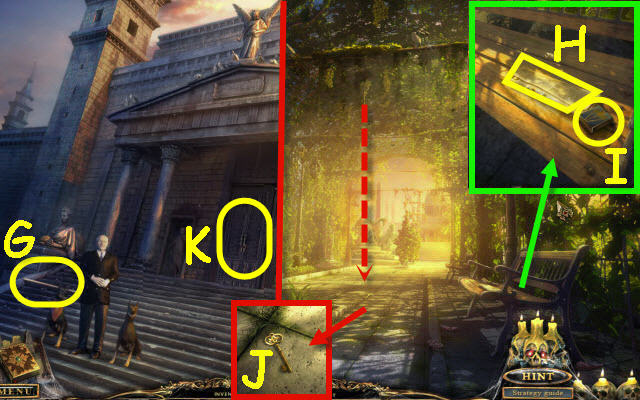
- Select anywhere in the scene to speak to Gordon.
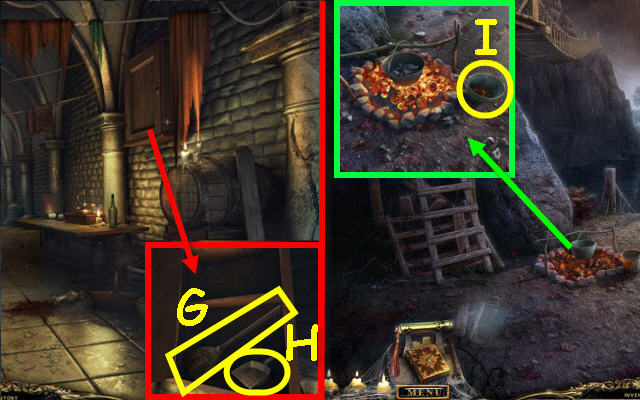
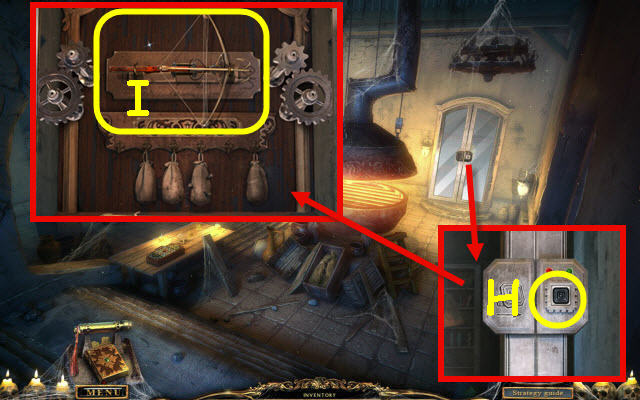
- Take the STICK (G).
- Back out.
- Examine the bench; read the paper (H) and take the BOX OF MATCHES (I).
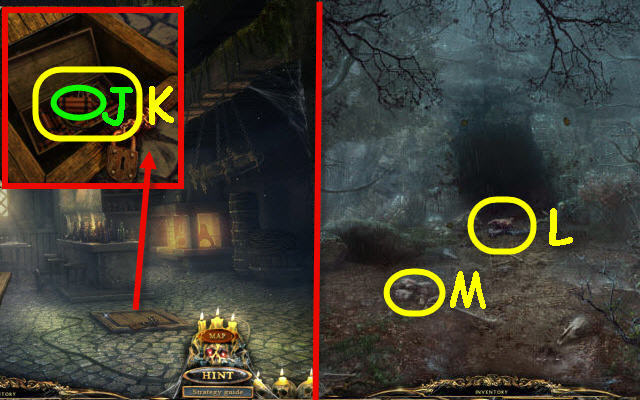
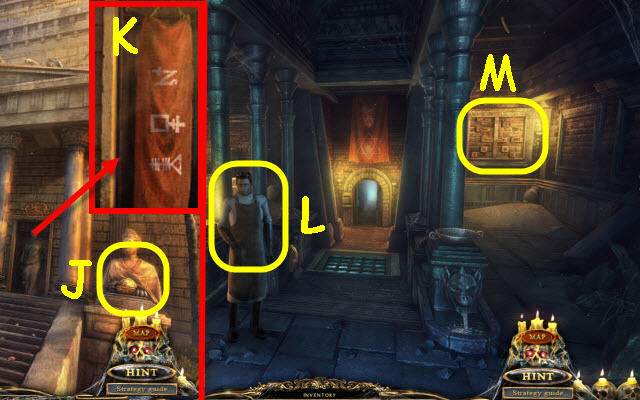
- Examine the dangling key and use the STICK on it. Examine the ground; take the KEY (J).
- Go right at the end of the walkway.
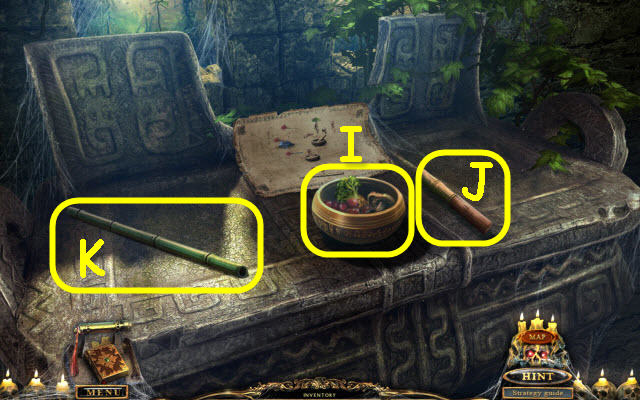
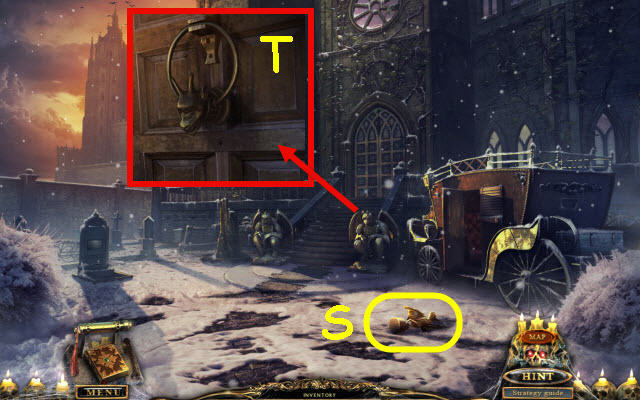
- Examine the door; use the KEY on the lock (K).
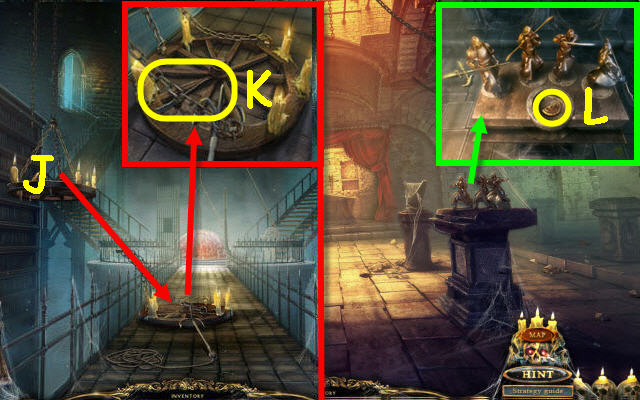
- Enter the cathedral and go forward after the cutscene to trigger a puzzle.
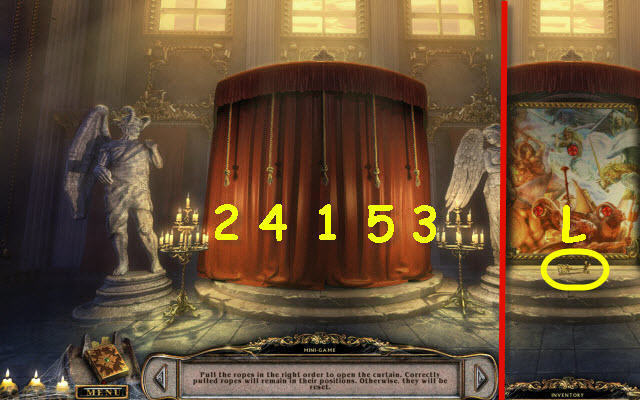
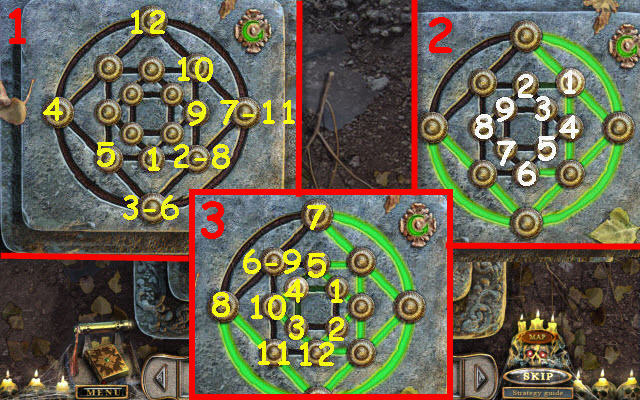
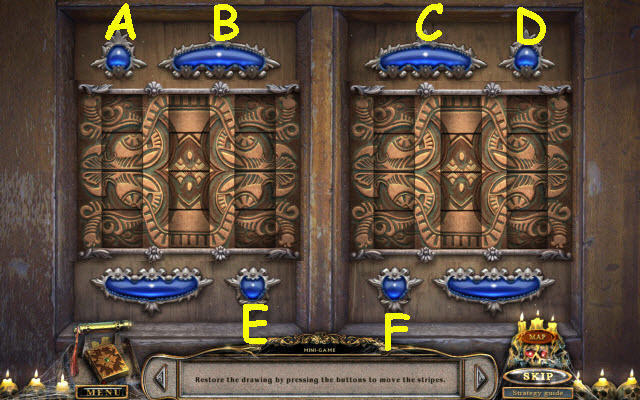
- Pull the ropes in the correct order.
- To solve the puzzle, select the ropes as marked (1-5).
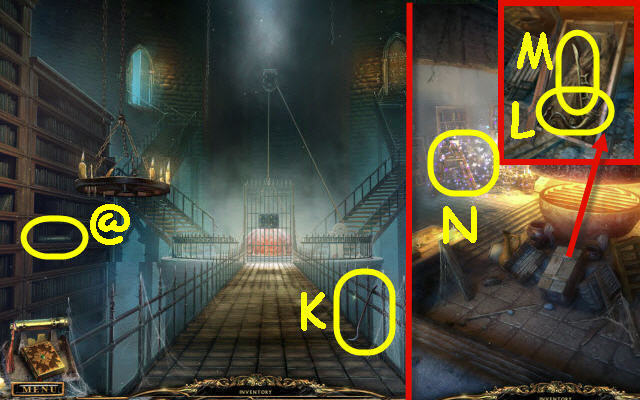
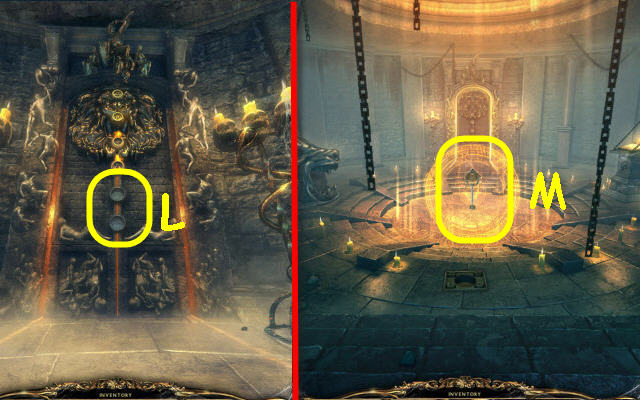
- Take the CROSS KEY (L).
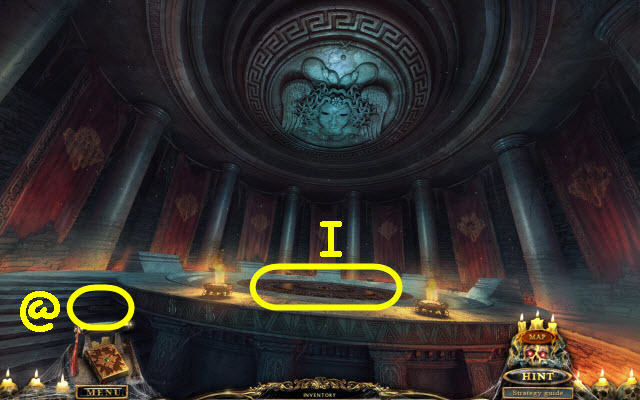
- Back out three times; go left at the end of the walkway.

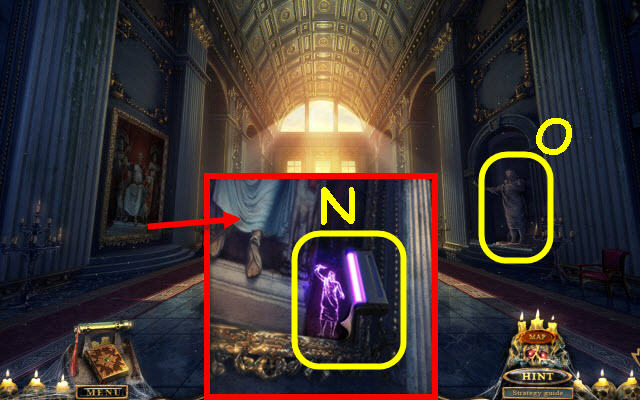
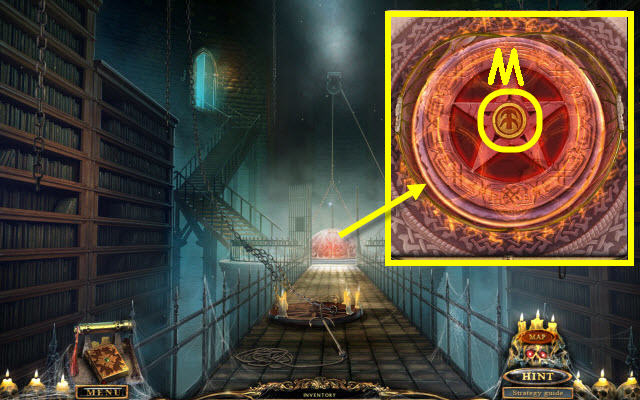
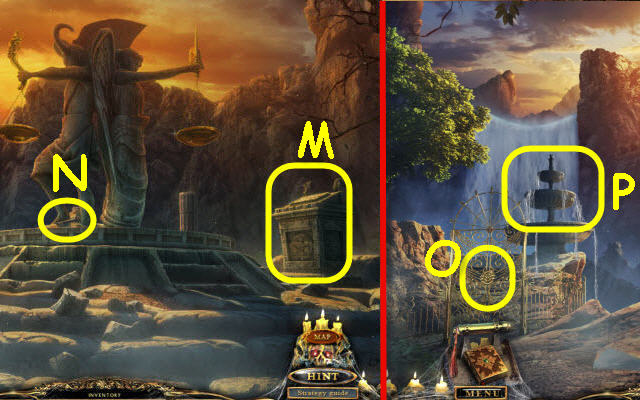
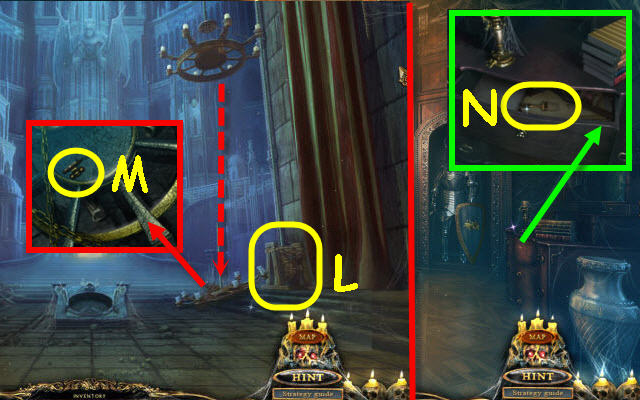
- Examine the harp; use the CROSS KEY on the cross (M).
- Reexamine the harp to trigger a puzzle.
- Arrange the notes to play the correct melody.
- Pull the chain to check your progress.
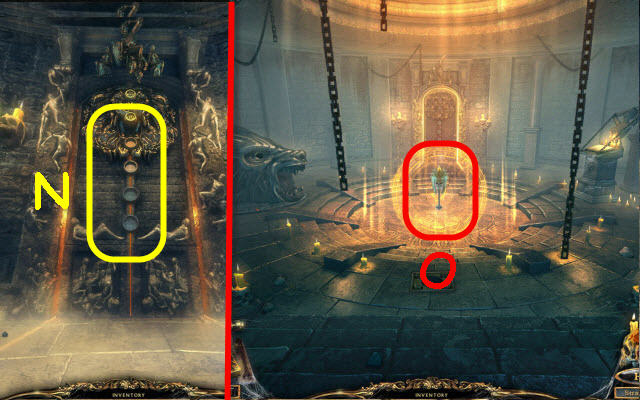
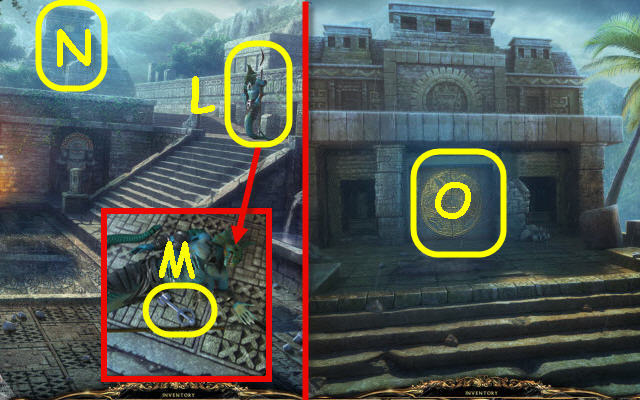
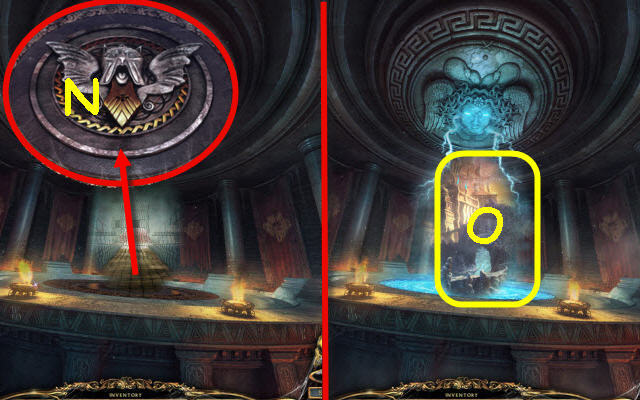
- See screenshot for solution (N).
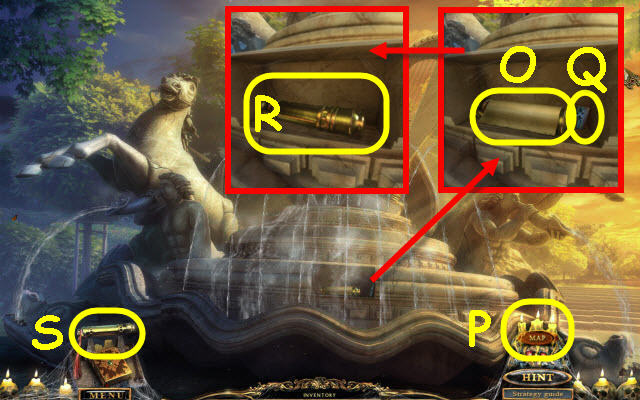
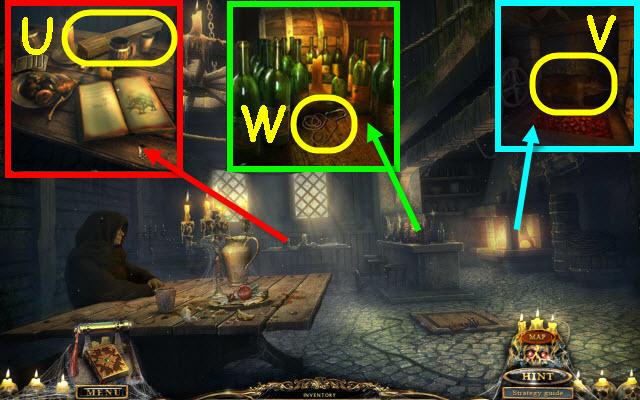
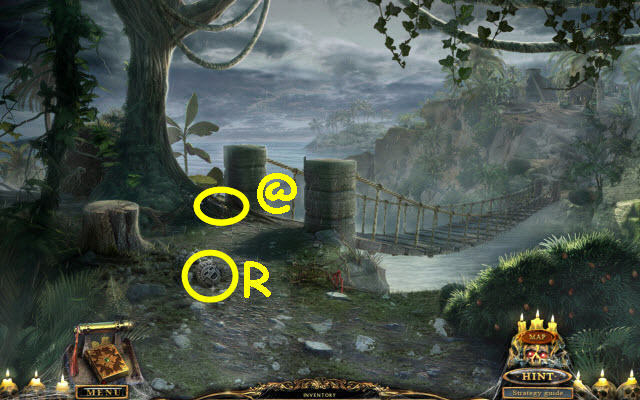
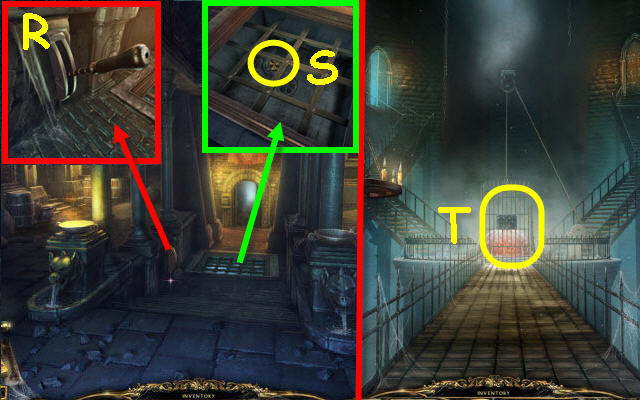
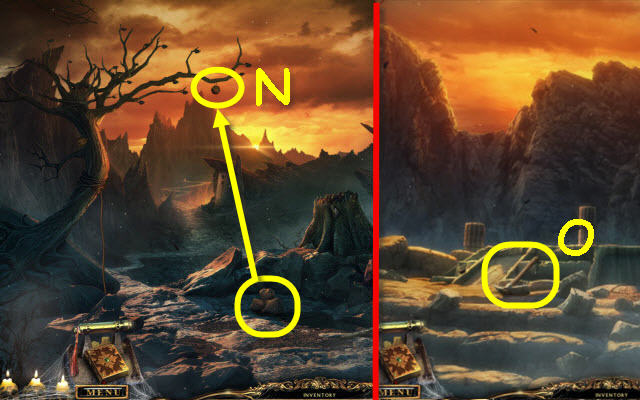
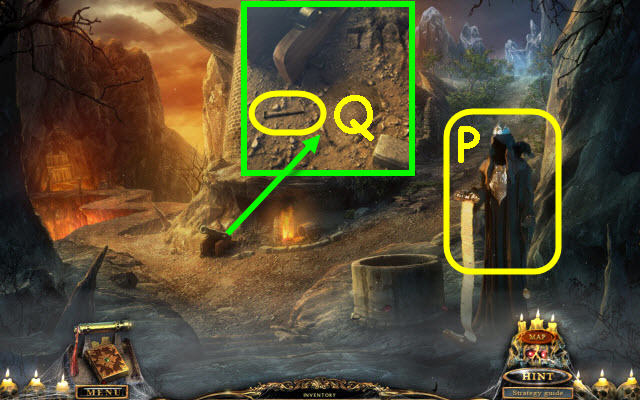
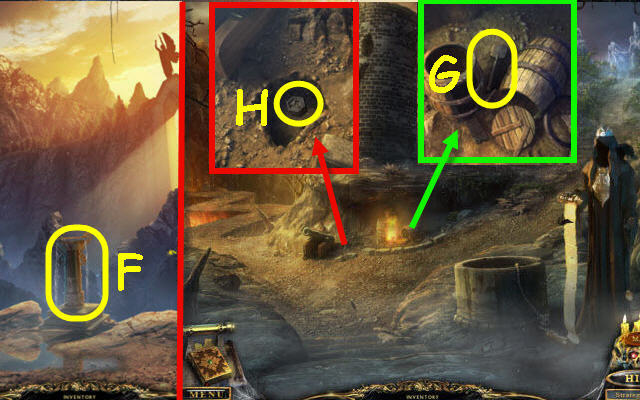
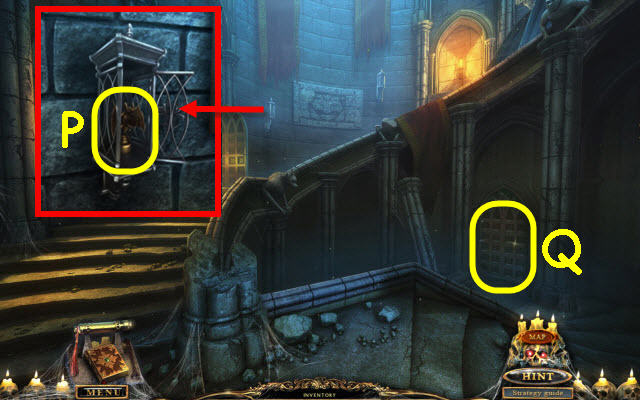
- Examine the compartment; take the map (O) which will be added to your toolbar (P).
- You may now use the map to fast travel to other locations.
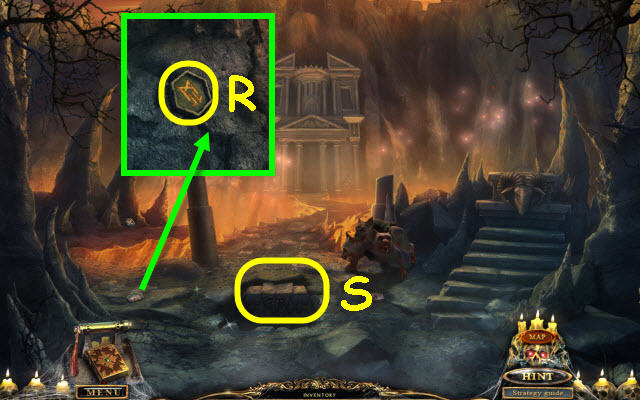
- Take the PASSCARD (Q).
- Take the message holder (R) which will be added to your toolbar (S) and automatically get the first MESSAGE.
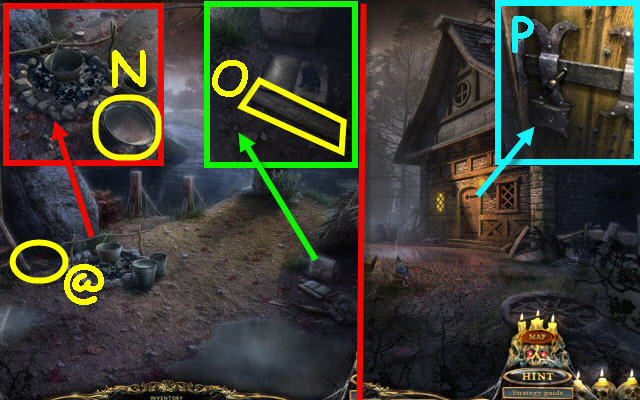
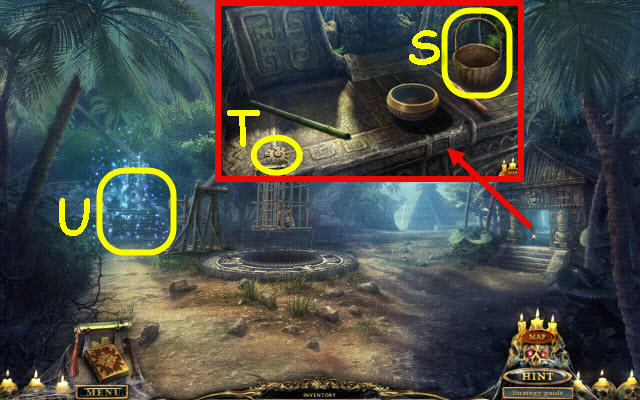
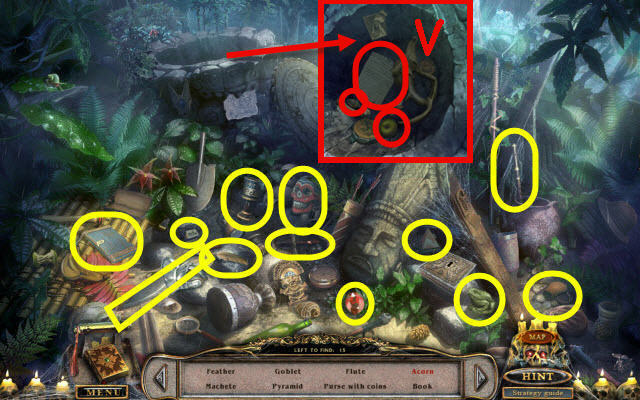
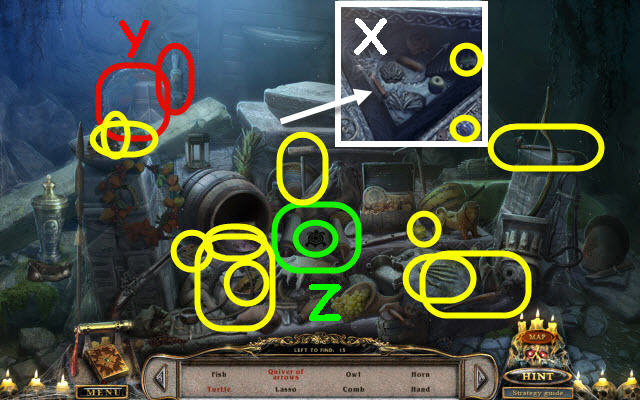
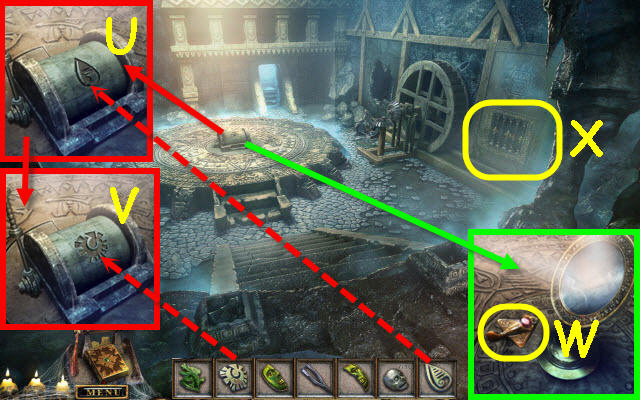
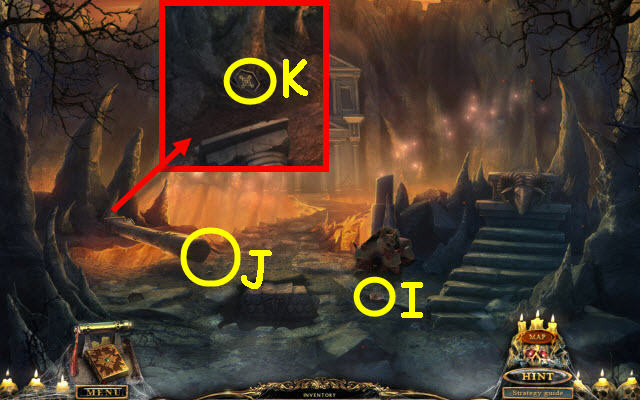
- Back out and examine the statue in the center left to access a HOP.
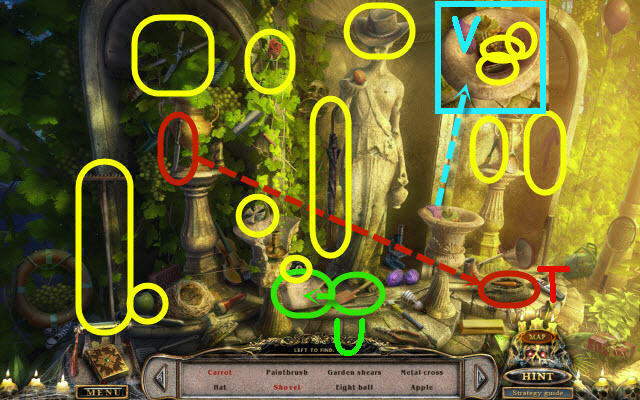
- Find the items listed.
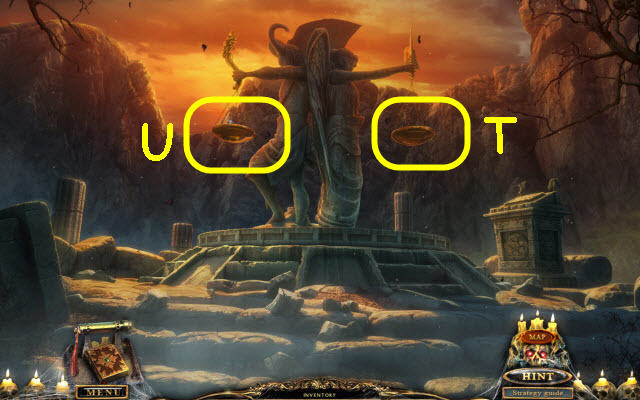
- Use the knife on the sack to get the carrot (T).
- Move the newspaper to get the shovel (U).
- Examine the urn to get the star, key and pencils (V).
- You will earn a CROSS.
- Go right at the end of the walkway.
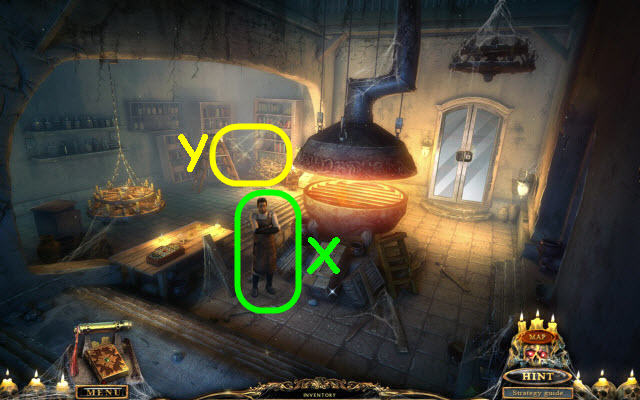
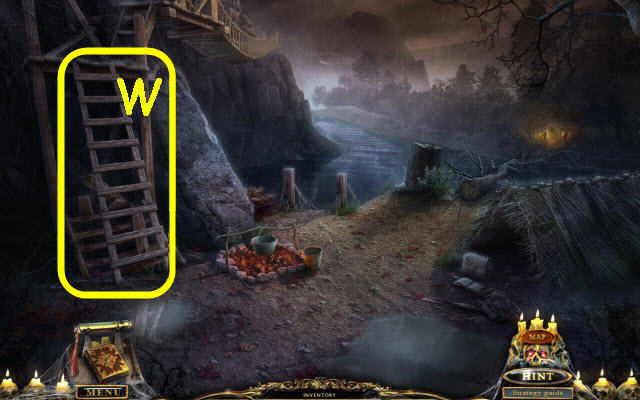
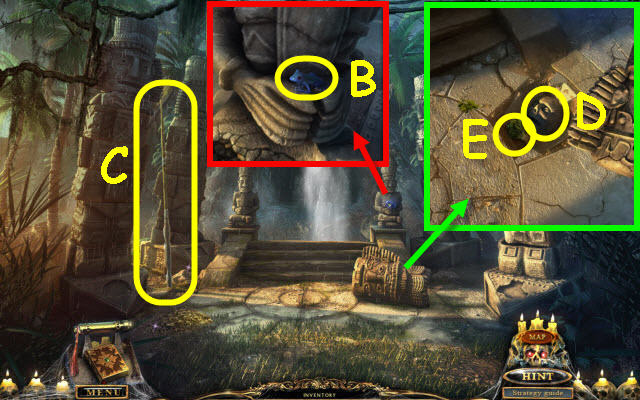
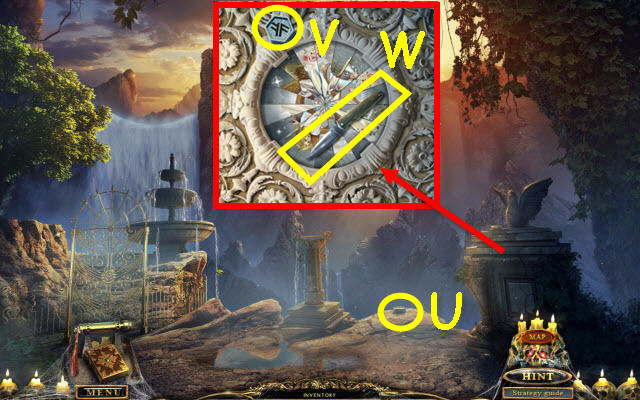
- Examine the statue on the left (W) and place the CROSS in the slot.
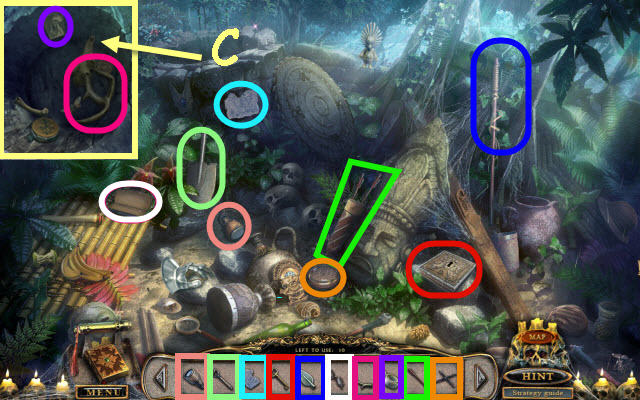
- Examine the alcove; take the MOSAIC PART (X) and note the symbols on the banner.
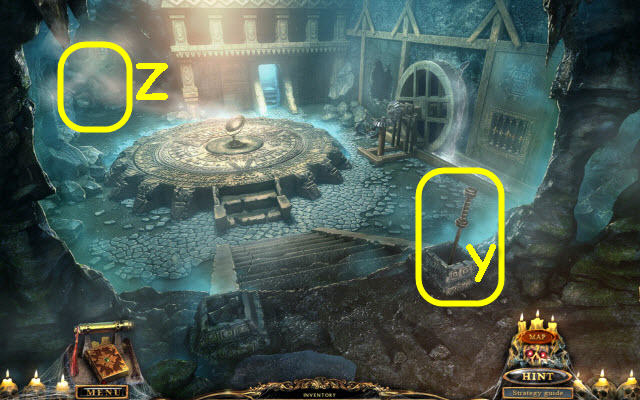
- Enter the cathedral.
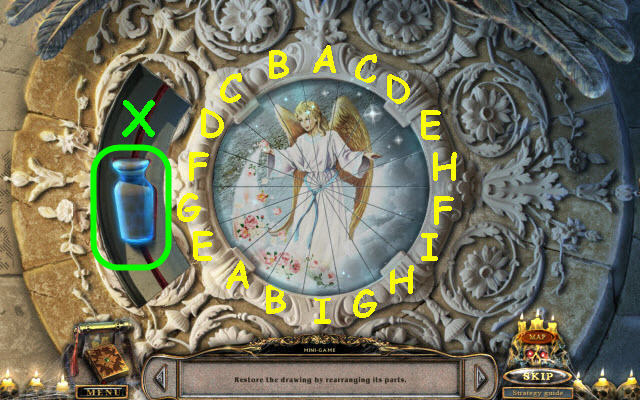
- Examine the floor mosaic and place the MOSAIC PART on it to trigger a puzzle (Y).
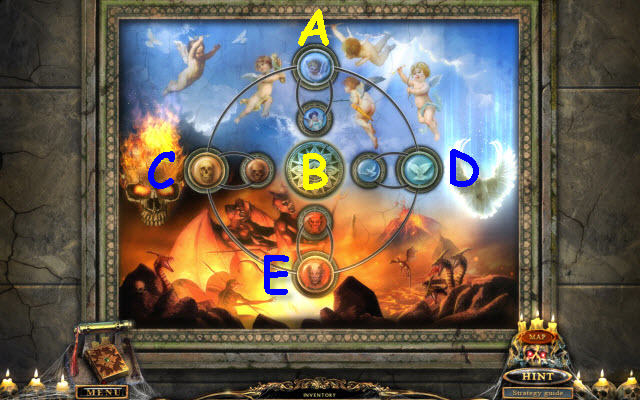
- Arrange the mosaic pieces to the matching backgrounds.
- To solve the puzzle, select the following disks: B, A, C, E, B x 2, D, C, E and B.
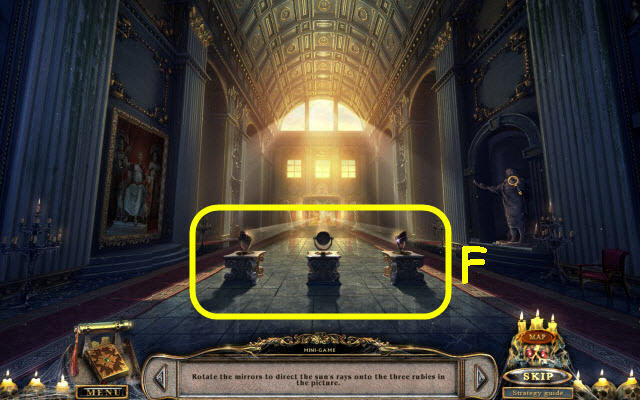
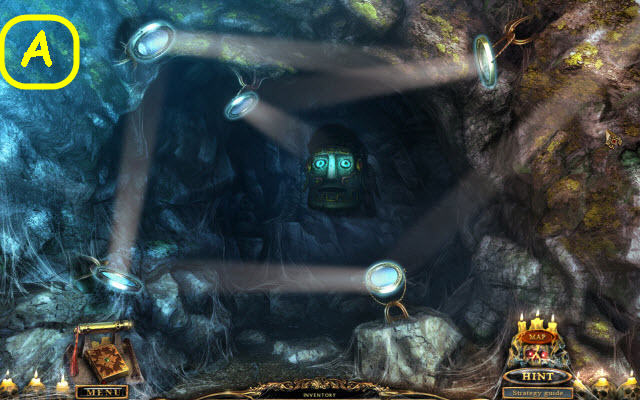
- Rotate the mirrors to beam the light on the rubies in the further nave.
- To solve the puzzle, select each of the three mirrors two times (F).
- Go forward.
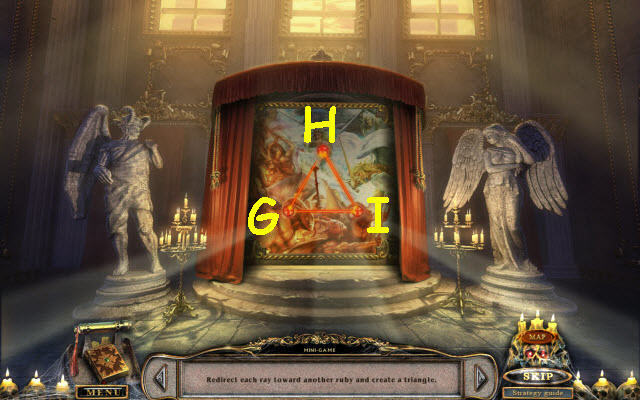
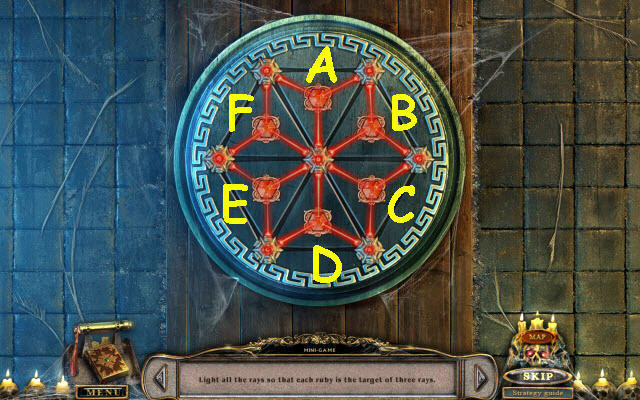
- Make a triangle with the rays.
- To solve the puzzle select the following rubies: G, H and I x 2.
- Go forward.
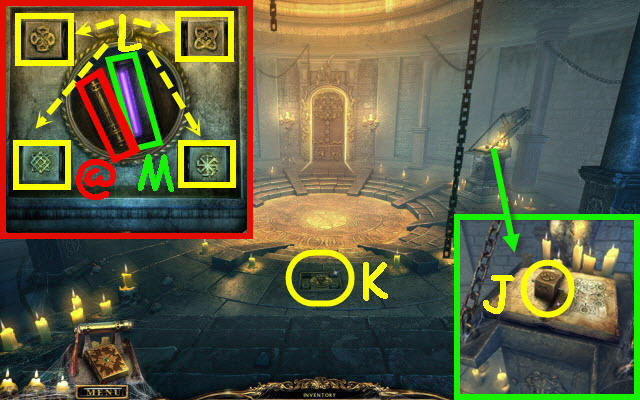
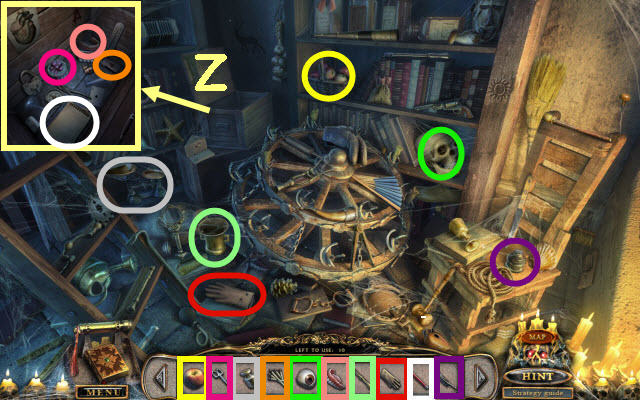
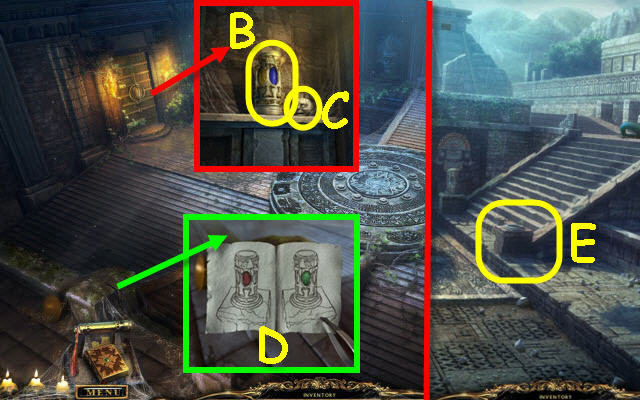
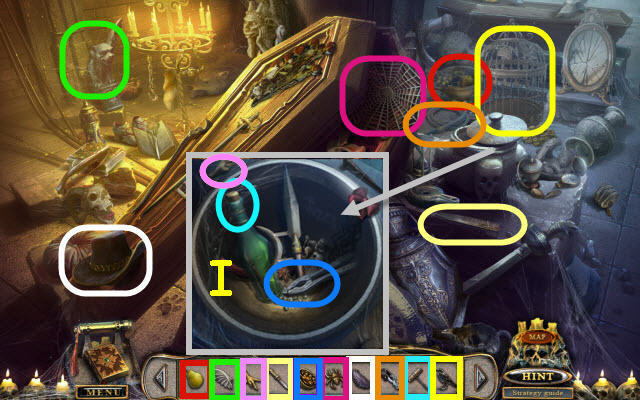
- Examine the altar; read the book and take the CUBE (J).
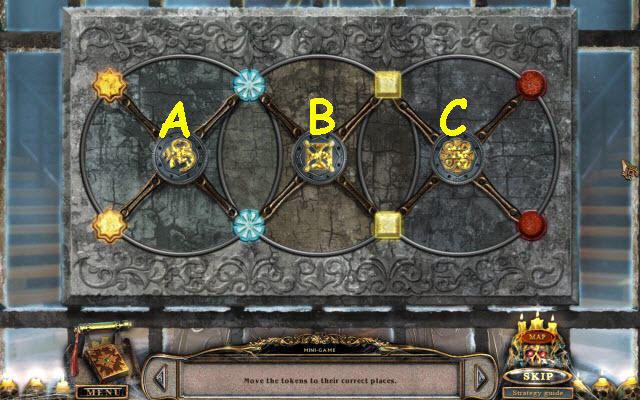
- Examine the bas-relief and place the CUBE in the upper left slot to trigger a puzzle (K).
- Rotate the cubes to match the photo in your journal.
- To solve the puzzle, turn the following cubes: Upper left x 2, upper right, lower right x 3, and the lower left x 2 (L).
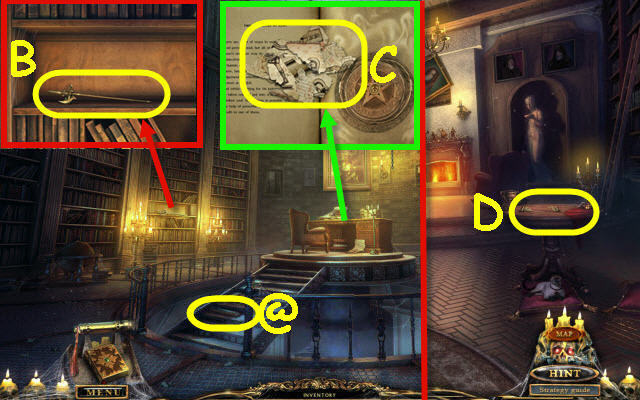
- Take the UV LAMP (M) and the MESSAGE (@).
- Back out twice.
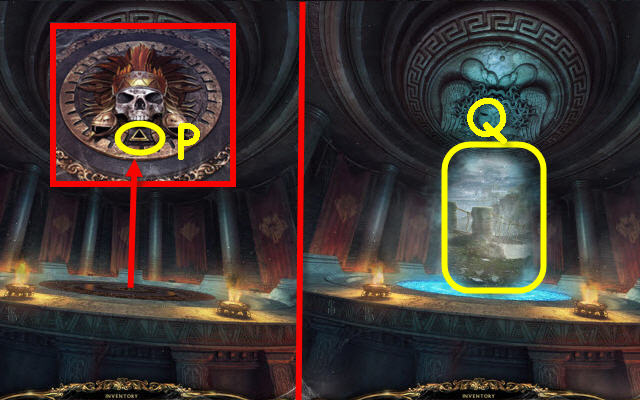
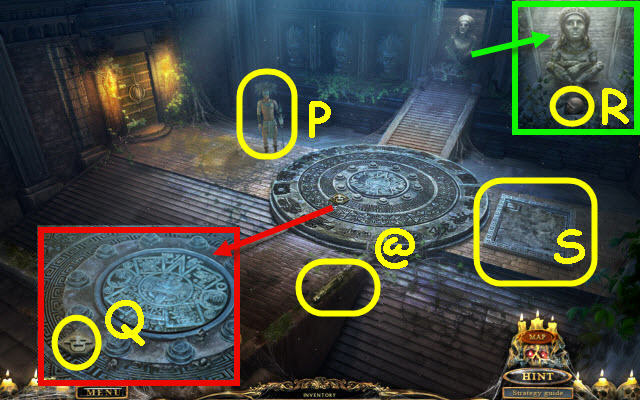
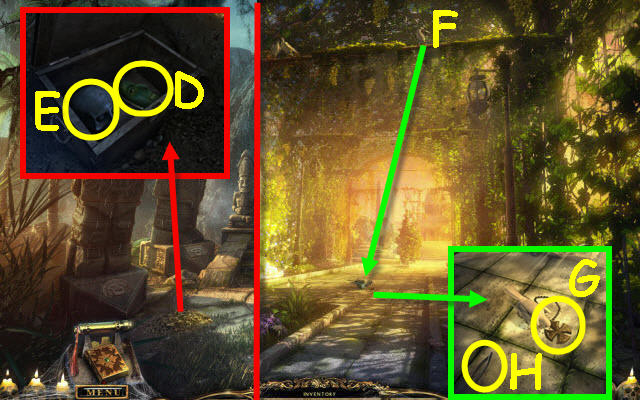
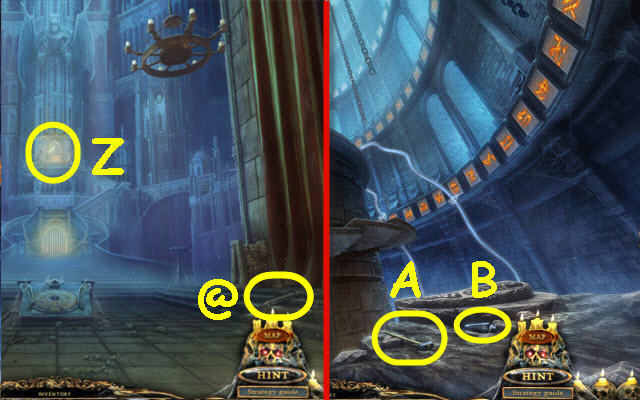
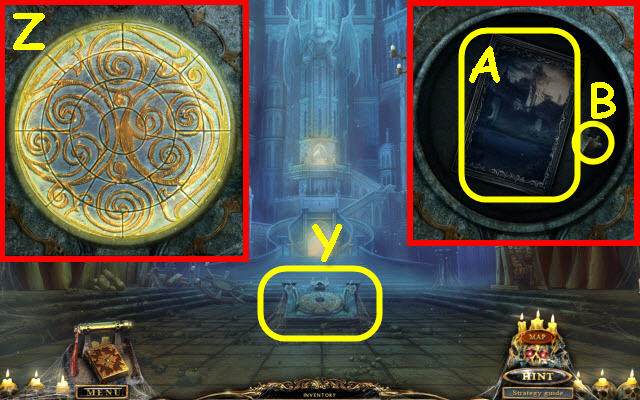
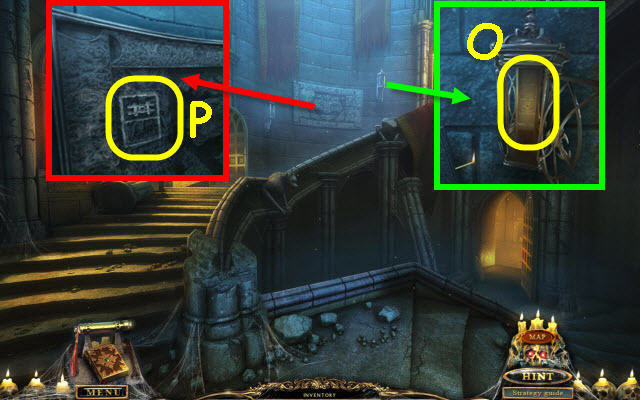
- Examine the painting on the left; zoom into the bottom right and use the UV LAMP on it to get a clue (N).
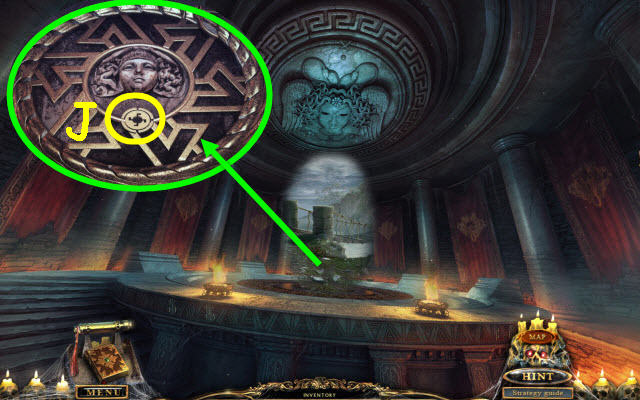
- Back out of the painting and examine the statue to trigger a puzzle (O).
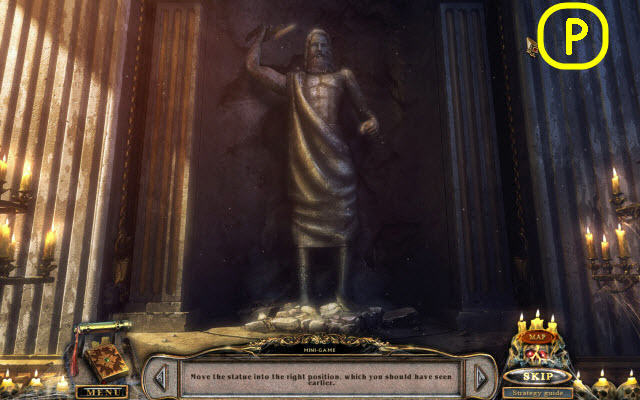
- Adjust the statue to match the clue from the painting.
- See screenshot for solution (P).
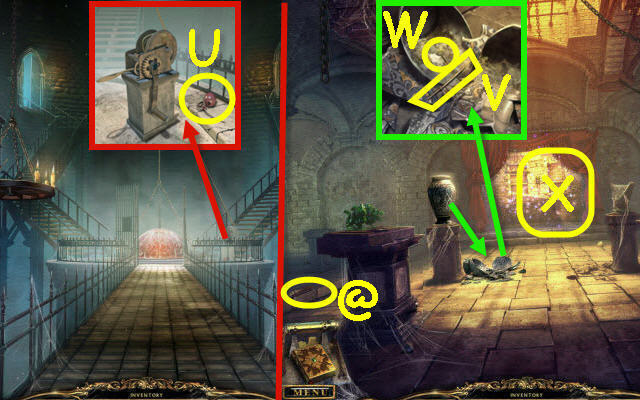
- Go right into the elevator.
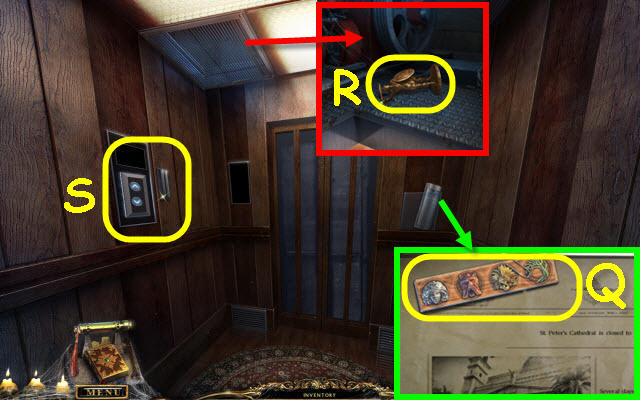
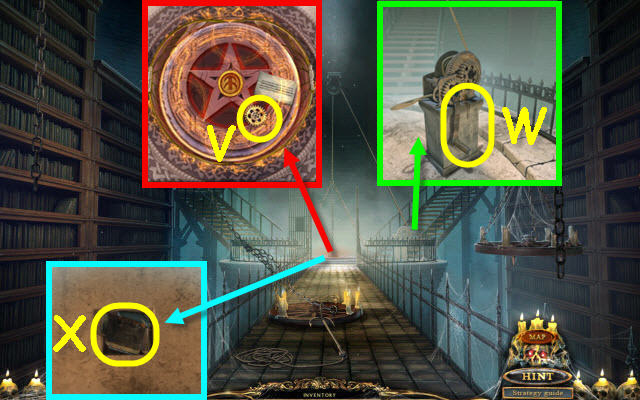
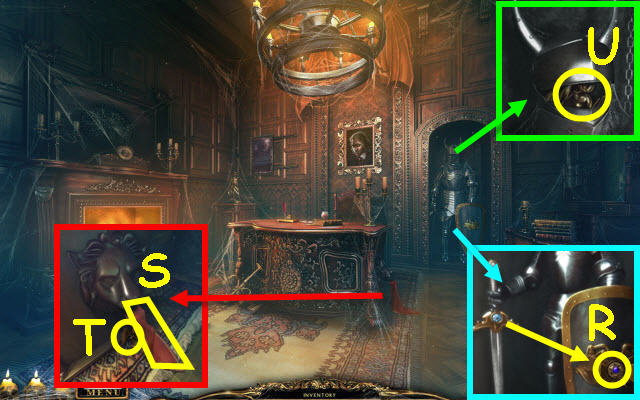
- Open the newspaper; take the TEMPLATE (Q).
- Examine the grate and use the SCREWDRIVER on the 4 screws; take the STATUETTE (R).
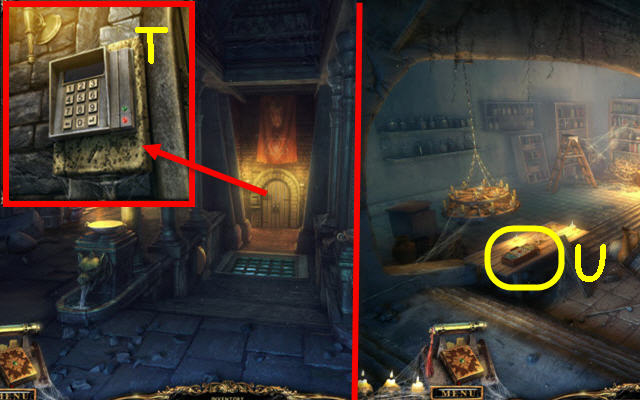
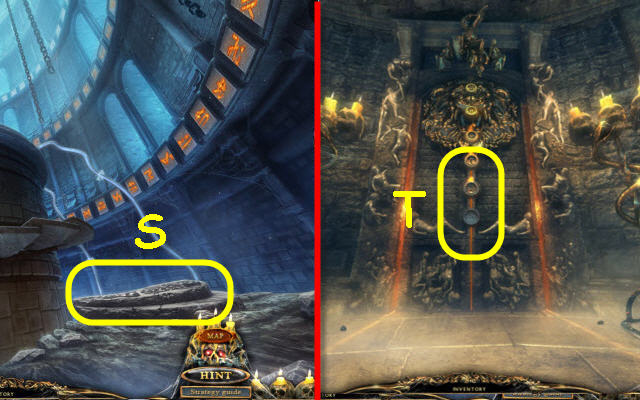
- Examine the panel and use the PASSCARD on the reader; press the down button (S).
- Go forward.
- Go forward to the door and use the PASSCARD on the reader (T).
- Go forward and then right to the laboratory.
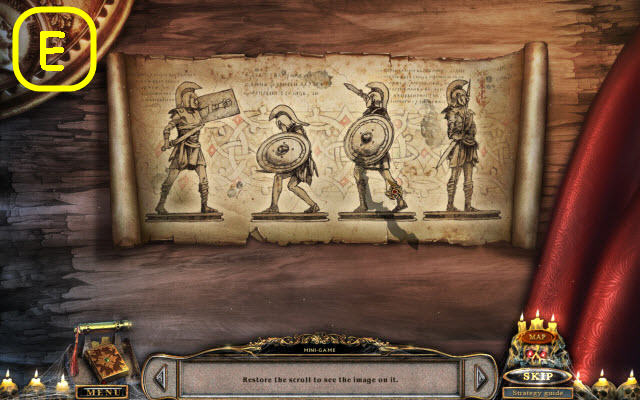
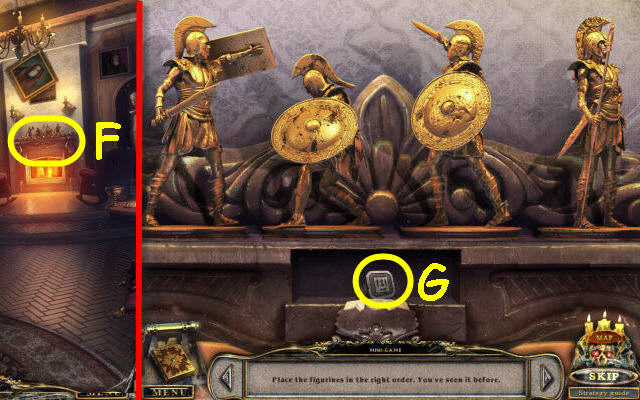
- Examine the table; place the TEMPLATE on the board to trigger a puzzle (U).
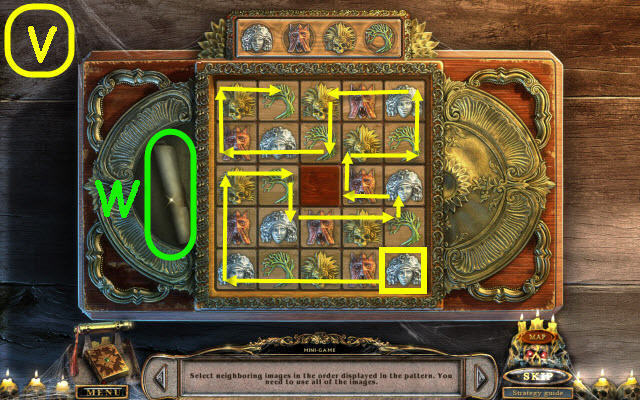
- Select the images in the order of the upper pattern.
- See screenshot for solution (V).
- Take the HALF OF THE DIAGRAM (W).
- Select anywhere to speak to the strange guy (X).
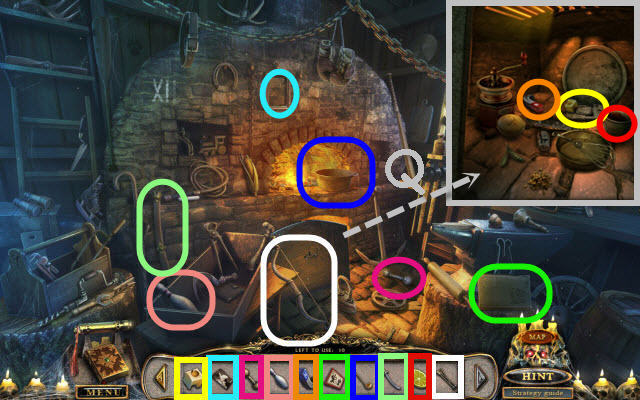
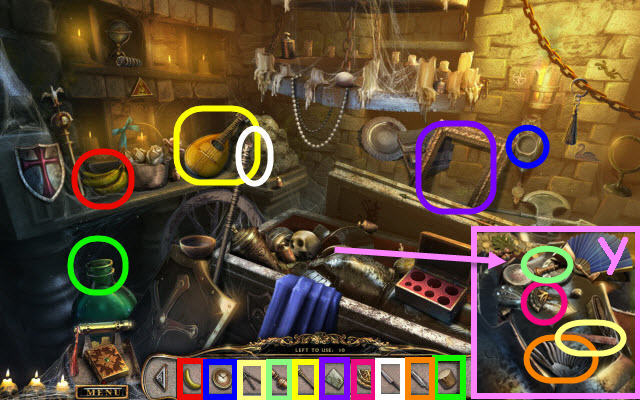
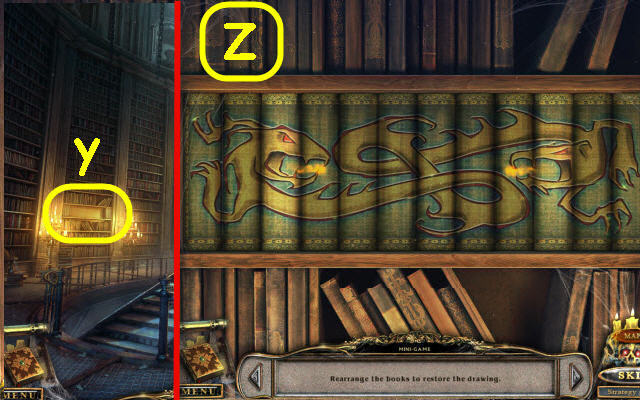
- Examine the corner to trigger a HOP (Y).
- Place the items where they belong in the scene.
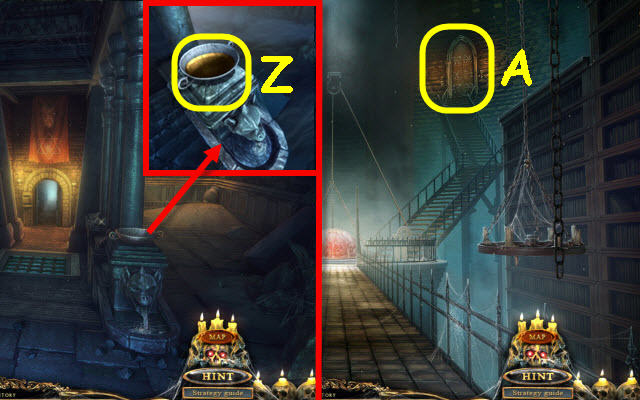
- Examine the box to place some items (Z).
- You will earn a KEY.
- Back out.
- Examine the gate and use the KEY on the lock (A).
- Go left through the newly-opened gate.
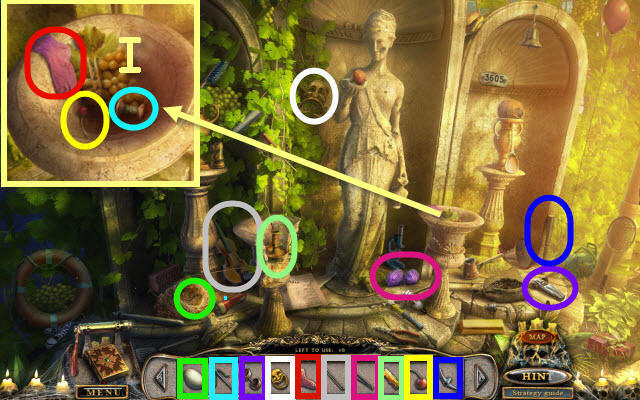
- Select anywhere in the scene to speak to Father Benedict and get a KEY.
- Examine the cat; take the EYE (B).
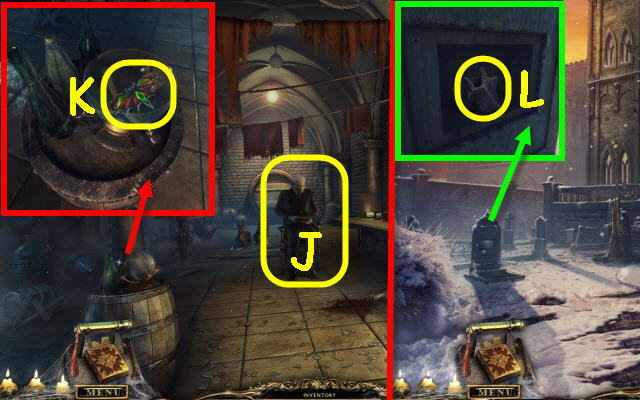
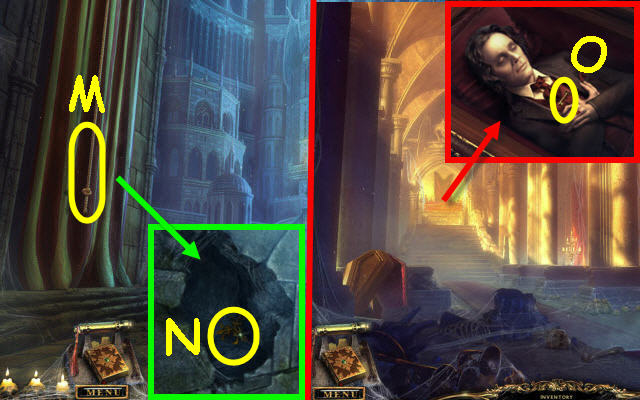
- Examine the painting and move it; take the DRAGON (C), VINYL RECORD (D) and read the note.
- Examine the trunk and use the DRAGON on the lock; take the JADE DRAGON FIGURINE (E).
- Back out twice and go left into the wine cellar.
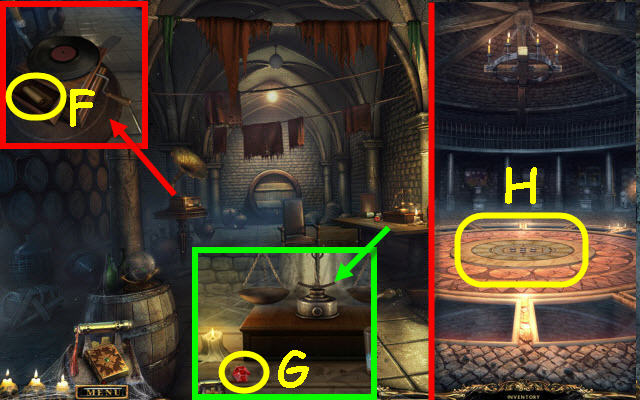
- Examine the gramophone and place the VINYL RECORD on it. Crank the handle and take the 2nd HALF OF THE DIAGRAM (F).
- Examine the table; take the RUBY 1/6 (G).
- Go to the Round room.
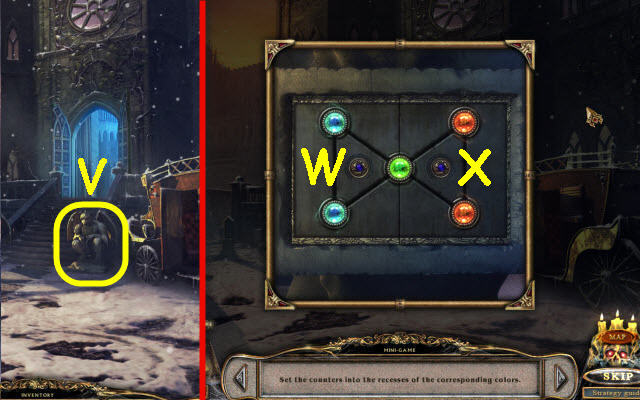
- Examine the center floor and place the 2 HALVES OF THE DIAGRAM on it to trigger a puzzle (H).
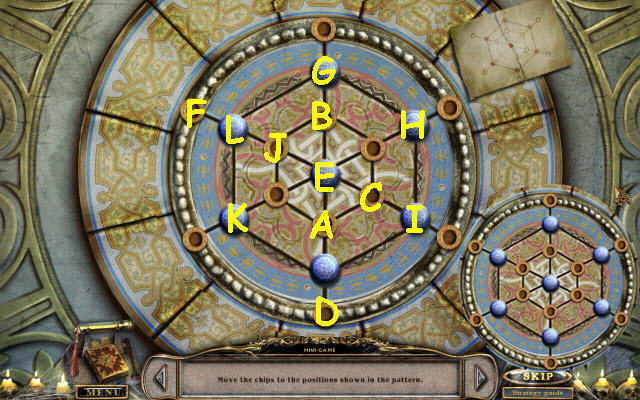
- Slide the chips to match the pattern scheme.
- To solve the puzzle, move the following buttons: K counterclockwise to H, I diagonally to L, A up to B, A counterclockwise to C, E down to D, C clockwise to A, B up to G, E diagonally to C, J clockwise to B, E diagonally to F, B counterclockwise to J and F diagonally to L.
- Go down the stairs to the portals.
- Take the MESSAGE (@).
- Examine the center and use the KEY on the lock (I).
- Go forward through the portal.
Chapter 2: Stamp of the Beast

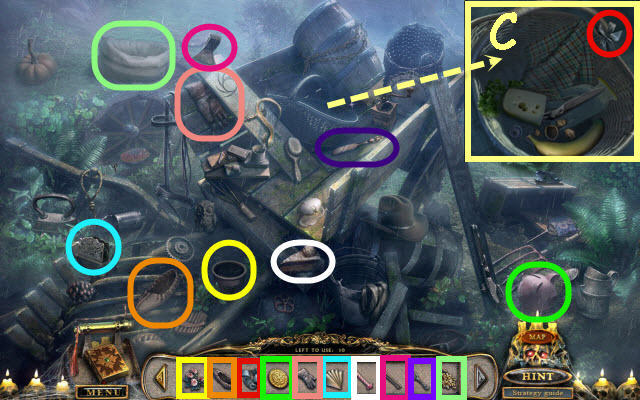
- Examine the wolf head; open its mouth and take the RUNES (J).
- Examine the cart to access a HOP (K).

- Find the items listed.
- Use the ladle on the bucket and then use the ladle on the glass to get a glass of water (L).
- Examine the basket and use the nut cracker on the nut to get a cracked walnut (M).
- You will earn a HAMMER.
- Go forward to the left of the well.
- Take the MESSAGE (@).
- Examine the fire pit; take the BUCKET OF WATER (N).
- Examine the book; read the page and take the RUNG 1/5 (O).
- Back out and go forward to the right of the well.
- Examine the door; use the HAMMER on the lock (P).
- Examine the opened doorway to access a HOP.
- Place the items where they belong in the scene.
- Move the fire panel and examine the furnace to place some of the items (Q).
- You will earn a MAGNET.
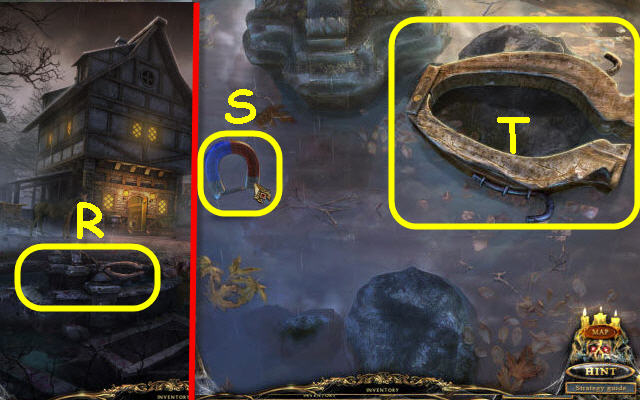
- Examine the fountain and place the MAGNET in the water to trigger a puzzle (R).
- Move the MAGNET over the water to find the NAIL (S).
- Move the lower part of the yoke in place; place the NAIL on the top and use the HAMMER on the nail. Take the YOKE (T).
- Go forward into the tavern.
- Select anywhere in the scene to speak to the woman.
- Examine the back table; read the book, take the RUNG 2/5 (U).
- Examine the fireplace and use the BUCKET OF WATER on the coals; take the PIGLET (V).
- Examine the counter and move the bottles; take the ROPE WITH HOOK (W).
- Back out twice and go left of the well.

- Examine the branch; use the ROPE WITH HOOK to snag the WHIP (X).
- Go to the Village.
- Examine the horse; place the YOKE around its neck and connect the bars. Use the WHIP on the horse (Y).
- Examine the stall; take the ROPE (Z).
- Back out.
- Examine the well and use the ROPE on it (A1).
- Go down; take the RUNG 3/5 (A) and read the book.
- Examine the cart to access a HOP (B).
- Place the items where they belong in the scene.
- Examine the basket to place some items (C).
- You will earn an AXE.
- Go up the path on the left.
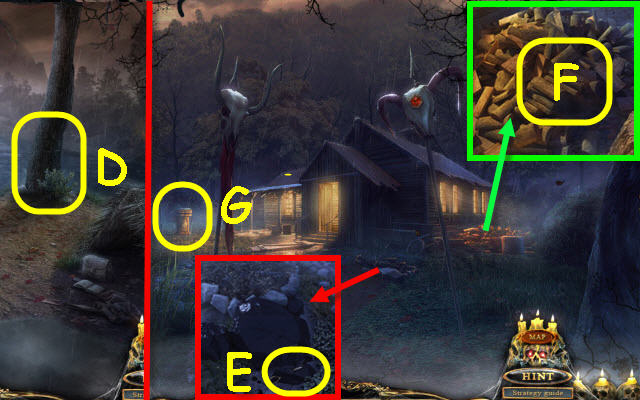
- Examine the tree trunk and use the AXE on it (D).
- Cross the water via the fallen tree to the scientist’s yard.
- Examine the rocks; use the HAMMER on the tar and take the TARRED OBJECT (E).
- Examine the woodpile; take WOOD (F).
- Examine the pedestal and place the RUNES on it to trigger a puzzle (G).
- Light up all the lines.
- To solve the puzzle, select the runes in the order listed (1-3).
- Take the RUBY 2/6.
- Enter the Scientist’s house.
- Examine the kettle; take the RUNG 4/5 (H).
- Examine the bench and look at the drawing; take the SPACER (I) and RUBY 3/6 (J).
- Examine the trap and use the SPACER on it; take the LITTLE KEY (K).
- Examine the trunk and use the LITTLE KEY on the lock; read the note and take the NAILS (L).
- Go to the Mountain.

- Examine the fire ring and place the TARRED OBJECT in the hanging bucket. Place the WOOD in the ring and use the BOX OF MATCHES on it; take the SCISSOR HALF (M).
- Go to the Tavern.
- Speak to the woman (N); receive a RUBY 4/6.
- Back out.
- Examine the doorway of the building on the right to access a HOP.
- Find the items listed.
- Examine the furnace to get the peas and muffin (O).
- Use the chalk on the Roman numerals to get a number 12 (P).
- Move the cloth to get a butterfly (Q).
- You will earn a SICKLE.
- Go to the Scientist’s yard.
- Examine the grass and use the SICKLE on it; take the RUBY 5/6 (R).
- Examine the skull and use the SCISSOR HALF to get the RUBY 6/6 (S).
- Enter the Scientist’s house.
- Examine the ring in the floor and place the 6 RUBIES on it to trigger a puzzle (T).
- Set the rays so that each ruby has three.
- To solve the puzzle, select the following rubies: E, C, A, D, B and F.

- Examine the opened hatch; take the RUNG 5/5 (U).
- Go to the Village.
- Examine the stall and use the 5 RUNGS, NAILS and HAMMER on the broken ladder; take the LADDER (V).
- Go to the mountain.
- Place the LADDER by the steps (W).
- Go up the ladder and forward into the cave.
- Examine the vase; take the LOCK PART (X).
- Take the MESSAGE (@).
- Examine the dry ground and dig a few times; take the 2nd LOCK PART (Y).
- Examine the top of the barrel; take the 3rd LOCK PART (Z).
- Examine the fire ring; take the STICK (A) and 4th LOCK PART (B).
- Examine the trunk and place the 4 LOCK PARTS on their matching sections of the lock. Reexamine the trunk and take the LANTERN (C).
- Examine the top of the ladder and use the STICK on the stone. Use the HAMMER on the STICK and then pull the STICK (D) until the rock is moved.
- Go up the ladder and then to the Scientist’s house.
- Examine the hatch and use the LANTERN on it; use the BOX OF MATCHES on the LANTERN (E).
- Examine the lit hatch to access a HOP.
- Place the items where they belong in the scene.
- Use the crowbar on the stone and examine the hole to place some of the items (F).
- You will earn a CABINET HANDLE.
- Go to the Wine cellar.
- Select anywhere in the scene to speak to Gordon.
- Move the cloth and examine the cabinet; place the CABINET HANDLE on it and turn the handle. Take the BROOM (G) and DUSTPAN (H).
- Go to the Mountain.
- Examine the fire ring and use the DUSTPAN on the embers; take the bucket to get EMBERS (I).
- Go to the Tavern.
- Examine the hatch and use the EMBERS and AXE on the lock; open the hatch and take the DYNAMITE (J) and TRAP (K).
- Go to At the cave.
- Place the TRAP and PIGLET at the cave entrance (L).
- Throw a rock (M) at the cave entrance; you will receive a SEAL.
- Go forward.
- Place the SEAL on the gates (N).
- Take the KEY (O).
- Go to the Portals.
- Examine the center and use the KEY on the lock (P).
- Go forward into the portal (Q).
Chapter 3: The Village of Maya
- Take the MESSAGE (@).
- Take the STONE FIGURINE (R).
- Select the far end of the rope bridge to cross to the other side.
- Select anywhere in the scene to speak to the priest; you will receive a TRANQUILIZER RECIPE.
- Examine the building; take the BASKET (S) and the SYMBOL (T).
- Examine the ruins to access a HOP (U).
- Find the items listed.
- Remove the lid and examine the opened stone container to get the acorn, apple and paper (V).
- You will earn a MACHETE.
- Go forward to the Temple entrance.

- Take the FENCE PART (W).
- Examine the right stair pedestal; take the 2nd STONE FIGURINE (X).
- Back out.
- Examine the cage and place the FENCE PART over the opening (Y).
- Examine the crane; use the MACHETE on the rope (Z).
- Examine the cage; use the MACHETE on the ropes (A); you will receive a DART.
- Go up the stone path to the Waterfall.
- Examine the statue on the right; use the DART on the frog to get a POISONED DART (B).
- Take the SPEAR (C).
- Examine the totem head and use the SPEAR on it; take the SKULL 1/10 (D) and the ROOT (E).
- Go to the Temple entrance.
- Examine the clogged fountain and use the SPEAR on it; take the 2nd EYE (F).
- Go to the Bridge.
- Examine the stump and use the SPEAR on it; take the MUSHROOM (G).
- Examine the bush and place the BASKET by it; pick a few berries and take the BERRIES (H).
- Go to the Village and examine the building.
- Place the TRANQUILIZER RECIPE on the table.
- Place the MUSHROOM, ROOT and BERRIES in the mortar (I).
- Use the pestle (J) on the mortar and then use the POISONED DART on the mortar to get a TRANQUILIZER DART.
- Use the TRANQUILIZER DART on the tube; take the BLOWGUN (K).
- Go to the Temple entrance.
- Use the BLOWGUN on the guard (L).
- Examine the tranquilized guard; take the TEMPLE KEY (M).
- Go up to the temple (N).
- Examine the temple door and use the TEMPLE KEY on the lock (O).
- Enter the Temple.
Chapter 4: Church of Time
- Select anywhere in the room to speak with Tepeu (P).
- Take the MESSAGE (@).
- Examine the center pedestal; take the 3rd STONE FIGURINE (Q).
- Examine the STATUE and place the 2 EYES in the sockets; take the SKULL 2/10 (R).
- Examine the square tiles and use the BROOM on it to trigger a puzzle (S).
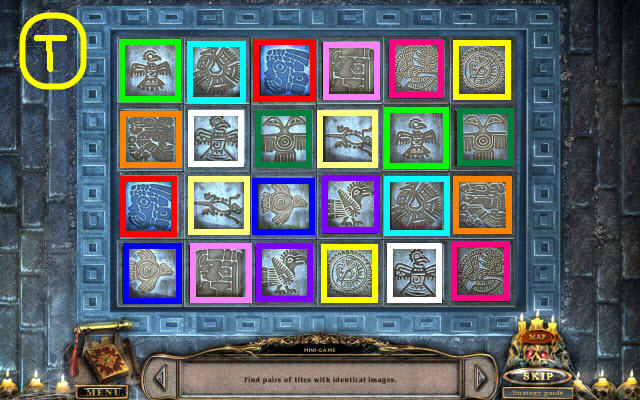
- Find the matching pairs.
- See screenshot for solution (T).
- Take the 4th STONE FIGURINE and SKULL 3/10.
- Go to the Waterfall.
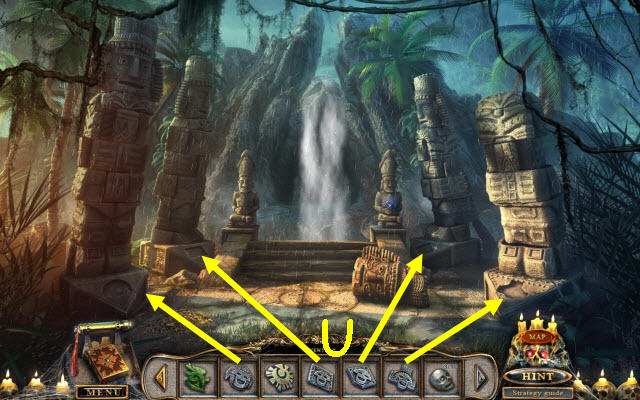
- Examine each totem base and place the 4 matching FIGURINES to the bases (U).
- You will trigger a puzzle.
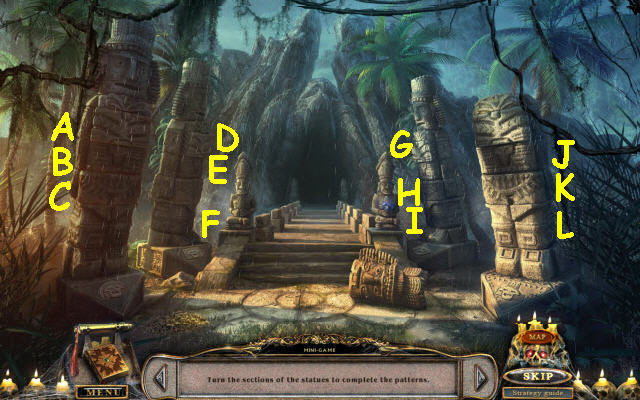
- Turn the totem pieces to restore them.
- To solve the puzzle turn each section as follows: A, B x 2, C x 3, D x 2, E x 3, F, G x 3, H, I x 2, J, K x 2, and L x 3.
- Go forward.
- Take the MESSAGE (@).
- Take the SKULL 4/10 (V).
- Examine the doorway to access a HOP (W).
- Find the items listed.
- Remove the lid and examine the container to get the leaf and button (X).
- Move the disk to find the quiver of arrows (Y).
- Open the scroll to get the turtle (Z).
- You will earn a LASSO.
- Go to the bridge.

- Examine the ledge and use the LASSO on the spade; take the SPADE (A).
- Cross the bridge.
- Examine the ruins to access a HOP (B).
- Place the items where they belong in the scene.
- Examine the container to place some items (C).
- You will earn BREADCRUMBS.
- Go to the Waterfall.
- Examine the loose ground and use the SPADE on it. Open the box lid; take the MASK HALF (D) and SKULL 5/10 (E).
- Go to the Garden.
- Examine the bird and use the BREADCRUMBS on it (F).
- Examine the ground next to the bird; take the CROSS (G) and TWEEZERS (H).
- Examine the statue in the center on the left to access a HOP.
- Place the items where they belong in the scene.
- Examine the container to place some items (I).
- You will earn a PICKAXE.
- Go right at the end of the walkway.
- Examine the statue on the right (J) and place the CROSS in the slot.
- Examine the alcove; note the symbols on the banner (K).
- Go to the Basement.
- Select anywhere in the scene to speak to the man (L).
- Examine the symbols to trigger a puzzle (M).
- Select the correct symbols.
- Clue: The symbols are located the banners at the Cathedral entrance and in your journal.
- See screenshot for solution (N).
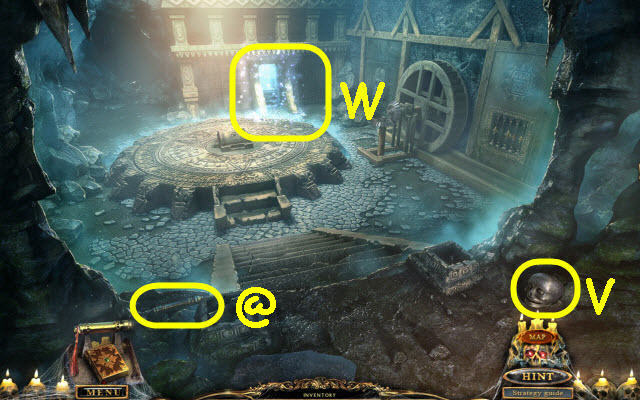
- Take the SKULL 6/10 (O), MESSAGE (@), 2nd MASK HALF (P).
- Go to the Cave.
- Select the bas-relief and use the PICKAXE on it; take the SKULL 7/10 (Q) and MEDALLION (R).
- Go to the Temple entrance.
- Examine the idol and place the MEDALLION in his hand; take the LEVER (S).
- Return to the Cave.
- Examine the doorway to access a HOP.
- Place the items where they belong in the scene.
- Examine the container to place some items (T1).
- You will earn a 2nd SYMBOL.
- Examine the mechanism and place the LEVER on it; pull the LEVER to an empty symbol and place the matching SYMBOL in it (U).
- Pull the LEVER two times to get the next empty symbol slot and place the matching SYMBOL in it (V).
- Zoom back into the center and take the AIRPLANE (W).
- Examine the wall mechanism and place the AIRPLANE on it to trigger a puzzle (X).
- Arrange the rubies on the center bar.
- To solve the puzzle, select the following: A up until the ruby lights up, B down until B and D light up, E up until it lights up, D down until it lights up, A all the way up to line up the rubies with C and then C down so that they all light up.
- Pull the lever twice to shine the mirror beam to the far left corner (Y).
- Examine the far left corner to trigger a puzzle (Z).
- Rotate the mirrors to shine them on the mask.
- See screenshot for solution (A).
- Take the SKULL 8/10.
- Go to the Temple.
- Examine the doorway and place the 2 MASK HALVES on the lock; take the CYLINDER (B) and the SKULL 9/10 (C).
- Examine the upper left of the staircase; use the TWEEZERS in the crack to get a clue (D).
- Back out twice.
- Examine the right pedestal on the bottom of the stairs and place the CYLINDER on it to trigger a puzzle (E).
- Set the cylinders per the clue from the Temple pedestal.
- Solution: Examine the left cylinder and adjust it to red (E). Examine the right cylinder and set it to green (F).
- Examine the bottom stair opening; take the SKULL 10/10 (G).
- Go to the Temple.
- Examine the center pedestal and place the 10 SKULLS on it to trigger a puzzle.
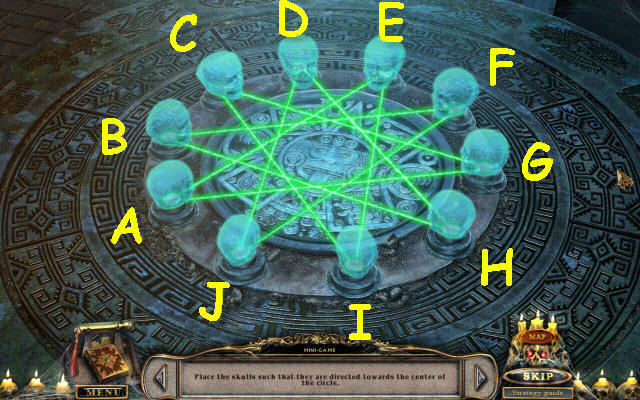
- Set the skulls so they all face the center.
- To solve the puzzle, select the following skulls: G to A, A to E, H to D, H to B, I to C, A to G, C to G, D to J, J to F, J to D, H to D, J to D, D to H, I to E, E to A, and I to E.
- You will earn a SEAL.
- Go forward to the Gates.
- Place the SEAL on the gates (H).
- Take the KEY (I).
- Go to the Portals.
- Examine the portal; place the KEY in the lock (J).
- Go forward through the portal.
Chapter 5: Abandoned Castle
- Take the CROWBAR (K).
- Take the MESSAGE (@).
- Go to the Laboratory.
- Examine the crate and use the CROWBAR on the lid; take the CANDLESTICK (L) and FIGURINE WEAPON (M).
- Examine the corner bookshelves to access a HOP (N).

- Find the items listed.
- Use the knife on the cheese to get a slice of cheese (O).
- Examine the crate to get the compass and playing card (P).
- Move the broom to get the number 4 (Q).
- You will earn a LEVER.
- Go to the basement.
- Examine the mechanism and place the LEVER on it; pull the LEVER (R).
- Examine the grate; take the DEVICE PART (S).
- Go to the Bridges.
- Examine the gate and place the DEVICE PART in the center to trigger a puzzle (T).
- Place the symbols in their correct locations.
- To solve the puzzle, select the following disks: B, A x 2, B, C x 2 and B x 3.
- Examine the winch; take the EMPTY OIL CAN (U).
- Go forward up the left staircase.
- Take the MESSAGE (@).
- Knock over the vase and zoom into the broken vase; take the 2nd FIGURINE WEAPON (V) and KEY (W).
- Examine the curtained alcove to access a HOP (X).
- Place the items where they belong in the scene.
- Move the breastplate and examine the area to place some items (Y).
- You will earn a MEDALLION HALF.
- Go to the basement.
- Examine the bowl on the fountain; use the EMPTY OIL CAN on it to get a FILLED OIL CAN (Z).
- Go to the Bridges.
- Examine the door on the upper right; move the broken wood and use the KEY in the lock (A).
- Go through the newly-opened door.
- Take the MESSAGE (@).
- Examine the bookcase; take the 3rd FIGURINE WEAPON (B).
- Examine the desk and open the book; take the PARCHMENT FRAGMENTS (C).
- Go to the Archbishop’s chambers.
- Select anywhere in the scene to speak to the Archbishop.
- Examine the table and place the PARCHMENT FRAGMENTS on it to trigger a puzzle (D).
- Assemble the pieces to complete the picture.
- See screenshot for solution (E).
- Examine the mantel and place the STATUETTE on the empty pedestal to trigger a puzzle (F).
- Set the figurines to match the arrangement from the parchment fragment pieces puzzle.
- See screenshot for solution.
- Take the SIGNET (G).
- Go to the Laboratory.
- Examine the door and use the SIGNET on the lock (H).
- Take the CROSSBOW (I).
- Go to the Bridges.
- Use the CROSSBOW on the chandelier and pull it close (J).
- Examine the chandelier; take the 4th FIGURINE WEAPON (K).
- Go to the Repository.
- Examine the pedestal and place the 4 FIGURINE WEAPONS on the statues; take the 2nd MEDALLION HALF (L).
- Return to the Bridges.
- Examine the dome and place the 2 MEDALLION HALVES on it; select the center to trigger a cutscene (M).
Chapter 6: Purgatory
- Pick up the rocks and throw them at the rune 3 times; you will get a RUNE 1/10 (N).
- Go up the stone stairs.
- Take the PICKAXE (O).
- Back out and go forward.
- Select anywhere in the scene to speak to the Guardian (P).
- Examine the cannon; take the PEG (Q).
- Go forward on the winding path.
- Examine the rune and use the PICKAXE on it; take the RUNE 2/10 (R).
- Examine the etched stone to trigger a HOP (S).
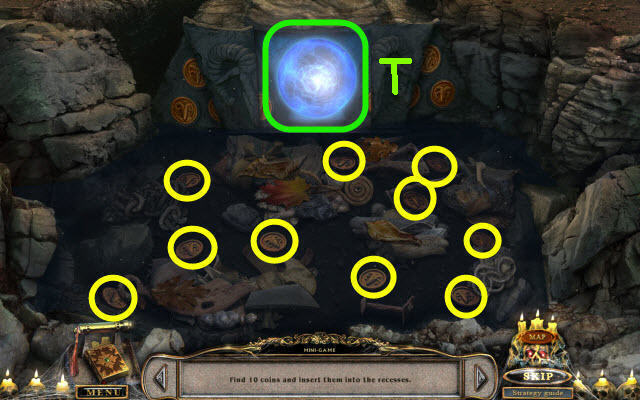
- Find the 10 coins and place them in the slots.
- Move the debris to unearth the coins circled in yellow.
- Take the BLUE ORB (T).
- Go to the Gates of Heaven.
- Take the RUNE 3/10 (U).
- Examine the pedestal and place the BLUE ORB in the center. Take the RUNE 4/10 (V) and the KNIFE (W).
- You will automatically trigger a puzzle.
- Switch the pieces to complete the picture.
- To solve the puzzle, switch the same lettered pieces as marked in the screen.
- Take the BLUE WEIGHT (X).
- Go to Purgatory.
- Examine the rope and use the KNIFE on it to get a ROPE (Y).
- Examine the tree stump and use the KNIFE on the rune; take the RUNE 5/10 (Z).
- Go forward to the Crossroads.
- Examine the well and place the ROPE and the PEG on the ground near it; use the rock (A) on the PEG and select the ROPE (B).
- Take the EMPTY BUCKET (C), RUNE 6/10 (D) and read the clue (E).
- Go up the path on the right.
- Examine the fountain (F); use the EMPTY BUCKET on it to receive a BUCKET OF WATER.
- Back out.
- Select anywhere in the scene to speak to the Guardian and receive an Ocarina.
- Examine the fire and use the BUCKET OF WATER on it; take the SHOVEL (G).
- Examine the cannon and use the SHOVEL on the loose dirt; take the RUNE 7/10 (H).
- Go forward on the winding path.
- Use the OCARINA on the Cerberus; take the RUNE 8/10 (I).
- Examine the column (J) and use the SHOVEL on the loose dirt at the base.
- Examine the top of the fallen column; take the RUNE 9/10 (K).
- Go to Purgatory.
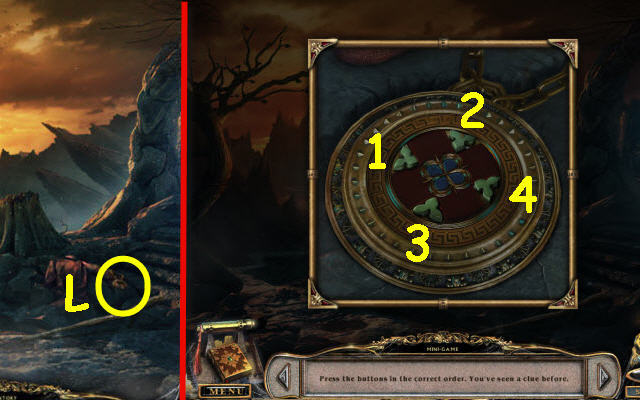
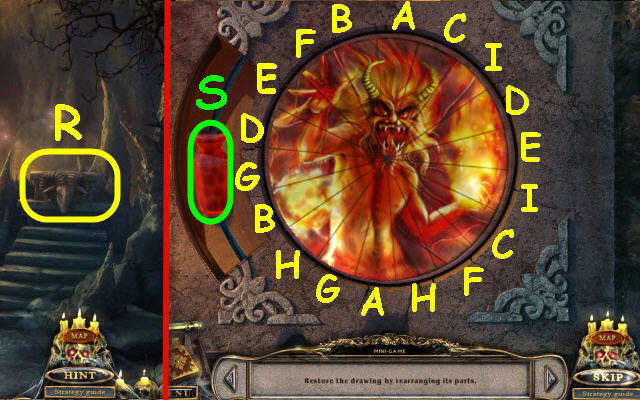
- Examine the medallion to trigger a puzzle (L).
- Press the buttons in the correct order.
- The clue is located in the bottom of the well.
- See screenshot for correct order (1-4).
- Take the RUNE 10/10.
- Go up the stairs on the right.
- Examine the pedestal and place the 10 RUNES on it (M).
- Take the KEY (N).
- Go to the Gates of Heaven.
- Examine the gate and use the KEY on the lock (O).
- Examine the fountain to trigger a puzzle (P).
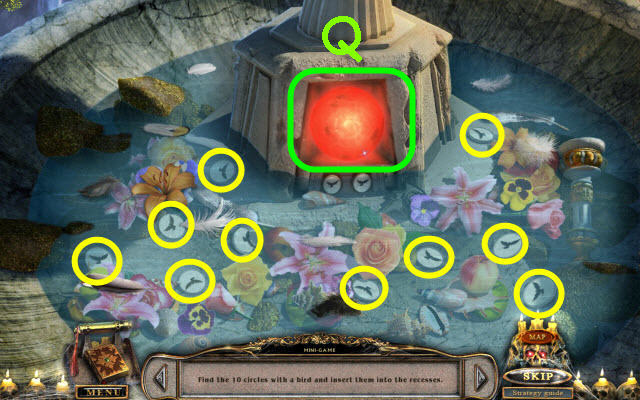
- Find the ten coins and place them in the slots.
- Move the shells and flowers to reveal the coins circled in yellow.
- Take the RED ORB (Q).
- Go to the Gates of Hell.
- Examine the pedestal with the ram’s head and place the RED ORB on it to trigger a puzzle (R).
- Switch the pieces to complete the picture.
- To solve the puzzle, switch the same lettered pieces as marked in the screen.
- Take the RED WEIGHT (S).
- Go to the Scales.
- Place the BLUE WEIGHT on the right scale (T).
- Place the RED WEIGHT on the left scale (U).
- Examine the end of the walkway; read the note and take the GEAR (V).
- Examine the winch and place the GEAR on the larger gear. Use the FILLED OIL CAN on the smaller gear; crank the handle (W).
- Examine the end of the walkway; take the BOOKS (X).
- Go to the Archives.
- Examine the empty bookcase and place the BOOKS on it to trigger a puzzle (Y).
- Arrange the books to complete the pattern.
- See screenshot for solution (Z).
- Take the 2nd JADE DRAGON FIGURINE, read the clue and take the MINERAL.
- Go to the Repository.
- Examine the curtained area to access a HOP.
- Find the items listed.
- Place the weights circled in green in the box to get weights (A).
- Place the egg in the bowl to get a bowl with an egg (B).
- Examine the chest plate to get the compass (C).
- You will earn WEIGHTS.
- Go to the Wine cellar.
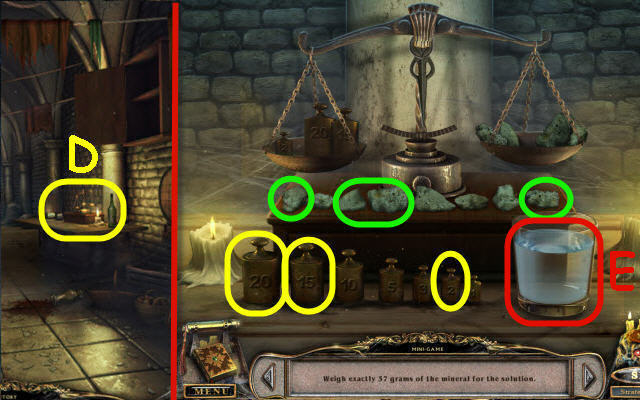
- Examine the scale and place the WEIGHTS and MINERAL by them to trigger a puzzle (D).
- Weigh out 37 grams.
- To solve the puzzle, select the yellow circled weights and the green circled minerals. They will automatically place themselves on the scales.
- Take the SOLVENT (E).
- Go to the Archives.
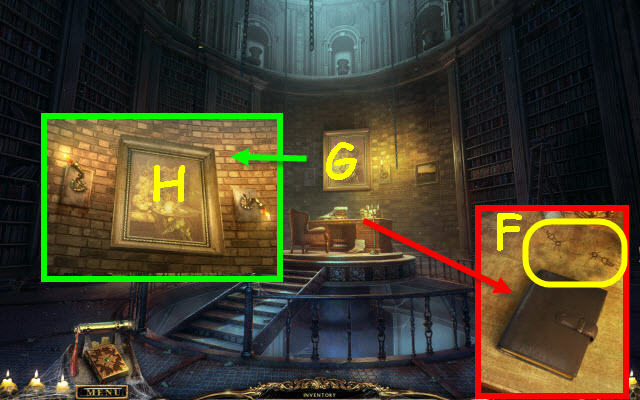
- Examine the desk; use the SOLVENT on the splotch to get a clue (F).
- Examine the painting and place the CANDLESTICK on the left holder to trigger a puzzle (G).
- To solve the puzzle, move the candles per the clue from the desk.
- To solve the puzzle, select the left candlestick once and the right candlestick four times. Pull down the painting when set (H).
- Examine the statue; take the MEDALLION (I).
- Go to the Repository.
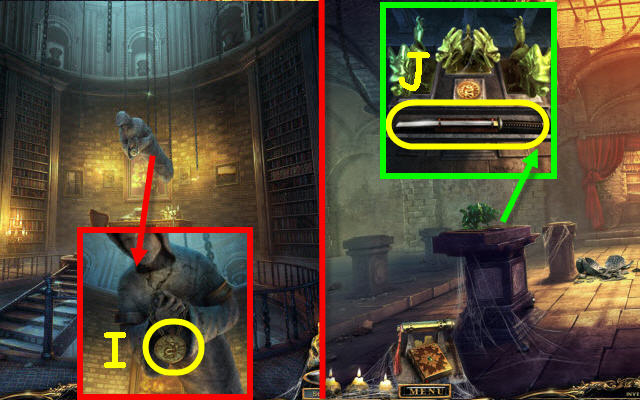
- Examine the left pedestal and place the 2 JADE DRAGON FIGURINES and the MEDALLION on it; take the SWORD (J).
- Go to the Bridges.
- Examine the winch; use the SWORD on the rope (K).
- You will automatically get a SEAL.
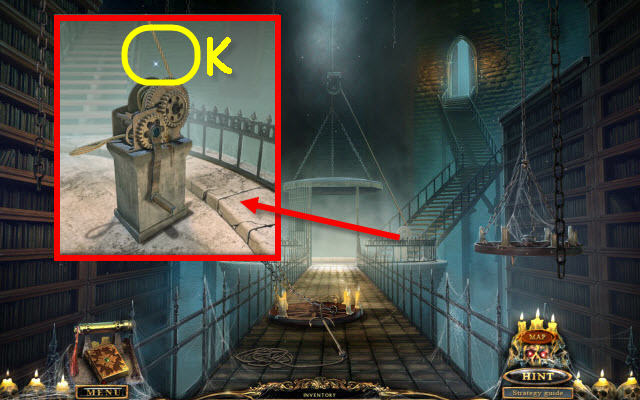
- Go forward to the Gates.
- Place the SEAL on the door (L).
- Take the KEY (M).
- Go to the Portals.
- Examine the center and place the KEY in the lock (N).
- Go through the Portal (O).
- Go up towards the Castle Entrance.
Chapter 7: Vampire Castle
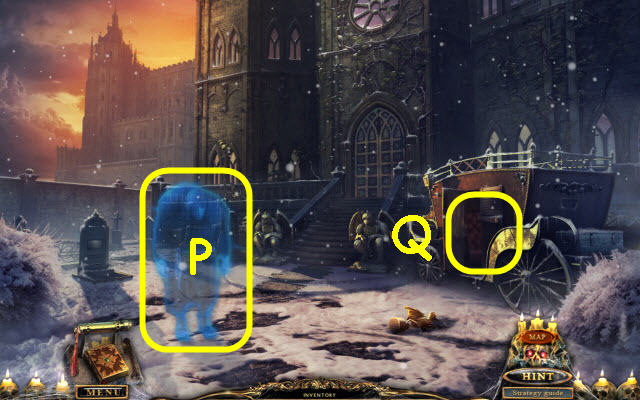
- Select anywhere in the scene to speak to Giovanni (P).
- Examine the carriage to access a HOP (Q).
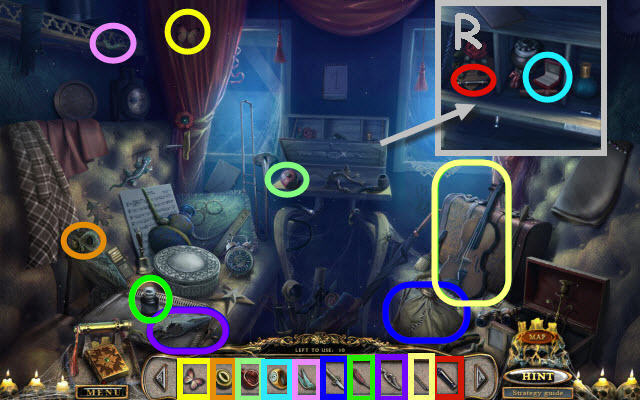
- Place the items where they belong in the scene.
- Open the cabinet and examine the compartments place some of the items (R).
- You will earn a DOOR KNOCKER.
- Take the BAT FIGURINE 1/6 (S).
- Examine the door and place the DOOR KNOCKER on it (T).
- Use the knocker to trigger a puzzle.
- Slide the sections to complete the drawings.
- To solve the puzzle, select the following buttons: B x 3, A, E x 2, C, D x 3 and F x 2.
- Examine the left gargoyle to trigger a puzzle (U).
- Place the dragon by their matching symbols.
- To solve the puzzle, select the following positions: V, X, W and Y.
- Take the JEWEL.
- Enter the Castle.
- Take the MESSAGE (@).
- Go up to the Stairway (Z) and go left through the door to the Main hall.
- Take the HAMMER (A) and SPEARHEAD (B).
- Go to the Castle entrance.
- Examine the carriage to access a HOP.
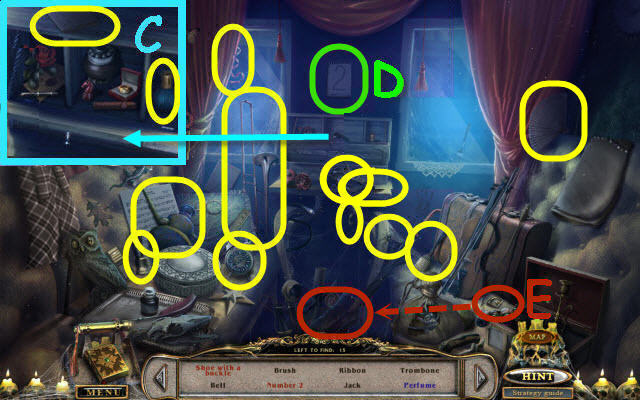
- Find the items listed.
- Examine the cabinet to find the perfume and notepad (C).
- Take down the number 1 to get a number 2 (D).
- Place the shoe on the boot to get a shoe with a buckle (E).
- You will earn a JACK.
- Go to the Hallway.
Chapter 8: The Last Stamp
- Examine the top of the stairs and use the JACK on the gate; crank the handle (F).
- Go forward up the stairs.
- Select anywhere in the scene to speak to Giovanni (G).
- Take the MESSAGE (@).
- Move the casket lid and examine the opened casket to access a HOP (H).
- Place the items where they belong in the scene.
- Remove the jar lid and examine the opened jar to place some of the items (I).
- You will earn a GLASS CUTTER.
- Go to the Wine cellar.
- Select anywhere in the scene to speak to Gordon (J).
- Examine the globe and use the GLASS CUTTER on it; take the STAINED GLASS BAT (K).
- Go to the Castle entrance.
- Examine the gravestone and use the SPEARHEAD on it; take the BACKBONE PART (L).
- Go to the Hallway.
- Pull the cord (M) and examine the wall behind the curtain. Use the HAMMER on the broken wall; take the SYMBOL (N).
- Go to the Dungeon.
- Examine the top of the stairs and place the STAINED GLASS BAT on the casket. Move both hands; take the KEY (O).
- Go to the Stairway.
- Examine the lantern and place the SYMBOL on it; take the BAT FIGURINE 2/6 (P).
- Examine the door and use the KEY in the lock; turn the key (Q).
- Go right through the newly-opened doorway.
- Place the JEWEL on the sword; take the BUTTON (R) from the shield.
- Examine the side of the desk and pull the cloth (S).
- Reexamine the side of the desk; take the BAT FIGURINE 3/6 (T).
- Examine the helmet and pull up the mask; take the BAT FIGURINE 4/6 (U).
- Go to the Castle entrance.
- Examine the gargoyle on the right and place the BUTTON on it to trigger a puzzle (V).
- Switch the blue and the red buttons.
- To solve the puzzle, select the following buttons: X, W, X, W and X.
- Take the MOSAIC PART.
- Go to the Hallway.
- Examine the mosaic and place the MOSAIC PART on it to trigger a puzzle (Y).
- Swap any two pieces to complete the puzzle.
- See screenshot for completed mosaic (Z).
- Take the PAINTING (A) and the 2nd BACKBONE PART (B).
- Go to the Study.
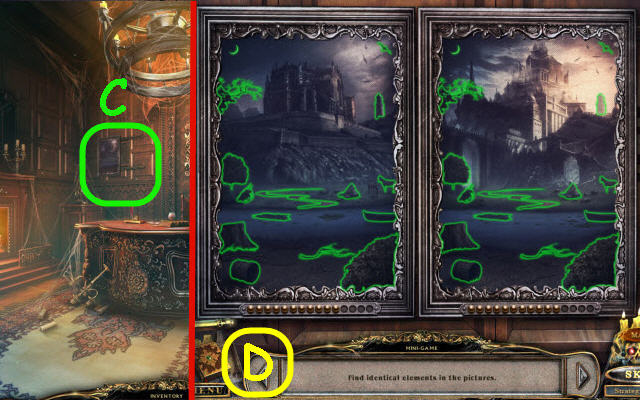
- Examine the painting and place the PAINTING on the right tracks (C).
- Find the identical items in the pictures.
- See screenshot for solution (D).
- Take the BAT FIGURINE 5/6.
- Go to the Dungeon.
- Examine the coffin to access a HOP.
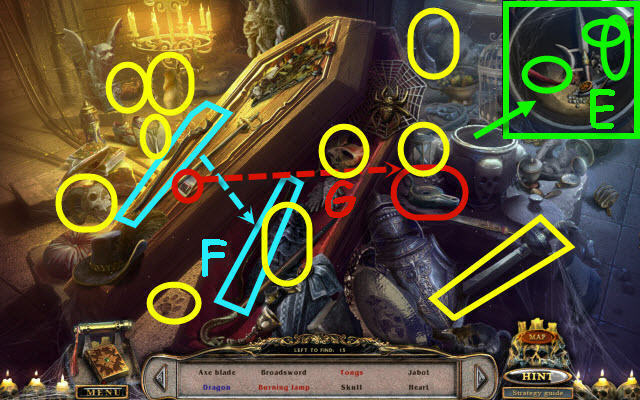
- Find the items listed.
- Examine the container to find the dragon, pepper and lock of hair (E).
- Place the tong half by the tong half to get the tongs (F).
- Use the matches on the lamp to get a burning lamp (G).
- You will earn TONGS.
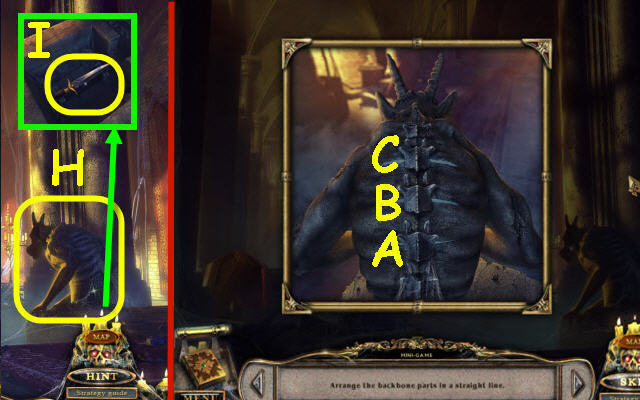
- Examine the gargoyle and place the 2 BACKBONE PARTS on it to trigger a puzzle (H).
- To solve the puzzle, select the following bones: A, B and C.
- Examine the gargoyle base; take the KNIFE (I).
- Go to the Study.
- Examine the fireplace and use the TONGS to move the lever; take the LEVER (J).
- Examine the portrait and use the KNIFE on it; take the MESSAGE (@) and SYMBOL (K).
- Go to the Hallway.
- Examine the winch and place the LEVER on it (L); select the winch to lower the chandelier.
- Examine the chandelier; take the DRESSER HANDLE (M).
- Go to the Study.
- Examine the dresser and place the DRESSER HANDLE on it. Open the drawer; take the BRUSH (N).
- Go to the Stairway.
- Examine the lantern and place the SYMBOL on it; use the BOX OF MATCHES on it to get a clue (O).
- Examine the bas-relief and use the BRUSH on it to get a clue (P).
- Go to the Study.
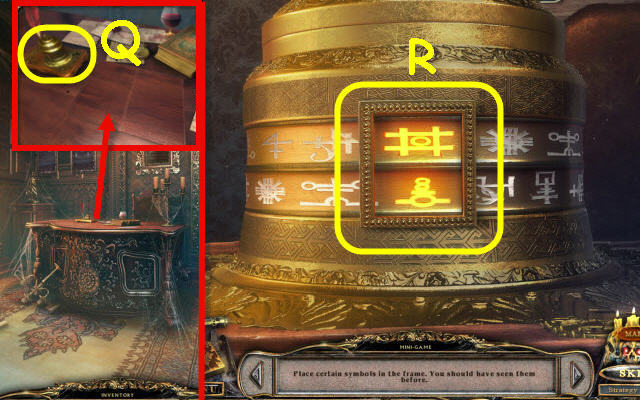
- Examine the desk; select the quill to trigger a puzzle (Q).
- Using the two clues from the Stairway to set the correct symbols.
- See screenshot for solution (R).
- Take the BAT FIGURINE 6/6.
- Go to the Main hall.
- Examine the raised stone and place the 6 BAT FIGURINES on it (S).
- You will automatically receive a SEAL.
- Go forward.
- Place the SEAL on the door (T).
- Congratulations! You have successfully completed Portal of Evil: Stolen Runes.


 Christmas Eve: Midnight's Call Walkthrough, Guide, & Tips
 Witch Switch Tips and Tricks, Guide, & Tips
 Haunted Train: Frozen in Time Walkthrough, Guide, & Tips
 The Dark Hills of Cherai: the Regal Scepter Walkthrough, Guide, & Tips
 Mystery of the Ancients: Deadly Cold Walkthrough, Guide, & Tips