Mystery of the Ancients: Deadly Cold Walkthrough, Guide, & Tips
Mystery of the Ancients: Deadly Cold Walkthrough

Welcome to the Mystery of the Ancients: Deadly Cold Walkthrough
Ice giants are attacking citizens as a deadly blizzard arrives.
Whether you use this document as a reference when things get difficult or as a road map to get you from beginning to end, we’re pretty sure you’ll find what you’re looking for here.
This document contains a complete Mystery of the Ancients: Deadly Cold game walkthrough featuring annotated screenshots from actual gameplay!
We hope you find this information useful as you play your way through the game. Use the walkthrough menu below to quickly jump to whatever stage of the game you need help with.
Remember to visit the Big Fish Games Forums if you find you need more help. Have fun!
This walkthrough was created by Anita Cule, and is protected under US Copyright laws. Any unauthorized use, including re-publication in whole or in part, without permission, is strictly prohibited.
General Tips
- This is the official guide for Mystery of the Ancients: Deadly Cold.
- This guide will not mention each time you have to zoom into a location; the screenshots will show each zoom scene.
- Hidden-object puzzles are referred to as HOPs. This guide will not show screenshots of the HOPs, however, it will mention when an HOP is available and the inventory item you’ll collect from it.
- Some inventory items require further actions.
- This guide will give step-by-step solutions for all puzzles which are not random. Read the instructions in the game for each puzzle.
Chapter 1: Kira and Victor

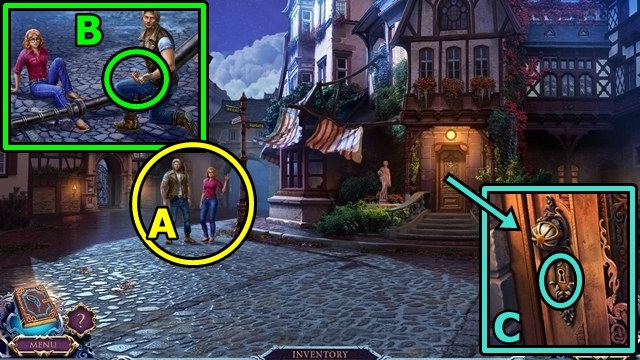
- Talk to Victor and Kira (A).
- Take VICTOR’S KEY (B).
- Insert VICTOR’S KEY (C). Enter Kira’s House.
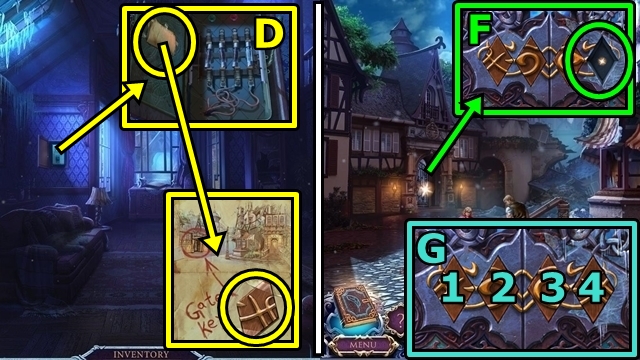
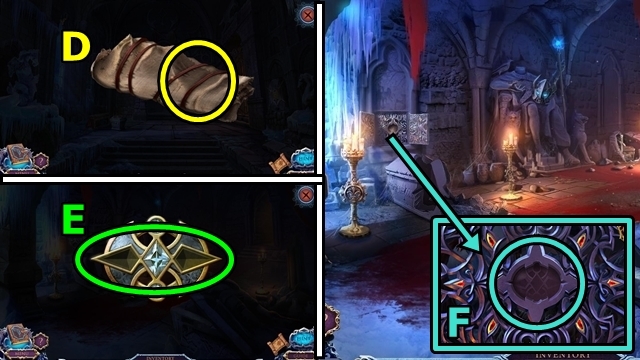
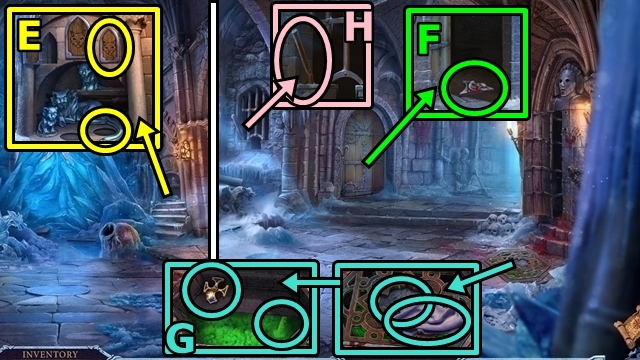
- Open the fuse box; unfold the paper (D). Take the GATE KEY (E).
- Move down.
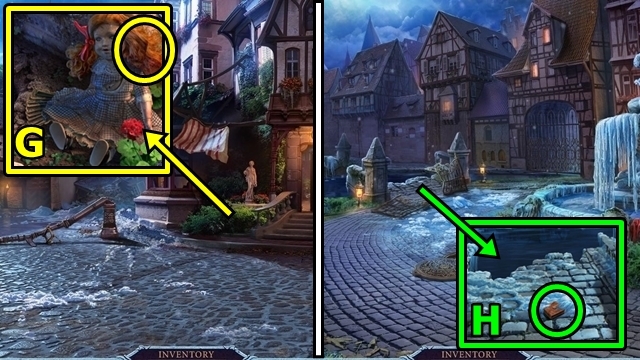
- Insert the GATE KEY (F); play the mini-game.
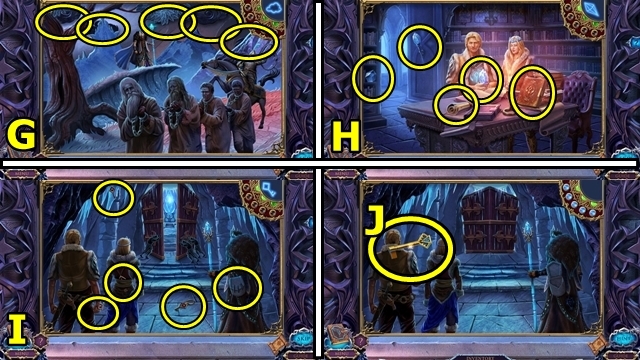
- Solution: 2-4-3-1 (G).
- Go through the gate.

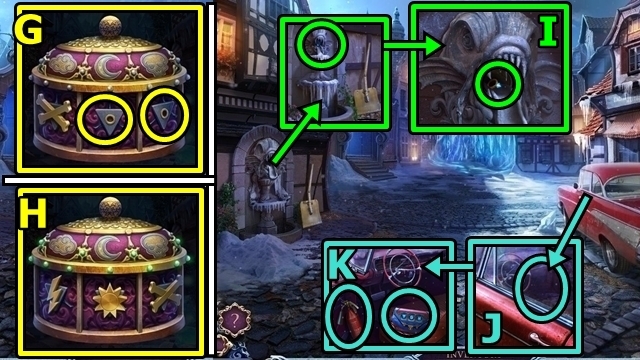
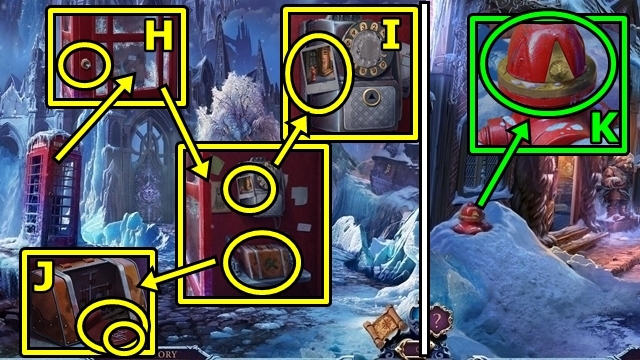
- Take the GLUE (H).
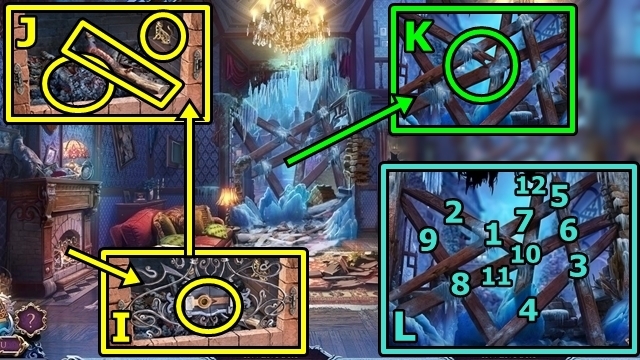
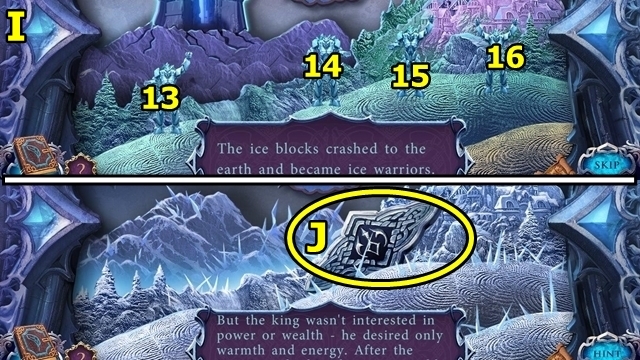
- Pick up the GLOVES (I).
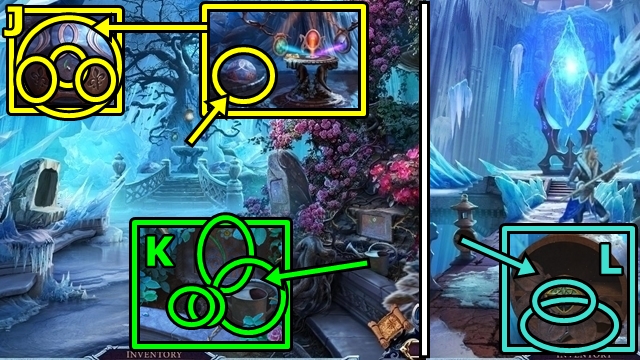
- Take the SPADE (J).
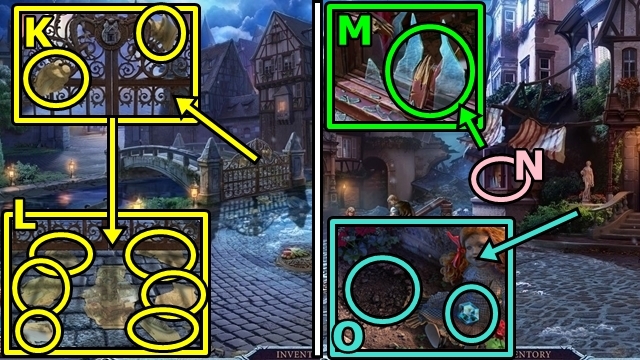
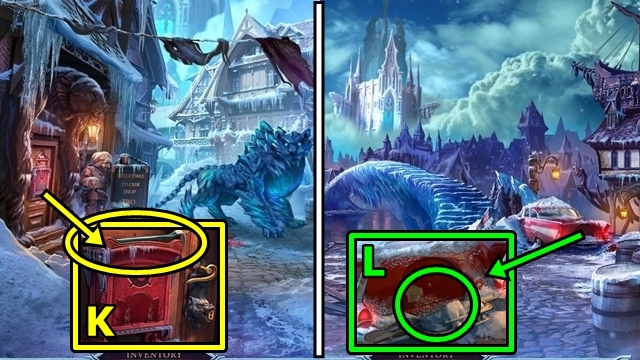
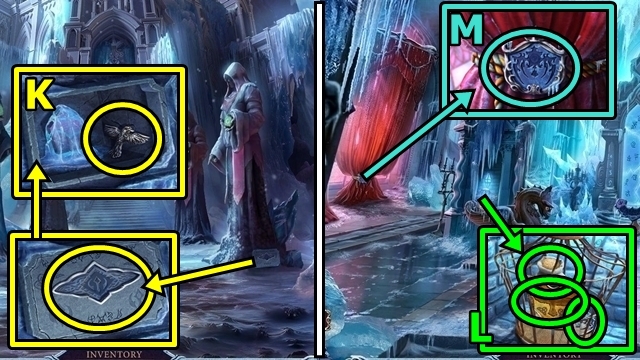
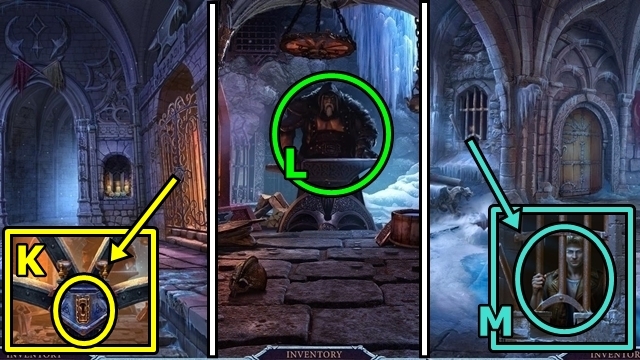
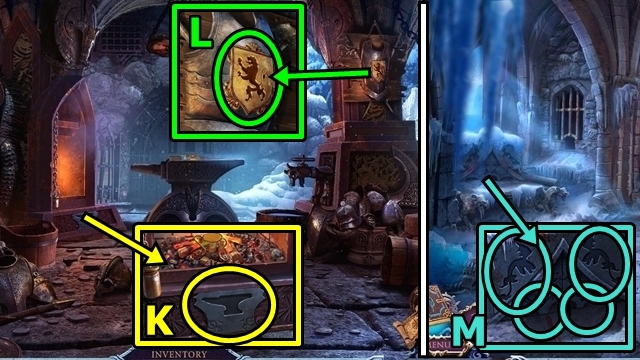
- Try to take the paper (K).
- Rearrange the pieces (L); add the GLUE. Take the map, then the FUSE (1/3).
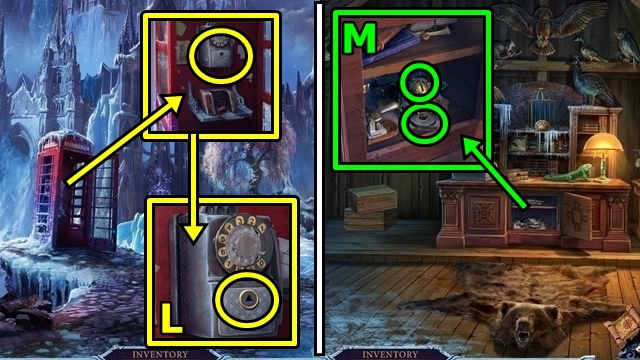
- Move down.
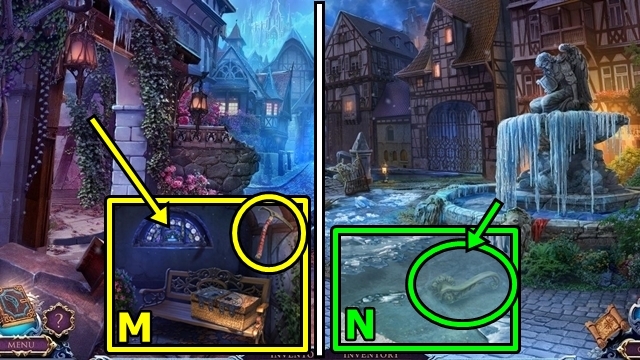
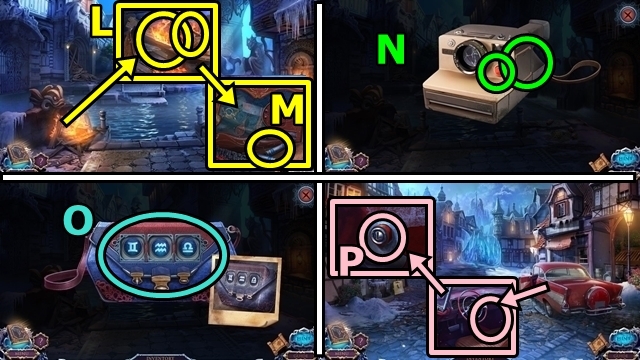
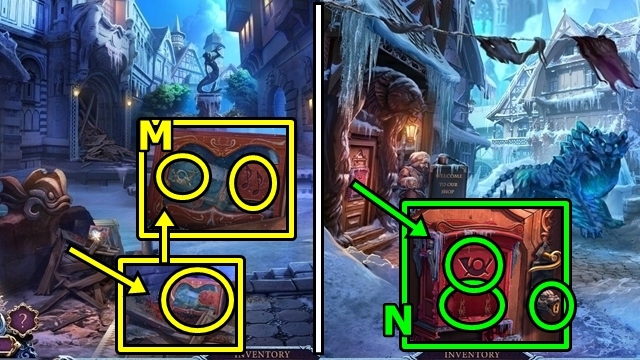
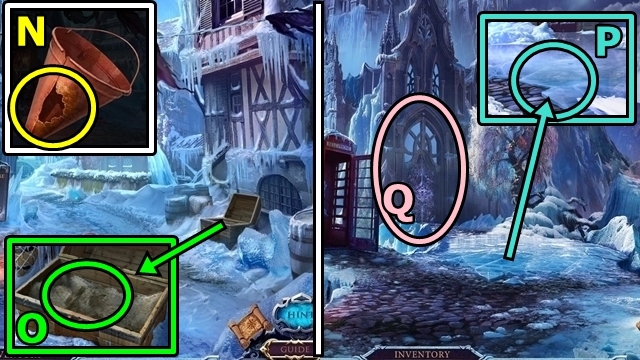
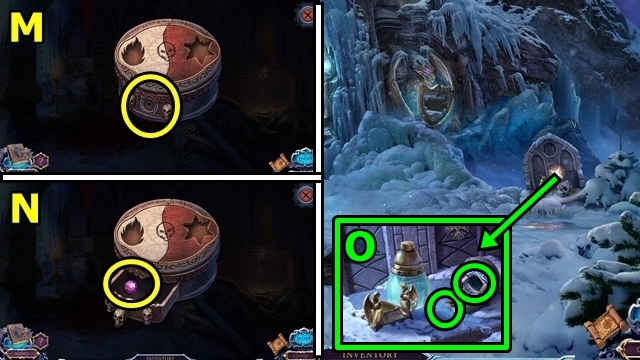
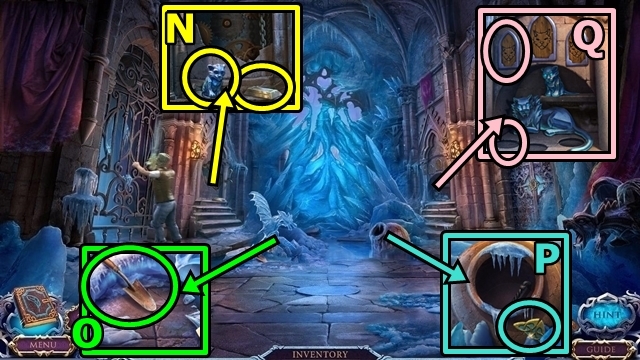
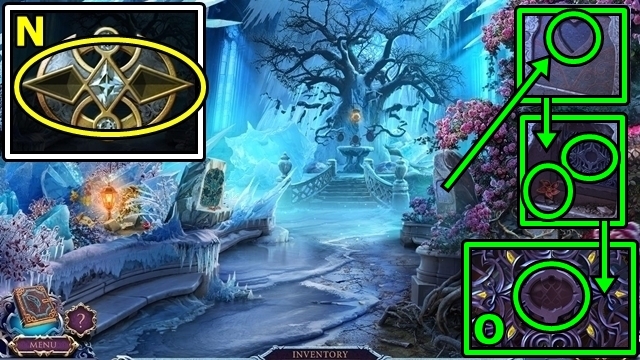
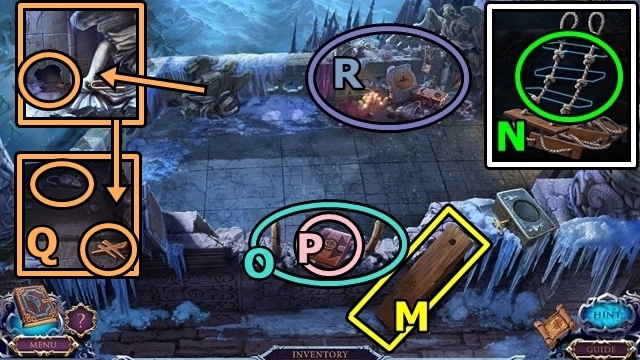
- Use the GLOVES (M). Play the HOP (N); take the FUSE (2/3).
- Take the BLUE GEM; use the SPADE; take the SCREWDRIVER (O).
- Return to the Fountain Square.
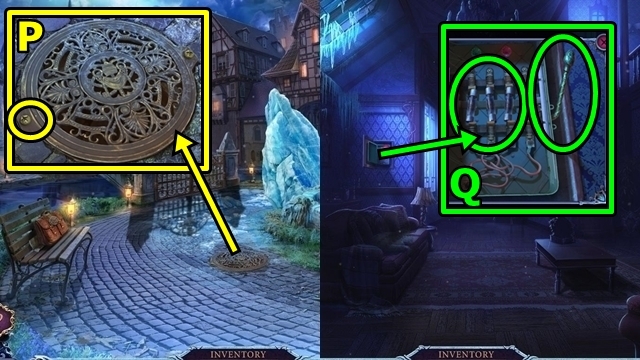
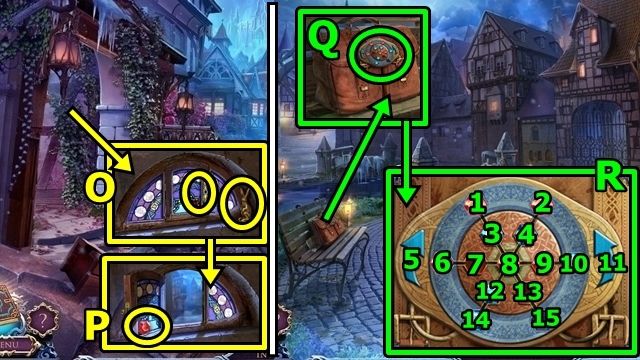
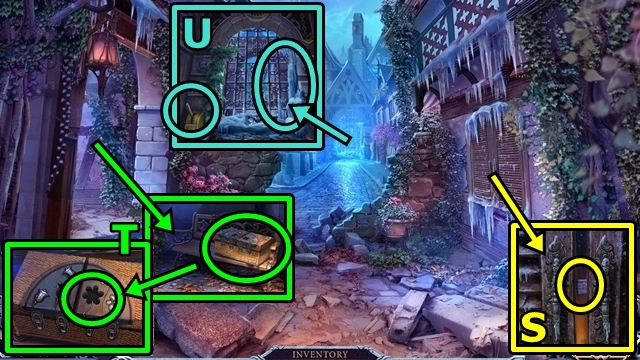
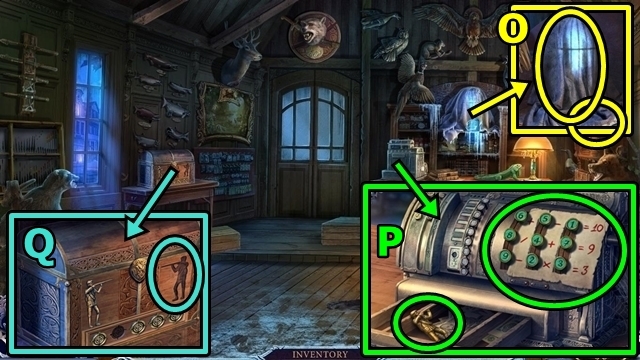
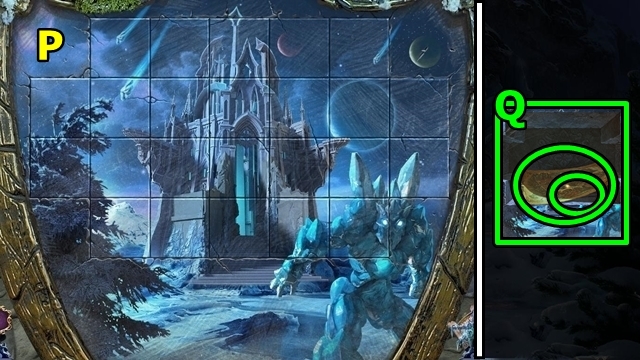
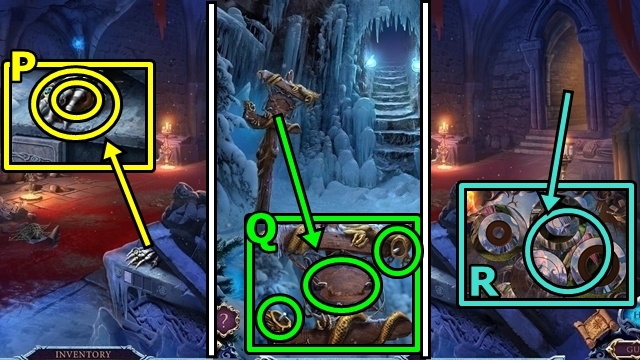
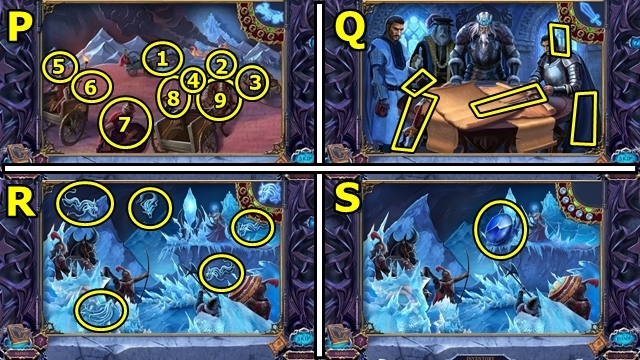
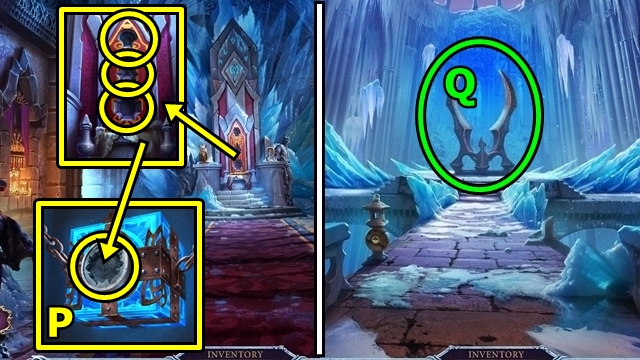
- Use the SCREWDRIVER (P); take the FUSE (3/3).
- Return to Kira’s House.
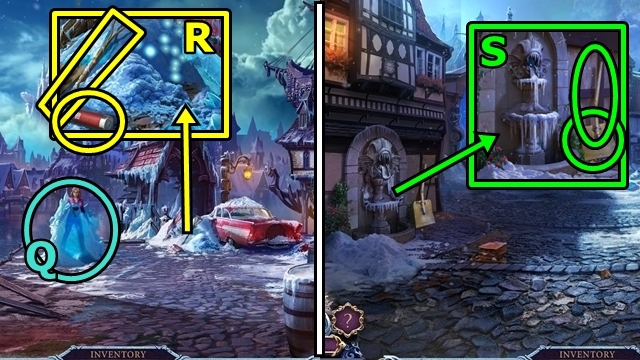
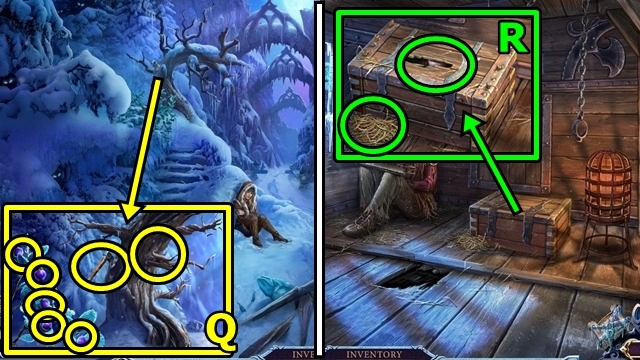
- Remove the fuses. Add the three FUSES; pull the lever (Q).
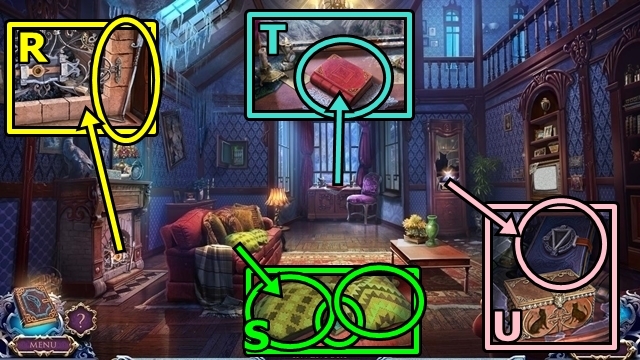
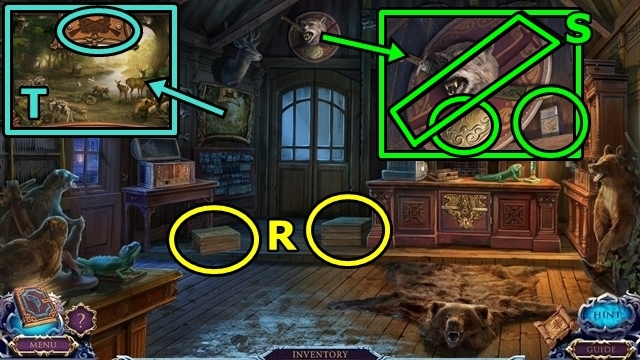
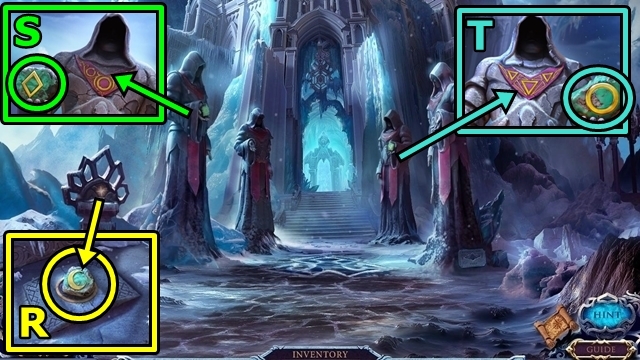
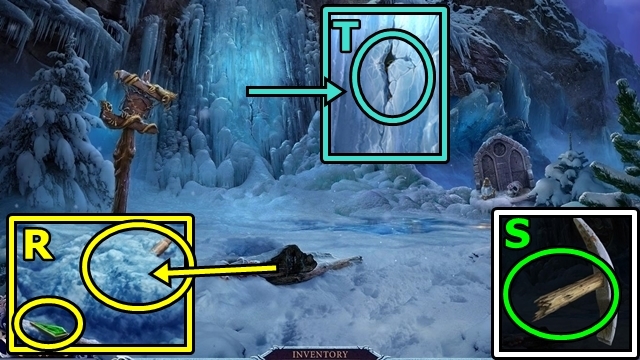
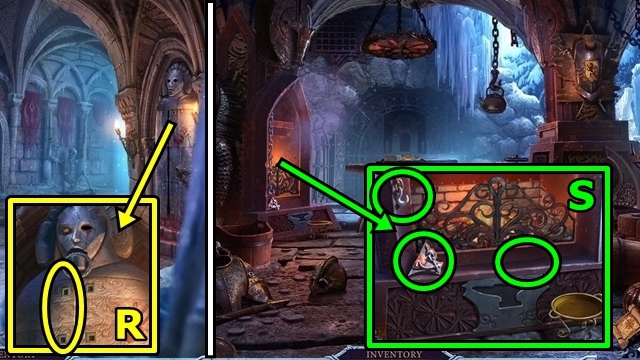
- Take the FIREPLACE IRON (R).
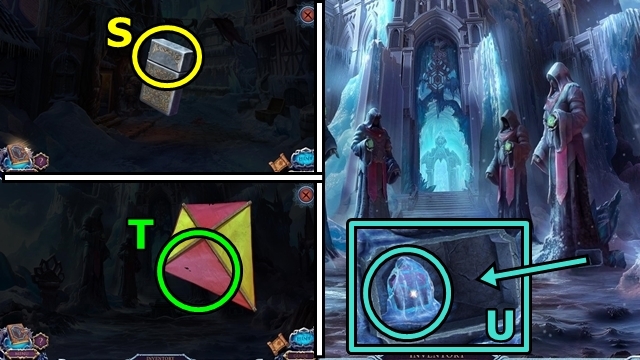
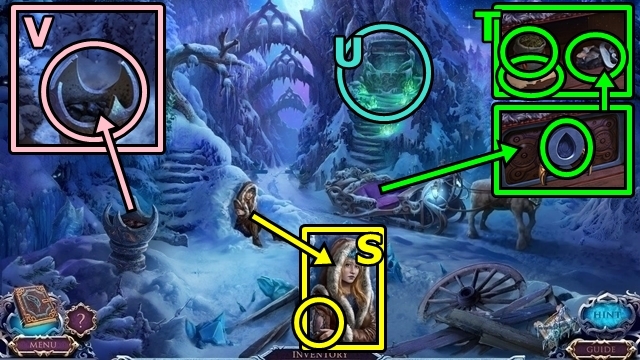
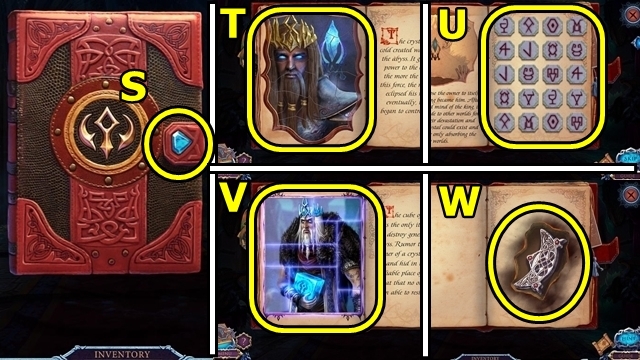
- Move the pillows; take the BOOK (S).
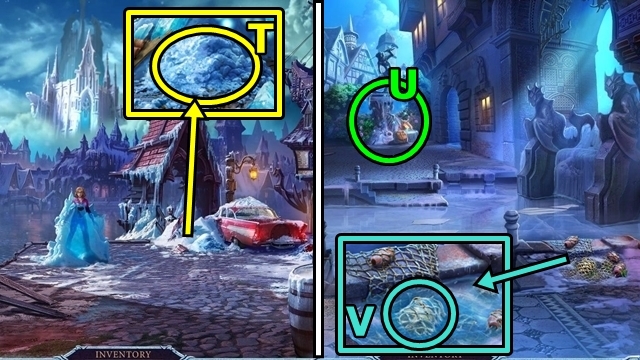
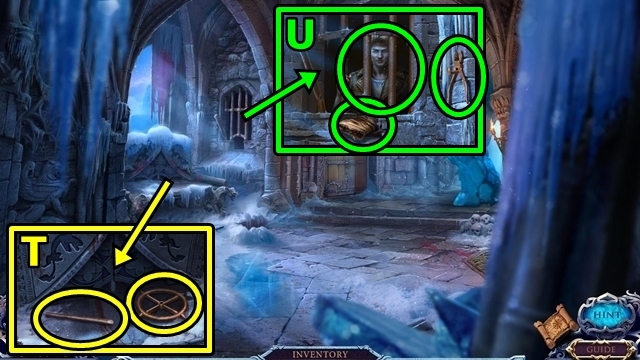
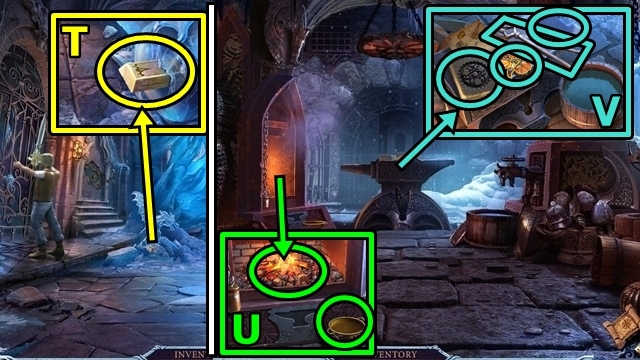
- Take the BOOK (T).
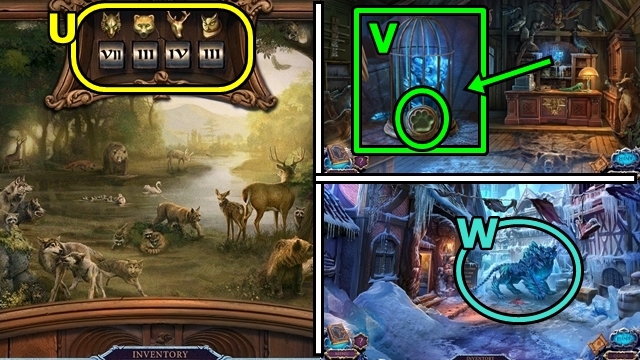
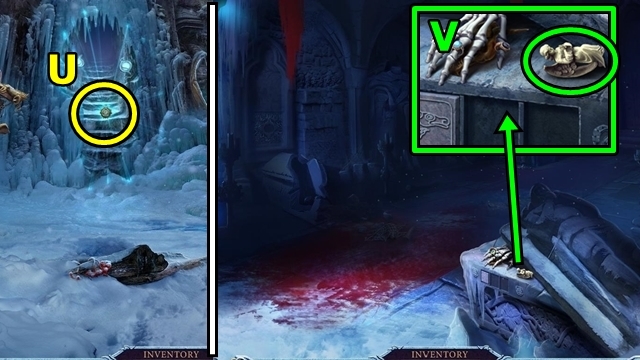
- Take the STRANGE BOOK (U).
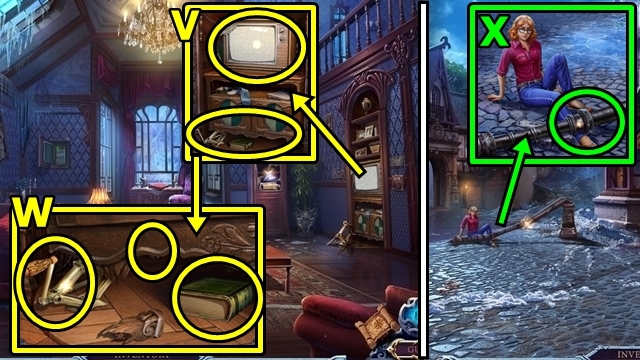
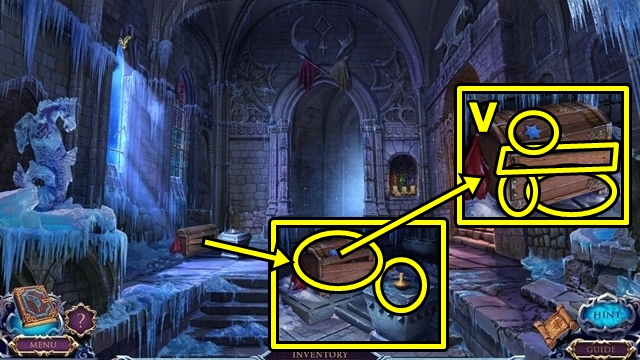
- Watch the television. Look under the cabinet (V).
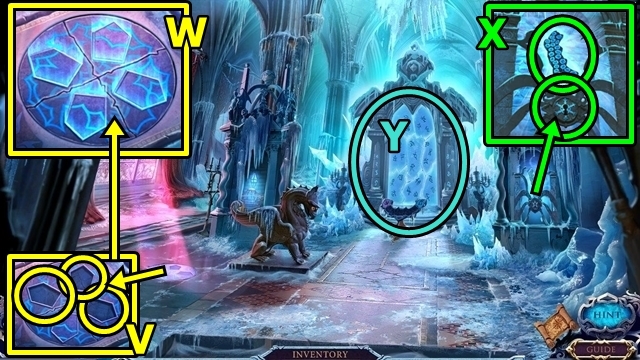
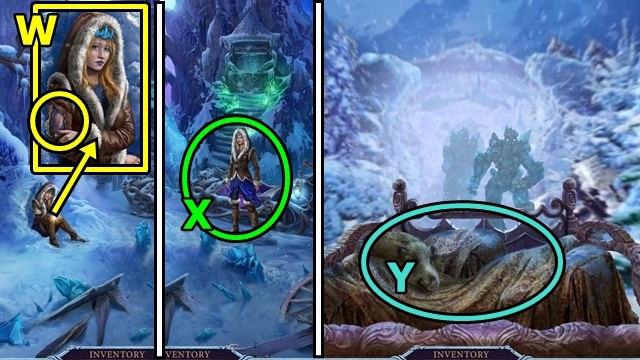
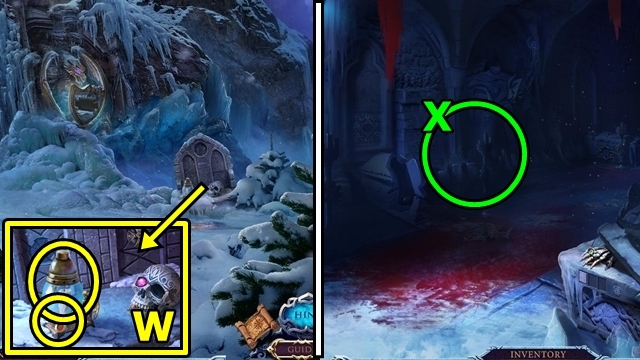
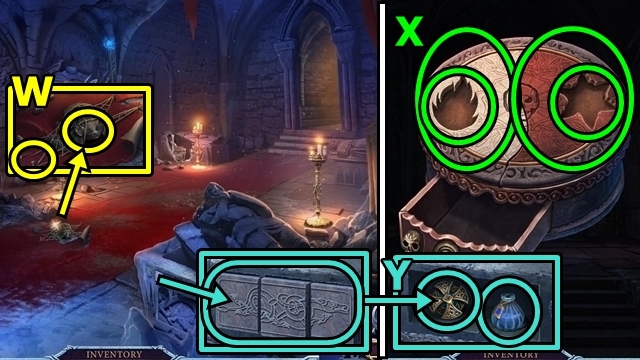
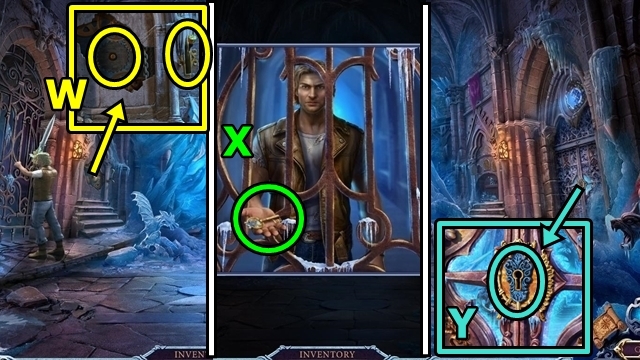
- Use the jack. Use the FIREPLACE IRON; take the FIREPLACE KNOB. Add the two BOOKS; take the CAR JACK (W).
- Move down.
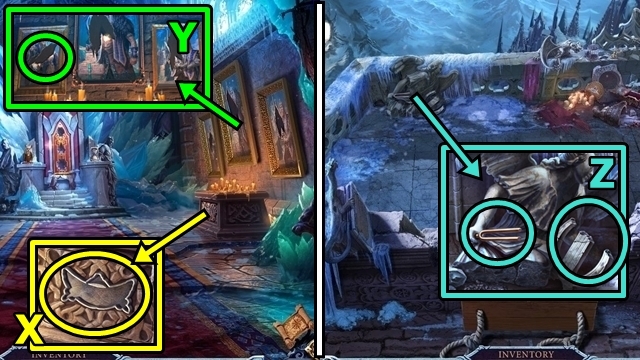
- Use the CAR JACK (X).
- Talk to Kira. Enter Kira’s House.
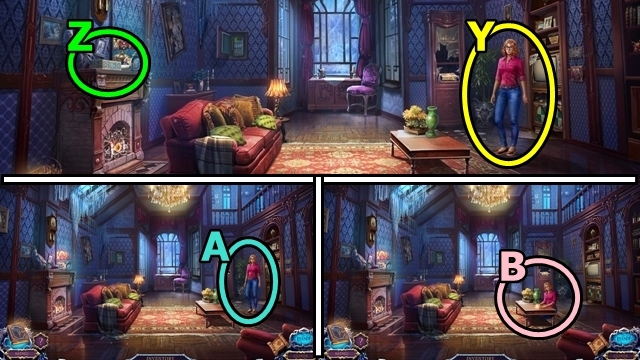
- Talk to Kira (Y).
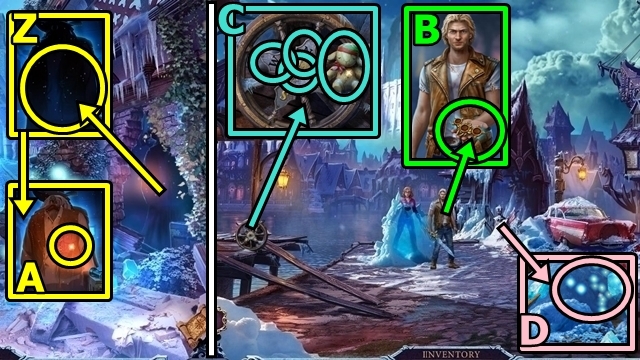
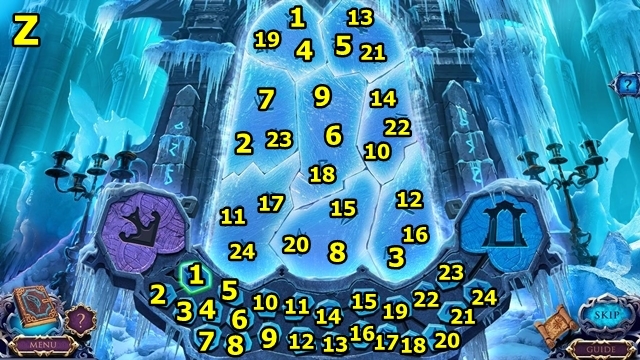
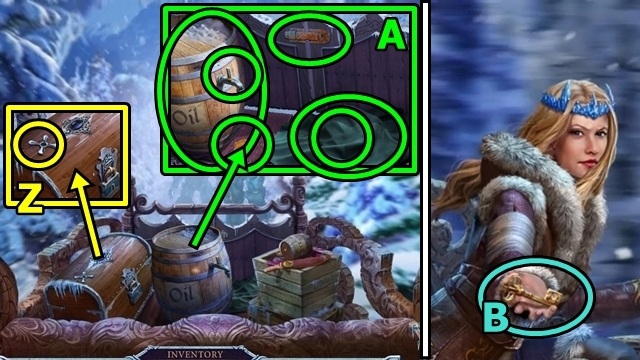
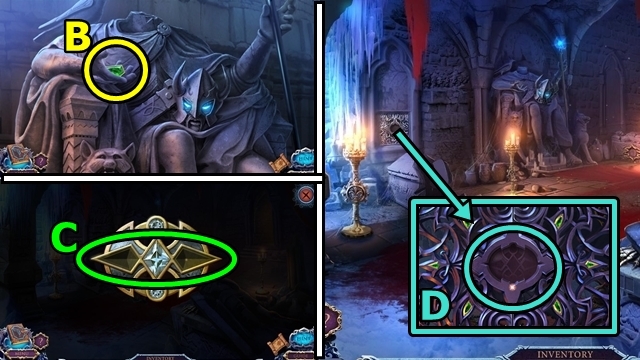
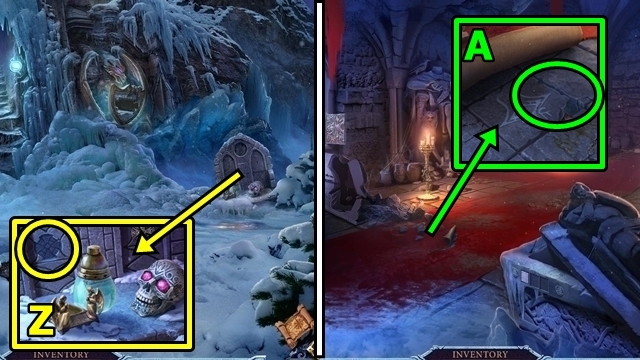
- Play the HOP (Z); take the BROKEN AMULET.
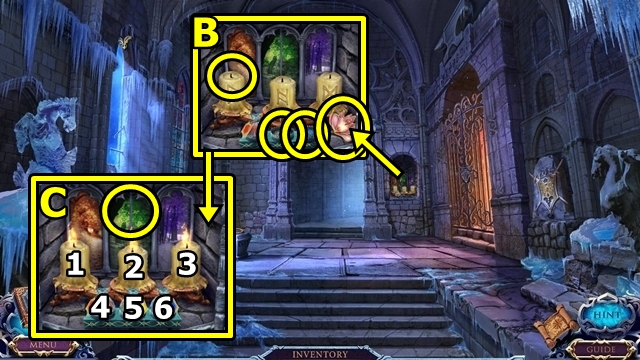
- Offer the BROKEN AMULET (A).
- Fix the broken amulet (B).
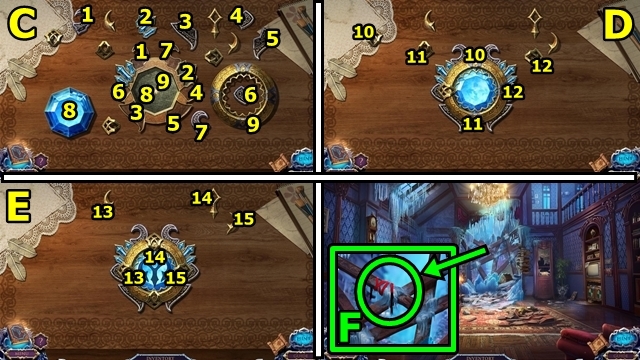
- Solution: (C-E).
- Take the RIBBON (F).
- Return to Main Street.
- Place the RIBBON (G); take the FAN.
- Go to Fountain Square.
- Pick up VICTOR’S WALLET (H).
- Return to Kira’s House.
- Insert the FIREPLACE KNOB (I); slide the knob.
- Take the GOLDEN CAT. Use the FAN; take the TORCH (J).
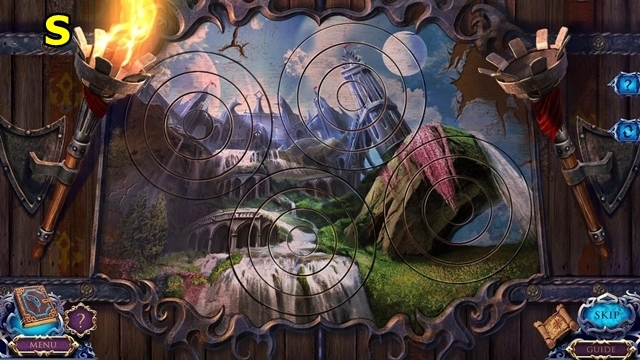
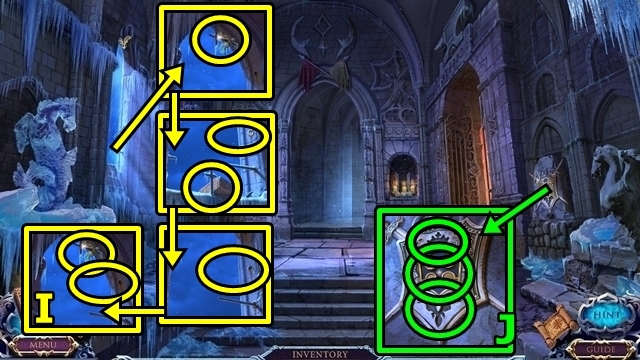
- Use the TORCH (K); play the mini-game.
- Solution: (L).
- Move forward.
- Take the ICE AXE (M).
- Return to Fountain Square.
- Use the ICE AXE; take the HANDLE (N).
- Return to the Back Alley.
- Take the HARE FIGURINE (O). Insert the HANDLE; pull the handle; take the RED GEM (P).
- Return to Fountain Square.
- Insert the BLUE GEM and RED GEM (Q); play the mini-game.
- Solution: 5×2-15-5-12-5-14-5×2-3-5-1-5-4-8 (R). Take the RULER.
- Return to the Back Alley.
- Insert the RULER (S). Play the HOP; take the FLOWER.
- Insert the FLOWER (T); take the BLOWTORCH.
- Use the BLOWTORCH; push the lever (U).
- Move forward.
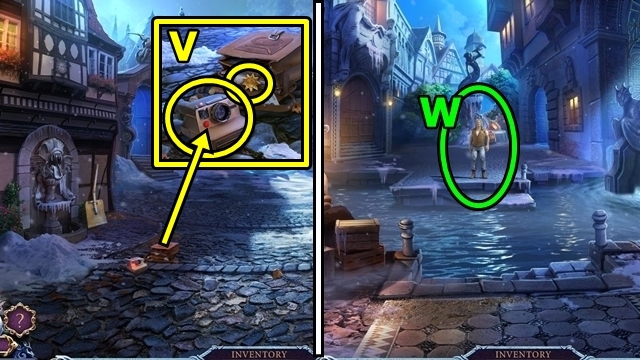
- Take the INSTANT CAMERA and SUN SYMBOL (V).
- Go through the archway.
- Talk to Victor (W); receive the GOLDEN CAT.
- Return to Kira’s House.
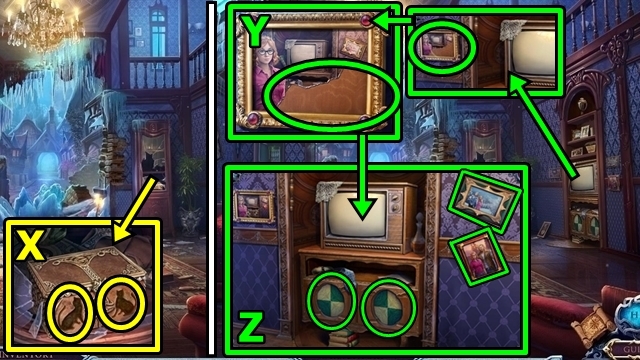
- Insert the two GOLDEN CATS (X); take the LEG PART and PHOTO PART.
- Insert the PHOTO PART (Y).
- Adjust the frames and cupboards (Z).
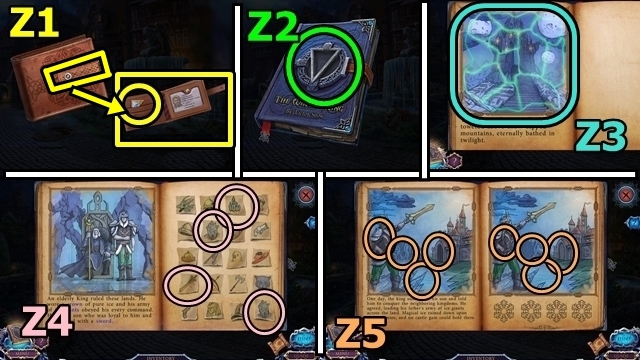
- Lift the flap, then open VICTOR’S WALLET (inventory). Remove the picture; take the TRIANGULAR GEM (Z1).
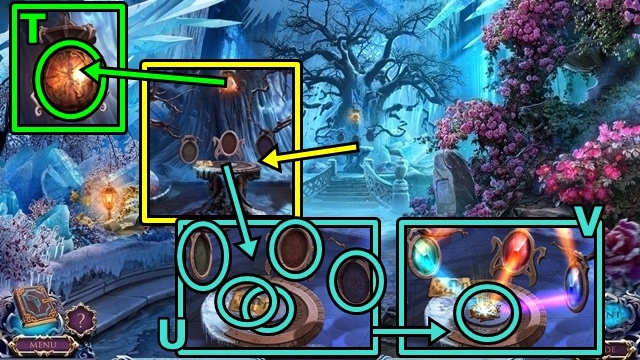
- Insert the TRIANGULAR GEM (Z2) into the STRANGE BOOK (inventory). Turn the page; play the mini-game.
- Solution: (Z3-Z5). Take the BROKEN TOY.
- Repair the BROKEN TOY (inventory). Add the LEG PART (A); receive the ICE GIANT TOY.
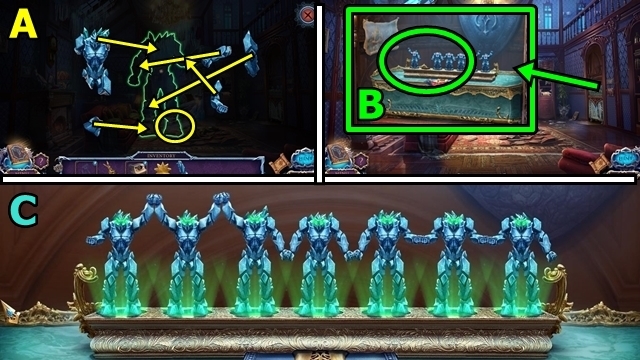
- Place the ICE GIANT TOY (B); play the mini-game.
- Solution: (C).
- Take VICTOR’S SWORD.
- Return to Canal Falls.

- Take the FLOWER (D).
- Return to the Back Alley.
- Insert the FLOWER (E); take the PRUNERS.
- Take the LIGHTNING CHARM. Use the PRUNERS; take the BOX (F).
- Return to Market Avenue.
- Add the SUN SYMBOL and LIGHTNING CHARM (G) to the BOX (inventory). Rearrange the symbols; take the TWEEZERS.
- Use the TWEEZERS; receive the DIAMOND RING (I).
- Use the DIAMOND RING (J). Unlock the car door; take the PURSE and FIRE EXTINGUISHER (K).
- Go to the Canal Falls.
- Use the FIRE EXTINGUISHER (L). Move the burnt wood; take the BATTERIES (M).
- Open the panel of the INSTANT CAMERA (inventory). Insert the BATTERIES; press the red button (N); examine the photograph. Repeat twice; receive the CODE PHOTO.
- Move down.
- Rearrange the PURSE symbols (inventory) (O); take the CAR KEY.
- Insert the CAR KEY (P); turn twice.
- Talk to Kira (Q).
- Take the HOT TEA and SHOVEL HANDLE (R).
- Move down.
- Remove the handle; insert the SHOVEL HANDLE; take the SHOVEL (S).
- Move forward.
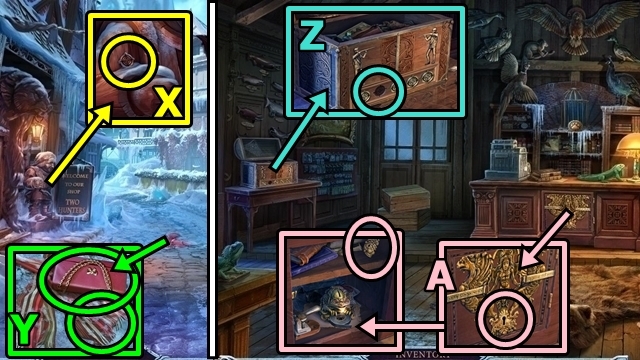
- Use the SHOVEL (T); take the RAZOR.
- Return to Canal Falls.
- Play the HOP (U); take the HARE (2/2).
- Pour the HOT TEA. Use the RAZOR; take the RACOON MEDALLION (V).
- Move down.

- Insert the RACOON MEDALLION (W).
- Take the PLIERS. Use the PLIERS (X); place the HARES (2/2); play the mini-game.
- Solution: (Y). Take the FLASHLIGHT.
- Move down.
- Use the FLASHLIGHT (Z); take the LETTER W (A).
- Return to the Old Pier.
- Talk to Kira and Victor; take the SOUL CATCHER (B).
- Take the STUFFED LAMB. Use the RAZOR on the STUFFED LAMB (inventory); take the LETTER N. Insert the LETTER W and LETTER N; take the NOTE (1/2) (C).
- Use the SOUL CATCHER (D).
- Go to the Back Alley.
- Use the SOUL CATCHER (E).
- Go to Canal Falls.
- Use the SOUL CATCHER (F).
- Return to the Old Pier.
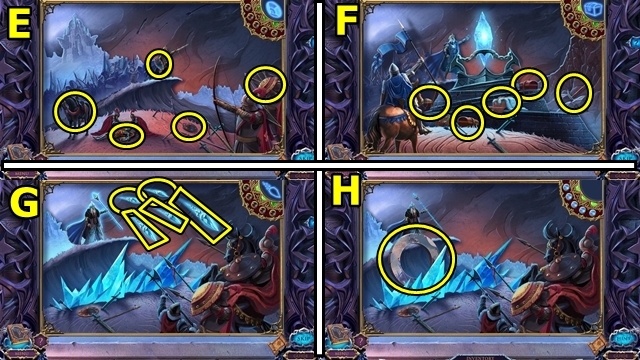
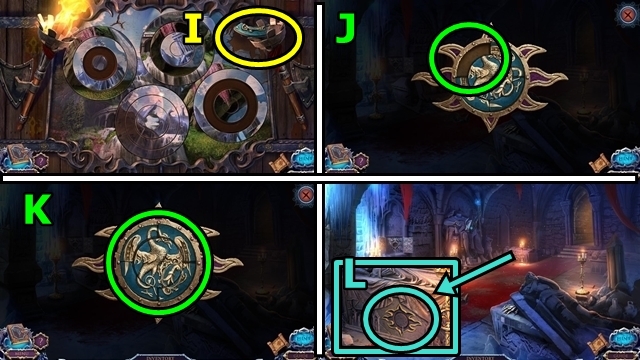
- Use the SOUL CATCHER (G); play the mini-game.
- Solution: (H-J).
- Receive VICTOR’S AMULET.
- Cross the ice bridge.
Chapter 2: Baumholder City
- Take the CROWBAR (K).
- Move down.
- Use the CROWBAR (L). Play the HOP; receive the NOTE (2/2).
- Return to Canal Falls.
- Insert the two NOTES; take the GOLDEN HORN (M).
- Return to the Street.
- Insert the GOLDEN HORN (N); take the KEY. Insert the KEY.
- Enter the Hunters’ Shop.
- Pull the cloth; take the PAPER (O).
- Place the PAPER; play the mini-game.
- Solution: (P). Take the HUNTER.
- Insert the HUNTER (Q); take the SABER.
- Move the boxes (R).
- Take the LIGHTER. Add the SABER (S); take the EMBLEM.
- Insert the EMBLEM (T); play the mini-game.
- Solution: (U). Take the ANIMAL PAW.
- Insert the ANIMAL PAW (V); receive the KITTEN.
- Move down.
- Offer the KITTEN (W).
- Take the TARGET (X).
- Take KIRA’S PURSE (Y). Move the scarf; take the TABLE KEY.
- Enter the Hunters’ Shop.
- Insert the TARGET (Z); take the GRINDSTONE.
- Insert the TABLE KEY; take the AMULET HALF (A).
- Move down, then forward.
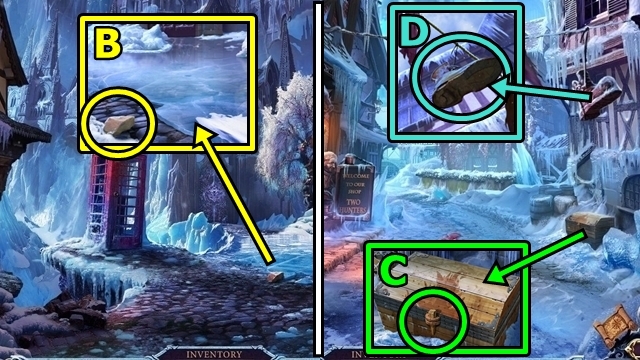
- Take the STONE (B).
- Move down.
- Use the STONE (C); take the BOAT HOOK and LEAKY BUCKET.
- Use the BOAT HOOK (D); receive the BOOT.
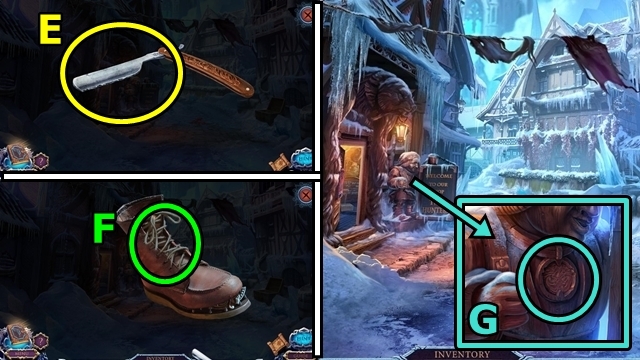
- Use the GRINDSTONE on the BLUNT RAZOR (inventory) (E); receive the RAZOR.
- Use the RAZOR on the BOOT (inventory) (F). Shake the boot; take the AMULET HALF.
- Add the two AMULET HALVES (G); take the KNOB.
- Move forward.
- Insert the KNOB (H); take the PHOTO (I). Take the NAILS. Use the RAZOR; receive the LEATHER (J).
- Move down.
- Lift the lid (K); take the TELEPHONE KEY.
- Move forward.
- Insert the TELEPHONE KEY (L); take the COIN.
- Return to the Hunters’ Shop.
- Insert the COIN; take the DUCT TAPE (M).
- Move down.
- Add the LEATHER and DUCT TAPE to the LEAKY BUCKET (inventory) (N); receive the EMPTY BUCKET.
- Use the EMPTY BUCKET (O); receive the BUCKET OF SAND.
- Move forward.
- Use the BUCKET OF SAND (P); play the HOP (Q).
- Enter the Gate.
- Take the MOON STONE (R).
- Take the RHOMBUS STONE (S).
- Take the CIRCULAR STONE (T).
- Move forward.
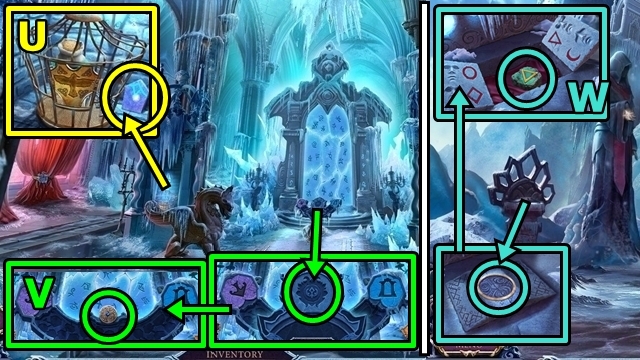
- Take the TILE (1/3) (U).
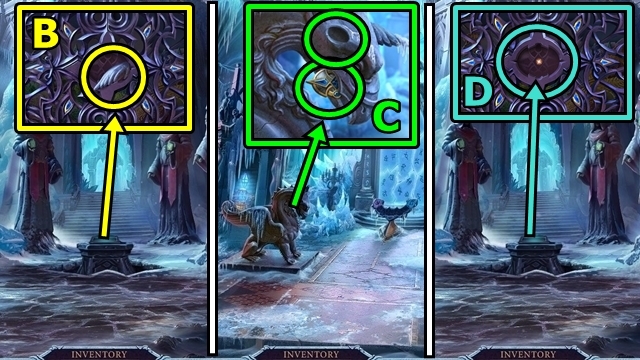
- Insert VICTOR’S AMULET; take the ROUND TOKEN (V).
- Return to the Staircase.
- Insert the ROUND TOKEN; take the TRIANGULAR STONE (W).
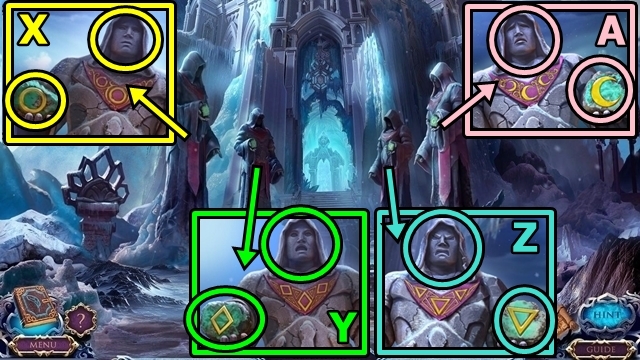
- Place the CIRCULAR STONE; adjust the face (X).
- Place the RHOMBUS STONE; adjust the face (Y).
- Place the TRIANGULAR STONE; adjust the face (Z).
- Place the MOON STONE; adjust the face (A).
- Take the GRIFFIN EAR (B).
- Move forward.
- Place the GRIFFIN EAR; take the BLUE KEY (C).
- Move down.
- Insert the BLUE KEY (D); play the mini-game.
- Solution: (E-I).
- Take the TOWER SYMBOL (J).
- Insert the TOWER SYMBOL; take the RAVEN (K).
- Move forward.
- Insert the RAVEN. Take the BIRD SEED and CURTAIN KEY (L).
- Insert the CURTAIN KEY (M). Play the HOP; receive the TILE (2/3).
- Return to the Gate.

- Try to take the kite (N). Offer the BIRD SEED. Try to take a board (O). Take the BOARDS (3/3) (P). Place the BOARDS; add the NAILS. Take the hammer; use on nails (Q). Take the KITE (R).
- Move forward.
- Open the LIGHTER (inventory) (S). Flick the thumbwheel twice; receive the LIT LIGHTER.
- Remove the KITE (inventory) paper (T). Break the sticks; receive the PAPER AND WOOD.
- Add the PAPER AND WOOD; use the LIT LIGHTER; take the TILE (3/3) (U).
- Move forward.
- Insert the TILES (3/3) (V); play the mini-game.
- Solution: (W). Take the SNOW KEY.
- Insert the SNOW KEY; take the RUNE STONE (X).
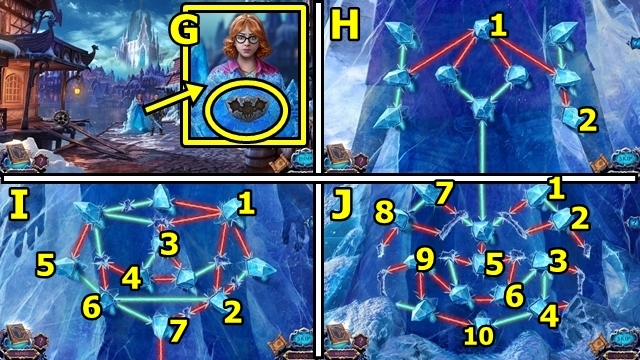
- Play the mini-game (Y).
- Solution: (Z).
- Move forward.
Chapter 3: Britta
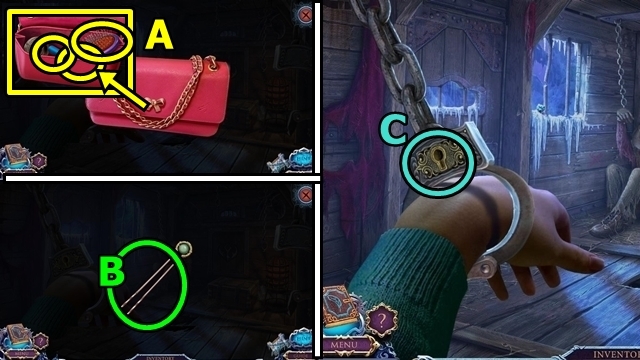
- Open the CLUTCH (inventory) (A). Remove the items; take the LOCKPICK. Bend it three times (B); receive the LOCK PICK.
- Use the LOCKPICK (C); play the mini-game.

- Solution: 5-2-4-1-3 (D).
- Take the CAT HEAD (E).
- Remove the board; take the NOTE WITH CODE; take the WATCH (F).
- Take the HOOK (G).
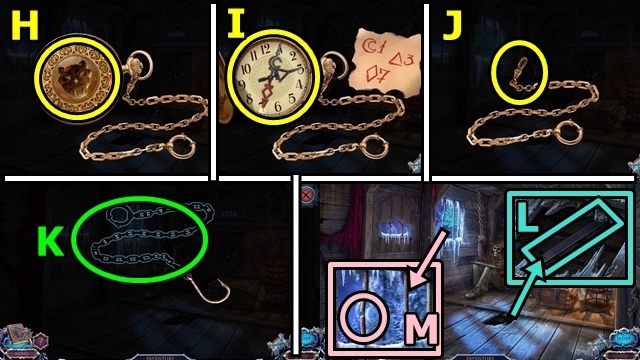
- Add the CAT HEAD to the WATCH (inventory) (H). Rearrange the hands (I); take the CHAIN (J).
- Add the CHAIN to the HOOK (inventory) (K); take the HOOK AND CHAIN.
- Use the HOOK AND CHAIN; receive the SAW (L).
- Use the SAW (M).
- Exit the train.
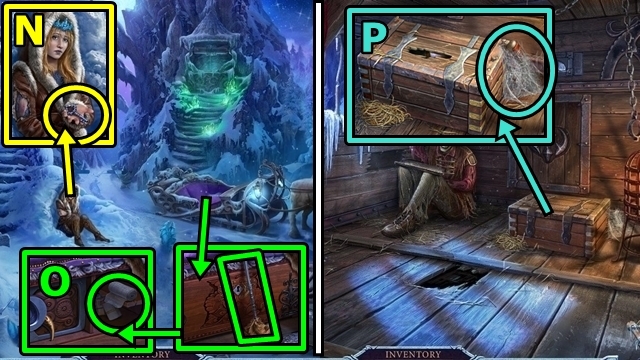
- Talk to Britta; take the KEY (N).
- Take the BRUSH. Insert the KEY; take the BANDAGE (O).
- Move down.
- Use the BRUSH; take the AXE HANDLE (P).
- Exit the train.
- Take the BERRY (5/5). Remove the handle; insert the AXE HANDLE; take the AXE. Use the AXE; receive the BRANCHES (Q).
- Move down.
- Take the STRAW; use the AXE; take the MUG (R).
- Exit the train.
- Add the BANDAGE; take the TEARDROP TOKEN (S).
- Insert the TEARDROP TOKEN; take the FLINT AND STEEL, HEALING HERBS and POTION RECIPE (T).
- Play the HOP (U); receive the CAULDRON.
- In this order, place the: STRAW, BRANCHES, FLINT AND STEEL, CAULDRON, HEALING HERBS, BERRY (5/5), then MUG; receive the HEALING POTION (V).
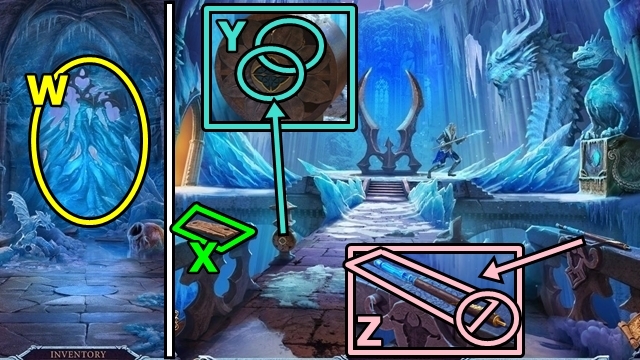
- Offer the HEALING POTION (W).
- Get on the sleigh (X).
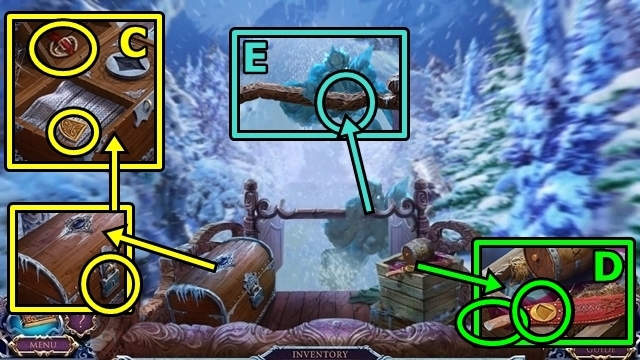
- Lift the blanket (Y).
- Take the VALVE (Z).
- Lift the cloth. Position the oil can. Place the VALVE then turn. Take the FULL OILCAN. Use the FULL OILCAN; slide the latch. Push the oil barrel (A).
- Take the KEY (B).
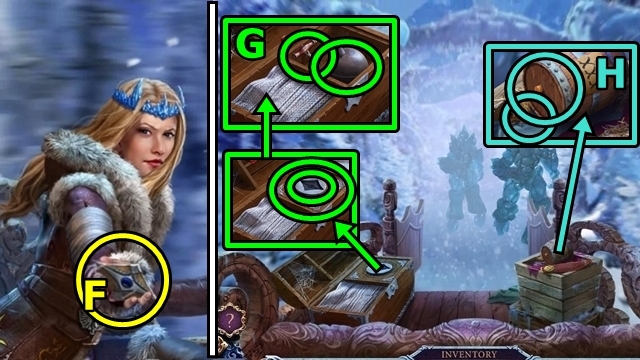
- Insert the KEY then turn. Take the MACHETE CLASP. Undo the buckle; take the FUSE (C).
- Insert the MACHETE CLASP; take the MACHETE (D).
- Use the MACHETE (E).
- Take the CHEST TILE (F).
- Insert the CHEST TILE. Lift the cover; take the BOMB SHELL and CORKSCREW (G).
- Use the CORKSCREW (H); take the GUNPOWDER.
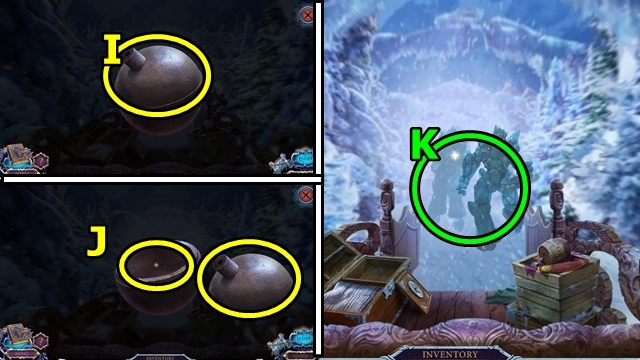
- Open the BOMB SHELL (inventory) (I). Add the GUNPOWDER; replace the top (J). Add the FUSE; use the FLINT AND STEEL; receive the BOMB.
- Throw the BOMB (K).
Chapter 4: The Ice Kingdom
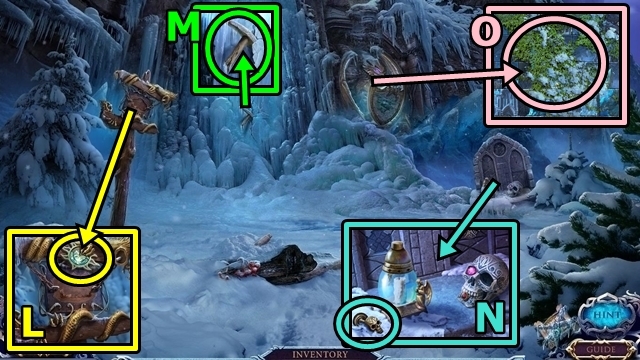
- Take the TOMB KEY (L).
- Take the BROKEN PICKAXE (M).
- Take the SKULL HANDLE (N).
- Use the MACHETE (O); play the mini-game.
- Solution: (P).
- Take the map and MITTENS (Q).
- Take the GREEN CRYSTAL (1/2). Use the MITTENS; take the HANDLE (R).
- Remove the handle of the BROKEN PICKAXE (inventory) (S). Add the HANDLE; receive the PICKAXE.
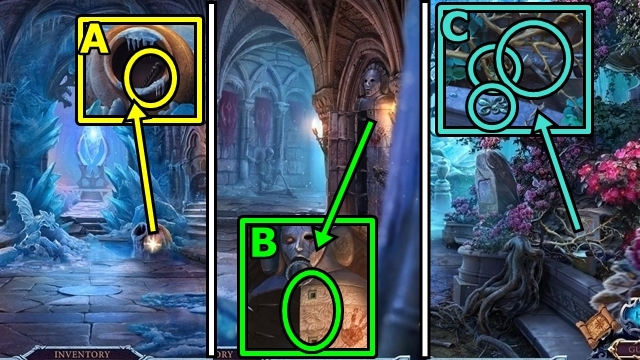
- Use the PICKAXE (T); insert VICTOR’S AMULET.
- Take the AMULET (U).
- Go up the stairs.
- Take the ANGEL (V).
- Move down.
- Set the ANGEL. Remove the glass. Use the FLINT AND STEEL; take the CANDLE (W).
- Go up the stairs.
- Use the CANDLE (X).
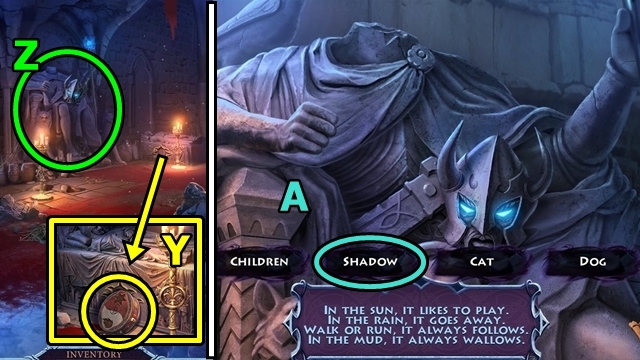
- Take the BOX (Y).
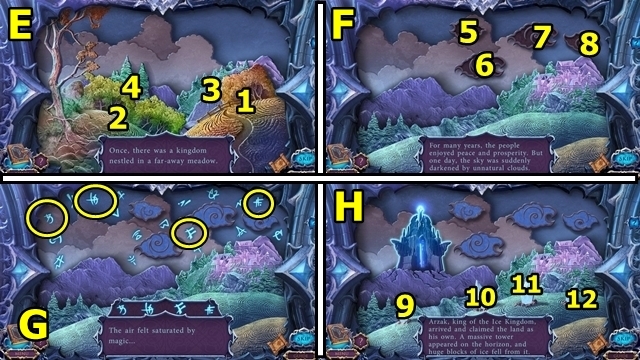
- Play the mini-game (Z).
- Solution: Answers (in no particular order): Secret, Icicles, Riddle, Clouds, Shadow, Memories, Frost, Water, Storm, Echo, and Air (A).
- Take the GREEN CRYSTAL (2/2) (B).
- Insert the two GREEN CRYSTALS on the EMPTY KEY (inventory); receive the GREEN KEY.
- Insert the GREEN KEY (D); play the mini-game.
- Solution: (E-G).
- Take the CIRCLES (1/2) (H).
- Go through the doorway.
- Take the TOMB KEY PART (I).
- Return to the Tomb.
- Add the TOMB KEY PART to the TOMB KEY (inventory) (J). Rearrange (K); receive the TOMB KEY.
- Insert the TOMB KEY (L). Play the HOP; take the DRAGON HEAD.
- Move down.
- Add the SKULL HANDLE to the BOX (inventory) (M). Open the drawer; take the SKULL EYE (N).
- Insert the SKULL EYE (O); take the RING.
- Go up the stairs.
- Place the RING; take the DRAGON HEAD (P).
- Move down.
- Place the two DRAGON HEADS. Remove the inset; take the CIRCLES (2/2) (Q).
- Go up the stairs.
- Add the two CIRCLE ITEMS (R); play the mini-game.
- Solution: (S).
- Go through the doorway, then forward.
Chapter 5: Inside the Tower
- Take the IRON BAR (1/3) and TURNING WHEEL (T).
- Talk to Victor. Take the BUNDLE and PLIERS (U).
- Move down.
- Touch the chest. Add the TURNING WHEEL, then turn. Take the SNOWFLAKE. Remove the board. Use the PLIERS; take the MALLET (V).
- Move down.
- Use the PLIERS (W); take the FIRE SYMBOL.
- Insert the FIRE SYMBOL and SNOWFLAKE on the BOX (inventory); lift the tops; take the two PLATES (2/2) (X).
- Insert and rearrange the two PLATES. Take the CROSS KEY and BLUE BOTTLE (Y).
- Move down.
- Insert the CROSS KEY (Z); take the CHISEL.
- Go up the stairs.
- Lift the carpet. Insert the CHISEL (A); use the MALLET; take the YELLOW BOTTLE.
- Go through the doorway.
- Take the FLOWER (1/4). Place the YELLOW BOTTLE and BLUE BOTTLE. Use the FLINT AND STEEL (B); play the mini-game.
- Solution: 4-1, 5-1, 5-2, 6-2, 4-3, 6-3 (C). Take the RED CRYSTAL (1/2).
- Move down.
- Remove the cords, then unfold the BUNDLE (inventory) (D); take the BROKEN SWORD and RED CRYSTAL (2/2).
- Insert the two RED CRYSTALS on the EMPTY KEY (inventory); receive the RED KEY.
- Insert the RED KEY (F); play the mini-game.
- Solution: (G-I).
- Take the RAIL KEY (J).
- Go through the doorway.
- Insert the RAIL KEY (K), then turn. Enter the Smithy.
- Offer the BROKEN SWORD (L). Play the HOP; take the SWORD.
- Move down, then forward.
- Offer the SWORD (M).
- Follow Victor.
Chapter 6: The Ice Barrier
- Take the CAT and INGOT (1/2) (N).
- Take the TROWEL (O).
- Take the TOP TILE (P).
- Place the CAT; take the HANDLE (Q).
- Move down.
- Insert the HANDLE (R). Open the door; take the WEIGHT.
- Return to the Smithy.
- Take the SKULL PART (1/2). Add the WEIGHT. Use the TROWEL (S); receive the TROWEL WITH COALS.
- Return to the Ice Barrier.
- Use the TROWEL WITH COALS; take the INGOT (2/2) (T).
- Return to the Smithy.
- Put the dish on the fire; add the INGOTS (U); take the MOLTEN METAL.
- Take the FLOWER (2/4). Place the MOLTEN METAL, then pour. Use the tongs (V); take the GEAR.
- Return to the Ice Barrier.
- Insert the GEAR; pull the lever (W).
- Talk to Victor; take the KEY (X).
- Insert the KEY, then turn (Y).
- Enter the Garden.

- Play the HOP (Z); take the RED LENS.
- Take the CAT (A).
- Take the LADDER (B). Take the YELLOW CRYSTAL and VIAL (C). Take the GARGOYLE (D).
- Move down.
- Place the CAT; take the CROWN (E).
- Move down.
- Open the door; take the SKULL PART (2/2) (F).
- Take the RAG. Add the two SKULL PARTS; take the CROSS EMBLEM. Use the VIAL (G); receive the VIAL WITH ACID.
- Use the VIAL WITH ACID; take the IRON BAR (2/3) (H).
- Move down.
- Reach for the emblem; receive the IRON BAR (3/3). Insert an IRON BAR; use the stone. Add the remaining IRON BARS; take the DRAGON EMBLEM (I).
- Insert the CROWN, CROSS EMBLEM and DRAGON EMBLEM (J); take the ANVIL.
- Enter the Smithy.
- Insert the ANVIL (K), then press. Take the GREEN LENS and LION.
- Insert the LION. Open the plate; take the GARGOYLE (L).
- Move down, then forward.
- Insert the two GARGOYLES. Take the YELLOW CRYSTAL (2/2) and HEART STONE (M).
- Return to the Garden.
- Insert the two YELLOW CRYSTALS on the EMPTY KEY (inventory); receive the YELLOW KEY.
- Insert the HEART STONE. Take the FLOWER (3/4). Insert the YELLOW KEY (O); play the mini-game.
- Solution: (P-R).
- Take the BLUE LENS (S).
- Use the RAG (T).
- Examine the instructions; insert the GREEN LENS, RED LENS, BLUE LENS and AMULET (U). Reposition the lenses (V); take the CHARGED AMULET.
- Move down.
Chapter 7: The Throne Room
- Use the CHARGED AMULET (W).
- Move forward.
- Take the PLANK (1/3) (X).
- Insert the TOP TILE; take the WALKING STICK HANDLE (Y).
- Attach the WALKING STICK HANDLE; take the WALKING STICK (Z).
- Move down.
- Use the WALKING STICK (A); receive the HANDLE.
- Move down.
- Insert the HANDLE (B); take the SHEARS.
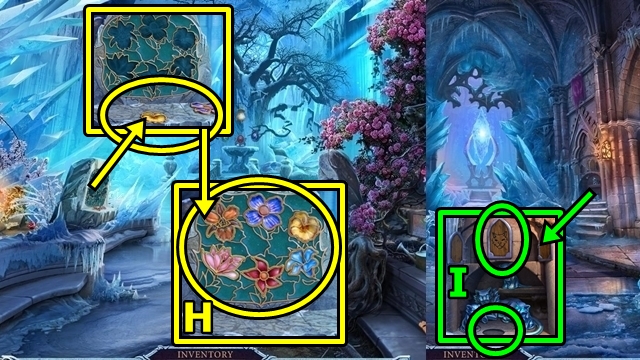
- Return to the Garden.
- Take the FLEUR-DE-LIS (1/2). Use the SHEARS; take the BOTTOM TILE (C).
- Move down, then forward.

- Take the EYE (D).
- Move down twice.
- Insert the EYE (E); take the BULL’S HEAD.
- Move forward twice.
- Insert the BULL HEAD (F); take the KNIGHT.
- Insert the KNIGHT (G); take the FLOWER (4/4).
- Return to the Garden.
- Place the four FLOWERS, then insert (H). Take the CAT and PLANK (2/3).
- Move down.
- Insert the CAT; take the FLEUR-DE-LIS (2/2) (I).
- Enter the Garden.
- Insert the two FLEUR-DE-LIS. Lift the dome; take the SEEDLING (J).
- Plant the SEEDLING. Cover, water; take the MAGIC RUNE (1/3) (K).
- Move down, then forward.
- Insert the BOTTOM TILE; take the MAGIC RUNE (2/3) (L).
- Go left twice.
- Take the PLANK (3/3) (M).
- Add the three PLANKS to the LADDER (inventory) (N). Receive the LADDER.
- Place the LADDER (O).
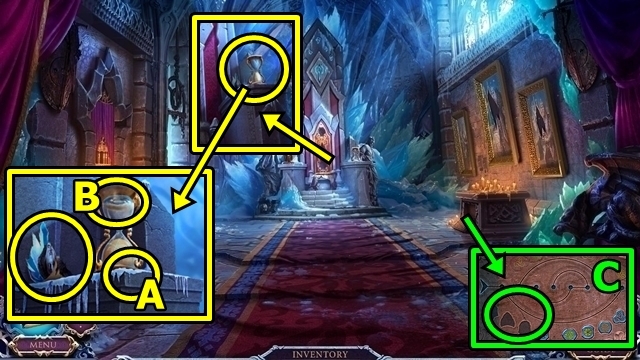
- Take the BOOK (P).
- Take the SYMBOL. Use the WALKING STICK; take the MECHANICAL MOUSE (Q).
- Play the HOP (R); receive the THRONE PIECE.
- Move down.
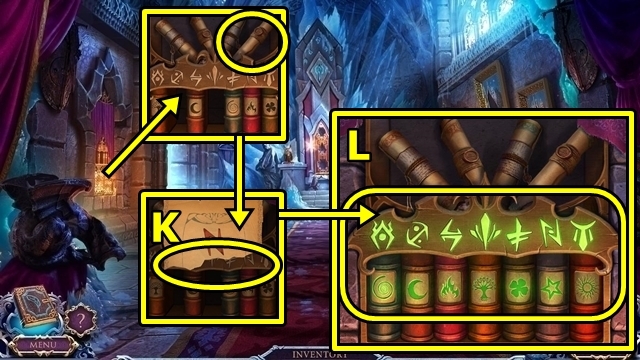
- Open the BOOK (inventory) (S); play the mini-game.
- Solution: (T-V). Take the SILVER INLAY (W).
- Insert the SILVER INLAY (X); take the PICTURE PIECE.
- Insert the PICTURE PIECE (Y); take the HARP PART.
- Go to the Balcony.
- Add the HARP PART; take the TUNING FORK (Z).
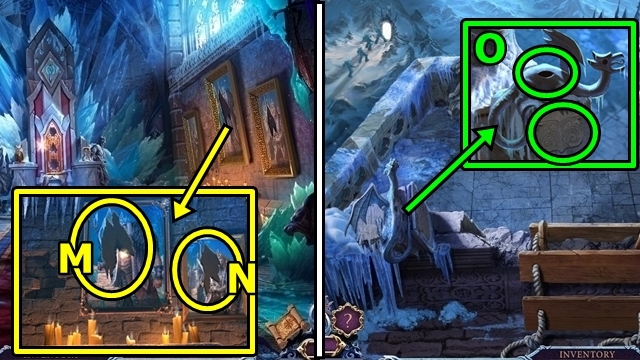
- Move down.
- Take the PICTURE PIECE. Flip the hourglass; use the TUNING FORK (A); take the MAGIC RUNE (3/3) (B).
- Add the three MAGIC RUNES (C); play the mini-game.

- Solution: (D-E).
- Take the DANCER and SCROLL PART (F).
- Go to the balcony.
- Place the DANCER, then turn. Take the WIND-UP KEY (G).
- Move down.
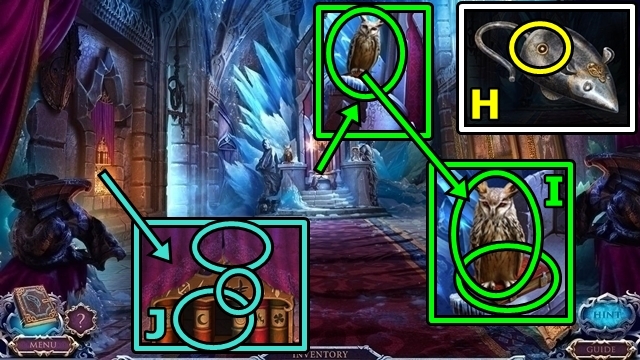
- Add the WIND-UP KEY to the MECHANICAL MOUSE (inventory) (H), then turn. Receive the MECHANICAL MOUSE.
- Use the MECHANICAL MOUSE; take the BOOK (1/2) (I).
- Insert the SYMBOL; take the BOOK (2/2). Place the two BOOKS (J).
- Attach the SCROLL PART; move the scroll (K).
- Rearrange (L); take the PICTURE PIECE.
- Insert the PICTURE PIECE (M); take the THRONE PIECE.
- Insert the PICTURE PIECE (N); take the DRAGON WING.
- Go to the Balcony.
- Place the DRAGON WING. Remove the inset; take the THRONE PIECE (O).
- Move down.
- Insert the three THRONE PARTS. Insert the AMULET, then undo the flap. Take the CUBE (P).
- Move down.
- Use the CUBE (Q); play the mini-game.
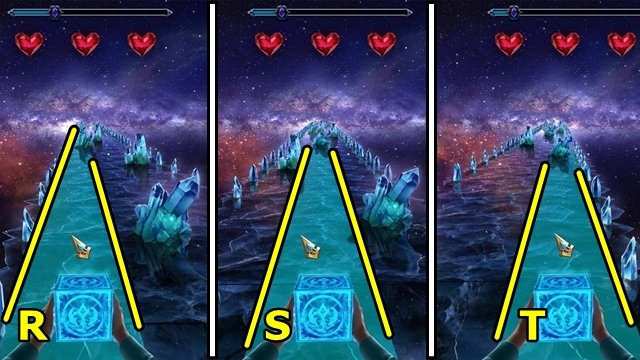
- Solution: Avoid the obstacles (R-T).
- Congratulations! You’ve completed Mystery of the Ancients: Deadly Cold.


 The Great Unknown: Houdini's Castle Walkthrough, Guide, & Tips
 Eternal Night: Realm of Souls Walkthrough, Guide, & Tips
 Joan Jade and The Gates of Xibalba Walkthrough, Guide, & Tips
 Spirit of Revenge: Elizabeth's Secret Walkthrough, Guide, & Tips
 Enchantia: Wrath of the Phoenix Queen Walkthrough, Guide, & Tips