Enchantia: Wrath of the Phoenix Queen Walkthrough, Guide, & Tips
Enchantia: Wrath of the Phoenix Queen Walkthrough

Welcome to the Enchantia: Wrath of the Phoenix Queen Walkthrough
Explore the magical world of Enchantia as you race to save the land from the evil Phoenix Queen.
Whether you use this document as a reference when things get difficult or as a road map to get you from beginning to end, we’re pretty sure you’ll find what you’re looking for here.
This document contains a complete Enchantia: Wrath of the Phoenix Queen game walkthrough featuring annotated screenshots from actual gameplay!
We hope you find this information useful as you play your way through the game. Use the walkthrough menu below to quickly jump to whatever stage of the game you need help with.
Remember to visit the Big Fish Games Forums if you find you need more help. Have fun!
This walkthrough was created by prpldva, and is protected under US Copyright laws. Any unauthorized use, including re-publication in whole or in part, without permission, is strictly prohibited.
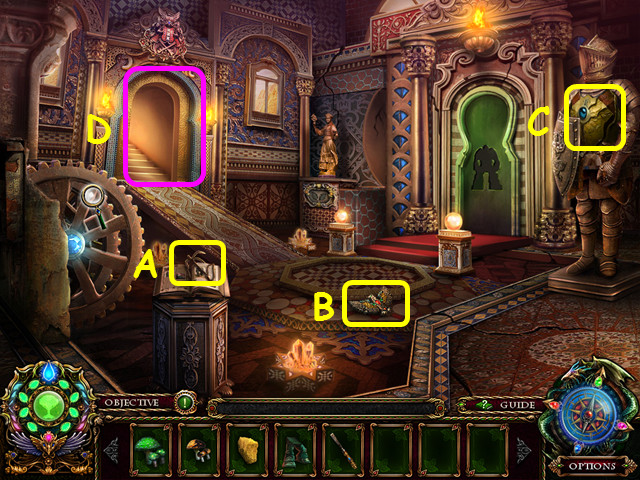
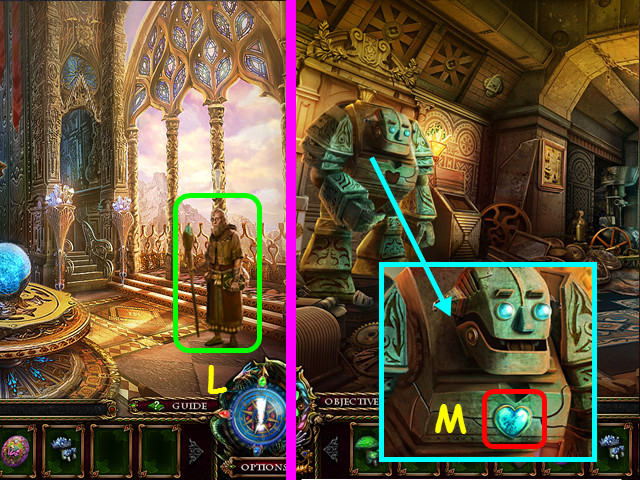
General Tips

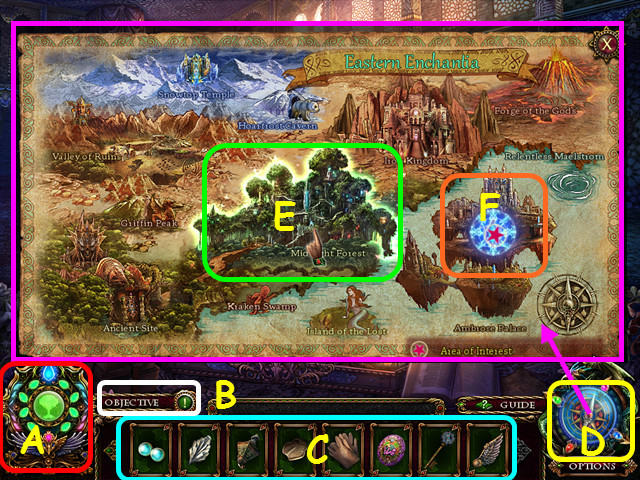
- This is the official guide for Enchantia: Wrath of the Phoenix Queen.
- Hidden-object scenes are referred to as HOS in this walkthrough.
- Mini-games and HOS are sometimes randomized; your solution may vary.
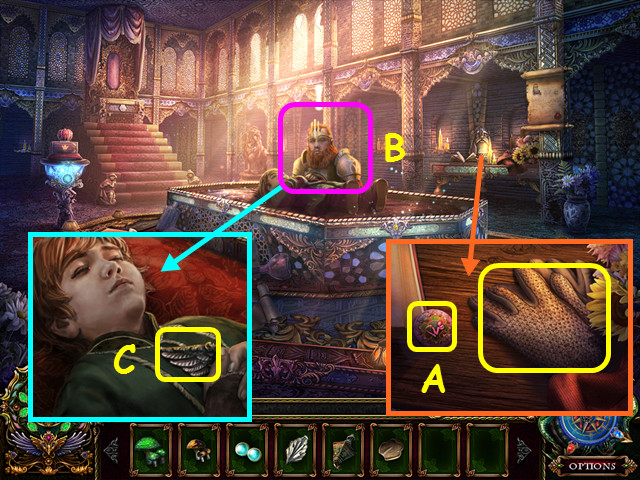
- Hints are unlimited, but you must wait for the meter to refill (A).
- Select the ‘Objective’ button to see your current task (B).
- Your inventory (C) is located in the lower panel. Select an item to use it.
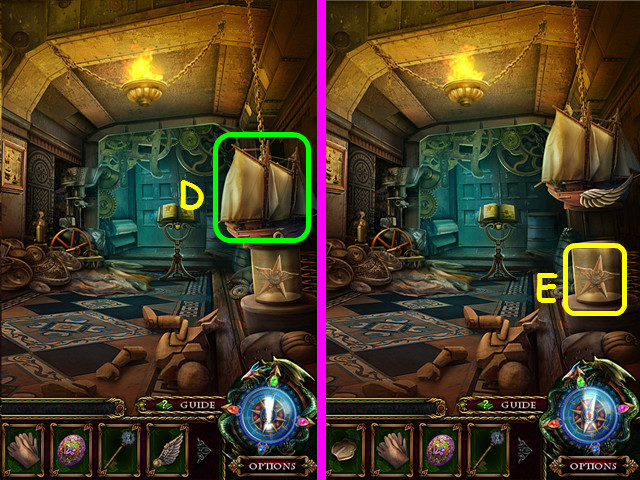
- Select the compass to view the map (D).
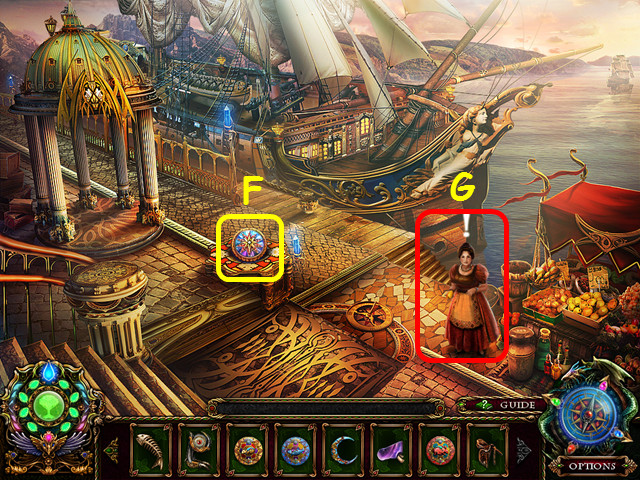
- You can travel to locations that glow when you hover your mouse (E).
- Locations with a glowing orb indicate there is something new to explore (F).
Prologue
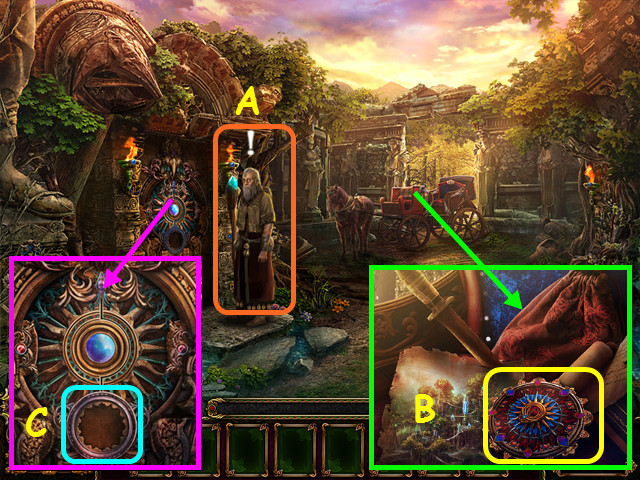
- You will have the option of a brief tutorial.
- Talk to the Professor (A).
- Look in the carriage and take the SUN EMBLEM (B).
- Look at the door and place the SUN EMBLEM in the open hole (C).
- Zoom into the emblem for a mini-game.

- Select two features to swap positions (D).
- Restore the facial features to the correct locations (E).
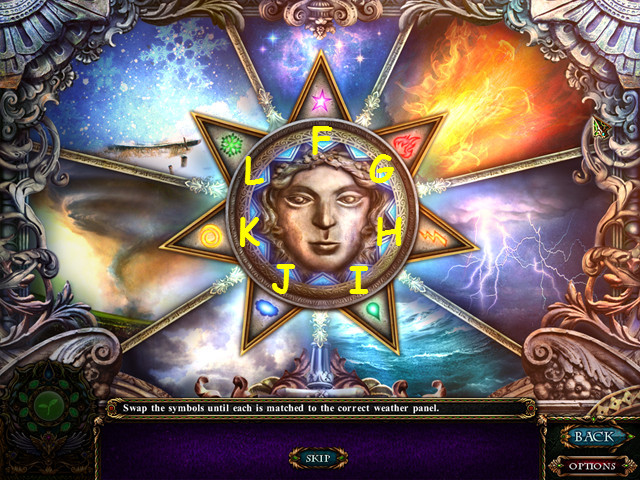
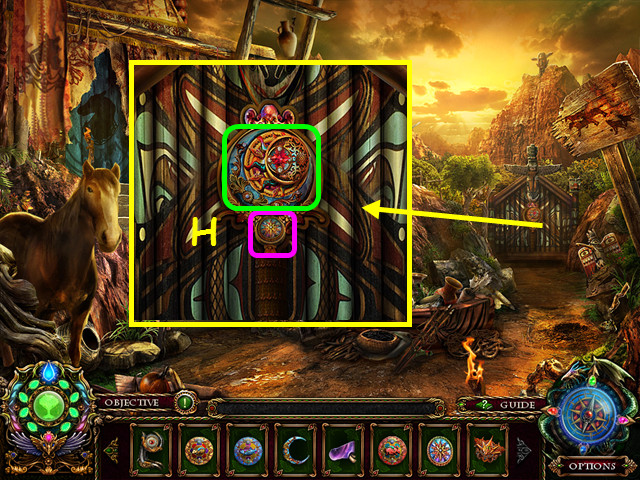
- Swap the symbols in the star points so they are matched with the correct weather panel.
- Select 2 star points to swap positions.
- Once you select the first point, not all points will be available.
- Select: (G, L), (H, J), (L, J), (L, G), (L, J), (K, I), (K, F), (H, F), and (K, F).
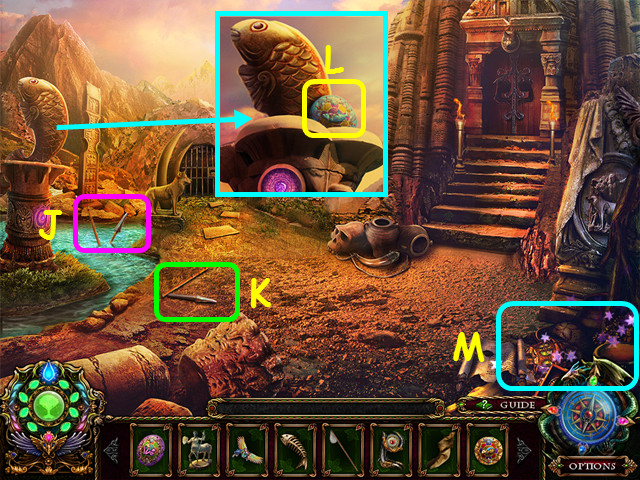
- Enter the door.
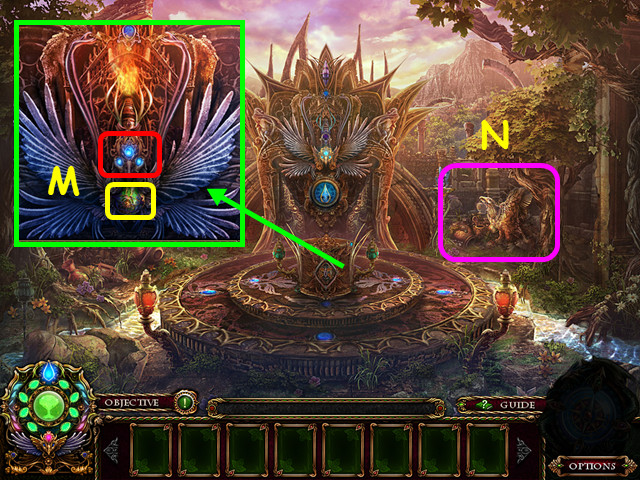
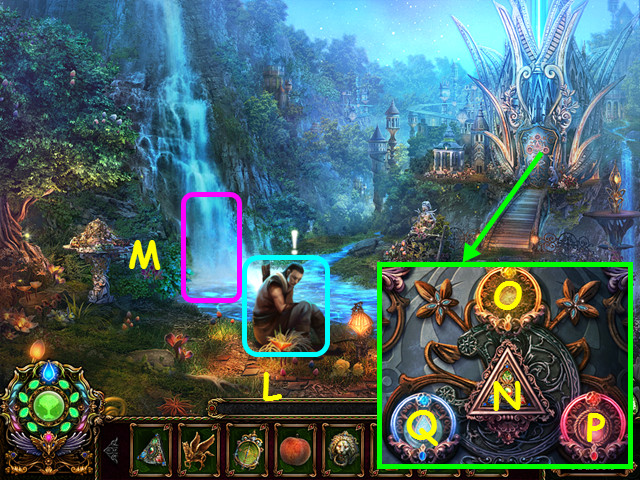
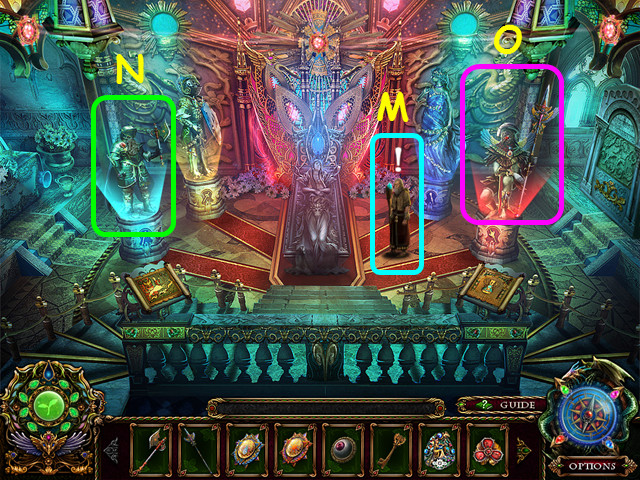
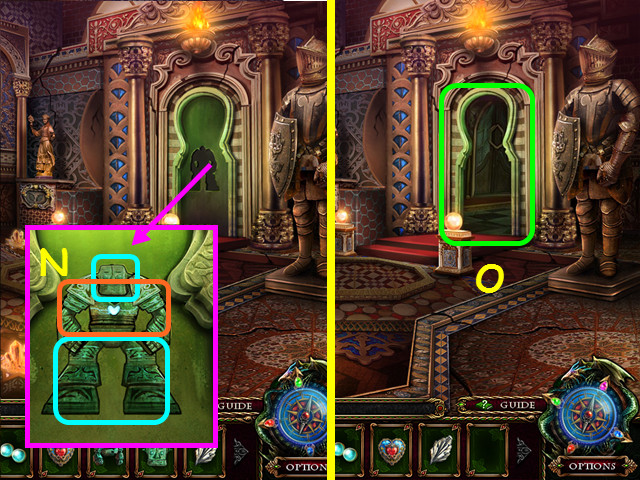
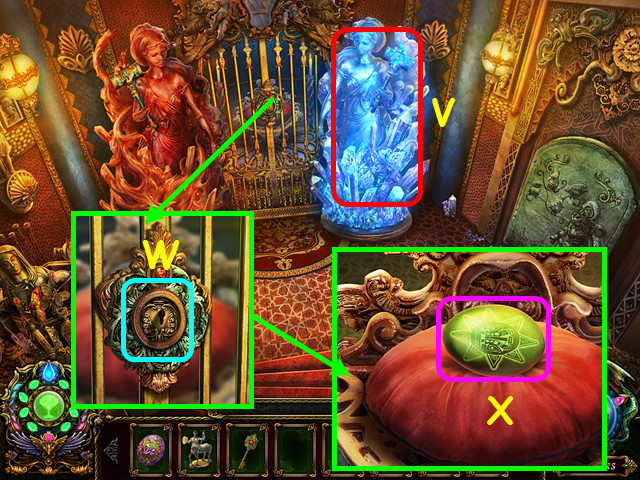
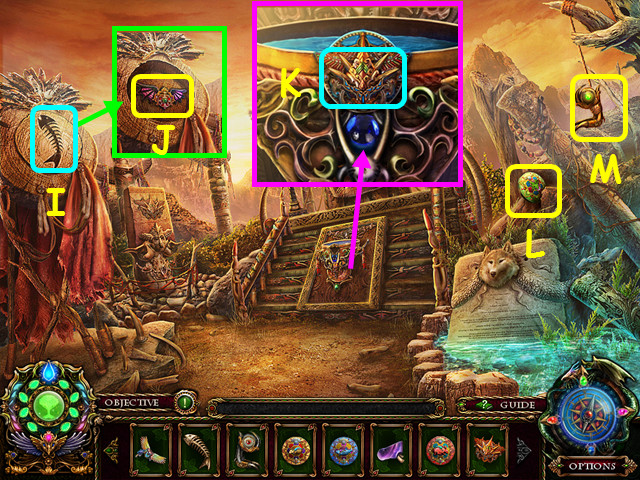
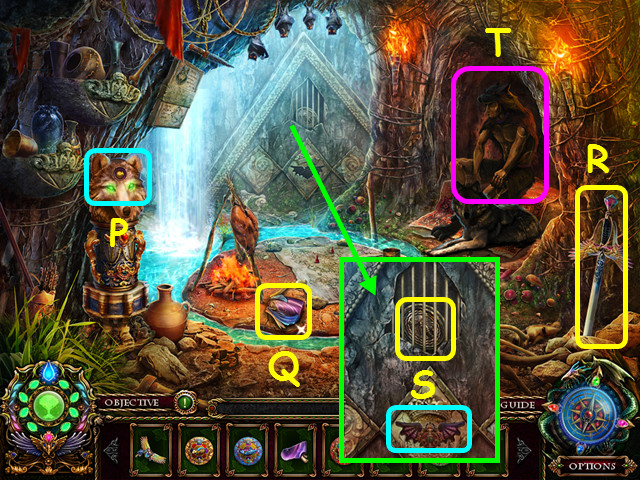
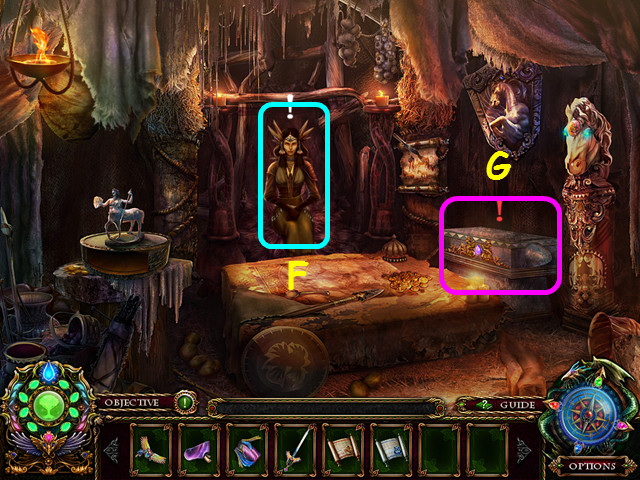
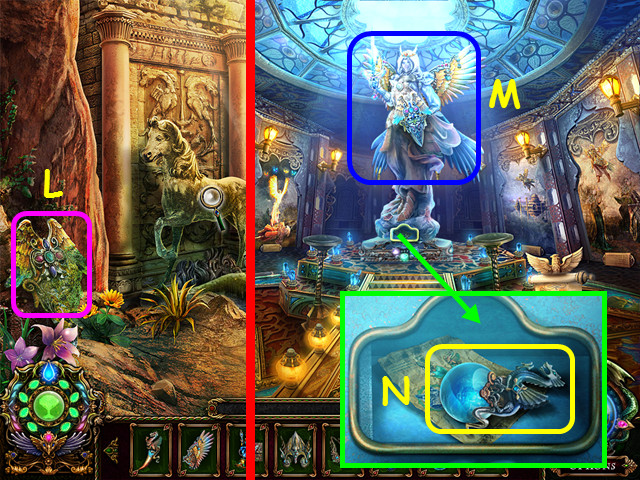
- Look at the statue in the center, move the head up, then take the EARTH ORB (M).
- Select the area on the right for a HOS (N).
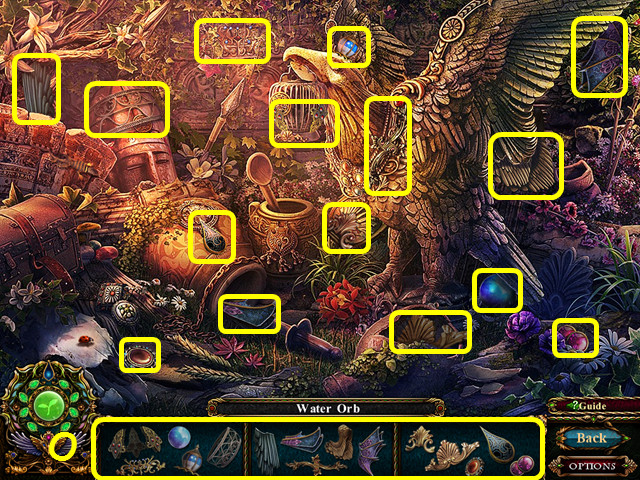
- Locate all the fragments (O).
- You will earn the WATER ORB.
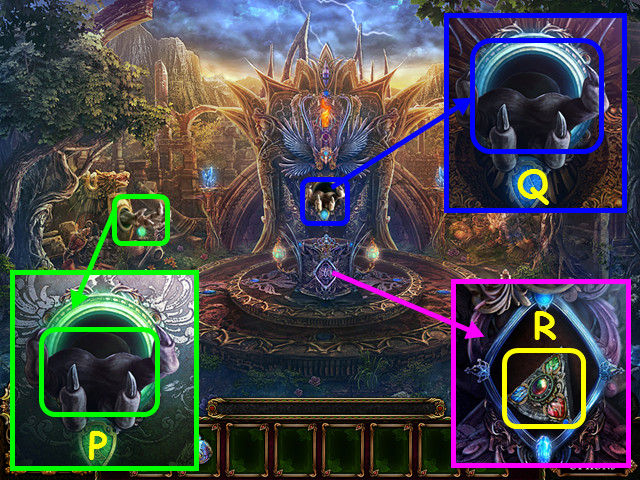
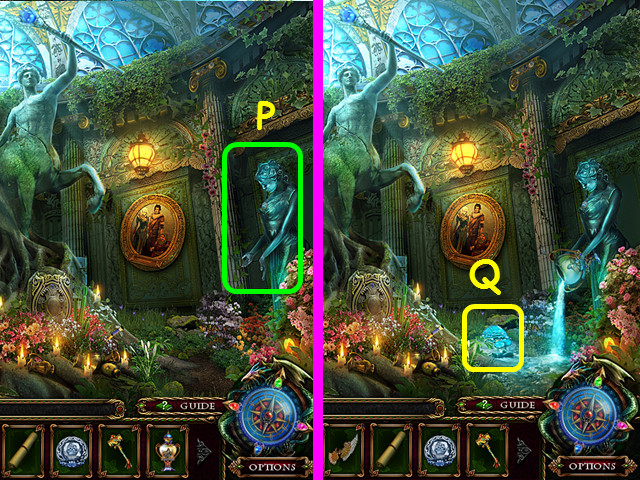
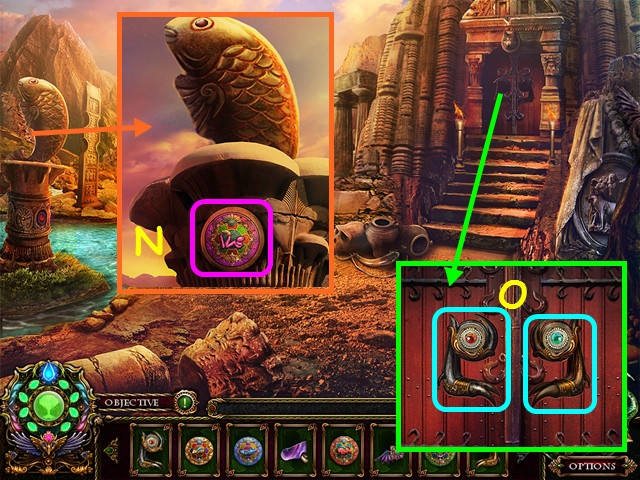
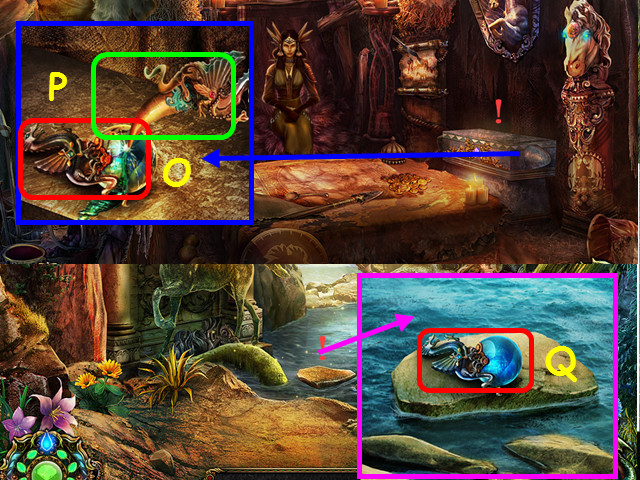
- Select the green shield to make a clawed hand appear, then zoom in and place the EARTH ORB in the hand (P).
- Select the blue shield to make a clawed hand appear, then zoom in and place the WATER ORB in the hand (Q).
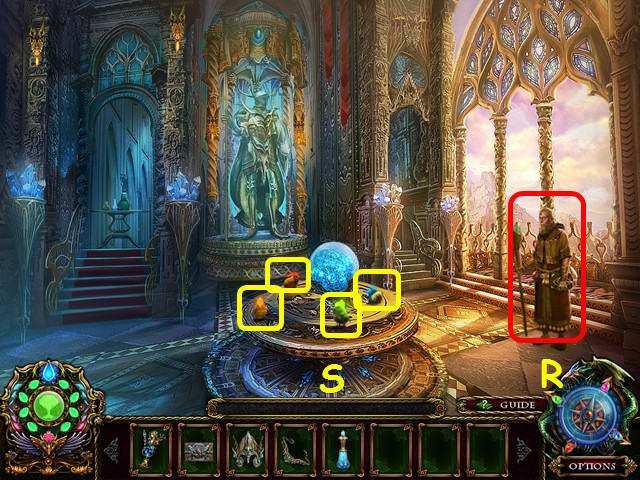
- Look at the base of the statue and take the ELEMENTAL ARTIFACT (R).
- Walk down.
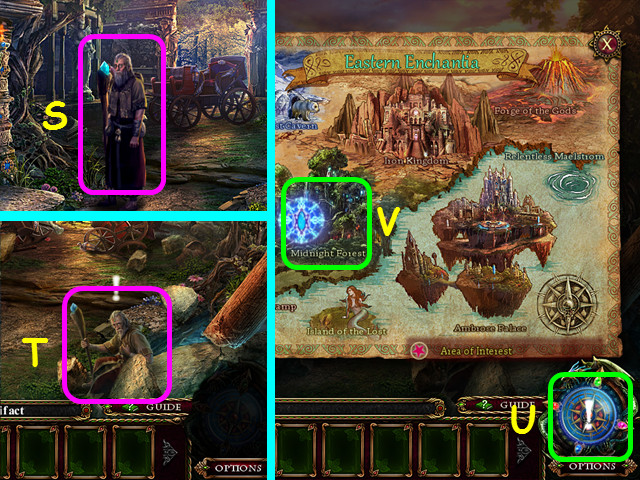
- Give the ELEMENTAL ARTIFACT to the Professor (S).
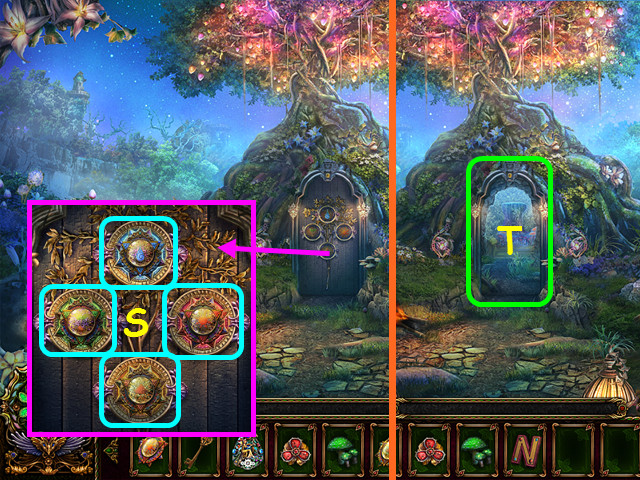
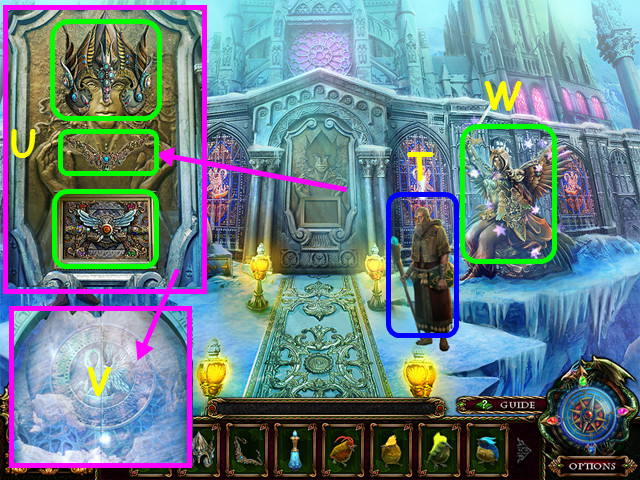
- After the cut-scene, talk to the professor again and you will receive the compass (T).
- The compass will go in the right corner of your menu bar (U).
- Select the compass to bring up the map, then select the Midnight Forest (V).
Act 1: Peril in Midnight Forest
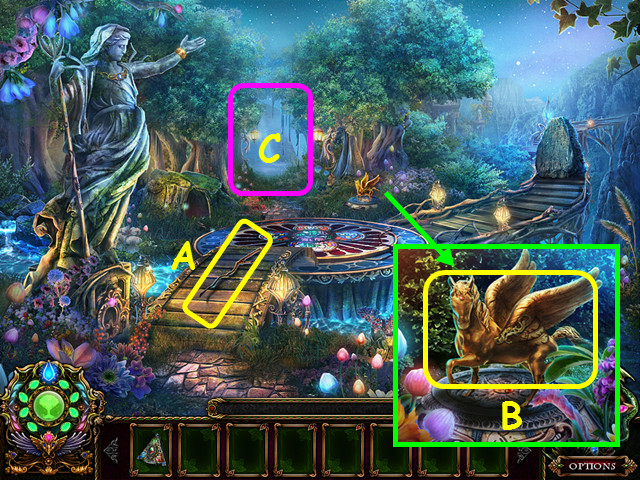
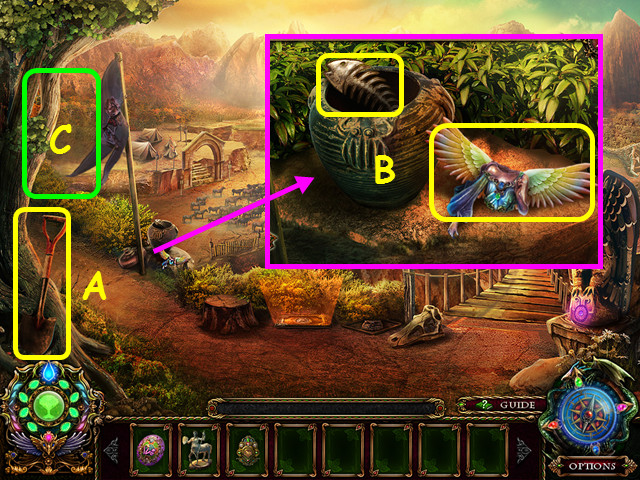
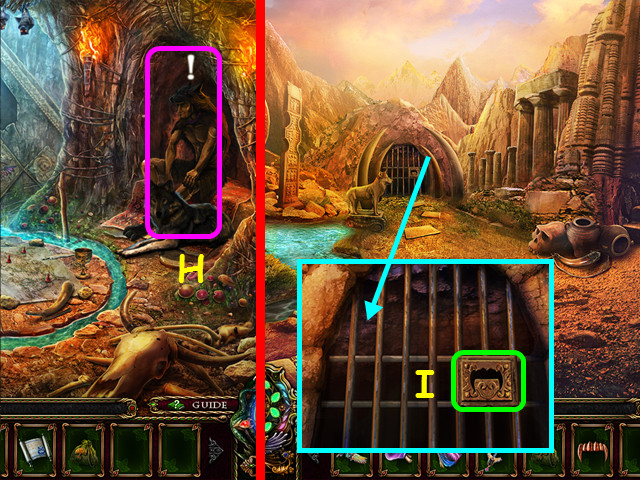
- Take the TWIG (A).
- Look at the pedestal and take the GOLD HORSE FIGURINE (B).
- Walk on the left path through the trees (C).
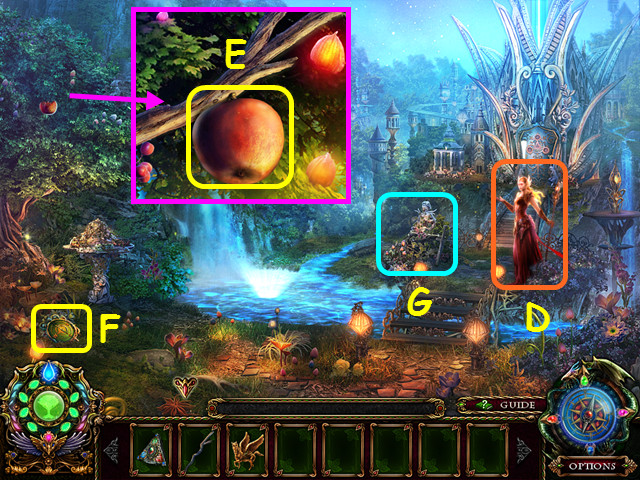
- Talk to the Phoenix Queen (D).
- Look at the tree and take an APPLE (E).
- Take the COMPASS (F).
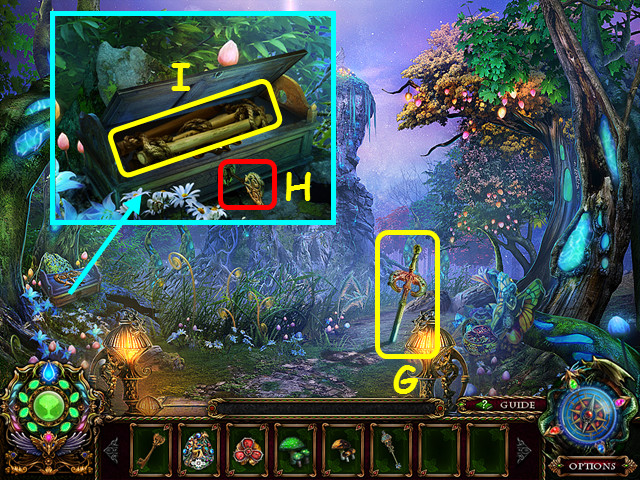
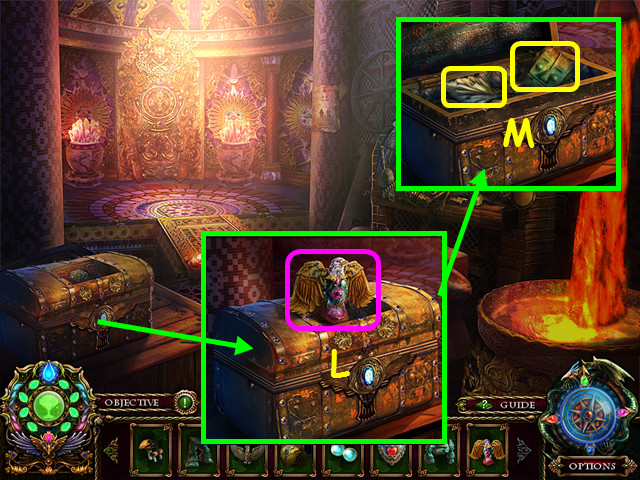
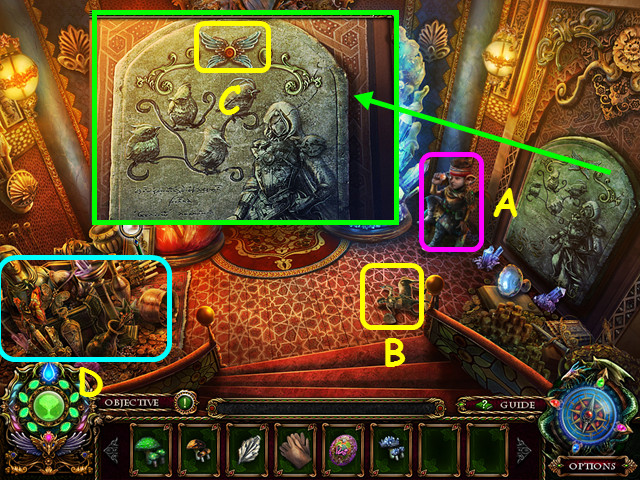
- Select the statue for a HOS (G).

- Locate all the fragments (H).
- You will earn the LION KNOB.
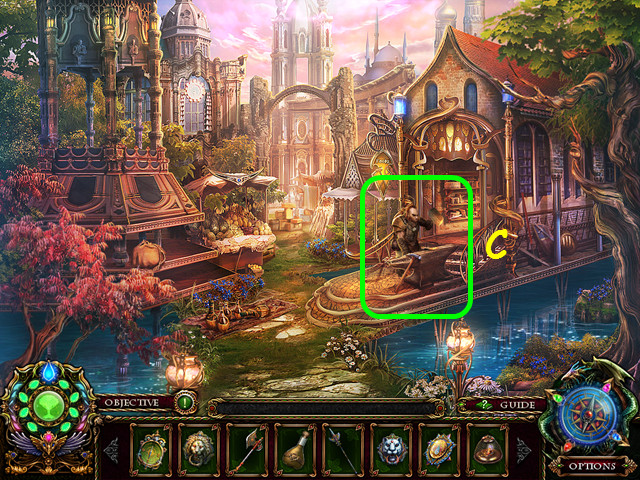
- Walk down. After the barricade is blown up, go right on the wooden bridge.

- Take the WEB SOLVENT (I).
- Take the EMPTY JAR (J).
- Use the TWIG on the camp fire to make the BURNING TWIG (K).
- Walk down, then go to the left.
- Talk to the archer (L).
- Use the EMPTY JAR on the waterfall to get the JAR WITH WATER (M).
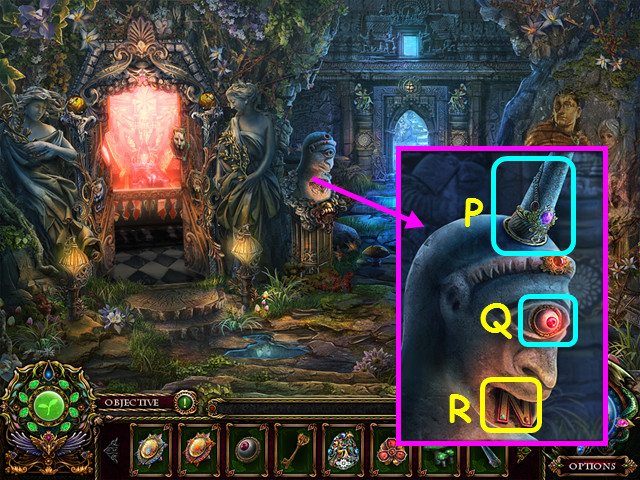
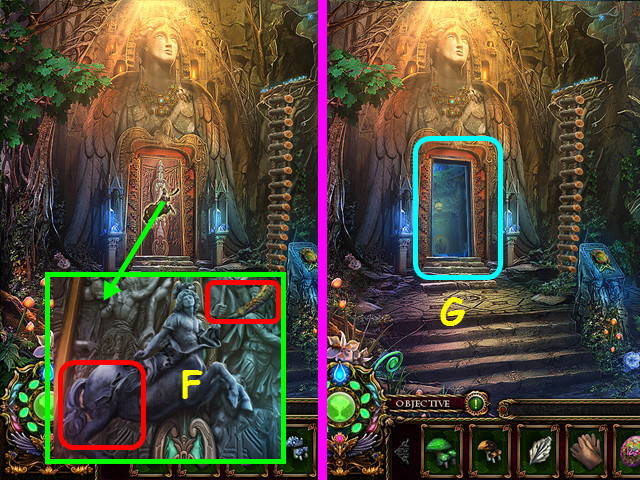
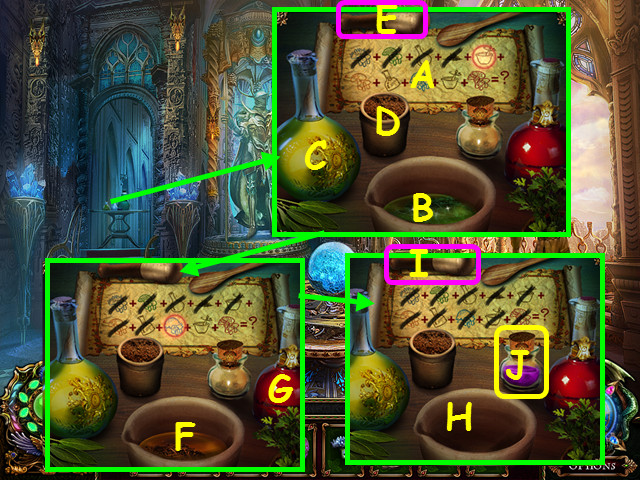
- Look at the door and place the ELEMENTAL ARTIFACT in the center (N).
- Brush the dirt in the top symbol (O).
- Use the BURNING TWIG on the lower right symbol (P).
- Use the JAR WITH WATER on the lower left symbol (Q).
- Enter the door.
Act 2: The Mysterious Elven Memorial
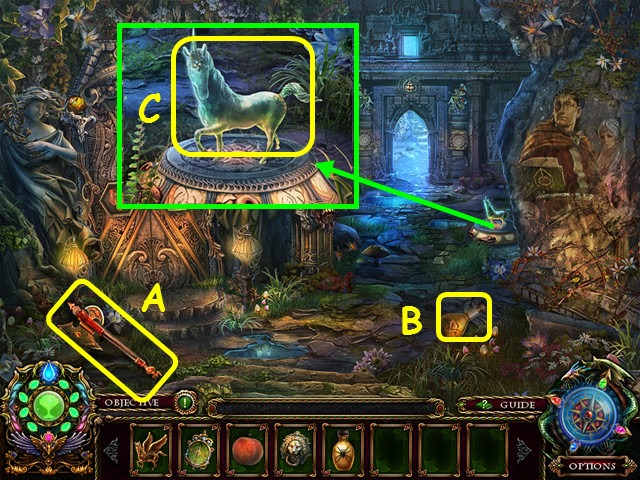
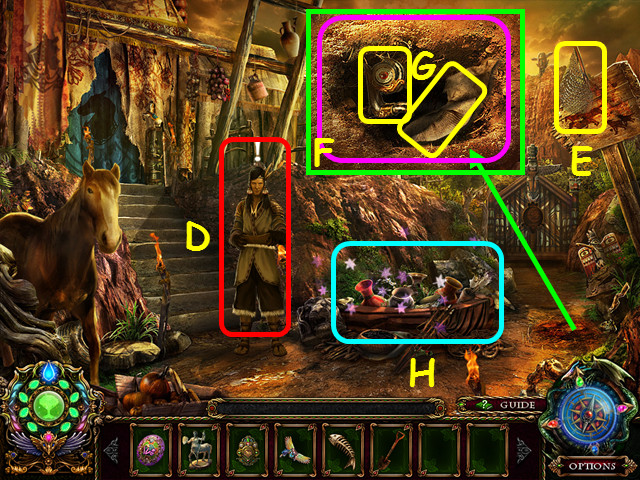
- Take the SILVER AX (A).
- Take the OIL CAN (B).
- Look at the pedestal and take the BRONZE HORSE FIGURINE (C).
- Enter the right door.
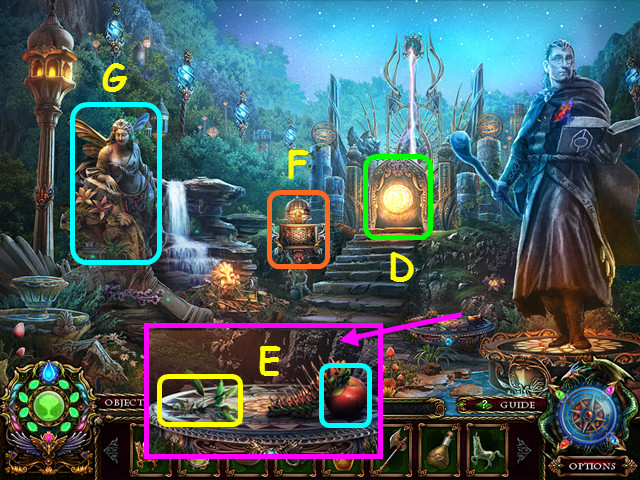
- Look at the monument (D).
- Look at the pedestal, place the APPLE on the right, then take the CURATIVE HERB (E).
- Note the mini-game (F).
- Select the statue for a HOS (G).
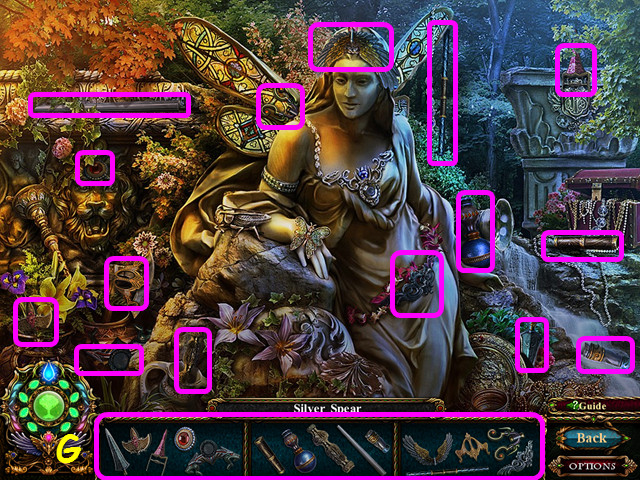
- Locate all the fragments (H).
- You will earn the SILVER SPEAR.
- Select the mini-game.
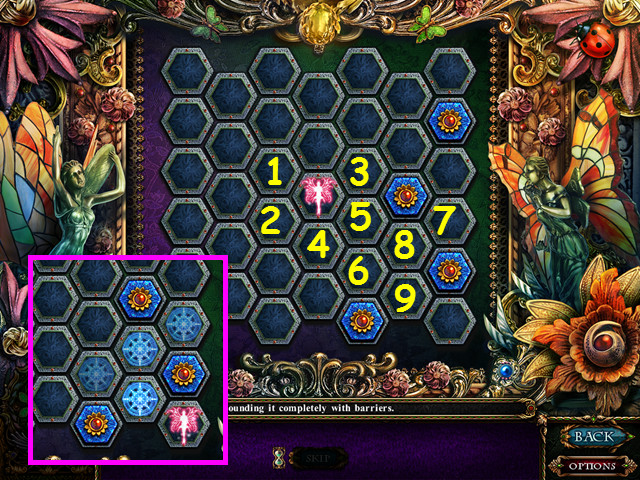
- Trap the fairy by surrounding it with barriers. Select an empty space to place a barrier.
- You only have 4 barriers to place. Once you have placed 4, selecting a 5th spot will remove the 1st one you placed.
- This mini-game is randomly generated; your solution may vary.
- Our solution was to select the spaces in this order (1-9).
- Take the TIGER KNOB once the panel opens.
- Walk down twice.
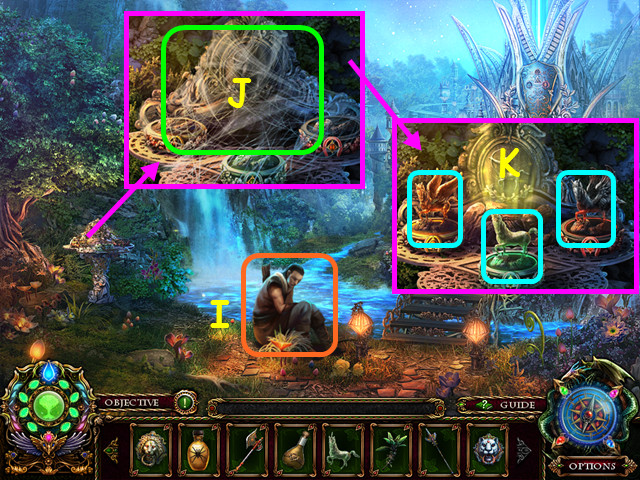
- Give the CURATIVE HERB to the Archer (I).
- Continue talking to the Archer and he will give you the IRON HORSE FIGURINE.
- Look at the table and use the WEB SOLVENT to remove the webbing (J).
- Place the GOLD HORSE FIGURINE on the left pedestal, the BRONZE HORSE FIGURINE on the center pedestal, and the IRON HORSE FIGURINE on the right (K).
- Talk to the Archer for a new location.
- Look at the compass and select Ambrose Palace.
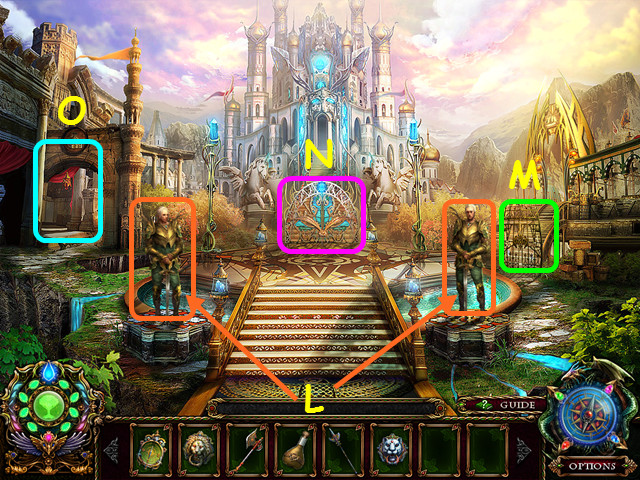
- Talk to both guards (L).
- Note the harbor entrance (M).
- Note the locked palace gate (N).
- Walk left to the market (O).
- Talk to the blacksmith (P).
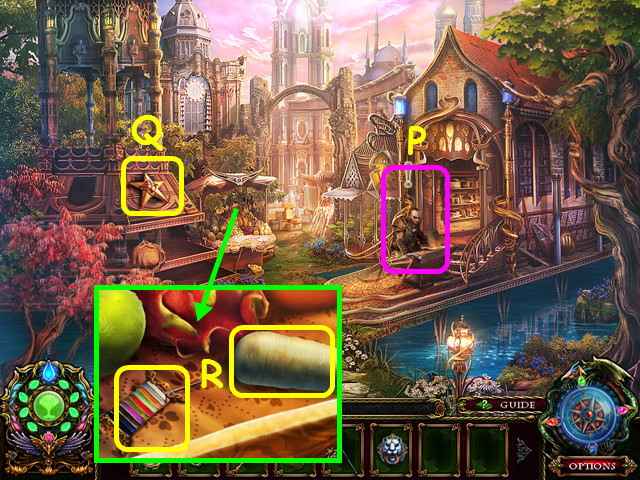
- Take the STONE STAR (Q).
- Look at the stall; take the SEWING KIT and the WHITE CARROT (R).
- Select the compass, then travel to Midnight Forest.
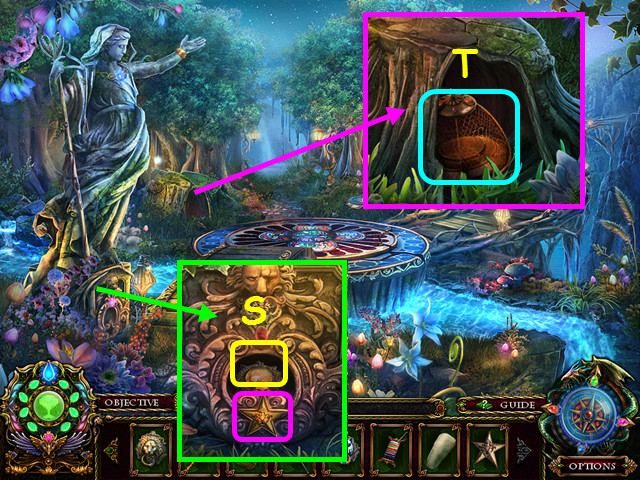
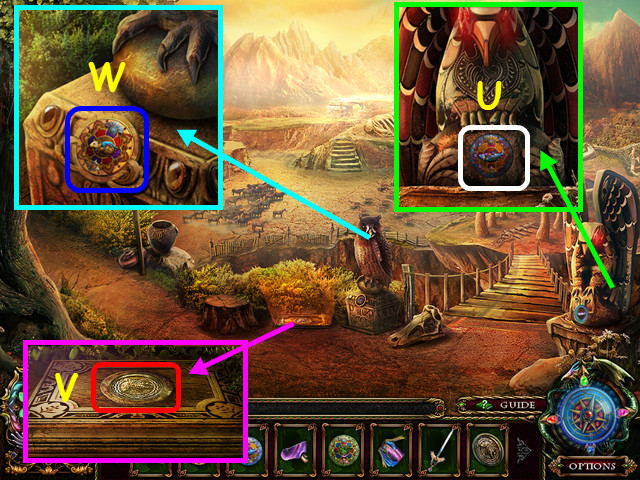
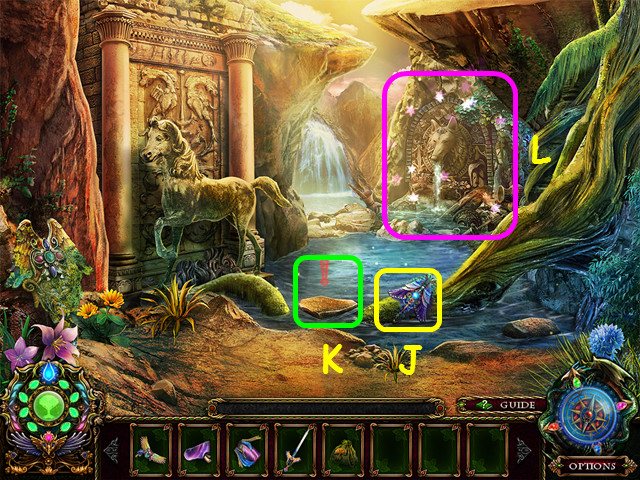
- Look at the base of the statue; place the STONE STAR in the indentations, then take the WATER DISK (S).
- Look at the stump, use the SEWING KIT on the mesh, then take the INSECT CAGE (T).
- Walk to the right.
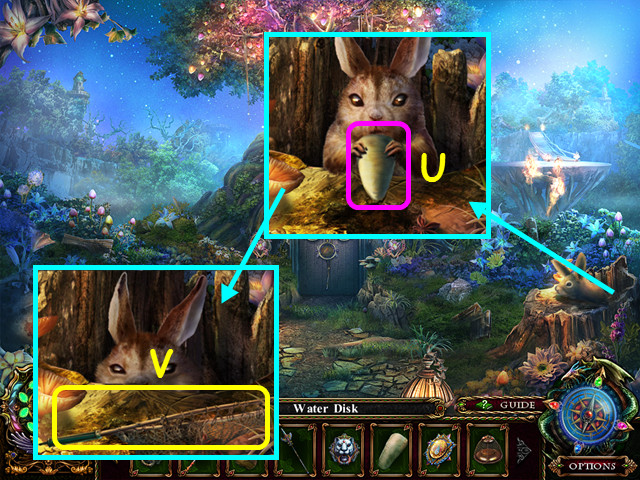
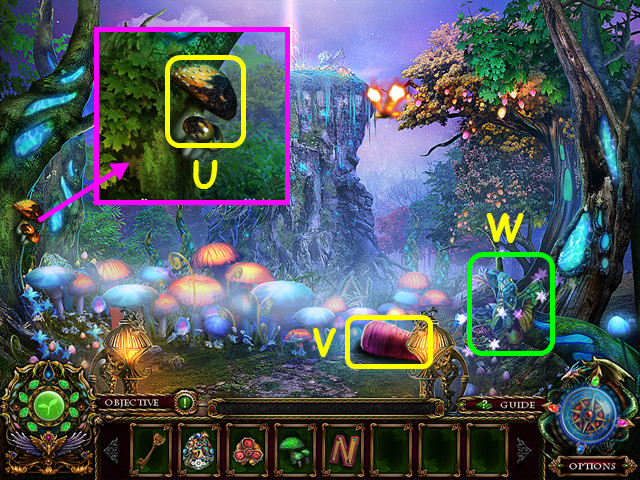
- Look at the hoarder squirrel and give him the WHITE CARROT (U).
- He will give you the NET (V).
- Walk down; go left, then right twice.
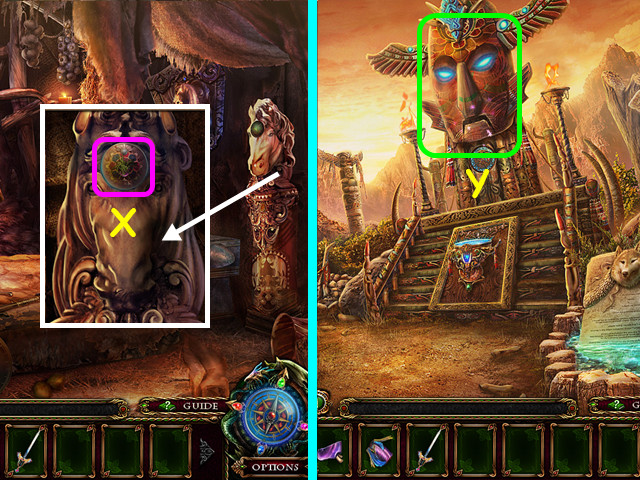
- Look at the statue and use the NET on the butterfly (A).
- Use the INSECT CAGE on the net to get the INSECT CAGE WITH CRIMSON BUTTERFLY (B).
- Use the compass to return to Ambrose Palace, then walk left to the market.
- Use the INSECT CAGE WITH CRIMSON BUTTERFLY on the blacksmith (C).
- After you talk to him, he will give you the CENTAUR FIGURINE.
- Use the compass to return to Midnight Forest, then walk to the left.
- Look at the table and place the CENTAUR FIGURINE on the empty pedestal (D).
- Enter the waterfall entrance (E).
Act 3: Secrets Revealed
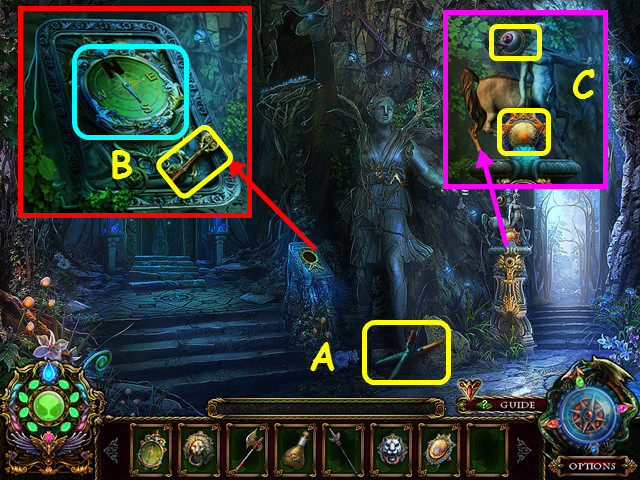
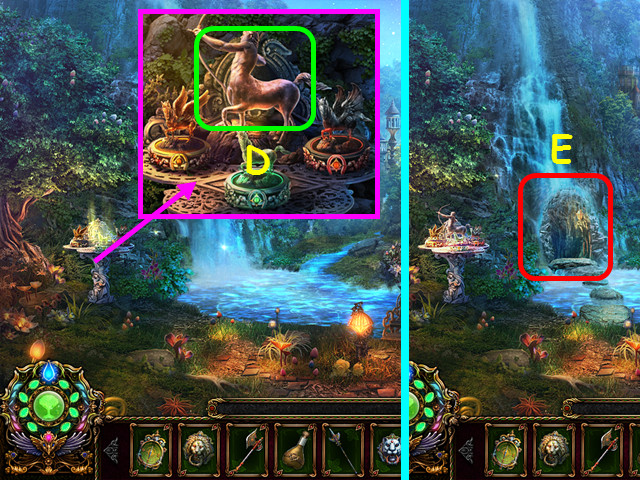
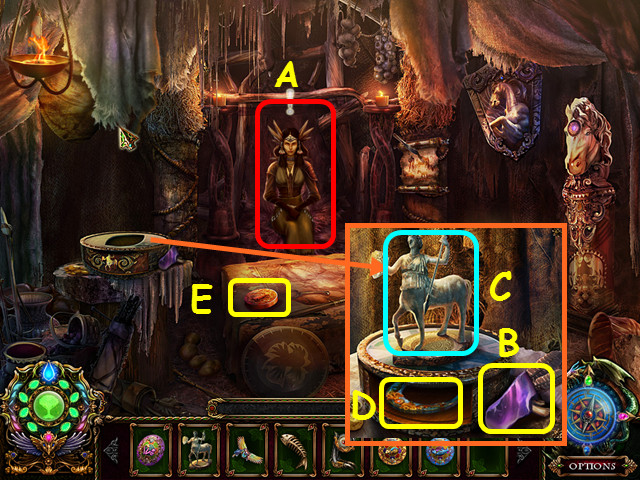
- Take the SHEARS (A).
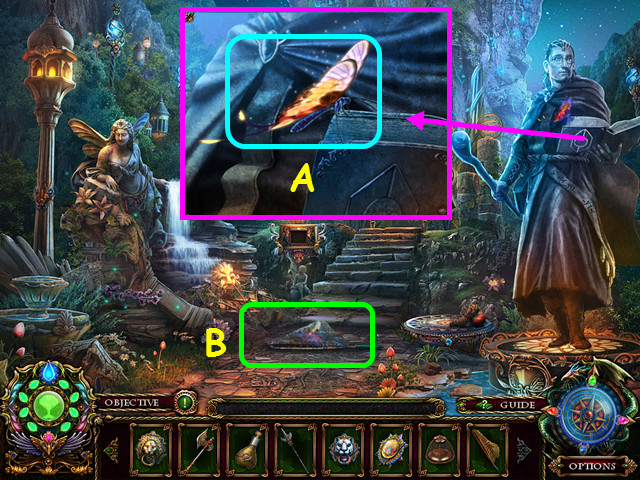
- Look at the pedestal, take the BRASS KEY, and place the COMPASS in the hole (B).
- Look at the centaur; take the SUN DISK and the GLASS EYE (C).
- Walk down, then select the statue for a HOS.
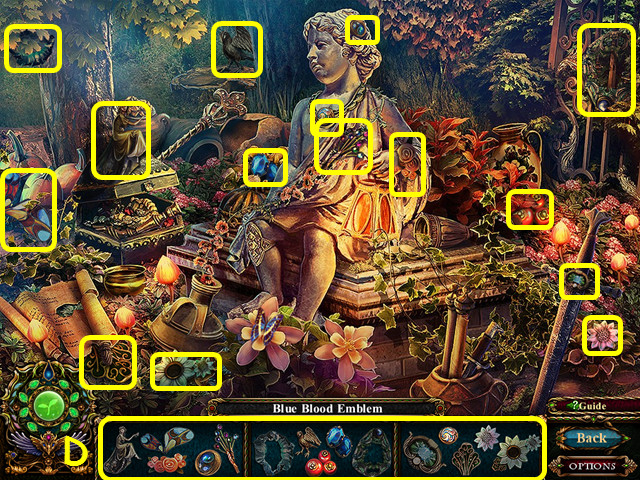
- Locate all the fragments (D).
- You will earn the BLUE BLOOD EMBLEM.
- Walk to the right twice.
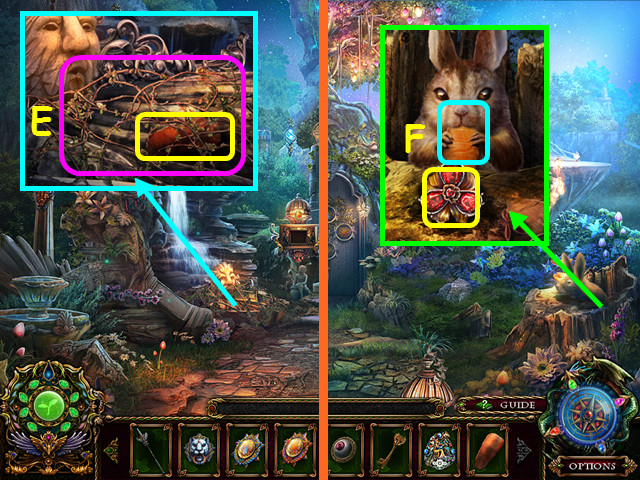
- Look at the fountain, use the SHEARS on the vines, then take the CARROT (E).
- Walk down 3 times, then go to the right.
- Look at the hoarding squirrel and give him the CARROT, then take the RUBY GEM (F).
- Walk down, go left, then enter the waterfall. Walk to the right.
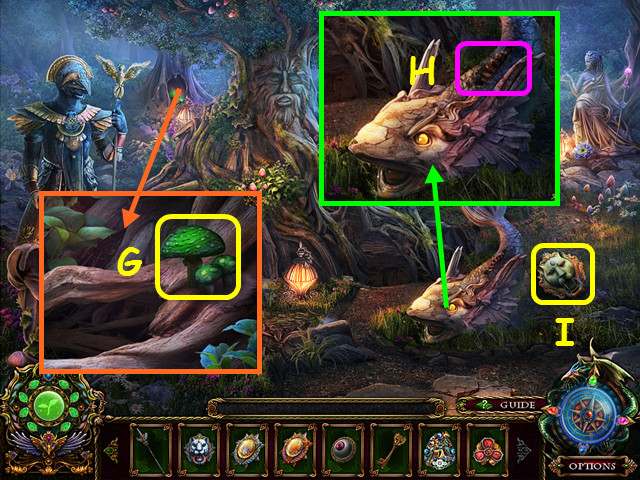
- Look at the roots and take the WOOD MUSHROOM HERB (G).
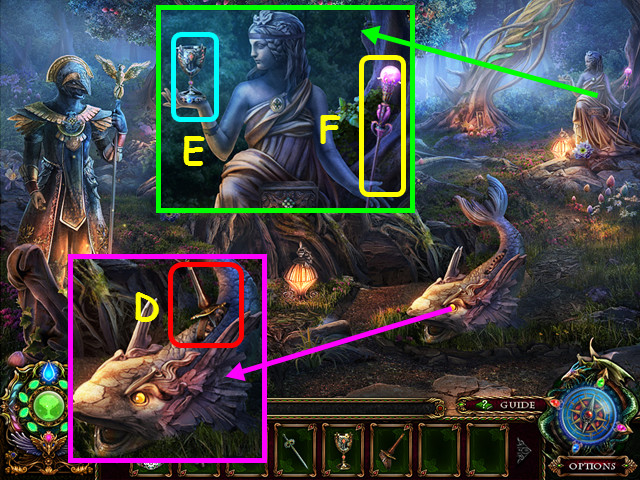
- Look at the fish and use the OIL CAN on the gear (H).
- Take the SABERTOOTH KNOB (I).
- Walk down twice, then go to the right.

- Look at the door and place the LION KNOB on the right, the TIGER KNOB on the left, and the SABERTOOTH KNOB in the top center (J).
- Enter the door (K).

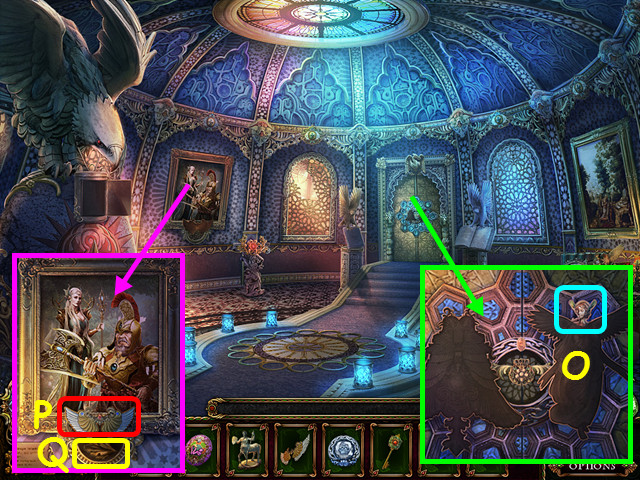
- Look at the scroll and take the CYCLOPS HORN (L).
- Note the mini-game on the right (M).
- Select the area on the left for a HOS (N).
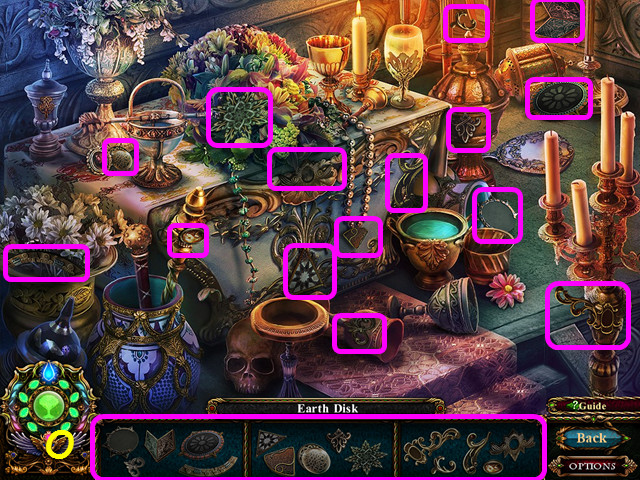
- Locate all the fragments (O).
- You will earn the EARTH DISK.
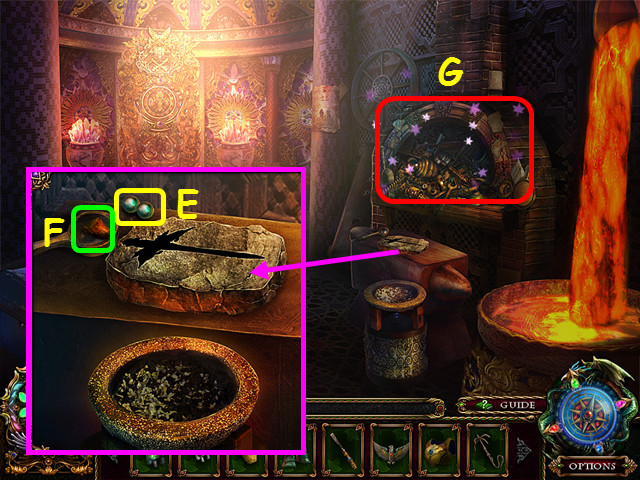
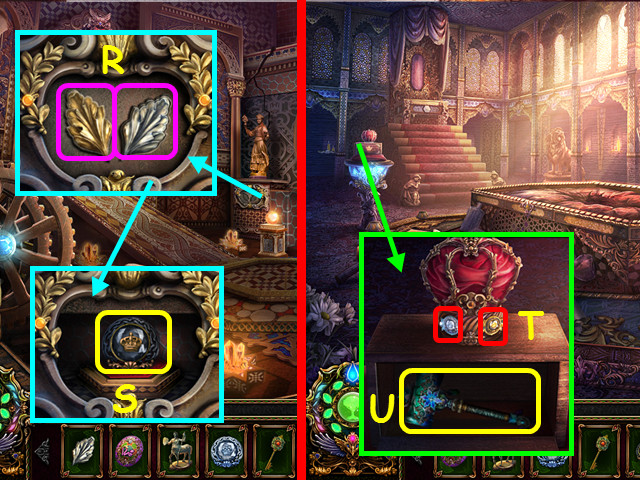
- Look at the mini-game on the right.
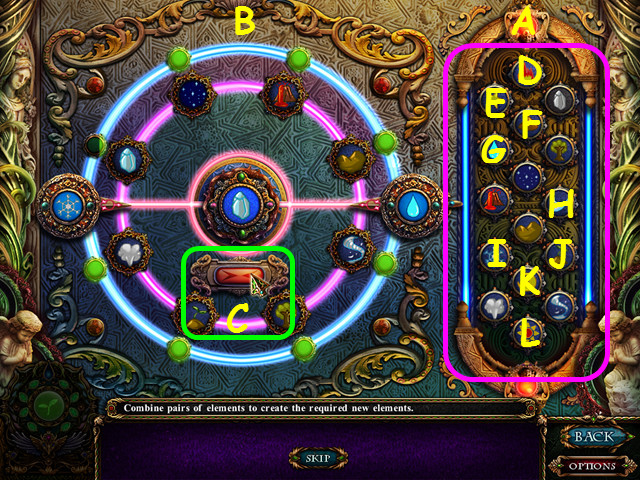
- Combine pairs of elements on the right (A) to make the elements in the circle (B).
- Select 2 elements, then press the button to combine (C).
- Combine the following pairs: (D, F), (D, G), (E, K), (F, G), (F, L), (G, H), (J, L), and (G, I).
- Talk to the professor and he will give you the SEED DISK (M).
- Use the SILVER AX on the left statue (N).
- Use the SILVER SPEAR on the right statue (O).
- Walk down.
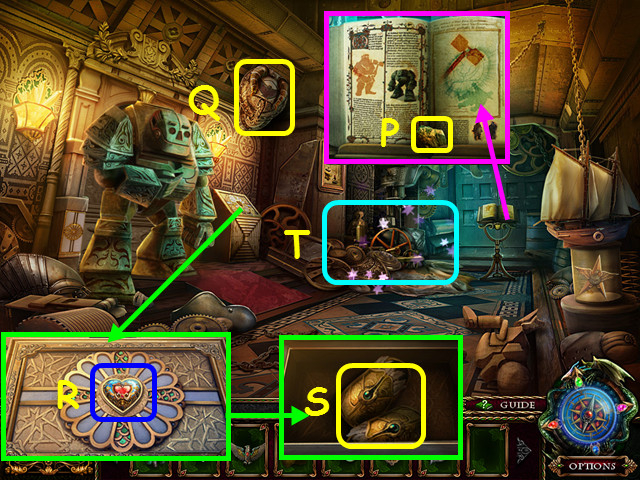
- Look at the Cyclops and place the CYCLOPS HORN on his head (P).
- Place the GLASS EYE in the socket (Q).
- Take the NORTH INSIGNIA (R).
- Walk down twice, then go to the right.
- Look at the door; place the WATER DISK in the top circle, the SUN DISK in the right circle, the SEED DISK in the left circle, and the EARTH DISK in the bottom circle (S).
- Enter the door (T).
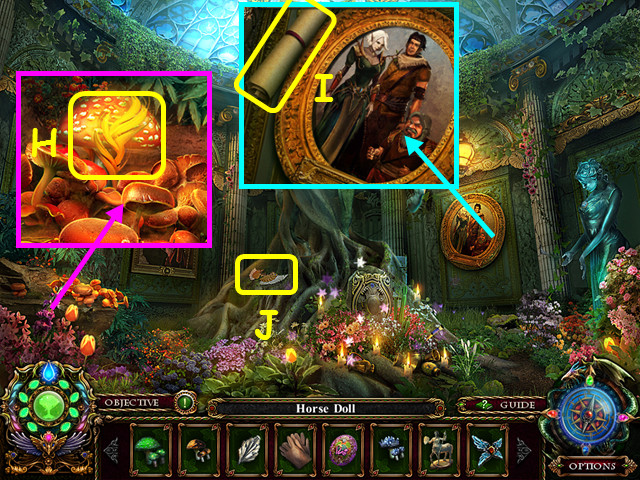
- Look at the tree and take the EARTH MUSHROOM HERB (U).
- Take the PURPLE CARROT (V).
- Select the fairy statue for a HOS (W).
- Locate all the fragments (X).
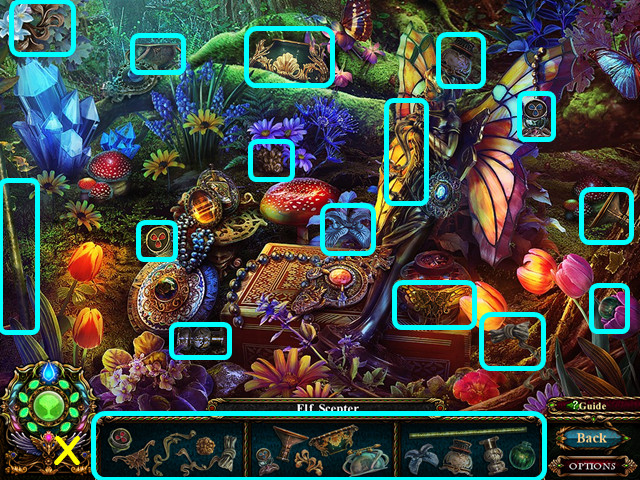
- You will earn the ELF SCEPTER.
- Walk down.
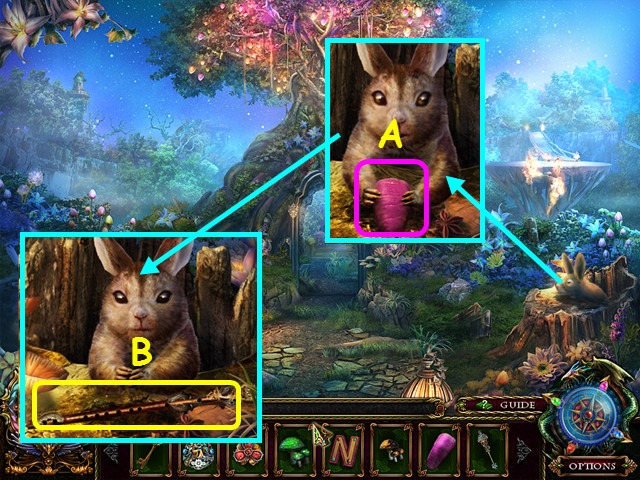
- Look at the hoarding bunny and give him the PURPLE CARROT (A).
- Take the TREE FLUTE (B).
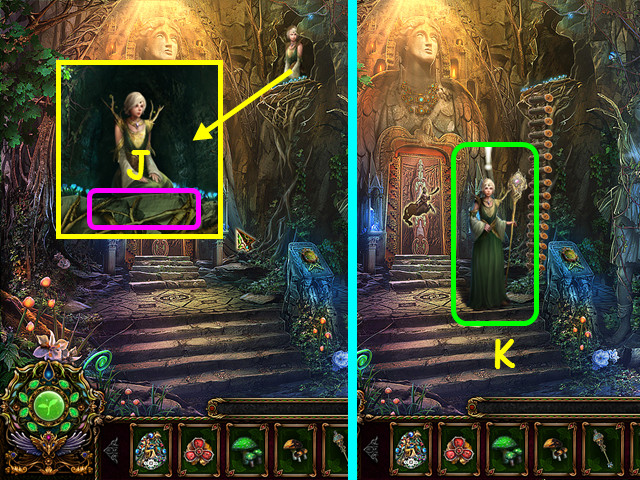
- Walk down, go left, then enter the waterfall.
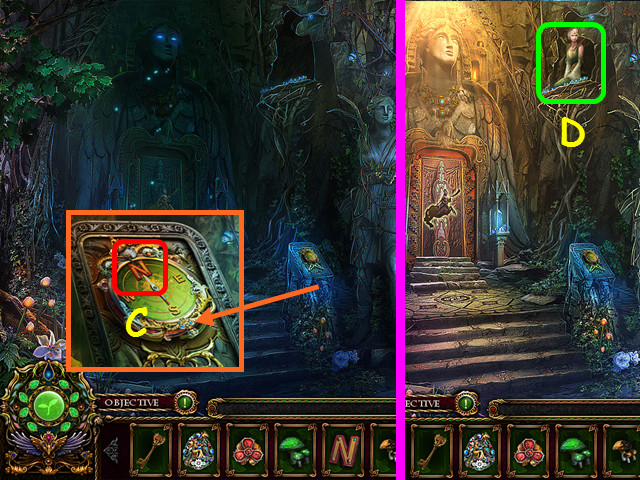
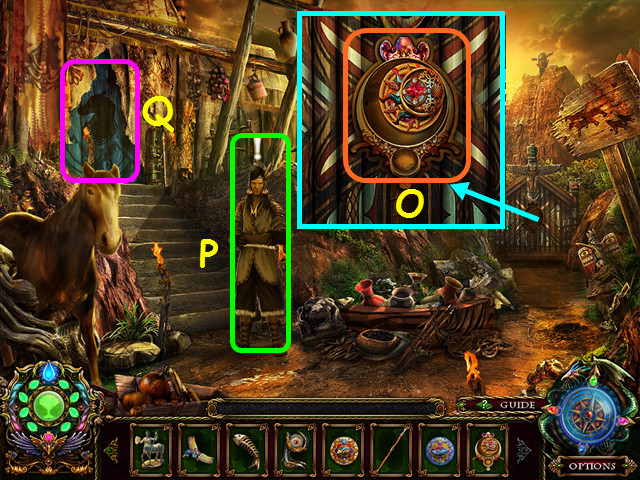
- Look at the stand and place the NORTH INSIGNIA into the ‘N’ (C).
- Zoom into the alcove, then talk to the lady (D).
- Walk to the right.
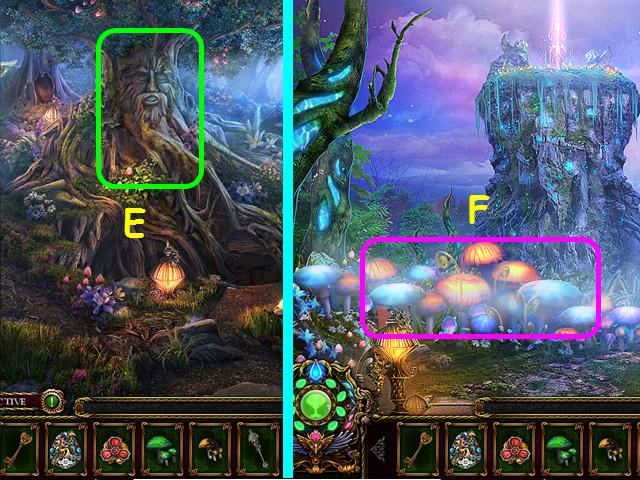
- Use the TREE FLUTE on the tree (E).
- Talk to the tree and you will receive the MUSHROOM TOXIN.
- Walk down 3 times, walk to the right, then go forward.
- Use the MUSHROOM TOXIN on the mushrooms (F).
- Take the SILVER SWORD (G).
- Look at the chest and use the BRASS KEY on the lock (H).
- Take the ROPE LADDER (I).
- Walk down twice, then go left twice.
- Look at the lady and use the ROPE LADDER on the ledge (J).
- Once she climbs down, talk to the lady (K).
- She will give you the SAPPHIRE GEM.
- Walk to the right.
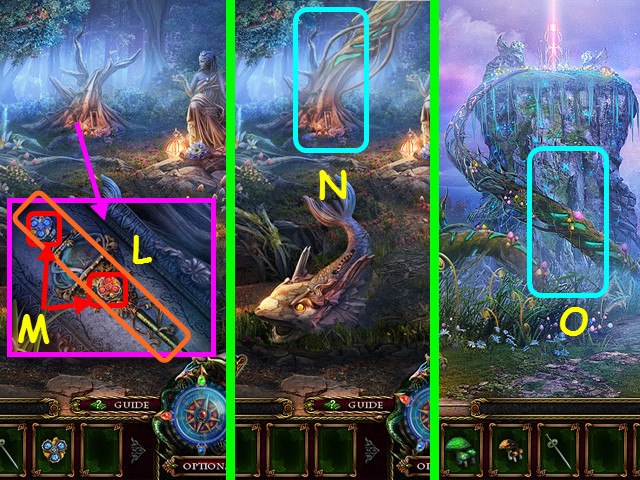
- Look at the holder and place the ELF SCEPTER inside (L).
- Place the RUBY GEM and the SAPPHIRE GEM onto the scepter (M).
- Go up the vine (N).
- Go up to the archive (O).
Act 4: Battle with Phoenix Queen
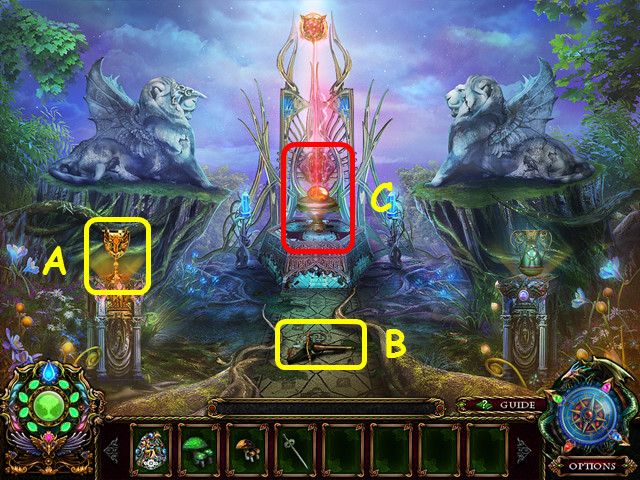
- Take the MAIDEN CUP (A).
- Take the HANDLE (B).
- Look at the ancient archive (C).
- Walk down, then go to the left.
- Look at the fish and use the HANDLE on the gear (D).
- Look at the statue and place the MAIDEN CUP in her hand (E).
- Take the SILVER STAFF (F).
- Walk down twice, go right, then enter the door on the left.
- Use the SILVER SWORD on the second statue on the left (G).
- Use the SILVER STAFF on the second statue from the right (H).
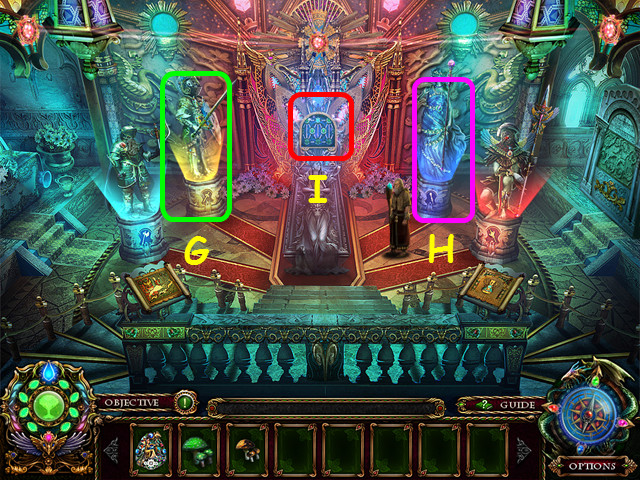
- Look at the area above the queen’s sarcophagus for a mini-game (I).
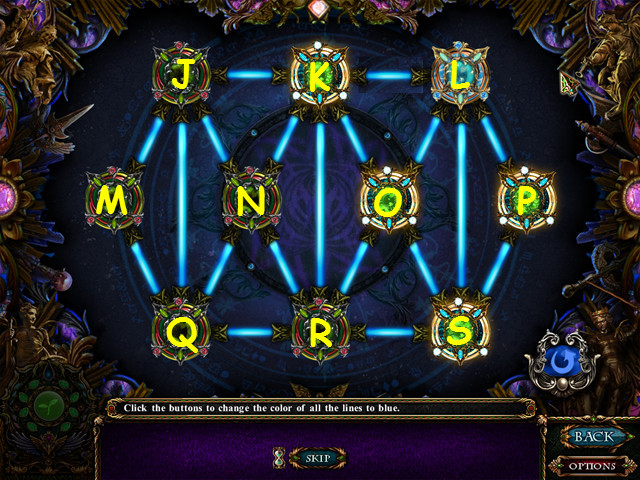
- Change all the lines between the gems to blue.
- You can only press gems that are lit.
- Press on the gems in this order: R, Q, M, J, Q, N, J, K, N, R, K, O, R, S, O, L, S, P, L, and K.
- Walk down twice, enter the waterfall, go to the right, climb the vine, then go up to the archive.
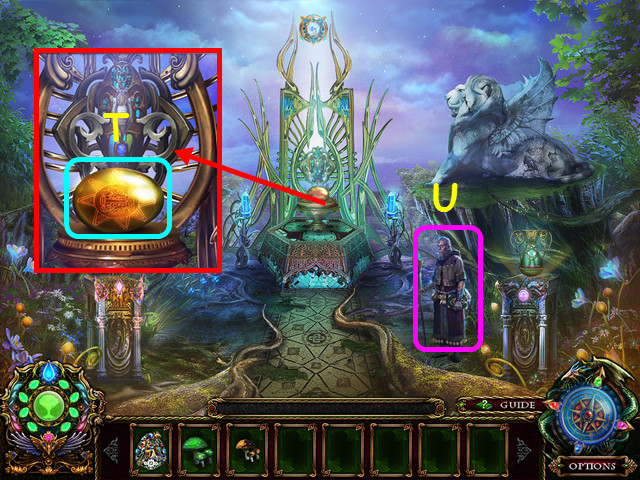
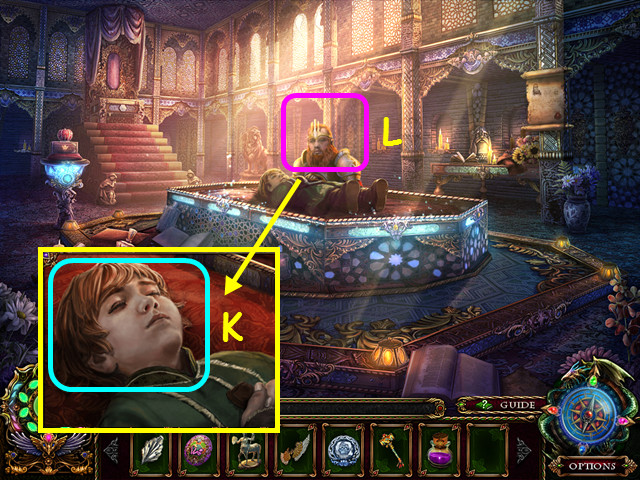
- Zoom into the platform and touch the egg (T).
- Talk to the professor and he will give you the DWARF BADGE (U).
- Look at the compass and select the Iron Kingdom.
Act 5: Surprises in the Iron Kingdom
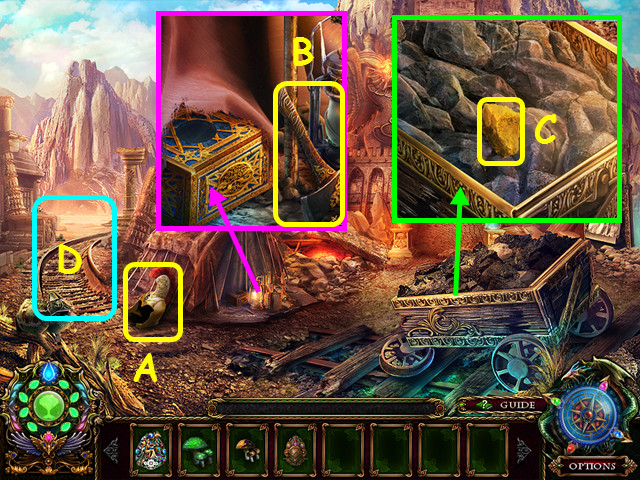
- Take the DWARF LORD HELM (A).
- Look at the tent and take the AX (B).
- Look at the cart; remove the 4 pieces of ore to find the GOLD NUGGET (C).
- Follow the tracks to the left (D).
- Take the DWARF LORD PAULDRONS (E).
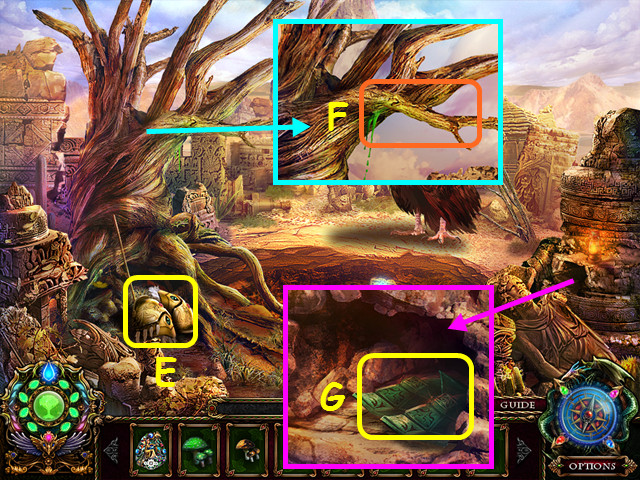
- Look at the tree and use the AX on the branch (F).
- Look in the hole and take the DOLL LEGS (G).
- Walk down, then enter the palace.
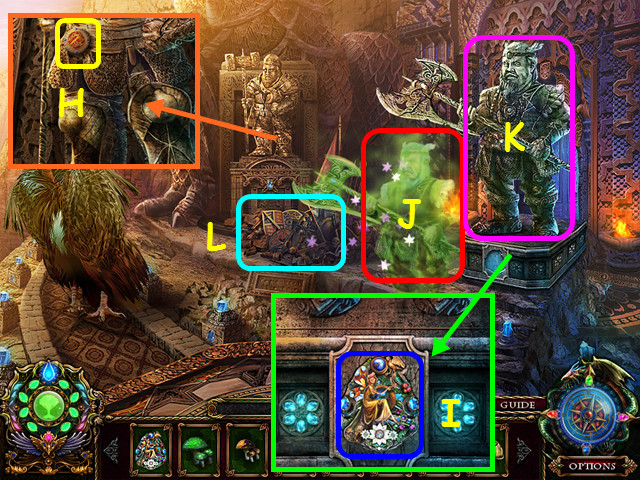
- Look at the left statue and take the KINGDOM SEAL (H).
- Look at the base of the right statue and place the BLUE BLOOD EMBLEM in the niche (I).
- Talk to the dwarf spirit (J).
- Place the DWARF LORD HELM and the DWARF LORD PAULDRONS on the right statue (K).
- Select the shields for a HOS (L).
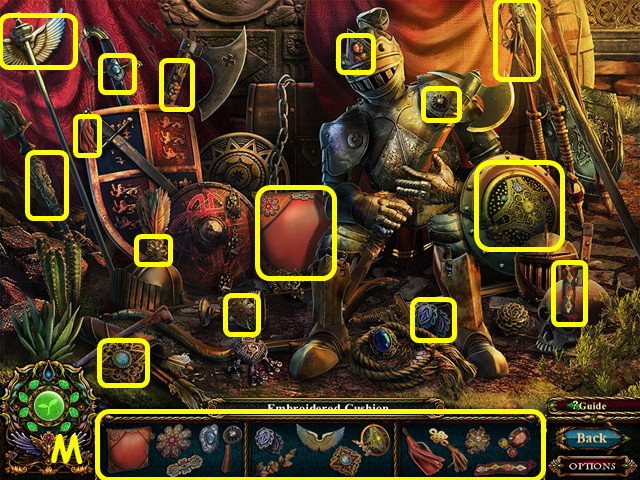
- Locate all the fragments (M).
- You will earn the EMBROIDERED CUSHION.
- Walk down.
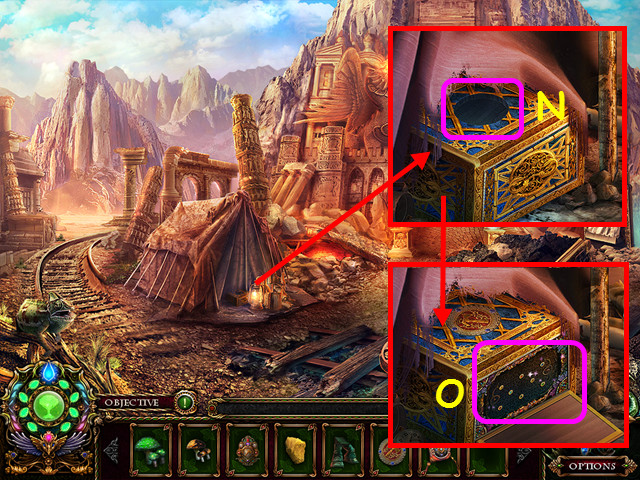
- Look at the tent and place the KINGDOM SEAL in the top of the box (N).
- Select the front of the box for a mini-game (O).
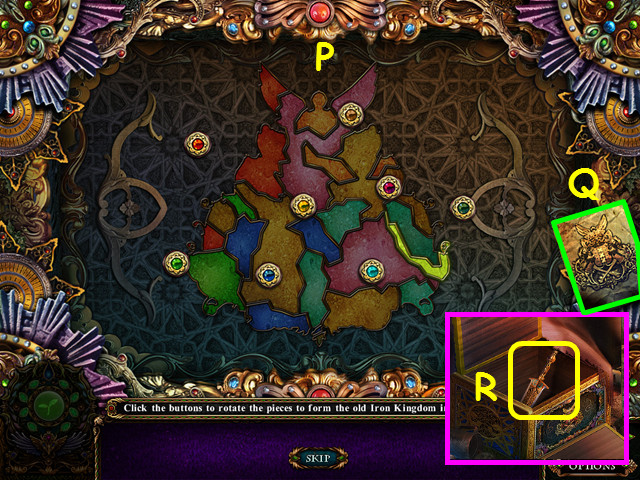
- Rotate the pieces using the jeweled buttons to form the shape (P) of the insignia (Q).
- Each button rotates a different colored piece.
- Take the SMALL DAGGER from the box (R).
- Walk to the left.
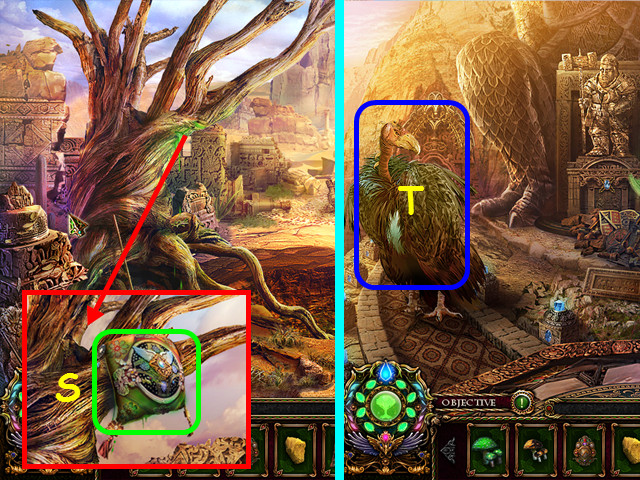
- Look at the tree; use the EMBROIDERED CUSHION on the sap, then take the PUTRID SMELLING CUSHION (S).
- Walk down, then go forward to the palace.
- Use the PUTRID SMELLING CUSHION on the VULTURE (T).
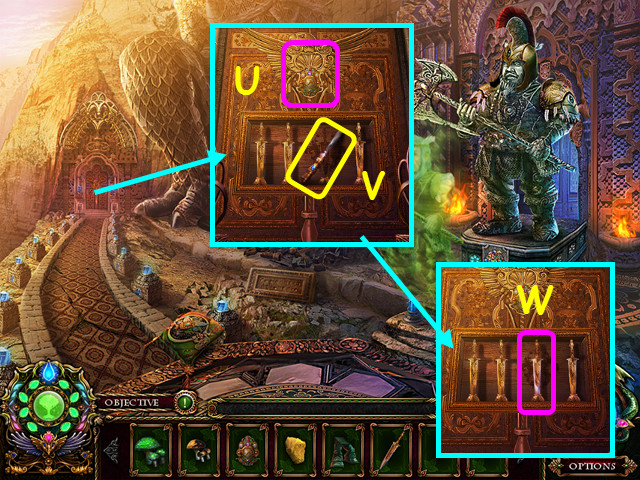
- Look at the door on the left and place the DWARF BADGE in the indentation (U).
- Take the CHISEL (V), then replace it with the SMALL DAGGER (W).
- Enter the door on the left.
Act 6: Exploring the Dwarven Palace
- Zoom into the book and take the GRAPPLING HOOK (A).
- Take the EAGLE INSIGNIA (B).
- Take the DWARF LORD BREASTPLATE (C).
- Walk up the left ramp (D).
- Look at the anvil and take the METAL EYES (E).
- Place the GOLD NUGGET in the bowl (F).
- Select the hearth for a HOS (G).
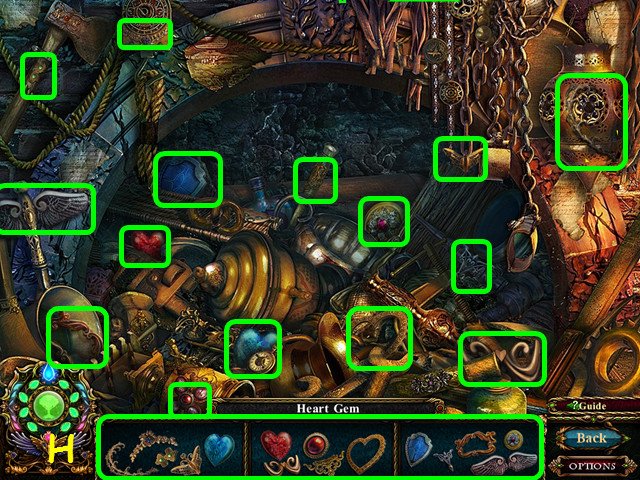
- Locate all the fragments (H).
- You will earn the HEART GEM.
- Walk down 3 times.
- Look in the cavern and use the GRAPPLING HOOK to get the DOLL BODY (I).
- Walk to the left.

- Look in the pit and use the CHISEL on the cover (J).
- Take the CRYSTAL EAGLE (K).
- Walk down, go right to the palace, and walk to the left twice.
- Look at the crate and place the CRYSTAL EAGLE on top (L).
- Take the DOLL HEAD and the SILVER LEAF (M).
- Walk down.
- Look at the door and place the DOLL LEGS, DOLL HEAD, and the DOLL BODY in the frame (N).
- Walk to the right (O).
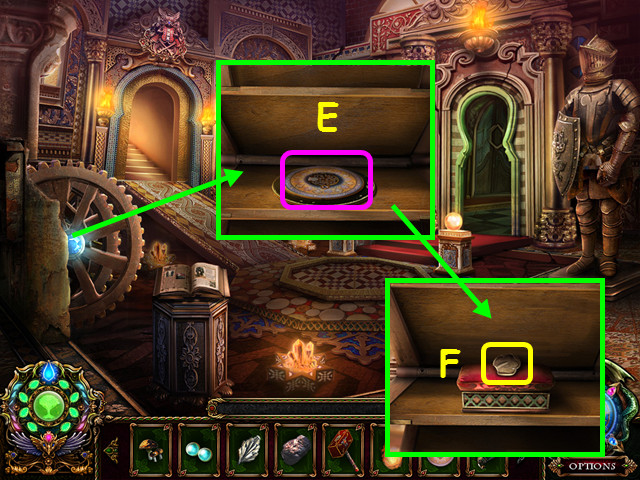
- Look at the book and take the ORE (P).
- Take the CRAFTED SHIELD (Q).
- Look at the box and place the HEART GEM in the lid (R).
- Take the DWARF LORD GAUNTLETS (S).
- Select the debris for a HOS (T).
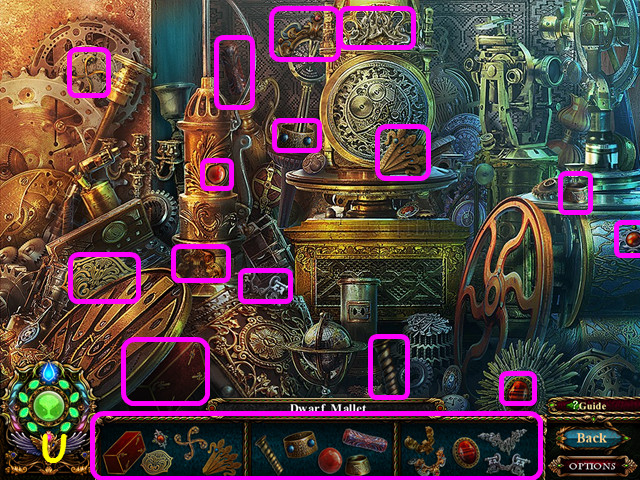
- Locate all the fragments (U).
- You will earn the DWARF MALLET.
- Walk down twice.
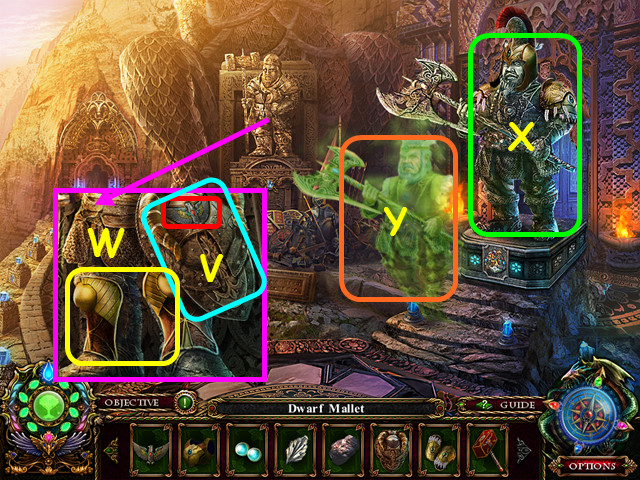
- Look at the left statue and place the CRAFTED SHIELD on it, then place the EAGLE INSIGNIA on the shield (V).
- Take the DWARF LORD GREAVES (W).
- Use the DWARF LORD BREASTPLATE, DWARF LORD GAUNTLETS, and the DWARF LORD GREAVES on the right statue (X).
- Talk to the spirit (Y).
- Walk to the right.
Act 7: The Last Dwarf King

- Look at the book and take the FIRESTONE (A).
- Take the CERAMIC PLATE (B).
- Select the table for a HOS (C).
- Locate all the fragments (D).
- You will earn the METAL EARS.
- Walk down, then go to the left.
- Look at the wheel and place the CERAMIC PLATE on the shelf (E).
- Take the METAL TONGUE (F).
- Walk to the left.
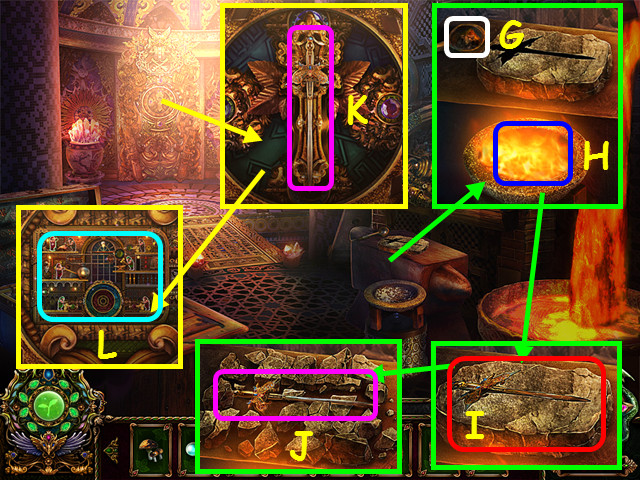
- Look at the anvil and place the ORE in the bowl (G).
- Place the FIRESTONE in the burner (H).
- Use the DWARF MALLET on the stone (I).
- Take the MYSTIC SWORD (J).
- Look at the door and place the MYSTIC SWORD in the indentation (K).
- Select the opening for a mini-game (L).
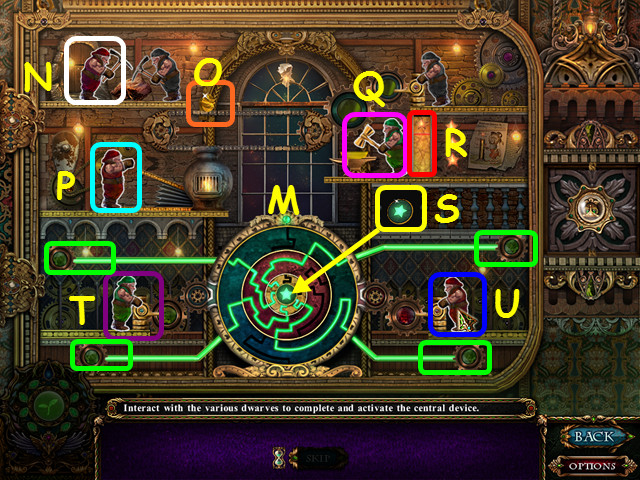
- Interact with the dwarves to activate the central device (M).
- Select the dwarf with the pick (N) 3 times, until the gold nugget moves to the right (O).
- Select the bellows dwarf (P).
- Select the dwarf at the anvil (Q) three times, when the bar is up by the star (R).
- Move the green star to the center of the device (S).
- You need to light the 4 lines of power (green).
- Select the lower left dwarf (T) twice, then select the lower right dwarf twice (U).
- Walk forward.
- Look at the table; take the WORM COIN and the CHAIN GLOVES (A).
- Talk to the Dwarf King and he will give you the AMBROSE PALACE KEY (B).
- Look at the prince and take the TOY WINGS (C).
- Walk down twice, then go to the right.
- Use the TOY WINGS on the sailboat (D).
- Take the GOLD STAR (E).
- Walk down twice, then walk to the right.
- Look at the base of the eagle statue and place the GOLD STAR in the indentation (F).
- Take the METAL NOSE (G).
- Walk down, go to the left, then go to the right.

- Look at the golem and give him the METAL EYES, METAL TONGUE, METAL NOSE, and METAL EARS (H).
- Look at the golem’s body to learn you need one more piece (I).
- Look at the compass and travel to Ambrose Palace.
- Talk to Windleaf and she will give you the METAL MUSHROOM HERB (J).
- Look at the gate and use the AMBROSE PALACE KEY on the lock (K).
- Walk forward.
- Talk to the Professor and he will give you the GOLEM HEART (L).
- Use the compass to return to the Iron Kingdom.
- Enter the palace, walk left, then right.
- Look at the golem and place the GOLEM HEART in his chest (M).
- Walk left into the vault that was behind the golem.
Act 8: Finding the Second Songbird
- Talk to Widge (A).
- Take the HORSE DOLL (B).
- Look at the carving and take the SKYBIRD EMBLEM (C).
- Select the area on the left for a HOS (D).

- Locate all the fragments (E).
- You will earn the CENTAUR HORN.
- Talk to Widge again and he will give you the CENTAUR MURAL FRAGMENT.
- Use the compass to travel to Midnight Forest.
- Walk to the left, then enter the waterfall.
- Look at the door; place the CENTAUR HORN and the CENTAUR MURAL FRAGMENT into the indentations (F).
- Enter the door (G).
- Look at the rocks and use the CHAIN GLOVES to take the FIRE MUSHROOM HERB (H).
- Look at the right painting and take the HERBAL MUSHROOM RECIPE (I).
- Take the WINGS OF FRIENDSHIP (J).
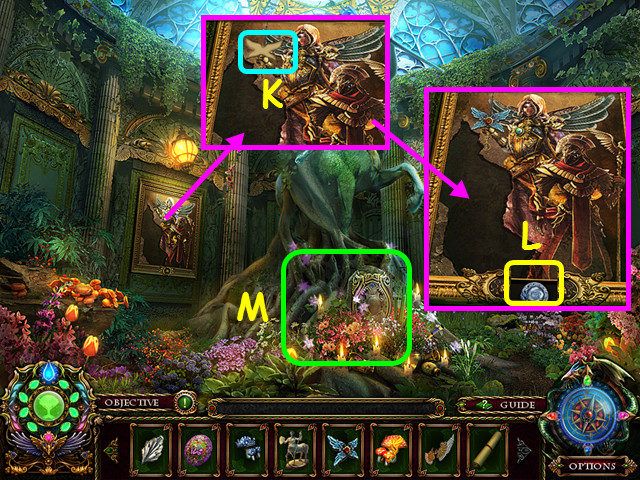
- Look at the left painting and place the SKYBIRD EMBLEM in the white spot (K).
- Take the WHITE DIAMOND (L).
- Select the area at the base of the centaur for a HOS (M).
- Locate all the fragments (N).
- You will earn the BURNING MALLET.
- Walk down twice, then go to the right twice.
- Select the statue on the left for a HOS.
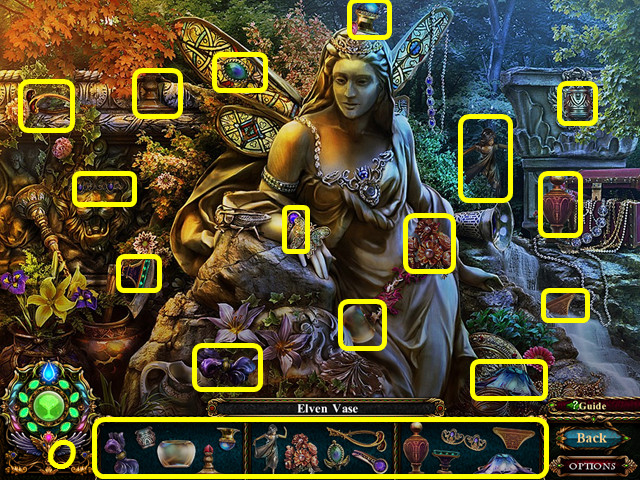
- Locate all the fragments (O).
- You will earn the ELVEN VASE.
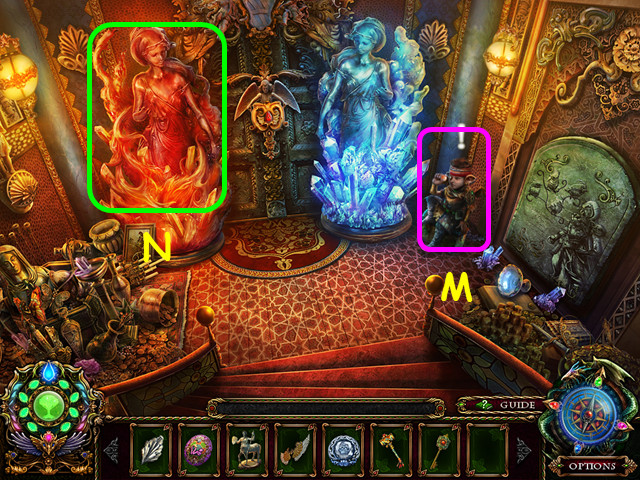
- Walk down twice, then walk to the left twice.
- Use the ELVEN VASE on the right statue (P).
- Take the WATER MUSHROOM HERB (Q).
- Use the compass to travel to Ambrose Palace, then walk forward.
- Look at the table and place the HERBAL MUSHROOM RECIPE on the surface (A).
- Place the METAL MUSHROOM HERB and the WOOD MUSHROOM HERB into the mortar (B).
- Pour the yellow liquid into the mortar (C), then some of the brown spice (D).
- Select the pestle (E).
- Add the EARTH MUSHROOM HERB to the mortar (F), followed by the red liquid (G).
- Add the WATER MUSHROOM HERB to the mortar (H), then select the pestle (I).
- Add the FIRE MUSHROOM herb to the mortar, then take the HERBAL MUSHROOM POTION (J).
- Use the compass to go to the Iron Kingdom.
- Enter the palace, then go to the left 3 times.
- Look at the prince and use the HERBAL MUSHROOM POTION on him (K).
- Talk to the king and he will give you the VAULT KEY (L).
- Walk down twice, go right, then left to the vault.
- Talk to Widge and he will give you the SKYBIRD RELIC HEAD (M).
- Give the BURNING MALLET to the fire goddess statue (N).
- Walk down 3 times, then walk to the right.
- Look at the door and place the SKYBIRD RELIC HEAD in the indentation (O).
- Look at the painting and place the WINGS OF FRIENDSHIP in the frame (P).
- Take the GOLDEN LEAF (Q).
- Walk down, then go to the left.
- Look at the base of the small statue; place the SILVER LEAF and the GOLDEN LEAF in the indentation (R).
- Take the BLACK DIAMOND (S).
- Walk to the left twice.
- Look at the crown and place the WHITE DIAMOND on the left and the BLACK DIAMOND on the right (T).
- Take the FREEZING MALLET (U).
- Walk down twice, go right, then go left.
- Use the FREEZING MALLET on the ice goddess statue (V).
- Look at the gate and use the VAULT KEY in the lock (W).
- Look inside the vault and touch the egg (X).
- You will be transported back to Ambrose Palace.
- Talk to the Professor and he will give you the HORSE LORD BADGE.
- Use the compass to travel to the Valley of Ruins.
Act 9: Visiting the Valley of Ruins
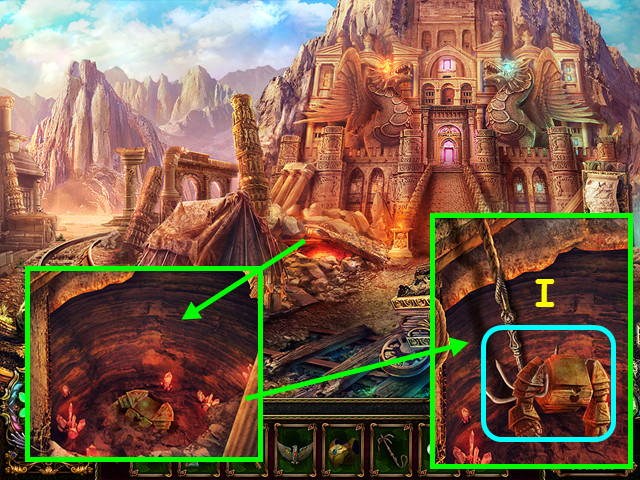
- Take the SHOVEL (A).
- Look at the base of the pole; take the SKYBIRD RELIC UPPER WINGS and the BONE FISH (B).
- Walk to the left (C).
- Talk to the guard and give him the HORSE LORD BADGE (D).
- Zoom into the sign and take the FISHING NET (E).
- Look at the ground and use the SHOVEL on the soil (F).
- Take the STONE CLAW and the STURDY CLOTH (G).
- Select the pottery for a HOS (H).
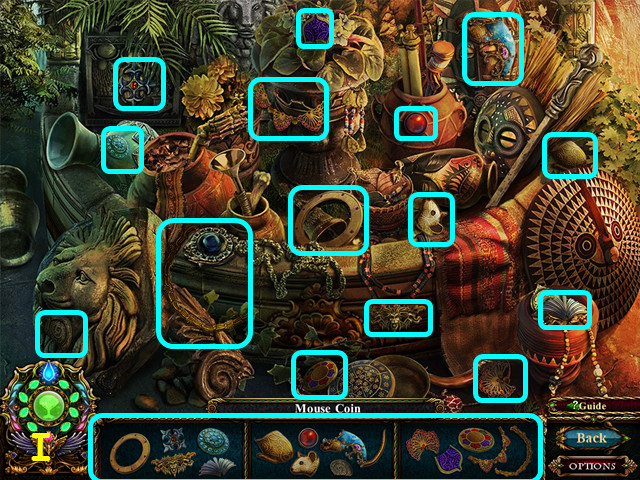
- Locate all the fragments (I).
- You will earn the MOUSE COIN.
- Walk down, then walk to the right.
- Zoom into the water and use the FISHING NET on the weapon pieces (J).
- Use the STURDY CLOTH on the weapon pieces to make the SILVER LANCE (K).
- Look at the fish totem and take the FISH COIN (L).
- Select the lower right corner for a HOS (M).
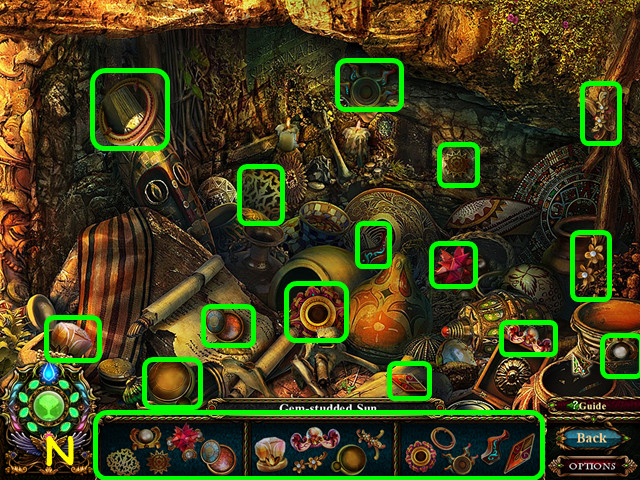
- Locate all the fragments (N).
- You will earn the GEM-STUDDED SUN.
- Walk down, then go to the left.
- Look at the gate and place the GEM-STUDDED SUN in the lock (O).
- Give the SILVER LANCE to the guard (P).
- Walk to the left (Q).
Act 10: Awakening the Totem Spirit
- Talk to the Horse Lord and she will give you the BURNT SADDLE (A).
- Look at the table and take the SKYBIRD RELIC LEGS (B).
- Place the HORSE DOLL on the box (C), then take the GEM-STUDDED MOON (D).
- Take the HARE COIN (E).
- Use the compass to travel to Ambrose Palace, then walk right to the harbor.
- Take the GEM-STUDDED STAR (F).
- Show the BURNT SADDLE to the vendor (G).
- She will give you the SPIRIT AMULET.
- Use the compass to return to the Valley of Ruins, then walk to the left.
- Look at the gate and place the GEM-STUDDED MOON in the center, and the GEM-STUDDED STAR at the bottom of the lock (H).
- Walk to the right.
- Place the STONE FISH into the left display (I).
- Take the GILDED BAT (J).
- Look at the basin and place the SPIRIT AMULET into the outline (K).
- Take the GRASS COIN (L).
- Take the WOODEN CLAW (M).
- Walk down twice, then go to the right.
- Look at the fish totem and place the WORM COIN in the base (N).
- Look at the door and place the STONE CLAW on the left, and place the WOODEN CLAW on the right (O).
- Enter the door.
- Zoom into the wolf and place the HARE COIN in his head (P).
- Take the SKYBIRD RELIC LOWER WINGS (Q).
- Take the SKYBIRD SWORD (R).
- Look at the back wall and place the GILDED BAT in the indentation, then take the SCORPION PLATE (S).
- Talk to the Wolf Clan Chieftan (T).
- Walk down twice.
- Look at the eagle and place the FISH COIN in the base (U).
- Look at the box and place the SCORPION PLATE in the lid (V).
- Look at the owl and place the MOUSE COIN in the base (W).
- Walk to the left twice.
- Look at the horse and place the GRASS COIN in his head (X).
- Walk down, then go forward.
- Look at the idol for a mini-game (Y).
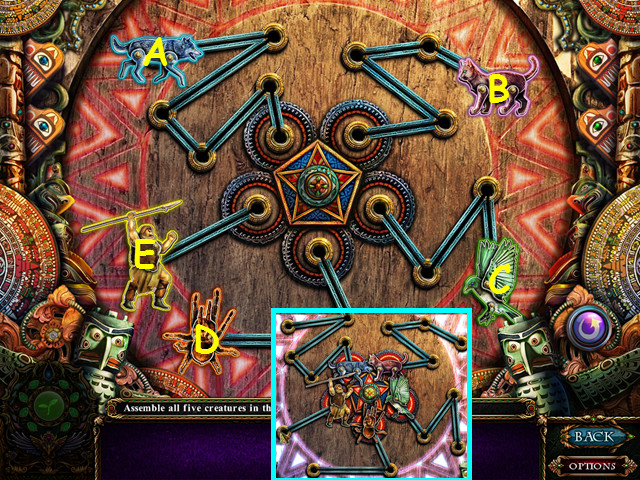
- Move the pieces so they reach the center at the same time.
- Select the pieces in this order: wolf (A), cat (B), bird (C), spider (D), and hunter (E).
- After the idol speaks, you will earn the NOTES FOR THE HORSE TRIBE and the NOTES FOR THE WOLF TRIBE.
- Walk down, then go to the left.
- Give the NOTES FOR THE HORSE TRIBE to the Horse Lord (F).
- She will give you the TREE MINERALS.
- Note the anvil (G).
- Walk down twice, then walk to the right twice.
- Give the NOTES FOR THE WOLF TRIBE to the Wolf Chieftain (H).
- He will give you the SHINY FANGS.
- Talk to the Wolf Chieftain again.
- Walk down.
- Look at the gate and use the SHINY FANGS in the lock (I).
- Walk through the gate.
- Take the SKYBIRD RELIC CAPE (J).
- Note the rock (K).
- Look at the fountain for a HOS (L).

- Locate all the fragments (M).
- You will earn the SKY CASTLE.
- Use the compass to travel to the Midnight Forest, then walk left, right, and left again.
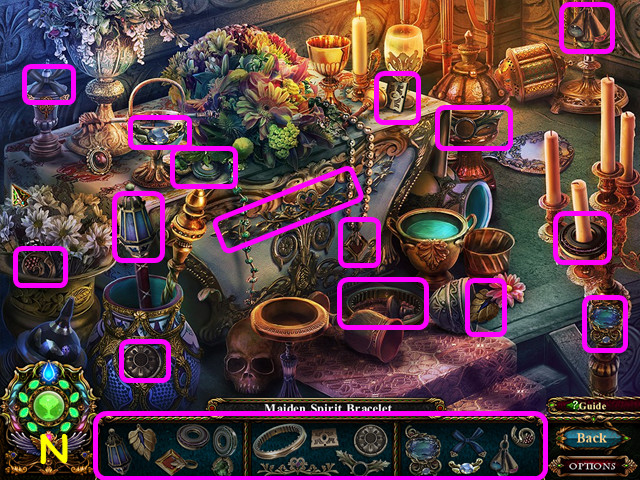
- Select the area on the left for a HOS.
- Locate all the fragments (N).
- You will earn the MAIDEN SPIRIT BRACELET.
- Walk down 3 times, go to the right, then forward.
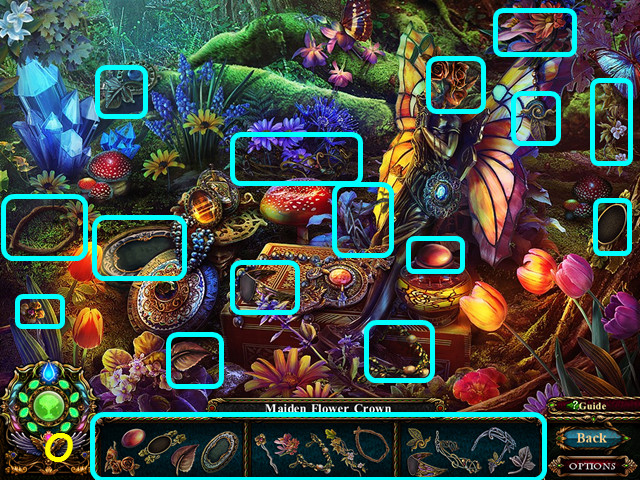
- Select the area on the right for a HOS.
- Locate all the fragments (O).
- You will earn the MAIDEN FLOWER CROWN.
- Walk to the left.
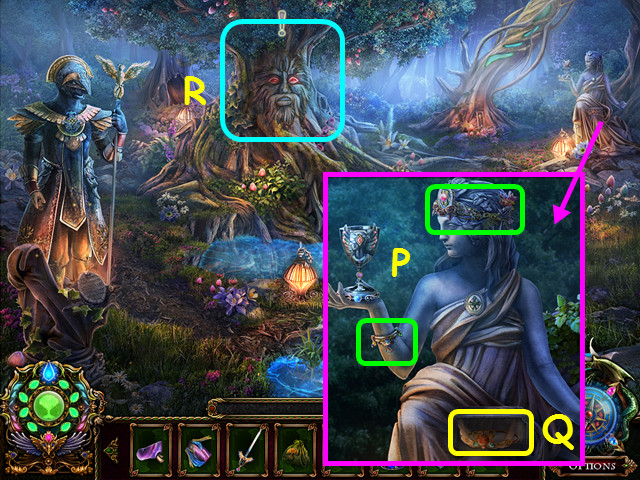
- Look at the statue; place the MAIDEN FLOWER CROWN on her head and the MAIDEN SPIRIT BRACELET on her arm (P).
- Take the SKYBIRD CROWN (Q).
- Use the TREE MINERALS on the tree (R).
- The tree will give you the DRAGON TALON.
Act 11: War in the Valley of Ruins
- Use the compass to travel to the Valley of Ruins.
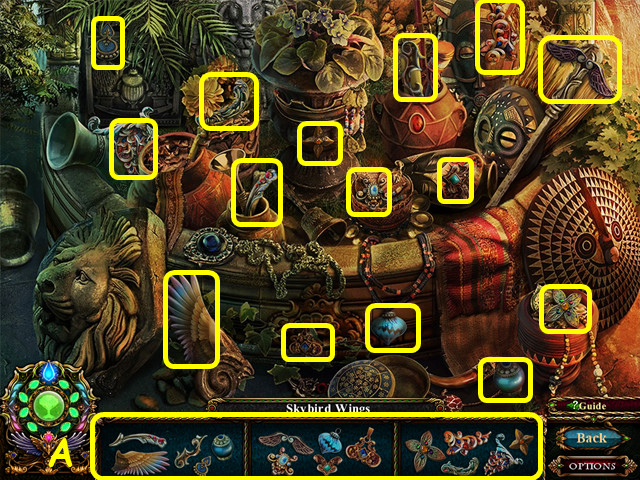
- Walk to the left and select the pottery for a HOS.
- Locate all the fragments (A).
- You will earn the SKYBIRD WINGS.
- Walk down, then go to the right.
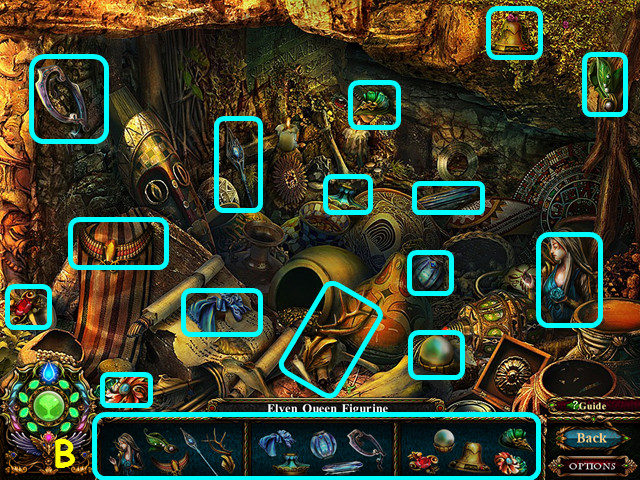
- Look in the lower right corner for a HOS.
- Locate all the fragments (B).
- You will earn the ELVEN QUEEN FIGURINE.
- Use the compass to travel to the Iron Kingdom.

- Enter the palace, then go left twice.
- Select the hearth for a HOS.
- Locate all the fragments (C).
- You will earn the ELVEN STONE TABLET.
- Walk down, right, and left.
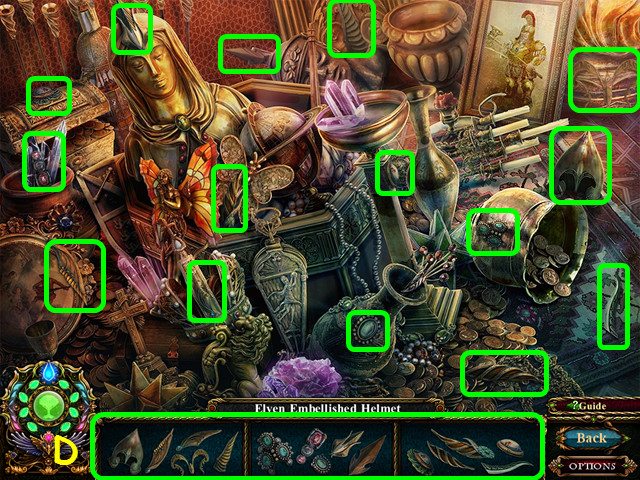
- Select the treasure on the left for a HOS.
- Locate all the fragments (D).
- You will earn the ELVEN EMBELLISHED HELMET.
- Walk down 3 times, then go to the right.
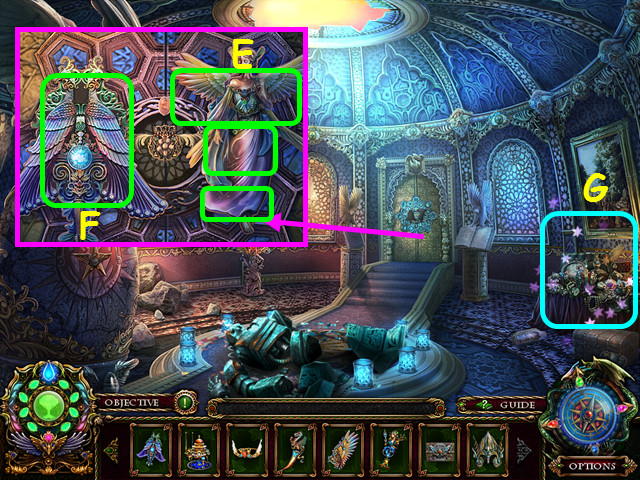
- Look at the door and place the SKYBIRD RELIC LEGS, SKYBIRD RELIC UPPER WINGS, and the SKYBIRD RELIC LOWER WINGS into the right indentation (E).
- Place the SKYBIRD RELIC CAPE into the left indentation (F).
- Select the table on the right for a HOS (G).
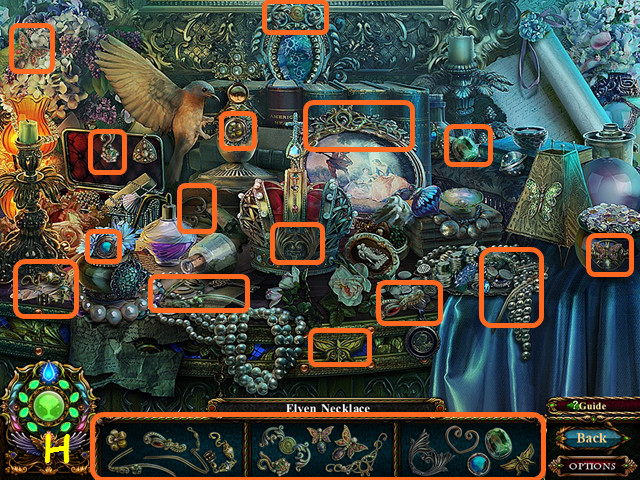
- Locate all the fragments (H).
- You will earn the ELVEN NECKLACE.
- Walk forward.
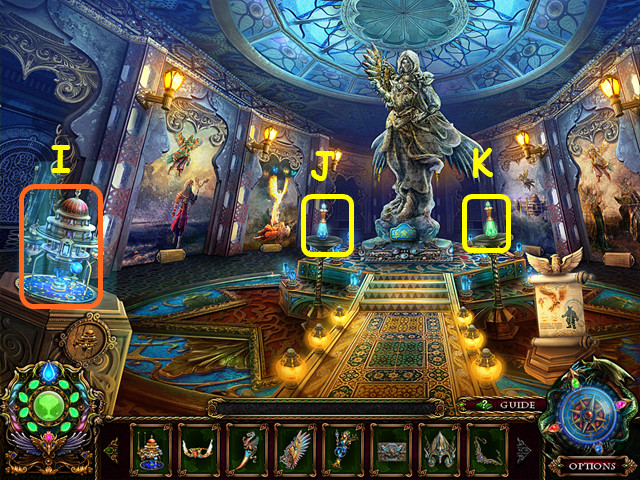
- Place the SKY CASTLE on the platform (I).
- Take the THAWING POTION (J).
- Take the ACIDIC POTION (K).
- Use the compass to return to the Valley of Ruins.
- Walk to the right, then enter the cave.
- Use the ACIDIC POTION on the wings, then take the SKYBIRD SHIELD (L).
- Use the compass to travel to the Iron Kingdom.
- Enter the castle, walk right, then forward.
- Place the SKYBIRD CROWN, SKYBIRD SHIELD, SKYBIRD WINGS, and the SKYBIRD SWORD on the statue (M).
- Take the DRAGON TEAR (N).
- Use the compass to travel to the Valley of Ruins.
- Walk to the left twice.
- Look at the anvil, then place the DRAGON TEAR on the surface (O).
- Use the DRAGON TALON on the dragon tear (P).
- Note- you can also perform these steps on the rock in the Wolf tribe’s cave (Q).
- You will automatically transport to inside Ambrose Palace.
- Talk to the Professor (R).
- Take the MOONLIGHT SONGBIRD, the BLUELEAF SONGBIRD, the CLOUDFIRE SONGBIRD, and the GRASSYLAKE SONGBIRD (S).
- Use the compass to travel to Snowtop Temple.
- Talk to the Professor (T).
- Look at the door and place the ELVEN EMBELLISHED HELMET, the ELVEN NECKLACE, and the ELVEN STONE TABLET into the panel (U).
- Look at the door again and use the THAWING POTION on the ice (V).
- Select the right statue for a HOS (W).
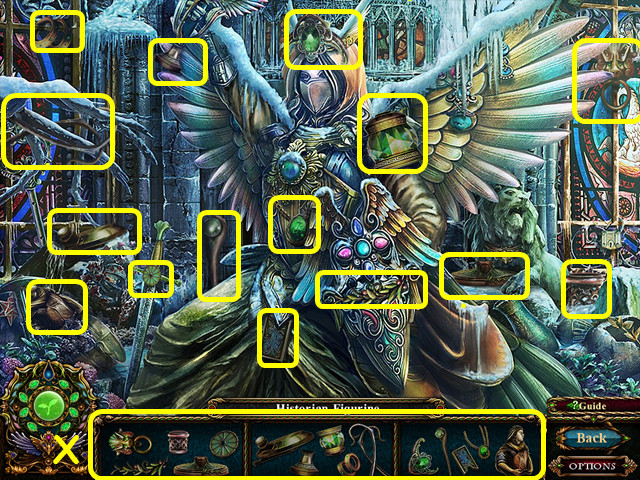
- Locate all the fragments (X).
- You will earn the HISTORIAN FIGURINE.
- Walk forward.
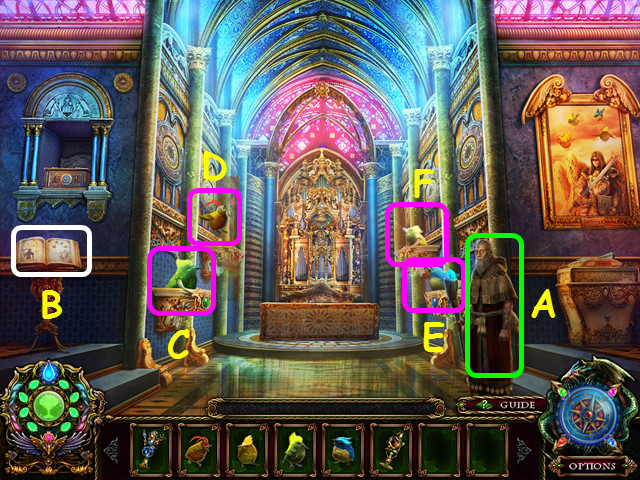
- Talk to the Professor (A).
- Look at the book on the left (B).
- Place the GRASSYLAKE SONGBIRD on the lower left shelf (C).
- Place the CLOUDFIRE SONGBIRD on the upper left shelf (D).
- Place the BLUELEAF SONGBIRD on the lower right shelf (E).
- Place the MOONLIGHT SONGBIRD on the upper right shelf (F).
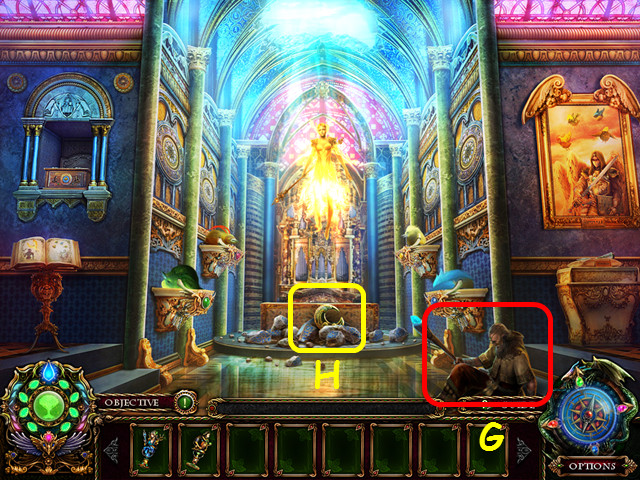
- Talk to the Professor (G).
- Take the CRESCENT MOON (H).
- Walk down.
- Look at the monument and place the CRESCENT MOON in the indentation (I).
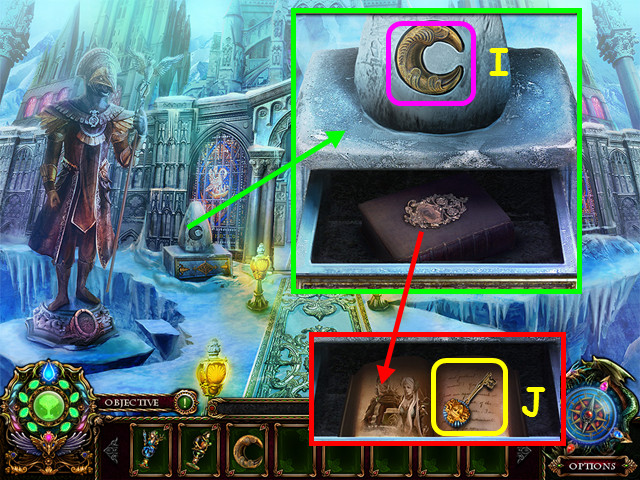
- Open the book and take the ELVEN METAL KEY (J).
- Walk forward.
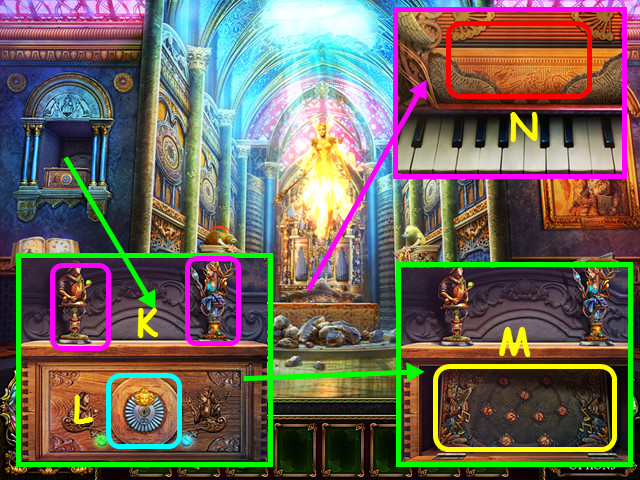
- Look at the box; place the HISTORIAN FIGURINE on the left and the ELVEN QUEEN FIGURINE on the right (K).
- Use the ELVEN METAL KEY on the lock (L).
- Take the SCORE OF THE SKYBIRDS (M).
- Look at the piano and place the SCORE OF THE SKYBIRDS in the stand for a mini-game (N).
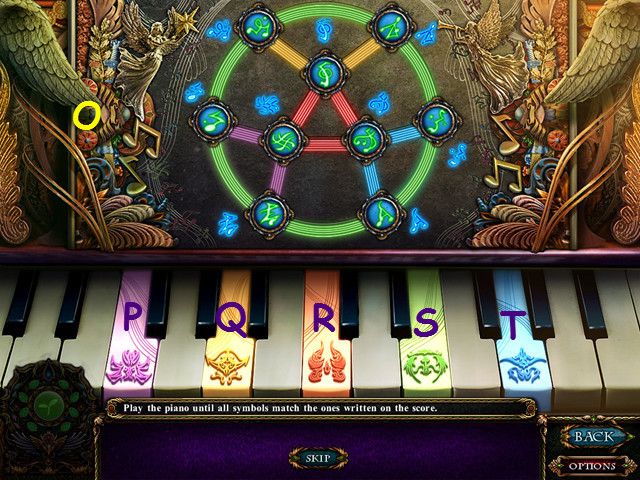
- Play the piano to move the pieces to positions with matching symbols (O).
- Each piano key with a symbol will rotate a different set of pieces.
- Hover your mouse over a key to highlight the pieces that will move when you press that key.
- Play the keys in this order: Px1, Rx2, Px1, Rx1, Px1, Tx2, Sx1, Tx2, Rx2, Sx1, Qx2, Rx1, Px2, Sx1, Px2, Rx1, Px2, Rx2, Px1, Sx3, Rx1, Qx2, Rx2, Qx1, and Rx1.
- Congratulations, you have completed Enchantia: Wrath of the Phoenix Queen.


 Ghost Towns: The Cats of Ulthar Walkthrough, Guide, & Tips
 Final Cut: Encore Walkthrough, Guide, & Tips
 Big City Adventure: Vancouver Walkthrough, Guide, & Tips
 Maze: Subject 360 Walkthrough, Guide, & Tips
 Mystery Age: The Dark Priests Walkthrough, Guide, & Tips