The Dark Hills of Cherai: the Regal Scepter Walkthrough, Guide, & Tips
The Dark Hills of Cherai: the Regal Scepter Walkthrough

Welcome to the The Dark Hills of Cherai the Regal Scepter Walkthrough!
Explore The Dark Hills of Cherai and find The Regal Scepter in this unique Hidden Object Puzzle Adventure game!
Whether you use this document as a reference when things get difficult or as a road map to get you from beginning to end, we’re pretty sure you’ll find what you’re looking for here.
This document contains a complete The Dark Hills of Cherai the Regal Scepter game walkthrough featuring annotated screenshots from actual gameplay!
We hope you find this information useful as you play your way through the game. Use the walkthrough menu below to quickly jump to whatever stage of the game you need help with.
Remember to visit the Big Fish Games Forums if you find you need more help. Have fun!
This walkthrough was created by Rebekah, and is protected under US Copyright laws. Any unauthorized use, including re-publication in whole or in part, without permission, is strictly prohibited.
General Tips

- You will not need to follow the exact path of this guide; however, some actions will need to be performed before you can complete another scene.
- Zoom into the sparkling areas to trigger a Hidden Object Scene. Throughout the guide, we will use the acronym ‘HOS’ for Hidden Object Scenes.
- The game is played using three different characters. There are three ways to switch between characters.
- You may click on their names (A-C) to switch between characters from any location.
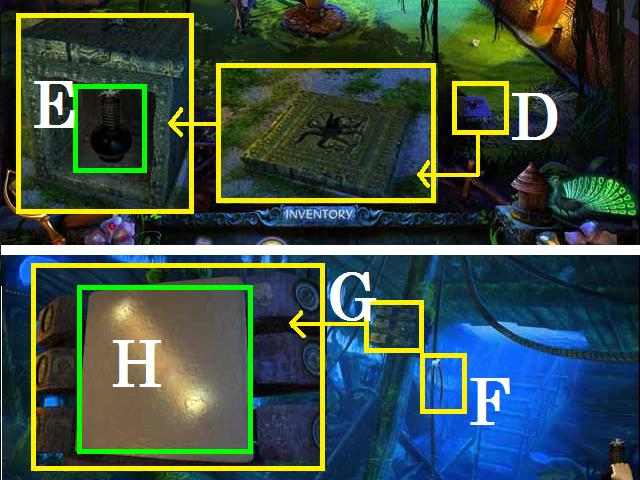
- You may open your map (D) to switch between characters by clicking their icon (E), as well as jump from location to location.
- You may change characters and swap Inventory Items inside the Meeting Places.
- You will need to unlock each character Meeting Place before you can swap Items with that character.
- You can click on the mini temple (F) and jump to a Meeting Place.
- You have two help options and three ways to use them in this game.
- Use the Mirror (G) as often as you like or use the Peacock (H) once it is full.
- You may drop an Inventory Item over the Peacock once it is full to see where it needs to be used.
Chapter 1: The Journey Begins

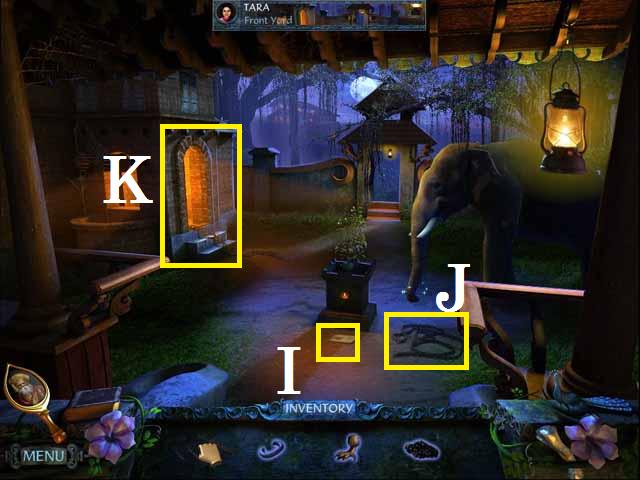
- Once you have chosen Casual or Advanced mode you will start playing as Tara.
- Pick up the NOTE (I) and the LONG CHAIN (J).
- Enter the Store House (K).

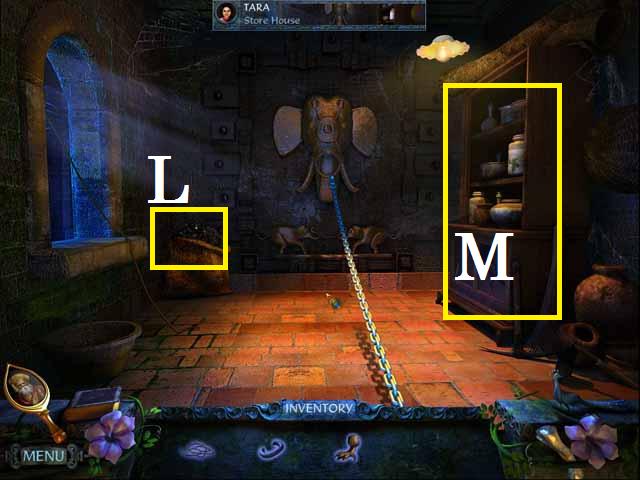
- Pick up the CHARCOAL (L).
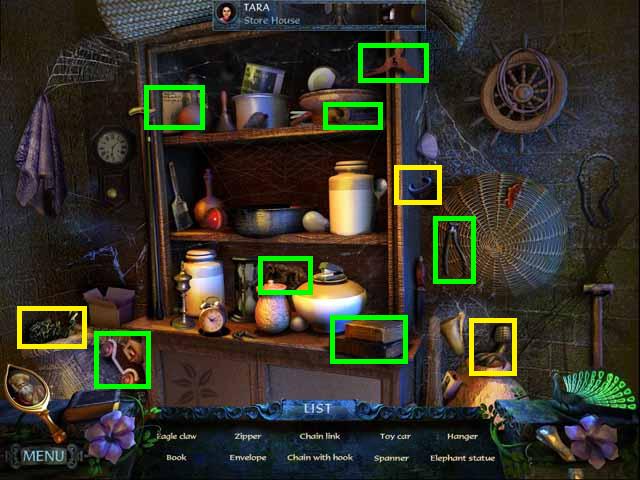
- Zoom into the sparkling cabinet (M) to play a HOS.


- After you have picked up all of the items (green and yellow) you will receive the CHAIN with HOOK, the CHAIN LINK, and the EAGLE CLAW.

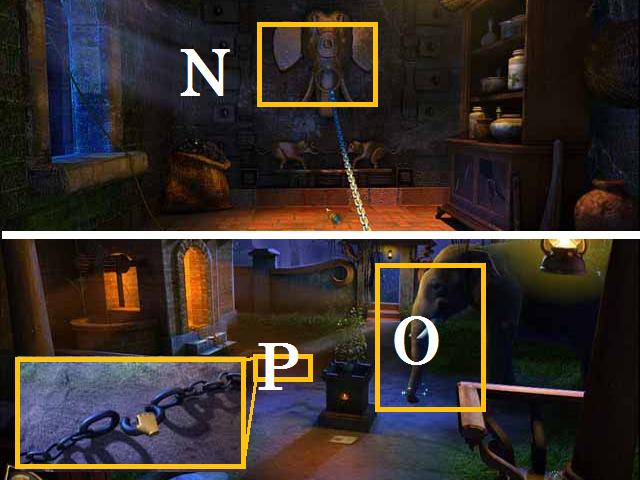
- Place the CHAIN with HOOK on the door (N) and exit the room.
- Place the LONG CHAIN on the elephant (O).
- Zoom into the gap (P) between the CHAINS; place the CHAIN LINK.
- Click on the elephant and go back inside.

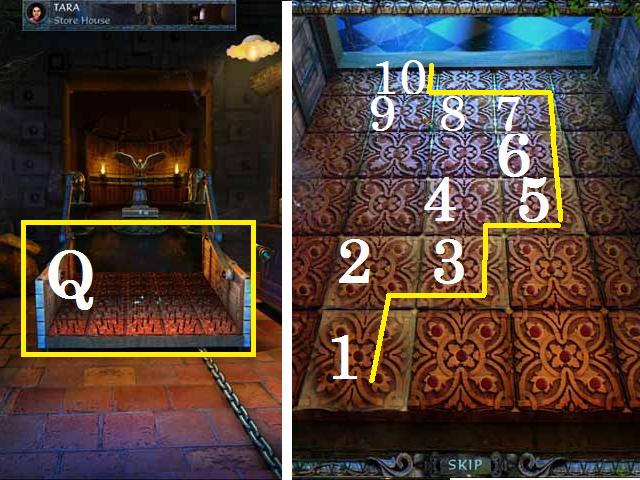
- Zoom into the spiked ramp (Q).
- Click on the squares in order (1-10) as shown in the screenshot.
- Enter the Secret Chamber.

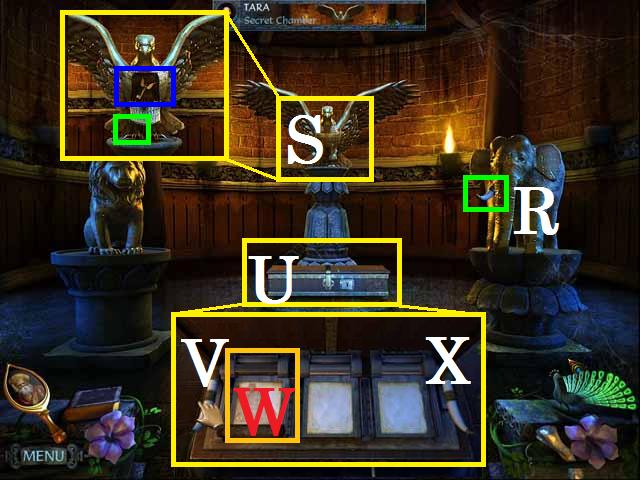
- Pick up the IVORY HANDLE (R).
- Zoom into the eagle (S); place the EAGLE CLAW.
- Pick up the KEY (blue).
- Unlock the box (U) with the KEY.
- Place the IVORY HANDLE (V).
- Drop the CHARCOAL over the first pad (W).
- Click the left IVORY HANDLE (V) then the right one (X); continue alternating until all three pads have been imprinted with the map pieces.

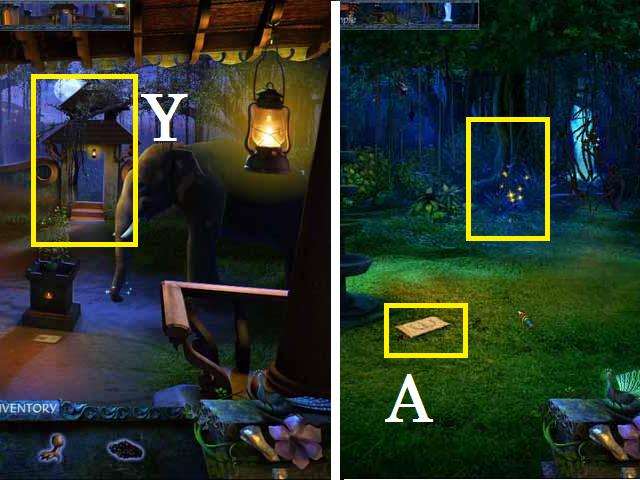
- Return to the yard.
- Try to exit through the gate (Y); once the way is clear, go through it to the Palace Gate.
- Take the Path Ahead to the Eagle Temple.
- Pick up the NOTE (A).

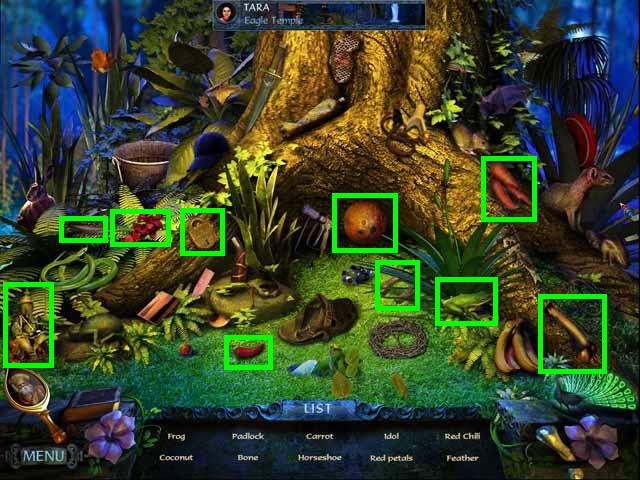
- Zoom into the sparkles to play a HOS.
- Receive the ICON, COCONUT, and the RED PETALS.

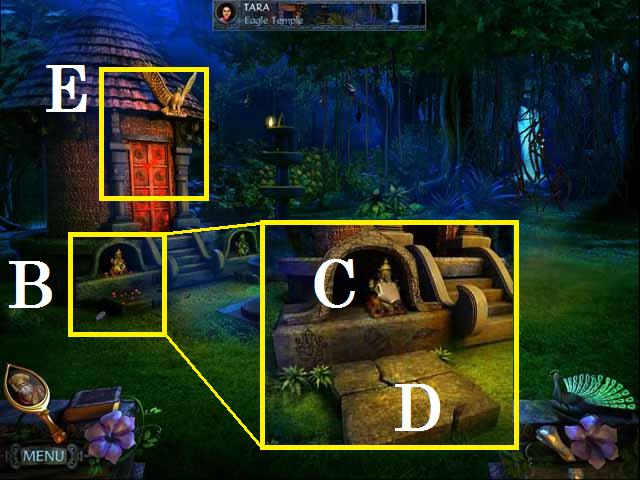
- Zoom into the arch (B); place the IDOL (C).
- Drop the COCONUT on the stone (D) followed by the PETALS.
- Enter the hut (E); go down the stairs to enter the Meeting Place.

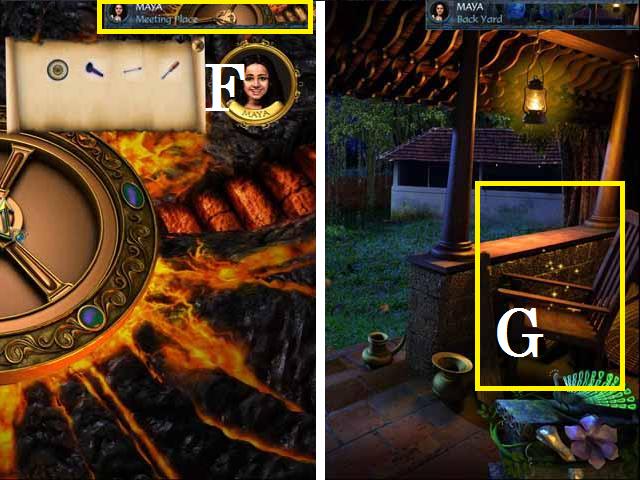
- Click on the Maya tab (F) to play as her for a while.
- Zoom into the sparkling chair (G) to play a HOS.

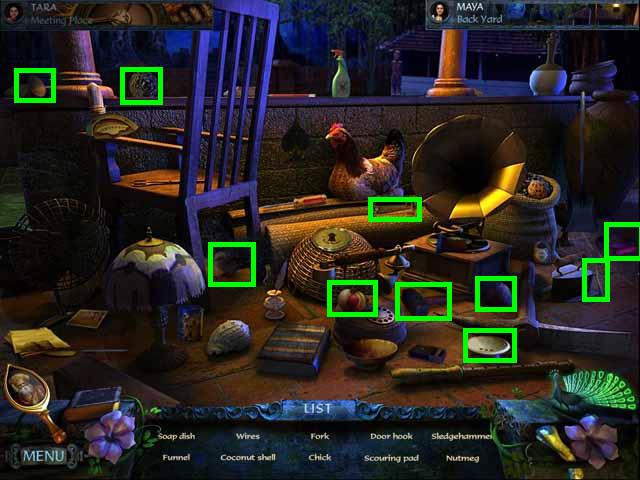
- Receive the FUNNEL and the SLEDGEHAMMER.

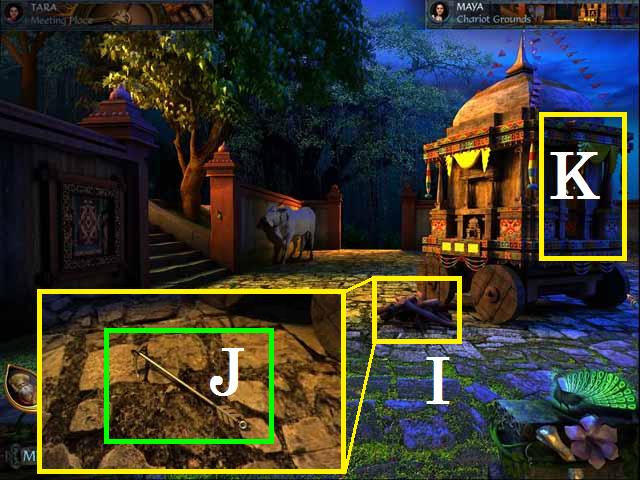
- Go through the Path to move to the Chariot Ground.
- Zoom into the logs (I); remove them one at a time, top to bottom, until you have revealed the HOOK ARROW.
- Pick up the ARROW (J).
- Zoom into the chariot (K).

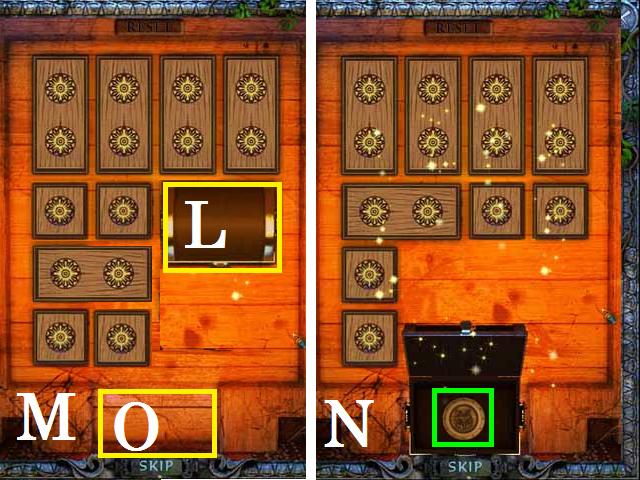
- There are multiple solutions to this puzzle. First, move the box (L) over to the right; next, move the small pieces into the configuration as shown (M).
- Move the box down and the small pieces into the configuration shown (N).
- Lastly, move the box out through the slot (O).
- Pick up the AMULET (green).

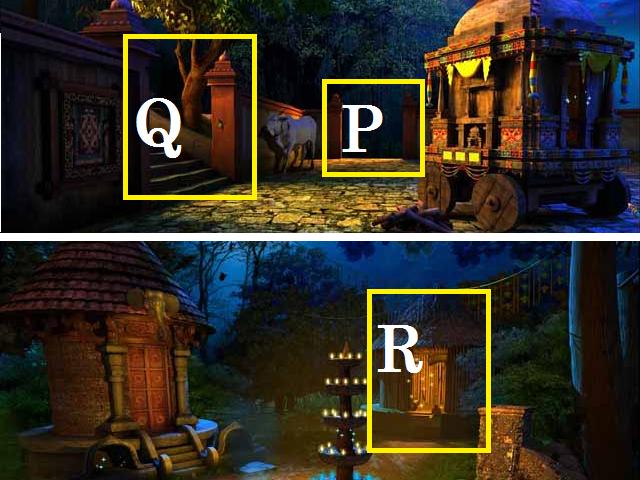
- Try to take the Path (P).
- Take the Path (Q) to the Elephant Temple.
- Zoom into the sparkling hit (R) to play a HOS.

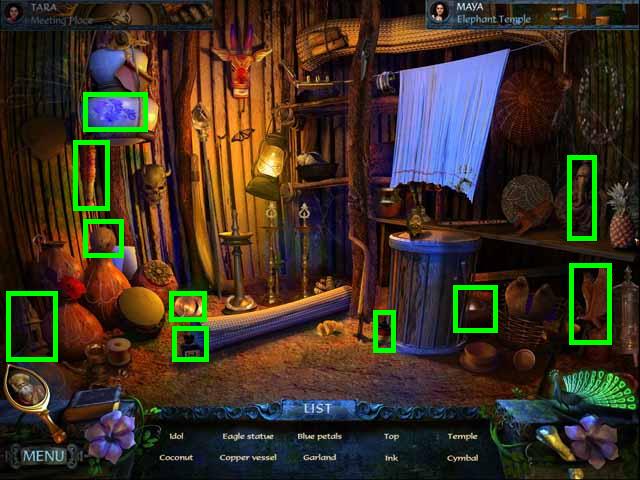
- Receive the IDOL, COCONUT, and the BLUE PETALS.
- Zoom into the arch; place the IDOL, COCONUT, and PETALS as you did before.
- Enter the Meeting Place.

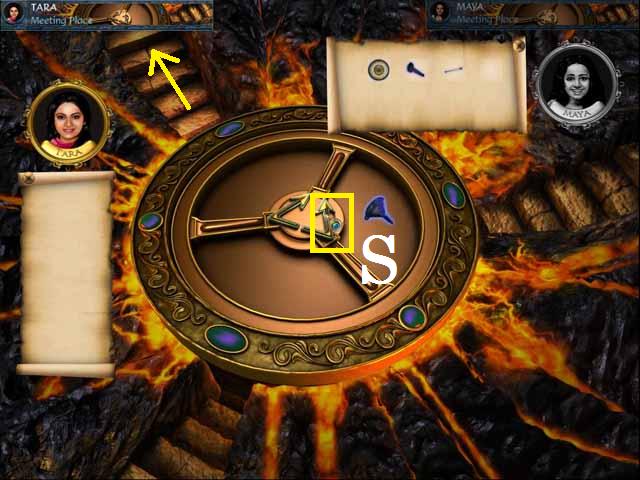
- (Note: you may need to move the characters to the Meeting Place) To swap items follow the tutorial, as directed, and hit the arrow (S) that points to the character you wish to pass the item to.
- Give Tara the SLEDGEHAMMER, and FUNNEL.
- Switch characters to play as Tara.

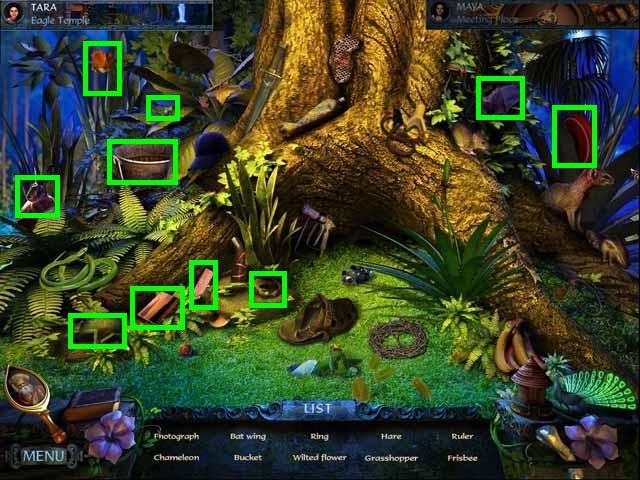
- Exit the Eagle Temple; zoom into the sparkles again to play a HOS.
- Receive the BUCKET.

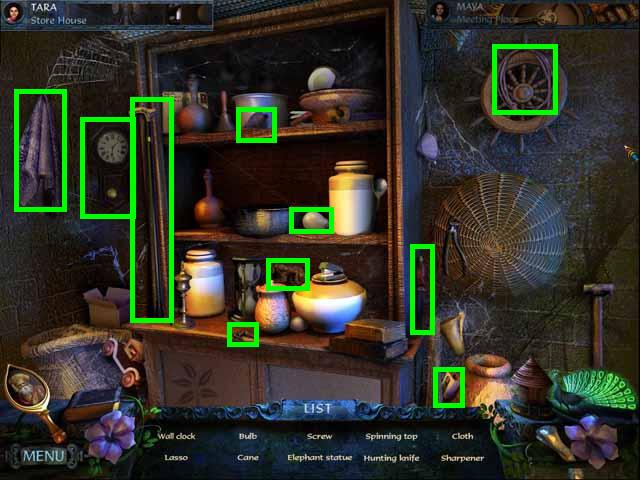
- Move to the Store House.
- Zoom back into the cabinet to play a HOS.
- Receive the LASSO.

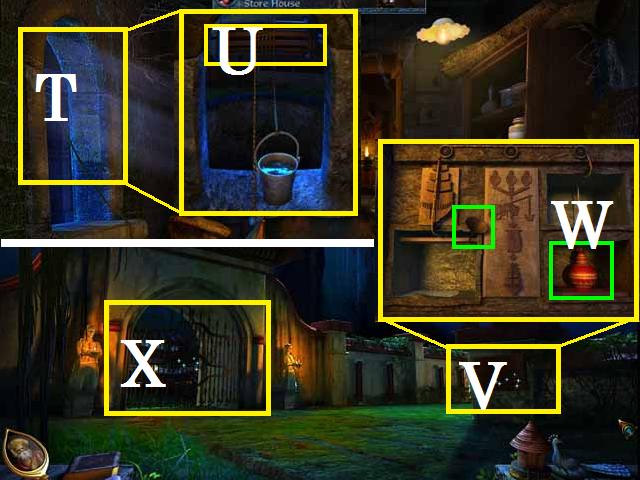
- Zoom into the window (T); place the bucket and push it out.
- Click the spinner (U) to raise the bucket.
- Pick up the FILLED BUCKET.
- Go to the Palace Gate.
- Zoom into the panel (V).
- Place the FUNNEL, as shown in the screenshot, and pour in the contents of the BUCKET.
- Pick up the RED URN (W).
- Make sure to zoom into the gate (X) and click on the plants.

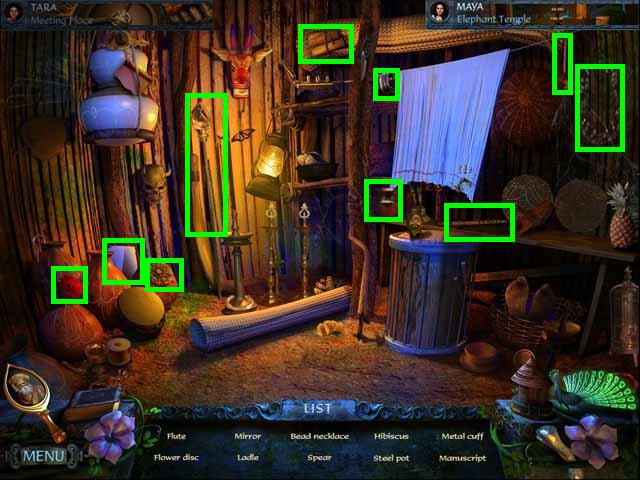
- Return to the Meeting Place.
- Give the RED URN and the LASSO to Maya; switch to her character.
- Exit the Meeting Place and zoom into the sparkling hut to play a HOS.
- Receive the MIRROR and FLOWER DISK.

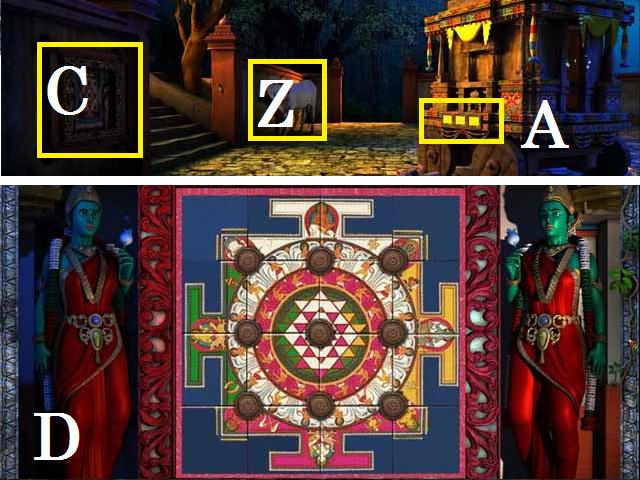
- Move back one scene to the Chariot Ground.
- Place the LASSO on the OX (Z) and pick it up.
- Zoom into the side of the chariot (A) and place the MIRROR.
- Zoom into the panel (C); see the screenshot (D) for the final image.
- Pick up the POWER STONE.

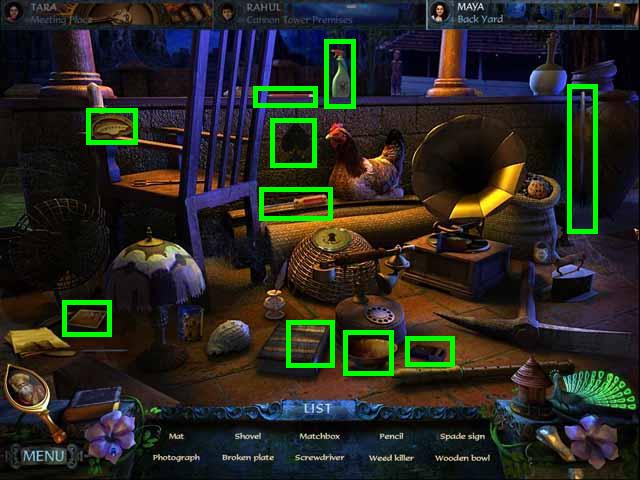
- Move back one scene to the Front Yard; zoom into the sparkling chair to play a HOS.
- Receive the WEED KILLER and the SCREWDRIVER.

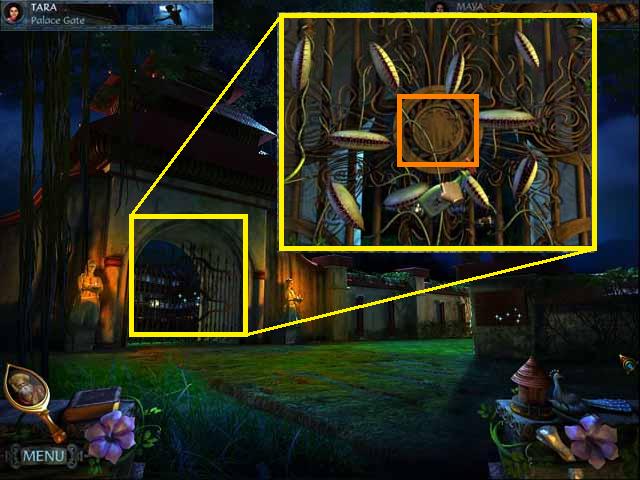
- Switch characters to Tara; give her the WEED KILLER, SCREWDRIVER, and the SUN DISK.
- Move to the Palace Gate.
- Use the WEED KILLER on the gate then place the SUN DISK in the center (orange).
- Go through the gate to enter Durbar Hall.

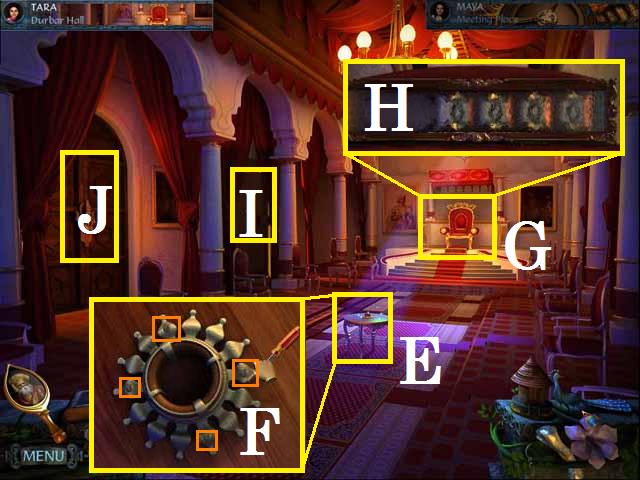
- Zoom into the table (E).
- Remove all four screws with the SCREWDRIVER; pick up the SUNCREST (F).
- Zoom into the throne (G); smash the glass (H) completely with the SLEDGEHAMMER.
- Go ahead and zoom into both doors (I, J).

- Give Maya the SUNCREST and switch to her character.
- Exit the Meeting Place.
- Zoom into the panel (K) on the ground; place the SUNCREST and pick up the BLUE URN (L).
- Switch to Rahul.
- Pick up the PAPER (M).
Chapter 2: Enter Rahul

- Move down the Path.
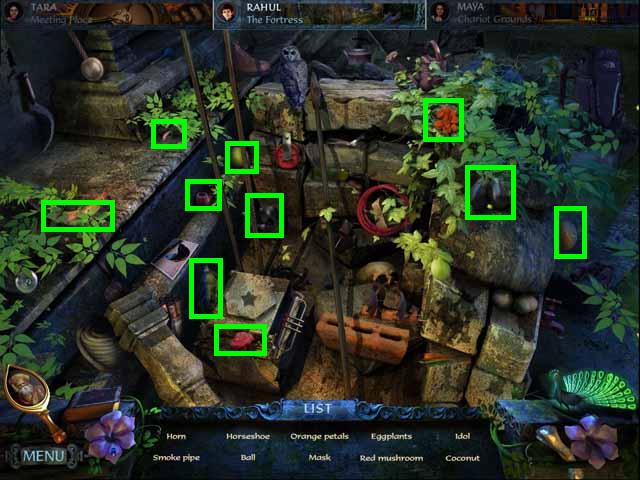
- Zoom into the sparkles to play a HOS.
- Receive the IDOL, COCONUT, and PETALS.

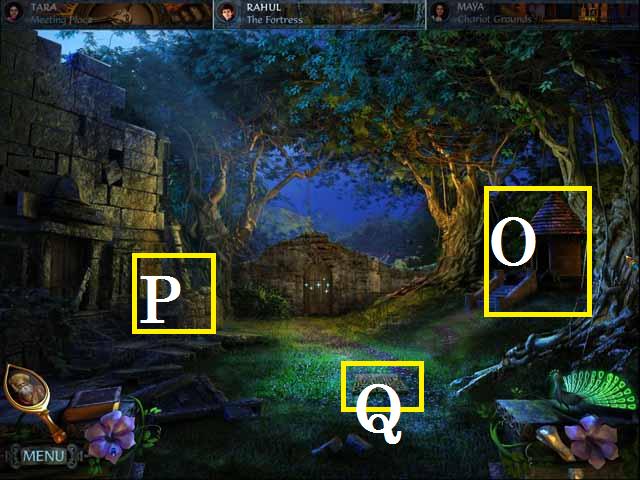
- Zoom into the Lion Temple (O).
- You can go ahead and zoom into the wall (P) and close the window.
- Zoom into the puzzle (Q).

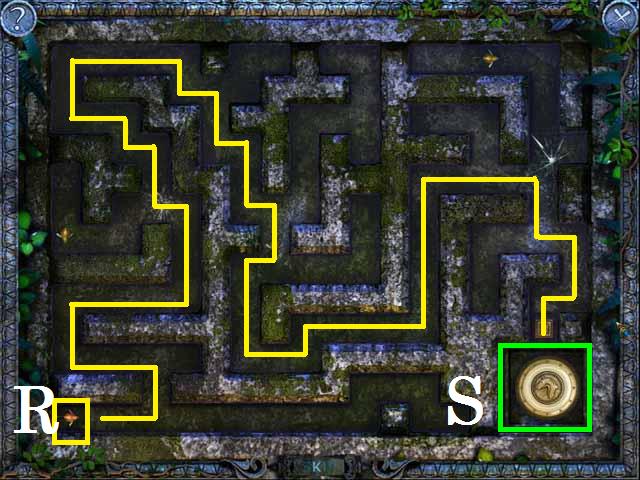
- Click in front of the fish (R) to move it in that direction.
- Follow the path (yellow) to the exit and pick up the AMULET (S).

- Move back one scene to the Cannon Tower Premises.
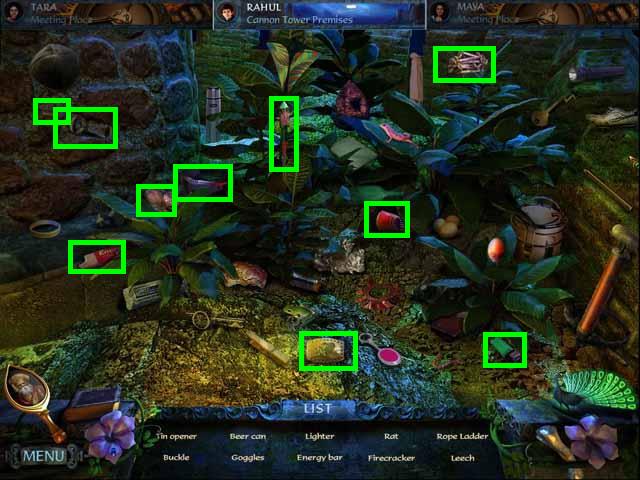
- Zoom into the sparkles to play a HOS.
- Receive the ROPE LADDER and FIRECRACKER.
- Return to the Fortress Gate.
- Zoom into the fallen Lion Temple; place the ROPE LADDER.
- Go down the LADDER; open the Temple door as you did before.
- Enter the Meeting Place.
- Give Maya the FIRECRACKER.
- Give Rahul the SLEDGEHAMMER, HOOK ARROW, and the AMULET.
- (Note: you will need to give Rahul the first six AMULETS you find. The rest can stay with the character that found it).
- Continue playing as Rahul.

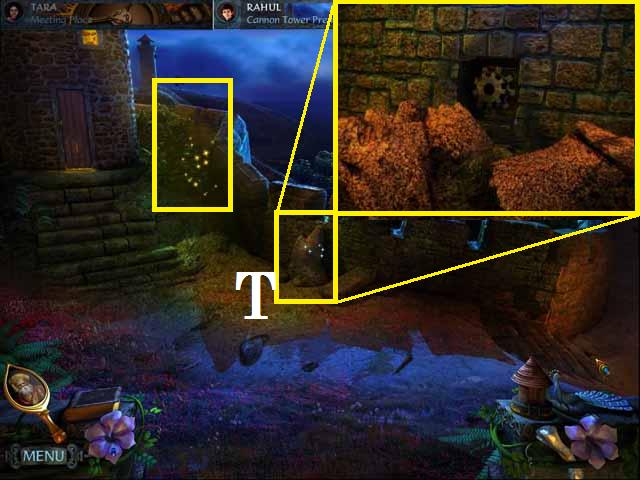
- Return to the Tower Premises.
- Break the rock (T) with the SLEDGEHAMMER.

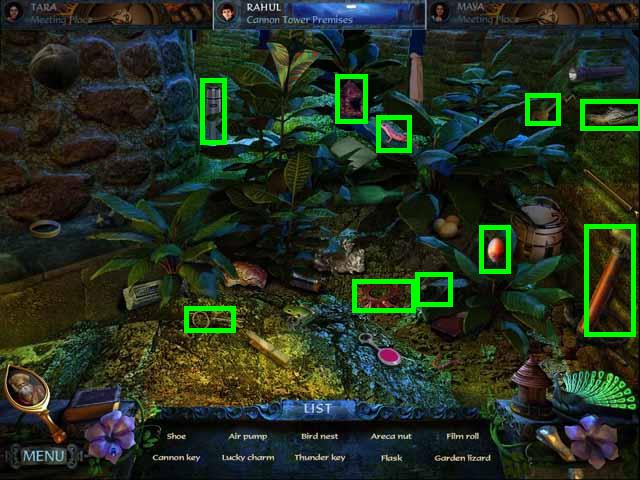
- Zoom into the sparkles to play a HOS.
- Receive the THUNDER KEY and the CANNON KEY.


- Switch to Maya.
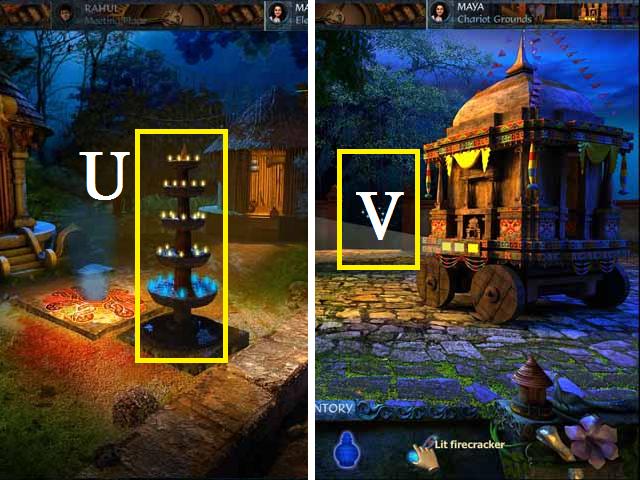
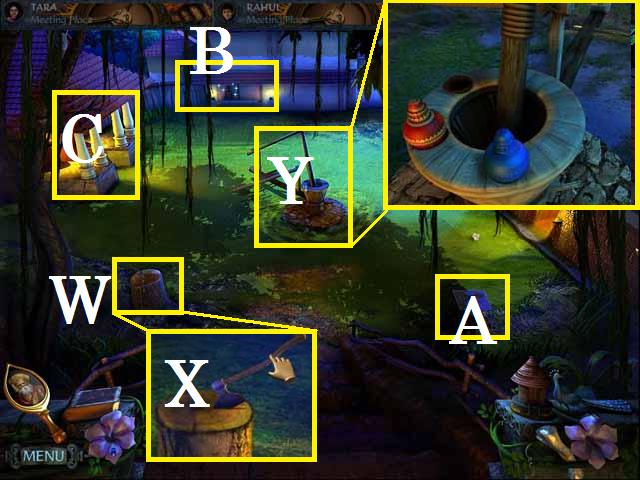
- Exit the Meeting Place; light the FIRECRACKER on the lamp (U).
- Move to the Chariot Ground and shoot the LIT FIRECRACKER at the bats (V).

- Go through the path to the Ox Driven Mill.
- Zoom into the tree stump (W); pick up the AXE (X) by clicking on it (X) until it works itself loose.
- Place the OX on the mill (Y) and zoom in.
- Place the BLUE and RED URNS as shown in the screenshot.
- Zoom into the stone (A) and close the window.
- Zoom into the back wall (B); close the window.
- Enter Kalaripayattu Arena (C).

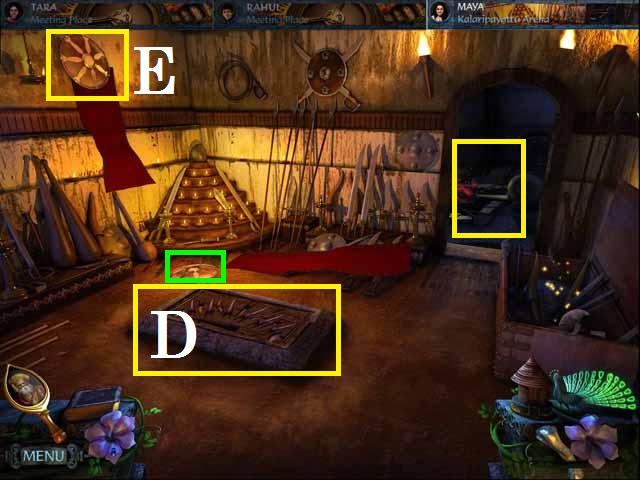
- Zoom into the dagger display (D) and close the window.
- Click on the SHIELD (E); pick it up off the floor.

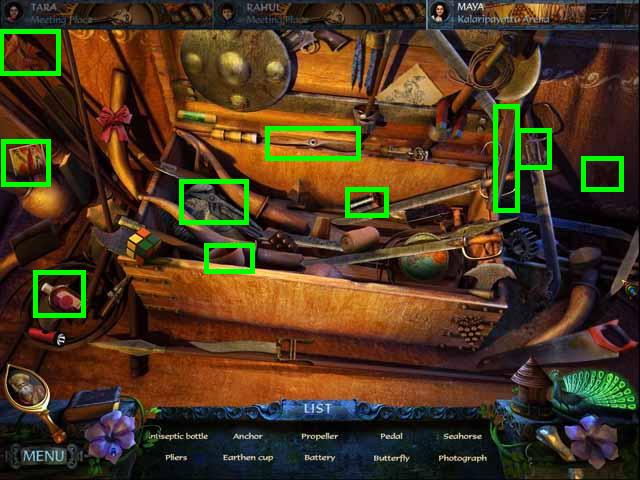
- Zoom into the sparkling chest to play a HOS.
- Receive the PLIERS and PEDAL.
- Go into the backroom.

- Pick up the CHAIN CUTTER (F) and the LEFTOVER FOOD (G).
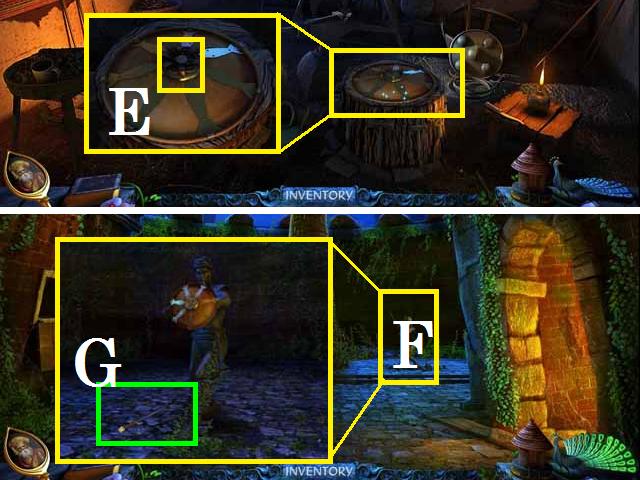
- Zoom into the stump (H); place the SHIELD and close the window.
- Zoom into the grind stone (I); place the PEDAL.
- Exit the Arena and enter the Sacred Pool (J).

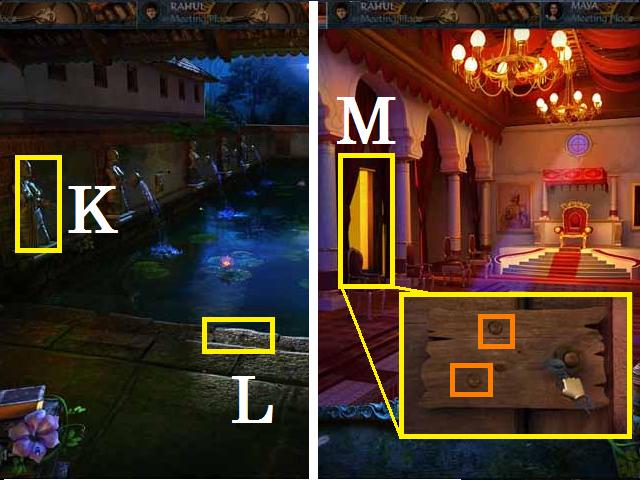
- Zoom into the statue (K); click on her and close the window.
- Zoom into the stone (L); close the window.
- Give Tara the PLIERS and switch to her character.
- Enter Durbar Hall.
- Zoom into the door (M); remove the nails (yellow) with the PLIERS.

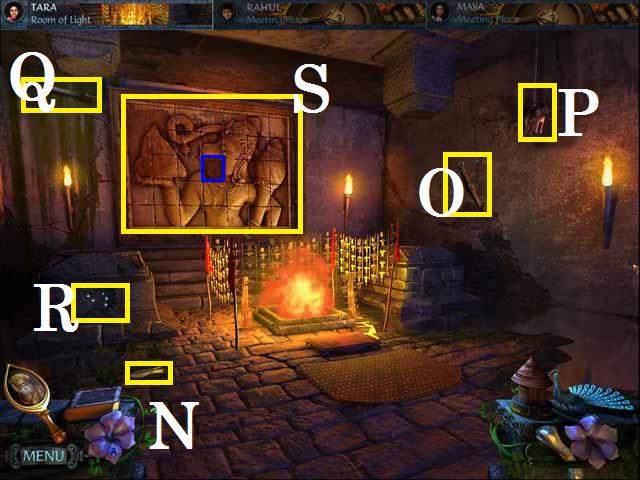
- Enter the Room of Light.
- Pick up the DOOR HANDLE (N) and the CROSSBOW (O).
- Click on the WATERING CAN (P), the BLUNT MACHETE (Q), and the mirror indent (R).
- Zoom into the wall panel (S); see the screenshot for the final image.
- Pick up the POWER STONE from the center panel (blue).


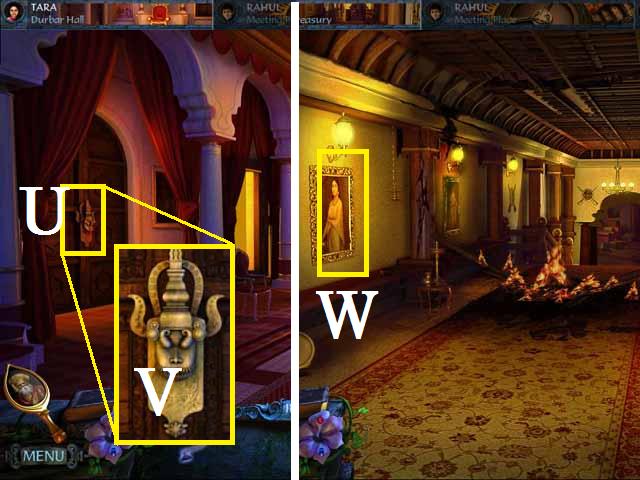
- Back up one scene; zoom into the door (U) and place the DOOR HANDLE (V).
- Enter the Corridor to the Treasury.
- Click on the painting (W) and close the window.

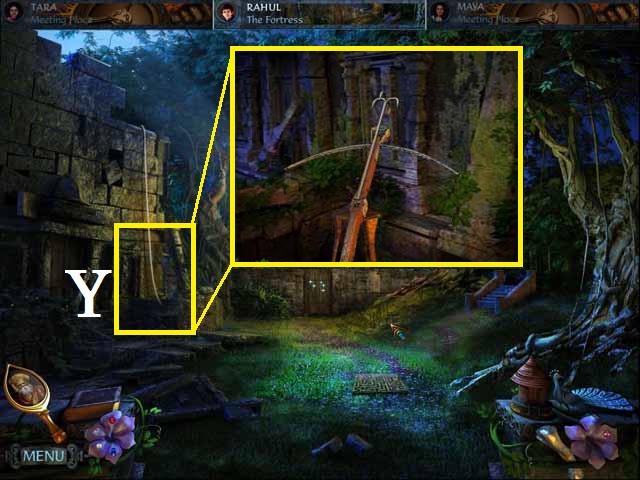
- Give the CROSSBOW to Rahul and switch to his character.
- Go up the rope; zoom into the wall (Y).
- Place the CROSSBOW and the HOOK ARROW as shown in the screenshot.

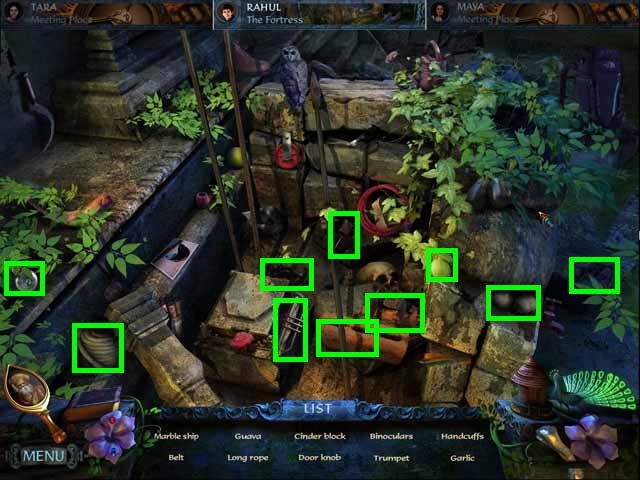
- Exit the scene and return then to the Fortress.
- Zoom into the sparkles to play a HOS.
- Receive the LONG ROPE and MARBLE SHIP.

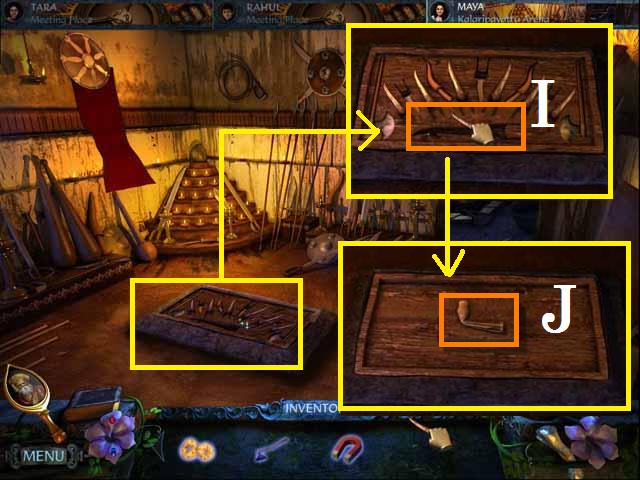
- Zoom back into the wall; place the LONG ROPE and click on the CROSSBOW.
- Go over the wall to the Fortress Courtyard.
- Pick up the SAIL (Z) and the NOTE (A).
- Zoom into the panel (B); open it with the CANNON KEY and pull the lever (1).
- Pick up the GUN POWDER (C).
- Click on the mirror (D) and the statue (E) and close the windows.
- Take the path to the Hidden Dock.

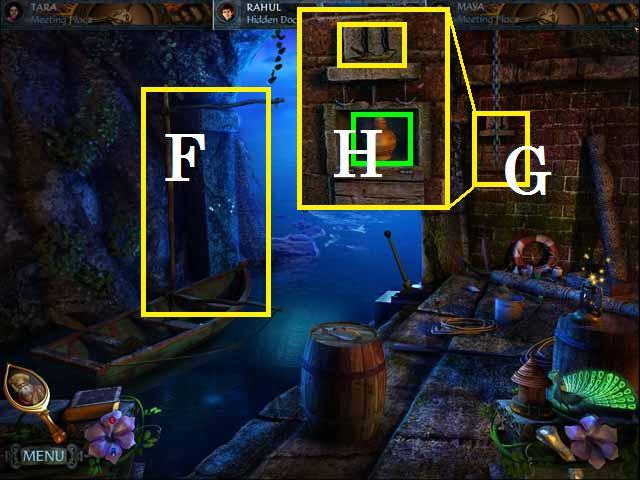
- Place the SAIL (F).
- Zoom into the panel (G); place the MARBLE SHIP.
- Pick up the ORANGE URN (H).

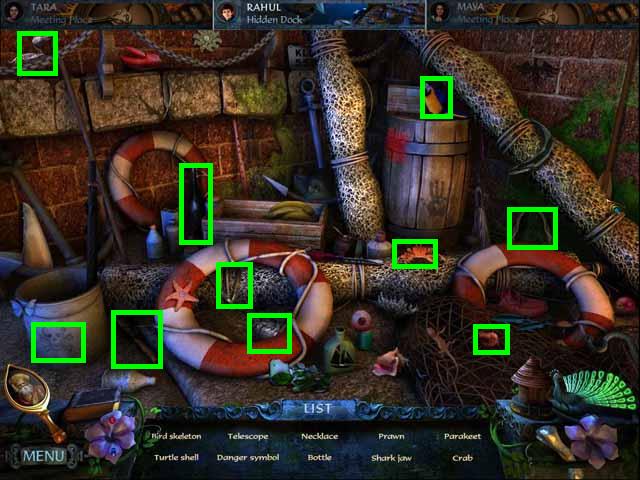
- Zoom into the sparkles to play a HOS.
- Receive the TELESCOPE and NECKLACE.

- Give the ORANGE URN to Maya and switch to her character.
- Go to the Ox Driven Mill; zoom into the mill and place the URN.
- Enter the Arena.
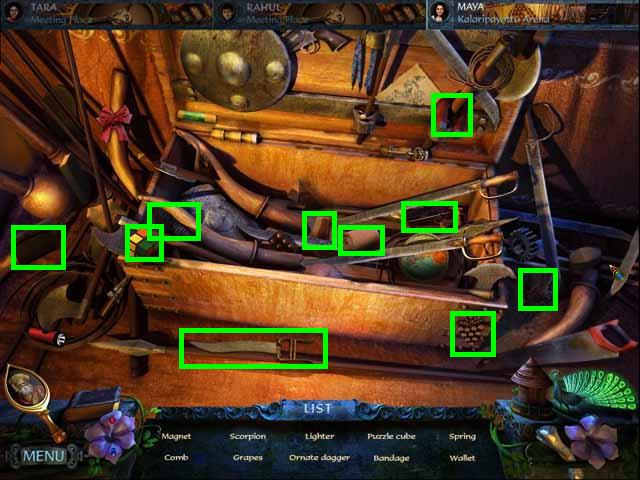
- Zoom into the sparkles to play a HOS.
- Receive the MAGNET and the ORNATE DAGGER.


- Zoom into the dagger case; place the ORNATE DAGGER (I) and pick up the LARGE LEVER (J).
- Give the LARGE LEVER and the MAGNET to Rahul and switch to his character.

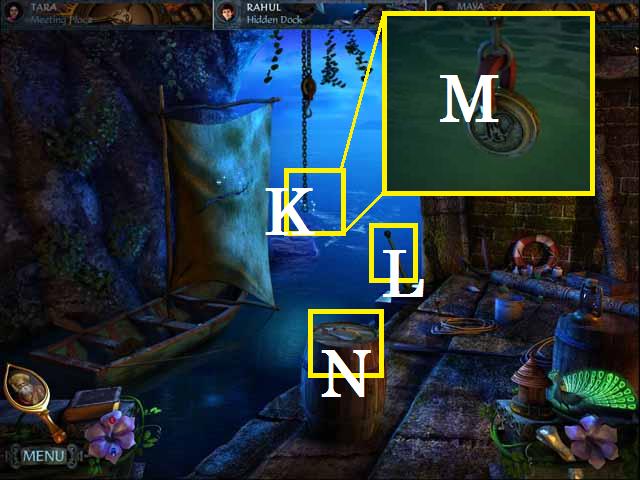
- Go to the Hidden Dock.
- Place the MAGNET on the chain (K).
- Pull the lever (L); pick up the AMULET (M).
- Pick up the DEAD FISH (N).
Chapter 3: Opening the Tower Top

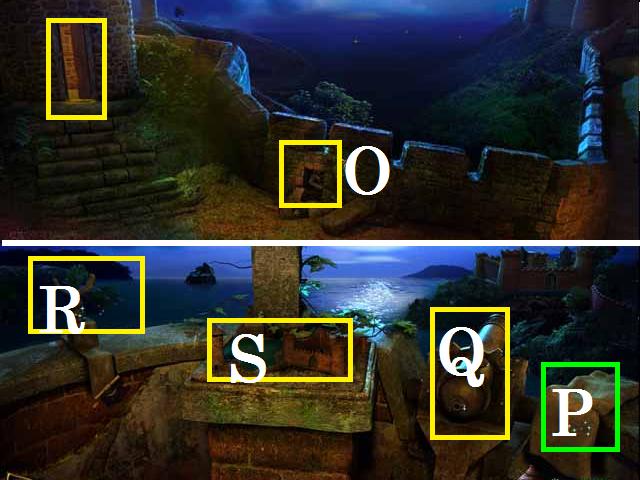
- Go to the Tower Premises.
- Zoom into the wall (O); place the LARGE LEVER.
- Enter the Tower.
- Pick up the SACK (P).
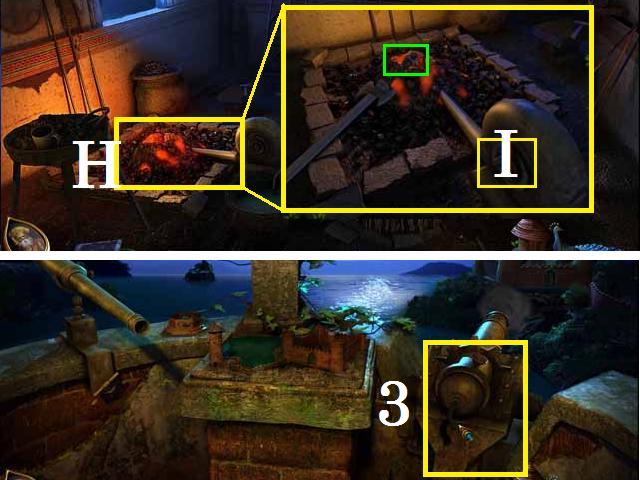
- Pour the GUN POWDER into the cannon (Q).
- Place the TELESCOPE (R).
- You can go ahead and zoom into the model (S).

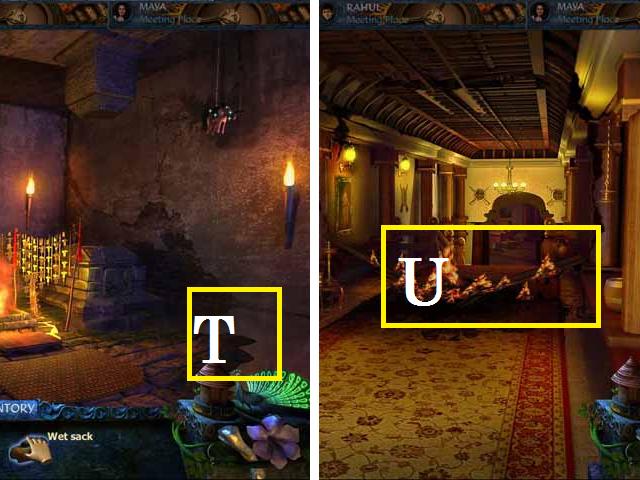
- Give the SACK to Tara and switch to her character.
- Go to the Room of Light.
- Place the SACK in the puddle (T) and pick it back up.
- Move to the Corridor to the Treasury.
- Place the WET SACK on the flames (U).
- Move forward into the Treasury.

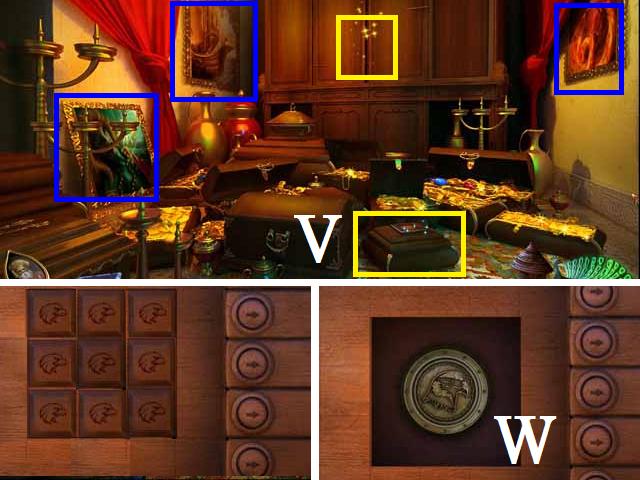
- Zoom into the box (V).
- Using the arrows, slide the boxes into position until they fill in the space outlined as shown in the screenshot.
- Pick up the AMULET (W).
- You can go ahead and zoom into the three paintings (blue).

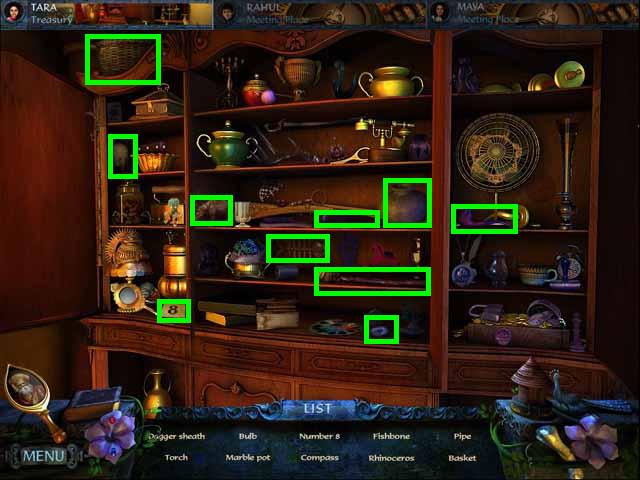
- Zoom into the sparkling cabinet to pay a HOS.
- Receive the TORCH and the MARBLE POT.

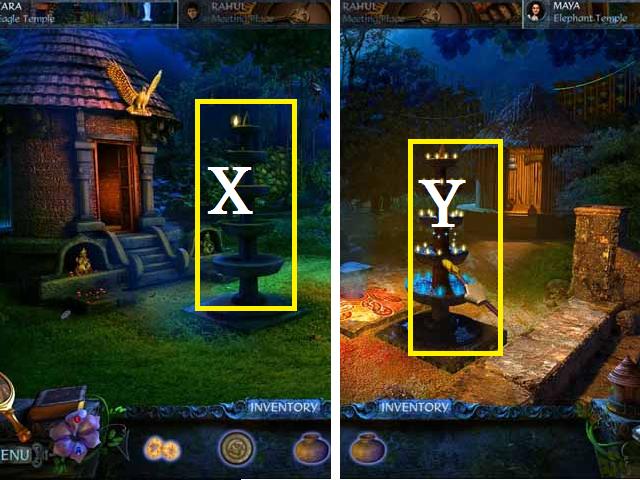
- Return to the Eagle Tower.
- Place the TORCH under the dripping oil lamp (X).
- Give Maya the TORCH with OIL and the MARBLE POT; switch to her character.
- Exit the Meeting Place and light the TORCH on the lamp (Y).

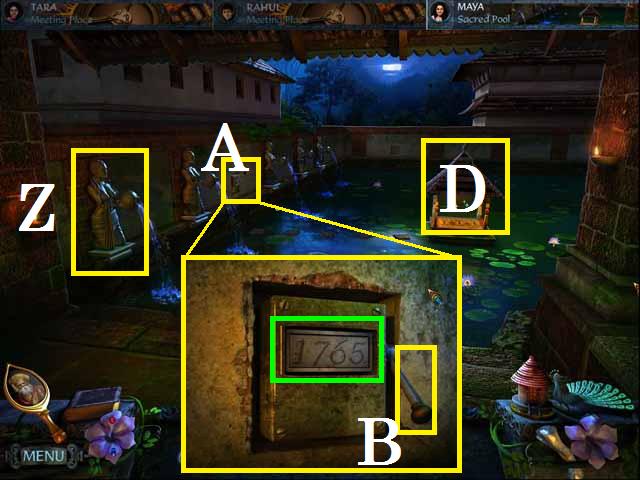
- Go to the Sacred Pool.
- Place the MARBLE POT on the statue (Z).
- Zoom into the panel (A).
- Pull the lever (B) and pick up the DATE PLATE (green).
- Zoom into the hut (D).

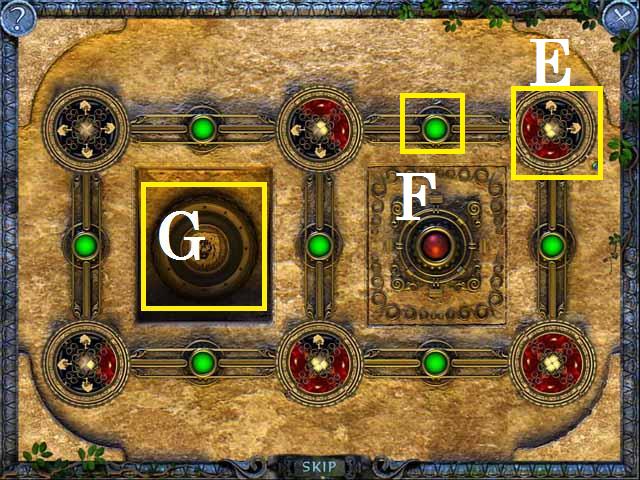
- Click the disks (E) to spin them and the buttons (F) to swap the facing pieces.
- One possible solution is shown in the screenshot.
- Pick up the AMULET (G).

- Give the DATE PLATE to Tara and the LIT TORCH to Rahul.
- Switch to Tara’s character.
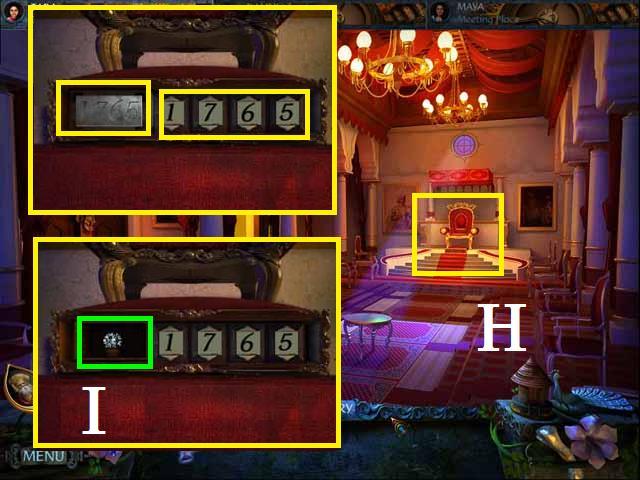
- Move to Durbar Hall.
- Zoom into the throne (H); place the DATE PLATE.
- Set the dials to match the PLATE as shown in the screenshot.
- Pick up the POWER STONE (I).

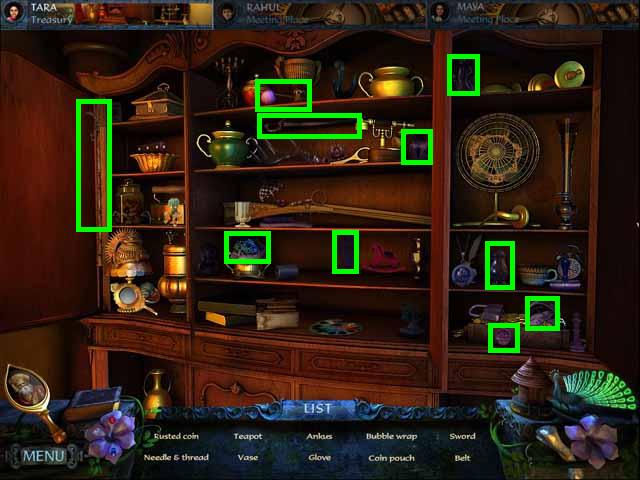
- Move to the Treasury; zoom into the sparkles to play a HOS.
- Receive the NEEDLE AND THREAD and the ANKUS.

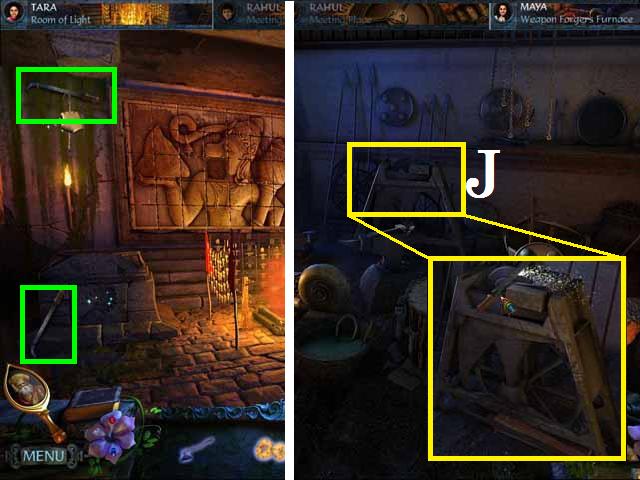
- Move to the Room of Light.
- Knock down the BLUNT MACHETE (green) with the ANKUS and pick it up.
- Give the NEEDLE and THREAD to Rahul.
- Give Maya the MACHETE and switch to her character.
- Move to the Weapon Forger’s Furnace.
- Sharpen the MACHETE on the wheel (J) and pick it back up.

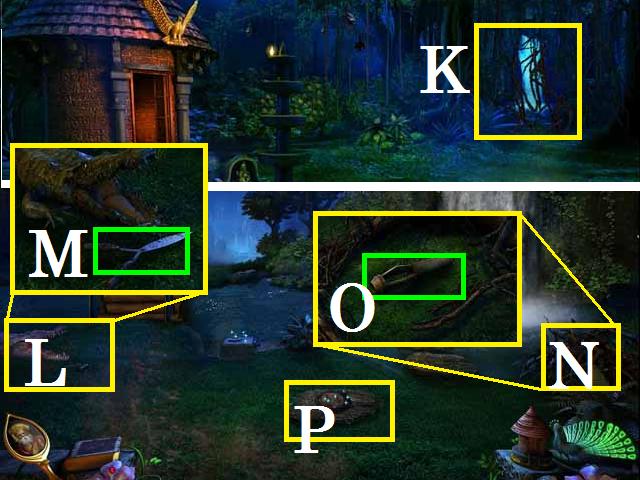
- Give Tara the SHARP MACHETE, the AXE and the DEAD FISH.
- Switch to Tara.
- Exit the Meeting Place and cut the vines (K) with the MACHETE.
- Go down the path to the Waterfall.
- Zoom into the alligator (L).
- Feed the alligator the DEAD FISH and pick up the (M) SHEARS.
- Zoom into the pile of sticks (N); chop them with the AXE and pick up the NOZZLE (O).
- Zoom into the manhole (P).

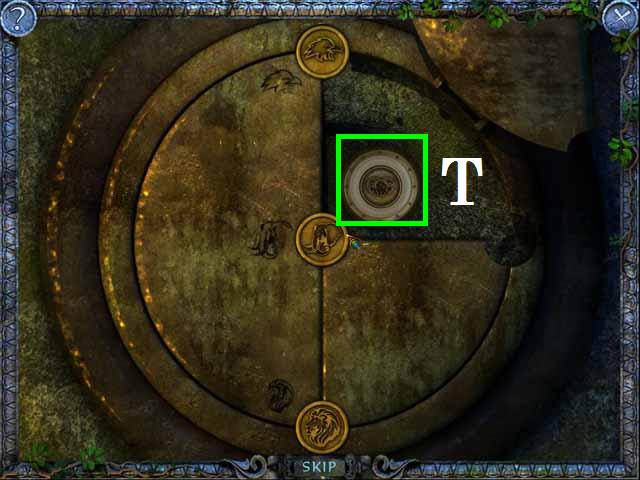
- The beginning positions may be random.
- Slide the coins to the positions shown in the screenshot.
- Pick up the AMULET (T).

- Give Rahul the SHEARS and NOZZLE and switch to his character.
- Move to the underground dock.
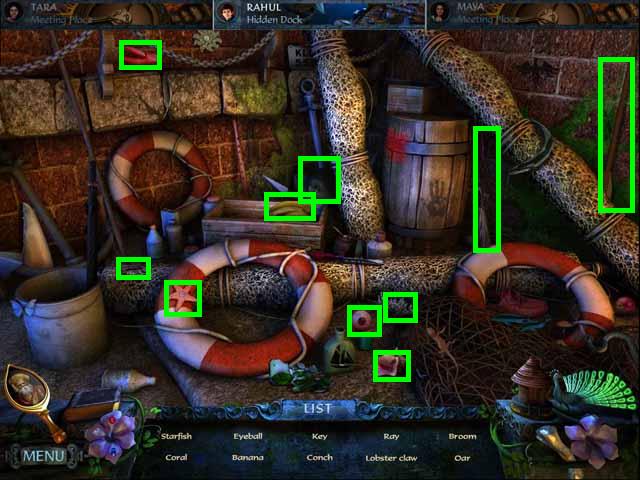
- Zoom into the sparkles to play a HOS.
- Receive the OAR.

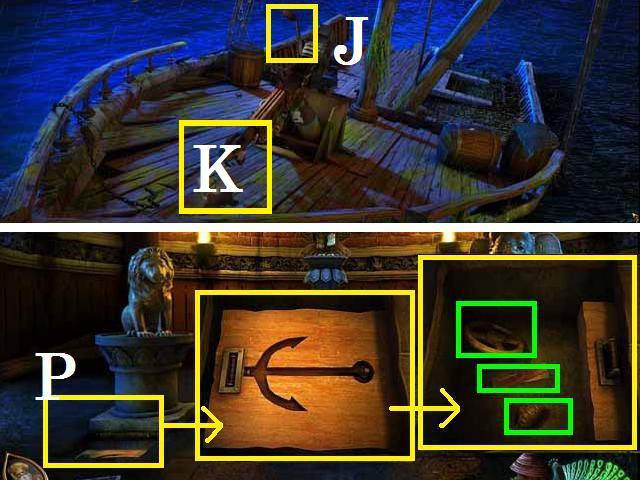
- Fix the sail (V) with the NEEDLE AND THREAD.
- Take the path ahead to the Ship Wreck.
- Pull the chain (W); pick up the ANCHOR (X).
- Pick up the EMPTY CANISTER (1).
- Place the NOZZLE on the flame thrower (Y).

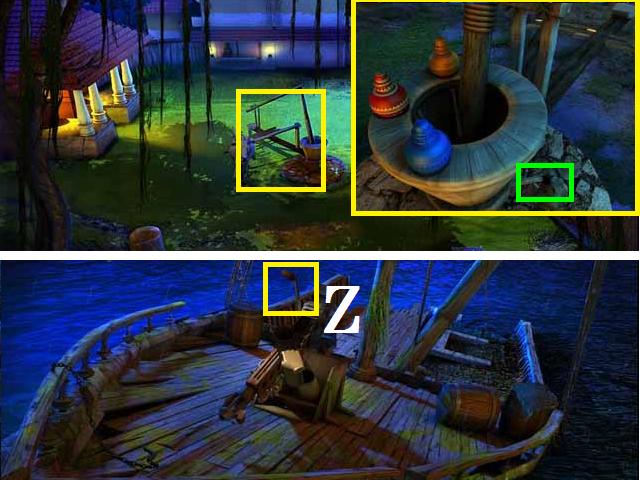
- Give the EMPTY CANISTER to Maya and switch to her character.
- Move to the OX Driven Mill.
- Zoom back into the mill and place the CANISTER as shown in the screenshot.
- Click the mill to turn it and pick up the FILLED CANISTER (green).
- Return the CANISTER to Rahul and switch to his character.
- Move to the Ship Wreck.
- Place the CANISTER on the flame thrower and pull the handle (Z).

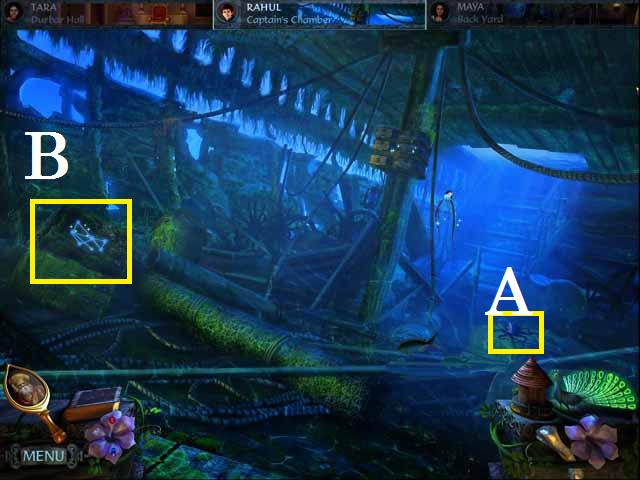
- Take the Path Ahead to the Captain’s Chamber.
- Pick up the OCTOPUS MOTIF (A).
- Zoom into the crate (B).

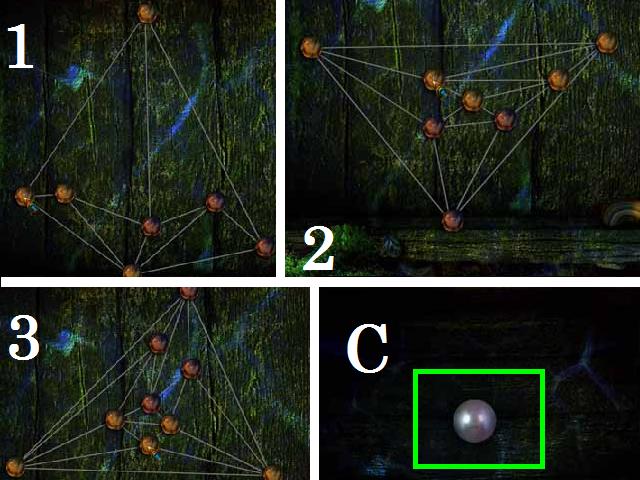
- Move the stones around until none of the lines cross each other. See the screenshot for possible solutions.
- Pick up the POWER STONE (C).

- Give Maya the OCTOPUS MOTIF and switch to her character.
- Move to the Ox Driven Mill; place the OCTOPUS MOTIFE in the slot (D).
- Pick up the OCTOPUS INK (E).
- Give the OCTOPUS INK to Rahul.
- Make sure Rahul has all of the AMULETS and then switch to his character.
- Move back to the Captain’s Chamber.
- Drop the INK over the octopus (F).
- Zoom into the crate (G); place the six AMULETS.
- Pick up the WAX BLOCK (H).
Chapter 4: Second Map Piece


- Move back one scene and place the WAX BLOCK in front of the flame thrower (I).
- Pull the handle (J).
- Pick up the ENGRAVED ROLLER (K).
- Give the ROLLER, ANCHOR, and CHAIN CUTTERS to Tara and switch to her character.
- Move to the Store House; pick up more CHARCOAL.
- Enter the Secret Chamber.
- Zoom back into the box; place the ROLLER, and then the CHARCOAL.
- Pull the left and right handles, alternating until all three plates are engraved.
- Zoom into the floor (P); place the ANCHOR.
- Pick up the TRIANGLE HANDLE (green), MANUSCRIPT (green), and the CRANK WHEEL (green).

- Return to the Waterfall.
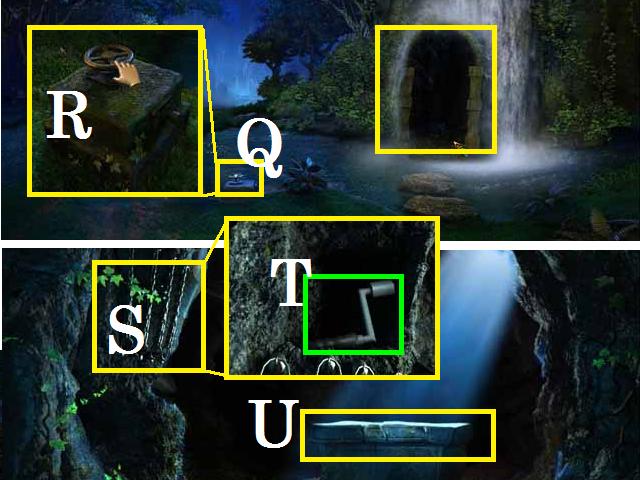
- Zoom into the pillar (Q); place the CRANK WHEEL (R) and turn it.
- Enter the Cavern.
- Zoom into the chains (S); cut them all with the CUTTERS.
- Pick up the CRANK HANDLE (T).
- Zoom into the alter (U).

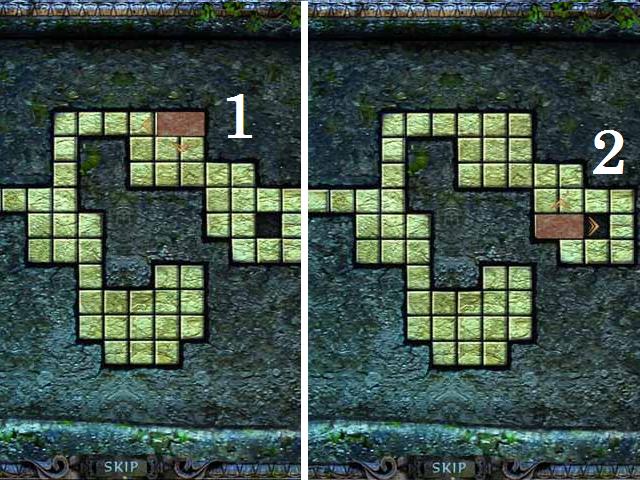
- Use the arrows to move the block into the hole.
- You will need to move the block to the right, down, and to the right again before you can move it up.
- Move the block around until you have the configuration (1) as shown in the screenshot.
- Move the block down and over. Continue moving the block around until you have the configuration (2) as shown in the screenshot and move it into the hole.

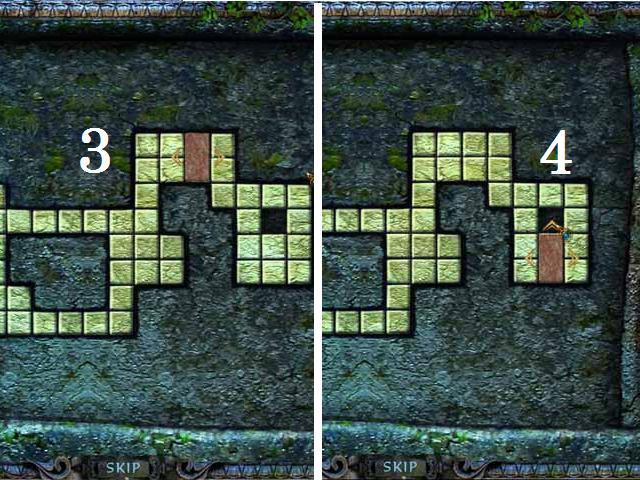
- Move the block into the position (3), as shown in the screen shot, then over and down. (Hint: it works well if you go down and under before moving up).
- Move the block into the position (4), as shown in the screenshot, then move it into the hole.

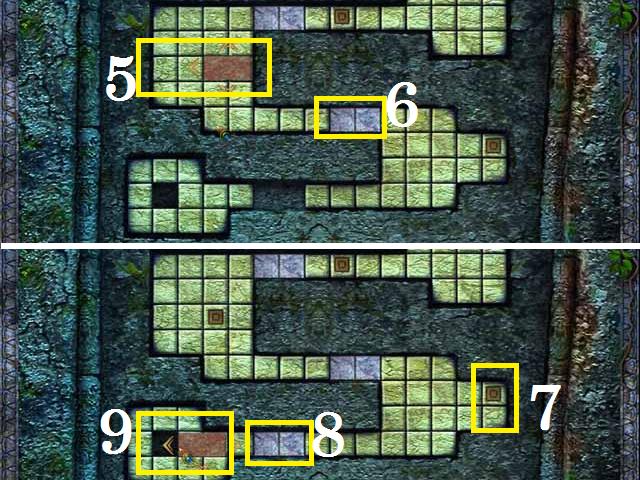
- Move the block all the way over to the left.
- Move the block into position (5) while making sure that the bridge (6) is not gaped until you move it down into position (5).
- Move the block down and over the button (7) to bridge the gap (8).
- Move the block all the way to the left and move it around until you have the position (9) as shown in the screenshot, then move it into the hole.
- Pick up the AMULET.

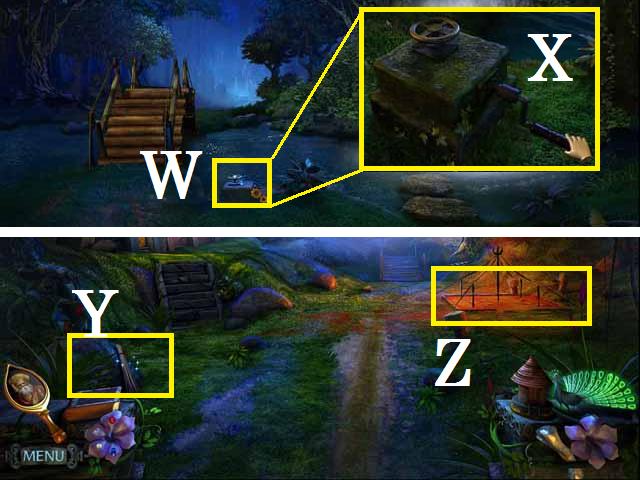
- Back up one scene and zoom into the pillar (W).
- Place the CRANK HANDLE (X) and spin it.
- Cross the bridge to the Jungle Retreat.
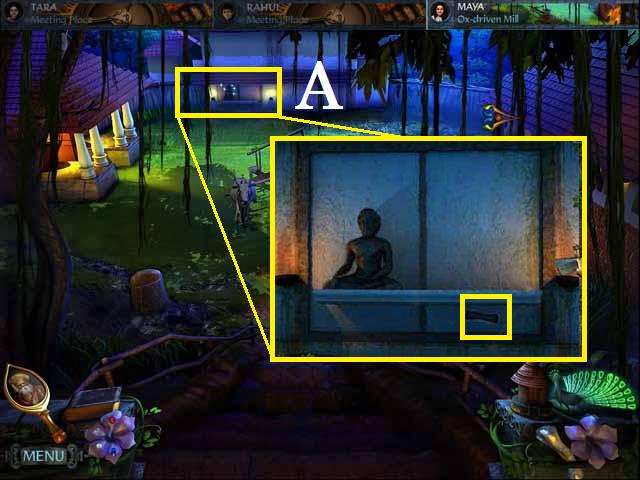
- Zoom into the rock (Y); click on the broom.
- Zoom into the board (Z); click on the ropes.

- Give Maya the MANUSCRIPT and the THUNDER KEY then switch to her character.
- Move to the Ox driven Mill.
- Zoom into the back wall (A); place the MANUSCRIPT.
- Go through the now open path to the Library.

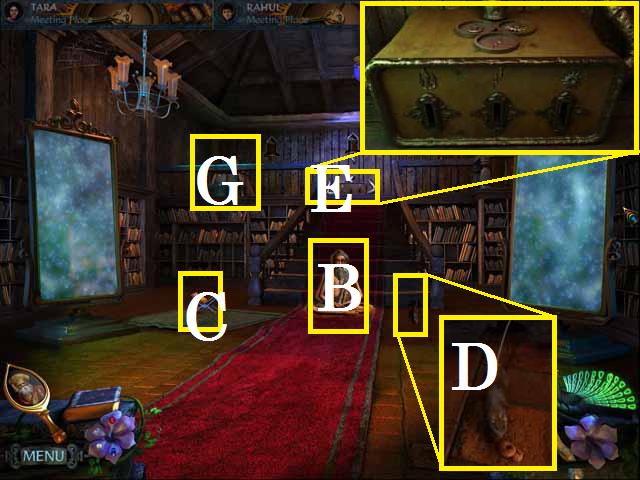
- Click on the guy (B).
- Zoom into the book (C); you can flip through the pages for hints at how to win the game.
- Feed the mouse (D) the LEFTOVER FOOD.
- Pick up the MOUSE.
- Zoom into the key box (E) and insert the THUNDER KEY.
- Zoom into the case (G).

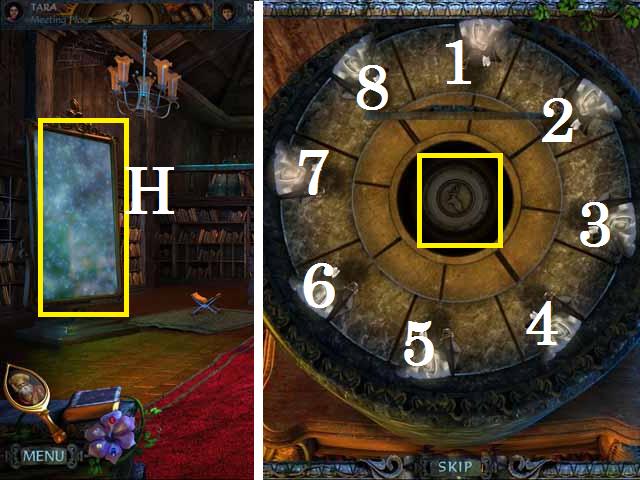
- There are many solutions to this puzzle; one possible solution is shown here.
- . Click on the knights in the following sequence: 2, 7, 3, 8, 4, 1, 5, 5, 5, 5, 5, 5, 5, 6, 6, and 7.
- Pick up the AMULET.
- Go through the mirror (H) to Kathakali Academy Gate.

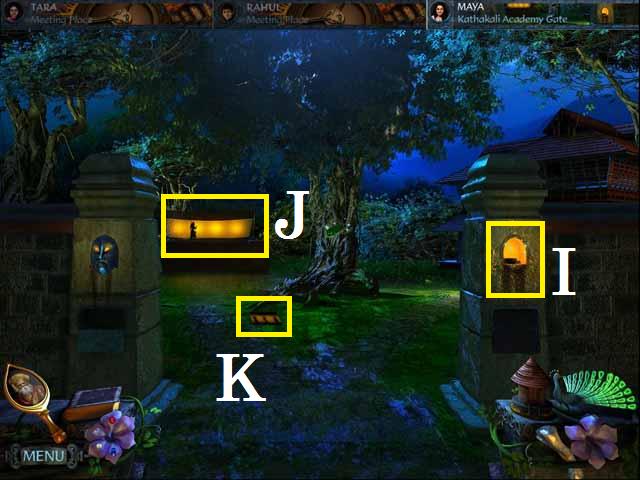
- Zoom into the light (I) and the stage (J).
- Pick up the NOTE (K).

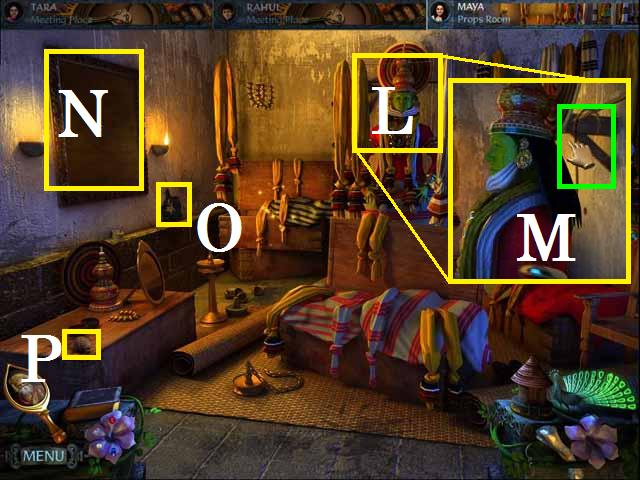
- Move forward down the path to the Props Room.
- Zoom into the puppet (L); pick up the LONG HOOK (M).
- Zoom into the blank frame (N).
- Pick up the PEACOCK MOTIF (O) and the THREAD SPOOL (P).

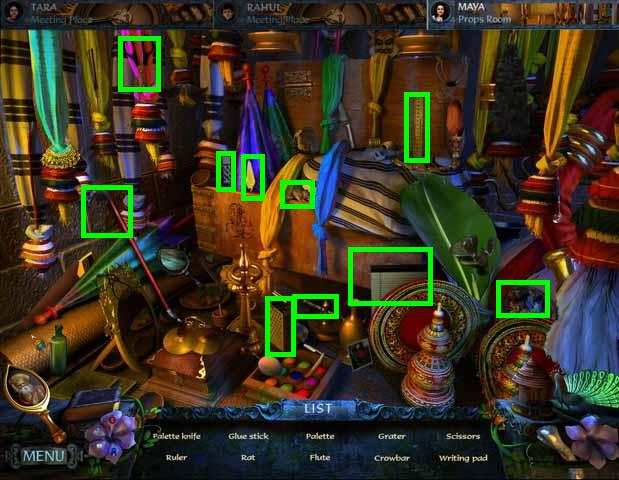
- Zoom into the sparkles to play a HOS.
- Receive the SCISSORS and the CROWBAR.

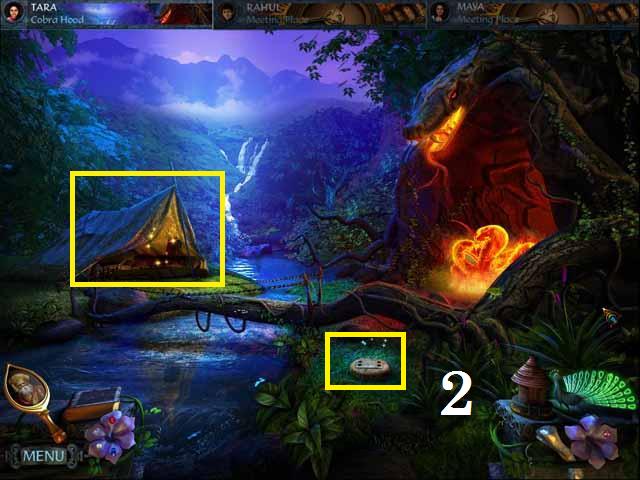
- Return to the Library and go through the other mirror to the Cliffside Ruins.
- Pick up the NOTE (Q), the EAGLE SHIELDS (R), and the SHOVEL (S).
- Zoom into the pile of rocks (T).
- Move the rocks with the CROWBAR and pick up the RED RITUAL DUST (U).
- Go ahead and zoom into the sparkling cliff edge (V) and the pillar (W).

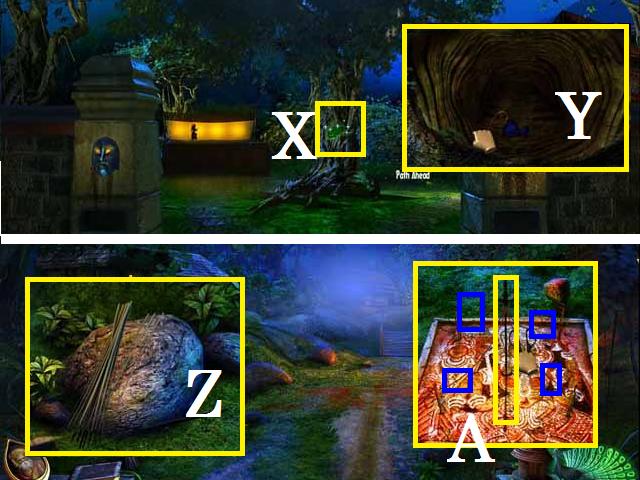
- Return to the Kathakali Academy Gate.
- Zoom into the tree (X) and pick up the BLUE RITUAL DUST (Y) with the LONG HOOK.
- Give both BAGS OF DUST, the SCISSORS, the OAR, and the THREAD SPOOL to Tara.
- Switch to Tara.
- Move to the Jungle Retreat.
- Zoom back into the rock and put the THREAD SPOOL over the broom pieces (Z).
- Pick up the BROOM.
- Zoom into the board and cut all four strings (blue).
- Pick up the TRIDENT (A).

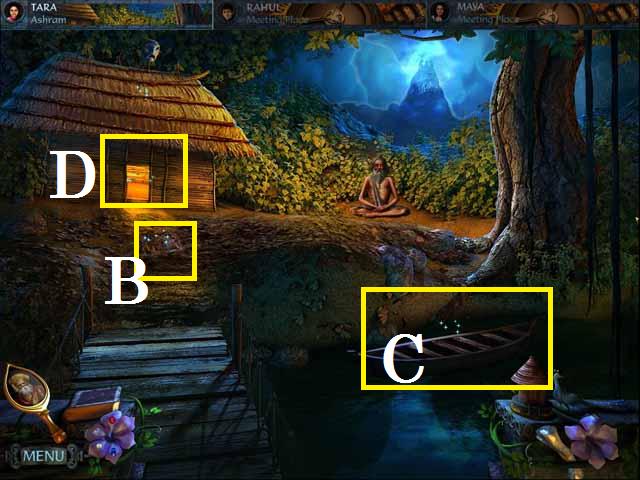
- Move forward to the Ashram.
- Zoom into the stone (B) and sweep with the BROOM.
- Place the OAR in the boat (C).
- Enter the hut (D) to solve a puzzle.

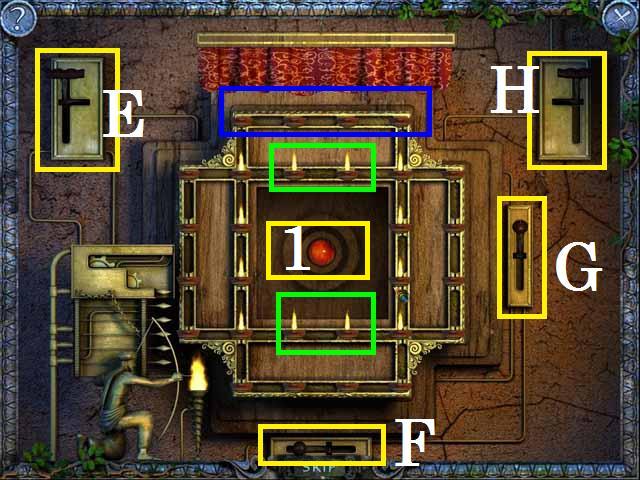
- Light several rows of candles using the switch (E).
- Move the candles with the (F) and (G) switches until you have two lit candles in the center on the top and bottom rows of the middle square as shown in the screenshot (green).
- Move the remaining candle to the top row (blue), without disturbing the center candles. Blow them out one or more at a time by pulling the switch (H).
- Light another row of candles and move all four to the very top row as if to blow them out.
- Light another row and, using the switch (G) move all of the candles into the final position, as shown in the screenshot.
- Pick up the POWER STONE (G).


- Take the Path to the Cobra Hood.
- Zoom into the marble platform (H).

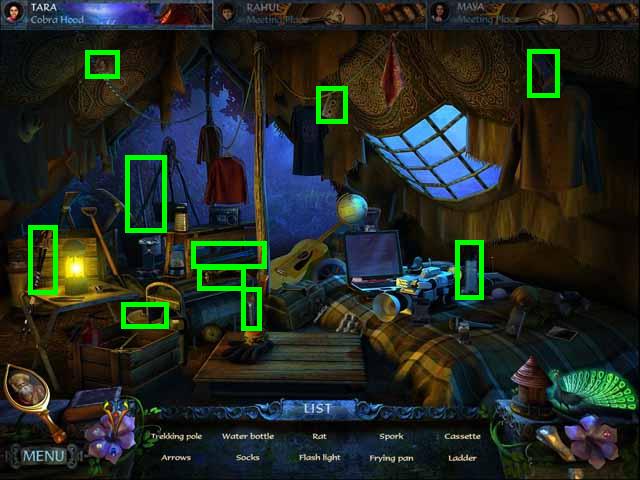
- Click on the sparkling tent to play a HOS.
- Receive the LADDER and ARROWS.

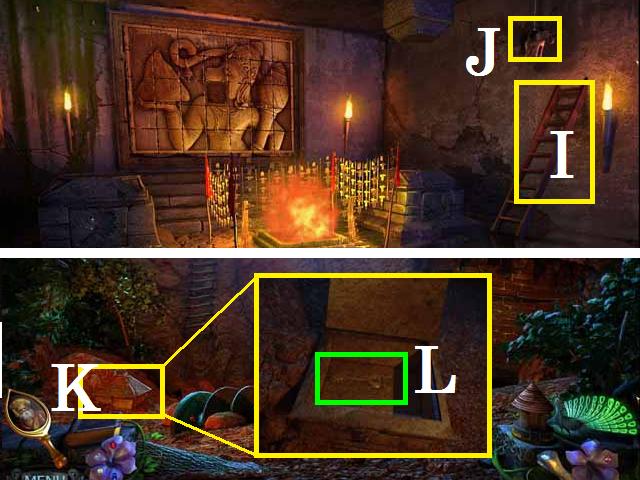
- Move to the Room of Light.
- Place the Ladder (I) and pick up the WATERING CAN (J).
- Give the WATERING CAN to Maya.
- Move Maya to the Sacred Pool.
- Fill the WATERING CAN in the pool.
- Give the MOUSE, TRIDENT, SHOVEL, TRIANGLE HANDLE and FULL WATERING CAN to Rahul.
- Switch to play Rahul.
- Exit the Meeting Place.
- Zoom into the Box (K); dig up with the SHOVEL.
- Pick up the SUN KEY (L).

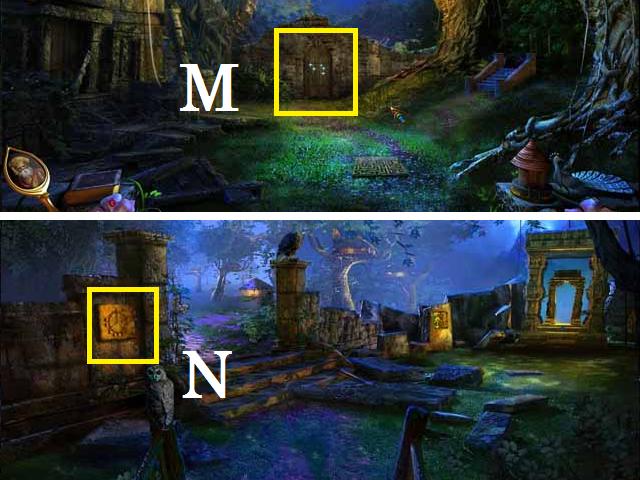
- Move to the Fortress Gate.
- Zoom into the gate (M); place the TRIANGLE HANDLE.
- Go through the gate to the Tribal Village.
- Zoom into the plaque (N).

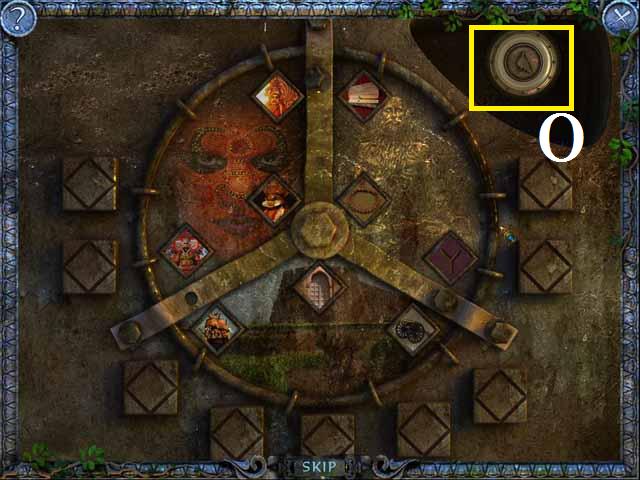
- Place the tiles in the correct spots, as shown in the screenshot.
- Pick up the AMULET (O).

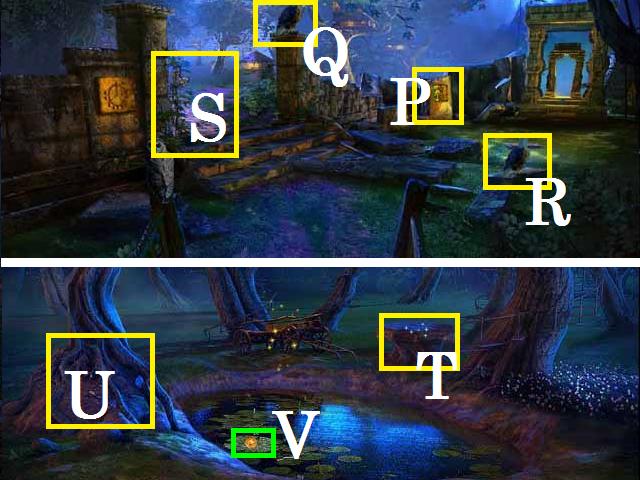
- Zoom into the stone pillar (P).
- Feed the eagle (Q) the MOUSE.
- Pick up the EAGLE (R) once it lands.
- Take the path (S) to the Tree of Life.
- Zoom into the tree stump (T).
- WATER the tree (U) with the CAN.
- Pick up the POWER STONE (V).

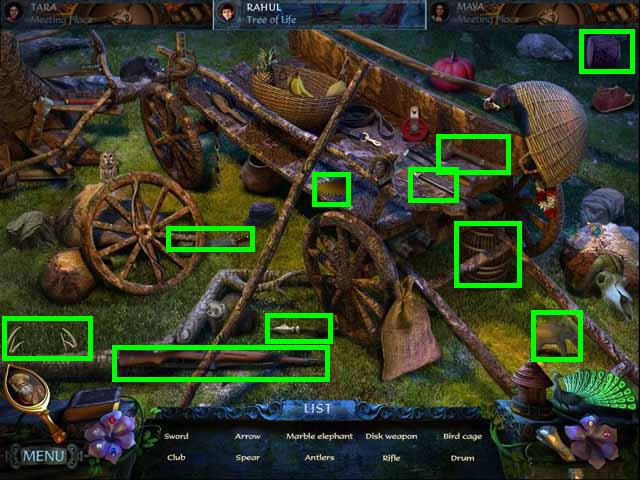
- Zoom into the sparkles to play a HOS.
- Receive the DISK WEAPON and MARBLE ELEPHANT.

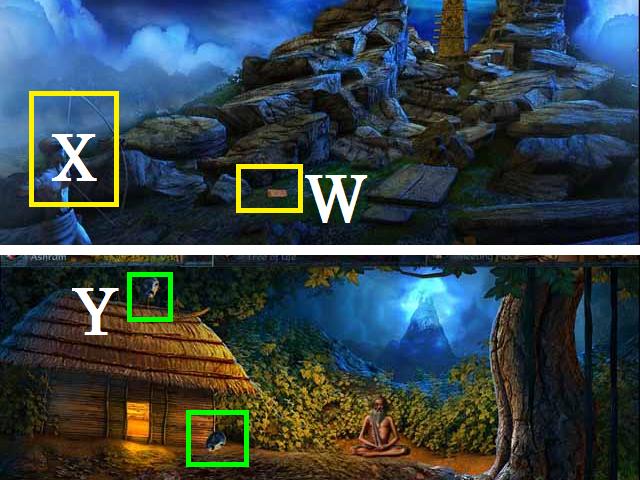
- Back up one scene and take the other path to the Hermit Mountaintop.
- Pick up the NOTE (W).
- Zoom into the Statue (X).
- Give the DISK WEAPON, the EAGLE SHIELDS, and the EAGLE to Tara.
- Switch to Tara.
- Move to Ashram.
- Cut the MASK (Y) down with the DISK WEAPON then pick it up once it stops (green).

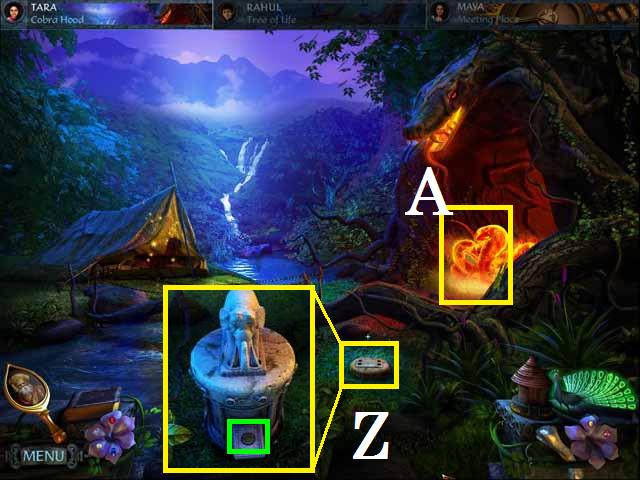
- Move to Cobra Hood.
- Place the MARBLE ELEPHANT on the platform (Z).
- Pick up the COIN (green).
- Drop the EAGLE over the snakes (A).

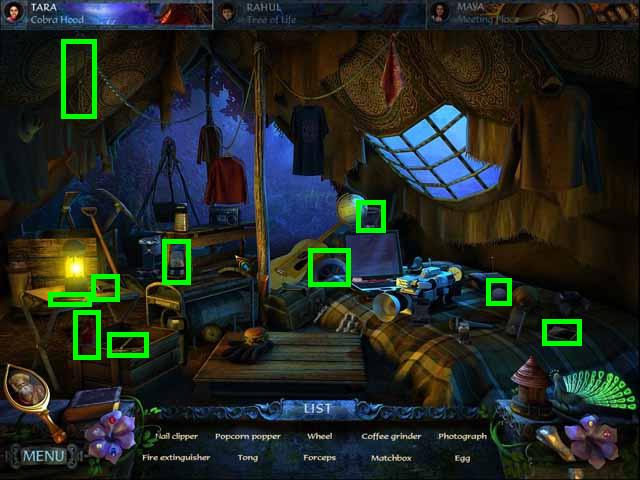
- Zoom into the tent to play a HOS.
- Receive the TONGS and WHEEL.
Chapter 5: Opening Cobra Gateway

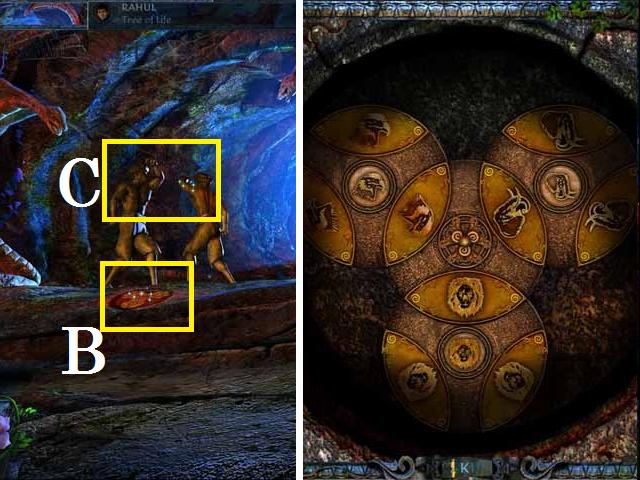
- Take the Path to the Cobra Gateway.
- Place the EAGLE SHIELDS on the Statues (C).
- Click on each statue to position them in front of the cobras.
- Zoom into the ground (B) in front of the statues.
- The beginning positions may be random. Place the symbols in the disks as shown in the screenshot. (Hint: place all of the outer ring positions first then rotate the center ring).
- Pick up the AMULET.

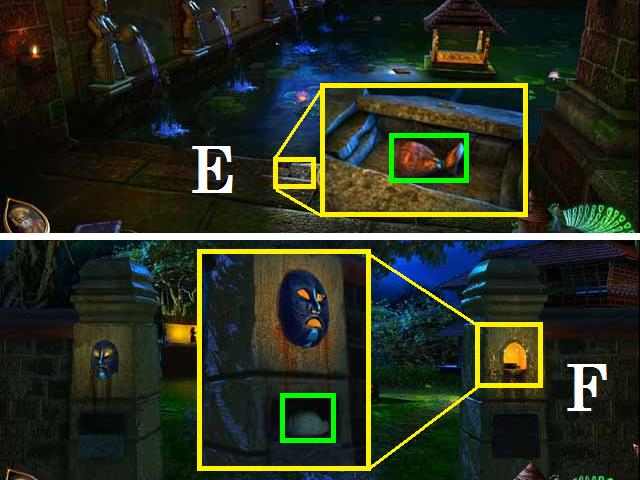
- Give Maya the MASK, SUN KEY and COIN.
- Switch to Maya.
- Move to the Library and place the SUN KEY in the key box.
- Move to the Sacred Pool.
- Place the coin on the stone (E); pick up the ORANGE RITUAL DUST (green).
- Move to the Kathakali Academy Gate.
- Place the MASK over the light (F); pick up the CONCH TALISMAN (green).

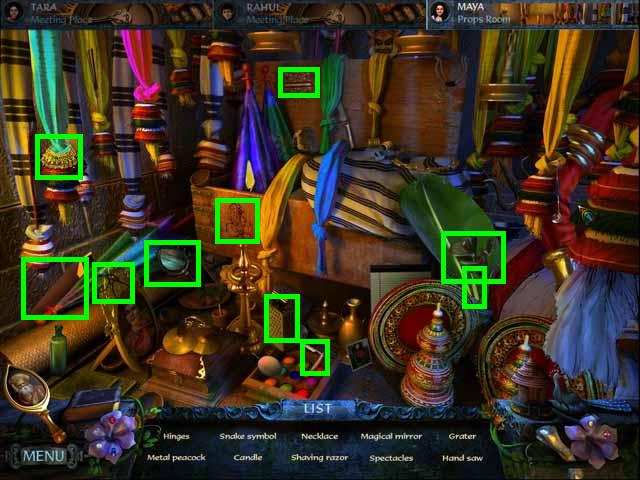
- Go forward to the Props Room.
- Zoom into the sparkles to play a HOS.
- Receive the METAL PEACOCK and MAGICAL MIRROR.

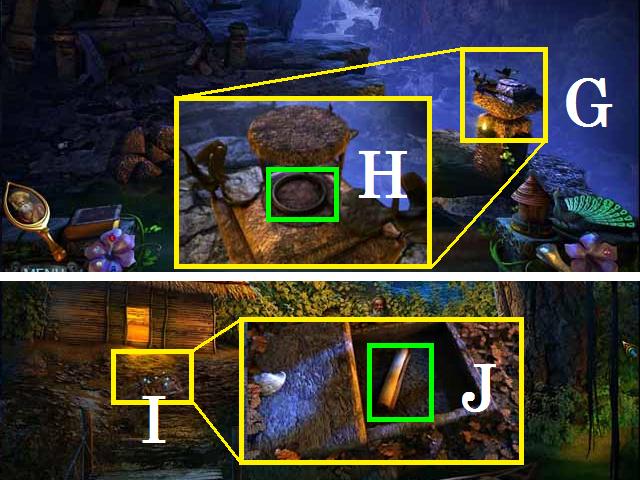
- Move to the Cliffside Ruins.
- Zoom into the pillar (G); place the METAL PEACOCK.
- Pick up the BANGLE (H).
- Give Tara the CONCH TALISMAN, the BANGLE, the NECKLACE, and the ORANGE RITUAL DUST.
- Switch to Tara.
- Move to the Ashram.
- Zoom into the stone (I); place the CONCH TALISMAN and pick up the MANTRA (J).

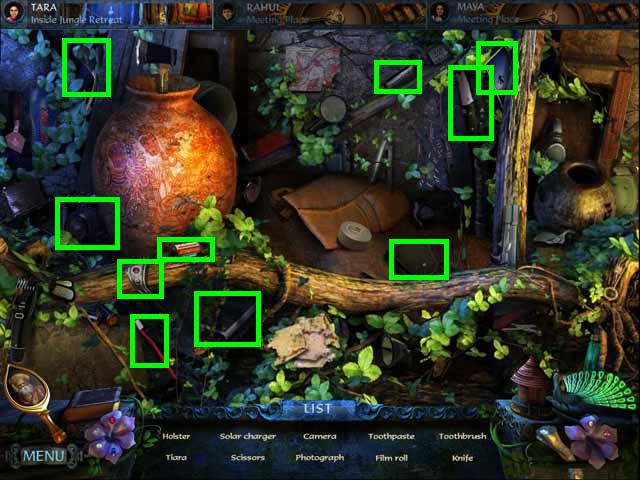
- Move back one scene and enter the Jungle Retreat.
- Zoom into the sparkle to play a HOS.
- Receive the KNIFE and TIARA.

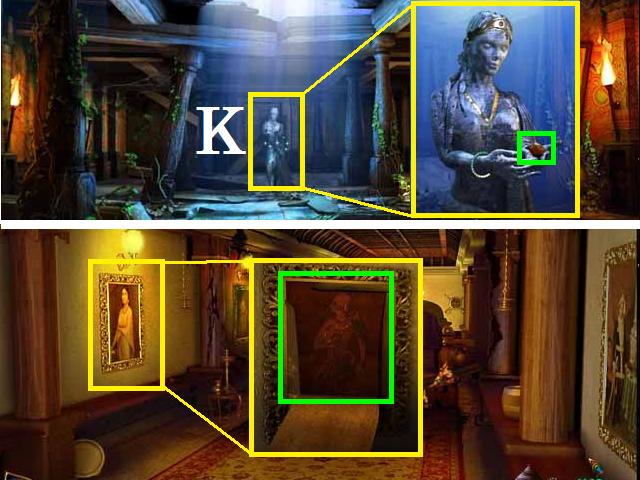
- Zoom into the statue (K).
- Place the NECKLACE, BANGLE, and TIARA as shown in the screenshot.
- Pick up the POWER STONE (green).
- Move to the Corridor to Treasury.
- Zoom back into the painting; cut the canvas with the KNIFE.
- Pick up the PRINCE PUPPET (green).

- Give Rahul the ARROWS and WHEEL.
- Switch to Rahul.
- Move to the Tree of Life.
- Zoom into the sparkles to play a HOS.
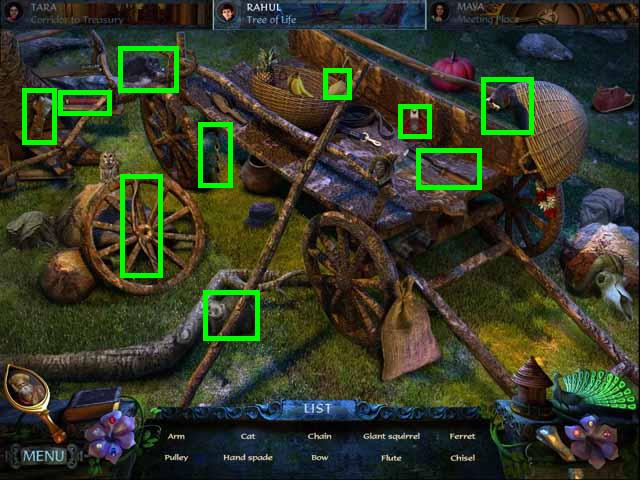
- Receive the ARM and CHISEL.

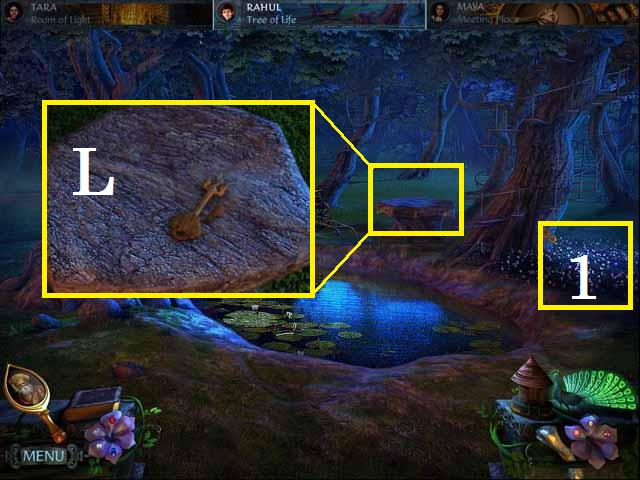
- Zoom into the tree stump; use the CHISEL on the FLAME KEY (L) and pick it up.
- Zoom into the flowers (1).

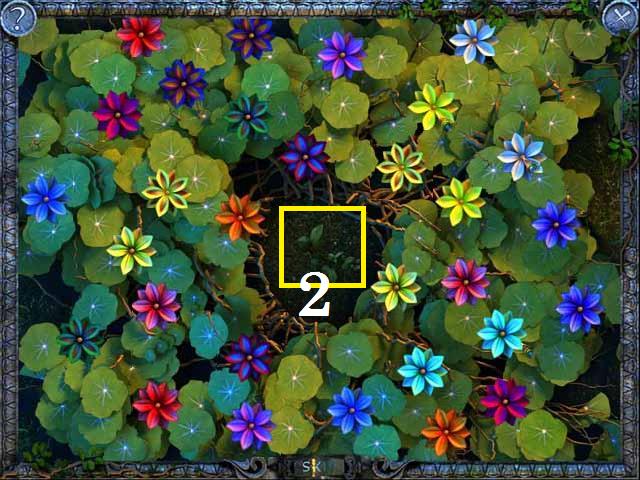
- The flower positions are random; see the screenshot for a sample key.
- Pick up the SAPLING (2).

- Move to the Hermit Mountaintop.
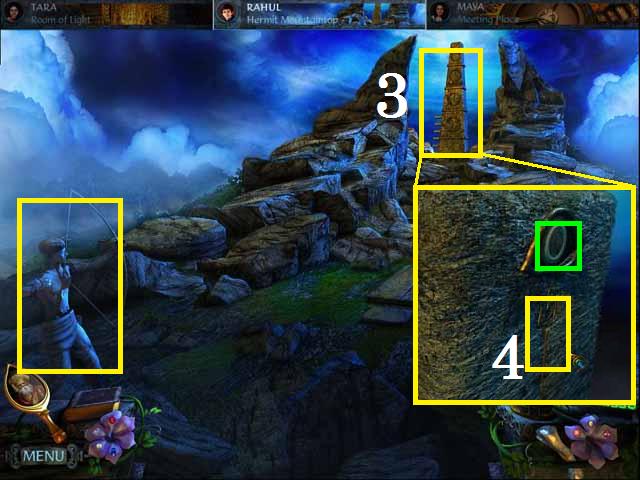
- Place the ARM followed by the ARROWS on the archer statue.
- Click on the statue to shoot the arrows.
- Zoom into the tower (3); place the TRIDENT (4).
- Pick up the AMULET (green).

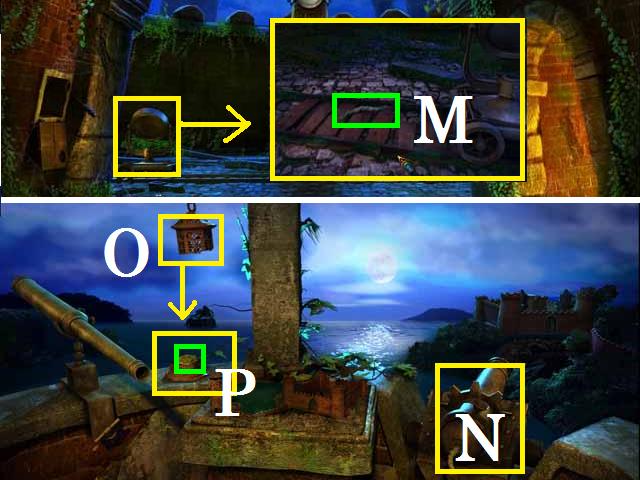
- Move to the Fortress Courtyard.
- Place the WHEEL on the mirror.
- Pick up the FUSE (M).
- Move to the Top of the Tower.
- Place the FUSE (N) on the cannon.
- Click on the lamp (O) repeatedly until it breaks.
- Pick up the INSIGNIA (P) once it falls.

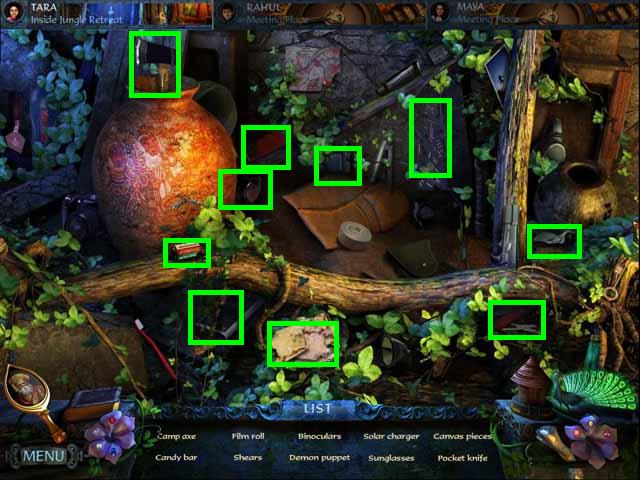
- Switch to Tara.
- Move to Inside Jungle Retreat.
- Zoom into the sparkles to play a HOS.
- Receive the CANVAS PIECES and DEMON PUPPET.

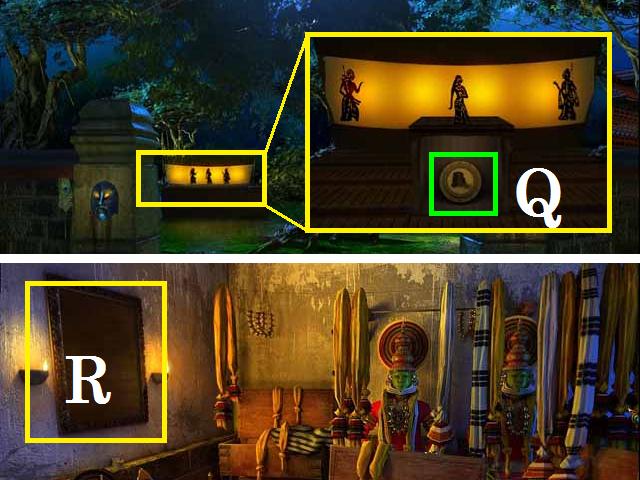
- Give the FLAME KEY, PRINCE PUPPET, CANVAS PIECES, the SAPLING, the SHEARS, and DEMON PUPPET to Maya.
- Switch to Maya.
- Move to the Library and place the last FLAME KEY in the box.
- Move to the Kathakali Academy Gate.
- Place the both PUPPETS on the stage.
- Pick up the AMULET (Q).
- Move to the Prop Room.
- Drop the CANVAS PIECES over the frame (R).

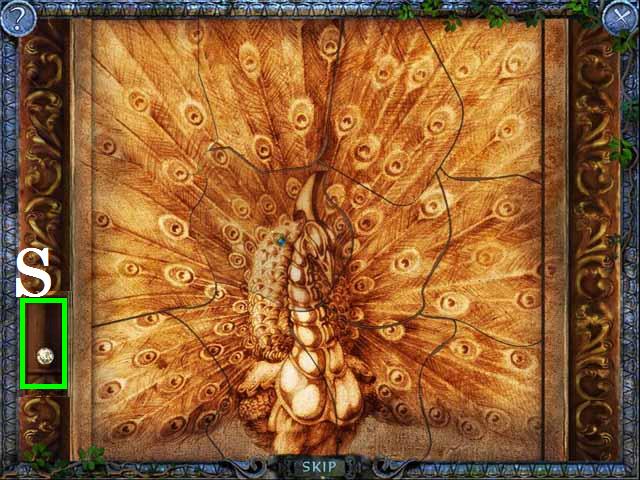
- See the screenshot for the final image.
- Pick up the POWER STONE (S).

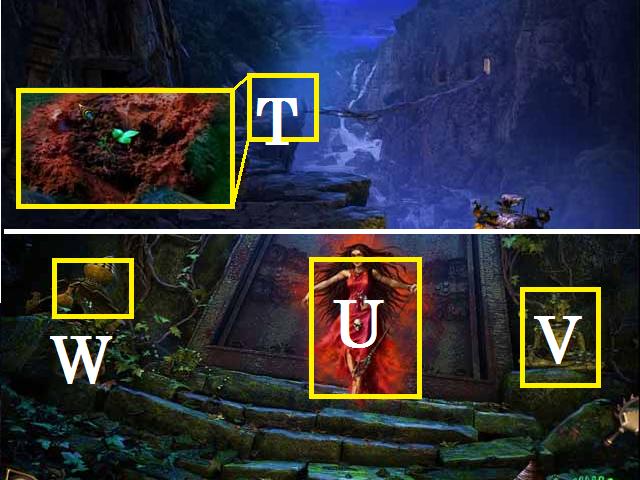
- Move to the Cliffside Ruins.
- Zoom into the cliff edge (T); plant the SAPLING.
- Cross the bridge to the Rock Doorway.
- Drop the MAGICAL MIRROR over Yakashi (U) and pick it back up.
- Zoom into the HERMIT STATUE (V); cut the vines with the SHEARS.
- Pick up the HERMIT STATUE.
- Zoom into the urn (W).

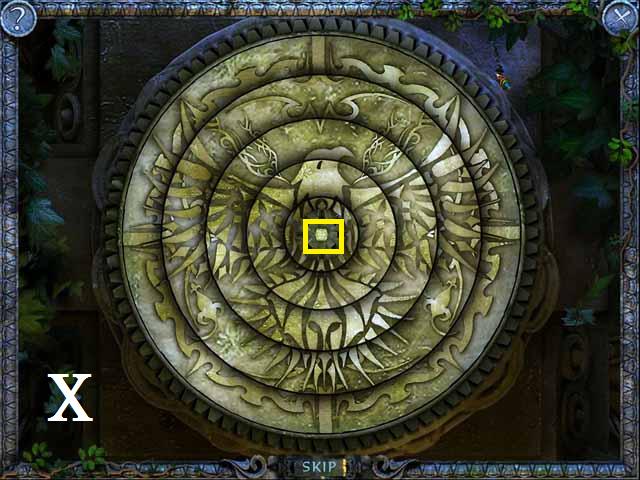
- See the screenshot for the final image (X).
- Pick up the POWER STONE (yellow).

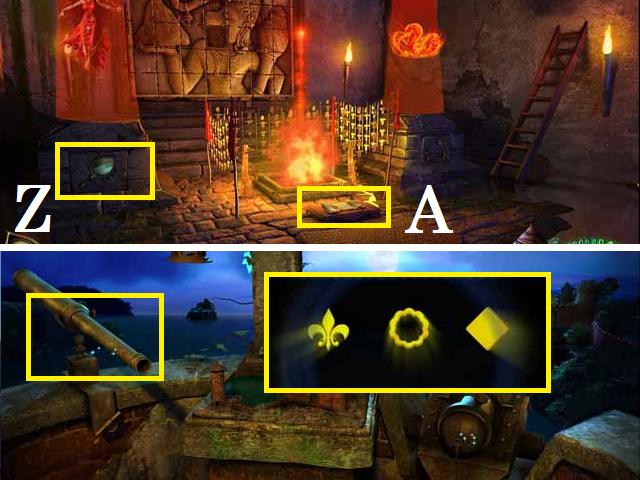
- Give Tara the YAKASHI MIRROR and switch to her character.
- Move to the Room of Light.
- Place the YAKASHI MIRROR on the pillar (Z).
- Place the MANTRA on the altar (A) followed by the ORANGE, BLUE, and RED RITUAL DUST into the fire.
- Give the HERMIT STATUE and PEACOCK MOTIF to Rahul.
- Move to the Top of the Tower.
- Zoom into the telescope; make note of the symbols.

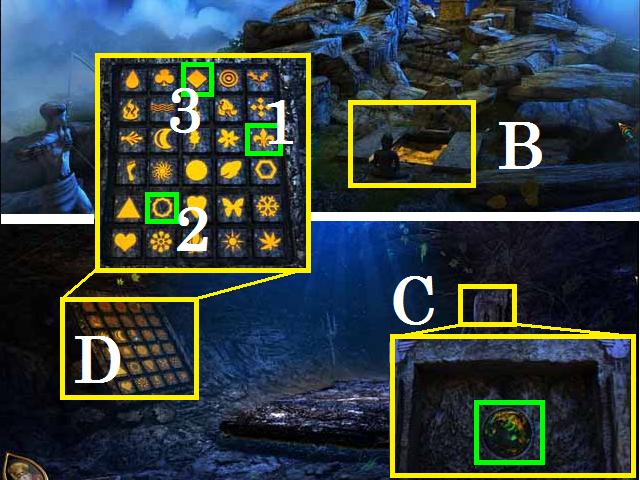
- Move to Hermit Mountaintop.
- Place the HERMIT STATUE on the slab (B).
- Go down into the Dolmen.
- Zoom into the panel (C); place the PEACOCK MOTIF and pick up the POWER STONE (green).
- Zoom into the symbol panel (D).
- Hit the symbols that you see in the telescope. See the screenshot (green).

- Give the INSIGNIA to Maya and switch to her character.
- Move to the Weapons Forgers Furnace.
- Place the INSIGNIA on the SHIELD (E) and pick it up.
- Give the SHIELD to Rahul and switch to his character.
- Move to the Fortress Courtyard.
- Zoom into the statue (F); place the SHIELD.
- Pick up the SWORD (G).
- Click on the mirror.

- Return to the Top of the Tower.
- Light the cannon with the BURNING TORCH.
- Give the SWORD and TONGS to Maya and switch to her character.
- Move to the Weapons Forgers Furnace.
- Place the SWORD in the fire (H) and spin the handle (I).
- Pick up the POWER STONE (green) with the TONGS.
Chapter 6: The Finale

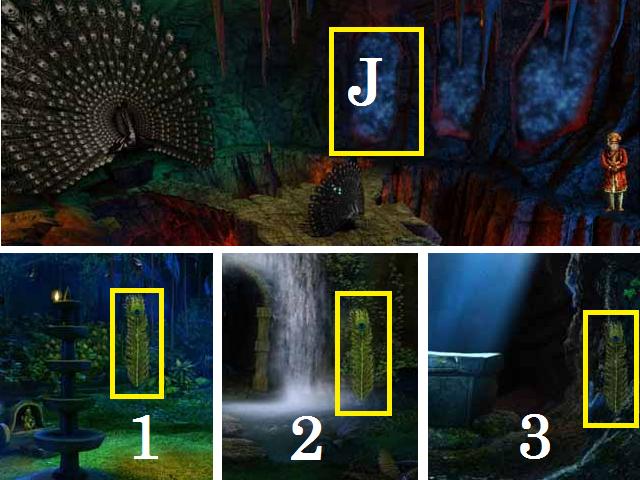
- Move to the Rock Doorway.
- Go through the gateway to the Cave.
- (NOTE: you may start at a different location other than the one this walkthrough takes you to).
- Exit through the far left tunnel (J).
- You will need to revisit every location and collect the PEACOCK FEATHERS.
- The Eagle Temple (1).
- The Waterfall (2).
- The Cavern (3).

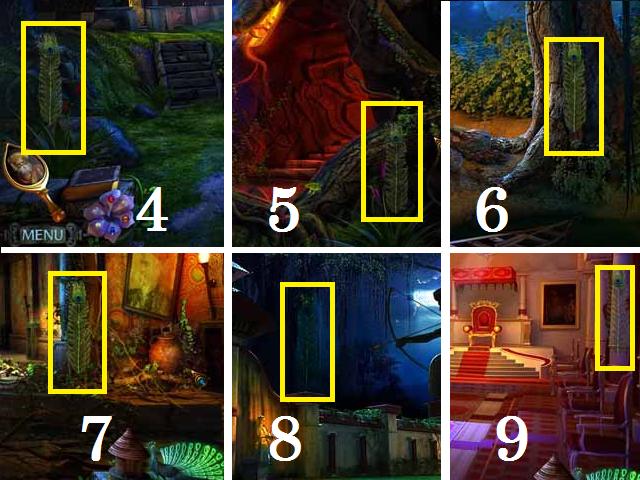
- Jungle Retreat (4).
- Cobra Hood (5).
- Ashram (6).
- Inside Jungle Retreat (7).
- Palace Gate (8).
- Durbar Hall (9).

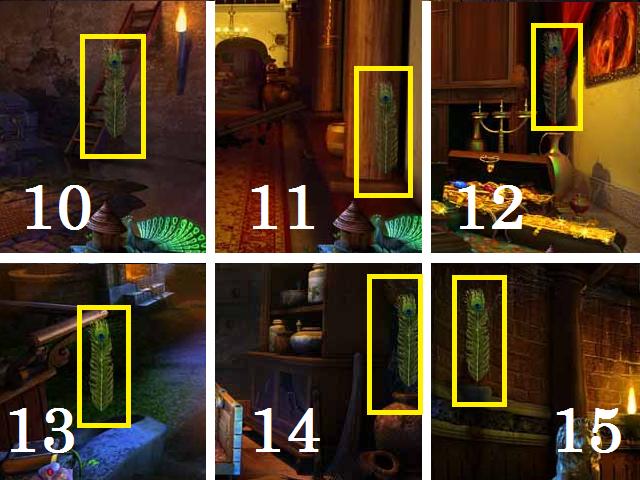
- Room of Light (10).
- Corridor to Treasury (11).
- Treasury (12).
- Front Yard (13).
- Store House (14).
- Secret Chamber (15).

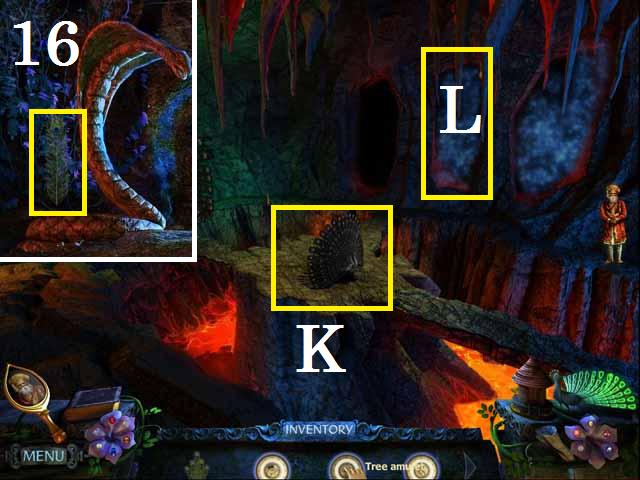
- Cobra Gateway (16).
- Drop the PEACOCK FEATHERS over the small peacock (K).
- Go through the middle tunnel (L).

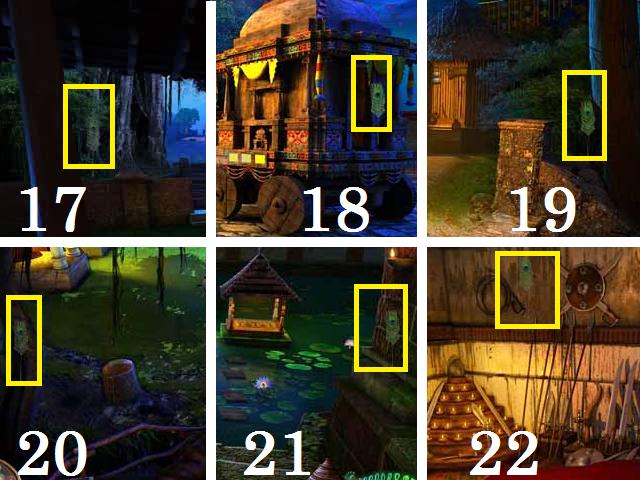
- Front Yard (17).
- Chariot Grounds (18).
- Elephant Temple (19).
- Ox Driven Mill (20).
- Sacred Pool (21).
- Kalaripayattu Arena (22).

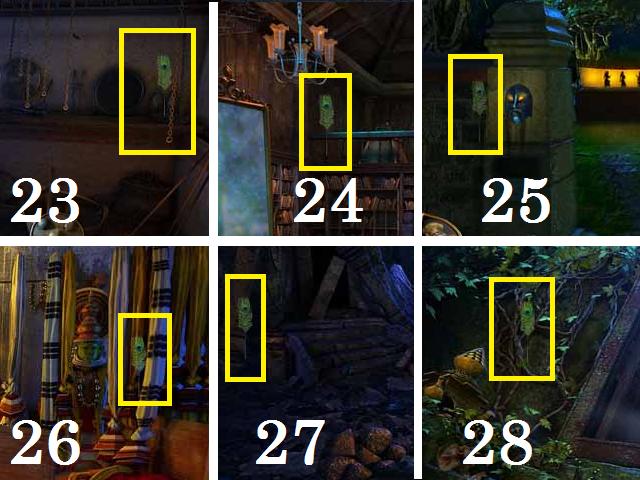
- Weapon Forgers Furnace (23).
- The Library (24).
- Kathakali Academy Gate (25).
- Props Room (26).
- Cliffside Ruins(27).
- Rock Doorway (28).
- Drop the PEACOCK FEATHERS over the small peacock.
- Go through the last tunnel.

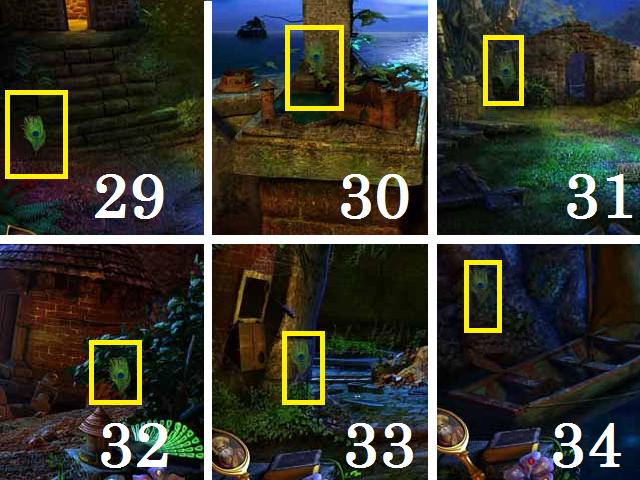
- Canon Tower Premises (29).
- Top of the Tower (30).
- The Fortress (31).
- Lion Temple (32).
- Fortress Courtyard (33).
- Hidden Dock (34).

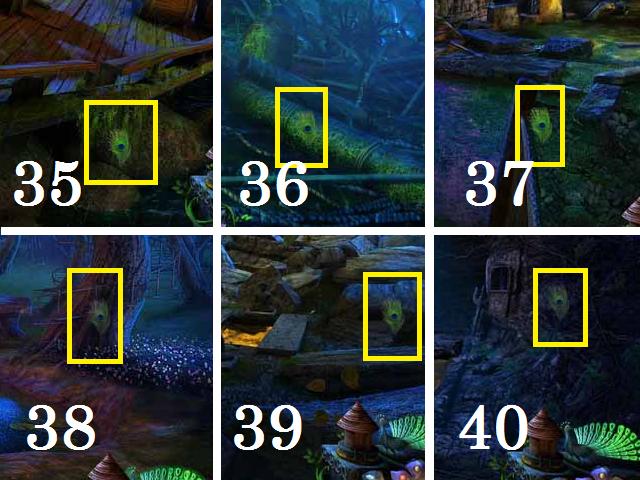
- Shipwreck (35).
- Captain’s Chamber (36).
- Tribal Village (37).
- Tree of Life (38).
- Hermit Mountaintop (39).
- The Dolmen (40).

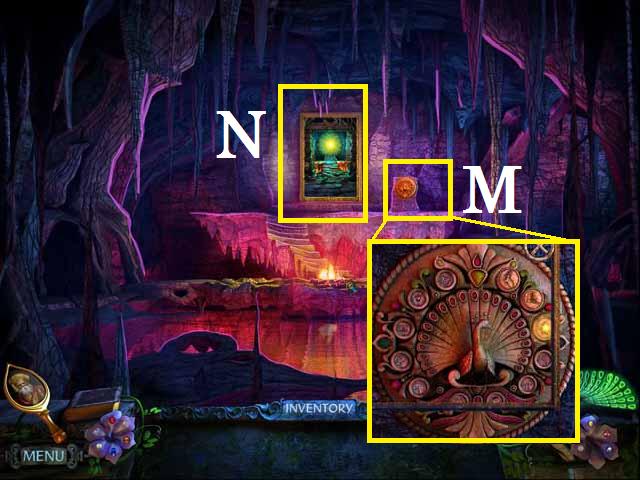
- After you place the last set of PEACOCK FEATHERS zoom into the stone (M).
- Place all of the AMULETS on the peacock.
- Zoom into the doorway (N).
- Be the first to repeat the symbol patterns to kill off his power first. The patterns are random.
- Congratulations you have saved the day once again!





 Otherworld: Shades of Fall Walkthrough, Guide, & Tips
 Fierce Tales: Marcus' Memory Walkthrough, Guide, & Tips
 Nightmare Adventures: The Turning Thorn Walkthrough, Guide, & Tips
 Hidden Expedition: Smithsonian Hope Diamond Walkthrough, Guide, & Tips
 Sandra Fleming Chronicles: Crystal Skulls Walkthrough, Guide, & Tips