Sea of Lies: Nemesis Walkthrough, Guide, & Tips
Sea of Lies: Nemesis Walkthrough

Welcome to the Sea of Lies: Nemesis Walkthrough
A series of unexplained deaths baffle authorities, and you’re called in to investigate.
Whether you use this document as a reference when things get difficult or as a road map to get you from beginning to end, we’re pretty sure you’ll find what you’re looking for here.
This document contains a complete Sea of Lies: Nemesis game walkthrough featuring annotated screenshots from actual gameplay!
We hope you find this information useful as you play your way through the game. Use the walkthrough menu below to quickly jump to whatever stage of the game you need help with.
Remember to visit the Big Fish Games Forums if you find you need more help. Have fun!
General Tips
- This is the official guide for Sea of Lies: Nemesis!
- This guide will not mention each time you have to zoom into a location; the screenshots will show each zoom scene.
- Hidden-object puzzles are referred to as HOPs. This guide will not show screenshots of the HOPs, however, it will mention when an HOP is available and the inventory item you’ll collect from it.
- You can play a Match 3 game instead of an HOP; just select the ‘Play Match 3′ button in the lower-left corner.
- This guide will give step-by-step solutions for all puzzles which are not random. Please read the instructions in the game for each puzzle.
Chapter 1: The Library

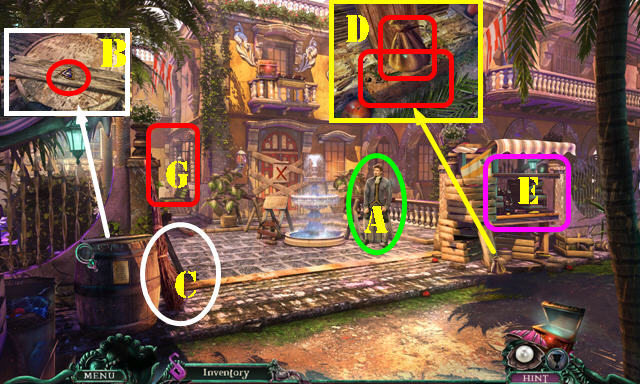
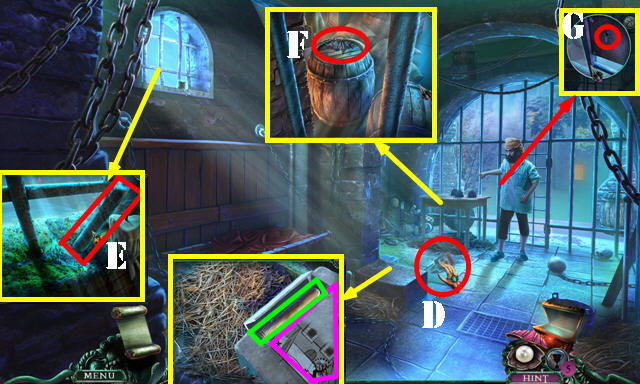
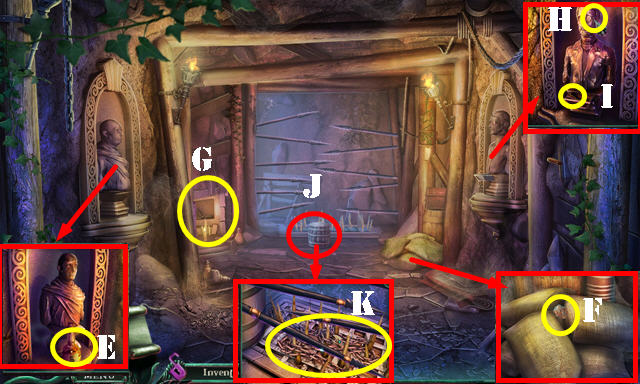
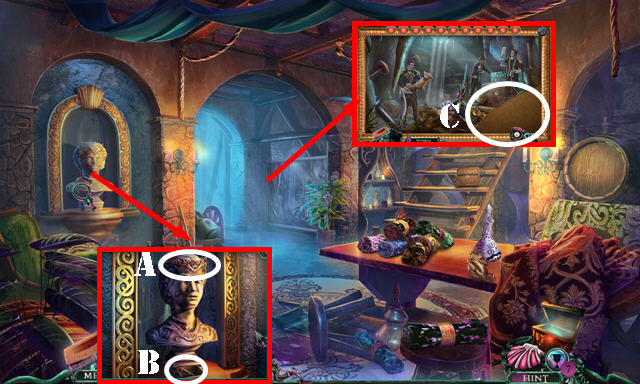
- Talk to Sergio (A).
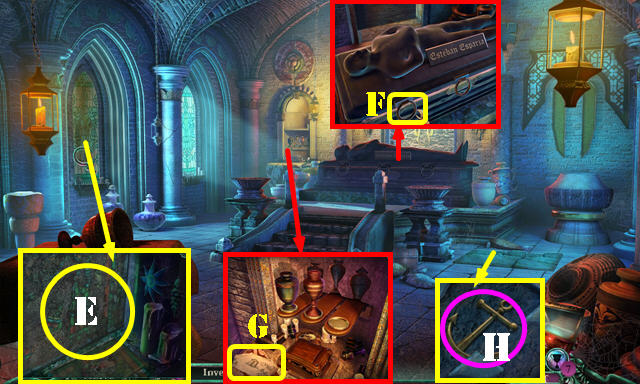
- Take the PIPE END 1/4 (B) and BROOM (C).
- Use the BROOM on the ants; take the COIN POUCH and BRICK (D).
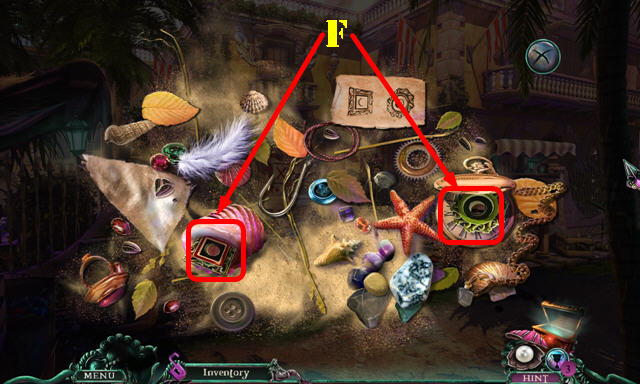
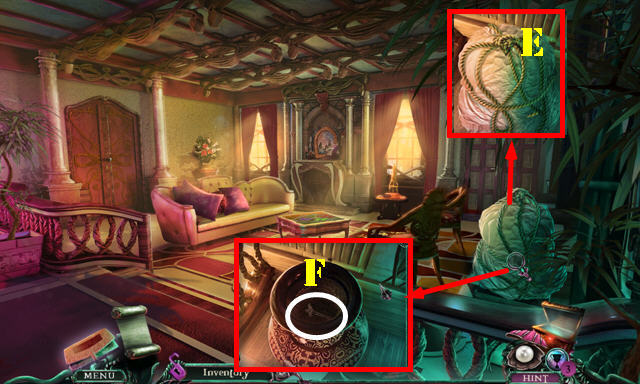
- Play the HOP (E) to receive the PIPE PARTS.
- Take the PIPE ENDS 2/4 and 3/4 from the COIN POUCH (inventory) (F).
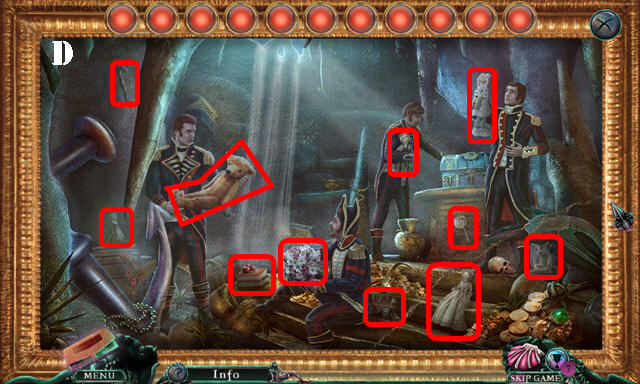
- Go to the Backyard (G).
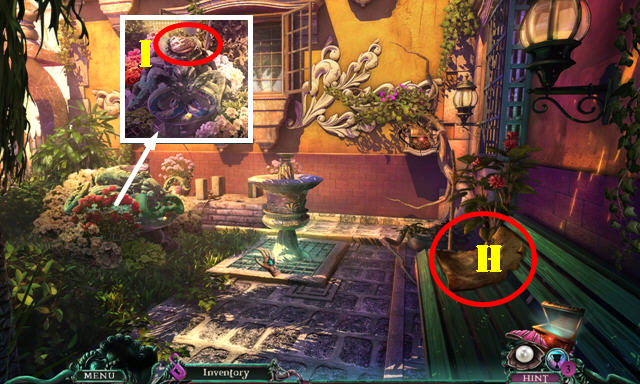
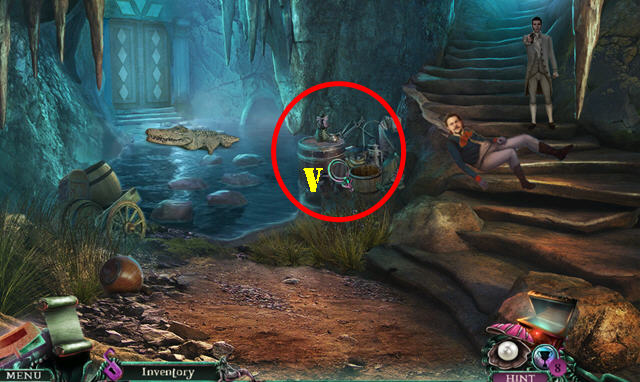
- Take the Map (H) and the MEAT FORK below it.
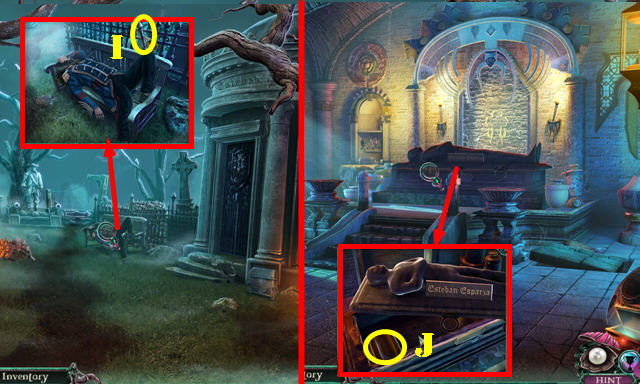
- Take the PAINTING FRAGMENT 1/3 (I).
- Walk down.
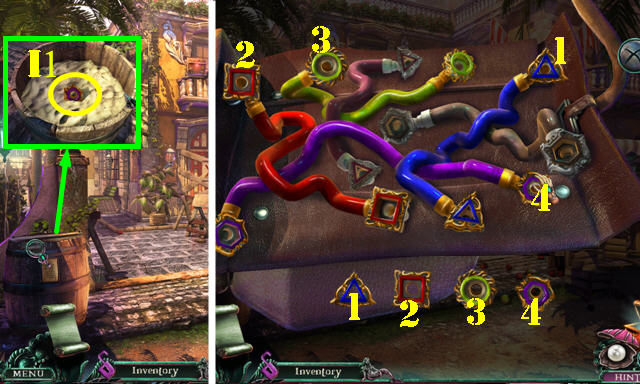
- Use the MEAT FORK on the plank; take the BARREL LID and PIPE END 4/4 (I).
- Place the 4 PIPE ENDS on the PIPE PARTS (inventory); drag them to their right spots to get the PIPES (1-4).
- Go to the Backyard.
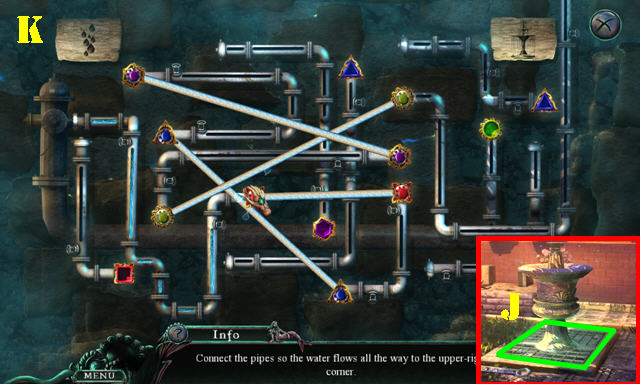
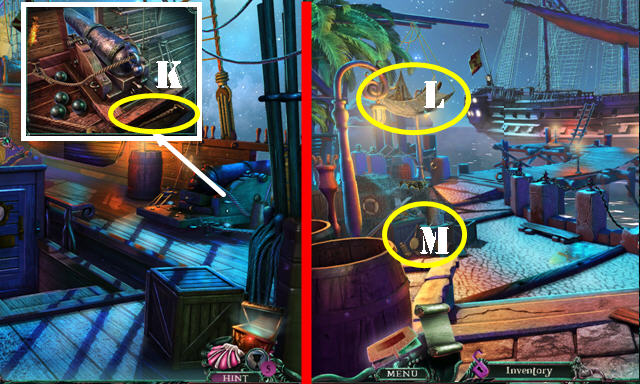
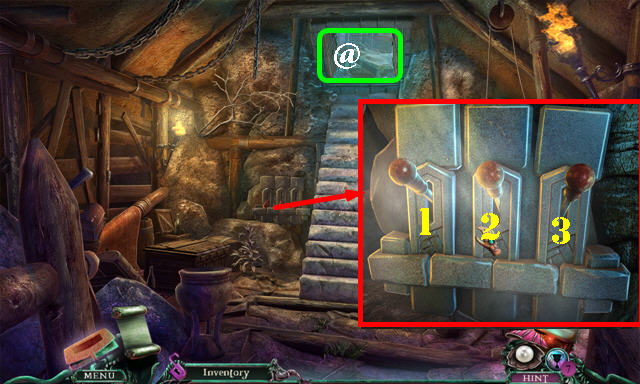
- Open the grate (J); place the PIPES for a puzzle.
- Solution (K).

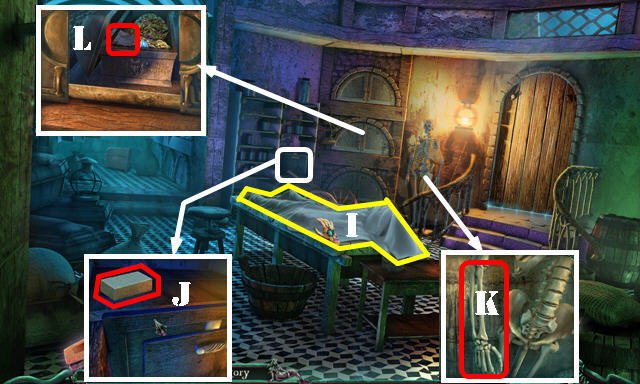
- Take the WINDOW HANDLE (L).
- Look at the window (M) and look down. Place the BRICK and BARREL LID (N).
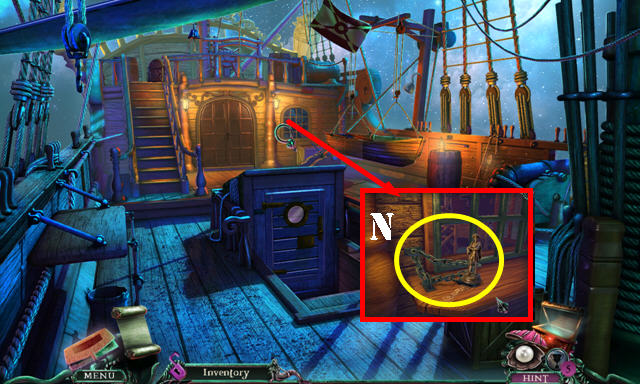
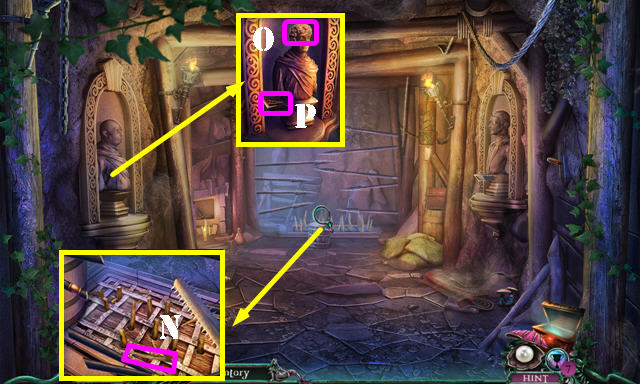
- Use the MEAT FORK (O); place the WINDOW HANDLE. Enter the Office.
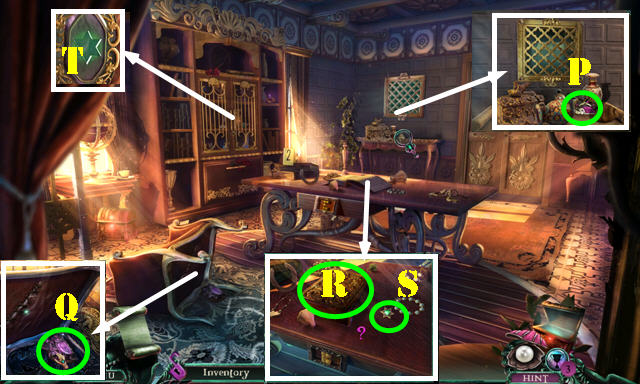
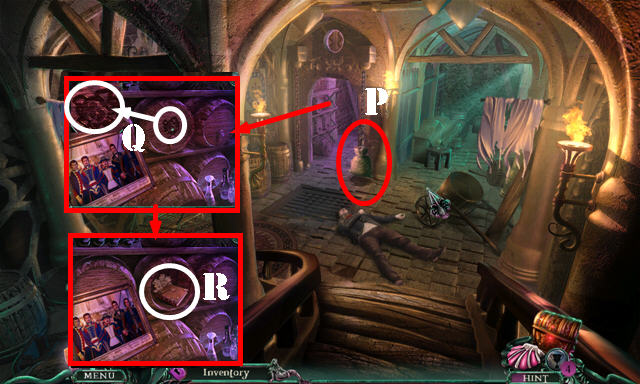
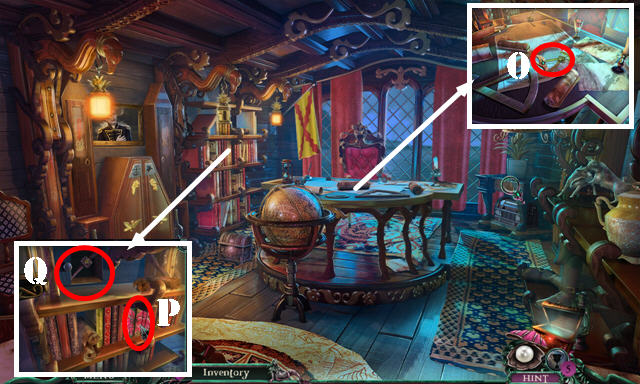
- Move the items; take the OCTOPUS SHIELD 1/2 (P).
- Take the OCTOPUS SHIELD 2/2 (Q).
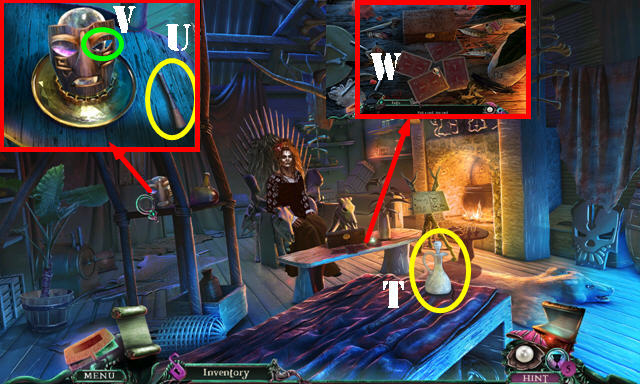
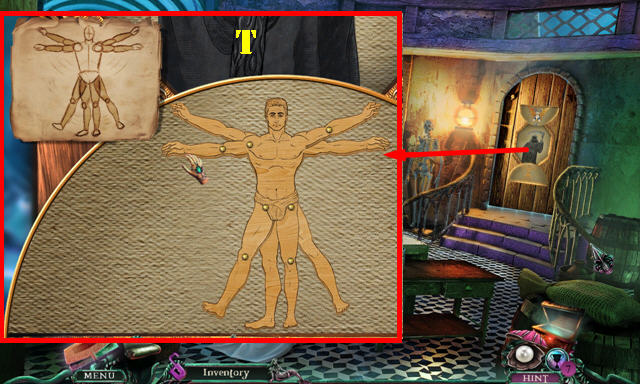
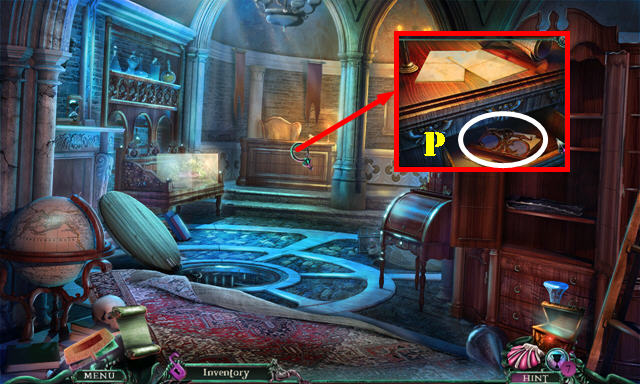
- Look at the book (R); take the STAR KEY (S).
- Place the STAR KEY (T) to activate the HOP; play it to receive the AWL.
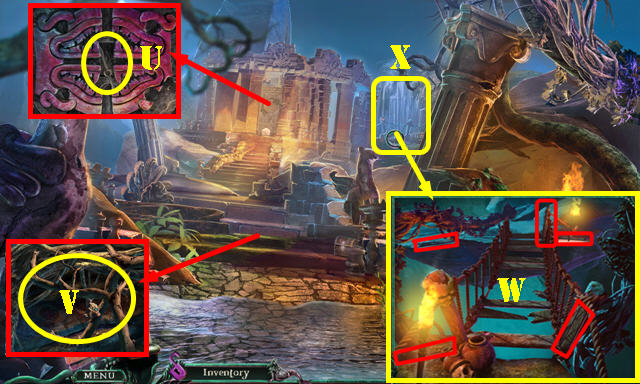
- Walk down.

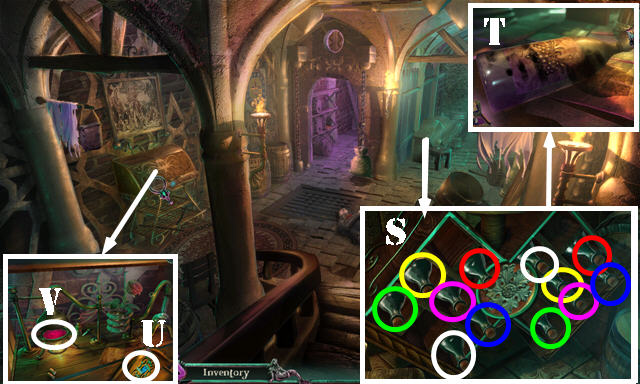
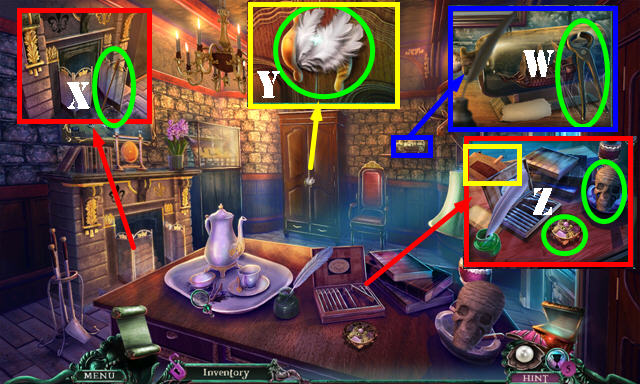
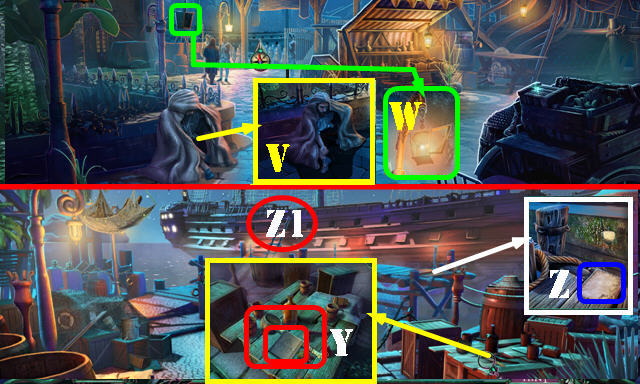
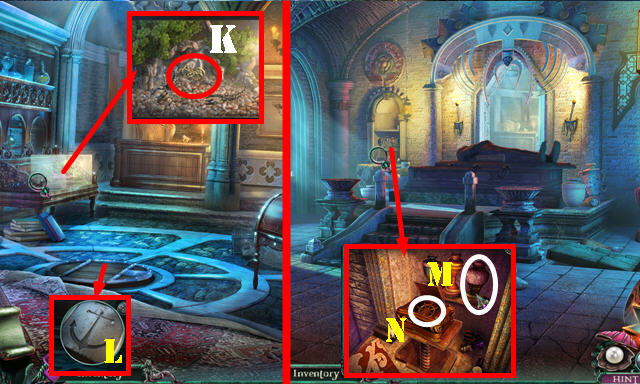
- Place the 2 OCTOPUS SHIELDS (U); take the MAGNET (V).
- Return to the Office.
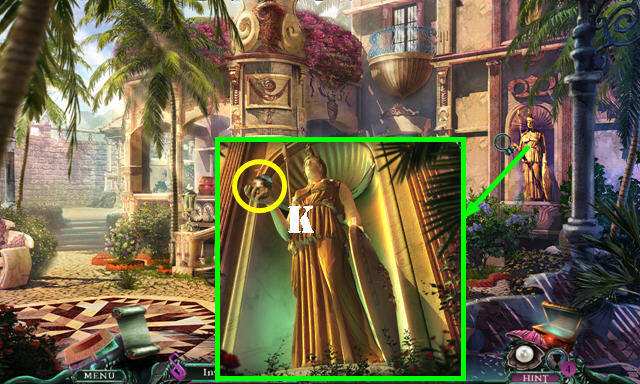
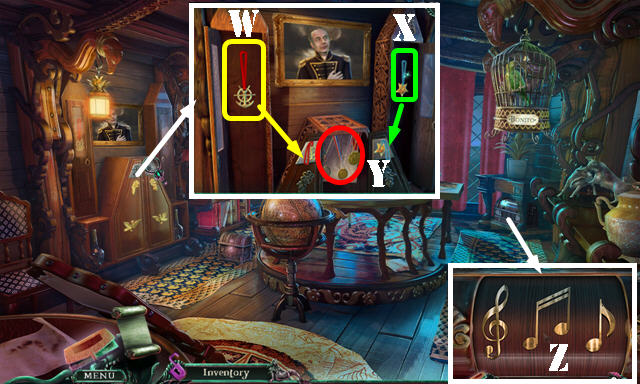
- Use the AWL (W). Use the MAGNET to get the KEY (X).
- Use the KEY (Y).
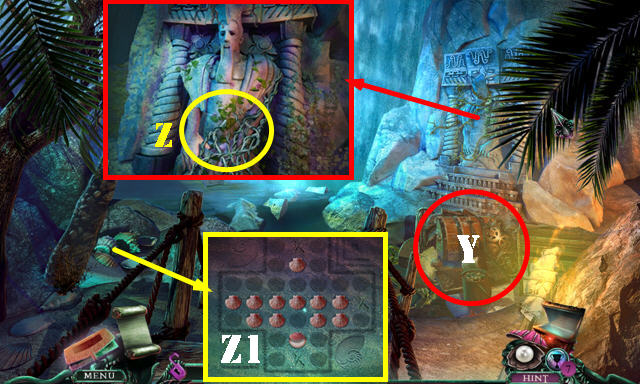
- Enter the Living Room.
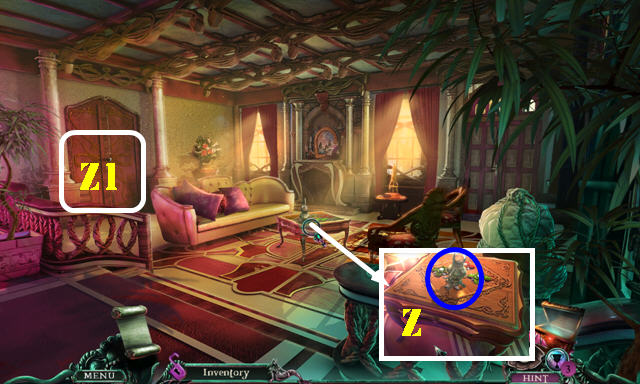
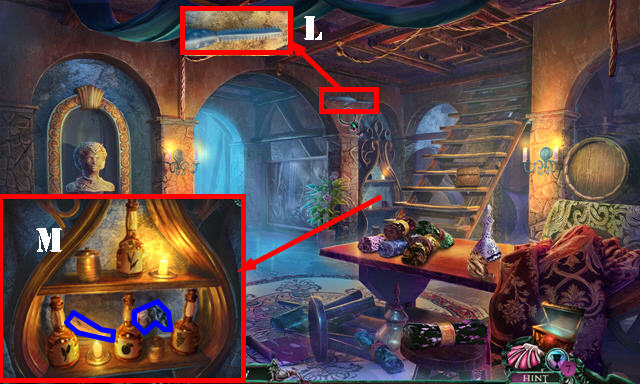
- Take the OIL LAMP (Z).
- Go to the Kitchen (Z1).
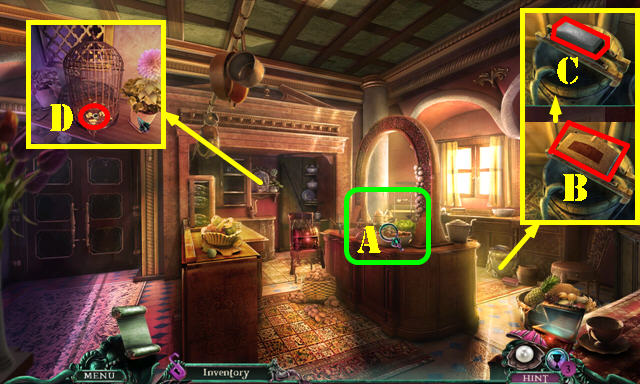
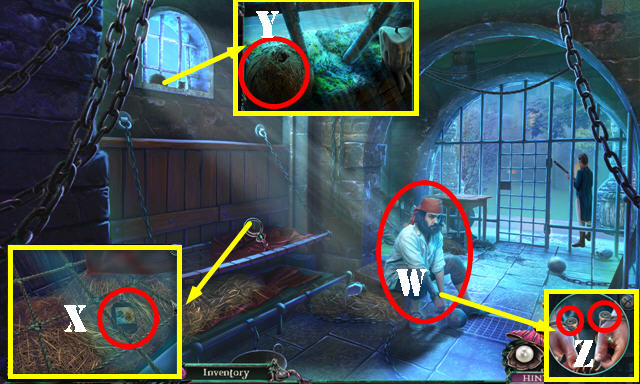
- Talk to the man.
- Play the HOP (A) to receive the DULL KNIFE.
- Take the FINGERPRINTING KIT (B).
- Use the DULL KNIFE on the whetstone to get the SHARP KNIFE (C).
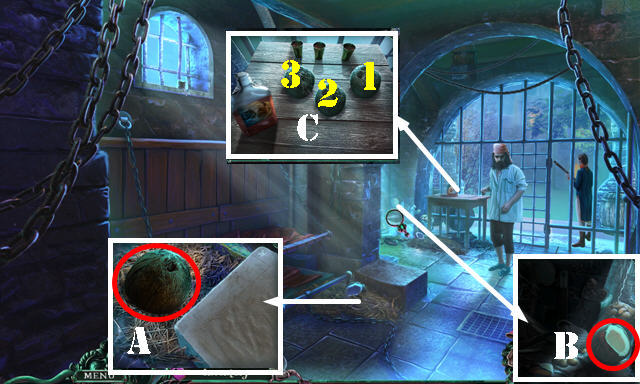
- Move the leaves; take the RING (D).
- Walk down.
- Cut the ROPE with the SHARP KNIFE (E).
- Place the ROPE on the MAGNET to get the MAGNET WITH ROPE (inventory).
- Remove the lid; use the MAGNET WITH ROPE to get the HAIRPIN (F).
- Walk down.
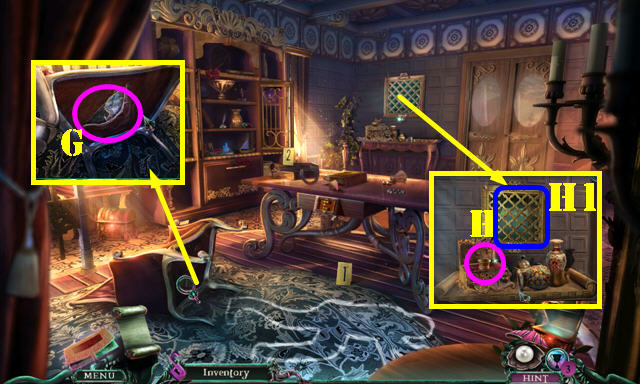
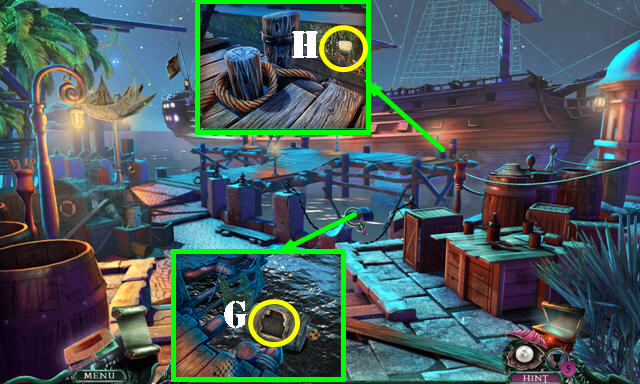
- Use the SHARP KNIFE; take the PAINTING FRAGMENT 2/3 (G).
- Use the HAIRPIN on the lock; take the LENS (H).
- Use the FINGERPRINTING KIT on the shaft (H1).
- Return to the Living Room.
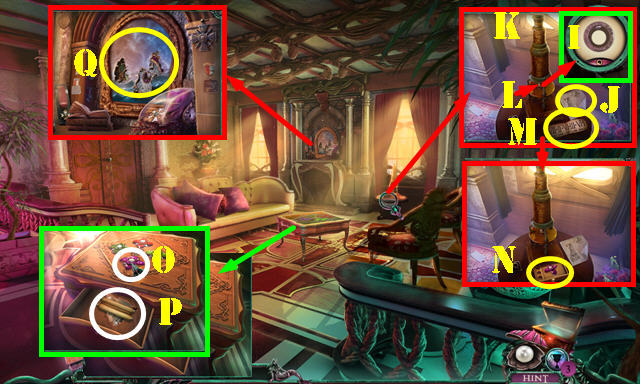
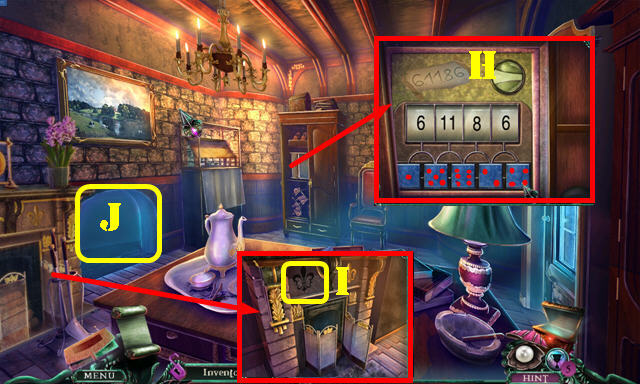
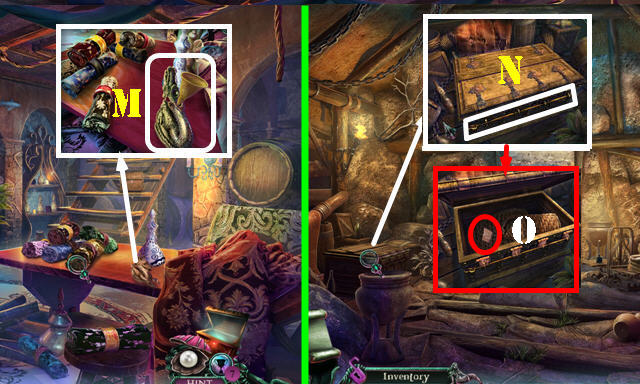
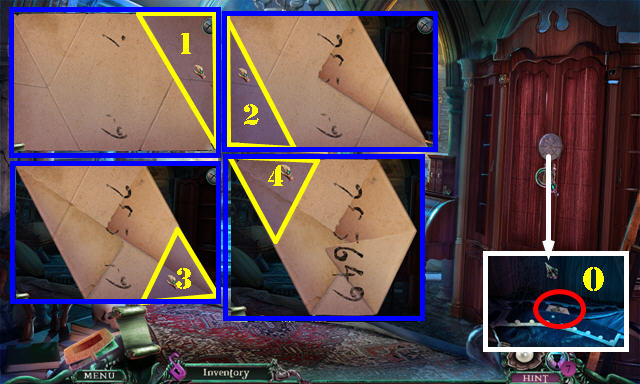
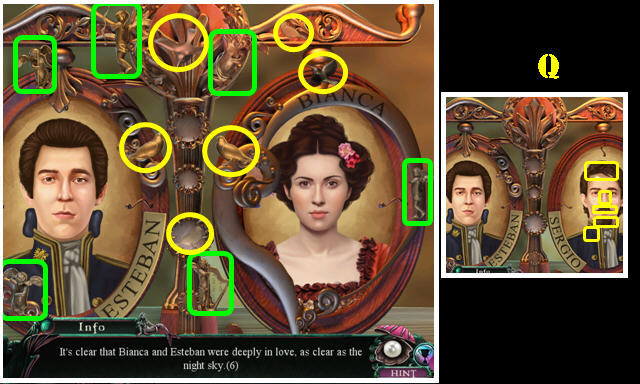
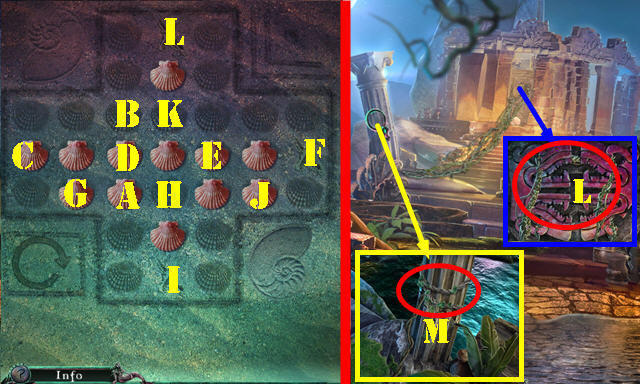
- Look at the note (J). Place the LENS (K) and RING (L).
- Rotate the lens as shown (I); take the ROMAN NUMERALS (M) and JEWELED FLOWER (N).
- Place the JEWELED FLOWER (O); read the scroll and take the PAINTING FRAGMENT 3/3 (P).
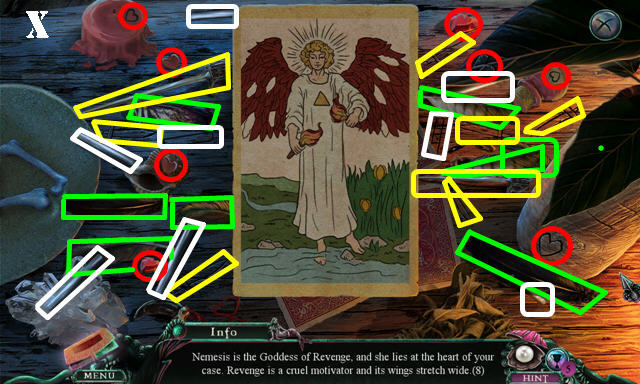
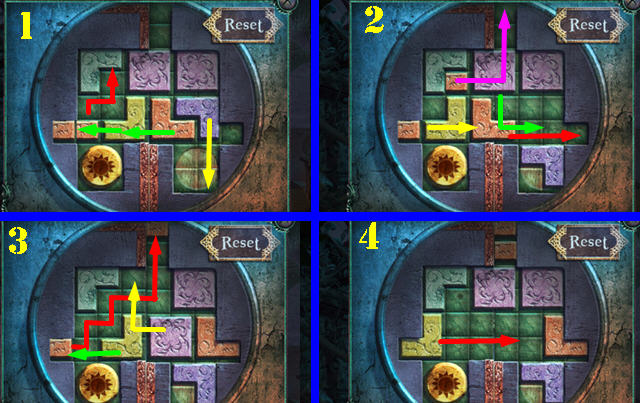
- Place the 3 PAINTING FRAGMENTS (Q) and zoom into the clock; place the ROMAN NUMERALS on it to activate a puzzle.
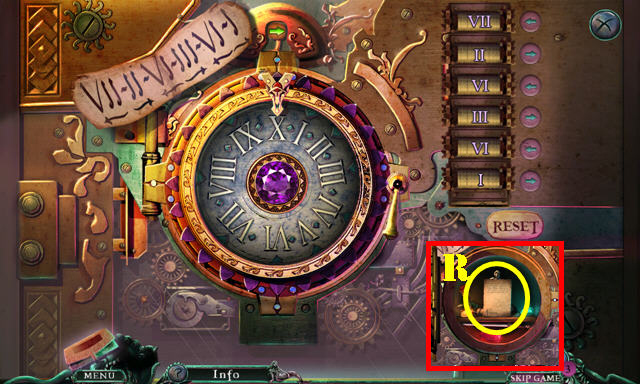
- Solution: VII-counterclockwise, II-clockwise, VI-counterclockwise, III-clockwise, VI- counterclockwise, I- clockwise.
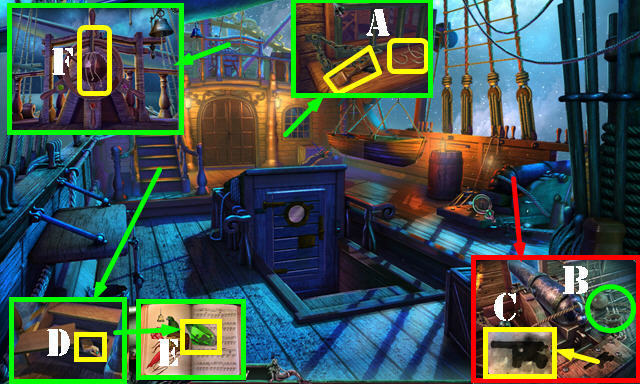
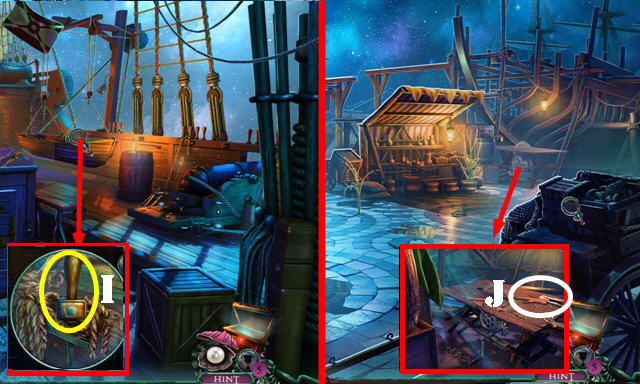
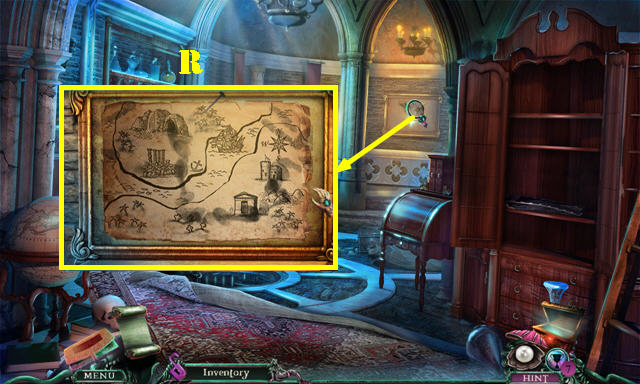
- Take the note (R), move the statue; take the HEXAGONAL WRENCH.
- Walk down.
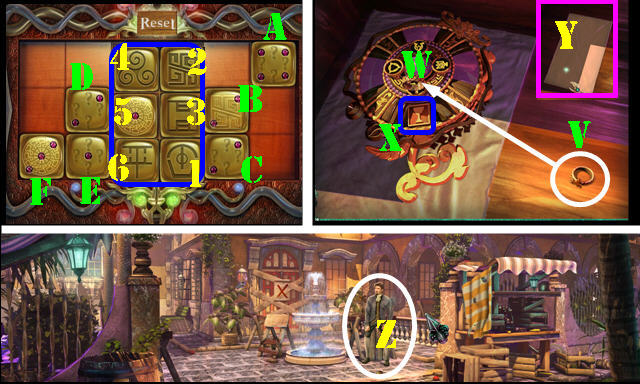
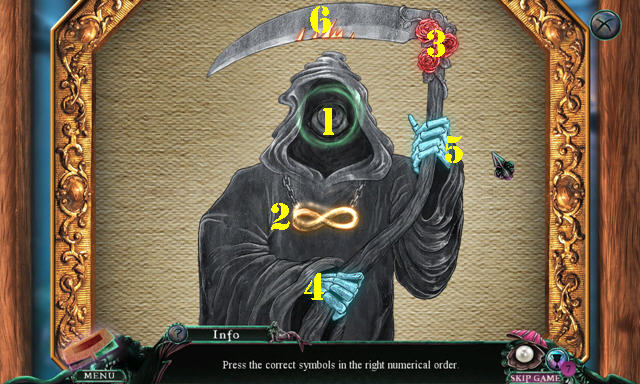
- Use the HEXAGONAL WRENCH on the bolts (S). Take the DIE (T).
- Place the DIE (U) to activate a puzzle.
- Solution: A-1, B-2, C-3, D-4, E-6, F-5.
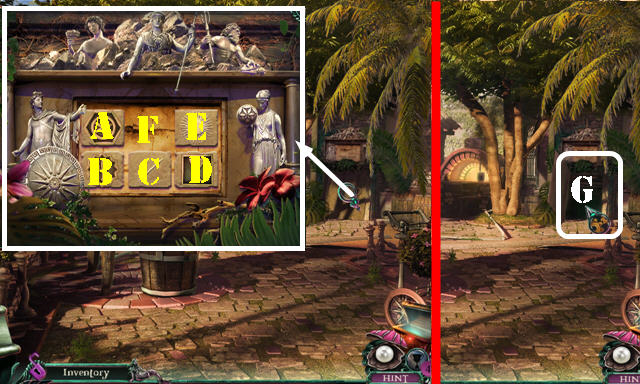
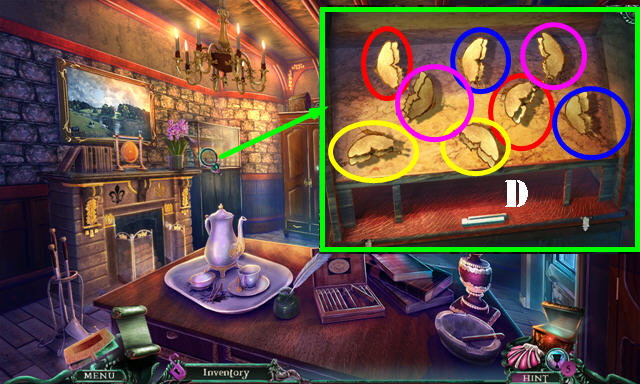
- Place the ring (V) on the amulet (W); take the ORNATE TILE 1/3 (X) and AMULET.
- Open the envelope and read the letter; take the LETTER (Y).
- Return to the Villa Entrance.
- Give the letter to Sergio (Z).
Chapter 2: Francisco Flores
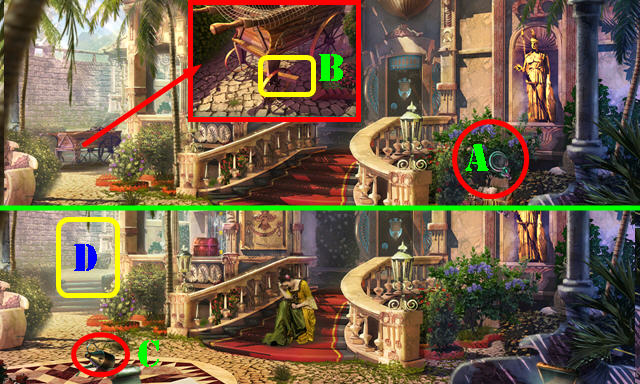
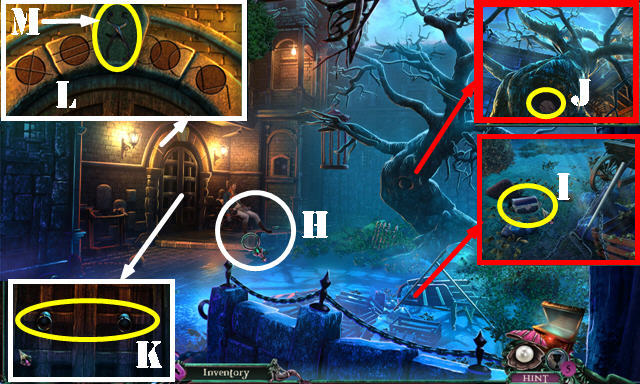
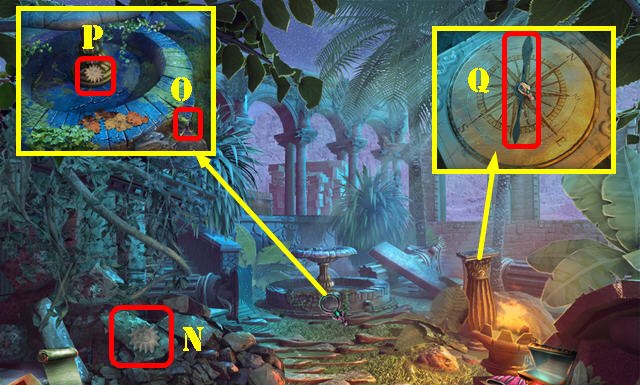
- Play the HOP (A) to receive the ROCK.
- Talk to Bianca to receive BIANCA’S LOCKET.
- Use the ROCK to get the PLANK (B).
- Take the OLIVE OIL (C).
- Go to the Gazebo (D).
- Talk to Francisco.
- Open the gate (E) to activate a HOP; play it to get the ORNATE TILE 2/3.
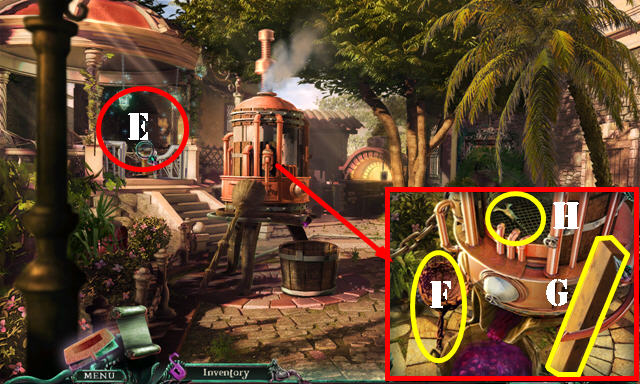
- Take the FRUIT PICKER (F). Place the PLANK (G); take the CORKSCREW (H).
- Take the TWIG (I); move the leaves.
- Use the TWIG on the fire to get the BURNING TWIG (J).
- Use the OLIVE OIL and BURNING TWIG in the OIL LAMP to get the LANTERN (inventory).
- Walk down.
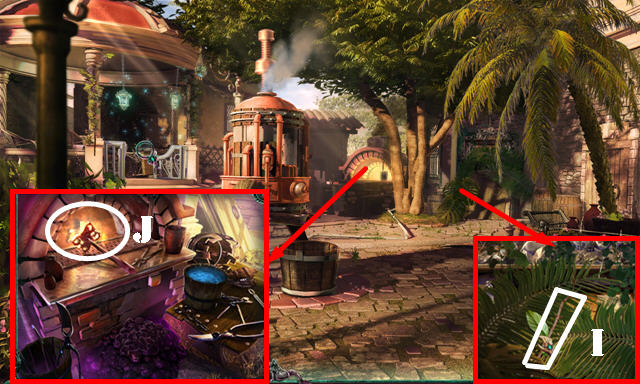
- Use the FRUIT PICKER to get the BRONZE APPLE (K).
- Open the BRONZE APPLE; take the ORNATE TILE 3/3 (inventory).
- Return to the Gazebo.
- Place the 3 ORNATE TILES for a puzzle.
- Solution: E-D-C-B-A-F-E-D-C-B-A-F-E-D-C.
- Use the LANTERN (G).
- Use the BURNING TWIG on the 3 torches (blue).
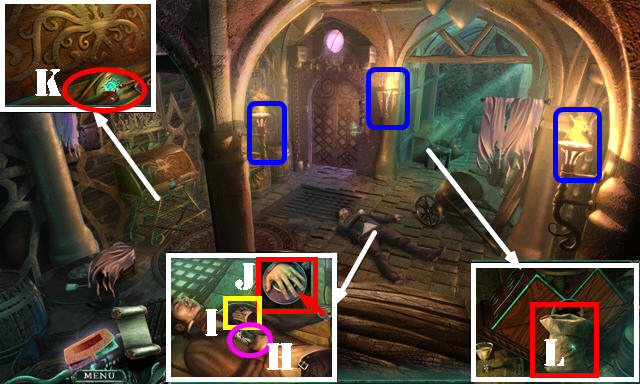
- Move the arm (H). Look at the note; take the GLOVES (I).
- Take the AMULET RING and WINE TASTER (J).
- Take the SCOOP (K) and EMPTY SACK (L).
- Place the AMULET RING on the AMULET; take the CRYSTALLIZED CORAL (inventory).
- Walk down.
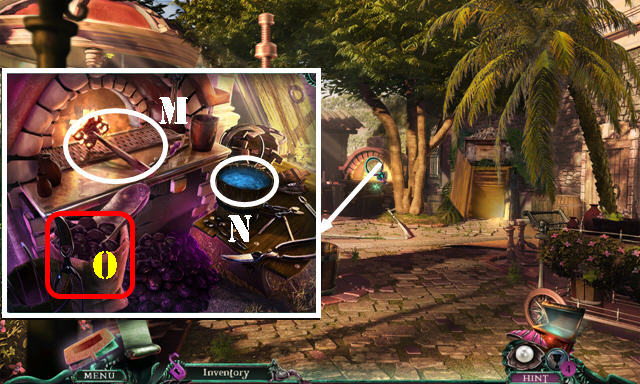
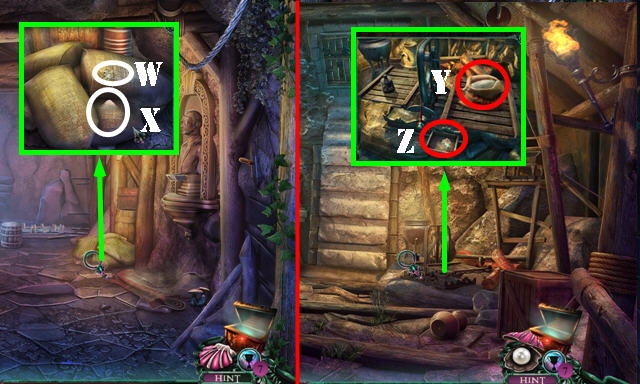
- Use the GLOVES on the iron (M); dip it in the water (N) to get the BRANDING IRON.
- Put down the EMPTY SACK; use the SCOOP on the coal to get the FULL SACK (O).
- Go to the Wine Cellar.
- Place the FULL SACK (P).
- Look at the picture and touch it; place the CRYSTALLIZED CORAL (Q). Look at the book; take the DIONYSUS TOKEN (R).
- Place the DIONYSUS TOKEN for a puzzle. Solution (S).
- Use the FINGERPRINTING KIT on the bottle to get the WINE (T).
- Use the CORKSCREW on the WINE (inventory).
- Use the BRANDING IRON (U); place the WINE TASTER (V) and pour the WINE into it.
- Walk down.
- Talk to Williams (W).
- Move the items; take the CLOSED BOTTLE OF GROG (X).
- Take the COCONUT SHELL 1/3 (Y).
- Remove the cork from the CLOSED BOTTLE OF GROG to get the BOTTLE OF GROG and LOCKPICK (inventory).
- Use the LOCKPICK (Z) to get the SHACKLES.
- Give the BOTTLE OF GROG to Williams.
- Take the COCONUT SHELLS 2/3 and 3/3 (A-B).
- Place the 3 COCONUT SHELLS and zoom into the table for a puzzle (C).
- Touch the coconuts to begin; guess the location of the gem 3 times Solution: 1-2-3.
- Take the BOTTLE OF GROG (D) and drag it over the stone (purple). Touch the stone; look at the scroll (green). Take the OLD SPOON.
- Use the OLD SPOON to get the IRON BAR (E).
- Use the IRON BAR to get the RING OF KEYS (F).
- Use the RING OF KEYS (G); go to the Prison Yard.
Chapter 3: The Prison Yard
- Play the HOP (H) to receive the STEEL.
- Touch the dirt; take the BOX (I).
- Take the CIRCULAR TILE (J).
- Place the SHACKLES (K) and then the CIRCULAR TILE for a puzzle.
- Solution (L). Take the NIPPERS (M).
- Walk down.

- Place BIANCA’S LOCKET on the BOX and open it. Remove the cloth; read the note; take the PUMPKIN SEEDS and FLINT (inventory).
- Place the FLINT on the STEEL to get the FLINT AND STEEL (inventory).
- Use the NIPPERS to get the LONG ROPE (O).
- Use the FLINT AND STEEL on the candle; take the CANDLE (P).
- Use the CANDLE in the dark to activate a HOP (Q); play it to get the PARCEL.
- Open the PARCEL; read the note; take the SAW (inventory).
- Go to the Prison Yard.
- Use the SAW on the pole; take the RAKE (R).
- Remove the screw from the RAKE, then touch it; take the RAKE HEAD and HANDLE (inventory).
- Place the RAKE HEAD on the LONG ROPE to get the GRAPPLING HOOK (inventory).
- Place the GRAPPLING HOOK (S).
- Go up to the Prison Roof.
- Use the HANDLE to get the STICKY HANDLE (T).
- Take the LION HEAD from the STICKY HANDLE; receive the LION HEAD and STICKY HANDLE (inventory).
- Remove several pieces of the roof (U) to activate a HOP; play it to get the DIAMOND BROOCH.
- Zoom into the door; place the STICKY HANDLE (V) and use the DIAMOND BROOCH on the glass. Turn the key; enter the Warden’s Office.
- Take the WIRE NIPPERS (W), FIRE POKER (X) and PLUMES (Y).
- Grab the FINGERPRINTING KIT, WOODEN SKULL and AMULET (Z).
- Walk down.
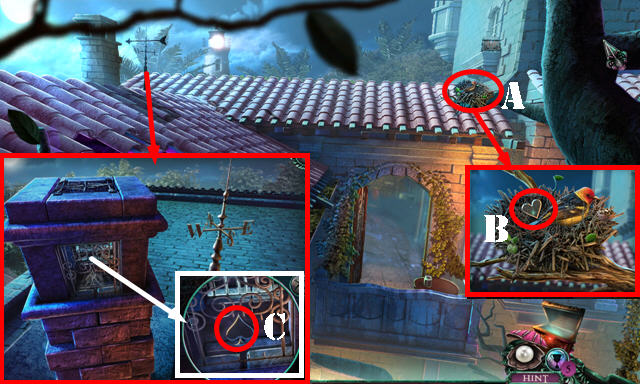
- Use the FIRE POKER on the nest (A); give the PUMPKIN SEEDS to the bird; take the SPADE AND HEART SYMBOLS 1/2 (B).
- Use the WIRE NIPPERS on the bars; use the PLUMES on the cobwebs. Take the SPADE AND HEART SYMBOLS 2/2 (C).
- Return to the Warden’s Office.
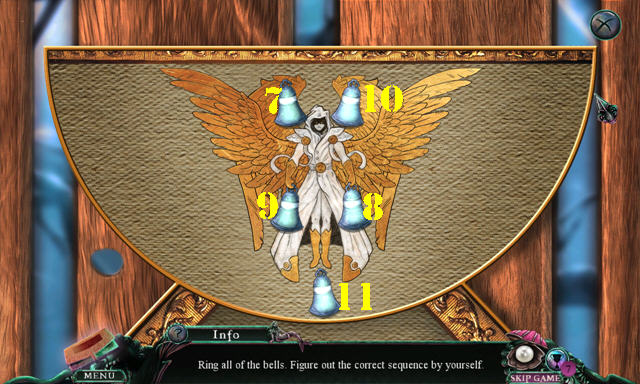
- Place the 2 SPADE AND HEART SYMBOLS for a puzzle.
- Solution (D). Take the BRONZE BUTTERFLY.
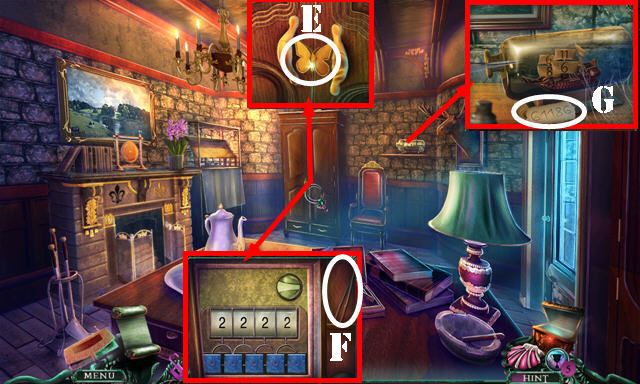
- Place the BRONZE BUTTERFLY (E); take the TWEEZERS (F).
- Remove the cork. Use the TWEEZERS in the bottle four times; take the CODE (G).
- Place the CODE (H) for a puzzle.
- Set the dice to this: 1-5-6-2-4. Read the note; take the WARDEN’S RING.
- Place the WARDEN’S RING on the AMULET; take the FLEUR-DE-LIS TOKEN (inventory).
- Place the FLEUR-DE-LIS TOKEN (I); enter the Cave Maze (J).
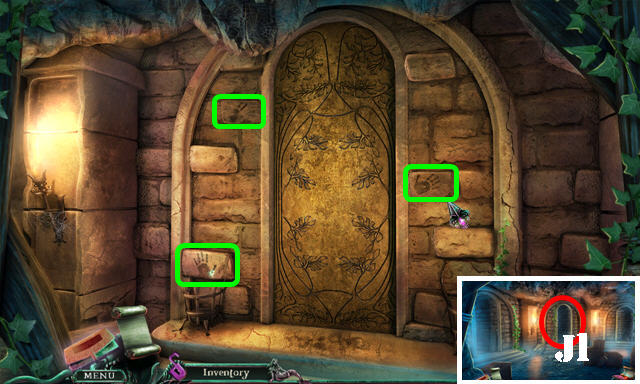
- Go through the center door (J1).
- Use the FINGERPRINTING KIT on the wall; touch the 3 stones (green) and go through the door.
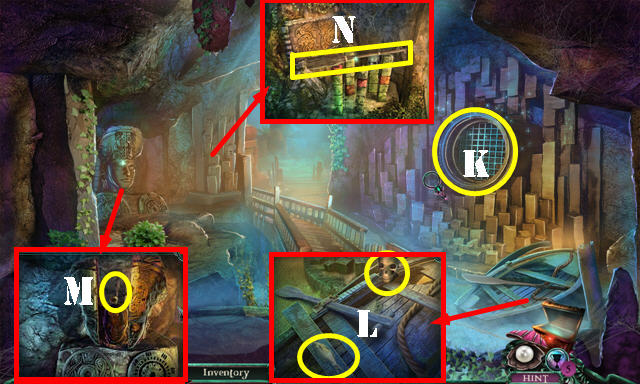
- Play the HOP (K) to get the TRITON SEASHELL.
- Take the DRIED FISH and IVORY SKULL (L).
- Place the LION HEAD; take the CANDLE SNUFFER (M).
- Take the PADDLE 1/2 (N).
- Go forward.
- Take the OLD RAG (O) and BLUEBERRIES (P).
- Place the TRITON SEASHELL on the lobster (Q); take the WOODEN MUG (R).
- Take the GEMSTONE EYE from the WOODEN MUG (inventory).
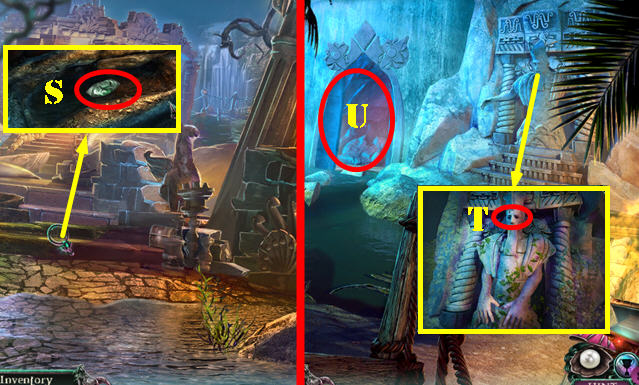
- Go to Alma’s Hut (S).
- Take the COCONUT OIL (T) and CHISEL (U).
- Place the GEMSTONE EYE (V); take the MASK and CRYSTAL SKULL below it.
- Look at the cards (W).
- Pick any card to begin with and then pick the rest (X). Feathers (green), Hearts (red), Swords (yellow), Bars (white).
- Look at the card in the box; take the ANIMAL TOKENS.
- Walk down.
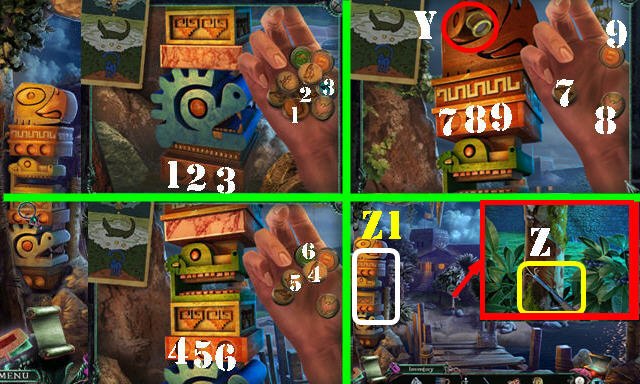
- Place the ANIMAL TOKENS for a puzzle (Z1).
- Solution (1-9). Take the SPYGLASS LENS (Y).
- Place the WOODEN MUG (Z); use the CHISEL on the bark to get the LIQUID RUBBER.
- Walk down.
 THE
THE
- Use the COCONUT OIL (A); take the PADDLE 2/2 (green).
- Place the MASK; take the GOLDEN SKULL (B).
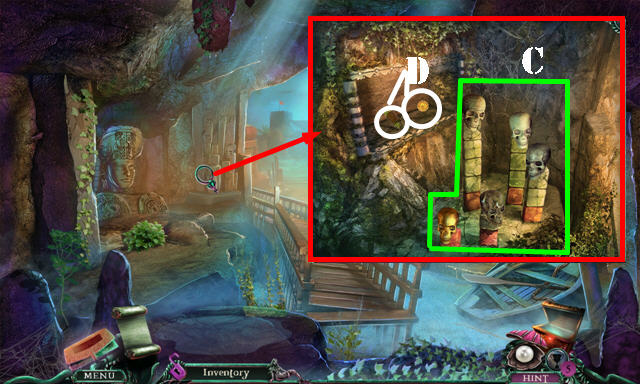
- Place the WOODEN SKULL, IVORY SKULL, CRYSTAL SKULL, and GOLDEN SKULL for a puzzle.
- Solution (C). Take the DOUBLOON and BROKEN SPYGLASS (D).
- Place the SPYGLASS LENS on the BROKEN SPYGLASS to get the SPYGLASS (inventory).
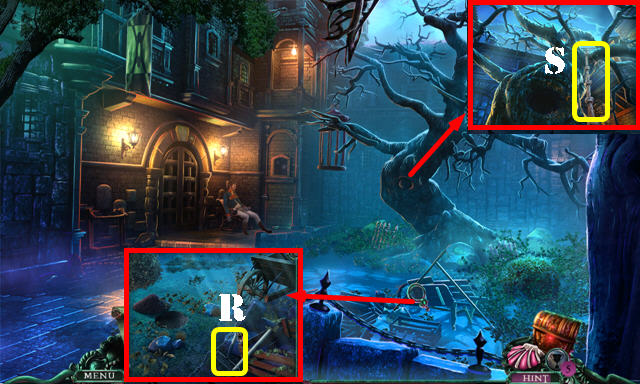
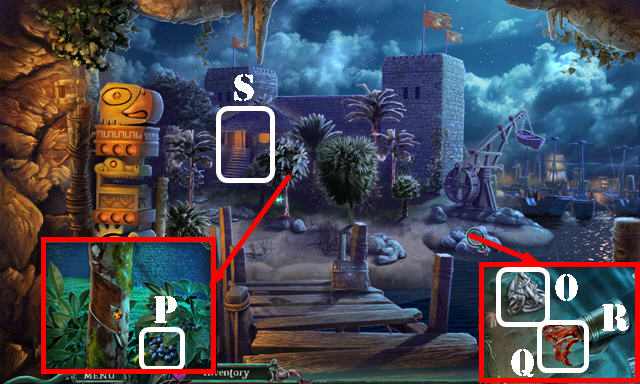
- Go to the Beach.
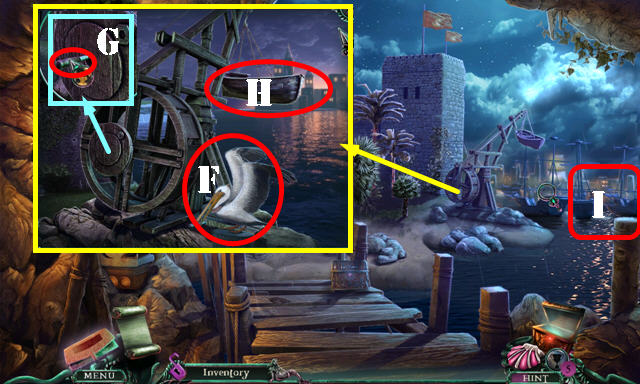
- Use the SPYGLASS on the scene (I) and touch it.
- Give the DRIED FISH to the pelican (F) to get the CRANE LEVER.
- Place the CRANE LEVER (G) and the 2 PADDLES (H).
- Go to the Docks (I).
Chapter 4: The Docks
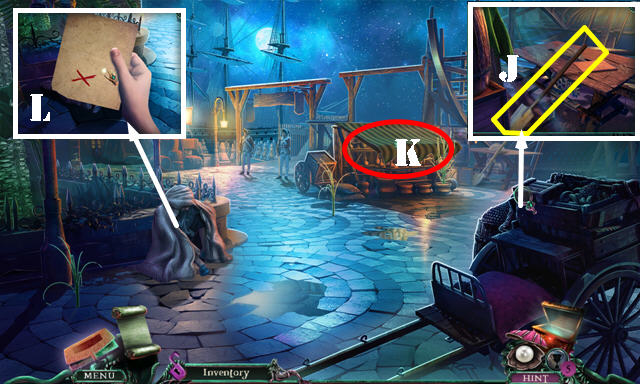
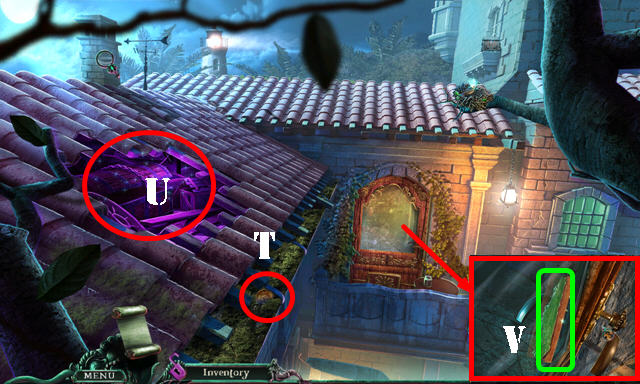
- Take the SHOVEL (J).
- Touch the awning to activate a HOP (K); play it to get the GROUND RED PEPPER.
- Give the DOUBLOON to Williams; take the STRANGE PAPER (L).
- Return to Alma’s Hut.
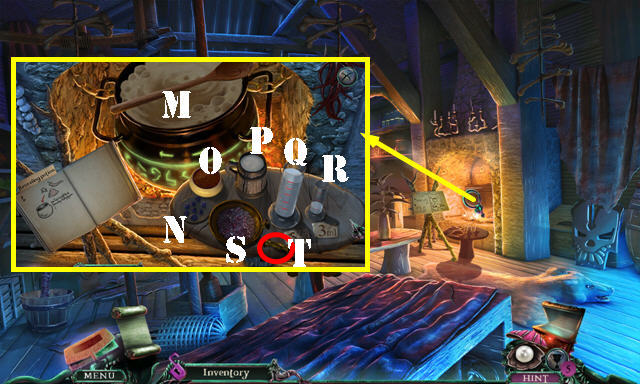
- Zoom into the cauldron. Place the BLUEBERRIES, GROUND RED PEPPER, and LIQUID RUBBER for a puzzle.
- Solution: O-M, Nx3-S, T-S, S-M, P-R, R-Q, P-R, R-Q, R-M.
- Place the STRANGE SHEET in the cauldron; take the DRAWN MAP.
- Walk down.
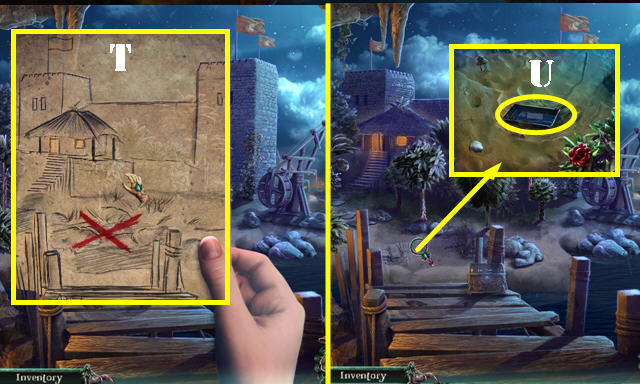
- Place the DRAWN MAP (T).
- Use the SHOVEL on the sand. Open the box; read the note and take the OFFICER UNIFORM (U).
- Return to the Docks.
- Give the OFFICER UNIFORM to Williams (V).
- Use the OLD RAG and CANDLE SNUFFER (W).
- Go to the Pier.
- Look at the note. Take the RUM DIPPER (Y). Take the PIECE OF PARCHMENT (Z).
- Go to the Justicia’s Deck (Z1).
- Take the CHISEL and FISH HOOKS (A).
- Take the BALL AND CHAIN (B).
- Place the PIECE OF PARCHMENT (C); use the FINGERPRINTING KIT on it to get the CANNON IMPRINT.
- Remove the step and open the book (D); take the JEWEL 1/3 (E) and BOOK.
- Take the CAT-O-NINE TAILS (F); place the FISH HOOKS on it to get the GRIPPING DEVICE (inventory).
- Walk down.
- Use the GRIPPING DEVICE on the barrel and then use the BALL AND CHAIN on it. Use the RUM DIPPER to get the GUNPOWDER (G).
- Use the CHISEL to get the SHARP SHELL (H).
- Go to Justicia’s Deck.
- Cut the rope with the SHARP SHELL; take the BELAYING PIN 1/2 (I).
- Return to the Docks.
- Put down the CANNON IMPRINT and touch the saw; take the WOODEN CANNON and SAWDUST (J).
- Return to Justicia’s Deck.
- Place the WOODEN CANNON; take the FLAMING STICK (K).
- Walk down.
- Use the FLAMING STICK (L). Play the HOP (M) to get the HEAVY STATUE.
- Return to Justicia’s Deck.
- Use the GUNPOWDER and SAWDUST. Put down the HEAVY STATUE and use the FLAMING STICK (N).
- Remove the bars and enter the Captain’s Quarters.
- Talk to Sergio.
- Read the note; take the CALIPER (O).
- Place the BOOK (P); take the BELAYING PIN 2/2 (Q).
- Walk down.
- Place the 2 BELAYING PINS for a puzzle.
- Rotate the pieces to the top (@). Solution: triangle, pentagon, five-pointed star, hexagon, six-pointed star, rhombus.
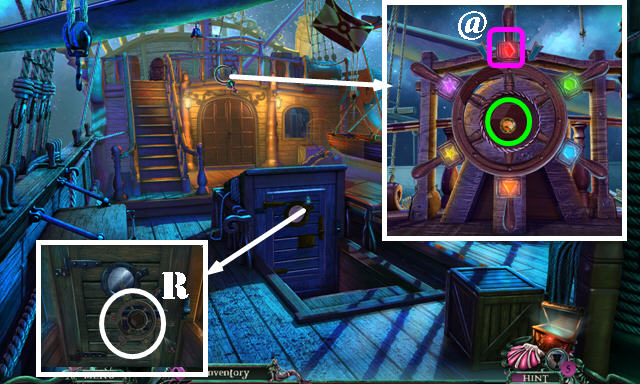
- Take JEWEL 2/3 and SHIP’S WHEEL (green).
- Place the SHIP’S WHEEL (R) and open the door; enter Below Deck.

- Touch the lantern (orange) to activate a HOP (S); play it to get the BRASS NOTE 1/3.
- Move the pillow; take the JAW HARP (T).
- Take the HOOK KNIFE and BOTTLE 1/3 (U).
- Use the CALIPER to get the BRASS NOTE 2/3 (V).
- Take the IMPROVISED PICKLOCK from the JAW HARP (inventory).
- Return to the Captain’s Quarters.
- Use the IMPROVISED PICKLOCK on both locks; place both necklaces (W-X); move the medals; read the note and take the BRASS NOTE 3/3 (Y).
- Place the 3 BRASS NOTES (Z); open the door for a puzzle.
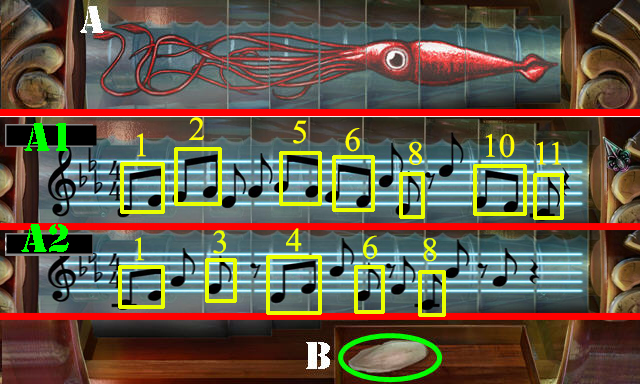
- Solution (A).
- First sequence (A1): 1-2-5-6-8-10-11.
- Second sequence (A2): 1-3-4-6-8.
- Take the CUTTLEBONE (B).
- Place the CUTTLEBONE (C); take the JEWEL 3/3 (D).
- Return Below Deck.
- Place the 3 JEWELS; move and open the book (E), and then take the MONOCLE (F).
- Use the HOOK KNIFE on the lid (G); remove the cork (H).
Chapter 5: The Warehouse
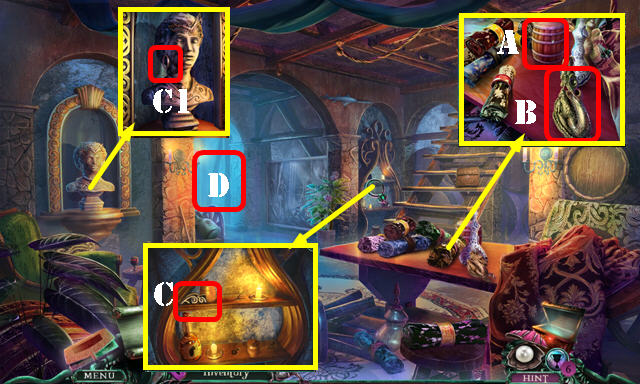
- Move the items; take the SMALL KEG (A). Touch the dragon (B).
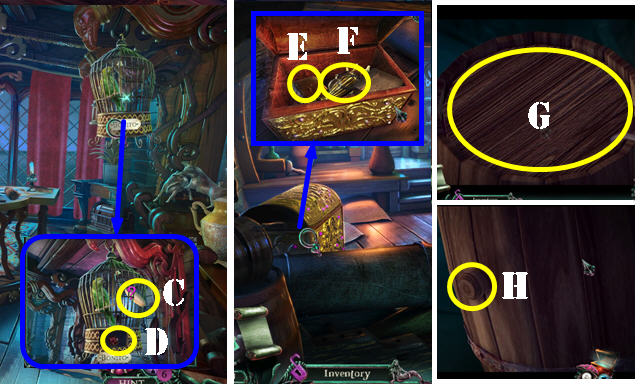
- Take the BOOKSTAND LOCK SLOT 1/2 (C) and GOLDEN LOOP EARRING (C1).
- Go to the Tunnel (D).
- Take the BOTTLE 2/3 (E) and ROSE ORNAMENT 1/4 (F).
- Move the panel (G) for a HOP; play it to get the BOTTLE 3/3.
- Place the MONOCLE (H); take the WALL HANDLE 1/3 (I).
- Place the SMALL KEG (J); take the CHAIN (K).
- Place the GOLDEN LOOP EARRING on the CHAIN; take the CHAIN LASSO (inventory).
- Walk down.
- Use the CHAIN LASSO to get the SAWFISH BLADE (L).
- Place the 3 BOTTLES for a puzzle. Solution (M); take the WIG and BELLOWS (blue).
- Go to the Tunnel.
- Use the SAWFISH BLADE; take the WOODEN SPIKE (N).
- Place the WIG (O); take the WALL HANDLE 2/3 (P).
- Go to the Strange Wall.

- Take the FUNNEL (Q), EMPTY SACK (R), PAINTING PIECE (S), CROWN CENTERPIECE (T), and BOOKSTAND LOCK SLOT 2/2 (U).
- Use the BELLOWS on the glass; place the 2 BOOKSTAND LOCK SLOTS; open the glass and take the SKETCH PIECE 1/3 (V).
- Walk down.
- Use the WOODEN SPIKE (W); use the EMPTY SACK to get the TWO POUNDS OF SUGAR (X).
- Go to the Strange Wall.
- Place the TWO POUNDS OF SUGAR (Y); take the ROSE ORNAMENT 2/4 (Z).
- Return to the Warehouse.
- Place the CROWN CENTERPIECE (A); take the WALL HANDLE 3/3 (B).
- Place the PAINTING PIECE for a puzzle (C).
- Solution (D).
- Take the WOODEN CYLINDER (E).
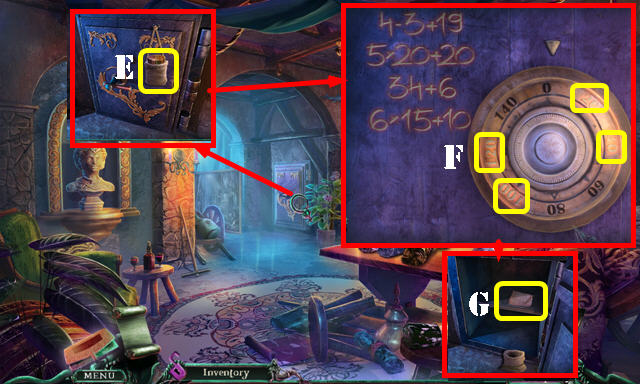
- Use the FINGERPRINTING KIT on the dial for a puzzle.
- Solution: 20, 120, 40, 100 (F).
- Open the safe; take the SKETCH PIECE (G).
- Go to the Tunnel.
- Place the WOODEN CYLINDER for a puzzle.
- Solution (H). Take the DECORATIVE WREATH.
- Go to the Strange Wall.
- Place the 3 WALL HANDLES for a puzzle.
- Solution: 3-2.
- Go to the Mortuary (@).
- Remove the sheet (I) for a HOP; play it to get the FORMALDEHYDE JAR.
- Take the SPONGE (J) and SKELETON ARM (K).
- Place the DECORATIVE WREATH; open the lid; take the SKETCH PIECE 2/3 (L).
- Return to the Warehouse.
- Touch the dragon; place the FUNNEL (M). Place the FORMALDEHYDE JAR in the funnel to get the DRAGON TORCH.
- Go to the Strange Wall.
- Use the DRAGON TORCH on the locks (N); open the chest; take the SKETCH PIECE 3/3 (O).
- Place the 3 SKETCH PIECES on the SKETCH PIECE (inventory).
- Solution: Px3, Q, Rx2, Sx2. You receive the COMPLETED PUZZLE.
- Go to the Mortuary.
- Place the COMPLETED PUZZLE on the door for a puzzle.
- Solution part 1 (T).
- Solution part 2 (1-6).
- Solution part 3 (7-11).
- Enter the Graveyard.
Chapter 6: The Graveyard
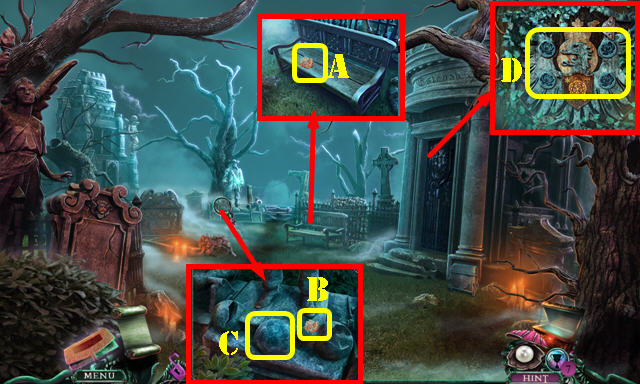
- Take the ROSE ORNAMENT 3/4 (A) and 4/4 (B).
- Take the CANNONBALL (C).
- Place the 4 ROSE ORNAMENTS (D); enter the Crypt.
- Use the SPONGE on the window (E) for a HOP; play it to get the MAP PIECE 1/3.
- Take the IRON RING (F) and MAP PIECE 2/3 (G).
- Remove the stones; take the ANCHOR (H).
- Walk down.
- Talk to Williams.
- Use the IRON RING to get the IRON BAR (I).
- Return to the Crypt.
- Use the IRON BAR on the lid; place the CANNONBALL (J). Enter the Secret Room.
- Use the SKELETON ARM to get the BRASS LETTERS (K).
- Move the carpet; place the ANCHOR (L) to activate a HOP; play it to get the URN.
- Walk down.
- Place the URN (M); open the box and take the SHIP’S WHEEL (N).
- Return to the Secret Room.
- Place the SHIP’S WHEEL; look at the photo. Take the FOLDED PAPER (O); open it for a puzzle.
- Solution (1-4). You receive the CODE PAPER.
- Place the CODE PAPER (P); turn dials to 285649. Take the frames and look at them for a puzzle.
- Solution: cherubs (green) and birds (yellow).
- Differences solution (Q). Take the MAP PIECE 3/3.
- Place the 3 MAP PIECES for a puzzle.
- Solution (R).
- Use the FINGERPRINTING KIT on the map. Take the MAP and NAIL.
- Go to the Graveyard.
- Put the pieces back in place (1-6).
- Place the BRASS LETTERS; take the SNUFF TOBACCO (S).
- Give the SNUFF TOBACCO (T) and then the MAP to Williams.
- Take the COMPASS NEEDLE (U).
- Remove the branches (V).
- Find the missing boards (W).
- Go to the Waterfall (X).
- Play the HOP (Y) to get the PEARL.
- Take the VINES (Z).
- Place the PEARL for a puzzle (Z1).
- Solution: A-B, C-D, B-A, E-F, G-H, H-I, J-H, H-K, K-L.
- Take the STONE SUN PIECE 1/3.
- Walk down.
- Place the VINES (L), then attach them to the column (M).
- Enter the Stone Structure.
- Move the leaves.
- Take the STONE SUN PIECE 2/3 (N).
- Use the NAIL on the clog (O); take the STONE SUN PIECE 3/3 (P).
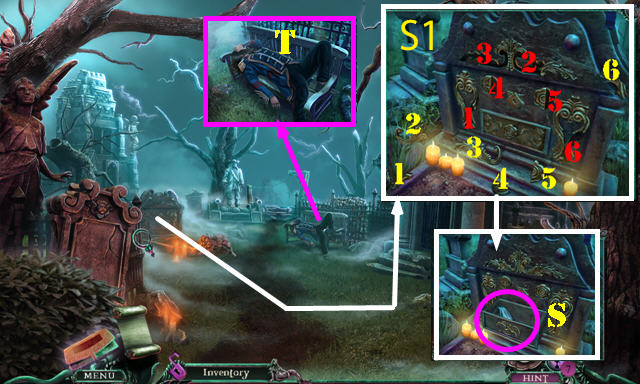
- Place the COMPASS NEEDLE and spin it for a puzzle (Q).
- Solution (1-8). Follow the arrows in this order: red, green, yellow, purple, and white.
- Take the STATUE EYE 1/2.
- Walk down.
- Place the 3 STONE SUN PIECES; take the STATUE EYE 2/2 (S).
- Go to the Waterfall.
- Place the 2 STATUE EYES (T).
- Go to the Waterfall Cave (U).
- Try to go forward. Talk to Francisco.
- Play the HOP (V) to receive the BROKEN WATCH.
- Open the BROKEN WATCH for a puzzle (inventory).
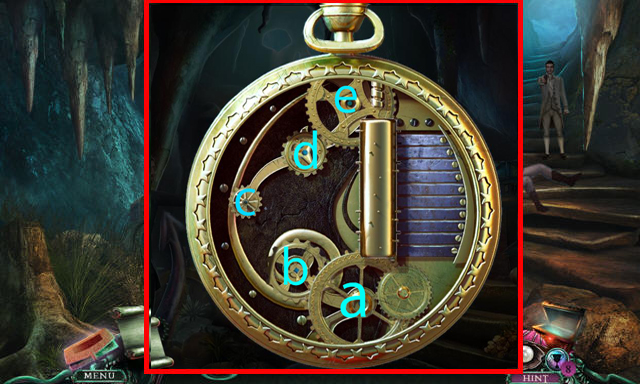
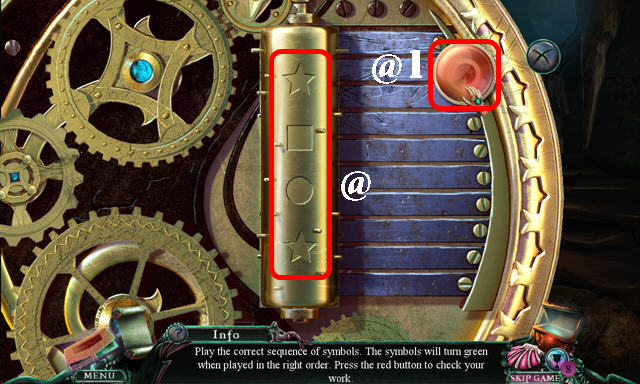
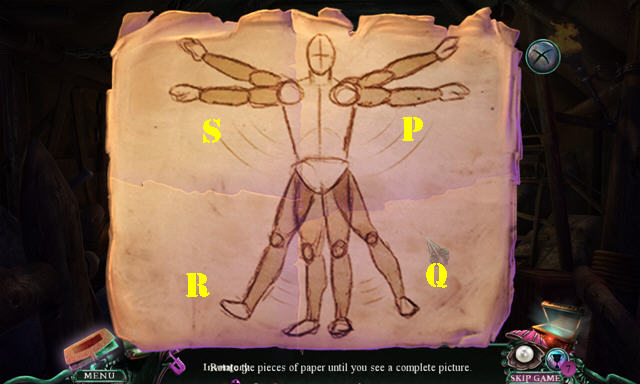
- Solution, part 1, swap B-C, E-D, and A-B.
- Solution, part 2: change symbols as shown (@) and press the button (@1). You receive the POCKET WATCH.
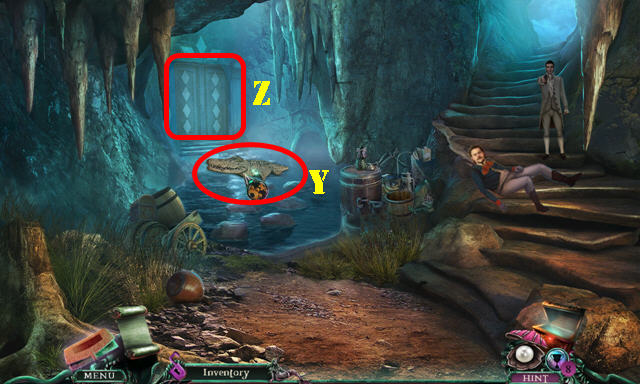
- Place the POCKET WATCH on the crocodile (Y).
- Go to the Treasure room (Z) to receive FRANCISCO’S RING.
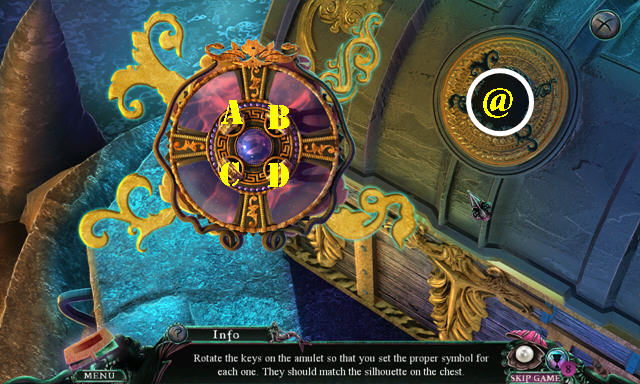
- Place FRANCISCO’S RING in the AMULET (inventory) to get the AMULET.
- Place the AMULET for a puzzle (@).
- Solution: Ax3-Bx4-Cx2-Dx1.
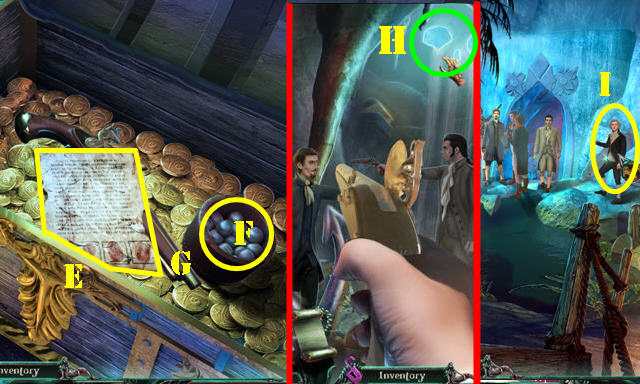
- Open the chest; take the INCRIMINATING CONTRACT (E).
- Open the lid; take the GOLDEN MUSKET BALLS (F).
- Place the GOLDEN MUSKET BALLS (G).
- Shoot the pistol (H).
- Give the INCRIMINATING CONTRACT to the Governor (I).
- Congratulations, you’ve completed Sea of Lies: Nemesis!


 Haunted Manor: Queen of Death Walkthrough, Guide, & Tips
 Delaware St. John Volume 2: The Town with No Name Walkthrough, Guide, & Tips
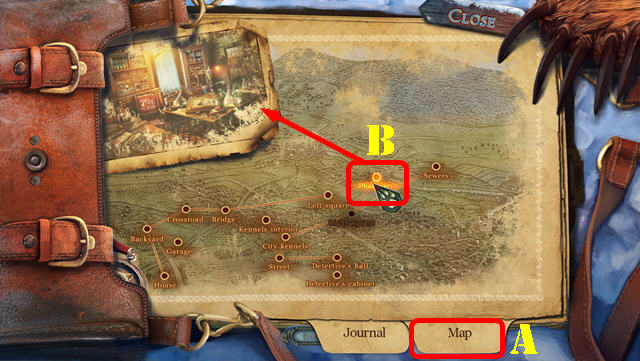 Fierce Tales: The Dog's Heart Walkthrough, Guide, & Tips
 Grim Façade: The Artist and the Pretender Walkthrough, Guide, & Tips
 Shattered Minds: Encore Walkthrough, Guide, & Tips