Nightmares from the Deep: The Siren's Call Walkthrough, Guide, & Tips
Nightmares from the Deep: The Siren’s Call Walkthrough

Welcome to the Nightmares from the Deep: The Siren’s Call Walkthrough
Face off against Davy Jones and his nightmares from the deep!
Whether you use this document as a reference when things get difficult or as a road map to get you from beginning to end, we’re pretty sure you’ll find what you’re looking for here.
This document contains a complete Nightmares from the Deep: The Siren’s Call game walkthrough featuring annotated screenshots from actual gameplay!
We hope you find this information useful as you play your way through the game. Use the walkthrough menu below to quickly jump to whatever stage of the game you need help with.
Remember to visit the Big Fish Games Forums if you find you need more help. Have fun!
This walkthrough was created by Nathaniel A., and is protected under US Copyright laws. Any unauthorized use, including re-publication in whole or in part, without permission, is strictly prohibited.
General Tips

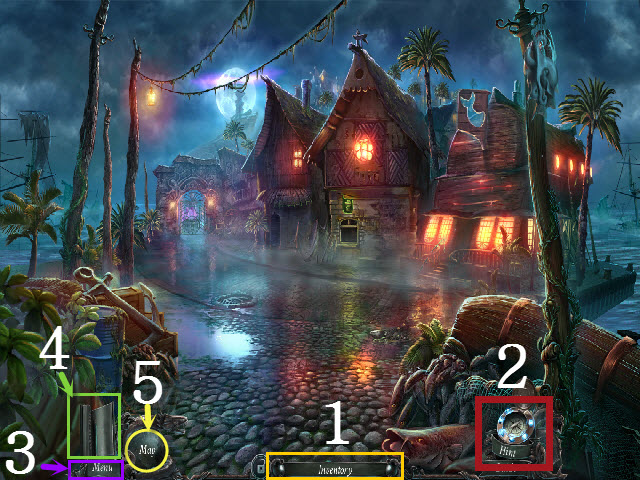
- This is the official guide for Nightmares from the Deep: The Siren’s Call.
- Hidden-object puzzles are referred to as HOPs in this guide. Items listed in yellow are hidden, or they require additional actions to locate. Interactive items in HOPs are color-coded.
- Sometimes a HOP or step will not become available until a journal entry has been added. Please refer to the guide to see if you have missed any of these steps. HOPs may be random; our lists may vary from yours.
- There are three difficulty levels: Casual, Advanced, and Expert. The difficulty level may be changed at any time.
- The Inventory items are stored here (1).
- The Hint button will offer hints and allow you to skip puzzles, but will take some time to recharge (2).
- Selecting the Menu button will bring up the Options, Help, and allow you to exit the game (3).
- The Diary will show your current tasks and clues (4).
- Early on you will be given an in-game map. This may be used to fast travel from location to location (5).
Chapter 1: An Unexpected Guest

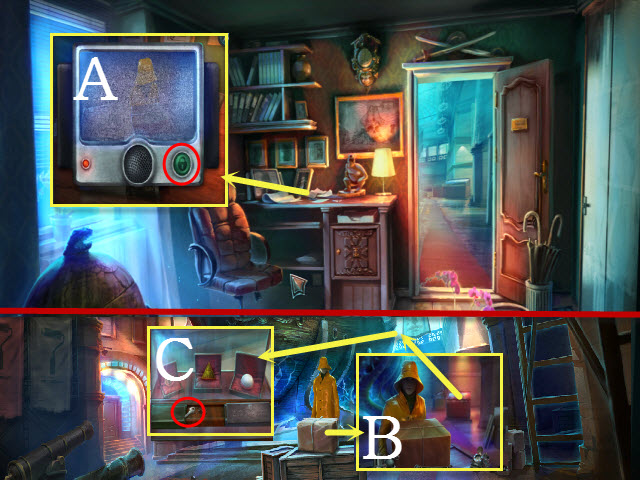
- Examine the desk and select the screen; press the green button (A).
- Walk forward to the Hall.
- Talk to the Fisherman; examine the display case (B).
- Take the OFFICE KEY (C).
- Walk down to your Office.

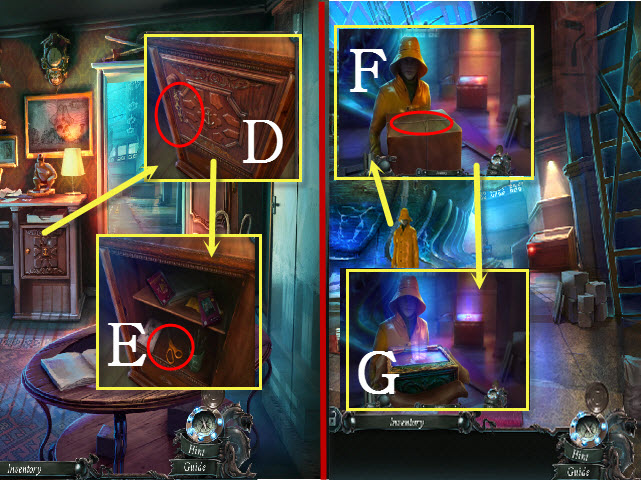
- Examine the cupboard door; place the OFFICE KEY in the lock and turn it (D).
- Examine the book; take the SCISSORS (E).
- Walk forward to the Hall.
- Examine the Fisherman; use the SCISSORS on the rope (F).
- Select the rope and open the package (G).

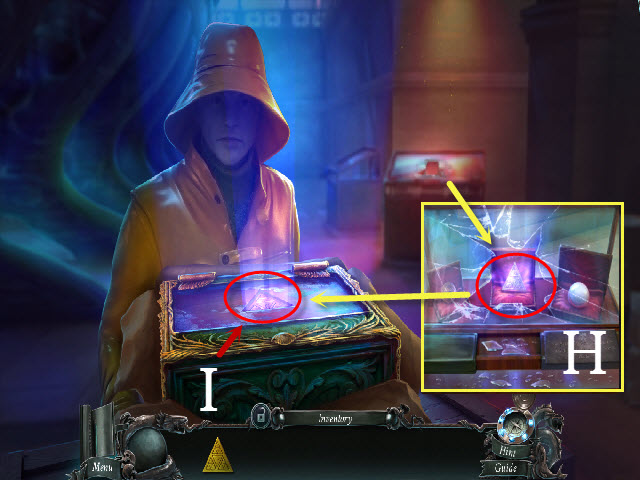

- Examine the display case; take the TRIANGULAR PENDANT (H).
- Place the TRIANGULAR PENDANT in the engraving to activate a puzzle (I).
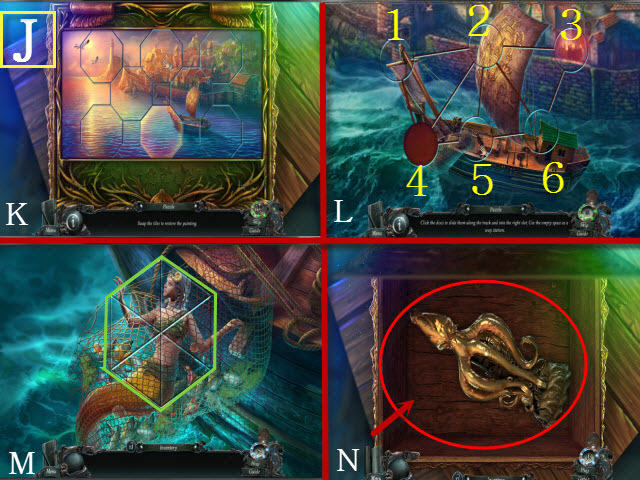
- Please see the screenshot for the solutions (J).
- Phase 1: Arrange the tiles so they create a complete picture (K).
- Phase 2: Slide the tiles to recreate the image; solution: 4, 5, 2, 1, 4, 5, 2, 4, 5, 2, 3, 6, 5, and 4 (L).
- Phase 3: Swap adjacent titles to create a complete picture (M).
- Select the handle; take the idol (N).

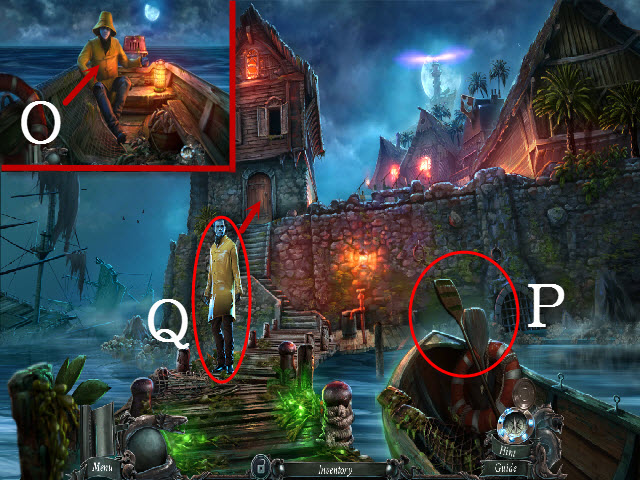
- Talk to the Fisherman (O).
- Take the OAR (P).
- Select the Fisherman; walk forward to the Corridor (Q).

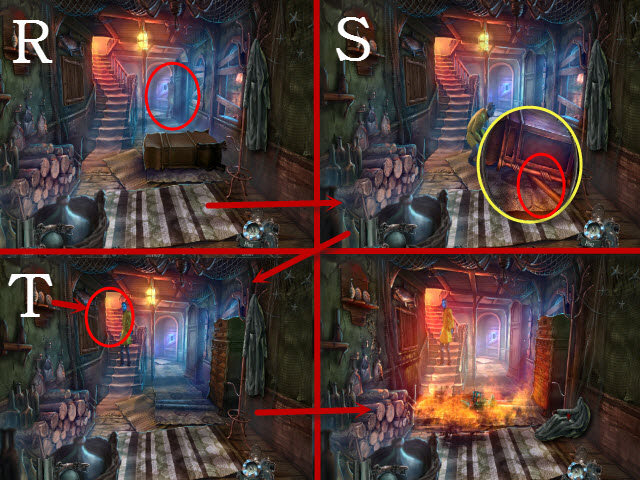
- Talk to the Fisherman and move the dresser twice (R).
- Examine the second dresser; place the OAR underneath it and select the OAR (S).
- Walk upstairs to the Bedroom (T).

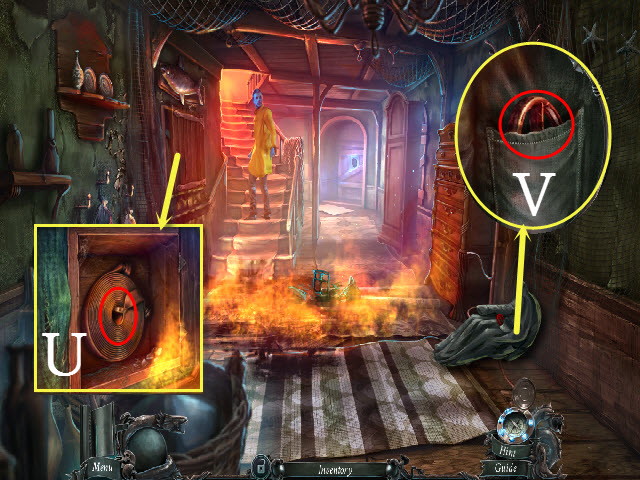
- Examine the cupboard and open it; use the OAR to get the HOSE (U).
- Examine the coat; take the VALVE (V).
- Walk down.

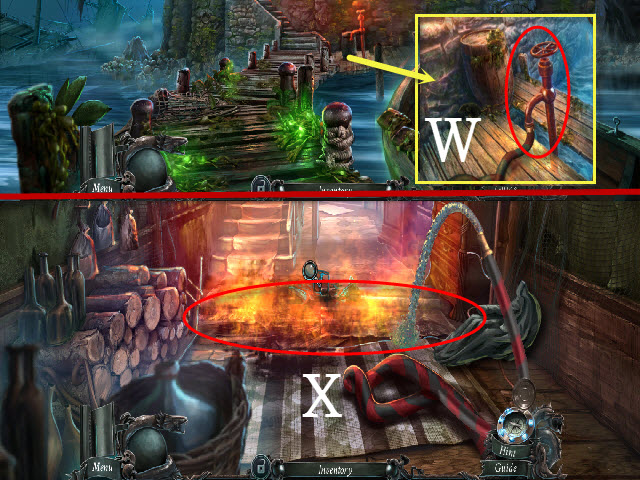
- Examine the pump; place the HOSE and the VALVE on the pump (W).
- Turn the valve.
- Walk forward.
- Select the hose; drag it around the flames to extinguish the fire (X).
- Walk upstairs to the Bedroom.

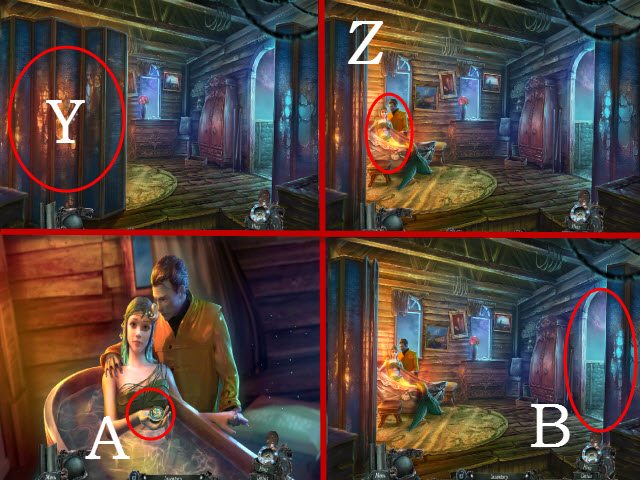
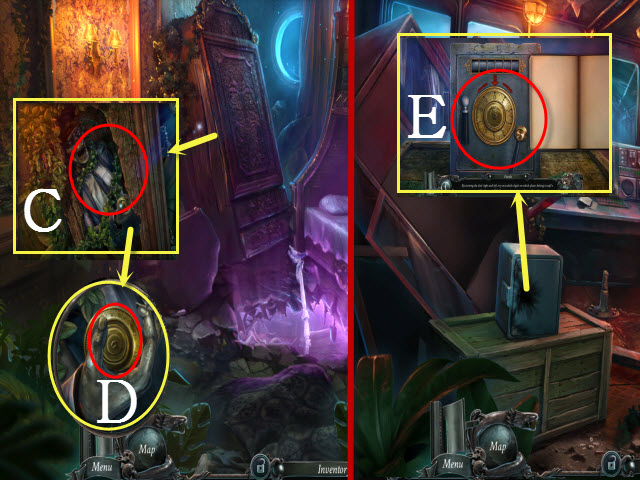
- Move the curtain (Y).
- Talk to Calliope (Z).
- Take the 1/12 GOLDEN FISH (A).
- Examine the balcony (B).
- Examine the Fisherman; select the antiques to activate a HOP.
Chapter 2: Boats Away

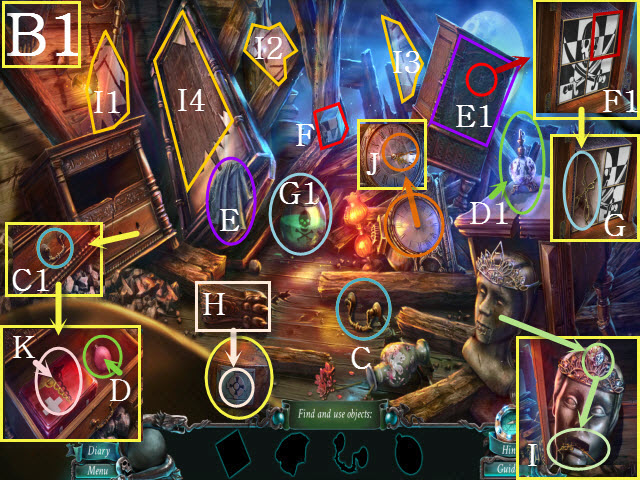
- Find the listed items (B1).
- Take the drawer handle (C); place it on the drawer and open it (C1).
- Take the pump (D) and place it on the perfume bottle; select the bottle (D1).
- Take the cloth (E); use it on the cupboard and open it (E1).
- Take the checkerboard piece (F); place it on the checkerboard and swap the tiles to create a whole image (F1).
- Take the tongs (G); use the tongs to get the cross (G1).
- Move the wood; place the cross in the recess and take the tiara’s jewel (H).
- Place the tiara’s jewel on the crown and take the clock hands (I).
- Place the glass shards (I1-I3) on the mirror (I4).
- Place the clock hands on the clock and set the time to 4:15; take the caduceus (J).
- Place the caduceus in the engraving to get the SMELLING SALTS (K).

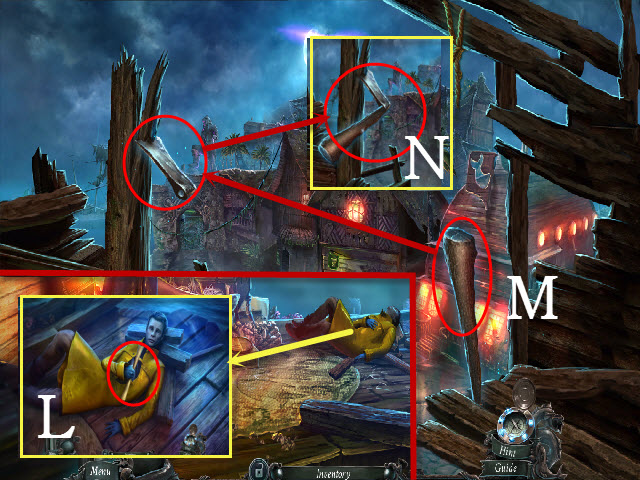
- Examine the Fisherman; use the SMELLING SALTS on him and take the Map (L).
- Examine the balcony; place the handle with the blade (M); take the HATCHET (N).
- Walk downstairs.

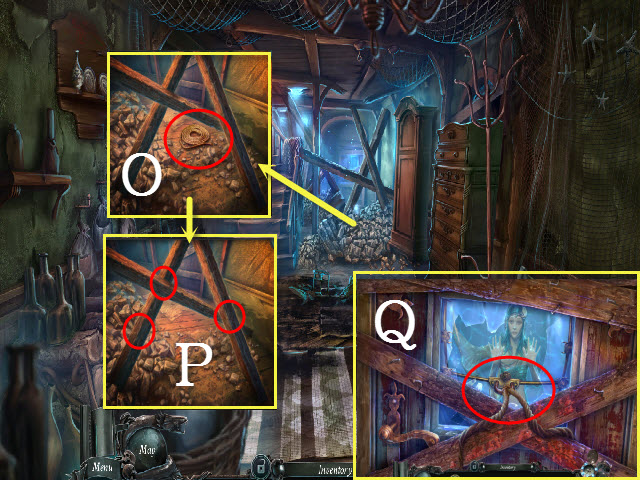
- Examine the rubble; move the rubble and take the ROPE (O).
- Examine the beams and use the HATCHET on them (P).
- Walk forward to the Front Door.
- Place the rope on the boards; select the rope (Q).

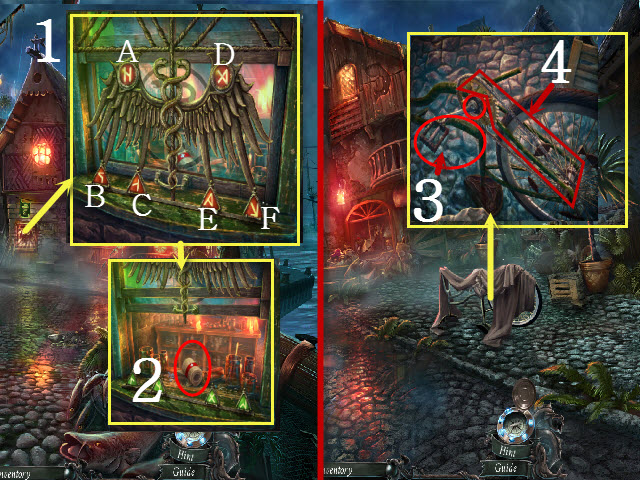
- Examine the window; select the buttons: Bx2, Cx2, Ex1, and Fx2 (1).
- Open the window; take the BANDAGES (2).
- Walk forward to the Archway.
- Examine the bike; move the blanket.
- Select the bolt; take the PEDAL (3) and the CHAIN (4).
- Examine the gate.

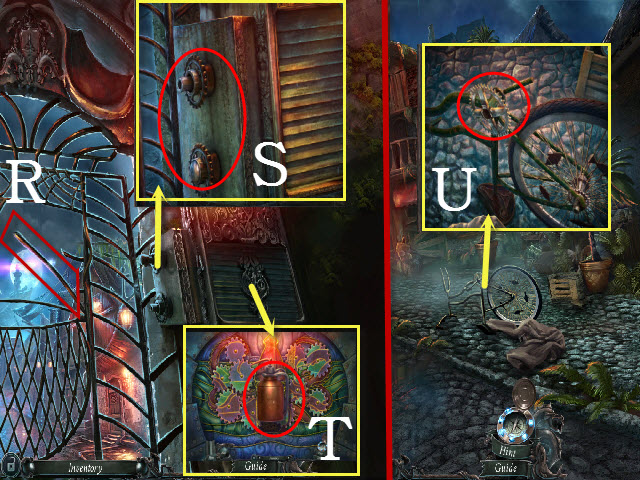
- Take the ROD (R).
- Examine the gear; place the PEDAL and CHAIN on it (S).
- Select the pedal.
- Examine the mechanism and take the OILCAN (T).
- Walk down.
- Examine the bike; use the OILCAN on the gear and take the GEAR (U).
- Walk down to the Square.

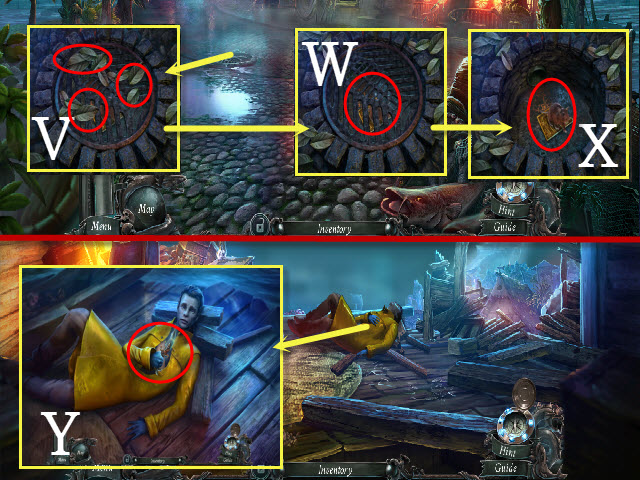
- Examine the manhole cover; move the three leaves (V).
- Use the ROD on the manhole cover (W).
- Select the mouse and take the 1/2 MECHANISM PLATE (X).
- Return to the Bedroom.
- Select the Fisherman; give him the BANDAGES and take the DAGGER (Y).
- Return to the Square.

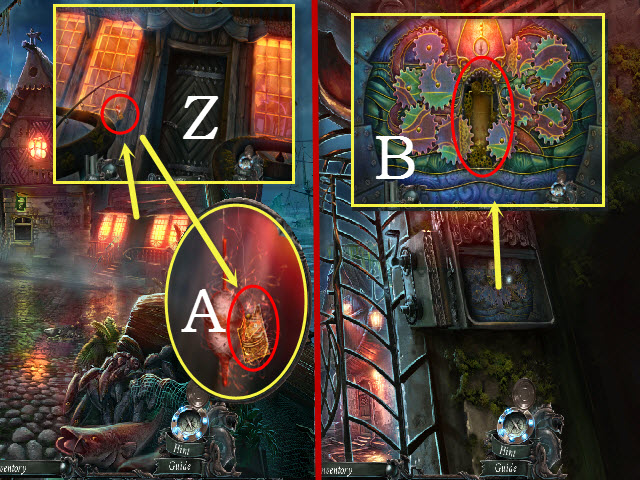
- Examine the Tavern and select the fishing lure; use the DAGGER on it (Z) and take the 2/2 MECHANISM PLATE (A).
- Return to the Archway and look at the gate.
- Examine the mechanism and press the button; place the 2/2 MECHANISM PLATE and the GEAR on it to activate a puzzle (B).

- To solve the puzzle, arrange the cogs so that they complete a whole image.
- Please see the screenshot for the solution (C).
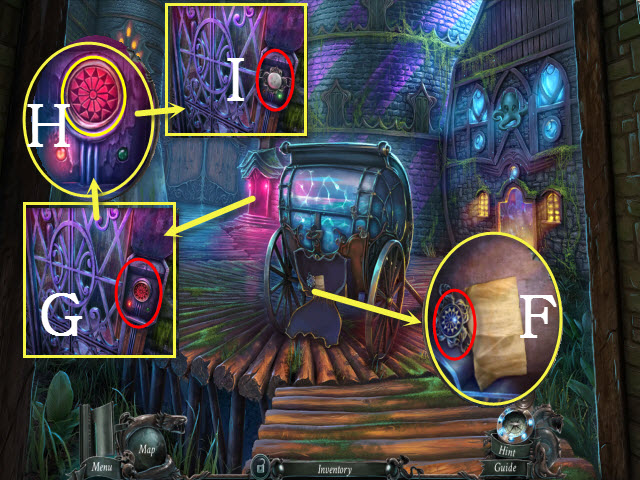
- Enter the Promenade; select the carriage.

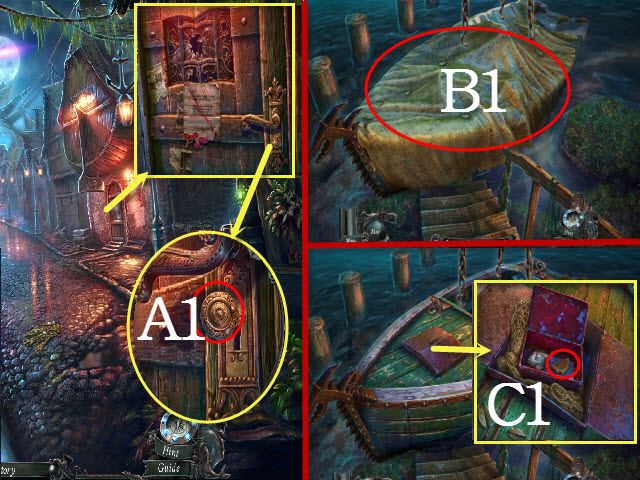
- Examine the door; look at the handle and select the knob to get the COIN (A1).
- Walk forward to the Gate; walk left to the Dilapidated Harbor.
- Select the sheet three times and move the bar (B1).
- Examine the doors and open them.
- Move the net and open the suitcase; move the fishbone and take the CIRCLE HALF (C1).
- Return to the Archway; examine the stall to activate a HOP.

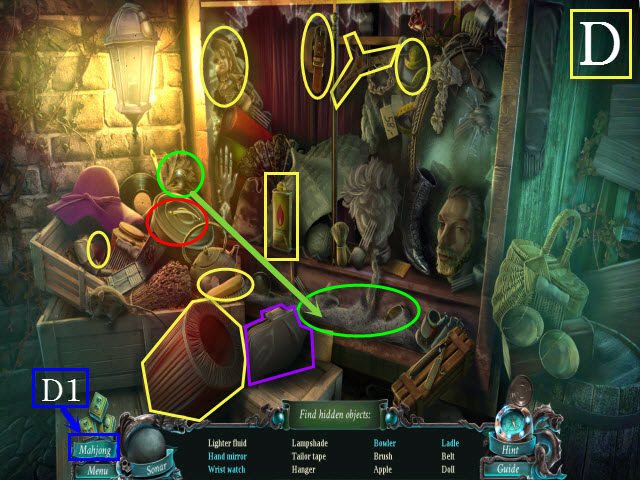
- Play the HOP to receive the LIGHTER FUEL (D). Alternatively, you may choose to play a game of Mahjong instead (D1).
- Return to the Gate.

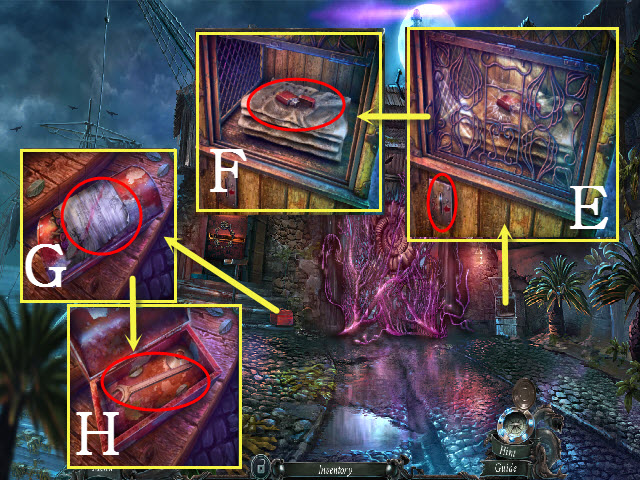
- Examine the vending machine; place the COIN in the slot (E).
- Open the grate; use the LIGHTER FUEL on the lighter to receive the LIGHTER (F).
- Examine the toolbox; look at the note (G).
- Open the toolbox; move the tool and take the WRENCH (H).
- Return to the Bedroom.


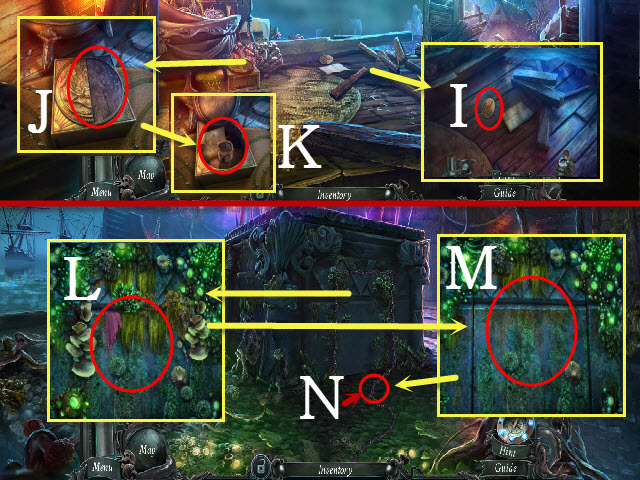
- Examine the floor; look at the note and pick up the REBEL SYMBOL (I).
- Examine the box and place the CIRCLE HALF on the engraving; open the box (J).
- Take the GUNPOWDER (K).
- Return to the Promenade; walk left to the Statue.
- Examine the base and select the wall; use the DAGGER three times on it (L).
- Place the GUNPOWDER on the wall (M).
- Use the LIGHTER on the gunpowder (N).
- Examine the wall to activate a puzzle.

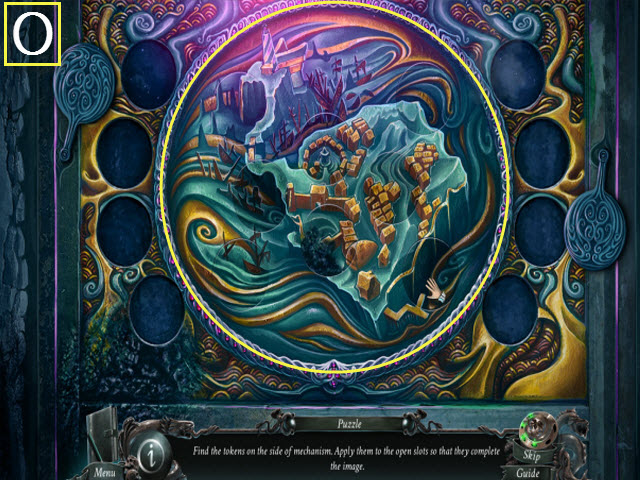
- To solve the puzzle, place the tokens in the correct slots to complete the image.
- Please see the screenshot for the solution (O).
- Enter the Secret Chamber.

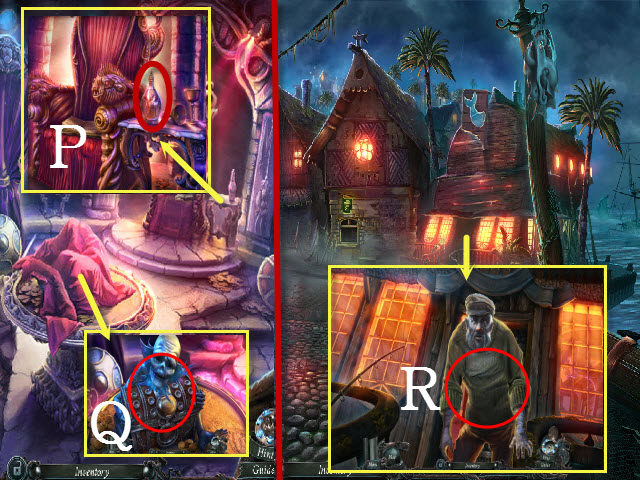
- Examine the throne; take the BOTTLE OF RUM (P).
- Move the sheet and examine the chest; talk to the goblin (Q).
- Return to the Square.
- Examine the tavern and select the door; give the sailor the BOTTLE OF RUM (R).
- Enter the Tavern; examine the bar to activate a HOP.

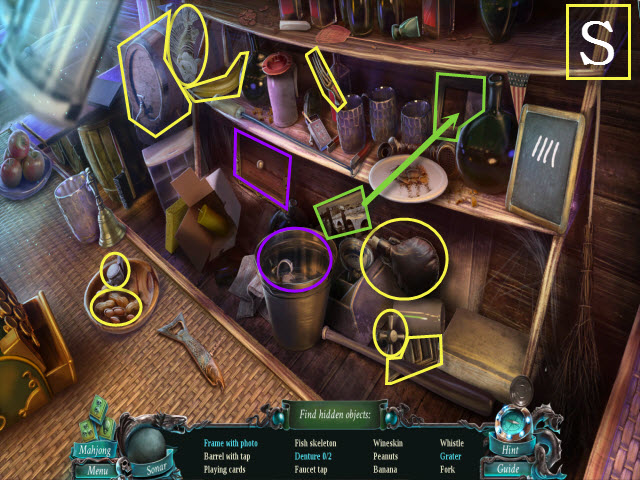
- Play the HOP to receive the BANANA (S).

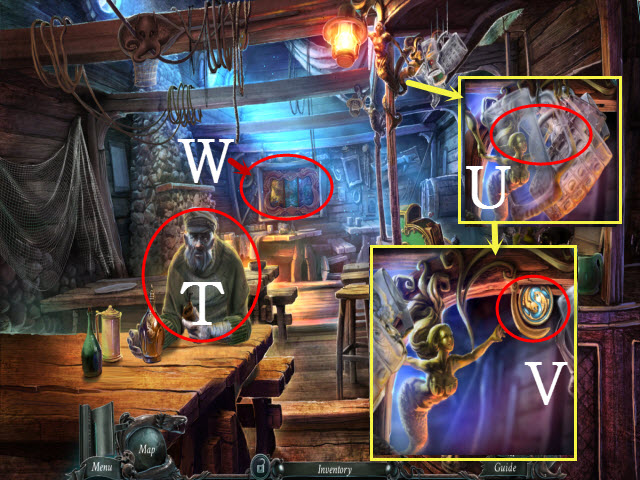
- Talk to the sailor and you will receive the PHOTO (T).
- Examine the mugs; move them (U).
- Move the statuette and take the 2/12 GOLDEN FISH (V).
- Examine the mirror to activate a puzzle (W).

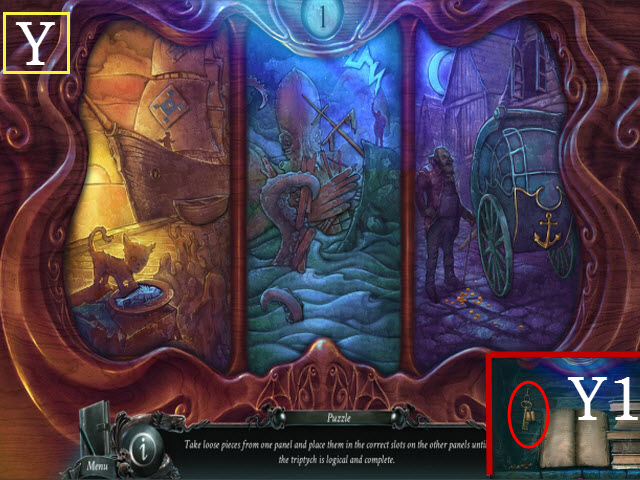
- To solve the puzzle, place the pieces in the correct slots to complete the image.
- Please see the screenshot for the solution (Y).
- Take the NEWSPAPER KEY (Y1).
- Return to the Promenade.

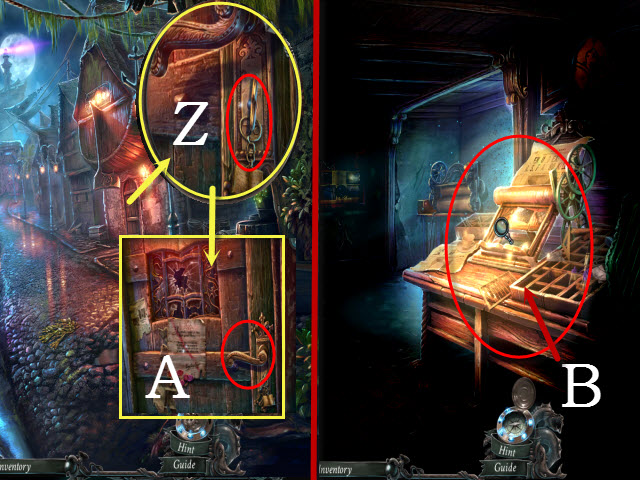
- Examine the door and select the lock; use the NEWSPAPER KEY on it (Z).
- Turn the key and select the handle; enter the Newspaper Office (A).
- Use the LIGHTER on the scene and select the desk to activate a HOP (B).

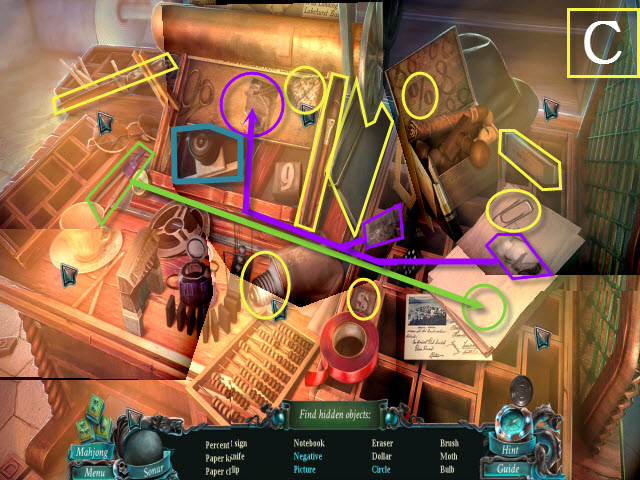
- Play the HOP to receive the LIGHT BULB (C).

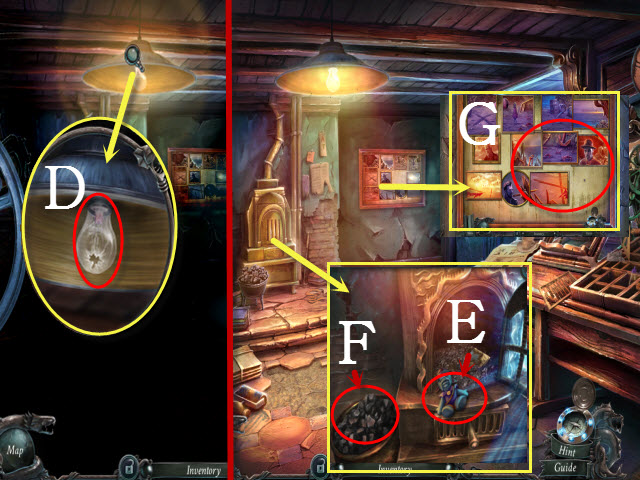
- Select the light and move the bulb; place the LIGHT BULB in the slot (D).
- Examine the furnace and open the door; move the soot and select the toy to receive the 1/3 TOY SOLDIER (E).
- Take the COAL (F).
- Examine the board; place the PHOTO on it to activate a puzzle (G).

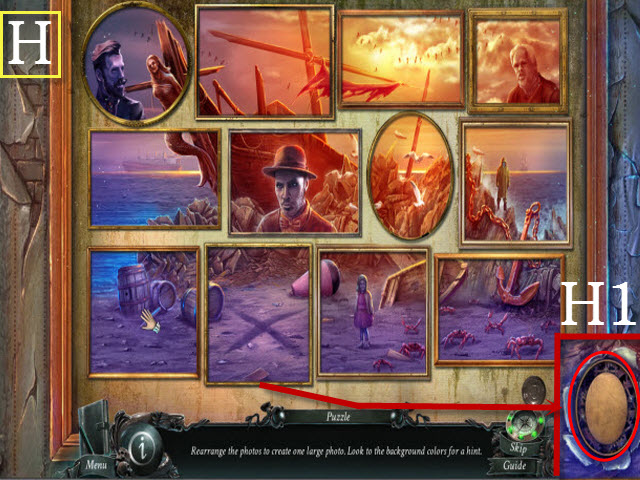
- To solve the puzzle, arrange the photographs to form a cohesive image.
- Please see the screenshot for the solution (H).
- Place the REBEL SYMBOL in the slot (H1).
- Walk downstairs to the Hideout.

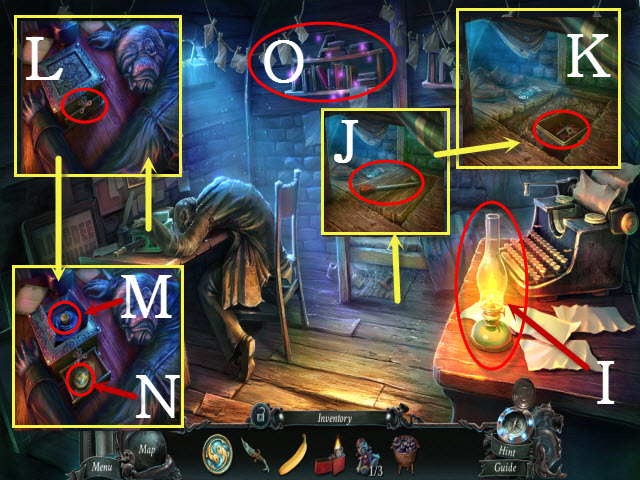
- Use the LIGHTER on the lantern (I).
- Move the sheet and look under the bed; move the two cobwebs and take the CRANE LEVER (J).
- Move the two floorboards and the dirt; open the tin and take the WIND-UP KEY (K).
- Examine the corpse and move the arm; place the WIND-UP KEY in the box slot and turn it (L).
- Take the SIGNET RING (M) and the 3/12 GOLDEN FISH (N).
- Examine the shelf to activate a HOP (O).

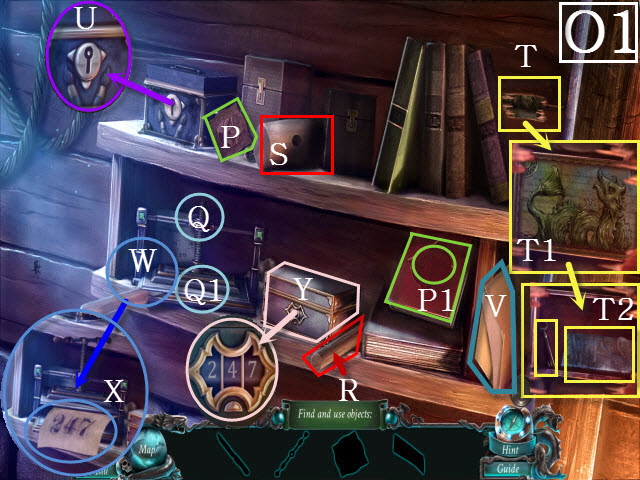
- Find the listed items (O1).
- Place the book symbol (P) on the book and take the handle (P1).
- Place the handle on the letterpress; select the handle and take the knife (Q).
- Use the knife on the hammer handle and take it (R); on the hammer head to receive the hammer (S).
- Move the books and use the hammer on the crack (T); solve mini-game (T1) to get the fonts and the paint box key (T2).
- Use the paint box key on the lock to get the printing ink (U).
- Take the blank paper (V).
- Place the fonts, the printing ink, and the blank paper on the letterpress (W); select the letterpress and look at the code (X).
- Enter 247 to get the BOLTS (Y).
- Return to the Secret Chamber.

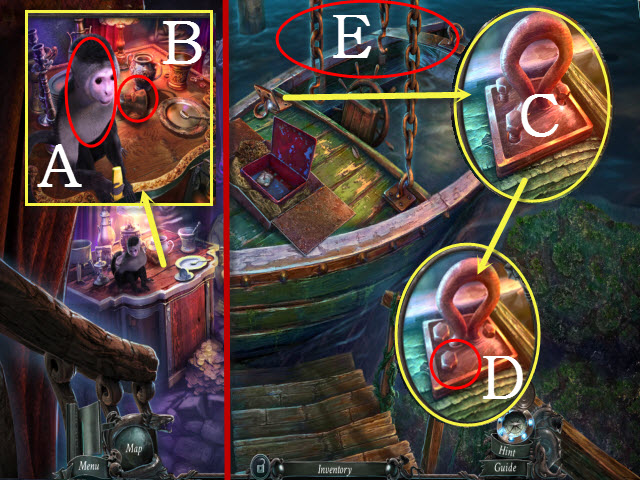
- Examine the monkey; give him the BANANA (A).
- Take the FIREPROOF GLOVE (B).
- Return to the Dilapidated Harbor.
- Examine the ring; move it and place the BOLTS on it (C).
- Use the WRENCH on the three bolts (D).
- Select the three chains (E).
- Walk down; examine the controls to activate a puzzle.

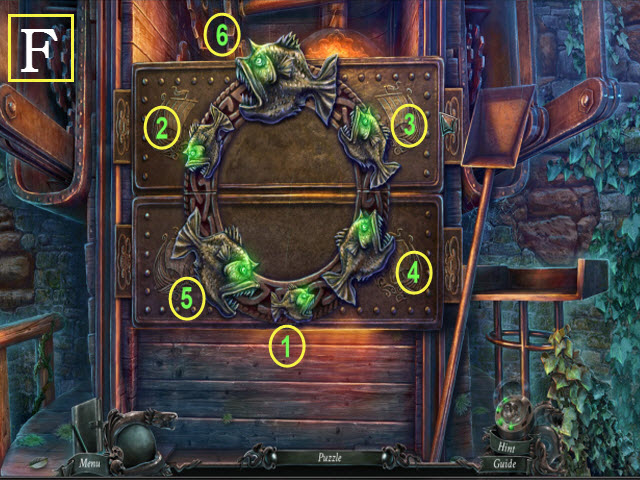
- To solve the puzzle, choose the fish in the proper sequence: 1-6 (F).

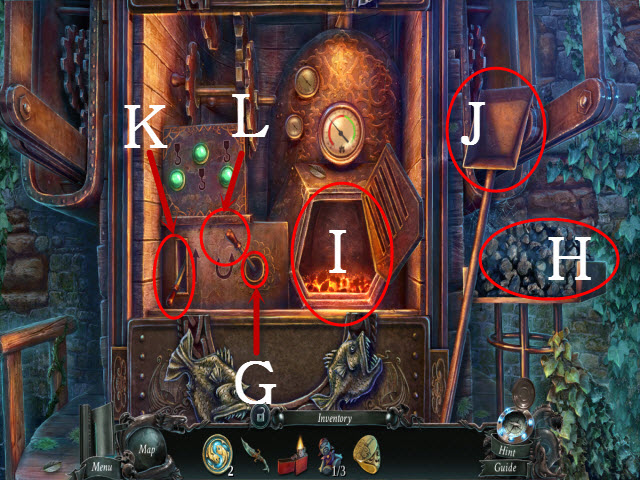
- Examine the controls; place the CRANE LEVER in the slot (G).
- Place the COAL on the shelf (H).
- Use the FIREPROOF GLOVE on the furnace (I).
- Use the shovel with the coal (J).
- Pull the left lever (K).
- Pull the right lever (L).
- Walk forward to the Street.
Chapter 3: Beneath the Town

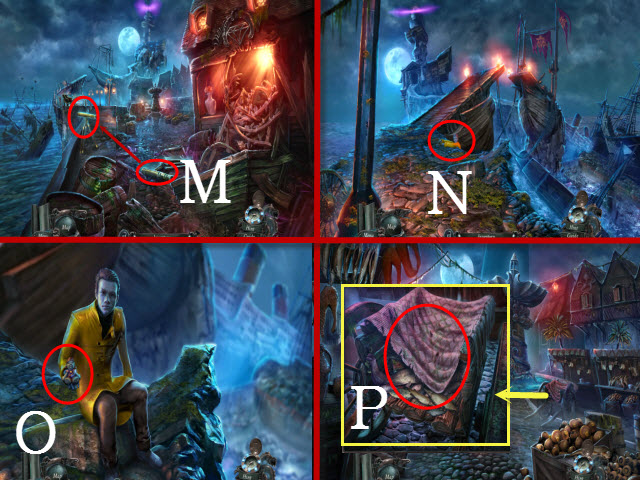
- Select the lens; examine the telescope (M).
- Examine the cliff; select the Fisherman (N).
- Talk to the Fisherman; take the 2/3 TOY SOLDIER (O).
- Walk down and then walk forward to the Fountain.
- Examine the cart; take the THICK CLOTH (P).
- Walk down.

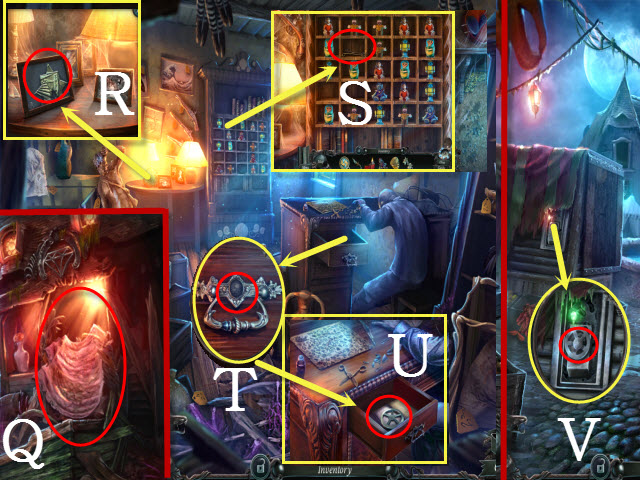
- Place the THICK CLOTH on the boards; enter the Pawn Shop (Q).
- Examine the table; move the glass and the photo.
- Take the 1/3 PRINTING MATRIX PIECES (R).
- Examine the cubbies; take the TONGS (S).
- Examine the desk and look at the drawer; place the SIGNET RING in the slot (T) and select the handle.
- Take the STEEL WHEEL (U).
- Return to the Fountain.
- Examine the switch; place the STEEL WHEEL on it and turn the wheel to activate a HOP (V).

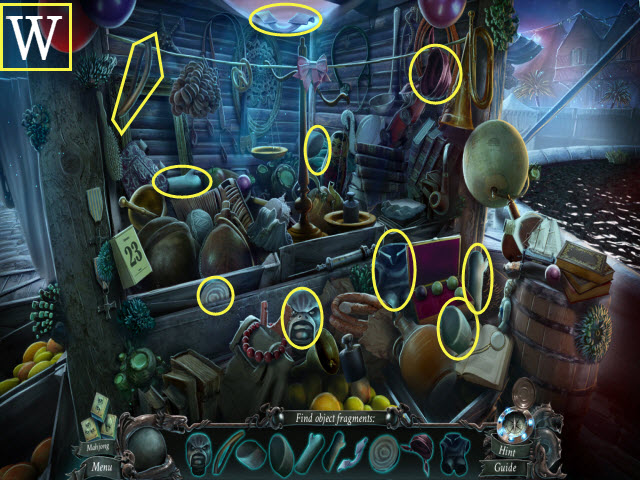
- Play the HOP.
- You will receive the 3/3 TOY SOLDIER (W).

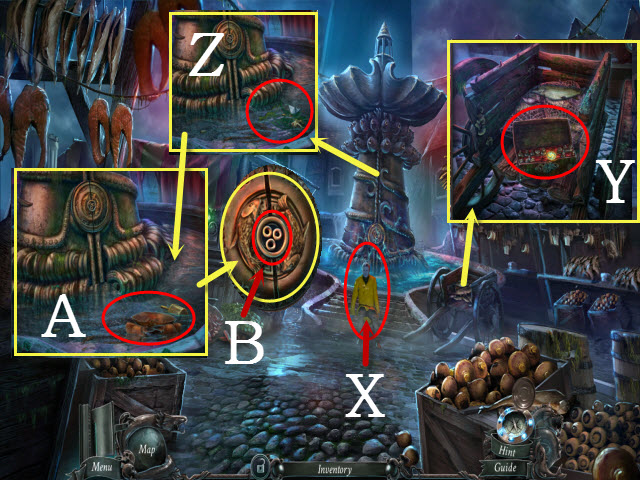
- Talk to the Fisherman (X).
- Examine the cart and move the three fish; use the DAGGER on the chest to get the 4/12 GOLDEN FISH (Y).
- Examine the fountain; move the moss and select the key (Z).
- Use the TONGS to get the KEY (A).
- Examine the lock; place the KEY in it and turn it (B).
- Examine the steam vents to activate a puzzle.

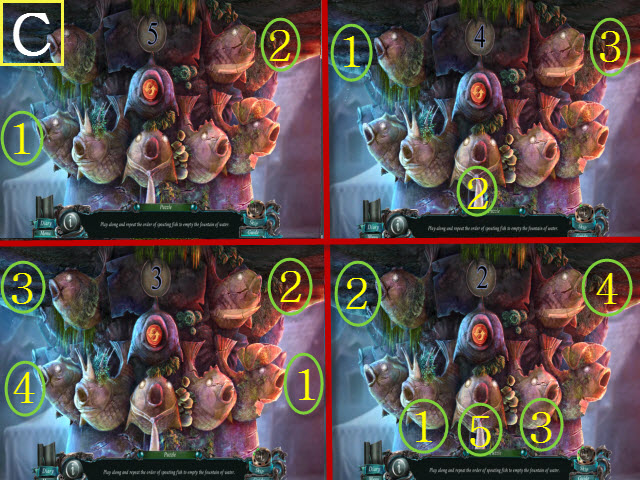

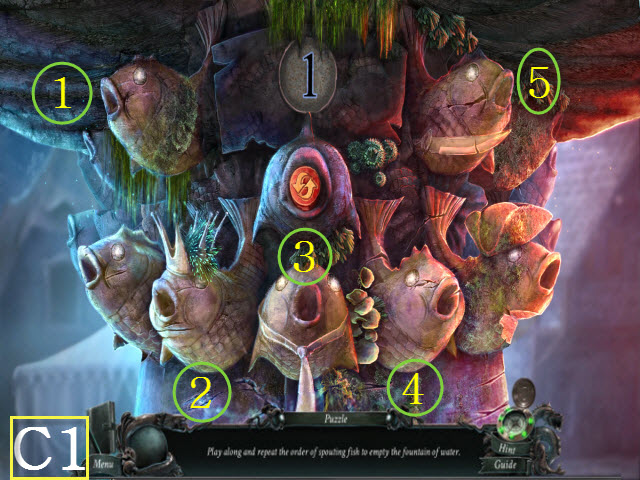
- To solve the puzzle, select the fish and play a game of Simon Says; there are five phases.
- Please see the screenshots for the solutions (C and C1).
- Return to the Pawn Shop.

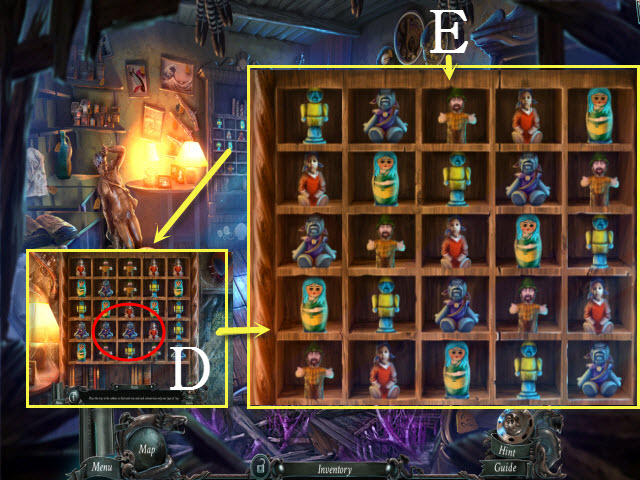
- Examine the cubbies; place the 3/3 TOY SOLDIER on the shelf to activate a puzzle (D).
- To solve the puzzle, arrange the toys so that each row has only one type of toy per row vertically or horizontally.
- Please see the screenshot for the solution (E).
- Examine the doorway to activate a HOP.

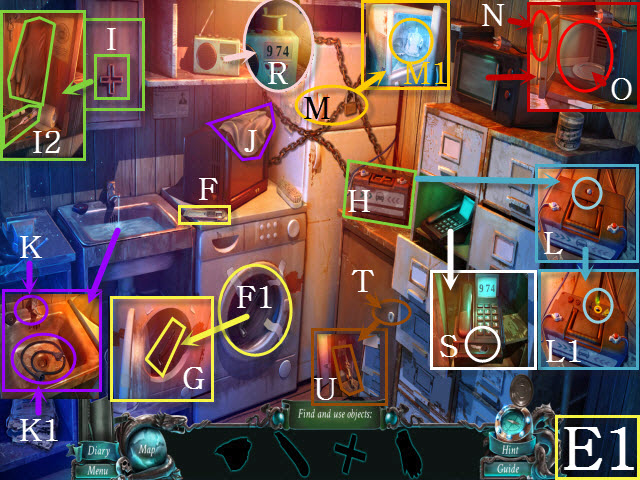
- Find the listed items (E1).
- Take the cutter (F); use the cutter on the tape (F1) and open the door to take the wrench (G).
- Take the red cross (H); place it in the slot (I) and take the rubber gloves and the syringe (I2).
- Take the rag (J); turn off the faucet (K) and use the rag to get the extension cord (K1).
- Use the wrench on the bolt (L); open the lid and use the syringe on the hole to get the syringe with acid (L1).
- Use the syringe with acid on the lock (M); use the rubber gloves on the ice and take the ice block (M1).
- Place the extension cord in the outlet (N) and open the microwave; place the ice block in it and close the door to get the crank (O).
- Place the crank on the radio and turn it to get the 974 clue (R); dial 974 on the phone and take the key (S).
- Use the key on the cabinet (T) lock to get the BLOWTORCH (U).
- Return to the Fountain.

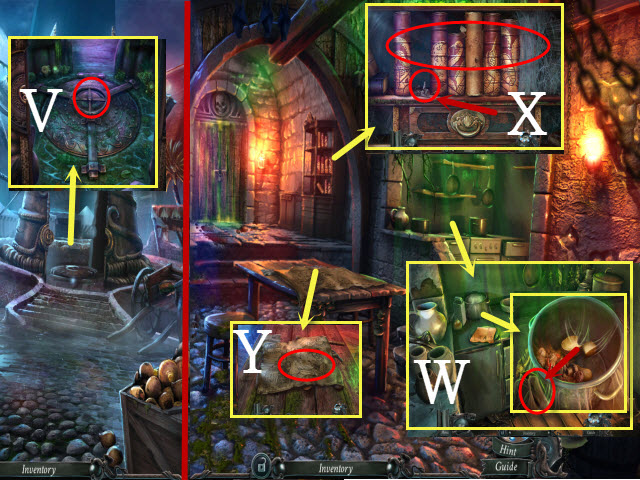
- Examine the hatch; move the moss and use the BLOWTORCH on the hatch to open it (V).
- Enter the Underground.
- Look at the stove; move the pot lid and examine the pot.
- Select all of the items in the pot; touch the satchel to receive the CASH REGISTER BUTTONS (W).
- Examine the books and move the cobwebs and the old paper; take the BLUNDERBUSS LOCK (X).
- Examine the table; select the map (Y).

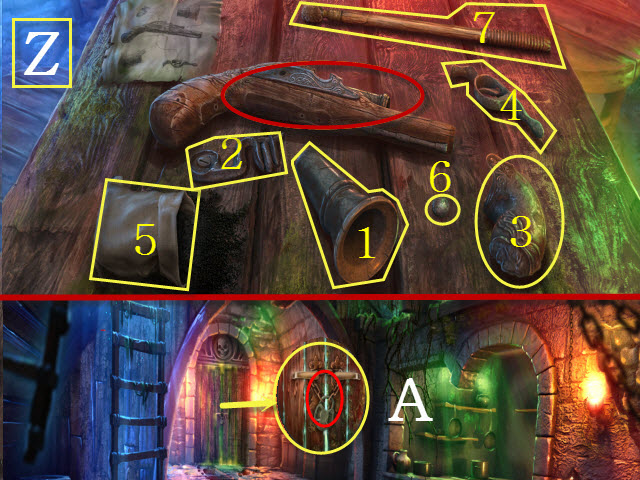
- Examine the table; place the BLUNDERBUSS LOCK on it.
- Assemble the blunderbuss; place each object in this order: 1-7 (Z).
- Take the BLUNDERBUSS PISTOL.
- Examine the door; use the BLUNDERBUSS PISTOL on the padlock (A).
- Enter the Catacombs; examine the boat to activate a HOP.

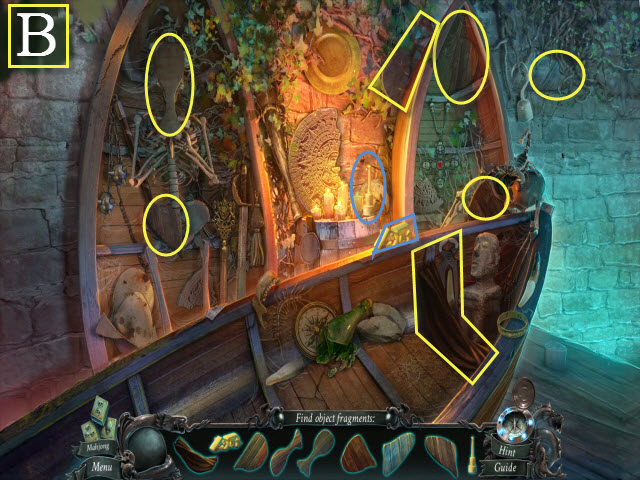
- Play the HOP to receive the BELLOWS (B).
Chapter 4: The Labyrinth

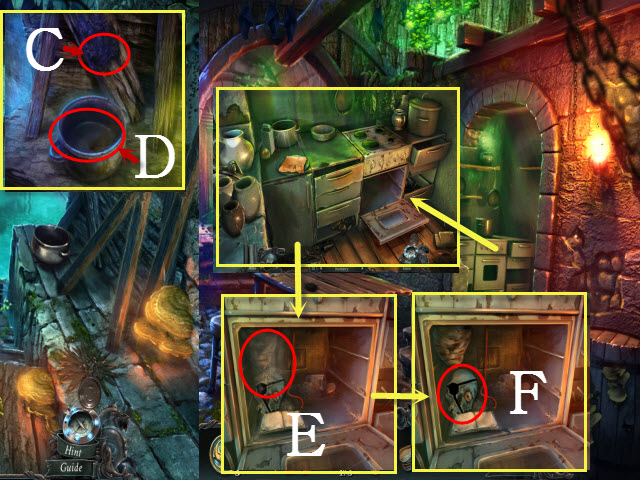
- Examine the pot and use the DAGGER on the tar (C); take the POT OF HARD TAR (D).
- Walk down.
- Examine the oven; open it and select the hornet nest.
- Use the BELLOWS on the hornets (E).
- Take the ONE-EYED SKULL (F).
- Return to the Catacombs.
- Examine the door; place the ONE-EYED SKULL on it to activate a puzzle.

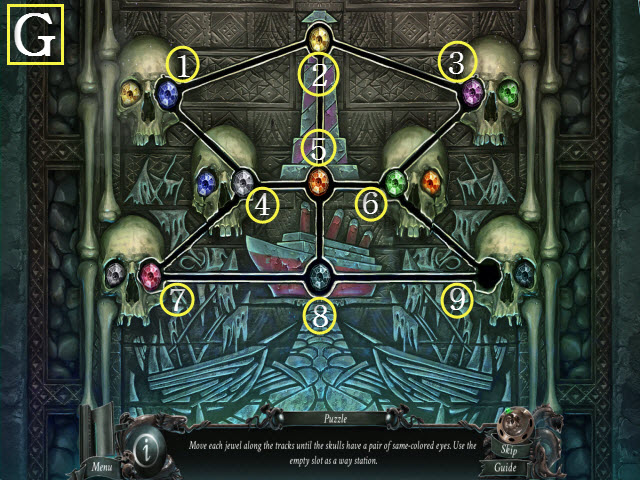
- To solve the puzzle, slide the gems into the corresponding colored slots.
- Please see the screenshot for the solution: 8, 7, 4, 1, 2, 3, 6, and 5 (G).
- Enter the Labyrinth.

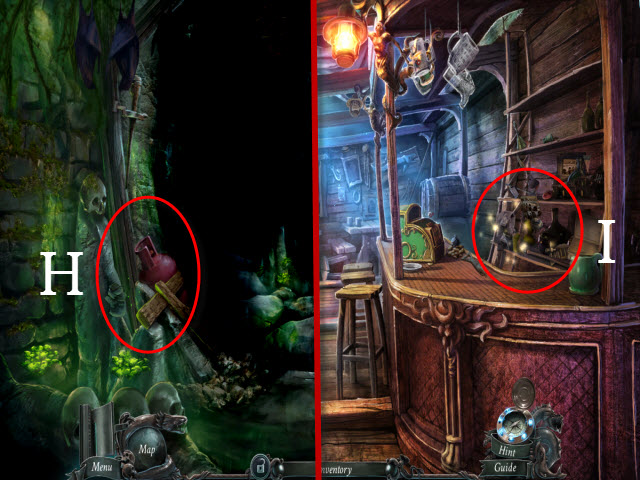
- Move the two planks to receive the GAS CYLINDER (H).
- Return to the Tavern.
- Examine the bar to activate a HOP (I).

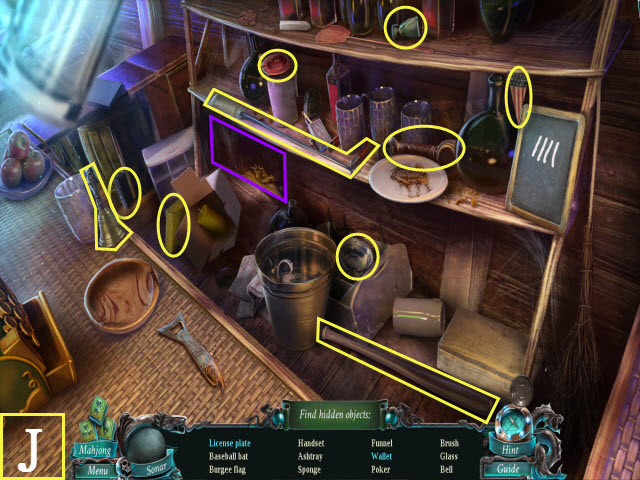
- Play the HOP to receive the BASEBALL BAT (J).
- Examine the register; place the CASH REGISTER BUTTONS on it to activate a puzzle.

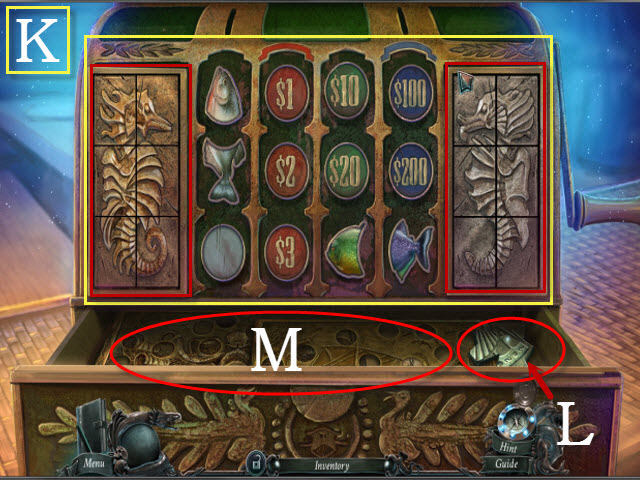
- To solve the puzzle, arrange like buttons vertically so that the images on the left and right are correct.
- Please see the screenshot for the solution (K).
- Take the 2/3 PRINTING MATRIX PIECES (L) and the DECODER PLATES (M).
- Return to the Archway; examine the stall to activate a HOP.

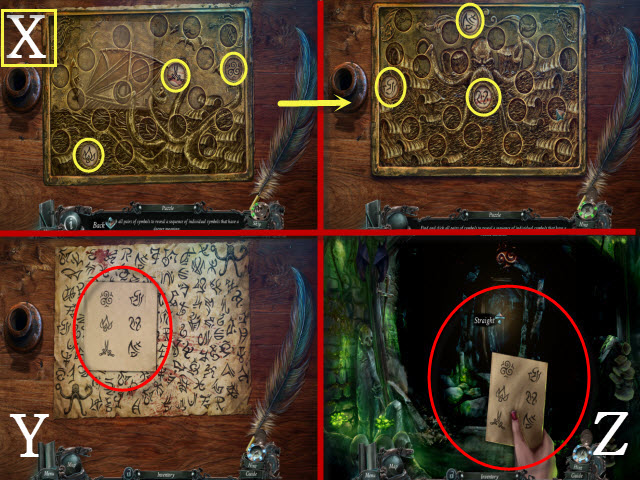
- Play the HOP to receive the COMB (O).
- Return to the Street.

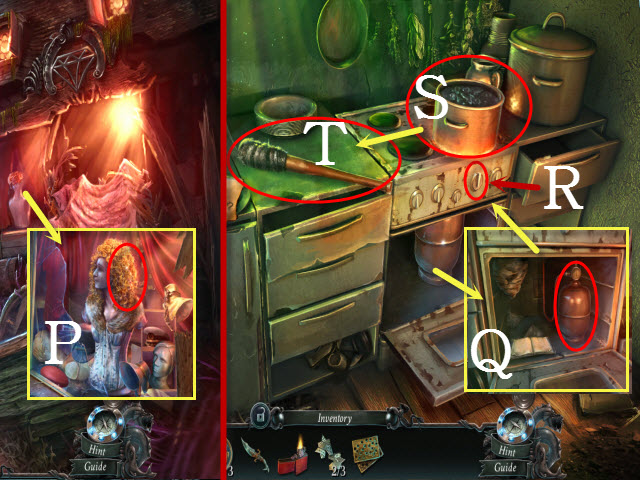
- Examine the mannequin; use the COMB on the mannequin’s hair to get the HAIR BRISTLE (P).
- Return to the Underground and examine the oven.
- Place the GAS CYLINDER in the oven; select the cylinder (Q) and turn the oven dial (R).
- Use the LIGHTER on the burner and place the POT OF HARD TAR on it; use the BASEBALL BAT on the pot (S).
- Place the HAIR BRISTLE with the baseball bat and then use the LIGHTER on it to receive the TORCH (T).
- Return to the Labyrinth.

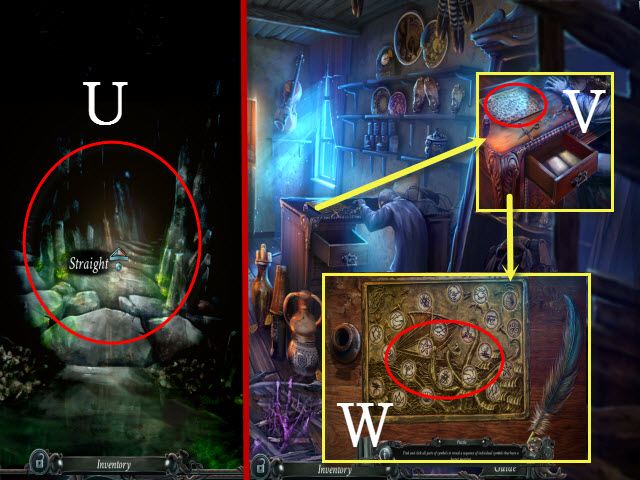
- Use the TORCH on the scene (U).
- Walk forward.
- Return to the Pawn Shop.
- Examine the desk; look at the map (V).
- Place the decoder plates on the map to activate a puzzle (W).


- To solve the puzzle, choose matching pairs until only three symbols remain (X).
- Take the STRANGE CODE (Y).
- Return to the Labyrinth.
- Use the STRANGE CODE on the scene and follow the symbols to navigate the tunnels (Z).
- Order: straight, right, straight, left, right, and straight.
Chapter 5: The Shipwreck Cemetery

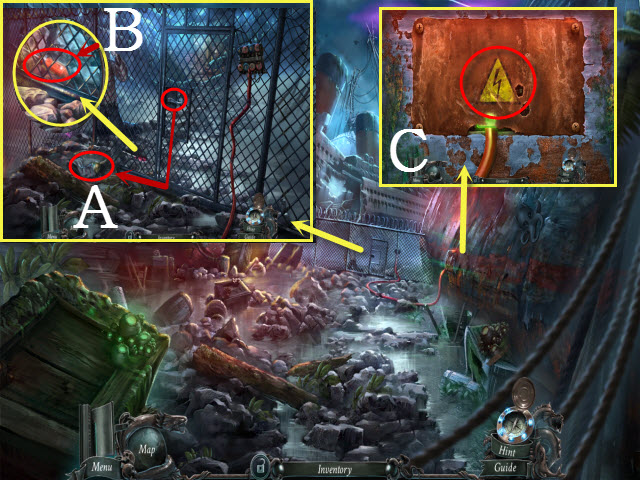
- Examine the gate; select the handle to get the HOOK (A).
- Examine the fence; use the HOOK to get the SCREWDRIVER (B).
- Examine the circuit breaker; use the SCREWDRIVER on the screws to activate a puzzle (C).

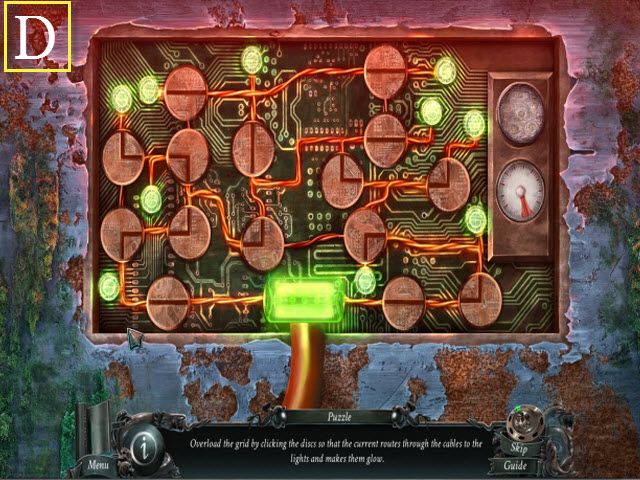
- To solve the puzzle, turn the knobs so that all the green lights are lit.
- Please see the screenshot for the solution (D).
- Examine the gate; open the door and enter the Foyer.

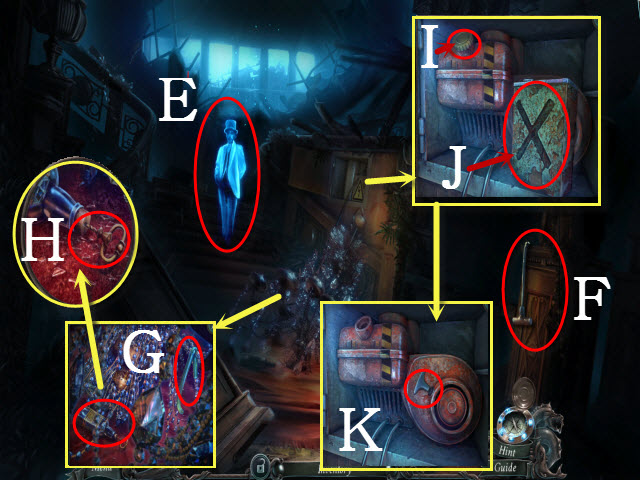
- Talk to the ghost (E).
- Take the STARTER CORD (F).
- Examine the floor and take the TUBE (G); look at the bottle and take the CORKSCREW (H).
- Examine the panel; remove the nozzle (I) and take the EMPTY FUEL CAN (J).
- Remove the old starter cord (K).
- Walk down.

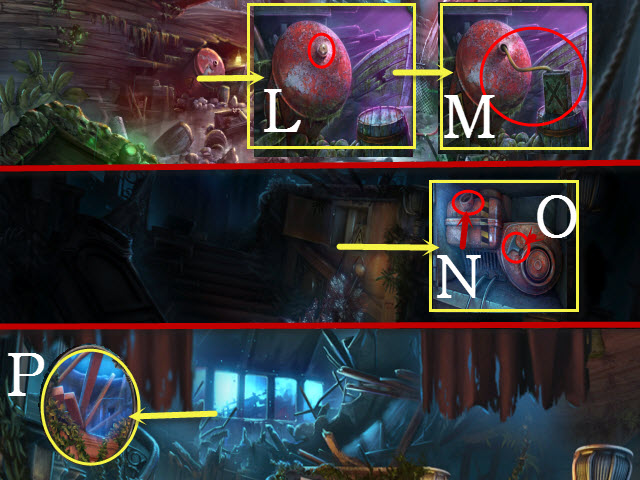
- Examine the tank; use the CORKSCREW on the cork (L).
- Place the TUBE and the EMPTY FUEL CAN next to the tank; pick up the FULL FUEL CAN (M).
- Walk forward.
- Examine the generator and use the FULL FUEL CAN on the nozzle (N); place STARTER CORD in the slot and then pull it three times (O).
- Examine the beams (P); select the stairs to activate a HOP.

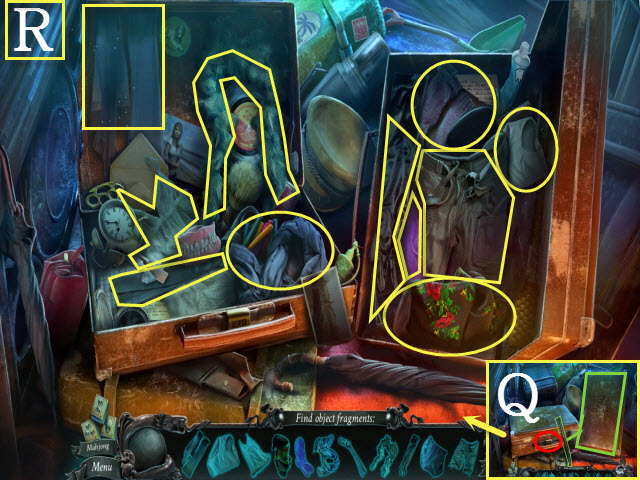
- Select the suitcase handle; use the crowbar to open the suitcase (Q).
- Play the HOP to receive the IMPROVISED ROPE (R).

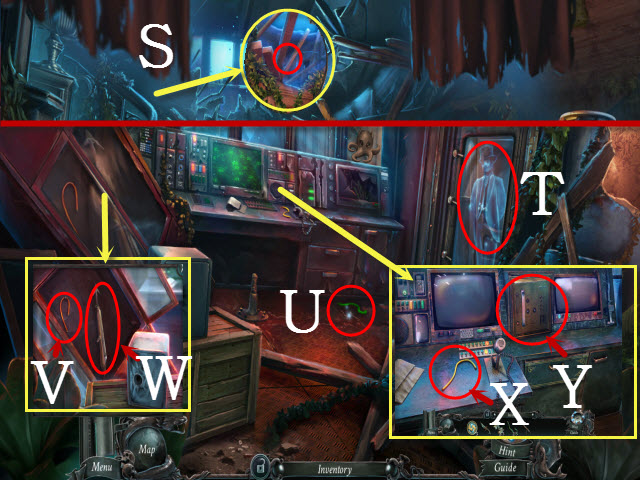
- Examine the boards; use the IMPROVISED ROPE on them (S).
- Walk up to the Bridge.
- Talk to the ghost (T).
- Pick up the 1/3 CABLES (U).
- Examine the display case and open the doors; take the 2/3 CABLES (V) and the HARPOON GUN (W).
- Examine the console and take the 3/3 CABLES (X).
- Open the console panel and look inside it; place the 3/3 CABLES to activate a puzzle (Y).

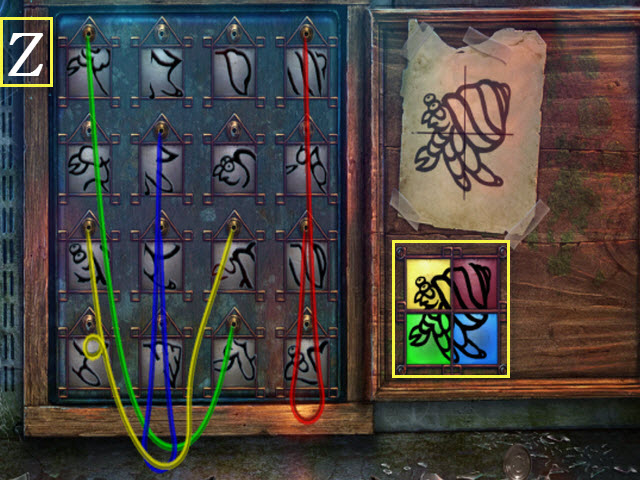
- To solve the puzzle, place the wires in various slots to complete the image.
- This puzzle is random; please see the screenshot for one possible solution (Z).

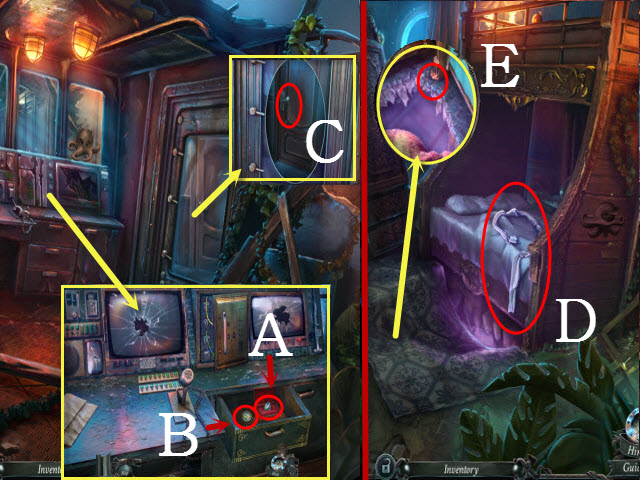
- Open the jewelry box; take the DIAMOND (A) and the 5/12 GOLDEN FISH (B).
- Examine the door and use the DIAMOND on the glass; move the glass and then turn the handle (C).
- Enter the Passenger Cabin.
- Talk to the ghost.
- Move the sheet; take the SHEET ROPE (D).
- Move the rug and examine the hole; hang the SHEET ROPE from the beam (E).
- Enter the Captain’s Cabin.

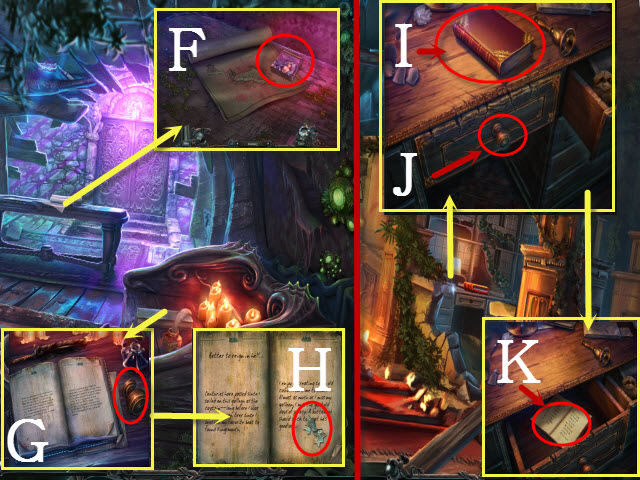
- Examine the table; take the STONE PICTURE (F).
- Examine the desk; take the KNOB (G).
- Open the book; examine it and take the 3/3 PRINTING MATRIX PIECES (H).
- Return to the Foyer.
- Examine the desk; take the RED BOOK (I) and place the KNOB in the slot (J).
- Turn the knob and look at the book (K).
- Return to the Passenger Cabin; examine the bed to activate a puzzle.

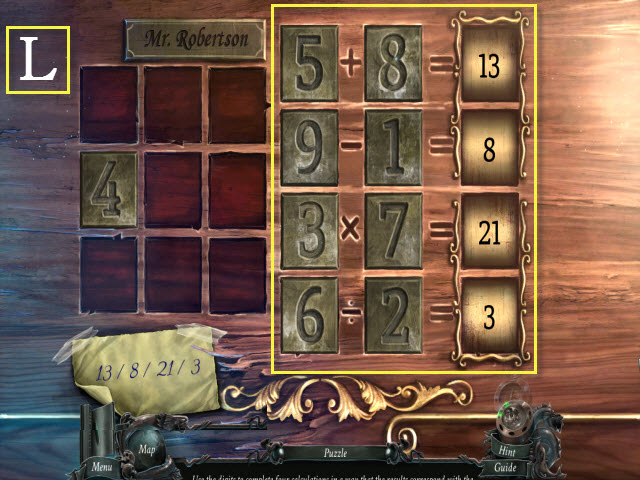
- To solve the puzzle, arrange the tiles so the mathematical equations are true.
- Please see the screenshot for the solution (L).
- Examine the compartment to activate a HOP.

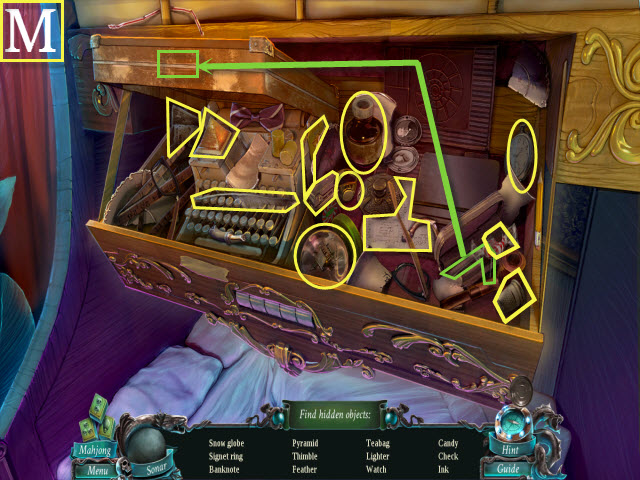
- Use the lockpick on the suitcase (green).
- Play the HOP to receive the PRINTING INK (M).
- Return to the Underground.
- Examine the bookshelf; place the RED BOOK on it to activate a puzzle.

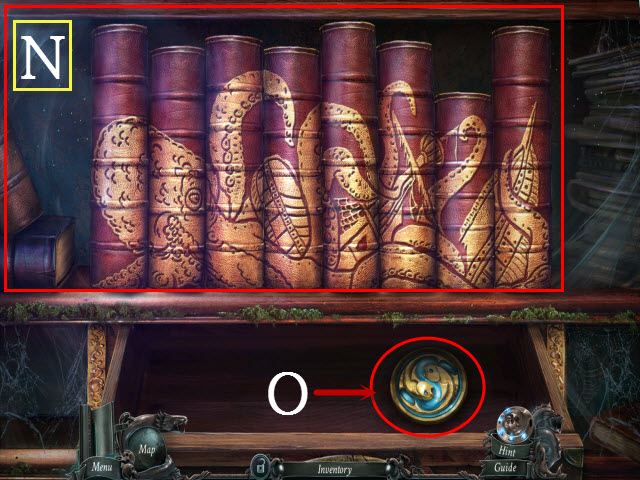
- To solve the puzzle, arrange the books to form a complete image.
- Please see the screenshot for the solution (N).
- Take the GOLDEN FISH 6/12 (O).
- Return to the Fountain; examine the stall to activate a HOP.

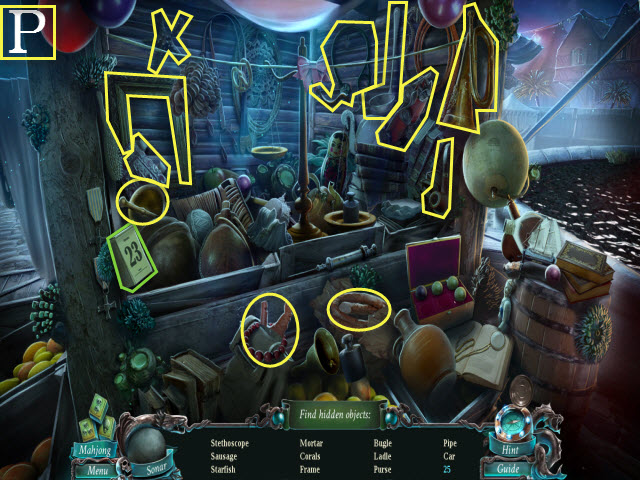
- Play the HOP to receive the STETHOSCOPE (P).
- Return to the Hideout.
- Examine the bulletin board; move the notes and place the 3/3 PRINTING MATRIX PIECES on it to activate a puzzle.

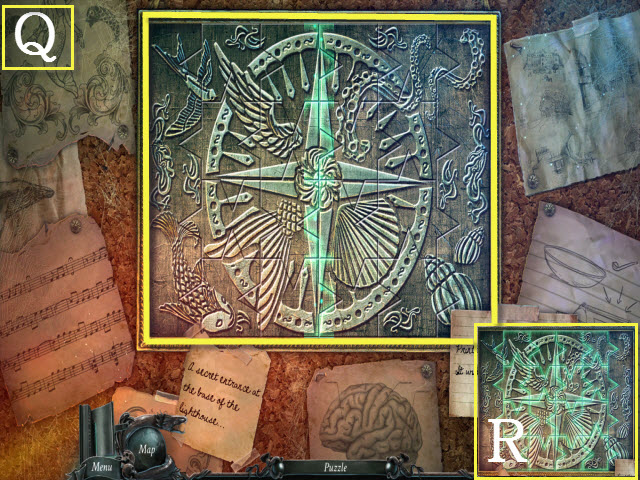
- To solve the puzzle, arrange the pieces to form a complete image.
- Please see the screenshot for the solution (Q).
- Take the MATRIX (R).
- Walk down; examine the table to activate a HOP.

- Play the HOP.
- You will receive the INSULATING TAPE (S).

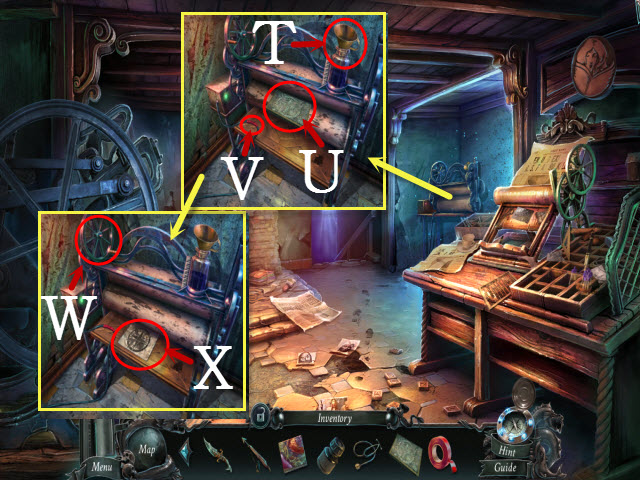
- Examine the press; use the PRINTING INK (T) on the nozzle and place the MATRIX (U) and the INSULATING TAPE on it (V).
- Turn the valve (W) and take the RING’S PATTERN (X).
- Return to the Statue.
- Examine the junk to activate a HOP.

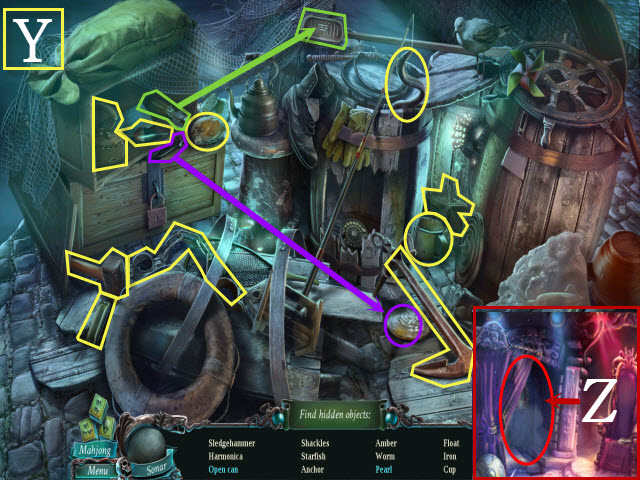
- Play the HOP to receive the SLEDGEHAMMER (Y).
- Enter the Secret Chamber.
- Move the statue; examine the painting and place the STONE PICTURE on it to activate a puzzle (Z).

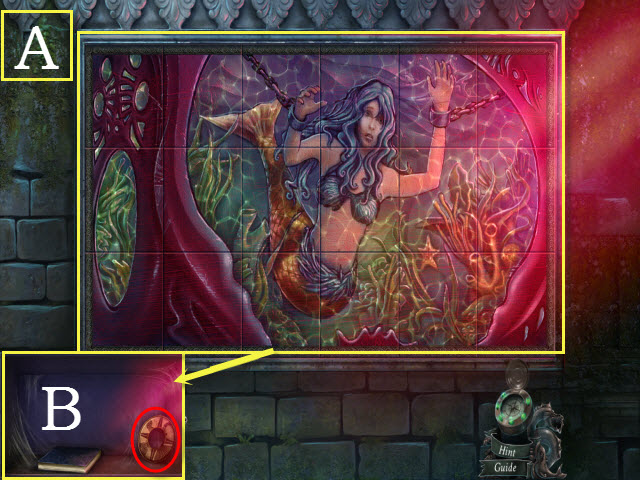
- To solve the puzzle, swap the tiles to form a complete image.
- Please see the screenshot for the solution (A).
- Take the STONE RING (B).
- Return to the Passenger Cabin.


- Examine the armoire; use the SLEDGEHAMMER on the crack three times (C).
- Examine the hand; move it twice and take the SAFE DIAL (D).
- Walk down to the Bridge.
- Examine the safe; place the STETHOSCOPE and the SAFE DIAL on it to activate a puzzle (E).

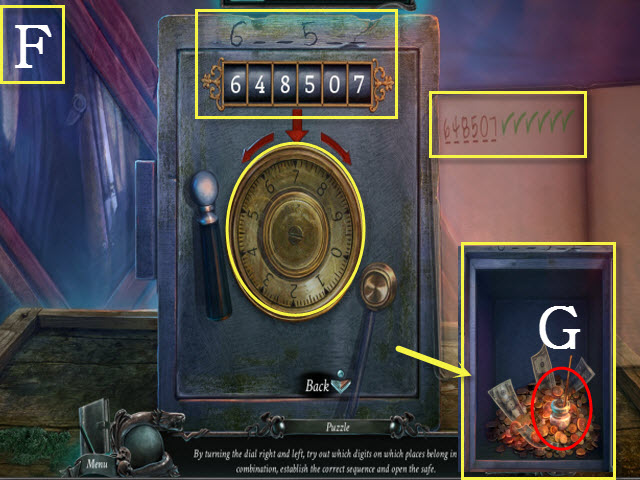
- To solve the puzzle, try various numbers until you discover the combination.
- Please see the screenshot for the solution (F).
- Take the STICKY RESIN (G).
- Return to the Captain’s Cabin.
- Talk to the Fisherman.
- Examine the door; place the STONE RING and the RING’S PATTERN on it to activate a puzzle.

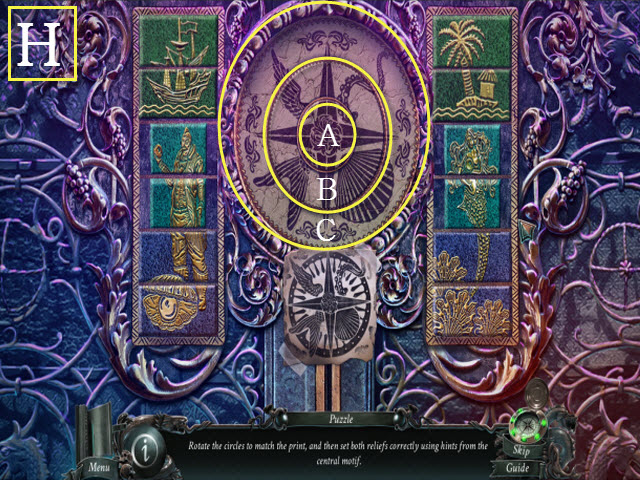

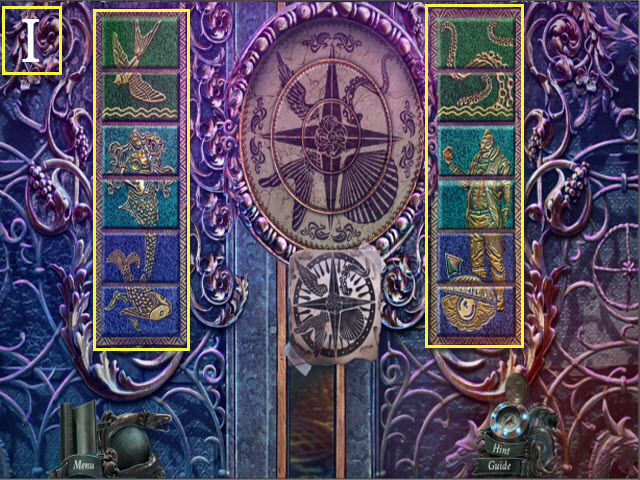
- Phase 1: Align B, C, and then A to match the image on the bottom (H).
- Phase 2: Flip the tiles to complete the images; please see screenshot for the solution (I).
- Enter the Prison.
Chapter 6: The Lighthouse

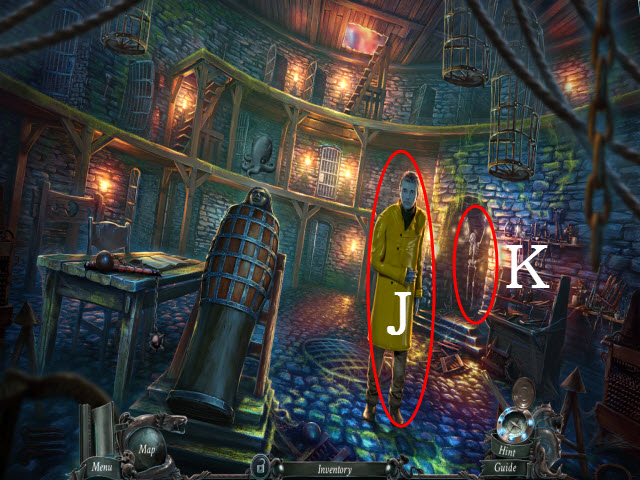
- Talk to the Fisherman (J).
- Examine the skeleton to activate a HOP (K).

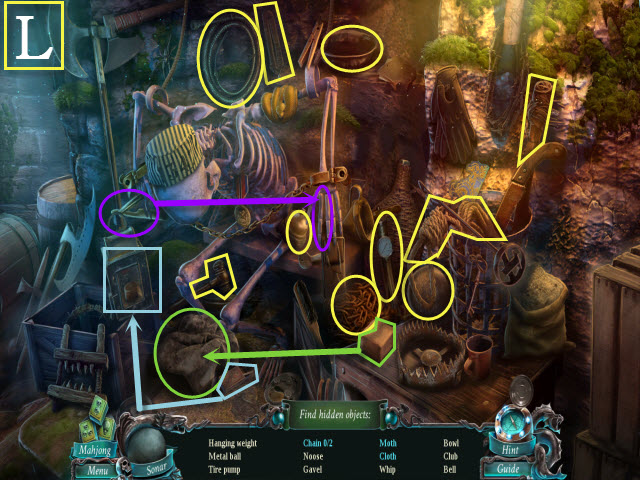
- Play the HOP to receive the CHAIN (L).
- Walk upstairs to the Storeroom.

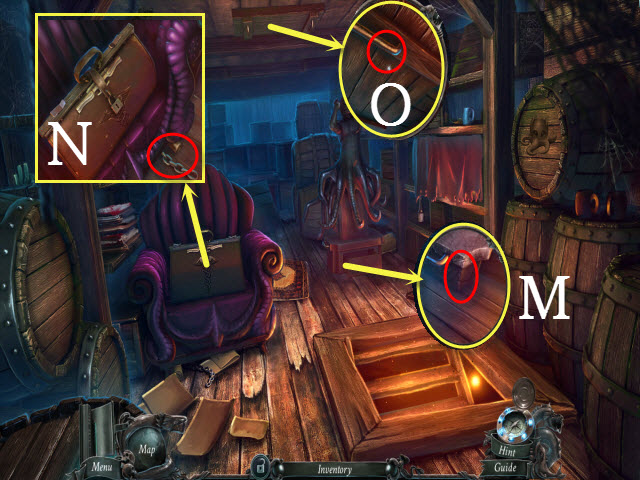
- Move the sheet; examine the statue and place the CHAIN on the leg (M).
- Move the sheet; examine the chair and pick up the OLD CHAIN (N).
- Examine the trapdoor; place the OLD CHAIN on it (O).

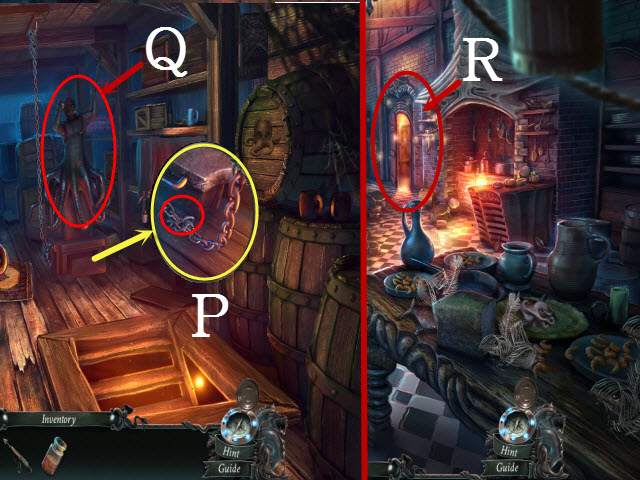
- Examine the statue and select the chain (P); move the statue twice (Q).
- Walk upstairs to the kitchen; open the pantry door and examine it to activate a HOP (R).

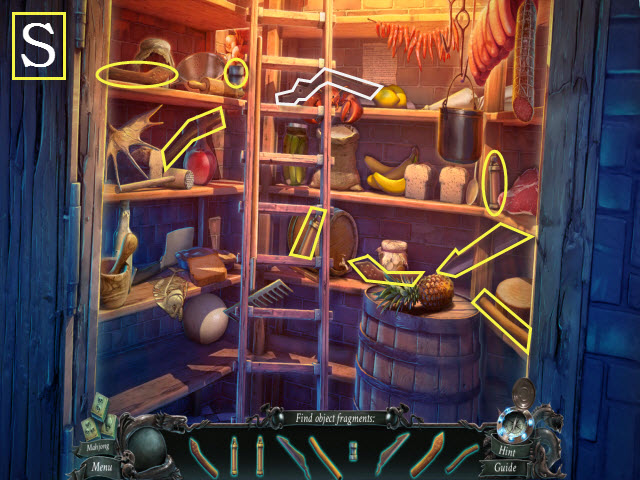
- Play the HOP to receive the GARDEN SHEARS (S).

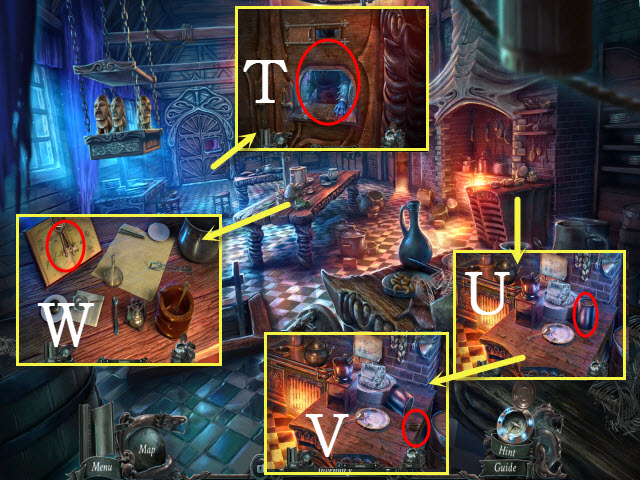
- Examine the door; open the hatch and talk to the Guardian (T).
- Examine the table; use the DAGGER (U) on the can and take the COFFEE SYMBOL (V).
- Examine the workbench; take the KEYS (W).
- Return to Prison.

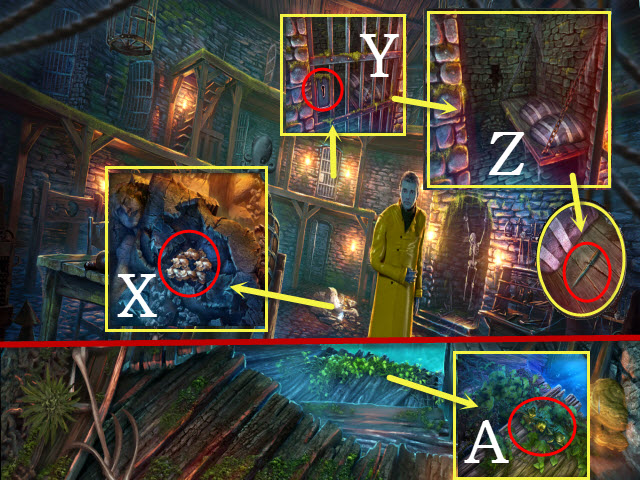
- Examine the rubble; move the stones to get the 1/3, 2/3, and 3/3 GOLDEN FLAKES (X).
- Examine the cell and use the KEYS on the lock (Y).
- Examine the cot and move the mattress; take the ICE PICK (Z).
- Return to the Catacombs.
- Examine the vines; use the GARDEN SHEARS to get the FLOWER STALK (A).
- Examine the boat to activate a HOP.

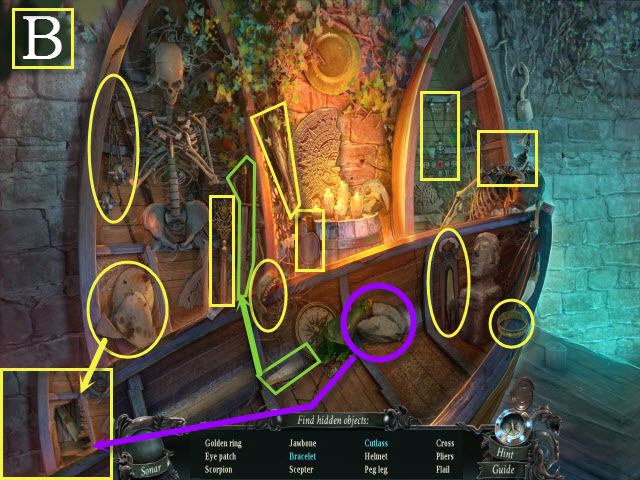
- Play the HOP to receive the PLIERS (B).
- Return to the Passenger Cabin.
- Examine the bed to activate a HOP.

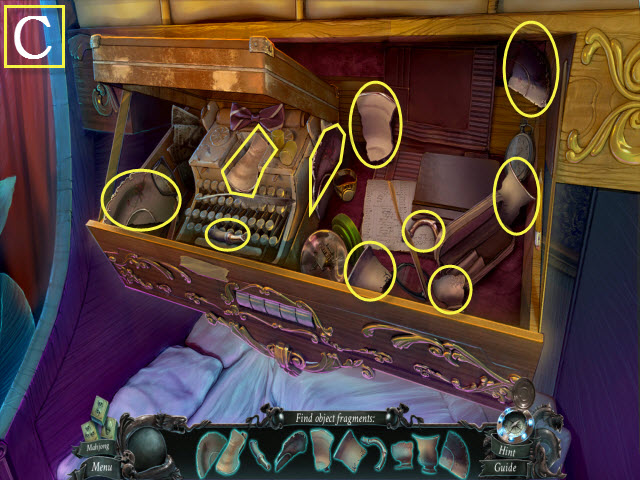
- Play the HOP to receive the CHINA CUP (C).
- Return to the Storeroom.

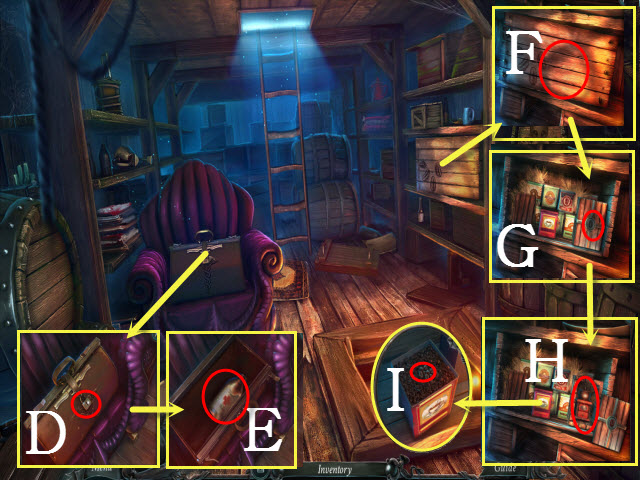
- Examine the chair; use the KEYS on the lock and select the two latches to open it (D).
- Take the HYDROGEN PEROXIDE (E).
- Move the cloth; examine the crate and use the PLIERS on the nails (F).
- Open the crate and place the COFFEE SYMBOL in the slot (G).
- Open the box and take the COFFEE GRINDER (H).
- Examine the tin; use the DAGGER on the lid to get the COFFEE BEANS (I).
- Return to the Kitchen.
- Examine the workbench; place the HYDROGEN PEROXIDE, the FLOWER STALKS, and the 3/3 GOLDEN FLAKES on it to activate a puzzle.

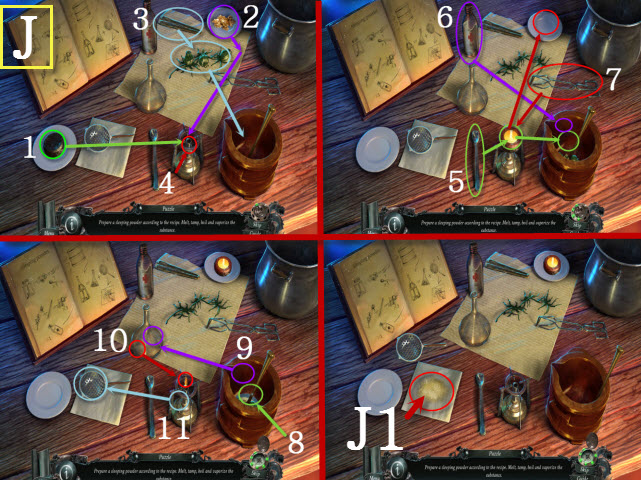
- Please see the screenshot for the correct order 1-11 (J).
- Take the SLEEPING POWDER (J1).

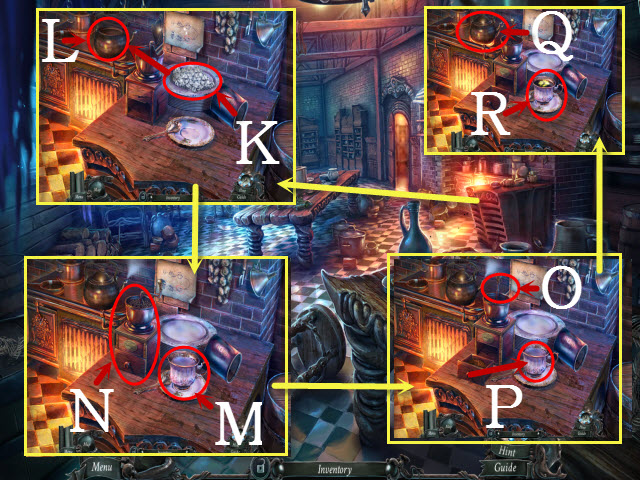
- Examine the table; use the ICE PICK on the ice (K).
- Open the kettle; place the ice in it (L).
- Place the CHINA CUP on the plate (M); place the COFFEE GRINDER and the COFFEE BEANS on the mechanism (N).
- Select the crank (O); place the ground coffee in the china cup (P).
- Select the kettle (Q).
- Place the SLEEPING POWDER in the china cup and take the SPIKED COFFEE (R).

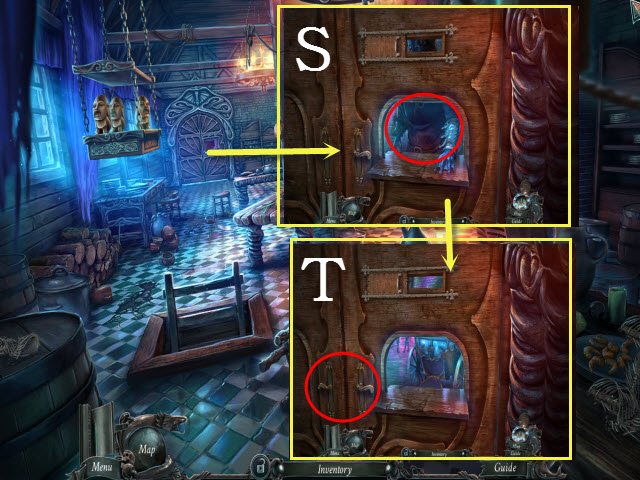
- Examine the door; give the guard the SPIKED COFFEE (S).
- Select the door handle to enter the Yard (T) and walk right to the Quarters.
Chapter 7: Find Calliope

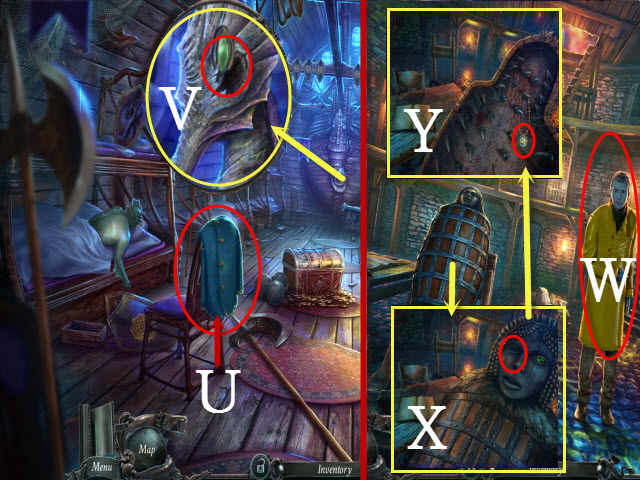
- Take the UNIFORM (U).
- Examine the seahorse; use the DAGGER on its eye to get the GREEN EYE (V).
- Return to the Prison.
- Give the UNIFORM to the Fisherman (W).
- Examine the sarcophagus; place the GREEN EYE in the socket (X).
- Take the 7/12 GOLDEN FISH (Y).
- Examine the skeleton to activate a HOP.

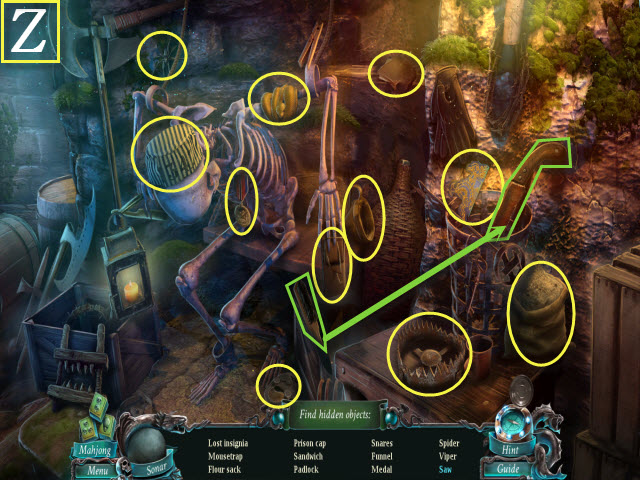
- Play the HOP to receive the GOLD INSIGNIA (Z).
- Return to the Yard.

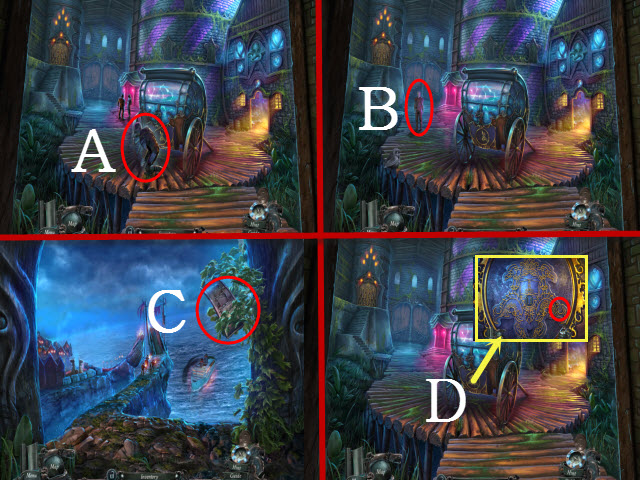
- Select the Fisherman (A).
- Talk to the Fisherman (B).
- Walk forward to the Embankment.
- Take the CHEST PANEL (C).
- Walk down.
- Examine the carriage and place the GOLD INSIGNIA on it; select the morphing dolphin to activate a puzzle (D).

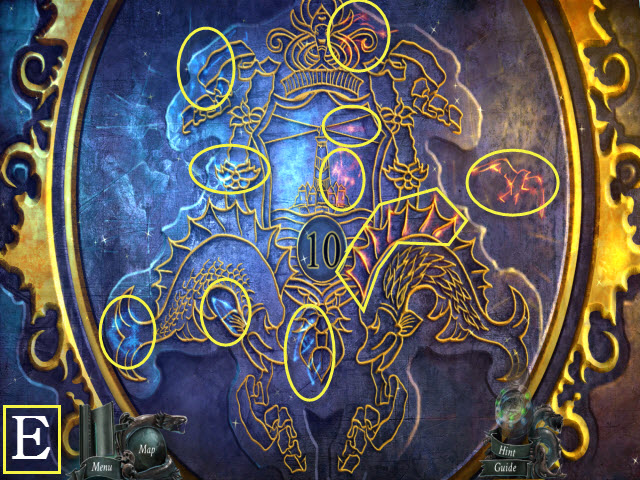
- To solve the puzzle, find the ten morphing figures within the picture.
- Please see the screenshot for the morphing locations (E).

- Examine the trunk; take the RING (F).
- Examine the door; open the panel and examine it (G).
- Place the RING on the mechanism (H) and select the button (I).
- Enter the elevator.

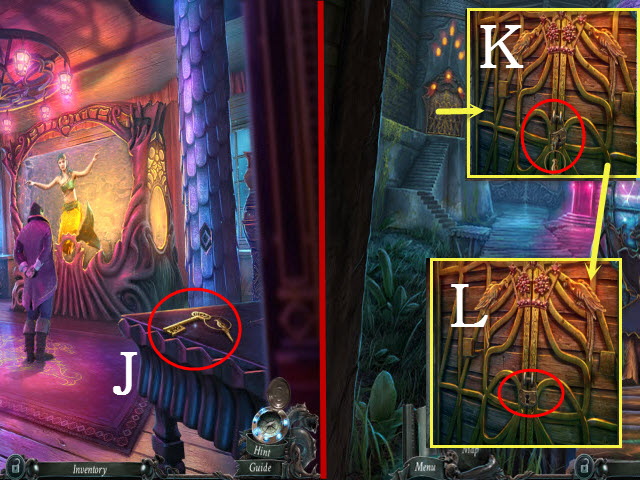
- Take the TREASURY KEY (J).
- Walk down.
- Examine the door and move the bar; place the TREASURY KEY in the keyhole (K).
- Move the lock and open the door (L).
- Examine the Treasury to activate a HOP.

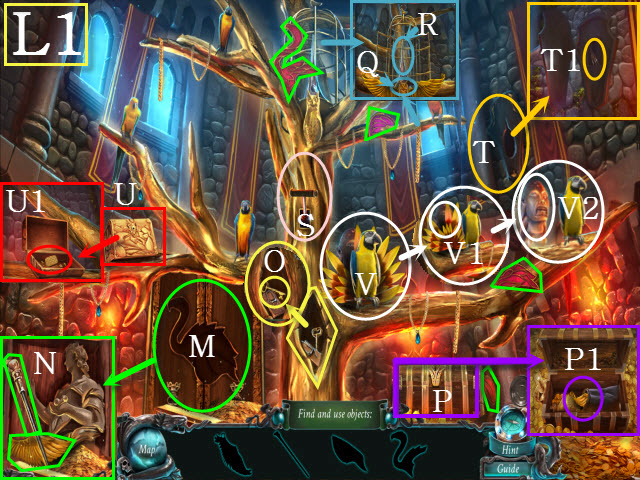
- Find the listed items (L1).
- Place the four flamingo parts (green) on the flamingo (M); open the door and take the cane and the wing (N).
- Use the cane on the mousetrap to get the key (O).
- Use the key on the chest (P); open the bag and take the wing (P1).
- Place the wings on the owl (Q); select the owl and take the trophy (R).
- Pull the lever (S).
- Place the trophy on the wall mount and select it (T); take the lock picks (T1).
- Use the lock picks on the keyhole (U) and take the cracker (U1).
- Give the cracker to the parrot (V); take the feather and place it with the plumage (V1) to get the BRASS IDOL (V2).

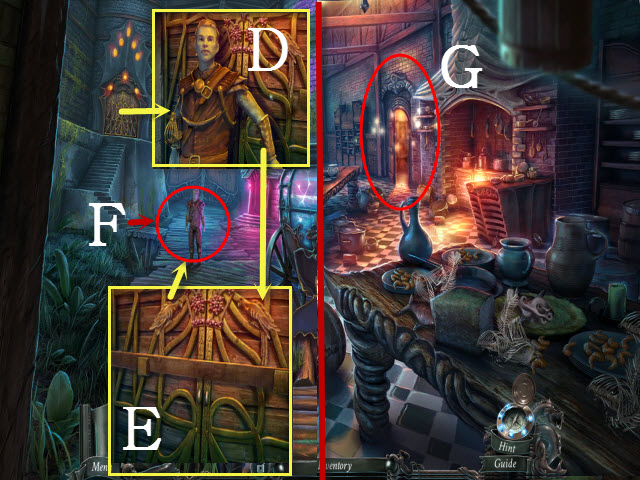
- Talk to the Fisherman (D).
- Select the door (E).
- Talk to the Fisherman (F).
- Return to the Kitchen.
- Examine the pantry to activate a HOP (G).

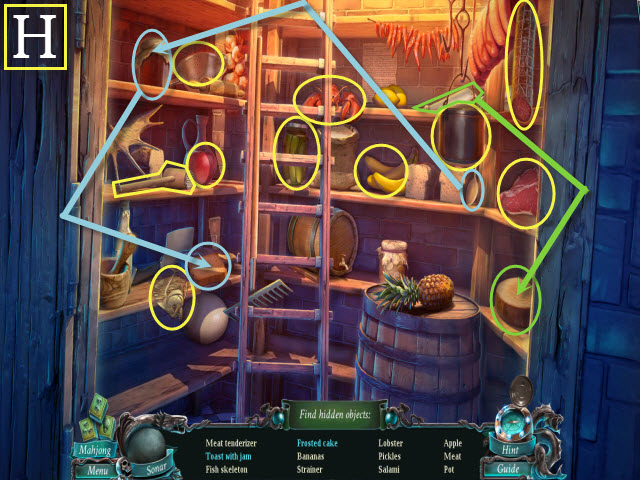
- Play the HOP to receive the MEAT (H).

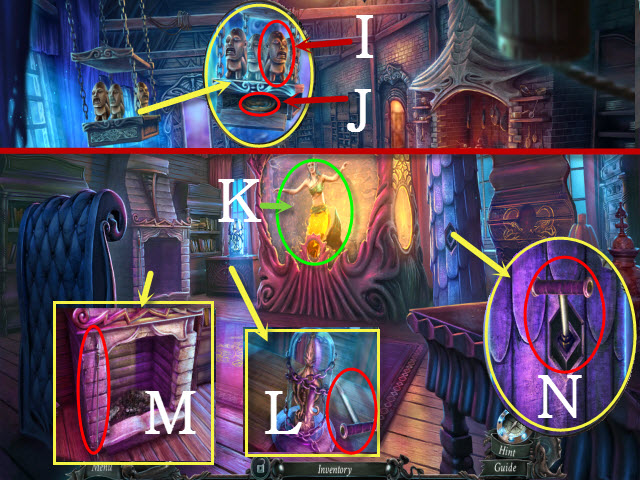
- Examine the idols; place the BRASS IDOL with them (I).
- Take the 8/12 GOLDEN FISH (J).
- Return to the Apartment.
- Talk to Calliope (K).
- Examine the table; take the LEVER (L).
- Examine the fireplace; take the FIRE POKER (M).
- Examine the pillar; place the LEVER on the slot and pull it (N).
- Walk upstairs to the Gong.
Chapter 8: Get Kraken!

 #
#
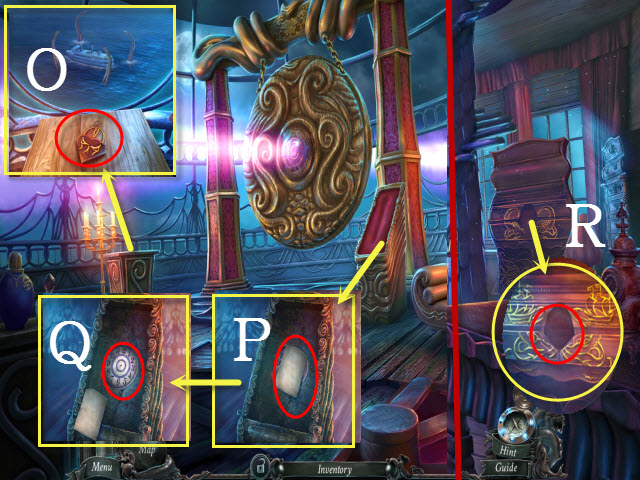
- Examine the altar; take the WOODEN SEAL (O).
- Examine the stand; move the cover and look at the note (P).
- Take the CLOCK FACE (Q).
- Walk down.
- Examine the dresser; place the WOODEN SEAL in the slot (R) to activate a HOP.

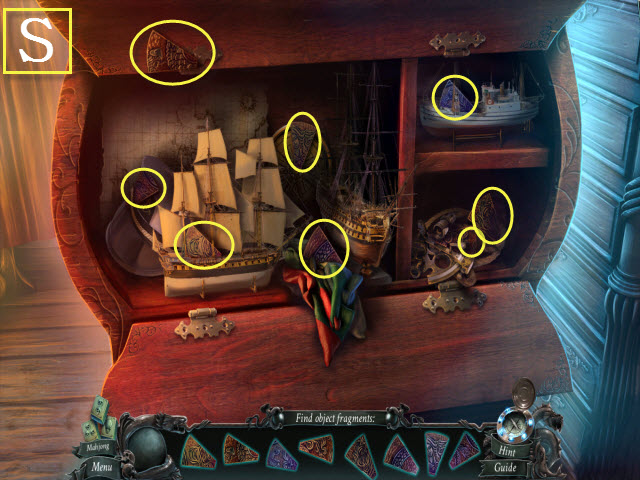
- Play the HOP to receive the GONG PIECES (S).
- Walk upstairs.
- Examine the gong; place the GONG PIECES on it to activate a puzzle.

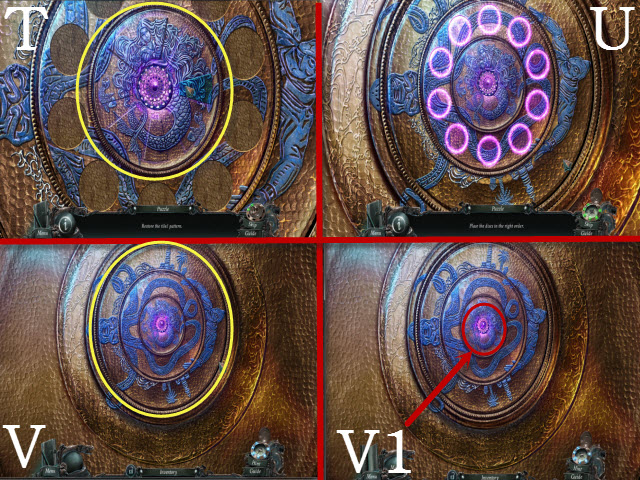
- Phase 1: Arrange the pieces to create a whole image (T).
- Phase 2: Swap the tiles to form a whole image (U).
- Phase 3: Align the dials to create a whole image (V).
- Take the CHEST SEAL (V1).
- Return to the Yard.

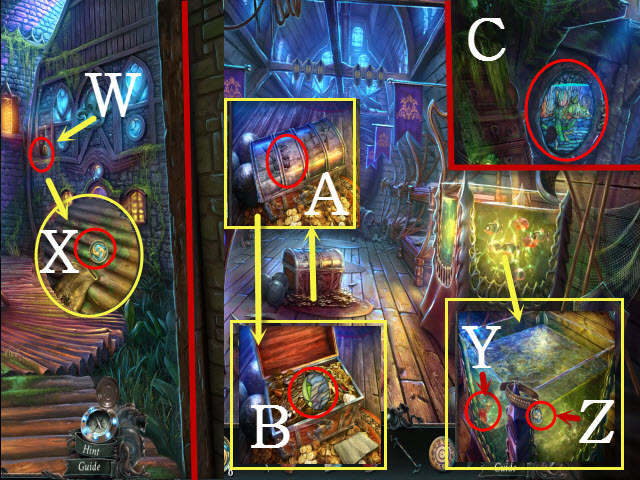
- Examine the satchel; use the HARPOON GUN on it (W).
- Examine the satchel; open it to get the 9/12 GOLDEN FISH (X).
- Walk right to the Quarters.
- Examine the fish tank; place the MEAT (Y) in it and use the FIRE POKER to get the 10/12 GOLDEN FISH (Z).
- Examine the chest; place the CHEST PANEL on it (A).
- Open the chest and look at the note; use the STICKY RESIN on the glass shards to get the STAINED-GLASS DISK (B).
- Return to the Captain’s Cabin.
- Examine the stained-glass window; place the STAINED-GLASS DISK in the slot to activate a puzzle (C).

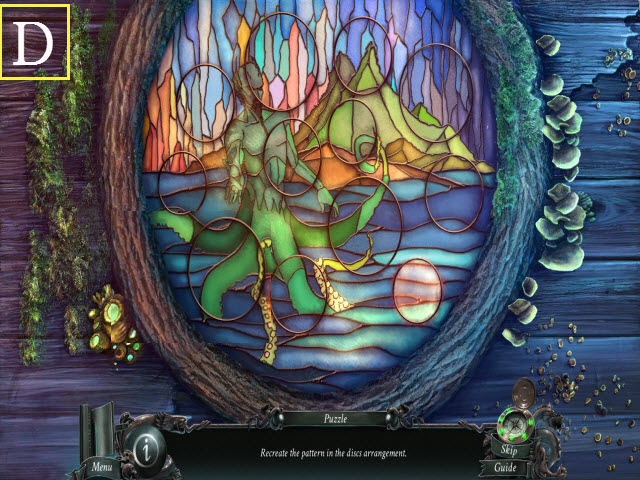
- Rotate the puzzle pieces to create a whole image.
- Please see the screenshot for the solution (D).

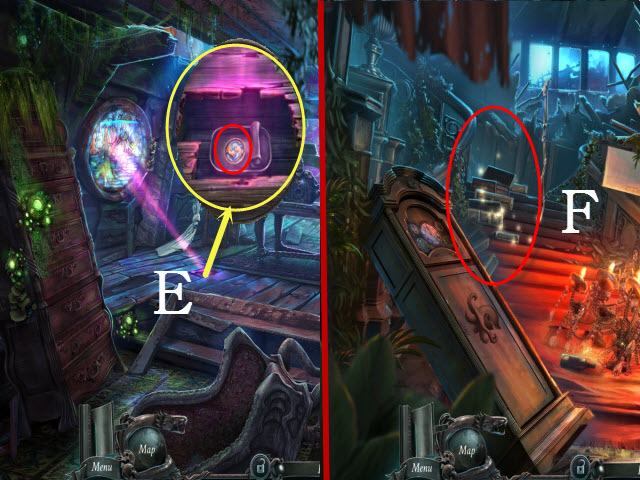
- Examine the floorboards and use the DAGGER on them; open the tin and take the 11/12 GOLDEN FISH (E).
- Return to the Foyer; examine the suitcases to activate a HOP (F).

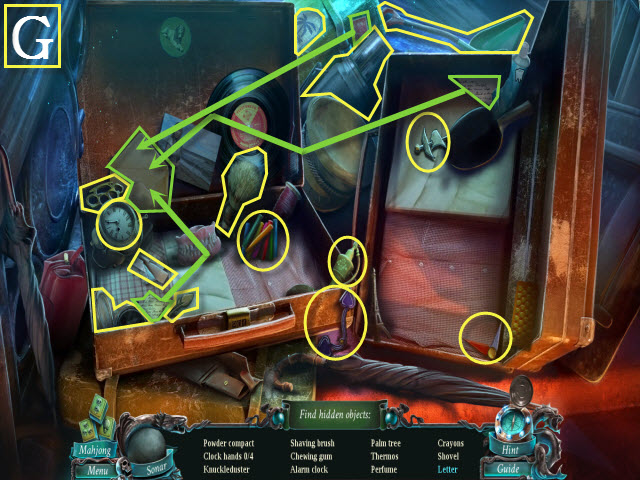
- Play the HOP to receive the CLOCK HANDS (G).
- Examine the clock; place the CLOCK FACE and then the CLOCK HANDS on it to begin a puzzle.

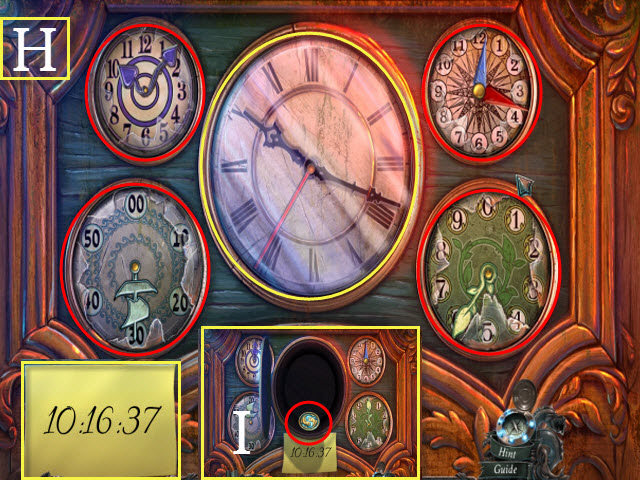
- To solve the puzzle, align the hands so they match the note.
- Please see the screenshot for the solution (H).
- Take the 12/12 GOLDEN FISH (I).
- Return to the Captain’s Cabin.

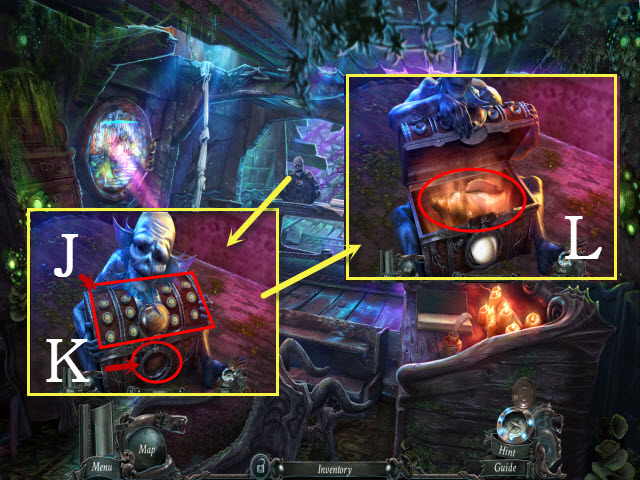
- Examine the chest and place the 12/12 GOLDEN FISH in the slots (J); place the CHEST SEAL in the slot (K).
- Take the CONCH (L).
- Return to the Yard; take the elevator to the Apartment.

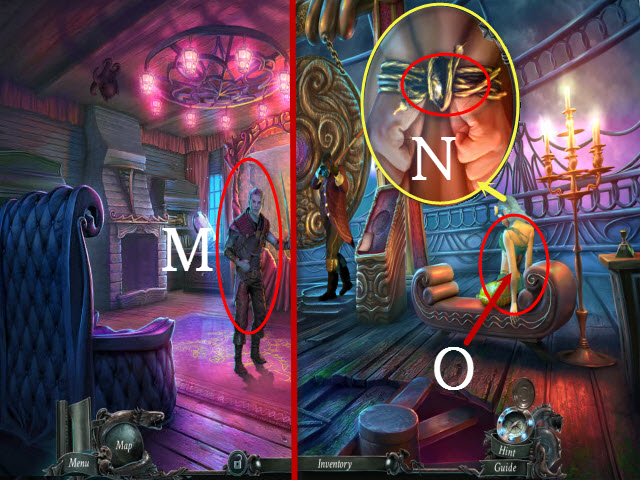
- Talk to the Fisherman (M).
- Walk upstairs.
- Examine Calliope; use the DAGGER on the rope three times (N).
- Give the CONCH to Calliope (O).
- Congratulations! You have completed Nightmares from the Deep: The Siren’s Call!


 #
#


 Danse Macabre: Deadly Deception Walkthrough, Guide, & Tips
 Danger Next Door: Miss Teri Tale's Adventure Walkthrough, Guide, & Tips
 Oddly Enough: Pied Piper Walkthrough, Guide, & Tips
 AGON: The Lost Sword of Toledo Walkthrough, Guide, & Tips
 My Singing Monsters Tips and Tricks, Guide, & Tips