AGON: The Lost Sword of Toledo Walkthrough, Guide, & Tips
AGON: The Lost Sword of Toledo Walkthrough

Welcome to the AGON: The Lost Sword of Toledo Walkthrough!
Help Professor Hunt search the Spanish city of Toledo! Discover the secrets behind a mysterious sword in this fun Adventure game!
Whether you use this document as a reference when things get difficult or as a road map to get you from beginning to end, we’re pretty sure you’ll find what you’re looking for here.
This document contains a complete AGON: The Lost Sword of Toledo game walkthrough featuring annotated screenshots from actual gameplay!
We hope you find this information useful as you play your way through the game. Use the walkthrough menu below to quickly jump to whatever stage of the game you need help with.
Remember to visit the Big Fish Games Forums if you find you need more help. Have fun!
This walkthrough was created by BrownEyedTigre, and is protected under US Copyright laws. Any unauthorized use, including re-publication in whole or in part, without permission, is strictly prohibited.
General Tips
- This is an Adventure Game.
- Click on Options to adjust Audio, Video, Pan Speed, Subtitles and Difficulty level.
- You move forward by clicking your left mouse when your cursor turns into a large arrow.
- You turn by holding down the left mouse button down and panning up, down, left or right.
- Under Extra Features, there is reading material on previous episodes and general story enhancements to give you a more in-depth gaming experience.
- There are 8 save slots for you to save anywhere you like.
- All conversations are saved under the Files or F button in the upper right.
- Your inventory can be accessed by pressing the Inventory or the I button on the upper right.
- The game is not linear, and you may do things in a different order than this walkthrough.
- The cursor will change to a gear when you can use an inventory item.
- The game is story driven and it is important to listen for clues in your conversations.
- The conversations will also trigger new areas so it is of importance to exhaust all conversation trees.
- You can end a conversation by clicking the esc key.
- Use the arrows on the inventory bar to scroll through the inventory.
- If an inventory item has a gear icon next to it, you can right-click to get a close-up or disassemble it.
- Click on the Menu or the M button on the upper right to exit, save, load a previous game or exit.
- The game wills autosave when you exit in addition to your saves.
Part 1: Locate the Candelas

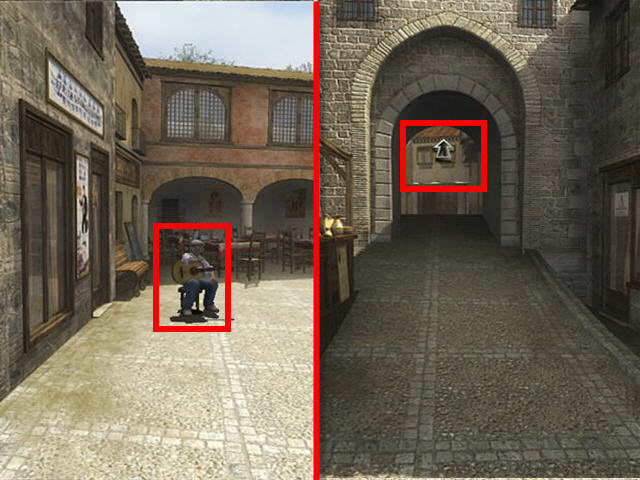
- Click-hold, turn right and head towards the man playing the guitar.
- Speak to the guitarist and exhaust all conversation. This and all future conversations will be stored in the files on the upper right of the screen.
- Turn around and go straight one time and then right.
- Head straight to the archway.

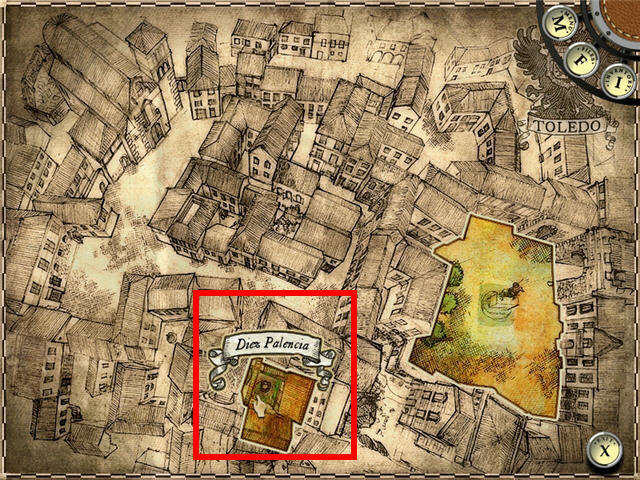
- Click on the Diez Palencia location on the map.
- Speak to Carmen and get a PAINTER’S DOOR KEY.
- Exhaust all conversation with Carmen.
- Turn right and go towards the door.

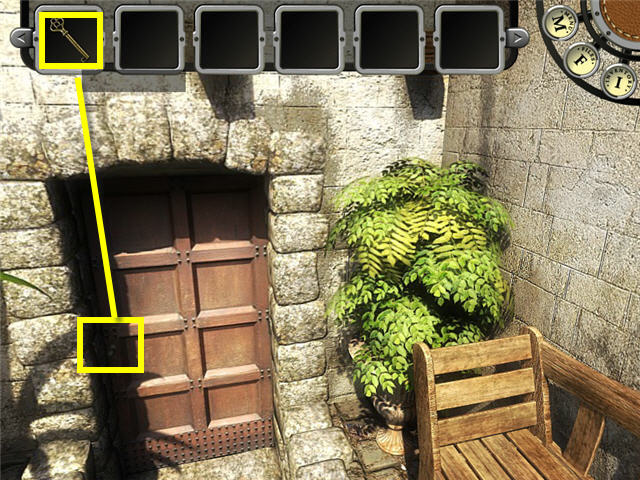
- Use the PAINTER’S DOOR KEY on the door.
- Click the door to open after using the PAINTER’S DOOR KEY.
- Click on the book cases left of the bed and note the books.
- Pan left and go forward and note the music books on the bookcase.
- Pan left and go forward and click on each of the paintings on the floor next to the easel.

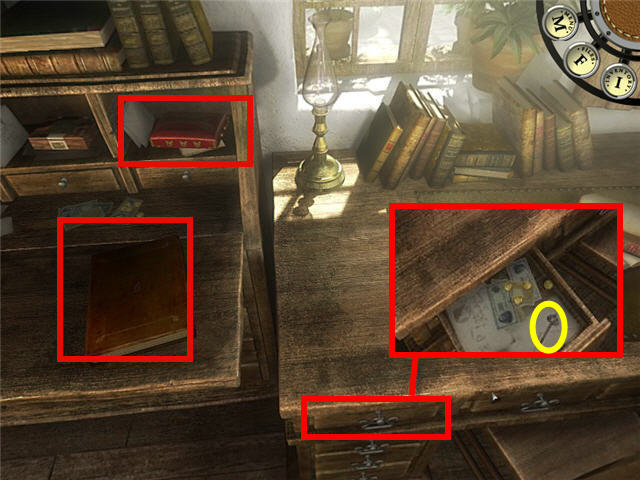
- Pan left and go forward and click on the cigar box in the cubby hole above the writing table and read the letter.
- Look at the student log on the desk.
- Open the drawer on the upper left of the desk and take the WINDING KEY.
Part 2: The Music Box

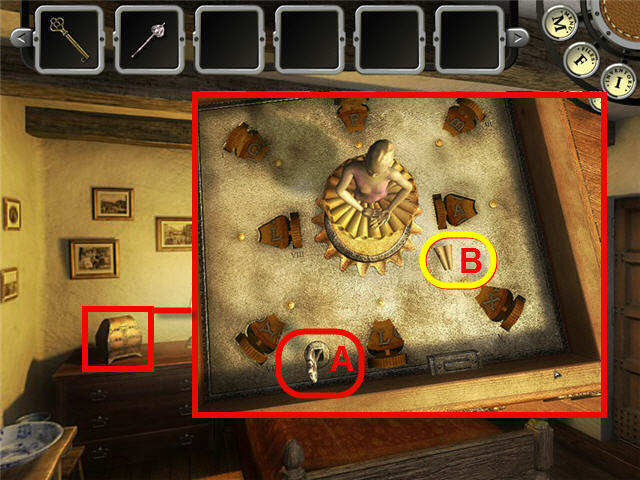
- Head over to the left side of the bed and click on the music box.
- Use the WINDING KEY (A) on the slot on the bottom left of the music box.
- Click on the WINDING KEY to get the ballerina to dance.
- Click on the ballerina as she is dancing and take the SMALL LETTER (B) that is dropped.
- Exit the room and click once to go straight ahead and pan right to see Carmen. If you go directly towards Carmen while she is gardening she will not speak to you.
- Exhaust all conversation with Carmen and give her the SMALL LETTER when done.
- Try and exit through the double doors behind you by clicking on the left of the double doors.

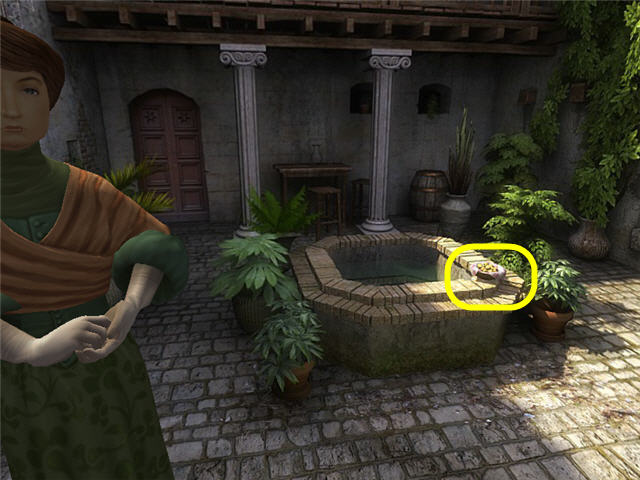
- Take a BISCUIT from the edge of the well.
- Exit through the double doors.
- Click on Plaza de la Mancha on the map.
- Pan left and speak to the guitar player and give him the BISCUIT so he plays you 3 songs.
- None of these are the song on the music box, so you need to go back to the well via the archway and get another BISCUIT.
- Click on Domingo, the guitarist and then give him the second BISCUIT.
- None of these are the song on the music box, so you need to get another BISCUIT.
- Click on Domingo, the guitarist and give him the third BISCUIT.
- The first tune he plays after giving him the third BISCUIT is the one on the music box. Look in your files and see the name is El Nenufar.
- Head back to Diez Palencia and into the painter’s room.

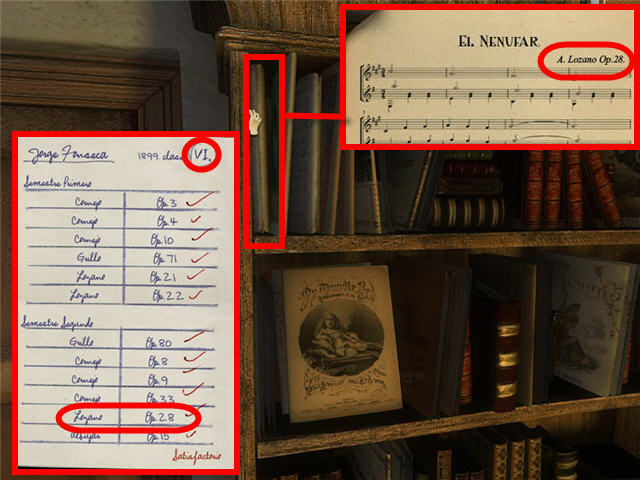
- Head to the back of the room and click on the bookshelf next to the door.
- Take down the music book on the top left.
- Find the El Nenufar page and see that it was written by A. Lozano and it was his OP. 28.
- Go to the writing desk and click on the student log book.
- Note on the 3rd page there is an entry for El Nenufar and in the upper right of the page there is a VI.
- Head to the night stand on the left of the bed and click on the music box.

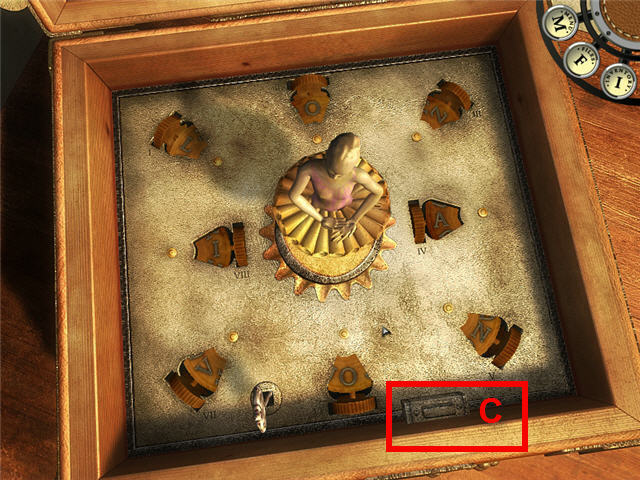
- Starting at the upper left and going clockwise, turn the dials so that they spell LOZANOVI.
- Click the button (C) on the bottom edge of the box to open.
- Click on the blue cloth two times in the opened music box to reveal a MEDALLION and a LETTER.
- Click on the LETTER or the MEDALLION and Carmen will take them.
- Exit through the double doors and click on the Candelas residence on the map.
Part 3: Francisco

- Speak to Isabel and exhaust all conversation.
- Turn and exit the house.
- Click on the Policia Local on the map.
- Speak to Officer Reoyos and exhaust all conversation.
- Head back to the Plaza de la Mancha.

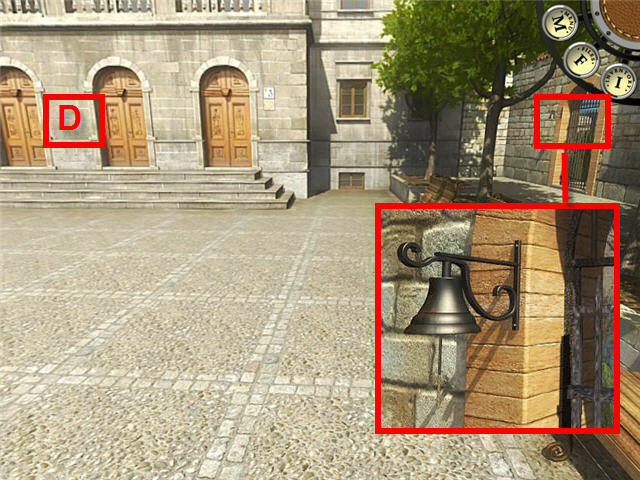
- Head towards the Palace (D) on the right of the Plaza and see that no one is home.
- Turn right and go forward one time.
- Head to the gate and ring the bell on the left of the man on the bench reading the newspaper.
- Ring the bell on the left side of the gate and speak with Hugo.
- If you cannot ring the bell it’s because you did not go to the Palace first.
- Exhaust all conversation and get a VALUABLE STAMP.
- Click on Hugo again and exhaust all conversation.
- Head to the archway to access the map and click on the new location Arriaga.
- Go to Arriaga’s shop and click on Arriaga.
- Exhaust all conversation with show him the VALUABLE STAMP.
- Offer him 1900 or 1700 and you will haggle down to 1600.
- Click on Arriaga again and exhaust all conversation.
- Head back to the Plaza de la Mancha and enter the palace garden.
- Go into the gazebo and speak to Hugo entirely.
- Give Hugo the 1600 PESETAS and you will have 100 PESETAS left in inventory.
- Hugo will give you PERMISSION and a WINERY BOOK.
- Exit the garden and go to the archway.
- Click on the Policia Local.

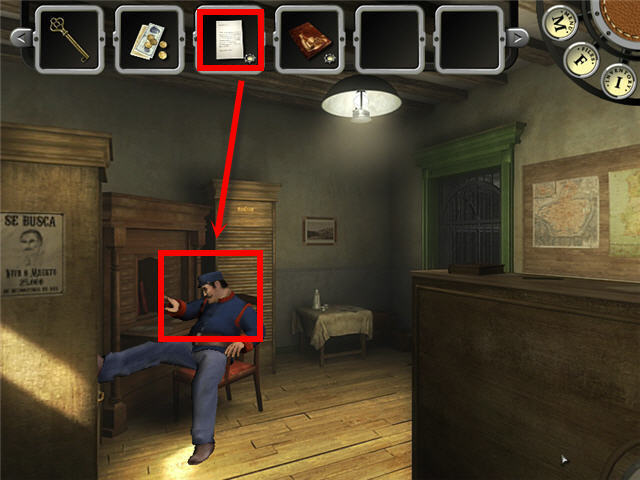
- Give the PERMISSION to Officer Reoyos.
- Head down the corridor to Francisco’s jail cell and exhaust all conversation with Francisco.
- Leave the cell area and ask Officer Reoyo for a paper and pencil.
- Exhaust all conversation with the Officer.
- Head back to the Diez Palencia and enter the painters’ room.
Part 4: Message to Isabel

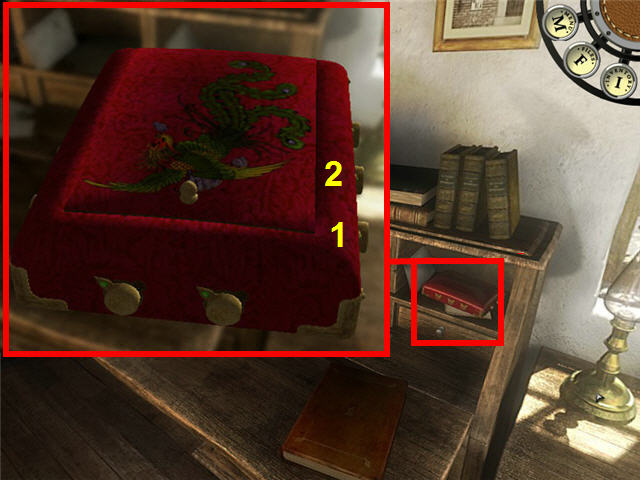
- Save game here before you adjust the dials.
- Click on the cigar box in the cubby hole on the writing desk.
- The goal is to turn all 8 switches to face to the right. Turning one will turn others.
- The solution is to click on the switch on the bottom right (1) and then the one above it (2). See screenshot for solution.
- Click on the lid and take a CIGAR from the opened box.
- As an alternative to the puzzle, you can also go to see Hugo in the garden and speak to him about the CIGAR.
- Read the letter while he is gone and then head to leave.
- He will return with the CIGAR when you try and leave through the gate.
- When you get a CIGAR, head back to the Policia Local and approach the Officer.
- Give the CIGAR to Officer Reoyos.


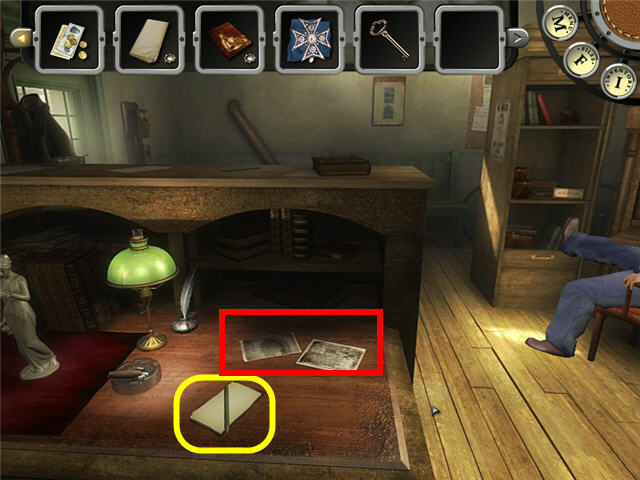
- Head to the desk and take the PAPER AND PENCIL.
- Click on the photos and note the tiles.
- Head into the jail and hand the PAPER AND PENCIL to Francisco.
- If Francisco does not take the paper, be sure to click on Quit on the conversation options if you did not exhaust all conversations with him on your first meeting.
- Get FRANCISCO’S LETTER automatically.
- Leave the jail and head over to the Candelas area on the map.
- Give FRANCISCO’S LETTER to Isabel.
- Head upstairs and enter the room on your left.
- You can take items but they will disappear from your inventory when you exit the room.
- Look at the photo album on the desk and note the tile photos.
- Pan left and look at the book on the nightstand.
- Look out the open window and see Arriaga’s shop.
- Leave the house and click on Diez Palencia on the map.
Part 5: The Sword of Toledo

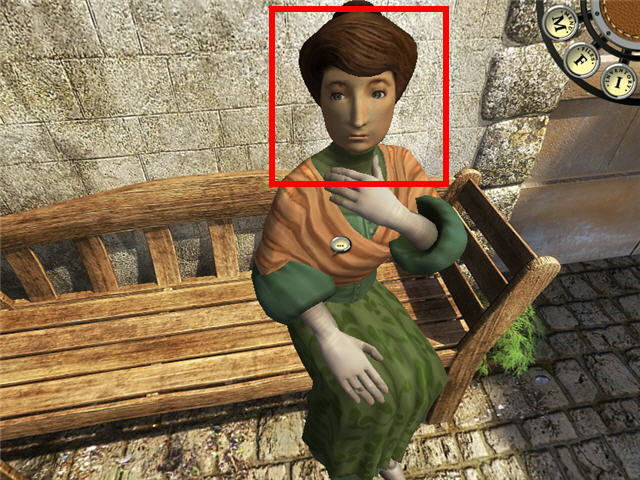
- Speak to Carmen sitting on the bench and exhaust all conversation.
- You will get the MEDALLION and the LONG LETTER.
- Read the LONG LETTER and then speak to Carmen again and exhaust all conversation.
- Carmen will give you a DARKROOM KEY.
- Leave the courtyard and click on Iglesia San Pedro.
- Speak to Father Perez and exhaust all conversation.
- Pan right and look at the large iron door to the right.
- Head to Arriaga’s Shop and speak with Arriaga.
- Show the MEDALLION to Arriaga and follow him upstairs.
- If you lose sight of him, go left 1 time, turn right and forward 3 times, turn right and go up the stairs, turn right and up the stairs again, right one time and into the open door on the room on the left.

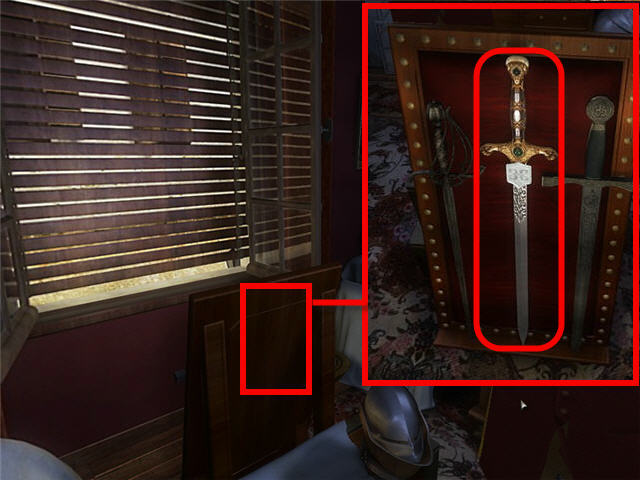
- Look at all the items for sale and head toward the window.
- Click on the blinds to try and open them.
- Turn away from the window and click on the sword in the center.
- Speak to Arriaga and choose either response.
- Exit the room and head back to the Diez Palencia residence and into the painter’s room.

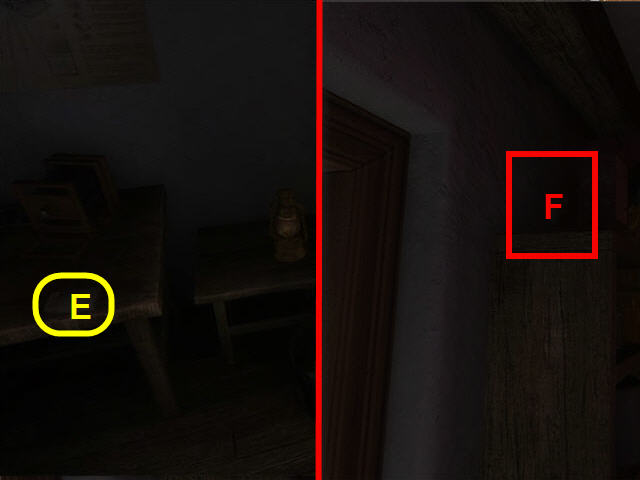
- Use the DARKROOM KEY on the door in the back of the room.
- Turn right and take the MATCHES (E) from the table on the right.
- Turn left and use the MATCHES on the darkroom lamp on top of the bookcase next to the doorway.
- Look at the photos on the line and note the one of the tile.
- Look down and slight left and click on the rug to expose a hatch.
- Click on the hatch and see that it is locked.

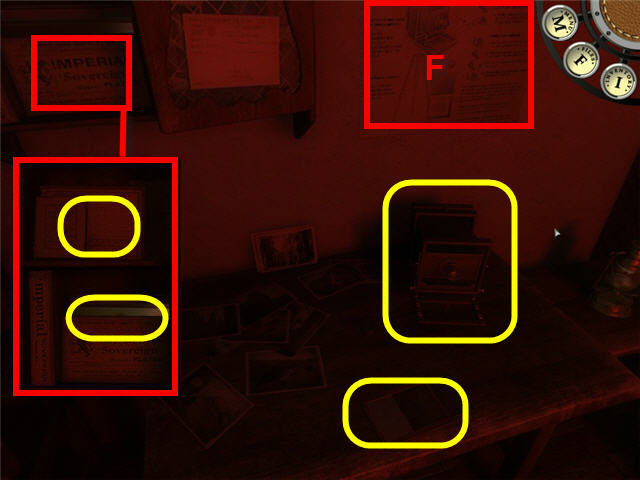
- Turn and look at the table and take the CAMERA and the EMPTY PHOTO CASSETTE.
- Automatically get a LENS CAP in inventory.
- Click on the cabinet above the table and take the PHOTOPAPER and the GLASS NEGATIVE.
- Look at the instructions (F) for taking a photograph on the wall.
- Click on the red lamp to close the lid.
- Combine the GLASS NEGATIVE on the EMPTY PHOTO CASSETTE in inventory to get a LOADED PHOTO CASSETTE.
- Click on the red lamp to open the flap and exit the area.
- Head to the Candelas.

- Speak with Isabel and head up to Francisco’s room.
- Take the TOY TRICYCLE from the shelf to your right.
- Take the FISHING ROD from the corner of the room.
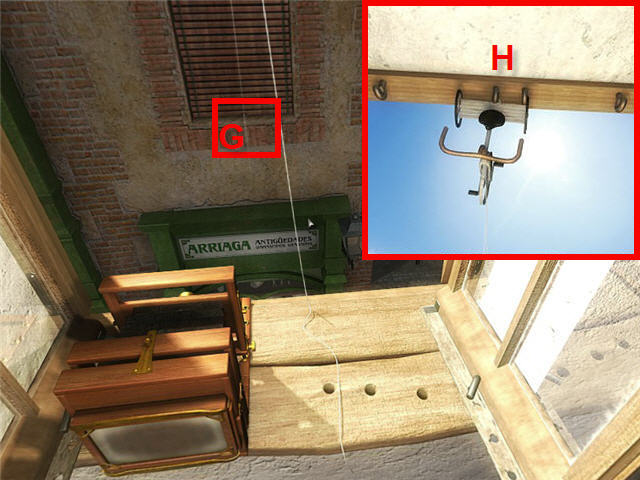
- Place the CAMERA in the window facing Arriaga’s Shop.
- Use the FISHING ROD on the bottom of the blinds (G) in Arriaga’s upper window.
- Look up and hang the TOY TRICYCLE on the middle hook (H).
- Look down and click on the end of the fishing line on the window sill and pan up to click it on the front wheel of the TOY TRICYCLE.

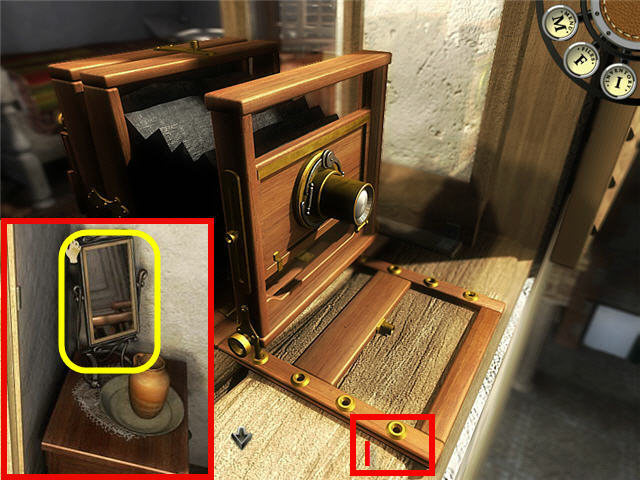
- Click on the front of the CAMERA.
- Click on the ring (I) farthest away to stretch out the CAMERA.
- Back out of the close-up.
- Click on the back of the CAMERA.
- Back out and pan right and take the MIRROR.
- Place the MIRROR on the windowsill to the right of the CAMERA.
- Click on the top of the MIRROR two times so that it lights up Arriaga’s window.
- Click on the back of the camera and Mr. Hunt states it’s good.

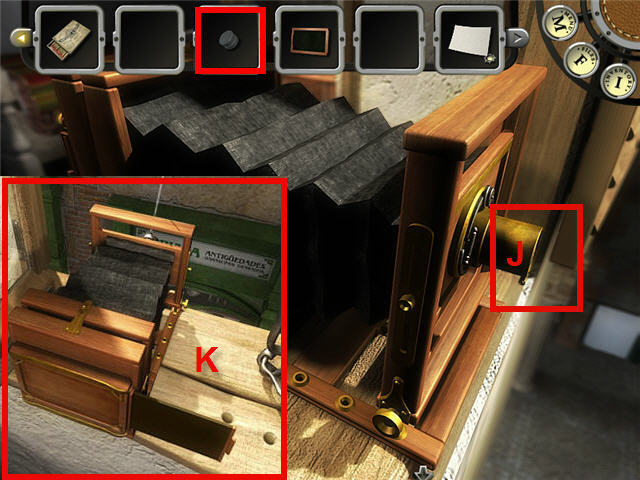
- Click on the front of the CAMERA.
- Place the LENS CAP on the front of the CAMERA (J).
- If you cannot place the lens cap, be sure you clicked on the back of the camera and Mr. Hunt states it’s good.
- Back out of the close-up and click on the fishing line on the windowsill and then click on the front of the camera and then again on the CAMERA LENS.
- Back out of the CLOSE-UP and place the LOADED PHOTO CASSETTE on the rear of the CAMERA and get FROSTED GLASS in inventory.
- Click on the right side of the back of the CAMERA and the frame moves out (K).
- Exit the house and head to Ariagga’s shop.
- Speak to Mr. Ariagga and ask to see the sword.
- Head upstairs and go into the room on the left.
- Speak to Arriaga again.
- Head to the window and click on the blinds.
- Speak to Ariagga and leave the shop.
- Return to the Candelas residence.

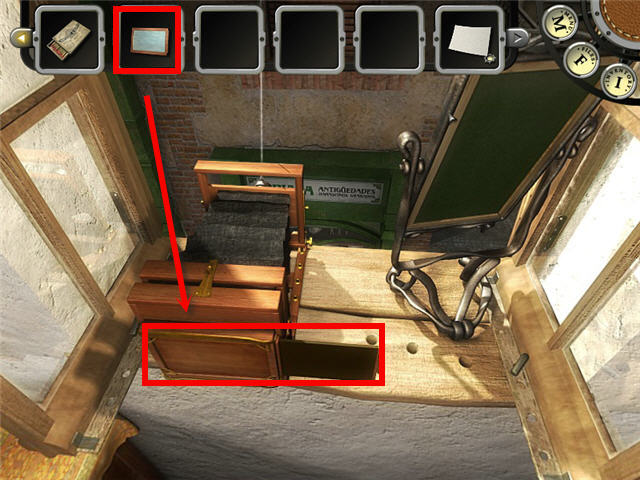
- Speak to Isabel and then head upstairs to Francisco’s room.
- Click the FROSTED GLASS on the back of the CAMERA to get an EXPOSED NEGATIVE IN CASSETTE.
- Leave the area and head to the Diez Palencia.
Part 6: Music Box Part 2
- In order to open the 2nd part of the music box, you need an important date in the painter’s life.
- Speak to Carmen at the Diez Palencia courtyard and exhaust all conversation.
- Leave the area and head to the Policia Local.
- You need to find the date that the Different Sun secret society was formed.

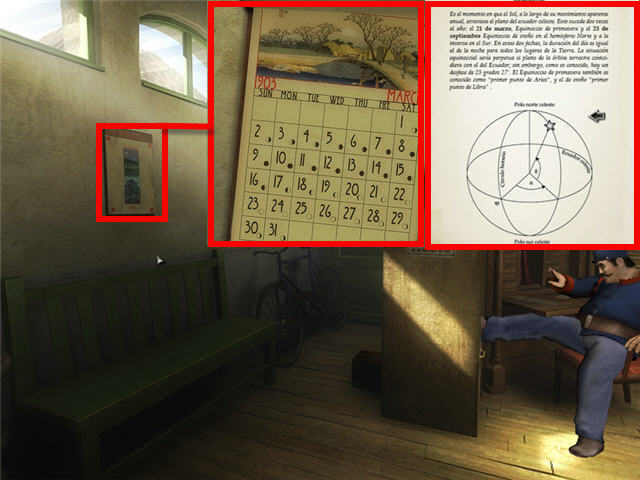
- Based on your conversation with Father Perez, open your WINERY BOOK in inventory and check page 12 and see the Spring Equinox was on March 21st.
- Click on the calendar on the wall above the green bench and flip to March.
- Note the date of the full moon after the Spring Equinox is March 23rd.
- Easter is on the Sunday after the full moon, which makes the date March 30, 1903.
- The year the society was founded was 14 years before, so the date is March 30, 1889.
- We still need to find what day of the week it falls on.
- Leave the Policia Local and head to the Candela’s.
- Head up to Francisco’s Room and click on the book on the nightstand.

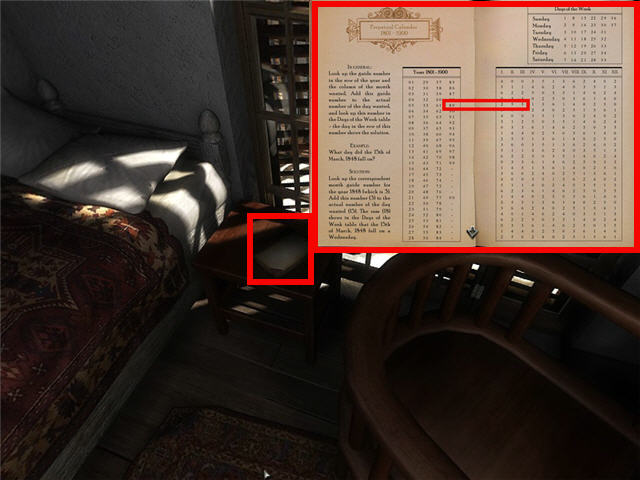
- Click to the perpetual calendar page and read the instructions.
- The Different Sun Secret Society was formed on Saturday, March 30, 1889.
- Head to the Diez Palencia and into the painter’s room.

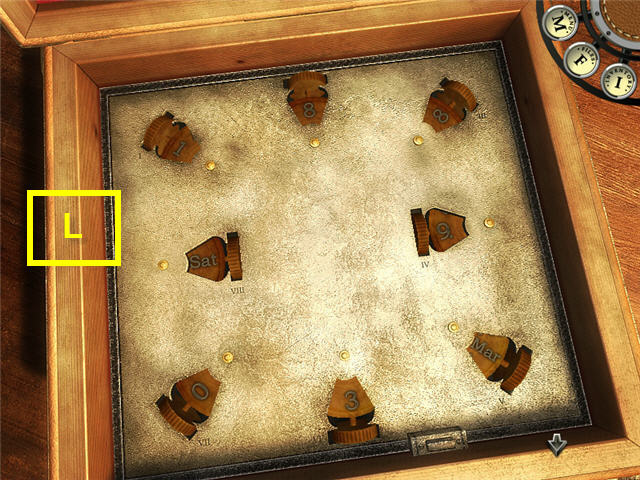
- Click on the music box to get a close-up.
- Starting at upper left and moving clockwise, set the dials to 1-8-8-9-Mar-3-0-Sat. See screenshot (L) for solution.
- Click the button on the bottom edge of the music box to open.
- Take the PAINTER’S NOTEBOOK and the PADLOCK KEY.
- Note the next code to find for the music box.
Part 7: Photo Developing
- Click on the PAINTER’S NOTEBOOK in inventory and see the instructions for photo developing.
- Go into the darkroom.

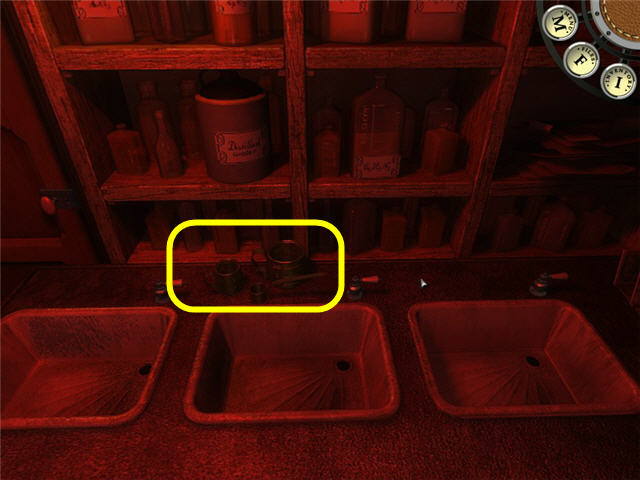
- Take the CUP 10 OZ, CUP 1 OZ, and CUP 1GR from the sink area.

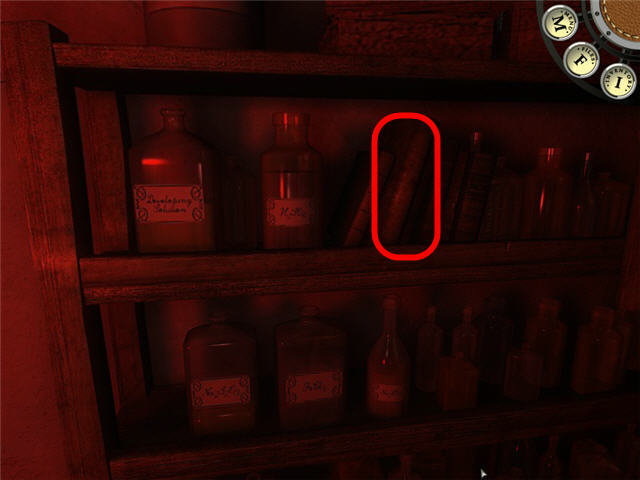
- Take the book on Photographic Chemical Descriptions to see the chemical names and symbols.

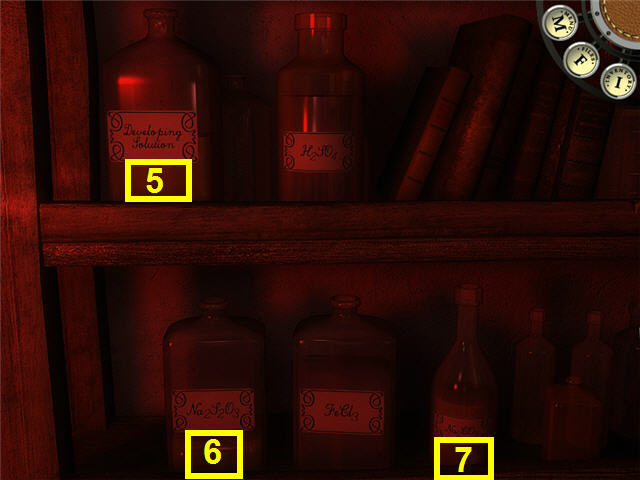
- The chemicals on the shelves on the back wall are as marked; 5 – Developing Solution, 6 – Natrium Thiosulphate, and 7 – Natrium Carbonite.
- The Water can be found by panning right from the sink in the large jug with the spigot.
- If you have a chemical you do not want in a cup, you can return the contents back to the container you got it from.
- Head to the sink.
- Get 40 ounces of water by using the CUP 10 OZ on the jug to the right of the sinks and emptying it in the left sink 4 times.
- Use the CUP 10oz to get 10 ounces of Developing Solution (bottle #5 in the Screenshot) and place in the left sink.
- Get 40 ounces of water by using the CUP 10 OZ on the jug to the right of the sinks and emptying it in the middle sink 4 times.
- Use the CUP 10oz to get 10 ounces of Natrium Thiosulfate (bottle #6 in the Screenshot) and place in the middle sink.
- Get 50 ounces of water by using the CUP 10 OZ on the jug to the right of the sinks and emptying it in the right sink 5 times.
- Get 5 OZ of Natrium Carbonite (bottle #7 in the Screenshot) by using the CUP 1 OZ, 5 separate times (empty in sink, get another cup) and placing them in the right sink.
- Click on the cover of the red lamp to close it.
- Right click on the EXPOSED NEGATIVE IN CASSETTE to get an EXPOSED GLASS NEGATIVE and an EMPTY PHOTO CASSETTE.
- Place the EXPOSED GLASS NEGATIVE in the left sink for 30 seconds, using the timer on the left.
- Remove it from the left sink and place in the middle sink for 30 seconds.
- Remove and place in the right sink for 60 seconds.
- Turn and click on the red lamp.

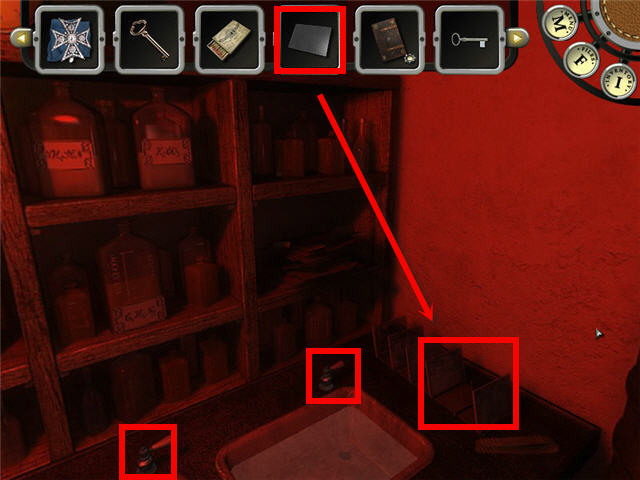
- Place the WET DEVELOPED GLASS NEGATIVE in the tray on the right of the sinks.
- Drain all 3 sinks by clicking on the faucets on the upper right of each sink.

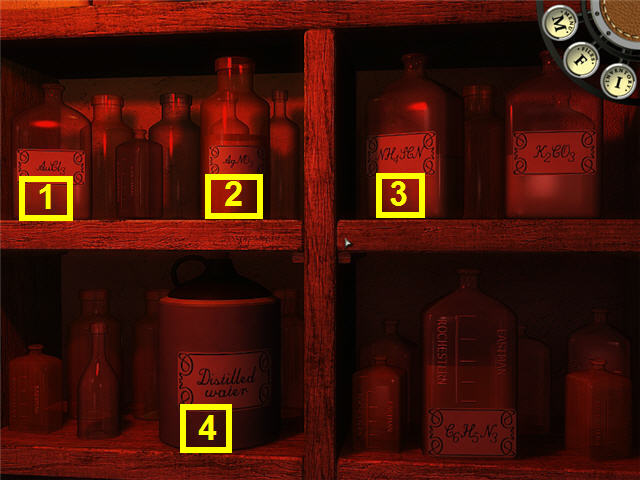
- The chemicals on the shelves above the sink are as marked; 1 – Gold Chloride, 2 – Silver Nitrate, 3 – Ammonium Rhodanide and 4 – Distilled Water.
- Get 40 ounces of distilled water (bottle #4 in the Screenshot) by using the CUP 10 OZ on the jug to the right of the sinks and emptying it in any sink 4 times.
- Use the CUP 10 OZ to get 10 ounces of Silver Nitrate (bottle #2 in the Screenshot) and place in the sink with the distilled water.
- Place the PHOTOPAPER in the sink with the solution for ten seconds.

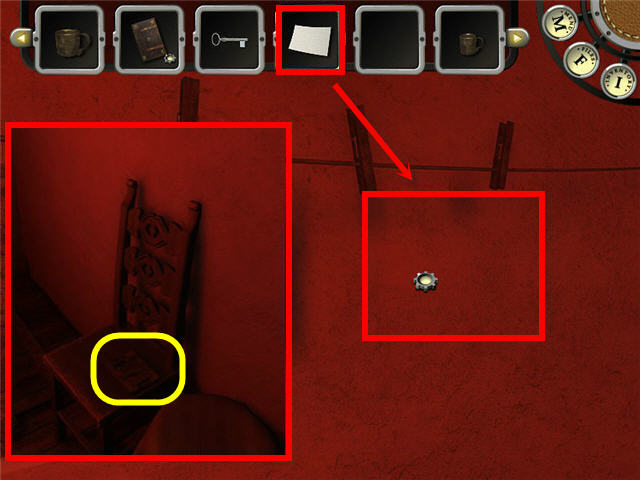
- Hang the WET SENSITIZED PHOTOPAPER on the line.
- Turn and take the DEVELOPED GLASS NEGATIVE from the tray on the right of the sinks.
- Turn and take the DRY SENSITIZED PHOTOPAPER off the drying line.
- Take the EMPTY COPYFRAME from the chair.
- Combine the EMPTY COPYFRAME and the DEVELOPED GLASS NEGATIVE and get a COPYFRAME W/GLASS NEGATIVE.
- Combine the DRY SENSITIZED PHOTOPAPER with the COPYFRAME W/GLASS NEGATIVE to get a LOADED COPYFRAME.

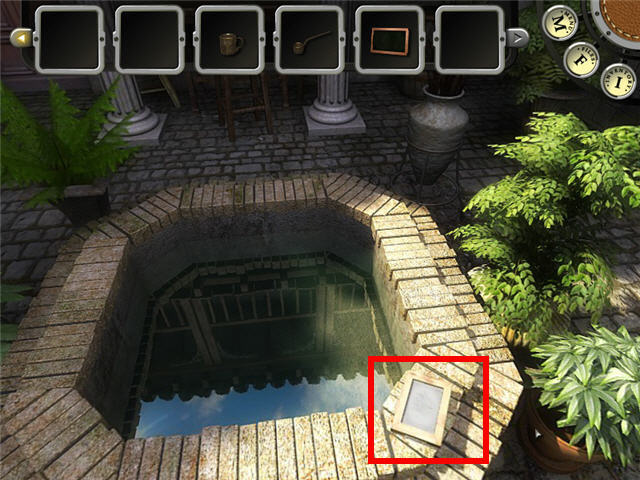
- Head out of the painters quarters and place the LOADED COPYFRAME on the corner of the well to dry.
Part 8: Music Box Part 3
- Turn and speak to Carmen. Exhaust all conversation.

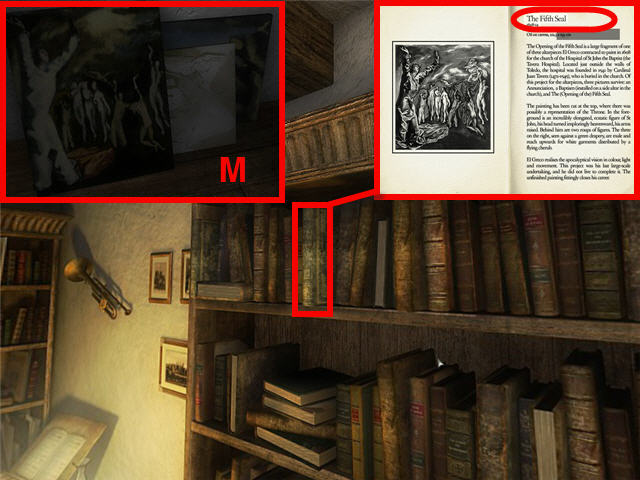
- Head into the painters quarters and click on the paintings (M) in the corner of the room by the easel.
- Go across the room and look at the El Greco art book on the top shelf of the left bookcase.
- Scroll through the book to the end and see the painting with the arms up, just like the ones the painter did.
- The paintings are called the Fifth Seal.
- Exit the area and go to Iglesia San Pedro.
- Speak to the Father and exhaust all conversation.
- You will get a SMALL BIBLE in inventory.
- Head back to the painter’s room at Diez Palencia.

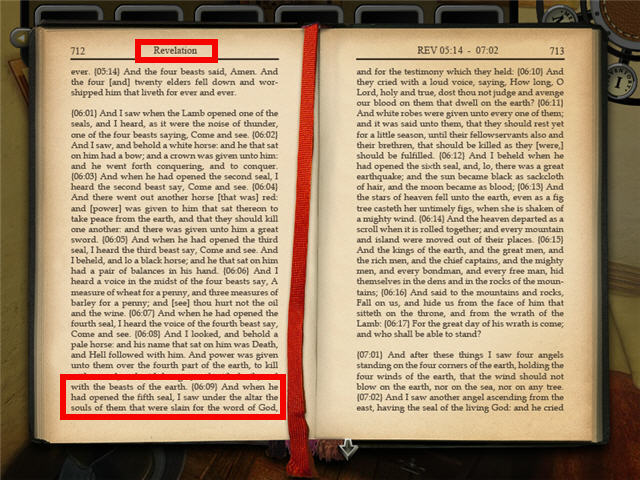
- Right click on the SMALL BIBLE and flip through the bookmarked places to find the relevant passage.
- The passage is located on Page 712, The Book of Revelation 6:09.

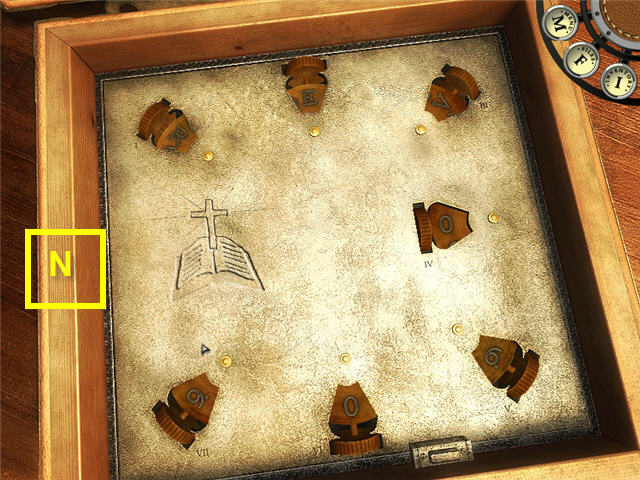
- Enter REV0609 on the music box starting from the upper left and going clockwise. See screenshot (N) for solution.
- Click on the button on the bottom edge of the music box.
- Take the SHORT LETTER and the WEIRD KEY.
- Right-click on the SHORT LETTER to read it.
Part 9: Secret Room
- Head into the darkroom and go into the corner with the padlocked hatch door on the floor under the drying line.
- Use the PADLOCK KEY on the lock.
- Click on the lock to open the hatch.
- Try and go down the hatch, but it is too dark.

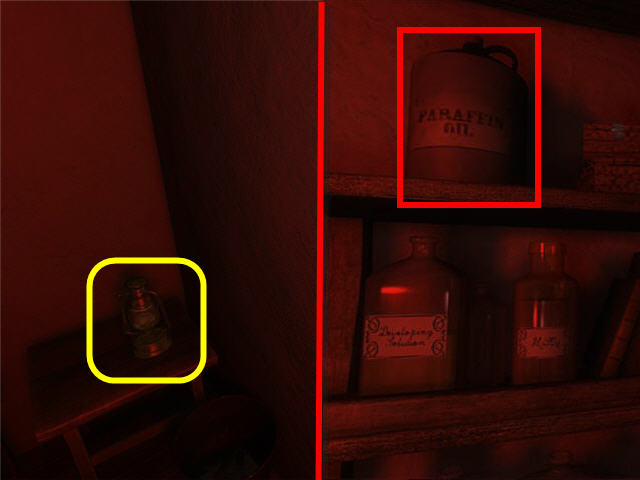
- Back away from the hatch and take the EMPTY OIL LAMP from the stool in the corner.
- Use the EMPTY OIL LAMP on the Paraffin Wax on the upper shelf on the back wall to get a FILLED OIL LAMP.
- Click on the hatch and go down to the sewers.

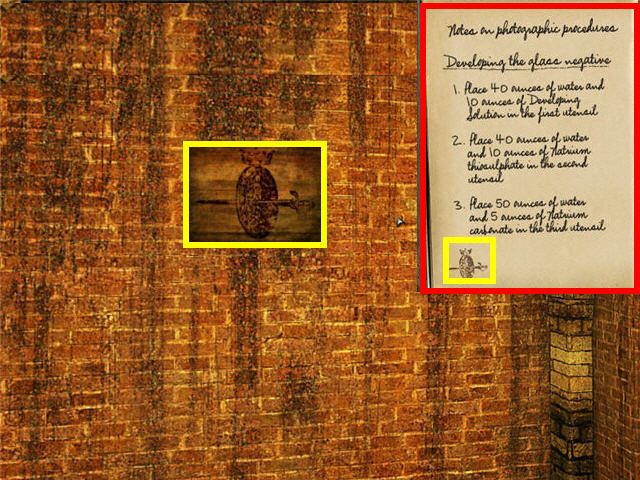
- The way through the maze is to follow the symbols that are on the bottom of the PAINTER’S NOTEBOOK.
- The order of the symbols that will be on the walls are; Sword and Shield, Horse, Sun, Monkey, Rings with Crown, Hand, Portrait, Flower.
- To get through the maze face the left after getting down in the sewer.
- Go forward 3x, Turn right and go forward 3x, Turn right and go forward 1x, Turn left and go forward 1x.
- Look at the lock on the gate and see that it a strange lock.
- Turn right and go forward 4x, Turn left and go forward 2x, Turn left and go forward 3x, Turn left and go forward 1x, turn right and go forward 1x, turn right and go forward 1x, turn left and go forward 1 time, turn right and go forward 1x.
- Go through the opening in the wall.

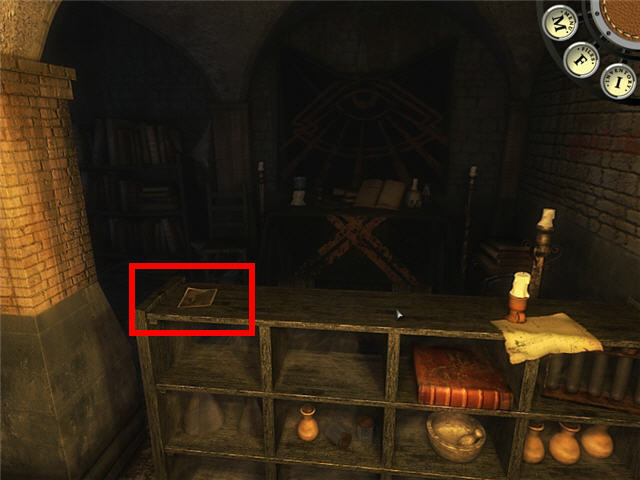
- Turn to the shelves on the right and check the photograph.
- Go forward into the room and turn right towards the bookshelves.

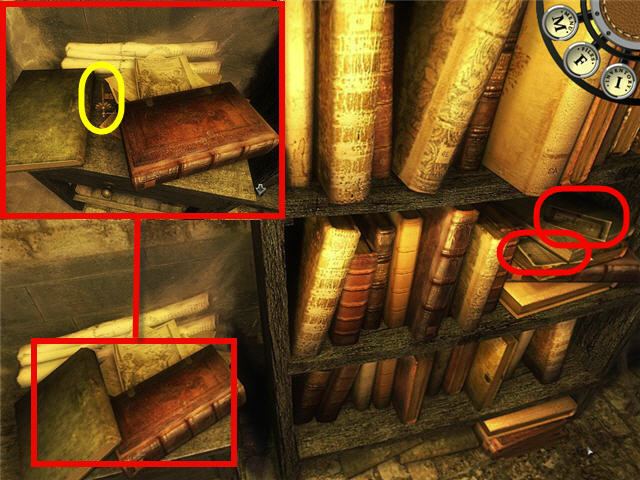
- Click on the little table to the left of the bookshelves.
- Click on the green book on the left and it moves to expose a key.
- Take the WEIRD KEY.
- Look through the book that was moved and the scroll above it.
- Look at the books on the bookshelf on the right and note the 2 pictures with tiles on them.

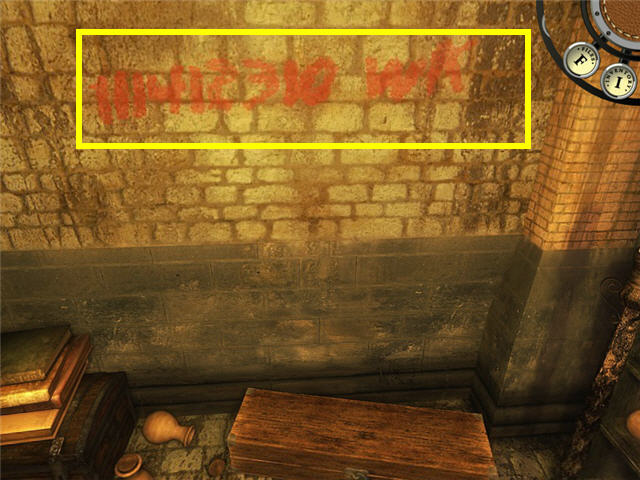
- Turn to the right and walk towards the wall and see the writing on the wall; 111412310 WK.
- Click on the chest on the ground.
- Back out from the chest and pan left and click on the book.
- Pan left again and click on the two photographs of the tiles on the altar.
- Exit the room via the broken wall and get a new map.
- Click on Diez Palencia.
Part 10: Photo Developing Part 2
- Exit the painter’s quarters and go to the well and get the SUNDRIED LOADED COPYFRAME.
- Right click on the SUNDRIED LOADED COPYFRAME and get a DEVELOPED GLASS NEGATIVE, EMPTY COPYFRAME and SUNLIGHT-COPY PHOTO.
- Head back into the darkroom.

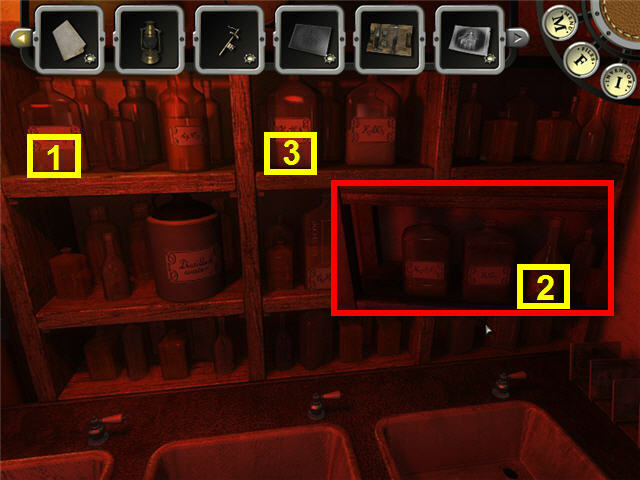
- Empty all the sinks by clicking on the handles above them.
- Get 60 ounces of water by using the CUP 10 OZ on the jug to the right of the sinks and emptying it in the left sink 6 times.
- Get 40 ounces of water by using the CUP 10 OZ on the jug to the right of the sinks and emptying it in the middle sink 4 times.
- Use the CUP 1 OZ on the Gold Chloride (Bottle #1 in the screenshot) and place in the middle sink.
- Use the CUP 1 GR on the Ammonium Rhodanide (Bottle #3 in Screenshot) and place it in the middle sink.
- Get 40 ounces of water by using the CUP 10 OZ on the jug to the right of the sinks and emptying it in the right sink 4 times.
- Use the CUP 10 OZ on the Natrium Carbonate Gold Chloride (Bottle #2 in the screenshot, taken from the shelves on the back wall) and place in the right sink.
- Place the SUNLIGHT- COPY PHOTO in the left sink for 20 seconds.
- Remove and place the WASHED PHOTO in the middle sink for 80 seconds.
- Remove and place the COLORIZED PHOTO in the right sink for 80 seconds.
- Take the WET PROCESSED PHOTO.
- Empty the sinks.
- Get 60 ounces of water by using the CUP 10 OZ on the jug to the right of the sinks and emptying it in any sink 6 times.
- Place the WET PROCESSED PHOTO in the sink with the water for 60 seconds.
- Take the WET FINAL PHOTOGRAPH.
- Hang the WET FINAL PHOTOGRAPH on the line to dry.
- Walk away from the drying line and walk back.
- Take the FINAL PHOTOGRAPH.
- Leave the painters room and give the FINAL PHOTOGRAPH to Carmen in the courtyard. Exhaust all conversation.
Part 11: The Iron Door

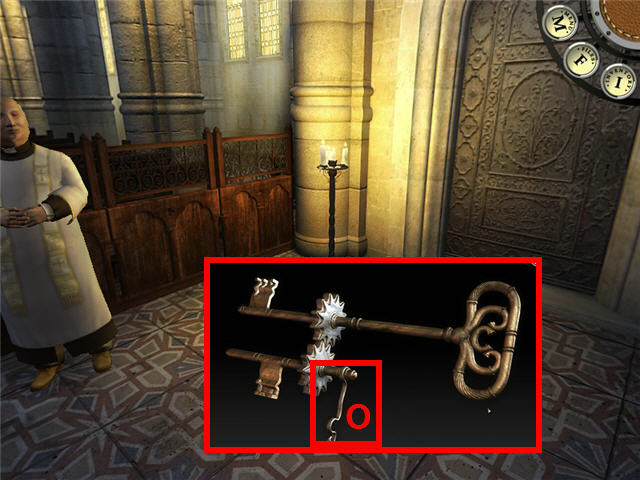
- Leave the area and head to the Iglesia San Pedro.
- Go towards the large iron door to the right of Father Perez.
- Right-Click one of the WEIRD KEYS in inventory and then click on the other WEIRD KEY in inventory and combine it with the one in close-up.
- Click the snap (O) on the WEIRD KEYS to get a DOUBLE KEY.
- Click on the door lock on the iron door to get a close-up.
- Try and use the DOUBLE KEY on the keyhole on the iron door.
- Head to Plaza de la Mancha and speak to Domingo, the guitar player.
- Give Domingo 100 PESETAS to make a phone call.
- Go back to the Iglesia San Pedro and talk to Father Perez.
- As soon as he leaves, use the DOUBLE KEY on the iron door and click on it to turn.
- Click on the door to open.
- Head up to the church tower.

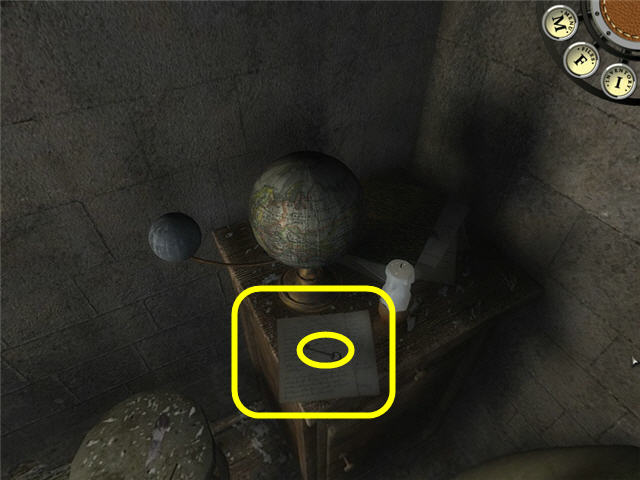
- Click on the ladder.
- Walk past the ladder and look down in the corner on the table.
- Take the KEY FROM THE TOWER and the LETTER FROM CARLOS.
- Read the LETTER FROM CARLOS.

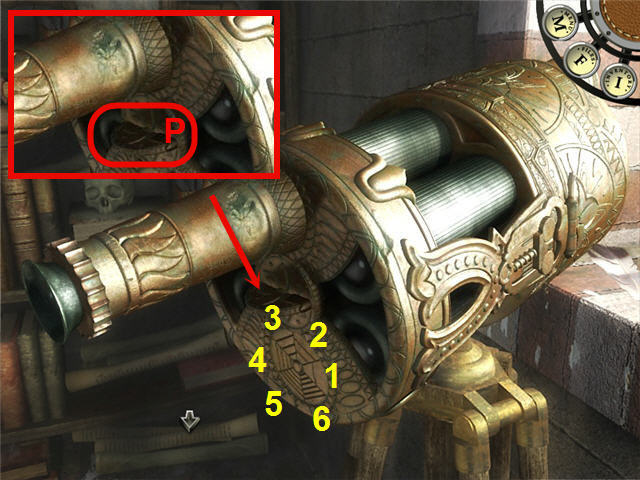
- Head straight and click on the kaleidoscope to get a close-up.
- Look through the eye piece and see the patterns.
- These are the same patterns seen on the tiles throughout the game on buildings or photographs.
- There are 6 tubes in the kaleidoscope and 8 patterns in each.
- The goal of the puzzle is to set the correct pattern of the kaleidoscope with the correct number using the clue given on the wall in the secret room.
- The number on the wall was 111412310 which can be broken out to these 6 numbers, 1-11-4-12-3-10.
- These numbered tiles can be matched up to the tiles found at Plaza de la Mancha, Francisco’s room, the secret room in the sewer, the Palace and the painter’s room.
- See screenshot for location of dial (P) and the 6 positions you will need to move it in. See that 1 has one line, 2 has 2 lines, etc.

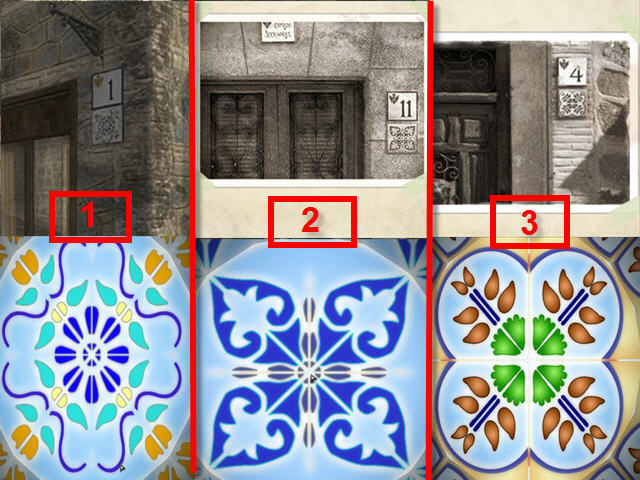
- See screenshot for the first set of 3 solutions.
- Set the dial to face the direction of the 1 line section on the bottom of the dial.
- Look through the viewer and place your cursor on the right or left of the screen to toggle through the patterns. Stop when you hit the pattern for #1 in screenshot and exit the viewer.
- Set the dial to face the direction of the 2 line section on the bottom of the dial.
- Look through the viewer and place your cursor on the right or left of the screen to toggle through the patterns. Stop when you hit the pattern for #2 in screenshot and exit the viewer.
- Set the dial to face the direction of the 3 line section on the bottom of the dial.
- Look through the viewer and place your cursor on the right or left of the screen to toggle through the patterns. Stop when you hit the pattern for #3 in screenshot and exit the viewer.

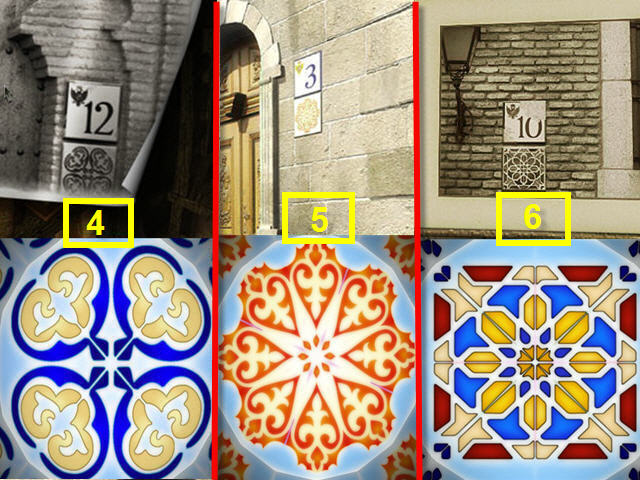
- See screenshot for the second set of 3 solutions.
- Set the dial to face the direction of the 4 line section on the bottom of the dial.
- Look through the viewer and place your cursor on the right or left of the screen to toggle through the patterns. Stop when you hit the pattern for #4 in screenshot and exit the viewer.
- Set the dial to face the direction of the 5 line section on the bottom of the dial.
- Look through the viewer and place your cursor on the right or left of the screen to toggle through the patterns. Stop when you hit the pattern for #5 in screenshot and exit the viewer.
- Set the dial to face the direction of the 6 line section on the bottom of the dial.
- Look through the viewer and place your cursor on the right or left of the screen to toggle through the patterns. Stop when you hit the pattern for #6 in screenshot and exit the viewer.

- When you have correctly adjusted the patterns the kaleidoscope will open up.
- Take the CODEX PAGE from inside the kaleidoscope.
- Exit the area and head back to Diez Palencia.
- Head through the painters room and go down the hatch into the sewer.
- Move forward one step to get the map and click on the secret cellar.

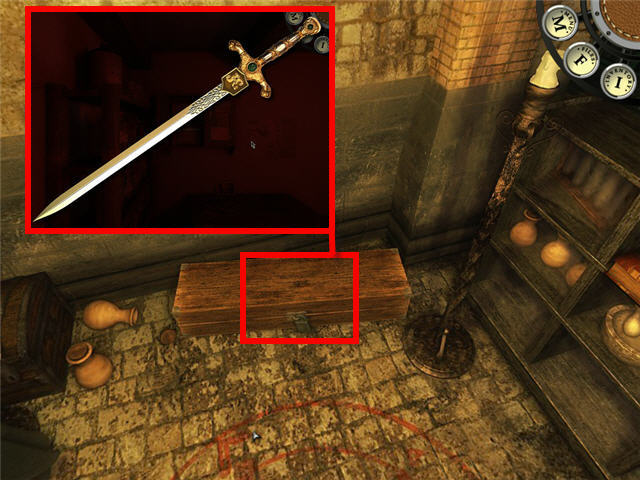
- Head into the corner and look at the locked chest under the writing on the wall.
- Use the KEY FROM THE TOWER on the lock and then click to open the chest.
- Take the ORIGINAL SWORD from the chest.
- Right-Click on the ORIGINAL SWORD in inventory and note the initials JC.
- Exit the area and head back to Diez Palencia.
- Exit the area and head to the Candelas residence.
Part 12: The Escape Route
- Speak to Isabel and exhaust all conversation.
- Get a FORGE KEY from Isabel.
- Exit the area and go to Candelas II in blue on the map under Candelas.

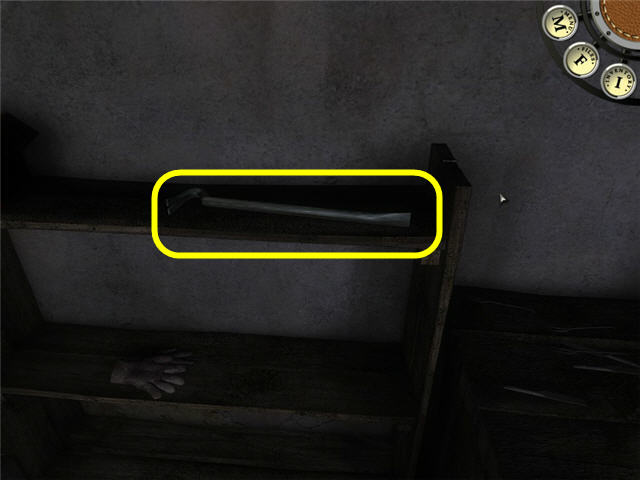
- Take the CROWBAR from the shelf along the wall, left of the kiln.
- Exit the area and go to Diez Palencia.
- Go through the painter’s room and down the hatch in the darkroom to the sewers.
- Move to get the map and click on the location called Exit on the map.

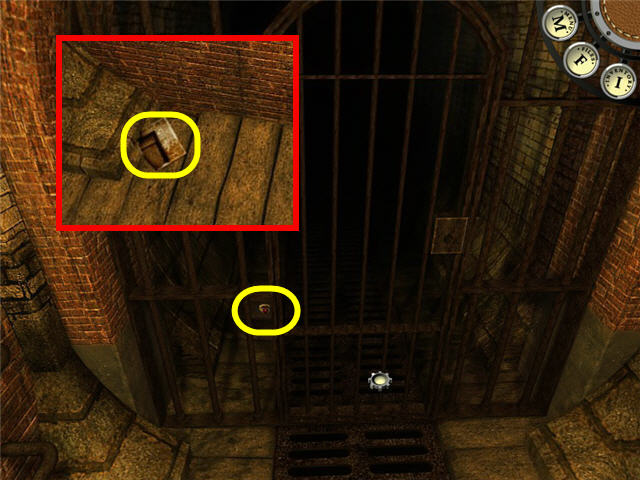
- Look at the ruby ring on the other side of the locked gate.
- Use the CROWBAR on the ring to get a RUBY RING.
- Pan left and pick up the PHOTO on the ground.
- Climb up the ladder on the wall and use the CROWBAR on the grate.
- Look at Ricardo the parrot.
- Head into the house and go straight 3 times to the shop in the front.


- Click on the birdseed on the counter and take one of each of the 3 BIRDSEED.
- Pan left and go forward one time.

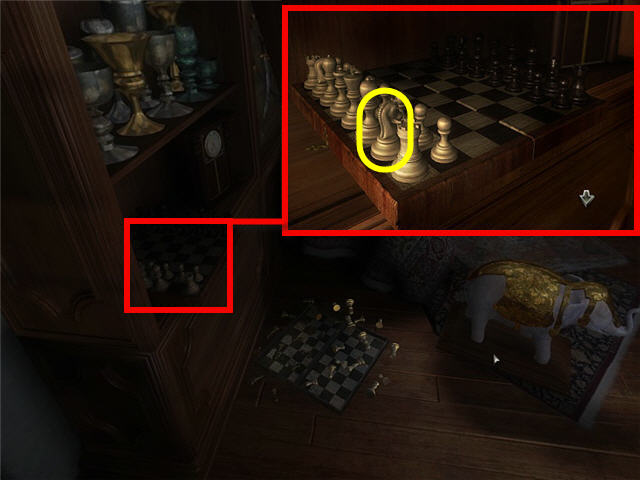
- Turn and click on the chess set on the floor 2 times or till you hear that all the knights are missing.
- Click on the chess set on the shelf above the one on the floor and take the IVORY KNIGHT.
- Head through the curtains and out the back door.
- Head to Ricardo the parrot and give him the 3 different BIRDSEEDS.
- Feeding Ricardo the BIRDSEED from the spilled bowl is the one that will give you your needed the clue.
- Note the steps to the Viennese Waltz that Ricardo recites; Forward, left, forward, right, right, left, forward, forward, right, right, forward, left, left, right, left.
- Head down the manhole with the cover removed that you exited from.
- Click on the locked gate to get a close-up of the keyhole.
- Use the IVORY KNIGHT on the keyhole to the locked gate.
- Head any direction in the sewer to trigger the map and click on Diez Palencia.
- Exit the area and head to the forge, Candelas II.
Part 13: Making a Key

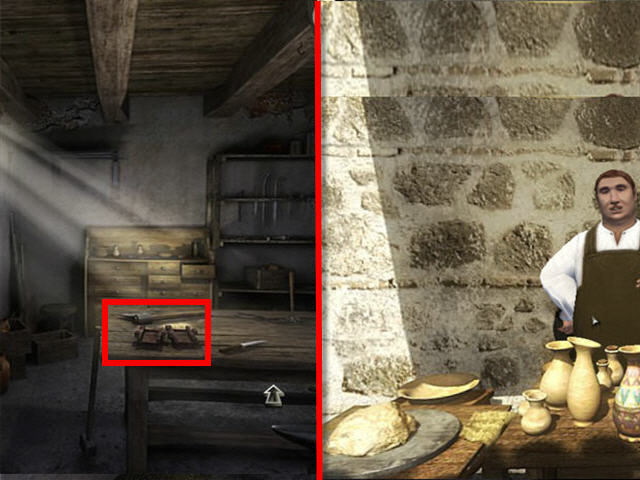
- Click on the casting forge on the table and note that you need clay, metal and the right temperature.
- Leave the area and head to Plaza de la Mancha.
- Speak to the man at the pottery stand before the archway.
- Give the man the RUBY RING and take some CLAY from the tray on the left.
- Head back to the Candelas II.
- Click on the workbench and get a close-up of the casting frames.
- Take the KNIFE on the table.
- Use the KNIFE in inventory on the CLAY and get CLAY BRICKS.
- Place the CLAY BRICKS on the casting frames.
- Place the IVORY KNIGHT in the clay frame on the left.
- Click on the right frame to place it on top of the left.
- Click on the casting frame to separate them and take the IVORY KNIGHT out of the left frame.

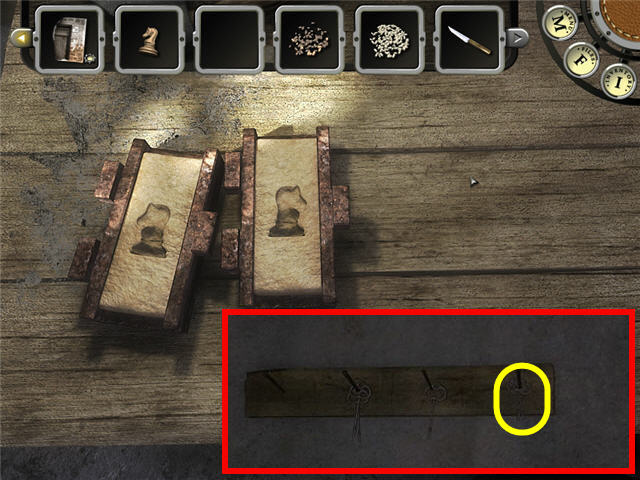
- Use the KNIFE on the left frame to cut a path for pouring metal.
- Leave the table and go to the right and take an UNFINISHED KEY from the hook on the wall above the shelf.
- Click on the casting molds to get a close-up.
- Place the UNFINISHED KEY on the left mold.
- Click on the right mold to close it and take the CASTING FRAME.


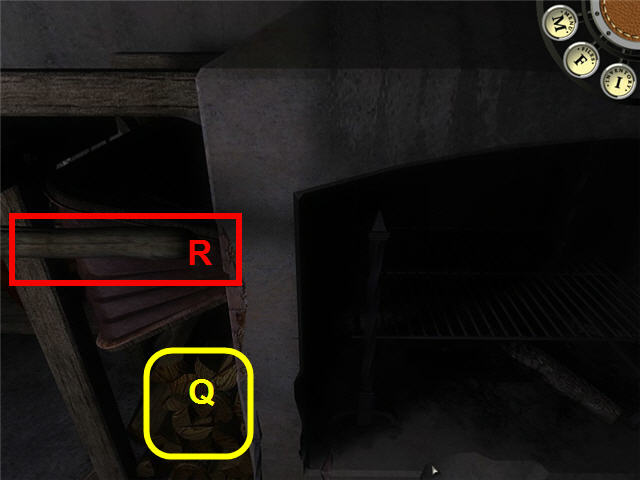
- Head to the kiln and take the firewood (Q) from the left and place it in the kiln.
- Head to Plaza de la Mancha and take the NEWSPAPER from the bench where the man was reading earlier and come back to Candelas II.
- Place the NEWSPAPER in the kiln.
- Use the MATCHES in the kiln.
- Use the handle for the bellows (R) on the left 3 times to stoke the fire.
- Place the CASTING MOLD in the kiln.
- Head to the left and take the GLOVES from the shelf below where you took the CROWBAR.
- Go back to the kiln and take the POT on the stump to the right on the floor directly outside of the kiln.
- Use the GLOVES on the CASTING MOLD to move it to the left.
- If it does not let you move it, you either need to stoke the fire a few times with the bellows or walk away and come back.
- Place the POT in the kiln and stoke the fire 3 more times with the bellows.
- Walk away from the kiln and come back.
- Use the GLOVES on the POT and pour the metal into the CASTING MOLD.
- Take the COMPLETED MOULD IN CASTING FRAME out of the kiln with your bare hands.

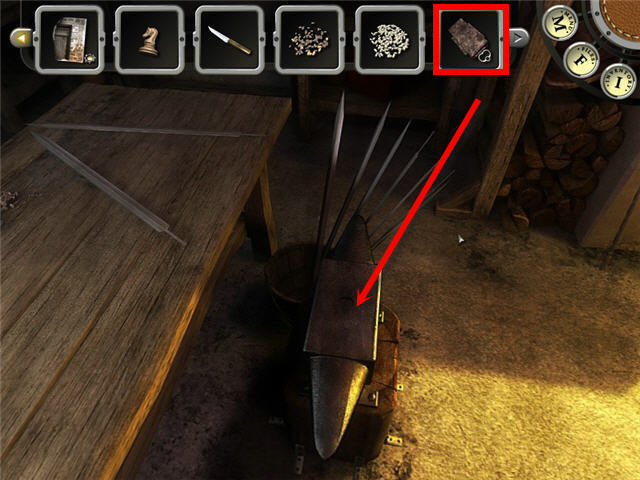
- Place the COMPLETED MOULD IN CASTING FRAME on the anvil by the workbench.
- Use the KNIFE on the COMPLETED MOULD IN CASTING FRAME.
- Take the MOULDED CHESSMAN KEY from the opened mold.
- Head to Diez Palencia and through the painter’s room and down to the sewer.
- Move in any direction of the sewer to trigger the map.
- Click on the Exit area of the map.
- Click on the keyhole of the gate to get a close-up.
- Use the MOULDED CHESSMAN KEY on the lock.
- Click to open the gate.

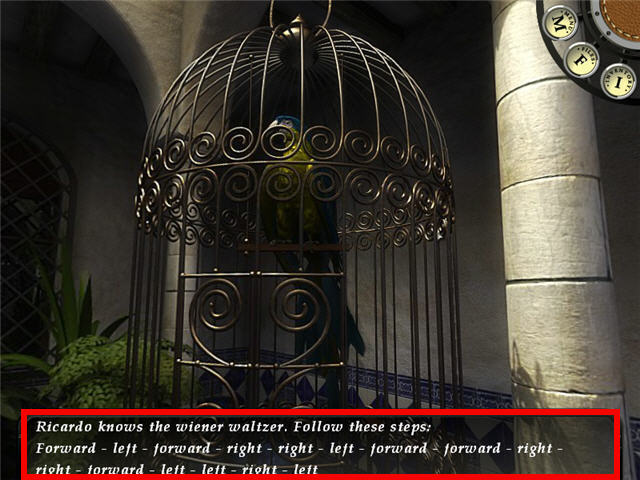
- Use the directions from Ricardo, the parrot to get through the maze.
- The solution is; (Forward- No need to do this, you did it when you walked in from the gate) left, forward, right, right, left, forward, forward, right, right, forward, left, left, right, left.
- Be sure to click after each move.
Part 14: Escape

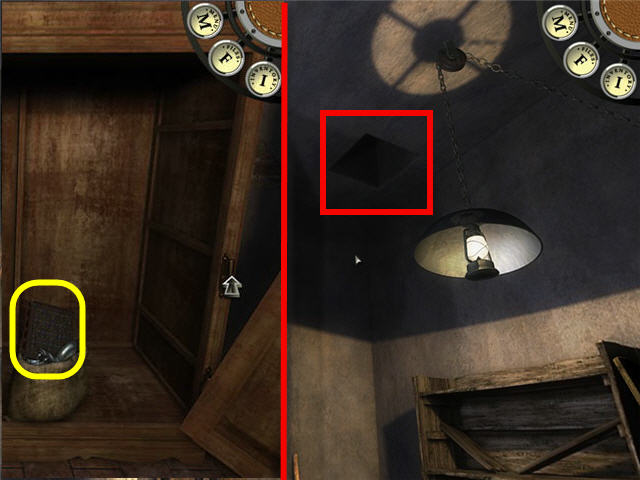
- Turn right and take the ALQUERQUE BOARD from the bag in the cabinet.
- Look up and see a chain with a hook hanging from the ceiling.
- Turn right and look up to see a hole in the ceiling in the corner.

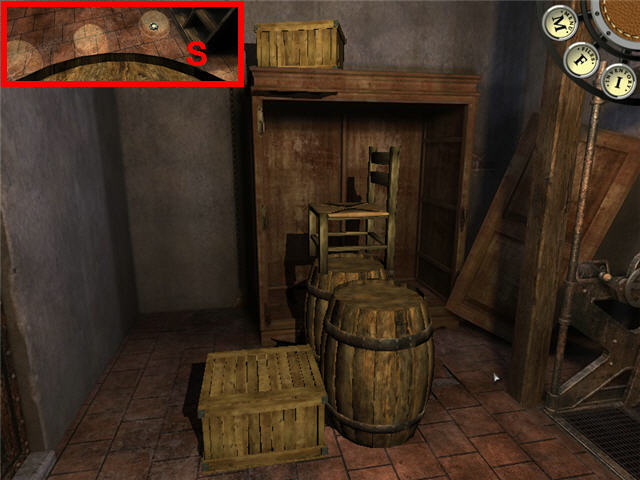
- The goal is to move the barrels, chair and crate over to the open cabinet so that you can climb up and get the chain.
- Pick up a barrel from the corner and turn around.
- You will see markings on the floor (S) where you can place the barrel down.
- Place the barrel down on an area closest to the open cabinet.
- Take the other barrel and place it near the other one.
- Repeat this process till you have them placed lined up in front of the cabinet.
- Place either the chair or crate on top of one of the barrels and the remaining chair or crate in front of the barrels. See screenshot for one solution.
- Climb back up the steps by clicking up high and you will get an arrow.
- Take the ROPE from the crate.
- Take the open CRATE that the ROPE was in and climb down and place it on the floor.
- Head back up the makeshift steps.
- Take the spade to get a SPADE HEAD and a BROKEN SPADE HANDLE.
- Look slightly up and to your left while still standing on the barrels and use the CROWBAR on the chain with the hook to get a CHAIN.

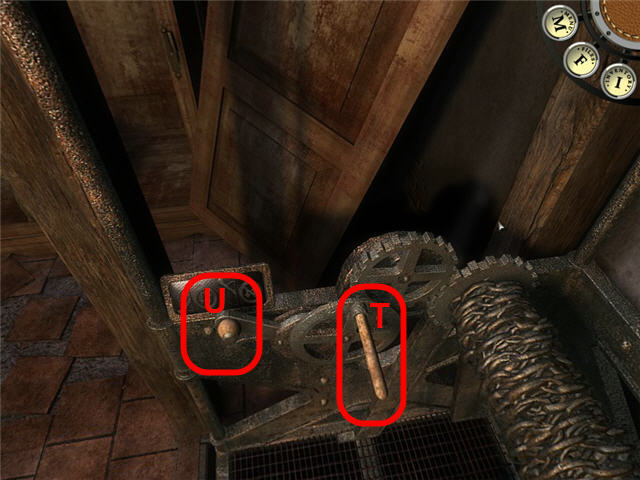
- Walk into the elevator and place the BROKEN SPADE HANDLE in the slot (T) by the gears.
- Click on the brake (U) to release it and then click on the makeshift handle.

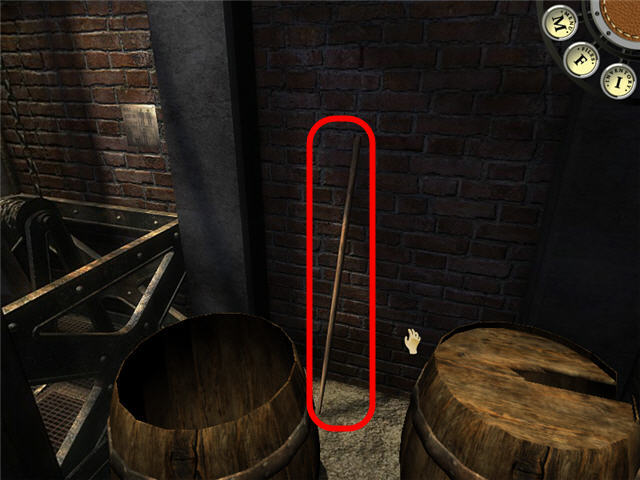
- Exit the elevator on the lower floor and go to the corner with the barrels.
- Click on and take the LONG POLE behind the barrels.
- Move the barrel in the corner with a top to the left of the open barrel.
- Take the barrel with no cover and place it where the covered barrel was.
- Move the barrel with the cover where the open barrel was.
- The two barrels should now be switched and you can move from the corner.
- Move forward to the elevator and place the covered barrel in the elevator.
- Step in and click on the brake and then the makeshift handle.
- Exit the elevator but leave the barrel for now.

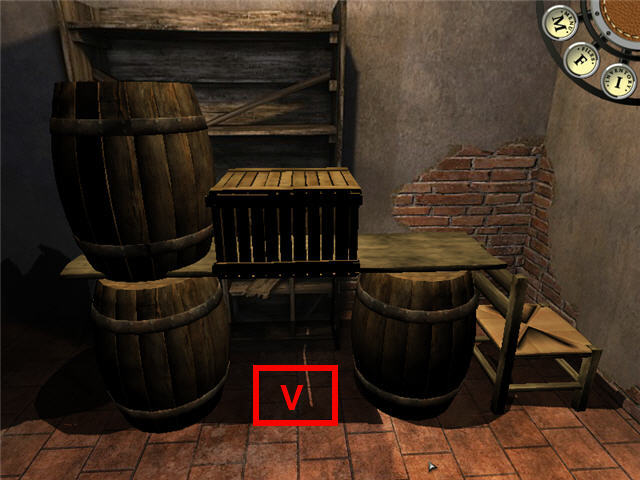
- Move the two original barrels over to the bookshelf on the other side of the room.
- Place the plank that is leaning against the right side of the bookshelf over the two barrels.
- Place the new barrel from the elevator on top of the plank.
- Place the covered crate in front of the new barrel.
- Place the chair on the right of the structure. See screenshot (V) for one solution.
- Climb up the structure you built and walk to the opening in the ceiling.
- Look up the hole in the ceiling and use the CHAIN on the grate and get down.
- Head into the elevator, release the brake and click on the handle.

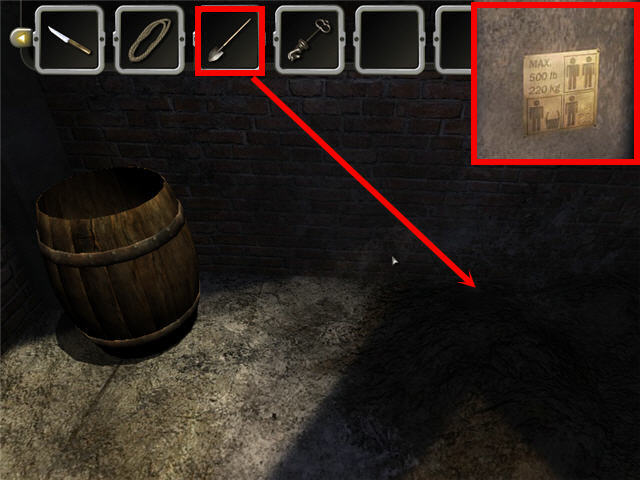
- Note the sign on the elevator on weight capacity and pay special attention to the pictures.
- In inventory, combine the LONG POLE with the SPADE HEAD to get a SPADE.
- Face the wall between the barrel and the dirt pile.
- Use the SPADE and scoop dirt into the barrel 4 times to equal the weight of one adult.
- The SPADE will light up as bit when you are in a spot you get dirt.
- Move the barrel with 4 scoops of dirt into the elevator.
- Get in the elevator and release the brake and click the handle.
- Remove the barrel with dirt out of the elevator.
- Take the open crate that you took from the top of the open cupboard and place it in the elevator.
- Get in the elevator and release the brake and click the handle.
- Place the crate out of the elevator and exit the elevator.
- Use the SPADE on the dirt and place in the crate 2 times.
- Pick up the crate full of dirt and enter the elevator.
- Put the crate down in the elevator and release the brake and click the handle.
- Head up and empty the dirt from the crate into the half filled barrel.
- Go back down the elevator and get another crate full of 2 scoops of dirt.
- Head back up and empty the crate into the barrel of dirt.
- Take the empty crate and go down in the elevator for the third and last time.
- Fill the crate with 2 scoops of dirt and bring it up in the elevator.
- Remove the dirt filled crate from the elevator.

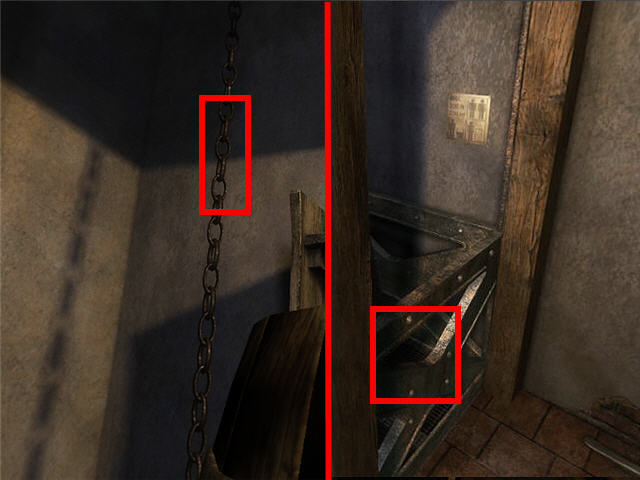
- Head into the corner by the chain under the hole.
- Click on the CHAIN above the barrel.
- If you click too low you will move the barrel instead of grabbing the chain.
- Attach the CHAIN to the lower section of the elevator.
- Place the dirt filled barrel in the elevator.
- I had to get in the elevator in order to move the barrel and the following crate in there.
- Place the dirt filled crate on top of the dirt filled barrel in the elevator.
- Exit the elevator.
- Use the SPADE on the brake release of the elevator while you are standing outside it.

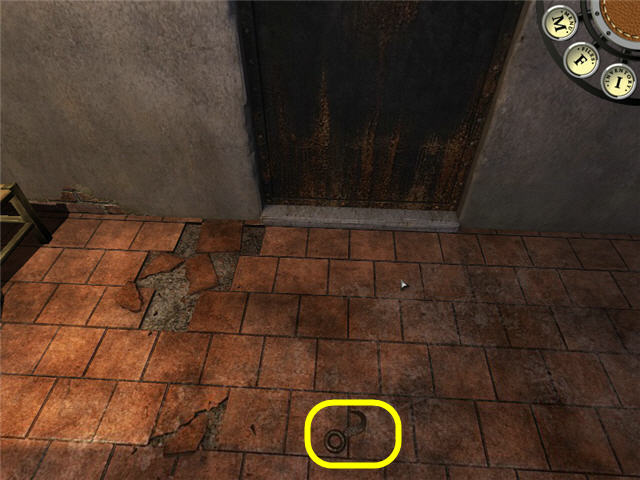
- Turn around and pick up the HOOK on the floor.
- Combine the HOOK with the ROPE in inventory to get a ROPE WITH HOOK.
- Climb up the makeshift stairs.
- Use the ROPE WITH HOOK on the opening.
- Click on the attached ROPE WITH HOOK and climb up to the forge.
- Speak with Isabel.
- Exit the forge and speak with Francisco.
Part 15: Alquerque Board Game

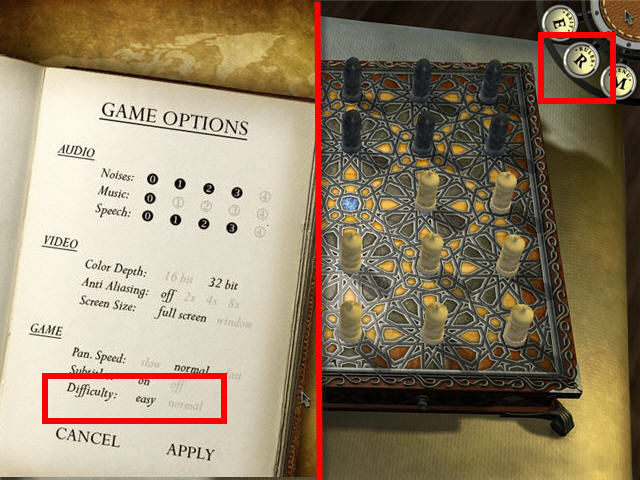
- The Rules to the game are now added to your tools on the upper right where the inventory was.
- The Alquerque board game is completely random.
- If you played the game in Normal Mode, you can go back to the main menu and change it to Easy Mode.
- The objective is to capture all of your opponent’s pieces or make it so that they cannot move.
- The strategy is similar to playing checkers.
- You will get a GRANITE PLATE when you win the game.
- Congratulations! You have completed AGON – The Lost Sword of Toledo!



 Drawn: Dark Flight ® Walkthrough, Guide, & Tips
 Epic Adventures: La Jangada Walkthrough, Guide, & Tips
 Age of Oracles: Tara's Journey Walkthrough, Guide, & Tips
 Reveries: Soul Collector Walkthrough, Guide, & Tips
 Mystic Diary: Haunted Island Walkthrough, Guide, & Tips