Drawn: Dark Flight ® Walkthrough, Guide, & Tips
Drawn: Dark Flight ® Walkthrough
Welcome to the Drawn: Dark Flight ® Walkthrough!
Explore the Kingdom of Stonebriar and solve the mysteries of the shadows that prowl its streets!
Whether you use this document as a reference when things get difficult or as a road map to get you from beginning to end, we’re pretty sure you’ll find what you’re looking for here.
This document contains a complete Drawn: Dark Flight ® game walkthrough featuring annotated screenshots from actual gameplay!
We hope you find this information useful as you play your way through the game. Use the walkthrough menu below to quickly jump to whatever stage of the game you need help with.
Remember to visit the Big Fish Games Forums if you find you need more help. Have fun!
This walkthrough was created by Margie B, and is protected under US Copyright laws. Any unauthorized use, including re-publication in whole or in part, without permission, is strictly prohibited.
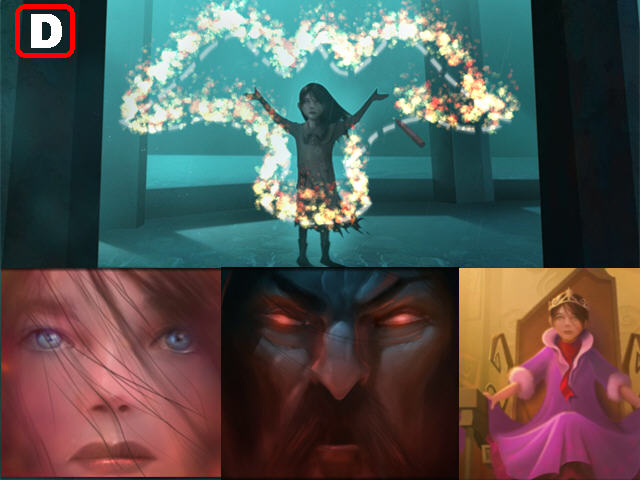
GENERAL TIPS

- This is the Official Drawn: Dark Flight ® Strategy Guide!
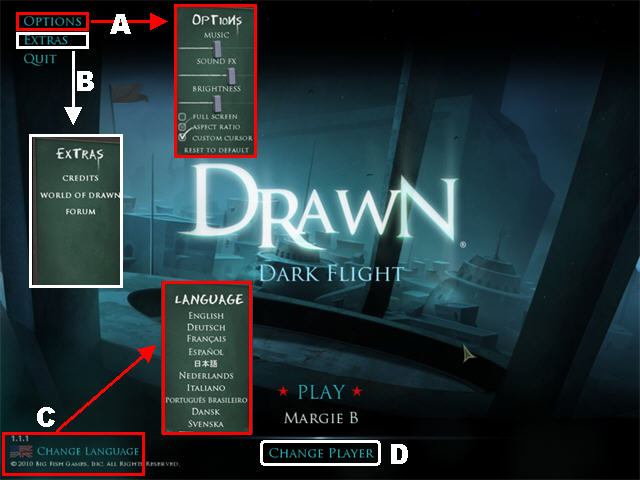
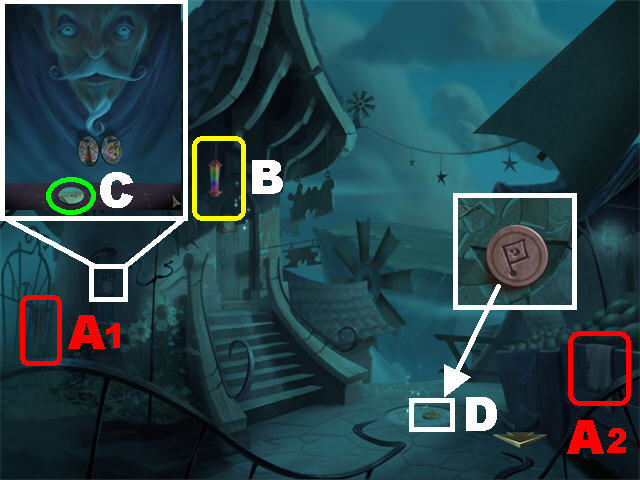
- Click on OPTIONS (A) in the main menu to adjust music, sound, custom cursor, screen size and brightness.
- Click on EXTRAS (B) to view the credits, access the forum, the Collector’s Edition version of the game and its predecessor.
- Open the CHANGE LANGUAGE (C) tab to play the game in any of the 10 languages offered.
- Choose Casual or Experienced Mode at the beginning of the game. In Experienced Mode you will not have to view the tutorial.
- You can click on the “ESC” key on your keyboard to skip the story.
- Read the letters and notes found throughout the game, they will give you information regarding gameplay and storyline.
- The sketches in your inventory can be used to unlock certain areas within the paintings.

- Click on the lock icon (E) in the lower right to manage your inventory tray. When it is in the locked position your inventory tray will remain visible. If you decide to unlock it, the inventory tray will become visible once you mouse over it with your cursor.
- The MENU (F) tab will take you to the options, help and main menu. You can also quit or resume the game from this tab.
- The HELP (G) tab gives you instructions on using the hint system, cursors, and navigation arrows.
- Inventory items (H) are stored in the bottom tray. Use the arrows on either side of the inventory tray to scroll through all available items.
- The hand cursor allows you to pick up inventory items.
- Place inventory items in parts of the scene in which a jigsaw piece appears.
- A magnifying glass icon allows you to zoom into certain areas or pick up inventory items.
- Some inventory items will be used right away and others will be used much later in the game.
- Click on Franklin’s portrait (I) in the lower left side and then on the objective you need help with. Franklin will give you hints as to what you need to do next.
- There are several tips for each objective, so if the first tip doesn’t help, click on Franklin again to receive the next clue.
Chapter 1: Underground
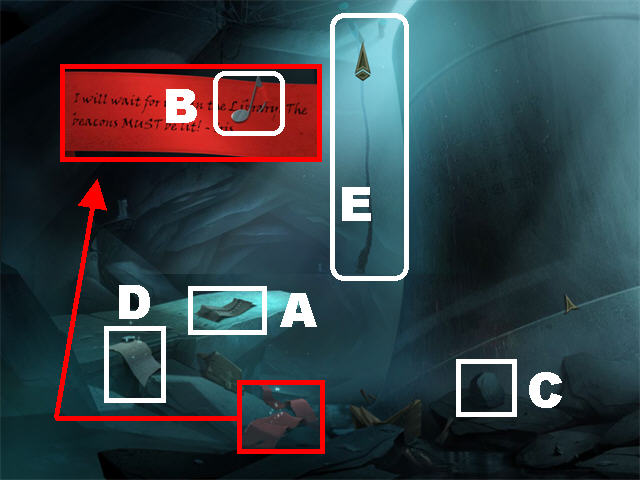
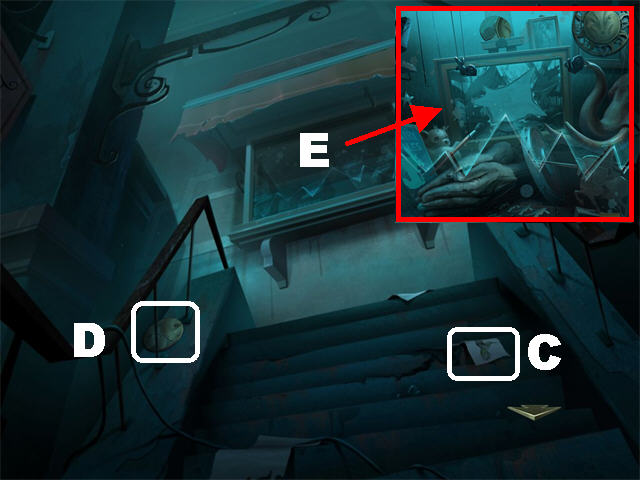
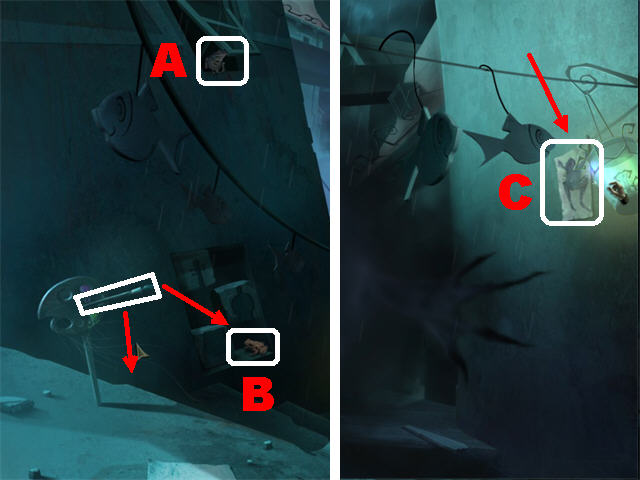
- Grab the SKETCH OF ROPE (A).
- Zoom into the red cloth; take SILVER NOTE 1/10 (B).
- Take the LARGE STONE (C) in the lower right.
- Read the NOTE (D) in the lower left.
- Place the SKETCH OF ROPE on the rope piece in the ceiling; click on the rope to go up (E).
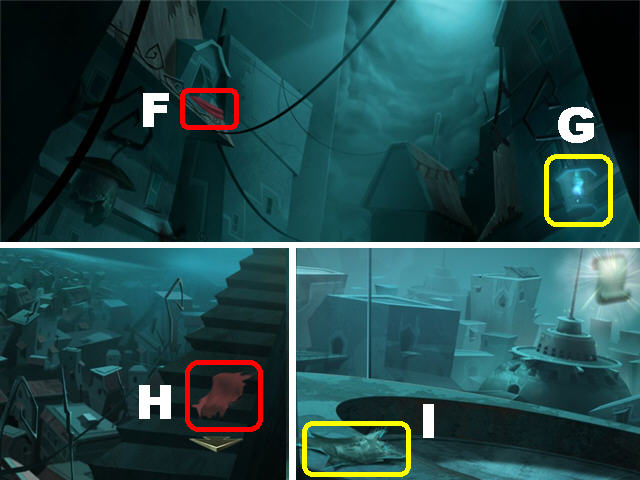
- Click on Franklin in the lower left (F).
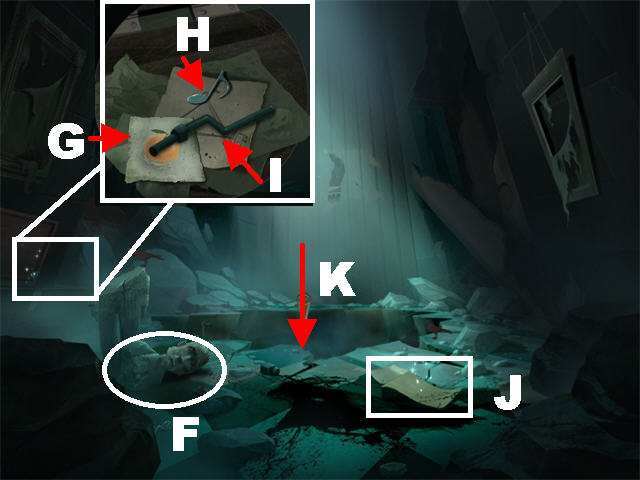
- Zoom into the chest in the lower left; take the ORANGE SKETCH (G), SILVER NOTE 2/10 (H) and the LEVER (I).
- Look at the BRIDGE SKETCH (J) in the lower right. You need a brush to complete the sketch.
- Go down the chasm (K) and proceed forward.

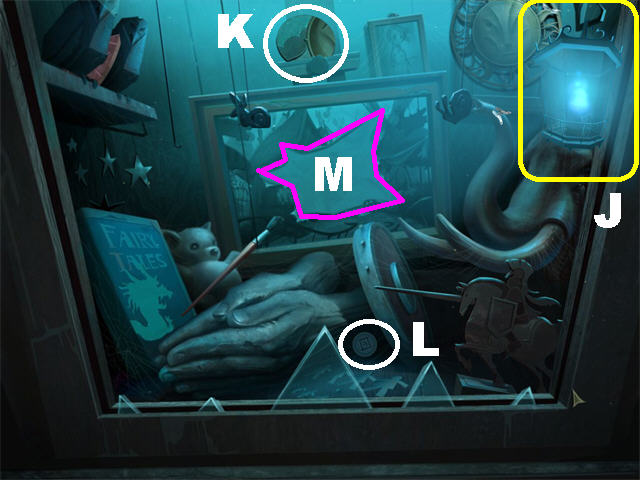
- Place the LEVER on the mechanism (L).
- Click on the lever to open the left lion’s mouth and eye.
- Place the LARGE STONE in the left lion’s mouth before it closes to hold it open.
- Zoom into the lion’s mouth; take SILVER NOTE 3/10 (M) and the PAPER PHOENIX (N).
- Click on the lever again to open the lion’s eye; take the REFLECTIVE DISK (O).
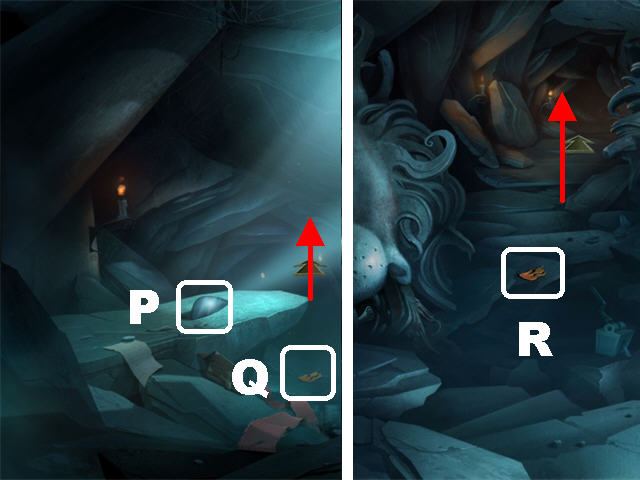
- Click down.
- Place the REFLECTIVE DISK on the small cliff (P). This action will light up the hall ahead.
- Grab the PAPER FLAME 1/3 (Q) that fell on the ground.
- Go forward.
- Take the PAPER FLAME 2/3 (R) on the ground.
- Proceed forward.
- Take PAPER FLAME 3/3 (S) on the ground.
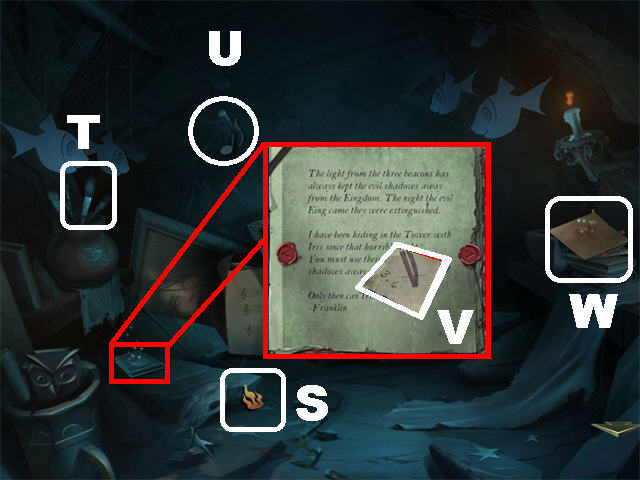
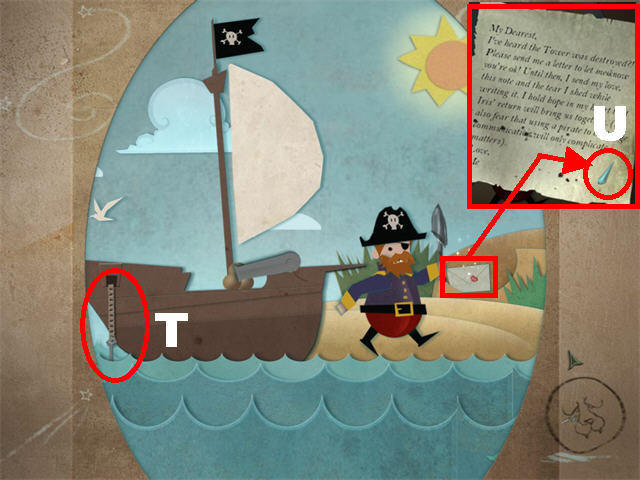
- Grab the DRY BRUSH (T) on left.
- Take SILVER NOTE 4/10 (U) in upper left.
- Zoom into the book in the lower left; take the PAPER SCRAP (V). You can click on the arrows on the side of the book to read the rest of the story.
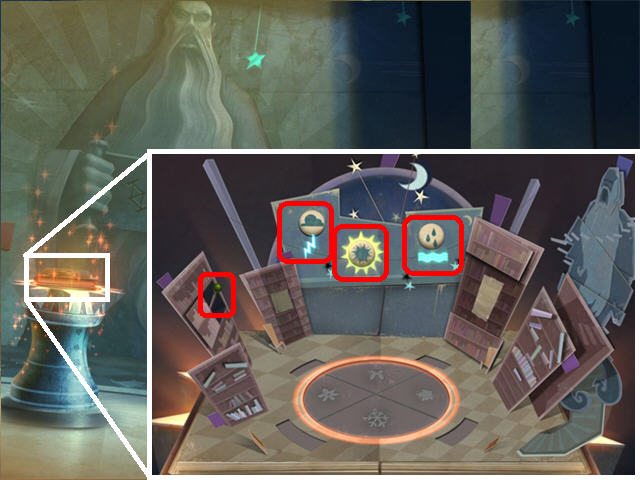
- Take a closer look at the pop-up book on right (W).
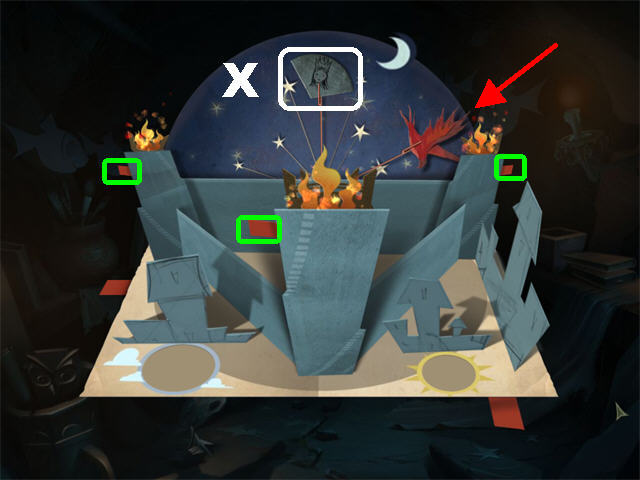
- Pull the 3 small tabs marked in green to make the beacons appear.
- Place the 3 PAPER FLAMES on the 3 BEACONS.
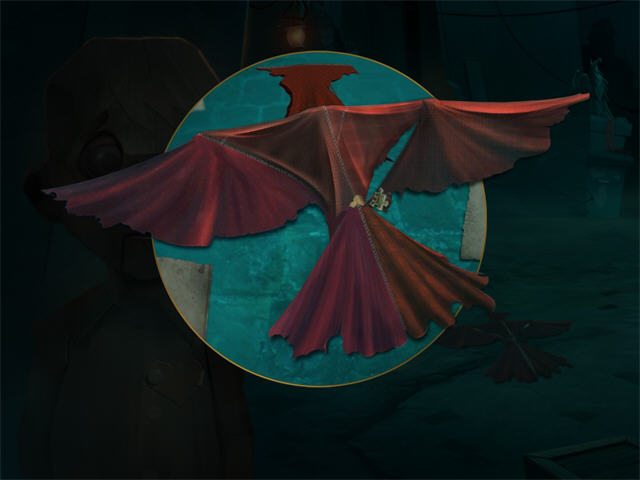
- The PAPER PHOENIX belongs on the left stick across the night view.
- Drag the PAPER PHOENIX to the right as shown in the screenshot.
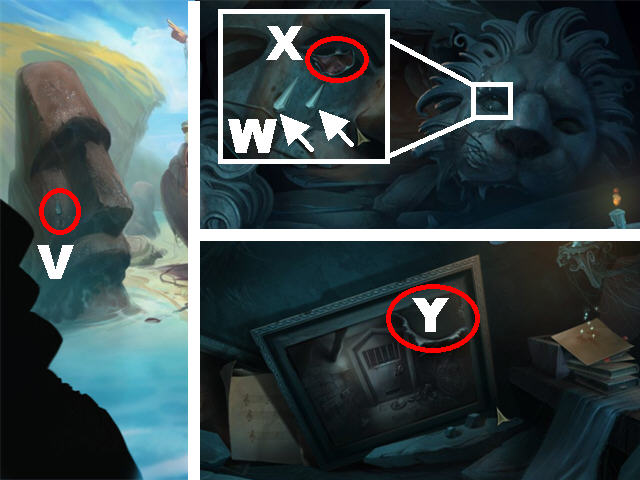
- Grab the QUEEN WEDGE (X) in the upper center.
- Close the pop-up book, click down twice and go up the rope.
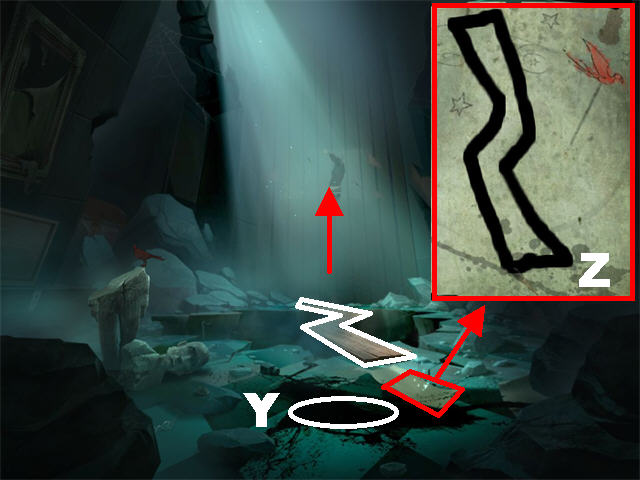
- Place the DRY BRUSH on the ink (Y) on the ground to create the INKY BRUSH.
- Zoom onto bridge sketch on the ground.
- Use the INKY BRUSH to trace the outline of the bridge (Z).
- Place the BRIDGE SKETCH over the chasm and go forward.
Chapter 2: Shipwreck
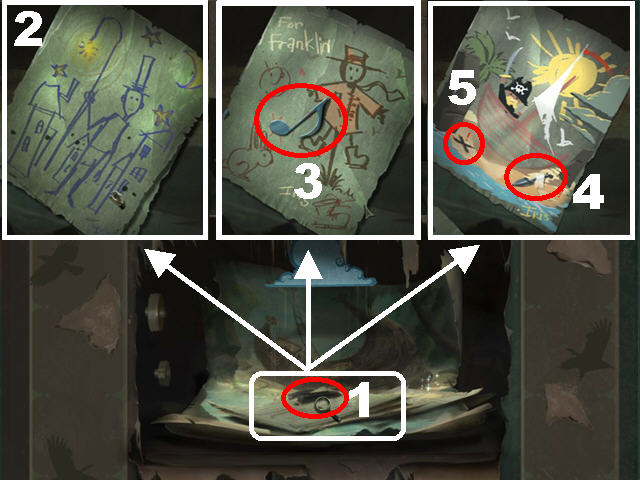
- Click on the wallpaper twice to remove it.
- Take the CHARCOAL (1).
- Click on the stack of papers.
- Take the LAMPLIGHTER SKETCH (2).
- Take SILVER NOTE 5/10 (3). Click on the scarecrow sketch to remove it and reveal the pirate sketch.
- Take the SHOVEL (4). Note the “X” (5) on the ground. Click on the outside of the pirate sketch to exit it.
- Enter the painting.
- Zoom into the paper in the lower right; attach the PAPER SCRAP to it and take the BELT (D).
- Note the combination (E) that appears on the page after the belt has been removed. Exit the sketch.
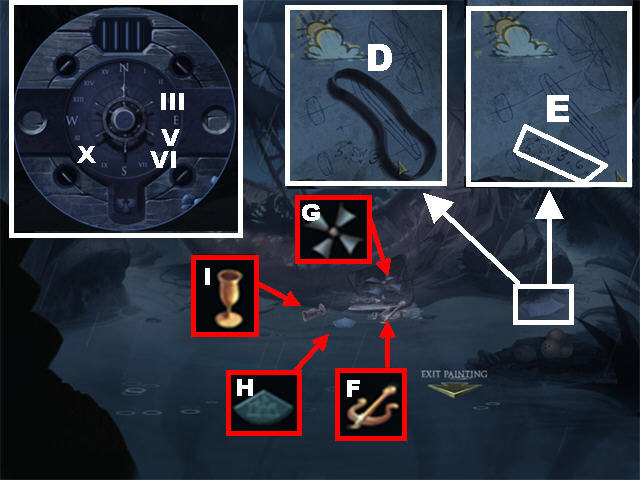
- Zoom into the center of the boat to reveal a combination lock. To solve it use the clue you found on the sketch.
- Turn the needle clockwise to V.
- Turn the needle counterclockwise to X (which is the number in between W and S).
- Turn the needle clockwise to III.
- Turn the needle counterclockwise to VI.
- Part of the ship will open and some items will spill out.
- Take the ANCHOR (F), FAN (G), CASTLE WEDGE (H) and the GOBLET (I).
- Exit the painting.
- Place the FAN and the BELT on the gear on left (J).
- Take the PAPER CLOUD (K) that falls after the fan starts blowing.
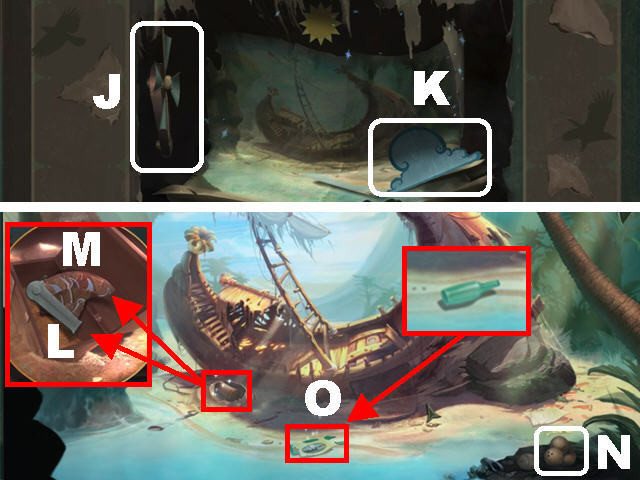
- Enter the painting; the weather should be bright and a bottle will float to shore.
- Place your shovel on the ‘’X’’ on the left a total of 3 times.
- Zoom into the freshly-dug hole; take the CANNON (L) and the GLOWING STONE 1/2 (M).
- Take the COCONUTS (N) on lower right.
- Click on the bottle to break it (O).
- Zoom into the broken bottle to trigger a puzzle.
- Click on the pirate and he will tell you he has scurvy.
- Give the ORANGE SKETCH to the pirate.
- Place the CANNON on the right side of the ship (P).
- Place the COCONUTS (Q) next to the CANNON.
- Click on a coconut to load it into the cannon.
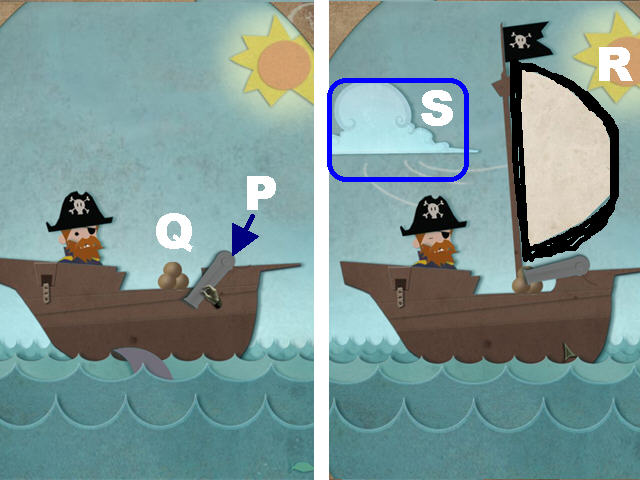
- Aim the cannon by dragging it into position and click on the cannon to shoot the coconuts at the sharks.
- Once you eliminate the sharks successfully, an outline of a sail will appear.
- Use your CHARCOAL to trace the outline of the sail (R).
- Place the PAPER CLOUD in the sky to make the ship move (S).
- Once the ship stops moving, place the ANCHOR on the left side of the boat (T).
- Click on the bushes twice to reveal and “X”.
- Give the SHOVEL to the pirate so he can dig a hole.
- Click on the letter; take CRYSTAL TEAR 1/2 (U) in the corner of the letter.
- Close the note and the LOVE LETTER will be added to inventory.
- Exit the puzzle.
- Give the LOVE LETTER to the Giant Tiki on left.
- Take CRYSTAL TEAR 2/2 on the Tiki’s cheek (V).
- Exit the painting
- Click down once, go through the chasm in the ground and proceed forward.
- Zoom into the right lion’s glowing eye.
- Place the 2 CRYSTAL TEARS in the empty slots (W).
- Take the SCRAP OF CANVAS that appears in the lion’s eye (X).
- Proceed forward.
- Place the SCRAP OF CANVAS on the painting to enter it (Y).
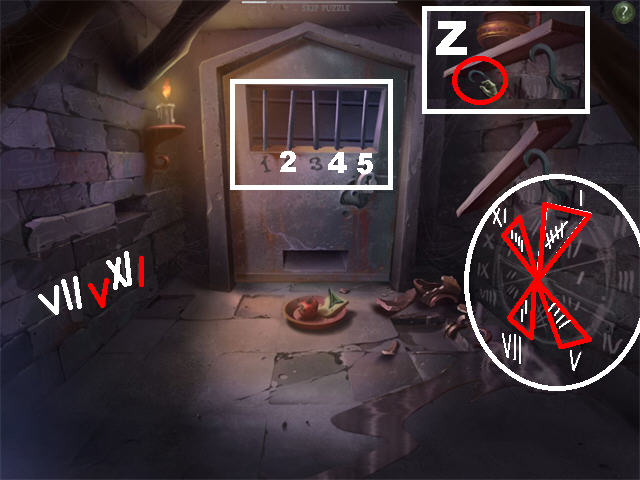
- Click on the METAL HOOK (Z) that is holding the shelf on right and the METAL HOOK will be automatically added to inventory.
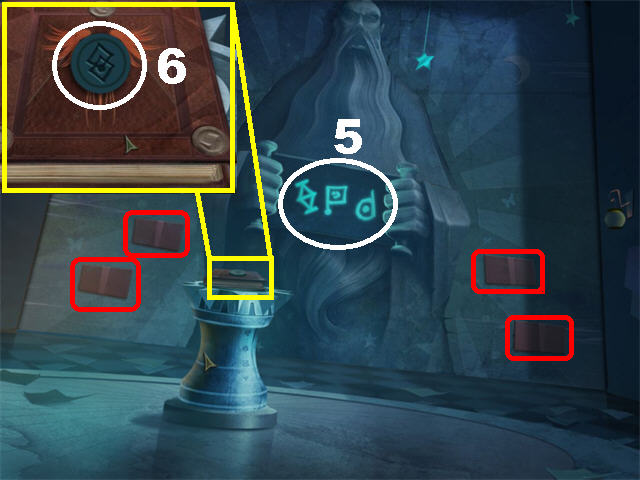
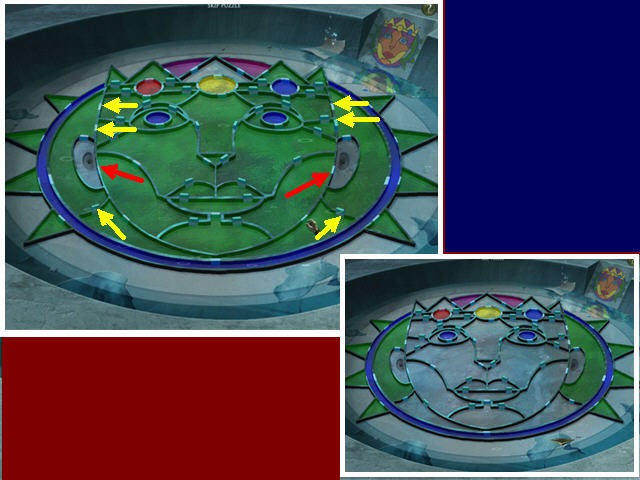
- Use the number wheel on the right side of the wall and the Roman numerals on the left side of the wall to solve the puzzle.
- Click on the metal bars using the METAL HOOK in this order:” 2-4-4-5”
- Go through the door.
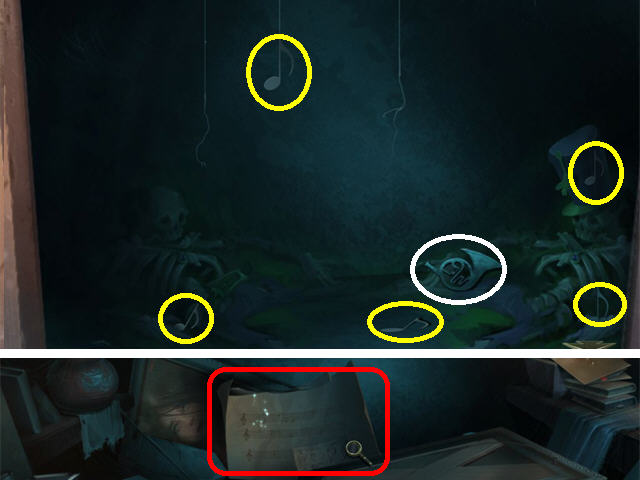
- Pick up the 5 SILVER NOTES marked in yellow and you will now have 10/10 SILVER NOTES needed.
- Take the FRENCH HORN marked in white.
- Click down twice and the painting will fall on the ground.
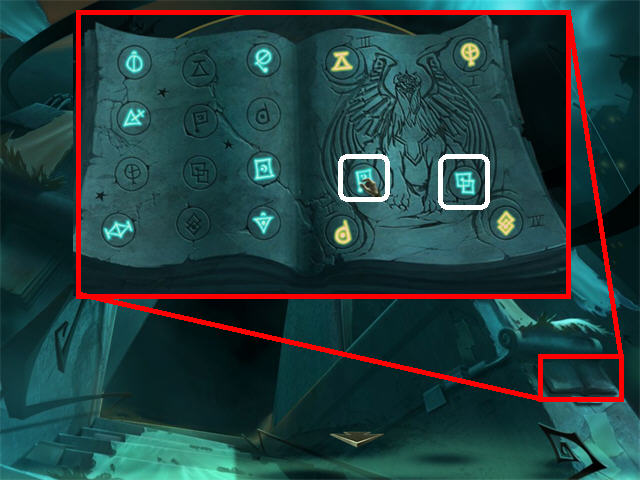
- Click on the MUSIC SHEET marked in red to trigger a mini-game.
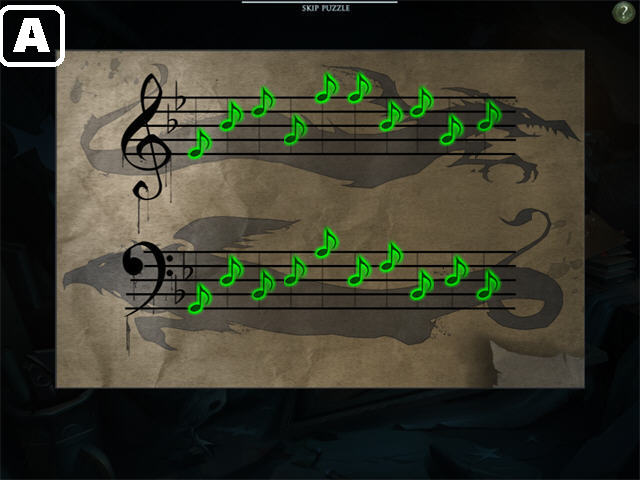
- Place the 10 SILVER NOTES on the empty bars on the sheet.
- Notes must be placed in the correct spot.
- Green Notes are in the correct spot.
- Orange Notes have to be moved either one up or one down.
- Red notes must be moved either 2 spaces above or below.
- Please look at the screenshot for the solution (A).
- Go forward twice after the secret cavern is revealed.
Chapter 3: The Secret Cavern
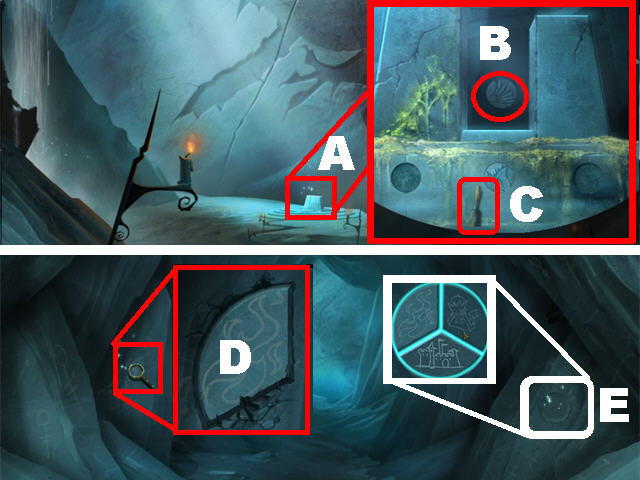
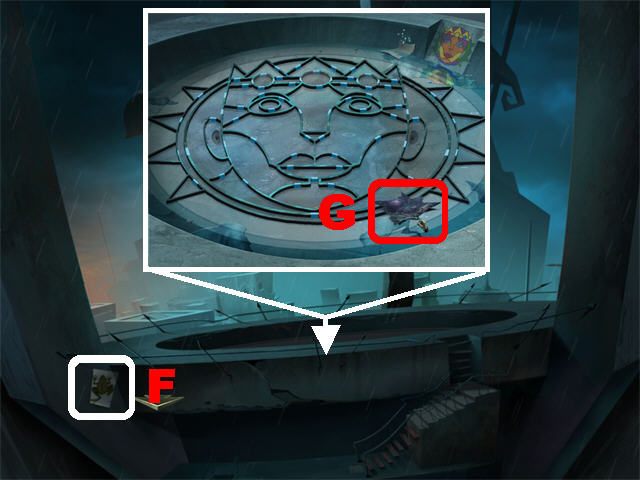
- Zoom into the pillars (A).
- Click on the center column until a disk is visible; take STONE DISK 3 (B).
- Grab the CHISEL (C). Close out the pop-up window.
- Click down.
- Zoom into the glowing area on left; use the CHISEL to retrieve the DRAGON WEDGE (D).
- Zoom into glowing area on right; place the DRAGON WEDGE, CASTLE WEDGE, and the QUEEN WEDGE in the carving (E).
- STONE DISK 2 will be automatically added to inventory.
- Go forward.
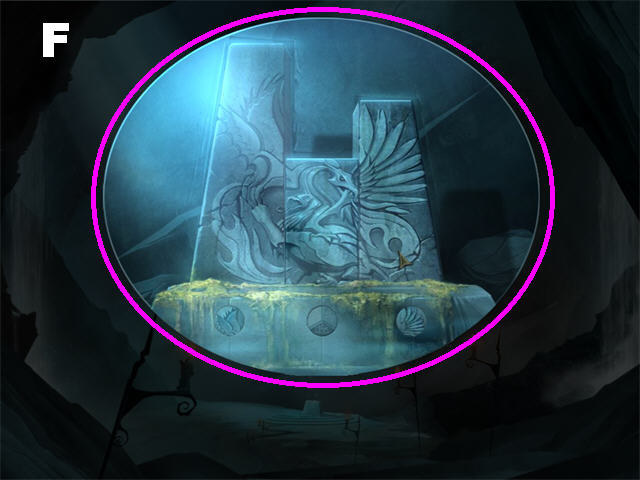
- Zoom into the pillars.
- Remove the disk below the center column to obtain STONE DISK 1.
- Place STONE DISK 1 in the left slot.
- Place STONE DISK 2 in the center slot.
- Place STONE DISK 3 in the right slot.
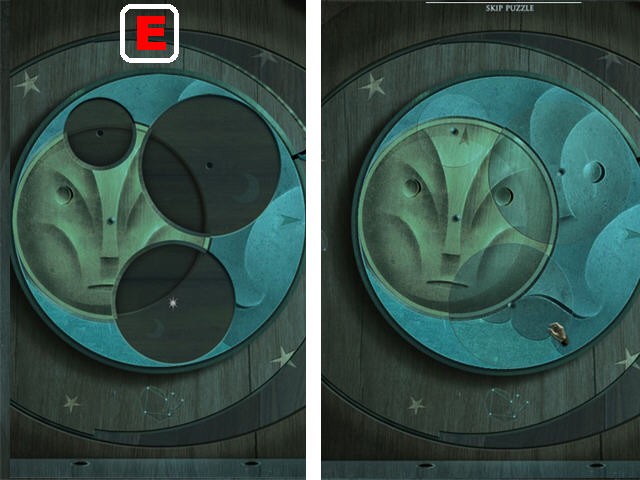
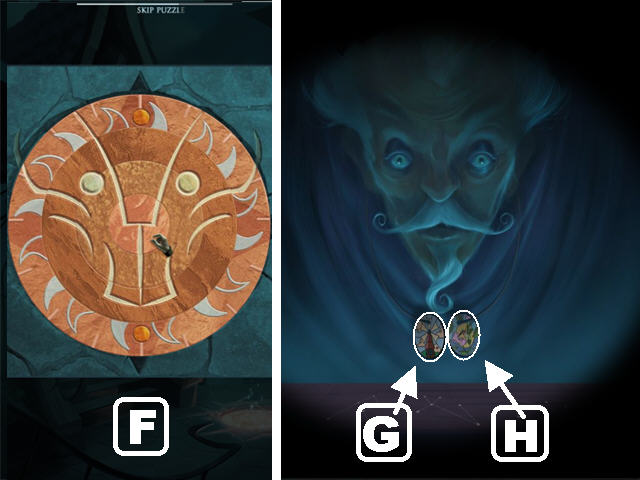
- Click on the pillars until they form the image shown in the screenshot (F).
- Go forward after the puzzle has been solved.
Chapter 4: The Town
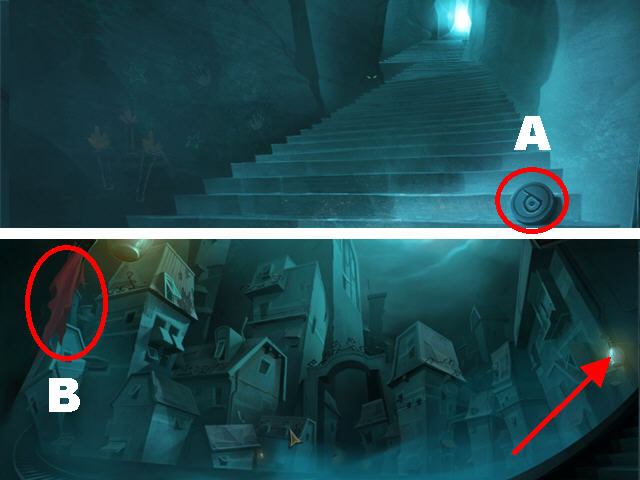
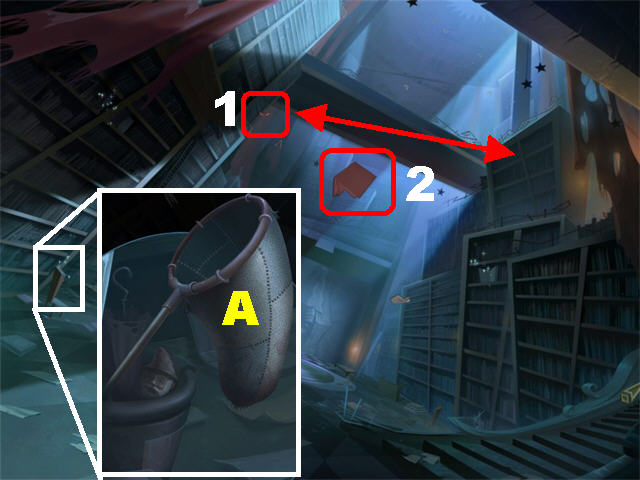
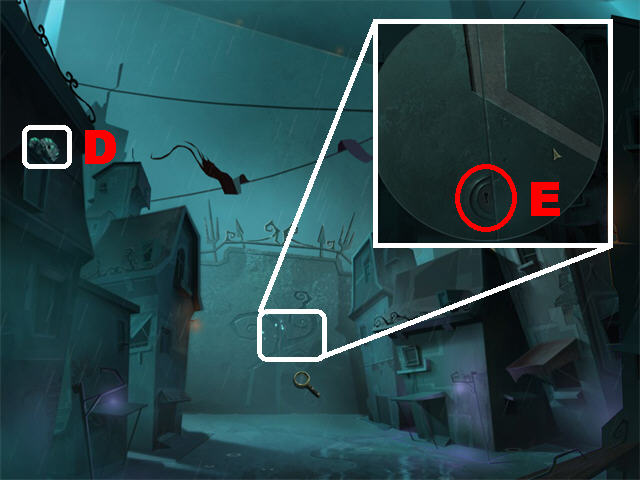
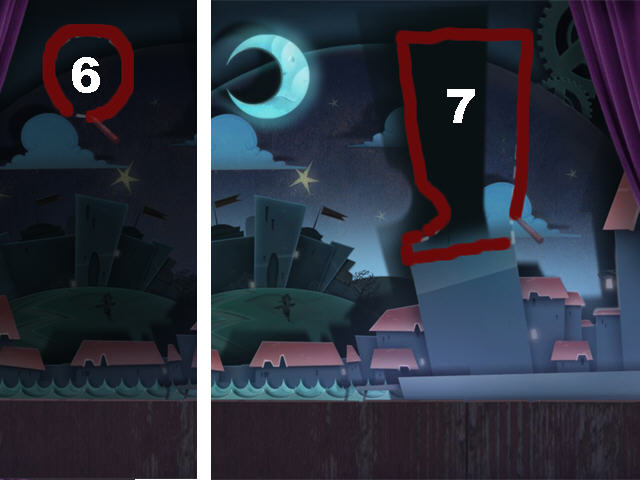
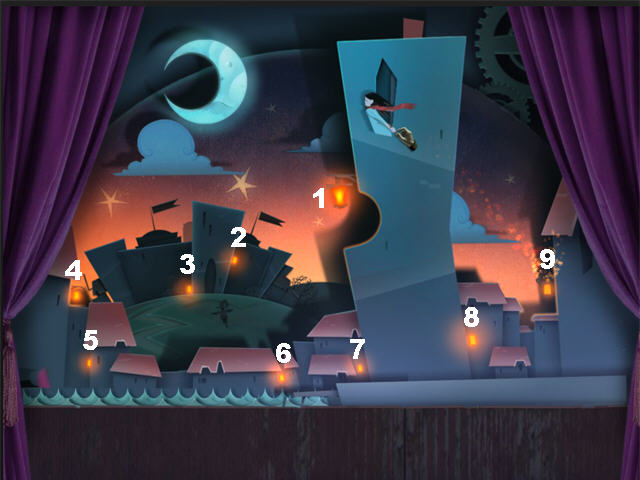
- Take the STONE SYMBOL 1/4 (A) in the lower right.
- Go forward to reach the Town.
- Take the RED FABRIC 1/6 on upper left (B).
- Go right.
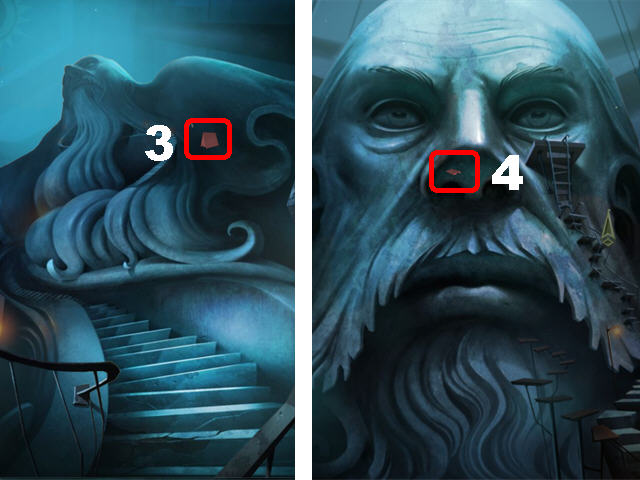
- Grab the HUMMINGBIRD SKETCH (C) on the steps.
- Take the LARGE DISC (D) on left.
- Go forward towards the Shop Window (E).
- Click on the window and it will ask you for a blue light.
- Click down twice and go forward.
- Take the RED FABRIC 2/6 on upper left (F).
- Grab the BLUE LANTERN (G) in the upper right.
- Click down, and make 2 lefts.
- Take the RED FABRIC 3/6 on the steps (H).
- Go up the steps.
- Take the PIECE OF POSTER (I) on the left.
- Click down 3 times, take steps on right, and forward to the window.
- Place the BLUE LANTERN on the hook in the upper right (J).
- Click on the window to open it.
- Take the MEDIUM DISC (K) in the upper center.
- Take the STONE SYMBOL 2/4 (L) in the lower center.
- Place the PIECE OF POSTER on the torn painting to enter Windmill City (M).
Chapter 5: Windmill City
- Take the RED FABRIC 4/6 and 5/6 marked in red (A1 and A2).
- Place the HUMMINGBIRD SKETCH on the bird feeder (B).
- Zoom into the door on the left side of the house.
- The hummingbird will merge onto the stained glass window revealing the Gardener. He tells you that you need to bring him the sun to obtain the paper symbols.
- Take the SMALL DISC (C) at the bottom of the scene. Exit this scene.
- Zoom into the broken sundial on the floor; take STONE SYMBOL 3/4 (D).
- Take a closer look at the front door.
- Drag the x-large disc around until the 3 empty circles are visibly formed (E).
- Place the LARGE DISC, MEDIUM DISC, and SMALL DISC into their matching slots.
- To solve the puzzle move the discs using the methods below.
- Drag the MEDIUM DISC counterclockwise until it lines up with edges of the sun image.
- Move the SMALL DISC clockwise until the edges of the SMALL and LARGE DISCS are facing to the right.
- Move the X-LARGE DISC counterclockwise until all the edges are almost lined up.
- Keep shifting between SMALL DISC going clockwise and X-LARGE DISC going counterclockwise until they line up.
- Please watch our video solution!
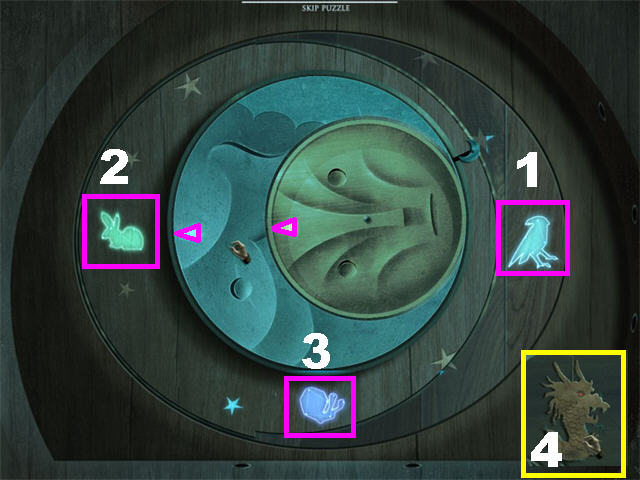
- Animal symbols will appear on 3 ends of the puzzle.
- Rotate the disks so both glowing arrows are pointing at the BIRD (1) first, followed by the RABBIT (2), and finally the SNAIL (3).
- Take the DRAGON in the center of the puzzle (4).
- Exit the puzzle and then the painting.
- Place the DRAGON on the fairy tales book on left (A).
- Click on the SNAIL (B) in the upper right to propel the knight forward.
- Take the HEAVY STONE BIRD (C) in the hand; place it on the string in the upper left (D).
- Click on the hanging bird and grab the GLOWING STONE 2/2 (E) in the upper left.
- Enter the painting.
- Zoom into the broken sundial on the ground.
- Place the 2 GLOWING STONES in their appropriate slots to trigger a puzzle.
- Rotate the rings until they form the image shown in the screenshot (F).
- Take the PAPER WINDMILL (G) and the PAPER HUMMINGBIRD (H) from the Gardener after the puzzle has been completed.
- Click downwards until you reach the scene with the music sheet and pop-up book.
- Click on the pop-up book on right (I).
- Pull the 2 red tabs (green arrows) at the bottom right and on the left side of the book.
- Place the PAPER WINDMILL in the lower left slot (J).
- Place the PAPER HUMMINGBIRD in the lower right slot (K).
- The book will fold itself up; take the MAGICAL SCROLL (L) in the center of the page.
- Go forward 4 times to arrive in Town. Make a left twice, and go up the steps to reach the first Beacon.
- Place the MAGICAL SCROLL on the ghostly scroll.
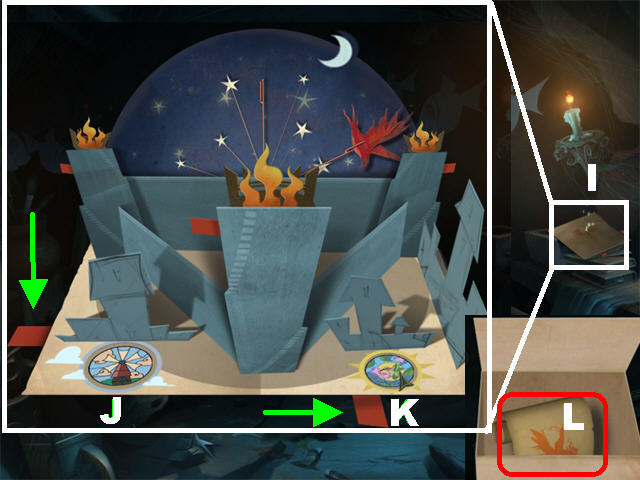
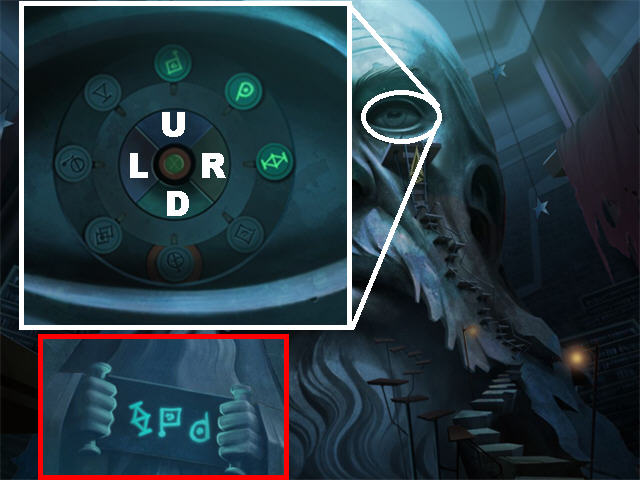
- Click in the center of the beacon to trigger a puzzle.
- Your goal is to light up all the symbols by clicking on the blue pivot points.
- The solution to this puzzle is random; the screenshot shows you the final image (1).
- Please watch our video for a random solution!
- Click down 3 times, and go forward. The shadows will disappear from this area. Go forward one more time to reach the puppet.
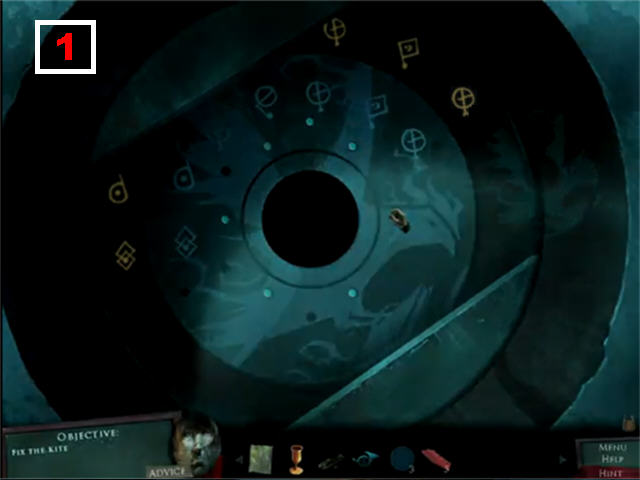
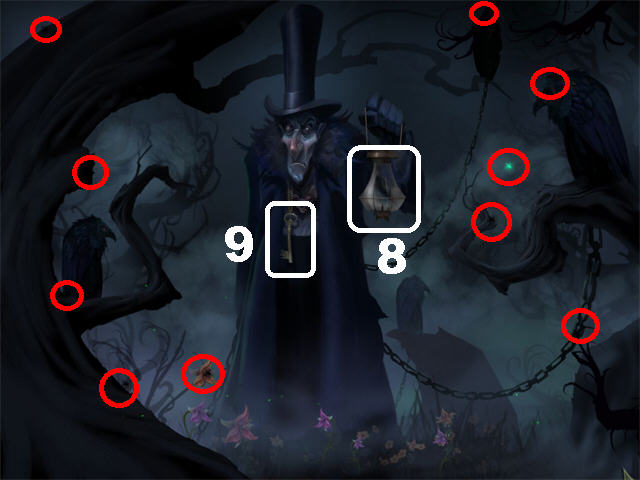
- Click on the puppet and it will ask you to fix its kite.
- Click on the heart shape on the puppet’s chest; take the NEEDLE AND THREAD (M).
- Zoom into the piece of wood on the floor; take the HAMMER (N) and the NAILS (O).
- Go forward.
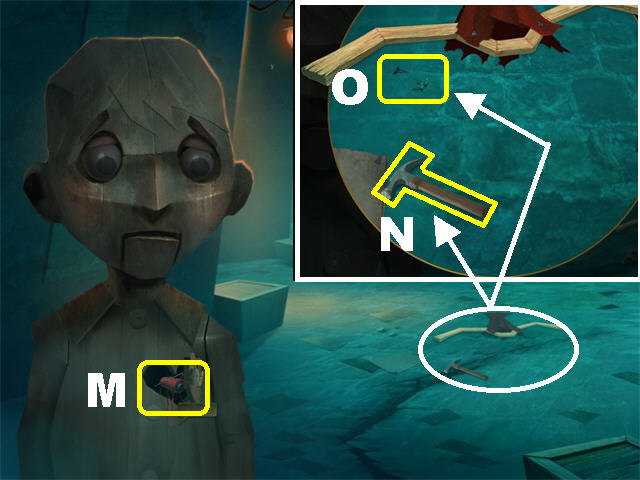
- Take the WOOD (P).
- Take the RED FABRIC 6/6 in the upper left (Q).
- Click down.
- Zoom into the broken kite on the ground.
- Place the WOOD on the kite.
- Place the NAILS on top of the piece of wood you just placed.
- Place the HAMMER on each of the 3 NAILS.
- Place the 6 RED FABRICS on the frame as shown in the screenshot.
- Place the NEEDLE AND THREAD on the fabric until it is fixed. You will see a brief scene of the puppet flying the kite.
- Go forward twice.
- Take a closer look at the book in the lower right.
- Notice the symbols that appear on the right side of the page when lightning strikes it.
- Note the Roman numerals marked next to each symbol on the right page.
- The symbol placements are random so you need to look at the ones in your game.

- Click on the left book.
- Place the symbols you found on the right book according to the Roman numerals on the page. For example, if the right book has the round symbol with the number IV next to it, make sure you place that matching symbol on the left book next to the number IV.
- You may have to go back and forth to look at the symbols of the book on the right.
- Note the symbols that light up in the middle of the page (yellow circles) after all the symbols have been entered correctly. Those 2 symbols have to be placed on the book on the right.
- Return to the book on the right.
- On the right side of the page place the symbols found in the left book into the slots marked in yellow.
- The back door has been unlocked; go through it to access the Library.
Chapter 6: The Library
- Zoom into the sparkly chair in the lower left; grab the NET (A).
- Use the NET to grab the 2 Red flying LIBRARY BOOKS marked in red (1 and 2). The books will be in constant motion; grab them with the NET once they are easily visible.
- Click on the steps in the lower right.
- Use the NET to catch the Red flying LIBRARY BOOK marked in red (3). The book hovers around the upper part of the scene so catch it when it is not moving too much.
- Go forward.
- Take the last Red Flying LIBRARY BOOK (4) that hovers around the eyes and nose of the statue.
- Return to the bottom of the Library and go forward.
- Place the 4 LIBRARY BOOKS in the empty slots marked in red.
- Note the symbols (5) that appear on the wall. You’ll need those to solve the next puzzle.
- Zoom into the book; take STONE SYMBOL 4/4 (6).
- Exit the book, click down, go up the right steps, take next set of steps and up to the right eye of the statue.
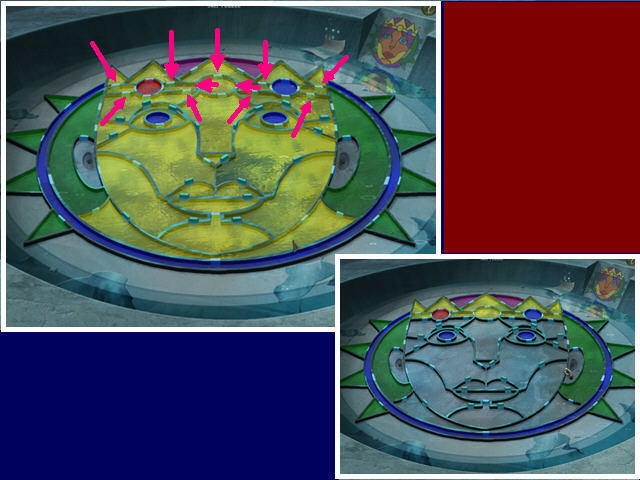
- Place the 4 STONE SYMBOLS in the empty slots to begin the puzzle.
- You only have to light up the 4 symbols shown to you after you placed the 4 red books. These symbols are unique to your game so make sure to pay close attention to them.
- To light up the symbols you have to click on the 4 sections in the center of the eye so the symbol you want to light up ends up on the red circle at the bottom.
- The green “X” in the middle of the eye will reset the puzzle.The TOP wedge moves the pieces 4 spaces counterclockwise.
The BOTTOM wedge moves the pieces 3 spaces counterclockwise.
The LEFT wedge moves the pieces 4 spaces clockwise.
The RIGHT wedge moves the pieces 3 spaces clockwise.
- Please look at the screenshot for a random solution.
- Go through the open mouth after the puzzle has been solved.
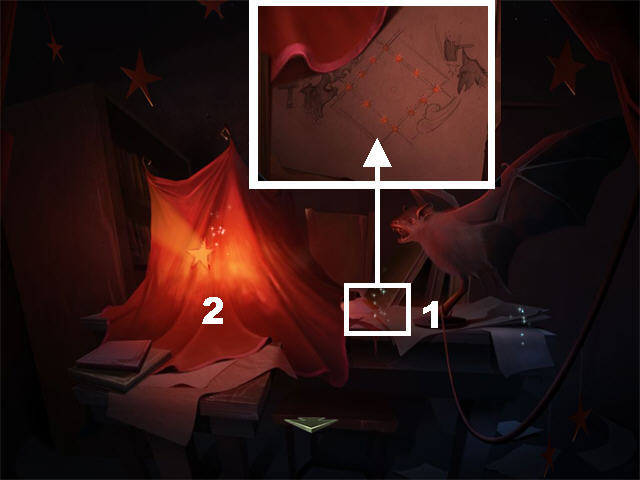
- Click on the sparkly area in the middle (1); note the diagram of the candle puzzle.
- Click on the red cloth to activate the puzzle (2).
- Using the diagram you just uncovered you must light the center square of candles
- Click on the “?” to read the instructions for this game.
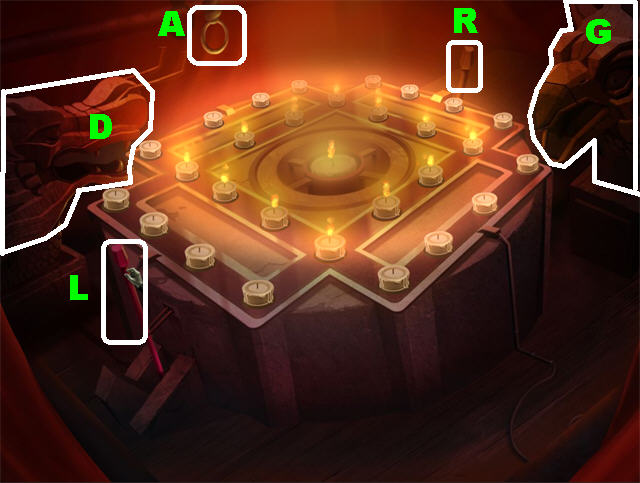
- Click on the ROPE (A) to reset the puzzle if you want to follow this solution.D = Dragon
G = Griffon
L = Left Lever
R = Right Lever
- To solve the puzzle click on the items in this order:D once, R eight times
D once, R once
L Once, Right Once (repeat 2 more times)
L once, D once
R five times, G once
R three times, D onceR three times, G once
R two times, G once
R six times, G once
R once, L four times
- Check out our video solution!
- You will be automatically taken back down to the bottom of the library after the puzzle has been solved.
- Go forward.
- Open the book on the pedestal.
- Look at the flashing symbol on the backdrop.
- Drag the backdrop around until the correct image is located above the flashing symbol.
- Once you have the correct image, the next symbol will light up; repeat the process above for the next 2 symbols.Waves = Raindrops
Lightning Bolt = Clouds
Sun Rays = Sun
- Move the purple tabs to pop open the sections of the book. Some tabs need be moved left , right, or up and down.
- Click on the lever that appears on the left in order to open the back wall of the Library.
- Go forward to reach the Children’s Wing.
Chapter 7: The Children’s Wing
- Go left.
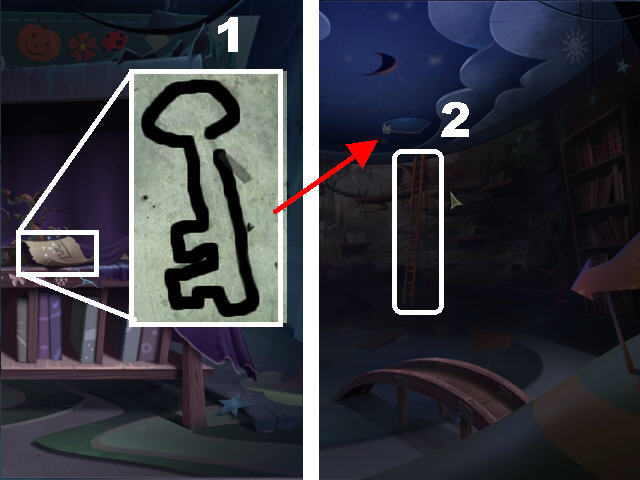
- Zoom into the page; use your CHARCOAL to trace the outline of the hatch KEY (1).
- Click down.
- Move the ladder twice so it is next to the hatch in the ceiling.
- Place the SKETCH OF A KEY on the hatch in the ceiling (2).
- Go into the hatch.
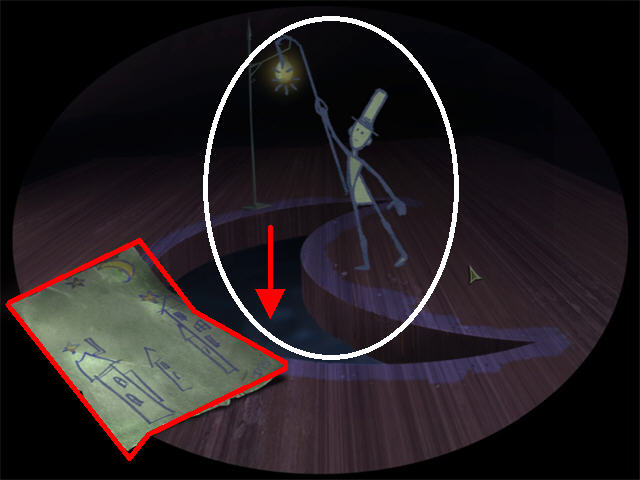
- Place the LAMPLIGHTER SKETCH on the ground and the Lamplighter will leap out of the page to light the lamp.
- Go down.
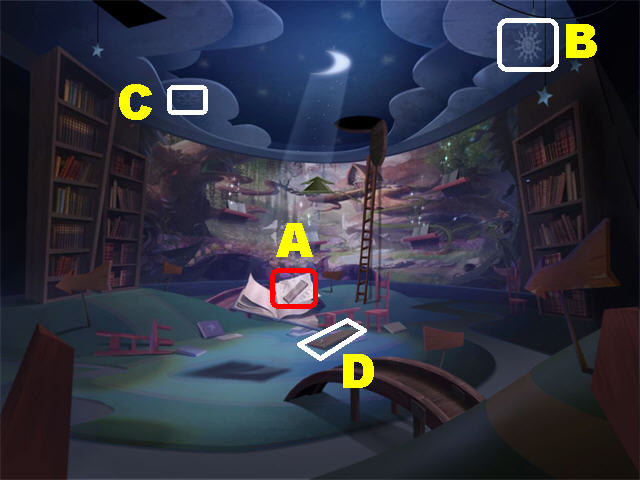
- Grab the SKTECH OF A PLANK in the center of the scene (A).
- Take the SNOWFLAKE in the upper right (B).
- Take the SNOWFLAKE in the upper left (C).
- Grab the PLANK on the ground (D).
- Enter the large painting on the back wall.

- Place the PLANK and the SKETCH OF A PLANK on the bridge (E). The gnome will cross the bridge.
- Grab the PICKAXE (F) the gnome drops outside the treehouse.
- Break the pile of rocks with the PICKAXE so the water can flow (G).
- Fill the GOBLET with water from the waterfall (H) to create the CUP OF WATER.
- Use the CUP OF WATER on the mound of dirt (I) on the ground; collect the BLUE FLOWER (J) that grows on the tree when it is in full bloom.
- Grab the next 3 BLUE FLOWERS (K, L and M) when they are in full bloom.
- Use the NET to catch the GREEN BUTTERFLY (N) and the BEE (P). You may have to wait until some of these insects stand still before you can catch them.
- Take the GRASSHOPPER (O) located around the bottom of the scene.
- Collect the LARGE MUSHROOMS (Q).
- Take the MUSHROOM (R).
- Grab the LEAF (S) on right.
- Collect the OAK LEAF (T) in upper left.
- Grab the SNOWFLAKE in the sky (U).
- Click down.
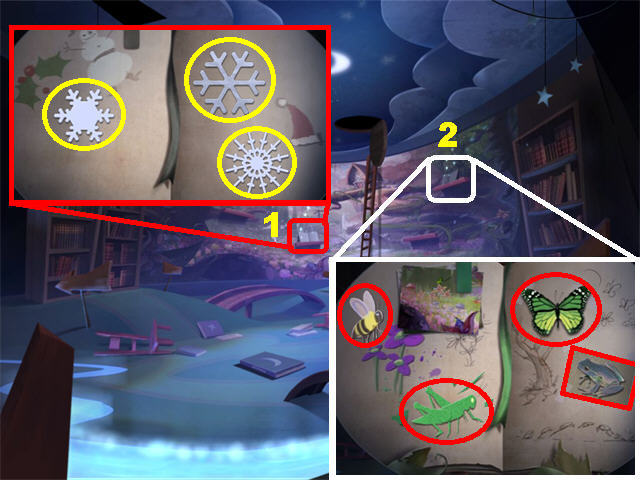
- Open the upper left book (V); place the OAK LEAF, LEAF, LARGE MUSHROOM, and MUSHROOM into their matching silhouettes.
- Grab the PARTIAL ACORN SKETCH (W) on the left page; the BOOK OF FALL will be automatically added to inventory.
- Open the lower right book (X); Place the 4 BLUE FLOWERS into their matching slots.
- Grab the PARTIAL CARROT SKETCH (Y); the BOOK OF SPRING will be automatically added to inventory.
- Open the book on lower left (1); place the 3 SNOWFLAKES into their matching silhouettes.
- The BOOK OF WINTER will be automatically added to inventory.
- Open the book on the upper right (2); place the GRASSHOPPER, BEE, FROG, and the BUTTERFLY into their matching silhouettes.
- The BOOK OF SUMMER will be automatically entered into inventory.
- Enter the painting on the back wall.
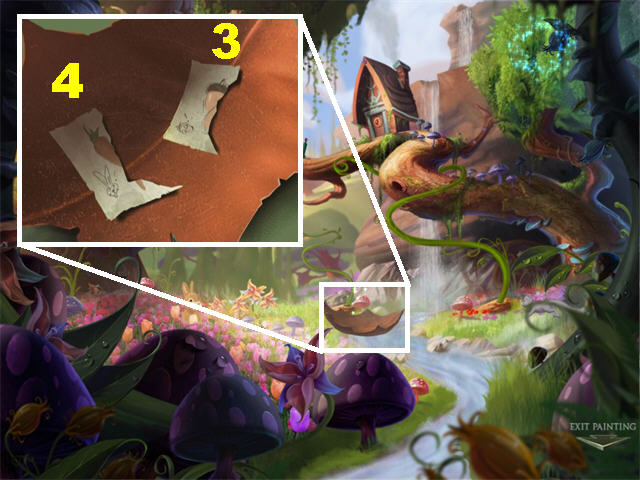
- Zoom into the large leaf in the water; place the PARTIAL ACORN SKETCH on the torn acorn sketch (3).
- Place the PARTIAL CARROT SKETCH on the torn carrot sketch on the leaf (4).
- The Rabbit and the Squirrel will hop on the large leaf; click down and wait for them to pass through the water.
- Head towards the left once the rabbit and the squirrel can no longer be seen in the scene.
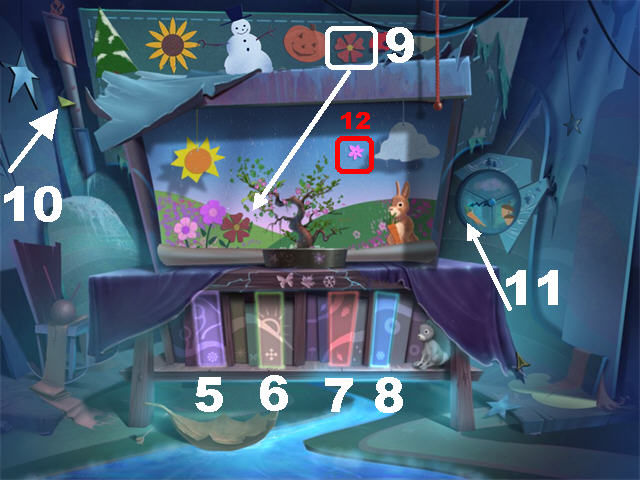
- There are some empty slots at the bottom of the stage. From left to right, place the BOOK OF SPRING (5), BOOK OF SUMMER (6), BOOK OF FALL (7), and the BOOK OF WINTER (8) on the shelf to unlock the curtain.
- Grab the FLOWER (9) in the upper right and place it on the flower outline in the painting.
- Move the temperature gauge (10) on the left until the sun appears.
- Move the needle of the wheel on the right to the carrot; the rabbit will see this and hop into the painting (11).
- Use the NET to catch the PAPER FLOWER (12) floating around the scene.

- Click on the rope in the upper right to change the backdrop (A).
- Grab the SUNFLOWER (B) and the LADYBUG (C) above the scene and place them in the dotted lines in the painting.
- Move the temperature gauge (D) on the left until the cloud disappears and the sun remains.
- Use the NET to catch the PAPER BUTTERFLY (E) floating around the scene.
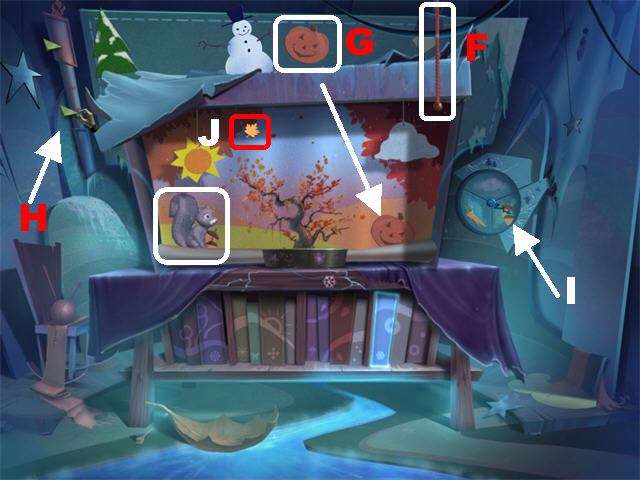
- Click on the rope in the upper right to change the backdrop (F).
- Grab the PUMPKIN (G) above the scene and place it in the matching dotted line.
- Move the temperature gauge (H) on left until the cloud appears and it starts raining.
- Move the needle of the wheel on the right to the acorn; the squirrel will see this and enter the painting (I).
- Use the NET to catch the PAPER LEAF (J) floating around the scene.
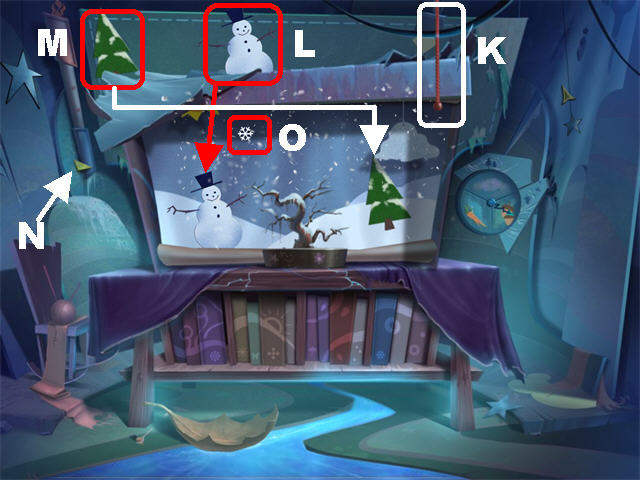
- Click on the rope in the upper right to change the backdrop (K).
- Grab the SNOWMAN (L) and the TREE (M) above the scene and place them in the dotted lines in the background.
- Move the temperature gauge (N) on left all the way down until it begins to snow.
- Use the NET to catch the PAPER SNOWFLAKE (O) floating around the scene.
- Click down twice.
- Zoom into the pop-up book on the pedestal.
- Place the PAPER SNOWFLAKE, PAPER LEAF, PAPER BUTTERFLY, and PAPER FLOWER into their matching slots.
- Go down the steps that appear after you complete the puzzle.
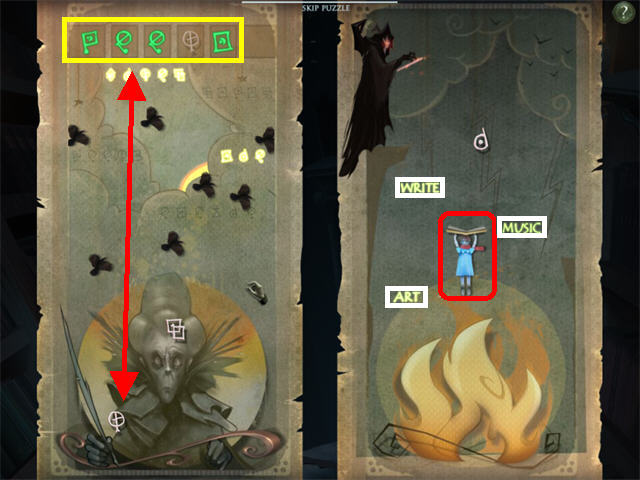
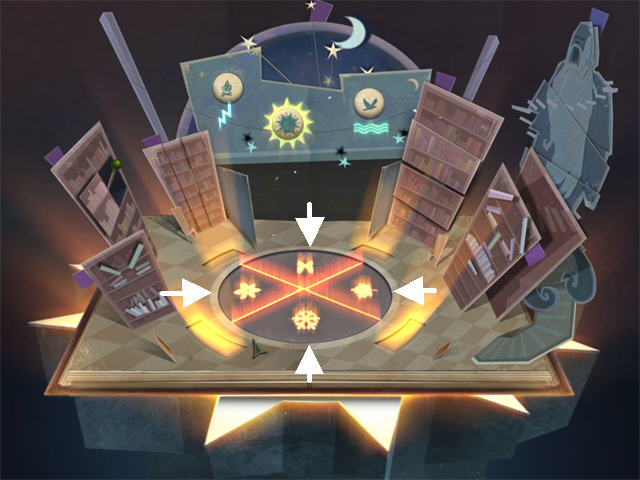
- Zoom into the left or right scroll on either side of the bookcase to trigger a puzzle.
- Grab the symbols on the right side of the page by positioning the girl with the book below the symbol you want to transfer to the left.
- Once the symbols are on the left side, you must maneuver them all the way to the top without letting them hit the crows.
- Drag the crows out of the way so the correct symbol passes through.
- If your symbol touches any of the crows it will disappear.
- If the incorrect symbol passes the crows it will eliminate one of the glowing symbols on top.
- You must solve 3 stages to complete the puzzle.
- Go forward after you solve the puzzle.
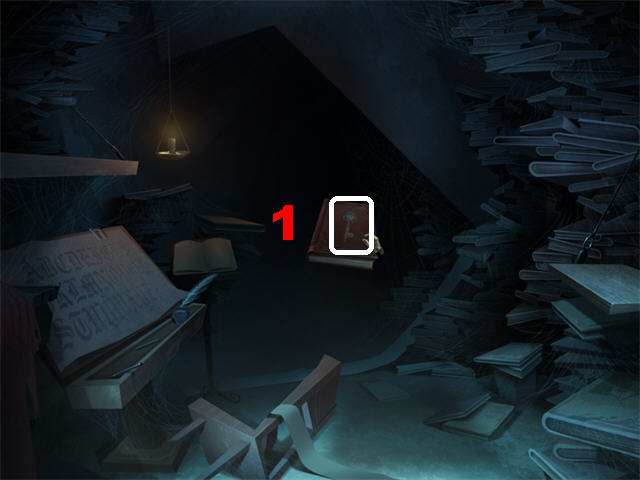
- Grab the METAL KEY (1) on the book and Iris will appear.
- Go forward twice after Iris finishes talking.
Chapter 8: The Violin Door
- Once you arrive, you will see a large statue of a violinist, head right.
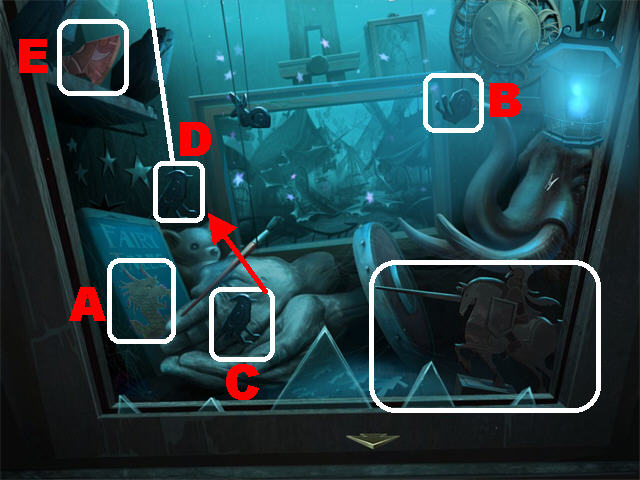
- Open the window in the upper left; take the FROG 1/3 (A).
- Drag the PAINTBRUSH downwards; grab the FROG 2/3 (B) that appears in the niche on the left side of the wall.
- Go forward; click on the lantern in the upper right to move it aside; grab the SKETCH OF FROG 1/3 (C) behind the lantern before it covers it back up.
- Click down twice and go forward.
- Grab the FROG 3/3 (D) in the upper left.
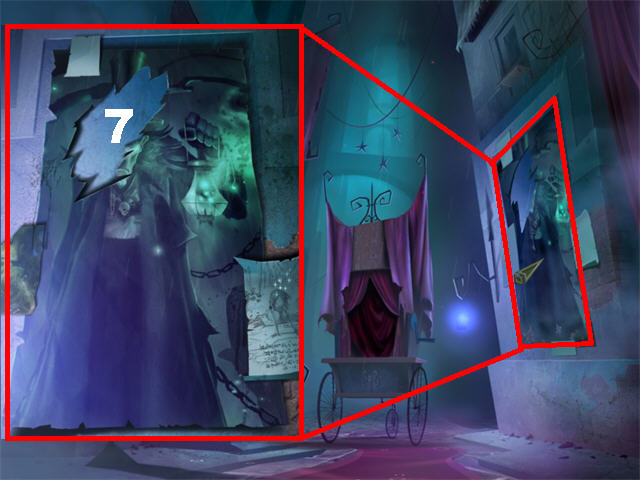
- Zoom into the back door; place the METAL KEY in the keyhole (E) and go through the door.
- Grab the SKETCH OF FROG 2/3 (F) in the lower left; you’ve arrived at the second beacon.
- Zoom into the beacon; take the SCRAP OF POSTER (G).
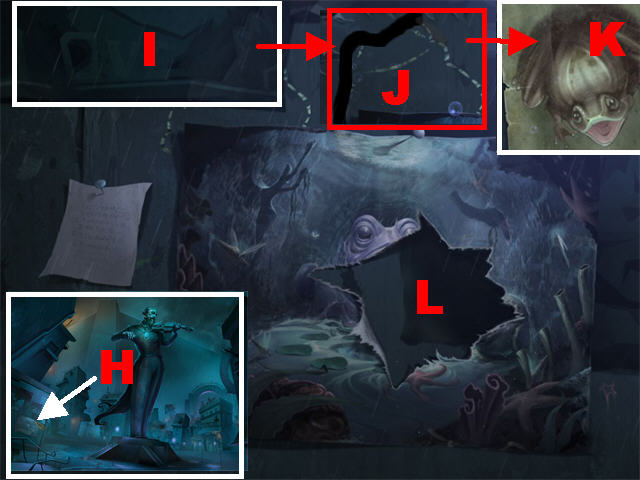
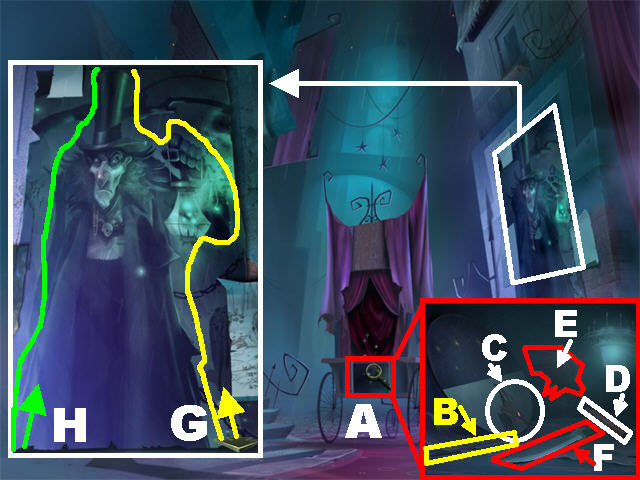
- Return to the statue of the large violinist; zoom into the painting in the lower left (H).
- Remove the paper (I) in the upper left to reveal an image of a frog.
- Trace the dotted outline of the frog (J) with the CHARCOAL; take the SKETCH OF FROG 3/3 (K) above the painting.
- Place the SCRAP OF POSTER (L) in the center of the painting to automatically enter the painting.
- Take the SHARP ROCK (M) in the lower left.
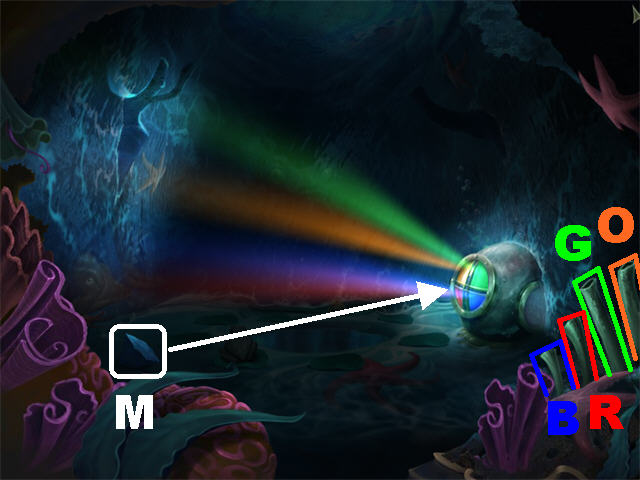
- Break the glass on the diving helmet with the SHARP ROCK for the lights to fly into the tubers in the lower right.
- From bottom to top, the colors are Blue (B). Red (R), Green (G), Orange (O). The sequences are as follows:B-R-G-O-B-O
B-G-R-B-O-R
G-R-G-B-O-G
- Zoom into the water after the puzzle has been solved.
- Place the 3 FROGS and the 3 FROG SKETCHES on the empty lily pads.
- Click on a frog to make it eat the frog in front of it. As soon as it has eaten its throat will flare up.
- Click on a full frog to make it spit out a fly.
- To reset the puzzle, click in the center of it.
- The frogs have been numbered from 1 to 8 in the screenshot. To solve the puzzle click on the frogs in the following manner:3-5-7-1-4
6-8-7-7-8
2-3-3-6-6-8
- Check out our video solution!
- Open the chest that appears after the puzzle has been solved; grab the RED DYE, BLUE DYE, and YELLOW DYE.
- Exit the painting to arrive at the large violinist. Go forward and through the back door to reach the second beacon.

- Click on the second beacon.
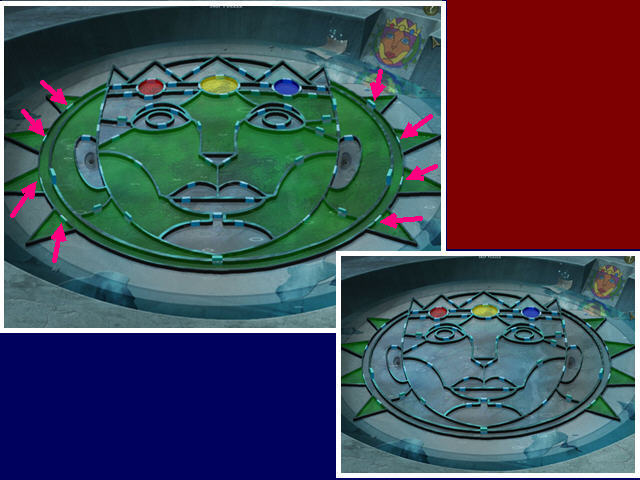
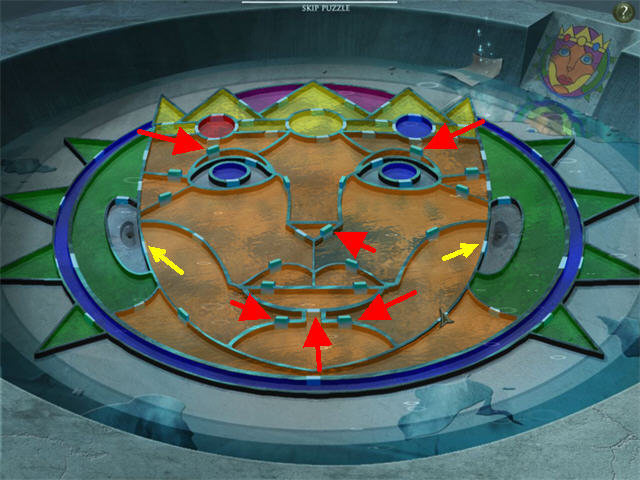
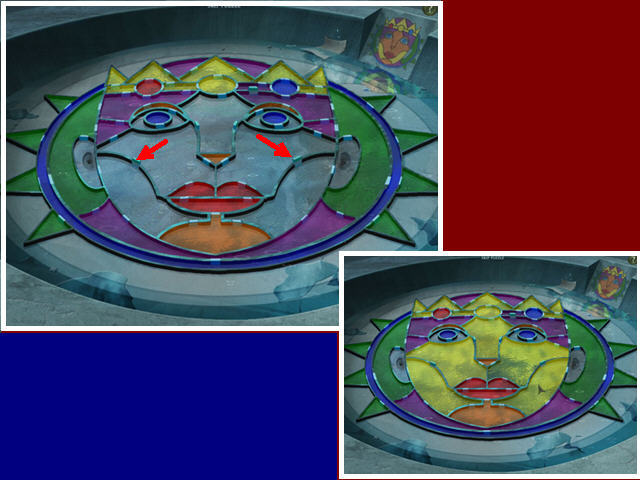
- Place the RED DYE (A), YELLOW DYE (B), and BLUE DYE (C) in the round reservoirs above the puzzle.
- Use the colored water to create the image of the QUEEN shown in the upper right corner of the scene.
- You can mix 2 colors to obtain a new one. Red and blue create purple. Yellow and red create orange. Yellow and blue create green.
- Open and close the gates to so the colors can flow through them or so the colors can stay locked into a particular area.
- Open the ear gates (D and E) to drain the colors out of the puzzle.
- Open the gates indicated with the pink arrows. Then open as many gates as you can so the colors can flow through the whole puzzle.
- Open the reservoirs for the YELLOW and BLUE dyes so you can obtain the GREEN dye throughout the puzzle.
- Close the pointy gates on the outside of the puzzle (pink arrows).
- Drain the color out of the rest of the puzzle through the ears. All your green points on the outer edge of the puzzle should be green.
- Check out our video solution!
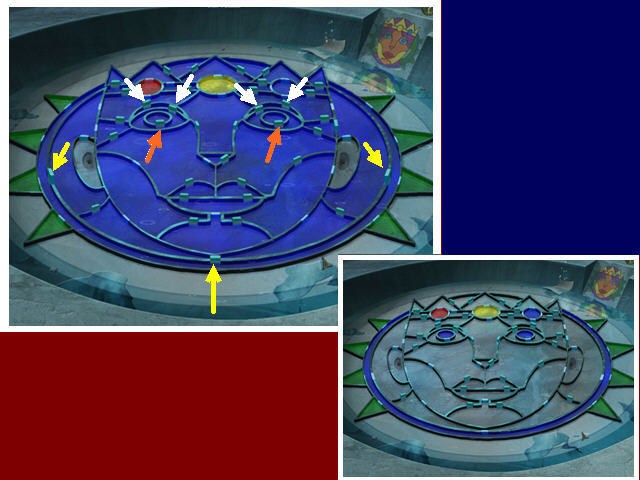
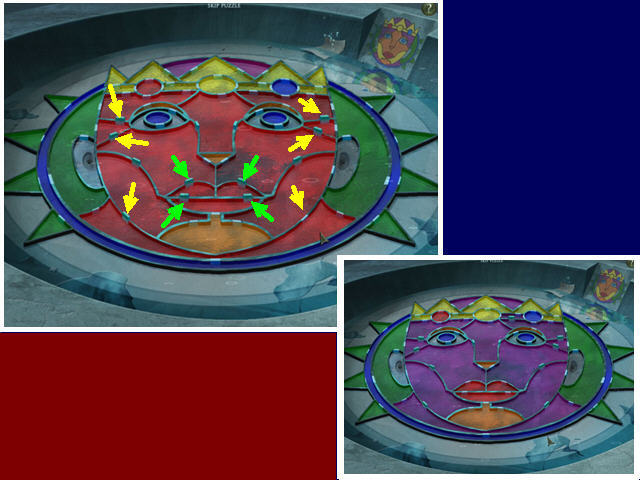
- Open the gates to the eyelids and the eyes (white and orange arrows).
- Open the gates to the outer rim (yellow arrows).
- Flood the scene with BLUE.
- Close the gates to the eyes (orange arrows) and leave the gates to the eyelids open (white arrows).
- Close the gates to the blue rim around the edges of the puzzle (yellow arrows).
- Do NOT drain the color out of the puzzle yet. The smaller screenshot shows you what it would look like if you drained all the color out leaving only the eyes and blue rim.
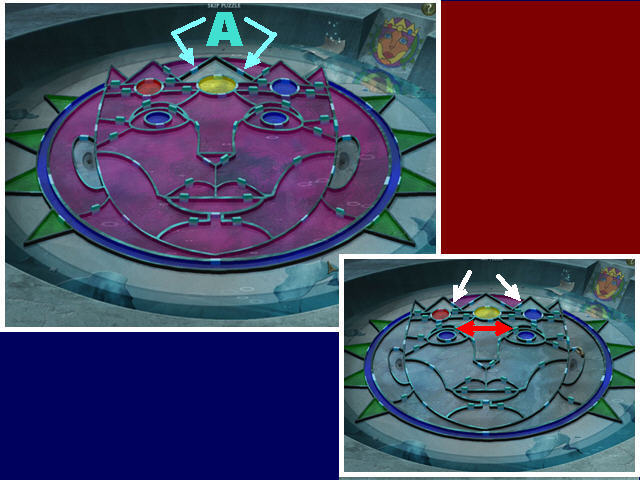
- Open the gates to the top part of the crown, making sure you that you do NOT open the 2 gates associated with the TRIANGLE (A) above the yellow reservoir; you want to leave that empty for now.
- Open the RED reservoir so the scene fills with PURPLE once it mixes with the BLUE color already in the scene.
- Close the gates attached to the PURPLE part of the top of the crown (white arrows in smaller image).
- Drain all the purple color out through the ears so that only the blue eyes, the purple part of the top of the crown remains along with the green pointy area.
- Close the gates surrounding the eyeballs (red arrows in smaller image).
- Mix BLUE and YELLOW to flood the scene with GREEN.
- Close the gates surrounding the TOP EAR GATES so that it remains GREEN (yellow arrows).
- Drain the colors by using the BOTTOM EAR GATES (red arrows) on both sides.
- Open the gates to the parts of the top crown that need to be painted YELLOW.
- Fill the scene with YELLOW.
- Close the crown gates (pink arrows) so YELLOW remains in the correct areas.
- Release the rest of the YELLOW through the BOTTOM EAR GATES.
- Open the eyelids, the nose and the chin gates (red arrows).
- Combine RED and YELLOW to make ORANGE.
- Close the gates to the eyelids, the nose and the chin (red arrows).
- Drain the color out through the BOTTOM EAR GATES (yellow arrows).
- Open the gates to the lips (green arrows).
- Flood the scene with RED.
- Close the gates to the lips (green arrows).
- Flood the scene with BLUE to make PURPLE with the existing RED in the scene.
- Close out the gates to all the purple temple and neck areas (yellow arrows).
- Drain the color through the BOTTOM EAR GATES.
- Open the gates for the cheeks (red arrows).
- Fill the rest of the scene with YELLOW.
- Close all the cheek gates (red arrows).
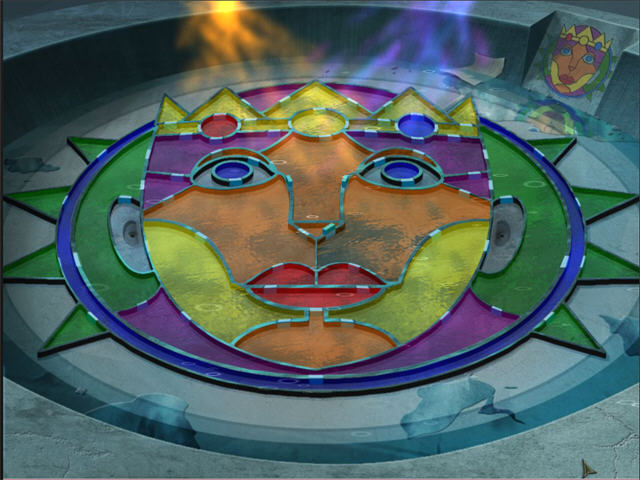
- Open the nose gates so you can fill the rest of the face with ORANGE.
- You have completed second beacon puzzle of the Queen’s Face!
- Click down twice, go right, and forward. Wait for the shadows to disappear.
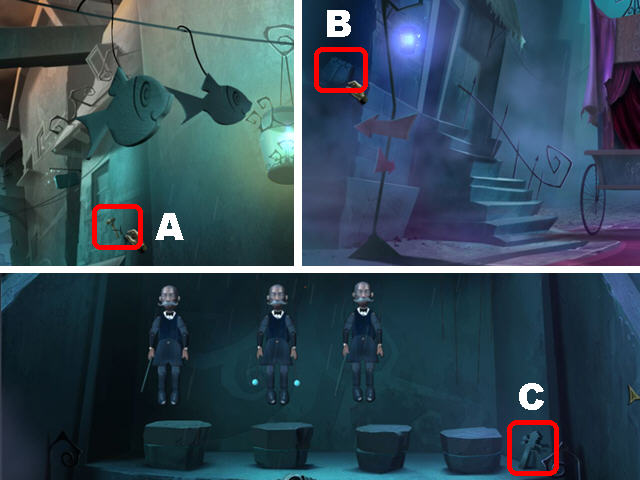
- Take the UNLIT TORCH (A) on right, below the hanging fish.
- Go forward and then make a left.
- Take the PARTIAL STONE BLOCK 1/3 (B) on left.
- Turn left into the marionette stage.
- Take the PARTIAL STONE BLOCK 2/3 (C) on the right side of the stage.
- Return to the second beacon by clicking downwards until you reach the large violinist and then go forward twice.
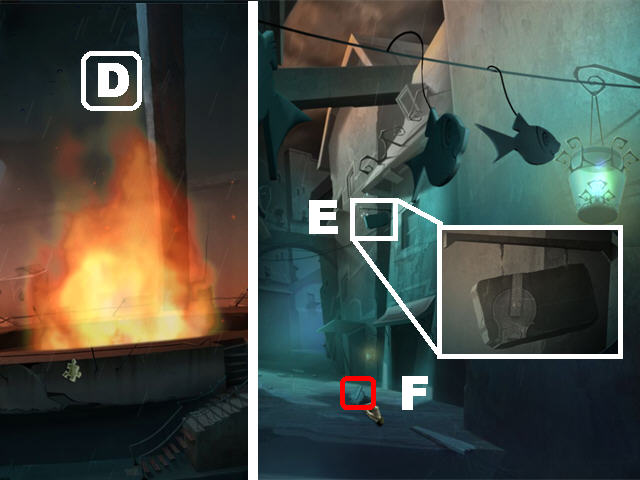
- Place the UNLIT TORCH in the beacon to obtain the LIT TORCH (D).
- Click down twice, make a right, and go forward.
- Zoom into the hanging sign (E) on right.
- Burn the rope with the LIT TORCH; take the PARTIAL STONE BLOCK 3/3 (F) that falls on the ground.
- Click down once.
- Place the 3 PARTIAL STONE BLOCKS in the appropriate niche on the left side the wall (G).
- Move the PAINTBRUSH upwards to solidify all the pieces (H).
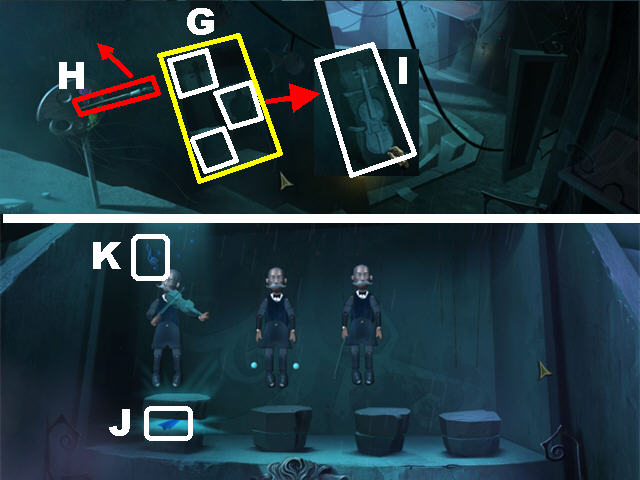
- Take the VIOLIN (I).
- Go forward twice, make a left and another left by the curtained cart to access the marionette stage.
- Give the VIOLIN to the first marionette on the left.
- Grab the BLUE PAPER AIRPLANE (J) at the base of the statue.
- Take the BLUE CLEF (K) floating around the violinist.
- Click down twice and go forward.
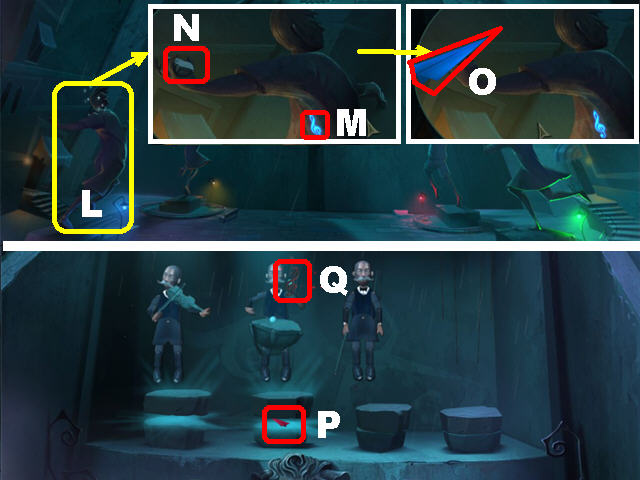
- Zoom into the child statue on the left (L).
- Place the BLUE CLEF on the statue’s shirt (M).
- Grab the TIMPANE (N) from the statue’s hand.
- Place the BLUE PAPER AIRPLANE in the statue’s hand (O).
- Click down and go left twice to access the marionette stage.
- Give the TIMPANE to the second marionette from the left.
- Take the RED PAPER AIRPLANE (P) at the base of the marionette.
- Grab the RED CLEF (Q) floating round the percussionist.
- Click down twice and go forward.
- Zoom into the statue with the red light (R).
- Place the RED CLEF on the statue’s shirt (S).
- Grab the THEATER POSTER (T) from the statue’s right hand.
- Place the RED PAPER AIRPLANE in the statue’s right hand (U).
- Click down once.
- Zoom into the bulletin board on the left.
- Place the THEATER POSTER on the bulletin board to trigger a puzzle.
- Drag the pieces onto the board to arrange the pieces into the image of a cello.
- Place your cursor around the edges and click on the swirly arrow to rotate the pieces.
- Please look at the screenshot for the solution (V).
- Take the CELLO (W) after the puzzle has been completed.
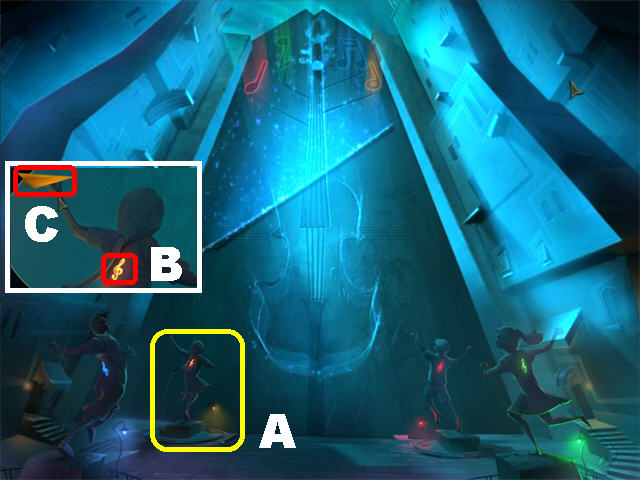
- Make 2 lefts to return to the marionette stage.
- Give the CELLO to the third marionette.
- Take the GREEN PAPER AIRPLANE (1) at the base of the marionette.
- Grab the GREEN CLEF (2) floating round the cellist.
- Click down twice and go forward.
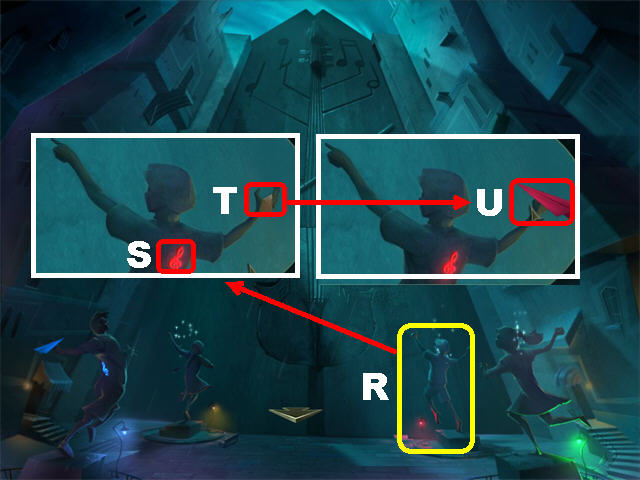
- Zoom into the statue with the green light (3) on the right.
- Place the GREEN CLEF on the statue’s shirt (4).
- Grab the SCRAP OF POSTER (5) from the statue’s hand.
- Place the GREEN PAPER AIRPLANE in the statue’s hand (6).
- Click down and turn left.
- Zoom into the poster on the right; place the SCRAP OF POSTER on the poster to enter the painting (7).
- Click on the man to talk to him and he will raise his lantern.
- Grab the 10 FIREFLIES marked in red in the scene.
- Place the 10 FIREFLIES in the lantern (8).
- Take the THEATER CART KEY (9).
- Exit the painting.
- Place the THEATER CART KEY on the cart doors (A).
- Zoom into the cart door; take the PAPER LANCE (B), PAPER DRAGON HEAD (C), CRAYON (D), PAPER DRAGON WING (E), and KNIFE (F).
- Zoom into the poster on the right; cut along the white dotted lines with the KNIFE starting with the bottom right side of the poster (G).
- Now cut the left side of the poster with the KNIFE starting from the lower left side (H).
- Go into the cart.
- Use the CRAYON to trace the sun (1).

- Click on the scene to close and open the curtain.
- Place the PAPER DRAGON HEAD (2) and the PAPER DRAGON WING (4) on the dragon.
- Give the PAPER LANCE to the King (3).
- Click on the scene to close and open the curtain.
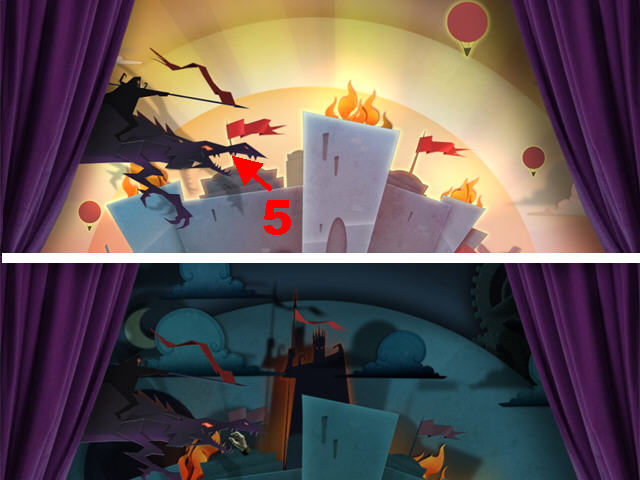
- Click on the DRAGON’S HEAD (5) to change the scene from day to night.
- Click on the scene to close and open the curtain.
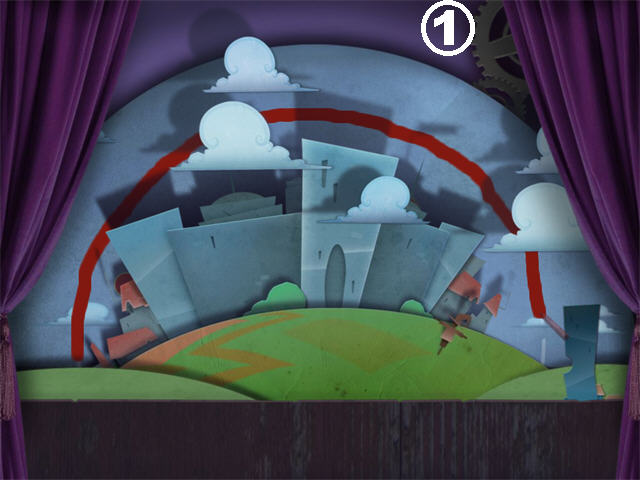
- Trace the outline of the moon with your CRAYON (6).
- Trace the outline of the Painted Towers with your CRAYON (7).
- Move the tab above the painted tower for iris to appear.
- You must hit all the lanterns with the fire from the torch the little girl’s holding.
- Aim your torch at the lantern you want to hit, let go of the mouse once the torch is in the right position.
- Light all 9 lanterns to complete the puzzle.
- Check out our video solution!
- Click on the scene to close the curtain.
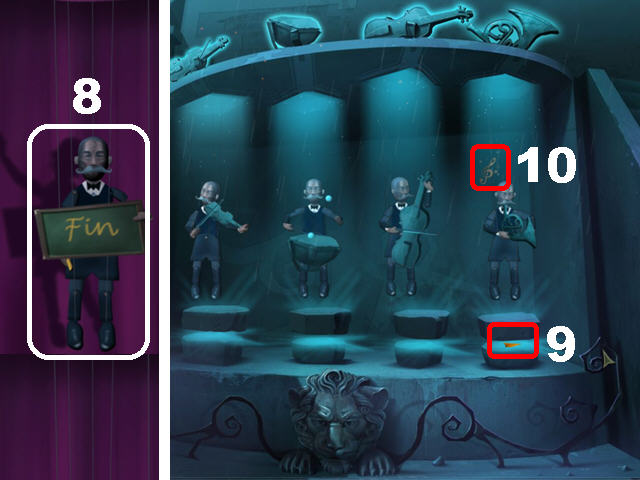
- Take the MARIONETTE (8) on the curtains.
- Exit the cart and make a left.
- Place the MARIONETTE on the last set of strings on the right.
- Give the last marionette the FRENCH HORN.
- Take the ORANGE PAPER AIRPLANE (9) at the base of the marionette.
- Grab the ORANGE CLEF (10) floating around the last marionette.
- Click down twice and go forward.
- Zoom into the statue with the orange light (A) on left.
- Place the ORANGE CLEF on the statue’s shirt (B).
- Place the ORANGE PAPER AIRPLANE in the statue’s left hand (C).
- Close the pop-up window and 4 statues will launch their paper airplanes.
- Go forward after the violin door opens to find Iris and the last beacon.
- Click on Iris to hear what she has to say.
- Use your CRAYON to trace the outline of the phoenix (D).
- Congratulations! You’ve helped a young girl become a Queen!


 Strange Cases: The Faces of Vengeance Walkthrough, Guide, & Tips
 Ancient Adventures: Gift of Zeus Walkthrough, Guide, & Tips
 Fairway Solitaire HD Tips and Tricks, Guide, & Tips
 Shattered Minds: Encore Walkthrough, Guide, & Tips
 Hallowed Legends: Ship of Bones Walkthrough, Guide, & Tips