Time Mysteries: Inheritance Walkthrough, Guide, & Tips
Time Mysteries: Inheritance Walkthrough
Welcome to the Time Mysteries: Inheritance Walkthrough!
Vivien Ambrose has just discovered how to travel through time! Set off through history in Time Mysteries: Inheritance!
Whether you use this document as a reference when things get difficult or as a road map to get you from beginning to end, we’re pretty sure you’ll find what you’re looking for here.
This document contains a complete Time Mysteries: Inheritance game walkthrough featuring annotated screenshots from actual gameplay!
We hope you find this information useful as you play your way through the game. Use the walkthrough menu below to quickly jump to whatever stage of the game you need help with.
Remember to visit the Big Fish Games Forums if you find you need more help. Have fun!
This walkthrough was created by BrownEyedTigre, and is protected under US Copyright laws. Any unauthorized use, including re-publication in whole or in part, without permission, is strictly prohibited.
General Tips
- “Time Mysteries: Inheritance” is an Interactive Hidden Object Game!
- Click on “Settings” to adjust game volume, cursor, screen and game modes, and tutorial options.
- You can replenish the number of hints by playing a quick round of Match 3 mini-games as often as you need.
- There is a “solve” button for the puzzles.
- You have a choice between Regular Mode, with a quicker skip button recharge rate and sparkles in areas requiring attention, or Expert Mode, with no sparkles and a slower skip recharge rate.
- There is a Diary on the bottom left that will be updated as you go along with the tasks you need to complete.
- Place your cursor around the edge of the screen to see if an arrow directing you to another location appears.
- Some things need to be clicked, in order to trigger another action, even though you cannot do anything with those things currently.
- Your cursor will turn into a magnifying glass if you can get a closer look or need to do an action there.
- Click the little red X in the upper right of the close-up windows to close them.
- Click on “menu,” on the bottom right of the task bar, to exit the game.
Chapter 1: The Attic

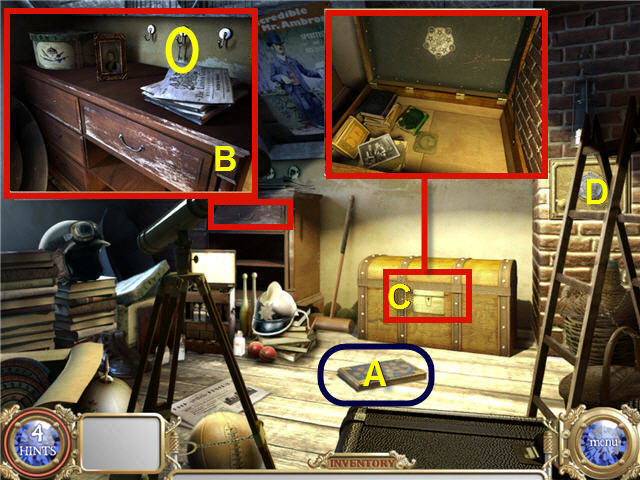
- Pick up the DIARY (A) and read the entry.
- Click on the chest (C).
- Click on the dresser (B).
- Take the KEY on the hook and then read the newspaper on the dresser top.
- Use the KEY on the lock of the chest.
- Click on the photo, the pentagram on the lid, and the medallion shaped lock.
- Click on the gold wall plate behind the ladder.

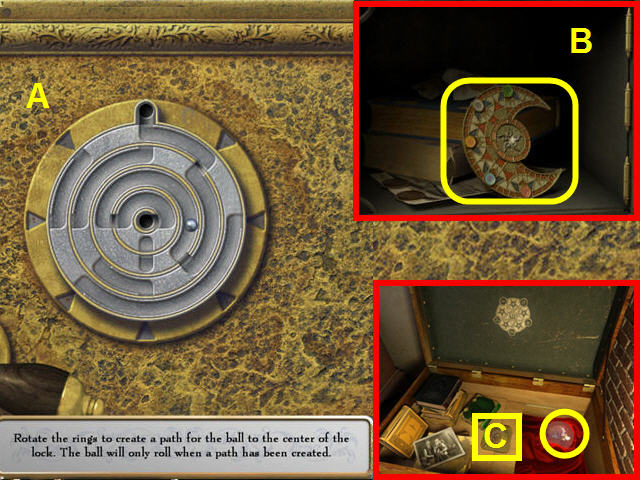
- Rotate the rings in order to create a path for the ball to go from the top hole to the center.
- The ball will not move until all the rings have been correctly aligned. See screenshot for solution (A).
- Take the MEDALLION (B).
- Use the MEDALLION on the lock, on the bottom of the interior of the chest (C), and then take the CRYSTAL BALL.
- Click on the stack of books in the bottom left.

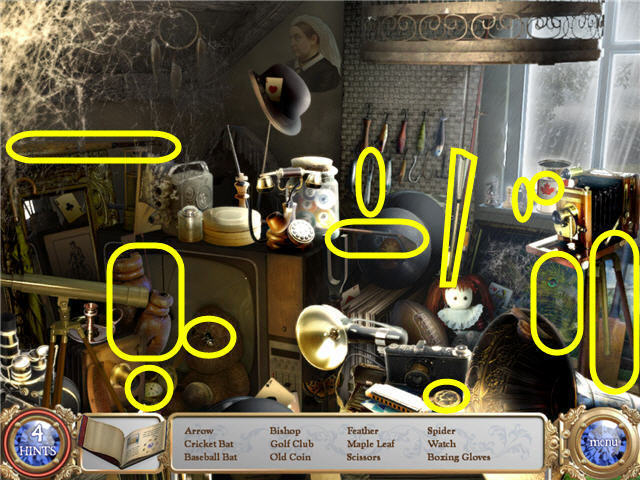
- Find the items listed and get a pair of SCISSORS.

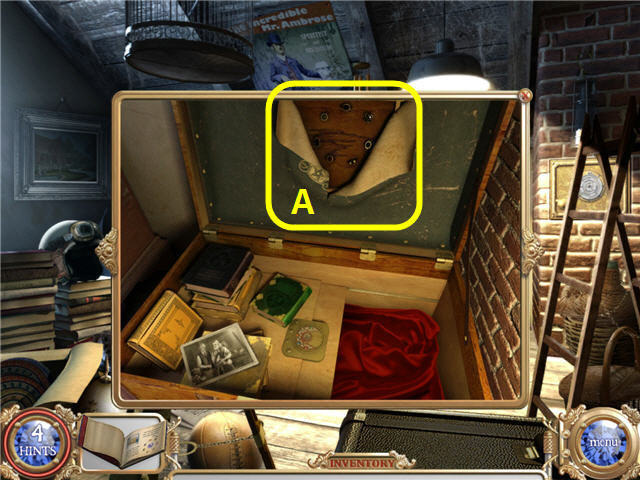
- Use the SCISSORS on the pentagram, on the inside of the lid on the chest.
- Take all 7 MAGIC RINGS.
- Head to the 13th Century Archive Room to the right.

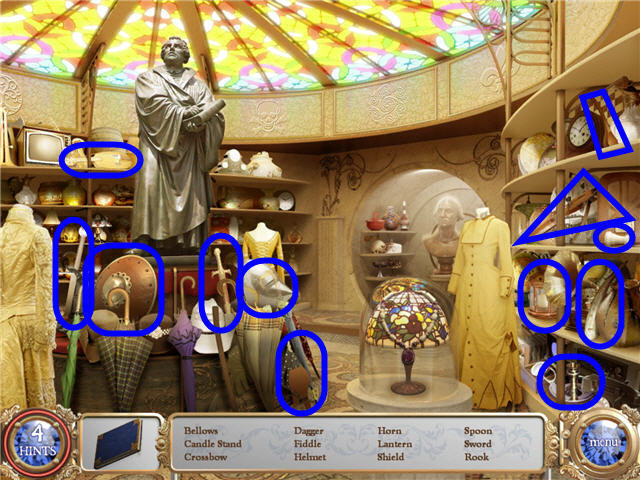
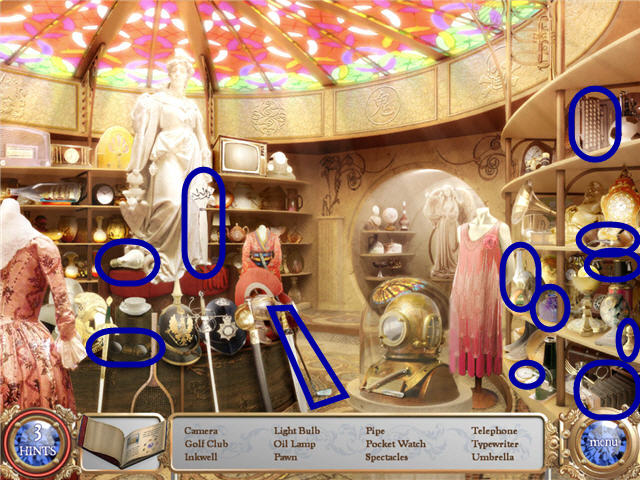
- Find the items listed and get 13th CENTURY OBJECTS.

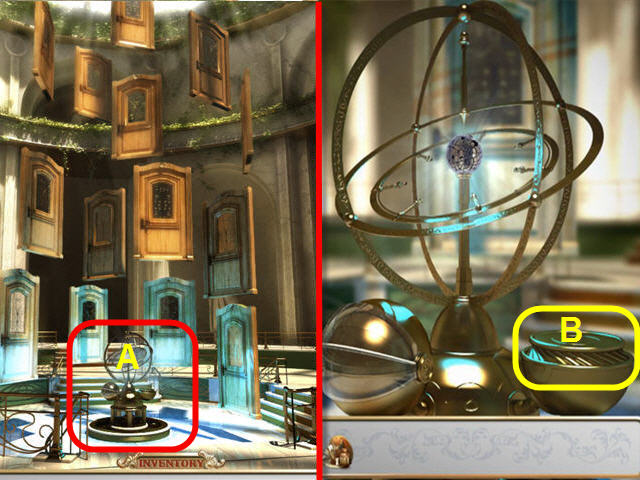
- Click on the Nexus Machine (A).
- Place the 13th CENTURY OBJECTS on the plate (B).
Chapter 2: 13th Century

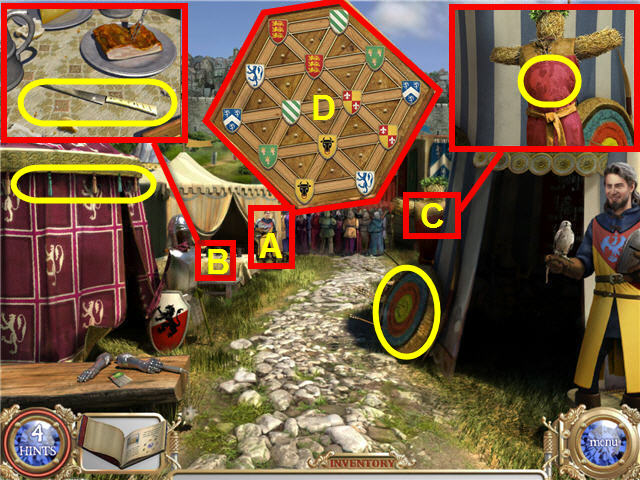
- Speak to the gentleman by the yellow tent (A).
- Take the KNIFE from the table (B).
- Take the TASSEL from the maroon tent on the left.
- Take an ARROW from the target.
- Speak to the gentleman by the yellow tent again to play a matching game (D).
- Match all the pairs. Your layout may be different from this example (they are randomized).
- Click on the dummy (C) and then again on the crest on the clothing when in close-up.
- Click on the village at the top of the screen.

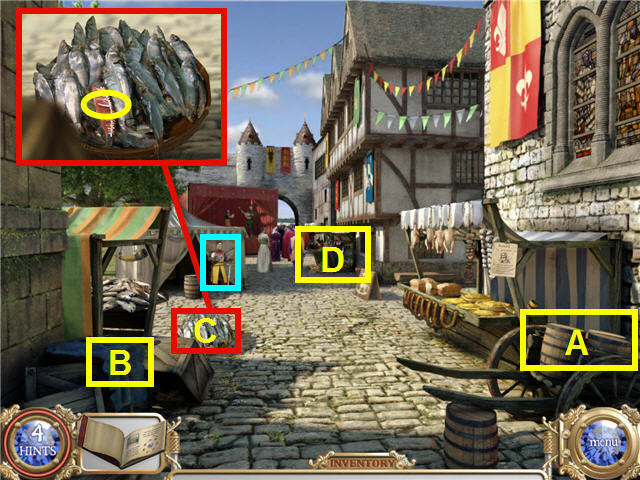
- Click on the barrels to the right (A).
- Take the THREAD.
- Use the KNIFE on the blue material on the left (B).
- Get a HERALDIC.
- Click on the fish (C) and then take the THREAD AND NEEDLE.
- Click on the bottom of the screen to exit.
- Click on the dummy.
- Place the HERALDIC and the THREAD AND NEEDLE on the surcoat.
- Take the completed emblem and it will automatically be on your clothes.
- Head back up to the village and speak to Sir Bodwin, marked in blue on the screenshot.
- Click on the market stall (D).

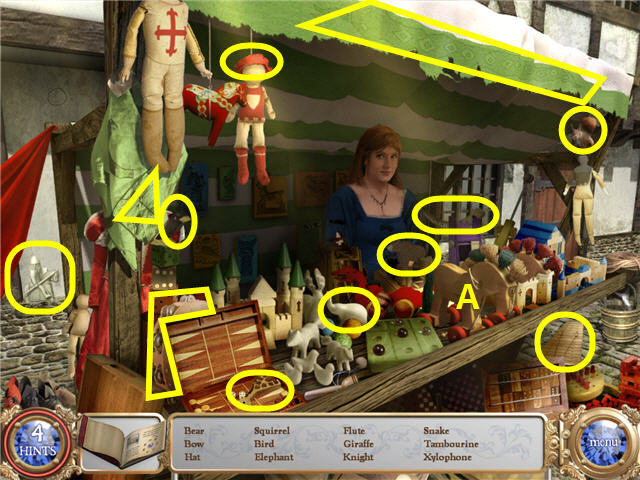
- Speak to the merchant.
- Click on the wooden horse (A).
- Place the TASSEL on the holes on the horse’s head.
- Place the ARROW on the hole where the wheels should be.
- Click anywhere on the stall.
- Find the items listed and get a CHESS SET.
- Click on Sir Bodwin and place the CHESS SET on the board in front of him.
- Click on the chess board.

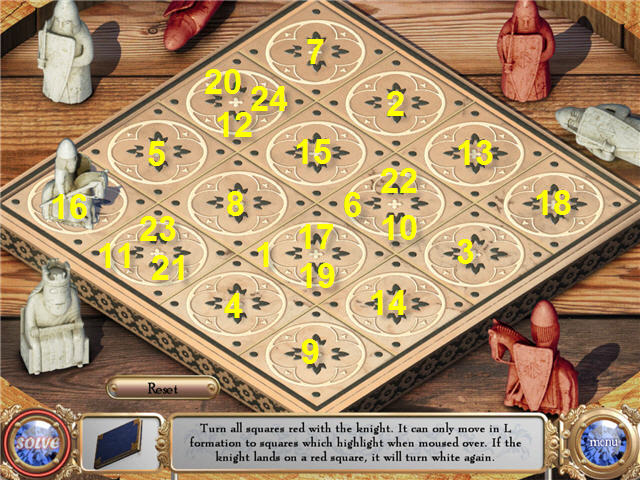
- Move the knight in an L shape, one step over and two up, turning all the squares red.
- If you hit a square you have already turned red, it will turn white again. See screenshot for solution.
- Head to the tent area via the bottom of the screen.

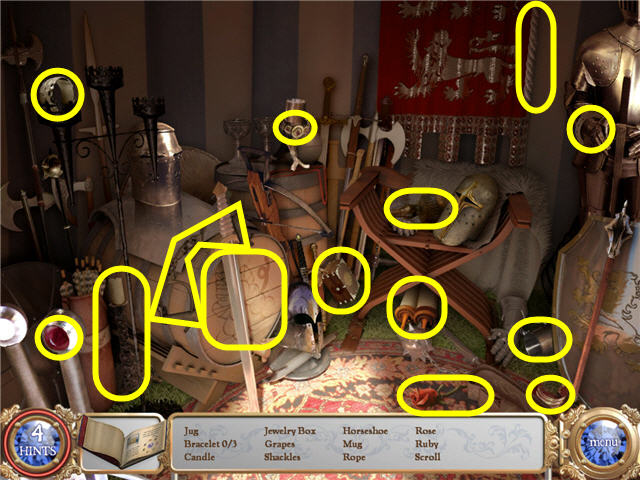
- Enter the blue striped tent.
- Find all the items listed and you will get a JEWELRY BOX.
- Head up to the village and give the JEWELRY BOX to Sir Bodwin.
- Take the MAGIC RING.

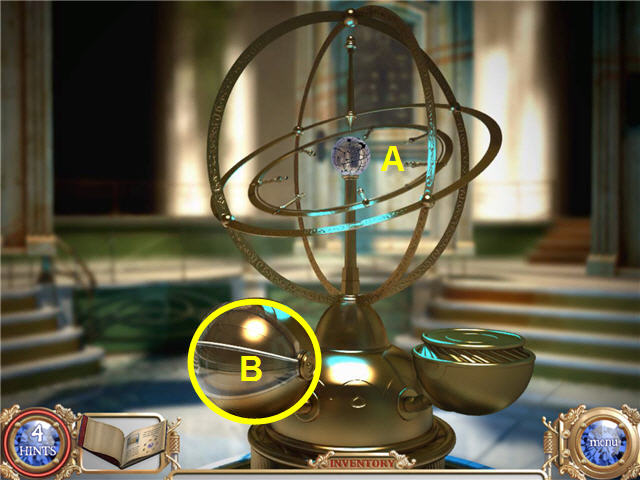
- Place the MAGIC RING on the Nexus Machine (A).
- Back out 1 time and click on the sphere (B).

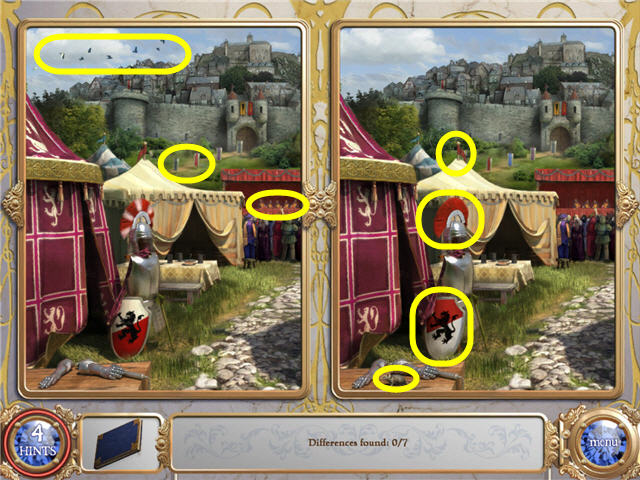
- Find the 7 differences.
- Head to the right, to the 19th Century Archive Room.

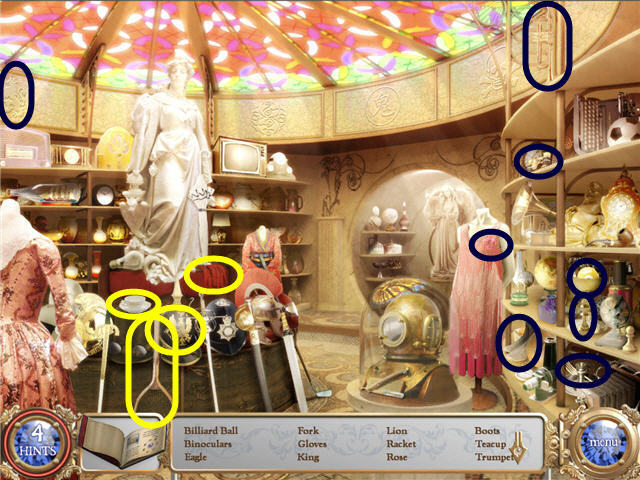
- Find the items listed and get 19th CENTURY OBJECTS.
- Place the 19th CENTURY OBJECTS on the Nexus Machine Plate.
- Head through the door to the 19th Century.
Chapter 3: 19th Century

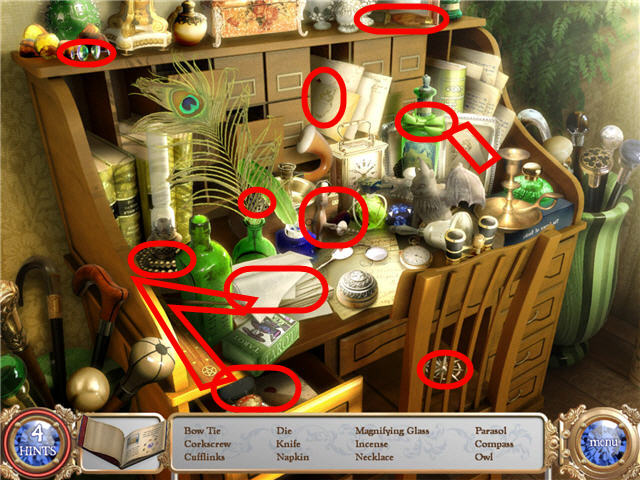
- Click on the desk in the corner of the room.
- Find all the items listed and get a ROSE medallion.

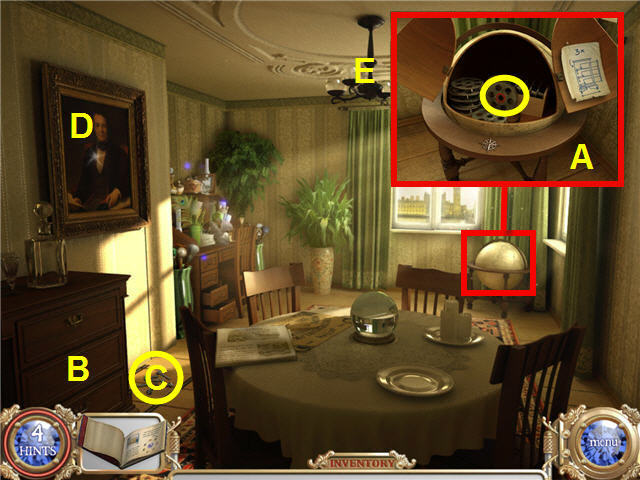
- Click on the globe (A) in the right corner and then place the ROSE medallion in the front slot.
- Take the FILM from the opened globe.
- Read the note on the inside of the globe.
- Open the 3 drawers on the dresser (B).
- Pick up the SCREWS (C) from the floor.
- Read the newspaper on the table.
- Click on the ceiling light fixture (E) and get a LIGHT BULB.
- Click on the painting (D).
- Click on the plate with holes on the door behind the painting.

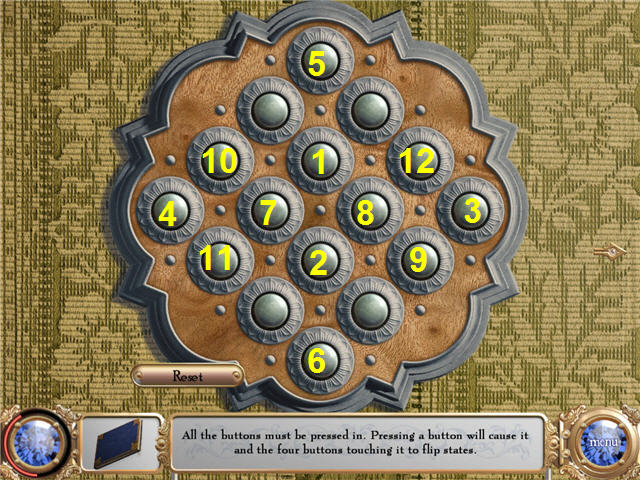
- Push the buttons in the correct order so that all the buttons end up pushed in.
- Any button directly touching the one you push will go in or out as well. See screenshot for solution.

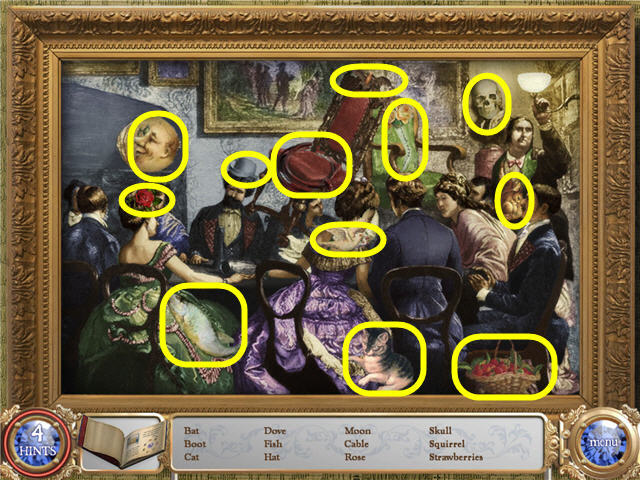
- Head through the newly opened door.
- Click on the painting on the wall.
- Find all the items listed and get a CABLE.
- Click on the projector and then push the little red button near the top.
- Click on the electrical box on the wall.

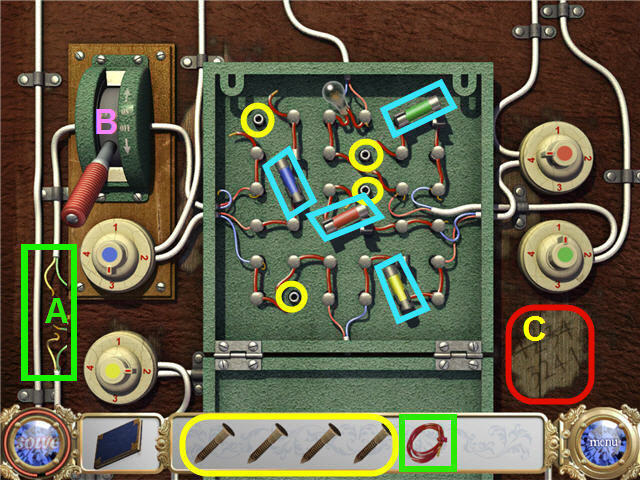
- Place the SCREWS in the screw holes (marked in yellow on the screenshot).
- Click the fuses (marked in blue on the screenshot) to reposition them.
- Place the CABLE on the split wires (A).
- Turn the dials to point them to the number matching the etching in the wood on the bottom right.
- Set the upper left to 3, lower left to 2, upper right to 4, and lower right to 1. See screenshot for solution.
- Flip the switch (B) when complete.

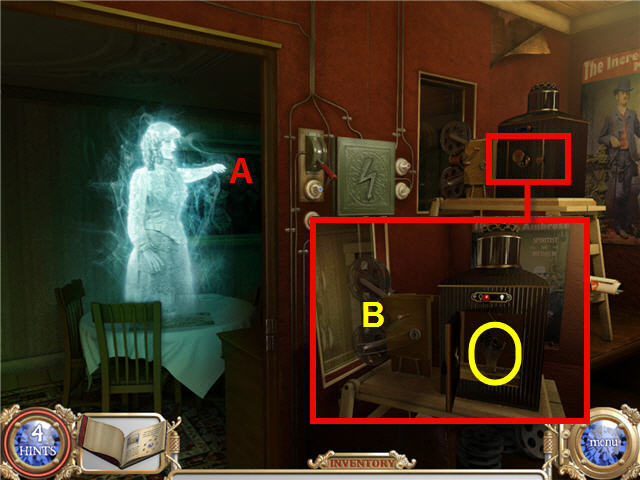
- Click on the projector to get a close-up.
- Click on the side door of the projector.
- Replace the burned out bulb with the LIGHT BULB in inventory.
- Click the film on the front of the projector (B).
- Click the little red button on the side of the projector.
- Click twice on the section of painting (A) to which the apparition is pointing.
- Click on the compartment and take the MAGIC RING.
- Place the MAGIC RING on the Nexus Machine.
- Back out 1 time and click on the sphere.

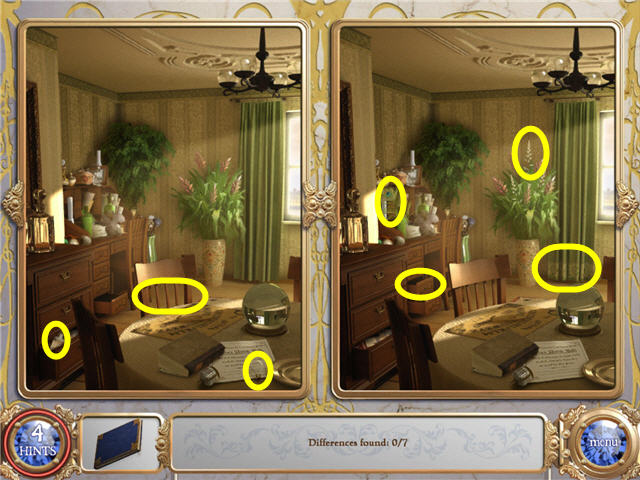
- Find the 7 differences.
- Head to the right, to the 17th Century Archive Room.

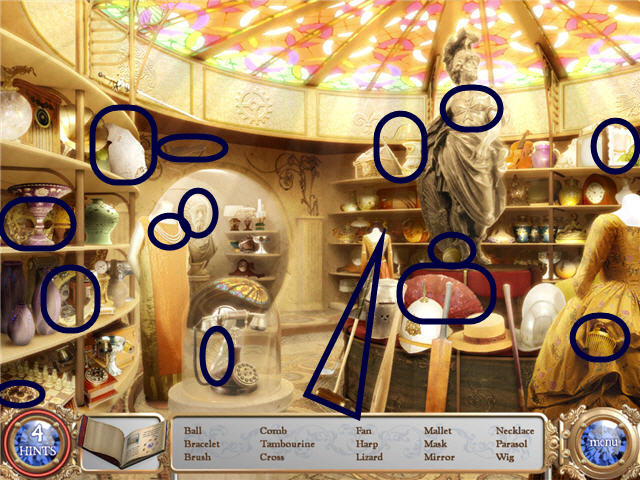
- Find the items listed and get 17th CENTURY OBJECTS.
- Place the 17th CENTURY OBJECTS on the Nexus Machine Plate.
- Head through the door to the 17th Century.
Chapter 4: 17th Century

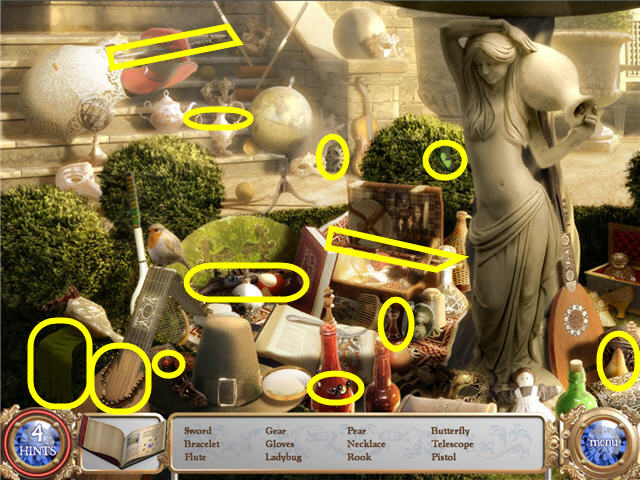
- Click on the fountain on the right.
- Find all the items listed and get a MEDIUM GEAR.
- Click on the entrance to the manor.

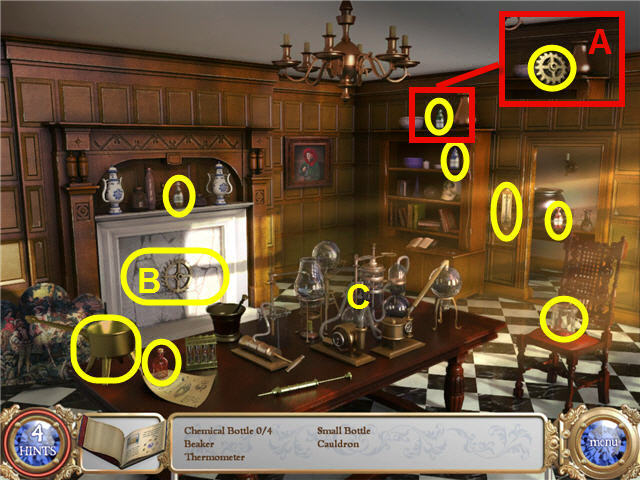
- Take the MEDIUM GEAR (A) from the top of the bookshelf.
- Click on the fireplace screen to expose a gear.
- Click on the MEDIUM GEAR (B) on the fireplace front.
- Click on the bookshelf.
- Find the items listed and you will get a POT, EMPTY BOTTLE, BEAKER, and THERMOMETER in inventory.
- Click on the chemistry lab on the table until it states you need cold water.
- Head outside and use the POT on the water to the left by the statue to get COLD WATER.
- Go back inside the manor.

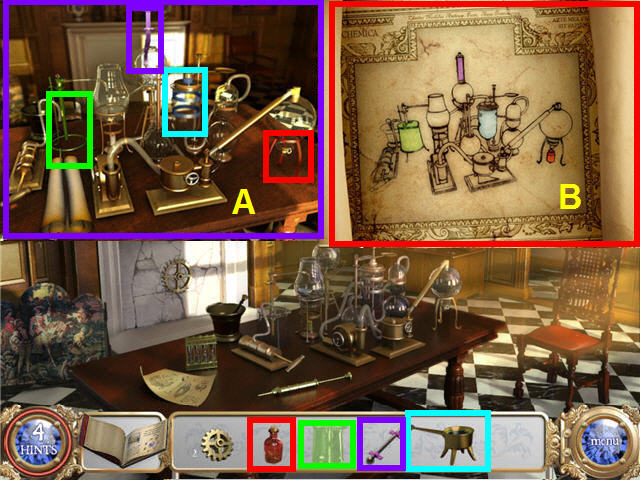
- Click on the chemistry lab.
- Place the POT, the EMPTY BOTTLE, the BEAKER, and the THERMOMETER on the lab (A) using the color chart (B).

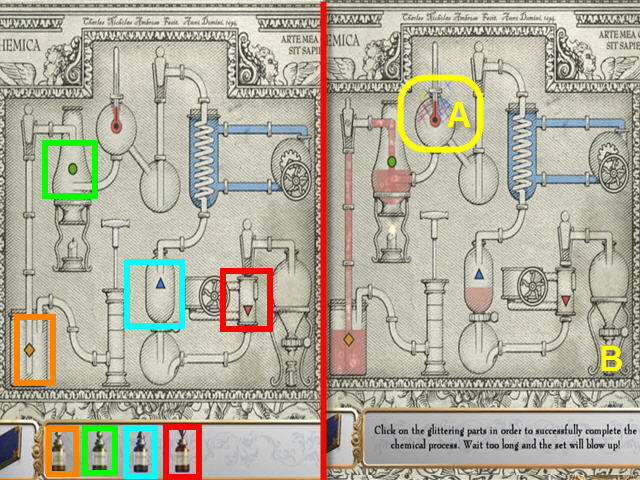
- Place the bottles on the lab by matching the colors and caps.
- As the liquid passes through, the different sections glitter, click on the glittering part (A) quickly. You will have to do this repeatedly until the liquid goes into the vial at the end.
- Take the NITROGLYCERINE (B) when complete.
- Place the NITROGLYCERINE on the gear in the fireplace.
- Click on the fireplace.

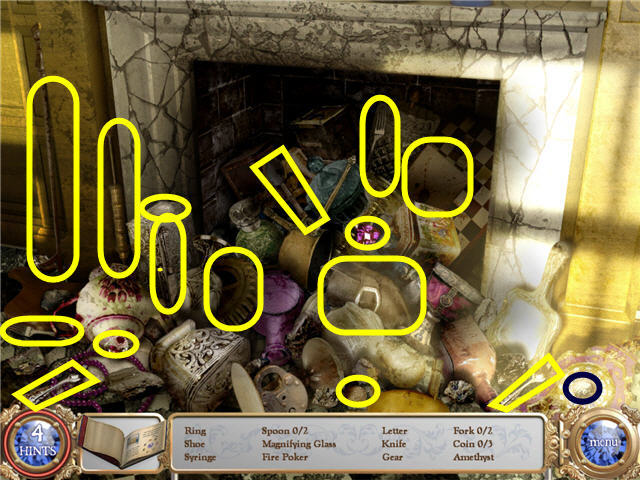
- Find the items listed and get the SMALL GEAR.
- Exit the manor.

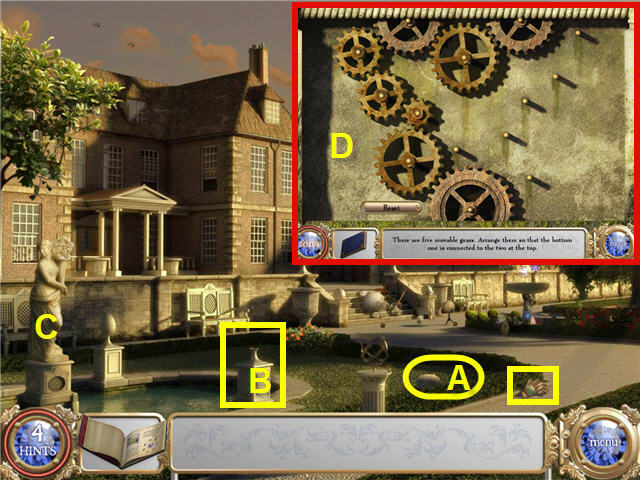
- Click on the glove on the ground.
- Pick up the STONE EGG (A).
- Place the STONE EGG on the pedestal (B).
- Click on the statue (C).
- Click on the gear section to get a close-up.
- Place the 3 GEARS on any peg onto which they will fit, regardless of the the gears touching.
- Rearrange the 5 movable GEARS so that they are all connected. See screenshot (D) for solution.
- Click on the weights in the upper section, above the gears.

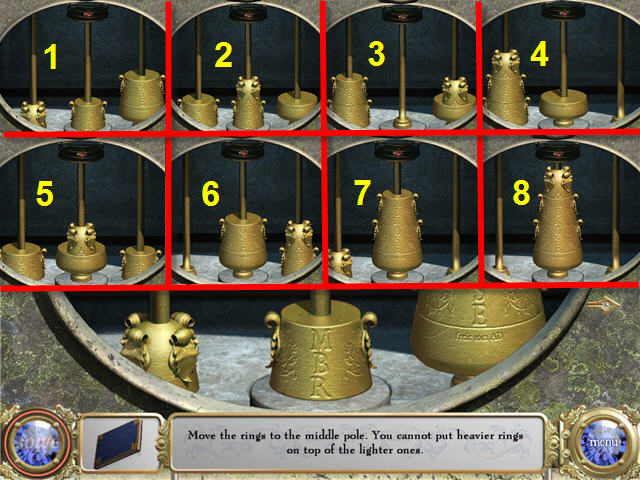
- Move all the pieces from the right post to the middle post without stacking any larger ring on top of a smaller ring. See screenshots for step by step solution.
- Take the MAGIC RING.
- Place the MAGIC RING on the Nexus Machine.
- Back out 1 time and click on the sphere.

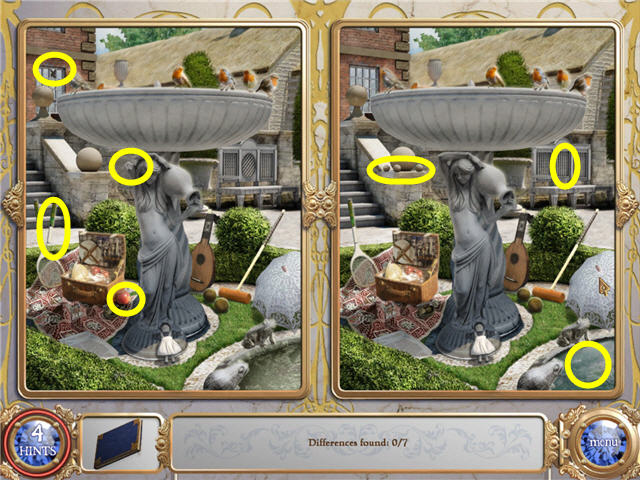
- Find the 7 differences.
- Head to the right, to the 15th Century Archive Room.

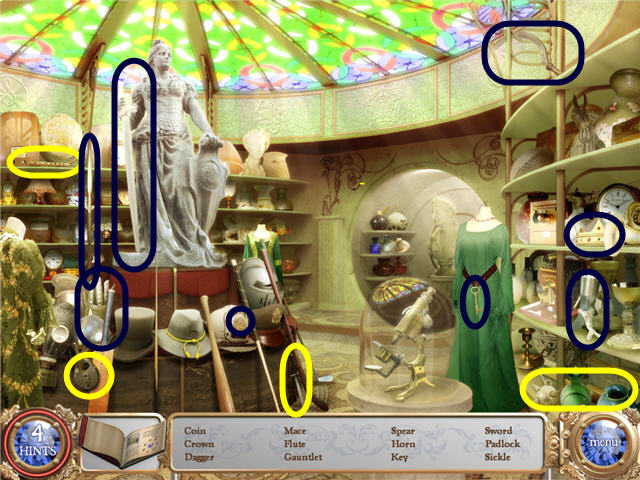
- Find the items listed and get 15th CENTURY OBJECTS.
- Place the 15th CENTURY OBJECTS on the Nexus Machine Plate.
- Head through the door to the 15th Century.
Chapter 5: 15th Century

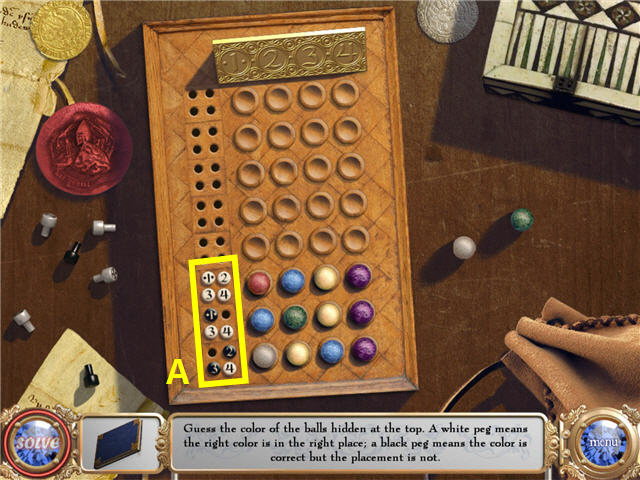
- Click on the man and play a game.
- Guess the correct order and colors of the marble placement.
- Place the marbles you think are correct on the bottom row and check what the pegs on the left say when you have placed them all.
- Look at the screenshot (A) and see the pegs on the left, next to the marbles.
- The black pegs indicate the correct color in the incorrect spot; the white pegs indicate the correct color in the correct spot; missing pegs mean that color marble should not be included at all.
- Using the info from the pegs on the bottom row, move up a row and place the marbles again. Repeat until complete.
- You will get a KEY in inventory.
- Click on the painting on the wall above the red sheet.

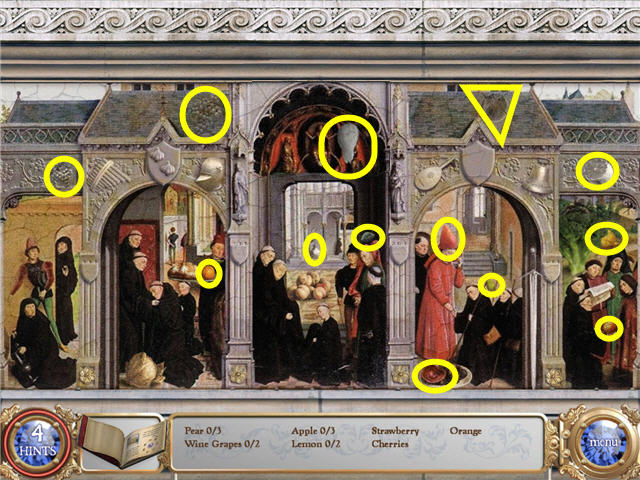
- Find all the items listed and get an APPLE MEDALLION.

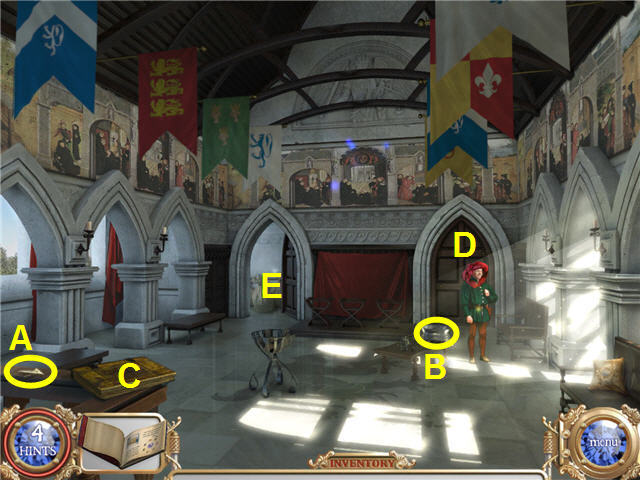
- Pick up the KEY PART (A) on the railing.
- Take the METAL BOWL (B) from the table.
- Read the book (C).
- Check the sack (E) on the floor through the door to the left.
- Go through the door (D) and click on the table on the left.

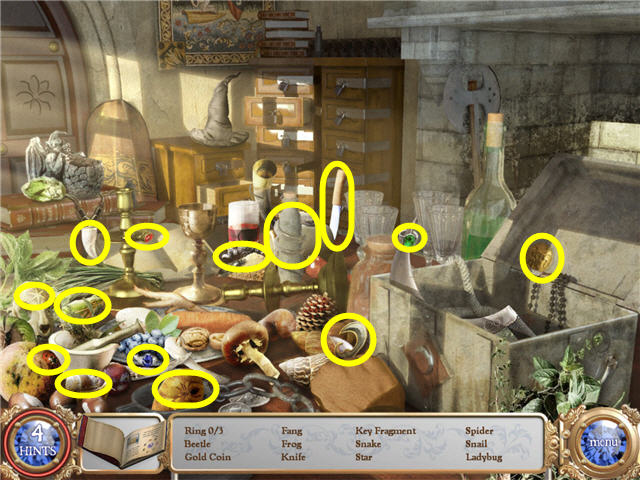
- Find all the items listed and get a KEY PART.

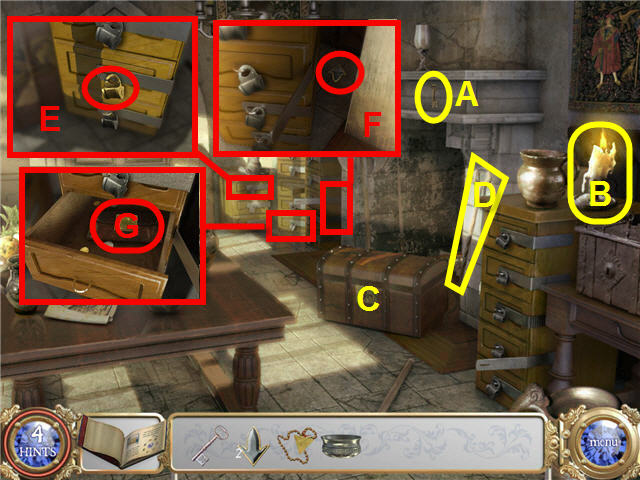
- Take the KEY (A) from the mantle.
- Take the CANDLE (B) on the right of the fireplace.
- Click on the chest (C) to get a diary entry.
- Take the POKER (D) next to the chest.
- Use the gold KEY on the gold lock (E) and take the DAGGER.
- Click on the area to the left of the mantle (F) and then attempt to take the KEY PART.
- Use the POKER on the KEY PART.
- Use the sliver KEY on the middle set of locked drawers (G).
- Use the APPLE MEDALLION on the locked leather pouch in the drawer.

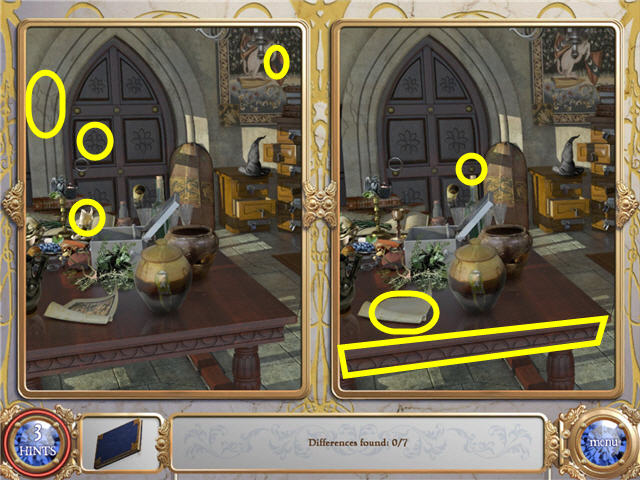
- Arrange the pieces from the triangle (A) to make a square (B).
- You can left-click on the pieces to rotate them.
- Take the RESIN from the pouch when opened.
- Exit the room.

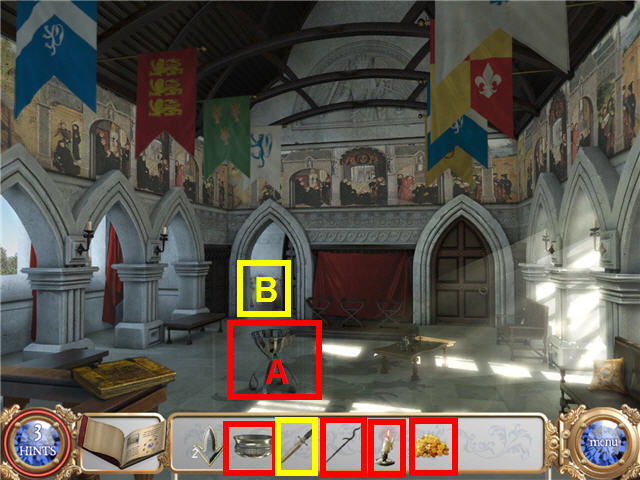
- Click on the fire pit (A).
- Use the CANDLE on the fire pit.
- Place the METAL BOWL on the fire.
- Place the RESIN in the METAL BOWL.
- Place the POKER in the melted resin to get a STICKY POKER.
- Use the DAGGER on the sack (B) in the room on the left.

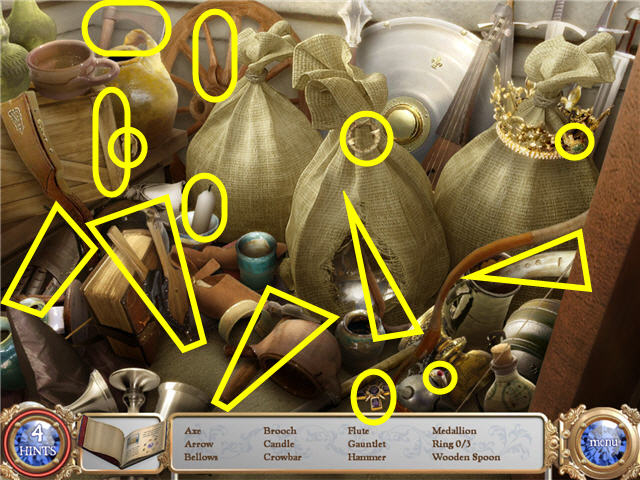
- Find all the items listed and get a CROWBAR.
- Head into the room on the right.

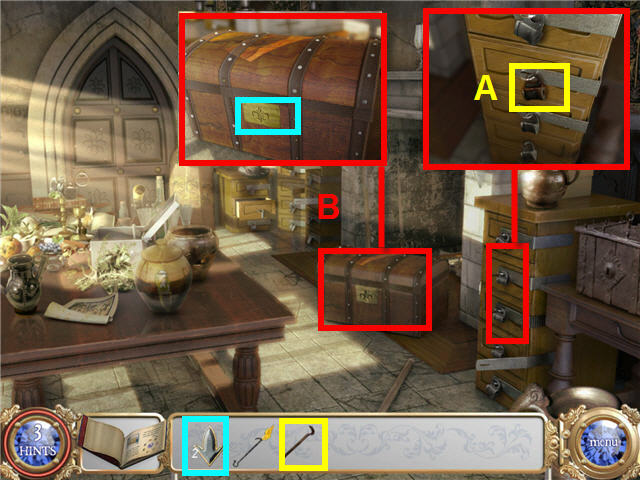
- Click on the locked drawers on the right of the fireplace.
- Use the CROWBAR on the rusty lock (A) and take the KEY PART.
- Click on the area to the left of the fireplace (B) and then use the STICKY POKER on the KEY PART.
- Place the 4 KEY PARTS on the lock on the chest.
- Take the MAGIC RING from the chest.
- Place the MAGIC RING on the Nexus Machine.
- Back out 1 time and click on the sphere.


- Find the 7 differences.
- Head to the right, to the 8th Century Archive Room.

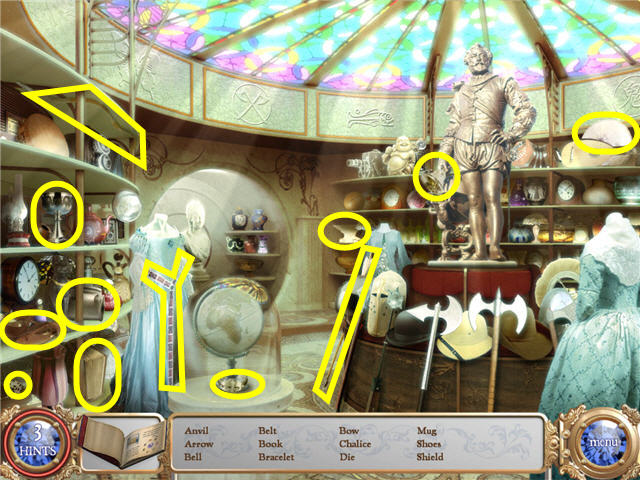
- Find the items listed and get 8th CENTURY OBJECTS.
- Place the 8th CENTURY OBJECTS on the Nexus Machine Plate.
- Head through the door to the 8th Century.
Chapter 6: 8th Century

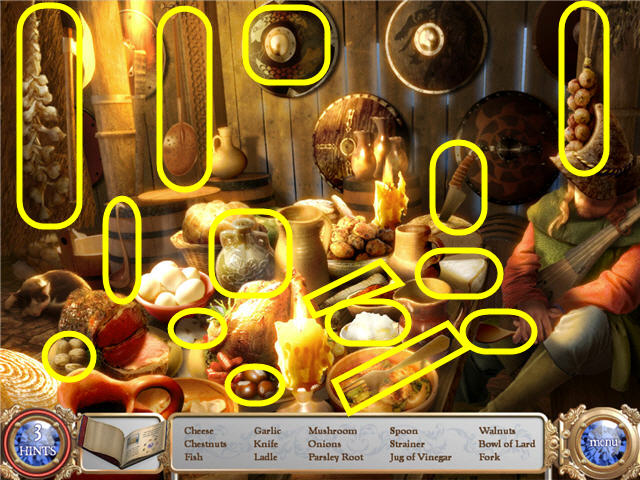
- Head into the Alchemist’s hut on the right and then click on the table under the deer head on the wall.
- Find the items listed and get VINEGAR.

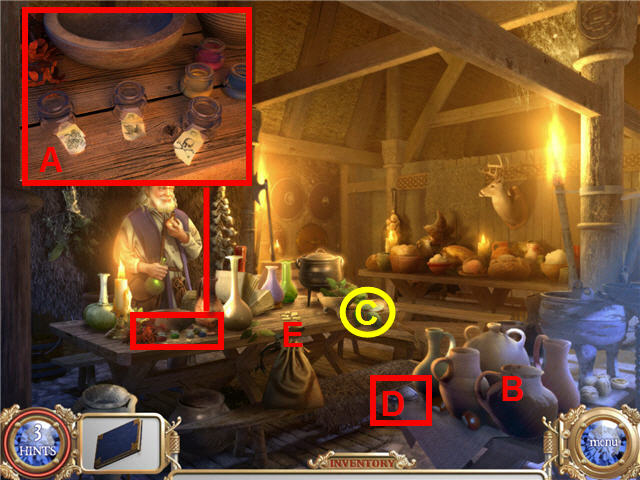
- Click on the Alchemist.
- Click on the table and look at the jars (A).
- Click on the jugs (B) 2 times to see what you need.
- Take the POISON IVY (C) on the table.
- Click on the stone (D).
- Click on the ripped note (E).
- Exit the hut and then click to the right of the right door, on the building in the distance.

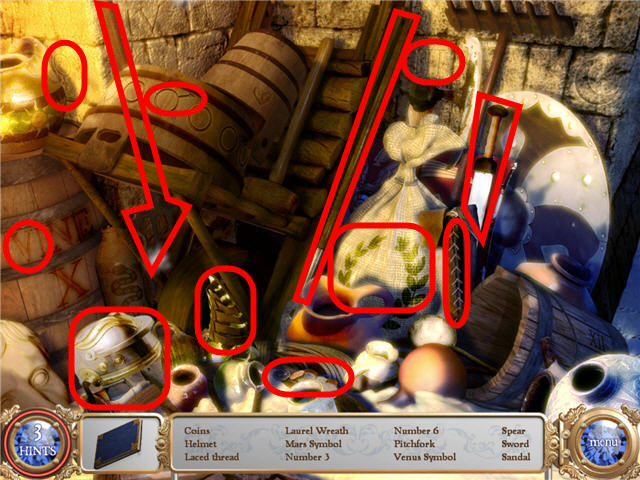
- Find all the items listed and get a STRING.

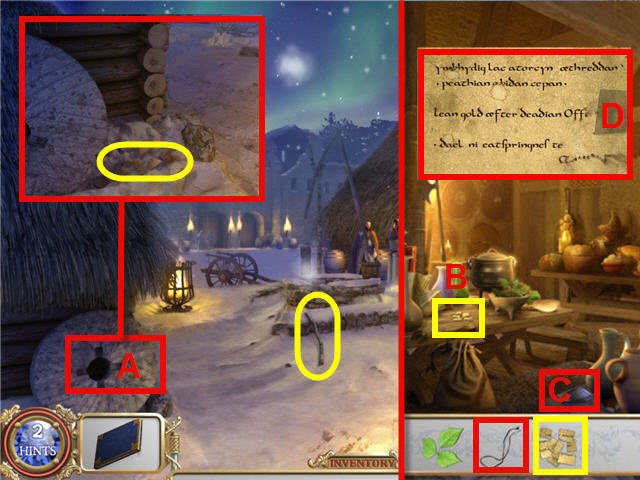
- Pick up the POLE on the stone retainer wall.
- Use the POLE on the wheel (A) and pick up the PIECES OF PAPER.
- Look inside the well and click on the glittering metal on the side.
- Head inside the hut.
- Use the STRING on the magnetic stone (C) and get a MAGNETIC STONE ON STRING in inventory.
- Place the PIECES OF PAPER on the ripped papers (B) on the table.
- Reassemble the PIECES OF PAPER; you can rotate them by left-clicking on them and then clicking and dragging them together.
- They will click in place and lighten in color when correct. See screenshot (D) for solution.
- Head outside and click on the well.
- Use the MAGNETIC STONE ON STRING on the metal object inside the well and get the BOTTLE OF POISON.
- Head back into the Alchemist’s hut.

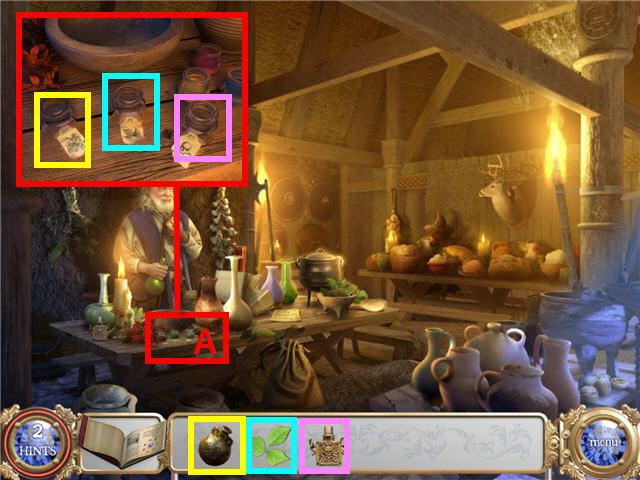
- Click on the Alchemist.
- Click on the bottles on the table in front of the Alchemist (A).
- Place the VINEGAR in the jars with the grapes on the left.
- Place the POISON IVY in the middle jar.
- Place the POISON on the skull-and-crossbones jar on the right.

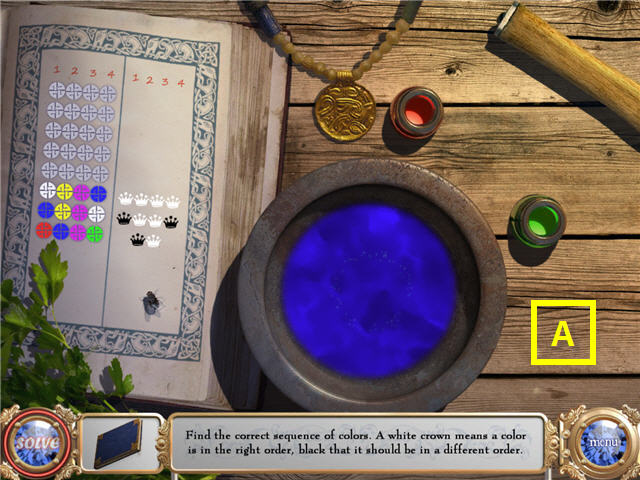
- Place the colors in the bowl in the correct order.
- Place 4 colors in the bowl and then check the colors of the crowns in the journal to the right of the colors you’ve chosen.
- A black crown means you have a correct color but it needs to be in a different spot.
- A white crown means you have the correct color in the correct spot.
- A missing crown means that that color is not to be used at all.
- Continue on until you have all the correct colors in order. See screenshot (A) for an example (your solution may be differ).
- You will get a POTION in inventory when completed.
- Use the POTION on the jugs on the table to the bottom right.
- Use the POTION on each wine bottle and take the one that is poisoned to get POISONED WINE in inventory.
- Give the POISONED WINE to the Alchemist and get the MAGIC RING.
- Place the MAGIC RING on the Nexus Machine.
- Back out 1 time and click on the sphere.

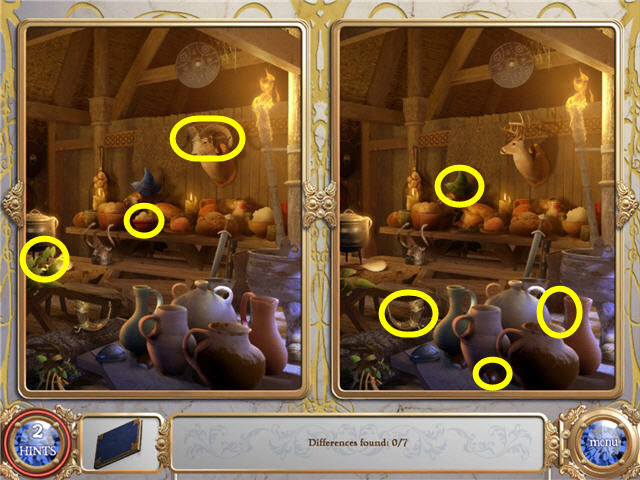
- Find the 7 differences.
- Head to the right, to the 7th Century Archive Room.

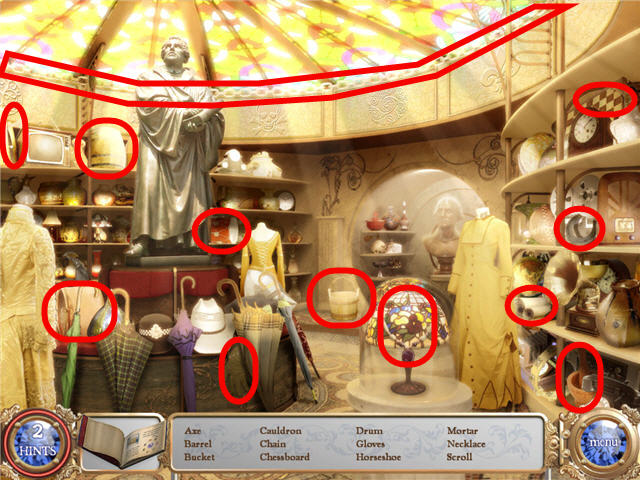
- Find the items listed and get 7th CENTURY OBJECTS.
- Place the 7th CENTURY OBJECTS on the Nexus Machine Plate.
- Head through the door to the 7th Century.
Chapter 7: 7th Century

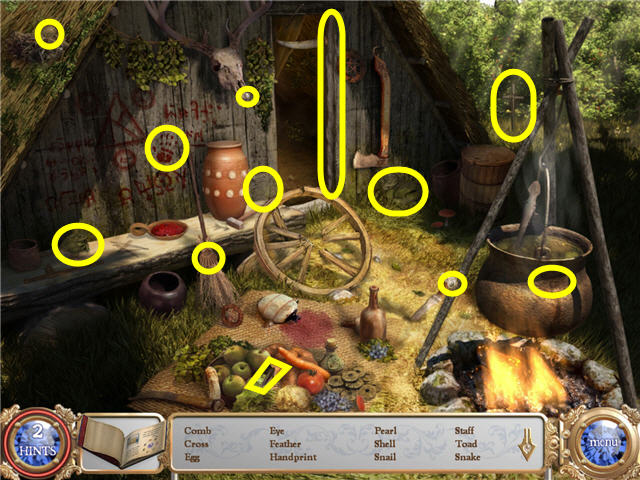
- Click on the area in front of the witch’s house by the wagon wheel.
- Find the items listed and get a PEARL in inventory.

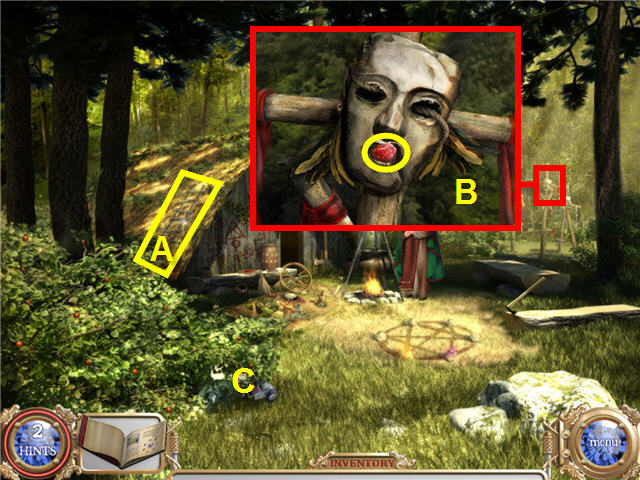
- Take the LADDER (A) from the roof top.
- Use the LADDER on the masks (B).
- Take the RUBY from the mask’s mouth.
- Head into the witch’s house.

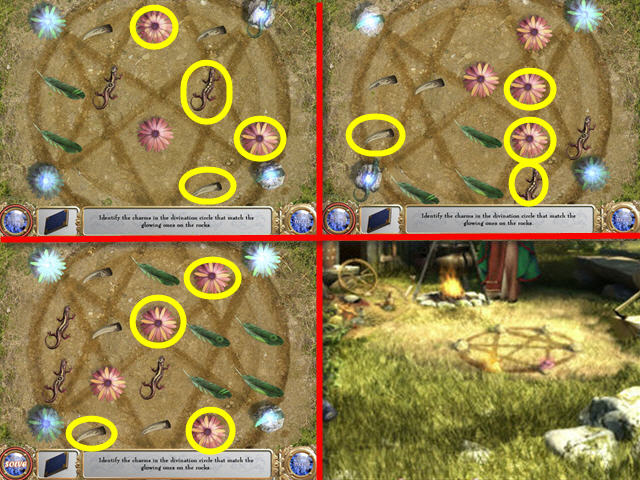
- Click on the corner of the burlap blanket (A) and take the SAPPHIRE.
- Take the EMERALD (B) from the bench.
- Click on the game on the right bench.

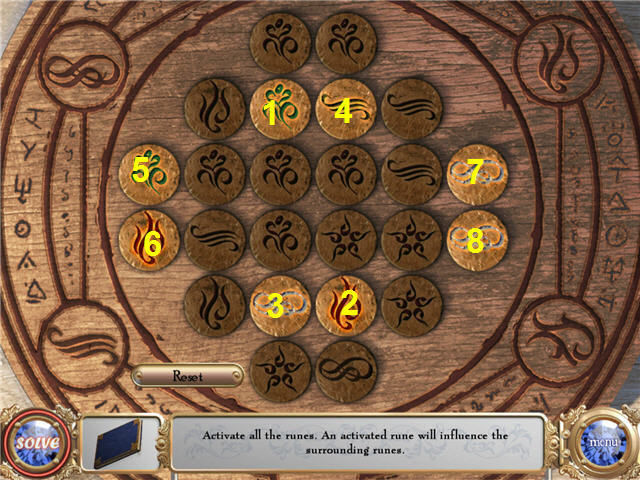
- Light up all the runes by clicking on them.
- Clicking on a rune will change the surrounding runes.
- When completed you will get a BOARD. See screenshot for solution.
- Exit the house and click on the hexagram.

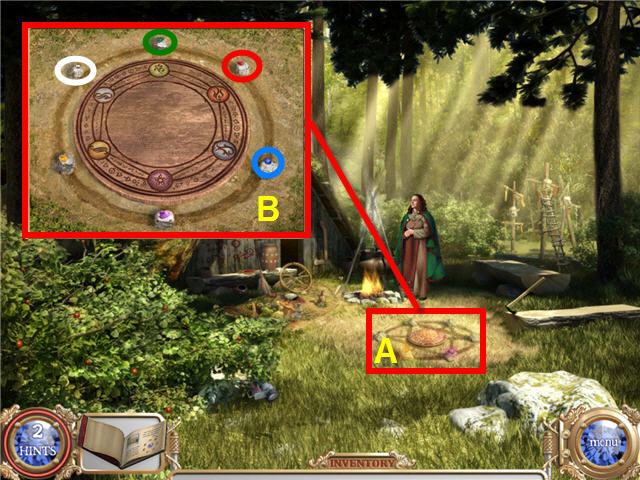
- Place the BOARD on the hexagram (A).
- Place the EMERALD, SAPPHIRE, RUBY, and PEARL in the matching colored spots on the board. See screenshot for solution (B).
- Click on the witch.
- Head into the house and click on the shelves to the right of the door.

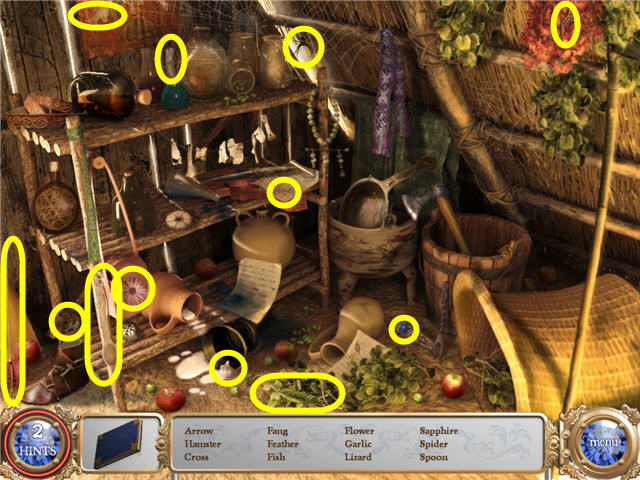
- Find the items listed and you will get a bag of INGREDIENTS.
- Give the INGREDIENTS to the witch and then click on her again so that she asks you to sit down.
- Click on the hexagon.


- Click on a charm in the center of the hexagon that matches a glowing one on one of the 4 corners. Your puzzle may differ from this example (they are randomized).

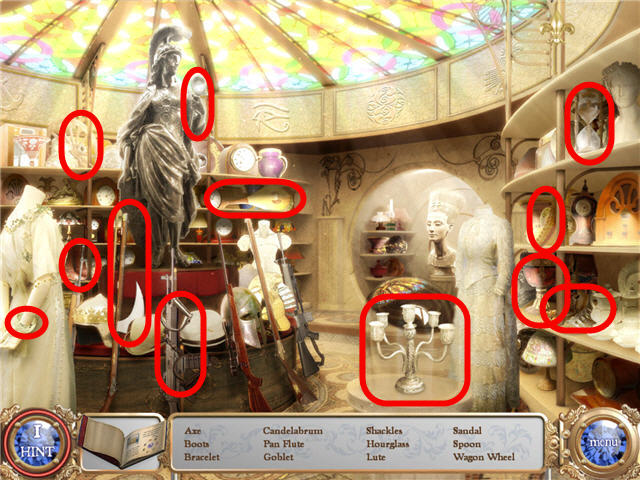
- Head to the right, into the 11th Century Archive Room.
- Find the items listed and get 11th CENTURY OBJECTS.
- Place the 11th CENTURY OBJECTS on the Nexus Machine Plate.
- Head through the door to the 11th Century.
Chapter 8: 11th Century

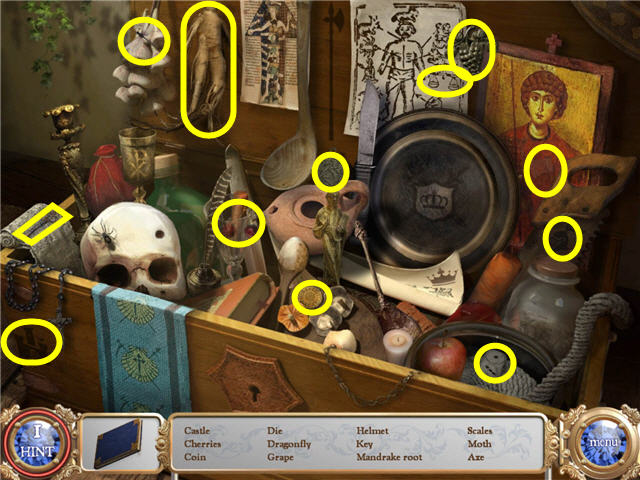
- Click on the monk 2 times.
- Click on the chest to the left of the doorway.
- Find the items listed and you will get a MANDRAKE ROOT.

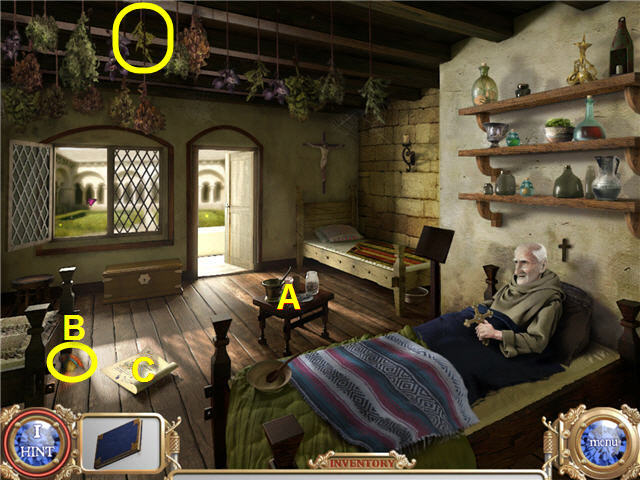
- Click on the table (A) in the center of the room and then click on all the items.
- Take the STAINED GLASS FRAGMENT (B) on the floor.
- Read the note (C).
- Take the VALERIAN (D).
- Head out the door to the Abby.

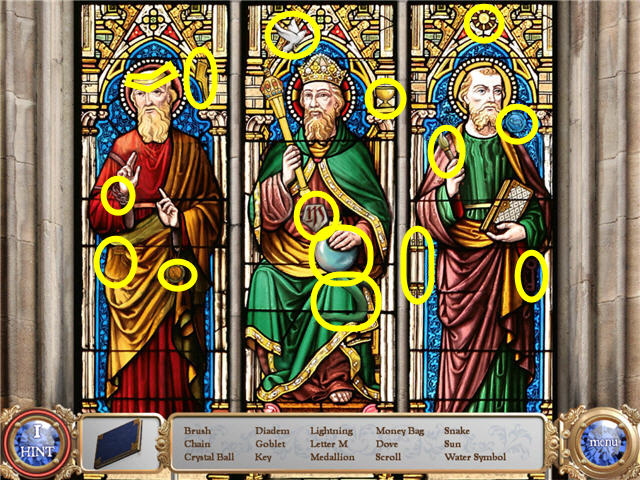
- Click on the large stained glass in the center behind the altar.
- Find the items listed and get a STAINED GLASS FRAGMENT.

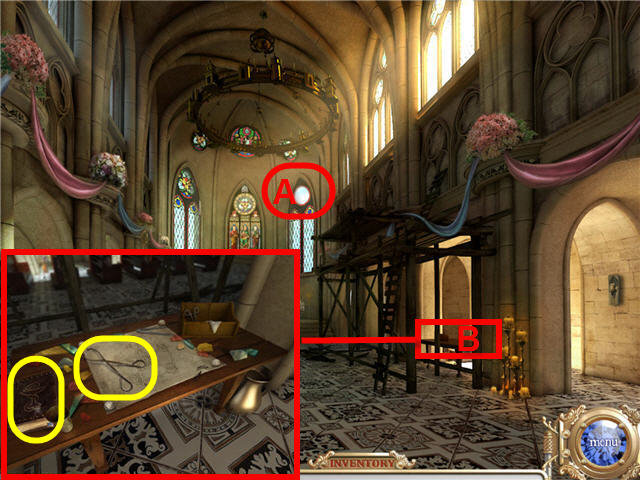
- Click on the missing stained glass (A).
- Click on the table (B) on the right of the scaffolding.
- Take the PLIERS and the BOOK from the table.
- Head back to the monk.

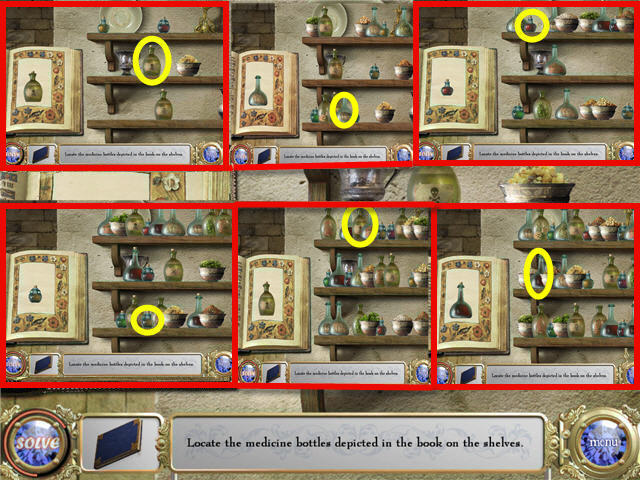
- Place the book on the bookstand to the left of the monk.
- Click on the shelves above the monk’s head.
- Find the bottle on the shelf that is shown in the book. Your bottle may differ from the one in this guide (they are random).
- You will get POPPY JUICE.

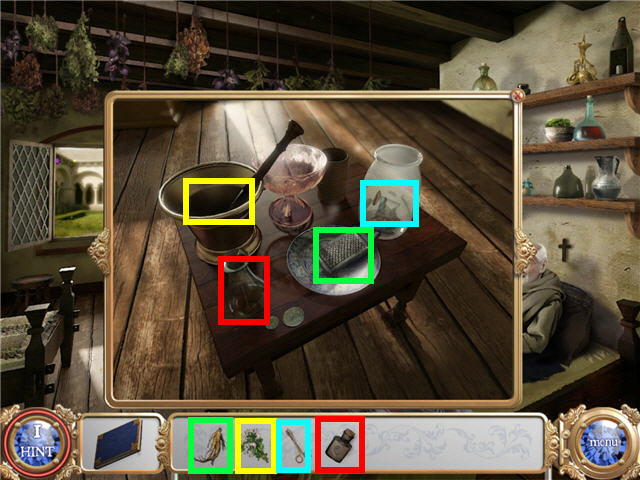
- Click on the table in the center of the room.
- Place the POPPY JUICE in the beaker.
- Use the MANDRAKE ROOT on the grater to get GRATED ROOT.
- Use the PLIERS on the jar of leeches to get a STAINED GLASS FRAGMENT.
- Use the VALERIAN on the mortar and pestle to get VALERIAN POWDER.
- Place the GRATED ROOT on the beaker.
- Place the VALERIAN POWDER on the beaker.
- Take the HEALING POTION.
- Give the monk the HEALING POTION.
- Take the CROSS from the sleeping monk’s hands.
- Head back into the abbey and click on the table by the scaffolding.
- Place the STAINED GLASS FRAGMENTS on the table until you don’t have any more.
- Click on the pentagram template on the table.

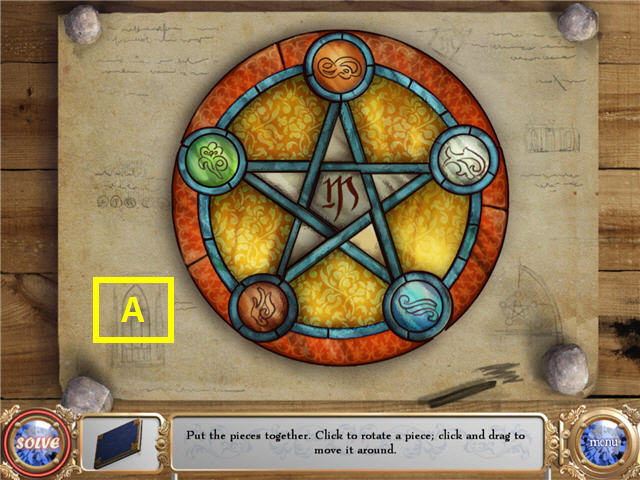
- Assemble the stained glass on the template.
- You can left-click to rotate them and they will lock into place when correct. See screenshot (A) for solution.
- You will get a COMPLETED STAINED GLASS when finished.

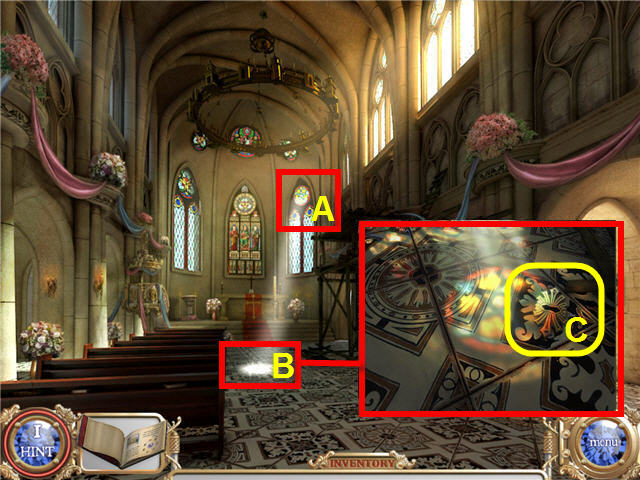
- Place the COMPLETED STAIN GLASS in the hole in the right front window (A).
- Click on the sunbeam (B).
- Place the CROSS in the slot on the floor (C) and take the MAGIC RING.
- Place the MAGIC RING on the Nexus Machine.
- Back out 1 time and click on the sphere.

- Find the 7 differences.
- Head to the right, to the 19th Century Archive Room.


- Find the items listed and get 19th CENTURY OBJECTS.
- Place the 19th CENTURY OBJECTS on the Nexus Machine Plate.
- Head through the door to the 19th Century.
Chapter 9: 19th Century

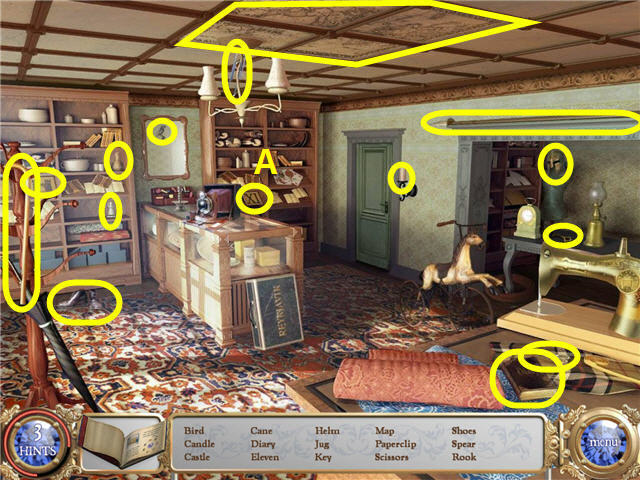
- Find all the items listed and get a KEY.
- Click on the bookshelf to the right (A).

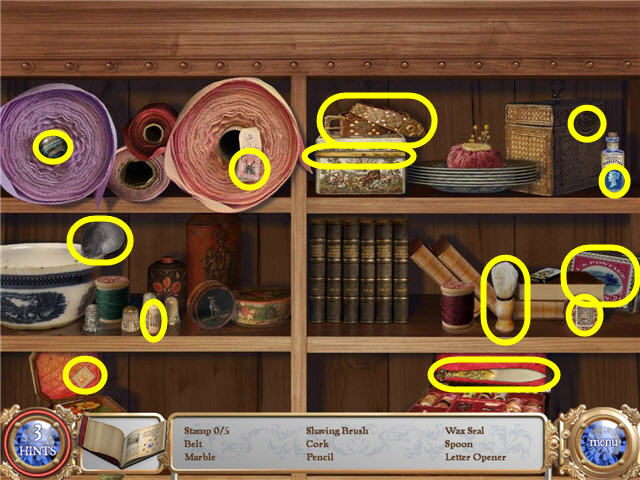
- Find all the items listed and get a LETTER OPENER.

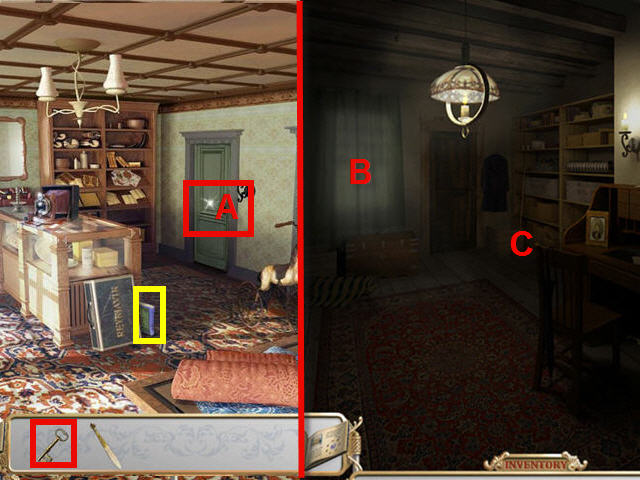
- Check the book on the floor next to the suitcase.
- Use the KEY on the green door (A) and enter the next room.
- Click on the curtain (B) to light up the room.
- Click on the broom to the right (C).

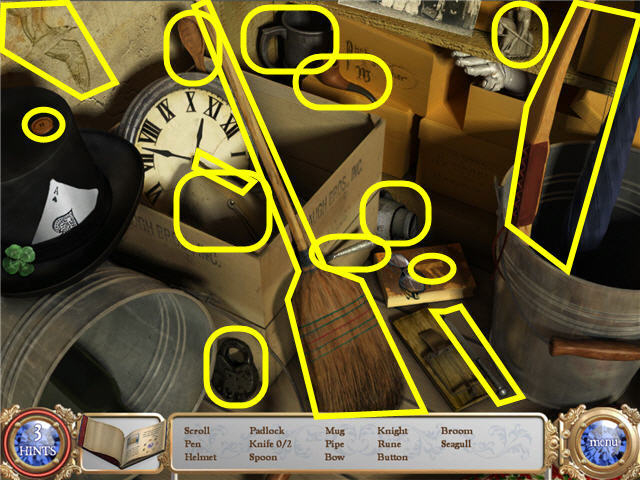
- Find all the items listed and get a BROOM.

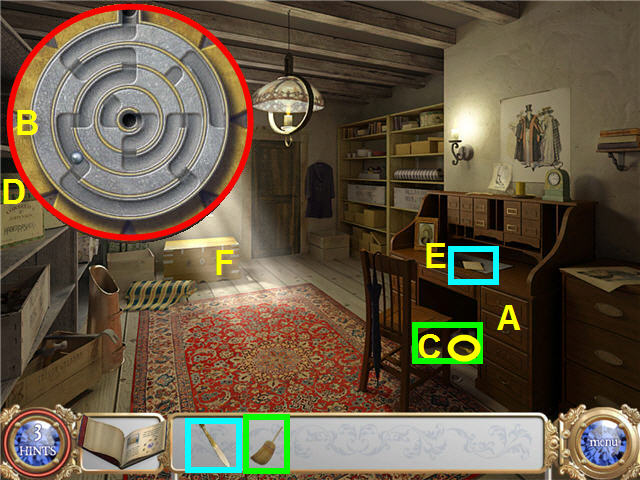
- Click on the drawers (A) on the right hand side of the desk 2 times to expose a safe.
- The goal is to rotate the rings in order to create a path for the ball to go from the top hole to the center.
- The ball will not move until all the rings have been correctly aligned. See screenshot for solution (B).
- Take the SILVER KEY.
- Click on the golden key under the desk (C).
- Use the BROOM on the mice under the desk and then take the GOLDEN KEY.
- Click on the hatbox (D) and then click on the lock on the box.
- Use the LETTER OPENER on the letter on the desk (E).
- Click on the chest (F).
- Exit the room via the bottom of the screen and click on the display case.

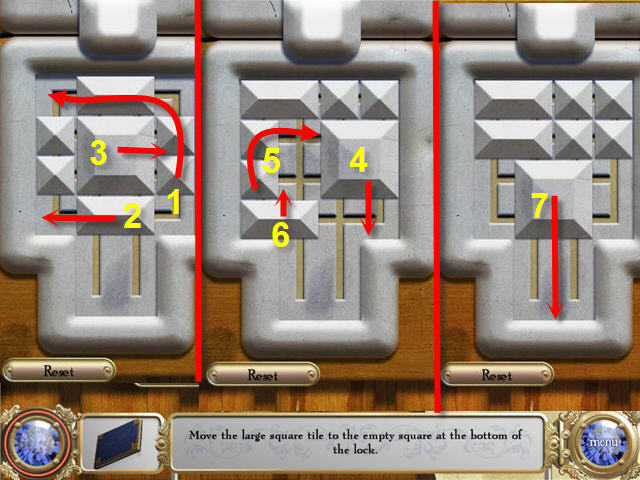
- Free the large square by sliding the other pieces out of the way. See screenshot for solution.
- Take the MEDALLION when completed.
- Head back through the green door.

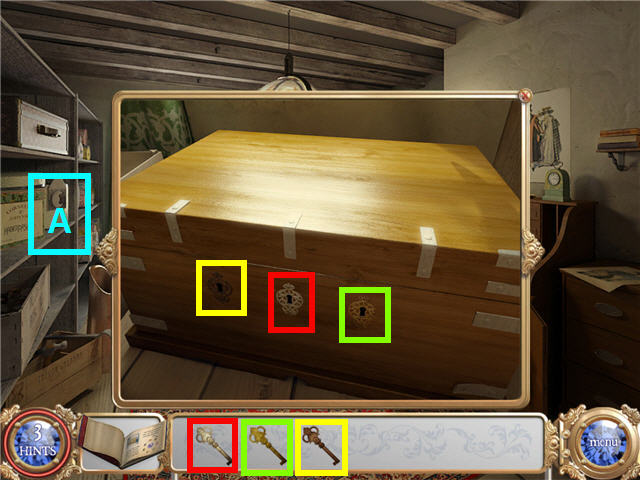
- Click on the hat box (A) and use the MEDALLION on the lock.
- Take the COPPER KEY from the hat box.
- Click on the chest.
- Use the SILVER KEY, GOLDEN KEY, and COPPER KEY in their matching keyholes.
- Take the MAGIC RING from the chest.
- Place the MAGIC RING on the Nexus Machine.
- Back out 1 time and click on the sphere.

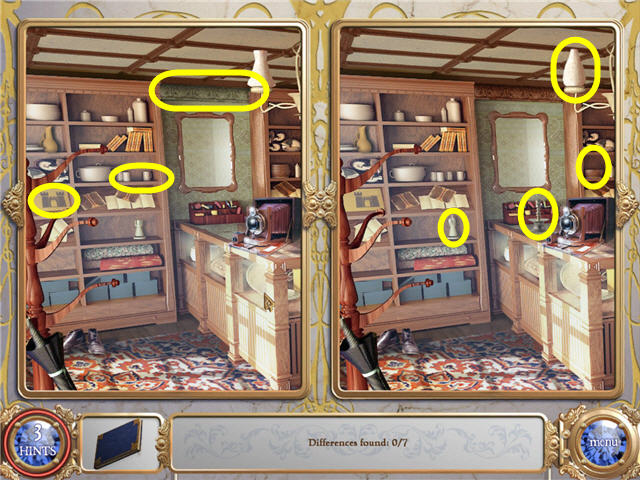
- Find the 7 differences.
- Head to the right, to the 21st Century Archive Room.

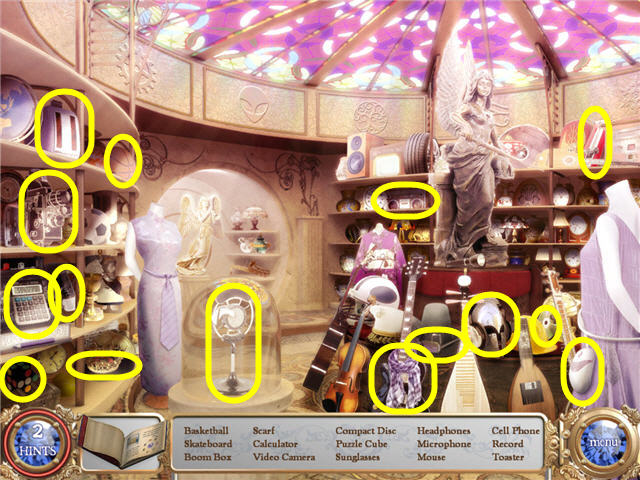
- Find the items listed and get 21st CENTURY OBJECTS.
- Place the 21st CENTURY OBJECTS on the Nexus Machine Plate.
- Head through the door to the 21st Century.
Chapter 10: 21st Century

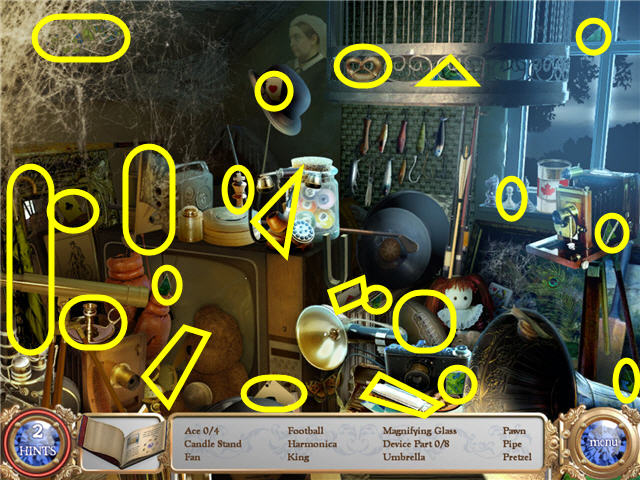
- Click on the stack of books on the left.
- Find all the items listed and get PARTS.
- Click the PARTS on the floating time device.

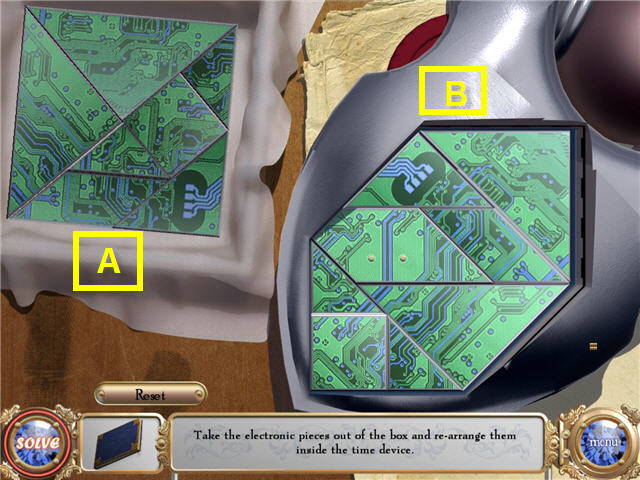
- Use the pieces from the square (A), arranging them on the hexagon so that none are overlapping and there no spaces.
- You can rotate the pieces by left clicking on them.
- They will lock into place when correct. See screenshot for solution (B).
Chapter 11: Stonehenge

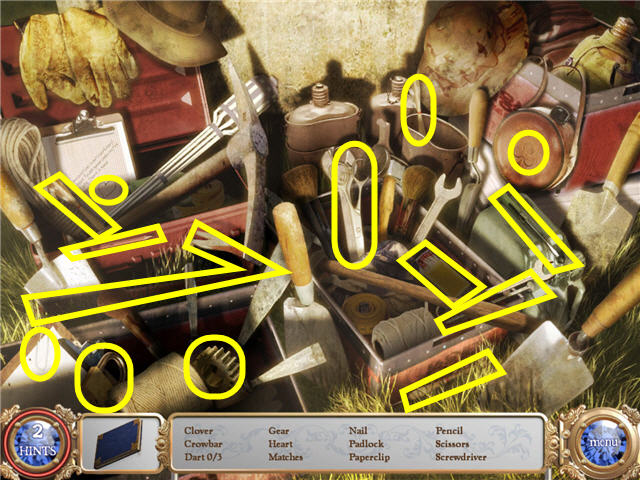
- Click on the pile of items on the bottom left.
- Find the items listed and get MATCHES in inventory.

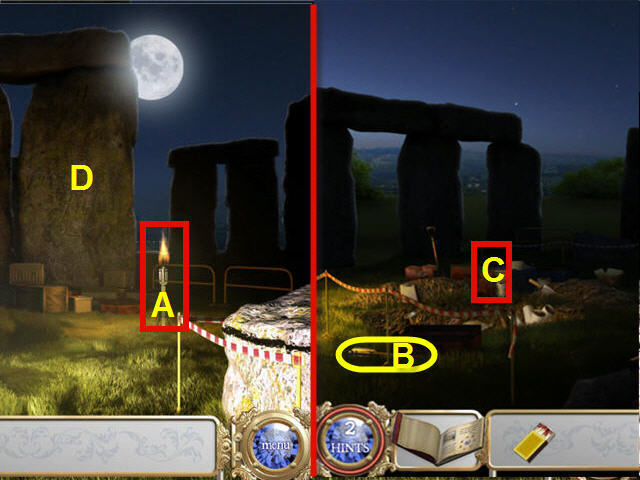
- Use the MATCHES on the torch (A) in the grass.
- Click on the stone (D).
- Head up into the space to the left of the middle stone pillars.
- Pick up the TORCH (B) and place it in the area missing a torch (C).
- Use the MATCHES on the TORCH (C).

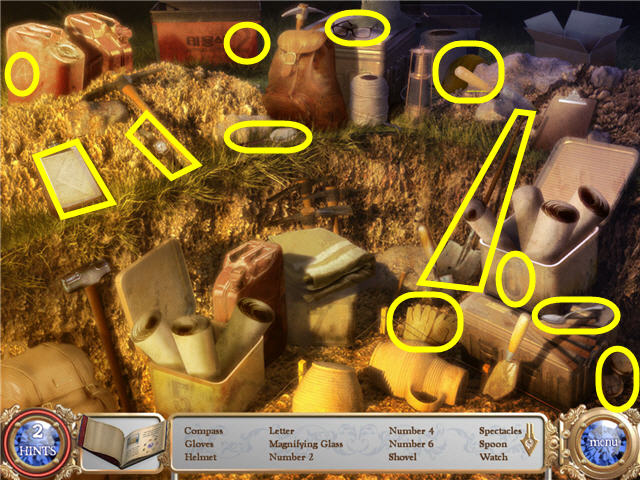
- Click on the pile of items to the left of the torch.
- Find the items listed and get a SHOVEL.

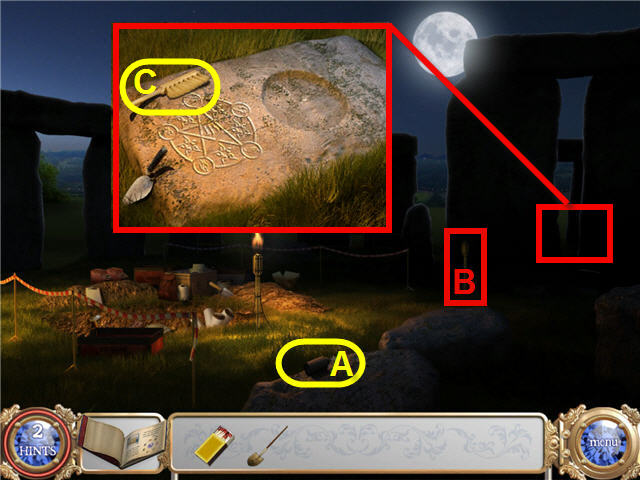
- Pick up the OILCAN (A).
- Use the OILCAN on the torch (B).
- Use the MATCHES on the torch (B).
- Click on the area on the right of the torch.
- Take the BRUSH (C) from the stone slab.
- Head to the left.
- Use the BRUSH on the mossy stone on the right middle pillar.
- Click on the pile of items below the pentagram on the stone.

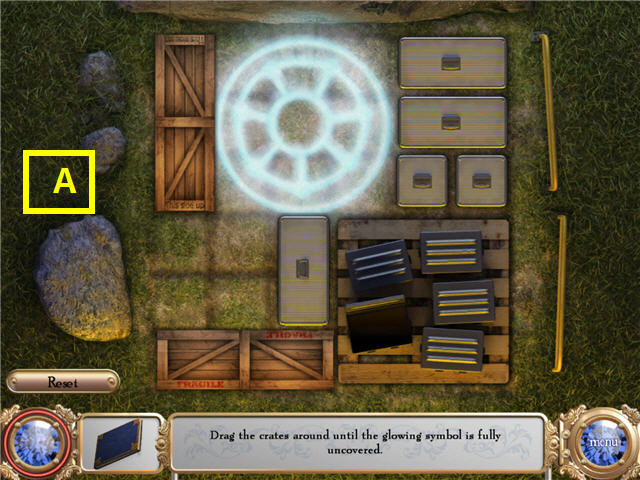
- Slide the crates around the grid so that the symbol is fully exposed and glowing.
- Crates can be moved in any direction. See screenshot for one solution (A).
- Use the SHOVEL on the symbol in the ground and take the DRUID DISK.
- Head back to the area left of the middle pillar.

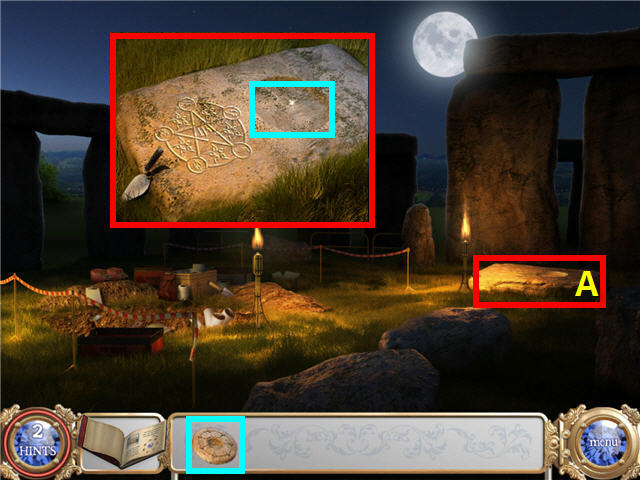
- Click on the stone slab with the pentagram (A) on the right.
- Place the DRUID DISK on the round slot next to the pentagram.
- Click on the DRUID DISK once it is in place.

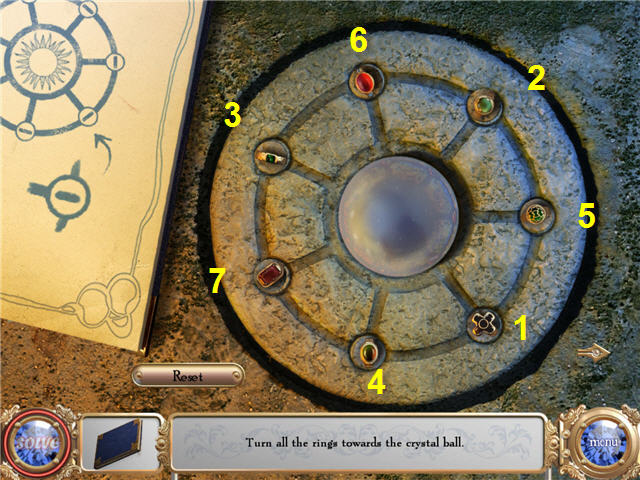
- Turn all the rings toward the crystal ball so that all the beams of light are lit.
- Turning one ring will turn the rings next to it.
- Congratulations! You have completed Time Mysteries: Inheritance.





 Lost Lands: The Four Horsemen Walkthrough, Guide, & Tips
 Mystery Trackers: Four Aces Walkthrough, Guide, & Tips
 The Dracula Files Walkthrough, Guide, & Tips
 Curse of the Ghost Ship Walkthrough, Guide, & Tips
 Haunted Manor: Lord of Mirrors Walkthrough, Guide, & Tips