Mystery Trackers: Four Aces Walkthrough, Guide, & Tips
Mystery Trackers: Four Aces Walkthrough

Welcome to the Mystery Trackers: Four Aces Walkthrough
Save Brightfield from a shocking plot by a dastardly organization!
Whether you use this document as a reference when things get difficult or as a road map to get you from beginning to end, we’re pretty sure you’ll find what you’re looking for here.
This document contains a complete Mystery Trackers: Four Aces game walkthrough featuring annotated screenshots from actual gameplay!
We hope you find this information useful as you play your way through the game. Use the walkthrough menu below to quickly jump to whatever stage of the game you need help with.
Remember to visit the Big Fish Games Forums if you find you need more help. Have fun!
This walkthrough was created by Lucky Smile, and is protected under US Copyright laws. Any unauthorized use, including re-publication in whole or in part, without permission, is strictly prohibited.
General Tips

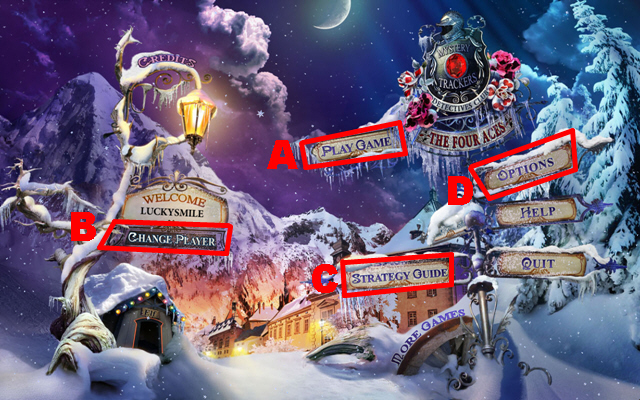
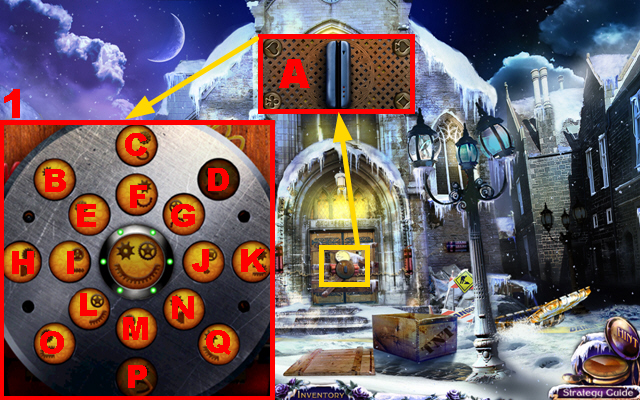
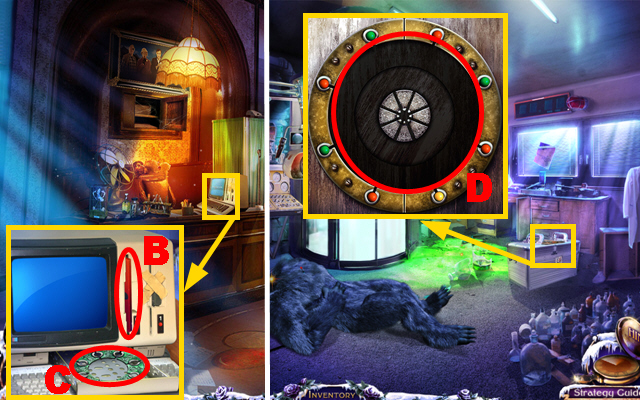
- This is the official guide for Mystery Trackers: Four Aces.
- Press (A) to start playing the game.
- Select change player (B) to edit, delete, or create any profile.
- You can purchse the Strategy Guide (C) here.
- Select options (D) to adjust the sound, the display mode, and the difficulty of the game.
- Hidden Object Scenes will be referred to as HOS throughout the guide.
- You can choose between casual, advanced, hardcore, and detective modes to set the difficulty of the game.
Chapter 1: Entering Brightfield
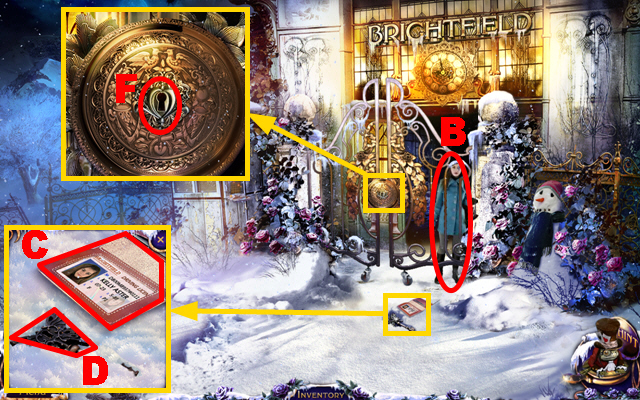
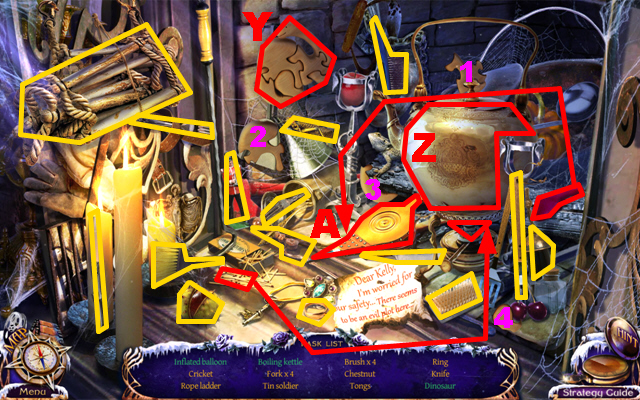
- Talk to the girl (B).
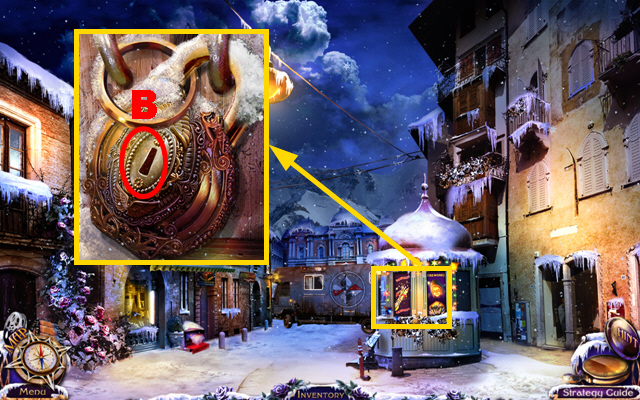
- Zoom into the snow; check the ID (C) and take the GATE KEY (D).
- Zoom into the lock; put the GATE KEY into the lock (F), and turn the key once.
- Try moving forward.
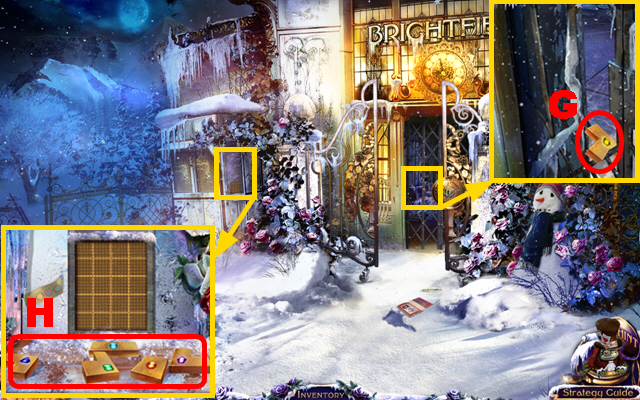
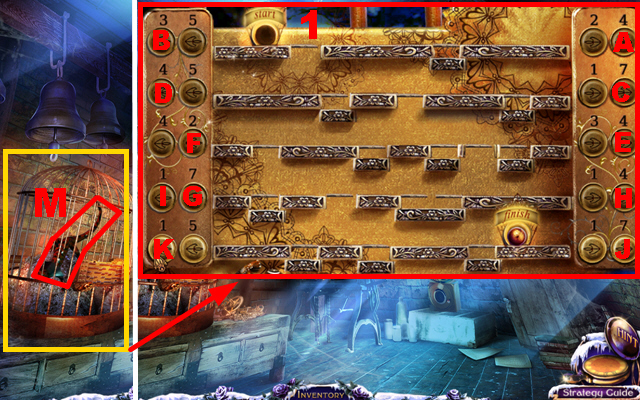
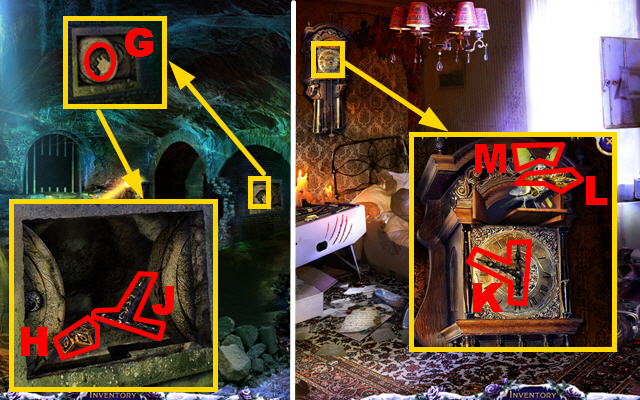
- Zoom into the blocked entrance; take the PUZZLE PIECE (G).
- Zoom into the window; add the PUZZLE PIECE to the board (H).
- Play the mini-game.
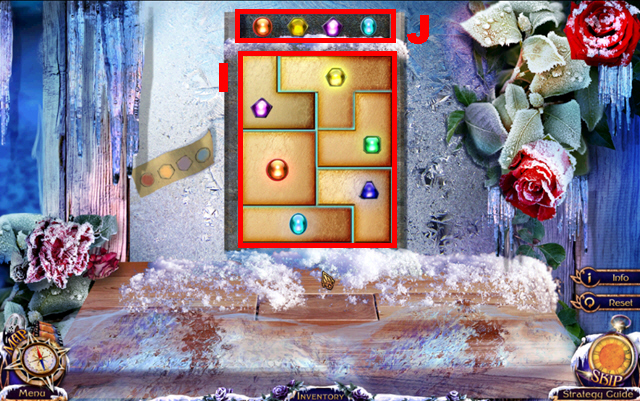
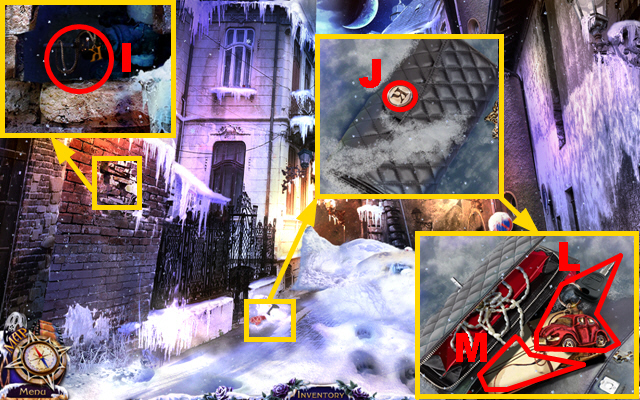
- Drag and move all the puzzle pieces into the panel.
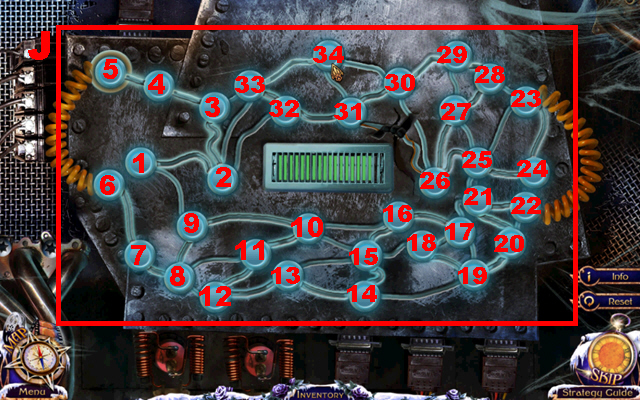
- After the pieces have been correctly placed (I), select the pieces in the indicated sequence (J).
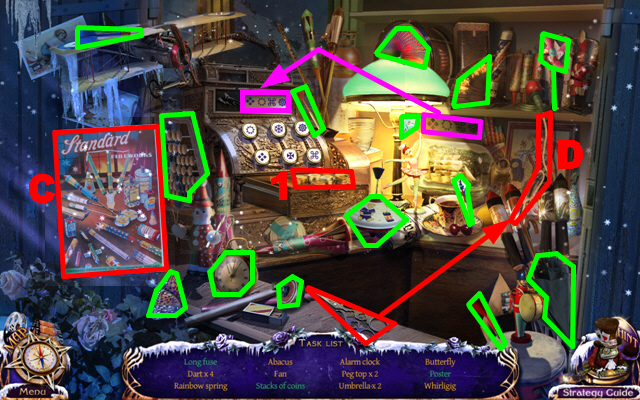
- Play the HOS.
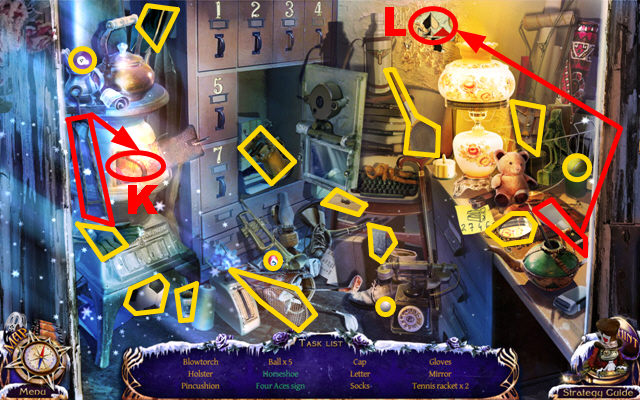
- Open the drawers 2, 7, 4, and 6.
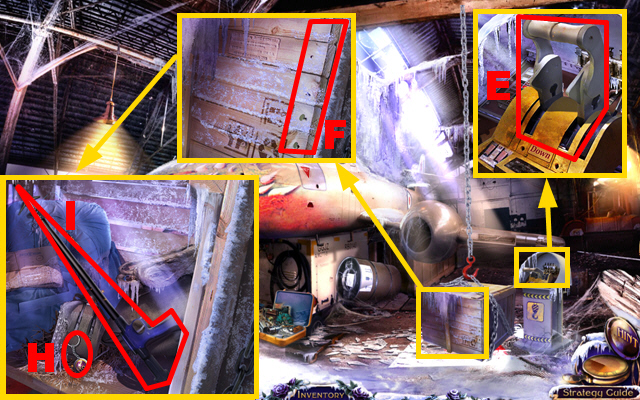
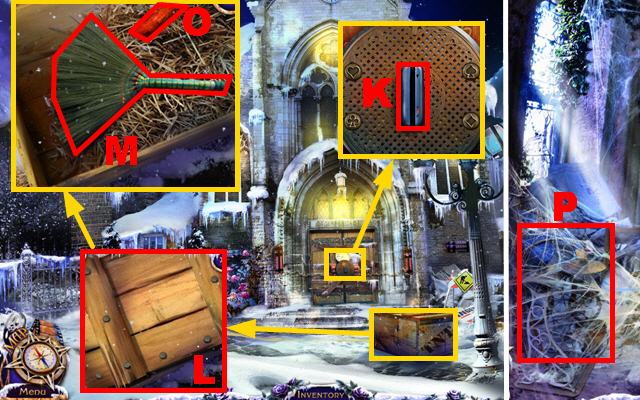
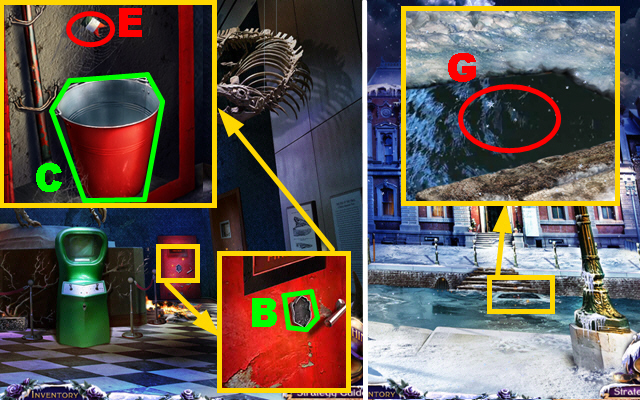
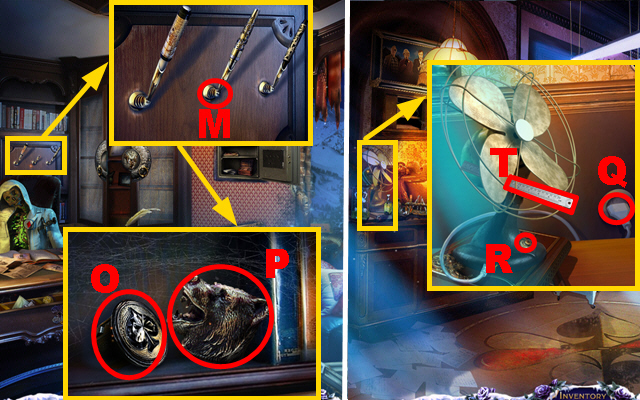
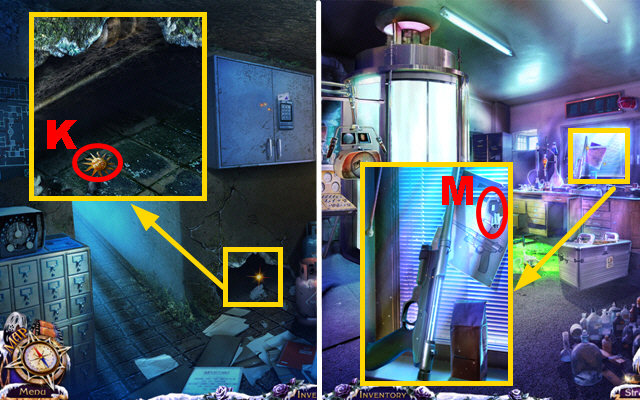
- Use the tongs on the oven to get the horseshoe (K).
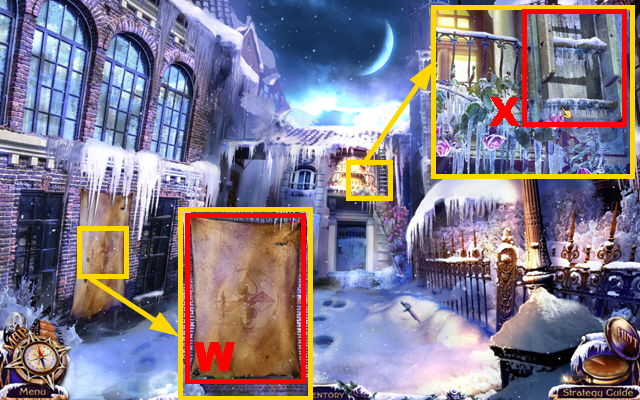
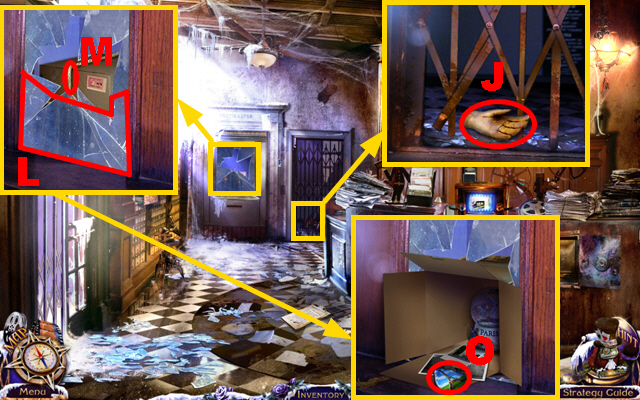
- Take the scraper and remove the wallpaper; take the four aces sign (L).
- The BLOWTORCH will be added to inventory.
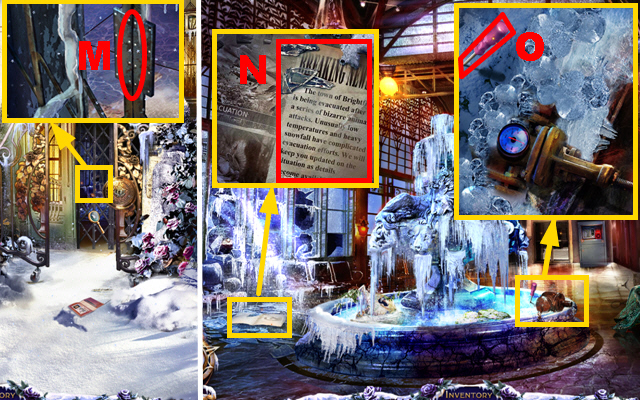
- Zoom into the entrance; use the BLOWTORCH on the blocked door (M).
- Move forward.
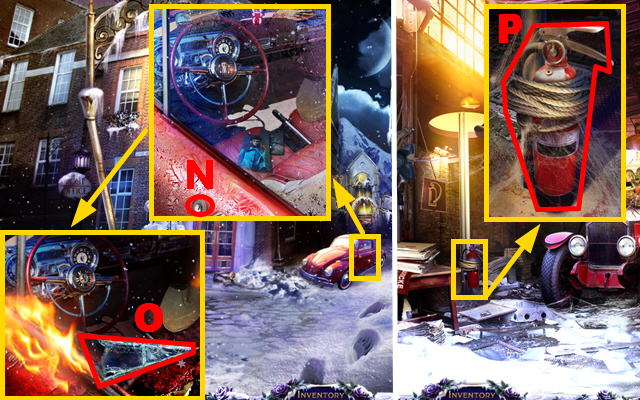
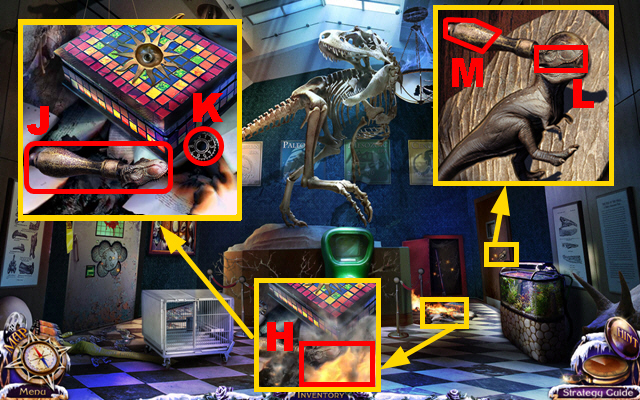
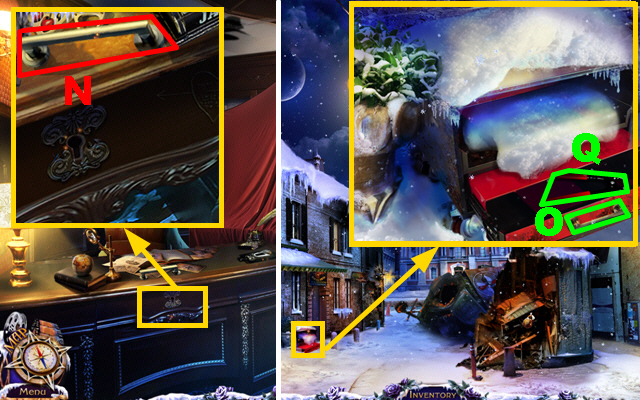
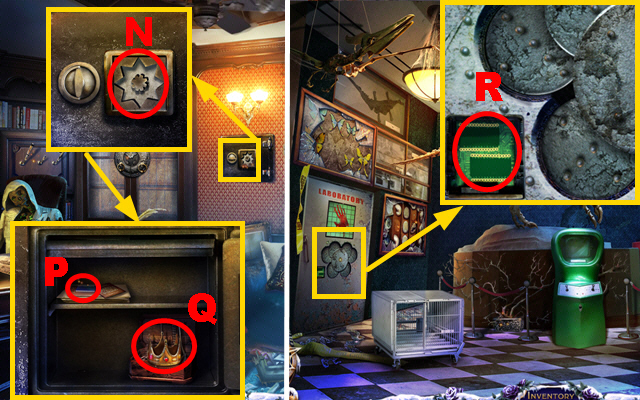
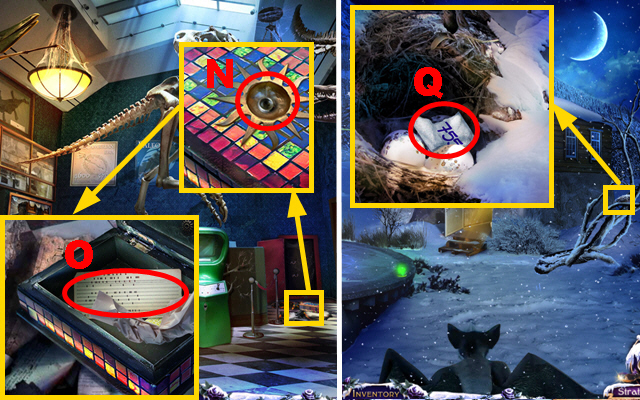
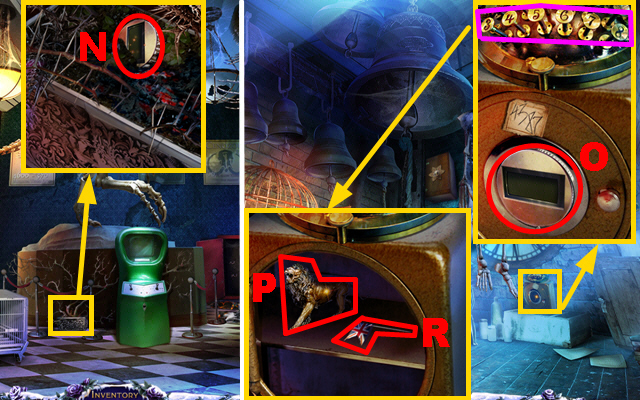
- Zoom into the paper and check the article (N).
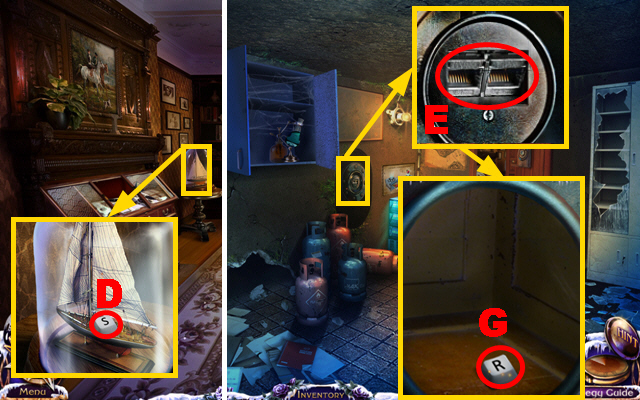
- Zoom into the fountain; take the SCREWDRIVER (O).
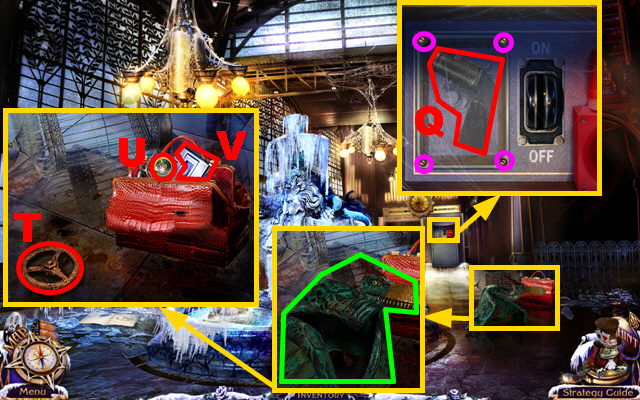
- Try to zoom into the exit door.
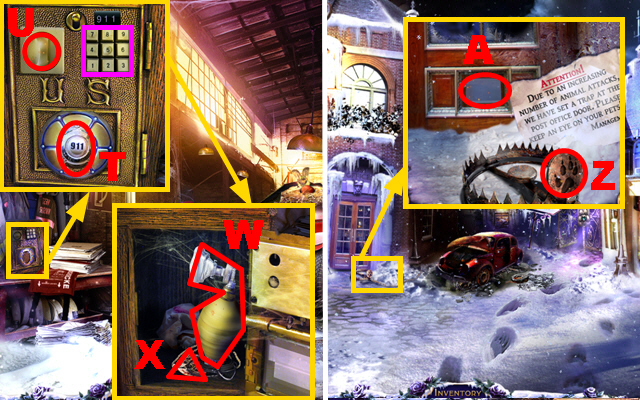
- Zoom into the fire alert panel; use the SCREWDRIVER 4 times on the screws marked in purple.
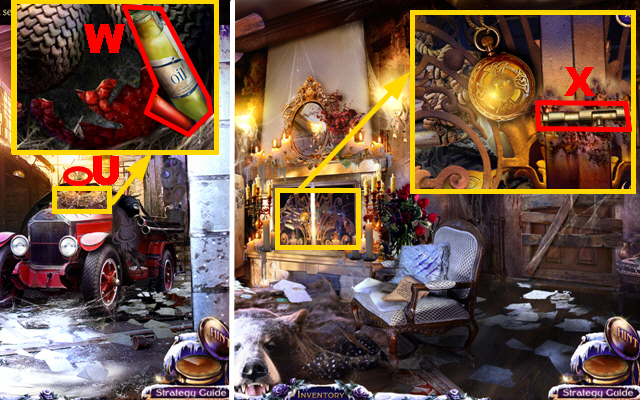
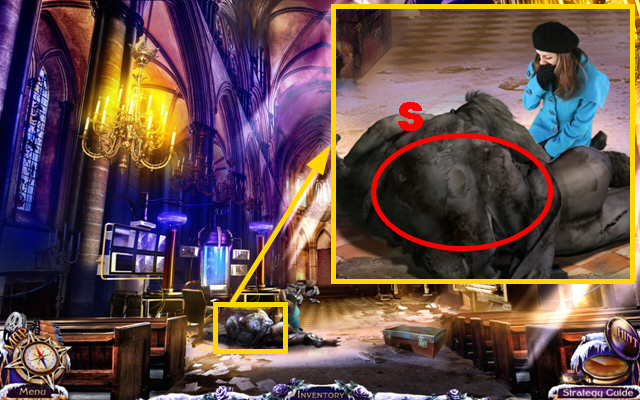
- Take the LOADED FLARE GUN (Q).
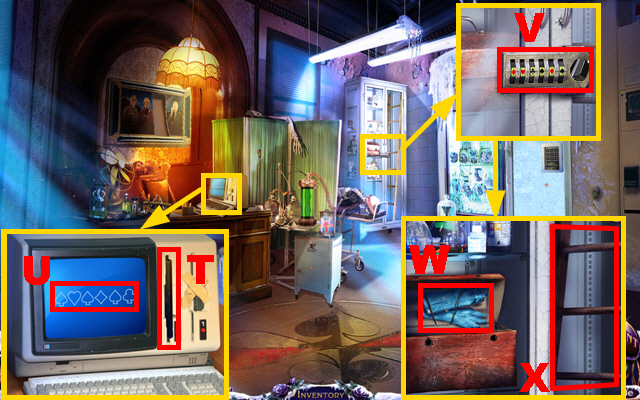
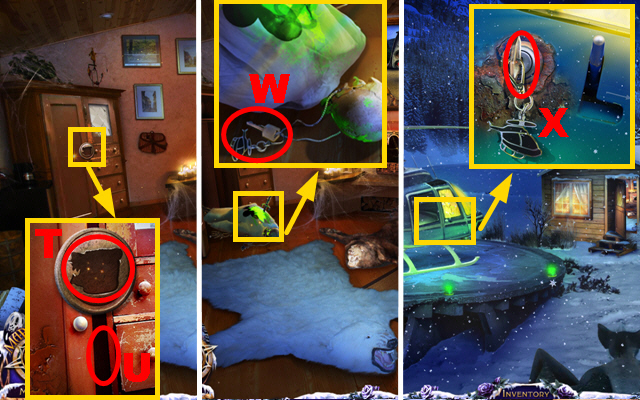
- Zoom into the bag; chase away the creature marked in green with the LOADED FLARE GUN.
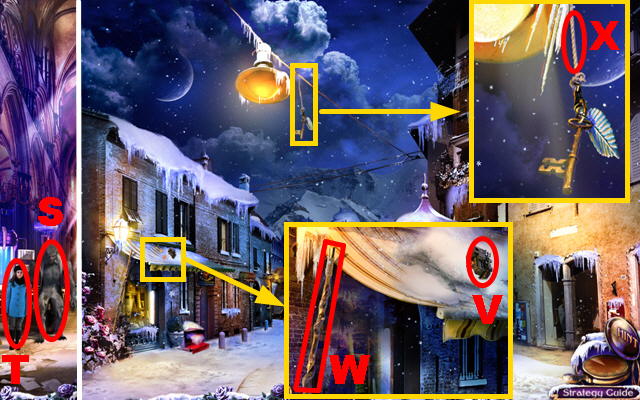
- Zoom into the bag once more; take the VALVE HANDLE (T), and the 1/3 POST OFFICE TRINKET (U).
- Turn on the recorder (V).
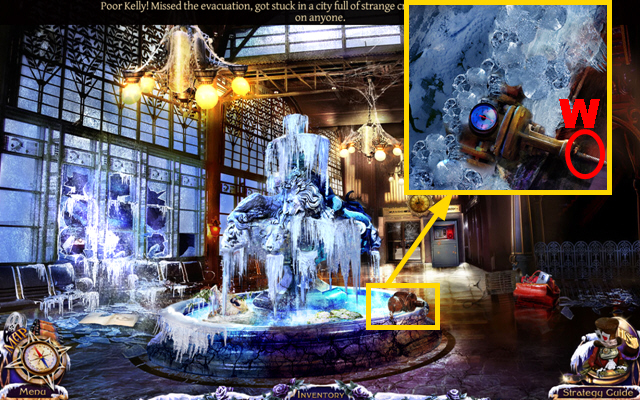
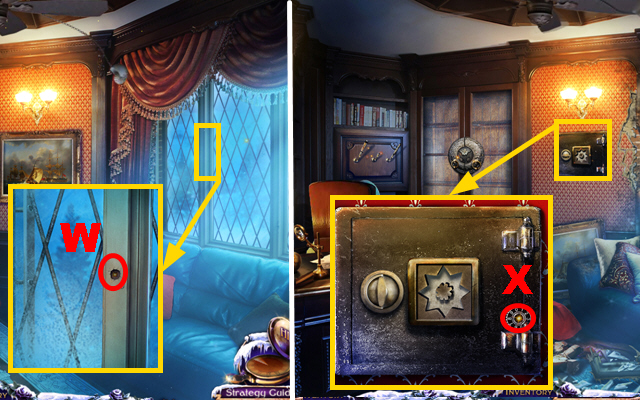
- Zoom into the fountain; put the VALVE HANDLE on the device (W).
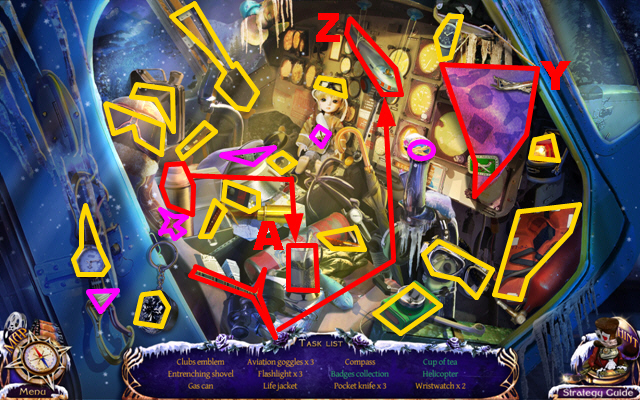
- Play the HOS.
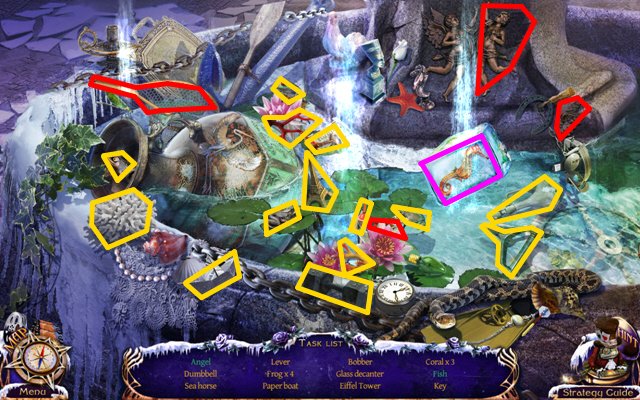
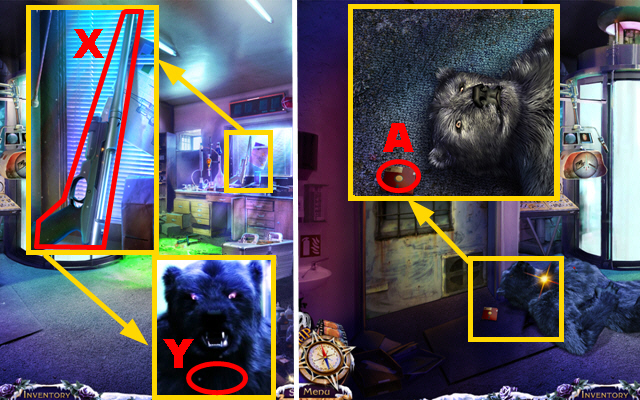
- Rearrange the seahorse pieces marked in purple; take the seahorse.
- Take the wings, put them on the angel, and take the angel (X).
- Take the net and use it on the fish to get the fish.
- The SECURITY PANEL LEVER will be added to inventory.
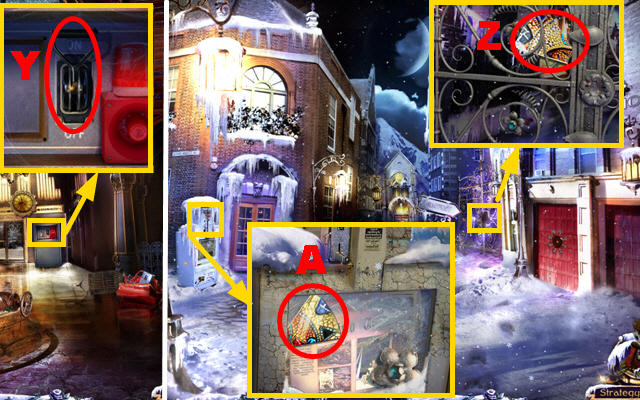
- Zoom into the security panel; put the SECURITY PANEL LEVER in the slot (Y) and pull the lever.
- Move forward.
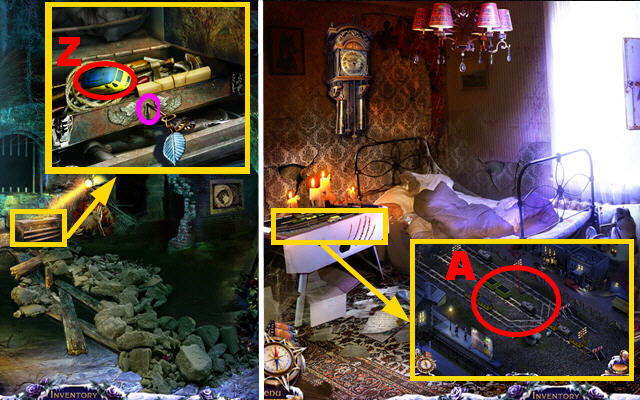
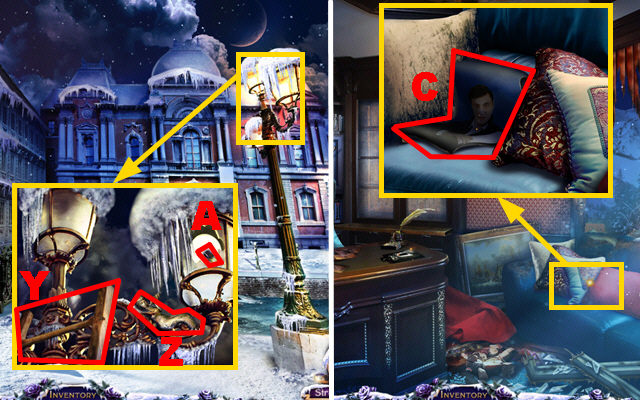
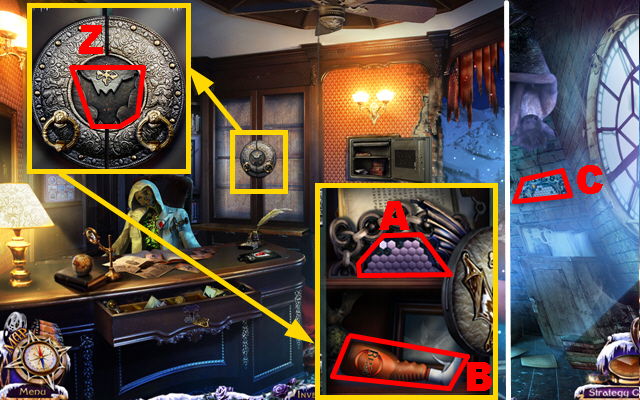
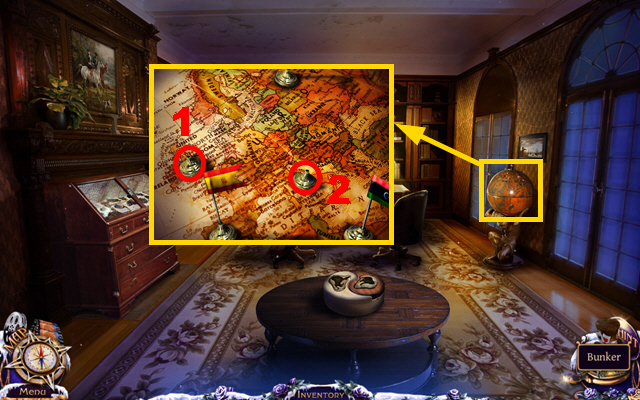
- Zoom into the gate; take the 1/2 PUZZLE PIECE (Z).
- Zoom into the newspaper stand; take the 2/2 PUZZLE PIECE (A).
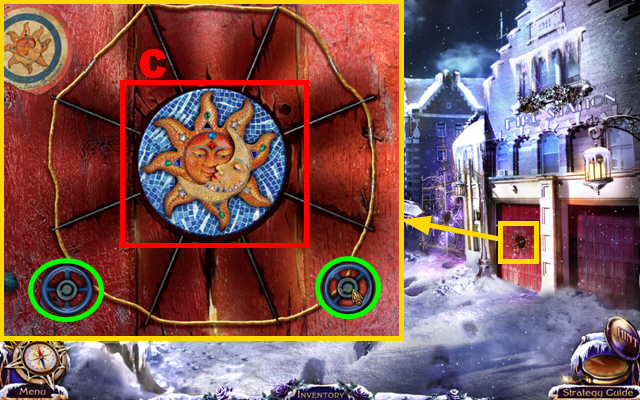
- Zoom into the fire station entrance; add the 2 PUZZLE PIECES to the board.
- Rearrange the picture by moving the pieces towards the center piece.
- Turn the valves marked in green to rotate the pieces.
- The screenshot displays the correct solution (C).
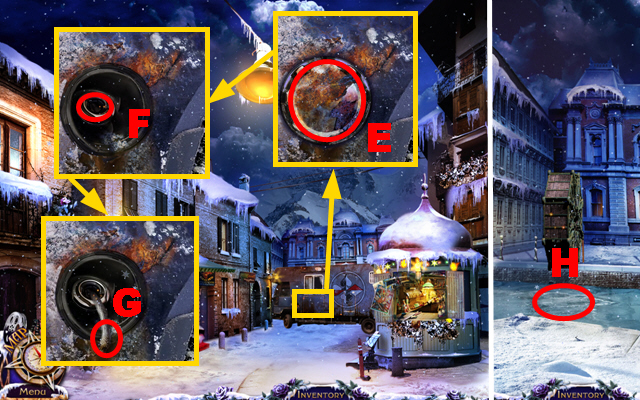
- Turn right.
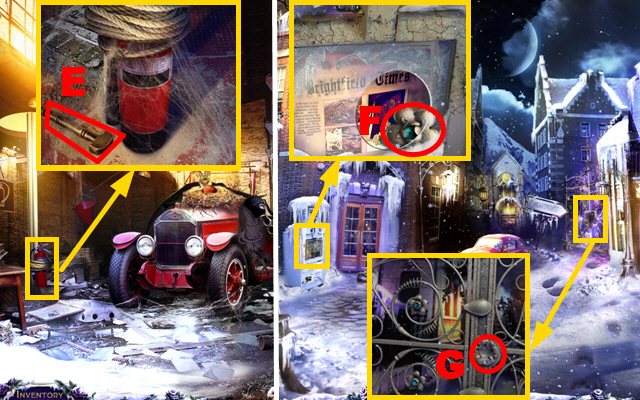
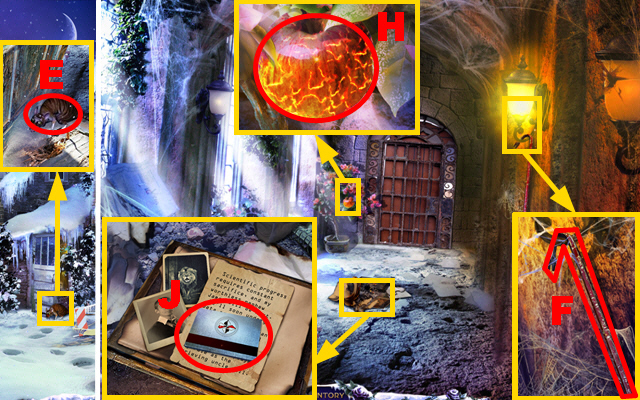
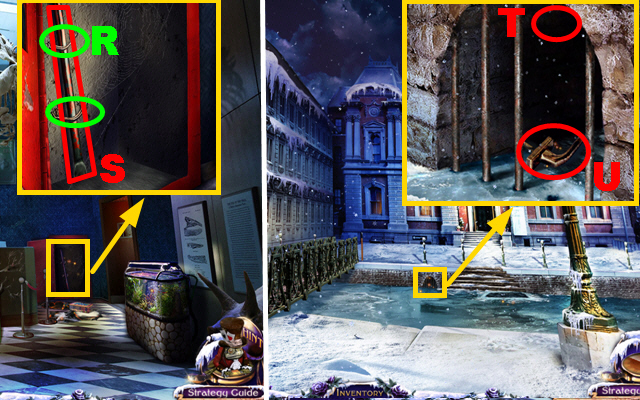
- Zoom into the extinguisher; take the GLASS CUTTER (E).
- Walk down.
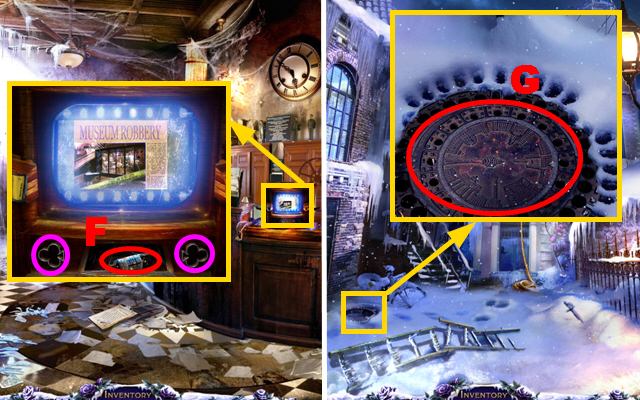
- Zoom into the newspaper stand; cut the glass with the GLASS CUTTER and take the FLOWER MEDALLION (F).
- Zoom into the gate; put the FLOWER MEDALLION into the empty slot (G).
- Go to the side street.
- Zoom into the brick wall and move the brick; take the LETTER K MEDALLION (I).
- Zoom into the snow pile; use ELF on it to remove the snow.
- Put the LETTER K MEDALLION into the bag’s slot (J); take KELLY’S CAR KEY (L) and read the letter (M).
- Walk down.
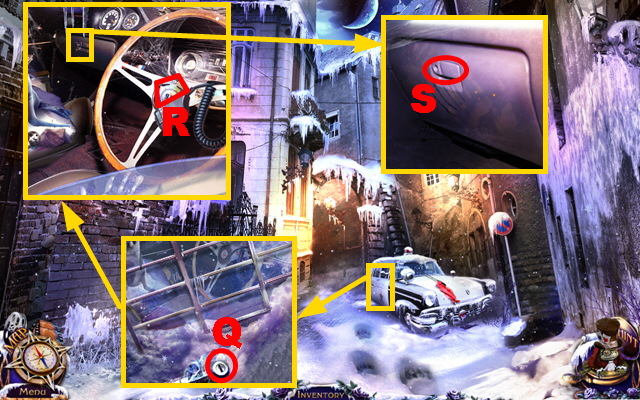
- Zoom into the car; put KELLY’S CAR KEY into the lock (N) and turn the key once.
- Zoom into the car once more; take the GLASS SHARD (O).
- Enter the fire station.
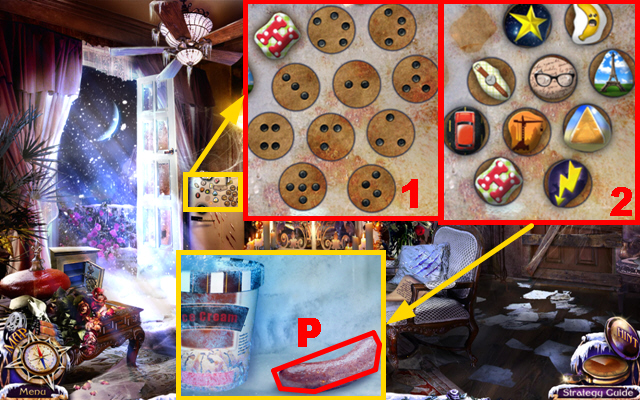
- Zoom into the extinguisher; cut the rope with the GLASS SHARD three times; take the EXTINGUISHER (P).
- Walk down.
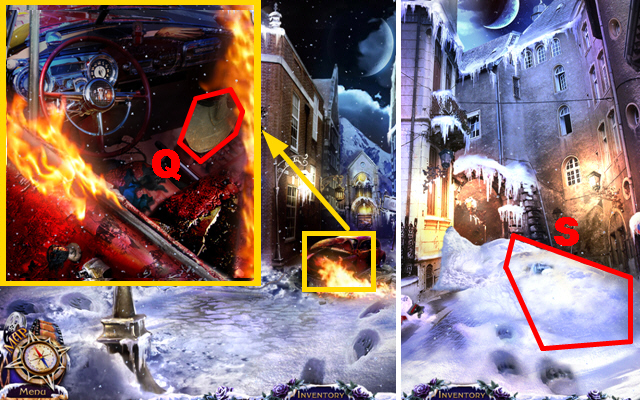
- Zoom into the car; use the EXTINGUISHER to quench the fire; take the SHOVEL (Q).
- Go to the side street.
- Use the SHOVEL on the large snow pile three times (S).
Chapter 2: The Dead End
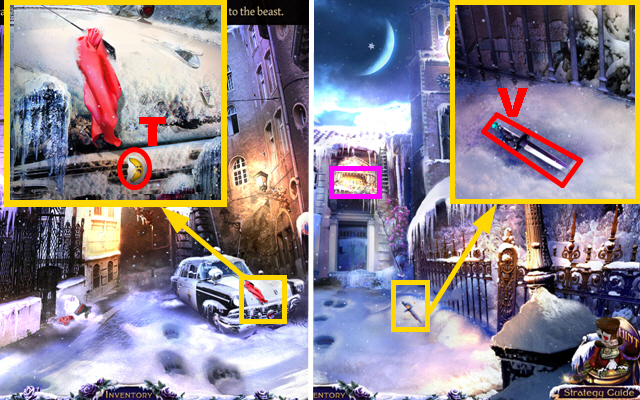
- Zoom into the front of the police car; take the 1/3 FRIDGE MAGNET (T).
- Move forward.
- Zoom into the balcony marked in purple.
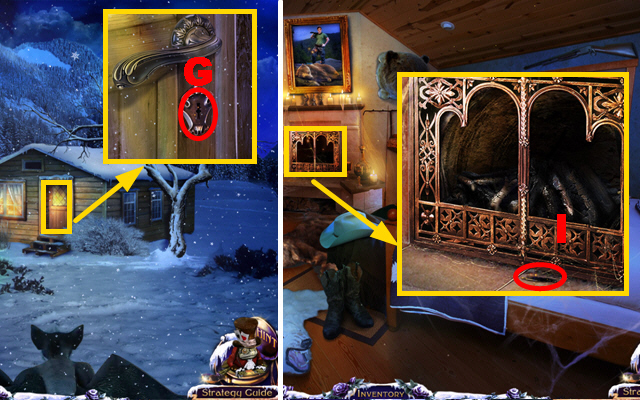
- Zoom into the snow; use ELF on it to remove the snow and then take the DAGGER (V).
- Zoom into the covered window; cut the thick cloth with the DAGGER (W).
- Zoom into the balcony and lower the ladder (X).
- Try to go up the ladder.
- Turn left.
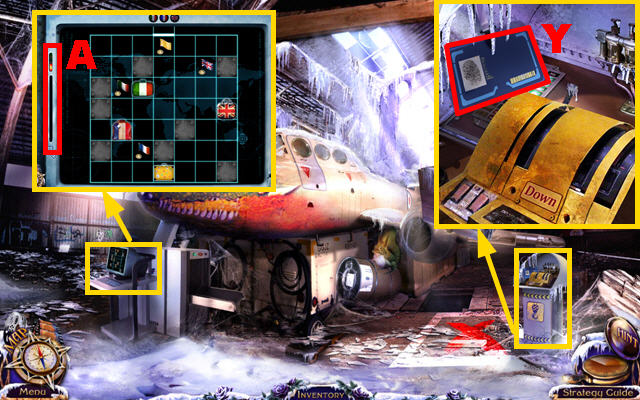
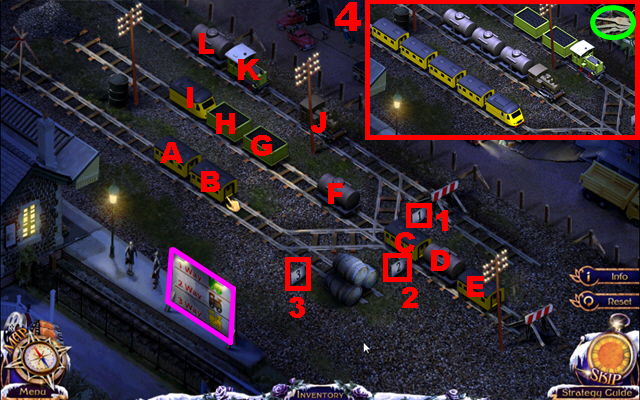
- Zoom into the right control panel; take the ACCESS CARD (Y).
- Zoom into the baggage scanner; put the ACCESS CARD into the appropriate slot (A).
- Play the mini-game.
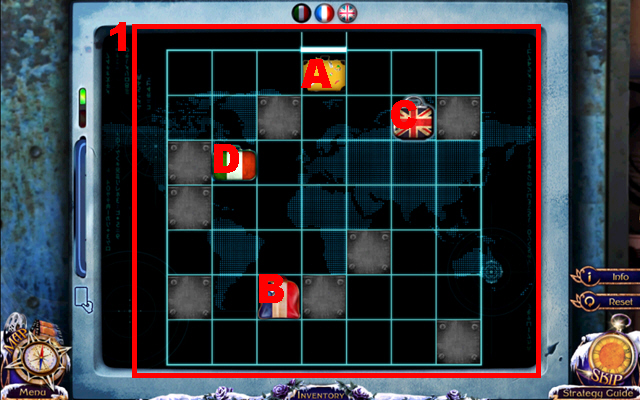
- Move each suitcase into its respective tile.
- Select any suitcase and press on an arrow to move it in that direction.
- To solve this puzzle (1), move the suitcases (A – D) in the following order: D-left, D-up, D-right, B-up, B-right, C-left, C-up, C-right, A-right, A-up, A-left, A-up, C-down, C-left, and C-down.
- B-left, B-down, B-left, B-down, B-right, C-right, C-up, C-left, D-left, C-down, C-left, C-down, C-right, C-up, D-left, D-down, D-right, D-up, and D-left.
- Play the HOS.
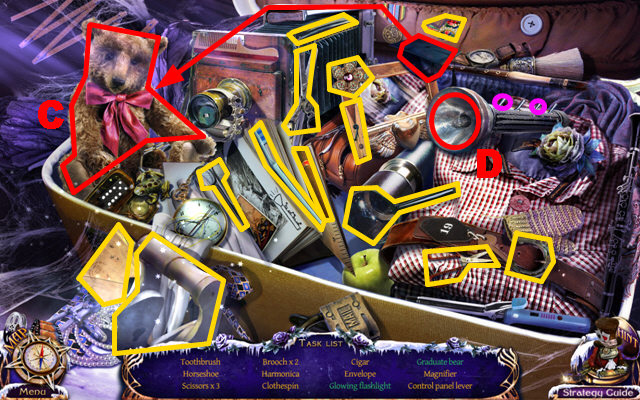
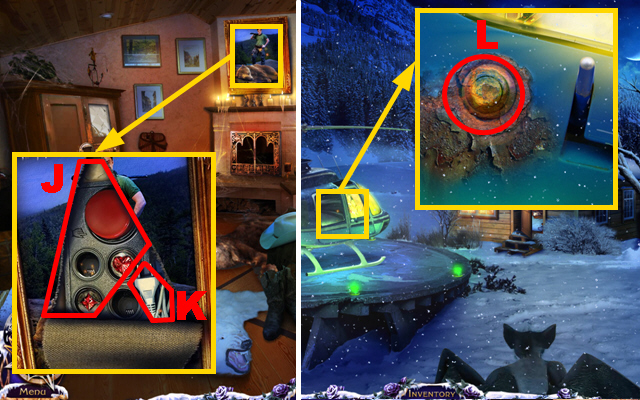
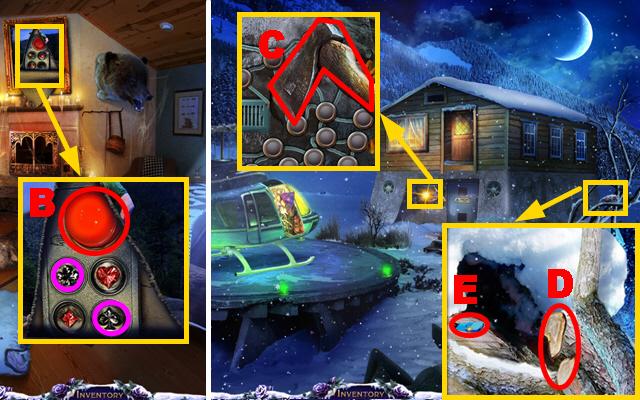
- Take the hat, put it onto the bear, and take the graduate bear (C).
- Press the switches marked in purple and take the glowing flashlight (D).
- The CONTROL PANEL LEVER will be added to inventory.
- Zoom into the control panel; put the CONTROL PANEL LEVER into the slot (E).
- Pull the lever.
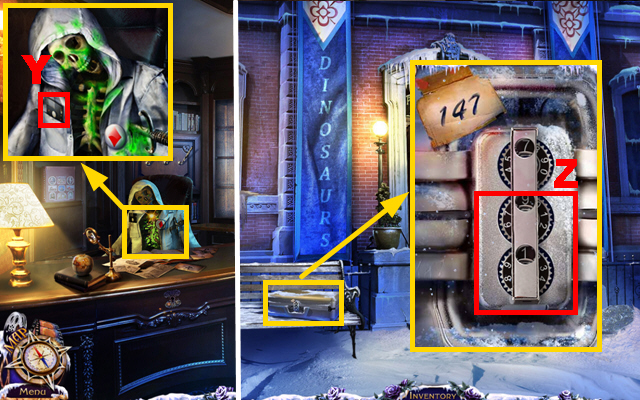
- Zoom into the box; use the DAGGER to open it (F).
- Take the 2/3 POST OFFICE TRINKET (H) and the LOADED SPEAR GUN (I).
- Walk down.
- Use the LOADED SPEAR GUN on the balcony (J).
- Climb up the rope to enter the lair.
- Zoom anywhere to activate a cutscene.
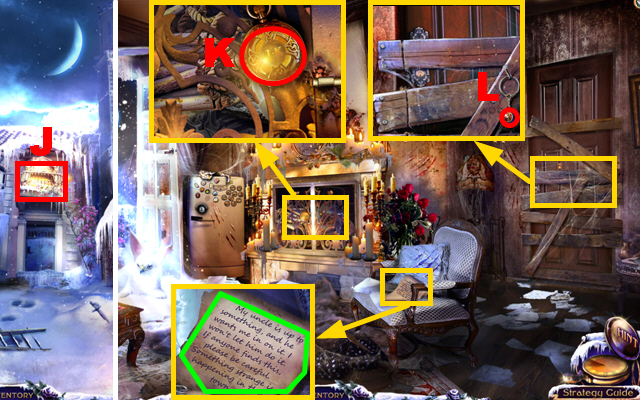
- Zoom into the chair and read the letter marked in green.
- Zoom into the fireplace; open the medallion (K) to activate a cutscene.
- Zoom into the blocked door; take the 3/3 POST OFFICE TRINKET (L).
- Turn left.
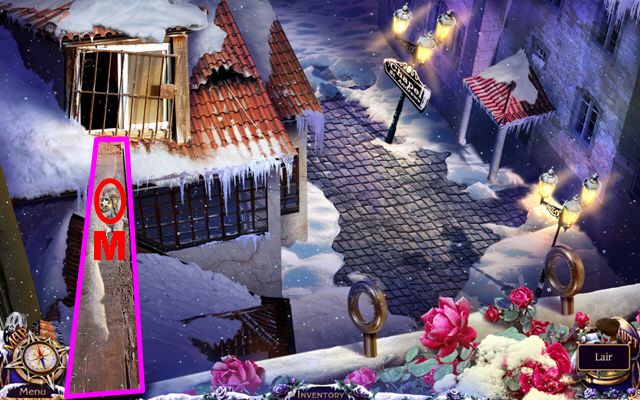
- Use ELF on the wooden board marked in purple; take the POLICE CAR KEY (M).
- Go to the side street.
- Zoom into the back of the police car; put the POLICE CAR KEY into the lock (Q), and turn the key once.
- Turn right.
- Take the POLICE BADGE (R) to activate a cutscene.
- Zoom into the compartment; open it(S).
- Go to the fire station.
- Zoom into the safe; put the POLICE BADGE into the slot (T) and enter the code: 9-1-1 (purple).
- Turn the switch (U) to open the safe.
- Take the OXYGEN MASK (W) and the WOLF PAW MEDALLION (X).
- Walk down.
- Zoom into the entrance of the post office and use the WOLF PAW MEDALLION to disarm the trap (Z).
- Send ELF through the doggie door (A).
- Go through the door to enter the post office.
Chapter 3: The Post Office
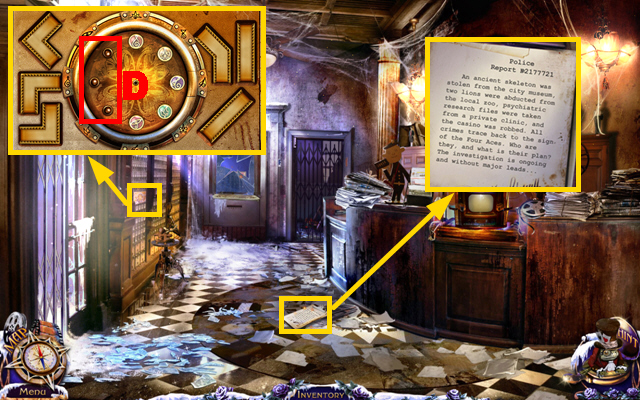
- Zoom into the note on the floor and read it.
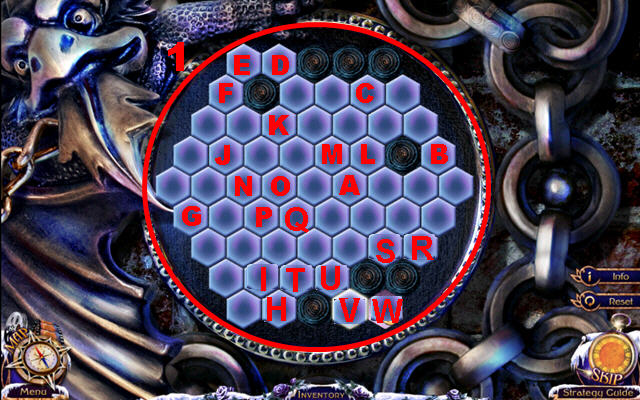
- Zoom into the left wall; add the 3 POST OFFICE TRINKETS to the board (D).
- Play the mini-game.
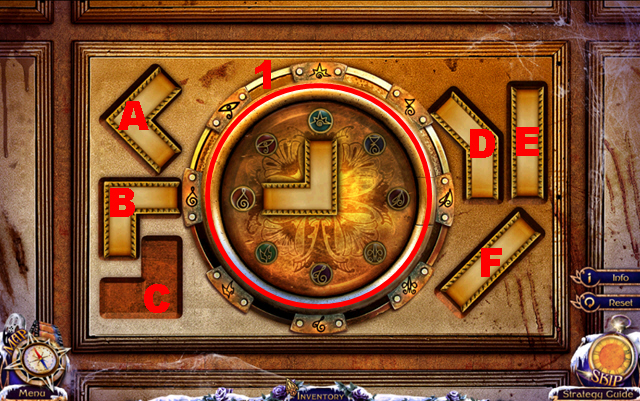
- Each symbol button has to be placed correctly.
- Swap buttons by setting stripes (A-F) into the center.
- To solve this puzzle (1), set the stripes in the following order: D, A, E, F, B, C, B, E, B, and C.
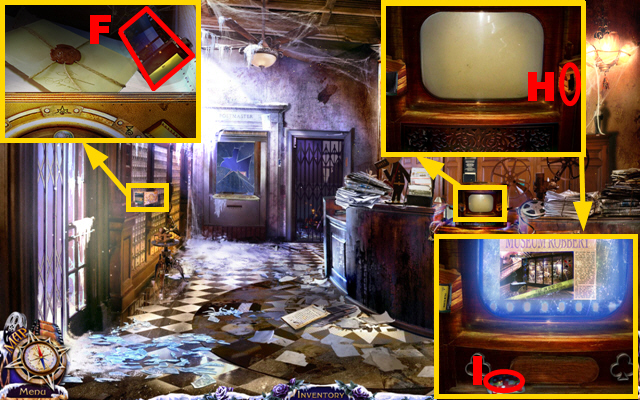
- Zoom into the left wall; take the MICROFILM (F).
- Zoom into the machine and put the MICROFILM into the machine (H).
- Watch the film and take the 2/3 FRIDGE MAGNET (I).
- Zoom into the door and send ELF through the opening; take the LEATHER GLOVE (J).
- Zoom into the window; use the LEATHER GLOVE 3 times on the shards to remove them (L) and then use the DAGGER to cut the rope (M).
- Open the box; take the 3/3 FRIDGE MAGNET (O).
- Go to the lair.
- Zoom into the refrigerator; add the 3 FRIDGE MAGNETS to it and play the mini-game.
- Match the magnets to their correct holders. The holders can be rotated by pressing on them.
- Rotate the holders into their correct positions (1).
- To solve this puzzle, put each magnet into the correct holder (2).
- Take the TASTY SAUSAGE (P).
- Go to the side street.
- Turn right to enter the police car.
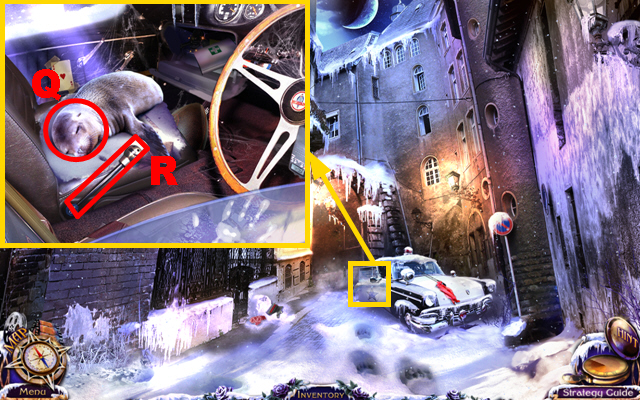
- Give the TASTY SAUSAGE to the seal (Q).
- Push the lever (R).
- Play the HOS.
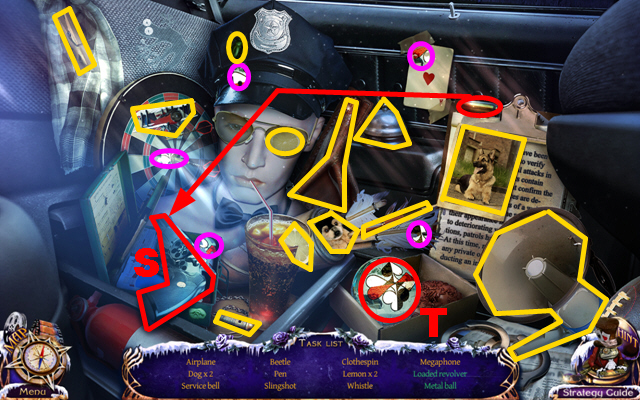
- Put the bullet into the revolver and take the loaded revolver (S).
- Take the five puzzle pieces marked in purple, put them onto the metal ball, and take the metal ball (T).
- The MEGAPHONE will be added to inventory.
- Go to the fire station.
- Use the MEGAPHONE to chase away the large bat (U).
- Zoom into the nest; take the OIL (W). The UNLOADED FLARE GUN will be reloaded automatically.
- Go to the lair.
- Zoom into the fireplace; use the OIL on the hinges (X).
- Play the HOS.
- Take the dinosaur parts 1 – 4 and put them on the dinosaur; take the dinosaur (Y).
- Take a match, use it on the burner, and take the boiling kettle (Z).
- Take the flat balloon, connect it to the pump, press the pump (A), and take the inflated balloon.
- The ROPE LADDER will be added to inventory.
- Turn left.
- Put the ROPE LADDER onto the holders (B).
- Move forward.
- Zoom into the beast to activate a cutscene.
- Use the LOADED FLARE GUN to chase away the beast (C).
- Zoom into Kelly; put the OXYGEN MASK on her face (D); press the pump three times to activate a cutscene.
- Zoom into the chapel’s left door; use ELF to scare away the big rat (E).
- Enter the chapel corridor.
- Zoom into the hooded man to activate a cutscene.
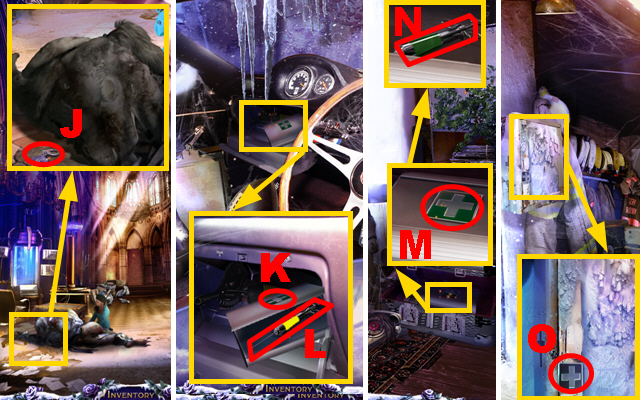
- Zoom into the lantern; take the CROWBAR (F).
- Zoom into the flower; take the FIRE APPLE (H).
- Zoom into the floor; remove the paper and open the case.
- Take the ACCESS CARD (J) and read the note.
- Walk down.
- Zoom into the chapel door to activate a cutscene.
- Zoom into the chapel door; put the ACCESS CARD into the slot (K).
- Zoom into the dynamite box and open it with the CROWBAR (L); take the DUSTER (M), and the DYNAMITE (O).
- Enter the chapel corridor.
- Use the DUSTER on the cobwebs three times to remove them (P).
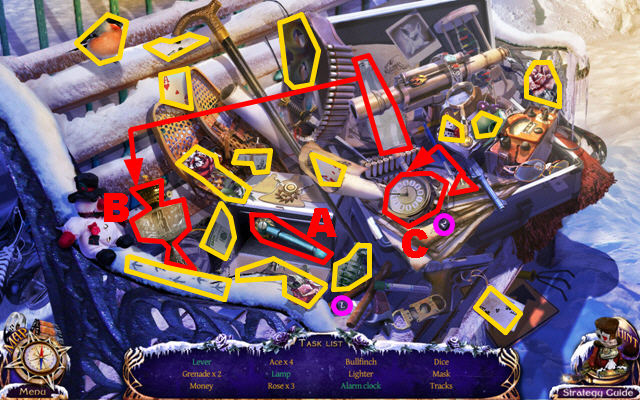
- Play the HOS.
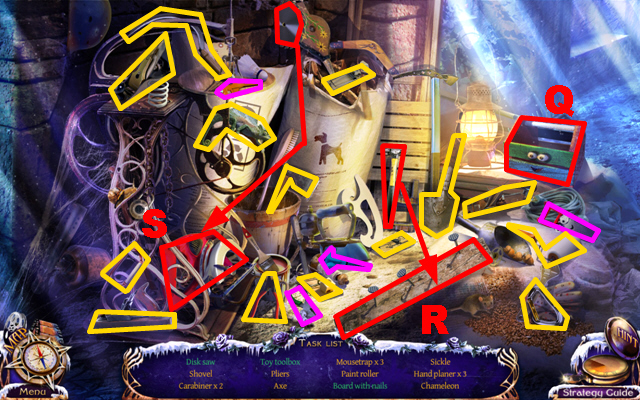
- Collect the four tools marked in purple, put them into the toolbox, and take the toy toolbox (Q).
- Take the hammer, use it on the board four times, and take the board with nails (R).
- Take the disk, put it on the saw, and take the disk saw (S).
- The CIRCULAR SAW will be added to inventory.
- Go to the lair.

- Zoom into the blocked door; use the CIRCULAR DISK to saw through the boards (T).
- Move forward.
- Zoom into the bed; send ELF under the bed; take the 1/3 TRANSISTOR (U).
- Zoom into the case; put the ACCESS CARD (W) into the slot and take the FOUR ACES KEY (Y).
- Go to the chapel.
- Zoom into the chapel’s entrance; put the FOUR ACES KEY into the lock (A).
- Play the mini-game.
- Collect two pieces that match the center piece when combined six times.
- To solve this puzzle (1), select the pieces in the following pairs: D+M, D+J, F+D, O+J, P+I, and P+D.
- Enter the chapel.
Chapter 4: The Chapel
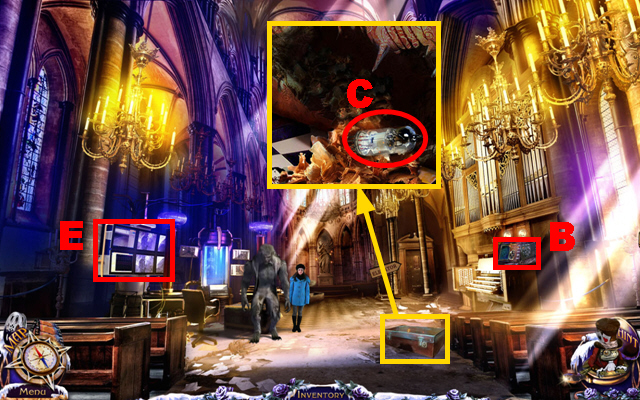
- Zoom into the radio (B) to activate a cutscene.
- Zoom into the case; use ELF in the hole to recover an item; take the 2/3 TRANSISTOR (C).
- Zoom into the device (E) to activate another cutscene.
- Go to the post office.
- Zoom into the machine; put the FOUR ACES KEY into the lock marked in purple and take the 3/3 TRANSISTOR (F).
- Go to the dead end.
- Zoom into the sewer cover; cut open the lid with the CIRCULAR SAW (G).
- Go to the chapel.
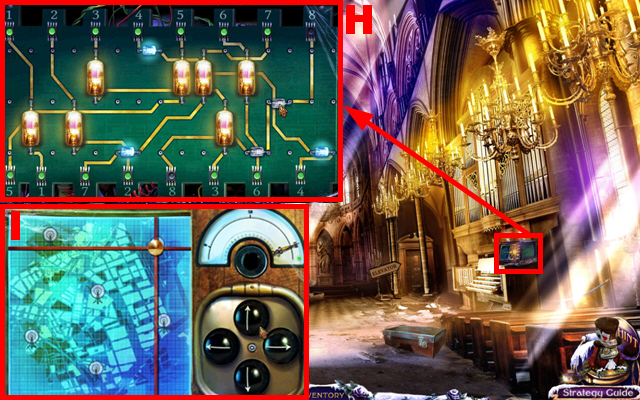
- Zoom into the radio; remove the lid, add the 3 TRANSISTORS to the radio, and play the mini-game.
- Move the transistors to close electric chains.
- The screenshot displays the correct solution (H).
- Search the correct radio station by pressing on the black arrow buttons.
- The screenshot displays the position of the correct radio station (I).
- Zoom into the beast; take the MAGNETIC CROSS-SHAPED KEY (J).
- Go to the side street.
- Enter the police car.
- Zoom into the compartment; put the MAGNETIC CROSS-SHAPED KEY into the lock (K) and take the 1/3 MEDICINE (L).
- Go to the bedroom.
- Zoom into the case; put the MAGNETIC CROSS-SHAPED KEY into the lock (M) and take the 2/3 MEDICINE (N).
- Go to the fire station.
- Zoom into the cabinet; put the MAGNETIC CROSS-SHAPED KEY into the lock (O).
- Play the HOS.
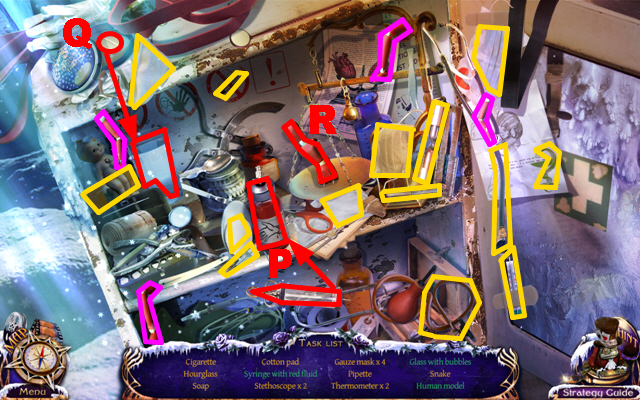
- Dip the syringe into the vial; take the syringe with red fluid (P).
- Put the pill into the glass; take the glass with bubbles (Q).
- Collect four parts of the human body marked in purple, put them on the mannequin, and take the human model (R).
- The 3/3 MEDICINE will be added to inventory.
- Go to the chapel.
- Zoom into the beast; use the 3 MEDICINES on the beast to heal it (S).
- Play the HOS.
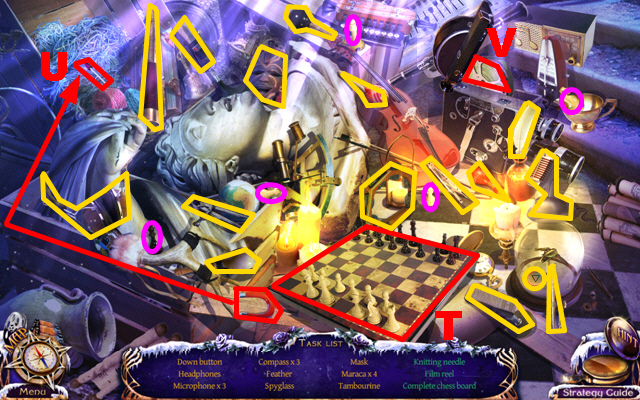
- Collect five chess pieces marked in purple, put them onto the chess board, and collect the complete chess board (T).
- Take the magnet, use it on the yarn, and take the knitting needle (U).
- Open the projector and take the reel film (V).
- The DOWN BUTTON will be added to inventory.
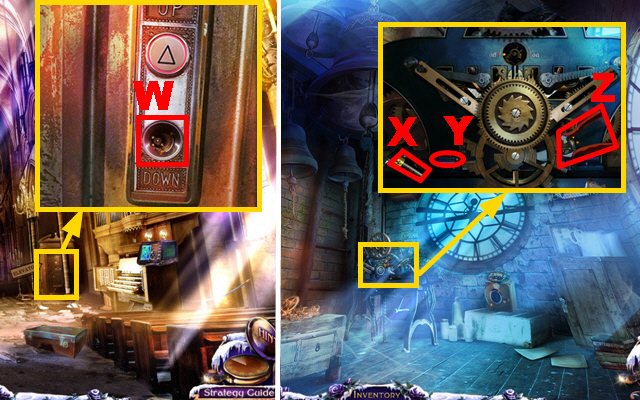
- Zoom into the elevator panel and put the DOWN BUTTON into the slot (W).
- Press the down button.
- Move forward.
- Zoom into the safe; press the plates in the sequence (1-6) and take 50 chips (A).
- Zoom into the machine; take the 1/4 BATTERY (X), the 1/2 ELECTRONIC CHIP (Y), and the PRUNING SHEARS (Z).
- Go to the bedroom.
- Zoom into the cabinet; use the PRUNING SHEARS on the branches three times to remove them (A); open the cabinet.
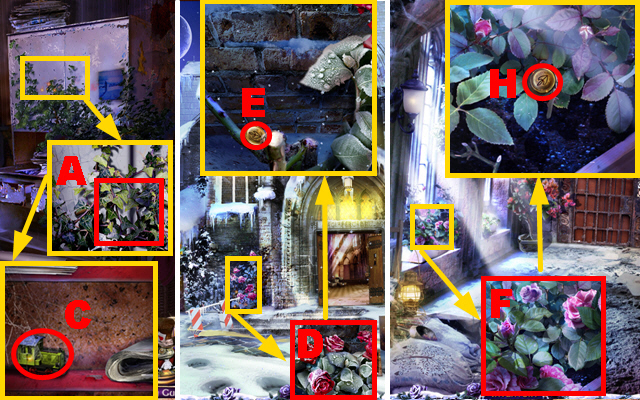
- Take the 1/3 TOY LOCOMOTIVE (C).
- Go to the front of the chapel.
- Zoom into the roses; use the PRUNING SHEARS on the roses three times to remove them (D) and take the 1/3 GOLD LOCK BUTTON (E).
- Go to the chapel corridor.
- Zoom into the roses; use the PRUNING SHEARS on the roses three times (F).
- Take the 2/3 GOLD LOCK BUTTON (H).
- Go to the sewers.
Chapter 5: The Sewers

- Zoom into the barrel; use the PRUNING SHEARS on the roses three times (I); take the 3/3 GOLD LOCK BUTTON (K).
- Put the DYNAMITE BLOCK onto the wooden board (L).
- Go to the belfry.
- Zoom into the cage; add the 3 GOLD LOCK BUTTONS to the board and play the mini-game.
- Press the buttons to direct the ball across five levels into the finish hole.
- Press the buttons in this order (A-K), to solve this puzzle (1).
- Give the FIRE APPLE to the fire salamander (M); take the FIRE SALAMANDER.
- Go to the sewers.

- Use the FIRE SALAMANDER on the dynamite to set off an explosion (N).
- Zoom into the skeleton; take the SLEDGEHAMMER (O).
- Zoom into the bars; use the CIRCULAR SAW on the metal bars (P); take 1 chip the WRENCH (R).
- Go to the chapel.
- Give the SLEDGEHAMMER to the beast (S).
- Talk to Kelly (T) and the VIDEOPHONE will be added to inventory.
- Go forward to the shopping street.
- Touch anywhere to activate a cutscene.
- Zoom into the kiosk roof; send ELF onto the roof; take the 2/3 TOY LOCOMOTIVE (V).
- Combine the PRUNING SHEARS with the stick (W) and take the LONG PRUNING SHEARS.
- Zoom into the lantern; cut the rope (X) with the LONG PRUNING SHEARS to obtain the LEAFKEY.
- Go to the sewers.
- Zoom into the chest; put the LEAFKEY into the lock marked in purple and turn the key once.
- Take the 3/3 TOY LOCOMOTIVE (Z).
- Go to the bedroom.
- Zoom into the toy machine; add the 3 TOY LOCOMOTIVES to the rails (A).
- Play the mini-game.
- Rearrange the cars and locomotives according to the sign marked in purple.
- Direct the cars and locomotives (A-L) to the different spots on the rails (1-3) to solve this puzzle (4).
- Move the cars in the following order: A – 2 back, B – 2 back, C – 3 back, D – rail 1, E – rail 3, F – 3 forward, G – 4 forward, J – 1 back, F – rail 1, H – 4 forward, G – rail 1, I – 5 forward, and I – rail 3.
- H – 5 back, D – 5 back, I – 3 forward, D – 4 forward, H – 4 forward, H – rail 3, D – 7 back, G – 2 forward, F – 2 forward, F – 5 back, J – 3 forward, K – 3 forward, and J – 4 back.
- K – 1 forward, K – rail 2, L – 4 forward, H – 3 back, L – 2 forward, G – 1 forward, G – rail 1, H – 2 forward, H – rail 1, K – 3 forward, K – rail 1, D – rail 3, J – 5 forward, D – 1 forward, D – 4 back, J – 4 back, and I – rail 3.
- Take the LOCKPICK marked in green.
- Go to the shopping street.
- Zoom into the fireworks shop; put the LOCKPICK into the lock (B).
- Play the HOS.
- Press the symbol buttons on the register in the same sequence as the pattern marked in purple; take the stacks of coins (1).
- Rearrange the poster by swapping its pieces; take the poster (C).
- Use the scissors to cut the rope; take the long fuse (D).
- The LONG FUSE will be added to inventory.
- Zoom into the truck; use the WRENCH on the lid (E) to remove it and put the LONG FUSE into the gas tank (F).
- Use the FIRE SALAMANDER to light up the fuse (G).
- Move forward.
- Zoom into the guy to activate a cutscene.
- Use the VIDEOPHONE on the river (H) to call James for help.
- Move forward.
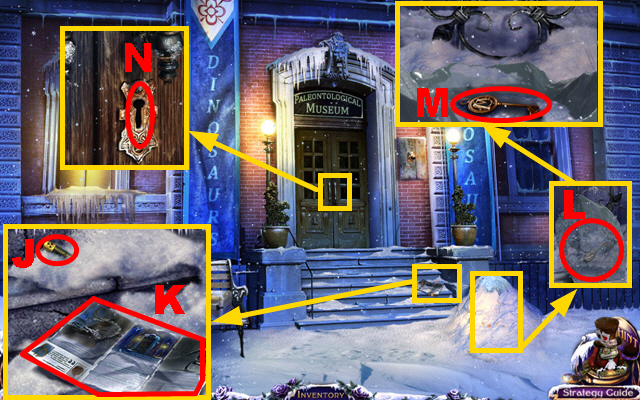
- Zoom into the brochure; take the 2/4 BATTERY (J) and read the brochure (K).
- Zoom into the snow pile; use ELF on it to remove the snow and then use the FIRE SALAMANDER to melt the block of ice (L).
- Take the MUSEUM KEY (M).
- Zoom into the door; put the MUSEUM KEY into the lock (N) and turn the key once.
- Enter the museum.
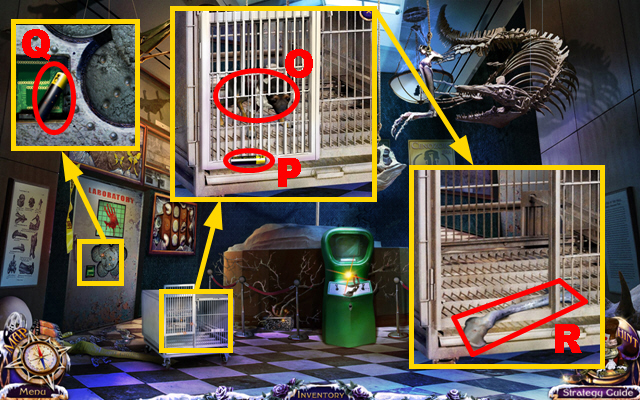
- Zoom into the guy to activate a cutscene.
- Zoom into the cage; send ELF into the cage and try to use the VIDEOPHONE on ELF (O).
- Take the 3/4 BATTERY (P).
- Zoom into the laboratory door; take the 4/4 BATTERY (Q); the VIDEOPHONE will be automatically charged.
- Zoom into the cage; use the VIDEOPHONE on ELF to call James; take the 1/2 DINOSAUR FOOT (R).
- Zoom into the green control panel; take the 2/2 DINOSAUR FOOT (T).
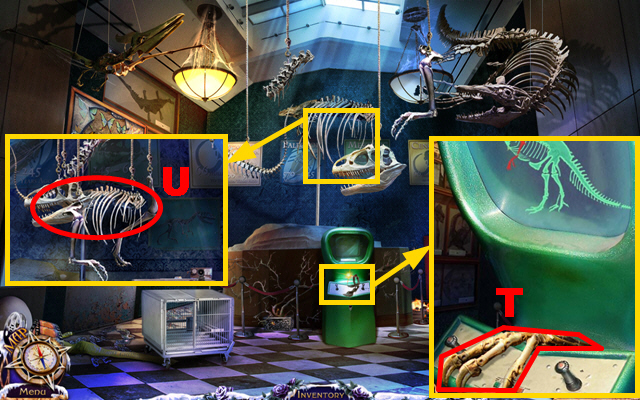
- Zoom into the dinosaur skeleton; add the 2 DINOSAUR FEET to the skeleton (U).
- Play the mini-game.
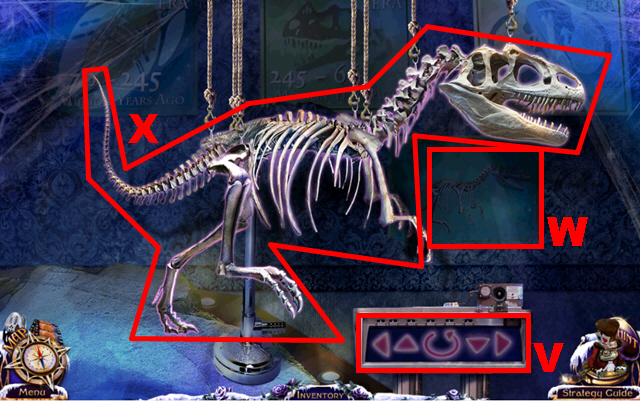
- Move and turn around any selected skeleton part by pressing the buttons on the panel (V).
- The poster indicates the correct arrangement (W).
- The screenshot displays the correct solution (X).
- Play the HOS.
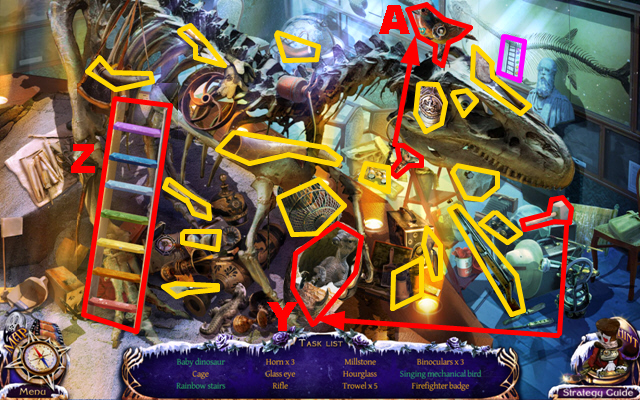
- Take the sledgehammer, use it to crack the egg, and take the baby dinosaur (Y).
- Press the stairs on the ladder to change their color according to the pattern marked in purple; take the rainbow stairs (Z).
- Take the handle, put it on the bird, and take the singing mechanical bird (A).
- The FIRE BADGE will be added to inventory.
- Zoom into the fire box; put the FIRE BADGE into the slot (B); take the BUCKET (C) and the 1/2 FLAG (E).
- Walk down twice.
- Zoom into the river and put the BUCKET into the water (G) to receive the BUCKET WITH WATER.
- Go forward twice.
- Zoom into the fire; use the BUCKET WITH WATER to extinguish the flames (H).
- Take the DOOR HANDLE (J) and the 1/2 BRIEFCASE LOCK DIAL (K).
- Zoom into the right door; put the DOOR HANDLE into the slot (L) and press the handle (M).
- Turn right.
Chapter 6: The Museum Office
- Touch anywhere to activate a cutscene.
- Zoom into the drawer; take the TOOLBOX HANDLE (N).
- Go to the shopping street.
- Zoom into the shop entrance; put the TOOLBOX HANDLE on the toolbox (O); take the WIRE CUTTERS (Q).
- Go to the museum.
- Zoom into the fire box; use the WIRE CUTTERS to cut the wires (R); take the CROWBAR (S).
- Go to Canal Street.
- Zoom into the drainage; use the CROWBAR on the metal bar (T) to remove it; take the BRONZE HANDLE (V).
- Go to the museum office.
- Zoom into the window; put the BRONZE HANDLE on the window (W) and push the handle once.
- Zoom into the safe; take the 2/2 BRIEFCASE LOCK DIAL (X).
- Turn the chair.
- Zoom into the skeleton; take the FLOPPY DISK (Y).
- Go to the museum entrance.
- Zoom into the case; put the 2 BRIEFCASE LOCK DIALS on it (Z); enter the code 1-4-7, from top to bottom, to open the case.
- Play the HOS.
- Put the two buttons marked in purple on the safe; enter the code 7-3-2-4-9 and take the lever (A).
- Take the upper part of the lamp, put it on its lower part, and take the lamp (B).
- Take the handle, put it on the alarm clock, and take the alarm clock (C).
- The LEVER will be added to inventory.
- Go to the belfry.
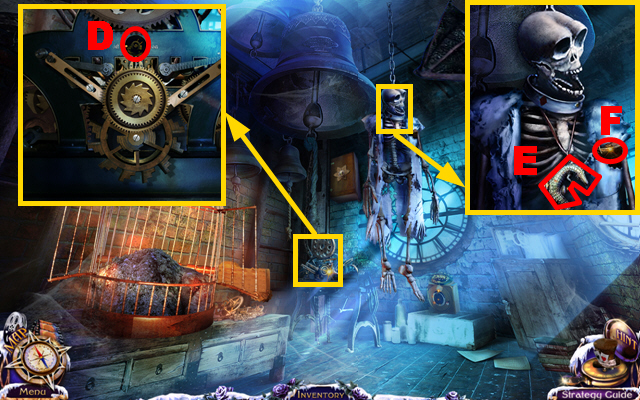
- Zoom into the machine; put the LEVER into the slot (D) and press the lever.
- Zoom into the skeleton; take the CROCODILE AMULET (E) and read the diary fragment (F).
- Go to the sewers.
- Zoom into the wall; put the CROCODILE AMULET into the slot (G).
- Take the 1/2 STAR HALF (H) and the CLOCK HANDS (J).
- Go to the bedroom.
- Zoom into the clock; put the CLOCK HANDS on it (K).
- Take the 2/2 STAR HALF (L) and the 1/2 BUTTERFLY (M).
- Go to the museum office.
- Zoom into the safe; put the 2 STAR HALVES into the slot (N).
- Take the 2/2 ELECTRONIC CHIP (P) and the GOLDEN CROWN (Q).
- Walk down.
- Zoom into the laboratory door; put the 2 ELECTRONIC CHIPS into the slots (R).
- Play the mini-game.

- Turn each gear by pressing the centric gears marked in purple.
- Concentrate on assembling the gears on the fringes first.
- The outlines of the gears and the fixed center piece indicate which pieces belong together.
- The screenshot displays the correct solution (1).
- Go left.
- Zoom into the computer and put the FLOPPY DISK into the slot (T).
- Watch the video and note the sequence (U).
- Zoom into the cabinet; enter the code (spade-heart-spade-diamond-spade-club) to open the lock (V).
- Use the SCREWDRIVER on the screws twice; take the RUBBER GLOVES (W) and the LADDER (X).
- Go to canal street.
- Zoom into the lantern; lean the LADDER against it (Y); take the MERMAID FIGURINE (Z) and the 1/2 NEON FUSE (A).
- Go to the museum office.
- Zoom into the pillows and remove 3 of them; take the PIECE OF PICTURE (C).
- Go to the museum laboratory.

- Zoom into the picture; set the PIECE OF PICTURE into the hole (D).
- Open the door and take the 2/2 NEON FUSE (E).
- Zoom into the freezer; put the 2 NEON FUSES into the slots (F) and enter the code 2-4-8.
- Take the 2/2 BUTTERFLY (G); use the FIRE SALAMANDER on the frozen key and take the DRAWER KEY (H).
- Walk down.
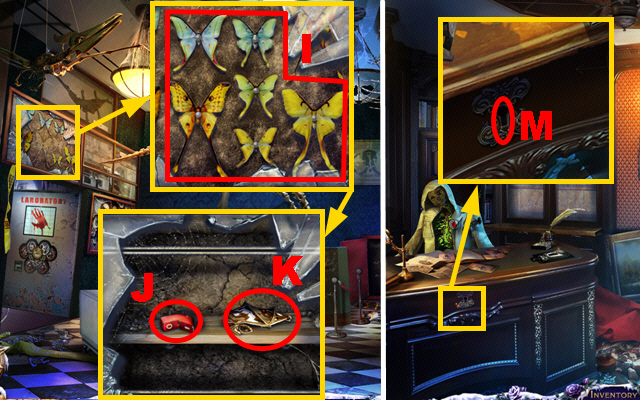
- Zoom into the butterfly showcase and add the 2 BUTTERFLIES to it; swap the butterflies so that each of them is placed correctly (I).
- Take the FAN CONTROL SWITCH (J) and the 1/3 BAT AMULET PIECE (K).
- Enter the museum office.
- Zoom into the drawer; put the DRAWER KEY into the lock (M) and turn it once.
- Play the HOS.
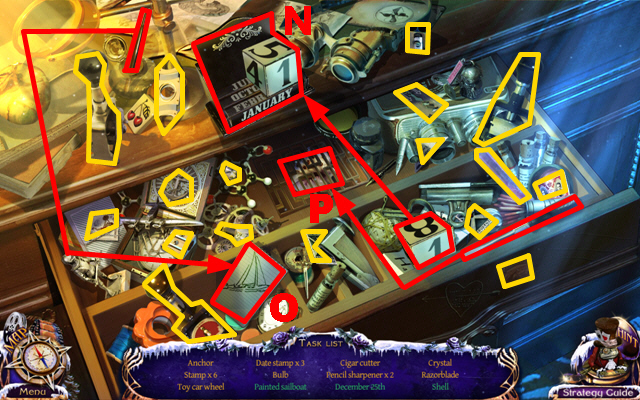
- Take the number block and put it into the compartment; press the number blocks and the month block until it shows ’25 December’. Take December 25th (N).
- Take the pen and use it to draw on the paper; take the painted sailboat (O).
- Take the screwdriver, remove the lid, and take the shell (P).
- The 1/2 SHELL will be added to inventory.
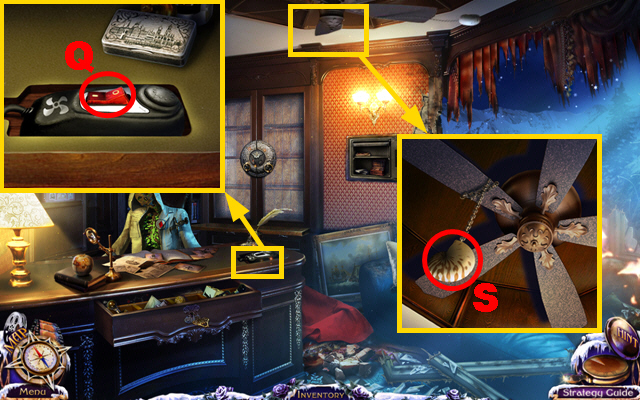
- Zoom into the desk; put the FAN CONTROL SWITCH into the slot (Q); press the switch.
- Zoom into the fan; take the 2/2 SHELL (S).
- Walk down.
- Zoom into the shell showcase; put the 2 SHELLS on it; rearrange the shells so that each shell is placed correctly (T).
- Take the PEARL (U) and the 2/3 BAT AMULET PIECE (V).
- Zoom into the aquarium; put the MERMAID FIGURINE, the GOLDEN CROWN, and the PEARL on the right side of the case (X).
- Take the 3/3 BAT AMULET PIECE (Y).
- Go right.
- Zoom into the glass locker; put the 3 BAT AMULET PIECES into the slot (Z).
- Take the COLLAR CONTROL HALF (A) and the RUST REMOVER (B).
- Go to the belfry.
- Combine the COLLAR CONTROL HALF with its other half (C).
- Zoom into the remote control to play a mini-game.
- Move the blue tile around the board to color all tiles blue.
- No tile can be crossed more than once.
- To solve this puzzle (1), press the tiles in the order (A-V).
Chapter 7: The Heliport
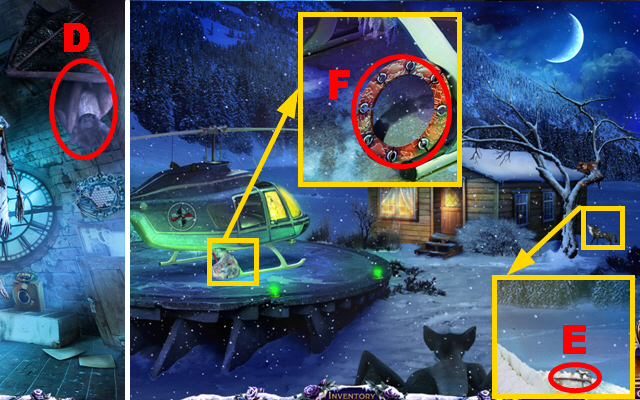
- Mount the bat (D) to fly to the heliport.
- Zoom into the tree; use ELF to chase away the creatures and then take the HUNTING CABIN KEY (E).
- Zoom into the heliport; use the FIRE SALAMANDER to melt the ice. You will receive the POCKETKNIFE.
- Take the 1/2 METAL RING (F).
- Zoom into the hunting cabin; use the FIRE SALAMANDER to melt the frozen handle; put the HUNTING CABIN KEY into the lock (G) and turn the key once.
- Move forward.
- Zoom into the fireplace; use ELF in the fireplace to recover an item; take the FOUNTAIN PEN (I).
- Zoom into the picture; use the POCKETKNIFE to cut the picture (J) and take the POWER CORD (K).
- Walk down.
- Zoom into the helicopter; use the RUST REMOVER to remove the rust on the lid (L).
- Go to the museum office.
- Zoom into the shelf; put the FOUNTAIN PEN in the holder (M) and move all the three fountain pens down.
- Take the SPADES EMBLEM (O) and the BEAR HEAD (P).
- Walk down and turn left.
- Zoom into the fan; connect the POWER CORD to the fan (Q) and press the button (R).
- Take the RULER (T).
- Go to the hunting cabin.
- Zoom into the cabinet; put the BEAR HEAD into the slot (T) and use the RULER to open the cabinet (U).
- Zoom into the skeleton; take the HELICOPTER KEY (W).
- Walk down.
- Zoom into the helicopter; put the HELICOPTER KEY into the lock (X) and turn the key once.
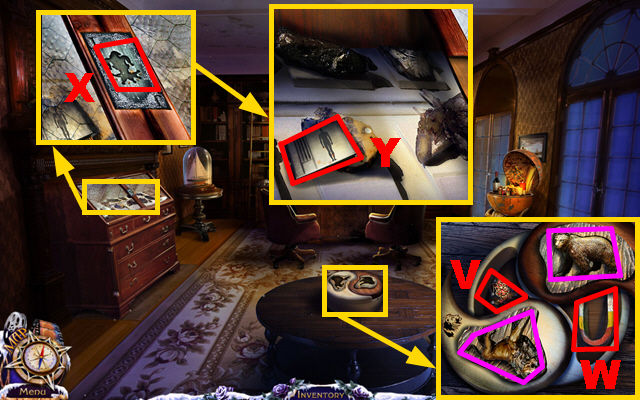
- Play the HOS.
- Collect the five badges marked in purple, put them on the flag, and take the badges collection (Y).
- Take the rotor, put it on the helicopter, and take the helicopter (Z).
- Take the container, use it to fill the cup with tea, and take the cup of tea (A).
- The CLUBS EMBLEM will be added to inventory.
- Go forward.
- Zoom into the torn picture; put the CLUBS EMBLEM and the SPADES EMBLEM into the slots marked in purple.
- Press the red button (B).
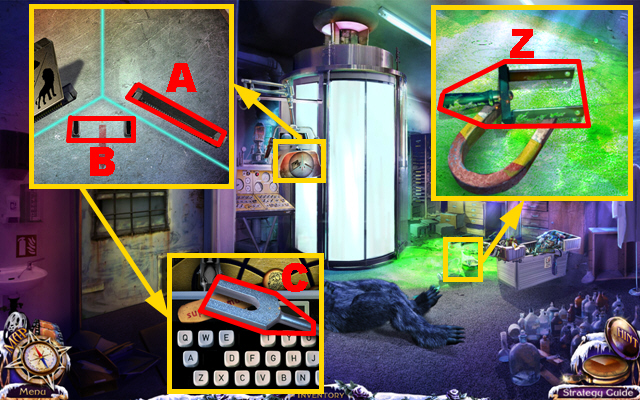
- Zoom into the bunker entrance; use the RUBBER GLOVES to get the AXE (C).
- Zoom into the tree; use the AXE on the branches twice (D).
- Use ELF to inspect the hole and then take the TOGGLE SWITCH (E).
- Go to the museum entrance.
- Zoom into the dashboard; put the TOGGLE SWITCH into the slot (F) and press on it.
- Take the INSULATING TAPE (G) and the WIRE (H).
- Go to the heliport.
- Zoom into the panel; use the WIRE and the INSULATING TAPE to repair the panel (I) and play the mini-game.
- Light up all the lamps to complete the puzzle.
- Each lamp can only be lit once, and you can only light up lamps that are directly connected through a wire.
- To complete this puzzle (J), light up the lamps in the order shown in the screenshot (1-34).
- Move forward.
- Zoom into the wall; use ELF to recover an item; take the SUN AMULET (K).
- Enter the laboratory.
- Zoom anywhere to activate a cutscene.
- Zoom into the window; take the STAR-SHAPED KEY (M).
- Go to the museum.
- Zoom into the case; put the SUN AMULET into the slot (N) and take the PUNCH CARD (O).
- Go to the heliport.
- Zoom into the bird’s nest; take the CODE SCRAP (Q).
- Go to the museum laboratory.
- Zoom into the small cabinet; put the STAR-SHAPED KEY into the lock (R); take the EMPTY DART SYRINGE (T).
- Go to the bunker.
- Zoom into the cabinet; put the CODE SCRAP next to the other paper (U) and insert the PUNCH CARD into the slot (V).
- Enter the code 4-7-5-5 into the panel marked in purple to open the cabinet.
- Dip the EMPTY DART SYRINGE into the medicine (W); the FULL DART SYRINGE will be added to inventory.
- Move forward.
- Zoom into the window; put the FULL DART SYRINGE into the gun (X); take the TRANQUILIZER GUN.
- Use the TRANQUILIZER GUN on the bear (Y).
- Zoom into the bear; take the FLOPPY DISK (A).
- Go to the museum laboratory.
- Zoom into the computer and put the FLOPPY DISK into the slot (B); take the 2/2 METAL RING (C).
- Go to the bunker laboratory.
- Zoom into the box; put the 2 METAL RINGS on the board (D) and play the mini-game.
- Rearrange the balls according to the colors of the rings.
- Press any ball with an empty slot next to it to move that ball into the empty slot.
- Rotate the green or the red ring clockwise by pressing any plate in between two balls.
- It is helpful to place a green ball in the center slot marked in purple first.
- The screenshot displays the correct solution (E).
- Play the HOS.

- Collect three blue rings, two green rings, and one yellow ring marked in purple, put them on the similarly colored number stacks, and take the toy pyramid collection (F).
- Take the mirror, put it next to the paper, and take the word ‘science’ (G).
- Take the pipette, use it on the coin, and take the shiny coin (H).
- The CAMERA will be added to inventory.

- Zoom into the bear; use the CAMERA on the bear’s eye to take a picture from his eye (I); the PHOTO OF AN EYE will be added to inventory.
- Walk down.
- Zoom into the holoprojector; put the PHOTO OF AN EYE into the slot (J) and take the EYE HOLOGRAM (K).
- Zoom into the door; put the EYE HOLOGRAM on the lock (L).
- Go to the museum.
- Zoom into the withered plant; use the FIRE SALAMANDER to burn the branches on the plant; take the SAFE WHEEL (N).
- Go to the belfry.
- Zoom into the safe; put the SAFE WHEEL into the slot (O) and enter the code 4-3-8-7 by pressing the buttons marked in purple.
- Take the LION FIGURINE (P) and the 2/2 FLAG (R).
- Go to the bunker.
- Use the Eye hologram to open the door into the bunker office.
- Move forward to enter the bunker office.
Chapter 8: The Bunker Office
- Zoom into the globe; put the 2 FLAGS into the slots marked in purple (1) and (2).
- Play the HOS.
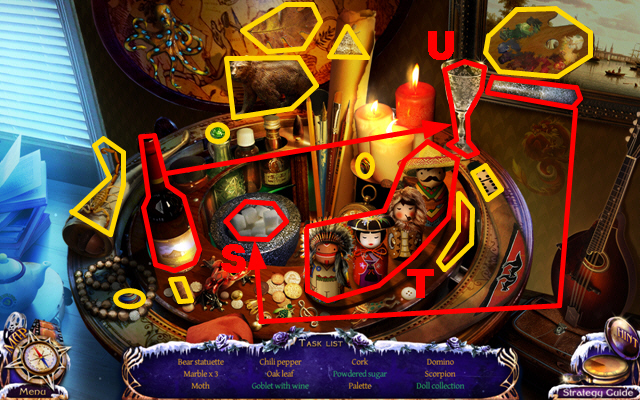
- Take the pestle, use it on the sugar cubes, and take the powdered sugar (S).
- Swap the heads of the dolls so that they match their clothing; take the doll collection (T).
- Take the bottle, fill the goblet with wine, and take the goblet with wine (U).
- The BEAR FIGURINE will be added to inventory.
- Zoom into the front desk; put the LION FIGURINE and the BEAR FIGURINE into the slots marked in purple.
- Take the JOKER MEDALLION (V) and the MAGNET (W).
- Zoom into the showcase; put the JOKER MEDALLION in the slot (X) and take the CARTRIDGE (Y).
- Go to the bunker laboratory.
- Zoom into the floor; put the MAGNET on the floor and take the CONTROL PANEL SWITCH (Z).
- Zoom into the machine; put the CARTRIDGE into the slot (A) and the CONTROL PANEL SWITCH into the slot (B).
- Take the TUNING FORK (C).
- Go to the bunker office.
- Zoom into the glass box; put the TUNING FORK next to it to break the glass and take the 1/2 BUTTON (D).
- Walk down.
- Zoom into the wall; put the TUNING FORK into the slot (E); take the 2/2 BUTTON (G).
- Enter the bunker laboratory.
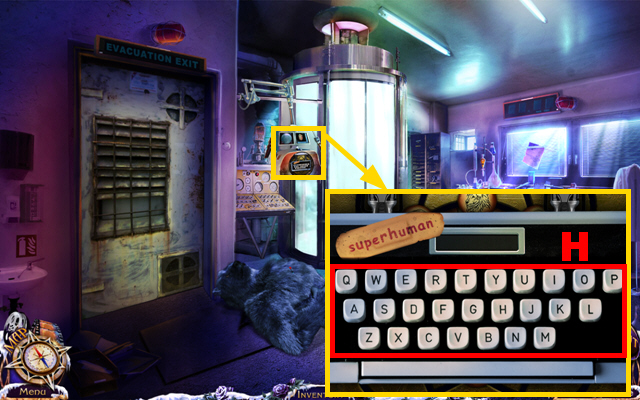
- Zoom into the machine; put the 2 BUTTONS on the machine.
- Type the word ‘superhuman’ on the keyboard (H).
- Play the mini-game.
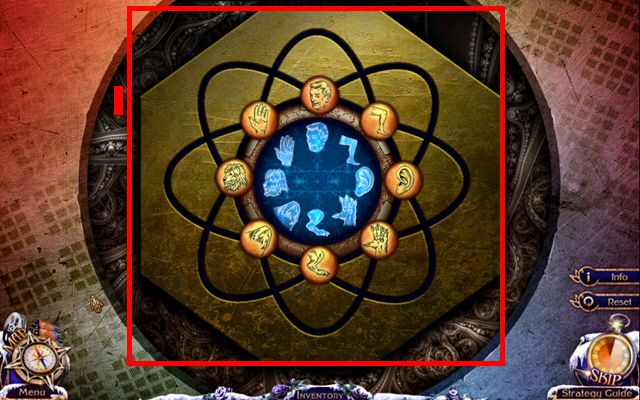
- Move all buttons next to their matching symbols.
- When pressing a button it will move two spots clockwise, while the two buttons next to it will move one spot counterclockwise.
- To solve this puzzle (I), press the buttons in the following order: human head, human ear, and human hand.
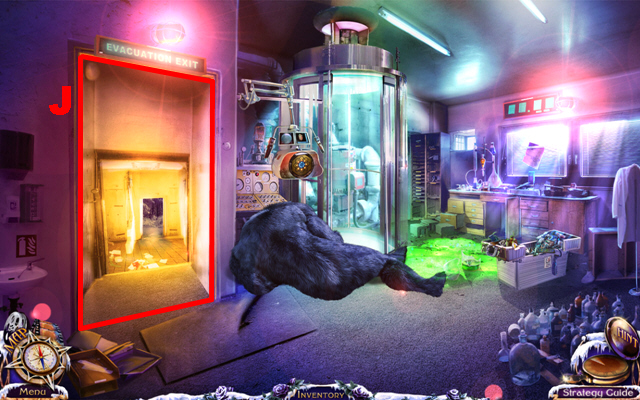
- Leave the bunker through the evacuation exit (J).
- Congratulations, you have completed Mystery Trackers: Four Aces.


 Diamon Jones: Eye of the Dragon Handbuch, Guide, & Tips
 Strangestone Walkthrough, Guide, & Tips
 Grim Legends: Song of the Dark Swan Walkthrough, Guide, & Tips
 Cascade Tips and Tricks, Guide, & Tips
 9: The Dark Side of Notre Dame Walkthrough, Guide, & Tips