Strangestone Walkthrough, Guide, & Tips
Strangestone Walkthrough

Welcome to the Strangestone Walkthrough
Spend the night in an abandoned mansion. Can you survive to uncover the terrible secret about your ancestor?
Whether you use this document as a reference when things get difficult or as a road map to get you from beginning to end, we’re pretty sure you’ll find what you’re looking for here.
This document contains a complete Strangestone game walkthrough featuring annotated screenshots from actual gameplay!
We hope you find this information useful as you play your way through the game. Use the walkthrough menu below to quickly jump to whatever stage of the game you need help with.
Remember to visit the Big Fish Games Forums if you find you need more help. Have fun!
This walkthrough was created by LuckySmile, and is protected under US Copyright laws. Any unauthorized use, including re-publication in whole or in part, without permission, is strictly prohibited.
General Tips

- This is the official guide for Strangestone.
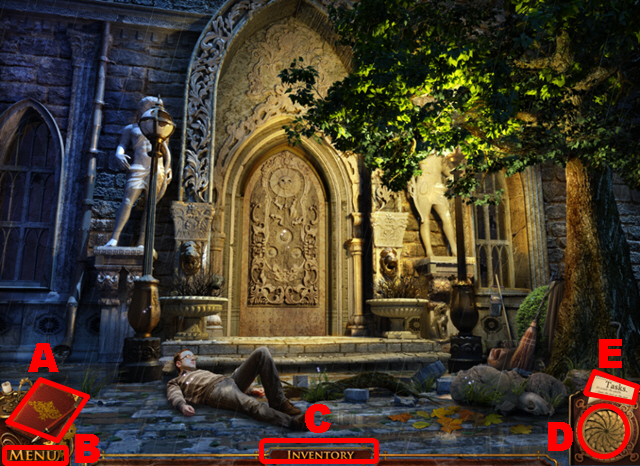
- Access the journal (A) to review the information you have gathered.
- Select the menu (B) to leave the game or to adjust the sound and display mode.
- The inventory (C) stores items that you find for later use.
- Press the hint button (D) if you need help at any time.
- Access the tasks (E) to see the map of the current location and to review your current mission.
- Hidden-object puzzle scenes will be referred to as HOPS throughout this guide.
- In the beginning you can choose between two difficulty levels, casual and expert. The choice affects hint and skip recharging.
Chapter 1 : The Mansion

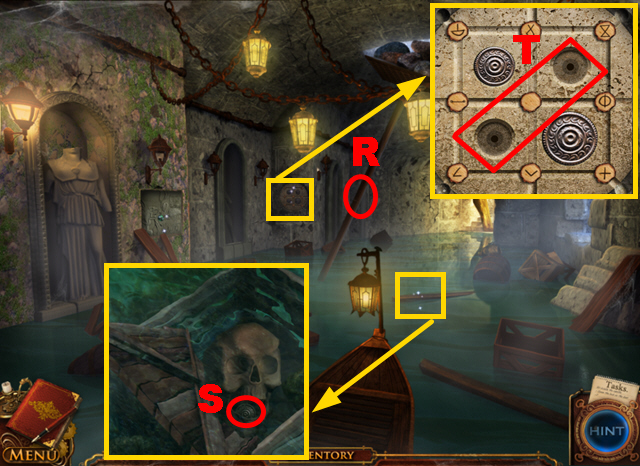
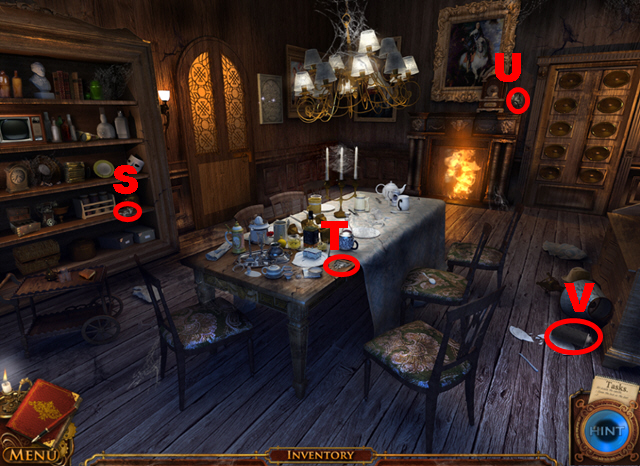
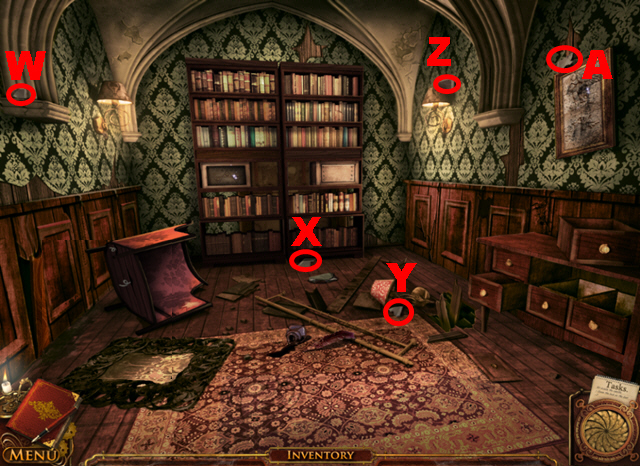
- Take the CROWBAR (R).
- Zoom into the area below the tree; remove the leaves and take the journal page (S).
- Zoom into the stairs; use the CROWBAR to remove a brick and take the first SUN KEY (T).
- Zoom into the lantern; use the CROWBAR on the door twice to open it and take the second SUN KEY (U).
- Zoom into the entrance, back down, and play the HOPS.
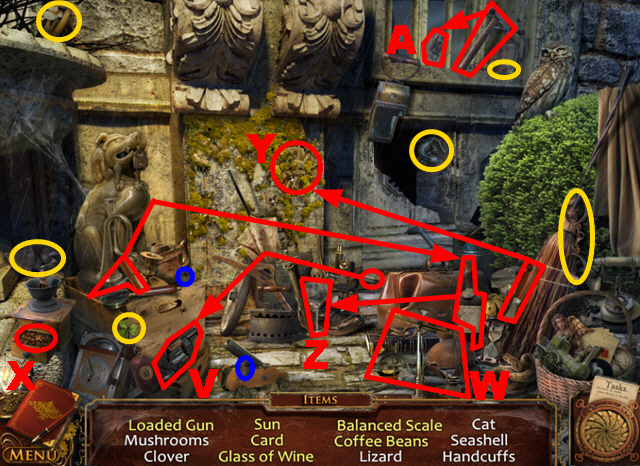
- Put the bullet into the gun (V); the loaded gun will be acquired and shoot a hole into the wall.
- Take the two weights marked in blue, put them onto the scale, and take the balanced scale (W).
- Open the grinder and take the coffee beans (X).
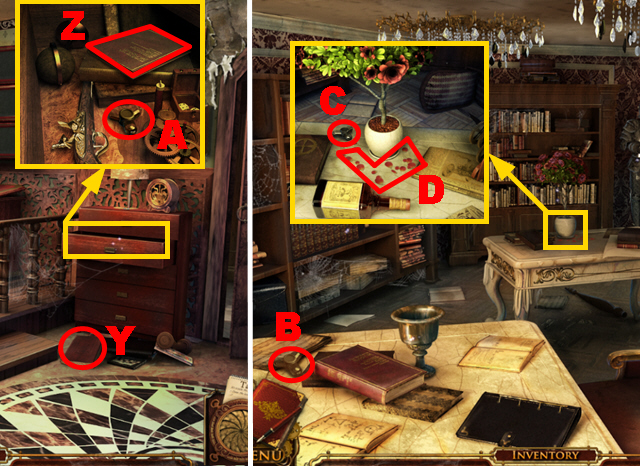
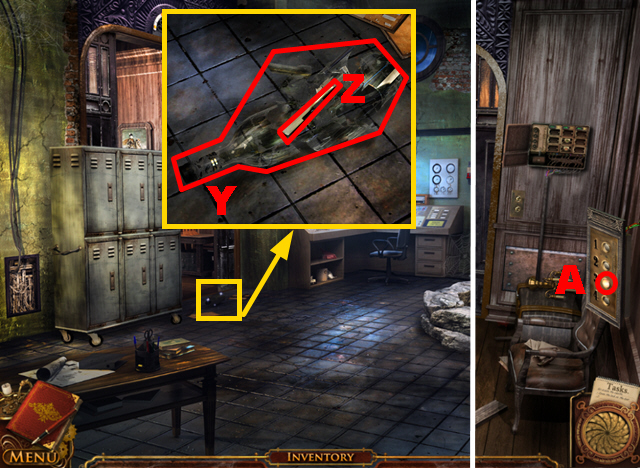
- Take the scraper, use it to remove the moss twice, and take the sun (Y).
- Take the corkscrew, use it to open the bottle, pour the wine into the glass, and take the glass of wine (Z).
- Take the hammer, use it to break the window, and take the card (A).
- You will receive the third SUN KEY.
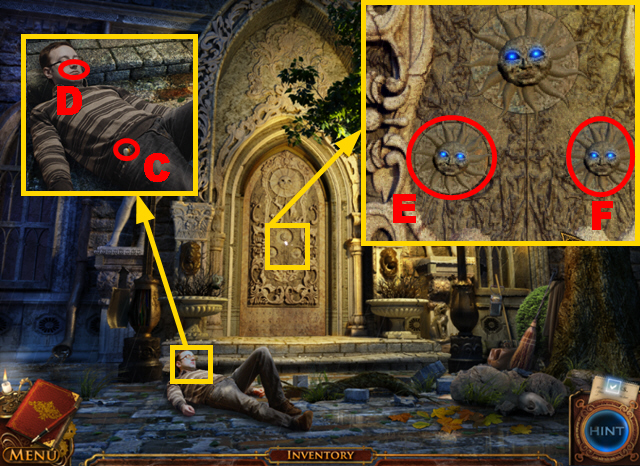
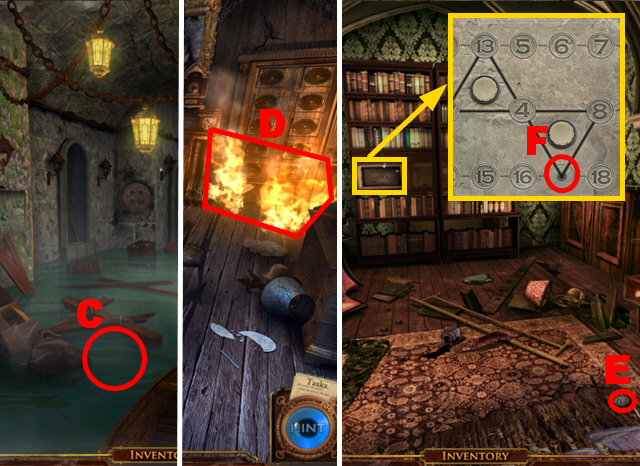
- Zoom into the guy; take the PILLS (C) and put them into his mouth (D).
- Zoom into the door; put the 3 SUN KEYS into the slots.
- Turn the sun (F) twice and the sun (E) once to open the door.
- Move forward.
- Play the HOPS.
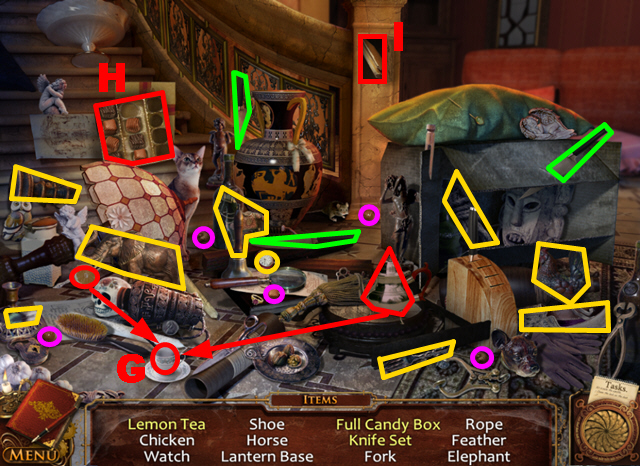
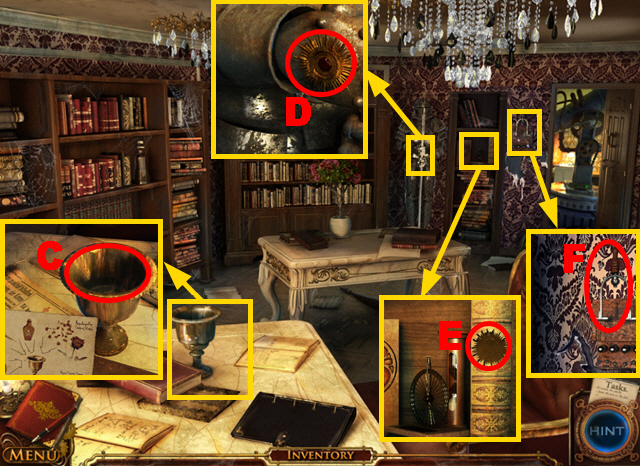
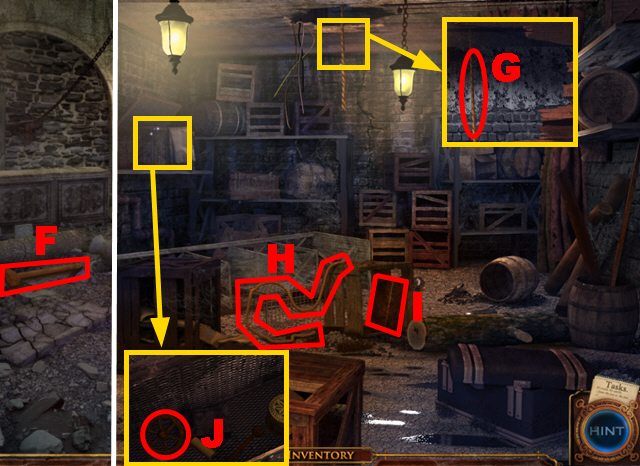
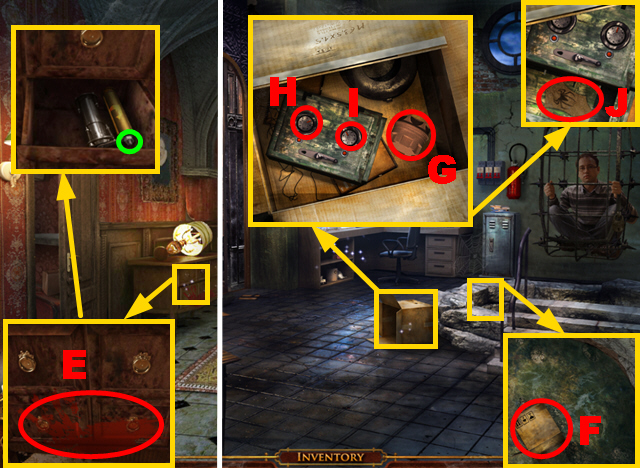
- Fill the tea and the lemon into the cup; take the lemon tea (G).
- Collect the 5 chocolates marked in purple, put them into the box, and take the full candy box (H).
- Collect the 3 knives marked in green to acquire the knife set.
- Open the secret compartment and take the journal page (I).
- The LANTERN BASE will be acquired.
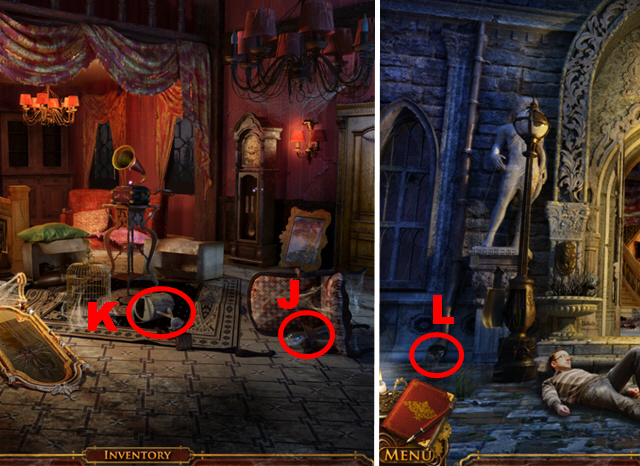
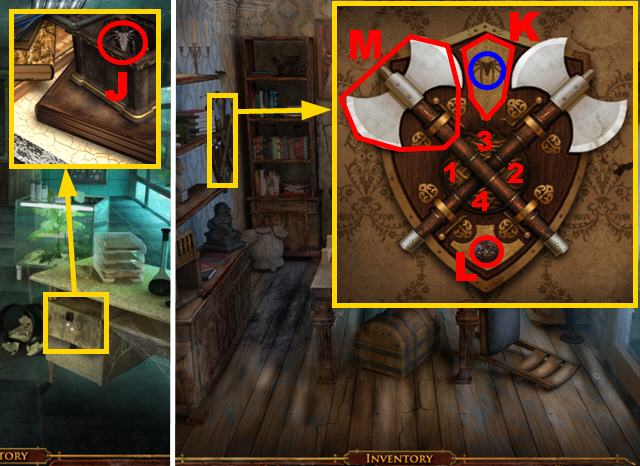
- Take the GLASS COVER (J) and the EMPTY WATERING CAN (K).
- Walk down.
- Hold the EMPTY WATERING CAN below the gutter (L); you will receive the FULL WATERING CAN.
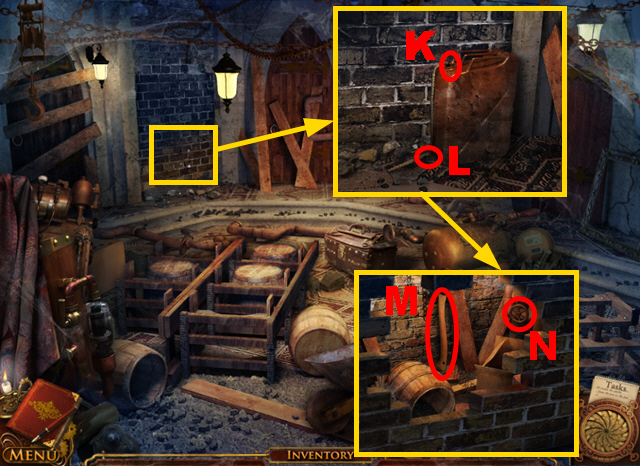
- Move forward twice.
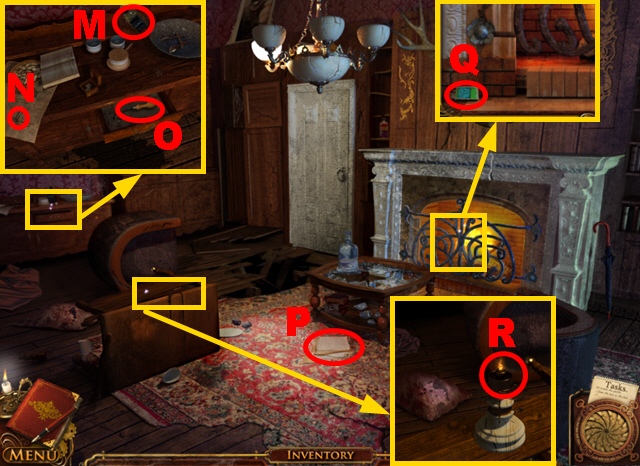
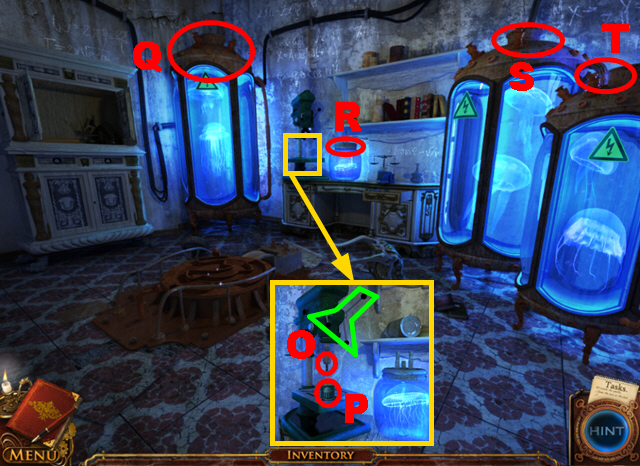
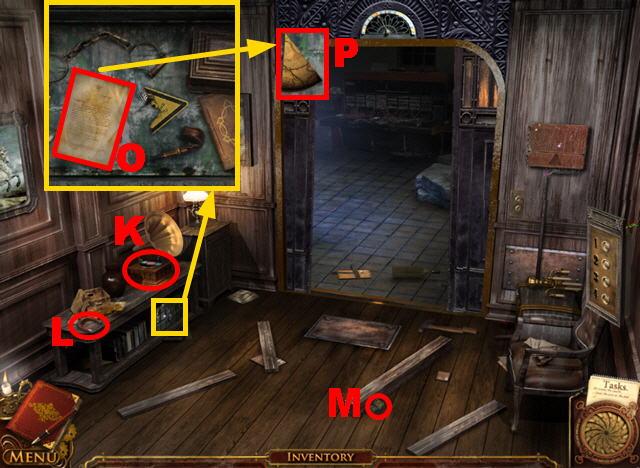
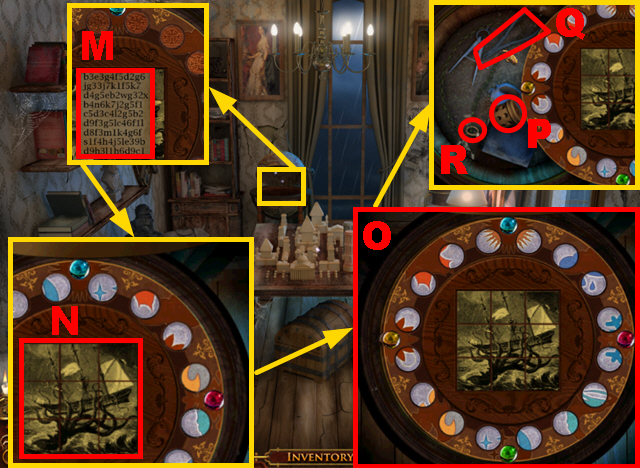
- Zoom into the side table; take the FUEL (M), move the book aside, and take the KEY (N).
- Open the drawer and take the SCREWDRIVER (O).
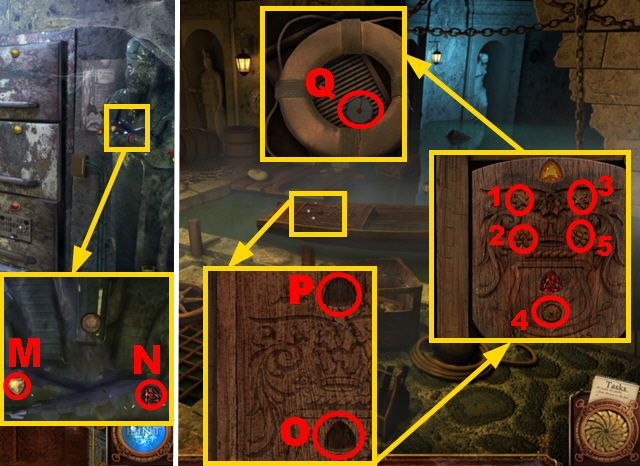
- Take the journal page (P).
- Zoom into the fireplace; take the MATCHES (Q).
- Zoom into the broken table; put down the LANTERN BASE.
- Pour the FUEL into the LANTERN BASE and use the MATCHES to light it (R).
- Put the GLASS COVER on the LANTERN BASE to acquire the LANTERN.
- Walk down.
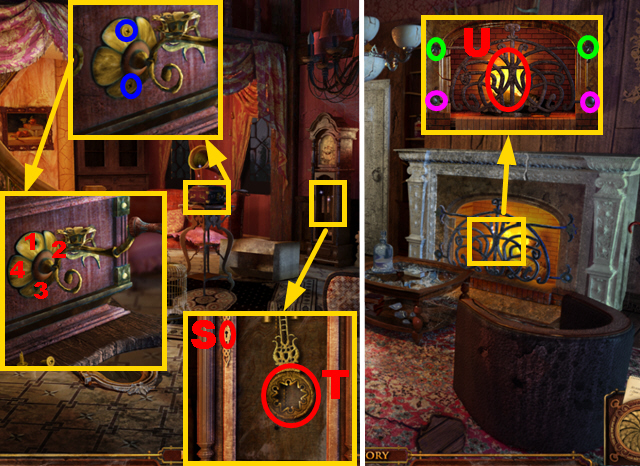
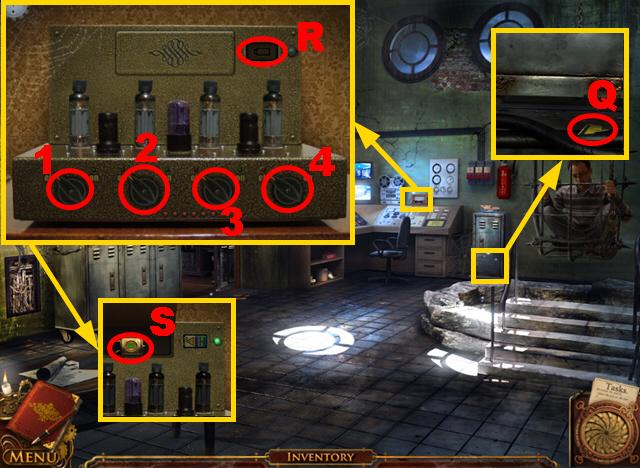
- Zoom into the gramophone; use the SCREWDRIVER twice to remove the screws marked in blue.
- Press the petals in the indicated sequence 1 – 4 to acquire the FLOWER-TIPPED HANDLE.
- Zoom into the clock; put the KEY into the lock (S) to open it and take the PENDULUM WITH STAR (T).
- Move forward.
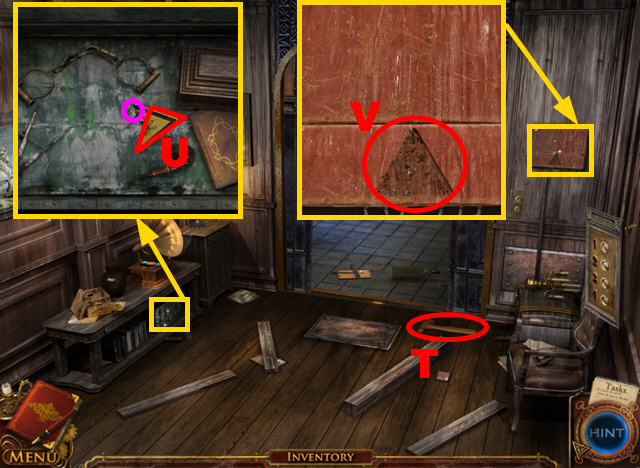
- Zoom into the fireplace; put out the fire (U) with the FULL WATERING CAN.
- Use the FLOWER-TIPPED GRAMOPHONE HANDLE to remove the 2 flower-shaped bolts marked in purple.
- Use the PENDULUM WITH STAR to remove the 2 star-shaped screws marked in green; the FIREPLACE SCREEN will be acquired.
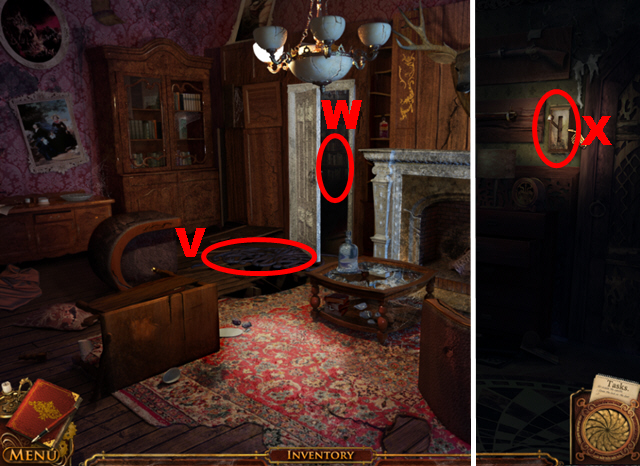
- Put down the FIREPLACE SCREEN to cross the gap (V).
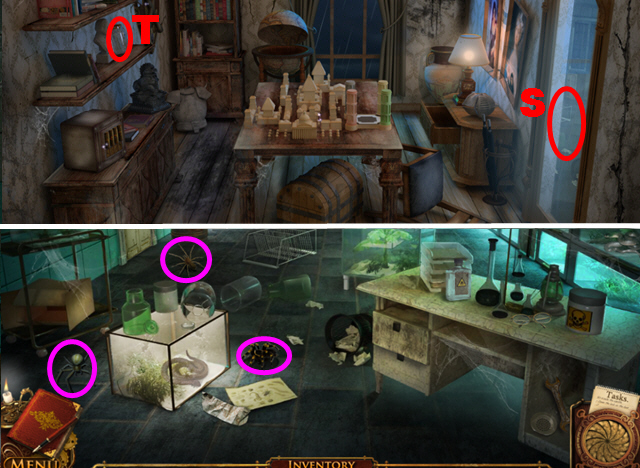
- Use the LANTERN to enter the dark room (W).
- Press the light switch (X).
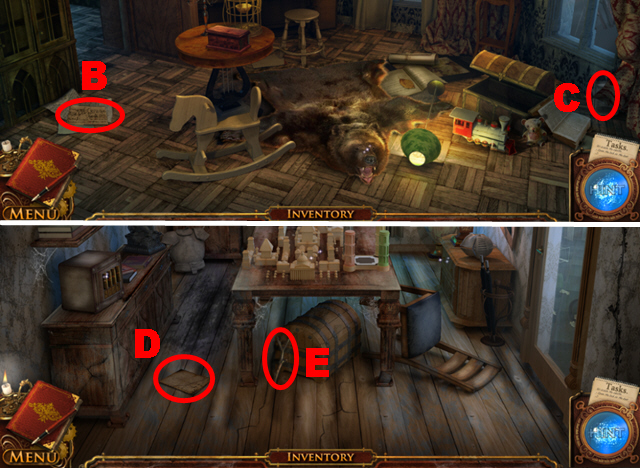
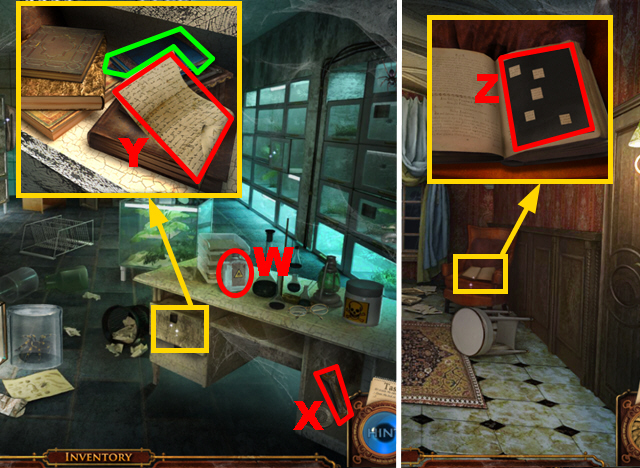
- Take the first BOOK (Y).
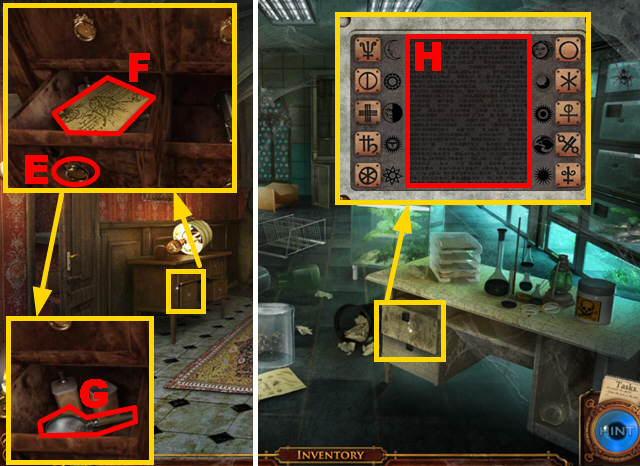
- Zoom into the drawer; take the formula (Z) and the 1/10 VACUUM TUBE (A).
- Move forward.
- Take the 2/10 VACUUM TUBE (B).
- Zoom into the flowerpot; take the 3/10 VACUUM TUBE (C) and the ROSE PETALS (D).
- Walk down.
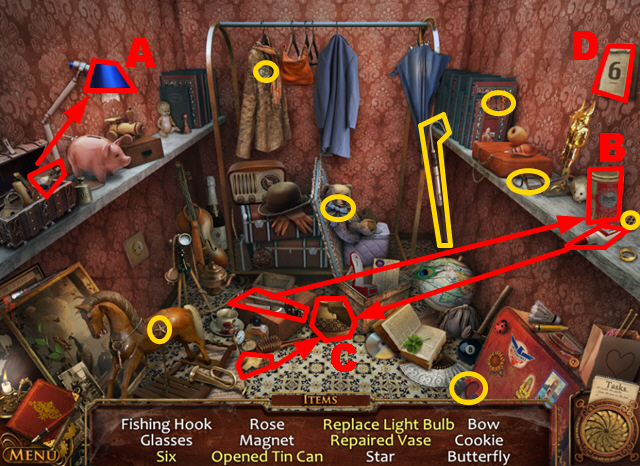
- Play the HOPS.
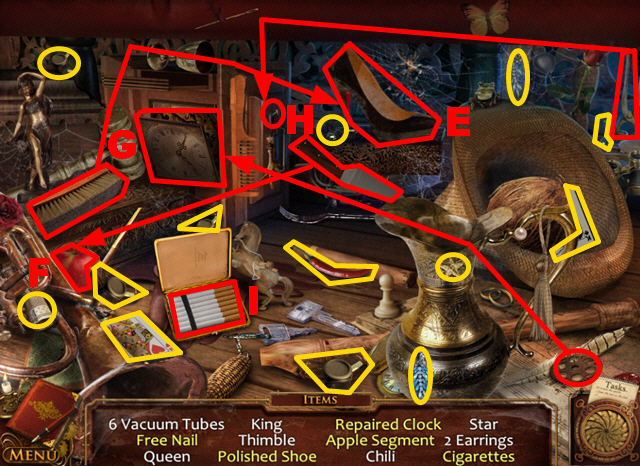
- Take the brush, use it to clean the shoe, and take the polished shoe (E).
- Take the knife, cut the apple with it (F), and take the apple segment.
- Take the gear and put it into the clock (G) to acquire the repaired clock.
- Take the pliers and use it to remove the nail (H); the free nail will be acquired.
- Open the box and take the cigarettes (I).
- You will receive 5 VACUUM TUBES.
- Move forward twice.
- Play the HOPS.
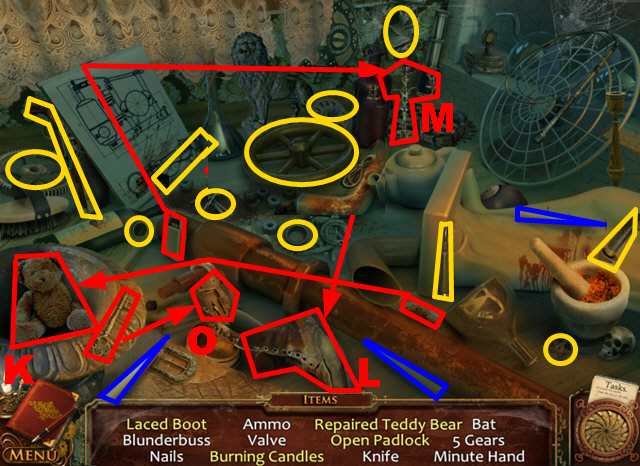
- Take the teddy bear’s arm and put it onto the teddy bear (K) to acquire the repaired teddy bear.
- Take the shoelace and add it to the boot (L) to acquire the laced boot.
- Collect 3 candles marked in blue, put them into the candlestick (M), take the matches, use them to light the 3 candles; the burning candles will be acquired.
- Take the journal pages (N).
- Take the key and put it into the padlock (O) to acquire the open padlock.
- You will receive the VALVE.
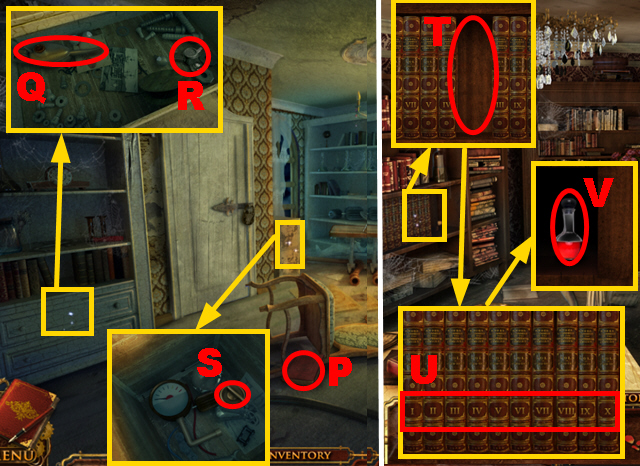
- Take the second BOOK (P).
- Zoom into the cabinet; take the OIL (Q) and the 9/10 VACUUM TUBE (R).
- Zoom into the crate; take the TUNING KNOB (S).
- Walk down.
- Zoom into the bookshelf; put the 2 BOOKS into the gap (T).
- Switch the books so that the order is: I, II, III, IV, V, VI, VII, VIII, IX, and X (U).
- Take the ACID (V).
- Walk down.

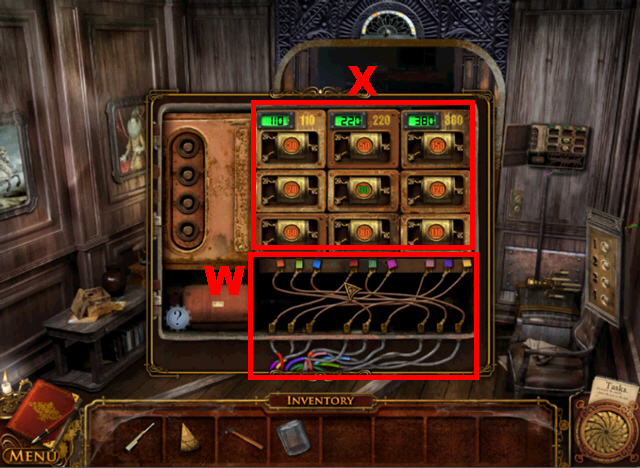
- Zoom into the TV; put the TUNING KNOB into the slot (W).
- To complete this mini-game, turn the knob (X) 6 times, the knob (Y) 6 times, and the knob (Z) twice.
- Take the POISON (A) and the 10/10 VACUUM TUBE (B).
- Move forward.
- Zoom into the goblet; fill the ACID, the OIL, the POISON, and the ROSE PETALS into the goblet (C) to acquire the RUST REMOVER.
- Zoom into the knight; pour the RUST REMOVER over the amulet (D) and take the GOLDEN AMULET.
- Zoom into the shelf; put the GOLDEN AMULET into the niche (E).
- Zoom into the lever; pull the lever (F).
- Move forward.
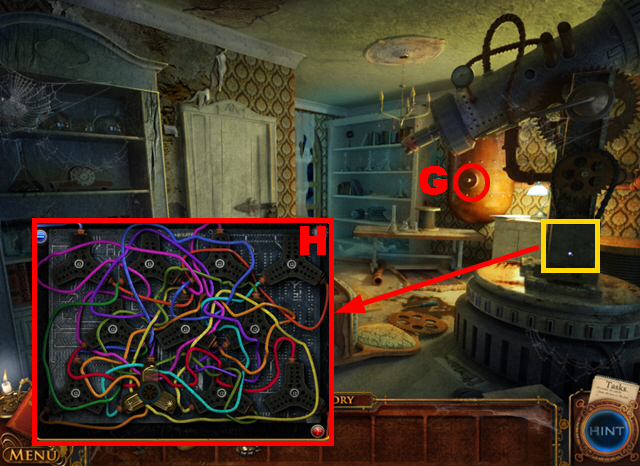
- Put the VALVE onto the device (G) and turn the valve.
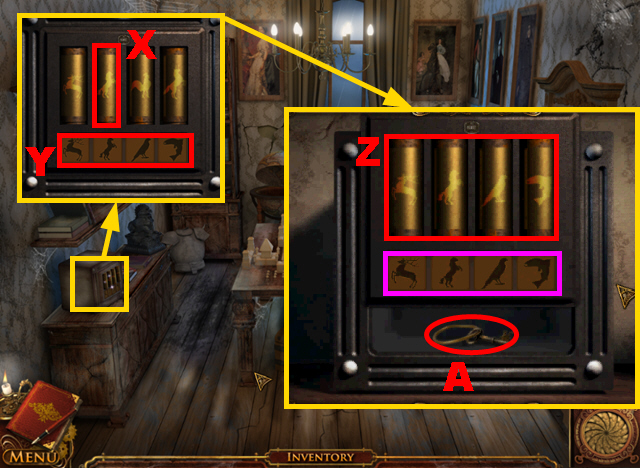
- Zoom into the switching board; add the 10 VACUUM TUBES to it (H) to play a mini-game.
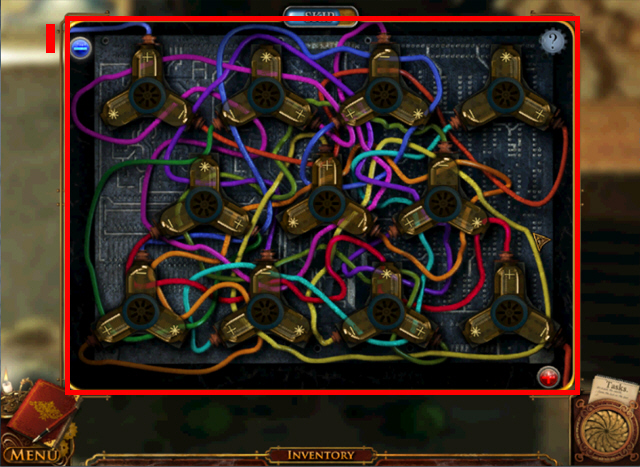
- Turn the 11 vacuum tubes so that each plus and each minus sign of every vacuum tube is connected to a wire.
- The screenshot displays the correct solution (I).
- The laser will open the door automatically.
- Move forward.
Chapter 2: The Jellyfish Lab
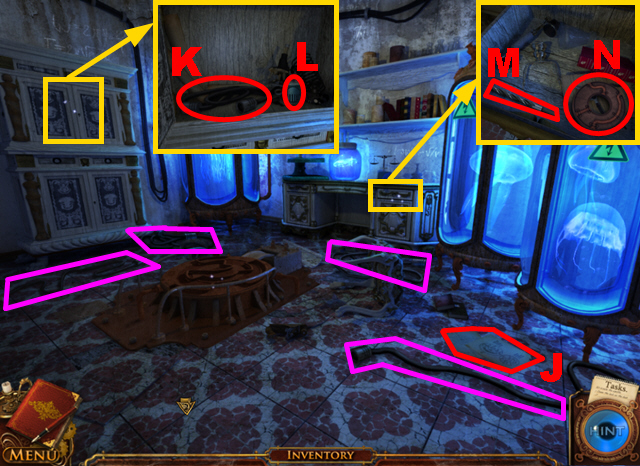
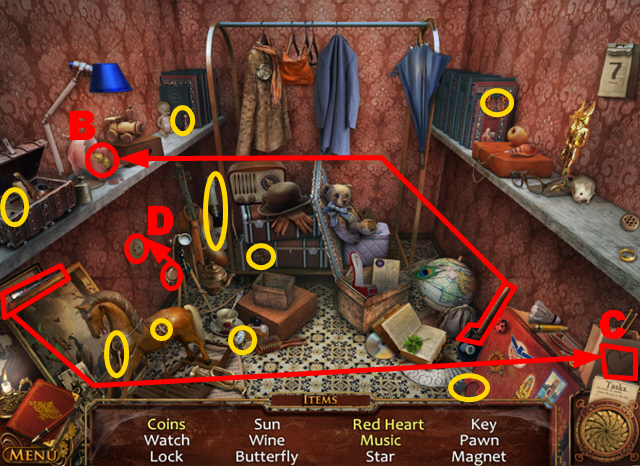
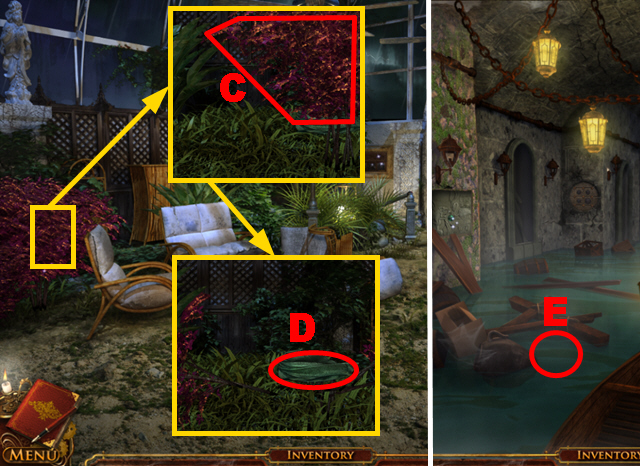
- Collect 4 CABLES marked in purple.
- Take the journal page (J).
- Zoom into the cupboard and open the door; take the CABLE (K) and the SEALED CAN OF JELLYFISH FOOD (L).
- Zoom into the drawer; take the DRILL (M) and the HATCH CIRCUIT (N).
- Zoom into the drill device; add the DRILL to it (O) and put down the SEALED CAN OF JELLYFISH FOOD (P).
- Turn the lever marked in green and take the OPEN CAN OF JELLYFISH FOOD.
- Feed all the Jellyfish Q – T with the OPEN CAN OF JELLYFISH FOOD.
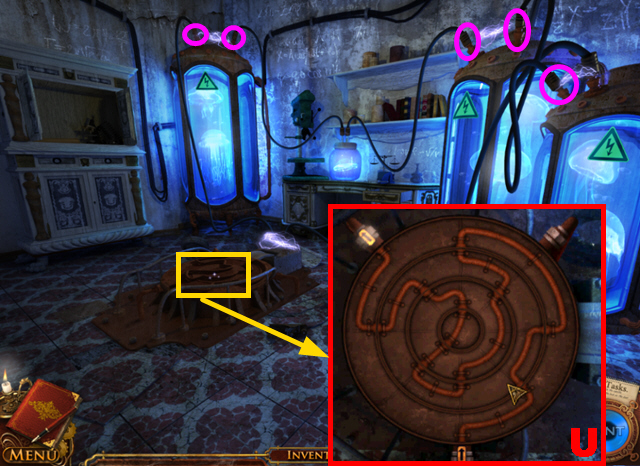
- Connect the five CABLES to the outlets marked in purple.
- Zoom into the hatch; put the HATCH CIRCUIT on it and play the mini-game.
- Rotate the circuits to connect the input and the output.
- The screenshot displays the correct solution (U).
- Climb down the hatch.
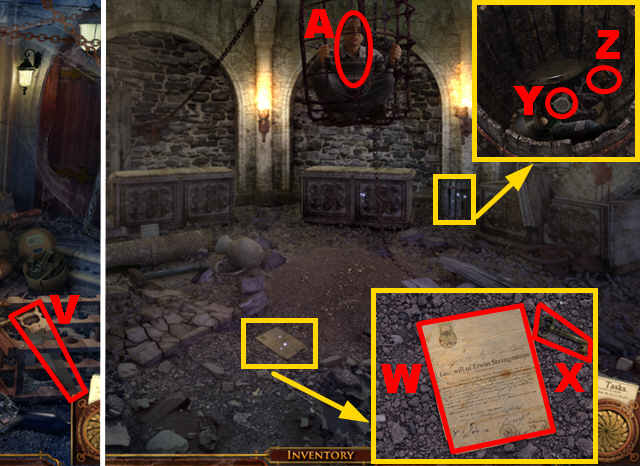
- Take the SAW (V).
- Move forward.
- Zoom into the floor; take the last will (W) and the KEY (X).
- Zoom into the barrel; take the SARCOPHAGUS PLAQUE (Y) and the VALVE (Z).
- Give the KEY to your brother (A).
- Zoom into the sarcophagus; add the SARCOPHAGUS PLAQUE to it to play a mini-game.
- Switch the letter plaques so that they spell ERWIN (B).
- To complete this puzzle, press the letters in the following sequence: E, N, R, N, I, E, I, E, N, I, N, R, E, W, I, E, R, W, E, I, N, W, E, and R.
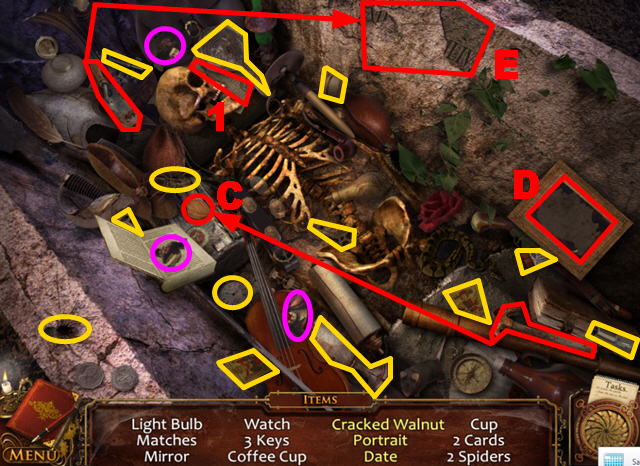
- Play the HOPS.
- Take the hammer and use it on the walnut (C) to acquire the cracked walnut.
- Open the book; collect the three picture pieces marked in purple and put them into the frame (D) to acquire the portrait.
- Take the shovel and use it on the plaster five times (E) to acquire the date.
- Take the journal page (1).
- You will receive the MATCHES.
- Take the HAMMER (F).
- Move forward.
- Zoom into the rope; pull the rope (G).
- Take the ROPE (H) and the FUEL CAN (I).
- Zoom into the basket; take the VALVE (J).
- Walk down twice.
- Zoom into the wall; put down the FUEL CAN and put the ROPE into the opening (K).
- Set the ROPE on fire with the MATCHES (L).
- Zoom into the wall once more; use the HAMMER twice to remove the remaining stones.
- Take the AXE (M) and the VALVE (N).
- Move forward twice.
- Use the SAW to cut the TRUNK (O).
- Use the AXE to trim the wooden piece (P); you will receive the WOODEN PLUG.
- Put the WOODEN PLUG into the drain (Q).
- Use the HAMMER to break the lid (R) and take the VALVE (S).
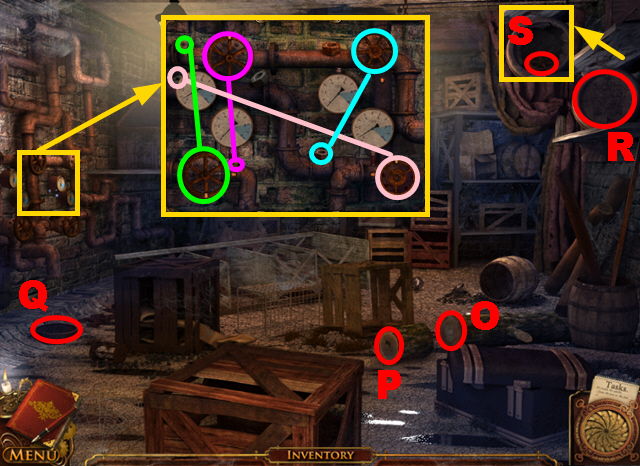
- Zoom into the pipes; put the 4 VALVES on the pipes.
- Fix each VALVE with its related screw.
- Play the mini-game.
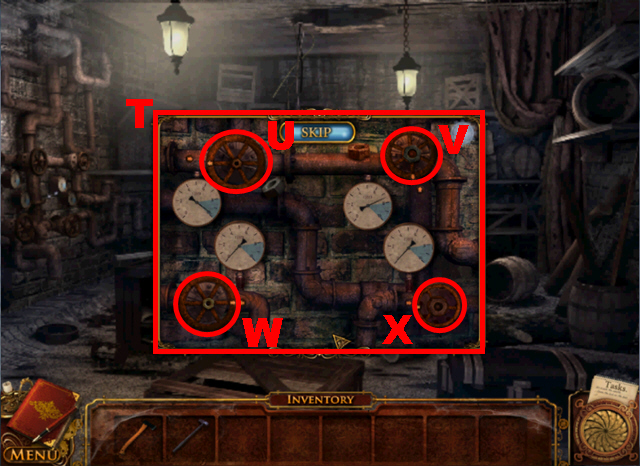
- To solve this puzzle (T), the arrow on each valve has to point at the arrow next to it.
- Turn the valves in the following sequence to complete this mini-game: Ux6, Wx1, Xx9, Wx17, Xx3, Wx4, Xx5, Wx6, Xx3, Wx1, Xx4, Wx4, Xx2, Wx2, Xx1, Wx1, Xx2, Wx2, xx2, Wx3, Xx1, Wx8, Xx8, Wx1, Xx3, Wx1, Xx1, and Wx4.
- Play the HOPS.
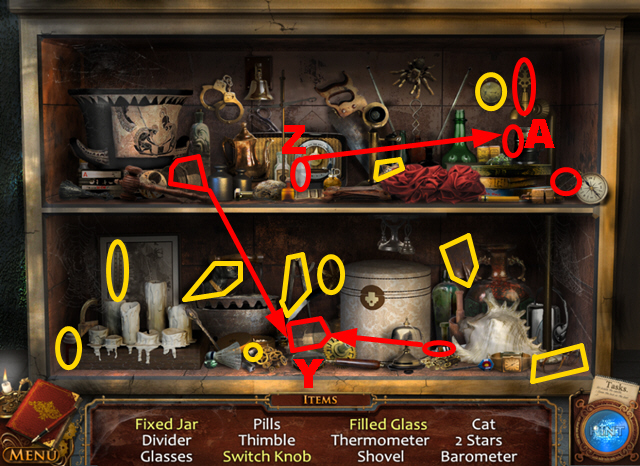
- Take the glue, spread it on the broken jar, take the other half of the jar, and put it on the jar to acquire the fixed jar (Y).
- Take the glass, put it below the faucet, and turn the handle to acquire the filled glass (Z).
- Move aside the compass and take the switch knob (A).
- You will receive the SWITCH KNOB and the GLASS JAR.
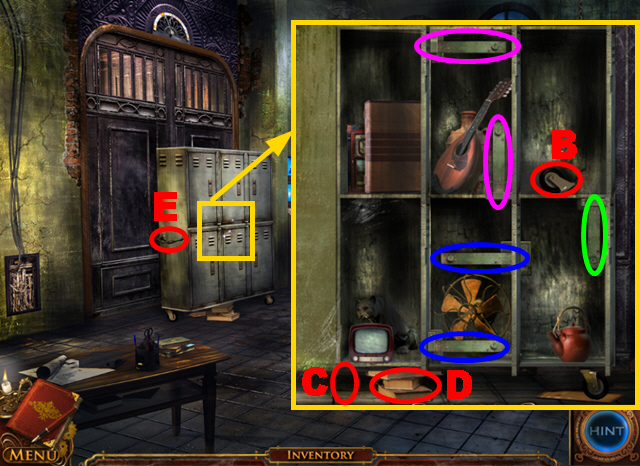
- Zoom into the wardrobe; open the central door in the top row; remove the two latches marked in purple.
- Open the left door in the top row and the central door in the bottom row; remove the latches marked in blue.
- Remove both the right and the left door in the bottom row; remove the latch marked in green.
- Open the right door in the top row; move aside the kettle, the radio, and the guitar.
- Take the WARDROBE WHEEL (B).
- Add the WARDROBE WHEEL to the wardrobe (C).
- Remove the three books (D).
- Pull aside the wardrobe (E).
- Zoom into the floor; take the SWITCH KNOB (F).
- Zoom into the drawer; remove two books and open the third book; take the SWITCH KNOB (G) and the combination note (H).
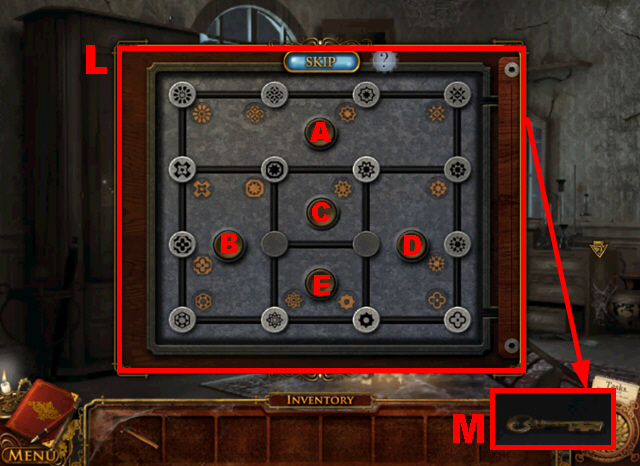
- Zoom into the panel; put the 3 SWITCH KNOBS on it (I) and play the mini-game.
- Turn the knobs marked in blue to enter the code ’421′ (J) to open the door.
- Turn left.
- Turn on the gramophone (K).
- Take the MAGNET (L) and the BATTERY (M).
- Zoom into the crate; take the journal page (O) and the GLOBE PIECE below the page (P).
- Move forward.
- Zoom into the small cabinet; put down the MAGNET and take the SYMBOL PIECE (Q).
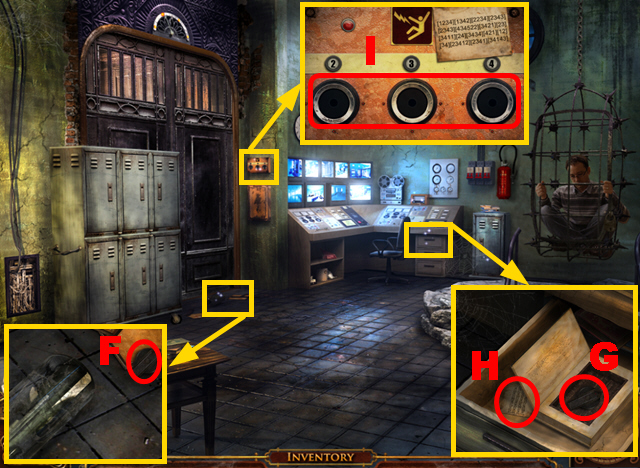
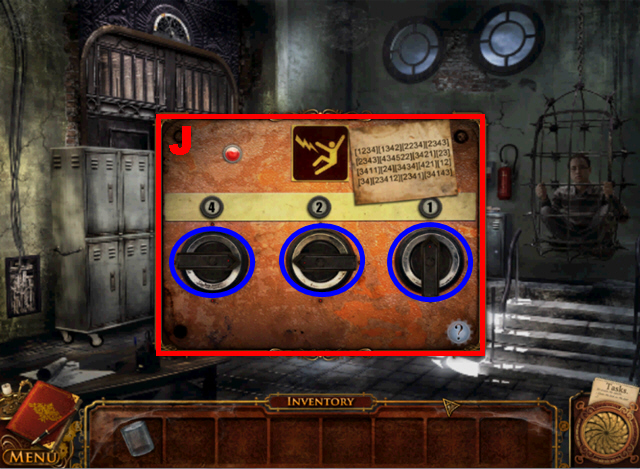
- Zoom into the device; put the BATTERY into the slot (R).
- You have to turn the switches 1 – 4 in the correct order four times to destroy the lamps.
- To destroy the first lamp, press the switches in the following sequence: 4, 1, 3, and 2.
- To destroy the second lamp, press the switches in the following sequence: 3, 2, 1, and 4.
- To destroy the third lamp, press the switches in the following sequence: 1, 2, 4, and 3.
- To destroy the fourth lamp, press the switches in the following sequence: 4, 2, 1, and 3.
- Take the CAPACITOR (S).
- Turn left.
- Take the HAMMER (T).
- Zoom into the crate; use the HAMMER to remove the nail marked in purple and take the SYMBOL PIECE (U).
- Zoom into the panel; put the 2 SYMBOL PIECES into the slot (V) and play the mini-game.
- To solve the first part of this puzzle (W), switch the wires so that the colors at the top of each wire match the color of the wire on the bottom.
- To solve the second part of the puzzle (X), add the CAPACITOR to the panel and switch the resistors so that the sum of the numbers on the capacitors in each column match the column’s number.
- Move forward.
- Zoom into the floor; use the HAMMER on the bottle to break it (Y) and take the ORGAN KEY (Z).
- Turn left.
- Press the third floor button (A).
- Move forward.
Chapter 3: The Leisure Room
- Take the journal page (B).
- Move aside the curtain and take the GLASS JAR (C).
- Turn left.
- Take the journal page (D) and the STICK (E).

- Zoom into the drawer; take the knife marked in green, cut away the glue (F), and take the ORGAN KEY (G).
- Walk down.
- Zoom into the carpet; use the STICK to keep the mouth open (H) and take the ORGAN KEY (I).
- Open the cabinet and zoom into it; take the GLOBE PIECE (J).
- Turn left.
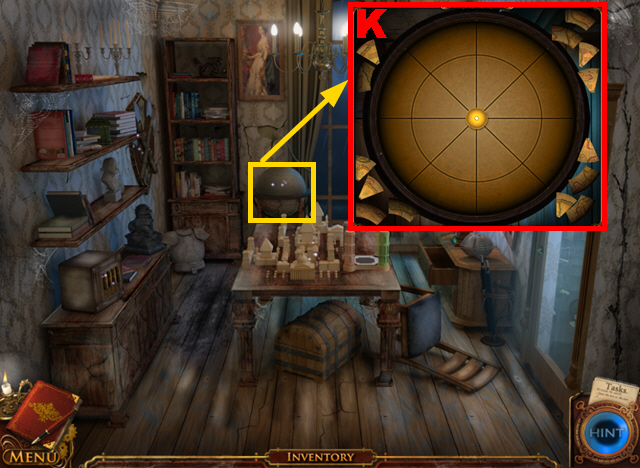
- Zoom into the globe; add the 2 GLOBE PIECES to it (K) to play a mini-game.
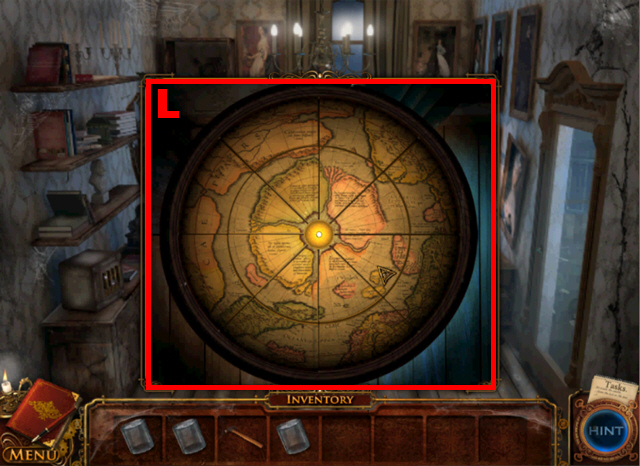
- To solve this puzzle (L), put the globe pieces into the correct places to create a coherent picture.
- Zoom into the globe; take the NOTE (M).
- Move the rows and columns of the picture to arrange it correctly (N).
- To solve the last part of this puzzle (O), switch the symbols to their correct positions.
- If you press any symbol, its two neighboring symbols will switch places.
- Take the COLUMN PIECE (P).
- Take the tweezers (Q), free the ring with the tweezers, and take the RING (R).
- Use the RING to cut the glass door (S).
- Move aside the small statue and take the GLASS JAR (T).
- Turn right.
- Put the 3 GLASS JARS on the 3 spiders marked in purple.
- Take the SOLVENT (W) and the WRENCH (X).
- Zoom into the drawer; take the journal page (Y) and remove the blue books marked in green.
- Turn left.
- Zoom into the chair; turn the pages of the book once and take the NOTES (Z).
- Play the HOPS.
- Remove the broken light bulb from the lamp (A), take the light bulb, and put it into the lamp to acquire the replace light bulb.
- Take the tin opener and use it to open the tin can (B) to acquire the opened tin can.
- Take the glue, spread it on the broken vase (C), take the vase piece, and put it on the broken vase to acquire the repaired vase.
- Remove a calendar paper and take the six (D).
- You will receive the FISHING HOOK.
- Zoom into the dresser; pour the SOLVENT over the paint to remove the paint (E).
- Open the right drawer at the bottom and use the WRENCH to remove the bolt marked in green to acquire the ROLLER PIECE.
- Walk down four times, press the second floor button, and move forward.
- Zoom into the well; use the FISHING HOOK to pull out the box (F).
- Zoom into the box; take the COLUMN PIECE (G) and turn the knob (H) twice and the knob (I) five times.
- Take the SPIDER PLATE (J).
- Play the HOPS.
- Take the pencil sharpener and use it on the pencil (K) to acquire the sharpened pencil.
- Take the iron and use it to iron the cloth (L) to acquire the ironed cloth.
- Take the tape and put it into the player (M) to acquire the music player.
- You will receive the SCISSORS.
- Move forward, press the third floor button, move forward, turn left, and turn right.
- Zoom into the sweater; use the SCISSORS to cut the sweater (N); you will receive the RAG.
- Zoom into the snake’s cage; cover the snake with the RAG (O) and take the ORGAN KEY (P).
- Walk down twice.
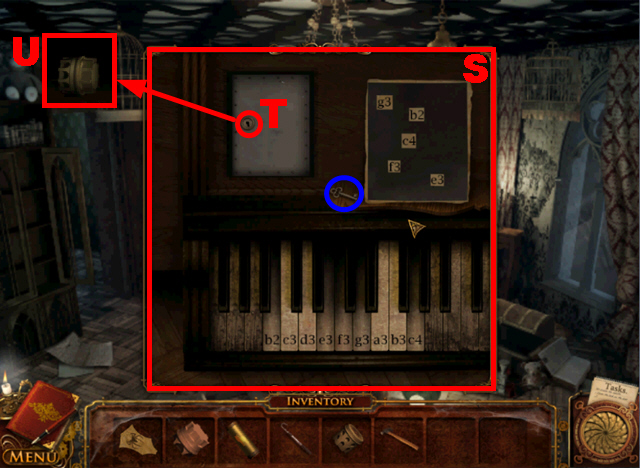
- Zoom into the piano; put the 4 ORGAN KEYS into the gaps (Q), put down the NOTE, and put the NOTES on the NOTE (R).
- Play the mini-game.
- To solve this puzzle (S), press the organ keys in the following sequence: g3, b2, c4, f3, and e3.
- Take the key marked in blue and put it into the lock (T) to open the safe.
- Take the COLUMN PIECE (U).
- Turn left.
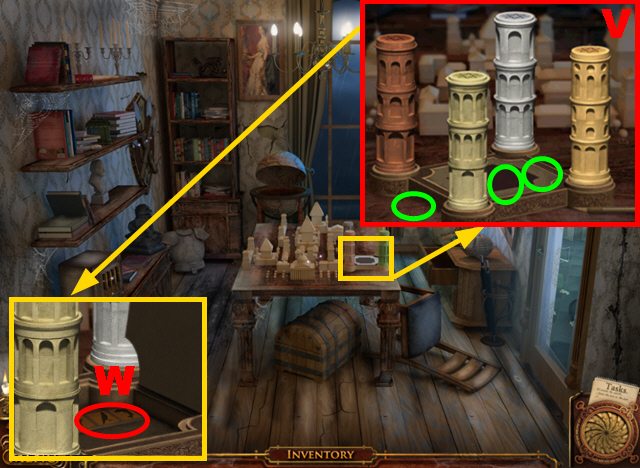
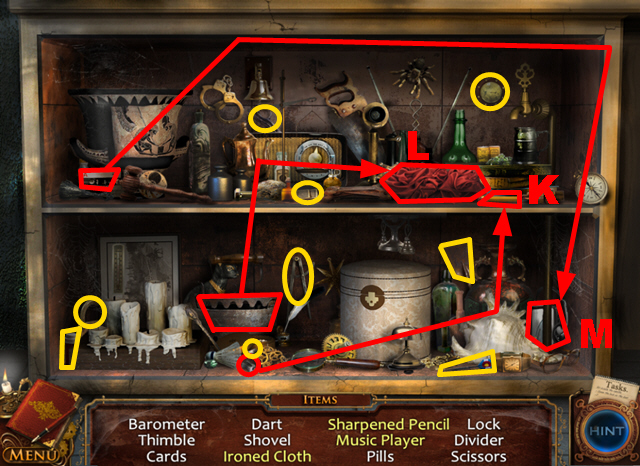
- Zoom into the table; put down the 3 COLUMN PIECES to play a mini-game.
- Recreate the four towers according to color and pattern.
- To solve this puzzle (V), switch the column pieces and use the three spots marked in green to put down column pieces that you will need later.
- Concentrate on one column at a time.
- Take the MAP PLATE (W).
- Zoom into the safe; put the MAP PLATE and the ROLLER PIECE into the niches (X) and (Y).
- Play the mini-game.
- To complete this mini-game (Z), switch the roller pieces according to the pattern marked in purple.
- Take the CUPBOARD KEYS (A).
- Turn right and turn left.
- Play the HOPS.
- Take the hammer, use it to break the piggybank, and take the coins (B).
- Take the brush and paint the heart with it (C) to acquire the red heart.
- Put the plug into the outlet (D) to acquire the music.
- You will receive the SUN AMULET.
- Zoom into the cupboard; put the CUPBOARD KEYS into the lock (E) to open the drawer.
- Take the journal page (F) and the MAGNIFYING GLASS below the page (G).
- Walk down.
- Zoom into the desk and then zoom into the box; use the MAGNIFYING GLASS on the panel (H) and play the mini-game.
- Hover over the panel marked in green to see which symbols belong together.
- To solve this puzzle (I), switch the symbols so that all the pairs match.
- Take the METAL SPIDER (J).
- Walk down.
- Zoom into the shield; put the SPIDER PLATE into the niche (K) and the SUN AMULET into the niche (L).
- Put the METAL SPIDER into the slot marked in blue.
- Press down the symbols in the indicated order 1 – 4.
- Take the AXE (M).
- Turn right and turn left.
Chapter 4: The Flooded Vault
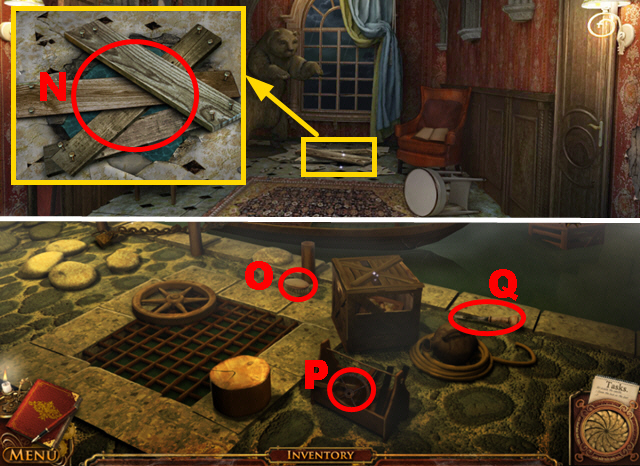
- Zoom into the boards; hit the boards with the AXE four times to remove them (N).
- Go down the hole.
- Take the CLOTHES BRUSH (O), the VALVE (P), and the CHISEL (Q).
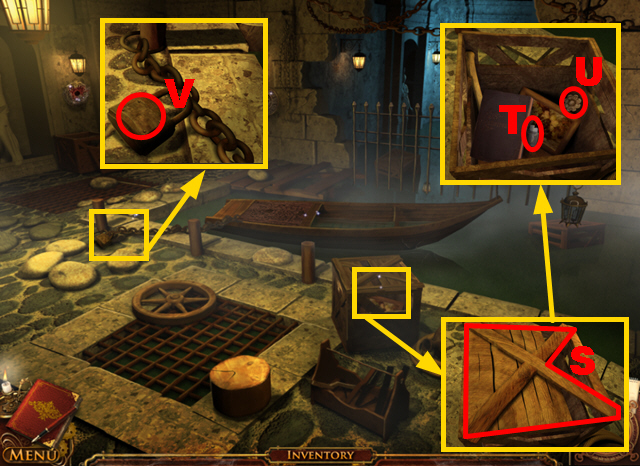
- Zoom into the crate; use the HAMMER to remove the boards (S).
- Remove the book; take the LIGHTER (T) and the AMULET (U).
- Zoom into the chain; put the CHISEL into the padlock (V) and hit the CHISEL with the HAMMER.
- Play the mini-game.
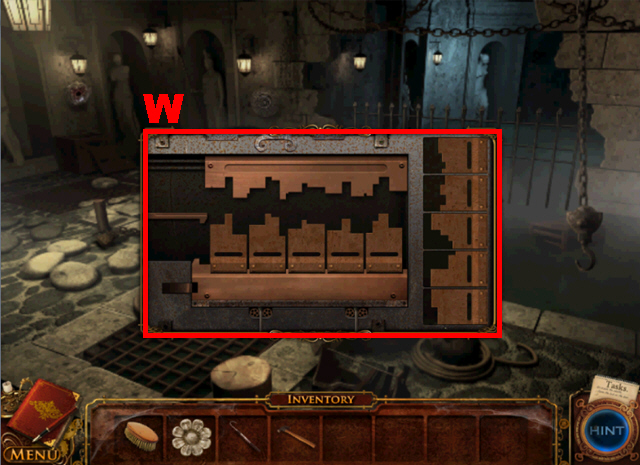
- To solve this puzzle (W), switch the lock pieces in a way so that the pattern of the top and the bottom row match.
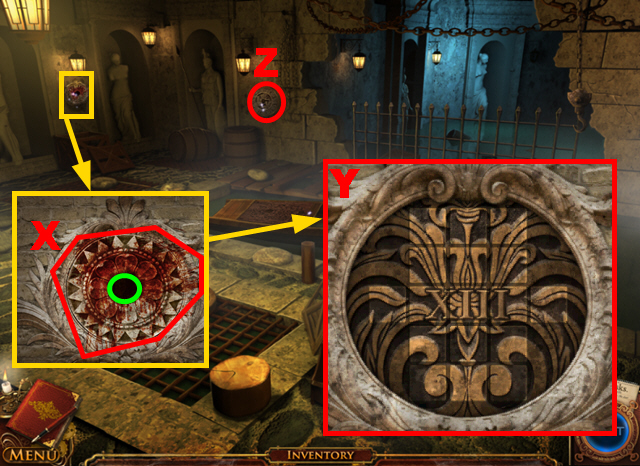
- Zoom into the flower engraving; clean the engraving with the CLOTHES BRUSH (X) three times.
- Put the AMULET into the niche marked in green.
- Switch the puzzle pieces to recreate the correct picture (Y); correctly placed pieces will light up.
- The gate will be opened automatically.
- Zoom into the wall to play a mini-game (Z).
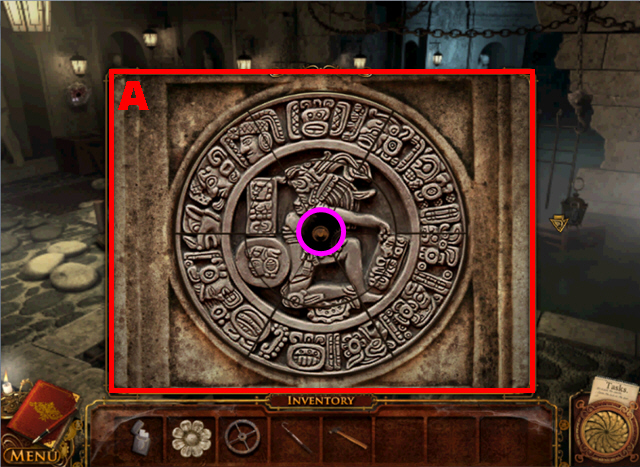
- Switch the pieces of the structure to arrange the correct pattern (A).
- Put the VALVE into the slot marked in purple.
- Take the LANTERN (B).
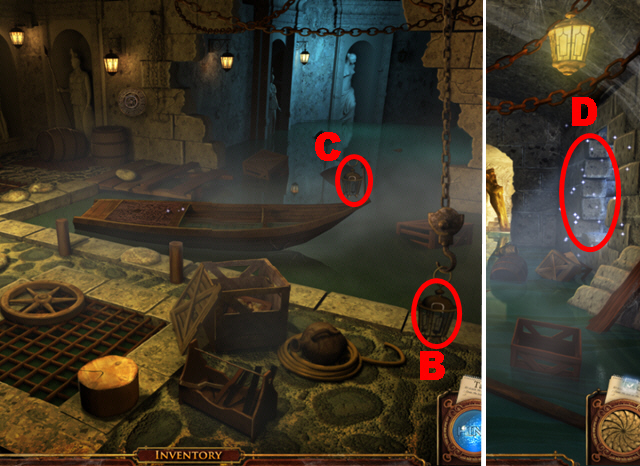
- Connect the LANTERN to the boat (C) and light it with the LIGHTER.
- Move forward.
- Play the HOPS.
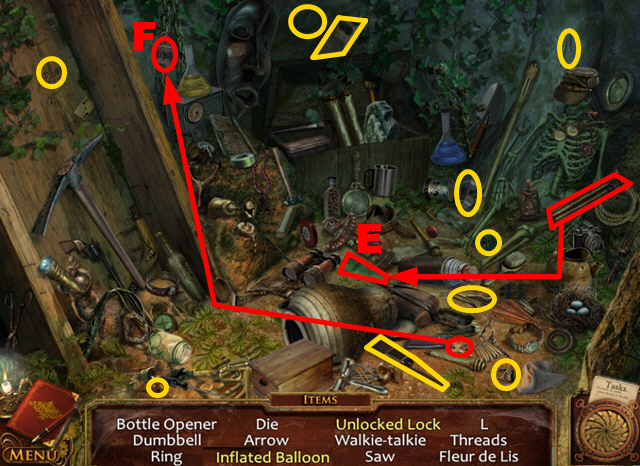
- Take the air pump and put it down next to the balloon (E) to acquire the inflated balloon.
- Take the key and put it into the padlock (F) to acquire the unlocked lock.
- You will receive the SAW.
- Move forward.
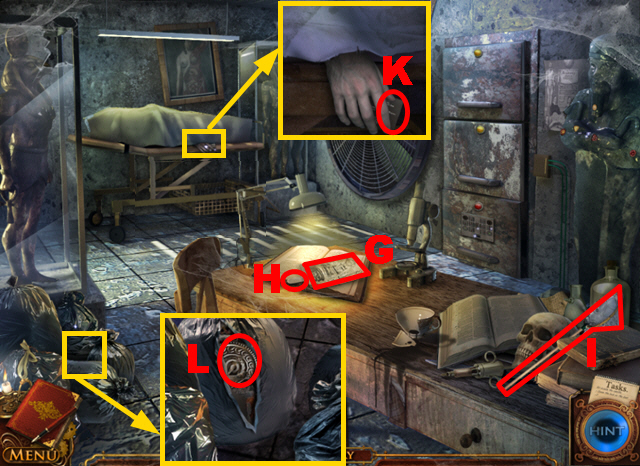
- Take the journal pages (G), the SCALPEL (H) and the NET (I).
- Zoom into the covered body; take the business card (K).
- Zoom into the garbage bags; move aside two bags and cut the rear bag open with the SCALPEL; take the PUZZLE BUTTON (L).
- Zoom into the statue; use the SCALPEL to cut out and acquire the 2 STONES (M) and (N).
- Walk down twice.
- Zoom into the boat; put the red STONE into the lower niche (O) and the yellow STONE into the upper niche (P).
- Press the gems in the indicated order 1 – 5.
- Take the LOCK PIECE (Q).
- Move forward.
- Use the SAW to cut the supporting beam (R).
- Zoom into the board; use the FISHING HOOK to open the skull’s mouth and use the NET on the button (S) to acquire the PUZZLE BUTTON.
- Zoom into the circular panel; put down the 2 PUZZLE BUTTONS (T) to play a mini-game.
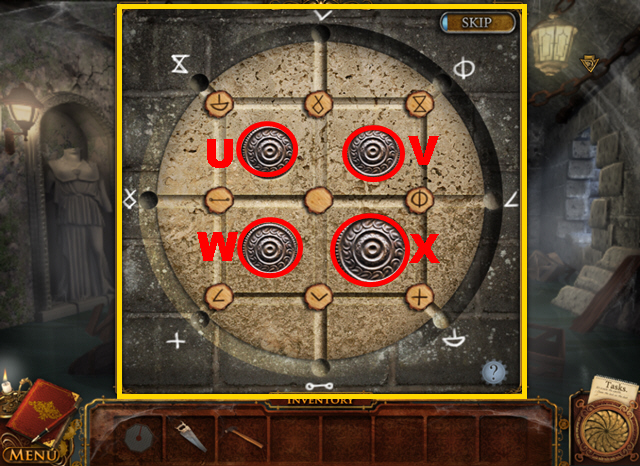
- To solve this puzzle, press the buttons U-X in the following sequence: X x7, W x2, X, U, W x2, X, U, W x3, U x2, W, and U x3.
- Take the LOCK PIECE (Y).
- Move forward.

- Zoom into the safe; put the 2 LOCK PIECES into the niches marked in green.
- Play the mini-game.
- To solve this puzzle (Z), restore the circuit by swapping lock pieces so that each line is correctly connected.
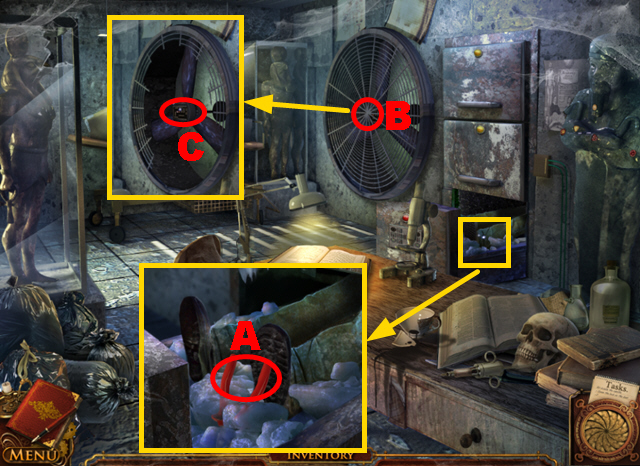
- Zoom into the open drawer; remove the ice with the HAMMER four times and take the WIRE CUTTERS (A).
- Use the WIRE CUTTERS to remove the fan grid (B).
- Zoom into the fan (C) to play a mini-game.
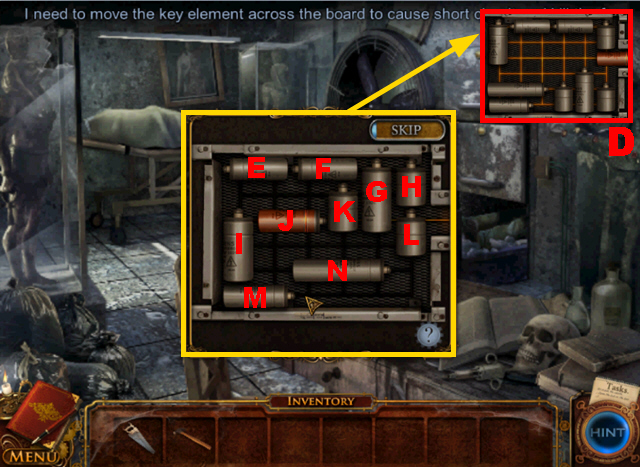
- To solve this puzzle (D), move the batteries in the following sequence: N right, M right, I down, K down, N left, G down, L down, H down, F right, E right, I up, N left, K down, M left, K down, G down, E left, F left, H up, L down, and J right.
- Move forward.
Chapter 5: The Garden
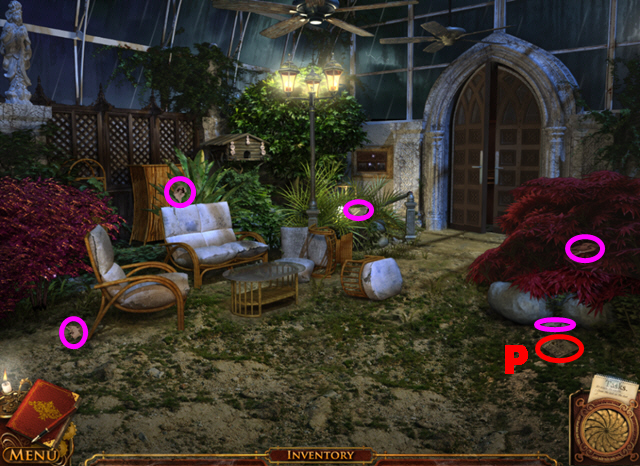
- Take the COMBINATION PLATE (P).
- Collect the five PICTURE PIECES (1/13, 2/13, 3/13, 4/13, 5/13) marked in purple.
1
- Move forward.
- Play the HOPS.

- Take the knife, use it to cut the orange, take both orange halves, and squeeze them on the juicer (Q) to acquire the orange juice.
- Take the pan, put it onto the burner (R), take the egg, and put it into the pan to acquire the fried egg.
- You will receive the GARDEN SHEARS and the NAMEPLATE.
- Collect the 6/13 PICTURE PIECE (S), the 7/13 PICTURE PIECE (T), and the 8/13 PICTURE PIECE (U).
- Take the SPRAYER (V).
- Move forward.
- Collect the 9/13 PICTURE PIECE (W), the 10/13 PICTURE PIECE (X), the 11/13 PICTURE PIECE (Y), the 12/13 PICTURE PIECE (Z), and the 13/13 PICTURE PIECE (A).
- Walk down twice.
- Zoom into the bush; use the GARDEN SHEARS five times to remove the bush (C) and take the RAG (D).
- Walk down twice.
- Put the RAG into the water (E) to acquire the DAMP RAG.
- Move forward four times.
- Zoom into the picture frame; use the DAMP RAG three times to clean the picture (F).
- Play the mini-game.
- Recreate the correct picture (G) by pressing the four picture pieces to solve this puzzle.
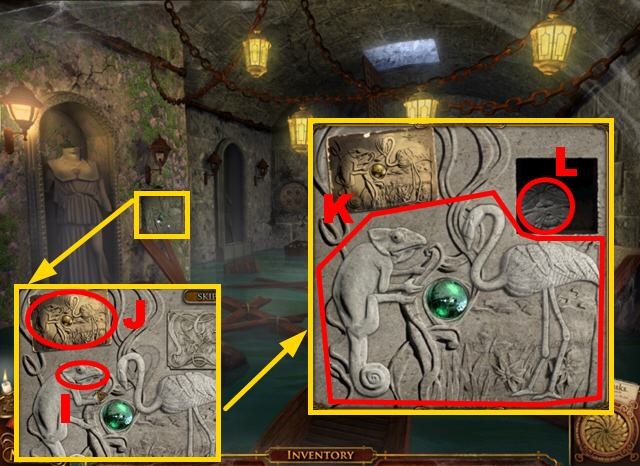
- Take the CHAMELEON HEAD (H).
- Walk down four times.
- Zoom into the mural; put the CHAMELEON HEAD into the niche (I) and put down the COMBINATION PLATE (J).
- To complete this puzzle, put the chameleon and the flamingo into the correct positions (K) indicated by the outlines.
- Take the KEY (L).
- Move forward twice.

- Cut loose the boards marked in blue with the SAW (M) and put the boards on the wires (N) to cross them.
- Zoom into the portrait; put down the 13 PICTURE PIECES (O).
- Play the mini-game.
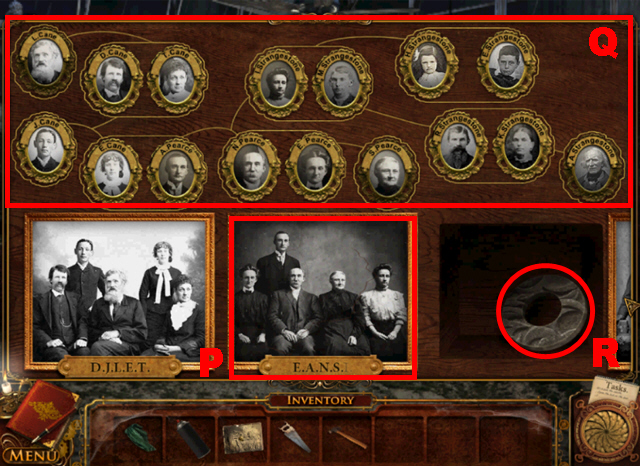
- Recreate the photo (P) by placing the picture pieces correctly to activate the second part of the mini-game.
- Put down the NAMEPLATE and swap the nameplates to connect each portrait with the correct nameplate (Q).
- Take the MASTER KEY (R).
- Move forward.
- Play the HOPS.
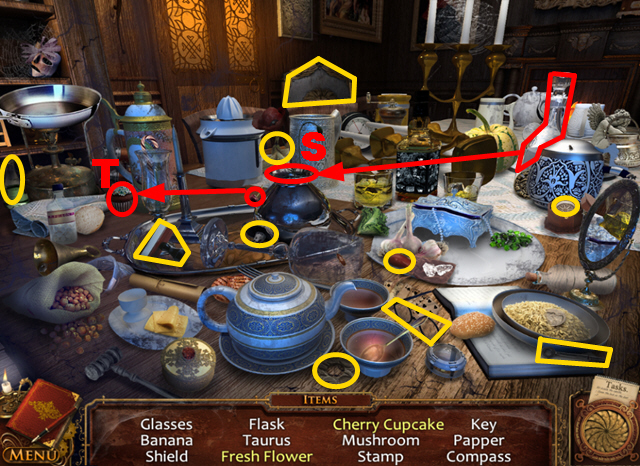
- Take the water bottle and pour it on the flower (S) to acquire the fresh flower.
- Take the cherry and put it on the cupcake (T) to acquire the cherry cupcake.
- You will receive the DOOR PUZZLE PIECE.
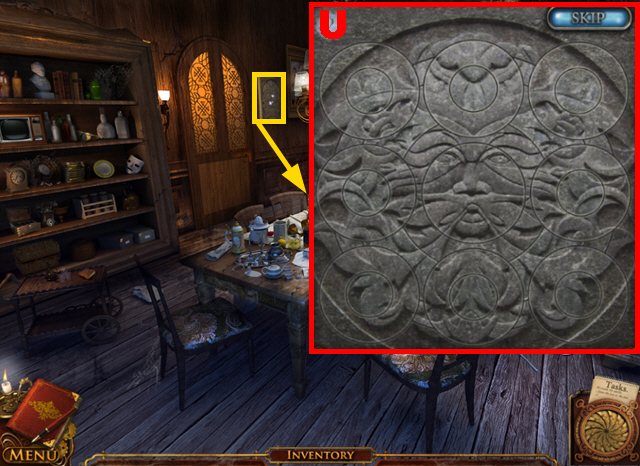
- Zoom into lock panel; put down the KEY, the MASTER KEY, and the DOOR PUZZLE PIECE to play a mini-game.
- Rotate the pieces to restore the correct picture (U).
- Turn left.
Chapter 6: The Study
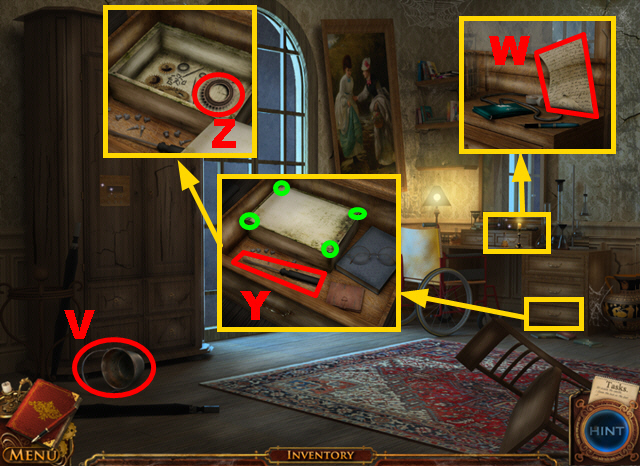
- Take the BUCKET (V).
- Zoom into the desk; take the journal page (W).
- Open the drawer and zoom into it; take the screwdriver (Y) and remove the four nails marked in green with it.
- Take the GEAR (Z).
- Walk down four times.
- Play the HOPS.
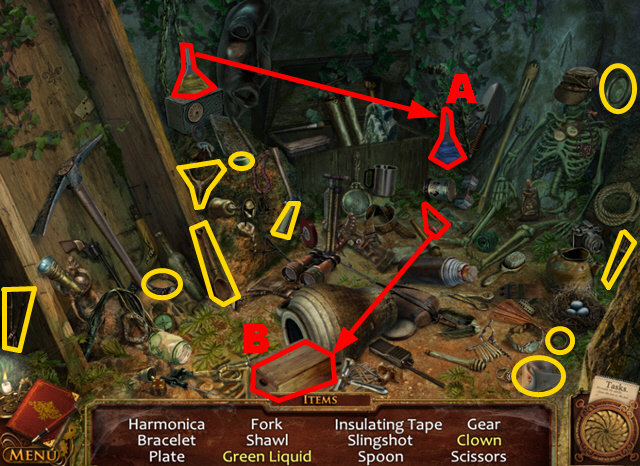
- Take the yellow liquid and fill it into the blue liquid (A) to acquire the green liquid.
- Take the handle and put it into the box (B) to acquire the clown.
- You will receive the GEAR.
- Put the BUCKET into the water (C) to acquire the BUCKET OF WATER.
- Move forward three times.
- Use the BUCKET OF WATER to extinguish the fire (D).
- Move forward.
- Take the NUMBER BUTTON (E).
- Zoom into the panel; put down the NUMBER BUTTON (F) and play the mini-game.
- To solve this puzzle (V), press the buttons W-Y in the following sequence: X, Y, W x2, Y, X, Y x3, X, Y, X x2, Y x2, X, and Y.
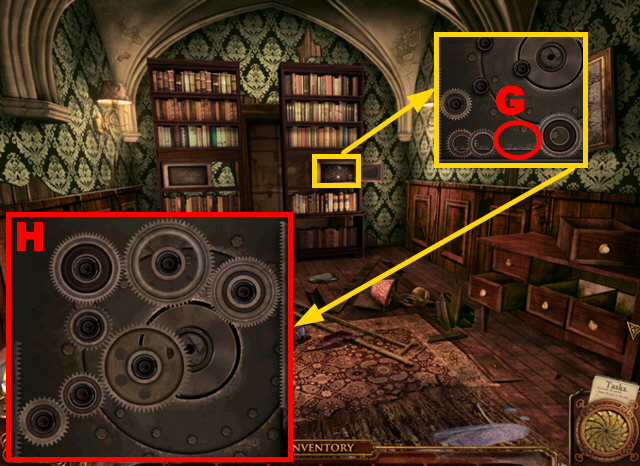
- Zoom into the new panel; put down the 2 GEARS (G) and play the mini-game.
- Align the gears correctly (H) to solve this puzzle.
- Walk down and turn left.

- Zoom into the desk; use the SPRAYER on the mirror (I) to acquire the code ’2561′.
- Zoom into the cabinet; enter the code ’2561′ (J).
- Enter the code 521463 into the panel (K) to open the cabinet.
- Zoom into the cabinet once more to play a mini-game.
- Rearrange the symbols by pressing the buttons so that each symbol is is next to its equivalent (L).
- In the step-by-step solution below, ‘cc’ refers to counter-clockwise and ‘cw’ refers to clockwise.
- Press the buttons A-E in the following sequence to solve this puzzle: E cc, D ccx3, A ccx2, D ccx2, A cc, B ccx3, E cc, D ccx3, A cc, B cwx2, C cc, E cc, C ccx2, and E cc.
- C cw, E cc, B ccx2, E ccx2, C cc, B ccx4, D ccx3, E cc, C ccx2, E cc, C ccx3, D cwx2, C ccx2, D cc, C cc, E cc, C ccx2, E cc, C cc, E ccx3, C ccx2, and E cc.
- Take the CAGE KEYS (M).
- Walk down, move forward twice, press the second floor button, and move forward.
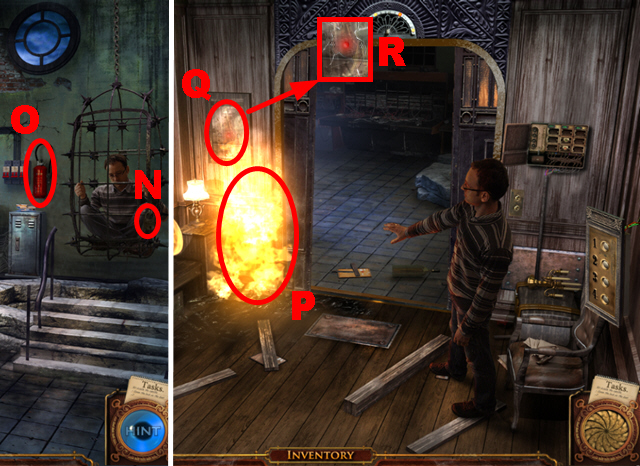
- Put the CAGE KEYS into the lock (N) and take the EXTINGUISHER (O).
- Move forward.
- Use the EXTINGUISHER to put out the flames (P).
- Use the HAMMER to break the glass panel (Q) and press the emergency button (R).
- Move forward.

- Take the KEY (S), the VALVE (T), the HOSE (U), the GARAGE ADAPTER (V) and the EMPTY FUEL CAN (W).
- Zoom into the shelf; put the VALVE on the pipe (X).
- Take the WRENCH (Y), the HANDLE (Z), and the 3 GARAGE ADAPTERS marked in green.
- Put down the EMPTY FUEL CAN next to the barrel (A) and open the barrel with the WRENCH.
- Use the HOSE to connect the EMPTY FUEL CAN to the barrel (B) to acquire the FULL FUEL CAN.
- Turn left.
- Zoom into the floor panel; put the 4 GARAGE ADAPTERS into the correct positions (C) and use the HANDLE on each adapter marked in purple to open the panel.
- Take the 2 PIPES (D) and (E).
- Move forward.
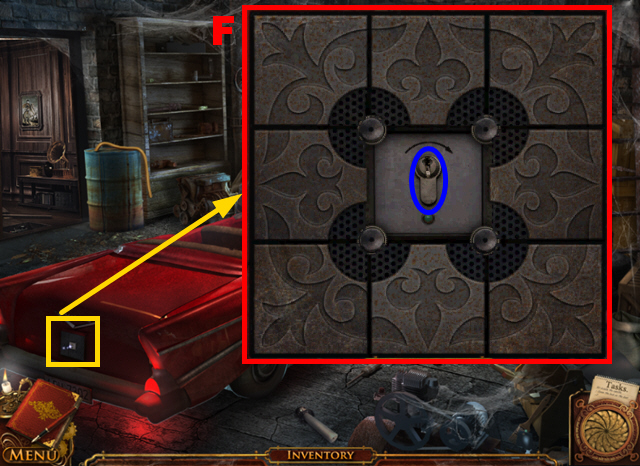
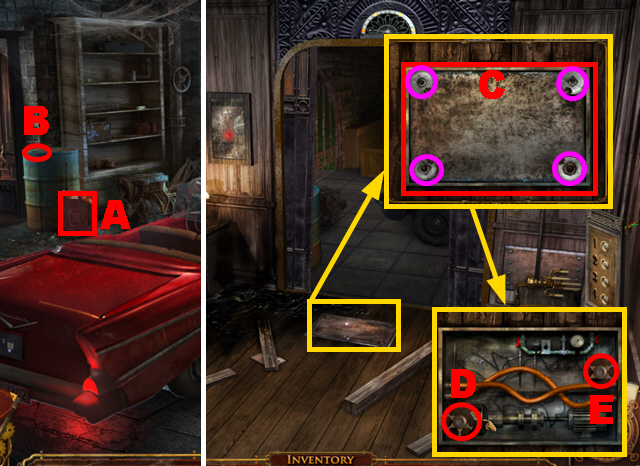
- Zoom into the trunk; play the mini-game.
- To solve this puzzle (F), move around the pieces to recreate the correct picture.
- Put the KEY into the lock marked in blue.
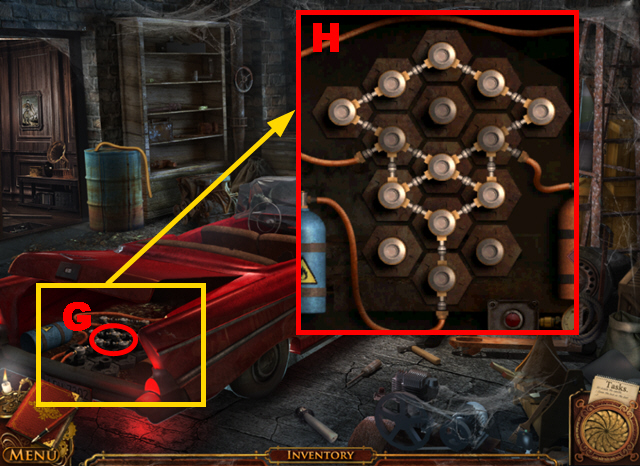
- Fill the FULL FUEL CAN into the engine (G).
- Zoom into the engine; put down the 2 PIPES to play a mini-game.
- Form a full circle by swapping the pipes to solve this puzzle (H).
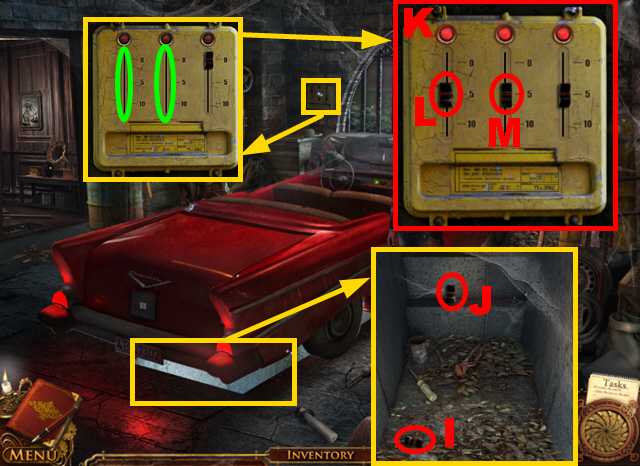
- Zoom into the area below the car; take the 2 SWITCHES (I) and (J).
- Zoom into the panel; put the 2 SWITCHES into the slots marked in green.
- To solve this puzzle (K), first press the switch (L) once, and then press the switch (M) once.
- Congratulations, you have finished Strangestone.


 Myths of the World: The Heart of Desolation Walkthrough, Guide, & Tips
 Tulula: Legend of a Volcano Walkthrough, Guide, & Tips
 The Keepers: The Order's Last Secret Walkthrough, Guide, & Tips
 The Curse of the Ring Walkthrough, Guide, & Tips
 Hidden Mysteries: The Forbidden City Walkthrough, Guide, & Tips